Create a Content Card
This article covers how to create a Content Card in Braze when you build campaigns and Canvases. Here, we’ll walk you through choosing a messaging type, composing your card, and scheduling your message delivery.
Step 1: Choose where to build your message
Use campaigns for single, simple messaging (such as informing users about a product with one message). Use Canvases for multi-step user journeys (such as sending tailored product suggestions based on user behavior over time).
- Go to Messaging > Campaigns and select Create Campaign.
- Select Content Cards or, for campaigns targeting multiple channels, select Multichannel.
- Name your campaign something clear and meaningful.
- Add teams and tags as needed.
- Tags make your campaigns easier to find and build reports out of. For example, when using the Report Builder, you can filter by the relevant tags.
- Add and name as many variants as you like for your campaign. You can choose different platforms, message types, and layouts for each of your added variants. For more on variants, refer to Multivariate and A/B testing.

If all of the messages in your campaign are going to be similar or have the same content, compose your message before adding additional variants. You can then select Copy from Variant from the Add Variant dropdown.
- Create your Canvas using the Canvas composer.
- After setting up your Canvas, add a Message step in the Canvas builder. Name your step something clear and meaningful.
- Select Content Cards as your messaging channel.
- Choose when Braze calculates audience eligibility and personalization for the Content Card. This can be at step entry or at first impression (recommended). Steps containing Content Cards can be scheduled or action-based.
- Choose whether to remove Content Cards when users complete a purchase or perform a custom event.
- Set an expiration for the Content Card (time in feed). This can be after a duration of time or at a specific time.
- Filter your audience, or the recipients, for this step as necessary in the Delivery Settings. You can further refine your audience by specifying segments and adding additional filters. Audience options are checked after the delay, at the time messages are sent.
- Choose any other messaging channels that you want to pair with your message.
Step 2: Specify your message types
Select one of three essential Content Card types: Classic, Captioned Image, and Image Only.
To learn more about the expected behavior and look of each type, refer to Creative Details, or check out the links in the following table. These Content Card types are accepted by both mobile apps and web applications.
| Message Type | Example | Description |
|---|---|---|
| Classic | 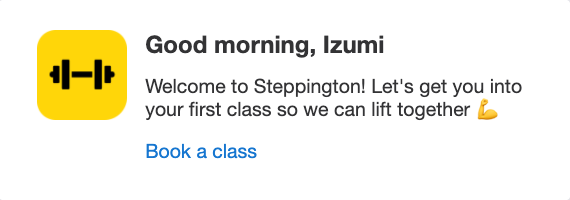 |
The Classic Card has a straightforward layout with a bolded title, message text, and an optional image that sits to the start of the title and text. It’s best to use a square image or icon with the Classic Card. |
| Captioned Image | 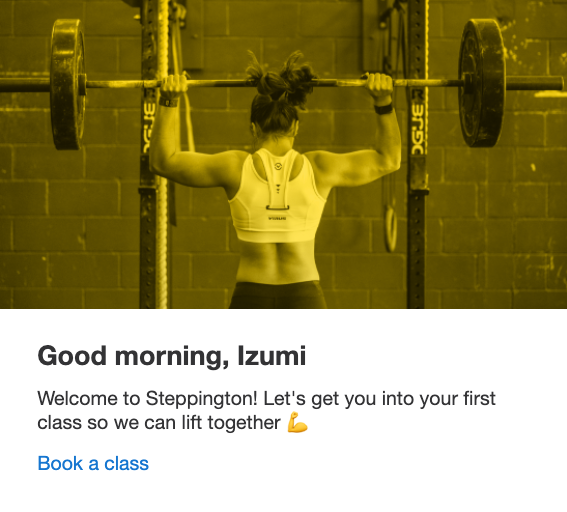 |
The Captioned Image Card showcases your content with copy and an attention-grabbing image. |
| Image Only | 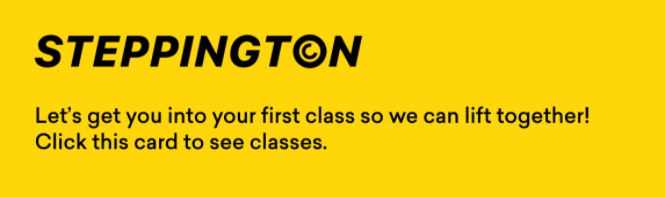 |
The Image Only Card commands attention with space for images, GIFs, and other creative non-text content. |
Step 3: Compose a Content Card
You can edit all aspects of your message’s content and behavior in the Compose tab of the message editor.

The content here varies based on the Card Type chosen in the previous step, but may include any of the following options:
Language
Select Add Languages to add your desired languages from the provided list. This inserts Liquid into your message. We recommend selecting your languages before writing your content so you can fill in your text where it belongs in the Liquid. For our full list of available languages you can use, refer to Languages supported.

Create right-to-left messages
The final appearance of right-to-left messages depends largely on how service providers render them. For best practices on crafting right-to-left messages that display as accurately as possible, refer to Creating right-to-left messages.
Title and message
Write anything you want. There are no limits, but the faster you can get your message across and get your customer clicking, the better! We recommend clear and concise titles and message content. Note that these fields aren’t provided for Image Only Cards.
Image
To add an image to your Content Card, you can select Add Image or provide an image URL. Selecting Add Image opens the Media Library, where you can select a previously uploaded image or add a new one.
Each message type and platform may have its own suggested proportions and requirements, so be sure to check what those are before commissioning or making an image from scratch. Keep in mind that Content Card message fields are limited to 2 KB in total size.

If you are pulling in images with Connected Content or Liquid, ensure that your image URL begins with https://. Using http:// will crash your app.
Pin to top
Braze displays a pinned card at the top of a user’s feed and the user can’t dismiss it. If a user’s feed has multiple pinned cards, Braze orders them chronologically. When Braze delivers a Content Card, it is either pinned or unpinned, and that status does not change for the lifetime of the card. If you change the pinned setting on a campaign, the update applies to cards sent in the future only. It does not change the pinned status of cards already in a user’s feed.

On-click behavior
When your customer clicks on a presented link in the card, your link can either lead them deeper into your app or to another site. If you choose an on-click behavior for your Content Card, remember to update your Link Text accordingly.
The following actions are available for Content Card links:
| Action | Description |
|---|---|
| Redirect to Web URL | Open a non-native web page. |
| Deep Link into App | Deep link into an existing screen in your app. |
| Log Custom Event | Choose a custom event to trigger. Can be used to display another Content Card or trigger additional messaging. |
| Log Custom Attribute | Choose a custom attribute to set for the current user. |
The Log Custom Event and Log Custom Attribute options require the following SDK version compatibility:
Step 4: Configure additional settings (optional)
You can use key-value pairs to create categories for your Cards, create multiple Content Card feeds, and customize how cards are sorted.
To add key-value pairs to your message, go to the Settings tab and select Add New Pair.
Step 5: Build the remainder of your campaign or Canvas
Build the remainder of your campaign. Continue to the next sections for additional details on how to best use our tools to build Content Cards.
Choose a delivery schedule or trigger
Content Cards can be delivered based on a scheduled time, an action, or an API trigger. For more, refer to Scheduling your campaign.
You can also set the campaign’s duration and Quiet hours and determine the Content Card’s expiration. Set a specific expiration date or the days until a Card expires, up to 30 days. All variants have identical expiration dates.
The expiration countdown starts from the card’s send time:
- Scheduled campaigns: The countdown begins at the scheduled launch time.
- Action-based campaigns: The countdown begins when the user performs the triggering action.
For example, if an action-based Content Card is sent at 2 pm today with a 1-day expiration, it expires at 2 pm the following day.

Frequency capping doesn’t apply to Content Cards.
For action-based delivery, there is an expected short delay before the Content Card appears. For example, when a campaign is triggered on session start, this trigger event must first be flushed to Braze’s servers. Next, the user’s eligibility for the campaign is recorded. When the SDK syncs, the card is created and returned in the same sync response. If the SDK sync happened before the user’s eligibility is recorded, they do not receive the card. For first-session users, this delay is unavoidable. For existing users who need instant availability, consider using scheduled delivery instead.
Scheduled delivery
For Content Card campaigns with scheduled delivery, you can choose when Braze evaluates audience eligibility and personalization for new Content Card campaigns by specifying when the card is created. For more, refer to card creation.
Choose users to target
Next, target users by choosing segments or filters to narrow your audience. You automatically receive a preview of what that approximate segment population looks like. Keep in mind that exact segment membership is always calculated before the message is sent.
Your message will only be sent to users who already match the conditions you set in the Target Audience step. After that, they still need to meet the trigger you define in the Schedule Delivery step. Think of the target audience as a waiting room—only people already inside can move forward when the next action happens.
Choose conversion events
Braze allows you to track how often users perform specific actions, conversion events, after receiving a campaign. You have the option of allowing up to a 30-day window during which a conversion is counted if the user takes the specified action.
If you haven’t done so already, complete the remaining sections of your Canvas component. For further details on how build out the rest of your Canvas, implement multivariate testing and Intelligent Selection, and more, refer to the Build your Canvas step of our Canvas documentation.
Step 6: Review and deploy
After you’ve finished building the last of your campaign or Canvas, review its details, test it, then send it when you’re ready. For more information, see Send test messages.
After a Content Card is launched, it can’t be edited. It can only be stopped from sending to new users and removed from users’ feeds. Refer to Updating sent cards to understand how you can approach this scenario.
Next, check out Content Card reporting to learn how you can access the results of your Content Card campaigns.
Things to know
Payload and feed limitations
To support performance, Content Cards have two key constraints: a limit on the payload size for each card and a maximum number of cards that can appear in a feed.
Size limitations for Content Cards
The entire data payload for a single Content Card cannot exceed 2 KB after any Liquid personalization is rendered. This includes:
- Title
- Message
- Image URL (the length of the URL string itself, not the image file size)
- Link text
- Link URLs for all specified platforms (separate URLs for iOS, Android, and Web all count towards the total)
- Key-value pairs (both the key names and their values)
Using Liquid to pull in long strings of text (such as from custom attributes) can cause you to exceed the limit.
The campaign composer displays a warning if your static content exceeds the limit. We do not predict the size for dynamic content using Liquid. If the message size exceeds 2 KB, it is aborted at send time. You can see these aborts in the Message Activity Log with the reason Content card maximum size exceeded.
During test sends, Content Cards that exceed 2 KB can still be delivered and displayed properly.
Here are some best practices for managing Content Card payload size:
- Use URL shorteners for long links. URLs, especially those with extensive tracking parameters, can run into size limit issues. Using a URL shortening service can dramatically reduce the character count and free up space in the payload.
- Truncate dynamic content with Liquid. When personalizing cards with dynamic text from user attributes or API calls, the length of the content can be unpredictable. Proactively use Liquid filters like
truncateto cap the length of any dynamic text. - Be efficient with multi-platform URLs. The 2 KB limit includes the URLs for all platforms you define. Using long, unique URLs for each platform can multiply the size of the payload. If possible, use a single link that works across all platforms, or use URL shorteners as needed.
- Consider Banners for richer content. For use cases that consistently require large amounts of content, Content Cards may not be the right channel. Banners do not have the same 2 KB payload limitation and are better suited for embedding richer content directly into an app or website experience.
Number of cards in feed
Each user can have up to 250 non-expired Content Cards in their feed at any given time. When this limit is exceeded, Braze stops returning the oldest cards, even if they are unread. Dismissed cards also count toward this limit, meaning a high number of dismissed cards can reduce the space available for older ones.
To prevent issues with the card limit, we advise the following best practices:
- Use shorter expiration dates: For campaigns that are time sensitive (such as a weekend sale), set a specific expiration date. This way, cards are automatically removed from the feed and won’t count towards the limit after they are no longer relevant.
- Leverage action-based removal: Set up removal events for transactional or goal-based cards. For example, a card prompting a user to complete their profile should be removed as soon as a
profile_completedevent is logged. - Audit long-running campaigns: Review recurring or ongoing campaigns to ensure they aren’t creating a poor experience for your users by filling the feed with too many cards over time.
Understanding re-eligibility for Content Cards
Re-eligibility determines if and when a user can receive a message from the same campaign more than once. For Content Cards, understanding how this works is critical for managing recurring campaigns and ensuring users don’t receive duplicate or stale messages.
How re-eligibility is calculated
If you turn on re-eligibility, the countdown for when a user can “re-enter” a campaign begins after they are sent the message. The specific moment this countdown starts depends on your card creation settings:
- Content Cards using at first impression use impression time to calculate re-eligibility.
- Content Cards created at campaign launch, in multichannel campaigns, or at Canvas step entry use whichever send time or impression time is latest.
The 30-day expiration and re-eligibility
A common source of confusion is the interaction between campaign re-eligibility and the automatic 30-day expiration of all Content Cards.
All Content Cards are automatically purged from Braze’s systems 30 days after they are sent or removed. If you have a long-running, recurring campaign with re-eligibility turned off, a user may still receive the same card again after 30 days. When the original card is purged, the system no longer sees a record of that user having received the campaign, making them eligible again on their next session.
For users to only receive a message from a specific campaign once, add an audience filter to your campaign or Canvas step for users who have not received a message from this campaign. This filter is the most reliable way to prevent duplicate sends from long-running campaigns.
Managing live Content Cards
After Content Cards have been sent, they sit waiting in an “inbox” ready to be delivered to the user (similar to what happens for emails). After content is pulled into the Content Card (at the time of display), it cannot be changed during its lifespan. This applies even if you’re calling an API through Connected Content, and the data from the endpoint changes. This data won’t get updated. It can only be stopped from sending to new users and removed from users’ feeds. If you modify a campaign, only future cards that are sent have the update.
Updating launched cards
To change a card for users who have already received it, you must use one of the following methods:
Option 1: Duplicate the campaign (recommended for immediate changes)
We recommend this option for messages where you are showing the latest content in the card, changes must be shown immediately, or when re-eligibility is turned off.
The first approach is to archive the campaign and launch a new, duplicated campaign:
- Stop the original campaign and, when prompted, select
Remove card after the next sync. - Duplicate the campaign, make your edits, and launch the new version.
When you duplicate the campaign, you need to define the audience for the new version. Use segmentation filters to control who receives the updated card:
- If users should never be re-eligible for a Content Card, you can filter for users who haven’t received the previous version of the Content Card by setting the filter
Received Message from Campaignto the condition toHas Not. - If users who received the prior card should be re-eligible in X days, you can set the filter for
Last Received Message from specific campaignto more than X days ago ORReceived Message from Campaignwith theHas Notcondition.
Impact
- Existing recipients: New and existing recipients would see the updated card at the next feed refresh if they are eligible.
- Reporting: Each version of the card would have separate analytics.
Let’s say you’ve set a campaign to be triggered by a session start, and it has re-eligibility set to 30 days. A user received the campaign two days ago, and you want to change the copy. First, you’d archive the campaign and remove the cards from the feed. Second, you’d duplicate the campaign and re-launch with the new copy. If the user has another session, they’ll immediately receive the new card.
Option 2: Stop and relaunch the same campaign
We recommend using this option for unique messages in a notification center or message inbox (such as promotions), when it’s important for analytics to be unified, or when the timeliness of the message isn’t a concern (such as existing recipients can wait for the eligibility window before seeing the updated cards).
This approach keeps all your analytics unified in a single campaign. Newly eligible users receive the new card, but it delays the update for existing recipients until they are re-eligible:
- Stop your campaign and, when prompted, select Remove card after the next sync.
- Edit your campaign as needed.
- Restart your campaign.
Impact
- Existing recipients: Users who have already received the card would not receive the updated cards until they become re-eligible. If re-eligibility is turned off, they would never receive the new card.
- Reporting: One campaign contains all reporting analytics for the card versions launched. Braze won’t differentiate between the versions launched.
Let’s say you have a campaign that’s triggered by a session start and has re-eligibility set to 30 days. A user received the campaign two days ago, and you want to change the copy. First, stop the campaign and remove the card from the feed. Second, re-publish the campaign with the new copy. If the user has another session, they’ll receive the new card in 28 days.
Removing and expiring cards
Manual card removal
You can manually remove cards for all users’ feeds at any time by stopping the campaign.
- Open the Content Card campaign and select Stop Campaign.
- When prompted, select Remove card after the next sync. The card is removed on the next feed refresh.
Automated card removal
You can automatically remove a card when a user performs a specific action, such as completing a purchase or activating a feature.
In your campaign or Canvas step, specify a removal event. When a user performs that event, the card is removed from their feed on a subsequent refresh after Braze processes the event.
This removal is not instantaneous. There is a processing delay, so it may take several minutes and more than one feed refresh for the card to disappear.
You can specify multiple custom events and purchases that should remove a card from a user’s feed. When any of those actions are performed by the user, any existing cards sent by the campaign’s cards are removed. Any future eligible cards continue to be sent according to the message’s schedule.

Card expiration
Content Cards remain available for up to 30 days from when they are sent; after 30 days, Braze removes them from user feeds and purges them from Braze’s systems.
Making cards last longer than 30 days
For use cases requiring messages to persist longer than the 30-day Content Card limit, consider using Banners. Banners are designed for persistence and do not have a mandatory expiration date, allowing them to stay visible as long as they are needed.
If you want a card to seem like it’s always available, you can create a recurring campaign that effectively replaces the card every 30 days:
- Set the duration of the Content Card for 30 days.
- Set the campaign re-eligibility to 30 days.
- Set the campaign to trigger on “Session Start.”
Content Card sync and refresh
Content Cards sync on a schedule and when your app refreshes the feed. Sync behavior differs between full and partial syncs, and your SDK integration affects when cards refresh at session start. For implementation details, see Customize the Content Card feed and Creating Content Cards.
Impact of stopping Content Cards campaigns
When you stop a campaign and select Remove card after the next sync, Braze removes the card from user feeds on the next refresh. Impression counts may be lower than send counts because users cannot impress cards that are removed before they view them.