Nested custom attributes
Nested custom attributes allow you to define a set of attributes as a property of another attribute. In other words, when you define a custom attribute object, you can define a set of additional attributes for that object.
For example, let’s say you want to define a custom attribute on the user profile called favorite_book. This custom attribute can be defined as an object that has the nested attributes title, author, and publishing_date, like so:
1
2
3
4
5
"favorite_book": {
  "title": "The Hobbit",
  "author": "J.R.R. Tolkien",
  "publishing_date": "1937"
}
This nested data allows you to create segments using information from a custom attribute object, and personalize your messages using a custom attribute object and Liquid.
Custom attribute objects can contain data types, such as:
- Numbers
- Strings
- Booleans
- Arrays
- Time
- When filtering a nested time custom attribute, you can choose to filter based on “Day of Year” or “Time”. “Day of Year” will check only the month and day for comparison. “Time” will compare the full timestamp, including the year.
- Other objects
- Arrays of objects
Limitations
- Nested custom attributes are intended for custom attributes sent via the Braze SDK or API.
- Objects have a maximum size of 50 KB.
- Key names and string values have a size limit of 255 characters.
- Key names cannot contain spaces.
- Not all Braze Partners support nested custom attributes. Refer to the Partner documentation to confirm if the integration supports this feature.
- Nested custom attributes cannot be used as a filter when making a Connected Audience API call.
API example
The following is a /users/track example with a “Most Played Song” object. To capture the properties of the song, we’ll send an API request that lists most_played_song as an object, along with a set of object properties.
1
2
3
4
5
6
7
8
9
10
11
12
13
14
15
16
17
{
  "attributes": [
    {
      "external_id": "user_id",
      "most_played_song": {
        "song_name": "Solea",
        "artist_name": "Miles Davis",
        "album_name": "Sketches of Spain",
        "genre": "Jazz",
        "play_analytics": {
            "count": 1000,
            "top_10_listeners": true
        }
      }
    }
  ]
}
To update an existing object, send a POST to users/track with the _merge_objects parameter in the request. This will deep merge your update with the existing object data. Deep merging ensures that all levels of an object are merged into another object instead of only the first level. In this example, we already have a most_played_song object in Braze, and now we’re adding a new field, year_released, to the most_played_song object.
1
2
3
4
5
6
7
8
9
10
11
{
  "attributes": [
    {
      "external_id": "user_id",
      "_merge_objects": true,
      "most_played_song": {
          "year_released": 1960
      }
    }
  ]
}
After this request is received, the custom attribute object will now look like the following:
1
2
3
4
5
6
7
8
9
10
11
"most_played_song": {
  "song_name": "Solea",
  "artist_name" : "Miles Davis",
  "album_name": "Sketches of Spain",
  "year_released": 1960,
  "genre": "Jazz",
  "play_analytics": {
     "count": 1000,
     "top_10_listeners": true
  }
}
You must set _merge_objects to true, or your objects will be overwritten. _merge_objects is false by default.
To delete a custom attribute object, send a POST to users/track with the custom attribute object set to null.
1
2
3
4
5
6
7
8
{
  "attributes": [
    {
      "external_id": "user_id",
      "most_played_song": null
    }
  ]
}
SDK example
Create
1
2
3
4
5
6
7
8
9
10
11
12
13
14
15
val json = JSONObject()
    .put("song_name", "Solea")
    .put("artist_name", "Miles Davis")
    .put("album_name", "Sketches of Spain")
    .put("genre", "Jazz")
    .put(
        "play_analytics",
        JSONObject()
            .put("count", 1000)
            .put("top_10_listeners", true)
    )

braze.getCurrentUser { user ->
    user.setCustomUserAttribute("most_played_song", json)
}
Update
1
2
3
4
5
6
val json = JSONObject()
    .put("year_released", 1960)

braze.getCurrentUser { user ->
    user.setCustomUserAttribute("most_played_song", json, true)
}
Delete
1
2
3
braze.getCurrentUser { user ->
    user.unsetCustomUserAttribute("most_played_song")
}
Create
1
2
3
4
5
6
7
8
9
10
11
12
let json: [String: Any?] = [
  "song_name": "Solea",
  "artist_name": "Miles Davis",
  "album_name": "Sketches of Spain",
  "genre": "Jazz",
  "play_analytics": [
    "count": 1000,
    "top_10_listeners": true,
  ],
]

braze.user.setCustomAttribute(key: "most_played_song", dictionary: json)
Update
1
2
3
4
5
let json: [String: Any?] = [
  "year_released": 1960
]

braze.user.setCustomAttribute(key: "most_played_song", dictionary: json, merge: true)
Delete
1
braze.user.unsetCustomAttribute(key: "most_played_song")
Create
1
2
3
4
5
6
7
8
9
10
11
12
import * as braze from "@braze/web-sdk";
const json = {
  "song_name": "Solea",
  "artist_name": "Miles Davis",
  "album_name": "Sketches of Spain",
  "genre": "Jazz",
  "play_analytics": {
    "count": 1000,
    "top_10_listeners": true
  }
};
braze.getUser().setCustomUserAttribute("most_played_song", json);
Update
1
2
3
4
5
6
import * as braze from "@braze/web-sdk";
const json = {
  "year_released": 1960
};
braze.getUser().setCustomUserAttribute("most_played_song", json, true);
Delete
1
2
import * as braze from "@braze/web-sdk";
braze.getUser().setCustomUserAttribute("most_played_song", null);
Capturing dates as object properties
To capture dates as object properties, you must use the $time key. In the following example, an “Important Dates” object is used to capture the set of object properties, birthday and wedding_anniversary. The value for these dates is an object with a $time key, which cannot be a null value.
If you haven’t captured dates as object properties initially, we recommend resending this data using the $time key for all users. Otherwise, this may result in incomplete segments when using the $time attribute.
1
2
3
4
5
6
7
8
9
10
11
{
  "attributes": [
    {
      "external_id": "time_with_nca_test",
      "important_dates": {
        "birthday": {"$time" : "1980-01-01T19:20:30Z"},
        "wedding_anniversary": {"$time" : "2020-05-28T19:20:30Z"}
      }
    }
  ]
}
Note that for nested custom attributes, if the year is less than 0 or greater than 3000, Braze does not store these values on the user.
Liquid templating
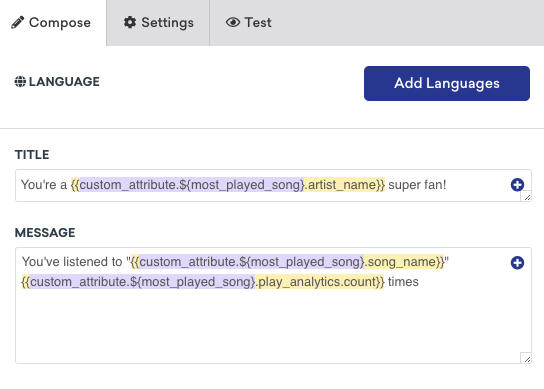
The following Liquid templating example shows how to reference the custom attribute object properties saved from the preceding API request and use them in your messaging.
Use the custom_attribute personalization tag and dot notation to access properties on an object. Specify the name of the object (and position in array if referencing an array of objects), followed by a dot (period), followed by the property name.
{{custom_attribute.${most_played_song}[0].artist_name}} — “Miles Davis”
{{custom_attribute.${most_played_song}[0].song_name}} — “Solea”
{{custom_attribute.${most_played_song}[0].play_analytics.count}} — “1000”
Segmentation
You can build segments based on nested custom attributes to further target your users. To do so, filter your segment based on the custom attribute object, then specify the path to your property name and associated value you want to segment on. If you’re not sure what that path looks like, you can generate a schema and use the nested object explorer to have Braze populate that path for you.
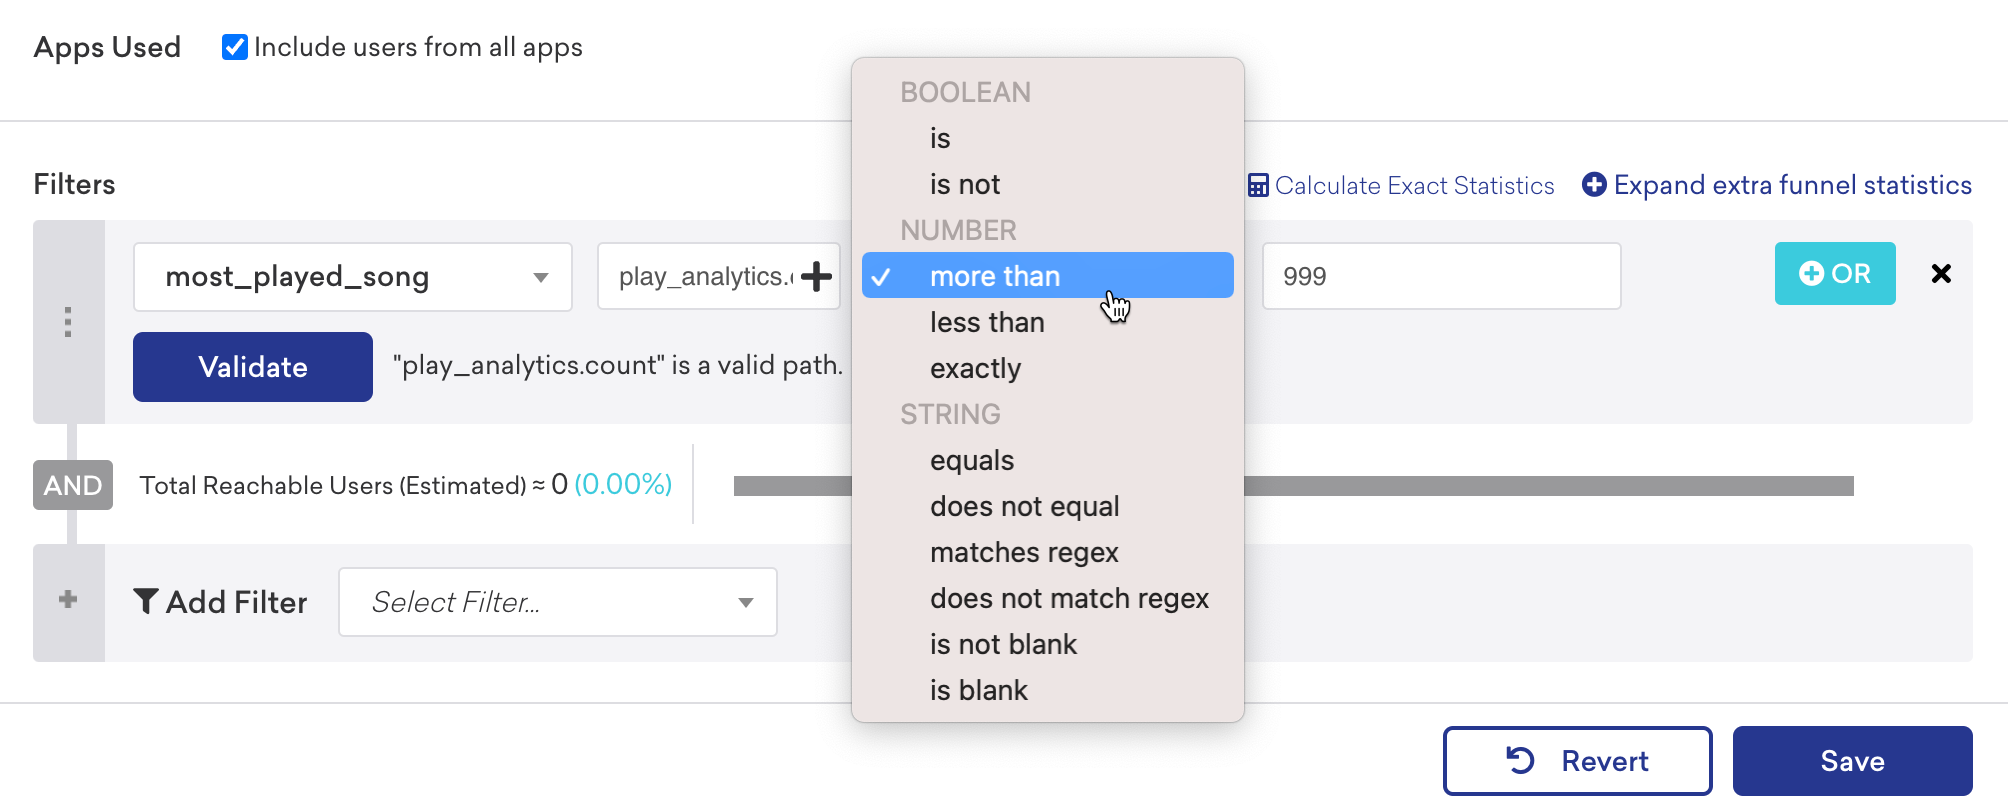
After adding a path to your property, click Validate to verify that the value in the path field is valid.

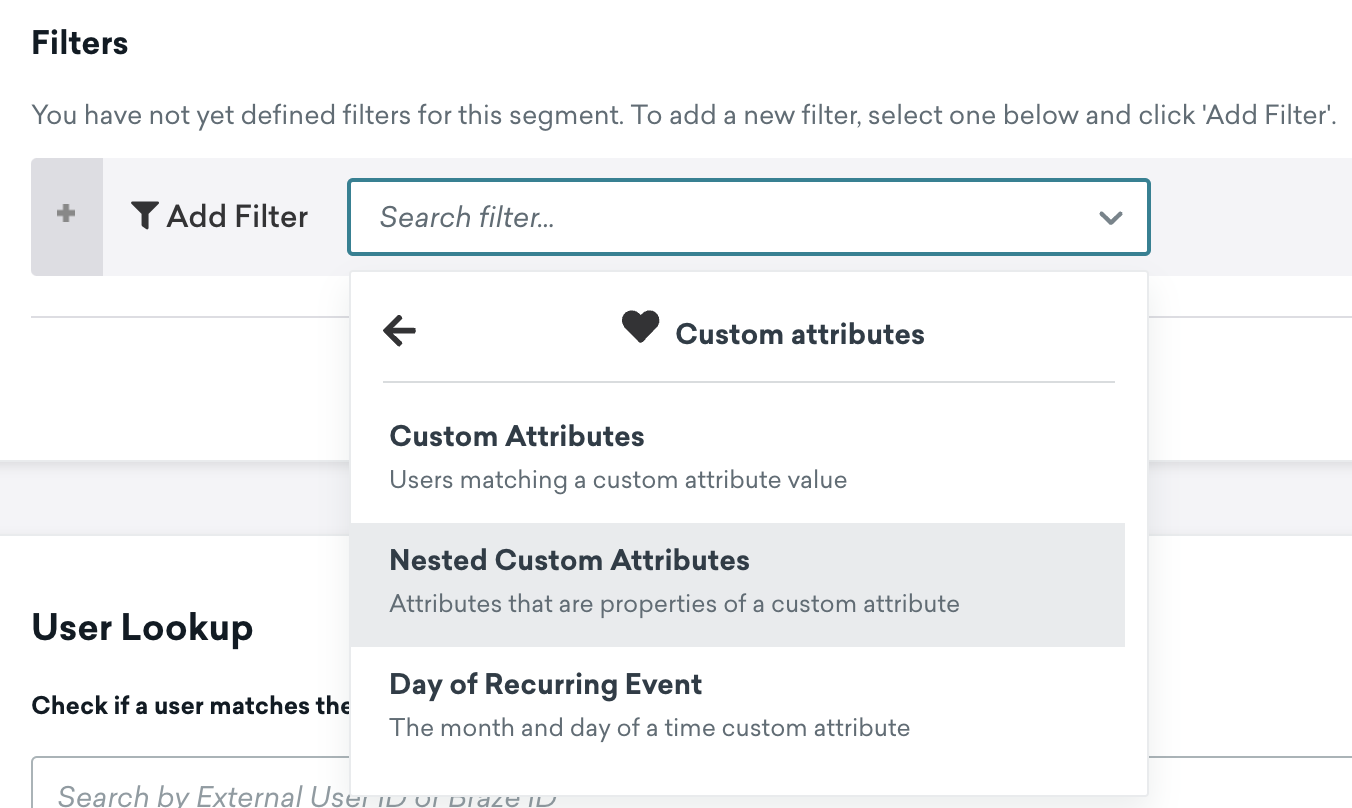
To segment with nested custom attributes, select the Nested Custom Attributes filter to expose a dropdown from which you can select a specific nested custom attribute.
When working with nested custom attributes segmentation, you’ll have access to a new comparator grouped by data type. For example, since play_analytics.count is a number, you can select a comparator under the Number category.
Filtering for Time data types
When filtering a nested time custom attribute, you can choose to filter with operators under the Day of Year or Time categories when comparing the date value.
If you select an operator under the Day of Year category, only the month and day will be checked for comparison instead of the full timestamp of the nested custom attribute value. Selecting an operator under the Time category will compare the full timestamp, including the year.
Multi-criteria segmentation
Use Multi-Criteria Segmentation to create a segment that matches multiple criteria within a single object. This qualifies the user into the segment if they have at least one object array that matches all the criteria specified. For example, users will only match this segment if their key is not blank, and if their number is more than 0.
You can also use the Copy Liquid for segment feature to generate Liquid code for this segment and use that in a message. For example, let’s say you have an array of account objects and a segment that targets customers with active taxable accounts. To get customers to contribute to the account goal associated with one of their active and taxable account, you’ll want to create a message to nudge them.

When you select Copy Liquid for segment, Braze will automatically generate Liquid code that returns an object array that only contains accounts that are active and taxable.
1
2
3
4
5
6
7
{% assign segmented_nested_objects = '' | split: '' %}
{% assign obj_array = {{custom_attribute.${accounts}}} %}
{% for obj in obj_array %}
  {% if obj["account_type"] == 'taxable' and obj["active"] == true %}
    {% assign segmented_nested_objects = obj_array | slice: forloop.index0 | concat: segmented_nested_objects | reverse %}
  {% endif %}
{% endfor %}
From here, you can use segmented_nested_objects and personalize your message. In our use case, we want to take a goal from the first active taxable account and personalize it:
1
Get to your {{segmented_nested_objects[0].goal}} goal faster, make a deposit using our new fast deposit feature!
This returns the following message to your customer: “Get to your retirement goal faster, make a deposit using our new fast deposit feature!”
Generate a schema using the nested object explorer
You can generate a schema for your objects to build segment filters without needing to memorize nested object paths. To do so, perform the following steps.
Step 1: Generate a schema
For this example, suppose we have an accounts object array that we’ve just sent to Braze:
1
2
3
4
5
6
7
8
"accounts": [
  {"type": "taxable",
  "balance": 22500,
  "active": true},
  {"type": "non-taxable",
  "balance": 0,
  "active": true},
 ]
In the Braze dashboard, navigate to Data Settings > Custom Attributes.
If you are using the older navigation, you can find Custom Attributes under Manage Settings.
Search for your object or object array. In the Attribute Name column, click Generate Schema.

It may take a few minutes for your schema to generate depending on how much data you’ve sent us.
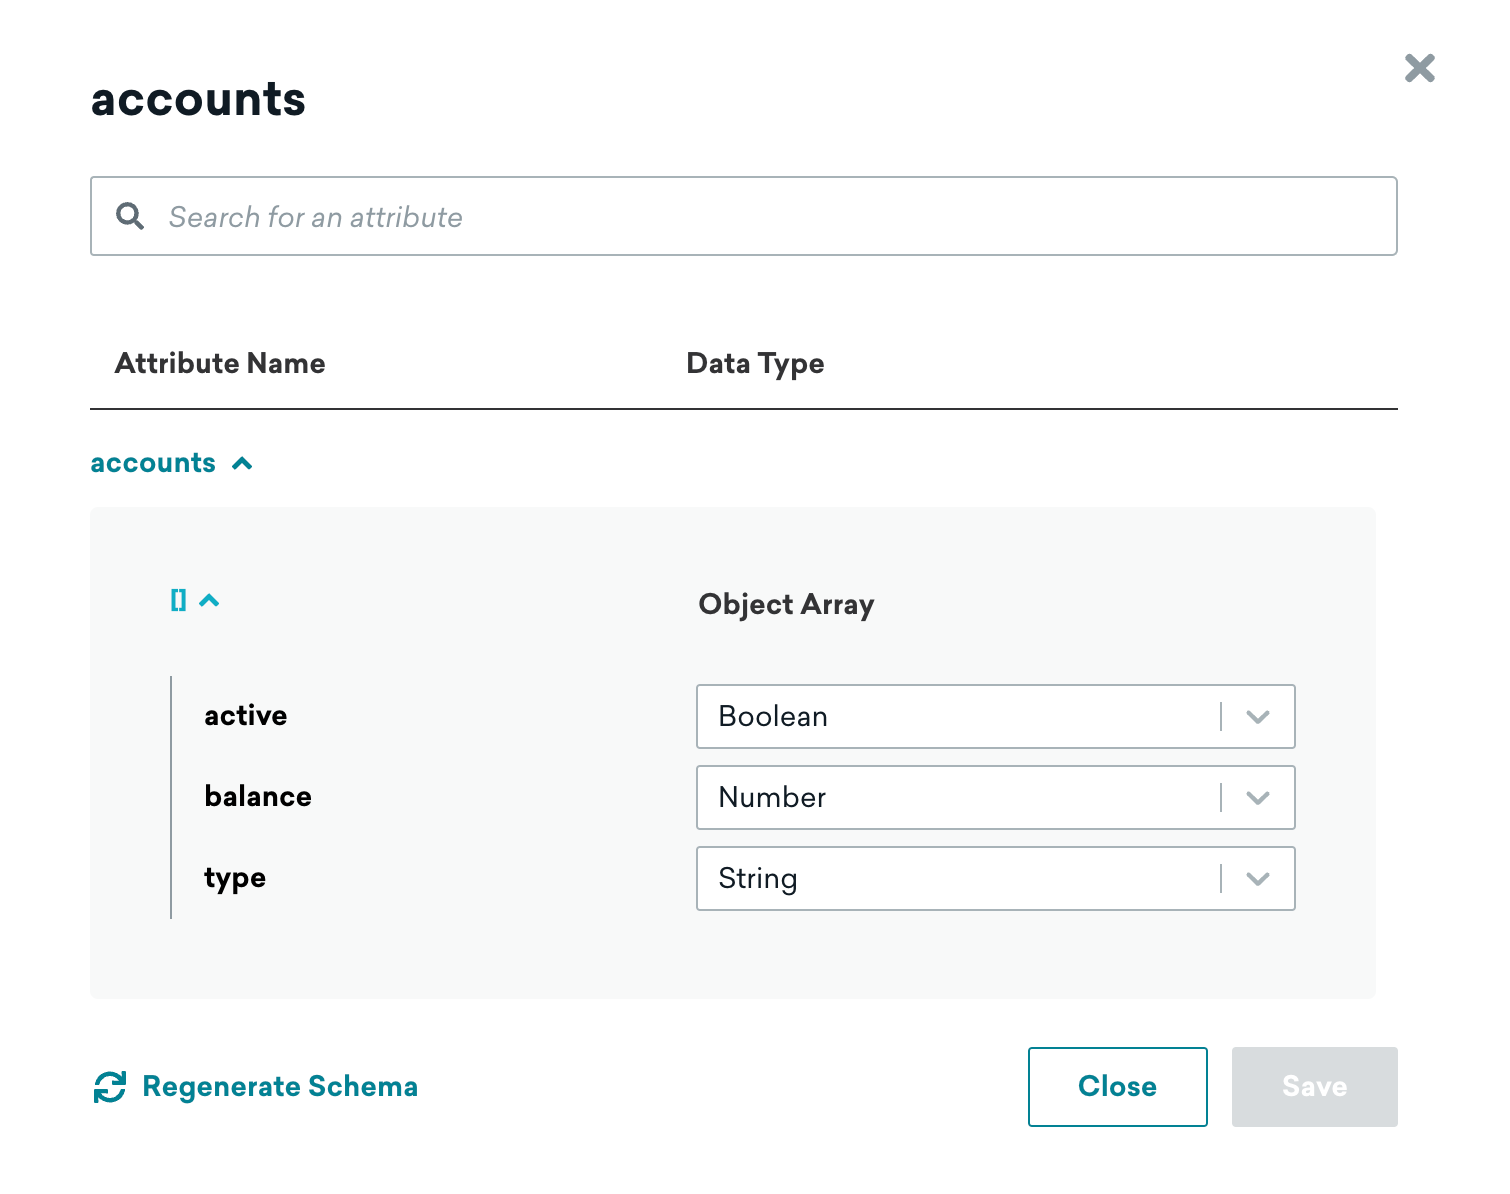
After the schema has been generated, a new plus button appears in place of the Generate Schema button. You can click on it to see what Braze knows about this nested custom attribute.
During schema generation, Braze looks at previous data sent and builds an ideal representation of your data for this attribute. Braze also analyzes and adds a data type for your nested values. This is done by sampling the previous data sent to Braze for the given nested attribute.
For our accounts object array, you can see that within the object array, there’s an object that contains the following:
- A boolean type with a key of
active(regardless of if the account is active or not) - A number type with a key of
balance(balance amount in the account) - A string type with a key of
type(non-taxable or taxable account)
Now that we’ve analyzed and built a representation of the data, let’s build a segment.
Step 2: Build a segment
Let’s target customers who have a balance of less than 100 so that we can send them a message nudging them to make a deposit.
Create a segment and add the filter Nested Custom Attribute, then search for and select your object or object array. Here we’ve added the accounts object array.

Click the plus button in the path field. This will bring up a representation of your object or object array. You can select any of the listed items and Braze will insert them into the path field for you. For our use case, we need to get the balance. Select the balance and the path (in this case, [].balance) is automatically populated in the path field.
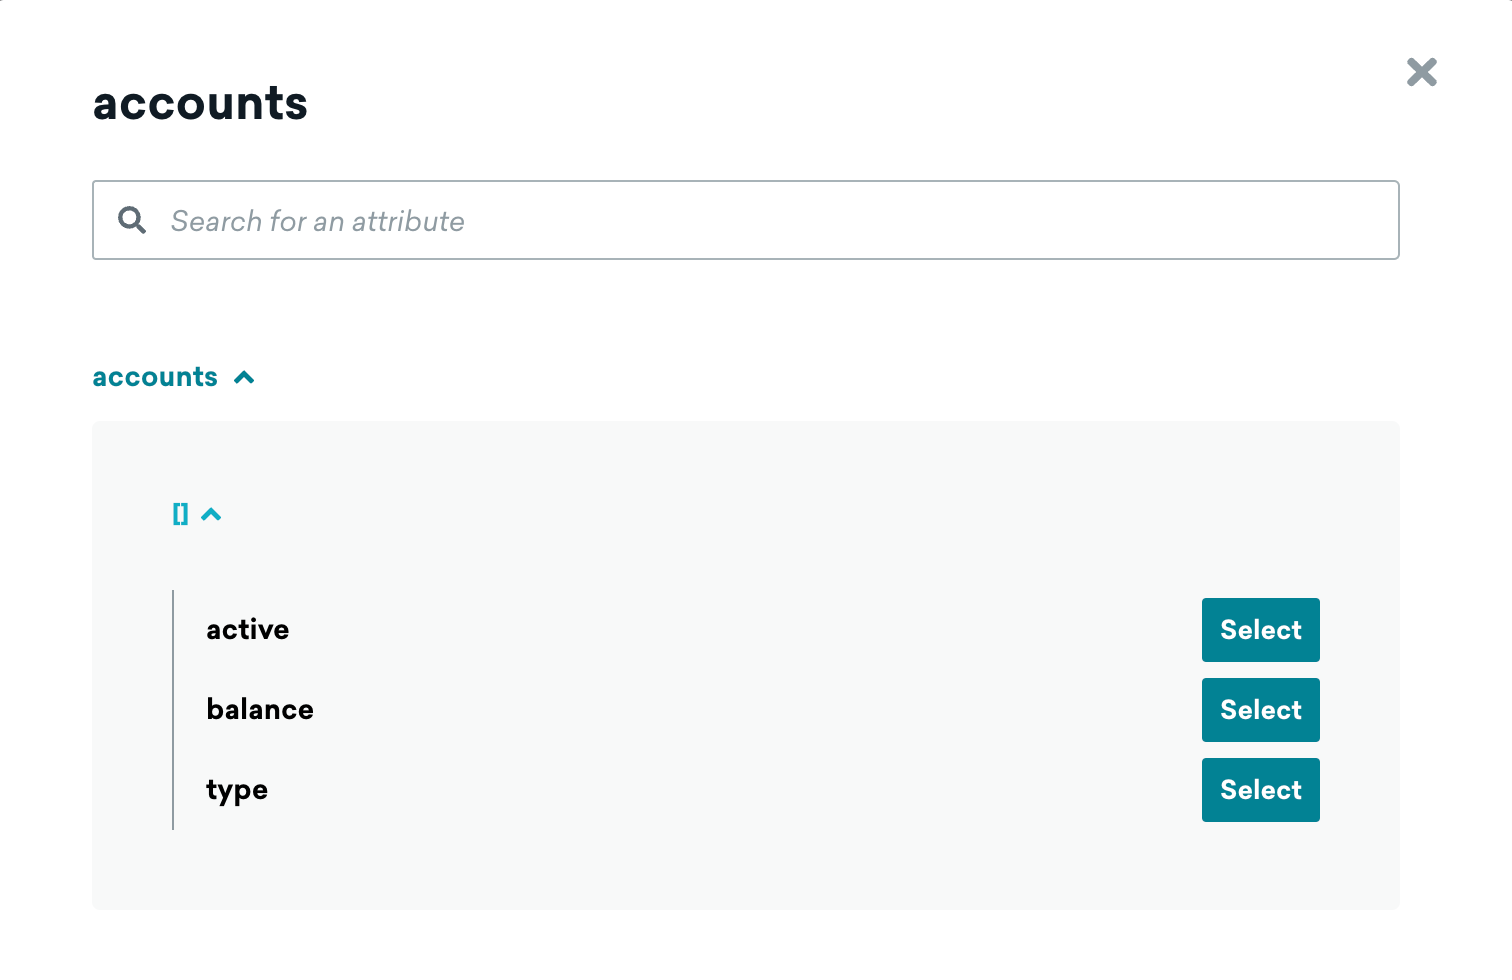
You can click Validate to verify that the contents of the path field is valid, then build the rest of the filter as needed. Here we’ve specified that the balance should be less than 100.

That’s it! You just created a segment using a nested custom attribute, all without needing to know how the data is structured. The nested object explorer in Braze generated a visual representation of your data and allowed you to explore and select exactly what you needed to create a segment.
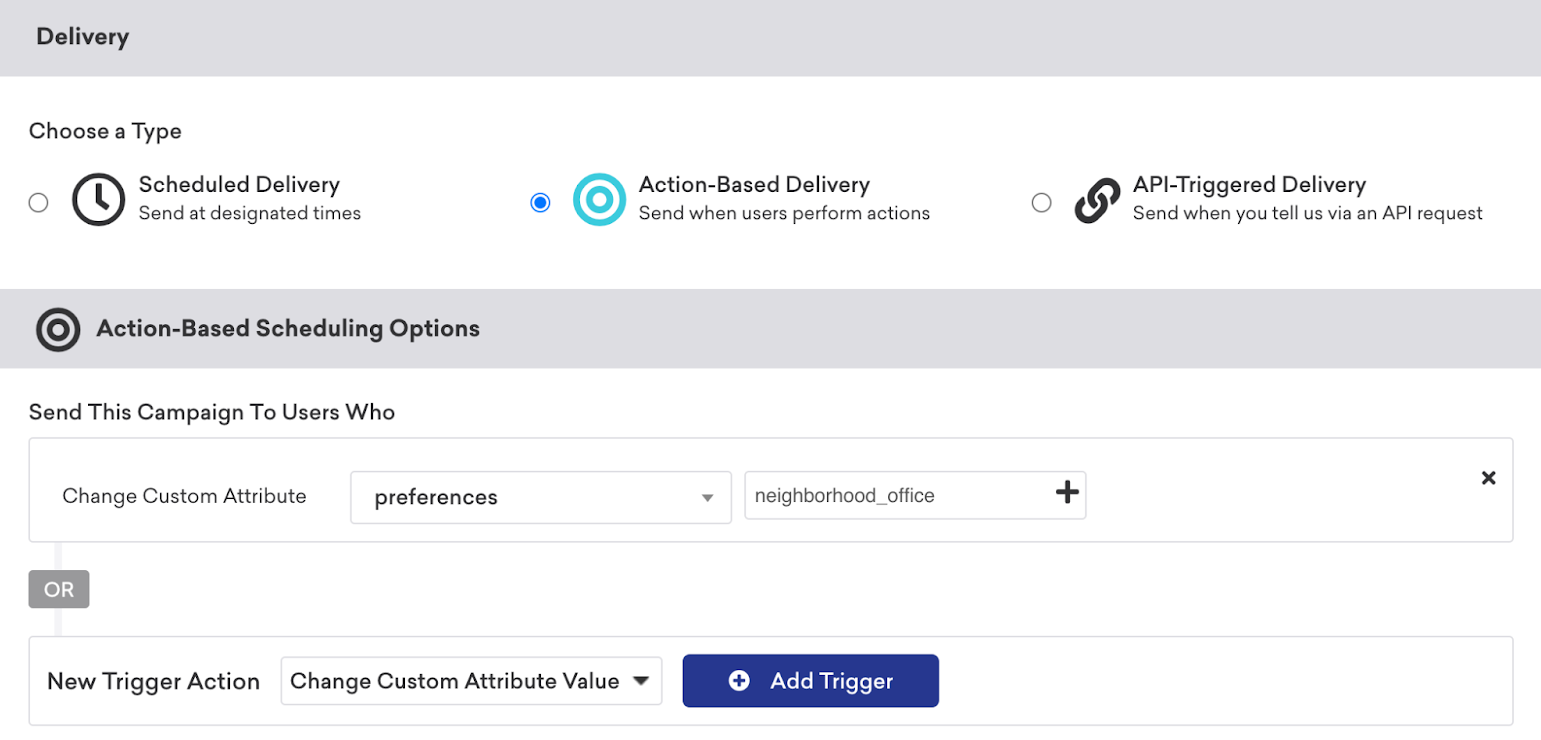
Trigger nested custom attribute changes
You can trigger when a nested custom attribute object changes. This option is not available for changes to object arrays. If you don’t see an option to view the path explorer, check that you’ve generated a schema.
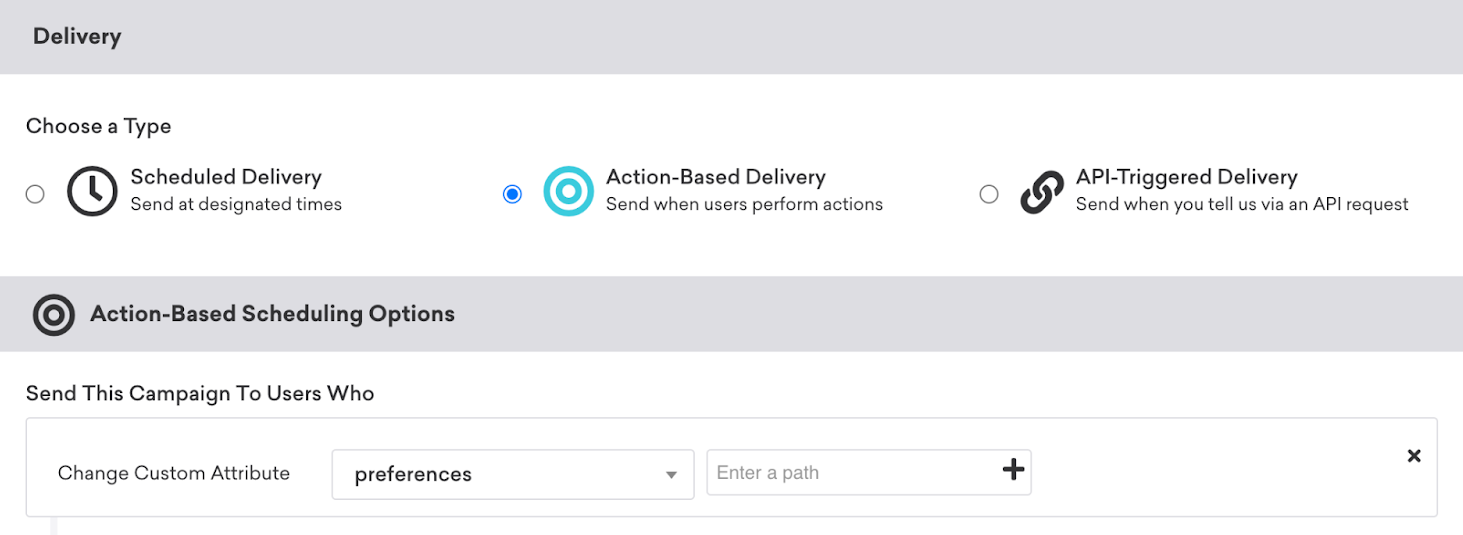
For example, in the following action-based campaign, you can add a new trigger action for Change Custom Attribute Value to target users who have changed their neighborhood office preferences.
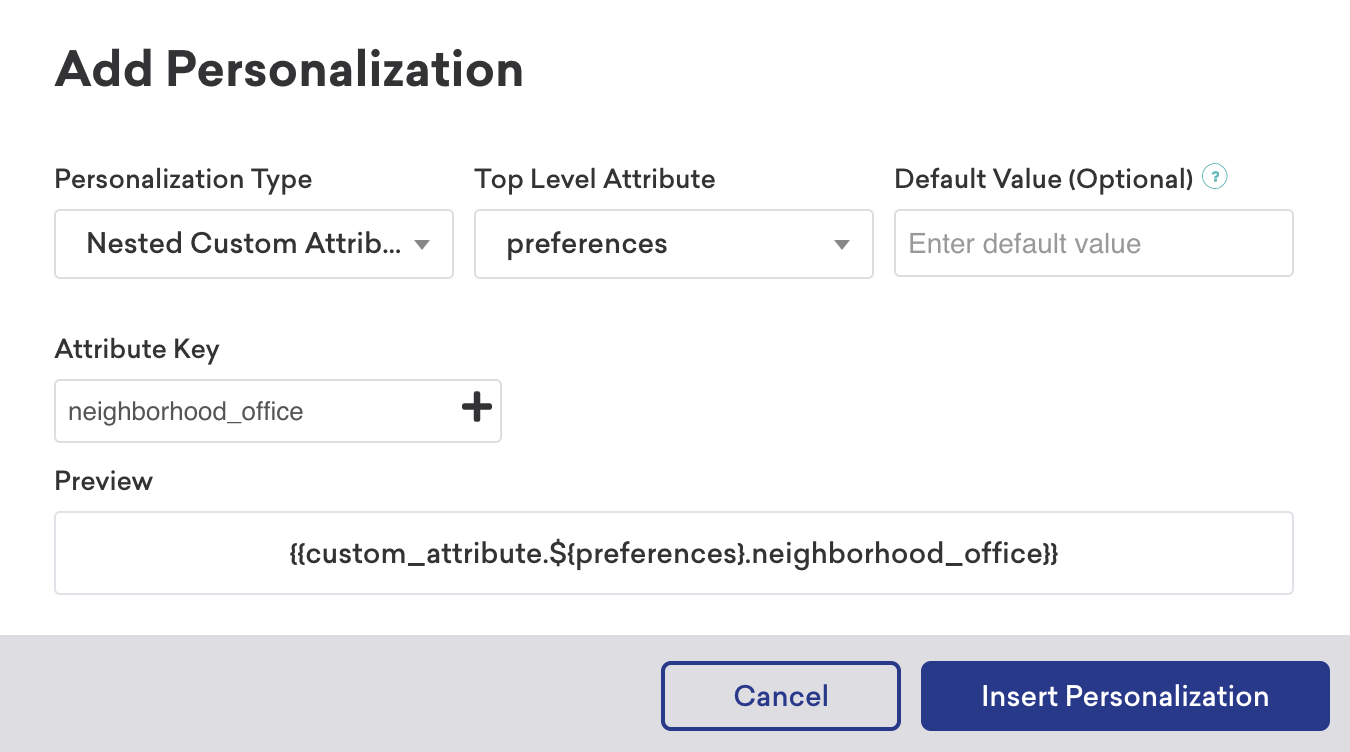
Personalization
Using the Add Personalization modal, you can also insert nested custom attributes into your messaging. Select Nested Custom Attributes as the personalization type. Next, select the top-level attribute and attribute key.
For example, in the personalization modal below, this inserts the nested custom attribute of a local neighborhood office based on a user’s preferences.
Check that a schema has been generated if you don’t see the option to insert nested custom attributes.
Regenerate schemas
After a schema has been generated, it can be regenerated once every 24 hours. This section describes how to regenerate your schema. For more detailed information on schemas, refer to the section in this article on generating a schema.
To regenerate the schema for your nested custom attribute:
- Go to Data Settings > Custom Attributes.
- Search for your nested custom attribute.
- In the Attribute Name column for your attribute, click to manage the schema.
- A modal will appear. Click Regenerate Schema.
The option to regenerate schema will be disabled if it has been less than 24 hours since the schema was last regenerated. Regenerating the schema will only detect new objects and will not delete objects that currently exist in the schema.
If you want to reset the schema for an object array with an existing object, you need to create a new custom attribute. Schema regeneration does not delete existing objects.
If data does not appear as expected after regenerating the schema, the attribute may not be ingested often enough. User data is sampled on previous data sent to Braze for the given nested attribute. If the attribute isn’t ingested enough, it won’t be picked up for the schema.
Data Points
Any key that is updated consumes a data point. For example, this object initialized in the user profile counts as seven (7) data points:
1
2
3
4
5
6
7
8
9
10
11
12
13
14
15
16
17
18
{
  "attributes": [
    {
      "external_id": "user_id",
      "most_played_song": {
        "song_name": "Solea",
        "artist_name": "Miles Davis",
        "album_name": "Sketches of Spain",
        "year_released": 1960,
        "genre": "Jazz",
        "play_analytics": {
          "count": 1000,
          "top_10_listeners": true
        }
      }
    }
  ]
}
Updating a custom attribute object to null also consumes a data point.
 Edit this page on GitHub