Rules-based recommendations
A rules-based recommendation engine uses user data and product information to suggest relevant items to users within messages. It uses Liquid and either Braze catalogs or Connected Content, to dynamically personalize content based on user behavior and attributes.
To learn more about Liquid, catalogs, and Connected Content, check out these Braze Learning courses:
- Personalized Recommendations with Email
- Dynamic Personalization with Liquid
- Connected Content Fundamentals
Rules-based recommendations are based on fixed logic that you must manually set. This means your recommendations won’t adjust to a user’s purchase history and tastes unless you update the logic.
To create personalized AI recommendations that automatically adjust to a user’s history, check out AI item recommendations.
Creating a catalogs recommendation engine
- Create a catalog of products.
- For each product, add a list of recommended products as a string separated by a delimiter (like a pipe
|) in a column named “product_recommendations”. - Pass the product ID that you want to find recommendations for to the catalog.
- Get the
product_recommendationsvalue for that catalog item and split it by the delimiter with a Liquid split filter. - Pass one or more of those IDs back to the catalog to collect the other product details.
Catalogs use case
Let’s say you have a health food app and want to create a Content Card campaign that sends different recipes based on how long a user has been signed up for your app.
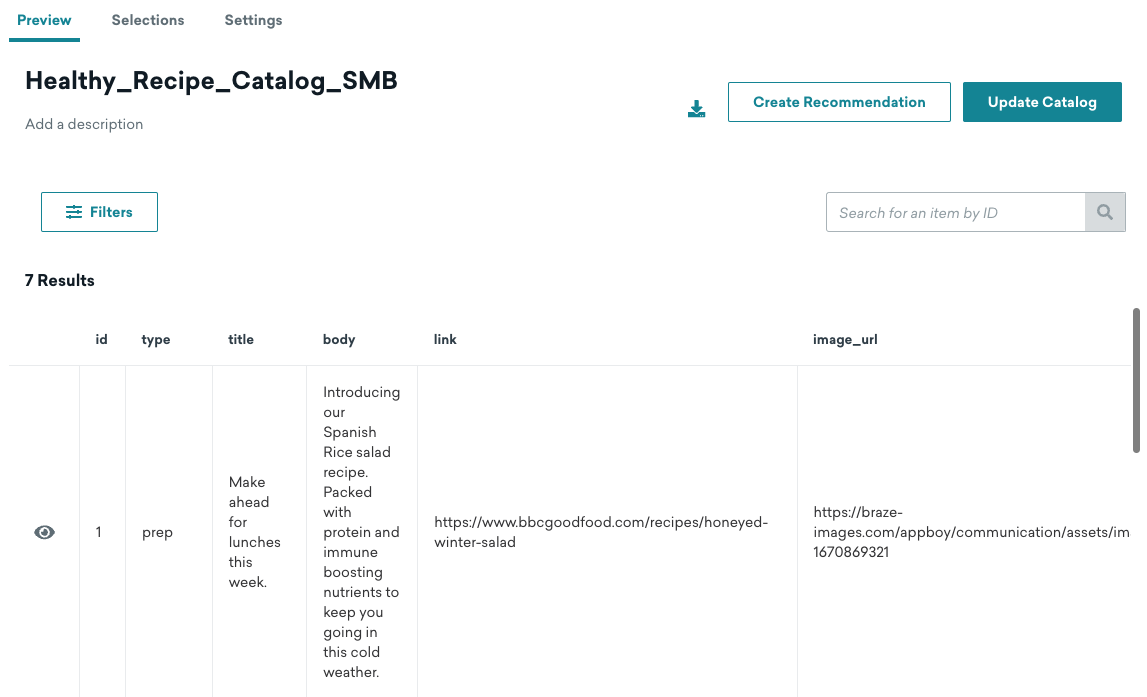
- Create and upload a catalog via CSV that includes the following information:
- id: A unique number that correlates to the number of days since the user signed up with your app. For example,3correlates to three days.
- type: The recipe category, such ascomfort,fresh, and others.
- title: The title of the content card that will be sent for each ID, such as “Make ahead for lunch this week” or “Let’s taco about it”.
- link: The link to the recipe article.
- image_url: The image that corresponds to the recipe.
- After the catalog is uploaded to Braze, check the preview of a select number of catalog items to confirm the information imported accurately. The items may be randomized in the preview, but this won’t affect the output of the recommendation engine.
- Create a Content Card campaign. In the composer, enter Liquid logic to determine which users should receive the campaign, and which recipe and image should display. In this use case, Braze will pull the user’s
start_date(or sign-up date) and compare it to the current date. The difference in days will determine which Content Card is sent.
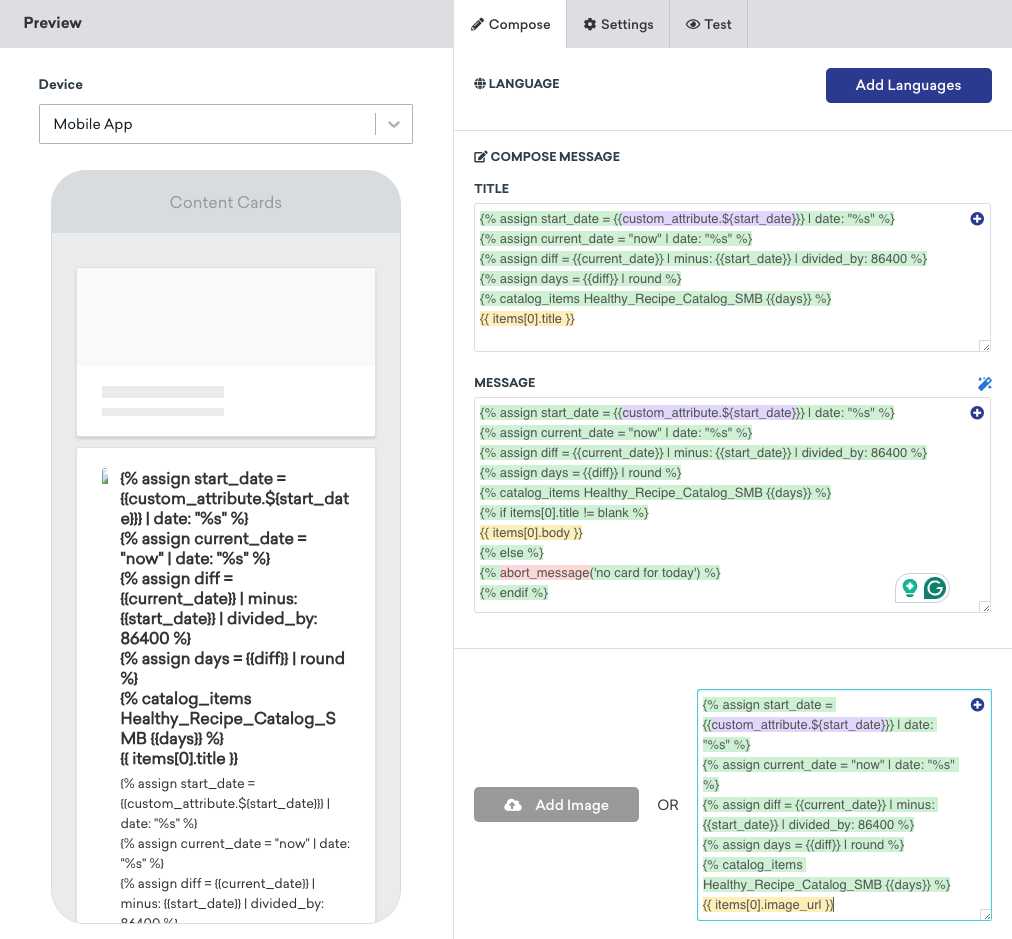
Title:
1
2
3
4
5
6
{% assign start_date = {{custom_attribute.${start_date}}} | date: "%s" %}
{% assign current_date = "now" | date: "%s" %}
{% assign diff = {{current_date}} | minus: {{start_date}} | divided_by: 86400 %}
{% assign days = {{diff}} | round %}
{% catalog_items Healthy_Recipe_Catalog_SMB {{days}} %}
{{ items[0].title }}
Message:
1
2
3
4
5
6
7
8
9
10
{% assign start_date = {{custom_attribute.${start_date}}} | date: "%s" %}
{% assign current_date = "now" | date: "%s" %}
{% assign diff = {{current_date}} | minus: {{start_date}} | divided_by: 86400 %}
{% assign days = {{diff}} | round %}
{% catalog_items Healthy_Recipe_Catalog_SMB {{days}} %}
{% if items[0].title != blank %}
{{ items[0].body }}
{% else %}
{% abort_message('no card for today') %}
{% endif %}
Image:
1
2
3
4
5
6
{% assign start_date = {{custom_attribute.${start_date}}} | date: "%s" %}
{% assign current_date = "now" | date: "%s" %}
{% assign diff = {{current_date}} | minus: {{start_date}} | divided_by: 86400 %}
{% assign days = {{diff}} | round %}
{% catalog_items Healthy_Recipe_Catalog_SMB {{days}} %}
{{ items[0].image_url }}
- In the On click behavior section, enter Liquid logic for where users should be redirected when they click the Content Card on iOS, Android, and Web devices.
1
2
3
4
5
6
{% assign start_date = {{custom_attribute.${start_date}}} | date: "%s" %}
{% assign current_date = "now" | date: "%s" %}
{% assign diff = {{current_date}} | minus: {{start_date}} | divided_by: 86400 %}
{% assign days = {{diff}} | round %}
{% catalog_items Healthy_Recipe_Catalog_SMB {{days}} %}
{{ items[0].link }}
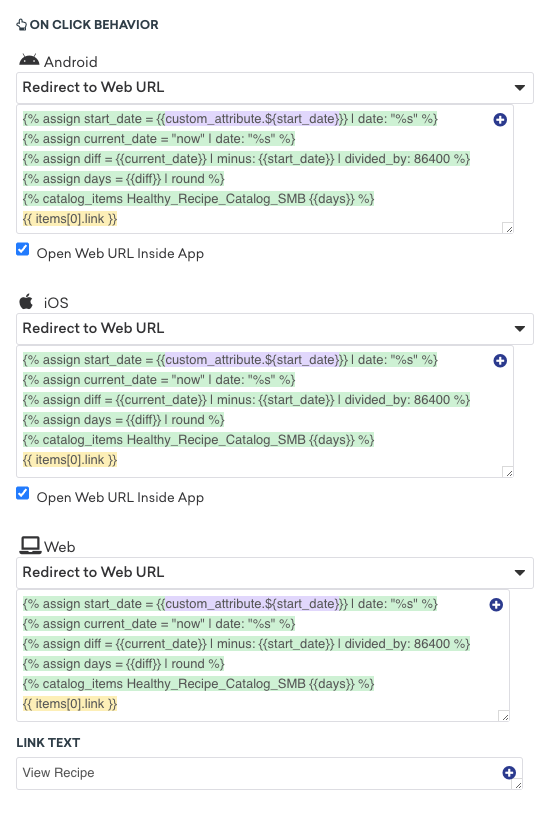
- Go to the Test tab and select Custom user under Preview message as user. Enter a date in the Custom attribute field to preview the Content Card that would be sent to a user who signed up on that date.

Creating a Connected Content recommendation engine
- Create a Connected Content endpoint in one of the following ways:
- Convert a spreadsheet into a JSON API endpoint by using a service like SheetDP, and take note of the API URL this generates
- Build, host, and maintain a custom-built in-house endpoint
- Buy a recommendations engine via a third-party partner, such as one of our Alloy partners, including Amazon Personalise, Certona, Dynamic Yield and others
- Write Connected Content Liquid into the message body or Content Block HTML editor that will call your endpoint to search your database.
- Align the Liquid with a custom attribute value it finds in a given user’s profile.
- Pull the correct recommendation as a result.
1
2
3
4
5
6
7
8
{% connected_content YOUR-API-URL :save items %}

{% assign recommended_item_ids_from_user_profile = custom_attribute.${RECOMMENDED_ITEM_IDS} | split: ';' %}

{% for item_id in recommended_item_ids_from_user_profile %}
  {% assign recommended_item = items | where: "ITEM_ID", ITEM_ID | first %}
  recommended_item.item_name
{% endfor %}
| Attribute | Replacement |
|---|---|
YOUR-API-URL |
Replace with the actual URL of your API. |
RECOMMENDED_ITEM_IDS |
Replace with the actual name of your custom attribute that contains the IDs of recommended items. This attribute is expected to be a string of IDs separated by semicolons. |
ITEM_ID |
Replace with the actual name of the attribute in your API response that corresponds to the item ID. |
This is a basic example and you might need to modify it further based on your specific needs and data structure. For more detailed guidance, refer to the Liquid documentation or consult with a developer.
Connected Content use case
Let’s say you want to pull restaurant recommendations from the Zomato Restaurants database and save the result as a local variable called restaurants. You can make the following Connected Content call:
1
2
3
4

{% connected_content https://developers.zomato.com/api/v2.1/search?entity_id={{city_id}}&entity_type=city&count=20&cuisines={{food_type}}&sort=rating:headers{“user-key”:“USER_KEY”} :save restaurants %}

{{city_food.restaurants[0]}}
Next, let’s say you want to pull restaurant recommendations based on a user’s city and food type. You can do so by dynamically inserting the custom attributes for the user’s city and food type to the beginning of the call, and then assigning the value of restaurants to the variable city_food.restaurants.
The Connected Content call would look like this:
1
2
3
4
5
6
7
8
{% assign city_id = {{custom_attribute.${city_id} | default: ‘306’}} %}
{% assign food_type = {{custom_attribute.${food_type} | default: ‘471’}} %}

{%- connected_content https://developers.zomato.com/api/v2.1/search?entity_id={{city_id}}&entity_type=city&count=20&cuisines={{food_type}}&sort=rating:headers{“user-key”:“USER_KEY”} :save restaurants %}

{% assign restaurants = city_food.restaurants %}

{{city_food.restaurants[0]}}
If you want to tailor the response to retrieve only the restaurant name and rating, you can add filters to the end of the call, like so:
1
2
3
4
5
6
7
8
{% assign city_id = {{custom_attribute.${city_id} | default: ‘306’}} %}
{% assign food_type = {{custom_attribute.${food_type} | default: ‘471’}} %}

{%- connected_content https://developers.zomato.com/api/v2.1/search?entity_id={{city_id}}&entity_type=city&count=20&cuisines={{food_type}}&sort=rating:headers{“user-key”:”USER_KEY”} :save restaurants %}
{% assign restaurants = city_food.restaurants %}

{{city_food.restaurants[0].restaurant.name}}
{{city_food.restaurants[0].restaurant.user_rating.rating_text}}
Finally, let’s say you want to group together the restaurant recommendations by rating. Do the following:
- Use
assignto create blank arrays for rating categories of “excellent”, “very good”, and “good”. - Add a
forloop that examines the rating of each restaurant in the list.- If a rating is “Excellent”, append the restaurant name to the
excellent_restaurantsstring, then add a * character at the end to separate each restaurant name. - If a rating is “Very Good”, append the restaurant name to the
very_good_restaurantsstring, then add a * character at the end. - If a rating is “Good”, append the restaurant name to the
good_restaurantsstring, then add a * character at the end.
- If a rating is “Excellent”, append the restaurant name to the
- Limit the number of restaurant recommendations returned to four per category.
This is what the final call would look like:
1
2
3
4
5
6
7
8
9
10
11
12
13
14
15
16
17
18
19
20
21
22
23
24
25
26
27
28
29
30
31
32
33
34
35
36
37
38
39
40
41
42
43
44
45
46
47
48
49
{% assign city_id = {{custom_attribute.${city_id} | default: ‘306’}} %}
{% assign food_type = {{custom_attribute.${food_type} | default: ‘471’}} %}
{%- connected_content https://developers.zomato.com/api/v2.1/search?entity_id={{city_id}}&entity_type=city&count=20&cuisines={{food_type}}&sort=rating:headers{“user-key”:”USER_KEY”} :save restaurants %}
{% assign restaurants = city_food.restaurants %}
{% assign excellent_restaurants = “” %}
{% assign very_good_resturants = “” %}
{% assign good_restaurants = “” %}
{% for list in restaurants %}
{% if {{list.restaurant.user_rating.rating_text}} == `Excellent` %}
{% assign excellent_restaurants = excellent_restaurants | append: list.restaurant.name | append: `*` %}
{% elseif {{list.restaurant.user_rating.rating_text}} == `Very Good` %}
{% assign very_good_restaurants = very_good_restaurants | append: list.restaurant.name | append: `*` %}
{% elseif {{list.restaurant.user_rating.rating_text}} == `Good` %}
{% assign good_restaurants = good_restaurants | append: list.restaurant.name | append: `*` %}
{% endif %}
{% endfor %}
{% assign excellent_array = excellent_restaurants | split: `*` %}
{% assign very_good_array = very_good_restaurants | split: `*` %}
{% assign good_array = good_restaurants | split: `*` %}

Excellent places
{% for list in excellent_array %}

{{list}}
{% assign total_count = total_count | plus:1 %}
{% if total_count >= 4 %}
{% break %}
{% endif %}
{% endfor %}

Very good places
{% for list in very_good_array %}

{{list}}
{% assign total_count = total_count | plus:1 %}
{% if total_count >= 4 %}
{% break %}
{% endif %}
{% endfor %}

Good places
{% for list in good_array %}

{{list}}
{% assign total_count = total_count | plus:1 %}
{% if total_count >= 4 %}
{% break %}
{% endif %}
{% endfor %}
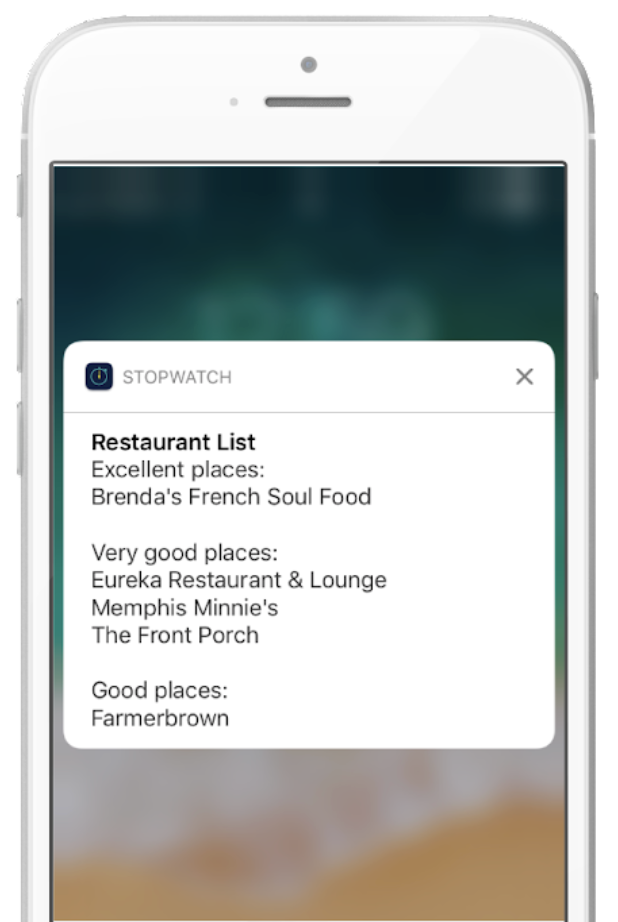
See the below screenshot for an example of how the response displays on a user’s device.
Considerations
When deciding which recommendation engine suits your available resources and use cases, refer to this table of considerations:
| Considerations | Liquid | Catalogs CSV | Catalogs API | Connected Content |
|---|---|---|---|---|
| Does not consume data points | Not supported | Supported | Supported | Supported |
| No code solution | Not supported | Supported if pre-generated Liquid | Not supported | Not supported |
| Advanced Liquid often required | Supported | Not supported | Not supported | Supported |
| Updates to data in the product feed | Not supported | Supported if the recommendations aren’t often updated | Supported if recommendations are updated up to hourly | Supported and recommendations are updated up to real-time |
| Generate recommendations within Braze UI | Supported | Supported | Supported | Not supported if generated outside of Braze |
| No hosting, managing, troubleshooting recommendations data | Supported | Supported | Supported | Not supported |
 Edit this page on GitHub