Setting up IPs and domains
This article will walk you through the requirements and steps needed to set up your IP addresses and pools, as well as domains and subdomains needed before you can begin sending emails with Braze.
Though most of the setup process is done by Braze, we have outlined the requirements and materials for this setup.
Method 1: Coordinate with Braze (recommended)
Step 1: Outline information
Send the following information to your Braze representative:
- Your chosen domains and subdomains
- The approximate number of emails you’ll be sending each month, which will help determine how many IPs you’ll need
- How you prefer to map your sending domains to your allocated IP
Step 2: Braze configures information
After receiving your email, we’ll get to work configuring your IPs, domains and subdomains, and IP pools.
Step 3: Add DNS records
After your IPs, domains, subdomains, and IP pools are configured, we’ll send you a list of DNS records. Ask your engineers and developers to add these DNS records where needed, and after they have been added, let the Braze Onboarding team know.
Next steps
We’ll check your setup and validate all information in our internal systems. The Braze Onboarding team will let you know when you’re ready to go, or if there are issues with your DNS records that you must address with your engineering team.
Method 2: Self-service email setup
This method will set up one sending domain, one tracking domain, and one IP in total for a company. If you’re planning to set up more, please consult with Braze Onboarding team (method 1).
This self-service email setup feature is currently in beta. Contact your Braze account manager if you’re interested in participating in the beta.
If you’re using the self-service email setup feature, be sure to also consult with the Braze Onboarding team.
Prerequisites
To use self-service email setup, you must meet the following prerequisites:
- You are a new customer in onboarding.
- You have the “Can Manage Company Settings” company-level permission.
Step 1: Begin setup
- Go to Settings > Admin Settings under Company Settings.
- Next, select the Sender Verification tab. To view this tab, you must have the “Can Manage Company Settings” company-level permission.
- Click the Start setup button.
If you are using the older navigation, you can find Sender Verification by selecting your profile icon.
Step 2: Add and verify a sending domain
A sending domain is used in the “from” address when sending an email. Enter a sending domain and click Submit.
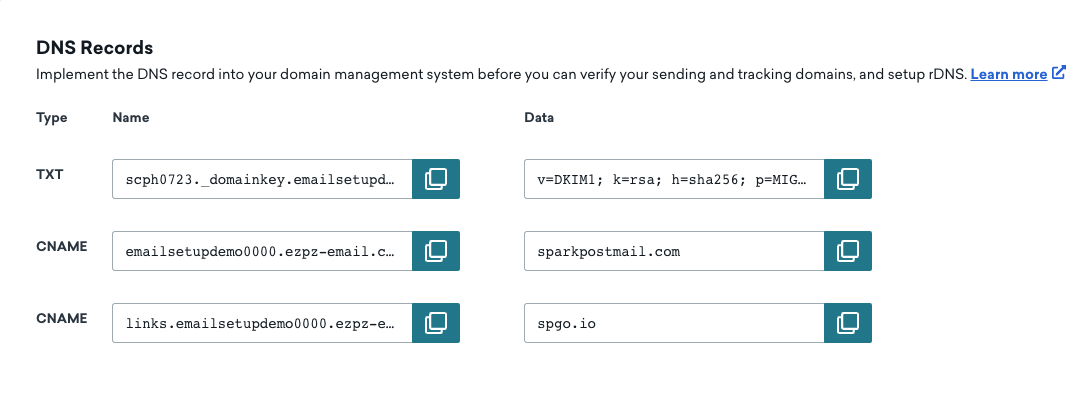
Next, add the TXT and CNAME records from the bottom of the page to your DNS provider. Then, return to the Braze dashboard and click Verify.

The sending domain must be a subordinate to a domain you own. For example, if you own “example.com”, a subdomain could be “mail.example.com”, which allows you to use the sending address “@mail.example.com”.
Step 3: Add and verify a tracking domain
A tracking domain is used to wrap links in your emails for click-tracking and branding purposes. This will be visible to users when they hover over or click your email links. We recommend matching this to your sending domain.
Enter a tracking domain and click Submit. Next, add the CNAME records from the bottom of the page to your DNS provider. Then, return to the Braze dashboard and click Verify.
Step 4: Add an IP address
Braze will generate an A record to associate your IP address with your sending subdomain in a setup called reverse DNS (rDNS). Add the A record in your DNS provider then click Set up rDNS to support deliverability.
Note that additional domains that have been added will not appear in the Sender Verification section. To add more domains, contact the Braze Support team.
Next steps
After your sender verification is complete, we recommend IP warming so that your messages reach their destination inboxes at a consistently high rate. After completing this setup, be sure to also consult with the Braze Onboarding team to confirm if your domains and IP address are working.
 Edit this page on GitHub