Connected Sources
Connected sources are a zero-copy alternative to directly syncing data with Braze’s Cloud Data Ingestion (CDI) feature. With a connected source, directly query your data warehouse to create new segments–without copying any of the underlying data to Braze.
Once a connected source is added to your Braze workspace, you can create a CDI segment within Segment Extensions. CDI Segments lets you write SQL that directly queries on your own data warehouse (using data there that’s made available via your CDI Connected Source), and creates and maintains a group of users that can be targeted within Braze.
For more information on creating a segment with this source, see the CDI Segments documentation.
Because connected sources run on your data warehouse directly, you will incur all costs associated with running these queries in your data warehouse. Connected sources do not consume data points, and CDI segments do not consume SQL Segment credits.
Integrating connected sources
Step 1: Connect your resources
Cloud Data Ingestion connected sources require some setup on the Braze side and in your instance. Follow these steps to set up the integration−some steps will be done in your data warehouse and some steps will be done in your Braze dashboard.
In your data warehouse
- Create a role and grant permissions to query and create tables in a schema.
- Set up your warehouse and give access to that role.
- Create a user for that role.
- Depending on your configuration, you may need to allow Braze IPs in your Snowflake network policy.
In the Braze dashboard
- Create a new connected source in the Braze dashboard.
- Configure the sync details for the connected source.
- Retrieve the public key provided in the Braze dashboard.
In your data warehouse
- Append the public key from the Braze dashboard to the Snowflake user for authentication. When you’re finished, you can use the connected source to create one or more CDI Segments.
- Set up the source data and required resources in your Redshift environment.
- Create a new connected source in the Braze dashboard.
- Test the integration.
- Use the connected source to create one or more CDI Segments.
- Set up the source data and required resources in your BigQuery environment.
- Create a service account and allow access to the BigQuery project(s) and dataset(s) that contain the data you want to sync.
- Create a new connected source in the Braze dashboard.
- Test the integration.
- Use the connected source to create one or more CDI Segments.
- Set up the source data and required resources in your Databricks environment.
- Create a service account and allow access to the Databricks project(s) and dataset(s) that contain the data you want to sync.
- Create a new connected source in the Braze dashboard.
- Test the integration.
- Use the connected source to create one or more CDI Segments.
There may be two to five minutes of warm-up time when Braze connects to Classic and Pro SQL instances, which will lead to delays during connection setup and testing, as well as during CDI Segment creation and refresh. Using a serverless SQL instance will minimize warmup time and improve query throughput, but may result in slightly higher integration costs.
Step 2: Set up your data warehouse
First, set up the source data and required resources in your data warehouse environment. The connected source may reference one or more tables, so ensure your Braze user has permissions for all tables you want available in the connected source.
Step 2.1: Create a role and grant permissions
Create a role for your connected source to use. This role will be used to generate the list of tables available in your CDI segments, and to query source tables to create new segments. After the connected source is created, Braze will discover the names and description of all tables available to the user in the source schema.
You may choose to grant access to all tables in a schema, or grant privileges only to specific tables. Whichever tables the Braze role has access to will be available to query in the CDI segment.
The create table permission is required so Braze can create a table with your CDI Segment query results before updating the segment in Braze. Braze will create a temporary table per segment, and the table will only persist while Braze is updating the segment.
1
2
3
4
5
6
7
8
9
10
11
12
13
CREATE ROLE BRAZE_INGESTION_ROLE;

GRANT USAGE ON DATABASE BRAZE_CLOUD_PRODUCTION TO ROLE BRAZE_INGESTION_ROLE;
GRANT USAGE ON SCHEMA BRAZE_CLOUD_PRODUCTION.INGESTION TO ROLE BRAZE_INGESTION_ROLE;
GRANT CREATE TABLE ON SCHEMA BRAZE_CLOUD_PRODUCTION.INGESTION TO ROLE BRAZE_INGESTION_ROLE;

-- grant access to all current and future tables or views in the schema
GRANT SELECT ON ALL TABLES IN SCHEMA BRAZE_CLOUD_PRODUCTION.INGESTION TO ROLE BRAZE_INGESTION_ROLE;
GRANT SELECT ON FUTURE TABLES IN SCHEMA BRAZE_CLOUD_PRODUCTION.INGESTION TO ROLE BRAZE_INGESTION_ROLE;

-- grant access to specific tables or views in the schema
GRANT SELECT ON TABLE BRAZE_CLOUD_PRODUCTION.INGESTION.USERS_ATTRIBUTES_SYNC TO ROLE BRAZE_INGESTION_ROLE;
Step 2.2: Set up the warehouse and give access to Braze role
1
2
3
CREATE WAREHOUSE BRAZE_INGESTION_WAREHOUSE;

GRANT USAGE ON WAREHOUSE BRAZE_INGESTION_WAREHOUSE TO ROLE BRAZE_INGESTION_ROLE;
The warehouse will need to have the auto-resume flag on. If not, you will need to grant Braze additional OPERATE privileges on the warehouse for Braze to turn it on when it’s time to run the query.
Step 2.3: Set up the user
1
2
3
CREATE USER BRAZE_INGESTION_USER;

GRANT ROLE BRAZE_INGESTION_ROLE TO USER BRAZE_INGESTION_USER;
You will share connection information with Braze and receive a public key to append to the user in a later step.
When connecting different workspaces to the same Snowflake account, you must create a unique user for each Braze workspace where you are creating an integration. Within a workspace, you can reuse the same user across integrations, but integration creation will fail if a user on the same Snowflake account is duplicated across workspaces.
Step 2.4: Allow Braze IPs in Snowflake network policy (optional)
Depending on the configuration of your Snowflake account, you may need to allow the following IP addresses in your Snowflake network policy. For more information on enabling this, see the relevant Snowflake documentation on modifying a network policy.
For instances US-01, US-02, US-03, US-04, US-05, US-06, US-07, these are the relevant IP addresses:
23.21.118.19134.206.23.17350.16.249.952.4.160.21454.87.8.3454.156.35.25152.54.89.23818.205.178.15
For instances EU-01 and EU-02, these are the relevant IP addresses:
52.58.142.24252.29.193.12135.158.29.22818.157.135.973.123.166.463.64.27.363.65.88.253.68.144.1883.70.107.88
Step 2.1: Create user and grant permissions
1
2
3
4
CREATE USER braze_user PASSWORD '{password}';
GRANT USAGE ON SCHEMA BRAZE_CLOUD_PRODUCTION.INGESTION to braze_user;
GRANT CREATE ON SCHEMA BRAZE_CLOUD_PRODUCTION.INGESTION to braze_user;
GRANT SELECT ON TABLE USERS_ATTRIBUTES_SYNC TO braze_user;
Create a user for your connected source to use. This user will be used to generate the list of tables available in your CDI segments, and to query source tables to create new segments. After the connected source is created, Braze will discover the names and description of all tables available to the user in the source schema. If creating multiple CDI integrations, you may want to grant permissions to a schema or manage permissions using a group.
You may choose to grant access to all tables in a schema, or grant privileges only to specific tables. Whichever tables the Braze role has access to will be available to query in the CDI segment. Be sure to grant access to any new tables to the user when they’re created, or set default permissions for the user.
The create table permission is required so Braze can create a table with your CDI Segment query results before updating the segment in Braze. Braze will create a temporary table per segment, and the table will only persist while Braze is updating the segment.
Step 2.2: Allow access to Braze IPs
If you have a firewall or other network policies, you must give Braze network access to your Redshift instance. Allow access from the below IPs corresponding to your Braze dashboard’s region.
You may also need to change your security groups to allow Braze access to your data in Redshift. Make sure to explicitly allow inbound traffic on the IPs below and on the port used to query your Redshift cluster (default is 5439). You should explicitly allow Redshift TCP connectivity on this port even if the inbound rules are set to “allow all”. In addition, it is important that the endpoint for the Redshift cluster be publicly accessible in order for Braze to connect to your cluster.
If you do not want your Redshift cluster to be publicly accessible, you can set up a VPC and EC2 instance to use an ssh tunnel to access the Redshift data. For more information, see AWS: How do I access a private Aamazon Redshift cluster from my local machine?
For instances US-01, US-02, US-03, US-04, US-05, US-06, US-07, these are the relevant IP addresses:
23.21.118.19134.206.23.17350.16.249.952.4.160.21454.87.8.3454.156.35.25152.54.89.23818.205.178.15
For instances EU-01 and EU-02, these are the relevant IP addresses:
52.58.142.24252.29.193.12135.158.29.22818.157.135.973.123.166.463.64.27.363.65.88.253.68.144.1883.70.107.88
Step 2.1: Create a Service Account and grant permissions
Create a service account in GCP for Braze to use to connect and read data from your table(s). The service account should have the below permissions:
- BigQuery Connection User: This will allow Braze to make connections.
- BigQuery User: This will provide Braze access to run queries, read dataset metadata, and list tables.
- BigQuery Data Viewer: This will provide Braze access to view datasets and their contents.
- BigQuery Job User: This will provide Braze access to run jobs.
- bigquery.tables.create This will provide Braze access to create temporary tables during segment refresh.
Create a service account for your connected source to use. This user will be used to generate the list of tables available in your CDI segments, and to query source tables to create new segments. After the connected source is created, Braze will discover the names and description of all tables available to the user in the source schema.
You may choose to grant access to all tables in a dataset, or grant privileges only to specific tables. Whichever tables the Braze role has access to will be available to query in the CDI segment.
The create table permission is required so Braze can create a table with your CDI Segment query results before updating the segment in Braze. Braze will create a temporary table per segment, and the table will only persist while Braze is updating the segment.
After creating the service account and granting permissions, generate a JSON key. For more information, see Google Cloud: Create and delete service account keys. You’ll upload this to the Braze dashboard later.
Step 2.2: Allow access to Braze IPs
If you have network policies in place, you must give Braze network access to your Big Query instance. Allow access from the below IPs corresponding to your Braze dashboard’s region.
For instances US-01, US-02, US-03, US-04, US-05, US-06, US-07, these are the relevant IP addresses:
23.21.118.19134.206.23.17350.16.249.952.4.160.21454.87.8.3454.156.35.25152.54.89.23818.205.178.15
For instances EU-01 and EU-02, these are the relevant IP addresses:
52.58.142.24252.29.193.12135.158.29.22818.157.135.973.123.166.463.64.27.363.65.88.253.68.144.1883.70.107.88
Step 2.1: Create a Access Token
In order for Braze to access Databricks, a personal access token needs to be created.
- In your Databricks workspace, click your Databricks username in the top bar, and then select User Settings from the drop-down.
- Make sure the service account has
CREATE TABLEpriviliges on the schema used for the connected souce. - On the Access tokens tab, click Generate new token.
- Enter a comment that helps you to identify this token, such as “Braze CDI”, and change the token’s lifetime to no lifetime by leaving the Lifetime (days) box empty (blank).
- Click Generate.
- Copy the displayed token, and then click Done.
This token will be used to generate the list of tables available in your CDI segments, and to query source tables to create new segments. After the connected source is created, Braze will discover the names and description of all tables available to the user in the source schema.
You may choose to grant access to all tables in a schema, or grant privileges only to specific tables. Whichever tables the Braze role has access to will be available to query in the CDI segment.
The create table permission is required so Braze can create a table with your CDI Segment query results before updating the segment in Braze. Braze will create a temporary table per segment, and the table will only persist while Braze is updating the segment.
Keep the token in a safe place until you need to enter it on the Braze dashboard during the credential creation step.
Step 2.2: Allow access to Braze IPs
If you have network policies in place, you must give Braze network access to your Databricks instance. Allow access from the below IPs corresponding to your Braze dashboard’s region.
For instances US-01, US-02, US-03, US-04, US-05, US-06, US-07, these are the relevant IP addresses:
23.21.118.19134.206.23.17350.16.249.952.4.160.21454.87.8.3454.156.35.25152.54.89.23818.205.178.15
For instances EU-01 and EU-02, these are the relevant IP addresses:
52.58.142.24252.29.193.12135.158.29.22818.157.135.973.123.166.463.64.27.363.65.88.253.68.144.1883.70.107.88
Step 3: Create a connected source in the Braze dashboard
Step 3.1: Add Snowflake connection information and source table
Next, create a connected source in the Braze dashboard. Go to Data Settings > Cloud Data Ingestion. Navigate to the Connected Sources tab and click Create data connection.
Input the information for your Snowflake data warehouse and source schema, then proceed to the next step.

Step 3.2: Configure sync details
Next, choose a name for connected source. This name will be used in the list of available sources when you create a new CDI Segment.
Configure a maximum runtime for this source. Braze will automatically abort any queries that exceed the maximum runtime when it’s creating or refreshing a segment. The maximum runtime allowed is 60 minutes; a lower runtime will reduce costs incurred on your Snowflake account.
If queries are consistently timing out and you have set a maximum runtime of 60 minutes, consider trying to optimize your query execution time or dedicating a larger warehouse to the Braze user.

Step 3.3: Note the public key
In the Test connection page, you will see a RSA public key. Note this down. You will need it complete the integration in Snowflake.

Step 4: Finalize the data warehouse configuration
Add the public key you noted during the last step to your user in Snowflake. This will allow Braze to connect to Snowflake. For details on how to do this, see the Snowflake documentation.
If you want to rotate the keys at any point, Braze can generate a new key pair and provide you with the new public key.
1
ALTER USER BRAZE_INGESTION_USER SET rsa_public_key='{INSERT_YOUR_KEY}';
Once you have added the key to the user in Snowflake, select Test Connection in Braze, and then select Done. Your connected source is now created and ready to use in CDI Segments.
Step 4.1: Add Redshift connection information and source table
Go to Data Settings > Cloud Data Ingestion. Navigate to the Connected Sources tab and click Create data connection.
If you are using the older navigation, go to Cloud Data Ingestion under Data.
Input the information for your Redshift account and source schema, then proceed to the next step.
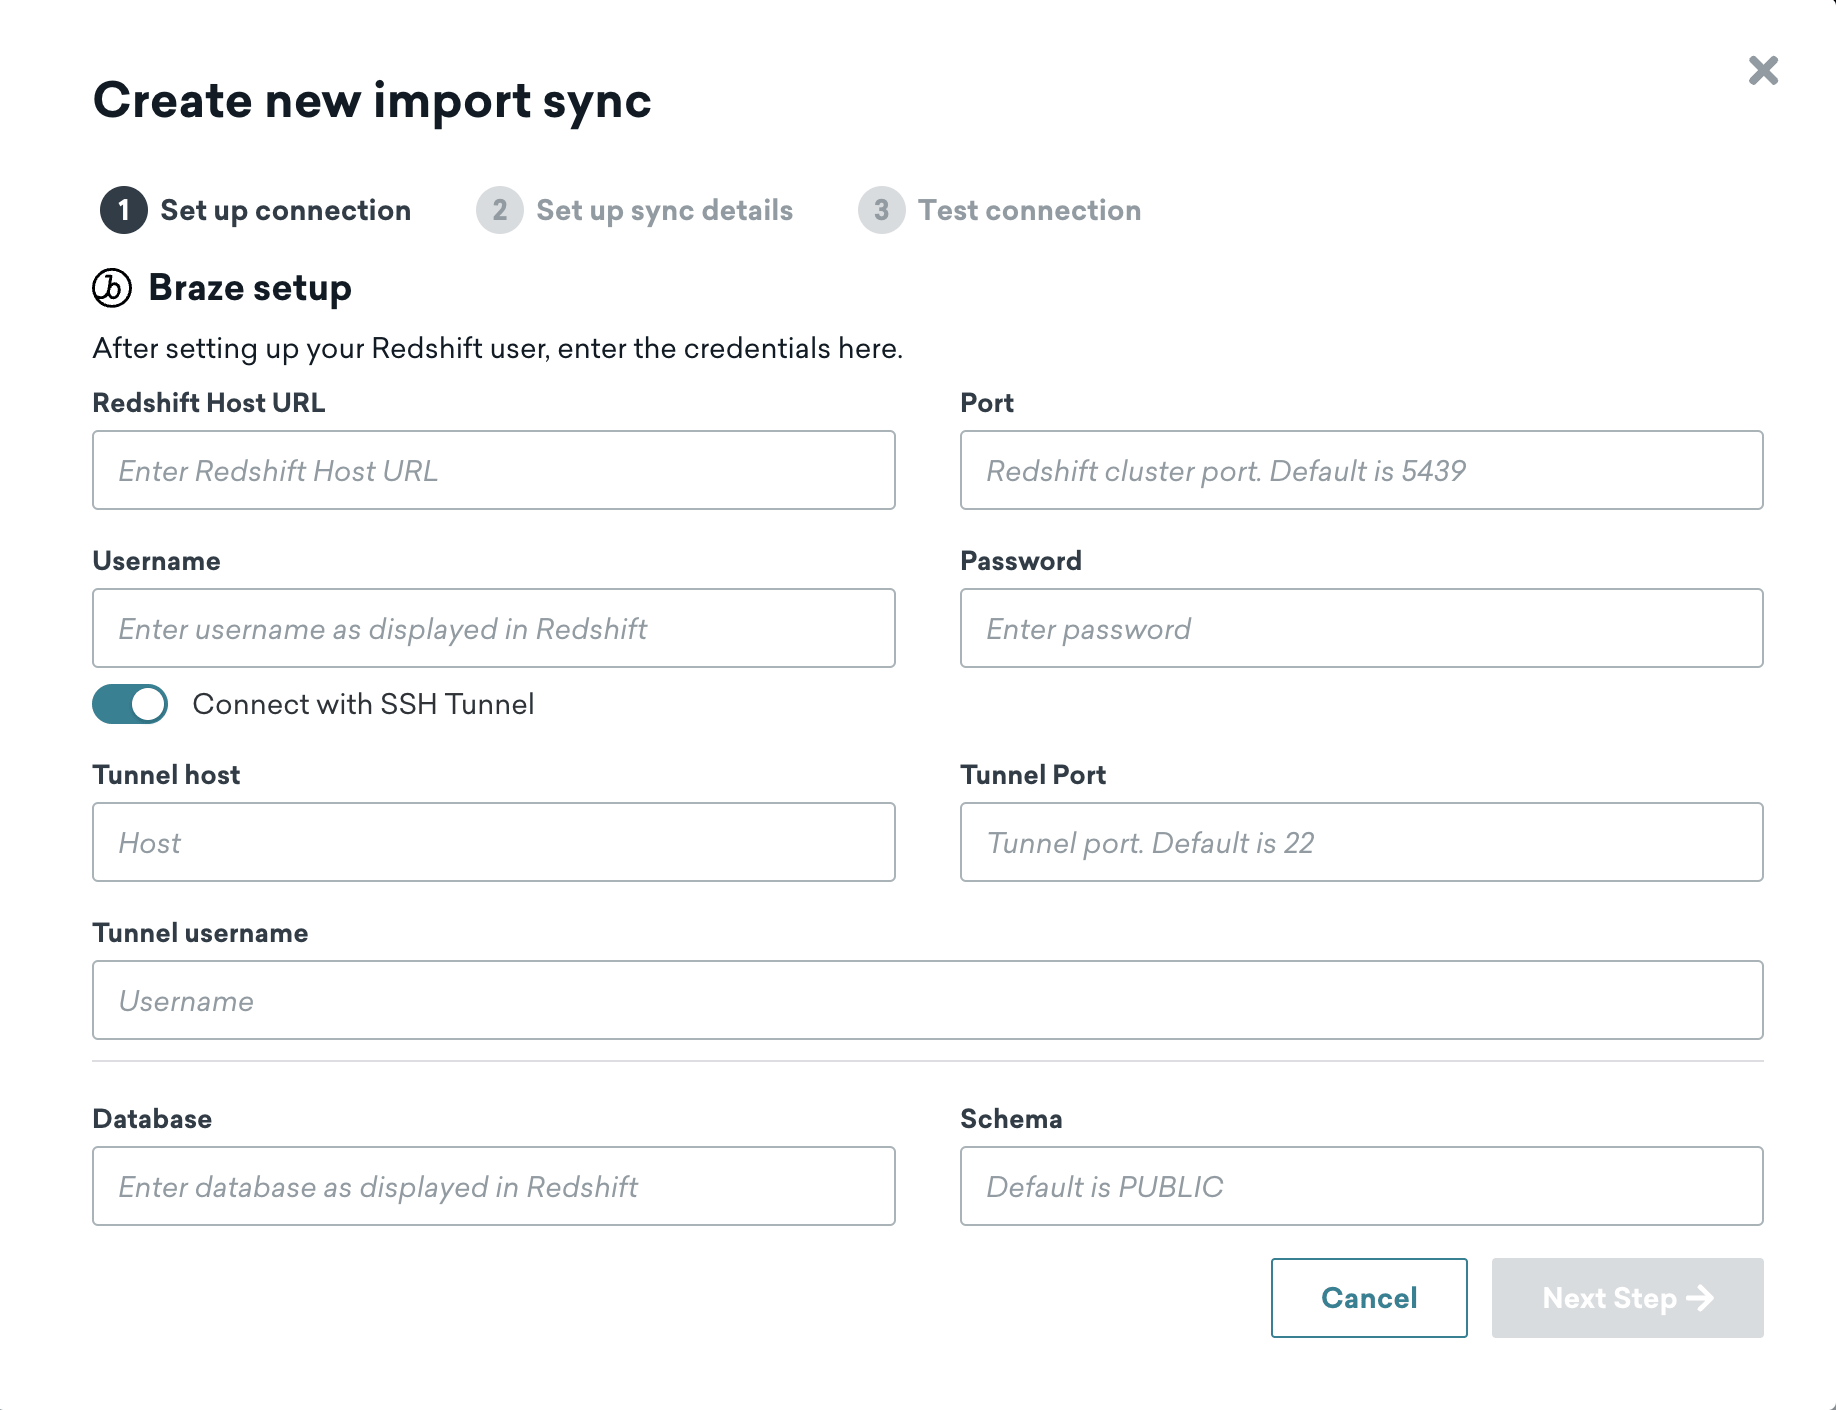
Step 4.2: Configure sync details
Next, choose a name for connected source. This name will be used in the list of available sources when you create a new CDI Segment.
Configure a maximum runtime for this source. Braze will automatically abort any queries that exceed the maximum runtime when it’s creating or refreshing a segment. The maximum runtime allowed is 60 minutes; a lower runtime will reduce costs incurred on your Snowflake account.
If queries are consistently timing out and you have set a maximum runtime of 60 minutes, consider trying to optimize your query execution time.
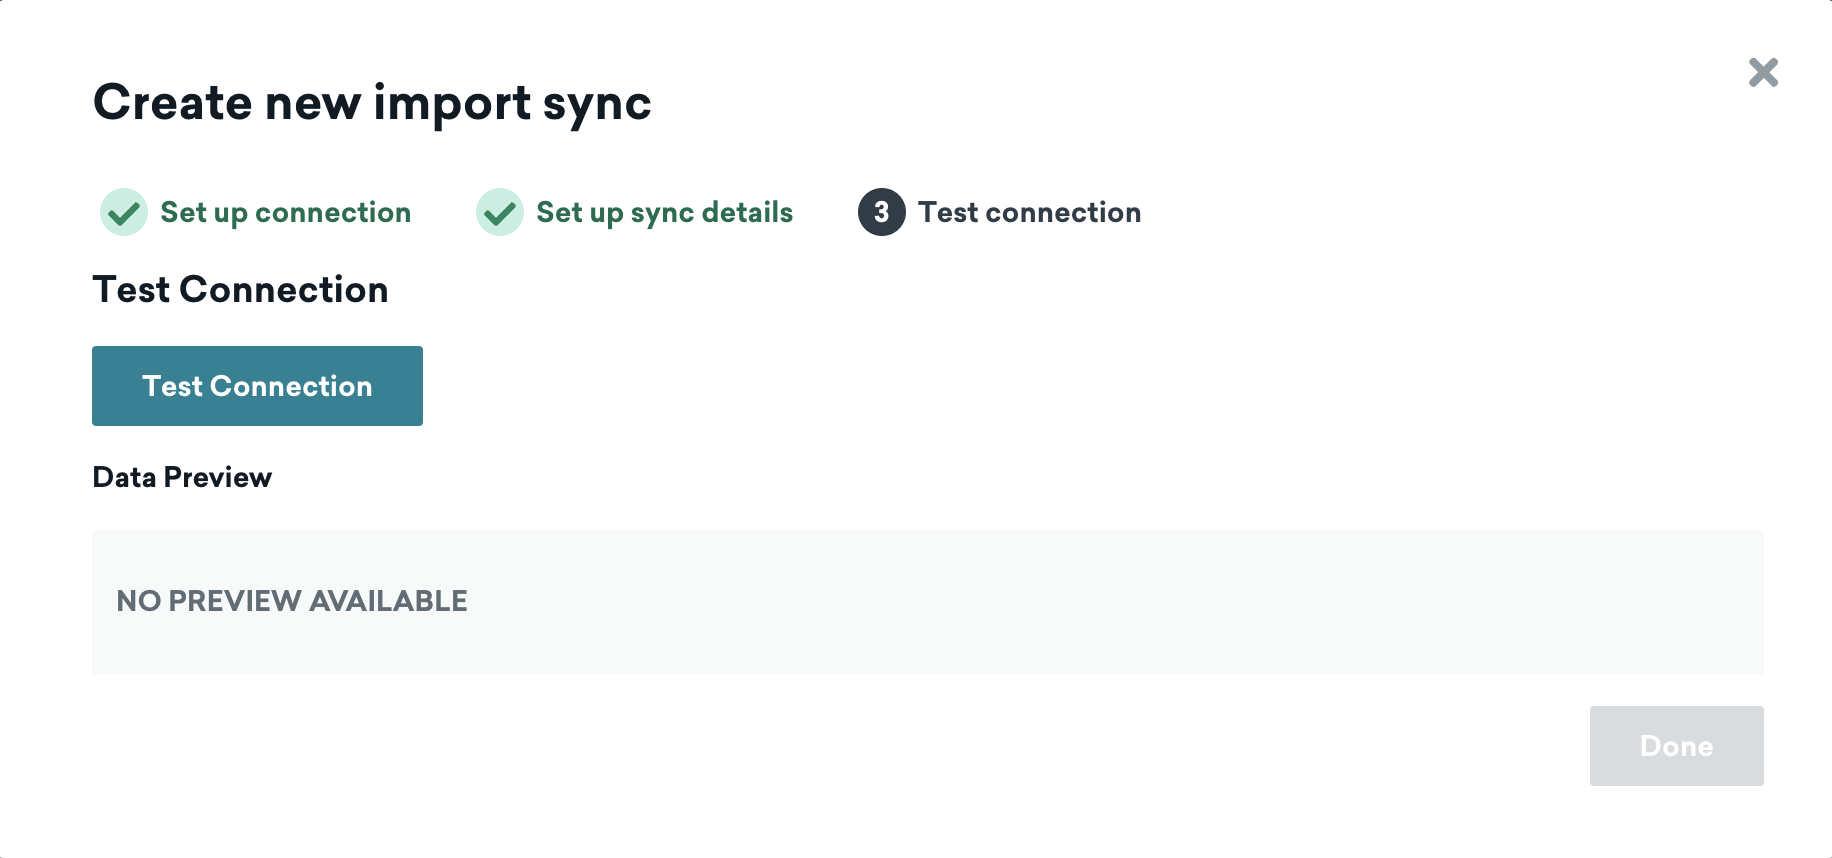
Step 4.3: Test Connection
Select Test Connection in Braze to verify that the list of tables visible to the user is what you expect, select Done. Your connected source is now created and ready to use in CDI Segments.
Step 4.1: Add BigQuery connection information and source dataset
Upload the JSON key and provide a name for the service account, then input the details of your source dataset.
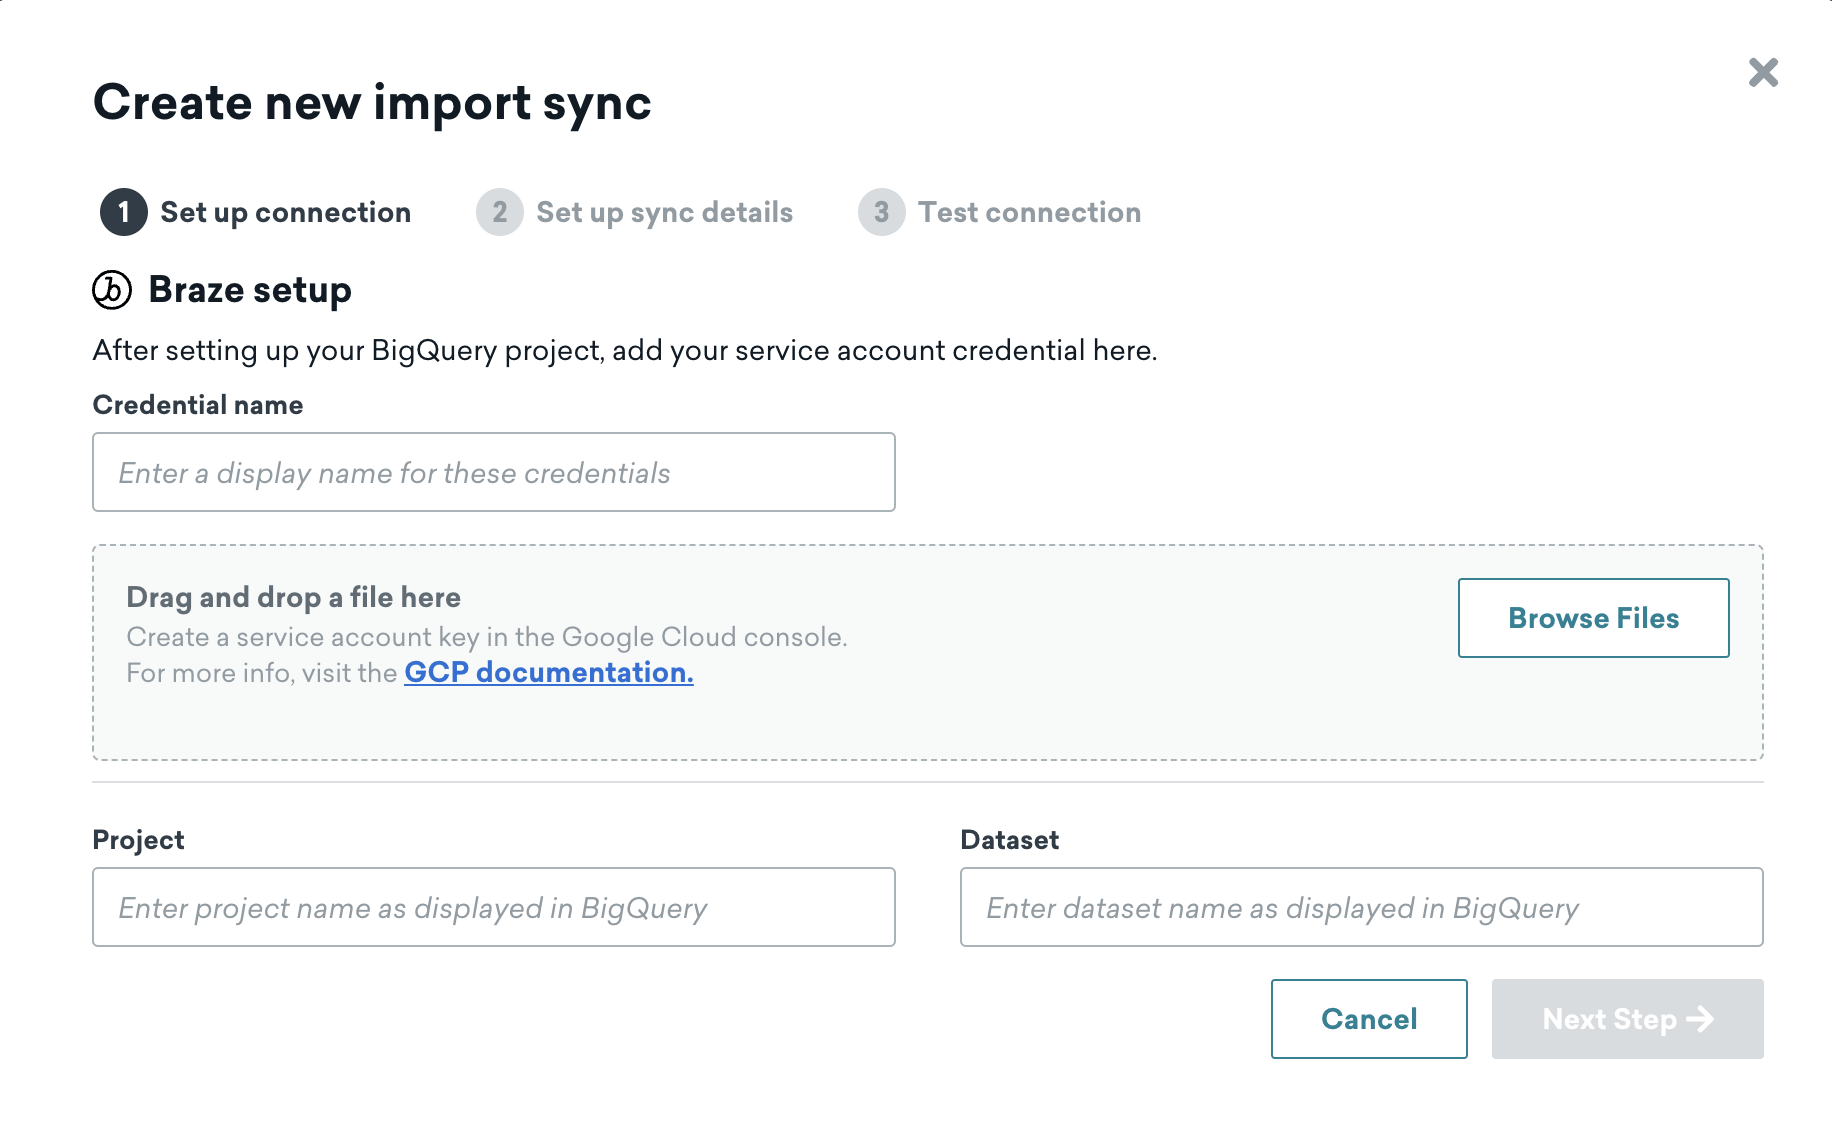
Step 4.2: Configure sync details
Next, choose a name for connected source. This name will be used in the list of available sources when you create a new CDI Segment.
Configure a maximum runtime for this source. Braze will automatically abort any queries that exceed the maximum runtime when it’s creating or refreshing a segment. The maximum runtime allowed is 60 minutes; a lower runtime will reduce costs incurred on your Snowflake account.
If queries are consistently timing out and you have set a maximum runtime of 60 minutes, consider trying to optimize your query execution time.
Step 4.3: Test Connection
Select Test Connection in Braze to verify that the list of tables visible to the user is what you expect, select Done. Your connected source is now created and ready to use in CDI Segments.
Step 4.1: Add Databricks connection information and source dataset
Input the information for your Databricks data warehouse and source data, then proceed to the next step.
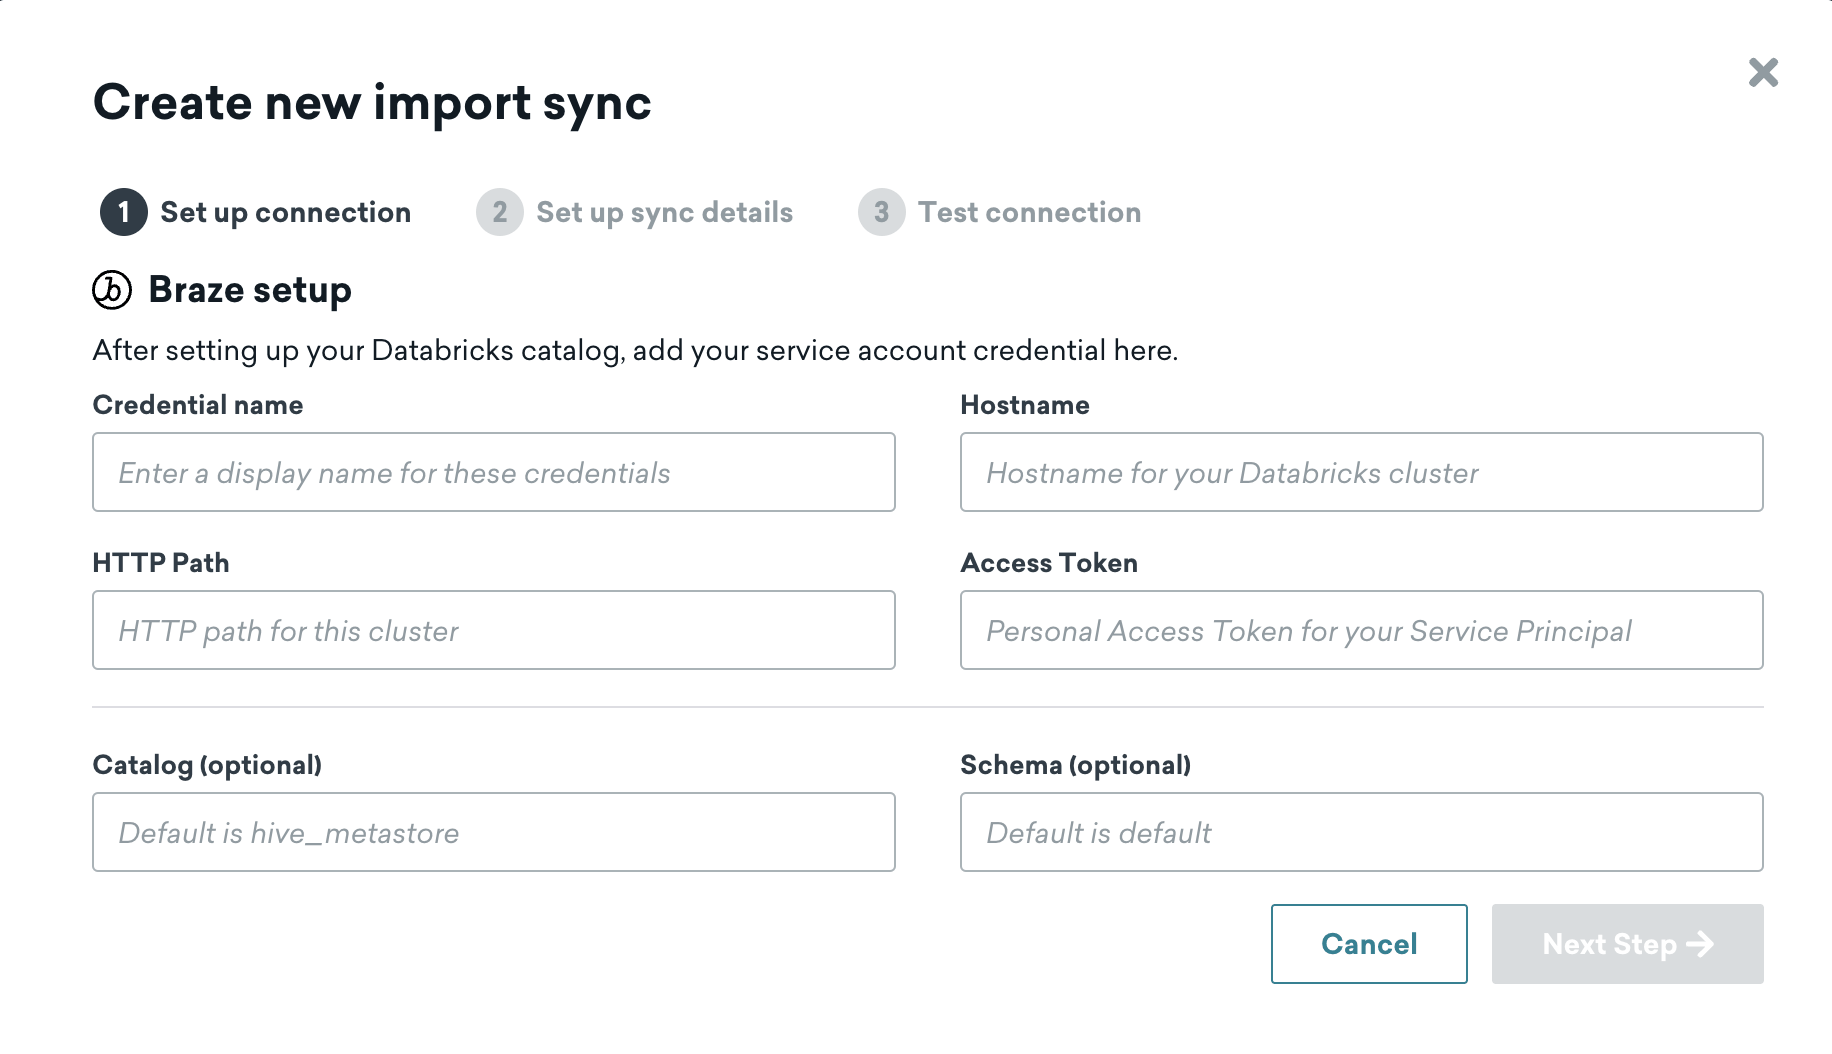
Step 4.2: Configure sync details
Next, choose a name for connected source. This name will be used in the list of available sources when you create a new CDI Segment.
Configure a maximum runtime for this source. Braze will automatically abort any queries that exceed the maximum runtime when it’s creating or refreshing a segment. The maximum runtime allowed is 60 minutes; a lower runtime will reduce costs incurred on your Snowflake account.
If queries are consistently timing out and you have set a maximum runtime of 60 minutes, consider trying to optimize your query execution time.
Step 4.3: Test Connection
Select Test Connection in Braze to verify that the list of tables visible to the user is what you expect, select Done. Your connected source is now created and ready to use in CDI Segments.
You must successfully test a source before it can move from Draft to Active state. If you need to close out of the creation page, your integration will be saved, and you can revisit the details page to make changes and test.
Setting up additional integrations or users (optional)
You may set up multiple integrations with Braze, but each integration should be configured to connect a different schema. When creating additional connections, you may reuse existing credentials if connecting to the same Snowflake account.
If you reuse the same user and role across integrations, you will not need to add the public key again.
You may set up multiple sources with Braze, but each source should be configured to connect a different schema. When creating additional sources, you may reuse existing credentials if connecting to the same Redshift account.
You may set up multiple sources with Braze, but each source should be configured to connect a different dataset. When creating additional sources, you may reuse existing credentials if connecting to the same BigQuery account.
You may set up multiple sources with Braze, but each source should be configured to connect a different schema. When creating additional sources, you may reuse existing credentials if connecting to the same Databricks account.
Using the connected source
Once the source is created, it can be used to create one or more CDI Segments. For more information on creating a segment with this source, see the CDI Segments documentation.
If queries are consistently timing out and you have set a maximum runtime of 60 minutes, consider trying to optimize your query execution time or dedicating more compute resources (e.g., a larger warehouse) to the Braze user.
 Edit this page on GitHub