Set up your Decisioning Studio Go agent
This article describes how to configure a Decisioning Studio Go agent with the self-serve setup flow in the Braze dashboard.
For an overview of how Decisioning Studio Go works, see BrazeAI Decisioning Studio Go. To confirm your program is a good fit before you configure an agent, see Examples for Decisioning Studio Go.
Prerequisites
Confirm you have the following ready:
- A segment for your entry audience that isn’t actively used in another Canvas or campaign
- At least one email template
- The variant content you want to test, such as alternative subject lines, CTAs, and hero images. You can create variants during setup, but having them ready speeds up configuration
- Workspace access with permissions to configure AI Decisioning agents
If your workspace hasn’t been provisioned for Decisioning Studio Go, you won’t see the agent configuration option in the AI Decisioning tab. Contact your customer success manager to get access.
Step 1: Set up your agent
- In the Braze dashboard, go to the AI Decisioning tab.
- Select Create Agent.
- Give your agent a name that distinguishes this agent from others in your workspace. An example is “Loyalty Members—Weekly Engagement” rather than “Email Agent”.
- (Optional) Add a description to provide context that you or a teammate may need later. This can include what the agent is for, which segment it targets, and what success looks like.
The agent optimizes your email creative to maximize genuine engagement, measured by meaningful click activity per user. Clicks pass through multiple independent validation filters that screen out automated activity and opt-out-related clicks, so the signal reflects real customer interest rather than raw click volume.
Step 2: Select the target audience
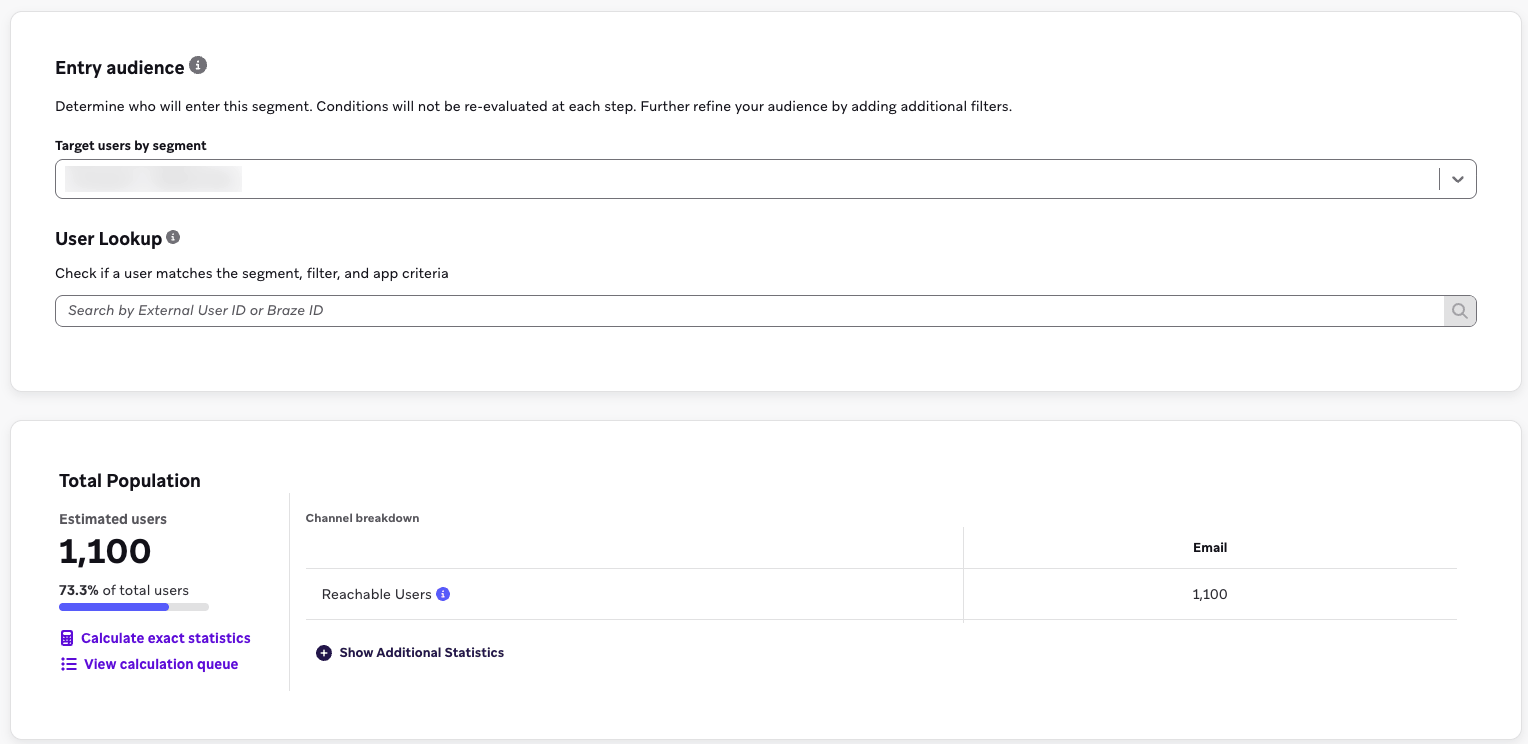
Select the Braze segment your agent sends to. Users in this segment are automatically split into two groups:
- Decisioning Studio group: Receives AI-optimized email content. The agent picks the best variant combination for each user.
- Random control group: Minimum 5% of the segment. Receives randomly selected combinations of the same options on randomly selected days. This group is required.
Why a dedicated segment matters
If users in your selected segment also receive messages from other Canvases or campaigns, engagement the agent observes is affected by those other messages. The agent can’t tell whether a user clicked because of its decisions or because of something else. A warning appears if your selected segment is in use elsewhere; proceed, but expect noisier results.
User Lookup
Use User Lookup to verify whether specific users meet your segment criteria. This is useful for verifying your segment definition.
Audience filters
Audience filters aren’t supported in this release. If you need additional targeting criteria, create a segment with those filters applied, then select that segment as your entry audience.
Integrate with existing Canvases
To use Decisioning Studio Go inside a broader journey:
- Create a dedicated segment for users who should be in the agent.
- In your Canvas, use a User Update step to add the user to that segment at the right point in the journey.
- Confirm that users exit the Canvas so the agent (not the Canvas) handles email sending for everyone in the segment from that point on.
Step 3: Configure the schedule
Determine when the agent is allowed to send.
Step 3.1: Determine the send frequency
Select how often users receive emails from this agent—for example, three times per week. This is a single selection. The agent doesn’t optimize between different frequencies; it picks days and times within the frequency you set.
Step 3.2: Select the days of the week
Choose which days the agent can send on. You must select at least as many days as your frequency requires (if the agent sends three times per week, select at least three days; selecting more days gives the agent more flexibility). The agent optimizes within that set, picking the best days for each user. For maximum flexibility, select all seven days.
Step 3.3: Set quiet hours
Specify times when the agent shouldn’t send. Quiet hours use the user’s local time zone. The most common use is to block late-night and very-early-morning sends. Outside quiet hours, the agent schedules sends at the times most likely to drive clicks for each user.
Step 3.4: Set frequency capping rules
Your frequency capping rules can be applied at the agent level:
- Apply frequency cap: Prevents the agent from sending to a user once their frequency cap has been met. Depending on how your rules are configured, this cap may apply at the individual user level or the overall account level. In either case, messages are not sent to that user while the cap is met.
- Count toward cap: Choose whether sends from this agent count toward the user’s overall cap.

If your frequency cap protects user experience, the agent’s sends are already targeted and you may not need to count them toward the cap. If your cap controls overall send volume or spend, you likely want them counted. Your customer success manager or solutions consultant can help you confirm the right approach for your workspace.
Step 4: Add content and templates
Define what the agent has to work with:
- Base creatives: The full email templates. The agent first picks which base creative to send to a given user.
- Creative components: The specific elements within a base creative—subject line, CTA, and hero image—that the agent personalizes per user.
You can build base creatives by:
- Using the standard Braze email composer.
- Importing an email from an existing Canvas or campaign.
Use a single base creative or many. With one base creative, the agent personalizes only the components inside it. With multiple base creatives—for example, one casual, one formal, and one promotional—the agent also picks which base creative is right for each user. The agent can also choose from several base creatives with no additional creative components.
Step 4.1: Mark personalization points with Liquid tags
For each component you want the agent to personalize, replace the static content in your base creative with a Liquid tag from the personalization menu. Then provide the variant options in the Creative Components section.
The supported components in this release are:
- Subject line: Replace the subject line in Sending Settings with the Liquid tag for subject line.
- CTA: Replace the button text in the email body with the Liquid tag for CTA.
- Image: Replace the hero image URL with the Liquid tag for image.

Content blocks aren’t supported as substitution points for personalized components. Place your personalized subject line, CTA, and image directly in the email body rather than inside a content block.
Step 4.2: Add variants
In the Creative Components section, add the variant options for each personalization point:
- Multiple subject line options
- Multiple CTA text options
- Multiple image URLs
Each variant can be associated with specific base creatives, or made available across all base creatives. For example, if you have one base creative promoting a sale and another promoting new arrivals, you can restrict your Don't miss our biggest savings of the year subject line to the sale creative only, while keeping your Just dropped CTA available across both.
Images must be selected from the Braze media library. If there’s an image you want to use, upload it to the media library first.
Step 4.3: Preview and test
As you add more content, preview and test your message using the dynamic preview that shows how different variant combinations render. This is helpful to spot and resolve rendering issues before launch. After your base creatives and variants are configured, you can see a full list of all combinations the agent is allowed to send.
You can also test send the message to yourself or a teammate. Test sends display the specific variant combination you select, not what the agent would pick for any particular user.
Step 5: Define constraints
Constraints prevent the agent from sending repetitive content to the same user. The following levels are available:
- Base creative level: Prevents the same base creative from being sent to a user more than once within a window you define. Useful when each base creative is distinct enough that repeating it within, for example, a week would feel stale.
- Subject line level: Prevents the same subject line from being sent to a user more than once within a window you define. Useful when subject lines are the most visible repetition signal.
Variant-level constraints on specific images or CTAs aren’t supported in this release.
Step 6: Review and launch
The Review screen displays your full configuration: audience and random control split, schedule, base creatives, variant counts, and active constraints. Review and resolve any validation warnings (for example, segment overlap with another campaign) that display in this section.
Select Launch to activate the agent. It transitions from Draft to Active and begins sending on the next eligible day.
After launch
Training period
When your agent launches, it enters a training period. A training indicator displays in the reporting interface. Performance can fluctuate in the first days as the agent explores combinations. Emails continue to send while it learns. There is no waiting period.
Meaningful changes in performance appear after the agent moves out of training and into active personalization. Reporting indicates when that transition happens, so you always know what stage your agent is in.
Reporting views
The reporting interface offers three main views:
| View | Description |
|---|---|
| Performance | Click rates, engagement metrics, and the lift of the Decisioning Studio group versus the random control. |
| Configuration | The current settings of the agent—useful for confirming what’s running. |
| Agent preferences | Counts of how often each variant has been chosen by the agent, showing what the agent is gravitating toward for your audience. |
Element-level breakdowns show how individual subject lines, CTAs, and images perform across all combinations.
Edit an active agent
Go to the Configuration view to modify audience, schedule, creatives, or constraints after launch. The Configuration view shows a summary of changes. Promote changes before they take effect. Adding new variants doesn’t reset the agent’s training on existing variants; it adds new options to the agent’s menu.
Pause or stop
An agent’s lifecycle is Draft > Active > Stopped. Select Stop at any time to halt an agent; it stops sending and resumes when you reactivate it.
Reference
The following table summarizes areas of Decisioning Studio Go and related details.
| Area | Details |
|---|---|
| Channel | Email only |
| Conversion metric | Clicks only (unique daily clicks per user) |
| Personalization points | Subject line, CTA, hero image (per base creative) |
| Audience | One Braze segment, with required random control (minimum 5%) |
| Frequency | Single selection (no frequency decisioning) |
| Test sends | Through Braze composer |
| Reporting | Performance, Configuration, and Agent preferences views, plus element-level breakdowns |
Considerations
- Content blocks aren’t supported as personalization substitution points.
- Image URLs must be added manually. Currently, media library integration isn’t supported.
- Audience filters aren’t supported beyond segment selection.
- Body copy, preheader, and header personalization aren’t available yet.
Troubleshooting
Contact your customer success manager or solutions consultant for help with agent configuration, performance review, or program design.
For common questions, see the Decisioning Studio Go FAQ.