Manage Subscriptions block
Add a Manage Subscriptions block to a landing page so users can view, opt in to, and update their email, SMS, or WhatsApp subscription groups.
The Manage Subscriptions block supports two main use cases:
- Manage existing subscriptions: Share the landing page’s Liquid tag in an email, SMS, WhatsApp, or other channel message. When an identified user opens the page, the block automatically pre-fills each subscription group’s checkbox with their current subscription state, so they can review and update their preferences.
- Capture new opt-ins: Add the block to a lead generation landing page alongside an Email Capture or Phone Capture block, so new visitors can choose which subscription groups to join when they submit the form.

Each Manage Subscriptions block is for one channel: email, SMS, or WhatsApp. To collect more than one channel, add a separate block for each—a channel can only be used by one block per page. For RCS consent, use a Phone Capture block instead.
Prerequisites
| Requirements | Description |
|---|---|
| Email, SMS, or WhatsApp subscription groups | At least one email subscription group, SMS subscription group, or WhatsApp subscription group for the channel you add to the block. Create email groups from the dashboard or the Subscription Group endpoints. SMS groups are provisioned during SMS setup. WhatsApp groups are created when you integrate WhatsApp with your workspace. |
| Landing page permissions | The same permissions required to create and edit any landing page. |
| SMS or WhatsApp channel | If SMS or WhatsApp don’t appear in the channel picker, contact your customer success manager or account manager to enable them for your workspace. |
Step 1: Add the Manage Subscriptions block
In the drag-and-drop landing page editor, go to the Build section and select Form Blocks. Drag Manage Subscriptions into a row on your page; it auto-adjusts to the column width.
The block is empty until you add subscription groups to it. To show groups for more than one channel, add a Manage Subscriptions block for each channel.
Step 2: Select the channel and subscription groups
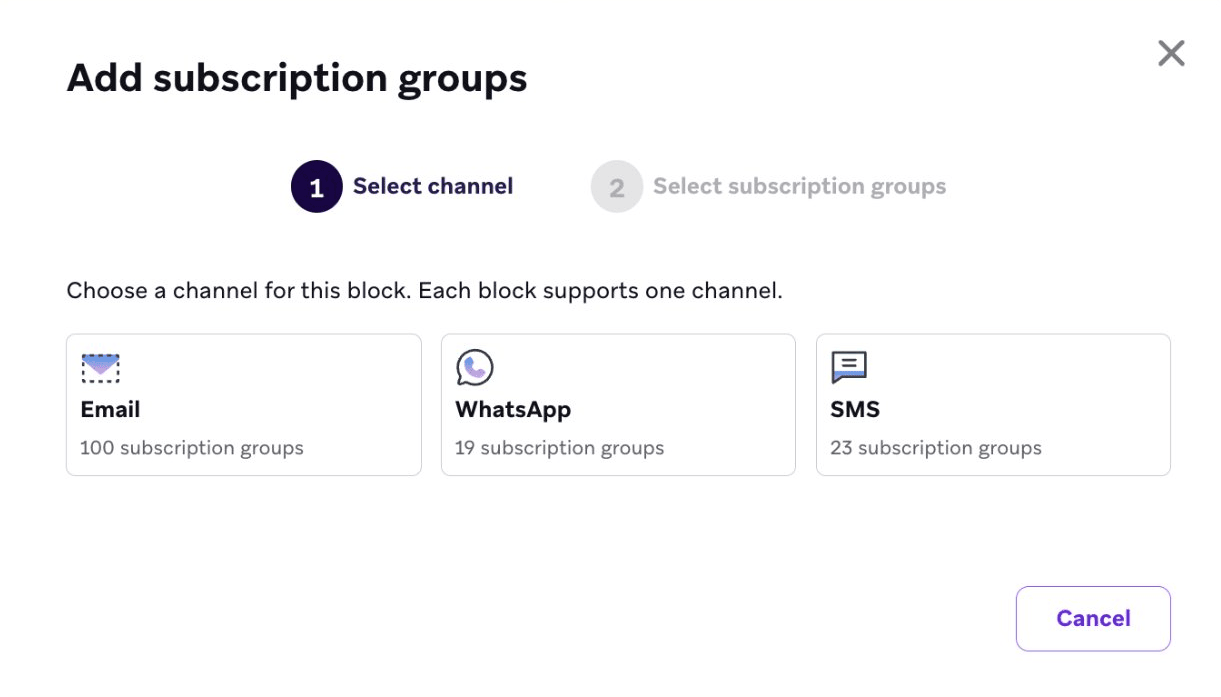
With the Manage Subscriptions block selected, select + Add subscription groups in the right-hand Manage Subscriptions panel. The Add subscription groups modal opens.
- On Select channel, choose Email, WhatsApp, or SMS. Each card shows how many subscription groups that channel has in your workspace. Each block supports one channel, so if a channel is already used by another Manage Subscriptions block on the page, its card is labeled Added and can’t be selected.
- On Select subscription groups, select the groups to include. The list heading matches the channel (Email subscription groups, SMS subscription groups, or WhatsApp subscription groups).
- Select Add selected. This button stays disabled until you select at least one group.
Each subscription group appears as its own selectable checkbox on the landing page.
Changing the channel or groups later
When a block already has a channel, selecting + Add subscription groups opens the modal to select subscription groups with the current groups checked. To switch the block to a different channel, select Back and choose another card. Changing the channel clears the groups selected in the modal, and the block doesn’t update until you select Add selected.
If a channel isn’t set up yet
If your workspace has no subscription groups for the channel you selected, the modal links you to create them:
- For email, go to Subscription groups
- For SMS or WhatsApp, complete the SMS or WhatsApp subscription group setup
After setting up the subscription groups, return to the block.

The Manage Subscriptions block only lists groups you explicitly add. Adding a subscription group to the block doesn’t automatically subscribe visitors to it—a visitor must select the group’s checkbox and submit the form.
Step 3: Configure the block settings
Use the Manage Subscriptions panel to adjust how the block behaves and appears.
Subscription groups
The panel lists the block’s groups under a channel-specific heading (for example, SMS subscription groups).
- Reorder groups: Drag a subscription group by its handle to change the order it appears in the block.
- Add or remove groups: Select + Add subscription groups to include more groups, or select the delete icon next to a group to remove it from the block.
When you add groups, the groups already on the block keep their current order and any newly selected groups are appended in the order they appear in the modal’s list. Reorder them in this panel if needed.
Include descriptions
Turn on Include descriptions to display each subscription group’s description text alongside its name, giving visitors more context about what they’re opting into. Descriptions are pulled from the group itself.
Email and WhatsApp subscription groups can carry a description. SMS subscription groups don’t, so turn off Include descriptions for an SMS block. If you leave descriptions on, they show placeholder text rather than real copy.
“Subscribe to all” checkbox
The “Subscribe to all” checkbox setting is on by default. It adds an extra checkbox to the block, labeled Subscribe to all messages by default—you can edit the label inline on the canvas. When a visitor selects it, every subscription group checkbox in the block is selected, which is useful for a quick opt-in to all listed groups. Turn the setting off in the Manage Subscriptions panel if you don’t want to show this checkbox. This checkbox is a convenience control only; what gets saved is the state of the individual group checkboxes.
Style options
Use Style options to set the font family, weight, size, line height, letter spacing, text color, and accent color for the block, and—when Include descriptions is on—for the description text.
Update existing subscriptions
To let existing users review and update their email, SMS, or WhatsApp subscriptions, share the landing page using its Liquid tag in an email, SMS, WhatsApp, Canvas step, or other message. When a user opens the page through that link, Braze identifies them and automatically pre-fills each subscription group checkbox in the Manage Subscriptions block to match their current subscription state—similar to an email preference center.
The user can select or clear checkboxes to update their subscriptions, then submit the form to save their changes. On submit, each checkbox writes that group’s subscription state: a selected checkbox subscribes the user, and a cleared checkbox unsubscribes them. Subscription groups that aren’t listed on the page are left unchanged.
Pre-filling a user’s current subscription state in the Manage Subscriptions block is included by default and doesn’t require the Landing Pages Pro tier. This differs from Liquid-based pre-fill for other form fields, which requires Landing Pages Pro.
Capture new subscribers
To collect new subscribers, pair the Manage Subscriptions block with a capture field for that channel:
- Email: Add an Email Capture block so the page captures the visitor’s email address alongside their email subscription group selections.
- SMS or WhatsApp: Add a Phone Capture block so the page captures the visitor’s phone number alongside their SMS or WhatsApp subscription group selections.
On a Phone Capture block, the subscription group is optional. Leave it empty when a Manage Subscriptions block on the same page is handling consent, so visitors choose their groups from the checklist instead of being subscribed to a single group on submit. Set a subscription group on Phone Capture when it’s the only place you’re collecting consent.
If the visitor isn’t identified (for example, they arrive without a landing page Liquid tag), the checkboxes start unselected. When they submit the form, they’re subscribed to whichever subscription groups they selected.
Things to know
- One channel per block, one block per channel: Each Manage Subscriptions block covers a single channel, and a channel can only be used by one block on a page. A page can have up to three: one email, one SMS, and one WhatsApp.
- Clearing a checkbox unsubscribes: Submitting the form saves the state of every group checkbox in the block, so a cleared checkbox unsubscribes the user from that group. Groups not listed on the page are unaffected.
- Descriptions for SMS: SMS subscription groups don’t carry description text. Turn off Include descriptions on SMS blocks.
- No “Clear selections” checkbox: Landing pages don’t offer the “Clear selections” checkbox available in the drag-and-drop email preference center.
- RCS: This block doesn’t list RCS subscription groups. To collect consent for RCS, use a Phone Capture block.
- Form placement: The block must sit inside the form area of the page. On a multi-step landing page, the editor flags the block if it’s placed outside a form step.
- Confirmation experience: Landing pages with form blocks, including Manage Subscriptions, need a confirmation experience after submission. Create a confirmation page and link to it from your Submit button.
- Editor blocks reference: For a full reference of every landing page block and its properties, see Editor blocks (landing pages).