Create custom agents
Learn how to create custom agents, what to prepare before you start, and how to put them to work across messaging, decisioning, and data management. For more general information, see Braze Agents.
Prerequisites
Before you start, you’ll need the following:
- Permission to access the Agent Console in your workspace. Check with your Braze admins if you don’t see this option.
- Permission to create and edit custom AI Agents.
- An idea of what you want the agent to accomplish. Braze Agents can support the following actions:
- Personalized messaging: Generate subject lines, headlines, in-product copy, or other content.
- User routing: Route users in Canvas based on behavior, preferences, or custom attributes.
- Data management: Calculate values, enrich catalog entries, or refresh profile fields.
How it works
When you create an agent, you define its purpose and set guardrails for how it should behave. After it’s live, the agent can be deployed in Braze to generate personalized copy, make real-time decisions, or update catalog fields. As you build your agent, you can save it as a draft, and you can pause or update an agent anytime from the dashboard.
The following use cases showcase a few ways to leverage custom agents.
| Use case | Description |
|---|---|
| Customer feedback handling | Pass user feedback to an agent to analyze sentiment and generate empathetic follow-up messages. For high-value users, the agent might escalate the response or include perks. |
| Localize content | Translate catalog text into another language for global campaigns, or adjust tone and length for region-specific channels. For example, translate “Classic Clubmaster Sunglasses” into Spanish as “Gafas de sol Classic Clubmaster,” or shorten descriptions for SMS campaigns. |
| Summarize reviews or feedback | Summarize sentiment or feedback into a new field, such as assigning sentiment scores like Positive, Neutral, or Negative, or creating a short text summary like “Most customers mention great fit, but note slow shipping.” |
Create an agent
Step 1: Choose an agent type
To create an agent, first choose your agent type:
- Go to Agent Console.
- Choose Canvas Step Agents or Catalog Agents.
Step 2: Choose how to build an agent
Select Create agent, then choose one of the following options:
- Custom agent to build an agent from a blank slate
- An option in Create an agent with Operator to use BrazeAI Operator to apply a starting template
If you use Operator, review and approve its changes in chat before continuing to the next step.
Step 3: Set up details
Next, set up the details for your agent:
- Enter a name and description to help your team understand its purpose.
- (optional) Add tags to filter your agent.
- Choose the model for your agent to use.
- If you’re not using the Braze Auto model, select the model’s thinking level. You can choose from minimal, low, medium, or high. We recommend starting with Minimal and testing your agent’s responses and adjusting this as needed.
- Set a daily invocation limit. By default, this value is set to 250,000, but can be raised to 1,000,000. If you’re interested in increasing the limit over 1,000,000, contact your customer success manager to learn more.

Step 4: Write the instructions
Give the agent instructions. If you used an Operator template, review the pre-filled instructions and edit as needed.
Include instructions for what the agent should do in unexpected or ambiguous scenarios. This minimizes the risk that agent confusion leads to errors. For example, rather than asking the agent for only “positive” or “negative” sentiment values, ask it to return “unsure” if it can’t decide.
Refer to the Writing instructions for best practices and Examples for inspiration on how to prompt your agent.

For Canvas agents, you can use Liquid in your instructions to reference user attributes, such as their first and last name, or custom attributes. Any Liquid variable in the agent instructions is automatically passed to the Agent step when a user enters the step.
Add context
Select + Agent context to choose what your agent can reference. This includes:
- Catalog fields: Give the agent access to your catalog data for more accurate responses.
- Segment membership: Let the agent personalize responses based on which segments a user belongs to. You can select up to five segments.
- Brand guidelines: Reference the brand voice and style guidelines for the agent to follow. For example, if you want your agent to generate SMS copy to encourage users to sign up for a gym membership, you can use this field to reference your predefined bold, motivational guideline.
- All Canvas Context: Analyze all Canvas context data for a user when this agent is invoked, including any variables that are not referenced in the Instructions section.
- User interaction data: Provide the agent with each user’s recent campaign and Canvas opens, clicks, and conversion data.
Step 5: Select the output
In the Output section, you can organize and define the agent’s output by basic schemas or advanced schemas. If you used an Operator template, review the pre-filled output schema and edit as needed.
For best results, make sure that what you specify in the Output section matches any agent instructions you entered in Step 4. For example, if you mentioned in the agent instructions that you want an object with two strings, make sure you specify an object with two strings in the Output section. If your agent instructions don’t align with your specified output, the agent may get confused, time out, or generate undesired outputs.
When you use an advanced output schema, add a string field named explanation if you want the agent to return its rationale in addition to its other outputs. Tell the agent in your instructions to populate explanation when that helps you review or debug responses.
Configure fallback values
Fallback values are available for Canvas step agents only. In the Output section for a Canvas agent, you can define values that Braze uses when an agent invocation fails—for example, when the LLM times out or returns an invalid API key error. Fallback values work like personalization defaults. You might set a static subject line or short message that still gives users useful output when the agent cannot run.
Catalog agents do not support configuring fallback values in Agent Console.
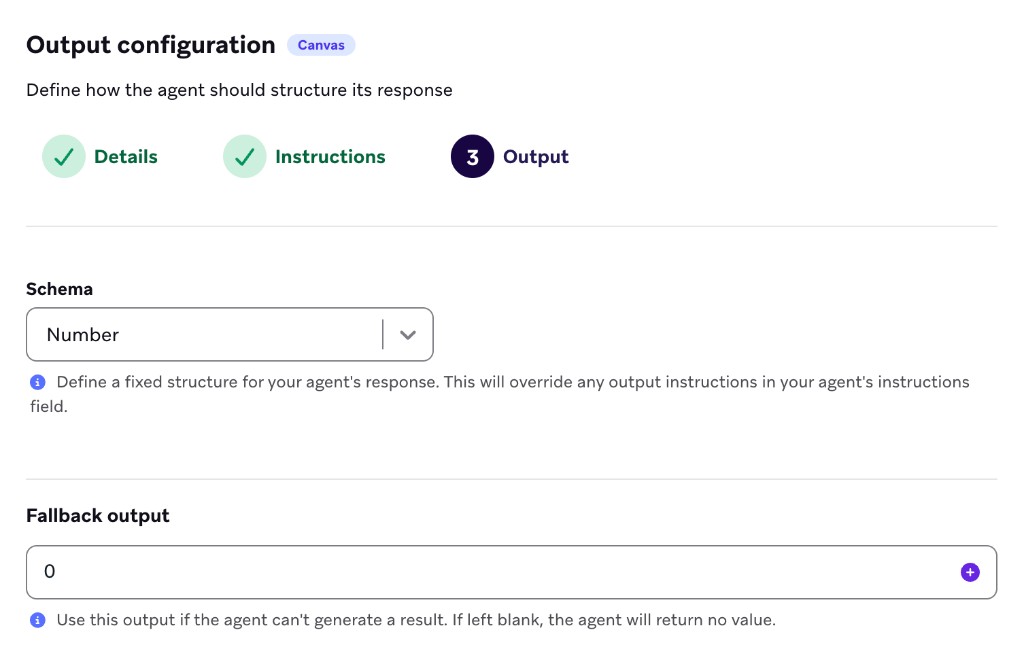
For Canvas agents, fallback values support Liquid templating so you can reference user attributes or context variables in the fallback text.
The fallback fields adapt to your Canvas agent’s output format:
| Output format | Fallback configuration |
|---|---|
| String, number, or boolean | Enter a single fallback value (Liquid supported). |
| Fields (advanced schema) | Enter a fallback value for each field defined in the agent’s output. |
| JSON schema (advanced schema) | Braze reads your JSON schema and generates an input field for each property so you can define a fallback value per key. |
When a Canvas agent with fallback values runs in an Agent step, Braze renders the fallback per user and stores it in the output variable instead of null. If you do not configure fallback values, failed invocations leave the Canvas output unset (null).
For runtime behavior, see Error handling and fallback behavior.
Step 6: Test the agent
The Preview pane is an instance of the agent that shows up as a side-by-side panel within the configuration experience. You can use this section to test the agent while you’re creating or making updates to it to experience it in a similar way to end users. This step helps you confirm that it’s behaving the way you expect, and gives you a chance to fine-tune before it goes live.
- In the Test your agent field, enter example customer data or customer responses—anything that reflects real scenarios your agent will handle.
- Preview the agent’s response for a random user, existing user, or custom user.
- Select Simulate response. The agent will execute based on your configuration and display its response.

Test runs count toward your daily invocation limit.

Review the output with a critical eye. Consider the following questions:
- Does the copy feel on brand?
- Does the decision logic route customers as intended?
- Are the calculated values accurate?
If something feels off, update the agent’s configuration and test again. Run a few different inputs to see how the agent adapts across scenarios, especially edge cases like no data or invalid responses.
Avoid telling the agent exactly what you do not want it to do. LLMs may still generate that content if you mention it in the instructions.
Step 7: Use your agent
Your agent is now ready to use! For details, refer to Deploy agents.
Agent templates built with Operator
Operator can pre-configure instructions, output fields, and context for the following Agent Console starting templates. Choose a template in Operator or ask Operator to apply one by name.
Canvas Step Agent templates
| Template | Description | Example output |
|---|---|---|
| Personalized copywriter | Generate channel-specific message copy from user attributes, Canvas context, and brand guidelines | Email subject and preheader; push title and body |
| Feedback analyst | Parse open-text survey or support feedback into structured fields for Canvas branching | Sentiment, topic, recommended next action |
| Journey router | Route each user to the most relevant Canvas path based on profile and journey context | Path name or boolean for Decision Split steps |
Catalog Agent templates
| Template | Description | Example output |
|---|---|---|
| Description writer | Write short marketing descriptions from existing catalog columns | Product or destination description |
| Item categorizer | Assign categories or tags from row data | Category labels for filtering and recommendations |
| Localization translator | Translate catalog strings into target locales within character limits | Localized text per locale |