Set up IPs and domains
This article guides you through the requirements and steps needed to set up your IP addresses and pools, as well as domains and subdomains needed before you can begin sending emails with Braze.

Starting in 2026, Braze uses Amazon Simple Email Service (SES) as the default email service provider (ESP) for new email setups. For more details, see Amazon SES setup.
Method 1: Self-service email setup
This method sets up your sending and tracking domains for a company. You’ll need to consult the Braze Onboarding team first and send the following information to your Braze representative to get your IP pools and IP addresses added:
- Your chosen domains and subdomains
- The approximate number of emails you send each month, which helps determine how many IPs you need
- How you prefer to map your sending domains to your allocated IP pools
Prerequisites
To use self-service email setup, confirm you meet the following prerequisites:
- You are a new customer in onboarding.
- You have the “Edit Domain Settings” company-level permission.
Step 1: Begin setup
- Go to Settings > Email Self Serve under Company Settings.
- Select Start setup.
Step 2: Add and verify a sending domain
A sending domain is used in the “from” address when sending an email.
- Enter a sending domain and select Submit.
- Add the TXT and CNAME records from the bottom of the page to your DNS provider.
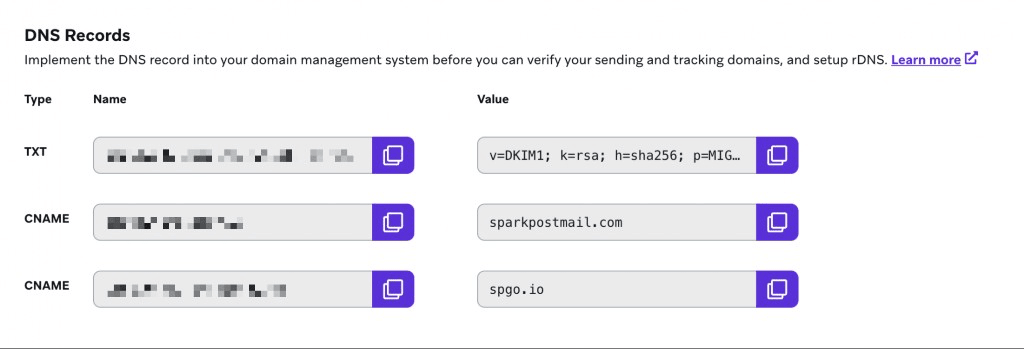
- Return to the Braze dashboard and select Verify.
Ask your engineers and developers to add these DNS records where needed. For in-depth explanations of how DNS records work across Braze email service providers, including SPF, DKIM, DMARC, and ESP-specific record structures, see Understanding DNS records.
The following table contains resources for creating and managing DNS records with commonly used domain providers. If you’re using a different provider, refer to that provider’s documentation or contact their support team for information.
| Domain provider | Resources |
|---|---|
| Bluehost | DNS Records Explained DNS Management Add Edit or Delete DNS Entries |
| Dreamhost | How do I add custom DNS records? |
| GoDaddy | Add a CNAME record |
| Cloudflare | Manage DNS records |
| Squarespace | Adding custom DNS settings |
| Amazon Route 53 | Creating records by using the Amazon Route 53 console |
| Google Cloud DNS | Quickstart: Set up DNS records for a domain name with Cloud DNS |
If verification fails and you believe your DNS records are correct, contact Braze Support for assistance.
The sending domain must be subordinate to a domain you own. For example, if you own “example.com”, a subdomain could be “mail.example.com”, which allows you to use the sending address “@mail.example.com”.
Step 3: Add and verify a tracking domain
A tracking domain is used to wrap links in your emails for click-tracking and branding purposes. This is visible to your recipients when they hover over or click your email links. Braze recommends matching this to your sending domain.
- Enter a tracking domain and select Submit.
- Add the CNAME records from the bottom of the page to your DNS provider.
- Return to the Braze dashboard and select Verify.
Step 4: Add an IP address
Braze generates an A record to associate your IP address with your sending subdomain in a setup called reverse DNS (rDNS). Add the A record in your DNS provider, then select Set up rDNS to support deliverability.
To add or edit your IP addresses for an IP pool, contact Braze Support.
IP pools with more than one dedicated IP
When an IP pool contains multiple dedicated IP addresses, Braze and your email service provider spread large sends across those IPs for capacity and deliverability. Distribution is approximate—not every message in a campaign uses every IP, and smaller sends may look uneven across addresses. SendGrid often processes mail in chunks (on the order of roughly 1,500 messages per chunk), so volume does not always split in a strict one-to-one ratio across IPs. If you routinely send very high daily volume, discuss pool sizing with your Braze onboarding or customer success contact.
Next steps
After your sender verification is complete, Braze recommends IP warming so that your messages reach their destination inboxes at a consistently high rate.
After completing this setup, consult with the Braze Onboarding team to confirm whether your domains and IP warming are working.
Method 2: Verified domains
Verified domains let you grant Braze control of a specific subdomain so Braze can automate email setup and HTTPS click tracking. With DNS domain delegation, Braze manages the DNS records needed for email sending and click tracking. For example, if your subdomain is “mail.example.com”, you can delegate it to Braze to set up your sending and tracking domains.
Verified domains currently support Amazon SES only. If you’re using SendGrid or SparkPost, this feature isn’t available.
Verified domains is supported for email only. If you’re interested in verified domains for channels other than email, submit product feedback.
Setup
Step 1: Coordinate with Braze
Send the following information to your Braze representative:
- Your chosen domains and subdomains
- How you prefer to map your domains to your IP pools
- The approximate number of emails you plan to send each month on each subdomain, which helps determine how many IPs you need for your IP pools
- Any previous deliverability concerns that should be flagged
Step 2: Braze configures information
After receiving your email, Braze adds the expected number of IPs and IP pools. After the IP pools and IP addresses have been added, follow the steps in Verified domains.