Content Optimizer agent step
The Content Optimizer agent step lets you configure and test multiple versions of content components within a single step. It helps you experiment with content variations and automatically optimizes toward the best-performing combinations over time. For an introduction, see Content Optimizer.

Content Optimizer is currently in beta. For help getting started, contact your customer success manager.
Create a Content Optimizer step
For best results, use the Content Optimizer agent in Canvases where users enter the step gradually over time. If all users enter the step at once, the agent won’t have time to learn from early results.
Step 1: Add a step
Drag and drop the Content Optimizer component from the sidebar, or select the plus button at the bottom of a step and select Content Optimizer.
Step 2: Create your base message
The base message is the starting point for your step. Variants for each content component are dynamically inserted based on the combinations defined in the Content Optimizer Settings tab.

During the beta period, the supported channels are email, push notifications, and SMS/MMS/RCS.
From the Messaging Channels tab, select Email and create your base email message. Refer to our dedicated Email section for help.
The Content Optimizer agent uses the send settings (such as the email domain and reply-to address) specified in this variant to send all messages. You can either start with a new design or select an existing template for this message. At this step, consider which components of the message you want to optimize for. You define these in step 4.
Supported components to optimize include:
- Subject
- Body Header
- Body Content
- Primary CTA
From the Messaging Channels tab, select Push notifications and create your base push notification. Refer to our dedicated Push section for help.
The Content Optimizer agent uses the selected push platforms specified in this variant to send all messages. You can either start with a new design or select an existing template for this message. At this step, consider which components of the message you want to optimize for. You define these in step 4.
Supported components to optimize include:
- Title
- Message
From the Messaging Channels tab, select SMS/MMS/RCS and create your base message. Refer to our dedicated SMS/MMS/RCS section for help.
The Content Optimizer agent uses the Content and Message details specified in this variant to send all messages. You can either start with a new design or select an existing template for this message. At this step, consider which components of the message you want to optimize for. You define these in step 4.
Supported components to optimize include:
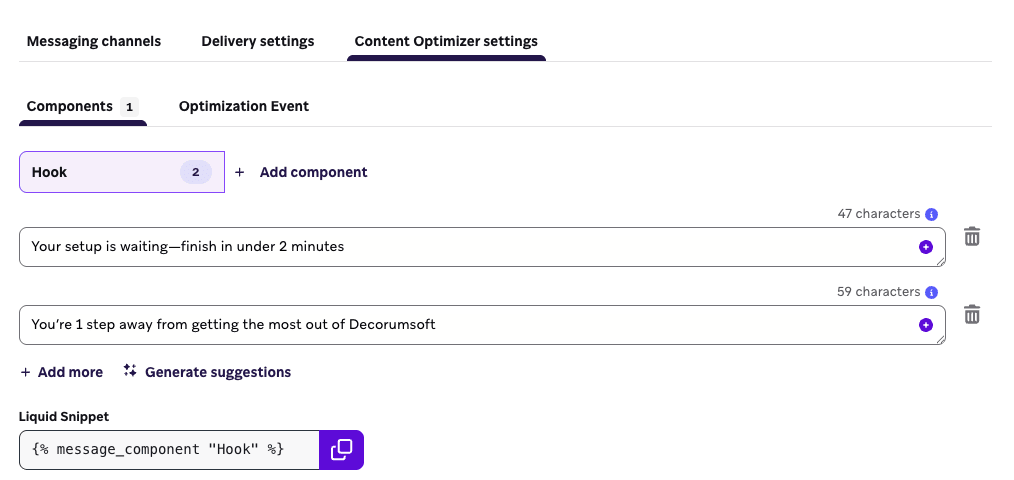
- Hook
- Body
- CTA
Step 3: Specify delivery settings
In the Delivery Settings tab, you can specify if the step should use Intelligent Timing or delivery validations. For more details, refer to Edit delivery settings in Message step.
Step 4: Add content components and variants
Content components are the individual elements of your message that you want to test, such as different subject lines or titles. These components allow you to generate multiple versions of a message and automatically optimize based on performance over time.
- Email: You can add up to three content components per step and up to five variants per component, for a total of 125 unique content combinations.
- Push notifications: You can add up to two components per step and up to five variants per component, for a total of 25 unique content combinations.
- SMS/MMS/RCS: You can add up to two content components per step, and up to five variants per component, for a total of 25 unique content combinations.
When you use Generate AI suggestions, Braze sends content to OpenAI to generate variant ideas. Send-time traffic allocation does not use OpenAI. For details on what data is sent and how it is used, see OpenAI and Content Optimizer.

Step 4.1: Configure content components
To configure components, go to the Content Optimizer Settings tab.
Choose which components you want to optimize for email messages. Supported options are:
- Subject
- Body Header
- Body Content
- Primary CTA
For each selected component, define a set of alternative versions of that content (variants). Use clear, distinct variants that differ in tone, structure, or content. This helps Content Optimizer identify top performers more effectively. You can:
- Write your own variants manually.
- Use AI-generated suggestions to explore new options quickly.

Choose which components you want to optimize for push notifications. Supported options are:
- Title
- Message
For each selected component, define a set of alternative versions of that content (variants). Use clear, distinct variants that differ in tone, structure, or content. This helps Content Optimizer identify top performers more effectively. You can:
- Write your own variants manually.
- Use AI-generated suggestions to explore new options quickly.

After selecting your subscription group and message type (if applicable), choose which components you want to optimize for SMS/MMS/RCS. Supported options are:
- Hook
- Body
- CTA
After an SMS/MMS/RCS Content Optimizer step is launched, you cannot update the subscription group or message type.
For each selected component, define a set of alternative versions of that content (variants). Use clear, distinct variants that differ in tone, structure, or content. This helps Content Optimizer identify top performers more effectively. You can:
- Write your own variants manually.
- Use AI-generated suggestions to explore new options quickly.
Step 4.2: Add Liquid to your message
After defining at least two variants for each component, copy the associated Liquid tag for each one and paste it into the corresponding location in your base message.
- For example, if you’re optimizing the subject line, paste the
{% message_component "Subject" %}tag in the subject field of the email composer. - You can also include component tags inside longer text to test just a portion of the component. For example:
Hey there, {% message_component "Subject" %}.

If you don’t add a Liquid tag for a selected content component, you’ll see a warning on the Content Optimizer Settings tab and an error on the Messaging Channels tab. The Canvas can’t be launched until all selected components are properly added to your base message.
As the Canvas runs, the agent mixes and matches variants across components to generate different content combinations. Over time, higher-performing combinations are prioritized for delivery, helping you improve performance without manual intervention.
Liquid references
| Channel | Component | Liquid snippet |
|---|---|---|
| Subject | {% message_component "Subject" %} |
|
| Body Header | {% message_component "Body Header" %} |
|
| Body Content | {% message_component "Body Content" %} |
|
| Primary CTA | {% message_component "Primary CTA" %} |
|
| Push | Title | {% message_component "Title" %} |
| Push | Message | {% message_component "Message" %} |
| SMS/MMS/RCS | Hook | {% message_component "Hook" %} |
| SMS/MMS/RCS | Body | {% message_component "Body" %} |
| SMS/MMS/RCS | CTA | {% message_component "CTA" %} |
Step 5: Select optimization event
The optimization event determines how the Content Optimizer agent evaluates performance and allocates traffic to content combinations over time.
Your selected optimization event applies to all content components in this step.
For email, you can optimize for one of the following events. The agent uses opens and clicks that are registered within 7 days of sending a message to shift delivery toward higher-performing content combinations.
| Event | Description | Use cases |
|---|---|---|
| Opens | Optimizes for combinations that get recipients to open the email. | Testing subject lines or aiming to increase visibility |
| Clicks | Optimizes for combinations that drive engagement with links. Does not include bot clicks or Braze-recognized unsubscribe clicks. | Driving traffic, engagement, or conversion from links |
For push notifications, you can optimize Opens. This optimizes combinations that get recipients to open the push notification. You can use this optimization event to test variations in title or message copy.
For SMS and MMS messages, you can optimize Clicks. For RCS messages, you can optimize Reads or Clicks.
In order for the step to have an event that it optimizes towards:
- SMS and MMS messages must contain a link.
- RCS messages must contain a link or a suggested reply.
At this time, RCS messaging with Content Optimizer does not support SMS fallbacks.
Step states
As a Content Optimizer step runs, Braze evaluates content variant performance and assigns the step one of three states, visible in the Canvas.
| State | What it means |
|---|---|
| Learning | The agent is still collecting performance data across your content variants and hasn’t found a consistent, reliable winner yet. |
| Optimizing | The agent has found variants that consistently outperform others and is shifting delivery toward the winning combinations. |
| Action Recommended | The step has run for a while without a clear winner emerging. Review your step setup to help the agent find one. |
Actions to consider
If your step enters the Action Recommended state, consider the following:
- Increase how many users enter the Canvas, if possible. More sends give the agent more data to learn from.
- In general, test more combinations rather than fewer (see Best practices). This gives the agent a clearer signal on what’s winning. If your audience volume is low (averaging under approximately 3,000 sends per day), consider reducing the number of variants slightly instead, since too many combinations relative to your volume can slow learning.
- Make your content variants more clearly distinct from each other in tone, structure, or content.
- If you can’t increase your audience and your variant count and content diversity already look right, your step may simply need more time to find winners.
Edit a launched step
After your Canvas is launched, you can update a running Content Optimizer step by opening it in the Canvas editor. You can:
- Add new variants to any existing component, either manually or using AI-generated suggestions, up to the five-variant limit per component.
- Deactivate variants to stop sending them to users.
- Re-activate previously deactivated variants, as long as doing so keeps the component at or below the five-variant limit.
When you publish changes, the optimizer resets and begins reallocating traffic from scratch across all active variants and combinations. Avoid updating variants while the step is in the Learning state. Historical data from before the edit is retained and viewable in the Content Analytics tab.
The following settings cannot be changed after launch:
- The content of existing active variants
- Which components are being tested
- The optimization event
For SMS/MMS/RCS steps, the subscription group and message type also cannot be changed after launch.
Best practices
- In general, test more components rather than fewer for the Content Optimizer step. For example, instead of testing two components for email, test three.
- Testing at least 10 total combinations generally yields better results.
- If this is your first time using Content Optimizer, consider using an Experiment Paths step so only part of your audience enters the branch that contains the Content Optimizer step. For example, you could send half your users down a path with the Content Optimizer step and send the other half of your users down a control path that sends the Message Step with your current business-as-usual content. Then, gather data for 2-3 weeks and compare any key performance indicators (KPIs) or counter-metrics before you increase traffic to the paths with Content Optimizer steps.
- For an effective one-to-one comparison, include your business-as-usual content as one of the variants for each component in your Content Optimizer step.
- When you’re ready to update after your Content Optimizer step has been in the Optimizing state for some time, deactivate low-performing variants and add new ones that build on the traits of your top performers.
Considerations
- Multi-language settings aren’t supported in Content Optimizer steps. Instead, use one Content Optimizer step per language and branch paths individually.
- Liquid tags for Content Optimizer components aren’t supported in Message steps, so the Liquid aborts in Message steps.
- After a Content Optimizer step is launched, you can’t change which components are being tested, the content of existing active variants, or the optimization event. For SMS/MMS/RCS steps, the subscription group and message type also can’t be changed.
Analytics
To review performance, open the step-level analytics panel to see metrics by content variant and overall combination performance. The Content Optimizer step uses the same analytics as the Message step.
If you’ve updated the step after launch, the send allocation chart marks when each content edit occurred. Data from deactivated variants is retained and remains viewable in the analytics panel, so you can compare performance across the full lifetime of the step.

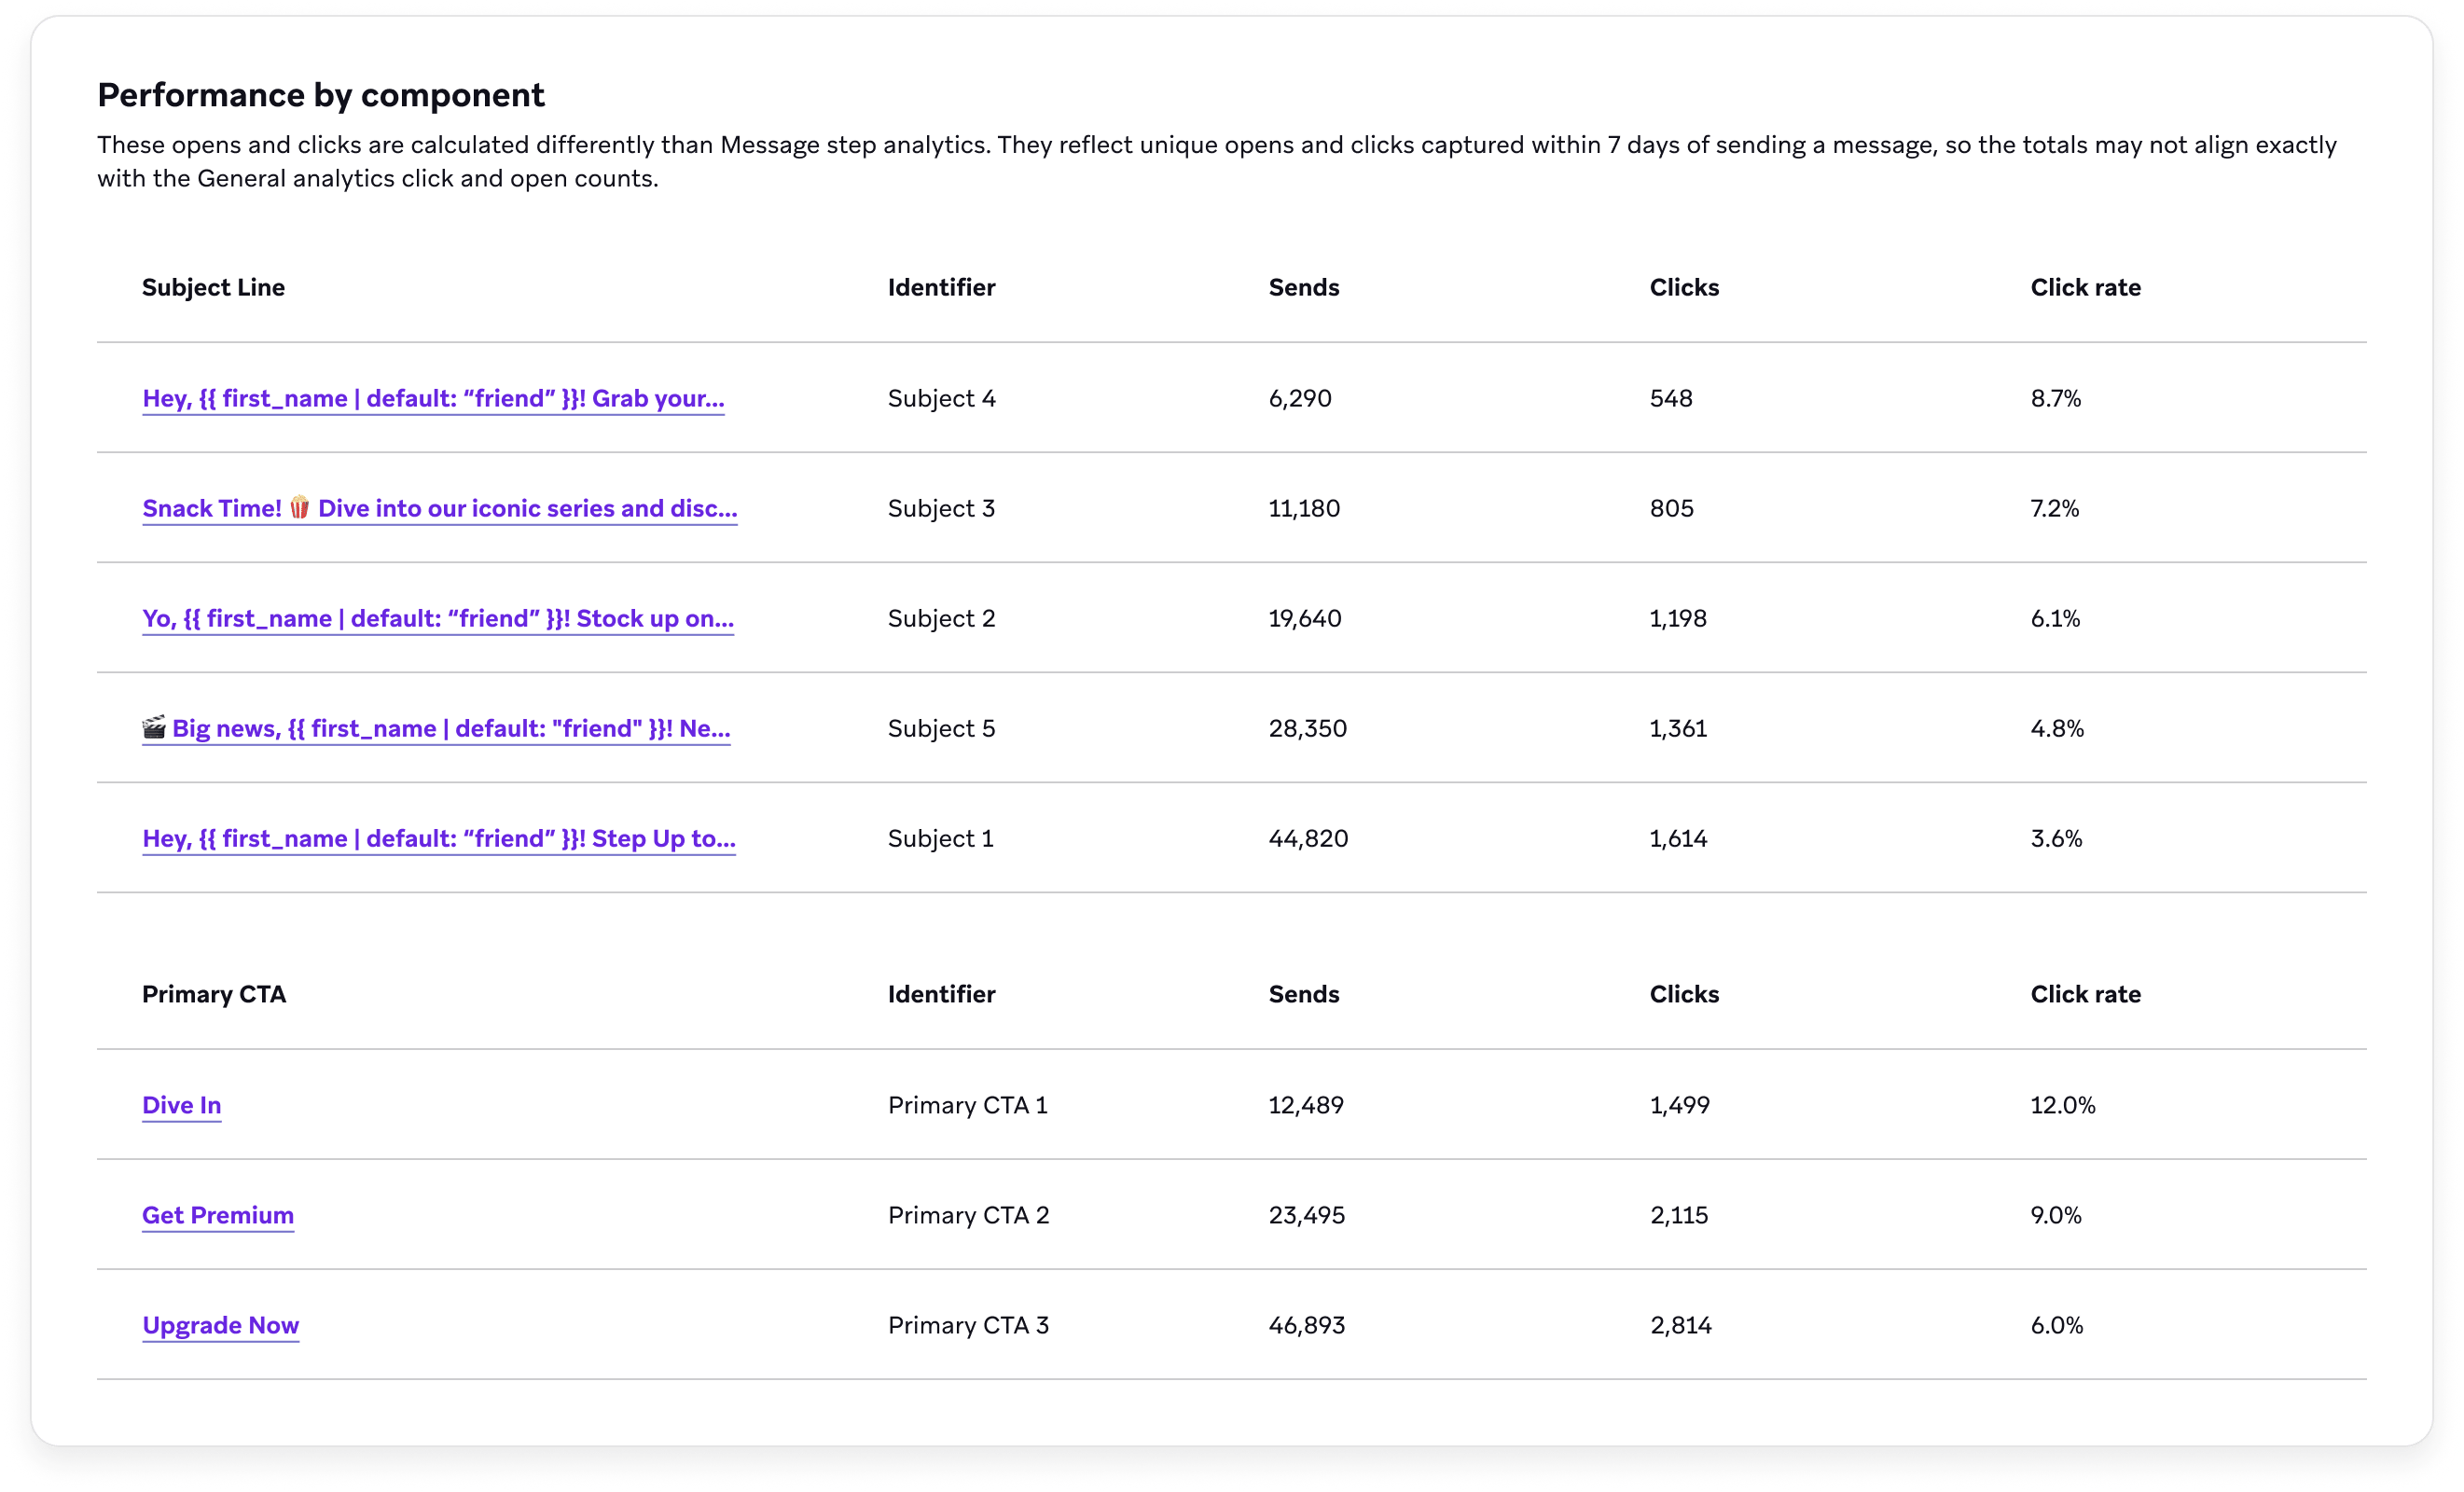
Performance by component
The Performance by component section displays the performance for each component in the Content Optimizer step. The Component column matches the content component you’re testing (for example, Subject line or Primary CTA). The Identifier column matches the identifier for this variant in the Content Optimizer Settings tab.
The unique opens and clicks are captured within seven days of sending a message. Which columns you see depends on your channel and selected optimization event.
| Metric | Description |
|---|---|
| Sends | The number of sends attributed to this variant for that component in this step, using the same step-level send counting as Sends in the Performance by combination table. |
| Opens | When this column appears for your channel, the number of unique opens for this variant within seven days of send. See Unique Opens. |
| Open rate | When this column appears, the percentage of sends for this variant that logged at least one qualifying unique open within seven days. |
| Clicks | The number of unique clicks for this variant within seven days of send. See Total Clicks, Unique Clicks, and Step 5: Select optimization event. |
| Click rate | The percentage of sends for this variant that logged at least one qualifying unique click within seven days, using the same step window as the Performance by combination table. For more information, see Why step analytics differ from general analytics. |
| Reads | When this column appears (for example, for RCS when you optimize for reads), counts when a consumer reads the message with read receipts enabled. See Reads. |
| Read rate | The percentage of sends for this variant that resulted in a read among users with read receipts on. See Read Rate. |
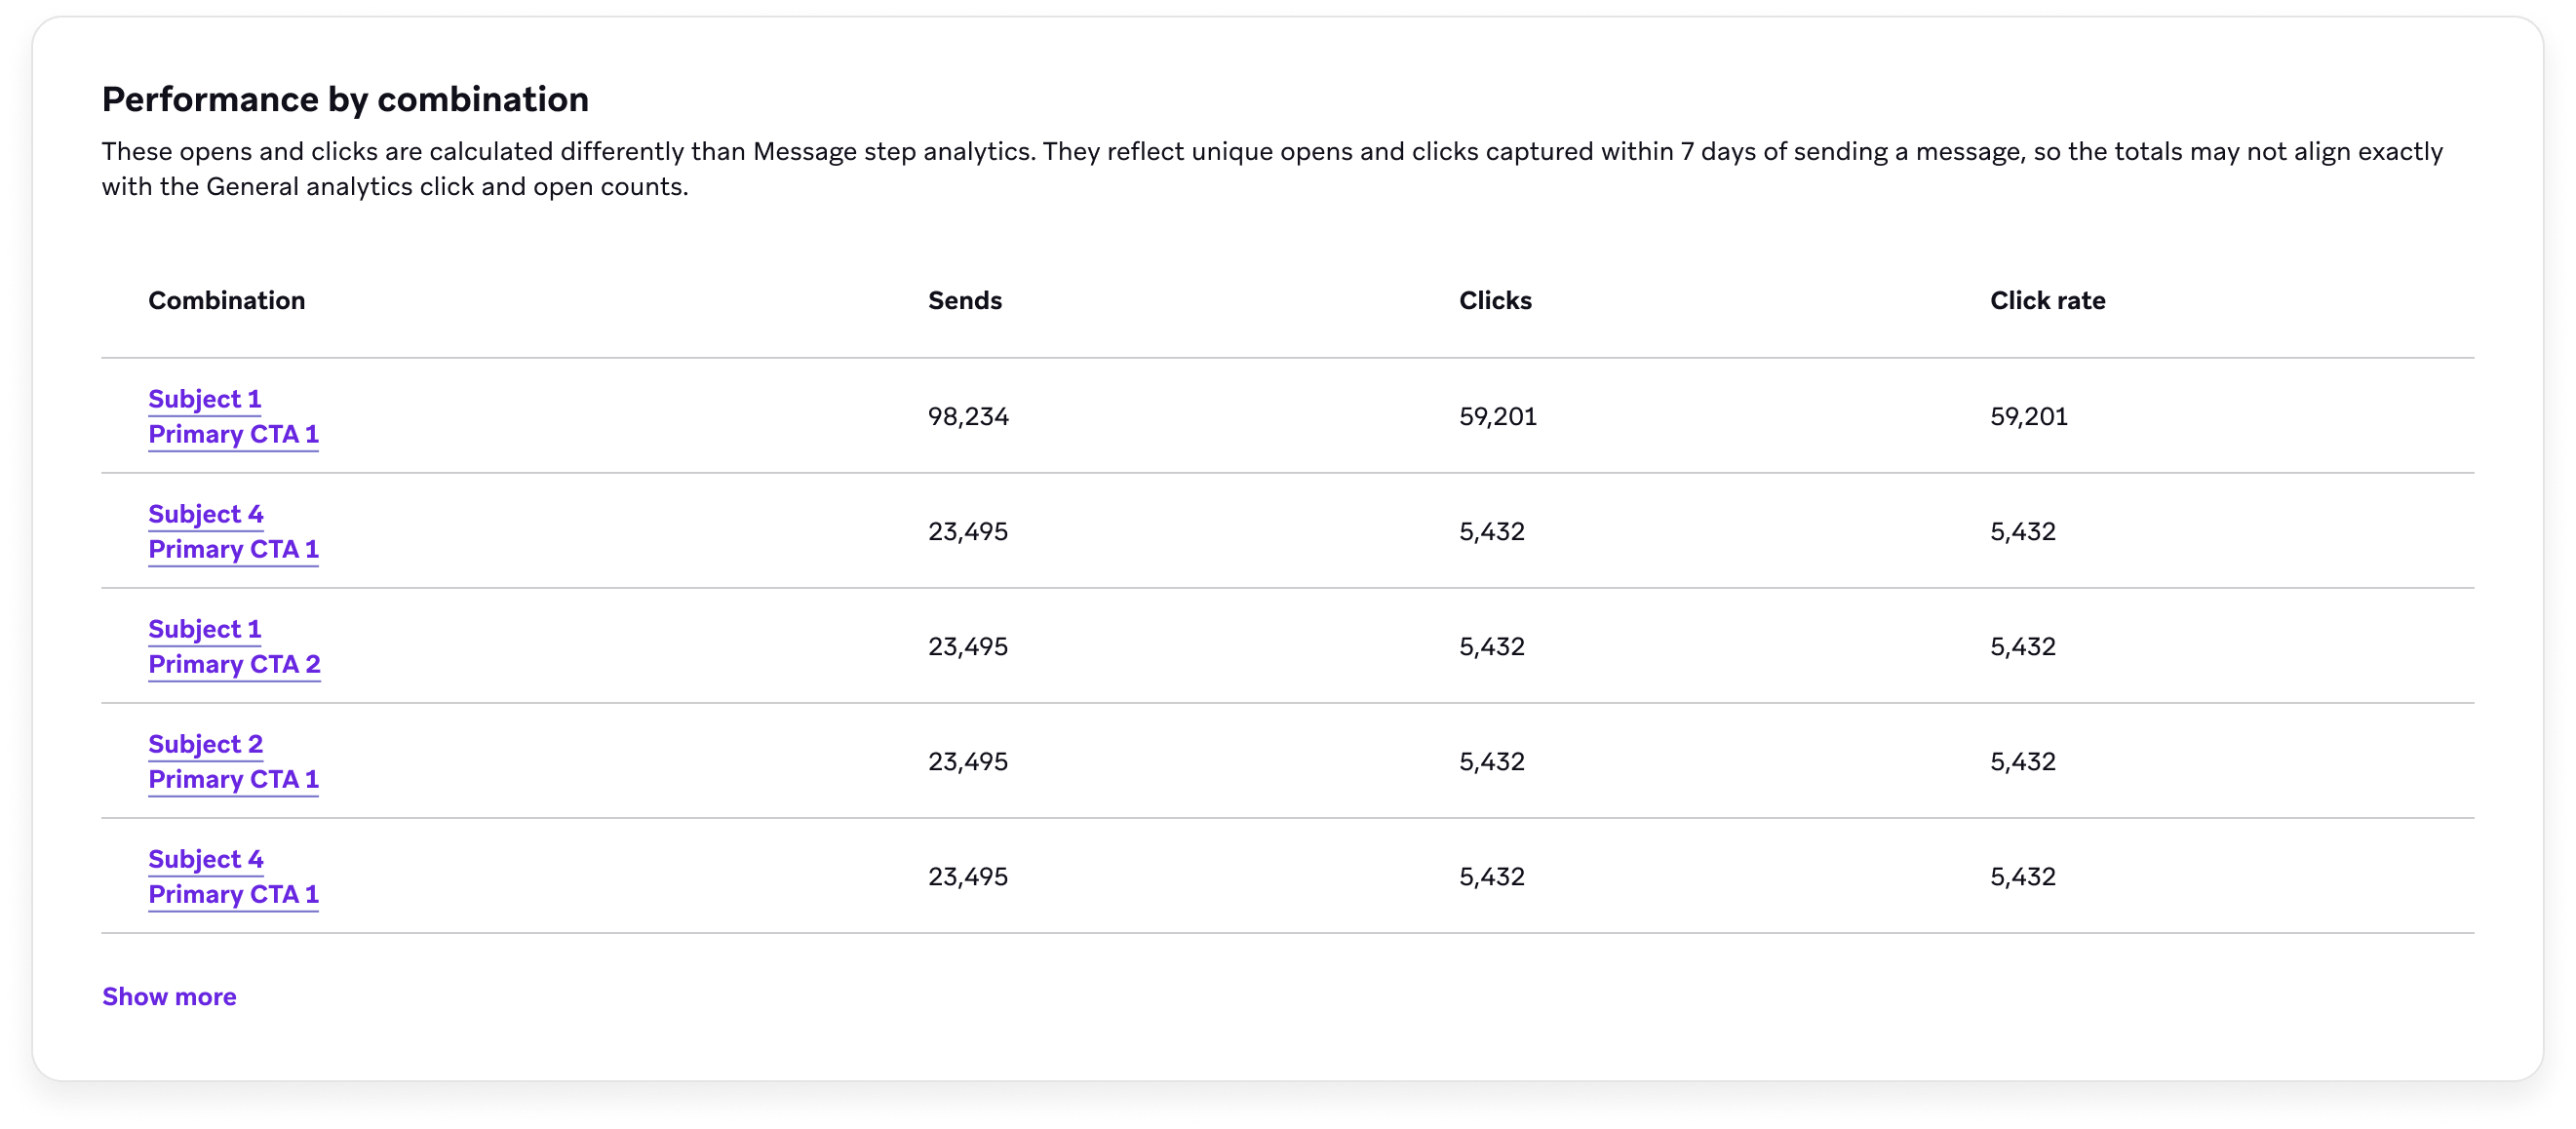
Performance by combination
The Performance by combination section displays the performance for each combination in the Content Optimizer step. Combinations are the mix of variants that define this row—one selected variant from each content component you’re testing (for example, a subject line paired with a primary CTA).
The unique opens and clicks are captured within seven days of sending a message. The columns you see depend on your channel and selected optimization event.
| Metric | Description |
|---|---|
| Sends | The total number of messages sent from this step using this combination. Counts follow the same general meaning as Sends, scoped to each combination. |
| Opens | The number of unique opens for this combination within seven days of send. For how unique opens are defined for email, see Unique Opens. |
| Open rate | The percentage of sends for this combination that logged at least one qualifying unique open within seven days. |
| Clicks | The number of unique clicks for this combination within seven days of send. For how Braze defines clicks by channel, see Total Clicks and Unique Clicks. |
| Click rate | The percentage of sends for this combination that logged at least one qualifying unique click within seven days. Because Content Optimizer uses the step’s seven-day, de-duplicated counts, this rate may not match click rates in general campaign analytics. For more information, see Why step analytics differ from general analytics. |
| Reads | When this column appears (for example, for RCS when you optimize for reads), counts when a consumer reads the message with read receipts enabled. |
| Read rate | When this column appears, the percentage of sends for this combination that resulted in a read among users with read receipts on. |
Why step analytics differ from general analytics
Reasons that analytics in the Content Optimizer step differ from the Analytics section include:
- Push sends are de-duplicated for sends to the same user on different devices.
- In general, clicks and opens are de-duplicated to be unique for each user.
- Only clicks and opens that happen within seven days of sending a message are counted in the Content Optimizer step.
Troubleshooting
| Issue | Description | Fix |
|---|---|---|
| Missing Liquid tags | If you add a content component (such as Subject or CTA) but don’t insert the corresponding Liquid tag into your base message, you’ll see: - A warning on the Content Optimizer Settings tab - An error on the Messaging Channels tab |
Copy the Liquid snippet shown under each component in the Content Optimizer Settings tab and paste it into the appropriate part of your message. |
| Orphaned Liquid tags | If you delete a content component but leave its Liquid tag in the base message, the message may not render as expected when sent. | Remove any unused message_component tags from your base message before launching. |