Using catalogs
After creating a catalog, you can reference non-user data in your Braze campaigns through Liquid. You can use catalogs in all of your messaging channels, including anywhere in the drag-and-drop editor where Liquid is supported.
Using catalogs in a message
The following video walks through how to use catalogs in a message.
Step 1: Add personalization type
In the message composer of your choice, select Add Personalization and select Catalog Items for the Personalization type. Then, select your catalog name. Using our previous example, we’ll select the “Games” catalog.
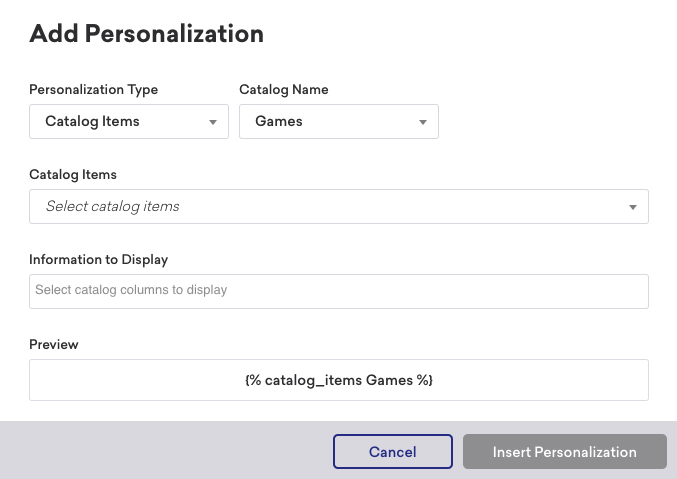
We can immediately see the following Liquid preview:
1
{% catalog_items Games %}
Step 2: Select catalog items
Next, it’s time to add your catalog items! Using the dropdown, select the catalog items and the information to display. This information corresponds to the columns in your uploaded CSV file used to generate your catalog.
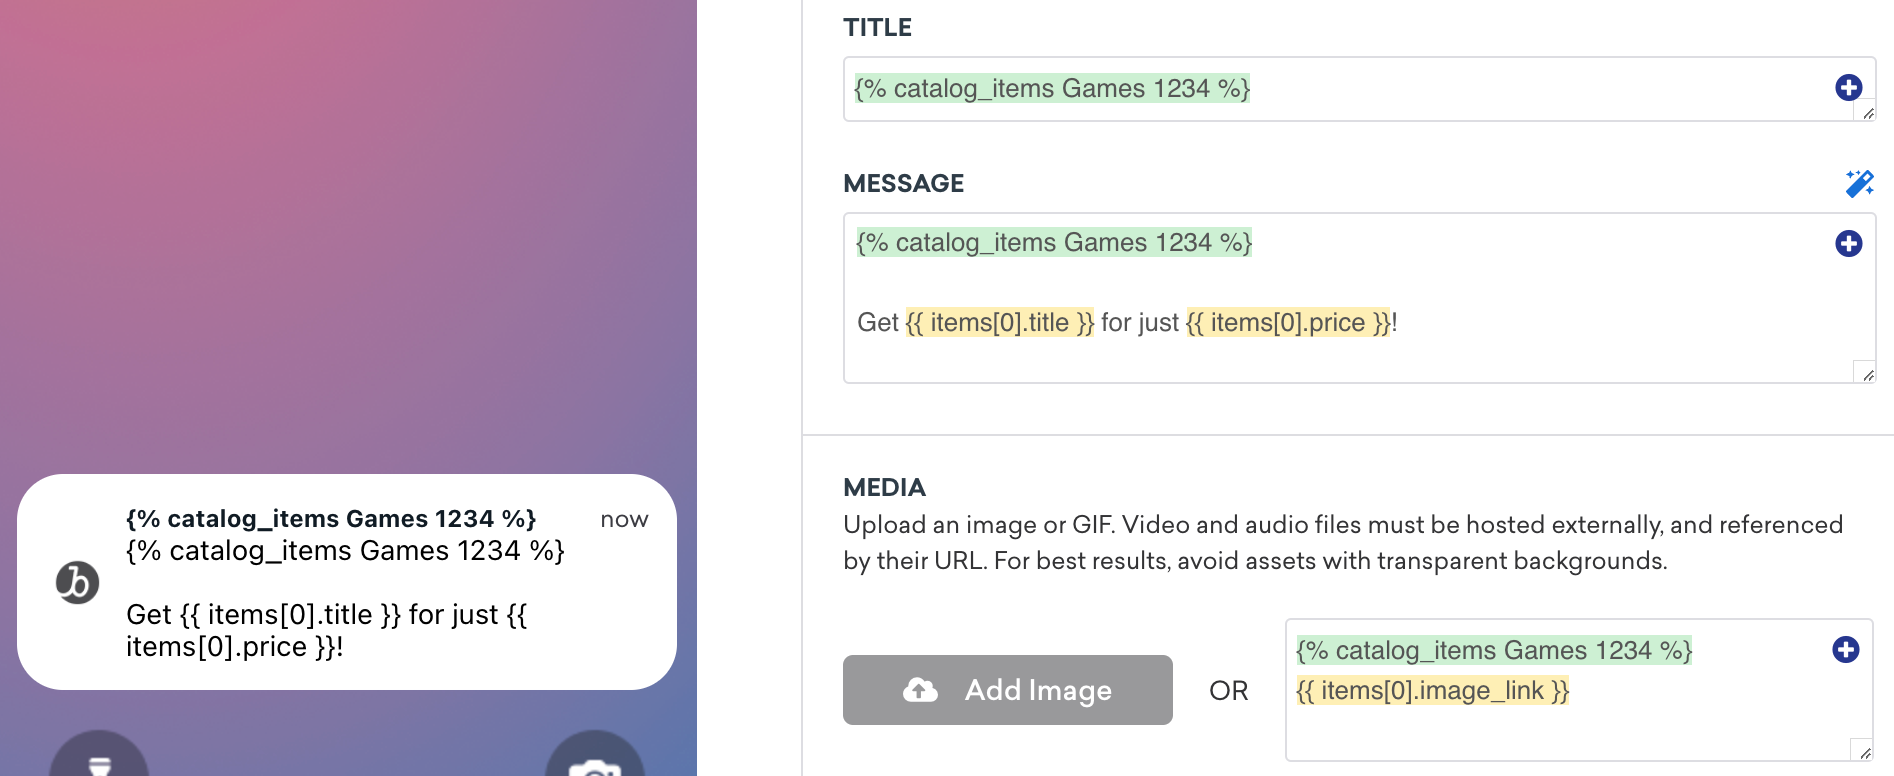
For example, to reference the title and price of our Tales game, we could select the id for Tales (1234) as the catalog item and request title and price for the displayed information.
1
2
3
{% catalog_items Games 1234 %}

Get {{ items[0].title }} for just {{ items[0].price }}!
This renders as the following:
Get Tales for just 7.49!
Exporting catalogs
There are two ways you can export catalogs from the dashboard:
- Hover over the catalog row in the Catalogs section. Then, select the Export catalog button.
- Select your catalog. Then, select the Export catalog button in the Preview tab of the catalog.
You’ll receive an email to download the CSV file after initiating the export. You’ll have up to four hours to retrieve this file.
Additional use cases
Multiple items
You aren’t limited to one item in a message. Use the Add Personalization modal to add up to three catalog items at a time. To add more, select Add Personalization again in the composer and select additional catalog items and information to display.
Check out this example where we add the id of three games, Tales, Teslagrad, and Acaratus, for Catalog Items and select title for Information to Display.
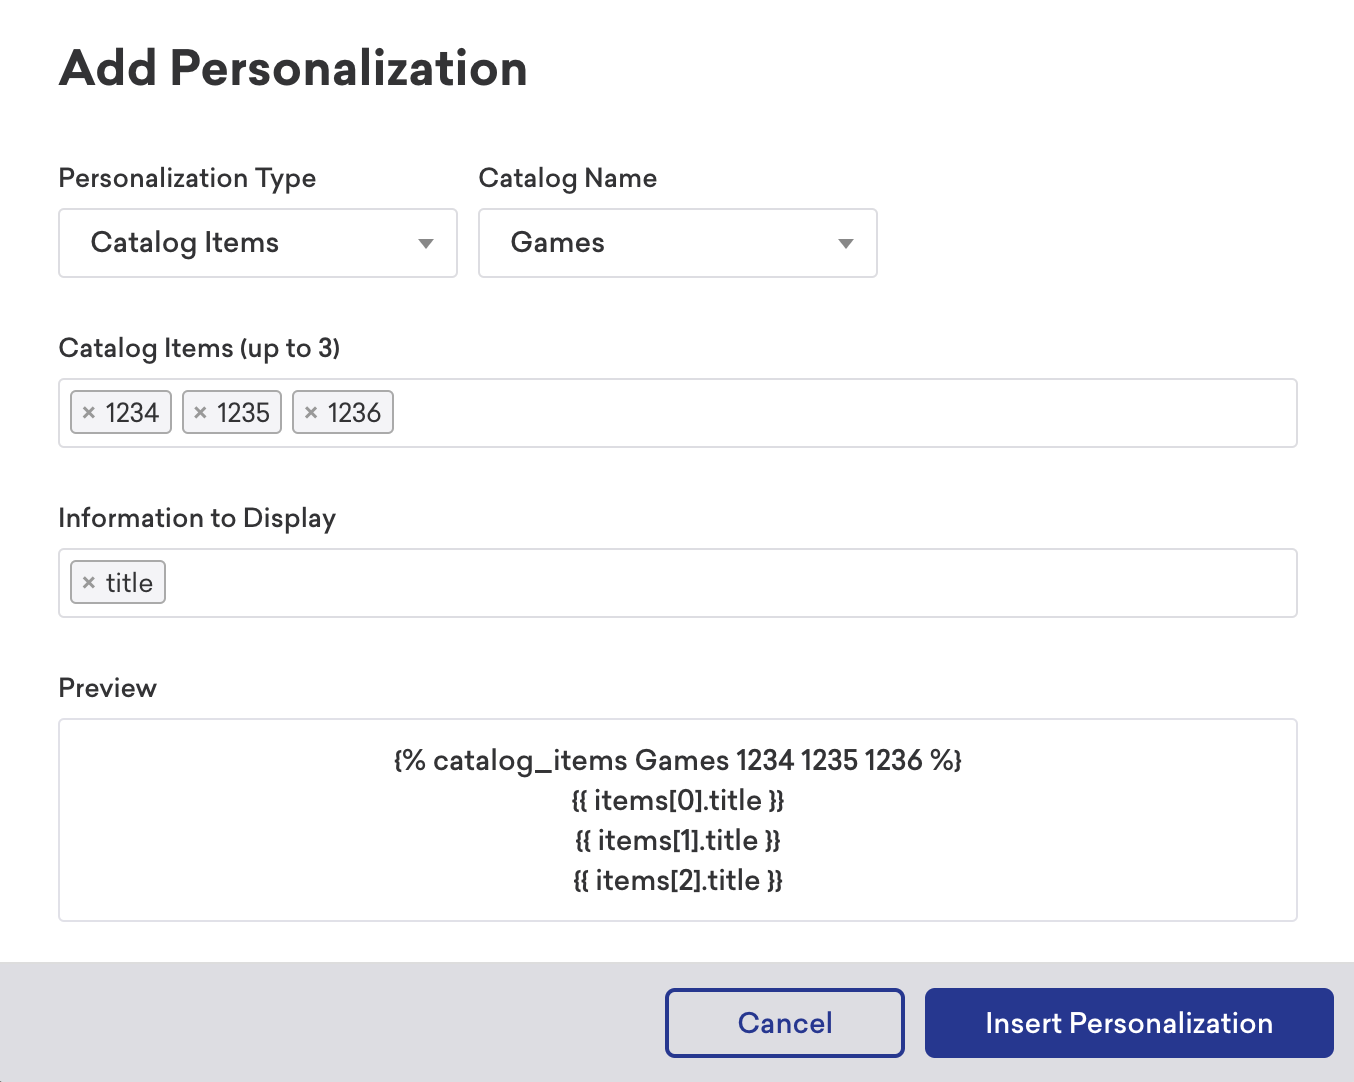
We can further personalize our message by adding some text around our Liquid:
1
2
Get the ultimate trio {% catalog_items Games 1234 1235 1236 %}
{{ items[0].title }}, {{ items[1].title }}, and {{ items[2].title }} today!
This returns as the following:
Get the ultimate trio Tales, Teslagrad, and Acaratus today!

Using Liquid if statements
You can use catalog items to create conditional statements. For example, you can trigger a certain message to display when a specific item is selected in your campaign. You must declare the catalog (and, if applicable, the selection) before referencing items in an if statement.
With catalog items
1
2
3
4
5
6
{% catalog_items Games 1234 %}
{% if items[0].on_sale == true %}
  {{ items[0].title }} is on sale! Get it for {{ items[0].price }}.
{% else %}
  Check out {{ items[0].title }} at full price.
{% endif %}
In this example, the catalog_items tag fetches item 1234 from the Games catalog, and then the if statement checks the on_sale field to display different messages.
With catalog selections
1
2
3
4
5
6
7
8
{% catalog_selection_items item-list selections %}
{% if items[0].venue_name.size > 10 %}
Message if the venue name's size is more than 10 characters.
{% elsif items[0].venue_name.size <= 10 %}
Message if the venue name's size is 10 characters or fewer.
{% else %}
{% abort_message('no venue_name') %}
{% endif %}
In this example, different messages display based on whether the venue_name field has more or fewer than 10 characters. If venue_name is blank, the message is aborted.
To output how many items a selection returns, use the Liquid size filter on the items array after the tag, not on a single field:
1
{% catalog_selection_items item-list selections %}{{ items | size }}
To avoid Liquid syntax errors, select the + plus button in the message composer to insert catalog Liquid tags automatically.
Using images
You can also reference images in the catalog to use in your messaging. To do so, use the catalogs tag and item object in the Liquid field for images.
For example, to add the image_link from our Games catalog to our promotional message for Tales, select the id for the Catalog Items field and image_link for the Information to Display field. This adds the following Liquid tags to our image field:
1
2
3
{% catalog_items Games 1234 %}

{{ items[0].image_link }}
Here’s what this looks like when the Liquid is rendered:


In HTML channels such as email, avoid extra spaces or line breaks between the closing {% catalog_items ... %} tag and the Liquid that prints the image URL (for example, {{ items[0].image_link }}). Extra whitespace in the template can prevent the image URL from resolving correctly in the rendered message. Keep the URL expression immediately adjacent to the catalog tag, as in: <img src="{% catalog_items Games 1234 %}{{ items[0].image_link }}">.
Templating catalog items
You can also use templating to dynamically pull catalog items based on custom attributes. For example, let’s say a user has the custom attribute wishlist, which contains an array of game IDs from your catalog.
1
2
3
4
5
6
7
8
{
    "attributes": [
        {
            "external_id": "user_id",
            "wishlist": ["1234", "1235"]
        }
    ]
}

JSON objects in catalogs are only ingested through the API. You can’t upload a JSON object using a CSV file.
Using Liquid templating, you can dynamically pull out the wishlist IDs and then use them in your message. To do so, assign a variable to your custom attribute, then use the Add Personalization modal to pull a specific item from the array. Variables referenced as the catalog item ID must be wrapped in curly brackets to be referenced properly, such as ``.
Remember, arrays start at 0, not 1.
For example, to let a user know that Tales (an item in our catalog that they’ve wished for) is on sale, we can add the following to our message composer:
1
2
3
4
{% assign wishlist = {{custom_attribute.${wishlist}}}%}
{% catalog_items Games {{ wishlist[0] }} %}

Get {{ items[0].title }} now for {{ items[0].price }}!
Which will display as the following:
Get Tales now for just 7.49!
With templating, you can render a different catalog item for each user based on their individual custom attributes, event properties, or any other templatable field.
Uploading a CSV
You can upload a CSV of new catalog items to add or catalog items to update. To delete a list of items, you can upload a CSV of item IDs to delete them.
Using Liquid
You can also manually piece together catalogs with Liquid logic. However, note that if you type in an ID that doesn’t exist, Braze will still return an items array without objects. We recommend that you include error handling, such as checking the size of the array and using an if statement to account for an empty array case.
Templating catalog items including Liquid
Similar to Connected Content, you must use the :rerender flag in a Liquid tag to render a catalog item’s Liquid content. Note that the :rerender flag is only one level deep, meaning it won’t apply to any nested Liquid tag calls.
If a catalog item contains user profile fields (within a Liquid personalization tag), these values must be defined in Liquid earlier in the message and before the templating in order to render the Liquid properly. If the :rerender flag isn’t provided, it will render the raw Liquid content.
For example, if a catalog named “Messages” has an item with this Liquid:

To render the following Liquid content:
1
2
3
4
Hi ${first_name},

{% catalog_items Messages greet_msg :rerender %}
{{ items[0].Welcome_Message }}
This will display as the following:
1
2
3
Hi Peter,

Welcome to our store, Peter!
Catalog Liquid tags can’t be used recursively inside catalogs.
Troubleshooting catalog personalization
If catalog or selection Liquid doesn’t display as you expect in a message or Canvas step, check the following:
| Symptom | What to check |
|---|---|
| Preview shows items but live sends are empty | Confirm catalog item IDs exist at send time. If the ID in your Liquid doesn’t match a row, Braze returns an empty items array—see Using Liquid. Check for typos and for ID sources (such as event properties) that are missing on the trigger or user profile. |
| Composer preview works in a campaign but not in Canvas | Confirm you’re using the right Liquid context—Canvas context properties versus event properties—and that those fields exist on the trigger. See Context and event properties. |
| A selection returns no items | Review selection filters and limits; confirm that the catalog data is synced and that the column names match your filters. |
:rerender or templated delivery looks wrong |
For nested Liquid inside catalog fields, you need :rerender and correct ordering of variables—see Templating catalog items including Liquid. Templated in-app messages resolve at trigger time; see What are templated in-app messages?. Some channels restrict catalog tags (for example, certain :rerender uses with Banners)—see Are all Liquid tags supported? in the Banners FAQ. |
For general Liquid behavior, see Liquid use cases and Using Liquid.
Structuring your catalog data
When planning how to structure your catalog data, start from your intended use case and design the catalog around it. Each row in the catalog represents an item (with a unique id). The columns should contain the attributes for that item, such as URLs, description copy, image URLs, price, rating, size, or color.
When to use standard catalog calls
With standard catalog calls, you match a value against the id column. By inserting a custom attribute or event property (as an ID string) into the catalog Liquid tag, you can pull multiple attributes for a single item into your message. Common use cases include:
- Recently viewed product or service
- Wishlist items
- Deals by location
- Product purchased
- Lifecycle stage content
- Most recently searched product or service
When to use catalog selections
Catalog selections let you filter across any column in your catalog and return up to 50 matching items. By inserting custom attributes or event properties into the selection filters, the results are personalized for each user. Common use cases include:
- Items where category equals a user’s preference
- Items matching a user’s preferred brand, cuisine, or size
- Subscription type or loyalty tier content
- Products within a user’s average order value range
The key difference is that standard catalog calls look up a single known item by id, while catalog selections query across the catalog and return multiple items that match your filter criteria.