File storage integrations
This page covers how to set up Cloud Data Ingestion to sync data from Amazon S3, Google Cloud Storage, or Azure Blob Storage to Braze.
How it works
You can use Cloud Data Ingestion (CDI) to directly integrate one or more storage buckets in your cloud account with Braze. When you add a new file to a bucket, your cloud provider publishes a notification, and Braze Cloud Data Ingestion syncs the data.
The notification mechanism depends on your provider:
- Amazon S3: When new files are published to S3, a message is posted to an Amazon Simple Queue Service (SQS) queue, and Braze consumes that message to ingest the new file.
- Google Cloud Storage (GCS): When new files are finalized in the bucket, GCS publishes an
OBJECT_FINALIZEnotification to a Pub/Sub topic. Braze consumes those notifications from a Pub/Sub subscription to ingest the new file. - Azure Blob Storage: When new files are created in the container, an event subscription in Azure Event Grid publishes a Blob Created event to an Azure Storage queue. Braze reads those messages from the queue to ingest the new file.
Cloud Data Ingestion supports the following:
- JSON files
- CSV files
- Parquet files
- Attribute, custom event, purchase event, user delete, and catalog data
Setting up Cloud Data Ingestion
The setup steps depend on your file storage provider. Select the tab for your provider, then complete the shared configuration in the sections that follow.
The integration requires the following resources:
- S3 bucket for data storage
- SQS queue for new file notifications
- IAM role for Braze access
AWS definitions
| Term | Definition |
|---|---|
| Amazon Resource Name (ARN) | The ARN is a unique identifier for AWS resources. |
| Identity and Access Management (IAM) | IAM is a web service that lets you securely control access to AWS resources. In this tutorial, create an IAM policy and assign it to an IAM role to integrate your S3 bucket with Braze Cloud Data Ingestion. |
| Amazon Simple Queue Service (SQS) | SQS is a hosted queue that lets you integrate distributed software systems and components. |
Setting up Cloud Data Ingestion in AWS
Step 1: Create a source bucket
Create a general-purpose S3 bucket with default settings in your AWS account. S3 buckets can be reused across syncs as long as the folder is unique.
The default settings are:
- ACLs Disabled
- Block all public access
- Disable bucket versioning
- SSE-S3 encryption
- SSE-S3 is the only supported server-side encryption type. Amazon KMS encryption is not supported.
Note the region where you created the bucket. You’ll create an SQS queue in the same region in the next step.
Step 2: Create SQS queue
Create an SQS queue to track when objects are added to the bucket you’ve created. Use the default configuration settings for now.
An SQS queue must be unique globally (for example, only one can be used for a CDI sync and cannot be reused in another workspace).

Be sure to create this SQS in the same region as the one you created the bucket in.
Note the ARN and URL of the SQS queue. You’ll need them frequently during this configuration.
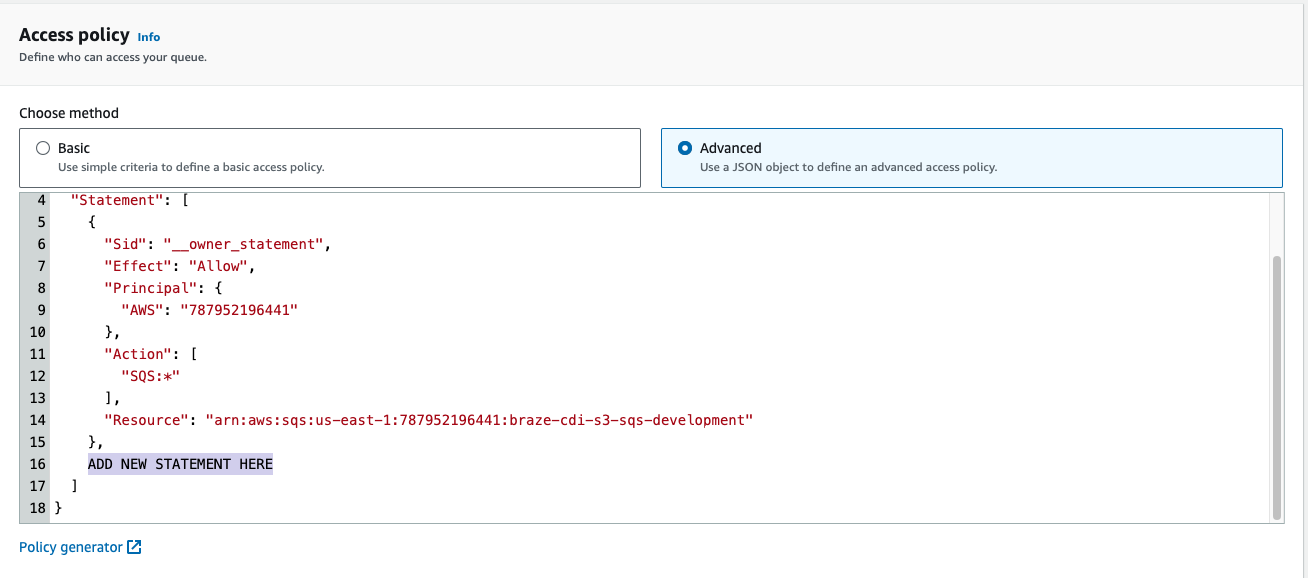
Step 3: Set up access policy
To set up the access policy, choose Advanced options.
Append the following statement to the queue’s access policy, being careful to replace YOUR-BUCKET-NAME-HERE with your bucket name, and YOUR-SQS-ARN with your SQS queue ARN, and YOUR-AWS-ACCOUNT-ID with your AWS account ID:
{
"Sid": "braze-cdi-s3-sqs-publish",
"Effect": "Allow",
"Principal": {
"Service": "s3.amazonaws.com"
},
"Action": "SQS:SendMessage",
"Resource": "YOUR-SQS-ARN",
"Condition": {
"StringEquals": {
"aws:SourceAccount": "YOUR-AWS-ACCOUNT-ID"
},
"ArnLike": {
"aws:SourceArn": "arn:aws:s3:::YOUR-BUCKET-NAME-HERE"
}
}
}
Step 4: Add an event notification to the S3 bucket
- In the bucket created in step 1, go to Properties > Event notifications.
- Give the configuration a name. Optionally, specify a prefix or suffix to target if you only want a subset of files to be ingested by Braze.
- Under Destination, select SQS queue and provide the ARN of the SQS you created in step 2.

If you upload your files to the root folder of an S3 bucket and then move some of the files to a specific folder in the bucket, you may encounter an unexpected error. Instead, you can change the event notifications to send for only the files in the prefix, avoid placing files in the S3 bucket outside that prefix, or update the integration with no prefix, which then ingests all files.
Step 5: Create an IAM policy
Create an IAM policy to allow Braze to interact with your source bucket. To get started, sign in to the AWS management console as an account administrator.
-
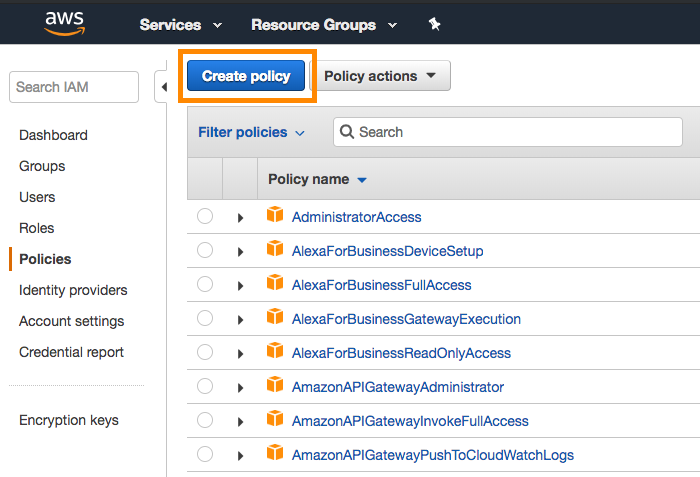
Go to the IAM section of the AWS Console, select Policies in the navigation bar, then select Create Policy.
-
Open the JSON tab and input the following code snippet into the Policy Document section, taking care to replace
YOUR-BUCKET-NAME-HEREwith your bucket name, andYOUR-SQS-ARN-HEREwith your SQS queue name:
{
"Version": "2012-10-17",
"Statement": [
{
"Effect": "Allow",
"Action": ["s3:ListBucket", "s3:GetObjectAttributes", "s3:GetObject"],
"Resource": ["arn:aws:s3:::YOUR-BUCKET-NAME-HERE"]
},
{
"Effect": "Allow",
"Action": ["s3:ListBucket", "s3:GetObjectAttributes", "s3:GetObject"],
"Resource": ["arn:aws:s3:::YOUR-BUCKET-NAME-HERE/*"]
},
{
"Effect": "Allow",
"Action": [
"sqs:DeleteMessage",
"sqs:GetQueueUrl",
"sqs:ReceiveMessage",
"sqs:GetQueueAttributes"
],
"Resource": "YOUR-SQS-ARN-HERE"
}
]
}
-
Select Review Policy when you’re finished.
-
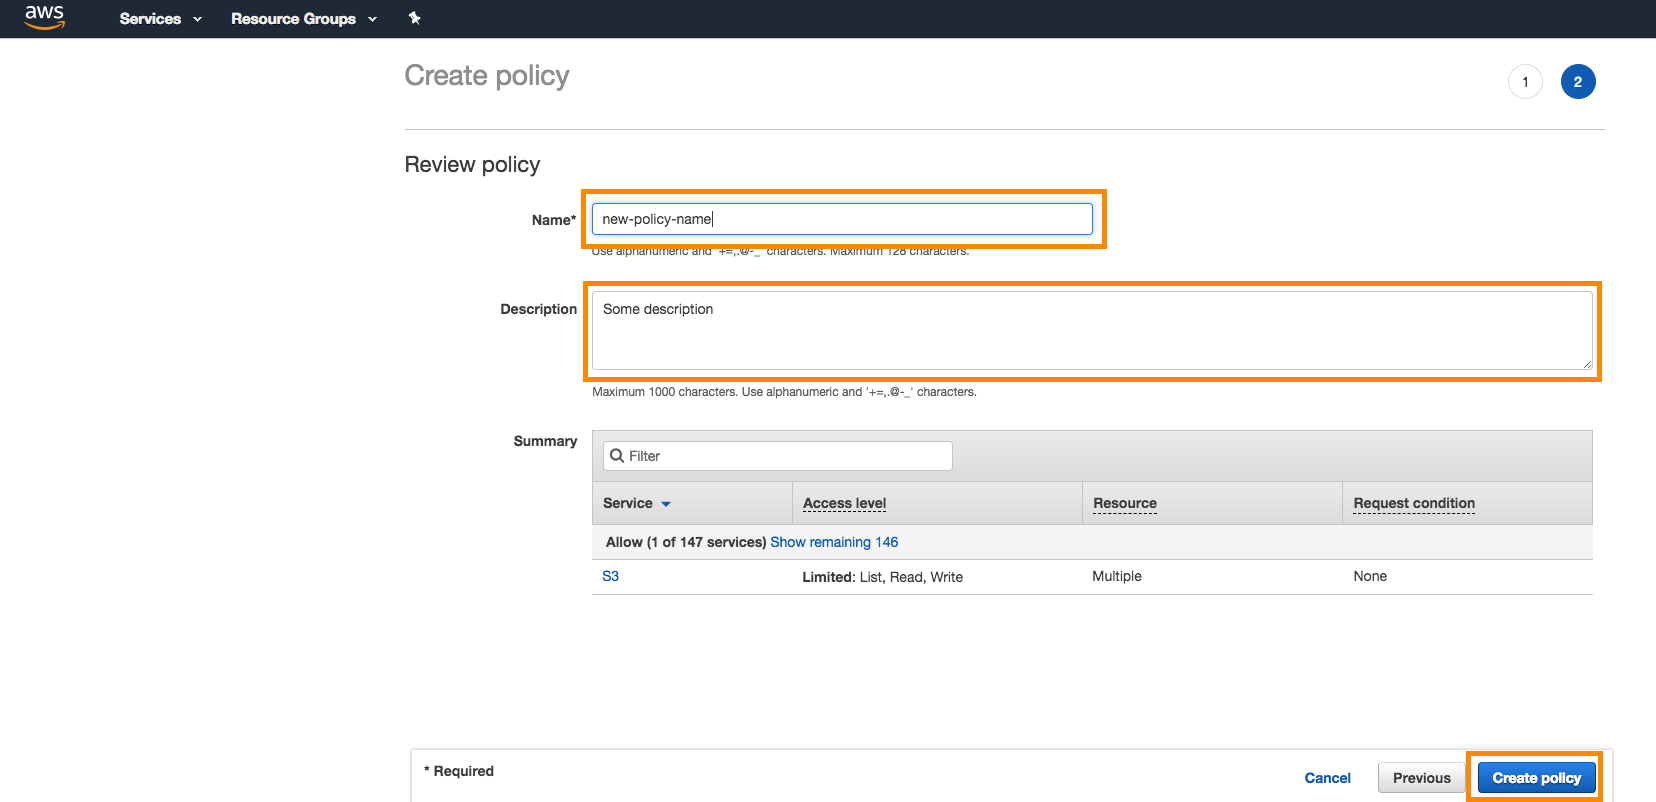
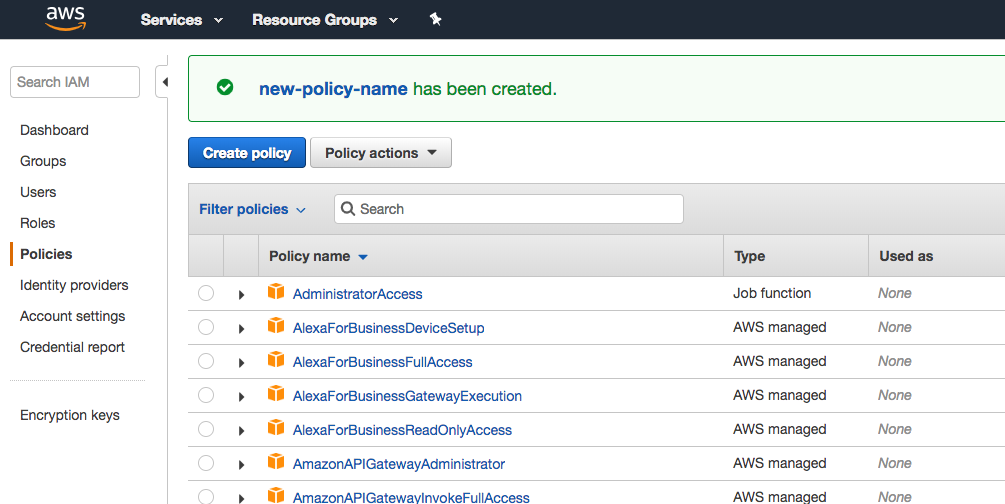
Give the policy a name and description, then select Create Policy.
Step 6: Create an IAM role
To complete the setup on AWS, create an IAM role and attach the IAM policy from step 5 to it.
- Within the same IAM section of the console where you created the IAM policy, go to Roles > Create Role.
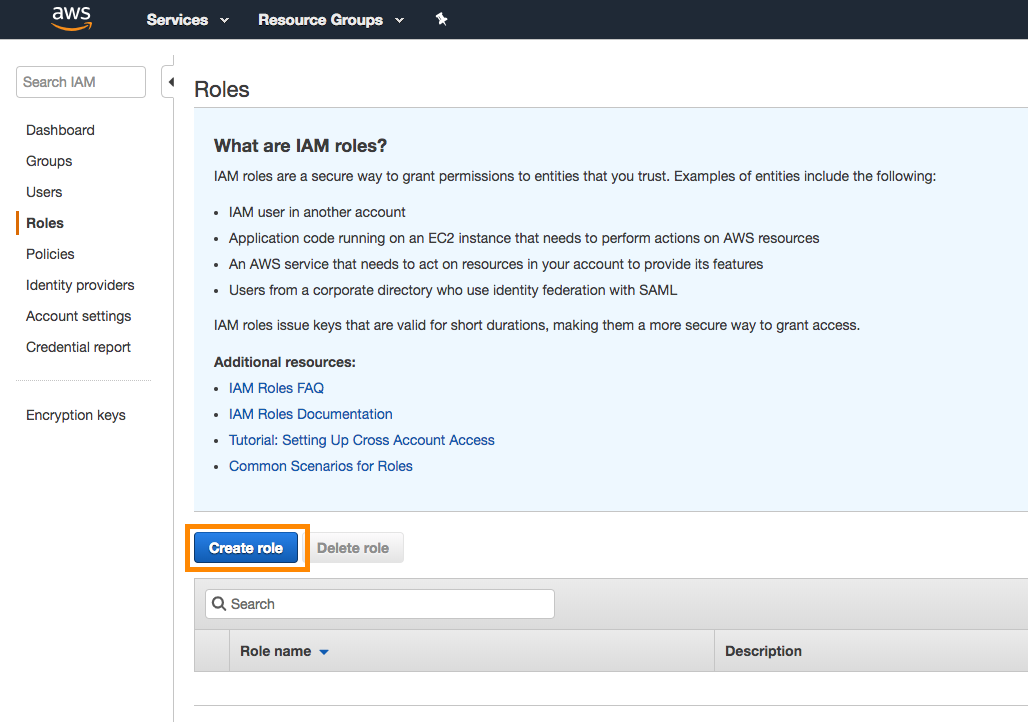
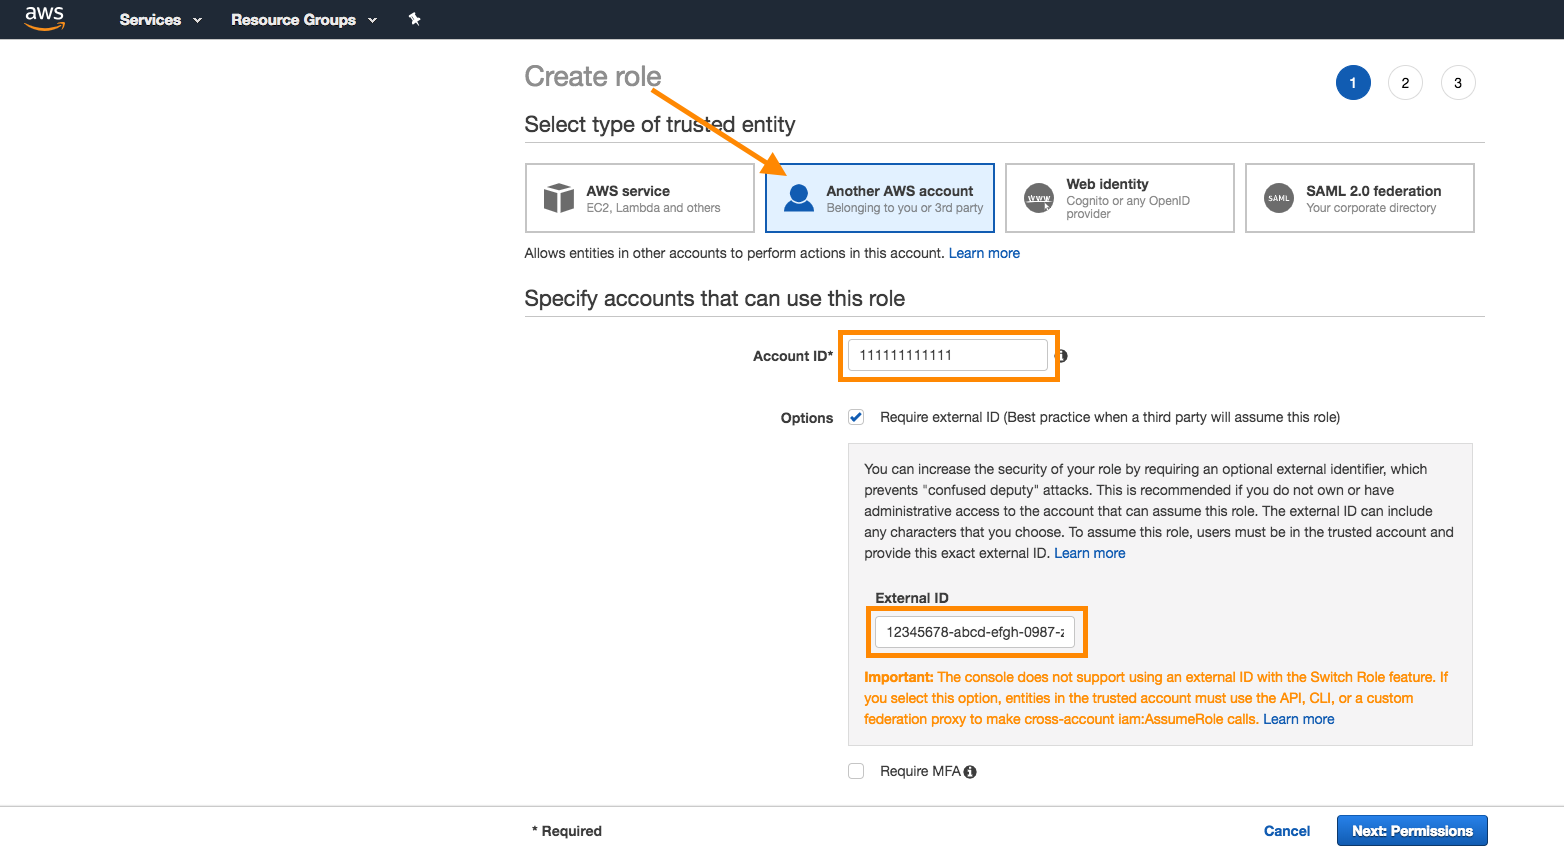
- In AWS, select Another AWS Account as the trusted entity selector type. Provide your Braze account ID. Select the Require external ID checkbox.
- In Braze, go to Data Settings > Cloud Data Ingestion > Sources, select Add data source, and select Amazon S3 from the file sources section.
- Copy the automatically generated Braze Account ID.
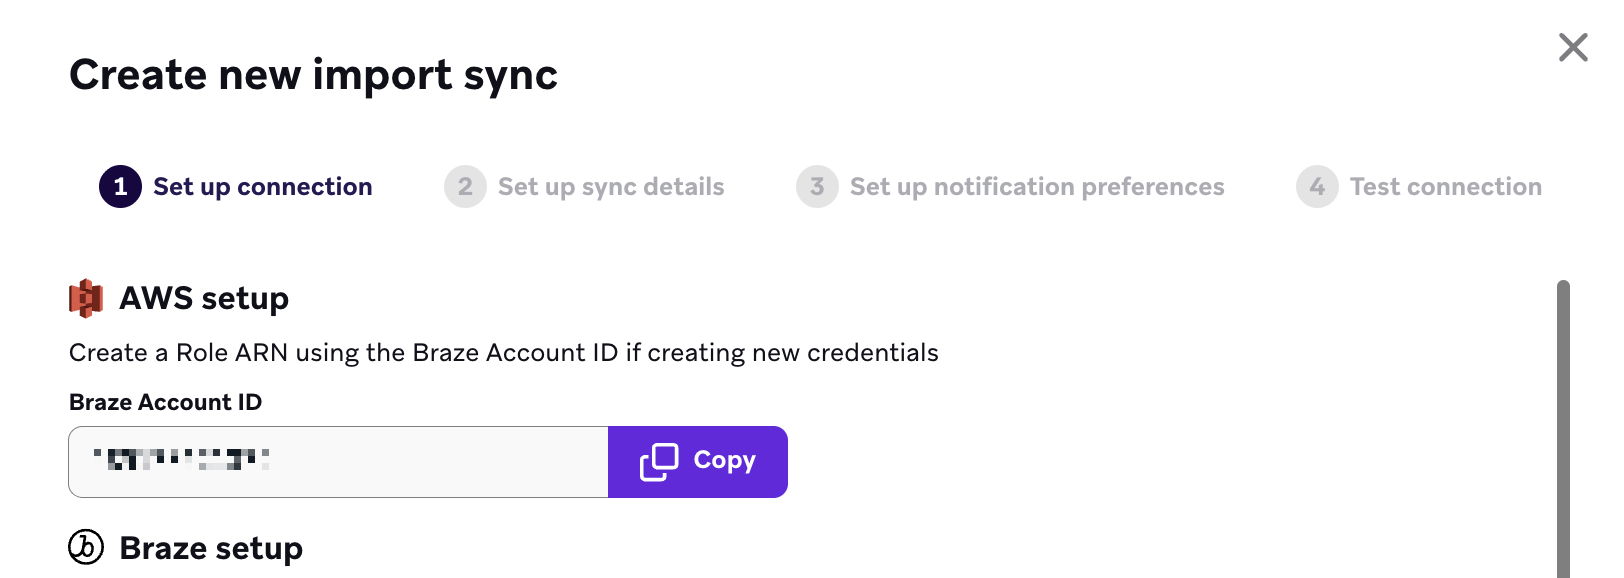
- In AWS, paste the account ID and then select Next.
- Attach the policy created in step 4 to the role. Search for the policy in the search bar, and select a checkmark next to the policy to attach it. Select Next when complete.
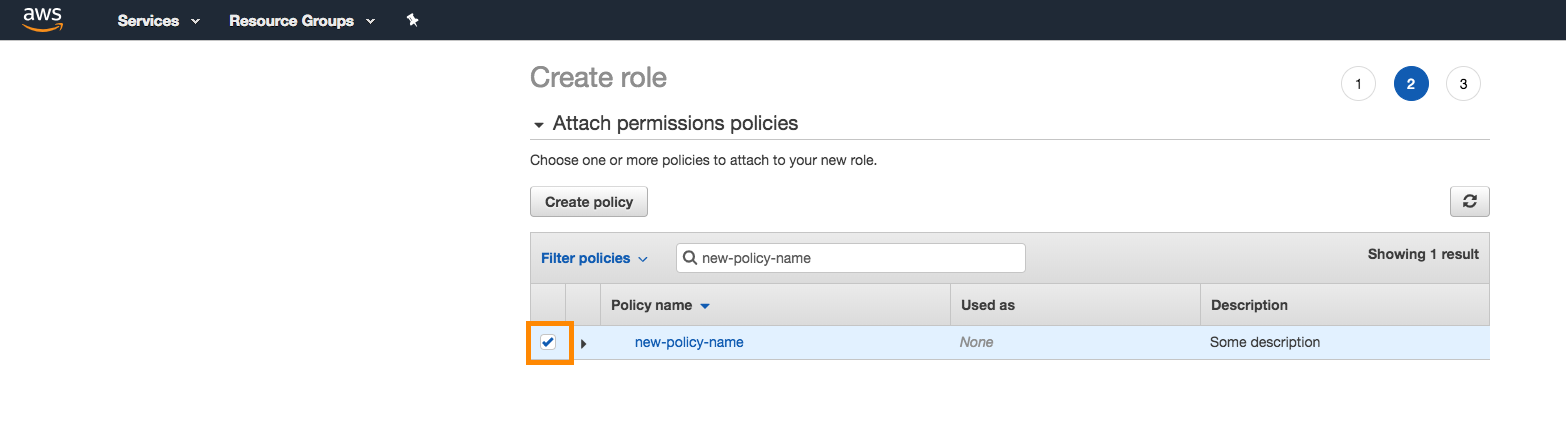
Give the role a name and a description, and select Create Role.
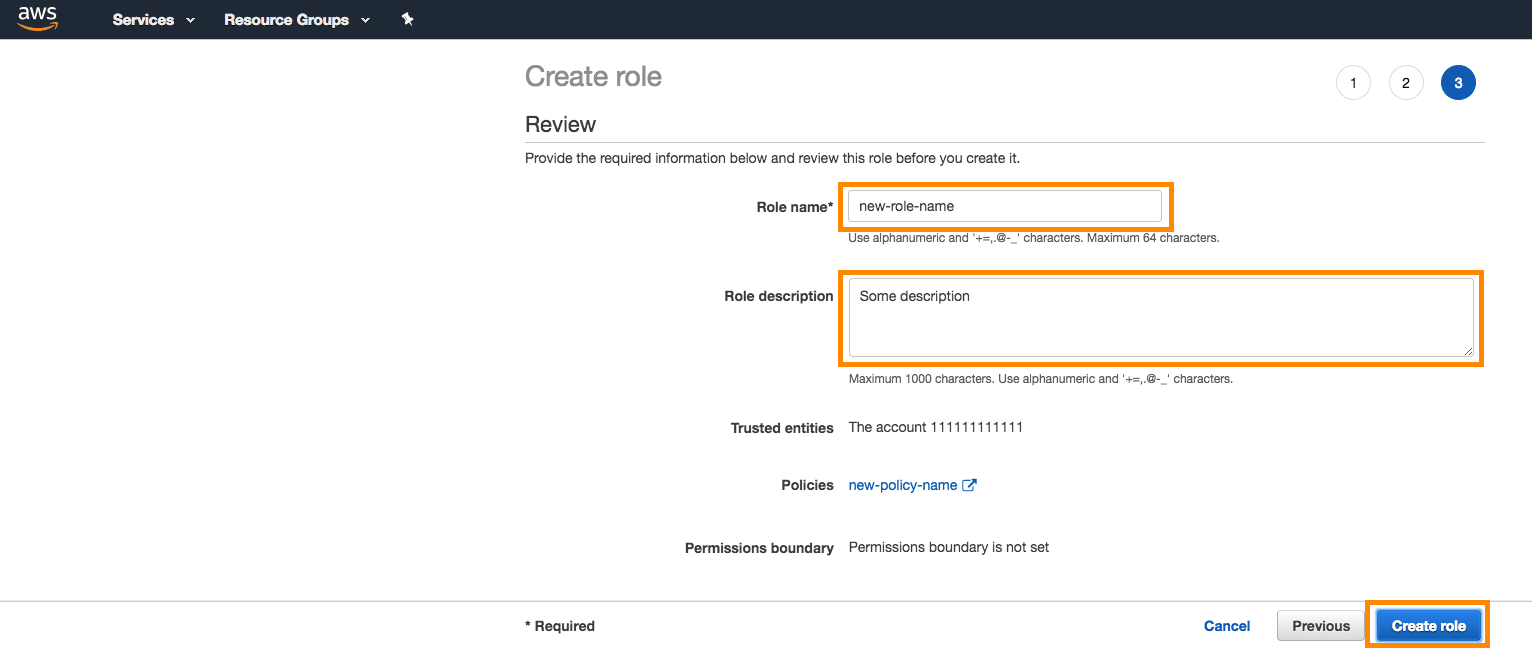
- Take note of the ARN of the role you created and the external ID you generated, because you need them to create the Cloud Data Ingestion integration.
Setting up Cloud Data Ingestion in Braze
- First, create a new source in the Braze dashboard. Go to Data Settings > Cloud Data Ingestion > Sources, select Add data source, and then select Amazon S3.
- Choose a name for your source and input the information from the AWS setup process to create a new source. Specify the following:
- Role ARN
- External ID
- Bucket name
- Region
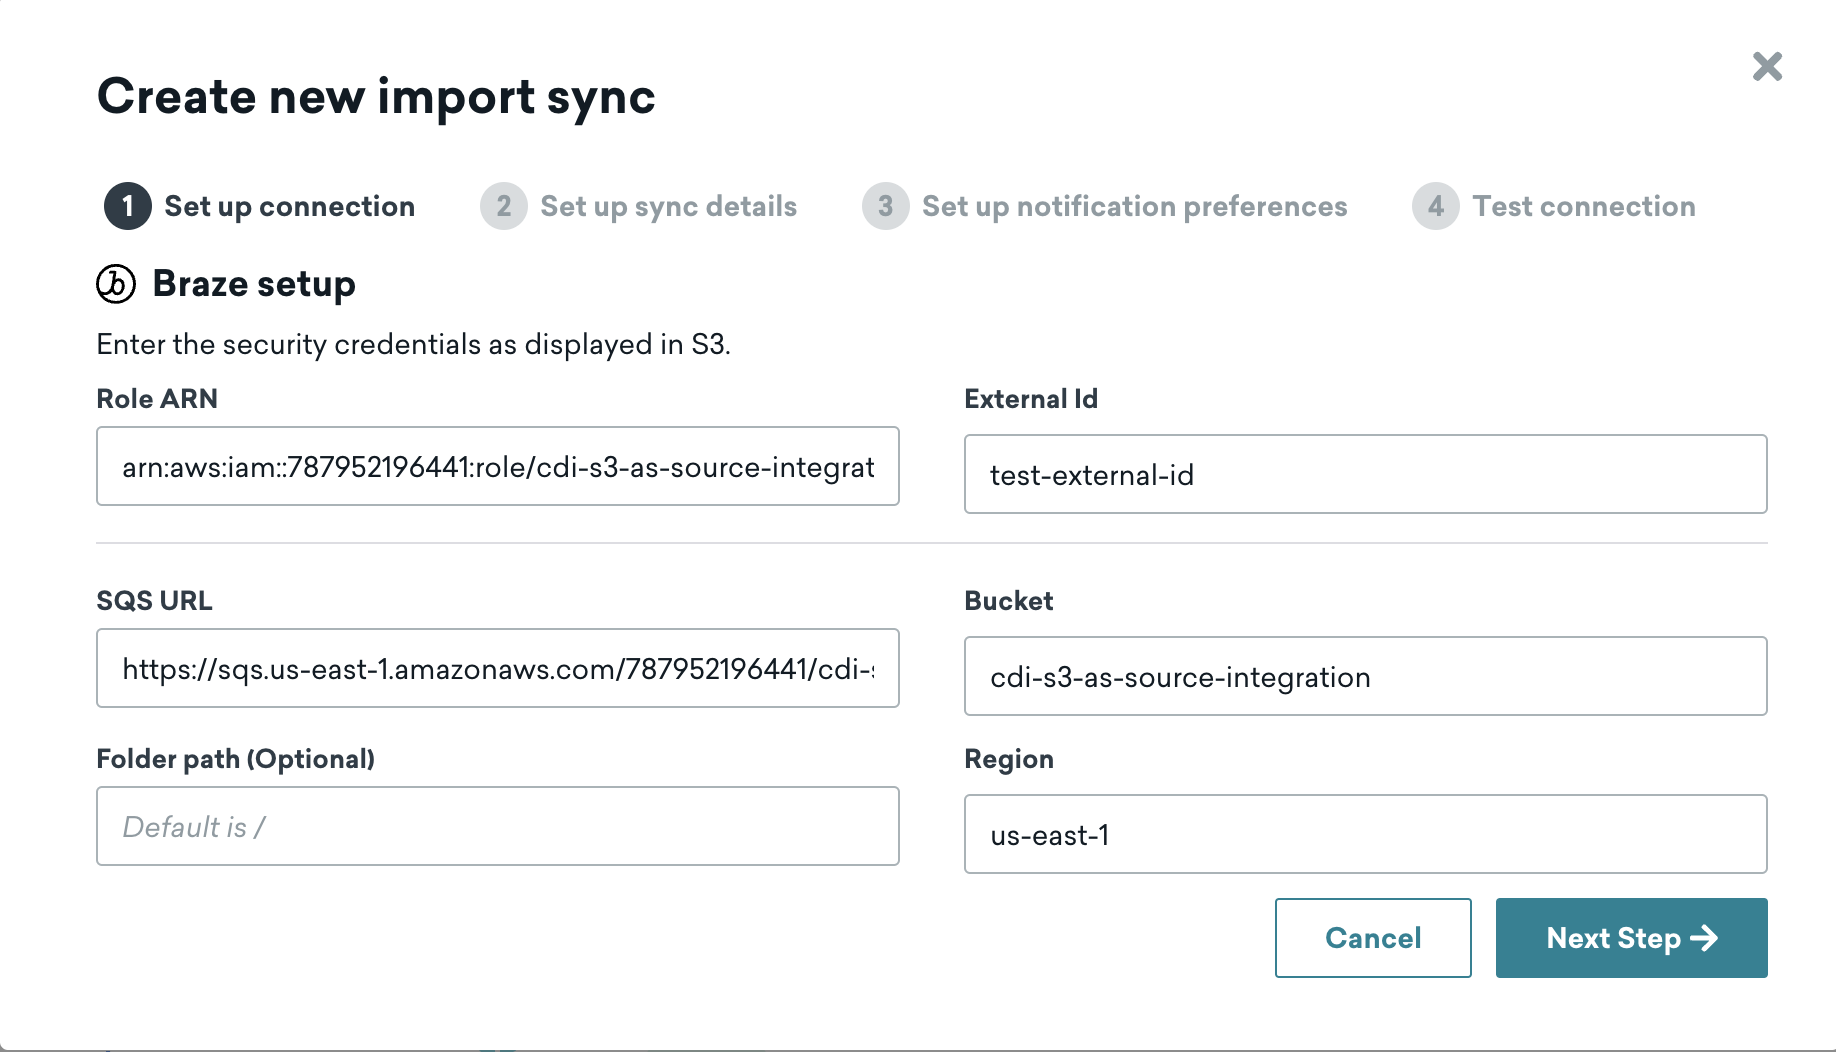
- Select Test connection to confirm Braze can access your bucket. After a successful test, select Connect to Source. If the connection fails, an error message appears to help troubleshoot the issue.
- Next, create a new sync. Go to Data Settings > Cloud Data Ingestion > Syncs and select Create data sync.
- Choose a name for your sync. Then, select any active S3 source and input your source table for the sync. Select a data type and select Test Connection.
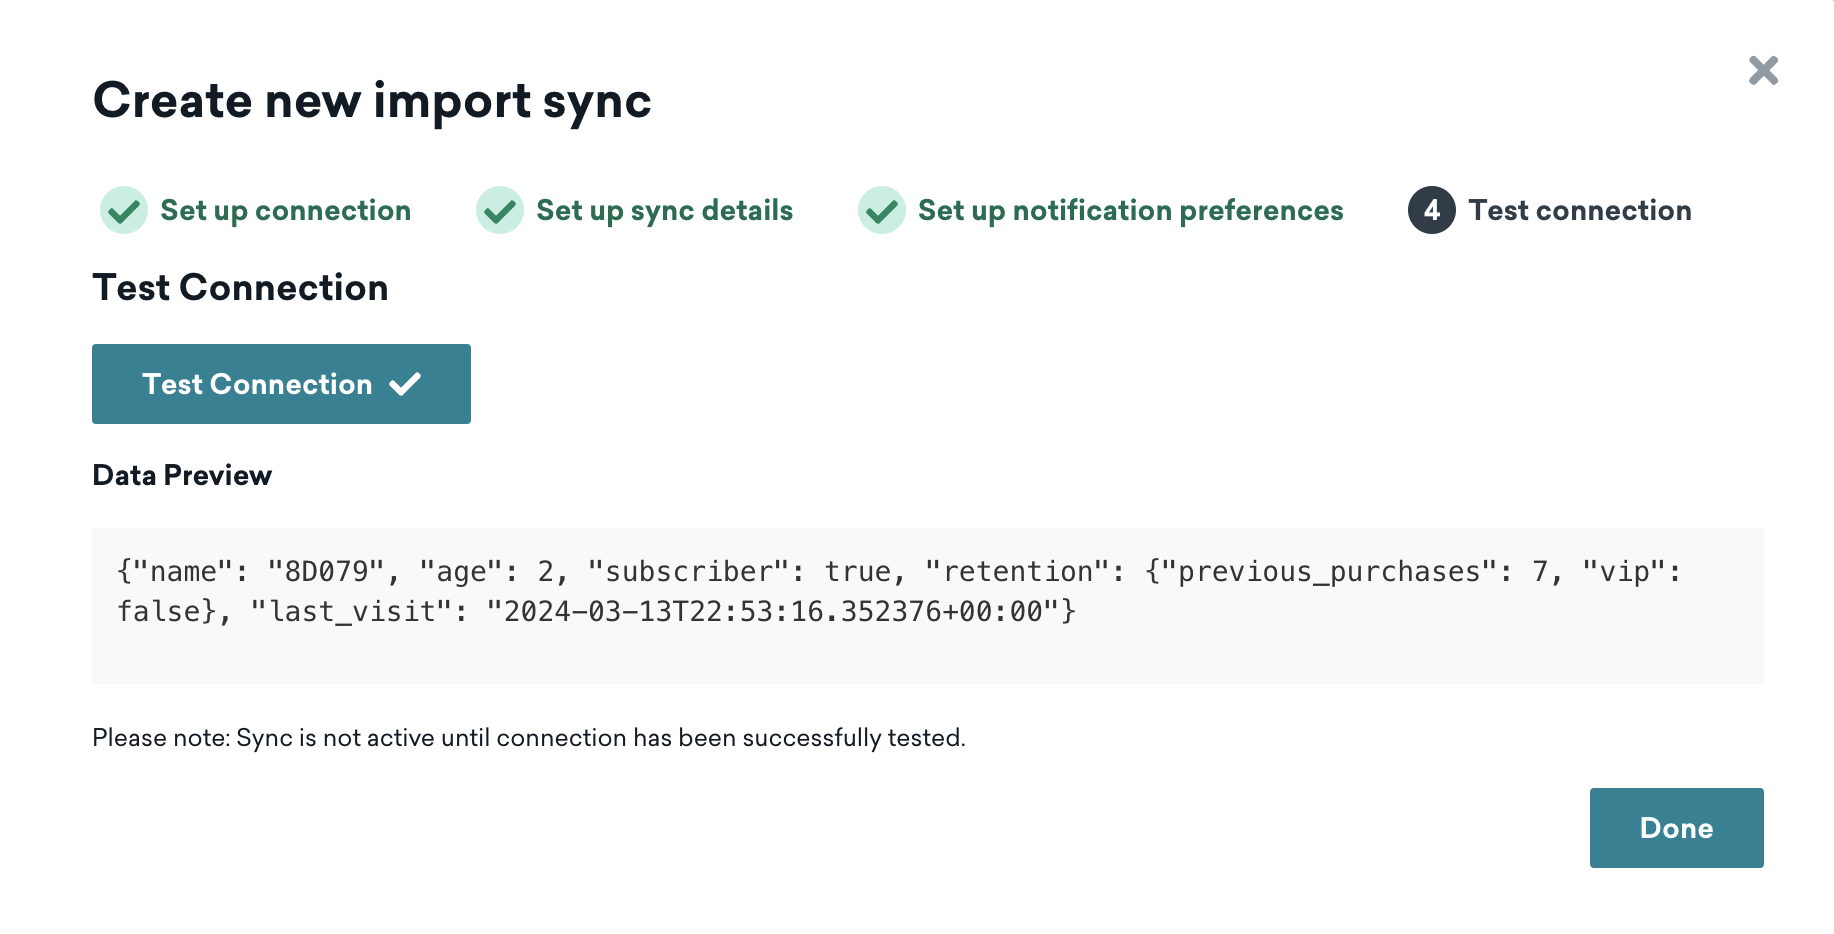
- Input the remaining information from the AWS setup process. Specify the following:
- SQS URL (must be unique for each new integration)
- Folder path (optional, must be unique across syncs in a workspace)
- Select a data type and select Test Connection to confirm Braze can list the files available to ingest (not the data inside those files). Once successful, select Next: Notifications.
- Add contact email addresses for notifications if the sync breaks because of access or permissions issues. Optionally, turn on notifications for user-level errors and sync successes.
- Create the sync.
The integration requires the following resources:
- A Cloud Storage bucket for data storage
- A Pub/Sub topic and subscription for new file notifications
- A service account that Braze accesses through Workload Identity Federation or a JSON key you upload to Braze
GCP definitions
| Term | Definition |
|---|---|
| Google Cloud project | A project organizes all your Google Cloud resources and is identified by a unique project ID and project number. |
| Cloud Storage bucket | A bucket is the container that holds the data files you want Braze to ingest. |
| Pub/Sub topic | A topic is the named resource that receives new-file notifications from your Cloud Storage bucket. |
| Pub/Sub subscription | A subscription attaches to a topic and delivers its messages. Braze consumes new-file notifications from a pull subscription. |
| Service account | A service account is a non-human identity that Braze uses to access your bucket and subscription. Braze impersonates it through Workload Identity Federation, or uses a JSON key you upload. |
| Workload Identity Federation | Workload Identity Federation (WIF) lets Braze impersonate your service account with a short-lived identity, so you don’t create or upload a key. |
| IAM role | An Identity and Access Management (IAM) role is a collection of permissions that you assign to the service account on your bucket and subscription. |
Setting up Cloud Data Ingestion in Google Cloud
Step 1: Create a Cloud Storage bucket
In the Google Cloud console, go to Cloud Storage > Buckets > Create. Note the project ID and the bucket name. You’ll need them when you configure the source in Braze. We recommend enabling uniform bucket-level access so that permissions are managed with IAM.
Alternatively, create the bucket with gcloud:
gcloud storage buckets create gs://YOUR-BUCKET-NAME \
--project=YOUR-PROJECT-ID \
--location=YOUR-REGION \
--uniform-bucket-level-access
Step 2: Create a Pub/Sub topic and subscription
In the Google Cloud console, go to Pub/Sub > Topics > Create topic. You can let Google create a default subscription, or create one separately. Then, create a pull subscription on that topic.
Alternatively, use gcloud:
gcloud pubsub topics create YOUR-TOPIC --project=YOUR-PROJECT-ID
gcloud pubsub subscriptions create YOUR-SUBSCRIPTION \
--topic=YOUR-TOPIC --project=YOUR-PROJECT-ID --ack-deadline=60
Note the subscription ID. Braze needs the subscription (not the topic) when you create the sync. The subscription must be a pull subscription.

Don’t configure a dead-letter queue on this subscription. Braze doesn’t support dead-letter queues for Cloud Data Ingestion subscriptions. To learn more, see Dead-letter topics in the Google Cloud documentation.
Step 3: Send bucket notifications to the topic
Creating a Cloud Storage to Pub/Sub notification isn’t available in the Google Cloud console. You must use gcloud (shown here), Terraform, or the JSON API. To learn more, see Configure Pub/Sub notifications for Cloud Storage in the Google Cloud documentation.
First, assign the Cloud Storage service agent permission to publish to the topic, then create the notification for OBJECT_FINALIZE. The OBJECT_FINALIZE event fires whenever a new object is created or finalized in the bucket.
# Get the Cloud Storage service agent for your project
gcloud storage service-agent --project=YOUR-PROJECT-ID
# Assign it Pub/Sub Publisher on the topic
gcloud pubsub topics add-iam-policy-binding YOUR-TOPIC \
--project=YOUR-PROJECT-ID \
--member="serviceAccount:service-YOUR-PROJECT-NUMBER@gs-project-accounts.iam.gserviceaccount.com" \
--role="roles/pubsub.publisher"
# Create the OBJECT_FINALIZE notification (optionally scope to a folder with --object-prefix)
gcloud storage buckets notifications create gs://YOUR-BUCKET-NAME \
--topic=YOUR-TOPIC \
--event-types=OBJECT_FINALIZE \
--payload-format=json
Replace the following placeholders in these commands:
YOUR-PROJECT-ID: Your Google Cloud project ID, the human-readable identifier (for example,my-gcp-project).YOUR-TOPIC: The Pub/Sub topic you created in Step 2.YOUR-BUCKET-NAME: Your Cloud Storage bucket name.YOUR-PROJECT-NUMBER: Your project number, the numeric identifier used in the Cloud Storage service agent’s email address. This is different from the project ID. Find it on the Dashboard in the Google Cloud console, or run the following command:
gcloud projects describe YOUR-PROJECT-ID --format="value(projectNumber)"
Step 4: Create a service account
In the Google Cloud console, go to IAM & Admin > Service Accounts > Create service account.
Alternatively, use gcloud:
gcloud iam service-accounts create braze-cdi-gcs \
--project=YOUR-PROJECT-ID \
--display-name="Braze CDI GCS"
Step 5: Assign permissions
The connector needs exactly these permissions: storage.buckets.get, storage.objects.get, and storage.objects.list on the bucket, and pubsub.subscriptions.consume on the subscription. You can assign them with either a custom role or predefined roles.
Custom role: Create a custom role with exactly those permissions and bind it to the bucket and the subscription:
gcloud iam roles create brazeCdiGcs --project=YOUR-PROJECT-ID \
--title="Braze CDI GCS" \
--permissions=storage.buckets.get,storage.objects.get,storage.objects.list,pubsub.subscriptions.consume \
--stage=GA
gcloud storage buckets add-iam-policy-binding gs://YOUR-BUCKET-NAME \
--member="serviceAccount:[email protected]" \
--role="projects/YOUR-PROJECT-ID/roles/brazeCdiGcs"
gcloud pubsub subscriptions add-iam-policy-binding YOUR-SUBSCRIPTION \
--project=YOUR-PROJECT-ID \
--member="serviceAccount:[email protected]" \
--role="projects/YOUR-PROJECT-ID/roles/brazeCdiGcs"
Predefined roles: Assign roles/storage.objectViewer and roles/storage.legacyBucketReader on the bucket, and roles/pubsub.subscriber on the subscription. The objectViewer role provides storage.objects.get and storage.objects.list, and legacyBucketReader provides storage.buckets.get:
gcloud storage buckets add-iam-policy-binding gs://YOUR-BUCKET-NAME \
--member="serviceAccount:[email protected]" \
--role="roles/storage.objectViewer"
gcloud storage buckets add-iam-policy-binding gs://YOUR-BUCKET-NAME \
--member="serviceAccount:[email protected]" \
--role="roles/storage.legacyBucketReader"
gcloud pubsub subscriptions add-iam-policy-binding YOUR-SUBSCRIPTION \
--project=YOUR-PROJECT-ID \
--member="serviceAccount:[email protected]" \
--role="roles/pubsub.subscriber"
Step 6: Set up authentication
Braze can access the service account with Workload Identity Federation or a service account key. Existing service account key credentials keep working, and you don’t need to migrate them. One Workload Identity Federation credential can serve both Google Cloud Storage and BigQuery sources.
Set up a workload identity pool and provider, and bind the Braze principal to the service account from Step 4. For steps, see Configuring Google Cloud for Workload Identity Federation. Use the service account you created in Step 4, and skip the guide’s service account creation step.
If you’ve already set up Workload Identity Federation for another Google Cloud Storage or BigQuery source, you don’t need to repeat it. Grant the existing service account the permissions in Step 5.
In the Google Cloud console, open the service account, go to Keys > Add key > Create new key, and select JSON.
Alternatively, use gcloud:
gcloud iam service-accounts keys create braze-cdi-gcs-key.json \
--iam-account=[email protected]
Setting up Cloud Data Ingestion in Braze
- In Braze, go to Data Settings > Cloud Data Ingestion > Sources, select Add data source, and then select Google Cloud Storage.
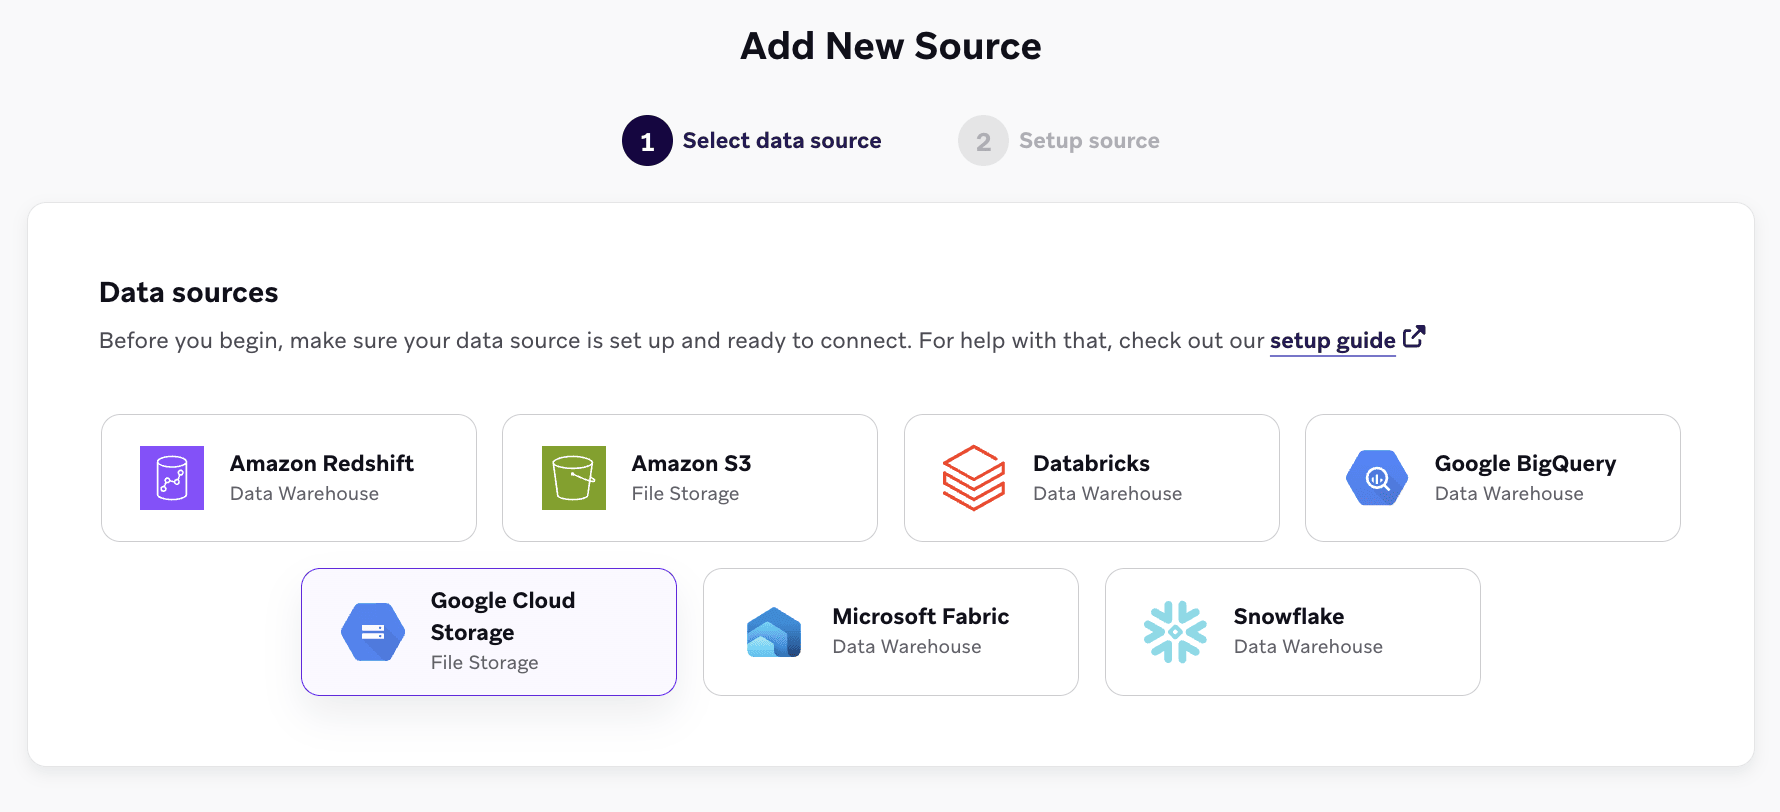
- Complete the source fields:
- Bucket: your bucket name
- Project ID: your GCP project ID
- Credential: give the credential a name and select the authentication method from step 6. For Workload Identity Federation, enter the Project number, Workload identity pool ID, Provider ID, and Service account email. For Service Account Key, upload the JSON key file.
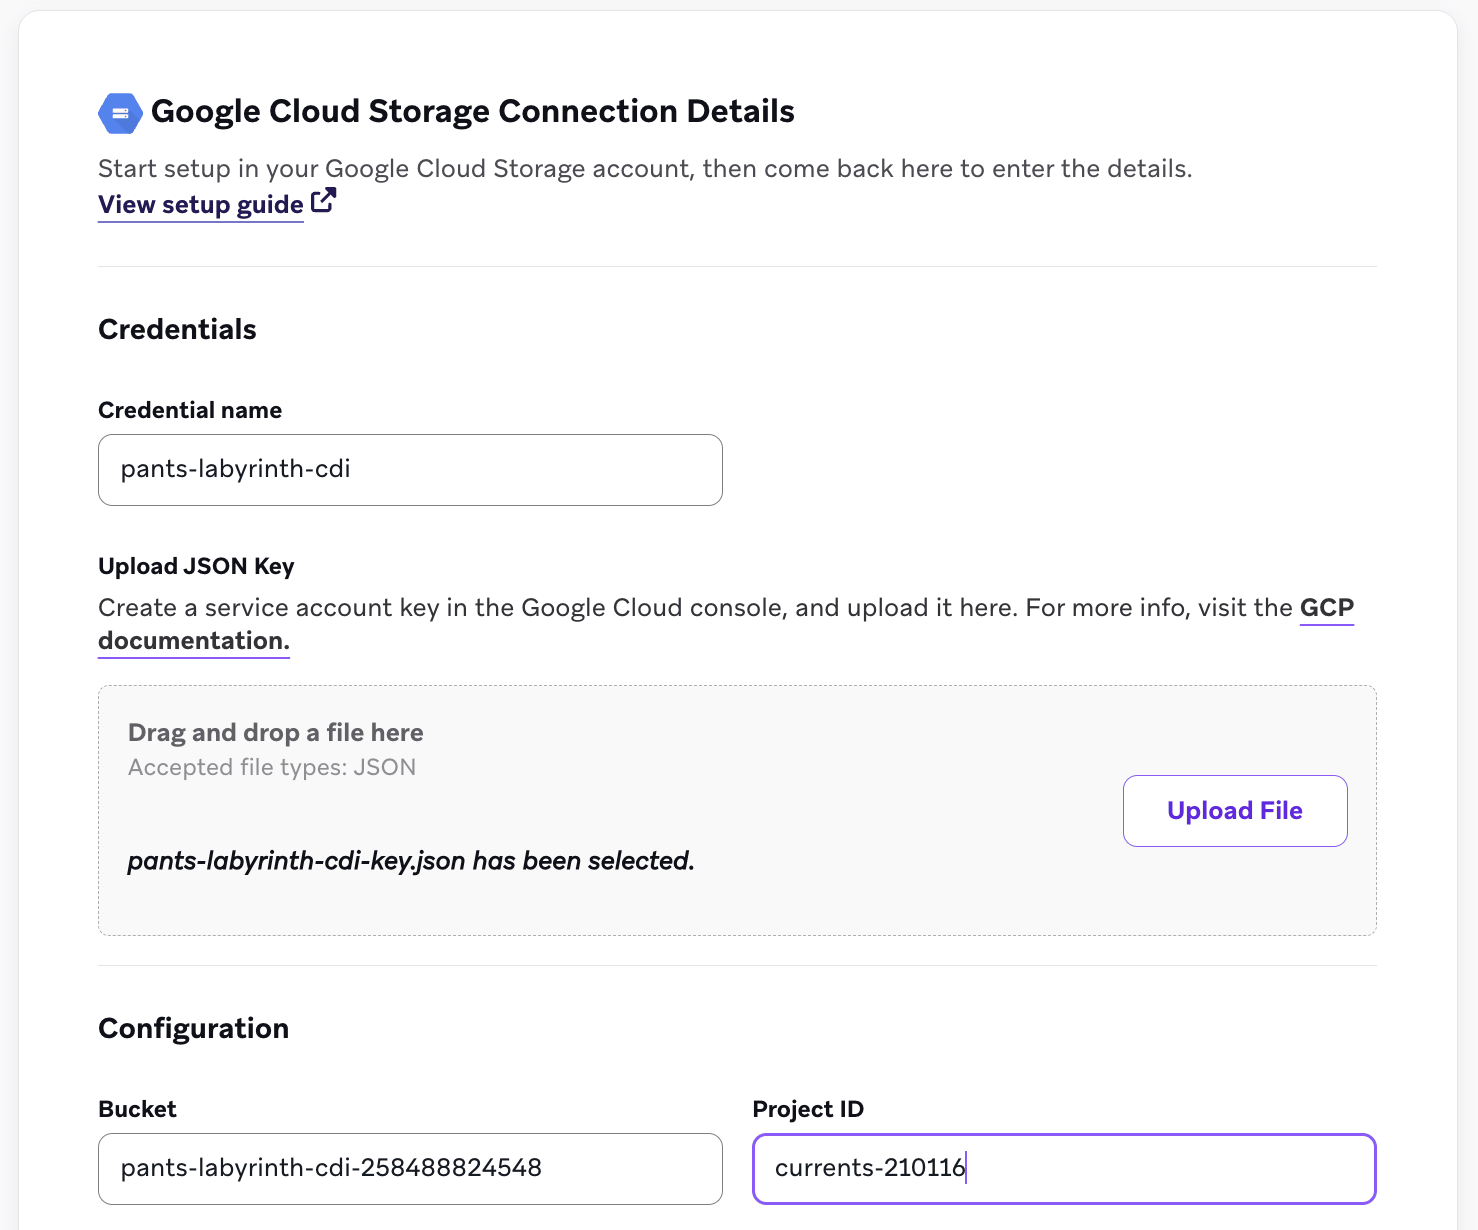
- Select Test connection, then select Connect to Source.
- Create a sync. Go to Data Settings > Cloud Data Ingestion > Syncs and select Create data sync. Choose a sync name and a Data Type (such as User Attributes, Custom Events, Purchase Events, Catalog, or Delete Users), then select Next.
- On the Data definition step, select your GCS source, then specify the following:
- Pub/Sub subscription ID: the subscription ID from step 2 (not the topic)
- Folder path (optional): a path prefix within the bucket (see Syncing a folder in a shared bucket)
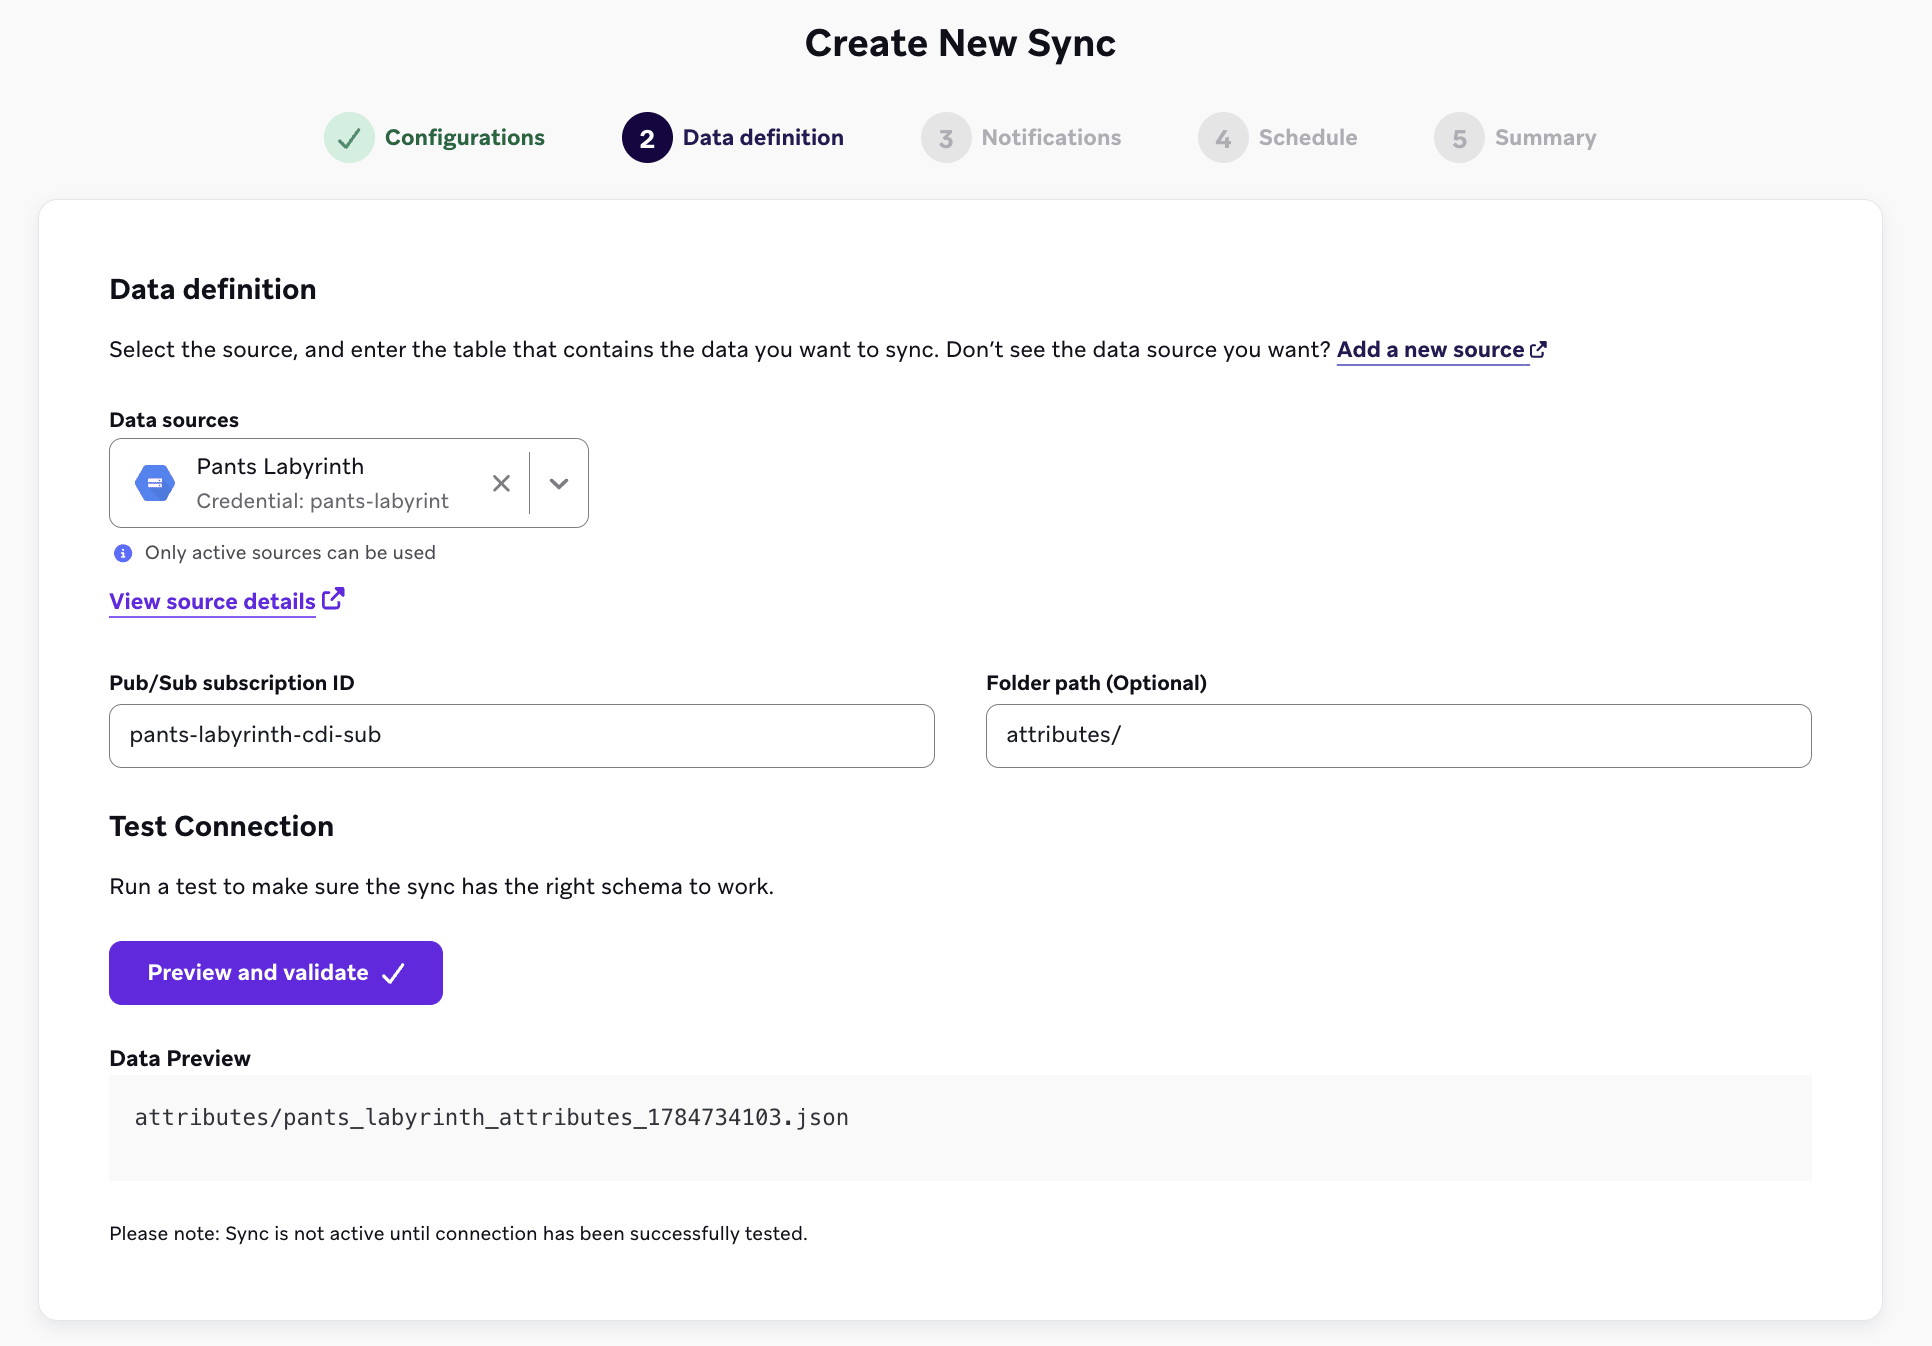
- Select Preview and validate to confirm Braze can reach the subscription and list the files available to ingest. A successful test lists existing files in the bucket, but those files aren’t synced automatically.
- Add contact email addresses for error notifications. Google Cloud Storage syncs are event-driven, so no schedule is required. Braze ingests new files as they’re uploaded. Review the summary, then select Create sync.
Syncing a folder in a shared bucket
You can reuse one bucket across multiple syncs, but each sync must target a distinct folder and have its own dedicated Pub/Sub subscription.
The folder path and the subscription must both be unique across syncs in a workspace for multiple syncs sharing the same source bucket. As in Step 2, don’t configure a dead-letter queue on any of these subscriptions.
For each folder you want to sync in a shared bucket:
- Set the sync’s Folder field to the path prefix (for example,
attributes/). Braze only lists and ingests objects whose path starts with that prefix. -
Create a dedicated topic and a prefix-scoped notification for that folder, then create a subscription on that topic:
# One topic per folder gcloud pubsub topics create YOUR-ATTRIBUTES-TOPIC --project=YOUR-PROJECT-ID # Assign the Cloud Storage service agent publisher on the topic gcloud pubsub topics add-iam-policy-binding YOUR-ATTRIBUTES-TOPIC \ --project=YOUR-PROJECT-ID \ --member="serviceAccount:service-YOUR-PROJECT-NUMBER@gs-project-accounts.iam.gserviceaccount.com" \ --role="roles/pubsub.publisher" # Notification scoped to the folder with --object-prefix gcloud storage buckets notifications create gs://YOUR-BUCKET-NAME \ --topic=YOUR-ATTRIBUTES-TOPIC --event-types=OBJECT_FINALIZE \ --payload-format=json --object-prefix=attributes/ # One subscription per sync gcloud pubsub subscriptions create YOUR-ATTRIBUTES-SUBSCRIPTION \ --topic=YOUR-ATTRIBUTES-TOPIC --project=YOUR-PROJECT-ID --ack-deadline=60
-
Assign the Braze service account consume permission on that subscription, as in Step 5:
gcloud pubsub subscriptions add-iam-policy-binding YOUR-ATTRIBUTES-SUBSCRIPTION \ --project=YOUR-PROJECT-ID \ --member="serviceAccount:[email protected]" \ --role="roles/pubsub.subscriber"
If you created the custom role in Step 5, use
--role="projects/YOUR-PROJECT-ID/roles/brazeCdiGcs"instead. - When you create the sync in Braze, enter this folder’s new Pub/Sub subscription ID and Folder path so the sync ingests only that folder’s files.
The integration requires the following resources:
- A storage account with a blob container for data storage
- An Azure Storage queue and an event subscription for new file notifications
- A Microsoft Entra ID service principal that CDI uses to read the container and the queue
Azure definitions
| Term | Definition |
|---|---|
| Storage account | A storage account is the top-level Azure resource that holds both the container CDI reads files from and the queue CDI reads notifications from. |
| Container | A container holds the data files you want CDI to ingest. Containers live inside a storage account. |
| Azure Storage queue | A queue receives new-file notifications from your container. CDI reads and acknowledges messages from this queue to know which files to ingest. |
| Event subscription | An event subscription routes events from your storage account to a destination, using the Azure Event Grid service. You configure it to send Blob Created events to your queue. |
| System topic | A system topic represents the source of the events. Event Grid creates one for your storage account when you add the first event subscription. |
| Service principal | A service principal is a Microsoft Entra ID identity that CDI authenticates as. You create it through an app registration and enter its credentials in Braze. |
| Azure role assignment | A role assignment grants a service principal a set of permissions at a given scope. You assign three built-in roles to the Braze service principal on your storage account. |
Setting up Cloud Data Ingestion in Azure
Step 1: Create a container
The container and the queue must live in the same storage account. You can reuse an existing storage account. If you don’t have one yet, go to Storage accounts > + Create in the Azure portal to create it.
- In the Azure portal, go to your storage account, then go to Data storage > Containers.
- Select + Add container and give it a name.
Note the storage account name and the container name. You’ll need both when you configure the source in Braze.
Step 2: Create a queue
- In the same storage account, go to Data storage > Queues.
- Select + Queue and give it a name.
Note the queue name. You’ll need it when you create the sync, and each sync needs its own queue.
Step 3: Create an event subscription
Create an event subscription so that your container tells the queue whenever a file arrives.
- In the same storage account, go to Events, then select + Event Subscription.
- Under Event Subscription Details, enter a Name, and set Event Schema to Event Grid Schema.
- Under Topic Details, review the System Topic Name. If your storage account doesn’t have a system topic yet, enter a name to create one. If it already has one, the field shows that name and can’t be changed. All event subscriptions on a storage account use the same system topic.
- Under Event Types, set Filter to Event Types to Blob Created only. Blob Deleted is also selected by default, so clear it.
- Under Endpoint Details, set Endpoint Type to Storage Queue. The Configure an endpoint link appears after you choose an endpoint type.
- Select Configure an endpoint, then choose the storage account you’re working in.
- Select Select existing queue, then choose the queue you created in step 2.
- Select Select to confirm the endpoint.
- Select Create.
Step 4: Create a service principal
CDI connects to your storage account using a service principal with Microsoft Entra ID authentication. Braze needs the following details to connect:
- Tenant ID (also called directory) for your Azure account
- Principal ID (also called application ID) for the service principal
- Client secret for Braze to authenticate
Registering an application requires permission to create app registrations in Microsoft Entra ID. If you don’t have it, ask an Entra administrator to complete this step and share the credentials with you.
- In the Azure portal, navigate to the Microsoft Entra admin center, and then App Registrations.
- Select + New registration under Identity > Applications > App registrations
- Enter a name, and select
Accounts in this organizational directory onlyas the supported account type. Then, select Register. - Select the application (service principal) you just created, then navigate to Certificates & secrets > + New client secret
- Enter a description for the secret, and set an expiry period for the secret. Then, select Add.
- Note the client secret created to use in the Braze setup.
Azure doesn’t allow unlimited expiry on service principal secrets. Remember to refresh the credentials before they expire to maintain the flow of data to Braze.
We recommend creating a service principal that’s used only for CDI, so its access stays limited to the container and queue you’re syncing. If you already have one set up for a Microsoft Fabric source, you can reuse it, but it then has access to both. Either way, it needs the role assignments in the next step.
Step 5: Assign permissions to the service principal
CDI needs only enough access to read your files and process queue messages. Assign these three built-in roles on the storage account itself, not at the subscription or resource group, because role assignments inherit downward. Don’t assign broader roles such as Storage Blob Data Contributor, Storage Account Contributor, or Owner, which grant write and management permissions that CDI never uses.
- Go to your storage account, then go to Access Control (IAM).
- Select Add > Add role assignment.
- Search for the service principal you created in step 4 by name.
- Assign it the following built-in roles:
- Storage Blob Data Reader: lets CDI read the files in your container.
- Storage Queue Data Reader: lets CDI read the queue itself, so it can find the queue you named on the sync and check its properties.
- Storage Queue Data Message Processor: lets CDI peek, retrieve, and delete messages on your queue.
You can use a custom role instead, as long as it grants only read access to blobs in the container, read access to the queue, and the ability to receive and delete messages on the queue.
If Add role assignment is grayed out, your account can’t assign roles on this storage account. This requires a role such as Owner or User Access Administrator. Ask an Azure administrator to complete this step.
Setting up Cloud Data Ingestion in Braze
- In Braze, go to Data Settings > Cloud Data Ingestion > Sources, select Add data source, and then select Azure Blob.
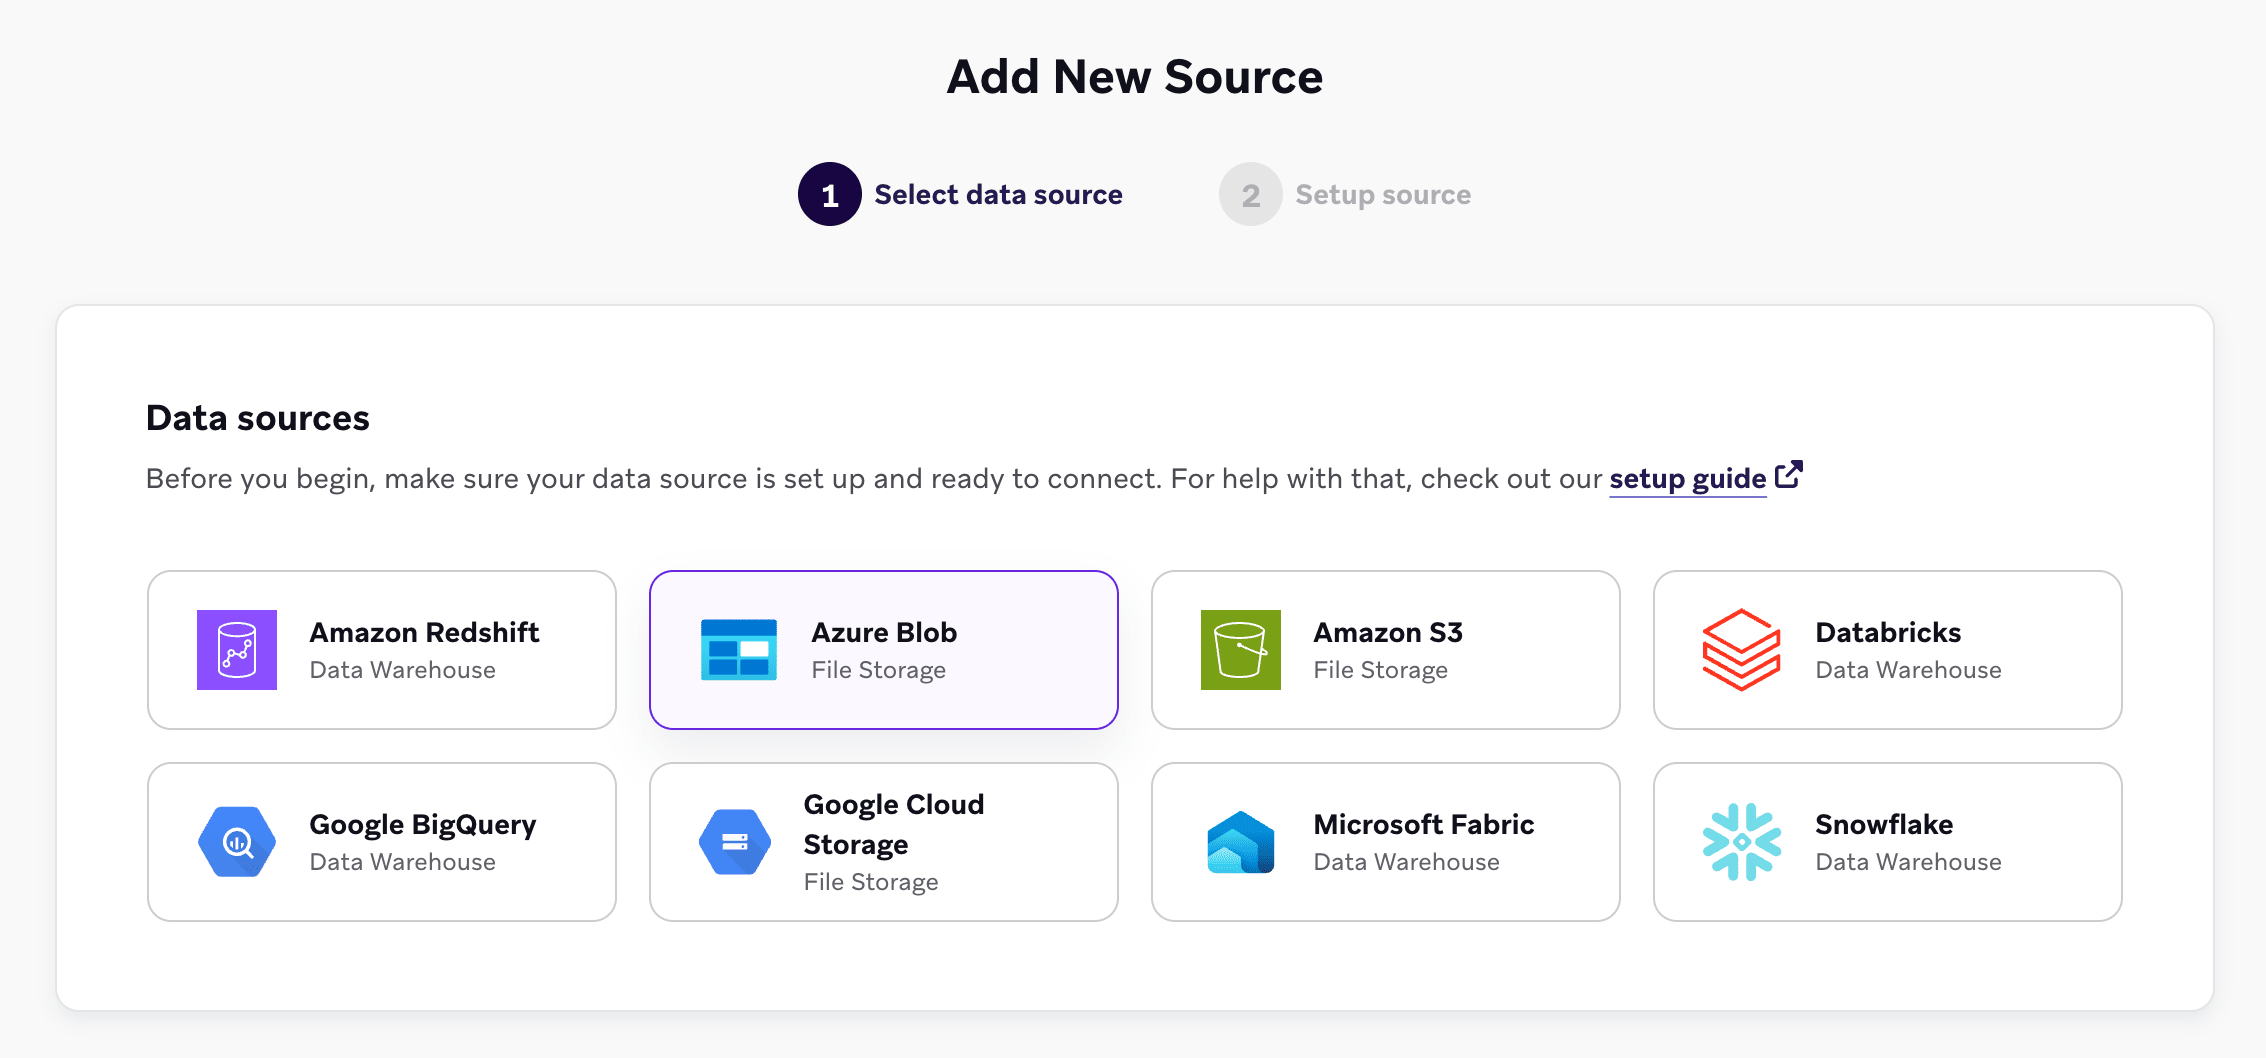
- Complete the Azure Blob Connection Details fields:
- Credentials: Tenant ID, Principal ID, and Client Secret
- Configuration: Storage account and Container
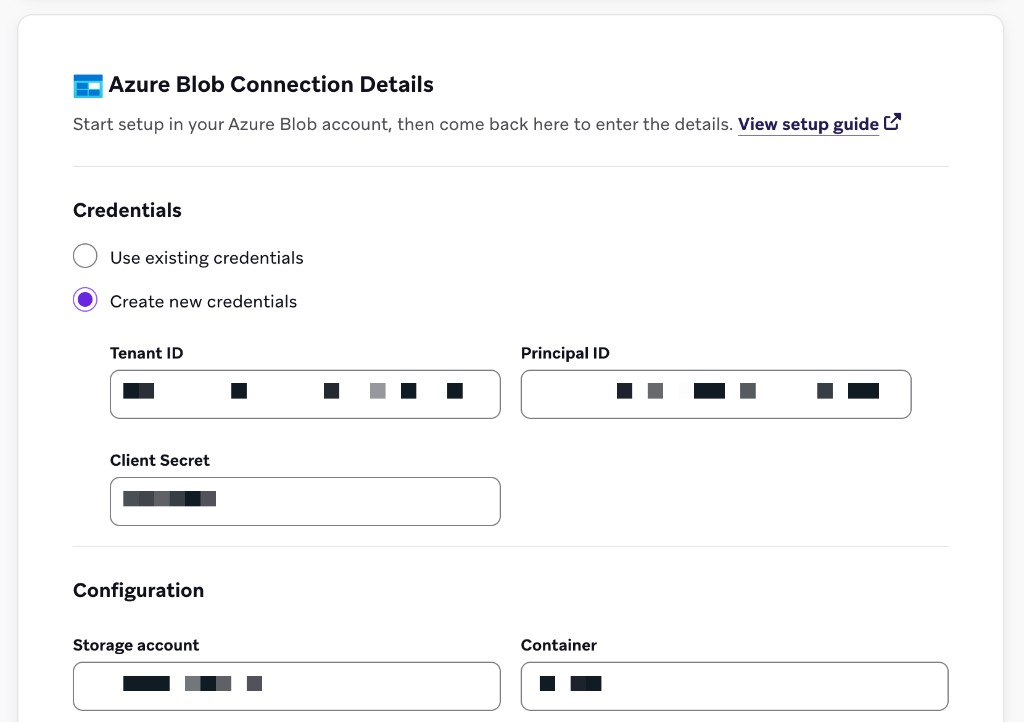
- Select Test connection, then select Connect to Source.
- Create a sync. Go to Data Settings > Cloud Data Ingestion > Syncs and select Create data sync.
- On Configurations, choose a sync name, select your Azure Blob source, and select a Data Type (such as User Attributes, Custom Events, Purchase Events, Catalog, or Delete Users).
- On Data definition, specify the following:
- Storage queue name: the queue you created in Step 2. Each sync needs its own queue (see Syncing a folder in a shared container).
- Folder path (Optional): a path prefix within the container
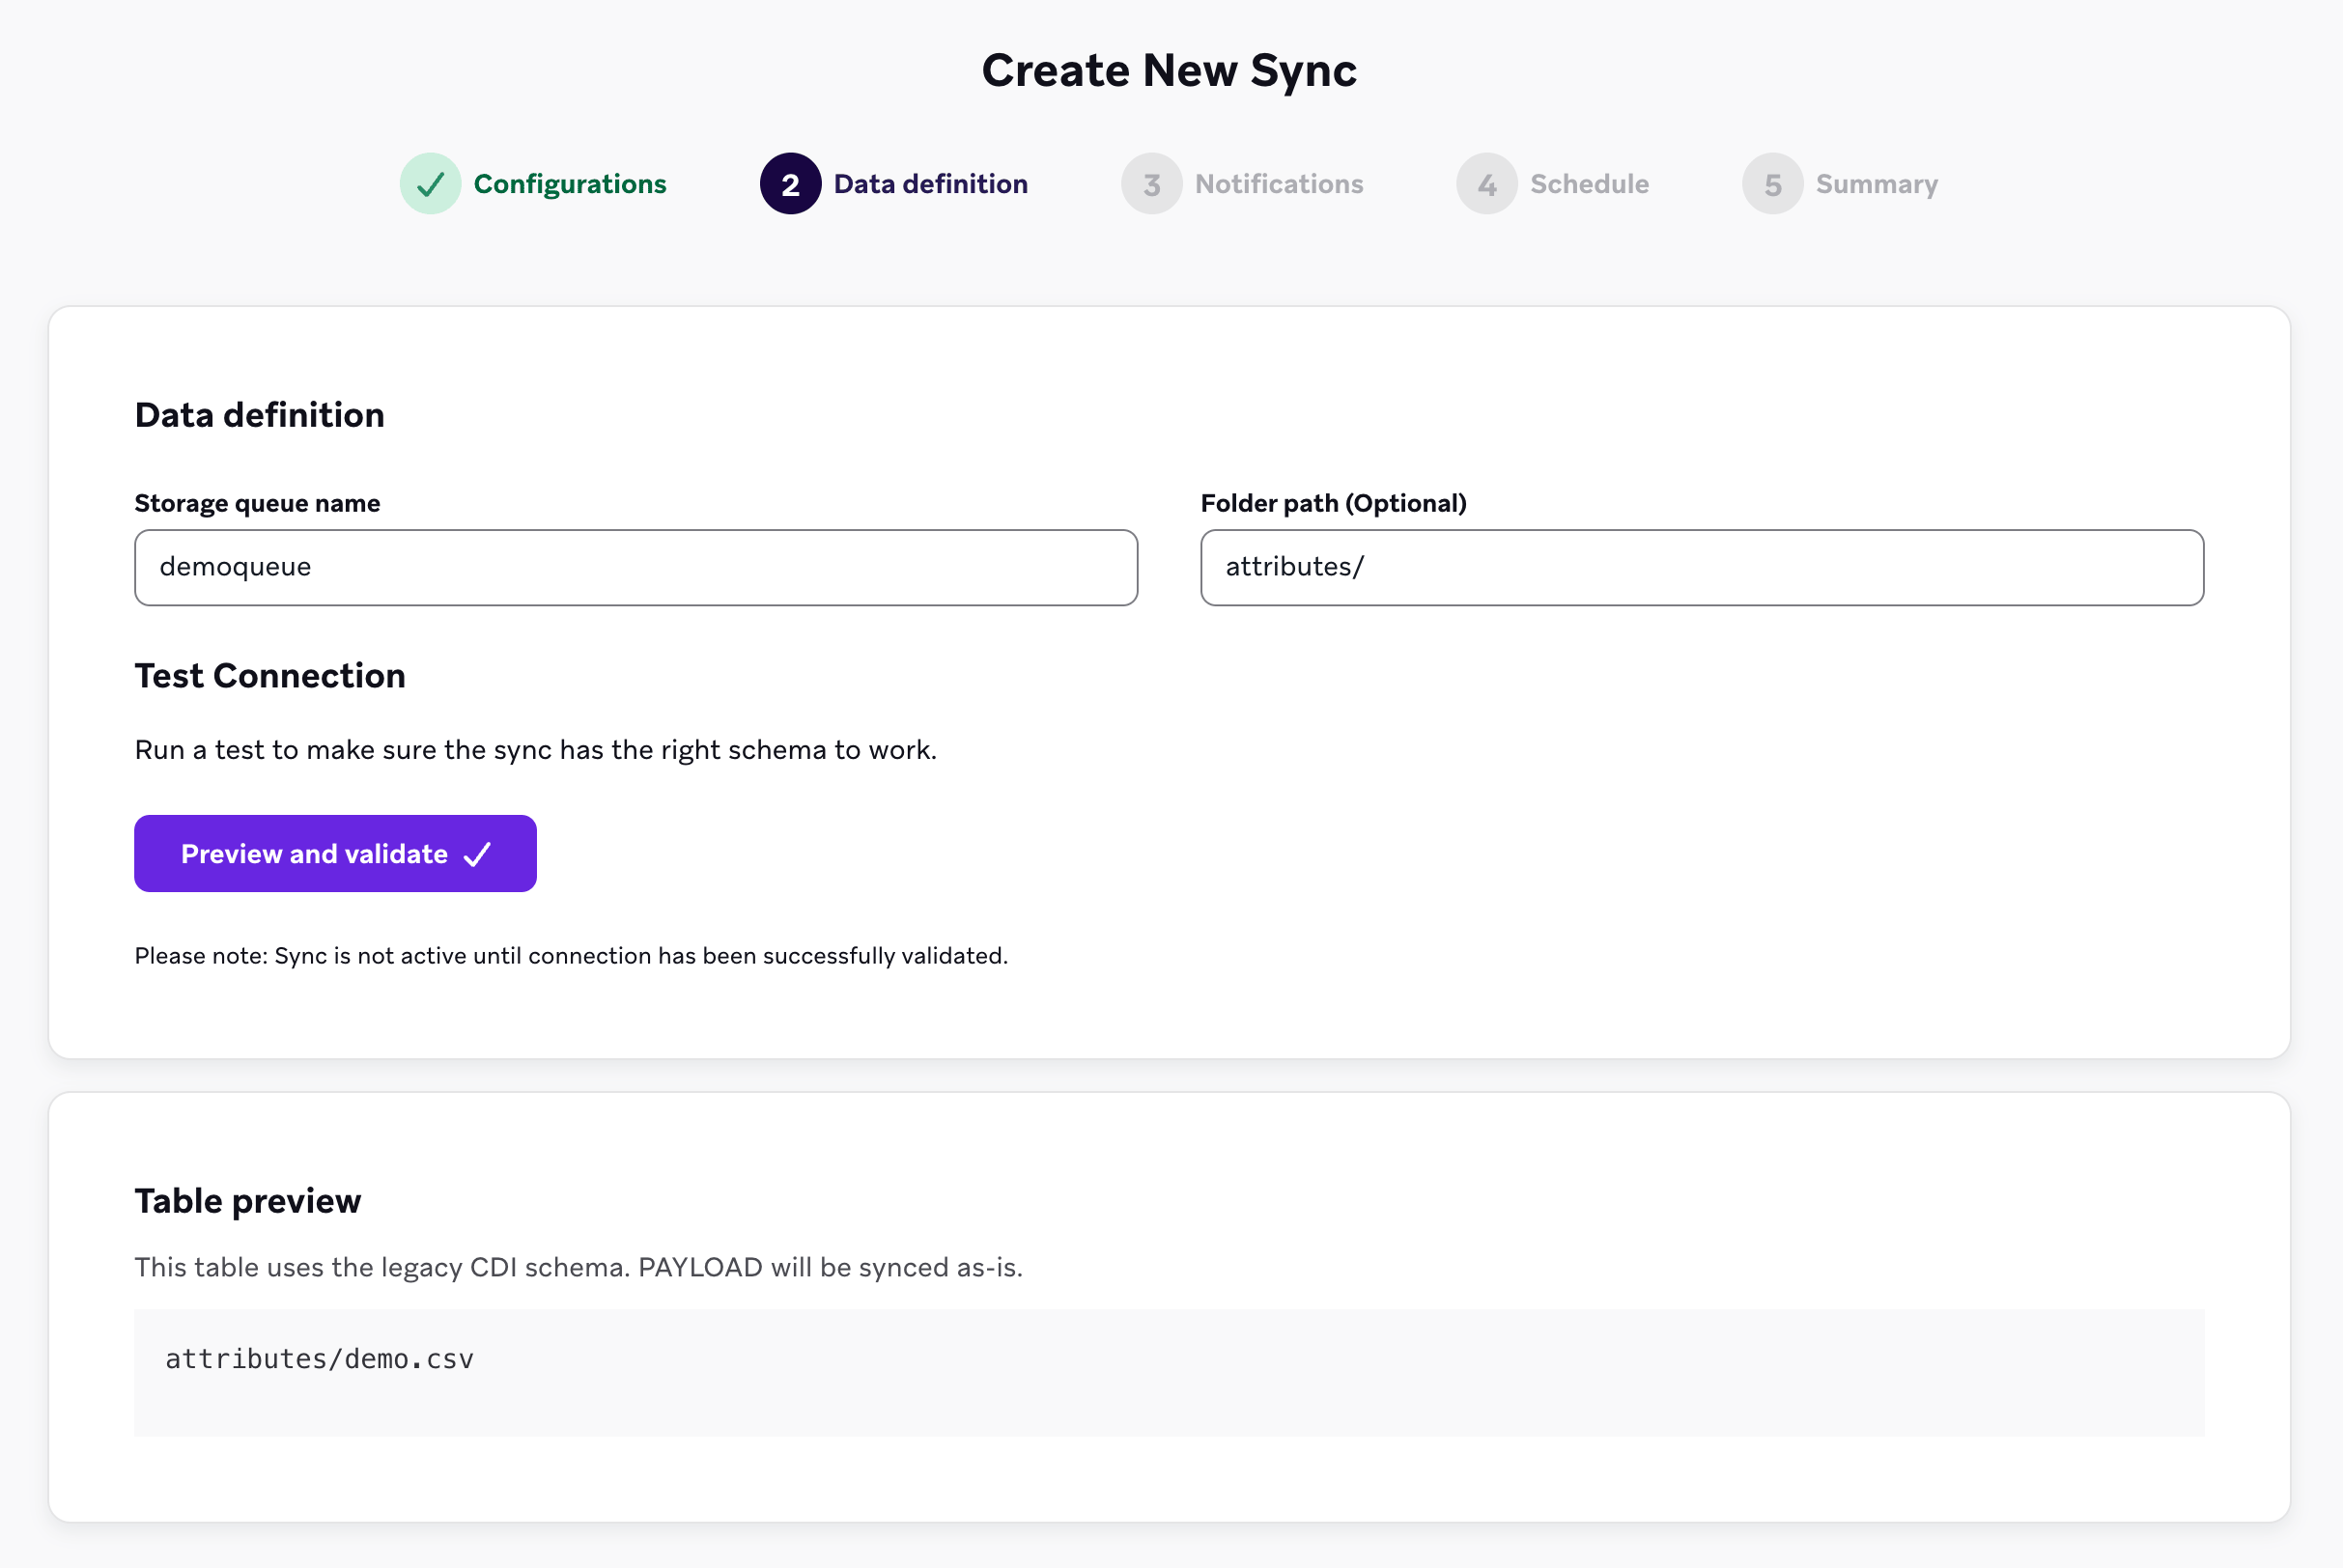
- Select Preview and validate to confirm CDI can reach the queue and list the files available to ingest. A successful test lists existing files in the container, but those files aren’t synced automatically. The sync isn’t active until the connection validates successfully.
- On Notifications, add contact email addresses for error notifications.
- Schedule has no options for file storage syncs. Azure Blob Storage syncs are event-driven, so CDI ingests new files as they’re uploaded.
- Review the Summary, then select Create sync.
Syncing a folder in a shared container
You can reuse one container across multiple syncs, but each sync needs its own storage queue and its own folder.
Two syncs can’t use the same storage queue. If you enter a queue that another sync already uses, CDI flags it and links to the existing sync.
For each folder you want to sync in a shared container:
- Create a queue for that folder, as in Step 2.
- Create an event subscription that sends the container’s Blob Created events to that queue, as in Step 3.
- When you create the sync in Braze, enter that folder’s Storage queue name and set Folder path (Optional) to the folder prefix, such as
attributes/. CDI only ingests files whose path starts with that prefix.
Required file formats
The required file formats are the same for Amazon S3, Google Cloud Storage, and Azure Blob Storage. Cloud Data Ingestion supports JSON, CSV, and Parquet files. The required columns depend on the data type:
- User data (attributes, custom events, purchase events) uses user identifiers and a payload
- Catalog data uses catalog identifiers
If you’re using file storage for catalog data, use this page with Sync and delete catalog data for catalog-specific requirements and behavior.
Braze doesn’t enforce any additional filename requirements beyond what’s enforced by your file storage provider. Filenames should be unique. Appending a timestamp helps ensure uniqueness.
For examples of all supported file types (attributes, custom events, purchases, catalogs, and user deletes), see the sample files in braze-examples.
User identifiers
For user data syncs (attributes, custom events, purchase events), each row in your source file requires exactly one user identifier and a PAYLOAD column. A source file may contain rows with different identifier types, but each individual row should only use one.
| Identifier | Description |
|---|---|
EXTERNAL_ID |
This identifies the user you want to update. This should match the external_id value used in Braze. |
ALIAS_NAME and ALIAS_LABEL |
These two columns create a user alias object. alias_name should be a unique identifier, and alias_label specifies the type of alias. Users may have multiple aliases with different labels, but only one alias_name per alias_label. |
BRAZE_ID |
The Braze user identifier. This is generated by the Braze SDK, and new users cannot be created using a Braze ID through Cloud Data Ingestion. To create new users, specify an external user ID or user alias. |
EMAIL |
The user’s email address. If multiple profiles with the same email address exist, the most recently updated profile is prioritized for updates. If you include both email and phone, Braze uses the email as the primary identifier. |
PHONE |
The user’s phone number. If multiple profiles with the same phone number exist, the most recently updated profile is prioritized for updates. |
In addition to an identifier, each row must include a PAYLOAD column containing a JSON string of the fields you want to sync to the user in Braze.
Unlike with data warehouse sources, the UPDATED_AT column is neither required nor supported for file storage syncs.
Catalog identifiers
For catalog syncs, your source file must contain the following columns. Catalog files use different identifiers than user data files.
| Column | Required | Description |
|---|---|---|
ID |
Yes | The unique identifier for the catalog item. Used to create, update, or delete the item in Braze. |
PAYLOAD |
Yes | A JSON string of the catalog fields and values to sync. Must match the schema of your catalog in Braze. |
DELETED |
No | When true, the catalog item with the matching ID is removed from the catalog in Braze. Omit this column or set to false for create or update operations. |
Examples
{"external_id":"s3-qa-0","payload":"{\"name\": \"GT896\", \"age\": 74, \"subscriber\": true, \"retention\": {\"previous_purchases\": 21, \"vip\": false}, \"last_visit\": \"2023-08-08T16:03:26.600803\"}"}
{"external_id":"s3-qa-1","payload":"{\"name\": \"HSCJC\", \"age\": 86, \"subscriber\": false, \"retention\": {\"previous_purchases\": 0, \"vip\": false}, \"last_visit\": \"2023-08-08T16:03:26.600824\"}"}
{"external_id":"s3-qa-2","payload":"{\"name\": \"YTMQZ\", \"age\": 43, \"subscriber\": false, \"retention\": {\"previous_purchases\": 23, \"vip\": true}, \"last_visit\": \"2023-08-08T16:03:26.600831\"}"}
{"external_id":"s3-qa-3","payload":"{\"name\": \"5P44M\", \"age\": 15, \"subscriber\": true, \"retention\": {\"previous_purchases\": 7, \"vip\": true}, \"last_visit\": \"2023-08-08T16:03:26.600838\"}"}
{"external_id":"s3-qa-4","payload":"{\"name\": \"WMYS7\", \"age\": 11, \"subscriber\": true, \"retention\": {\"previous_purchases\": 0, \"vip\": false}, \"last_visit\": \"2023-08-08T16:03:26.600844\"}"}
{"external_id":"s3-qa-5","payload":"{\"name\": \"KCBLK\", \"age\": 47, \"subscriber\": true, \"retention\": {\"previous_purchases\": 11, \"vip\": true}, \"last_visit\": \"2023-08-08T16:03:26.600850\"}"}
{"external_id":"s3-qa-6","payload":"{\"name\": \"T93MJ\", \"age\": 47, \"subscriber\": true, \"retention\": {\"previous_purchases\": 10, \"vip\": false}, \"last_visit\": \"2023-08-08T16:03:26.600856\"}"}
Every line in your source file must contain valid JSON, or the file is skipped.
{"external_id":"s3-qa-0","payload":"{\"app_id\": \"YOUR_APP_ID\", \"name\": \"view-206\", \"time\": \"2024-04-02T14:34:08\", \"properties\": {\"bool_value\": false, \"preceding_event\": \"unsubscribe\", \"important_number\": 206}}"}
{"external_id":"s3-qa-1","payload":"{\"app_id\": \"YOUR_APP_ID\", \"name\": \"view-206\", \"time\": \"2024-04-02T14:34:08\", \"properties\": {\"bool_value\": false, \"preceding_event\": \"unsubscribe\", \"important_number\": 206}}"}
Every line in your source file must contain valid JSON, or the file is skipped.
{"external_id":"s3-qa-0","payload":"{\"app_id\": \"YOUR_APP_ID\", \"product_id\": \"product-11\", \"currency\": \"BSD\", \"price\": 8.511527858335066, \"time\": \"2024-04-02T14:34:08\", \"quantity\": 19, \"properties\": {\"is_a_boolean\": true, \"important_number\": 40, \"preceding_event\": \"click\"}}"}
{"external_id":"s3-qa-1","payload":"{\"app_id\": \"YOUR_APP_ID\", \"product_id\": \"product-11\", \"currency\": \"BSD\", \"price\": 8.511527858335066, \"time\": \"2024-04-02T14:34:08\", \"quantity\": 19, \"properties\": {\"is_a_boolean\": true, \"important_number\": 40, \"preceding_event\": \"click\"}}"}
Every line in your source file must contain valid JSON, or the file is skipped.
external_id,payload
s3-qa-load-0-d0daa196-cdf5-4a69-84ae-4797303aee75,"{""name"": ""SNXIM"", ""age"": 54, ""subscriber"": true, ""retention"": {""previous_purchases"": 19, ""vip"": true}, ""last_visit"": ""2023-08-08T16:03:26.598806""}"
s3-qa-load-1-d0daa196-cdf5-4a69-84ae-4797303aee75,"{""name"": ""0J747"", ""age"": 73, ""subscriber"": false, ""retention"": {""previous_purchases"": 22, ""vip"": false}, ""last_visit"": ""2023-08-08T16:03:26.598816""}"
s3-qa-load-2-d0daa196-cdf5-4a69-84ae-4797303aee75,"{""name"": ""EP1U0"", ""age"": 99, ""subscriber"": false, ""retention"": {""previous_purchases"": 23, ""vip"": false}, ""last_visit"": ""2023-08-08T16:03:26.598822""}"
ID,PAYLOAD,DELETED
85,"{""product_name"": ""Product 85"", ""price"": 85.85}",false
1,"{""product_name"": ""Product 1"", ""price"": 1.01}",true
Include an optional DELETED column. When DELETED is true, that catalog item is removed from the catalog in Braze. For the full list of required columns, see Catalog identifiers. For delete behavior, see Deleting catalog items. For an end-to-end catalog setup flow (including creating the target catalog and sync behavior), see Sync and delete catalog data.
Deleting data
Cloud Data Ingestion for file storage supports deleting users and catalog items through file uploads. Use separate syncs and file formats for each.
- Deleting users – Create a sync with data type Delete Users and upload files that contain only user identifiers (no payload).
- Deleting catalog items – Use your existing catalog sync and add a
deleted(orDELETED) column to mark items for removal.
Deleting users
To delete user profiles in Braze using files in your source bucket:
- Create a new Cloud Data Ingestion sync (same setup as for other syncs).
- When configuring the sync in Braze, set Data Type to Delete Users.
- Upload files to your source bucket that contain only user identifier columns. Do not include a
PAYLOADcolumn—the sync fails if payload is present, to avoid accidental deletions.
Each row in the file must identify exactly one user using one of:
| Identifier | Description |
|---|---|
EXTERNAL_ID |
Matches the external_id used in Braze. |
ALIAS_NAME and ALIAS_LABEL |
Both columns together identify the user by alias. |
BRAZE_ID |
Braze-generated user ID (existing users only). |
Deleting users is permanent and cannot be undone. Include only users you intend to remove. For more details, see Delete users with Cloud Data Ingestion.
Example – JSON (user deletes):
{"external_id":"user-to-delete-001"}
{"external_id":"user-to-delete-002"}
{"braze_id":"braze-id-from-profile"}
Example – CSV (user deletes):
external_id
user-to-delete-001
user-to-delete-002
When the sync runs, Braze processes new files in the bucket and deletes the corresponding user profiles.
Deleting catalog items
To remove items from a catalog using file storage:
- Use the same sync you use to sync catalog data (data type Catalogs).
- In your CSV or JSON files, add an optional
deleted(orDELETED) column. - Set
deletedtotruefor any catalog item you want removed from the catalog in Braze.
Each row still needs ID and PAYLOAD. For rows marked for deletion, the payload can be minimal; Braze removes the item by ID.
Example – JSON (catalog item delete):
{"id":"85","payload":"{\"product_name\": \"Product 85\", \"price\": 85.85}"}
{"id":"1","payload":"{\"product_name\": \"Product 1\", \"price\": 1.01}","deleted":true}
Example – CSV (catalog item delete):
ID,PAYLOAD,DELETED
85,"{""product_name"": ""Product 85"", ""price"": 85.85}",false
1,"{""product_name"": ""Product 1"", ""price"": 1.01}",true
When the sync runs, rows with deleted: true cause the matching catalog item to be deleted in Braze. For full catalog sync and delete behavior, see Sync and delete catalog data.
Things to know
- Files added to the source bucket or container should not exceed 512 MB. This limit applies to Amazon S3, Google Cloud Storage, and Azure Blob Storage. Files larger than 512 MB result in an error and are not synced to Braze. Azure Blob Storage itself allows much larger files, but CDI applies the same 512 MB limit across all file storage sources.
- While there is no additional limit on the number of rows per file, we recommend using smaller files to improve how fast your syncs run. For example, a 500 MB file would take considerably longer to ingest than five separate 100 MB files.
- There’s no additional limit on the number of files uploaded in a given time.
- Ordering isn’t supported in or between files. We recommend batching updates periodically if you’re monitoring for any expected race conditions.
Troubleshooting
Uploading files and processing
CDI only processes files that are added after the sync is created. In this process, Braze looks for new files to be added, which triggers a new notification. This kicks off a new sync to process the new file. For Amazon S3, the notification is a message to SQS. For Google Cloud Storage, it’s an OBJECT_FINALIZE message to Pub/Sub. For Azure Blob Storage, it’s a Blob Created event delivered to an Azure Storage queue.
You can use existing files to validate that Braze can access your bucket and detect files to ingest, but they are not synced to Braze. For the CDI to process them, you must re-upload to the source bucket any existing files that you want synced.
Handling unexpected file errors (Amazon S3)
If you’re observing a high number of errors or failed files, you may have another process adding files to the S3 bucket in a folder other than the target folder for CDI.
When files are uploaded to the source bucket but not in the source folder, CDI processes the SQS notification, but it does not take any action on the file, so this may appear as an error.
If your issue is related to S3 notifications or SQS destination permissions (for example, destination validation errors), refer to AWS documentation:
- Enabling and configuring event notifications using the Amazon S3 console
- Granting permissions to publish event notification messages to a destination
- Troubleshooting issues in Amazon SQS
Handling unexpected file errors (Google Cloud Storage)
Like Amazon S3, CDI only processes files uploaded after the sync is created. Each new object triggers an OBJECT_FINALIZE message to your Pub/Sub topic. To ingest files that already exist in the bucket, re-upload them.
If files are not ingested, verify the following:
- The bucket notification exists. List the notifications on the bucket with
gcloud storage buckets notifications list gs://YOUR-BUCKET-NAME. - The Cloud Storage service agent has
roles/pubsub.publisheron the topic. - The Braze service account has consume permission on the subscription (
pubsub.subscriptions.consume, assigned through either the custom role orroles/pubsub.subscriber). - The subscription doesn’t have a dead-letter queue configured. Braze doesn’t support dead-letter queues for Cloud Data Ingestion subscriptions.
For more information, see Pub/Sub notifications for Cloud Storage in the Google Cloud documentation.
Handling unexpected file errors (Azure Blob Storage)
Like Amazon S3 and Google Cloud Storage, CDI only processes files uploaded after the sync is created. Each new blob triggers a Blob Created event to your queue. To ingest files that already exist in the container, re-upload them.
If files aren’t ingested, verify the following:
- The event subscription exists on the storage account and is filtered to Blob Created.
- The event subscription uses Event Grid Schema. CDI can’t read events delivered in another schema.
- The event subscription’s endpoint points at the queue configured on the sync, not a different queue.
- The Braze service principal has Storage Blob Data Reader, Storage Queue Data Reader, and Storage Queue Data Message Processor on the storage account.
- The service principal’s client secret hasn’t expired. Azure enforces an expiry on client secrets, and an expired secret stops the sync.
For more information, see Azure Blob Storage as an Event Grid source in the Microsoft documentation.