Multi-step landing page forms
Break a long landing page form into multiple steps, each with its own fields, so users move through your form one step at a time. Every multi-step form includes a locked confirmation step, so users always see a confirmation after they submit.
Prerequisites
To access the landing page builder, you need certain permissions. If you don’t have access, ask your Braze admin for help.
You should also be familiar with landing page form blocks.
How multi-step forms work
To create a multi-step form, add a Form row from the Layout section of the Build panel. The Form row includes built-in action buttons and multi-step support, so you don’t need to assemble the row structure yourself.
You can add only one Form row per landing page. When you drag it onto your page, it starts with a single step and a locked confirmation step that runs after submission.

Because the Form row manages its own multi-step navigation, all of your steps live inside that single row on one page. This is different from the standard approach of building a single-step form and linking its Submit button to a separate confirmation landing page. For more information, see Step 4: Create a confirmation page.
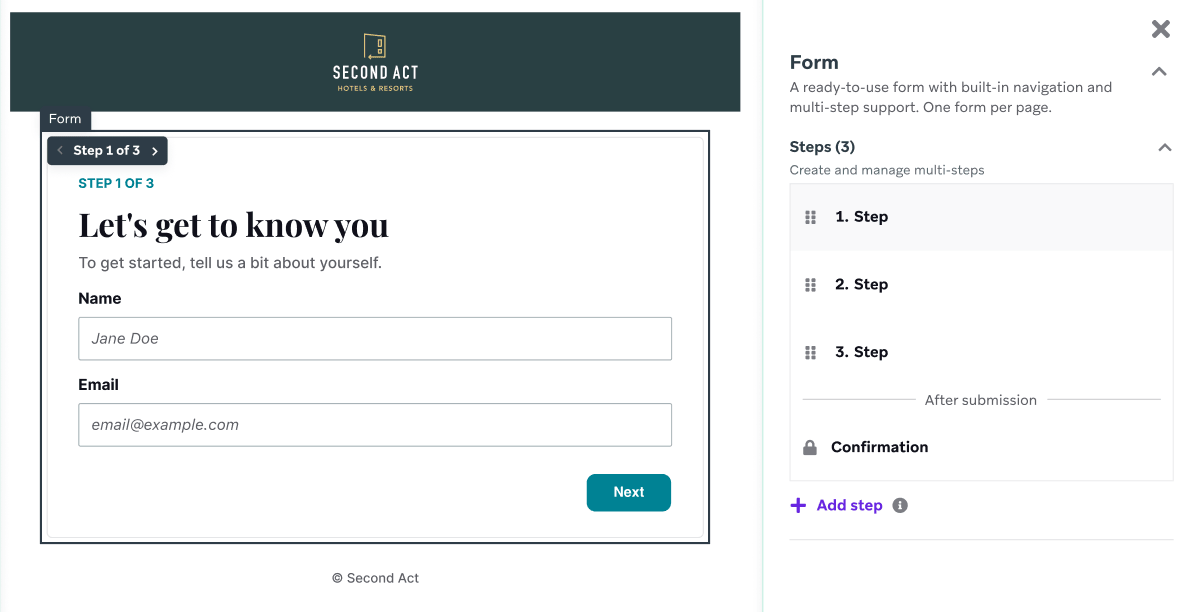
Add a multi-step form
- In the landing page editor, go to the Build panel and select Layout.
- Drag the Form row into your page.
- With the Form row selected, use the Steps section in the right-side properties panel to build out your form:
- Add form blocks (such as Email Capture, Phone Capture, Input Field, Dropdown, Checkbox, or Checkbox Group) to Step 1.
- Select Add step to create additional steps, and add form blocks to each one.
For example, a three-step form might ask for a name on Step 1, a phone number on Step 2, and then land on the Confirmation step to thank the user for submitting.
Navigate between steps while editing
Move between steps in the editor in two ways:
| Method | How to |
|---|---|
| Step navigator | In the canvas, use the Step X of Y control to move to the previous or next step. |
| Steps panel | Select the Form row, then use the Steps section in the right-side properties panel to jump directly to a step, including the Confirmation step. |
Manage steps
Use the Steps section in the Form row’s properties panel to add, remove, and reorder steps:
| Action | How to |
|---|---|
| Add a step | Select Add step. New steps are added after your existing steps and before the Confirmation step. |
| Remove a step | Select the trash icon next to the step you want to remove. Note that the Confirmation step doesn’t have a trash icon and can’t be removed or reordered. It always runs last, after a user completes the preceding steps. |
| Reorder steps | Use the drag handle next to a step to change its order. |
Customize the confirmation step
Every multi-step form includes a Confirmation step listed under After submission in the Steps section. This step is locked so that it can’t be deleted, which means users always see a confirmation experience after they submit your form.
Although the Confirmation step can’t be removed, you can customize it like any other step: select it in the Steps section, then add and style blocks to build your confirmation message.
Track data from partially completed forms
If a user leaves your form before reaching the Confirmation step, Braze still saves the data from any steps they completed to their user profile. The Submitted a Landing Page form event doesn’t log until the user completes every step and reaches the Confirmation step.
Retargeting and trigger delivery rely on the Submitted a Landing Page form event. A user who submits some but not all steps is saved to their profile, but isn’t included in that event—even though their partial data was captured.
This differs from landing page surveys, where a user who doesn’t reach the final step is tracked as a partial submission.
Limitations and considerations
- A landing page supports a single Form row, so all of your steps and your confirmation step live in that one row.
- You can add up to 10 data-collection steps. The Confirmation step doesn’t count toward that limit.
- Each step includes a default button with on-click set to go to the next step. That action validates and saves the current step’s inputs; on the last data-collection step, it also logs the Submitted a Landing Page form event and advances to Confirmation. If a step isn’t connected, add on-click behavior so the button goes to the next step. For more information, see Button in Editor blocks.
- You don’t need to create or link to a second landing page to serve as your confirmation experience because the Confirmation step is built into the Form row.
- If you don’t see the Form row under Layout, contact your Braze account manager.