Contact cards
Contact cards (sometimes known as vCard or Virtual Contact Files (VCF)) are a standardized file format for sending business and contact information that you can easily import into address books or contact books.

Sending a contact card is charged as an MMS. Review your expected MMS volume and Message or Action Credits usage when you create contact cards, and confirm costs in your Braze Billing page.
Contact cards can be created programmatically and uploaded to the Braze media library or created through our built-in contact card generator. These cards can be assigned common properties such as your company’s name, phone number, address, email, and a small photo. To start making contact cards, first make sure you’re set up to use MMS in Braze.
Contact card generator
Step 1: Assign name
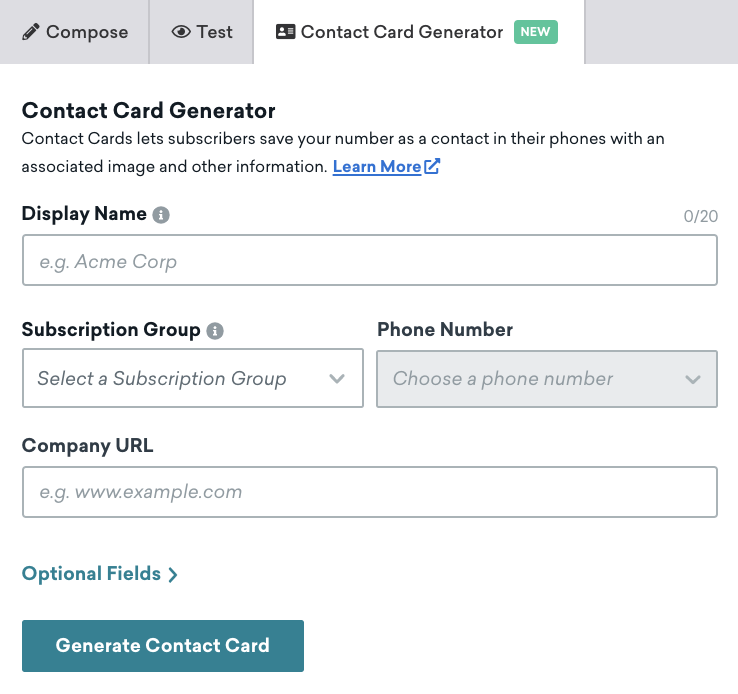
Contact cards can be created from the SMS and MMS composer. Select the Contact Card Generator tab to get started.
Enter your company name or nickname. This is the name your users see when they save the card. A 20-character limit is enforced to ensure the user can see your whole company name or alias in their contacts and messaging app.
Step 2: Assign phone number
Select the subscription group and desired phone number from the available dropdown options.
The Subscription Group and Phone Number dropdowns list only MMS-capable subscription groups and sending numbers. Contact cards are delivered as MMS, so alphanumeric codes and SMS-only numbers are not available in the generator.
This number is listed in your contact card and available on their phone to text to after it’s saved.
Alphanumeric codes aren’t compatible with two-way messaging.
Step 3: Optional fields
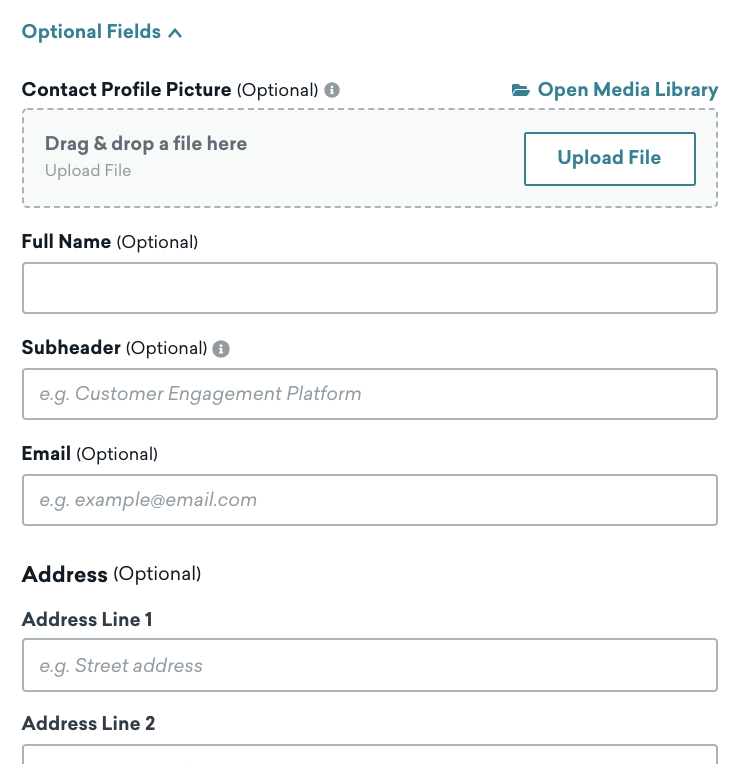
Upload contact card contact photo
You can upload an optional contact photo for your contact card. We recommend a 240 x 240 px JPEG or PNG image. Any high-resolution images uploaded are resized to 240 x 240 px to support message deliverability, as MMS messages larger than 5 MB may fail.
The uploaded image appears on the contact card when the recipient opens it; the Full Name field determines what appears in the message chat thumbnail.
Add more information
Other fields allow you to insert your name, subheader, address, and other contact information that your user may want to have available.
The Full Name field determines the initials that appear in the message chat thumbnail. When the field is marked as optional and is left blank, recipients see a white circle instead of initials.
Step 4: Saving your contact card
After inputting all the necessary fields, select Generate Contact Card, and it automatically attaches to your campaign or Canvas. From here, you can add a message, test your contact card, and launch your campaign or Canvas.
The contact card is also saved in the media library to easily reuse in future campaigns and Canvases.
Adding an existing contact card
To add an existing contact card, create a campaign or Canvas and select your desired subscription group. Next, an Add Media option appears in the message composer window. Here, you can upload an existing contact card file or locate one through the media library.