Create an in-app message
You can create an in-app message or in-browser message using the Braze platform using campaigns, Canvas, or as an API campaign. We highly recommend planning out your messages and preparing all materials ahead of time using our handy In-app message prep guide.
Step 1: Choose where to build your message
Not sure whether your message should be sent using a campaign or a Canvas? Campaigns are better for single, targeted messaging campaigns, while Canvases are better for multi-step user journeys.
- Go to Messaging > Campaigns and select Create Campaign.
- Select In-App Message. Note that in-app messages aren’t available in multichannel campaigns.
- Name your campaign something clear and meaningful.
- Add Teams and Tags as needed.
- Tags make your campaigns easier to find and build reports out of. For example, when using the Report Builder, you can filter by particular tags.
- Add and name as many variants as you need for your campaign. You can choose different platforms, message types, and layouts for each of your added variants. For more on this topic, refer to Multivariate and A/B testing.
If all of the messages in your campaign are going to be similar or have the same content, compose your message before adding additional variants. You can then choose Copy from Variant from the Add Variant dropdown.
- Create your Canvas using the Canvas composer.
- After you’ve set up your Canvas, add a step in the Canvas builder. Name your step something clear and meaningful.
- Choose a step schedule and specify a delay as needed. Note that steps containing in-app messages cannot be action-based.
- Filter your Audience for this step, as necessary. You can further refine the recipients of this step by specifying segments and adding additional filters. Audience options will be checked after the delay, at the time messages are sent.
- Choose your advancement behavior.
- Choose any other messaging channels which you would like to pair with your message.
You can’t have multiple in-app message variants in a single step.
You can find more Canvas-specific information in In-app messages in Canvas.
Step 2: Specify delivery platforms
Start by choosing which platforms should receive the message. Use this selection to limit the delivery of a campaign to a specific set of apps. For example, you might choose Web Browsers for an in-browser message encouraging users to download your mobile app to ensure they do not receive the message after already getting your app. Because platform selections are specific to each variant, you could try testing message engagement per platform.
| Platform | Message Delivery |
|---|---|
| Mobile Apps | iOS & Android SDKs |
| Web Browsers | Web SDK |
| Both Mobile Apps & Web Browsers | iOS, Android & Web SDKs |
Step 3: Specify your message types
Once you’ve selected a sending platform, browse the message types, layouts, and other options associated with it. Learn more about the expected behavior and look of each of these messages on our Creative Details page, or by clicking on the linked message types in the following tables.
When deciding which message type to use, consider how much space your message will occupy and how disruptive it may feel to the user experience.
- Slideup messages are the least intrusive, appearing subtly without blocking content.
- Modal messages sit in the middle—prominent enough to catch attention without fully taking over the screen.
- Fullscreen messages are the most attention-grabbing and best for critical announcements or promotions.
The more complex your content, the more space you’ll need—and the more likely your message will interrupt the user’s flow.
Message types
These in-app messages are accepted by both mobile apps and web applications.
| Message Type | Type Description | Available Layouts | Other Options | Recommended Use |
|---|---|---|---|---|
| Fullscreen | Messages that cover the entire screen with a message block. |
|
Enforced Device Orientation (Portrait or Landscape) | Big and bold! Use when you want to make sure users see your content, such as your most critical campaigns, important notifications, or massive promotions. Note that on mobile devices, portrait and landscape messages won't display if the orientation of the device doesn't match the orientation of the message. |
| Modal | Messages that cover the entire screen with a screen overlay and a message block. |
|
N/A | A good middle ground. Use when you need an apparent way to catch your user's attention, such as encouraging users to try a new feature or take advantage of a promotion. |
| Slideup | Messages that slide into view in a designated place without blocking the rest of the screen. | N/A | N/A | Unobtrusive—takes up the least amount of screen real estate. Use when alerting users to small snippets of information, such as new features, announcements, use of cookies, etc. |
Advanced message types
These in-app messages are customizable to your needs.
| Message Type | Type Description | Available Layouts | Requirements | Recommended Use |
|---|---|---|---|---|
| Custom HTML Message | Custom messages that perform as defined in your custom code (HTML, CSS, and/or JavaScript). | N/A | Must set allowUserSuppliedJavascript initialization option to true for your in-app message to work. |
This is a good option if you want all the advantages of IAMs but need additional functionality or for the appearance to stay "on brand". You can alter every little detail of the message—font, color, shape, size, buttons, etc. Example use cases include asking users for app feedback, email capture forms, or paginated messages |
| Email Capture Form | Typically used to capture the viewer's email. | N/A | Must set allowUserSuppliedJavascript initialization option to true for your in-app message to work. |
When prompting users to submit their email address. |
| Web Modal with CSS | Modal messages for web with customizable CSS. |
|
Web Modal with CSS is unique to the Web SDK and can only be used after selecting Web Browsers. | When you want to upload or write custom CSS to create beautiful, all-around custom-styled messaging. |
If Braze detects that you don’t have a close or dismissal button included in your code, we will request that you add one in. For your convenience, we have provided a snippet that you can copy and paste into your code: <a href= "appboy://close">X</a>.
Step 4: Compose your in-app message
The Compose tab allows you to edit all aspects of your message’s content and behavior.

The content of the Compose tab varies based on your chosen message options in the previous step, but may include any of the following options:
Language
Select Add Languages and select your desired languages from the provided list. This will insert Liquid into your message. We recommend selecting your languages before writing your content so you can fill in your text where it belongs in the Liquid. See our full list of available languages.
Image
Depending on your message type, you can Upload Image, Pick a Badge, or use Font Awesome. To upload an image, select Add Image or provide an image URL. Selecting Add Image opens the Media Library, where you can select a previously uploaded image or add a new one. Each message type and platform may have its own suggested proportions and requirements—be sure to check what those are before commissioning or making an image from scratch.
Header and body
Write anything you want! Include completely custom copy (often with custom HTML capabilities) with the options to include Liquid and other types of personalization. The faster you can get your message across and get your customer clicking—the better! We recommend clear and concise headers and message content.
Some message types do not need and therefore do not ask for headers.
Tips
Generating AI copy
Need help creating awesome copy? Try using the AI copywriting assistant. Input a product name or description and the AI will generate human-like marketing copy for use in your messaging.

Creating right-to-left messages
Need help crafting right-to-left messages for languages like Arabic and Hebrew? Refer to Creating right-to-left messages for best practices.
Button text
When available for your message type, you can have up to two buttons appear under your body of text. You can create and edit custom button text and color. You can also add Terms of Service Link within email capture forms.
If you choose to only use one button, it will automatically adjust to take over the available space at the bottom of your message instead of leaving room for an additional button.
Choosing a primary button
If you decide to format these buttons with your own colors, we recommend that you use Button 2 for your more preferred result.
In other words, if you want your user to click on one button more than the other, make sure it is on the right. The right button has often displayed better potential to get clicked, especially if it has a somewhat contrasting or otherwise stand-out color from the rest of the message. This is only emphasized when the button on the left blends more visually with the message.

On-click behavior
When your customer clicks on a button in your in-app message, the following actions are available.
| Action | Description |
|---|---|
| Redirect to Web URL | Open a non-native web page. |
| Deep Link into App | Deep link into an existing screen in your app. |
| Close Message | Closes the currently active message. |
| Log Custom Event | Choose a custom event to trigger. Can be used to display another in-app message or trigger additional messaging. |
| Log Custom Attribute | Choose a custom attribute to set for the current user. |
| Request Push Permission | Shows the native push permission. Read more about push priming, as well as best practices for priming users for push. |
Note: the Request Push Permission, Log Custom Event, and Log Custom Attribute options require the following SDK minimum versions:
iOS device options
If desired, you can restrict your in-app message to only send to iOS devices. To do so, click Change and select Only send to iOS devices.
Message close
Choose between the following options:
- Dismiss Automatically: Select how many seconds the message will remain on the screen.
- Wait for User Swipe or Touch: Requires a dismissal or close option.
Slide up position
This setting only applies to the Slideup message type. Choose between having your slideup appear From Bottom of App Screen or From Top of App Screen.
HTML and assets
This setting only applies to the Custom code message type. Copy and paste HTML into the available space and upload your assets using a ZIP file.
Email capture input placeholder
This setting only applies to the email capture form message type. Enter custom copy that will appear as the placeholder text for the email input field. This defaults to “Enter your email address”.
Step 5: Style your in-app message
The Style tab allows you to adjust all visual aspects of your message. Upload an image or badge, or pick a pre-designed badge icon. Change the colors of the header and body text, buttons, and background by selecting from a palette or entering a hex, RGB, or HSB code.
The content of the Style tab varies based on your chosen message options in the previous step, but may include any of the following options:
| Formatting | Input | Description |
|---|---|---|
| Color Profile | Apply from in-app message templates gallery. | Select Apply Template and choose from the gallery. Then, select Save. |
| Text Alignment | Left, Center, or Right. | Only available for newer Braze SDK versions. |
| Header | HEX color code. | Your desired HEX color will display. You will also be able to choose the opacity of the color. |
| Text | HEX color code. | Your desired HEX color will display. You will also be able to choose the opacity of the color. |
| Buttons | HEX color code. | Your desired HEX colors will display. You will also be able to choose the opacity of the colors. You can choose colors for: the message’s Close Button Background as well as each button’s Background, Text, and Border. |
| Button Border | HEX color code. | New! This will allow you to set your primary and secondary buttons apart from one another. We suggest outlining buttons with contrasting colors. |
| Background Color | HEX color code. | Your desired HEX color will display. You will also be able to choose the opacity of the color. This is the background of the entire message and will clearly display behind your text body. |
| Screen Overlay | HEX color code. | Your desired HEX color will display. You will also be able to choose the opacity of the color. Only available for newer Braze SDK versions. This is the frame around the entire message. |
| Chevron or other Close Message Option | HEX color code. | Your desired HEX color will display. You will also be able to choose the opacity of the color. |
Always preview and test your message before sending.
Some in-app message types do not have the option for styling beyond uploading custom HTML (or CSS or JavaScript) and assets using a ZIP file. Web Modal with CSS allows you to upload or write custom CSS to create beautiful, all-around custom-styled messaging.
Step 6: Configure additional settings (optional)
Key-value pairs
You can add key-value pairs to send extra custom fields to user devices.
Step 7: Build the remainder of your campaign or Canvas
Build the remainder of your campaign; see the following sections for further guidance on how to best use our tools to build in-app messages.
Choose a trigger
Select the action you’d like to trigger your message off of, as well as the start and end times for your campaign or Canvas.
Note that if you intend to trigger your in-app message based off a custom event, that custom event must be sent using the SDK.
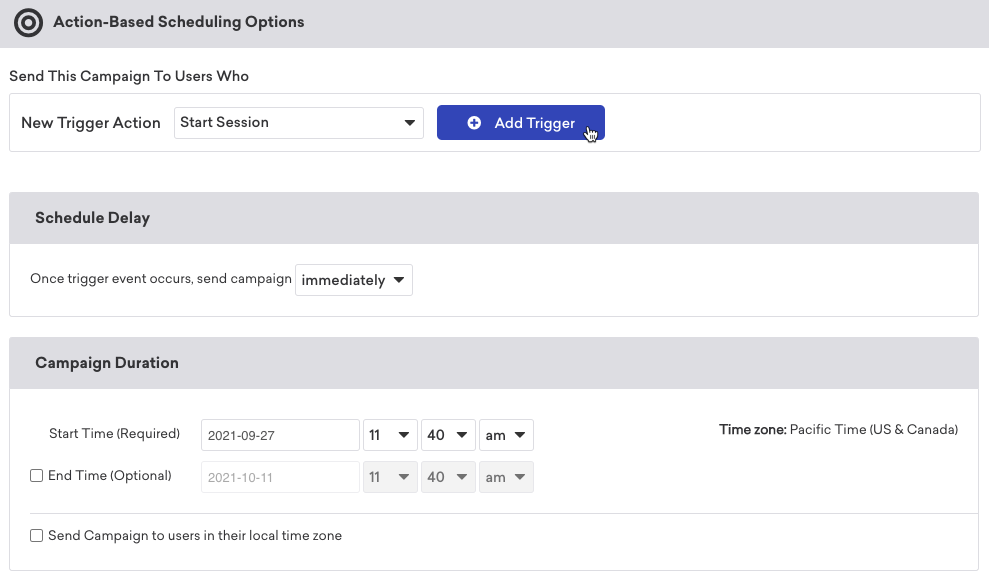
In-app message delivery is entirely based on the following action triggers:
- Making a purchase
- Opening the app/webpage
- Performing a custom event (only works with events sent using the SDK)
- Opening a specific push message
- Automatically schedule campaigns to send at a certain time with respect to the local time of each of your users.
- Messages can also be configured to recur on a daily, weekly (optionally on specific days), or monthly basis.
A start date and time must be selected; however, an end date is optional. An end date will stop that specific in-app message from showing up on devices after the specified date/time.
Refer to our developer documentation for server-side event triggering and local in-app message delivery.
Online versus offline triggering
In-app messages work by sending the message and triggers to the user’s device. After the in-app messages are on a device, it waits to display until the trigger condition is met. If the in-app messages are already cached on the user’s device, you can even trigger in-app messages offline with no connection to Braze (for example, in Airplane mode).
Once an in-app message has been stopped, there may be some users that continue to see the message if they started a session before the message was stopped and subsequently perform the trigger event. These users will be counted as a unique impression even after the campaign has been stopped.
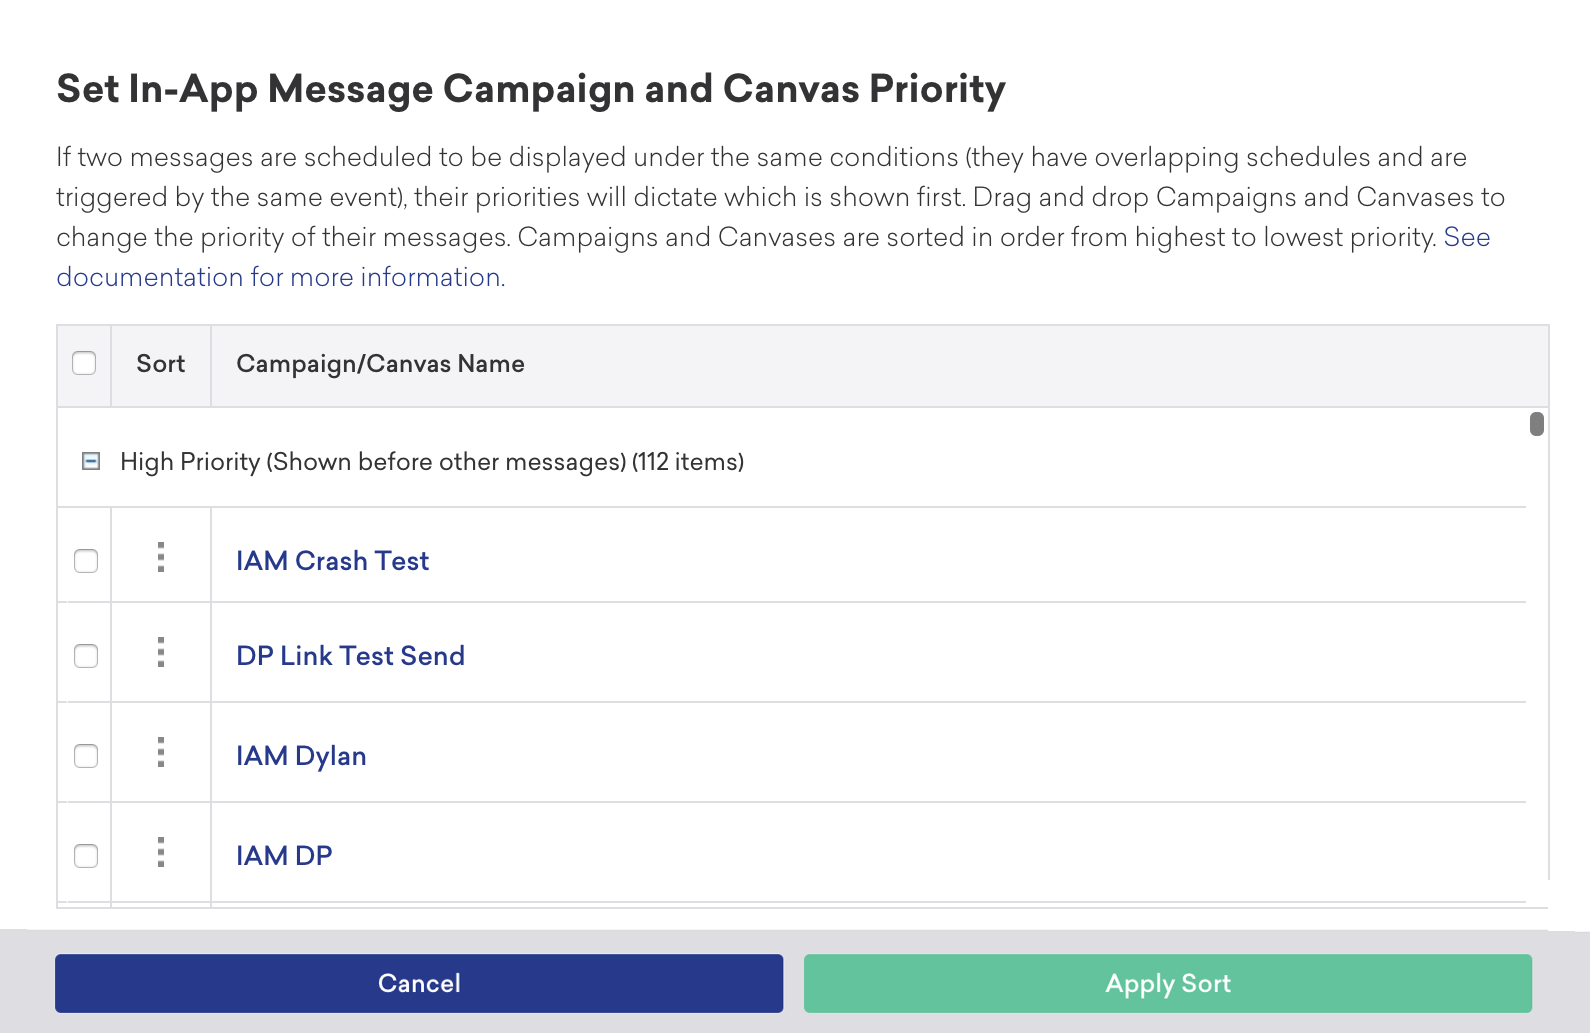
Choose a priority
Finally, after you’ve selected the action the in-app message will be triggered off of, you should also set a priority. If two messages are triggered off of the same action, high priority messages will be scheduled to appear on users’ devices before messages with lower priorities.
You can choose between the following message priorities:
- High priority (shown before other messages)
- Medium priority (default)
- Low priority (shown after other messages)
The high, medium, and low options for triggered message priorities are buckets, and as such, multiple messages could have the same selected priority. When multiple messages share the same priority, the most recently created or assigned message takes precedence and is shown first:
- Default priority bucket: When two campaigns share the same trigger and use the default (medium) priority, the campaign that was created last receives the trigger.
- Specific priority bucket: When multiple campaigns share the same trigger and are assigned to a specific priority bucket, the campaign most recently assigned to that bucket receives the trigger.
To set priorities within these buckets, click Set Exact Priority, and you can drag and drop campaigns to order them with the correct priority.
Choose users to target
Next, you must target users by choosing segments or filters to narrow your audience. You automatically receive a snapshot of what that approximate segment population looks like. Keep in mind that exact segment membership is always calculated before the message is sent.
If there’s a delay on the in-app message step, segment membership will be evaluated after the delay. If the user is eligible, the in-app message will sync on the next available session.
Re-evaluate campaign eligibility and Liquid
In some scenarios, you may want to re-evaluate a user’s eligibility as they trigger an in-app message to display. Examples include campaigns that target a custom attribute that frequently changes or messages that should reflect any last-minute profile changes.

When you select Re-evaluate campaign eligibility before displaying, an additional request to Braze will be made to confirm that the user is still eligible for this message before sending. Additionally, any Liquid variables or Connected Content will be templated at that moment before the message is displayed.
This prevents in-app messages from being sent to users within expired or archived campaigns. If you don’t re-evaluate a user’s eligibility, the user will receive the in-app message even after the campaign has expired or is archived because the message is in your SDK and waiting for users to trigger it.
Enabling this option will result in a slight delay (< 100ms) between when a user triggers an in-app message and when the message is displayed due to the added eligibility and templating request.
Do not use this option for messages that can be triggered while a user is offline or when eligibility and Liquid re-evaluation are not required.
Use data added by REST API in a message
User data that the /users/track endpoint adds in the same session can sometimes be used in that user’s in-app message. For example, if a user is in the audience for an in-app message that is waiting on a trigger, starts a session, and in that same session the REST API updates their profile, that new data can appear in the in-app message when Re-evaluate campaign eligibility before displaying is selected. Braze won’t template the in-app message until it’s time to render.
If one trigger both sends data to Braze and fires the in-app message, the message can’t use that newly updated profile data, even with a scheduled delay. Use two separate triggers instead: one to send the data, and one to trigger the in-app message.
Choose conversion events
Braze allows you to track how often users perform specific actions, conversion events, after receiving a campaign. You have the option of allowing up to a 30-day window during which a conversion will be counted if the user takes the specified action.
If you haven’t done so already, complete the remaining sections of your Canvas component. For further details on how build out the rest of your Canvas, implement multivariate testing and Intelligent Selection, and more, refer to the Build your Canvas step of our Canvas documentation.
For information on Canvas-specific in-app messaging options, refer to In-app messages in Canvas.
Step 8: Review and deploy
After you’ve finished building the last of your campaign or Canvas, review its details, test it, then send it!
Next, check out In-app message reporting to learn how you can access the results of your messaging campaigns.
Things to know
Active in-app message campaign limits
Braze values reliability and speed. We suggest you send only the data you need to Braze and turn off any campaigns that no longer add value to your brand.
Processing action-based in-app message campaigns that are still in an active state but no longer sending messages or are no longer needed slows down the overall performance of the Braze services for you and other customers. This extra time needed to process these large numbers of idle campaigns means that any in-app messages will take longer to appear on the end-user’s devices, which impacts the end user’s experience.
You can have up to 200 active, action-based in-app message campaigns per workspace to optimize the speed of message delivery and to prevent timeouts. This doesn’t apply to Canvases.
The 200 count includes active in-app message campaigns that have not yet reached end time and those that have no end time. Active in-app message campaigns that have passed their end times will not be counted. The average Braze customer has a total of 26 campaigns active at once—so it’s unlikely that this limitation will impact you.
Local time delivery evaluation
When an in-app message campaign is scheduled using the user’s local time zone, the evaluation of the campaign’s start and end time is handled on the device itself.
In-app message campaigns are typically pushed to a user’s device when the app session starts or refreshes. At that moment:
- The SDK evaluates whether the user qualifies for any trigger-based in-app messages.
- The device checks whether the user’s trigger event occurred within the campaign’s start and end time (as defined by the user’s local time zone).
- If both conditions are met, the in-app message is eligible for display.
Considerations
- If a user triggers an event (such as a button tap) shortly after the in-app message is delivered, the message may not appear until the next session refresh—assuming all eligibility criteria are still met.
- Similar to other channel types, in-app message campaigns should ideally be launched 24–48 hours in advance. This buffer gives users sufficient time to meet eligibility and initiate a session for the message to be evaluated and displayed.
 Edit this page on GitHub