Amazon Personalize
Amazon Personalize is like having your very own all day Amazon machine learning recommendation system. Based on over 20 years of recommendation experience, Amazon Personalize enables you to improve customer engagement by powering real-time personalized product and content recommendations and targeted marketing promotions.
Using machine learning and an algorithm you help define, Amazon Personalize can help you train a model that outputs high-quality recommendations for your websites and applications. These models will allow you to create lists of recommendations based on users’ past behaviors, sort items by relevancy, and recommend other items based on similarity. Lists obtained from the Amazon Personalize API can then be used in Braze Connected Content to run personalized Braze recommendation campaigns. By integrating with Amazon Personalize, customers are given the freedom to control the parameters used to train the models and define optional business objectives that optimize the algorithm’s output.
This reference article will help you understand the use cases Amazon Personalize offers, the data it works with, how to configure the service, and how to integrate this with Braze.
Prerequisites
| Requirement | Description |
|---|---|
| Amazon Web Service account | An AWS account is required to take advantage of this partnership. After you have an AWS account, you can access Amazon Personalize through the Amazon Personalize console, the AWS Command Line Interface (AWS CLI), or the AWS SDKs. |
| Defined use cases | Before creating a model, you must determine your use case for this integration. Reference the following list for common use cases. |
| Datasets | Amazon Personalize recommendation models require three different types of datasets, interactions, users, and items. Reference the following details to see the requirements for each dataset. |
Use Cases
Before creating a model, you must determine your use case for this integration. Some common use cases include:
- Recommend items for users based on their previous interactions, creating a truly personalized experience for your users.
- Provide a list of items or search results tailored to each user, increasing engagement by showing items by relevancy to the user.
- Find recommendations for similar items, helping users discover new things.
In the following guide, we will focus on the user personalized recommendations recipe.
Datasets
To get started with Amazon Personalize recommendation models, you need three types of datasets:
- Interactions
- Stores historical interactions between users and items
- Requires
USER_ID,ITEM_ID,EVENT_TYPEandTIMESTAMPvalues and optionally accepts metadata about the event
- Users
- Stores metadata about the users
- Requires a
USER_IDvalue and at least one metadata field (string or numerical) such as gender, age, loyalty membership
- Items
- Stores metadata about items
- Requires an
ITEM_IDand at least one metadata field (textural, categorical, or numerical) which describes the item
For a user recommendations recipe, you must provide an interactions dataset containing at least 1000 points of interaction data from at least 25 unique users with at least two interactions each. These datasets can be uploaded in bulk using CSV files stored in S3 or incrementally through the API.
Creating Models
Step 1: Training
Once datasets are imported, you can create a solution. A solution uses one of Amazon Personalize recipes (algorithms) to train a model. In our case, we will use the USER_PERSONALIZATION recipe. Training the solution creates a solution version (trained model) which you can evaluate based on the performance metrics of the model.
Amazon Personalize lets you adjust hyperparameters that the model uses for training. For example:
- The “User history length percentile” parameter found in the Amazon Personalize console lets you adjust the percentile of user history to include in the training:

min_user_history_length_percentile: excludes a percentage of users with very short history lengths, which can be helpful to eliminate popular items and build recommendations based on deeper underlying patterns.max_user_history_length_percentile: adjust the percentage of users to take into account when training with very long history lengths.
The number of hidden dimensions helps detect more complicated patterns for complex datasets, while the back-propagation through time technique (BPTT) adjusts rewards for an early event after a chain of events took place that resulted in a high-value action.
Additionally, Amazon Personalize offers automatic hyperparameter tuning by running multiple versions of the solution with different values simultaneously. To use the tuning, turn on Perform HPO when creating a solution.
Step 2: Evaluate and Compare
Once a solution finishes training, you are ready to evaluate it and compare different versions. Each solution version displays computed metrics. Some of the available metrics include:
Normalize discounted cumulative gain: compares recommended order of items to the actual list of items and gives each item a weight corresponding to its position in the listPrecision @k: the amount of properly recommended items divided by the amount of all recommended items, wherekis the number of itemsMean reciprocal rank: focuses on the first, highest ranked recommendation and calculates how many recommended items are seen before the first matched recommendation appearsCoverage: the proportion of unique recommended items to the total number of unique items in the dataset
Getting Recommendations
Once you have created a solution version that you’re happy with, it is time to put the recommendations to use. There are two ways to access the recommendations:
- Real-time campaign
A campaign is a deployed solution version with a defined minimum transaction throughput. A transaction is a single API call to get recommendation output, and it is defined as TPS, or transactions per second, with a minimum value of one. The campaign will scale resources in case of an increased load, but it will not drop below your minimum value. You can query the recommendations in the console, AWS CLI, or through AWS SDKs in your code. - Batch job
A batch job exports the recommendations to an S3 bucket. The job takes an input of a JSON file with a list of user IDs for which you want to export the recommendations. Then, after specifying the correct permissions and the output destination, you’re ready to run the job. The runtime depends on the size of your datasets and the recommendations list length.
Filters
Filters let you adjust the recommendation output by excluding items based on the item’s ID, event type, or metadata. You can also filter users based on their metadata, such as age or loyalty membership status. Filters can come in handy to prevent recommending items that the user has already interacted with.
Integrating results with Braze
With the created model and recommendations campaign, you are ready to run a Braze campaign for your users using Content Cards and Connected Content. Before running a Braze campaign, you must create a service that can serve these recommendations through an API. You can follow step 3 in the workshop article to deploy the service using AWS services. You can also deploy your own independent backend service that provides the recommendations.
Example Content Card campaign
Let’s run a Content Card campaign with the first recommended item from the list.
In the following examples, we are going to query
GET http://<service-endpoint.com>/recommendations?user_id=user123 endpoint with a user_id parameter which will return a list of recommended items:
1
2
3
4
5
6
7
8
9
10
11
12
13
14
15
16
17
[
  {
    "id": "abc123",
    "url": "http://productpage.com/product/abc123",
    "name": "First Item",
    "price": 39.99,
    "image": "http://pp.cdn.com/abvh3321pjb1j"
  },
  {
    "id": "xyz987",
    "url": "http://productpage.com/product/xyz987",
    "name": "Great Item",
    "price": 19.99,
    "image": "http://pp.cdn.com/234bjl1gioj1b2b"
  },
  ...
]
In the Braze dashboard, create a new Content Card campaign. In the message text field, create a Connected Content Liquid block to query the API and save the response in the recommendations variable:
1
{% connected_content https:/<service-endpoint.com>/recommendations?user_id={{${user_id}}} :save recommendations %}
You can then reference the first item in the resulting array and display the content to the user:
1
2
3
This seems like a great fit for you:
{% recommendations[0].name %}
{% recommendations[0].price %}
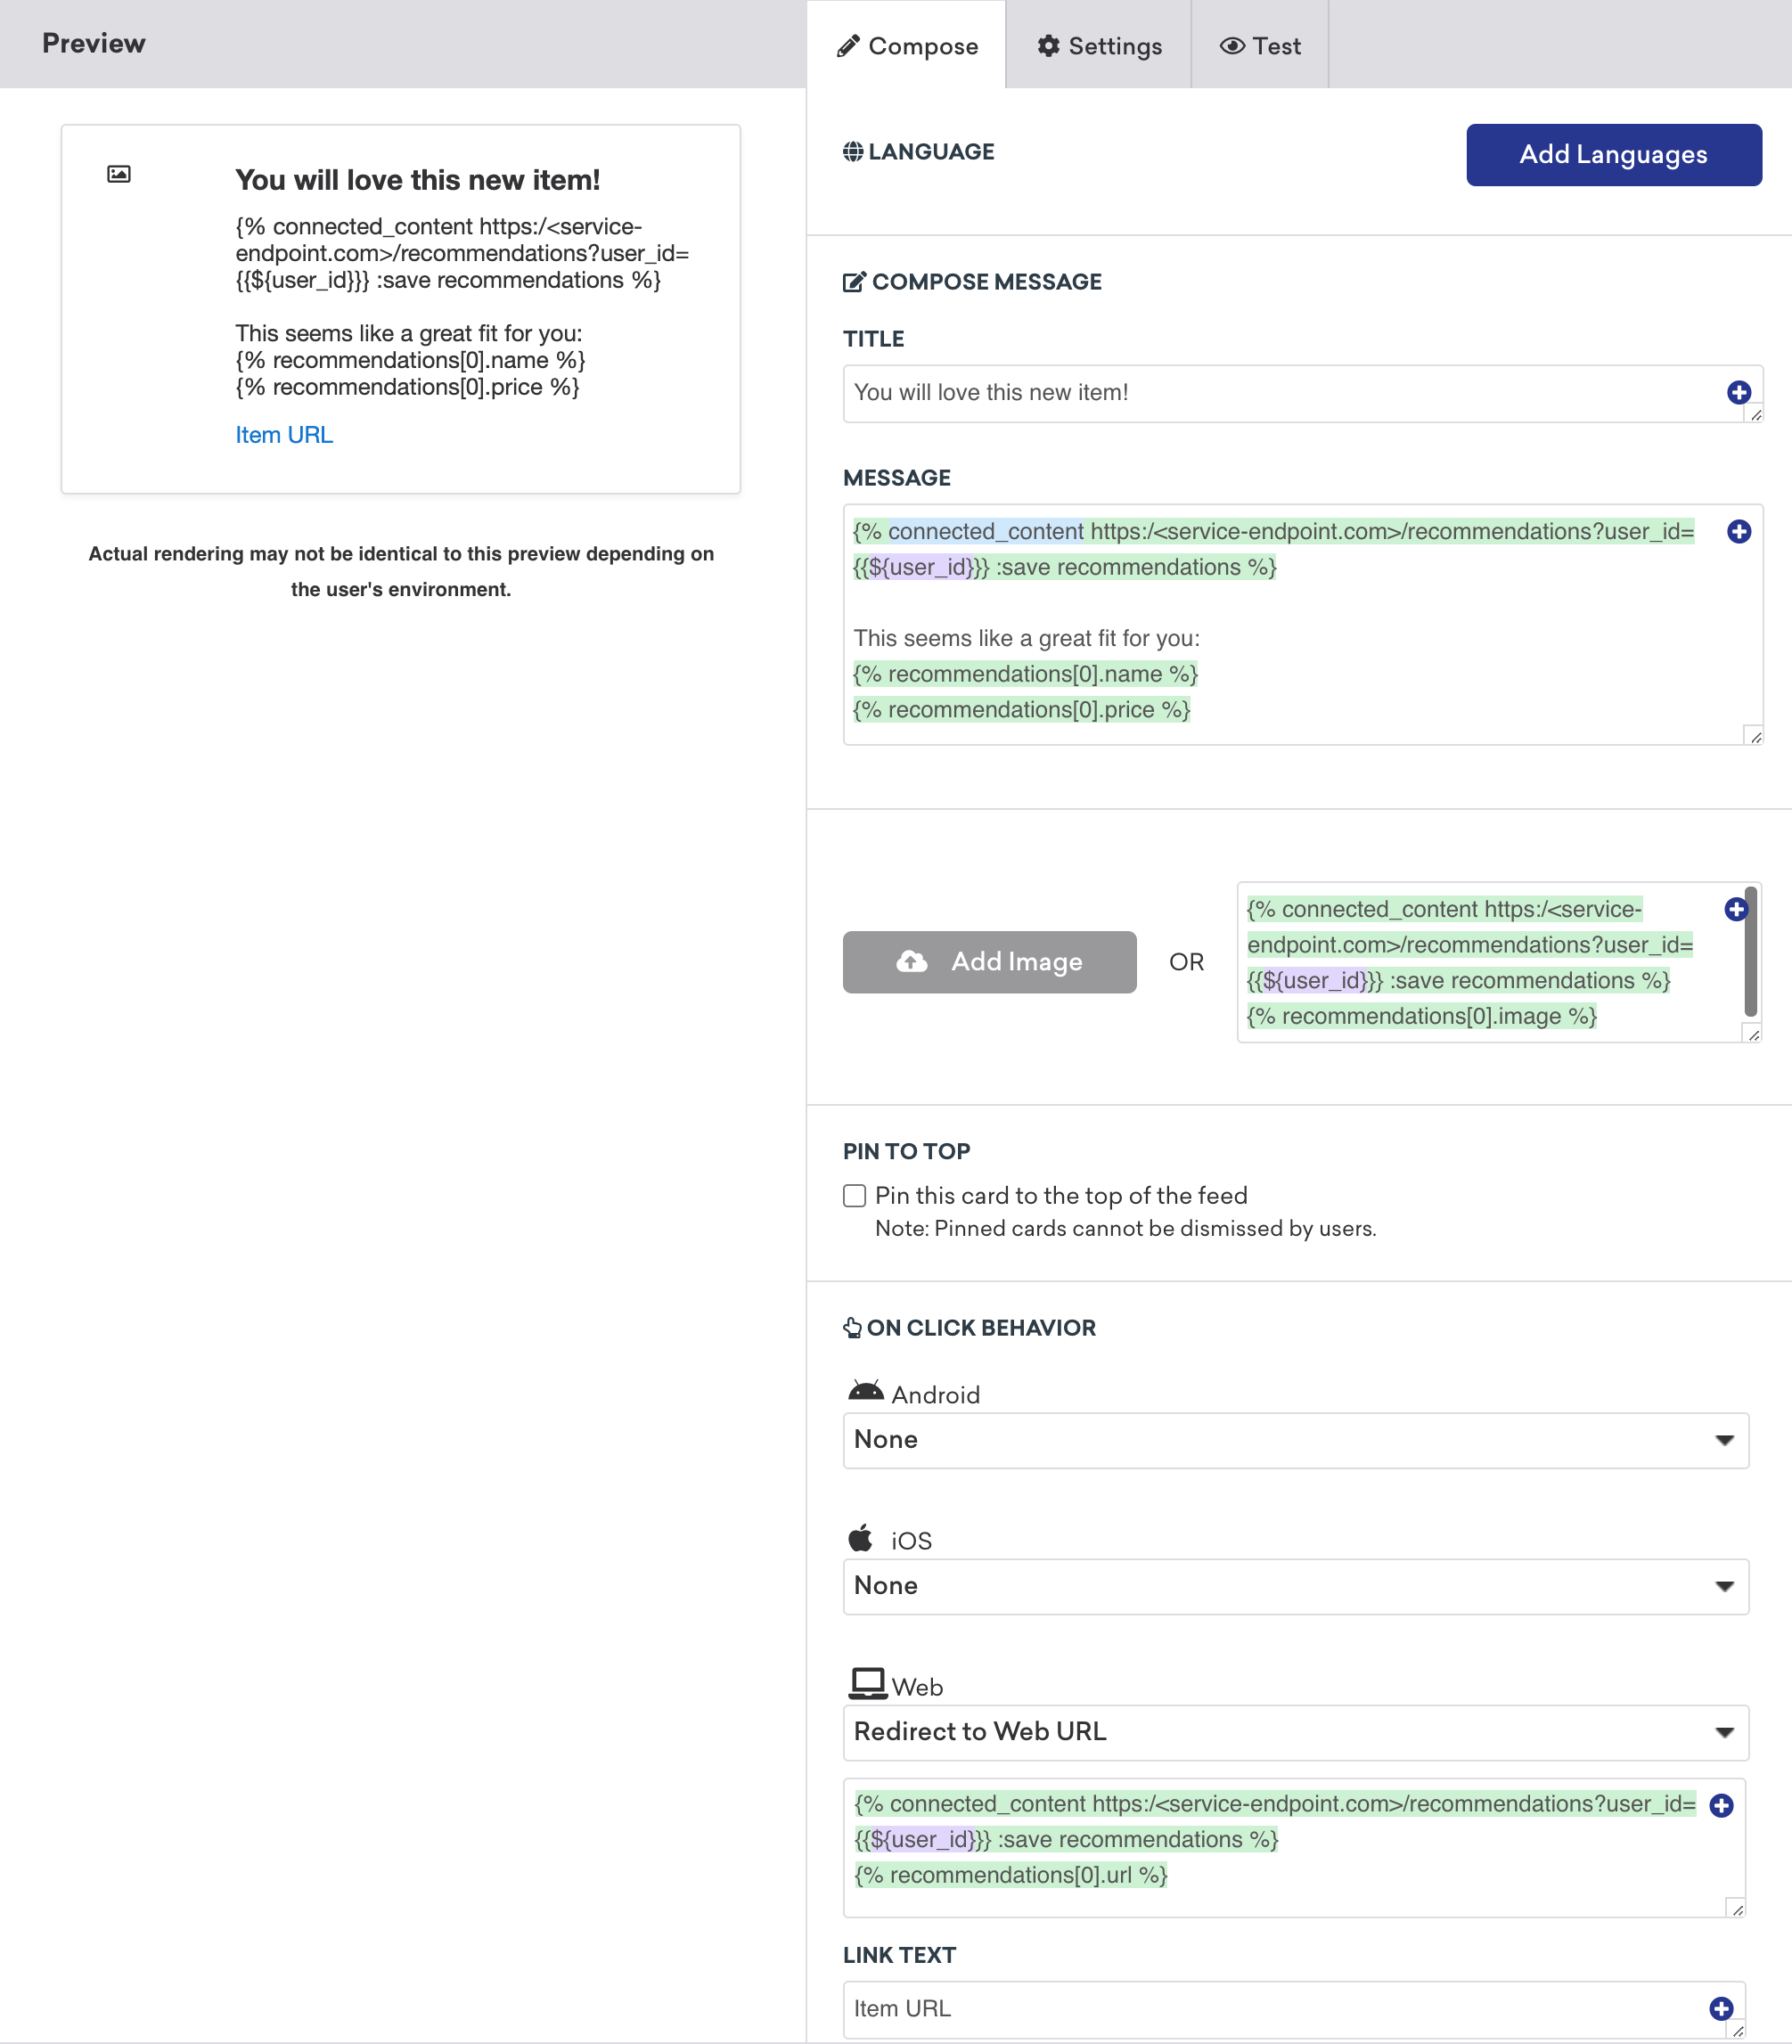
Including the title, the image, and linking the URL, this is what the complete Content Card would look like:
 Edit this page on GitHub