Amazon Personalize workshop
This reference article will walk you through the process of configuring Amazon Personalize and integrating it into your Braze environment using Connected Content. This is done using a hands-on workshop that will walk you through all the steps required to deploy and train Amazon Personalize solutions and integrate them into a Braze email campaign.
The following examples are deployed in a fully-functional example ecommerce site called the Retail Demo Store. The resources and code for this tutorial are published in the AWS Samples Retail Demo Store. You can use this reference architecture implementation as an outline to implement Amazon Personalize in your own environment.
Requirements
You will need to clone the Retail Demo Store repository and follow the steps outlined to deploy the workshop environment to your AWS account. An AWS account is required to complete the workshop and to run the integration code.
Integration architecture
Before setting up Braze to send personalized messages to users, review the relevant components required for a typical ecommerce website, using the Retail Demo Store architecture as an example.

- Retail Demo Store’s web UI uses the AWS Amplify JavaScript library to send training events to Amazon Personalize.
- Braze campaign user records are updated from the Global Store User service.
- When a Braze campaign runs, a Connected Content template is used to fetch recommendations from Personalize and populate an email template for a target user.
- Product catalog information can be used to train recommendation models as well.
Braze will send emails to your users based on their behavior or attributes of their user profiles. This data can help identify users and build user profiles to help determine when to send a message or email.
This event data flow will happen in parallel to the behavioral event data being sent to Amazon Personalize. In this workshop, the demo store uses Amplify to send events to Personalize. This data is used to train a recommendations model that can then be used in Braze Connected Content calls to personalize content to users when your Braze campaign runs.
Braze Connected Content will be able to get these recommendations via a recommendation service running in AWS. The Retail Demo Store workshop shows an example recommendation service deployment. In a deployment scenario in your own infrastructure, you will need to deploy a similar service to get items from your own catalog service.
Setting up the reference architecture workshop
Step 1: Deploy the Retail Demo Store to your AWS account
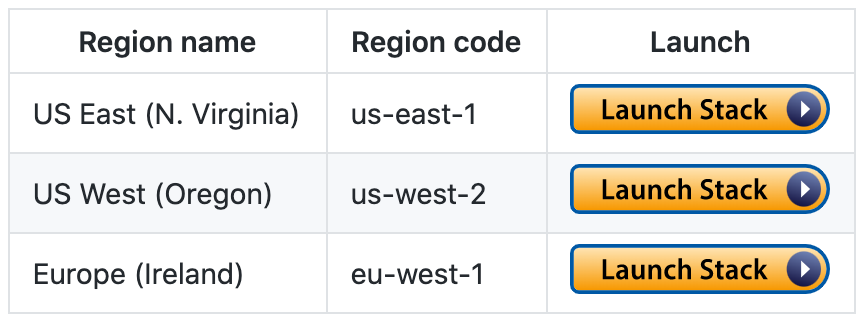
In the following table, choose an AWS Region and select Launch Stack. This list does not represent all the possible regions where you can deploy the project, only the currently configured regions for deployment with the Retail Demo Store.
Accept all the default parameter values for the template. The deployment of all the project resources should take 25-30 minutes.
Step 2: Build Amazon Personalize campaigns
Before you can provide personalized product recommendations, you first need to train the machine learning models and provide inference endpoints that will allow you to get recommendations from Amazon Personalize. The CloudFormation template deployed in step 1 includes an Amazon SageMaker notebook instance that provides a Jupyter notebook with detailed step-by-step instructions.
- Sign in to the AWS account where you deployed the AWS CloudFormation template in step 1.
- On the Amazon SageMaker console, choose Notebook instances.
- If you don’t see the RetailDemoStore notebook instance, make sure you are in the same region where you deployed the project in step 1.
- To access the notebook instance, choose Open Jupyter or Open JupyterLab.
- When the Jupyter web interface has loaded for the notebook instance, choose the
workshop/1-Personalization/1.1-Personalize.ipynbnotebook. You may have to choose theworkshopfolder to see the notebook subdirectories. - When you have the
1.1-Personalizenotebook open, step through the workshop by executing each cell. You can choose Run from the Jupyter toolbar to sequentially execute the code in the cells. The notebook takes approximately two hours to complete.
Step 3: Send personalized emails from Braze
With the Amazon Personalize solutions and campaigns in place, your instance of the Retail Demo Store is ready to provide recommendations to your email campaigns. In step 1, you deployed the demo web application and all associated services, including the recommendation service needed to integrate your email campaigns with Braze through Connected Content, which uses the Amazon Personalize campaigns you deployed in step 2.
Similar to the Personalization workshop in step 2, the following Braze messaging workshop steps you through setting up the Braze and Amazon Personalize integration.
- Sign in to the AWS account where you deployed the AWS CloudFormation template in step 1.
- On the Amazon SageMaker console, choose Notebook Instances.
- If you don’t see the RetailDemoStore notebook instance, make sure you are in the same AWS region where you deployed the project.
- To access the notebook instance, choose Open Jupyter or Open JupyterLab.
- When the Jupyter web interface has loaded for the notebook instance, choose the
workshop/4-Messaging/4.2-Braze.ipynbnotebook. You may have to choose theworkshopfolder to see the notebook subdirectories. - When you have the
4.2-Brazenotebook open, step through the workshop by executing each cell. You can choose Run from the Jupyter toolbar to sequentially execute the code in the cells. The notebook takes approximately 1 hour to complete.
Step 4: Clean up resources
To avoid incurring future charges, delete the AWS resources the Retail Demo Store project created by deleting the AWS CloudFormation stack you created in step 1.
 Edit this page on GitHub