Tealium
Tealium is a universal data hub and customer data platform composed of EventStream, AudienceStream, and iQ Tag Management that enables you to connect mobile, web, and alternative data from third-party sources. Tealium’s connection to Braze enables a data flow of custom events, user attributes, and purchases that empower you to act on your data in real-time.

The Braze and Tealium integration allows you to track your users and route data to various user analytics providers. Tealium allows you to:
- Sync Tealium audiences with AudienceStream to Braze for use in personalizing Braze campaigns and Canvases or building segments.
- Import data across platforms. Braze offers both a side-by-side SDK integration for your Android, iOS, and web applications and a server-to-server integration that can be used within any platform that can report event data.
Tealium EventStream is a data collection and API hub that sits at the center of your data. EventStream handles the entire data supply chain from setup and installation to identifying, validating, and enhancing incoming user data. EventStream takes real-time action with event feeds and connectors. The following are the features that make up the EventStream.
- Data sources (installation and data collection)
- Live events (real-time data inspection)
- Event specifications and attributes (data layer requirements and validation)
- Event feeds (filtered event types)
- Event connectors (API hub actions)
Tealium AudienceStream is an omnichannel customer segmentation and real-time action engine. AudienceStream takes the data that flows into EventStream and creates visitor profiles that represent the most important attributes of your customers’ engagement with your brand. Refer to our AudienceStream article for set up steps.
Tealium iQ allows you to trigger code in your apps by using a tag in the Tealium iQ Tag Management UI. This tag will collect, control, and deliver event data from mobile and web platforms, allowing you to configure a native Braze implementation without adding Braze-specific code to your apps. Users can choose to integrate Mobile Remote Commands through iQ Tag Management or JSON configuration files (recommended Tealium approach). Users using the Braze Web SDK must integrate through the web iQ tag.
To learn more about the pros and cons of each method, refer to the following Tealium iQ tag manager section.

Tealium offers both batch and non-batch connector actions. The non-batch connector should be used when real-time requests are important to the use case and there are no concerns about hitting the Braze API rate limit specifications. Contact Braze Support or your customer success manager if you have any questions.
For batch connectors, requests are queued until one of the following thresholds is met:
- Maximum number of requests: 75
- Maximum time since oldest request: 10 minutes
- Maximum size of requests: 1 MB
Tealium does not batch consent events (subscription preferences) or user deletion events by default.
Prerequisites
| Requirement | Description |
|---|---|
| Tealium account | A Tealium account with server and/or client-side access is required to take advantage of this partnership. |
| Installed source and Tealium source libraries | The origin of any data sent into Tealium, such as mobile apps, websites, or backend servers. You must install the libraries into your app, site, or server before being able to set up a successful Tealium connector. |
| Braze REST and SDK endpoint | Your REST or SDK endpoint URL. Your endpoint will depend on the Braze URL for your instance. |
| Braze app identifier key (side-by-side only) | Your app identifier key. This can be found within the Braze Dashboard > Manage Settings > API Key. |
| Code version (side-by-side only) | Corresponds to SDK version and should be in major.minor format (for example, 3.2 not 3.0.1). The code version should be 3.0 or higher. |
| REST API key (server-to-server only) | A Braze REST API key with users.track and users.delete permissions. This can be created within Braze Dashboard > Developer Console > REST API Key > Create New API Key. |
Choose your integration type
| Integration | Details |
|---|---|
| Side-by-side | Uses Tealium’s SDK to translate events into the Braze native calls, allowing access to deeper features and more comprehensive usage of Braze than the server-to-server integration. If you plan on using Braze remote commands, note that Tealium does not support all Braze methods (for example, Content Cards). To use a Braze method that isn’t mapped through a corresponding remote command, you will have to invoke the method by adding native Braze code to your codebase. |
| Server-to-server | Forwards data from Tealium to the Braze REST API endpoints. Does not support Braze UI features such as in-app messaging, Content Cards, or push notifications. There also exists automatically captured data, such as device-level fields, that are not available through this method. Consider a side-by-side integration if you wish to use these features. |
Side-by-side SDK integration
Remote commands
Remote commands are a feature of the Tealium iOS and Android libraries that allow you to make calls from the Tealium SDK—through the Braze servers—to Braze. The Braze remote command module will automatically install and build the required Braze libraries and handle all message rendering and analytics tracking. To use Braze mobile remote command, you will need Tealium libraries installed in your apps.
Tealium offers two ways to integrate Mobile Remote Command, there is no loss of functionality between integration types, and the underlying native code is identical.
| Mobile remote command method | Pros | Cons |
|---|---|---|
| Remote command tag | Easily modify the mappings and data sent to the remote command using the Tealium iQ UI. This allows us to send additional data or events to a 3rd party SDK after the app is already in the app store, without the client having to update the app. |
The Tag Management module in the app relies on a hidden webview to process JavaScript. |
| JSON configuration file (Recommended) |
Using the JSON method eliminates the need to have a hidden webview in the app and greatly reduces memory consumption. The JSON file can be hosted remotely or locally within the customer’s app. |
At the moment, there is no UI to manage this, so it requires a bit of extra effort. Note: Tealium is working on adding a management UI that will solve this issue and bring the same level of flexibility to JSON remote commands as they have with the iQ Tag management version |
Use Braze mobile remote command data mappings to set default user attributes and custom attributes and track purchases and custom events. Refer to the following chart for corresponding Braze methods.
| Remote command | Braze method |
|---|---|
| appendcustomarrayattribute | addToCustomAttributeArrayWithKey() |
| emailnotification | setEmailNotificationSubscriptionType() |
| incrementcustomattribute | incrementCustomAttribute() |
| initialize | startWithApiKey() |
| logcustomevent | logCustomEvent() |
| logpurchase | logPurchase() |
| pushnotification | setPushNotificationSubscriptionType() |
| removecustomattribute | setCustomAttributeWithKey() |
| setcustomattribute | setCustomAttributeArrayWithKey() |
| setcustomarrayattribute | setCustomAttributeArrayWithKey() |
| setlastknownlocation | setLastKnownLocationWithLatitude() |
| unsetcustomattribute | unsetCustomAttributeWithKey() |
| useralias | addAlias() |
| userattribute | ABKUser() |
| useridentifier | changeUser() |
You can find more details on how to set up Braze mobile remote command and an overview of supported methods in the Tealium developer documentation:
Braze mobile remote commands do not support all Braze methods and messaging channels (for example, Content Cards). To use a Braze method that isn’t mapped through a corresponding remote command, you will have to invoke the method directly by adding native Braze code to your codebase.
Braze Web SDK tag
Use the Braze Web SDK Tag to deploy the Braze Web SDK to your website. Tealium iQ Tag Management allows customers to add Braze as a tag within the Tealium dashboard to track visitor activity. Tags are typically used by marketers to understand the efficacy of online advertising, email marketing, and site personalization.
- In Tealium, navigate to iQ > Tags > + Add Tag > Braze Web SDK.
- In the Tag Configuration dialogue box, enter the API Key (your Braze app identifier key), Base URL (Braze SDK endpoint), and Braze Web SDK code version. You can also enable logging to log information in the web console for debugging purposes.
- In the Load Rules dialogue box, choose “Load on All Pages” or select Create Rule to determine when and where to load an instance of this tag on your site.
- In the Data Mappings dialogue box, select Create Mappings to map Tealium data to Braze. The destination variables for the Braze Web SDK tag are built into the Data Mapping tab for the tag. The following tables list the available destination categories and describe each destination name.
- Select Finish.
Side-by-side integrations resources
- iOS remote command: Tealium documentation, Tealium GitHub repository
- Android remote command: Tealium documentation, Tealium GitHub repository
- Web SDK tag: Tealium documentation
Server-to-server integration
This integration forwards data from Tealium to the Braze REST API.
Server-to-server integration does not support Braze UI features like in-app messaging, Content Cards, or push notifications. There also exists automatically captured data (such as device-level fields) that are not available through this method.
If you wish to use this data and these features, consider our side-by-side SDK integration.
Step 1: Set up a source
Tealium requires that you first set up a valid data source for your connector to draw from.
- From the sidebar in Tealium under Server-Side, navigate to Sources > Data Sources > + Add Data Source.
- Locate your desired platform within the available categories, and name your source, this is a required field.

- From the Event Specifications options, choose the event specifications you would like to include. Event specifications help you identify the event names and required attributes to track in your installation. These specifications will be applied to incoming events.

Take some time to think about what data is most valuable to you and which specifications seem most appropriate for your use case. Custom event specifications are also available. - The next dialogue advances to the Get Code step. The base code and event tracking code provided here serve as your installation guide. Download the provided PDF if you wish to share these instructions with your team. Select Save & Continue when finished.
- You will now be able to view your saved source as well as add or remove event specs.

From the detailed data source view you can perform the following actions:- View and copy the data source key
- View installation instructions
- Return to the Get Code page
- Add or remove event specifications
- Navigate to view live events related to an event specification
- And more…
- Lastly, select Save / Publish found at the top of the page. If you do not publish your source, you will be unable to find it when configuring your Braze connector.
Refer to Data Sources for further instruction on setting up and editing your data source.
Step 2: Create an event connector
A connector is an integration between Tealium and another vendor used to transmit data. These connectors contain actions that represent their partner’s supported APIs.
- From the sidebar in Tealium under Server-Side, navigate to EventStream > Event Connectors.
- Select the blue + Add Connector button to look through the connector marketplace. In the new dialogue box that appears, use the spotlight search to find the Braze connector.
- To add this connector, click the Braze connector tile. When clicked, you can view the connection summary and a list of the required information, supported actions, and configuration instructions. Configuration comprises three steps: source, configuration, and action.
Source
After the source has been configured, go back to the Braze connector page under EventStream > Event Connectors > + Add Connector > Braze.
Then, select the data source you just built, and under Event Feed, select All Events or a specific event specification, the recommended path to send only changed values into Braze. Select Continue.
Configuration
Next, select Add Connector at the bottom of the page. Name your connector and provide your Braze API endpoint and Braze REST API key here.

If you have created a connector before, you may optionally use an existing one from the available connector list and modify it to fit your needs with the pencil icon or delete it with the trash icon.
Action
Next, name your connector action and select an action type that will send data according to the mapping you configure. Here, you will map Braze attributes, events, and purchases to Tealium attribute, event, and purchase names.
Not all fields offered are required.
This action allows you to track user, event, and purchase attributes all in one action.
| Parameters | Description |
|---|---|
| User ID | Use this field to map the Tealium user ID field to its Braze equivalent. Map one or more user ID attributes. When multiple IDs are specified, the first non-blank value is picked based on the following priority order: External ID, Braze ID, Alias Name, and Alias Label. - External ID and Braze ID should not be specified if importing push tokens. - If specifying a user alias, the alias name and alias label should be set. For more information, check out the Braze /users/track endpoint. |
| User attributes | Use existing Braze user profile field names to update user profile values in the Braze dashboard or add your own custom user attribute data to the user profiles. - By default, new users are created if one does not exist. - By setting Update Existing Only to true, only existing users are updated, and no new user is created.- If a Tealium attribute is empty, it is converted to null and removed from the Braze user profile. Enrichments should be used if null values should not be sent to Braze to remove a user attribute. |
| Modify user attributes | Use this field to increment or decrement certain user attributes - Integer attributes may be incremented by positive or negative integers. - Array attributes may be modified by adding or removing values from existing arrays. |
| Event | An event represents a single occurrence of a custom event by a particular user at a timestamp. Use this field to track and map event attributes like those in the Braze event object. - Event attribute Name is required for every mapped event.- Event attribute Time is automatically set to now unless explicitly mapped. - By default, new events will be created if one does not exist. By setting Update Existing Only to true, only existing events will be updated, and no new event will be created.- Map array type attributes to add multiple events. Array type attributes must be of equal length. - Single value attributes can be used and applied to each event. |
| Event template | Provide event templates to be referenced in body data. Templates can be used to transform data before sending it to Braze. Refer to Tealium’s Templates Guide to learn more. |
| Event template variable | Provide event template variables as data input. Refer to Tealium’s Template Variables Guide to learn more. |
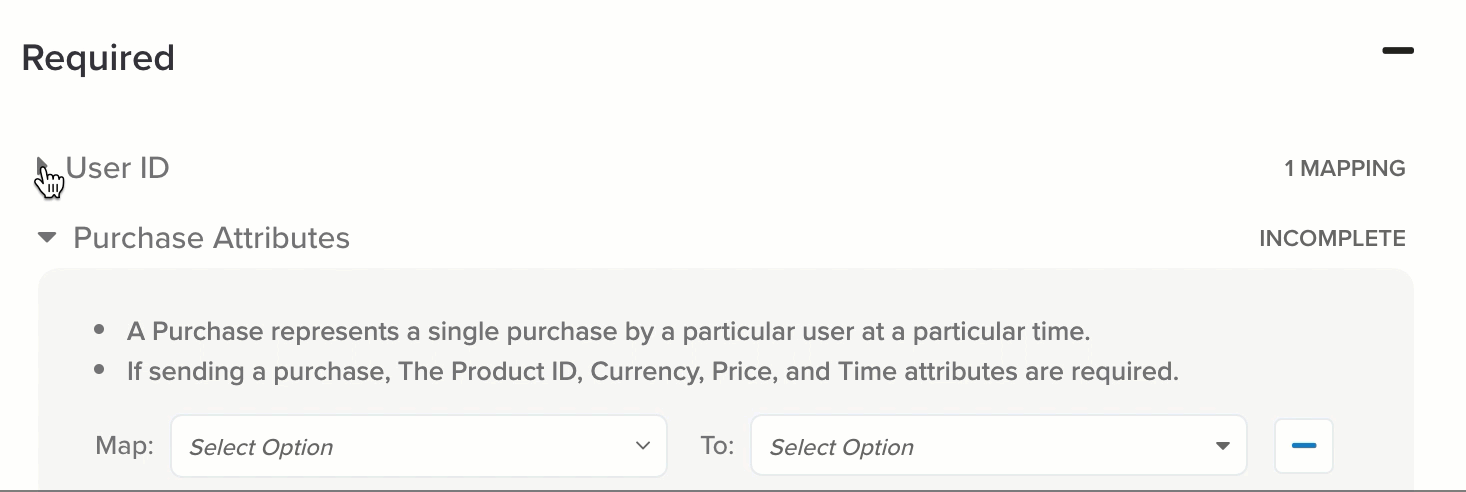
| Purchase | Use this field to track and map user purchase attributes like those in the Braze purchase object. - Purchase attributes Product ID, Currency, and Price are required for every mapped purchase.- Purchase attribute Time is automatically set to now unless explicitly mapped.- By default, new purchases will be created if one does not exist. By setting Update Existing Only to true, only existing purchases will be updated, and no new purchase will be created.- Map array type attributes to add multiple purchase items. Array type attributes must be of equal length. - Single value attributes can be used and will apply to each item. |
| Purchase template | Templates can be used to transform data prior to it being sent to Braze. - Define a purchase template if you need nested objects support. - When a purchase template is defined, the configuration set up in the purchases section of your action will be ignored. - Refer to Tealium’s Templates Guide to learn more. |
| Purchase template variable | Provide product template variables as data input. Refer to Tealium’s Template Variables Guide to learn more. |

This action allows you to delete users from the Braze dashboard.
| Parameters | Description |
|---|---|
| User ID | Use this field to map the Tealium User ID field to it’s Braze equivalent. - Map one or more user ID attributes. When multiple IDs are specified, the first non-blank value is picked based on the following priority order: External ID, Braze ID, Alias Name, and Alias Label. - When specifying a user alias, Alias Name and Alias Label should both be set. For more information, see the Braze /users/delete endpoint. |

If you would like to modify your chosen options, select Back to edit or Finish to complete.
Select Continue.
Your connector now displays in the list of connectors on your Tealium home page. 
Make sure to select Save / Publish for your connector when finished. The actions you configured will now fire when the trigger connections are met.
Step 3: Test your Tealium connector
After your connector is up and running, you should test it to ensure it’s working properly. The most simple way to test this is to use the Tealium Trace Tool. To start using Trace, make sure that you have added the Tealium Tools browser extension.
- To start a new trace, select Trace on the sidebar under Server-Side options. Select Start and capture the Trace ID.
- Open the browser extension and enter the Trace ID into AudienceStream Trace.
- Examine the real-time log.
- Check for the action you want to validate by selecting Actions Triggered entry to expand.
- Look for the action you want to validate and view the log status.
Refer to Tealium’s Trace documentation for more detailed instructions on implementing Tealium’s Trace tool.
Integration demo
Potential data point overages
There are three primary ways that you might accidentally log unnecessary data points when integrating Braze through Tealium:
Sending duplicate data - only send Braze deltas of attributes
Tealium does not send Braze deltas of user attributes. For example, if you have an EventStream action that tracks a user’s first name, email, and cell phone number, Tealium will send all three attributes to Braze anytime the action is triggered. Tealium won’t be looking for what changed or was updated and send only that information.
Solution:
You can check your backend to assess whether an attribute has changed or not, and if so, call Tealium’s relevant methods to update the user profile. This is what users who integrate Braze directly usually do.
OR
If you don’t store your own version of a user profile in your backend and can’t tell if attributes change or not, you can use AudienceStream and
create enrichments to only send user attributes when values have changed. See Tealium’s documentation on enrichment rules.
Sending irrelevant data or needlessly overwriting data
If you have multiple EventStreams that target the same event feed, all actions enabled for that connector will automatically fire anytime a single action is triggered. This could also result in data being overwritten in Braze and logging unnecessary data points.
Solution:
Set up a separate event specification or feed to track each action.
OR
Disable actions(or connectors) that you do not want to fire by using the toggles in the Tealium dashboard.
Initializing Braze too early
If you are integrating with Tealium using the Braze Web SDK tag, you may see a dramatic increase in your MAU. If Braze is initialized on page load, Braze will create an anonymous profile every time a web user navigates to the website for the first time. This includes bot traffic, which can inflate your Active Users count. Some may want to only track user behavior when users have completed some action, such as “Signed In” or “Watched Video”, to lower their MAU count.
Solution:
Set up load rules to determine exactly when and where a tag loads on your site. For more comprehensive guidance on filtering bot traffic and conditionally initializing the SDK, see Filtering bot traffic.