mParticle
mParticle’s customer data platform empowers you to do more with your data. Sophisticated marketers use mParticle to orchestrate data across their entire growth stack, enabling them to win in key customer journey moments.
The Braze and mParticle integration allows you to seamlessly control the flow of information between the two systems:
- Sync mParticle audiences to Braze for Braze campaign and Canvas segmentation.
- Share data across the two platforms. This can be done through the mParticle kit integration and the server-to-server integration.
- Send Braze user interaction to mParticle through Currents, making it actionable across the entire growth stack.
Prerequisites
| Requirement | Description |
|---|---|
| mParticle account | An mParticle account is required to take advantage of this partnership. |
| Braze instance | Your Braze instance can be found on the API overview page. (For example: US-01, US-02, etc.) |
| Braze app identifier key | Your app identifier key. This can be found within the Braze Dashboard > Manage Settings > API Key. |
| Workspace REST API key | (Server-to-server) A Braze REST API key This can be created within the Braze Dashboard > Developer Console > API Settings > API Key. |
Integration
Audiences
Use Braze and mParticle’s partnership to configure your integration and import mParticle audiences directly into Braze for retargeting, creating a full loop of data from one system to another. Any integration you set up will count toward your account’s data point volume.
Forwarding Audiences
mParticle offers three ways to set cohort membership attributes, controlled by the “Send Segments As” configuration setting. Refer to the following sections for the processing of each option:
- Single string attribute
- Single array attribute
- One attribute per segment
- Both single array attribute and single string attribute
- Both single array attribute and one attribute per segment
- Both single string attribute and one attribute per segment
- Single array attribute, single string attribute, and one attribute per segment
Single string attribute
mParticle will create a single custom attribute called SegmentMembership. The value of this attribute is a string of comma-separated mParticle audience IDs that match the user. These audience IDs can be found in the mParticle dashboard under Audiences.
For example, if an mParticle audience “Ibiza dreamers” has an audience ID of “11036”, you can segment these users with the filter SegmentMembership — matches regex — 11036.
While this is the default option in mParticle, most Braze users opt to use single array attributes for the filtering experience when creating segments in Braze.
This solution is not recommended if you have more than a few audiences because custom attributes can be up to 255 characters long, so you will not be able to store dozens or hundreds of audiences on a user profile using this method. If you have a large number of cohorts per user, we strongly recommend the “one attribute per segment” configuration.

Single array attribute
mParticle creates a single custom array attribute in Braze for each user, called SegmentMembershipArray. The value of this attribute is an array of mParticle audience IDs that match the user.
For example, if a user is a member of three mParticle audiences with the audience IDs of “13053”, “13052”, and “13051”, you can segment for users who match one of those audience with the filter SegmentMembershipArray — includes value — 13051.
Braze array attributes have a maximum length of 25. If any of your users are members of over 25 audiences, membership information will be truncated by Braze. To work around this, contact your Braze representative to increase your max array length threshold.
One attribute per segment
mParticle will create a boolean custom attribute for each audience a user belongs to. For example, if an mParticle audience is called “Possible Parisians”, you can segment these users with the filter In Possible Parisians - equals - true.

Both single array attribute and single string attribute
mParticle will send attributes as described by both single array attribute and single string attribute.
Both single array attribute and one attribute per segment
mParticle will send attributes as described by both single array attribute and one attribute per segment.
Both single string attribute and one attribute per segment
mParticle will send attributes as described by both single string attribute and one attribute per segment.
Single array attribute, single string attribute, and one attribute per segment
mParticle will send attributes as described by single array attribute, single string attribute, and one attribute per segment.
Step 1: Create an audience in mParticle
To create an audience in mParticle:
- Navigate to Audiences > Single Workspace > + New Audience.
- To connect Braze as an output for your audience, you must provide the following fields:
| Field Name | Description |
|---|---|
| API key | Found in the Braze dashboard at Settings > API Keys. If you are using the older navigation, you can find API keys at Developer Console > API Settings. |
| API key operating system | Select which operating system your Braze API key corresponds to. This selection will limit the types of push tokens forwarded on an audience update. |
| Send segments as | The method of sending audiences to Braze. See the section Forwarding audiences for details. |
| Workspace REST API key | Braze REST API key with full permissions. This can be created in the Braze dashboard from Settings > API Keys. |
| External identity type | The mParticle user identity type to forward as an external ID to Braze. We recommend leaving this to the default value, Customer ID. |
| Email identity type | The mParticle user identity type to forward as the email to Braze. |
| Braze instance | Specify which cluster your Braze data will be forwarded to. |
- Lastly Save your audience.
You should begin seeing audiences syncing to Braze within a few minutes. Audience membership will only update for users with external_ids (that is, not anonymous users). For more information on creating Braze mParticle audience, see the mParticle documentation on Configuration settings.
Step 2: Segment users in Braze
In Braze, to create a segment of these users, navigate to Segments under Engagement and name your segment. The following are two examples of segments depending on the option you selected for Send segments as. For more details on each option, see Forwarding audiences
- Single array attribute: Select
SegmentMembershipArrayas your filter. Next, use the “includes value” option and input your desired audience ID.
- One attribute per segment: Select your custom attribute as the filter. Next, use the “equals” option and choose the appropriate logic.

Once saved, you can reference this segment during Canvas or campaign creation in the targeting users step.
Deactivating and deleting connections
Since mParticle does not directly maintain segments in Braze, it will not delete segments when the corresponding mParticle audience connection is deleted or deactivated. When this happens, mParticle will not update the audience user attributes in Braze to remove the audience from each user.
To remove the audience from a Braze user before deletion, adjust the audience filters to force the audience size to 0 before deleting an audience. After the audience calculation has completed and returns 0 users, delete the audience. Then, the audience membership will update in Braze to false for the single attribute option or removes the audience ID from the array format.
Data mapping
Data can be mapped to Braze using the embedded kit integration if you want to connect your mobile and web apps to Braze through mParticle. You can also use the server-to-server API integration to forward server-side data to Braze.
Regardless of which approach you choose, you must set up Braze as an output:
Configure your Braze output settings
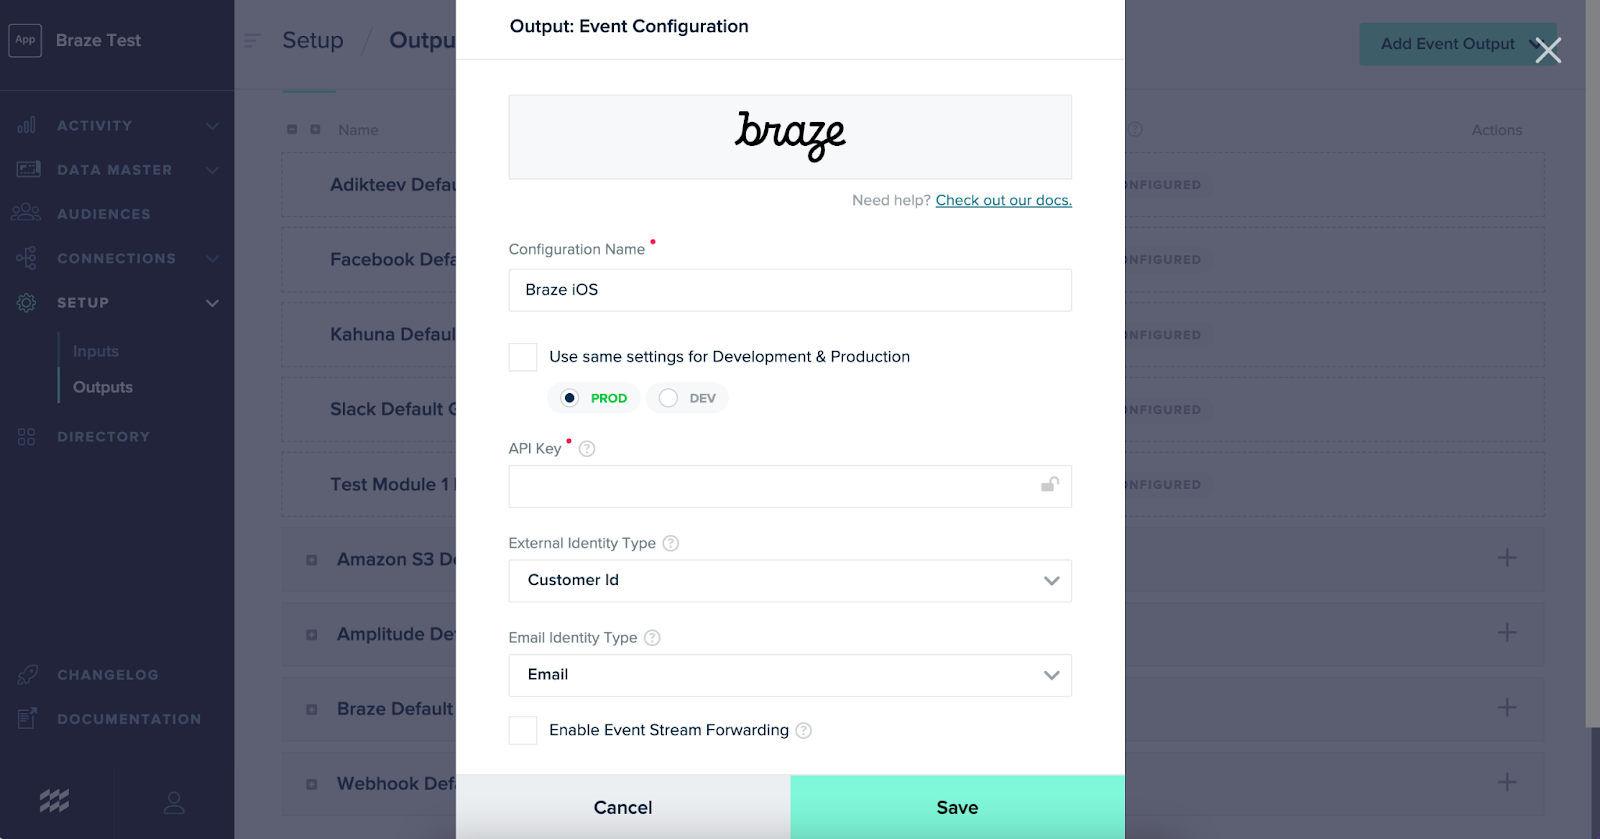
In mParticle, navigate to Setup > Outputs > Add Outputs and selected Braze to open the Braze kit configuration. Save when completed.
| Setting name | Description |
|---|---|
| Braze app identifier key | Your Braze app identifier key can be found in the Braze dashboard from Settings > API Keys. Note that API keys will differ for each platform (iOS, Android, and Web). |
| External identity type | The mParticle user identity type to forward as an external ID to Braze. We recommend leaving this to the default value, Customer ID |
| Email identity type | The mParticle user identity type to forward as an email to Braze. We recommend leaving this to the default value, Email, |
| Braze instance | The cluster your Braze data will be forwarded to; this should be the same cluster your dashboard is on. |
| Enable event stream forwarding | (Server-to-server) When enabled, all events will be forwarded in real-time. If not, all events will be forwarded in bulk. When choosing to enable event stream forwarding, ensure that the data you are passing to Braze will respect rate limits. |
Embedded kit integration
The mParticle and Braze SDK will be present on your application through the embedded kit integration. However, unlike a direct Braze integration, mParticle takes care of calling the majority of Braze SDK methods for you. The mParticle methods you use to track user data will automatically be mapped to Braze’s SDK methods.
These mappings of mParticle’s SDK for Android, iOS and Web are open source and can be found on mParticle’s GitHub page.
The embedded kit SDK integration allows you to take advantage of our full suite of features (push, in-app messages, and all relevant message analytics tracking).
For Content Cards and custom in-app message integrations, call the Braze SDK methods directly.
Step 1: Integrate the mParticle SDKs
Integrate the appropriate mParticle SDKs into your app based on your platform needs:
Step 2: Complete mParticle’s Braze event kit integration
While the Braze SDK does not need to be directly included within your website or app for this mParticle integration, the following mParticle Appboy Kit must be installed to forward data from your app to Braze.
mParticle’s Braze event kit integration guide will walk you through custom mParticle and Braze alignment instructions based on your messaging needs (Push, Location Tracking, etc.).
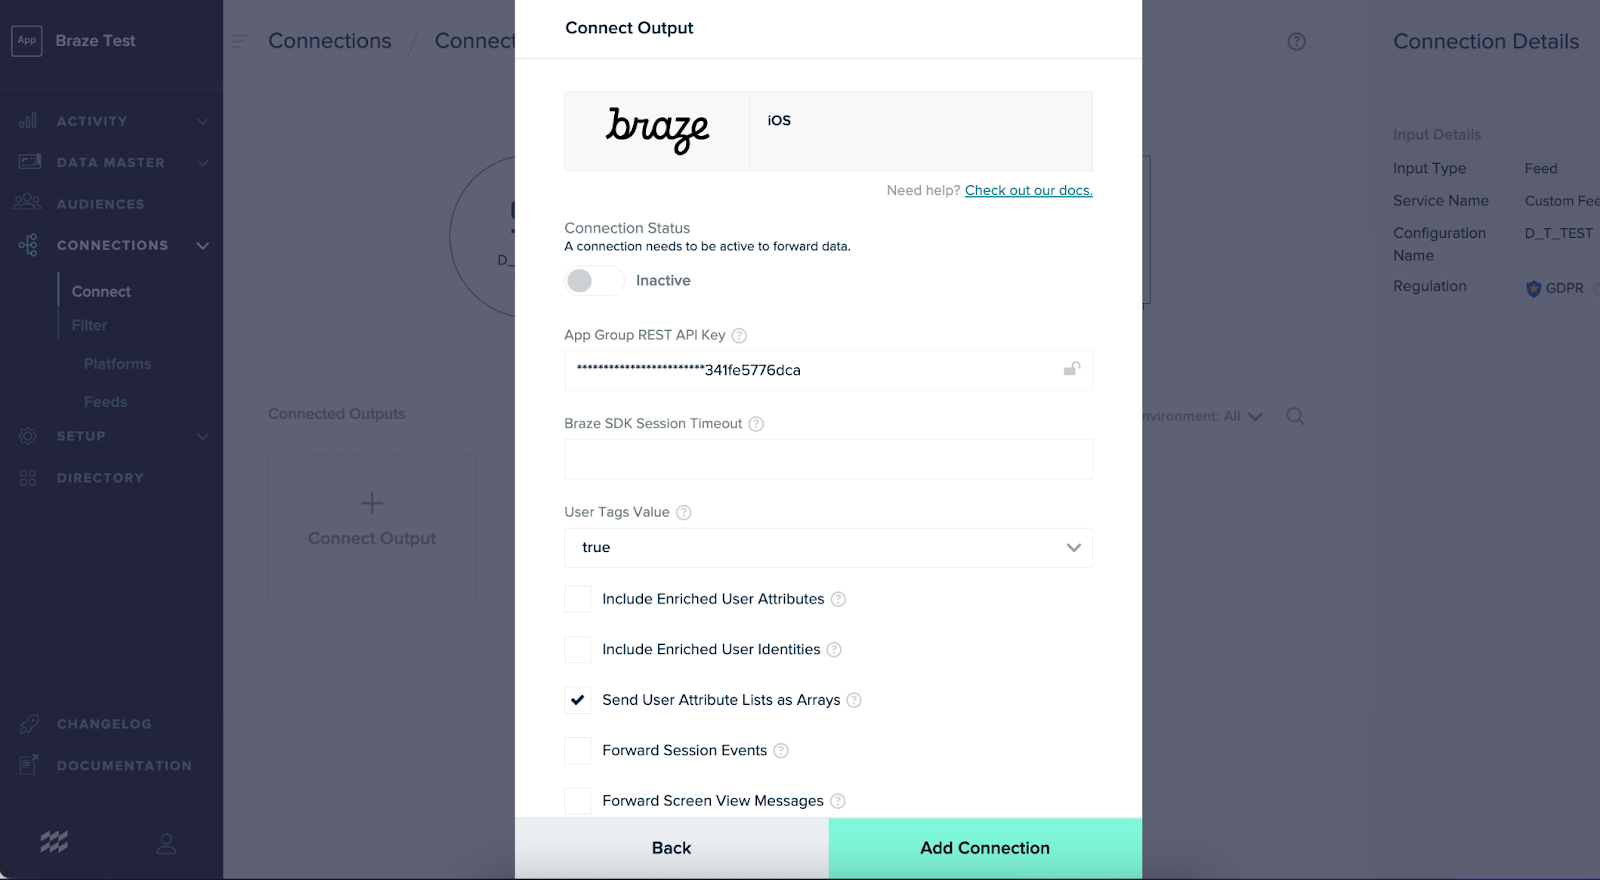
Step 3: Connections settings for your Braze output
In mParticle, navigate to Connections > Connect > [Your desired platform] > Connect Output to add Braze as an output. Save when completed.
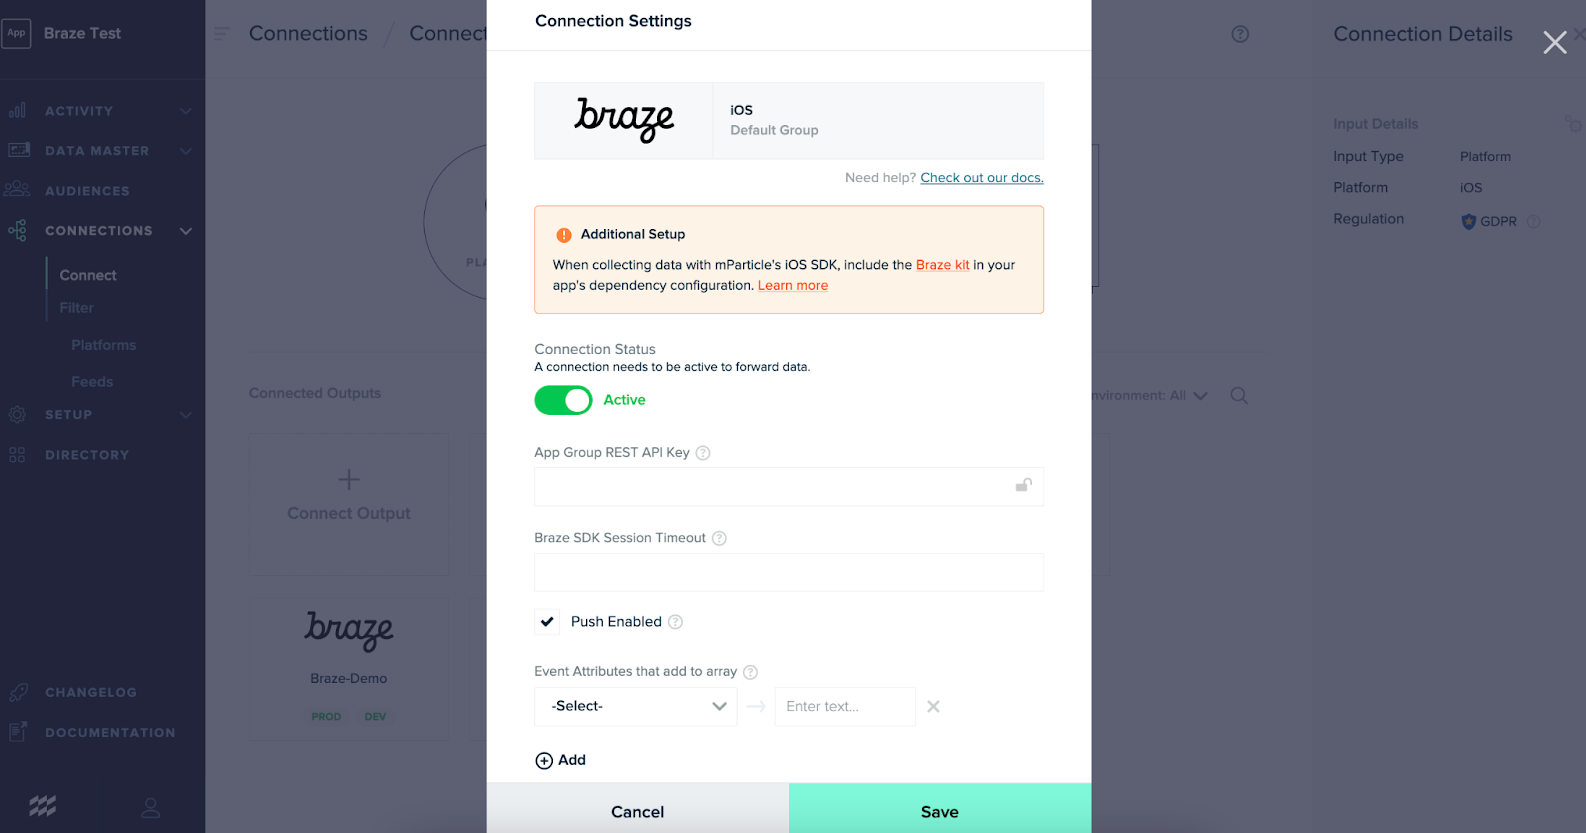
Not all connection settings will apply to all platforms and integration types. For a breakdown of connection settings and the platforms they apply to, see mParticle’s documentation.
Server API integration
This is an add-on to route your backend data to Braze if you’re using mParticle’s server-side SDKs (for example, Ruby, Python, etc.). To set up this server-to-server integration with Braze, follow mParticle’s documentation.
Server-to-server integration does not support Braze UI features such as in-app messaging, Content Cards, or push notifications. There also exists automatically captured data, such as device-level fields, that are unavailable through this method.
Consider a side-by-side integration if you wish to use these features.
For server-side data to be forwarded to Braze, it must include an external_id; anonymous users will not be forwarded.
Connections settings for your Braze output
In mParticle, navigate to Connections > Connect > [Your desired platform] > Connect Output to add Braze as an output. Save when completed.
Not all connection settings will apply to all platforms and integration types. For a breakdown of connection settings and the platforms they apply to, see mParticle’s documentation.
Before enabling “Enriched User Attributes” or “Enriched User Identities” we recommend reviewing Data point overages to ensure you are aware of how these settings will impact data point usage.
Data mapping details
Data types
Not all data types are supported between both platforms.
- Custom event properties support string, numeric, boolean, or date objects. It does not support arrays or nested objects.
- Custom attributes support string, numerical, boolean, date objects, and arrays but does not support objects or nested objects.
Braze doesn’t support timestamps before year 0 or after year 3000 in Time type custom attributes. Braze will ingest these values when they are sent by mParticle but the value will be stored as a string.
Data mapping
| mParticle data type | Braze data type | Description |
|---|---|---|
| User attributes (reserved) | Standard attribute | For example, mParticle’s $FirstName reserved user attribute key is mapped to first_name standard attribute field for Braze. |
| User attributes (other) | Custom Attribute | Any user attributes passed to mParticle that fall outside of its reserved user attribute keys are logged in Braze as a custom attribute. User attributes support string, numerical, boolean, date, and arrays but do not support objects or nested objects. |
| Custom event | Custom event | mParticle custom events are recognized by Braze as a custom event. Event attributes are forwarded as custom event properties. Event attributes passed to Braze as event properties support string, numeric, boolean, or date objects but do not support arrays or nested objects. |
| Purchase commerce event | Purchase event | Purchase commerce events will be mapped to Braze purchase events. Toggle the setting value for bundle commerce event data to log purchases at the order-level or product-level. For example, if false, a single incoming event with two unique products, promotions, or impressions would result in at least two outgoing Braze events. If set to true, it would result in a single outgoing event with a nested products, promotions or impressions array, respectively.For more information on the additional commerce fields that will be logged, see mParticle’s documentation. When setting “bundle commerce event data” as false product attributes passed to Braze as purchase event properties, support string, numeric, boolean, or date objects but do not support arrays or nested objects. |
| All other commerce events | Custom event | All other commerce events will be mapped to custom events. Toggle the setting value for bundle commerce event data to log purchases at the order-level or product-level. For example, if false, a single incoming event with two unique products, promotions, or impressions would result in at least two outgoing Braze events. If set to true, it would result in a single outgoing event with a nested products, promotions or impressions array, respectively.In addition to certain default commerce values, product attributes will be logged as Braze event properties. For more information on the additional commerce fields that will be logged, see mParticle’s documentation When setting “bundle commerce event data” as false product attributes passed to Braze as event properties, support string, numeric, boolean, or date objects but do not support arrays or nested objects. |
User identity mapping
For each mParticle output, you can select the external identity type to send to Braze as the external_id. While the default value is customer ID, you can choose to map another ID, such as MPID, to send to Braze as the external_id. Be aware that choosing an identifier other than customer ID may influence how data is sent in Braze.
For example, mapping MPID to your Braze external_id will have the following effects:
- Due to the nature of when MPID is assigned, all users will be assigned an
external_idon session start. - Currents setup may require additional mapping due to differing data types between MPID and
external_id.
Forwarding erasure requests (data subject requests)
Forward erasure requests to Braze by configuring a data subject request output to Braze. To forward erasure requests to Braze, follow mParticle’s documentation.
Potential data point overages
Enriched user attributes
Enabling enrich user attributes/identities (server-to-server only)
In the mParticle connection settings, Braze recommends turning off Include Enriched User Attributes. If enabled, mParticle will forward all available user attributes (such as standard attributes, custom attributes, and calculated attributes) from the existing profile to Braze on each logged event. This will result in high consumption of data points since mParticle will send Braze the same unchanged attributes on each call.
For example, if a user adds first name, last name, and phone number during their first session and later signs up for a newsletter adding the same information, in addition to email, triggering a newsletter sign-up event:
- If turned on (default), five data points will be incurred. (sign-up event, email address, first name, last name, and phone number)
- If turned off, two data points will be incurred (sign-up event and email address)
Turning off this setting won’t check for changing data. It will, however, prevent the integration from sending all user attributes on the user’s profile that weren’t received on the original inbound batch or explicitly set as an attribute for the event. It is important to still check that only deltas are passed to Braze.
Considerations of turning off enriched user attributes
There are a few considerations to be aware of when turning off Include Enriched User Attributes:
- The server-to-server integration uses the mParticle events API to send events to Braze. Each request is triggered by an event. When a user attribute is changed, such as updating an email address, but is not associated with a specific event (for example, a profile update custom event), the new value is only passed to an output like Braze as an “enriched attribute” in the payload of the next event triggered by the user. When Include Enriched User Attributes is turned off, this new attribute value unassociated with a specific event will not be passed to Braze.
- To solve this, we recommend creating a separate “user attribute updated” event that only sends the specific user attribute(s) that have been updated to Braze. Note that with this approach, you are still logging an additional data point for the “user attribute updated” event, but data point consumption will be far less than sending all user attributes on every call with the feature enabled.
- Calculated Attributes are passed to Braze as an enriched user attribute, so when “Enriched User Attributes” is turned off these will no longer be passed to Braze. To forward calculated attributes to Braze when “Enriched User Attributes” are turned off, a calculated attribute feed could help without pushing all the attributes. The feed will fire an update downstream to Braze when a calculated attribute changes.
Sending unnecessary or duplicate data to Braze
Braze counts a data point each time an attribute is passed to Braze, even if the value is unchanged. For this reason, Braze recommends only forwarding data needed to action on within Braze and ensuring that only deltas of attributes are being passed.
 Edit this page on GitHub