AppsFlyer
AppsFlyer is a mobile marketing analytics and attribution platform that helps you analyze and optimize your apps through marketing analytics, mobile attribution, and deep linking.
The Braze and AppsFlyer integration allows you to better understand how to optimize and build more holistic campaigns by leveraging mobile install attribution data from AppsFlyer.
You can also pass your AppsFlyer audiences (cohorts) directly to Braze with the AppsFlyer Audiences integration, allowing you to create powerful customer engagement campaigns targeted toward just the right users at just the right time.
Prerequisites
| Requirement | Description |
|---|---|
| AppsFlyer account | An AppsFlyer account is required to take advantage of this partnership. |
| iOS or Android app | This integration supports iOS and Android apps. Depending on your platform, code snippets may be required in your application. Details on these requirements can be found in step 1 of the integration process. |
| AppsFlyer SDK | In addition to the required Braze SDK, you must install the AppsFlyer SDK. |
| Email domain setup complete | You must have completed the IP and domain setup step of setting up your email during Braze onboarding. |
| SSL certificate | Your SSL certificate must be configured. |
Integration
Step 1: Map device ID
Android
If you have an Android app, you will need to pass a unique Braze device ID to AppsFlyer.
Make sure the following lines of code are inserted at the correct place—after the Braze SDK is launched and before the initialization code for the AppsFlyer SDK. See the AppsFlyer Android SDK integration guide for more information.
1
2
3
4
HashMap<String, Object> customData = new HashMap<String,Object>();
String deviceId =(Braze.getInstance(MyActivity.this).getDeviceId());
customData.put("brazeCustomerId", deviceId);
AppsFlyerLib.setAdditionalData(customData);
iOS
Prior to February 2023, our AppsFlyer attribution integration used the IDFV as the primary identifier to match iOS attribution data. It is not necessary for Braze customers using Objective-C to fetch the Braze device_id and sent to AppsFlyer upon install as there will be no disruption of service.
For those using the Swift SDK v5.7.0+, if you wish to continue using IDFV as the mutual identifier, you must confirm that the useUUIDAsDeviceId field is set to false so there is no disruption of the integration.
If set to true, you must implement the iOS device ID mapping for Swift in order to pass the Braze device_id to AppsFlyer upon app install in order for Braze to appropriately match iOS attributions.
1
2
3
4
5
6
7
8
9
BRZConfiguration *configurations = [[BRZConfiguration alloc] initWithApiKey:@"BRAZE_API_KEY" endpoint:@"BRAZE_END_POINT"];
[configurations setUseUUIDAsDeviceId:NO];
Braze *braze = [[Braze alloc] initWithConfiguration:configurations];
[braze deviceIdWithCompletion:^(NSString * _Nonnull brazeDeviceId) {
    NSLog(@">>[BRZ]: %@", brazeDeviceId);
    [[AppsFlyerLib shared] setAdditionalData:@{
        @"brazeDeviceId": brazeDeviceId
    }];
}];
Swift completion handler
1
2
3
4
5
6
7
8
9
let configuration = Braze.Configuration(
    apiKey: "<BRAZE_API_KEY>",
    endpoint: "<BRAZE_ENDPOINT>")
configuration.useUUIDAsDeviceId = false
let braze = Braze(configuration: configuration)
braze.deviceId {
    brazeDeviceId in
    AppsFlyerLib.shared().customData = ["brazeDeviceId": brazeDeviceId]
}
Swift await
1
2
3
4
5
6
7
let configuration = Braze.Configuration(
    apiKey: "<BRAZE_API_KEY>",
    endpoint: "<BRAZE_ENDPOINT>")
configuration.useUUIDAsDeviceId = false
let braze = Braze(configuration: configuration)
let brazeDeviceId = await braze.deviceId()
AppsFlyerLib.shared().customData = ["brazeDeviceId": brazeDeviceId]
Unity
1
2
3
4
Appboy.AppboyBinding.getDeviceId()
Dictionary<string, string> customData = new Dictionary<string, string>();
customData.Add("brazeCustomerId", Appboy.AppboyBinding.getDeviceId());
AppsFlyer.setAdditionalData(customData);
Step 2: Get the Braze data import key
In Braze, navigate to Partner Integrations > Technology Partners and select AppsFlyer.
If you are using the older navigation, you can find Technology Partners under Integrations.
Here, you will find the REST endpoint and generate your Braze data import key. After the key is generated, you can create a new key or invalidate an existing one. The data import key and the REST endpoint are used in the next step when setting up a postback in AppsFlyer’s dashboard.
Step 3: Configure Braze in AppsFlyer’s dashboard
- In AppsFlyer, navigate to the Integrated Partners page on the left bar. Next, search for Braze and click on Braze’s logo to open up a configuration window.
- Within the Integration tab, switch on Activate Partner.
- Provide the data import key and REST endpoint that you found in Braze’s dashboard.
- Toggle Advanced Privacy off and save your configuration.
Additional information on these instructions is available in AppsFlyer’s documentation.
Step 4: Confirm the integration
Once Braze receives attribution data from AppsFlyer, the status connection indicator on the AppsFlyer technology partners page in Braze will change from “Not Connected” to “Connected”. A timestamp of the last successful request will also be included.
Note that this will not happen until we receive data about an attributed install. Organic installs, which should be excluded from the AppsFlyer postback, are ignored by our API and are not counted when determining if a successful connection was established.
Step 5: Viewing user attribution data
Available data fields
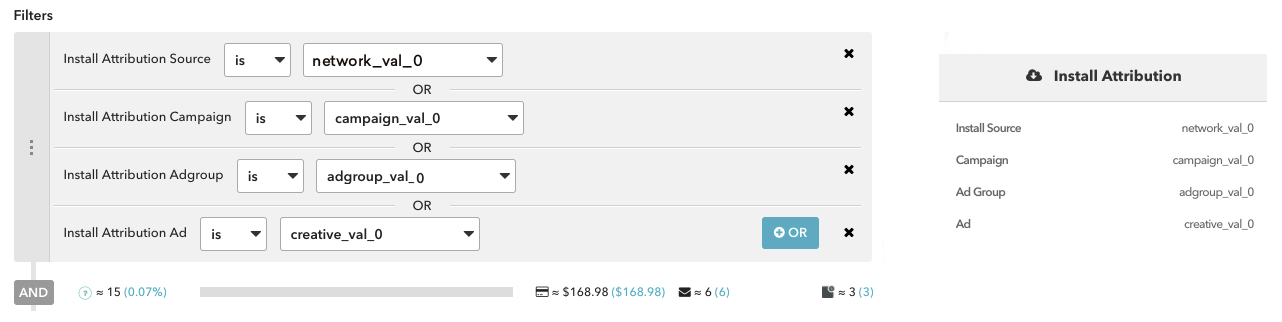
Assuming you configure your integration as suggested, Braze will map all non-organic install data to segment filters.
| AppsFlyer data field | Braze segment filter |
|---|---|
media_source |
Attributed Source |
campaign |
Attributed Campaign |
af_adset |
Attributed Adgroup |
af_ad |
Attributed Ad |
Your user base can be segmented by attribution data in the Braze dashboard using the Install Attribution filters.
Additionally, attribution data for a particular user is available on each user’s profile in the Braze dashboard.
Attribution data for Facebook and X (formerly Twitter) campaigns is not available through our partners. These media sources do not permit their partners to share attribution data with third parties and, therefore, our partners cannot send that data to Braze.
Integrate AppsFlyer with an Email Service Provider for deep linking
AppsFlyer integrates with both SendGrid and SparkPost as Email Service Providers (ESPs) to support deep linking and click tracking. Follow the instructions below to integrate with your ESP of choice.
Deep links—links that direct users toward a specific page or place within an app or website—are used to create a tailored user experience. While widely used, issues can arise when using emailed deep links with click tracking, another important feature used in collecting user data. These issues are due to ESPs wrapping deep links in a click-recording domain, breaking the original link. As such, supporting deep links requires additional setup. By integrating AppsFlyer with either SendGrid or SparkPost, you avoid these issues. Learn more about this topic in Universal links and App Links.
Step 1: Set up OneLink in AppsFlyer
- In AppsFlyer, select a OneLink template for your email campaigns. Make sure the template supports universal links (iOS) or App Links (Android).
- Configure your app to support deep linking with OneLink. See the AppsFlyer documentation for details on configuring your app to support OneLink.
Step 2: Configure your app to support universal links and App Links
Universal links (iOS) or App Links (Android) are allowed by the device’s operating system to open a specified app when clicked.
Perform the following steps to support universal links and App Links.
Set up the Apple App Site Association (AASA) file hosting to enable universal links in your emails.
- Obtain an AASA file in one of the following methods:
- If you’ve set up OneLink with universal links, you may already have an AASA file associated with OneLink. To obtain the AASA file, perform the following:
- Copy the OneLink subdomain of your OneLink template. Make sure the template supports universal links.
- Paste it instead of the placeholder in the following URL:
<OneLinkSubdomain>.onelink.me/.well-known/apple-app-site-association - To download the AASA file, paste the OneLink URL into your browser’s address bar and press Enter. The file will then be downloaded to your computer, and you can open and view its contents using any text editor.
- Apple’s guide on universal links explains how to create the AASA file.
- If you’ve set up OneLink with universal links, you may already have an AASA file associated with OneLink. To obtain the AASA file, perform the following:
- Host the AASA file in your click-recording domain server. The file should be hosted in the path:
click.example.com/.well-known/apple-app-site-association.
See the SendGrid documentation to learn how to configure the AASA file for SendGrid and set up CDN services to host the AASA file.
Once the AASA file is hosted, any change of your OneLink configuration (modification or replacement) requires generating a new AASA file.
Set up the Digital Asset Links file hosting to enable App Links in your emails.
- Obtain a Digital Asset Links file in one of the following methods:
- If you’ve set up OneLink with App Links, you may already have a Digital Asset Links file associated with OneLink. To obtain the file, perform the following:
- Copy the OneLink subdomain of your OneLink template. Make sure the template supports App Links.
- Add
/.well-known/assetlinks.jsonto the end of the OneLink URL. - To download the Digital Asset Links file, paste the OneLink URL into your browser’s address bar and press Enter. For example,
https://<OneLinkSubdomain>.onelink.me/.well-known/assetlinks.json. The file will then be downloaded to your computer, and you can open and view its contents using any text editor.
- Android’s guide to App Links explains how to create the Digital Asset Links file.
- If you’ve set up OneLink with App Links, you may already have a Digital Asset Links file associated with OneLink. To obtain the file, perform the following:
- Host the Digital Asset Links file in your click-recording domain server. The file should be hosted in the path:
click.example.com/.well-known/apple-app-site-association.
See the SendGrid documentation to learn how to configure the Digital Asset Links file for SendGrid and set up CDN services to host the Digital Asset Links file.
Once the Digital Asset Links file is hosted, any change of your OneLink configuration (modification or replacement) requires generating a new file.
Step 2a: Set up AASA file hosting
Set up the Apple App Site Association (AASA) file hosting to enable universal links in your emails.
- Obtain an AASA file in one of the following methods:
- If you’ve set up OneLink with universal links, you may already have an AASA file associated with OneLink. To obtain the AASA file, perform the following:
- Copy the OneLink subdomain of your OneLink template. Make sure the template supports universal links.
- Paste it instead of the placeholder in the following URL:
<OneLinkSubdomain>.onelink.me/.well-known/apple-app-site-association - To download the AASA file, paste the OneLink URL into your browser’s address bar and press Enter. The file will then be downloaded to your computer, and you can open and view its contents using any text editor.
- Apple’s guide on universal links explains how to create the AASA file.
- If you’ve set up OneLink with universal links, you may already have an AASA file associated with OneLink. To obtain the AASA file, perform the following:
- Host the AASA file in your click-recording domain server. The file should be hosted in the path:
click.example.com/.well-known/apple-app-site-association.
See the SparkPost documentation to learn how to configure the AASA file for SparkPost and set custom link sub-paths.
Once the AASA file is hosted, any change of your OneLink configuration (modification or replacement) requires generating a new AASA file.
Step 2b: Redirect your click-tracking domain to your AASA file host
During your email configuration, you created a CNAME record in your DNS server. Perform the following steps after you verify your click-tracking domain in Braze.
- Delete the CNAME record that redirects your subdomain to the SparkPost domain.
- Create a CNAME record that redirects your click-tracking domain to the CDN hosting your app AASA file, instead of the record you deleted above.
Step 2a: Set up Digital Asset Links file hosting
Set up the Digital Asset Links file hosting to enable App Links in your emails.
- Obtain a Digital Asset Links file in one of the following methods:
- If you’ve set up OneLink with App Links, you may already have a Digital Asset Links file associated with OneLink. To obtain the file, perform the following:
- Copy the OneLink subdomain of your OneLink template. Make sure the template supports App Links.
- Add
/.well-known/assetlinks.jsonto the end of the OneLink URL. - To download the Digital Asset Links file, paste the OneLink URL into your browser’s address bar and press Enter. For example,
https://<OneLinkSubdomain>.onelink.me/.well-known/assetlinks.json. The file will then be downloaded to your computer, and you can open and view its contents using any text editor.
- Android’s guide to App Links explains how to create the Digital Asset Links file.
- If you’ve set up OneLink with App Links, you may already have a Digital Asset Links file associated with OneLink. To obtain the file, perform the following:
- Host the Digital Asset Links file in your click-recording domain server. The file should be hosted in the path:
click.example.com/.well-known/apple-app-site-association.
See the SparkPost documentation to learn how to configure the Digital Asset Links file for SparkPost and set custom link sub-paths.
Once the Digital Asset Links file is hosted, any change of your OneLink configuration (modification or replacement) requires generating a new file.
Step 2b: Redirect your click-tracking domain to your digital asset links file host
During your email configuration, you created a CNAME record in your DNS server. Perform the following steps after you verify your click-tracking domain in Braze.
- Delete the CNAME record that redirects your subdomain to the SparkPost domain.
- Create a CNAME record that redirects your click-tracking domain to the CDN hosting your app Digital Asset Links file, instead of the record you deleted above.
Step 3: Configure your AppsFlyer SDK to support deep linking
Step 3a: Configure your SDK to support the AASA file
After you host the AASA file in your click-recording domain, configure your AppsFlyer SDK to support the AASA file.
- In Xcode, select your project.
- Select Capabilities.
- Turn on Associated Domains.
- Click +, and enter your click domain. For example,
applinks:click.example.com. When a click on the universal link occurs, your app is opened and the SDK is initiated. To enable the app to extract the OneLink behind the click domain and resolve the deep link, perform the following:
Step 3b: Handle the deep link data
- Provide the click recording domain to the SDK API
resolveDeepLinkURLs. This API needs to be called before SDK initialization.AppsFlyerLib.shared().resolveDeepLinkURLs = ["click.example.com","spgo.io"] - Use the
onAppOpenAttributionAPI to get the deep link parameters and handle the deep link data.
Step 3a: Configure your SDK to support the Digital Asset Links file
After you host the Digital Asset Links file in your click-recording domain in the previous step, configure your SDK to support the file.
In your Android manifest, add the click domain host and any prefix in the activity tag of the activity you want to deep link into.
1
2
3
4
5
6
7
8
9
10
11
12
<activity android:name=".DeepLinkActivity">
    <intent-filter android:autoVerify="true">
      <action android:name="android.intent.action.VIEW" />
      <category android:name="android.intent.category.DEFAULT" />
      <category android:name="android.intent.category.BROWSABLE" />
      <data
        android:scheme="https"
        android:host="click.example.com"
        android:pathPrefix="/campaign"
      />
    </intent-filter>
  </activity>
Step 3b: Handle the deep link data
When a click on an App Link occurs, your app is opened and the SDK is initiated. To enable the app to extract the OneLink behind the click domain and resolve the deep link, list the click domains in the SDK method setResolveDeepLinkURLs. This property needs to be set before SDK initialization. AppsFlyerLib.getInstance().setResolveDeepLinkURLs("clickdomain.com", "myclickdomain.com", "anotherclickdomain.com");
Step 3a: Configure your SDK to support the AASA file
After you host the AASA file in your click-recording domain, configure your SDK to support the AASA file.
- In Xcode, select your project.
- Select Capabilities.
- Turn on Associated Domains.
- Click +, and enter your click domain. For example,
applinks:click.example.com.
Step 3b: Handle the deep link data
When a click on the universal link occurs, your app is opened and the SDK is initiated. To enable the SDK to extract the OneLink behind the click domain, perform the following:
- List the click domains in the SDK property
resolveDeepLinkURLs. Make sure to set this property before SDK initialization. - Make sure that List spgo.io is one of the listed domains. SparkPost owns this domain and it’s part of the redirection flow.
AppsFlyerLib.shared().resolveDeepLinkURLs = ["click.example.com","spgo.io"] - Use the
onAppOpenAttributionAPI to get the deep link parameters and handle the deep link data.
Step 3a: Configure your SDK to support the Digital Asset Links file
After you host the Digital Asset Links file in your click-recording domain in the previous step, configure your SDK to support the file.
In your Android manifest, add the click domain host and any prefix in the activity tag of the activity you want to deep link into.
1
2
3
4
5
6
7
8
9
10
11
12
<activity android:name=".DeepLinkActivity">
    <intent-filter android:autoVerify="true">
      <action android:name="android.intent.action.VIEW" />
      <category android:name="android.intent.category.DEFAULT" />
      <category android:name="android.intent.category.BROWSABLE" />
      <data
        android:scheme="https"
        android:host="click.example.com"
        android:pathPrefix="/campaign"
      />
    </intent-filter>
  </activity>
Step 3b: Handle the App Link data
When a click on an App Link occurs, your app is opened and the SDK is initiated. To enable the app to extract the OneLink behind the click domain and resolve the deep link, perform the following:
- List the click domains in the SDK method
setResolveDeepLinkURLs. This property needs to be set before SDK initialization. - Make sure that List spgo.io is one of the listed domains. SparkPost owns this domain and it’s part of the redirection flow.
AppsFlyerLib.getInstance().setResolveDeepLinkURLs("clickdomain.com", "myclickdomain.com", "spgo.io");
Once you’ve completed the integration steps, you can perform QA and troubleshooting by sending a deep link using OneLink. See the AppsFlyer documentation for details on using OneLink.
AppsFlyer click tracking URLs in Braze (optional)
You can use AppsFlyer’s OneLink attribution links in Braze campaigns across push, email, and more. This allows you to send back install or re-engagement attribution data from their Braze campaigns into AppsFlyer. As a result, you’ll be able to measure your marketing efforts more effectively and make data-driven decisions.
You can simply create your OneLink tracking URL in AppsFlyer and directly insert it into your Braze campaigns. AppsFlyer will then use their probabilistic attribution methodologies to attribute the user that has clicked on the link. We recommend appending your AppsFlyer tracking links with a device identifier to improve the accuracy of attributions from your Braze campaigns. This will deterministically attribute the user that has clicked on the link.
For Android, Braze allows customers to opt-in to Google Advertising ID collection (GAID). The GAID is also collected natively through the AppsFlyer SDK integration. You can include the GAID in your AppsFlyer click tracking links by utilizing the following Liquid logic:
1
2
3
{% if most_recently_used_device.${platform} == 'android' %}
aifa={{most_recently_used_device.${google_ad_id}}}
{% endif %}
For iOS, both Braze and AppsFlyer automatically collect the IDFV natively through our SDK integrations. This can be used as the device identifier. You can include the IDFV in your AppsFlyer click tracking links by utilizing the following Liquid logic:
1
2
3
{% if most_recently_used_device.${platform} == 'ios' %}
idfv={{most_recently_used_device.${id}}}
{% endif %}
 Edit this page on GitHub