Tealium AudienceStream
Tealium AudienceStream is an omnichannel customer segmentation and real-time action engine. AudienceStream takes the data that flows into EventStream and creates visitor profiles representing the most important attributes of your customers’ engagement with your brand.
The Braze and Tealium integration leverages AudienceStream visitor profiles. Shared behaviors segment these profiles to create sets of visitors with common traits, known as audiences. These audiences can help fuel your marketing technology stack in real-time via connectors.
Tealium AudienceStreams and EventStreams offer both batch and non-batch connector actions. The non-batch connector should be used when real-time requests are important to the use case and there are no concerns about hitting Braze’s API rate limit specifications. Contact Braze Support or your customer success manager if you have any questions.
Prerequisites
| Name | Description |
|---|---|
| Tealium account | A Tealium account with server-side access is required. We recommend also using the client-side integrations to take advantage of this partnership. |
| REST API key | A Braze REST API key with users.track, users.delete, and subscription.status.set permissions.This can be created within Braze dashboard > Developer Console > REST API Key > Create New API Key |
| Braze REST endpoint | Your REST endpoint URL. Your endpoint will depend on the Braze URL for your instance. |
Integration
Step 1: Set up attributes and badges
Understanding attributes
The first step in using AudienceStream is to create attributes. Attributes allow you to define the important characteristics representing a visitor’s habits, preferences, actions, and engagement with your brand.
Visit Attributes: Visit attributes relate to the user’s current visit (or session). The data stored in these attributes persist for the length of the visit. Some example visit attributes include:
- Visit Duration (Number)
- Current Browser (String)
- Current Device (String)
- Page View Count (Number)
Visitor Attributes: Visitor attributes relate to the current user. The data stored in these attributes persist for the lifetime of the user. Some example visitor attributes include:
- Lifetime Order Value (Number)
- First Name (String)
- Birthdate (Date)
- Purchases Brands (Tally)
Visit Tealium for a full list of available data types.
Attribute enrichment
Once you identify your desired attributes, you can configure them with enrichments - business rules that determine when and how to update the values of attributes. Each data type offers its own selection of enrichments for manipulating the attribute’s value. This is associated with the “WHEN” setting. The following options are available for each visit and visitor attribute:
- New Visitor: occurs the first time a visitor comes to your site.
- New Visit: occurs on a new visit by a visitor.
- Any Event: occurs on any event.
- Visit Ended: occurs when a visit ends.
You can also create a custom condition, called a rule, that will determine when the enrichment will occur.
Badges
Badges are special visitor attributes that represent valuable behavior patterns. Badges are assigned or removed from visitors based on the logic of their enrichments. This logic usually combines multiple conditions to capture visitor segments or sets a threshold for when a particular value is reached.
Attribute and badge example
Create a visitor attribute “Lifetime Order Value” that calculates the cumulative amount spent (order_total) by the customer for all completed orders (purchase event). To set up lifetime order value in your Tealium account, adhere to the following the instructions:
- Navigate to AudienceStream > Visitor/Visit Attributes and click Add Attribute.
- Select the scope as Visitor and click Continue.
- Select the data type Number and click Continue.
- Enter the name of the attribute, “Lifetime Order Value”.
- Click Add Enrichment and select Increment or Decrement Number.
- Select the attribute containing the value to increment by (
order_total). - Leave the “WHEN” set to “Any Event”, then click Create a New Rule.
- Create a rule that identifies when a purchase event has occurred.
- Click Save, then Finish.
Now, all customers will have a lifetime order value attribute tied to them.
You may create badges that help you classify and target your users by certain attributes they share. For the following example, we create a VIP Badge for users with a “Lifetime Order Value” of over $500.
- Navigate to AudienceStream > Visitor/Visit Attributes and click Add Attribute.
- Select the scope as Visitor and click Continue.
- Select the data type Badge and click Continue.
- Enter the name of the badge, “VIP”.
- Click Add Enrichment and select Assign Badge.
- Leave the “WHEN” set to “Any Event”.
- Create a rule for badge assignment by selecting Create Rule. Assign a title to this rule, and using the previous attribute created, set the rule to “…has attribute “Lifetime Order Value greater than 500”.
- Click Save, and then Finish.
Step 2: Create an audience
From the Tealium home page, select Audiences under AudienceStream from the sidebar navigation. Here, you can create an audience of users with common attributes. A user’s entry into or exit from this audience will be the trigger for the Connector Action, set up in the next step, that passes this information to the user profile in Braze.
First, name your audience, and then consider what attributes would apply to the type of audience you are trying to create. For example, to create an audience of VIP users, you could create an audience of visitors who have the VIP badge.
Make sure to Save / Publish your audience when finished.
Step 3: Create an event connector
A connector is an integration between Tealium and another vendor used to transmit data. These connectors contain actions that represent their partner’s supported APIs.
- From the sidebar in Tealium under Server-Side, navigate to AudienceStream > Audience Connectors.
- Select the blue + Add Connector button to look through the connector marketplace. In the new dialogue box that appears, use the spotlight search to find the Braze connector.
- To add this connector, click the Braze connector tile. When clicked, you can view the connection summary and a list of the required information, supported actions, and configuration instructions. The configuration comprises three steps: source, configuration, and action.
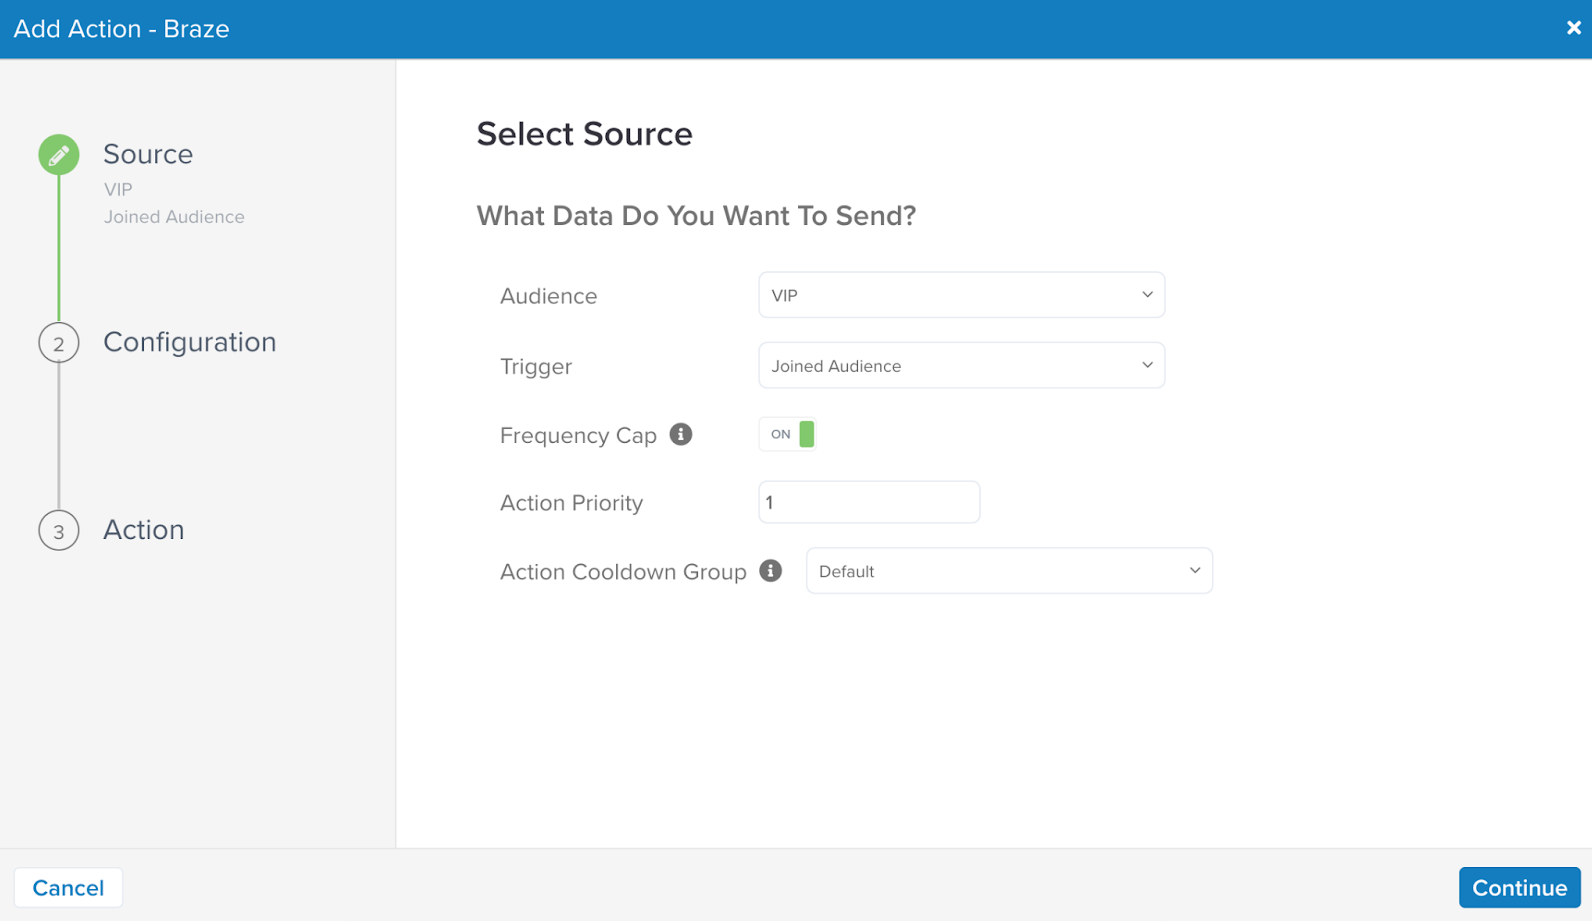
Source
In the Source dialogue that appears, select the audience you created in the previous step and a trigger that you feel is appropriate for your situation. You also can toggle on the frequency cap to control how often this action triggers.
Configuration
Next, a Configuration dialogue will appear. Select Add Connector at the bottom of the page. Name your connector and provide your Braze API endpoint and Braze REST API key here.
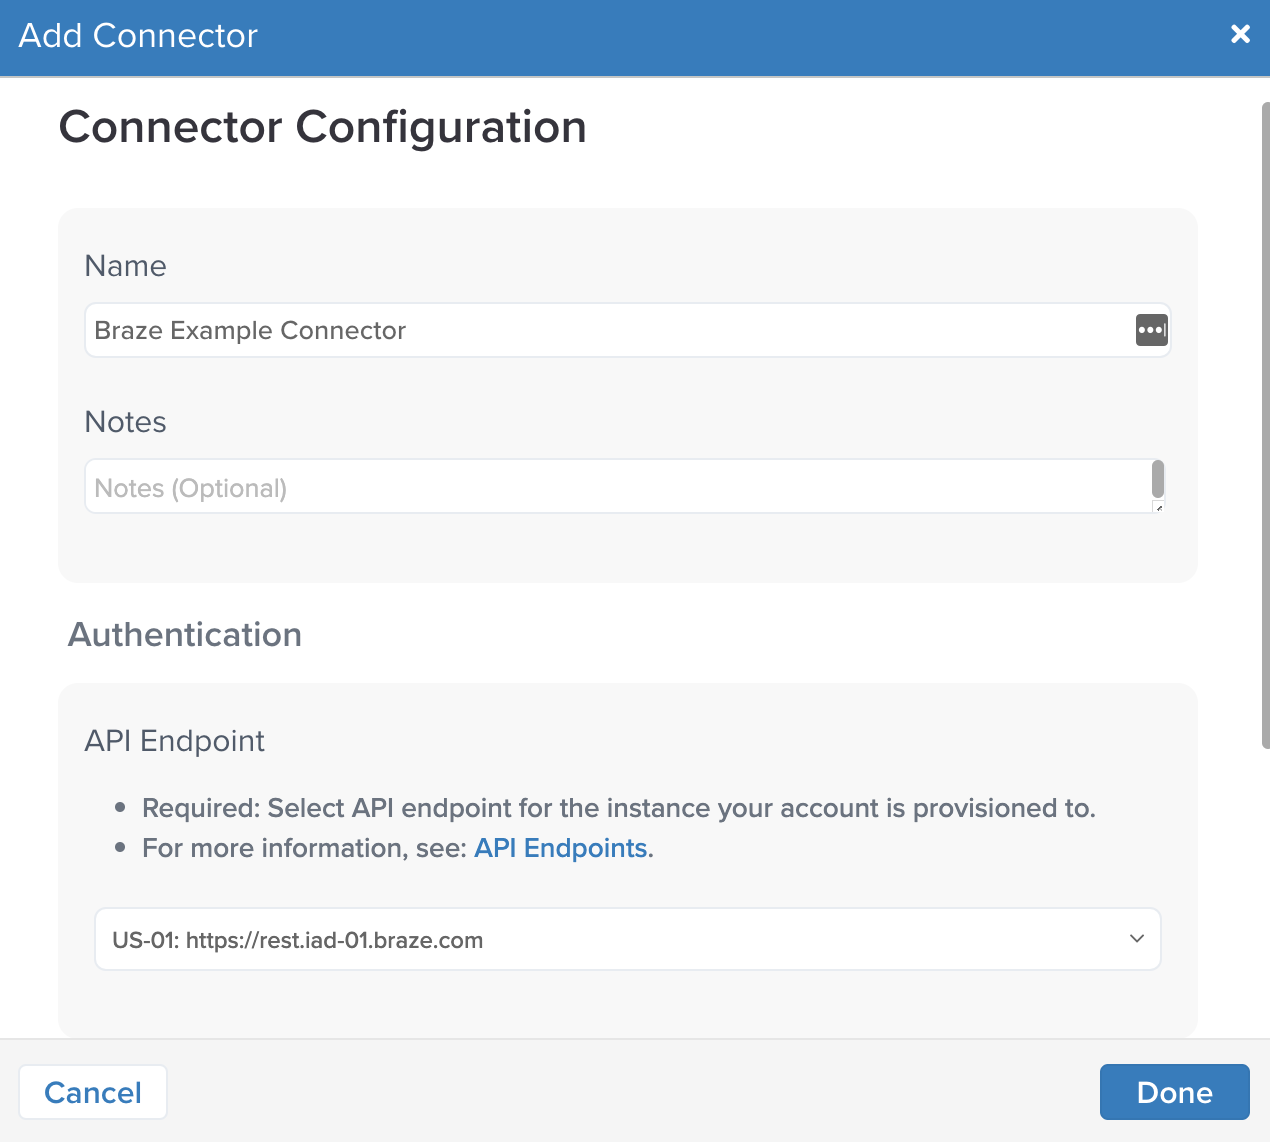
If you have created a connector before, you may optionally use an existing one from the available connector list and modify it to fit your needs with the pencil icon or delete it with the trash icon.
After you have created or selected a connector to link this audience, click Done to continue.
Action
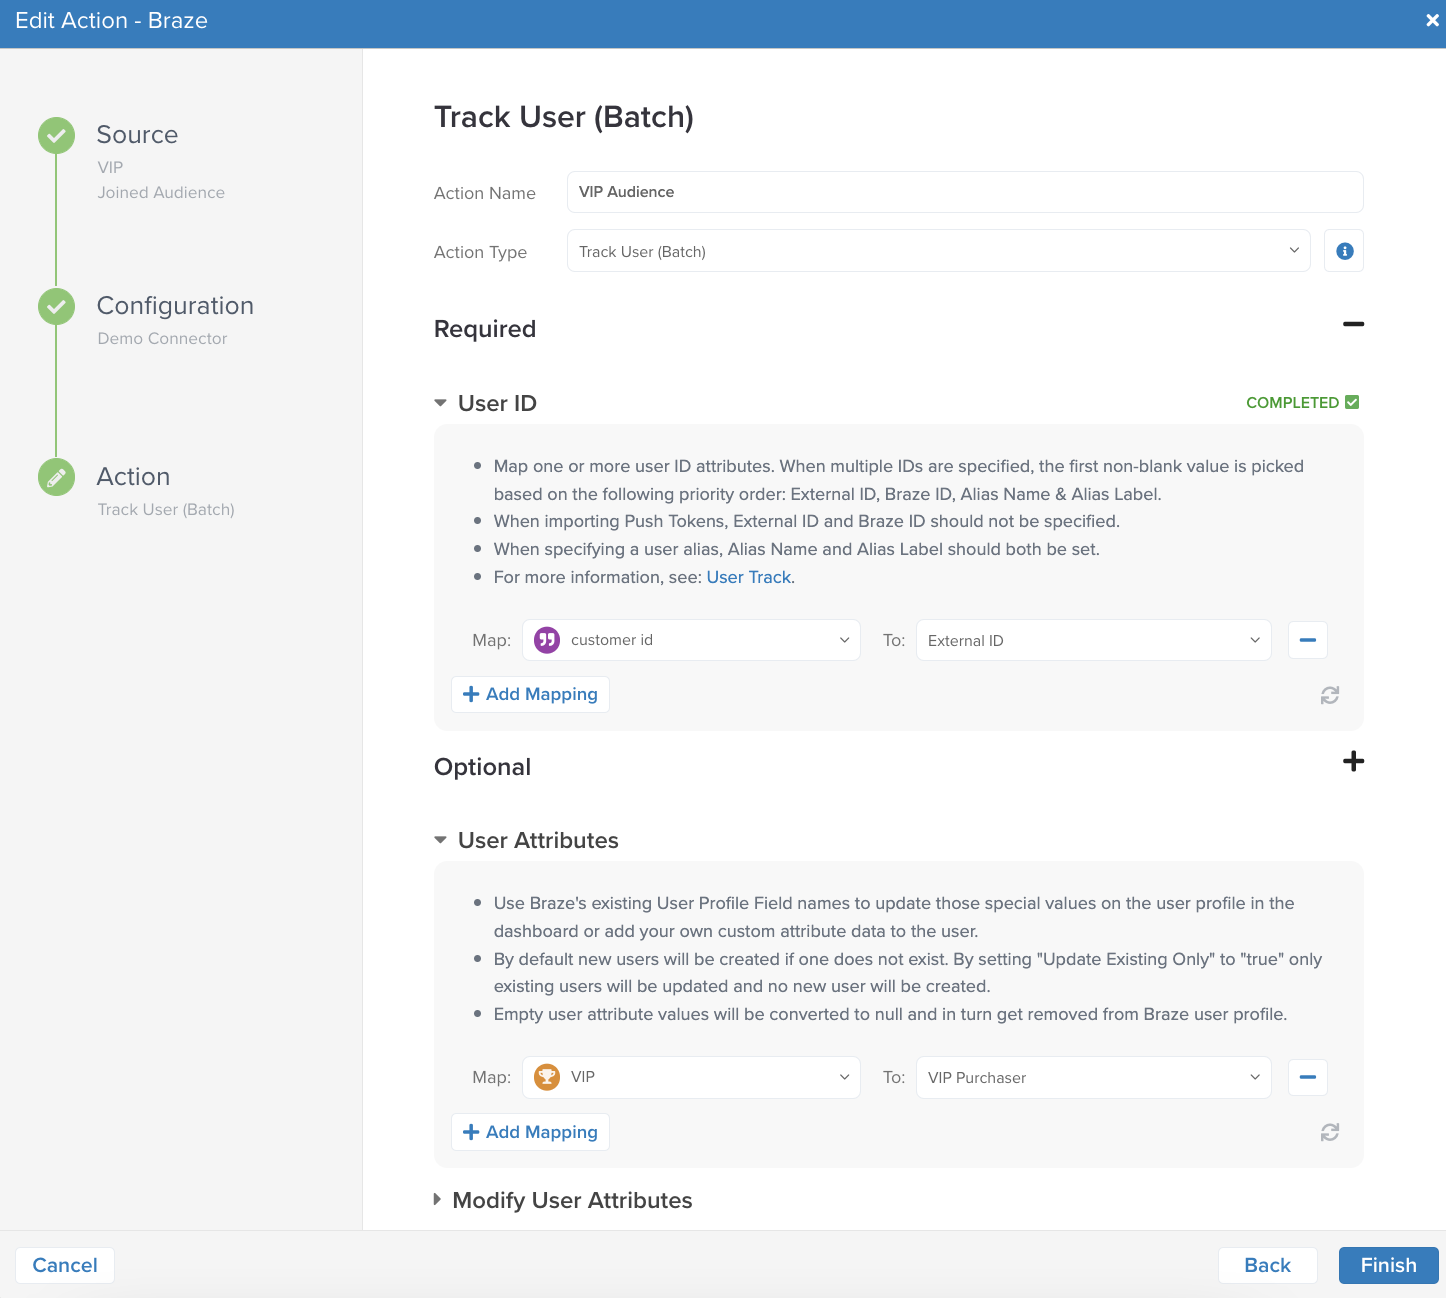
Next, name your connector action and select an action type that will send data according to the mapping you configure. Here, you will map Braze attributes to Tealium attribute names. Depending on which action type you choose, there will be a varied selection of fields required by Tealium. The following are examples and explanations of these fields.
Not all fields offered are required.
This action allows you to track user, event, and purchase attributes all in one action. Although the Track User action is the same for both AudienceStream and EventStream, Tealium recommends setting user attribute mappings with AudienceStream actions and the event and purchase mappings with EventStream actions.
| Parameters | Description |
|---|---|
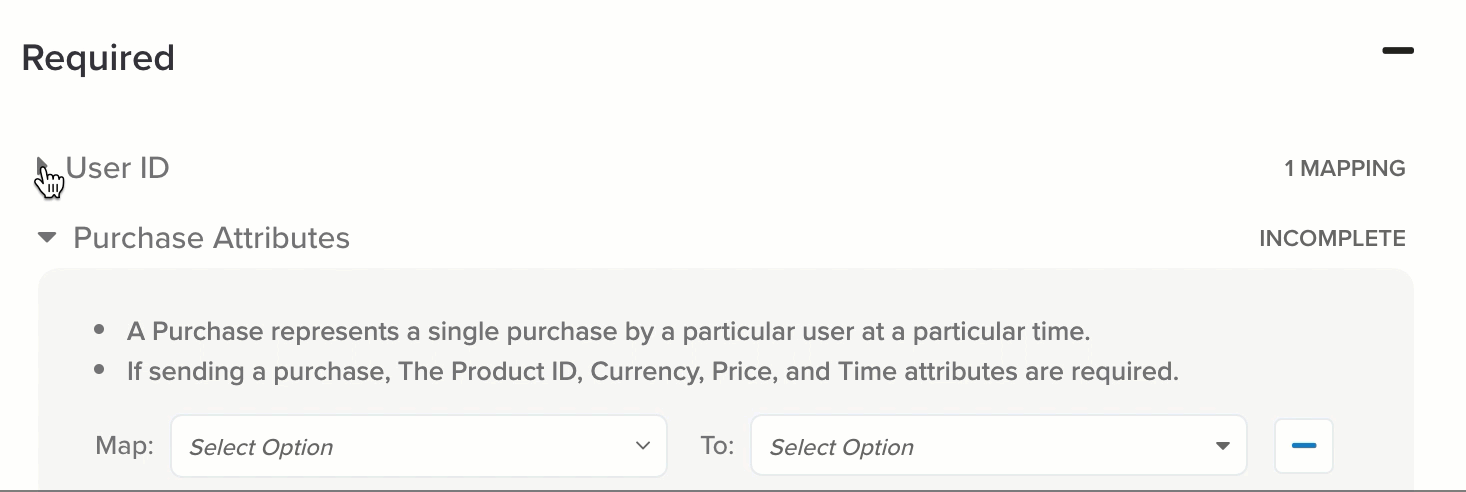
| User ID | Use this field to map the Tealium user ID field to its Braze equivalent. Map one or more user ID attributes. When multiple IDs are specified, the first non-blank value is picked based on the following priority order: External ID, Braze ID, Alias Name, and Alias Label. - External ID and Braze ID should not be specified if importing push tokens. - If specifying a user alias, the alias name and alias label should be set. For more information, check out the Braze /users/track endpoint. |
| User attributes | Use Braze’s existing user profile field names to update user profile values in the Braze dashboard or add your own custom user attribute data to the user profiles. - By default, new users will be created if one does not exist. - By setting Update Existing Only to true, only existing users will be updated, and no new user will be created.- If a Tealium attribute is empty, it will be converted to null and removed from the Braze user profile. Enrichments should be used if null values should not be sent to Braze to remove a user attribute. |
| Modify user attributes | Use this field to increment or decrement certain user attributes - Integer attributes may be incremented by positive or negative integers. - Array attributes may be modified by adding or removing values from existing arrays. |
| Event | An event represents a single occurrence of a custom event by a particular user at a timestamp. Use this field to track and map event attributes like those in the Braze event object. - Event attribute Name is required for every mapped event.- Event attribute Time is automatically set to now unless explicitly mapped. - By default, new events will be created if one does not exist. By setting Update Existing Only to true, only existing events will be updated, and no new event will be created.- Map array type attributes to add multiple events. Array type attributes must be of equal length. - Single value attributes can be used and applied to each event. |
| Event template | Provide event templates to be referenced in body data. Templates can be used to transform data before sending it to Braze. Refer to Tealium’s Templates Guide to learn more. |
| Event template variable | Provide event template variables as data input. Refer to Tealium’s Template Variables Guide to learn more. |
| Purchase | Use this field to track and map user purchase attributes like those in the Braze purchase object. - Purchase attributes Product ID, Currency, and Price are required for every mapped purchase.- Purchase attribute Time is automatically set to now unless explicitly mapped.- By default, new purchases will be created if one does not exist. By setting Update Existing Only to true, only existing purchases will be updated, and no new purchase will be created.- Map array type attributes to add multiple purchase items. Array type attributes must be of equal length. - Single value attributes can be used and will apply to each item. |
| Purchase template | Templates can be used to transform data prior to it being sent to Braze. - Define a purchase template if you need nested objects support. - When a purchase template is defined, the configuration set up in the purchases section of your action will be ignored. - Refer to Tealium’s Templates Guide to learn more. |
| Purchase template variable | Provide product template variables as data input. Refer to Tealium’s Template Variables Guide to learn more. |
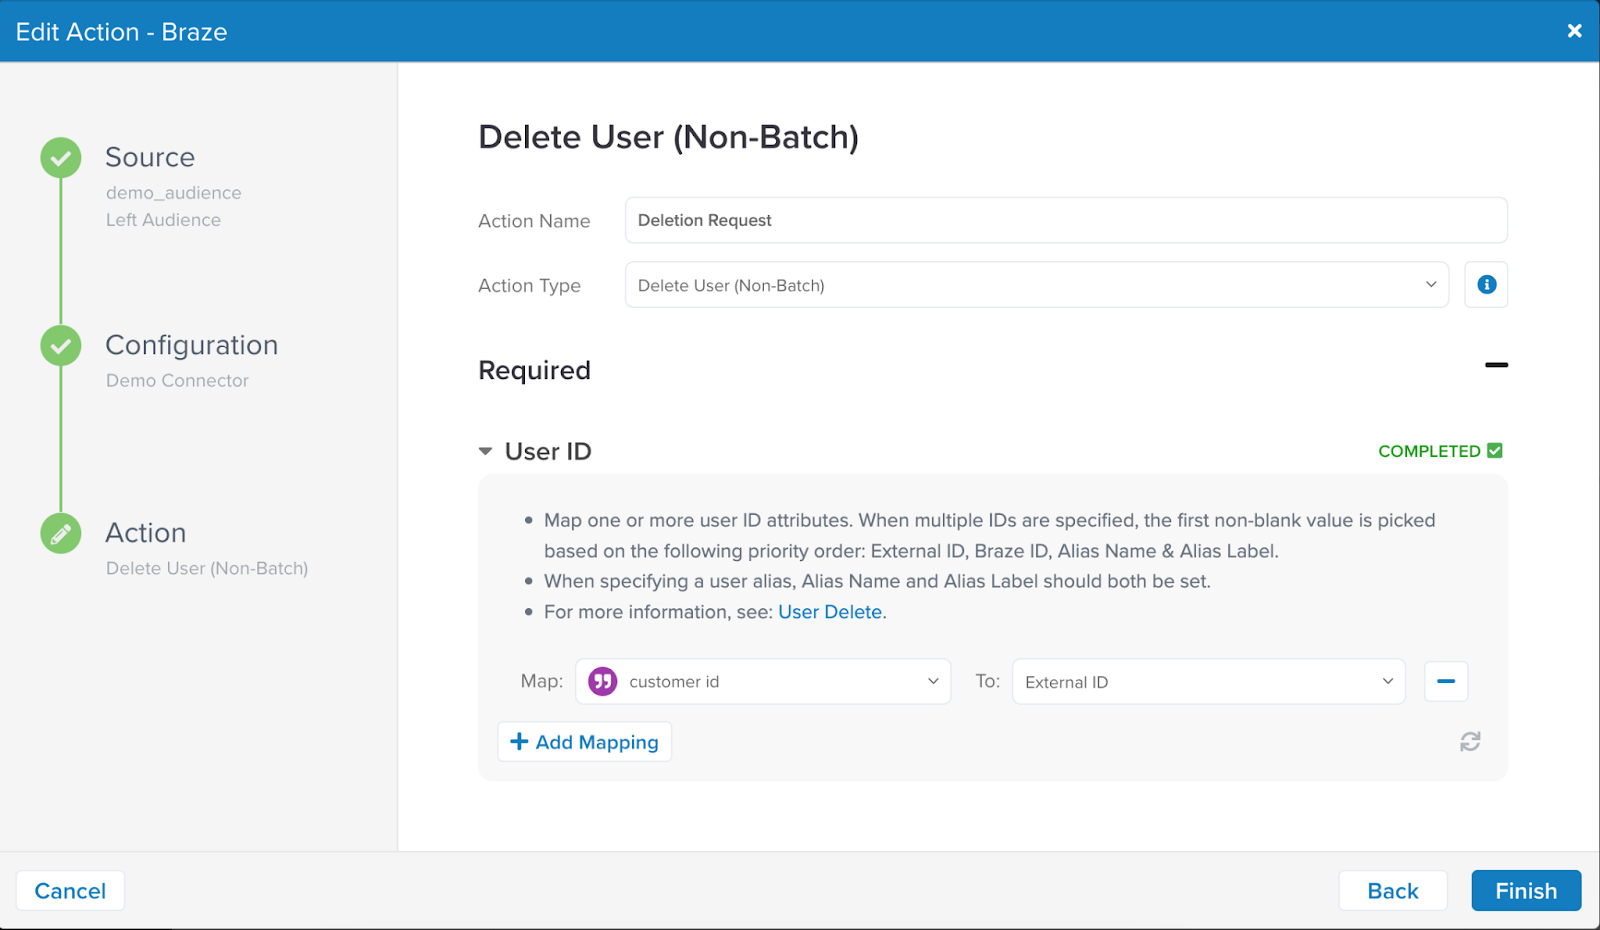
This action allows you to delete users from the Braze dashboard.
| Parameters | Description |
|---|---|
| User ID | Use this field to map the Tealium User ID field to its Braze equivalent. - Map one or more user ID attributes. When multiple IDs are specified, the first non-blank value is picked based on the following priority order: External ID, Braze ID, Alias Name, and Alias Label. - When specifying a user alias, Alias Name and Alias Label should both be set. For more information, see the Braze /users/delete endpoint. |
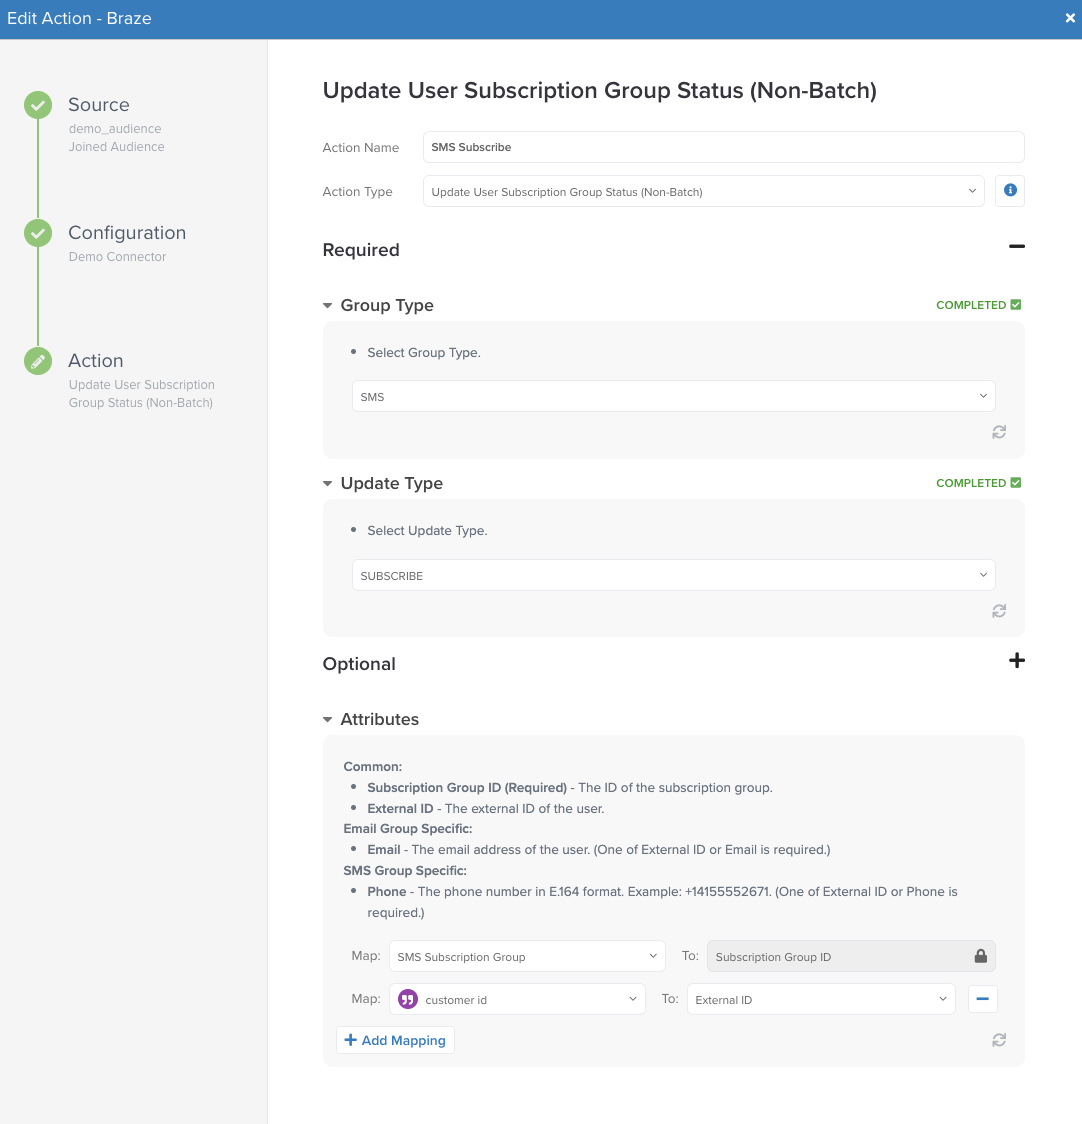
This action allows you to add or remove users from Braze SMS or email subscription groups.
| Parameters | Description |
|---|---|
| Group type | Use this field to denote if this is an SMS or Email subscription group. |
| Update type | Map this action to an unsubscribe or subscription event |
| Attributes | - Subscription group ID (required): The ID of the subscription group related to the group type mapped in the preceding field. - External ID: The external ID of the user. Email group specific: - Email: The email address of the user. If the external ID is not defined, the email will be required. SMS group specific: - Phone: The phone number in E.164 format. For example, +14155552671. If the external ID is not defined, the phone will be required. |
Select Finish.
Summary
View the summary of the connector you created. If you would like to modify your chosen options, select Back to edit or Finish to complete.
Your connector is now displayed in the list of connectors on your Tealium home page.
Make sure to save or publish your connector when finished. The actions you configured will now fire when the trigger connections are met.
Step 4: Test your Tealium connector
After your connector is up and running, you should test it to ensure it’s working properly. The most simple way to test this is to use the Tealium Trace Tool. To start using Trace, make sure you have added the Tealium Tools browser extension.
- To start a new trace, select Trace on the sidebar under Server-Side options. Click Start and capture the Trace ID.
- Open the browser extension and enter the Trace ID into AudienceStream Trace.
- Examine the real-time log.
- Check for the action you want to validate by clicking the Actions Triggered entry to expand.
- Look for the action you want to validate and view the log status.
Refer to Tealium’s Trace documentation for more detailed instructions on implementing Tealium’s Trace tool.
Integration demo
Potential data point overages
There are three primary ways that you might accidentally hit data overages when integrating Braze through Tealium:
Sending duplicate data - only send Braze deltas of attributes
Tealium doesn’t send Braze deltas of user attributes. For example, if you have an EventStream action that tracks a user’s first name, email, and cell phone number, Tealium will send all three attributes to Braze anytime the action is triggered. Tealium won’t be looking for what changed or was updated and send only that information.
Solution:
You can check your backend to assess whether an attribute has changed or not, and if so, call Tealium’s relevant methods to update the user profile. This is what users who integrate Braze directly usually do.
OR
If you don’t store your own version of a user profile in your backend and can’t tell if attributes change or not, you can use AudienceStream and create enrichments to only send user attributes when values have changed.
Sending irrelevant data or needlessly overwriting data
If you have multiple EventStreams that target the same event feed, all actions enabled for that connector will automatically fire anytime a single action is triggered, this could also result in data being overwritten in Braze.
Solution:
Set up a separate event specification or feed to track each action.
OR
Disable actions(or connectors) that you do not want to fire by using the toggles in the Tealium dashboard.
Initializing Braze too early
Users integrating with Tealium using the Braze Web SDK tag may see a dramatic increase in their MAU. If Braze is initialized on page load, Braze will create an anonymous profile every time a web user navigates to the website for the first time. Some may want to only track user behavior when users have completed some action, such as “Signed In” or “Watched Video”, to lower their MAU count.
Solution:
Set up load rules to determine exactly when and where a tag loads on your site.
 Edit this page on GitHub