Amazon S3
Amazon S3 is a highly scalable storage system offered by Amazon Web Services.

If you’re switching between cloud storage providers, contact your Braze customer success manager for further assistance on setting up and validating your new integration.
The Braze and Amazon S3 integration features two integration strategies:
- Leverage Currents, enabling you to store data there until you want to connect it to other platforms, tools, and locations.
- Use dashboard data exports (such as CSV exports and engagement reports).
Prerequisites
| Requirement | Description |
|---|---|
| Amazon S3 account | You need an Amazon S3 account to take advantage of this partnership. |
| Dedicated S3 bucket | Before integrating with Amazon S3, you must create an S3 bucket for your app. If you already have an S3 bucket, we still recommend creating a new bucket specifically for Braze so you can limit permissions. Refer to the following instructions on how to create a new bucket. |
| Currents | To export data back into Amazon S3, you need to have Braze Currents set up for your account. Currents isn’t required if you’re only setting up message archiving. |
Creating a new S3 bucket
To create a bucket for your app, do the following:
- Open the Amazon S3 console and follow the instructions to Sign in or Create an Account with AWS.
- After signing in, select S3 from the Storage & Content Delivery category.
- Select Create Bucket on the next screen.
- When prompted, create your bucket and select an AWS Region.
Braze does not let you choose or configure a region in the dashboard. The AWS Region is fixed by where you create the bucket in the AWS console. The integration sends data to the bucket name you provide, and AWS automatically routes requests to the bucket’s region. If your connector tries to connect to a different region than you want (for example, eu-west-1 instead of eu-central-1), create or use an S3 bucket in your desired region in AWS. There is nothing to change on the Braze side.

Integration
Braze has two different integration strategies with Amazon S3—one for Braze Currents and one for all dashboard data exports (such as CSV exports or engagement reports). Both integrations support two different authentication or authorization methods:
AWS secret key auth method
This authentication method generates a secret key and an access key ID that enables Braze to authenticate as a user on your AWS account to write data to your bucket.
Step 1: Create user
If you’re only setting up message archiving, follow the steps in the Dashboard Data Export tab.
To retrieve your access key ID and secret access key, create an IAM user and administrators group in AWS.
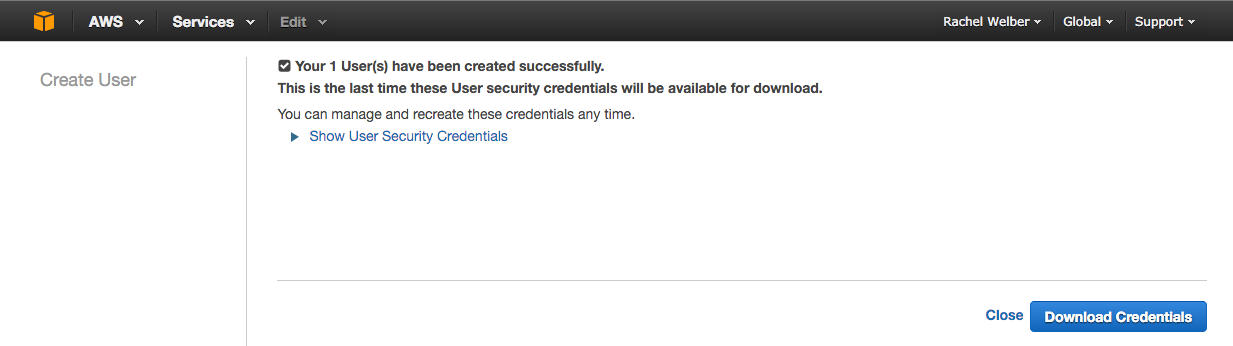
Step 2: Get credentials
After creating a new user, select Show User Security Credentials to reveal your access key ID and secret access key. Next, note these credentials somewhere or select the Download Credentials button, as you need to input these into the Braze dashboard later.
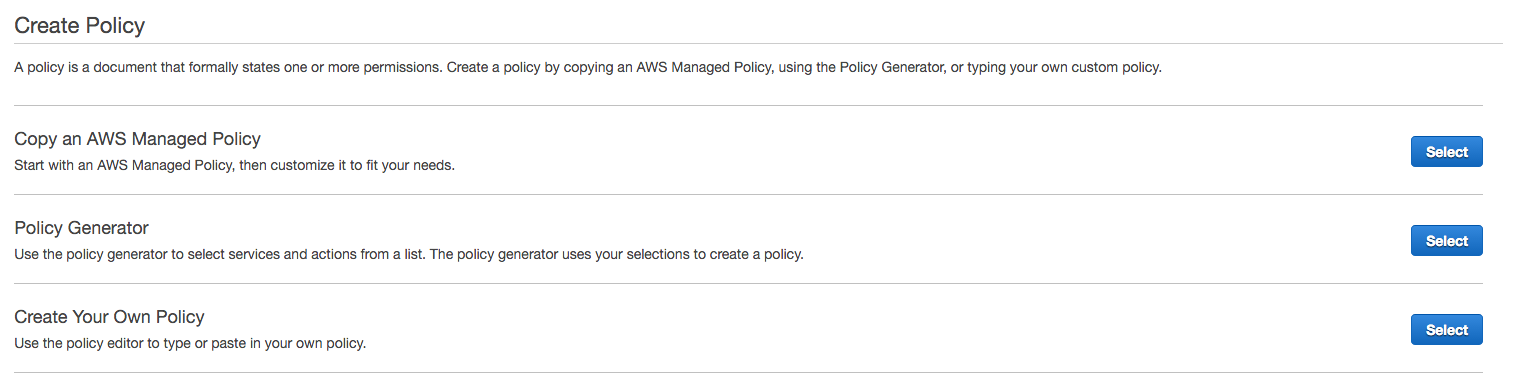
Step 3: Create policy
Navigate to Policies > Get Started > Create Policy to add permissions for your user. Next, select Create Your Own Policy. This gives limited permissions, so Braze can only access the specified buckets.
Different policies are required for Currents and Dashboard Data Export. s3:GetObject is required to allow the Braze backend to perform error handling.
Specify a policy name of your choice, and input the following code snippet into the Policy Document section. Be sure to replace INSERTBUCKETNAME with your bucket name. Without these permissions, the integration fails the credentials check and won’t be created.
If you’re only setting up message archiving, use the code snippet in the Dashboard Data Export tab.
1
2
3
4
5
6
7
8
9
10
11
12
13
14
15
{
    "Version": "2012-10-17",
    "Statement": [
        {
            "Effect": "Allow",
            "Action": ["s3:ListBucket", "s3:GetBucketLocation"],
            "Resource": ["arn:aws:s3:::INSERTBUCKETNAME"]
        },
        {
            "Effect": "Allow",
            "Action": ["s3:PutObject", "s3:GetObject"],
            "Resource": ["arn:aws:s3:::INSERTBUCKETNAME/*"]
        }
    ]
}
1
2
3
4
5
6
7
8
9
10
11
12
13
14
15
{
    "Version": "2012-10-17",
    "Statement": [
        {
            "Effect": "Allow",
            "Action": ["s3:ListBucket", "s3:GetBucketLocation"],
            "Resource": ["arn:aws:s3:::INSERTBUCKETNAME"]
        },
        {
            "Effect": "Allow",
            "Action": ["s3:GetObject", "s3:PutObject", "s3:DeleteObject"],
            "Resource": ["arn:aws:s3:::INSERTBUCKETNAME*", "arn:aws:s3:::INSERTBUCKETNAME/", "arn:aws:s3:::INSERTBUCKETNAME"]
        }
    ]
}
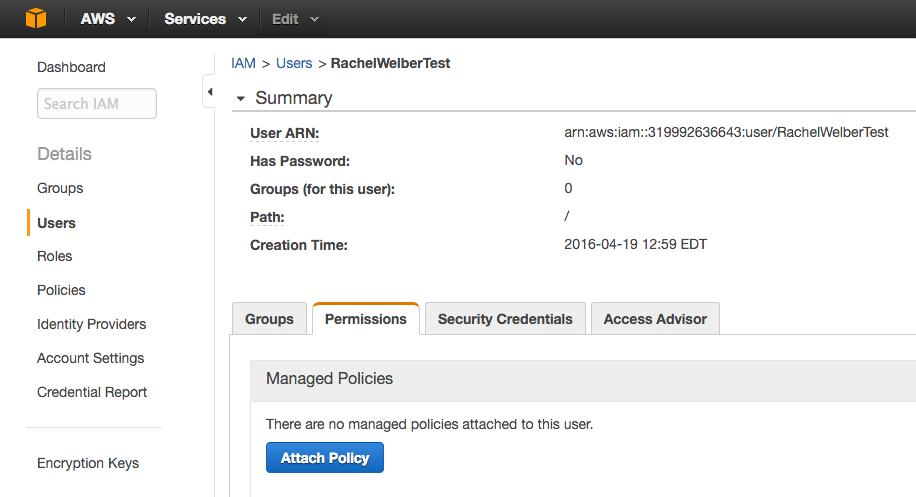
Step 4: Attach policy
After creating a new policy, go to Users and select into your specific user. In the Permissions tab, select Attach Policy, and select the new policy you created. Now, you’re ready to link your AWS credentials to your Braze account.
Step 5: Link Braze to AWS
If you’re only setting up message archiving, follow the steps in the Dashboard Data Export tab.
In Braze, go to Partner Integrations > Currents.
Next, select Create New Current then Amazon S3 Data Export.
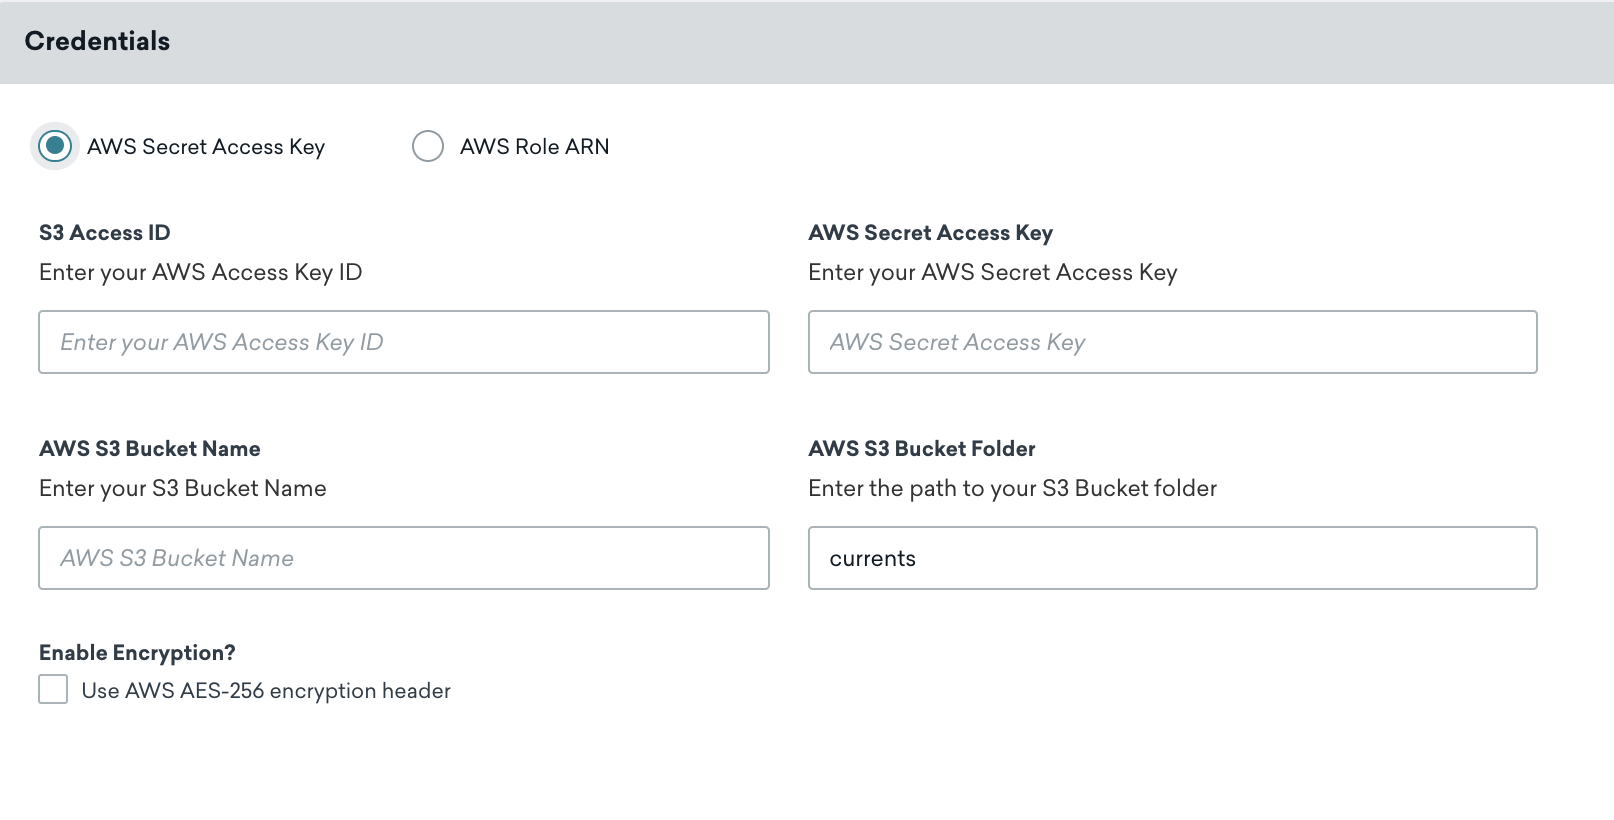
Name your Current. In the Credentials section, make sure AWS Secret Access Key is selected, then input your S3 access ID, AWS secret access key, and AWS S3 bucket name in the designated fields.

Keep your AWS access key ID and secret access key up to date. If your connector’s credentials expire, the connector stops sending events. If this persists for more than 5 days, the connector’s events are dropped, and data is permanently lost.
You can also add the following customization based on your needs:
- Folder Path: Defaults to
currents. If this folder does not exist, Braze automatically creates one for you. - Server-Side, At-Rest AES-256 Encryption: Defaults to OFF and includes the
x-amz-server-side-encryptionheader.
Select Launch Current to continue.
A notification informs you whether your credentials have been successfully validated. AWS S3 is now set up for Braze Currents.
In Braze, go to Partner Integrations > Technology Partners and select Amazon S3.
On the AWS Credentials page, make sure AWS Secret Access Key is selected, then input your AWS access ID, AWS secret access key, and AWS S3 bucket name in the designated fields. When inputting your secret key, select Test Credentials first to ensure your credentials work, then select Save when successful.
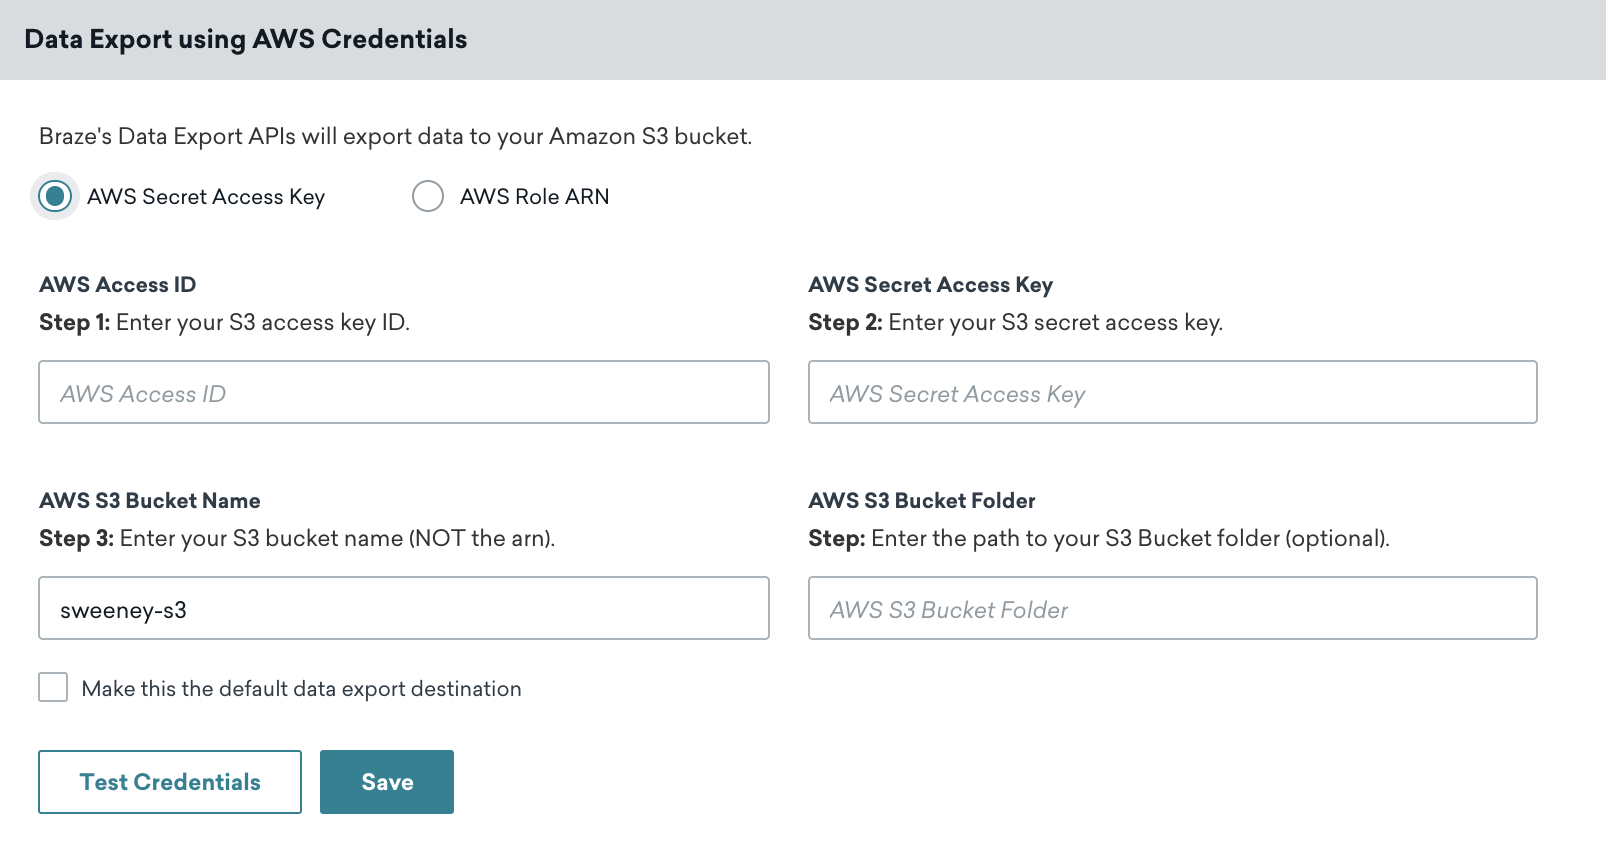

You can always retrieve new credentials by navigating to your user, and selecting Create Access Key in the Security Credentials tab within the AWS Console.
A notification informs you whether your credentials have been successfully validated. AWS S3 is now integrated into your Braze account.
AWS role ARN auth method
This authentication method generates a role Amazon Resource Name (ARN) that enables the Braze Amazon account to authenticate as a member of the role you created to write data to your bucket.
Step 1: Create policy
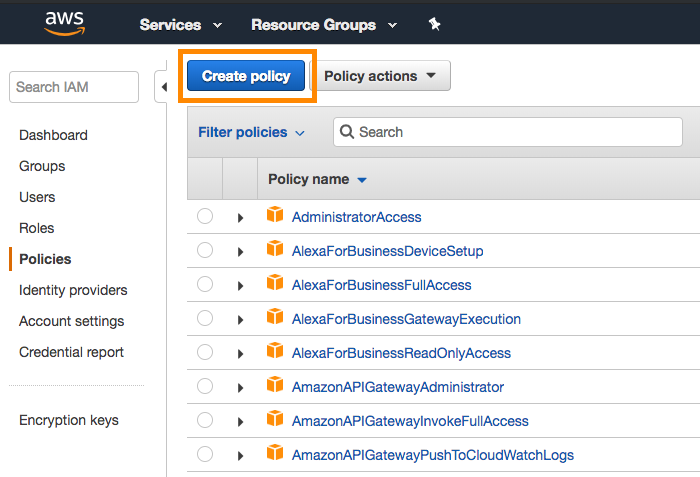
To get started, sign in to the AWS management console as an account administrator. Navigate to the IAM section of the AWS Console, select Policies in the navigation bar, and select Create Policy.
Different policies are required for Currents and Dashboard Data Export. s3:GetObject is required to allow the Braze backend to perform error handling.
Open the JSON tab and input the following code snippet into the Policy Document section. Be sure to replace INSERTBUCKETNAME with your bucket name. Select Review Policy when you’re finished.
If you’re only setting up message archiving, use the code snippet in the Dashboard Data Export tab.
1
2
3
4
5
6
7
8
9
10
11
12
13
14
15
{
    "Version": "2012-10-17",
    "Statement": [
        {
            "Effect": "Allow",
            "Action": ["s3:ListBucket", "s3:GetBucketLocation"],
            "Resource": ["arn:aws:s3:::INSERTBUCKETNAME"]
        },
        {
            "Effect": "Allow",
            "Action": ["s3:PutObject", "s3:GetObject"],
            "Resource": ["arn:aws:s3:::INSERTBUCKETNAME/*"]
        }
    ]
}
1
2
3
4
5
6
7
8
9
10
11
12
13
14
15
{
    "Version": "2012-10-17",
    "Statement": [
        {
            "Effect": "Allow",
            "Action": ["s3:ListBucket", "s3:GetBucketLocation"],
            "Resource": ["arn:aws:s3:::INSERTBUCKETNAME"]
        },
        {
            "Effect": "Allow",
            "Action": ["s3:PutObject", "s3:GetObject","s3:DeleteObject"],
            "Resource": ["arn:aws:s3:::INSERTBUCKETNAME/*"]
        }
    ]
}
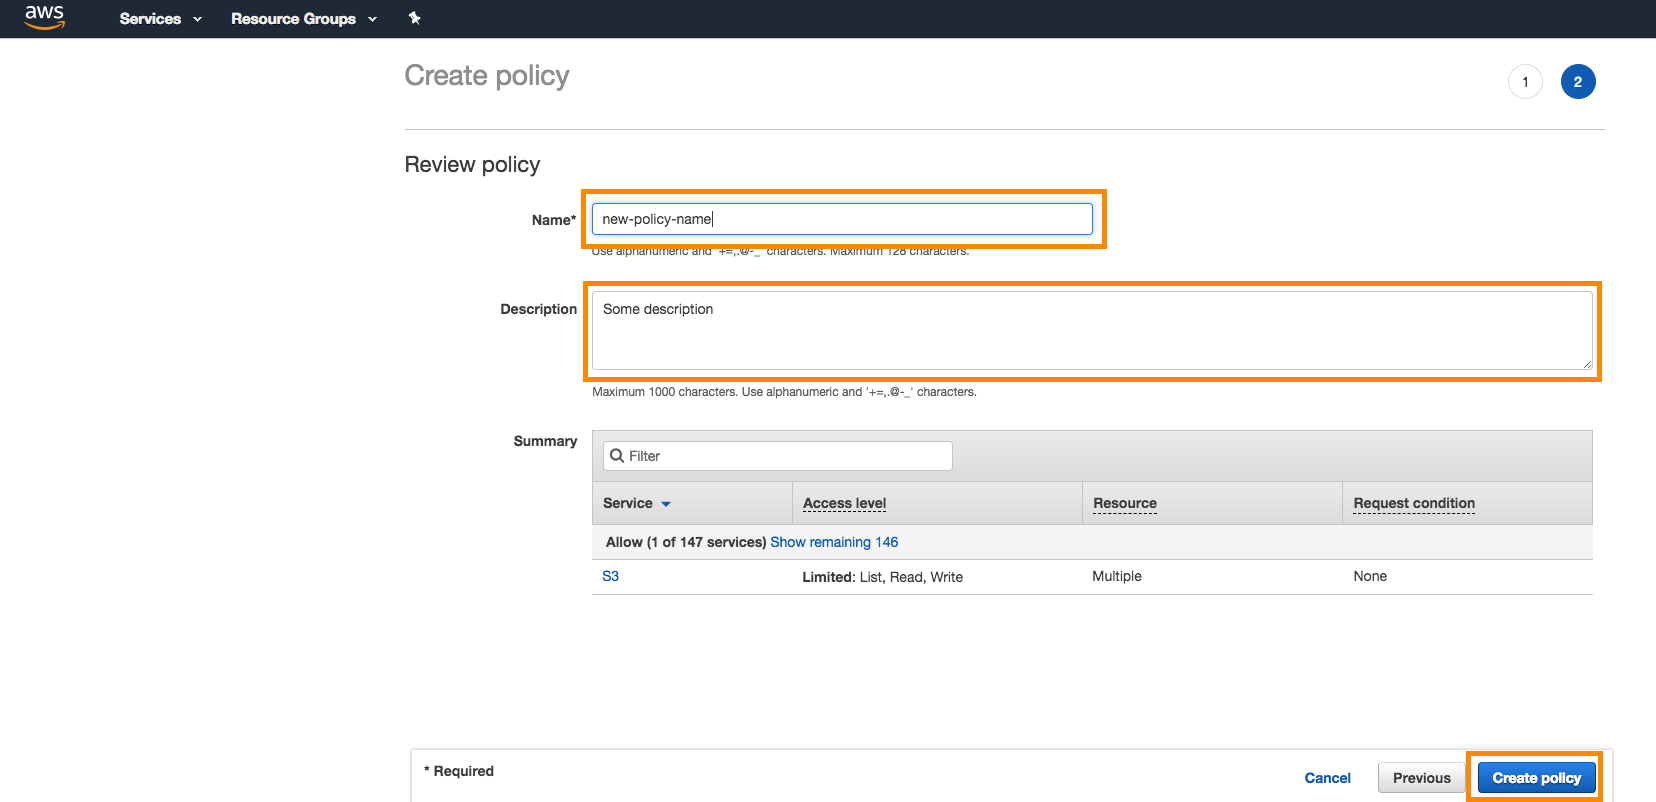
Next, give the policy a name and a description and select Create Policy.
Step 2: Create role
Within the same IAM section of the console, select Roles > Create Role.
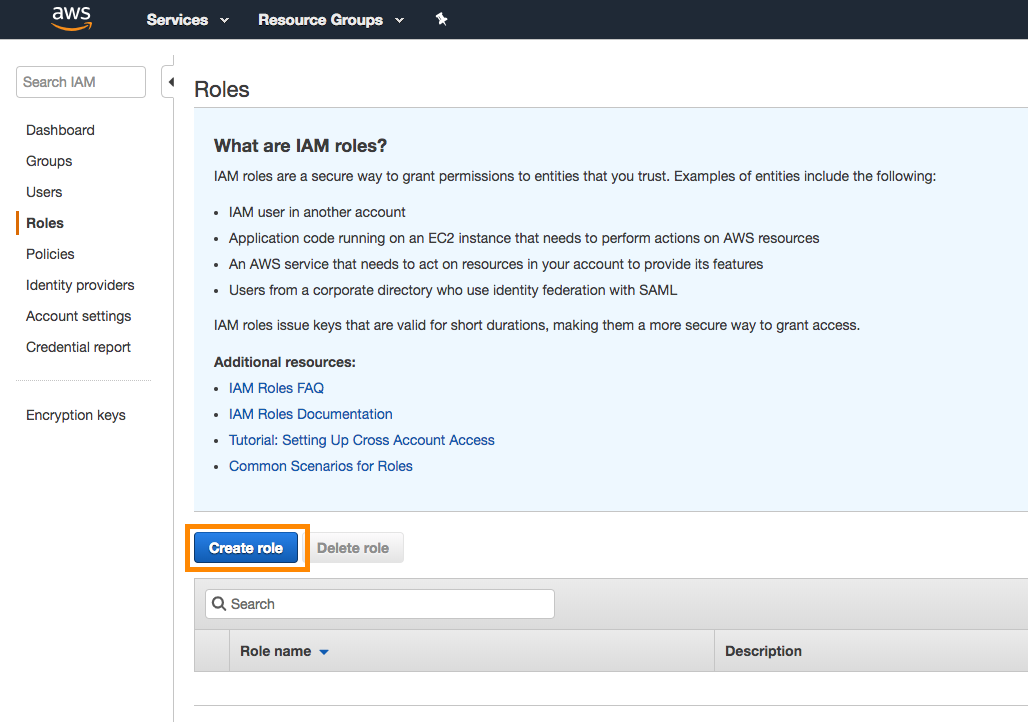
Retrieve your Braze account ID and external ID from your Braze account:
- Currents: In Braze, go to Partner Integrations > Currents. Next, select Create New Current then Amazon S3 Data Export. Here you’ll find the identifiers needed to create your role.
- Dashboard data export: In Braze, go to Partner Integrations > Technology Partners and select Amazon S3. Here you’ll find the identifiers needed to create your role. (Create your roles here if you’re only setting up message archiving.)
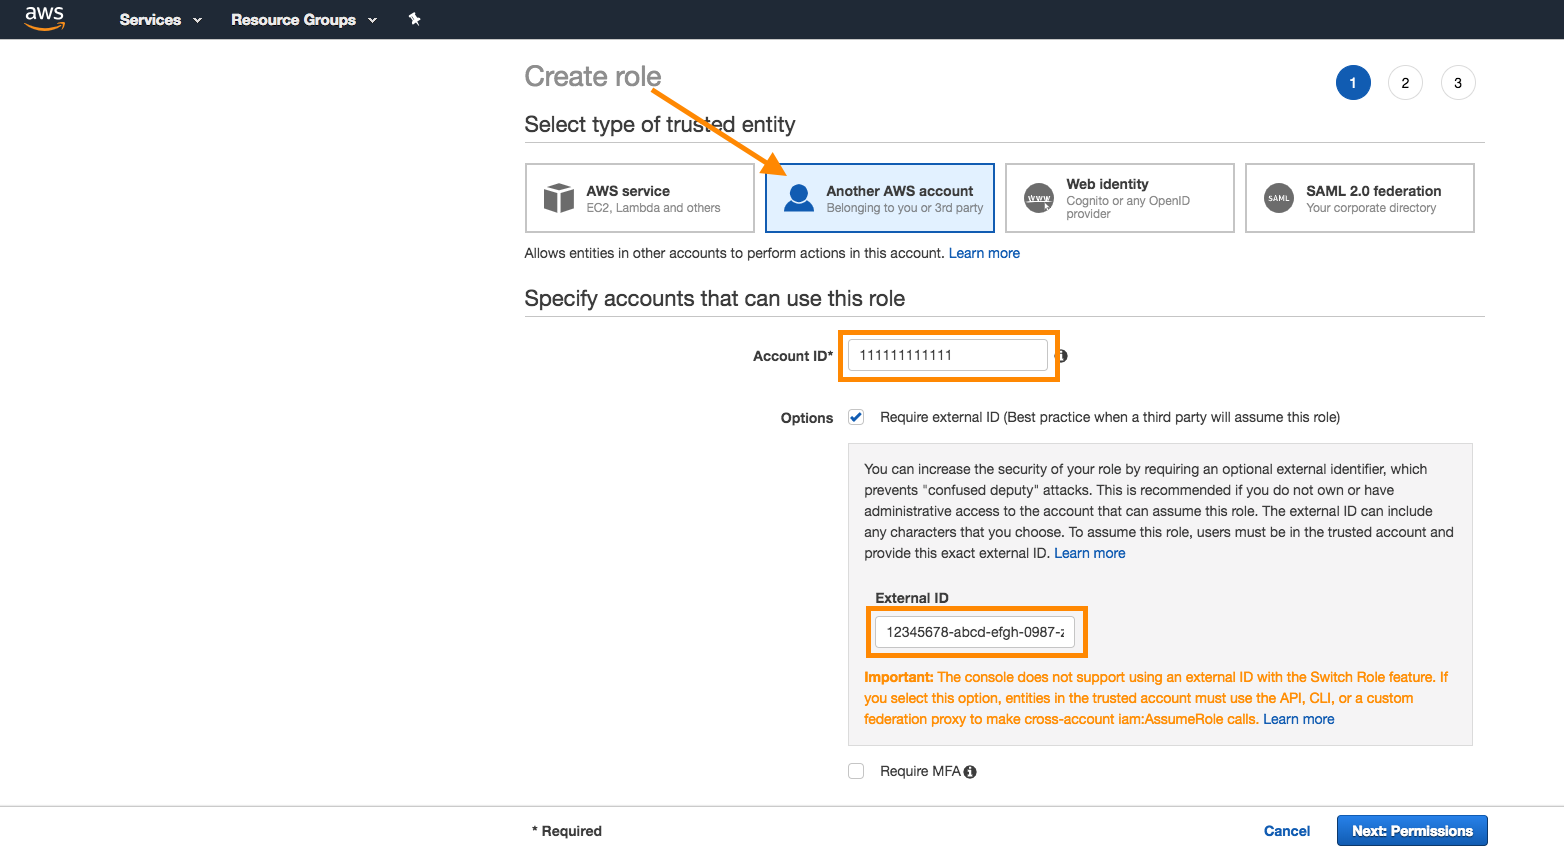
Back on the AWS Console, select Another AWS Account as the trusted entity selector type. Provide your Braze account ID, check the Require external ID box, and enter the Braze external ID. Select Next when complete.
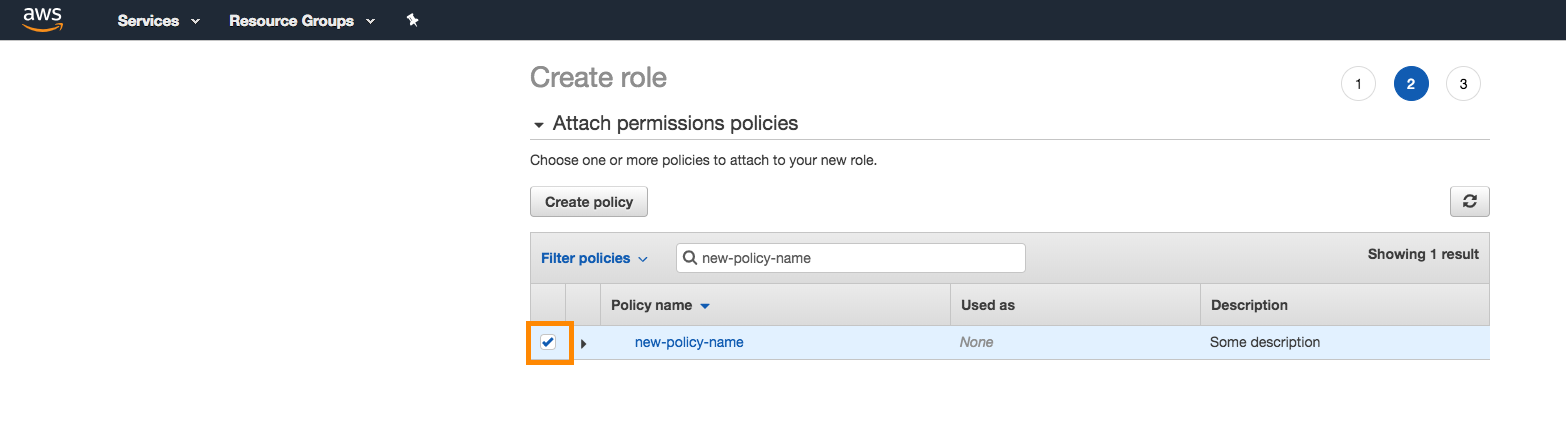
Step 3: Attach policy
Next, attach the policy you created earlier to the role. Search for the policy in the search bar, and place a checkmark next to the policy to attach it. Select Next when complete.
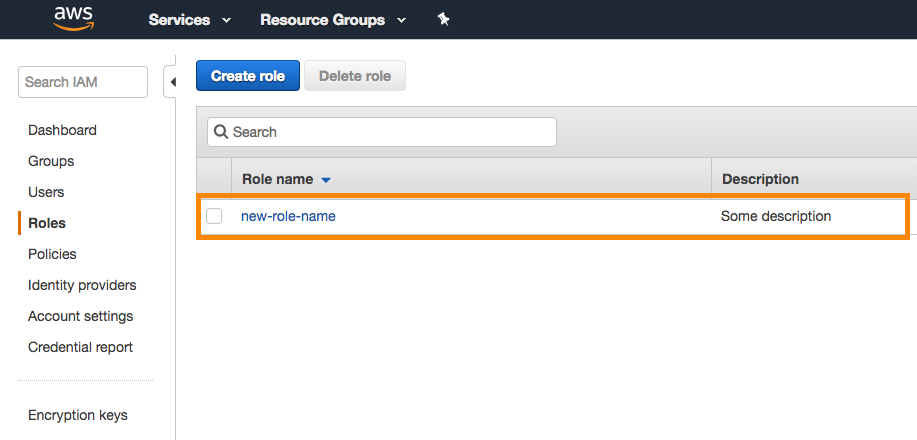
Give the role a name and a description, and select Create Role.
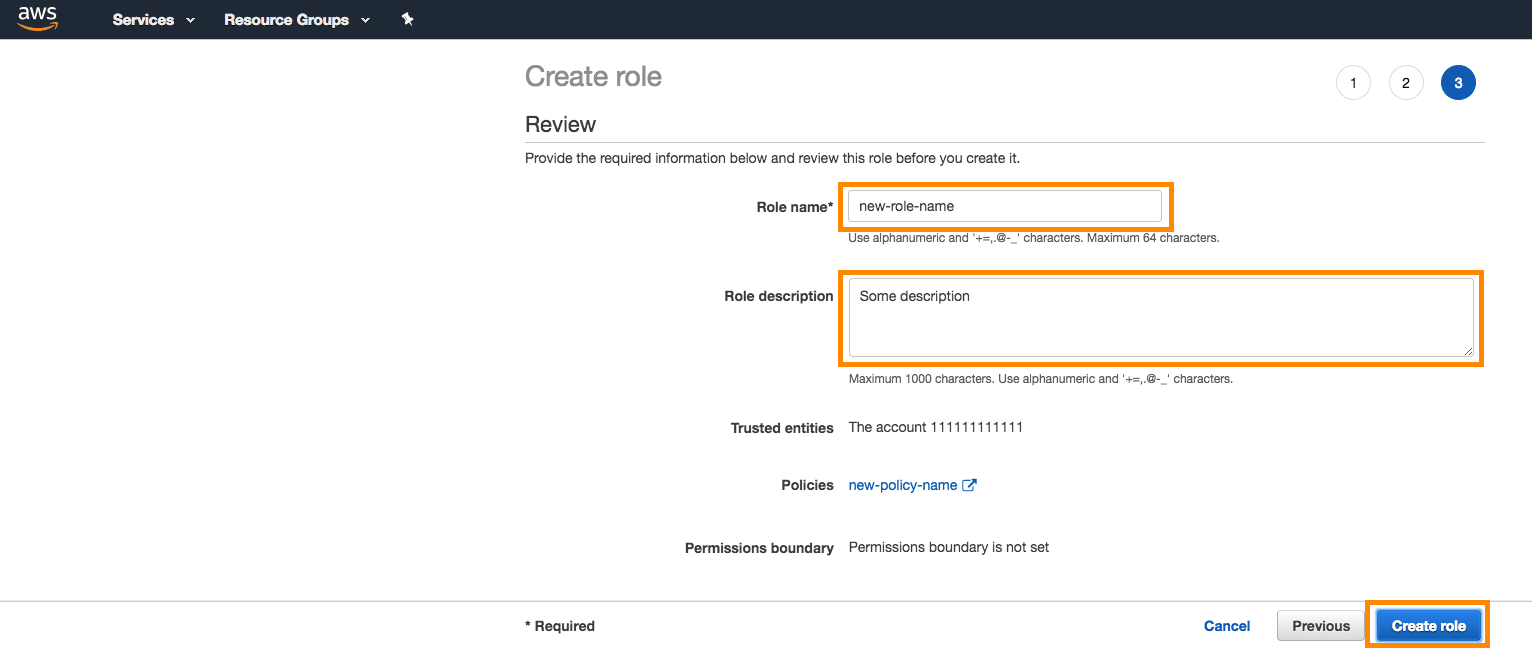
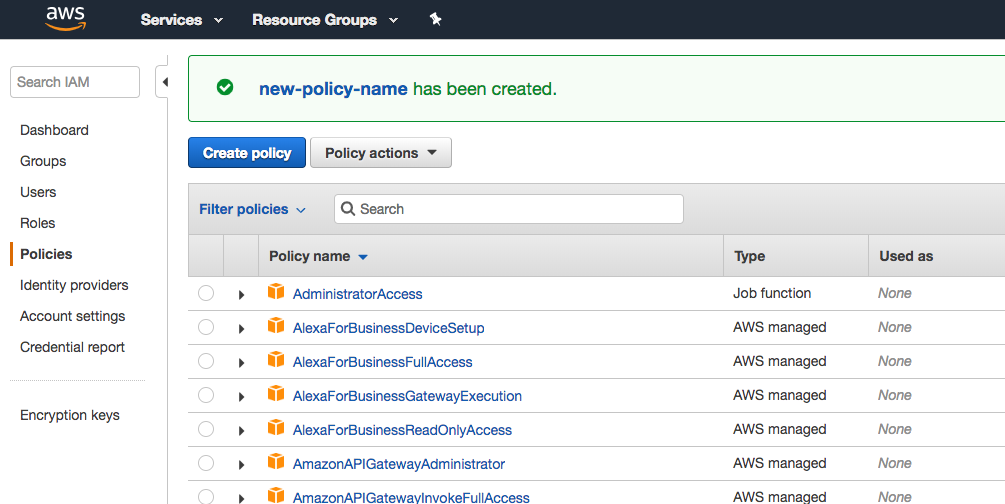
You’ll now see your newly created Role on the list.
Step 4: Link to Braze AWS
In the AWS Console, find your newly created role in the list. Select the name to open up the details of that role.
Take note of the Role ARN at the top of the Role summary page.
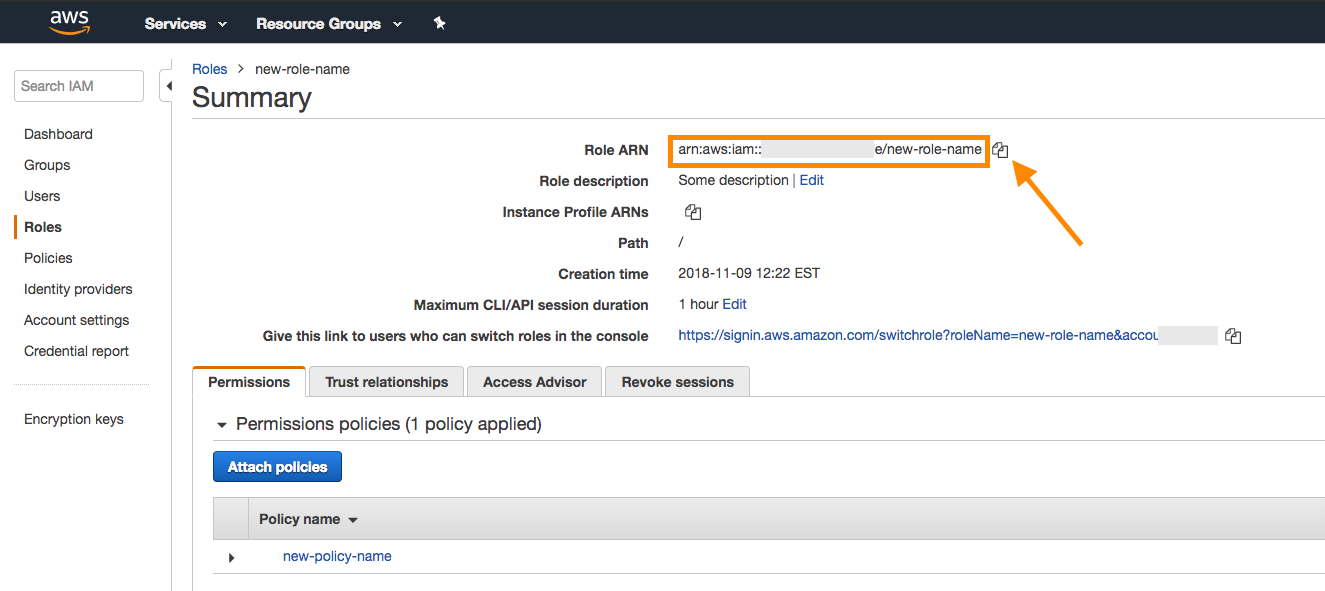
Return to your Braze account and copy the role ARN into the field provided.
If you’re only setting up message archiving, follow the steps in the Dashboard Data Export tab.
In Braze, go to Partner Integrations > Currents. Next, select Create New Current and select Amazon S3 Data Export
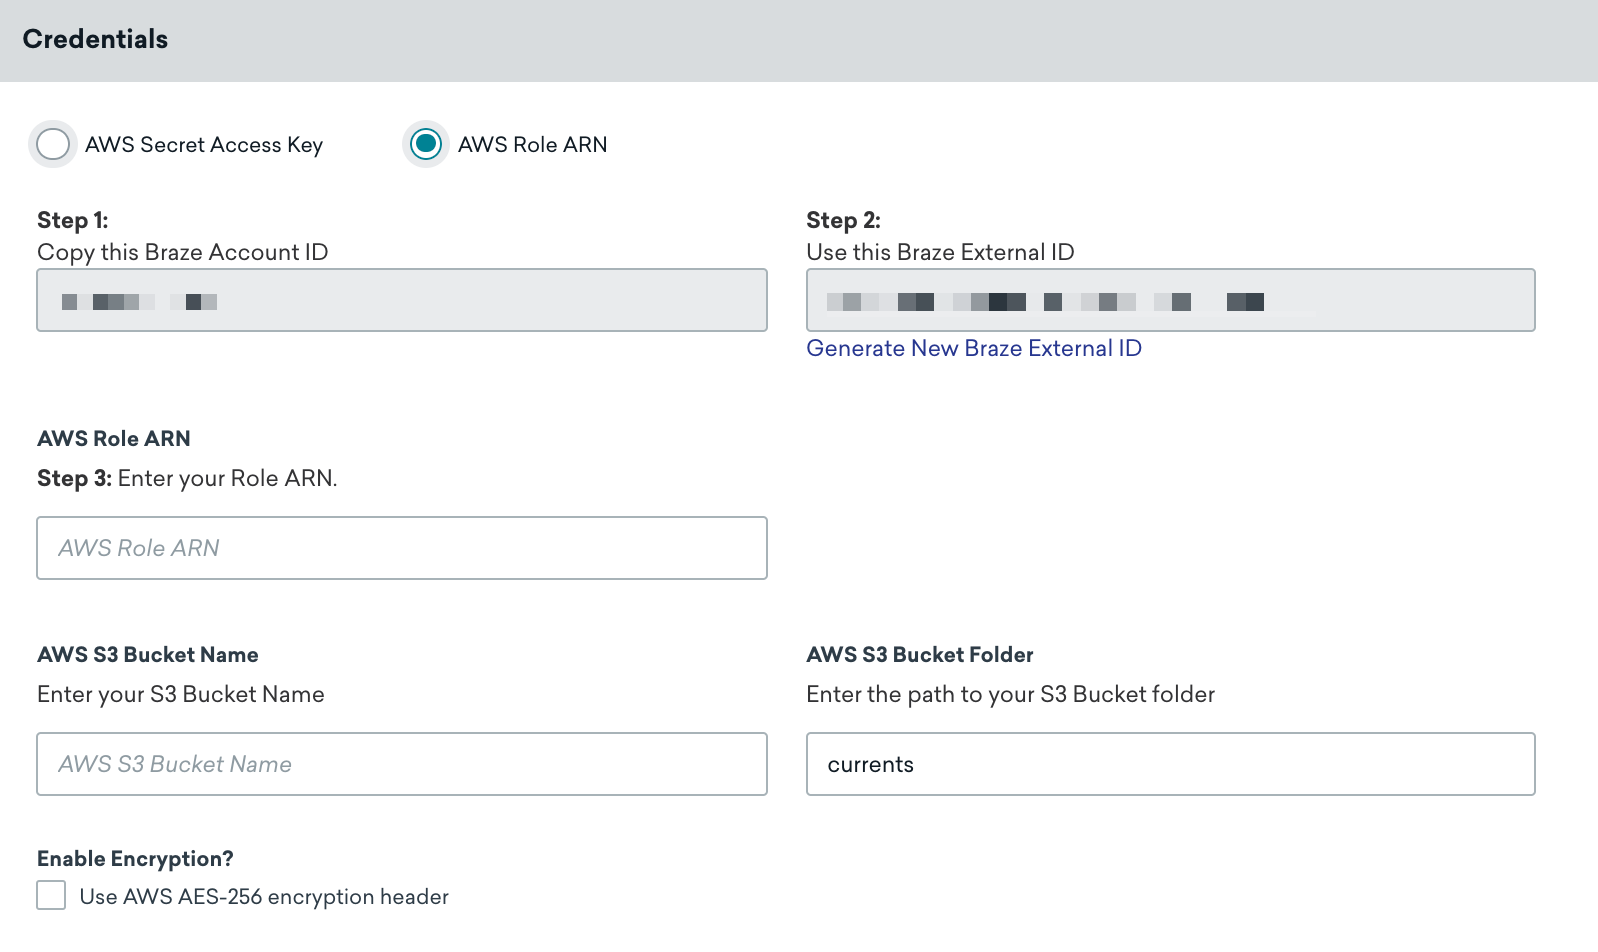
Give your Current a name. Then, in the Credentials section, make sure AWS Role ARN is selected, then provide your role ARN and AWS S3 bucket name in the designated fields.
You can also add the following customization based on your needs:
- Folder Path (defaults to
currents) - Server-Side, At-Rest AES-256 Encryption (defaults to OFF) - Includes the
x-amz-server-side-encryptionheader
Select Launch Current to continue. A notification indicates if your credentials have been successfully validated. AWS S3 is now set up for Braze Currents.
If you receive an “S3 credentials are invalid” error, this may be due to integrating too quickly after creating a role in AWS. Wait and try again. If the message mentions PutObject access or server-side encryption on dashboard data exports, see Troubleshooting S3 credential errors.
In Braze, go to the Technology Partners page under Integrations and select Amazon S3.
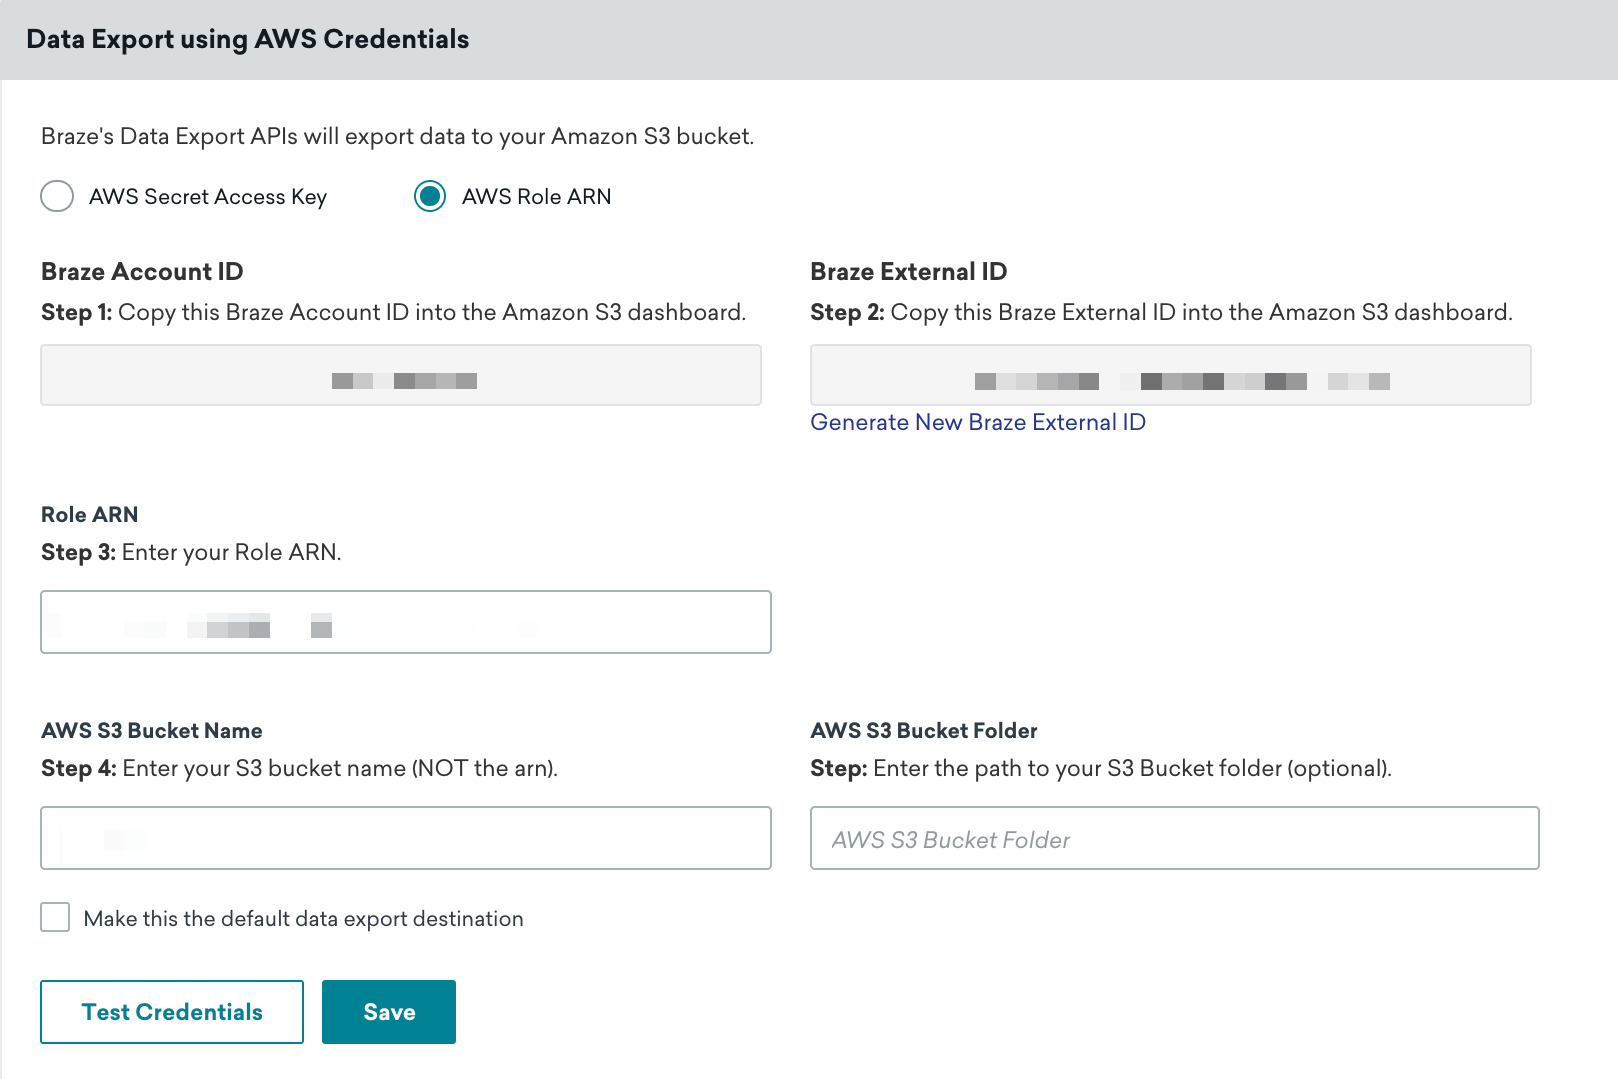
On the AWS Credentials page, make sure the AWS Role ARN radio button is selected, then input your role ARN and AWS S3 bucket name in the designated fields. Select Test Credentials first to confirm your credentials work properly, then select Save when successful.
You can always retrieve new credentials by navigating to your user, and selecting Create Access Key on the Security Credentials tab within the AWS Console.
A notification informs you whether your credentials have been successfully validated. AWS S3 is now integrated into your Braze account.
Updating Amazon S3 credentials for Currents
You can update the Amazon S3 credentials on an existing Braze Currents connector without stopping the integration or losing data already exported to your bucket.
To refresh credentials—or to switch between AWS Secret Access Key and AWS Role ARN—finish the IAM and AWS-side steps for your chosen method earlier in this article (policies, user or role, and identifiers as needed).
When you’ve finished preparing credentials in AWS, go to Partner Integrations > Currents in Braze, locate your Amazon S3 connector in the list, select Edit, update Credentials, and select Update Current. Braze validates the credentials you enter; your connector keeps running and data already in your bucket remains available. For more information, see Updating Currents in Set up Currents.
Export behavior
Users who have integrated a cloud data storage solution and export APIs, dashboard reports, or CSV reports experience the following:
- All API exports do not return a download URL in the response body and must be retrieved through data storage.
- All dashboard reports and CSV reports are sent to the user’s email for download (no storage permissions required) and backed up on Data Storage.
Unable to connect to S3, please validate that your credentials are correct error
If you see this error when downloading a CSV export, open the Amazon S3 integration on the Technology Partners page and select Test Credentials. The result explains what failed validation—for example, the key might be missing GetObject permission, which prevents Braze from generating download links.
Update your IAM policy so the integration user or role can call s3:GetObject on the S3 bucket and object path configured in your Braze integration. For more export issues, see Export troubleshooting.
JSON format requirement: For JSON exports, Braze uses JSONL (newline-delimited JSON) format, where each line contains a separate JSON object. This format differs from standard JSON, which is a single JSON array or object. Each line in the exported file is a valid JSON object, but the file as a whole is not a single valid JSON document. When processing these files, parse each line individually as a separate JSON object rather than attempting to parse the entire file as a single JSON document.
Currents exports use Apache Avro format (.avro files), not JSON. This JSON format requirement applies to dashboard data exports and API exports.
Multiple connectors
If you intend to create more than one Currents connector to send to your S3 bucket, you can use the same credentials, but must specify a different folder path for each. You can create these in the same workspace, or split and create them within multiple workspaces. You also have the option of creating a single policy for each integration, or creating one policy that covers both integrations.
If you plan on using the same S3 bucket for both Currents and data exports, you need to create two separate policies as each integration requires different permissions.
Troubleshooting
Error: Account does not have PutObject access
If you see the following error when saving Amazon S3 credentials for dashboard data exports, it may be due to incorrect permissions or server-side encryption settings.
1
S3 Credentials are invalid because this account does not have 'PutObject access'. Please check the permissions and ensure that this key has access to 'PutObject' in the 'CUSTOMER-BUCKET-HERE' bucket.
To resolve this issue, check the following areas.
Incorrect bucket policy
Confirm that you created a policy with the correct permissions as outlined in Amazon S3 integration (use the Dashboard Data Export policy for your authentication method).
Server-side encryption
1
User: arn:aws:sts::XXX:assumed-role/braze-iam-role/braze is not authorized to perform: kms:GenerateDataKey on resource: arn:aws:XXX because no identity-based policy allows the kms:GenerateDataKey action
If you receive this error message from Braze Support or in your AWS logs, your S3 bucket is configured with AWS Key Management Service (SSE-KMS) encryption. Braze does not support SSE-KMS for Currents or dashboard data exports. To resolve this, disable SSE-KMS in your S3 bucket.
Braze supports server-side encryption using S3 managed keys (SSE-S3), which is compatible with both Currents and dashboard data exports.
Check additional permissions
Make sure you have the necessary permissions, including s3:GetBucketLocation and s3:PutObject.