PassKit
PassKit enables you to extend your mobile reach by integrating Apple Wallet, and Google Pay passes into your customer’s experience. Easily create, manage, distribute, and analyze the performance of digital coupons, loyalty cards, membership cards, tickets, and much more; without your customers needing another app.
The Braze and PassKit integration allows you to increase and measure the engagement of your online campaigns by instantly delivering custom Apple Wallet and Google Pay passes. You can then analyze usage and make real-time adjustments to increase in-store traffic by triggering location-based messages and personalized, dynamic updates to your customer’s mobile wallet.
Prerequisites
| Requirement | Description |
|---|---|
| PassKit account | You will need to have a PassKit account and a PassKit account manager. |
userDefinedID |
To appropriately update custom events and custom attributes to your users between PassKit and Braze, you will need to set the Braze external ID as the userDefinedID. This userDefinedID will be used when making API calls to the PassKit endpoints. |
| Braze REST API key | A Braze REST API key with users.track permissions. This can be created in the Braze dashboard from Settings > API Keys. |
| Braze REST endpoint | Your REST endpoint URL. Your endpoint will depend on the Braze URL for your instance. |
Integration
To further enrich your customers’ mobile wallet experiences, from within your PassKit dashboard, you can opt to pass data into Braze through Braze’s /users/track endpoint.
Examples of data to share from PassKit includes:
- Pass created: when a customer clicks on a pass link and is first shown a pass.
- Pass installs: when the customer adds and saves the pass to their wallet app.
- Pass updates: when a pass is updated.
- Pass delete: when a customer deletes the pass from their wallet app.
Once the data is passed into Braze, you can build audiences, personalize content via Liquid, and trigger campaigns or Canvases after these actions have been performed.
Connect Passkit to Braze
To pass data from PassKit, ensure that you have set your Braze external ID as PassKit’s externalId.
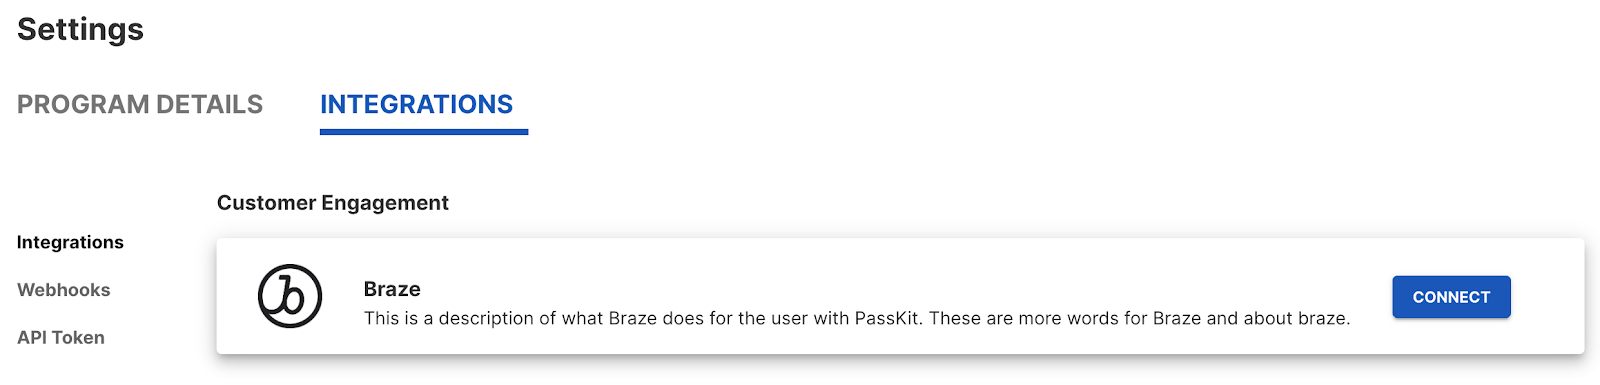
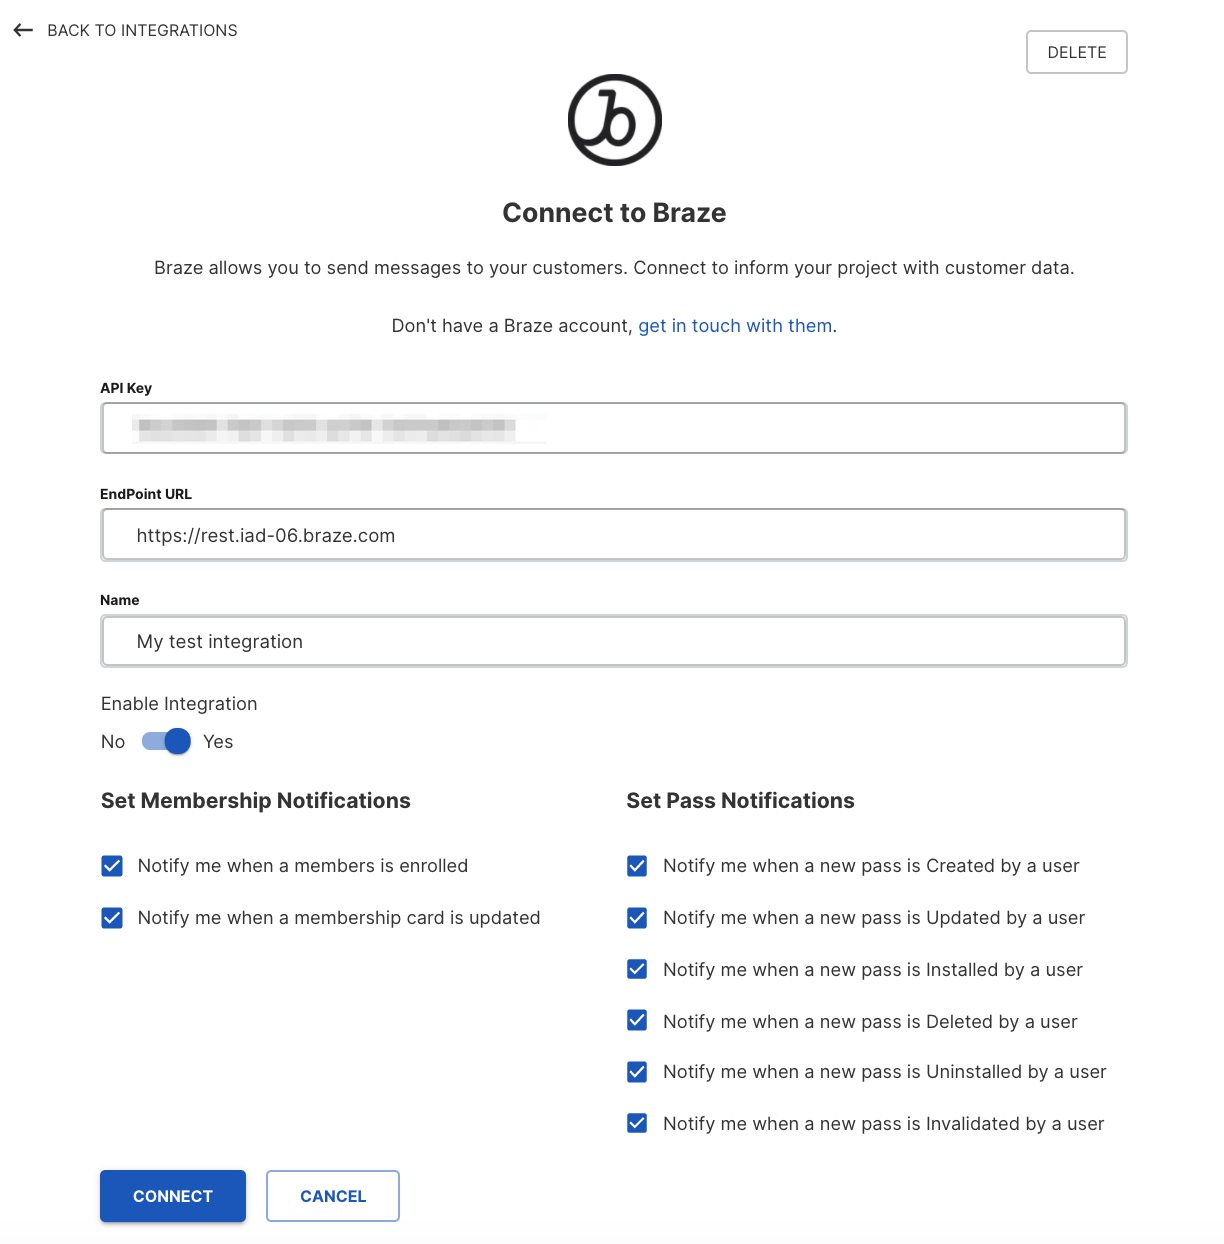
- Within Settings, under Integrations in your PassKit pass project or program click Connect under the Braze Tab.
- Fill out your Braze API key, endpoint URL, and provide a name for your connector.
- Toggle Enable Integration and whichever events you want in Braze to trigger or personalize your messages with.
Create pass using a SmartPass link
Within Braze, you can set up a SmartPass link to generate a unique URL for your customers to install their pass on either Android or iOS. To do this, you must define an encrypted SmartPass data payload that can be called from a Braze Content Block. This Content Block can then be reused for future passes and coupons. The following will be used during your integration:
- PassKit URL: Your PassKit URL is a unique URL for your PassKit program.
Each program has a unique URL, and you can find it under the Distribution tab of your PassKit program or project. (for example, https://pub1.pskt.io/c/ww0jir) - PassKit secret: Along with the URL, you will need to have the PassKit Key for this program handy.
This can be found on the same page as your PassKit URL. - Program (or project) ID: Your PassKit Program ID will be required to create the SmartPass URL.
You can find it under the Settings tab of your project or program.
For more information on creating encrypted SmartPass links, check out this PassKit article.
Step 1: Define your pass data payload
First, you must define the coupon or member payload.
There are many different components you can include in your payload, but here as two important ones to note:
| Component | Required | Type | Description |
|---|---|---|---|
person.externalId |
Required | String | Set as the Braze external ID, this is crucial for the callbacks from PassKit back to Braze to work, allowing Braze users to have coupons for multiple offers in one campaign. Not enforced as unique. |
members.member.externalId |
Optional | String | Set as the Braze external ID, you may use your external ID to update the membership pass. Setting this field enforces the user as unique within the membership program. |
For a full list of available fields, their types, and helpful descriptions, have a look at the PassKit GitHub documentation.
Example payload
1
2
3
4
5
6
7
8
{
  "members.member.externalId": "{{${user_id}}}",
  "members.member.points": "100",
  "members.tier.name": "current_customer",
  "person.displayName": "{{${first_name}}} {{${last_name}}}",
  "person.externalId": "{{${user_id}}}",
  "universal.expiryDate": "{{ "now" | date: "%s" | plus: 31622400 | date: "%FT%TZ" }}"
}
Step 2: Create and encode an undefined payload variable
Create and name a new Content Block by navigating to Templates > Content Blocks within the Braze dashboard.
If you are using the older navigation, go to Engagement > Templates & Media > Content Block Library.
Select Create Content Block to get started.
Next, you must define your Content Block Liquid Tag. After saving this Content Block, this Liquid tag can be referenced when composing messages. In this example, we have assigned the Liquid tag as {{content_blocks.${passKit_SmartPass_url}}}.
Within this Content Block, we will not directly include the payload, but reference it in a {{passData}} variable. The first code snippet you must add to your Content Block captures a Base64 encoding of the {{passData}} variable.
1
{% capture base64JsonPayload %}{{passDatapassData|base64_encode}}{% endcapture %}
Step 3: Create your encryption signature using a SHA1 HMAC hash
Next, you will be creating your encryption signature using a SHA1 HMAC hash of the project URL and the payload.
The second code snippet you must add to your Content Block captures the URL to be used for hashing.
1
{% capture url %}{{projectUrl}}?data={{base64JsonPayload}}{% endcapture %}
Next, you must generate a signature using this hash and your Project Secret. This can be done by including a third code snippet:
1
{% capture sig %}{{url | hmac_sha1: "Project_Secret"}}{% endcapture %}
Finally, append the signature to the full URL using the fifth code snippet:
1
{% capture longURL %}{{projectUrl}}?data={{base64JsonPayload}}&sig={{sig}}{% endcapture %}
Step 4: Print your URL
Lastly, make sure you call your final URL so that it prints your SmartPass URL within your message.
1
{{longURL}}
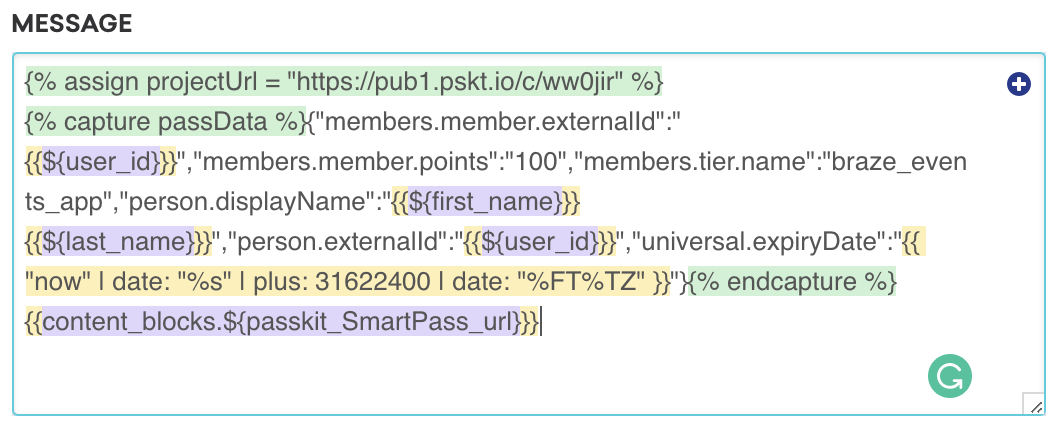
At this point, you will have created a Content Block that looks something like this:
1
2
3
4
5
6
7
8
9
{% capture base64JsonPayload %}{{passData|base64_encode}}{% endcapture %}

{% capture url %}{{projectUrl}}?data={{base64JsonPayload}}{% endcapture %}

{% capture sig %}{{url | hmac_sha1: "Project_Secret"}}{% endcapture %}

{% capture longURL %}{{projectUrl}}?data={{base64JsonPayload}}&sig={{sig}}&utm_source=braze&utm_campaign={{campaign.${name}}}{% endcapture %}{% capture longURL %}{{longURL | url_encode}}{% endcapture %}

{{longURL}}
In this example, UTM parameters have been added to track the source of these installs back to Braze and this campaign.
Remember to save your Content Block before leaving the page.
Step 5: Putting it all together
Once this Content Block has been made, it can be reused again in the future.
You may notice there are two variables left undefined in the example Content Block.
{{passData}} - Your JSON pass data payload defined in step 1
{{projectUrl}} - Your project or program’s URL which you find on the distribution tab of your Passkit project.
This decision is purposeful and supports the reusability of the Content Block. Because these variables are only referenced, not created within the Content Block, these variables can change without remaking the Content Block.
For example, maybe you want to change the introductory offer to include more initial points in your loyalty program, or perhaps you want to create a secondary member card or coupon. These scenarios would require different Passkit projectURLs or different pass payloads, which you would define per campaign in Braze.
Composing the message body
You’ll want to capture both of these variables in your message body and then call your Content Block. Capture your minified JSON payload from step 1:
Assign the project URL
1
{% assign projectUrl = "https://pub1.pskt.io/c/ww0jir" %}
Capture the JSON
1
{% capture passData %}{"members.member.externalId": "{{${user_id}}}","members.member.points": "100","members.tier.name": "current_customer","person.displayName": "{{${first_name}}} {{${last_name}}}","person.externalId": "{{${user_id}}}","universal.expiryDate": "{{ "now" | date: "%s" | plus: 31622400 | date: "%FT%TZ" }}"}{% endcapture %}
Reference the Content Block you just made
1
{{content_block.${passkit_SmartPass_url}}}
Your message body should look something like this:
The output URL for the sample is:
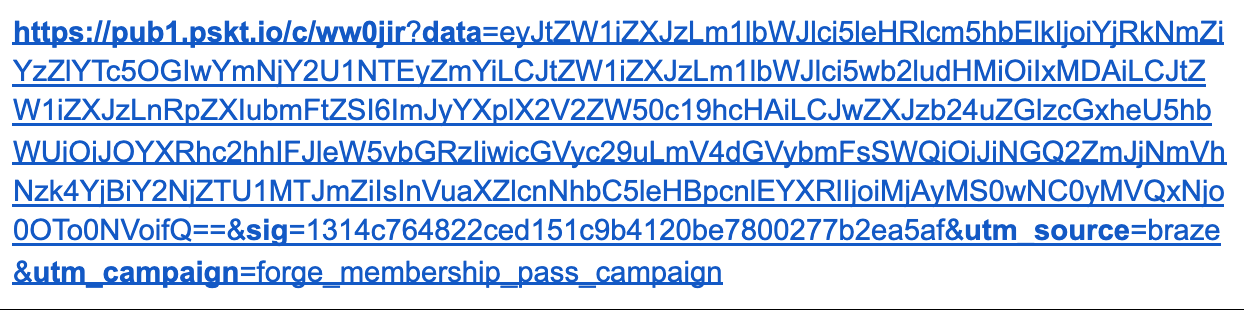
The output URL will be long. The reason for this is that it contains all the pass data and incorporates best-in-class security to ensure data integrity and no tempering via URL modification. If using SMS to distribute this URL, you may want to run it through a link shortening process such as bit.ly. This can be done through a Connected Content call to a bit.ly endpoint.
Update pass using the PassKit webhook
Within Braze, you can set up a webhook campaign or a webhook within a Canvas to update an existing pass based on your user’s behavior. Check out the following links for information on useful PassKit endpoints.
Payload parameters
Before you get started, here are the common JSON payload parameters that you can include within your create and update webhooks to PassKit.
| Data | Type | Description |
|---|---|---|
externalId |
String | Allows a unique Id to be added to the pass record to provide compatibility with an existing system using unique customer identifiers (for example, membership numbers). You can retrieve pass data by using this endpoint via userDefinedId and campaignName instead of pass ID. This value must be unique within a campaign, and after this value is set, it cannot be changed.For the Braze integration, we would recommend using the Braze external ID: {{${user_id}}} |
campaignId (coupon) programId (membership) |
String | The ID for the campaign or program template you created in PassKit. To find this, head to the Settings tab in your PassKit pass project. |
expiryDate |
IO8601 datetime | The pass expiry date. After the expiry date, the pass is automatically voided (see isVoided). This value will override the template and campaign end date value. |
status |
String | The current status of a coupon, such as REDEEMED or UNREDEEMED. |
Step 1: Create your Braze webhook template
To create a PassKit webhook template to use in future campaigns or Canvases, navigate to the Templates & Media section in the Braze dashboard. If you would like to create a one-off PassKit webhook campaign or use an existing template, select Webhook in Braze when creating a new campaign.
Once you have selected the PassKit webhook template, you should see the following:
- Webhook URL:
https://api-pub1.passkit.io/coupon/singleUse/coupon - Request Body: Raw Text
Request headers and method
PassKit requires an HTTP Header for authorization that includes your PassKit API key encoded in base 64. The following will already be included within the template as a key-value pair, but in the Settings tab, you must replace the <PASSKIT_LONG_LIVED_TOKEN> with your PassKit token. To retrieve your token, navigate to your PassKit project/program, navigate to Settings > Integrations > Long Lived Token.
- HTTP Method: PUT
- Request Header:
- Authorization: Bearer
<PASSKIT_LONG_LIVED_TOKEN> - Content-Type: application/json
- Authorization: Bearer
Request body
To set up the webhook, fill out the new event details within the request body, including the payload parameters necessary for your use case:
1
2
3
4
5
{
  "externalId": "{{${user_id}}}",
  "campaignId": " 2xa1lRy8dBz4eEElBfmIz8",
  "expiryDate": "2020-05-10T00:00:00Z"
}
Step 2: Preview your request
Your raw text will automatically highlight if it is an applicable Braze tag.
Preview your request in the Preview panel or navigate to the Test tab, where you can select a random user, an existing user, or customize your own to test your webhook.
Remember to save your template before leaving the page!
Updated webhook templates can be found in the Saved Webhook Templates list when creating a new webhook campaign.
Retrieve pass details via Connected Content
In addition to creating and updating passes, you can also retrieve your users’ pass metadata via Braze’s Connected Content to incorporate personalized pass details within your messaging campaigns.
PassKit Connected Content call
1
2
3
{% connected_content  https://api-pub1.passkit.io/coupon/singleUse/coupon/externalId/{{${user_id}}} :headers {"Authorization": "Bearer <PASSKIT_LONG_LIVED_TOKEN>","Content-Type": "application/json"} :save passes %}

{{passes.status}}
Liquid example responses
1
2
3
4
5
6
7
8
9
10
11
{
    "redemptionDate": null,
    "redemptionCode": "",
    "lat": 0,
    "lon": 0,
    "alt": 0,
    "redemptionSource": "",
    "redemptionReference": "",
    "transactionReference": "",
    "transactionAmount": 0
}
1
UNREDEEMED
 Edit this page on GitHub