Send test messages
Before sending a messaging campaign to your users, as a suggested best practice, we recommend testing to make sure it looks right and operates as intended. You can create and send test messages to select devices or team members using the tools in the Braze dashboard.

Make sure to save your campaign draft after testing to avoid deleting your campaign. You can send test messages without saving the message as a draft.
Step 1: Identify your test users
Before testing your messaging campaign, it’s important to identify your test users. These users can be either existing user IDs or email addresses, or new users that are used exclusively for testing messaging campaigns.
Optional: Create a Content Test Group
A convenient way to organize your test users is by creating a Content Test Group, which includes a group of users that will receive test messages from campaigns. You can add this test group to the Add Content Test Groups field under Test Recipients in your campaign, and launch your tests without creating or adding individual test users.
Step 2: Send channel-specific test messages
For steps to send test messages, refer to the following section for your respective channel.
Before you can test Banner messages in Braze, you’ll need to create a Banner campaign in Braze. Additionally, verify that the placement you want to test is already placed in your app or website.
After creating your Banner message, you can preview your Banner or send a test message.
- Draft your Banner message.
- Select Preview to preview your Banner or send a test message.
- To send a test message, add either a content test group or one or more individual users as Test Recipients, then select Send Test.
You’ll be able to view your test message on the device for up to 5 minutes.


Keep in mind, your preview may not be identical to the final render on a user’s device due to differences across hardware.
Test checklist
- Is your Banner campaign assigned to a placement?
- Do the images and media show up and act as expected on your targeted device types and screen sizes?
- Do your links and buttons direct the user to where they should go?
- Does the Liquid function as expected? Have you accounted for a default attribute value in the event that the Liquid returns no information?
- Is your copy clear, concise, and correct?
To send a test to either content test groups or individual users, push must be enabled on your test devices with valid push tokens registered for the test user before sending. For iOS users, you must tap the push notification sent by Braze in order to view the test Content Card. This behavior only applies to test Content Cards.
Test Content Cards are delivered through a push notification. The card is packaged in the push payload, and the SDK extracts and caches it locally when the push is received.
This process bypasses the normal card delivery system, which is why push must be enabled even though you’re testing a Content Card.
Test Content Cards expire approximately five minutes after they are sent.
After creating your Content Card, you can send a test Content Card to your app to see what it will look like in real-time.
- Draft your Content Card.
- Select the Test tab and select at least one Content Test Group or individual user to receive this test message.
- Select Send Test to send your Content Card to your app.

Preview
You can preview your card as you compose it in the Preview tab. This should help you visualize what your final message will look like from your user’s perspective.
In the Preview tab of your composer, the view of your message might not be identical to its actual rendering on the user’s device. We recommend always sending a test message to a device to ensure that your media, copy, personalization, and custom attributes generate correctly.
Test checklist
- Is your test user opted in to push with a valid push token?
- Do the images and media show up and act as expected?
- Does the Liquid function as expected? Have you accounted for a default attribute value if the Liquid returns no information?
- Is your copy clear, concise, and correct?
- Do your links direct the user to where they should go?
- Is your test user opted into push with a valid push token?
Troubleshooting broken images
If a Content Card image is not rendering or appears broken:
- Verify the URL is correct and URL-encoded: Special characters in the URL (such as spaces or query parameters) must be properly encoded. Otherwise, the image request fails.
- Check content security policies: If your organization has a content security policy (CSP) or internal IT security rules, the policy may block the image domain. Confirm that the image URL’s domain is allowed by your CSP.
- Use HTTPS: Image URLs should use
https://rather thanhttp://to avoid mixed-content blocking in browsers and apps. - Open the URL directly in a browser: If the image doesn’t load in a browser, the issue is with the image URL or hosting—not with Braze.
Debug
After your Content Cards are sent, you can break down or debug any issues from the Event User Log in the Developer Console.
A common use case is trying to debug why a user can’t see a particular Content Card. To do so, you can look in the Event User Logs for the Content Cards delivered to the SDK on session start, but prior to an impression, and trace those back to a specific campaign:
- Go to Settings > Event User Log.
- Locate and expand the SDK Request for your test user.
- Click Raw Data.
-
Find the
idfor your session. The following shows an example excerpt:1 2 3 4 5 6 7 8 9 10 11 12
[ { "session_id": "D1B051E6-469B-47E2-B830-5A728D1D4AC5", "data": { "ids": [ "NDg2MTY5MmUtNmZjZS00MjE1LWJkMDUtMzI1NGZiOWU5MDU3" ] }, "name": "cci", "time": 1636106490.155 } ]
-
Use a decoding tool like Base64 Decode and Encode to decode the
idfrom Base64 format and find the associatedcampaign_id. In our example, this results in the following:1
4861692e-6fce-4215-bd05-3254fb9e9057_$_cc=c3b25740-f113-c047-4b1d-d296f280af4f&mv=6185005b9d9bee79387cce45&pi=cmp
Where
4861692e-6fce-4215-bd05-3254fb9e9057is thecampaign_id. -
Go to the Campaigns page and search for the
campaign_id.

From there, you can review your message settings and content to drill down and determine why a user can’t see a particular Content Card.
- Draft your email message.
- Select Preview and Test.
- Select the Test Send tab and add your email address or user ID in the Add individual users field.
- Select Send Test to send your drafted email to your inbox.

If your email includes a preference center link, test sends do not generate a working link or let you save preferences. To test the preference center, launch the message to a test user or small internal segment instead. For details, see Testing preference centers.
If your email campaign includes a large image and isn’t displaying as expected in Outlook, consider reducing the actual file dimensions of the image with an image editing or resizing tool instead of only scaling it with CSS or HTML.


- Create your LINE message.
- Select the Test tab and select at least one Content Test Group or individual user to receive this test message.
- Select Send Test to send your message.

Mobile push
- Draft your mobile push.
- Select the Test tab and add your email address or user ID in the Add Individual Users field.
- Select Send Test to send your drafted message to your device.

If you see an error that none of the selected users have matching push tokens, the test user does not have a valid push token for the selected platform. The user must have started a session in the app and enabled push for that device. For more information, see Push enablement and push subscription.
Web push
- Create your web push.
- Select the Test tab.
- Select Send Test to Myself.
- Select Send Test to send your web push to your web browser.

If you have already accepted push messages from the Braze dashboard, the message displays in the corner of your screen. Otherwise, select Allow when prompted, and the message displays.
If you see an error that none of the selected users have matching push tokens for Web Push, verify that the test user has a valid push token registered for the selected platform. To receive a push token, the user must be configured to receive push notifications for the app on their device. For more details, see Push enablement and push subscription.
After creating your SMS, MMS, or RCS message, you can send a test message to your phone to see what it will look like in real-time.
- Draft your SMS, MMS, or RCS message.
- Select the Test tab and select at least one Content Test Group or individual user to receive this test message.
- Select Send Test to send your test message.

After creating your webhook, you can do a test send to check the webhook response. Select the Test tab and select Send Test to send a test send to the supplied webhook URL. You can also select an individual user to preview the response as a specific user.
- Create your WhatsApp message.
- Select the Test tab and select at least one Content Test Group or individual user to receive this test message.
- Initiate a conversation window by sending a WhatsApp message to the phone number associated with the subscription group you’re using for this message. The associated phone number is listed in the alert on the Test tab.
- Select Send Test to send your message.

Test personalized campaigns
If you are testing campaigns that populate user data or use custom event properties, you’ll need to take additional or different steps.
Testing campaigns personalized with user attributes
If you are using personalization in your message, you’ll need to take additional steps to properly preview your campaign and check that user data is properly populating the content.
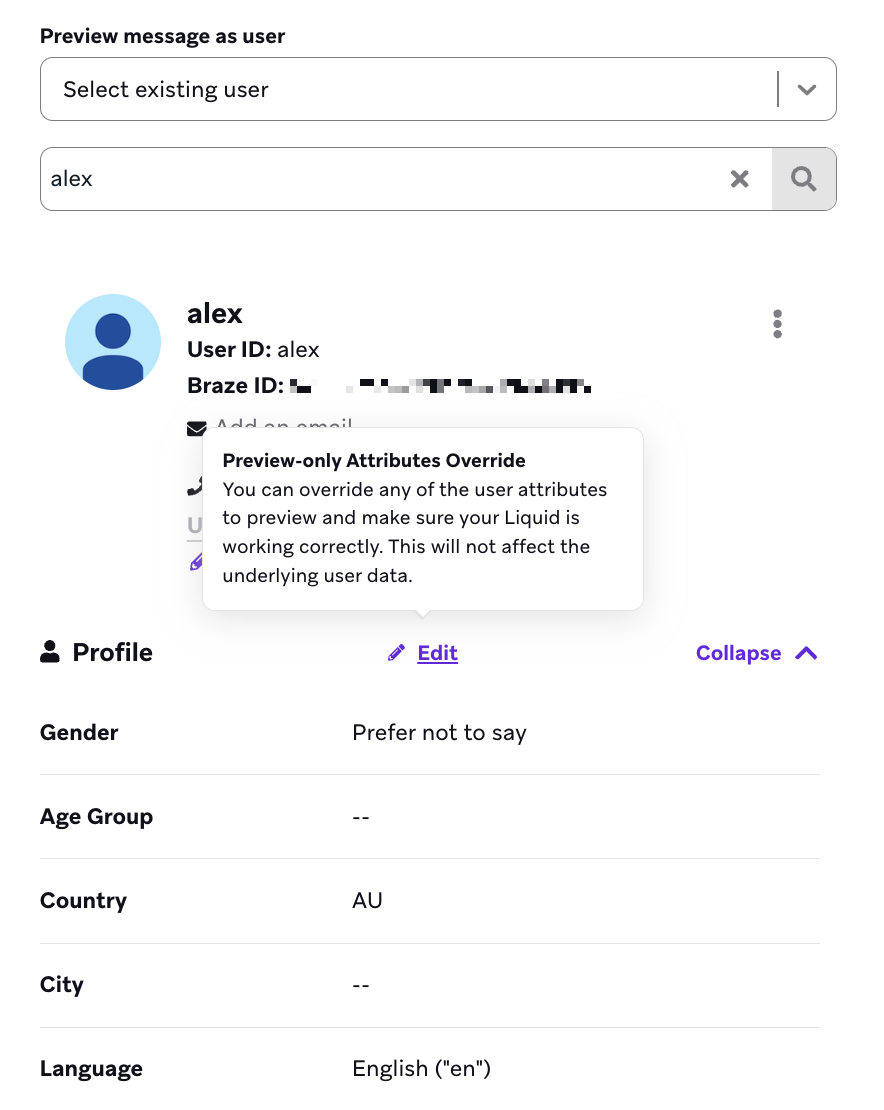
When sending a test message, make sure to choose either the option to Select Existing User or preview as a Custom User.

Selecting an existing user
If selecting an existing user, enter the specific user ID or email in the search field. Then, use the dashboard preview to see how your message would appear to that user, and send a test message to your device that reflects what that user would see.

Selecting a custom user
If previewing as a custom user, enter text for various fields available for personalization, such as the user’s first name and any custom attributes. Once again, you can enter your own email address to send a test to your device.

Customizing an existing user
You can edit individual fields from a random or existing user to help test dynamic content within your message. Select Edit to convert the selected user into a custom user you can modify.
Testing campaigns personalized with custom event properties
Testing campaigns personalized with custom event properties differs slightly from testing other types of campaigns outlined.
Method 1: Triggering campaign manually
You can trigger the campaign yourself as a robust way to test campaigns personalized using custom event properties:
- Write up the copy involving the event property.

- Use action-based delivery to deliver the campaign when the event occurs.
If you’re testing an iOS push campaign, you must set the delay to one minute to allow yourself time to exit the app because iOS doesn’t deliver push notifications for the currently open app. Other types of campaigns can be set to deliver immediately.

- Target the users as you would for testing by using a testing filter or targeting your own email address, and finish creating the campaign.

- Go into your app and complete the custom event.
The campaign will trigger and show the message customized with the event property.


Method 3: Using Liquid
You can test custom event properties by manually inputting values with Liquid.
- In the message editor, input values for your custom event properties.
- Select the Preview as a User tab to check that the correct message displays.
Limitations
There are a few situations where test messages don’t behave the same way as campaigns or Canvases sent to real users. In these instances, consider launching the campaign or Canvas to a limited set of test users to validate this behavior.
- Viewing the Braze preference center from test messages causes the Save Preferences button to be disabled. Preference center Liquid tags may also not resolve to valid links. This is expected behavior. To test end-to-end, see Testing preference centers.
- For testing in-app messages and Content Cards, the target user must have a push token for the target device.
- For testing unsubscribe links in emails, make sure your test user’s email address is in the respective workspace.
- The
List-Unsubscribeheader is not included in emails sent by the test message functionality. - Emails sent to seed group users do not update the user profile Campaign Received list or increment Sends in dashboard analytics.
Troubleshooting
In-app messages
If your in-app message campaign is not triggered by a push campaign, check the in-app campaign segmentation to confirm the user meets the target audience before receiving the push message.
For test sends on Android and iOS, the in-app messages that use the Request push permission on-click behavior may not display on some devices. As a workaround:
- Android: Devices must be on Android 13 and our Android SDK version 21.0.0. Another reason may be that the device on which the in-app message is displayed already has a system-level prompt. You may have selected Do not ask again, so you may need to reinstall the app to reset the notification permissions before testing again.
- iOS: We recommend your developer team review the implementation of push notifications for your app and manually remove any code that would request push permissions. For more information, see Push primer in-app messages.
For an action-based in-app message campaign to deliver, you must log custom events through the Braze SDK, not REST APIs, so users can receive eligible in-app messages directly to their device. Users receive the in-app message if they perform the event during the session.