Email Preferences
Email Preferences is where you can set specific outbound email settings like custom footers, custom opt-in and opt-out pages, and more. Including these options in your outbound emails makes for a fluid and cohesive experience for your users.
Email Preferences can be found under Settings in the dashboard.
Sending configuration
The email settings under the Sending Configuration section determine which details are included in your email campaigns. In particular, these settings are mainly related to what your user sees when they receive an email from Braze.
Outbound email settings
When configuring your email settings, your outbound email settings identify which name and email addresses are used when Braze sends emails to your users.
In this section, you can add the names and email addresses you can use when Braze sends emails to your users. The display names and email addresses are available in the Edit Sending Info options as you compose your email campaign. Note that updates made to the outbound email settings do not retroactively affect existing sends.

Personalizing with Liquid
You can also use Liquid in the From Display Name and Local Part fields to dynamically template the sending email based on custom attributes. For example, you can use conditional logic to send from different brands or regions:
1
2
3
4
5
6
7
{% if ${language} == 'en' %}
English Display Name
{% elsif ${language} == 'de' %}
German Display Name
{% else %}
Default to English Display Name
{% endif %}
Adding an email address in this section allows you to select it as a reply-to address for your email campaign. You can also make an email address the default one by selecting Make Default. These email addresses will be available in the Edit Sending Info options as you compose your email campaign.

Personalizing with Liquid
You can also use Liquid in the Reply-To Address field to dynamically template the reply-to address based on custom attributes. For example, you can use conditional logic to send replies to different regions or departments:
1
2
3
4
5
6
7
{% if {{custom_attribute.${region}}} == 'US' %}
[email protected]
{% elsif {{custom_attribute.${region}}} == 'EU' %}
[email protected]
{% else %}
[email protected]
{% endif %}
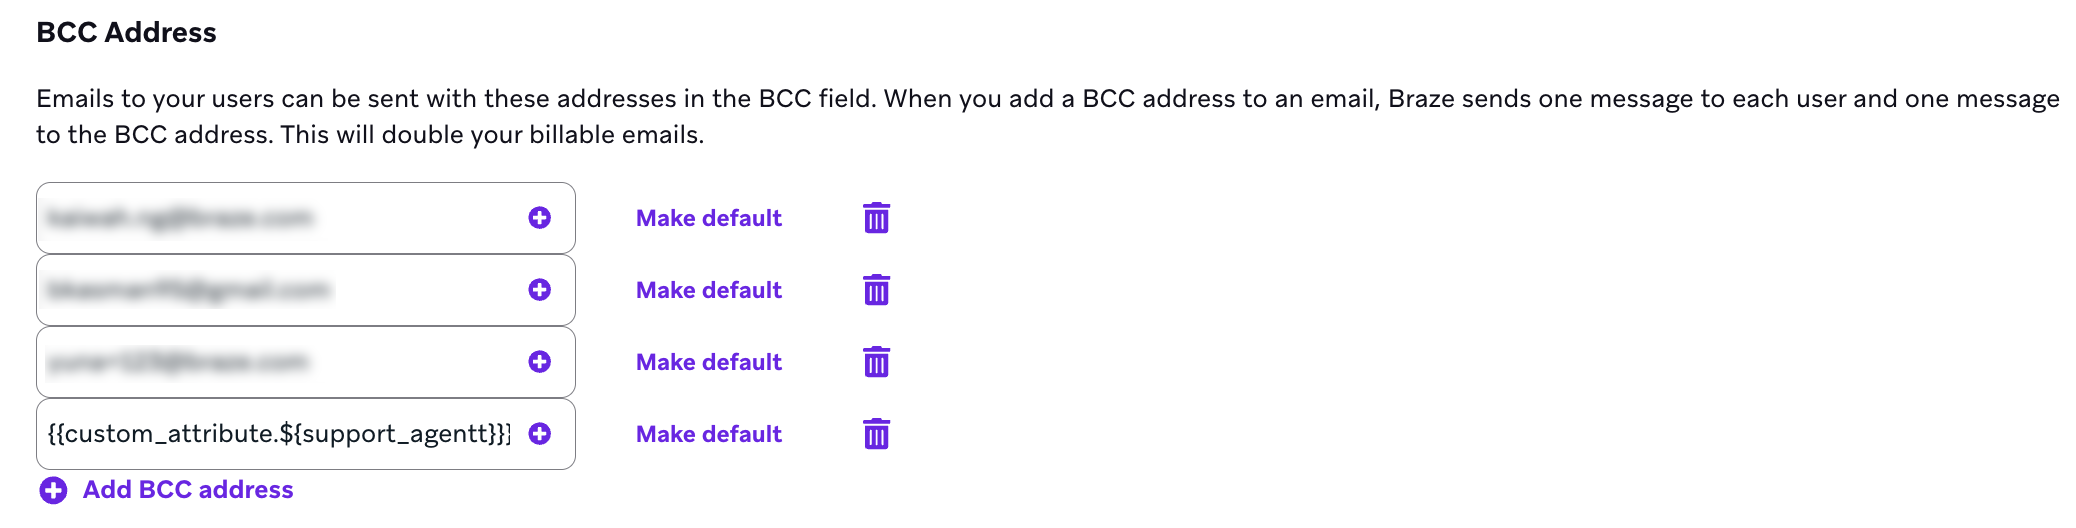
This section allows you to manage BCC addresses you can append to outbound email messages sent from Braze. Appending a BCC address to an email message sends an identical copy of the message that your user receives to your BCC inbox. This is a useful tool to retain copies of messages you sent to your users for compliance requirements or customer support issues. BCC emails are not included in email reporting and analytics.
BCC addresses are available for SendGrid and SparkPost only. As an alternative to BCC addresses, we recommend using messaging archiving to save a copy of messages sent to users for archival or compliance purposes.
Appending a BCC address to your campaign or Canvas results in doubling your billable emails for the campaign or Canvas component since Braze sends one message to your user and one to your BCC address.

After you add an address, the address will be made available to select when composing an email in either campaigns or Canvas steps. Select Make Default next to an address to set this address to be selected by default when launching a new email campaign or Canvas component. To override this at the message level, you can select No BCC when setting up your message.
If you require that all email messages sent from Braze have a BCC address included, you can select the Require a BCC address for all your email campaigns toggle. This will require you to select a default address, which will be automatically selected on new email campaigns or Canvas steps. The default address will also be automatically added to all messages triggered through our REST API. There is no need to change the existing API request to include the address.
Dynamic BCC
With dynamic BCC, you can use Liquid in your BCC address. Note that this feature is only available in Email Preferences and can’t be set on the campaign itself. Only one BCC address per email recipient is allowed.
For example, you can add {{custom_attribute.${support_agent}}} as the BCC address for emails from your support team.
Open tracking pixel

The email opening tracking pixel is an invisible 1 x 1 px image and is automatically inserted into your email HTML. This pixel helps Braze detect whether your users have opened your email. When a user’s email client makes a request to our tracking pixel, the request can contain information such as the IP address, user agent, and timestamp. Email open information can be very useful, helping you determine effective marketing strategies by understanding the corresponding open rates.
Placing the tracking pixel
The default behavior in Braze is to append the tracking pixel to the bottom of your email. For the majority of users, this is the ideal place to put the pixel. While the pixel is already styled to cause as few visual changes as possible, any unintentional visual changes would be the least visible at the bottom of an email. This is also the default for email providers such as SendGrid and SparkPost.
Changing location of tracking pixel
Braze currently supports overriding the ESP’s default open tracking pixel location (the last tag in the <body> of an email) to move it to the first tag in the <body>.
![]()
To change the location:
- In Braze, go to Settings > Email Preferences.
- Select from the following options: Move for SendGrid, Move for SparkPost, or Move for Amazon SES
- Select Save.
After you save, Braze sends special instructions to the ESP to place the open tracking pixel at the top of all HTML emails.
SSL enablement wraps the URL of the tracking pixel with HTTPS instead of HTTP. If your SSL is misconfigured, it may affect the efficacy of the tracking pixel.
List-unsubscribe header
Since February 15, 2024, new companies have the list-unsubscribe header (with one-click unsubscribe) enabled by default.
Using a list-unsubscribe header allows your recipients to unsubscribe easily from marketing emails by displaying an Unsubscribe button within the mailbox UI, and not the message body.
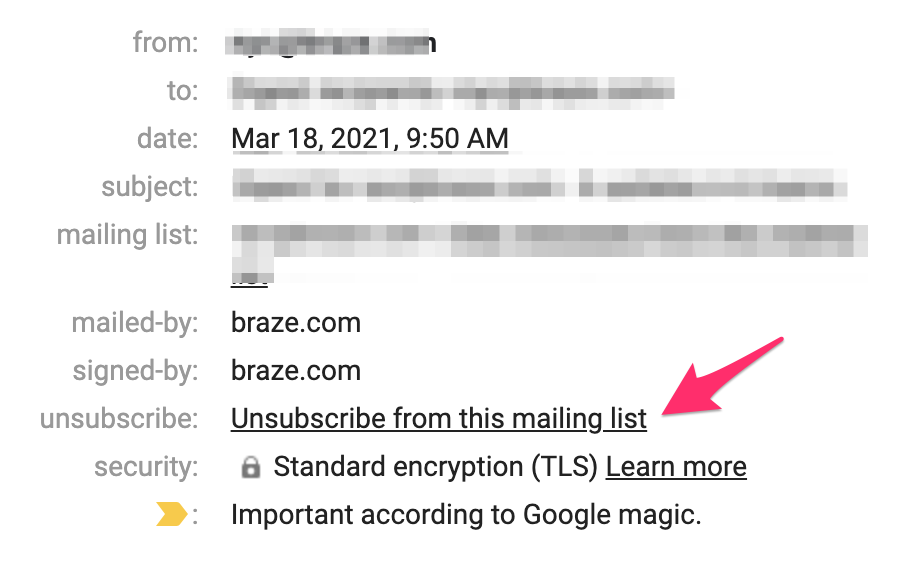
When a recipient selects Unsubscribe, the mailbox provider sends the unsubscribe request to the destination defined in the email header.
Enabling list-unsubscribe is a deliverability best practice and a requirement at some of the premier mailbox providers. It encourages end users to safely remove themselves from unwanted messages, versus hitting the spam button in an email client, the latter of which is detrimental to sending reputation and email deliverability.
When managing your subscriptions in Gmail, Gmail can also pull in the unsubscribe link from the body of the message, but prioritizes the list-unsubscribe if it’s present in the header.
Mailbox provider support
The following table summarizes mailbox provider support for “mailto:” header, list-unsubscribe URL, and one-click unsubscribe (RFC 8058).
| List-unsubscribe header | Mailto: header | List-unsubscribe URL | One-click unsubscribe (RFC 8058) |
|---|---|---|---|
| Gmail | Supported* | Supported | Supported |
| Gmail Mobile | Not supported | Not supported | Not supported |
| Apple Mail | Supported | Not supported | Not supported |
| Outlook.com | Supported | Not supported | Not supported |
| Yahoo! Mail | Supported* | Not supported | Supported |
*Yahoo and Gmail are eventually deprecating the “mailto:” header and will support only one-click.
Displaying the header is ultimately determined by the mailbox provider. To check if the list-unsubscribe header is included in the raw (text) email for the recipient in Gmail, do the following:
- Select Show Original in the email. This opens a new tab with the raw version of the email and its headers.
- Search for “List-Unsubscribe”.
If the header is in the raw version of the email but is not displayed, the mailbox provider has determined not to show the unsubscribe option, meaning we don’t have further insight as to why the mailbox provider isn’t displaying the header. Seeing the list-unsubscribe header is ultimately reputation-based. In most cases, the better your sender reputation with the mailbox provider, the more likely the list-unsubscribe header will appear.
Email unsubscribe header in workspaces

When the email unsubscribe header feature is turned on, this setting applies to the entire workspace, not the company level. It’s added to campaigns and Canvases that are set up to send to users who are subscribed or opted-in, or opted-in users in the Target Audience step of the campaign and Canvas builders.
When using the “workspace default,” Braze doesn’t add the one-click unsubscribe header for campaigns that are considered transactional, which are configured to “send to all users, including unsubscribed users”. To override this and add the one-click unsubscribe header when sending to unsubscribed users, you can select Unsubscribe globally from all emails in the message-level one-click list-unsubscribe settings.
Default list-unsubscribe header
Gmail intends for senders to implement the one-click unsubscribe for all their outgoing commercial, promotional messages as of June 1, 2024. For more information see Gmail’s sender guidelines and Gmail’s Email Sender Guidelines FAQ. Yahoo announced an early 2024 timeline for the updating requirements. For more information, refer to More Secure, Less Spam: Enforcing Email Standards for a Better Experience.
To use the Braze unsubscribe feature to process unsubscribes directly, select Include a one-click list-unsubscribe (mailto and HTTP) email header for emails sent to subscribed or opted-in users and select Braze default as the standard Braze URL and mail-to.

Braze supports the following versions of the list-unsubscribe header:
| List-unsubscribe version | Description |
|---|---|
| One-click (RFC 8058) | Offers a straightforward way for recipients to opt out from emails with a single click. This is a requirement from Yahoo and Gmail for bulk senders. |
| List-unsubscribe URL or HTTPS | Provides recipients with a link that directs the recipient to a web page where they can unsubscribe. |
| Mailto | Specifies an email address as the destination for the unsubscribe request message to be sent from the recipient to the brand. To process mailto list-unsubscribe requests, such unsubscribe requests need to include the email address as stored in Braze for the End User who is unsubscribing. This may be provided by the “from-address” of the email from where the End User is unsubscribing, the encoded subject, or the encoded body from the email received by the End User that they are unsubscribing from. In very limited cases, some inbox providers don’t adhere to the RFC 2368 protocol, resulting in the email address not being properly passed. This can lead to an unsubscribe request not being able to be processed in Braze. |
When Braze receives a list-unsubscribe request from a user via any of the above methods, this user’s global email subscription state is set to unsubscribed. If there isn’t a match, Braze does not process this request.
One-click unsubscribe
Using one-click unsubscribe for the list-unsubscribe header (RFC 8058) focuses on providing an easy way for recipients to opt out of emails.
Message-level one-click list-unsubscribe
The message-level one-click list-unsubscribe setting overrides the email unsubscribe header feature set for workspaces. Apply the one-click unsubscribe behavior per campaign or Canvas step for the following uses:
- Add a Braze one-click unsubscribe for a specific subscription group to support multiple brands/lists within one workspace
- Toggle between the default Braze unsubscribe or custom URL
- Add your custom one-click unsubscribe URL
- Omit one-click unsubscribe on this message
The message-level one-click list-unsubscribe setting is only available when using the drag-and-drop editor and the updated HTML editor. If you’re using the previous HTML editor, switch to the updated HTML editor to use this feature.
In your email editor, go to Sending Settings > Sending Info. Select from the following options:
- Use workspace default: Uses the Email Unsubscribe Header settings set in Email Preferences. Any changes made to this setting apply to all messages.
- Unsubscribe globally from all emails: Uses the Braze default one-click unsubscribe header. Users who click the unsubscribe button have their global email subscription state set to “Unsubscribed”.
- Unsubscribe from specific subscription group: Uses the specified subscription group. Braze unsubscribes users who click the unsubscribe button from the selected subscription group.
- When selecting a subscription group, add the Subscription Group filter in Target Audiences to only target users who are subscribed to this specific group. The subscription group selected for one-click unsubscribe must match the subscription group you’re targeting. If there is a mismatch in the subscription group, you may risk sending to a user who is trying to unsubscribe from a subscription group they’re already unsubscribed from.
The Unsubscribe from specific subscription group setting only applies to the one-click list-unsubscribe header. The mailto list-unsubscribe header is not affected when selecting this option. This means a recipient who unsubscribes using this method logs a global unsubscribe, not an unsubscribe from the specific subscription group. To exclude the mailto list-unsubscribe header from globally unsubscribing users, when selecting this setting, contact Support.
- Custom: Adds your custom one-click unsubscribe URL for you to process unsubscribes directly.
- Exclude unsubscribe
Excluding one-click unsubscribe or any unsubscribe mechanism should only be done for transactional messaging, such as password resets, receipts, and confirmation emails.
Adjusting this setting overrides the default behavior for one-click list unsubscribe in this email.

Requirements
If you’re sending emails using your own custom unsubscribe functionality, you must meet the following requirements to make sure the one-click unsubscribe URL that you set up is in accordance with RFC 8058:
- The URL must be able to handle unsubscribe POST requests.
- The URL must start with
https://. - The URL must not return an HTTPS redirect or a body. One-click unsubscribe links that go to a landing or other type of web page don’t comply with RFC 8058.
- POST requests must not set cookies.
Select Custom list-unsubscribe header to add your own configured one-click unsubscribe endpoint, and an optional “mailto:”. Braze requires an input for URL to support a custom list-unsubscribe header because the one-click unsubscribe HTTP is a requirement from Yahoo and Gmail for bulk senders.

Append email subject lines
Use the toggle to include “[TEST]” and “[SEED]” in your test and seed email subject lines. This can help identify any email campaigns sent as tests.

Inline CSS on new emails by default
CSS inlining is a technique that automatically inlines CSS styles for your emails and new emails. For some email clients, this can improve the way that your emails render.
Changing this setting does not affect any of your existing email messages or templates. You can override this default at any time while composing messages or templates. For more information, refer to CSS inlining.
Resubscribe users when their email changes
You may automatically resubscribe users when they change their email address. For example, if a previously unsubscribed workspace user changes their email address to one that is not on the unsubscribe list for Braze, they automatically become resubscribed.

Subscription pages and footers
For commercial emails, the CAN-SPAM Act requires that all commercial emails include an unsubscribe option. With the custom footer settings, you are able to remain CAN-SPAM compliant while also customizing your email opt-out footer. In order to remain compliant, you must add your custom footer to all emails sent as part of campaigns for this workspace.
Note the following requirements when creating a custom footer for your email messaging:
- Must include an unsubscribe URL and physical mailing address.
- Should be less than 100 KB.

To learn more about custom footer Liquid templating, check out our documentation on Custom footers.
Braze lets you set a Custom Unsubscribe Page with your own HTML. This page appears after a user has selected to unsubscribe from the bottom of an email. Note that this page should be less than 750 KB.

Learn more about best practices for email list management in Managing email subscriptions.
You can create a custom opt-in page using your own HTML. Including this in your email can be especially beneficial if you want your branding and message to remain consistent throughout your user lifecycle. Note that this page should be less than 750 KB.

Learn more about best practices for email list management in Managing email subscriptions.
When in the Preview section for a subscription page or footer, select Copy preview link to generate and copy a shareable preview link that shows what the email footer, unsubscribe page, or opt-in page looks like for a random user. The link lasts for seven days before it needs to be regenerated.
Frequently asked questions
One-click unsubscribe
Can the one-click unsubscribe URL (via list-unsubscribe header) link to a preference center?
No, that doesn’t adhere to RFC 8058, meaning you won’t be compliant with Yahoo and Gmail’s one-click unsubscribe requirement.
Why do I receive the error message “Your email body does not include an unsubscribe link” when composing my preference center?
A preference center is not considered an unsubscribe link. Your email recipients must have the option to unsubscribe from any commercial emails to remain CAN-SPAM compliant.
Do I need to edit past email campaigns and Canvases to apply the one-click unsubscribe setting after enabling it?
If you don’t have any of the use cases for message-level one-click list-unsubscribe setting, there’s no required action as long as the setting is turned on under Email Preferences. Braze automatically adds the one-click unsubscribe headers to all outgoing marketing and promotional messages. However, if you do need to configure one-click unsubscribe behavior on a per-message level, you’ll need to update prior campaigns and Canvas steps with the email accordingly.
I can see the list-unsubscribe and one-click unsubscribe header in the original message or raw data, but why don’t I see the Unsubscribe button in Gmail or Yahoo?
Gmail and Yahoo ultimately decide whether or not to display the list-unsubscribe or one-click unsubscribe header. For new senders or senders with low sender reputation, this can occasionally cause the unsubscribe button not to display.
Does the custom one-click unsubscribe header support Liquid?
Yes, Liquid and conditional logic are supported to allow for dynamic one-click unsubscribe URLs for the header.
If you’re adding conditional logic, avoid having output values that add whitespaces to your URL, as Braze does not remove these whitespaces.
Message-level one-click list-unsubscribe
If I add the email headers for one-click manually, and I have the email unsubscribe header turned on, what is the expected behavior?
The email headers added for one-click list-unsubscribe apply to all future sends of this campaign.
Why do subscription groups have to match across message variants in order to launch?
For a campaign with A/B testing, Braze randomly sends a user one of the variants. If you have two different subscription groups set on the same campaign (Variant A is set to Subscription Group A, and Variant B is set to Subscription Group B), we cannot guarantee that users who are subscribed to only Subscription Group B receive Variant B. There can be a scenario where users are unsubscribing from a subscription group they’ve already opted out of.
The email unsubscribe header setting is turned off in Email Preferences, but in my campaign’s sending info, the one-click list-unsubscribe setting is set to “Use workspace default”. Is this a bug?
No. If the workspace setting is turned off and the message setting is set to Use workspace default, then Braze follows what’s configured in Email Preferences. This means we do not add the one-click unsubscribe header for the campaign.
What happens if a subscription group is archived? Does this break the one-click unsubscribe on emails sent?
If a subscription group referenced in Sending Info for one-click is archived, Braze still processes unsubscribes from one-click. The subscription group no longer appears on the dashboard (segment filter, user profile, and similar areas).
Is the one-click unsubscribe setting available for email templates?
No, we currently do not have plans to add this for email templates, as these templates aren’t assigned to a sending domain. If you’re interested in this feature for email templates, submit product feedback.
Does this feature check that the one-click unsubscribe URL added to the custom option is valid?
No, we don’t check or validate any links in the Braze dashboard. Be sure to properly test your URL before launch.
 Edit this page on GitHub