SDK iOS integration
This reference article covers the iOS SDK integration for the Unity platform. Follow these guide to get Braze running in your Unity application.
If you are transitioning from a manual integration, read the instructions on Transitioning to an automated integration.
Step 1: Choose your Braze Unity package
The Braze .unitypackage bundles native bindings for the Android and iOS platforms, along with a C# interface.
The Braze Unity package is available for download on the Braze Unity releases page with two integration options:
Appboy.unitypackageonly- This package bundles the Braze Android and iOS SDKs without any additional dependencies. With this integration method, there will not be proper functionality of Braze in-app messaging, and Content Cards features on iOS. If you intend on utilizing full Braze functionality without custom code, use the option below instead.
- To use this integration option, ensure that the box next to
Import SDWebImage dependencyis unchecked in the Unity UI under “Braze Configuration”.
Appboy.unitypackagewithSDWebImage- This integration option bundles the Braze Android and iOS SDKs and the SDWebImage dependency for the iOS SDK, which is required for the proper functionality of Braze in-app messaging, and Content Cards features on iOS. The
SDWebImageframework is used for downloading and displaying images, including GIFs. If you intend on utilizing full Braze functionality, download and import this package. - To automatically import
SDWebImage, be sure to check the box next toImport SDWebImage dependencyin the Unity UI under “Braze Configuration”.
- This integration option bundles the Braze Android and iOS SDKs and the SDWebImage dependency for the iOS SDK, which is required for the proper functionality of Braze in-app messaging, and Content Cards features on iOS. The
iOS: To see if you require the SDWebImage dependency for your iOS project, visit the iOS in-app message documentation.
Android: As of Unity 2.6.0, the bundled Braze Android SDK artifact requires AndroidX dependencies. If you were previously using a jetified unitypackage, then you can safely transition to the corresponding unitypackage.
Step 2: Import the package
In the Unity Editor, import the package into your Unity project by navigating to Assets > Import Package > Custom Package. Next, click Import.
Alternatively, follow the Unity asset package import instructions for a more detailed guide on importing custom Unity packages.
If you only wish to import the iOS or Android plugin, deselect the Plugins/Android or Plugins/iOS subdirectory when importing the Braze .unitypackage.
Step 3: Set your API key
Braze provides a native Unity solution for automating the Unity iOS integration. This solution modifies the built Xcode project using Unity’s PostProcessBuildAttribute and subclasses the UnityAppController using the IMPL_APP_CONTROLLER_SUBCLASS macro.
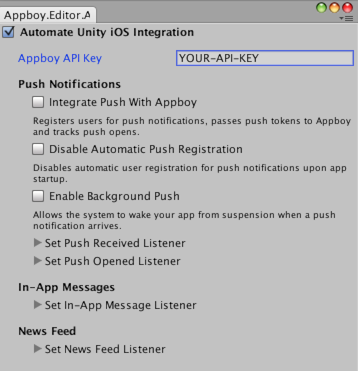
- In the Unity Editor, open the Braze Configuration Settings by navigating to Braze > Braze Configuration.
- Check the Automate Unity iOS Integration box.
- In the Braze API Key field, input your application’s API key found in Manage Settings.
If your application is already using another UnityAppController subclass, you will need to merge your subclass implementation with AppboyAppDelegate.mm.
Basic SDK integration complete
Braze should now be collecting data from your application, and your basic integration should be complete. For more information on integrating push, check out the following articles: Android and iOS, in-app messages, and Content Cards.
To learn about advanced SDK integration options, check out Advanced Implementation.
 Edit this page on GitHub