This page references our older Objective-C SDK. Check out our new Swift SDK to integrate our latest Swift-first library.
Braze iOS SDK integration guide
This optional iOS integration guide takes you on a step-by-step journey on setup best practices when first integrating the iOS SDK and its core components into your application. This guide will help you build a
BrazeManager.swifthelper file that will decouple any dependencies on the Braze iOS SDK from the rest of your production code, resulting in oneimport AppboyUIin your entire application. This approach limits issues that arise from excessive SDK imports, making it easier to track, debug, and alter code.
This guide assumes you have already added the SDK into your Xcode project.
Integration overview
The following steps help you build a BrazeManager helper file that your production code calls into. This helper file will deal with all Braze-related dependencies by adding various extensions for the following integration topics listed. Each topic will include horizontal tab steps and code snippets in both Swift and Objective-C. Note that the Content Card and in-app message steps are not required for integration if you do not plan to utilize these channels in your application.
- Create BrazeManager.swift
- Initialize the SDK
- Push notifications
- Access user variables and methods
- Log analytics
- In-app messages (optional)
- Content Cards (optional)
- Next steps
Create BrazeManager.swift
Create BrazeManager.swift
To build out your BrazeManager.swift file, create a new Swift file named BrazeManager to add to your project at your desired location. Next, Replace import Foundation with import AppboyUI for SPM (import Appboy_iOS_SDK for CocoaPods) and then create a BrazeManager class that will be used to host all Braze-related methods and variables. Appboy_iOS_SDK
BrazeManageris anNSObjectclass and not a struct, so it can conform to ABK delegates such as theABKInAppMessageUIDelegate.- The
BrazeManageris a singleton class by design to ensure that only one instance of this class will be used. This is done to provide a unified point of access to the object.
- Add a static variable named shared that initializes the
BrazeManagerclass. This is guaranteed to be lazily initiated only once. - Next, add a private constant variable named apiKey and set it as the API key-value from your workspace in the Braze dashboard.
- Add a private computed variable named appboyOptions, which will store configuration values for the SDK. It will be empty for now.
1
2
3
4
5
6
7
8
9
10
11
12
class BrazeManager: NSObject {
  // 1
  static let shared = BrazeManager()

  // 2
  private let apikey = "YOUR-API-KEY"

  // 3
  private var appboyOptions: [String:Any] {
    return [:]
  }
}
1
2
3
4
5
6
7
8
9
10
11
12
13
14
15
16
17
18
19
20
21
22
@implementation BrazeManager

// 1
+ (instancetype)shared {
    static BrazeManager *shared = nil;
    static dispatch_once_t onceToken;
    dispatch_once(&onceToken, ^{
        shared = [[BrazeManager alloc] init];
        // Do any other initialisation stuff here
    });
    return shared;
}

// 2
- (NSString *)apiKey {
  return @"YOUR-API-KEY";
}

// 3
- (NSDictionary *)appboyOptions {
  return [NSDictionary dictionary];
}
Initialize the SDK
Initialize SDK from BrazeManager.swift
Next, you must initialize the SDK. This guide assumes you have already added the SDK into your Xcode project. You must also have your workspace SDK endpoint and LogLevel set in your Info.plist file or in appboyOptions.
Add the didFinishLaunchingWithOptions method from the AppDelegate.swift file without a return type in your BrazeManager.swift file. By creating a similar method in the BrazeManager.swift file, there will not be an import AppboyUI statement in your AppDelegate.swift file.
Next, initialize the SDK using your newly declared apiKey and appboyOptions variables.
Initialization should be done in the main thread.
1
2
3
func application(_ application: UIApplication, didFinishLaunchingWithOptions launchOptions: [UIApplication.LaunchOptionsKey: Any]?) {
  Appboy.start(withApiKey: apikey, in: application, withLaunchOptions: launchOptions, withAppboyOptions: appboyOptions)
}
1
2
3
- (void)application:(UIApplication *)application didFinishLaunchingWithOptions:(NSDictionary *)launchOptions {
  [Appboy startWithApiKey:[self apiKey] inApplication:application withLaunchOptions:launchOptions withAppboyOptions:[self appboyOptions]];
}
Handle Appboy initialization in the AppDelegate.swift
Next, navigate back to the AppDelegate.swift file and add the following code snippet in the AppDelegate’s didFinishLaunchingWithOptions method to handle the Appboy initialization from the BrazeManager.swift helper file. Remember, there is no need to add an import AppboyUI statement in the AppDelegate.swift.
1
2
3
4
5
6
7
8
9
10
func application(
  _ application: UIApplication,
  didFinishLaunchingWithOptions launchOptions: [UIApplication.LaunchOptionsKey: Any]?
) -> Bool {
  // Override point for customization after application launch

  BrazeManager.shared.application(application, didFinishLaunchingWithOptions: launchOptions)

  return true
}
1
2
3
4
5
6
7
- (BOOL)application:(UIApplication *)application didFinishLaunchingWithOptions:(NSDictionary *)launchOptions {
  // Override point for customization after application launch

  [[BrazeManager shared] application:application didFinishLaunchingWithOptions:launchOptions];

  return YES;
}
Proceed to compile your code and run your application.
At this point, the SDK should be up and running. In your dashboard, observe that sessions are being logged before advancing any further.
Push notifications
Add push certificate
Navigate to your existing workspace in the Braze dashboard. Under Push Notification Settings upload your push certificate file to your Braze dashboard and save it.
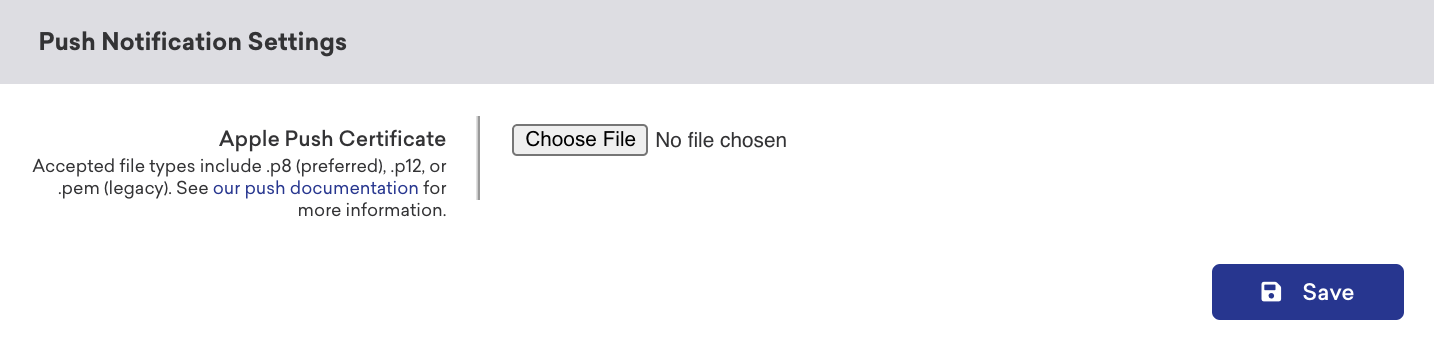
Don’t miss the dedicated checkpoint at the end of this step!
Register for push notifications
Next, register for push notifications. This guide assumes you have set up your push credentials correctly in your Apple developer portal and Xcode project.
The code for registering push notifications will be added in the didFinishLaunching... method in the BrazeManager.swift file. Your initialization code should end up looking like the following:
- Configure the contents for requesting authorization to interact with the user. These options are listed as an example.
- Request authorization to send your users push notifications. The user’s response to allow or deny push notifications is tracked in the
grantedvariable. - Forward the push authorization results to Braze after the user interacts with the notification prompt.
- Initiate the registration process with APNs; this should be done in the main thread. If the registration succeeds, the app calls your
AppDelegateobject’sdidRegisterForRemoteNotificationsWithDeviceTokenmethod.
1
2
3
4
5
6
7
8
9
10
11
12
13
func application(_ application: UIApplication, didFinishLaunchingWithOptions launchOptions:[UIApplication.LaunchOptionsKey:Any]?) {
  Appboy.start(withAPIKey: apikey, in: application, withLaunchOptions: launchOptions, withAppboyOptions: appboyOptions)
  // 1
  let options: UNAuthorizationOptions = [.alert, .sound, .badge]
  // 2
  UNUserNotificationCenter.current().requestAuthorization(option: options) { (granted, error) in
  // 3
    Appboy.sharedInstance()?.pushAuthorization(fromUserNotificationCenter: granted)
  }

  // 4
  UIApplications.shared.registerForRemoteNotificiations()
}
1
2
3
4
5
6
7
8
9
10
11
12
13
14
15
- (void)application:(UIApplication *)application didFinishLaunchingWithOptions:(NSDictionary *)launchOptions {
  [Appboy startWithApiKey:[self apiKey] inApplication:application withLaunchOptions:launchOptions withAppboyOptions:[self appboyOptions]];

  // 1
  UNAuthorizationOptions options = (UNAuthorizationOptionSound | UNAuthorizationOptionAlert | UNAuthorizationOptionBadge);

  // 2
  [[UNUserNotificationCenter currentNotificationCenter] requestAuthorizationWithOptions:options completionHandler:^(BOOL granted, NSError * _Nullable error) {
  // 3
    [[Appboy sharedInstance] pushAuthorizationFromUserNotificationCenter:granted];
  }];

  // 4
  [[UIApplication sharedApplication] registerForRemoteNotifications];
}
Proceed to compile your code and run your application.
- In your app, confirm that you are being prompted for push notifications before advancing any further.
- If you are not prompted, try deleting and re-installing the app to ensure the push notification prompt was not displayed previously.
Observe you are being prompted for push notifications before advancing any further.
Forward push notification methods
Next, forward the system push notifications methods from AppDelegate.swift to BrazeManager.swift to be handled by the Braze iOS SDK.
Step 1: Create extension for push notification code
Create an extension for your push notification code in your BrazeManager.swift file so it reads in a more organized manner as to what purpose is being served in the helper file, like so:
- Following the pattern of not including an
import AppboyUIstatement in yourAppDelegate, we will handle the push notifications methods in theBrazeManager.swiftfile. User’s device tokens will need to be passed to Braze from thedidRegisterForRemote...method. This method is required to implement silent push notifications. Next, add the same method from theAppDelegatein yourBrazeManagerclass. - Add the following line inside the method to register the device token to Braze. This is necessary for Braze to associate the token with the current device.
1
2
3
4
5
6
7
8
9
10
11
// MARK - Push Notifications
extension BrazeManager {
  // 1
  func application(
    _ application: UIApplication,
    didRegisterForRemoteNotificationsWithDeviceToken deviceToken: Data
  ) {
    // 2
    Appboy.sharedInstance().?registerDeviceToken(deviceToken)
  }
}
1
2
3
4
5
6
// MARK - Push Notifications
// 1
- (void)application:(UIApplication *)application didRegisterForRemoteNotificationsWithDeviceToken:(NSData *)deviceToken {
  // 2
  [[Appboy sharedInstance] registerDeviceToken:deviceToken];
}
Step 2: Support remote notifications
In the Signing & Capabilities tab, add Background Modes support and select Remote notifications to begin your support of remote push notifications originating from Braze.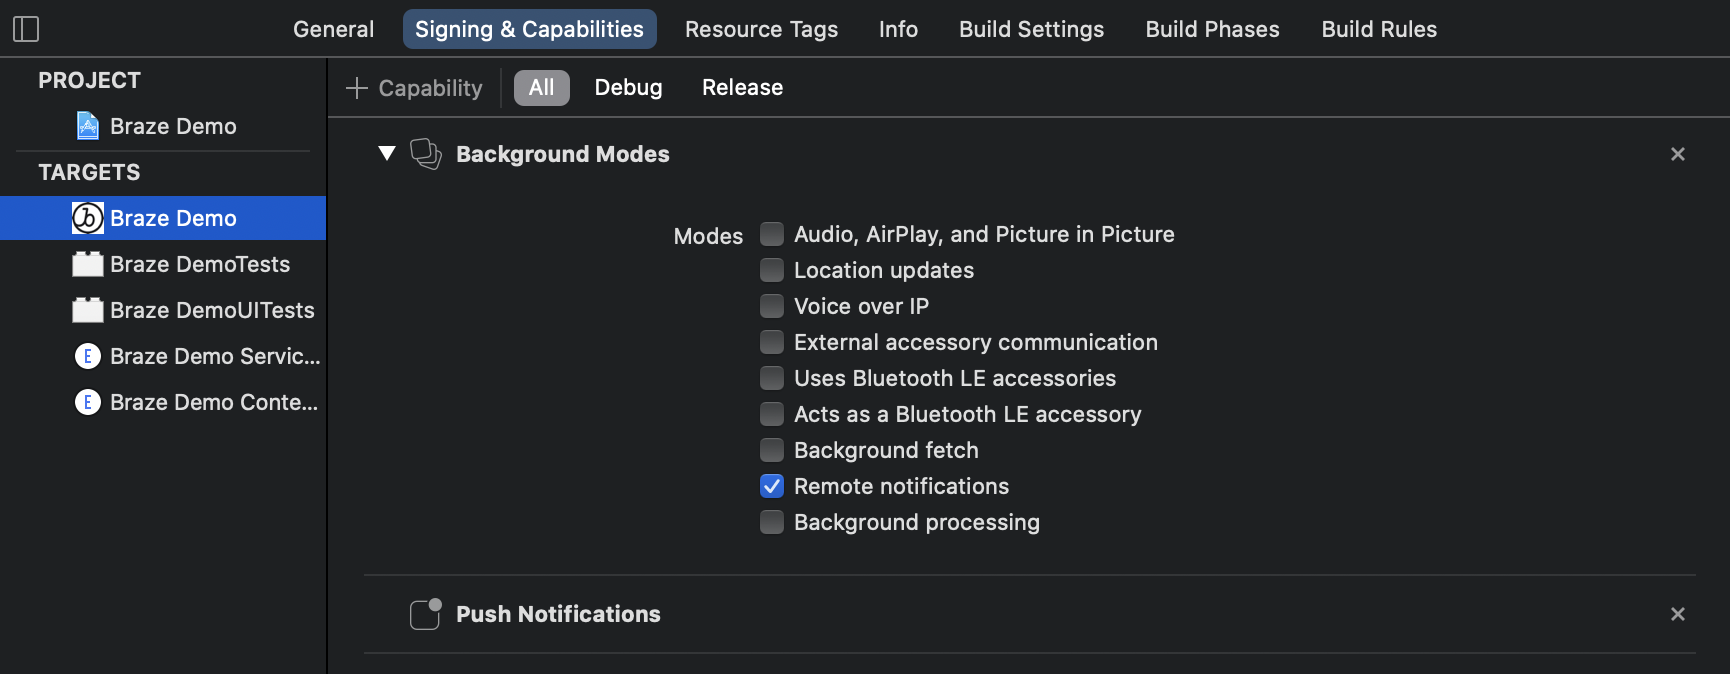
Step 3: Remote notification handling
The Braze SDK can handle remote push notifications that originate from Braze. Forward remote notifications to Braze; the SDK will automatically ignore push notifications that do not originate from Braze. Add the following method to your BrazeManager.swift file in the push notification extension.
1
2
3
4
5
6
7
8
9
10
11
func application(
  _ application: UIApplication,
  didReceiveRemoteNotification userInfo: [AnyHashable : Any],
  fetchCompletionHandler completionHandler: @escaping (UIBackgroundFetchResult) -> Void
) {
  Appboy.sharedInstance()?.register(
    application,
    didReceiveRemoteNotification: userInfo,
    fetchCompletionHandler: completionHandler
  )
}
1
2
3
- (void)application:(UIApplication *)application didReceiveRemoteNotification:(NSDictionary *)userInfo fetchCompletionHandler:(void (^)(UIBackgroundFetchResult))completionHandler {
  [[Appboy sharedInstance] registerApplication:application didReceiveRemoteNotification:userInfo fetchCompletionHandler:completionHandler];
}
Step 4: Forward notification responses
The Braze SDK can handle the response of push notifications that originate from Braze. Forward the response of the notifications to Braze; the SDK will automatically ignore responses from push notifications that do not originate from Braze. Add the following method to your BrazeManager.swift file:
1
2
3
4
5
6
7
8
9
10
11
func userNotificationCenter(
  _ center: UNUserNotificationCenter,
  didReceive response: UNNotificationResponse,
  withCompletionHandler completionHandler: @escaping () -> Void
) {
  Appboy.sharedInstance()?.userNotificationCenter(
    center,
    didReceive: response,
    withCompletionHandler: completionHandler
  )
}
1
2
3
4
5
6
7
- (void)userNotificationCenter:(UNUserNotificationCenter *)center
didReceiveNotificationResponse:(UNNotificationResponse *)response
         withCompletionHandler:(void (^)(void))completionHandler {
  [[Appboy sharedInstance] userNotificationCenter:center
                   didReceiveNotificationResponse:response
                            withCompletionHandler:completionHandler];
}
Proceed to compile your code and run your application.
Try sending yourself a push notification from the Braze dashboard and observe that analytics are being logged from push notifications before advancing any further.
Access user variables and methods
Create user variables and methods
Next, you will want easy access to the ABKUser variables and methods. Create an extension for your user code in the BrazeManager.swift file so it reads in a more organized manner as to what purpose is being served in the helper file, like so:
- An
ABKUserobject represents a known or anonymous user in your iOS application. Add a computed variable to retrieve theABKUser; this variable will be reused to retrieve variables about the user. - Query the user variable to easily access the
userId. Among the other variables, theABKUserobject is responsible for (firstName,lastName,phone,homeCity, etc.) - Set the user by calling
changeUser()with a correspondinguserId.
1
2
3
4
5
6
7
8
9
10
11
12
13
14
15
16
17
// MARK: - User
extension BrazeManager {
  // 1
  var user: ABKUser? {
    return Appboy.sharedInstance()?.user
  }

  // 2
  var userId: String? {
    return user?.userID
  }

  // 3
  func changeUser(_ userId: String) {
    Appboy.sharedInstance()?.changeUser(userId)
  }
}
1
2
3
4
5
6
7
8
9
10
11
12
13
14
15
// MARK: - User
  // 1
- (ABKUser *)user {
  return [[Appboy sharedInstance] user];
}

   // 2
- (NSString *)userId {
  return [self user].userID;
}

  // 3
- (void)changeUser:(NSString *)userId {
  [[Appboy sharedInstance] changeUser:userId];
}
Proceed to compile your code and run your application.
Try identifying users from a successful sign-in/sign-up. Be sure you have a solid understanding of what is and what is not an appropriate user identifier.
In your dashboard, observe that the user identifier is logged before advancing any further.
Log analytics
Create log custom event method
Based on the following Braze SDK logCustomEvent method, create a matching method.
Braze logCustomEvent reference method
This is by design because only the BrazeManager.swift file can directly access the Braze iOS SDK methods. Therefore, by creating a matching method, the result is the same and is done without the need for any direct dependencies on the Braze iOS SDK in your production code.
1
open func logCustomEvent(_ eventName: String, withProperties properties: [AnyHashable : Any]?)
Matching method
Log custom events from the Appboy object to Braze. Properties is an optional parameter with a default value of nil. Custom events are not required to have properties but are required to have a name.
1
2
3
func logCustomEvent(_ eventName: String, withProperties properties: [AnyHashable: Any]? = nil) {
  Appboy.sharedInstance()?.logCustomEvent(eventName, withProperties: properties)
}
1
2
3
- (void)logCustomEvent:(NSString *)eventName withProperties:(nullable NSDictionary *)properties {
  [[Appboy sharedInstance] logCustomEvent:eventName withProperties:properties];
}
Create log custom attributes method
The SDK can log numerous types as custom attributes. There is no need to create helper methods for each value type that can be set. Instead, only expose one method that can filter down to the appropriate value.
1
2
3
4
5
- (BOOL)setCustomAttributeWithKey:(NSString *)key andBOOLValue:(BOOL)value;
- (BOOL)setCustomAttributeWithKey:(NSString *)key andIntegerValue:(NSIntenger)value;
- (BOOL)setCustomAttributeWithKey:(NSString *)key andDoubleValue:(double)value;
- (BOOL)setCustomAttributeWithKey:(NSString *)key andStringValue:(NSString *)value;
- (BOOL)setCustomAttributeWithKey:(NSString *)key andDateValue:(NSDate *)value;
Custom attributes are logged from the ABKUser object.
Create one method that can encompass all of the available types that can be set for an attribute. Add this method in your BrazeManager.swift file in the analytics extension. This can be done by filtering through the valid custom attribute types and call the method associated with the matching type.
- The parameter
valueis a generic type that conforms to theEquatableprotocol. This is explicitly done, so if the type is not what the Braze iOS SDK expects, there will be a compile-time error. - The parameters
keyandvalueare optional parameters that will be conditionally unwrapped in the method. This is just one way to ensure non-nil values are being passed to the Braze iOS SDK.
1
2
3
4
5
6
7
8
9
10
11
12
13
14
15
16
17
func setCustomAttributeWithKey<T: Equatable>(_ key: String?, andValue value: T?) {
  guard let key = key, let value = value else { return }
  switch value.self {
  case let value as Date:
    user?.setCustomAttributeWithKey(key, andDateValue: value)
  case let value as Bool:
    user?.setCustomAttributeWithKey(key, andBOOLValue: value)
  case let value as String:
    user?.setCustomAttributeWithKey(key, andStringValue: value)
  case let value as Double:
    user?.setCustomAttributeWithKey(key, andDoubleValue: value)
  case let value as Int:
    user?.setCustomAttributeWithKey(key, andIntegerValue: value)
  default:
   return
  }
}
1
2
3
4
5
6
7
8
9
10
11
12
13
14
15
- (void)setCustomAttributeWith:(NSString *)key andValue:(id)value {
  if ([value isKindOfClass:[NSDate class]]) {
    [[self user] setCustomAttributeWithKey:key andDateValue:value];
  } else if ([value isKindOfClass:[NSString class]]) {
    [[self user] setCustomAttributeWithKey:key andStringValue:value];
  } else if ([value isKindOfClass:[NSNumber class]]) {
    if (strcmp([value objCType], @encode(double)) == 0) {
      [[self user] setCustomAttributeWithKey:key andDoubleValue:[value doubleValue]];
    } else if (strcmp([value objCType], @encode(int)) == 0) {
      [[self user] setCustomAttributeWithKey:key andIntegerValue:[value integerValue]];
    } else if ([value boolValue]) {
      [[self user] setCustomAttributeWithKey:key andBOOLValue:[value boolValue]];
    }
  }
}
Create log purchase method
Next, based on the following Braze SDK logPurchase method, create a matching method.
Braze logPurchase reference method
This is by design because only the BrazeManager.swift file can directly access the Braze iOS SDK methods. Therefore, by creating a matching method, the result is the same and is done without the need for any direct dependencies on the Braze iOS SDK in your production code.
1
open func logPurchase(_ productIdentifier: String, inCurrency currency: String, atPrice price: NSDecimalNumber, withoutQuantity quantity: UInt)
Matching method
Log purchases from the Appboy object to Braze. The SDK has multiple methods for logging purchases, and this is just one example. This method also handles creating the NSDecimal and UInt objects. How you want to handle that part is up to you, provided is just one example.
1
2
3
4
5
6
func logPurchase(_ productIdentifier: String, inCurrency currency: String, atPrice price:
String, withQuantity quantity: Int) {

  Appboy.sharedInstance()?.logPurchase(productIdentifier, inCurrency: currency, atPrice: NSDecimalNumber(string: price), withQuantity: UInt(quantity))

}
1
2
3
- (void)logPurchase:(NSString *)productIdentifier inCurrency:(nonnull NSString *)currencyCode atPrice:(nonnull NSDecimalNumber *)price withQuantity:(NSUInteger)quantity {
  [[Appboy sharedInstance] logPurchase:productIdentifier inCurrency:currencyCode atPrice:price withQuantity:quantity];
}
Proceed to compile your code and run your application.
Try logging custom events.
In your dashboard, observe that the custom events are logged before advancing any further.
In-app messages
The following in-app message section is not required for integration if you do not plan to utilize this channel in your application.
Conform to ABKInAppMessageUIDelegate
Next, enable your BrazeManager.swift file code to conform to the ABKInAppMessageUIDelegate to directly handle the associated methods.
The code for conforming to the delegate will be added in the didFinishLaunching... methods in the BrazeManager.swift file. Your initialization code should end up looking like this:
1
2
3
4
5
6
7
8
9
10
11
func application(_ application: UIApplication, didFinishLaunchingWithOptions launchOptions: [UIApplication.LaunchOptionsKey: Any]?) {
  Appboy.start(withApiKey: apiKey, in: application, withLaunchOptions: launchOptions, withAppboyOptions: appboyOptions)

  let options: UNAuthorizationOptions = [.alert, .sound, .badge]
  UNUserNotificationCenter.current().requestAuthorization(options: options) { (granted, error) in
    Appboy.sharedInstance()?.pushAuthorization(fromUserNotificationCenter: granted)
  }
  UIApplication.shared.registerForRemoteNotifications()

  Appboy.sharedInstance()?.inAppMessageController.inAppMessageUIController?.setInAppMessageUIDelegate?(self)
}
1
2
3
4
5
6
7
8
9
10
11
- (void)application:(UIApplication *)application didFinishLaunchingWithOptions:(NSDictionary *)launchOptions {
  [Appboy startWithApiKey:[self apiKey] inApplication:application withLaunchOptions:launchOptions withAppboyOptions:[self appboyOptions]];

  UNAuthorizationOptions options = (UNAuthorizationOptionSound | UNAuthorizationOptionAlert | UNAuthorizationOptionBadge);
  [[UNUserNotificationCenter currentNotificationCenter] requestAuthorizationWithOptions:options completionHandler:^(BOOL granted, NSError * _Nullable error) {
    [[Appboy sharedInstance] pushAuthorizationFromUserNotificationCenter:granted];
  }];
  [[UIApplication sharedApplication] registerForRemoteNotifications];

  [[Appboy sharedInstance].inAppMessageController.inAppMessageUIController setInAppMessageUIDelegate:self];
}
Add delegate methods
Next, create an extension that conforms to the ABKInAppMessageUIDelegate.
Add the following snippet the analytics section. Note that the BrazeManager.swift object is set as the delegate; this will be where the BrazeManager.swift file handles all the ABKInAppMessageUIDelegate methods.
The ABKInAppMessageUIDelegate does not come with any required methods, but the following is an example of one.
1
2
3
4
5
6
7
8
9
10
11
12
13
14
15
// MARK: - ABKInAppMessage UI Delegate
extension AppboyManager: ABKInAppMessageUIDelegate{
  func inAppMessageViewControllerWith(_ inAppMessage: ABKInAppMessage) -> ABKInAppMessageViewController {
    switch inAppMessage {
    case is ABKInAppMessageSlideup:
      return ABKInAppMessageSlideupViewController(inAppMessage: inAppMessage)
    case is ABKInAppMessageModal:
      return ABKInAppMessageModalViewController(inAppMessage: inAppMessage)
    case is ABKInAppMessageFull:
      return ABKInAppMessageFullViewController(inAppMessage: inAppMessage)
    case is ABKInAppMessageHTML:
      return ABKInAppMessageHTMLViewController(inAppMessage: inAppMessage)
    default:
      return ABKInAppMessageViewController(inAppMessage: inAppMessage)
}
1
2
3
4
5
6
7
8
9
10
11
12
13
// MARK: - ABKInAppMessage UI Delegate
- (ABKInAppMessageViewController *)inAppMessageViewControllerWithInAppMessage:(ABKInAppMessage *)inAppMessage {
  if ([inAppMessage isKindOfClass:[ABKInAppMessageSlideup class]]) {
    return [[ABKInAppMessageSlideupViewController alloc] initWithInAppMessage:inAppMessage];
  } else if ([inAppMessage isKindOfClass:[ABKInAppMessageModal class]]) {
    return [[ABKInAppMessageModalViewController alloc] initWithInAppMessage:inAppMessage];
  } else if ([inAppMessage isKindOfClass:[ABKInAppMessageFull class]]) {
    return [[ABKInAppMessageFullViewController alloc] initWithInAppMessage:inAppMessage];
  } else if ([inAppMessage isKindOfClass:[ABKInAppMessageHTML class]]) {
    return [[ABKInAppMessageHTMLViewController alloc] initWithInAppMessage:inAppMessage];
  }
  return nil;
}
Proceed to compile your code and run your application.
Try sending yourself an in-app message.
In the BrazeManager.swift file, set a breakpoint at the entry of the example ABKInAppMessageUIDelegate method. Send yourself an in-app message and confirm the breakpoint is hit before advancing any further.
Content Cards
The following Content Card section is not required for integration if you do not plan to utilize this channel in your application.
Create Content Card variables and methods
Enable your production code to display the Content Cards view controller without the need for unnecessary import AppboyUI statements.
Create an extension for your Content Cards code in your BrazeManager.swift file, so it reads in a more organized manner as to what purpose is being served in the helper file, like so:
- Display the
ABKContentCardsTableViewController. An optionalnavigationControlleris the only parameter needed to present or push our view controller. - Initialize an
ABKContentCardsTableViewControllerobject and optionally change the title. You must also add the initialized view controller to the navigation stack.
1
2
3
4
5
6
7
8
9
10
11
12
// MARK: - Content Cards
extension BrazeManager {

  // 1
  func displayContentCards(navigationController: UINavigationController?) {

    // 2
    let contentCardsVc = ABKContentCardsTableViewController()
    contentCardsVc.title = "Content Cards"
    navigationController?.pushViewController(contentCardsVc, animated: true)
  }
}
1
2
3
4
5
6
7
8
// MARK: - Content Cards
  // 1
- (void)displayContentCards:(UINavigationController *)navigationController {
  // 2
  ABKContentCardsTableViewController *contentCardsVc = [[ABKContentCardsTableViewController alloc] init];
  contentCardsVc.title = @"Content Cards";
  [navigationController pushViewController:contentCardsVc animated:YES];
}
Proceed to compile your code and run your application.
Try displaying the ABKContentCardsTableViewController in your application before advancing any further.
Next steps
Congratulations! You’ve completed this best practice integration guide! An example BrazeManager helper file can be found on GitHub.
Now that you have decoupled any dependencies on the Braze iOS SDK from the rest of your production code, check out some of our optional advanced implementation guides:
 Edit this page on GitHub