Android SDK integration
This reference article covers how to integrate the Android SDK into your Android or FireOS application. Installing the Braze SDK will provide you with basic analytics functionality and working in-app messages with which you can engage your users.
For optimal performance on Android 12, we recommend upgrading to Braze Android SDK v13.1.2+ as soon as possible. For more information, see our Android 12 upgrade guide.
Step 1: Integrate the Braze library
The Braze Android SDK can optionally be integrated without UI components. However, Content Cards and in-app messaging will be rendered inoperable unless you pass the custom data to a UI solely of your design. Additionally, push notifications will not work because our push handling code is in the UI library. It is important to note that these UI elements are fully customizable. We strongly recommend the integration of these features. Refer to the Content Cards and in-app message documentation for a list of benefits of using each channel or tool.
Basic integration
To access Braze messaging features, you must integrate the UI library. See the following Android Studio directions to integrate the UI library depending on your IDE:
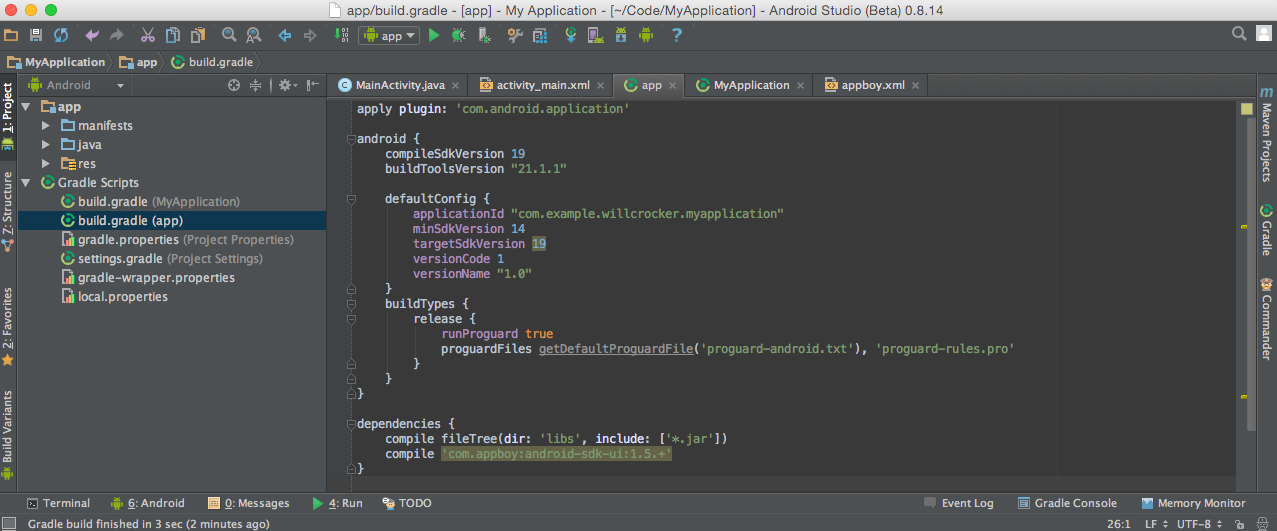
Add Braze dependency
Add the android-sdk-ui dependency to your app’s build.gradle.
If you are using any location or Braze Geofence functionality, also include android-sdk-location in your app’s build.gradle.
If you’re using a non-native Android SDK (for example, Flutter, Cordova, Unity, etc.), that SDK already has the android-sdk-ui dependency for the correct version of the Android SDK. Do not update that version manually.
1
2
3
4
dependencies {
  implementation "com.braze:android-sdk-ui:+"
  implementation "com.braze:android-sdk-location:+"
}
The following example shows where to place the dependency line in your build.gradle. Note that the version used in the example uses an old version. Visit Braze Android SDK releases for the most up-to-date version of the Braze Android SDK.
Perform Gradle sync
Be sure to perform a Gradle sync to build your project and incorporate the dependency additions.

Step 2: Configure the Braze SDK in braze.xml
As of December 2019, custom endpoints are no longer given out, if you have a pre-existing custom endpoint, you may continue to use it. For more details, refer to our list of available endpoints.
Now that the libraries have been integrated, you must create a braze.xml file in your project’s res/values folder. If you are on a specific data cluster or have a pre-existing custom endpoint, you need to specify the endpoint in your braze.xml file as well.
The contents of that file should resemble the following code snippet. Make sure to substitute YOUR_APP_IDENTIFIER_API_KEY with the identifier found in the Manage Settings page of the Braze dashboard. Log in at dashboard.braze.com to find your cluster address.
1
2
3
4
5
<?xml version="1.0" encoding="utf-8"?>
<resources>
<string name="com_braze_api_key">YOUR_APP_IDENTIFIER_API_KEY</string>
<string translatable="false" name="com_braze_custom_endpoint">YOUR_CUSTOM_ENDPOINT_OR_CLUSTER</string>
</resources>
Step 3: Add required permissions to AndroidManifest.xml
Now that you’ve added your API key, you need to add the following permissions to your AndroidManifest.xml:
1
2
<uses-permission android:name="android.permission.INTERNET" />
<uses-permission android:name="android.permission.ACCESS_NETWORK_STATE" />
With the release of Android M, Android switched from an install-time to a runtime permissions model. However, both of these permissions are normal permissions and are granted automatically if listed in the app manifest. For more information, visit Android’s [permission documentation][46].
Step 4: Tracking user sessions in Android
Activity lifecycle callback integration
Calls to openSession(), closeSession(),ensureSubscribedToInAppMessageEvents(), and InAppMessageManager registration are optionally handled automatically.
Register activity lifecycle callbacks
Add the following code to the onCreate() method of your Application class:
1
2
3
4
5
6
7
public class MyApplication extends Application {
  @Override
  public void onCreate() {
    super.onCreate();
    registerActivityLifecycleCallbacks(new BrazeActivityLifecycleCallbackListener());
  }
}
1
2
3
4
5
6
class MyApplication : Application() {
  override fun onCreate() {
    super.onCreate()
    registerActivityLifecycleCallbacks(BrazeActivityLifecycleCallbackListener())
  }
}
See our SDK reference documentation for more information on the parameters available for BrazeActivityLifecycleCallbackListener.
Step 5: Enable location tracking
If you want to enable Braze location collection, update your braze.xml file to include com_braze_enable_location_collection and ensure its value is set to true:
1
<bool name="com_braze_enable_location_collection">true</bool>
Starting with Braze Android SDK version 3.6.0, Braze location collection is disabled by default.
SDK integration complete
Braze will now be able to collect specified data from your application and your basic integration should be complete.
Visit the following articles in order to enable custom event tracking, push messaging, Content Cards and the complete suite of Braze features.
 Edit this page on GitHub