This page references our older Objective-C SDK. Check out our new Swift SDK to integrate our latest Swift-first library.
Looking for the basic push notification developer integration guide? Find it here.
Push notification implementation guide
This optional and advanced implementation guide covers ways to leverage push notification content app extensions to get the most out of your push messages. Included are three custom use cases built by our team, accompanying code snippets, and guidance on logging analytics. Visit our Braze Demo Repository here! Note that this implementation guide is centered around a Swift implementation, but Objective-C snippets are provided for those interested.
Notification content app extensions
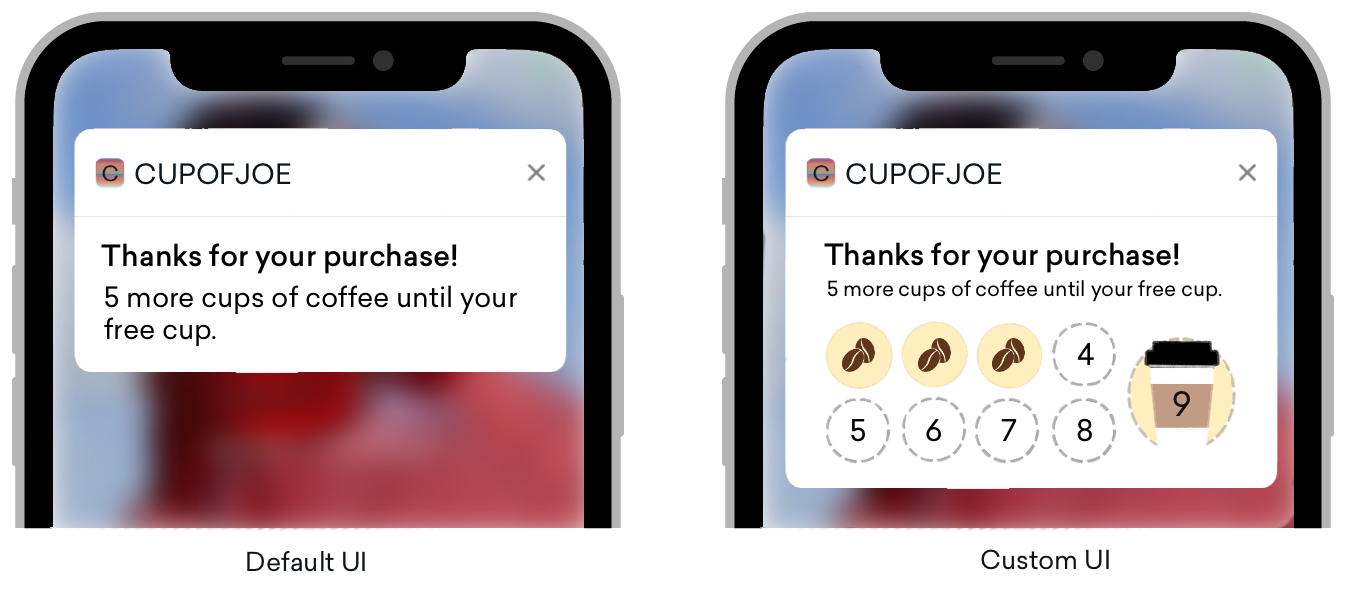
Push notifications while seemingly standard across different platforms, offer immense customization options past what is normally implemented in the default UI. When a push notification is expanded, content notification extensions enable a custom view of the expanded push notification.
Push notifications can be expanded in three different ways:
- A long press on the push banner
- Swiping down on the push banner
- Swiping the banner to the left and selecting “View”
These custom views offer smart ways to engage customers allowing you to display many distinct types of content including interactive notifications, notifications populated with user data, and even push messages that can capture information like phone numbers and email. While implementing push in this way may be unfamiliar to some, one of our well-known features at Braze, Push Stories, are a prime example of what a custom view for a notification content app extension can look like!
Requirements
- Push notifications successfully integrated in your app
- iOS 10 or higher
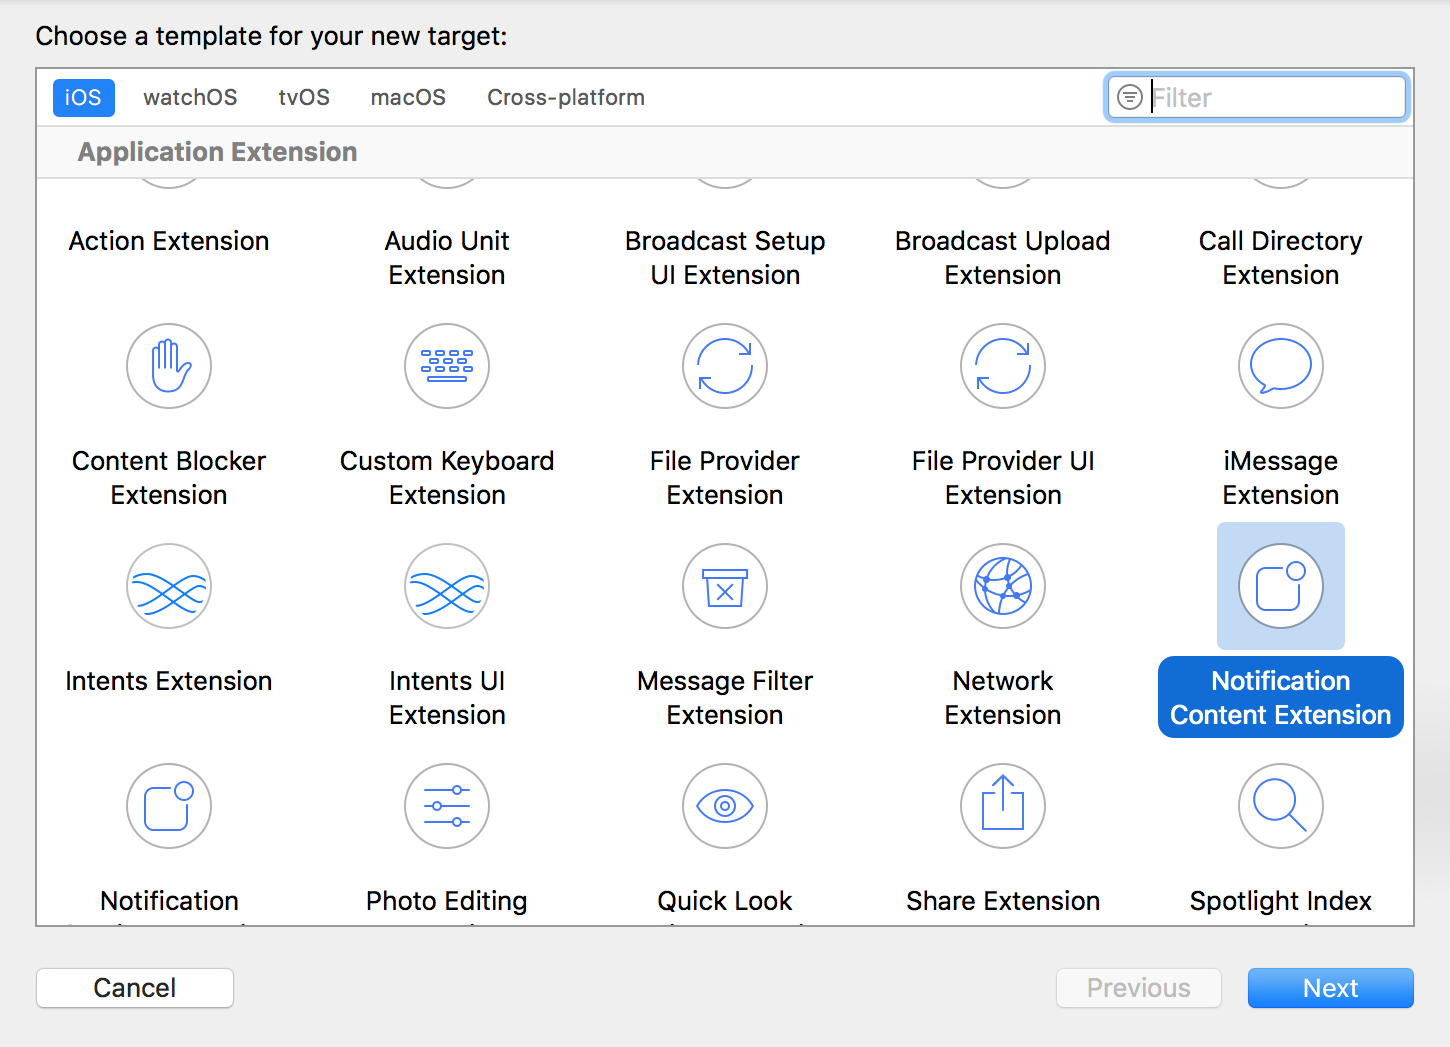
- The following files generated by Xcode based on your coding language:
Swift
- NotificationViewController.swift
- MainInterface.storyboard
Objective-C
- NotificationViewController.h
- NotificationViewController.m
- MainInterface.storyboard
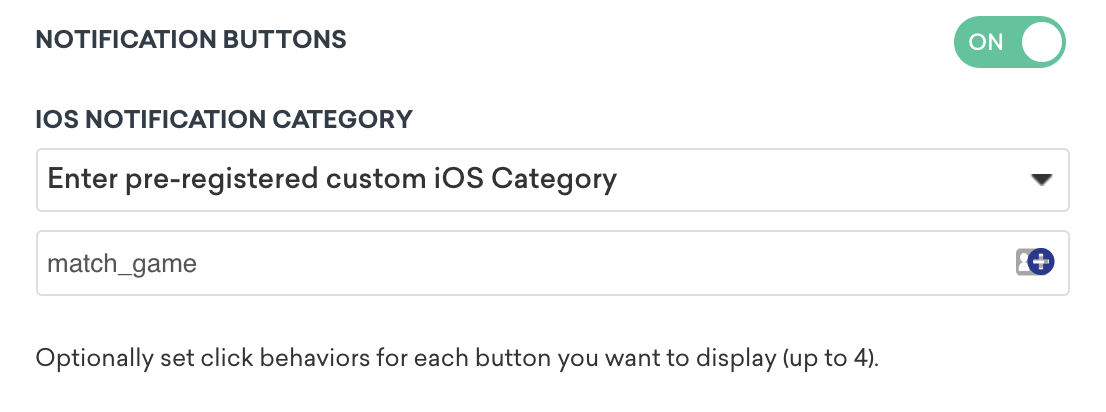
Custom category configuration
To set up a custom view in the dashboard you must toggle on notification buttons and enter your custom category. The pre-registered custom iOS category you provide is then checked against the UNNotificationExtensionCategory in the .plist of your Notification Content Extension Target. The value given here must match what is set in the Braze dashboard.
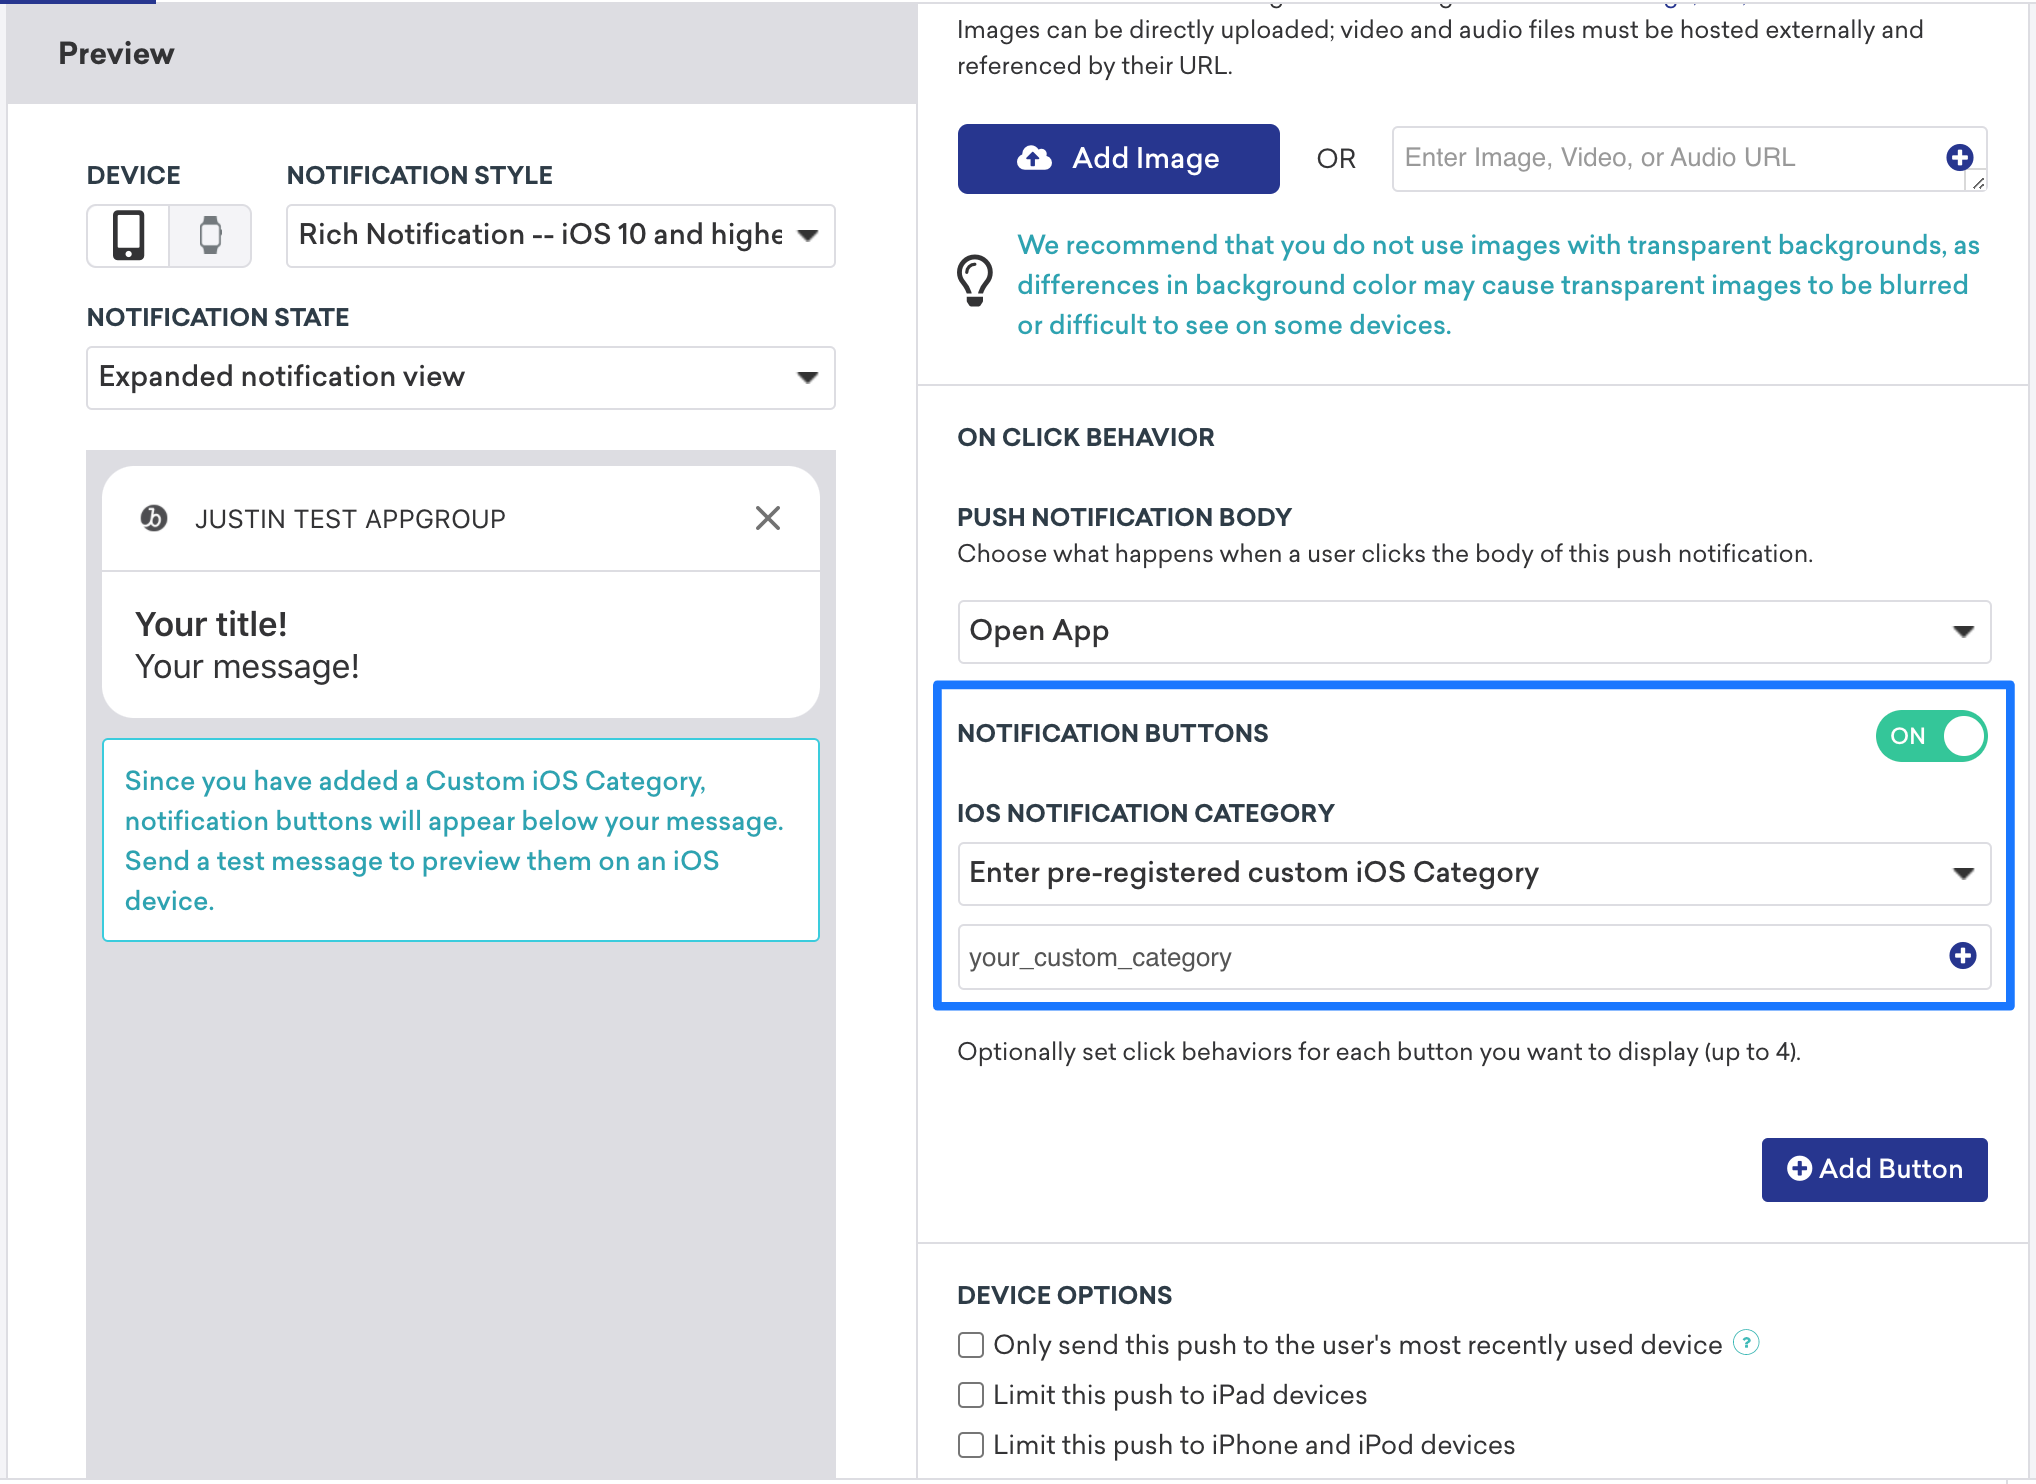

Since pushes with content extensions aren’t always apparent, it is recommended to include a call to action to nudge your users to expand their push notifications.
Use case and implementation walkthrough
There are three push notification content app extension types provided. Each type has a concept walkthrough, potential use cases, and a look into how push notification variables may look and be used in the Braze dashboard:
- Interactive push notification
- Personalized push notifications
- Information capture push notifications
Interactive push notification
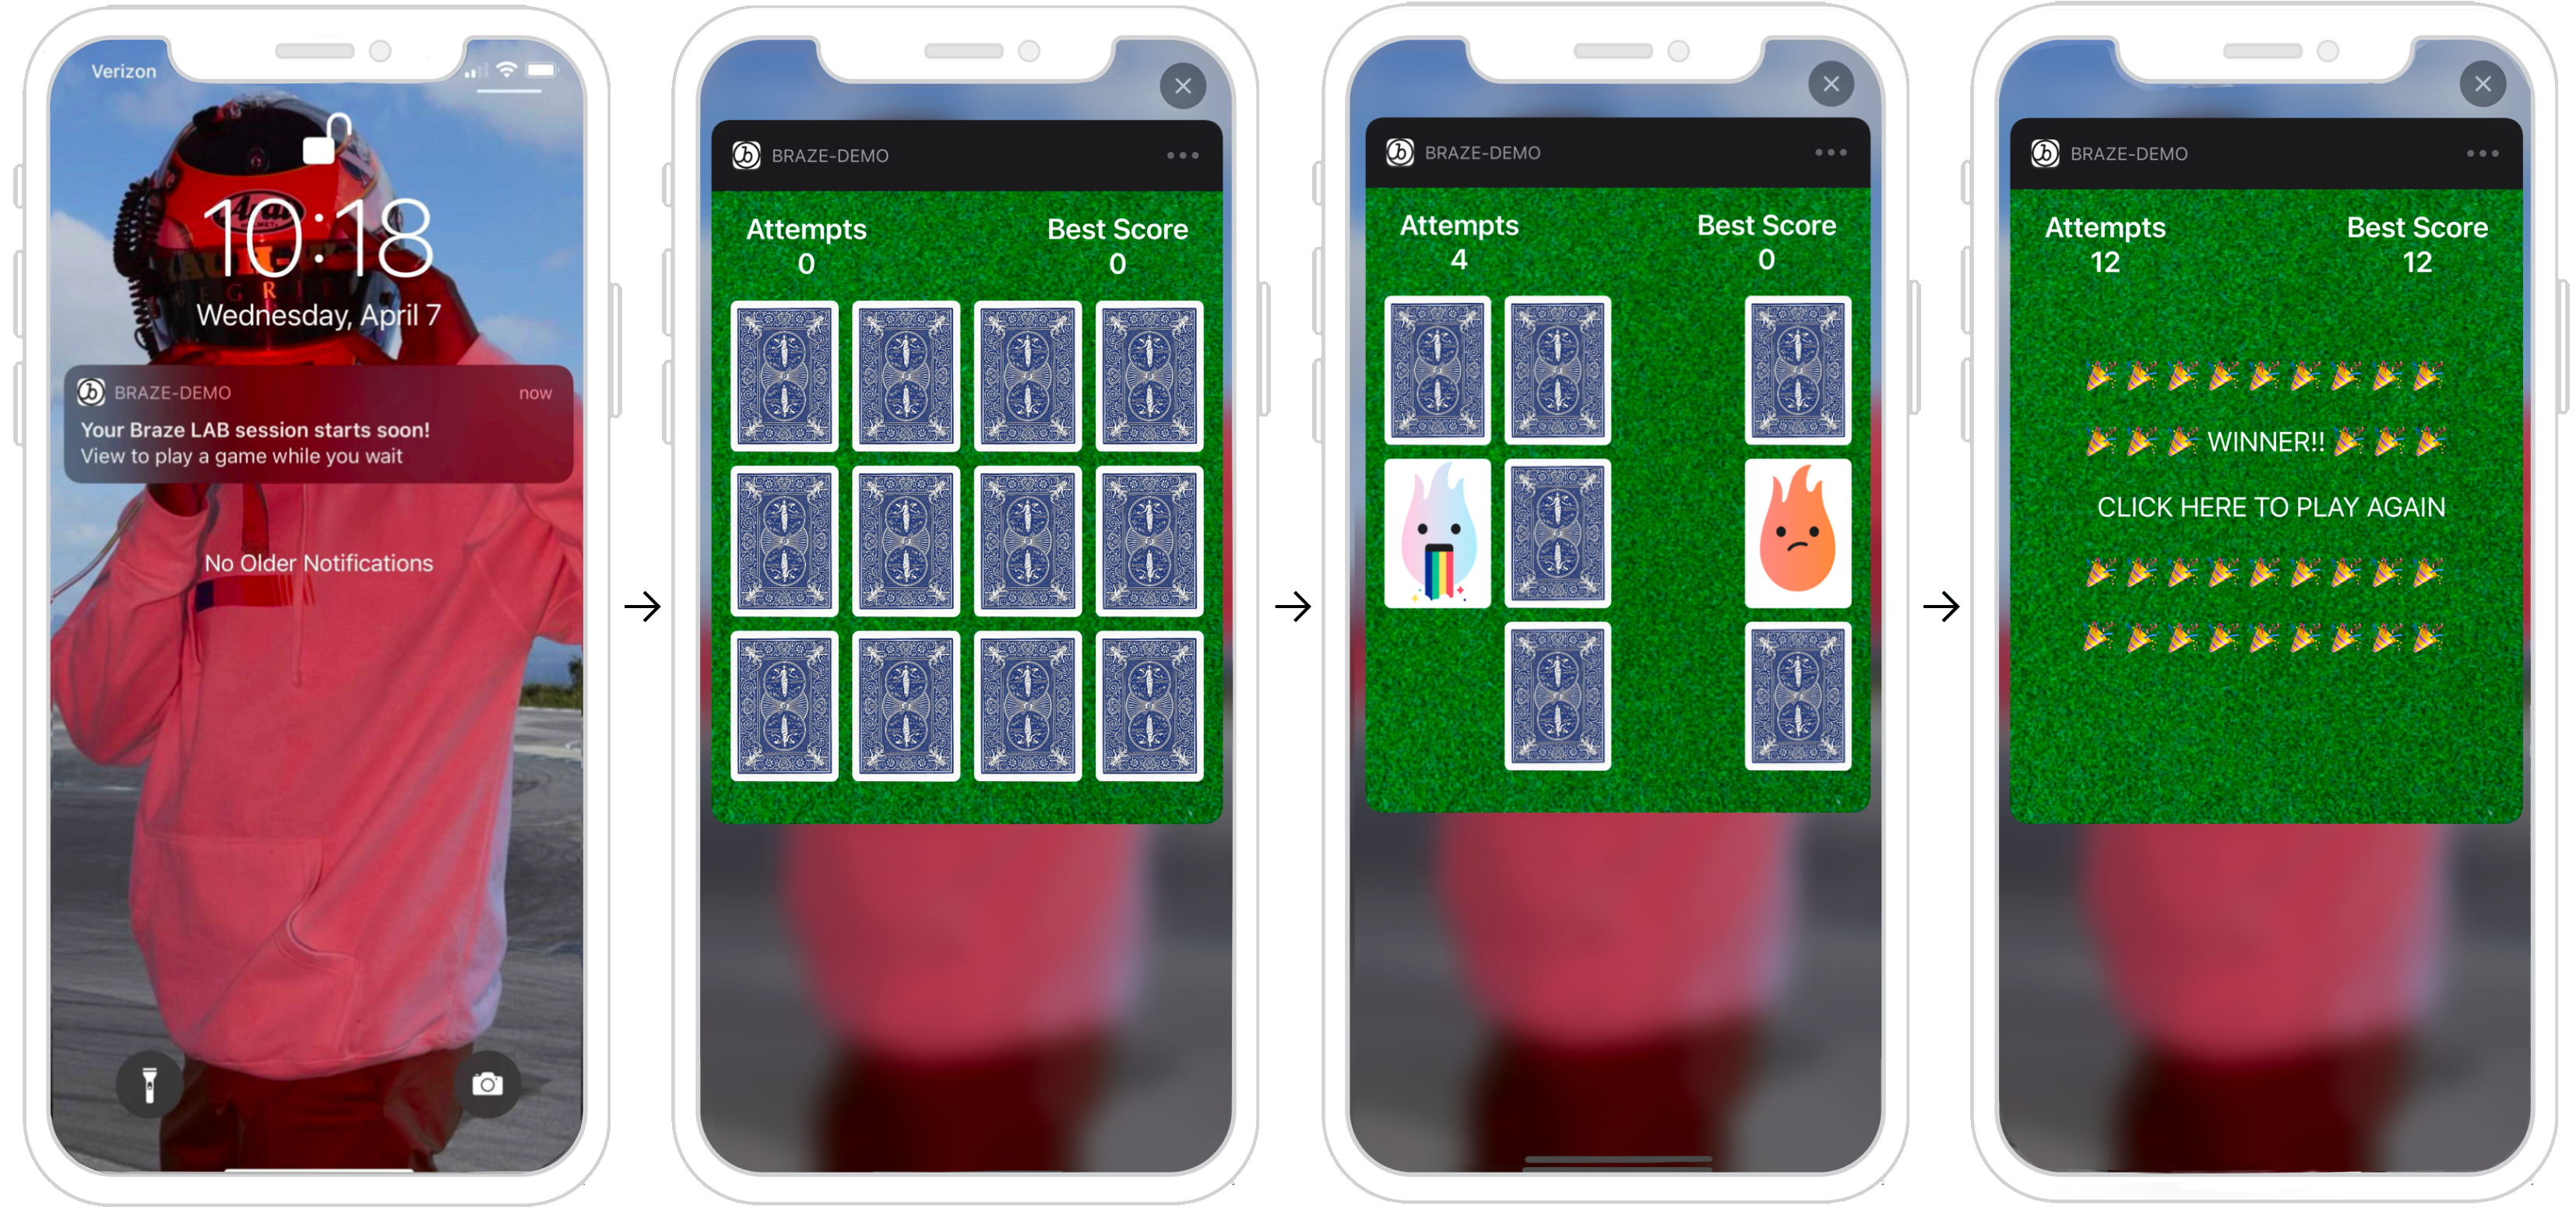
Push notifications can respond to user actions inside a content extension. For users running iOS 12 or later, this means you can turn your push messages into fully interactive push notifications! This interactivity offers many possibilities to get your users engaged in your notifications. The following example shows a push where users are able to play a match game inside the expanded notification.
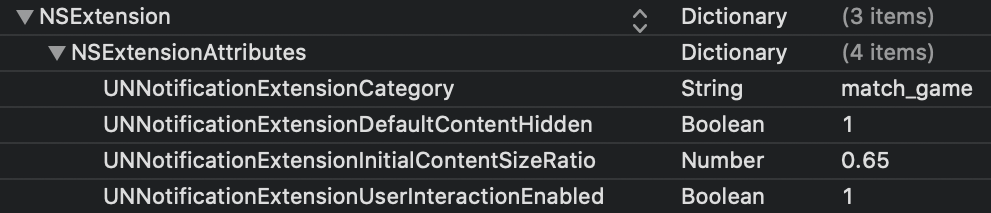
Dashboard configuration
To set up a custom view in the dashboard, within the notification button settings enter the specific category you want to display. Next, in the .plist of your Notification Content Extension, you must also set the custom category to the UNNotificationExtensionCategory attribute. The value given here must match what is set in the Braze dashboard. Lastly, to enable user interactions in a push notification, set the UNNotificationExtensionInteractionEnabled key to true.
Other use cases
Push content extensions are an exciting option to introduce interactivity to your promotions and applications. Some examples include a game for users to play, a spin-to-win wheel for discounts, or a “like” button to save a listing or song.
Ready to log analytics?
Visit the following section to get a better understanding of how the flow of data should look.
Personalized push notifications
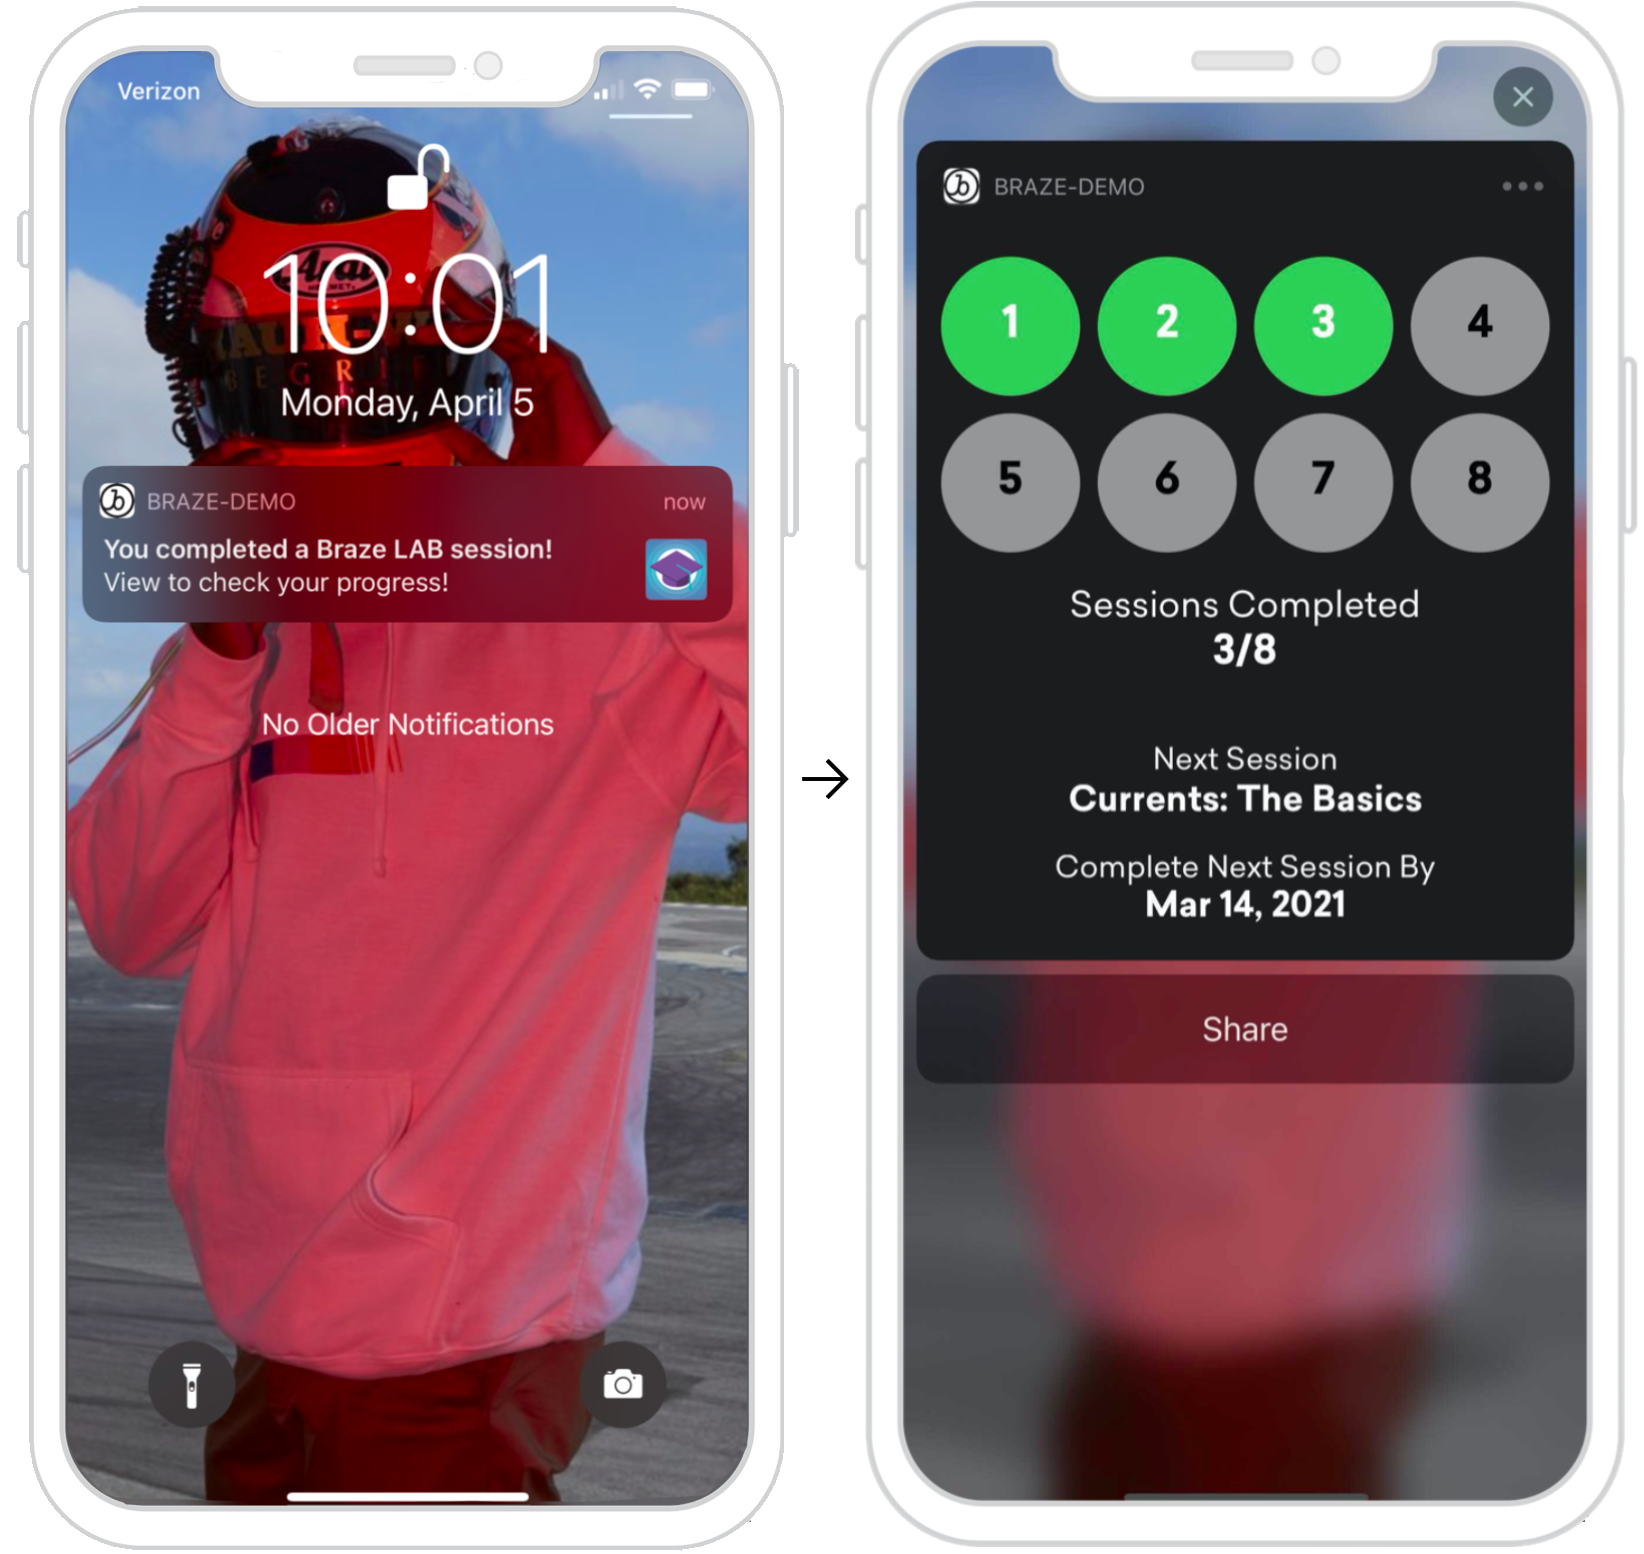
Push notifications can display user-specific information inside a content extension. The example to the right shows a push notification after a user has completed a specific task (Braze Learning course) and is now encouraged to expand this notification to check their progress. The information provided here is user-specific and can be fired off as a session is completed or specific user action is taken by leveraging an API trigger.
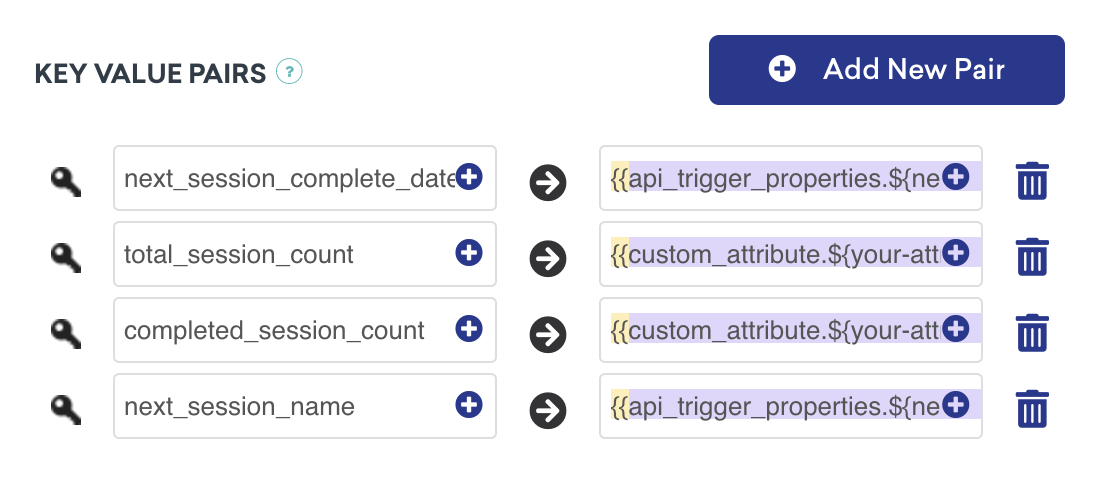
Dashboard configuration
To set up a personalized push in the dashboard, you must register the specific category you want to be displayed, and then within the key-value pairs using standard Liquid, set the appropriate user attributes you want the message to show. These views can be personalized based on specific user attributes of a specific user profile.
Handling key-value pairs
The following method, didReceive is called when the content extension has received a notification, it can be found within the NotificationViewController. The key-value pairs provided in the dashboard are represented in the code through the use of a userInfo dictionary.
Parsing Key-Value Pairs from Push Notifications
1
2
3
4
5
6
7
8
9
func didReceive(_ notification: UNNotification) {
  let userInfo = notification.request.content.userInfo

  guard let value = userInfo["YOUR-KEY-VALUE-PAIR"] as? String,
        let otherValue = userInfo["YOUR-OTHER-KEY-VALUE-PAIR"] as? String,
  else { fatalError("Key-Value Pairs are incorrect.")}

  ...
}
1
2
3
4
5
6
7
8
9
10
11
- (void)didReceiveNotification:(nonnull UNNotification *)notification {
  NSDictionary *userInfo = notification.request.content.userInfo;

  if (userInfo[@"YOUR-KEY-VALUE-PAIR"] && userInfo[@"YOUR-OTHER-KEY-VALUE-PAIR"]) {

  ...

  } else {
    [NSException raise:NSGenericException format:@"Key-Value Pairs are incorrect"];
  }
}
Other use cases
The ideas for progress-based and user-focused push content extensions are endless, some examples include adding the option to share your progress across different platforms, expressing achievements unlocked, punch cards, or even onboarding checklists.
Ready to log analytics?
Visit the following section to get a better understanding of how the flow of data should look.
Information capture push notification
Push notifications can capture user information inside a content extension, allowing you to push the limits of what is possible with a push. Examining the following flow shown, the view is able to respond to state changes. Those state change components are represented in each image.
- User receives a push notification.
- Push is opened and prompts the user for information.
- Information is provided and if valid, the register button is shown.
- Confirmation view is displayed, and push gets dismissed.
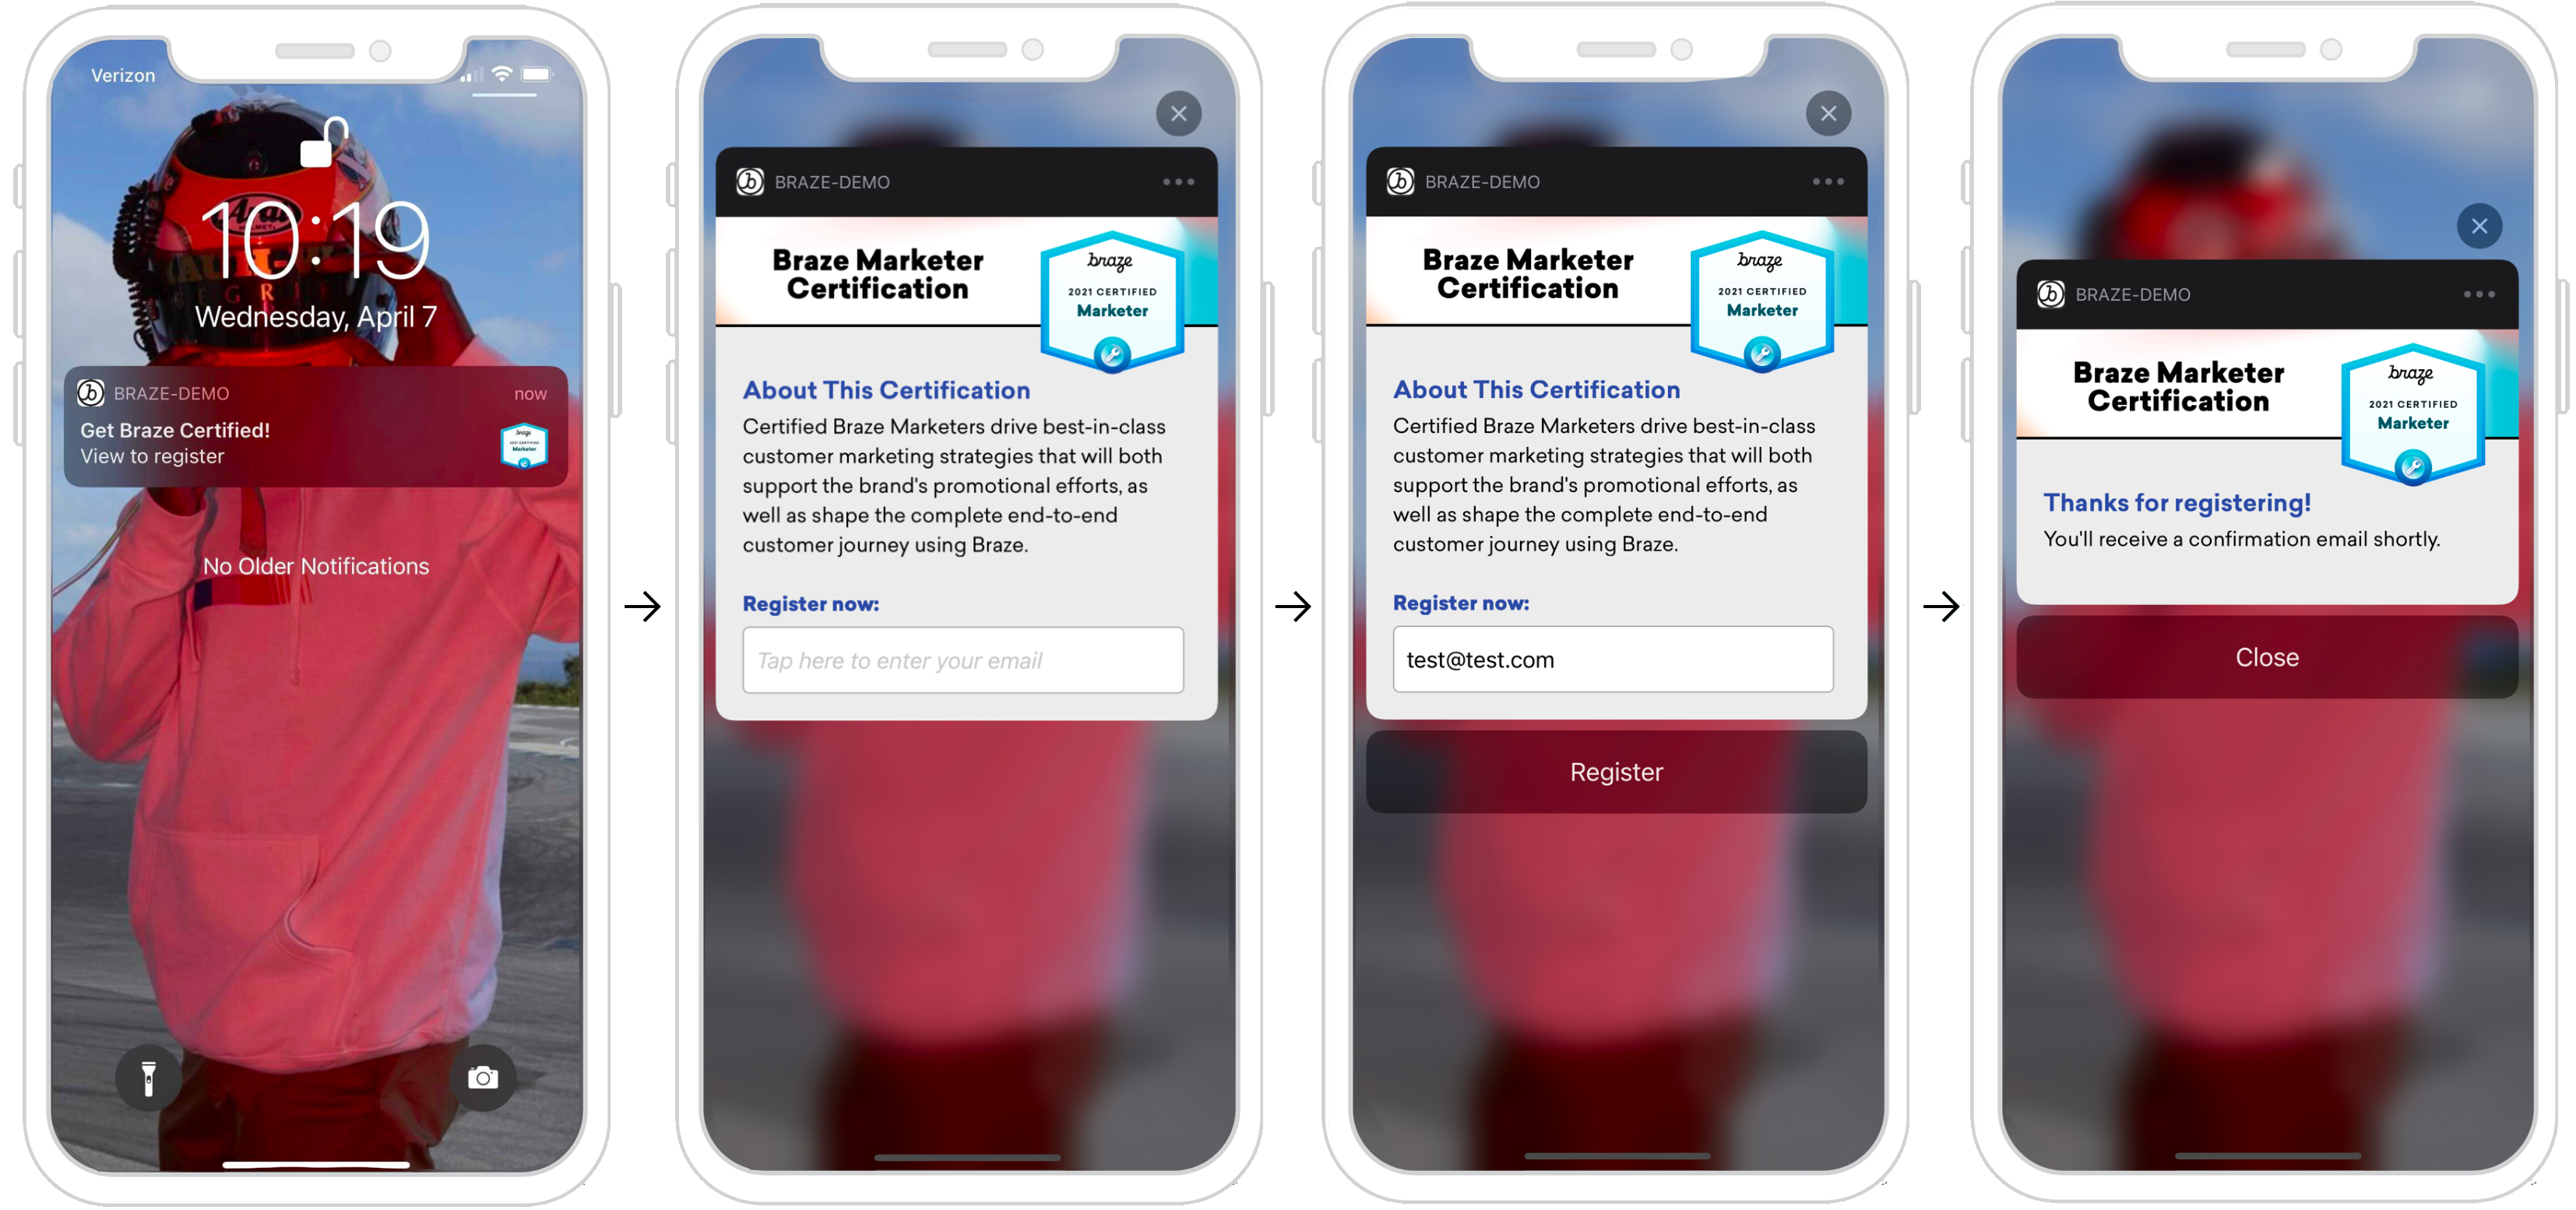
Note that the information requested here can be a wide range of things such as SMS number capture, it doesn’t have to be email-specific.
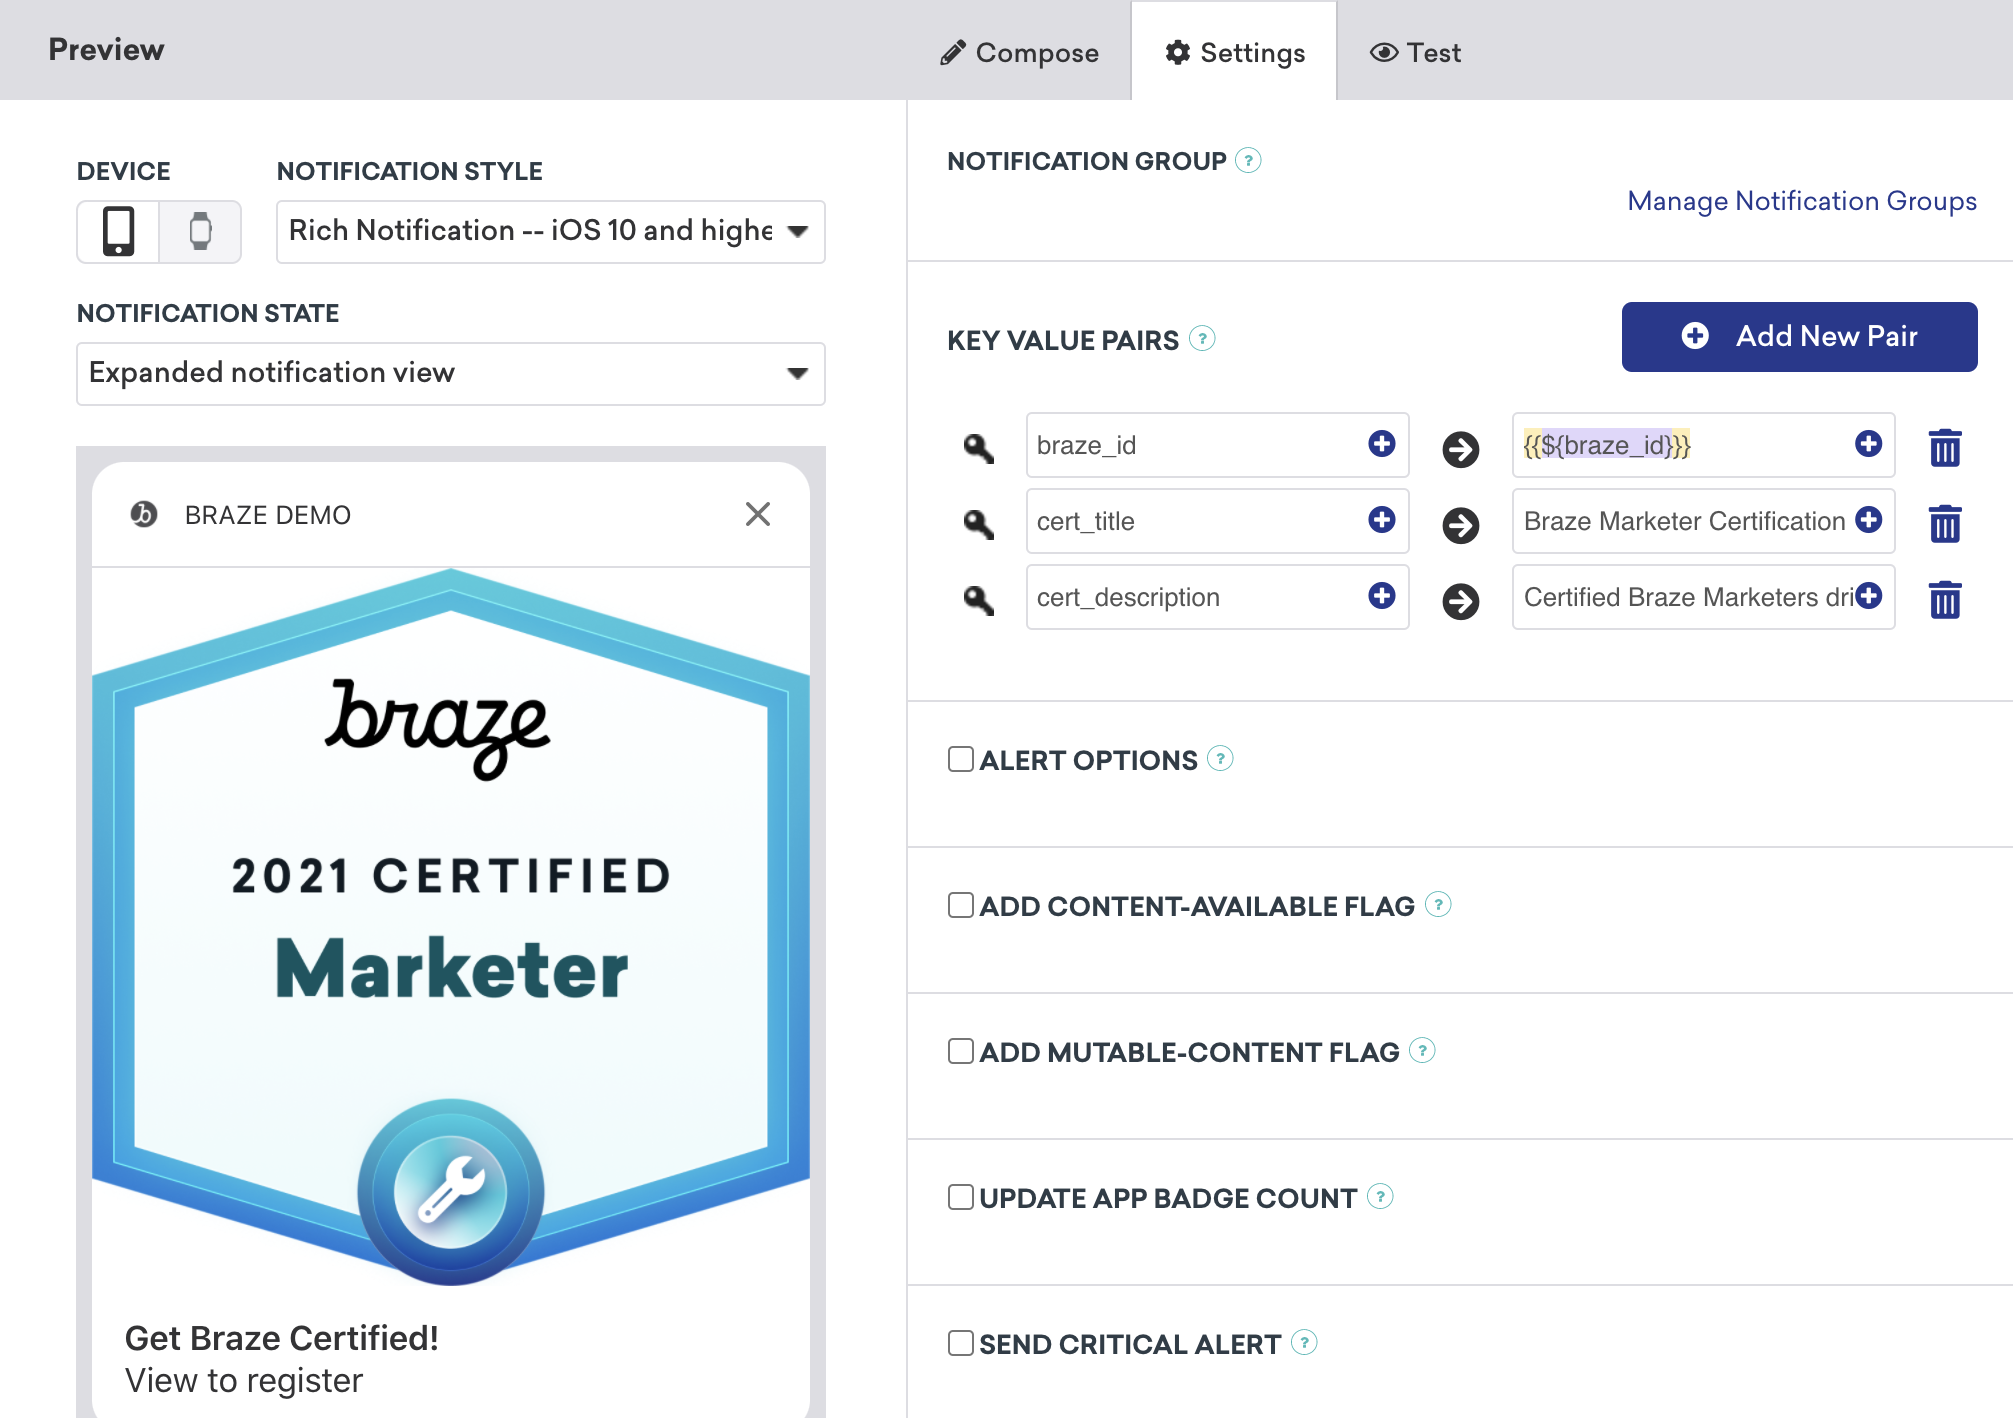
Dashboard configuration
To set up an information capture capable push in the dashboard, you must register and set your custom category, and provide the key-value pairs that are needed. As seen in the example, you may also include an image in your push. To do this, you must integrate rich notifications, set the notification style in your campaign to Rich Notification, and include a rich push image.
Handling button actions
Each action button is uniquely identified. The code checks if your response identifier is equal to the actionIndentifier, and if so, knows that the user clicked the action button.
Handling Push Notification Action Button Responses
1
2
3
4
5
6
7
func didReceive(_ response: UNNotificationResponse, completionHandler completion: @escaping (UNNotificationContentExtensionResponseOption) -> Void) {
  if response.actionIdentifier == "YOUR-REGISTER-IDENTIFIER" {
    // do something
  } else {
    // do something else
  }
}
1
2
3
4
5
6
7
- (void)didReceiveNotificationResponse:(UNNotificationResponse *)response completionHandler:(void (^)(UNNotificationContentExtensionResponseOption))completion {
  if ([response.actionIdentifier isEqualToString:@"YOUR-REGISTER-IDENTIFIER"]) {
    completion(UNNotificationContentExtensionResponseOptionDismiss);
  } else {
    completion(UNNotificationContentExtensionResponseOptionDoNotDismiss);
  }
}
Dismissing pushes
Push notifications can be automatically dismissed from an action button press. There exist three pre-built push dismissal options that are recommended:
completion(.dismiss)- Dismisses the notificationcompletion(.doNotDismiss)- Notification stays opencompletion(.dismissAndForward)- Push dismisses and the user gets forwarded into the application.
Other use cases
Requesting user input through push notifications is an exciting opportunity that many companies do not take advantage of. In these push messages, you can not only request basic information like name, email, or number, but you could also prompt users to complete a user profile if unfinished, or even to submit feedback.
Ready to log analytics?
Visit the following section to get a better understanding of how the flow of data should look.
Logging analytics
Logging with the Braze API (recommended)
Logging analytics can only be done in real-time with the help of the customer’s server hitting our /users/track endpoint. To log analytics, send down the braze_id value in the key-value pairs field (as seen in the following screenshot) to identify which user profile to update.

Logging manually
Logging manually will require you to first configure App Groups within Xcode, and then create, save, and retrieve analytics. This will require some custom developer work on your end. The following code snippets shown will help address this.
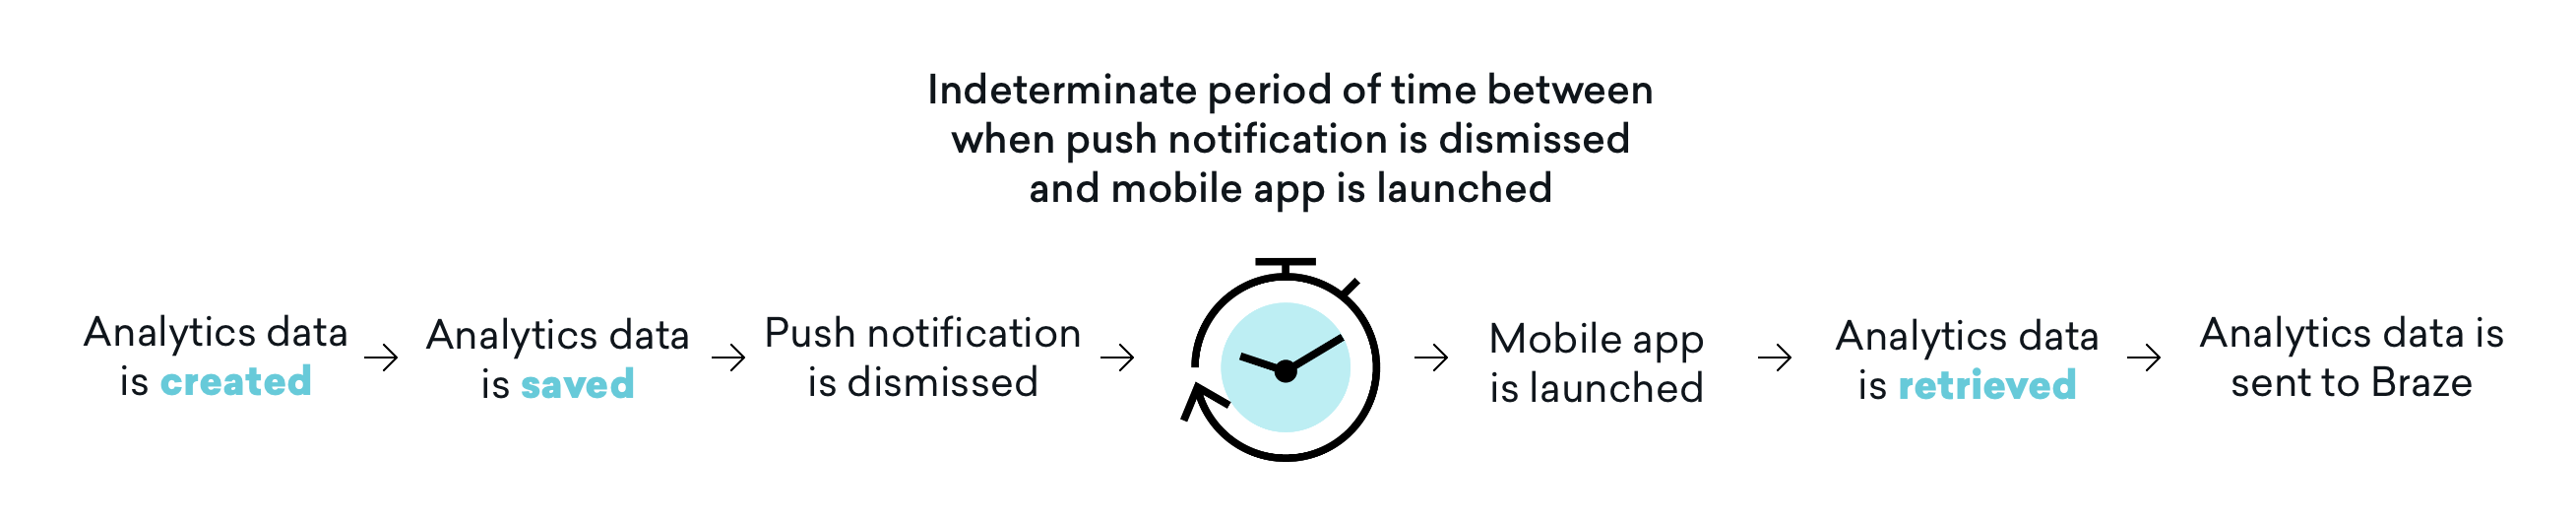
It’s also important to note that analytics are not sent to Braze until the mobile application is subsequently launched. This means that, depending on your dismissal settings, there often exists an indeterminate period of time between when a push notification is dismissed and the mobile app is launched and the analytics are retrieved. While this time buffer may not affect all use cases, users should consider the impact and if necessary, adjust their user journey to include opening the application to address this concern.
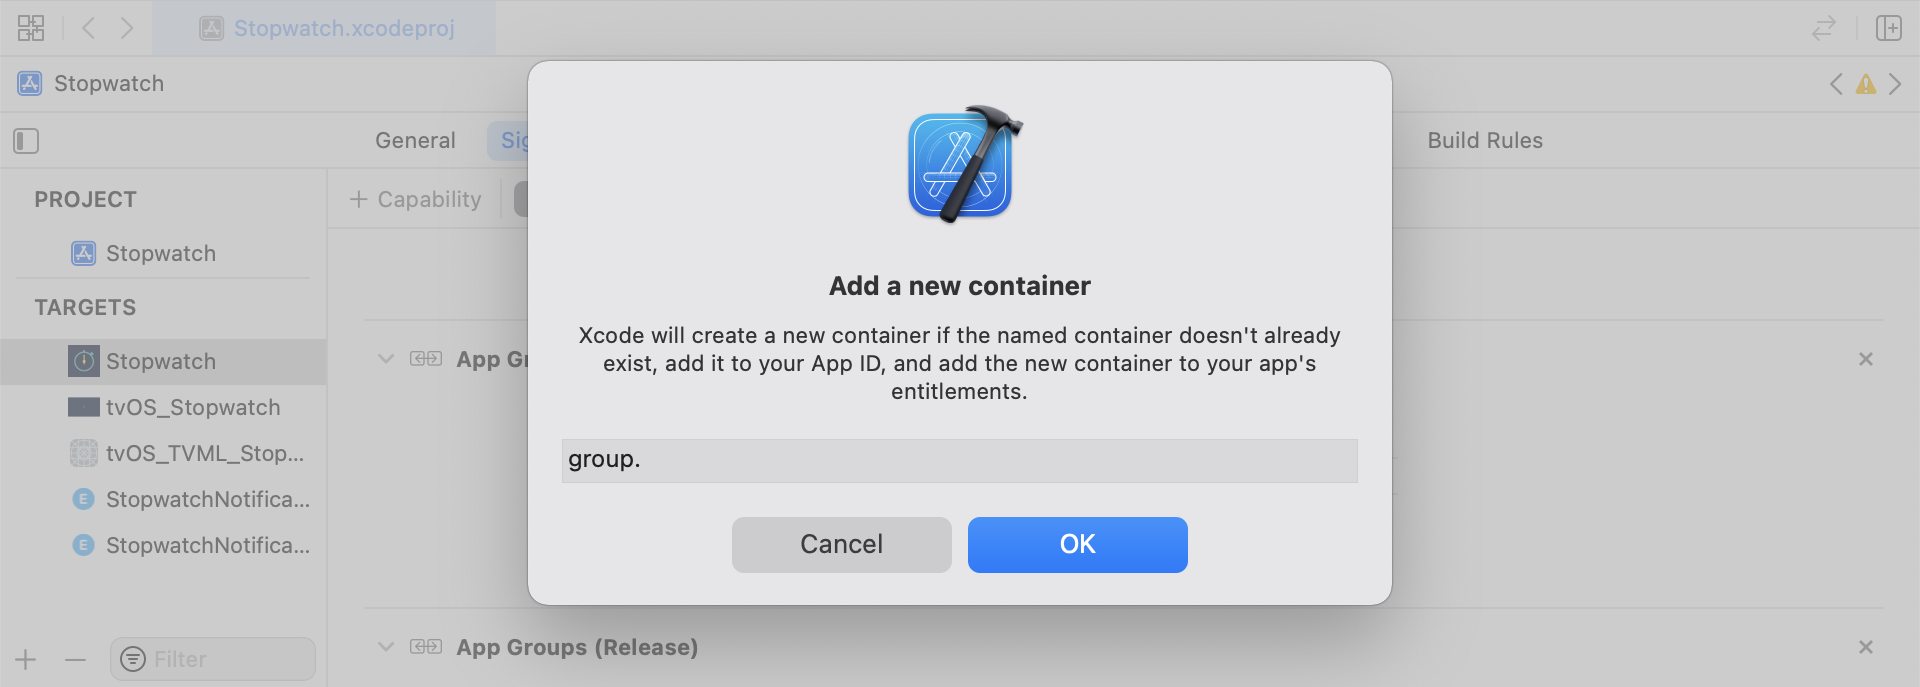
Step 1: Configure App Groups within Xcode
Add a capability App Groups. If you haven’t had any app group in your app, go to the capability of the main app target, turn on the App Groups, and click the “+”. Use your App’s bundle ID to create the App Group. For example, if your app’s bundle ID is com.company.appname, you can name your App Group group.com.company.appname.xyz. Make sure the App Groups are turned on for both your main app target and the content extension target.
Step 2: Integrate code snippets
The following code snippets are a helpful reference on how to save and send custom events, custom attributes, and user attributes. This guide will be speaking in terms of UserDefaults, but the code representation will be in the form of a helper file RemoteStorage. There also exist additional helper files UserAttributes and EventName Dictionary that are used when sending and saving user attributes. All helper files can be found at the end of this guide.
Saving custom events
To save custom events you must create the analytics from scratch. This is done by creating a dictionary, populating it with metadata, and saving the data through the use of a helper file.
- Initialize a dictionary with event metadata
- Initialize
userDefaultsto retrieve and store the event data - If there is an existing array, append new data to the existing array and save
- If there is not an existing array, save the new array to
userDefaults
1
2
3
4
5
6
7
8
9
10
11
12
13
14
15
16
func saveCustomEvent(with properties: [String: Any]? = nil) {
  // 1
  let customEventDictionary = Dictionary(eventName: "YOUR-EVENT-NAME", properties: properties)

  // 2
  let remoteStorage = RemoteStorage(storageType: .suite)

  // 3
  if var pendingEvents = remoteStorage.retrieve(forKey: .pendingCustomEvents) as? [[String: Any]] {
    pendingEvents.append(contentsOf: [customEventDictionary])
    remoteStorage.store(pendingEvents, forKey: .pendingCustomEvents)
  } else {
  // 4
    remoteStorage.store([customEventDictionary], forKey: .pendingCustomEvents)
  }
}
1
2
3
4
5
6
7
8
9
10
11
12
13
14
15
16
17
- (void)saveCustomEvent:(NSDictionary<NSString *, id> *)properties {
  // 1
  NSDictionary<NSString *, id> *customEventDictionary = [[NSDictionary alloc] initWithEventName:@"YOUR-EVENT-NAME" properties:properties];

  // 2
  RemoteStorage *remoteStorage = [[RemoteStorage alloc] initWithStorageType:StorageTypeSuite];
  NSMutableArray *pendingEvents = [[remoteStorage retrieveForKey:RemoteStorageKeyPendingCustomEvents] mutableCopy];

  // 3
  if (pendingEvents) {
    [pendingEvents addObject:customEventDictionary];
    [remoteStorage store:pendingEvents forKey:RemoteStorageKeyPendingCustomAttributes];
  } else {
  // 4
    [remoteStorage store:@[ customEventDictionary ] forKey:RemoteStorageKeyPendingCustomAttributes];
  }
}
Sending custom events to Braze
After the SDK is initialized is the best time to log any saved analytics from a notification content app extension. This can be done by, looping through any pending events, checking for the “Event Name” key, setting the appropriate values in Braze, and then clearing the storage for the next time this function is needed.
- Loop through the array of pending events
- Loop through each key-value pair in the
pendingEventsdictionary - Explicitly checking key for “Event Name” to set the value accordingly
- Every other key-value will be added to the
propertiesdictionary - Log individual custom event
- Remove all pending events from storage
1
2
3
4
5
6
7
8
9
10
11
12
13
14
15
16
17
18
19
20
21
22
23
24
25
26
27
28
29
30
31
32
func logPendingCustomEventsIfNecessary() {
  let remoteStorage = RemoteStorage(storageType: .suite)
  guard let pendingEvents = remoteStorage.retrieve(forKey: .pendingCustomEvents) as? [[String: Any]] else { return }

  // 1
  for event in pendingEvents {
    var eventName: String?
    var properties: [AnyHashable: Any] = [:]

  // 2
    for (key, value) in event {
      if key == PushNotificationKey.eventName.rawValue {
  // 3
        if let eventNameValue = value as? String {
          eventName = eventNameValue
        } else {
          print("Invalid type for event_name key")
        }
      } else {
  // 4
        properties[key] = value
      }
    }
  // 5
    if let eventName = eventName {
      logCustomEvent(eventName, withProperties: properties)
    }
  }

  // 6
  remoteStorage.removeObject(forKey: .pendingCustomEvents)
}
1
2
3
4
5
6
7
8
9
10
11
12
13
14
15
16
17
18
19
20
21
22
23
24
25
26
27
28
29
30
31
32
- (void)logPendingEventsIfNecessary {
  RemoteStorage *remoteStorage = [[RemoteStorage alloc] initWithStorageType:StorageTypeSuite];
  NSArray *pendingEvents = [remoteStorage retrieveForKey:RemoteStorageKeyPendingCustomEvents];

  // 1
  for (NSDictionary<NSString *, id> *event in pendingEvents) {
    NSString *eventName = nil;
    NSMutableDictionary *properties = [NSMutableDictionary dictionary];

  // 2
    for (NSString* key in event) {
      if ([key isEqualToString:@"event_name"]) {
  // 3
        if ([[event objectForKey:key] isKindOfClass:[NSString class]]) {
          eventName = [event objectForKey:key];
        } else {
          NSLog(@"Invalid type for event_name key");
        }
      } else {
  // 4
        properties[key] = event[key];
      }
    }
  // 5
    if (eventName != nil) {
      [[Appboy sharednstance] logCustomEvent:eventName withProperties:properties];
    }
  }

  // 6
  [remoteStorage removeObjectForKey:RemoteStorageKeyPendingCustomEvents];
}
Saving custom attributes
To save custom attributes you must create the analytics from scratch. This is done by creating a dictionary, populating it with metadata, and saving the data through the use of a helper file.
- Initialize a dictionary with attribute metadata
- Initialize
userDefaultsto retrieve and store the attribute data - If there is an existing array, append new data to the existing array and save
- If there is not an existing array, save the new array to
userDefaults
1
2
3
4
5
6
7
8
9
10
11
12
13
14
15
16
func saveCustomAttribute() {
  // 1
  let customAttributeDictionary: [String: Any] = ["YOUR-CUSTOM-ATTRIBUTE-KEY": "YOUR-CUSTOM-ATTRIBUTE-VALUE"]

  // 2
  let remoteStorage = RemoteStorage(storageType: .suite)

  // 3
  if var pendingAttributes = remoteStorage.retrieve(forKey: .pendingCustomAttributes) as? [[String: Any]] {
    pendingAttributes.append(contentsOf: [customAttributeDictionary])
    remoteStorage.store(pendingAttributes, forKey: .pendingCustomAttributes)
  } else {
  // 4
    remoteStorage.store([customAttributeDictionary], forKey: .pendingCustomAttributes)
  }
}
1
2
3
4
5
6
7
8
9
10
11
12
13
14
15
16
17
- (void)saveCustomAttribute {
  // 1
  NSDictionary<NSString *, id> *customAttributeDictionary = @{ @"YOUR-CUSTOM-ATTRIBUTE-KEY": @"YOUR-CUSTOM-ATTRIBUTE-VALUE" };

  // 2
  RemoteStorage *remoteStorage = [[RemoteStorage alloc] initWithStorageType:StorageTypeSuite];
  NSMutableArray *pendingAttributes = [[remoteStorage retrieveForKey:RemoteStorageKeyPendingCustomAttributes] mutableCopy];

  // 3
  if (pendingAttributes) {
    [pendingAttributes addObject:customAttributeDictionary];
    [remoteStorage store:pendingAttributes forKey:RemoteStorageKeyPendingCustomAttributes];
  } else {
  // 4
    [remoteStorage store:@[ customAttributeDictionary ] forKey:RemoteStorageKeyPendingCustomAttributes];
  }
}
Sending custom attributes to Braze
After the SDK is initialized is the best time to log any saved analytics from a notification content app extension. This can be done by looping through the pending attributes, setting the appropriate custom attribute in Braze, and then clearing the storage for the next time this function is needed.
- Loop through the array of pending attributes
- Loop through each key-value pair in the
pendingAttributesdictionary - Log individual custom attribute with corresponding key and value
- Remove all pending attributes from storage
1
2
3
4
5
6
7
8
9
10
11
12
13
14
15
16
17
18
19
20
21
22
func logPendingCustomAttributesIfNecessary() {
  let remoteStorage = RemoteStorage(storageType: .suite)
  guard let pendingAttributes = remoteStorage.retrieve(forKey: .pendingCustomAttributes) as? [[String: Any]] else { return }

  // 1
  pendingAttributes.forEach { setCustomAttributesWith(keysAndValues: $0) }

  // 4
  remoteStorage.removeObject(forKey: .pendingCustomAttributes)
}

func setCustomAttributesWith(keysAndValues: [String: Any]) {
  // 2
  for (key, value) in keysAndValues {
  // 3
    if let value = value as? [String] {
      setCustomAttributeArrayWithKey(key, andValue: value)
    } else {
      setCustomAttributeWithKey(key, andValue: value)
    }
  }
}
1
2
3
4
5
6
7
8
9
10
11
12
13
14
15
16
17
18
19
20
- (void)logPendingCustomAttributesIfNecessary {
  RemoteStorage *remoteStorage = [[RemoteStorage alloc] initWithStorageType:StorageTypeSuite];
  NSArray *pendingAttributes = [remoteStorage retrieveForKey:RemoteStorageKeyPendingCustomAttributes];

  // 1
  for (NSDictionary<NSString*, id> *attribute in pendingAttributes) {
    [self setCustomAttributeWith:attribute];
  }

  // 4
  [remoteStorage removeObjectForKey:RemoteStorageKeyPendingCustomAttributes];
}

- (void)setCustomAttributeWith:(NSDictionary<NSString *, id> *)keysAndValues {
  // 2
  for (NSString *key in keysAndValues) {
  // 3
    [self setCustomAttributeWith:key andValue:[keysAndValues objectForKey:key]];
  }
}
Saving user attributes
When saving user attributes, it is recommended to create a custom object to decipher what type of attribute is being updated (email, first_name, phone_number, etc.). The object should be compatible with being stored/retrieved from UserDefaults. See the UserAttribute helper file for one example of how to accomplish this.
- Initialize an encoded
UserAttributeobject with the corresponding type - Initialize
userDefaultsto retrieve and store the event data - If there is an existing array, append new data to the existing array and save
- If there is not an existing array, save the new array to
userDefaults
1
2
3
4
5
6
7
8
9
10
11
12
13
14
15
16
func saveUserAttribute() {
  // 1
  guard let data = try? PropertyListEncoder().encode(UserAttribute.userAttributeType("USER-ATTRIBUTE-VALUE")) else { return }

  // 2
  let remoteStorage = RemoteStorage(storageType: .suite)

  // 3
  if var pendingAttributes = remoteStorage.retrieve(forKey: .pendingUserAttributes) as? [Data] {
    pendingAttributes.append(contentsOf: [data])
    remoteStorage.store(pendingAttributes, forKey: .pendingUserAttributes)
  } else {
  // 4
    remoteStorage.store([data], forKey: .pendingUserAttributes)
  }
}
1
2
3
4
5
6
7
8
9
10
11
12
13
14
15
16
17
18
19
20
21
22
23
- (void)saveUserAttribute {
  // 1
  UserAttribute *userAttribute = [[UserAttribute alloc] initWithUserField:@"USER-ATTRIBUTE-VALUE" attributeType:UserAttributeTypeEmail];

  NSError *error;
  NSData *data = [NSKeyedArchiver archivedDataWithRootObject:userAttribute requiringSecureCoding:YES error:&error];

  if (error != nil) {
    // log error
  }
  // 2
  RemoteStorage *remoteStorage = [[RemoteStorage alloc] initWithStorageType:StorageTypeSuite];
  NSMutableArray *pendingAttributes = [[remoteStorage retrieveForKey:RemoteStorageKeyPendingUserAttributes] mutableCopy];

  // 3
  if (pendingAttributes) {
    [pendingAttributes addObject:data];
    [remoteStorage store:pendingAttributes forKey:RemoteStorageKeyPendingUserAttributes];
  } else {
  // 4
    [remoteStorage store:@[data] forKey:RemoteStorageKeyPendingUserAttributes];
  }
}
Sending user attributes to Braze
After the SDK is initialized is the best time to log any saved analytics from a notification content app extension. This can be done by looping through the pending attributes, setting the appropriate custom attribute in Braze, and then clearing the storage for the next time this function is needed.
- Loop through the array of
pendingAttributesdata - Initialize an encoded
UserAttributeobject from attribute data - Set specific user field based on the User Attribute type (email)
- Remove all pending user attributes from storage
1
2
3
4
5
6
7
8
9
10
11
12
13
14
15
16
17
18
func logPendingUserAttributesIfNecessary() {
  let remoteStorage = RemoteStorage(storageType: .suite)
  guard let pendingAttributes = remoteStorage.retrieve(forKey: .pendingUserAttributes) as? [Data] else { return }

  // 1
  for attributeData in pendingAttributes {
  // 2
    guard let userAttribute = try? PropertyListDecoder().decode(UserAttribute.self, from: attributeData) else { continue }

  // 3
    switch userAttribute {
    case .email(let email):
      user?.email = email
    }
  }
  // 4
  remoteStorage.removeObject(forKey: .pendingUserAttributes)
}
1
2
3
4
5
6
7
8
9
10
11
12
13
14
15
16
17
18
19
20
21
22
23
24
25
26
27
- (void)logPendingUserAttributesIfNecessary {
  RemoteStorage *remoteStorage = [[RemoteStorage alloc] initWithStorageType:StorageTypeSuite];
  NSArray *pendingAttributes = [remoteStorage retrieveForKey:RemoteStorageKeyPendingUserAttributes];

  // 1
  for (NSData *attributeData in pendingAttributes) {
    NSError *error;

  // 2
    UserAttribute *userAttribute = [NSKeyedUnarchiver unarchivedObjectOfClass:[UserAttribute class] fromData:attributeData error:&error];

    if (error != nil) {
      // log error
    }

  // 3
    if (userAttribute) {
      switch (userAttribute.attributeType) {
        case UserAttributeTypeEmail:
          [self user].email = userAttribute.userField;
          break;
      }
    }
  }
  // 4
  [remoteStorage removeObjectForKey:RemoteStorageKeyPendingUserAttributes];
}
Helper files
RemoteStorage Helper File
1
2
3
4
5
6
7
8
9
10
11
12
13
14
15
16
17
18
19
20
21
22
23
24
25
26
27
28
29
30
31
32
33
34
35
36
37
38
39
40
41
42
43
44
45
46
enum RemoteStorageKey: String, CaseIterable {

  // MARK: - Notification Content Extension Analytics
  case pendingCustomEvents = "pending_custom_events"
  case pendingCustomAttributes = "pending_custom_attributes"
  case pendingUserAttributes = "pending_user_attributes"
}

enum RemoteStorageType {
  case standard
  case suite
}

class RemoteStorage: NSObject {
  private var storageType: RemoteStorageType = .standard
  private lazy var defaults: UserDefaults = {
    switch storageType {
    case .standard:
      return .standard
    case .suite:
      return UserDefaults(suiteName: "YOUR-DOMAIN-IDENTIFIER")!
    }
  }()

  init(storageType: RemoteStorageType = .standard) {
    self.storageType = storageType
  }

  func store(_ value: Any, forKey key: RemoteStorageKey) {
    defaults.set(value, forKey: key.rawValue)
  }

  func retrieve(forKey key: RemoteStorageKey) -> Any? {
    return defaults.object(forKey: key.rawValue)
  }

  func removeObject(forKey key: RemoteStorageKey) {
    defaults.removeObject(forKey: key.rawValue)
  }

  func resetStorageKeys() {
    for key in RemoteStorageKey.allCases {
      defaults.removeObject(forKey: key.rawValue)
    }
  }
}
1
2
3
4
5
6
7
8
9
10
11
12
13
14
15
16
17
18
19
20
21
22
23
24
25
26
27
28
29
30
31
32
33
34
35
36
37
38
39
40
41
42
43
44
45
46
47
48
49
50
51
52
53
54
55
56
57
58
59
60
@interface RemoteStorage ()

@property (nonatomic) StorageType storageType;
@property (nonatomic, strong) NSUserDefaults *defaults;

@end

@implementation RemoteStorage

- (id)initWithStorageType:(StorageType)storageType {
  if (self = [super init]) {
    self.storageType = storageType;
  }
  return self;
}

- (void)store:(id)value forKey:(RemoteStorageKey)key {
  [[self defaults] setValue:value forKey:[self rawValueForKey:key]];
}

- (id)retrieveForKey:(RemoteStorageKey)key {
  return [[self defaults] objectForKey:[self rawValueForKey:key]];
}

- (void)removeObjectForKey:(RemoteStorageKey)key {
  [[self defaults] removeObjectForKey:[self rawValueForKey:key]];
}

- (void)resetStorageKeys {
  [[self defaults] removeObjectForKey:[self rawValueForKey:RemoteStorageKeyPendingCustomEvents]];
  [[self defaults] removeObjectForKey:[self rawValueForKey:RemoteStorageKeyPendingCustomAttributes]];
  [[self defaults] removeObjectForKey:[self rawValueForKey:RemoteStorageKeyPendingUserAttributes]];
}

- (NSUserDefaults *)defaults {
  if (!self.defaults) {
    switch (self.storageType) {
      case StorageTypeStandard:
        return [NSUserDefaults standardUserDefaults];
        break;
      case StorageTypeSuite:
        return [[NSUserDefaults alloc] initWithSuiteName:@"YOUR-DOMAIN-IDENTIFIER"];
    }
  } else {
    return self.defaults;
  }
}

- (NSString*)rawValueForKey:(RemoteStorageKey)remoteStorageKey {
    switch(remoteStorageKey) {
    case RemoteStorageKeyPendingCustomEvents:
      return @"pending_custom_events";
    case RemoteStorageKeyPendingCustomAttributes:
      return @"pending_custom_attributes";
    case RemoteStorageKeyPendingUserAttributes:
      return @"pending_user_attributes";
    default:
      [NSException raise:NSGenericException format:@"Unexpected FormatType."];
  }
}
UserAttribute Helper File
1
2
3
4
5
6
7
8
9
10
11
12
13
14
15
16
17
18
19
20
21
22
23
24
25
26
enum UserAttribute: Hashable {
  case email(String?)
}

// MARK: - Codable
extension UserAttribute: Codable {
  private enum CodingKeys: String, CodingKey {
    case email
  }

  func encode(to encoder: Encoder) throws {
    var values = encoder.container(keyedBy: CodingKeys.self)

    switch self {
    case .email(let email):
      try values.encode(email, forKey: .email)
    }
  }

  init(from decoder: Decoder) throws {
    let values = try decoder.container(keyedBy: CodingKeys.self)

    let email = try values.decode(String.self, forKey: .email)
    self = .email(email)
  }
}
1
2
3
4
5
6
7
8
9
10
11
12
13
14
15
16
17
18
19
20
21
22
23
24
25
26
@implementation UserAttribute

- (id)initWithUserField:(NSString *)userField attributeType:(UserAttributeType)attributeType {
  if (self = [super init]) {
    self.userField = userField;
    self.attributeType = attributeType;
  }
  return self;
}

- (void)encodeWithCoder:(NSCoder *)encoder {
  [encoder encodeObject:self.userField forKey:@"userField"];
  [encoder encodeInteger:self.attributeType forKey:@"attributeType"];
}

- (id)initWithCoder:(NSCoder *)decoder {
  if (self = [super init]) {
    self.userField = [decoder decodeObjectForKey:@"userField"];

    NSInteger attributeRawValue = [decoder decodeIntegerForKey:@"attributeType"];
    self.attributeType = (UserAttributeType) attributeRawValue;
  }
  return self;
}

@end
EventName Dictionary Helper File
1
2
3
4
5
6
7
8
9
10
11
12
extension Dictionary where Key == String, Value == Any {
  init(eventName: String, properties: [String: Any]? = nil) {
    self.init()
    self[PushNotificationKey.eventName.rawValue] = eventName

    if let properties = properties {
      for (key, value) in properties {
        self[key] = value
      }
    }
  }
}
1
2
3
4
5
6
7
8
9
10
11
12
13
14
15
@implementation NSDictionary (Helper)

- (id)initWithEventName:(NSString *)eventName properties:(NSDictionary *)properties {
  self = [self init];
  if (self) {
    dict[@"event_name"] = eventName;

    for(id key in properties) {
      dict[key] = properties[key];
    }
  }
  return self;
}

@end
 Edit this page on GitHub