Push stories
Learn how to set up push stories for the Braze SDK.
Prerequisites
Before you can use this feature, you’ll need to integrate the Swift Braze SDK. You’ll also need to set up push notifications, which includes implementing the UNNotification framework.
The following minimum SDK version is required to receive Push Stories:
Setting up Push Stories
Step 1: Adding the Notification Content Extension target
In your app project, go to menu File > New > Target and add a new Notification Content Extension target and activate it.

Xcode should generate a new target for you and create files automatically for you including:
NotificationViewController.swiftMainInterface.storyboard
Step 2: Enable capabilities
In Xcode, add the Background Modes capability using the Signing & Capabilities pane to the main app target. Select both the Background fetch and Remote notifications checkboxes.

Adding an App Group
Additionally, from the Signing & Capabilities pane in Xcode, add the App Groups capability to your main app target as well as the Notification Content Extension targets. Then, click the + button. Use your app’s bundle ID to create the app group. For example, if your app’s bundle ID is com.company.appname, you can name your app group group.com.company.appname.xyz.

App Groups in this context refer to Apple’s App Groups Entitlement and not your Braze workspace (previously app group) ID.
If you do not add your app to an App Group, your app may fail to populate certain fields from the push payload and will not work fully as expected.
Step 3: Adding the Push Story framework to your app
After following the Swift Package Manager integration guide, add BrazePushStory to your Notification Content Extension:


Add the following line to your Podfile:
1
2
3
4
5
6
7
8
9
10
11
12
13
14
target 'YourAppTarget' do
pod 'BrazeKit'
pod 'BrazeUI'
pod 'BrazeLocation'
end

target 'YourNotificationContentExtensionTarget' do
pod 'BrazePushStory'
end

# Only include the below if you want to also integrate Rich Push
target 'YourNotificationServiceExtensionTarget' do
pod 'BrazeNotificationService'
end

After updating the Podfile, navigate to the directory of your Xcode app project within your terminal and run pod install.
Download the latest BrazePushStory.zip from the GitHub release page, extract it, and add the BrazePushStory.xcframework to your project’s Notification Content Extension.

Make sure that Do Not Embed is selected for BrazePushStory.xcframework under the Embed column.
Step 4: Updating your notification view controller
In NotificationViewController.swift, add the following line to import the header files:
1
import BrazePushStory
Next, replace the default implementation by inheriting BrazePushStory.NotificationViewController:
1
class NotificationViewController: BrazePushStory.NotificationViewController {}
Custom handling push story events
If you want to implement your own custom logic to handle push story notification events, inherit BrazePushStory.NotificationViewController as shown in the previous example and override the didReceive methods in the following example.
1
2
3
4
5
6
7
8
9
10
11
12
13
14
15
16
17
import BrazePushStory
import UserNotifications
import UserNotificationsUI

class NotificationViewController: BrazePushStory.NotificationViewController {
  override func didReceive(_ notification: UNNotification) {
    super.didReceive(notification)

    // Custom handling logic
  }

  override func didReceive(_ response: UNNotificationResponse, completionHandler completion: @escaping (UNNotificationContentExtensionResponseOption) -> Void) {
    super.didReceive(response, completionHandler: completion)

    // Custom handling logic
  }
}
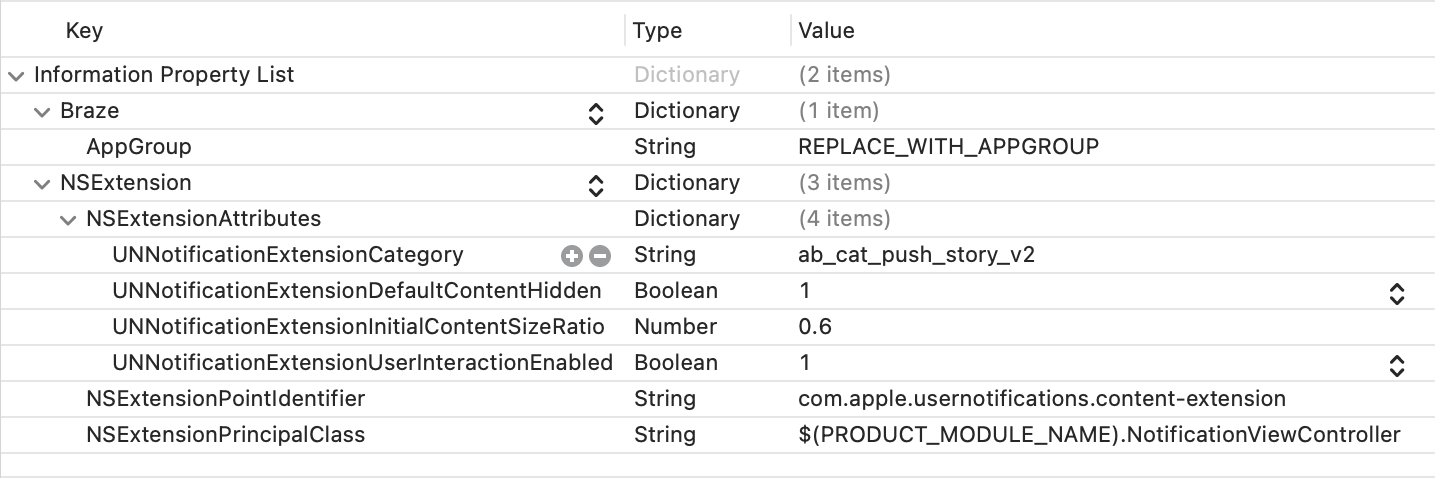
Step 5: Setting the Notification Content Extension plist
Open the Info.plist file of the Notification Content Extension, then add and change the following keys under NSExtension \ NSExtensionAttributes:
| Key | Type | Value |
|---|---|---|
UNNotificationExtensionCategory |
String | ab_cat_push_story_v2 |
UNNotificationExtensionDefaultContentHidden |
Boolean | YES |
UNNotificationExtensionInitialContentSizeRatio |
Number | 0.6 |
UNNotificationExtensionUserInteractionEnabled |
Boolean | YES |
Additionally, add the following top-level Braze dictionary to the same Info.plist file, replacing REPLACE_WITH_APPGROUP with the App Group you created in Step 2:
| Key | Type | Value |
|---|---|---|
Braze.AppGroup |
String | REPLACE_WITH_APPGROUP |
Your Info.plist file should match the following image:
Step 6: Updating the Braze integration in your main app
Before initializing Braze, assign the name of your app group to your Braze configuration’s push.appGroup property.
1
2
3
4
let configuration = Braze.Configuration(apiKey: "<YOUR-BRAZE-API-KEY>",
                                        endpoint: "<YOUR-BRAZE-ENDPOINT>")
configuration.push.appGroup = "REPLACE_WITH_APPGROUP"
let braze = Braze(configuration: configuration)
Prerequisites
Before you can use this feature, you’ll need to integrate the Cordova Braze SDK. You’ll also need to set up push notifications.
Setting up push stories
Step 1: Create a notification content extension
In your Xcode project, create a notification content extension. For a full walkthrough, see iOS Push Stories Tutorial.
Step 2: Configure your push app group
In your project’s config.xml file, configure the push app group you just created.
1
<preference name="com.braze.ios_push_app_group" value="NOTIFICATION_CONTENT_EXTENTION" />
Replace PUSH_APP_GROUP with the name of your push app group. Your config.xml should be similar to the following:
1
<preference name="com.braze.ios_push_app_group" value="MyPushAppGroup" />
Step 3: Add a new target
Open your Podfile and add BrazePushStory to the notification content extension target you created previously. To avoid duplicate symbol errors, use static linking.
1
2
3
4
target 'NOTIFICATION_CONTENT_EXTENSION' do
  use_frameworks! :linkage => :static
  pod 'BrazePushStory'
end
Replace NOTIFICATION_CONTENT_EXTENSION with the name of your notification content extension. Your Podfile should be similar to the following:
1
2
3
4
target 'MyAppNotificationContentExtension' do
  use_frameworks! :linkage => :static
  pod 'BrazePushStory'
end
Step 4: Reinstall your CocoaPods dependencies
In the terminal, go to your iOS directory and reinstall your CocoaPod dependencies.
1
2
cd PATH_TO_PROJECT/platform/ios
pod install
Prerequisites
Before you can use this feature, you’ll need to integrate the React Native Braze SDK. You’ll also need to set up push notifications.
Enabling push stories
For the React Native SDK, push stories are available for Android by default.
To enable Push Stories on iOS using Expo, ensure you have an app group defined for your application. For more information, see Adding an App Group.
Next, configure the enableBrazeIosPushStories property to true and assign your app group ID to iosPushStoryAppGroup in your expo.plugins object in app.json:
1
2
3
4
5
6
7
8
9
10
11
12
13
14
{
  "expo": {
    "plugins": [
      [
        "@braze/expo-plugin",
        {
          ...
          "enableBrazeIosPushStories": true,
          "iosPushStoryAppGroup": "group.com.company.myApp.PushStories"
        }
      ]
    ]
  }
}
Lastly, add the bundle identifier for this app extension to your project’s credentials configuration: <your-app-bundle-id>.BrazeExpoPushStories. For further details on this process, refer to Using app extensions with Expo Application Services.
If you are using Push Stories with Expo Application Services, be sure to use the EXPO_NO_CAPABILITY_SYNC=1 flag when running eas build. There is a known issue in the command line which removes the App Groups capability from your extension’s provisioning profile.