Shopify 제품 동기화
Shopify 스토어의 모든 제품을 Braze 카탈로그에 동기화하여 더 깊은 메시징 개인화를 구현할 수 있습니다.
Shopify 카탈로그는 Shopify 스토어에서 제품을 편집하고 변경할 때 거의 실시간으로 업데이트됩니다. 유기한 장바구니, 주문 확인 등에 최신 제품 세부 정보와 정보를 활용할 수 있습니다.
핵심 Shopify 제품 데이터 지원 외에도 Shopify 컬렉션, 제품 태그, 제품 메타필드를 Braze 카탈로그에 동기화할 수 있습니다. 이러한 추가 필드를 통해 더 풍부한 개인화, 더 정밀한 카탈로그 선택, 세그먼트 확장을 통한 더 강력한 세분화가 가능합니다.
Shopify 제품 동기화 설정하기
이미 Shopify 스토어를 설치한 경우에도 이 섹션의 지침에 따라 제품을 동기화할 수 있습니다.
1단계: 동기화 켜기
Shopify 설치 플로우 또는 Shopify 파트너 페이지를 통해 제품을 Braze 카탈로그에 동기화할 수 있습니다.
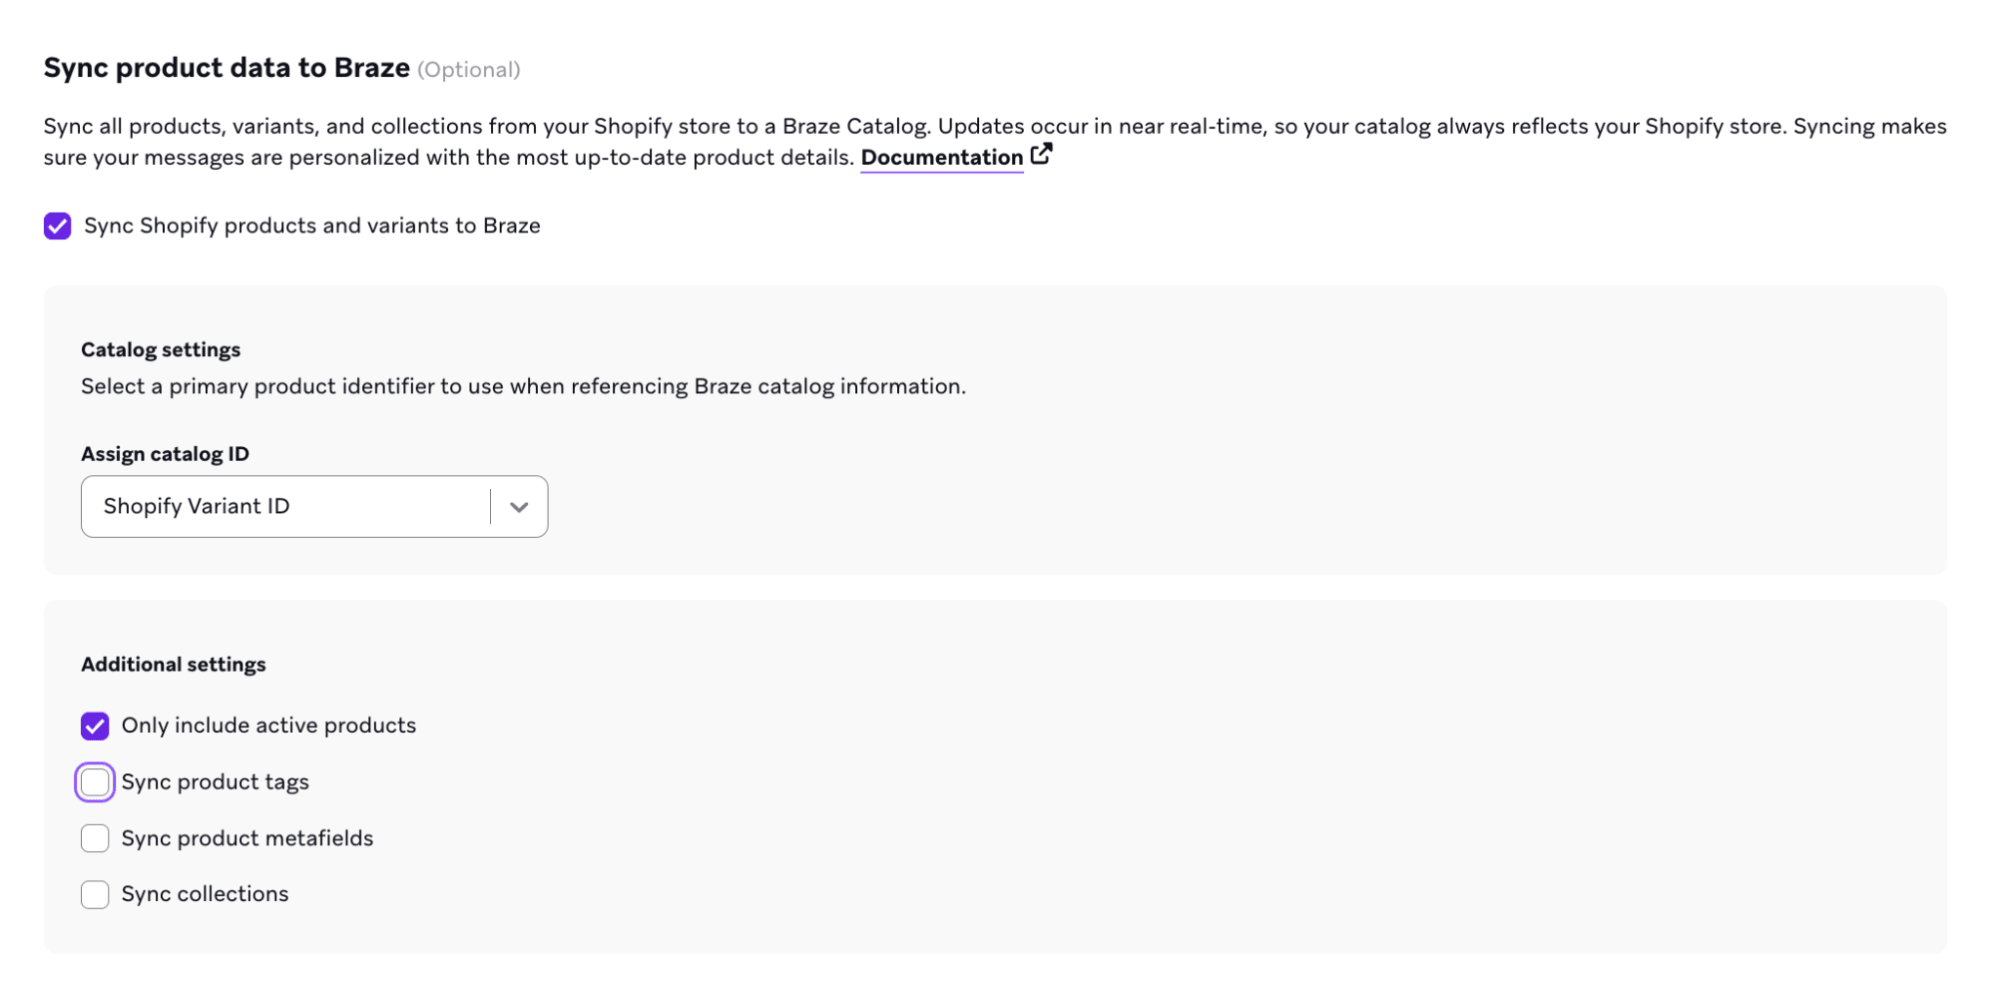
2단계: 제품 식별자 선택
카탈로그 ID로 사용할 제품 식별자를 선택합니다:
- Shopify Variant ID
- SKU
선택한 제품 식별자의 ID 및 헤더 값에는 문자, 숫자, 하이픈, 밑줄만 포함할 수 있습니다. 제품 식별자가 이 형식을 따르지 않으면 Braze가 카탈로그 동기화에서 해당 항목을 필터링합니다.
이것이 Braze 카탈로그 정보를 참조하는 데 사용하는 기본 식별자가 됩니다.

SKU를 카탈로그 ID로 선택하는 경우, 스토어의 모든 제품과 배리언트에 SKU가 설정되어 있고 고유한지 확인하세요.
- 항목에 SKU가 누락된 경우 Braze는 해당 제품을 카탈로그에 동기화할 수 없습니다.
- 동일한 SKU를 가진 제품이 두 개 이상인 경우 예기치 않은 동작이 발생하거나 중복 SKU로 인해 제품 정보가 의도치 않게 덮어쓰여질 수 있습니다.
3단계: 추가 제품 데이터 구성(선택 사항)
제품 태그, Shopify 컬렉션, 메타필드 동기화를 선택적으로 활성화할 수 있습니다. 초기 동기화 후 Shopify 파트너 페이지에서 이러한 설정을 활성화하거나 수정할 수 있습니다.
먼저 Shopify에서 제품 태그, Shopify 컬렉션, 메타필드를 추가하세요. Shopify에 존재하지 않으면 Braze에 표시되지 않습니다.

- Braze에 제품 데이터 동기화 페이지에서 제품 태그 동기화 체크박스를 선택하여 제품 태그 선택 모달을 엽니다.
- Braze 카탈로그에 동기화할 제품 태그를 최대 20개까지 선택합니다. 선택한 태그만 동기화됩니다.

- 기존 Shopify 통합이 있는 경우, 제품 동기화에 필요한 새 스코프를 설치하기 위해 Braze Shopify 앱을 재인증하세요. 신규 고객인 경우 다음 단계로 이동하세요.

- 제품 메타필드 동기화를 선택하여 메타필드 구성 모달을 엽니다.

- 동기화할 검색 가능한 메타필드를 최대 20개까지 선택합니다. 각 메타필드는 카탈로그 선택 또는 세그먼트 확장과 같은 기능에서 사용할 수 있는 별도의 열이 됩니다.
- 메타필드 이름을 지정할 때 공백은 “_“로 변환되고 모든 특수 문자는 Braze 카탈로그 필드 이름 제한에 맞게 제거됩니다.

Braze는 다음 메타필드 오브젝트와 해당 유형 일부를 지원합니다.
| 메타필드 유형 | 데이터 유형 |
|---|---|
boolean |
부울 |
color, list.color |
문자열(16진수 색상, 예: #FFF123), 문자열 배열 |
date, list.date |
문자열(ISO 8601 날짜), 문자열 배열(ISO 8601 날짜) |
date_time, list.date_time |
문자열(ISO 8601 날짜/시간), 문자열 배열(ISO 8601 날짜/시간) |
id, list.id |
문자열, 문자열 배열 |
multi_line_text_field |
문자열 |
number_decimal |
문자열 |
number_integer |
정수 |
single_line_text_field, list.single_line_text_field |
문자열, 문자열 배열 |
url, list.url |
문자열(URL), 문자열 배열(URL) |
metaobject_reference, list.metaobject_reference |
문자열, 문자열 배열 |
mixed_reference, list.mixed_reference |
문자열, 문자열 배열 |
Braze는 일부 목록 유형을 포함한 다음 메타필드 오브젝트를 지원하지 않습니다:
dimension(list.dimension)weight(list.weight)link(list.link)jsonlist.number_decimallist.number_integermoneyrating(list.rating)volume(list.volume)rich_text_field
- Shopify 컬렉션 동기화를 선택하여 컬렉션 설정 모달을 엽니다.
- 동기화할 컬렉션을 최대 20개까지 선택합니다.
- 모달은 Shopify 스토어에서 가장 최근에 생성되거나 업데이트된 컬렉션 최대 5,000개의 검색 가능한 목록을 제공합니다.
- 이전에 선택한 컬렉션이 상위 5,000개에 더 이상 포함되지 않더라도 선택 항목에 계속 표시됩니다.
Braze는 Shopify 컬렉션 ID를 사용하여 동기화된 컬렉션을 식별하며, 이는 카탈로그 선택 및 세그먼트 필터를 구축할 때 사용됩니다.


4단계: 동기화 진행 상황 추적
구성을 저장하면 Braze가 제품 동기화를 시작하고 Shopify 파트너 페이지에서 상태가 진행 중으로 업데이트됩니다. 동기화 시간은 스토어의 제품 및 배리언트 수에 따라 달라집니다.
동기화가 진행 중이면 페이지를 떠나도 됩니다. 동기화가 완료되면 Braze가 대시보드 알림을 보냅니다. 완료 후 상태가 활성으로 업데이트되며, Shopify 파트너 페이지에서 카탈로그 이름을 선택하여 제품을 확인할 수 있습니다.

Shopify 카탈로그 내에서 동기화된 제품 태그, 메타필드, 컬렉션을 새 열로 확인할 수도 있습니다.


동기화가 카탈로그 저장 한도를 초과하면 Braze가 동기화를 중단하고 새 제품 업데이트가 더 이상 반영되지 않습니다. 필요한 경우 고객 성공 매니저에게 문의하여 티어를 업그레이드하세요.
5단계: 구성 관리
각 동기화 유형에는 Shopify 파트너 페이지에 동기화된 총 수, 현재 상태, 카탈로그 링크가 표시된 요약 카드가 있습니다. 보기 아이콘을 선택하여 활성 구성을 확인하고 편집할 수 있습니다.
Shopify 파트너 페이지에서 언제든지 제품 태그, 컬렉션, 제품 메타필드 관리를 포함한 Shopify 제품 동기화를 수정할 수 있습니다.

동기화된 선택 항목을 변경하면 해당 항목을 참조하는 활성 Campaign, Canvases 또는 카탈로그 선택에 영향을 미칠 수 있습니다. 변경 사항을 적용하기 전에 활성 콘텐츠가 올바르게 작동하도록 업데이트하세요.
지원되는 Shopify 카탈로그 데이터
| 필드 | 데이터 유형 | 예시 |
|---|---|---|
id |
문자열 | 카탈로그 제품 식별자가 Shopify Variant ID인 경우 45264808411274카탈로그 제품 식별자가 SKU인 경우 12345(2단계에서 선택한 값과 일치) |
store_name |
문자열 | “your-store”(.myshopify.com 없이 Shopify 스토어 서브도메인) |
shopify_product_id |
숫자 | 7939032613002(Braze 카탈로그에 숫자로 저장됨. Shopify API는 이 ID를 문자열로 반환할 수 있음) |
shopify_variant_id |
숫자 | 45264808411274(Braze 카탈로그에 숫자로 저장됨. Shopify API는 이 ID를 문자열로 반환할 수 있음) |
product_title |
문자열 | “Classic leather jacket” |
variant_title |
문자열 | “Large / Red”, “Medium”, 또는 단일 배리언트 제품의 경우 “Default Title” |
status |
문자열 | “active”, “draft”, “archived” |
product_image_url |
문자열 | “https://cdn.shopify.com/s/files/1/0641/0970/7402/files/t_shir.jpg?v=1736538760” |
variant_image_url |
문자열 | 배리언트 이미지가 없는 경우 제품 이미지와 동일한 CDN 스타일 URL. 그렇지 않으면 배리언트별 이미지 URL |
vendor |
문자열 | “Flash and Thread”, “PantsLabyrinth” |
product_type |
문자열 | “Outerwear”, “T-Shirts”(Shopify의 제품 Product type에서 가져옴) |
product_url |
문자열 | “https://your-store.myshopify.com/products/classic-leather-jacket” |
product_handle |
문자열 | “classic-leather-jacket” |
published_scope |
문자열 | “web”, “global” |
price |
숫자 | 10.00, 24.99Shopify는 종종 가격을 문자열로 반환합니다(예: REST Admin API에서 "199.00"). Braze는 이 카탈로그 필드에 대해 숫자로 변환합니다. |
compare_at_price |
숫자 | Shopify에서 Compare at price가 설정된 경우 15.00Shopify에 비교 가격이 없는 경우 0. Shopify API는 일반적으로 설정되지 않은 비교 가격에 대해 null을 반환합니다. Braze는 필드가 항상 숫자가 되도록 카탈로그에 0을 저장합니다(이는 Shopify가 0으로 보내는 값이 아닌 Braze 기본값입니다). |
inventory_quantity |
숫자 | 20, 0, 또는 초과 판매가 허용되는 경우 음수 값(예: -18) |
options |
문자열 | “Size,Color” Shopify는 제품당 최대 3개의 옵션 유형을 허용합니다(예: Size, Color, Material). options 값은 해당 이름의 쉼표로 구분된 목록입니다. |
option_values |
문자열 | “Medium,Red”, “Large,Red” 각 값은 options와 동일한 순서로 매핑됩니다(최대 3개 값). |
sku |
문자열 | “12345”, “SKU-001-RED-L” |
product_tags |
배열 | ["Summer", "Sale", "New"]제품 태그 동기화가 필요합니다. |
collection_ids |
배열 | [123456789012, 987654321098](Shopify 컬렉션 ID)Shopify 컬렉션 동기화가 필요합니다. |
| 메타필드 열 | 유형에 따라 다름 | 동기화된 각 메타필드는 키 이름으로 된 별도의 열로 표시됩니다. 자세한 내용은 3단계의 “제품 메타필드” 탭에서 지원되는 메타필드를 참조하세요. |

Shopify 카탈로그는 Shopify에서 관리됩니다. 카탈로그를 업데이트하려면 Shopify 스토어에서 직접 변경하면 자동으로 Braze에 동기화됩니다. Shopify 카탈로그를 삭제하려면 Braze의 Shopify 파트너 페이지로 이동하여 동기화를 비활성화하세요.
Shopify 카탈로그 사용 사례
이 사용 사례에서는 동기화된 Shopify 카탈로그 데이터를 사용하여 메시지를 개인화하는 방법을 보여줍니다.
Braze는 각 Shopify 제품의 배리언트를 최대 250개까지 카탈로그에 동기화합니다. 이 한도를 초과하는 배리언트는 동기화되지 않습니다. 제품당 250개 이상의 배리언트가 필요한 경우 Braze 고객 성공 매니저에게 문의하세요.
제품 태그를 사용하여 Shopify에서 제품이 분류된 방식에 따라 메시지를 개인화할 수 있습니다. 예를 들어, 카탈로그 선택을 통해 “Summer Sale” 태그가 지정된 모든 제품을 포함하는 프로모션을 보내거나, “Premium” 태그가 지정된 제품을 구매한 사용자 Segment를 구축할 수 있습니다.
제품 태그는 각 카탈로그 항목의 배열 필드로 저장됩니다. 제품 태그 동기화를 구성하려면 Shopify 제품 태그를 참조하세요.
카탈로그 선택
- Shopify에서 관련 제품에 “Women’s” 제품 태그를 지정합니다.

- Braze에서 태그 동기화를 활성화하고 “Women’s” 제품 태그를 선택합니다.

개인화
카탈로그 선택에서 제품 태그나 컬렉션을 참조할 때는 카탈로그 데이터에 표시되는 배열 괄호 []나 따옴표 "" 없이 값 자체만 사용하세요. 예를 들어, 카탈로그에서 제품 태그가 ["Women's"]로 표시되는 경우 선택 필터에 Women's라고 입력하세요.
- 해당 제품 태그(예: “Women’s”)가 있는 제품을 필터링하는 카탈로그 선택을 생성합니다. 단일 카탈로그 선택 내에서 하나의 고유 배열 필드만 사용할 수 있으며, 카탈로그 선택에 최대 50개의 제품을 포함할 수 있습니다.

- 메시지 작성기에서 “Women’s” 태그가 지정된 카탈로그 선택의 제품을 템플릿으로 삽입할 위치에 선택을 추가합니다. 예를 들어, 다음과 같은 HTML 제품 블록을 사용할 수 있습니다:
1
2
3
4
5
6
7
8
9
10
11
12
13
14
15
16
17
18
19
20
21
22
23
24
25
26
27
28
29
30
31
32
33
34
35
36
37
38
39
40
{% catalog_selection_items se-team-ecommerce_shopify_catalog womens_clothing %}

{% if items[0] == blank %}
{% abort_message('Catalog selection returned no items') %}
{% endif %}

<table role="presentation" width="100%" cellpadding="0" cellspacing="0" style="border-collapse:collapse;">
  {% for item in items %}
  {% if forloop.index0 < 3 %}
  {% assign title = item.product_title | default: '' %}
  {% assign image_url = item.variant_image_url | default: '' %}
  {% assign price = item.price | default: '' %}
  {% assign url = item.product_url | default: '' %}

  <tr>
    <td width="200" valign="top" style="padding:12px 12px 12px 0;">
      {% if image_url == blank %}
      <div style="width:200px;height:200px;background:#f2f2f2;line-height:200px;text-align:center;font-family:Arial,sans-serif;font-size:12px;color:#666;">
        No image
      </div>
      {% else %}
        {% if url == blank %}
        <img src="{{ image_url }}" width="200" height="200" alt="{{ title | escape }}" style="display:block;border:0;outline:none;text-decoration:none;" />
        {% else %}
        <a href="{{ url }}" style="text-decoration:none;">
          <img src="{{ image_url }}" width="200" height="200" alt="{{ title | escape }}" style="display:block;border:0;outline:none;text-decoration:none;" />
        </a>
        {% endif %}
      {% endif %}
    </td>

    <td valign="top" style="padding:12px 0;font-family:Arial,sans-serif;font-size:14px;line-height:20px;color:#111;">
      {% if title != blank %}<div style="font-weight:600;">{{ title | escape }}</div>{% endif %}
      {% if price != blank %}<div>Price: ${{ price }}</div>{% endif %}
      {% if url != blank %}<div><a href="{{ url }}" style="color:#F84B09;">View product</a></div>{% endif %}
    </td>
  </tr>
  {% endif %}
  {% endfor %}
</table>
또는 푸시 알림에서 “Women’s” 태그가 지정된 특정 제품을 언급하려면 개인화 추가 도구를 사용하여 카탈로그 항목을 지정할 수 있습니다.
1
2
3
4
5
Checkout the latest women's clothing:
    {% catalog_selection_items se-team-ecommerce_shopify_catalog womens_clothing %}
    {{ items[0].product_title}}{{items[0].price}}
    {{ items[1].product_title}}{{items[1].price}}
    {{ items[2].product_title}}{{items[2].price}}

카탈로그 세분화(SQL)
세그먼트 확장을 사용하여 제품 태그와 상호작용한 사용자를 기반으로 Segment를 구축할 수 있습니다. 예를 들어, 특정 제품 태그가 포함된 카탈로그 항목과 상호작용한 사용자를 찾으려면 다음 쿼리를 사용하세요:
1
2
3
4
5
6
7
8
9
10
11
12
13
14
15
16
17
18
19
20
21
22
23
-- Description:
-- This query fetches users who have engaged with catalog items that contain a specific product tag. It joins the catalog
-- to custom events by matching any element in an array within events.properties.products (e.g. any product
-- with variant_id equal to a catalog item), using Snowflake LATERAL FLATTEN to explode the array.
SELECT
DISTINCT(events.user_id)
FROM
    USERS_BEHAVIORS_CUSTOMEVENT_SHARED AS events,
    LATERAL FLATTEN(input => GET_PATH(TRY_PARSE_JSON(events.properties), 'products'), outer => false) AS event_item
    JOIN CATALOGS_ITEMS_SHARED AS items ON (
        (
                items.field_name = 'id'
                    AND
                items.field_value = GET_PATH(event_item.value, 'variant_id')::STRING
            )
            OR
        items.item_id = GET_PATH(event_item.value, 'variant_id')::STRING
    )
WHERE
    events.name = 'ecommerce.order_placed'
    and events.app_group_id = '<app_group_id>'
    AND items.catalog_id = '<catalog_id>'
    AND (items.field_name = 'product_tags' AND ARRAY_CONTAINS('<product_tag_value>'::VARIANT, TRY_PARSE_JSON(items.field_value)));
제품 메타필드를 사용하여 Shopify의 표준 필드를 넘어서는 커스텀 제품 세부 정보로 메시지를 개인화할 수 있습니다. 예를 들어, 주문 확인에 관리 지침을 포함하거나, 추천 이메일에 원산지를 표시하거나, 특정 소재를 구매한 사용자를 세분화할 수 있습니다.
동기화된 각 메타필드는 카탈로그에서 별도의 열이 되며, 데이터 유형은 메타필드 유형에 따라 결정됩니다. 메타필드 동기화를 설정하려면 Shopify 제품 메타필드를 참조하세요.
카탈로그 선택
- Shopify에서 관련 제품의
seasonal제품 메타필드를summer로 설정합니다(이것은 제품 태그가 아닌 메타필드 값입니다).

- Braze에서 메타필드 동기화를 활성화하고
custom.seasonal(또는 Shopify 메타필드와 일치하는 네임스페이스 및 키)을 선택합니다.
개인화
- 해당 값이 포함된 메타필드를 필터링하는 카탈로그 선택을 생성합니다.

- 메시지 작성기에서 제품 메타필드를 템플릿으로 삽입할 위치에 선택을 추가합니다. 예를 들어, 다음과 같은 HTML 제품 블록을 사용할 수 있습니다:
1
2
3
4
5
6
7
8
9
10
11
12
13
14
15
16
17
18
19
20
21
22
23
24
25
26
27
28
29
30
31
32
33
34
35
36
37
38
39
40
{% catalog_selection_items se-team-ecommerce_shopify_catalog seasonal_summer %}

{% if items[0] == blank %}
{% abort_message('Catalog selection returned no items') %}
{% endif %}

<table role="presentation" width="100%" cellpadding="0" cellspacing="0" style="border-collapse:collapse;">
  {% for item in items %}
  {% if forloop.index0 < 3 %}
  {% assign title = item.product_title | default: '' %}
  {% assign image_url = item.variant_image_url | default: '' %}
  {% assign price = item.price | default: '' %}
  {% assign url = item.product_url | default: '' %}

  <tr>
    <td width="200" valign="top" style="padding:12px 12px 12px 0;">
      {% if image_url == blank %}
      <div style="width:200px;height:200px;background:#f2f2f2;line-height:200px;text-align:center;font-family:Arial,sans-serif;font-size:12px;color:#666;">
        No image
      </div>
      {% else %}
        {% if url == blank %}
        <img src="{{ image_url }}" width="200" height="200" alt="{{ title | escape }}" style="display:block;border:0;outline:none;text-decoration:none;" />
        {% else %}
        <a href="{{ url }}" style="text-decoration:none;">
          <img src="{{ image_url }}" width="200" height="200" alt="{{ title | escape }}" style="display:block;border:0;outline:none;text-decoration:none;" />
        </a>
        {% endif %}
      {% endif %}
    </td>

    <td valign="top" style="padding:12px 0;font-family:Arial,sans-serif;font-size:14px;line-height:20px;color:#111;">
      {% if title != blank %}<div style="font-weight:600;">{{ title | escape }}</div>{% endif %}
      {% if price != blank %}<div>Price: ${{ price }}</div>{% endif %}
      {% if url != blank %}<div><a href="{{ url }}" style="color:#F84B09;">View product</a></div>{% endif %}
    </td>
  </tr>
  {% endif %}
  {% endfor %}
</table>
또는 푸시 알림에서 특정 메타필드 값이 있는 제품을 언급하려면 개인화 추가 도구를 사용하여 카탈로그 항목을 지정할 수 있습니다.
1
2
3
4
5
Check out the latest summer products:
    {% catalog_selection_items se-team-ecommerce_shopify_catalog seasonal_summer %}
    {{ items[0].product_title}}{{items[0].price}}
    {{ items[1].product_title}}{{items[1].price}}
    {{ items[2].product_title}}{{items[2].price}}

카탈로그 세분화(SQL)
세그먼트 확장을 사용하여 제품 메타필드와 상호작용한 사용자를 기반으로 Segment를 구축할 수 있습니다. 예를 들어, 메타필드 배열에 특정 값이 포함된 제품으로 이커머스 이벤트를 트리거한 사용자를 찾으려면 다음 쿼리를 사용하세요:
1
2
3
4
5
6
7
8
9
10
11
12
13
14
15
16
17
18
19
20
21
22
23
24
25
26
27
28
29
30
31
32
-- -----------------------------------------------------------------------------
-- When the metafield is stored as a JSON array in catalog field_value (for example,
-- '["winter","summer"]' or a list-type Shopify metafield serialized to JSON),
-- use ARRAY_CONTAINS like product_tags. Cast the element you search for to
-- VARIANT so types match the parsed array elements.
-- -----------------------------------------------------------------------------

-- Description:
-- Fetches users who triggered the ecommerce event with a product whose
-- metafield array contains a specific value (for example, segment on "seasonal").
-- For a date range, add events.time >= $start_date AND events.time <= $end_date.
-- For first/last triggered, reuse the CTE pattern from Template 3 with this
-- ARRAY_CONTAINS predicate instead of items.field_value = '<metafield_value>'.
SELECT
    DISTINCT(events.user_id)
FROM
    USERS_BEHAVIORS_CUSTOMEVENT_SHARED AS events,
    LATERAL FLATTEN(input => GET_PATH(TRY_PARSE_JSON(events.properties), 'products'), outer => false) AS event_item
    JOIN CATALOGS_ITEMS_SHARED AS items ON (
        (
            items.field_name = 'id'
            AND items.field_value = GET_PATH(event_item.value, 'variant_id')::STRING
        )
        OR
        items.item_id = GET_PATH(event_item.value, 'variant_id')::STRING
    )
WHERE
    events.name = 'ecommerce.order_placed'
    AND events.app_group_id = '<app_group_id>'
    AND items.catalog_id = '<catalog_id>'
    AND items.field_name = '<metafield_name>'
    AND ARRAY_CONTAINS('<array_element_value>'::VARIANT, TRY_PARSE_JSON(items.field_value));
특정 제품 메타필드로 주문한 고객을 세분화하려면 다음 SQL 세그먼트 확장 템플릿 중 하나를 사용하세요(전체 기간, 특정 기간, 이벤트를 처음 또는 마지막으로 트리거한 경우).
1
2
3
4
5
6
7
8
9
10
11
12
13
14
15
16
17
18
19
20
21
22
23
24
25
26
27
28
29
30
31
32
33
34
35
36
37
38
39
40
41
42
43
44
45
46
47
48
49
50
51
52
53
54
55
56
57
58
59
60
61
62
63
64
65
66
67
68
69
70
71
72
73
74
75
76
77
78
79
80
81
82
83
84
85
86
87
88
89
90
91
92
93
94
95
96
97
98
99
100
101
102
103
104
105
106
107
108
109
110
111
112
113
114
115
116
117
118
119
120
121
-- =============================================================================
-- Segment Extension: Metafields × Ecommerce Events — Example SQL Templates
-- =============================================================================
-- Metafield column names in CATALOGS_ITEMS_SHARED follow:
--   field_name = 'metafield_<namespace>_<key>'
-- Replace placeholders: app_group_id, catalog_id, event name, and the metafield
-- field_name + value. For array-type metafield values, use ARRAY_CONTAINS
-- with TRY_PARSE_JSON(items.field_value) similar to the product_tags example.
-- =============================================================================

-- -----------------------------------------------------------------------------
-- Template 1: Map metafields to event triggers (all time)
-- -----------------------------------------------------------------------------
-- Users who have ever triggered the ecommerce event with a product that has
-- the given metafield value. Event-agnostic: change events.name for the
-- desired event (e.g. ecommerce.order_placed, ecommerce.product_viewed).
-- -----------------------------------------------------------------------------

-- Description:
-- Fetches users who have engaged with catalog items that have a specific
-- product metafield. Joins the catalog to custom events by matching
-- events.properties.products (e.g. variant_id) to catalog items.
SELECT
    DISTINCT(events.user_id)
FROM
    USERS_BEHAVIORS_CUSTOMEVENT_SHARED AS events,
    LATERAL FLATTEN(input => GET_PATH(TRY_PARSE_JSON(events.properties), 'products'), outer => false) AS event_item
    JOIN CATALOGS_ITEMS_SHARED AS items ON (
        (
            items.field_name = 'id'
            AND items.field_value = GET_PATH(event_item.value, 'variant_id')::STRING
        )
        OR
        items.item_id = GET_PATH(event_item.value, 'variant_id')::STRING
    )
WHERE
    events.name = 'ecommerce.order_placed'
    AND events.app_group_id = '<app_group_id>'
    AND items.catalog_id = '<catalog_id>'
    AND items.field_name = '<metafield_name>'
    AND items.field_value = '<metafield_value>';


-- -----------------------------------------------------------------------------
-- Template 2: Map metafields to event triggers (for a specific period)
-- -----------------------------------------------------------------------------
-- Same as Template 1, restricted to events within a time window. Use
-- $start_date and $end_date (Segment Extension parameters) or literal
-- Unix timestamps.
-- -----------------------------------------------------------------------------

-- Description:
-- Fetches users who triggered the ecommerce event with a product that has
-- the given metafield value within the specified time range.
SELECT
    DISTINCT(events.user_id)
FROM
    USERS_BEHAVIORS_CUSTOMEVENT_SHARED AS events,
    LATERAL FLATTEN(input => GET_PATH(TRY_PARSE_JSON(events.properties), 'products'), outer => false) AS event_item
    JOIN CATALOGS_ITEMS_SHARED AS items ON (
        (
            items.field_name = 'id'
            AND items.field_value = GET_PATH(event_item.value, 'variant_id')::STRING
        )
        OR
        items.item_id = GET_PATH(event_item.value, 'variant_id')::STRING
    )
WHERE
    events.name = 'ecommerce.order_placed'
    AND events.app_group_id = '<app_group_id>'
    AND events.time >= $start_date
    AND events.time <= $end_date
    AND items.catalog_id = '<catalog_id>'
    AND items.field_name = '<metafield_name>'
    AND items.field_value = '<metafield_value>';


-- -----------------------------------------------------------------------------
-- Template 3: Map metafields — first or last triggered an event
-- -----------------------------------------------------------------------------
-- Users for whom the *first* (earliest) or *last* (most recent) matching
-- event (by time) involved a product with the given metafield. Switch
-- ORDER BY to time ASC for first, time DESC for last.
-- -----------------------------------------------------------------------------

-- Description:
-- Fetches users whose first (or last) occurrence of the ecommerce event
-- involved a catalog item with the specified metafield value.
WITH events_with_catalog_metafield AS (
    SELECT
        events.user_id,
        events.time,
        events.id AS event_id,
        ROW_NUMBER() OVER (
            PARTITION BY events.user_id
            ORDER BY events.time ASC   -- use DESC for "last triggered"
        ) AS rn
    FROM
        USERS_BEHAVIORS_CUSTOMEVENT_SHARED AS events,
        LATERAL FLATTEN(input => GET_PATH(TRY_PARSE_JSON(events.properties), 'products'), outer => false) AS event_item
        JOIN CATALOGS_ITEMS_SHARED AS items ON (
            (
                items.field_name = 'id'
                AND items.field_value = GET_PATH(event_item.value, 'variant_id')::STRING
            )
            OR
            items.item_id = GET_PATH(event_item.value, 'variant_id')::STRING
        )
    WHERE
        events.name = 'ecommerce.order_placed'
        AND events.app_group_id = '<app_group_id>'
        AND items.catalog_id = '<catalog_id>'
        AND items.field_name = '<metafield_name>'
        AND items.field_value = '<metafield_value>'
)
SELECT
    user_id
FROM
    events_with_catalog_metafield
WHERE
    rn = 1;
Shopify 컬렉션을 사용하여 Shopify 사이트 및 앱 경험에서도 사용되는 큐레이트된 제품 그룹을 메시지에 가져올 수 있습니다. 예를 들어, 프로모션 이메일에 “New Arrivals”를 소개하거나, 유기한 장바구니 Canvas에서 “Best Sellers”를 교차 판매하거나, 시즌 컬렉션을 탐색한 사용자를 타겟팅할 수 있습니다.
카탈로그 선택
- Shopify에서 최고 성과 제품으로 “New Women’s Products - In Stock” 컬렉션을 생성합니다.

- Braze에서 컬렉션 동기화를 활성화하고 “Women’s Products - In Stock”을 선택합니다.

Shopify 컬렉션의 경우 컬렉션 ID를 사용해야 하며, 이는 컬렉션을 볼 때 URL에서 확인할 수 있습니다. 예를 들어, https://admin.shopify.com/store/se-team-ecommerce/collections/470645342446 URL의 컬렉션 ID는 470645342446입니다.
개인화
카탈로그 선택에서 컬렉션 ID를 참조할 때는 카탈로그 데이터에 표시되는 배열 괄호 [] 없이 숫자 ID 값만 사용하세요. 예를 들어, 카탈로그에서 컬렉션 ID가 [123456789012, 987654321098]로 표시되는 경우 선택 필터에 숫자 ID(예: 470645342446)만 입력하세요.
- 해당 컬렉션의 ID가 있는 제품으로 필터링된 “New Women’s Products - In Stock”이라는 카탈로그 선택을 생성합니다. 단일 카탈로그 선택 내에서 하나의 고유 배열 필드만 사용할 수 있으며, 컬렉션에 최대 50개의 제품을 포함할 수 있습니다.
- Collections 필드로 필터링하여 자체 커스텀 선택을 생성할 수도 있습니다.

- 메시지에서 생성한 선택을 사용하거나 컬렉션을 직접 참조하여 컬렉션을 템플릿으로 삽입합니다. 예를 들어, 다음과 같은 HTML 제품 블록을 사용할 수 있습니다:
1
2
3
4
5
6
7
8
9
10
11
12
13
14
15
16
17
18
19
20
21
22
23
24
25
26
27
28
29
30
31
32
33
34
35
36
37
38
39
40
{% catalog_selection_items se-team-ecommerce_shopify_catalog shopify_collection_womens_instock %}

{% if items[0] == blank %}
{% abort_message('Catalog selection returned no items') %}
{% endif %}

<table role="presentation" width="100%" cellpadding="0" cellspacing="0" style="border-collapse:collapse;">
  {% for item in items %}
  {% if forloop.index0 < 3 %}
  {% assign title = item.product_title | default: '' %}
  {% assign image_url = item.variant_image_url | default: '' %}
  {% assign price = item.price | default: '' %}
  {% assign url = item.product_url | default: '' %}

  <tr>
    <td width="200" valign="top" style="padding:12px 12px 12px 0;">
      {% if image_url == blank %}
      <div style="width:200px;height:200px;background:#f2f2f2;line-height:200px;text-align:center;font-family:Arial,sans-serif;font-size:12px;color:#666;">
        No image
      </div>
      {% else %}
      {% if url == blank %}
      <img src="{{ image_url }}" width="200" height="200" alt="{{ title | escape }}" style="display:block;border:0;outline:none;text-decoration:none;" />
      {% else %}
      <a href="{{ url }}" style="text-decoration:none;">
        <img src="{{ image_url }}" width="200" height="200" alt="{{ title | escape }}" style="display:block;border:0;outline:none;text-decoration:none;" />
      </a>
      {% endif %}
      {% endif %}
    </td>

    <td valign="top" style="padding:12px 0;font-family:Arial,sans-serif;font-size:14px;line-height:20px;color:#111;">
      {% if title != blank %}<div style="font-weight:600;">{{ title | escape }}</div>{% endif %}
      {% if price != blank %}<div>Price: ${{ price }}</div>{% endif %}
      {% if url != blank %}<div><a href="{{ url }}" style="color:#F84B09;">View product</a></div>{% endif %}
    </td>
  </tr>
  {% endif %}
  {% endfor %}
</table>
또는 푸시 알림에서 특정 신제품을 언급하려면 개인화 추가 도구를 사용하여 카탈로그 항목을 지정할 수 있습니다.
1
2
3
4
5
Checkout the latest women's clothing:
    {% catalog_selection_items se-team-ecommerce_shopify_catalog shopify_collection_womens_instock %}
    {{ items[0].product_title}}{{items[0].price}}
    {{ items[1].product_title}}{{items[1].price}}
    {{ items[2].product_title}}{{items[2].price}}

카탈로그 세분화(SQL)
컬렉션과 상호작용한 사용자 Segment를 생성합니다. 세그먼트 확장을 사용하여 컬렉션 멤버십을 기반으로 Segment를 구축할 수 있습니다. 예를 들어, 지난 1년간 특정 컬렉션의 제품을 구매한 사용자를 찾으려면 다음 쿼리를 사용하세요:
1
2
3
4
5
6
7
8
9
10
11
12
13
14
15
16
17
18
19
20
21
22
23
-- Description:
-- This query fetches users who have engaged with catalog items that contain a specific collection ID. It joins the catalog
-- to custom events by matching any element in an array within events.properties.products (e.g. any product
-- with variant_id equal to a catalog item), using Snowflake LATERAL FLATTEN to explode the array.
SELECT
DISTINCT(events.user_id)
FROM
    USERS_BEHAVIORS_CUSTOMEVENT_SHARED AS events,
    LATERAL FLATTEN(input => GET_PATH(TRY_PARSE_JSON(events.properties), 'products'), outer => false) AS event_item
    JOIN CATALOGS_ITEMS_SHARED AS items ON (
        (
                items.field_name = 'id'
                    AND
                items.field_value = GET_PATH(event_item.value, 'variant_id')::STRING
            )
            OR
        items.item_id = GET_PATH(event_item.value, 'variant_id')::STRING
    )
WHERE
    events.name = 'ecommerce.order_placed'
    and events.app_group_id = '<app_group_id>'
    AND items.catalog_id = '<catalog_id>'
    AND (items.field_name = 'collection_ids' AND ARRAY_CONTAINS('<collection_ids_value>'::VARIANT, TRY_PARSE_JSON(items.field_value)));
가격 인하 알림 및 재입고 알림도 설정할 수 있습니다!
각 사용 사례에 대해 카탈로그에서 사용자의 가입 상태를 캡처하는 커스텀 이벤트를 생성해야 합니다. 커스텀 이벤트에는 Shopify 제품 동기화의 일부로 선택한 SKU 또는 Shopify Variant ID 에 매핑되는 이벤트 속성정보가 필요합니다.
제품 동기화 비활성화
Shopify 제품 동기화 기능을 비활성화하면 전체 카탈로그와 제품이 삭제됩니다. 이 카탈로그의 제품 데이터를 활발히 사용 중인 메시지에도 영향을 미칠 수 있습니다. 비활성화 전에 해당 Campaign이나 Canvases를 업데이트하거나 일시 중지했는지 확인하세요. 그렇지 않으면 제품 세부 정보가 없는 메시지가 발송될 수 있습니다. 카탈로그 페이지에서 직접 Shopify 카탈로그를 삭제하지 마세요.
문제 해결
Shopify 제품 동기화에서 오류가 발생하면 다음 오류 중 하나가 원인일 수 있습니다. 문제를 수정하고 동기화를 해결하는 방법에 대한 지침을 따르세요:
| 오류 | 원인 | 해결 방법 |
|---|---|---|
| 서버 오류 | 제품 동기화를 시도할 때 Shopify 측에서 서버 오류가 발생한 경우입니다. | 동기화를 비활성화하고 전체 제품 인벤토리를 다시 동기화하세요. |
| 중복 SKU | SKU를 카탈로그 항목 ID로 사용하고 동일한 SKU를 가진 제품이 있는 경우 발생합니다. 카탈로그 항목 ID는 고유해야 하므로 모든 제품에 고유한 SKU가 있어야 합니다. | Shopify에서 전체 제품 및 배리언트 목록을 감사하여 중복 SKU가 없는지 확인하세요. 중복 SKU가 있는 경우 Shopify 스토어 계정에서만 고유한 SKU로 업데이트하세요. 수정 후 동기화를 비활성화하고 전체 제품 인벤토리를 다시 동기화하세요. |
| 카탈로그 한도 초과 | 카탈로그 한도를 초과한 경우 발생합니다. Braze는 더 이상 저장 공간이 없어 동기화를 완료하거나 동기화를 활성 상태로 유지할 수 없습니다. | 이 문제에 대한 두 가지 해결 방법이 있습니다: 1. 카탈로그 한도를 늘리려면 계정 매니저에게 문의하여 티어를 업그레이드하세요. 2. 다음 항목을 삭제하여 저장 공간을 확보하세요: - 다른 카탈로그의 카탈로그 항목 - 다른 카탈로그 - 생성된 선택 항목 두 해결 방법 중 하나를 사용한 후 동기화를 비활성화한 다음 다시 동기화해야 합니다. |