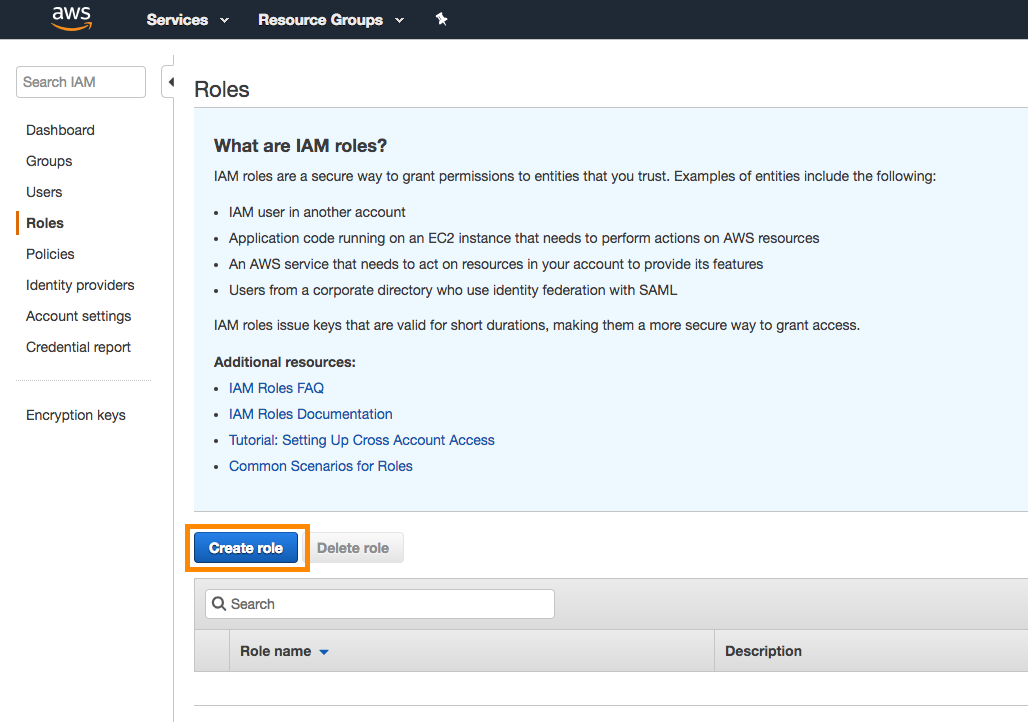
Amazon S3
Amazon S3는 Amazon Web Services에서 제공하는 확장성이 뛰어난 스토리지 시스템입니다.

클라우드 스토리지 제공업체 간에 전환하는 경우, 새로운 통합을 설정하고 검증하는 데 대한 추가 지원을 받으려면 Braze 고객 성공 매니저에게 문의하세요.
Braze와 Amazon S3 통합에는 두 가지 통합 전략이 있습니다:
- Currents를 활용하여 다른 플랫폼, 도구 및 위치에 연결할 때까지 데이터를 저장할 수 있습니다.
- 대시보드 데이터 내보내기(CSV 내보내기 및 참여 보고서 등)를 사용합니다.
필수 조건
| 요구 사항 | 설명 |
|---|---|
| Amazon S3 계정 | 이 파트너십을 이용하려면 Amazon S3 계정이 필요합니다. |
| 전용 S3 버킷 | Amazon S3와 통합하기 전에 앱용 S3 버킷을 생성해야 합니다. 이미 S3 버킷이 있는 경우에도 권한을 제한할 수 있도록 Braze 전용 새 버킷을 만드는 것을 권장합니다. 새 버킷을 만드는 방법은 다음 지침을 참조하세요. |
| Currents | 데이터를 Amazon S3로 다시 내보내려면 계정에 Braze 커런츠가 설정되어 있어야 합니다. 메시지 아카이브만 설정하는 경우에는 Currents가 필요하지 않습니다. |
새 S3 버킷 만들기
앱용 버킷을 만들려면 다음을 수행합니다:
- Amazon S3 콘솔을 열고 지침에 따라 Sign in 또는 Create an Account with AWS를 선택합니다.
- 로그인한 후 Storage & Content Delivery 카테고리에서 S3를 선택합니다.
- 다음 화면에서 Create Bucket을 선택합니다.
- 메시지가 표시되면 버킷을 만들고 AWS 리전을 선택합니다.
Braze에서는 대시보드에서 리전을 선택하거나 구성할 수 없습니다. AWS 리전은 AWS 콘솔에서 버킷을 생성한 위치에 따라 고정됩니다. 통합은 사용자가 제공한 버킷 이름으로 데이터를 전송하며, AWS가 자동으로 요청을 해당 버킷의 리전으로 라우팅합니다. 커넥터가 원하는 리전과 다른 리전에 연결하려고 하는 경우(예: eu-central-1 대신 eu-west-1), AWS에서 원하는 리전에 S3 버킷을 생성하거나 사용하세요. Braze 측에서 변경할 사항은 없습니다.

통합
Braze는 Amazon S3와 두 가지 통합 전략을 제공합니다. 하나는 Braze 커런츠용이고, 다른 하나는 모든 대시보드 데이터 내보내기(CSV 내보내기 또는 참여 보고서 등)용입니다. 두 통합 모두 두 가지 인증 또는 승인 방법을 지원합니다:
AWS 비밀 키 인증 방법
이 인증 방법은 비밀 키와 액세스 키 ID를 생성하여 Braze가 AWS 계정의 사용자로 인증하여 버킷에 데이터를 쓸 수 있도록 합니다.
1단계: 사용자 생성
메시지 아카이브만 설정하는 경우에는 대시보드 데이터 내보내기 탭의 단계를 따르세요.
액세스 키 ID와 비밀 액세스 키를 검색하려면 AWS에서 IAM 사용자 및 관리자 그룹을 만드세요.
2단계: 자격 증명 가져오기
새 사용자를 만든 후 Show User Security Credentials를 선택하여 액세스 키 ID와 비밀 액세스 키를 확인합니다. 그런 다음 자격 증명을 어딘가에 기록해 두거나 Download Credentials 버튼을 선택합니다. 나중에 Braze 대시보드에 입력해야 하기 때문입니다.

3단계: 정책 생성
Policies > Get Started > Create Policy로 이동하여 사용자에 대한 권한을 추가합니다. 그런 다음 Create Your Own Policy를 선택합니다. 이렇게 하면 제한된 권한이 부여되어 Braze가 지정된 버킷에만 액세스할 수 있습니다.

Currents와 대시보드 데이터 내보내기에는 서로 다른 정책이 필요합니다. s3:GetObject는 Braze 백엔드가 오류 처리를 수행할 수 있도록 하기 위해 필요합니다.
원하는 정책 이름을 지정하고 다음 코드 스니펫을 Policy Document 섹션에 입력합니다. INSERTBUCKETNAME을 버킷 이름으로 바꿔야 합니다. 이러한 권한이 없으면 통합이 자격 증명 확인에 실패하여 생성되지 않습니다.
메시지 아카이브만 설정하는 경우에는 대시보드 데이터 내보내기 탭의 코드 스니펫을 사용하세요.
1
2
3
4
5
6
7
8
9
10
11
12
13
14
15
{
    "Version": "2012-10-17",
    "Statement": [
        {
            "Effect": "Allow",
            "Action": ["s3:ListBucket", "s3:GetBucketLocation"],
            "Resource": ["arn:aws:s3:::INSERTBUCKETNAME"]
        },
        {
            "Effect": "Allow",
            "Action": ["s3:PutObject", "s3:GetObject"],
            "Resource": ["arn:aws:s3:::INSERTBUCKETNAME/*"]
        }
    ]
}
1
2
3
4
5
6
7
8
9
10
11
12
13
14
15
{
    "Version": "2012-10-17",
    "Statement": [
        {
            "Effect": "Allow",
            "Action": ["s3:ListBucket", "s3:GetBucketLocation"],
            "Resource": ["arn:aws:s3:::INSERTBUCKETNAME"]
        },
        {
            "Effect": "Allow",
            "Action": ["s3:GetObject", "s3:PutObject", "s3:DeleteObject"],
            "Resource": ["arn:aws:s3:::INSERTBUCKETNAME*", "arn:aws:s3:::INSERTBUCKETNAME/", "arn:aws:s3:::INSERTBUCKETNAME"]
        }
    ]
}
4단계: 정책 연결
새 정책을 만든 후 Users로 이동하여 특정 사용자를 선택합니다. Permissions 탭에서 Attach Policy를 선택하고 방금 만든 새 정책을 선택합니다. 이제 AWS 자격 증명을 Braze 계정에 연결할 준비가 되었습니다.

5단계: Braze를 AWS에 연결
메시지 아카이브만 설정하는 경우에는 대시보드 데이터 내보내기 탭의 단계를 따르세요.
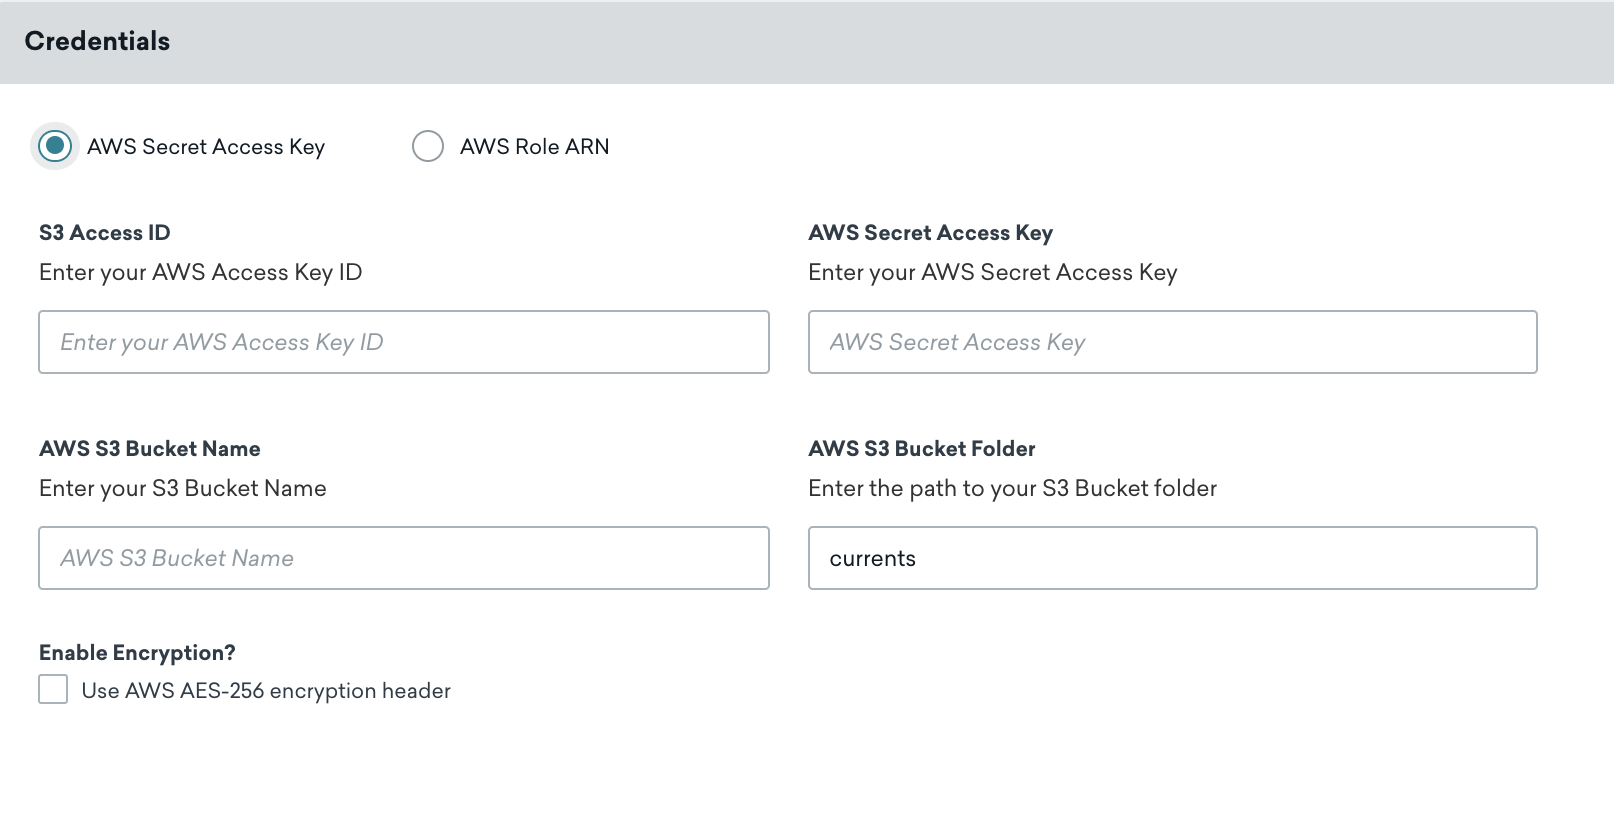
Braze에서 파트너 통합 > Currents로 이동합니다.
그런 다음 Create New Current을 선택한 후 Amazon S3 Data Export를 선택합니다.
Current의 이름을 지정합니다. Credentials 섹션에서 AWS Secret Access Key가 선택되어 있는지 확인한 다음, 지정된 필드에 S3 액세스 ID, AWS 비밀 액세스 키 및 AWS S3 버킷 이름을 입력합니다.

AWS 액세스 키 ID와 비밀 액세스 키를 최신 상태로 유지하세요. 커넥터의 자격 증명이 만료되면 커넥터는 이벤트 전송을 중지합니다. 이 상태가 5일 이상 지속되면 커넥터의 이벤트가 삭제되고 데이터가 영구적으로 손실됩니다.
필요에 따라 다음 커스터마이징을 추가할 수도 있습니다:
- Folder Path: 기본값은
currents입니다. 이 폴더가 없는 경우 Braze에서 자동으로 폴더를 생성합니다. - Server-Side, At-Rest AES-256 Encryption: 기본값은 OFF이며
x-amz-server-side-encryption헤더를 포함합니다.
Launch Current을 선택하여 계속합니다.
알림을 통해 자격 증명이 성공적으로 확인되었는지 여부를 알 수 있습니다. 이제 AWS S3가 Braze 커런츠를 위해 설정되었습니다.
Braze에서 파트너 통합 > 기술 파트너로 이동하여 Amazon S3를 선택합니다.
AWS Credentials 페이지에서 AWS Secret Access Key가 선택되어 있는지 확인한 다음, 지정된 필드에 AWS 액세스 ID, AWS 비밀 액세스 키 및 AWS S3 버킷 이름을 입력합니다. 비밀 키를 입력할 때 먼저 Test Credentials를 선택하여 자격 증명이 작동하는지 확인한 다음, 성공하면 Save를 선택합니다.
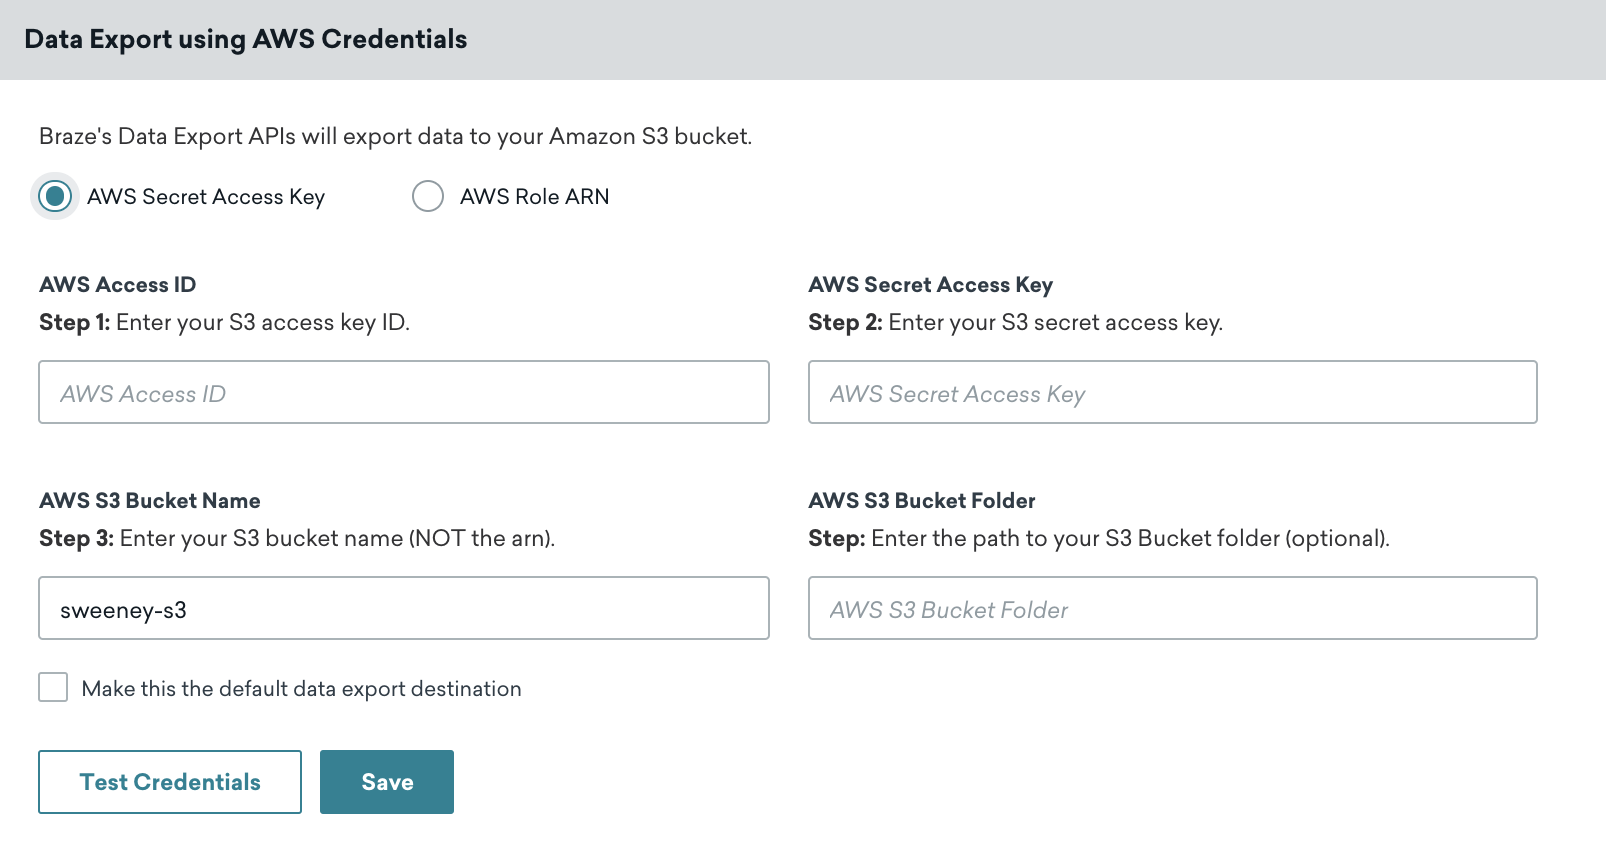

AWS 콘솔의 Security Credentials 탭에서 사용자로 이동하여 Create Access Key를 선택하면 언제든지 새 자격 증명을 검색할 수 있습니다.
알림을 통해 자격 증명이 성공적으로 확인되었는지 여부를 알 수 있습니다. 이제 AWS S3가 Braze 계정에 통합되었습니다.
AWS 역할 ARN 인증 방법
이 인증 방법은 역할 Amazon 리소스 이름(ARN)을 생성하여 Braze Amazon 계정이 사용자가 만든 역할의 멤버로 인증하여 버킷에 데이터를 쓸 수 있도록 합니다.
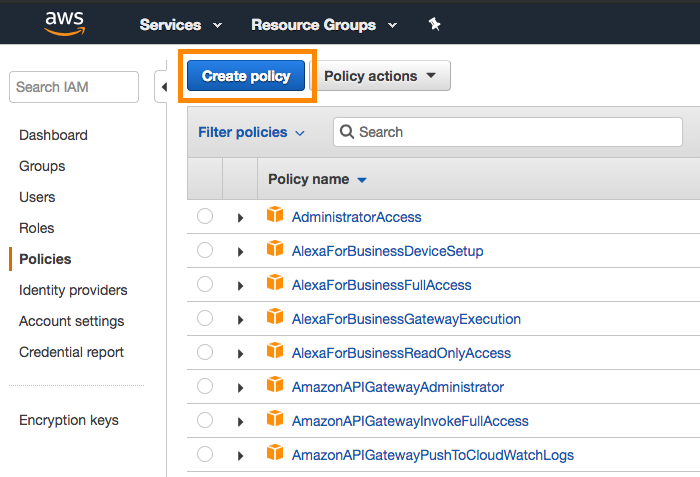
1단계: 정책 생성
시작하려면 계정 관리자로 AWS 관리 콘솔에 로그인합니다. AWS 콘솔의 IAM 섹션으로 이동하여 탐색 바에서 Policies를 선택한 다음 Create Policy를 선택합니다.
Currents와 대시보드 데이터 내보내기에는 서로 다른 정책이 필요합니다. s3:GetObject는 Braze 백엔드가 오류 처리를 수행할 수 있도록 하기 위해 필요합니다.
JSON 탭을 열고 다음 코드 스니펫을 Policy Document 섹션에 입력합니다. INSERTBUCKETNAME을 버킷 이름으로 바꿔야 합니다. 완료되면 Review Policy를 선택합니다.
메시지 아카이브만 설정하는 경우에는 대시보드 데이터 내보내기 탭의 코드 스니펫을 사용하세요.
1
2
3
4
5
6
7
8
9
10
11
12
13
14
15
{
    "Version": "2012-10-17",
    "Statement": [
        {
            "Effect": "Allow",
            "Action": ["s3:ListBucket", "s3:GetBucketLocation"],
            "Resource": ["arn:aws:s3:::INSERTBUCKETNAME"]
        },
        {
            "Effect": "Allow",
            "Action": ["s3:PutObject", "s3:GetObject"],
            "Resource": ["arn:aws:s3:::INSERTBUCKETNAME/*"]
        }
    ]
}
1
2
3
4
5
6
7
8
9
10
11
12
13
14
15
{
    "Version": "2012-10-17",
    "Statement": [
        {
            "Effect": "Allow",
            "Action": ["s3:ListBucket", "s3:GetBucketLocation"],
            "Resource": ["arn:aws:s3:::INSERTBUCKETNAME"]
        },
        {
            "Effect": "Allow",
            "Action": ["s3:PutObject", "s3:GetObject","s3:DeleteObject"],
            "Resource": ["arn:aws:s3:::INSERTBUCKETNAME/*"]
        }
    ]
}
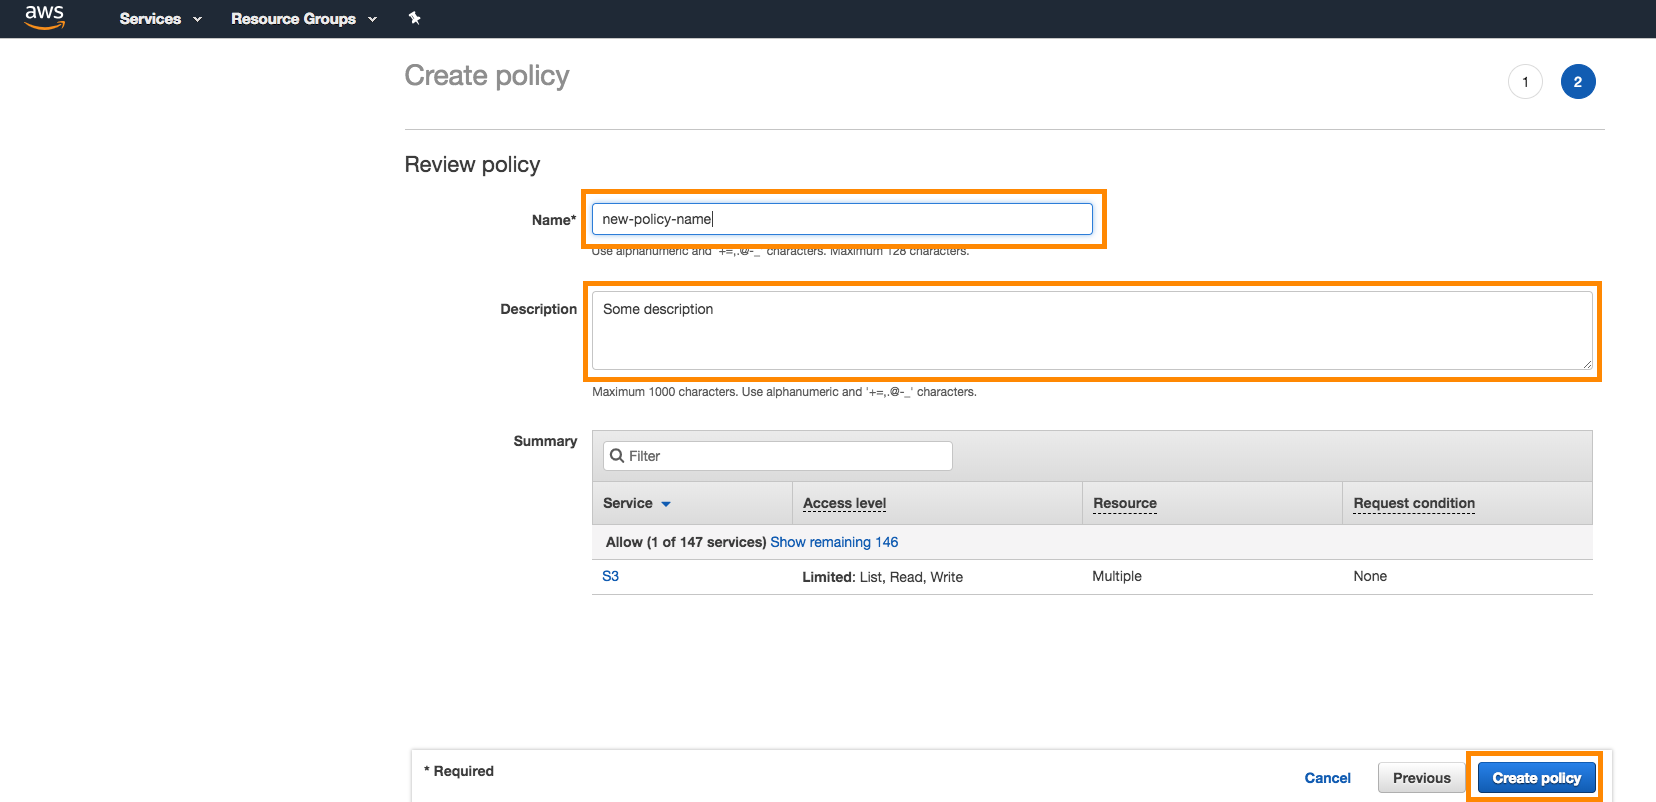
다음으로 정책에 이름과 설명을 지정하고 Create Policy를 선택합니다.

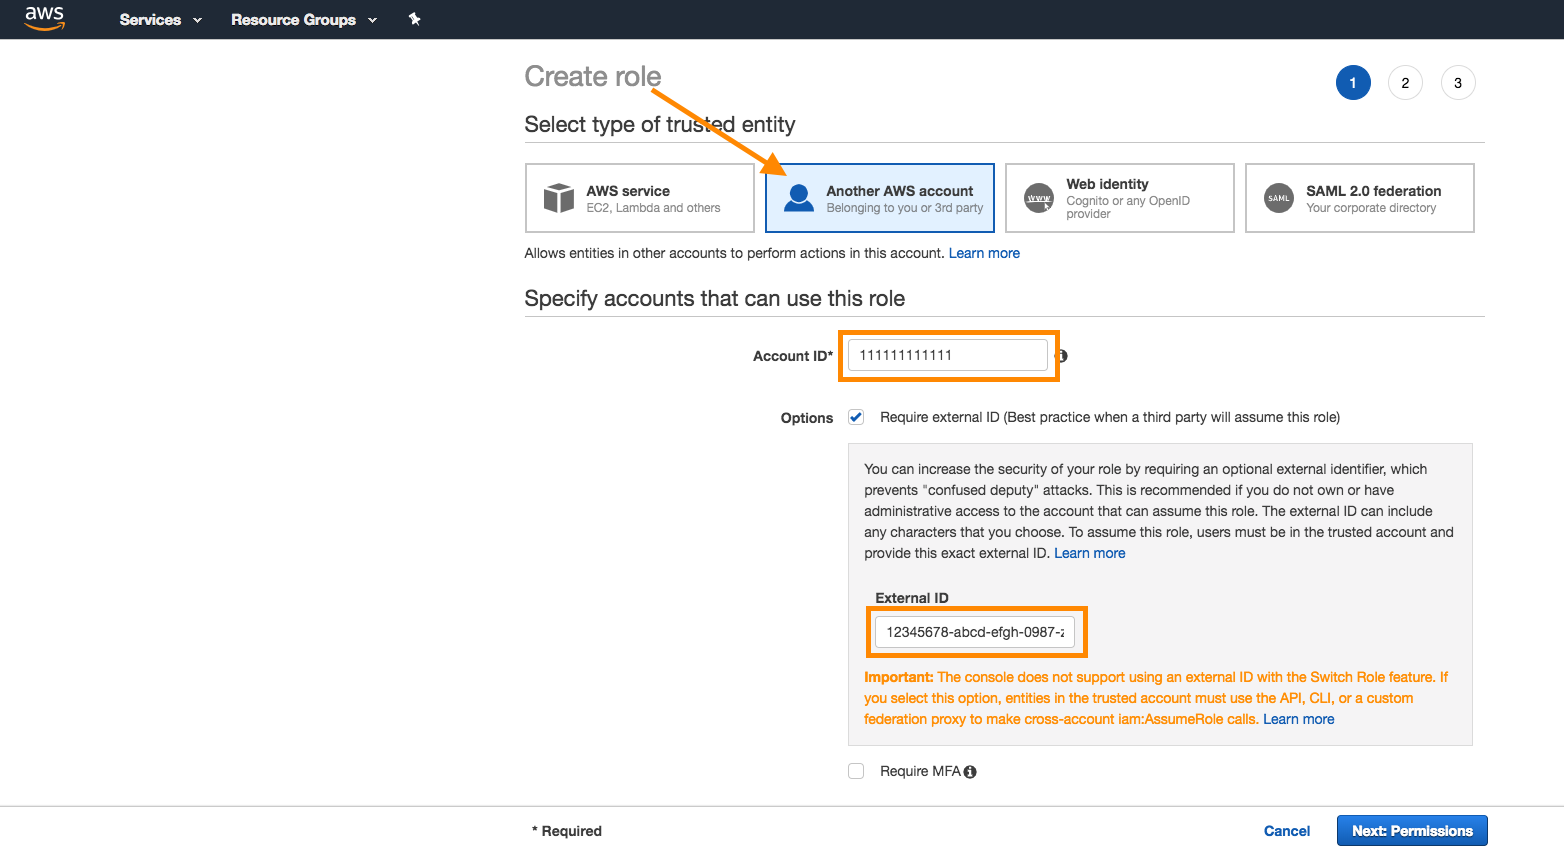
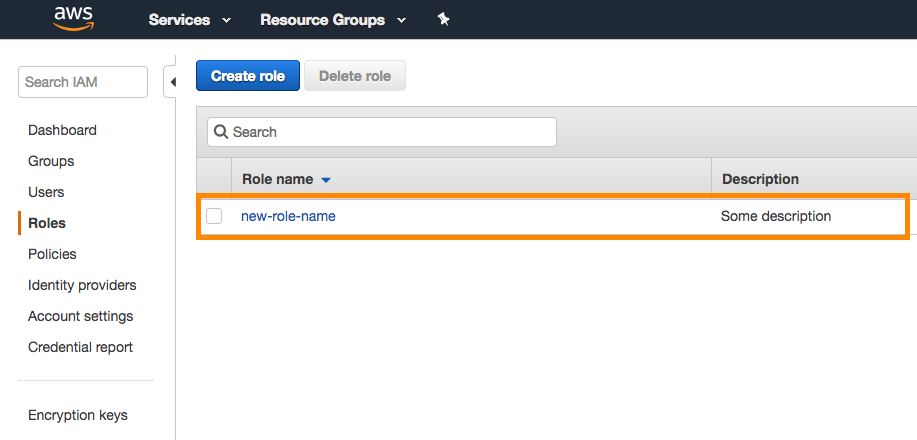
2단계: 역할 생성
콘솔의 동일한 IAM 섹션에서 Roles > Create Role을 선택합니다.
Braze 계정에서 Braze 계정 ID와 외부 ID를 검색합니다:
- Currents: Braze에서 파트너 통합 > Currents로 이동합니다. 그런 다음 Create New Current을 선택한 후 Amazon S3 Data Export를 선택합니다. 여기에서 역할을 만드는 데 필요한 식별자를 찾을 수 있습니다.
- 대시보드 데이터 내보내기: Braze에서 파트너 통합 > 기술 파트너로 이동하여 Amazon S3를 선택합니다. 여기에서 역할을 만드는 데 필요한 식별자를 찾을 수 있습니다. (메시지 아카이브만 설정하는 경우에는 여기에서 역할을 만드세요.)
AWS 콘솔로 돌아가서 신뢰할 수 있는 엔터티 선택기 유형으로 Another AWS Account를 선택합니다. Braze 계정 ID를 입력하고 Require external ID 확인란을 선택한 다음 Braze 외부 ID를 입력합니다. 완료되면 Next를 선택합니다.
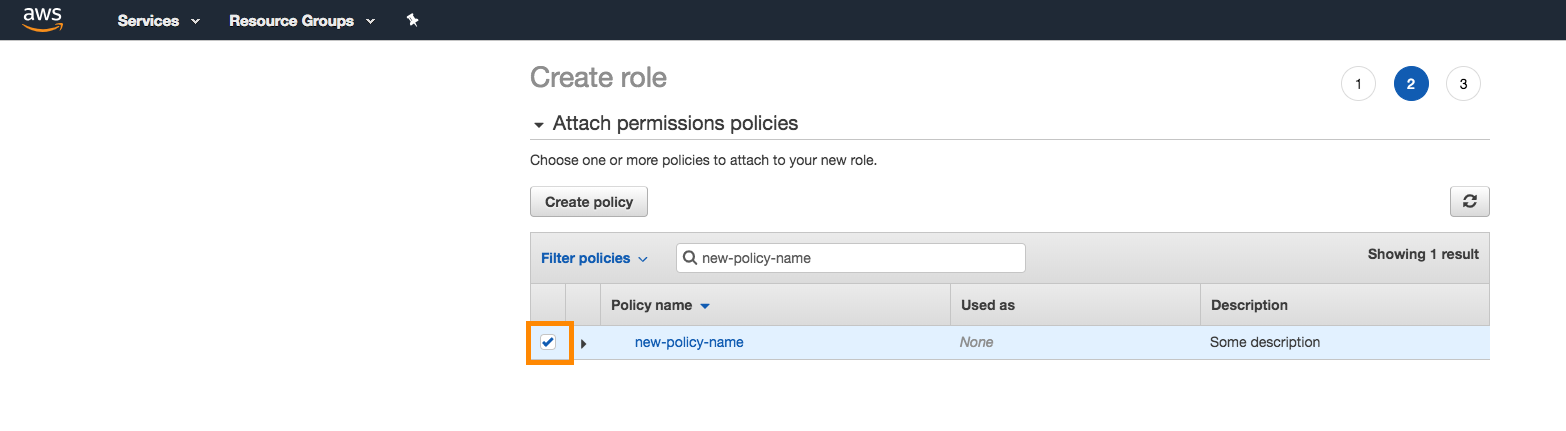
3단계: 정책 연결
다음으로 앞서 만든 정책을 역할에 연결합니다. 검색 바에서 정책을 검색하고 정책 옆에 체크 표시를 하여 연결합니다. 완료되면 Next를 선택합니다.
역할에 이름과 설명을 지정하고 Create Role을 선택합니다.
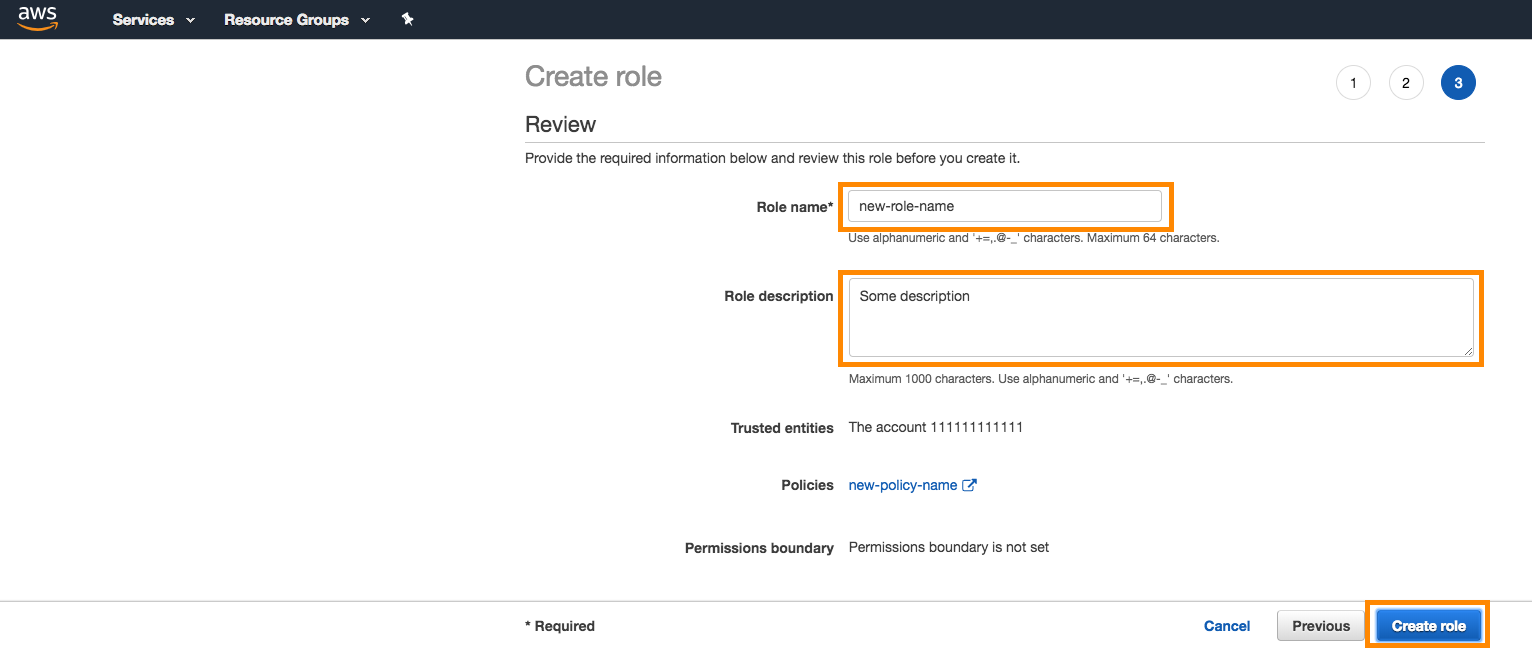
이제 목록에 새로 만든 역할이 표시됩니다.
4단계: Braze AWS에 연결
AWS 콘솔에서 새로 만든 역할을 목록에서 찾습니다. 이름을 선택하여 해당 역할의 세부 정보를 엽니다.
역할 요약 페이지 상단에 있는 Role ARN을 기록해 둡니다.
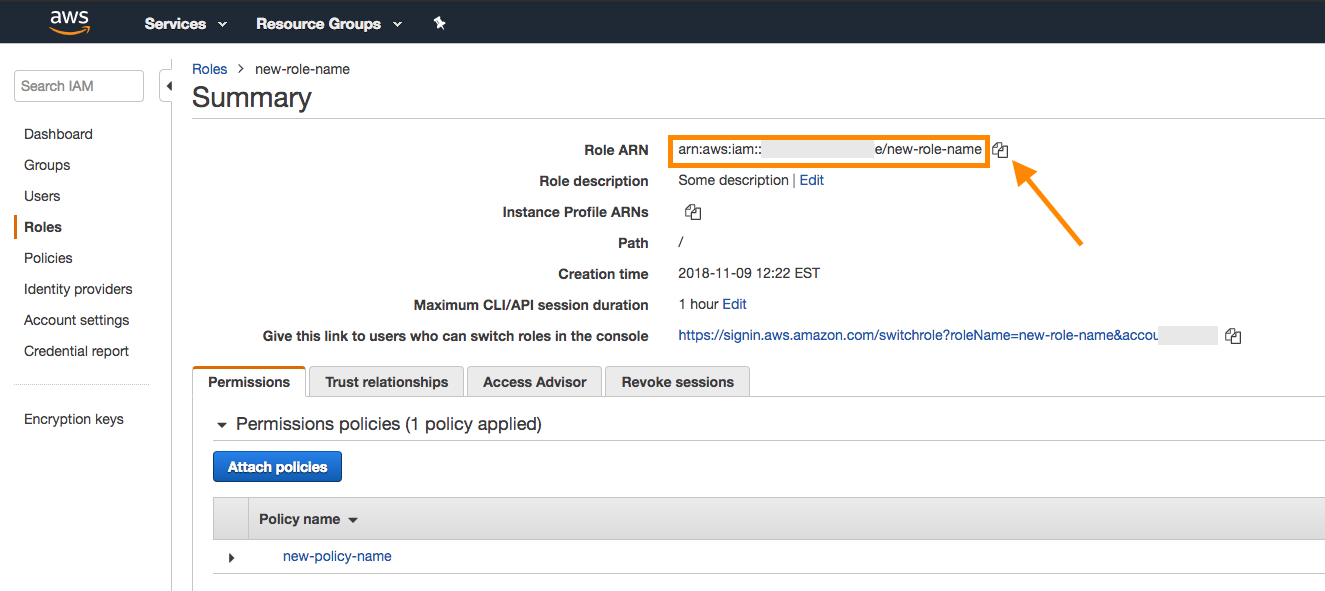
Braze 계정으로 돌아가서 제공된 필드에 역할 ARN을 복사합니다.
메시지 아카이브만 설정하는 경우에는 대시보드 데이터 내보내기 탭의 단계를 따르세요.
Braze에서 파트너 통합 > Currents로 이동합니다. 그런 다음 Create New Current을 선택하고 Amazon S3 Data Export를 선택합니다.
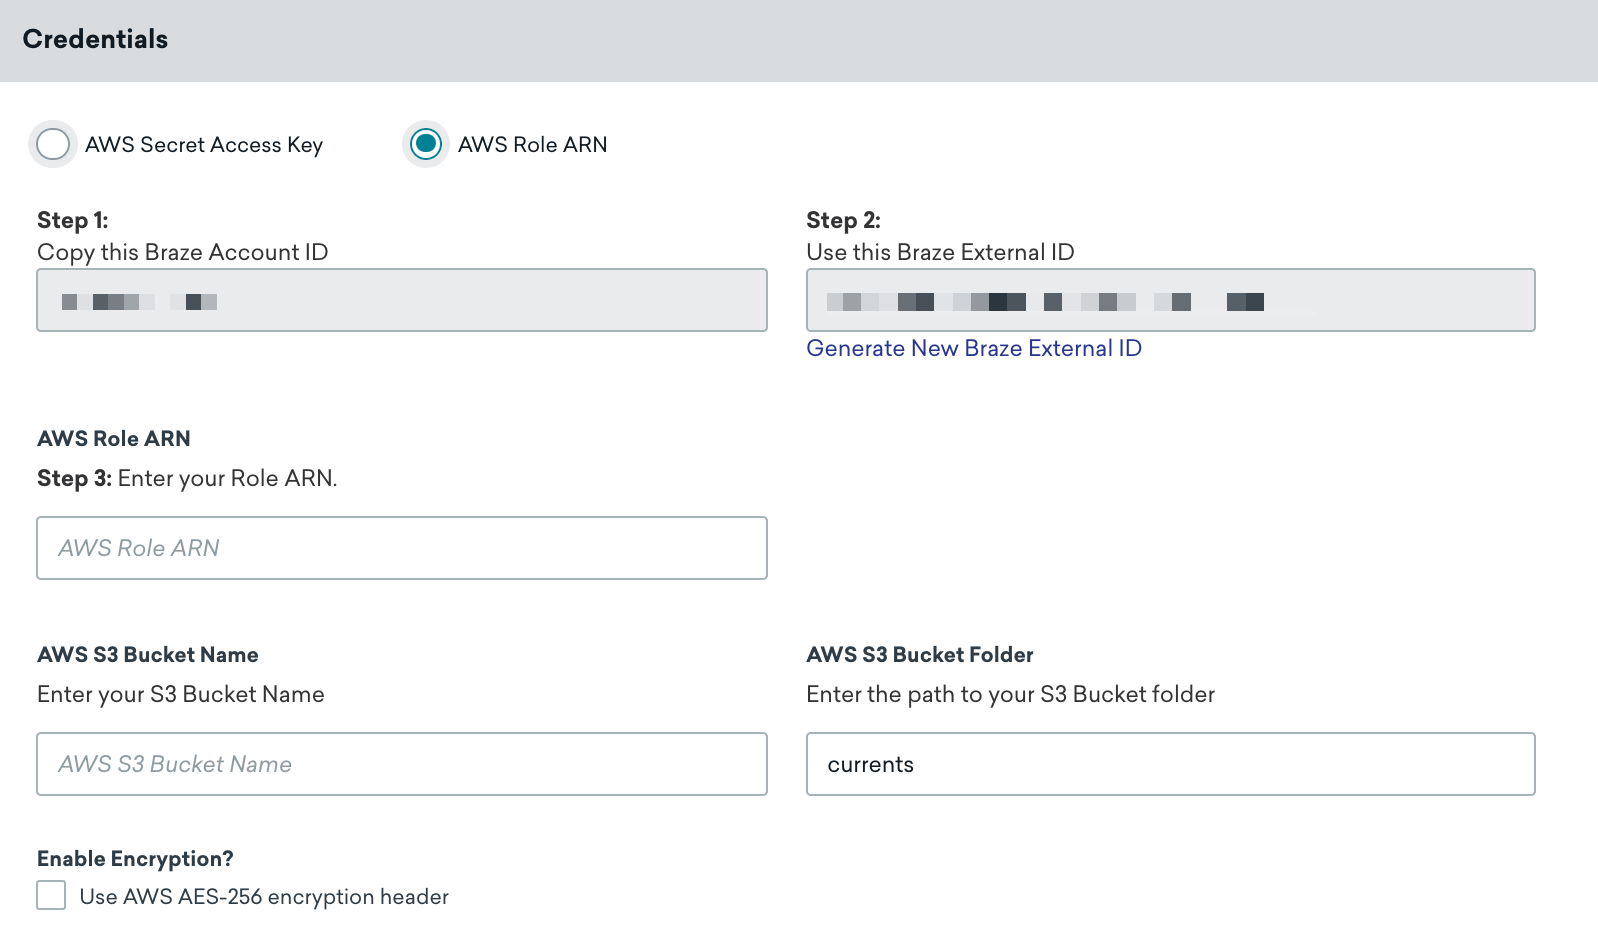
Current에 이름을 지정합니다. 그런 다음 Credentials 섹션에서 AWS Role ARN이 선택되어 있는지 확인하고 지정된 필드에 역할 ARN과 AWS S3 버킷 이름을 입력합니다.
필요에 따라 다음 커스터마이징을 추가할 수도 있습니다:
- Folder Path(기본값:
currents) - Server-Side, At-Rest AES-256 Encryption(기본값: OFF) -
x-amz-server-side-encryption헤더를 포함합니다
Launch Current을 선택하여 계속합니다. 알림은 자격 증명이 성공적으로 확인되었는지 여부를 나타냅니다. 이제 AWS S3가 Braze 커런츠를 위해 설정되었습니다.
“S3 credentials are invalid” 오류가 표시되면 AWS에서 역할을 만든 직후 너무 빨리 통합하여 발생한 것일 수 있습니다. 잠시 기다린 후 다시 시도하세요. 메시지에 대시보드 데이터 내보내기에 대한 PutObject 액세스 또는 서버 측 암호화가 언급된 경우 S3 자격 증명 오류 문제 해결을 참조하세요.
Braze에서 통합 아래의 기술 파트너 페이지로 이동하여 Amazon S3를 선택합니다.
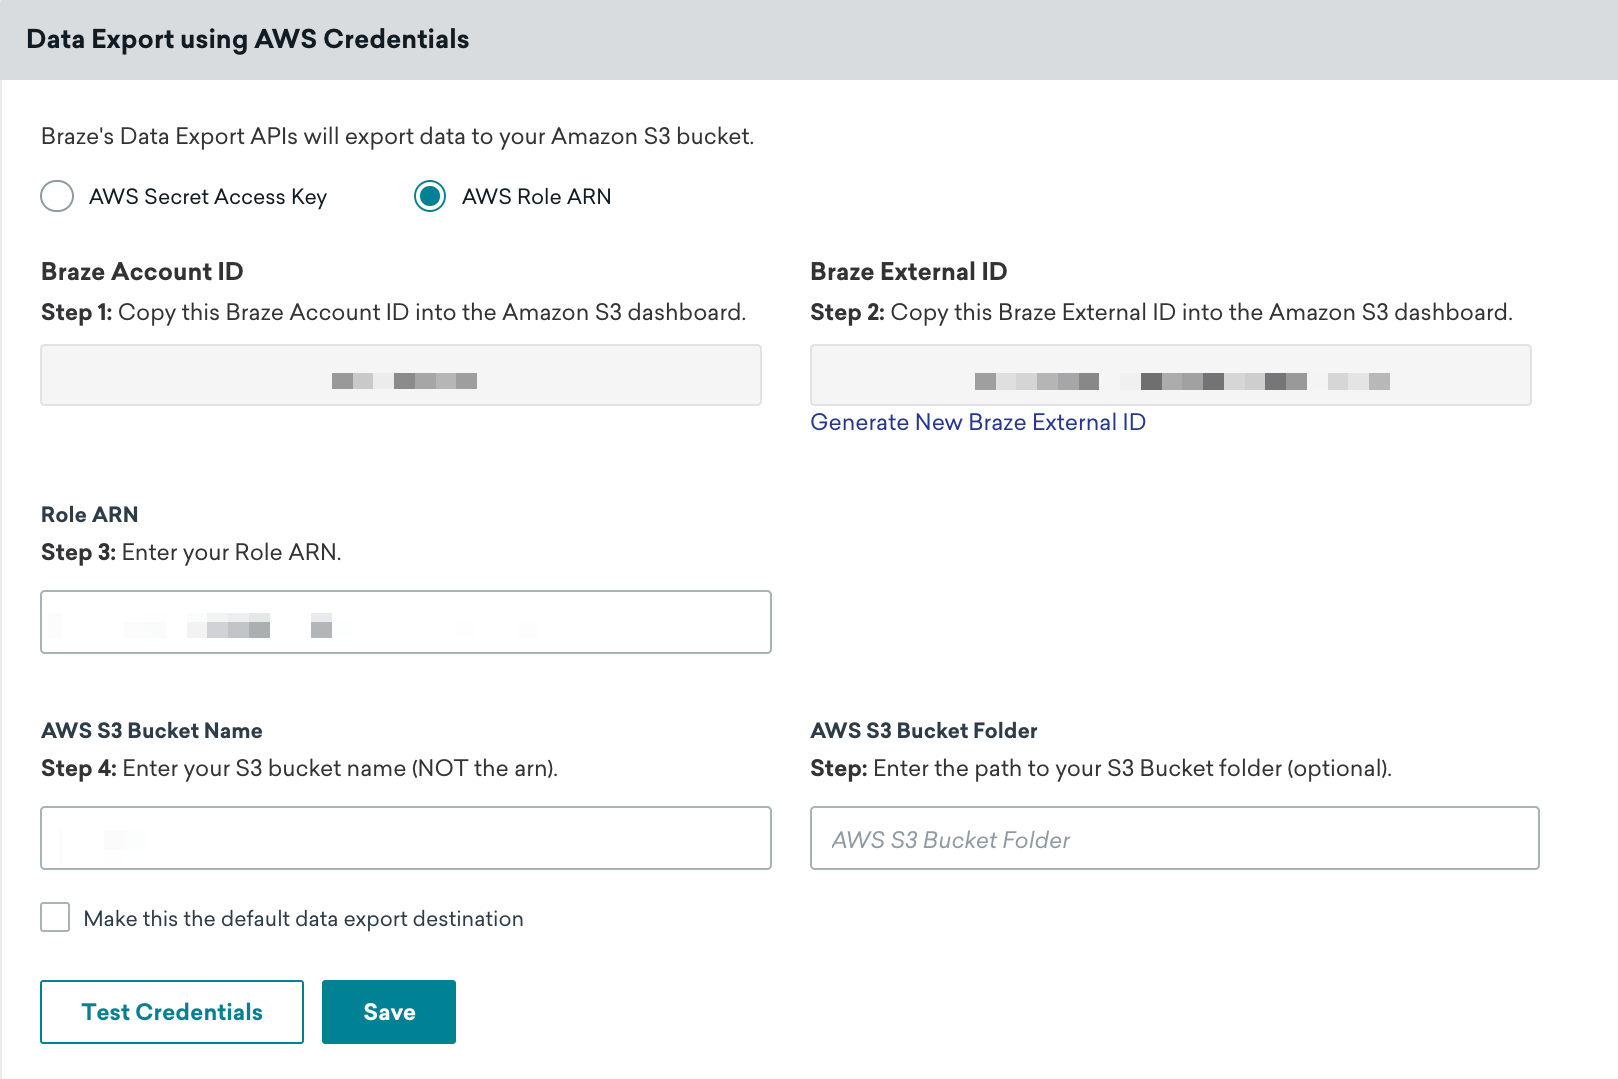
AWS Credentials 페이지에서 AWS Role ARN 라디오 버튼이 선택되어 있는지 확인한 다음, 지정된 필드에 역할 ARN과 AWS S3 버킷 이름을 입력합니다. 먼저 Test Credentials를 선택하여 자격 증명이 올바르게 작동하는지 확인한 다음, 성공하면 Save를 선택합니다.
AWS 콘솔의 Security Credentials 탭에서 사용자로 이동하여 Create Access Key를 선택하면 언제든지 새 자격 증명을 검색할 수 있습니다.
알림을 통해 자격 증명이 성공적으로 확인되었는지 여부를 알 수 있습니다. 이제 AWS S3가 Braze 계정에 통합되었습니다.
Currents의 Amazon S3 자격 증명 업데이트
통합을 중지하거나 이미 버킷으로 내보낸 데이터를 잃지 않고 기존 Braze Currents 커넥터의 Amazon S3 자격 증명을 업데이트할 수 있습니다.
자격 증명을 새로고침하거나 AWS Secret Access Key와 AWS Role ARN 간에 전환하려면, 이 문서 앞부분에서 선택한 방법에 대한 IAM 및 AWS 측 단계(정책, 사용자 또는 역할, 필요한 식별자)를 완료하세요.
AWS에서 자격 증명 준비를 마쳤으면 Braze에서 파트너 통합 > Currents로 이동하여 목록에서 Amazon S3 커넥터를 찾고 Edit을 선택한 다음 Credentials를 업데이트하고 Update Current을 선택합니다. Braze가 입력한 자격 증명을 검증하며, 커넥터는 계속 실행되고 버킷에 이미 있는 데이터는 그대로 사용할 수 있습니다. 자세한 내용은 Currents 설정에서 Currents 업데이트를 참조하세요.
내보내기 동작
클라우드 데이터 스토리지 솔루션을 통합하고 API, 대시보드 보고서 또는 CSV 보고서를 내보내는 사용자는 다음과 같은 경험을 하게 됩니다:
- 모든 API 내보내기는 응답 본문에서 다운로드 URL을 반환하지 않으며 데이터 스토리지를 통해 검색해야 합니다.
- 모든 대시보드 보고서와 CSV 보고서는 다운로드할 수 있도록 사용자의 이메일로 전송되며(스토리지 권한 필요 없음), 데이터 스토리지에 백업됩니다.
Unable to connect to S3, please validate that your credentials are correct 오류
CSV 내보내기를 다운로드할 때 이 오류가 표시되면 기술 파트너 페이지에서 Amazon S3 통합을 열고 Test Credentials를 선택합니다. 결과에서 검증에 실패한 항목이 설명됩니다. 예를 들어 키에 GetObject 권한이 없어 Braze가 다운로드 링크를 생성할 수 없는 경우가 있습니다.
통합 사용자 또는 역할이 Braze 통합에 구성된 S3 버킷 및 오브젝트 경로에서 s3:GetObject를 호출할 수 있도록 IAM 정책을 업데이트하세요. 추가 내보내기 문제에 대해서는 내보내기 문제 해결을 참조하세요.
JSON 형식 요구 사항: JSON 내보내기의 경우 Braze는 각 줄에 별도의 JSON 오브젝트가 포함되는 JSONL(줄 바꿈으로 구분된 JSON) 형식을 사용합니다. 이 형식은 단일 JSON 배열 또는 오브젝트인 표준 JSON과는 다릅니다. 내보낸 파일의 각 줄은 유효한 JSON 오브젝트이지만 파일 전체가 하나의 유효한 JSON 문서가 아닙니다. 이러한 파일을 처리할 때는 전체 파일을 하나의 JSON 문서로 구문 분석하지 말고 각 줄을 별도의 JSON 오브젝트로 개별적으로 구문 분석하세요.
Currents 내보내기는 JSON이 아닌 Apache Avro 형식(.avro 파일)을 사용합니다. 이 JSON 형식 요구 사항은 대시보드 데이터 내보내기 및 API 내보내기에 적용됩니다.
다중 커넥터
S3 버킷으로 보낼 Currents 커넥터를 두 개 이상 만들려는 경우 동일한 자격 증명을 사용할 수 있지만 각각에 대해 다른 폴더 경로를 지정해야 합니다. 동일한 워크스페이스에서 만들거나 여러 워크스페이스에서 분할하여 만들 수 있습니다. 각 통합에 대해 단일 정책을 만들거나 두 통합을 모두 포함하는 하나의 정책을 만들 수도 있습니다.
Currents와 데이터 내보내기 모두에 동일한 S3 버킷을 사용하려는 경우, 각 통합에 서로 다른 권한이 필요하므로 두 개의 별도 정책을 만들어야 합니다.
문제 해결
오류: 계정에 PutObject 액세스 권한이 없음
대시보드 데이터 내보내기를 위해 Amazon S3 자격 증명을 저장할 때 다음 오류가 표시되면 잘못된 권한 또는 서버 측 암호화 설정 때문일 수 있습니다.
1
S3 Credentials are invalid because this account does not have 'PutObject access'. Please check the permissions and ensure that this key has access to 'PutObject' in the 'CUSTOMER-BUCKET-HERE' bucket.
이 문제를 해결하려면 다음 영역을 확인하세요.
잘못된 버킷 정책
Amazon S3 통합에 설명된 대로 올바른 권한으로 정책을 만들었는지 확인합니다(인증 방법에 맞는 대시보드 데이터 내보내기 정책을 사용하세요).
서버 측 암호화
1
User: arn:aws:sts::XXX:assumed-role/braze-iam-role/braze is not authorized to perform: kms:GenerateDataKey on resource: arn:aws:XXX because no identity-based policy allows the kms:GenerateDataKey action
Braze 고객지원 또는 AWS 로그에서 이 오류 메시지를 받은 경우, S3 버킷이 AWS Key Management Service(SSE-KMS) 암호화로 구성되어 있는 것입니다. Braze는 Currents 또는 대시보드 데이터 내보내기에 대해 SSE-KMS를 지원하지 않습니다. 이 문제를 해결하려면 S3 버킷에서 SSE-KMS를 비활성화하세요.
Braze는 S3 관리 키를 사용한 서버 측 암호화(SSE-S3)를 지원하며, 이는 Currents와 대시보드 데이터 내보내기 모두와 호환됩니다.
추가 권한 확인
s3:GetBucketLocation 및 s3:PutObject를 포함한 필요한 권한이 있는지 확인하세요.