Shopify 커스텀 통합 설정
이 페이지에서는 커스텀 스토어프론트를 사용하여 Braze를 Shopify Hydrogen 스토어 또는 헤드리스 Shopify 스토어와 통합하는 방법을 안내합니다.
이 가이드에서는 Shopify의 Hydrogen 프레임워크를 예시로 사용합니다. 그러나 브랜드에서 Shopify를 스토어 백엔드로 사용하면서 “헤드리스” 프론트엔드 설정을 사용하는 경우에도 유사한 접근 방식을 따를 수 있습니다.
Shopify 헤드리스 스토어를 Braze와 통합하려면 다음 두 가지 목표를 완료해야 합니다:
- Braze Web SDK를 초기화하고 로드하여 온사이트 추적 활성화
Shopify 웹사이트에 코드를 수동으로 추가하여 Braze 온사이트 추적을 활성화합니다. Shopify 헤드리스 스토어에 Braze SDK를 구현하면 세션, 익명 사용자 행동, 결제 전 쇼핑객 동작, 그리고 개발팀과 함께 포함하기로 선택한 커스텀 이벤트 또는 커스텀 속성을 포함한 온사이트 활동을 추적할 수 있습니다. 인앱 메시지나 Content Cards와 같이 SDK에서 지원하는 채널도 추가할 수 있습니다.
- Braze Shopify 통합 설치
Shopify 스토어를 Braze에 연결하면 Shopify 웹훅을 통해 고객, 결제, 주문 및 제품 데이터에 접근할 수 있습니다.

통합을 시작하기 전에 Shopify 스토어프론트의 결제 하위 도메인이 올바르게 설정되었는지 확인하세요. 자세한 내용은 온라인 스토어에서 Hydrogen으로 마이그레이션을 참조하세요.
이 설정이 올바르게 되어 있지 않으면 Braze가 Shopify 결제 웹훅을 처리할 수 없습니다. 또한 스토어프론트와 결제 페이지 간의 공유 도메인에 의존하기 때문에 로컬 개발 환경에서 통합을 테스트하는 것도 불가능합니다.
이러한 목표를 완료하려면 다음 단계를 따르세요:
Braze Web SDK 초기화 및 로드
1단계: Braze 웹사이트 앱 생성
Braze에서 설정 > 앱 설정으로 이동한 다음 앱 추가를 선택합니다. 앱 이름으로 “Shopify”를 입력합니다.

스토어 이름은 반드시 “Shopify”로 지정해야 합니다. 그렇지 않으면 통합이 제대로 작동하지 않을 수 있습니다.
2단계: 하위 도메인 및 환경 변수 추가
- Shopify 하위 도메인을 설정하여 온라인 스토어에서 Hydrogen으로 트래픽을 리디렉션합니다.
- 로그인을 위한 콜백 URI를 추가합니다. (도메인이 추가되면 URI가 자동으로 추가됩니다.)
- Shopify 환경 변수를 설정합니다:
- 1단계에서 생성한 웹사이트 앱의 값을 사용하여 두 개의 환경 변수를 생성합니다.
BRAZE_API_KEYBRAZE_API_URL
3단계: 온사이트 추적 활성화
첫 번째 단계는 Braze Web SDK를 초기화하는 것입니다. NPM 패키지를 설치하여 수행하는 것을 권장합니다:
1
2
3
npm install --save @braze/web-sdk@5.4.0
# or, using yarn:
# yarn add @braze/web-sdk
Braze Web SDK 버전은 5.4.0이어야 합니다.
그런 다음 vite.config.js 파일에 최상위 키로 이 설정을 포함합니다:
1
2
3
optimizeDeps: {
    exclude: ['@braze/web-sdk']
}
NPM 패키지를 설치한 후 Layout 컴포넌트 내부의 useEffect 훅에서 SDK를 초기화해야 합니다. Hydrogen 버전에 따라 이 컴포넌트는 root.jsx 또는 layout.jsx 파일에 위치할 수 있습니다:
1
2
3
4
5
6
7
8
9
10
11
12
13
14
15
16
17
18
19
20
21
// Add these imports
import * as braze from "@braze/web-sdk";
import { useEffect } from 'react';

export function Layout({children}) {
  const nonce = useNonce();
  // @type {RootLoader}
  const data = useRouteLoaderData('root');

  // Add useEffect call to initialize Braze SDK
  useEffect(() => {
    if(!braze.isInitialized()) {
      braze.initialize(data.brazeApiKey, {
        baseUrl: data.brazeApiUrl,
      });
      braze.openSession()
    }
  }, [data])

  return (...);
}
data.brazeApiKey 및 data.brazeApiUrl 값은 2단계에서 생성한 환경 변수를 사용하여 컴포넌트 로더에 포함해야 합니다:
1
2
3
4
5
6
7
8
9
10
11
12
13
14
15
16
17
18
19
20
21
22
23
24
25
26
27
28
29
30
export async function loader(args) {
  // Start fetching non-critical data without blocking time to first byte
  const deferredData = loadDeferredData(args);

  // Await the critical data required to render initial state of the page
  const criticalData = await loadCriticalData(args);

  const {storefront, env} = args.context;

  return {
    ...deferredData,
    ...criticalData,
    publicStoreDomain: env.PUBLIC_STORE_DOMAIN,
    // Add the two properties below to the returned value
    brazeApiKey: env.BRAZE_API_KEY,
    brazeApiUrl: env.BRAZE_API_URL,
    shop: getShopAnalytics({
      storefront,
      publicStorefrontId: env.PUBLIC_STOREFRONT_ID,
    }),
    consent: {
      checkoutDomain: env.PUBLIC_CHECKOUT_DOMAIN,
      storefrontAccessToken: env.PUBLIC_STOREFRONT_API_TOKEN,
      withPrivacyBanner: false,
      // Localize the privacy banner
      country: args.context.storefront.i18n.country,
      language: args.context.storefront.i18n.language,
    },
  };
}

콘텐츠 보안 정책(일반적으로 entry.server.jsx Hydrogen 파일에 위치)은 로컬 및 프로덕션 환경 모두에서 Braze 스크립트의 기능에 영향을 줄 수 있습니다. Oxygen을 통해 Shopify로 전송되는 미리보기 빌드 또는 커스텀 배포를 통해 테스트하는 것을 권장합니다. 문제가 발생하면 JavaScript가 작동할 수 있도록 CSP를 구성해야 합니다.
4단계: Shopify 계정 로그인 이벤트 추가
쇼핑객이 계정에 로그인하고 사용자 정보를 Braze에 동기화할 때를 추적합니다. 여기에는 Braze 외부 ID로 고객을 식별하기 위해 changeUser 메서드를 호출하는 것이 포함됩니다.
현재 커스텀 Braze 외부 ID를 지원하기 위한 가이드는 제공되지 않습니다. 지금 통합에 이 기능이 필요한 경우 고객 성공 매니저에게 문의하세요.
시작하기 전에 Hydrogen 내에서 고객 로그인이 작동하도록 콜백 URI를 설정했는지 확인하세요. 자세한 내용은 Hydrogen에서 Customer Account API 사용을 참조하세요.
- 콜백 URI를 설정한 후 Braze SDK를 호출하는 함수를 정의합니다. 새 파일(예:
Tracking.jsx)을 생성하고 컴포넌트에서 가져옵니다:
1
2
3
4
5
6
7
8
9
10
11
12
13
14
15
16
17
18
19
20
21
22
23
24
25
26
27
28
29
30
31
32
33
34
35
import * as braze from "@braze/web-sdk";

export function trackCustomerLogin(customerData, storefrontUrl) {
  const customerId = customerData.id.substring(customerData.id.lastIndexOf('/') + 1)
  const customerSessionKey = `ab.shopify.shopify_customer_${customerId}`;
  const alreadySetCustomerInfo = sessionStorage.getItem(customerSessionKey);

  if(!alreadySetCustomerInfo) {
    const user = braze.getUser()

    // To use Shopify customer ID as Braze External ID, use:
    // braze.changeUser(customerId)

    // To use Shopify customer email as Braze External ID, use:
      // braze.changeUser(customerData.emailAddress?.emailAddress)
        // To use hashing for email addresses, apply hashing before calling changeUser

    // To use your own custom ID as the Braze External ID, pass that value to the changeUser call.

    user.setFirstName(customerData.firstName);
    user.setLastName(customerData.lastName);
    if(customerData.emailAddress.emailAddress) {
      user.setEmail(customerData.emailAddress?.emailAddress);
    }

    if(customerData.phoneNumber?.phoneNumber) {
      user.setPhoneNumber(customerData.phoneNumber?.phoneNumber);
    }
    braze.logCustomEvent(
      "shopify_account_login",
      { source: storefrontUrl }
    )
    sessionStorage.setItem(customerSessionKey, customerId);
  }
}
- Braze SDK를 초기화하는 동일한
useEffect훅에서 이 함수에 대한 호출을 추가합니다:
1
2
3
4
5
6
7
8
9
10
11
12
13
14
15
16
17
18
19
20
21
22
23
24
import { trackCustomerLogin } from './Tracking';

export function Layout({children}) {
  const nonce = useNonce();
  // @type {RootLoader}
  const data = useRouteLoaderData('root');

  useEffect(() => {
    if(!braze.isInitialized()) {
      braze.initialize(data.brazeApiKey, {
        baseUrl: data.brazeApiUrl,
        enableLogging: true,
      });
      braze.openSession()
    }

    // Add call to trackCustomerLogin function
    data.isLoggedIn.then((isLoggedIn) => {
      if(isLoggedIn) {
        trackCustomerLogin(data.customerData, data.publicStoreDomain)
      }
    })

  }, [data])
app/graphql/customer-account/CustomerDetailsQuery.js파일에 있는 Customer API GraphQL 쿼리에서 고객 이메일 주소와 전화번호를 가져옵니다:
1
2
3
4
5
6
7
8
9
10
11
12
13
14
15
16
17
18
19
20
21
22
23
24
25
26
27
28
29
30
31
32
33
34
35
export const CUSTOMER_FRAGMENT = `#graphql
  fragment Customer on Customer {
    id
    firstName
    lastName
    emailAddress {
      emailAddress
    }
    phoneNumber {
      phoneNumber
    }
    defaultAddress {
      ...Address
    }
    addresses(first: 6) {
      nodes {
        ...Address
      }
    }
  }
  fragment Address on CustomerAddress {
    id
    formatted
    firstName
    lastName
    company
    address1
    address2
    territoryCode
    zoneCode
    city
    zip
    phoneNumber
  }
`;
- 마지막으로 로더 함수에서 고객 데이터를 로드합니다:
1
2
3
4
5
6
7
8
9
10
11
12
13
14
15
16
17
18
19
20
21
22
23
24
25
26
27
28
29
30
31
32
33
34
35
36
37
38
39
40
41
42
43
44
45
46
// Add import for GraphQL Query
import { CUSTOMER_DETAILS_QUERY } from './graphql/customer-account/CustomerDetailsQuery';

export async function loader(args) {
  // Start fetching non-critical data without blocking time to first byte
  const deferredData = loadDeferredData(args);

  // Await the critical data required to render initial state of the page
  const criticalData = await loadCriticalData(args);

  const {storefront, env} = args.context;

  // Add GraphQL call to Customer API
  const isLoggedIn = await deferredData.isLoggedIn;
  let customerData;
  if (isLoggedIn) {
    const { data, errors } = await args.context.customerAccount.query(
        CUSTOMER_DETAILS_QUERY,
    );
    customerData = data.customer
  } else {
    customerData = {}
  }

  return {
    ...deferredData,
    ...criticalData,
    publicStoreDomain: env.PUBLIC_STORE_DOMAIN,
    brazeApiKey: env.BRAZE_API_KEY,
    brazeApiUrl: env.BRAZE_API_URL,
    // Add the property below to the returned value
    customerData: customerData,
    shop: getShopAnalytics({
      storefront,
      publicStorefrontId: env.PUBLIC_STOREFRONT_ID,
    }),
    consent: {
      checkoutDomain: env.PUBLIC_CHECKOUT_DOMAIN,
      storefrontAccessToken: env.PUBLIC_STOREFRONT_API_TOKEN,
      withPrivacyBanner: false,
      // Localize the privacy banner
      country: args.context.storefront.i18n.country,
      language: args.context.storefront.i18n.language,
    },
  };
}
5단계: Product Viewed 및 Cart Updated 이벤트 추적 추가
Product Viewed 이벤트
Tracking.jsx파일에 다음 함수를 추가합니다:
1
2
3
4
5
6
7
8
9
10
11
12
13
14
15
16
17
18
19
20
21
export function trackProductViewed(product, storefrontUrl) {
  const eventData = {
    product_id: product.id.substring(product.id.lastIndexOf('/') + 1),
    product_name: product.title,
    variant_id: product.selectedOrFirstAvailableVariant.id.substring(product.selectedOrFirstAvailableVariant.id.lastIndexOf('/') + 1),
    image_url: product.selectedOrFirstAvailableVariant.image?.url,
    product_url: `${storefrontUrl}/products/${product.handle}`,
    price: product.selectedOrFirstAvailableVariant.price.amount,
    currency: product.selectedOrFirstAvailableVariant.price.currencyCode,
    source: storefrontUrl,
    type: ["price_drop", "back_in_stock"],
    metadata: {
    sku: product.selectedOrFirstAvailableVariant.sku
  }

  }
  braze.logCustomEvent(
    "ecommerce.product_viewed",
    eventData
  )
}
- 사용자가 제품 페이지를 방문할 때마다 이전 함수를 호출하려면
app/routes/products.$handle.jsx파일 내의 Product 컴포넌트에useEffect훅을 추가합니다:
1
2
3
4
5
6
7
8
9
10
11
12
13
14
15
import { trackProductViewed } from '~/tracking';
import { useEffect } from 'react';

export default function Product() {
  // @type {LoaderReturnData}
  // retrieve storefrontUrl to be passed into trackProductViewed
  const {product, storefrontUrl} = useLoaderData();

  // Add useEffect hook for tracking product_viewed event
  useEffect(() => {
    trackProductViewed(product, storefrontUrl)
  }, [])

  return (...)
}
- “storefrontUrl” 값을 추가합니다(기본적으로 컴포넌트 로더에 포함되어 있지 않기 때문입니다):
1
2
3
4
5
6
7
8
9
10
11
12
13
14
15
16
17
18
19
20
21
22
23
24
25
async function loadCriticalData({context, params, request}) {
  const {handle} = params;
  const {storefront} = context;

  if (!handle) {
    throw new Error('Expected product handle to be defined');
  }

  const [{product}] = await Promise.alll([
    storefront.query(PRODUCT_QUERY, {
      variables: {handle, selectedOptions: getSelectedProductOptions(request)},
    }),
    // Add other queries here, so that they are loaded in parallel
  ]);

  if (!product?.id) {
    throw new Response(null, {status: 404});
  }

  return {
    product,
   // Add this property to the returned value
    storefrontUrl: context.env.PUBLIC_STORE_DOMAIN,
  };
}
Cart Updated 이벤트
이 통합에서 사용자 별칭은 Braze가 웹훅을 올바른 고객 프로필에 매칭할 수 있도록 다음 형식을 사용해야 합니다:
alias_label:shopify_cart_${cartToken}alias_name:shopify_cart_token
cart_updated이벤트를 추적하고 장바구니 토큰을 설정하는 함수를 정의합니다:
1
2
3
4
5
6
7
8
9
10
11
12
13
14
15
16
17
18
19
20
21
22
23
24
25
26
27
28
29
30
31
32
33
34
35
36
37
38
39
40
41
export function trackCartUpdated(cart, storefrontUrl) {
  const eventData = {
    cart_id: cart.id,
    total_value: cart.cost.totalAmount.amount,
    currency: cart.cost.totalAmount.currencyCode,

    products: cart.lines.nodes.map((line) => {
      return {
        product_id: line.merchandise.product.id.toString(),
        product_name: line.merchandise.product.title,
        variant_id: line.merchandise.id.toString(),
        image_url: line.merchandise.image.url,
        product_url: `${storefrontUrl}/products/${line.merchandise.product.handle}`,
        quantity: Number(line.quantity),
        price: Number(line.cost.totalAmount.amount / Number(line.quantity))
      }
    }),
    source: storefrontUrl,
    metadata: {},
  };

  braze.logCustomEvent(
    "ecommerce.cart_updated",
    eventData
  )
}

export function setCartToken(cart) {
  const cartId = cart.id.substring(cart.id.lastIndexOf('/') + 1)
  const cartToken = cartId.substring(0, cartId.indexOf("?key="));
  if (cartToken) {
    const cartSessionKey = `ab.shopify.shopify_cart_${cartToken}`;
    const alreadySetCartToken = sessionStorage.getItem(cartSessionKey);

    if (!alreadySetCartToken) {
      braze.getUser().addAlias("shopify_cart_token", `shopify_cart_${cartToken}`)
      braze.requestImmediateDataFlush();
      sessionStorage.setItem(cartSessionKey, cartToken);
    }
  }
}
- Braze가 속성에 접근할 수 있도록 fetcher 액션에서
cart오브젝트를 반환합니다.app/routes/cart.jsx파일로 이동하여action함수에 다음을 추가합니다:
1
2
3
4
5
6
7
8
9
10
11
12
13
14
15
16
17
18
19
20
21
22
23
24
25
26
27
28
29
30
31
32
33
34
35
36
37
export async function action({request, context}) {
  const {cart} = context;

  ...

  switch (action) {
    case CartForm.ACTIONS.LinesAdd:
      result = await cart.addLines(inputs.lines);
      break;
    ...
  }

  const cartId = result?.cart?.id;
  const headers = cartId ? cart.setCartId(result.cart.id) : new Headers();
  const {cart: cartResult, errors, warnings} = result;

  const redirectTo = formData.get('redirectTo') ?? null;
  if (typeof redirectTo === 'string') {
    status = 303;
    headers.set('Location', redirectTo);
  }

  return data(
    {
      cart: cartResult,
      // Add these two properties to the returned value
      updatedCart: await cart.get(),
      storefrontUrl: context.env.PUBLIC_STORE_DOMAIN,
      errors,
      warnings,
      analytics: {
        cartId,
      },
    },
    {status, headers},
  );
}
Remix fetcher에 대한 자세한 내용은 useFetcher를 참조하세요.
- Hydrogen 스토어는 일반적으로 장바구니 오브젝트 상태를 관리하는
CartForm컴포넌트를 정의하며, 이는 장바구니에서 항목을 추가, 제거 및 수량 변경할 때 사용됩니다.AddToCartButton컴포넌트에 또 다른useEffect훅을 추가하여 폼 fetcher 상태가 변경될 때마다(사용자 장바구니가 업데이트될 때마다)trackCartUpdated함수를 호출합니다:
1
2
3
4
5
6
7
8
9
10
11
12
13
14
15
16
17
18
19
20
21
22
23
24
25
26
27
28
29
30
31
32
33
34
35
36
37
38
39
40
41
42
43
44
45
46
// Add imports
import { trackCartUpdated, setCartToken } from '~/tracking';
import { useEffect } from 'react';
import { useFetcher } from '@remix-run/react';

export function AddToCartButton({
  analytics,
  children,
  disabled,
  lines,
  onClick,
}) {

  // Define a new Fetcher to be used for tracking cart updates
  const fetcher = useFetcher({ key: "cart-fetcher" });

  // Add useEffect hook for tracking cart_updated event and setting cart token alias
  useEffect(() => {
    if(fetcher.state === "idle" && fetcher.data) {
      trackCartUpdated(fetcher.data.updatedCart, fetcher.data.storefrontUrl)
      setCartToken(fetcher.data.updatedCart);
    }
  }, [fetcher.state, fetcher.data])

  // Add the fetcherKey prop to the CartForm component
  return (
    <CartForm route="/cart" inputs= fetcherKey="cart-fetcher" action={CartForm.ACTIONS.LinesAdd}>
      {(fetcher) => (
        <>
          <input
            name="analytics"
            type="hidden"
            value={JSON.stringify(analytics)}
          />
          <button
            type="submit"
            onClick={onClick}
            disabled={disabled ?? fetcher.state !== 'idle'}
          >
            {children}
          </button>
        </>
      )}
    </CartForm>
  );
}
- 장바구니에서 기존 제품을 업데이트하는 액션에도 동일한
fetcherKey를 사용합니다.CartLineRemoveButton및CartLineUpdateButton컴포넌트(기본적으로app/components/CartLineItem.jsx파일에 위치)에 다음을 추가합니다:
1
2
3
4
5
6
7
8
9
10
11
12
13
14
15
16
17
18
19
20
21
22
23
24
25
26
27
28
29
function CartLineRemoveButton({lineIds, disabled}) {
  // Add the fetcherKey prop to the CartForm component
  return (
    <CartForm
      fetcherKey="cart-fetcher"
      route="/cart"
      action={CartForm.ACTIONS.LinesRemove}
      inputs=
    >
      <button disabled={disabled} type="submit">
        Remove
      </button>
    </CartForm>
  );
}

function CartLineUpdateButton({children, lines}) {
  // Add the fetcherKey prop to the CartForm component
  return (
    <CartForm
      route="/cart"
      fetcherKey="cart-fetcher"
      action={CartForm.ACTIONS.LinesUpdate}
      inputs=
    >
      {children}
    </CartForm>
  );
}
Braze Shopify 통합 설치
1단계: Shopify 스토어 연결
Shopify 파트너 페이지로 이동하여 설정을 시작합니다. 먼저 설정 시작을 선택하여 Shopify App Store에서 Braze 애플리케이션을 설치합니다. 안내된 단계를 따라 설치 프로세스를 완료합니다.

2단계: Braze SDK 활성화
Shopify Hydrogen 또는 헤드리스 스토어의 경우 커스텀 설정 옵션을 선택합니다.
온보딩 프로세스를 계속하기 전에 Shopify 웹사이트에서 Braze SDK를 활성화했는지 확인합니다.

3단계: Shopify 데이터 추적
Shopify 웹훅을 통해 제공되는 더 많은 Shopify 이벤트와 속성을 추가하여 통합을 강화합니다. 이 통합을 통해 추적되는 데이터에 대한 자세한 내용은 Shopify 데이터 기능을 참조하세요.

4단계: 과거 데이터 백필(선택 사항)
커스텀 설정을 통해 표준 통합과 동일한 과거 Shopify 데이터 로드를 선택적으로 포함할 수 있습니다: 통합을 완료한 날짜로부터 지난 90일간의 주문 이벤트와 지난 1년간의 고객 프로필. 이 초기 데이터 로드를 포함하려면 초기 데이터 로드 옵션의 체크박스를 선택합니다.
나중에 백필을 수행하려면 지금 초기 설정을 완료하고 나중에 이 단계로 돌아올 수 있습니다.

초기 로드에 포함되는 전체 데이터 목록, 매출 보고 동작 및 동기화 모니터링에 대해서는 과거 데이터 백필을 참조하세요.
5단계: 커스텀 데이터 추적 설정(고급)
Braze SDK를 사용하면 이 통합에서 지원하는 데이터 이상의 커스텀 이벤트 또는 커스텀 속성을 추적할 수 있습니다. 커스텀 이벤트는 스토어에서의 고유한 상호작용을 캡처합니다. 예를 들면:
| 커스텀 이벤트 | 커스텀 속성 |
|---|---|
|
|
이벤트 또는 커스텀 속성을 기록하려면 사용자의 기기에서 SDK가 초기화(활동 수신 대기)되어 있어야 합니다. 커스텀 데이터 기록에 대해 자세히 알아보려면 User object 및 logCustomEvent를 참조하세요.
6단계: 사용자 관리 방법 구성(선택 사항)
드롭다운에서 external_id 유형을 선택합니다.
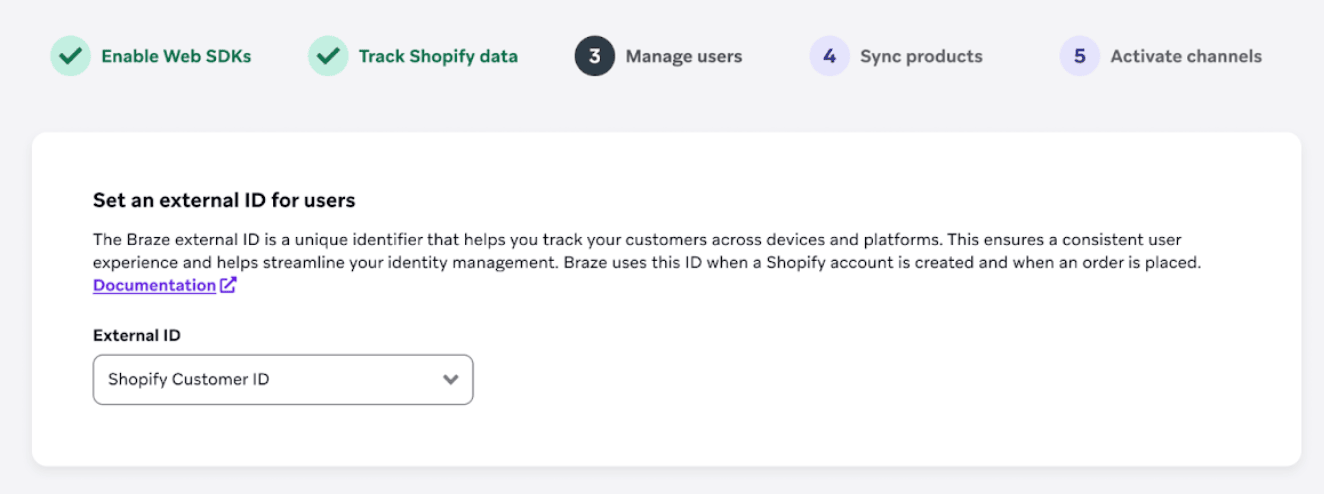
이메일 주소 또는 해시된 이메일 주소를 Braze 외부 ID로 사용하면 데이터 소스 전반에서 ID 관리를 간소화할 수 있습니다. 그러나 사용자 개인정보 보호 및 데이터 보안에 대한 잠재적 위험을 고려하는 것이 중요합니다.
- 추측 가능한 정보: 이메일 주소는 쉽게 추측할 수 있어 공격에 취약합니다.
- 악용 위험: 악의적인 사용자가 웹 브라우저를 변경하여 다른 사람의 이메일 주소를 외부 ID로 전송하면 민감한 메시지나 계정 정보에 접근할 수 있습니다.
기본적으로 Braze는 Shopify의 이메일을 외부 ID로 사용하기 전에 소문자로 자동 변환합니다. 이메일 또는 해시된 이메일을 외부 ID로 사용하는 경우 이메일 주소를 외부 ID로 할당하기 전이나 다른 데이터 소스에서 해시하기 전에 이메일 주소도 소문자로 변환되었는지 확인하세요. 이렇게 하면 외부 ID의 불일치를 방지하고 Braze에서 중복된 고객 프로필이 생성되는 것을 방지할 수 있습니다.
다음 단계는 외부 ID 선택에 따라 달라집니다:
- 커스텀 외부 ID 유형을 선택한 경우: 6.1~6.3단계를 완료하여 커스텀 외부 ID 구성을 설정합니다.
- Shopify 고객 ID, 이메일 또는 해시된 이메일을 선택한 경우: 6.1~6.3단계를 건너뛰고 바로 6.4단계로 넘어갑니다.
6.1단계: braze.external_id 메타필드 생성
- Shopify 관리자 패널에서 설정 > 메타필드로 이동합니다.
- 고객 > 정의 추가를 선택합니다.
- 네임스페이스 및 키에
braze.external_id를 입력합니다. - 유형에서 ID 유형을 선택합니다.
메타필드가 생성되면 고객을 위해 메타필드를 채웁니다. 다음과 같은 방법을 권장합니다:
- 고객 생성 웹훅 수신:
customer/create이벤트를 수신하도록 웹훅을 설정합니다. 이를 통해 새 고객이 생성될 때 메타필드를 작성할 수 있습니다. - 기존 고객 백필: Admin API 또는 Customer API를 사용하여 이전에 생성된 고객의 메타필드를 백필합니다.
6.2단계: 외부 ID를 검색할 엔드포인트 생성
외부 ID를 검색하기 위해 Braze가 호출할 수 있는 공용 엔드포인트를 생성해야 합니다. 이를 통해 Shopify에서 braze.external_id 메타필드를 직접 제공할 수 없는 시나리오에서 Braze가 ID를 가져올 수 있습니다.
엔드포인트 사양
메서드: GET
Braze는 다음 매개변수를 엔드포인트로 전송합니다:
| 매개변수 | 필수 | 데이터 유형 | 설명 |
|---|---|---|---|
| shopify_customer_id | 필수 | 문자열 | Shopify 고객 ID입니다. |
| shopify_storefront | 필수 | 문자열 | 요청에 대한 스토어프론트 이름입니다. 예: <storefront_name>.myshopify.com |
| email_address | 선택 사항 | 문자열 | 로그인한 사용자의 이메일 주소입니다. 특정 웹훅 시나리오에서는 이 필드가 누락될 수 있습니다. 엔드포인트 로직은 여기서 null 값을 고려해야 합니다(예: 내부 로직에 필요한 경우 shopify_customer_id를 사용하여 이메일을 가져옵니다). |
엔드포인트 예시
1
GET https://mystore.com/custom_id?shopify_customer_id=1234&[email protected]&shopify_storefront=dev-store.myshopify.com
예상 응답
Braze는 외부 ID JSON을 반환하는 200 상태 코드를 기대합니다:
1
2
3
{
  "external_id": "my_external_id"
}
유효성 검사
shopify_customer_id 및 email_address(있는 경우)가 Shopify의 고객 값과 일치하는지 확인하는 것이 중요합니다. Shopify Admin API 또는 Customer API를 사용하여 이러한 매개변수의 유효성을 검사하고 올바른 braze.external_id 메타필드를 검색할 수 있습니다.
실패 동작 및 병합
200 이외의 상태 코드는 모두 실패로 간주됩니다.
- 병합 영향: 엔드포인트가 실패하면(
200이 아닌 값을 반환하거나 시간 초과), Braze는 외부 ID를 검색할 수 없습니다. 따라서 Shopify 사용자와 Braze 고객 프로필 간의 병합은 해당 시점에 이루어지지 않습니다. - 재시도 로직: Braze는 표준 즉시 네트워크 재시도를 시도할 수 있지만, 실패가 지속되면 다음 적격 이벤트(예: 사용자가 프로필을 업데이트하거나 결제를 완료할 때)까지 병합이 연기됩니다.
- 지원 가능성: 적시에 사용자 병합을 지원하려면 엔드포인트의 가용성이 높고 선택적
email_address필드를 원활하게 처리하는지 확인하세요.
6.3단계: 외부 ID 입력
6단계를 반복하고 Braze 외부 ID 유형으로 커스텀 외부 ID를 선택한 후 엔드포인트 URL을 입력합니다.
고려 사항
- Braze가 엔드포인트에 요청을 보낼 때 외부 ID가 생성되지 않은 경우 통합은
changeUser함수가 호출될 때 기본적으로 Shopify 고객 ID를 사용합니다. 이 단계는 익명 사용자 프로필을 식별된 고객 프로필과 병합하는 데 매우 중요합니다. 따라서 일시적으로 워크스페이스 내에 여러 유형의 외부 ID가 존재할 수 있습니다. braze.external_id메타필드에서 외부 ID를 사용할 수 있으면 통합에서 이 외부 ID에 우선순위를 지정하여 할당합니다.- 이전에 Shopify 고객 ID가 Braze 외부 ID로 설정된 경우
braze.external_id메타필드 값으로 대체됩니다.
- 이전에 Shopify 고객 ID가 Braze 외부 ID로 설정된 경우
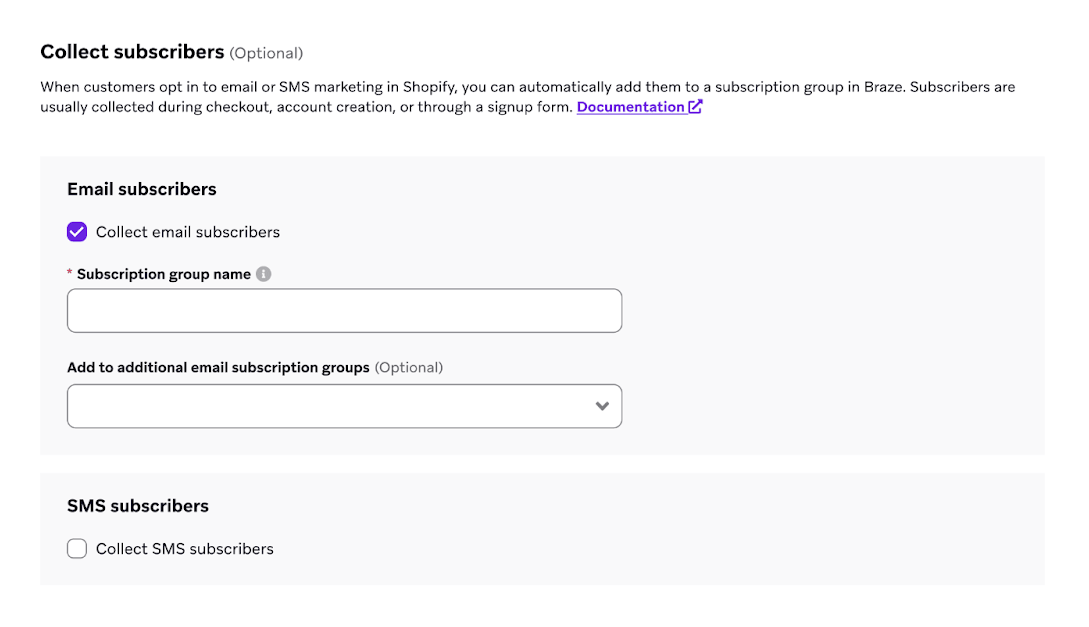
6.4단계: Shopify에서 이메일 또는 SMS 옵트인 수집(선택 사항)
Shopify에서 이메일 또는 SMS 마케팅 옵트인을 수집할 수 있는 옵션이 있습니다.
이메일 또는 SMS 채널을 사용하는 경우 이메일 및 SMS 마케팅 옵트인 상태를 Braze에 동기화할 수 있습니다. Shopify에서 이메일 마케팅 옵트인을 동기화하면 Braze는 해당 특정 스토어와 연결된 모든 사용자에 대해 이메일 구독 그룹을 자동으로 생성합니다. 이 구독 그룹에 고유한 이름을 생성해야 합니다.
Shopify 개요에서 언급한 바와 같이, 서드파티 캡처 폼을 사용하려면 개발자가 Braze SDK 코드를 통합해야 합니다. 이를 통해 폼 제출에서 이메일 주소와 글로벌 이메일 구독 상태를 캡처할 수 있습니다. 구체적으로 theme.liquid 파일에 다음 메서드를 구현하고 테스트해야 합니다:
- setEmail: 고객 프로필에 이메일 주소를 설정합니다
- setEmailNotificationSubscriptionType: 글로벌 이메일 구독 상태를 업데이트합니다
7단계: 제품 동기화(선택 사항)
Shopify 스토어의 모든 제품을 Braze 카탈로그에 동기화하여 더 깊은 메시징 개인화를 구현할 수 있습니다. 자동 업데이트가 거의 실시간으로 이루어지므로 카탈로그에 항상 최신 제품 세부 정보가 반영됩니다. 자세한 내용은 Shopify 제품 동기화를 확인하세요.

8단계: 채널 활성화
Shopify 직접 통합을 사용하여 인앱 메시지, Content Cards 및 피처 플래그를 활성화하려면 SDK에 각 채널을 추가합니다. 아래에서 각 채널에 대해 제공된 설명서 링크를 따르세요:
- 인앱 메시지: 리드 캡처 폼 사용 사례를 위한 인앱 메시지 활성화에 대해서는 인앱 메시지를 참조하세요.
- Content Cards: 받은편지함 또는 웹사이트 배너 사용 사례를 위한 Content Cards 활성화에 대해서는 Content Cards를 참조하세요.
- 피처 플래그: 사이트 실험 사용 사례를 위한 피처 플래그 활성화에 대해서는 피처 플래그를 참조하세요.
9단계: 설정 완료
모든 단계를 완료한 후 설정 완료를 선택하여 파트너 페이지로 돌아갑니다. 그런 다음 표시되는 배너에 안내된 대로 Shopify 관리자 페이지에서 Braze 앱 임베드를 활성화합니다.

코드 예제
shopify-hydrogen-example은 이전 단계에서 다룬 모든 코드를 포함하는 예제 Hydrogen 앱입니다.