Writing ESLint Rules for Fun and Profit (or 5 Easy Steps to Improve Your Development Experience Today!)
Published on April 06, 2020/Last edited on April 06, 2020/7 min read


Sean Laude
Senior Software Engineer, BrazeThe JavaScript community owes a debt of gratitude to its compiler maintainers. As the language converges towards a common ECMA implementation, we can use Babel to introduce language features before they have time to bake in every browser engine or JS runtime. Moreover, the parsers that power these compilers provide us with a sensible abstract syntax tree (AST)—that is, a representation of code as an object graph—to better understand our code and create useful tooling around it.
ASTs are no small blessing for anyone working with JavaScript. They give us the power to view code as structured data, rather than plain text requiring hacky regular expressions and inscrutable grep flags to interpret. This ability to comprehend code and easily transform it can feel close to magic...and even the simplest transforms will make you feel like some kind of software wizard. At Braze, we use the static code analysis tool ESLint, which leverages ASTs, to make our development experience better—so let’s explore how we’re using it and how you, too, can utilize and customize your ESLint rules.
Linting: One of the Not-So-Abstract Benefits of ASTs
Every developer’s toolkit needs a good linter—one of the many tools built using the power of ASTs—and ESLint has emerged in recent years as the de facto static code checker for both JavaScript and Typescript. Combined with pre-commit hooks, linting becomes an invaluable part of your development experience by enforcing basic stylistic rules and conventions. I would hazard to guess that installing Babel’s preset-env will cover about 80% of your needs and you can congratulate yourself for a good day’s work after installing it and fixing the errors. For that lingering 20%, there is a large number of plugins and rule sets for you to use, but also provisions for inventing rules to suit the needs of your organization.
To illustrate this, here’s a specific challenge we have at Braze: We write a lot of integration tests to test parts of our web SDK and our main REST API.
The Braze platform is built to support responsive customer messaging, so these tests typically involve triggering a Campaign or a Canvas to send and then querying its stats to assert that something happened as a result. We identify these Campaigns or Canvases in our APIs using a globally unique identifier (GUID), which will look something like this in our tests:
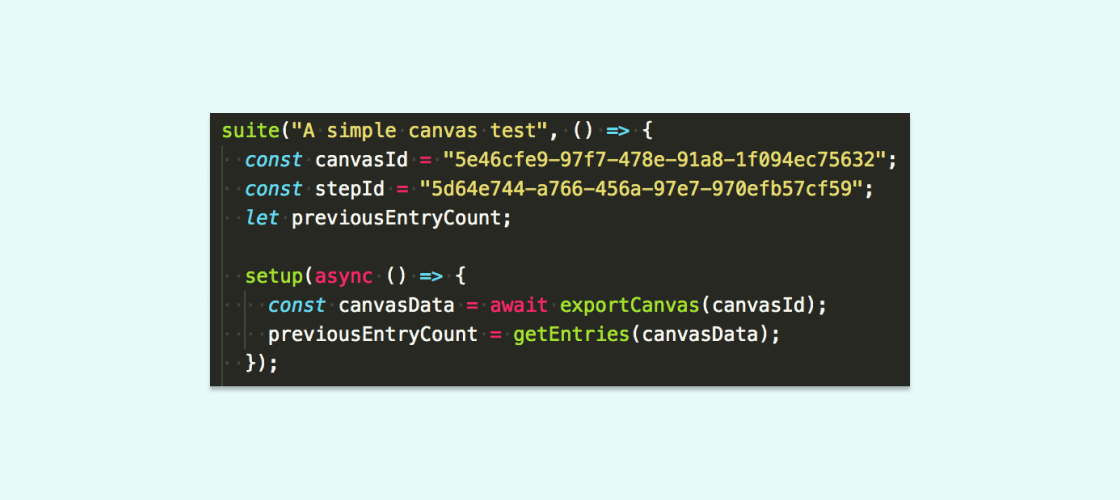
These tests typically complete without failure and we’re able to sleep soundly knowing that Canvas will keep humming to the tune of millions of messages correctly sent per day. But when they do fail, we try our darndest to diagnose the problem and extinguish the flames ASAP. (n.b. Rest assured, dear reader, we only run these tests in our staging environment where we bake code before pushing to production).
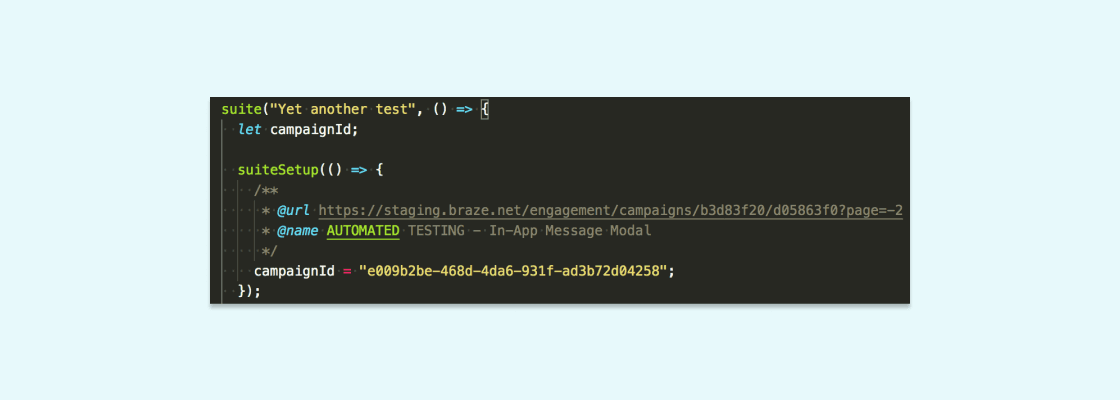
When there is a failure, we trace it back to the test and look for the GUID(s) of the underlying test object(s). At Braze, we’re big fans of dogfooding, so we’ll check the stats for that object in our customer-facing Dashboard application and also verify that it’s configured correctly. For that reason, embedding a hard link to the object in the Dashboard test comments is really important; as it turns out, most integrated development environments (IDEs) are really good at recognizing URLs, so the engineer diagnosing the failure is one click away from vital information.
We structure these annotations as JSDoc comments like so:
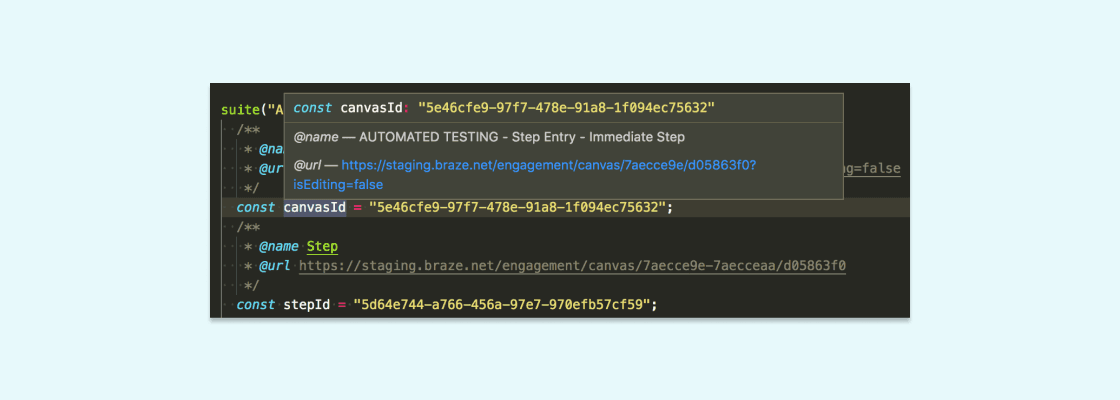
When we settled on this convention, we took the next logical step of writing a custom ESLint rule that checks if GUIDs have the proper annotation and then applied it to the rest of the codebase.
And here’s how we did it in only five easy steps:
1. Figure out what you’re trying to do
In this case, we were looking for any kind of variable declaration that also assigns a string resembling a GUID. We also found some cases where a variable is declared, but the GUID was assigned elsewhere, so we kept that in mind as we moved into step 2...
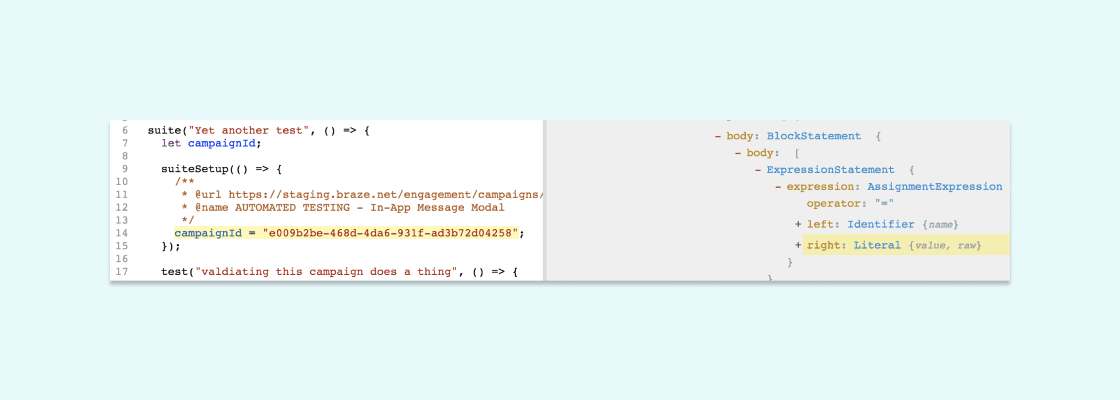
2. Figure out what the AST looks like for that bit of code
Among other tools for AST exploration, I cannot recommend astexplorer.net enough when it comes to this step. Just paste in some code, choose the parser you need (in the case of developing eslint rules, choose espree) and see what the output is:
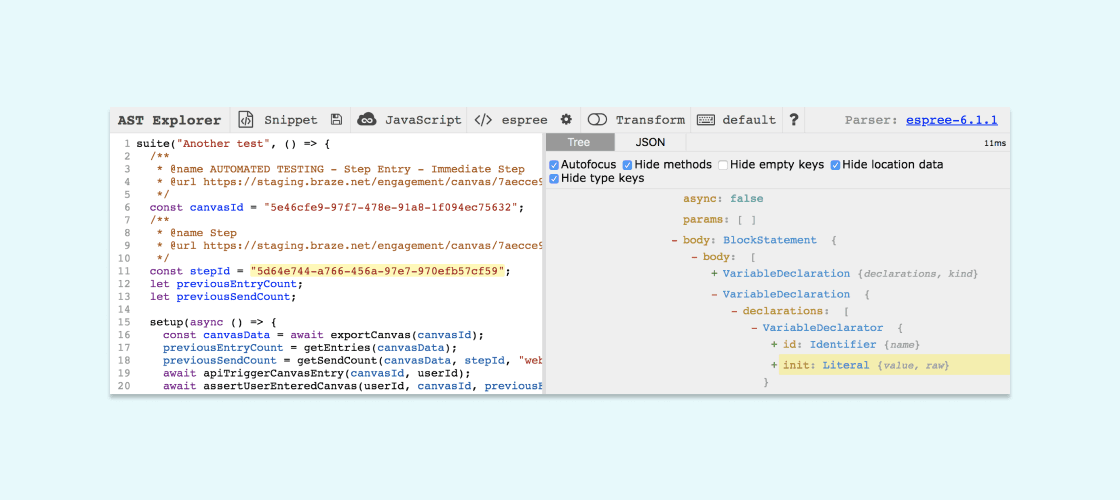
As mentioned in step 1, there are two ways to express a GUID assignment. Given that, we noted the node types and related properties.
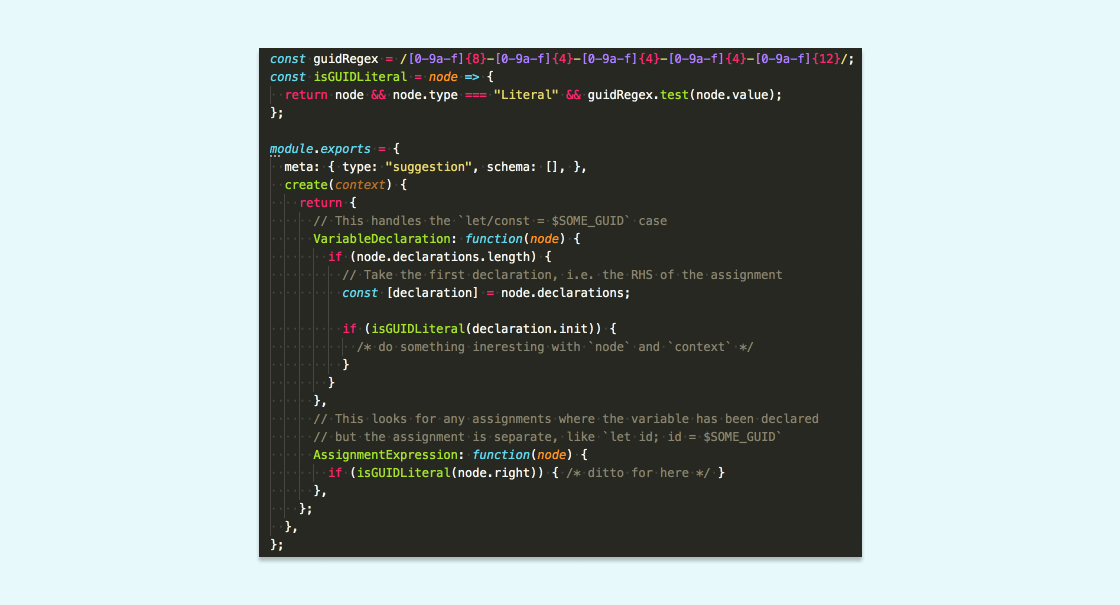
3. Write logic to find the nodes you’re looking for
Here’s where we actually started writing some code. We named a file require-guid-annotations.js, put it in a /rules directory, and then got to work.
ESLint rules are an object consisting of a meta object of rule properties and a create function that takes a context object as an argument. This function does all the heavy lifting, returning an object that describes what ESLint should do when it traverses the AST. Its keys are the node types you wish to visit and the value is a function that takes that node as an argument. Since the logic we needed visits self-contained nodes and does not need to keep track of node exits, it turned out to be fairly simple:
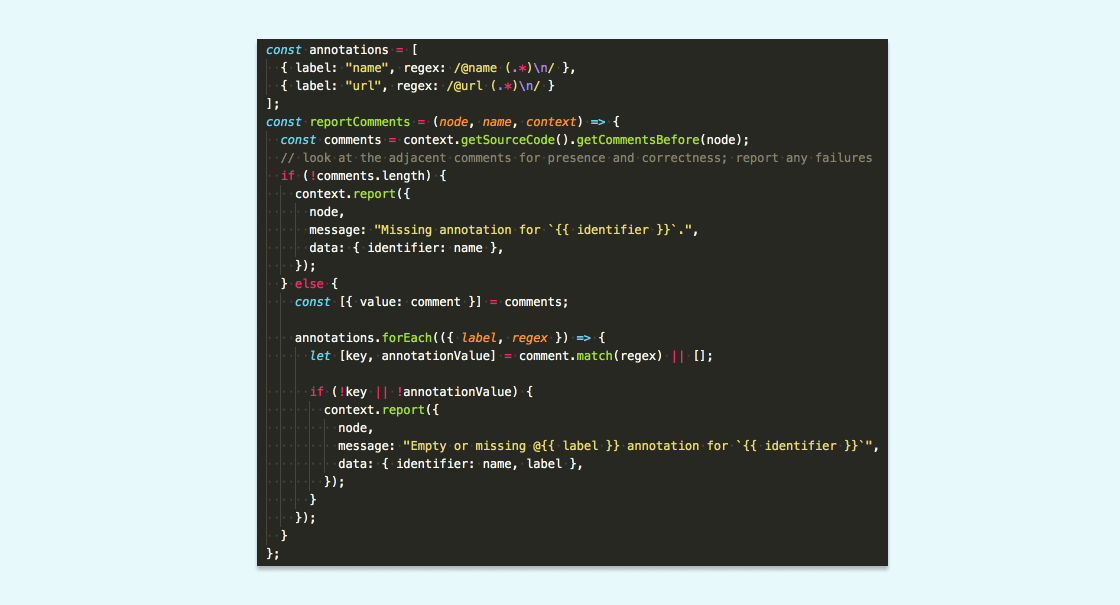
4. Tell ESLint what’s up
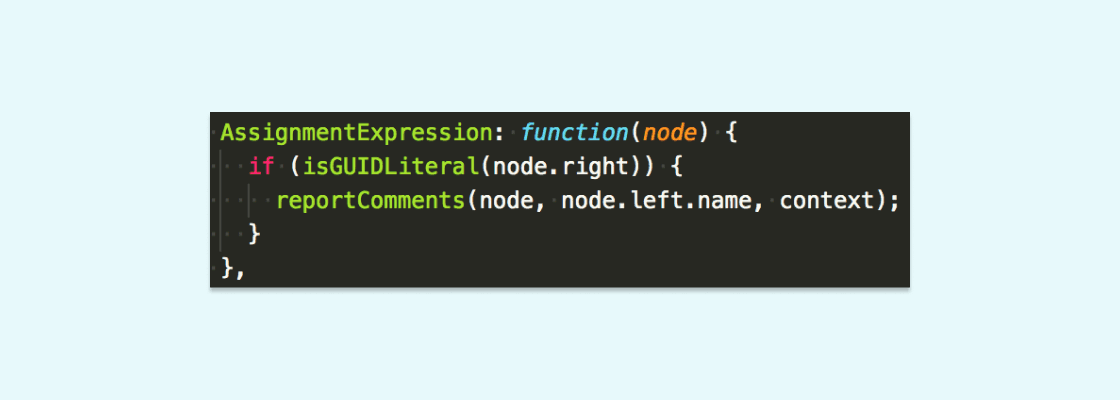
After we identified the relevant nodes, we used the context argument to report them if needed. Comments are not a part of the AST returned by espree, so you have to use a special function in order to get the comments adjacent to a node. Most important, the context.report object is what actually tells ESLint what errors to print out. Given the comments and their substance, we wrote some simple imperative logic around calls to context.report:
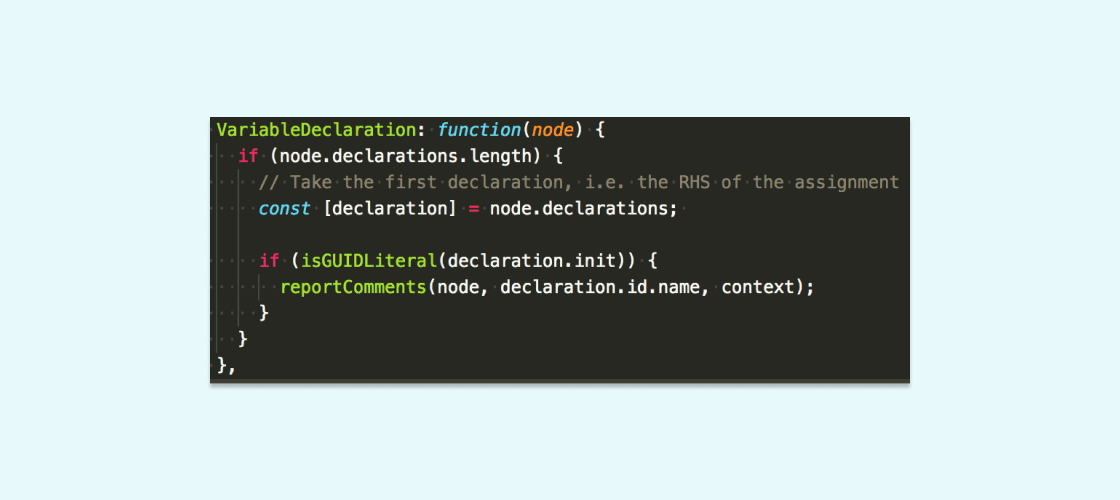
After that, we wired up reportComments for each node type, accounting for the different shape of each:
Note the difference in how the name argument is referenced for this node type:
5. Wire up your rule and take it for a spin
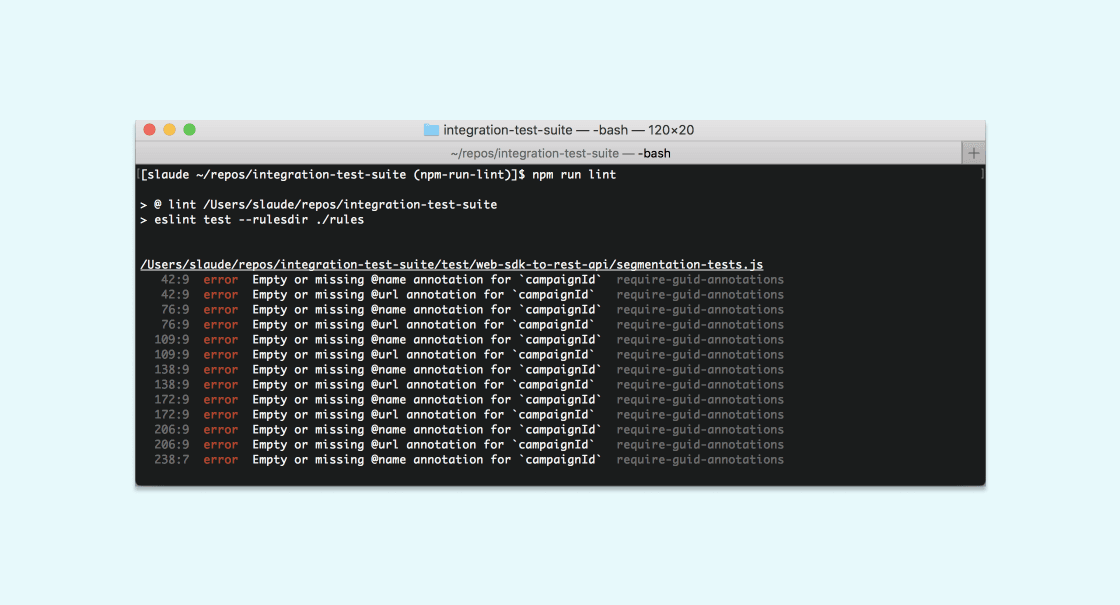
Finally, we added our brand-new rule to our .eslintrc config and identified where our rules live, adding those flags to our npm run lint command, ran it, and saw a large number of errors we needed to fix:
Since this requires some developer intervention, we could not add logic to fix comments automatically, but it is possible to define that behavior for rules when running ESLint with the --fix flag.
Final Thoughts (If you’ve read this far, congratulations! You now understand ~80% of how ESLint works!)
Hopefully, this very specific illustration underlines, bolds, and italicizes the idea that code is structured data. If you write code, you are designing an artifact and putting deliberate thought into every line, and this deliberation and care can only be improved by superior tooling.
As we continue to write more integration tests here at Braze, we’ve found that we have an easier time enforcing conventions through automation, ensuring that interacting with the test suite remains a consistently pleasant experience. Without the tooling to make sure all GUIDs are annotated, our lives would be noticeably worse, because of the additional time it would take to debug a test.
In truth, this delay might amount to mere seconds of time that would probably have been used emoji-reacting to cat GIFs on Slack—but still, consider how much of your current development experience is built around these interactions with tooling and then think about how streamlining each one can save time and effort.
Interested in learning more about Braze and maybe joining our team? Check out our jobs page.
Related Tags
Be Absolutely Engaging.™
Sign up for regular updates from Braze.
Related Content
 Article12 min read
AI-driven marketing strategies: How leading brands use AI to scale 1:1 customer relationships
July 09, 2026 Article11 min read
Email and SMS marketing: How to build a combined cross-channel strategy
July 09, 2026 Article2 min read
Braze recognized as an AWS Media & Entertainment Competency Partner
July 08, 2026