Push-Benachrichtigungsdaten protokollieren
Erfahren Sie, wie Sie Push-Benachrichtigungsdaten über das Braze SDK protokollieren können.
Daten über die Braze-API protokollieren (empfohlen)
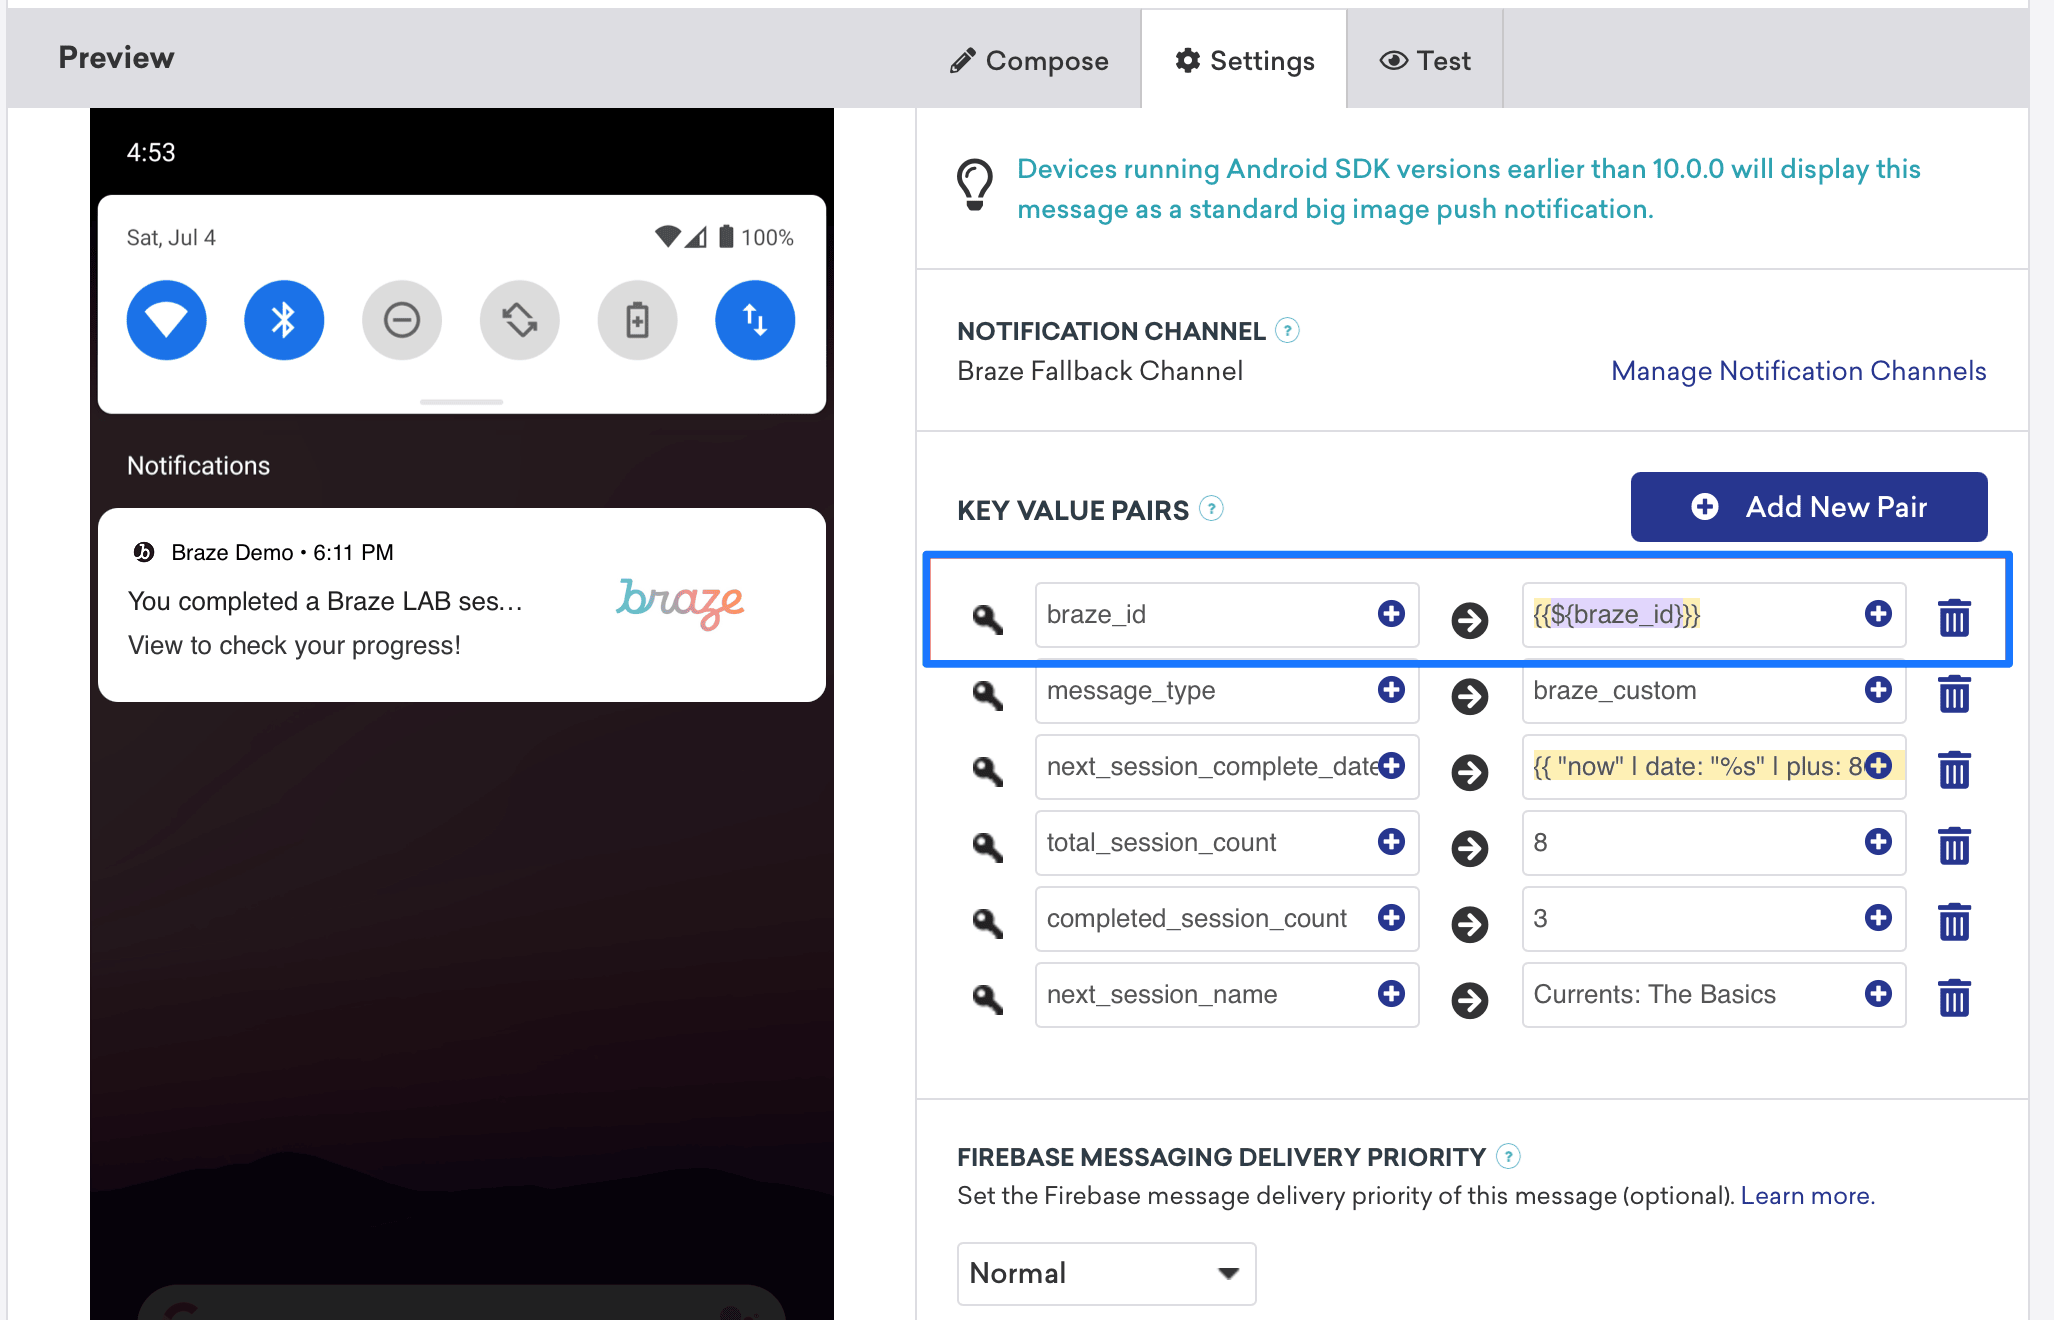
Sie können Analytics in Realtime protokollieren, indem Sie Aufrufe an den /users/track-Endpunkt senden. Um Analytics zu protokollieren, senden Sie den braze_id-Wert aus dem Braze-Dashboard, um festzustellen, welches Nutzerprofil aktualisiert werden soll.
Daten manuell protokollieren
Abhängig von den Details Ihres Payloads können Sie Analytics manuell innerhalb Ihrer FirebaseMessagingService.onMessageReceived-Implementierung oder Ihrer Startaktivität protokollieren. Ihre FirebaseMessagingService-Unterklasse muss die Ausführung innerhalb von 9 Sekunden nach dem Aufruf abschließen, um nicht vom Android-System markiert oder beendet zu werden.
Protokollierung von Daten mit der Braze API (empfohlen)
Analytics können in Realtime mit Hilfe des Braze-API-/users/track-Endpunkts protokolliert werden. Um Analytics zu protokollieren, senden Sie den Wert braze_id im Schlüssel-Wert-Paar-Feld (wie im folgenden Screenshot zu sehen), um zu identifizieren, welches Kundenprofil aktualisiert werden soll.

Manuelles Aufzeichnen von Daten
Beim manuellen Aufzeichnen müssen Sie zunächst Workspaces in Xcode konfigurieren und anschließend Analytics erstellen, speichern und abrufen. Dies erfordert einige angepasste Entwicklungsarbeit auf Ihrer Seite. Die folgenden Code-Snippets helfen Ihnen dabei.
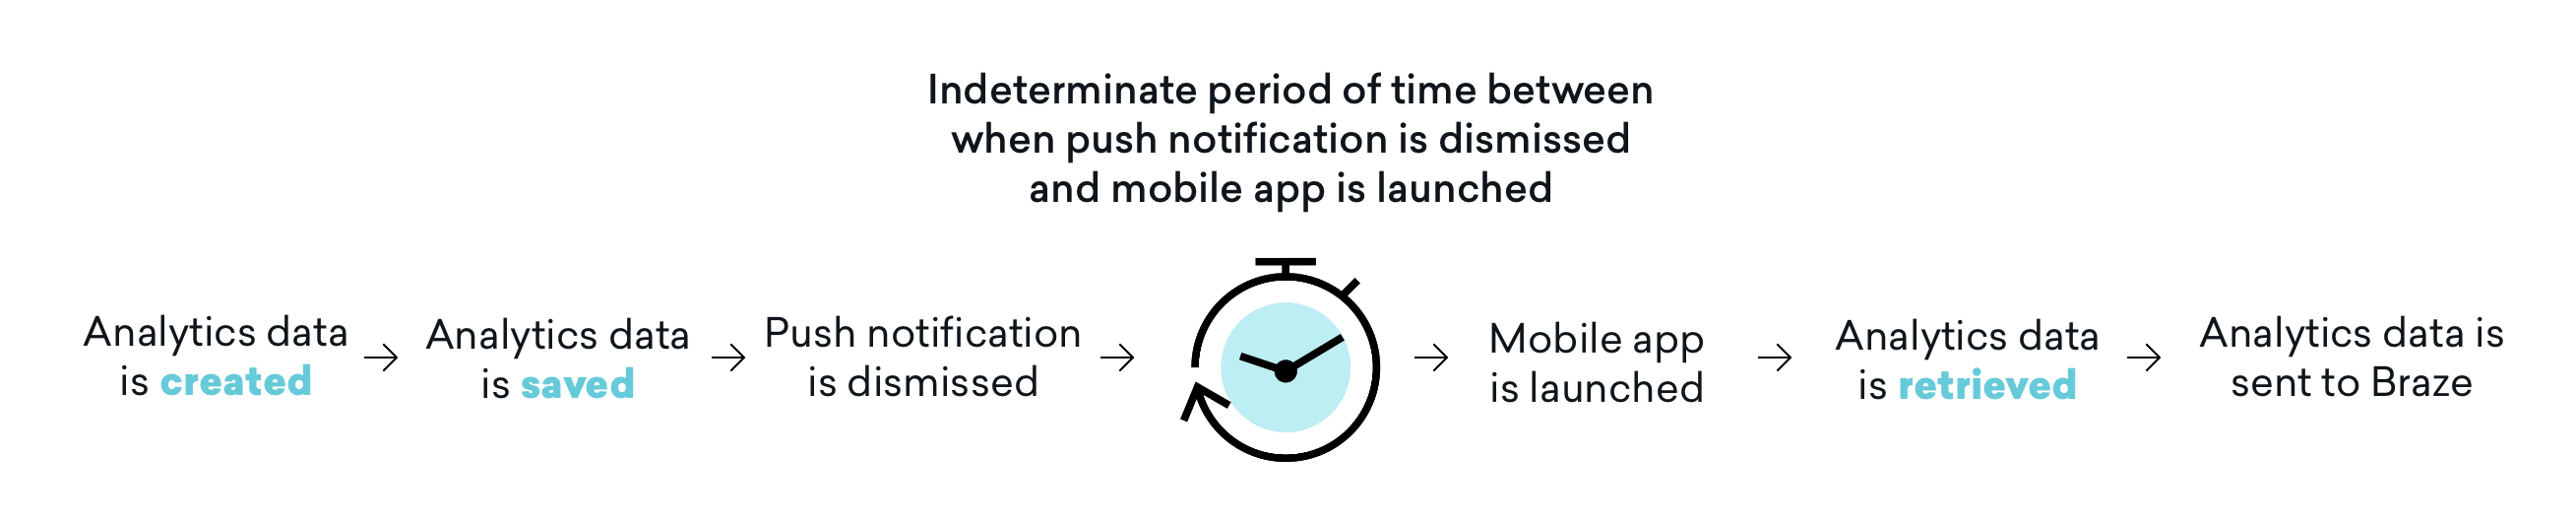
Bitte beachten Sie, dass Analytics erst dann an Braze gesendet werden, wenn die mobile Anwendung anschließend gestartet wird. Das bedeutet, dass – abhängig von Ihren Einstellungen zum Verwerfen – häufig ein unbestimmter Zeitraum zwischen dem Verwerfen einer Push-Benachrichtigung und dem Start der mobilen App sowie dem Abrufen der Analytics besteht. Obwohl dieser Zeitpuffer möglicherweise nicht alle Anwendungsfälle betrifft, sollten Sie diese Auswirkung berücksichtigen und Ihre User Journey gegebenenfalls anpassen, um das Öffnen der Anwendung einzubeziehen.
Schritt 1: App-Gruppen in Xcode konfigurieren
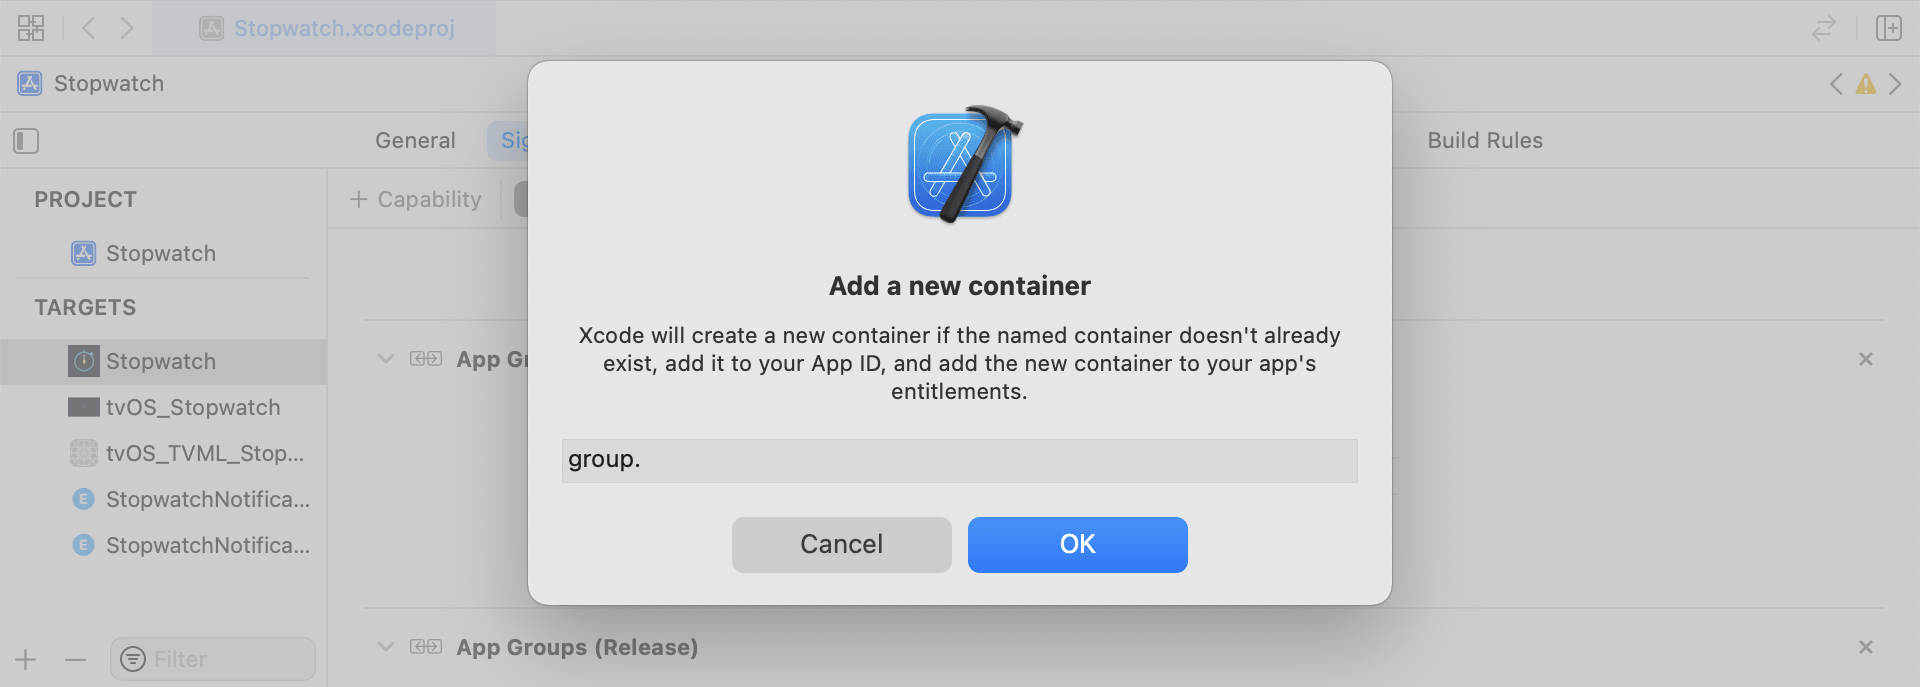
Fügen Sie in Xcode die App Groups-Capability hinzu. Wenn Sie noch keine Workspaces in Ihrer App haben, navigieren Sie zur Capability des Haupt-App-Targets, aktivieren Sie App Groups und klicken Sie auf den +-Button zum Hinzufügen. Verwenden Sie dann die Bundle-ID Ihrer App, um den Workspace zu erstellen. Wenn die Bundle-ID Ihrer App beispielsweise com.company.appname lautet, können Sie Ihren Workspace group.com.company.appname.xyz nennen. Stellen Sie sicher, dass App Groups sowohl für Ihr Haupt-App-Target als auch für das Content-Extension-Target aktiviert sind.
Schritt 2: Code-Snippets integrieren
Die folgenden Code-Snippets dienen als hilfreiche Referenz zum Speichern und Senden von angepassten Events, angepassten Attributen und Nutzer:innen-Attributen. In dieser Anleitung wird in Bezug auf UserDefaults gesprochen, die Code-Darstellung erfolgt jedoch in Form der Hilfsdatei RemoteStorage. Es gibt zusätzliche Hilfsdateien, UserAttributes und EventName Dictionary, die beim Senden und Speichern von Nutzer:innen-Attributen verwendet werden.
Angepasste Events speichern
Um angepasste Events zu speichern, müssen Sie die Analytics von Grund auf erstellen. Dazu wird ein Dictionary erstellt, mit Metadaten befüllt und die Daten mithilfe einer Hilfsdatei gespeichert.
- Initialisieren Sie ein Dictionary mit Event-Metadaten
- Initialisieren Sie
userDefaults, um die Event-Daten abzurufen und zu speichern - Falls ein bestehendes Array vorhanden ist, fügen Sie neue Daten an das vorhandene Array an und speichern Sie es
- Falls kein bestehendes Array vorhanden ist, speichern Sie das neue Array in
userDefaults
func saveCustomEvent(with properties: [String: Any]? = nil) {
// 1
let customEventDictionary = Dictionary(eventName: "YOUR-EVENT-NAME", properties: properties)
// 2
let remoteStorage = RemoteStorage(storageType: .suite)
// 3
if var pendingEvents = remoteStorage.retrieve(forKey: .pendingCustomEvents) as? [[String: Any]] {
pendingEvents.append(contentsOf: [customEventDictionary])
remoteStorage.store(pendingEvents, forKey: .pendingCustomEvents)
} else {
// 4
remoteStorage.store([customEventDictionary], forKey: .pendingCustomEvents)
}
}
- (void)saveCustomEvent:(NSDictionary<NSString *, id> *)properties {
// 1
NSDictionary<NSString *, id> *customEventDictionary = [[NSDictionary alloc] initWithEventName:@"YOUR-EVENT-NAME" properties:properties];
// 2
RemoteStorage *remoteStorage = [[RemoteStorage alloc] initWithStorageType:StorageTypeSuite];
NSMutableArray *pendingEvents = [[remoteStorage retrieveForKey:RemoteStorageKeyPendingCustomEvents] mutableCopy];
// 3
if (pendingEvents) {
[pendingEvents addObject:customEventDictionary];
[remoteStorage store:pendingEvents forKey:RemoteStorageKeyPendingCustomAttributes];
} else {
// 4
[remoteStorage store:@[ customEventDictionary ] forKey:RemoteStorageKeyPendingCustomAttributes];
}
}
Angepasste Events an Braze senden
Der beste Zeitpunkt, um gespeicherte Analytics aus einer Notification-Content-App-Extension zu protokollieren, ist direkt nach der Initialisierung des SDK. Dies kann durch Iteration über alle ausstehenden Events erfolgen, wobei der Schlüssel „Event Name“ geprüft, die entsprechenden Werte in Braze gesetzt und anschließend der Speicher für den nächsten Aufruf dieser Funktion geleert wird.
- Iterieren Sie über das Array der ausstehenden Events
- Iterieren Sie über jedes Schlüssel-Wert-Paar im
pendingEvents-Dictionary - Prüfen Sie den Schlüssel explizit auf „Event Name“, um den Wert entsprechend zu setzen
- Jedes weitere Schlüssel-Wert-Paar wird dem
properties-Dictionary hinzugefügt - Protokollieren Sie das einzelne angepasste Event
- Entfernen Sie alle ausstehenden Events aus dem Speicher
func logPendingCustomEventsIfNecessary() {
let remoteStorage = RemoteStorage(storageType: .suite)
guard let pendingEvents = remoteStorage.retrieve(forKey: .pendingCustomEvents) as? [[String: Any]] else { return }
// 1
for event in pendingEvents {
var eventName: String?
var properties: [AnyHashable: Any] = [:]
// 2
for (key, value) in event {
if key == PushNotificationKey.eventName.rawValue {
// 3
if let eventNameValue = value as? String {
eventName = eventNameValue
} else {
print("Invalid type for event_name key")
}
} else {
// 4
properties[key] = value
}
}
// 5
if let eventName = eventName {
AppDelegate.braze?.logCustomEvent(eventName, properties: properties)
}
}
// 6
remoteStorage.removeObject(forKey: .pendingCustomEvents)
}
- (void)logPendingEventsIfNecessary {
RemoteStorage *remoteStorage = [[RemoteStorage alloc] initWithStorageType:StorageTypeSuite];
NSArray *pendingEvents = [remoteStorage retrieveForKey:RemoteStorageKeyPendingCustomEvents];
// 1
for (NSDictionary<NSString *, id> *event in pendingEvents) {
NSString *eventName = nil;
NSMutableDictionary *properties = [NSMutableDictionary dictionary];
// 2
for (NSString* key in event) {
if ([key isEqualToString:@"event_name"]) {
// 3
if ([[event objectForKey:key] isKindOfClass:[NSString class]]) {
eventName = [event objectForKey:key];
} else {
NSLog(@"Invalid type for event_name key");
}
} else {
// 4
properties[key] = event[key];
}
}
// 5
if (eventName != nil) {
[AppDelegate.braze logCustomEvent:eventName properties:properties];
}
}
// 6
[remoteStorage removeObjectForKey:RemoteStorageKeyPendingCustomEvents];
}
Angepasste Attribute speichern
Um angepasste Attribute zu speichern, müssen Sie die Analytics von Grund auf erstellen. Dazu wird ein Dictionary erstellt, mit Metadaten befüllt und die Daten mithilfe einer Hilfsdatei gespeichert.
- Initialisieren Sie ein Dictionary mit Attribut-Metadaten
- Initialisieren Sie
userDefaults, um die Attributdaten abzurufen und zu speichern - Falls ein bestehendes Array vorhanden ist, fügen Sie neue Daten an das vorhandene Array an und speichern Sie es
- Falls kein bestehendes Array vorhanden ist, speichern Sie das neue Array in
userDefaults
func saveCustomAttribute() {
// 1
let customAttributeDictionary: [String: Any] = ["YOUR-CUSTOM-ATTRIBUTE-KEY": "YOUR-CUSTOM-ATTRIBUTE-VALUE"]
// 2
let remoteStorage = RemoteStorage(storageType: .suite)
// 3
if var pendingAttributes = remoteStorage.retrieve(forKey: .pendingCustomAttributes) as? [[String: Any]] {
pendingAttributes.append(contentsOf: [customAttributeDictionary])
remoteStorage.store(pendingAttributes, forKey: .pendingCustomAttributes)
} else {
// 4
remoteStorage.store([customAttributeDictionary], forKey: .pendingCustomAttributes)
}
}
- (void)saveCustomAttribute {
// 1
NSDictionary<NSString *, id> *customAttributeDictionary = @{ @"YOUR-CUSTOM-ATTRIBUTE-KEY": @"YOUR-CUSTOM-ATTRIBUTE-VALUE" };
// 2
RemoteStorage *remoteStorage = [[RemoteStorage alloc] initWithStorageType:StorageTypeSuite];
NSMutableArray *pendingAttributes = [[remoteStorage retrieveForKey:RemoteStorageKeyPendingCustomAttributes] mutableCopy];
// 3
if (pendingAttributes) {
[pendingAttributes addObject:customAttributeDictionary];
[remoteStorage store:pendingAttributes forKey:RemoteStorageKeyPendingCustomAttributes];
} else {
// 4
[remoteStorage store:@[ customAttributeDictionary ] forKey:RemoteStorageKeyPendingCustomAttributes];
}
}
Angepasste Attribute an Braze senden
Der beste Zeitpunkt, um gespeicherte Analytics aus einer Notification-Content-App-Extension zu protokollieren, ist direkt nach der Initialisierung des SDK. Dies kann durch Iteration über die ausstehenden Attribute erfolgen, wobei das entsprechende angepasste Attribut in Braze gesetzt und anschließend der Speicher für den nächsten Aufruf dieser Funktion geleert wird.
- Iterieren Sie über das Array der ausstehenden Attribute
- Iterieren Sie über jedes Schlüssel-Wert-Paar im
pendingAttributes-Dictionary - Protokollieren Sie einzelne angepasste Attribute mit dem entsprechenden Schlüssel und Wert
- Entfernen Sie alle ausstehenden Attribute aus dem Speicher
func logPendingCustomAttributesIfNecessary() {
let remoteStorage = RemoteStorage(storageType: .suite)
guard let pendingAttributes = remoteStorage.retrieve(forKey: .pendingCustomAttributes) as? [[String: Any]] else { return }
// 1
pendingAttributes.forEach { setCustomAttributesWith(keysAndValues: $0) }
// 4
remoteStorage.removeObject(forKey: .pendingCustomAttributes)
}
func setCustomAttributesWith(keysAndValues: [String: Any]) {
// 2
for (key, value) in keysAndValues {
// 3
if let value = value as? [String] {
setCustomAttributeArrayWithKey(key, andValue: value)
} else {
setCustomAttributeWithKey(key, andValue: value)
}
}
}
- (void)logPendingCustomAttributesIfNecessary {
RemoteStorage *remoteStorage = [[RemoteStorage alloc] initWithStorageType:StorageTypeSuite];
NSArray *pendingAttributes = [remoteStorage retrieveForKey:RemoteStorageKeyPendingCustomAttributes];
// 1
for (NSDictionary<NSString*, id> *attribute in pendingAttributes) {
[self setCustomAttributeWith:attribute];
}
// 4
[remoteStorage removeObjectForKey:RemoteStorageKeyPendingCustomAttributes];
}
- (void)setCustomAttributeWith:(NSDictionary<NSString *, id> *)keysAndValues {
// 2
for (NSString *key in keysAndValues) {
// 3
[self setCustomAttributeWith:key andValue:[keysAndValues objectForKey:key]];
}
}
Nutzer:innen-Attribute speichern
Beim Speichern von Nutzer:innen-Attributen empfehlen wir, ein angepasstes Objekt zu erstellen, um zu entschlüsseln, welcher Attributtyp aktualisiert wird (email, first_name, phone_number usw.). Das Objekt sollte kompatibel sein mit dem Speichern/Abrufen aus UserDefaults. In der Hilfsdatei UserAttribute finden Sie ein Beispiel, wie dies umgesetzt werden kann.
- Initialisieren Sie ein kodiertes
UserAttribute-Objekt mit dem entsprechenden Typ - Initialisieren Sie
userDefaults, um die Event-Daten abzurufen und zu speichern - Falls ein bestehendes Array vorhanden ist, fügen Sie neue Daten an das vorhandene Array an und speichern Sie es
- Falls kein bestehendes Array vorhanden ist, speichern Sie das neue Array in
userDefaults
func saveUserAttribute() {
// 1
guard let data = try? PropertyListEncoder().encode(UserAttribute.userAttributeType("USER-ATTRIBUTE-VALUE")) else { return }
// 2
let remoteStorage = RemoteStorage(storageType: .suite)
// 3
if var pendingAttributes = remoteStorage.retrieve(forKey: .pendingUserAttributes) as? [Data] {
pendingAttributes.append(contentsOf: [data])
remoteStorage.store(pendingAttributes, forKey: .pendingUserAttributes)
} else {
// 4
remoteStorage.store([data], forKey: .pendingUserAttributes)
}
}
- (void)saveUserAttribute {
// 1
UserAttribute *userAttribute = [[UserAttribute alloc] initWithUserField:@"USER-ATTRIBUTE-VALUE" attributeType:UserAttributeTypeEmail];
NSError *error;
NSData *data = [NSKeyedArchiver archivedDataWithRootObject:userAttribute requiringSecureCoding:YES error:&error];
if (error != nil) {
// log error
}
// 2
RemoteStorage *remoteStorage = [[RemoteStorage alloc] initWithStorageType:StorageTypeSuite];
NSMutableArray *pendingAttributes = [[remoteStorage retrieveForKey:RemoteStorageKeyPendingUserAttributes] mutableCopy];
// 3
if (pendingAttributes) {
[pendingAttributes addObject:data];
[remoteStorage store:pendingAttributes forKey:RemoteStorageKeyPendingUserAttributes];
} else {
// 4
[remoteStorage store:@[data] forKey:RemoteStorageKeyPendingUserAttributes];
}
}
Nutzer:innen-Attribute an Braze senden
Der beste Zeitpunkt, um gespeicherte Analytics aus einer Notification-Content-App-Extension zu protokollieren, ist direkt nach der Initialisierung des SDK. Dies kann durch Iteration über die ausstehenden Attribute erfolgen, wobei das entsprechende angepasste Attribut in Braze gesetzt und anschließend der Speicher für den nächsten Aufruf dieser Funktion geleert wird.
- Iterieren Sie über das Array der
pendingAttributes-Daten - Initialisieren Sie ein kodiertes
UserAttribute-Objekt aus den Attributdaten - Setzen Sie das spezifische Nutzer:innen-Feld basierend auf dem User-Attribute-Typ (E-Mail)
- Entfernen Sie alle ausstehenden Nutzer:innen-Attribute aus dem Speicher
func logPendingUserAttributesIfNecessary() {
let remoteStorage = RemoteStorage(storageType: .suite)
guard let pendingAttributes = remoteStorage.retrieve(forKey: .pendingUserAttributes) as? [Data] else { return }
// 1
for attributeData in pendingAttributes {
// 2
guard let userAttribute = try? PropertyListDecoder().decode(UserAttribute.self, from: attributeData) else { continue }
// 3
switch userAttribute {
case .email(let email):
user?.email = email
}
}
// 4
remoteStorage.removeObject(forKey: .pendingUserAttributes)
}
- (void)logPendingUserAttributesIfNecessary {
RemoteStorage *remoteStorage = [[RemoteStorage alloc] initWithStorageType:StorageTypeSuite];
NSArray *pendingAttributes = [remoteStorage retrieveForKey:RemoteStorageKeyPendingUserAttributes];
// 1
for (NSData *attributeData in pendingAttributes) {
NSError *error;
// 2
UserAttribute *userAttribute = [NSKeyedUnarchiver unarchivedObjectOfClass:[UserAttribute class] fromData:attributeData error:&error];
if (error != nil) {
// log error
}
// 3
if (userAttribute) {
switch (userAttribute.attributeType) {
case UserAttributeTypeEmail:
[self user].email = userAttribute.userField;
break;
}
}
}
// 4
[remoteStorage removeObjectForKey:RemoteStorageKeyPendingUserAttributes];
}
Hilfsdateien
RemoteStorage-Hilfsdatei
enum RemoteStorageKey: String, CaseIterable {
// MARK: - Notification Content Extension Analytics
case pendingCustomEvents = "pending_custom_events"
case pendingCustomAttributes = "pending_custom_attributes"
case pendingUserAttributes = "pending_user_attributes"
}
enum RemoteStorageType {
case standard
case suite
}
class RemoteStorage: NSObject {
private var storageType: RemoteStorageType = .standard
private lazy var defaults: UserDefaults = {
switch storageType {
case .standard:
return .standard
case .suite:
return UserDefaults(suiteName: "YOUR-DOMAIN-IDENTIFIER")!
}
}()
init(storageType: RemoteStorageType = .standard) {
self.storageType = storageType
}
func store(_ value: Any, forKey key: RemoteStorageKey) {
defaults.set(value, forKey: key.rawValue)
}
func retrieve(forKey key: RemoteStorageKey) -> Any? {
return defaults.object(forKey: key.rawValue)
}
func removeObject(forKey key: RemoteStorageKey) {
defaults.removeObject(forKey: key.rawValue)
}
func resetStorageKeys() {
for key in RemoteStorageKey.allCases {
defaults.removeObject(forKey: key.rawValue)
}
}
}
@interface RemoteStorage ()
@property (nonatomic) StorageType storageType;
@property (nonatomic, strong) NSUserDefaults *defaults;
@end
@implementation RemoteStorage
- (id)initWithStorageType:(StorageType)storageType {
if (self = [super init]) {
self.storageType = storageType;
}
return self;
}
- (void)store:(id)value forKey:(RemoteStorageKey)key {
[[self defaults] setValue:value forKey:[self rawValueForKey:key]];
}
- (id)retrieveForKey:(RemoteStorageKey)key {
return [[self defaults] objectForKey:[self rawValueForKey:key]];
}
- (void)removeObjectForKey:(RemoteStorageKey)key {
[[self defaults] removeObjectForKey:[self rawValueForKey:key]];
}
- (void)resetStorageKeys {
[[self defaults] removeObjectForKey:[self rawValueForKey:RemoteStorageKeyPendingCustomEvents]];
[[self defaults] removeObjectForKey:[self rawValueForKey:RemoteStorageKeyPendingCustomAttributes]];
[[self defaults] removeObjectForKey:[self rawValueForKey:RemoteStorageKeyPendingUserAttributes]];
}
- (NSUserDefaults *)defaults {
if (!self.defaults) {
switch (self.storageType) {
case StorageTypeStandard:
return [NSUserDefaults standardUserDefaults];
break;
case StorageTypeSuite:
return [[NSUserDefaults alloc] initWithSuiteName:@"YOUR-DOMAIN-IDENTIFIER"];
}
} else {
return self.defaults;
}
}
- (NSString*)rawValueForKey:(RemoteStorageKey)remoteStorageKey {
switch(remoteStorageKey) {
case RemoteStorageKeyPendingCustomEvents:
return @"pending_custom_events";
case RemoteStorageKeyPendingCustomAttributes:
return @"pending_custom_attributes";
case RemoteStorageKeyPendingUserAttributes:
return @"pending_user_attributes";
default:
[NSException raise:NSGenericException format:@"Unexpected FormatType."];
}
}
UserAttribute-Hilfsdatei
enum UserAttribute: Hashable {
case email(String?)
}
// MARK: - Codable
extension UserAttribute: Codable {
private enum CodingKeys: String, CodingKey {
case email
}
func encode(to encoder: Encoder) throws {
var values = encoder.container(keyedBy: CodingKeys.self)
switch self {
case .email(let email):
try values.encode(email, forKey: .email)
}
}
init(from decoder: Decoder) throws {
let values = try decoder.container(keyedBy: CodingKeys.self)
let email = try values.decode(String.self, forKey: .email)
self = .email(email)
}
}
@implementation UserAttribute
- (id)initWithUserField:(NSString *)userField attributeType:(UserAttributeType)attributeType {
if (self = [super init]) {
self.userField = userField;
self.attributeType = attributeType;
}
return self;
}
- (void)encodeWithCoder:(NSCoder *)encoder {
[encoder encodeObject:self.userField forKey:@"userField"];
[encoder encodeInteger:self.attributeType forKey:@"attributeType"];
}
- (id)initWithCoder:(NSCoder *)decoder {
if (self = [super init]) {
self.userField = [decoder decodeObjectForKey:@"userField"];
NSInteger attributeRawValue = [decoder decodeIntegerForKey:@"attributeType"];
self.attributeType = (UserAttributeType) attributeRawValue;
}
return self;
}
@end
EventName-Dictionary-Hilfsdatei
extension Dictionary where Key == String, Value == Any {
init(eventName: String, properties: [String: Any]? = nil) {
self.init()
self[PushNotificationKey.eventName.rawValue] = eventName
if let properties = properties {
for (key, value) in properties {
self[key] = value
}
}
}
}
@implementation NSDictionary (Helper)
- (id)initWithEventName:(NSString *)eventName properties:(NSDictionary *)properties {
self = [self init];
if (self) {
dict[@"event_name"] = eventName;
for(id key in properties) {
dict[key] = properties[key];
}
}
return self;
}
@end