푸시 알림
푸시 알림을 사용하면 중요한 이벤트가 발생할 때 앱에서 알림을 보낼 수 있습니다. 전달할 새 인스턴트 메시지, 송출할 뉴스 속보 알림 또는 오프라인으로 시청할 수 있도록 다운로드할 준비가 된 사용자가 좋아하는 TV 프로그램의 최신 에피소드가 있을 때 푸시 알림을 전송할 수 있습니다. 또한 애플리케이션이 필요할 때만 실행되므로 백그라운드 가져오기보다 더 효율적입니다.

웹 URL로 리디렉션과 앱 내에서 웹 URL 열기가 선택되지 않았는데도 링크가 앱 내에서 열리는 경우, 앱이 해당 URL을 직접 처리하고 있을 수 있습니다(예: iOS의 유니버설 링크 또는 Android의 앱 링크). 브라우저에서 링크를 열려면, 사용자가 알림을 탭할 때 앱이 해당 URL을 시스템 브라우저로 위임하는지 확인하거나, 클릭 동작이 Braze 대시보드 설정과 일치하도록 앱의 URL 처리 방식을 조정하세요. 클릭 동작 및 URL 처리 구성 방법은 해당 플랫폼의 푸시 설명서를 참조하세요.
필수 조건
이 기능을 사용하려면 먼저 Braze Web SDK를 통합해야 합니다.
푸시 프로토콜
웹 푸시 알림은 대부분의 주요 브라우저에서 지원하는 W3C 푸시 표준을 사용하여 구현됩니다. 특정 푸시 프로토콜 표준 및 브라우저 지원에 대한 자세한 내용은 Apple Mozilla 및 Microsoft의 리소스를 참조하세요.
푸시 알림 설정하기
1단계: 서비스 워커 구성하기
프로젝트의 service-worker.js 파일에 다음 스니펫을 추가하고, 웹 SDK를 초기화할 때 manageServiceWorkerExternally 초기화 옵션을 true로 설정합니다.

웹 서버는 서비스 워커 파일을 제공할 때 Content-Type: application/javascript를 반환해야 합니다. 또한 서비스 워커 파일의 이름이 service-worker.js가 아닌 경우 serviceWorkerLocation 초기화 옵션을 사용해야 합니다.
2단계: 브라우저 등록하기
사용자의 브라우저에서 푸시 알림을 수신할 수 있도록 즉시 푸시 권한을 요청하려면 braze.requestPushPermission()을 호출합니다. 먼저 해당 브라우저에서 푸시가 지원되는지 테스트하려면 braze.isPushSupported()를 호출합니다.
푸시 권한을 요청하기 전에 소프트 푸시 프롬프트를 전송하여 사용자에게 푸시 관련 UI를 먼저 표시할 수도 있습니다.
macOS에서는 푸시 알림을 표시하려면 권한이 부여되더라도 최종 사용자가 시스템 설정 > 알림에서 Google Chrome과 Google Chrome Helper (Alerts)를 모두 활성화해야 합니다.
3단계: skipWaiting 비활성화하기(선택 사항)
Braze 서비스 워커 파일은 설치 시 자동으로 skipWaiting을 호출합니다. 이 기능을 비활성화하려면 Braze를 가져온 후 서비스 워커 파일에 다음 코드를 추가합니다.
사용자 푸시 알림 탈퇴
사용자의 푸시 알림을 탈퇴하려면 braze.unregisterPush()를 호출합니다.
최신 버전의 Safari 및 Firefox에서는 이 메서드를 짧은 수명의 이벤트 핸들러(예: 버튼 클릭 핸들러 또는 소프트 푸시 프롬프트)에서 호출해야 합니다. 이는 푸시 등록에 대한 Chrome의 사용자 경험 모범 사례와 일치합니다.
대체 도메인
웹 푸시를 통합하려면 도메인이 보안 상태여야 하며, 이는 일반적으로 https, localhost 및 W3C 푸시 표준에 정의된 기타 예외를 의미합니다. 또한 도메인의 루트에서 서비스 워커를 등록할 수 있거나, 최소한 해당 파일의 HTTP 헤더를 제어할 수 있어야 합니다. 이 문서에서는 대체 도메인에서 Braze 웹 푸시를 통합하는 방법을 다룹니다.
사용 사례
W3C 푸시 표준에 명시된 모든 조건을 충족할 수 없는 경우, 이 방법을 사용하여 웹사이트에 푸시 프롬프트 대화 상자를 추가할 수 있습니다. 이는 http 웹사이트에서 사용자가 옵트인하도록 하거나, 푸시 프롬프트 표시를 차단하는 브라우저 확장 프로그램 팝업에서 옵트인하도록 하려는 경우에 유용합니다.
고려 사항
웹의 많은 해결 방법과 마찬가지로, 브라우저는 지속적으로 발전하므로 이 방법이 향후에는 적용되지 않을 수 있습니다. 계속하기 전에 다음 사항을 확인하세요.
- 별도의 보안 도메인(
https://)을 소유하고 있으며 해당 도메인에서 서비스 워커를 등록할 수 있는 권한이 있어야 합니다. - 사용자가 웹사이트에 로그인되어 있어야 푸시 토큰이 올바른 프로필에 매칭됩니다.
이 방법은 Shopify용 푸시 알림을 구현하는 데 사용할 수 없습니다. Shopify는 이 방식으로 푸시를 전달하는 데 필요한 헤더를 자동으로 제거합니다.
대체 푸시 도메인 설정
다음 예시를 명확하게 설명하기 위해 http://insecure.com과 https://secure.com을 두 개의 도메인으로 사용하여, http://insecure.com의 방문자가 푸시에 등록하는 것을 목표로 합니다. 이 예시는 브라우저 확장 프로그램의 팝업 페이지에 대한 chrome-extension:// 스킴에도 적용할 수 있습니다.
1단계: 프롬프트 플로우 시작
insecure.com에서 URL 파라미터를 사용하여 현재 로그인한 사용자의 Braze 외부 ID를 전달하면서 보안 도메인으로 새 창을 엽니다.
http://insecure.com
<button id="opt-in">Opt-In For Push</button>
<script>
// the same ID you would use with `braze.changeUser`:
const user_id = getUserIdSomehow();
// pass the user ID into the secure domain URL:
const secure_url = `https://secure.com/push-registration.html?external_id=${user_id}`;
// when the user takes some action, open the secure URL in a new window
document.getElementById("opt-in").onclick = function(){
if (!window.open(secure_url, 'Opt-In to Push', 'height=500,width=600,left=150,top=150')) {
window.alert('The popup was blocked by your browser');
} else {
// user is shown a popup window
// and you can now prompt for push in this window
}
}
</script>
2단계: 푸시 등록
이 시점에서 secure.com은 팝업 창을 열어 동일한 사용자 ID로 Braze 웹 SDK를 초기화하고 웹 푸시에 대한 사용자의 권한을 요청합니다.
https://secure.com/push-registration.html
3단계: 도메인 간 통신(선택 사항)
이제 insecure.com에서 시작되는 이 워크플로우를 통해 사용자가 옵트인할 수 있으므로, 사용자가 이미 옵트인했는지 여부에 따라 사이트를 수정하고 싶을 수 있습니다. 사용자가 이미 푸시에 등록되어 있다면 등록을 요청할 필요가 없습니다.
iFrame과 postMessage API를 사용하여 두 도메인 간에 통신할 수 있습니다.
insecure.com
insecure.com 도메인에서 보안 도메인(푸시가 실제로 등록된 곳)에 현재 사용자의 푸시 등록 정보를 요청합니다.
<!-- Create an iframe to the secure domain and run getPushStatus onload-->
<iframe id="push-status" src="https://secure.com/push-status.html" onload="getPushStatus()" style="display:none;"></iframe>
<script>
function getPushStatus(event){
// send a message to the iframe asking for push status
event.target.contentWindow.postMessage({type: 'get_push_status'}, 'https://secure.com');
// listen for a response from the iframe's domain
window.addEventListener("message", (event) => {
if (event.origin === "http://insecure.com" && event.data.type === 'set_push_status') {
// update the page based on the push permission we're told
window.alert(`Is user registered for push? ${event.data.isPushPermissionGranted}`);
}
}
}
</script>
secure.com/push-status.html
자주 묻는 질문(FAQ)
서비스 워커
루트 디렉토리에서 서비스 워커를 등록할 수 없는 경우 어떻게 하나요?
기본적으로 서비스 워커는 등록된 동일한 디렉토리 내에서만 사용할 수 있습니다. 예를 들어, 서비스 워커 파일이 /assets/service-worker.js에 있는 경우 example.com/assets/* 또는 assets 폴더의 하위 디렉토리 내에서만 등록할 수 있으며, 홈페이지(example.com/)에서는 등록할 수 없습니다. 이러한 이유로 서비스 워커를 루트 디렉토리(예: https://example.com/service-worker.js)에서 호스팅하고 등록하는 것이 권장됩니다.
루트 도메인에서 서비스 워커를 등록할 수 없는 경우, 서비스 워커 파일을 제공할 때 Service-Worker-Allowed HTTP 헤더를 사용하는 대안적인 방법이 있습니다. 서버가 서비스 워커에 대한 응답에서 Service-Worker-Allowed: /를 반환하도록 구성하면, 브라우저에 범위를 확장하도록 지시하여 다른 디렉토리에서도 사용할 수 있게 됩니다.
태그 매니저를 사용하여 서비스 워커를 생성할 수 있나요?
아니요, 서비스 워커는 웹사이트 서버에서 호스팅되어야 하며 태그 매니저를 통해 로드할 수 없습니다.
사이트 보안
HTTPS가 필요한가요?
네. 웹 표준에서는 푸시 알림 권한을 요청하는 도메인이 안전해야 합니다.
사이트가 “안전”한 것으로 간주되는 경우는 언제인가요?
사이트가 다음 보안 출처 패턴 중 하나와 일치하면 안전한 것으로 간주됩니다. Braze 웹 푸시 알림은 이 개방형 표준을 기반으로 구축되므로 중간자 공격이 방지됩니다.
(https, , *)(wss, *, *)(, localhost, )(, .localhost, *)(, 127/8, )(, ::1/128, *)(file, *, —)(chrome-extension, *, —)
안전한 사이트를 사용할 수 없는 경우 어떻게 하나요?
업계 모범 사례는 전체 사이트를 안전하게 만드는 것이지만, 사이트 도메인을 보호할 수 없는 고객은 보안 Modal을 사용하여 요구 사항을 우회할 수 있습니다. 대체 푸시 도메인 사용에 대한 가이드에서 자세한 내용을 확인하거나 작동 데모를 확인하세요.
필수 조건
이 기능을 사용하려면 먼저 Android Braze SDK를 통합해야 합니다.
기본 제공 기능
다음 기능은 Braze Android SDK에 기본으로 포함되어 있습니다. 다른 푸시 알림 기능을 사용하려면 앱에 푸시 알림을 설정해야 합니다.
| 기능 | 설명 |
|---|---|
| Push Stories | Android Push Stories는 기본적으로 Braze Android SDK에 포함되어 있습니다. 자세한 내용은 Push Stories를 참조하세요. |
| 푸시 프라이머 | 푸시 프라이머 Campaign은 사용자가 앱의 푸시 알림을 기기에서 활성화하도록 유도합니다. SDK 커스텀 설정 없이 노코드 푸시 프라이머를 사용하여 구현할 수 있습니다. |
푸시 알림 수명 주기에 관하여
다음 플로우차트는 Braze가 푸시 알림 수명 주기(예: 권한 프롬프트, 토큰 생성, 메시지 전달)를 처리하는 방식을 보여줍니다.
---
config:
  theme: neutral
---
flowchart TD

%% Permission flow
subgraph Permission[Push Permissions]
    B{Android version of the device?}
    B -->|Android 13+| C["requestPushPermissionPrompt() called"]
    B -->|Android 12 and earlier| D[No permissions required]

    %% Connect Android 12 path to Braze state
    D --> H3[Braze: user subscription state]
    H3 --> J3[Defaults to 'subscribed' when user profile created]

    C --> E{Did the user grant push permission?}
    E -->|Yes| F[POST_NOTIFICATIONS permission granted]
    E -->|No| G[POST_NOTIFICATIONS permission denied]

    %% Braze subscription state updates
    F --> H1[Braze: user subscription state]
    G --> H2[Braze: user subscription state]

    H1 --> I1{Automatically opt in after permission granted?}
    I1 -->|true| J1[Set to 'opted-in']
    I1 -->|false| J2[Remains 'subscribed']

    H2 --> K1[Remains 'subscribed'<br/>or 'unsubscribed']

    %% Subscription state legend
    subgraph BrazeStates[Braze subscription states]
        L1['Subscribed' - default state<br/>when user profile created]
        L2['Opted-in' - user explicitly<br/>wants push notifications]
        L3['Unsubscribed' - user explicitly<br/>opted out of push]
    end

    %% Note about user-level states
    note1[Note: These states are user-level<br/>and apply across all devices for the user]

    %% Connect states to legend
    J1 -.-> L2
    J2 -.-> L1
    J3 -.-> L1
    K1 -.-> L3
    note1 -.-> BrazeStates
end

%% Styling
classDef permissionClass fill:#e3f2fd,stroke:#1565c0,stroke-width:2px
classDef tokenClass fill:#e8f5e9,stroke:#2e7d32,stroke-width:2px
classDef sdkClass fill:#fff3e0,stroke:#e65100,stroke-width:2px
classDef configClass fill:#f3e5f5,stroke:#7b1fa2,stroke-width:2px
classDef displayClass fill:#ffebee,stroke:#c62828,stroke-width:2px
classDef deliveryClass fill:#fce4ec,stroke:#c2185b,stroke-width:2px
classDef brazeClass fill:#e8f5e9,stroke:#2e7d32,stroke-width:3px

class A,B,C,E,F,G permissionClass
class H,I tokenClass
class J,K sdkClass
class N,O,P configClass
class R,S,S1,T,U,V displayClass
class W,X,X1,X2,Y,Z deliveryClass
class H1,H2,H3,I1,J1,J2,J3,K1,L1,L2,L3,note1 brazeClass
---
config:
  theme: neutral
---
flowchart TD

%% Token generation flow
subgraph Token[Token Generation]
    H["Braze SDK initialized"] --> Q{Is FCM auto-registration enabled?}
    Q -->|Yes| L{Is required configuration present?}
    Q -->|No| M[No FCM token generated]
    L -->|Yes| I[Generate FCM token]
    L -->|No| M
    I --> K[Register token with Braze]

    %% Configuration requirements
    subgraph Config[Required configuration]
        N['google-services.json' file is present]
        O['com.google.firebase:firebase-messaging' in gradle]
        P['com.google.gms.google-services' plugin in gradle]
    end

    %% Connect config to check
    N -.-> L
    O -.-> L
    P -.-> L
end

%% Styling
classDef permissionClass fill:#e3f2fd,stroke:#1565c0,stroke-width:2px
classDef tokenClass fill:#e8f5e9,stroke:#2e7d32,stroke-width:2px
classDef sdkClass fill:#fff3e0,stroke:#e65100,stroke-width:2px
classDef configClass fill:#f3e5f5,stroke:#7b1fa2,stroke-width:2px
classDef displayClass fill:#ffebee,stroke:#c62828,stroke-width:2px
classDef deliveryClass fill:#fce4ec,stroke:#c2185b,stroke-width:2px
classDef brazeClass fill:#e8f5e9,stroke:#2e7d32,stroke-width:3px

class A,B,C,E,F,G permissionClass
class H,I tokenClass
class J,K sdkClass
class N,O,P configClass
class R,S,S1,T,U,V displayClass
class W,X,X1,X2,Y,Z deliveryClass
class H1,H2,H3,I1,J1,J2,J3,K1,L1,L2,L3,note1 brazeClass
---
config:
  theme: neutral
  fontSize: 10
---
flowchart TD

subgraph Display[Push Display]
    %% Push delivery flow
    W[Push sent to FCM servers] --> X{Did FCM receive push?}
    X -->|App is terminated| Y[FCM cannot deliver push to the app]
    X -->|Delivery conditions met| X1[App receives push from FCM]
    X1 --> X2[Braze SDK receives push]
    X2 --> R[Push type?]

    %% Push Display Flow
    R -->|Standard push| S{Is push permission required?}
    R -->|Silent push| T[Braze SDK processes silent push]
    S -->|Yes| S1{Did the user grant push permission?}
    S -->|No| V[Notification is shown to the user]
    S1 -->|Yes| V
    S1 -->|No| U[Notification is not shown to the user]
end

%% Styling
classDef permissionClass fill:#e3f2fd,stroke:#1565c0,stroke-width:2px
classDef tokenClass fill:#e8f5e9,stroke:#2e7d32,stroke-width:2px
classDef sdkClass fill:#fff3e0,stroke:#e65100,stroke-width:2px
classDef configClass fill:#f3e5f5,stroke:#7b1fa2,stroke-width:2px
classDef displayClass fill:#ffebee,stroke:#c62828,stroke-width:2px
classDef deliveryClass fill:#fce4ec,stroke:#c2185b,stroke-width:2px
classDef brazeClass fill:#e8f5e9,stroke:#2e7d32,stroke-width:3px

class A,B,C,E,F,G permissionClass
class H,I tokenClass
class J,K sdkClass
class N,O,P configClass
class R,S,S1,T,U,V displayClass
class W,X,X1,X2,Y,Z deliveryClass
class H1,H2,H3,I1,J1,J2,J3,K1,L1,L2,L3,note1 brazeClass
푸시 알림 설정하기

사용량 제한
Firebase Cloud Messaging(FCM) API의 기본 사용량 제한은 분당 600,000건입니다. 이 제한에 도달하면 Braze가 몇 분 후에 자동으로 재시도합니다. 한도 증가를 요청하려면 Firebase 지원팀에 문의하세요.
1단계: 프로젝트에 Firebase 추가하기
먼저 Android 프로젝트에 Firebase를 추가합니다. 단계별 안내는 Google의 Firebase 설정 가이드를 참조하세요.
2단계: 의존성에 Cloud Messaging 추가하기
다음으로 프로젝트 의존성에 Cloud Messaging 라이브러리를 추가합니다. Android 프로젝트에서 build.gradle을 열고 dependencies 블록에 다음 줄을 추가합니다.
implementation "google.firebase:firebase-messaging:+"
의존성은 다음과 비슷하게 보여야 합니다:
dependencies {
implementation project(':android-sdk-ui')
implementation "com.google.firebase:firebase-messaging:+"
}
3단계: Firebase Cloud Messaging API 활성화하기
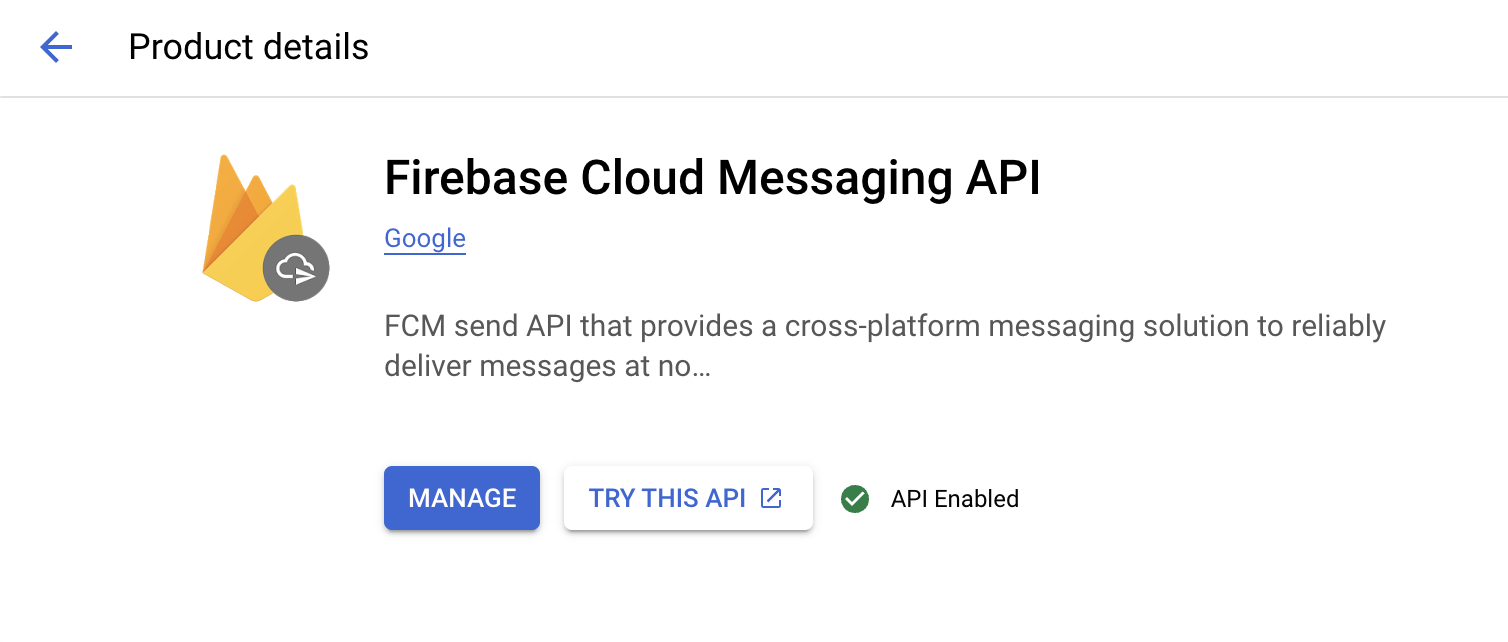
Google Cloud에서 Android 앱이 사용 중인 프로젝트를 선택한 다음, Firebase Cloud Messaging API를 활성화합니다.
4단계: 서비스 계정 만들기
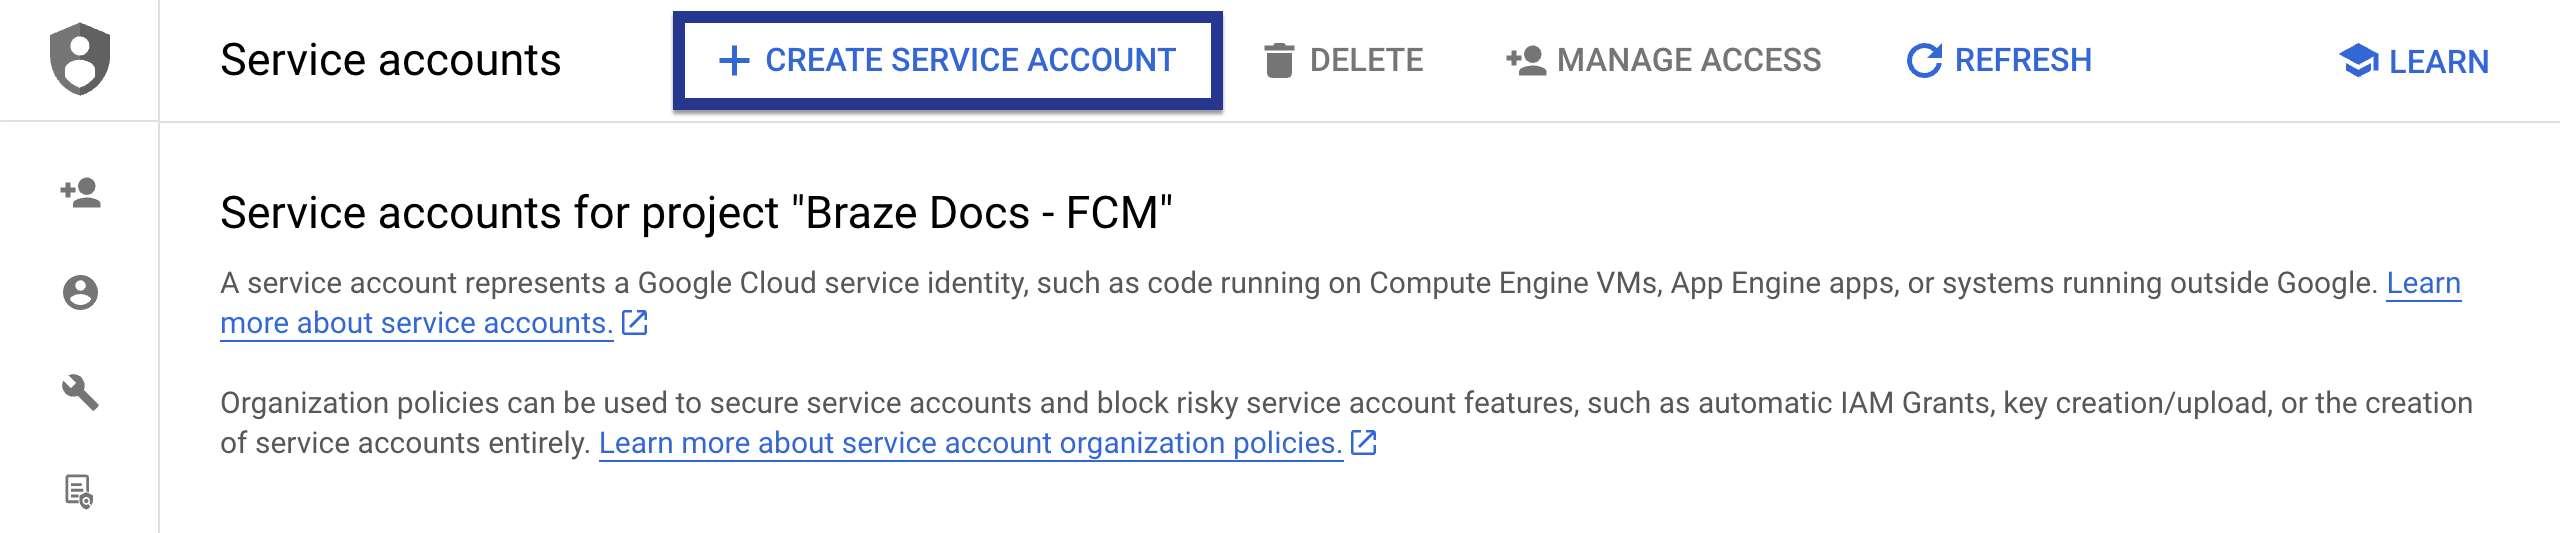
다음으로, FCM 토큰 등록 시 Braze가 인증된 API 호출을 할 수 있도록 새 서비스 계정을 만듭니다. Google Cloud에서 Service Accounts로 이동한 다음 프로젝트를 선택합니다. Service Accounts 페이지에서 Create Service Account를 선택합니다.
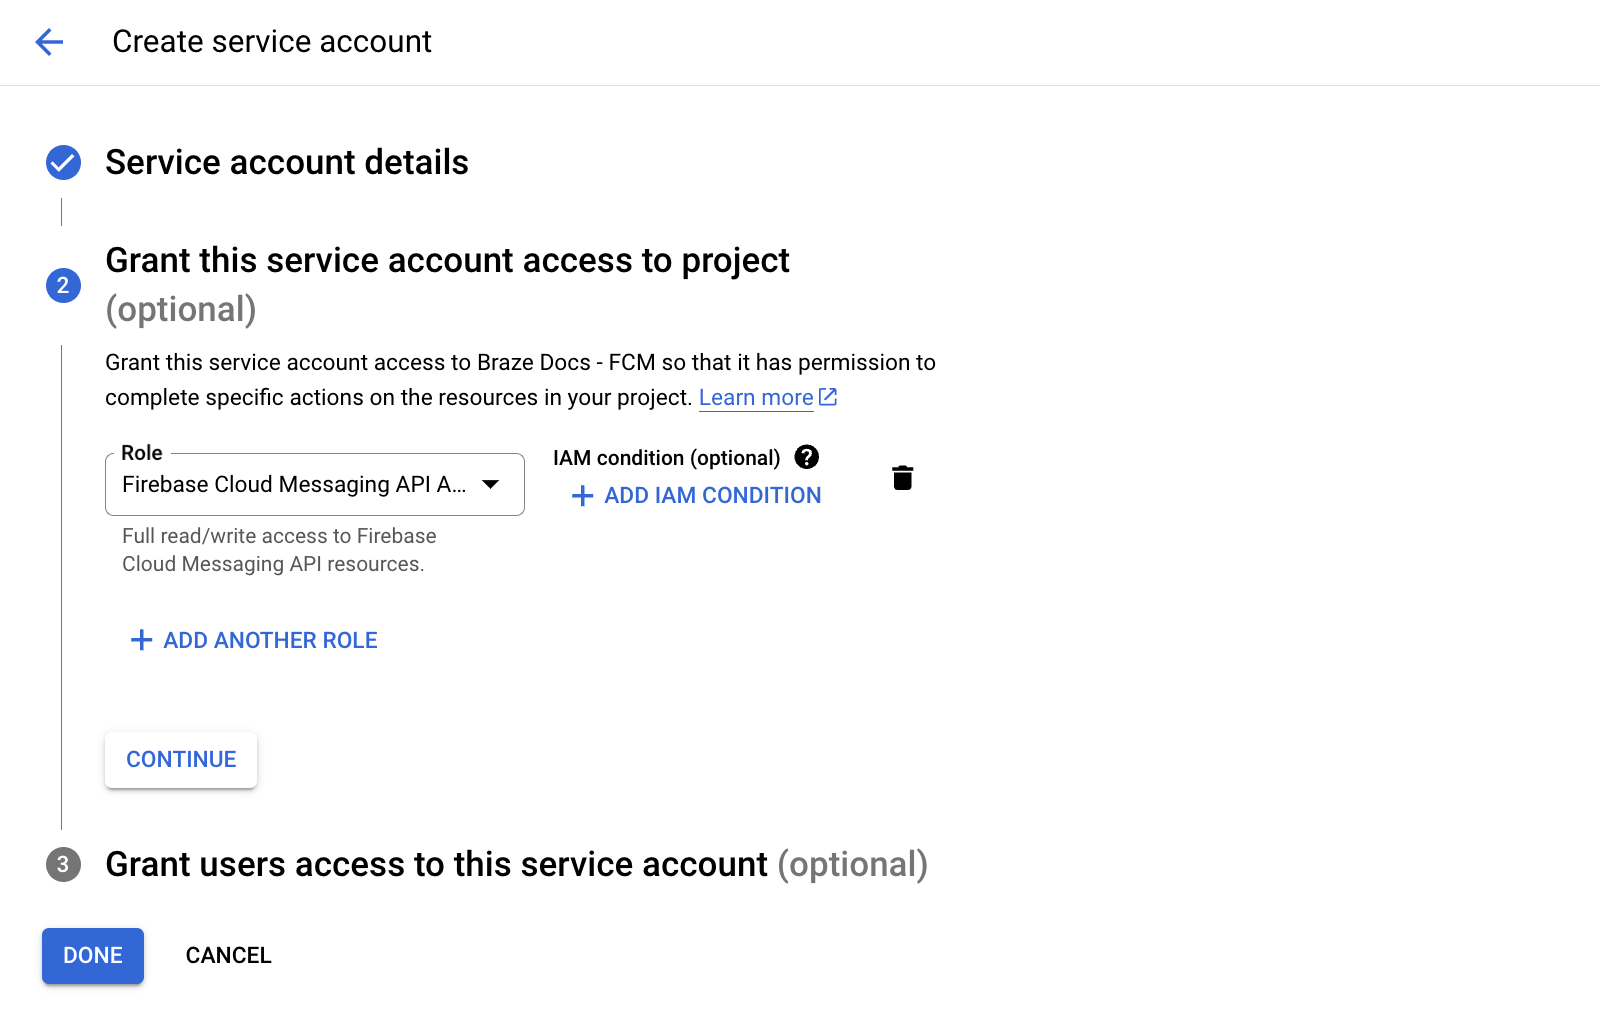
서비스 계정 이름, ID 및 설명을 입력한 다음 Create and continue를 선택합니다.
Role 필드에서 역할 목록에서 Firebase Cloud Messaging API Admin을 찾아 선택합니다. 더 제한적인 액세스를 원하면 cloudmessaging.messages.create 권한이 있는 커스텀 역할을 만든 다음 목록에서 해당 역할을 선택합니다. 완료되면 Done을 선택합니다.

Firebase Cloud Messaging Admin이 아닌 Firebase Cloud Messaging API Admin을 선택해야 합니다.
5단계: JSON 자격 증명 생성하기
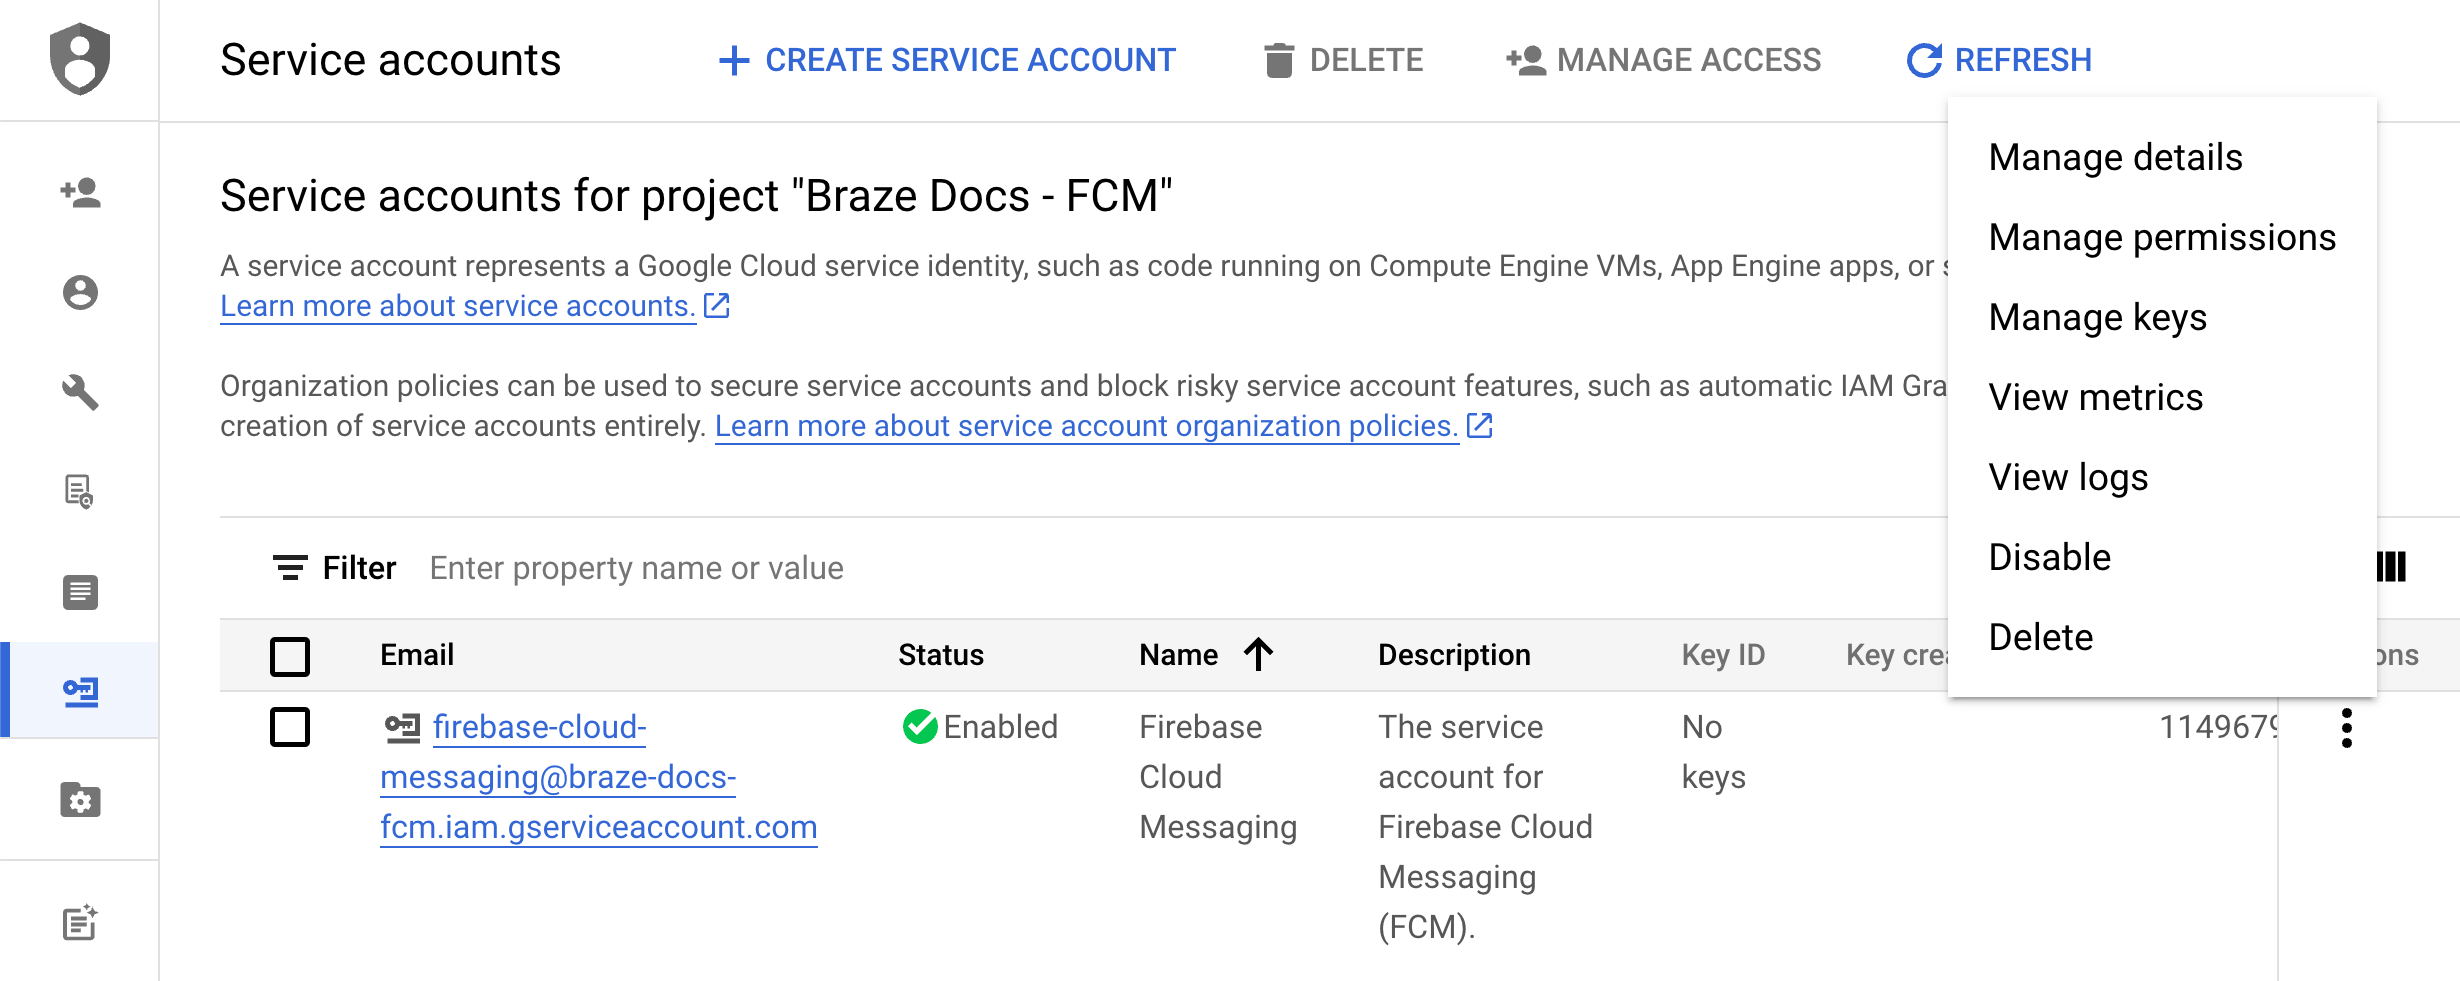
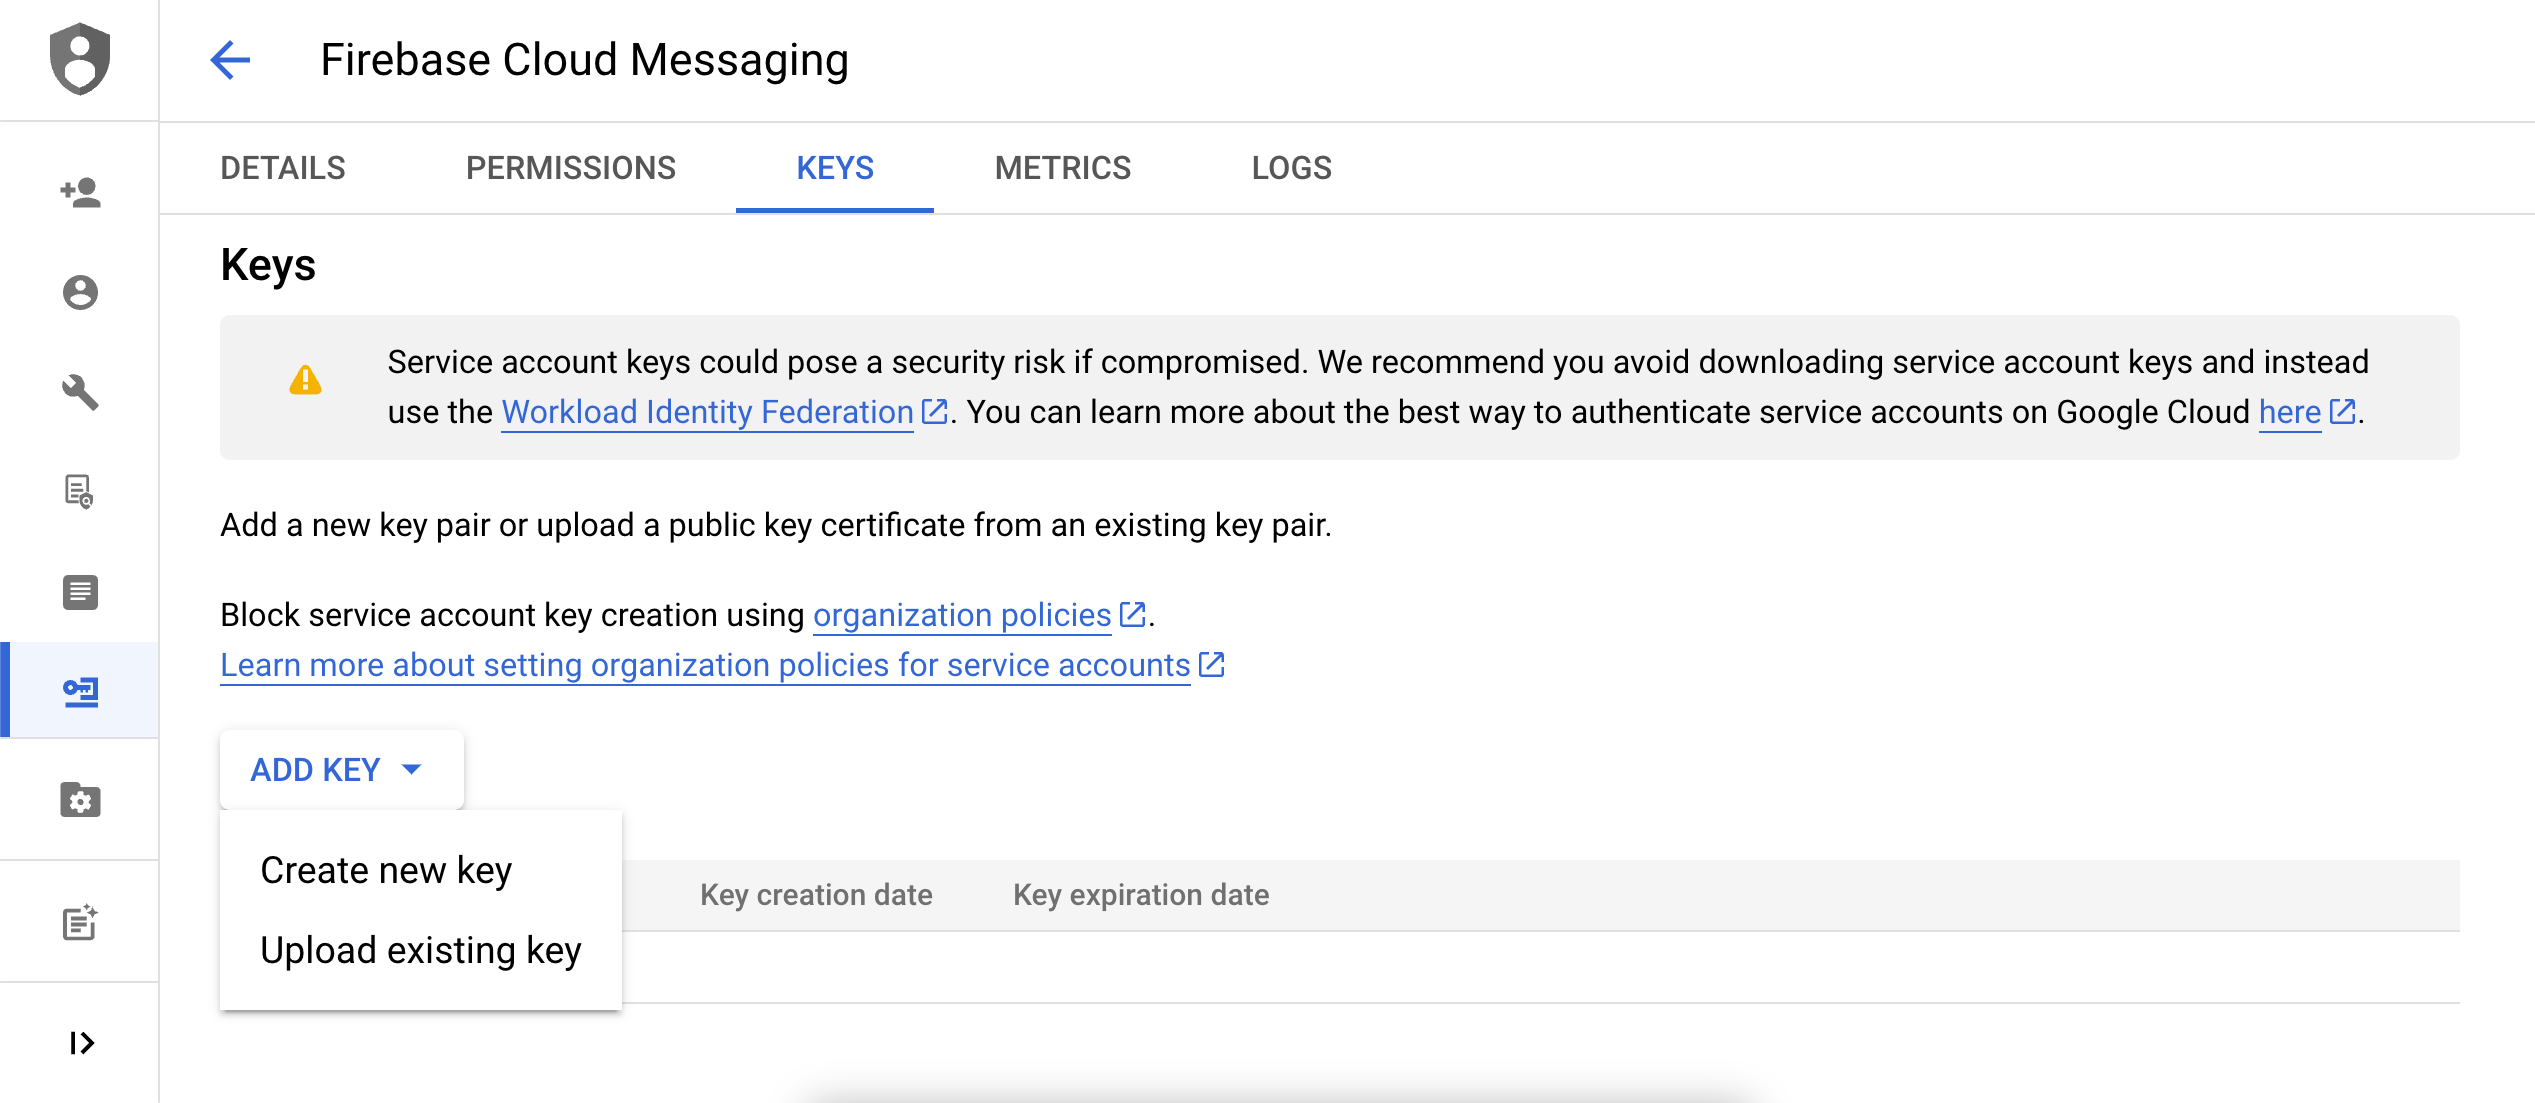
다음으로 FCM 서비스 계정의 JSON 자격 증명을 생성합니다. Google Cloud IAM & Admin에서 Service Accounts로 이동한 다음 프로젝트를 선택합니다. 이전에 만든 FCM 서비스 계정을 찾은 다음 Actions > Manage Keys를 선택합니다.
Add Key > Create new key를 선택합니다.
JSON을 선택한 다음 Create를 선택합니다. 서비스 계정을 FCM 프로젝트 ID와 다른 Google Cloud 프로젝트 ID를 사용하여 만든 경우, JSON 파일에서 project_id에 할당된 값을 수동으로 업데이트해야 합니다.
키를 다운로드한 위치를 기억해 두세요—다음 단계에서 필요합니다.
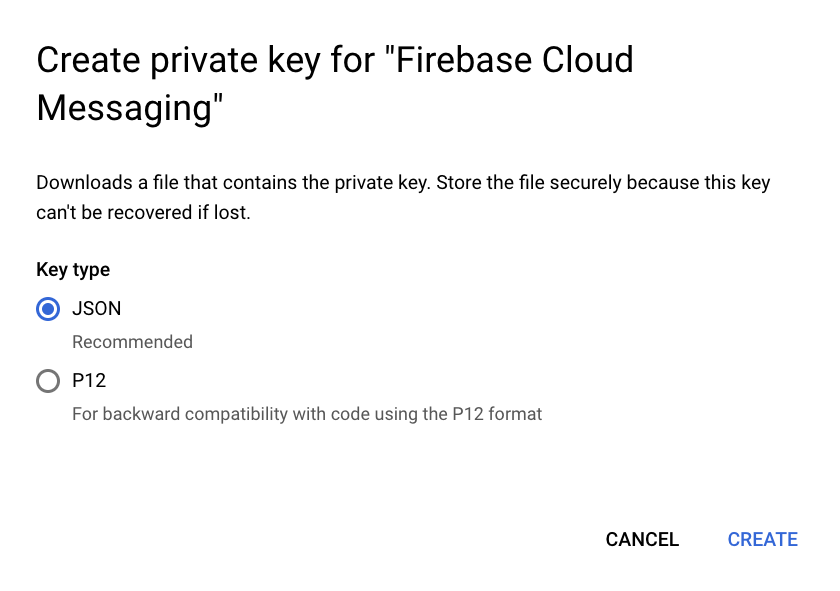
비공개 키는 유출될 경우 보안 위험이 될 수 있습니다. JSON 자격 증명을 안전한 장소에 보관하세요—Braze에 업로드한 후 키를 삭제할 예정입니다.
6단계: Braze에 JSON 자격 증명 업로드하기
다음으로 Braze 대시보드에 JSON 자격 증명을 업로드합니다. Braze에서 Settings > App Settings를 선택합니다.
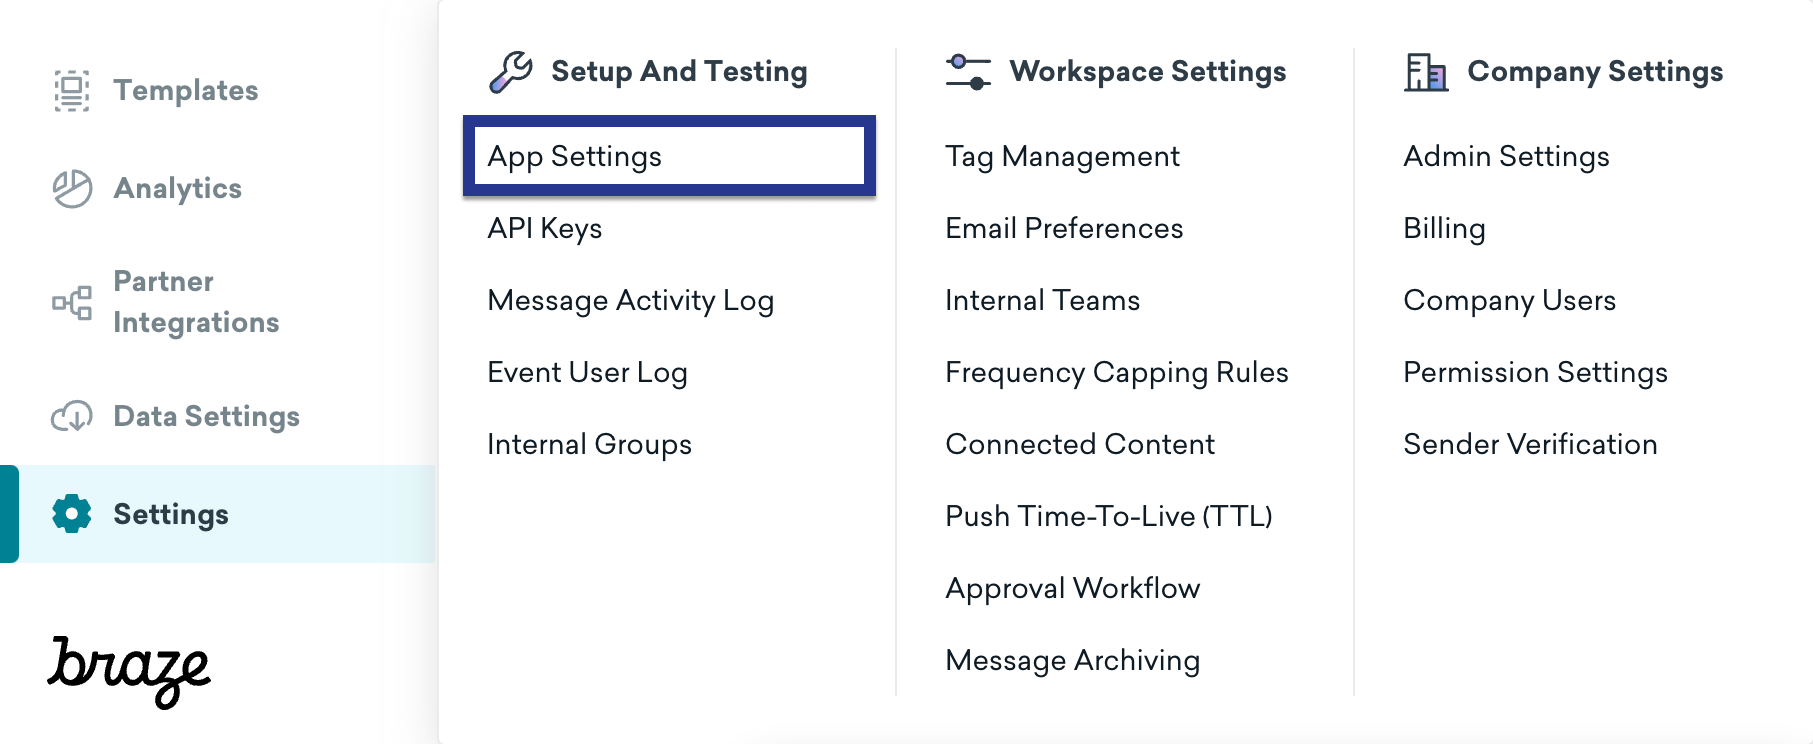
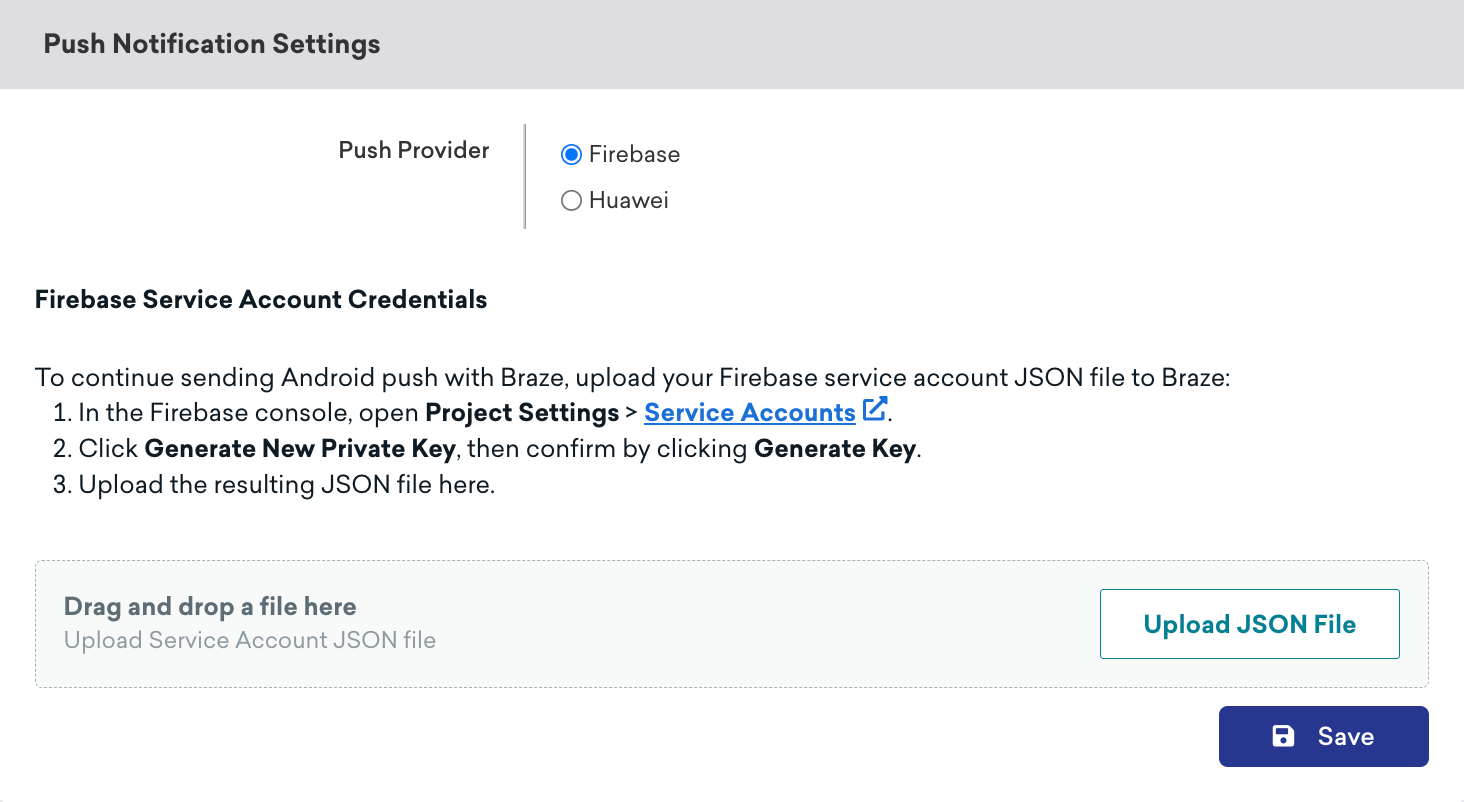
Android 앱의 Push Notification Settings 아래에서 Firebase를 선택한 다음 Upload JSON File을 선택하고 이전에 생성한 자격 증명을 업로드합니다. 완료되면 Save를 선택합니다.
7단계: 자동 토큰 등록 설정하기
사용자 중 한 명이 푸시 알림을 옵트인하면, 푸시 알림을 보내기 전에 해당 사용자의 기기에서 FCM 토큰을 생성해야 합니다. Braze SDK를 사용하면 프로젝트의 Braze 설정 파일에서 각 사용자 기기에 대한 자동 FCM 토큰 등록을 활성화할 수 있습니다.
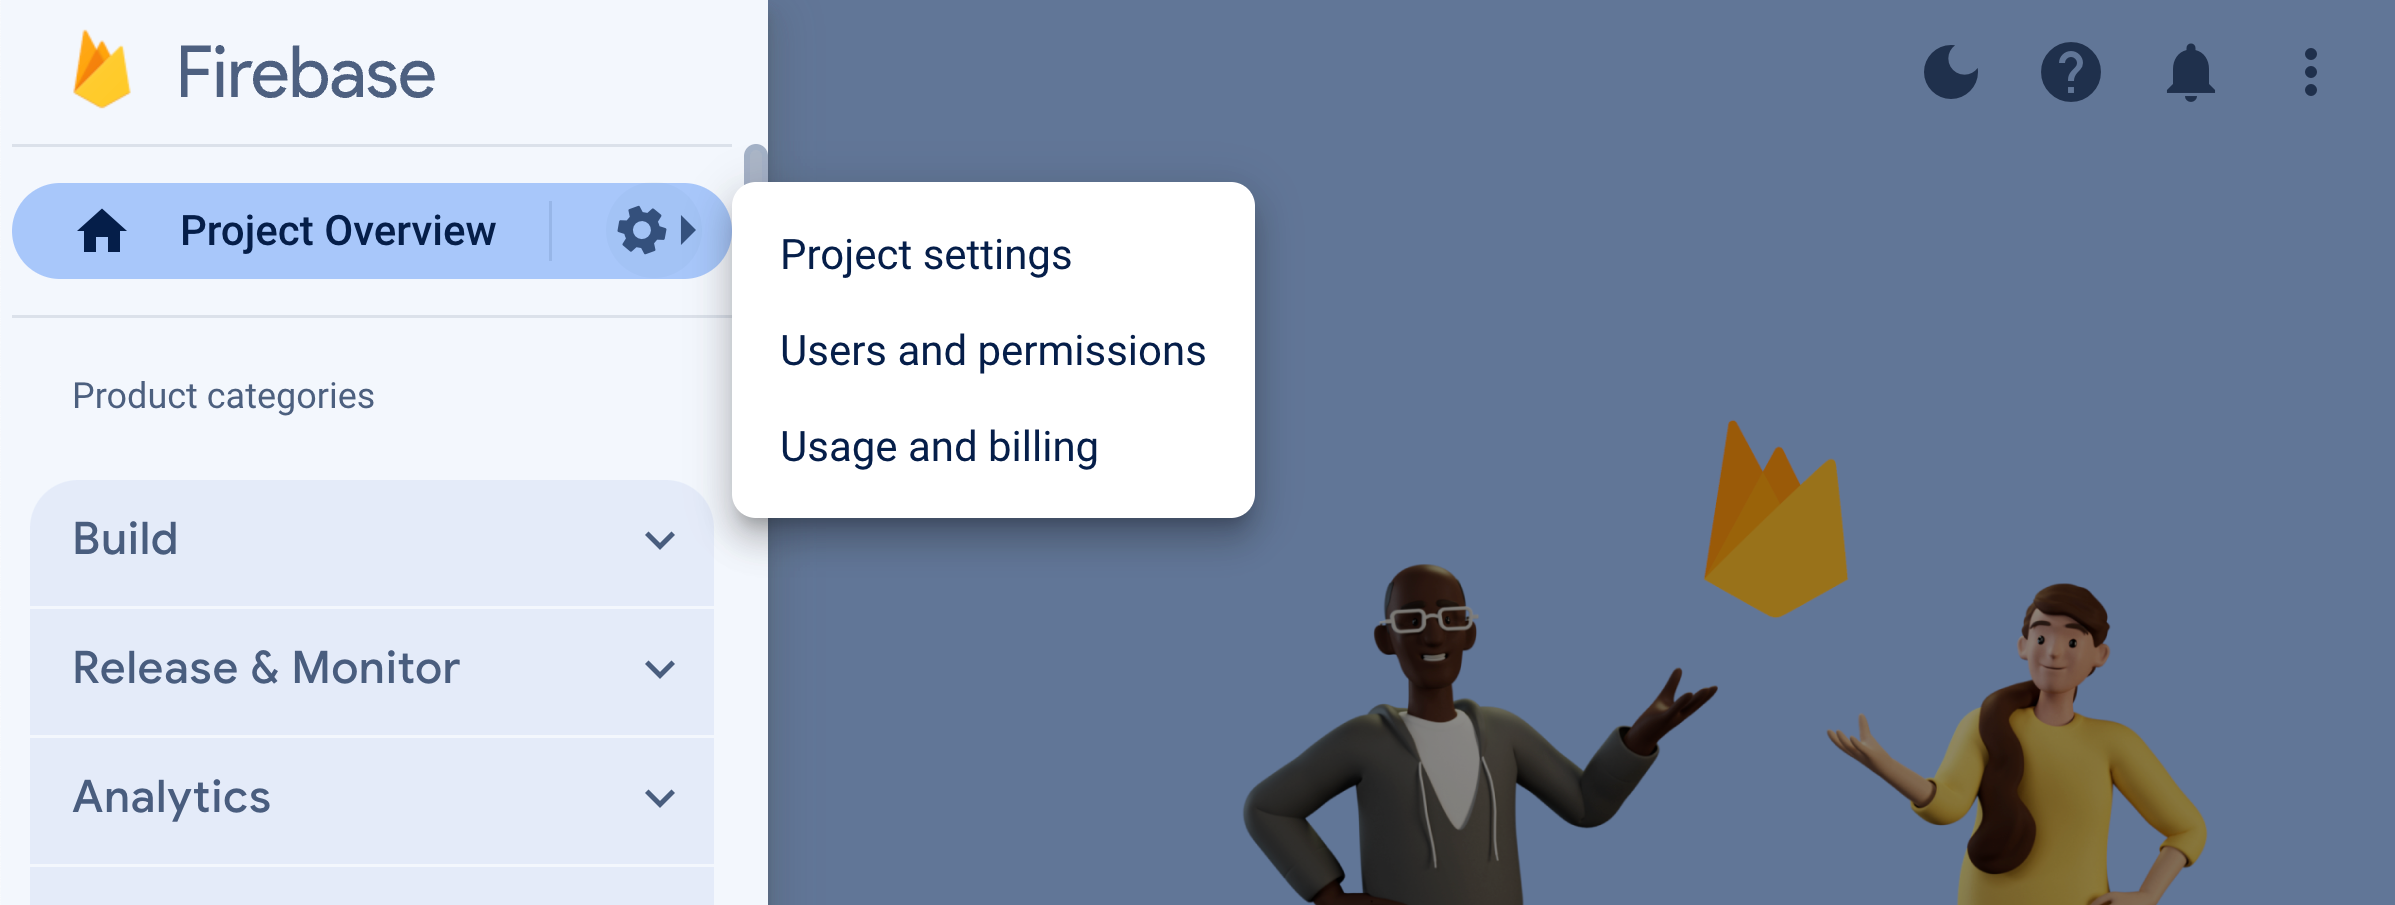
먼저 Firebase Console로 이동하여 프로젝트를 연 다음 Settings > Project settings를 선택합니다.
Cloud Messaging을 선택한 다음 Firebase Cloud Messaging API (V1) 아래에서 Sender ID 필드의 번호를 복사합니다.
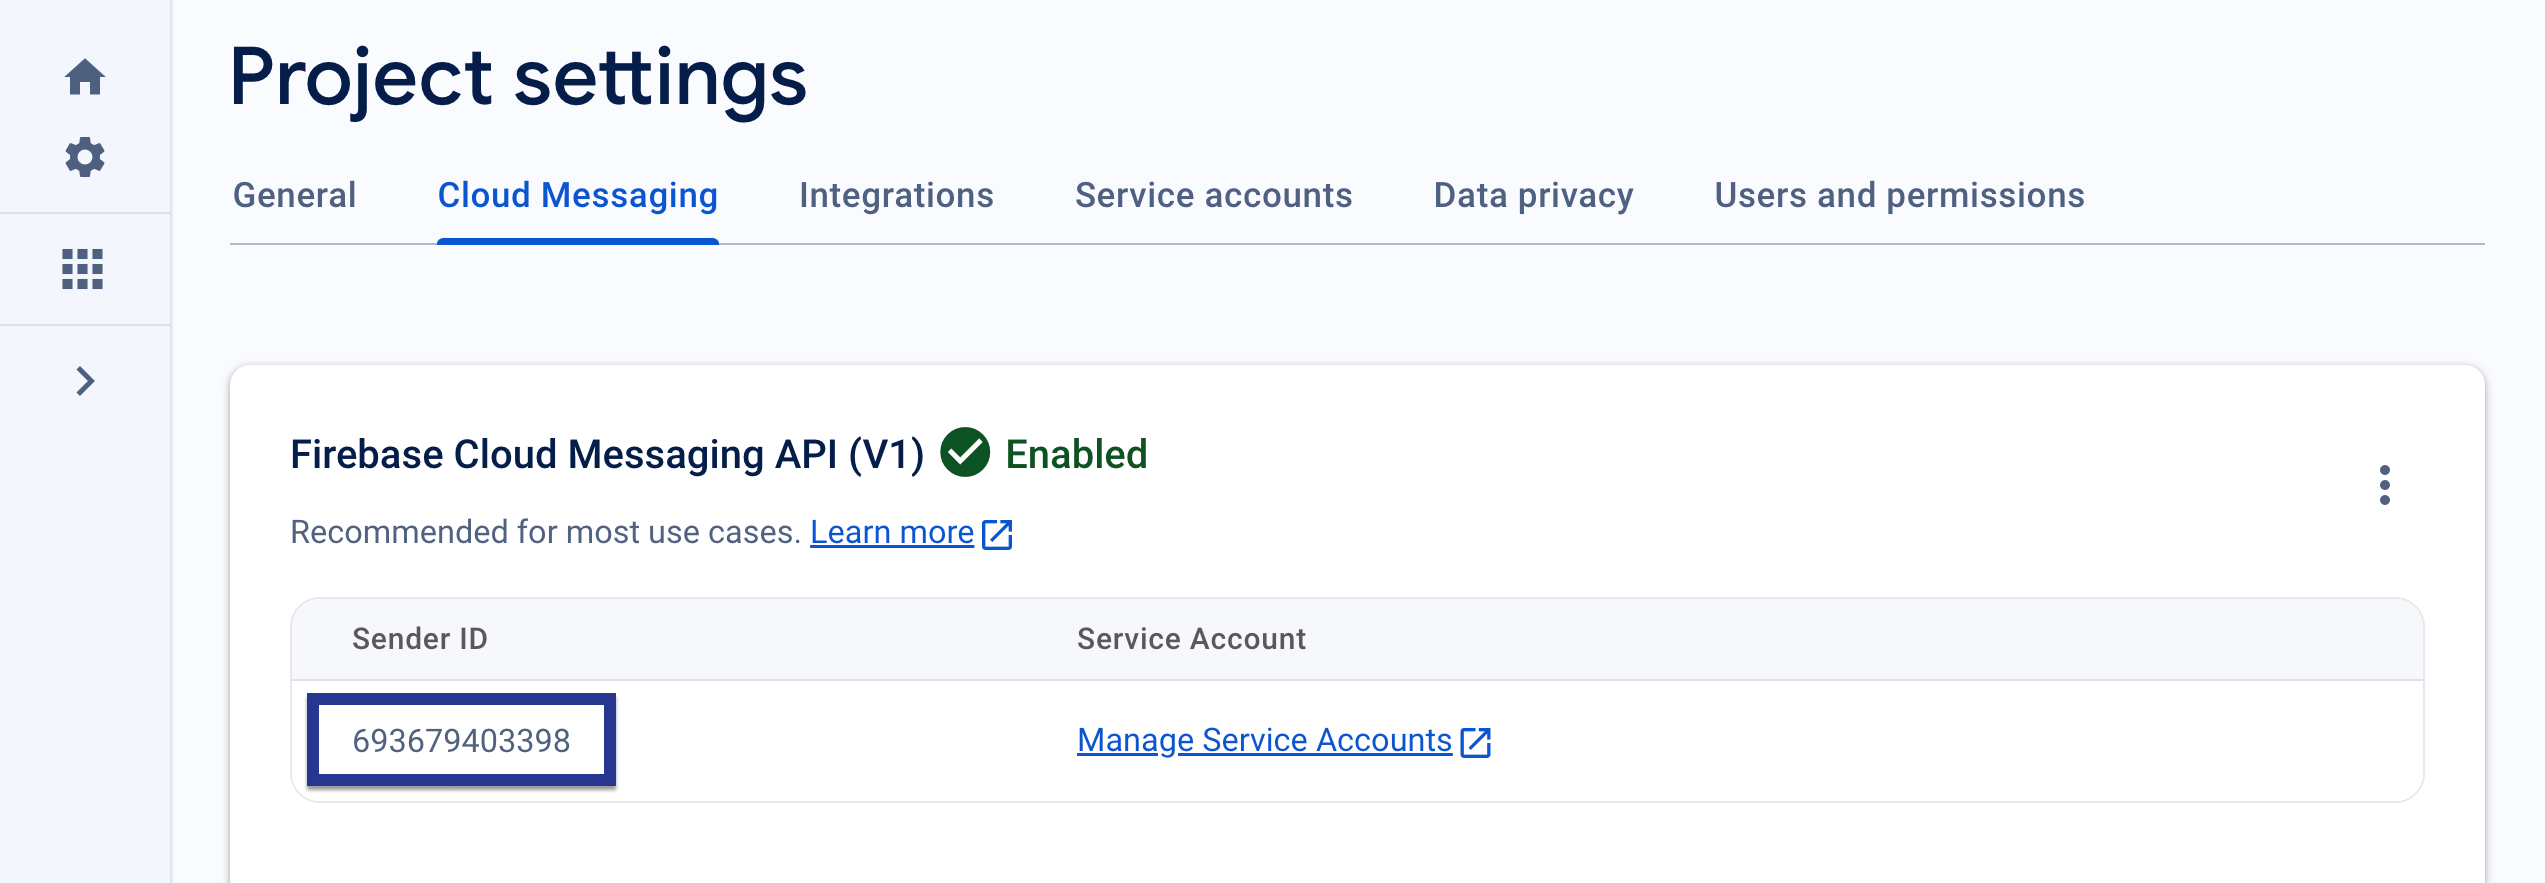
그런 다음 Android Studio 프로젝트를 열고 Firebase Sender ID를 사용하여 braze.xml 또는 BrazeConfig에서 자동 FCM 토큰 등록을 활성화합니다.
자동 FCM 토큰 등록을 구성하려면 braze.xml 파일에 다음 줄을 추가합니다:
<bool translatable="false" name="com_braze_firebase_cloud_messaging_registration_enabled">true</bool>
<string translatable="false" name="com_braze_firebase_cloud_messaging_sender_id">FIREBASE_SENDER_ID</string>
FIREBASE_SENDER_ID를 Firebase 프로젝트 설정에서 복사한 값으로 바꿉니다. braze.xml은 다음과 비슷하게 보여야 합니다:
<?xml version="1.0" encoding="utf-8"?>
<resources>
<string translatable="false" name="com_braze_api_key">12345ABC-6789-DEFG-0123-HIJK456789LM</string>
<bool translatable="false" name="com_braze_firebase_cloud_messaging_registration_enabled">true</bool>
<string translatable="false" name="com_braze_firebase_cloud_messaging_sender_id">603679405392</string>
</resources>
자동 FCM 토큰 등록을 구성하려면 BrazeConfig에 다음 줄을 추가합니다:
.setIsFirebaseCloudMessagingRegistrationEnabled(true)
.setFirebaseCloudMessagingSenderIdKey("FIREBASE_SENDER_ID")
.setIsFirebaseCloudMessagingRegistrationEnabled(true)
.setFirebaseCloudMessagingSenderIdKey("FIREBASE_SENDER_ID")
FIREBASE_SENDER_ID를 Firebase 프로젝트 설정에서 복사한 값으로 바꿉니다. BrazeConfig는 다음과 비슷하게 보여야 합니다:
BrazeConfig brazeConfig = new BrazeConfig.Builder()
.setApiKey("12345ABC-6789-DEFG-0123-HIJK456789LM")
.setCustomEndpoint("sdk.iad-01.braze.com")
.setSessionTimeout(60)
.setHandlePushDeepLinksAutomatically(true)
.setGreatNetworkDataFlushInterval(10)
.setIsFirebaseCloudMessagingRegistrationEnabled(true)
.setFirebaseCloudMessagingSenderIdKey("603679405392")
.build();
Braze.configure(this, brazeConfig);
val brazeConfig = BrazeConfig.Builder()
.setApiKey("12345ABC-6789-DEFG-0123-HIJK456789LM")
.setCustomEndpoint("sdk.iad-01.braze.com")
.setSessionTimeout(60)
.setHandlePushDeepLinksAutomatically(true)
.setGreatNetworkDataFlushInterval(10)
.setIsFirebaseCloudMessagingRegistrationEnabled(true)
.setFirebaseCloudMessagingSenderIdKey("603679405392")
.build()
Braze.configure(this, brazeConfig)
FCM 토큰을 수동으로 등록하려면, 앱의 onCreate() 메서드 내에서 Braze 인스턴스의 registeredPushToken 속성정보를 설정하세요.
// Kotlin
Braze.getInstance(context).registeredPushToken = "FCM_TOKEN"
// Java
Braze.getInstance(context).setRegisteredPushToken("FCM_TOKEN");
여러 Firebase 프로젝트 사용하기
앱에서 여러 Firebase 프로젝트를 사용하는 경우 다음 단계를 따르세요:
- 앱의
google-services.json에서 초기화된 기본 Firebase 프로젝트에서 Braze 푸시를 유지합니다. - 커스텀 Firebase 메시징 서비스를 사용하는 경우, 커스텀 Firebase 메시징 서비스에서 설치 ID 등록하기를 완료합니다.
- 앱이 다른 방식으로 푸시 토큰을 가져오는 경우, 이전 팁에 나온 대로 수동으로
registeredPushToken을 설정합니다.
Firebase Cloud Messaging에는 수동으로 초기화한 FirebaseApp에서 토큰을 검색하는 지원 API가 없습니다. onNewToken 및 onRegistered와 같은 FirebaseMessagingService 콜백은 기본 프로젝트에 대해서만 실행됩니다. 자세한 내용은 Firebase 설명서의 여러 프로젝트 구성을 참조하세요.
버전 세부 정보는 SDK 체인지로그를 참조하세요.
8단계: 애플리케이션 클래스에서 자동 요청 제거하기
무음 푸시 알림을 보낼 때마다 Braze가 불필요한 네트워크 요청을 트리거하지 않도록, Application 클래스의 onCreate() 메서드에 구성된 자동 네트워크 요청을 제거합니다. 자세한 내용은 Android 개발자 레퍼런스: Application을 참조하세요.
알림 표시하기
1단계: Braze Firebase Messaging Service 등록하기
새로운 Firebase Messaging Service, 기존 서비스 또는 Braze가 아닌 Firebase Messaging Service를 생성할 수 있습니다. 특정 요구 사항에 가장 적합한 것을 선택하세요.
Braze에는 푸시 수신 및 열기 인텐트를 처리하는 서비스가 포함되어 있습니다. BrazeFirebaseMessagingService 클래스를 AndroidManifest.xml에 등록해야 합니다.
<service android:name="com.braze.push.BrazeFirebaseMessagingService"
android:exported="false">
<intent-filter>
<action android:name="com.google.firebase.MESSAGING_EVENT" />
</intent-filter>
</service>
알림 코드도 BrazeFirebaseMessagingService를 사용하여 열기 및 클릭 동작 추적을 처리합니다. 이 서비스가 올바르게 작동하려면 AndroidManifest.xml에 등록해야 합니다. 또한 Braze는 시스템에서 보낸 알림에 고유 키를 접두사로 추가하여 Braze 시스템에서 보낸 알림만 렌더링합니다. 다른 FCM 서비스에서 보낸 알림을 렌더링하려면 추가 서비스를 별도로 등록할 수 있습니다. Firebase 푸시 샘플 앱의 AndroidManifest.xml을 참조하세요.
Braze SDK 3.1.1 이전에는 AppboyFcmReceiver가 FCM 푸시를 처리하는 데 사용되었습니다. AppboyFcmReceiver 클래스는 매니페스트에서 제거하고 위의 통합으로 교체해야 합니다.
이미 Firebase Messaging Service가 등록되어 있는 경우, BrazeFirebaseMessagingService.handleBrazeRemoteMessage()를 통해 RemoteMessage 객체를 Braze에 전달할 수 있습니다. 이 메서드는 RemoteMessage 객체가 Braze에서 발신된 경우에만 알림을 표시하며, 그렇지 않은 경우 안전하게 무시합니다.
커스텀 Firebase Messaging Service에서 설치 ID 등록하기
firebase-messaging v25.1.0 이상을 사용하는 경우, Firebase 등록에 Firebase Installation ID가 사용됩니다. 커스텀 Firebase Messaging Service에서 onRegistered를 오버라이드하고 registeredPushToken을 설정하세요.
public class MyFirebaseMessagingService extends FirebaseMessagingService {
@Override
public void onRegistered(String installationId) {
super.onRegistered(installationId);
Braze.getInstance(this).setRegisteredPushToken(installationId);
}
@Override
public void onMessageReceived(RemoteMessage remoteMessage) {
super.onMessageReceived(remoteMessage);
if (BrazeFirebaseMessagingService.handleBrazeRemoteMessage(this, remoteMessage)) {
// This Remote Message originated from Braze and a push notification was displayed.
// No further action is needed.
} else {
// This Remote Message did not originate from Braze.
// No action was taken and you can safely pass this Remote Message to other handlers.
}
}
}
class MyFirebaseMessagingService : FirebaseMessagingService() {
override fun onRegistered(installationId: String) {
super.onRegistered(installationId)
Braze.getInstance(this).registeredPushToken = installationId
}
override fun onMessageReceived(remoteMessage: RemoteMessage?) {
super.onMessageReceived(remoteMessage)
if (BrazeFirebaseMessagingService.handleBrazeRemoteMessage(this, remoteMessage)) {
// This Remote Message originated from Braze and a push notification was displayed.
// No further action is needed.
} else {
// This Remote Message did not originate from Braze.
// No action was taken and you can safely pass this Remote Message to other handlers.
}
}
}
사용하려는 다른 Firebase Messaging Service가 있는 경우, 앱이 Braze가 아닌 푸시를 수신할 때 호출할 대체(fallback) Firebase Messaging Service를 지정할 수도 있습니다.
braze.xml에서 다음을 지정하세요.
<bool name="com_braze_fallback_firebase_cloud_messaging_service_enabled">true</bool>
<string name="com_braze_fallback_firebase_cloud_messaging_service_classpath">com.company.OurFirebaseMessagingService</string>
또는 런타임 구성을 통해 설정할 수 있습니다.
BrazeConfig brazeConfig = new BrazeConfig.Builder()
.setFallbackFirebaseMessagingServiceEnabled(true)
.setFallbackFirebaseMessagingServiceClasspath("com.company.OurFirebaseMessagingService")
.build();
Braze.configure(this, brazeConfig);
val brazeConfig = BrazeConfig.Builder()
.setFallbackFirebaseMessagingServiceEnabled(true)
.setFallbackFirebaseMessagingServiceClasspath("com.company.OurFirebaseMessagingService")
.build()
Braze.configure(this, brazeConfig)
2단계: 디자인 가이드라인에 맞게 작은 아이콘 설정하기
Android 알림 아이콘에 대한 일반 정보는 알림 개요를 참조하세요.
Android N부터 색상이 포함된 작은 알림 아이콘 에셋을 업데이트하거나 제거해야 합니다. Android 시스템(Braze SDK가 아님)은 액션 아이콘과 알림 작은 아이콘에서 알파 및 투명도 채널이 아닌 모든 채널을 무시합니다. 즉, Android는 투명 영역을 제외한 알림 작은 아이콘의 모든 부분을 단색으로 변환합니다.
올바르게 표시되는 알림 작은 아이콘 에셋을 만들려면 다음을 따르세요.
- 흰색을 제외한 모든 색상을 이미지에서 제거합니다.
- 에셋의 흰색이 아닌 모든 영역은 투명해야 합니다.
부적절한 에셋의 일반적인 증상은 작은 알림 아이콘이 단색 사각형으로 렌더링되는 것입니다. 이는 Android 시스템이 알림 작은 아이콘 에셋에서 투명 영역을 찾지 못하기 때문입니다.
아래 그림의 큰 아이콘과 작은 아이콘은 올바르게 디자인된 아이콘의 예시입니다.

3단계: 알림 아이콘 구성하기
braze.xml에서 아이콘 지정하기
Braze에서는 braze.xml에 드로어블 리소스를 지정하여 알림 아이콘을 구성할 수 있습니다.
<drawable name="com_braze_push_small_notification_icon">REPLACE_WITH_YOUR_ICON</drawable>
<drawable name="com_braze_push_large_notification_icon">REPLACE_WITH_YOUR_ICON</drawable>
작은 알림 아이콘 설정은 필수입니다. 설정하지 않으면 Braze는 앱 아이콘을 작은 알림 아이콘으로 기본 사용하며, 이는 최적의 표시가 아닐 수 있습니다.
큰 알림 아이콘 설정은 선택 사항이지만 권장됩니다.
아이콘 강조 색상 지정하기
알림 아이콘 강조 색상은 braze.xml에서 오버라이드할 수 있습니다. 색상이 지정되지 않은 경우, 기본 색상은 Lollipop에서 시스템 알림에 사용하는 것과 동일한 회색입니다.
<integer name="com_braze_default_notification_accent_color">0xFFf33e3e</integer>
색상 참조를 선택적으로 사용할 수도 있습니다.
<color name="com_braze_default_notification_accent_color">@color/my_color_here</color>
4단계: 딥링크 추가하기
자동 딥링크 열기 활성화하기
푸시 알림 클릭 시 Braze가 자동으로 앱 및 딥링크를 열도록 하려면 braze.xml에서 com_braze_handle_push_deep_links_automatically를 true로 설정하세요.
<bool name="com_braze_handle_push_deep_links_automatically">true</bool>
이 플래그는 런타임 구성을 통해서도 설정할 수 있습니다.
BrazeConfig brazeConfig = new BrazeConfig.Builder()
.setHandlePushDeepLinksAutomatically(true)
.build();
Braze.configure(this, brazeConfig);
val brazeConfig = BrazeConfig.Builder()
.setHandlePushDeepLinksAutomatically(true)
.build()
Braze.configure(this, brazeConfig)
딥링크를 커스텀 처리하려면 Braze의 푸시 수신 및 열기 인텐트를 수신하는 푸시 콜백을 만들어야 합니다. 자세한 내용은 푸시 이벤트에 콜백 사용하기를 참조하세요.
포그라운드 알림 처리
기본적으로 Android에서 앱이 포그라운드 상태일 때 푸시 알림이 도착하면 시스템이 자동으로 이를 표시합니다. Braze가 푸시 알림 페이로드를 처리하도록(분석 추적, 딥링크 처리 및 커스텀 처리) 하려면, FirebaseMessagingService.onMessageReceived 메서드 내에서 수신된 푸시 데이터를 Braze로 전달하세요.
작동 방식
BrazeFirebaseMessagingService.handleBrazeRemoteMessage를 호출하면, Braze는 페이로드가 Braze 푸시 알림인지 판별하고, 맞다면 NotificationManagerCompat 메서드를 사용하여 알림을 생성하고 표시합니다. iOS와 달리 Android는 앱이 포그라운드에 있든 백그라운드에 있든 관계없이 알림을 표시합니다.
package com.example.push;
import com.braze.push.BrazeFirebaseMessagingService;
import com.google.firebase.messaging.FirebaseMessagingService;
import com.google.firebase.messaging.RemoteMessage;
public class MyFirebaseMessagingService extends FirebaseMessagingService {
@Override
public void onMessageReceived(RemoteMessage remoteMessage) {
super.onMessageReceived(remoteMessage);
// Let Braze process the payload and display the notification
if (BrazeFirebaseMessagingService.handleBrazeRemoteMessage(this, remoteMessage)) {
// Braze successfully handled the push notification
} else {
// Handle non-Braze messages
}
}
}
package com.example.push
import com.braze.push.BrazeFirebaseMessagingService
import com.google.firebase.messaging.FirebaseMessagingService
import com.google.firebase.messaging.RemoteMessage
class MyFirebaseMessagingService : FirebaseMessagingService() {
override fun onMessageReceived(remoteMessage: RemoteMessage) {
super.onMessageReceived(remoteMessage)
// Let Braze process the payload and display the notification
if (BrazeFirebaseMessagingService.handleBrazeRemoteMessage(this, remoteMessage)) {
// Braze successfully handled the push notification
} else {
// Handle non-Braze messages
}
}
}
자세한 내용은 Braze Android SDK 리포지토리의 Firebase 통합 샘플을 참조하세요.
포그라운드 동작 커스텀 설정
시스템 알림을 억제하거나 인앱 UI를 대신 표시하는 등 커스텀 포그라운드 동작을 원하는 경우 다음과 같이 할 수 있습니다.
subscribeToPushNotificationEvents를 사용하여 푸시 이벤트에 반응하고,BrazeNotificationUtils.routeUserWithNotificationOpenedIntent메서드로 딥링크를 처리합니다. 자세한 내용은 Firebase 푸시 샘플을 참조하세요.- 커스텀
IBrazeNotificationFactory를 사용하여 직접 알림을 빌드하고 게시하거나, 처리 경로에서notificationManager.notify를 호출하지 않아 알림을 억제합니다.
알림 커스텀 설정에 대한 자세한 내용은 커스텀 알림 팩토리를 참조하세요.
커스텀 딥링크 만들기
아직 앱에 딥링크를 추가하지 않았다면, 딥링킹에 대한 Android 개발자 문서의 안내를 따르세요. 딥링크가 무엇인지 자세히 알아보려면 FAQ 문서를 참조하세요.
딥링크 추가
Braze 대시보드에서는 푸시 알림 Campaigns 및 Canvases에 딥링크 또는 웹 URL을 설정할 수 있으며, 알림을 클릭하면 해당 링크가 열립니다.
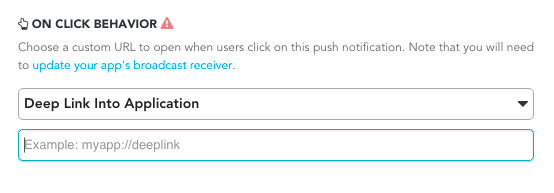
백 스택 동작 커스텀 설정
Android SDK는 기본적으로 푸시 딥링크를 따라갈 때 호스트 앱의 메인 런처 액티비티를 백 스택에 배치합니다. Braze를 사용하면 메인 런처 액티비티 대신 백 스택에서 열릴 커스텀 액티비티를 설정하거나 백 스택을 완전히 비활성화할 수 있습니다.
예를 들어, 런타임 구성을 사용하여 YourMainActivity라는 액티비티를 백 스택 액티비티로 설정하려면 다음과 같이 합니다.
BrazeConfig brazeConfig = new BrazeConfig.Builder()
.setPushDeepLinkBackStackActivityEnabled(true)
.setPushDeepLinkBackStackActivityClass(YourMainActivity.class)
.build();
Braze.configure(this, brazeConfig);
val brazeConfig = BrazeConfig.Builder()
.setPushDeepLinkBackStackActivityEnabled(true)
.setPushDeepLinkBackStackActivityClass(YourMainActivity.class)
.build()
Braze.configure(this, brazeConfig)
braze.xml에 대한 동등한 구성은 다음을 참조하세요. 클래스 이름은 Class.forName()이 반환하는 것과 동일해야 합니다.
<bool name="com_braze_push_deep_link_back_stack_activity_enabled">true</bool>
<string name="com_braze_push_deep_link_back_stack_activity_class_name">your.package.name.YourMainActivity</string>
5단계: 알림 채널 정의
Braze Android SDK는 Android 알림 채널을 지원합니다. Braze 알림에 알림 채널 ID가 포함되어 있지 않거나 잘못된 채널 ID가 포함된 경우, Braze는 SDK에 정의된 기본 알림 채널로 알림을 표시합니다. 회사 사용자는 플랫폼 내에서 Android 알림 채널을 사용하여 알림을 그룹화합니다.
기본 Braze 알림 채널의 사용자 표시 이름을 설정하려면 BrazeConfig.setDefaultNotificationChannelName()을 사용하세요.
기본 Braze 알림 채널의 사용자 표시 설명을 설정하려면 BrazeConfig.setDefaultNotificationChannelDescription()을 사용하세요.
API Campaigns에 Android 푸시 오브젝트 매개변수를 업데이트하여 notification_channel 필드를 포함하세요. 이 필드를 지정하지 않으면, Braze는 대시보드 대체 채널 ID로 알림 페이로드를 전송합니다.
기본 알림 채널 외에 Braze는 어떤 채널도 생성하지 않습니다. 다른 모든 채널은 호스트 앱에서 프로그래밍 방식으로 정의한 후 Braze 대시보드에 입력해야 합니다.
기본 채널 이름과 설명은 braze.xml에서도 구성할 수 있습니다.
<string name="com_braze_default_notification_channel_name">Your channel name</string>
<string name="com_braze_default_notification_channel_description">Your channel description</string>
6단계: 알림 표시 및 분석 테스트
표시 테스트
이 시점에서 Braze에서 보낸 알림을 확인할 수 있어야 합니다. 테스트하려면 Braze 대시보드의 Campaigns 페이지로 이동하여 푸시 알림 Campaign을 만드세요. Android Push를 선택하고 메시지를 디자인합니다. 그런 다음 작성기에서 눈 모양 아이콘을 클릭하여 테스트 발신자를 띄우세요. 현재 사용자의 사용자 ID 또는 이메일 주소를 입력하고 테스트 전송을 클릭합니다. 기기에 푸시가 표시되어야 합니다.
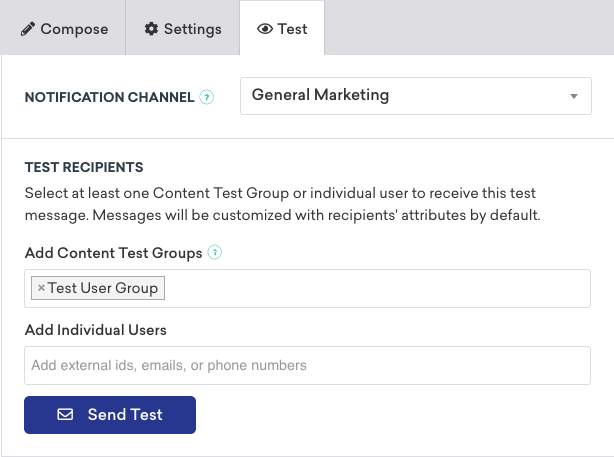
푸시 표시 관련 문제는 문제 해결 가이드를 참조하세요.
분석 테스트
이 시점에서 푸시 알림 열람에 대한 분석 로깅도 작동해야 합니다. 알림이 도착했을 때 클릭하면 Campaign 결과 페이지에서 직접 열람 수가 1 증가해야 합니다. 푸시 분석에 대한 자세한 내용은 푸시 리포팅 문서를 참조하세요.
푸시 분석 관련 문제는 문제 해결 가이드를 참조하세요.
커맨드 라인에서 테스트
커맨드 라인 인터페이스를 통해 인앱 및 푸시 알림을 테스트하려면, cURL과 메시징 API를 사용하여 터미널에서 단일 알림을 전송할 수 있습니다. 테스트 케이스에 맞는 올바른 값으로 다음 필드를 교체해야 합니다.
YOUR_API_KEY(설정 > API 키로 이동합니다.)YOUR_EXTERNAL_USER_ID(사용자 검색 페이지에서 프로필을 검색합니다.)YOUR_KEY1(선택 사항)YOUR_VALUE1(선택 사항)
curl -X POST -H "Content-Type: application/json" -H "Authorization: Bearer {YOUR_API_KEY}" -d '{
"external_user_ids":["YOUR_EXTERNAL_USER_ID"],
"messages": {
"android_push": {
"title":"Test push title",
"alert":"Test push",
"extra": {
"YOUR_KEY1":"YOUR_VALUE1"
}
}
}
}' https://rest.iad-01.braze.com/messages/send
이 예시는 US-01 인스턴스를 사용합니다. 이 인스턴스에 해당하지 않는 경우 US-01 엔드포인트를 사용 중인 엔드포인트로 교체하세요.
대화형 푸시 알림
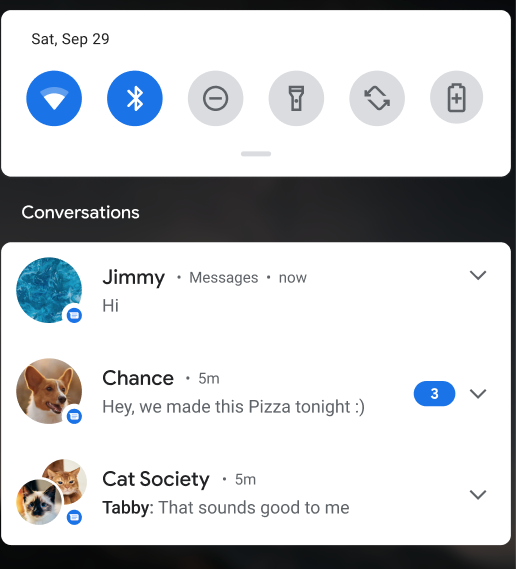
사람 및 대화 이니셔티브는 휴대폰의 시스템 표면에서 사람과 대화를 더 돋보이게 하기 위한 Android의 다년간 이니셔티브입니다. 이 우선순위는 다른 사람들과의 커뮤니케이션 및 상호작용이 모든 인구 통계에 걸쳐 대다수 Android 사용자에게 여전히 가장 가치 있고 중요한 기능 영역이라는 사실에 기반합니다.
사용 요건
- 이 알림 유형은 Braze Android SDK v15.0.0 이상 및 Android 11 이상 기기가 필요합니다.
- 지원되지 않는 기기 또는 SDK는 표준 푸시 알림으로 대체됩니다.
이 기능은 Braze REST API를 통해서만 사용할 수 있습니다. 자세한 내용은 Android 푸시 오브젝트를 참조하세요.
FCM 할당량 초과 오류
Firebase Cloud Messaging(FCM) 할당량이 초과되면 Google은 “할당량 초과” 오류를 반환합니다. FCM의 기본 제한은 분당 600,000건의 요청입니다. Braze는 Google의 권장 모범 사례에 따라 전송을 재시도합니다. 그러나 이러한 오류가 대량으로 발생하면 전송 시간이 몇 분 더 길어질 수 있습니다. 잠재적인 영향을 완화하기 위해, Braze는 사용량 제한이 초과되고 있다는 알림과 오류를 방지하기 위해 취할 수 있는 조치를 안내합니다.
현재 제한을 확인하려면 Google Cloud Console > APIs & Services > Firebase Cloud Messaging API > Quotas & System Limits로 이동하거나 FCM API 할당량 페이지를 방문하세요.
모범 사례
이러한 오류 발생량을 낮게 유지하기 위해 다음 모범 사례를 권장합니다.
FCM에 사용량 제한 증가 요청하기
FCM에 사용량 제한 증가를 요청하려면 Firebase 지원팀에 직접 문의하거나 다음을 수행하세요.
- FCM API 할당량 페이지로 이동합니다.
- Send requests per minute 할당량을 찾습니다.
- Edit Quota를 선택합니다.
- 새 값을 입력하고 요청을 제출합니다.
워크스페이스 사용량 제한 적용하기
Android 푸시 알림에 워크스페이스 사용량 제한을 적용할 수 있습니다. 이를 통해 발신 메시지의 전송 속도를 조절할 수 있습니다. 자세한 내용은 워크스페이스 메시징 사용량 제한을 참조하세요.
사용량 제한
푸시 알림은 전송 속도가 제한되므로 애플리케이션에 필요한 만큼 많이 보내도 괜찮습니다. iOS와 Apple 푸시 알림 서비스(APNs) 서버가 알림 전송 빈도를 제어하므로 너무 많이 보내도 문제가 발생하지 않습니다. 푸시 알림이 제한되는 경우, 기기가 다음 번에 연결 유지 패킷을 보내거나 다른 알림을 받을 때까지 지연될 수 있습니다.
푸시 알림 설정하기
1단계: APNs 토큰 업로드하기
Braze를 사용하여 iOS 푸시 알림을 보내려면 먼저 Apple 개발자 설명서에 설명된 대로 .p8 푸시 알림 파일을 업로드해야 합니다:
- Apple 개발자 계정에서 Certificates, Identifiers & Profiles로 이동합니다.
- Keys에서 All을 선택하고 페이지 상단의 추가 버튼(+)을 클릭합니다.
- Key Description에 서명 키의 고유한 이름을 입력합니다.
- Key Services에서 Apple Push Notification service (APNs) 체크박스를 선택한 다음 Continue를 클릭합니다. Confirm을 클릭합니다.
- 키 ID를 기록해 두세요. Download를 클릭하여 키를 생성하고 다운로드합니다. 다운로드한 파일은 한 번만 다운로드할 수 있으므로 안전한 곳에 저장하세요.
- Braze에서 설정 > 앱 설정으로 이동하여 Apple Push Certificate 아래에
.p8파일을 업로드합니다. 개발용 또는 프로덕션 푸시 인증서를 업로드할 수 있습니다. 앱이 앱 스토어에 실시간으로 출시된 후 푸시 알림을 테스트하려면 앱의 개발 버전을 위한 별도의 워크스페이스를 설정하는 것이 좋습니다. - 메시지가 표시되면 앱의 번들 ID, 키 ID 및 팀 ID를 입력합니다. 또한 프로비저닝 프로필에 의해 정의되는 앱의 개발 환경 또는 프로덕션 환경 중 어디로 알림을 보낼지 지정해야 합니다.
- 완료되면 저장을 선택합니다.
2단계: 푸시 기능 활성화하기
Xcode에서 기본 앱 타겟의 Signing & Capabilities 섹션으로 이동하여 푸시 알림 기능을 추가합니다.

3단계: 푸시 처리 설정하기
Swift SDK를 사용하여 Braze에서 수신한 원격 알림의 처리를 자동화할 수 있습니다. 이것이 푸시 알림을 처리하는 가장 간단한 방법이며 권장되는 처리 방법입니다.
3.1단계: 푸시 속성에서 자동화 활성화하기
자동 푸시 통합을 활성화하려면 push 구성의 automation 속성을 true로 설정합니다:
let configuration = Braze.Configuration(apiKey: "{YOUR-BRAZE-API-KEY}", endpoint: "{YOUR-BRAZE-API-ENDPOINT}")
configuration.push.automation = true
BRZConfiguration *configuration = [[BRZConfiguration alloc] initWithApiKey:@"{YOUR-BRAZE-API-KEY}" endpoint:@"{YOUR-BRAZE-API-ENDPOINT}"];
configuration.push.automation = [[BRZConfigurationPushAutomation alloc] initEnablingAllAutomations:YES];
이렇게 하면 SDK가 다음을 수행하도록 지시합니다:
- 시스템에 푸시 알림을 위한 애플리케이션을 등록합니다.
- 초기화 시 푸시 알림 인증/권한을 요청합니다.
- 푸시 알림 관련 시스템 델리게이트 메서드의 구현을 동적으로 제공합니다.
SDK가 수행하는 자동화 단계는 코드베이스에 있는 기존 푸시 알림 처리 통합과 호환됩니다. SDK는 Braze에서 수신한 원격 알림의 처리만 자동화합니다. 자체 또는 다른 서드파티 SDK 원격 알림을 처리하기 위해 구현된 시스템 핸들러는 automation이 활성화되어 있어도 계속 작동합니다.
푸시 알림 자동화를 활성화하려면 SDK를 메인 스레드에서 초기화해야 합니다. SDK 초기화는 애플리케이션이 실행을 완료하기 전에 또는 AppDelegate application(_:didFinishLaunchingWithOptions:) 구현에서 이루어져야 합니다.
SDK 초기화 전에 추가 설정이 필요한 경우, 지연 초기화 설명서 페이지를 참조하세요.
3.2단계: 개별 구성 재정의하기 (선택 사항)
더 세밀한 제어를 위해 각 자동화 단계를 개별적으로 활성화하거나 비활성화할 수 있습니다:
// Enable all automations and disable the automatic notification authorization request at launch.
configuration.push.automation = true
configuration.push.automation.requestAuthorizationAtLaunch = false
// Enable all automations and disable the automatic notification authorization request at launch.
configuration.push.automation = [[BRZConfigurationPushAutomation alloc] initEnablingAllAutomations:YES];
configuration.push.automation.requestAuthorizationAtLaunch = NO;
사용 가능한 모든 옵션은 Braze.Configuration.Push.Automation을, 자동화 동작에 대한 자세한 내용은 automation을 참조하세요.
앱에 특화된 추가 동작을 위해 푸시 알림에 의존하는 경우에도, 수동 푸시 알림 통합 대신 자동 푸시 통합을 사용할 수 있습니다. subscribeToUpdates(_:) 메서드는 Braze에서 처리한 원격 알림에 대한 알림을 받을 수 있는 방법을 제공합니다.
3.1단계: APNs에 푸시 알림 등록하기
사용자의 기기가 APNs에 등록할 수 있도록 앱의 application:didFinishLaunchingWithOptions: 델리게이트 메서드에 적절한 코드 샘플을 포함합니다. 모든 푸시 통합 코드는 애플리케이션의 메인 스레드에서 호출해야 합니다.
Braze는 푸시 실행 버튼 지원을 위한 기본 푸시 카테고리도 제공하며, 이는 푸시 등록 코드에 수동으로 추가해야 합니다. 추가 통합 단계는 푸시 실행 버튼을 참조하세요.
앱 델리게이트의 application:didFinishLaunchingWithOptions: 메서드에 다음 코드를 추가합니다.
다음 코드 샘플에는 임시 푸시 인증 통합이 포함되어 있습니다(5번째 및 6번째 줄). 앱에서 임시 인증을 사용할 계획이 없는 경우, requestAuthorization 옵션에 UNAuthorizationOptionProvisional을 추가하는 코드 줄을 제거할 수 있습니다.
푸시 임시 인증에 대한 자세한 내용은 iOS 알림 옵션을 참조하세요.
application.registerForRemoteNotifications()
let center = UNUserNotificationCenter.current()
center.setNotificationCategories(Braze.Notifications.categories)
center.delegate = self
var options: UNAuthorizationOptions = [.alert, .sound, .badge]
if #available(iOS 12.0, *) {
options = UNAuthorizationOptions(rawValue: options.rawValue | UNAuthorizationOptions.provisional.rawValue)
}
center.requestAuthorization(options: options) { granted, error in
print("Notification authorization, granted: \(granted), error: \(String(describing: error))")
}
[application registerForRemoteNotifications];
UNUserNotificationCenter *center = UNUserNotificationCenter.currentNotificationCenter;
[center setNotificationCategories:BRZNotifications.categories];
center.delegate = self;
UNAuthorizationOptions options = UNAuthorizationOptionAlert | UNAuthorizationOptionSound | UNAuthorizationOptionBadge;
if (@available(iOS 12.0, *)) {
options = options | UNAuthorizationOptionProvisional;
}
[center requestAuthorizationWithOptions:options
completionHandler:^(BOOL granted, NSError *_Nullable error) {
NSLog(@"Notification authorization, granted: %d, "
@"error: %@)",
granted, error);
}];
앱이 실행을 완료하기 전에 center.delegate = self를 사용하여 델리게이트 객체를 동기적으로 할당해야 하며, application:didFinishLaunchingWithOptions:에서 할당하는 것이 좋습니다. 그렇지 않으면 앱이 수신되는 푸시 알림을 놓칠 수 있습니다. 자세한 내용은 Apple의 UNUserNotificationCenterDelegate 설명서를 참조하세요.
앱이 wipeData()를 호출한 후 동일한 앱 실행에서 Braze SDK를 다시 활성화하는 경우, SDK에서 사용하는 기기 토큰을 다시 채우려면 registerForRemoteNotifications()를 다시 호출해야 합니다.
3.2단계: Braze에 푸시 토큰 등록하기
APNs 등록이 완료되면 결과로 받은 deviceToken을 Braze에 전달하여 사용자에 대한 푸시 알림을 활성화합니다.
앱의 application(_:didRegisterForRemoteNotificationsWithDeviceToken:) 메서드에 다음 코드를 추가합니다:
AppDelegate.braze?.notifications.register(deviceToken: deviceToken)
앱의 application:didRegisterForRemoteNotificationsWithDeviceToken: 메서드에 다음 코드를 추가합니다:
[AppDelegate.braze.notifications registerDeviceToken:deviceToken];
application:didRegisterForRemoteNotificationsWithDeviceToken: 델리게이트 메서드는 application.registerForRemoteNotifications()가 호출된 후 매번 호출됩니다.
다른 푸시 서비스에서 Braze로 마이그레이션하는 경우 사용자의 기기가 이미 APNs에 등록되어 있으면, 이 메서드는 다음에 호출될 때 기존 등록의 토큰을 수집하며 사용자가 푸시를 다시 옵트인할 필요가 없습니다.
3.3단계: 푸시 처리 활성화하기
다음으로, 수신한 푸시 알림을 Braze에 전달합니다. 이 단계는 푸시 분석 로깅 및 링크 처리에 필요합니다. 모든 푸시 통합 코드는 애플리케이션의 메인 스레드에서 호출해야 합니다.
기본 푸시 처리
Braze 기본 푸시 처리를 활성화하려면 앱의 application(_:didReceiveRemoteNotification:fetchCompletionHandler:) 메서드에 다음 코드를 추가합니다:
if let braze = AppDelegate.braze, braze.notifications.handleBackgroundNotification(
userInfo: userInfo,
fetchCompletionHandler: completionHandler
) {
return
}
completionHandler(.noData)
다음으로, 앱의 userNotificationCenter(_:didReceive:withCompletionHandler:) 메서드에 다음을 추가합니다:
if let braze = AppDelegate.braze, braze.notifications.handleUserNotification(
response: response,
withCompletionHandler: completionHandler
) {
return
}
completionHandler()
Braze 기본 푸시 처리를 활성화하려면 애플리케이션의 application:didReceiveRemoteNotification:fetchCompletionHandler: 메서드에 다음 코드를 추가합니다:
BOOL processedByBraze = AppDelegate.braze != nil && [AppDelegate.braze.notifications handleBackgroundNotificationWithUserInfo:userInfo
fetchCompletionHandler:completionHandler];
if (processedByBraze) {
return;
}
completionHandler(UIBackgroundFetchResultNoData);
다음으로, 앱의 (void)userNotificationCenter:didReceiveNotificationResponse:withCompletionHandler: 메서드에 다음 코드를 추가합니다:
BOOL processedByBraze = AppDelegate.braze != nil && [AppDelegate.braze.notifications handleUserNotificationWithResponse:response
withCompletionHandler:completionHandler];
if (processedByBraze) {
return;
}
completionHandler();
포그라운드 푸시 처리
포그라운드 푸시 알림을 활성화하고 Braze가 수신 시 이를 인식하도록 하려면 UNUserNotificationCenter.userNotificationCenter(_:willPresent:withCompletionHandler:)를 구현합니다. 사용자가 포그라운드 알림을 탭하면 userNotificationCenter(_:didReceive:withCompletionHandler:) 푸시 델리게이트가 호출되고 Braze가 푸시 클릭 이벤트를 기록합니다.
func userNotificationCenter(
_ center: UNUserNotificationCenter,
willPresent notification: UNNotification,
withCompletionHandler completionHandler: @escaping (UNNotificationPresentationOptions
) -> Void) {
if let braze = AppDelegate.braze {
// Forward notification payload to Braze for processing.
braze.notifications.handleForegroundNotification(notification: notification)
}
// Configure application's foreground notification display options.
if #available(iOS 14.0, *) {
completionHandler([.list, .banner])
} else {
completionHandler([.alert])
}
}
포그라운드 푸시 알림을 활성화하고 Braze가 수신 시 이를 인식하도록 하려면 userNotificationCenter:willPresentNotification:withCompletionHandler:을 구현합니다. 사용자가 포그라운드 알림을 탭하면 userNotificationCenter:didReceiveNotificationResponse:withCompletionHandler: 푸시 델리게이트가 호출되고 Braze가 푸시 클릭 이벤트를 기록합니다.
- (void)userNotificationCenter:(UNUserNotificationCenter *)center
willPresentNotification:(UNNotification *)notification
withCompletionHandler:(void (^)(UNNotificationPresentationOptions options))completionHandler {
if (AppDelegate.braze != nil) {
// Forward notification payload to Braze for processing.
[AppDelegate.braze.notifications handleForegroundNotificationWithNotification:notification];
}
// Configure application's foreground notification display options.
if (@available(iOS 14.0, *)) {
completionHandler(UNNotificationPresentationOptionList | UNNotificationPresentationOptionBanner);
} else {
completionHandler(UNNotificationPresentationOptionAlert);
}
}
알림 테스트
명령줄을 통해 인앱 및 푸시 알림을 테스트하려면 터미널에서 CURL 및 메시징 API를 사용하여 단일 알림을 보낼 수 있습니다. 다음 필드를 테스트 사례에 맞는 올바른 값으로 바꿔야 합니다:
YOUR_API_KEY- 설정 > API 키에서 확인할 수 있습니다.YOUR_EXTERNAL_USER_ID- 사용자 검색 페이지에서 확인할 수 있습니다. 자세한 내용은 사용자 ID 할당하기를 참조하세요.YOUR_KEY1(선택 사항)YOUR_VALUE1(선택 사항)
다음 예제에서는 US-01 인스턴스를 사용하고 있습니다. 이 인스턴스를 사용하고 있지 않다면 API 설명서를 참조하여 요청할 엔드포인트를 확인하세요.
curl -X POST -H "Content-Type: application/json" -H "Authorization: Bearer {YOUR_API_KEY}" -d '{
"external_user_ids":["YOUR_EXTERNAL_USER_ID"],
"messages": {
"apple_push": {
"alert":"Test push",
"extra": {
"YOUR_KEY1":"YOUR_VALUE1"
}
}
}
}' https://rest.iad-01.braze.com/messages/send
푸시 알림 업데이트 구독하기
Braze가 처리한 푸시 알림 페이로드에 접근하려면 Braze.Notifications.subscribeToUpdates(payloadTypes:_:) 메서드를 사용합니다.
payloadTypes 매개변수를 사용하여 푸시 열람 이벤트, 푸시 수신 이벤트 또는 둘 다와 관련된 알림을 구독할지 지정할 수 있습니다.
// This subscription is maintained through a Braze cancellable, which will observe for changes until the subscription is cancelled.
// You must keep a strong reference to the cancellable to keep the subscription active.
// The subscription is canceled either when the cancellable is deinitialized or when you call its `.cancel()` method.
let cancellable = AppDelegate.braze?.notifications.subscribeToUpdates(payloadTypes: [.open, .received]) { payload in
print("Braze processed notification with title '\(payload.title)' and body '\(payload.body)'")
}
푸시 수신 이벤트는 포그라운드 알림과 content-available 백그라운드 알림에서만 트리거됩니다. 앱이 종료된 상태에서 수신된 알림이나 content-available 필드가 없는 백그라운드 알림에서는 트리거되지 않습니다.
NSInteger filtersValue = BRZNotificationsPayloadTypeFilter.opened.rawValue | BRZNotificationsPayloadTypeFilter.received.rawValue;
BRZNotificationsPayloadTypeFilter *filters = [[BRZNotificationsPayloadTypeFilter alloc] initWithRawValue: filtersValue];
BRZCancellable *cancellable = [notifications subscribeToUpdatesWithPayloadTypes:filters update:^(BRZNotificationsPayload * _Nonnull payload) {
NSLog(@"Braze processed notification with title '%@' and body '%@'", payload.title, payload.body);
}];
푸시 수신 이벤트는 포그라운드 알림과 content-available 백그라운드 알림에서만 트리거됩니다. 앱이 종료된 상태에서 수신된 알림이나 content-available 필드가 없는 백그라운드 알림에서는 트리거되지 않습니다.
자동 푸시 통합을 사용하는 경우, subscribeToUpdates(_:)는 Braze가 처리한 원격 알림에 대해 알림을 받을 수 있는 유일한 방법입니다. 알림이 Braze에 의해 자동으로 처리될 때 UIAppDelegate 및 UNUserNotificationCenterDelegate 시스템 메서드는 호출되지 않습니다.
앱이 종료된 상태에서 최종 사용자가 알림을 탭한 후 구독이 트리거되도록 하려면 application(_:didFinishLaunchingWithOptions:)에서 푸시 알림 구독을 생성하세요.
포그라운드 알림 처리
기본적으로 앱이 포그라운드에 있을 때 푸시 알림이 도착하면 iOS는 자동으로 표시하지 않습니다. 포그라운드에서 푸시 알림을 표시하고 Braze 분석으로 추적하려면, UNUserNotificationCenterDelegate.userNotificationCenter(_:willPresent:withCompletionHandler:) 구현 내에서 handleForegroundNotification(notification:) 메서드를 호출하세요.
작동 방식
handleForegroundNotification(notification:) 를 호출하면, Braze가 알림 페이로드를 처리하여 분석 데이터를 기록하고 딥링크 또는 버튼 동작을 처리합니다. 실제 표시 동작은 완료 핸들러에 전달하는 UNNotificationPresentationOptions에 의해 제어됩니다.
import BrazeKit
import UserNotifications
extension AppDelegate: UNUserNotificationCenterDelegate {
func userNotificationCenter(
_ center: UNUserNotificationCenter,
willPresent notification: UNNotification,
withCompletionHandler completionHandler: @escaping (UNNotificationPresentationOptions) -> Void
) {
// Let Braze process the notification payload
if let braze = AppDelegate.braze {
braze.notifications.handleForegroundNotification(notification: notification)
}
// Control how the notification appears in the foreground
if #available(iOS 14.0, *) {
completionHandler([.banner, .list, .sound])
} else {
completionHandler([.alert, .sound])
}
}
}
전체 예제는 Braze Swift SDK 리포지토리의 푸시 알림 수동 통합 샘플을 참조하세요.
푸시 프라이머
푸시 프라이머 Campaign은 사용자가 기기에서 앱에 대한 푸시 알림을 활성화하도록 권장합니다. 노코드 푸시 프라이머를 사용하면 SDK 커스텀 설정 없이도 이 작업을 수행할 수 있습니다.
동적 APNs 게이트웨이 관리
동적 Apple Push Notification Service(APNs) 게이트웨이 관리는 올바른 APNs 환경을 자동으로 감지하여 iOS 푸시 알림의 안정성과 효율성을 향상시킵니다. 이전에는 푸시 알림을 위해 APNs 환경(개발 또는 프로덕션)을 수동으로 선택해야 했으며, 이로 인해 잘못된 게이트웨이 구성, 전달 실패, BadDeviceToken 오류가 발생하는 경우가 있었습니다.
동적 APNs 게이트웨이 관리를 사용하면 다음과 같은 이점이 있습니다:
- 향상된 안정성: 알림이 항상 올바른 APNs 환경으로 전달되어 전달 실패가 줄어듭니다.
- 간소화된 구성: 더 이상 APNs 게이트웨이 설정을 수동으로 관리할 필요가 없습니다.
- 오류 복원력: 유효하지 않거나 누락된 게이트웨이 값이 원활하게 처리되어 중단 없는 서비스를 제공합니다.
전제 조건
Braze는 다음 SDK 버전 요구 사항을 충족하는 iOS 푸시 알림에 대한 동적 APNs 게이트웨이 관리를 지원합니다:
작동 방식
iOS 앱이 Braze Swift SDK와 통합되면, aps-environment를 포함한 기기 관련 데이터를 Braze SDK API로 전송합니다(사용 가능한 경우). apns_gateway 값은 앱이 개발(dev) 또는 프로덕션(prod) APNs 환경을 사용하고 있는지 나타냅니다.
Braze는 각 기기에 대해 보고된 게이트웨이 값도 저장합니다. 유효한 새 게이트웨이 값이 수신되면 Braze는 저장된 값을 자동으로 업데이트합니다.
Braze가 푸시 알림을 전송할 때:
- 기기에 유효한 게이트웨이 값(dev 또는 prod)이 저장되어 있으면, Braze는 이를 사용하여 올바른 APNs 환경을 결정합니다.
- 게이트웨이 값이 저장되어 있지 않으면, Braze는 앱 설정 페이지에 구성된 APNs 환경을 기본값으로 사용합니다.
자주 묻는 질문
이 기능이 도입된 이유는 무엇인가요?
동적 APNs 게이트웨이 관리를 사용하면 올바른 환경이 자동으로 선택됩니다. 이전에는 APNs 게이트웨이를 수동으로 구성해야 했으며, 이로 인해 BadDeviceToken 오류, 토큰 무효화, APNs 사용량 제한 문제가 발생할 수 있었습니다.
푸시 전달 성능에 어떤 영향을 미치나요?
이 기능은 푸시 토큰을 항상 올바른 APNs 환경으로 라우팅하여 잘못 구성된 게이트웨이로 인한 실패를 방지함으로써 전달률을 향상시킵니다.
이 기능을 비활성화할 수 있나요?
동적 APNs 게이트웨이 관리는 기본적으로 활성화되어 있으며 안정성 향상을 제공합니다. 수동 게이트웨이 선택이 필요한 특정 사용 사례가 있는 경우, Braze 지원팀에 문의하세요.
Android TV 푸시 알림 소개

네이티브 기능은 아니지만, Braze Android SDK와 Firebase Cloud Messaging을 활용하여 Android TV용 푸시 토큰을 등록하면 Android TV 푸시 통합이 가능합니다. 다만, 알림 페이로드가 수신된 후 이를 표시할 UI를 직접 구축해야 합니다.
전제 조건
이 기능을 사용하려면 다음을 완료해야 합니다.
푸시 알림 설정하기
Android TV용 푸시 알림을 설정하려면 다음을 수행합니다.
- 앱에서 알림을 표시할 커스텀 뷰를 만듭니다.
- 커스텀 알림 팩토리를 만듭니다. 이렇게 하면 기본 SDK 동작이 재정의되어 알림을 수동으로 표시할 수 있습니다.
null을 반환하면 SDK가 처리하지 않으므로 알림을 표시하려면 커스텀 코드가 필요합니다. 이 단계를 완료하면 Android TV로 푸시를 보낼 수 있습니다. - (선택 사항) 클릭 분석을 효과적으로 추적하려면 클릭 분석 추적을 설정합니다. Braze 푸시 열람 및 수신 인텐트를 수신하는 푸시 콜백을 만들어 이를 구현할 수 있습니다.
이러한 알림은 지속되지 않으며 기기가 표시하는 동안에만 사용자에게 보입니다. 이는 Android TV의 알림 센터가 알림 기록을 지원하지 않기 때문입니다.
Android TV 푸시 알림 테스트하기
푸시 구현이 성공적인지 테스트하려면 일반 Android 기기와 동일하게 Braze 대시보드에서 알림을 보냅니다.
- 애플리케이션이 닫혀 있는 경우: 푸시 메시지가 화면에 토스트 알림으로 표시됩니다.
- 애플리케이션이 열려 있는 경우: 자체 호스팅 UI에 메시지를 표시할 수 있습니다. Android 모바일 SDK 인앱 메시지의 UI 스타일을 따르세요.
모범 사례
Braze를 사용하는 마케터의 경우, Android TV로 Campaign(캠페인)을 시작하는 것은 Android 모바일 앱으로 푸시를 보내는 것과 동일합니다. 이러한 기기만 타겟팅하려면 세분화에서 Android TV 앱을 선택하세요.
FCM에서 반환하는 전달 및 클릭 응답은 모바일 Android 기기와 동일한 규칙을 따르므로, 오류는 메시지 활동 로그에서 확인할 수 있습니다.
필수 조건
이 기능을 사용하려면 먼저 Cordova Braze SDK를 통합해야 합니다. SDK를 통합한 후 기본 푸시 알림 기능이 기본적으로 활성화됩니다. 리치 푸시 알림 및 Push Stories를 사용하려면 개별적으로 설정해야 합니다. iOS 푸시 메시지를 사용하려면 유효한 푸시 인증서를 업로드해야 합니다.
Cordova 플러그인을 추가, 제거 또는 업데이트할 때마다 Cordova는 iOS 앱의 Xcode 프로젝트에서 Podfile을 덮어씁니다. 이는 Cordova 플러그인을 수정할 때마다 이러한 기능을 다시 설정해야 함을 의미합니다.
푸시 딥링킹 활성화
기본적으로 Braze Cordova SDK는 푸시 알림의 딥링크를 자동으로 처리하지 않습니다. 푸시 딥링킹을 활성화하려면 딥링킹의 설정 단계를 따르세요. 이러한 푸시 설정 옵션 및 기타 옵션에 대한 자세한 내용은 선택적 설정을 참조하세요.
기본 푸시 알림 비활성화 (iOS 전용)
iOS용 Braze Cordova SDK를 통합하면 기본 푸시 알림 기능이 기본값으로 활성화됩니다. iOS 앱에서 이 기능을 비활성화하려면 config.xml 파일에 다음을 추가하세요. 자세한 내용은 선택적 구성을 참조하세요.
<platform name="ios">
<preference name="com.braze.ios_disable_automatic_push_registration" value="NO" />
<preference name="com.braze.ios_disable_automatic_push_handling" value="NO" />
</platform>
사전 준비 사항
이 기능을 사용하려면 먼저 Flutter Braze SDK를 통합해야 합니다.
푸시 알림 설정하기
1단계: 초기 설정 완료하기
1.1단계: 푸시 등록하기
Google의 Firebase Cloud Messaging(FCM) API를 사용하여 푸시를 등록합니다. 전체 안내는 네이티브 Android 푸시 통합 가이드의 다음 단계를 참조하세요.
- 프로젝트에 Firebase 추가하기.
- 의존성에 Cloud Messaging 추가하기.
- 서비스 계정 생성하기.
- JSON 자격 증명 생성하기.
- Braze에 JSON 자격 증명 업로드하기.
1.2단계: Google 발신자 ID 가져오기
먼저 Firebase 콘솔로 이동하여 프로젝트를 열고 Settings > Project settings를 선택합니다.
Cloud Messaging을 선택한 다음 Firebase Cloud Messaging API (V1) 아래에서 Sender ID를 클립보드에 복사합니다.
1.3단계: braze.xml 업데이트하기
braze.xml 파일에 다음을 추가합니다. FIREBASE_SENDER_ID를 이전에 복사한 발신자 ID로 바꿉니다.
<bool translatable="false" name="com_braze_firebase_cloud_messaging_registration_enabled">true</bool>
<string translatable="false" name="com_braze_firebase_cloud_messaging_sender_id">FIREBASE_SENDER_ID</string>
1.1단계: APNs 인증서 업로드하기
Apple 푸시 알림 서비스(APNs) 인증서를 생성하고 Braze 대시보드에 업로드합니다. 전체 안내는 APNs 인증서 업로드하기를 참조하세요.
1.2단계: 앱에 푸시 알림 지원 추가하기
네이티브 iOS 통합 가이드를 따르세요.
2단계: 푸시 알림 이벤트 수신하기(선택 사항)
Braze가 감지하고 처리한 푸시 알림 이벤트를 수신하려면 subscribeToPushNotificationEvents()를 호출하고 실행할 인수를 전달합니다.
Braze 푸시 알림 이벤트는 Android와 iOS 모두에서 사용할 수 있습니다. 플랫폼 차이로 인해 iOS에서는 사용자가 알림과 상호작용한 경우에만 Braze 푸시 이벤트를 감지합니다.
// Create stream subscription
StreamSubscription pushEventsStreamSubscription;
pushEventsStreamSubscription = braze.subscribeToPushNotificationEvents((BrazePushEvent pushEvent) {
print("Push Notification event of type ${pushEvent.payloadType} seen. Title ${pushEvent.title}\n and deeplink ${pushEvent.url}");
// Handle push notification events
});
// Cancel stream subscription
pushEventsStreamSubscription.cancel();
푸시 알림 이벤트 필드
iOS의 플랫폼 제한으로 인해 Braze SDK는 앱이 포그라운드에 있을 때만 푸시 페이로드를 처리할 수 있습니다. 리스너는 사용자가 푸시와 상호작용한 후 iOS에서 push_opened 이벤트 유형에 대해서만 트리거됩니다.
푸시 알림 필드의 전체 목록은 다음 표를 참조하세요.
| 필드 이름 | 유형 | 설명 |
|---|---|---|
payloadType |
String | 알림 페이로드 유형을 지정합니다. Braze Flutter SDK에서 전송되는 두 가지 값은 push_opened와 push_received입니다. iOS에서는 push_opened 이벤트만 지원됩니다. |
url |
String | 알림에 의해 열린 URL을 지정합니다. |
useWebview |
Boolean | true이면 URL이 앱 내 모달 웹뷰에서 열립니다. false이면 URL이 기기 브라우저에서 열립니다. |
title |
String | 알림의 제목을 나타냅니다. |
body |
String | 알림의 본문 또는 콘텐츠 텍스트를 나타냅니다. |
summaryText |
String | 알림의 요약 텍스트를 나타냅니다. iOS에서는 subtitle에서 매핑됩니다. |
badgeCount |
Number | 알림의 배지 수를 나타냅니다. |
timestamp |
Number | 애플리케이션이 페이로드를 수신한 시간을 나타냅니다. |
isSilent |
Boolean | true이면 페이로드가 무음으로 수신됩니다. Android 무음 푸시 알림 전송에 대한 자세한 내용은 Android의 무음 푸시 알림을 참조하세요. iOS 무음 푸시 알림 전송에 대한 자세한 내용은 iOS의 무음 푸시 알림을 참조하세요. |
isBrazeInternal |
Boolean | 기능 플래그 동기화 또는 제거 추적과 같은 내부 SDK 기능에 대해 알림 페이로드가 전송된 경우 true입니다. 페이로드는 사용자에게 무음으로 수신됩니다. |
imageUrl |
String | 알림 이미지와 연결된 URL을 지정합니다. |
brazeProperties |
Object | Campaign과 연결된 Braze 속성정보(키-값 페어)를 나타냅니다. |
ios |
Object | iOS 전용 필드를 나타냅니다. |
android |
Object | Android 전용 필드를 나타냅니다. |
3단계: 푸시 알림 표시 테스트하기
네이티브 레이어에서 푸시 알림을 구성한 후 통합을 테스트하려면 다음을 수행합니다.
- Flutter 애플리케이션에서 활성 사용자를 설정합니다. 이를 위해
braze.changeUser('your-user-id')를 호출하여 플러그인을 초기화합니다. - Campaigns로 이동하여 새 푸시 알림 Campaign을 생성합니다. 테스트할 플랫폼을 선택합니다.
- 테스트 알림을 작성하고 Test 탭으로 이동합니다. 테스트 사용자와 동일한
user-id를 추가하고 Send Test를 클릭합니다. - 잠시 후 기기에서 알림을 수신해야 합니다. 알림이 표시되지 않으면 알림 센터를 확인하거나 설정을 업데이트해야 할 수 있습니다.
Xcode 14부터 iOS 시뮬레이터에서 원격 푸시 알림을 테스트할 수 있습니다.
4단계: 딥링크 추가하기(Android)
Android에서 com_braze_handle_push_deep_links_automatically의 기본값은 false입니다. 기본값으로 설정된 경우 푸시 알림을 탭하면 Dart 리스너에 push_opened 이벤트가 전송되지만, 네이티브 SDK가 앱을 포그라운드로 가져오거나 딥링크 대상을 자동으로 열지 않습니다. 알림을 탭해도 앱이 실행되지 않는 경우 이 플래그가 가장 가능성 있는 원인입니다.
푸시 알림을 탭할 때 Braze가 자동으로 앱과 딥링크를 열도록 하려면 braze.xml에서 com_braze_handle_push_deep_links_automatically를 true로 설정합니다.
<bool name="com_braze_handle_push_deep_links_automatically">true</bool>
이 플래그는 네이티브 Android 코드에서 런타임 구성을 통해서도 설정할 수 있습니다.
val brazeConfig = BrazeConfig.Builder()
.setHandlePushDeepLinksAutomatically(true)
.build()
Braze.configure(this, brazeConfig)
딥링크를 커스텀 처리하려면 2단계에서 설명한 subscribeToPushNotificationEvents() 리스너를 사용하여 push_opened 이벤트의 url 필드를 직접 라우팅합니다. 자세한 내용은 딥링킹을 참조하세요.
필수 조건
이 기능을 사용하려면 먼저 Android Braze SDK를 통합해야 합니다.
푸시 알림 설정하기
Huawei에서 제조한 최신 휴대폰에는 Google의 Firebase Cloud Messaging(FCM) 대신 푸시를 전달하는 데 사용되는 서비스인 Huawei Mobile Services(HMS)가 탑재되어 있습니다.
1단계: Huawei 개발자 계정 등록
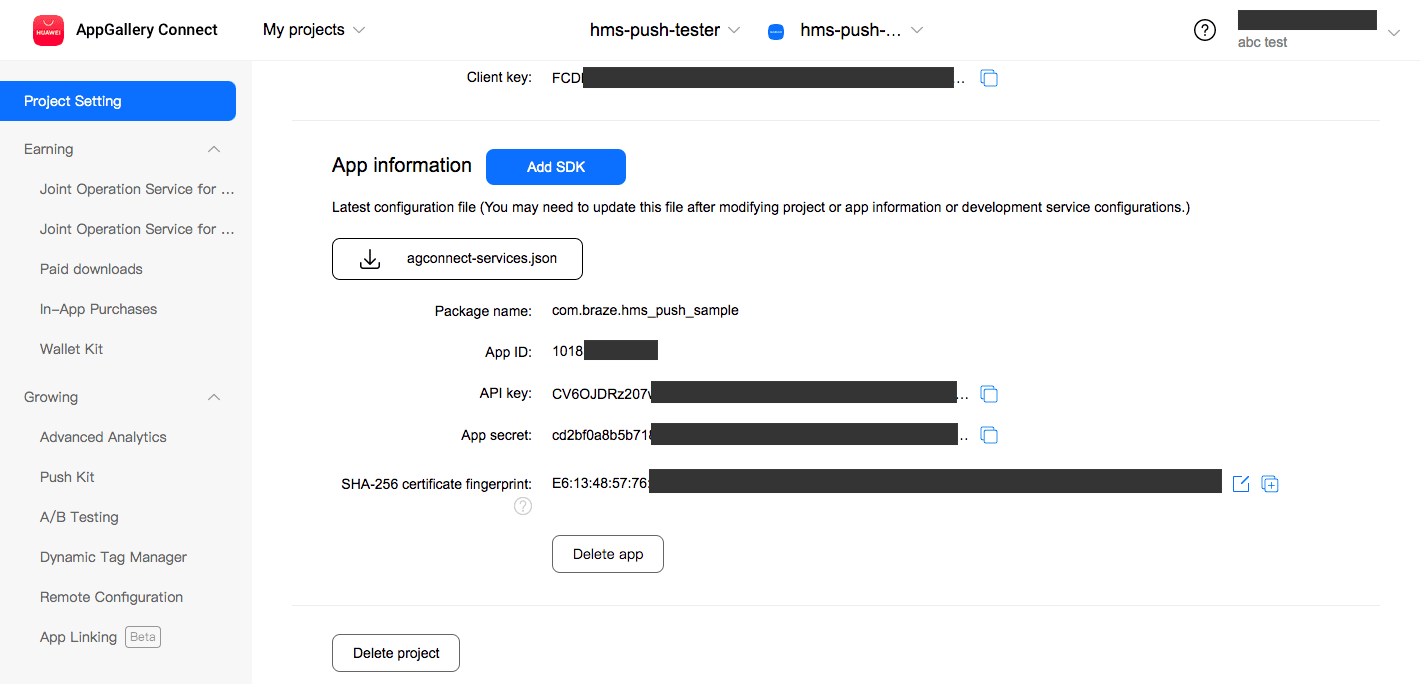
시작하기 전에 Huawei 개발자 계정을 등록하고 설정해야 합니다. Huawei 계정에서 My Projects > Project Settings > App Information으로 이동하여 App ID와 App secret을 메모해 두세요.
2단계: Braze 대시보드에서 새 Huawei 앱 만들기
Braze 대시보드에서 설정 탐색 아래에 있는 App Settings로 이동합니다.
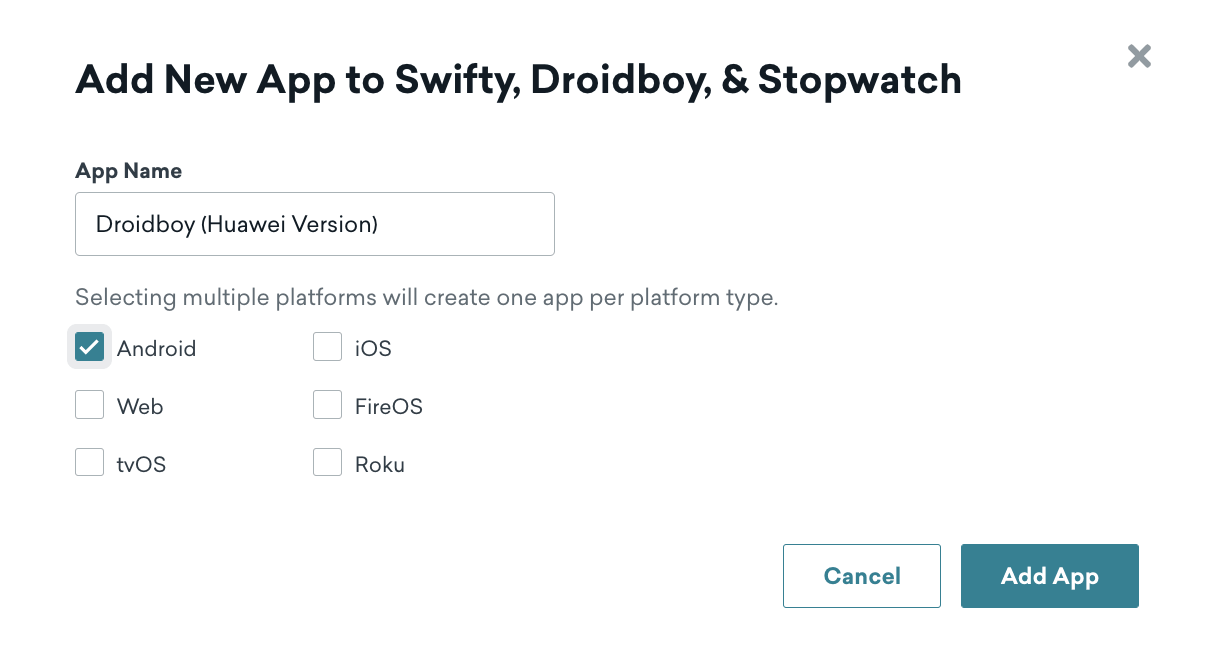
+ Add App을 클릭하고 이름(예: My Huawei App)을 입력한 다음 플랫폼으로 Android를 선택합니다.
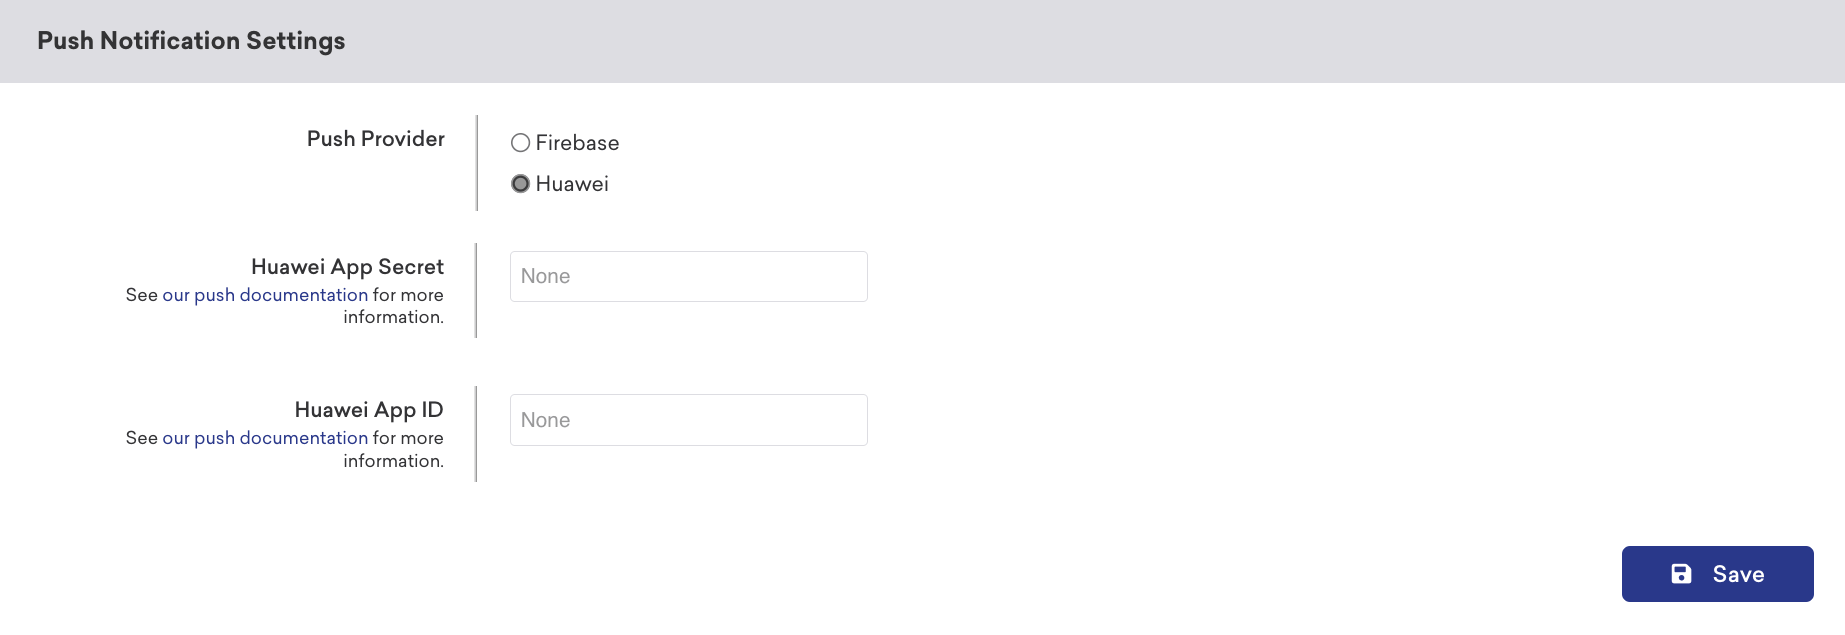
새 Braze 앱이 생성되면 푸시 알림 설정을 찾아 푸시 공급자로 Huawei를 선택합니다. 그런 다음 Huawei Client Secret과 Huawei App ID를 입력합니다.
3단계: Huawei 메시징 SDK를 앱에 통합하기
Huawei에서는 Huawei Messaging Service를 애플리케이션에 통합하는 방법을 자세히 설명하는 Android 통합 코드랩을 제공하고 있습니다. 해당 단계를 따라 시작하세요.
코드랩을 완료한 후, 푸시 토큰을 받아 메시지를 Braze SDK로 전달하는 커스텀 Huawei Message Service를 만들어야 합니다.
public class CustomPushService extends HmsMessageService {
@Override
public void onNewToken(String token) {
super.onNewToken(token);
Braze.getInstance(this.getApplicationContext()).setRegisteredPushToken(token);
}
@Override
public void onMessageReceived(RemoteMessage remoteMessage) {
super.onMessageReceived(remoteMessage);
if (BrazeHuaweiPushHandler.handleHmsRemoteMessageData(this.getApplicationContext(), remoteMessage.getDataOfMap())) {
// Braze has handled the Huawei push notification
}
}
}
class CustomPushService: HmsMessageService() {
override fun onNewToken(token: String?) {
super.onNewToken(token)
Braze.getInstance(applicationContext).setRegisteredPushToken(token!!)
}
override fun onMessageReceived(hmsRemoteMessage: RemoteMessage?) {
super.onMessageReceived(hmsRemoteMessage)
if (BrazeHuaweiPushHandler.handleHmsRemoteMessageData(applicationContext, hmsRemoteMessage?.dataOfMap)) {
// Braze has handled the Huawei push notification
}
}
}
커스텀 푸시 서비스를 추가한 후, AndroidManifest.xml에 다음을 추가합니다:
<service
android:name="package.of.your.CustomPushService"
android:exported="false">
<intent-filter>
<action android:name="com.huawei.push.action.MESSAGING_EVENT" />
</intent-filter>
</service>
4단계: 포그라운드 알림 처리하기
기본적으로 앱이 포그라운드에 있는 동안 푸시 알림이 도착하면 Huawei가 자동으로 알림을 표시합니다. Braze가 푸시 알림 페이로드를 처리하도록(분석 추적, 딥링크 처리 및 커스텀 처리) 하려면, HmsMessageService.onMessageReceived 메서드 내에서 수신된 푸시 데이터를 Braze로 전달하세요.
BrazeHuaweiPushHandler.handleHmsRemoteMessageData를 호출하면, Braze가 해당 페이로드가 Braze 푸시 알림인지 판단하고, 맞다면 알림을 생성하여 표시합니다. 자세한 내용은 Android 푸시 알림 설명서의 포그라운드 알림 처리하기를 참조하세요.
전체 예시는 Braze Android SDK 설명서의 Huawei 핸들러 참조를 참조하세요.
5단계: 푸시 알림 테스트하기 (선택 사항)
이 시점에서 Braze 대시보드에 새로운 Huawei Android 앱을 만들고, Huawei 개발자 자격 증명으로 구성하고, Braze 및 Huawei SDK를 앱에 통합한 상태입니다.
다음으로, Braze에서 새 푸시 Campaign을 테스트하여 통합을 확인할 수 있습니다.
5.1단계: 새 푸시 알림 Campaign 만들기
Campaigns 페이지에서 새 Campaign을 만들고, 메시지 유형으로 Push Notification을 선택합니다.
Campaign 이름을 지정한 후 푸시 플랫폼으로 Android Push를 선택합니다.
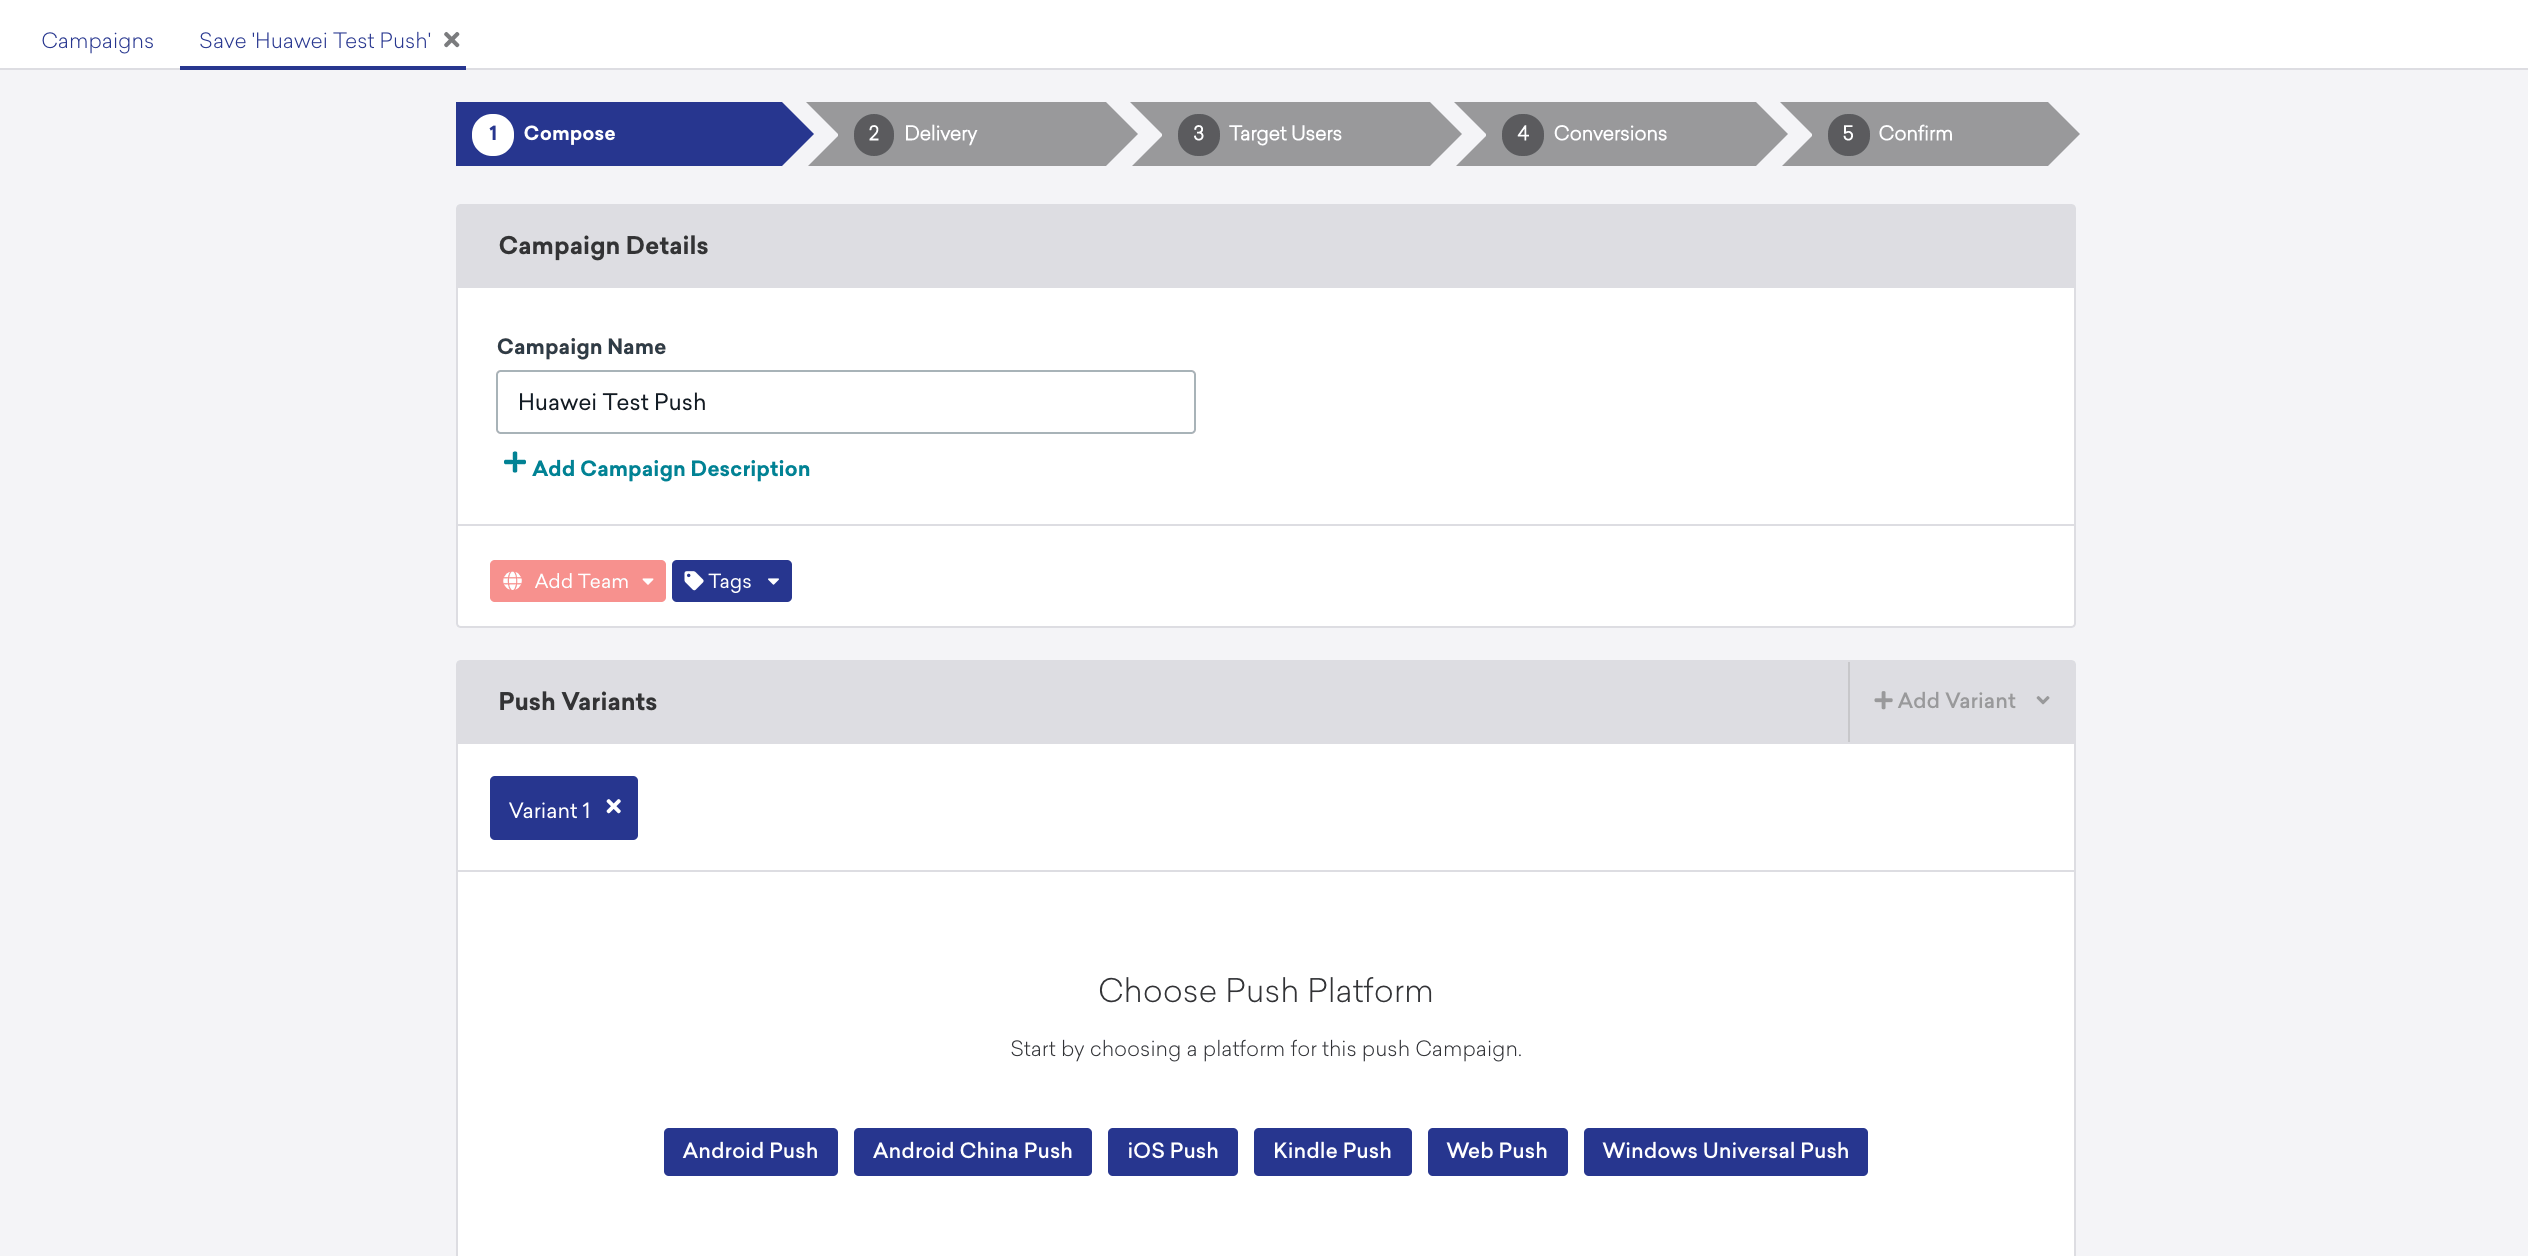
다음으로, 제목과 메시지를 입력하여 푸시 Campaign을 작성합니다.
5.2단계: 테스트 푸시 보내기
테스트 탭에서 changeUser(USER_ID_STRING) 메서드를 사용하여 앱에 설정한 사용자 ID를 입력하고, Send Test를 클릭하여 테스트 푸시를 보냅니다.
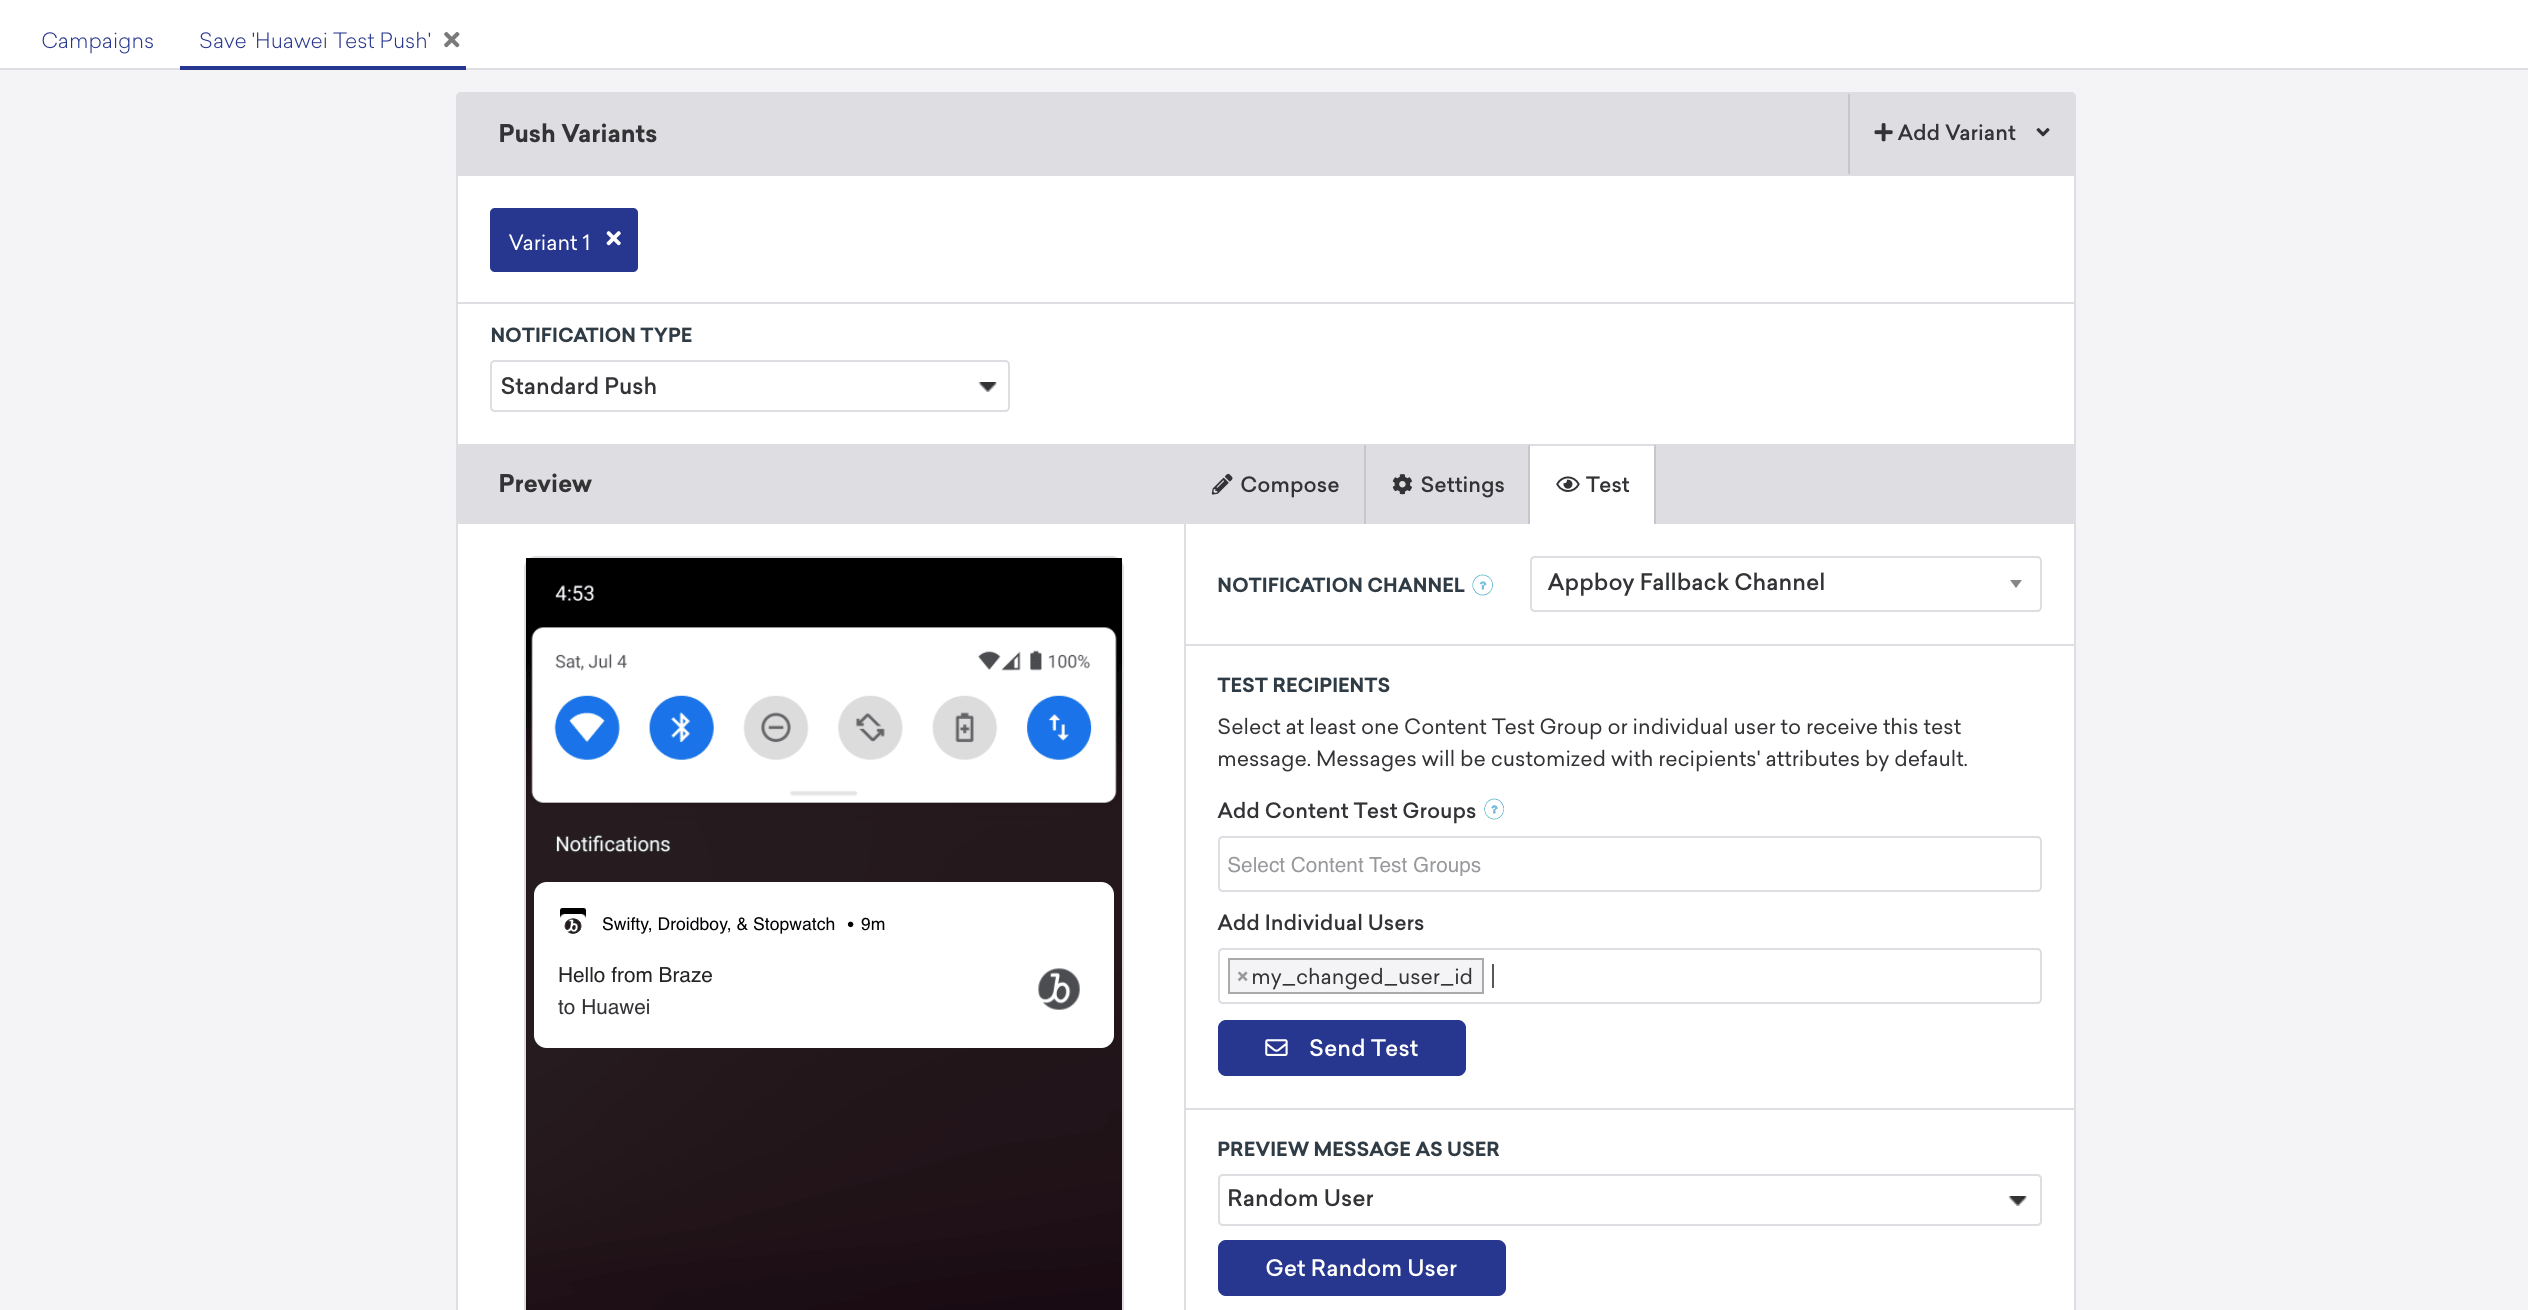
이 시점에서 Braze로부터 Huawei(HMS) 기기에 테스트 푸시 알림이 수신되어야 합니다.
5.3단계: Huawei 세분화 설정 (선택 사항)
Braze 대시보드의 Huawei 앱은 Android 푸시 플랫폼 위에 구축되어 있으므로, 모든 Android 사용자(Firebase Cloud Messaging 및 Huawei Mobile Services)에게 푸시를 보내거나 Campaign 오디언스를 특정 앱으로 세분화할 수 있는 유연성이 있습니다.
Huawei 앱에만 푸시를 보내려면 새 Segment를 만들고 앱 섹션에서 Huawei 앱을 선택합니다.
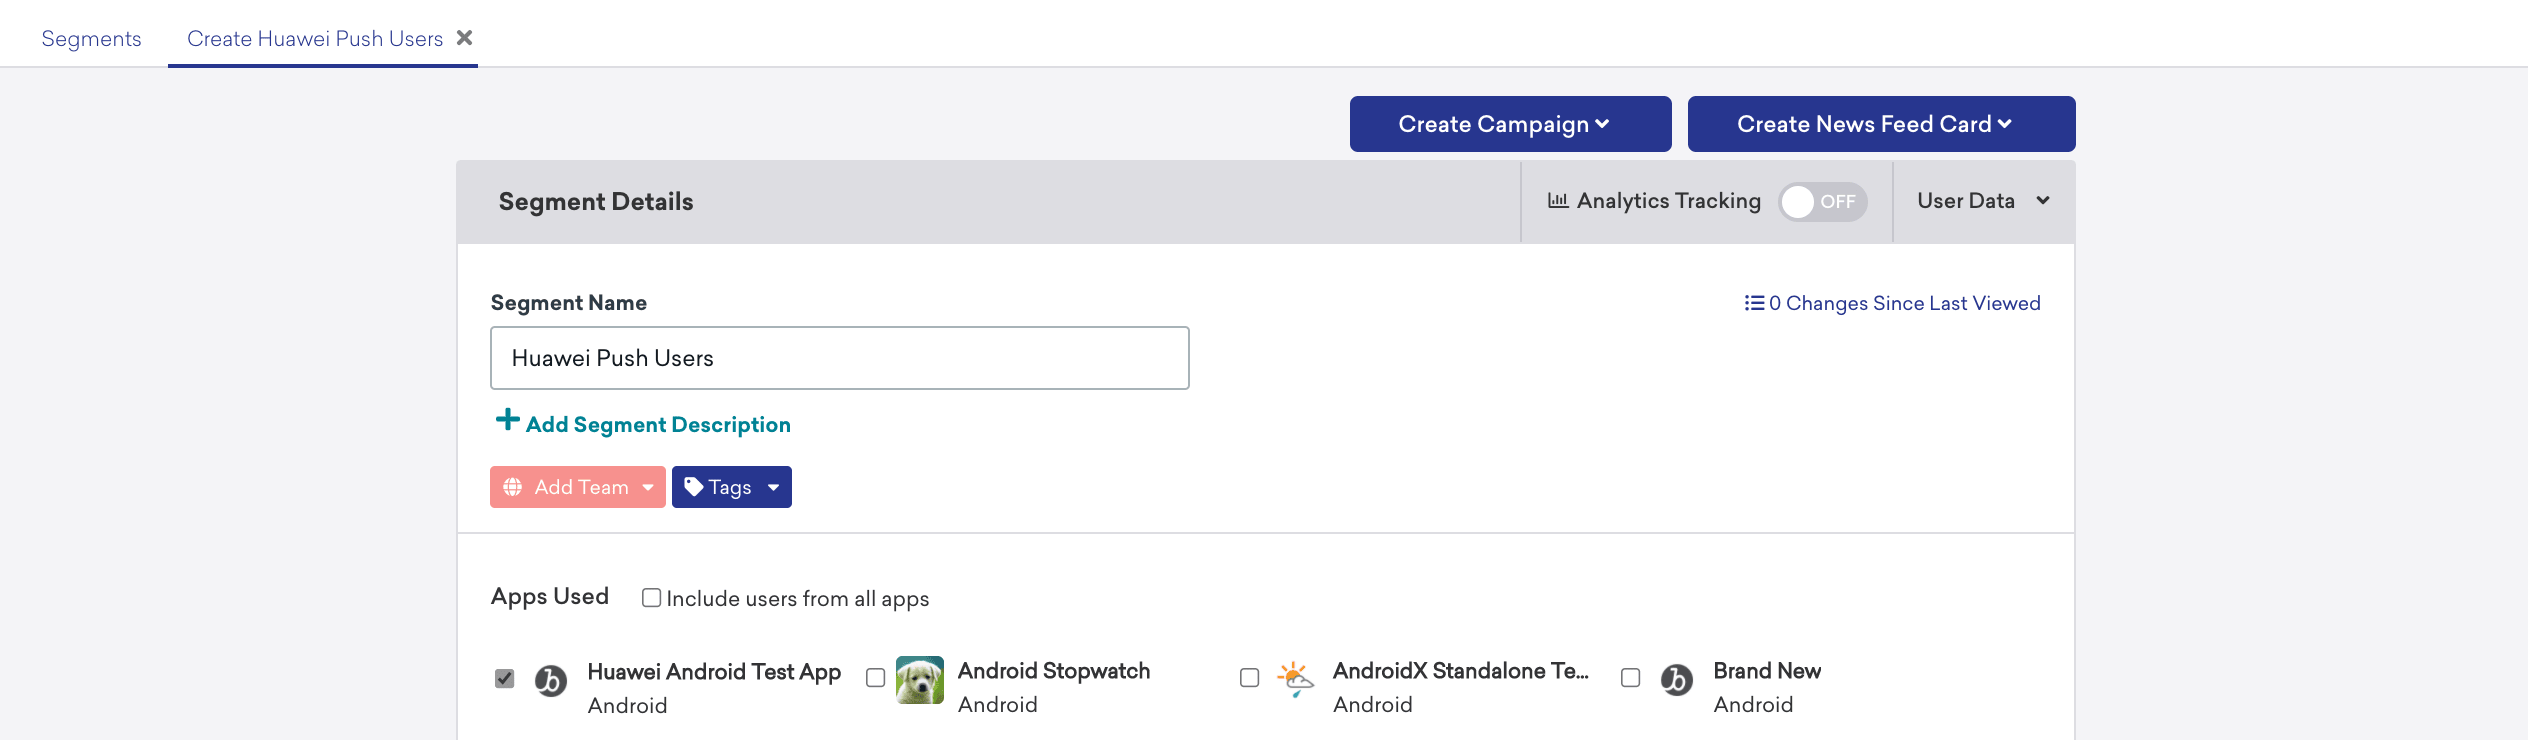
물론, 모든 Android 푸시 공급자에게 동일한 푸시를 보내려면 앱을 지정하지 않으면 현재 워크스페이스에 구성된 모든 Android 앱에 전송됩니다.
필수 조건
이 기능을 사용하려면 먼저 React Native Braze SDK를 통합해야 합니다.
푸시 알림 설정
1단계: 초기 설정 완료
필수 조건
Expo를 푸시 알림에 사용하려면 먼저 Braze Expo 플러그인을 설정해야 합니다.
1.1단계: app.json 파일 업데이트
다음으로 Android 및 iOS용 app.json 파일을 업데이트합니다:
- Android:
enableFirebaseCloudMessaging옵션을 추가합니다. - iOS:
enableBrazeIosPush옵션을 추가합니다.
1.2단계: Google 발신자 ID 추가
먼저 Firebase 콘솔로 이동하여 프로젝트를 연 다음, Settings > Project settings를 선택합니다.
Cloud Messaging을 선택한 다음, Firebase Cloud Messaging API (V1)에서 Sender ID를 클립보드에 복사합니다.
그런 다음 프로젝트의 app.json 파일을 열고 firebaseCloudMessagingSenderId 속성을 클립보드의 Sender ID로 설정합니다. 예를 들면 다음과 같습니다:
"firebaseCloudMessagingSenderId": "693679403398"
1.3단계: Google 서비스 JSON 경로 추가
프로젝트의 app.json 파일에 google-services.json 파일의 경로를 추가합니다. 이 파일은 구성에서 enableFirebaseCloudMessaging: true를 설정할 때 필요합니다.
{
"expo": {
"android": {
"googleServicesFile": "PATH_TO_GOOGLE_SERVICES"
},
"plugins": [
[
"@braze/expo-plugin",
{
"androidApiKey": "YOUR-ANDROID-API-KEY",
"iosApiKey": "YOUR-IOS-API-KEY",
"enableBrazeIosPush": true,
"enableFirebaseCloudMessaging": true,
"firebaseCloudMessagingSenderId": "YOUR-FCM-SENDER-ID",
"androidHandlePushDeepLinksAutomatically": true
}
],
]
}
}
Expo Notifications와 같은 추가 푸시 알림 라이브러리를 사용하는 경우, 네이티브 설정 지침 대신 이 설정을 사용해야 합니다.
Braze Expo 플러그인을 사용하지 않거나 이러한 설정을 네이티브로 구성하려는 경우, 네이티브 Android 푸시 통합 가이드를 참조하여 푸시를 등록하세요.
Braze Expo 플러그인을 사용하지 않거나 이러한 설정을 네이티브로 구성하려는 경우, 네이티브 iOS 푸시 통합 가이드의 다음 단계를 참조하여 푸시를 등록하세요:
1.1단계: 푸시 권한 요청
앱 시작 시 푸시 권한을 요청할 계획이 없다면 AppDelegate에서 requestAuthorizationWithOptions:completionHandler: 호출을 생략하세요. 그런 다음 2단계로 건너뛰세요. 그렇지 않으면 네이티브 iOS 통합 가이드를 따르세요.
1.2단계(선택 사항): 푸시 키 마이그레이션
이전에 expo-notifications를 사용하여 푸시 키를 관리했다면 애플리케이션의 루트 폴더에서 expo fetch:ios:certs를 실행합니다. 이렇게 하면 푸시 키(.p8 파일)가 다운로드되며, Braze 대시보드에 업로드할 수 있습니다.
2단계: 푸시 알림 권한 요청
Braze.requestPushPermission() 메서드(v1.38.0 이상에서 사용 가능)를 사용하여 iOS 및 Android 13 이상에서 사용자에게 푸시 알림 권한을 요청합니다. Android 12 이하에서는 이 메서드가 아무 동작도 하지 않습니다.
이 메서드는 SDK가 iOS에서 사용자에게 요청할 권한을 지정하는 필수 매개변수를 받습니다. 이 옵션은 Android에는 영향을 미치지 않습니다.
const permissionOptions = {
alert: true,
sound: true,
badge: true,
provisional: false
};
Braze.requestPushPermission(permissionOptions);
2.1단계: 푸시 알림 수신 대기(선택 사항)
Braze가 수신 푸시 알림을 감지하고 처리한 이벤트를 추가로 구독할 수 있습니다. 리스너 키 Braze.Events.PUSH_NOTIFICATION_EVENT를 사용합니다.
iOS 푸시 수신 이벤트는 포그라운드 알림과 content-available 백그라운드 알림에 대해서만 트리거됩니다. 종료된 상태에서 수신된 알림이나 content-available 필드가 없는 백그라운드 알림에 대해서는 트리거되지 않습니다.
Braze.addListener(Braze.Events.PUSH_NOTIFICATION_EVENT, data => {
console.log(`Push Notification event of type ${data.payload_type} seen. Title ${data.title}\n and deeplink ${data.url}`);
console.log(JSON.stringify(data, undefined, 2));
});
푸시 알림 이벤트 필드
푸시 알림 필드의 전체 목록은 아래 표를 참조하세요:
| 필드 이름 | 유형 | 설명 |
|---|---|---|
payload_type |
문자열 | 알림 페이로드 유형을 지정합니다. Braze React Native SDK에서 전송되는 두 가지 값은 push_opened와 push_received입니다. |
url |
문자열 | 알림에 의해 열린 URL을 지정합니다. |
use_webview |
부울 | true이면 URL이 인앱 모달 웹뷰에서 열립니다. false이면 기기 브라우저에서 URL이 열립니다. |
title |
문자열 | 알림의 제목을 나타냅니다. |
body |
문자열 | 알림의 본문 또는 콘텐츠 텍스트를 나타냅니다. |
summary_text |
문자열 | 알림의 요약 텍스트를 나타냅니다. iOS에서는 subtitle에서 매핑됩니다. |
badge_count |
숫자 | 알림의 배지 수를 나타냅니다. |
timestamp |
숫자 | 애플리케이션이 페이로드를 수신한 시간을 나타냅니다. |
is_silent |
부울 | true이면 페이로드가 무음으로 수신됩니다. Android 무음 푸시 알림 전송에 대한 자세한 내용은 Android 무음 푸시 알림을 참조하세요. iOS 무음 푸시 알림 전송에 대한 자세한 내용은 iOS 무음 푸시 알림을 참조하세요. |
is_braze_internal |
부울 | 피처 플래그 동기화 또는 제거 추적과 같은 내부 SDK 기능을 위해 알림 페이로드가 전송된 경우 true입니다. 페이로드는 사용자에게 무음으로 수신됩니다. |
image_url |
문자열 | 알림 이미지와 연결된 URL을 지정합니다. |
braze_properties |
오브젝트 | Campaign과 관련된 Braze 속성정보(키-값 페어)를 나타냅니다. |
ios |
오브젝트 | iOS 전용 필드를 나타냅니다. |
android |
오브젝트 | Android 전용 필드를 나타냅니다. |
3단계: 딥링킹 활성화(선택 사항)
푸시 알림 클릭 시 Braze가 React 컴포넌트 내에서 딥링크를 처리할 수 있도록 하려면, 먼저 React Native Linking 라이브러리에 설명된 단계를 구현하거나 원하는 솔루션을 사용하세요. 그런 다음 아래의 추가 단계를 따르세요.
딥링크에 대한 자세한 내용은 FAQ 문서를 참조하세요.
기존 React Native 푸시 통합을 마이그레이션하는 경우, Braze SDK, React Native, Expo 또는 관련 라이브러리를 업그레이드한 후 딥링킹을 다시 테스트하세요. 다음 사항을 확인하세요:
- React Native Linking이 여전히 구성되어 있고 딥링크 URL을 처리하고 있는지 확인합니다.
- iOS 초기 푸시 페이로드 처리(3.1단계 참조)가 구현되어 있고 앱 시작 시 여전히 호출되는지 확인합니다.
- 푸시 클릭 이벤트를 처리하는 데 사용하는 네이티브 델리게이트 또는 리스너 메서드가 여전히 등록되어 있고 예상대로 호출되는지 확인합니다.
Braze Expo 플러그인을 사용하는 경우, app.json에서 androidHandlePushDeepLinksAutomatically를 true로 설정하여 푸시 알림 딥링크를 자동으로 처리할 수 있습니다.
딥링크를 수동으로 처리하려면 네이티브 Android 설명서를 참조하세요: 딥링크 추가.
3.1단계: 앱 시작 시 푸시 알림 페이로드 저장
React Native SDK 19.1.0부터 지원됩니다.
메인 액티비티의 onCreate() 메서드에 populateInitialPushPayloadFromIntent를 추가하세요. 초기 Intent 데이터를 캡처하려면 React Native가 초기화되기 전에 호출해야 합니다. 예를 들면 다음과 같습니다:
override fun onCreate(savedInstanceState: Bundle?) {
BrazeReactUtils.populateInitialPushPayloadFromIntent(intent)
super.onCreate(savedInstanceState)
}
3.2단계: 종료 상태에서의 딥링크 처리
React Native Linking이 처리하는 기본 시나리오 외에도, Braze.getInitialPushPayload 메서드를 구현하고 url 값을 가져와서 앱이 실행되지 않는 상태에서 푸시 알림으로 열리는 딥링크를 처리하세요. 예를 들면 다음과 같습니다:
// Handles deep links when an app is launched from a hard close via push click.
Braze.getInitialPushPayload(pushPayload => {
if (pushPayload) {
console.log('Braze.getInitialPushPayload is ' + pushPayload);
showToast('Initial URL is ' + pushPayload.url);
handleOpenUrl({ pushPayload.url });
}
});
이 메서드를 사용하려면 해당 플랫폼의 3.1단계에서 네이티브 설정이 필요합니다. Braze Expo 플러그인을 사용하는 경우 자동으로 처리될 수 있습니다.
iOS에서 푸시 알림의 딥링크를 처리하려면 네이티브 iOS 레이어에서도 링크 처리를 구성해야 합니다.
여기에는 커스텀 URL 스킴을 등록하고 AppDelegate에서 URL 핸들러를 구현하는 것이 포함됩니다. 전체 설정 지침은 네이티브 iOS 설명서의 딥링크 처리를 참조하세요.
3.1단계: 앱 시작 시 푸시 알림 페이로드 저장
Braze Expo 플러그인을 사용하는 경우 3.1단계를 건너뛰세요. 이 기능은 자동으로 처리됩니다.
iOS의 경우 AppDelegate의 didFinishLaunchingWithOptions 메서드에 populateInitialPayloadFromLaunchOptions를 추가합니다. 예를 들면 다음과 같습니다:
- (BOOL)application:(UIApplication *)application didFinishLaunchingWithOptions:(NSDictionary *)launchOptions
{
// ... Perform regular React Native setup
BRZConfiguration *configuration = [[BRZConfiguration alloc] initWithApiKey:apiKey endpoint:endpoint];
configuration.triggerMinimumTimeInterval = 1;
configuration.logger.level = BRZLoggerLevelInfo;
Braze *braze = [BrazeReactBridge initBraze:configuration];
AppDelegate.braze = braze;
[self registerForPushNotifications];
[[BrazeReactUtils sharedInstance] populateInitialPayloadFromLaunchOptions:launchOptions];
return [super application:application didFinishLaunchingWithOptions:launchOptions];
}
func application(
_ application: UIApplication,
didFinishLaunchingWithOptions launchOptions: [UIApplication.LaunchOptionsKey: Any]? = nil
) -> Bool {
// ... Perform regular React Native setup
let configuration = Braze.Configuration(apiKey: apiKey, endpoint: endpoint)
configuration.triggerMinimumTimeInterval = 1
configuration.logger.level = .info
let braze = BrazeReactBridge.initBraze(configuration)
AppDelegate.braze = braze
registerForPushNotifications()
BrazeReactUtils.shared().populateInitialPayload(fromLaunchOptions: launchOptions)
return super.application(application, didFinishLaunchingWithOptions: launchOptions)
}
3.2단계: 종료 상태에서의 딥링크 처리
React Native Linking이 처리하는 기본 시나리오 외에도, Braze.getInitialPushPayload 메서드를 구현하고 url 값을 가져와서 앱이 실행되지 않는 상태에서 푸시 알림으로 열리는 딥링크를 처리하세요. 예를 들면 다음과 같습니다:
// Handles deep links when an app is launched from a hard close via push click.
Braze.getInitialPushPayload(pushPayload => {
if (pushPayload) {
console.log('Braze.getInitialPushPayload is ' + pushPayload);
showToast('Initial URL is ' + pushPayload.url);
handleOpenUrl({ pushPayload.url });
}
});
이 메서드를 사용하려면 해당 플랫폼의 3.1단계에서 네이티브 설정이 필요합니다. Braze Expo 플러그인을 사용하는 경우 자동으로 처리될 수 있습니다.
3.3단계: 유니버설 링크 활성화(선택 사항)
유니버설 링크 지원을 활성화하려면, 주어진 URL을 열지 여부를 결정하는 Braze 델리게이트를 구현한 다음 Braze 인스턴스에 등록하세요.
iOS 디렉토리에 BrazeReactDelegate.swift 파일을 생성하고 다음을 추가하세요. YOUR_DOMAIN_HOST를 실제 도메인으로 교체하세요.
import Foundation
import BrazeKit
import UIKit
class BrazeReactDelegate: NSObject, BrazeDelegate {
/// This delegate method determines whether to open a given URL.
/// Reference the context to get additional details about the URL payload.
func braze(_ braze: Braze, shouldOpenURL context: Braze.URLContext) -> Bool {
if let host = context.url.host,
host.caseInsensitiveCompare("YOUR_DOMAIN_HOST") == .orderedSame {
// Sample custom handling of universal links
let application = UIApplication.shared
let userActivity = NSUserActivity(activityType: NSUserActivityTypeBrowsingWeb)
userActivity.webpageURL = context.url
// Routes to the `continueUserActivity` method, which should be handled in your AppDelegate.
application.delegate?.application?(
application,
continue: userActivity,
restorationHandler: { _ in }
)
return false
}
// Let Braze handle links otherwise
return true
}
}
그런 다음 프로젝트의 AppDelegate.swift 파일의 didFinishLaunchingWithOptions에서 BrazeReactDelegate를 생성하고 등록하세요.
import BrazeKit
class AppDelegate: UIResponder, UIApplicationDelegate {
static var braze: Braze?
// Keep a strong reference to the BrazeDelegate so it is not deallocated.
private var brazeDelegate: BrazeReactDelegate?
func application(
_ application: UIApplication,
didFinishLaunchingWithOptions launchOptions: [UIApplication.LaunchOptionsKey: Any]? = nil
) -> Bool {
// Other setup code (e.g., Braze initialization)
brazeDelegate = BrazeReactDelegate()
AppDelegate.braze?.delegate = brazeDelegate
return true
}
}
iOS 디렉토리에 BrazeReactDelegate.h 파일을 생성한 다음 다음 코드 스니펫을 추가하세요.
#import <Foundation/Foundation.h>
#import <BrazeKit/BrazeKit-Swift.h>
@interface BrazeReactDelegate: NSObject<BrazeDelegate>
@end
다음으로 BrazeReactDelegate.m 파일을 생성한 다음 다음 코드 스니펫을 추가하세요. YOUR_DOMAIN_HOST를 실제 도메인으로 교체하세요.
#import "BrazeReactDelegate.h"
#import <UIKit/UIKit.h>
@implementation BrazeReactDelegate
/// This delegate method determines whether to open a given URL.
///
/// Reference the `BRZURLContext` object to get additional details about the URL payload.
- (BOOL)braze:(Braze *)braze shouldOpenURL:(BRZURLContext *)context {
if ([[context.url.host lowercaseString] isEqualToString:@"YOUR_DOMAIN_HOST"]) {
// Sample custom handling of universal links
UIApplication *application = UIApplication.sharedApplication;
NSUserActivity* userActivity = [[NSUserActivity alloc] initWithActivityType:NSUserActivityTypeBrowsingWeb];
userActivity.webpageURL = context.url;
// Routes to the `continueUserActivity` method, which should be handled in your `AppDelegate`.
[application.delegate application:application
continueUserActivity:userActivity restorationHandler:^(NSArray<id<UIUserActivityRestoring>> * _Nullable restorableObjects) {}];
return NO;
}
// Let Braze handle links otherwise
return YES;
}
@end
그런 다음 프로젝트의 AppDelegate.m 파일의 didFinishLaunchingWithOptions에서 BrazeReactDelegate를 생성하고 등록하세요.
#import "BrazeReactUtils.h"
#import "BrazeReactDelegate.h"
@interface AppDelegate ()
// Keep a strong reference to the BrazeDelegate to ensure it is not deallocated.
@property (nonatomic, strong) BrazeReactDelegate *brazeDelegate;
@end
- (BOOL)application:(UIApplication *)application didFinishLaunchingWithOptions:(NSDictionary *)launchOptions
{
// Other setup code
self.brazeDelegate = [[BrazeReactDelegate alloc] init];
braze.delegate = self.brazeDelegate;
}
예제 통합은 이 AppDelegate 예제에서 샘플 앱을 참조하세요.
4단계: 포그라운드 알림 처리
포그라운드 알림 처리는 플랫폼과 설정에 따라 다르게 작동합니다. 통합 방식에 맞는 접근 방법을 선택하세요:
iOS의 경우 포그라운드 알림 처리는 네이티브 Swift 통합과 동일합니다. UNUserNotificationCenterDelegate.userNotificationCenter(_:willPresent:withCompletionHandler:) 구현 내에서 handleForegroundNotification(notification:)을 호출하세요.
자세한 내용과 코드 예제는 Swift 푸시 알림 설명서의 포그라운드 알림 처리를 참조하세요.
Android의 경우 포그라운드 알림 처리는 네이티브 Android 통합과 동일합니다. FirebaseMessagingService.onMessageReceived 메서드 내에서 BrazeFirebaseMessagingService.handleBrazeRemoteMessage를 호출하세요.
자세한 내용과 코드 예제는 Android 푸시 알림 설명서의 포그라운드 알림 처리를 참조하세요.
Expo 관리 워크플로에서는 네이티브 알림 핸들러를 직접 호출하지 않습니다. 대신 Expo Notifications API를 사용하여 포그라운드 표시를 제어하고, Braze Expo 플러그인이 네이티브 처리를 자동으로 수행합니다.
import * as Notifications from 'expo-notifications';
import Braze from '@braze/react-native-sdk';
// Control foreground presentation in Expo
Notifications.setNotificationHandler({
handleNotification: async () => ({
shouldShowAlert: true, // Show alert while in foreground
shouldPlaySound: false,
shouldSetBadge: false,
}),
});
// React to Braze push events
const subscription = Braze.addListener('pushNotificationEvent', (event) => {
console.log('Braze push event', {
type: event.payload_type, // "push_received" | "push_opened"
title: event.title,
url: event.url,
is_silent: event.is_silent,
});
// Handle deep links, custom behavior, etc.
});
// Handle initial payload when app launches via push
Braze.getInitialPushPayload((payload) => {
if (payload) {
console.log('Initial push payload', payload);
}
});
Expo 관리 워크플로에서는 Braze Expo 플러그인이 네이티브 푸시 처리를 자동으로 수행합니다. 위에 표시된 Expo Notifications 표시 옵션을 통해 포그라운드 UI를 제어할 수 있습니다.
베어 워크플로 통합의 경우 네이티브 iOS 및 Android 접근 방식을 따르세요.
5단계: 테스트 푸시 알림 전송
이 시점에서 기기에 알림을 보낼 수 있어야 합니다. 다음 단계에 따라 푸시 통합을 테스트하세요.
macOS 13부터 특정 기기에서는 Xcode 14 이상에서 실행되는 iOS 16+ 시뮬레이터에서 iOS 푸시 알림을 테스트할 수 있습니다. 자세한 내용은 Xcode 14 릴리스 노트를 참조하세요.
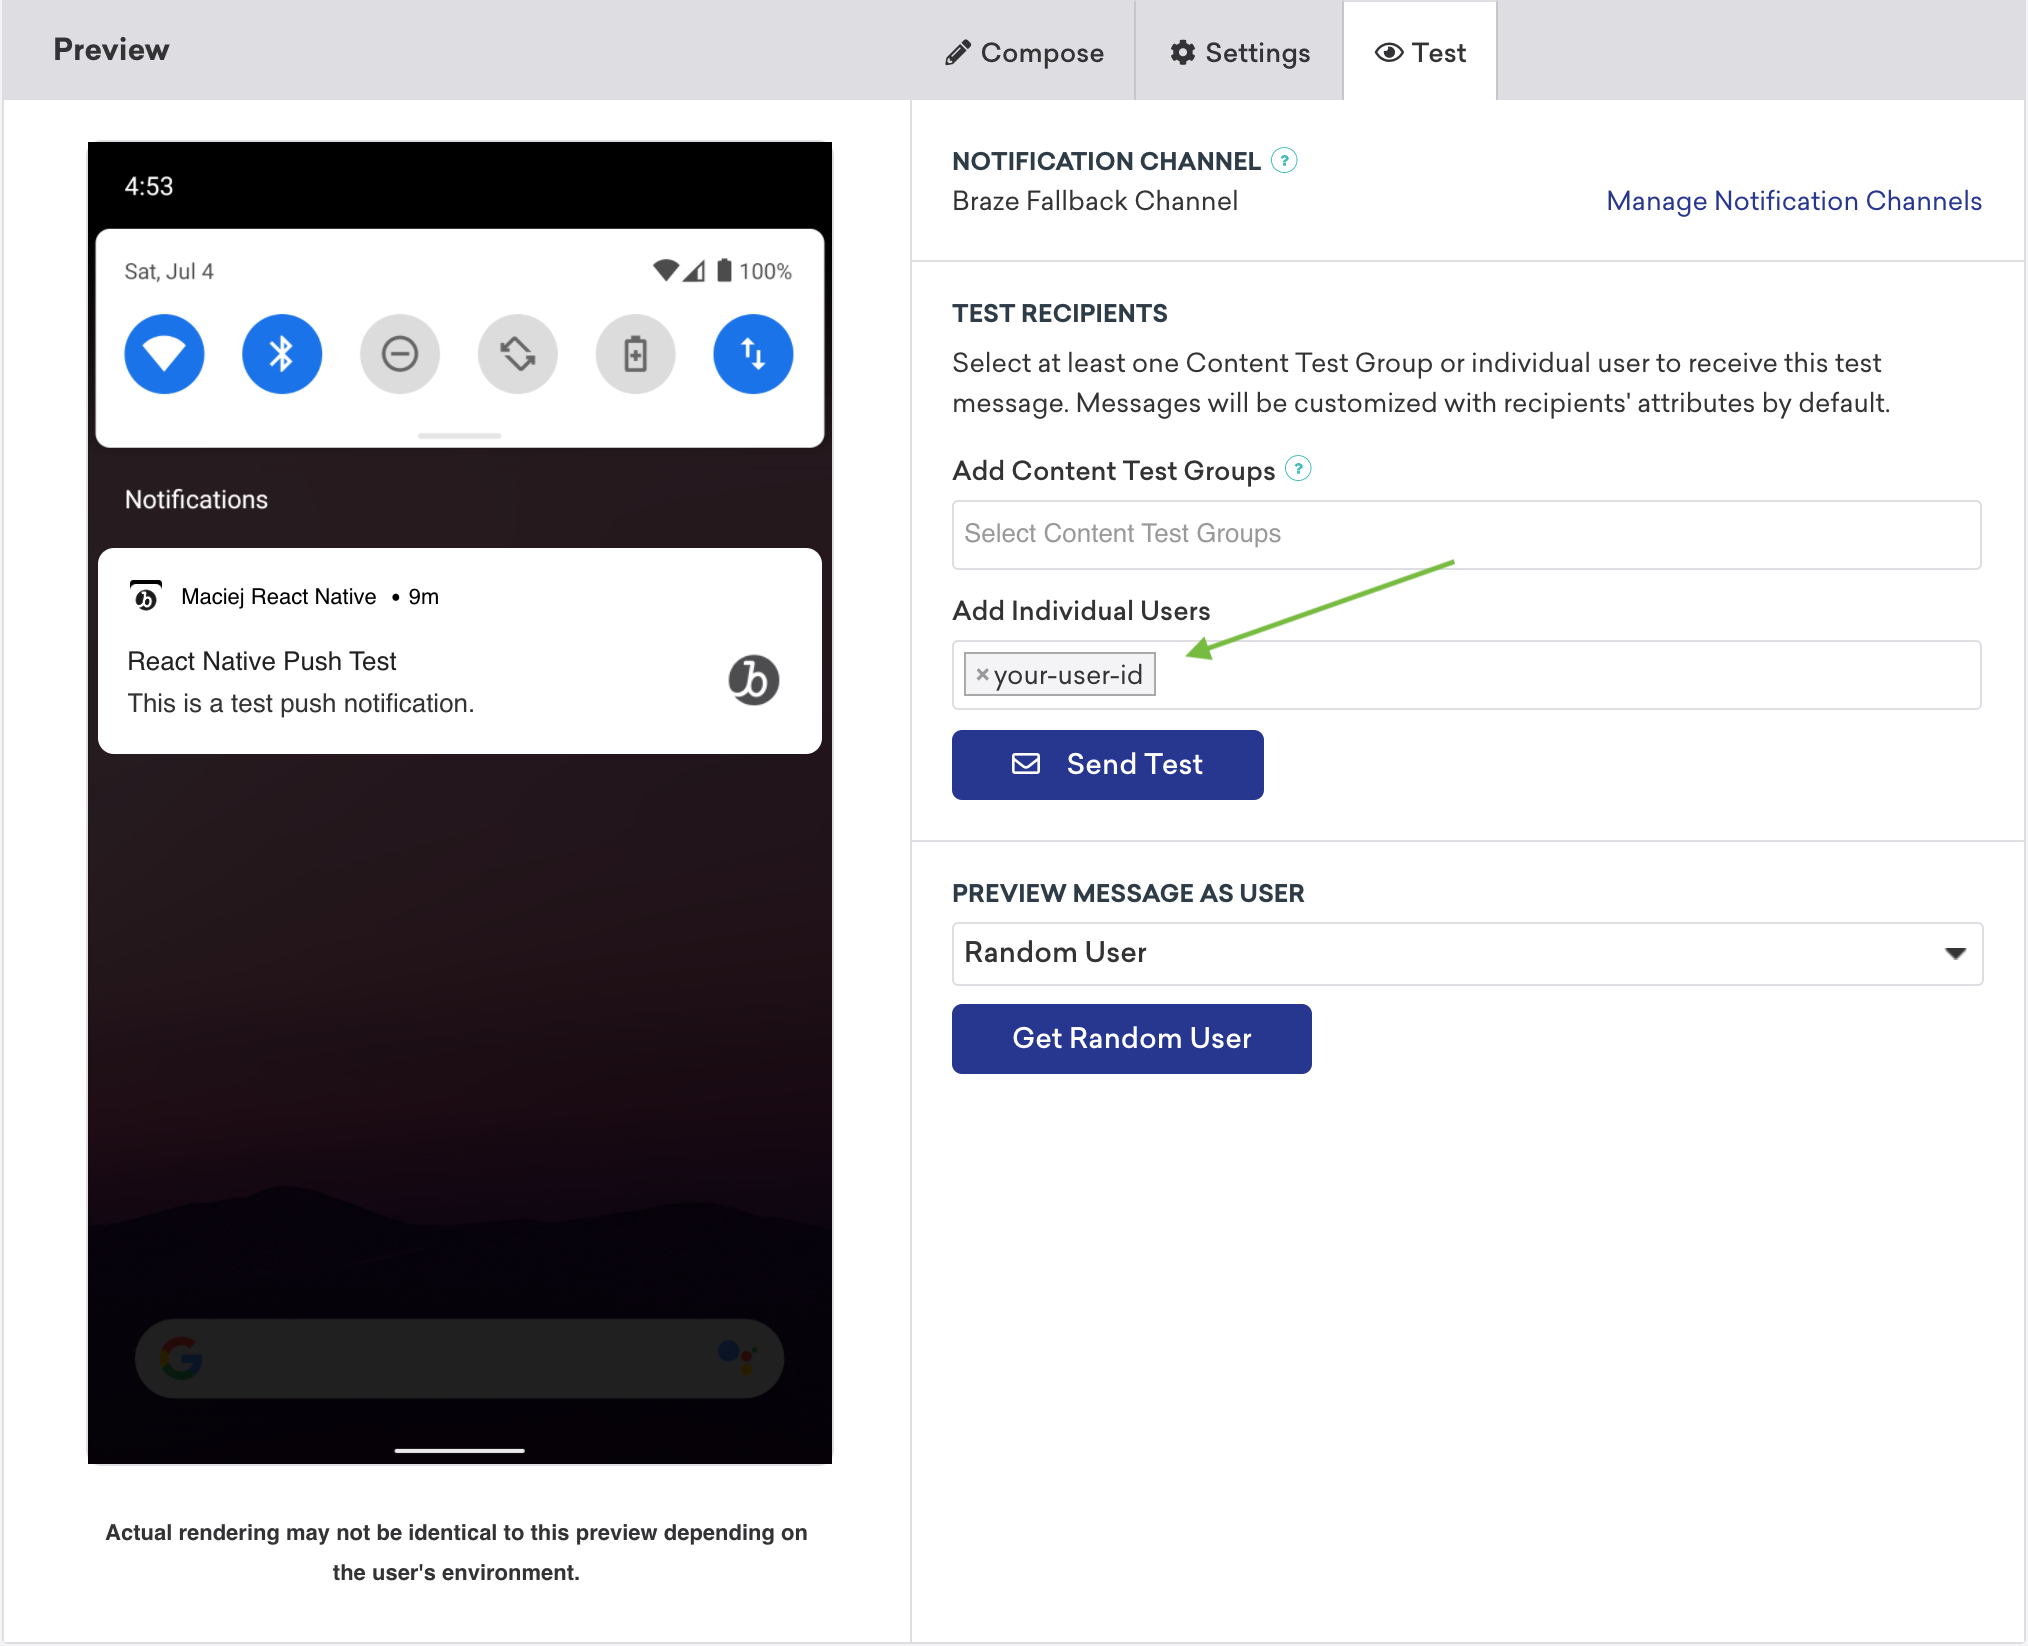
Braze.changeUserId('your-user-id')메서드를 호출하여 React Native 애플리케이션에서 활성 사용자를 설정합니다.- Campaigns로 이동하여 새 푸시 알림 Campaign을 만듭니다. 테스트할 플랫폼을 선택합니다.
- 테스트 알림을 작성하고 Test 탭으로 이동합니다. 테스트 사용자와 동일한
user-id를 추가하고 Send Test를 클릭합니다. 곧 기기에서 알림을 받을 수 있습니다.
Expo 플러그인 사용하기
Expo용 푸시 알림을 설정한 후, 네이티브 Android 또는 iOS 레이어에서 코드를 작성하지 않고도 다음과 같은 푸시 알림 동작을 처리할 수 있습니다.
Android 푸시를 추가 FMS로 전달하기
추가 Firebase Messaging Service(FMS)를 사용하려면, 애플리케이션이 Braze가 아닌 푸시를 수신할 때 호출할 대체 FMS를 지정할 수 있습니다. 예시:
{
"expo": {
"plugins": [
[
"@braze/expo-plugin",
{
...
"androidFirebaseMessagingFallbackServiceEnabled": true,
"androidFirebaseMessagingFallbackServiceClasspath": "com.company.OurFirebaseMessagingService"
}
]
]
}
}
Expo Application Services에서 앱 확장 프로그램 사용하기
Expo Application Services(EAS)를 사용하고 있으며 enableBrazeIosRichPush 또는 enableBrazeIosPushStories를 활성화한 경우, 프로젝트에서 각 앱 확장 프로그램에 해당하는 번들 식별자를 선언해야 합니다. EAS에서 코드 서명을 관리하도록 프로젝트가 구성된 방식에 따라 이 단계에 접근하는 방법은 여러 가지가 있습니다.
한 가지 방법은 Expo의 앱 확장 프로그램 설명서를 따라 app.json 파일에서 appExtensions 구성을 사용하는 것입니다. 또는 Expo의 로컬 자격 증명 설명서를 따라 credentials.json 파일에서 multitarget 설정을 구성할 수 있습니다.
문제 해결
다음은 Braze React Native SDK 및 Expo 플러그인을 사용한 푸시 알림 통합의 일반적인 문제 해결 단계입니다.
푸시 알림이 작동하지 않는 경우
Expo 플러그인을 통한 푸시 알림이 작동하지 않는 경우:
- Braze SDK가 여전히 세션을 추적하고 있는지 확인합니다.
wipeData의 명시적 또는 암시적 호출에 의해 SDK가 비활성화되지 않았는지 확인합니다.- Expo 또는 관련 라이브러리에 대한 최근 업그레이드를 검토하여 Braze 구성과 충돌이 있는지 확인합니다.
- 최근 추가된 프로젝트 종속성을 검토하여 기존 푸시 알림 델리게이트 메서드를 수동으로 재정의하고 있는지 확인합니다.
기기 토큰이 Braze에 등록되지 않는 경우
기기 토큰이 Braze에 등록되지 않는 경우, 먼저 푸시 알림이 작동하지 않는 경우 항목을 확인하세요.
문제가 지속되면 별도의 종속성이 Braze 푸시 알림 구성에 간섭하고 있을 수 있습니다. 해당 종속성을 제거하거나 Braze.registerPushToken을 수동으로 호출해 볼 수 있습니다.
푸시 알림의 딥링크가 열리지 않는 경우
마이그레이션 후 푸시 알림의 딥링크가 열리지 않는 경우, 다음을 확인하세요:
- 업그레이드된 앱에서 React Native Linking 설정이 여전히 유효한지 확인합니다.
- iOS 네이티브 통합의 경우,
populateInitialPayloadFromLaunchOptions및Braze.getInitialPushPayload를 구현하여 종료된 상태에서 앱이 실행될 때 초기 푸시 페이로드를 검색하고 해당url을 딥링크 핸들러에 전달할 수 있는지 확인합니다. - Braze Expo 플러그인을 사용하는 경우,
androidHandlePushDeepLinksAutomatically가 구현에 맞게 올바르게 설정되어 있는지 확인합니다. - 알림 처리 또는 앱 델리게이트 동작을 재정의하는 최근 추가된 종속성이 있는지 검토합니다.
이러한 확인을 완료한 후에도 문제가 지속되면 지원 티켓을 제출하고 SDK 로그와 재현 단계를 포함해 주세요.
필수 조건
이 기능을 사용하려면 먼저 Braze Web SDK를 통합해야 합니다. 웹 SDK에 대한 푸시 알림 설정도 필요합니다. iOS 및 iPadOS 사용자에게는 Safari v16.4 이상을 사용하는 경우에만 푸시 알림을 보낼 수 있습니다.
모바일용 Safari 푸시 설정하기
1단계: 매니페스트 파일 만들기
웹 애플리케이션 매니페스트는 웹사이트가 사용자의 홈 화면에 설치될 때 어떻게 표시되는지를 제어하는 JSON 파일입니다.
예를 들어, 앱 전환기에서 사용하는 배경 테마 색상과 아이콘을 설정하거나, 네이티브 앱처럼 전체 화면으로 렌더링할지, 앱을 가로 또는 세로 모드로 열지 여부를 설정할 수 있습니다.
웹사이트의 루트 디렉토리에 다음 필수 필드를 포함하여 새 manifest.json 파일을 생성합니다.
{
"name": "your app name",
"short_name": "your app name",
"display": "fullscreen",
"icons": [{
"src": "favicon.ico",
"sizes": "128x128",
}]
}
지원되는 필드의 전체 목록은 MDN 웹 앱 매니페스트 설명서에서 확인할 수 있습니다.
2단계: 매니페스트 파일 연결하기
웹사이트의 <head> 요소에 매니페스트 파일이 호스팅된 위치를 가리키는 다음 <link> 태그를 추가합니다.
<link rel="manifest" href="/manifest.json" />
3단계: 서비스 워커 추가하기
웹사이트에는 웹 푸시 통합 가이드에 설명된 대로 Braze 서비스 워커 라이브러리를 가져오는 서비스 워커 파일이 있어야 합니다.
4단계: 홈 화면에 추가하기
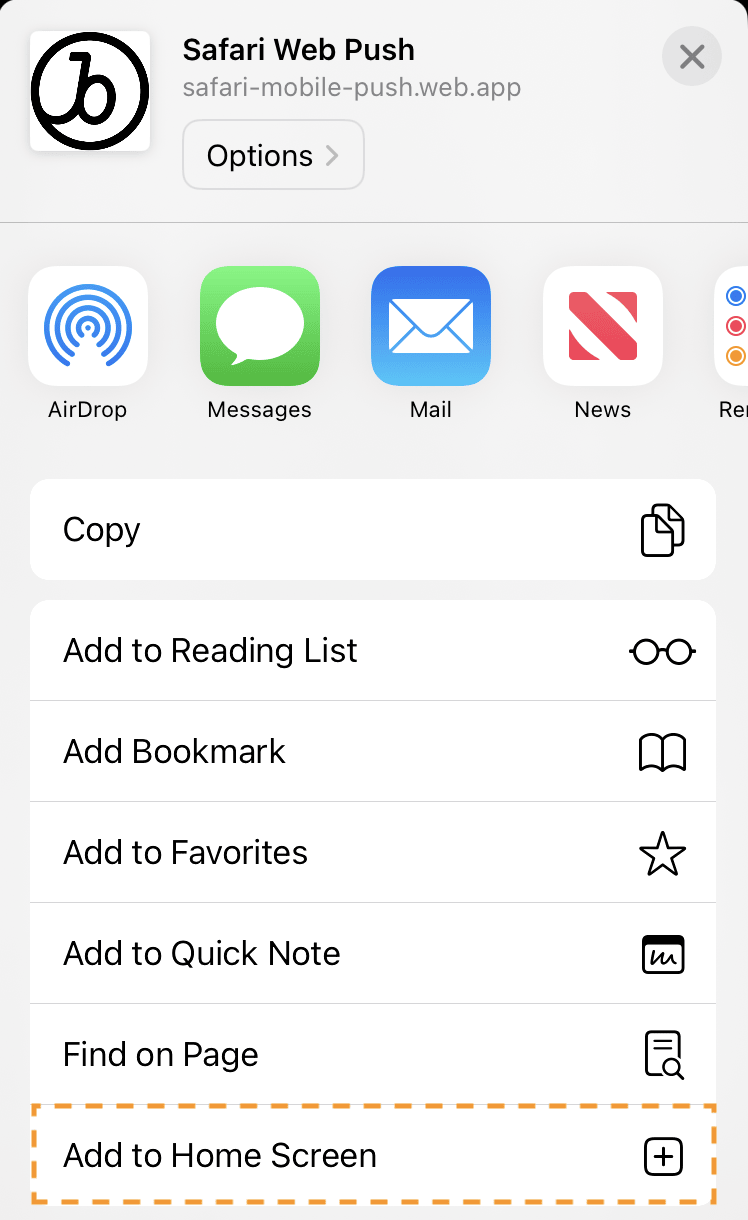
주요 브라우저(Safari, Chrome, Firefox, Edge 등)는 최신 버전에서 웹 푸시 알림을 모두 지원합니다. iOS 또는 iPadOS에서 푸시 권한을 요청하려면 공유 > 홈 화면에 추가를 선택하여 웹사이트를 사용자의 홈 화면에 추가해야 합니다. 홈 화면에 추가 기능을 사용하면 사용자가 웹사이트를 북마크하고 홈 화면에 아이콘을 추가할 수 있습니다.
5단계: 네이티브 푸시 프롬프트 표시하기
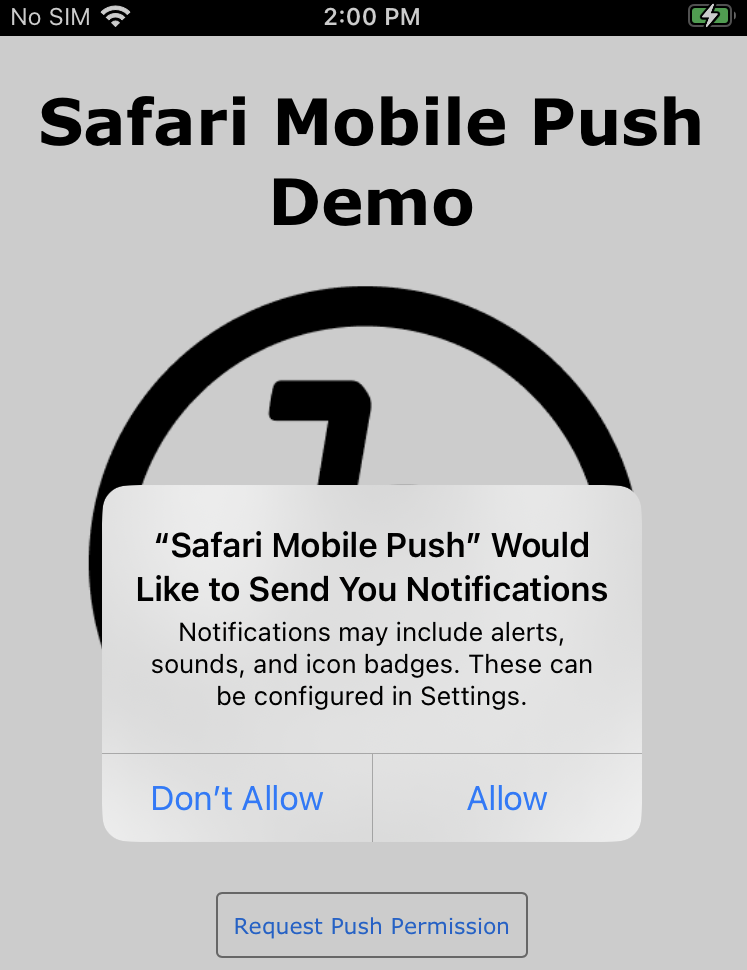
앱이 홈 화면에 추가된 후, 사용자가 특정 동작(예: 버튼 클릭)을 수행할 때 푸시 권한을 요청할 수 있습니다. 이는 requestPushPermission 메서드를 사용하거나 코드 없는 푸시 프라이머 인앱 메시지를 통해 수행할 수 있습니다.
프롬프트를 수락하거나 거부한 후에는 프롬프트를 다시 표시하려면 웹사이트를 삭제하고 홈 화면에 다시 설치해야 합니다.
예시:
import { requestPushPermission } from "@braze/web-sdk";
button.onclick = function(){
requestPushPermission(() => {
console.log(`User accepted push prompt`);
}, (temporary) => {
console.log(`User ${temporary ? "temporarily dismissed" : "permanently denied"} push prompt`);
});
};
다음 단계
다음으로, 통합을 검증하기 위해 테스트 메시지를 자신에게 보내보세요. 통합이 완료되면, 노코드 푸시 프라이머 메시지를 사용하여 푸시 옵트인 비율을 최적화할 수 있습니다.
필수 조건
이 기능을 사용하려면 먼저 Unity Braze SDK를 통합해야 합니다.
푸시 알림 설정하기
1단계: 플랫폼 설정
1.1단계: Firebase 활성화
시작하려면 Firebase Unity 설정 설명서를 따르세요.
Firebase Unity SDK를 통합하면 AndroidManifest.xml이 덮어쓰기될 수 있습니다. 이 경우 원본으로 되돌려야 합니다.
1.2단계: Firebase 자격 증명 설정
Firebase 서버 키와 발신자 ID를 Braze 대시보드에 입력해야 합니다. 이를 위해 Firebase 개발자 콘솔에 로그인하고 Firebase 프로젝트를 선택합니다. 다음으로 Settings 아래에서 Cloud Messaging을 선택하고 서버 키와 발신자 ID를 복사합니다: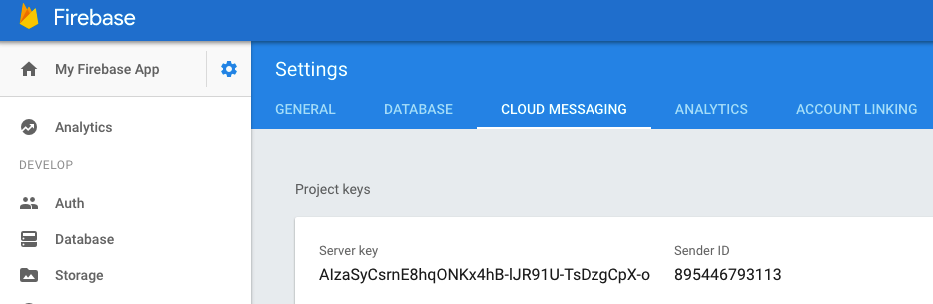
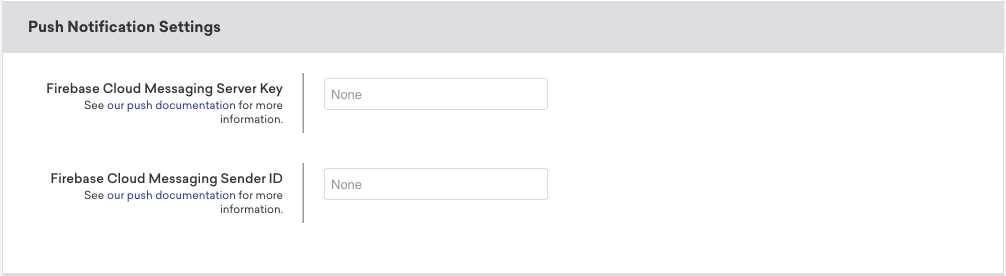
Braze에서 설정 관리 아래 App Settings 페이지에서 Android 앱을 선택합니다. 다음으로 Firebase Cloud Messaging Server Key 필드에 Firebase 서버 키를, Firebase Cloud Messaging Sender ID 필드에 Firebase 발신자 ID를 입력합니다.
1.1단계: 통합 방법 확인
Braze는 iOS 푸시 통합을 자동화하기 위한 네이티브 Unity 솔루션을 제공합니다. 대신 통합을 수동으로 설정하고 관리하려면 Swift: 푸시 알림을 참조하세요.
그렇지 않으면 다음 단계로 계속 진행합니다.
자동 푸시 알림 솔루션은 iOS 12의 임시 승인 기능을 활용하며, 네이티브 푸시 프롬프트 팝업과 함께 사용할 수 없습니다.
1.1단계: ADM 활성화
- 아직 계정이 없다면 Amazon Apps & Games 개발자 포털에서 계정을 생성합니다.
- OAuth 자격 증명(클라이언트 ID 및 클라이언트 시크릿)과 ADM API 키를 발급받습니다.
- Unity Braze 설정 창에서 Automatic ADM Registration Enabled를 활성화합니다.
- 또는
res/values/braze.xml파일에 다음 줄을 추가하여 ADM 등록을 활성화할 수 있습니다:
- 또는
<bool name="com_braze_push_adm_messaging_registration_enabled">true</bool>
2단계: 푸시 알림 구성
2.1단계: 푸시 설정 구성
Braze SDK는 Firebase Cloud Messaging 서버와의 푸시 등록을 자동으로 처리하여 기기가 푸시 알림을 수신할 수 있도록 합니다. Unity에서 Automate Unity Android Integration을 활성화한 다음, 다음 Push Notification 설정을 구성합니다.
| 설정 | 설명 |
|---|---|
| Automatic Firebase Cloud Messaging Registration Enabled | Braze SDK가 기기의 FCM 푸시 토큰을 자동으로 가져와 전송하도록 지시합니다. |
| Firebase Cloud Messaging Sender ID | Firebase 콘솔의 발신자 ID입니다. |
| Handle Push Deeplinks Automatically | 푸시 알림을 클릭했을 때 SDK가 딥링크를 열거나 앱을 여는 것을 처리할지 여부입니다. |
| Small Notification Icon Drawable | 푸시가 도착했을 때 표시되는 작은 아이콘의 Android drawable 리소스 참조입니다. @drawable/ 접두사를 포함한 전체 참조를 입력합니다(예: @drawable/hourglass_icon). 자동 통합은 이 값을 입력한 대로 braze.xml에 기록합니다. 비워두면 알림이 애플리케이션 아이콘을 작은 아이콘으로 사용합니다. |
| Large Notification Icon Drawable | 알림의 선택적 큰 아이콘입니다. 작은 아이콘과 동일한 @drawable/ 형식을 사용합니다(예: @drawable/my_large_icon). |
Small Notification Icon Drawable과 Large Notification Icon Drawable은 Braze > Braze Configuration의 Push Configuration 아래에 나타납니다. 두 값 모두 입력한 대로 braze.xml에 기록됩니다. @drawable/ 접두사를 직접 포함해야 합니다—Braze Unity 통합이 자동으로 추가하지 않습니다(예: <drawable name="com_braze_push_small_notification_icon">@drawable/hourglass_icon</drawable>).
2.1단계: APNs 토큰 업로드
Braze를 사용하여 iOS 푸시 알림을 보내려면 먼저 Apple 개발자 설명서에 설명된 대로 .p8 푸시 알림 파일을 업로드해야 합니다:
- Apple 개발자 계정에서 Certificates, Identifiers & Profiles로 이동합니다.
- Keys에서 All을 선택하고 페이지 상단의 추가 버튼(+)을 클릭합니다.
- Key Description에 서명 키의 고유한 이름을 입력합니다.
- Key Services에서 Apple Push Notification service (APNs) 체크박스를 선택한 다음 Continue를 클릭합니다. Confirm을 클릭합니다.
- 키 ID를 기록해 두세요. Download를 클릭하여 키를 생성하고 다운로드합니다. 다운로드한 파일은 한 번만 다운로드할 수 있으므로 안전한 곳에 저장하세요.
- Braze에서 설정 > 앱 설정으로 이동하여 Apple Push Certificate 아래에
.p8파일을 업로드합니다. 개발용 또는 프로덕션 푸시 인증서를 업로드할 수 있습니다. 앱이 앱 스토어에 실시간으로 출시된 후 푸시 알림을 테스트하려면 앱의 개발 버전을 위한 별도의 워크스페이스를 설정하는 것이 좋습니다. - 메시지가 표시되면 앱의 번들 ID, 키 ID 및 팀 ID를 입력합니다. 또한 프로비저닝 프로필에 의해 정의되는 앱의 개발 환경 또는 프로덕션 환경 중 어디로 알림을 보낼지 지정해야 합니다.
- 완료되면 저장을 선택합니다.
2.2단계: 자동 푸시 활성화
Unity 에디터에서 Braze > Braze Configuration으로 이동하여 Braze 설정을 엽니다.
Integrate Push With Braze를 체크하면 사용자가 자동으로 푸시 알림에 등록되고, 푸시 토큰이 Braze에 전달되며, 푸시 열람에 대한 분석이 추적되고, 기본 푸시 알림 처리를 활용할 수 있습니다.
2.3단계: 백그라운드 푸시 활성화(선택 사항)
푸시 알림에 대해 background mode를 활성화하려면 Enable Background Push를 체크합니다. 이를 통해 푸시 알림이 도착했을 때 시스템이 suspended 상태에서 애플리케이션을 깨울 수 있으므로, 푸시 알림에 대한 응답으로 콘텐츠를 다운로드할 수 있습니다. 이 옵션은 제거 추적 기능에 필요합니다.
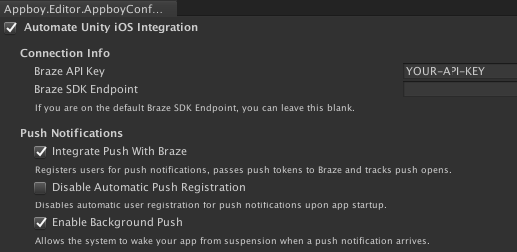
2.4단계: 자동 등록 비활성화(선택 사항)
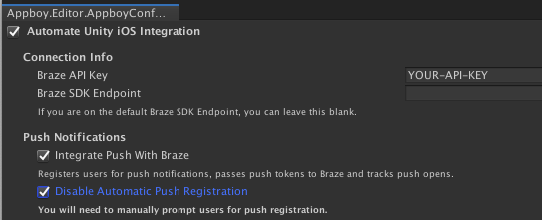
아직 푸시 알림에 옵트인하지 않은 사용자는 애플리케이션을 열면 자동으로 푸시 권한이 부여됩니다. 이 기능을 비활성화하고 수동으로 사용자를 푸시에 등록하려면 Disable Automatic Push Registration을 체크합니다.
- iOS 12 이상에서 Disable Provisional Authorization이 체크되지 않은 경우, 사용자는 조용한 푸시를 받을 수 있도록 임시로(무음으로) 승인됩니다. 체크된 경우 사용자에게 네이티브 푸시 프롬프트가 표시됩니다.
- 런타임에 프롬프트가 표시되는 시점을 정확히 구성해야 하는 경우, Braze 설정 에디터에서 자동 등록을 비활성화하고 대신
AppboyBinding.PromptUserForPushPermissions()를 사용합니다.
2.1단계: AndroidManifest.xml 업데이트
앱에 AndroidManifest.xml이 없는 경우 다음을 템플릿으로 사용할 수 있습니다. 이미 AndroidManifest.xml이 있는 경우, 아래의 누락된 섹션이 기존 AndroidManifest.xml에 추가되어 있는지 확인합니다.
<?xml version="1.0" encoding="utf-8"?>
<manifest xmlns:android="http://schemas.android.com/apk/res/android"
package="REPLACE_WITH_YOUR_PACKAGE_NAME">
<uses-permission android:name="android.permission.ACCESS_NETWORK_STATE" />
<uses-permission android:name="android.permission.INTERNET" />
<permission
android:name="REPLACE_WITH_YOUR_PACKAGE_NAME.permission.RECEIVE_ADM_MESSAGE"
android:protectionLevel="signature" />
<uses-permission android:name="REPLACE_WITH_YOUR_PACKAGE_NAME.permission.RECEIVE_ADM_MESSAGE" />
<uses-permission android:name="com.amazon.device.messaging.permission.RECEIVE" />
<application android:icon="@drawable/app_icon"
android:label="@string/app_name">
<!-- Calls the necessary Braze methods to ensure that analytics are collected and that push notifications are properly forwarded to the Unity application. -->
<activity android:name="com.braze.unity.BrazeUnityPlayerActivity"
android:label="@string/app_name"
android:configChanges="fontScale|keyboard|keyboardHidden|locale|mnc|mcc|navigation|orientation|screenLayout|screenSize|smallestScreenSize|uiMode|touchscreen"
android:screenOrientation="sensor">
<meta-data android:name="android.app.lib_name" android:value="unity" />
<meta-data android:name="unityplayer.ForwardNativeEventsToDalvik" android:value="true" />
<intent-filter>
<action android:name="android.intent.action.MAIN" />
<category android:name="android.intent.category.LAUNCHER" />
</intent-filter>
</activity>
<receiver android:name="com.braze.push.BrazeAmazonDeviceMessagingReceiver" android:permission="com.amazon.device.messaging.permission.SEND">
<intent-filter>
<action android:name="com.amazon.device.messaging.intent.RECEIVE" />
<action android:name="com.amazon.device.messaging.intent.REGISTRATION" />
<category android:name="REPLACE_WITH_YOUR_PACKAGE_NAME" />
</intent-filter>
</receiver>
</application>
</manifest>
2.2단계: ADM API 키 저장
먼저 앱의 ADM API 키를 생성한 다음, api_key.txt라는 파일에 키를 저장하고 프로젝트의 Assets/ 디렉토리에 추가합니다.
api_key.txt에 후행 줄바꿈과 같은 공백 문자가 포함되어 있으면 Amazon이 키를 인식하지 못합니다.
다음으로, mainTemplate.gradle 파일에 다음을 추가합니다:
task copyAmazon(type: Copy) {
def unityProjectPath = $/file:///**DIR_UNITYPROJECT**/$.replace("\\", "/")
from unityProjectPath + '/Assets/api_key.txt'
into new File(projectDir, 'src/main/assets')
}
preBuild.dependsOn(copyAmazon)
2.3단계: ADM Jar 추가
필요한 ADM Jar 파일은 Unity JAR 설명서에 따라 프로젝트의 어느 곳에든 배치할 수 있습니다.
2.4단계: Braze 대시보드에 클라이언트 시크릿과 클라이언트 ID 추가
마지막으로, 1단계에서 발급받은 클라이언트 시크릿과 클라이언트 ID를 Braze 대시보드의 설정 관리 페이지에 추가해야 합니다.
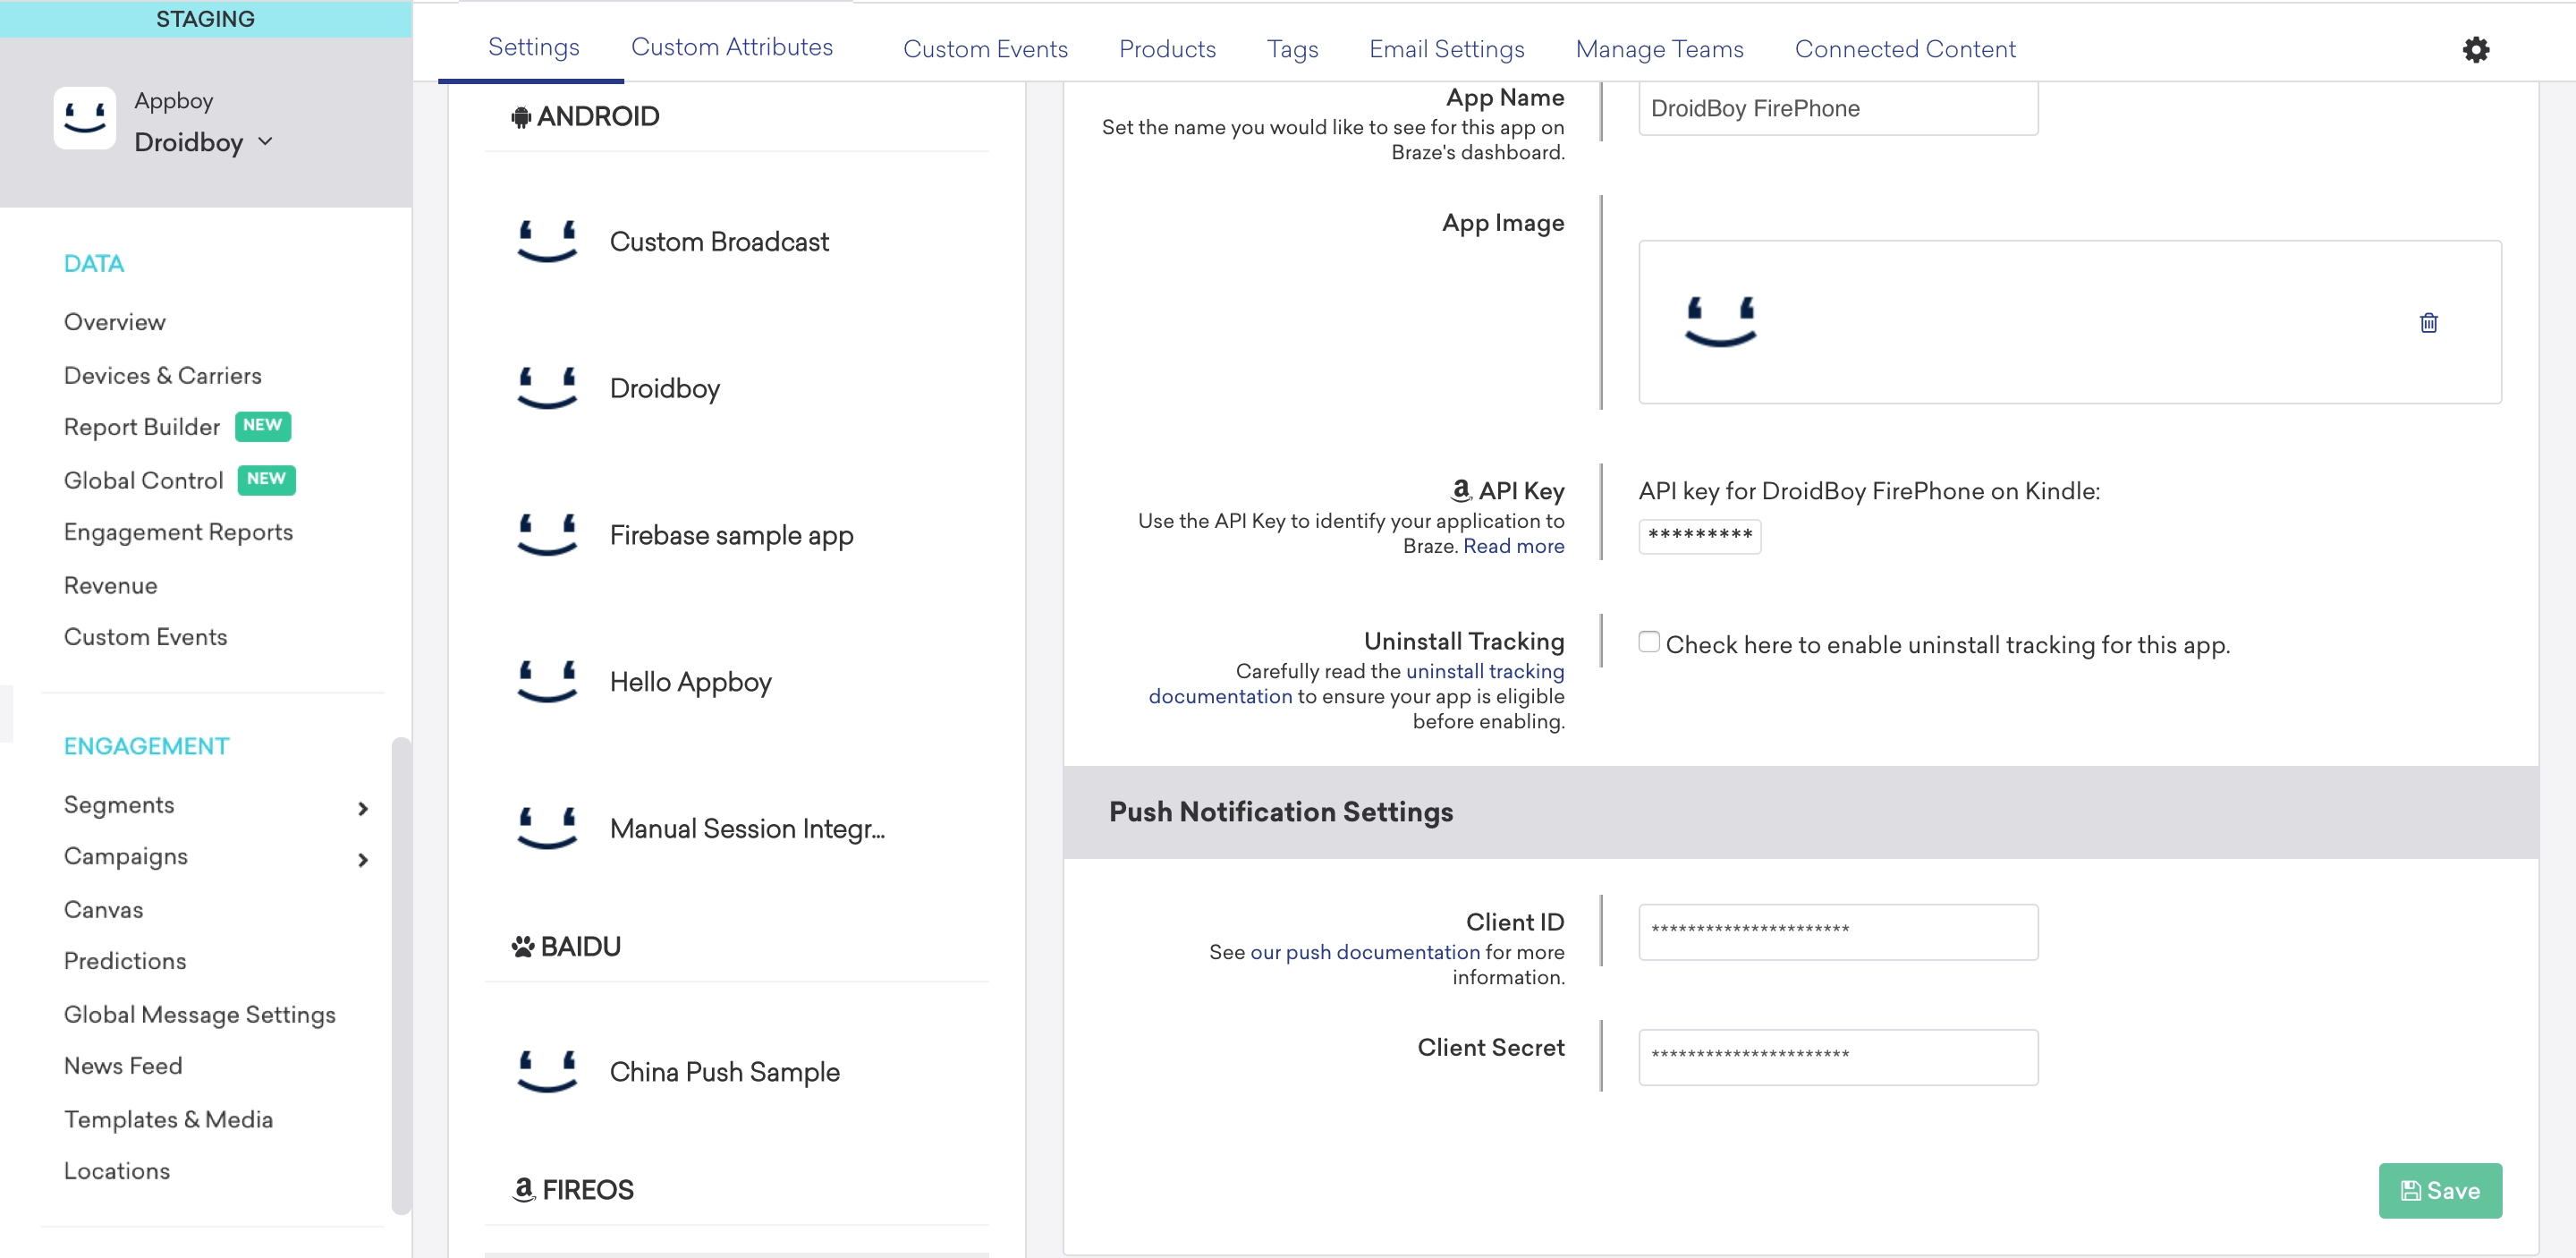
3단계: 푸시 리스너 설정
3.1단계: 푸시 수신 리스너 활성화
푸시 수신 리스너는 사용자가 푸시 알림을 받을 때 실행됩니다. 푸시 페이로드를 Unity로 보내려면 Set Push Received Listener 아래에서 게임 오브젝트 이름과 푸시 수신 리스너 콜백 메서드를 설정합니다.
3.2단계: 푸시 열람 리스너 활성화
푸시 열람 리스너는 사용자가 푸시 알림을 클릭하여 앱을 실행할 때 실행됩니다. 푸시 페이로드를 Unity로 보내려면 Set Push Opened Listener 아래에서 게임 오브젝트 이름과 푸시 열람 리스너 콜백 메서드를 설정합니다.
3.3단계: 푸시 삭제 리스너 활성화
푸시 삭제 리스너는 사용자가 푸시 알림을 스와이프하여 제거하거나 닫을 때 실행됩니다. 푸시 페이로드를 Unity로 보내려면 Set Push Deleted Listener 아래에서 게임 오브젝트 이름과 푸시 삭제 리스너 콜백 메서드를 설정합니다.
푸시 리스너 예시
다음 예시는 각각 PushNotificationReceivedCallback, PushNotificationOpenedCallback, PushNotificationDeletedCallback이라는 콜백 메서드 이름을 사용하여 BrazeCallback 게임 오브젝트를 구현합니다.
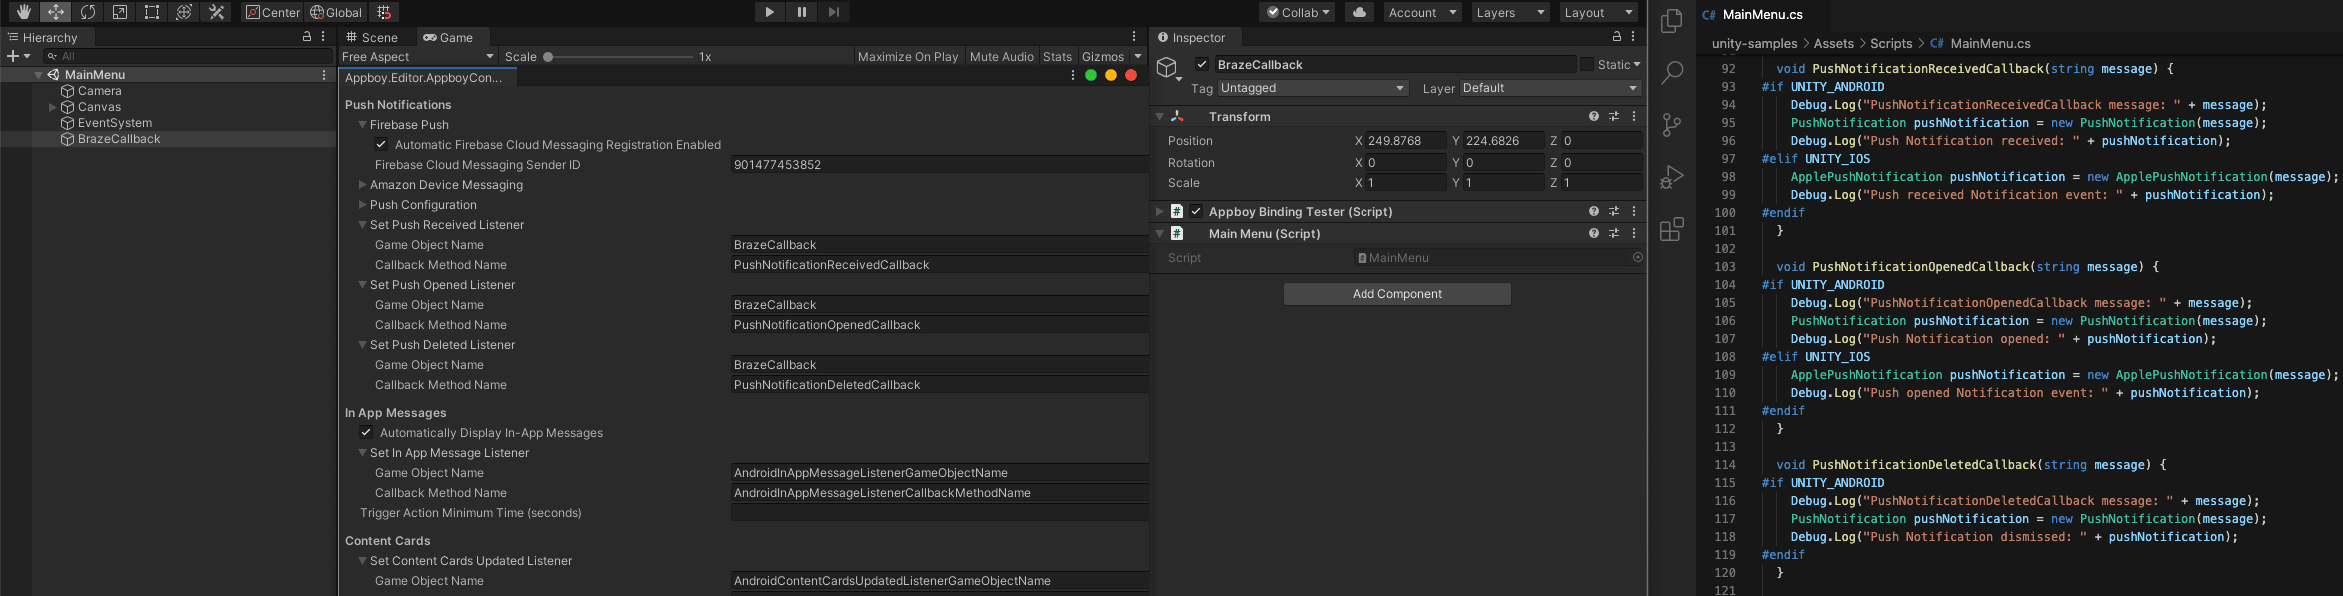
public class MainMenu : MonoBehaviour {
void PushNotificationReceivedCallback(string message) {
#if UNITY_ANDROID
Debug.Log("PushNotificationReceivedCallback message: " + message);
PushNotification pushNotification = new PushNotification(message);
Debug.Log("Push Notification received: " + pushNotification);
#elif UNITY_IOS
ApplePushNotification pushNotification = new ApplePushNotification(message);
Debug.Log("Push received Notification event: " + pushNotification);
#endif
}
void PushNotificationOpenedCallback(string message) {
#if UNITY_ANDROID
Debug.Log("PushNotificationOpenedCallback message: " + message);
PushNotification pushNotification = new PushNotification(message);
Debug.Log("Push Notification opened: " + pushNotification);
#elif UNITY_IOS
ApplePushNotification pushNotification = new ApplePushNotification(message);
Debug.Log("Push opened Notification event: " + pushNotification);
#endif
}
void PushNotificationDeletedCallback(string message) {
#if UNITY_ANDROID
Debug.Log("PushNotificationDeletedCallback message: " + message);
PushNotification pushNotification = new PushNotification(message);
Debug.Log("Push Notification dismissed: " + pushNotification);
#endif
}
}
3.1단계: 푸시 수신 리스너 활성화
푸시 수신 리스너는 사용자가 애플리케이션을 활발히 사용하는 동안(예: 앱이 포그라운드에 있을 때) 푸시 알림을 받을 때 실행됩니다. Braze 설정 에디터에서 푸시 수신 리스너를 설정합니다. 런타임에 게임 오브젝트 리스너를 구성해야 하는 경우 AppboyBinding.ConfigureListener()를 사용하고 BrazeUnityMessageType.PUSH_RECEIVED를 지정합니다.
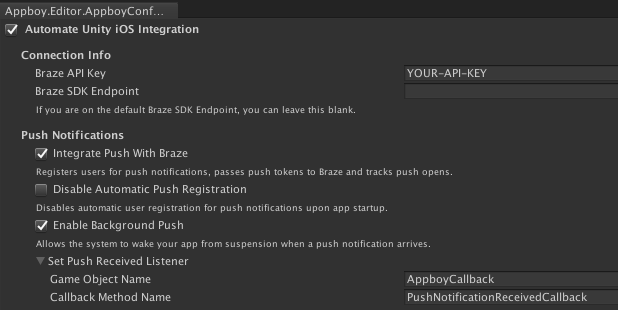
3.2단계: 푸시 열람 리스너 활성화
푸시 열람 리스너는 사용자가 푸시 알림을 클릭하여 앱을 실행할 때 실행됩니다. 푸시 페이로드를 Unity로 보내려면 Set Push Opened Listener 옵션 아래에서 게임 오브젝트 이름과 푸시 열람 리스너 콜백 메서드를 설정합니다:
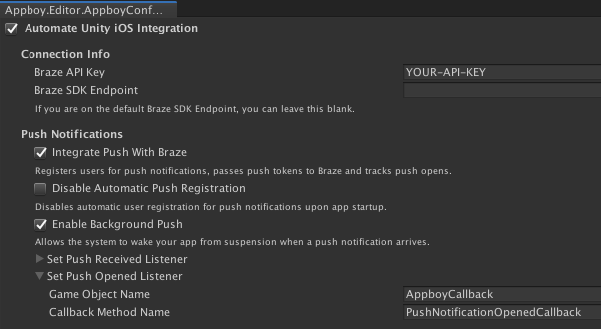
런타임에 게임 오브젝트 리스너를 구성해야 하는 경우 AppboyBinding.ConfigureListener()를 사용하고 BrazeUnityMessageType.PUSH_OPENED를 지정합니다.
푸시 리스너 예시
다음 예시는 각각 PushNotificationReceivedCallback과 PushNotificationOpenedCallback이라는 콜백 메서드 이름을 사용하여 AppboyCallback 게임 오브젝트를 구현합니다.
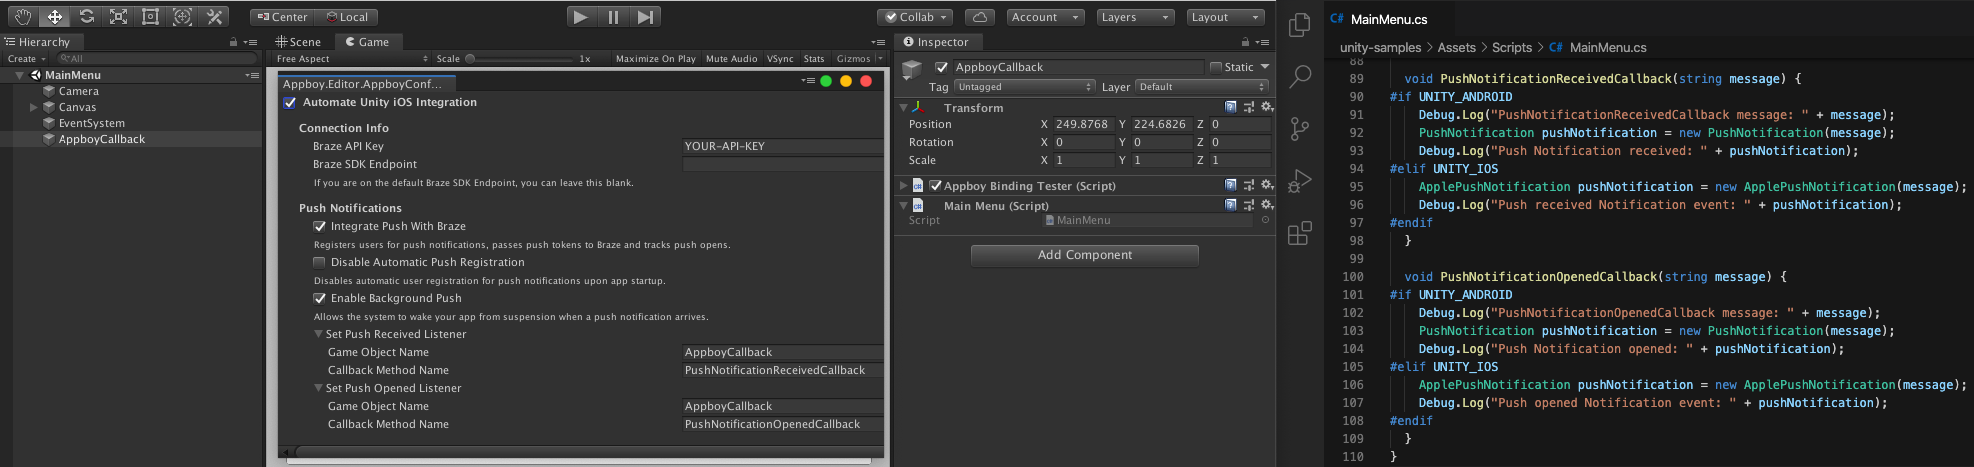
public class MainMenu : MonoBehaviour {
void PushNotificationReceivedCallback(string message) {
#if UNITY_ANDROID
Debug.Log("PushNotificationReceivedCallback message: " + message);
PushNotification pushNotification = new PushNotification(message);
Debug.Log("Push Notification received: " + pushNotification);
#elif UNITY_IOS
ApplePushNotification pushNotification = new ApplePushNotification(message);
Debug.Log("Push received Notification event: " + pushNotification);
#endif
}
void PushNotificationOpenedCallback(string message) {
#if UNITY_ANDROID
Debug.Log("PushNotificationOpenedCallback message: " + message);
PushNotification pushNotification = new PushNotification(message);
Debug.Log("Push Notification opened: " + pushNotification);
#elif UNITY_IOS
ApplePushNotification pushNotification = new ApplePushNotification(message);
Debug.Log("Push opened Notification event: " + pushNotification);
#endif
}
}
이전 단계에서 AndroidManifest.xml을 업데이트할 때 다음 줄을 추가했으므로 푸시 리스너가 자동으로 설정되었습니다. 따라서 추가 설정이 필요하지 않습니다.
<action android:name="com.amazon.device.messaging.intent.RECEIVE" />
<action android:name="com.amazon.device.messaging.intent.REGISTRATION" />
선택적 구성
앱 내 리소스로 딥링킹
Braze는 기본적으로 표준 딥링크(웹사이트 URL, Android URI 등)를 처리할 수 있지만, 커스텀 딥링크를 만들려면 추가적인 Manifest 설정이 필요합니다.
설정 안내는 앱 내 리소스로 딥링킹을 참고하세요.
Braze 푸시 알림 아이콘 추가
알림 아이콘 이미지를 Assets/Plugins/Android/res 아래에 추가하지 마세요. Unity는 해당 경로에서 Android 리소스를 제공하는 방식을 더 이상 지원하지 않으며, 빌드 경고나 유효성 검사 오류가 발생할 수 있습니다. 대신 아이콘 드로어블을 Android Archive(AAR) 플러그인 또는 Android 라이브러리 프로젝트에 패키징하여 다른 드로어블처럼 빌드된 앱의 리소스에 병합되도록 하세요.
프로젝트에 푸시 아이콘을 추가하려면, res/drawable*(또는 밀도별 폴더)에 아이콘 이미지 파일이 포함된 AAR 플러그인 또는 Android 라이브러리를 생성한 후, Braze > Braze Configuration에서 전체 @drawable/ 리소스 이름을 사용하여 각 아이콘을 참조하세요(2.1단계: 푸시 설정 구성 참조). Unity의 패키징 및 가져오기 단계는 Android 라이브러리 프로젝트 및 Android Archive 플러그인을 참고하세요.
작은 아이콘 아트워크 규칙(알파 전용, 색상 없음)에 대해서는 Android 푸시 알림, 2단계: 디자인 가이드라인에 맞게 작은 아이콘 조정을 참고하세요.
푸시 토큰 콜백
OS로부터 Braze 기기 토큰의 사본을 받으려면, AppboyBinding.SetPushTokenReceivedFromSystemDelegate()를 사용하여 델리게이트를 설정하세요.
현재 ADM에 대한 선택적 구성은 없습니다.
필수 조건
이 기능을 사용하기 전에 .NET MAUI Braze SDK를 통합해야 합니다.
푸시 알림 설정
.NET MAUI(이전의 Xamarin)에서 푸시 알림을 통합하려면 네이티브 Android 푸시 알림 단계를 완료해야 합니다. 다음 단계는 요약일 뿐입니다. 전체 안내는 네이티브 푸시 알림 가이드를 참조하세요.
1단계: 프로젝트 업데이트
- Android 프로젝트에 Firebase를 추가합니다.
- Android 프로젝트의
build.gradle에 Cloud Messaging 라이브러리를 추가합니다.implementation "google.firebase:firebase-messaging:+"
2단계: JSON 자격 증명 생성
- Google Cloud에서 Firebase Cloud Messaging API를 활성화합니다.
- Service Accounts > 프로젝트 선택 > Create Service Account를 선택한 후, 서비스 계정 이름, ID, 설명을 입력합니다. 완료되면 Create and continue를 선택합니다.
- Role 필드에서 역할 목록에서 Firebase Cloud Messaging API Admin을 찾아 선택합니다.
- Service Accounts에서 프로젝트를 선택한 다음 Actions > Manage Keys > Add Key > Create new key를 선택합니다. JSON을 선택한 후 Create를 선택합니다.
3단계: JSON 자격 증명 업로드
- Braze에서 설정 > 앱 설정을 선택합니다. Android 앱의 푸시 알림 설정에서 Firebase를 선택한 다음 JSON 파일 업로드를 선택하고 이전에 생성한 자격 증명을 업로드합니다. 완료되면 저장을 선택합니다.
- Firebase 콘솔로 이동하여 자동 FCM 토큰 등록을 활성화합니다. 프로젝트를 열고 Settings > Project settings를 선택합니다. Cloud Messaging을 선택한 후, Firebase Cloud Messaging API (V1)에서 Sender ID 필드의 번호를 복사합니다.
- Android Studio 프로젝트에서
braze.xml에 다음을 추가합니다.
<bool translatable="false" name="com_braze_firebase_cloud_messaging_registration_enabled">true</bool>
<string translatable="false" name="com_braze_firebase_cloud_messaging_sender_id">FIREBASE_SENDER_ID</string>
무음 푸시 알림을 보낼 때마다 Braze가 불필요한 네트워크 요청을 트리거하지 않도록, Application 클래스의 onCreate() 메서드에서 구성된 자동 네트워크 요청을 제거하세요. 자세한 내용은 Android 개발자 참조: Application을 참조하세요.
1단계: 초기 설정 완료
애플리케이션에 푸시를 설정하고 서버에 자격 증명을 저장하는 방법에 대한 자세한 내용은 Swift 통합 안내를 참조하세요. 자세한 내용은 iOS MAUI 샘플 애플리케이션을 참조하세요.
2단계: 푸시 알림 권한 요청
.NET MAUI SDK는 이제 자동 푸시 설정을 지원합니다. Braze 인스턴스 구성에 다음 코드를 추가하여 푸시 자동화 및 권한을 설정하세요.
configuration.Push.Automation = new BRZConfigurationPushAutomation(true);
configuration.Push.Automation.RequestAuthorizationAtLaunch = false;
자세한 내용은 iOS MAUI 샘플 애플리케이션을 참조하세요. 추가 정보는 Xamarin 설명서의 Xamarin.iOS의 향상된 사용자 알림을 참조하세요.