
AppboyKit(Objective-C SDK라고도 함)는 더 이상 지원되지 않으며 Swift SDK로 대체되었습니다. 더 이상 새로운 기능, 버그 수정, 보안 업데이트 또는 기술 지원이 제공되지 않지만, 메시징 및 분석은 정상적으로 계속 작동합니다. 자세한 내용은 새로운 Braze Swift SDK 소개를 참조하세요.

인앱 메시징 구현 가이드
이 고급 구현 가이드(선택 사항)에서는 인앱 메시지 코드 고려사항, 저희 팀이 구축한 세 가지 커스텀 사용 사례 및 관련 코드 스니펫을 다룹니다. GitHub의 Braze 데모 리포지토리를 방문하세요! 이 구현 가이드는 Swift 구현을 중심으로 하지만 관심 있는 분을 위해 Objective-C 스니펫도 제공됩니다. HTML 구현을 찾고 계신가요? HTML 템플릿 리포지토리를 살펴보세요!
코드 고려사항
다음 가이드에서는 기본 인앱 메시지 외에 사용할 수 있는 선택적 커스텀 개발자 통합을 제공합니다. 커스텀 뷰 컨트롤러는 각 사용 사례에 포함되어 기능을 확장하고 인앱 메시지의 모양과 느낌을 네이티브로 커스터마이징하는 예제를 제공합니다.
ABKInAppMessage 서브클래스
다음 코드 스니펫은 인앱 메시지를 채울 서브클래스 뷰를 결정하는 Braze SDK의 UI 델리게이트 메서드입니다. 이 가이드에서는 기본 구현을 다루고 전체, 슬라이드업 및 모달 서브클래스를 매력적인 방식으로 구현하는 방법을 보여줍니다. 커스텀 뷰 컨트롤러를 설정하려면 다른 모든 인앱 메시지 서브클래스도 설정해야 합니다. 서브클래싱의 개념을 확실히 이해한 후, 사용 사례를 확인하여 인앱 메시징 서브클래스 구현을 시작하세요.
ABKInAppMessage 서브클래스
extension AppboyManager: ABKInAppMessageUIDelegate {
func inAppMessageViewControllerWith(_ inAppMessage: ABKInAppMessage) -> ABKInAppMessageViewController {
switch inAppMessage {
case is ABKInAppMessageSlideup:
return slideupViewController(inAppMessage: inAppMessage) //Custom Method
case is ABKInAppMessageModal:
return modalViewController(inAppMessage: inAppMessage) //Custom Method
case is ABKInAppMessageFull:
return fullViewController(inAppMessage: inAppMessage) //Custom Method
case is ABKInAppMessageHTML:
return ABKInAppMessageHTMLViewController(inAppMessage: inAppMessage)
default:
return ABKInAppMessageViewController(inAppMessage: inAppMessage)
}
}
}
ABKInAppMessage 서브클래스
- (ABKInAppMessageViewController *)inAppMessageViewControllerWithInAppMessage:(ABKInAppMessage *)inAppMessage {
if ([inAppMessage isKindOfClass:[ABKInAppMessageSlideup class]]) {
return [self slideupViewControllerWithInAppMessage:inAppMessage]; //Custom Method
} else if ([inAppMessage isKindOfClass:[ABKInAppMessageModal class]]) {
return [self modalViewControllerWithInAppMessage:inAppMessage]; //Custom Method
} else if ([inAppMessage isKindOfClass:[ABKInAppMessageFull class]]) {
return [self fullViewControllerWithInAppMessage:inAppMessage]; //Custom Method
} else if ([inAppMessage isKindOfClass:[ABKInAppMessageHTML class]]) {
return [[ABKInAppMessageHTMLViewController alloc] initWithInAppMessage:inAppMessage];
} else {
return [[ABKInAppMessageViewController alloc] initWithInAppMessage:inAppMessage];
}
}
사용 사례
아래에 세 가지 사용 사례를 제공합니다. 각 사용 사례는 자세한 설명, 관련 코드 스니펫, 그리고 Braze 대시보드에서 인앱 메시지가 어떻게 보이고 사용될 수 있는지를 보여줍니다.
커스텀 슬라이드업 인앱 메시지
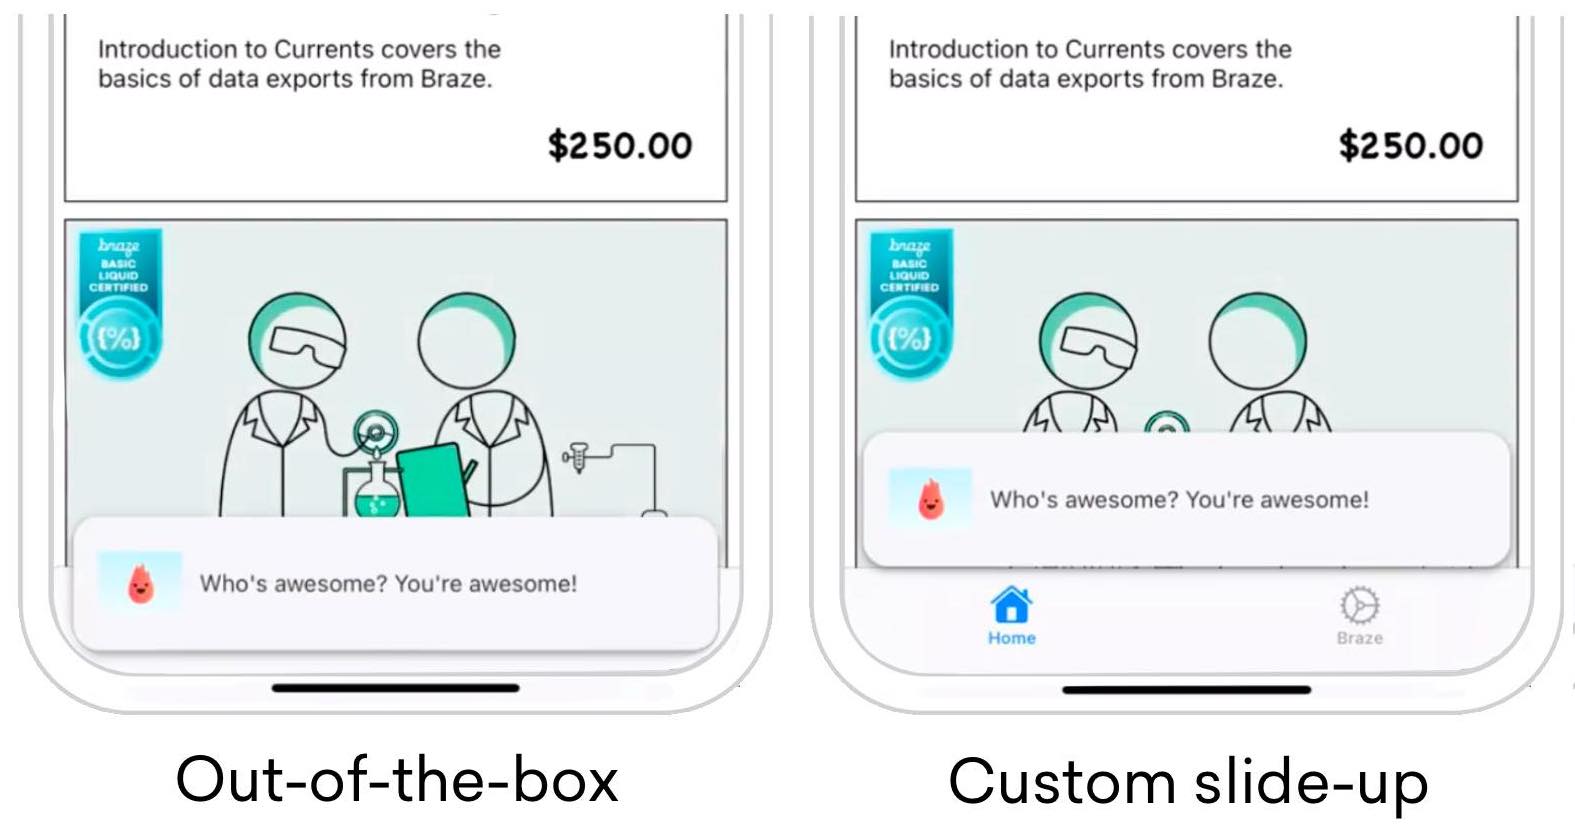
슬라이드업 인앱 메시지를 작성하면서 기본 메서드로는 메시지의 위치를 수정할 수 없다는 점을 알 수 있습니다. 이러한 수정은 ABKInAppMessageSlideupViewController를 서브클래싱하고 offset 변수를 자체 커스텀 변수로 재정의하면 가능합니다. 오른쪽 이미지는 슬라이드업 인앱 메시지를 조정하는 방법의 예를 보여줍니다.
SlideFromBottomViewController를 방문하여 시작하세요.
기본 UI에 추가 동작 추가
offset 변수 업데이트
offset 변수를 업데이트하고 필요에 맞게 자체 오프셋을 설정합니다.
func setSlideConstraint() {
offset = 0
}
override var offset: CGFloat {
get {
return super.offset
}
set {
super.offset = newValue + adjustedOffset
}
}
Version 3.34.0 or earlier
slideConstraint 변수 업데이트
slideConstraint 공용 변수는 슈퍼클래스 ABKInAppMessageSlideupViewController에서 제공됩니다.
func setSlideConstraint() {
slideConstraint?.constant = bottomSpacing
}
private var bottomSpacing: CGFloat {
return AppboyManager.shared.activeApplicationViewController.topMostViewController().view.safeAreaInsets.bottom
}
Braze 데모 리포지토리에서 topMostViewController() 함수를 확인하세요.
offset 변수 업데이트
offset 변수를 업데이트하고 필요에 맞게 자체 오프셋을 설정합니다.
- (void)setOffset {
self.offset = 0;
}
- (CGFloat)offset {
return [super offset];
}
- (void)setOffset:(CGFloat)offset {
[super setOffset:offset + [self adjustedOffset]];
}
Version 3.34.0 or earlier
slideConstraint 변수 업데이트
slideConstraint 공용 변수는 슈퍼클래스 ABKInAppMessageSlideupViewController에서 제공됩니다.
- (void)self.setSlideConstraint:(NSLayoutConstraint *)slideConstraint {
slideConstraint.constant = bottomSpacing;
}
- (CGFloat)bottomSpacing {
return [AppboyManager shared].activeApplicationViewController.topMostViewController.view.safeAreaInsets.bottom;
}
재정의 및 커스텀 제약 조건 설정
beforeMoveInAppMessageViewOnScreen()을 재정의하고 필요에 맞게 커스텀 제약 조건 값을 설정합니다. 원래 값은 슈퍼클래스에 설정됩니다.
override func beforeMoveInAppMessageViewOnScreen() {
super.beforeMoveInAppMessageViewOnScreen()
setOffset()
}
Version 3.34.0 or earlier
override func beforeMoveInAppMessageViewOnScreen() {
setSlideConstraint()
}
재정의 및 커스텀 제약 조건 설정
beforeMoveInAppMessageViewOnScreen()을 재정의하고 필요에 맞게 커스텀 제약 조건 값을 설정합니다. 원래 값은 슈퍼클래스에 설정됩니다.
- (void)beforeMoveInAppMessageViewOnScreen {
[super beforeMoveInAppMessageViewOnScreen];
[self setOffset];
}
Version 3.34.0 or earlier
- (void)beforeMoveInAppMessageViewOnScreen {
[self setSlideConstraint:self.slideConstraint];
}
기기 방향에 대한 제약 조건 조정
서브클래스가 레이아웃 변경 중 제약 조건을 동기화하는 책임을 지므로, viewWillTransition()에서 해당 값을 조정합니다.
커스텀 모달 인앱 메시지
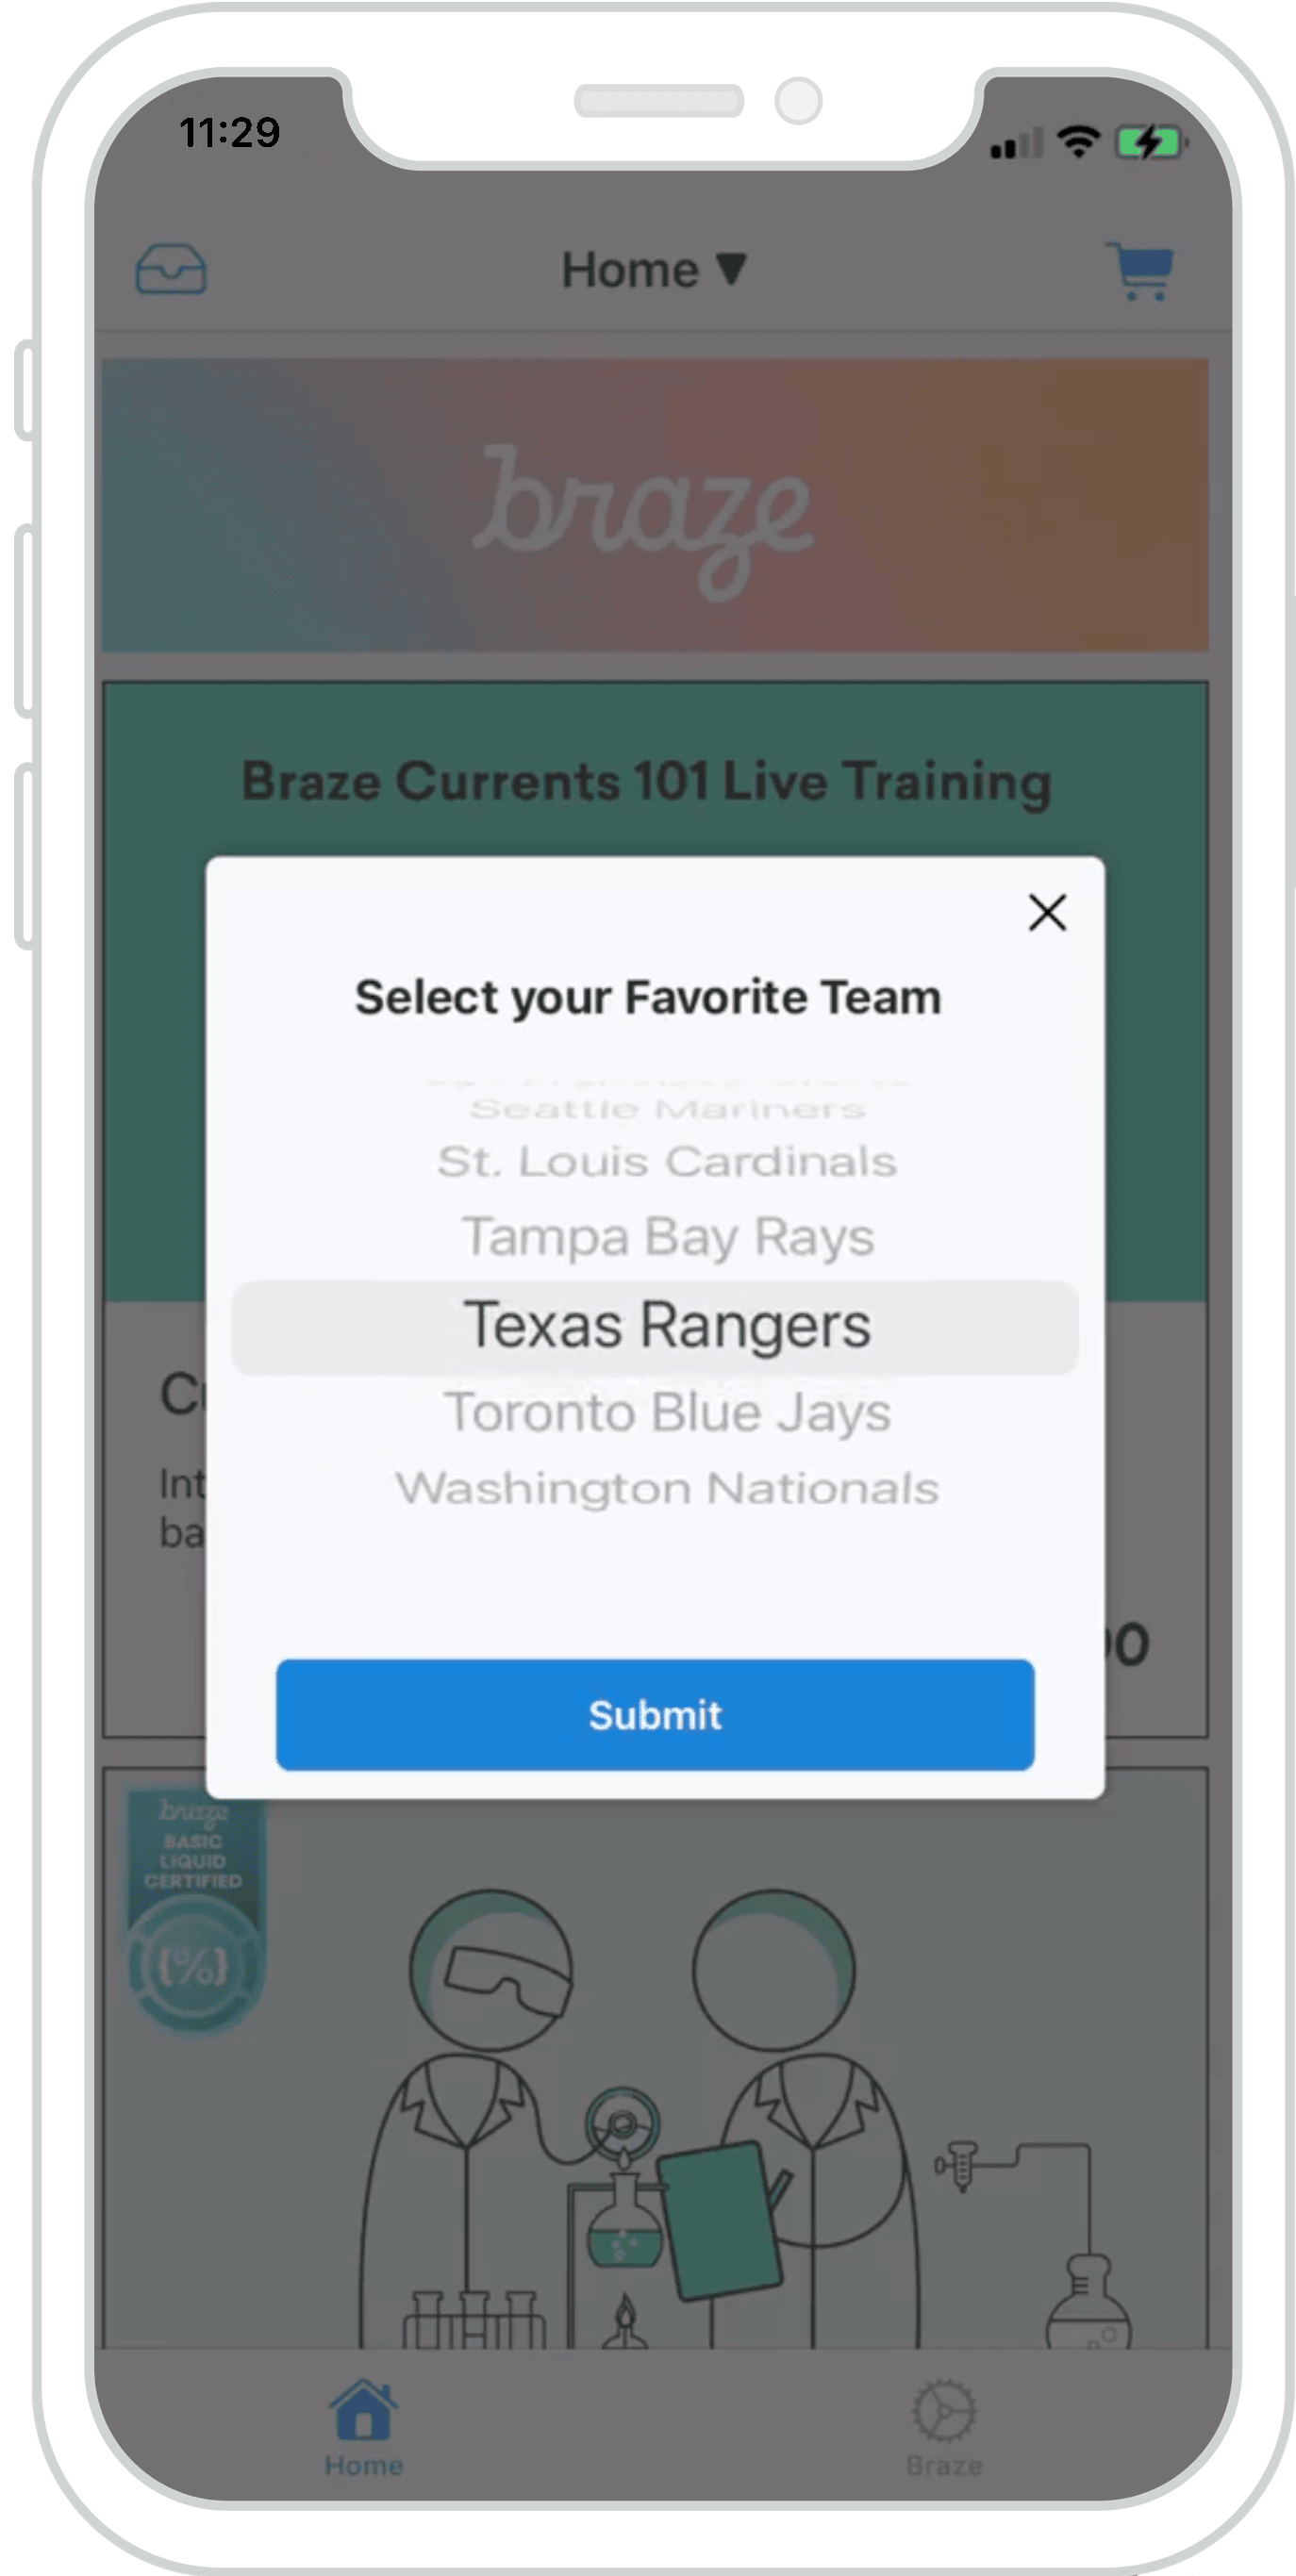
ABKInAppMessageModalViewController를 서브클래싱하여 UIPickerView를 활용하면 소중한 사용자 속성을 수집하는 매력적인 방법을 제공할 수 있습니다. 커스텀 모달 인앱 메시지를 사용하면 연결된 콘텐츠 또는 사용 가능한 목록을 통해 항목의 동적 목록에서 속성을 표시하고 캡처할 수 있습니다.
자체 뷰를 서브클래싱된 인앱 메시지에 삽입할 수 있습니다. 이 예제에서는 UIPickerView를 활용하여 ABKModalInAppMessageViewController의 기능을 확장하는 방법을 보여줍니다.
ModalPickerViewController를 방문하여 시작하세요.
대시보드 구성
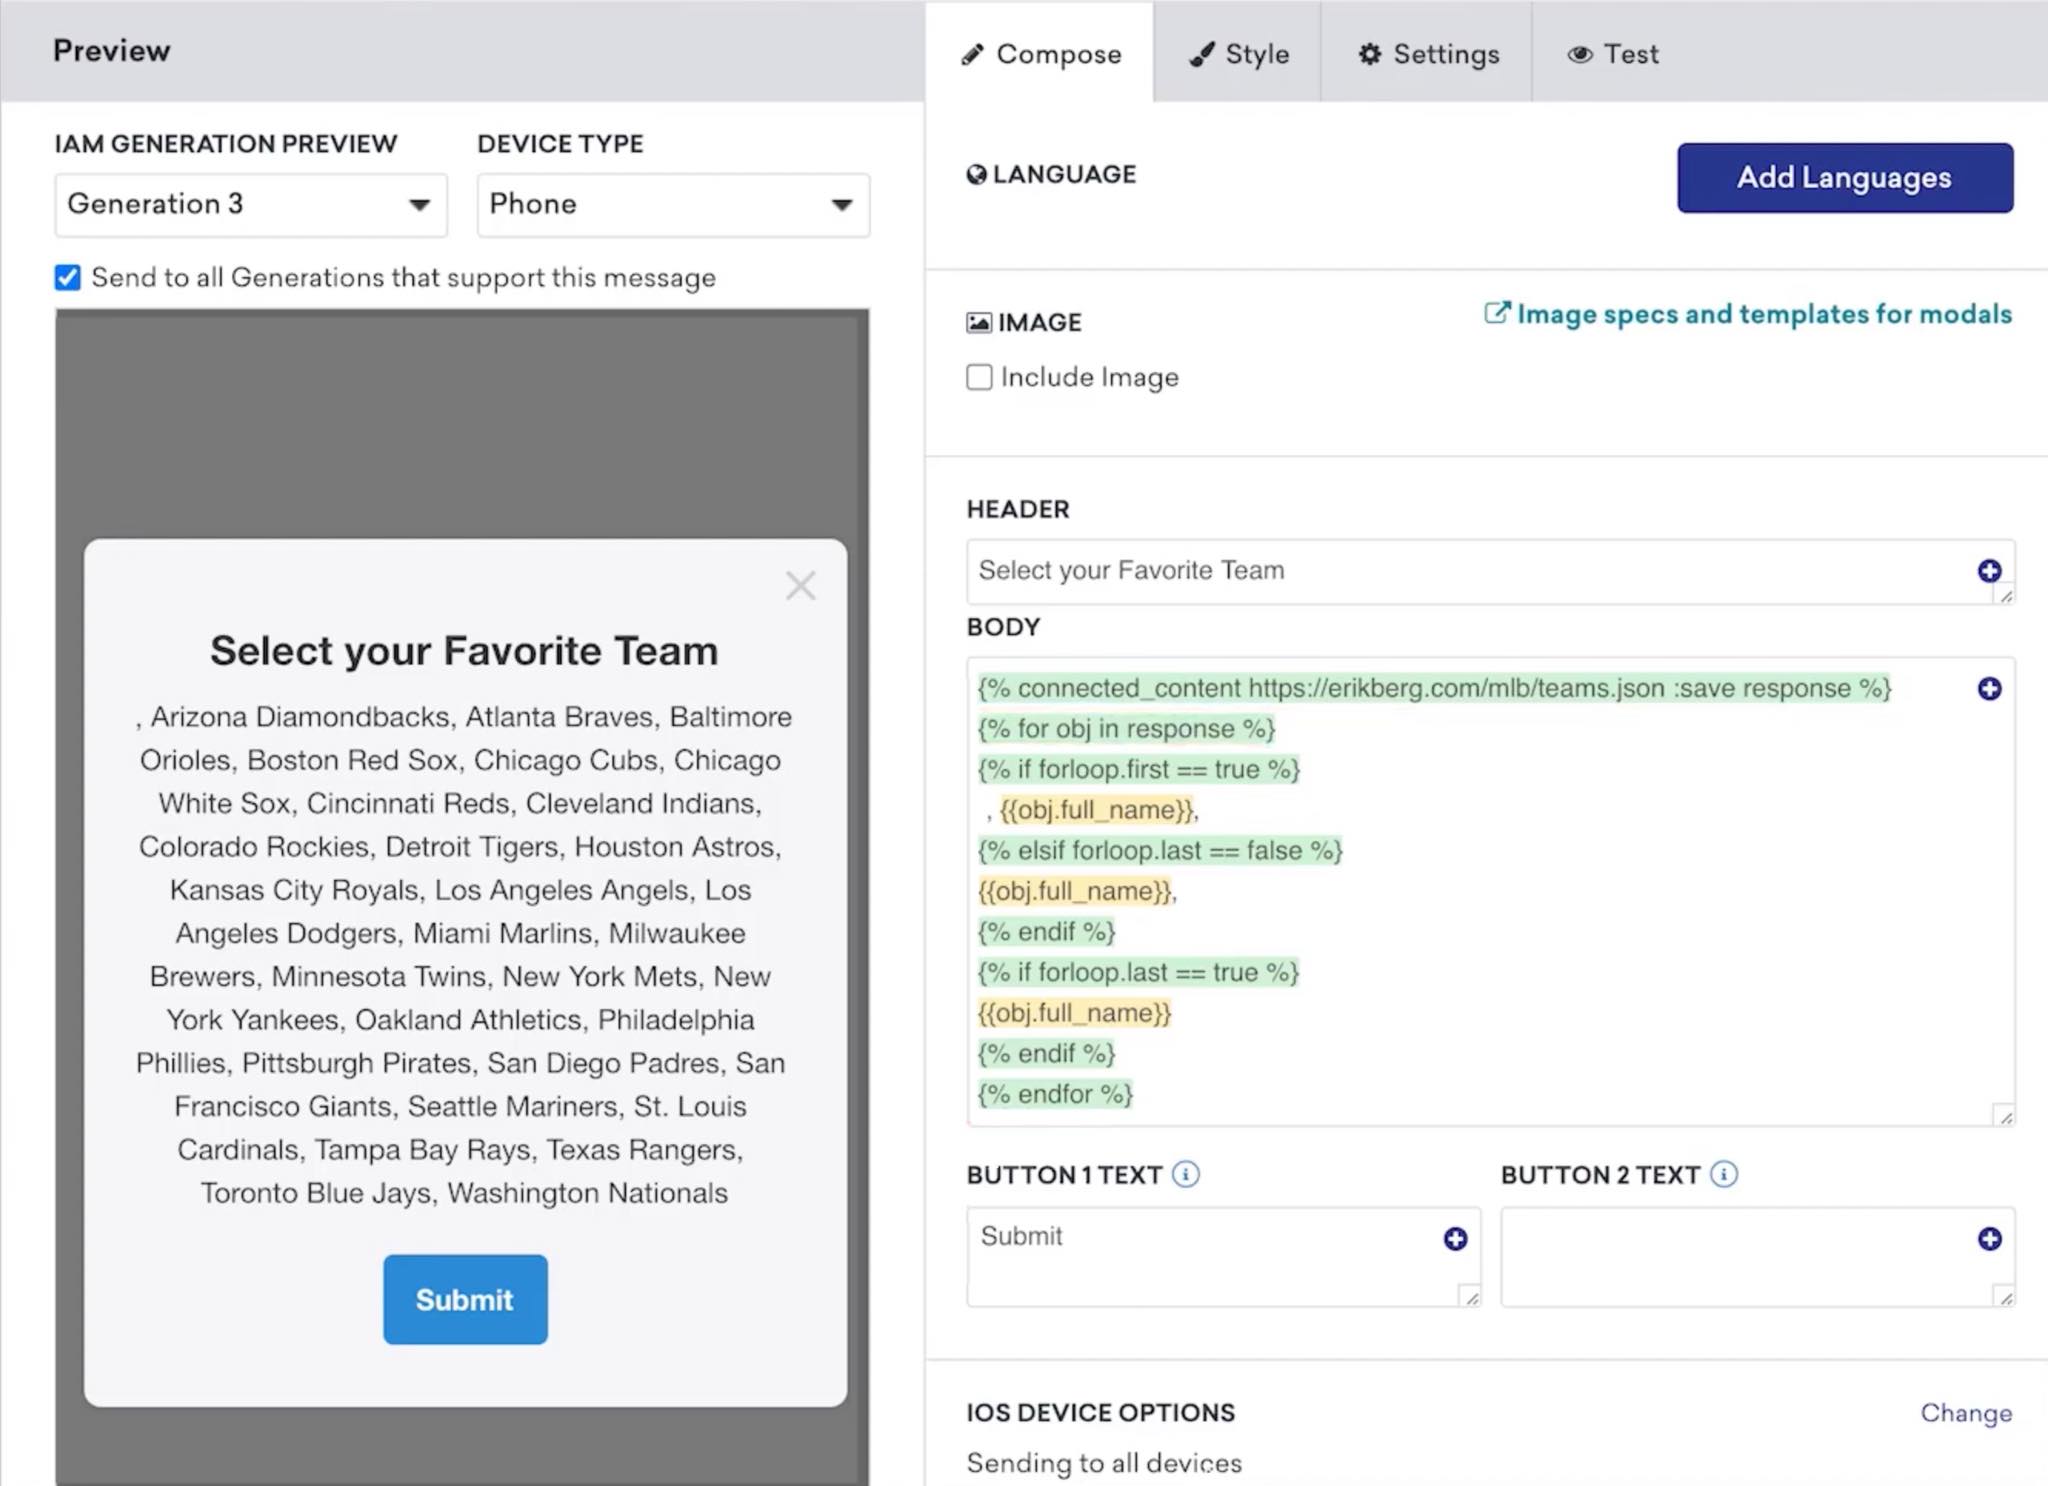
대시보드에서 모달 인앱 메시지를 설정하려면 쉼표로 구분된 문자열로 형식화된 항목 목록을 제공해야 합니다. 이 예제에서는 연결된 콘텐츠를 사용하여 팀 이름의 JSON 목록을 가져오고 적절하게 형식을 지정합니다.
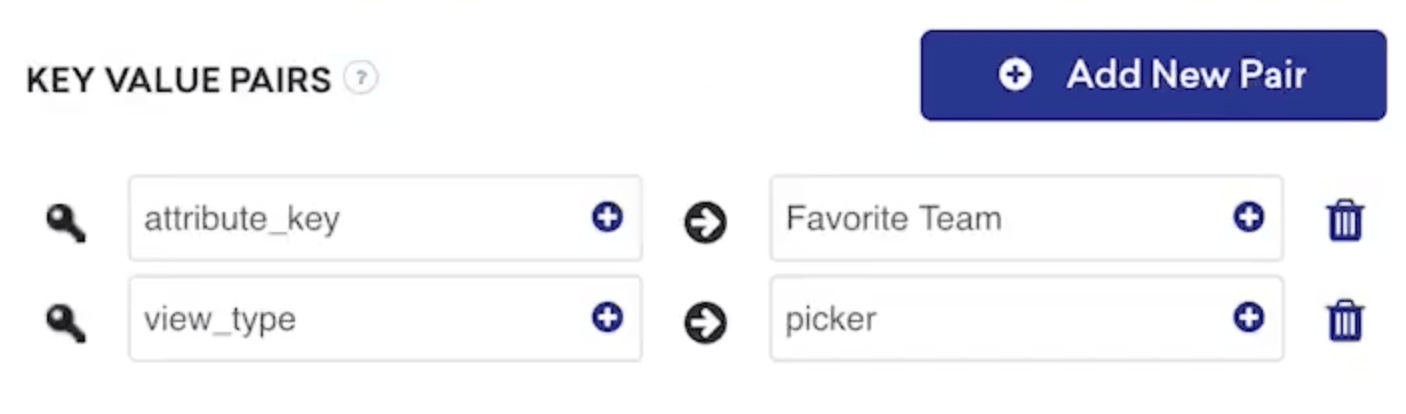
키-값 페어에서 attribute_key를 제공합니다. 이 키는 사용자가 선택한 값과 함께 고객 프로필에 커스텀 속성으로 저장됩니다. 커스텀 뷰 로직은 Braze로 전송된 사용자 속성을 처리해야 합니다.
ABKInAppMessage 오브젝트의 extras 사전을 통해 올바른 뷰를 표시하도록 알리는 view_type 키(있는 경우)를 쿼리할 수 있습니다. 인앱 메시지는 메시지별로 구성되므로 커스텀 및 기본 모달 뷰가 조화롭게 작동할 수 있다는 점에 유의하세요.
UI 표시 동작에 view_type 사용
원하는 서브클래스 뷰 컨트롤러를 로드하도록 view_type에 대해 extras 사전을 쿼리합니다.
func modalViewController(inAppMessage: ABKInAppMessage) -> ABKInAppMessageModalViewController {
switch inAppMessage.extras?[InAppMessageKey.viewType.rawValue] as? String {
case InAppMessageViewType.picker.rawValue:
return ModalPickerViewController(inAppMessage: inAppMessage)
default:
return ABKInAppMessageModalViewController(inAppMessage: inAppMessage)
}
}
UI 표시 동작에 view_type 사용
원하는 서브클래스 뷰 컨트롤러를 로드하도록 view_type에 대해 extras 사전을 쿼리합니다.
- (ABKInAppMessageModalViewController *)modalViewControllerWithInAppMessage:(ABKInAppMessage *)inAppMessage {
InAppMessageData *inAppMessageData = [[InAppMessageData alloc] init];
NSString *key = [inAppMessageData rawValueForInAppMessageKey:InAppMessageKeyViewType];
NSString *viewType = [inAppMessageData rawValueForInAppMessageViewType:InAppMessageViewTypePicker];
if ([inAppMessage.extras objectForKey:key] && [inAppMessage.extras[key] isEqualToString:viewType]) {
return [[ModalViewController alloc] initWithInAppMessage:inAppMessage];
} else {
return [[ABKInAppMessageModalViewController alloc] initWithInAppMessage:inAppMessage];
}
}
커스텀 뷰 재정의 및 제공
loadView()를 재정의하고 필요에 맞게 커스텀 뷰를 설정합니다.
override var nibname: String{
return "ModalPickerViewController"
}
override func loadView() {
Bundle.main.loadNibNamed(nibName, owner: self, options: nil)
}
커스텀 뷰 재정의 및 제공
loadView()를 재정의하고 필요에 맞게 커스텀 뷰를 설정합니다.
- (void)loadView {
NSString *nibName = @"ModalPickerViewController";
[[NSBundle mainBundle] loadNibNamed:nibName owner:self options:nil];
}
동적 목록을 위한 변수 형식 지정
UIPickerView 구성요소를 다시 로드하기 전에 inAppMessage 메시지 변수가 문자열로 출력됩니다. 이 메시지는 올바르게 표시되도록 항목 배열로 형식화되어야 합니다. 예를 들어, components(separatedBy: ", ")를 사용하여 달성할 수 있습니다.
override func viewDidLoad() {
super.viewDidLoad()
items = inAppMessage.message.separatedByCommaSpaceValue
pickerView.reloadAllComponents()
}
PickerView를 위한 변수 형식 지정
UIPickerView 구성요소를 다시 로드하기 전에 inAppMessage 메시지 변수가 문자열로 출력됩니다. 이 메시지는 올바르게 표시되도록 항목 배열로 형식화되어야 합니다. 예를 들어, componentsSeparatedByString을 사용하여 달성할 수 있습니다.
- (void)viewDidLoad {
[super viewDidLoad];
self.items = [[NSArray alloc] initWithArray:[self.inAppMessage.message componentsSeparatedByString:@", "]];
[self.pickerView reloadAllComponents];
}
커스텀 속성 할당
서브클래스를 사용하여 사용자가 제출을 누른 후 속성과 이에 대응하는 선택된 값을 Braze에 전달합니다.
@IBAction func primaryButtonTapped(_ sender: Any) {
guard let item = selectedItem, !item.isEmpty, let attributeKey = inAppMessage.extras?[InAppMessageKey.attributeKey.rawValue] as? String else { return }
AppboyManager.shared.setCustomAttributeWithKey(attributeKey, andStringValue: item)
}
커스텀 속성 할당
서브클래스를 사용하여 사용자가 제출을 누른 후 속성과 이에 대응하는 선택된 값을 Braze에 전달합니다.
- (IBAction)primaryButtonTapped:(id)sender {
InAppMessageData *inAppMessageData = [[InAppMessageData alloc] init];
NSString *key = [inAppMessageData rawValueForInAppMessageKey:InAppMessageKeyAttributeKey];
if (self.selectedItem.length > 0 && [self.inAppMessage.extras objectForKey:key]) {
[[AppboyManager shared] setCustomAttributeWithKey:self.inAppMessage.extras[key] andStringValue:self.selectedItem];
}
}

커스텀 전체 인앱 메시지
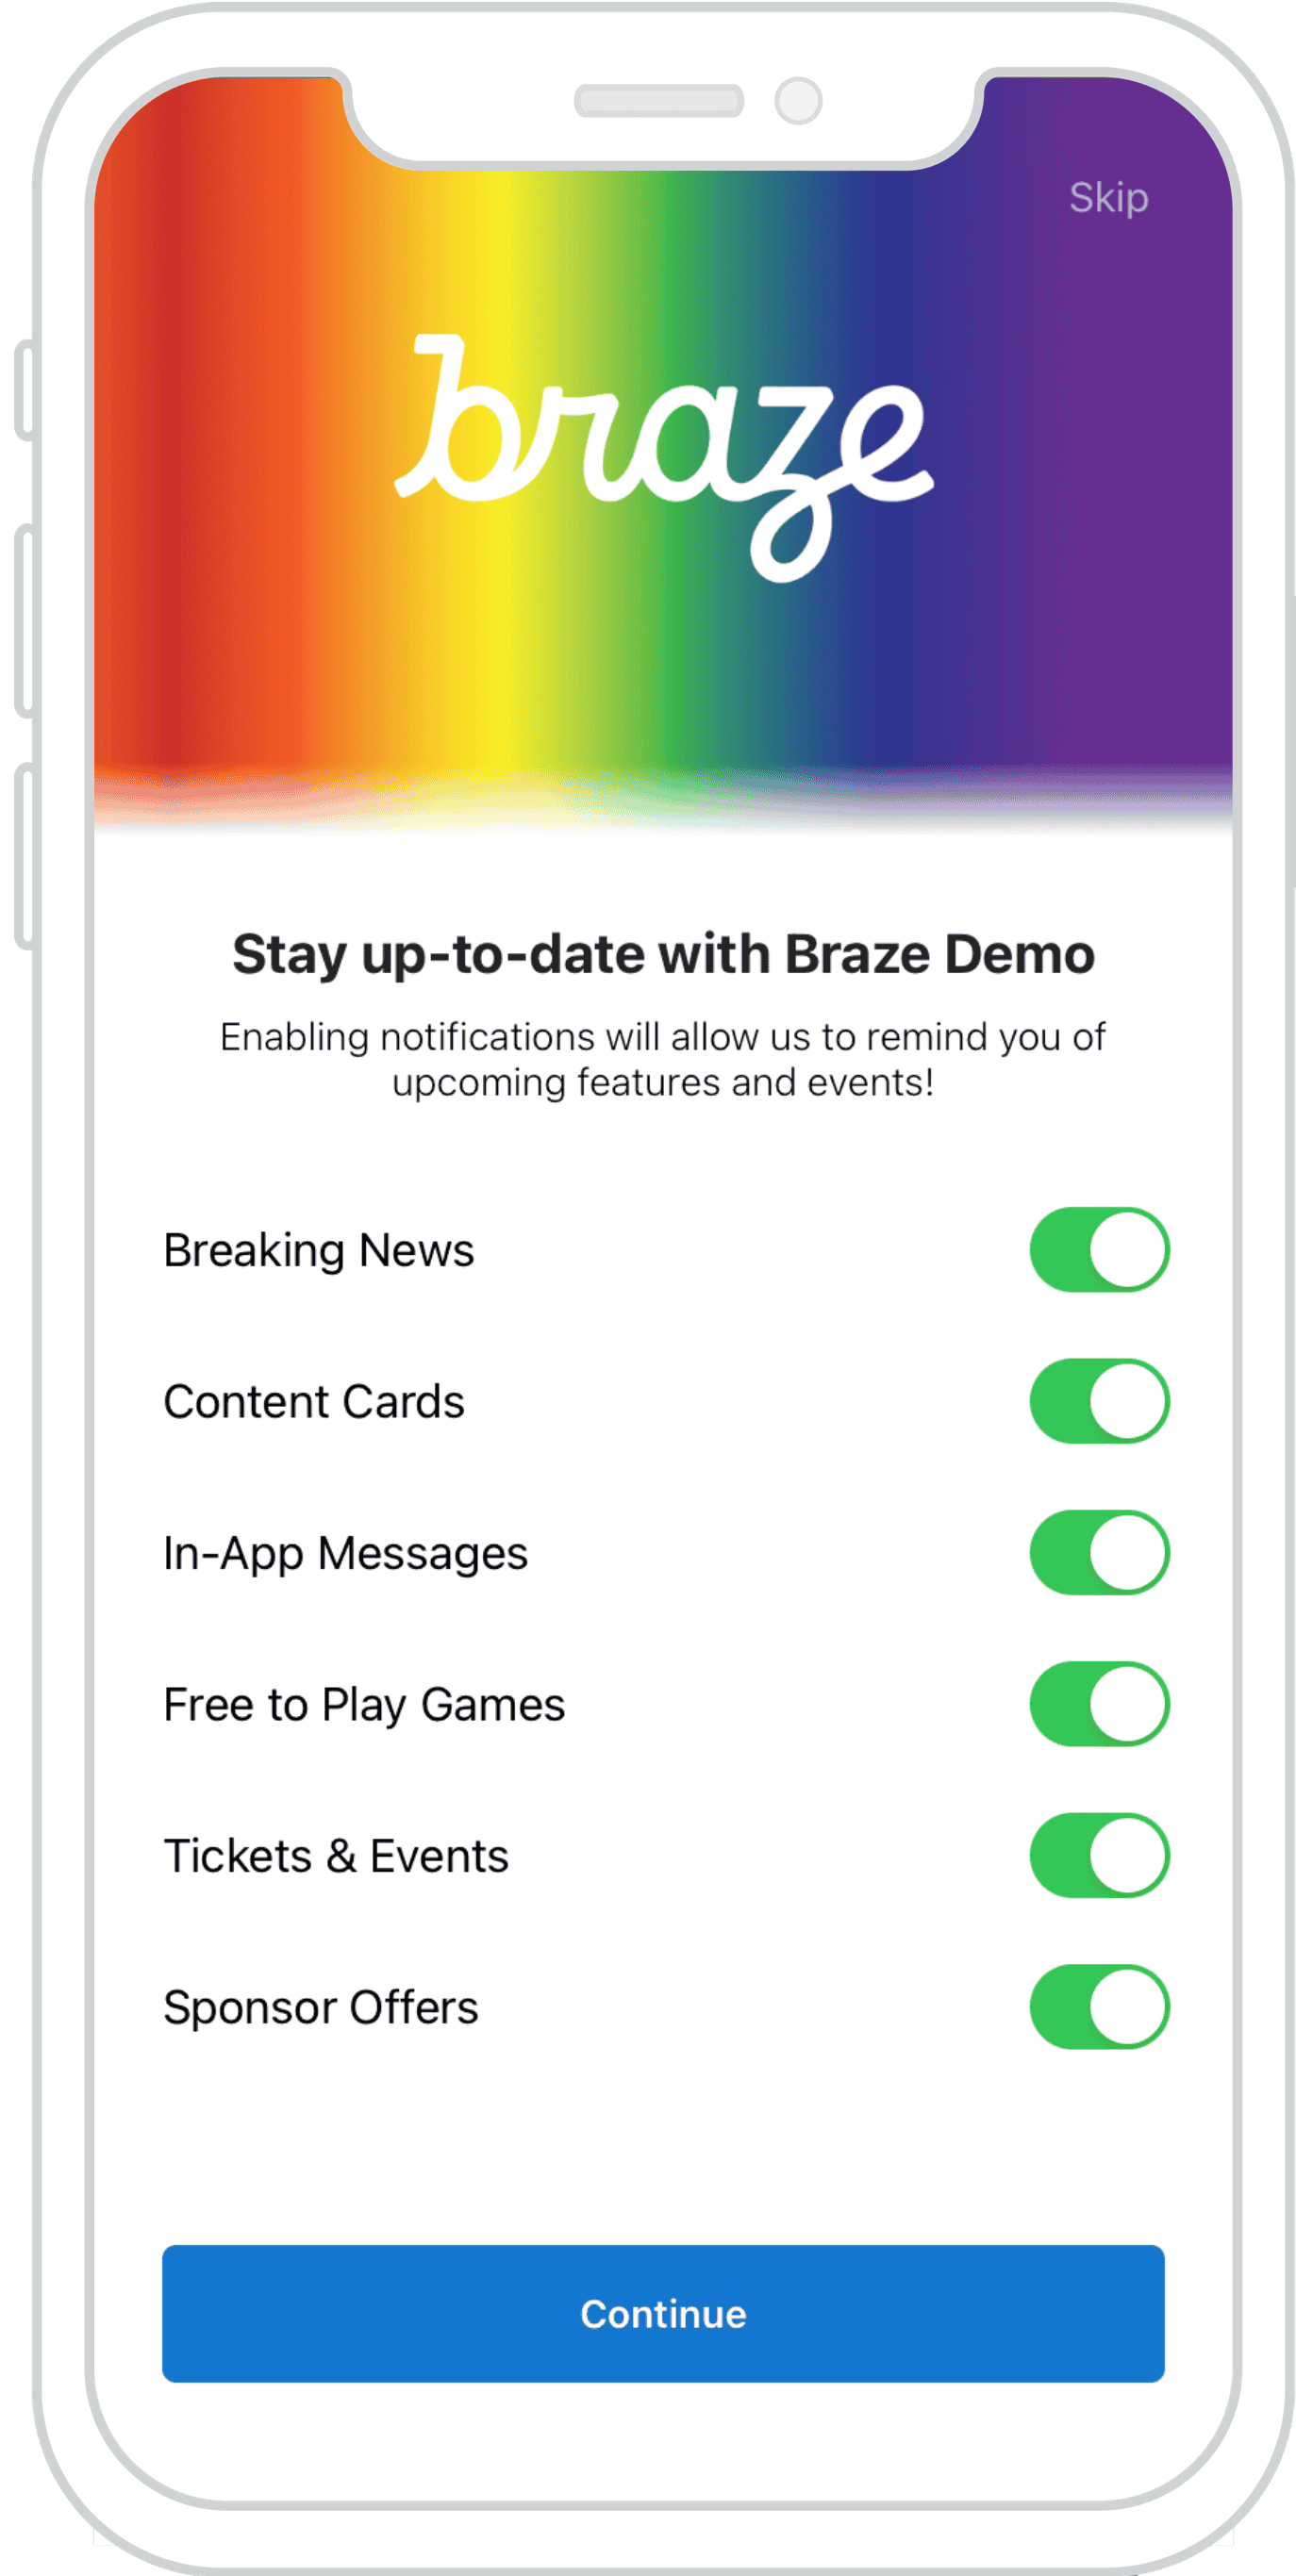
커스텀 전체 인앱 메시지를 사용하여 인터랙티브하고 사용자 친화적인 프롬프트를 만들어 소중한 고객 데이터를 수집하세요. 오른쪽 예제는 알림 환경설정이 포함된 인터랙티브 푸시 프라이머로 재구성된 커스텀 전체 인앱 메시지의 구현을 보여줍니다.
FullListViewController를 방문하여 시작하세요.
대시보드 구성
대시보드에서 커스텀 전체 인앱 메시지를 설정하려면 쉼표로 구분된 문자열로 형식화된 태그 목록을 제공해야 합니다.
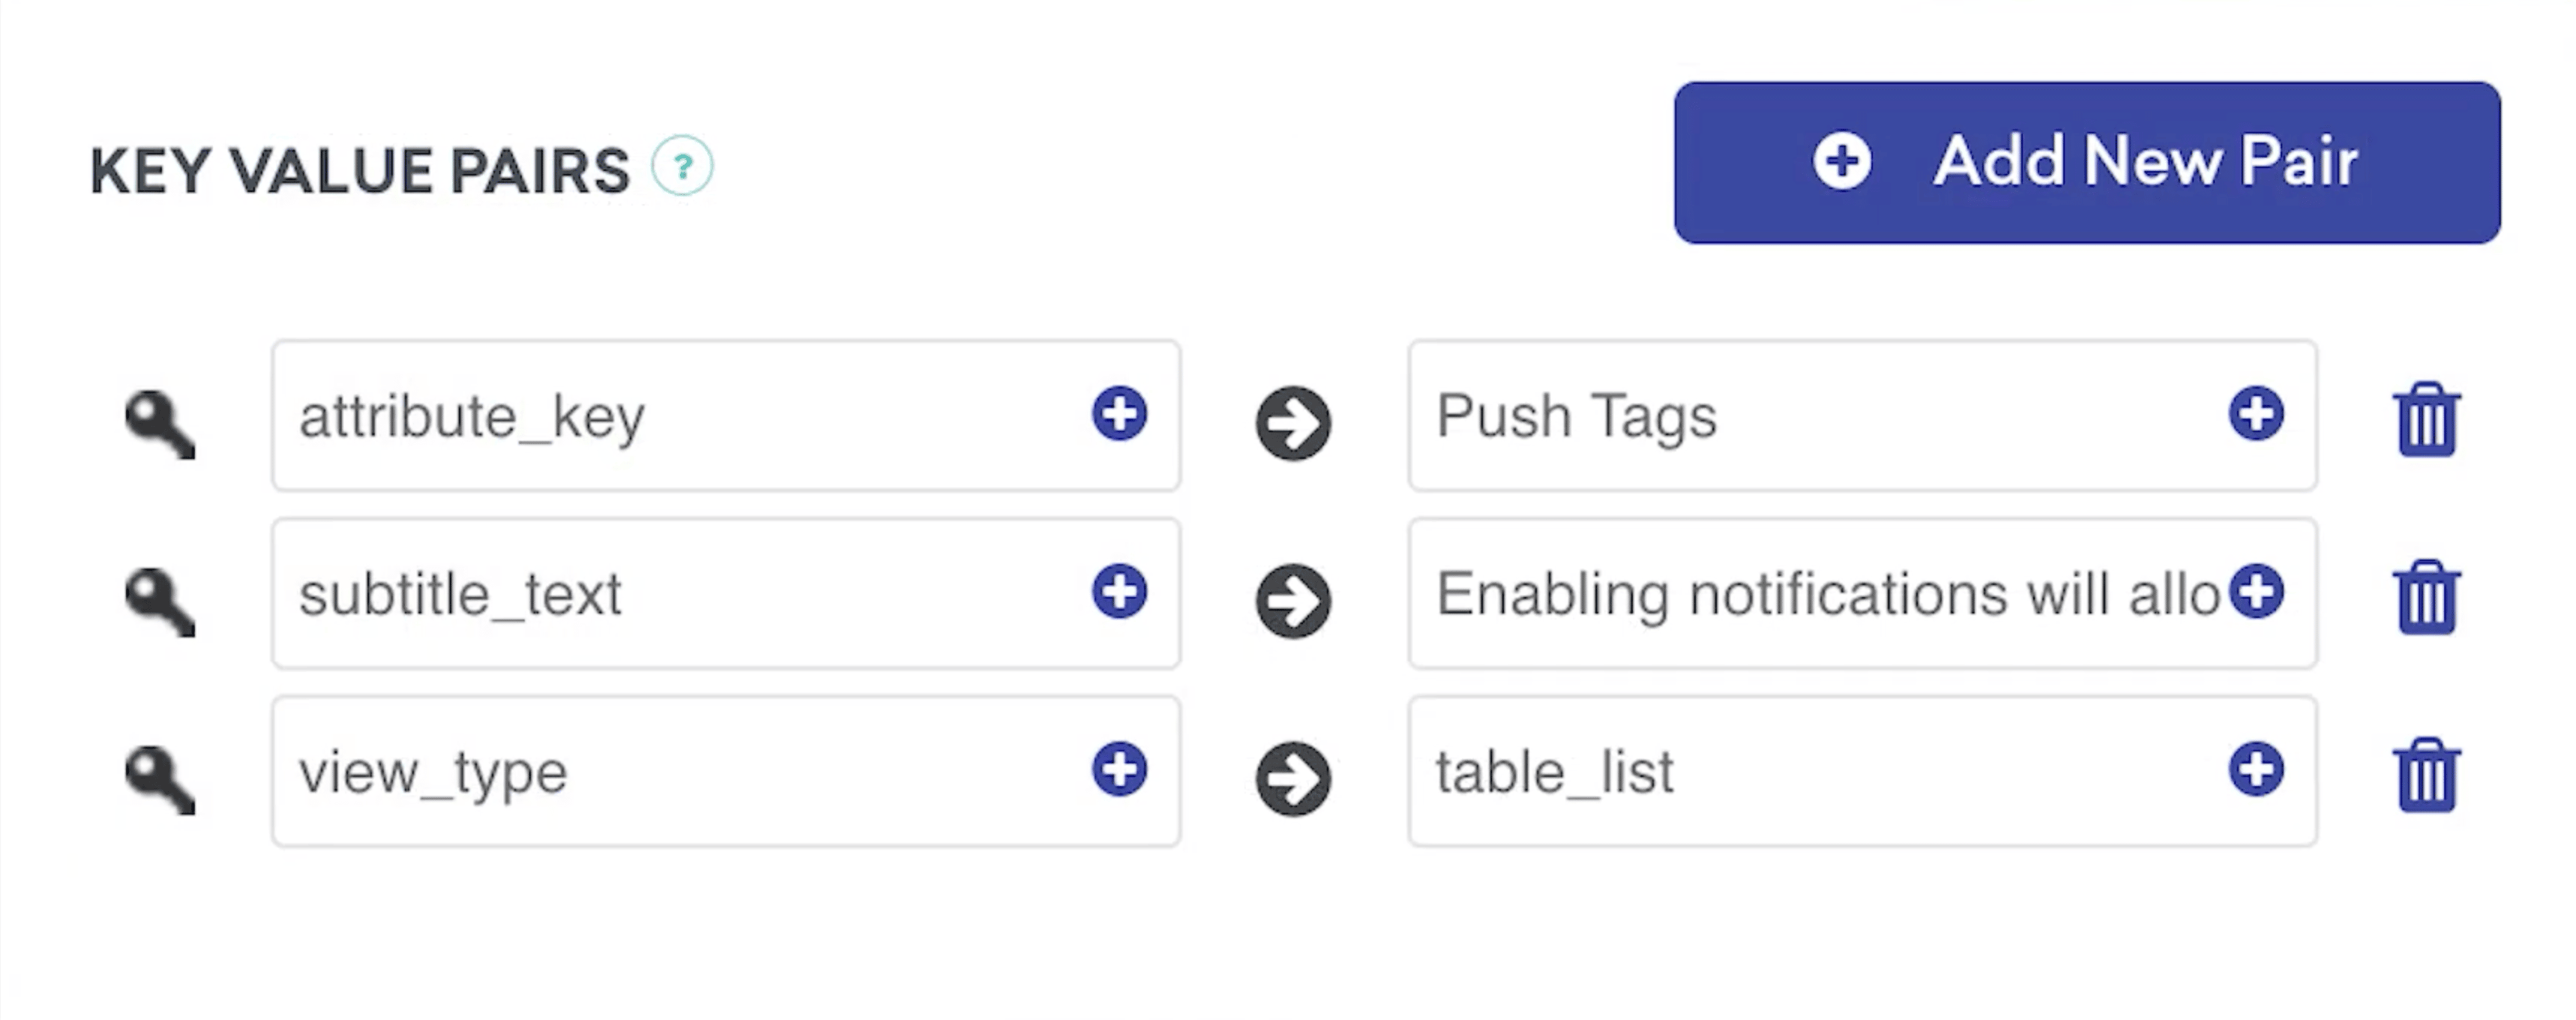
키-값 페어에서 attribute_key를 제공합니다. 이 키는 사용자가 선택한 값과 함께 고객 프로필에 커스텀 속성으로 저장됩니다. 커스텀 뷰 로직은 Braze로 전송된 사용자 속성을 처리해야 합니다.
인앱 메시지 터치 가로채기
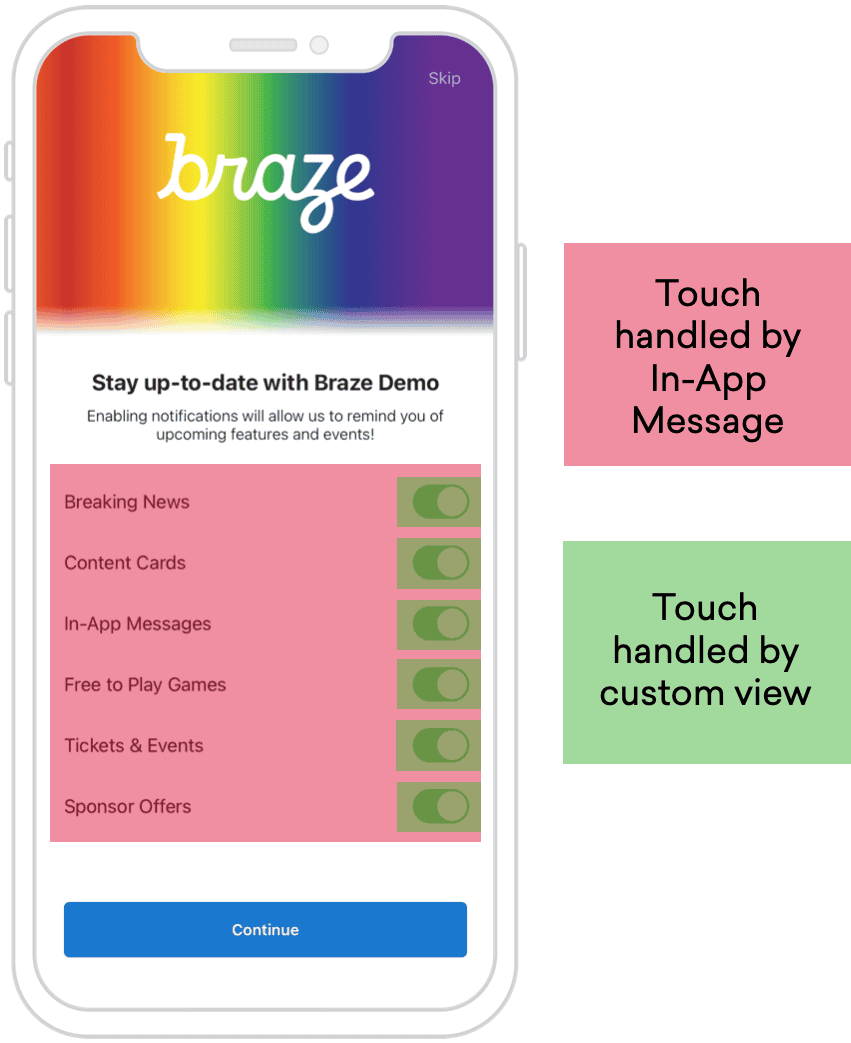 인앱 메시지 터치를 가로채는 것은 커스텀 전체 인앱 메시지 버튼이 올바르게 작동하도록 하는 데 매우 중요합니다. 기본적으로
 ABKInAppMessageImmersive는 메시지에 탭 제스처 인식기를 추가하여 사용자가 버튼 없이 메시지를 해제할 수 있습니다. UISwitch 또는 버튼을 UITableViewCell 뷰 계층 구조에 추가하면 터치가 커스텀 뷰에 의해 처리됩니다. iOS 6부터 버튼 및 기타 컨트롤이 제스처 인식기보다 우선하므로, 커스텀 전체 인앱 메시지가 정상적으로 작동합니다.