Action buttons
The Braze Swift SDK provides URL handling support for push action buttons.
There are four sets of default push action buttons for Braze default push categories: Accept/Decline, Yes/No, Confirm/Cancel, and More.
If you want to create your own custom notification categories, see action button customization.
Automatic integration (recommended)
When integrating push using the configuration.push.automation configuration option, Braze automatically registers the action buttons for the default push categories and handles the push action button click analytics and URL routing.
Manual integration
To manually enable these push action buttons, first register for the default push categories. Then, use the didReceive(_:completionHandler:) delegate method to enable push action buttons.
Step 1: Adding Braze default push categories
Use the following code to register for the default push categories when you register for push:
1
UNUserNotificationCenter.current().setNotificationCategories(Braze.Notifications.categories)
1
[[UNUserNotificationCenter currentNotificationCenter] setNotificationCategories:BRZNotifications.categories];
Clicking on push action buttons with background activation mode will only dismiss the notification and not open the app. The next time the user opens the app, the button click analytics for these actions will be flushed to the server.
Step 2: Enable interactive push handling
To enable our push action button handling, including click analytics and URL routing, add the following code to your app’s didReceive(_:completionHandler:) delegate method:
1
AppDelegate.braze?.notifications.handleUserNotification(response: response, withCompletionHandler: completionHandler)
1
2
[AppDelegate.braze.notifications handleUserNotificationWithResponse:response
                                              withCompletionHandler:completionHandler];
If you use the UNNotification framework and have implemented the Braze notification methods, you should already have this method integrated.
Push category customization
In addition to providing a set of default push categories, Braze supports custom notification categories and actions. After you register categories in your application, you can use the Braze dashboard to send these custom notification categories to your users.
These categories can then be assigned to push notifications via our dashboard to trigger the action button configurations of your design.
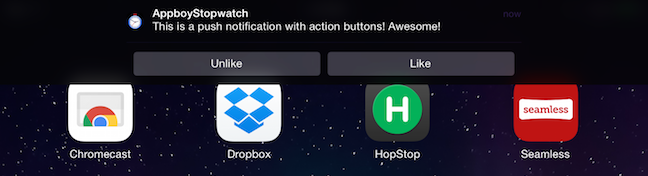
Example custom push category
Here’s an example that leverages the LIKE_CATEGORY displayed on the device:
Step 1: Register a category
To register a category in your app, use a similar approach to the following:
1
2
3
4
5
6
7
8
9
10
Braze.Notifications.categories.insert(
  .init(identifier: "LIKE_CATEGORY",
        actions: [
          .init(identifier: "LIKE_IDENTIFIER", title: "Like", options: [.foreground]),
          .init(identifier: "UNLIKE_IDENTIFIER", title: "Unlike", options: [.foreground])
        ],
        intentIdentifiers: []
       )
)
UNUserNotificationCenter.current().setNotificationCategories(Braze.Notifications.categories)
1
2
3
4
5
6
7
8
9
10
11
12
13
14
15
16
17
NSMutableSet<UNNotificationCategory *> *categories = [BRZNotifications.categories mutableCopy];

UNNotificationAction *likeAction = [UNNotificationAction actionWithIdentifier:@"LIKE_IDENTIFIER"
                                                                        title:@"Like"
                                                                      options:UNNotificationActionOptionForeground];

UNNotificationAction *unlikeAction = [UNNotificationAction actionWithIdentifier:@"UNLIKE_IDENTIFIER"
                                                                          title:@"Unlike"
                                                                        options:UNNotificationActionOptionForeground];

UNNotificationCategory *likeCategory = [UNNotificationCategory categoryWithIdentifier:@"LIKE_CATEGORY"
                                                                              actions:@[likeAction, unlikeAction]
                                                                    intentIdentifiers:@[]
                                                                              options:UNNotificationCategoryOptionNone];

[categories addObject:likeCategory];
[UNUserNotificationCenter.currentNotificationCenter setNotificationCategories:categories];
When you create a UNNotificationAction, you can specify a list of action options. For example, UNNotificationActionOptions.foreground let’s your users open your app after tapping the action button. This is necessary for navigational on-click behaviors, such as “Open App” and “Deep Link into Application”. For more information, see UNNotificationActionOptions.
Step 2: Select your categories
After you register a category, use the Braze dashboard to send notifications of that type to users.
You only need to define custom notification categories for action buttons with special actions, such as deep linking into your app or opening a URL. You do not need to define them for action buttons that only dismiss a notification.
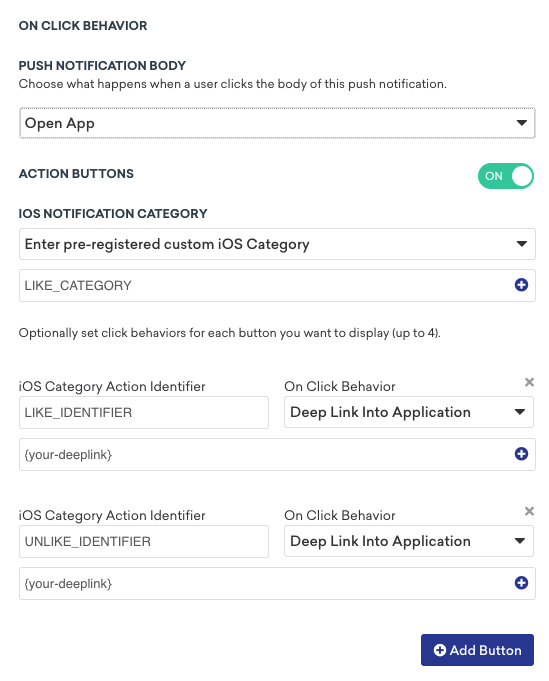
- In the Braze dashboard, select Messaging > Push Notifications, then choose your iOS push campaign.
- Under Compose push notification, turn on Action Buttons.
- In the iOS Notification Category dropdown, select Enter pre-registered custom iOS Category.
- Finally, enter one of the categories you created earlier. The following example, uses the custom category:
LIKE_CATEGORY.
 Edit this page on GitHub