Microsoft Azure Blob Storage
Microsoft Azure Blob Storage is a massively scalable object storage for unstructured data offered by Microsoft as part of the Azure product suite.

If you’re switching between cloud storage providers, contact your Braze customer success manager for further assistance on setting up and validating your new integration.
The Braze and Microsoft Azure Blob Storage integration allows you to export data back to Azure and stream Currents data. Later, you can use an ETL process (Extract, Transform, Load) to transfer your data to other locations.
Prerequisites
| Requirement | Description |
|---|---|
| Microsoft Azure and Azure storage account | A Microsoft Azure and Azure storage account are required to take advantage of this partnership. |
| Currents | To export data to Currents, you must have Braze Currents set up for your account. Currents isn’t required if you’re only setting up message archiving. |
Integration
To integrate with Microsoft Azure Blob Storage, you must have a storage account and a container to allow Braze to either export data back to Azure or stream Currents data. Braze supports two authentication methods:
- Connection string method
- Certificate service principal method (Currents only)
Connection string auth method
Step 1: Create a storage account
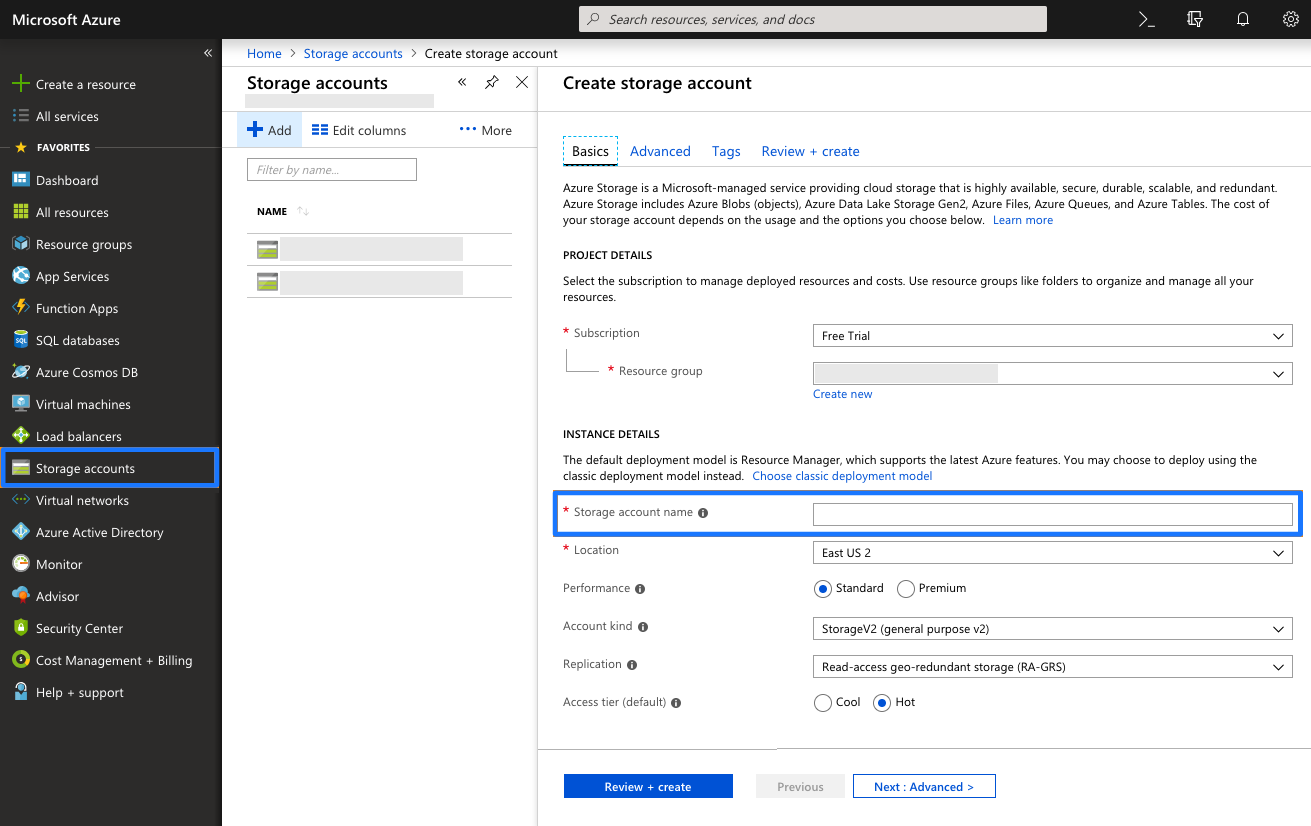
In Microsoft Azure, navigate to Storage Accounts in the sidebar and click + Add to create a new storage account. Next, provide a storage account name. Other default settings will not need to be updated. Lastly, select Review + create.
Even if you already have a storage account, we recommend creating a new one specifically for your Braze data.
Step 2: Get the connection string
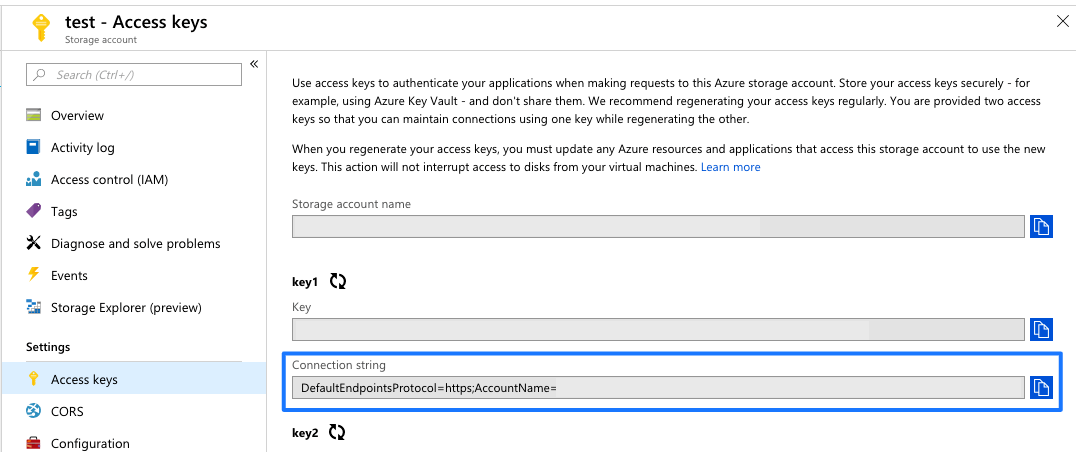
Once the storage account is deployed, navigate to the Access Keys menu from the storage account and take note of the connection string.
Microsoft provides two access keys to maintain connections using one key while regenerating the other. You only need the connection string from one of them.

Braze uses the connection string from this menu, not the key.
Step 3: Create a blob service container
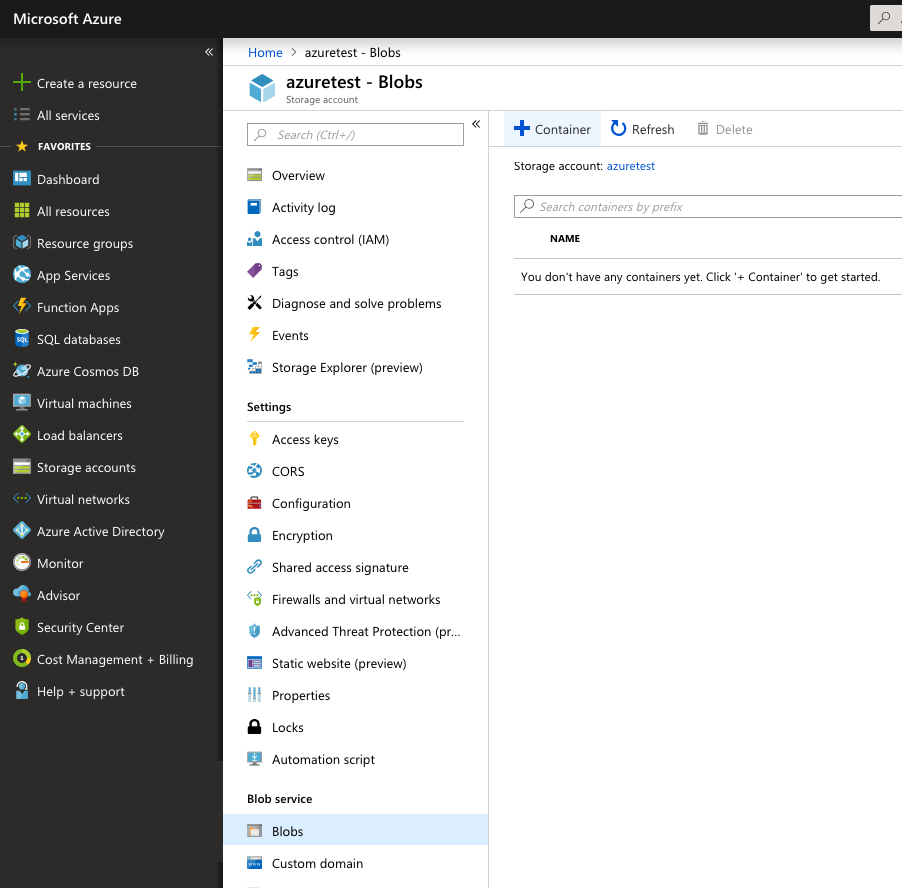
Navigate to the Blobs menu under the Blob Service section of your storage account. Create a Blob Service Container within that storage account you created earlier.
Provide a name for your Blob Service Container. Other default settings will not need to be updated.
Step 4: Set up Currents
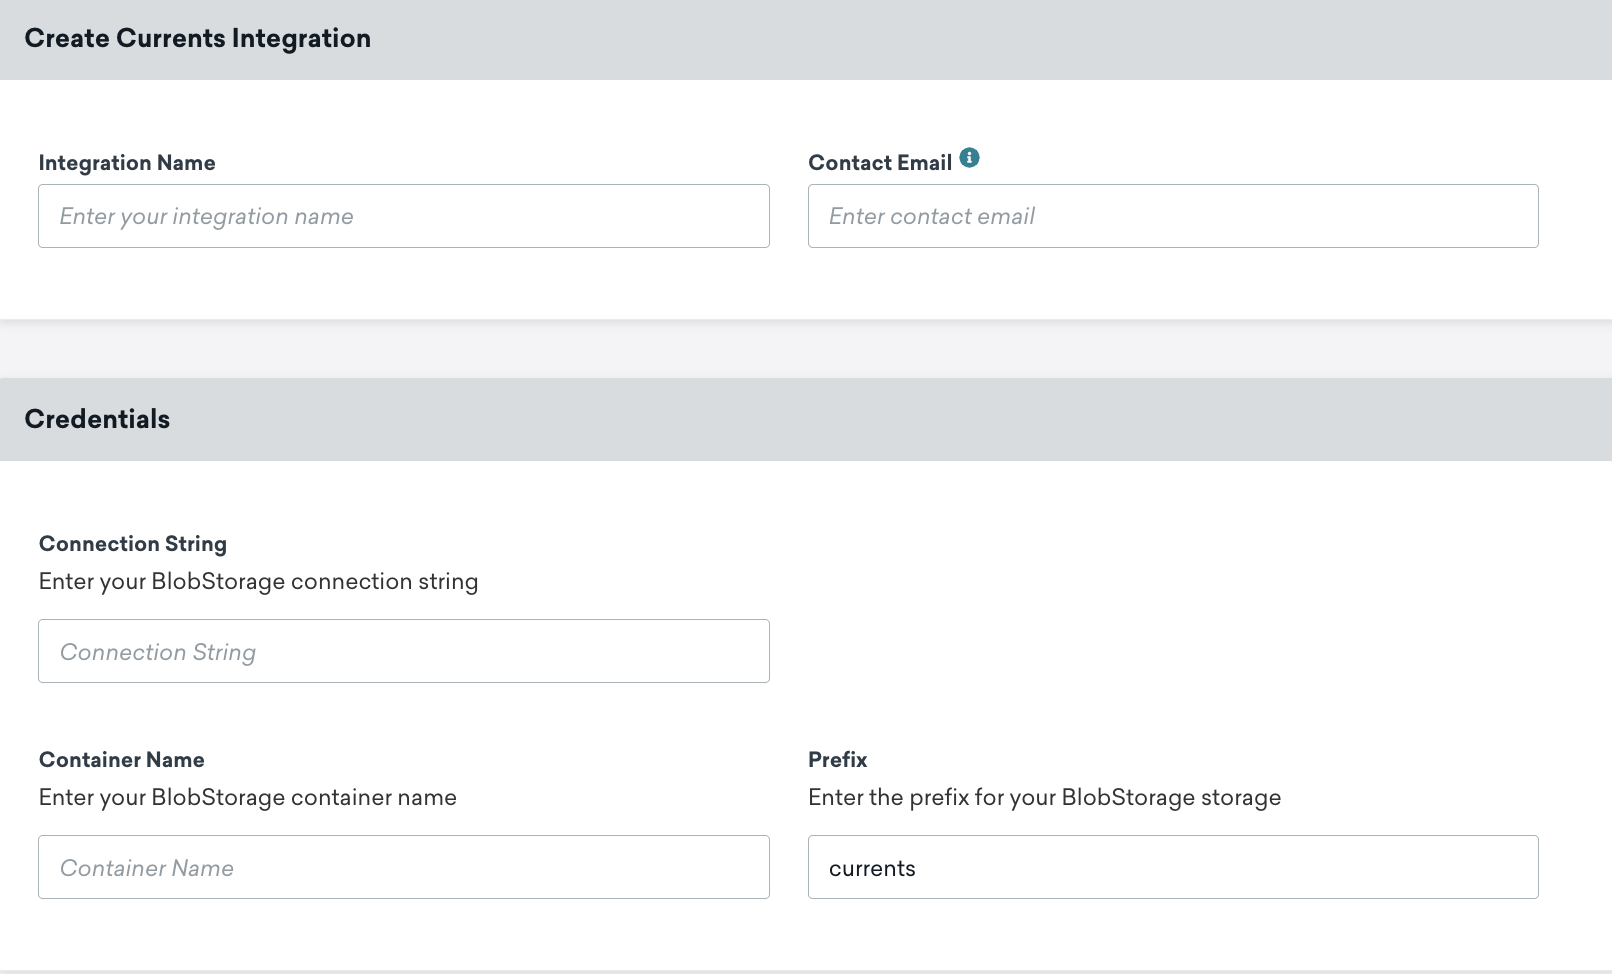
In Braze, navigate to Currents > + Create Current > Azure Blob Data Export and provide your integration name and contact email.
Provide a contact email for integration error notifications. Braze sends notifications to this address if the integration encounters errors, such as credential issues or connectivity problems. To help ensure the right people receive alerts, use a distribution list or group email address.
Next, provide your connection string, container name, and BlobStorage prefix (optional).
Finally, scroll to the bottom of the page and select which message engagement events or customer behavior events you would like to export. When completed, launch your Current.
Step 5: Set up Azure data export
The following configures credentials that are used for:
- Segment exports through the API
- CSV exports (campaign, segment, Canvas user data export via the dashboard)
- Engagement reports
In Braze, navigate to Partner Integrations > Technology Partners > Microsoft Azure and provide your connection string, Azure storage container name, and Azure storage prefix.
Next, make sure the Make this the default data export destination box is checked, this will make sure your exported data is sent to Azure. When completed, save your integration.
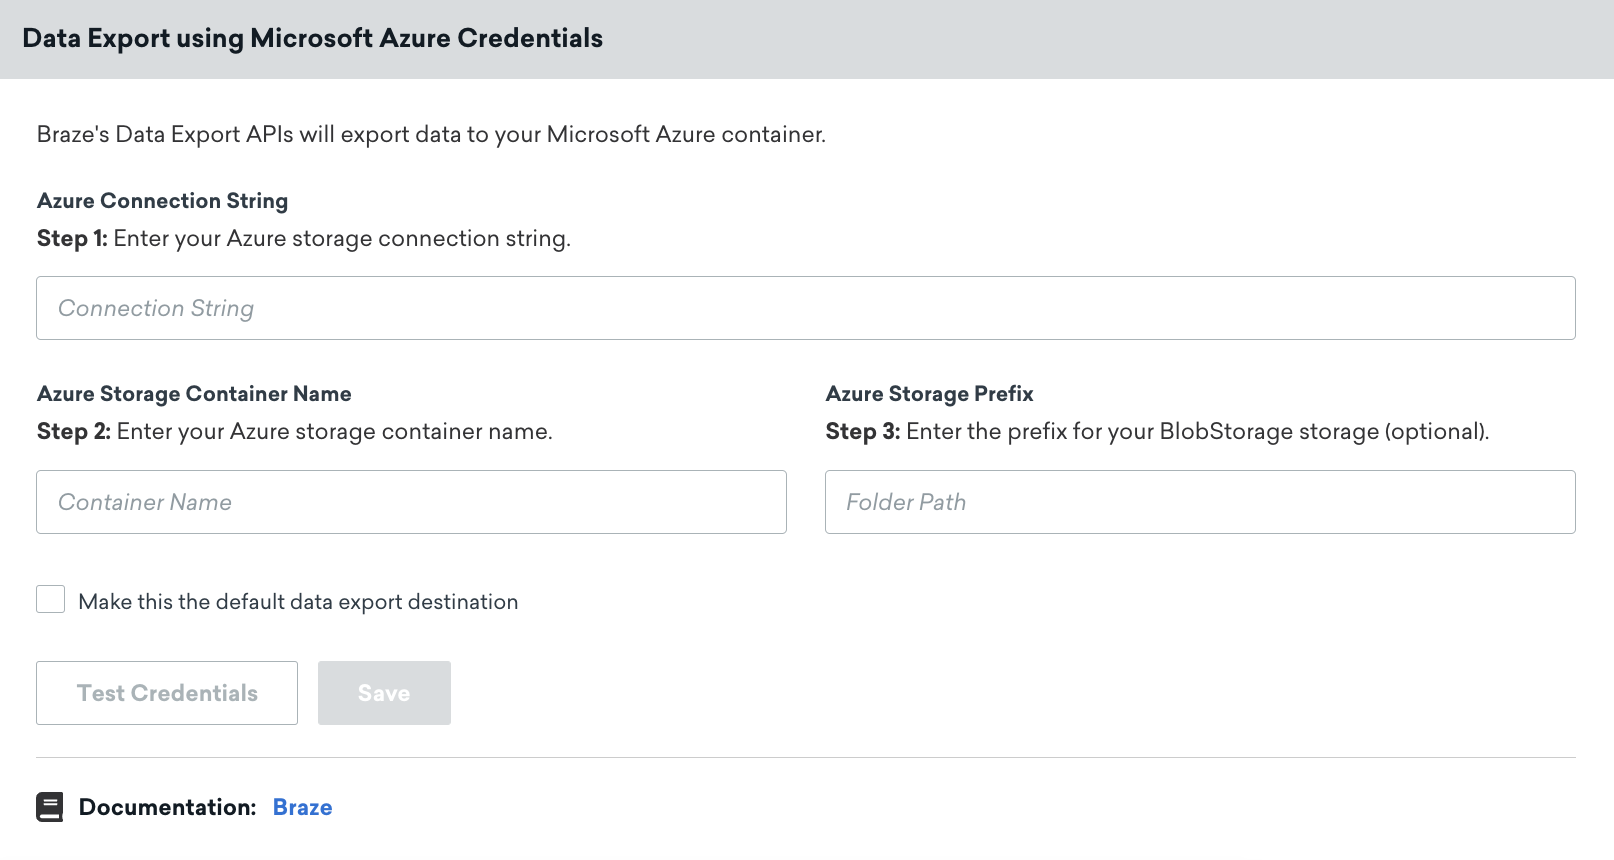
It’s important to keep your connection string up to date; if your connector’s credentials expire, the connector stops sending events. If this persists for more than 48 hours, the connector’s events are dropped, and data is permanently lost.
Certificate service principal auth method
This method authenticates to Microsoft Entra ID using a certificate, then writes to your container using Azure role-based access control (RBAC) without a shared account key. It’s available for Braze Currents only.
You upload only the public certificate to Microsoft Entra ID—your private key is never sent to Azure. Braze stores your certificate and private key encrypted at rest, grants access only through the Storage Blob Data Contributor role you assign, and you can revoke that access at any time by removing the certificate from your app registration in Azure.
Before you begin, create a storage account and a blob service container as described in the Connection string method.
Step 1: Register an application
In Microsoft Azure, navigate to Microsoft Entra ID > App registrations > + New registration. Provide a name (for example, braze-currents), then select Register. For detailed steps, see Microsoft’s Register an application with the Microsoft identity platform.
On your new app registration’s Overview page, take note of the following values. You’ll provide both to Braze in Step 6.
- Application (client) ID
- Directory (tenant) ID
Step 2: Create a certificate
Braze authenticates using a certificate: you upload the public certificate to Azure, and give Braze the certificate together with its private key.
To generate a self-signed certificate and an unencrypted 2048-bit RSA private key, run:
openssl req -x509 -newkey rsa:2048 -keyout key.pem -out cert.pem \
-days 730 -nodes -subj "/CN=braze-currents"
This creates two files:
| File | Purpose |
|---|---|
cert.pem |
Your public certificate. Upload this to Azure in the next step. |
key.pem |
Your private key. Never upload this to Azure. You’ll provide it to Braze in Step 6. |
The private key must be unencrypted—it can’t be protected by a passphrase. Only upload the public certificate to Azure; never upload your private key.
Already have a certificate? If you have an existing certificate as a .pfx file—for example, from Azure Key Vault, your certificate authority, or Microsoft’s PowerShell method—convert it to the format Braze requires instead of generating a new one:
# The public certificate to upload to Azure (Step 3)
openssl pkcs12 -in your-cert.pfx -nokeys -out cert.pem
# The certificate and its unencrypted private key to give to Braze (Step 6)
openssl pkcs12 -in your-cert.pfx -nodes -out braze-currents.pem
Enter your .pfx password when prompted. The -nodes flag exports the private key unencrypted, as Braze requires.
Step 3: Upload the certificate
In your app registration, navigate to Certificates & secrets > Certificates > Upload certificate, then upload the cert.pem file you created in the previous step. Add a description and select Add. For detailed steps, see Microsoft’s Add and manage app credentials in Microsoft Entra ID.
Take note of your certificate’s expiration date. See Updating Azure credentials for Currents.
Step 4: Grant access to your storage account
Next, give your app registration permission to write to your container.
Navigate to your storage account and select Access Control (IAM) > + Add > Add role assignment. Then:
- On the Role tab, select Storage Blob Data Contributor.
- On the Members tab, select User, group, or service principal, select + Select members, and search for the app registration name you created in Step 1.
- Select Review + assign.
For detailed steps, see Microsoft’s Assign an Azure role for access to blob data.
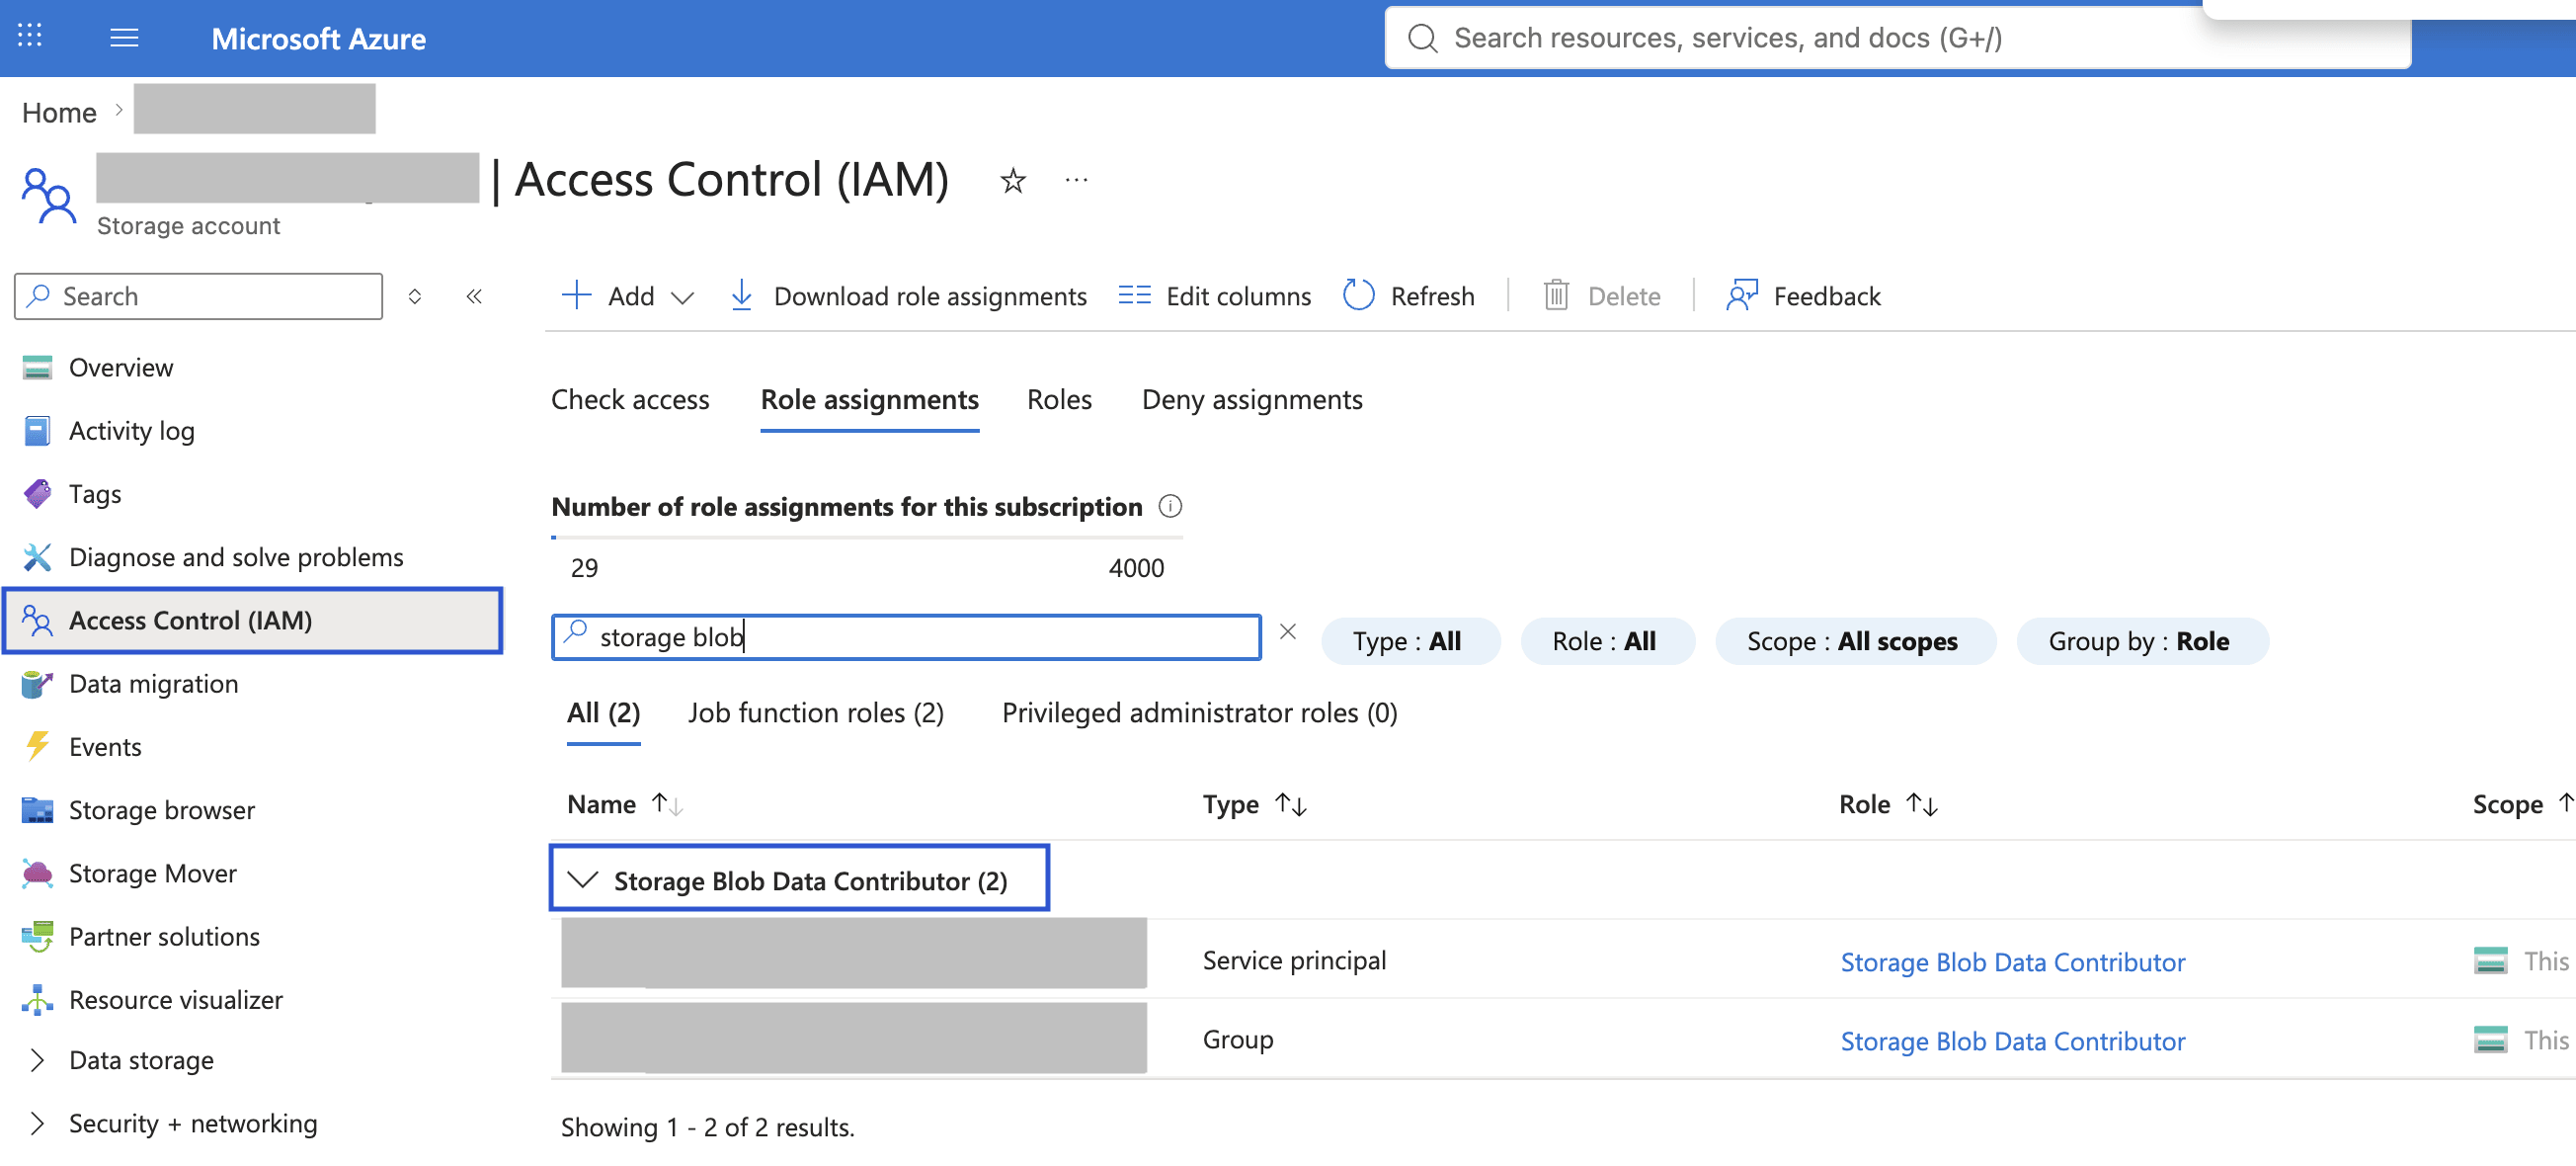
Assign the role at the storage account level rather than on an individual container.
Without this role assignment, Braze can authenticate to Microsoft Entra ID but won’t be able to write to your container.
Step 5: Get your account endpoint
From your storage account, navigate to Settings > Endpoints and take note of the Blob service endpoint. It looks like https://<your-storage-account>.blob.core.windows.net.
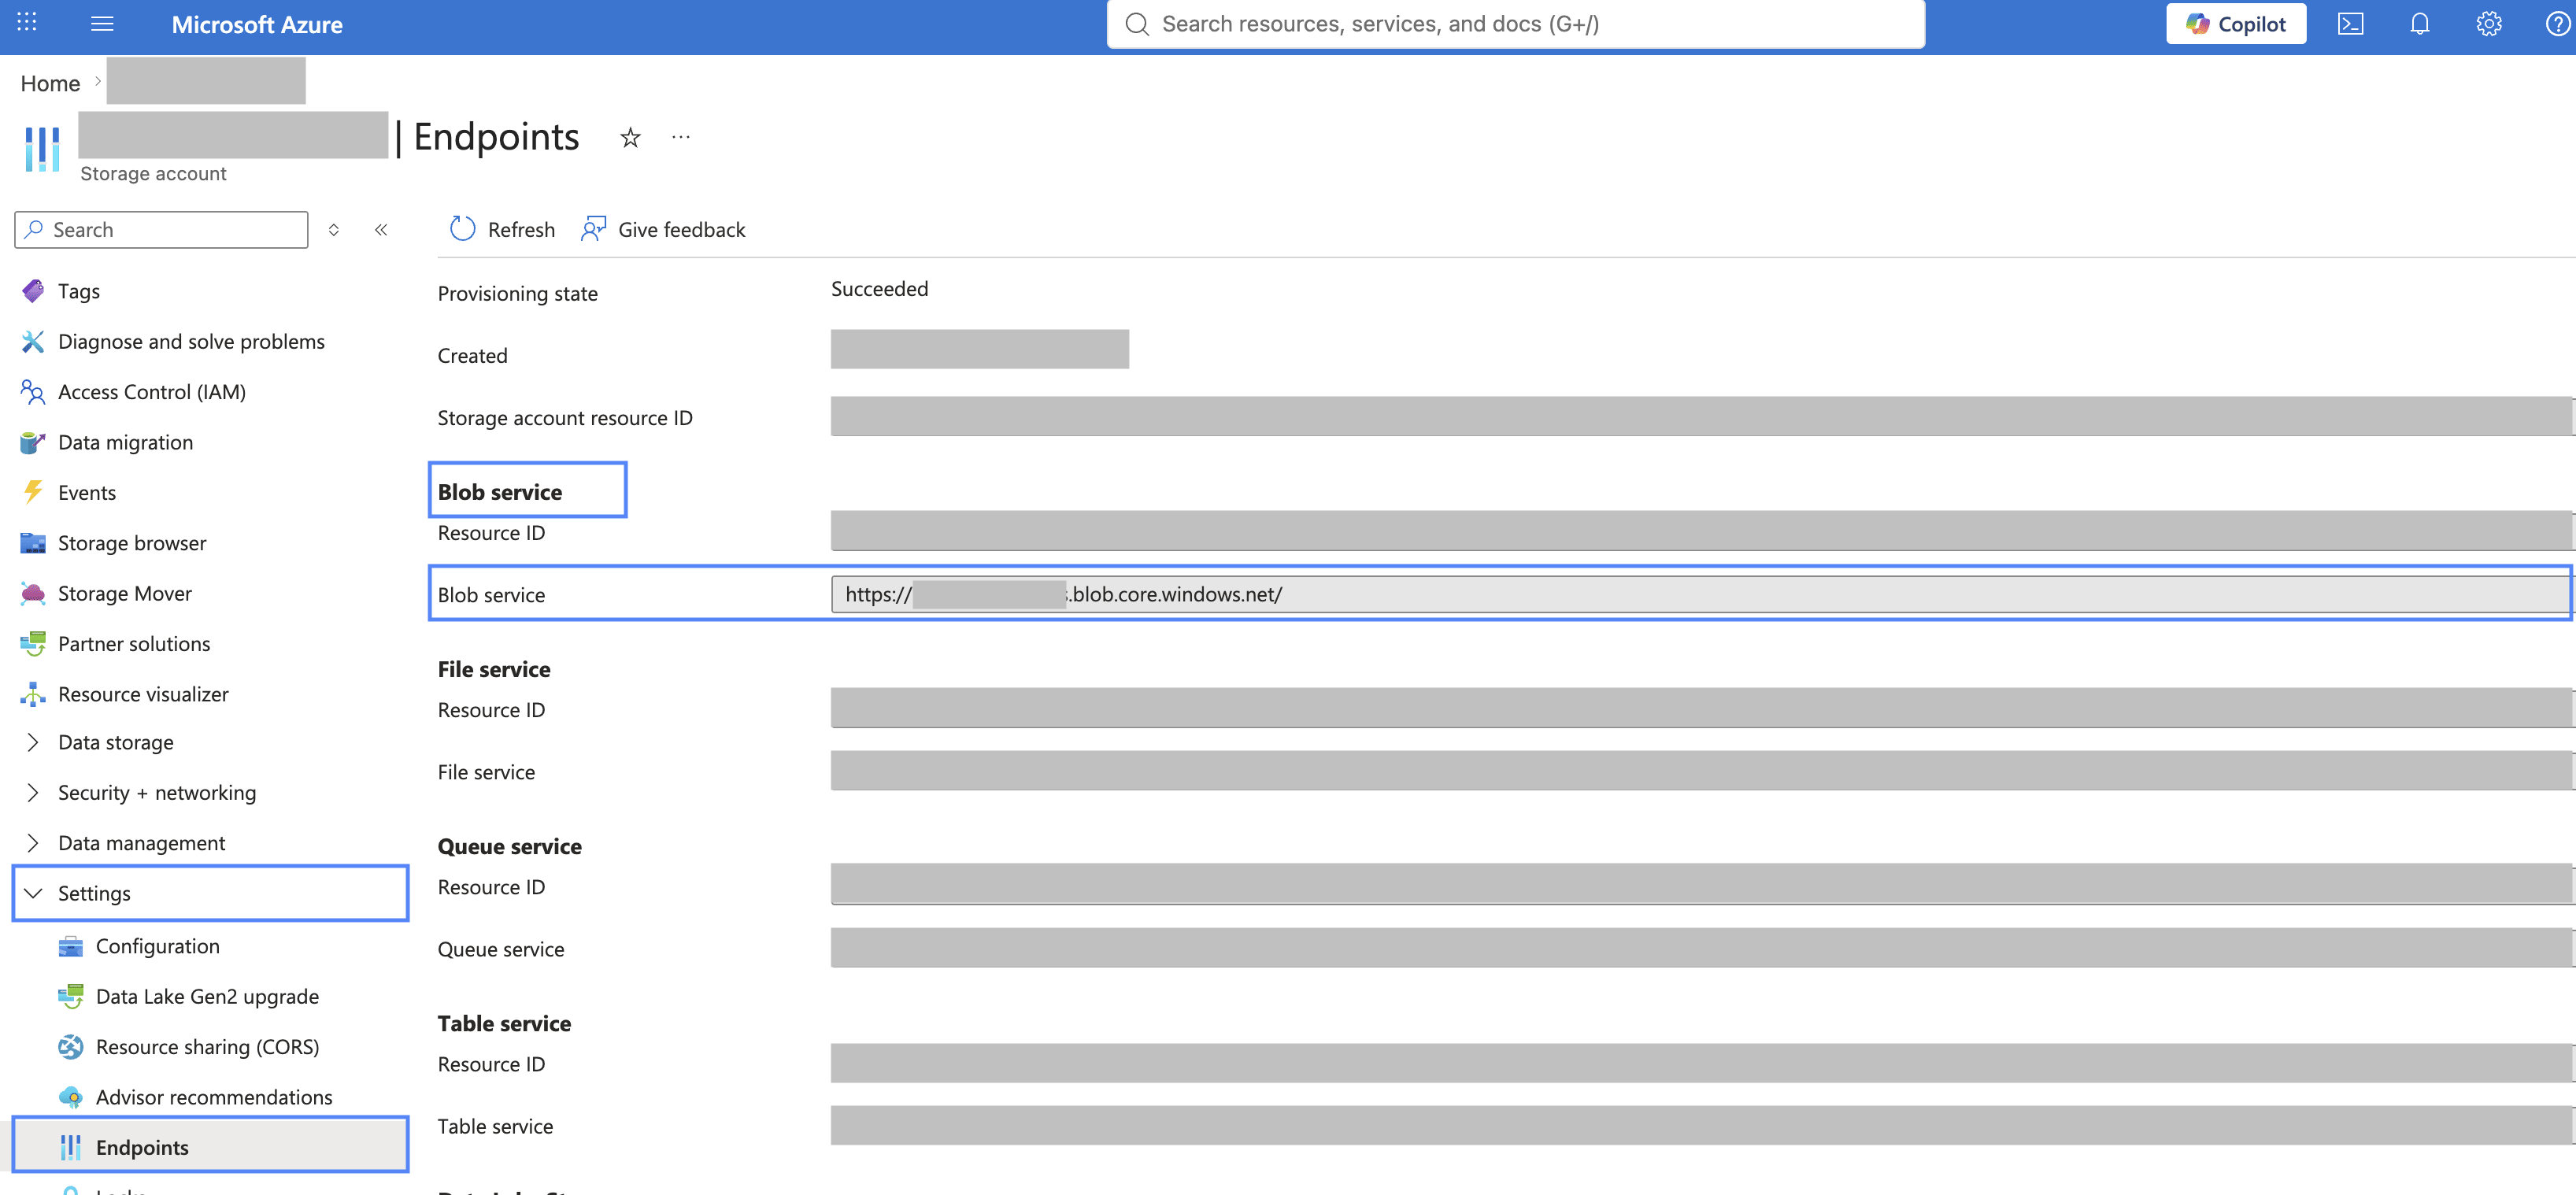
Certificate service principal authentication supports the public Azure cloud only. Your blob endpoint must end in .blob.core.windows.net.
Step 6: Set up Currents
Braze needs a single PEM file containing your certificate and its unencrypted private key. If you generated a new certificate in Step 2, combine the two files into one:
cat cert.pem key.pem > braze-currents.pem
If you converted an existing .pfx in Step 2, you already have this braze-currents.pem file.
In Braze, navigate to Currents > + Create Current > Azure Blob Data Export, then provide your integration name and contact email.
Provide a contact email for integration error notifications. Braze sends notifications to this address if the integration encounters errors, such as credential issues or connectivity problems. To help ensure the right people receive alerts, use a distribution list or group email address.
For Credentials, select Certificate Service Principal and provide the following:
| Field | Value |
|---|---|
| Tenant ID | The Directory (tenant) ID from Step 1. |
| Client ID | The Application (client) ID from Step 1. |
| Account Endpoint | The Blob service endpoint from Step 5. |
| Certificate | The braze-currents.pem file containing your certificate and its unencrypted private key. |
| Container Name | The name of your blob container. |
| Prefix | Optional. A path prefix for your exported data within the container. |
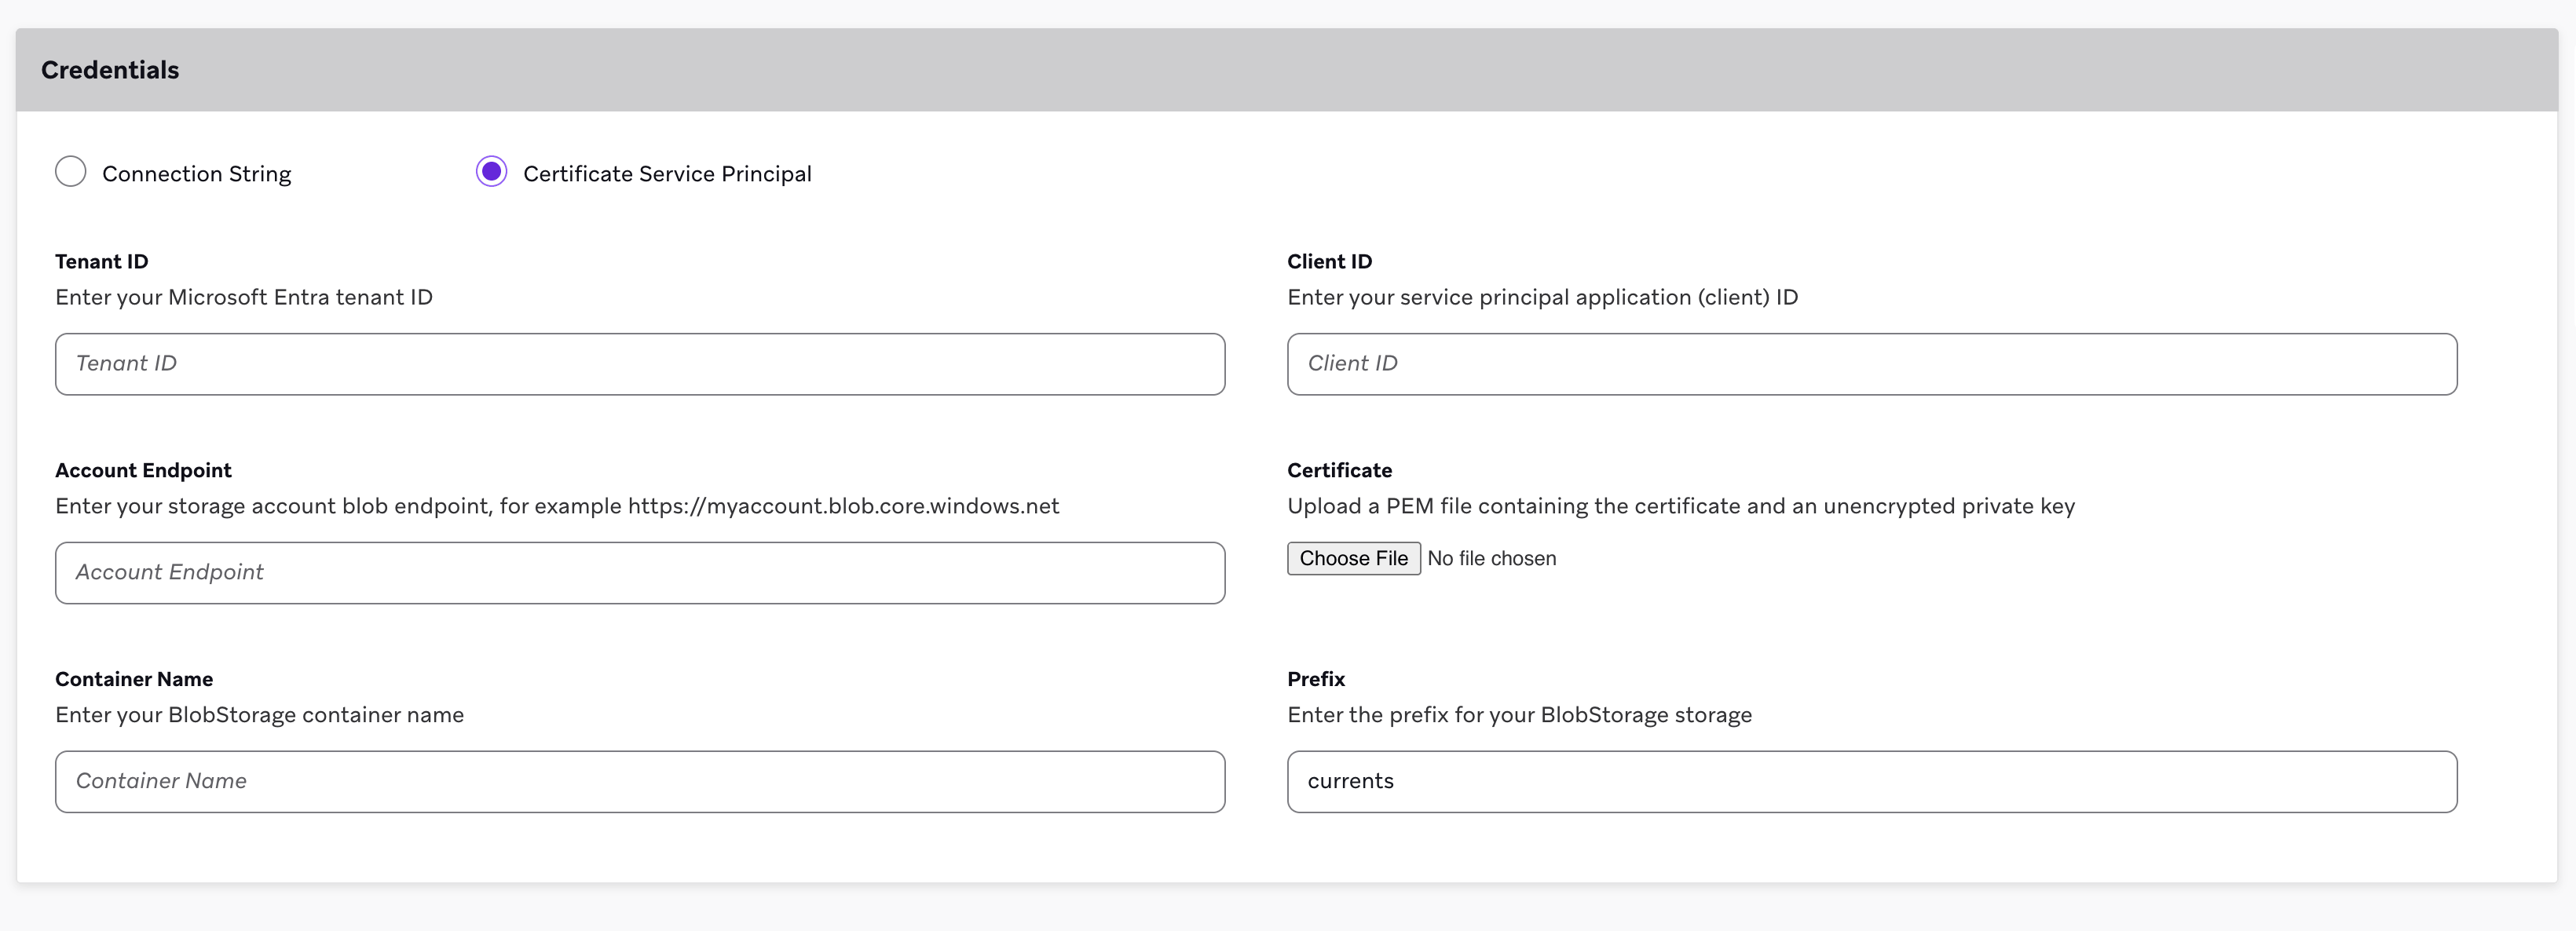
When you save, Braze validates the credentials you enter.
Finally, scroll to the bottom of the page and select which message engagement events or customer behavior events you’d like to export. When completed, launch your Current.
Updating Azure credentials for Currents
You can update the Azure credentials on an existing Braze Currents connector without stopping the integration or losing data already exported to your container.
To refresh credentials—or to switch between the Connection String and Certificate Service Principal methods—finish the Azure-side steps for your chosen method earlier in this article. Then, in Braze, go to Currents, locate your Azure Blob connector in the list, select Edit Current, update Credentials, and select Update Current. Braze validates the credentials you enter; your connector keeps running and data already in your container remains available. For more information, see Updating Currents in Set up Currents.
It’s important to keep your certificate up to date. If your certificate expires, the connector stops sending events until you provide a valid certificate, and a prolonged interruption can result in data loss.
Export behavior
Users that have integrated a cloud data storage solution, and are trying to export APIs, dashboard reports, or CSV reports will experience the following:
- All API exports will not return a download URL in the response body and must be retrieved through data storage.
- All dashboard reports and CSV reports will be sent to the user’s email for download (no storage permissions required) and backed up on data storage.
JSON format requirement: For JSON exports, Braze uses JSONL (newline-delimited JSON) format, where each line contains a separate JSON object. This format differs from standard JSON, which is a single JSON array or object. Each line in the exported file is a valid JSON object, but the file as a whole is not a single valid JSON document. When processing these files, parse each line individually as a separate JSON object rather than attempting to parse the entire file as a single JSON document.
Currents exports use Apache Avro format (.avro files), not JSON. This JSON format requirement applies to dashboard data exports and API exports that use JSON format.
FAQ
Can Braze provide IP addresses to allowlist for Azure Blob storage?
Braze doesn’t publish a fixed IP allowlist for Currents or dashboard exports to Azure Blob storage. Braze writes to your container using the credentials and container name you provide, and Azure controls network access through your storage account settings (for example, firewall rules on the storage account or private endpoints).
If your security team requires IP-based restrictions, use Azure networking features on your storage account rather than an IP list from Braze. For setup steps, see Microsoft’s documentation on securing Azure Storage.