Content Cardsを作成する
この記事では、カスタムContent Cardsを実装する際に使用する基本的なアプローチと、3つの一般的なユースケースについて説明します。Content Cardsカスタマイズガイドの他の記事をすでに読んで、デフォルトでできることとカスタムコードが必要なことを理解していることを前提としています。特に、カスタムContent Cardsの分析を記録する方法を理解しておくと役立ちます。

カードの作成
ステップ1: カスタムUIを作成する
まず、カードのレンダリングに使用するカスタムHTMLコンポーネントを作成します。
まず、独自のカスタムフラグメントを作成します。デフォルトの ContentCardsFragment はデフォルトのContent Cardsタイプのみを処理するように設計されていますが、良い出発点になります。
まず、独自のカスタムビューコントローラコンポーネントを作成します。デフォルトの BrazeContentCardUI.ViewController はデフォルトのContent Cardsタイプのみを処理するように設計されていますが、良い出発点になります。
ステップ2: カードの更新を購読する
カードが更新されたときにデータ更新を購読するためのコールバック関数を登録します。Content Cardsオブジェクトを解析し、title、cardDescription、imageUrl などのペイロードデータを抽出してから、結果のモデルデータを使用してカスタムUIを表示できます。
Content Cardsのデータモデルを取得するには、Content Cardsの更新を購読します。以下のプロパティに特に注意してください。
id: Content CardsのID文字列を表します。カスタムContent Cardsから分析をログに記録するために使用される一意の識別子です。extras: Brazeダッシュボードからのすべてのキーと値のペアを包含します。
id と extras 以外のすべてのプロパティは、カスタムContent Cardsでは解析が任意です。データモデルの詳細については、各プラットフォームのインテグレーション記事を参照してください。Android、iOS、Web。
subscribeToContentCardsEvents を使用してContent Cardsイベントを受信します。SDKはイベントオブジェクトを使ってハンドラーを呼び出します。event.type で分岐して各種イベントを処理します。イベント値の詳細については、イベント購読を参照してください。
import * as braze from "@braze/web-sdk";
function renderCards(cards) {
// For example:
cards.forEach(card => {
if (card.isControl) {
// Do not display the control card, but remember to call `logContentCardImpressions([card])`
}
else if (card instanceof braze.ClassicCard || card instanceof braze.CaptionedImage) {
// Use `card.title`, `card.imageUrl`, etc.
}
else if (card instanceof braze.ImageOnly) {
// Use `card.imageUrl`, etc.
}
});
}
// - Available in version 7.0.0+
const subscriptionId = braze.subscribeToContentCardsEvents((event) => {
switch (event.type) {
case braze.ChannelEventType.CACHE_REPLAY:
// Sent once, right away, with the cards that are already cached.
// Render them now instead of waiting for the network.
renderCards(event.cacheSnapshot.contentCards.cards);
break;
case braze.ChannelEventType.CACHE_LOAD:
// The cache changed without a refresh, such as after changeUser().
// The snapshot can be empty, so clear cards from the previous user.
renderCards(event.cacheSnapshot.contentCards.cards);
break;
case braze.ChannelEventType.DATA_UPDATED:
// A refresh finished, even if no cards changed, or a card was dismissed.
renderCards(event.cacheSnapshot.contentCards.cards);
break;
case braze.ChannelEventType.ERROR:
switch (event.retryState) {
case braze.RetryState.SDK_WILL_RETRY:
// The SDK is retrying. Keep the current cards and wait.
break;
case braze.RetryState.INTEGRATOR_MAY_RETRY: {
// The SDK stopped retrying. Try again later, and limit how often you retry.
const delayMs = event.rateLimitedUntil
? Math.max(event.rateLimitedUntil.getTime() - Date.now(), 0)
: 30000;
setTimeout(() => braze.requestContentCardsRefresh(), delayMs);
break;
}
case braze.RetryState.DO_NOT_RETRY:
// The failure is final. For example, Content Cards are disabled for this workspace.
if (event.reason === braze.ChannelErrorReason.FEATURE_DISABLED) {
// Hide your Content Cards UI.
}
break;
}
break;
}
});
const deprecatedSubscriptionId = braze.subscribeToContentCardsUpdates((updates) => {
renderCards(updates.cards);
});
braze.openSession();
// Remove the subscription when you no longer need it
// braze.removeSubscription(subscriptionId);

Content Cardsは、openSession() の前に subscribeToContentCardsEvents()(または非推奨の subscribeToContentCardsUpdates())を呼び出した場合にのみ、セッション開始時に更新されます。いつでも手動でフィードを更新することもできます。
各イベントがいつ発火するか、各更新理由、リトライ状態、分析アクション、エラー理由の意味については、イベント購読を参照してください。
Web SDK 7.0.0以降では subscribeToContentCardsEvents を使用してください。subscribeToContentCardsUpdates は以前のパターンで、7.0.0で非推奨になりました。以前のパターンは現在のカードのみを配信するため、カードが変更された理由や更新が失敗したタイミングを知ることができません。
ステップ2a: プライベートサブスクライバー変数を作成する
カードの更新を購読するには、まずカスタムクラスでサブスクライバーを保持するためのプライベート変数を宣言します。
// - Available in version 44.0.0+
private IEventSubscriber<ContentCardsEvent> mContentCardsEventSubscriber;
private IEventSubscriber<ContentCardsUpdatedEvent> mContentCardsUpdatedSubscriber;
ステップ2b: イベントを購読する
subscribeToContentCardsEvents() で購読するための以下のコードを追加します。通常はカスタムContent CardsアクティビティのActivity.onCreate() 内で行います。必要な ContentCardsEvent サブクラスでパターンマッチングを行います。
// - Available in version 44.0.0+
// Remove the previous subscriber before rebuilding a new one with our new activity.
Braze.getInstance(context).removeSingleSubscription(mContentCardsEventSubscriber, ContentCardsEvent.class);
mContentCardsEventSubscriber = new IEventSubscriber<ContentCardsEvent>() {
@Override
public void trigger(ContentCardsEvent event) {
if (event instanceof ContentCardsEvent.CacheReplay) {
handleCards(((ContentCardsEvent.CacheReplay) event).getCacheSnapshot());
} else if (event instanceof ContentCardsEvent.CacheLoad) {
handleCards(((ContentCardsEvent.CacheLoad) event).getCacheSnapshot());
} else if (event instanceof ContentCardsEvent.DataUpdated) {
handleCards(((ContentCardsEvent.DataUpdated) event).getCacheSnapshot());
}
}
};
Braze.getInstance(context).subscribeToContentCardsEvents(mContentCardsEventSubscriber);
Braze.getInstance(context).requestContentCardsRefresh();
// Remove the previous subscriber before rebuilding a new one with our new activity.
Braze.getInstance(context).removeSingleSubscription(mContentCardsUpdatedSubscriber, ContentCardsUpdatedEvent.class);
mContentCardsUpdatedSubscriber = new IEventSubscriber<ContentCardsUpdatedEvent>() {
@Override
public void trigger(ContentCardsUpdatedEvent event) {
List<Card> allCards = event.getAllCards();
}
};
Braze.getInstance(context).subscribeToContentCardsUpdates(mContentCardsUpdatedSubscriber);
Braze.getInstance(context).requestContentCardsRefresh();
private void handleCards(ContentCardsCacheSnapshot cacheSnapshot) {
List<Card> allCards = cacheSnapshot.getCards();
}
イベントはバックグラウンドスレッドで到着します。ビューを更新する前にメインスレッドに切り替えてください。
ステップ2c: 購読を解除する
カスタムアクティビティがビューから外れたときに購読を解除します。アクティビティの onDestroy() ライフサイクルメソッドに以下のコードを追加してください。
// - Available in version 44.0.0+
Braze.getInstance(context).removeSingleSubscription(mContentCardsEventSubscriber, ContentCardsEvent.class);
Braze.getInstance(context).removeSingleSubscription(mContentCardsUpdatedSubscriber, ContentCardsUpdatedEvent.class);
ステップ2a: プライベートサブスクライバー変数を作成する
カードイベントを購読するには、まずカスタムクラスでサブスクライバーを保持するためのプライベート変数を宣言します。
// - Available in version 44.0.0+
private var contentCardsEventSubscriber: IEventSubscriber<ContentCardsEvent>? = null
private var contentCardsUpdatedSubscriber: IEventSubscriber<ContentCardsUpdatedEvent>? = null
ステップ2b: イベントを購読する
subscribeToContentCardsEvents() で購読するための以下のコードを追加します。通常はカスタムContent CardsアクティビティのActivity.onCreate() 内で行います。必要な ContentCardsEvent サブクラスでパターンマッチングを行います。
// - Available in version 44.0.0+
// Remove the previous subscriber before rebuilding a new one with our new activity.
Braze.getInstance(context).removeSingleSubscription(contentCardsEventSubscriber, ContentCardsEvent::class.java)
contentCardsEventSubscriber = IEventSubscriber { event ->
when (event) {
is ContentCardsEvent.CacheReplay -> handleCards(event.cacheSnapshot)
is ContentCardsEvent.CacheLoad -> handleCards(event.cacheSnapshot)
is ContentCardsEvent.DataUpdated -> handleCards(event.cacheSnapshot)
else -> {}
}
}
Braze.getInstance(context).subscribeToContentCardsEvents(contentCardsEventSubscriber)
Braze.getInstance(context).requestContentCardsRefresh()
// Remove the previous subscriber before rebuilding a new one with our new activity.
Braze.getInstance(context).removeSingleSubscription(contentCardsUpdatedSubscriber, ContentCardsUpdatedEvent::class.java)
contentCardsUpdatedSubscriber = IEventSubscriber { event ->
val allCards = event.allCards
}
Braze.getInstance(context).subscribeToContentCardsUpdates(contentCardsUpdatedSubscriber)
Braze.getInstance(context).requestContentCardsRefresh()
private fun handleCards(cacheSnapshot: ContentCardsCacheSnapshot) {
val allCards = cacheSnapshot.cards
}
イベントはバックグラウンドスレッドで到着します。ビューを更新する前にメインスレッドに切り替えてください。
ステップ2c: 購読を解除する
カスタムアクティビティがビューから外れたときに購読を解除します。アクティビティの onDestroy() ライフサイクルメソッドに以下のコードを追加してください。
// - Available in version 44.0.0+
Braze.getInstance(context).removeSingleSubscription(contentCardsEventSubscriber, ContentCardsEvent::class.java)
Braze.getInstance(context).removeSingleSubscription(contentCardsUpdatedSubscriber, ContentCardsUpdatedEvent::class.java)
各イベントがいつ発火するか、各更新理由、リトライ状態、分析アクション、エラー理由の意味については、イベント購読を参照してください。
Android SDK 44.0.0以降では subscribeToContentCardsEvents を使用してください。subscribeToContentCardsUpdates は以前のパターンで、44.0.0で非推奨になりました。
Content Cardsのデータモデルにアクセスするには、braze インスタンスで contentCards.cards を呼び出します。
let cards: [Braze.ContentCard] = AppDelegate.braze?.contentCards.cards
さらに、Content Cardsイベントを購読してキャッシュの変更、分析、エラーを監視できます。以下の2つの方法があります。
- キャンセル可能オブジェクトを保持する方法、または
AsyncStreamを保持する方法。
キャンセル可能オブジェクト
// - Available in version 19.0.0+
// This subscription is maintained through a Braze cancellable, which will observe for events until the subscription is cancelled.
// You must keep a strong reference to the cancellable to keep the subscription active.
// The subscription is canceled either when the cancellable is deinitialized or when you call its `.cancel()` method.
let cancellable = AppDelegate.braze?.contentCards.subscribeToEvents { [weak self] event in
switch event {
case .cacheReplay(let cacheSnapshot):
// Initial cache snapshot, delivered immediately after subscribing
break
case .cacheLoad(let cacheSnapshot):
// Cache loaded at the start of a user session (for example, after `changeUser()`)
break
case .dataUpdated(let cacheSnapshot, let reason):
// Cache changed after the initial replay
break
case .impressionEvent(let card, let action):
break
case .clickEvent(let card, let action):
break
case .dismissEvent(let card, let action):
break
case .error(let reason, let retryState):
break
}
}
let cancellable = AppDelegate.braze?.contentCards.subscribeToUpdates { [weak self] contentCards in
// Implement your completion handler to respond to updates in `contentCards`.
}
AsyncStream
// - Available in version 19.0.0+
Task {
for await event in AppDelegate.braze?.contentCards.eventsStream ?? AsyncStream { _ in } {
// Same switch statement as the cancellable example above.
}
}
let stream: AsyncStream<[Braze.ContentCard]> = AppDelegate.braze?.contentCards.cardsStream
Swift SDK 19.0.0以降では subscribeToEvents(_:) または eventsStream を使用してください。subscribeToUpdates(_:) と cardsStream は以前のパターンで、19.0.0で非推奨になりました。
NSArray<BRZContentCardRaw *> *contentCards = AppDelegate.braze.contentCards.cards;
さらに、Content Cardsイベントを購読したい場合は、subscribeToEvents: を呼び出せます。各イベントタイプはそれぞれのクラスにブリッジされます(例: BRZContentCardsDataUpdatedEvent)。isKindOfClass: で判別できます。初回のキャッシュリプレイとその後のデータ更新はどちらも BRZContentCardsDataUpdatedEvent にブリッジされます。reason を BRZContentCardsDataUpdatedEvent.cacheReplayReason と比較して区別してください。
// - Available in version 19.0.0+
// This subscription is maintained through a Braze cancellable, which will continue to observe for events until the subscription is cancelled.
BRZCancellable *cancellable = [self.braze.contentCards subscribeToEvents:^(BRZContentCardsEvent *event) {
if ([event isKindOfClass:[BRZContentCardsDataUpdatedEvent class]]) {
BRZContentCardsDataUpdatedEvent *updated = (BRZContentCardsDataUpdatedEvent *)event;
if (updated.reason == BRZContentCardsDataUpdatedEvent.cacheReplayReason) {
// Initial cache snapshot, delivered immediately after subscribing
} else {
// Cache changed after the initial replay
}
} else if ([event isKindOfClass:[BRZContentCardsCacheLoadEvent class]]) {
// Cache loaded at the start of a user session (for example, after `changeUser()`)
}
}];
BRZCancellable *cancellable = [self.braze.contentCards subscribeToUpdates:^(NSArray<BRZContentCardRaw *> *contentCards) {
// Implement your completion handler to respond to updates in `contentCards`.
}];
Swift SDK 19.0.0以降では subscribeToEvents: を使用してください。subscribeToUpdates: は以前のパターンで、19.0.0で非推奨になりました。
各イベントがいつ発火するか、各更新理由、リトライ状態、分析アクション、エラー理由の意味については、イベント購読を参照してください。
ステップ3: 分析を実装する
Content Cardsのインプレッション、クリック、閉じるアクションは、カスタムビューでは自動的にログに記録されません。すべての指標をBrazeダッシュボードの分析に正しくログ記録するには、それぞれのメソッドを実装する必要があります。
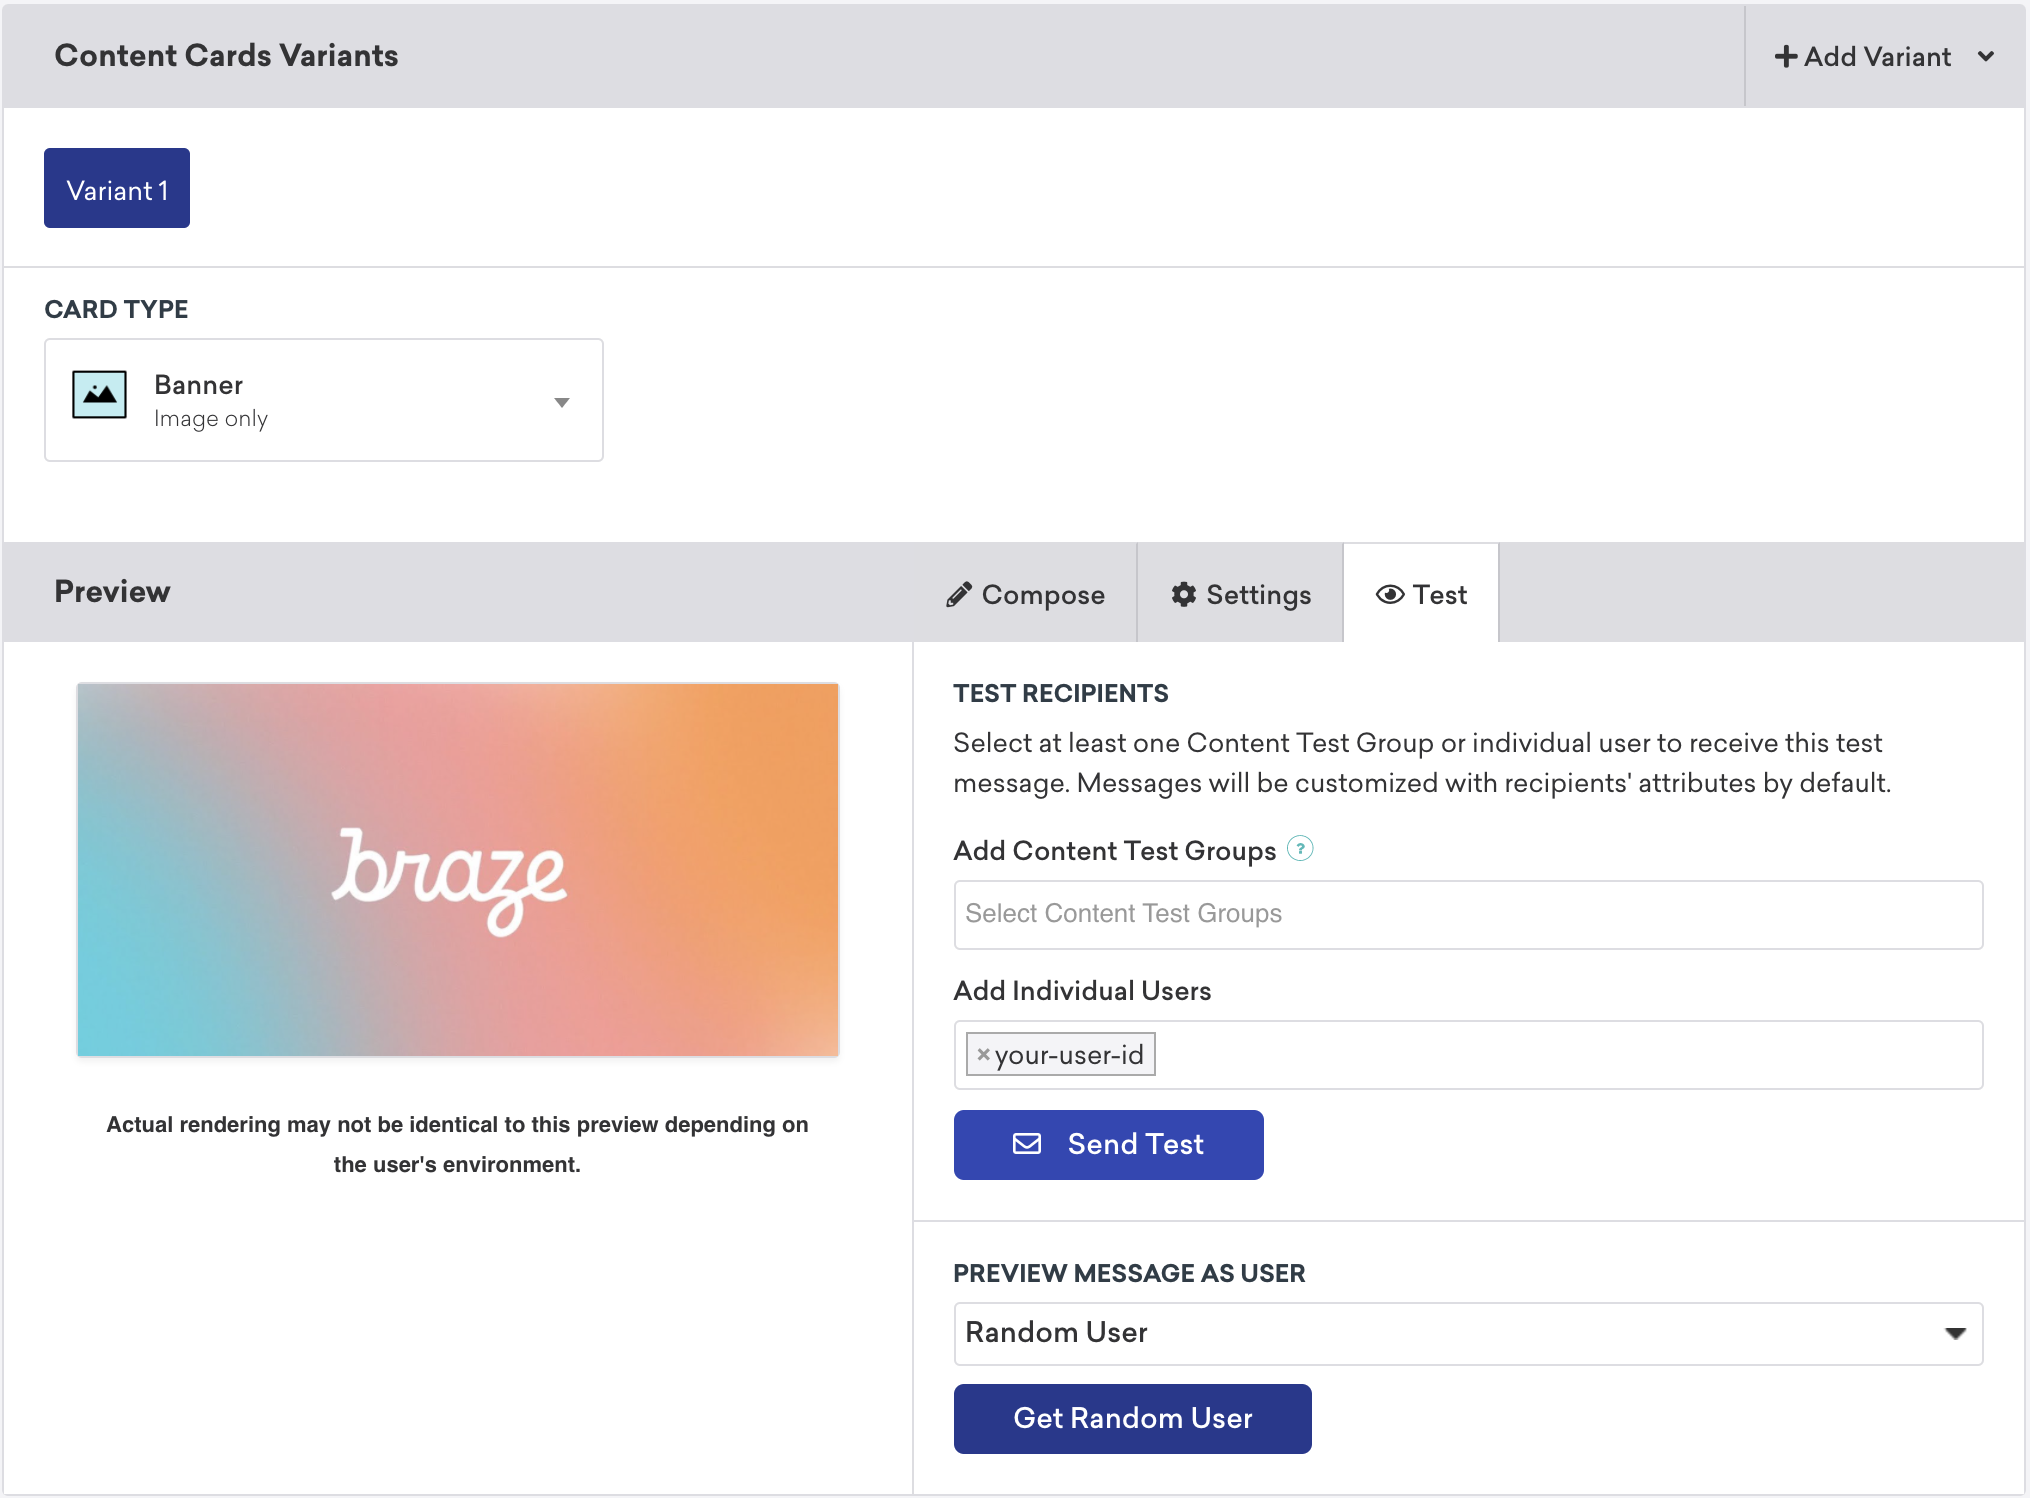
ステップ4: カードをテストする(任意)
Content Cardsをテストするには:
changeUser()メソッドを呼び出して、アプリケーションでアクティブユーザーを設定します。- Brazeでキャンペーンに移動し、新しいContent Cardsキャンペーンを作成します。
- キャンペーンでテストを選択し、テストユーザーの
user-idを入力します。準備ができたら、テスト送信を選択します。すぐにデバイスでContent Cardsを起動できるようになります。
Content Cardsの配置
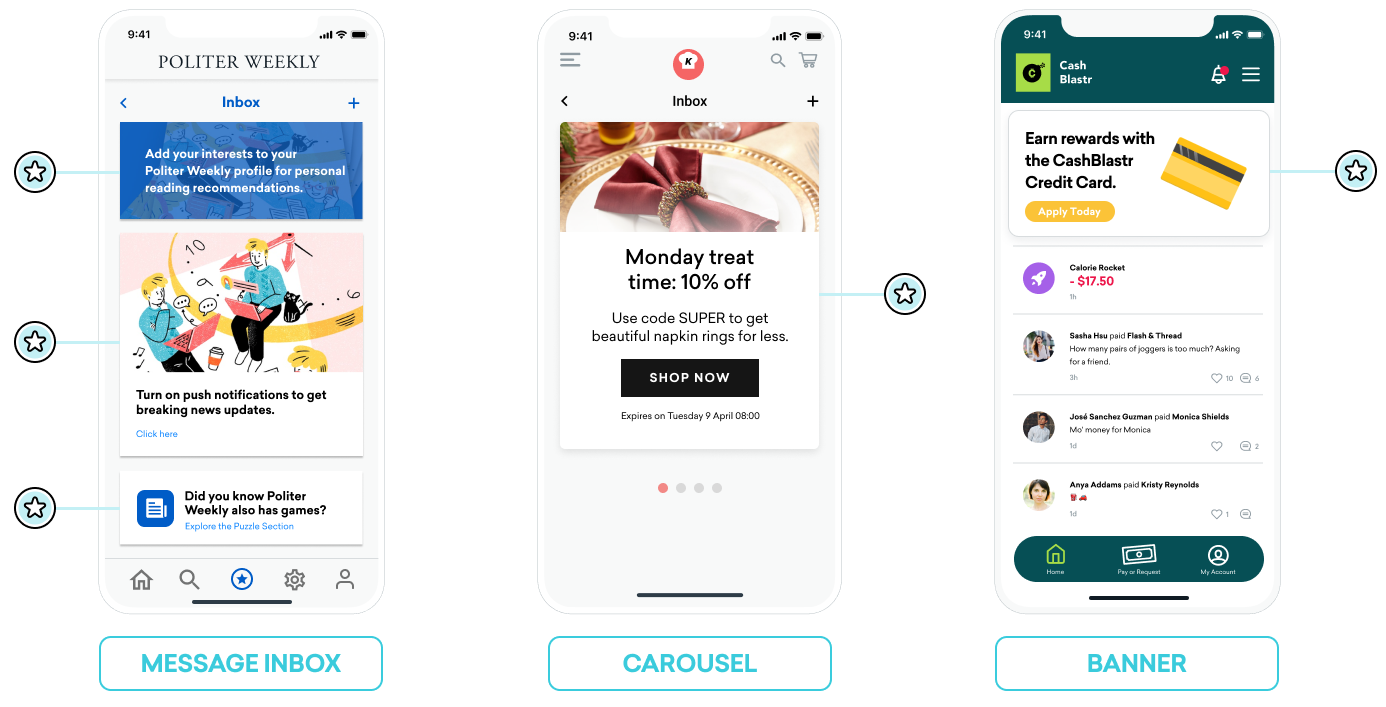
Content Cardsはさまざまな方法で使用できます。一般的な実装として、メッセージセンター、ダイナミック画像広告、画像カルーセルの3つがあります。これらの配置のそれぞれについて、Content Cardsにキーと値のペア(データモデルのextrasプロパティ)を割り当て、その値に基づいて、実行時にカードの動作、外観、または機能をダイナミックに調整します。
メッセージ受信トレイ
Content Cardsを使用してメッセージセンターをシミュレートできます。この形式では、各メッセージが独自のカードとなり、クリックイベントを制御するキーと値のペアを含んでいます。これらのキーと値のペアは、ユーザーが受信トレイのメッセージをクリックしたときにどこに遷移するかをアプリケーションが判断するために参照するキー識別子です。キーと値のペアの値は任意です。
例
たとえば、読書のおすすめを有効にするよう促すカードと、新規購読者セグメントに付与するクーポンコードの2つのメッセージカードを作成するとします。
body、title、buttonTextのようなキーは、マーケターが設定できるシンプルな文字列値を持つことができます。termsのようなキーは、法務部門が承認した短いフレーズのコレクションを提供する値を持つことができます。styleやclass_typeのようなキーは、アプリやサイトでカードがどのようにレンダリングされるかを決定するために設定できる文字列値を持ちます。
読書のおすすめカードのキーと値のペア:
| キー | 値 |
|---|---|
body |
Add your interests to your Politer Weekly profile for personal reading recommendations. |
style |
info |
class_type |
notification_center |
card_priority |
1 |
新規購読者クーポンのキーと値のペア:
| キー | 値 |
|---|---|
title |
Subscribe for unlimited games |
body |
End of Summer Special - Enjoy 10% off Politer games |
buttonText |
Subscribe Now |
style |
promo |
class_type |
notification_center |
card_priority |
2 |
terms |
new_subscribers_only |
追加情報(Android)
AndroidおよびFireOS SDKでは、メッセージセンターのロジックはBrazeからのキーと値のペアによって提供されるclass_type値によって駆動されます。createContentCardableメソッドを使用すると、これらのクラスタイプをフィルターおよび識別できます。
クリック時の動作にclass_typeを使用する
Content Cardsのデータをカスタムクラスにインフレートする際、データのContentCardClassプロパティを使用して、データの格納に使用する具象サブクラスを決定します。
private fun createContentCardable(metadata: Map<String, Any>, type: ContentCardClass?): ContentCardable?{
return when(type){
ContentCardClass.AD -> Ad(metadata)
ContentCardClass.MESSAGE_WEB_VIEW -> WebViewMessage(metadata)
ContentCardClass.NOTIFICATION_CENTER -> FullPageMessage(metadata)
ContentCardClass.ITEM_GROUP -> Group(metadata)
ContentCardClass.ITEM_TILE -> Tile(metadata)
ContentCardClass.COUPON -> Coupon(metadata)
else -> null
}
}
次に、ユーザーとメッセージリストの操作を処理する際、メッセージのタイプを使用してユーザーに表示するビューを決定できます。
override fun onCreate(savedInstanceState: Bundle?) {
super.onCreate(savedInstanceState)
//...
listView.onItemClickListener = AdapterView.OnItemClickListener { parent, view, position, id ->
when (val card = dataProvider[position]){
is WebViewMessage -> {
val intent = Intent(this, WebViewActivity::class.java)
val bundle = Bundle()
bundle.putString(WebViewActivity.INTENT_PAYLOAD, card.contentString)
intent.putExtras(bundle)
startActivity(intent)
}
is FullPageMessage -> {
val intent = Intent(this, FullPageContentCard::class.java)
val bundle = Bundle()
bundle.putString(FullPageContentCard.CONTENT_CARD_IMAGE, card.icon)
bundle.putString(FullPageContentCard.CONTENT_CARD_TITLE, card.messageTitle)
bundle.putString(FullPageContentCard.CONTENT_CARD_DESCRIPTION, card.cardDescription)
intent.putExtras(bundle)
startActivity(intent)
}
}
}
}
クリック時の動作にclass_typeを使用する
Content Cardsのデータをカスタムクラスにインフレートする際、データのContentCardClassプロパティを使用して、データの格納に使用する具象サブクラスを決定します。
private ContentCardable createContentCardable(Map<String, ?> metadata, ContentCardClass type){
switch(type){
case ContentCardClass.AD:{
return new Ad(metadata);
}
case ContentCardClass.MESSAGE_WEB_VIEW:{
return new WebViewMessage(metadata);
}
case ContentCardClass.NOTIFICATION_CENTER:{
return new FullPageMessage(metadata);
}
case ContentCardClass.ITEM_GROUP:{
return new Group(metadata);
}
case ContentCardClass.ITEM_TILE:{
return new Tile(metadata);
}
case ContentCardClass.COUPON:{
return new Coupon(metadata);
}
default:{
return null;
}
}
}
次に、ユーザーとメッセージリストの操作を処理する際、メッセージのタイプを使用してユーザーに表示するビューを決定できます。
@Override
protected void onCreate(Bundle savedInstanceState) {
super.onCreate(savedInstanceState)
//...
listView.setOnItemClickListener(new AdapterView.OnItemClickListener() {
@Override
public void onItemClick(AdapterView<?> parent, View view, int position, long id){
ContentCardable card = dataProvider.get(position);
if (card instanceof WebViewMessage){
Bundle intent = new Intent(this, WebViewActivity.class);
Bundle bundle = new Bundle();
bundle.putString(WebViewActivity.INTENT_PAYLOAD, card.getContentString());
intent.putExtras(bundle);
startActivity(intent);
}
else if (card instanceof FullPageMessage){
Intent intent = new Intent(this, FullPageContentCard.class);
Bundle bundle = Bundle();
bundle.putString(FullPageContentCard.CONTENT_CARD_IMAGE, card.getIcon());
bundle.putString(FullPageContentCard.CONTENT_CARD_TITLE, card.getMessageTitle());
bundle.putString(FullPageContentCard.CONTENT_CARD_DESCRIPTION, card.getCardDescription());
intent.putExtras(bundle)
startActivity(intent)
}
}
});
}
カルーセル
完全にカスタムされたカルーセルフィードにContent Cardsを設定し、ユーザーがスワイプして追加の注目カードを表示できるようにすることができます。デフォルトでは、Content Cardsは作成日順(新しいものから順)にソートされ、ユーザーは対象となるすべてのカードを表示できます。
Content Cardsのカルーセルを実装するには:
- Content Cardsの変更を監視し、Content Cardsの到着を処理するカスタムロジックを作成します。
- カルーセルに一度に特定の数のカードを表示するカスタムのクライアントサイドロジックを作成します。たとえば、配列から最初の5つのContent Cardsオブジェクトを選択したり、キーと値のペアを導入して条件ロジックを構築したりできます。
画像のみ
Content Cardsは「カード」のように見える必要はありません。たとえば、Content Cardsはホームページや指定ページの上部に永続的に表示されるダイナミック画像として表示できます。
これを実現するには、マーケターが画像のみタイプのContent Cardsを使用してキャンペーンまたはキャンバスステップを作成します。次に、Content Cardsを補足コンテンツとして使用するために適切なキーと値のペアを設定します。