Cloudinary
Cloudinary is an image and video platform used to manage, edit, optimize, and deliver images and video at scale to any campaign across channels and customer journeys. When integrated and enabled, Cloudinary’s media management powers dynamic, contextual, and personalized asset delivery for your Braze campaigns and Canvases.
About this integration
Connecting Cloudinary to Braze gives brands access to visual media stored in Cloudinary Assets for use in Braze messaging channels. With Cloudinary’s dynamic links, you can select and customize images and videos in real time based on Braze user attributes. Together, Cloudinary and Braze support crafting visually rich, personalized campaigns that tell each product’s story and deliver one-of-a-kind experiences at scale.
This page outlines four possible, but not exhaustive, integration methods between Cloudinary and Braze. These integration methods primarily rely on modifying asset links manually copied from Cloudinary’s Media Library.

More advanced integration methods, including using Connected Content to call Cloudinary’s Admin API are possible, but the approach will vary between customers. Contact your Cloudinary and Braze customer success manager for guidance.
Prerequisites
| Requirements | Description |
|---|---|
| Cloudinary Account | A Cloudinary Account is required to take advantage of this partnership |
Integration methods

Some of these integration methods use the f_auto and q_auto Cloudinary Transformations, which offer deeper customization of the behavior and appearance for image and video assets. For more information on modifying a Cloudinary asset link to include Transformations, refer to Transformation URL structure.
Select campaign assets through Cloudinary DAM
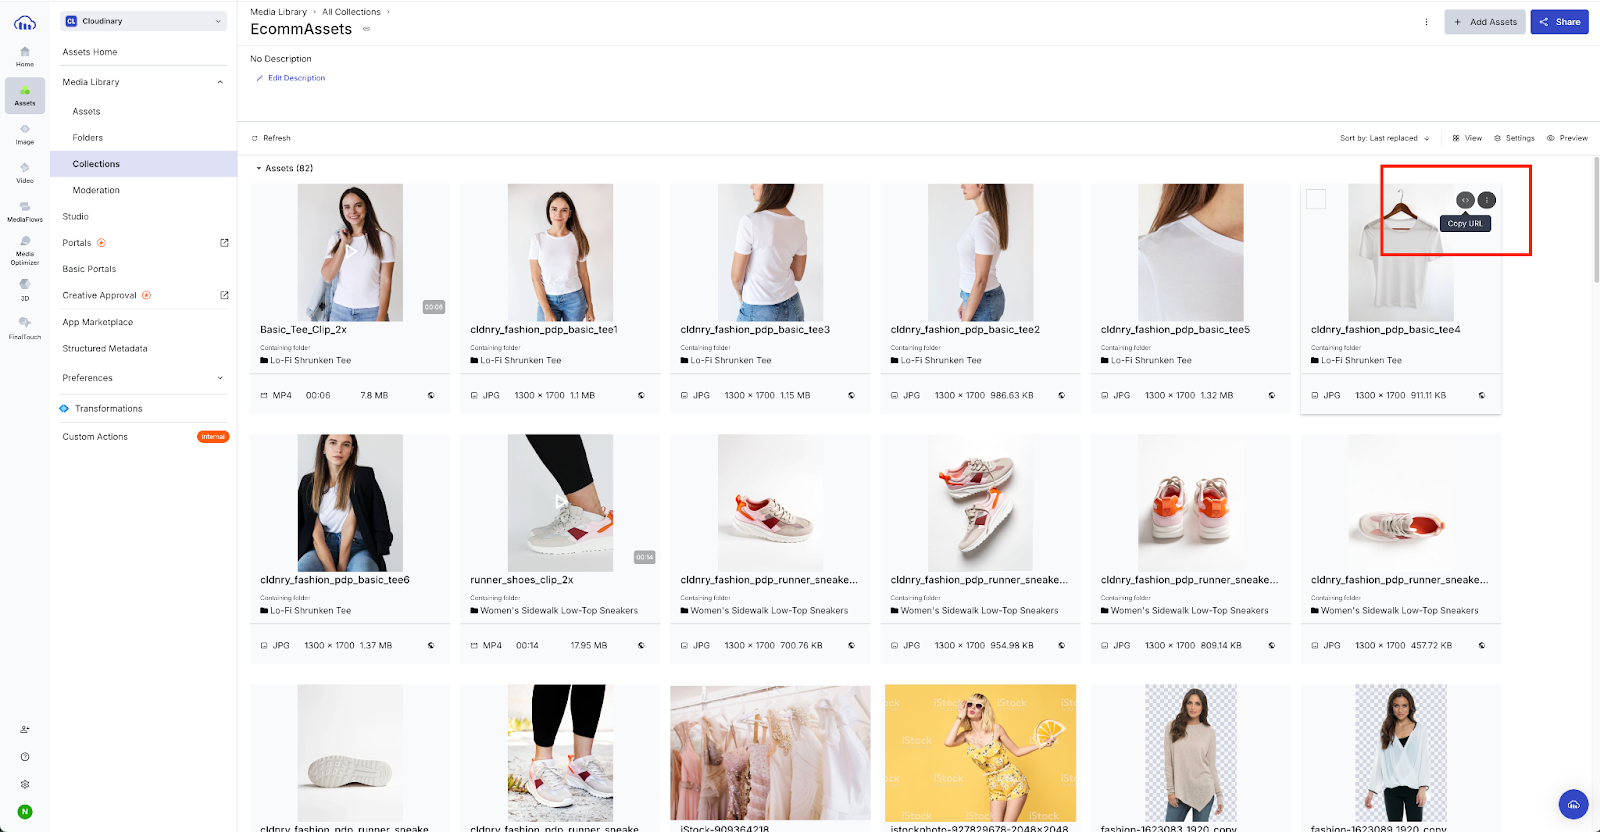
The most direct way to use images and videos directly from Cloudinary’s DAM in your Braze campaigns and Canvases is to pull the URL from the Cloudinary Media Library’s Asset page.
Images and GIFs setup
- Copy the image or GIF URL from the DAM in Cloudinary by going to Assets > Media Library > Assets > Copy URL.
- Create the image tag in HTML, then add
f_auto,q_autoto the copied URL to optimize the image or GIF.
Example image URL
1
2
<img src="https://res.cloudinary.com/demo/image/upload/v1678993440/f_auto,q_auto/cld-sample.jpg" alt="Summer Campaign">
</img>
Videos setup
- Copy the image or GIF link from the DAM in Cloudinary by going to Assets > Media Library > Assets > Copy URL.
- Create the video tag in HTML, then add
f_auto,q_autoto the copied URL to automatically optimize the format and quality of the video.
Example video URL
1
2
3
<video class="video" autoplay muted playsinline controls>
  <source src="https://res.cloudinary.com/demo/video/upload/v1651840278/f_auto,q_auto/samples/cld-sample-video.mp4">
</video>
Refer to Video for specific Android and iOS considerations.
Convert videos to GIFs for emails
Use the f_auto:animated Cloudinary Transformation to automatically convert video assets to GIFs. This is of particular value if you’re using the Braze email channel, as GIFs are optimized to reduce email payloads, which, if too high, can cause deliverability issues.
Conversion setup
- Copy the video URL from the Cloudinary DAM.
- Create the image tag and add
f_auto:animated,fl_lossyto reduce the GIF size and pick the best animated format for the client. - Add
c_scale,w_nnnto correspond to the desired GIF width in the email layout. - Add
e_loopto loop the animation.
Example GIF URL
1
https://res.cloudinary.com/demo/video/upload/c_scale,w_500,e_loop/f_auto:animated,fl_lossy/samples/cld-sample-video.gif
Dynamically select campaign assets based on targeting attributes
This integration method enables dynamic media personalization by intelligently selecting the best asset for each user based on their attributes in real time.
If you include Liquid tags as parameters in a Cloudinary link within a Braze campaign message, when the message is sent, the associated Braze attributes will dynamically replace the Liquid tags. This could be user-specific data such as language or customer tier. Cloudinary will then use those attributes to determine which campaign asset best fits that user, and automatically return the correct image or video. This results in recipients only receiving assets that are contextually relevant and brand approved.
How it works
Cloudinary organizes campaign assets using tags and Structured Metadata (SMD) to make them searchable.
Each campaign asset is grouped under a campaign tag (for example, spring_launch) and enriched with structured metadata fields that correspond to Braze attributes like language=en or tier=gold. When Braze calls the Cloudinary link, a Custom Function processes the incoming attributes, searches for the asset with matching tags and metadata, and then returns the best fitting match.
If an exact match isn’t found, the function automatically selects a fallback or “next best” option for continuity in every experience. When the asset is selected, Cloudinary’s transformation layer (for example, f_auto or q_auto) optimizes the media for delivery. This combination of tagging, metadata, and custom functions gives developers a flexible, API-driven way to automate personalized asset delivery.
Refer to Cloudinary’s braze-personalization GitHub repo for instructions on creating and applying custom functions, and an example custom function for asset selection and fallback options for a given campaign. For more guidance, contact your Cloudinary support team.
Prerequisites
To enable dynamic asset selection, Cloudinary must be able to return a set of assets based on tags and metadata. If the list delivery type is restricted, Cloudinary cannot provide the dynamic list needed for personalized asset selection in Braze campaigns.
- Unrestrict the list delivery type: Open the Security Settings in your Cloudinary Console, and clear the Resource list item under Restricted image types.
Dynamic selection setup
- Set up the tag and the metadata for assets in Cloudinary.
- Upload your custom function to the Cloudinary DAM.
- Create the Cloudinary URL for the desired tag.
- Using the tag URL as a base, add dynamic image Liquid tags to incorporate Braze attributes and the custom function.
Example URL
This example presumes that assets in Cloudinary have two defined SMD fields (“locale” and “audience”) populated with the expected values corresponding to Braze attributes. Also, assets required for the campaign have been given the “samples” tag, and the custom function segmentedBanner.js has been uploaded into the Cloudinary account.
1
2
3
4
5
6
7

// Use the appropriate Braze attributes.
{% assign audience = {{custom_attribute.${sample_audience_identifier}}} %}
{% assign locale = {{${language}}}%}

// The URL for the "samples" tag used in the campaign is https://solutions-demo-res.cloudinary.com/image/list/v1690000000/samples.json, which is the base for the dynamic image URL.
<img src="https://solutions-demo-res.cloudinary.com/image/list/f_auto,q_auto/$locale_#{locale}/$audience_!{audience}!/fn_select:js:v1700000000:segmentedBanner.js/v1690000000/campaigns/samples.json" alt="Banner">
Output URLs
- Output URL for users with audience
internaland localeen:1
https://solutions-demo-res.cloudinary.com/image/list/f_auto,q_auto/$locale_!en!/$audience_!Internal!/fn_select:js:v1700000000:segmentedBanner.js/v1690000000/samples.json
- Output URL for users with audience
externaland localees:1
https://solutions-demo-res.cloudinary.com/image/list/$locale_!es!/$audience_!External!/fn_select:js:v1700000000:segmentedBanner.js/v1690000000/samples.json
- Fallback image URL:
1
https://solutions-demo-res.cloudinary.com/image/list/$locale_!unknown!/$audience_!unknown!/fn_select:js:v1700000000:segmentedBanner.js/v1690000000/samples.json
Personalized image generation
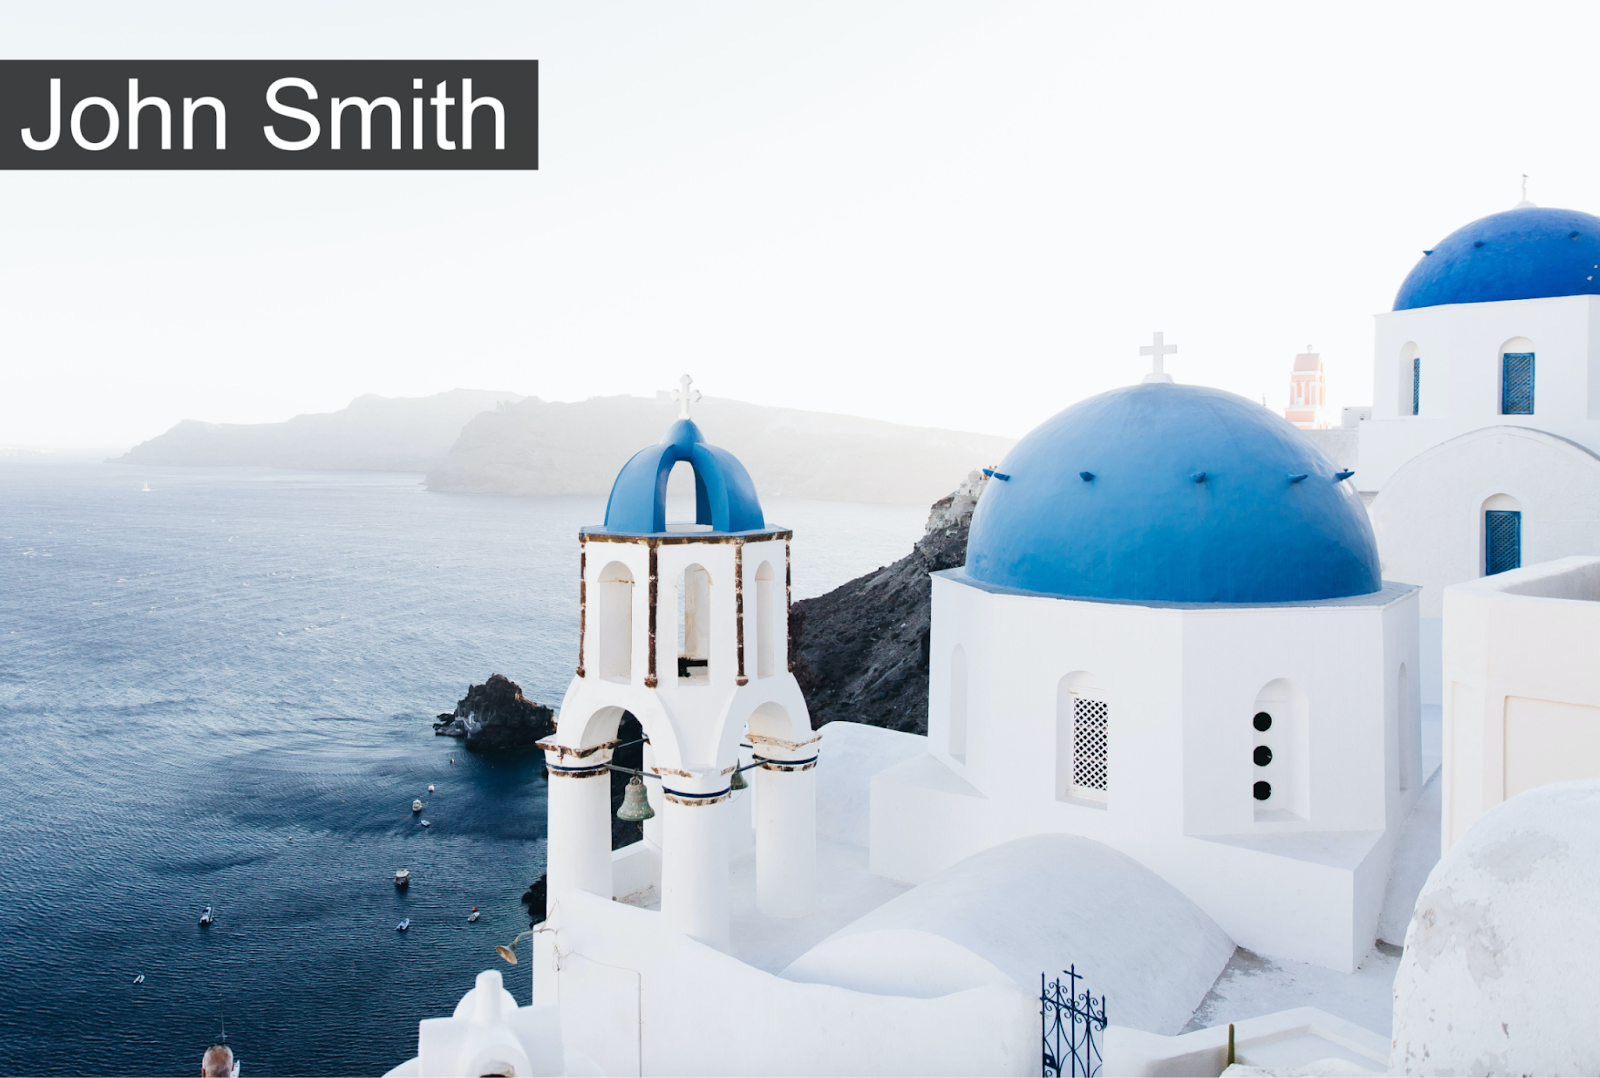
Cloudinary’s Text Overlay Transformations use user data from Braze directly within a Cloudinary asset.
The following example demonstrates how the l_text Transformation can be used to insert a user’s name onto an asset. Further customization can be achieved by leveraging Liquid tags when developing campaigns and Canvases to determine what text should populate the l_text parameters.
For more guidance on how Transformation parameters can be used to design an asset, contact your Cloudinary support team.
Example l_text Transformation
1
2
3
4
{% assign first_name = {{${first_name}}}%}
{% assign second_name = {{${last_name}}}%}

<img src="https://res.cloudinary.com/demo/image/upload/l_text:Arial_300:%20{{first_name}}%20{{second_name}}%20,co_white,b_rgb:00000080/fl_layer_apply,g_north_west,y_200/docs/white-church-europe-sea.jpg">
Example output URL
1
<img src="https://res.cloudinary.com/demo/image/upload/l_text:Arial_300:%20John%20Smith%20,co_white,b_rgb:00000080/fl_layer_apply,g_north_west,y_200/docs/white-church-europe-sea.jpg">
```