Setting up the Braze MCP server
Learn how to connect to the Braze remote MCP server, authenticate with OAuth, and start using Braze tools from your MCP client. For more information, see Braze MCP server.

The locally hosted Braze MCP server (beta) is deprecated and doesn’t receive additional updates.
Prerequisites
Before you start, make sure you have the following:
| Prerequisite | Description |
|---|---|
| Supported MCP client | Any client that supports remote MCP servers with OAuth can work. Braze has verified Claude, ChatGPT, Cursor, OpenAI Codex, Claude Code, and Visual Studio Code. |
| Approved redirect URI | A company admin must approve your client’s redirect URI in Settings > Admin Settings > OAuth. The admin can copy it from the client’s OAuth or connector settings. For more information, see Manage OAuth settings. |
| Braze dashboard account | You sign in with your normal Braze credentials, including SSO or SAML if your company uses it. There is no separate MCP login. |
| Server endpoint selection | Choose https://mcp.braze.com/mcp (US) or https://mcp.braze.eu/mcp (EU). Either endpoint can reach any Braze cluster. |
| No IP allowlisting | Customers who use IP Allowlisting cannot use the Braze MCP server at this time. |

Your agent’s access mirrors your dashboard permissions. If your dashboard access is scoped to a team rather than a full workspace, some tools may not work.
Managing access (for admins)
Before users can connect, a company admin must turn on MCP OAuth access in Settings > Admin Settings > OAuth. For more information, see Manage OAuth settings.
Grant access
Admins control access to the MCP server through the “Use MCP Server” permission. By default, users do not have this permission and it must be explicitly granted.
Revoke access
To revoke access, remove the “Use MCP Server” permission from the user. Removing dashboard permissions from a user also removes those capabilities from any connected agent on the next request.
If you think a token has been leaked or misused, a company admin can revoke every MCP OAuth token for the company at once in Settings > Admin Settings > OAuth. Every connected client loses access and all users must reconnect. For more information, see Revoke MCP OAuth tokens.
Audit usage
When a user successfully connects through OAuth, an event is logged to the security event report.
Connect your client
Step 1: Confirm permissions and workspace access
- Confirm you have the “Use MCP Server” permission, or ask your company admin to verify it for you.
- If you need access to multiple workspaces, make sure the permission is enabled for all relevant workspaces.
- Ask your company admin to confirm that your client’s redirect URI is approved in OAuth settings. If it isn’t, you can’t finish signing in to Braze in Step 3.
Step 2: Add Braze as a remote MCP connector
In your MCP client, add a new remote server or custom connector and enter your Braze MCP URL. For example, in Claude you can go to Settings > Connectors > Add custom connector and paste the URL.
No client ID, client secret, or API key is required. Your client registers itself with Braze automatically. Registration doesn’t approve the client’s redirect URI for your company, so an admin still needs to approve it as described in Step 1.
Braze MCP endpoint options:
https://mcp.braze.com/mcp(US)https://mcp.braze.eu/mcp(EU)

EU customers should use the EU endpoint. Non-EU customers can use either endpoint.
Client setup guides:
Step 3: Sign in to Braze through OAuth
The first time your agent calls a Braze tool, your client opens a browser window and sends you to Braze to sign in.
- Sign in to Braze as you normally would, including SSO if required.
- If your login can access more than one company on the same cluster, select the company you want to use.
- On the consent screen, review the access the application is requesting.
- Select the acknowledgment checkbox to agree to the Braze Privacy Policy, then select Continue to return to your MCP client.
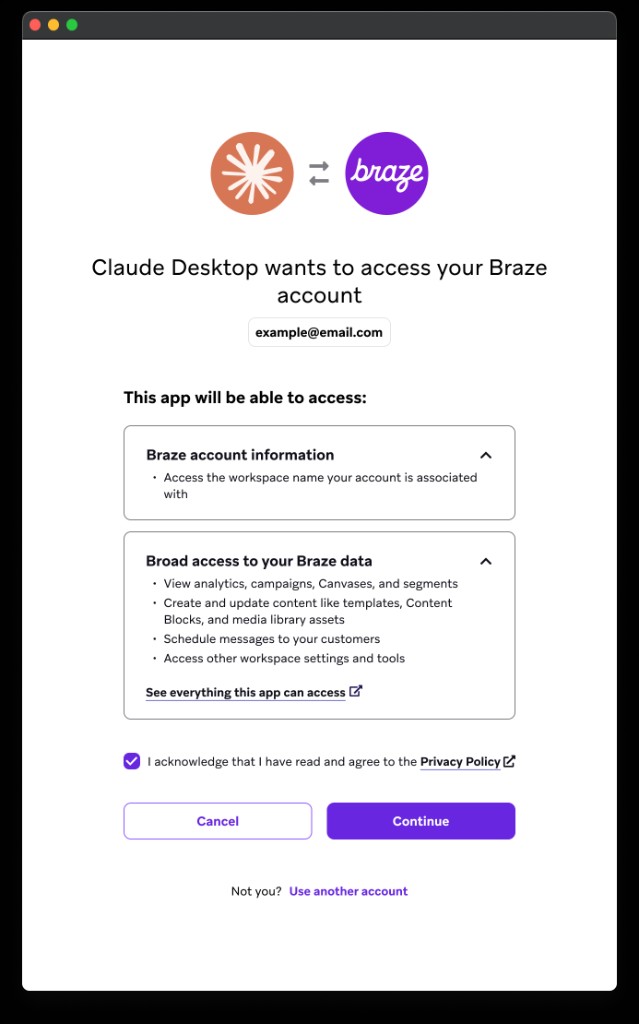
Your session uses short-lived access tokens that refresh automatically. You may occasionally need to sign in again.
Step 4: Tell your agent which workspace to use
If your account can access more than one workspace, specify the workspace in your prompt. For example:
I'd like to look at campaign analytics for the past week in the Production workspace.Can you compare this week's analytics between my prod-1 workspace and my prod-2 workspace?
If you do not specify a workspace, your agent may ask you to clarify.
Step 5: Send a test prompt
After setup, send a quick validation prompt such as:
List the Braze tools available in this workspace.Show my recent Canvases from the Production workspace.
For more examples, see Using the Braze MCP server.
Example: Connect with Claude
Connecting a client takes only a few steps. The following walkthrough uses Claude, but the flow is similar for other supported clients.
Before you start, make sure a company admin has approved your client’s redirect URI, as described in Step 1.
- In Claude, go to Settings > Connectors > Add custom connector.
- Enter a name, such as
Braze, then paste your Braze MCP URL:https://mcp.braze.com/mcpfor US orhttps://mcp.braze.eu/mcpfor EU. You don’t need a client ID, client secret, or API key. - Select Add to save the connector. Claude registers itself with Braze automatically, but this doesn’t approve its redirect URI for your company.
- Select Connect to start authentication. Claude opens a browser window and sends you to Braze to sign in.
- Sign in to Braze with your usual credentials, including SSO if your company uses it. If your login can access more than one company on the same cluster, select the company you want to use.
- On the consent screen, review the requested access, select the acknowledgment checkbox, then select Continue. Claude returns to your chat, and your agent can now use Braze tools.
To confirm the connection, send a test prompt such as Show my recent Canvases from the Production workspace.
Migrating from the local beta server
You can run the local beta server and the remote-hosted server side by side during migration. You may need to explicitly tell your agent which one to use.
The remote-hosted server includes new tools that do not exist in the local beta server. If you built skills for the local server, you may need to update those skills to reference new tool names and behavior.
After you confirm your workflows and skills are working on the remote server, disable the local-hosted server.
Troubleshooting
Authentication fails in a supported client
- Confirm your company admin has turned on MCP OAuth access in OAuth settings.
- Confirm your user has the “Use MCP Server” permission.
- Confirm your client’s redirect URI is approved. If you see “This app needs approval” or a generic error such as “An unexpected error occurred” on the consent step, ask your company admin to confirm that the redirect URI’s status is Approved in OAuth settings.
- Retry sign-in and authorization.
Authentication is blocked in an unverified client
Braze maintains an allowlist of supported client domains for security. If you connect from a client that isn’t on the allowlist, authentication may be blocked. Want support for your MCP client? Consider leaving product feedback.
Clients that run locally on your machine without a custom scheme, such as Claude Code and OpenAI Codex, should also work.
A working connection stops authenticating
If your client was connected and now fails to authenticate, your company admin may have revoked your company’s MCP OAuth tokens. Sign in to Braze through your client again to create a new connection. If sign-in still fails, confirm that MCP OAuth access is on and that you still have the “Use MCP Server” permission.
Tools don’t appear in your client
If your agent can’t list the Braze tools, wait a few minutes and try again. These issues are often temporary and resolve on their own.
Agent cannot access expected tools
- Confirm your dashboard user has the required permissions. Your agent can only use tools that match your own dashboard access.
- Confirm you selected the expected workspace in your prompt.
- Ask your agent to call
get_workspacesand verify the available workspace IDs.
Agent uses the wrong workspace
If your account can access more than one workspace, name the workspace in your prompt using the exact name shown in the Braze dashboard. If you don’t specify a workspace, your agent may ask you to clarify or use an unexpected one.
Before your agent starts work, always confirm which workspace it is using. In some cases, an agent may select a different workspace than the one you intended.
Switching to a different company
Your company is set when you first authorize. To work in a different company on the same cluster, disconnect the Braze connector in your client, re-authorize, and select the other company during sign-in.
Legal disclaimer
How instructions and responses are handled
The Braze MCP server receives instructions from your Third-Party Provider MCP client, such as Claude, ChatGPT, Copilot, Gemini CLI, Codex, or Cursor, exactly as that provider’s underlying AI model formulates them. When you type a request in natural language, the AI model interprets your request and translates it into one or more specific tool calls to Braze. Braze receives and executes the tool call as sent. Braze does not see your original natural-language prompt and cannot verify that the generated tool call fully or accurately reflects your intended request.
When Braze returns data or a result, that response is sent back to your Third-Party Provider MCP client, which then interprets, formats, and presents it to you. Braze does not control how the AI model presents, summarizes, or describes returned information.
Braze is not liable for instructions generated by, or responses conveyed through, any Third-Party Provider MCP client. Braze recommends not using “auto-mode” if your Third-Party Provider MCP client offers it for automatic action implementation. Review AI-generated summaries against source data in your Braze dashboard and review any AI-proposed action before implementing it through your Third-Party Provider MCP client.