Push notifications
Push notifications allow you to send out notifications from your app when important events occur. You might send a push notification when you have new instant messages to deliver, breaking news alerts to send, or the latest episode of your user’s favorite TV show ready for them to download for offline viewing. They are also more efficient than background fetch, as your application only launches when necessary.

If Redirect to web URL with Open web URL inside app isn’t selected, but the link still opens inside the app, the app may be handling the URL (for example, with universal links on iOS or App Links on Android). To open the link in the browser instead, confirm your app delegates the URL to the system browser when the user taps the notification, or adjust your app’s URL handling so that the click action matches the Braze dashboard setting. See your platform’s push documentation for how click actions and URL handling are configured.
This guide uses code samples from the Braze Web SDK 4.0.0+. To upgrade to the latest Web SDK version, see SDK Upgrade Guide.
Prerequisites
Before you can use this feature, you’ll need to integrate the Web Braze SDK.
Push protocols
Web push notifications are implemented using the W3C push standard, which most major browsers support. For more information on specific push protocol standards and browser support, you can review resources from Apple Mozilla and Microsoft.
Setting up push notifications
Step 1: Configure your service worker
In your project’s service-worker.js file, add the following snippet and set the manageServiceWorkerExternally initialization option to true when initializing the Web SDK.

Your web server must return a Content-Type: application/javascript when serving your service worker file. Additionally, if your service worker file is not service-worker.js named, you’ll need to use the serviceWorkerLocation initialization option.
Step 2: Register the browser
To immediately request push permissions from a user so their browser can receive push notifications, call braze.requestPushPermission(). To test if push is supported in their browser first, call braze.isPushSupported().
You can also send a soft push prompt to the user before requesting push permission to show your own push-related UI.
On macOS, both Google Chrome and Google Chrome Helper (Alerts) must be enabled by the end-user in System Settings > Notifications before push notifications can be displayed—even if permissions are granted.
Step 3: Disable skipWaiting (optional)
The Braze service worker file will automatically call skipWaiting upon install. If you’d like to disable this functionality, add the following code to your service worker file, after importing Braze:
Unsubscribing a user
To unsubscribe a user, call braze.unregisterPush().
Recent versions of Safari and Firefox require that you call this method from a short-lived event handler (such as from a button-click handler or soft push prompt). This is consistent with Chrome’s user experience best practices for push registration.
Alternate domains
To integrate web push, your domain must be secure, which generally means https, localhost, and other exceptions as defined in the W3C push standard. You’ll also need to be able to register a Service Worker at the root of your domain, or at least be able to control the HTTP headers for that file. This article covers how to integrate Braze Web Push on an alternate domain.
Use cases
If you can’t meet all of the criteria outlined in the W3C push standard, you can use this method to add a push prompt dialog to your website instead. This can be helpful if you want to let your users opt-in from an http website or a browser extension popup that’s preventing your push prompt from displaying.
Considerations
Keep in mind, like many workarounds on the web, browsers continually evolve, and this method may not be viable in the future. Before continuing, ensure that:
- You own a separate secure domain (
https://) and permissions to register a Service Worker on that domain. - Users are logged in to your website which ensures push tokens are match to the correct profile.
You cannot use this method to implement push notifications for Shopify. Shopify will automatically remove the headers need to deliver push this way.
Setting up an alternate push domain
To make the following example clear, we’ll use use http://insecure.com and https://secure.com as our two domains with the goal of getting visitors to register for push on http://insecure.com. This example could also be applied to a chrome-extension:// scheme for a browser extension’s popup page.
Step 1: Initiate prompting flow
On insecure.com, open a new window to your secure domain using a URL parameter to pass the currently logged-in user’s Braze external ID.
http://insecure.com
1
2
3
4
5
6
7
8
9
10
11
12
13
14
15
16
17
<button id="opt-in">Opt-In For Push</button>
<script>
// the same ID you would use with `braze.changeUser`:
const user_id = getUserIdSomehow();
// pass the user ID into the secure domain URL:
const secure_url = `https://secure.com/push-registration.html?external_id=${user_id}`;

// when the user takes some action, open the secure URL in a new window
document.getElementById("opt-in").onclick = function(){
    if (!window.open(secure_url, 'Opt-In to Push', 'height=500,width=600,left=150,top=150')) {
        window.alert('The popup was blocked by your browser');
    } else {
        // user is shown a popup window
        // and you can now prompt for push in this window
    }
}
</script>
Step 2: Register for push
At this point, secure.com will open a popup window in which you can initialize the Braze Web SDK for the same user ID and request the user’s permission for Web push.
https://secure.com/push-registration.html
Step 3: Communicate between domains (optional)
Now that users can opt-in from this workflow originating on insecure.com, you may want to modify your site based on if the user is already opted-in or not. There’s no point in asking the user to register for push if they already are.
You can use iFrames and the postMessage API to communicate between your two domains.
insecure.com
On our insecure.com domain, we will ask the secure domain (where push is actually registered) for information on the current user’s push registration:
1
2
3
4
5
6
7
8
9
10
11
12
13
14
15
16
<!-- Create an iframe to the secure domain and run getPushStatus onload-->
<iframe id="push-status" src="https://secure.com/push-status.html" onload="getPushStatus()" style="display:none;"></iframe>

<script>
function getPushStatus(event){
    // send a message to the iframe asking for push status
    event.target.contentWindow.postMessage({type: 'get_push_status'}, 'https://secure.com');
    // listen for a response from the iframe's domain
    window.addEventListener("message", (event) => {
        if (event.origin === "http://insecure.com" && event.data.type === 'set_push_status') {
            // update the page based on the push permission we're told
            window.alert(`Is user registered for push? ${event.data.isPushPermissionGranted}`);
        }
    }
}
</script>
secure.com/push-status.html
Frequently Asked Questions (FAQ)
Service workers
What if I can’t register a service worker in the root directory?
By default, a service worker can only be used within the same directory it is registered in. For example, if your service worker file exists in /assets/service-worker.js, it would only be possible to register it within example.com/assets/* or a subdirectory of the assets folder, but not on your homepage (example.com/). For this reason, it is recommended to host and register the service worker in the root directory (such as https://example.com/service-worker.js).
If you cannot register a service worker in your root domain, an alternative approach is to use the Service-Worker-Allowed HTTP header when serving your service worker file. By configuring your server to return Service-Worker-Allowed: / in the response for the service worker, this will instruct the browser to broaden the scope and allow it to be used from within a different directory.
Can I create a service worker using a Tag Manager?
No, service workers must be hosted on your website’s server and can’t be loaded via Tag Manager.
Site security
Is HTTPS required?
Yes. Web standards require that the domain requesting push notification permission be secure.
When is a site considered “secure”?
A site is considered secure if it matches one of the following secure-origin patterns. Braze Web push notifications are built on this open standard, so man-in-the-middle attacks are prevented.
(https, , *)(wss, *, *)(, localhost, )(, .localhost, *)(, 127/8, )(, ::1/128, *)(file, *, —)(chrome-extension, *, —)
What if a secure site is not available?
While industry best practice is to make your whole site secure, customers who cannot secure their site domain can work around the requirement by using a secure modal. Read more in our guide to using Alternate push domain or view a working demo.
Prerequisites
Before you can use this feature, you’ll need to integrate the Android Braze SDK.
Built-in features
The following features are built into the Braze Android SDK. To use any other push notification features, you will need to set up push notifications for your app.
| Feature | Description |
|---|---|
| Push Stories | Android Push Stories are built into the Braze Android SDK by default. To learn more, see Push Stories. |
| Push Primers | Push primer campaigns encourage your users to enable push notifications on their device for your app. This can be done without SDK customization using our no code push primer. |
About the push notification lifecycle
The following flowchart shows how Braze handles the push notification lifecycle, such as permission prompts, token generation, and message delivery.
Setting up push notifications

To check out a sample app using FCM with the Braze Android SDK, see Braze: Firebase Push Sample App.
Rate limits
Firebase Cloud Messaging (FCM) API has a default rate limit of 600,000 requests per minute. If you reach this limit, Braze will automatically try again in a few minutes. To request an increase, contact Firebase Support.
Step 1: Add Firebase to your project
First, add Firebase to your Android project. For step-by-step instructions, see Google’s Firebase setup guide.
Step 2: Add Cloud Messaging to your dependencies
Next, add the Cloud Messaging library to your project dependencies. In your Android project, open build.gradle, then add the following line to your dependencies block.
1
implementation "google.firebase:firebase-messaging:+"
Your dependencies should look similar to the following:
1
2
3
4
dependencies {
  implementation project(':android-sdk-ui')
  implementation "com.google.firebase:firebase-messaging:+"
}
Step 3: Enable the Firebase Cloud Messaging API
In Google Cloud, select the project your Android app is using, then enable the Firebase Cloud Messaging API.

Step 4: Create a service account
Next, create a new service account, so Braze can make authorized API calls when registering FCM tokens. In Google Cloud, go to Service Accounts, then choose your project. On the Service Accounts page, select Create Service Account.

Enter a service account name, ID, and description, then select Create and continue.
In the Role field, find and select Firebase Cloud Messaging API Admin from the list of roles. For more restrictive access, create a custom role with the cloudmessaging.messages.create permission, then choose it from the list instead. When you’re finished, select Done.
Be sure to select Firebase Cloud Messaging API Admin, not Firebase Cloud Messaging Admin.

Step 5: Generate JSON credentials
Next, generate JSON credentials for your FCM service account. On Google Cloud IAM & Admin, go to Service Accounts, then choose your project. Locate the FCM service account you created earlier, then select Actions > Manage Keys.

Select Add Key > Create new key.

Choose JSON, then select Create. If you created your service account using a different Google Cloud project ID than your FCM project ID, you’ll need to manually update the value assigned to the project_id in your JSON file.
Be sure to remember where you downloaded the key—you’ll need it in the next step.

Private keys could pose a security risk if compromised. Store your JSON credentials in a secure location for now—you’ll delete your key after you upload it to Braze.
Step 6: Upload your JSON credentials to Braze
Next, upload your JSON credentials to your Braze dashboard. In Braze, select Settings > App Settings.

Under your Android app’s Push Notification Settings, choose Firebase, then select Upload JSON File and upload the credentials you generated earlier. When you’re finished, select Save.

Private keys could pose a security risk if compromised. Now that your key is uploaded to Braze, delete the file you generated previously.
Step 7: Set up automatic token registration
When one of your users opt-in for push notifications, your app needs to generate an FCM token on their device before you can send them push notifications. With the Braze SDK, you can enable automatic FCM token registration for each user’s device in your project’s Braze configuration files.
First, go to Firebase Console, open your project, then select Settings > Project settings.

Select Cloud Messaging, then under Firebase Cloud Messaging API (V1), copy the number in the Sender ID field.

Next, open your Android Studio project and use your Firebase Sender ID to enable automatic FCM token registration within your braze.xml or BrazeConfig.
To configure automatic FCM token registration, add the following lines to your braze.xml file:
1
2
<bool translatable="false" name="com_braze_firebase_cloud_messaging_registration_enabled">true</bool>
<string translatable="false" name="com_braze_firebase_cloud_messaging_sender_id">FIREBASE_SENDER_ID</string>
Replace FIREBASE_SENDER_ID with the value you copied from your Firebase project settings. Your braze.xml should look similar to the following:
1
2
3
4
5
6
<?xml version="1.0" encoding="utf-8"?>
<resources>
  <string translatable="false" name="com_braze_api_key">12345ABC-6789-DEFG-0123-HIJK456789LM</string>
  <bool translatable="false" name="com_braze_firebase_cloud_messaging_registration_enabled">true</bool>
<string translatable="false" name="com_braze_firebase_cloud_messaging_sender_id">603679405392</string>
</resources>
To configure automatic FCM token registration, add the following lines to your BrazeConfig:
1
2
.setIsFirebaseCloudMessagingRegistrationEnabled(true)
.setFirebaseCloudMessagingSenderIdKey("FIREBASE_SENDER_ID")
1
2
.setIsFirebaseCloudMessagingRegistrationEnabled(true)
.setFirebaseCloudMessagingSenderIdKey("FIREBASE_SENDER_ID")
Replace FIREBASE_SENDER_ID with the value you copied from your Firebase project settings. Your BrazeConfig should look similar to the following:
1
2
3
4
5
6
7
8
9
10
BrazeConfig brazeConfig = new BrazeConfig.Builder()
  .setApiKey("12345ABC-6789-DEFG-0123-HIJK456789LM")
  .setCustomEndpoint("sdk.iad-01.braze.com")
  .setSessionTimeout(60)
  .setHandlePushDeepLinksAutomatically(true)
  .setGreatNetworkDataFlushInterval(10)
  .setIsFirebaseCloudMessagingRegistrationEnabled(true)
  .setFirebaseCloudMessagingSenderIdKey("603679405392")
  .build();
Braze.configure(this, brazeConfig);
1
2
3
4
5
6
7
8
9
10
val brazeConfig = BrazeConfig.Builder()
  .setApiKey("12345ABC-6789-DEFG-0123-HIJK456789LM")
  .setCustomEndpoint("sdk.iad-01.braze.com")
  .setSessionTimeout(60)
  .setHandlePushDeepLinksAutomatically(true)
  .setGreatNetworkDataFlushInterval(10)
  .setIsFirebaseCloudMessagingRegistrationEnabled(true)
  .setFirebaseCloudMessagingSenderIdKey("603679405392")
  .build()
Braze.configure(this, brazeConfig)
If you’d like to manually register FCM tokens instead, set the registeredPushToken property on the Braze instance inside your app’s onCreate() method.
1
2
// Kotlin
Braze.getInstance(context).registeredPushToken = "FCM_TOKEN"
1
2
// Java
Braze.getInstance(context).setRegisteredPushToken("FCM_TOKEN");
Step 8: Remove automatic requests in your application class
To prevent Braze from triggering unnecessary network requests every time you send silent push notifications, remove any automatic network requests configured in your Application class’s onCreate() method. For more information see, Android Developer Reference: Application.
Displaying notifications
Step 1: Register Braze Firebase Messaging Service
You can either create a new, existing, or non-Braze Firebase Messaging Service. Choose whichever best meets your specific needs.
Braze includes a service to handle push receipt and open intents. Our BrazeFirebaseMessagingService class will need to be registered in your AndroidManifest.xml:
1
2
3
4
5
6
<service android:name="com.braze.push.BrazeFirebaseMessagingService"
  android:exported="false">
  <intent-filter>
    <action android:name="com.google.firebase.MESSAGING_EVENT" />
  </intent-filter>
</service>
Our notification code also uses BrazeFirebaseMessagingService to handle open and click action tracking. This service must be registered in the AndroidManifest.xml to function correctly. Also, remember that Braze prefixes notifications from our system with a unique key so that we only render notifications sent from our systems. You may register additional services separately to render notifications sent from other FCM services. See AndroidManifest.xml in the Firebase push sample app.
Before Braze SDK 3.1.1, AppboyFcmReceiver was used to handle FCM push. The AppboyFcmReceiver class should be removed from your manifest and replaced with the preceding integration.
If you already have a Firebase Messaging Service registered, you can pass RemoteMessage objects to Braze via BrazeFirebaseMessagingService.handleBrazeRemoteMessage(). This method will only display a notification if the RemoteMessage object originated from Braze and will safely ignore if not.
1
2
3
4
5
6
7
8
9
10
11
12
13
public class MyFirebaseMessagingService extends FirebaseMessagingService {
  @Override
  public void onMessageReceived(RemoteMessage remoteMessage) {
    super.onMessageReceived(remoteMessage);
    if (BrazeFirebaseMessagingService.handleBrazeRemoteMessage(this, remoteMessage)) {
      // This Remote Message originated from Braze and a push notification was displayed.
      // No further action is needed.
    } else {
      // This Remote Message did not originate from Braze.
      // No action was taken and you can safely pass this Remote Message to other handlers.
    }
  }
}
1
2
3
4
5
6
7
8
9
10
11
12
class MyFirebaseMessagingService : FirebaseMessagingService() {
  override fun onMessageReceived(remoteMessage: RemoteMessage?) {
    super.onMessageReceived(remoteMessage)
    if (BrazeFirebaseMessagingService.handleBrazeRemoteMessage(this, remoteMessage)) {
      // This Remote Message originated from Braze and a push notification was displayed.
      // No further action is needed.
    } else {
      // This Remote Message did not originate from Braze.
      // No action was taken and you can safely pass this Remote Message to other handlers.
    }
  }
}
If you have another Firebase Messaging Service you would also like to use, you can also specify a fallback Firebase Messaging Service to call if your application receives a push that isn’t from Braze.
In your braze.xml, specify:
1
2
<bool name="com_braze_fallback_firebase_cloud_messaging_service_enabled">true</bool>
<string name="com_braze_fallback_firebase_cloud_messaging_service_classpath">com.company.OurFirebaseMessagingService</string>
or set via runtime configuration:
1
2
3
4
5
BrazeConfig brazeConfig = new BrazeConfig.Builder()
        .setFallbackFirebaseMessagingServiceEnabled(true)
        .setFallbackFirebaseMessagingServiceClasspath("com.company.OurFirebaseMessagingService")
        .build();
Braze.configure(this, brazeConfig);
1
2
3
4
5
val brazeConfig = BrazeConfig.Builder()
        .setFallbackFirebaseMessagingServiceEnabled(true)
        .setFallbackFirebaseMessagingServiceClasspath("com.company.OurFirebaseMessagingService")
        .build()
Braze.configure(this, brazeConfig)
Step 2: Conform small icons to design guidelines
For general information about Android notification icons, visit the Notifications overview.
Starting in Android N, you should update or remove small notification icon assets that involve color. The Android system (not the Braze SDK) ignores all non-alpha and transparency channels in action icons and the notification small icon. In other words, Android will convert all parts of your notification small icon to monochrome except for transparent regions.
To create a notification small icon asset that displays properly:
- Remove all colors from the image except for white.
- All other non-white regions of the asset should be transparent.
A common symptom of an improper asset is the small notification icon rendering as a solid monochrome square. This is due to the Android system not being able to find any transparent regions in the notification small icon asset.
The following large and small icons pictured are examples of properly designed icons:
![]()
Step 3: Configure notification icons
Specifying icons in braze.xml
Braze allows you to configure your notification icons by specifying drawable resources in your braze.xml:
1
2
<drawable name="com_braze_push_small_notification_icon">REPLACE_WITH_YOUR_ICON</drawable>
<drawable name="com_braze_push_large_notification_icon">REPLACE_WITH_YOUR_ICON</drawable>
Setting a small notification icon is required. If you do not set one, Braze will default to using the application icon as the small notification icon, which may look suboptimal.
Setting a large notification icon is optional but recommended.
Specifying icon accent color
The notification icon accent color can be overridden in your braze.xml. If the color is not specified, the default color is the same gray Lollipop uses for system notifications.
1
<integer name="com_braze_default_notification_accent_color">0xFFf33e3e</integer>
You may also optionally use a color reference:
1
<color name="com_braze_default_notification_accent_color">@color/my_color_here</color>
Step 4: Add deep links
Enabling automatic deep link opening
To enable Braze to automatically open your app and any deep links when a push notification is clicked, set com_braze_handle_push_deep_links_automatically to true, in your braze.xml:
1
<bool name="com_braze_handle_push_deep_links_automatically">true</bool>
This flag can also be set via runtime configuration:
1
2
3
4
BrazeConfig brazeConfig = new BrazeConfig.Builder()
        .setHandlePushDeepLinksAutomatically(true)
        .build();
Braze.configure(this, brazeConfig);
1
2
3
4
val brazeConfig = BrazeConfig.Builder()
        .setHandlePushDeepLinksAutomatically(true)
        .build()
Braze.configure(this, brazeConfig)
If you want to custom handle deep links, you will need to create a push callback that listens for push received and opened intents from Braze. For more information, see Using a callback for push events.
Handling foreground notifications
By default, when a push notification arrives while your app is in the foreground on Android, the system displays it automatically. To have Braze process the push notification payload (for analytics tracking, deep link handling, and custom processing), route the incoming push data to Braze inside your FirebaseMessagingService.onMessageReceived method.
How it works
When you call BrazeFirebaseMessagingService.handleBrazeRemoteMessage, Braze determines if the payload is a Braze push notification and, if so, creates and displays the notification with the NotificationManagerCompat method. Unlike iOS, Android displays notifications regardless of whether the app is in the foreground or background.
1
2
3
4
5
6
7
8
9
10
11
12
13
14
15
16
17
18
19
package com.example.push;

import com.braze.push.BrazeFirebaseMessagingService;
import com.google.firebase.messaging.FirebaseMessagingService;
import com.google.firebase.messaging.RemoteMessage;

public class MyFirebaseMessagingService extends FirebaseMessagingService {
    @Override
    public void onMessageReceived(RemoteMessage remoteMessage) {
        super.onMessageReceived(remoteMessage);

        // Let Braze process the payload and display the notification
        if (BrazeFirebaseMessagingService.handleBrazeRemoteMessage(this, remoteMessage)) {
            // Braze successfully handled the push notification
        } else {
            // Handle non-Braze messages
        }
    }
}
1
2
3
4
5
6
7
8
9
10
11
12
13
14
15
16
17
18
package com.example.push

import com.braze.push.BrazeFirebaseMessagingService
import com.google.firebase.messaging.FirebaseMessagingService
import com.google.firebase.messaging.RemoteMessage

class MyFirebaseMessagingService : FirebaseMessagingService() {
    override fun onMessageReceived(remoteMessage: RemoteMessage) {
        super.onMessageReceived(remoteMessage)

        // Let Braze process the payload and display the notification
        if (BrazeFirebaseMessagingService.handleBrazeRemoteMessage(this, remoteMessage)) {
            // Braze successfully handled the push notification
        } else {
            // Handle non-Braze messages
        }
    }
}
For more information, see the Firebase integration sample in the Braze Android SDK repository.
Customizing foreground behavior
If you want custom foreground behavior, such as suppressing the system notification or showing an in-app UI instead, you can:
- Use
subscribeToPushNotificationEventsto react to push events and handle deep links with theBrazeNotificationUtils.routeUserWithNotificationOpenedIntentmethod. For more information, see the Firebase push sample. - Build and post your own notification using a custom
IBrazeNotificationFactory, or suppress the notification by not callingnotificationManager.notifyin your handling path.
For more information on customizing notifications, see Custom notification factory.
Creating custom deep links
Follow the instructions found within the Android developer documentation on deep linking if you have not already added deep links to your app. To learn more about what deep links are, see our FAQ article.
Adding deep links
The Braze dashboard supports setting deep links or web URLs in push notifications campaigns and Canvases that will be opened when the notification is clicked.

Customizing back stack behavior
The Android SDK, by default, will place your host app’s main launcher activity in the back stack when following push deep links. Braze allows you to set a custom activity to open in the back stack in place of your main launcher activity or to disable the back stack altogether.
For example, to set an activity called YourMainActivity as the back stack activity using runtime configuration:
1
2
3
4
5
BrazeConfig brazeConfig = new BrazeConfig.Builder()
        .setPushDeepLinkBackStackActivityEnabled(true)
        .setPushDeepLinkBackStackActivityClass(YourMainActivity.class)
        .build();
Braze.configure(this, brazeConfig);
1
2
3
4
5
val brazeConfig = BrazeConfig.Builder()
        .setPushDeepLinkBackStackActivityEnabled(true)
        .setPushDeepLinkBackStackActivityClass(YourMainActivity.class)
        .build()
Braze.configure(this, brazeConfig)
See the equivalent configuration for your braze.xml. Note that the class name must be the same as returned by Class.forName().
1
2
<bool name="com_braze_push_deep_link_back_stack_activity_enabled">true</bool>
<string name="com_braze_push_deep_link_back_stack_activity_class_name">your.package.name.YourMainActivity</string>
Step 5: Define notification channels
The Braze Android SDK supports Android notification channels. If a Braze notification does not contain the ID for a notification channel or that a Braze notification contains an invalid channel ID, Braze will display the notification with the default notification channel defined in the SDK. Company users use Android Notification Channels within the platform to group notifications.
To set the user facing name of the default Braze notification channel, use BrazeConfig.setDefaultNotificationChannelName().
To set the user facing description of the default Braze notification channel, use BrazeConfig.setDefaultNotificationChannelDescription().
Update any API campaigns with the Android push object parameter to include the notification_channel field. If this field is not specified, Braze will send the notification payload with the dashboard fallback channel ID.
Other than the default notification channel, Braze will not create any channels. All other channels must be programmatically defined by the host app and then entered into the Braze dashboard.
The default channel name and description can also be configured in braze.xml.
1
2
<string name="com_braze_default_notification_channel_name">Your channel name</string>
<string name="com_braze_default_notification_channel_description">Your channel description</string>
Step 6: Test notification display and analytics
Testing display
At this point, you should be able to see notifications sent from Braze. To test this, go to the Campaigns page on your Braze dashboard and create a Push Notification campaign. Choose Android Push and design your message. Then click the eye icon in the composer to get the test sender. Enter the user ID or email address of your current user and click Send Test. You should see the push show up on your device.

For issues related to push display, see our troubleshooting guide.
Testing analytics
At this point, you should also have analytics logging for push notification opens. Clicking on the notification when it arrives should result in the Direct Opens on your campaign results page to increase by 1. Check out our push reporting article for a break down on push analytics.
For issues related to push analytics, see our troubleshooting guide.
Testing from command line
If you’d like to test in-app and push notifications via the command-line interface, you can send a single notification through the terminal via cURL and the messaging API. You will need to replace the following fields with the correct values for your test case:
YOUR_API_KEY(Go to Settings > API Keys.)YOUR_EXTERNAL_USER_ID(Search for a profile on the Search Users page.)YOUR_KEY1(optional)YOUR_VALUE1(optional)
1
2
3
4
5
6
7
8
9
10
11
12
curl -X POST -H "Content-Type: application/json" -H "Authorization: Bearer {YOUR_API_KEY}" -d '{
  "external_user_ids":["YOUR_EXTERNAL_USER_ID"],
  "messages": {
    "android_push": {
      "title":"Test push title",
      "alert":"Test push",
      "extra": {
        "YOUR_KEY1":"YOUR_VALUE1"
      }
    }
  }
}' https://rest.iad-01.braze.com/messages/send
This example uses the US-01 instance. If you are not on this instance, replace the US-01 endpoint with your endpoint.
Conversation push notifications

The people and conversations initiative is a multi-year Android initiative that aims to elevate people and conversations in the system surfaces of the phone. This priority is based on the fact that communication and interaction with other people is still the most valued and important functional area for the majority of Android users across all demographics.
Usage requirements
- This notification type requires the Braze Android SDK v15.0.0+ and Android 11+ devices.
- Unsupported devices or SDKs will fallback to a standard push notification.
This feature is only available over the Braze REST API. See the Android push object for more information.
FCM quota exceeded errors
When your limit for Firebase Cloud Messaging (FCM) is exceeded, Google returns “quota exceeded” errors. The default limit for FCM is 600,000 requests per minute. Braze retries sending according to Google’s recommended best practices. However, a large volume of these errors can prolong sending time by several minutes. To mitigate potential impact, Braze will send you an alert that the rate limit is being exceeded and steps you can take to prevent the errors.
To check your current limit, go to your Google Cloud Console > APIs & Services > Firebase Cloud Messaging API > Quotas & System Limits, or visit the FCM API Quotas page.
Best practices
We recommend these best practices to keep these error volumes low.
Request a rate limit increase from FCM
To request a rate limit increase from FCM, you can contact Firebase Support directly or do the following:
- Go to the FCM API Quotas page.
- Locate the Send requests per minute quota.
- Select Edit Quota.
- Enter a new value and submit your request.
Apply a workspace rate limit
You can apply a workspace rate limit for Android push notifications. This can help regulate the delivery rate of your outgoing messages. For more details, see Workspace messaging rate limits.
Rate limits
Push notifications are rate-limited, so don’t be afraid of sending as many as your application needs. iOS and the Apple Push Notification service (APNs) servers will control how often they are delivered, and you won’t get into trouble for sending too many. If your push notifications are throttled, they might be delayed until the next time the device sends a keep-alive packet or receives another notification.
Setting up push notifications
Step 1: Upload your APNs token
Before you can send an iOS push notification using Braze, you need to upload your .p8 push notification file, as described in Apple’s developer documentation:
- In your Apple developer account, go to Certificates, Identifiers & Profiles.
- Under Keys, select All and click the add button (+) at the top of the page.
- Under Key Description, enter a unique name for the signing key.
- Under Key Services, select the Apple Push Notification service (APNs) checkbox, then click Continue. Click Confirm.
- Note the key ID. Click Download to generate and download the key. Make sure to save the downloaded file in a secure place, as you cannot download this more than once.
- In Braze, go to Settings > App Settings and upload the
.p8file under Apple Push Certificate. You can upload either your development or production push certificate. To test push notifications after your app is live in the App Store, its recommended to set up a separate workspace for the development version of your app. - When prompted, enter your app’s bundle ID, key ID, and team ID. You’ll also need to specify whether to send notifications to your app’s development or production environment, which is defined by its provisioning profile.
- When you’re finished, select Save.
Step 2: Enable push capabilities
In Xcode, go to the Signing & Capabilities section of the main app target and add the push notifications capability.

Step 3: Set up push handling
You can use the Swift SDK to automate the processing of remote notifications received from Braze. This is the simplest way to handle push notifications and is the recommended handling method.
Step 3.1: Enable automation in the push property
To enable the automatic push integration, set the automation property of the push configuration to true:
1
2
let configuration = Braze.Configuration(apiKey: "{YOUR-BRAZE-API-KEY}", endpoint: "{YOUR-BRAZE-API-ENDPOINT}")
configuration.push.automation = true
1
2
BRZConfiguration *configuration = [[BRZConfiguration alloc] initWithApiKey:@"{YOUR-BRAZE-API-KEY}" endpoint:@"{YOUR-BRAZE-API-ENDPOINT}"];
configuration.push.automation = [[BRZConfigurationPushAutomation alloc] initEnablingAllAutomations:YES];
This instructs the SDK to:
- Register your application for push notification on the system.
- Request the push notification authorization/permission at initialization.
- Dynamically provide implementations for the push notification related system delegate methods.
The automation steps performed by the SDK are compatible with pre-existing push notification handling integrations in your codebase. The SDK only automates the processing of remote notification received from Braze. Any system handler implemented to process your own or another third party SDK remote notifications will continue to work when automation is enabled.
The SDK must be initialized on the main thread to enable push notification automation. SDK initialization must happen before the application has finished launching or in your AppDelegate application(_:didFinishLaunchingWithOptions:) implementation.
If your application requires additional setup before initializing the SDK, please refer to the Delayed Initialization documentation page.
Step 3.2: Override individual configurations (optional)
For more granular control, each automation step can be enabled or disabled individually:
1
2
3
// Enable all automations and disable the automatic notification authorization request at launch.
configuration.push.automation = true
configuration.push.automation.requestAuthorizationAtLaunch = false
1
2
3
// Enable all automations and disable the automatic notification authorization request at launch.
configuration.push.automation = [[BRZConfigurationPushAutomation alloc] initEnablingAllAutomations:YES];
configuration.push.automation.requestAuthorizationAtLaunch = NO;
See Braze.Configuration.Push.Automation for all available options and automation for more information on the automation behavior.
If you rely on push notifications for additional behavior specific to your app, you may still be able to use automatic push integration instead of manual push notification integration. The subscribeToUpdates(_:) method provides a way to be notified of remote notifications processed by Braze.
Step 3.1: Register for push notifications with APNs
Include the appropriate code sample within your app’s application:didFinishLaunchingWithOptions: delegate method so that your users’ devices can register with APNs. Ensure that you call all push integration code in your application’s main thread.
Braze also provides default push categories for push action button support, which must be manually added to your push registration code. Refer to push action buttons for additional integration steps.
Add the following code to the application:didFinishLaunchingWithOptions: method of your app delegate.
The following code sample includes integration for provisional push authentication (lines 5 and 6). If you are not planning on using provisional authorization in your app, you can remove the lines of code that add UNAuthorizationOptionProvisional to the requestAuthorization options.
Visit iOS notification options to learn more about push provisional authentication.
1
2
3
4
5
6
7
8
9
10
11
application.registerForRemoteNotifications()
let center = UNUserNotificationCenter.current()
center.setNotificationCategories(Braze.Notifications.categories)
center.delegate = self
var options: UNAuthorizationOptions = [.alert, .sound, .badge]
if #available(iOS 12.0, *) {
  options = UNAuthorizationOptions(rawValue: options.rawValue | UNAuthorizationOptions.provisional.rawValue)
}
center.requestAuthorization(options: options) { granted, error in
  print("Notification authorization, granted: \(granted), error: \(String(describing: error))")
}
1
2
3
4
5
6
7
8
9
10
11
12
13
14
[application registerForRemoteNotifications];
UNUserNotificationCenter *center = UNUserNotificationCenter.currentNotificationCenter;
[center setNotificationCategories:BRZNotifications.categories];
center.delegate = self;
UNAuthorizationOptions options = UNAuthorizationOptionAlert | UNAuthorizationOptionSound | UNAuthorizationOptionBadge;
if (@available(iOS 12.0, *)) {
  options = options | UNAuthorizationOptionProvisional;
}
[center requestAuthorizationWithOptions:options
                      completionHandler:^(BOOL granted, NSError *_Nullable error) {
                        NSLog(@"Notification authorization, granted: %d, "
                              @"error: %@)",
                              granted, error);
}];
You must assign your delegate object using center.delegate = self synchronously before your app finishes launching, preferably in application:didFinishLaunchingWithOptions:. Not doing so may cause your app to miss incoming push notifications. Visit Apple’s UNUserNotificationCenterDelegate documentation to learn more.
If your app calls wipeData() and later re-enables the Braze SDK in the same app run, you must call registerForRemoteNotifications() again to re-populate the device token used by the SDK.
Step 3.2: Register push tokens with Braze
Once APNs registration is complete, pass the resulting deviceToken to Braze to enable for push notifications for the user.
Add the following code to your app’s application(_:didRegisterForRemoteNotificationsWithDeviceToken:) method:
1
AppDelegate.braze?.notifications.register(deviceToken: deviceToken)
Add the following code to your app’s application:didRegisterForRemoteNotificationsWithDeviceToken: method:
1
[AppDelegate.braze.notifications registerDeviceToken:deviceToken];
The application:didRegisterForRemoteNotificationsWithDeviceToken: delegate method is called every time after application.registerForRemoteNotifications() is called.
If you are migrating to Braze from another push service and your user’s device has already registered with APNs, this method will collect tokens from existing registrations the next time the method is called, and users will not have to re-opt-in to push.
Step 3.3: Enable push handling
Next, pass the received push notifications along to Braze. This step is necessary for logging push analytics and link handling. Ensure that you call all push integration code in your application’s main thread.
Default push handling
To enable the Braze default push handling, add the following code to your app’s application(_:didReceiveRemoteNotification:fetchCompletionHandler:) method:
1
2
3
4
5
6
7
if let braze = AppDelegate.braze, braze.notifications.handleBackgroundNotification(
  userInfo: userInfo,
  fetchCompletionHandler: completionHandler
) {
  return
}
completionHandler(.noData)
Next, add the following to your app’s userNotificationCenter(_:didReceive:withCompletionHandler:) method:
1
2
3
4
5
6
7
if let braze = AppDelegate.braze, braze.notifications.handleUserNotification(
  response: response,
  withCompletionHandler: completionHandler
) {
  return
}
completionHandler()
To enable the Braze default push handling, add the following code to your application’s application:didReceiveRemoteNotification:fetchCompletionHandler: method:
1
2
3
4
5
6
7
BOOL processedByBraze = AppDelegate.braze != nil && [AppDelegate.braze.notifications handleBackgroundNotificationWithUserInfo:userInfo
                                                                                                       fetchCompletionHandler:completionHandler];
if (processedByBraze) {
  return;
}

completionHandler(UIBackgroundFetchResultNoData);
Next, add the following code to your app’s (void)userNotificationCenter:didReceiveNotificationResponse:withCompletionHandler: method:
1
2
3
4
5
6
7
BOOL processedByBraze = AppDelegate.braze != nil && [AppDelegate.braze.notifications handleUserNotificationWithResponse:response
                                                                                                  withCompletionHandler:completionHandler];
if (processedByBraze) {
  return;
}

completionHandler();
Foreground push handling
To enable foreground push notifications and let Braze recognize them when they’re received, implement UNUserNotificationCenter.userNotificationCenter(_:willPresent:withCompletionHandler:). If a user taps your foreground notification, the userNotificationCenter(_:didReceive:withCompletionHandler:) push delegate will be called and Braze will log the push click event.
1
2
3
4
5
6
7
8
9
10
11
12
13
14
15
16
17
func userNotificationCenter(
  _ center: UNUserNotificationCenter,
  willPresent notification: UNNotification,
  withCompletionHandler completionHandler: @escaping (UNNotificationPresentationOptions
) -> Void) {
  if let braze = AppDelegate.braze {
    // Forward notification payload to Braze for processing.
    braze.notifications.handleForegroundNotification(notification: notification)
  }

  // Configure application's foreground notification display options.
  if #available(iOS 14.0, *) {
    completionHandler([.list, .banner])
  } else {
    completionHandler([.alert])
  }
}
To enable foreground push notifications and let Braze recognize them when they’re received, implement userNotificationCenter:willPresentNotification:withCompletionHandler:. If a user taps your foreground notification, the userNotificationCenter:didReceiveNotificationResponse:withCompletionHandler: push delegate will be called and Braze will log the push click event.
1
2
3
4
5
6
7
8
9
10
11
12
13
14
15
- (void)userNotificationCenter:(UNUserNotificationCenter *)center
       willPresentNotification:(UNNotification *)notification
         withCompletionHandler:(void (^)(UNNotificationPresentationOptions options))completionHandler {
  if (AppDelegate.braze != nil) {
    // Forward notification payload to Braze for processing.
    [AppDelegate.braze.notifications handleForegroundNotificationWithNotification:notification];
  }

  // Configure application's foreground notification display options.
  if (@available(iOS 14.0, *)) {
    completionHandler(UNNotificationPresentationOptionList | UNNotificationPresentationOptionBanner);
  } else {
    completionHandler(UNNotificationPresentationOptionAlert);
  }
}
Testing notifications
If you’d like to test in-app and push notifications via the command line, you can send a single notification through the terminal via CURL and the messaging API. You will need to replace the following fields with the correct values for your test case:
YOUR_API_KEY- available at Settings > API Keys.YOUR_EXTERNAL_USER_ID- available on the Search Users page. See assigning user IDs for more information.YOUR_KEY1(optional)YOUR_VALUE1(optional)
In the following example, the US-01 instance is being used. If you’re not on this instance, refer to our API documentation to see which endpoint to make requests to.
1
2
3
4
5
6
7
8
9
10
11
curl -X POST -H "Content-Type: application/json" -H "Authorization: Bearer {YOUR_API_KEY}" -d '{
  "external_user_ids":["YOUR_EXTERNAL_USER_ID"],
  "messages": {
    "apple_push": {
      "alert":"Test push",
      "extra": {
        "YOUR_KEY1":"YOUR_VALUE1"
      }
    }
  }
}' https://rest.iad-01.braze.com/messages/send
Subscribing to push notifications updates
To access the push notification payloads processed by Braze, use the Braze.Notifications.subscribeToUpdates(payloadTypes:_:) method.
You can use the payloadTypes parameter to specify whether you’d like to subscribe to notifications involving push open events, push received events, or both.
1
2
3
4
5
6
// This subscription is maintained through a Braze cancellable, which will observe for changes until the subscription is cancelled.
// You must keep a strong reference to the cancellable to keep the subscription active.
// The subscription is canceled either when the cancellable is deinitialized or when you call its `.cancel()` method.
let cancellable = AppDelegate.braze?.notifications.subscribeToUpdates(payloadTypes: [.open, .received]) { payload in
  print("Braze processed notification with title '\(payload.title)' and body '\(payload.body)'")
}
Keep in mind, push received events will only trigger for foreground notifications and content-available background notifications. It will not trigger for notifications received while terminated or for background notifications without the content-available field.
1
2
3
4
5
NSInteger filtersValue = BRZNotificationsPayloadTypeFilter.opened.rawValue | BRZNotificationsPayloadTypeFilter.received.rawValue;
BRZNotificationsPayloadTypeFilter *filters = [[BRZNotificationsPayloadTypeFilter alloc] initWithRawValue: filtersValue];
BRZCancellable *cancellable = [notifications subscribeToUpdatesWithPayloadTypes:filters update:^(BRZNotificationsPayload * _Nonnull payload) {
  NSLog(@"Braze processed notification with title '%@' and body '%@'", payload.title, payload.body);
}];
Keep in mind, push received events will only trigger for foreground notifications and content-available background notifications. It will not trigger for notifications received while terminated or for background notifications without the content-available field.
When using the automatic push integration, subscribeToUpdates(_:) is the only way to be notified of remote notifications processed by Braze. The UIAppDelegate and UNUserNotificationCenterDelegate system methods are not called when the notification is automatically processed by Braze.
Create your push notification subscription in application(_:didFinishLaunchingWithOptions:) to ensure your subscription is triggered after an end-user taps a notification while your app is in a terminated state.
Handling foreground notifications
By default, when a push notification arrives while your app is in the foreground, iOS does not display it automatically. To display push notifications in the foreground and track them with Braze analytics, call the handleForegroundNotification(notification:) method inside your UNUserNotificationCenterDelegate.userNotificationCenter(_:willPresent:withCompletionHandler:) implementation.
How it works
When you call handleForegroundNotification(notification:), Braze processes the notification payload to log analytics and handle any deep links or button actions. The actual display behavior is controlled by the UNNotificationPresentationOptions you pass to the completion handler.
1
2
3
4
5
6
7
8
9
10
11
12
13
14
15
16
17
18
19
20
21
22
import BrazeKit
import UserNotifications

extension AppDelegate: UNUserNotificationCenterDelegate {
  func userNotificationCenter(
    _ center: UNUserNotificationCenter,
    willPresent notification: UNNotification,
    withCompletionHandler completionHandler: @escaping (UNNotificationPresentationOptions) -> Void
  ) {
    // Let Braze process the notification payload
    if let braze = AppDelegate.braze {
      braze.notifications.handleForegroundNotification(notification: notification)
    }

    // Control how the notification appears in the foreground
    if #available(iOS 14.0, *) {
      completionHandler([.banner, .list, .sound])
    } else {
      completionHandler([.alert, .sound])
    }
  }
}
For a complete example, see the push notifications manual integration sample in the Braze Swift SDK repository.
Push primers
Push primer campaigns encourage your users to enable push notifications on their device for your app. This can be done without SDK customization using our no code push primer.
Dynamic APNs gateway management
Dynamic Apple Push Notification Service (APNs) gateway management enhances the reliability and efficiency of iOS push notifications by automatically detecting the correct APNs environment. Previously, you would manually select APNs environments (development or production) for your push notifications, which sometimes led to incorrect gateway configurations, delivery failures, and BadDeviceToken errors.
With dynamic APNs gateway management, you’ll have:
- Improved reliability: Notifications are always delivered to the correct APNs environment, reducing failed deliveries.
- Simplified configuration: You no longer need to manually manage APNs gateway settings.
- Error resilience: Invalid or missing gateway values are gracefully handled, providing uninterrupted service.
Prerequisites
Braze supports Dynamic APNs gateway management for push notifications on iOS with the following SDK version requirement:
How it works
When an iOS app integrates with the Braze Swift SDK, it sends device-related data, including aps-environment to the Braze SDK API, if available. The apns_gateway value indicates whether the app is using the development (dev) or production (prod) APNs environment.
Braze also stores the reported gateway value for each device. If a new, valid gateway value is received, Braze updates the stored value automatically.
When Braze sends a push notification:
- If a valid gateway value (dev or prod) is stored for the device, Braze uses it to determine the correct APNs environment.
- If no gateway value is stored, Braze defaults to the APNs environment configured in the App Settings page.
Frequently asked questions
Why was this feature introduced?
With dynamic APNs gateway management, the correct environment is selected automatically. Previously, you had to manually configure the APNs gateway, which could lead to BadDeviceToken errors, token invalidation, and potential APNs rate-limiting issues.
How does this impact push delivery performance?
This feature improves delivery rates by always routing push tokens to the correct APNs environment, avoiding failures caused by misconfigured gateways.
Can I disable this feature?
Dynamic APNs Gateway Management is turned on by default and provides reliability improvements. If you have specific use cases that require manual gateway selection, contact Braze Support.
About push notifications for Android TV

While not a native feature, Android TV push integration is made possible by leveraging the Braze Android SDK and Firebase Cloud Messaging to register a push token for Android TV. However, you must build a UI to display the notification payload after it is received.
Prerequisites
To use this feature, you must complete the following:
Setting up push notifications
To set up push notifications for Android TV:
- Create a custom view in your app to display your notifications.
- Create a custom notification factory. This overrides the default SDK behavior and allows you to manually display the notifications. By returning
null, this prevents the SDK from processing and requires custom code to display the notification. After completing these steps, you can start sending push to Android TV. - (Optional) To track click analytics effectively, set up click analytics tracking. This can be achieved by creating a push callback to listen for Braze push opened and received intents.
These notifications do not persist and are only visible to the user when the device displays them. This is due to Android TV’s notification center not supporting historical notifications.
Testing Android TV push notifications
To test if your push implementation is successful, send a notification from the Braze dashboard as you would normally for an Android device.
- If the application is closed: The push message displays a toast notification on the screen.
- If the application is open: You have the opportunity to display the message in your own hosted UI. Follow the UI styling of the Android Mobile SDK in-app messages.
Best practices
For marketers using Braze, launching a campaign to Android TV is identical to launching a push to Android mobile apps. To target these devices exclusively, select the Android TV App in segmentation.
The delivered and clicked response returned by FCM follows the same convention as a mobile Android device; therefore, any errors are visible in the message activity log.
Prerequisites
Before you can use this feature, you’ll need to integrate the Cordova Braze SDK. After you integrate the SDK, basic push notification functionality is enabled by default. To use rich push notifications and push stories, you’ll need to set them up individually. To use iOS push messages, you also need to upload a valid push certificate.
Anytime you add, remove, or update your Cordova plugins, Cordova will overwrite the Podfile in your iOS app’s Xcode project. This means you’ll need to set these features up again anytime you modify your Cordova plugins.
Enabling push deep linking
By default, the Braze Cordova SDK doesn’t automatically handle deep links from push notifications. To enable push deep linking, follow the configuration steps in Deep linking. For more details about these and other push configuration options, see Optional configurations.
Disabling basic push notifications (iOS only)
After you integrate the Braze Cordova SDK for iOS, basic push notification functionality is enabled by default. To disable this functionality in your iOS app, add the following to your config.xml file. For more information, see Optional configurations.
1
2
3
4
<platform name="ios">
    <preference name="com.braze.ios_disable_automatic_push_registration" value="NO" />
    <preference name="com.braze.ios_disable_automatic_push_handling" value="NO" />
</platform>
Prerequisites
Before you can use this feature, you’ll need to integrate the Flutter Braze SDK.
Setting up push notifications
Step 1: Complete the initial setup
Step 1.1: Register for push
Register for push using Google’s Firebase Cloud Messaging (FCM) API. For a full walkthrough, refer to the following steps from the Native Android push integration guide:
- Add Firebase to your project.
- Add Cloud Messaging to your dependencies.
- Create a service account.
- Generate JSON credentials.
- Upload your JSON credentials to Braze.
Step 1.2: Get your Google Sender ID
First, go to Firebase Console, open your project, then select Settings > Project settings.
Select Cloud Messaging, then under Firebase Cloud Messaging API (V1), copy the Sender ID to your clipboard.
Step 1.3: Update your braze.xml
Add the following to your braze.xml file. Replace FIREBASE_SENDER_ID with the sender ID you copied previously.
1
2
<bool translatable="false" name="com_braze_firebase_cloud_messaging_registration_enabled">true</bool>
<string translatable="false" name="com_braze_firebase_cloud_messaging_sender_id">FIREBASE_SENDER_ID</string>
Step 1.1: Upload APNs certificates
Generate an Apple Push Notification service (APNs) certificate and uploaded it to the Braze dashboard. For a full walkthrough, see Uploading your APNs certificate.
Step 1.2: Add push notification support to your app
Follow the native iOS integration guide.
Step 2: Listen for push notification events (optional)
To listen for push notification events that Braze has detected and handled, call subscribeToPushNotificationEvents() and pass in an argument to execute.
Braze push notification events are available on both Android and iOS. Due to platform differences, iOS will only detect Braze push events when a user has interacted with a notification.
1
2
3
4
5
6
7
8
9
10
// Create stream subscription
StreamSubscription pushEventsStreamSubscription;

pushEventsStreamSubscription = braze.subscribeToPushNotificationEvents((BrazePushEvent pushEvent) {
  print("Push Notification event of type ${pushEvent.payloadType} seen. Title ${pushEvent.title}\n and deeplink ${pushEvent.url}");
  // Handle push notification events
});

// Cancel stream subscription
pushEventsStreamSubscription.cancel();
Push notification event fields
Because of platform limitations on iOS, the Braze SDK can only process push payloads while the app is in the foreground. Listeners will only trigger for the push_opened event type on iOS after a user has interacted with a push.
For a full list of push notification fields, refer to the following table:
| Field Name | Type | Description |
|---|---|---|
payloadType |
String | Specifies the notification payload type. The two values that are sent from the Braze Flutter SDK are push_opened and push_received. Only push_opened events are supported on iOS. |
url |
String | Specifies the URL that was opened by the notification. |
useWebview |
Boolean | If true, URL will open in-app in a modal webview. If false, the URL will open in the device browser. |
title |
String | Represents the title of the notification. |
body |
String | Represents the body or content text of the notification. |
summaryText |
String | Represents the summary text of the notification. This is mapped from subtitle on iOS. |
badgeCount |
Number | Represents the badge count of the notification. |
timestamp |
Number | Represents the time at which the payload was received by the application. |
isSilent |
Boolean | If true, the payload is received silently. For details on sending Android silent push notifications, refer to Silent push notifications on Android. For details on sending iOS silent push notifications, refer to Silent push notifications on iOS. |
isBrazeInternal |
Boolean | This will be true if a notification payload was sent for an internal SDK feature, such as Feature Flag sync or uninstall tracking. The payload is received silently for the user. |
imageUrl |
String | Specifies the URL associated with the notification image. |
brazeProperties |
Object | Represents Braze properties associated with the campaign (key-value pairs). |
ios |
Object | Represents iOS-specific fields. |
android |
Object | Represents Android-specific fields. |
Step 3: Test displaying push notifications
To test your integration after configuring push notifications in the native layer:
- Set an active user in the Flutter application. To do so, initialize your plugin by calling
braze.changeUser('your-user-id'). - Head to Campaigns and create a new push notification campaign. Choose the platforms that you’d like to test.
- Compose your test notification and head over to the Test tab. Add the same
user-idas the test user and click Send Test. - You should receive the notification on your device shortly. You may need to check in the Notification Center or update Settings if it doesn’t display.
Starting with Xcode 14, you can test remote push notifications on an iOS simulator.
Prerequisites
Before you can use this feature, you’ll need to integrate the Android Braze SDK.
Setting up push notifications
Newer phones manufactured by Huawei come equipped with Huawei Mobile Services (HMS) - a service used to deliver push instead of Google’s Firebase Cloud Messaging (FCM).
Step 1: Register for a Huawei developer account
Before getting started, you’ll need to register and set up a Huawei Developer account. In your Huawei account, go to My Projects > Project Settings > App Information, and take note of the App ID and App secret.

Step 2: Create a new Huawei app in the Braze dashboard
In the Braze dashboard, go to App Settings, listed under the Settings navigation.
Click + Add App, provide a name (such as My Huawei App), select Android as the platform.

Once your new Braze app has been created, locate the push notification settings and select Huawei as the push provider. Next, provide your Huawei Client Secret and Huawei App ID.

Step 3: Integrate the Huawei messaging SDK into your app
Huawei has provided an Android integration codelab detailing integrating the Huawei Messaging Service into your application. Follow those steps to get started.
After completing the codelab, you will need to create a custom Huawei Message Service to obtain push tokens and forward messages to the Braze SDK.
1
2
3
4
5
6
7
8
9
10
11
12
13
14
15
public class CustomPushService extends HmsMessageService {
  @Override
  public void onNewToken(String token) {
    super.onNewToken(token);
    Braze.getInstance(this.getApplicationContext()).setRegisteredPushToken(token);
  }

  @Override
  public void onMessageReceived(RemoteMessage remoteMessage) {
    super.onMessageReceived(remoteMessage);
    if (BrazeHuaweiPushHandler.handleHmsRemoteMessageData(this.getApplicationContext(), remoteMessage.getDataOfMap())) {
      // Braze has handled the Huawei push notification
    }
  }
}
1
2
3
4
5
6
7
8
9
10
11
12
13
class CustomPushService: HmsMessageService() {
  override fun onNewToken(token: String?) {
    super.onNewToken(token)
    Braze.getInstance(applicationContext).setRegisteredPushToken(token!!)
  }

  override fun onMessageReceived(hmsRemoteMessage: RemoteMessage?) {
    super.onMessageReceived(hmsRemoteMessage)
    if (BrazeHuaweiPushHandler.handleHmsRemoteMessageData(applicationContext, hmsRemoteMessage?.dataOfMap)) {
      // Braze has handled the Huawei push notification
    }
  }
}
After adding your custom push service, add the following to your AndroidManifest.xml:
1
2
3
4
5
6
7
<service
  android:name="package.of.your.CustomPushService"
  android:exported="false">
  <intent-filter>
    <action android:name="com.huawei.push.action.MESSAGING_EVENT" />
  </intent-filter>
</service>
Step 4: Handle foreground notifications
By default, when a push notification arrives while your app is in the foreground, Huawei displays it automatically. To have Braze process the push notification payload (for analytics tracking, deep link handling, and custom processing), route the incoming push data to Braze inside your HmsMessageService.onMessageReceived method.
When you call BrazeHuaweiPushHandler.handleHmsRemoteMessageData, Braze determines if the payload is a Braze push notification and, if so, creates and displays the notification. For more information, see Handling foreground notifications in the Android push notifications documentation.
For a complete example, see the Huawei handler reference in the Braze Android SDK documentation.
Step 5: Test your push notifications (optional)
At this point, you’ve created a new Huawei Android app in the Braze dashboard, configured it with your Huawei developer credentials, and have integrated the Braze and Huawei SDKs into your app.
Next, we can test out the integration by testing a new push campaign in Braze.
Step 5.1: Create a new push notification campaign
In the Campaigns page, create a new campaign, and choose Push Notification as your message type.
After you name your campaign, choose Android Push as the push platform.

Next, compose your push campaign with a title and message.
Step 5.2: Send a test push
In the Test tab, enter your user ID, which you’ve set in your app using the changeUser(USER_ID_STRING) method, and click Send Test to send a test push.

At this point, you should receive a test push notification on your Huawei (HMS) device from Braze.
Step 5.3: Set up Huawei segmentation (optional)
Since your Huawei app in the Braze dashboard is built upon the Android push platform, you have the flexibility to send push to all Android users (Firebase Cloud Messaging and Huawei Mobile Services), or you can choose to segment your campaign audience to specific apps.
To send push to only Huawei apps, create a new Segment and select your Huawei App within the Apps section.

Of course, if you want to send the same push to all Android push providers, you can choose not to specify the app which will send to all Android apps configured within the current workspace.
Prerequisites
Before you can use this feature, you’ll need to integrate the React Native Braze SDK.
Setting up push notifications
Step 1: Complete the initial setup
Prerequisites
Before you can use Expo for push notifications, you’ll need to set up the Braze Expo plugin.
Step 1.1: Update your app.json file
Next update your app.json file for Android and iOS:
- Android: Add the
enableFirebaseCloudMessagingoption. - iOS: Add the
enableBrazeIosPushoption.
Step 1.2: Add your Google Sender ID
First, go to Firebase Console, open your project, then select Settings > Project settings.
Select Cloud Messaging, then under Firebase Cloud Messaging API (V1), copy the Sender ID to your clipboard.
Next, open your project’s app.json file and set your firebaseCloudMessagingSenderId property to the Sender ID in your clipboard. For example:
1
"firebaseCloudMessagingSenderId": "693679403398"
Step 1.3: Add the path to your Google Services JSON
In your project’s app.json file, add the path to your google-services.json file. This file is required when setting enableFirebaseCloudMessaging: true in your configuration.
1
2
3
4
5
6
7
8
9
10
11
12
13
14
15
16
17
18
19
20
{
  "expo": {
    "android": {
      "googleServicesFile": "PATH_TO_GOOGLE_SERVICES"
    },
    "plugins": [
      [
        "@braze/expo-plugin",
        {
          "androidApiKey": "YOUR-ANDROID-API-KEY",
          "iosApiKey": "YOUR-IOS-API-KEY",
          "enableBrazeIosPush": true,
          "enableFirebaseCloudMessaging": true,
          "firebaseCloudMessagingSenderId": "YOUR-FCM-SENDER-ID",
          "androidHandlePushDeepLinksAutomatically": true
        }
      ],
    ]
  }
}
Note that you will need to use these settings instead of the native setup instructions if you are depending on additional push notification libraries like Expo Notifications.
If you are not using the Braze Expo plugin, or would like to configure these settings natively instead, register for push by referring to the Native Android push integration guide.
If you are not using the Braze Expo plugin, or would like to configure these settings natively instead, register for push by referring to the following steps from the Native iOS push integration guide:
Step 1.1: Request for push permissions
If you don’t plan on requesting push permissions when the app is launched, omit the requestAuthorizationWithOptions:completionHandler: call in your AppDelegate. Then, skip to Step 2. Otherwise, follow the native iOS integration guide.
Step 1.2 (Optional): Migrate your push key
If you were previously using expo-notifications to manage your push key, run expo fetch:ios:certs from your application’s root folder. This will download your push key (a .p8 file), which can then be uploaded to the Braze dashboard.
Step 2: Request push notifications permission
Use the Braze.requestPushPermission() method (available on v1.38.0 and up) to request permission for push notifications from the user on iOS and Android 13+. For Android 12 and earlier, this method is a no-op.
This method takes in a required parameter that specifies which permissions the SDK should request from the user on iOS. These options have no effect on Android.
1
2
3
4
5
6
7
8
const permissionOptions = {
  alert: true,
  sound: true,
  badge: true,
  provisional: false
};

Braze.requestPushPermission(permissionOptions);
Step 2.1: Listen for push notifications (optional)
You can additionally subscribe to events where Braze has detected and handled an incoming push notification. Use the listener key Braze.Events.PUSH_NOTIFICATION_EVENT.
iOS push received events will only trigger for foreground notifications and content-available background notifications. It will not trigger for notifications received while terminated or for background notifications without the content-available field.
1
2
3
4
Braze.addListener(Braze.Events.PUSH_NOTIFICATION_EVENT, data => {
  console.log(`Push Notification event of type ${data.payload_type} seen. Title ${data.title}\n and deeplink ${data.url}`);
  console.log(JSON.stringify(data, undefined, 2));
});
Push notification event fields
For a full list of push notification fields, refer to the following table:
| Field Name | Type | Description |
|---|---|---|
payload_type |
String | Specifies the notification payload type. The two values that are sent from the Braze React Native SDK are push_opened and push_received. |
url |
String | Specifies the URL that was opened by the notification. |
use_webview |
Boolean | If true, URL will open in-app in a modal webview. If false, the URL will open in the device browser. |
title |
String | Represents the title of the notification. |
body |
String | Represents the body or content text of the notification. |
summary_text |
String | Represents the summary text of the notification. This is mapped from subtitle on iOS. |
badge_count |
Number | Represents the badge count of the notification. |
timestamp |
Number | Represents the time at which the payload was received by the application. |
is_silent |
Boolean | If true, the payload is received silently. For details on sending Android silent push notifications, refer to Silent push notifications on Android. For details on sending iOS silent push notifications, refer to Silent push notifications on iOS. |
is_braze_internal |
Boolean | This will be true if a notification payload was sent for an internal SDK feature, such as Feature Flag sync or uninstall tracking. The payload is received silently for the user. |
image_url |
String | Specifies the URL associated with the notification image. |
braze_properties |
Object | Represents Braze properties associated with the campaign (key-value pairs). |
ios |
Object | Represents iOS-specific fields. |
android |
Object | Represents Android-specific fields. |
Step 3: Enable deep linking (optional)
To enable Braze to handle deep links inside React components when a push notification is clicked, first implement the steps described in React Native Linking library, or with your solution of choice. Then, follow the additional steps.
To learn more about what deep links are, see our FAQ article.
If you’re migrating an existing React Native push integration, re-test deep linking after you upgrade the Braze SDK, React Native, Expo, or related libraries. Confirm that:
- React Native Linking is still configured and handling your deep link URLs.
- Your iOS initial push payload handling (see Step 3.1: Store the push notification payload on app launch) is implemented and still called on app launch.
- Any native delegate or listener methods you use to handle push click events are still registered and invoked as expected.
If you’re using the Braze Expo plugin, you can handle push notification deep links automatically by setting androidHandlePushDeepLinksAutomatically to true in your app.json.
To handle deep links manually instead, refer to the native Android documentation: Adding deep links.
Step 3.1: Store the push notification payload on app launch
This is supported as of React Native SDK 19.1.0.
Add populateInitialPushPayloadFromIntent to your main activity’s onCreate() method. This must be called before React Native initializes to capture the initial Intent data. For example:
1
2
3
4
override fun onCreate(savedInstanceState: Bundle?) {
  BrazeReactUtils.populateInitialPushPayloadFromIntent(intent)
  super.onCreate(savedInstanceState)
}
Step 3.2: Handle deep links from a closed state
In addition to the base scenarios handled by React Native Linking, implement the Braze.getInitialPushPayload method and retrieve the url value to account for deep links from push notifications that open your app when it isn’t running. For example:
1
2
3
4
5
6
7
8
// Handles deep links when an app is launched from a hard close via push click.
Braze.getInitialPushPayload(pushPayload => {
  if (pushPayload) {
    console.log('Braze.getInitialPushPayload is ' + pushPayload);
    showToast('Initial URL is ' + pushPayload.url);
    handleOpenUrl({ pushPayload.url });
  }
});
This method requires the native setup in Step 3.1 for your platform. If you’re using the Braze Expo plugin, this may be handled automatically.
To handle deep links from push notifications on iOS, you must also configure link handling in your native iOS layer.
This includes registering a custom URL scheme and implementing a URL handler in your AppDelegate. For full setup instructions, see Handling deep links in the native iOS documentation.
Step 3.1: Store the push notification payload on app launch
Skip step 3.1 if you’re using the Braze Expo plugin, as this functionality is handled automatically.
For iOS, add populateInitialPayloadFromLaunchOptions to your AppDelegate’s didFinishLaunchingWithOptions method. For example:
1
2
3
4
5
6
7
8
9
10
11
12
13
14
15
- (BOOL)application:(UIApplication *)application didFinishLaunchingWithOptions:(NSDictionary *)launchOptions
{
  // ... Perform regular React Native setup

  BRZConfiguration *configuration = [[BRZConfiguration alloc] initWithApiKey:apiKey endpoint:endpoint];
  configuration.triggerMinimumTimeInterval = 1;
  configuration.logger.level = BRZLoggerLevelInfo;
  Braze *braze = [BrazeReactBridge initBraze:configuration];
  AppDelegate.braze = braze;

  [self registerForPushNotifications];
  [[BrazeReactUtils sharedInstance] populateInitialPayloadFromLaunchOptions:launchOptions];

  return [super application:application didFinishLaunchingWithOptions:launchOptions];
}
1
2
3
4
5
6
7
8
9
10
11
12
13
14
15
16
func application(
  _ application: UIApplication,
  didFinishLaunchingWithOptions launchOptions: [UIApplication.LaunchOptionsKey: Any]? = nil
) -> Bool {
  // ... Perform regular React Native setup

  let configuration = Braze.Configuration(apiKey: apiKey, endpoint: endpoint)
  configuration.triggerMinimumTimeInterval = 1
  configuration.logger.level = .info
  let braze = BrazeReactBridge.initBraze(configuration)
  AppDelegate.braze = braze
  registerForPushNotifications()
  BrazeReactUtils.shared().populateInitialPayload(fromLaunchOptions: launchOptions)

  return super.application(application, didFinishLaunchingWithOptions: launchOptions)
}
Step 3.2: Handle deep links from a closed state
In addition to the base scenarios handled by React Native Linking, implement the Braze.getInitialPushPayload method and retrieve the url value to account for deep links from push notifications that open your app when it isn’t running. For example:
1
2
3
4
5
6
7
8
// Handles deep links when an app is launched from a hard close via push click.
Braze.getInitialPushPayload(pushPayload => {
  if (pushPayload) {
    console.log('Braze.getInitialPushPayload is ' + pushPayload);
    showToast('Initial URL is ' + pushPayload.url);
    handleOpenUrl({ pushPayload.url });
  }
});
This method requires the native setup in Step 3.1 for your platform. If you’re using the Braze Expo plugin, this may be handled automatically.
Step 3.3: Enable Universal Links (optional)
To enable universal linking support, implement a Braze delegate that determines whether to open a given URL, then register it with your Braze instance.
Create a BrazeReactDelegate.swift file in your iOS directory and add the following. Replace YOUR_DOMAIN_HOST with your actual domain.
1
2
3
4
5
6
7
8
9
10
11
12
13
14
15
16
17
18
19
20
21
22
23
24
25
26
27
import Foundation
import BrazeKit
import UIKit

class BrazeReactDelegate: NSObject, BrazeDelegate {

  /// This delegate method determines whether to open a given URL.
  /// Reference the context to get additional details about the URL payload.
  func braze(_ braze: Braze, shouldOpenURL context: Braze.URLContext) -> Bool {
    if let host = context.url.host,
       host.caseInsensitiveCompare("YOUR_DOMAIN_HOST") == .orderedSame {
      // Sample custom handling of universal links
      let application = UIApplication.shared
      let userActivity = NSUserActivity(activityType: NSUserActivityTypeBrowsingWeb)
      userActivity.webpageURL = context.url
      // Routes to the `continueUserActivity` method, which should be handled in your AppDelegate.
      application.delegate?.application?(
        application,
        continue: userActivity,
        restorationHandler: { _ in }
      )
      return false
    }
    // Let Braze handle links otherwise
    return true
  }
}
Then, create and register your BrazeReactDelegate in didFinishLaunchingWithOptions of your project’s AppDelegate.swift file.
1
2
3
4
5
6
7
8
9
10
11
12
13
14
15
16
17
18
19
20
import BrazeKit

class AppDelegate: UIResponder, UIApplicationDelegate {

  static var braze: Braze?

  // Keep a strong reference to the BrazeDelegate so it is not deallocated.
  private var brazeDelegate: BrazeReactDelegate?

  func application(
    _ application: UIApplication,
    didFinishLaunchingWithOptions launchOptions: [UIApplication.LaunchOptionsKey: Any]? = nil
  ) -> Bool {
    // Other setup code (e.g., Braze initialization)

    brazeDelegate = BrazeReactDelegate()
    AppDelegate.braze?.delegate = brazeDelegate
    return true
  }
}
Create a BrazeReactDelegate.h file in your iOS directory and then add the following code snippet.
1
2
3
4
5
6
#import <Foundation/Foundation.h>
#import <BrazeKit/BrazeKit-Swift.h>

@interface BrazeReactDelegate: NSObject<BrazeDelegate>

@end
Next, create a BrazeReactDelegate.m file and then add the following code snippet. Replace YOUR_DOMAIN_HOST with your actual domain.
1
2
3
4
5
6
7
8
9
10
11
12
13
14
15
16
17
18
19
20
21
22
23
24
#import "BrazeReactDelegate.h"
#import <UIKit/UIKit.h>

@implementation BrazeReactDelegate

/// This delegate method determines whether to open a given URL.
///
/// Reference the `BRZURLContext` object to get additional details about the URL payload.
- (BOOL)braze:(Braze *)braze shouldOpenURL:(BRZURLContext *)context {
  if ([[context.url.host lowercaseString] isEqualToString:@"YOUR_DOMAIN_HOST"]) {
    // Sample custom handling of universal links
    UIApplication *application = UIApplication.sharedApplication;
    NSUserActivity* userActivity = [[NSUserActivity alloc] initWithActivityType:NSUserActivityTypeBrowsingWeb];
    userActivity.webpageURL = context.url;
    // Routes to the `continueUserActivity` method, which should be handled in your `AppDelegate`.
    [application.delegate application:application
                 continueUserActivity:userActivity restorationHandler:^(NSArray<id<UIUserActivityRestoring>> * _Nullable restorableObjects) {}];
    return NO;
  }
  // Let Braze handle links otherwise
  return YES;
}

@end
Then, create and register your BrazeReactDelegate in didFinishLaunchingWithOptions of your project’s AppDelegate.m file.
1
2
3
4
5
6
7
8
9
10
11
12
13
14
15
16
17
#import "BrazeReactUtils.h"
#import "BrazeReactDelegate.h"

@interface AppDelegate ()

// Keep a strong reference to the BrazeDelegate to ensure it is not deallocated.
@property (nonatomic, strong) BrazeReactDelegate *brazeDelegate;

@end

- (BOOL)application:(UIApplication *)application didFinishLaunchingWithOptions:(NSDictionary *)launchOptions
{
  // Other setup code

  self.brazeDelegate = [[BrazeReactDelegate alloc] init];
  braze.delegate = self.brazeDelegate;
}
For an example integration, reference our sample app in this AppDelegate example.
Step 4: Handle foreground notifications
Foreground notification handling works differently depending on your platform and setup. Choose the approach that matches your integration:
For iOS, foreground notification handling is the same as the native Swift integration. Call handleForegroundNotification(notification:) inside your UNUserNotificationCenterDelegate.userNotificationCenter(_:willPresent:withCompletionHandler:) implementation.
For complete details and code examples, see Handling foreground notifications in the Swift push notifications documentation.
For Android, foreground notification handling is the same as the native Android integration. Call BrazeFirebaseMessagingService.handleBrazeRemoteMessage inside your FirebaseMessagingService.onMessageReceived method.
For complete details and code examples, see Handling foreground notifications in the Android push notifications documentation.
In Expo-managed workflow, you don’t call native notification handlers directly. Instead, use the Expo Notifications API to control foreground presentation, while the Braze Expo Plugin handles native processing automatically.
1
2
3
4
5
6
7
8
9
10
11
12
13
14
15
16
17
18
19
20
21
22
23
24
25
26
27
28
29
import * as Notifications from 'expo-notifications';
import Braze from '@braze/react-native-sdk';

// Control foreground presentation in Expo
Notifications.setNotificationHandler({
  handleNotification: async () => ({
    shouldShowAlert: true,    // Show alert while in foreground
    shouldPlaySound: false,
    shouldSetBadge: false,
  }),
});

// React to Braze push events
const subscription = Braze.addListener('pushNotificationEvent', (event) => {
  console.log('Braze push event', {
    type: event.payload_type,   // "push_received" | "push_opened"
    title: event.title,
    url: event.url,
    is_silent: event.is_silent,
  });
  // Handle deep links, custom behavior, etc.
});

// Handle initial payload when app launches via push
Braze.getInitialPushPayload((payload) => {
  if (payload) {
    console.log('Initial push payload', payload);
  }
});
In Expo-managed workflow, the Braze Expo Plugin handles native push processing automatically. You control foreground UI via the Expo Notifications presentation options shown earlier.
For bare workflow integrations, follow the native iOS and Android approaches instead.
Step 5: Send a test push notification
At this point, you should be able to send notifications to the devices. Adhere to the following steps to test your push integration.
Starting in macOS 13, on certain devices, you can test iOS push notifications on an iOS 16+ simulator running on Xcode 14 or higher. For further details, refer to the Xcode 14 Release Notes.
- Set an active user in the React Native application by calling
Braze.changeUserId('your-user-id')method. - Head to Campaigns and create a new push notification campaign. Choose the platforms that you’d like to test.
- Compose your test notification and head over to the Test tab. Add the same
user-idas the test user and click Send Test. You should receive the notification on your device shortly.

Using the Expo plugin
After you set up push notifications for Expo, you can use it to handle the following push notifications behaviors—without needing to write any code in the native Android or iOS layers.
Forwarding Android push to additional FMS
If you want to use an additional Firebase Messaging Service (FMS), you can specify a fallback FMS to call if your application receives a push that isn’t from Braze. For example:
1
2
3
4
5
6
7
8
9
10
11
12
13
14
{
  "expo": {
    "plugins": [
      [
        "@braze/expo-plugin",
        {
          ...
          "androidFirebaseMessagingFallbackServiceEnabled": true,
          "androidFirebaseMessagingFallbackServiceClasspath": "com.company.OurFirebaseMessagingService"
        }
      ]
    ]
  }
}
Using app extensions with Expo Application Services
If you are using Expo Application Services (EAS) and have enabled enableBrazeIosRichPush or enableBrazeIosPushStories, you will need to declare the corresponding bundle identifiers for each app extension in your project. There are multiple ways you can approach this step, depending on how your project is configured to manage code signing with EAS.
One approach is to use the appExtensions configuration in your app.json file by following Expo’s app extensions documentation. Alternatively, you can set up the multitarget setting in your credentials.json file by following Expo’s local credentials documentation.
Troubleshooting
These are common troubleshooting steps for push notification integrations with the Braze React Native SDK and Expo plugin.
Push notifications stopped working
If push notifications through the Expo plugin have stopped working:
- Check that the Braze SDK is still tracking sessions.
- Check that the SDK wasn’t disabled by an explicit or implicit call to
wipeData. - Review any recent upgrades to Expo or it’s related libraries, as there may be conflicts with your Braze configuration.
- Review recently added project dependencies and check if they are manually overriding your existing push notification delegate methods.
For iOS integrations, you can also reference our push notification setup tutorial to help you identify potential conflicts with your project dependencies.
Device token won’t register with Braze
If your device token won’t register with Braze, first review Push notifications stopped working.
If your issue persists, there may be a separate dependency interfering with your Braze push notification configuration. You can try removing it or manually call Braze.registerPushToken instead.
Deep links from push notifications don’t open
If deep links from push notifications stop opening after a migration, check the following:
- Verify your React Native Linking setup is still valid in your upgraded app.
- For iOS native integrations, confirm you implemented
populateInitialPayloadFromLaunchOptionsandBraze.getInitialPushPayloadso that, when the app is launched from a terminated state, it can retrieve the initial push payload and pass itsurlinto your deep link handler. - If you’re using the Braze Expo plugin, verify
androidHandlePushDeepLinksAutomaticallyis set correctly for your implementation. - Review recently added dependencies for overrides to notification handling or app delegate behavior.
If you’ve completed these checks and the issue persists, open a support ticket and include SDK logs plus reproduction steps.
Prerequisites
Before you can use this feature, you’ll need to integrate the Web Braze SDK. You’ll also need to set up push notifications for the Web SDK. Note that you can only send push notifications to iOS and iPadOS users that are using Safari v16.4 or later.
Setting up Safari push for mobile
Step 1: Create a manifest file
A Web Application Manifest is a JSON file that controls how your website is presented when installed to a user’s home screen.
For example, you can set the background theme color and icon that the App Switcher uses, whether it renders as full screen to resemble a native app, or whether the app should open in landscape or portrait mode.
Create a new manifest.json file in your website’s root directory, with the following mandatory fields.
1
2
3
4
5
6
7
8
9
{
  "name": "your app name",
  "short_name": "your app name",
  "display": "fullscreen",
  "icons": [{
    "src": "favicon.ico",
    "sizes": "128x128",
  }]
}
The full list of supported fields can be found in MDN’s Web App Manifest documentation.
Step 2: Link the manifest file
Add the following <link> tag to your website’s <head> element pointing to where your manifest file is hosted.
1
<link rel="manifest" href="/manifest.json" />
Step 3: Add a service worker
Your website must have a service worker file that imports the Braze service-worker library, as described in our web push integration guide.
Step 4: Add to home screen
Popular browsers (such as Safari, Chrome, FireFox, and Edge) all support web push notifications in their later versions. To request push permission on iOS or iPadOS, your website must be added to the user’s home screen by selecting Share To > Add to Home Screen. Add to Homescreen lets users bookmark your website, adding your icon to their valuable home screen real estate.

Step 5: Show the native push prompt
After the app has been added to your home screen you can now request push permission when the user takes an action (such as clicking a button). This can be done using the requestPushPermission method, or with a no-code push primer in-app message.
After you accept or decline the prompt, you need to delete and reinstall the website to your home screen to be able to show the prompt again.

For example:
1
2
3
4
5
6
7
8
9
import { requestPushPermission } from "@braze/web-sdk";

button.onclick = function(){
    requestPushPermission(() => {
        console.log(`User accepted push prompt`);
    }, (temporary) => {
        console.log(`User ${temporary ? "temporarily dismissed" : "permanently denied"} push prompt`);
    });
};
Next steps
Next, send yourself a test message to validate the integration. After your integration is complete, you can use our no-code push primer messages to optimize your push opt-in rates.
Prerequisites
Before you can use this feature, you’ll need to integrate the Unity Braze SDK.
Setting up push notification
Step 1: Set up the platform
Step 1.1: Enable Firebase
To get started, follow the Firebase Unity setup documentation.
Integrating the Firebase Unity SDK may cause your AndroidManifest.xml to be overridden. If that occurs, make sure to revert it to the original.
Step 1.2: Set your Firebase credentials
You need to input your Firebase Server Key and Sender ID into the Braze dashboard. To do this, log in to the Firebase Developers Console and select your Firebase project. Next, select Cloud Messaging under Settings and copy the Server Key and Sender ID:
In Braze, select your Android app on the App Settings page under Manage Settings. Next, enter your Firebase Server Key in the Firebase Cloud Messaging Server Key field and Firebase Sender ID in the Firebase Cloud Messaging Sender ID field.

Step 1.1: Verify integration method
Braze provides a native Unity solution for automating iOS push integrations. If you you’d like to set up and manage your integration manually instead, see Swift: Push Notifications.
Otherwise, continue to the next step.
Our automatic push notification solution takes advantage of iOS 12’s Provisional Authorization feature and is not available to use with the native push prompt pop-up.
Step 1.1: Enable ADM
- Create an account with the Amazon Apps & Games Developer Portal if you have not already done so.
- Obtain OAuth credentials (Client ID and Client Secret) and an ADM API key.
- Enable Automatic ADM Registration Enabled in the Unity Braze Configuration window.
- Alternatively, you may add the following line to your
res/values/braze.xmlfile to enable ADM registration:
- Alternatively, you may add the following line to your
1
  <bool name="com_braze_push_adm_messaging_registration_enabled">true</bool>
Step 2: Configure push notifications
Step 2.1: Configure push settings
The Braze SDK can automatically handle push registration with the Firebase Cloud Messaging Servers to have devices receive push notifications. In Unity, enable Automate Unity Android Integration, then configure the following Push Notification settings.
| Setting | Description |
|---|---|
| Automatic Firebase Cloud Messaging Registration Enabled | Instructs the Braze SDK to automatically retrieve and send an FCM push token for a device. |
| Firebase Cloud Messaging Sender ID | The Sender ID from your Firebase console. |
| Handle Push Deeplinks Automatically | Whether the SDK should handle opening deep links or opening the app when push notifications are clicked. |
| Small Notification Icon Drawable | Android drawable resource reference for the small icon shown when a push arrives. Enter the full reference including the @drawable/ prefix (for example, @drawable/hourglass_icon). The automated integration writes this value into braze.xml as entered. If you leave this empty, the notification uses the application icon as the small icon. |
| Large Notification Icon Drawable | Optional large icon for notifications. Use the same @drawable/ format as the small icon (for example, @drawable/my_large_icon). |
Small Notification Icon Drawable and Large Notification Icon Drawable appear under Push Configuration in Braze > Braze Configuration. Both values are written into braze.xml as you enter them. Include the @drawable/ prefix yourself—the Braze Unity integration does not add it for you (for example, <drawable name="com_braze_push_small_notification_icon">@drawable/hourglass_icon</drawable>).
Step 2.1: Upload your APNs token
Before you can send an iOS push notification using Braze, you need to upload your .p8 push notification file, as described in Apple’s developer documentation:
- In your Apple developer account, go to Certificates, Identifiers & Profiles.
- Under Keys, select All and click the add button (+) at the top of the page.
- Under Key Description, enter a unique name for the signing key.
- Under Key Services, select the Apple Push Notification service (APNs) checkbox, then click Continue. Click Confirm.
- Note the key ID. Click Download to generate and download the key. Make sure to save the downloaded file in a secure place, as you cannot download this more than once.
- In Braze, go to Settings > App Settings and upload the
.p8file under Apple Push Certificate. You can upload either your development or production push certificate. To test push notifications after your app is live in the App Store, its recommended to set up a separate workspace for the development version of your app. - When prompted, enter your app’s bundle ID, key ID, and team ID. You’ll also need to specify whether to send notifications to your app’s development or production environment, which is defined by its provisioning profile.
- When you’re finished, select Save.
Step 2.2: Enable automatic push
Open the Braze Configuration Settings in the Unity Editor by navigating to Braze > Braze Configuration.
Check Integrate Push With Braze to automatically register users for push notifications, pass push tokens to Braze, track analytics for push opens, and take advantage of our default push notification handling.
Step 2.3: Enable background push (optional)
Check Enable Background Push if you want to enable background mode for push notifications. This allows the system to wake your application from the suspended state when a push notification arrives, enabling your application to download content in response to push notifications. Checking this option is required for our uninstall tracking functionality.
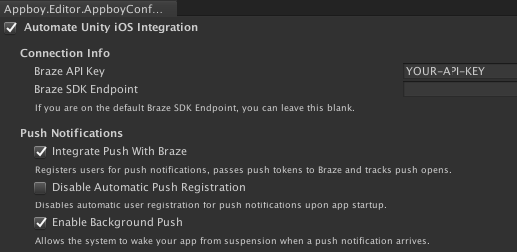
Step 2.4: Disable automatic registration (optional)
Users who have not yet opted-in to push notifications will automatically be authorized for push upon opening your application. To disable this feature and manually register users for push, check Disable Automatic Push Registration.
- If Disable Provisional Authorization is not checked on iOS 12 or later, the user will be provisionally (silently) authorized to receive quiet push. If checked, the user will be shown the native push prompt.
- If you need to configure exactly when the prompt is shown at runtime, disable automatic registration from the Braze configuration editor and use
AppboyBinding.PromptUserForPushPermissions()instead.

Step 2.1: Update AndroidManifest.xml
If your app does not have an AndroidManifest.xml, you can use the following as a template. Otherwise, if you already have an AndroidManifest.xml, ensure that any of the following missing sections are added to your existing AndroidManifest.xml.
1
2
3
4
5
6
7
8
9
10
11
12
13
14
15
16
17
18
19
20
21
22
23
24
25
26
27
28
29
30
31
32
33
34
35
36
37
<?xml version="1.0" encoding="utf-8"?>
<manifest xmlns:android="http://schemas.android.com/apk/res/android"
          package="REPLACE_WITH_YOUR_PACKAGE_NAME">

  <uses-permission android:name="android.permission.ACCESS_NETWORK_STATE" />
  <uses-permission android:name="android.permission.INTERNET" />
  <permission
    android:name="REPLACE_WITH_YOUR_PACKAGE_NAME.permission.RECEIVE_ADM_MESSAGE"
    android:protectionLevel="signature" />
  <uses-permission android:name="REPLACE_WITH_YOUR_PACKAGE_NAME.permission.RECEIVE_ADM_MESSAGE" />
  <uses-permission android:name="com.amazon.device.messaging.permission.RECEIVE" />

  <application android:icon="@drawable/app_icon"
               android:label="@string/app_name">

    <!-- Calls the necessary Braze methods to ensure that analytics are collected and that push notifications are properly forwarded to the Unity application. -->
    <activity android:name="com.braze.unity.BrazeUnityPlayerActivity"
      android:label="@string/app_name"
      android:configChanges="fontScale|keyboard|keyboardHidden|locale|mnc|mcc|navigation|orientation|screenLayout|screenSize|smallestScreenSize|uiMode|touchscreen"
      android:screenOrientation="sensor">
      <meta-data android:name="android.app.lib_name" android:value="unity" />
      <meta-data android:name="unityplayer.ForwardNativeEventsToDalvik" android:value="true" />
      <intent-filter>
        <action android:name="android.intent.action.MAIN" />
        <category android:name="android.intent.category.LAUNCHER" />
      </intent-filter>
    </activity>

    <receiver android:name="com.braze.push.BrazeAmazonDeviceMessagingReceiver" android:permission="com.amazon.device.messaging.permission.SEND">
      <intent-filter>
          <action android:name="com.amazon.device.messaging.intent.RECEIVE" />
          <action android:name="com.amazon.device.messaging.intent.REGISTRATION" />
          <category android:name="REPLACE_WITH_YOUR_PACKAGE_NAME" />
      </intent-filter>
    </receiver>
  </application>
</manifest>
Step 2.2: Store your ADM API key
First, generate an ADM API Key for your app, then save the key to a file named api_key.txt and add it in your project’s Assets/ directory.
Amazon will not recognize your key if api_key.txt contains any white space characters, such as a trailing line break.
Next, in your mainTemplate.gradle file, add the following:
1
2
3
4
5
6
7
task copyAmazon(type: Copy) {
    def unityProjectPath = $/file:///**DIR_UNITYPROJECT**/$.replace("\\", "/")
    from unityProjectPath + '/Assets/api_key.txt'
    into new File(projectDir, 'src/main/assets')
}

preBuild.dependsOn(copyAmazon)
Step 2.3: Add ADM Jar
The required ADM Jar file may be placed anywhere in your project according to the Unity JAR documentation.
Step 2.4: Add Client Secret and Client ID to your Braze dashboard
Lastly, you must add the Client Secret and Client ID you obtained in Step 1 to the Braze dashboard’s Manage Settings page.
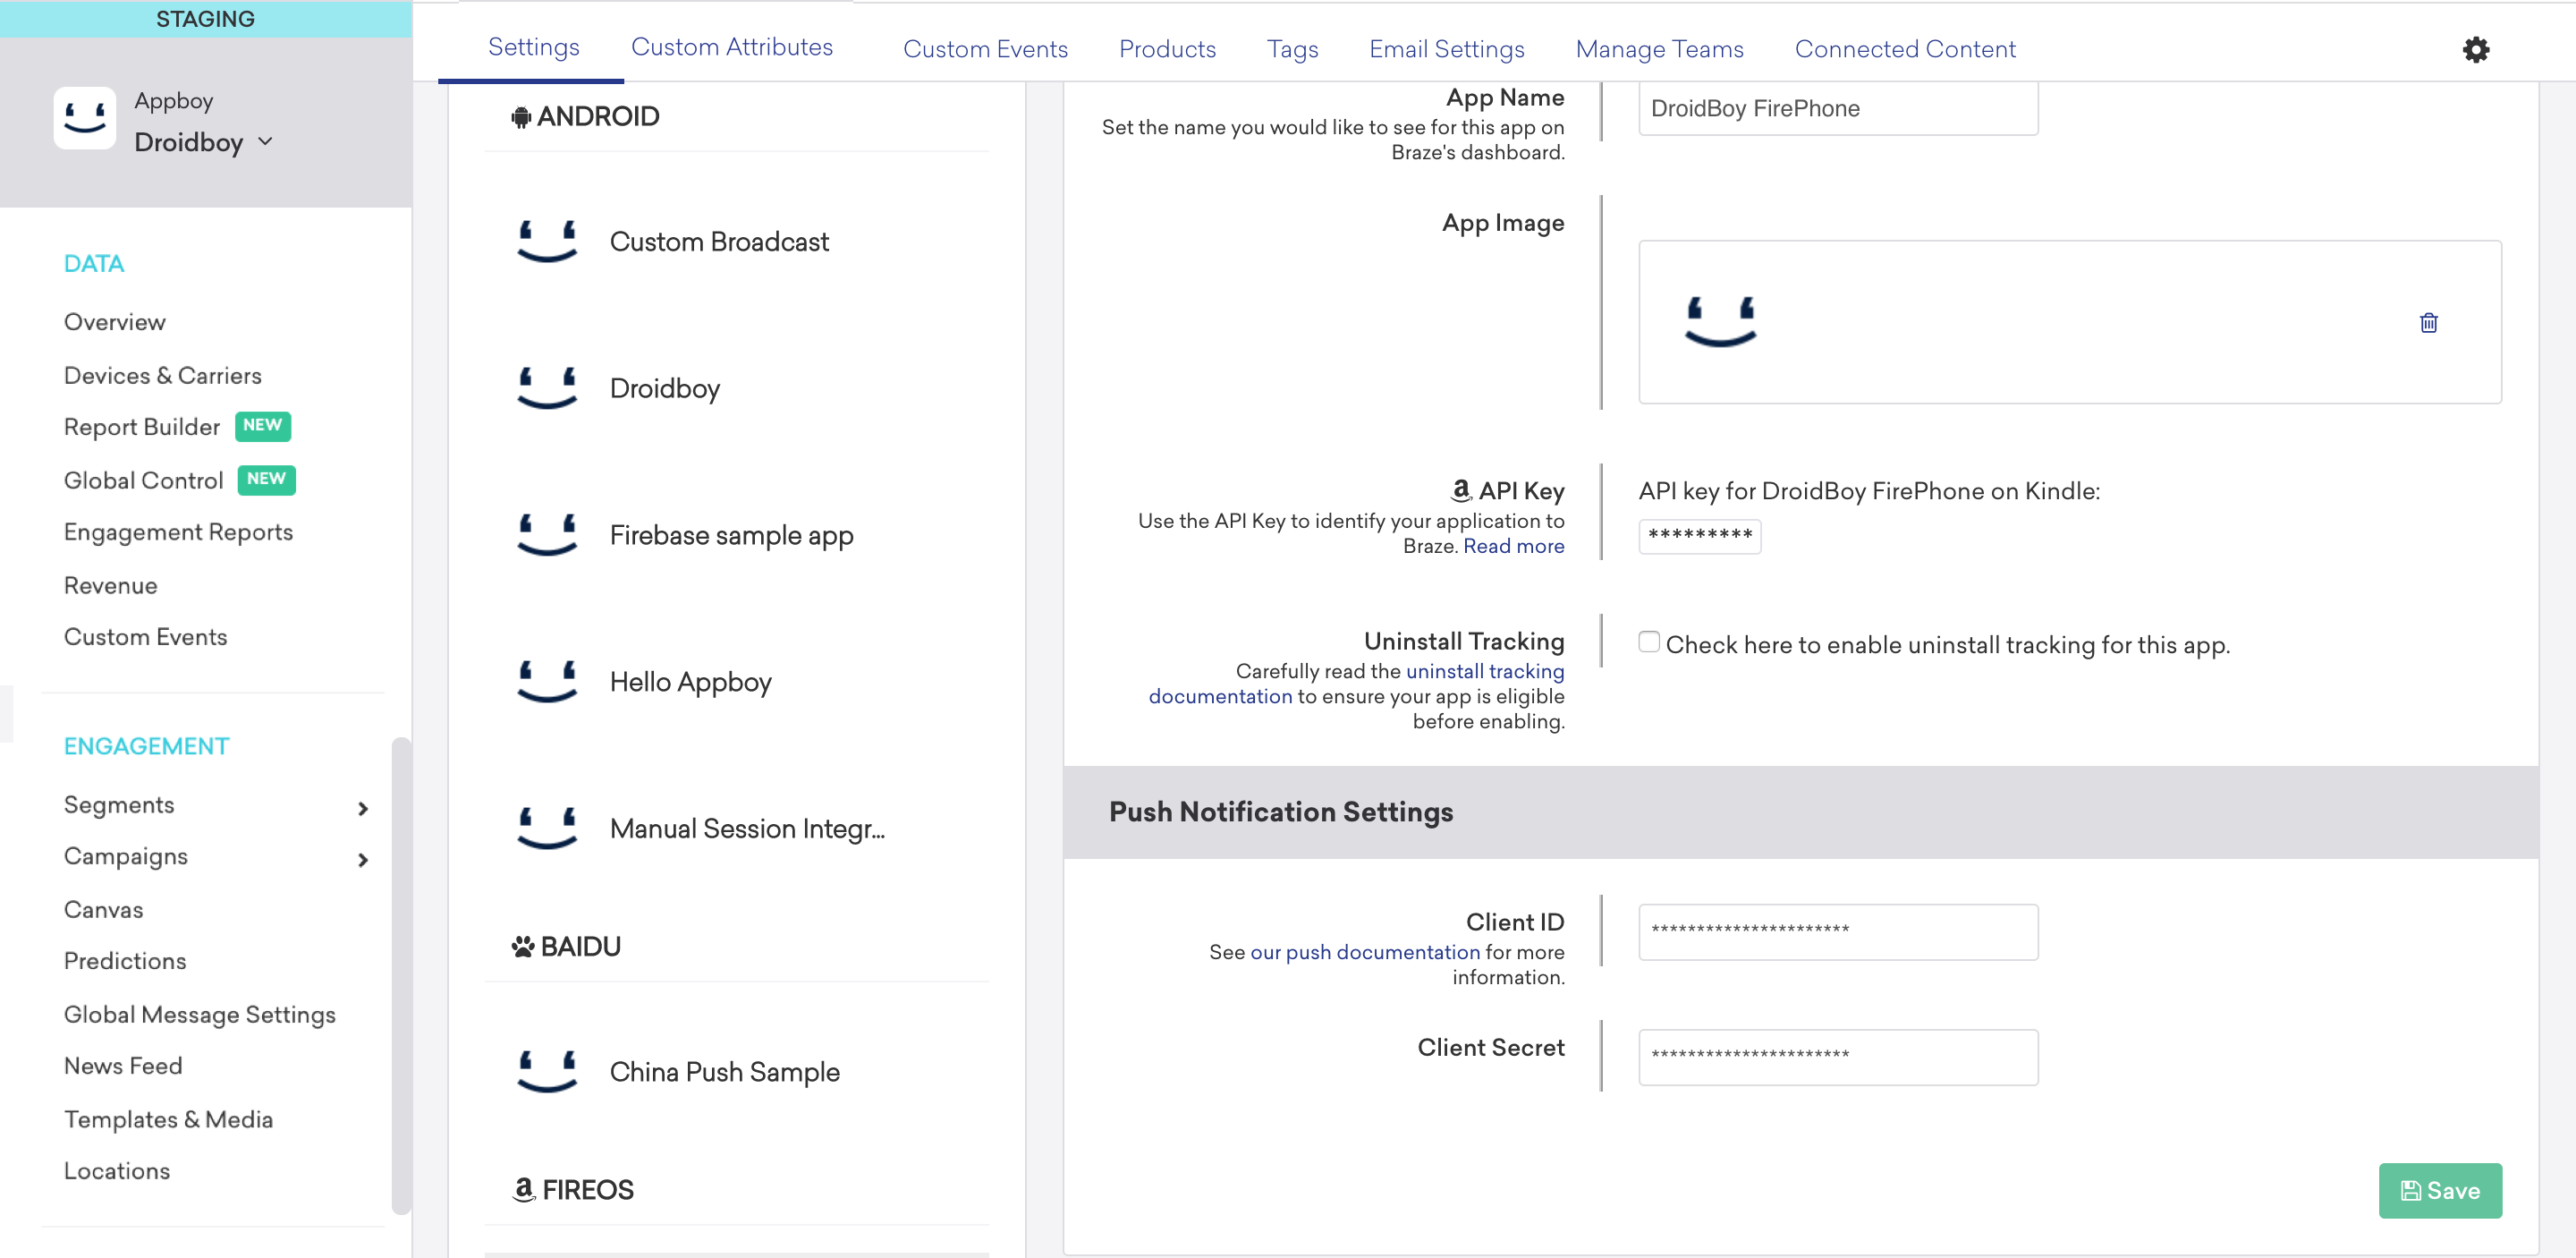
Step 3: Set push listeners
Step 3.1: Enable push received listener
The push received listener is fired when a user receives a push notification. To send the push payload to Unity, set the name of your game object and push the received listener callback method under the Set Push Received Listener.
Step 3.2: Enable push opened listener
The push opened listener is fired when a user launches the app by clicking on a push notification. To send the push payload to Unity, set the name of your game object and push opened listener callback method under the Set Push Opened Listener.
Step 3.3: Enable push deleted listener
The push deleted listener is fired when a user swipes away or dismisses a push notification. To send the push payload to Unity, set the name of your game object and push deleted listener callback method under the Set Push Deleted Listener.
Push listener example
The following example implements the BrazeCallback game object using a callback method name of PushNotificationReceivedCallback, PushNotificationOpenedCallback, and PushNotificationDeletedCallback respectively.

1
2
3
4
5
6
7
8
9
10
11
12
13
14
15
16
17
18
19
20
21
22
23
24
25
26
27
28
29
30
31
public class MainMenu : MonoBehaviour {
  void PushNotificationReceivedCallback(string message) {
#if UNITY_ANDROID
    Debug.Log("PushNotificationReceivedCallback message: " + message);
    PushNotification pushNotification = new PushNotification(message);
    Debug.Log("Push Notification received: " + pushNotification);
#elif UNITY_IOS
    ApplePushNotification pushNotification = new ApplePushNotification(message);
    Debug.Log("Push received Notification event: " + pushNotification);
#endif
  }

  void PushNotificationOpenedCallback(string message) {
#if UNITY_ANDROID
    Debug.Log("PushNotificationOpenedCallback message: " + message);
    PushNotification pushNotification = new PushNotification(message);
    Debug.Log("Push Notification opened: " + pushNotification);
#elif UNITY_IOS
    ApplePushNotification pushNotification = new ApplePushNotification(message);
    Debug.Log("Push opened Notification event: " + pushNotification);
#endif
  }

  void PushNotificationDeletedCallback(string message) {
#if UNITY_ANDROID
    Debug.Log("PushNotificationDeletedCallback message: " + message);
    PushNotification pushNotification = new PushNotification(message);
    Debug.Log("Push Notification dismissed: " + pushNotification);
#endif
  }
}
Step 3.1: Enable push received listener
The push received listener is fired when a user receives a push notification while actively using the application (such as when the app is foregrounded). Set the push received listener in the Braze configuration editor. If you need to configure your game object listener at runtime, use AppboyBinding.ConfigureListener() and specify BrazeUnityMessageType.PUSH_RECEIVED.
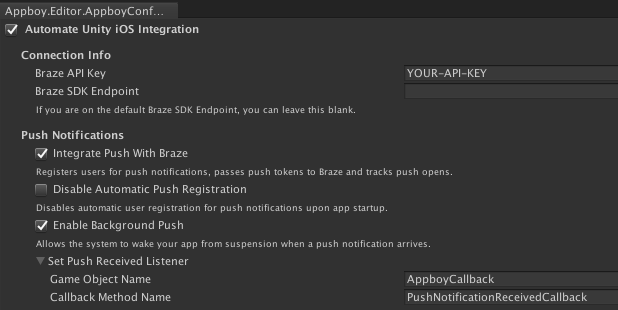
Step 3.2: Enable push opened listener
The push opened listener is fired when a user launches the app by clicking on a push notification. To send the push payload to Unity, set the name of your game object and push opened listener callback method under the Set Push Opened Listener option:

If you need to configure your game object listener at runtime, use AppboyBinding.ConfigureListener() and specify BrazeUnityMessageType.PUSH_OPENED.
Push listener example
The following example implements the AppboyCallback game object using a callback method name of PushNotificationReceivedCallback and PushNotificationOpenedCallback, respectively.

1
2
3
4
5
6
7
8
9
10
11
12
13
14
15
16
17
18
19
20
21
22
23
public class MainMenu : MonoBehaviour {
  void PushNotificationReceivedCallback(string message) {
#if UNITY_ANDROID
    Debug.Log("PushNotificationReceivedCallback message: " + message);
    PushNotification pushNotification = new PushNotification(message);
    Debug.Log("Push Notification received: " + pushNotification);
#elif UNITY_IOS
    ApplePushNotification pushNotification = new ApplePushNotification(message);
    Debug.Log("Push received Notification event: " + pushNotification);
#endif
  }

  void PushNotificationOpenedCallback(string message) {
#if UNITY_ANDROID
    Debug.Log("PushNotificationOpenedCallback message: " + message);
    PushNotification pushNotification = new PushNotification(message);
    Debug.Log("Push Notification opened: " + pushNotification);
#elif UNITY_IOS
    ApplePushNotification pushNotification = new ApplePushNotification(message);
    Debug.Log("Push opened Notification event: " + pushNotification);
#endif
  }
}
By updating your AndroidManifest.xml in the previous step, push listeners were automatically set up when you added the following lines. So, no further setup is required.
1
2
<action android:name="com.amazon.device.messaging.intent.RECEIVE" />
<action android:name="com.amazon.device.messaging.intent.REGISTRATION" />
Optional configurations
Deep linking to in-app resources
Although Braze can handle standard deep links (such as website URLs, Android URIs, etc.) by default, creating custom deep links requires an additional Manifest setup.
For setup guidance, visit Deep Linking to In-App Resources.
Adding Braze push notification icons
Do not add notification icon images under Assets/Plugins/Android/res. Unity deprecated providing Android resources in that path, which can surface build warnings or validation errors. Package your icon drawables in an Android Archive (AAR) plug-in or Android library project instead so they merge into the built app’s resources like any other drawable.
To add push icons to your project, create an AAR plug-in or Android library that contains the icon image files under res/drawable* (or density-specific folders), then reference each icon in Braze > Braze Configuration using the full @drawable/ resource name (see Step 2.1: Configure push settings). For Unity’s packaging and import steps, see Android Library Projects and Android Archive plug-ins.
For small icon artwork rules (alpha-only, no color), see Android push notifications, Step 2: Conform small icons to design guidelines.
Push token callback
To receive a copy of Braze device tokens from the OS, set a delegate using AppboyBinding.SetPushTokenReceivedFromSystemDelegate().
There are no optional configurations for ADM at this time.
Prerequisites
Before you can use this feature, you’ll need to integrate the .NET MAUI Braze SDK.
Setting up push notifications
To integrate push notifications for .NET MAUI (formerly Xamarin), you’ll need to complete the steps for native Android push notifications. The following steps are only a summary. For a full walkthrough, see the native push notification guide.
Step 1: Update your project
- Add Firebase to your Android project.
- Add the Cloud Messaging library to your Android project’s
build.gradle:1
implementation "google.firebase:firebase-messaging:+"
Step 2: Create your JSON credentials
- In Google Cloud, enable the Firebase Cloud Messaging API.
- Select Service Accounts > your project > Create Service Account, then enter a service account name, ID, and description. When you’re finished, select Create and continue.
- In the Role field, find and select Firebase Cloud Messaging API Admin from the list of roles.
- In Service Accounts, choose your project, then select Actions > Manage Keys > Add Key > Create new key. Choose JSON, then select Create.
Step 3: Upload your JSON credentials
- In Braze, select Settings > App Settings. Under your Android app’s Push Notification Settings, choose Firebase, then select Upload JSON File and upload the credentials you generated earlier. When you’re finished, select Save.
- Enable automatic FCM token registration, by going to Firebase Console. Open your project, then select Settings > Project settings. Select Cloud Messaging, then under Firebase Cloud Messaging API (V1), copy the number in the Sender ID field.
- In your Android Studio project and the following to your
braze.xml.
1
2
  <bool translatable="false" name="com_braze_firebase_cloud_messaging_registration_enabled">true</bool>
  <string translatable="false" name="com_braze_firebase_cloud_messaging_sender_id">FIREBASE_SENDER_ID</string>
To prevent Braze from triggering unnecessary network requests every time you send silent push notifications, remove any automatic network requests configured in your Application class’s onCreate() method. For more information see, Android Developer Reference: Application.
Step 1: Complete the initial setup
See the Swift integration instructions for information about setting up your application with push and storing your credentials on our server. Refer to the iOS MAUI sample application for more details.
Step 2: Request push notifications permission
Our .NET MAUI SDK now supports automatic push set up. Set up push automation and permissions by adding the following code to your Braze instance configuration:
1
2
configuration.Push.Automation = new BRZConfigurationPushAutomation(true);
configuration.Push.Automation.RequestAuthorizationAtLaunch = false;
Refer to the iOS MAUI sample application for more details. For more details, see the Xamarin documentation for Enhanced User Notifications in Xamarin.iOS.