# Braze Developer Guide Full Text
Consolidated full markdown text for all pages in the Developer Guide collection.
# Braze-Entwicklerhandbuch
Source: /docs/de/developer_guide/home/index.md
Braze-Entwicklerhandbuch
Hier finden Entwickler:innen alles, was sie über das Braze SDK wissen müssen. Jedes SDK wird in seinem eigenen öffentlichen GitHub-Repository gehostet, das vollständig kompilierbare Beispiel-Apps enthält, mit denen Sie die Features von Braze testen oder neben Ihren eigenen Anwendungen implementieren können. Weitere Informationen finden Sie unter Referenzen, Repositories und Beispiel-Apps . Möchten Sie sich mit anderen Entwickler:innen vernetzen, lernen und sich von ihnen inspirieren lassen, die mit Braze arbeiten? Treten Sie der Braze-Entwickler:innen-Community bei!
Auf dieser Landing-Page finden Entwickler:innen alle mit Braze verfügbaren Integrationen.
Featured:
- Web
- Android
- Swift
# Erste Schritte
Source: /docs/de/developer_guide/getting_started/index.md
Sie können diesem Leitfaden folgen oder sich bei [Braze Learning](https://learning.braze.com) nach geführten Kursen umsehen, wie z. B. unsere Lernpfade [für Marketer](https://learning.braze.com/path/marketer) und [für Entwickler:innen](https://learning.braze.com/path/developer).
# SDK-Übersicht für Entwickler:innen
Source: /docs/de/developer_guide/getting_started/sdk_overview/index.md
# [](https://learning.braze.com/path/developer/sdk-integration-basics){: style="float:right;width:120px;border:0;" class="noimgborder"} SDK-Übersicht für Entwickler:innen {#braze-learning-course-image_buster-assetsimgbl_icon3png-httpslearningbrazecompathdevelopersdk-integration-basics-stylefloatrightwidth120pxborder0-classnoimgbordersdk-overview-for-developers}
> Bevor Sie mit der Integration der Braze SDKs beginnen, werden Sie sich vielleicht fragen, was genau Sie da eigentlich entwickeln und integrieren. Vielleicht sind Sie neugierig, wie Sie das SDK weiter an Ihre Bedürfnisse anpassen können. Dieser Artikel hilft Ihnen, alle Ihre Fragen zum SDK zu beantworten.
Sind Sie ein Marketer, der einen grundlegenden Überblick über das SDK benötigt? Sehen Sie sich stattdessen unsere [Übersicht für Marketer](https://www.braze.com/docs/de/de/user_guide/get_started/sdk_overview) an.
Kurz gesagt, das Braze SDK:
* Sammelt und synchronisiert Nutzerdaten in einem konsolidierten Nutzerprofil
* Sammelt automatisch Sitzungsdaten, Geräteinformationen und Push-Tokens
* Erfasst Marketingdaten und angepasste Daten speziell für Ihr Unternehmen
* Unterstützt Push-Benachrichtigungen, In-App Messages und Content-Card-Nachrichtenkanäle
Sehen Sie sich das folgende Video an, um eine kurze Einführung in die Grundlagen der Braze SDK-Integration und die Kernfunktionalität zu erhalten.
## App-Performance {#app-performance}
Braze sollte keine negativen Auswirkungen auf die Performance Ihrer App haben.
Die Braze SDKs haben einen sehr geringen Platzbedarf. Wir ändern die Flush-Rate der Nutzerdaten automatisch in Abhängigkeit von der Qualität des Netzwerks und ermöglichen darüber hinaus eine manuelle Netzwerksteuerung. Wir stapeln API-Anfragen aus dem SDK automatisch, um sicherzustellen, dass die Daten schnell erfasst werden und gleichzeitig die maximale Netzwerkeffizienz erhalten bleibt. Und schließlich ist die Menge der Daten, die bei jedem API-Aufruf vom Client an Braze gesendet wird, äußerst gering.
## SDK-Kompatibilität {#sdk-compatibility}
Das Braze SDK ist so konzipiert, dass es andere SDKs in Ihrer App nicht beeinträchtigt. Sollten Sie Probleme feststellen, die Ihrer Meinung nach auf Inkompatibilität mit einem anderen SDK zurückzuführen sind, wenden Sie sich bitte an den Braze-Support.
## Standard-Analytics und Sitzungsbehandlung {#default-analytics-and-session-handling}
Bestimmte Nutzerdaten werden von unserem SDK automatisch erfasst, z. B. die zuerst verwendete App, die zuletzt verwendete App, die Gesamtzahl der Sitzungen, das Betriebssystem des Geräts usw. Wenn Sie unseren Integrationsleitfäden folgen, um unsere SDKs zu implementieren, können Sie die Vorteile dieser [Standard-Datenerfassung](https://www.braze.com/docs/de/de/user_guide/data/unification/user_data/sdk_data_collection) nutzen. Wenn Sie diese Liste überprüfen, können Sie vermeiden, die gleichen Informationen über Nutzer:innen mehrfach zu speichern. Mit Ausnahme des Sitzungsbeginns und des Sitzungsendes werden alle anderen automatisch erfassten Daten nicht auf Ihre Datenpunkt-Nutzung angerechnet.
**Note:**
Alle unsere Features sind konfigurierbar, aber es empfiehlt sich, das Standardmodell für die Datenerfassung vollständig zu implementieren.
Falls erforderlich können Sie nach Abschluss der Integration [die Erfassung bestimmter Daten beschränken](#blocking-data-collection).
## Daten hoch- und herunterladen {#data-upload-and-download}
Das Braze SDK speichert Daten (Sitzungen, angepasste Events usw.) im Cache und lädt sie in regelmäßigen Abständen hoch. Erst nachdem die Daten hochgeladen wurden, werden die Werte im Dashboard aktualisiert. Das Upload-Intervall berücksichtigt den Zustand des Geräts und richtet sich nach der Qualität der Netzwerkverbindung:
| Qualität der Netzwerkverbindung | Data-Flush-Intervall |
|---|---|
| Sehr gut | 10 Sekunden |
| Gut | 30 Sekunden |
| Schlecht | 60 Sekunden |
{: .reset-td-br-1 .reset-td-br-2 aria-label="Daten hoch- und herunterladen" }
Wenn keine Netzwerkverbindung besteht, werden die Daten lokal auf dem Gerät zwischengespeichert, bis die Netzwerkverbindung wiederhergestellt ist. Wenn die Verbindung wiederhergestellt ist, werden die Daten auf Braze hochgeladen.
Braze sendet zu Beginn einer Sitzung Daten an das SDK, die darauf basieren, in welche Segmente die Nutzer:innen zum Zeitpunkt der Sitzung fallen. Die neuen In-App-Nachrichten werden während der Sitzung nicht aktualisiert. Allerdings werden die Nutzerdaten während der Sitzung kontinuierlich verarbeitet, wenn sie vom Client gesendet werden. Inaktive Nutzer:innen (die die App das letzte Mal vor mehr als 7 Tagen genutzt haben) erhalten zum Beispiel bei ihrer ersten Sitzung in der App immer noch gezielte Inhalte.
## Sperrung der Datenerfassung {#blocking-data-collection}
Es ist möglich (wird aber nicht empfohlen), die automatische Erfassung bestimmter Daten aus Ihrer SDK-Integration zu blockieren bzw. Prozesse, die dies tun, zuzulassen.
Die Sperrung der Datenerfassung ist nicht empfehlenswert, da die Entfernung von analytischen Daten die Kapazität Ihrer Plattform für Personalisierung und Targeting verringert. Zum Beispiel:
- Wenn Sie keine vollständige Integration für den Standort auf einem der SDKs vornehmen, können Sie Ihre Nachrichten nicht anhand von Sprache oder Standort personalisieren.
- Wenn Sie die Integration für die Zeitzone nicht wählen, können Sie möglicherweise keine Nachrichten innerhalb der Zeitzone von Nutzer:innen versenden.
- Wenn Sie sich dafür entscheiden, keine visuellen Informationen für bestimmte Geräte zu integrieren, wird der Inhalt der Nachrichten möglicherweise nicht für dieses Gerät optimiert.
Wir empfehlen Ihnen dringend, die SDKs vollständig zu integrieren, um die Möglichkeiten unseres Produkts voll auszuschöpfen.
Sie können entweder bestimmte Teile des SDK einfach nicht integrieren oder [`disableSDK`](https://js.appboycdn.com/web-sdk/latest/doc/modules/braze.html#disablesdk) für spezifische Nutzer:innen verwenden. Diese Methode synchronisiert die Daten, die vor dem Aufruf von `disableSDK()` aufgezeichnet wurden, und führt dazu, dass alle nachfolgenden Aufrufe des Braze Web SDK für diese Seite und zukünftige Seitenladungen ignoriert werden. Wenn Sie die Datenerfassung zu einem späteren Zeitpunkt wieder aufnehmen möchten, können Sie mit der Methode [`enableSDK()`](https://js.appboycdn.com/web-sdk/latest/doc/modules/braze.html#enablesdk) die Datenerfassung fortsetzen. Mehr dazu erfahren Sie in unserem Artikel [Deaktivieren von Web-Tracking](https://www.braze.com/docs/de/de/developer_guide/analytics/managing_data_collection?sdktab=web).
Sie können mit [`setDeviceObjectAllowlist`](https://braze-inc.github.io/braze-android-sdk/kdoc/braze-android-sdk/com.braze.configuration/-braze-config/-builder/set-device-object-allowlist.html?query=fun%20setDeviceObjectAllowlist(deviceObjectAllowlist:%20EnumSet%3CDeviceKey%3E):%20BrazeConfig.Builder) das SDK so konfigurieren, dass es nur eine Teilmenge der Schlüssel oder Werte des Geräteobjekts gemäß einer festgelegten Allowlist sendet. Dies muss über [`setDeviceObjectAllowlistEnabled`](https://braze-inc.github.io/braze-android-sdk/kdoc/braze-android-sdk/com.braze.configuration/-braze-config/-builder/set-device-object-allowlist-enabled.html?query=fun%20setDeviceObjectAllowlistEnabled(enabled:%20Boolean):%20BrazeConfig.Builder) aktiviert werden.
**Important:**
Eine leere Allowlist führt dazu, dass **keine** Gerätedaten an Braze gesendet werden.
Sie können die zulässigen Felder zu [`configuration.devicePropertyAllowList`](https://braze-inc.github.io/braze-swift-sdk/documentation/brazekit/braze/configuration-swift.class/devicepropertyallowlist) in Ihrer `Braze.Configuration` zuweisen, um eine Allowlist für Gerätefelder anzulegen, die vom SDK erfasst werden. Die vollständige Liste der Felder ist definiert in [`Braze.Configuration.DeviceProperty`](https://braze-inc.github.io/braze-swift-sdk/documentation/brazekit/braze/configuration-swift.class/deviceproperty). Um die Erfassung aller Gerätefelder zu deaktivieren, setzen Sie den Wert dieser Eigenschaft auf ein leeres Set (`[]`).
**Important:**
Standardmäßig werden alle Felder durch das Braze Swift SDK erfasst. Das Entfernen einiger Geräteeigenschaften kann SDK-Features deaktivieren.
Weitere Einzelheiten zur Verwendung finden Sie unter [Speicher](https://www.braze.com/docs/de/de/developer_guide/storage?tab=swift) in der Dokumentation zum Swift SDK.
## Welche Version des SDK verwende ich? {#what-version-of-the-sdk-am-i-on}
Sie können die SDK-Version einer bestimmten App im Dashboard unter **Einstellungen > App Settings** sehen. Unter **Live SDK Version** finden Sie die höchste Braze SDK-Version, die von Ihrer letzten Live-App für mindestens 5 % Ihrer Nutzer:innen verwendet wurde.
{: style="max-width:80%"}
**Tip:**
Wenn Sie eine iOS-App haben, können Sie sich vergewissern, dass Sie das [Swift SDK](https://www.braze.com/docs/de/de/developer_guide/sdk_integration?sdktab=swift) anstelle des alten [Objective-C iOS SDK](https://www.braze.com/docs/de/de/developer_guide/platforms/legacy_sdks/ios/initial_sdk_setup/overview) verwenden, wenn Ihre **Live SDK Version** gleich oder höher als 5.0.0 ist, was die erste veröffentlichte Version des Swift SDK war.
# Übersicht über die Plattform
Source: /docs/de/developer_guide/getting_started/platform_overview/index.md
# [](https://learning.braze.com/path/developer){: style="float:right;width:120px;border:0;" class="noimgborder"}Erste Schritte: Übersicht über die Plattform {#braze-learning-course-image_buster-assetsimgbl_icon3png-httpslearningbrazecompathdeveloper-stylefloatrightwidth120pxborder0-classnoimgbordergetting-started-platform-overview}
> Dieser Artikel beschreibt die grundlegenden Komponenten und Funktionen der Braze-Plattform. Links in diesem Artikel führen zu wichtigen Themen von Braze.
**Tip:**
Schauen Sie sich unseren kostenlosen Kurs [Developer Learning Path](https://learning.braze.com/path/developer) zusammen mit diesen Artikeln an.
## Was ist Braze? {#what-is-braze}
Braze ist eine Customer-Engagement-Plattform. Sie erfasst Nutzerdaten, zeigt Nutzeraktionen und -verhalten an und ermöglicht es Ihnen, darauf zu reagieren. Die Plattform umfasst drei Hauptkomponenten: das SDK, das Dashboard und die REST API.
Für Marketer, die einen allgemeineren Überblick über Braze suchen, empfiehlt sich stattdessen der Abschnitt [Erste Schritte für Marketer](https://www.braze.com/docs/de/de/user_guide/get_started).
{: style="max-width:55%;float:right;margin-left:15px;"}
### SDK
Die [Braze SDKs](#integrating-braze) können in Ihre Mobil- und Webanwendungen integriert werden, um leistungsstarke Tools für Marketing, Nutzerverwaltung und Analytics bereitzustellen.
Kurz gesagt, wenn das SDK vollständig integriert ist:
* Sammelt und synchronisiert es Nutzerdaten in einem konsolidierten Nutzerprofil
* Erfasst es automatisch Sitzungsdaten, Geräteinformationen und Push-Token
* Erfasst es Marketing-Engagement-Daten und angepasste Daten speziell für Ihr Unternehmen
* Ist es auf Sicherheit ausgelegt und wird von Dritten auf Penetration getestet
* Ist es optimiert für Geräte mit niedrigem Batteriestand oder langsamem Netzwerk
* Unterstützt es serverseitige JWT-Signaturen für zusätzliche Sicherheit
* Hat es nur Schreibzugriff auf Ihre Systeme (kann keine Nutzerdaten abrufen)
* Unterstützt es Push-Benachrichtigungen, In-App-Nachrichten und Content-Card-Messaging-Kanäle
### Dashboard-Benutzeroberfläche {#dashboard-user-interface}
Das Dashboard ist die Benutzeroberfläche, die alle Daten und Interaktionen im Zentrum der Braze-Plattform steuert. Marketer nutzen das Dashboard, um ihre Arbeit zu erledigen und Inhalte zu erstellen. Entwickler:innen nutzen das Dashboard, um Einstellungen für die Integration von Apps zu verwalten, wie z. B. API-Schlüssel und Zugangsdaten für Push-Benachrichtigungen.
Wenn Sie gerade erst anfangen, sollte Ihr Teamadministrator Sie (und alle anderen Teammitglieder, die Zugriff auf Braze benötigen) als [Nutzer:innen in Ihrem Dashboard](https://www.braze.com/docs/de/de/user_guide/administer/personal) hinzufügen.
### REST API
Mit der Braze-API können Sie Daten in großem Umfang in und aus Braze verschieben. Verwenden Sie die API, um Updates aus dem Backend, aus Data Warehouses sowie aus anderen Erst- und Drittanbieterquellen einzubringen. Darüber hinaus können Sie die API nutzen, um angepasste Events zu Segmentierungszwecken direkt aus webbasierten Anwendungen hinzuzufügen. Sie können Nachrichten über die API triggern und versenden, sodass technische Ressourcen komplexe JSON-Metadaten in Ihre Campaigns aufnehmen können.
Die API stellt zudem einen Webdienst bereit, mit dem Sie Aktionen Ihrer Nutzer:innen direkt über HTTP aufzeichnen können, anstatt über die SDKs für Mobilgeräte und Web. In Kombination mit Webhooks bedeutet dies, dass Sie Aktionen verfolgen und Aktivitäten für Nutzer:innen innerhalb und außerhalb Ihres App-Erlebnisses triggern können. Der [API-Leitfaden](https://www.braze.com/docs/de/de/api/home) enthält eine Liste der verfügbaren Braze-API-Endpunkte und ihrer Verwendungsmöglichkeiten.
Mehr über die Teile und Komponenten von Braze finden Sie hier: [Erste Schritte: Überblick über die Architektur](https://www.braze.com/docs/de/de/developer_guide/getting_started/architecture_overview).
## Datenanalyse und Maßnahmen {#data-analysis-and-action}
Die in Braze gespeicherten Daten bleiben erhalten und können für Segmentierung, Personalisierung und Targeting verwendet werden, solange Sie Braze-Kund:in sind. So können Sie auf Nutzerprofildaten (z. B. Sitzungsaktivitäten oder Käufe) zugreifen, bis Sie sich entscheiden, diese Informationen zu löschen. Ein Streaming-Dienst könnte zum Beispiel die angesehenen Inhalte jeder Abonnentin und jedes Abonnenten vom ersten Tag an verfolgen (auch wenn das schon viele Jahre her ist) und diese Daten nutzen, um relevante Nachrichten zu versenden.
{: style="max-width:80%"}
### App-Analytics {#app-analytics}
Das Braze-Dashboard zeigt Grafiken an, die in Realtime auf der Grundlage von Analytics-Metriken und angepassten Events, die Sie instrumentieren, aktualisiert werden. Konsistente Messungen und Optimierungen mithilfe von A/B-Tests, benutzerdefinierten Berichten, Analytics und automatisierter Intelligenz unterstützen Ihr Customer-Engagement und Ihre Differenzierung.
### Nutzersegmentierung {#user-segmentation}
Mit der Segmentierung können Sie Nutzergruppen auf der Grundlage leistungsstarker Filter ihres In-App-Verhaltens, demografischer Daten und Ähnlichem erstellen. Außerdem haben Sie in Braze die Möglichkeit, jede In-App-Nutzeraktion als „angepasstes Event“ zu definieren, wenn die gewünschte Aktion nicht standardmäßig erfasst wird. Dasselbe gilt für Nutzermerkmale über „angepasste Attribute“. Nachdem ein Nutzersegment im Dashboard erstellt wurde, bewegen sich Ihre Nutzer:innen in das Segment hinein und aus ihm heraus, wenn sie die definierten Kriterien erfüllen (oder nicht erfüllen). Sie können z. B. ein Segment erstellen, das alle Nutzer:innen umfasst, die in der App Geld ausgegeben haben und die App zuletzt vor mehr als zwei Wochen genutzt haben.
Mehr über unsere Datenmodelle erfahren Sie hier: [Erste Schritte: Übersicht über Analytics](https://www.braze.com/docs/de/de/developer_guide/getting_started/architecture_overview).
## Multichannel-Messaging {#multichannel-messaging}
Nachdem Sie ein Segment definiert haben, können Sie mit den Messaging-Tools von Braze auf dynamische, personalisierte Weise mit Ihren Nutzer:innen in Kontakt treten. Braze wurde mit einem kanalunabhängigen, nutzerzentrierten Datenmodell entwickelt. Die Nachrichtenübermittlung erfolgt innerhalb Ihrer App oder Website (z. B. durch das Versenden von In-App-Nachrichten oder durch grafische Elemente wie Content-Card-Karusselle und Banner) oder außerhalb Ihres App-Erlebnisses (z. B. durch das Versenden von Push-Benachrichtigungen oder E-Mails). So können Ihre Marketer beispielsweise eine Push-Benachrichtigung und eine E-Mail an das im vorherigen Abschnitt definierte Beispielsegment senden.
{: style="border:none" }
| Kanal | Beschreibung |
| ---------------------------------------------------------------------------------------------------- | ------------------------------------------------------------------------------------------------------------------------------------------------------ |
| [Content Cards](https://www.braze.com/docs/de/de/user_guide/channels/content_cards)* | Senden Sie zielgerichtete und dynamische In-App-Benachrichtigungen, ohne die Kund:innen zu unterbrechen. |
| [E-Mail](https://www.braze.com/docs/de/de/user_guide/channels/email) | Versenden Sie Rich-HTML-Nachrichten, indem Sie Ihre E-Mail mit dem Rich-Text-Editor, unserem Drag-and-Drop-Editor oder durch Hochladen einer Ihrer vorhandenen HTML-Templates erstellen. |
| [In-App-Nachrichten](https://www.braze.com/docs/de/de/in-app_messages) | Senden Sie unaufdringliche In-App-Benachrichtigungen über die speziell entwickelte, native Benutzeroberfläche von Braze. |
| [Push](https://www.braze.com/docs/de/de/user_guide/channels/push) | Triggern Sie automatisch Push-Benachrichtigungen aus Messaging-Kampagnen oder Newsfeed-Elementen mithilfe des Apple Push Notification Service (APNs) für iOS oder Firebase Cloud Messaging (FCM) für Android. |
| [SMS, MMS und RCS](https://www.braze.com/docs/de/de/user_guide/channels/sms_mms_and_rcs)* | Nutzen Sie SMS, MMS oder RCS, um Transaktionsbenachrichtigungen zu versenden, Aktionen zu teilen, Erinnerungen zu senden und vieles mehr. |
| [Web-Push](https://www.braze.com/docs/de/de/user_guide/channels/push/platform_specific_resources/web) | Senden Sie Webbrowser-Benachrichtigungen, auch wenn Ihre Nutzer:innen gerade nicht auf Ihrer Website aktiv sind. |
| [Webhooks](https://www.braze.com/docs/de/de/about_webhooks) | Verwenden Sie Webhooks, um Aktionen außerhalb der App zu triggern und andere Systeme und Anwendungen mit Echtzeitdaten zu versorgen. |
| [WhatsApp](https://www.braze.com/docs/de/de/user_guide/channels/whatsapp/whatsapp_setup)* | Stellen Sie eine direkte Verbindung zu Ihren Nutzer:innen und Kund:innen her, indem Sie die beliebte Peer-to-Peer-Messaging-Plattform nutzen: WhatsApp. |
{: .reset-td-br-1 .reset-td-br-2 aria-label="Multichannel-Messaging" }
*Als Add-on-Feature erhältlich.*
### Anpassbare Komponenten {#customizable-components}
Alle Komponenten von Braze sind barrierefrei, anpassungsfähig und individuell gestaltbar. Sie können mit Braze beginnen, indem Sie die Standardkomponenten der BrazeUI verwenden und sie an Ihre Marke und Ihren Anwendungsfall anpassen.
Um über die Standardoptionen hinauszugehen, können Sie benutzerdefinierten Code schreiben, um das Aussehen eines Messaging-Kanals zu aktualisieren, damit er besser zu Ihrer Marke passt. So können Sie beispielsweise die Schriftart, die Schriftgröße und die Farben einer Komponente ändern. Marketer behalten direkt im Braze-Dashboard die Kontrolle über die Zielgruppe, den Inhalt, das On-Click-Verhalten und den Ablauf.
Sie können auch vollständig angepasste Komponenten erstellen, um zu steuern, wie Ihre Nachrichten aussehen, wie sie sich verhalten und wie sie mit anderen Messaging-Kanälen interagieren (z. B. Triggern einer Content-Card auf der Grundlage einer Push-Benachrichtigung). Braze bietet SDK-Methoden, mit denen Sie Metriken wie Impressionen, Klicks und Ausblendungen im Braze-Dashboard protokollieren können. Für jeden Messaging-Kanal gibt es einen Analytics-Artikel mit hilfreichen Informationen.
## Integration von Braze {#integrating-braze}
Braze ist für eine schnelle Integration konzipiert. Die durchschnittliche Amortisationszeit beträgt in unserem Kundenstamm sechs Wochen. Weitere Informationen zum Integrationsprozess finden Sie unter [Erste Schritte: Übersicht über die Integration](https://www.braze.com/docs/de/de/developer_guide/getting_started/integration_overview).
## Ressourcen als Lesezeichen {#resources-to-bookmark}
Als technische Ressource werden Sie an vielen Details von Braze beteiligt sein. Hier finden Sie gute Quellen, die Sie sich außerhalb unserer Dokumentation merken sollten. Halten Sie unser Glossar mit [den wichtigsten Begriffen](https://www.braze.com/docs/de/de/user_guide/get_started/terms_to_know) für den Fall bereit, dass Sie Fragen zu Braze-Begriffen haben.
| Ressource | Was Sie lernen werden |
|---|---|
| [SDK-Debugging](https://www.braze.com/docs/de/de/developer_guide/sdk_integration/debugging) | Bei der Fehlerbehebung Ihrer Integration ist das SDK-Debugging-Tool ein hilfreiches Werkzeug. Stellen Sie sicher, dass Sie es zur Hand haben! |
| [Öffentliches GitHub von Braze](https://github.com/braze-inc/) | In unserem GitHub-Repository finden Sie ausführliche Informationen zur Integration und Beispielcode. |
| [GitHub-Repository für Android SDK](https://github.com/braze-inc/braze-android-sdk/) | Das Android SDK GitHub-Repository. |
| [Android SDK-Referenz](https://appboy.github.io/appboy-android-sdk/kdoc/index.html) | Klassendokumentation für das Android SDK. |
| [iOS (Swift) SDK GitHub-Repository](https://github.com/braze-inc/braze-swift-sdk) | Das Swift SDK GitHub-Repository. |
| [iOS (Swift) SDK-Referenz](https://braze-inc.github.io/braze-swift-sdk/) | Klassendokumentation für das iOS SDK. |
| [GitHub-Repository für Web SDK](https://github.com/braze-inc/braze-web-sdk) | Das Web SDK GitHub-Repository. |
| [Web SDK-Referenz](https://js.appboycdn.com/web-sdk/5.0/doc/modules/braze.html) | Klassendokumentation für das iOS SDK. |
| [SDK-Changelogs](https://www.braze.com/docs/de/de/developer_guide/changelogs) | Braze bietet planmäßige monatliche Releases sowie zusätzliche Releases für kritische Probleme und größere Betriebssystem-Updates. |
| [Braze API Postman-Kollektion](https://documenter.getpostman.com/view/4689407/SVYrsdsG?version=latest) | Laden Sie hier unsere Postman-Kollektion herunter. |
| [Braze Systemstatus-Monitor](https://braze.statuspage.io/) | Unsere Statusseite wird immer dann aktualisiert, wenn es zu Zwischenfällen oder Ausfällen kommt. Besuchen Sie diese Seite, um Benachrichtigungen zu abonnieren. |
{: .reset-td-br-1 .reset-td-br-2 aria-label="Ressourcen als Lesezeichen" }
# Überblick über die Integration
Source: /docs/de/developer_guide/getting_started/integration_overview/index.md
# [](https://learning.braze.com/sdk-integration-basics){: style="float:right;width:120px;border:0;" class="noimgborder"} Erste Schritte: Überblick über die Integration {#braze-learning-course-image_buster-assetsimgbl_icon3png-httpslearningbrazecomsdk-integration-basics-stylefloatrightwidth120pxborder0-classnoimgbordergetting-started-integration-overview}
> Dieser Artikel bietet einen grundlegenden Überblick über den Onboarding-Prozess.
{: style="max-width:50%;float:right;margin-left:15px;border:none;"}
Als technische Ressource stärken Sie Ihr Team durch die Integration von Braze in Ihren Tech-Stack. Das Onboarding gliedert sich im Wesentlichen in vier Schritte:
* [Identifizierung und Planung](#discovery): Arbeiten Sie mit Ihrem Team zusammen, um den Projektumfang abzustimmen, eine Struktur für Daten und Kampagnen zu planen und eine geeignete Workspace-Struktur zu erstellen.
* [Integration](#integration): Führen Sie Ihren Plan aus, indem Sie das SDK und die API integrieren, Messaging-Kanäle aktivieren und den Import und Export von Daten einrichten.
* [Qualitätssicherung](#qa): Bestätigen Sie, dass der Daten- und Nachrichtenaustausch zwischen der Braze-Plattform und Ihrer App oder Website wie erwartet funktioniert.
* [Wartung](#maintenance): Nachdem Sie Braze an Ihr Marketingteam übergeben haben, sorgen Sie weiterhin dafür, dass alles reibungslos läuft.
**Tip:**
Wir wissen, dass jedes Unternehmen seine eigenen Bedürfnisse hat, und Braze ist so konzipiert, dass es eine Vielzahl von Anpassungsmöglichkeiten bietet, die auf Ihre speziellen Anforderungen zugeschnitten werden können. Die Integrationszeit hängt von Ihrem Anwendungsfall ab.
## Identifizierung und Planung {#discovery}
In dieser Phase arbeiten Sie mit Ihrem Team zusammen, um den Umfang der Onboarding-Aufgaben festzulegen und sicherzustellen, dass alle Beteiligten auf ein gemeinsames Ziel ausgerichtet sind.
Ihr Team führt eine End-to-End-Planung Ihrer Anwendungsfälle durch, um sicherzustellen, dass alles wie erwartet erstellt werden kann und die richtigen Daten dafür zur Verfügung stehen. In dieser Phase sind Ihr Projektleiter, der CRM-Leiter, die Front- und Backend-Entwickler:innen, die Produktverantwortlichen und die Marketer beteiligt.
Die Identifizierungs- und Planungsphase dauert im Durchschnitt etwa sechs Wochen. Technische Leiter können in dieser Phase mit einem Zeitaufwand von 2–4 Stunden pro Woche rechnen. Entwickler:innen, die mit dem Produkt arbeiten, können davon ausgehen, dass sie in der Identifizierungs- und Planungsphase 10–20 Stunden pro Woche für Braze aufwenden müssen.
**Tip:**
Während der Einführungsphase Ihres Unternehmens wird Braze technische Übersichtssitzungen abhalten. Wir empfehlen Entwickler:innen dringend, diese Sitzungen zu besuchen. Technische Übersichtssitzungen bieten Ihnen die Möglichkeit, Gespräche über die Skalierbarkeit der Plattformarchitektur zu führen und praktische Beispiele dafür zu sehen, wie Unternehmen Ihrer Größe mit ähnlichen Anwendungsfällen bereits erfolgreich waren.
{: style="max-width:40%;float:right;margin-left:15px;"}
### Kampagnenplanung {#campaign-planning}
Ihr CRM-Team arbeitet die Messaging-Anwendungsfälle aus, die Sie in naher Zukunft einführen werden. Dazu gehören:
* [Kanal](https://www.braze.com/docs/de/de/user_guide/channels) (zum Beispiel Push-Benachrichtigungen oder In-App-Nachrichten)
* [Zustellungsmethode](https://www.braze.com/docs/de/de/user_guide/messaging/campaigns/schedule_your_campaign) (zum Beispiel geplante Zustellung oder aktionsbasierte Zustellung)
* [Zielgruppe](https://www.braze.com/docs/de/de/user_guide/audience/segments)
* [Erfolgsmetriken](https://www.braze.com/docs/de/de/user_guide/messaging/messaging_fundamentals/conversion_events)
Eine Neukundenkampagne könnte zum Beispiel so aussehen: eine E-Mail, die täglich um 10 Uhr an ein Segment von Kund:innen gesendet wird, die gestern ihre erste Sitzung protokolliert haben. Das Konversions-Event (die Erfolgsmetrik) ist das Protokollieren einer Sitzung.
**Important:**
Mit der Integration kann erst begonnen werden, wenn der Schritt der Kampagnenplanung abgeschlossen ist. In diesem Schritt wird festgelegt, welche Komponenten von Braze während der Integrationsphase konfiguriert werden müssen.
### Erstellen von Datenanforderungen {#creating-data-requirements}
Ihr CRM-Team sollte dann festlegen, welche Daten benötigt werden, um die geplanten Kampagnen einzuführen, indem es Datenanforderungen erstellt.
Viele gängige Arten von Nutzerattributen, wie Name, E-Mail-Adresse, Geburtsdatum, Land und Ähnliches, werden nach der Integration des Braze SDK automatisch getrackt. Andere Arten von Daten müssen als angepasste Daten definiert werden.
Als Entwickler:in legen Sie gemeinsam mit Ihrem Team fest, welche zusätzlichen, angepassten Daten getrackt werden sollen. Ihre angepassten Daten haben Einfluss darauf, wie Ihre Nutzerbasis klassifiziert und segmentiert wird. Sie richten eine Event-Taxonomie für Ihren Growth Stack ein, um Ihre Daten so zu strukturieren, dass sie bei der Übertragung in und aus Braze mit Ihren Systemen kompatibel sind.
**Tip:**
Halten Sie die Nomenklatur der Daten in allen Tools einheitlich. Ihr Data Warehouse kann zum Beispiel „zeitlich begrenztes Angebot kaufen“ auf eine bestimmte Weise erfassen. Sie müssen entscheiden, ob für dieses Format ein angepasstes Event in Braze erforderlich ist.
Erfahren Sie mehr über [automatisch erfasste Daten und angepasste Daten](https://www.braze.com/docs/de/de/developer_guide/analytics).
### Planung von Anpassungen {#customizations-planning}
Sprechen Sie mit Ihren Marketern über deren gewünschte Anpassungen. Möchten Sie zum Beispiel die Standard-Content Cards von Braze implementieren? Möchten Sie ihr Erscheinungsbild leicht anpassen, damit es Ihren Markenrichtlinien entspricht? Möchten Sie eine völlig neue Benutzeroberfläche für eine Komponente entwickeln und deren Analytics von Braze verfolgen lassen? Unterschiedliche Stufen der Anpassung erfordern einen unterschiedlichen Umfang.
### Zugang zum Dashboard erhalten {#getting-dashboard-access}
Das Braze-Dashboard ist unsere Web-UI-Oberfläche. Marketer nutzen das Dashboard, um ihre Arbeit zu erledigen und Inhalte zu erstellen. Entwickler:innen nutzen das Dashboard, um Einstellungen für die Integration von Apps zu verwalten, wie z. B. API-Schlüssel und Zugangsdaten für Push-Benachrichtigungen.
Ihr Teamadministrator sollte Sie (und alle anderen Teammitglieder, die Zugriff auf Braze benötigen) als Nutzer:innen in Ihrem Dashboard hinzufügen.
### Workspaces und API-Schlüssel {#workspaces-and-api-keys}
Ihr Teamadministrator wird auch verschiedene [Workspaces](https://www.braze.com/docs/de/de/user_guide/administer/global/create_and_manage_workspaces) erstellen. Workspaces fassen Ihre Daten – Nutzer:innen, Segmente, API-Schlüssel – an einem Ort zusammen. Es empfiehlt sich, lediglich verschiedene Versionen derselben App oder sehr ähnlicher Apps in einem Workspace zusammenzufassen.
Ein wichtiger Aspekt ist, dass Workspaces API-Schlüssel für mehrere Plattformen (z. B. iOS und Android) bereitstellen. Sie verwenden die korrelierten API-Schlüssel, um SDK-Daten mit einem bestimmten Workspace zu verknüpfen. Navigieren Sie zu Ihren Workspaces, um auf den API-Schlüssel für Ihre einzelnen Apps zuzugreifen. Vergewissern Sie sich, dass jeder API-Schlüssel über die erforderlichen Berechtigungen verfügt, um die von Ihnen vorgesehenen Aufgaben auszuführen. Weitere Informationen finden Sie im [Artikel über die API-Bereitstellung](https://www.braze.com/docs/de/de/api/basics#rest-api-key).
**Important:**
Wichtig ist, dass Sie unterschiedliche Umgebungen für die Entwicklung und die Produktion einrichten. Die Einrichtung einer Testumgebung verhindert, dass Sie während des Onboardings und der QA echtes Geld ausgeben. Um eine Testumgebung zu erstellen, richten Sie einen Test-Workspace ein und stellen Sie sicher, dass Sie dessen API-Schlüssel verwenden, damit nicht der Produktions-Workspace mit Testdaten gefüllt wird.
## Integration {#integration}
{: style="max-width:45%;float:right;margin-left:15px;"}
Braze unterstützt iOS-Apps, Android-Apps, Web-Apps und mehr. Sie können sich auch für ein plattformübergreifendes Wrapper-SDK entscheiden, wie z. B. React Native oder Unity. In der Regel dauert eine Integration bei unseren Kunden zwischen 1 und 6 Wochen. Viele Kunden haben für die Braze-Integration nur eine:n einzige:n Entwickler:in benötigt – abhängig von der Breite der technischen Fähigkeiten und der verfügbaren Kapazität. Letztlich kommt es darauf an, welchen Umfang Ihre spezifische Integration hat und wie viel Zeit Ihr Team dem Braze-Projekt widmet.
Sie brauchen Entwickler:innen, die sich mit Folgendem auskennen:
* Arbeiten in der nativen Schicht Ihrer App oder Website
* Erstellen von Prozessen, die auf unsere REST API zugreifen
* Integrationstests
* JSON-Web-Token-Authentifizierung
* Allgemeine Kenntnisse der Datenverwaltung
* Einrichten von DNS-Einträgen
### CDP-Integrationspartner {#cdp-integration-partners}
Viele Kunden sehen im Onboarding von Braze eine Gelegenheit, auch eine Customer Data Platform (CDP) als Integrationspartner einzubinden. Braze bietet Daten-Tracking und Analytics, während eine CDP zusätzlich Daten-Routing und Orchestrierung bieten kann. Braze unterstützt die nahtlose Integration mit vielen CDPs, darunter u. a. [mParticle](https://www.braze.com/docs/de/de/partners/data_and_analytics/customer_data_platform/mparticle/mparticle) und [Segment](https://www.braze.com/docs/de/de/partners/data_and_analytics/customer_data_platform/segment/segment).
Wenn Sie eine Side-by-Side-Integration mit einer CDP durchführen, werden die Aufrufe aus dem SDK der CDP dem Braze SDK zugeordnet. Im Wesentlichen ist Folgendes zu beachten:
* Identifizierungsaufrufe auf `changeUser` ([Android](https://braze-inc.github.io/braze-android-sdk/kdoc/braze-android-sdk/com.braze/-i-braze/change-user.html), [iOS](https://braze-inc.github.io/braze-swift-sdk/documentation/brazekit/braze/changeuser(userid:sdkauthsignature:fileid:line:)/), [Web](https://js.appboycdn.com/web-sdk/latest/doc/modules/braze.html#changeuser)) zuordnen und Attribute festlegen.
* Daten-Flush-Aufrufe auf `requestImmediateDataFlush` ([Android](https://braze-inc.github.io/braze-android-sdk/kdoc/braze-android-sdk/com.braze/-i-braze/request-immediate-data-flush.html?query=abstract%20fun%20requestImmediateDataFlush()), [iOS](https://braze-inc.github.io/braze-swift-sdk/documentation/brazekit/braze/requestimmediatedataflush()), [Web](https://js.appboycdn.com/web-sdk/latest/doc/modules/braze.html#requestimmediatedataflush)) zuordnen.
* Angepasste Events oder Käufe protokollieren.
Je nachdem, für welche Plattform Sie sich entschieden haben, sind möglicherweise Beispiel-Integrationen zwischen dem Braze SDK und der CDP Ihrer Wahl verfügbar. Weitere Informationen finden Sie in unserer [Liste der CDP-Technologiepartner](https://www.braze.com/docs/de/de/partners/data_and_analytics).
### Braze-SDK-Integration {#braze-sdk-integration}
Das Braze SDK stellt zwei wichtige Funktionen bereit: Es erfasst und synchronisiert Nutzerdaten in ein konsolidiertes Nutzerprofil und stellt Messaging-Kanäle wie Push-Benachrichtigungen, In-App-Nachrichten und Content Cards bereit.
**Tip:**
Wenn das Braze SDK vollständig in Ihre App oder Website integriert ist, eröffnen sich völlig neue Marketing-Möglichkeiten. Wenn Sie die Integration des Braze SDK aufschieben, sind einige der in der Dokumentation beschriebenen Funktionen nicht verfügbar.
**Note:**
Um eine zusätzliche Sicherheitsebene hinzuzufügen, können Sie die [SDK-Authentifizierung](https://www.braze.com/docs/de/de/developer_guide/sdk_integration/authentication) aktivieren, um unbefugte SDK-Anfragen zu verhindern. Dieses Feature ist auf allen gängigen Plattformen verfügbar, einschließlich Web, iOS, Android, React Native, Flutter, Unity, Cordova, .NET MAUI (Xamarin) und Expo.
Während der SDK-Implementierung werden Sie:
* SDK-Integrationscode für jede Plattform schreiben, die Sie unterstützen möchten.
* Die Messaging-Kanäle für jede Plattform aktivieren und so sicherstellen, dass das Braze SDK die Daten aus Ihren Interaktionen mit Ihren Kund:innen über E-Mail, SMS, Push-Benachrichtigungen und andere Kanäle verfolgt.
* Alle geplanten Anpassungen der UI-Komponenten erstellen (z. B. angepasste Content Cards). Für vollständig angepasste Inhalte müssen Sie Analytics protokollieren, da die automatische Datenerfassung des SDK Ihre neuen Komponenten nicht erkennt. Sie können sich bei dieser Implementierung an unseren Standardkomponenten orientieren.
### Verwendung der Braze API {#using-the-braze-api}
Sie werden unsere REST API zu verschiedenen Zeitpunkten Ihrer Nutzung von Braze für verschiedene Aufgaben verwenden. Die Braze API ist nützlich für:
1. Importieren von historischen Daten; und
2. Kontinuierliche Updates, die nicht in Braze ausgelöst werden. Wenn ein Nutzerprofil beispielsweise auf VIP hochgestuft wird, ohne dass sich die Person bei einer App anmeldet, muss die API diese Information an Braze übermitteln.
Starten Sie mit der [Braze API](https://www.braze.com/docs/de/de/api/basics).
**Important:**
Achten Sie bei der Verwendung der API darauf, dass Sie Ihre Anfragen bündeln und nur Delta-Werte senden. Braze schreibt jedes gesendete Attribut neu. Aktualisieren Sie keine angepassten Attribute, deren Werte sich nicht geändert haben.
### Einrichten der Produktanalytik {#setting-up-product-analytics}
Bei Braze dreht sich alles um Daten. Die Daten in Braze werden im Nutzerprofil gespeichert.
Datenpunkte sind eine Struktur, mit der Sie sicherstellen, dass Sie die richtigen Daten und nicht bloß „irgendwelche“ Daten für Ihre Marketer erfassen. Machen Sie sich mit den [Datenpunkten](https://www.braze.com/docs/de/de/user_guide/data/infrastructure/data_points) vertraut.
### Migrieren alter Nutzerdaten {#migrating-legacy-user-data}
Sie können den Braze-Endpunkt [`/users/track`](https://www.braze.com/docs/de/de/api/endpoints/user_data/post_user_track) verwenden, um historische Daten zu migrieren, die außerhalb von Braze aufgezeichnet wurden. Beispiele für häufig importierte Daten sind Push-Token und frühere Käufe. Dieser Endpunkt kann für einmalige Importe oder regelmäßige Batch-Updates verwendet werden.
Sie können auch Nutzer:innen importieren und Kundenattributwerte durch einen einmaligen [CSV-Upload](https://www.braze.com/docs/de/de/user_guide/data_and_analytics/user_data_collection/user_import#importing-a-csv) in das Dashboard aktualisieren. Das Hochladen von CSV-Dateien kann für Marketer hilfreich sein, während unsere REST API mehr Flexibilität ermöglicht.
### Einrichten des Sitzungs-Trackings {#setting-up-session-tracking}
Das Braze SDK generiert Datenpunkte für „Sitzung öffnen“ und „Sitzung schließen“. Außerdem führt das Braze SDK in regelmäßigen Abständen Daten-Flushes durch. Unter den folgenden Links finden Sie die Standardwerte für das Sitzungs-Tracking. Alle Werte können angepasst werden – [Android](https://www.braze.com/docs/de/de/developer_guide/analytics/tracking_sessions?tab=android), [iOS](https://www.braze.com/docs/de/de/developer_guide/analytics/tracking_sessions?tab=swift), [Web](https://www.braze.com/docs/de/de/developer_guide/analytics/tracking_sessions?tab=web).
### Tracking von angepassten Events, Attributen und Kauf-Events {#tracking-custom-events-attributes-and-purchase-events}
Stimmen Sie sich mit Ihrem Team ab, wie Sie Ihr geplantes Datenschema, einschließlich angepasster Events, Nutzerattribute und Kauf-Events, einrichten möchten. Ihr [angepasstes Datenschema](https://www.braze.com/docs/de/de/user_guide/data/activation/events/custom_events) wird über das Dashboard eingegeben und muss genau dem entsprechen, was Sie während der SDK-Integration implementieren.
**Tip:**
Nutzer-IDs – in Braze `external_id` genannt – sollten für alle bekannten Nutzer:innen festgelegt werden. Diese sollten sich nicht ändern und zugänglich sein, wenn eine Person die App öffnet. So können Sie Ihre Nutzer:innen über verschiedene Geräte und Plattformen hinweg verfolgen. Lesen Sie den Artikel [Nutzerlebenszyklus](https://www.braze.com/docs/de/de/user_guide/data/unification/user_data/user_profile_lifecycle) für bewährte Verfahren.
### Andere Tools {#other-tools}
Je nach Anwendungsfall müssen Sie möglicherweise weitere Tools einrichten. Beispielsweise müssen Sie möglicherweise ein Tool wie [Geofences](https://www.braze.com/docs/de/de/user_guide/engagement_tools/locations_and_geofences#about-locations-and-geofences) konfigurieren, um Ihre Nutzer-Storys zu realisieren. Wir haben festgestellt, dass Kund:innen, die die Möglichkeit haben, diese zusätzlichen Tools nach Abschluss der wesentlichen Integrationsschritte einzurichten, am erfolgreichsten sind.
## Qualitätssicherung {#qa}
Durch eine QA-Prüfung, die Sie während der Integration durchführen, stellen Sie sicher, dass alles wie erwartet funktioniert. Diese QA lässt sich in zwei allgemeine Kategorien einteilen: Datenaufnahme und Messaging-Kanäle.
**Important:**
Stellen Sie sicher, dass Ihre Produktions- und Testumgebungen eingerichtet sind, bevor Sie mit der QA beginnen.
| **QA der Datenaufnahme** | **QA des Messagings** |
|---------------------------|---------------------------------------------------------------|
| Die Qualitätssicherung bezieht sich auf die Aufnahme, die Speicherung und den Export der Daten. | So stellen Sie sicher, dass Ihre Nachrichten korrekt an Ihre Nutzer:innen gesendet werden und alles hervorragend aussieht. |
| Führen Sie Tests durch, um sicherzustellen, dass die Daten ordnungsgemäß gespeichert werden. | Erstellen Sie Segmente von Nutzer:innen. |
| Vergewissern Sie sich, dass die Sitzungsdaten dem vorgesehenen Workspace in Braze korrekt zugewiesen werden. | Starten Sie Campaigns und Canvases erfolgreich. |
| Bestätigen Sie, dass Beginn und Ende der Sitzung aufgezeichnet werden. | Vergewissern Sie sich, dass die richtigen Campaigns für die richtigen Nutzersegmente angezeigt werden. |
| Bestätigen Sie, dass die Informationen zu den Nutzerattributen in den Nutzerprofilen korrekt erfasst sind. | Vergewissern Sie sich, dass die Push-Token korrekt registriert werden. |
| Testen Sie, ob die angepassten Daten in den Nutzerprofilen korrekt erfasst werden. | Vergewissern Sie sich, dass die Push-Token korrekt entfernt werden. |
| Erstellen Sie anonyme Nutzerprofile. | Testen Sie, ob die Push-Campaigns korrekt an die Geräte gesendet werden und das Engagement protokolliert wird. |
| Bestätigen Sie, dass aus anonymen Nutzerprofilen bekannte Nutzerprofile werden, wenn die Methode `changeUser()` aufgerufen wird. | Testen Sie, ob In-App-Nachrichten zugestellt und Metriken protokolliert werden. |
| | Testen Sie, ob Content Cards zugestellt und Metriken protokolliert werden. |
| | Ermöglichen Sie Connected-Content (zum Beispiel AccuWeather). |
| | Vergewissern Sie sich, dass alle Integrationen von Messaging-Kanälen ordnungsgemäß zusammenarbeiten. |
{: .reset-td-br-1 .reset-td-br-2 aria-label="Qualitätssicherung" }
**Note:**
Verwenden Sie bei der QA Ihrer SDK-Integration den [SDK-Debugger](https://www.braze.com/docs/de/de/developer_guide/sdk_integration/debugging), um Probleme zu beheben, ohne die ausführliche Protokollierung für Ihre App zu aktivieren.
### Übergabe von Braze an Marketer {#passing-braze-off-to-marketers}
Nach der Integration Ihrer Plattform oder Website werden Sie Ihr Marketingteam einbeziehen wollen, um ihm die Verantwortung für die Plattform zu übertragen. Dieser Prozess sieht in jedem Unternehmen anders aus, kann aber Folgendes umfassen:
* Zusammenstellen komplexer [Liquid-Logik](https://www.braze.com/docs/de/de/user_guide/personalization_and_dynamic_content/liquid#about-liquid)
* Unterstützung beim [IP-Warming für E-Mails](https://www.braze.com/docs/de/de/user_guide/channels/email/email_setup/ip_warming)
* Sicherstellen, dass andere Beteiligte verstehen, welche Arten von Daten getrackt werden
### Für die Zukunft entwickeln {#develop-for-the-future}
Haben Sie schon einmal eine Codebasis geerbt und hatten keine Ahnung, was sich die ursprünglichen Entwickler:innen dabei gedacht haben? Schlimmer noch: Haben Sie schon einmal Code geschrieben, ihn vollständig verstanden und waren dann völlig verwirrt, als Sie ein Jahr später darauf zurückkamen?
Beim Onboarding von Braze werden die gemeinsamen Entscheidungen, die Sie in Bezug auf Daten, Nutzerprofile, den Umfang der Integrationen, die Funktionsweise von Anpassungen und mehr getroffen haben, noch frisch in Ihrem Gedächtnis und daher offensichtlich sein. Wenn Ihr Team Braze erweitern möchte oder wenn Ihrem Braze-Projekt andere technische Ressourcen zugewiesen werden, werden diese Informationen nicht mehr so präsent sein.
Erstellen Sie eine Ressource, um die Informationen festzuhalten, die Sie in den technischen Übersichtssitzungen gelernt haben. Diese Ressource hilft Ihnen, Zeit beim Onboarding neuer Entwickler:innen für Ihr Team zu sparen (oder kann von Ihnen selbst als Referenz herangezogen werden, wenn Sie Ihre aktuelle Braze-Implementierung erweitern müssen).
## Wartung {#maintenance}
Nach der Übergabe an Ihre Marketer werden Sie weiterhin für die Wartung zuständig sein. Achten Sie auf iOS- und Android-Updates, die sich auf das Braze SDK auswirken könnten, und stellen Sie sicher, dass Ihre Drittanbieter auf dem neuesten Stand sind.
Aktualisierungen an der Braze-Plattform können Sie über das Braze [GitHub](https://github.com/braze-inc/) verfolgen. Gelegentlich erhält Ihr Administrator auch E-Mails über dringende Updates und Fehlerbehebungen direkt von Braze.
## SDK-Rate-Limits {#sdk-rate-limits}
### Monatlich aktive Nutzer:innen CY 24-25, Universal MAU, Web MAU und Mobile MAU {#monthly-active-users-cy-24-25-universal-mau-web-mau-and-mobile-mau}
Für Kund:innen, die Monthly Active Users CY 24-25, Universal MAU, Web MAU und Mobile MAU erworben haben, setzt Braze serverseitige Rate-Limits für API-Anfragen durch, die von unseren SDKs zur Aktualisierung von Sitzungen, Nutzerattributen, Events und anderen Nutzerprofildaten verwendet werden. Dies dient der Stabilität der Plattform und der Aufrechterhaltung eines schnellen, zuverlässigen Dienstes.
* Die stündlichen Rate-Limits richten sich nach dem erwarteten SDK-Traffic auf Ihrem Konto, der der Anzahl der monatlich aktiven Nutzer:innen (MAU), die Sie erworben haben, der Branche, der Saisonalität oder anderen Faktoren entsprechen kann. Wenn das stündliche Rate-Limit erreicht ist, drosselt Braze die Anfragen bis zur nächsten Stunde.
* Alle Rate-Limit-Anfragen werden vom SDK automatisch erneut versucht.
* SDK-Anfragen korrelieren mit der Menge der angepassten Daten, die in Ihrer Implementierung gesammelt werden. Wenn Sie ständig nahe an Ihrem stündlichen Rate-Limit liegen oder es erreichen, sollten Sie Folgendes in Betracht ziehen:
* Überprüfen Sie Ihre SDK-Integration, um eine übermäßige Datenerfassung zu reduzieren.
* Blockieren Sie angepasste Daten, die für Ihre Marketing-Anwendungsfälle nicht unbedingt erforderlich sind.
* Burst-Rate-Limits sind kurzlebige Rate-Limits, die angewendet werden, wenn in einem sehr kurzen Zeitraum (d. h. innerhalb von Sekunden) eine große Anzahl von Anfragen eintrifft. Sie müssen nicht eingreifen, wenn Burst-Limits auftreten – das SDK wird es kurz darauf erneut versuchen.
* Konstante Rate-Limits kontrollieren das anhaltende Anfragevolumen über einen rollierenden Zeitraum, der länger ist als das Burst-Fenster (z. B. mehrere Minuten), und tragen dazu bei, den laufenden Datenverkehr zwischen Burst-Limits und Ihrem stündlichen Rate-Limit auszugleichen.
### Ihre Rate-Limits finden {#finding-your-rate-limits}
Um die aktuellen Limits auf der Grundlage des erwarteten SDK-Durchsatzes zu finden, gehen Sie zu **Einstellungen** > **APIs und Bezeichner** > **API- und SDK-Limits**.
Die historische Nutzung finden Sie unter **Einstellungen** > **APIs und Bezeichner** > **API- und SDK-Dashboard**.
### Höhere Rate-Limits anfordern {#requesting-higher-rate-limits}
Sollten Sie ein höheres Braze-Rate-Limit benötigen, wenden Sie sich bitte an den Braze-Support oder Ihren Customer-Success-Manager und geben Sie dabei die folgenden Details an:
* Ob Sie eine vorübergehende oder dauerhafte Erhöhung benötigen.
* Warum Sie die Erhöhung benötigen.
* Welche Endpunkte und Umgebungen betroffen sind.
* Ihr voraussichtliches Traffic-Volumen und Ihren Zeitplan, einschließlich Startdatum, Dauer und Spitzenzeiten.
* Ob Sie Aufrufe bündeln oder den Datenverkehr über einen längeren Zeitraum verteilen können.
Nachdem Sie Ihre Anfrage eingereicht haben, prüft Braze diese und informiert Sie über das Ergebnis.
### Änderungen und Support {#changes-and-support}
Braze kann Rate-Limits ändern, um die Systemstabilität zu schützen oder einen höheren Datendurchsatz auf Ihrem Konto zu ermöglichen. Wenden Sie sich an den Braze-Support oder Ihren Customer-Success-Manager, wenn Sie Fragen zu Rate-Limits haben und wissen möchten, wie sich diese auf Ihr Unternehmen auswirken.
# Architektonische Übersicht
Source: /docs/de/developer_guide/getting_started/architecture_overview/index.md
# Die ersten Schritte: Architektonische Übersicht {#getting-started-architectural-overview}
> Dieser Artikel beschreibt die verschiedenen Teile des Technologie-Stacks von Braze und enthält Links zu relevanten Artikeln.
Bei Braze geht es in erster Linie um Daten. Die Braze-Plattform, unterstützt durch das SDK, die REST API und Partnerintegrationen, erlaubt Ihnen, Daten zu aggregieren und darauf zu reagieren.
{: style="display:block;margin:auto;" }
* [Datenaufnahme](#ingestion): Braze bezieht Daten aus einer Vielzahl von Quellen.
* [Klassifizierung](#classification): Ihr Marketing-Team segmentiert Ihre Nutzerbasis dynamisch anhand dieser Metriken.
* [Orchestrierung](#orchestration): Braze koordiniert auf intelligente Weise Nachrichten an verschiedene Zielgruppen-Segmente zum idealen Zeitpunkt.
* [Aktion](#action): Ihr Marketing-Team arbeitet mit den Daten und erstellt Inhalte über eine Vielzahl von Messaging-Kanälen wie SMS und E-Mail.
* [Personalisierung](#personalization): Die Daten werden in Realtime mit personalisierten Informationen über Ihre Zielgruppe transformiert.
* [Export](#exporting-data): Anschließend verfolgt Braze das Engagement Ihrer Nutzer:innen mit diesen Nachrichten und speist es zurück in die Plattform, wodurch ein Kreislauf entsteht. Sie erhalten Insights in diese Daten durch Realtime-Berichte und Analytics.
All dies zusammen sorgt für erfolgreiche Interaktionen zwischen Ihrer Nutzerbasis und Ihrer Marke, damit Sie Ihre Ziele erreichen können. Braze bietet das alles im Rahmen eines vertikal integrierten Stacks. Lassen Sie uns jede Schicht einzeln untersuchen.
## Datenaufnahme {#ingestion}
Braze basiert auf einer Streaming-Daten-Architektur, die Snowflake, Kafka, MongoDB und Redis nutzt. Daten aus verschiedenen Quellen können über SDK und API in Braze geladen werden. Die Plattform kann alle Daten in Realtime verarbeiten, unabhängig davon, wie verschachtelt oder strukturiert sie sind. Die Daten in Braze werden im Nutzerprofil gespeichert.
**Tip:**
Braze kann die Daten von Nutzer:innen während ihrer gesamten Journey mit Ihnen verfolgen – von dem Zeitpunkt, an dem sie anonym sind, bis zu dem Zeitpunkt, an dem sie in Ihrer App angemeldet und bekannt sind. Für alle Ihre Nutzer:innen sollten Nutzer-IDs festgelegt werden, die in Braze `external_id`s heißen. Diese sollten sich nicht ändern und zugänglich sein, wenn Nutzer:innen die App öffnen, damit Sie sie über verschiedene Geräte und Plattformen hinweg verfolgen können. Lesen Sie den [Artikel zum Nutzer:innen-Lebenszyklus](https://www.braze.com/docs/de/de/user_guide/data/unification/user_data/user_profile_lifecycle) für bewährte Verfahren.
{: style="display:block;margin:auto;" }
**Note:**
Diese personenbezogene Datenbank mit Nutzerprofilen ermöglicht eine interaktive Geschwindigkeit in Realtime. Braze berechnet Werte vor, wenn Daten eintreffen, und speichert die Ergebnisse in einem leichtgewichtigen Dokumentenformat, um schnell abrufbar zu sein. Und weil die Plattform von Anfang an so konzipiert wurde, ist sie ideal für die meisten Messaging-Anwendungsfälle – insbesondere in Kombination mit anderen Datenkonzepten wie Connected-Content, Produktkatalogen und verschachtelten Attributen.
### Aufschlüsselung der Datenquellen {#data-source-breakdown}
Braze setzt für verschiedene Features unterschiedliche Systeme zur Speicherung von Daten ein. Für die Datenverwaltung und Fehlerbehebung ist es wichtig zu verstehen, welche Features welche Datenquellen verwenden.
#### MongoDB-basierte Features {#mongodb-powered-features}
- Angepasste Events (verfolgt durch SDK und API)
- Angepasste Attribute
- Nutzerprofile
- Kauf-Events
- Die meisten Features der Segmentierung und des Targetings
#### Snowflake-basierte Features {#snowflake-powered-features}
- [SQL-Segmenterweiterungen](https://www.braze.com/docs/de/de/user_guide/audience/segments/segment_extension/sql_segments)
- [Vorhersagesuite](https://www.braze.com/docs/de/de/user_guide/brazeai)
- [Personalisierte Pfade](https://www.braze.com/docs/de/de/user_guide/messaging/canvas/canvas_components/experiment_step/personalized_paths) und [Personalisierte Variante](https://www.braze.com/docs/de/de/user_guide/engagement_tools/testing/multivariant_testing/optimizations#personalized-variant)
- [KI-personalisierte Artikelempfehlungen](https://www.braze.com/docs/de/de/user_guide/brazeai/item_recommendations/creating_recommendations/ai)
- [Geschätzte tatsächliche Öffnungsrate](https://www.braze.com/docs/de/de/user_guide/message_building_by_channel/email/reporting_and_analytics/email_reporting#estimated-real-open-rate) (verwendet keine angepassten Events)
**Important:**
**Überlegungen zur Datenlöschung:** Angepasste Events werden in MongoDB gespeichert und sind von den Snowflake-Daten getrennt. Wenn Sie fehlerhafte Daten angepasster Events entfernen müssen, müssen Sie dies in MongoDB vornehmen. Snowflake-basierte Features (wie SQL-Segmenterweiterungen und andere Snowflake-basierte Features) verwenden Daten aus Snowflake, die separat verarbeitet werden. Das Löschen von Daten aus einem System führt nicht automatisch zum Löschen dieser Daten aus dem anderen System.
### Backend-Datenquellen über die Braze-API {#backend-data-sources-through-the-braze-api}
Braze kann über unsere [REST API](https://www.braze.com/docs/de/de/api/endpoints/user_data) Daten aus Nutzer:innen-Datenbanken, Offline-Transaktionen und Data Warehouses abrufen.
### Frontend-Datenquellen über das Braze SDK {#frontend-data-sources-through-braze-sdk}
Braze erfasst über das [Braze SDK](https://www.braze.com/docs/de/de/user_guide/get_started/sdk_overview) automatisch First-Party-Daten aus Frontend-Datenquellen, z. B. aus Nutzergeräten. Das SDK behandelt neue (anonyme) Nutzer:innen und verwaltet die Daten ihres Nutzerprofils während ihres gesamten Lebenszyklus.
### Partnerintegrationen {#partner-integrations}
Braze hat über 150 Technologie-Partner, die wir „Alloys“ nennen. Sie können Ihre Daten-Feeds durch ein sinnvolles, robustes Netzwerk [interoperabler Technologien und Daten-APIs](https://www.braze.com/docs/de/de/partners/home) ergänzen.
### Direkte Warehouse-Anbindung über Braze Cloud-Datenaufnahme {#direct-warehouse-connection-through-braze-cloud-data-ingestion}
Sie können Kundendaten von Ihrem Data Warehouse über [Braze Cloud-Datenaufnahme](https://www.braze.com/docs/de/de/user_guide/data/unification/cloud_ingestion) in wenigen Minuten in die Plattform streamen und so relevante Nutzerattribute, Events und Käufe synchronisieren. Die Cloud-Datenaufnahme-Integration unterstützt komplexe Datenstrukturen, einschließlich verschachtelter JSON und Arrays von Objekten.
Cloud-Datenaufnahme kann Daten von Snowflake, Amazon Redshift, Databricks und Google BigQuery synchronisieren.
## Klassifizierung {#classification}
Die Klassifizierungsschicht ermöglicht es Ihrem Team, Zielgruppen, sogenannte [Segmente](https://www.braze.com/docs/de/de/user_guide/audience/segments), auf der Grundlage von Daten, die Braze durchlaufen, dynamisch zu klassifizieren und aufzubauen.
**Note:**
Die Klassifizierung, Orchestrierung und Personalisierung sind die Ebenen, auf denen Ihr Marketing-Team einen Großteil seiner Arbeit erledigen wird. Die Schnittstelle zu diesen Ebenen erfolgt meist über das Braze-Dashboard, unsere Weboberfläche. Entwickler:innen spielen eine Rolle beim Einrichten und Anpassen dieser Ebenen.
Viele gängige Arten von Nutzerattributen wie Name, E-Mail, Geburtsdatum, Land und andere werden vom SDK standardmäßig automatisch getrackt. Als Entwickler:in arbeiten Sie mit Ihrem Team zusammen, um zu definieren, welche zusätzlichen, angepassten Daten für Ihren Anwendungsfall sinnvoll zu tracken sind. Ihre angepassten Daten haben Einfluss darauf, wie Ihre Nutzerbasis klassifiziert und segmentiert wird. Sie werden dieses Datenmodell während des Implementierungsprozesses einrichten.
Erfahren Sie mehr über [automatisch erfasste Daten und angepasste Daten](https://www.braze.com/docs/de/de/developer_guide/analytics).
## Orchestrierung {#orchestration}
Die Orchestrierungsschicht erlaubt es Ihrem Marketing-Team, Nutzer-Journeys auf der Grundlage Ihrer Nutzerdaten und des früheren Engagements zu gestalten. Diese Arbeit wird hauptsächlich über unsere Dashboard-Oberfläche erledigt, aber Sie haben auch die Möglichkeit, [Campaigns über die API](https://www.braze.com/docs/de/de/api/api_campaigns#api-campaigns) zu starten. Sie können Braze beispielsweise über Ihr Backend mitteilen, wann die Nachrichten und Campaigns, die Ihre Marketer im Dashboard entworfen haben, versendet werden sollen, und sie gemäß Ihrer Backend-Logik triggern. Ein Beispiel für eine API-getriggerte Nachricht könnte das Zurücksetzen von Passwörtern oder Versandbestätigungen sein.
**Note:**
API-getriggerte Campaigns sind ideal für erweiterte transaktionale Anwendungsfälle. Sie erlauben Marketern die Verwaltung von Campaign-Texten, multivariaten Tests und Wiederzulassungsregeln im Braze-Dashboard und triggern gleichzeitig die Zustellung dieser Inhalte von Ihren Servern und Systemen. Die API-Anfrage zum Triggern der Nachricht kann auch zusätzliche Daten enthalten, die in Realtime in die Nachricht eingefügt werden.
### Feature-Flags {#feature-flags}
Braze ermöglicht Ihnen, Funktionen für eine Auswahl von Nutzer:innen über [Feature-Flags](https://www.braze.com/docs/de/de/developer_guide/feature_flags) aus der Ferne zu aktivieren oder zu deaktivieren. So können Ihre Marketer mit Messaging für Features, die Sie noch nicht für die gesamte Zielgruppe eingeführt haben, das richtige Segment Ihrer Nutzerbasis ansprechen. Darüber hinaus können Feature-Flags dazu verwendet werden, ein Feature in der Produktion ein- und auszuschalten, ohne zusätzliche Code-Bereitstellung oder Updates im App Store. So können Sie neue Features sicher und zuverlässig einführen.
## Personalisierung {#personalization}
Die Personalisierungsebene bietet Ihnen die Möglichkeit, dynamische Inhalte in Ihren Nachrichten zuzustellen. Durch den Einsatz von Liquid, einer weit verbreiteten Sprache für die Personalisierung, kann Ihr Team dynamisch auf vorhandene Daten zurückgreifen, um die auf jede Empfänger:in zugeschnittene Nachricht anzuzeigen. Darüber hinaus können Sie mithilfe von [Connected-Content](https://www.braze.com/docs/de/de/user_guide/messaging/design_and_edit/personalize/connected_content) beliebige Informationen, die auf Ihrem Webserver oder über eine API verfügbar sind, direkt in die von Ihnen versendeten Nachrichten, wie Push-Benachrichtigungen oder E-Mails, einfügen. Connected-Content baut auf Liquid auf und verwendet eine vertraute Syntax.
Und da dieser dynamische Content programmierbar ist, können Marketer berechnete Werte, Antworten aus anderen Aufrufen oder Artikel aus dem Produktkatalog einbeziehen. Nachdem Sie diese Systeme während der Implementierung eingerichtet haben, kann Ihr Marketing-Team dies mit wenig bis gar keiner Unterstützung durch technische Teams tun.
## Aktion {#action}
Die Aktionsschicht ermöglicht das eigentliche Messaging an Ihre Nutzer:innen. Der Zweck der Aktionsschicht ist es, die richtige Nachricht zum richtigen Zeitpunkt an die richtigen Nutzer:innen zu senden, und zwar auf der Grundlage der Daten, die über alle zuvor besprochenen Schichten verfügbar sind. Die Nachrichtenübermittlung erfolgt innerhalb Ihrer App oder Website (z. B. durch das Versenden von In-App-Nachrichten oder durch grafische Elemente wie Content-Card-Karusselle und Banner) oder außerhalb Ihres App-Erlebnisses (z. B. durch das Versenden von Push-Benachrichtigungen oder E-Mails).
### Messaging-Kanäle {#messaging-channels}
Braze wurde entwickelt, um mit seinem kanalagnostischen, nutzerzentrierten Datenmodell eine sich entwickelnde technologische Landschaft zu bewältigen. Das Dashboard verwaltet die Zustellung von Nachrichten und die Auslöser für Transaktionen. So können Ihre Marketer beispielsweise eine SMS-Nachricht triggern, die einen Gutschein für einen Ihrer neu eröffneten Standorte anbietet, wenn Nutzer:innen den Geofence in der Nähe dieses Standorts betreten, oder Nutzer:innen eine E-Mail schicken, um sie über die neue Staffel ihrer Lieblingssendung zu informieren.
Das [Braze SDK](https://www.braze.com/docs/de/de/user_guide/get_started/sdk_overview) ermöglicht zusätzliche Messaging-Kanäle: Push, In-App-Nachrichten und Content Cards. Sie integrieren das SDK in Ihre App oder Website, damit Ihr Marketing-Team das Braze-Dashboard nutzen kann, um seine Campaigns über alle unterstützten Messaging-Kanäle zu koordinieren.

## Daten exportieren {#exporting-data}
Alle Interaktionen der Endnutzer:innen mit Braze werden getrackt, sodass Sie Ihr Engagement und Ihre Reichweite messen können. Und nachdem Braze Ihre Daten aus all diesen Quellen zusammengetragen hat, können Sie sie mit einer Vielzahl von Tools zurück in Ihren Tech Stack exportieren und so den Kreislauf schließen.
### Currents
[Currents](https://www.braze.com/docs/de/de/user_guide/data/distribution/braze_currents) ist ein optionales Add-on für Braze, das einen granularen Streaming-Export ermöglicht, der kontinuierlich andere Ziele Ihres Stacks speist. Currents ist ein Rohdaten-Feed pro Nutzer:in und Event, der alle fünf Minuten oder alle 15.000 Events Daten exportiert, je nachdem, was zuerst eintritt. Beispiele für einige nachgelagerte Ziele für Currents sind u. a. Segment, S3, Redshift und Mixpanel.
### Snowflake-Datenfreigabe {#snowflake-data-sharing}
Die Snowflake-Funktionalität für [die sichere Datenfreigabe](https://www.braze.com/docs/de/de/partners/data_and_analytics/data_warehouses/snowflake) erlaubt es Braze, Ihnen einen sicheren Zugriff auf die Daten in unserem Snowflake-Portal zu gewähren, ohne dass Sie sich über Reibungsverluste im Arbeitsablauf, Fehlerpunkte und unnötige Kosten sorgen müssen, die mit den typischen Beziehungen zu Datenanbietern verbunden sind. Die gesamte Freigabe erfolgt über die eindeutige Dienstschicht und den Metadaten-Store von Snowflake: Es werden keine Daten zwischen Konten kopiert oder übertragen. Das ist ein wichtiges Konzept, da gemeinsam genutzte Daten keinen Speicherplatz in einem Verbraucherkonto beanspruchen und daher nicht zu Ihren monatlichen Gebühren für den Datenspeicher beitragen. Den Verbrauchern werden nur die Rechenressourcen (d. h. virtuelle Warehouses) berechnet, die zur Abfrage der gemeinsam genutzten Daten verwendet werden.
### Braze-Export-APIs {#braze-export-apis}
Die Braze-API stellt [Endpunkte](https://www.braze.com/docs/de/de/api/endpoints/export) zur Verfügung, die es Ihnen erlauben, sowohl aggregierte Analytics als auch einzelne Nutzerdaten programmatisch zu exportieren. Diese Daten können für Zielgruppen und Segmente beliebiger Größe exportiert werden.
### CSVs {#csvs}
Schließlich haben Sie die Möglichkeit, Ihre Daten auf aggregierter Ebene direkt vom Dashboard als [CSV-Datei](https://www.braze.com/docs/de/de/user_guide/data/distribution/export_braze_data) herunterzuladen. Die CSV-Option erlaubt es Ihren Team-Mitgliedern, Daten aus Braze zu exportieren.
**Tip:**
Während der CSV-Export ein Basislimit von 500.000 Zeilen hat, gibt es für die APIs diesbezüglich kein Limit.
## Praxisbeispiel {#putting-it-all-together}
Eine Ihrer Nutzer:innen, nennen wir sie Mel, hat gerade Ihre Produktankündigung erhalten. Hinter den Kulissen haben alle Ebenen der Braze-Plattform zusammengearbeitet, um sicherzustellen, dass dieser Prozess reibungslos abläuft.
Die Informationen von Mel wurden über einen CSV-Import von Ihrer Legacy-Plattform für Customer-Engagement in Braze übernommen. Jedes Mal, wenn Mel nach der Integration mit Ihrer App interagierte, wurden weitere Daten zu ihrem Kundenprofil hinzugefügt.
Ihre Produktankündigung wurde an alle Kund:innen gesendet, denen ein ähnlicher Artikel in Ihrer App gefallen hat. Sie haben diese Daten als angepasstes Event definiert. Das SDK hat dieses Event getrackt und Ihre Nutzerbasis entsprechend segmentiert. Braze orchestrierte die beste Tageszeit, um diese Ankündigung zu versenden, und personalisierte die Ankündigung, indem Mel mit ihrem bevorzugten Namen angesprochen wurde.
Wenn Mel die Ankündigung öffnet, fügt sie Ihr neues Produkt zu ihrer Wunschliste hinzu. Braze trackt automatisch, dass sie die E-Mail angeklickt hat. Das SDK verfolgt, dass sie Ihr neues Produkt auf die Wunschliste gesetzt hat. Jedes Mal, wenn sie mit Ihrer Marke interagieren, erfahren Sie und Ihre Nutzer:innen mehr übereinander.

# Mit einem LLM entwickeln
Source: /docs/de/developer_guide/getting_started/build_with_llm/index.md
# Mit einem LLM entwickeln {#building-with-an-llm}
> Nutzen Sie KI-Codierungsassistenten, um Ihren Braze-Integrations-Workflow zu beschleunigen. Verbinden Sie Ihre IDE über Context7 mit dem Braze Docs MCP-Server und erhalten Sie präzise, aktuelle SDK-Anleitungen direkt in Ihrer Entwicklungsumgebung.
KI-Codierungsassistenten können Ihnen beim Schreiben von Integrationscode, bei der Fehlerbehebung und beim Erkunden der Features des Braze SDK behilflich sein—jedoch nur, wenn sie über den richtigen Kontext verfügen. Der Braze Docs MCP-Server ermöglicht Ihrem KI-Assistenten direkten Zugriff auf die Braze-Dokumentation, sodass er präzise Code-Snippets generieren und technische Fragen auf Grundlage der neuesten SDK-Referenzen beantworten kann.
## Verbindung mit dem Braze Docs MCP herstellen {#connecting-to-the-braze-docs-mcp}
[Context7](https://context7.com/braze-inc/braze-docs) fungiert als Schnittstelle zwischen Ihrem KI-Assistenten und der Braze-Dokumentationsbibliothek. Durch Hinzufügen von Context7 zur MCP-Konfiguration Ihrer IDE kann Ihr KI-Assistent die gesamte Braze-Dokumentation abfragen und bei Bedarf relevante SDK-Referenzen, Code-Beispiele und Integrationsanleitungen abrufen.
### Einrichtung von Context7 {#setting-up-context7}
Um Ihren KI-Assistenten über Context7 mit dem Braze Docs MCP zu verbinden, fügen Sie die folgende Konfiguration zur `mcp.json`-Datei Ihrer IDE hinzu.
Gehen Sie in [Cursor](https://cursor.com/) zu **Settings** > **Tools and Integrations** > **MCP Tools** > **Add Custom MCP** und fügen Sie anschließend das folgende Snippet hinzu:
```json
{
"mcpServers": {
"context7": {
"command": "npx",
"args": ["-y", "@upstash/context7-mcp@latest"]
}
}
}
```
Speichern Sie die Konfiguration und starten Sie Cursor neu. Ihr KI-Assistent kann nun über Context7 auf die Braze-Dokumentation zugreifen, wenn Sie `use context7` in Ihre Prompts einfügen.
Öffnen Sie in Claude Desktop **Settings** > **Developer** > **Edit Config** und fügen Sie Folgendes zu Ihrer `claude_desktop_config.json`-Datei hinzu:
```json
{
"mcpServers": {
"context7": {
"command": "npx",
"args": ["-y", "@upstash/context7-mcp@latest"]
}
}
}
```
Speichern Sie die Konfiguration und starten Sie Claude Desktop neu.
Fügen Sie Folgendes zu Ihrer VS Code `settings.json`- oder `.vscode/mcp.json`-Datei hinzu:
```json
{
"mcpServers": {
"context7": {
"command": "npx",
"args": ["-y", "@upstash/context7-mcp@latest"]
}
}
}
```
Speichern Sie die Konfiguration und starten Sie VS Code neu.
**Note:**
Context7 unterscheidet sich vom [Braze MCP-Server](https://www.braze.com/docs/de/de/developer_guide/mcp_server). Context7 gewährt Ihrem KI-Assistenten Zugriff auf die **Braze-Dokumentation**, während der Braze MCP-Server schreibgeschützten Zugriff auf **Ihre Braze-Workspace-Daten** (wie Campaigns, Segmente und Analytics) ermöglicht. Sie können beide zusammen verwenden, um eine umfassendere KI-gestützte Entwicklungserfahrung zu erzielen.
## Prompts für die Braze-SDK-Entwicklung schreiben {#writing-prompts-for-braze-sdk-development}
Nachdem Sie Context7 eingerichtet haben, fügen Sie `use context7` in Ihre Prompts ein, um Ihrem KI-Assistenten mitzuteilen, dass er die Braze-Dokumentation als Kontext heranziehen soll. Die folgenden Beispiele veranschaulichen, wie Sie effektive Prompts für gängige SDK-Aufgaben erstellen können.
### React Native SDK {#react-native-sdk}
Diese Prompts veranschaulichen gängige Integrationsaufgaben für das [Braze React Native SDK](https://www.braze.com/docs/de/de/developer_guide/sdk_integration?sdktab=react%20native).
#### Initialisierung des SDK {#initializing-the-sdk}
```text
Using the Braze React Native SDK, show me how to initialize the SDK
in my App.tsx with an API key and custom endpoint. Include the
configuration for automatic session tracking. Use context7.
```
#### Protokollierung angepasster Events mit Eigenschaften {#logging-custom-events-with-properties}
```text
I need to track user activity in my React Native app using the Braze
React Native SDK. Show me how to log a custom event called
"ProductViewed" with properties for product_id, category, and price.
Use context7.
```
#### Push-Benachrichtigungen einrichten {#setting-up-push-notifications}
```text
Using the Braze React Native SDK, walk me through requesting push
notification permissions on both iOS and Android 13+. Include the
code for registering the push token with Braze. Use context7.
```
#### Umgang mit In-App-Nachrichten {#handling-in-app-messages}
```text
Show me how to subscribe to in-app messages using the Braze React
Native SDK, including how to log impressions and button clicks
programmatically. Use context7.
```
### Web SDK {#web-sdk}
Diese Prompts veranschaulichen gängige Integrationsaufgaben für das [Braze Web SDK](https://www.braze.com/docs/de/de/developer_guide/sdk_integration?sdktab=web).
#### Initialisierung des SDK
```text
Using the Braze Web SDK, show me how to initialize the SDK with
braze.initialize(), including the API key, base URL, and options
for enabling logging and automatic in-app message display.
Use context7.
```
#### Tracking von angepassten Events und Käufen {#tracking-custom-events-and-purchases}
```text
Using the Braze Web SDK, create a JavaScript module that logs a
custom event called "VideoPlayed" with properties for video_id,
duration_seconds, and completion_percentage. Also show how to log
a purchase with product ID, price, currency code, and quantity.
Use context7.
```
#### Registrierung für Web-Push {#registering-for-web-push}
```text
Using the Braze Web SDK, provide the HTML and JavaScript needed to
register a user for web push notifications after they click a
"Subscribe to updates" button. Include the service worker setup.
Use context7.
```
#### Verwaltung von Nutzerattributen {#managing-user-attributes}
```text
Using the Braze Web SDK, show me how to set standard user attributes
(first name, email, country) and custom user attributes (favorite_genre,
subscription_tier) for the current user. Use context7.
```
## Klartext-Dokumentation {#plain-text-documentation}
Sie können auf die Dokumentation des Braze Developer Guide als reine Textdateien zugreifen, die für KI-Tools und LLMs optimiert sind. Diese Dateien enthalten die Braze-Dokumentation in einem Format, das KI-Assistenten ohne den Aufwand des HTML-Renderings analysieren und verstehen können.
| Datei | Beschreibung |
|------|-------------|
| [llms.txt](https://www.braze.com/docs/de/de/developer_guide/llms.txt) | Ein Verzeichnis der Braze-Dokumentationsseiten für Entwickler:innen mit Titeln und Beschreibungen. Nutzen Sie dies als Ausgangspunkt, um die verfügbare Dokumentation zu entdecken. |
| [llms-full.txt](https://www.braze.com/docs/de/de/developer_guide/llms-full.txt) | Die vollständige Braze-Dokumentation für Entwickler:innen in einer einzigen Textdatei, formatiert für die Verwendung mit LLMs. |
{: .reset-td-br-1 .reset-td-br-2 aria-label="Klartext-Dokumentation" }
Diese Dateien entsprechen dem [llms.txt-Standard](https://llmstxt.org/), einer sich entwickelnden Konvention, um Dokumentationen für KI-Tools zugänglich zu machen. Sie können diese Dateien direkt in Ihren Prompts referenzieren oder ihren Inhalt zur Kontextualisierung in ein LLM einfügen.
# Anpassungsübersicht
Source: /docs/de/developer_guide/getting_started/customization_overview/index.md
# Anpassungsübersicht {#customization-overview}
> Fast alles bei Braze ist vollständig anpassbar! Die Artikel in diesem Anpassungsleitfaden zeigen Ihnen, wie Sie Ihr Braze-Erlebnis durch eine Mischung aus Konfiguration und Anpassung optimieren können. Während dieses Prozesses sollten Marketing- und Entwicklerteams eng zusammenarbeiten, um genau abzustimmen, wie die Messaging-Kanäle von Braze angepasst werden sollen.
**Note:**
Das Braze SDK ist ein leistungsstarkes Toolkit, das bei übergeordneter Betrachtung zwei wichtige Funktionen bietet: Es hilft beim Sammeln und Synchronisieren von Nutzerdaten über verschiedene Plattformen hinweg in einem konsolidierten Nutzerprofil und verwaltet außerdem Messaging-Kanäle wie In-App-Nachrichten, Push-Benachrichtigungen und Content Cards. Die Artikel im Anpassungsleitfaden setzen voraus, dass Sie den [Prozess der SDK-Implementierung](https://www.braze.com/docs/de/de/developer_guide/home) bereits durchlaufen haben.
Alle Komponenten von Braze sind barrierefrei, anpassungsfähig und individuell gestaltbar. Daher empfehlen wir Ihnen, mit den Standardkomponenten von `BrazeUI` zu beginnen und diese an Ihre Marke und Ihren Anwendungsfall anzupassen. Bei Braze gliedern wir die Anpassung in drei verschiedene Ansätze, basierend auf dem verbundenen Aufwand und dem Grad der Flexibilität. Diese Ansätze werden als „Crawl“, „Walk“ und „Run“ bezeichnet.
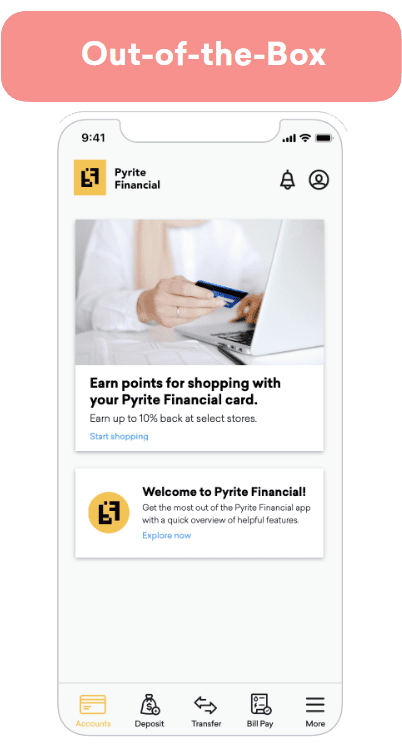
- **Crawl:** Nutzen Sie die grundlegenden Stil-Optionen für eine schnelle, mühelose Implementierung.
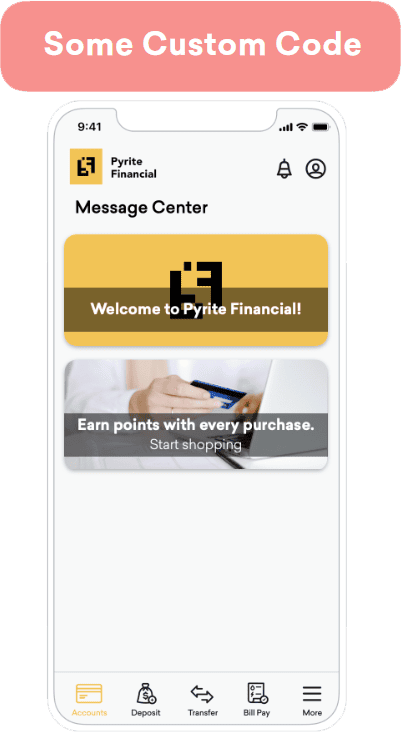
- **Walk:** Ergänzen Sie die Standard-Templates durch einige angepasste Stile, um sie besser auf Ihre Marke abzustimmen.
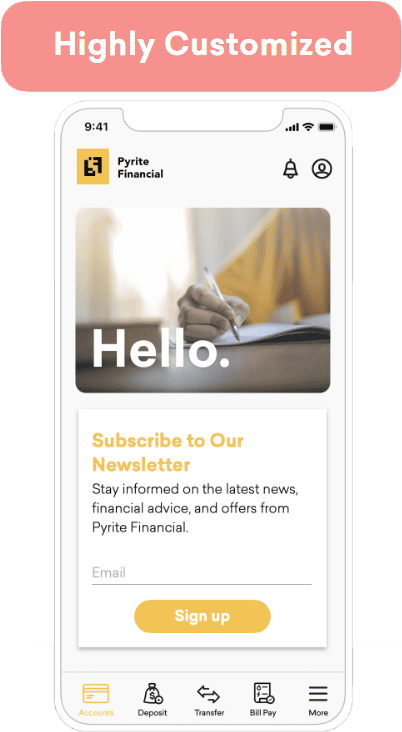
- **Run:** Passen Sie jeden Teil Ihrer Nachrichten an – vom Stil über das Verhalten bis hin zu den kanalübergreifenden Verbindungen.
{: style="max-width:35%;float:right;margin-left:15px;border:none;"}
Beim Crawl-Ansatz liegt die Anpassung direkt in den Händen der Marketer. Zwar ist im Vorfeld ein gewisser Entwicklungsaufwand erforderlich, um die Messaging-Kanäle von Braze in Ihre App oder Website zu integrieren, aber mit diesem Ansatz können Sie schneller loslegen.
Marketer legen über das Dashboard den Inhalt, die Zielgruppe und den Zeitpunkt der Nachrichten fest. Die Stil-Optionen sind jedoch begrenzt. Dieser Ansatz eignet sich am besten für Teams mit begrenzten Entwicklerressourcen oder für Teams, die schnell einfache Inhalte teilen möchten.
{: style="max-width:35%;float:right;margin-left:15px;border:none;"}
Der Walk-Ansatz ist ein hybrider Implementierungsansatz, bei dem sowohl Marketing- als auch Entwicklerteams zusammenarbeiten, um das Branding Ihrer App oder Website umzusetzen.
Während der Implementierung schreiben Entwickler:innen angepassten Code, um das Erscheinungsbild eines Messaging-Kanals besser an Ihre Marke anzupassen. Dazu gehört das Ändern von Schriftart, Schriftgröße, abgerundeten Ecken und Farben. Bei diesem Ansatz werden weiterhin die Standardoptionen verwendet, nur mit programmatischem Template-Styling ergänzt.
Marketer behalten weiterhin die Kontrolle über die Zielgruppe, den Inhalt, das On-Click-Verhalten und die Ablaufzeit direkt im Braze-Dashboard.
Anpassungsübersicht
Anpassung
Beschreibung
Aufwand
Niedrig
Entwicklungsarbeit
0–4 Stunden
UI
Verwenden Sie Braze-Templates oder Ihre eigenen, von Entwickler:innen erstellten Templates.
{: style="max-width:35%;float:right;margin-left:15px;border:none;"}
Beim Run-Ansatz übernehmen Entwickler:innen die Führung und haben die volle Kontrolle über das Nutzererlebnis. Angepasster Code bestimmt, wie die Nachrichten aussehen, wie sie sich verhalten und wie sie mit anderen Messaging-Kanälen interagieren (z. B. Auslösen einer Content Card auf Grundlage einer Push-Benachrichtigung).
Wenn Sie völlig neue, angepasste Inhalte erstellen – z. B. neue Arten von Content Cards oder In-App-Nachrichten mit maßgeschneiderter UI –, erfolgt das [Analytics-Tracking](https://www.braze.com/docs/de/de/developer_guide/analytics) nicht automatisch durch das Braze SDK. Analytics müssen programmatisch verarbeitet werden, damit Marketer weiterhin Zugriff auf Metriken wie Impressionen, Klicks und Ausblendungen im Braze-Dashboard haben. Rufen Sie die Analytics-Methoden des Braze SDK auf, damit das SDK diese Daten an Braze zurückgeben kann. Für jeden Messaging-Kanal gibt es einen Analytics-Artikel mit hilfreichen Informationen.
Anpassungsübersicht
Anpassung
Beschreibung
Aufwand
Hängt vom Anwendungsfall ab.
Entwicklungsarbeit
Geringer Aufwand: 1–4 Stunden Mittlerer Aufwand: 4–8 Stunden Hoher Aufwand: Mehr als 8 Stunden
UI
Angepasst
Verhalten
Angepasst
Analytics-Tracking
Angepasst
Schlüssel-Wert-Paare
Erforderlich
**Tip:**
Wenn Entwickler:innen und Implementierer angepasste Inhalte für Braze erstellen, bietet sich die Möglichkeit zur funktionsübergreifenden Zusammenarbeit mit Marketern. Wenn Sie beispielsweise eine neue UI oder eine neue Funktionalität für eine bestimmte Komponente entwickeln, bereiten Sie Ihr Team auf den Erfolg vor, indem Sie das neue Verhalten und die Integration mit Ihrem Backend dokumentieren.
# Braze SDK Tutorials
Source: /docs/de/developer_guide/tutorials/index.md
# Integrieren Sie das Braze SDK
Source: /docs/de/developer_guide/sdk_integration/index.md
# {: style="float:right;width:120px;border:0;" class="noimgborder"}Integrieren Sie das Braze SDK {#braze-logo-image_buster-assetsbraze_primary_icon_blacksvg-stylefloatrightwidth120pxborder0-classnoimgborderintegrate-the-braze-sdk}
> Erfahren Sie, wie Sie das Braze SDK integrieren können. Jedes SDK wird in seinem eigenen öffentlichen GitHub-Repository gehostet, das vollständig kompilierbare Beispiel-Apps enthält, mit denen Sie die Features von Braze testen oder neben Ihren eigenen Anwendungen implementieren können. Weitere Informationen finden Sie unter [Referenzen, Repositories und Beispiel-Apps](https://www.braze.com/docs/de/de/developer_guide/references). Allgemeine Informationen über das SDK finden Sie unter [Erste Schritte: Übersicht über die Integration](https://www.braze.com/docs/de/de/developer_guide/getting_started/integration_overview).
Gespiegelte SDK-README-Inhalte in der Dokumentation finden Sie unter [Repository-Leitfäden](https://www.braze.com/docs/de/de/developer_guide/sdk_repository_guides).
**Tip:**
Nach der Integration des SDK können Sie die [SDK-Authentifizierung](https://www.braze.com/docs/de/de/developer_guide/sdk_integration/authentication) aktivieren, um eine zusätzliche Sicherheitsebene hinzuzufügen, indem Sie unbefugte SDK-Anfragen verhindern. Die SDK-Authentifizierung ist für Internet, Android, Swift, React Native, Flutter, Unity, Cordova, .NET MAUI (Xamarin) und Expo verfügbar.
## About the Web Braze SDK
The Web Braze SDK lets you collect analytics and display rich in-app messages, push, and Content Card messages to your web users. For more information, see [Braze JavaScript reference documentation](https://js.appboycdn.com/web-sdk/latest/doc/modules/braze.html).
**Note:**
This guide uses code samples from the Braze Web SDK 4.0.0+. To upgrade to the latest Web SDK version, see [SDK Upgrade Guide](https://github.com/braze-inc/braze-web-sdk/blob/master/UPGRADE_GUIDE.md).
## Integrate the Web SDK
You can integrate the Web Braze SDK using the following methods. For additional options, see [other integration methods](#web_other-integration-methods).
- **Code-based integration:** Integrate the Web Braze SDK directly in your codebase using your preferred package manager or the Braze CDN. This gives you full control over how the SDK is loaded and configured.
- **Google Tag Manager:** A no-code solution that lets you integrate the Web Braze SDK without modifying your site's code. For more information, see [Google Tag Manager with the Braze SDK](https://www.braze.com/docs/de/de/developer_guide/sdk_integration/google_tag_manager/).
**Important:**
We recommend using the [NPM integration method](https://www.braze.com/docs/de/de/developer_guide/sdk_integration/?subtab=package%20manager&sdktab=web). Benefits include storing SDK libraries locally on your website, providing immunity from ad-blocker extensions, and contributing to faster load times as part of bundler support.
### Step 1: Install the Braze library
You can install the Braze library using one of the following methods. However, if your website uses a `Content-Security-Policy`, review the [Content Security Policy](https://www.braze.com/docs/de/de/developer_guide/platforms/web/content_security_policy/) before continuing.
**Important:**
While most ad blockers do not block the Braze Web SDK, some more-restrictive ad blockers are known to cause issues.
If your site uses NPM or Yarn package managers, you can add the [Braze NPM package](https://www.npmjs.com/package/@braze/web-sdk) as a dependency.
Typescript definitions are now included as of v3.0.0. For notes on upgrading from 2.x to 3.x, see our [changelog](https://github.com/braze-inc/braze-web-sdk/blob/master/UPGRADE_GUIDE.md).
```bash
npm install --save @braze/web-sdk
# or, using yarn:
# yarn add @braze/web-sdk
```
Once installed, you can `import` or `require` the library in the typical fashion:
```typescript
import * as braze from "@braze/web-sdk";
// or, using `require`
const braze = require("@braze/web-sdk");
```
Add the Braze Web SDK directly to your HTML by referencing our CDN-hosted script, which loads the library asynchronously.
**Important:**
The default **Prevent Cross-Site Tracking** setting in Safari can prevent in-app message types like Banners and Content Cards from displaying when you use the CDN integration method. To avoid this issue, use the NPM integration method so that Safari does not classify these messages as cross-site traffic and your web users can see them in all supported browsers.
### Step 2: Initialize the SDK
After the Braze Web SDK is added to your website, initialize the library with the API key and [SDK endpoint URL](https://www.braze.com/docs/de/de/user_guide/administrative/access_braze/sdk_endpoints) found in **Settings** > **App Settings** within your Braze dashboard. For a complete list of options for `braze.initialize()`, along with our other JavaScript methods, see [Braze JavaScript documentation](https://js.appboycdn.com/web-sdk/latest/doc/modules/braze.html#initialize).
**Note:**
**Custom domains for Web SDK requests are not supported**: The Web SDK `baseUrl` must be a Braze SDK endpoint (for example, `sdk.iad-05.braze.com`). Braze does not support routing Web SDK traffic through a customer-owned domain via CNAME records. If you need Web SDK requests to originate from your own domain, contact Braze support.
```javascript
// initialize the SDK
braze.initialize('YOUR-API-KEY-HERE', {
baseUrl: "YOUR-SDK-ENDPOINT-HERE",
enableLogging: false, // set to `true` for debugging
allowUserSuppliedJavascript: false, // set to `true` to support custom HTML messages
});
// Enable automatic display of in-app messages
// Required if you want in-app messages to display automatically when triggered
braze.automaticallyShowInAppMessages();
// if you use Content Cards
braze.subscribeToContentCardsUpdates(function(cards){
// cards have been updated
});
// optionally set the current user's external ID before starting a new session
// you can also call `changeUser` later in the session after the user logs in
if (isLoggedIn){
braze.changeUser(userIdentifier);
}
// `openSession` should be called last - after `changeUser` and `automaticallyShowInAppMessages`
braze.openSession();
```
**Important:**
**In-App Message Display**: To display in-app messages automatically when they're triggered, you must call `braze.automaticallyShowInAppMessages()`. Without this call, in-app messages don't display automatically. If you want to manage message display manually, remove this call and use `braze.subscribeToInAppMessage()` instead. For more information, see [In-app message delivery](https://www.braze.com/docs/de/de/developer_guide/in_app_messages/delivery/).
#### Troubleshooting missing sessions for anonymous users
If you're seeing "Session missing" behavior, or you're not able to track the session for users who stay anonymous on web, make sure your integration calls `braze.openSession()` during initialization.
- **Scenario:** Anonymous users can return a Braze ID, but session data is blank or missing.
- **Cause:** The implementation doesn't call `braze.openSession()`.
- **Resolution:** Always call `braze.openSession()` after initialization (and after `braze.changeUser()` if you set an external ID).
For more information, see [Step 2: Initialize the SDK](https://www.braze.com/docs/de/de/developer_guide/sdk_integration/?sdktab=web&tab=code-based%20integration#step-2-initialize-the-sdk).
**Important:**
Anonymous users on mobile or web devices may be counted towards your [MAU](https://www.braze.com/docs/de/de/user_guide/data_and_analytics/reporting/understanding_your_app_usage_data/#monthly-active-users). As a result, you may want to conditionally load or initialize the SDK to exclude these users from your MAU count.
### Prerequisites
Before you can use this integration method, you'll need to [create an account and container for Google Tag Manager](https://support.google.com/tagmanager/answer/14842164).
### Step 1: Open the tag template gallery
In [Google Tag Manager](https://tagmanager.google.com/), choose your workspace, then select **Templates**. In the **Tag Template** pane, select **Search Gallery**.
{: style="max-width:95%;"}
### Step 2: Add the initialization tag template
In the template gallery, search for `braze-inc`, then select **Braze Initialization Tag**.
{: style="max-width:80%;"}
Select **Add to workspace** > **Add**.
{: style="max-width:70%;"}
### Step 3: Configure the tag
From the **Templates** section, select your newly added template.
{: style="max-width:95%;"}
Select the pencil icon to open the **Tag Configuration** dropdown.

Enter the minimum required information:
| Field | Description |
| ------------- | ----------- |
| **API Key** | Your [Braze API Key](https://www.braze.com/docs/de/de/api/basics/#about-rest-api-keys), found in the Braze dashboard under **Settings** > **App Settings**. |
| **API Endpoint** | Your REST endpoint URL. Your endpoint will depend on the Braze URL for [your instance](https://www.braze.com/docs/de/de/api/basics/#endpoints). |
| **SDK Version** | The most recent `MAJOR.MINOR` version of the Web Braze SDK listed in the [changelog](https://www.braze.com/docs/de/de/developer_guide/changelogs/?sdktab=web). For example, if the latest version is `4.1.2`, enter `4.1`. For more information, see [About SDK version management](https://www.braze.com/docs/de/de/developer_guide/sdk_integration/version_management/). |
{: .reset-td-br-1 .reset-td-br-2 aria-label="Step 3: Configure the tag" }
For additional initialization settings, select **Braze Initialization Options** and choose any options you need.
{: style="max-width:65%;"}
### Step 4: Choose initialization options
The Braze Initialization Tag exposes the following options. Most of these map directly to the [Web SDK `InitializationOptions`](https://js.appboycdn.com/web-sdk/latest/doc/modules/braze.html#initializationoptions), and some correspond to Web SDK methods that the tag will call during initialization. Select the options that match your integration needs:
| GTM option | Web SDK configuration or method | Description |
| --- | --- | --- |
| **Allow HTML In-App Messages** | `allowUserSuppliedJavascript` | Enables HTML in-app messages, Banners, and user-supplied JavaScript click actions. Required for [HTML in-app messages](https://www.braze.com/docs/de/de/user_guide/channels/in_app_messages/message_types/custom_html/) and [Banners](https://www.braze.com/docs/de/de/developer_guide/banners/placements/?sdktab=web) that use custom HTML. Only enable this when you trust the HTML and JavaScript content, as it allows user-supplied JavaScript execution. |
| **App Version Number** | `appVersion`, `appVersionNumber` | App version for segmentation (for example, `1.2.3.4`). |
| **Automatically Open New Session** | `braze.openSession()` | Opens a new session after the SDK is initialized by calling this method for you. |
| **Automatically show new in app messages** | `braze.automaticallyShowInAppMessages()` | Automatically displays new in-app messages when they arrive from the server by calling this method after initialization. |
| **Disable Automatic Push Token Maintenance** | `disablePushTokenMaintenance` | Stops the SDK from syncing push tokens with the Braze backend on new sessions. |
| **Disable Automatic Service Worker Registration** | `manageServiceWorkerExternally` | Use if you register and control the service worker yourself. |
| **Disable Cookies** | `noCookies` | Uses localStorage instead of cookies for user/session data. Prevents cross-subdomain recognition. |
| **Disable Font Awesome** | `doNotLoadFontAwesome` | Prevents the SDK from loading Font Awesome from the CDN. Use if your site has its own Font Awesome. |
| **Enable SDK Authentication** | `enableSdkAuthentication` | Enables [SDK Authentication](https://www.braze.com/docs/de/de/developer_guide/sdk_integration/authentication/). |
| **Enable Web SDK Logging** | `enableLogging` | Enables console logging for debugging. Remove before production. |
| **Minimum Interval Between Triggered Messages** | `minimumIntervalBetweenTriggerActionsInSeconds` | Minimum seconds between trigger actions (default: 30). |
| **Open Cards in New Tab** | `openCardsInNewTab` | Opens Content Card links in a new tab when using the default Feed UI. |
| **Service Worker Location** | `serviceWorkerLocation` | Custom path for the service worker file (default: `/service-worker.js`). |
| **Session Timeout (seconds)** | `sessionTimeoutInSeconds` | Session timeout in seconds (default: 1800). |
{: .reset-td-br-1 .reset-td-br-2 .reset-td-br-3 aria-label="Step 4: Choose initialization options" }
**Note:**
To enable [Custom HTML in-app messages](https://www.braze.com/docs/de/de/user_guide/channels/in_app_messages/message_types/custom_html/) when using the Google Tag Manager Braze Initialization Tag, select **Allow HTML In-App Messages** in **Braze Initialization Options**. This checkbox maps to the `allowUserSuppliedJavascript` initialization option in `braze.initialize()` and sets it to `true`. The Google Tag Manager Braze Initialization Tag uses this label instead of the option name.
For options not exposed in the GTM template (such as `contentSecurityNonce`, `localization`, or `devicePropertyAllowlist`), use [runtime initialization](https://www.braze.com/docs/de/de/developer_guide/sdk_integration/?sdktab=web) instead.
### Step 5: Set to Trigger on *all pages*
The initialization tag should be run on all pages of your site. This allows you to use Braze SDK methods and record web push analytics.
### Step 6: Verify your integration
You can verify your integration using either of the following options:
- **Option 1:** Using Google Tag Manager's [debugging tool](https://support.google.com/tagmanager/answer/6107056?hl=en), you can check if the Braze Initialization Tag is triggering correctly on your configured pages or events.
- **Option 2:** Check for any network requests made to Braze from your web page. Additionally, the global `window.braze` library should now be defined.
## Filtering bot traffic {#bot-filtering}
MAU can include a percentage of bot users, which inflates your monthly active user count. While the Braze Web SDK includes built-in detection for some common web crawlers (such as search engine bots and social media preview bots), it is especially important to stay proactive with robust solutions to detect bots, as SDK updates alone cannot consistently detect every new bot.
### Limitations of SDK-side bot detection
The Web SDK includes basic user-agent-based bot detection that filters out known crawlers. However, this approach has limitations:
- **New bots emerge constantly**: AI companies and other actors regularly create new bots that may disguise themselves to avoid detection.
- **User-agent spoofing**: Sophisticated bots can mimic legitimate browser user-agents.
- **Custom bots**: Non-technical users can now easily create bots using large language models (LLMs), making bot behavior unpredictable.
### Implementing bot filtering
**Important:**
The following solutions are general suggestions. Tailor bot filtering logic to your unique environment and traffic patterns.
The most robust solution is to implement your own bot filtering logic before initializing the Braze SDK. Common approaches include:
#### Require user interaction
Consider delaying SDK initialization until a user performs a meaningful interaction, such as accepting a cookie consent banner, scrolling, or clicking. This approach is often easier to implement and can be highly effective at filtering bot traffic.
**Important:**
Delaying SDK initialization until user interaction might cause Banners and Content Cards to also not display until that interaction occurs.
#### Custom bot detection
Implement custom detection based on your specific bot traffic patterns, such as:
- Analyzing user-agent strings for patterns you've identified in your traffic
- Checking for headless browser indicators
- Using third-party bot detection services
- Monitoring behavioral signals specific to your site
**Example of conditional initialization:**
```javascript
// Only initialize Braze if your custom bot detection determines this is not a bot
if (!isLikelyBot()) {
braze.initialize('YOUR-API-KEY-HERE', {
baseUrl: "YOUR-SDK-ENDPOINT-HERE"
});
braze.automaticallyShowInAppMessages();
braze.openSession();
}
```
### Best practices
- Regularly analyze your MAU data and web traffic patterns to identify new bot behavior.
- Test thoroughly to ensure your bot filtering doesn't prevent legitimate users from being tracked.
- Update your filtering logic based on the bot traffic patterns you observe in your environment.
## Optional configurations
### Logging
To quickly enable logging, you can add `?brazeLogging=true` as a parameter to your website URL. Alternatively, you can enable [basic](#web_basic-logging) or [custom](#web_custom-logging) logging. For a centralized overview across all platforms, see [Verbose logging](https://www.braze.com/docs/de/de/developer_guide/sdk_integration/verbose_logging).
#### Basic logging
Use `enableLogging` to log basic debugging messages to the JavaScript console before the SDK is initialized.
```javascript
enableLogging: true
```
Your method should be similar to the following:
```javascript
braze.initialize('API-KEY', {
baseUrl: 'API-ENDPOINT',
enableLogging: true
});
braze.openSession();
```
Use `braze.toggleLogging()` to log basic debugging messages to the JavaScript console after the SDK is initialized. Your method should be similar to the following:
```javascript
braze.initialize('API-KEY', {
baseUrl: 'API-ENDPOINT',
});
braze.openSession();
...
braze.toggleLogging();
```
**Important:**
Basic logs are visible to all users, so consider disabling, or switch to [`setLogger`](#web_custom-logging), before releasing your code to production.
#### Custom logging
Use `setLogger` to log custom debugging messages to the JavaScript console. Unlike basic logs, these logs are not visible to users.
```javascript
setLogger(loggerFunction: (message: STRING) => void): void
```
Replace `STRING` with your message as a single string parameter. Your method should be similar to the following:
```javascript
braze.initialize('API-KEY');
braze.setLogger(function(message) {
console.log("Braze Custom Logger: " + message);
});
braze.openSession();
```
## Upgrading the SDK
**Note:**
This guide uses code samples from the Braze Web SDK 4.0.0+. To upgrade to the latest Web SDK version, see [SDK Upgrade Guide](https://github.com/braze-inc/braze-web-sdk/blob/master/UPGRADE_GUIDE.md).
When you reference the Braze Web SDK from our content delivery network, for example, `https://js.appboycdn.com/web-sdk/a.a/braze.min.js` (as recommended by our default integration instructions), your users receive minor updates (bug fixes and backward compatible features, versions `a.a.a` through `a.a.z` in this example) automatically when they refresh your site.
However, when we release major changes, we require you to upgrade the Braze Web SDK manually to ensure that breaking changes do not impact your integration. Additionally, if you download our SDK and host it yourself, you don't receive any version updates automatically and should upgrade manually to receive the latest features and bug fixes.
You can keep up-to-date with our latest release [following our release feed](https://github.com/braze-inc/braze-web-sdk/tags.atom) with the RSS Reader or service of your choice, and see [our changelog](https://github.com/braze-inc/braze-web-sdk/blob/master/CHANGELOG.md) for a full accounting of our Web SDK release history. To upgrade the Braze Web SDK:
- Update the Braze library version by changing the version number of `https://js.appboycdn.com/web-sdk/[OLD VERSION NUMBER]/braze.min.js`, or in your package manager's dependencies.
- If you have web push integrated, update the service worker file on your site - by default, this is located at `/service-worker.js` at your site's root directory, but the location may be customized in some integrations. You must access the root directory to host a service worker file.
You must update these two files in coordination with each other for proper functionality.
## Other integration methods
### Accelerated Mobile Pages (AMP)
**See more**
#### Step 1: Include AMP web push script
Add the following async script tag to your head:
```js
```
#### Step 2: Add subscription widgets
Add a widget to the body of your HTML that allows users to subscribe and unsubscribe from push.
```js
```
#### Step 3: Add `helper-iframe` and `permission-dialog`
The AMP Web Push component creates a popup to handle push subscriptions, so you must add the following helper files to your project to enable this feature:
- [`helper-iframe.html`](https://cdn.ampproject.org/v0/amp-web-push-helper-frame.html)
- [`permission-dialog.html`](https://cdn.ampproject.org/v0/amp-web-push-permission-dialog.html)
#### Step 4: Create a service worker file
Create a `service-worker.js` file in the root directory of your website and add the following snippet:
#### Step 5: Configure the AMP web push HTML element
Add the following `amp-web-push` HTML element to your HTML body. Keep in mind, you need to append your [`apiKey` and `baseUrl`](https://documenter.getpostman.com/view/4689407/SVYrsdsG) as query parameters to `service-worker-URL`.
```js
```
### Asynchronous Module Definition (AMD)
#### Disable support
If your site uses RequireJS or another AMD module-loader, but you prefer to load the Braze Web SDK through one of the other options in this list, you can load a version of the library that does not include AMD support. This version of the library can be loaded from the following CDN location:
#### Module loader
If you use RequireJS or other AMD module-loaders we recommend self-hosting a copy of our library and referencing it as you would with other resources:
```javascript
require(['path/to/braze.min.js'], function(braze) {
braze.initialize('YOUR-API-KEY-HERE', { baseUrl: 'YOUR-SDK-ENDPOINT' });
// Required if you want in-app messages to display automatically
braze.automaticallyShowInAppMessages();
braze.openSession();
});
```
### Electron {#electron}
Electron does not officially support web push notifications (see: this [GitHub issue](https://github.com/electron/electron/issues/6697)). There are other [open source workarounds](https://github.com/MatthieuLemoine/electron-push-receiver) you may try that have not been tested by Braze.
### Jest framework {#jest}
When using Jest, you may see an error similar to `SyntaxError: Unexpected token 'export'`. To fix this, adjust your configuration in `package.json` to ignore the Braze SDK:
```
"jest": {
"transformIgnorePatterns": [
"/node_modules/(?!@braze)"
]
}
```
### SSR frameworks {#ssr}
The Web SDK runs in a browser environment. In SSR frameworks, initialize Braze in a client-only component so your server never executes SDK code.
#### Framework-agnostic dynamic import
If your framework isn't listed in this section, you can dynamically import Braze from a client-only lifecycle hook.
```javascript
// MyComponent/braze-exports.js
// Export the parts of the SDK that you need.
export { initialize, openSession } from "@braze/web-sdk";
// MyComponent/MyComponent.js
useEffect(() => {
import("./braze-exports.js").then(({ initialize, openSession }) => {
initialize("YOUR-API-KEY-HERE", {
baseUrl: "YOUR-SDK-ENDPOINT",
enableLogging: true,
});
openSession();
});
}, []);
```
If you're using webpack, you can dynamically import only specific SDK exports.
```javascript
// MyComponent.js
useEffect(() => {
import(
/* webpackExports: ["initialize", "openSession"] */
"@braze/web-sdk"
).then(({ initialize, openSession }) => {
initialize("YOUR-API-KEY-HERE", {
baseUrl: "YOUR-SDK-ENDPOINT",
enableLogging: true,
});
openSession();
});
}, []);
```
#### Shared hook for Next.js and Remix
Create a reusable `useBraze` hook and call it near your app root.
```tsx
// hooks/useBraze.ts
import { useEffect, useRef } from "react";
export function useBraze() {
const didInit = useRef(false);
useEffect(() => {
if (didInit.current) {
return;
}
didInit.current = true;
import("@braze/web-sdk")
.then((braze) => {
const initialized = braze.initialize("YOUR-API-KEY-HERE", {
// Use your Braze Web SDK endpoint, such as sdk.iad-01.braze.com.
baseUrl: "YOUR-SDK-ENDPOINT",
enableLogging: false,
});
if (!initialized) {
return;
}
// Optional: Identify signed-in users before opening a session.
// braze.changeUser("external-id");
// Optional: Automatically display in-app messages.
// braze.automaticallyShowInAppMessages();
braze.openSession();
})
.catch((error) => {
console.error("Unable to load Braze SDK:", error);
});
}, []);
}
```
#### Next.js (App Router)
Call `useBraze` in a client component that wraps your app.
```tsx
// app/components/AppRoot.tsx
"use client";
import type { ReactNode } from "react";
import { useBraze } from "../hooks/useBraze";
export function AppRoot({ children }: { children: ReactNode }) {
useBraze();
return <>{children};
}
```
```tsx
// app/layout.tsx
import type { ReactNode } from "react";
import { AppRoot } from "./components/AppRoot";
export default function RootLayout({
children,
}: {
children: ReactNode;
}) {
return (
{children}
);
}
```
#### Next.js (Pages Router)
Call `useBraze` at the top of your custom app component.
```tsx
// pages/_app.tsx
import type { AppProps } from "next/app";
import { useBraze } from "../hooks/useBraze";
export default function App({ Component, pageProps }: AppProps) {
useBraze();
return (
);
}
```
#### Remix
Call `useBraze` at the top of your root route component.
For local Remix validation examples, run `PORT=4013 npm run dev`.
```tsx
// app/root.tsx
import { Outlet } from "@remix-run/react";
import { useBraze } from "./hooks/useBraze";
export default function App() {
useBraze();
return ;
}
```
#### Logging events and updating users
After `useBraze` initializes the SDK at your app root, other client components can call Braze methods. A common pattern is to call them inside user actions, such as `onClick` or `onSubmit`. In the example, the SDK methods are loaded inside the click handler instead of at the top of the file. This keeps the Web SDK out of server code and loads only what that action needs. The `webpackExports` comment tells webpack which methods to include, so your bundle stays smaller.
```tsx
// app/components/BuyButton.tsx
"use client";
export function BuyButton() {
const handleClick = async () => {
const { logCustomEvent, logPurchase, getUser } = await import(
/* webpackExports: ["logCustomEvent", "logPurchase", "getUser"] */
"@braze/web-sdk"
);
getUser()?.setCustomUserAttribute("last_purchase_date", "2026-05-04");
logCustomEvent("clicked_buy", { source: "product_page" });
logPurchase("sku_123", 19.99, "USD");
};
return ;
}
```
This example shows a `BuyButton` component that logs activity when someone clicks **Buy**. First, it imports only `logCustomEvent`, `logPurchase`, and `getUser` at click time. Then it updates a user attribute, logs a custom event, and logs a purchase. This pattern helps you keep initialization centralized in `useBraze`, while still tracking meaningful actions from any client component.
If you're using Remix with Vite and package-root imports fail at runtime, use the existing Vite workaround. For more information, see [Vite](https://www.braze.com/docs/de/de/developer_guide/sdk_integration/?sdktab=web#web_vite).
For a full list of available methods, see the [Braze JavaScript reference documentation](https://js.appboycdn.com/web-sdk/latest/doc/modules/braze.html).
### Tealium iQ
Tealium iQ offers a basic turnkey Braze integration. To configure the integration, search for Braze in the Tealium Tag Management interface, and provide the Web SDK API key from your dashboard.
For more details or in-depth Tealium configuration support, check out our [integration documentation](https://www.braze.com/docs/de/de/partners/data_and_infrastructure_agility/customer_data_platform/tealium/#about-tealium) or contact your Tealium account manager.
### Vite {#vite}
If you use Vite and see a warning around circular dependencies or `Uncaught TypeError: Class extends value undefined is not a constructor or null`, you may need to exclude the Braze SDK from its [dependency discovery](https://vitejs.dev/guide/dep-pre-bundling.html#customizing-the-behavior):
```
optimizeDeps: {
exclude: ['@braze/web-sdk']
},
```
### Other tag managers
Braze may also be compatible with other tag management solutions by following our integration instructions within a custom HTML tag. Contact a Braze representative if you need help evaluating these solutions.
## Integrating the Android SDK
### Step 1: Update your Gradle build configuration
In your project's repository configuration (for example, `settings.gradle`, `settings.gradle.kts`, or top-level `build.gradle`), add [`mavenCentral()`](https://docs.gradle.org/current/kotlin-dsl/gradle/org.gradle.api.artifacts.dsl/-repository-handler/maven-central.html) to your list of repositories. This syntax is the same for both Groovy and Kotlin DSL.
```groovy
repositories {
mavenCentral()
}
```
Next, add Braze to your dependencies. In the following examples, replace `SDK_VERSION` with the current version of your Android Braze SDK. For the full list of versions, see [Changelogs](https://www.braze.com/docs/de/de/developer_guide/changelogs/?sdktab=android).
**Note:**
- For Kotlin DSL (`build.gradle.kts`), use the `implementation("...")` syntax.
- For Groovy (`build.gradle`), use the `implementation '...'` syntax.
- For [version catalogs](https://developer.android.com/build/migrate-to-catalogs), add entries to your `gradle/libs.versions.toml` file and reference them using the generated accessors.
If you don't plan on using Braze UI components, add the following to your dependencies.
```groovy
dependencies {
implementation 'com.braze:android-sdk-base:SDK_VERSION' // (Required) Adds dependencies for the base Braze SDK.
implementation 'com.braze:android-sdk-location:SDK_VERSION' // (Optional) Adds dependencies for Braze location services.
}
```
```kotlin
dependencies {
implementation("com.braze:android-sdk-base:SDK_VERSION") // (Required) Adds dependencies for the base Braze SDK.
implementation("com.braze:android-sdk-location:SDK_VERSION") // (Optional) Adds dependencies for Braze location services.
}
```
In your `gradle/libs.versions.toml` file:
```toml
[versions]
braze = "SDK_VERSION"
[libraries]
braze-android-sdk-base = { group = "com.braze", name = "android-sdk-base", version.ref = "braze" }
braze-android-sdk-location = { group = "com.braze", name = "android-sdk-location", version.ref = "braze" }
```
Then, in your `build.gradle` or `build.gradle.kts` file, add the following dependencies. This syntax is the same for both Groovy and Kotlin DSL.
```groovy
dependencies {
implementation(libs.braze.android.sdk.base) // (Required) Adds dependencies for the base Braze SDK.
implementation(libs.braze.android.sdk.location) // (Optional) Adds dependencies for Braze location services.
}
```
If you plan on using Braze UI components, add the following to your dependencies.
```groovy
dependencies {
implementation 'com.braze:android-sdk-ui:SDK_VERSION' // (Required) Adds dependencies for the Braze SDK and Braze UI components.
implementation 'com.braze:android-sdk-location:SDK_VERSION' // (Optional) Adds dependencies for Braze location services.
}
```
```kotlin
dependencies {
implementation("com.braze:android-sdk-ui:SDK_VERSION") // (Required) Adds dependencies for the Braze SDK and Braze UI components.
implementation("com.braze:android-sdk-location:SDK_VERSION") // (Optional) Adds dependencies for Braze location services.
}
```
In your `gradle/libs.versions.toml` file:
```toml
[versions]
braze = "SDK_VERSION"
[libraries]
braze-android-sdk-ui = { group = "com.braze", name = "android-sdk-ui", version.ref = "braze" }
braze-android-sdk-location = { group = "com.braze", name = "android-sdk-location", version.ref = "braze" }
```
Then, in your `build.gradle` or `build.gradle.kts` file, add the following dependencies. This syntax is the same for both Groovy and Kotlin DSL.
```groovy
dependencies {
implementation(libs.braze.android.sdk.ui) // (Required) Adds dependencies for the Braze SDK and Braze UI components.
implementation(libs.braze.android.sdk.location) // (Optional) Adds dependencies for Braze location services.
}
```
### Step 2: Configure your `braze.xml`
**Note:**
As of December 2019, custom endpoints are no longer given out, if you have a pre-existing custom endpoint, you may continue to use it. For more details, refer to our list of available endpoints.
Create a `braze.xml` file in your project's `res/values` folder. If you are on a specific data cluster or have a pre-existing custom endpoint, you need to specify the endpoint in your `braze.xml` file as well.
The contents of that file should resemble the following code snippet. Make sure to substitute `YOUR_APP_IDENTIFIER_API_KEY` with the identifier found in the **Manage Settings** page of the Braze dashboard. Log in at [dashboard.braze.com](https://dashboard.braze.com) to find your [cluster address](https://www.braze.com/docs/de/de/user_guide/administrative/access_braze/sdk_endpoints).
```xml
YOUR_APP_IDENTIFIER_API_KEYYOUR_CUSTOM_ENDPOINT_OR_CLUSTER
```
### Step 3: Add permissions to `AndroidManifest.xml`
Next, add the following permissions to your `AndroidManifest.xml`:
```xml
```
**Note:**
With the release of Android M, Android switched from an install-time to a runtime permissions model. However, both of these permissions are normal permissions and are granted automatically if listed in the app manifest. For more information, visit Android's [permission documentation](https://developer.android.com/training/permissions/index.html).
### Step 4: Enable delayed initialization (optional)
To use delayed initialization, the minimum Braze SDK version is required:
**Note:**
While delayed initialization is enabled, all network connections are canceled, preventing the SDK from sending data to the Braze servers.
#### Step 4.1: Update your `braze.xml`
Delayed initialization is disabled by default. To enable, use one of the following options:
In your project's `braze.xml` file, set `com_braze_enable_delayed_initialization` to `true`.
```xml
true
```
To enable delayed initialization at runtime, use the following method.
```java
Braze.enableDelayedInitialization(context);
```
```kotlin
Braze.enableDelayedInitialization(context)
```
**Note:**
When delayed initialization is enabled and a push notification contains a deep link action, the deep link does not resolve.
#### Step 4.2: Configure push analytics (optional)
When delayed initialization is enabled, push analytics are queued by default. However, you can choose to [explicitly queue](#explicitly-queue-push-analytics) or [drop](#drop-push-analytics) push analytics instead.
##### Explicitly queue {#explicitly-queue-push-analytics}
To explicitly queue push analytics, choose one of the following options:
In your `braze.xml` file, set `com_braze_delayed_initialization_analytics_behavior` to `QUEUE`:
```xml
QUEUE
```
Add `QUEUE` to your [`Braze.enableDelayedInitialization()`](https://braze-inc.github.io/braze-android-sdk/kdoc/braze-android-sdk/com.braze/-braze/-companion/enable-delayed-initialization.html) method:
```java
Braze.enableDelayedInitialization(context, DelayedInitializationAnalyticsBehavior.QUEUE);
```
```kotlin
Braze.enableDelayedInitialization(context, DelayedInitializationAnalyticsBehavior.QUEUE)
```
##### Drop {#drop-push-analytics}
To drop push analytics, choose one of the following options:
In your `braze.xml` file, set `com_braze_delayed_initialization_analytics_behavior` to `DROP`:
```xml
DROP
```
Add `DROP` to the [`Braze.enableDelayedInitialization()`](https://braze-inc.github.io/braze-android-sdk/kdoc/braze-android-sdk/com.braze/-braze/-companion/enable-delayed-initialization.html) method:
```java
Braze.enableDelayedInitialization(context, DelayedInitializationAnalyticsBehavior.DROP);
```
```kotlin
Braze.enableDelayedInitialization(context, DelayedInitializationAnalyticsBehavior.DROP)
```
#### Step 4.3: Manually initialize the SDK
After your chosen delay period, use the [`Braze.disableDelayedInitialization()`](https://braze-inc.github.io/braze-android-sdk/kdoc/braze-android-sdk/com.braze/-braze/-companion/disable-delayed-initialization.html) method to manually initialize the SDK.
```java
Braze.disableDelayedInitialization(context);
```
```kotlin
Braze.disableDelayedInitialization(context)
```
### Step 5: Enable user session tracking
When you enable user session tracking, calls to `openSession()`, `closeSession()`,[`ensureSubscribedToInAppMessageEvents()`](https://braze-inc.github.io/braze-android-sdk/kdoc/braze-android-sdk/com.braze.ui.inappmessage/-braze-in-app-message-manager/ensure-subscribed-to-in-app-message-events.html), and `InAppMessageManager` registration can be handled automatically.
To register activity lifecycle callbacks, add the following code to the `onCreate()` method of your `Application` class.
```java
public class MyApplication extends Application {
@Override
public void onCreate() {
super.onCreate();
registerActivityLifecycleCallbacks(new BrazeActivityLifecycleCallbackListener());
}
}
```
```kotlin
class MyApplication : Application() {
override fun onCreate() {
super.onCreate()
registerActivityLifecycleCallbacks(BrazeActivityLifecycleCallbackListener())
}
}
```
For the list of available parameters, see [`BrazeActivityLifecycleCallbackListener`](https://braze-inc.github.io/braze-android-sdk/kdoc/braze-android-sdk/com.braze/-braze-activity-lifecycle-callback-listener/index.html).
## Testing session tracking
**Tip:**
You can also use the [SDK Debugger](https://www.braze.com/docs/de/de/developer_guide/debugging) to diagnose SDK issues.
If you experience issues while testing, enable [verbose logging](#android_enabling-logs), then use logcat to detect missing `openSession` and `closeSession` calls in your activities.
1. In Braze, go to **Overview**, select your app, then in the **Display Data For** dropdown choose **Today**.

2. Open your app, then refresh the Braze dashboard. Verify that your metrics have increased by 1.
3. Navigate through your app and verify that only one session has been logged to Braze.
4. Send the app to the background for at least 10 seconds, then bring it to the foreground. Verify that a new session was logged.
## Optional configurations
### Runtime configuration
To set your Braze options in code rather than your `braze.xml` file, use [runtime configuration](https://braze-inc.github.io/braze-android-sdk/kdoc/braze-android-sdk/com.braze/-braze/-companion/configure.html). If a value exists in both places, the runtime value will be used instead. After all required settings are supplied at runtime, you can delete your `braze.xml` file.
In the following example, a [builder object](https://braze-inc.github.io/braze-android-sdk/kdoc/braze-android-sdk/com.braze.configuration/-braze-config/-builder/index.html) is created and then passed to [`Braze.configure()`](https://braze-inc.github.io/braze-android-sdk/kdoc/braze-android-sdk/com.braze/-braze/-companion/configure.html). Note that only some of the available runtime options are shown—refer to our [KDoc](https://braze-inc.github.io/braze-android-sdk/kdoc/braze-android-sdk/com.braze.configuration/-braze-config/-builder/index.html) for the full list.
```java
BrazeConfig brazeConfig = new BrazeConfig.Builder()
.setApiKey("api-key-here")
.setCustomEndpoint("YOUR_CUSTOM_ENDPOINT_OR_CLUSTER")
.setSessionTimeout(60)
.setHandlePushDeepLinksAutomatically(true)
.setGreatNetworkDataFlushInterval(10)
.build();
Braze.configure(this, brazeConfig);
```
```kotlin
val brazeConfig = BrazeConfig.Builder()
.setApiKey("api-key-here")
.setCustomEndpoint("YOUR_CUSTOM_ENDPOINT_OR_CLUSTER")
.setSessionTimeout(60)
.setHandlePushDeepLinksAutomatically(true)
.setGreatNetworkDataFlushInterval(10)
.build()
Braze.configure(this, brazeConfig)
```
**Tip:**
Looking for another example? Check out our [Hello Braze sample app](https://github.com/braze-inc/braze-android-sdk/blob/master/samples/hello-braze/src/main/java/com/braze/helloworld/CustomApplication.java).
### Google Advertising ID
The [Google Advertising ID (GAID)](https://support.google.com/googleplay/android-developer/answer/6048248/advertising-id?hl=en) is an optional user-specific, anonymous, unique, and resettable ID for advertising, provided by Google Play services. GAID gives users the power to reset their identifier, opt-out of interest-based ads within Google Play apps, and provides developers with a simple, standard system to continue to monetize their apps.
The Google Advertising ID is not automatically collected by the Braze SDK and must be set manually via the [`Braze.setGoogleAdvertisingId()`](https://braze-inc.github.io/braze-android-sdk/kdoc/braze-android-sdk/com.braze/-i-braze/set-google-advertising-id.html) method.
```java
new Thread(new Runnable() {
@Override
public void run() {
try {
AdvertisingIdClient.Info idInfo = AdvertisingIdClient.getAdvertisingIdInfo(getApplicationContext());
Braze.getInstance(getApplicationContext()).setGoogleAdvertisingId(idInfo.getId(), idInfo.isLimitAdTrackingEnabled());
} catch (Exception e) {
e.printStackTrace();
}
}
}).start();
```
```kotlin
suspend fun fetchAndSetAdvertisingId(
context: Context,
scope: CoroutineScope = GlobalScope
) {
scope.launch(Dispatchers.IO) {
try {
val idInfo = AdvertisingIdClient.getAdvertisingIdInfo(context)
Braze.getInstance(context).setGoogleAdvertisingId(
idInfo.id,
idInfo.isLimitAdTrackingEnabled
)
} catch (e: Exception) {
e.printStackTrace()
}
}
}
```
**Important:**
Google requires the Advertising ID to be collected on a non-UI thread.
### Location tracking
To enable Braze location collection, set `com_braze_enable_location_collection` to `true` in your `braze.xml` file:
```xml
true
```
**Important:**
Starting with Braze Android SDK version 3.6.0, Braze location collection is disabled by default.
### Logging
By default, the Braze Android SDK log level is set to `INFO`. You can [suppress these logs](#android_suppressing-logs) or [set a different log level](#android_enabling-logs), such as `VERBOSE`, `DEBUG`, or `WARN`.
#### Enabling logs
To help troubleshoot issues in your app, or reduce turnaround times with Braze Support, you can enable verbose logs for the SDK. When you send verbose logs to Braze Support, ensure they begin as soon as you launch your application and end far after your issue occurs. For a centralized overview, see [Verbose logging](https://www.braze.com/docs/de/de/developer_guide/sdk_integration/verbose_logging). To learn how to interpret log output, see [Reading verbose logs](https://www.braze.com/docs/de/de/developer_guide/sdk_integration/reading_verbose_logs).
Keep in mind, verbose logs are only intended for your development environment, so you'll want to disable them before releasing your app.
**Important:**
Enable verbose logs before any other calls in `Application.onCreate()` to ensure your logs are as complete as possible.
To enable logs directly in your app, add the following to your application's `onCreate()` method before any other methods.
```java
BrazeLogger.setLogLevel(Log.MIN_LOG_LEVEL);
```
```kotlin
BrazeLogger.logLevel = Log.MIN_LOG_LEVEL
```
Replace `MIN_LOG_LEVEL` with the **Constant** of the log level you'd like to set as your minimum log level. Any logs at a level `>=` to your set `MIN_LOG_LEVEL` will be forwarded to Android's default [`Log`](https://developer.android.com/reference/android/util/Log) method. Any logs `<` your set `MIN_LOG_LEVEL` will be discarded.
| Constant | Value | Description |
|-------------|----------------|---------------------------------------------------------------------------|
| `VERBOSE` | 2 | Logs the most detailed messages for debugging and development. |
| `DEBUG` | 3 | Logs descriptive messages for debugging and development. |
| `INFO` | 4 | Logs informational messages for general highlights. |
| `WARN` | 5 | Logs warning messages for identifying potentially harmful situations. |
| `ERROR` | 6 | Logs error messages for indicating application failure or serious issues. |
| `ASSERT` | 7 | Logs assertion messages when conditions are false during development. |
{: .reset-td-br-1 .reset-td-br-2 .reset-td-br-3 aria-label="Enabling logs" }
For example, the following code will forward log levels `2`, `3`, `4`, `5`, `6`, and `7` to the `Log` method.
```java
BrazeLogger.setLogLevel(Log.VERBOSE);
```
```kotlin
BrazeLogger.logLevel = Log.VERBOSE
```
To enable logs in the `braze.xml`, add the following to your file:
```xml
MIN_LOG_LEVEL
```
Replace `MIN_LOG_LEVEL` with the **Value** of the log level you'd like to set as your minimum log level. Any logs at a level `>=` to your set `MIN_LOG_LEVEL` will be forwarded to Android's default [`Log`](https://developer.android.com/reference/android/util/Log) method. Any logs `<` your set `MIN_LOG_LEVEL` will be discarded.
| Constant | Value | Description |
|-------------|----------------|---------------------------------------------------------------------------|
| `VERBOSE` | 2 | Logs the most detailed messages for debugging and development. |
| `DEBUG` | 3 | Logs descriptive messages for debugging and development. |
| `INFO` | 4 | Logs informational messages for general highlights. |
| `WARN` | 5 | Logs warning messages for identifying potentially harmful situations. |
| `ERROR` | 6 | Logs error messages for indicating application failure or serious issues. |
| `ASSERT` | 7 | Logs assertion messages when conditions are false during development. |
{: .reset-td-br-1 .reset-td-br-2 .reset-td-br-3 aria-label="Enabling logs" }
For example, the following code will forward log levels `2`, `3`, `4`, `5`, `6`, and `7` to the `Log` method.
```xml
2
```
#### Verifying verbose logs
To verify that your logs are set to `VERBOSE`, check if `V/Braze` occurs somewhere in your logs. If it does, then verbose logs have been successfully enabled. For example:
```
2077-11-19 16:22:49.591 ? V/Braze v9.0.01 .bo.app.d3: Request started
```
#### Suppressing logs
To suppress all logs for the Braze Android SDK, set the log level to `BrazeLogger.SUPPRESS` in your application's `onCreate()` method _before_ any other methods.
```java
BrazeLogger.setLogLevel(BrazeLogger.SUPPRESS);
```
```kotlin
BrazeLogger.setLogLevel(BrazeLogger.SUPPRESS)
```
### Multiple API keys
The most common use case for multiple API keys is separating API keys for debug and release build variants.
To easily switch between multiple API keys in your builds, we recommend creating a separate `braze.xml` file for each relevant [build variant](https://developer.android.com/studio/build/build-variants.html). A build variant is a combination of build type and product flavor. By default, new Android projects are configured with [`debug` and `release` build types](https://developer.android.com/reference/tools/gradle-api/8.3/null/com/android/build/api/dsl/BuildType) and no product flavors.
For each relevant build variant, create a new `braze.xml` in the `src//res/values/` directory. When the build variant is compiled, it will use the new API key.
```xml
REPLACE_WITH_YOUR_BUILD_VARIANT_API_KEY
```
**Tip:**
To learn how to set up the API key in your code, see [Runtime configuration](https://www.braze.com/docs/de/de/developer_guide/sdk_integration/?sdktab=android#runtime-configuration).
### Exclusive in-app message TalkBack
In adherence to the [Android accessibility guidelines](https://developer.android.com/guide/topics/ui/accessibility), the Braze Android SDK offers Android Talkback by default. To ensure that only the contents of in-app messages are read out loud—without including other screen elements like the app title bar or navigation—you can enable exclusive mode for TalkBack.
To enable exclusive mode for in-app messages:
```xml
true
```
```kotlin
val brazeConfigBuilder = BrazeConfig.Builder()
brazeConfigBuilder.setIsInAppMessageAccessibilityExclusiveModeEnabled(true)
Braze.configure(this, brazeConfigBuilder.build())
```
```java
BrazeConfig.Builder brazeConfigBuilder = new BrazeConfig.Builder()
brazeConfigBuilder.setIsInAppMessageAccessibilityExclusiveModeEnabled(true);
Braze.configure(this, brazeConfigBuilder.build());
```
### R8 and ProGuard
[Code shrinking](https://developer.android.com/build/shrink-code) configuration is automatically included with your Braze integration.
Client apps that obfuscate Braze code must store release mapping files for Braze to interpret stack traces. If you want to continue to keep all Braze code, add the following to your ProGuard file:
```
-keep class bo.app.** { *; }
-keep class com.braze.** { *; }
```
## Integrating the Swift SDK
You can integrate and customize the Braze Swift SDK using the Swift Package Manager (SPM), CocoaPods, or manual integration methods. For more information about the various SDK symbols, see [Braze Swift reference documentation](https://braze-inc.github.io/braze-swift-sdk/documentation/brazekit/).
### Prerequisites
Before you start, verify your environment is supported by the [latest Braze Swift SDK version](https://github.com/braze-inc/braze-swift-sdk#version-information).
### Step 1: Install the Braze Swift SDK
We recommend using the [Swift Package Manager (SwiftPM)](https://swift.org/package-manager/) or [CocoaPods](http://cocoapods.org/) to install the Braze Swift SDK. Alternatively, you can install the SDK manually.
#### Step 1.1: Import SDK version
Open your project and navigate to your project's settings. Select the **Swift Packages** tab and click on the add button under the packages list.

**Note:**
Starting in version 7.4.0, the Braze Swift SDK has additional distribution channels as [static XCFrameworks](https://github.com/braze-inc/braze-swift-sdk-prebuilt-static) and [dynamic XCFrameworks](https://github.com/braze-inc/braze-swift-sdk-prebuilt-dynamic). If you'd like to use either of these formats instead, follow the installation instructions from its respective repository.
Enter the URL of our iOS Swift SDK repository `https://github.com/braze-inc/braze-swift-sdk` in the text field. Under the **Dependency Rule** section, select the SDK version. Finally, click **Add Package**.

#### Step 1.2: Select your packages
The Braze Swift SDK separates features into standalone libraries to provide developers with more control over which features to import into their projects.
| Package | Details |
| --------------- | --------------------------------------------------------------------------------------------------------------------------------------------------------------- |
| `BrazeKit` | Main SDK library providing support for analytics and push notifications. |
| `BrazeLocation` | Location library providing support for location analytics and geofence monitoring. |
| `BrazeUI` | Braze-provided user interface library for in-app messages, Content Cards, and Banners. Import this library if you intend to use the default UI components. |
{: .reset-td-br-1 .reset-td-br-2 aria-label="Step 1.2: Select your packages" }
{: .ws-td-nw-1}
##### About Extension libraries
**Warning:**
[BrazeNotificationService](https://braze-inc.github.io/braze-swift-sdk/tutorials/braze/b2-rich-push-notifications) and [BrazePushStory](https://braze-inc.github.io/braze-swift-sdk/tutorials/braze/b3-push-stories) are extension modules that provide additional functionality and should not be added directly to your main application target. Instead follow the linked guides to integrate them separately into their respective target extensions.
| Package | Details |
| -------------------------- | ------------------------------------------------------------------------------------- |
| `BrazeNotificationService` | Notification service extension library providing support for rich push notifications. |
| `BrazePushStory` | Notification content extension library providing support for Push Stories. |
{: .reset-td-br-1 .reset-td-br-2 aria-label="About Extension libraries" }
{: .ws-td-nw-1}
Select the package that best suits your needs and click **Add Package**. Make sure you select `BrazeKit` at a minimum.

#### Step 1.1: Install CocoaPods
For a full walkthrough, see CocoaPods' [Getting Started Guide](https://guides.cocoapods.org/using/getting-started.html). Otherwise, you can run the following command to get started quickly:
```bash
$ sudo gem install cocoapods
```
If you get stuck, checkout CocoaPods' [Troubleshooting Guide](http://guides.cocoapods.org/using/troubleshooting.html).
#### Step 1.2: Constructing the Podfile
Next, create a file in your Xcode project directory named `Podfile`.
**Note:**
Starting in version 7.4.0, the Braze Swift SDK has additional distribution channels as [static XCFrameworks](https://github.com/braze-inc/braze-swift-sdk-prebuilt-static) and [dynamic XCFrameworks](https://github.com/braze-inc/braze-swift-sdk-prebuilt-dynamic). If you'd like to use either of these formats instead, follow the installation instructions from its respective repository.
Add the following line to your Podfile:
```
target 'YourAppTarget' do
pod 'BrazeKit'
end
```
`BrazeKit` contains the main SDK library, providing support for analytics and push notifications.
We suggest you version Braze so pod updates automatically grab anything smaller than a minor version update. This looks like `pod 'BrazeKit' ~> Major.Minor.Build`. If you want to automatically integrate the latest Braze SDK version, even with major changes, you can use `pod 'BrazeKit'` in your Podfile.
##### About additional libraries
The Braze Swift SDK separates features into standalone libraries to provide developers with more control over which features to import into their projects. In addition to `BrazeKit`, you may add the following libraries to your Podfile:
| Library | Details |
| --------------------- | --------------------------------------------------------------------------------------------------------------------------------------------------------------- |
| `pod 'BrazeLocation'` | Location library providing support for location analytics and geofence monitoring. |
| `pod 'BrazeUI'` | Braze-provided user interface library for in-app messages, Content Cards, and Banners. Import this library if you intend to use the default UI components. |
{: .reset-td-br-1 .reset-td-br-2 aria-label="About additional libraries" }
{: .ws-td-nw-1}
###### Extension libraries
[BrazeNotificationService](https://braze-inc.github.io/braze-swift-sdk/tutorials/braze/b2-rich-push-notifications) and [BrazePushStory](https://braze-inc.github.io/braze-swift-sdk/tutorials/braze/b3-push-stories) are extension modules that provide additional functionality and should not be added directly to your main application target. Instead, you will need to create separate extension targets for each of these modules and import the Braze modules into their corresponding targets.
| Library | Details |
| -------------------------------- | ------------------------------------------------------------------------------------- |
| `pod 'BrazeNotificationService'` | Notification service extension library providing support for rich push notifications. |
| `pod 'BrazePushStory'` | Notification content extension library providing support for Push Stories. |
{: .reset-td-br-1 .reset-td-br-2 aria-label="Extension libraries" }
{: .ws-td-nw-1}
#### Step 1.3: Install the SDK
To install the Braze SDK CocoaPod, navigate to the directory of your Xcode app project within your terminal and run the following command:
```
pod install
```
At this point, you should be able to open the new Xcode project workspace created by CocoaPods. Make sure to use this Xcode workspace instead of your Xcode project.

#### Updating the SDK using CocoaPods
To update a CocoaPod, simply run the following command within your project directory:
```
pod update
```
#### Step 1.1: Download the Braze SDK
Go to the [Braze SDK release page on GitHub](https://github.com/braze-inc/braze-swift-sdk/releases), then download `braze-swift-sdk-prebuilt.zip`.

#### Step 1.2: Choose your frameworks
The Braze Swift SDK contains a variety of standalone XCFrameworks, which gives you the freedom to integrate the features you want—without needing to integrate them all. Reference the following table to choose your XCFrameworks:
| Package | Required? | Description |
| -------------------------- | --------- | ------------------------------------------------------------------------------------------------------------------------------------------------------------------------------------------------------------------------------------------------------------------------------------------------------------------------------------ |
| `BrazeKit` | Yes | Main SDK library that provides support for analytics and push notifications. |
| `BrazeLocation` | No | Location library that provides support for location analytics and geofence monitoring. |
| `BrazeUI` | No | Braze-provided user interface library for in-app messages, Content Cards, and Banners. Import this library if you intend to use the default UI components. |
| `BrazeNotificationService` | No | Notification service extension library that provides support for rich push notifications. Do not add this library directly to your main application target, instead [add the `BrazeNotificationService` library separately](https://braze-inc.github.io/braze-swift-sdk/tutorials/braze/b2-rich-push-notifications). |
| `BrazePushStory` | No | Notification content extension library that provides support for Push Stories. Do not add this library directly to your main application target, instead [add the `BrazePushStory` library separately](https://braze-inc.github.io/braze-swift-sdk/tutorials/braze/b3-push-stories). |
| `BrazeKitCompat` | No | Compatibility library containing all the `Appboy` and `ABK*` classes and methods that were available in the `Appboy-iOS-SDK` version 4.X.X. For usage details, refer to the minimal migration scenario in the [migration guide](https://braze-inc.github.io/braze-swift-sdk/documentation/braze/appboy-migration-guide/). |
| `BrazeUICompat` | No | Compatibility library containing all the `ABK*` classes and methods that were available in the `AppboyUI` library from `Appboy-iOS-SDK` version 4.X.X. For usage details, refer to the minimal migration scenario in the [migration guide](https://braze-inc.github.io/braze-swift-sdk/documentation/braze/appboy-migration-guide/). |
| `SDWebImage` | No | Dependency used only by `BrazeUICompat` in the minimal migration scenario. |
{: .reset-td-br-1 .reset-td-br-2 .reset-td-br-3 aria-label="Step 1.2: Choose your frameworks" }
{: .ws-td-nw-1 .reset-td-br-1 .reset-td-br-2 aria-label="Step 1.2: Choose your frameworks" }
#### Step 1.3: Prepare your files
Decide whether you want to use **Static** or **Dynamic** XCFrameworks, then prepare your files:
1. Create a temporary directory for your XCFrameworks.
2. In `braze-swift-sdk-prebuilt`, open the `dynamic` directory and move `BrazeKit.xcframework` into your directory. Your directory should be similar to the following:
```bash
temp_dir
└── BrazeKit.xcframework
```
3. Move each of your [chosen XCFrameworks](#swift_step-2-choose-your-frameworks) into your temporary directory. Your directory should be similar to the following:
```bash
temp_dir
├── BrazeKit.xcframework
├── BrazeKitCompat.xcframework
├── BrazeLocation.xcframework
└── SDWebImage.xcframework
```
#### Step 1.4: Integrate your frameworks
Next, integrate the **Dynamic** or **Static** XCFrameworks you [prepared previously](#swift_step-3-prepare-your-files):
In your Xcode project, select your build target, then **General**. Under **Frameworks, Libraries, and Embedded Content**, drag and drop the [files you prepared previously](#swift_step-3-prepare-your-files).

**Note:**
Starting with the Swift SDK 12.0.0, you should always select **Embed & Sign** for the Braze XCFrameworks for both the static and dynamic variants. This ensures that the frameworks resources are properly embedded in your app bundle.
**Tip:**
To enable GIF support, add `SDWebImage.xcframework`, located in either `braze-swift-sdk-prebuilt/static` or `braze-swift-sdk-prebuilt/dynamic`.
#### Common errors for Objective-C projects
If your Xcode project only contains Objective-C files, you may get "missing symbol" errors when you try to build your project. To fix these errors, open your project and add an empty Swift file to your file tree. This will force your build toolchain to embed [Swift Runtime](https://support.apple.com/kb/dl1998) and link to the appropriate frameworks during build time.
```bash
FILE_NAME.swift
```
Replace `FILE_NAME` with any non-spaced string. Your file should look similar to the following:
```bash
empty_swift_file.swift
```
### Step 2: Set up delayed initialization (optional)
You can choose to delay when the Braze Swift SDK is initialized, which is useful if your app needs to load a configuration or wait for user consent before starting the SDK. Delayed initialization makes sure Braze push notifications and push tokens received before SDK initialization are enqueued and processed once the SDK is initialized.
To use delayed initialization, the minimum Braze SDK version is required:
#### Step 2.1: Prepare for delayed initialization
Call `Braze.prepareForDelayedInitialization()` as early as possible in your app's lifecycle, ideally in or before `application(_:didFinishLaunchingWithOptions:)`. This makes sure that push notifications received before the SDK is initialized are properly captured and processed later.
**Note:**
This only applies to push notifications from Braze. Other push notifications are handled normally by system delegates.
```swift
func application(_ application: UIApplication, didFinishLaunchingWithOptions launchOptions: [UIApplication.LaunchOptionsKey: Any]?) -> Bool {
// Prepare the SDK for delayed initialization
Braze.prepareForDelayedInitialization()
// ... Additional non-Braze setup code
return true
}
```
```swift
@main
struct MyApp: App {
@UIApplicationDelegateAdaptor var appDelegate: AppDelegate
var body: some Scene {
WindowGroup {
ContentView()
}
}
}
class AppDelegate: NSObject, UIApplicationDelegate {
func application(_ application: UIApplication, didFinishLaunchingWithOptions launchOptions: [UIApplication.LaunchOptionsKey : Any]? = nil) -> Bool {
// Prepare the SDK for delayed initialization
Braze.prepareForDelayedInitialization()
// ... Additional non-Braze setup code
return true
}
}
```
```objc
- (BOOL)application:(UIApplication *)application didFinishLaunchingWithOptions:(NSDictionary *)launchOptions {
// Prepare the SDK for delayed initialization
[Braze prepareForDelayedInitialization];
// ... Additional non-Braze setup code
return YES;
}
```
When using delayed initialization, push notification automation is implicitly enabled. You can [customize the push automation](#swift_step-23-customize-push-automation-optional) configuration by passing a `pushAutomation` parameter.
#### Step 2.2: Configure push analytics behavior (optional)
When delayed initialization is enabled, push analytics are queued by default. However, you can choose to explicitly queue or drop push analytics instead.
##### Explicitly queue
To explicitly queue push analytics (default behavior), pass `.queue` to the `analyticsBehavior` parameter. Push analytics events that are queued prior to initialization will be processed and flushed to the server upon initialization.
```swift
Braze.prepareForDelayedInitialization(analyticsBehavior: .queue)
```
```objc
[Braze prepareForDelayedInitializationWithAnalyticsBehavior:BRZPushEnqueueBehaviorQueue];
```
##### Drop
To drop push analytics received before SDK initialization, pass `.drop` to the `analyticsBehavior` parameter. With this option, any push analytics event that occurs while the SDK is not initialized will be ignored.
```swift
Braze.prepareForDelayedInitialization(analyticsBehavior: .drop)
```
```objc
[Braze prepareForDelayedInitializationWithAnalyticsBehavior:BRZPushEnqueueBehaviorDrop];
```
#### Step 2.3: Customize push automation (optional)
You can customize the push automation configuration by passing a `pushAutomation` parameter. By default, all automation features are enabled except `requestAuthorizationAtLaunch`.
```swift
// Enable all push automation
featuresBraze.prepareForDelayedInitialization(pushAutomation: true)
// Or customize specific automation options
let automation = Braze.Configuration.Push.Automation()
automation.automaticSetup = true
automation.requestAuthorizationAtLaunch = false
Braze.prepareForDelayedInitialization(pushAutomation: automation)
```
```objc
// Enable all push automation features
[Braze prepareForDelayedInitializationWithPushAutomation:[[BRZConfigurationPushAutomation alloc] initWithAutomationEnabled:YES]];
// Or customize specific automation options
BRZConfigurationPushAutomation *automation = [[BRZConfigurationPushAutomation alloc] init];
automation.automaticSetup = YES;
automation.requestAuthorizationAtLaunch = NO;
[Braze prepareForDelayedInitializationWithPushAutomation:automation analyticsBehavior:BRZPushEnqueueBehaviorQueue];
```
#### Step 2.4: Initialize the SDK
After your chosen delay period (for example, after fetching configuration from a server or after user consent), initialize the SDK as normal:
```swift
func initializeBraze() {
let configuration = Braze.Configuration(apiKey: "YOUR-API-KEY", endpoint: "YOUR-ENDPOINT")
// Enable push automation to match the delayed initialization configuration
configuration.push.automation = true
let braze = Braze(configuration: configuration)
// Store the Braze instance for later use
AppDelegate.braze = braze
}
```
```objc
- (void)initializeBraze {
BRZConfiguration *configuration = [[BRZConfiguration alloc] initWithApiKey:@"YOUR-API-KEY" endpoint:@"YOUR-ENDPOINT"];
// Enable push automation to match the delayed initialization configuration
configuration.push.automation = [[BRZConfigurationPushAutomation alloc] initWithAutomationEnabled:YES];
Braze *braze = [[Braze alloc] initWithConfiguration:configuration];
// Store the Braze instance for later use
AppDelegate.braze = braze;
}
```
**Note:**
When the SDK is initialized, all queued push notifications, push tokens, and deep links are automatically processed.
### Step 3: Update your app delegate
**Important:**
The following assumes you've already added an `AppDelegate` to your project (which are not generated by default) and you are not using the delayed initialization feature. If you don't plan on using an `AppDelegate`, be sure to initialize the Braze SDK as early as possible, like during the app's launch. If you are using the delayed initialization feature, refer to [Step 2.4](#swift_step-24-initialize-the-sdk) for initializing the SDK and ignore this step.
Add the following line of code to your `AppDelegate.swift` file to import the features included in the Braze Swift SDK:
```swift
import BrazeKit
```
Next, add a static property to your `AppDelegate` class to keep a strong reference to the Braze instance throughout your application's lifetime:
```swift
class AppDelegate: UIResponder, UIApplicationDelegate {
static var braze: Braze? = nil
}
```
The SDK requires your application to retain a strong reference to the Braze instance throughout its usage. To prevent any unexpected side effects, ensure that you have fully captured that reference before accessing or modifying any properties or methods on the Braze instance.
Finally, in `AppDelegate.swift`, add the following snippet to your `application:didFinishLaunchingWithOptions:` method:
```swift
let configuration = Braze.Configuration(
apiKey: "YOUR-APP-IDENTIFIER-API-KEY",
endpoint: "YOUR-BRAZE-ENDPOINT"
)
let braze = Braze(configuration: configuration)
AppDelegate.braze = braze
```
Update `YOUR-APP-IDENTIFIER-API-KEY` and `YOUR-BRAZE-ENDPOINT` with the correct value from your **App Settings** page. Check out our [API identifier types](https://www.braze.com/docs/de/de/api/identifier_types/?tab=app%20ids) for more information on where to find your app identifier API key.
Add the following line of code to your `AppDelegate.m` file:
```objc
@import BrazeKit;
```
Next, add a static variable to your `AppDelegate.m` file to keep a reference to the Braze instance throughout your application's lifetime:
```objc
static Braze *_braze;
@implementation AppDelegate
+ (Braze *)braze {
return _braze;
}
+ (void)setBraze:(Braze *)braze {
_braze = braze;
}
@end
```
The SDK requires your application to retain a strong reference to the Braze instance throughout its usage. To prevent any unexpected side effects, ensure that you have fully captured that reference before accessing or modifying any properties or methods on the Braze instance.
Finally, within your `AppDelegate.m` file, add the following snippet within your `application:didFinishLaunchingWithOptions:` method:
```objc
BRZConfiguration *configuration = [[BRZConfiguration alloc] initWithApiKey:"YOUR-APP-IDENTIFIER-API-KEY"
endpoint:"YOUR-BRAZE-ENDPOINT"];
Braze *braze = [[Braze alloc] initWithConfiguration:configuration];
AppDelegate.braze = braze;
```
Update `YOUR-APP-IDENTIFIER-API-KEY` and `YOUR-BRAZE-ENDPOINT` with the correct value from your **Manage Settings** page. Check out our [API documentation](https://www.braze.com/docs/de/de/api/api_key/#the-app-identifier-api-key) for more information on where to find your app identifier API key.
**Note:**
`Braze.init` returns immediately on the calling thread. The SDK processes startup work on an internal queue. Reading sync properties such as `braze.deviceId` directly after `init` on the main thread will block the calling thread until the SDK has completed its post-initialization operations. For main-thread or latency-sensitive contexts, use `braze.getDeviceId(_:)` (Swift) or `[braze getDeviceIdWithCompletion:^(NSString *deviceId) { ... }]` (Objective-C) to read the value without blocking.
## Optional configurations
### Logging
For a centralized overview across all platforms, see [Verbose logging](https://www.braze.com/docs/de/de/developer_guide/sdk_integration/verbose_logging). To learn how to interpret log output, see [Reading verbose logs](https://www.braze.com/docs/de/de/developer_guide/sdk_integration/reading_verbose_logs).
#### Log levels
The default log level for the Braze Swift SDK is `.error`—it's also the minimum supported level when logs are enabled. These are the full list of log levels:
| Swift | Objective-C | Description |
| ----------- | ------------------------ | ------------------------------------------------------------ |
| `.debug` | `BRZLoggerLevelDebug` | Log debugging information + `.info` + `.error`. |
| `.info` | `BRZLoggerLevelInfo` | Log general SDK information (user changes, etc.) + `.error`. |
| `.error` | `BRZLoggerLevelError` | Log errors. |
| `.disabled` | `BRZLoggerLevelDisabled` | No logging occurs. |
{: .reset-td-br-1 .reset-td-br-2 .reset-td-br-3 aria-label="Log levels" }
{: .reset-td-br-1 .reset-td-br-2 .reset-td-br-3 aria-label="Log levels" }
#### Setting the log level
You can assign the log level at runtime in your `Braze.Configuration` object. For complete usage details, see [`Braze.Configuration.Logger`](https://braze-inc.github.io/braze-swift-sdk/documentation/brazekit/braze/configuration-swift.class/logger-swift.class).
```swift
let configuration = Braze.Configuration(
apiKey: "",
endpoint: ""
)
// Enable logging of general SDK information (such as user changes, etc.)
configuration.logger.level = .info
let braze = Braze(configuration: configuration)
```
```objc
BRZConfiguration *configuration = [[BRZConfiguration alloc] initWithApiKey:self.APIKey
endpoint:self.apiEndpoint];
// Enable logging of general SDK information (such as user changes, etc.)
[configuration.logger setLevel:BRZLoggerLevelInfo];
Braze *braze = [[Braze alloc] initWithConfiguration:configuration];
```
## Integrating the Cordova SDK
### Prerequisites
Before you start, verify your environment is supported by the [latest Braze Cordova SDK version](https://github.com/braze-inc/braze-cordova-sdk?tab=readme-ov-file#minimum-version-requirements).
### Step 1: Add the SDK to your project
**Warning:**
Only add the Braze Cordova SDK using the following methods. Do not attempt to install using other methods as it could lead to a security breach.
If you're on Cordova 6 or later, you can add the SDK directly from GitHub. Alternatively, you can download a ZIP of the [GitHub repository](https://github.com/braze-inc/braze-cordova-sdk) and add the SDK manually.
If you don't plan on using location collection and geofences, use the `master` branch from GitHub.
```bash
cordova plugin add https://github.com/braze-inc/braze-cordova-sdk#master
```
If you plan on using location collection and geofences, use the `geofence-branch` from GitHub.
```bash
cordova plugin add https://github.com/braze-inc/braze-cordova-sdk#geofence-branch
```
**Tip:**
You can switch between `master` and `geofence-branch` at anytime by repeating this step.
### Step 2: Configure your project
Next, adding the following preferences to the `platform` element in your project's `config.xml` file.
```xml
```
```xml
```
Replace the following:
| Value | Description |
| --------------------- | -------------------------------------------------------------------------------------------------------------------------------- |
| `BRAZE_API_KEY` | Your [Braze REST API key](https://www.braze.com/docs/de/de/user_guide/administrative/app_settings/api_settings_tab/#rest-api-keys). |
| `CUSTOM_API_ENDPOINT` | A custom API endpoint. This endpoint is used to route your Braze instance data to the correct App Group in your Braze dashboard. |
{: .reset-td-br-1 .reset-td-br-2 aria-label="Step 2: Configure your project" }
The `platform` element in your `config.xml` file should be similar to the following:
```xml
```
```xml
```
## Platform-specific syntax
The following section covers the platform-specific syntax when using Cordova with iOS or Android.
### Integers
Integer preferences are read as string representations, like in the following example:
```xml
```
Due to how the Cordova 8.0.0+ framework handles preferences, integer-only preferences (such as sender IDs) must be set to strings prepended with `str_`, like in the following example:
```xml
```
### Booleans
Boolean preferences are read by the SDK using `YES` and `NO` keywords as a string representation, like in the following example:
```xml
```
Boolean preferences are read by the SDK using `true` and `false` keywords as a string representation, like in the following example:
```xml
```
## Optional configurations {#optional}
You can add any of the following preferences to the `platform` element in your project's `config.xml` file:
| Method | Description |
| ------------------------------------------------- | ----------------------------------------------------------------------------------------------------------------------------------------------------------------------------------------------------------------------------------------------------- |
| `ios_api_key` | Sets the API key for your application. |
| `ios_api_endpoint` | Sets the [SDK endpoint](https://www.braze.com/docs/de/de/api/basics/#endpoints) for your application. |
| `ios_disable_automatic_push_registration` | Sets whether automatic push registration should be disabled. |
| `ios_disable_automatic_push_handling` | Sets whether automatic push handling should be disabled. |
| `ios_enable_idfa_automatic_collection` | Sets whether the Braze SDK should automatically collect the IDFA information. For more information, see [the Braze IDFA method documentation](https://braze-inc.github.io/braze-swift-sdk/documentation/brazekit/braze/set(identifierforadvertiser:)/). |
| `enable_location_collection` | Sets whether the automatic location collection is enabled (if the user permits). The `geofence-branch` |
| `geofences_enabled` | Sets whether geofences are enabled. |
| `ios_session_timeout` | Sets the Braze session timeout for your application in seconds. Defaults to 10 seconds. |
| `sdk_authentication_enabled` | Sets whether to enable the [SDK Authentication](https://www.braze.com/docs/de/de/developer_guide/platform_wide/sdk_authentication#sdk-authentication) feature. |
| `display_foreground_push_notifications` | Sets whether push notifications should be displayed while the application is in the foreground. |
| `ios_disable_un_authorization_option_provisional` | Sets whether `UNAuthorizationOptionProvisional` should be disabled. |
| `trigger_action_minimum_time_interval_seconds` | Sets the minimum time interval in seconds between triggers. Defaults to 30 seconds. |
| `ios_push_app_group` | Sets the app group ID for iOS push extensions. |
| `ios_forward_universal_links` | Sets whether the SDK automatically recognizes and forwards universal links to the system methods. Required for deep links from push notifications to work on iOS. Defaults to disabled. |
| `ios_log_level` | Sets the minimum logging level for `Braze.Configuration.Logger`. |
| `ios_use_uuid_as_device_id` | Sets if a randomly generated UUID should be used as the device ID. |
| `ios_flush_interval_seconds` | Sets the interval in seconds between automatic data flushes. Defaults to 10 seconds. |
| `ios_use_automatic_request_policy` | Sets whether the request policy for `Braze.Configuration.Api` should be automatic or manual. |
| `should_opt_in_when_push_authorized` | Sets if a user’s notification subscription state should automatically be set to `optedIn` when push permissions are authorized. |
{: .reset-td-br-1 .reset-td-br-2 aria-label="Optional configurations #optional" }
**Tip:**
For more detailed information, see [GitHub: Braze iOS Cordova plugin](https://github.com/braze-inc/braze-cordova-sdk/blob/master/src/ios/BrazePlugin.m).
| Method | Description |
| ----------------------------------------------------------------- | --------------------------------------------------------------------------------------------------------------------------------------------------------------------------------------------- |
| `android_api_key` | Sets the API key for your application. |
| `android_api_endpoint` | Sets the [SDK endpoint](https://www.braze.com/docs/de/de/api/basics/#endpoints) for your application. |
| `android_small_notification_icon` | Sets the notification small icon. |
| `android_large_notification_icon` | Sets the notification large icon. |
| `android_notification_accent_color` | Sets the notification accent color using a hexadecimal representation. |
| `android_default_session_timeout` | Sets the Braze session timeout for your application in seconds. Defaults to 10 seconds. |
| `android_handle_push_deep_links_automatically` | Sets whether the Braze SDK automatically handles push deep links. Required for deep links from push notifications to work on Android. Defaults to disabled. |
| `android_log_level` | Sets the log level for your application. The default log level is 4 and will minimally log info. To enable verbose logging for debugging, use log level 2. |
| `firebase_cloud_messaging_registration_enabled` | Sets whether to use Firebase Cloud Messaging for push notifications. |
| `android_fcm_sender_id` | Sets the Firebase Cloud Messaging sender ID. |
| `enable_location_collection` | Sets whether the automatic location collection is enabled (if the user permits). |
| `geofences_enabled` | Sets whether geofences are enabled. |
| `android_disable_auto_session_tracking` | Disable the Android Cordova plugin from automatically tracking sessions. For more information, see [Disabling automatic session tracking](#cordova_disable-automatic-session-tracking) |
| `sdk_authentication_enabled` | Sets whether to enable the [SDK Authentication](https://www.braze.com/docs/de/de/developer_guide/platform_wide/sdk_authentication#sdk-authentication) feature. |
| `trigger_action_minimum_time_interval_seconds` | Sets the minimum time interval in seconds between triggers. Defaults to 30 seconds. |
| `is_session_start_based_timeout_enabled` | Sets whether the session timeout behavior to be based either on session start or session end events. |
| `default_notification_channel_name` | Sets the user-facing name as seen via `NotificationChannel.getName` for the Braze default `NotificationChannel`. |
| `default_notification_channel_description` | Sets the user-facing description as seen via `NotificationChannel.getDescription` for the Braze default `NotificationChannel`. |
| `does_push_story_dismiss_on_click` | Sets whether a Push Story is automatically dismissed when clicked. |
| `is_fallback_firebase_messaging_service_enabled` | Sets whether the use of a fallback Firebase Cloud Messaging Service is enabled. |
| `fallback_firebase_messaging_service_classpath` | Sets the classpath for the fallback Firebase Cloud Messaging Service. |
| `is_content_cards_unread_visual_indicator_enabled` | Sets whether the Content Cards unread visual indication bar is enabled. |
| `is_firebase_messaging_service_on_new_token_registration_enabled` | Sets whether the Braze SDK will automatically register tokens in `com.google.firebase.messaging.FirebaseMessagingService.onNewToken`. |
| `is_push_deep_link_back_stack_activity_enabled` | Sets whether Braze will add an activity to the back stack when automatically following deep links for push. |
| `push_deep_link_back_stack_activity_class_name` | Sets the activity that Braze will add to the back stack when automatically following deep links for push. |
| `should_opt_in_when_push_authorized` | Sets if Braze should automatically opt-in the user when push is authorized. |
{: .reset-td-br-1 .reset-td-br-2 aria-label="Optional configurations #optional" }
**Tip:**
For more detailed information, see [GitHub: Braze Android Cordova plugin](https://github.com/braze-inc/braze-cordova-sdk/blob/master/src/android/BrazePlugin.kt).
The following is an example `config.xml` file with additional configurations:
```xml
```
```xml
```
## Disabling automatic session tracking (Android only) {#disable-automatic-session-tracking}
By default, the Android Cordova plugin automatically tracks sessions. To disable automatic session tracking, add the following preference to the `platform` element in your project's `config.xml` file:
```xml
```
To start tracking sessions again, call `BrazePlugin.startSessionTracking()`. Keep in mind, only sessions started after the next `Activity.onStart()` will be tracked.
## About the Flutter Braze SDK
After you integrate the Braze Flutter SDK on Android and iOS, you'll be able to use the Braze API within your [Flutter apps](https://flutter.dev/) written in Dart. This plugin provides basic analytics functionality and lets you integrate in-app messages and Content Cards for both iOS and Android with a single codebase.
## Integrating the Flutter SDK
### Prerequisites
Before you integrate the Braze Flutter SDK, you'll need to complete the following:
| Prerequisite | Description |
| --- | --- |
| Braze API app identifier | To locate your app's identifier, go to **Settings** > **APIs and Identifiers** > **App Identifiers**. For more information see, [API Identifier Types](https://www.braze.com/docs/de/de/api/identifier_types/#app-identifier).|
| Braze SDK endpoint | Your SDK endpoint URL (for example, `sdk..braze.com`). Your endpoint will depend on the [Braze URL for your instance](https://www.braze.com/docs/de/de/developer_guide/rest_api/basics/#endpoints).|
| Flutter SDK | Install the official [Flutter SDK](https://docs.flutter.dev/get-started/install) and ensure it meets the Braze Flutter SDK's [minimum supported version](https://github.com/braze-inc/braze-flutter-sdk#requirements). |
{: .reset-td-br-1 .reset-td-br-2 aria-label="Prerequisites" }
### Step 1: Integrate the Braze library
Add the Braze Flutter SDK package from the command line. This will add the appropriate line to your `pubspec.yaml`.
```bash
flutter pub add braze_plugin
```
### Step 2: Complete native SDK setup
#### 2.1 Set up Android
##### Provide credentials at compile time
Create a `braze.xml` file in your project's `android/res/values` folder. The API key and endpoint are provided at runtime from Dart, so they are not required in this file. To enable delayed initialization, add `com_braze_enable_delayed_initialization` to the file:
```xml
true
```
##### Provide credentials at runtime
Alternatively, you can enable delayed initialization programmatically in your `MainActivity.kt`:
```kotlin
import com.braze.Braze
class MainActivity : FlutterActivity() {
override fun onCreate(savedInstanceState: Bundle?) {
super.onCreate(savedInstanceState)
Braze.enableDelayedInitialization(context = this)
}
}
```
Add the required permissions to your `AndroidManifest.xml` file:
```xml
```
#### 2.2 Set up iOS
Within your existing `application(_:didFinishLaunchingWithOptions:)` method, add a call to `BrazePlugin.configure(_:postInitialization:)` to store your configuration. The Braze instance is created later when `initialize()` is called from Dart. The API key and endpoint are not set here.
Add the following code to your `AppDelegate.swift`:
```swift
import BrazeKit
import braze_plugin
// ...
override func application(
_ application: UIApplication,
didFinishLaunchingWithOptions launchOptions: [UIApplication.LaunchOptionsKey : Any]? = nil
) -> Bool {
// ... your existing didFinishLaunchingWithOptions setup ...
BrazePlugin.configure(
{ configuration in
configuration.logger.level = .info
// Set other non-API-key configurations here, such as:
// configuration.push.automation = true
// configuration.sessionTimeout = 60
},
postInitialization: { braze in
// Optional: Customize the Braze instance after creation.
// For example, set a custom in-app message presenter:
// let customPresenter = CustomInAppMessagePresenter()
// braze.inAppMessagePresenter = customPresenter
}
)
return true
}
```
Add the following code to your `AppDelegate.m`:
```objc
@import BrazeKit;
@import braze_plugin;
// ...
- (BOOL)application:(UIApplication *)application
didFinishLaunchingWithOptions:(NSDictionary *)launchOptions {
[BrazePlugin configure:^(BRZConfiguration *configuration) {
configuration.logger.level = BRZLoggerLevelInfo;
// Set other non-API-key configurations here, such as:
// configuration.push.automation = ...
// configuration.sessionTimeout = 60;
} postInitialization:^(Braze *braze) {
// Optional: customize the Braze instance after creation.
}];
return YES;
}
```
**Important:**
`BrazePlugin.configure()` only stores your configuration. No Braze instance exists until `initialize()` is called from Dart, so do not call any Braze SDK methods in the AppDelegate after `configure()`.
#### 2.1 Set up Android
To connect to Braze servers, create a `braze.xml` file in your project's `android/res/values` folder. Paste the following code and replace the API identifier key and endpoint with your values:
```xml
YOUR_APP_IDENTIFIER_API_KEYYOUR_CUSTOM_ENDPOINT_OR_CLUSTER
```
Add the required permissions to your `AndroidManifest.xml` file:
```xml
```
#### 2.2 Set up iOS
Add the Braze SDK imports at the top of the `AppDelegate.swift` file:
```swift
import BrazeKit
import braze_plugin
```
In the same file, create the Braze configuration object in the `application(_:didFinishLaunchingWithOptions:)` method and replace the API key and endpoint with your app's values. Then, create the Braze instance using the configuration, and create a static property on the `AppDelegate` for easy access:
```swift
static var braze: Braze? = nil
override func application(
_ application: UIApplication,
didFinishLaunchingWithOptions launchOptions: [UIApplication.LaunchOptionsKey : Any]? = nil
) -> Bool {
// Setup Braze
let configuration = Braze.Configuration(
apiKey: "",
endpoint: ""
)
// - Enable logging or customize configuration here
configuration.logger.level = .info
let braze = BrazePlugin.initBraze(configuration)
AppDelegate.braze = braze
return true
}
```
Import the Braze SDK at the top of the `AppDelegate.m` file:
```objc
@import BrazeKit;
@import braze_plugin;
```
In the same file, create the Braze configuration object in the `application:didFinishLaunchingWithOptions:` method and replace the API key and endpoint with your app's values. Then, create the Braze instance using the configuration, and create a static property on the `AppDelegate` for easy access:
```objc
- (BOOL)application:(UIApplication *)application
didFinishLaunchingWithOptions:(NSDictionary *)launchOptions {
// Setup Braze
BRZConfiguration *configuration =
[[BRZConfiguration alloc] initWithApiKey:@""
endpoint:@""];
// - Enable logging or customize configuration here
configuration.logger.level = BRZLoggerLevelInfo;
Braze *braze = [BrazePlugin initBraze:configuration];
AppDelegate.braze = braze;
[self.window makeKeyAndVisible];
return YES;
}
#pragma mark - AppDelegate.braze
static Braze *_braze = nil;
+ (Braze *)braze {
return _braze;
}
+ (void)setBraze:(Braze *)braze {
_braze = braze;
}
```
### Step 3: Set up the plugin
Import the plugin and create a single instance of `BrazePlugin`:
```dart
import 'package:braze_plugin/braze_plugin.dart';
final BrazePlugin braze = BrazePlugin();
```
Then call `initialize()` with your app identifier API key and SDK endpoint to create the Braze instance. See the following options for where to call this method in your app flow.
#### Standard initialization
To initialize the SDK when your app starts, call `initialize()` in `initState()`:
```dart
@override
void initState() {
super.initState();
braze.initialize("", "");
}
```
#### Delayed initialization
To defer SDK initialization until a later point in the session — for example, after the user grants consent or completes login — call `initialize()` when you're ready:
```dart
// ...
void onUserConsent() {
braze.initialize("", "");
}
```
**Warning:**
Push notifications and deep links received before `initialize()` is called are not processed on iOS. On Android, deep links from push notifications do not resolve while the SDK is waiting to be initialized. If your app relies on push or deep links at launch, use [standard initialization](#standard-initialization) instead.
#### Platform-specific API keys
Since your Android and iOS apps use different API keys, use platform detection:
```dart
import 'dart:io' show Platform;
if (Platform.isAndroid) {
braze.initialize("", "");
} else if (Platform.isIOS) {
braze.initialize("", "");
}
```
#### Re-initialization
You can call `initialize()` multiple times to re-initialize the SDK with a different API key and endpoint mid-session. Each call tears down the previous Braze instance and creates a new one.
**Important:**
To avoid undefined behaviors, only allocate and use a single instance of the `BrazePlugin` in your Dart code. All SDK method calls made before `initialize()` are ignored on iOS, so call `initialize()` before using any other Braze methods.
To import the plugin into your Dart code, use the following:
```dart
import 'package:braze_plugin/braze_plugin.dart';
```
Then, initialize an instance of the Braze plugin by calling `new BrazePlugin()` like in [our sample app](https://github.com/braze-inc/braze-flutter-sdk/blob/master/example/lib/main.dart).
**Important:**
To avoid undefined behaviors, only allocate and use a single instance of the `BrazePlugin` in your Dart code.
## Testing the integration
You can verify that the SDK is integrated by checking session statistics in the dashboard. If you run your application on either platform, you should see a new session in the dashboard (in the **Overview** section).
Open a session for a particular user by calling the following code in your app.
```dart
BrazePlugin braze = BrazePlugin();
braze.initialize("", "");
braze.changeUser("{some-user-id}");
```
```dart
BrazePlugin braze = BrazePlugin();
braze.changeUser("{some-user-id}");
```
Search for the user with `{some-user-id}` in the dashboard under **Audience** > **Search Users**. There, you can verify that session and device data have been logged.
## About the React Native Braze SDK
Integrating the React Native Braze SDK provides basic analytics functionality and lets you integrate in-app messages and Content Cards for both iOS and Android with one codebase.
## New Architecture compatibility
The following minimum SDK version is compatible with all apps using [React Native's New Architecture](https://reactnative.dev/docs/the-new-architecture/landing-page):
Starting with SDK version 6.0.0, Braze uses a React Native Turbo Module, which is compatible with both the New Architecture and legacy bridge architecture. This means no additional setup is required.
**Warning:**
If your iOS app conforms to `RCTAppDelegate` and follows our previous `AppDelegate` setup, review the samples in [Complete native setup](#reactnative_step-2-complete-native-setup) to prevent crashes when subscribing to events in the Turbo Module.
## React and React Native version requirements
Braze doesn't publish separate minimum React versions beyond what the React Native SDK supports. To integrate the SDK, use React Native version 0.71 or later. For the full list of supported React Native versions, see the [React Native SDK GitHub repository](https://github.com/braze-inc/braze-react-native-sdk?tab=readme-ov-file#version-support).
When you upgrade React, React Native, or the Braze SDK, review the SDK [CHANGELOG](https://github.com/braze-inc/braze-react-native-sdk/blob/master/CHANGELOG.md) for breaking changes before you deploy.
## Integrating the React Native SDK
### Prerequisites
For supported React Native versions and upgrade guidance, see [React and React Native version requirements](#react-and-react-native-version-requirements).
### Step 1: Integrate the Braze library
```bash
npm install @braze/react-native-sdk
```
```bash
yarn add @braze/react-native-sdk
```
### Step 2: Complete native setup
If your app uses Expo, see [Using the Expo plugin](#reactnative-using-the-expo-plugin). If your app uses pure React Native, see [Using React Native CLI](#reactnative-using-react-native-cli).
Choose one setup method in each version tab: Expo plugin or React Native CLI.
#### Method 1: Using the Expo plugin {#reactnative-using-the-expo-plugin}
##### 2.1 Install the Braze Expo plugin
Ensure that your version of the Braze Expo plugin is at least 4.1.0. For the full list of supported versions, see the [Braze Expo plugin repository](https://github.com/braze-inc/braze-expo-plugin?tab=readme-ov-file#version-support).
The following code snippet shows the command to install the Braze Expo plugin:
```bash
npx expo install @braze/expo-plugin
```
##### 2.2 Add the plugin to your app.json
In your `app.json`, add the Braze Expo plugin. The API key and endpoint are no longer set here. Provide them at runtime through `Braze.initialize()` from JavaScript. Add the following optional configuration parameters based on your implementation needs:
| Method | Type | Description |
| --------------------------------------------- | ------- | -------------------------------------------------------------------------------------------------------------------------------------------------------- |
| `enableBrazeIosPush` | boolean | iOS only. Whether to use Braze to handle push notifications on iOS. |
| `enableFirebaseCloudMessaging` | boolean | Android only. Whether to use Firebase Cloud Messaging for push notifications. |
| `firebaseCloudMessagingSenderId` | string | Android only. Your Firebase Cloud Messaging sender ID. |
| `sessionTimeout` | integer | The Braze session timeout for your application in seconds. |
| `enableSdkAuthentication` | boolean | Whether to enable the [SDK Authentication](https://www.braze.com/docs/de/de/developer_guide/platform_wide/sdk_authentication#sdk-authentication) feature. |
| `logLevel` | integer | The log level for your application. The default log level is 8 and minimally logs info. To enable verbose logging for debugging, use log level 0. |
| `minimumTriggerIntervalInSeconds` | integer | The minimum time interval in seconds between triggers. Defaults to 30 seconds. |
| `enableAutomaticLocationCollection` | boolean | Whether automatic location collection is enabled (if the user permits). |
| `enableGeofence` | boolean | Whether geofences are enabled. |
| `enableAutomaticGeofenceRequests` | boolean | Whether geofence requests should be made automatically. |
| `dismissModalOnOutsideTap` | boolean | iOS only. Whether a modal in-app message is dismissed when the user clicks outside of the in-app message. |
| `androidHandlePushDeepLinksAutomatically` | boolean | Android only. Whether the Braze SDK should automatically handle push deep links. |
| `androidPushNotificationHtmlRenderingEnabled` | boolean | Android only. Sets whether the text content in a push notification should be interpreted and rendered as HTML using `android.text.Html.fromHtml`. |
| `androidNotificationAccentColor` | string | Android only. Sets the Android notification accent color. |
| `androidNotificationLargeIcon` | string | Android only. Sets the Android notification large icon. |
| `androidNotificationSmallIcon` | string | Android only. Sets the Android notification small icon. |
| `iosRequestPushPermissionsAutomatically` | boolean | iOS only. Whether the user should automatically be prompted for push permissions on app launch. |
| `enableBrazeIosRichPush` | boolean | iOS only. Whether to enable rich push features for iOS. |
| `enableBrazeIosPushStories` | boolean | iOS only. Whether to enable Braze Push Stories for iOS. |
| `iosPushStoryAppGroup` | string | iOS only. The app group used for iOS Push Stories. |
| `iosUseUUIDAsDeviceId` | boolean | iOS only. Whether the device ID uses a randomly generated UUID. |
| `iosForwardUniversalLinks` | boolean | iOS only. Specifies if the SDK should automatically recognize and forward universal links to the system methods (default: `false`). |
{: .reset-td-br-1 .reset-td-br-2 .reset-td-br-3 aria-label="2.2 Add the plugin to your app.json" }
The following code snippet shows an example `app.json` configuration:
```json
{
"expo": {
"plugins": [
[
"@braze/expo-plugin",
{
"sessionTimeout": 60,
"enableGeofence": false,
"enableBrazeIosPush": false,
"enableFirebaseCloudMessaging": false,
"firebaseCloudMessagingSenderId": "YOUR-FCM-SENDER-ID",
"androidHandlePushDeepLinksAutomatically": true,
"enableSdkAuthentication": false,
"logLevel": 0,
"minimumTriggerIntervalInSeconds": 0,
"enableAutomaticLocationCollection": false,
"enableAutomaticGeofenceRequests": false,
"dismissModalOnOutsideTap": true,
"androidPushNotificationHtmlRenderingEnabled": true,
"androidNotificationAccentColor": "#ff3344",
"androidNotificationLargeIcon": "@drawable/custom_app_large_icon",
"androidNotificationSmallIcon": "@drawable/custom_app_small_icon",
"iosRequestPushPermissionsAutomatically": false,
"enableBrazeIosPushStories": true,
"iosPushStoryAppGroup": "group.com.example.myapp.PushStories",
"iosForwardUniversalLinks": false
}
]
]
}
}
```
###### Configuring Android push notification icons {#android-push-icons}
When using `androidNotificationLargeIcon` and `androidNotificationSmallIcon`, follow these best practices for proper icon display:
**Icon placement and format**
To use custom push notification icons with the Braze Expo plugin:
1. Create your icon files following the Icon requirements listed in the Icon requirements.
2. Place them in your project's Android native directories at `android/app/src/main/res/drawable-/`.
For example, use `android/app/src/main/res/drawable-mdpi/` and `android/app/src/main/res/drawable-hdpi/`.
3. Alternatively, if you're managing assets in your React Native directory, you can use Expo's [app.json icon configuration](https://docs.expo.dev/versions/latest/config/app/#icon) or create an [Expo config plugin](https://docs.expo.dev/config-plugins/introduction/) to copy the icons to the Android drawable folders during prebuild.
The Braze Expo plugin references these icons using Android's drawable resource system.
**Icon requirements**
- **Small icon:** Must be a white silhouette on a transparent background (this is an Android platform requirement)
- **Large icon:** Can be a full-color image.
- **Format:** PNG format is recommended.
- **Naming:** Use lowercase letters, numbers, and underscores only (for example, `my_large_icon.png`)
**Configuration in app.json**
The following code snippet shows how to reference Android notification icons in `app.json` using the `@drawable/` prefix:
```json
{
"expo": {
"plugins": [
[
"@braze/expo-plugin",
{
"androidNotificationLargeIcon": "@drawable/large_icon",
"androidNotificationSmallIcon": "@drawable/small_icon"
}
]
]
}
}
```
**Important:**
Do not use relative file paths (such as `src/assets/images/icon.png`) or include the file extension when referencing icons. The Expo plugin requires the `@drawable/` prefix to properly locate the icons in the Android native folders after the prebuild process.
**How it works**
The Braze Expo plugin references your icon files from the Android `drawable` directories. When you run `npx expo prebuild`, Expo generates the native Android project structure. Your icons must be present in the Android `drawable` folders (either placed manually or copied through a config plugin) before the build process. The plugin then configures the Braze SDK to use these drawable resources by their names (without path or extension), which is why the `@drawable/` prefix is required in your configuration.
For more information on Android notification icons, see [Android's notification icon guidelines](https://developer.android.com/develop/ui/views/notifications#icon).
##### 2.3 Build and run your application
Prebuilding your application generates the native files necessary for the Braze Expo plugin to work.
The following code snippet shows the command to prebuild your application:
```bash
npx expo prebuild
```
Run your application as specified in the [Expo docs](https://docs.expo.dev/workflow/customizing/). If you make changes to the configuration options, prebuild and run the application again.
#### Method 2: Using React Native CLI {#reactnative-using-react-native-cli}
##### Set up Android
**2.1 Add the Kotlin Gradle plugin**
The following code snippet shows how to add the Kotlin Gradle plugin in your top-level project `build.gradle` under `buildscript` > `dependencies`:
```groovy
buildscript {
dependencies {
...
// Choose your Kotlin version
classpath("org.jetbrains.kotlin:kotlin-gradle-plugin:1.8.10")
}
}
```
This adds Kotlin to your project.
**2.2 Configure the Braze SDK**
Create a `braze.xml` file in your project's `res/values` folder. The API key and endpoint are provided at runtime from JavaScript, so they are not required in this file. The following code snippet shows how to enable delayed initialization with `com_braze_enable_delayed_initialization`:
```xml
true
```
**Note:**
You can still add other native configuration values to `braze.xml` (such as push, session timeout, and logging settings). These are applied automatically when `Braze.initialize()` is called from JavaScript.
The following code snippet shows the required permissions for your `AndroidManifest.xml` file:
```xml
```
**Tip:**
On Braze Android SDK version 12.2.0 or later, you can automatically pull in the android-sdk-location library by setting `importBrazeLocationLibrary=true` in your `gradle.properties` file.
**2.3 Implement user session tracking**
The calls to `openSession()` and `closeSession()` are handled automatically.
The following code snippet shows what to add to the `onCreate()` method of your `MainApplication` class:
```java
import com.braze.BrazeActivityLifecycleCallbackListener;
@Override
public void onCreate() {
super.onCreate();
...
registerActivityLifecycleCallbacks(new BrazeActivityLifecycleCallbackListener());
}
```
```kotlin
import com.braze.BrazeActivityLifecycleCallbackListener
override fun onCreate() {
super.onCreate()
...
registerActivityLifecycleCallbacks(BrazeActivityLifecycleCallbackListener())
}
```
**2.4 Handle intent updates**
If your MainActivity has `android:launchMode` set to `singleTask`, the following code snippet shows what to add to your `MainActivity` class:
```java
@Override
public void onNewIntent(Intent intent) {
super.onNewIntent(intent);
setIntent(intent);
}
```
```kotlin
override fun onNewIntent(intent: Intent) {
super.onNewIntent(intent)
setIntent(intent)
}
```
##### Set up iOS
**2.5 (Optional) Configure Podfile for dynamic XCFrameworks**
To import certain Braze libraries, such as BrazeUI, into an Objective-C++ file, you must use the `#import` syntax. Starting in version `7.4.0` of the Braze Swift SDK, binaries have an [optional distribution channel as dynamic XCFrameworks](https://github.com/braze-inc/braze-swift-sdk-prebuilt-dynamic), which are compatible with this syntax.
If you'd like to use this distribution channel, manually override the CocoaPods source locations in your Podfile. Reference this sample and replace `{your-version}` with the relevant version you wish to import:
```ruby
pod 'BrazeKit', :podspec => 'https://raw.githubusercontent.com/braze-inc/braze-swift-sdk-prebuilt-dynamic/{your-version}/BrazeKit.podspec'
pod 'BrazeUI', :podspec => 'https://raw.githubusercontent.com/braze-inc/braze-swift-sdk-prebuilt-dynamic/{your-version}/BrazeUI.podspec'
pod 'BrazeLocation', :podspec => 'https://raw.githubusercontent.com/braze-inc/braze-swift-sdk-prebuilt-dynamic/{your-version}/BrazeLocation.podspec'
```
**2.6 Install pods**
Since React Native automatically links the libraries to the native platform, you can install the SDK with the help of CocoaPods.
The following code snippet shows how to install pods from the root folder of the project:
```bash
# To install using the React Native New Architecture
cd ios && pod install
# To install using the React Native legacy architecture
cd ios && RCT_NEW_ARCH_ENABLED=0 pod install
```
**2.7 Configure the Braze SDK**
Use `BrazeReactInitializer.configure` in your `AppDelegate` to register native configuration. The closures you provide are stored and applied later when `Braze.initialize(apiKey, endpoint)` is called from JavaScript.
The following code snippet shows how to import the Braze SDK at the top of the `AppDelegate.swift` file:
```swift
import BrazeKit
import braze_react_native_sdk
```
In the `application(_:didFinishLaunchingWithOptions:)` method, register your native configuration using `BrazeReactInitializer.configure`. Do not set the API key or endpoint here. They are provided from JavaScript through `Braze.initialize()`.
- **`configure` closure**: Receives a `Braze.Configuration` and lets you set native configuration properties (logging, push, sessions, and more).
- **`postInitialization` closure** _(optional)_: Receives the live `Braze` instance after creation, for setup that requires the instance (for example, storing a reference or setting delegates).
The following code snippet shows an example `AppDelegate.swift` implementation that uses `BrazeReactInitializer.configure`:
```swift
@main
class AppDelegate: UIResponder, UIApplicationDelegate {
static var braze: Braze? = nil
func application(
_ application: UIApplication,
didFinishLaunchingWithOptions launchOptions: [UIApplication.LaunchOptionsKey: Any]? = nil
) -> Bool {
BrazeReactInitializer.configure { configuration in
configuration.logger.level = .info
configuration.push.automation = true
} postInitialization: { braze in
AppDelegate.braze = braze
}
// ... React Native setup
return true
}
}
```
The following code snippet shows how to import the Braze SDK at the top of the `AppDelegate.m` file:
```objc
@import BrazeKit;
@import braze_react_native_sdk;
```
In the `application:didFinishLaunchingWithOptions:` method, register your native configuration using `BrazeReactInitializer`. Do not set the API key or endpoint here. They are provided from JavaScript through `Braze.initialize()`.
The following code snippet shows an example `AppDelegate.m` implementation that uses `BrazeReactInitializer`:
```objc
- (BOOL)application:(UIApplication *)application
didFinishLaunchingWithOptions:(NSDictionary *)launchOptions {
[BrazeReactInitializer configure:^(BRZConfiguration *configuration) {
configuration.logger.level = BRZLoggerLevelInfo;
configuration.push.automation = [[BRZConfigurationPushAutomation alloc] initWithAutomationEnabled:YES];
} postInitialization:^(Braze *braze) {
// Store the Braze instance for later use.
}];
/* Other configuration */
return YES;
}
```
**Important:**
`BrazeReactInitializer.configure()` only stores your configuration. No Braze instance exists until `Braze.initialize()` is called from JavaScript, so do not call any Braze SDK methods in the AppDelegate after `configure()`.
When you call `Braze.initialize()` again, the same `configure` and `postInitialization` blocks are applied to the new Braze instance.
#### Method 1: Using the Expo plugin
##### Step 2.1: Install the Braze Expo plugin
Ensure that your version of the Braze React Native SDK is at least 1.37.0. For the full list of supported versions, see the [Braze React Native repository](https://github.com/braze-inc/braze-react-native-sdk?tab=readme-ov-file#version-support).
The following code snippet shows the command to install the Braze Expo plugin:
```bash
npx expo install @braze/expo-plugin
```
##### Step 2.2: Add the plugin to your app.json
In your `app.json`, add the Braze Expo plugin. You can provide the following configuration options:
| Method | Type | Description |
| --------------------------------------------- | ------- | -------------------------------------------------------------------------------------------------------------------------------------------------------- |
| `androidApiKey` | string | Required. The [API key](https://www.braze.com/docs/de/de/api/identifier_types/) for your Android application, located in your Braze dashboard under **Manage Settings**. |
| `iosApiKey` | string | Required. The [API key](https://www.braze.com/docs/de/de/api/identifier_types/) for your iOS application, located in your Braze dashboard under **Manage Settings**. |
| `baseUrl` | string | Required. The [SDK endpoint](https://www.braze.com/docs/de/de/api/basics/#endpoints) for your application, located in your Braze dashboard under **Manage Settings**. |
| `enableBrazeIosPush` | boolean | iOS only. Whether to use Braze to handle push notifications on iOS. Introduced in React Native SDK v1.38.0 and Expo Plugin v0.4.0. |
| `enableFirebaseCloudMessaging` | boolean | Android only. Whether to use Firebase Cloud Messaging for push notifications. Introduced in React Native SDK v1.38.0 and Expo Plugin v0.4.0. |
| `firebaseCloudMessagingSenderId` | string | Android only. Your Firebase Cloud Messaging sender ID. Introduced in React Native SDK v1.38.0 and Expo Plugin v0.4.0. |
| `sessionTimeout` | integer | The Braze session timeout for your application in seconds. |
| `enableSdkAuthentication` | boolean | Whether to enable the [SDK Authentication](https://www.braze.com/docs/de/de/developer_guide/platform_wide/sdk_authentication#sdk-authentication) feature. |
| `logLevel` | integer | The log level for your application. The default log level is 8 and minimally logs info. To enable verbose logging for debugging, use log level 0. |
| `minimumTriggerIntervalInSeconds` | integer | The minimum time interval in seconds between triggers. Defaults to 30 seconds. |
| `enableAutomaticLocationCollection` | boolean | Whether automatic location collection is enabled (if the user permits). |
| `enableGeofence` | boolean | Whether geofences are enabled. |
| `enableAutomaticGeofenceRequests` | boolean | Whether geofence requests should be made automatically. |
| `dismissModalOnOutsideTap` | boolean | iOS only. Whether a modal in-app message is dismissed when the user clicks outside of the in-app message. |
| `androidHandlePushDeepLinksAutomatically` | boolean | Android only. Whether the Braze SDK should automatically handle push deep links. |
| `androidPushNotificationHtmlRenderingEnabled` | boolean | Android only. Sets whether the text content in a push notification should be interpreted and rendered as HTML using `android.text.Html.fromHtml`. |
| `androidNotificationAccentColor` | string | Android only. Sets the Android notification accent color. |
| `androidNotificationLargeIcon` | string | Android only. Sets the Android notification large icon. |
| `androidNotificationSmallIcon` | string | Android only. Sets the Android notification small icon. |
| `iosRequestPushPermissionsAutomatically` | boolean | iOS only. Whether the user should automatically be prompted for push permissions on app launch. |
| `enableBrazeIosRichPush` | boolean | iOS only. Whether to enable rich push features for iOS. |
| `enableBrazeIosPushStories` | boolean | iOS only. Whether to enable Braze Push Stories for iOS. |
| `iosPushStoryAppGroup` | string | iOS only. The app group used for iOS Push Stories. |
| `iosUseUUIDAsDeviceId` | boolean | iOS only. Whether the device ID will use a randomly generated UUID. |
| `iosForwardUniversalLinks` | boolean | iOS only. Specifies if the SDK should automatically recognize and forward universal links to the system methods (default: `false`). When enabled, the SDK will automatically forward universal links to the system methods defined in [Supporting universal links in your app](https://braze-inc.github.io/braze-swift-sdk/documentation/brazekit/braze/configuration-swift.class/forwarduniversallinks/). Introduced in React Native SDK v11.1.0 and Expo Plugin v3.2.0. |
{: .reset-td-br-1 .reset-td-br-2 .reset-td-br-3 aria-label="Step 2.2: Add the plugin to your app.json" }
The following code snippet shows an example `app.json` configuration:
```json
{
"expo": {
"plugins": [
[
"@braze/expo-plugin",
{
"androidApiKey": "YOUR-ANDROID-API-KEY",
"iosApiKey": "YOUR-IOS-API-KEY",
"baseUrl": "YOUR-SDK-ENDPOINT",
"sessionTimeout": 60,
"enableGeofence": false,
"enableBrazeIosPush": false,
"enableFirebaseCloudMessaging": false,
"firebaseCloudMessagingSenderId": "YOUR-FCM-SENDER-ID",
"androidHandlePushDeepLinksAutomatically": true,
"enableSdkAuthentication": false,
"logLevel": 0,
"minimumTriggerIntervalInSeconds": 0,
"enableAutomaticLocationCollection": false,
"enableAutomaticGeofenceRequests": false,
"dismissModalOnOutsideTap": true,
"androidPushNotificationHtmlRenderingEnabled": true,
"androidNotificationAccentColor": "#ff3344",
"androidNotificationLargeIcon": "@drawable/custom_app_large_icon",
"androidNotificationSmallIcon": "@drawable/custom_app_small_icon",
"iosRequestPushPermissionsAutomatically": false,
"enableBrazeIosPushStories": true,
"iosPushStoryAppGroup": "group.com.example.myapp.PushStories",
"iosForwardUniversalLinks": false
}
],
]
}
}
```
###### Configuring Android push notification icons
When using `androidNotificationLargeIcon` and `androidNotificationSmallIcon`, follow these best practices for proper icon display:
**Icon placement and format**
To use custom push notification icons with the Braze Expo plugin:
1. Create your icon files following the Icon requirements listed in the Icon requirements.
2. Place them in your project's Android native directories at `android/app/src/main/res/drawable-/` (for example, `android/app/src/main/res/drawable-mdpi/`, `drawable-hdpi/`, or similar.)
3. Alternatively, if you're managing assets in your React Native directory, you can use Expo's [app.json icon configuration](https://docs.expo.dev/versions/latest/config/app/#icon) or create an [Expo config plugin](https://docs.expo.dev/config-plugins/introduction/) to copy the icons to the Android drawable folders during prebuild.
The Braze Expo plugin references these icons using Android's drawable resource system.
**Icon requirements**
- **Small icon:** Must be a white silhouette on a transparent background (this is an Android platform requirement)
- **Large icon:** Can be a full-color image.
- **Format:** PNG format is recommended.
- **Naming:** Use lowercase letters, numbers, and underscores only (for example, `my_large_icon.png`)
**Configuration in app.json**
The following code snippet shows how to reference Android notification icons in `app.json` using the `@drawable/` prefix:
```json
{
"expo": {
"plugins": [
[
"@braze/expo-plugin",
{
"androidNotificationLargeIcon": "@drawable/large_icon",
"androidNotificationSmallIcon": "@drawable/small_icon"
}
]
]
}
}
```
**Important:**
Do not use relative file paths (such as `src/assets/images/icon.png`) or include the file extension when referencing icons. The Expo plugin requires the `@drawable/` prefix to properly locate the icons in the Android native folders after the prebuild process.
**How it works**
The Braze Expo plugin references your icon files from the Android `drawable` directories. When you run `npx expo prebuild`, Expo generates the native Android project structure. Your icons must be present in the Android `drawable` folders (either placed manually or copied through a config plugin) before the build process. The plugin then configures the Braze SDK to use these drawable resources by their names (without path or extension), which is why the `@drawable/` prefix is required in your configuration.
For more information on Android notification icons, see [Android's notification icon guidelines](https://developer.android.com/develop/ui/views/notifications#icon).
##### Step 2.3: Build and run your application
Prebuilding your application generates the native files necessary for the Braze Expo plugin to work.
The following code snippet shows the command to prebuild your application:
```bash
npx expo prebuild
```
Run your application as specified in the [Expo docs](https://docs.expo.dev/workflow/customizing/). Keep in mind, if you make any changes to the configuration options, you'll be required to prebuild and run the application again.
#### Method 2: Using React Native CLI
##### Set up Android
**Step 2.1: Add the Kotlin Gradle plugin**
The following code snippet shows how to add the Kotlin Gradle plugin in your top-level project `build.gradle` under `buildscript` > `dependencies`:
```groovy
buildscript {
dependencies {
...
// Choose your Kotlin version
classpath("org.jetbrains.kotlin:kotlin-gradle-plugin:1.8.10")
}
}
```
This adds Kotlin to your project.
**Step 2.2: Configure the Braze SDK**
To connect to Braze servers, create a `braze.xml` file in your project's `res/values` folder. The following code snippet shows an example `braze.xml` configuration. Replace the API [key](https://www.braze.com/docs/de/de/api/identifier_types/) and [endpoint](https://www.braze.com/docs/de/de/api/basics/#endpoints) with your values:
```xml
YOU_APP_IDENTIFIER_API_KEYYOUR_CUSTOM_ENDPOINT_OR_CLUSTER
```
The following code snippet shows the required permissions for your `AndroidManifest.xml` file:
```xml
```
**Tip:**
On Braze Android SDK version 12.2.0 or later, you can automatically pull in the android-sdk-location library by setting `importBrazeLocationLibrary=true` in your `gradle.properties` file.
**Step 2.3: Implement user session tracking**
The calls to `openSession()` and `closeSession()` are handled automatically.
The following code snippet shows what to add to the `onCreate()` method of your `MainApplication` class:
```java
import com.braze.BrazeActivityLifecycleCallbackListener;
@Override
public void onCreate() {
super.onCreate();
...
registerActivityLifecycleCallbacks(new BrazeActivityLifecycleCallbackListener());
}
```
```kotlin
import com.braze.BrazeActivityLifecycleCallbackListener
override fun onCreate() {
super.onCreate()
...
registerActivityLifecycleCallbacks(BrazeActivityLifecycleCallbackListener())
}
```
**Step 2.4: Handle intent updates**
If your MainActivity has `android:launchMode` set to `singleTask`, the following code snippet shows what to add to your `MainActivity` class:
```java
@Override
public void onNewIntent(Intent intent) {
super.onNewIntent(intent);
setIntent(intent);
}
```
```kotlin
override fun onNewIntent(intent: Intent) {
super.onNewIntent(intent)
setIntent(intent)
}
```
##### Set up iOS
**Step 2.5: (Optional) Configure Podfile for dynamic XCFrameworks**
To import certain Braze libraries, such as BrazeUI, into an Objective-C++ file, you must use the `#import` syntax. Starting in version `7.4.0` of the Braze Swift SDK, binaries have an [optional distribution channel as dynamic XCFrameworks](https://github.com/braze-inc/braze-swift-sdk-prebuilt-dynamic), which are compatible with this syntax.
If you'd like to use this distribution channel, manually override the CocoaPods source locations in your Podfile. The following code snippet shows a sample override. Replace `{your-version}` with the relevant version you wish to import:
```ruby
pod 'BrazeKit', :podspec => 'https://raw.githubusercontent.com/braze-inc/braze-swift-sdk-prebuilt-dynamic/{your-version}/BrazeKit.podspec'
pod 'BrazeUI', :podspec => 'https://raw.githubusercontent.com/braze-inc/braze-swift-sdk-prebuilt-dynamic/{your-version}/BrazeUI.podspec'
pod 'BrazeLocation', :podspec => 'https://raw.githubusercontent.com/braze-inc/braze-swift-sdk-prebuilt-dynamic/{your-version}/BrazeLocation.podspec'
```
**Step 2.6: Install pods**
Since React Native automatically links the libraries to the native platform, you can install the SDK with the help of CocoaPods.
The following code snippet shows how to install pods from the root folder of the project:
```bash
# To install using the React Native New Architecture
cd ios && pod install
# To install using the React Native legacy architecture
cd ios && RCT_NEW_ARCH_ENABLED=0 pod install
```
**Step 2.7: Configure the Braze SDK**
The following code snippet shows how to import the Braze SDK at the top of the `AppDelegate.swift` file:
```swift
import BrazeKit
import braze_react_native_sdk
```
In the `application(_:didFinishLaunchingWithOptions:)` method, replace the API [key](https://www.braze.com/docs/de/de/api/identifier_types/) and [endpoint](https://www.braze.com/docs/de/de/api/basics/#endpoints) with your app's values. Then, create the Braze instance using the configuration, and create a static property on the `AppDelegate` for easy access.
**Note:**
Our example assumes an implementation of [RCTAppDelegate](https://github.com/facebook/react-native/blob/e64756ae5bb5c0607a4d97a134620fafcb132b3b/packages/react-native/Libraries/AppDelegate/RCTAppDelegate.h), which provides a number of abstractions in the React Native setup. If you are using a different setup for your app, be sure to adjust your implementation as needed.
The following code snippet shows an example `AppDelegate.swift` setup:
```swift
func application(
_ application: UIApplication,
didFinishLaunchingWithOptions launchOptions: [UIApplication.LaunchOptionsKey : Any]? = nil
) -> Bool {
// Setup Braze
let configuration = Braze.Configuration(
apiKey: "{BRAZE_API_KEY}",
endpoint: "{BRAZE_ENDPOINT}")
// Enable logging and customize the configuration here.
configuration.logger.level = .info
let braze = BrazeReactBridge.perform(
#selector(BrazeReactBridge.initBraze(_:)),
with: configuration
).takeUnretainedValue() as! Braze
AppDelegate.braze = braze
/* Other configuration */
return true
}
// MARK: - AppDelegate.braze
static var braze: Braze? = nil
```
The following code snippet shows how to import the Braze SDK at the top of the `AppDelegate.m` file:
```objc
#import
#import "BrazeReactBridge.h"
```
In the `application:didFinishLaunchingWithOptions:` method, replace the API [key](https://www.braze.com/docs/de/de/api/identifier_types/) and [endpoint](https://www.braze.com/docs/de/de/api/basics/#endpoints) with your app's values. Then, create the Braze instance using the configuration, and create a static property on the `AppDelegate` for easy access.
**Note:**
Our example assumes an implementation of [RCTAppDelegate](https://github.com/facebook/react-native/blob/e64756ae5bb5c0607a4d97a134620fafcb132b3b/packages/react-native/Libraries/AppDelegate/RCTAppDelegate.h), which provides a number of abstractions in the React Native setup. If you are using a different setup for your app, be sure to adjust your implementation as needed.
The following code snippet shows an example `AppDelegate.m` setup:
```objc
- (BOOL)application:(UIApplication *)application
didFinishLaunchingWithOptions:(NSDictionary *)launchOptions {
// Setup Braze
BRZConfiguration *configuration = [[BRZConfiguration alloc] initWithApiKey:@"{BRAZE_API_KEY}"
endpoint:@"{BRAZE_ENDPOINT}"];
// Enable logging and customize the configuration here.
configuration.logger.level = BRZLoggerLevelInfo;
Braze *braze = [BrazeReactBridge initBraze:configuration];
AppDelegate.braze = braze;
/* Other configuration */
return YES;
}
#pragma mark - AppDelegate.braze
static Braze *_braze = nil;
+ (Braze *)braze {
return _braze;
}
+ (void)setBraze:(Braze *)braze {
_braze = braze;
}
```
### Step 3: Initialize the SDK
The following code snippet shows how to import the library in your React Native code:
```javascript
import Braze from "@braze/react-native-sdk";
```
Then call `Braze.initialize()` with your app identifier API key and SDK endpoint to create the Braze instance. See the following options for where to call this method in your app flow.
#### Standard initialization
The following code snippet shows how to initialize the SDK when your app starts by calling `Braze.initialize()` in a `useEffect`:
```javascript
import React, { useEffect } from "react";
import Braze from "@braze/react-native-sdk";
const App = () => {
useEffect(() => {
Braze.initialize("YOUR-API-KEY", "YOUR-SDK-ENDPOINT");
}, []);
return (
// Your app components
);
};
```
#### Delayed initialization
The following code snippet shows how to defer SDK initialization until later in the session. For example, after the user grants consent or completes login:
```javascript
function onUserConsent() {
Braze.initialize("YOUR-API-KEY", "YOUR-SDK-ENDPOINT");
}
```
**Warning:**
On iOS, push notifications received before `Braze.initialize()` are queued and processed after initialization. On Android, deep links from push notifications do not resolve while the SDK is waiting to be initialized. If your app relies on immediate deep link handling at launch, use [standard initialization](#standard-initialization) instead.
#### Platform-specific API keys
The following code snippet shows how to use platform detection when your Android and iOS apps use different API keys:
```javascript
import { Platform } from "react-native";
import Braze from "@braze/react-native-sdk";
const apiKey = Platform.select({
android: "YOUR-ANDROID-API-KEY",
ios: "YOUR-IOS-API-KEY",
}) ?? "";
Braze.initialize(apiKey, "YOUR-SDK-ENDPOINT");
```
#### Re-initialization
You can call `Braze.initialize()` multiple times to re-initialize the SDK with a different API key and endpoint mid-session. Each call tears down the previous Braze instance and creates a new one.
**Important:**
All SDK method calls made before `Braze.initialize()` are ignored on iOS, so call `Braze.initialize()` before using any other Braze methods.
For React Native SDK 19.1.0 and earlier, native initialization happens in Step 2. Import the library in your React Native code to call Braze methods. For more details, check out our [sample project](https://github.com/braze-inc/braze-react-native-sdk/tree/master/BrazeProject).
```javascript
import Braze from "@braze/react-native-sdk";
```
### Step 4: Test the integration (optional)
You can verify that the SDK is integrated by checking session statistics in the dashboard. If you run your application on either platform, you should see a new session in the dashboard (in the **Overview** section).
The following code snippet shows how to open a session for a particular user in your app:
```javascript
import Braze from "@braze/react-native-sdk";
Braze.initialize("YOUR-API-KEY", "YOUR-SDK-ENDPOINT");
Braze.changeUser("{some-user-id}");
```
Search for the user with `{some-user-id}` in the dashboard under **Audience** > **Search Users**. There, you can verify that session and device data have been logged.
To test your SDK integration, the following code snippet shows how to start a new session on either platform for a user.
```javascript
Braze.changeUser("userId");
```
The following code snippet shows an example of assigning the user ID at app startup:
```javascript
import React, { useEffect } from "react";
import Braze from "@braze/react-native-sdk";
const App = () => {
useEffect(() => {
Braze.changeUser("some-user-id");
}, []);
return (
...
)
```
In the Braze dashboard, go to [User Search](https://www.braze.com/docs/de/de/user_guide/engagement_tools/segments/using_user_search#using-user-search) and look for the user with the ID matching `some-user-id`. Here, you can verify that session and device data were logged.
## Next steps
After integrating the Braze SDK, you can start implementing common messaging features:
- [Push Notifications](https://www.braze.com/docs/de/de/developer_guide/push_notifications/): Set up and send push notifications to your users.
- [In-App Messages](https://www.braze.com/docs/de/de/developer_guide/in_app_messages/): Display contextual messages within your app.
- [Banners](https://www.braze.com/docs/de/de/developer_guide/banners/): Show persistent banners in your app interface.
## Integrating the Roku SDK
### Step 1: Add files
Braze SDK files can be found in the `sdk_files` directory in the [Braze Roku SDK repository](https://github.com/braze-inc/braze-roku-sdk).
1. Add `BrazeSDK.brs` to your app in the `source` directory.
2. Add `BrazeTask.brs` and `BrazeTask.xml` to your app in the `components` directory.
### Step 2: Add references
Add a reference to `BrazeSDK.brs` in your main scene using the following `script` element:
```
```
### Step 3: Configure
Within `main.brs`, set the Braze configuration on the global node:
```brightscript
globalNode = screen.getGlobalNode()
config = {}
config_fields = BrazeConstants().BRAZE_CONFIG_FIELDS
config[config_fields.API_KEY] = {YOUR_API_KEY}
' example endpoint: "https://sdk.iad-01.braze.com/"
config[config_fields.ENDPOINT] = {YOUR_ENDPOINT}
config[config_fields.HEARTBEAT_FREQ_IN_SECONDS] = 5
globalNode.addFields({brazeConfig: config})
```
You can find your [SDK endpoint](https://www.braze.com/docs/de/de/user_guide/administrative/access_braze/sdk_endpoints/) and API key within the Braze dashboard.
### Step 4: Initialize Braze
Initialize the Braze instance:
```brightscript
m.BrazeTask = createObject("roSGNode", "BrazeTask")
m.Braze = getBrazeInstance(m.BrazeTask)
```
## Optional configurations
### Logging
To debug your Braze integration, you can view the Roku debug console for Braze logs. Refer to [Debugging code](https://developer.roku.com/docs/developer-program/debugging/debugging-channels.md) from Roku Developers to learn more.
## About the Unity Braze SDK
For a full list of types, functions, variables, and more, see [Unity Declaration File](https://github.com/braze-inc/braze-unity-sdk/blob/master/Assets/Plugins/Appboy/BrazePlatform.cs). Additionally, if you've already integrated Unity manually for iOS, you can [switch to an automated integration](#unity_automated-integration) instead.
## Integrating the Unity SDK
### Prerequisites
Before you start, verify your environment is supported by the [latest Braze Unity SDK version](https://github.com/braze-inc/braze-unity-sdk/releases).
### Step 1: Choose your Braze Unity package
The Braze [`.unitypackage`](https://docs.unity3d.com/Manual/AssetPackages.html) bundles native bindings for the Android and iOS platforms, along with a C# interface.
There are several Braze Unity packages available for download on the [Braze Unity releases page](https://github.com/Appboy/appboy-unity-sdk/releases):
- `Appboy.unitypackage`
- This package bundles the Braze Android and iOS SDKs and the [SDWebImage](https://github.com/SDWebImage/SDWebImage) dependency for the iOS SDK, which is required for the proper functionality of Braze in-app messaging, and Content Cards features on iOS. The SDWebImage framework is used for downloading and displaying images, including GIFs. If you intend on utilizing full Braze functionality, download and import this package.
- `Appboy-nodeps.unitypackage`
- This package is similar to `Appboy.unitypackage` except for the [SDWebImage](https://github.com/SDWebImage/SDWebImage) framework is not present. This package is useful if you do not want the SDWebImage framework present in your iOS app.
**Note:**
As of Unity 2.6.0, the bundled Braze Android SDK artifact requires [AndroidX](https://developer.android.com/jetpack/androidx) dependencies. If you were previously using a `jetified` unitypackage, you can safely transition to the corresponding `unitypackage`.
If Android builds fail with "This project uses AndroidX dependencies, but the 'android.useAndroidX' property is not enabled", enable [Custom Gradle Properties Template](https://docs.unity3d.com/Manual/class-PlayerSettingsAndroid.html#Publishing) in your Unity Publishing Settings. Then open `Assets/Plugins/Android/gradleTemplate.properties` and set `android.useAndroidX=true`. For a working template, see the [Braze Unity sample app](https://github.com/braze-inc/braze-unity-sdk/tree/master/unity-samples) and its [`gradleTemplate.properties`](https://github.com/braze-inc/braze-unity-sdk/blob/master/unity-samples/Assets/Plugins/Android/gradleTemplate.properties) file.
The Braze [`.unitypackage`](https://docs.unity3d.com/Manual/AssetPackages.html) bundles native bindings for the Android and iOS platforms, along with a C# interface.
The Braze Unity package is available for download on the [Braze Unity releases page](https://github.com/Appboy/appboy-unity-sdk/releases) with two integration options:
1. `Appboy.unitypackage` only
- This package bundles the Braze Android and iOS SDKs without any additional dependencies. With this integration method, there will not be proper functionality of Braze in-app messaging and Content Cards features on iOS. If you intend on utilizing full Braze functionality without custom code, use the next option instead.
- To use this integration option, ensure that the box next to `Import SDWebImage dependency` is *unchecked* in the Unity UI under "Braze Configuration".
2. `Appboy.unitypackage` with `SDWebImage`
- This integration option bundles the Braze Android and iOS SDKs and the [SDWebImage](https://github.com/SDWebImage/SDWebImage) dependency for the iOS SDK, which is required for the proper functionality of Braze in-app messaging, and Content Cards features on iOS. The `SDWebImage` framework is used for downloading and displaying images, including GIFs. If you intend on utilizing full Braze functionality, download and import this package.
- To automatically import `SDWebImage`, be sure to *check* the box next to `Import SDWebImage dependency` in the Unity UI under "Braze Configuration".
**Note:**
To see if you require the [SDWebImage](https://github.com/SDWebImage/SDWebImage) dependency for your iOS project, visit the [iOS in-app message documentation](https://www.braze.com/docs/de/de/developer_guide/platform_integration_guides/swift/in-app_messaging/overview/).
### Step 2: Import the package
In the Unity Editor, import the package into your Unity project by navigating to **Assets > Import Package > Custom Package**. Next, click **Import**.
Alternatively, follow the [Unity asset package import](https://docs.unity3d.com/Manual/AssetPackages.html) instructions for a more detailed guide on importing custom Unity packages.
**Note:**
If you only wish to import the iOS or Android plugin, deselect the `Plugins/Android` or `Plugins/iOS` subdirectory when importing the Braze `.unitypackage`.
In the Unity Editor, import the package into your Unity project by navigating to **Assets > Import Package > Custom Package**. Next, click **Import**.
Alternatively, follow the [Unity asset package import](https://docs.unity3d.com/Manual/AssetPackages.html) instructions for a more detailed guide on importing custom Unity packages.
**Note:**
If you only wish to import the iOS or Android plugin, deselect the `Plugins/Android` or `Plugins/iOS` subdirectory when importing the Braze `.unitypackage`.
### Step 3: Configure the SDK
#### Step 3.1: Configure `AndroidManifest.xml`
Configure [`AndroidManifest.xml`](https://docs.unity3d.com/Manual/android-manifest.html) so the Braze SDK can function. If your app does not have an `AndroidManifest.xml`, you can use the following as a template. Otherwise, if you already have an `AndroidManifest.xml`, ensure that any of the following missing sections are added to your existing `AndroidManifest.xml`.
1. Go to the `Assets/Plugins/Android/` directory and open your `AndroidManifest.xml` file. This is the [default location in the Unity editor](https://docs.unity3d.com/Manual/android-manifest.html).
2. In your `AndroidManifest.xml`, add the required permissions and activities from in the following template.
3. When you're finished, your `AndroidManifest.xml` should only contain a single Activity with `"android.intent.category.LAUNCHER"` present.
```xml
```
**Important:**
All Activity classes registered in your `AndroidManifest.xml` file should be fully integrated with the Braze Android SDK, otherwise your analytics won't be collected. If you add your own Activity class, be sure you [extend the Braze Unity player](#unity_extend-unity-player) so you can prevent this.
#### Step 3.2: Update `AndroidManifest.xml` with your package name
To find your package name, click **File > Build Settings > Player Settings > Android Tab**.

In your `AndroidManifest.xml`, all instances of `REPLACE_WITH_YOUR_PACKAGE_NAME` should be replaced with your `Package Name` from the previous step.
#### Step 3.3: Add gradle dependencies
To add gradle dependencies to your Unity project, first enable ["Custom Main Gradle Template"](https://docs.unity3d.com/Manual/class-PlayerSettingsAndroid.html#Publishing) in your Publishing Settings. This will create a template gradle file that your project will use. A gradle file handles setting dependencies and other build-time project settings. For more information, check out the Braze Unity sample app's [mainTemplate.gradle](https://github.com/braze-inc/braze-unity-sdk/blob/master/unity-samples/Assets/Plugins/Android/mainTemplate.gradle).
The following dependencies are required:
```groovy
implementation 'com.google.firebase:firebase-messaging:22.0.0'
implementation "androidx.swiperefreshlayout:swiperefreshlayout:1.1.0"
implementation "androidx.recyclerview:recyclerview:1.2.1"
implementation "org.jetbrains.kotlin:kotlin-stdlib:1.6.0"
implementation "org.jetbrains.kotlinx:kotlinx-coroutines-android:1.6.1"
implementation 'androidx.core:core:1.6.0'
```
You may also set these dependencies using the [External Dependency Manager](https://github.com/googlesamples/unity-jar-resolver).
#### Step 3.4: Automate the Unity Android integration
Braze provides a native Unity solution for automating the Unity Android integration.
1. In the Unity Editor, open the Braze Configuration Settings by navigating to **Braze > Braze Configuration**.
2. Check the **Automate Unity Android Integration** box.
3. In the **Braze API Key** field, input your application's API key found in **Manage Settings** from the Braze dashboard.
**Note:**
This automatic integration should not be used with a manually created `braze.xml` file since the configuration values may conflict during project building. If you require a manual `braze.xml`, disable the automatic integration.
#### Step 3.1: Set your API key
Braze provides a native Unity solution for automating the Unity iOS integration. This solution modifies the built Xcode project using Unity's [`PostProcessBuildAttribute`](http://docs.unity3d.com/ScriptReference/Callbacks.PostProcessBuildAttribute.html) and subclasses the `UnityAppController` using the `IMPL_APP_CONTROLLER_SUBCLASS` macro.
1. In the Unity Editor, open the Braze Configuration Settings by navigating to **Braze > Braze Configuration**.
2. Check the **Automate Unity iOS Integration** box.
3. In the **Braze API Key** field, input your application's API key found in **Manage Settings**.

If your application is already using another `UnityAppController` subclass, you will need to merge your subclass implementation with `AppboyAppDelegate.mm`.
## Customizing the Unity package
### Step 1: Clone the repository
In your terminal, clone the [Braze Unity SDK GitHub repository](https://github.com/braze-inc/braze-unity-sdk), then navigate to that folder:
```bash
git clone git@github.com:braze-inc/braze-unity-sdk.git
cd ~/PATH/TO/DIRECTORY/braze-unity-sdk
```
```powershell
git clone git@github.com:braze-inc/braze-unity-sdk.git
cd C:\PATH\TO\DIRECTORY\braze-unity-sdk
```
### Step 2: Export package from repository
First, launch Unity and keep it running in the background. Then, in the repository root, run the following command to export the package to `braze-unity-sdk/unity-package/`.
```bash
/Applications/Unity/Unity.app/Contents/MacOS/Unity -batchmode -nographics -projectPath "$(pwd)" -executeMethod Appboy.Editor.Build.ExportAllPackages -quit
```
```powershell
"%UNITY_PATH%" -batchmode -nographics -projectPath "%PROJECT_ROOT%" -executeMethod Appboy.Editor.Build.ExportAllPackages -quit
```
**Tip:**
If you experience any issues after running these commands, refer to [Unity: Command Line Arguments](https://docs.unity3d.com/2017.2/Documentation/Manual/CommandLineArguments.html).
### Step 3: Import package into Unity
1. In Unity, import the desired package into your Unity project by navigating to **Assets** > **Import Package** > **Custom Package**.
2. If there's any files you don't want want to import, deselect them now.
3. Customize the exported Unity package located in `Assets/Editor/Build.cs`.
## Switch to an automated integration (Swift only) {#automated-integration}
To take advantage of the automated iOS integration offered in the Braze Unity SDK, follow these steps on transitioning from a manual to an automated integration.
1. Remove all Braze-related code from your Xcode project's `UnityAppController` subclass.
2. Remove Braze iOS libraries from your Unity or Xcode project (such as `Appboy_iOS_SDK.framework` and `SDWebImage.framework`).
3. Import the Braze Unity package into your project again. For a full walkthrough, see [Step 2: Import the package](#unity_step-2-import-the-package).
4. Set your API key again. For a full walkthrough, see [Step 3.1: Set your API key](#unity_step-31-set-your-api-key).
## Optional configurations
### Verbose logging
To enable verbose logging in the Unity Editor, do the following:
1. Open the Braze Configuration Settings by navigating to **Braze** > **Braze Configuration**.
2. Click the **Show Braze Android Settings** dropdown.
3. In the **SDK Log Level** field, input the value "0".
### Prime 31 compatibility
To use the Braze Unity plugin with Prime31 plugins, edit your project's `AndroidManifest.xml` to use the Prime31 compatible Activity classes. Change all references of
`com.braze.unity.BrazeUnityPlayerActivity` to `com.braze.unity.prime31compatible.BrazeUnityPlayerActivity`
### Amazon Device Messaging (ADM)
Braze supports integrating [ADM push](https://developer.amazon.com/public/apis/engage/device-messaging) into Unity apps. If you want to integrate ADM push, create a file called `api_key.txt` containing your ADM API key and place it in the `Plugins/Android/assets/` folder. For more information on integrating ADM with Braze, visit our [ADM push integration instructions](https://www.braze.com/docs/de/de/developer_guide/push_notifications/?sdktab=unity).
### Extending the Braze Unity player (Android only) {#extend-unity-player}
The example `AndroidManifest.xml` file provided has one Activity class registered, [`BrazeUnityPlayerActivity`](https://github.com/braze-inc/braze-android-sdk/blob/e804cb3a10ae68364b354b52abf1bef8a0d1a9dc/android-sdk-unity/src/main/java/com/braze/unity/BrazeUnityPlayerActivity.kt). This class is integrated with the Braze SDK and extends `UnityPlayerActivity` with session handling, in-app message registration, push notification analytics logging, and more. See [Unity](https://docs.unity3d.com/Manual/AndroidUnityPlayerActivity.html) for more information on extending the `UnityPlayerActivity` class.
If you are creating your own custom `UnityPlayerActivity` in a library or plugin project, you will need to extend our `BrazeUnityPlayerActivity` to integrate your custom functionality with Braze. Before beginning work on extending `BrazeUnityPlayerActivity`, follow our instructions for integrating Braze into your Unity project.
1. Add the Braze Android SDK as a dependency to your library or plugin project as described in the [Braze Android SDK integration instructions](https://www.braze.com/docs/de/de/developer_guide/sdk_integration/?sdktab=android).
2. Integrate our Unity `.aar`, which contains our Unity-specific functionality, to your Android library project you are building for Unity. The `appboy-unity.aar` is available from our [public repo](https://github.com/braze-inc/braze-unity-sdk/tree/master/Assets/Plugins/Android). After our Unity library is successfully integrated, modify your `UnityPlayerActivity` to extend `BrazeUnityPlayerActivity`.
3. Export your library or plugin project and drop it into `//Assets/Plugins/Android` as normal. Do not include any Braze source code in your library or plugin as they will already be present in `//Assets/Plugins/Android`.
4. Edit your `//Assets/Plugins/Android/AndroidManifest.xml` to specify your `BrazeUnityPlayerActivity` subclass as the main activity.
You should now be able to package an `.apk` from the Unity IDE that is fully integrated with Braze and contains your custom `UnityPlayerActivity` functionality.
## Troubleshooting
### Error: "File could not be read"
Errors resembling the following may be safely ignored. Apple software uses a proprietary PNG extension called CgBI, which Unity does not recognize. These errors will not affect your iOS build or the proper display of the associated images in the Braze bundle.
```
Could not create texture from Assets/Plugins/iOS/AppboyKit/Appboy.bundle/...png: File could not be read
```
## Integrating the .NET MAUI SDK
Integrating the Braze .NET MAUI (formerly Xamarin) SDK will provide you with basic analytics functionality as well as working in-app messages with which you can engage your users.
### Prerequisites
Before you can integrate the .NET MAUI Braze SDK, be sure you meet the following requirements:
- Starting in `version 3.0.0`, this SDK requires using .NET 6+ and removes support for projects using the Xamarin framework.
- Starting in `version 4.0.0`, this SDK dropped support for Xamarin & Xamarin.Forms and added support for .NET MAUI. See [Microsoft's policy](https://dotnet.microsoft.com/en-us/platform/support/policy/xamarin) around the end of support for Xamarin.
### Step 1: Get the .NET MAUI binding
A .NET MAUI binding is a way to use native libraries in .NET MAUI apps. The implementation of a binding consists of building a C# interface to the library, and then using that interface in your application. See the [.NET MAUI documentation](http://developer.xamarin.com/guides/android/advanced_topics/java_integration_overview/binding_a_java_library_%28.jar%29/). There are two ways to include the Braze SDK binding: using NuGet or compiling from source.
The simplest integration method involves getting the Braze SDK from the [NuGet.org](https://www.nuget.org/) central repository. In the Visual Studio sidebar, right click `Packages` folder and click `Add Packages...`. Search for 'Braze' and install the [`BrazePlatform.BrazeAndroidBinding`](https://www.nuget.org/packages/BrazePlatform.BrazeAndroidBinding/) package into your project.
To use Braze location services and geofences, also install the [`BrazePlatform.BrazeAndroidLocationBinding`](https://www.nuget.org/packages/BrazePlatform.BrazeAndroidLocationBinding/) package.
The second integration method is to include the [binding source](https://github.com/braze-inc/braze-xamarin-sdk). Under [`appboy-component/src/androidnet6`](https://github.com/braze-inc/braze-xamarin-sdk/tree/master/appboy-component/src/androidnet6/BrazeAndroidNet6Binding) you will find our binding source code; adding a project reference to the ```BrazeAndroidBinding.csproj``` in your .NET MAUI application will cause the binding to be built with your project and provide you access to the Braze Android SDK.
To use Braze location services and geofences, also add a project reference to the ```BrazeAndroidLocationBinding.csproj``` found under [`appboy-component/src/androidnet6/BrazeAndroidLocationBinding`](https://github.com/braze-inc/braze-xamarin-sdk/tree/master/appboy-component/src/androidnet6/BrazeAndroidLocationBinding).
**Important:**
The iOS bindings for .NET MAUI SDK version 4.0.0 and later use the [Braze Swift SDK](https://github.com/braze-inc/braze-swift-sdk/), while previous versions use the [legacy AppboyKit SDK](https://github.com/Appboy/Appboy-ios-sdk).
A .NET MAUI binding is a way to use native libraries in .NET MAUI apps. The implementation of a binding consists of building a C# interface to the library and then using that interface in your application. There are two ways to include the Braze SDK binding: using NuGet or compiling from source.
The simplest integration method involves getting the Braze SDK from the [NuGet.org](https://www.nuget.org/) central repository. In the Visual Studio sidebar, right-click `Packages` folder and click `Add Packages...`. Search for 'Braze' and install the latest .NET MAUI iOS NuGet packages: [Braze.iOS.BrazeKit](https://www.nuget.org/packages/Braze.iOS.BrazeKit), [Braze.iOS.BrazeUI](https://www.nuget.org/packages/Braze.iOS.BrazeUI), and [Braze.iOS.BrazeLocation](https://www.nuget.org/packages/Braze.iOS.BrazeLocation) into your project.
We also provide the compatibility libraries packages: [Braze.iOS.BrazeKitCompat](https://www.nuget.org/packages/Braze.iOS.BrazeKitCompat) and [Braze.iOS.BrazeUICompat](https://www.nuget.org/packages/Braze.iOS.BrazeUICompat), to help make your migration to .NET MAUI easier.
The second integration method is to include the [binding source](https://github.com/braze-inc/braze-xamarin-sdk). Under [`appboy-component/src/iosnet6`](https://github.com/braze-inc/braze-xamarin-sdk/tree/master/appboy-component/src/iosnet6/BrazeiOSNet6Binding) you will find our binding source code; adding a project reference to the ```BrazeiOSBinding.csproj``` in your .NET MAUI application will cause the binding to be built with your project and provide you access to the Braze iOS SDK. Make sure `BrazeiOSBinding.csproj` is showing in your project's "Reference" folder.
### Step 2: Configure your Braze instance
#### Step 2.1: Configure the Braze SDK in Braze.xml
Now that the libraries have been integrated, you have to create an `Braze.xml` file in your project's `Resources/values` folder. The contents of that file should resemble the following code snippet:
**Note:**
Be sure to substitute `YOUR_API_KEY` with the API key located at **Settings** > **API Keys** in the Braze dashboard.
```xml
YOUR_API_KEYYOUR_CUSTOM_ENDPOINT_OR_CLUSTERXAMARINNUGET
```
If you are including the binding source manually, remove `NUGET` from your code.
**Tip:**
To see an example `Braze.xml`, check out our [Android MAUI sample app](https://github.com/braze-inc/braze-xamarin-sdk/blob/master/appboy-component/samples/android-net-maui/BrazeAndroidMauiSampleApp/BrazeAndroidMauiSampleApp/Resources/values/Braze.xml).
#### Step 2.2: Add required permissions to Android manifest
Now that you've added your API key, you need to add the following permissions to your `AndroidManifest.xml` file:
```xml
```
For an example of your `AndroidManifest.xml`, see the [Android MAUI](https://github.com/braze-inc/braze-xamarin-sdk/blob/master/appboy-component/samples/android-net-maui/BrazeAndroidMauiSampleApp/BrazeAndroidMauiSampleApp/AndroidManifest.xml) sample application.
#### Step 2.3: Track user sessions and registering for in-app messages
To enable user session tracking and register your app for in-app messages, add the following call to the `OnCreate()` lifecycle method of the `Application` class in your app:
```kotlin
RegisterActivityLifecycleCallbacks(new BrazeActivityLifecycleCallbackListener());
```
When setting up your Braze instance, add the following snippet to configure your instance:
**Note:**
Be sure to substitute `YOUR_API_KEY` with the API key located at **Settings** > **API Keys** in the Braze dashboard.
```csharp
var configuration = new BRZConfiguration("YOUR_API_KEY", "YOUR_ENDPOINT");
configuration.Api.AddSDKMetadata(new[] { BRZSDKMetadata.Xamarin });
braze = new Braze(configuration);
```
See the `App.xaml.cs` file in the [iOS MAUI](https://github.com/braze-inc/braze-xamarin-sdk/blob/master/appboy-component/samples/ios-net-maui/BrazeiOSMauiSampleApp/BrazeiOSMauiSampleApp/App.xaml.cs) sample application.
### Step 3: Test the integration
Now you can launch your application and see sessions being logged to the Braze dashboard (along with device information and other analytics). For a more in-depth discussion of best practices for the basic SDK integration, consult the [Android integration instructions](https://www.braze.com/docs/de/de/developer_guide/sdk_integration/?sdktab=android).
Now you can launch your application and see sessions being logged to the Braze dashboard. For a more in-depth discussion of best practices for the basic SDK integration, consult the [iOS integration instructions](https://www.braze.com/docs/de/de/developer_guide/sdk_integration/?sdktab=swift).
**Important:**
Our current public .NET MAUI binding for the iOS SDK does not connect to the iOS Facebook SDK (linking social data) and does not include sending the IDFA to Braze.
# ChatGPT app integration
## Setup
### Step 1: Get the Braze integration file
Copy the `braze.js` file from our [ChatGPT apps integration repository](https://github.com/braze-inc/chatgpt-apps-braze-integration/blob/main/src/braze/braze.ts) to your project. This file contains all the necessary Braze SDK configuration and helper functions.
### Step 2: Install dependencies
Install our Web SDK for Braze's most up-to-date set of features:
**For client-side integration:**
```bash
npm install @braze/web-sdk
```
## Implementation
There are two ways to integrate Braze with your ChatGPT app depending on your use case:
### Client-side integration (custom widgets)
**Tip:**
**Recommended Approach:** This method enables rich messaging experiences and real-time user interaction tracking within your ChatGPT app widgets.
For displaying Braze messaging and tracking user interactions within your custom ChatGPT app widgets, use the Web SDK integration. A full messaging example can be found in our sample repository [here](https://github.com/braze-inc/chatgpt-apps-braze-integration/tree/main/src/inbox).
#### Configure widget metadata
Add the following metadata to your MCP server file to allow Braze domains, ensuring to update the CDN domain based on [your region](https://www.braze.com/docs/de/de/developer_guide/platforms/web/content_security_policy):
```javascript
"openai/widgetCSP": {
connect_domains: ["https://YOUR-SDK-ENDPOINT"],
resource_domains: [
"https://appboy-images.com",
"https://braze-images.com",
"https://cdn.braze.eu",
"https://use.fontawesome.com"
],
}
```
Replace `YOUR-SDK-ENDPOINT` with your actual Braze SDK endpoint.
#### Set up the useBraze hook
```javascript
import { useBraze } from "./utils/braze";
function YourWidget() {
const braze = useBraze({
apiKey: "your-braze-api-key",
baseUrl: "your-braze-endpoint.braze.com",
});
useEffect(() => {
if (!braze.isInitialized) {
return;
}
// Set user identity
braze.changeUser("user-id-123");
// Log widget interactions
braze.logCustomEvent("viewed_pizzaz_list");
}, [braze.isInitialized]);
return (
// Your widget JSX
);
}
```
#### Display Braze Content Cards
```javascript
const [cards, setCards] = useState([]);
useEffect(() => {
// Get cached content cards
setCards(braze.getCachedContentCards()?.cards ?? []);
// Subscribe to content card updates
braze.subscribeToContentCardsUpdates((contentCards) => {
setCards(contentCards.cards);
});
// Open session
braze.openSession();
return () => {
braze.removeAllSubscriptions();
}
}, []);
```
#### Track widget events
```javascript
// Track user interactions within your widget
const handleButtonClick = () => {
braze.logCustomEvent("widget_button_clicked", {
button_type: "save_list",
widget_name: "pizza_list"
});
};
const handleItemInteraction = (itemId) => {
braze.logCustomEvent("item_interacted", {
item_id: itemId,
interaction_type: "view_details"
});
};
```
### Server-side integration (MCP server)
If you also need a server-side integration for messaging functionality on your MCP server, contact `mcp-product@braze.com`. For tracking events and purchases from your MCP server, use our [REST API](https://www.braze.com/docs/de/de/api/home).
## About the Braze Vega SDK
The Braze Vega SDK lets you collect analytics and display rich in-app messages to your users. Most methods in the Braze Vega SDK are asynchronous and return promises that should be awaited or resolved.
## Integrating the Braze Vega SDK
### Step 1: Install the Braze library
Install the Braze Vega SDK using your preferred package manager.
If your project uses NPM, you can add the Braze Vega SDK as a dependency.
```bash
npm install @braze/vega-sdk --save
```
After installation, you can import the methods you need:
```javascript
import { initialize, changeUser, openSession } from "@braze/vega-sdk";
```
If your project uses Yarn, you can add the Braze Vega SDK as a dependency.
```bash
yarn add @braze/vega-sdk
```
After installation, you can import the methods you need:
```javascript
import { initialize, changeUser, openSession } from "@braze/vega-sdk";
```
### Step 2: Initialize the SDK
After the Braze Vega SDK is added to your project, initialize the library with the API key and [SDK endpoint URL](https://www.braze.com/docs/de/de/user_guide/administrative/access_braze/sdk_endpoints) found in **Settings** > **App Settings** within your Braze dashboard.
**Important:**
You must await or resolve the `changeUser` promise before calling other Braze methods, or events and attributes may be set on the incorrect user.
```javascript
import { useEffect } from "react-native";
import {
initialize,
changeUser,
logCustomEvent,
openSession,
setCustomUserAttribute,
setUserCountry
} from "@braze/vega-sdk";
const App = () => {
useEffect(() => {
const initBraze = async () => {
// Initialize the SDK
await initialize("YOUR-API-KEY", "YOUR-SDK-ENDPOINT", {
sessionTimeoutInSeconds: 60,
appVersionNumber: "1.2.3.4",
enableLogging: true, // set to `true` for debugging
});
// Change user
await changeUser("user-id-123");
// Start a session
await openSession();
// Log custom events and set user attributes
logCustomEvent("visited-page", { pageName: "home" });
setCustomUserAttribute("my-attribute", "my-attribute-value");
setUserCountry("USA");
};
initBraze();
}, []);
return (
// Your app components
);
};
```
**Important:**
Anonymous users may be counted towards your [MAU](https://www.braze.com/docs/de/de/user_guide/data_and_analytics/reporting/understanding_your_app_usage_data/#monthly-active-users). As a result, you may want to conditionally load or initialize the SDK to exclude these users from your MAU count.
## Optional configurations
### Logging
You can enable SDK logging to help with debugging and troubleshooting. There are multiple ways to enable logging.
#### Enable logging during initialization
Pass `enableLogging: true` to `initialize()` to log debugging messages to the console:
```javascript
initialize("YOUR-API-KEY", "YOUR-SDK-ENDPOINT", {
enableLogging: true
});
```
**Important:**
Basic logs are visible to all users, so consider disabling logging before releasing your code to production.
#### Enable logging after initialization
Use `toggleLogging()` to enable or disable SDK logging after initialization:
```javascript
import { toggleLogging } from "@braze/vega-sdk";
// Enable logging
toggleLogging();
```
#### Custom logging
Use `setLogger()` to provide a custom logger function for more control over how SDK logs are handled:
```javascript
import { setLogger } from "@braze/vega-sdk";
setLogger((message) => {
console.log("Braze Custom Logger: " + message);
// Add your custom logging logic here
});
```
### Configuration options
You can pass additional configuration options to `initialize()` to customize the SDK behavior:
```javascript
await initialize("YOUR-API-KEY", "YOUR-SDK-ENDPOINT", {
sessionTimeoutInSeconds: 60, // Configure session timeout (default is 1800 seconds)
appVersionNumber: "1.2.3.4", // Set your app version
enableLogging: true, // Enable SDK logging
});
```
## Upgrading the SDK
When you reference the Braze Vega SDK from NPM or Yarn, you can upgrade to the latest version by updating your package dependency:
```bash
npm update @braze/vega-sdk
# or, using yarn:
yarn upgrade @braze/vega-sdk
```
## Testing your integration
To verify your SDK integration is working correctly:
1. Initialize the SDK with `enableLogging: true` to see debug messages in the console
2. Ensure you `await changeUser()` before calling other SDK methods
3. Call `await openSession()` to start a session
4. Check your Braze dashboard under **Overview** to verify that session data is being recorded
5. Test logging a custom event and verify it appears in your dashboard
**Note:**
Verwenden Sie bei der QA Ihrer SDK-Integration den [SDK-Debugger](https://www.braze.com/docs/de/de/developer_guide/sdk_integration/debugging), um Probleme zu beheben, ohne die ausführliche Protokollierung für Ihre App aktivieren zu müssen.
# Google Tag Manager mit dem Braze SDK
Source: /docs/de/developer_guide/sdk_integration/google_tag_manager/index.md
# Google Tag Manager mit dem Braze SDK {#google-tag-manager-with-the-braze-sdk}
> Erfahren Sie, wie Sie [Google Tag Manager (GTM)](https://developers.google.com/tag-platform/tag-manager) mit dem Braze SDK verwenden können, um das Braze-Event-Tracking und Updates von Nutzer:innen-Attributen per Fernzugriff zu steuern, ohne dass Codeänderungen oder neue App-Versionen erforderlich sind.
## About Google Tag Manager for Web {#google-tag-manager}
Google Tag Manager (GTM) lets you remotely add, remove, and edit tags on your website without requiring a production code release or engineering resources. Braze offers the following templates for the Web SDK:
|Tag Type|Use Case|
|--------|--------|
| Initialization tag | This tag lets you [integrate the Web Braze SDK](https://www.braze.com/docs/de/de/developer_guide/sdk_integration/?tab=google%20tag%20manager&sdktab=web) without needing to modify your site’s code.|
| Action tag | This tag lets you [create Content Cards](https://www.braze.com/docs/de/de/developer_guide/content_cards/?sdktab=web#web_using-google-tag-manager), [set user attributes](https://www.braze.com/docs/de/de/developer_guide/analytics/setting_user_attributes/?tab=google%20tag%20manager&sdktab=web), and [manage data collection](https://www.braze.com/docs/de/de/developer_guide/analytics/managing_data_collection/?tab=google%20tag%20manager&sdktab=web).|
{: .reset-td-br-1 .reset-td-br-2 aria-label="About Google Tag Manager for Web #google-tag-manager" }
## Tag sequencing for Braze action tags
Custom events and other Braze action tags can fail when they fire before the **Braze Initialization** tag finishes loading the Web SDK. In Google Tag Manager, open the action tag, go to **Advanced Settings** > **Tag Sequencing**, select **A tag that fires before [this tag] is fired**, and choose your Braze Initialization tag.
For more detail, see [Verify tag sequencing for custom events](https://www.braze.com/docs/de/de/developer_guide/content_cards/?sdktab=web#tag-sequencing).
## Log purchases with GTM
In Braze action tags and Custom HTML tags, call `braze.logPurchase()` to record revenue. The legacy `appboy.logPurchase()` namespace is not supported in current Web SDK integrations.
## Logging custom events with GTM
You can log custom events using a **Custom HTML** tag in GTM. This approach uses the GTM [data layer](https://developers.google.com/tag-platform/tag-manager/datalayer) to pass event data from your site to a GTM tag that calls the Braze Web SDK.
### Step 1: Push the event to the data layer
In your site's code, push an event to the data layer wherever you want to trigger the custom event. For example, to log a custom event when a button is clicked:
```html
```
### Step 2: Create a trigger in GTM
1. In your GTM container, go to **Triggers** and create a new trigger.
2. Set the **Trigger Type** to **Custom Event**.
3. Set the **Event Name** to the same value you pushed to the data layer (for example, `my_custom_event`).
4. Choose when the trigger should fire (for example, **All Custom Events**).
### Step 3: Create a Custom HTML tag
1. In GTM, go to **Tags** and create a new tag.
2. Set the **Tag Type** to **Custom HTML**.
3. In the HTML field, add the following:
```html
```
4. Under **Triggering**, select the trigger you created in step 2.
5. Save and publish your container.
To include event properties, pass them as the second argument:
```html
```
## Google's EU User Consent Policy
**Important:**
Google is updating their [EU User Consent Policy](https://www.google.com/about/company/user-consent-policy/) in response to changes to the [Digital Markets Act (DMA)](https://ads-developers.googleblog.com/2023/10/updates-to-customer-match-conversion.html), which is in effect as of March 6, 2024. This new change requires advertisers to disclose certain information to their EEA and UK end users, as well as obtain necessary consents from them. Review the following documentation to learn more.
As part of Google's EU User Consent Policy, the following boolean custom attributes need to be logged to user profiles:
- `$google_ad_user_data`
- `$google_ad_personalization`
If setting these via the GTM integration, custom attributes require creating a custom HTML tag. The following is an example of how to log these values as boolean data types (not as strings):
```js
```
For more information, refer to [Audience Sync to Google](https://www.braze.com/docs/de/de/partners/canvas_audience_sync/google_audience_sync/).
## Prerequisites
Before you can use this feature, you'll need to [integrate the Android Braze SDK](https://www.braze.com/docs/de/de/developer_guide/sdk_integration/?sdktab=android).
## Using Google Tag Manager for Android
In the following example, a music streaming app wants to log different events as users listen to songs. Using Google Tag Manager for Android, they can control which of the Braze third-party vendors receive this event, and create tags specific to Braze.
### Step 1: Create a trigger for custom events
Custom events are logged with `actionType` set to `logEvent`. The Braze custom tag provider in this example is expecting the custom event name to be set using `eventName`.
To get started, create a trigger that looks for an "Event Name" that equals `played song`

Next, create a new tag (also known as a "Function Call") and enter the class path of your [custom tag provider](#adding-android-google-tag-provider) described later in this article. This tag will be triggered when you log the `played song` event.
In the tag's custom parameters (also known as the key-value pairs), set `eventName` to `played song`. This will be the custom event name logged to Braze.

**Important:**
When sending a custom event, be sure to set `actionType` to `logEvent`, and set a value for `eventName` so Braze receives the correct event name and action to take.
You can also include additional key-value pair arguments to the tag, which will be sent as custom event properties to Braze. `eventName` and `actionType` will not be ignored for custom event properties. In the following example tag, `genre` is passed and defined using a tag variable in Google Tag Manager, which is sourced from the custom event logged in the app.
Because Google Tag Manager for Android uses Firebase as the data layer, the `genre` event property is sent to Google Tag Manager as a "Firebase - Event Parameter" variable.

When a user plays a song in the app, an event will be logged through Firebase and Google Tag Manager using the Firebase analytics event name that matches the tag's trigger name, `played song`:
```java
Bundle params = new Bundle();
params.putString("genre", "pop");
params.putInt("number of times listened", 42);
mFirebaseAnalytics.logEvent("played song", params);
```
```kotlin
val params = Bundle()
params.putString("genre", "pop")
params.putInt("number of times listened", 42);
mFirebaseAnalytics.logEvent("played song", params)
```
### Step 2: Log custom attributes
Custom attributes are set via an `actionType` set to `customAttribute`. The Braze custom tag provider is expecting the custom attribute key-value to be set via `customAttributeKey` and `customAttributeValue`:
```java
Bundle params = new Bundle();
params.putString("customAttributeKey", "favorite song");
params.putString("customAttributeValue", "Private Eyes");
mFirebaseAnalytics.logEvent("customAttribute", params);
```
```kotlin
val params = Bundle()
params.putString("customAttributeKey", "favorite song")
params.putString("customAttributeValue", "Private Eyes")
mFirebaseAnalytics.logEvent("customAttribute", params)
```
### Step 3: Call `changeUser()`
Calls to `changeUser()` are made via an `actionType` set to `changeUser`. The Braze custom tag provider is expecting the Braze user ID to be set via an `externalUserId` key-value pair within your tag:
```java
Bundle params = new Bundle();
params.putString("externalUserId", userId);
mFirebaseAnalytics.logEvent("changeUser", params);
```
```kotlin
val params = Bundle()
params.putString("externalUserId", userId)
mFirebaseAnalytics.logEvent("changeUser", params)
```
### Step 4: Add a custom tag provider {#adding-android-google-tag-provider}
With the tags and triggers set up, you will also need to implement Google Tag Manager in your Android app which can be found in Google's [documentation](https://developers.google.com/tag-manager/android/v5/).
After the Google Tag Manager is installed in your app, add a custom tag provider to call Braze SDK methods based on the tags you've configured within Google Tag Manager.
Be sure to note the "Class Path" to the file - this is what you'll enter when setting up a Tag in the [Google Tag Manager](https://tagmanager.google.com/) console.
This example highlights one of many ways you can structure your custom tag provider. Specifically, it shows how to determine which Braze SDK method to call based on the `actionType` key-value pair sent from the GTM Tag.
The `actionType` shown in this example are `logEvent`, `customAttribute`, and `changeUser`, but you may prefer to change how your tag provider handles data from Google Tag Manager.
```java
public class BrazeGtmTagProvider implements CustomTagProvider {
private static final String TAG = BrazeLogger.getBrazeLogTag(BrazeGtmTagProvider.class);
private static final String ACTION_TYPE_KEY = "actionType";
// Custom Events
private static final String LOG_EVENT_ACTION_TYPE = "logEvent";
private static final String EVENT_NAME_VARIABLE = "eventName";
// Custom Attributes
private static final String CUSTOM_ATTRIBUTE_ACTION_TYPE = "customAttribute";
private static final String CUSTOM_ATTRIBUTE_KEY = "customAttributeKey";
private static final String CUSTOM_ATTRIBUTE_VALUE_KEY = "customAttributeValue";
// Change User
private static final String CHANGE_USER_ACTION_TYPE = "changeUser";
private static final String CHANGE_USER_ID_VARIABLE = "externalUserId";
private static Context sApplicationContext;
/**
* Must be set before calling any of the following methods
* so that the proper application context is available when needed.
*
* Recommended to be called in your {@link Application#onCreate()}.
*/
public static void setApplicationContext(Context applicationContext) {
if (applicationContext != null) {
sApplicationContext = applicationContext.getApplicationContext();
}
}
@Override
public void execute(Map map) {
BrazeLogger.i(TAG, "Got google tag manager parameters map: " + map);
if (sApplicationContext == null) {
BrazeLogger.w(TAG, "No application context provided to this tag provider.");
return;
}
if (!map.containsKey(ACTION_TYPE_KEY)) {
BrazeLogger.w(TAG, "Map does not contain the Braze action type key: " + ACTION_TYPE_KEY);
return;
}
String actionType = String.valueOf(map.remove(ACTION_TYPE_KEY));
switch (actionType) {
case LOG_EVENT_ACTION_TYPE:
logEvent(map);
break;
case CUSTOM_ATTRIBUTE_ACTION_TYPE:
setCustomAttribute(map);
break;
case CHANGE_USER_ACTION_TYPE:
changeUser(map);
break;
default:
BrazeLogger.w(TAG, "Got unknown action type: " + actionType);
break;
}
}
private void logEvent(Map tagParameterMap) {
String eventName = String.valueOf(tagParameterMap.remove(EVENT_NAME_VARIABLE));
Braze.getInstance(sApplicationContext).logCustomEvent(eventName, parseMapIntoProperties(tagParameterMap));
}
private BrazeProperties parseMapIntoProperties(Map map) {
BrazeProperties brazeProperties = new BrazeProperties();
for (Map.Entry entry : map.entrySet()) {
final Object value = entry.getValue();
final String key = entry.getKey();
if (value instanceof Boolean) {
brazeProperties.addProperty(key, (Boolean) value);
} else if (value instanceof Integer) {
brazeProperties.addProperty(key, (Integer) value);
} else if (value instanceof Date) {
brazeProperties.addProperty(key, (Date) value);
} else if (value instanceof Long) {
brazeProperties.addProperty(key, (Long) value);
} else if (value instanceof String) {
brazeProperties.addProperty(key, (String) value);
} else if (value instanceof Double) {
brazeProperties.addProperty(key, (Double) value);
} else {
BrazeLogger.w(TAG, "Failed to parse value into an BrazeProperties "
+ "accepted type. Key: '" + key + "' Value: '" + value + "'");
}
}
return brazeProperties;
}
private void setCustomAttribute(Map tagParameterMap) {
String key = String.valueOf(tagParameterMap.get(CUSTOM_ATTRIBUTE_KEY));
Object value = tagParameterMap.get(CUSTOM_ATTRIBUTE_VALUE_KEY);
Braze.getInstance(sApplicationContext).getCurrentUser(new IValueCallback() {
@Override
public void onSuccess(BrazeUser brazeUser) {
if (value instanceof Boolean) {
brazeUser.setCustomUserAttribute(key, (Boolean) value);
} else if (value instanceof Integer) {
brazeUser.setCustomUserAttribute(key, (Integer) value);
} else if (value instanceof Long) {
brazeUser.setCustomUserAttribute(key, (Long) value);
} else if (value instanceof String) {
brazeUser.setCustomUserAttribute(key, (String) value);
} else if (value instanceof Double) {
brazeUser.setCustomUserAttribute(key, (Double) value);
} else if (value instanceof Float) {
brazeUser.setCustomUserAttribute(key, (Float) value);
} else {
BrazeLogger.w(TAG, "Failed to parse value into a custom "
+ "attribute accepted type. Key: '" + key + "' Value: '" + value + "'");
}
}
});
}
private void changeUser(Map tagParameterMap) {
String userId = String.valueOf(tagParameterMap.get(CHANGE_USER_ID_VARIABLE));
Braze.getInstance(sApplicationContext).changeUser(userId);
}
}
```
```kotlin
class BrazeGtmTagProvider : CustomTagProvider {
override fun execute(map: MutableMap) {
BrazeLogger.i(TAG, "Got google tag manager parameters map: $map")
if (sApplicationContext == null) {
BrazeLogger.w(TAG, "No application context provided to this tag provider.")
return
}
if (!map.containsKey(ACTION_TYPE_KEY)) {
BrazeLogger.w(TAG, "Map does not contain the Braze action type key: $ACTION_TYPE_KEY")
return
}
val actionType = map.remove(ACTION_TYPE_KEY).toString()
when (actionType) {
LOG_EVENT_ACTION_TYPE -> logEvent(map)
CUSTOM_ATTRIBUTE_ACTION_TYPE -> setCustomAttribute(map)
CHANGE_USER_ACTION_TYPE -> changeUser(map)
else -> BrazeLogger.w(TAG, "Got unknown action type: $actionType")
}
}
private fun logEvent(tagParameterMap: MutableMap) {
val eventName = tagParameterMap.remove(EVENT_NAME_VARIABLE).toString()
Braze.getInstance(sApplicationContext).logCustomEvent(eventName, parseMapIntoProperties(tagParameterMap))
}
private fun parseMapIntoProperties(map: Map): BrazeProperties {
val brazeProperties = BrazeProperties()
map.forEach { param ->
val key = param.key
val value = param.value
when (value) {
is Boolean -> brazeProperties.addProperty(key, value)
is Int -> brazeProperties.addProperty(key, value)
is Date -> brazeProperties.addProperty(key, value)
is Long -> brazeProperties.addProperty(key, value)
is String -> brazeProperties.addProperty(key, value)
is Double -> brazeProperties.addProperty(key, value)
else -> BrazeLogger.w(TAG, "Failed to parse value into an BrazeProperties "
+ "accepted type. Key: '" + key + "' Value: '" + value + "'")
}
}
return brazeProperties
}
private fun setCustomAttribute(tagParameterMap: Map) {
val key = tagParameterMap[CUSTOM_ATTRIBUTE_KEY].toString()
val value = tagParameterMap[CUSTOM_ATTRIBUTE_VALUE_KEY]
Braze.getInstance(sApplicationContext).getCurrentUser { brazeUser ->
when (value) {
is Boolean -> brazeUser.setCustomUserAttribute(key, value)
is Int -> brazeUser.setCustomUserAttribute(key, value)
is Long -> brazeUser.setCustomUserAttribute(key, value)
is String -> brazeUser.setCustomUserAttribute(key, value)
is Double -> brazeUser.setCustomUserAttribute(key, value)
is Float -> brazeUser.setCustomUserAttribute(key, value)
else -> BrazeLogger.w(
TAG, "Failed to parse value into a custom "
+ "attribute accepted type. Key: '" + key + "' Value: '" + value + "'"
)
}
}
}
private fun changeUser(tagParameterMap: Map) {
val userId = tagParameterMap[CHANGE_USER_ID_VARIABLE].toString()
Braze.getInstance(sApplicationContext).changeUser(userId)
}
companion object {
private val TAG = BrazeLogger.getBrazeLogTag(BrazeGtmTagProvider::class.java)
private val ACTION_TYPE_KEY = "actionType"
// Custom Events
private val LOG_EVENT_ACTION_TYPE = "logEvent"
private val EVENT_NAME_VARIABLE = "eventName"
// Custom Attributes
private val CUSTOM_ATTRIBUTE_ACTION_TYPE = "customAttribute"
private val CUSTOM_ATTRIBUTE_KEY = "customAttributeKey"
private val CUSTOM_ATTRIBUTE_VALUE_KEY = "customAttributeValue"
// Change User
private val CHANGE_USER_ACTION_TYPE = "changeUser"
private val CHANGE_USER_ID_VARIABLE = "externalUserId"
private var sApplicationContext: Context? = null
/**
* Must be set before calling any of the following methods so
* that the proper application context is available when needed.
*
* Recommended to be called in your [Application.onCreate].
*/
fun setApplicationContext(applicationContext: Context?) {
if (applicationContext != null) {
sApplicationContext = applicationContext.applicationContext
}
}
}
}
```
In your `Application.onCreate()` be sure to add the following initialization for the previous snippet:
```java
BrazeGtmTagProvider.setApplicationContext(this.getApplicationContext());
```
```kotlin
BrazeGtmTagProvider.setApplicationContext(this.applicationContext)
```
## Prerequisites
Before you can use this feature, you'll need to [integrate the Swift Braze SDK](https://www.braze.com/docs/de/de/developer_guide/sdk_integration/?sdktab=swift).
## Using Google Tag Manager for Swift
In the following example, a music streaming app wants to log different events as users listen to songs. Using Google Tag Manager for iOS, they can control which of the Braze third-party vendors receive this event and create tags specific to Braze.
### Step 1: Create a trigger for custom events
Custom events are logged with `actionType` set to `logEvent`. In this example, the Braze custom tag provider is expecting the custom event name to be set using `eventName`.
First, create a trigger that looks for an `eventName` that equals `played song`.

Next, create a new Tag (also known as a "Function Call") and enter the class path of your [custom tag provider](#adding-ios-google-tag-provider) described later in this article. This tag will be triggered when you log the `played song` event. Because `eventName` is set to `played song` it will be used as custom event name that's logged to Braze.
**Important:**
When sending a custom event, set `actionType` to `logEvent`, and set a value for `eventName` so Braze receives the correct event name and action to take.

You can also include additional key-value pair arguments to the tag, which will be sent as custom event properties to Braze. `eventName` and `actionType` will not be ignored for custom event properties. In the following example tag, pass in `genre`, which was defined using a tag variable in Google Tag Manager and sourced from the custom event logged in the app.
The `genre` event property is sent to Google Tag Manager as a "Firebase - Event Parameter" variable since Google Tag Manager for iOS uses Firebase as the data layer.

When a user plays a song in the app, log an event through Firebase and Google Tag Manager using the Firebase analytics event name that matches the tag's trigger name, `played song`:
```swift
let parameters: [String: Any] = ["genre": "pop",
"number of times listened": 42]
Analytics.logEvent("played song", parameters: parameters)
```
```obj-c
NSDictionary *parameters = @{@"genre" : @"pop",
@"number of times listened" : @42};
[FIRAnalytics logEventWithName:@"played song" parameters:parameters];
```
### Step 2: Log custom attributes
Custom attributes are set via an `actionType` set to `customAttribute`. The Braze custom tag provider is expecting the custom attribute key-value to be set via `customAttributeKey` and `customAttributeValue`:
```swift
let parameters: [String: Any] = ["customAttributeKey": "favoriteSong",
"customAttributeValue": "Private Eyes"]
FIRAnalytics.logEvent(withName:"customAttribute", parameters: parameters)
```
```obj-c
NSDictionary *parameters = @{@"customAttributeKey" : @"favoriteSong",
@"customAttributeValue" : @"Private Eyes"};
[FIRAnalytics logEventWithName:@"customAttribute" parameters:parameters];
```
### Step 3: Call `changeUser()`
Calls to `changeUser()` are made via an `actionType` set to `changeUser`. The Braze custom tag provider is expecting the Braze user ID to be set via an `externalUserId` key-value pair within your tag:
```swift
let parameters: [String: Any] = ["externalUserId": "favorite userId"]
Analytics.logEvent(withName:"changeUser", parameters: parameters)
```
```obj-c
NSDictionary *parameters = @{@"externalUserId" : userId};
[FIRAnalytics logEventWithName:@"changeUser" parameters:parameters];
```
### Step 4: Add a custom tag provider {#adding-ios-google-tag-provider}
With the tags and triggers set up, you will also need to implement Google Tag Manager in your iOS app which can be found in Google's [documentation](https://developers.google.com/tag-manager/ios/v5/).
After Google Tag Manager is installed in your app, add a custom tag provider to call Braze SDK methods based on the tags you've configured within Google Tag Manager.
Be sure to note the "Class Path" to the file - this is what you'll enter when setting up a tag in the [Google Tag Manager](https://tagmanager.google.com/) console.
This example highlights one of many ways you can structure your custom tag provider. Specifically, it shows how to determine which Braze SDK method to call based on the `actionType` key-value pair sent from the GTM Tag. This example assumes you've assigned the Braze instance as a variable in the AppDelegate.
The `actionType` supported in this example are `logEvent`, `customAttribute`, and `changeUser`, but you may prefer to change how your tag provider handles data from Google Tag Manager.
Add the following code to your `BrazeGTMTagManager.swift` file.
```swift
import FirebaseAnalytics
import GoogleTagManager
import BrazeKit
let ActionTypeKey: String = "actionType"
// Custom Events
let LogEventAction: String = "logEvent"
let LogEventName: String = "eventName"
// Custom Attributes
let CustomAttributeAction: String = "customAttribute"
let CustomAttributeKey: String = "customAttributeKey"
let CustomAttributeValueKey: String = "customAttributeValue"
// Change User
let ChangeUserAction: String = "changeUser"
let ChangeUserExternalUserId: String = "externalUserId"
@objc(BrazeGTMTagManager)
final class BrazeGTMTagManager : NSObject, TAGCustomFunction {
@objc func execute(withParameters parameters: [AnyHashable : Any]!) -> NSObject! {
var parameters: [String : Any] = parameters as! [String : Any]
guard let actionType: String = parameters[ActionTypeKey] as? String else {
print("There is no Braze action type key in this call. Doing nothing.")
return nil
}
parameters.removeValue(forKey: ActionTypeKey)
if actionType == LogEventAction {
logEvent(parameters: parameters)
} else if actionType == CustomAttributeAction {
logCustomAttribute(parameters: parameters)
} else if actionType == ChangeUserAction {
changeUser(parameters: parameters)
}
return nil
}
func logEvent(parameters: [String : Any]) {
var parameters: [String : Any] = parameters
guard let eventName: String = parameters[LogEventName] as? String else { return }
parameters.removeValue(forKey: LogEventName)
AppDelegate.braze?.logCustomEvent(name: eventName, properties: parameters)
}
func logCustomAttribute(parameters: [String: Any]) {
guard let customAttributeKey = parameters[CustomAttributeKey] as? String else { return }
let customAttributeValue = parameters[CustomAttributeValueKey]
if let customAttributeValue = customAttributeValue as? String {
AppDelegate.braze?.user.setCustomAttribute(key: customAttributeKey, value: customAttributeValue)
} else if let customAttributeValue = customAttributeValue as? Date {
AppDelegate.braze?.user.setCustomAttribute(key: customAttributeKey, value: customAttributeValue)
} else if let customAttributeValue = customAttributeValue as? Double {
AppDelegate.braze?.user.setCustomAttribute(key: customAttributeKey, value: customAttributeValue)
} else if let customAttributeValue = customAttributeValue as? Bool {
AppDelegate.braze?.user.setCustomAttribute(key: customAttributeKey, value: customAttributeValue)
} else if let customAttributeValue = customAttributeValue as? Int {
AppDelegate.braze?.user.setCustomAttribute(key: customAttributeKey, value: customAttributeValue)
} else if let customAttibuteValue = customAttributeValue as? [String] {
AppDelegate.braze?.user.setCustomAttributeArray(key: customAttributeKey, array: customAttibuteValue)
}
}
func changeUser(parameters: [String: Any]) {
guard let userId = parameters[ChangeUserExternalUserId] as? String else { return }
AppDelegate.braze?.changeUser(userId: userId)
}
}
```
Add the following code to your `BrazeGTMTagManager.h` file:
```obj-c
@import Firebase;
@import GoogleTagManager;
@interface BrazeGTMTagManager : NSObject
@end
```
And add the following code to your `BrazeGTMTagManager.m` file:
```obj-c
#import
#import "BrazeGTMTagManager.h"
#import "BrazeKit"
#import "AppDelegate.h"
static NSString *const ActionTypeKey = @"actionType";
// Custom Events
static NSString *const LogEventAction = @"logEvent";
static NSString *const LogEventEventName = @"eventName";
// Custom Attributes
static NSString *const CustomAttributeAction = @"customAttribute";
static NSString *const CustomAttributeKey = @"customAttributeKey";
static NSString *const CustomAttributeValueKey = @"customAttributeValue";
// Change User
static NSString *const ChangeUserAction = @"changeUser";
static NSString *const ChangeUserExternalUserId = @"externalUserId";
@implementation BrazeGTMTagManager
- (NSObject *)executeWithParameters:(NSDictionary *)parameters {
NSMutableDictionary *mutableParameters = [parameters mutableCopy];
NSString *actionType = mutableParameters[ActionTypeKey];
if (!actionType) {
NSLog(@"There is no Braze action type key in this call. Doing nothing.", nil);
return nil;
}
[mutableParameters removeObjectForKey:ActionTypeKey];
if ([actionType isEqualToString:LogEventAction]) {
[self logEvent:mutableParameters];
} else if ([actionType isEqualToString:CustomAttributeAction]) {
[self logCustomAttribute:mutableParameters];
} else if ([actionType isEqualToString:ChangeUserAction]) {
[self changeUser:mutableParameters];
} else {
NSLog(@"Invalid action type. Doing nothing.");
}
return nil;
}
- (void)logEvent:(NSMutableDictionary *)parameters {
NSString *eventName = parameters[LogEventEventName];
[parameters removeObjectForKey:LogEventEventName];
[AppDelegate.braze logCustomEvent:eventName
properties:parameters];
}
- (void)logCustomAttribute:(NSMutableDictionary *)parameters {
NSString *customAttributeKey = parameters[CustomAttributeKey];
id customAttributeValue = parameters[CustomAttributeValueKey];
if ([customAttributeValue isKindOfClass:[NSString class]]) {
[AppDelegate.braze logCustomEvent:customAttributeKey
properties:parameters];
} else if ([customAttributeValue isKindOfClass:[NSDate class]]) {
[AppDelegate.braze.user setCustomAttributeWithKey:customAttributeKey
dateValue:customAttributeValue];
} else if ([customAttributeValue isKindOfClass:[NSNumber class]]) {
if (strcmp([customAttributeValue objCType], [@(YES) objCType]) == 0) {
[AppDelegate.braze.user setCustomAttributeWithKey:customAttributeKey
boolValue:[(NSNumber *)customAttributeValue boolValue]];
} else if (strcmp([customAttributeValue objCType], @encode(short)) == 0 ||
strcmp([customAttributeValue objCType], @encode(int)) == 0 ||
strcmp([customAttributeValue objCType], @encode(long)) == 0) {
[AppDelegate.braze.user setCustomAttributeWithKey:customAttributeKey
intValue:[(NSNumber *)customAttributeValue integerValue]];
} else if (strcmp([customAttributeValue objCType], @encode(float)) == 0 ||
strcmp([customAttributeValue objCType], @encode(double)) == 0) {
[AppDelegate.braze.user setCustomAttributeWithKey:customAttributeKey
doubleValue:[(NSNumber *)customAttributeValue doubleValue]];
} else {
NSLog(@"Could not map NSNumber value to Braze custom attribute:%@", customAttributeValue);
}
} else if ([customAttributeValue isKindOfClass:[NSArray class]]) {
[AppDelegate.braze.user setCustomAttributeArrayWithKey:customAttributeKey
array:customAttributeValue];
}
}
- (void)changeUser:(NSMutableDictionary *)parameters {
NSString *userId = parameters[ChangeUserExternalUserId];
[AppDelegate.braze changeUser:userId];
}
@end
```
## Fehlerbehebung {#troubleshooting}
Wenn Braze nicht initialisiert wird oder Ereignisse nicht wie erwartet angezeigt werden, überprüfen Sie, ob Ihr GTM-Container veröffentlicht ist, ob Trigger und die Reihenfolge der Tag-Auslösung mit dem [Lebenszyklus und der Initialisierungsstrategie](https://www.braze.com/docs/de/de/developer_guide/sdk_integration) Ihres SDK übereinstimmen und ob Testgeräte keine Braze-Endpunkte blockieren.
Bei Initialisierungsfehlern überprüfen Sie, ob das Braze-Tag oder der angepasste Tag-Anbieter den erwarteten `actionType` und die erwarteten Parameter erhält (siehe die Tabs für Android, Swift und Internet auf dieser Seite). Um beim Validieren von GTM-ausgelösten Ereignissen eine ausführliche Protokollierung zu erhalten, aktivieren Sie das SDK-Debug-Logging Ihrer Plattform, wie in den Integrationsleitfäden beschrieben, die in diesen Tabs verlinkt sind.
# Authentifizierung für das Braze SDK einrichten
Source: /docs/de/developer_guide/sdk_integration/authentication/index.md
# SDK-Authentifizierung einrichten {#set-up-sdk-authentication}
> Mit der SDK-Authentifizierung können Sie SDK-Anfragen, die im Namen von angemeldeten Nutzer:innen gestellt werden, einen (serverseitig generierten) kryptografischen Beweis liefern.
## Funktionsweise {#how-it-works}
Nachdem Sie dieses Feature in Ihrer App aktiviert haben, können Sie das Braze-Dashboard so konfigurieren, dass alle Anfragen mit einem ungültigen oder fehlenden JSON Web Token (JWT) abgelehnt werden. Dazu gehören:
- Versenden von angepassten Events, Attributen, Käufen und Sitzungsdaten
- Erstellen neuer Nutzer:innen in Ihrem Braze Workspace
- Aktualisieren von Standard-Nutzerprofil-Attributen
- Empfangen oder Triggern von Nachrichten
So können Sie verhindern, dass nicht authentifizierte angemeldete Nutzer:innen den SDK-API-Schlüssel Ihrer App für unzulässige Handlungen verwenden, beispielsweise um sich als andere Nutzer:innen auszugeben.
## Authentifizierung einrichten {#setting-up-authentication}
### Schritt 1: Richten Sie Ihren Server ein {#server-side-integration}
#### Schritt 1.1: Erzeugen eines Public/Private-Key-Paars {#generate-keys}
Erzeugen Sie ein RSA256 Public/Private-Key-Paar. Der Public Key wird schließlich dem Braze-Dashboard hinzugefügt, während der Private Key sicher auf Ihrem Server gespeichert werden muss.
Wir empfehlen einen RSA-Schlüssel mit 2048 Bit für die Verwendung mit dem RS256 JWT-Algorithmus.
**Warning:**
Denken Sie daran, Ihre Private Keys immer _geheim_ zu halten. Geben Sie Ihren Private Key niemals in Ihrer App oder auf Ihrer Website preis und codieren Sie ihn nicht fest ein. Jeder, der Ihren Private Key kennt, kann sich als Nutzer:innen ausgeben oder Nutzer:innen im Namen Ihrer Anwendung erstellen.
#### Schritt 1.2: Erstellen Sie ein JSON Web Token für die aktuelle Nutzer:in {#create-jwt}
Sobald Sie Ihren Private Key haben, sollte Ihre serverseitige Anwendung ihn verwenden, um ein JWT für die aktuell angemeldete Nutzer:in an Ihre App oder Website zurückzugeben.
Typischerweise könnte diese Logik überall dort zum Einsatz kommen, wo Ihre App normalerweise das Profil der aktuellen Nutzer:in anfragen würde, z. B. an einem Endpunkt für die Anmeldung oder wo Ihre App das Profil der aktuellen Nutzer:in aktualisiert.
Bei der Erstellung des JWT werden die folgenden Felder erwartet:
**JWT-Header**
| Feld | Erforderlich | Beschreibung |
| ----- | -------- | ----------------------------------- |
| `alg` | Ja | Der unterstützte Algorithmus ist `RS256`. |
| `typ` | Ja | Der Typ sollte `JWT` entsprechen. |
{: .reset-td-br-1 .reset-td-br-2 .reset-td-br-3 aria-label="JWT-Header" }
**JWT-Payload**
| Feld | Erforderlich | Beschreibung |
| ----- | -------- | -------------------------------------------------------------------------------------- |
| `sub` | Ja | Das „Subject“ muss die Nutzer-ID sein, die Sie dem Braze SDK beim Aufruf von `changeUser` übergeben. |
| `exp` | Ja | Die „Expiration“ gibt an, wann dieses Token ablaufen soll, als Unix-Zeitstempel in Sekunden (z. B. `1893456000` für den 1. Januar 2030). |
{: .reset-td-br-1 .reset-td-br-2 .reset-td-br-3 aria-label="JWT-Payload" }
**Tip:**
Um mehr über JSON Web Tokens zu erfahren oder die vielen Open-Source-Bibliotheken zu durchsuchen, die diesen Signierungsprozess vereinfachen, besuchen Sie [https://jwt.io](https://jwt.io).
### Schritt 2: SDK konfigurieren {#sdk-integration}
Dieses Feature ist ab den folgenden [SDK-Versionen](https://www.braze.com/docs/de/de/user_guide/engagement_tools/campaigns/ideas_and_strategies/new_features/#filtering-by-most-recent-app-versions) verfügbar:
**Note:**
Für iOS-Integrationen finden Sie auf dieser Seite die Schritte für das Braze Swift SDK. Für Beispiele zur Verwendung im Legacy-AppboyKit-iOS-SDK referenzieren Sie [diese Datei](https://github.com/Appboy/appboy-ios-sdk/blob/master/Example/Stopwatch/Sources/AppDelegate.m) und [diese Datei](https://github.com/Appboy/appboy-ios-sdk/blob/master/Example/Stopwatch/Sources/Utils/SdkAuthDelegate.m).
#### Schritt 2.1: Aktivieren Sie die Authentifizierung im Braze SDK. {#step-21-enable-authentication-in-the-braze-sdk}
Wenn dieses Feature aktiviert ist, fügt das Braze SDK das letzte bekannte JWT der aktuellen Nutzer:in an Netzwerkanfragen an Braze Server an.
**Note:**
Keine Sorge, die Initialisierung mit dieser Option allein hat keinerlei Auswirkungen auf die Datenerfassung, solange Sie nicht im Braze-Dashboard die [Authentifizierung erzwingen](#braze-dashboard).
Wenn Sie `initialize` aufrufen, setzen Sie die optionale Eigenschaft `enableSdkAuthentication` auf `true`.
```javascript
import * as braze from "@braze/web-sdk";
braze.initialize("YOUR-API-KEY-HERE", {
baseUrl: "YOUR-SDK-ENDPOINT-HERE",
enableSdkAuthentication: true,
});
```
Die SDK-Authentifizierung muss während der Initialisierung des nativen SDK aktiviert werden. Fügen Sie die folgende Konfiguration zu Ihrem nativen iOS- und Android-Code hinzu:
**iOS (AppDelegate.swift)**
```swift
import BrazeKit
import braze_react_native_sdk
let configuration = Braze.Configuration(
apiKey: "{YOUR-BRAZE-API-KEY}",
endpoint: "{YOUR-BRAZE-ENDPOINT}"
)
configuration.api.sdkAuthentication = true
let braze = BrazeReactBridge.perform(
#selector(BrazeReactBridge.initBraze(_:)),
with: configuration
).takeUnretainedValue() as! Braze
```
**Android (braze.xml)**
```xml
true
```
Nachdem Sie die SDK-Authentifizierung in der nativen Ebene aktiviert haben, können Sie die in den folgenden Schritten aufgeführten React Native JavaScript-Methoden verwenden.
Wenn Sie die Braze-Instanz konfigurieren, rufen Sie `setIsSdkAuthenticationEnabled` mit `true` auf.
```java
BrazeConfig.Builder brazeConfigBuilder = new BrazeConfig.Builder()
.setIsSdkAuthenticationEnabled(true);
Braze.configure(this, brazeConfigBuilder.build());
```
Alternativ können Sie auch `true` zu Ihrer braze.xml hinzufügen.
Wenn Sie die Braze-Instanz konfigurieren, rufen Sie `setIsSdkAuthenticationEnabled` mit `true` auf.
```kotlin
BrazeConfig.Builder brazeConfigBuilder = BrazeConfig.Builder()
.setIsSdkAuthenticationEnabled(true)
Braze.configure(this, brazeConfigBuilder.build())
```
Alternativ können Sie auch `true` zu Ihrer braze.xml hinzufügen.
Um die SDK-Authentifizierung zu aktivieren, setzen Sie die Eigenschaft `configuration.api.sdkAuthentication` Ihres `BRZConfiguration`-Objekts auf `YES`, bevor Sie die Braze-Instanz initialisieren:
```objc
BRZConfiguration *configuration =
[[BRZConfiguration alloc] initWithApiKey:@"{BRAZE_API_KEY}"
endpoint:@"{BRAZE_ENDPOINT}"];
configuration.api.sdkAuthentication = YES;
Braze *braze = [[Braze alloc] initWithConfiguration:configuration];
AppDelegate.braze = braze;
```
Um die SDK-Authentifizierung zu aktivieren, setzen Sie die Eigenschaft `configuration.api.sdkAuthentication` Ihres `Braze.Configuration`-Objekts auf `true`, wenn Sie das SDK initialisieren:
```swift
let configuration = Braze.Configuration(apiKey: "{YOUR-BRAZE-API-KEY}",
endpoint: "{YOUR-BRAZE-ENDPOINT}")
configuration.api.sdkAuthentication = true
let braze = Braze(configuration: configuration)
AppDelegate.braze = braze
```
Derzeit muss die SDK-Authentifizierung im Rahmen der Initialisierung des SDK im nativen iOS- und Android-Code aktiviert werden. Um die SDK-Authentifizierung im Flutter SDK zu aktivieren, folgen Sie den Integrationen für iOS und Android auf den anderen Tabs. Nachdem die SDK-Authentifizierung aktiviert ist, kann der Rest des Features in Dart integriert werden.
Die SDK-Authentifizierung muss als Teil der Initialisierung des SDK im nativen iOS- und Android-Code aktiviert werden. Wenn sie in der nativen Ebene aktiviert ist, können Sie die Flutter-SDK-Methoden verwenden, um die JWT-Signatur zu übergeben.
**iOS**
Um die SDK-Authentifizierung zu aktivieren, setzen Sie die Eigenschaft `configuration.api.sdkAuthentication` in Ihrem nativen iOS-Code auf `true`:
```swift
let configuration = Braze.Configuration(apiKey: "{YOUR-BRAZE-API-KEY}", endpoint: "{YOUR-BRAZE-ENDPOINT}")
configuration.api.sdkAuthentication = true
let braze = Braze(configuration: configuration)
```
**Android (braze.xml)**
```xml
true
```
Nachdem Sie die SDK-Authentifizierung in der nativen Ebene aktiviert haben, können Sie die in den folgenden Schritten aufgeführten Flutter-SDK-Methoden verwenden.
Die SDK-Authentifizierung muss während der Initialisierung des nativen SDK aktiviert werden. Fügen Sie die folgende Konfiguration zu Ihrem nativen iOS- und Android-Code hinzu:
**iOS**
Setzen Sie die Eigenschaft `SDKAuthenticationEnabled` in Ihrer Konfigurationsdatei auf `true`:
```xml
SDKAuthenticationEnabled
```
**Android (braze.xml)**
```xml
true
```
Nachdem Sie die SDK-Authentifizierung in der nativen Ebene aktiviert haben, können Sie die in den folgenden Schritten aufgeführten Unity-C#-Methoden verwenden.
Die SDK-Authentifizierung muss während der Initialisierung des nativen SDK aktiviert werden. Fügen Sie die folgende Konfiguration zu Ihrem nativen iOS- und Android-Code hinzu:
**iOS**
Um die SDK-Authentifizierung zu aktivieren, setzen Sie die Eigenschaft `enableSDKAuthentication` in Ihrer `config.xml` auf `true`:
```xml
```
**Android (braze.xml)**
```xml
true
```
Nachdem Sie die SDK-Authentifizierung in der nativen Ebene aktiviert haben, können Sie die in den folgenden Schritten aufgeführten Cordova-JavaScript-Methoden verwenden.
Die SDK-Authentifizierung muss während der Initialisierung des nativen SDK aktiviert werden. Konfigurieren Sie die SDK-Authentifizierung separat für iOS und Android:
**iOS**
Um die SDK-Authentifizierung zu aktivieren, setzen Sie die Eigenschaft `configuration.Api.SdkAuthentication` bei der Initialisierung des SDK auf `true`:
```csharp
var configuration = new BRZConfiguration("YOUR-API-KEY", "YOUR-ENDPOINT");
configuration.Api.SdkAuthentication = true;
var braze = new Braze(configuration);
```
**Android (braze.xml)**
```xml
true
```
Nach der Aktivierung der SDK-Authentifizierung können Sie die in den folgenden Schritten aufgeführten .NET MAUI-Methoden verwenden.
Bei Verwendung des Braze Expo-Plugins setzen Sie die Eigenschaft `enableSdkAuthentication` in Ihrer App-Konfiguration auf `true`. Dadurch wird die SDK-Authentifizierung automatisch in den nativen iOS- und Android-Schichten konfiguriert, ohne dass manuelle Änderungen am nativen Code erforderlich sind.
**app.json oder app.config.js**
```json
{
"expo": {
"plugins": [
[
"@braze/expo-plugin",
{
"enableSdkAuthentication": true
}
]
]
}
}
```
Nachdem Sie die SDK-Authentifizierung in Ihrer App-Konfiguration aktiviert haben, können Sie die auf dem React-Native-Tab angezeigten React Native JavaScript-Methoden für die folgenden Schritte verwenden.
**Note:**
Ein vollständiges Implementierungsbeispiel finden Sie in der [Braze Expo-Plugin-Beispiel-App](https://github.com/braze-inc/braze-expo-plugin/blob/main/example/components/Braze.tsx) auf GitHub.
#### Schritt 2.2: Setzen Sie das JWT der aktuellen Nutzer:in {#step-22-set-the-current-users-jwt}
Wann immer Ihre App die Braze-Methode `changeUser` aufruft, geben Sie auch das JWT an, das [serverseitig generiert](#braze-dashboard) wurde.
Sie können das Token auch so konfigurieren, dass es mitten in der Sitzung für die aktuelle Nutzer:in aktualisiert wird.
**Note:**
Denken Sie daran, dass `changeUser` nur aufgerufen werden sollte, wenn die Nutzer-ID sich _tatsächlich geändert hat_. Sie sollten diese Methode nicht zum Aktualisieren des Authentifizierungs-Tokens (JWT) verwenden, wenn sich die Nutzer-ID nicht geändert hat.
Geben Sie das JWT beim Aufruf von [`changeUser`](https://js.appboycdn.com/web-sdk/latest/doc/modules/braze.html#changeuser) an:
```javascript
import * as braze from "@braze/web-sdk";
braze.changeUser("NEW-USER-ID", "JWT-FROM-SERVER");
```
Oder wenn Sie das Token der Nutzer:in mitten in der Sitzung erneuert haben:
```javascript
import * as braze from "@braze/web-sdk";
braze.setSdkAuthenticationSignature("NEW-JWT-FROM-SERVER");
```
Geben Sie das JWT beim Aufruf von [`changeUser`](https://braze-inc.github.io/braze-react-native-sdk/classes/Braze.Braze-1.html#changeUser) an:
```typescript
import Braze from '@braze/react-native-sdk';
Braze.changeUser("NEW-USER-ID", "JWT-FROM-SERVER");
```
Oder wenn Sie das Token der Nutzer:in mitten in der Sitzung erneuert haben:
```typescript
import Braze from '@braze/react-native-sdk';
Braze.setSdkAuthenticationSignature("NEW-JWT-FROM-SERVER");
```
Geben Sie das JWT beim Aufruf von [`changeUser`](https://braze-inc.github.io/braze-android-sdk/kdoc/braze-android-sdk/com.braze/-i-braze/change-user.html) an:
```java
Braze.getInstance(this).changeUser("NEW-USER-ID", "JWT-FROM-SERVER");
```
Oder wenn Sie das Token der Nutzer:in mitten in der Sitzung erneuert haben:
```java
Braze.getInstance(this).setSdkAuthenticationSignature("NEW-JWT-FROM-SERVER");
```
Geben Sie das JWT beim Aufruf von [`changeUser`](https://braze-inc.github.io/braze-android-sdk/kdoc/braze-android-sdk/com.braze/-i-braze/change-user.html) an:
```kotlin
Braze.getInstance(this).changeUser("NEW-USER-ID", "JWT-FROM-SERVER")
```
Oder wenn Sie das Token der Nutzer:in mitten in der Sitzung erneuert haben:
```kotlin
Braze.getInstance(this).setSdkAuthenticationSignature("NEW-JWT-FROM-SERVER")
```
Geben Sie das JWT beim Aufruf von [`changeUser`](https://braze-inc.github.io/braze-swift-sdk/documentation/brazekit/braze/changeuser(userid:sdkauthsignature:fileid:line:)) an:
```objc
[AppDelegate.braze changeUser:@"userId" sdkAuthSignature:@"JWT-FROM-SERVER"];
```
Oder wenn Sie das Token der Nutzer:in mitten in der Sitzung erneuert haben:
```objc
[AppDelegate.braze setSDKAuthenticationSignature:@"NEW-JWT-FROM-SERVER"];
```
Geben Sie das JWT beim Aufruf von [`changeUser`](https://braze-inc.github.io/braze-swift-sdk/documentation/brazekit/braze/changeuser(userid:sdkauthsignature:fileid:line:)) an:
```swift
AppDelegate.braze?.changeUser(userId: "userId", sdkAuthSignature: "JWT-FROM-SERVER")
```
**Note:**
`changeUser` gibt sofort auf dem aufrufenden Thread zurück. Die hier angegebene SDK-Authentifizierungssignatur wird angehängt, nachdem der Nutzer:innenwechsel abgeschlossen ist.
Oder wenn Sie das Token der Nutzer:in mitten in der Sitzung erneuert haben:
```swift
AppDelegate.braze?.set(sdkAuthenticationSignature: "NEW-JWT-FROM-SERVER")
```
Geben Sie das JWT beim Aufruf von [`changeUser`](https://js.appboycdn.com/web-sdk/latest/doc/modules/braze.html#changeuser) an:
```dart
braze.changeUser("userId", sdkAuthSignature: "JWT-FROM-SERVER")
```
Oder wenn Sie das Token der Nutzer:in mitten in der Sitzung erneuert haben:
```dart
braze.setSdkAuthenticationSignature("NEW-JWT-FROM-SERVER")
```
Geben Sie das JWT beim Aufruf von `changeUser` an:
```dart
import 'package:braze_plugin/braze_plugin.dart';
BrazePlugin braze = BrazePlugin();
braze.changeUser("NEW-USER-ID", sdkAuthSignature: "JWT-FROM-SERVER");
```
Oder wenn Sie das Token der Nutzer:in mitten in der Sitzung erneuert haben:
```dart
import 'package:braze_plugin/braze_plugin.dart';
BrazePlugin braze = BrazePlugin();
braze.setSdkAuthenticationSignature("NEW-JWT-FROM-SERVER");
```
Geben Sie das JWT beim Aufruf von `ChangeUser` an:
```csharp
BrazeBinding.ChangeUser("NEW-USER-ID", "JWT-FROM-SERVER");
```
Oder wenn Sie das Token der Nutzer:in mitten in der Sitzung erneuert haben:
```csharp
BrazeBinding.SetSdkAuthenticationSignature("NEW-JWT-FROM-SERVER");
```
Geben Sie das JWT beim Aufruf von `changeUser` an:
```javascript
BrazePlugin.changeUser("NEW-USER-ID", "JWT-FROM-SERVER");
```
Oder wenn Sie das Token der Nutzer:in mitten in der Sitzung erneuert haben:
```javascript
BrazePlugin.setSdkAuthenticationSignature("NEW-JWT-FROM-SERVER");
```
Geben Sie das JWT beim Aufruf von `ChangeUser` an:
**iOS**
```csharp
Braze.SharedInstance?.ChangeUser("NEW-USER-ID", "JWT-FROM-SERVER");
```
Oder wenn Sie das Token der Nutzer:in mitten in der Sitzung erneuert haben:
```csharp
Braze.SharedInstance?.SetSDKAuthenticationSignature("NEW-JWT-FROM-SERVER");
```
**Android**
```csharp
Braze.GetInstance(this).ChangeUser("NEW-USER-ID", "JWT-FROM-SERVER");
```
Oder wenn Sie das Token der Nutzer:in mitten in der Sitzung erneuert haben:
```csharp
Braze.GetInstance(this).SetSdkAuthenticationSignature("NEW-JWT-FROM-SERVER");
```
Bei Verwendung des Braze Expo-Plugins verwenden Sie die gleichen React Native SDK-Methoden. Geben Sie das JWT beim Aufruf von `changeUser` an:
```typescript
import Braze from '@braze/react-native-sdk';
Braze.changeUser("NEW-USER-ID", "JWT-FROM-SERVER");
```
Oder wenn Sie das Token der Nutzer:in mitten in der Sitzung erneuert haben:
```typescript
import Braze from '@braze/react-native-sdk';
Braze.setSdkAuthenticationSignature("NEW-JWT-FROM-SERVER");
```
#### Schritt 2.3: Registrieren Sie eine Callback-Funktion für ungültige Token {#sdk-callback}
Wenn dieses Feature auf [Erforderlich](#enforcement-options) gesetzt ist, werden SDK-Anfragen in den folgenden Fällen von Braze abgelehnt:
- Das JWT war zum Zeitpunkt des Empfangs durch die Braze API bereits abgelaufen
- Das JWT war leer oder fehlte
- Das JWT konnte für die Public Keys, die Sie in das Braze-Dashboard hochgeladen haben, nicht verifiziert werden
Mit `subscribeToSdkAuthenticationFailures` können Sie sich benachrichtigen lassen, wenn SDK-Anfragen aus einem dieser Gründe fehlschlagen. Eine Callback-Funktion enthält ein Objekt mit dem relevanten [`errorCode`](#error-codes), dem `reason` für den Fehler, der `userId` der Anfrage (die Nutzer:in kann nicht anonym sein) und dem Authentifizierungstoken (JWT), das den Fehler verursacht hat.
Fehlgeschlagene Anfragen werden regelmäßig wiederholt, bis Ihre App ein neues gültiges JWT liefert. Wenn die Nutzer:in noch angemeldet ist, können Sie diesen Callback nutzen, um ein neues JWT von Ihrem Server anzufordern und das Braze SDK mit diesem neuen gültigen Token zu versorgen.
Wenn Sie einen Authentifizierungsfehler erhalten, überprüfen Sie, ob die `userId` im Fehler mit der aktuell angemeldeten Nutzer:in übereinstimmt. Fordern Sie anschließend eine neue Signatur von Ihrem Server an und übermitteln Sie diese an das Braze SDK. Sie können diese Fehler auch in Ihrem Überwachungs- oder Fehlerberichtsdienst protokollieren.
**Tip:**
Diese Callback-Methoden eignen sich hervorragend, um Ihren eigenen Überwachungs- oder Fehlerprotokollierungsdienst hinzuzufügen, damit Sie verfolgen können, wie oft Ihre Braze-Anfragen abgelehnt werden.
```javascript
import * as braze from "@braze/web-sdk";
braze.subscribeToSdkAuthenticationFailures((error) => {
console.error("SDK authentication failed:", error);
console.log("Error code:", error.errorCode);
console.log("User ID:", error.userId);
// Note: Do not log error.signature as it contains sensitive authentication credentials
// Verify the error.userId matches the currently logged-in user
// Fetch a new token from your server and set it
fetchNewSignature(error.userId).then((newSignature) => {
braze.setSdkAuthenticationSignature(newSignature);
});
});
```
```typescript
import Braze from '@braze/react-native-sdk';
const sdkAuthErrorSubscription = Braze.addListener(
Braze.Events.SDK_AUTHENTICATION_ERROR,
(error) => {
console.log(`SDK Authentication for ${error.userId} failed with error code ${error.errorCode}.`);
const updated_jwt = getNewTokenSomehow(error);
Braze.setSdkAuthenticationSignature(updated_jwt);
}
);
// Don't forget to remove the listener when done
// sdkAuthErrorSubscription.remove();
```
```java
Braze.getInstance(this).subscribeToSdkAuthenticationFailures(error -> {
String newToken = getNewTokenSomehow(error);
Braze.getInstance(getContext()).setSdkAuthenticationSignature(newToken);
});
```
```kotlin
Braze.getInstance(this).subscribeToSdkAuthenticationFailures({ error: BrazeSdkAuthenticationErrorEvent ->
val newToken: String = getNewTokenSomehow(error)
Braze.getInstance(getContext()).setSdkAuthenticationSignature(newToken)
})
```
```objc
Braze *braze = [[Braze alloc] initWithConfiguration:configuration];
braze.sdkAuthDelegate = delegate;
AppDelegate.braze = braze;
// Method to implement in delegate
- (void)braze:(Braze *)braze sdkAuthenticationFailedWithError:(BRZSDKAuthenticationError *)error {
NSLog(@"Invalid SDK Authentication Token.");
NSString *newSignature = getNewTokenSomehow(error);
[AppDelegate.braze setSDKAuthenticationSignature:newSignature];
}
```
```swift
let braze = Braze(configuration: configuration)
braze.sdkAuthDelegate = delegate
AppDelegate.braze = braze
// Method to implement in delegate
func braze(_ braze: Braze, sdkAuthenticationFailedWithError error: Braze.SDKAuthenticationError) {
print("Invalid SDK Authentication Token.")
let newSignature = getNewTokenSomehow(error)
AppDelegate.braze?.set(sdkAuthenticationSignature: newSignature)
}
```
```dart
braze.setBrazeSdkAuthenticationErrorCallback((BrazeSdkAuthenticationError error) async {
print("Invalid SDK Authentication Token.");
final newSignature = getNewTokenSomehow(error);
braze.setSdkAuthenticationSignature(newSignature);
});
```
```dart
import 'package:braze_plugin/braze_plugin.dart';
BrazePlugin braze = BrazePlugin();
braze.setBrazeSdkAuthenticationErrorCallback((BrazeSdkAuthenticationError error) async {
print("SDK Authentication for ${error.userId} failed with error code ${error.errorCode}.");
String newSignature = getNewTokenSomehow(error);
braze.setSdkAuthenticationSignature(newSignature);
});
```
**iOS**
Legen Sie den SDK-Authentifizierungsdelegaten in Ihrer nativen iOS-Implementierung fest:
```csharp
public class SdkAuthDelegate : BRZSdkAuthDelegate
{
public void Braze(Braze braze, BRZSDKAuthenticationError error)
{
Debug.Log("Invalid SDK Authentication Token.");
string newSignature = GetNewTokenSomehow(error);
BrazeBinding.SetSdkAuthenticationSignature(newSignature);
}
}
```
**Android**
```csharp
Braze.GetInstance(this).SubscribeToSdkAuthenticationFailures((error) => {
string newToken = GetNewTokenSomehow(error);
Braze.GetInstance(this).SetSdkAuthenticationSignature(newToken);
});
```
```javascript
BrazePlugin.subscribeToSdkAuthenticationFailures((error) => {
console.log(`SDK Authentication for ${error.user_id} failed with error code ${error.error_code}.`);
const newSignature = getNewTokenSomehow(error);
BrazePlugin.setSdkAuthenticationSignature(newSignature);
});
```
**iOS**
Legen Sie den SDK-Authentifizierungsdelegaten für Ihre `Braze`-Instanz fest:
```csharp
public class SdkAuthDelegate : BRZSdkAuthDelegate
{
public override void Braze(Braze braze, BRZSDKAuthenticationError error)
{
Console.WriteLine("Invalid SDK Authentication Token.");
string newSignature = GetNewTokenSomehow(error);
Braze.SharedInstance?.SetSDKAuthenticationSignature(newSignature);
}
}
// Set the delegate during initialization
var configuration = new BRZConfiguration("YOUR-API-KEY", "YOUR-ENDPOINT");
configuration.Api.SdkAuthentication = true;
var braze = new Braze(configuration);
braze.SdkAuthDelegate = new SdkAuthDelegate();
```
**Android**
```csharp
Braze.GetInstance(this).SubscribeToSdkAuthenticationFailures((error) => {
string newToken = GetNewTokenSomehow(error);
Braze.GetInstance(this).SetSdkAuthenticationSignature(newToken);
});
```
Bei Verwendung des Braze Expo-Plugins verwenden Sie die gleichen React Native SDK-Methoden:
```typescript
import Braze from '@braze/react-native-sdk';
const sdkAuthErrorSubscription = Braze.addListener(
Braze.Events.SDK_AUTHENTICATION_ERROR,
(error) => {
console.log(`SDK Authentication for ${error.userId} failed with error code ${error.errorCode}.`);
const updated_jwt = getNewTokenSomehow(error);
Braze.setSdkAuthenticationSignature(updated_jwt);
}
);
// Don't forget to remove the listener when done
// sdkAuthErrorSubscription.remove();
```
### Schritt 3: Aktivieren Sie die Authentifizierung im Dashboard {#braze-dashboard}
Als Nächstes können Sie im Braze-Dashboard die Authentifizierung für die Apps aktivieren, die Sie zuvor eingerichtet haben.
Beachten Sie, dass SDK-Anfragen ohne Authentifizierung wie gewohnt weiterlaufen, es sei denn, die SDK-Authentifizierungseinstellung der App ist im Braze-Dashboard auf **Erforderlich** gesetzt.
Sollte bei Ihrer Integration etwas schiefgehen (z. B. wenn Ihre App Token fälschlicherweise an das SDK weitergibt oder Ihr Server ungültige Token generiert), deaktivieren Sie dieses Feature im Braze-Dashboard, und die Daten fließen ohne Überprüfung wie gewohnt weiter.
#### Durchsetzungsoptionen {#enforcement-options}
Auf der Dashboard-Seite **Einstellungen verwalten** verfügt jede App über drei SDK-Authentifizierungsstatus, die steuern, wie Braze Anfragen überprüft.
| Einstellung | Beschreibung |
| ------ | ---------- |
| **Deaktiviert** | Braze überprüft das für eine Nutzer:in bereitgestellte JWT nicht. (Standardeinstellung) |
| **Optional** | Braze überprüft Anfragen für angemeldete Nutzer:innen, weist aber ungültige Anfragen nicht zurück. |
| **Erforderlich** | Braze überprüft Anfragen für angemeldete Nutzer:innen und weist ungültige JWTs zurück. |
{: .reset-td-br-1 .reset-td-br-2 aria-label="Durchsetzungsoptionen" }

Die Einstellung **Optional** ist eine nützliche Möglichkeit, die möglichen Auswirkungen dieses Features auf den SDK-Traffic Ihrer App zu überwachen.
Ein ungültiges JWT wird sowohl im Status **Optional** als auch im Status **Erforderlich** gemeldet, aber nur im Status **Erforderlich** werden SDK-Anfragen abgelehnt, sodass Apps es erneut versuchen und ein neues JWT anfordern müssen.
## Öffentliche Schlüssel verwalten {#key-management}
### Hinzufügen eines Public Keys {#adding-a-public-key}
Sie können bis zu drei öffentliche Schlüssel für jede App hinzufügen: einen primären, einen sekundären und einen tertiären. Sie können denselben Schlüssel bei Bedarf auch zu mehreren Apps hinzufügen. Um einen öffentlichen Schlüssel hinzuzufügen:
1. Gehen Sie zum Braze-Dashboard und wählen Sie **Settings** > **App Settings**.
2. Wählen Sie eine App aus Ihrer Liste der verfügbaren Apps.
3. Wählen Sie unter **SDK Authentication** die Option **Add Public Key**.
4. Geben Sie eine optionale Beschreibung ein, fügen Sie Ihren Public Key ein und wählen Sie **Add Public Key**.
### Einen neuen Primärschlüssel zuweisen {#assign-a-new-primary-key}
So weisen Sie einen Sekundär- oder Tertiärschlüssel als Ihren neuen Primärschlüssel zu:
1. Gehen Sie zum Braze-Dashboard und wählen Sie **Settings** > **App Settings**.
2. Wählen Sie eine App aus Ihrer Liste der verfügbaren Apps.
3. Wählen Sie unter **SDK Authentication** einen Schlüssel und wählen Sie **Manage** > **Make Primary Key**.
### Schlüssel löschen {#deleting-a-key}
Um einen Primärschlüssel zu löschen, [weisen Sie zunächst einen neuen Primärschlüssel zu](#assign-a-new-primary-key) und löschen Sie dann Ihren Schlüssel. So löschen Sie einen nicht-primären Schlüssel:
1. Gehen Sie zum Braze-Dashboard und wählen Sie **Settings** > **App Settings**.
2. Wählen Sie eine App aus Ihrer Liste der verfügbaren Apps.
3. Wählen Sie unter **SDK Authentication** einen nicht-primären Schlüssel und wählen Sie **Manage** > **Delete Public Key**.
## Analytics {#analytics}
Jede App zeigt eine Aufschlüsselung der SDK-Authentifizierungsfehler, die gesammelt wurden, während sich dieses Feature im Status **Optional** oder **Erforderlich** befindet.
Die Daten sind in Realtime verfügbar, und Sie können den Mauszeiger über Datenpunkte im Chart bewegen, um eine Aufschlüsselung der Fehler für ein bestimmtes Datum zu sehen.
{: style="max-width:80%"}
## Fehlercodes {#error-codes}
| Fehlercode | Fehlergrund | Beschreibung | Schritte zur Behebung |
| -------- | ------------ | --------- | --------- |
| 10 | `EXPIRATION_REQUIRED` | Die Gültigkeitsdauer ist ein Pflichtfeld für die Verwendung von Braze. | Fügen Sie Ihrer JWT-Erstellungslogik ein `exp`- oder Ablaufdatum-Feld hinzu. |
| 20 | `DECODING_ERROR` | Nicht übereinstimmender Public Key oder ein allgemeiner nicht abgefangener Fehler. | Kopieren Sie Ihr JWT in ein JWT-Testtool, um zu diagnostizieren, warum Ihr JWT ein ungültiges Format aufweist. |
| 21 | `SUBJECT_MISMATCH` | Die erwarteten und tatsächlichen Subjects stimmen nicht überein. | Das `sub`-Feld sollte dieselbe Nutzer-ID enthalten, die an die SDK-Methode `changeUser` übergeben wurde. |
| 22 | `EXPIRED` | Das bereitgestellte Token ist abgelaufen. | Verlängern Sie die Gültigkeitsdauer oder aktualisieren Sie Tokens regelmäßig, bevor sie ablaufen. |
| 23 | `INVALID_PAYLOAD` | Die Payload des Tokens ist ungültig. | Kopieren Sie Ihr JWT in ein JWT-Testtool, um zu diagnostizieren, warum Ihr JWT ein ungültiges Format aufweist. |
| 24 | `INCORRECT_ALGORITHM` | Der Algorithmus des Tokens wird nicht unterstützt. | Ändern Sie Ihr JWT, um `RS256`-Verschlüsselung zu verwenden. Andere Typen werden nicht unterstützt. |
| 25 | `PUBLIC_KEY_ERROR` | Der Public Key konnte nicht in das richtige Format konvertiert werden. | Kopieren Sie Ihr JWT in ein JWT-Testtool, um zu diagnostizieren, warum Ihr JWT ein ungültiges Format aufweist. |
| 26 | `MISSING_TOKEN` | Es wurde kein Token in der Anfrage angegeben. | Stellen Sie sicher, dass Sie beim Aufruf von `changeUser(id, token)` ein Token übergeben und dass Ihr Token nicht leer ist. |
| 27 | `NO_MATCHING_PUBLIC_KEYS` | Es gibt keine öffentlichen Schlüssel, die mit dem bereitgestellten Token übereinstimmen. | Der im JWT verwendete Private Key stimmt mit keinem der für Ihre App konfigurierten Public Keys überein. Bestätigen Sie, dass Sie die öffentlichen Schlüssel zur richtigen App in Ihrem Workspace hinzugefügt haben, die mit diesem API-Schlüssel übereinstimmt. |
| 28 | `PAYLOAD_USER_ID_MISMATCH` | Nicht alle Nutzer-IDs in der Anfrage-Payload stimmen wie erforderlich überein. | Dies ist unerwartet und kann zu einer fehlerhaften Payload führen. Öffnen Sie ein Support-Ticket, um Unterstützung zu erhalten. |
{: .reset-td-br-1 .reset-td-br-2 .reset-td-br-3 .reset-td-br-4 aria-label="Fehlercodes" }
## Häufig gestellte Fragen (FAQ) {#faq}
### Muss dieses Feature in allen meinen Apps gleichzeitig aktiviert werden? {#faq-app-by-app}
Nein, dieses Feature kann für bestimmte Apps aktiviert werden und muss nicht für alle Ihre Apps auf einmal verwendet werden.
### Was passiert mit Nutzer:innen, die noch ältere Versionen meiner App verwenden? {#faq-sdk-backward-compatibility}
Wenn Sie damit beginnen, dieses Feature zu erzwingen, werden Anfragen von älteren App-Versionen von Braze abgelehnt und vom SDK erneut versucht. Nachdem Nutzer:innen ihre App auf eine unterstützte Version aktualisiert haben, werden diese in der Warteschlange befindlichen Anfragen wieder akzeptiert.
Wenn möglich, sollten Sie Nutzer:innen zum Upgrade auffordern, wie Sie es bei jedem anderen Pflichtupdate tun würden. Alternativ können Sie das Feature [optional](#enforcement-options) lassen, bis Sie sehen, dass ein akzeptabler Prozentsatz der Nutzer:innen aktualisiert hat.
### Welche Gültigkeitsdauer sollte ich bei der Erstellung eines JWTs verwenden? {#faq-expiration}
Wir empfehlen, den höheren Wert der durchschnittlichen Sitzungsdauer, des Ablaufs von Sitzungs-Cookies/-Tokens oder der Häufigkeit zu verwenden, mit der Ihre Anwendung sonst das Profil der aktuellen Nutzer:in aktualisieren würde.
### Was passiert, wenn ein JWT mitten in der Sitzung einer Nutzer:in abläuft? {#faq-jwt-expiration}
Sollte das Token einer Nutzer:in mitten in der Sitzung ablaufen, verfügt das SDK über eine [Callback-Funktion](#sdk-callback), die Ihre App darüber informiert, dass ein neues JWT erforderlich ist, um weiterhin Daten an Braze zu senden.
### Was passiert, wenn meine serverseitige Integration nicht mehr funktioniert und ich kein JWT mehr erstellen kann? {#faq-server-downtime}
Wenn Ihr Server kein JWT bereitstellen kann oder Sie ein Problem bei der Integration feststellen, können Sie das Feature jederzeit im Braze-Dashboard deaktivieren.
Nach der Deaktivierung werden alle ausstehenden fehlgeschlagenen SDK-Anfragen vom SDK erneut versucht und von Braze akzeptiert.
### Warum verwendet dieses Feature Public/Private Keys und nicht Shared Secrets? {#faq-shared-secrets}
Bei der Verwendung von Shared Secrets könnte jeder, der Zugriff auf dieses Shared Secret hat, z. B. über die Braze-Dashboard-Seite, Token generieren und sich als Ihre Endnutzer:innen ausgeben.
Stattdessen verwenden wir Public/Private Keys, sodass selbst Braze-Mitarbeitende (geschweige denn die Nutzer:innen Ihres Unternehmens) keinen Zugriff auf Ihre Private Keys haben.
### Wie werden abgelehnte Anfragen erneut versucht? {#faq-retry-logic}
Wenn eine Anfrage aufgrund eines Authentifizierungsfehlers abgelehnt wird, ruft das SDK Ihren Callback auf, mit dem Sie das JWT der Nutzer:in aktualisieren können.
Anfragen werden in regelmäßigen Abständen mit einem exponentiellen Backoff-Verfahren wiederholt. Nach 50 aufeinanderfolgenden Fehlversuchen werden die Wiederholungen bis zum nächsten Sitzungsstart pausiert. Jedes SDK verfügt auch über eine Methode zur manuellen Anforderung eines Data Flush.
### Kann die SDK-Authentifizierung für anonyme Nutzer:innen verwendet werden? {#faq-anonymous-users}
Nein. Die SDK-Authentifizierung funktioniert, indem Ihre Website die Identität einer Person bestätigt, daher gilt sie nur für identifizierte Nutzer:innen. Als anonyme:r Nutzer:in gibt es keine Identität, die bestätigt werden könnte.
Die Durchsetzung beginnt nach dem Aufruf von `changeUser`. Bevor eine Nutzer:in identifiziert wird (z. B. beim anonymen Browsen vor der Registrierung), kann das SDK weiterhin Daten ohne JWT an Braze senden. Nach dem Aufruf von `changeUser` benötigen Anfragen für dieses identifizierte Profil ein gültiges JWT.
Das bedeutet, dass eine typische User Journey so aussehen könnte:
1. Eine Nutzer:in besucht Ihre Website oder öffnet Ihre App anonym. Braze erfasst diese Aktivität ohne JWT.
2. Die Nutzer:in registriert sich oder meldet sich an, und Ihre App ruft `changeUser` mit einer `external_id` auf.
3. Braze erfasst weiterhin die Aktivität für diese Nutzer:in, und die SDK-Authentifizierung wird für Anfragen dieses identifizierten Profils erzwungen.
### Funktioniert die SDK-Authentifizierung mit Nutzer-Aliasen? {#faq-aliases}
Nein. Die SDK-Authentifizierung erfordert eine `external_id`. Sie kann nicht eingerichtet werden, wenn nur eine `braze_id` oder `alias_id` verfügbar ist, daher können Alias-only-Profile die SDK-Authentifizierung nicht verwenden.
### Blockiert die Aktivierung der SDK-Authentifizierung die Erfassung nicht authentifizierter Aktivitäten? {#faq-unauthenticated-collection}
Nein. Die SDK-Authentifizierung blockiert keine legitime anonyme Aktivitätserfassung. Sie greift erst, nachdem ein Profil mit `changeUser` identifiziert wurde.
# Fehlersuche im Braze SDK
Source: /docs/de/developer_guide/sdk_integration/debugging/index.md
# Fehlersuche im Braze SDK {#debugging-the-braze-sdk}
> Erfahren Sie, wie Sie den integrierten Debugger des Braze SDK verwenden, damit Sie Probleme in Ihren SDK-gestützten Kanälen beheben können, ohne die ausführliche Protokollierung in Ihrer App aktivieren zu müssen.
**Tip:**
Für eine eingehendere Untersuchung können Sie auch [die ausführliche Protokollierung aktivieren](https://www.braze.com/docs/de/de/developer_guide/sdk_integration/verbose_logging), um detaillierte SDK-Ausgaben zu erfassen, und [erfahren, wie Sie ausführliche Protokolle lesen](https://www.braze.com/docs/de/de/developer_guide/sdk_integration/reading_verbose_logs) – für bestimmte Kanäle.
## Voraussetzungen {#prerequisites}
Um den Braze SDK-Debugger nutzen zu können, benötigen Sie die Berechtigungen „PII anzeigen“ und „Nutzerprofile anzeigen (PII geschwärzt)“. Um Ihre Debugging-Sitzungsprotokolle herunterzuladen, benötigen Sie außerdem die Berechtigung „Nutzerdaten exportieren“. Darüber hinaus muss Ihr Braze SDK die folgenden Mindestversionen erfüllen oder darauf verweisen:
Um Debugger-Protokolle zu erfassen, wenn `Braze.configuration.logger.level` auf `.disabled` gesetzt ist, verwenden Sie Swift SDK 11.9.0 oder höher. Weitere Informationen finden Sie in den [Swift-Changelogs](https://www.braze.com/docs/de/de/developer_guide/changelogs#swift_fixed-12).
## Fehlersuche im Braze SDK
**Tip:**
Um das Debugging für das Braze Web SDK zu aktivieren, können Sie [einen URL-Parameter verwenden](https://www.braze.com/docs/de/de/developer_guide/platform_integration_guides/web/initial_sdk_setup#logging).
### 1. Schritt: Schließen Sie Ihre App {#step-1-close-your-app}
Bevor Sie mit der Fehlersuche beginnen, schließen Sie die App, bei der gerade ein Problem auftritt. Sie können die App zu Beginn Ihrer Sitzung neu starten.
### 2. Schritt: Erstellen Sie eine Debugging-Sitzung {#step-2-create-a-debugging-session}
Gehen Sie in Braze zu **Einstellungen** und wählen Sie dann unter **Einrichtung und Tests** die Option **SDK-Debugger** aus.

Wählen Sie **Debugging-Sitzung erstellen**.

### 3. Schritt: Nutzer:in auswählen {#step-3-select-a-user}
Suchen Sie nach einer Nutzer:in anhand der E-Mail-Adresse, der `external_id`, des Nutzer-Alias oder des Push-Tokens. Wenn Sie bereit sind, Ihre Sitzung zu starten, wählen Sie **Nutzer:in auswählen**.
{: style="max-width:85%;"}
### 4. Schritt: App neu starten {#step-4-relaunch-the-app}
Starten Sie zunächst die App und bestätigen Sie, dass Ihr Gerät gekoppelt ist. Wenn die Kopplung erfolgreich war, starten Sie Ihre App neu—so stellen Sie sicher, dass die Initialisierungsprotokolle der App vollständig erfasst werden.
### 5. Schritt: Führen Sie die Reproduktionsschritte durch {#step-5-complete-the-reproduction-steps}
Nachdem Sie Ihre App neu gestartet haben, folgen Sie den Schritten, um den Fehler zu reproduzieren.
**Tip:**
Achten Sie bei der Reproduktion des Fehlers darauf, die Reproduktionsschritte so genau wie möglich zu befolgen, damit Sie [hochwertige Protokolle](#step-6-export-your-session-logs-optional) erstellen können.
### 6. Schritt: Beenden Sie die Sitzung {#step-6-end-your-session}
Wenn Sie mit Ihren Reproduktionsschritten fertig sind, wählen Sie **Sitzung beenden** > **Schließen**.
{: style="max-width:85%;"}
**Note:**
Es kann einige Minuten dauern, bis die Protokolle generiert sind – je nach Länge der Sitzung und der Qualität der Netzwerkverbindung.
### 7. Schritt: Sitzung teilen oder exportieren (optional) {#step-7-share-or-export-your-session-optional}
Nach der Sitzung können Sie Ihre Sitzungsprotokolle als CSV-Datei exportieren. Außerdem können andere Personen Ihre **Sitzungs-ID** verwenden, um nach Ihrer Debug-Sitzung zu suchen, sodass Sie ihnen Ihre Protokolle nicht direkt senden müssen.

# Ausführliche Protokollierung
Source: /docs/de/developer_guide/sdk_integration/verbose_logging/index.md
# Ausführliche Protokollierung
> Die ausführliche Protokollierung liefert detaillierte Low-Level-Informationen aus dem Braze SDK und bietet Ihnen Einblick in die Initialisierung des SDK, die Kommunikation mit Servern und die Verarbeitung von Messaging-Kanälen wie Push-Benachrichtigungen, In-App-Nachrichten und Content-Cards.
Wenn etwas nicht wie erwartet funktioniert – beispielsweise eine Push-Benachrichtigung nicht ankommt, eine In-App-Nachricht nicht angezeigt wird oder Nutzerdaten nicht synchronisiert werden –, helfen Ihnen ausführliche Protokolle dabei, die Ursache zu identifizieren. Anstatt zu vermuten, können Sie genau sehen, was das SDK bei jedem Schritt ausführt.
**Tip:**
Wenn Sie debuggen möchten, ohne die ausführliche Protokollierung manuell zu aktivieren, können Sie den [SDK-Debugger](https://www.braze.com/docs/de/de/developer_guide/sdk_integration/debugging) verwenden, um Debugging-Sitzungen direkt im Braze-Dashboard zu erstellen.
## Wann sollte ausführliche Protokollierung verwendet werden?
Aktivieren Sie die ausführliche Protokollierung, wenn erforderlich:
- **Überprüfen Sie die Initialisierung des SDK**: Bitte überprüfen Sie, ob das SDK mit dem korrekten SDK-API-Schlüssel und Endpunkt ordnungsgemäß startet.
- **Fehlerbehebung bei der Zustellung von Nachrichten**: Bitte überprüfen Sie, ob Push-Token registriert sind, In-App-Nachrichten ausgelöst werden oder Content-Cards synchronisiert sind.
- **Deeplinks debuggen**: Bitte überprüfen Sie, ob das SDK Deeplinks aus Push-Benachrichtigungen, In-App-Nachrichten oder Content-Cards empfängt und öffnet.
- **SitzungsTracking überprüfen**: Bitte bestätigen Sie, dass die Sitzungen wie erwartet beginnen und enden.
- **Diagnose von Verbindungsproblemen**: Bitte überprüfen Sie die Netzwerkanfragen und -antworten zwischen dem SDK und den Braze-Servern.
## Ausführliche Protokollierung Enablement aktivieren
**Important:**
Ausführliche Protokolle sind ausschließlich für Entwicklungs- und Testumgebungen vorgesehen. Bitte deaktivieren Sie die ausführliche Protokollierung, bevor Sie Ihre App in die Produktion freigeben, um zu verhindern, dass vertrauliche Informationen offengelegt werden.
Bitte aktivieren Sie die ausführliche Protokollierung vor allen anderen SDK-Aufrufen in Ihrer`Application.onCreate()`Methode, um die vollständigsten Ergebnisse zu erfassen.
**Im Code:**
```java
BrazeLogger.setLogLevel(Log.VERBOSE);
```
```kotlin
BrazeLogger.logLevel = Log.VERBOSE
```
**In`braze.xml`:**
```xml
2
```
Um zu überprüfen, ob die ausführliche Protokollierung aktiviert ist, suchen Sie in Ihrer `V/Braze`Logcat-Ausgabe nach. Zum Beispiel:
```
2077-11-19 16:22:49.591 ? V/Braze v9.0.01 .bo.app.d3: Request started
```
Ausführliche Informationen finden Sie unter [Android SDK-Protokollierung](https://www.braze.com/docs/de/de/developer_guide/sdk_integration#android_enabling-logs).
Stellen Sie die Protokollstufe während der Initialisierung auf`.debug` Ihrem`Braze.Configuration`Objekt ein.
```swift
let configuration = Braze.Configuration(
apiKey: "",
endpoint: ""
)
configuration.logger.level = .debug
let braze = Braze(configuration: configuration)
```
```objc
BRZConfiguration *configuration = [[BRZConfiguration alloc] initWithApiKey:@""
endpoint:@""];
[configuration.logger setLevel:BRZLoggerLevelDebug];
Braze *braze = [[Braze alloc] initWithConfiguration:configuration];
```
Die`.debug`Stufe ist die ausführlichste und wird für die Fehlerbehebung empfohlen. Ausführliche Informationen finden Sie unter [SWIFT SDK-Protokollierung](https://www.braze.com/docs/de/de/developer_guide/sdk_integration#swift_log-levels).
Fügen Sie`?brazeLogging=true`als URL-Parameter hinzu oder aktivieren Sie die Protokollierung während der SDK-Initialisierung:
```javascript
braze.initialize('YOUR-API-KEY', {
baseUrl: 'YOUR-SDK-ENDPOINT',
enableLogging: true
});
```
Sie können die Protokollierung auch nach der Initialisierung umschalten:
```javascript
braze.toggleLogging();
```
Die Protokolle werden auf dem Tab **„Konsole“** der Entwicklertools Ihres Browsers angezeigt. Ausführliche Informationen finden Sie unter [Internet-SDK-Protokollierung](https://www.braze.com/docs/de/de/developer_guide/sdk_integration#web_logging).
1. Öffnen Sie die Einstellungen für die Braze-Konfiguration, indem Sie zu **Braze** > **Braze-Konfiguration** navigieren.
2. Bitte wählen Sie das Dropdown-Menü **„Braze Android-Einstellungen anzeigen“** aus.
3. Geben Sie im Feld **„SDK-Protokollstufe**“ bitte ein`0`.
Legen Sie die Protokollstufe während der SDK-Konfiguration fest:
```javascript
const configuration = new Braze.BrazeConfiguration('YOUR-API-KEY', 'YOUR-SDK-ENDPOINT');
configuration.logLevel = Braze.LogLevel.Verbose;
```
## Protokolle sammeln
Nachdem Sie die ausführliche Protokollierung aktiviert haben, reproduzieren Sie bitte das Problem, das Sie bei der Fehlerbehebung beheben möchten, und erfassen Sie anschließend die Protokolle über die Konsole oder das Debugging-Tool Ihrer Plattform.
Verwenden Sie **Logcat** in Android Studio, um Protokolle zu erfassen:
1. Bitte schließen Sie Ihr Gerät an oder starten Sie einen Emulator.
2. Öffnen Sie in Android Studio **Logcat** über das untere Panel.
3. Bitte verwenden Sie den Filter für`V/Braze` oder , um die Braze`D/Braze` SDK-Ausgabe zu isolieren.
4. Bitte stellen Sie das Problem nach.
5. Bitte kopieren Sie die relevanten Protokolle und speichern Sie diese in einer Textdatei.
Verwenden Sie die **Konsolen**-App unter MacOS, um Protokolle zu erfassen:
1. Bitte installieren Sie die App auf Ihrem Gerät mit aktivierter ausführlicher Protokollierung.
2. Bitte schließen Sie Ihr Gerät an Ihren Mac an.
3. Öffnen Sie die **Konsolen**-App und wählen Sie Ihr Gerät aus der Seitenleiste **„Geräte“** aus.
4. Bitte verwenden Sie den Filter, um die Protokolle nach`Braze` oder`BrazeKit` in der Suchleiste zu filtern.
5. Bitte stellen Sie das Problem nach.
6. Bitte kopieren Sie die relevanten Protokolle und speichern Sie diese in einer Textdatei.
Bitte nutzen Sie die Entwicklertools Ihres Browsers:
1. Öffnen Sie die Entwicklertools Ihres Browsers (in der Regel **F12** oder **Cmd+Option+I**).
2. Bitte gehen Sie zum Tab **„Konsole**“.
3. Bitte stellen Sie das Problem nach.
4. Bitte kopieren Sie die Konsolenausgabe und speichern Sie sie in einer Textdatei.
**Tip:**
Wenn Sie Protokolle für den Braze-Support sammeln, beginnen Sie bitte mit der Protokollierung, bevor Sie Ihre App starten, und setzen Sie diese fort, bis das Problem aufgetreten ist. Dies unterstützt die Erfassung der gesamten Abfolge von Ereignissen.
## Ausführliche Protokolle lesen
Ausführliche Protokolle folgen einer einheitlichen Struktur, die Ihnen dabei hilft, die Aktivitäten des SDK nachzuvollziehen. Informationen zur Interpretation der Protokollausgabe für bestimmte Kanäle, einschließlich der zu suchenden Schlüsseleinträge und gängiger Muster der Fehlerbehebung, finden Sie unter [Ausführliche Protokolle lesen](https://www.braze.com/docs/de/de/developer_guide/sdk_integration/reading_verbose_logs).
## Weitergabe von Protokollen an den Braze-Support
Wenn Sie sich wegen eines SDK-Problems an den Braze-Support wenden, geben Sie bitte Folgendes an:
1. **Ausführliche Protokolldatei**: Eine vollständige Protokollierung vom Zeitpunkt vor dem Start der App bis zum Vorkommen des Problems.
2. **Schritte zur Reproduktion**: Eine klare Beschreibung der Handlungen, die das Problem triggern.
3. **Erwartetes vs. tatsächliches Verhalten**: Was Sie erwartet haben und was stattdessen eingetreten ist.
4. **SDK-Version**: Die Version des Braze SDK, die Sie verwenden.
5. **Plattform und Betriebssystemversion**: Beispielsweise iOS 18.0, Android 14 oder Chrome 120.
# Ausführliche Protokolle lesen
Source: /docs/de/developer_guide/sdk_integration/reading_verbose_logs/index.md
# Ausführliche Protokolle lesen {#reading-verbose-logs}
> Auf dieser Seite wird erläutert, wie die ausführliche Protokollausgabe des Braze SDK interpretiert werden kann. Für jeden Messaging-Kanal finden Sie die wichtigsten Protokolleinträge, deren Bedeutung und häufige Probleme, auf die Sie achten sollten.
Bevor Sie beginnen, stellen Sie sicher, dass Sie [die ausführliche Protokollierung aktiviert](https://www.braze.com/docs/de/de/developer_guide/sdk_integration/verbose_logging) haben und wissen, wie Sie Protokolle auf Ihrer Plattform erfassen können.
## Sitzungen {#sessions}
Sitzungen bilden die Grundlage für Analytics und die Nachrichtenzustellung von Braze. Viele Messaging-Features – einschließlich In-App-Nachrichten und Content Cards – erfordern eine gültige Sitzung, bevor sie funktionieren können. Sollten Sitzungen nicht korrekt protokolliert werden, untersuchen Sie dies zuerst. Weitere Informationen zum Aktivieren des Sitzungs-Trackings finden Sie unter [Schritt 5: Sitzungs-Tracking für Nutzer:innen aktivieren](https://www.braze.com/docs/de/de/developer_guide/sdk_integration?sdktab=android#android_step-5-enable-user-session-tracking).
### Wichtige Protokolleinträge {#key-log-entries}
**Sitzungsstart:**
```
Started user session (id: )
```
**Sitzungsende:**
```
Ended user session (id: , duration: s)
Logged event:
- userId:
- sessionId:
- data: sessionEnd(duration: )
```
**Sitzungsstart:**
Suchen Sie nach den folgenden Einträgen:
```
New session created with ID:
Session start event for new session received
Completed the openSession call
Opened session with activity:
```
Filtern Sie Netzwerkanfragen für Ihren konfigurierten Braze-Endpunkt (z. B. sdk.iad-01.braze.com), um das Sitzungsstart-Ereignis (`ss`) anzuzeigen.
**Sitzungsende:**
```
Closed session with activity:
Closed session with session ID:
Requesting data flush on internal session close flush timer.
```
### Was zu überprüfen ist {#what-to-check}
- Überprüfen Sie, ob beim Start der App ein Sitzungsstart-Protokoll erscheint.
- Wenn Sie keinen Sitzungsstart sehen, prüfen Sie, ob das SDK ordnungsgemäß initialisiert ist und ob `openSession` (Android) aufgerufen wird.
- Überprüfen Sie auf Android, ob eine Netzwerkanfrage an den Braze-Endpunkt gesendet wird. Wenn Sie dies nicht sehen, überprüfen Sie Ihren API-Schlüssel und Ihre Endpunkt-Konfiguration.
## Push-Benachrichtigungen {#push-notifications}
Protokolle für Push-Benachrichtigungen helfen Ihnen zu überprüfen, ob Geräte-Token registriert sind, Benachrichtigungen zugestellt werden und Klick-Ereignisse nachverfolgt werden.
### Token-Registrierung {#token-registration}
Zu Beginn einer Sitzung registriert das SDK das Push-Token des Geräts bei Braze.
```
Updated push notification authorization:
- authorization: authorized
Received remote notifications device token:
```
Filtern Sie Anfragen an Ihren konfigurierten Braze-Endpunkt (z. B. sdk.iad-01.braze.com) und suchen Sie nach `push_token` in den Attributen des Anfragetextes:
```
"attributes": [
{
"push_token": "",
"user_id": ""
}
]
```
Überprüfen Sie außerdem, ob die Geräteinformationen Folgendes enthalten:
```
"device": {
"ios_push_auth": "authorized",
"remote_notification_enabled": 1
}
```
Suchen Sie nach dem FCM-Registrierungsprotokoll:
```
Registering for Firebase Cloud Messaging token using sender id:
```
Überprüfen Sie Folgendes:
- `com_braze_firebase_cloud_messaging_registration_enabled` ist `true`.
- Die FCM-Absender-ID entspricht Ihrem Firebase-Projekt.
Ein häufiger Fehler ist `SENDER_ID_MISMATCH`, was bedeutet, dass die konfigurierte Absender-ID nicht mit Ihrem Firebase-Projekt übereinstimmt.
### Was zu überprüfen ist
- Falls `push_token` im Anfragetext fehlt, wurde das Token nicht erfasst. Überprüfen Sie die Push-Einstellungen in Ihrer App-Konfiguration.
- Wenn `ios_push_auth` den Wert `denied` oder `provisional` anzeigt, haben die Nutzer:innen keine vollständige Push-Berechtigung erteilt.
- Wenn Sie auf Android `SENDER_ID_MISMATCH` sehen, aktualisieren Sie Ihre FCM-Absender-ID, damit sie mit Ihrem Firebase-Projekt übereinstimmt.
### Push-Zustellung und Klick {#push-delivery-and-click}
Wenn eine Push-Benachrichtigung angetippt wird, protokolliert das SDK die Verarbeitungs- und Klick-Ereignisse.
```
Processing push notification:
- date:
- silent: false
- userInfo: {
"ab": { ... },
"ab_uri": "",
"aps": {
"alert": {
"body": "",
"title": ""
}
}
}
```
Gefolgt vom Klick-Ereignis:
```
Logged event:
- userId:
- sessionId:
- data: pushClick(campaignId: ...)
```
Wenn die Push-Benachrichtigung einen Deeplink enthält, sehen Sie außerdem:
```
Opening '':
- channel: notification
- useWebView: false
- isUniversalLink: false
```
```
BrazeFirebaseMessagingService: Got Remote Message from FCM
```
Gefolgt von der Push-Nutzlast und den Anzeigeprotokollen. Für Deeplinks suchen Sie nach den Einträgen „Deep Link Delegate“ oder `UriAction`.
### Was zu überprüfen ist
- Überprüfen Sie, ob die Push-Nutzlast die erwarteten Werte für `title`, `body` und alle Deeplinks (`ab_uri`) enthält.
- Bestätigen Sie, dass ein `pushClick`-Ereignis nach dem Antippen protokolliert wird.
- Sollte das Klick-Ereignis fehlen, prüfen Sie, ob Ihr App-Delegate oder Benachrichtigungs-Handler Push-Ereignisse ordnungsgemäß an das Braze SDK weiterleitet.
## In-App-Nachrichten {#in-app-messages}
Die In-App-Nachrichtenprotokolle zeigen Ihnen den gesamten Lebenszyklus: Zustellung vom Server, Auslösung basierend auf Ereignissen, Anzeige, Impression-Protokollierung und Klick-Tracking.
### Nachrichtenzustellung {#message-delivery}
Wenn Nutzer:innen eine Sitzung starten und für eine In-App-Nachricht berechtigt sind, empfängt das SDK die Nachrichtennutzlast vom Server.
Filtern Sie die Antworten von Ihrem konfigurierten Braze-Endpunkt (z. B. sdk.iad-01.braze.com), die die In-App-Nachrichtendaten enthalten.
Der Antworttext enthält die Nachrichtennutzlast, einschließlich:
```
"templated_message": {
"data": {
"message": "...",
"type": "HTML",
"message_close": "SWIPE",
"trigger_id": ""
},
"type": "inapp"
}
```
Suchen Sie nach dem Protokoll für das auslösende Ereignis:
```
Triggering action:
```
Dies bestätigt, dass die In-App-Nachricht einem Auslöseereignis zugeordnet wurde.
### Nachrichtenanzeige und Impression {#message-display-and-impression}
```
In-app message ready for display:
- triggerId: (campaignId: , ...)
- extras: { ... }
```
Gefolgt vom Impression-Protokoll:
```
Logged event:
- userId:
- sessionId:
- data: inAppMessageImpression(triggerIds: [...])
```
```
handleExistingInAppMessagesInStackWithDelegate:: Displaying in-app message
```
### Klick- und Button-Ereignisse {#click-and-button-events}
Wenn Nutzer:innen auf einen Button tippen oder die Nachricht schließen:
```
Logged event:
- userId:
- sessionId:
- data: inAppMessageButtonClick(triggerIds: [...], buttonId: "")
```
Wenn keine weiteren getriggerten Nachrichten übereinstimmen, sehen Sie außerdem:
```
No matching trigger for event.
```
Dies ist das erwartete Verhalten, wenn für das Ereignis keine zusätzlichen In-App-Nachrichten konfiguriert sind.
Filtern Sie Anfragen an Ihren konfigurierten Braze-Endpunkt (z. B. sdk.iad-01.braze.com) und suchen Sie nach Ereignissen mit dem Namen `sbc` (Button-Klick) oder `si` (Impression) im Anfragetext.
### Was zu überprüfen ist
- Sollte die In-App-Nachricht nicht angezeigt werden, überprüfen Sie zunächst, ob ein Sitzungsstart protokolliert wurde.
- Filtern Sie die Antworten von Ihrem konfigurierten Braze-Endpunkt, um zu bestätigen, dass die Nachrichtennutzlast zugestellt wurde.
- Falls keine Impressionen protokolliert werden, prüfen Sie, ob Sie einen benutzerdefinierten `inAppMessageDisplay`-Delegaten implementiert haben, der die Protokollierung unterdrückt.
- Wenn „Kein passender Auslöser für Ereignis“ angezeigt wird, ist dies normal und bedeutet, dass für dieses Ereignis keine zusätzlichen In-App-Nachrichten konfiguriert sind.
## Content Cards
Mithilfe von Content-Card-Protokollen können Sie überprüfen, ob Karten mit dem Gerät synchronisiert und den Nutzer:innen angezeigt werden und ob Interaktionen (Impressionen, Klicks, Ablehnungen) nachverfolgt werden.
### Kartensynchronisierung {#card-sync}
Content Cards werden zu Beginn der Sitzung und bei einer manuellen Aktualisierung synchronisiert. Wenn keine Sitzung protokolliert ist, werden keine Content Cards angezeigt.
Filtern Sie die Antworten von Ihrem konfigurierten Braze-Endpunkt (z. B. sdk.iad-01.braze.com), die die Kartendaten enthalten.
Der Antworttext enthält die Kartendaten, darunter:
```
"cards": [
{
"id": "",
"tt": "",
"ds": "",
"tp": "short_news",
"v": 0,
"cl": 0,
"p": 1
}
]
```
Schlüsselfelder:
- `v` (angesehen): `0` = nicht angesehen, `1` = angesehen
- `cl` (angeklickt): `0` = nicht angeklickt, `1` = angeklickt
- `p` (angeheftet): `0` = nicht angeheftet, `1` = angeheftet
- `tp` (Typ): `short_news`, `captioned_image`, `classic` usw.
```
Requesting content cards sync.
```
Gefolgt von einer POST-Anfrage an Ihren konfigurierten Braze-Endpunkt (z. B. sdk.iad-01.braze.com), die Nutzer:innen- und Geräteinformationen enthält.
### Impressionen, Klicks und Ablehnungen {#impressions-clicks-and-dismissals}
**Impression:**
```
Logged event:
- userId:
- sessionId:
- data: contentCardImpression(cardIds: [...])
```
**Klick:**
```
Logged event:
- userId:
- sessionId:
- data: contentCardClick(cardIds: [...])
```
Wenn die Karte eine URL enthält, sehen Sie außerdem:
```
Opening '':
- channel: contentCard
- useWebView: true
```
**Ablehnung:**
```
Logged event:
- userId:
- sessionId:
- data: contentCardDismissed(cardIds: [...])
```
Filtern Sie Anfragen an Ihren konfigurierten Braze-Endpunkt (z. B. sdk.iad-01.braze.com) und suchen Sie nach Ereignisnamen im Anfragetext:
- `cci` — Content-Card-Impression
- `ccc` — Content-Card-Klick
- `ccd` — Content Card abgelehnt
### Was zu überprüfen ist
- **Keine Karten angezeigt**: Überprüfen Sie, ob ein Sitzungsstart protokolliert wurde. Content Cards erfordern eine aktive Sitzung, um synchronisiert zu werden.
- **Fehlende Karten für neue Nutzer:innen**: Neue Nutzer:innen sehen möglicherweise bei ihrer ersten Sitzung keine Content Cards bis zur nächsten Sitzung. Dies ist das erwartete Verhalten.
- **Karte überschreitet die Größenbeschränkung**: Content Cards über 2 KB werden nicht angezeigt, und die Nachricht wird abgebrochen.
- **Karte bleibt nach Beendigung der Campaign bestehen**: Überprüfen Sie, ob die Synchronisierung nach Beendigung der Campaign abgeschlossen wurde. Content Cards werden nach einer erfolgreichen Synchronisierung vom Gerät entfernt. Stellen Sie beim Beenden einer Campaign sicher, dass die Option zum Entfernen aktiver Karten aus den Feeds der Nutzer:innen ausgewählt ist.
## Deeplinks {#deep-links}
Deeplink-Protokolle erscheinen in Push-Benachrichtigungen, In-App-Nachrichten und Content Cards. Die Protokollstruktur ist unabhängig vom Quellkanal konsistent.
Wenn das SDK einen Deeplink verarbeitet:
```
Opening '':
- channel:
- useWebView: false
- isUniversalLink: false
- extras: { ... }
```
Wobei `` eines der folgenden ist: `notification`, `inAppMessage` oder `contentCard`.
Für Deeplinks suchen Sie in Logcat nach den Einträgen **Deep Link Delegate** oder **UriAction**. Um die Deeplink-Auflösung unabhängig zu testen, führen Sie den folgenden Befehl aus:
```bash
adb shell am start -W -a android.intent.action.VIEW -d "" ""
```
Dies bestätigt, ob der Deeplink außerhalb des Braze SDK korrekt aufgelöst wird.
### Was zu überprüfen ist
- Überprüfen Sie, ob die Deeplink-URL mit der in der Campaign konfigurierten URL übereinstimmt.
- Falls der Deeplink über einen Kanal (z. B. Push) funktioniert, jedoch nicht über einen anderen (z. B. Content Cards), prüfen Sie, ob Ihre Deeplink-Implementierung alle Kanäle unterstützt.
- Unter iOS erfordern Universal Links eine zusätzliche Behandlung. Sollten Universal Links über Braze-Kanäle nicht funktionieren, überprüfen Sie, ob Ihre App das `BrazeDelegate`-Protokoll für die URL-Verarbeitung implementiert.
- Überprüfen Sie auf Android, ob die automatische Deeplink-Verarbeitung deaktiviert ist, falls Sie einen angepassten Handler verwenden. Andernfalls kann es zu Konflikten zwischen dem Standard-Handler und Ihrer Implementierung kommen.
## Nutzer:innen-Identifikation {#user-identification}
Wenn Nutzer:innen mit einer `external_id` identifiziert werden, protokolliert das SDK ein Ereignis zur Nutzer:innen-Änderung.
```
changeUser called with:
```
Wichtige Informationen:
- Rufen Sie `changeUser` auf, sobald sich Nutzer:innen anmelden – je früher, desto besser.
- Wenn sich Nutzer:innen abmelden, gibt es keine Möglichkeit, `changeUser` aufzurufen, um sie wieder in anonyme Nutzer:innen zurückzuversetzen.
- Wenn Sie keine anonymen Nutzer:innen wünschen, rufen Sie `changeUser` während des Sitzungsstarts oder beim App-Start auf.
Filtern Sie Anfragen an Ihren konfigurierten Braze-Endpunkt (z. B. sdk.iad-01.braze.com) und suchen Sie im Anfragetext nach der Nutzer:innen-Identifikation:
```
"user_id": ""
```
## Netzwerkanfragen {#network-requests}
Ausführliche Protokolle enthalten vollständige Details zu HTTP-Anfragen und -Antworten für die SDK-Kommunikation mit Braze-Servern. Diese sind hilfreich bei der Diagnose von Verbindungsproblemen.
### Anfragestruktur {#request-structure}
Filtern Sie Anfragen an Ihren konfigurierten Braze-Endpunkt (z. B. sdk.iad-01.braze.com). Die Anfragestruktur umfasst:
```
[http] request POST:
- Headers:
- Content-Type: application/json
- X-Braze-Api-Key:
- X-Braze-Req-Attempt: 1
- X-Braze-Req-Tokens-Remaining:
- Body: { ... }
```
```
Making request(id = ) to
```
### Was zu überprüfen ist
- **API-Schlüssel**: Überprüfen Sie, ob `X-Braze-Api-Key` mit dem API-Schlüssel Ihres Workspaces übereinstimmt.
- **Endpunkt**: Bestätigen Sie, dass die Anfrage-URL mit Ihrem konfigurierten SDK-Endpunkt übereinstimmt.
- **Wiederholungsversuche**: Ein `X-Braze-Req-Attempt`-Wert größer als 1 bedeutet, dass das SDK eine fehlgeschlagene Anfrage erneut versucht, was auf Verbindungsprobleme hindeuten kann.
- **Rate-Limiting**: `X-Braze-Req-Tokens-Remaining` zeigt die verbleibenden Anfrage-Token an. Ein niedriger Wert kann darauf hindeuten, dass das SDK die Rate-Limits erreicht.
- **Fehlende Anfragen**: Wenn Sie auf Android nach dem Sitzungsstart keine Anfrage an den Braze-Endpunkt sehen, überprüfen Sie Ihren API-Schlüssel und die Endpunkt-Konfiguration.
## Gängige Ereignisabkürzungen {#common-event-abbreviations}
In ausführlichen Protokollnutzlasten verwendet Braze abgekürzte Ereignisnamen. Hier ist eine Referenz:
| Abkürzung | Ereignis |
|---|---|
| `ss` | Sitzungsstart |
| `se` | Sitzungsende |
| `si` | In-App-Nachrichten-Impression |
| `sbc` | In-App-Nachrichten-Button-Klick |
| `cci` | Content-Card-Impression |
| `ccc` | Content-Card-Klick |
| `ccd` | Content Card abgelehnt |
| `lr` | Standort aufgezeichnet |
{: .reset-td-br-1 .reset-td-br-2 aria-label="Gängige Ereignisabkürzungen" }
## Fehlerbehebung {#troubleshooting}
### Wann kann ein Nutzerprofil 0 Sitzungen aufweisen? {#when-might-a-user-have-0-sessions-recorded-against-their-profile}
Ein Nutzerprofil kann 0 Sitzungen anzeigen, wenn Sie Nutzer:innen über die REST API ([`/users/track`](https://www.braze.com/docs/de/de/api/endpoints/user_data/post_user_track)) oder einen CSV-Import ohne die Felder **Erste Sitzung** oder **Letzte Sitzung** importieren. Sitzungen werden aufgezeichnet, wenn Nutzer:innen über das SDK mit Ihrer App interagieren. Weitere Details finden Sie unter [Nutzerprofil hat 0 Sitzungen](https://www.braze.com/docs/de/de/developer_guide/analytics/tracking_sessions#user-profile-has-0-sessions).
### Datendiskrepanzen bei gleichzeitiger Verwendung von SDK und REST API {#user-data-discrepancies-when-using-the-sdk-and-rest-api-together}
Wenn Sie das SDK und die REST API gleichzeitig verwenden, können Race-Conditions zu Datendiskrepanzen führen. Nachdem Sie `changeUser()` aufgerufen haben, lassen Sie das SDK ausstehende Daten senden, bevor Sie kritische REST-API-Aufrufe durchführen. Vermeiden Sie das Bündeln zeitkritischer Updates und erwägen Sie, eine kurze Verzögerung zwischen SDK- und API-Anfragen einzufügen. Informationen zum Verhalten von `changeUser()` finden Sie unter [Wie changeUser() funktioniert](https://www.braze.com/docs/de/de/developer_guide/analytics/setting_user_ids#how-changeuser-works).
### Daten erreichen Braze nicht {#data-not-reaching-braze}
Wenn Daten Braze nicht erreichen, bestätigen Sie, dass Ihre Firewall ausgehenden Datenverkehr zu Braze-API-Endpunkten und CDN-Anbietern zulässt. Führen Sie einen MTR-Test durch und verwenden Sie [Fastly Debug](https://www.fastly-debug.com/), während das Problem auftritt. Informationen zum Allowlisting und zur Fehlerbehebung bei Verbindungsproblemen finden Sie unter [API-Netzwerkverbindungsprobleme](https://www.braze.com/docs/de/de/api/network_connectivity_issues).
# Braze SDK-Rate-Limits
Source: /docs/de/developer_guide/sdk_integration/rate_limits/index.md
# Braze SDK-Rate-Limits {#braze-sdk-rate-limits}
> Erfahren Sie mehr über das intelligente, clientseitige Rate-Limiting des Braze SDK, das die Akkulaufzeit optimiert, die Bandbreitennutzung reduziert und eine zuverlässige Zustellung der Daten gewährleistet.
## SDK-Rate-Limits verstehen {#understanding-sdk-rate-limits}
Das Rate-Limiting des Braze SDK nutzt die folgenden Features, um die Performance zu optimieren, den Batterieverbrauch zu minimieren, die Datennutzung zu reduzieren und eine zuverlässige Zustellung der Daten zu gewährleisten:
### Asynchrone Verarbeitung {#asynchronous-processing}
Das Braze SDK verwendet einen Token-Bucket-Algorithmus für Rate-Limiting. Dieser Ansatz ermöglicht Aktivitätsschübe bei gleichzeitiger Aufrechterhaltung einer langfristigen Ratenkontrolle. Anstatt Anfragen in einer strengen Warteschlange zu verarbeiten, arbeitet der Token-Bucket asynchron:
- **Token-Generierung**: Die Token werden kontinuierlich in den Bucket nachgefüllt.
- **Bearbeitung von Anfragen**: Jeder SDK-Aufruf, der eingeht, wenn ein Token verfügbar ist, wird sofort ausgeführt – unabhängig davon, wann andere Aufrufe eingegangen sind.
- **Keine strenge Reihenfolge**: Anfragen warten nicht in einer Warteschlange; mehrere Aufrufe können um das nächste verfügbare Token konkurrieren.
- **Burst-Verarbeitung**: Kurze Aktivitätsausbrüche sind zulässig, sofern zum Zeitpunkt der Anfragen ausreichend Token verfügbar sind.
- **Ratenkontrolle**: Der langfristige Durchsatz wird durch die konstante Nachfüllrate der Token begrenzt.
Dieser asynchrone Ablauf unterstützt das SDK dabei, schnell auf die verfügbare Netzwerkkapazität zu reagieren und gleichzeitig ein vorhersehbares Gesamtverkehrsaufkommen aufrechtzuerhalten.
### Adaptives Rate-Limiting {#adaptive-rate-limiting}
Das Braze SDK kann Rate-Limits in Echtzeit anpassen, um die Netzwerk-Infrastruktur zu schützen und eine optimale Performance aufrechtzuerhalten. Dieser Ansatz:
- **Verhindert Überlastung**: Passt die Limits an, um Netzwerküberlastungen zu vermeiden.
- **Optimiert die Performance**: Gewährleistet einen reibungslosen Betrieb des SDK unter unterschiedlichen Bedingungen.
- **Reagiert auf Bedingungen**: Passt sich an das aktuelle Netzwerk und die Nutzungsmuster an.
**Note:**
Da sich die Limits in Echtzeit anpassen, werden keine genauen Bucket-Größen und statischen Werte angegeben. Diese können sich je nach Netzwerkbedingungen und Nutzung ändern.
### Netzwerkoptimierungen {#networking-optimizations}
Das Braze SDK enthält mehrere integrierte Funktionen zur Verbesserung der Effizienz, zur Reduzierung des Batterieverbrauchs und zur Bewältigung unterschiedlicher Netzwerkbedingungen:
- **Automatische Bündelung**: Stellt Ereignisse in eine Warteschlange und sendet sie in effizienten Stapeln.
- **Netzwerkbewusstes Verhalten**: Passt die Flush-Raten basierend auf der Verbindungsqualität an.
- **Batterieoptimierung**: Minimiert Funkaktivierungen und Netzwerkaufrufe.
- **Graceful Degradation**: Gewährleistet die Funktionalität auch bei schlechten Netzwerkbedingungen.
- **Hintergrund-/Vordergrund-Erkennung**: Optimiert das Verhalten, wenn sich der Lebenszyklus der App ändert.
## Best Practices {#best-practices}
Befolgen Sie diese Best Practices, um Probleme mit Rate-Limits zu vermeiden:
| Empfohlen | Nicht empfohlen |
| --- | --- |
| Verfolgen Sie relevante Nutzeraktionen und Meilensteine | Verfolgen Sie jede kleine Interaktion oder jedes UI-Ereignis |
| Aktualisieren Sie Inhalte nur bei Bedarf | Aktualisieren Sie Inhalte bei jeder Nutzeraktion (z. B. bei Scroll-Ereignissen) |
| Lassen Sie das SDK die Stapelverarbeitung automatisch durchführen | Erzwingen Sie eine sofortige Übertragung der Daten (sofern nicht unbedingt erforderlich) |
| Konzentrieren Sie sich auf Ereignisse, die einen Mehrwert für Analytics bieten | Rufen Sie SDK-Methoden in schneller Folge auf, ohne die Häufigkeit zu berücksichtigen |
{: .reset-td-br-1 .reset-td-br-2 aria-label="Best Practices" }
## Hilfe erhalten {#getting-help}
Sollten Sie Probleme mit den SDK-Rate-Limits haben, überprüfen Sie bitte die folgenden Netzwerkmethoden:
- `requestImmediateDataFlush()`
- `requestContentCardsRefresh()`
- `refreshFeatureFlags()`
- `logCustomEvent()`
- `logPurchase()`
Wenn Sie den [Braze Support](https://www.braze.com/docs/de/de/user_guide/administer/personal/braze_support) kontaktieren, geben Sie bitte die folgenden Details für jede der von Ihnen verwendeten Netzwerk-SDK-Methoden an:
```plaintext
Method name:
Frequency:
[Describe how often this is called, e.g., at every app launch, once per session]
Trigger/context:
[Describe what causes it to be called, e.g., button click, scroll event]
Code snippet:
[Paste the exact code where this method is called, one snippet for each time it is called]
Patterns in user flow that may cause bursts or excessive calls:
[Describe here]
```
# Braze in ChatGPT-Apps integrieren
Source: /docs/de/developer_guide/sdk_integration/chatgpt_apps/index.md
# Braze in ChatGPT-Apps integrieren {#integrate-braze-with-chatgpt-apps}
> Dieser Leitfaden beschreibt, wie Sie Braze in ChatGPT-Apps integrieren können, um Analytics und Ereignisprotokollierung in KI-gestützten Anwendungen zu ermöglichen.
{: style="float:right;max-width:30%;border:none;" }
## Übersicht {#overview}
ChatGPT-Apps bieten eine leistungsstarke Plattform für die Entwicklung von KI-basierten Konversationsanwendungen. Durch die Integration von Braze in Ihre ChatGPT-App können Sie auch im Zeitalter der KI weiterhin die Kontrolle über Ihre First-Party-Daten behalten, einschließlich der folgenden Aspekte:
- Verfolgen Sie das Engagement und das Verhalten der Nutzer:innen innerhalb Ihrer ChatGPT-App (z. B. indem Sie ermitteln, welche Fragen oder Chat-Features Ihre Kund:innen nutzen).
- Segmentieren und retargeten Sie Braze Campaigns auf der Grundlage von KI-Interaktionsmustern (z. B. indem Sie E-Mails an Nutzer:innen senden, die den Chat mehr als dreimal pro Woche genutzt haben).
### Wesentliche Vorteile {#key-benefits}
- **Übernehmen Sie die Verantwortung für die Customer Journey:** Während die Nutzer:innen über ChatGPT mit Ihrer Marke interagieren, behalten Sie Einblick in ihr Verhalten, ihre Präferenzen und ihr Engagement. Diese Daten werden direkt in die Braze-Nutzerprofile übertragen und nicht nur in die Analytics der KI-Plattform.
- **Plattformübergreifendes Retargeting:** Verfolgen Sie die Interaktionen der Nutzer:innen in Ihrer ChatGPT-App und sprechen Sie sie über Ihre Owned Channels (E-Mail, SMS, Push-Benachrichtigungen, In-App-Nachrichten) mit personalisierten Campaigns an, die auf ihren KI-Nutzungsmustern basieren.
- **Geben Sie 1:1-Aktionsinhalte an ChatGPT-Konversationen zurück:** Liefern Sie Braze [In-App-Nachrichten](https://www.braze.com/docs/de/de/user_guide/channels/in_app_messages), [Content Cards](https://www.braze.com/docs/de/de/user_guide/channels/content_cards) und mehr direkt innerhalb Ihrer ChatGPT-Erfahrung aus, indem Sie die angepassten Konversations-UI-Komponenten verwenden, die Ihr Team für Ihre App entwickelt hat.
- **Umsatz-Attribution:** Verfolgen Sie Käufe und Conversions, die aus Interaktionen mit der ChatGPT-App stammen.
## Voraussetzungen {#prerequisites}
Bevor Sie Braze in Ihre ChatGPT-App integrieren, müssen Sie über Folgendes verfügen:
- Eine neue Web-App und ein API-Schlüssel in Ihrem Braze-Workspace
- Eine [ChatGPT-App](https://openai.com/index/introducing-apps-in-chatgpt/), die auf der OpenAI-Plattform erstellt wurde ([OpenAI-Beispiel-App](https://github.com/openai/openai-apps-sdk-examples))
# ChatGPT app integration
## Setup
### Step 1: Get the Braze integration file
Copy the `braze.js` file from our [ChatGPT apps integration repository](https://github.com/braze-inc/chatgpt-apps-braze-integration/blob/main/src/braze/braze.ts) to your project. This file contains all the necessary Braze SDK configuration and helper functions.
### Step 2: Install dependencies
Install our Web SDK for Braze's most up-to-date set of features:
**For client-side integration:**
```bash
npm install @braze/web-sdk
```
## Implementation
There are two ways to integrate Braze with your ChatGPT app depending on your use case:
### Client-side integration (custom widgets)
**Tip:**
**Recommended Approach:** This method enables rich messaging experiences and real-time user interaction tracking within your ChatGPT app widgets.
For displaying Braze messaging and tracking user interactions within your custom ChatGPT app widgets, use the Web SDK integration. A full messaging example can be found in our sample repository [here](https://github.com/braze-inc/chatgpt-apps-braze-integration/tree/main/src/inbox).
#### Configure widget metadata
Add the following metadata to your MCP server file to allow Braze domains, ensuring to update the CDN domain based on [your region](https://www.braze.com/docs/de/de/developer_guide/platforms/web/content_security_policy):
```javascript
"openai/widgetCSP": {
connect_domains: ["https://YOUR-SDK-ENDPOINT"],
resource_domains: [
"https://appboy-images.com",
"https://braze-images.com",
"https://cdn.braze.eu",
"https://use.fontawesome.com"
],
}
```
Replace `YOUR-SDK-ENDPOINT` with your actual Braze SDK endpoint.
#### Set up the useBraze hook
```javascript
import { useBraze } from "./utils/braze";
function YourWidget() {
const braze = useBraze({
apiKey: "your-braze-api-key",
baseUrl: "your-braze-endpoint.braze.com",
});
useEffect(() => {
if (!braze.isInitialized) {
return;
}
// Set user identity
braze.changeUser("user-id-123");
// Log widget interactions
braze.logCustomEvent("viewed_pizzaz_list");
}, [braze.isInitialized]);
return (
// Your widget JSX
);
}
```
#### Display Braze Content Cards
```javascript
const [cards, setCards] = useState([]);
useEffect(() => {
// Get cached content cards
setCards(braze.getCachedContentCards()?.cards ?? []);
// Subscribe to content card updates
braze.subscribeToContentCardsUpdates((contentCards) => {
setCards(contentCards.cards);
});
// Open session
braze.openSession();
return () => {
braze.removeAllSubscriptions();
}
}, []);
```
#### Track widget events
```javascript
// Track user interactions within your widget
const handleButtonClick = () => {
braze.logCustomEvent("widget_button_clicked", {
button_type: "save_list",
widget_name: "pizza_list"
});
};
const handleItemInteraction = (itemId) => {
braze.logCustomEvent("item_interacted", {
item_id: itemId,
interaction_type: "view_details"
});
};
```
### Server-side integration (MCP server)
If you also need a server-side integration for messaging functionality on your MCP server, contact `mcp-product@braze.com`. For tracking events and purchases from your MCP server, use our [REST API](https://www.braze.com/docs/de/de/api/home).
# Über die Versionsverwaltung für das Braze SDK
Source: /docs/de/developer_guide/sdk_integration/version_management/index.md
# Über die Versionsverwaltung {#about-version-management}
> Erfahren Sie mehr über die Versionsverwaltung für das Braze SDK, damit Ihre App immer mit den neuesten Features und Qualitätsverbesserungen ausgestattet ist. Da ältere Versionen des SDK möglicherweise nicht die neuesten Patches, Bugfixes oder den neuesten Support erhalten, empfehlen wir Ihnen, Ihr SDK im Rahmen Ihres laufenden Entwicklungszyklus stets auf dem neuesten Stand zu halten.
## Empfehlungen zur Versionierung {#versioning-recommendations}
Alle Braze SDKs halten sich an die [Semantic Versioning Specification (SemVer)](https://semver.org/). Daher empfehlen wir bei einer Versionsnummer `MAJOR.MINOR.PATCH` Folgendes:
| Version | Über diese Version | Empfehlung |
|-------|------------------|--------------|
| `PATCH` | Updates sind immer abwärtskompatibel und enthalten wichtige Fehlerbehebungen. Sie sind immer sicher. | Sie sollten immer versuchen, sofort auf die neueste Patch-Version Ihrer aktuellen Haupt- und Nebenversion zu aktualisieren. |
| `MINOR` | Updates sind immer abwärtskompatibel und enthalten neue Funktionalität. Sie erfordern keine Änderungen am Code Ihrer Anwendung. | Sie müssen dies zwar nicht sofort tun, aber Sie sollten so bald wie möglich auf die neueste Nebenversion Ihrer aktuellen Hauptversion aktualisieren. |
| `MAJOR` | Updates enthalten grundlegende Änderungen, die möglicherweise Anpassungen an Ihrem Anwendungscode erfordern. | Da dies möglicherweise Code-Änderungen erfordert, aktualisieren Sie auf die neueste Hauptversion in einem Zeitrahmen, der für Ihr Team am besten geeignet ist. |
{: .reset-td-br-1 .reset-td-br-2 .reset-td-br-3 aria-label="Empfehlungen zur Versionierung" }
**Note:**
Manchmal erfordern neue Android- oder Apple-Betriebssystem-Updates Änderungen am Braze SDK. Um sicherzustellen, dass Ihre App mit neueren Geräten kompatibel bleibt, ist es wichtig, dass Sie Ihr SDK auf dem neuesten Stand halten.
## Benachrichtigungen über neue Releases erhalten {#getting-notified-of-new-releases}
Um automatische Benachrichtigungen zu erhalten, wenn eine neue SDK-Version veröffentlicht wird, können Sie das GitHub-Repository eines beliebigen Braze SDK beobachten:
1. Rufen Sie das GitHub-Repository des SDK auf (z. B. [braze-android-sdk](https://github.com/braze-inc/braze-android-sdk), [braze-swift-sdk](https://github.com/braze-inc/braze-swift-sdk) oder [braze-web-sdk](https://github.com/braze-inc/braze-web-sdk)).
2. Klicken Sie oben auf der Seite auf **Watch**.
3. Klicken Sie auf **Custom**, wählen Sie dann **Releases** aus und klicken Sie auf **Apply**.
Sie erhalten eine GitHub-Benachrichtigung (und je nach Ihren [Benachrichtigungseinstellungen](https://github.com/settings/notifications) auch eine E-Mail), sobald ein neues Release veröffentlicht wird. Die vollständige Liste der SDK-Repositories finden Sie unter [Referenzen, Repositories und Beispiel-Apps](https://www.braze.com/docs/de/de/developer_guide/references).
## Über bekannte Probleme {#about-known-issues}
Um sicherzustellen, dass unsere Änderungen Ihre Build-Pipelines nicht beeinträchtigen, **werden wir niemals ein Release ändern oder entfernen, nachdem es in einem Distributionssystem veröffentlicht wurde**—selbst wenn dieses bestimmte Release bekannte Probleme aufweist.
In diesen Fällen dokumentieren wir das Problem im [Changelog des Braze SDK](https://www.braze.com/docs/de/de/developer_guide/changelogs) und veröffentlichen dann so schnell wie möglich einen neuen Patch für die betroffenen Haupt- oder Nebenversionen.
# Android 13 Upgrade-Anleitung
Source: /docs/de/developer_guide/platforms/android/android_13/index.md
# Upgrading to Android 13
> This guide describes relevant changes introduced in Android 13 (2022) and the required upgrade steps for your Braze Android SDK integration.
Refer to the [Android 13 developer documentation](https://developer.android.com/about/versions/13) for a full migration guide.
## Android 13 Braze SDK
To prepare for Android 13, please upgrade your Braze SDK to the [latest version (v21.0.0+)](https://github.com/braze-inc/braze-android-sdk/blob/master/CHANGELOG.md#2300). Doing so will give you access to our new ["no-code" push primer feature](https://www.braze.com/docs/de/de/user_guide/message_building_by_channel/push/best_practices/push_primer_messages/).
## Changes in Android 13
### Push permission {#push-permission}
Android 13 introduces a [major change](https://developer.android.com/about/versions/13/changes/notification-permission) in how users manage apps that send push notifications. In Android 13, apps are required to obtain permission before push notifications can be shown.
{: style="float:right;max-width:430px;width:50%;margin-left:15px;border:0"}
This new permission follows a similar pattern to iOS and Web push, where you only have one attempt to obtain permission. If a user chooses `Don't Allow` or dismisses the prompt, your app cannot ask for permission again.
Note that apps are granted an [exemption](https://developer.android.com/about/versions/13/changes/notification-permission#eligibility) for users who previously had push notifications enabled prior to updating to Android 13. These users [will remain eligible](https://developer.android.com/about/versions/13/changes/notification-permission#existing-apps) to receive push when they update to Android 13 without having to request permission.
#### Permission prompt timing {#push-permission-timing}
**Targeting Android 13**
Apps targeting Android 13 can control when to request permission and show the native push prompt.
If your user upgrades from Android 12 to 13, your app was previously installed, and you were already sending push, the system automatically pre-grants the new notification permission to all eligible apps. In other words, these apps can continue to send notifications to users, and users don't see a runtime permission prompt.
For more details on this see Android's Developer Documentation for [effects on updates to existing apps](https://developer.android.com/about/versions/13/changes/notification-permission#existing-apps).
**Targeting Android 12 or earlier**
If your app does not yet target Android 13, then a new user on Android 13 installs your app, they will automatically see a push permission prompt when your app creates its first notification channel (via `notificationManager.createNotificationChannel`). Users who already have your app installed and then upgrade to Android 13 are never shown a prompt and are automatically granted push permission.
**Note:**
Braze SDK v23.0.0 automatically creates a default notification channel if one does not already exist when a push notification is received. If you don't target Android 13, this will cause the push permission prompt to be shown, which is required to show the notification.
## Preparing for Android 13 {#next-steps}
It is strongly recommended that your app targets Android 13 in order to control when users are prompted for push permission.
This will allow you to optimize your [push opt-in rates](https://www.braze.com/resources/articles/android-13-developer-preview-push-opt-ins-arrive-for-android-apps) by prompting users at more appropriate times and will lead to a better user experience in how and when your app asks for push permission.
To start using our new ["no-code" push primer feature](https://www.braze.com/docs/de/de/user_guide/message_building_by_channel/push/best_practices/push_primer_messages/), upgrade your Android SDK to the [latest version (v23.0.0+)](https://github.com/braze-inc/braze-android-sdk/blob/master/CHANGELOG.md#2300).
# Auf iOS 18 upgraden
Source: /docs/de/developer_guide/platforms/swift/ios_18/index.md
# Auf iOS 18 upgraden {#upgrading-to-ios-18}
> Sind Sie neugierig, wie Braze sich auf das kommende iOS-Release vorbereitet? Dieser Artikel fasst unsere Insights zum iOS 18 Release zusammen, um Ihnen und Ihren Nutzer:innen ein nahtloses Erlebnis zu ermöglichen.
Die [WWDC](https://developer.apple.com/wwdc24/) von Apple fand vom 9. bis 11. Juni 2024 statt. Erfahren Sie mehr über die Ankündigungen in unserem [Blogbeitrag](https://www.braze.com/resources/articles/wwdc-announcements-bring-apple-intelligence-rcs-and-more-to-ios-18) oder lesen Sie weiter, um zu erfahren, wie Sie iOS 18 mit Braze nutzen können.
## Änderungen in iOS 18 {#changes-in-ios-18}
### Live Activities auf der Apple Watch {#live-activities-on-apple-watch}
[Live Activities](https://www.braze.com/docs/de/de/developer_guide/push_notifications/live_notifications?sdktab=swift) werden von watchOS 11 unterstützt. Es ist keine zusätzliche Einrichtung erforderlich. Apple bietet jedoch die Möglichkeit, die Oberfläche der Uhr anzupassen.
### Apple Vision Pro
Die Vision Pro ist jetzt in China, Japan, Singapur, Australien, Kanada, Frankreich, Deutschland und Großbritannien erhältlich. Lesen Sie in unserem Blog, wie [Braze visionOS unterstützt](https://www.braze.com/resources/articles/building-braze-a-new-era-of-customer-engagement-braze-announces-visionos-support).
### iPhone-Benachrichtigungen unter macOS {#iphone-notifications-on-macos}
Apples neues Feature [zur iPhone-Spiegelung](https://www.apple.com/newsroom/2024/06/macos-sequoia-takes-productivity-and-intelligence-on-mac-to-new-heights/) erlaubt es Nutzer:innen, iPhone-Benachrichtigungen auf ihren macOS-Geräten zu empfangen. Beachten Sie, dass einige Medientypen wie Push Story-Bilder und GIFs nicht unterstützt werden, da sie nicht als macOS-Benachrichtigung dargestellt werden können.
### Apple Intelligence
[Apple Intelligence](https://developer.apple.com/documentation/Updates/Apple-Intelligence) ist jetzt für Geräte mit iOS 18.1 und höher verfügbar.
Als Nutzer:in von Braze sollten Sie vor allem das neue Feature [Benachrichtigungszusammenfassungen](https://support.apple.com/en-us/108781) kennen, das die Verarbeitung auf dem Gerät nutzt, um Push-Benachrichtigungen automatisch zu gruppieren und Textzusammenfassungen für zusammenhängende Push-Benachrichtigungen zu erstellen, die von einer einzelnen App gesendet wurden. Endnutzer:innen können auf eine Zusammenfassung tippen, um jede Push-Benachrichtigung so zu sehen, wie sie ursprünglich gesendet wurde.
Aufgrund der Art und Weise, wie diese Zusammenfassungen generiert werden, haben Sie keine Kontrolle über ihr spezifisches Verhalten oder den generierten Text. Dies hat jedoch keine Auswirkungen auf Analytics- oder Reporting-Features, wie z. B. das Push-Klick-Tracking.

# Visionos-Unterstützung
Source: /docs/de/developer_guide/platforms/swift/visionos/index.md
# visionOS-Unterstützung {#visionos-support}
> Ab [Braze Swift SDK 8.0.0](https://github.com/braze-inc/braze-swift-sdk/blob/main/CHANGELOG.md#800) können Sie Braze mit [visionOS](https://developer.apple.com/visionos/) nutzen, Apples Spatial-Computing-Plattform für den Apple Vision Pro. Ein Beispiel für eine visionOS-App, die Braze verwendet, finden Sie unter [Beispiel-Apps](https://www.braze.com/docs/de/de/developer_guide/references?tab=swift).
## Vollständig unterstützte Features {#fully-supported-features}
Die meisten Features, die unter iOS verfügbar sind, stehen auch unter visionOS zur Verfügung, darunter:
- Analytics (Sitzungen, angepasste Events, Käufe etc.)
- In-App Messaging (Datenmodelle und UI)
- Content Cards (Datenmodelle und UI)
- Push-Benachrichtigungen (für Nutzer:innen sichtbar mit Aktions-Buttons und stillen Benachrichtigungen)
- Feature-Flags
- Standort-Analytics
## Teilweise unterstützte Features {#partially-supported-features}
Einige Features werden von visionOS nur teilweise unterstützt, aber Apple wird diese wahrscheinlich in Zukunft adressieren:
- Rich-Push-Benachrichtigungen
- Bilder werden unterstützt.
- GIFs und Videos zeigen die Vorschau-Miniaturansicht an, können aber nicht abgespielt werden.
- Die Audiowiedergabe wird nicht unterstützt.
- Push Stories
- Das Blättern und Auswählen der Push-Story-Seite wird unterstützt.
- Das Navigieren zwischen Push-Story-Seiten mit **Next** wird nicht unterstützt.
## Nicht unterstützte Features {#unsupported-features}
- Geofence-Monitoring wird nicht unterstützt. Apple hat die Core-Location-APIs für die Regionsüberwachung unter visionOS nicht zur Verfügung gestellt.
- Live Activities werden nicht unterstützt. Derzeit ist ActivityKit nur auf iOS und iPadOS verfügbar.
# Upgrade-Leitfaden für das iOS 14-SDK
Source: /docs/de/developer_guide/platforms/swift/_archived_updates/ios_14/index.md
# Upgrade-Leitfaden für das iOS 14-SDK {#ios-14-sdk-upgrade-guide}
> Dieser Leitfaden beschreibt die für Braze relevanten Änderungen in iOS 14 sowie die erforderlichen Upgrade-Schritte für Ihre Braze iOS-SDK-Integration. Eine vollständige Liste der neuen iOS 14-Updates finden Sie auf Apples [iOS 14-Seite](https://www.apple.com/ios/ios-14/).
**Tip:**
Ab iOS 14.5 muss für die **IDFA**-Erfassung und für [bestimmte Datenfreigaben](https://developer.apple.com/app-store/user-privacy-and-data-use/#permission-to-track) eine Berechtigung über den neuen [AppTrackingTransparency](https://developer.apple.com/documentation/apptrackingtransparency)-Framework-Prompt eingeholt werden ([Mehr erfahren über IDFA](#idfa)).
## Zusammenfassung der wichtigsten Änderungen in iOS 14 {#summary-of-ios-14-breaking-changes}
- Apps für iOS 14 / Xcode 12 müssen unser [offizielles iOS 14-Release](https://github.com/Appboy/appboy-ios-sdk/releases/tag/3.27.0) verwenden.
- Für Nutzer:innen, die die neue Berechtigung _Ungefährer Standort_ auswählen, werden Geofences [nicht mehr von iOS unterstützt](https://developer.apple.com/documentation/corelocation/cllocationmanager/3600215-accuracyauthorization).
- Die Verwendung der Targeting-Features „Letzter bekannter Standort“ erfordert ein Upgrade auf Braze iOS SDK v3.26.1+, um Kompatibilität mit der Berechtigung _Ungefährer Standort_ herzustellen. Wenn Sie Xcode 12 verwenden, müssen Sie ein Upgrade auf mindestens v3.27.0 durchführen.
- Ab iOS 14.5 muss für die IDFA-Erfassung und für [bestimmte Datenfreigaben](https://developer.apple.com/app-store/user-privacy-and-data-use/#permission-to-track) eine Berechtigung über den neuen [AppTrackingTransparency](https://developer.apple.com/documentation/apptrackingtransparency)-Framework-Prompt eingeholt werden.
- Wenn Sie das Feld „Ad-Tracking aktiviert“ für das Campaign-Targeting oder für Analytics verwenden, müssen Sie auf Xcode 12 upgraden und das neue AppTrackingTransparency-Framework verwenden, um den Opt-in-Status Ihrer Nutzer:innen zu melden.
## Upgrade-Zusammenfassung {#upgrade-summary}
| Wenn Ihre App Folgendes verwendet: | Upgrade-Empfehlung | Beschreibung |
|------|--------|---|
| Xcode 12 | **Upgrade auf iOS SDK v3.27 oder höher** | Kund:innen, die Xcode 12 verwenden, müssen aus Kompatibilitätsgründen v3.27.0+ verwenden. Wenn Sie Probleme oder Fragen im Zusammenhang mit unserer iOS 14-Kompatibilität haben, öffnen Sie einen neuen [GitHub-Issue](https://github.com/Appboy/appboy-ios-sdk/issues). |
| Letzter Standort | **Upgrade auf iOS SDK v3.26.1 oder höher** | Wenn Sie das Targeting-Feature „Letzter Standort“ verwenden und noch Xcode 11 einsetzen, sollten Sie mindestens auf iOS SDK v3.26.1 upgraden, das das neue Feature _Ungefährer Standort_ unterstützt. Ältere SDKs sind nicht in der Lage, den Standort zuverlässig zu erfassen, wenn Nutzer:innen ein Upgrade auf iOS 14 durchführen _und_ „Ungefährer Standort“ auswählen.
Auch wenn Ihre App nicht auf iOS 14 abzielt, könnten Ihre Nutzer:innen ein Upgrade auf iOS 14 durchführen und die neue Option für die Standortgenauigkeit nutzen. Apps, die nicht auf iOS SDK v3.26.1+ aktualisiert werden, sind nicht in der Lage, Standortattribute zuverlässig zu erfassen, wenn Nutzer:innen ihren _ungefähren Standort_ auf iOS 14-Geräten angeben. |
| IDFA-Anzeigenverfolgungs-ID | **Upgrade auf Xcode 12 und iOS SDK v3.27 kann erforderlich sein** | 2021 hat Apple damit begonnen, einen Prompt zur Einholung einer Berechtigung für die IDFA-Erfassung zu verlangen. Das bedeutet, dass Apps auf Xcode 12 aktualisiert werden und das neue `AppTrackingTransparency`-Framework verwenden müssen, um weiterhin IDFA erfassen zu können. Für die Übermittlung von IDFA an das Braze SDK ist dann ebenfalls ein Upgrade auf v3.27.0+ erforderlich.
Apps, die die neuen iOS 14-APIs nicht verwenden, können keine IDFA erfassen. Sie erfassen stattdessen eine leere ID (`00000000-0000-0000-0000-000000000000`), nachdem Apple die Änderung 2021 durchgesetzt hat. Weitere Informationen darüber, ob dies auf Ihre App zutrifft, finden Sie unter [IDFA-Details](#idfa). |
{: .reset-td-br-1 .reset-td-br-2 .reset-td-br-3 aria-label="Upgrade-Zusammenfassung" }
## iOS 14-Verhaltensänderungen {#ios-14-behavior-changes}
### Berechtigung für den ungefähren Standort {#approximate-location-permission}
{: style="float:right;max-width:45%;margin-left:15px;"}
#### Übersicht {#overview}
Wenn eine Berechtigung zur Standortermittlung angefordert wird, können Nutzer:innen nun wählen, ob sie ihren _genauen Standort_ (bisheriges Verhalten) oder den neuen _ungefähren Standort_ angeben möchten. Der ungefähre Standort gibt einen größeren Radius zurück, in dem sich die Nutzer:innen befinden, anstelle ihrer genauen Koordinaten.
#### Geofences {#geofences}
Für Nutzer:innen, die die neue Berechtigung _Ungefährer Standort_ auswählen, werden Geofences [nicht mehr von iOS unterstützt](https://developer.apple.com/documentation/corelocation/cllocationmanager/3600215-accuracyauthorization). Für Ihre Braze-SDK-Integration sind zwar keine Updates erforderlich, aber Sie müssen möglicherweise Ihre [standortbasierte Marketingstrategie](https://www.braze.com/blog/geofencing-geo-targeting-beaconing-when-to-use/) für Campaigns anpassen, die auf Geofences basieren.
#### Standort-Targeting {#location-tracking}
Um weiterhin den _letzten bekannten Standort_ von Nutzer:innen zu erfassen, wenn die Berechtigung für den _ungefähren Standort_ erteilt wird, muss Ihre App mindestens auf v3.26.1 des Braze iOS SDK aktualisiert werden. Beachten Sie, dass die Ortung weniger präzise ist und nach unseren Tests bis zu 12.000 Meter (7+ Meilen) betragen hat. Wenn Sie die Targeting-Optionen für den _letzten bekannten Standort_ im Braze-Dashboard verwenden, sollten Sie den Radius des Standorts vergrößern, um neue _ungefähre Standorte_ zu berücksichtigen (wir empfehlen einen Radius von mindestens 1 Meile/1,6 km).
Apps, die das Braze iOS SDK nicht mindestens auf v3.26.1 aktualisieren, können das Standort-Tracking nicht mehr nutzen, wenn auf iOS 14-Geräten die Berechtigung für den _ungefähren Standort_ erteilt wird.
Nutzer:innen, die bereits Zugriff auf ihren Standort gewährt haben, können auch nach dem Upgrade weiterhin ihren _genauen Standort_ angeben.
Wenn Sie Xcode 12 verwenden, müssen Sie ein Upgrade auf mindestens v3.27.0 durchführen.
Weitere Informationen zum ungefähren Standort finden Sie in Apples WWDC-Video [What's New In Location](https://developer.apple.com/videos/play/wwdc2020/10660/).
### IDFA und App-Tracking-Transparenz {#idfa}
#### Übersicht
IDFA (Identifier for Advertisers) ist ein von Apple bereitgestellter Bezeichner zur Verwendung mit Werbe- und Attributionspartnern für geräteübergreifendes Tracking und ist an die Apple ID einer Person gebunden.
Ab iOS 14.5 muss ein neuer Prompt (eingeführt vom neuen `AppTrackingTransparency`-Framework) angezeigt werden, um die ausdrückliche Zustimmung der Nutzer:innen für IDFA einzuholen. Dieser Prompt, der um die Erlaubnis bittet, „Sie über Apps und Websites anderer Unternehmen zu verfolgen“, ist vergleichbar mit dem Prompt zur Standortermittlung.
Wenn Nutzer:innen dem Prompt nicht zustimmen oder wenn Sie nicht auf das `AppTrackingTransparency`-Framework von Xcode 12 aktualisieren, wird ein leerer IDFA-Wert (`00000000-0000-0000-0000-000000000000`) zurückgegeben und Ihre App darf die Nutzer:innen nicht erneut auffordern.
**Important:**
Diese IDFA-Updates werden wirksam, nachdem die Endnutzer:innen ihre Geräte auf iOS 14.5 aktualisiert haben. Stellen Sie sicher, dass Ihre App das neue `AppTransparencyFramework` mit Xcode 12 verwendet, wenn Sie IDFA erfassen möchten.
#### Änderungen an der Braze IDFA-Erfassung {#changes-to-braze-idfa-collection}
{: style="float:right;max-width:25%;margin-left:15px;border:0"}
1. Braze wird es Apps weiterhin ermöglichen, den IDFA-Wert von Nutzer:innen _an_ das Braze SDK zu übermitteln.
2. Das Kompilierungsmakro `ABK_ENABLE_IDFA_COLLECTION`, das eine optionale automatische IDFA-Erfassung bedingt kompilieren würde, funktioniert unter iOS 14 nicht mehr und wurde in 3.27.0 entfernt.
3. Wenn Sie das Feld „Ad-Tracking aktiviert“ für das Campaign-Targeting oder für Analytics verwenden, müssen Sie auf Xcode 12 upgraden und das neue AppTrackingTransparency-Framework verwenden, um den Opt-in-Status Ihrer Nutzer:innen zu melden. Der Grund für diese Änderung ist, dass in iOS 14 das alte Feld [`advertisingTrackingEnabled`](https://developer.apple.com/documentation/adsupport/asidentifiermanager/1614148-advertisingtrackingenabled) immer „Nein“ zurückgibt.
4. Wenn Ihre App IDFA oder IDFV als externe Braze-ID verwendet hat, empfehlen wir Ihnen dringend, diese Bezeichner zugunsten einer UUID aufzugeben. Weitere Informationen zur Migration externer IDs finden Sie unter [API-Endpunkte für die externe ID-Migration](https://www.braze.com/docs/de/de/api/endpoints/user_data/external_id_migration).
Lesen Sie mehr über Apples [Datenschutz-Updates](https://developer.apple.com/app-store/user-privacy-and-data-use/) und das neue [App-Tracking-Transparenz-Framework](https://developer.apple.com/documentation/apptrackingtransparency).
### Push-Autorisierung {#push-provisional-auth}
**Important:**
In iOS 14 sind keine Änderungen an der vorläufigen Push-Autorisierung enthalten. In einer früheren Beta-Version von iOS 14 führte Apple eine Änderung ein, die inzwischen wieder rückgängig gemacht wurde.
## Neue Funktionen in iOS 14 {#ios-14-new-features}
### App-Datenschutz und Datenerfassung im Überblick {#app-privacy}
Seit dem 8. Dezember 2020 sind für alle Einreichungen im App Store zusätzliche Schritte erforderlich, um die [neuen App-Datenschutzstandards von Apple](https://developer.apple.com/app-store/app-privacy-details/) einzuhalten.
#### Fragebogen im Apple Developer Portal {#apple-developer-portal-questionnaire}
Im _Apple Developer Portal_:
* Sie werden gebeten, einen Fragebogen auszufüllen, in dem Sie beschreiben, wie Ihre App oder Drittpartner Daten erfassen.
* Es wird erwartet, dass der Fragebogen immer auf dem neuesten Stand Ihrer letzten Veröffentlichung im App Store ist.
* Der Fragebogen kann auch ohne Einreichung einer neuen App aktualisiert werden.
* Sie müssen einen Link zur URL der Datenschutzrichtlinie Ihrer App einfügen.
Wenden Sie sich beim Ausfüllen Ihres Fragebogens an Ihr Rechtsteam und überlegen Sie, wie sich die Verwendung von Braze für die folgenden Felder auf Ihre Offenlegungspflichten auswirken könnte.
#### Braze Standard-Datenerfassung {#braze-default-data-collection}
**Bezeichner** – Eine anonyme Gerätekennung wird immer vom Braze SDK erfasst. Diese ist derzeit auf die Geräte-IDFV (Identifier for Vendors) eingestellt.
**Nutzungsdaten** – Dies kann Braze-Sitzungsdaten sowie jede Ereignis- oder Attributerfassung umfassen, die Sie zur Messung der Produktinteraktion verwenden.
#### Optionale Datenerfassung {#optional-data-collection}
Daten, die Sie möglicherweise durch Ihre Nutzung von Braze erfassen:
**Standort** – Das Braze SDK kann optional sowohl den ungefähren Standort als auch den genauen Standort erfassen. Diese Features sind standardmäßig deaktiviert.
**Kontaktinformationen** – Dies kann Ereignisse und Attribute im Zusammenhang mit der Identität der Nutzer:innen enthalten.
**Käufe** – Hierzu können Ereignisse und Käufe gehören, die im Namen der Nutzer:innen protokolliert wurden.
**Important:**
Beachten Sie, dass diese Liste nicht vollständig ist. Wenn Sie in Braze manuell weitere Informationen über Ihre Nutzer:innen erfassen, die auf andere Kategorien im App-Datenschutzfragebogen zutreffen, müssen Sie diese ebenfalls offenlegen.
Um mehr über diese Funktion zu erfahren, lesen Sie [Apples Datenschutz und Datennutzung](https://developer.apple.com/app-store/user-privacy-and-data-use/).
# Upgrade-Leitfaden für das iOS 15 SDK
Source: /docs/de/developer_guide/platforms/swift/_archived_updates/ios_15/index.md
# Upgrade-Leitfaden für das iOS 15 SDK {#ios-15-sdk-upgrade-guide}
> Dieser Leitfaden beschreibt die Änderungen, die mit iOS 15 (WWDC21) eingeführt wurden, und die erforderlichen Upgrade-Schritte für Ihre Braze iOS SDK-Integration. Eine vollständige Liste der neuen iOS 15 Updates finden Sie in den [iOS 15 Versionshinweisen](https://developer.apple.com/documentation/ios-ipados-release-notes/ios-ipados-15-release-notes) von Apple.
## Transparenzänderungen bei UI-Navigationen {#transparency-changes-to-ui-navigations}
Im Rahmen unserer jährlichen Tests von iOS-Betas haben wir eine von Apple vorgenommene Änderung festgestellt, die dazu führt, dass bestimmte UI-Navigationsleisten transparent statt undurchsichtig erscheinen. Dies wird unter iOS 15 sichtbar sein, wenn Sie die Braze Standard-UI für Content Cards verwenden oder wenn Web-Deeplinks innerhalb Ihrer App statt in einer separaten Browser-App geöffnet werden.
Um diese visuelle Veränderung in iOS 15 zu vermeiden, empfehlen wir Ihnen dringend, so schnell wie möglich auf das [Braze iOS SDK v4.3.2](https://github.com/Appboy/appboy-ios-sdk/releases/tag/4.3.2) zu upgraden, bevor Nutzer:innen ihr Telefon auf das neue Betriebssystem iOS 15 aktualisieren.
## Neue Benachrichtigungseinstellungen {#notification-settings}
Mit iOS 15 wurden neue Features für Benachrichtigungen eingeführt, die Nutzer:innen helfen, sich zu konzentrieren und häufige Unterbrechungen während des Tages zu vermeiden. Wir freuen uns, Unterstützung für diese neuen Features anbieten zu können. Diese Features erfordern keine zusätzlichen SDK-Upgrades und werden nur auf Nutzer:innen von iOS 15-Geräten angewendet.
### Fokus-Modi {#focus-mode}
Nutzer:innen von iOS 15 können jetzt „Fokus-Modi“ erstellen – angepasste Profile, mit denen sie festlegen, welche Benachrichtigungen ihren Fokus durchbrechen und prominent angezeigt werden sollen.
{: style="float:right;max-width:25%;margin-left:15px;border:0"}
### Unterbrechungsstufen {#interruption-levels}
In iOS 15 können Push-Benachrichtigungen mit einer von vier Unterbrechungsstufen gesendet werden:
* **Passiv** (neu) – Kein Ton, keine Vibration, kein Aufwachen des Bildschirms, kein Durchbrechen der Fokuseinstellungen.
* **Aktiv** (Standard) – Erlaubt Ton, Vibration, Aufwachen des Bildschirms, kein Durchbrechen der Fokuseinstellungen.
* **Zeitsensitiv** (neu) – Erlaubt Ton, Vibration, Aufwachen des Bildschirms, kann die Systemsteuerung durchbrechen, falls zulässig.
* **Kritisch** – Erlaubt Ton, Vibration, Aufwachen des Bildschirms, kann die Systemsteuerung durchbrechen und den Ruftonschalter umgehen.
Unter [iOS-Benachrichtigungsoptionen](https://www.braze.com/docs/de/de/user_guide/message_building_by_channel/push/ios/notification_options#interruption-level) erfahren Sie mehr darüber, wie Sie diese Option in iOS Push einstellen können.
### Zusammenfassung der Benachrichtigungen {#notification-summary}
{: style="float:right;max-width:25%;margin-left:15px;border:0"}
In iOS 15 können Nutzer:innen (optional) bestimmte Zeiten am Tag auswählen, um eine Zusammenfassung der Benachrichtigungen zu erhalten. Benachrichtigungen, die keine unmittelbare Aufmerksamkeit erfordern (z. B. wenn sie als „passiv“ gesendet werden oder während sich die Nutzer:innen im Fokusmodus befinden), werden gruppiert, um ständige Unterbrechungen während des Tages zu vermeiden.
Für jede Benachrichtigung, die Sie versenden, können Sie bald einen „Relevanzwert“ angeben, um zu steuern, welche Benachrichtigung oben in der Zusammenfassung erscheinen soll.
Unter [iOS-Benachrichtigungsoptionen](https://www.braze.com/docs/de/de/user_guide/message_building_by_channel/push/ios/notification_options#relevance-score) erfahren Sie mehr darüber, wie Sie den „Relevanzwert“ einer Benachrichtigung festlegen.
## Standort-Buttons {#location-buttons}
iOS 15 bietet Nutzer:innen eine neue, bequeme Möglichkeit, den Zugriff auf den Standort innerhalb einer App vorübergehend zu gewähren.
Der neue Standort-Button basiert auf der bestehenden Berechtigung „Einmalig zulassen“, ohne dass Nutzer:innen, die in der gleichen Sitzung mehrfach klicken, wiederholt aufgefordert werden.
Weitere Informationen finden Sie in Apples Video [Meet the Location Button](https://developer.apple.com/videos/play/wwdc2021/10102/) von der diesjährigen Worldwide Developer Conference (WWDC).
**Tip:**
Mit diesem Feature haben Sie eine zusätzliche Möglichkeit, Nutzer:innen um Erlaubnis zu fragen! Nutzer:innen, die bereits vor iOS 15 Standortberechtigungen abgelehnt haben, erhalten beim Klick auf den Standort-Button eine Aufforderung mit der Möglichkeit, die Berechtigung ein letztes Mal aus dem abgelehnten Zustand zurückzusetzen.
### Verwendung von Standort-Buttons mit Braze {#using-location-buttons-with-braze}
Für die Verwendung von Standort-Buttons mit Braze ist keine zusätzliche Integration erforderlich. Ihre App sollte den Standort der Nutzer:innen wie gewohnt weitergeben (sobald diese ihre Zustimmung erteilt haben).
Laut Apple wird für Nutzer:innen, die den Zugriff auf den Standort im Hintergrund bereits freigegeben haben, die Option „Während der Nutzung der App“ diese Berechtigung auch nach dem Upgrade auf iOS 15 weiterhin gewähren.
## Apple Mail {#mail}
In diesem Jahr hat Apple zahlreiche Updates in Bezug auf E-Mail-Tracking und Datenschutz angekündigt. Weitere Informationen finden Sie in unserem [Blogbeitrag](https://www.braze.com/resources/articles/9-ways-email-marketers-can-respond-to-apples-mail-privacy-protection-feature).
## Safari-IP-Adressstandort {#safari-ip-address-location}
In iOS 15 können Nutzer:innen Safari so konfigurieren, dass der anhand ihrer IP-Adressen ermittelte Standort anonymisiert oder verallgemeinert wird. Beachten Sie dies, wenn Sie standortbasiertes Targeting oder Segmentierung verwenden.
# Upgrade-Leitfaden für iOS 16
Source: /docs/de/developer_guide/platforms/swift/_archived_updates/ios_16/index.md
# Upgrade-Leitfaden für das iOS 16 SDK {#ios-16-sdk-upgrade-guide}
> Dieser Leitfaden beschreibt die relevanten Änderungen, die mit iOS 16 (2022) eingeführt wurden, und die Auswirkungen auf Ihre Braze iOS SDK-Integration. Eine vollständige Anleitung für die Migration finden Sie in den [iOS 16 Versionshinweisen](https://developer.apple.com/documentation/ios-ipados-release-notes/ios-ipados-16-release-notes).
## Änderungen in iOS 16 {#changes-in-ios-16}
### Safari Web-Push {#safari-web-push}
Apple hat zwei Änderungen an seiner Web-Push-Funktionalität angekündigt.
#### Desktop Web-Push (MacOS) {#macos-push}
Zuvor unterstützte Apple Push-Benachrichtigungen auf macOS (Desktop) über die eigenen Safari-Push-APIs.
Seit macOS Ventura (veröffentlicht am 24. Oktober 2022) [unterstützt Safari zusätzlich](https://webkit.org/blog/12824/news-from-wwdc-webkit-features-in-safari-16-beta/#web-push-for-macos) zu Safari-Push auch Web-Push-APIs. Dies ist ein bestehender browserübergreifender API-Standard, der in anderen gängigen Browsern verwendet wird.
Wenn Sie bereits Web-Push für Safari über Braze senden, ist keine Änderung erforderlich.
#### Mobiles Web-Push (iOS und iPadOS) {#ios-push}
Zuvor unterstützte Safari auf iPhone und iPad den Empfang von Push-Benachrichtigungen nicht.
Ab 2023 wird Apple Web-Push auf iPhones und iPads über Safari unterstützen.
Braze wird dieses neue iOS- und iPadOS-Web-Push unterstützen, ohne dass zusätzliche Änderungen oder Upgrades erforderlich sind.
## Vorbereitungen für iOS 16 {#next-steps}
Sie müssen das Braze iOS SDK nicht für iOS 16 upgraden, aber es gibt zwei weitere spannende Updates:
1. Braze hat ein [neues Swift SDK](https://github.com/braze-inc/braze-swift-sdk) veröffentlicht. Es bietet eine verbesserte Performance, neue Features und viele Verbesserungen.
2. Unser Braze Swift SDK unterstützt ein neues [„No-Code“-Push-Primer-Feature](https://www.braze.com/docs/de/de/user_guide/channels/push/best_practices/push_primer_messages)!
# Anleitung zum Upgrade für iOS 17
Source: /docs/de/developer_guide/platforms/swift/_archived_updates/ios_17/index.md
# Anleitung zum Upgrade für iOS 17 {#ios-17-upgrade-guide}
> Sind Sie neugierig, wie Braze sich auf das kommende iOS-Release vorbereitet? Dieser Artikel fasst unsere Insights zum iOS 17 Release zusammen, um Ihnen und Ihren Nutzer:innen ein nahtloses Erlebnis zu ermöglichen.
## Kompatibilität mit iOS 17 und Xcode 15 {#ios-17-and-xcode-15-compatibility}
Das Braze Swift SDK und das Objective-C SDK sind beide rückwärtskompatibel mit Xcode 14 und Xcode 15 sowie mit iOS 17-Geräten.
## Änderungen in iOS 17 {#changes-in-ios-17}
### Link-Tracking und UTM-Parameter-Stripping {#link-tracking-and-utm-parameter-stripping}
Eine der wichtigsten Änderungen in iOS 17 ist das Blockieren von UTM-Parametern in Safari. UTM-Parameter sind Code-Abschnitte, die zu URLs hinzugefügt werden. Sie werden häufig in Marketingkampagnen verwendet, um die Effektivität von E-Mail, SMS und anderen Messaging-Kanälen zu messen.
Diese Änderung wirkt sich nicht auf das Braze E-Mail-Klick-Tracking und SMS-Linkverkürzungen aus.
### App-Tracking-Transparenz {#app-tracking-transparency}
Apple kündigte an, den Anwendungsbereich von [Ad Tracking Transparency (ATT)](https://support.apple.com/en-us/HT212025) zu erweitern, mit dem Nutzer:innen kontrollieren können, ob eine App auf ihre Aktivitäten auf Apps und Websites anderer Unternehmen zugreifen kann. Das iOS 17 Release enthält zwei wichtige ATT-Features: Datenschutzmanifeste und Code Signing.
#### Datenschutzmanifeste {#privacy-manifests}
Apple verlangt jetzt eine Datenschutzmanifest-Datei, die den Grund für die Datenerfassung durch Ihre App und SDKs von Drittanbietern sowie deren Methoden zur Datenerfassung beschreibt. Ab iOS 17.2 blockiert Apple alle deklarierten Tracking-Endpunkte in Ihrer App, bis die Endnutzer:innen die ATT-Aufforderung akzeptieren.
Braze hat ein eigenes Datenschutzmanifest veröffentlicht, zusammen mit neuen flexiblen APIs, die deklarierte Tracking-Daten automatisch an spezielle `-tracking`-Endpunkte umleiten. Weitere Informationen finden Sie im [Datenschutzmanifest von Braze](https://www.braze.com/docs/de/de/developer_guide/analytics/managing_data_collection?sdktab=swift#swift_privacy-manifest).
#### Code Signing {#code-signing}
Code Signing erlaubt es Entwickler:innen, die ein SDK eines Drittanbieters in ihrer Anwendung verwenden, zu überprüfen, ob derselbe Entwickler bzw. dieselbe Entwicklerin es signiert hat wie frühere Versionen in Xcode.
### Braze SDK und Datenschutz {#braze-sdk-and-privacy}
Apple hat außerdem angekündigt, Ende 2023 eine Liste der SDKs von Drittanbietern zu veröffentlichen, die als „datenschutzrelevant“ gelten. Es wird erwartet, dass diese SDKs nach Einschätzung von Apple einen besonders großen Einfluss auf die Privatsphäre der Nutzer:innen haben.
Anders als herkömmliche Tracking-SDKs, die darauf ausgelegt sind, Nutzer:innen über mehrere Websites und Anwendungen hinweg zu überwachen, konzentriert sich das Braze SDK auf First-Party-Daten-Messaging und Nutzererlebnisse.
Wir gehen zwar nicht davon aus, dass das Braze SDK in diese Liste aufgenommen wird, aber wir werden die Situation genau beobachten und gegebenenfalls Updates veröffentlichen.
# Integration von Browser-Erweiterungen für das Internet
Source: /docs/de/developer_guide/platforms/web/browser_extensions/index.md
# Browser-Erweiterung {#browser-extension}
> Dieser Artikel beschreibt, wie Sie das Braze Web SDK innerhalb Ihrer Browser-Erweiterungen (Google Chrome, Firefox) verwenden können.
Integrieren Sie das Braze Web SDK in Ihre Browser-Erweiterung, um Analytics zu sammeln und Nutzer:innen umfangreiche Nachrichten anzuzeigen. Dazu gehören sowohl **Google Chrome-Erweiterungen** als auch **Firefox-Add-Ons**.
## Was wird unterstützt {#whats-supported}
Da es sich bei Erweiterungen um HTML und JavaScript handelt, können Sie Braze im Allgemeinen für Folgendes verwenden:
* **Analytics**: Erfassen Sie angepasste Events, Attribute und identifizieren Sie sogar wiederkehrende Nutzer:innen innerhalb Ihrer Erweiterung. Nutzen Sie diese Profileigenschaften, um kanalübergreifendes Messaging zu betreiben.
* **In-App-Nachrichten**: Triggern Sie In-App-Nachrichten, wenn Nutzer:innen innerhalb Ihrer Erweiterung eine Aktion ausführen, indem Sie unser natives oder angepasstes HTML-Messaging verwenden.
* **Content Cards**: Fügen Sie Ihrer Erweiterung einen Feed mit nativen Karten für Onboarding oder Aktionen hinzu.
* **Web-Push**: Senden Sie zeitnahe Benachrichtigungen, auch wenn Ihre Webseite gerade nicht geöffnet ist.
## Was nicht unterstützt wird {#whats-not-supported}
* Die Verwendung des Braze SDK innerhalb eines Service Workers wird nicht unterstützt. Sie können das Braze SDK jedoch weiterhin auf der Popup- oder Einstellungsseite Ihrer Erweiterung verwenden.
## Erweiterungstypen {#extension-types}
Braze kann in den folgenden Bereichen Ihrer Erweiterung eingesetzt werden:
| Bereich | Details | Was wird unterstützt |
|--------|-------|------|
| Popup-Seite | Die [Popup-Seite](https://developer.mozilla.org/en-US/docs/Mozilla/Add-ons/WebExtensions/user_interface/Popups) ist ein Dialog, der Nutzer:innen angezeigt werden kann, wenn sie auf das Symbol Ihrer Erweiterung in der Browser-Symbolleiste klicken. | Analytics, In-App-Nachrichten und Content Cards |
| Hintergrundskripte | [Hintergrundskripte](https://developer.chrome.com/extensions/background_pages) (nur Manifest v2) ermöglichen es Ihrer Erweiterung, die Navigation der Nutzer:innen zu inspizieren und mit ihr zu interagieren oder Webseiten zu verändern (z. B. wie Werbeblocker den Inhalt von Seiten erkennen und verändern). | Analytics, In-App-Nachrichten und Content Cards.
Hintergrundskripte sind für Nutzer:innen nicht sichtbar. Für Messaging müssten Sie also mit Browser-Tabs oder Ihrer Popup-Seite kommunizieren, wenn Sie Nachrichten anzeigen. |
| Optionsseiten | Auf der [Optionsseite](https://developer.mozilla.org/en-US/docs/Mozilla/Add-ons/WebExtensions/user_interface/Options_pages) können Ihre Nutzer:innen die Einstellungen Ihrer Erweiterung umschalten. Es handelt sich um eine eigenständige HTML-Seite, die einen neuen Tab öffnet. | Analytics, In-App-Nachrichten und Content Cards |
{: .reset-td-br-1 .reset-td-br-2, .reset-td-br-3 aria-label="Erweiterungstypen" }
## Berechtigungen {#permissions}
Für die Integration des Braze SDK (`braze.min.js`) als lokale Datei, die mit Ihrer Erweiterung gebündelt ist, sind in Ihrem `manifest.json` keine zusätzlichen Berechtigungen erforderlich.
Wenn Sie jedoch den [Google Tag Manager](https://www.braze.com/docs/de/de/developer_guide/platform_integration_guides/web/google_tag_manager/) verwenden, das Braze SDK von einer externen URL referenzieren oder eine strenge Content Security Policy für Ihre Erweiterung festgelegt haben, müssen Sie die [`content_security_policy`](https://developer.chrome.com/extensions/contentSecurityPolicy)-Einstellung in Ihrer `manifest.json` anpassen, um Remote-Skriptquellen zuzulassen.
## Erste Schritte {#getting-started}
**Tip:**
Bevor Sie beginnen, sollten Sie den [Leitfaden zur SDK-Ersteinrichtung](https://www.braze.com/docs/de/de/developer_guide/sdk_integration?sdktab=web) für das Web SDK lesen, um mehr über unsere JavaScript-Integration im Allgemeinen zu erfahren.
Vielleicht möchten Sie auch die [JavaScript SDK-Referenz](https://js.appboycdn.com/web-sdk/latest/doc/modules/braze.html) als Lesezeichen speichern, um alle Einzelheiten zu den verschiedenen SDK-Methoden und Konfigurationsoptionen nachzuschlagen.
Um das Braze Web SDK zu integrieren, müssen Sie zunächst eine Kopie der neuesten JavaScript-Bibliothek herunterladen. Dazu können Sie NPM verwenden oder sie direkt vom [Braze CDN](https://js.appboycdn.com/web-sdk/latest/braze.min.js) herunterladen.
Wenn Sie es vorziehen, den [Google Tag Manager](https://www.braze.com/docs/de/de/developer_guide/platform_integration_guides/web/google_tag_manager/) oder eine extern gehostete Kopie des Braze SDK zu verwenden, beachten Sie bitte, dass Sie für das Laden externer Ressourcen Ihre [`content_security_policy`](https://developer.chrome.com/extensions/contentSecurityPolicy)-Einstellung in Ihrem `manifest.json` anpassen müssen.
Kopieren Sie die Datei `braze.min.js` nach dem Download in das Verzeichnis Ihrer Erweiterung.
### Erweiterungs-Popups {#popup}
Um Braze zu einem Erweiterungs-Popup hinzuzufügen, referenzieren Sie die lokale JavaScript-Datei in Ihrer `popup.html`, wie Sie es bei einer normalen Website tun würden. Wenn Sie Google Tag Manager verwenden, können Sie Braze stattdessen mithilfe unserer [Google Tag Manager-Templates](https://www.braze.com/docs/de/de/developer_guide/platform_integration_guides/web/google_tag_manager/) hinzufügen.
```html
popup.html
```
### Hintergrundskript (nur Manifest v2) {#background-script}
Um Braze im Hintergrundskript Ihrer Erweiterung zu verwenden, fügen Sie die Braze-Bibliothek zu Ihrem `manifest.json` im Array `background.scripts` hinzu. Dadurch wird die globale Variable `braze` im Kontext Ihres Hintergrundskripts verfügbar.
```json
{
"manifest_version": 2,
"background": {
"scripts": [
"relative/path/to/braze.min.js",
"background.js"
]
}
}
```
### Optionsseite {#options-page}
Wenn Sie eine Optionsseite verwenden (über die Manifest-Eigenschaften `options` oder `options_ui`), können Sie Braze genauso einbinden wie in der [Anleitung zu `popup.html`](#popup).
## Initialisierung {#initialization}
Sobald das SDK eingebunden ist, können Sie die Bibliothek wie gewohnt initialisieren.
Da Cookies in Browser-Erweiterungen nicht unterstützt werden, können Sie Cookies deaktivieren, indem Sie mit `noCookies: true` initialisieren.
```javascript
braze.initialize("YOUR-API-KEY-HERE", {
baseUrl: "YOUR-API-ENDPOINT",
enableLogging: true,
noCookies: true
});
```
Weitere Informationen zu den unterstützten Initialisierungsoptionen finden Sie in der [Web SDK-Referenz](https://js.appboycdn.com/web-sdk/latest/doc/modules/braze.html#initialize).
## Push {#push}
Popup-Dialoge von Erweiterungen erlauben keine Push-Eingabeaufforderungen (sie haben keine URL-Leiste in der Navigation). Um sich innerhalb des Popup-Dialogs einer Erweiterung zu registrieren und Push-Berechtigungen anzufordern, müssen Sie eine alternative Domain-Lösung verwenden, wie unter [Alternative Push-Domain](https://www.braze.com/docs/de/de/developer_guide/platform_integration_guides/web/push_notifications/alternate_push_domain) beschrieben.
# Content-Security-Policy-Header für das Web
Source: /docs/de/developer_guide/platforms/web/content_security_policy/index.md
# Content-Security-Policy-Header {#content-security-policy-headers}
> Die Content-Security-Policy bietet zusätzliche Sicherheit, indem sie einschränkt, wie und wo Inhalte auf Ihrer Website geladen werden können. Dieser Referenzartikel beschreibt, welche Content-Security-Policy-Header beim Web SDK erforderlich sind.
**Important:**
Dieser Artikel richtet sich an Entwickler:innen, die an Websites arbeiten, die CSP-Regeln durchsetzen und mit Braze integriert sind. Er ist nicht als Ratschlag gedacht, wie Sie die Sicherheit angehen sollten.
**Note:**
This guide uses code samples from the Braze Web SDK 4.0.0+. To upgrade to the latest Web SDK version, see [SDK Upgrade Guide](https://github.com/braze-inc/braze-web-sdk/blob/master/UPGRADE_GUIDE.md).
## Nonce-Attribute {#nonce}
Wenn Sie in den Direktiven `script-src` oder `style-src` einen `nonce`-Wert verwenden, übergeben Sie diesen Wert an die Initialisierungsoption `contentSecurityNonce`, damit er an neu erstellte Skripte und Stile weitergegeben wird, die vom SDK generiert werden:
```javascript
import * as braze from "@braze/web-sdk";
braze.initialize(apiKey, {
baseUrl: baseUrl,
contentSecurityNonce: "YOUR-NONCE-HERE", // assumes a "nonce-YOUR-NONCE-HERE" CSP value
});
```
## Direktiven {#directives}
### `connect-src` {#connect-src}
**Warning:**
Ihre URL muss mit dem [API-SDK-Endpunkt](https://www.braze.com/docs/de/de/user_guide/administer/personal/sdk_endpoints) der von Ihnen gewählten `baseUrl`-Initialisierungsoption übereinstimmen.
| URL | Informationen |
|---|-----------|
| `connect-src https://sdk.iad-01.braze.com` | Ermöglicht dem SDK die Kommunikation mit Braze-APIs. Ändern Sie diese URL so, dass sie dem [API-SDK-Endpunkt](https://www.braze.com/docs/de/de/user_guide/administer/personal/sdk_endpoints) für die von Ihnen gewählte `baseUrl`-Initialisierungsoption entspricht. |
{: .reset-td-br-1 .reset-td-br-2 aria-label="connect-src" }
### `script-src` {#script-src}
| URL | Informationen |
|---|-----------|
| `script-src https://js.appboycdn.com` | Erforderlich, wenn Sie die im CDN gehostete Integration verwenden. |
| `script-src 'unsafe-eval'` | Erforderlich bei Verwendung des Integrations-Snippets, das einen Verweis auf `appboyQueue` enthält. Wenn Sie diese Direktive nicht verwenden möchten, [integrieren Sie das SDK stattdessen mit NPM](https://www.braze.com/docs/de/de/developer_guide/platform_integration_guides/web/initial_sdk_setup?tab=package%20manager). |
| `script-src 'nonce-...'` oder `script-src 'unsafe-inline'` | Erforderlich für bestimmte In-App-Nachrichten, wie z. B. angepasstes HTML. |
{: .reset-td-br-1 .reset-td-br-2 aria-label="script-src" }
### `img-src` {#img-src}
| URL | Informationen |
|---|-----------|
| `img-src: appboy-images.com braze-images.com cdn.braze.eu` | Erforderlich bei der Verwendung von Bildern, die im CDN von Braze gehostet werden. Die Hostnamen können je nach Dashboard-Cluster variieren.
**Wichtig:** Wenn Sie angepasste Schriftarten verwenden, müssen Sie auch `font-src` einbeziehen. |
{: .reset-td-br-1 .reset-td-br-2 aria-label="img-src" }
## Font Awesome {#font-awesome}
Um die automatische Einbindung von Font Awesome zu deaktivieren, verwenden Sie die Initialisierungsoption `doNotLoadFontAwesome`:
```javascript
import * as braze from "@braze/web-sdk";
braze.initialize(apiKey, {
baseUrl: baseUrl,
doNotLoadFontAwesome: true,
});
```
Wenn Sie Font Awesome verwenden möchten, sind die folgenden CSP-Direktiven erforderlich:
- `font-src https://use.fontawesome.com`
- `style-src https://use.fontawesome.com`
- `style-src 'nonce-...'` oder `style-src 'unsafe-inline'`
# Barrierefreiheit
Source: /docs/de/developer_guide/platforms/web/accessibility/index.md
# Barrierefreiheit {#accessibility}
> Dieser Artikel bietet eine Übersicht darüber, wie Braze die Barrierefreiheit innerhalb Ihrer Integration unterstützt.
Das Braze Web SDK unterstützt die Standards der [Web Content Accessibility Guidelines (WCAG 2.1)](https://www.w3.org/TR/WCAG21/). Wir halten bei allen unseren neuen Versionen einen [Lighthouse-Score von 100/100](https://developer.chrome.com/docs/lighthouse/accessibility/scoring) für Content Cards und In-App-Nachrichten ein, um unseren Standard für Barrierefreiheit aufrechtzuerhalten.
## Voraussetzungen {#prerequisites}
Die Mindest-SDK-Version, die WCAG 2.1 erfüllt, liegt nahe an v3.4.0. Wir empfehlen jedoch, auf mindestens Version 6.0.0 zu upgraden, um wichtige Fehlerbehebungen bei Bild-Tags zu erhalten.
### Wichtige Verbesserungen der Barrierefreiheit {#notable-accessibility-fixes}
| Version | Typ | Wichtige Änderungen |
|---------|------|-------------|
| **6.0.0** | **Major** | Bilder als ``-Tags, `imageAltText`- oder `language`-Felder, allgemeine Verbesserungen der Barrierefreiheit der UI |
| **3.5.0** | Geringfügig | Verbesserungen der Barrierefreiheit für scrollbaren Text |
| **3.4.0** | Behebung | Content Cards `article`-Rollenanpassung |
| **3.2.0** | Geringfügig | Mindestgröße von 45 x 45 Pixel für Touch-Ziele bei Buttons |
| **3.1.2** | Geringfügig | Standard-Alt-Text für Bilder |
| **2.4.1** | **Major** | Semantisches HTML (`h1` oder `button`), ARIA-Attribute, Tastaturnavigation, Fokusverwaltung |
| **2.0.5** | Geringfügig | Fokusverwaltung, Tastaturnavigation, Beschriftungen |
{: .reset-td-br-1, .reset-td-br-2 aria-label="Wichtige Verbesserungen der Barrierefreiheit" }
## Unterstützte Barrierefreiheitsfeatures {#supported-accessibility-features}
Wir unterstützen die folgenden Features für Content Cards und In-App-Nachrichten:
- ARIA-Rollen und -Labels
- Unterstützung der Tastaturnavigation
- Fokusverwaltung
- Screenreader-Ankündigungen
- Alt-Text-Unterstützung für Bilder
## Richtlinien zur Barrierefreiheit für SDK-Integrationen {#accessibility-guidelines-for-sdk-integrations}
Allgemeine Richtlinien zur Barrierefreiheit finden Sie unter [Barrierefreie Nachrichten in Braze erstellen](https://www.braze.com/docs/de/de/user_guide/messaging/messaging_fundamentals/accessibility). Dieser Leitfaden enthält Tipps und bewährte Verfahren für maximale Barrierefreiheit bei der Integration des Braze Web SDK in Ihre Webanwendung.
### Content Cards
#### Festlegen einer maximalen Höhe {#setting-a-maximum-height}
Um zu verhindern, dass Content Cards zu viel vertikalen Platz einnehmen, und um die Barrierefreiheit zu verbessern, können Sie eine maximale Höhe für den Feed-Container festlegen, wie in diesem Beispiel:
```css
/* Limit the height of the Content Cards feed */
.ab-feed {
max-height: 600px; /* Adjust to your needs */
overflow-y: auto;
}
/* For inline feeds (non-sidebar), you may want to limit individual cards */
.ab-card {
max-height: 400px; /* Optional: limit individual card height */
overflow: hidden;
}
```
#### Überlegungen zum Darstellungsbereich {#viewport-considerations}
Bei Content Cards, die inline angezeigt werden, sollten Sie die Einschränkungen des Darstellungsbereichs berücksichtigen, wie in diesem Beispiel dargestellt.
```css
/* Limit feed height on mobile to prevent covering too much screen */
@media (max-width: 768px) {
body > .ab-feed {
max-height: 80vh; /* Leave space for other content */
}
}
```
### In-App-Nachrichten {#in-app-messages}
**Warning:**
Fügen Sie keine wichtigen Informationen in Slide-up-In-App-Nachrichten ein, da diese für Screenreader nicht zugänglich sind.
### Überlegungen für Mobilgeräte {#mobile-considerations}
#### Responsives Design {#responsive-design}
Das SDK enthält responsive Haltepunkte. Stellen Sie sicher, dass Ihre Anpassungen auf allen Bildschirmgrößen funktionieren, wie in diesem Beispiel:
```css
/* Mobile-specific accessibility considerations */
@media (max-width: 768px) {
/* Ensure readable font sizes */
.ab-feed {
font-size: 14px; /* Minimum 14px for mobile readability */
}
/* Ensure sufficient touch targets */
.ab-card {
padding: 16px; /* Adequate padding for touch */
}
}
```
### Prüfung der Barrierefreiheit {#testing-accessibility}
#### Manuelle Test-Checkliste {#manual-test-checklist}
Überprüfen Sie die Barrierefreiheit manuell, indem Sie die folgenden Aufgaben ausführen:
- Navigieren Sie ausschließlich mit der Tastatur (Tab, Enter, Leertaste) durch Content Cards und In-App-Nachrichten.
- Testen Sie mit einem Screenreader (NVDA, JAWS, VoiceOver).
- Überprüfen Sie, ob alle Bilder über Alt-Text verfügen.
- Überprüfen Sie die Farbkontrastverhältnisse (verwenden Sie dazu Tools wie den WebAIM Contrast Checker).
- Testen Sie auf Mobilgeräten mit Touchscreen.
- Überprüfen Sie, ob die Fokusindikatoren sichtbar sind.
- Testen Sie das Fokus-Trapping bei modalen Nachrichten.
- Überprüfen Sie, ob alle interaktiven Elemente über eine Tastatur erreichbar sind.
### Häufige Probleme bei der Barrierefreiheit {#common-accessibility-issues}
Um häufige Probleme mit der Barrierefreiheit zu vermeiden, gehen Sie wie folgt vor:
1. **Fokusstile beibehalten:** Die Fokusindikatoren des SDK sind für Tastaturnutzer:innen von entscheidender Bedeutung.
2. **Verwenden Sie `display: none` nur für nicht-interaktive Elemente:** Verwenden Sie `visibility: hidden` oder `opacity: 0` zum Ausblenden interaktiver Elemente.
3. **Überschreiben Sie keine ARIA-Attribute:** Das SDK legt geeignete ARIA-Rollen und -Labels fest.
4. **Verwenden Sie `tabindex`-Attribute:** Diese steuern die Reihenfolge der Tastaturnavigation.
5. **Stellen Sie eine Bildlaufleiste bereit, wenn Sie `overflow: hidden` festlegen:** Stellen Sie sicher, dass scrollbare Inhalte weiterhin zugänglich sind.
6. **Greifen Sie nicht in die integrierten Tastatur-Handler ein:** Stellen Sie sicher, dass die vorhandene Tastaturnavigation ordnungsgemäß funktioniert.
# Smart-TV-Unterstützung für das Braze Web SDK
Source: /docs/de/developer_guide/platforms/web/smart_tvs/index.md
# Smart-TV-Unterstützung {#smart-tv-support}
> Mit dem Braze Web SDK können Sie Analytics erfassen und Smart-TV-Nutzer:innen reichhaltige In-App-Nachrichten und Content-Card-Nachrichten anzeigen, einschließlich [Samsung Tizen-TVs](https://developer.samsung.com/smarttv/develop/specifications/tv-model-groups.html) und [LG-TVs (webOS)](https://webostv.developer.lge.com/discover). Dieser Artikel beschreibt, wie Sie das Braze Web SDK für die Integration mit Smart-TVs verwenden.
**Tip:**
Eine vollständige technische Referenz finden Sie in unserer [JavaScript-Dokumentation](https://js.appboycdn.com/web-sdk/latest/doc/modules/braze.html) oder in unseren [Beispiel-Apps](https://github.com/Appboy/smart-tv-sample-apps), um das Web SDK auf einem Fernseher in Aktion zu sehen.
## Prerequisites
Before you can use this feature, you'll need to [integrate the Web Braze SDK](https://www.braze.com/docs/de/de/developer_guide/sdk_integration/?sdktab=web).
## Konfigurieren des Braze Web SDK {#configuring-the-web-braze-sdk}
Für die Integration mit Smart-TVs sind zwei Änderungen erforderlich:
1. Achten Sie beim Herunterladen oder Importieren des Web SDK darauf, dass Sie das „core“-Bundle verwenden (verfügbar unter `https://js.appboycdn.com/web-sdk/x.y/braze.core.min.js`, wobei `x.y` die gewünschte Version ist). Wir empfehlen die Verwendung der CDN-Version unseres Web SDK, da die NPM-Version in nativen ES-Modulen geschrieben ist, während die CDN-Version in ES5 transpiliert wird. Wenn Sie die [NPM-Version](https://www.npmjs.com/package/@braze/web-sdk) bevorzugen, stellen Sie sicher, dass Sie einen Bundler wie Webpack verwenden, der ungenutzten Code entfernt, und dass der Code in ES5 transpiliert wird.
2. Bei der Initialisierung des Web SDK müssen Sie die Initialisierungsoptionen `disablePushTokenMaintenance` und `manageServiceWorkerExternally` auf `true` setzen.
## Analytics {#analytics}
Alle Analytics-Methoden des Web SDK können auch bei Smart-TVs verwendet werden. Eine vollständige Anleitung zum Tracking von angepassten Events, angepassten Attributen und mehr finden Sie unter [Analytics](https://www.braze.com/docs/de/de/developer_guide/analytics/tracking_sessions?tab=web).
## In-App-Nachrichten und Content Cards {#in-app-messages-and-content-cards}
Das Braze Web SDK unterstützt sowohl [In-App-Nachrichten](https://www.braze.com/docs/de/de/developer_guide/in_app_messages?sdktab=web) als auch [Content Cards](https://www.braze.com/docs/de/de/developer_guide/content_cards?sdktab=web) auf Smart-TVs. Beachten Sie, dass Sie das [„Core“-Web-SDK](https://www.npmjs.com/package/@braze/web-sdk) verwenden müssen, da das Rendern von In-App-Nachrichten und Content Cards über unsere Standard-UI-Anzeige nicht unterstützt wird und stattdessen von Ihrer App angepasst werden sollte, um sich in das Erlebnis Ihrer TV-App einzufügen.
Weitere Informationen darüber, wie Ihre Smart-TV-App In-App-Nachrichten empfangen und anzeigen kann, finden Sie unter [Triggern von Nachrichten](https://www.braze.com/docs/de/de/developer_guide/in_app_messages/triggering_messages?tab=web).
# TV- und OTT-Integrationen für Braze
Source: /docs/de/developer_guide/platforms/tv_and_ott/index.md
# TV- und OTT-Integrationen {#tv-and-ott-integrations}
> So wie sich die Technologie mit neuen Plattformen und Geräten weiterentwickelt, kann auch Ihr Messaging mit Braze mitwachsen! Braze bietet verschiedene Engagement-Kanäle für eine Reihe von TV-Betriebssystemen und Over-the-Top (OTT)-Methoden zur Inhaltsbereitstellung.
## Plattformen und Features {#platforms-and-features}
Im Folgenden finden Sie eine Liste der Features und Messaging-Kanäle, die heute unterstützt werden.
Plattformen und Features
Gerätetyp
Daten und Analytics
In-App-Nachrichten
Content Cards
Push-Benachrichtigungen
Canvas
Feature-Flags
Banner
Amazon Fire TV
Kindle Fire
Android TV
LG TV (webOS)
N/A
Samsung Tizen TV
N/A
Roku
N/A
Apple TV OS
Apple Vision Pro
- = Unterstützt
- = Teilweise Unterstützung
- = Nicht von Braze unterstützt
- N/A = Nicht von der OTT-Plattform unterstützt
## Integrationsleitfäden {#integration-guides}
### Amazon Fire TV {#fire-tv}
Verwenden Sie das Braze Fire OS SDK zur Integration mit Amazon Fire TV-Geräten.
Zu den Features zählen:
- Datenerfassung und Analytics für kanalübergreifendes Engagement
- Push-Benachrichtigungen (bekannt als [„Heads Up Notifications“](https://developer.amazon.com/docs/fire-tv/notifications.html#headsup))
- Die Priorität muss auf „HIGH“ gesetzt sein, damit diese angezeigt werden. Alle Benachrichtigungen erscheinen im Fire TV-Einstellungsmenü.
- Content Cards
- Feature-Flags
- In-App-Nachrichten
- Um HTML-Nachrichten auf Nicht-Touch-Geräten wie TV-Geräten anzuzeigen, setzen Sie `com.braze.configuration.BrazeConfig.Builder.setIsTouchModeRequiredForHtmlInAppMessages` auf `false` (verfügbar ab [Android SDK v23.1.0](https://github.com/braze-inc/braze-android-sdk/blob/master/CHANGELOG.md#2310))
- Banner
- Verwenden Sie [Banner-Platzierungen](https://www.braze.com/docs/de/de/developer_guide/banners/placements), um Nachrichten direkt in Ihre Fire TV-App einzubetten.
Weitere Informationen finden Sie in der [Anleitung zur Fire OS-Integration](https://www.braze.com/docs/de/de/developer_guide/sdk_integration?sdktab=android).
### Kindle Fire {#kindle-fire}
Verwenden Sie das Braze Fire OS SDK für die Integration mit Amazon Kindle Fire-Geräten.
Zu den Features zählen:
- Datenerfassung und Analytics für kanalübergreifendes Engagement
- Push-Benachrichtigungen
- Content Cards
- Feature-Flags
- In-App-Nachrichten
- Banner
- Verwenden Sie [Banner-Platzierungen](https://www.braze.com/docs/de/de/developer_guide/banners/placements), um Nachrichten direkt in Ihr Kindle Fire einzubetten.
Weitere Informationen finden Sie in der [Anleitung zur Fire OS-Integration](https://www.braze.com/docs/de/de/developer_guide/sdk_integration?sdktab=android).
### Android TV {#android-tv}
Verwenden Sie das Braze Android SDK zur Integration mit Android TV-Geräten.
Zu den Features zählen:
- Datenerfassung und Analytics für kanalübergreifendes Engagement
- Content Cards
- Feature-Flags
- In-App-Nachrichten
- Um HTML-Nachrichten auf Nicht-Touch-Geräten wie TV-Geräten anzuzeigen, setzen Sie `com.braze.configuration.BrazeConfig.Builder.setIsTouchModeRequiredForHtmlInAppMessages` auf `false` (verfügbar ab [Android SDK v23.1.0](https://github.com/braze-inc/braze-android-sdk/blob/master/CHANGELOG.md#2310))
- * Push-Benachrichtigungen (manuelle Integration erforderlich)
- Push-Benachrichtigungen werden auf Android TV nicht nativ unterstützt. Warum, erfahren Sie in den [Design-Richtlinien](https://designguidelines.withgoogle.com/android-tv/patterns/notifications.html) von Google. Sie können jedoch **eine manuelle Integration der Push-Benachrichtigungs-UI vornehmen, um dies zu erreichen**. Lesen Sie in unserer [Dokumentation](https://www.braze.com/docs/de/de/developer_guide/push_notifications?sdktab=android%20tv) nach, wie Sie dies einrichten können.
- Banner
- Verwenden Sie [Banner-Platzierungen](https://www.braze.com/docs/de/de/developer_guide/banners/placements), um Nachrichten direkt in Ihre Android TV-App einzubetten.
Weitere Informationen finden Sie in der [Anleitung zur Android SDK-Integration](https://www.braze.com/docs/de/de/developer_guide/sdk_integration?sdktab=android).
**Note:**
Stellen Sie sicher, dass Sie im Dashboard eine neue Android-App für Ihre Android-OTT-Integration erstellen.
### LG webOS {#lg-webos}
Verwenden Sie das Braze Web SDK für die Integration mit [LG webOS-Fernsehern](https://webostv.developer.lge.com/discover).
Zu den Features zählen:
- Datenerfassung und Analytics für kanalübergreifendes Engagement
- Content Cards (über [Headless UI](#custom-ui))
- Feature-Flags
- In-App-Nachrichten (über [Headless UI](#custom-ui))
- Banner
- Verwenden Sie [Banner-Platzierungen](https://www.braze.com/docs/de/de/developer_guide/banners/placements), um Nachrichten direkt in Ihre webOS-App einzubetten.
Weitere Informationen finden Sie in der [Anleitung zur Smart-TV-Integration](https://www.braze.com/docs/de/de/developer_guide/platforms/web/smart_tvs).
### Samsung Tizen {#tizen}
Verwenden Sie das Braze Web SDK zur Integration mit [Samsung Tizen-Fernsehern](https://developer.samsung.com/smarttv/develop/specifications/tv-model-groups.html).
Zu den Features zählen:
- Datenerfassung und Analytics für kanalübergreifendes Engagement
- Content Cards (über [Headless UI](#custom-ui))
- Feature-Flags
- In-App-Nachrichten (über [Headless UI](#custom-ui))
- Banner
- Verwenden Sie [Banner-Platzierungen](https://www.braze.com/docs/de/de/developer_guide/banners/placements), um Nachrichten direkt in Ihre Tizen-App einzubetten.
Weitere Informationen finden Sie in der [Anleitung zur Smart-TV-Integration](https://www.braze.com/docs/de/de/developer_guide/platforms/web/smart_tvs).
### Roku {#roku}
Verwenden Sie das Braze Roku SDK zur Integration mit [Roku-Fernsehern](https://developer.roku.com/docs/developer-program/getting-started/roku-dev-prog.md).
Zu den Features zählen:
- Datenerfassung und Analytics für kanalübergreifendes Engagement
- In-App-Nachrichten (über [Headless UI](#custom-ui))
- Webviews werden von der Roku-Plattform nicht unterstützt, daher werden In-App-Nachrichten im HTML-Format nicht unterstützt.
- Feature-Flags
Weitere Informationen finden Sie in der [Anleitung zur Roku-Integration](https://www.braze.com/docs/de/de/developer_guide/in_app_messages?sdktab=roku).
### Apple TV OS {#tvos}
Verwenden Sie das Braze Swift SDK für die Integration mit tvOS. Beachten Sie, dass das Swift SDK keine Standard-UI oder -Ansichten für tvOS enthält, sodass Sie eigene implementieren müssen.
Zu den Features zählen:
- Datenerfassung und Analytics für kanalübergreifendes Engagement
- Content Cards (über [Headless UI](#custom-ui))
- Feature-Flags
- In-App-Nachrichten (über [Headless UI](#custom-ui))
- Webviews werden von der tvOS-Plattform nicht unterstützt, daher werden In-App-Nachrichten im HTML-Format nicht unterstützt.
- Sehen Sie sich unsere [Beispiel-App](https://github.com/braze-inc/braze-swift-sdk/tree/main/Examples#inappmessages-custom-ui) an, um mehr darüber zu erfahren, wie Sie eine Headless UI für angepasstes Messaging unter tvOS verwenden können.
- Stille Push-Benachrichtigungen und Badge-Aktualisierungen
- Banner
- Verwenden Sie [Banner-Platzierungen](https://www.braze.com/docs/de/de/developer_guide/banners/placements), um Nachrichten direkt in Ihre tvOS-App einzubetten.
Weitere Informationen finden Sie in der [Anleitung zur iOS Swift SDK-Integration](https://github.com/braze-inc/braze-swift-sdk).
**Note:**
Um zu vermeiden, dass mobile In-App-Nachrichten Ihren TV-Nutzer:innen angezeigt werden, sollten Sie entweder [App-Targeting](#app-targeting) einrichten oder Schlüssel-Wert-Paare verwenden, um Nachrichten herauszufiltern. Zum Beispiel können tvOS-Nachrichten nur dann angezeigt werden, wenn sie ein spezielles Schlüssel-Wert-Paar `tv = true` enthalten.
### Apple Vision Pro {#vision-pro}
Verwenden Sie das Braze Swift SDK für die Integration mit visionOS. Die meisten Features, die unter iOS verfügbar sind, stehen auch unter visionOS zur Verfügung, darunter:
- Analytics (Sitzungen, angepasste Events, Käufe usw.)
- In-App Messaging (Datenmodelle und UI)
- Content Cards (Datenmodelle und UI)
- Push-Benachrichtigungen (für Nutzer:innen sichtbar mit Aktions-Buttons und stillen Benachrichtigungen)
- Feature-Flags
- Standort-Analytics
- Banner
- Verwenden Sie [Banner-Platzierungen](https://www.braze.com/docs/de/de/developer_guide/banners/placements), um Nachrichten direkt in Ihre visionOS-App einzubetten.
Weitere Informationen finden Sie in der [Anleitung zur iOS Swift SDK-Integration](https://github.com/braze-inc/braze-swift-sdk).
**Important:**
Einige iOS-Features werden nur teilweise oder gar nicht unterstützt. Die vollständige Liste finden Sie unter [visionOS-Unterstützung](https://www.braze.com/docs/de/de/developer_guide/platform_integration_guides/swift/visionos).
## App-Targeting {#app-targeting}
Für das Targeting von OTT-Apps für Messaging empfehlen wir die Erstellung eines Segments speziell für Ihre OTT-App.

## Headless UI {#custom-ui}
**Important:**
Plattformen, die In-App-Nachrichten oder Content Cards über eine Headless UI unterstützen, enthalten **keine** Standard-UI oder -Ansichten. Erstellen Sie Ihre eigene angepasste Benutzeroberfläche (z. B. für In-App-Nachrichten) und verwenden Sie anschließend die vom SDK bereitgestellten Datenmodelle, um diese Benutzeroberflächen zu befüllen.
Mit Headless UI stellt Braze ein Datenmodell bereit, z. B. JSON, das Ihre App lesen und innerhalb einer UI verwenden kann, die Ihre App steuert. Diese Daten enthalten die im Dashboard konfigurierten Felder (Titel, Textkörper, Button-Text, Farben usw.), die Ihre App lesen und entsprechend anzeigen kann. Weitere Informationen zum angepassten Handling von Nachrichten finden Sie unter:
**Android SDK**
- [In-App-Nachrichten anpassen](https://www.braze.com/docs/de/de/developer_guide/in_app_messages/customization?sdktab=android#android_setting-custom-manager-listeners)
- [Content-Cards-Anpassung](https://www.braze.com/docs/de/de/developer_guide/content_cards/customizing_cards/style)
**Swift SDK**
- [In-App-Nachrichten anpassen](https://braze-inc.github.io/braze-swift-sdk/documentation/brazekit/brazeinappmessagepresenter/)
- [Beispiel-App für Headless UI](https://github.com/braze-inc/braze-swift-sdk/tree/main/Examples#inappmessages-custom-ui)
- [Content-Cards-Anpassung](https://braze-inc.github.io/braze-swift-sdk/documentation/brazekit/braze/contentcards-swift.class/)
**Web SDK**
- [In-App-Nachrichten anpassen](https://www.braze.com/docs/de/de/developer_guide/in_app_messages/triggering_messages?tab=web)
- [Content-Cards-Anpassung](https://www.braze.com/docs/de/de/developer_guide/content_cards/customizing_cards/style)
# Integrationsübersicht für iOS
Source: /docs/de/developer_guide/platforms/legacy_sdks/ios/initial_sdk_setup/overview/index.md
**Warning:**
[AppboyKit](https://github.com/Appboy/appboy-ios-sdk) (also known as the Objective-C SDK) is no longer supported and has been replaced by the [Swift SDK](https://www.braze.com/docs/de/de/developer_guide/sdk_integration/?sdktab=swift). It will no longer receive new features, bug fixes, security updates, or technical support—however, messaging and analytics will continue to function as normal. To learn more, see [Introducing the New Braze Swift SDK](https://www.braze.com/resources/articles/introducing-the-new-braze-swift-sdk).
Durch die Installation des Braze iOS SDK erhalten Sie grundlegende Analytics-Funktionen (Sitzungsverarbeitung) sowie grundlegende In-App-Nachrichten. Für zusätzliche Kanäle und Features müssen Sie die Integration weiter anpassen.
Das Braze iOS SDK kann mit CocoaPods, Carthage, dem Swift-Paketmanager oder einer manuellen Integration installiert oder aktualisiert werden.
Außerdem bietet das Braze iOS SDK vollständige Unterstützung für RubyMotion-Apps.
**Important:**
Zusätzlich zu einer APP-Datei fügt das iOS SDK der IPA-Datei der App 1 MB bis 2 MB hinzu. Für das Framework kommen weitere 30 MB hinzu.
Nachdem Sie die Integration mit einer der aufgelisteten Optionen durchgeführt, die Schritte zur [Fertigstellung der Integration](https://www.braze.com/docs/de/de/developer_guide/platforms/legacy_sdks/ios/initial_sdk_setup/completing_integration) befolgt und andere SDK-Anpassungen aktiviert haben (optional), fahren Sie mit der Integration, Aktivierung und Anpassung weiterer Kanäle und Funktionen fort, um sie an die Anforderungen Ihrer zukünftigen Campaigns anzupassen.
# Carthage-Integration für iOS
Source: /docs/de/developer_guide/platforms/legacy_sdks/ios/initial_sdk_setup/installation_methods/carthage_integration/index.md
**Warning:**
[AppboyKit](https://github.com/Appboy/appboy-ios-sdk) (also known as the Objective-C SDK) is no longer supported and has been replaced by the [Swift SDK](https://www.braze.com/docs/de/de/developer_guide/sdk_integration/?sdktab=swift). It will no longer receive new features, bug fixes, security updates, or technical support—however, messaging and analytics will continue to function as normal. To learn more, see [Introducing the New Braze Swift SDK](https://www.braze.com/resources/articles/introducing-the-new-braze-swift-sdk).
# Carthage-Integration {#carthage-integration}
## SDK importieren {#import-the-sdk}
Ab Version `4.4.0` unterstützt das Braze SDK bei der Integration über Carthage XCFrameworks. Um das vollständige SDK zu importieren, fügen Sie diese Zeilen in Ihre `Cartfile` ein:
```
binary "https://raw.githubusercontent.com/Appboy/appboy-ios-sdk/master/appboy_ios_sdk.json"
github "SDWebImage/SDWebImage"
```
Ziehen Sie für weitere Anweisungen zum Importieren des SDK die [Schnellstartanleitung für Carthage](https://github.com/Carthage/Carthage#quick-start) zurate.
Wenn Sie von einer Version vor `4.4.0` migrieren, folgen Sie dem [Carthage-Migrationsleitfaden für XCFrameworks](https://github.com/Carthage/Carthage#migrating-a-project-from-framework-bundles-to-xcframeworks).
**Note:**
Weitere Informationen zur Syntax der `Cartfile` oder zu Features wie dem Version-Pinning finden Sie in der [Carthage-Dokumentation](https://github.com/Carthage/Carthage/blob/master/Documentation/Artifacts.md#cartfile).
Informationen zur plattformspezifischen Verwendung von Carthage entnehmen Sie bitte dem [Nutzer:innenhandbuch](https://github.com/Carthage/Carthage#if-youre-building-for-ios-tvos-or-watchos).
### Frühere Versionen {#previous-versions}
Fügen Sie für die Versionen `3.24.0` bis `4.3.4` Folgendes in Ihre `Cartfile` ein:
```
binary "https://raw.githubusercontent.com/Appboy/appboy-ios-sdk/master/appboy_ios_sdk_full.json"
```
Um Versionen vor `3.24.0` zu importieren, fügen Sie Folgendes in Ihre `Cartfile` ein:
```
github "Appboy/Appboy-iOS-SDK" ""
```
Stellen Sie sicher, dass Sie `` durch die [entsprechende Version](https://github.com/Appboy/appboy-ios-sdk/releases) des Braze iOS SDK im Format „x.y.z“ ersetzen.
## Nächste Schritte {#next-steps}
Folgen Sie den Anweisungen, um [die Integration abzuschließen](https://www.braze.com/docs/de/de/developer_guide/platforms/legacy_sdks/ios/initial_sdk_setup/completing_integration).
## Nur-Core-Integration {#core-only-integration}
Wenn Sie das Core SDK ohne UI-Komponenten oder Abhängigkeiten verwenden möchten, installieren Sie die Core-Version des Braze Carthage Frameworks, indem Sie die folgende Zeile in Ihre `Cartfile` einfügen:
```
binary "https://raw.githubusercontent.com/Appboy/appboy-ios-sdk/master/appboy_ios_sdk_core.json"
```
# CocoaPods-Integration für iOS
Source: /docs/de/developer_guide/platforms/legacy_sdks/ios/initial_sdk_setup/installation_methods/cocoapods/index.md
**Warning:**
[AppboyKit](https://github.com/Appboy/appboy-ios-sdk) (also known as the Objective-C SDK) is no longer supported and has been replaced by the [Swift SDK](https://www.braze.com/docs/de/de/developer_guide/sdk_integration/?sdktab=swift). It will no longer receive new features, bug fixes, security updates, or technical support—however, messaging and analytics will continue to function as normal. To learn more, see [Introducing the New Braze Swift SDK](https://www.braze.com/resources/articles/introducing-the-new-braze-swift-sdk).
# CocoaPods-Integration {#cocoapods-integration}
## 1. Schritt: CocoaPods installieren {#step-1-install-cocoapods}
Die Installation des iOS SDK über [CocoaPods](http://cocoapods.org/) automatisiert den Großteil des Installationsprozesses für Sie. Bevor Sie mit diesem Vorgang beginnen, sollten Sie sicherstellen, dass Sie [Ruby Version 2.0.0](https://www.ruby-lang.org/en/installation/) oder höher verwenden. Für die Installation dieses SDK sind keine Kenntnisse der Ruby-Syntax erforderlich.
Führen Sie als Erstes folgenden Befehl aus:
```bash
$ sudo gem install cocoapods
```
Wenn Sie Probleme mit CocoaPods haben, lesen Sie bitte die [Anleitung zur Fehlerbehebung](http://guides.cocoapods.org/using/troubleshooting.html) für CocoaPods.
**Note:**
Wenn Sie aufgefordert werden, die ausführbare Datei `rake` zu überschreiben, finden Sie weitere Informationen in der Anleitung [„Erste Schritte“](http://guides.cocoapods.org/using/getting-started.html) auf CocoaPods.org.
## 2. Schritt: Erstellen des Podfile {#step-2-constructing-the-podfile}
Nachdem Sie den CocoaPods Ruby Gem installiert haben, müssen Sie in Ihrem Xcode-Projektverzeichnis eine Datei namens `Podfile` erstellen.
Fügen Sie die folgende Zeile in Ihr Podfile ein:
```
target 'YourAppTarget' do
pod 'Appboy-iOS-SDK'
end
```
Wir empfehlen Ihnen, Braze so zu versionieren, dass Pod-Updates automatisch alles erfassen, was kleiner als ein Minor-Versionsupdate ist. Dies sieht folgendermaßen aus: `pod 'Appboy-iOS-SDK' ~> Major.Minor.Build`. Wenn Sie die neueste Version des Braze SDK auch bei größeren Änderungen automatisch integrieren möchten, können Sie `pod 'Appboy-iOS-SDK'` in Ihrem Podfile verwenden.
### Subspecs {#subspecs}
Wir empfehlen Integratoren, unser vollständiges SDK zu importieren. Wenn Sie jedoch sicher sind, dass Sie nur ein bestimmtes Feature von Braze integrieren möchten, können Sie anstelle des vollständigen SDK nur die gewünschte UI-Subspec importieren.
| Subspec | Details |
| ------- | ------- |
| `pod 'Appboy-iOS-SDK/InAppMessage'` | Die Subspec `InAppMessage` enthält die In-App-Nachrichten-UI von Braze und das Core SDK. |
| `pod 'Appboy-iOS-SDK/ContentCards'` | Die Subspec `ContentCards` enthält die Content-Card-UI von Braze und das Core SDK. |
| `pod 'Appboy-iOS-SDK/NewsFeed'` | Die Subspec `NewsFeed` enthält das Braze Core SDK. |
| `pod 'Appboy-iOS-SDK/Core'` | Die Subspec `Core` enthält Unterstützung für Analytics, wie angepasste Events und Attribute. |
{: .ws-td-nw-1 aria-label="Subspecs" }
## 3. Schritt: Installieren des Braze SDK {#step-3-installing-the-braze-sdk}
Um die Braze SDK CocoaPods zu installieren, navigieren Sie in Ihrem Terminal zum Verzeichnis Ihres Xcode-App-Projekts und führen den folgenden Befehl aus:
```
pod install
```
Jetzt sollten Sie den von CocoaPods erstellten neuen Xcode-Projektarbeitsbereich öffnen können. Stellen Sie sicher, dass Sie diesen Xcode-Workspace anstelle Ihres Xcode-Projekts verwenden.

## Nächste Schritte {#next-steps}
Folgen Sie den Anweisungen, um [die Integration abzuschließen](https://www.braze.com/docs/de/de/developer_guide/platforms/legacy_sdks/ios/initial_sdk_setup/completing_integration).
## Aktualisieren des Braze SDK über CocoaPods {#updating-the-braze-sdk-via-cocoapods}
Um einen CocoaPod zu aktualisieren, führen Sie einfach den folgenden Befehl in Ihrem Projektverzeichnis aus:
```
pod update
```
# Swift-Paketmanager-Integration für iOS
Source: /docs/de/developer_guide/platforms/legacy_sdks/ios/initial_sdk_setup/installation_methods/swift_package_manager/index.md
**Warning:**
[AppboyKit](https://github.com/Appboy/appboy-ios-sdk) (also known as the Objective-C SDK) is no longer supported and has been replaced by the [Swift SDK](https://www.braze.com/docs/de/de/developer_guide/sdk_integration/?sdktab=swift). It will no longer receive new features, bug fixes, security updates, or technical support—however, messaging and analytics will continue to function as normal. To learn more, see [Introducing the New Braze Swift SDK](https://www.braze.com/resources/articles/introducing-the-new-braze-swift-sdk).
# Integration des Swift-Paketmanagers {#swift-package-manager-integration}
Die Installation des iOS SDK über den [Swift-Paketmanager](https://swift.org/package-manager/) (SPM) automatisiert den Großteil des Installationsprozesses für Sie. Bevor Sie mit diesem Vorgang beginnen, stellen Sie sicher, dass Sie Xcode 12 oder höher verwenden.
**Note:**
tvOS ist derzeit nicht über den Swift-Paketmanager verfügbar.
## Schritt 1: Hinzufügen der Abhängigkeit zu Ihrem Projekt {#step-1-adding-the-dependency-to-your-project}
### SDK-Version importieren {#import-sdk-version}
Öffnen Sie Ihr Projekt und navigieren Sie zu den Einstellungen Ihres Projekts. Wählen Sie den Tab **Swift Packages** und klicken Sie auf die Schaltfläche unterhalb der Paketliste.

Wenn Sie SDK-Version `3.33.1` oder höher importieren, geben Sie die URL unseres iOS-SDK-Repository (`https://github.com/braze-inc/braze-ios-sdk`) in das Textfeld ein und klicken Sie auf **Next**.
Für die Versionen `3.29.0` bis `3.32.0` verwenden Sie die URL `https://github.com/Appboy/Appboy-ios-sdk`.

Wählen Sie auf dem nächsten Bildschirm die SDK-Version aus und klicken Sie auf **Next**. Die Versionen `3.29.0` und höher sind mit dem Swift-Paketmanager kompatibel.

### Pakete auswählen {#select-packages}
Wählen Sie das Paket, das Ihren Anforderungen am besten entspricht, und klicken Sie auf **Finish**. Stellen Sie sicher, dass Sie entweder `AppboyKit` oder `AppboyUI` auswählen. Die Einbeziehung beider Pakete kann zu unerwünschtem Verhalten führen:
- `AppboyUI`
- Am besten geeignet, wenn Sie die von Braze bereitgestellten UI-Komponenten verwenden möchten.
- Enthält `AppboyKit` automatisch.
- `AppboyKit`
- Am besten geeignet, wenn Sie keine der von Braze bereitgestellten UI-Komponenten (z. B. Content Cards, In-App-Nachrichten usw.) verwenden müssen.
- `AppboyPushStory`
- Fügen Sie dieses Paket hinzu, wenn Sie Push Stories in Ihre App integriert haben. Dies wird ab der Version `3.31.0` unterstützt.
- Wählen Sie in der Dropdown-Liste unter `Add to Target` das Ziel für `ContentExtension` anstelle des Ziels Ihrer Hauptanwendung aus.

## Schritt 2: Ihr Projekt konfigurieren {#step-2-configuring-your-project}
Navigieren Sie als Nächstes zu den **Build-Einstellungen** Ihres Projekts und fügen Sie das `-ObjC`-Flag zur Einstellung **Other Linker Flags** hinzu. Dieses Flag muss hinzugefügt und eventuelle [Fehler](https://developer.apple.com/library/archive/qa/qa1490/_index.html) müssen behoben werden, um das SDK weiter integrieren zu können.

**Note:**
Wenn Sie das Flag `-ObjC` nicht hinzufügen, können Teile der API fehlen und das Verhalten ist nicht definiert. Es kann zu unerwarteten Fehlern (z. B. „unrecognized selector sent to class“), Abstürzen der Anwendung und anderen Problemen kommen.
## Schritt 3: Schema des Ziels bearbeiten {#step-3-editing-the-targets-scheme}
**Important:**
Wenn Sie Xcode 12.5 oder eine neuere Version verwenden, überspringen Sie diesen Schritt.
Wenn Sie Xcode 12.4 oder eine ältere Version verwenden, bearbeiten Sie das Schema des Ziels, das das Appboy-Paket enthält (Menüpunkt **Product > Scheme > Edit Scheme**):
1. Erweitern Sie das Menü **Build** und wählen Sie **Post-actions**. Drücken Sie auf das Pluszeichen (+) und wählen Sie **New Run Script Action**.
2. Wählen Sie in der Dropdown-Liste **Provide build settings from** das Ziel Ihrer App aus.
3. Kopieren Sie dieses Skript in das offene Feld:
```sh
# iOS
bash "$BUILT_PRODUCTS_DIR/Appboy_iOS_SDK_AppboyKit.bundle/Appboy.bundle/appboy-spm-cleanup.sh"
# macOS (if applicable)
bash "$BUILT_PRODUCTS_DIR/Appboy_iOS_SDK_AppboyKit.bundle/Contents/Resources/Appboy.bundle/appboy-spm-cleanup.sh"
```

## Nächste Schritte {#next-steps}
Folgen Sie den Anweisungen, um [die Integration abzuschließen](https://www.braze.com/docs/de/de/developer_guide/platforms/legacy_sdks/ios/initial_sdk_setup/completing_integration).
# Manuelle Integrationsmöglichkeiten für iOS
Source: /docs/de/developer_guide/platforms/legacy_sdks/ios/initial_sdk_setup/installation_methods/manual_integration_options/index.md
**Warning:**
[AppboyKit](https://github.com/Appboy/appboy-ios-sdk) (also known as the Objective-C SDK) is no longer supported and has been replaced by the [Swift SDK](https://www.braze.com/docs/de/de/developer_guide/sdk_integration/?sdktab=swift). It will no longer receive new features, bug fixes, security updates, or technical support—however, messaging and analytics will continue to function as normal. To learn more, see [Introducing the New Braze Swift SDK](https://www.braze.com/resources/articles/introducing-the-new-braze-swift-sdk).
# Manuelle Integration {#manual-integration}
**Tip:**
Wir empfehlen Ihnen dringend, das SDK über einen Paketmanager wie [Swift-Paketmanager](../swift_package_manager/), [CocoaPods](../cocoapods/) oder [Carthage](../carthage_integration/) zu implementieren. Damit sparen Sie viel Zeit und können einen Großteil des Prozesses automatisieren. Wenn Sie dazu jedoch nicht in der Lage sind, können Sie die Integration auch manuell vornehmen, indem Sie die Anweisungen befolgen.
## 1. Schritt: Herunterladen des Braze SDK {#step-1-downloading-the-braze-sdk}
### Option 1: Dynamisches XCFramework {#option-1-dynamic-xcframework}
1. Laden Sie `Appboy_iOS_SDK.xcframework.zip` von der [Release-Seite](https://github.com/appboy/appboy-ios-sdk/releases) herunter und extrahieren Sie die Datei.
2. Ziehen Sie dieses `.xcframework` in Xcode per Drag-and-Drop in Ihr Projekt.
3. Wählen Sie auf dem Tab **Allgemein** des Projekts **Embed & Sign** für `Appboy_iOS_SDK.xcframework` aus.
### Option 2: Statisches XCFramework für statische Integration {#option-2-static-xcframework-for-static-integration}
1. Laden Sie `Appboy_iOS_SDK.zip` von der [Release-Seite](https://github.com/appboy/appboy-ios-sdk/releases) herunter.
2. Wählen Sie in Xcode im Projektnavigator das Zielprojekt oder die Zielgruppe für Braze aus.
3. Navigieren Sie zu **File > Add Files > Project_Name**.
4. Fügen Sie die Ordner `AppboyKit` und `AppboyUI` als Gruppe zu Ihrem Projekt hinzu.
- Vergewissern Sie sich, dass die Option **Copy items into destination group's folder** ausgewählt ist, wenn Sie die Integration zum ersten Mal vornehmen. Erweitern Sie **Options** in der Dateiauswahl und wählen Sie **Copy items if needed** und **Create groups**.
- Löschen Sie die Verzeichnisse `AppboyKit/include` und `AppboyUI/include`.
5. (Optional) Wenn einer der folgenden Punkte auf Sie zutrifft:
- Sie möchten nur die wichtigsten Analytics-Features des SDK nutzen und keine UI-Features (z. B. In-App-Nachrichten oder Content Cards).
- Sie verfügen über ein angepasstes UI für Braze-UI-Features und kümmern sich selbst um das Herunterladen von Bildern.
Sie können die Kernversion des SDK verwenden, indem Sie die Dateien `ABKSDWebImageProxy.m` und `Appboy.bundle` entfernen. Dadurch werden die Abhängigkeit vom `SDWebImage`-Framework und alle UI-bezogenen Ressourcen (z. B. Nib-Dateien, Bilder, Lokalisierungsdateien) aus dem SDK entfernt.
**Warning:**
Wenn Sie versuchen, die Kernversion des SDK ohne Braze-UI-Features zu verwenden, werden In-App-Nachrichten nicht angezeigt. Der Versuch, die Braze Content-Cards-UI mit der Kernversion anzuzeigen, führt zu unvorhersehbarem Verhalten.
## 2. Schritt: Hinzufügen der erforderlichen iOS-Bibliotheken {#step-2-adding-required-ios-libraries}
1. Klicken Sie auf das Target für Ihr Projekt (über die Navigation auf der linken Seite) und wählen Sie den Tab **Build Phases**.
2. Klicken Sie auf den Button unter **Link Binary With Libraries**.
3. Wählen Sie im Menü `SystemConfiguration.framework` aus.
4. Markieren Sie diese Bibliothek als erforderlich, indem Sie das Pulldown-Menü neben `SystemConfiguration.framework` verwenden.
5. Wiederholen Sie den Vorgang, um jedes der folgenden erforderlichen Frameworks zu Ihrem Projekt hinzuzufügen, und markieren Sie jedes als „erforderlich“.
- `QuartzCore.framework`
- `libz.tbd`
- `CoreImage.framework`
- `CoreText.framework`
- `WebKit.framework`
6. Fügen Sie die folgenden Frameworks hinzu und markieren Sie sie als optional:
- `CoreTelephony.framework`
7. Wählen Sie den Tab **Build Settings**. Suchen Sie im Abschnitt **Linking** die Einstellung **Other Linker Flags** und fügen Sie das Flag `-ObjC` hinzu.
8. Das Framework `SDWebImage` wird benötigt, damit Content Cards und In-App-Nachrichten richtig funktionieren. `SDWebImage` wird für das Herunterladen und Anzeigen von Bildern, einschließlich GIFs, verwendet. Wenn Sie Content Cards oder In-App-Nachrichten verwenden möchten, folgen Sie den Schritten zur Integration von SDWebImage.
### SDWebImage-Integration {#sdwebimage-integration}
Um `SDWebImage` zu installieren, folgen Sie den [Anweisungen](https://github.com/SDWebImage/SDWebImage/wiki/Installation-Guide#build-sdwebimage-as-xcframework) des Herstellers und ziehen Sie das resultierende `XCFramework` per Drag-and-Drop in Ihr Projekt.
### Optionales Standort-Tracking {#optional-location-tracking}
1. Fügen Sie das `CoreLocation.framework` hinzu, um das Standort-Tracking zu aktivieren.
2. Sie müssen den Standort für Ihre Nutzer:innen über `CLLocationManager` in Ihrer App autorisieren.
## 3. Schritt: Objective-C-Bridging-Header {#step-3-objective-c-bridging-header}
**Note:**
Wenn Ihr Projekt nur Objective-C verwendet, überspringen Sie diesen Schritt.
Wenn Ihr Projekt Swift verwendet, benötigen Sie eine Bridging-Header-Datei.
Wenn Sie keine Bridging-Header-Datei haben, erstellen Sie eine und nennen Sie sie `your-product-module-name-Bridging-Header.h`, indem Sie **File > New > File > (iOS oder OS X) > Source > Header File** wählen. Fügen Sie dann die folgende Code-Zeile an den Anfang Ihrer Bridging-Header-Datei hinzu:
```
#import "AppboyKit.h"
```
Fügen Sie in den **Build Settings** Ihres Projekts den relativen Pfad Ihrer Header-Datei zur Build-Einstellung `Objective-C Bridging Header` unter `Swift Compiler - Code Generation` hinzu.
## Nächste Schritte {#next-steps}
Folgen Sie den Anweisungen, um [die Integration abzuschließen](https://www.braze.com/docs/de/de/developer_guide/platforms/legacy_sdks/ios/initial_sdk_setup/completing_integration).
# Führen Sie die iOS SDK-Integration durch
Source: /docs/de/developer_guide/platforms/legacy_sdks/ios/initial_sdk_setup/completing_integration/index.md
**Warning:**
[AppboyKit](https://github.com/Appboy/appboy-ios-sdk) (also known as the Objective-C SDK) is no longer supported and has been replaced by the [Swift SDK](https://www.braze.com/docs/de/de/developer_guide/sdk_integration/?sdktab=swift). It will no longer receive new features, bug fixes, security updates, or technical support—however, messaging and analytics will continue to function as normal. To learn more, see [Introducing the New Braze Swift SDK](https://www.braze.com/resources/articles/introducing-the-new-braze-swift-sdk).
# Die Integration abschließen {#complete-the-integration}
Bevor Sie diese Schritte ausführen, vergewissern Sie sich bitte, dass das SDK mit [Carthage](https://www.braze.com/docs/de/de/developer_guide/platforms/legacy_sdks/ios/initial_sdk_setup/installation_methods/carthage_integration), [CocoaPods](https://www.braze.com/docs/de/de/developer_guide/platforms/legacy_sdks/ios/initial_sdk_setup/installation_methods/cocoapods), dem [Swift-Paketmanager](https://www.braze.com/docs/de/de/developer_guide/platforms/legacy_sdks/ios/initial_sdk_setup/installation_methods/swift_package_manager) oder einer [manuellen](https://www.braze.com/docs/de/de/developer_guide/platforms/legacy_sdks/ios/initial_sdk_setup/installation_methods/manual_integration_options) Integration integriert wurde.
## 1. Schritt: Aktualisieren Sie Ihren App-Delegierten {#step-1-update-your-app-delegate}
Wenn Sie das Braze SDK mit CocoaPods, Carthage oder einer [dynamischen manuellen Integration](https://www.braze.com/docs/de/de/developer_guide/platforms/legacy_sdks/ios/initial_sdk_setup/installation_methods/manual_integration_options) integrieren, fügen Sie die folgende Codezeile in die Datei `AppDelegate.m` ein:
```objc
#import "Appboy-iOS-SDK/AppboyKit.h"
```
Wenn Sie die Integration mit dem Swift-Paketmanager oder einer [statischen manuellen Integration](https://www.braze.com/docs/de/de/developer_guide/platforms/legacy_sdks/ios/initial_sdk_setup/installation_methods/manual_integration_options) vornehmen, verwenden Sie stattdessen diese Zeile:
```objc
#import "AppboyKit.h"
```
Fügen Sie als Nächstes in der Datei `AppDelegate.m` das folgende Snippet in die Methode `application:didFinishLaunchingWithOptions:` ein:
```objc
[Appboy startWithApiKey:@"YOUR-APP-IDENTIFIER-API-KEY"
inApplication:application
withLaunchOptions:launchOptions];
```
Aktualisieren Sie `YOUR-APP-IDENTIFIER-API-KEY` mit dem richtigen Wert auf Ihrer Seite **Einstellungen verwalten**. In unserer [API-Dokumentation](https://www.braze.com/docs/de/de/api/api_key#the-app-identifier-api-key) finden Sie weitere Informationen darüber, wo Sie den API-Schlüssel für Ihre App-Kennung finden.
Wenn Sie das Braze SDK mit CocoaPods, Carthage oder einer [dynamischen manuellen Integration](https://www.braze.com/docs/de/de/developer_guide/platforms/legacy_sdks/ios/initial_sdk_setup/installation_methods/manual_integration_options) integrieren, fügen Sie die folgende Codezeile in die Datei `AppDelegate.swift` ein:
```swift
import Appboy_iOS_SDK
```
Wenn Sie die Integration mit dem Swift-Paketmanager oder einer [statischen manuellen Integration](https://www.braze.com/docs/de/de/developer_guide/platforms/legacy_sdks/ios/initial_sdk_setup/installation_methods/manual_integration_options) vornehmen, verwenden Sie stattdessen diese Zeile:
```swift
import AppboyKit
```
Weitere Informationen zur Verwendung von Objective-C-Code in Swift-Projekten finden Sie in der [Apple-Entwicklerdokumentation](https://developer.apple.com/library/ios/documentation/swift/conceptual/buildingcocoaapps/MixandMatch.html).
Fügen Sie als Nächstes in `AppDelegate.swift` das folgende Snippet zu `application(application: UIApplication, didFinishLaunchingWithOptions launchOptions: [NSObject: AnyObject]?) -> Bool` hinzu:
```swift
Appboy.start(withApiKey: "YOUR-APP-IDENTIFIER-API-KEY", in:application, withLaunchOptions:launchOptions)
```
Aktualisieren Sie `YOUR-APP-IDENTIFIER-API-KEY` mit dem richtigen Wert auf Ihrer Seite **Einstellungen verwalten**. In unserer [API-Dokumentation](https://www.braze.com/docs/de/de/api/api_key#the-app-identifier-api-key) finden Sie weitere Informationen darüber, wo Sie den API-Schlüssel für Ihre App-Kennung finden.
**Note:**
Das Singleton `sharedInstance` ist nil, bevor `startWithApiKey:` aufgerufen wird, da dies eine Voraussetzung für die Verwendung jeglicher Braze-Funktionen ist.
**Warning:**
Stellen Sie sicher, dass Sie Braze im Haupt-Thread Ihrer Anwendung initialisieren. Eine asynchrone Initialisierung kann zu fehlerhaften Funktionen führen.
## 2. Schritt: Legen Sie Ihren Daten-Cluster fest {#step-2-specify-your-data-cluster}
**Note:**
Beachten Sie, dass seit Dezember 2019 keine angepassten Endpunkte mehr vergeben werden. Bereits vorhandene angepasste Endpunkte können weiterhin verwendet werden. Weitere Einzelheiten finden Sie in unserer Liste der verfügbaren Endpunkte.
### Endpunktkonfiguration zur Kompilierzeit (empfohlen) {#compile-time-endpoint-configuration-recommended}
Wenn ein bereits vorhandener angepasster Endpunkt angegeben wird:
- Ab Braze iOS SDK v3.0.2 können Sie einen angepassten Endpunkt mithilfe der Datei `Info.plist` festlegen. Fügen Sie das Wörterbuch `Braze` zu Ihrer Datei `Info.plist` hinzu. Fügen Sie im Wörterbuch `Braze` den String-Untereintrag `Endpoint` hinzu und legen Sie den Wert auf die Autorität der URL des angepassten Endpunkts fest (z. B. `sdk.iad-01.braze.com`, nicht `https://sdk.iad-01.braze.com`). Beachten Sie, dass vor Braze iOS SDK v4.0.2 der Wörterbuchschlüssel `Appboy` anstelle von `Braze` verwendet werden muss.
Ihre Braze-Vertretung sollte Sie bereits über den [richtigen Endpunkt](https://www.braze.com/docs/de/de/user_guide/administer/personal/sdk_endpoints) informiert haben.
### Laufzeit-Endpunkt-Konfiguration {#runtime-endpoint-configuration}
Wenn ein bereits vorhandener angepasster Endpunkt angegeben wird:
- Ab Braze iOS SDK v3.17.0+ können Sie Ihren Endpunkt über den `ABKEndpointKey` innerhalb des `appboyOptions`-Parameters, der an `startWithApiKey:inApplication:withLaunchOptions:withAppboyOptions:` übergeben wird, überschreiben. Legen Sie den Wert auf die Autorität der URL des angepassten Endpunkts fest (z. B. `sdk.iad-01.braze.com`, nicht `https://sdk.iad-01.braze.com`).
## SDK-Integration abgeschlossen {#sdk-integration-complete}
Braze sollte nun Daten von Ihrer Anwendung erfassen und die grundlegende Integration sollte abgeschlossen sein. Lesen Sie die folgenden Artikel, um das [Tracking angepasster Events](https://www.braze.com/docs/de/de/developer_guide/analytics/logging_events?tab=swift), [Push-Nachrichten](https://www.braze.com/docs/de/de/developer_guide/platforms/legacy_sdks/ios/push_notifications/integration) und die gesamte Suite der Braze-Features zu aktivieren.
## Braze beim Start anpassen {#customizing-braze-on-startup}
Wenn Sie Braze beim Start anpassen möchten, können Sie stattdessen die Braze-Initialisierungsmethode `startWithApiKey:inApplication:withLaunchOptions:withAppboyOptions:` verwenden und ein optionales `NSDictionary` von Braze-Startschlüsseln übergeben.
Fügen Sie in Ihrer Datei `AppDelegate.m` innerhalb der Methode `application:didFinishLaunchingWithOptions:` die folgende Braze-Methode hinzu:
```objc
[Appboy startWithApiKey:@"YOUR-APP-IDENTIFIER-API-KEY"
inApplication:application
withLaunchOptions:launchOptions
withAppboyOptions:appboyOptions];
```
Beachten Sie, dass diese Methode die Initialisierungsmethode `startWithApiKey:inApplication:withLaunchOptions:` ersetzen würde.
Fügen Sie in `AppDelegate.swift` innerhalb der Methode `application(application: UIApplication, didFinishLaunchingWithOptions launchOptions: [NSObject: AnyObject]?) -> Bool` die folgende Braze-Methode hinzu, wobei `appboyOptions` ein `Dictionary` der Startkonfigurationswerte ist:
```swift
Appboy.start(withApiKey: "YOUR-APP-IDENTIFIER-API-KEY",
in:application,
withLaunchOptions:launchOptions,
withAppboyOptions:appboyOptions)
```
Beachten Sie, dass diese Methode die Initialisierungsmethode `startWithApiKey:inApplication:withLaunchOptions:` ersetzen würde.
Diese Methode wird mit den folgenden Parametern aufgerufen:
- `YOUR-APP-IDENTIFIER-API-KEY` – Der [App-Bezeichner](https://www.braze.com/docs/de/de/api/api_key#the-app-identifier-api-key)-API-Schlüssel aus dem Braze-Dashboard.
- `application` – Die aktuelle App.
- `launchOptions` – Das Optionen-`NSDictionary`, das Sie aus `application:didFinishLaunchingWithOptions:` erhalten.
- `appboyOptions` – Ein optionales `NSDictionary` mit Werten für die Startkonfiguration von Braze.
Siehe [Appboy.h](https://github.com/braze-inc/braze-ios-sdk/blob/master/AppboyKit/include/Appboy.h) für eine Liste der Braze-Startschlüssel.
## Appboy.sharedInstance() und Swift-Nullbarkeit {#appboysharedinstance-and-swift-nullability}
Abweichend von der üblichen Praxis ist das Singleton `Appboy.sharedInstance()` optional. Das liegt daran, dass `sharedInstance` `nil` ist, bevor `startWithApiKey:` aufgerufen wird, und es gibt einige nicht standardmäßige, aber nicht ungültige Implementierungen, in denen eine verzögerte Initialisierung verwendet werden kann.
Wenn Sie `startWithApiKey:` in Ihrem `didFinishLaunchingWithOptions:`-Delegaten aufrufen, bevor Sie auf `sharedInstance` von Appboy (Standardimplementierung) zugreifen, können Sie eine optionale Verkettung wie `Appboy.sharedInstance()?.changeUser("testUser")` verwenden, um lästige Überprüfungen zu vermeiden. Dies ist vergleichbar mit einer Objective-C-Implementierung, die von einem Nicht-Null-Wert für `sharedInstance` ausgeht.
## Zusätzliche Ressourcen {#additional-resources}
Die vollständige [Dokumentation der iOS-Klassen](http://appboy.github.io/appboy-ios-sdk/docs/annotated.html) ist verfügbar, um zusätzliche Anleitungen zu allen SDK-Methoden zu liefern.
# Andere SDK-Anpassungen für iOS
Source: /docs/de/developer_guide/platforms/legacy_sdks/ios/initial_sdk_setup/other_sdk_customizations/index.md
**Warning:**
[AppboyKit](https://github.com/Appboy/appboy-ios-sdk) (also known as the Objective-C SDK) is no longer supported and has been replaced by the [Swift SDK](https://www.braze.com/docs/de/de/developer_guide/sdk_integration/?sdktab=swift). It will no longer receive new features, bug fixes, security updates, or technical support—however, messaging and analytics will continue to function as normal. To learn more, see [Introducing the New Braze Swift SDK](https://www.braze.com/resources/articles/introducing-the-new-braze-swift-sdk).
# Andere SDK-Anpassungen {#other-sdk-customizations}
## Braze-Protokollstufe {#braze-log-level}
Die Standard-Protokollstufe für das Braze iOS SDK ist minimal oder `8` im folgenden Chart. Diese Stufe unterdrückt den größten Teil der Protokollierung, sodass in einer für die Produktion freigegebenen Anwendung keine sensiblen Informationen protokolliert werden.
Die verfügbaren Protokollstufen sind der folgenden Liste zu entnehmen:
### Protokollstufen {#log-levels}
| Ebene | Beschreibung |
|----------|-------------|
| 0 | Ausführlich. Alle Protokollinformationen werden in der iOS-Konsole protokolliert. |
| 1 | Debug. Debug- und höhere Protokollinformationen werden in der iOS-Konsole protokolliert. |
| 2 | Warnung. Warnungen und höhere Protokollinformationen werden in der iOS-Konsole protokolliert. |
| 4 | Fehler. Fehler- und höhere Protokollinformationen werden in der iOS-Konsole protokolliert. |
| 8 | Minimal. Minimale Informationen werden in der iOS-Konsole protokolliert. Die Standardeinstellung des SDK. |
{: .reset-td-br-1 .reset-td-br-2 aria-label="Protokollstufen" }
### Ausführliche Protokollierung {#verbose-logging}
Sie können die Protokollstufe auf jeden verfügbaren Wert einstellen. Die Einstellung der Protokollstufe auf „Ausführlich“ oder `0` kann jedoch bei der Fehlersuche in Ihrer Integration sehr nützlich sein. Diese Stufe ist nur für Entwicklungsumgebungen vorgesehen und sollte nicht in einer veröffentlichten Anwendung gewählt werden. Die ausführliche Protokollierung sendet keine zusätzlichen oder neuen Nutzerinformationen an Braze.
### Einstellung der Protokollstufe {#setting-log-level}
Die Protokollstufe kann entweder zur Kompilierzeit oder zur Laufzeit zugewiesen werden:
Fügen Sie ein Wörterbuch mit dem Namen `Braze` zu Ihrer Datei `Info.plist` hinzu. Fügen Sie im Wörterbuch `Braze` den String-Untereintrag `LogLevel` hinzu und setzen Sie den Wert auf `0`.
**Note:**
Vor Braze iOS SDK v4.0.2 muss der Wörterbuchschlüssel `Appboy` anstelle von `Braze` verwendet werden.
Beispiel für `Info.plist`-Inhalte:
```
BrazeLogLevel0
```
Fügen Sie `ABKLogLevelKey` im Parameter `appboyOptions` hinzu, der an `startWithApiKey:inApplication:withLaunchOptions:withAppboyOptions:` übergeben wird. Setzen Sie seinen Wert auf die Ganzzahl `0`.
```objc
NSMutableDictionary *appboyOptions = [NSMutableDictionary dictionary];
appboyOptions[ABKLogLevelKey] = @(0);
[Appboy startWithApiKey:@"YOUR-API-KEY"
inApplication:application
withLaunchOptions:launchOptions
withAppboyOptions:appboyOptions];
```
```swift
let appboyOptions: [AnyHashable: Any] = [
ABKLogLevelKey : 0
]
Appboy.start(withApiKey: "YOUR-API-KEY", in:application, withLaunchOptions:launchOptions, withAppboyOptions:appboyOptions)
```
**Note:**
Zur Laufzeit kann die Protokollstufe nur mit Braze iOS SDK v4.4.0 oder neuer eingestellt werden. Wenn Sie eine frühere SDK-Version verwenden, legen Sie die Protokollstufe stattdessen bei der Kompilierung fest.
## Optionale IDFV-Erhebung – Swift {#optional-idfv-collection-swift}
In früheren Versionen des Braze iOS Swift SDK wurde das Feld IDFV (Identifier for Vendors) automatisch als Geräte-ID der Nutzer:innen erfasst.
Ab Swift SDK v5.7.0 kann das IDFV-Feld optional deaktiviert werden. Stattdessen setzt Braze eine zufällige UUID als Geräte-ID. Weitere Informationen finden Sie unter [IDFV-Erhebung](https://www.braze.com/docs/de/de/developer_guide/analytics/managing_data_collection?sdktab=swift).
## Optionale IDFA-Erfassung {#optional-idfa-collection}
Die IDFA-Erfassung ist im Braze SDK optional und standardmäßig deaktiviert. Die IDFA-Erfassung ist in Braze nur erforderlich, wenn Sie unsere [Install-Attribution-Integrationen](https://www.braze.com/docs/de/de/partners/message_orchestration/attribution/adjust) verwenden möchten. Wenn Sie sich für die Speicherung Ihres IDFA entscheiden, speichern wir ihn kostenlos, sodass Sie die Vorteile dieser Optionen sofort nach der Veröffentlichung ohne zusätzliche Entwicklungsarbeit nutzen können.
Wir empfehlen daher, den IDFA weiterhin zu erfassen, wenn Sie eines der folgenden Kriterien erfüllen:
- Sie ordnen die Installation einer App einer zuvor geschalteten Werbung zu.
- Sie ordnen eine Aktion innerhalb der Anwendung einer zuvor geschalteten Anzeige zu.
### iOS 14.5 AppTrackingTransparency
Apple verlangt eine Genehmigungsabfrage zur IDFA-Erfassung, der die Nutzer:innen aktiv zustimmen müssen.
Zusätzlich zur Implementierung unseres `ABKIDFADelegate`-Protokolls muss Ihre Anwendung zur IDFA-Erfassung auch die Zustimmung der Nutzer:innen über Apples `ATTrackingManager` im App-Tracking-Transparenz-Framework einholen. Weitere Informationen finden Sie in Apples [Artikel zum Datenschutz](https://developer.apple.com/app-store/user-privacy-and-data-use/).
Die Genehmigungsabfrage im Rahmen der App-Tracking-Transparenz erfordert einen `Info.plist`-Eintrag, um Ihre Nutzung des Bezeichners zu erklären:
```
NSUserTrackingUsageDescriptionTo retarget ads and build a global profile to better serve you things you would like.
```
### Implementieren der IDFA-Erfassung {#implementing-idfa-collection}
Gehen Sie zur Implementierung der IDFA-Erfassung wie folgt vor:
#### 1. Schritt: ABKIDFADelegate implementieren {#step-1-implement-abkidfadelegate}
Erstellen Sie eine Klasse, die dem Protokoll [`ABKIDFADelegate`](https://github.com/Appboy/appboy-ios-sdk/blob/master/AppboyKit/include/ABKIDFADelegate.h) entspricht:
```objc
#import "IDFADelegate.h"
#import
#import
@implementation IDFADelegate
- (NSString *)advertisingIdentifierString {
return [[[ASIdentifierManager sharedManager] advertisingIdentifier] UUIDString];
}
- (BOOL)isAdvertisingTrackingEnabledOrATTAuthorized {
if (@available(iOS 14, *)) {
return [ATTrackingManager trackingAuthorizationStatus] == ATTrackingManagerAuthorizationStatusAuthorized;
}
return [[ASIdentifierManager sharedManager] isAdvertisingTrackingEnabled];
}
@end
```
```swift
import Appboy_iOS_SDK
import AdSupport
import AppTrackingTransparency
class IDFADelegate: NSObject, ABKIDFADelegate {
func advertisingIdentifierString() -> String {
return ASIdentifierManager.shared().advertisingIdentifier.uuidString
}
func isAdvertisingTrackingEnabledOrATTAuthorized() -> Bool {
if #available(iOS 14, *) {
return ATTrackingManager.trackingAuthorizationStatus == ATTrackingManager.AuthorizationStatus.authorized
}
return ASIdentifierManager.shared().isAdvertisingTrackingEnabled
}
}
```
##### 2. Schritt: Delegaten während der Braze-Initialisierung festlegen {#step-2-set-the-delegate-during-braze-initialization}
Legen Sie in dem an `startWithApiKey:inApplication:withAppboyOptions:` übergebenen Wörterbuch `appboyOptions` den Schlüssel `ABKIDFADelegateKey` auf eine Instanz Ihrer mit `ABKIDFADelegate` konformen Klasse fest.
## Ungefähre Größe des iOS SDK {#ios-sdk-size}
Die ungefähre Größe der iOS-SDK-Framework-Datei beträgt 30 MB. Die ungefähre .ipa-Größe (Ergänzung zur App-Datei) liegt zwischen 1 MB und 2 MB.
Braze misst die Größe unseres iOS SDK, indem es die Auswirkungen des SDK auf die `.ipa`-Größe beobachtet – gemäß Apples [Empfehlungen zur App-Größe](https://developer.apple.com/library/content/qa/qa1795/_index.html). Wenn Sie den Größenzuwachs Ihrer Anwendung durch das iOS SDK berechnen, empfehlen wir Ihnen, [einen Bericht zur App-Größe abzurufen](https://developer.apple.com/library/content/qa/qa1795/_index.html), um den Größenunterschied der `.ipa` vor und nach der Integration des Braze iOS SDK zu vergleichen. Wenn Sie die Größen aus dem Bericht zur App-Ausdünnung vergleichen, empfehlen wir Ihnen, auch die App-Größen für ausgedünnte `.ipa`-Dateien zu betrachten, da die universellen `.ipa`-Dateien größer sind als die Binärdateien, die aus dem App Store heruntergeladen und auf den Geräten der Nutzer:innen installiert werden.
**Note:**
Wenn Sie über CocoaPods mit `use_frameworks!` integrieren, stellen Sie `Enable Bitcode = NO` in den Build-Einstellungen des Ziels ein, um eine genaue Größenbestimmung zu erreichen.
# Braze SDK-Integrationsanleitung für iOS (optional)
Source: /docs/de/developer_guide/platforms/legacy_sdks/ios/initial_sdk_setup/ios_sdk_integration/index.md
**Warning:**
[AppboyKit](https://github.com/Appboy/appboy-ios-sdk) (also known as the Objective-C SDK) is no longer supported and has been replaced by the [Swift SDK](https://www.braze.com/docs/de/de/developer_guide/sdk_integration/?sdktab=swift). It will no longer receive new features, bug fixes, security updates, or technical support—however, messaging and analytics will continue to function as normal. To learn more, see [Introducing the New Braze Swift SDK](https://www.braze.com/resources/articles/introducing-the-new-braze-swift-sdk).
# Braze iOS SDK-Integrationsanleitung {#braze-ios-sdk-integration-guide}
> Dieser optionale Leitfaden zur iOS-Integration führt Sie Schritt für Schritt durch die bewährten Verfahren bei der ersten Integration des iOS SDK und seiner Kernkomponenten in Ihre Anwendung. Diese Anleitung hilft Ihnen bei der Erstellung einer `BrazeManager.swift`-Hilfsdatei, die alle Abhängigkeiten vom Braze iOS SDK vom Rest Ihres produktiven Codes entkoppelt, was zu einem einzigen `import AppboyUI` in Ihrer gesamten Anwendung führt. Dieser Ansatz vermeidet Probleme, die durch übermäßige SDK-Importe entstehen, und erleichtert das Tracking, Debugging und Ändern von Code.
**Important:**
Diese Anleitung geht davon aus, dass Sie das [SDK bereits zu Ihrem Xcode-Projekt hinzugefügt](https://www.braze.com/docs/de/de/developer_guide/platforms/legacy_sdks/ios/initial_sdk_setup/overview) haben.
## Überblick über die Integration {#integration-overview}
Die folgenden Schritte helfen Ihnen bei der Erstellung einer `BrazeManager`-Hilfsdatei, die Ihr Produktionscode aufruft. Diese Hilfsdatei kümmert sich um alle Braze-bezogenen Abhängigkeiten, indem sie verschiedene Erweiterungen für die nachfolgend aufgeführten Integrationsthemen hinzufügt. Jedes Thema enthält horizontale Tab-Schritte und Code-Snippets sowohl in Swift als auch in Objective-C. Beachten Sie, dass die Schritte für Content Cards und In-App-Nachrichten für die Integration nicht erforderlich sind, wenn Sie nicht vorhaben, diese Kanäle in Ihrer Anwendung zu verwenden.
- [BrazeManager.swift erstellen](#create-brazemanagerswift)
- [SDK initialisieren](#initialize-the-sdk)
- [Push-Benachrichtigungen](#push-notifications)
- [Zugriff auf Nutzer:innen-Variablen und -Methoden](#access-user-variables-and-methods)
- [Analytics protokollieren](#log-analytics)
- [In-App-Nachrichten (optional)](#in-app-messages)
- [Content Cards (optional)](#content-cards)
- [Nächste Schritte](#next-steps)
### BrazeManager.swift erstellen {#create-brazemanagerswift}
#### BrazeManager.swift erstellen
Um Ihre `BrazeManager.swift`-Datei zu erstellen, erstellen Sie eine neue Swift-Datei mit dem Namen _BrazeManager_, die Sie an dem von Ihnen gewünschten Ort zu Ihrem Projekt hinzufügen. Als Nächstes ersetzen Sie `import Foundation` durch `import AppboyUI` für SPM (`import Appboy_iOS_SDK` für CocoaPods) und erstellen dann eine Klasse `BrazeManager`, die als Host für alle Braze-bezogenen Methoden und Variablen dienen wird. `Appboy_iOS_SDK`
**Note:**
- `BrazeManager` ist eine `NSObject`-Klasse und keine Struktur, sodass sie mit ABK-Delegaten wie `ABKInAppMessageUIDelegate` konform gehen kann.
- `BrazeManager` ist eine Singleton-Klasse, sodass nur eine Instanz dieser Klasse verwendet wird. Dies geschieht, um einen einheitlichen Zugriffspunkt auf das Objekt zu schaffen.
1. Fügen Sie eine statische Variable namens _shared_ hinzu, die die Klasse `BrazeManager` initialisiert. Dieser Vorgang wird garantiert nur einmal ausgelöst.
2. Als Nächstes fügen Sie eine private konstante Variable namens _apiKey_ hinzu und setzen sie als API-Schlüsselwert aus Ihrem Workspace im Braze-Dashboard ein.
3. Fügen Sie eine private berechnete Variable namens _appboyOptions_ hinzu, die Konfigurationswerte für das SDK speichern wird. Sie wird vorerst leer sein.
```swift
class BrazeManager: NSObject {
// 1
static let shared = BrazeManager()
// 2
private let apikey = "YOUR-API-KEY"
// 3
private var appboyOptions: [String:Any] {
return [:]
}
}
```
```objc
@implementation BrazeManager
// 1
+ (instancetype)shared {
static BrazeManager *shared = nil;
static dispatch_once_t onceToken;
dispatch_once(&onceToken, ^{
shared = [[BrazeManager alloc] init];
// Do any other initialisation stuff here
});
return shared;
}
// 2
- (NSString *)apiKey {
return @"YOUR-API-KEY";
}
// 3
- (NSDictionary *)appboyOptions {
return [NSDictionary dictionary];
}
```
### SDK initialisieren {#initialize-the-sdk}
#### SDK von BrazeManager.swift aus initialisieren {#initialize-sdk-from-brazemanagerswift}
Als Nächstes müssen Sie das SDK initialisieren. Diese Anleitung geht davon aus, dass Sie das [SDK bereits zu Ihrem Xcode-Projekt hinzugefügt](https://www.braze.com/docs/de/de/developer_guide/platforms/legacy_sdks/ios/initial_sdk_setup/overview) haben. Sie müssen auch Ihren [Workspace-SDK-Endpunkt](https://www.braze.com/docs/de/de/developer_guide/platform_integration_guides/ios/initial_sdk_setup/completing_integration#step-2-specify-your-data-cluster) und [`LogLevel`](https://www.braze.com/docs/de/de/developer_guide/platform_integration_guides/ios/initial_sdk_setup/other_sdk_customizations#braze-log-level) in der Datei `Info.plist` oder in `appboyOptions` festgelegt haben.
Fügen Sie die Methode `didFinishLaunchingWithOptions` aus der Datei `AppDelegate.swift` ohne einen Rückgabetyp in Ihre Datei `BrazeManager.swift` ein. Wenn Sie eine ähnliche Methode in der Datei `BrazeManager.swift` erstellen, wird es in Ihrer Datei `AppDelegate.swift` keine Anweisung `import AppboyUI` geben.
Als Nächstes initialisieren Sie das SDK mit Ihren neu deklarierten Variablen `apiKey` und `appboyOptions`.
**Important:**
Die Initialisierung muss im Haupt-Thread durchgeführt werden.
```swift
func application(_ application: UIApplication, didFinishLaunchingWithOptions launchOptions: [UIApplication.LaunchOptionsKey: Any]?) {
Appboy.start(withApiKey: apikey, in: application, withLaunchOptions: launchOptions, withAppboyOptions: appboyOptions)
}
```
```objc
- (void)application:(UIApplication *)application didFinishLaunchingWithOptions:(NSDictionary *)launchOptions {
[Appboy startWithApiKey:[self apiKey] inApplication:application withLaunchOptions:launchOptions withAppboyOptions:[self appboyOptions]];
}
```
##### Appboy-Initialisierung in AppDelegate.swift behandeln {#handle-appboy-initialization-in-the-appdelegateswift}
Gehen Sie nun zurück zur Datei `AppDelegate.swift` und fügen Sie den folgenden Code-Snippet in die Methode `didFinishLaunchingWithOptions` von AppDelegate ein, um die Initialisierung von Appboy aus der Hilfsdatei `BrazeManager.swift` zu verarbeiten. Denken Sie daran, dass es nicht notwendig ist, eine Anweisung `import AppboyUI` in `AppDelegate.swift` hinzuzufügen.
```swift
func application(
_ application: UIApplication,
didFinishLaunchingWithOptions launchOptions: [UIApplication.LaunchOptionsKey: Any]?
) -> Bool {
// Override point for customization after application launch
BrazeManager.shared.application(application, didFinishLaunchingWithOptions: launchOptions)
return true
}
```
```objc
- (BOOL)application:(UIApplication *)application didFinishLaunchingWithOptions:(NSDictionary *)launchOptions {
// Override point for customization after application launch
[[BrazeManager shared] application:application didFinishLaunchingWithOptions:launchOptions];
return YES;
}
```
**Checkpoint:**
Fahren Sie mit der Kompilierung Ihres Codes fort und führen Sie Ihre Anwendung aus.
Jetzt sollte das SDK betriebsbereit sein. Vergewissern Sie sich in Ihrem Dashboard, dass die Sitzungen protokolliert werden, bevor Sie fortfahren.
### Push-Benachrichtigungen {#push-notifications}
#### Push-Zertifikat hinzufügen {#add-push-certificate}
Navigieren Sie zu Ihrem bestehenden Workspace im Braze-Dashboard. Laden Sie unter **Einstellungen für Push-Benachrichtigungen** Ihre Push-Zertifikatsdatei in Ihr Braze-Dashboard hoch und speichern Sie sie.
{: style="max-width:60%;"}
**Important:**
Verpassen Sie nicht den speziellen Kontrollpunkt am Ende dieses Schritts!
##### Für Push-Benachrichtigungen registrieren {#register-for-push-notifications}
Als Nächstes registrieren Sie sich für Push-Benachrichtigungen. Diese Anleitung setzt voraus, dass Sie in Ihrem Apple-Entwicklerportal und Ihrem Xcode-Projekt die [Push-Zugangsdaten korrekt eingerichtet](https://www.braze.com/docs/de/de/developer_guide/platforms/legacy_sdks/ios/push_notifications/integration) haben.
Der Code für die Registrierung von Push-Benachrichtigungen wird in der Methode `didFinishLaunching...` in der Datei `BrazeManager.swift` hinzugefügt. Ihr Code zur Initialisierung sollte am Ende wie folgt aussehen:
1. Konfigurieren Sie die Inhalte für die Anfrage zur Autorisierung der Interaktion mit den Nutzer:innen. Diese Optionen sind als Beispiel aufgeführt.
2. Fordern Sie die Genehmigung zum Senden von Push-Benachrichtigungen an Ihre Nutzer:innen an. Die Antwort der Nutzer:innen (Push-Benachrichtigungen zulassen oder ablehnen) wird in der Variable `granted` getrackt.
3. Leiten Sie die Ergebnisse der Push-Autorisierung an Braze weiter, nachdem die Nutzer:innen mit der Benachrichtigungsaufforderung interagiert haben.
4. Starten Sie den Registrierungsprozess mit APNs; dies muss im Haupt-Thread geschehen. Wenn die Registrierung erfolgreich ist, ruft die App im Objekt `AppDelegate` die Methode `didRegisterForRemoteNotificationsWithDeviceToken` auf.
```swift
func application(_ application: UIApplication, didFinishLaunchingWithOptions launchOptions:[UIApplication.LaunchOptionsKey:Any]?) {
Appboy.start(withAPIKey: apikey, in: application, withLaunchOptions: launchOptions, withAppboyOptions: appboyOptions)
// 1
let options: UNAuthorizationOptions = [.alert, .sound, .badge]
// 2
UNUserNotificationCenter.current().requestAuthorization(option: options) { (granted, error) in
// 3
Appboy.sharedInstance()?.pushAuthorization(fromUserNotificationCenter: granted)
}
// 4
UIApplications.shared.registerForRemoteNotificiations()
}
```
```objc
- (void)application:(UIApplication *)application didFinishLaunchingWithOptions:(NSDictionary *)launchOptions {
[Appboy startWithApiKey:[self apiKey] inApplication:application withLaunchOptions:launchOptions withAppboyOptions:[self appboyOptions]];
// 1
UNAuthorizationOptions options = (UNAuthorizationOptionSound | UNAuthorizationOptionAlert | UNAuthorizationOptionBadge);
// 2
[[UNUserNotificationCenter currentNotificationCenter] requestAuthorizationWithOptions:options completionHandler:^(BOOL granted, NSError * _Nullable error) {
// 3
[[Appboy sharedInstance] pushAuthorizationFromUserNotificationCenter:granted];
}];
// 4
[[UIApplication sharedApplication] registerForRemoteNotifications];
}
```
**Checkpoint:**
Fahren Sie mit der Kompilierung Ihres Codes fort und führen Sie Ihre Anwendung aus.
- Bestätigen Sie in Ihrer App, dass Sie zu Push-Benachrichtigungen aufgefordert werden, bevor Sie fortfahren.
- Wenn Sie nicht dazu aufgefordert werden, versuchen Sie, die App zu löschen und neu zu installieren, um sicherzustellen, dass die Aufforderung zur Push-Benachrichtigung zuvor nicht angezeigt wurde.
Vergewissern Sie sich, dass Sie zur Genehmigung von Push-Benachrichtigungen aufgefordert werden, bevor Sie fortfahren.
##### Methoden für Push-Benachrichtigungen weiterleiten {#forward-push-notification-methods}
Als Nächstes leiten Sie die Methoden für Push-Benachrichtigungen des Systems von `AppDelegate.swift` an `BrazeManager.swift` weiter, damit sie vom Braze iOS SDK verarbeitet werden können.
###### 1. Schritt: Erweiterung für den Code der Push-Benachrichtigung erstellen {#step-1-create-extension-for-push-notification-code}
Erstellen Sie eine Erweiterung für Ihren Code für Push-Benachrichtigungen in `BrazeManager.swift`, damit Sie besser erkennen können, welchem Zweck die Hilfsdatei dient, etwa so:
1. Nach dem Muster, dass Sie keine Anweisung `import AppboyUI` in Ihre `AppDelegate` einfügen, werden wir die Methoden für Push-Benachrichtigungen in `BrazeManager.swift` behandeln. Die Token für die Geräte der Nutzer:innen müssen von der Methode `didRegisterForRemote...` an Braze übergeben werden. Diese Methode ist erforderlich, um stille Push-Benachrichtigungen zu implementieren. Als Nächstes fügen Sie die gleiche Methode aus `AppDelegate` in Ihre `BrazeManager`-Klasse ein.
2. Fügen Sie die folgende Zeile innerhalb der Methode hinzu, um das Token des Geräts in Braze zu registrieren. Dies ist notwendig, damit Braze das Token mit dem aktuellen Gerät verknüpfen kann.
```swift
// MARK - Push Notifications
extension BrazeManager {
// 1
func application(
_ application: UIApplication,
didRegisterForRemoteNotificationsWithDeviceToken deviceToken: Data
) {
// 2
Appboy.sharedInstance().?registerDeviceToken(deviceToken)
}
}
```
```objc
// MARK - Push Notifications
// 1
- (void)application:(UIApplication *)application didRegisterForRemoteNotificationsWithDeviceToken:(NSData *)deviceToken {
// 2
[[Appboy sharedInstance] registerDeviceToken:deviceToken];
}
```
###### 2. Schritt: Fernbenachrichtigungen unterstützen {#step-2-support-remote-notifications}
Fügen Sie auf dem Tab **Signing & Capabilities** die Unterstützung für **Background Modes** hinzu und wählen Sie **Remote notifications**, um die Unterstützung für Remote-Push-Benachrichtigungen von Braze zu aktivieren.

###### 3. Schritt: Handhabung von Fernbenachrichtigungen {#step-3-remote-notification-handling}
Das Braze SDK kann Push-Fernbenachrichtigungen verarbeiten, die von Braze stammen. Leiten Sie Fernbenachrichtigungen an Braze weiter. Push-Benachrichtigungen, die nicht von Braze stammen, werden vom SDK automatisch ignoriert. Fügen Sie in der Erweiterung für Push-Benachrichtigungen die folgende Methode zu `BrazeManager.swift` hinzu.
```swift
func application(
_ application: UIApplication,
didReceiveRemoteNotification userInfo: [AnyHashable : Any],
fetchCompletionHandler completionHandler: @escaping (UIBackgroundFetchResult) -> Void
) {
Appboy.sharedInstance()?.register(
application,
didReceiveRemoteNotification: userInfo,
fetchCompletionHandler: completionHandler
)
}
```
```objc
- (void)application:(UIApplication *)application didReceiveRemoteNotification:(NSDictionary *)userInfo fetchCompletionHandler:(void (^)(UIBackgroundFetchResult))completionHandler {
[[Appboy sharedInstance] registerApplication:application didReceiveRemoteNotification:userInfo fetchCompletionHandler:completionHandler];
}
```
###### 4. Schritt: Antworten auf Benachrichtigungen weiterleiten {#step-4-forward-notification-responses}
Das Braze SDK kann die Antwort auf Push-Benachrichtigungen verarbeiten, die von Braze stammen. Leiten Sie die Antwort der Push-Benachrichtigungen an Braze weiter. Das SDK ignoriert automatisch Antworten von Push-Benachrichtigungen, die nicht von Braze stammen. Fügen Sie die folgende Methode in Ihre `BrazeManager.swift`-Datei ein:
```swift
func userNotificationCenter(
_ center: UNUserNotificationCenter,
didReceive response: UNNotificationResponse,
withCompletionHandler completionHandler: @escaping () -> Void
) {
Appboy.sharedInstance()?.userNotificationCenter(
center,
didReceive: response,
withCompletionHandler: completionHandler
)
}
```
```objc
- (void)userNotificationCenter:(UNUserNotificationCenter *)center
didReceiveNotificationResponse:(UNNotificationResponse *)response
withCompletionHandler:(void (^)(void))completionHandler {
[[Appboy sharedInstance] userNotificationCenter:center
didReceiveNotificationResponse:response
withCompletionHandler:completionHandler];
}
```
**Checkpoint:**
Fahren Sie mit der Kompilierung Ihres Codes fort und führen Sie Ihre Anwendung aus.
Versuchen Sie, sich selbst eine Push-Benachrichtigung vom Braze-Dashboard aus zu senden, und beobachten Sie, ob die Analytics von den Push-Benachrichtigungen protokolliert werden, bevor Sie fortfahren.
### Zugriff auf Nutzer:innen-Variablen und -Methoden {#access-user-variables-and-methods}
#### Nutzer:innen-Variablen und -Methoden erstellen {#create-user-variables-and-methods}
Als Nächstes benötigen Sie einfachen Zugriff auf die Variablen und Methoden von `ABKUser`. Erstellen Sie eine Erweiterung für Ihren Nutzer:innen-Code in `BrazeManager.swift`, damit Sie besser erkennen können, welchem Zweck die Hilfsdatei dient, etwa so:
1. Ein `ABKUser`-Objekt repräsentiert eine:n bekannte:n oder anonyme:n Nutzer:in in Ihrer iOS-Anwendung. Fügen Sie eine berechnete Variable hinzu, um `ABKUser` abzurufen. Diese Variable wird wiederverwendet, um Variablen über die Nutzer:innen abzurufen.
2. Fragen Sie die Nutzer:innen-Variable ab, um einfach auf die `userId` zugreifen zu können. Unter den anderen Variablen ist das Objekt `ABKUser` verantwortlich für (`firstName`, `lastName`, `phone`, `homeCity` usw.)
3. Legen Sie die Nutzer:innen fest, indem Sie `changeUser()` mit einer entsprechenden `userId` aufrufen.
```swift
// MARK: - User
extension BrazeManager {
// 1
var user: ABKUser? {
return Appboy.sharedInstance()?.user
}
// 2
var userId: String? {
return user?.userID
}
// 3
func changeUser(_ userId: String) {
Appboy.sharedInstance()?.changeUser(userId)
}
}
```
```objc
// MARK: - User
// 1
- (ABKUser *)user {
return [[Appboy sharedInstance] user];
}
// 2
- (NSString *)userId {
return [self user].userID;
}
// 3
- (void)changeUser:(NSString *)userId {
[[Appboy sharedInstance] changeUser:userId];
}
```
**Checkpoint:**
Fahren Sie mit der Kompilierung Ihres Codes fort und führen Sie Ihre Anwendung aus.
Versuchen Sie, Nutzer:innen anhand einer erfolgreichen Registrierung zu identifizieren. Vergewissern Sie sich, dass Sie genau wissen, was ein geeigneter Bezeichner für Nutzer:innen ist und was nicht.
Achten Sie in Ihrem Dashboard darauf, dass der Bezeichner der Nutzer:innen protokolliert wird, bevor Sie fortfahren.
### Analytics protokollieren {#log-analytics}
#### Methode zum Protokollieren angepasster Events erstellen {#create-log-custom-event-method}
Erstellen Sie auf der Grundlage der folgenden `logCustomEvent`-Methode des Braze SDK eine passende Methode.
**Referenzierte Braze-Methode `logCustomEvent`**
Das ist so gewollt, denn nur die Datei `BrazeManager.swift` kann direkt auf die Methoden des Braze iOS SDK zugreifen. Wenn Sie also eine passende Methode erstellen, ist das Ergebnis dasselbe und Sie brauchen keine direkten Abhängigkeiten vom Braze iOS SDK in Ihrem Produktionscode.
```
open func logCustomEvent(_ eventName: String, withProperties properties: [AnyHashable : Any]?)
```
**Passende Methode**
Protokollieren Sie angepasste Events vom Objekt `Appboy` in Braze. `Properties` ist ein optionaler Parameter mit dem Standardwert nil. Angepasste Events müssen keine Eigenschaften haben, aber einen Namen.
```swift
func logCustomEvent(_ eventName: String, withProperties properties: [AnyHashable: Any]? = nil) {
Appboy.sharedInstance()?.logCustomEvent(eventName, withProperties: properties)
}
```
```objc
- (void)logCustomEvent:(NSString *)eventName withProperties:(nullable NSDictionary *)properties {
[[Appboy sharedInstance] logCustomEvent:eventName withProperties:properties];
}
```
##### Methode zum Protokollieren angepasster Attribute erstellen {#create-log-custom-attributes-method}
Das SDK kann zahlreiche Typen als angepasste Attribute protokollieren. Es ist nicht notwendig, Hilfsmethoden für jeden Werttyp zu erstellen, der gesetzt werden kann. Stellen Sie stattdessen nur eine Methode zur Verfügung, mit der Sie auf den entsprechenden Wert filtern können.
```
- (BOOL)setCustomAttributeWithKey:(NSString *)key andBOOLValue:(BOOL)value;
- (BOOL)setCustomAttributeWithKey:(NSString *)key andIntegerValue:(NSIntenger)value;
- (BOOL)setCustomAttributeWithKey:(NSString *)key andDoubleValue:(double)value;
- (BOOL)setCustomAttributeWithKey:(NSString *)key andStringValue:(NSString *)value;
- (BOOL)setCustomAttributeWithKey:(NSString *)key andDateValue:(NSDate *)value;
```
Angepasste Attribute werden über das Objekt `ABKUser` protokolliert.
Erstellen Sie **eine Methode**, die alle verfügbaren Typen, die für ein Attribut festgelegt werden können, umfasst. Fügen Sie diese Methode in Ihrer `BrazeManager.swift`-Datei in der Analytics-Erweiterung hinzu. Dazu filtern Sie die gültigen angepassten Attribut-Typen und rufen die mit dem passenden Typ verbundene Methode auf.
- Der Parameter `value` ist ein generischer Typ, der dem Protokoll `Equatable` entspricht. Dies geschieht explizit. Wenn der Typ nicht dem entspricht, den das Braze iOS SDK erwartet, wird ein Kompilierungsfehler ausgegeben.
- Die Parameter `key` und `value` sind optionale Parameter, die in der Methode bedingt ausgepackt werden. Das ist nur eine Möglichkeit, um sicherzustellen, dass keine nil-Werte an das Braze iOS SDK übergeben werden.
```swift
func setCustomAttributeWithKey(_ key: String?, andValue value: T?) {
guard let key = key, let value = value else { return }
switch value.self {
case let value as Date:
user?.setCustomAttributeWithKey(key, andDateValue: value)
case let value as Bool:
user?.setCustomAttributeWithKey(key, andBOOLValue: value)
case let value as String:
user?.setCustomAttributeWithKey(key, andStringValue: value)
case let value as Double:
user?.setCustomAttributeWithKey(key, andDoubleValue: value)
case let value as Int:
user?.setCustomAttributeWithKey(key, andIntegerValue: value)
default:
return
}
}
```
```objc
- (void)setCustomAttributeWith:(NSString *)key andValue:(id)value {
if ([value isKindOfClass:[NSDate class]]) {
[[self user] setCustomAttributeWithKey:key andDateValue:value];
} else if ([value isKindOfClass:[NSString class]]) {
[[self user] setCustomAttributeWithKey:key andStringValue:value];
} else if ([value isKindOfClass:[NSNumber class]]) {
if (strcmp([value objCType], @encode(double)) == 0) {
[[self user] setCustomAttributeWithKey:key andDoubleValue:[value doubleValue]];
} else if (strcmp([value objCType], @encode(int)) == 0) {
[[self user] setCustomAttributeWithKey:key andIntegerValue:[value integerValue]];
} else if ([value boolValue]) {
[[self user] setCustomAttributeWithKey:key andBOOLValue:[value boolValue]];
}
}
}
```
##### Methode zum Protokollieren von Käufen erstellen {#create-log-purchase-method}
Als Nächstes erstellen Sie auf der Grundlage der Braze-SDK-Methode `logPurchase` eine passende Methode.
**Referenzierte Braze-Methode `logPurchase`**
Das ist so gewollt, denn nur die Datei `BrazeManager.swift` kann direkt auf die Methoden des Braze iOS SDK zugreifen. Wenn Sie also eine passende Methode erstellen, ist das Ergebnis dasselbe und Sie brauchen keine direkten Abhängigkeiten vom Braze iOS SDK in Ihrem Produktionscode.
```
open func logPurchase(_ productIdentifier: String, inCurrency currency: String, atPrice price: NSDecimalNumber, withoutQuantity quantity: UInt)
```
**Passende Methode**
Protokollieren Sie Käufe vom Objekt `Appboy` in Braze. Das SDK verfügt über mehrere Methoden zur Protokollierung von Käufen, und dies ist nur ein Beispiel. Diese Methode übernimmt auch die Erstellung der Objekte `NSDecimal` und `UInt`. Wie Sie diesen Teil handhaben wollen, bleibt Ihnen überlassen – dies ist nur ein Beispiel.
```swift
func logPurchase(_ productIdentifier: String, inCurrency currency: String, atPrice price:
String, withQuantity quantity: Int) {
Appboy.sharedInstance()?.logPurchase(productIdentifier, inCurrency: currency, atPrice: NSDecimalNumber(string: price), withQuantity: UInt(quantity))
}
```
```objc
- (void)logPurchase:(NSString *)productIdentifier inCurrency:(nonnull NSString *)currencyCode atPrice:(nonnull NSDecimalNumber *)price withQuantity:(NSUInteger)quantity {
[[Appboy sharedInstance] logPurchase:productIdentifier inCurrency:currencyCode atPrice:price withQuantity:quantity];
}
```
**Checkpoint:**
Fahren Sie mit der Kompilierung Ihres Codes fort und führen Sie Ihre Anwendung aus.
Versuchen Sie, angepasste Events zu protokollieren.
Achten Sie in Ihrem Dashboard darauf, dass die angepassten Events protokolliert werden, bevor Sie fortfahren.
### In-App-Nachrichten {#in-app-messages}
**Important:**
Der folgende Abschnitt zu In-App-Nachrichten ist für die Integration nicht erforderlich, wenn Sie diesen Kanal nicht in Ihrer Anwendung verwenden möchten.
#### Konformität mit ABKInAppMessageUIDelegate {#conform-to-abkinappmessageuidelegate}
Als Nächstes aktivieren Sie den Code Ihrer `BrazeManager.swift`-Datei, sodass er mit `ABKInAppMessageUIDelegate` konform ist und die zugehörigen Methoden direkt verarbeiten kann.
Der Code für die Konformität mit dem Delegaten wird in den `didFinishLaunching...`-Methoden in der Datei `BrazeManager.swift` hinzugefügt. Ihr Code für die Initialisierung sollte am Ende wie folgt aussehen:
```swift
func application(_ application: UIApplication, didFinishLaunchingWithOptions launchOptions: [UIApplication.LaunchOptionsKey: Any]?) {
Appboy.start(withApiKey: apiKey, in: application, withLaunchOptions: launchOptions, withAppboyOptions: appboyOptions)
let options: UNAuthorizationOptions = [.alert, .sound, .badge]
UNUserNotificationCenter.current().requestAuthorization(options: options) { (granted, error) in
Appboy.sharedInstance()?.pushAuthorization(fromUserNotificationCenter: granted)
}
UIApplication.shared.registerForRemoteNotifications()
Appboy.sharedInstance()?.inAppMessageController.inAppMessageUIController?.setInAppMessageUIDelegate?(self)
}
```
```objc
- (void)application:(UIApplication *)application didFinishLaunchingWithOptions:(NSDictionary *)launchOptions {
[Appboy startWithApiKey:[self apiKey] inApplication:application withLaunchOptions:launchOptions withAppboyOptions:[self appboyOptions]];
UNAuthorizationOptions options = (UNAuthorizationOptionSound | UNAuthorizationOptionAlert | UNAuthorizationOptionBadge);
[[UNUserNotificationCenter currentNotificationCenter] requestAuthorizationWithOptions:options completionHandler:^(BOOL granted, NSError * _Nullable error) {
[[Appboy sharedInstance] pushAuthorizationFromUserNotificationCenter:granted];
}];
[[UIApplication sharedApplication] registerForRemoteNotifications];
[[Appboy sharedInstance].inAppMessageController.inAppMessageUIController setInAppMessageUIDelegate:self];
}
```
##### Delegierte Methoden hinzufügen {#add-delegate-methods}
Als Nächstes erstellen Sie eine Erweiterung, die dem `ABKInAppMessageUIDelegate` entspricht.
Fügen Sie das folgende Snippet dem Abschnitt Analytics hinzu. Beachten Sie, dass das Objekt `BrazeManager.swift` als Delegat festgelegt ist. Hier wird die Datei `BrazeManager.swift` alle `ABKInAppMessageUIDelegate`-Methoden behandeln.
**Important:**
Der `ABKInAppMessageUIDelegate` enthält keine obligatorischen Methoden, aber im Folgenden finden Sie ein Beispiel für eine.
```swift
// MARK: - ABKInAppMessage UI Delegate
extension AppboyManager: ABKInAppMessageUIDelegate{
func inAppMessageViewControllerWith(_ inAppMessage: ABKInAppMessage) -> ABKInAppMessageViewController {
switch inAppMessage {
case is ABKInAppMessageSlideup:
return ABKInAppMessageSlideupViewController(inAppMessage: inAppMessage)
case is ABKInAppMessageModal:
return ABKInAppMessageModalViewController(inAppMessage: inAppMessage)
case is ABKInAppMessageFull:
return ABKInAppMessageFullViewController(inAppMessage: inAppMessage)
case is ABKInAppMessageHTML:
return ABKInAppMessageHTMLViewController(inAppMessage: inAppMessage)
default:
return ABKInAppMessageViewController(inAppMessage: inAppMessage)
}
```
```objc
// MARK: - ABKInAppMessage UI Delegate
- (ABKInAppMessageViewController *)inAppMessageViewControllerWithInAppMessage:(ABKInAppMessage *)inAppMessage {
if ([inAppMessage isKindOfClass:[ABKInAppMessageSlideup class]]) {
return [[ABKInAppMessageSlideupViewController alloc] initWithInAppMessage:inAppMessage];
} else if ([inAppMessage isKindOfClass:[ABKInAppMessageModal class]]) {
return [[ABKInAppMessageModalViewController alloc] initWithInAppMessage:inAppMessage];
} else if ([inAppMessage isKindOfClass:[ABKInAppMessageFull class]]) {
return [[ABKInAppMessageFullViewController alloc] initWithInAppMessage:inAppMessage];
} else if ([inAppMessage isKindOfClass:[ABKInAppMessageHTML class]]) {
return [[ABKInAppMessageHTMLViewController alloc] initWithInAppMessage:inAppMessage];
}
return nil;
}
```
**Checkpoint:**
Fahren Sie mit der Kompilierung Ihres Codes fort und führen Sie Ihre Anwendung aus.
Versuchen Sie, sich selbst eine In-App-Nachricht zu senden.
Setzen Sie in der Datei `BrazeManager.swift` einen Haltepunkt am Beginn der `ABKInAppMessageUIDelegate`-Beispielmethode. Senden Sie sich selbst eine In-App-Nachricht und bestätigen Sie, dass der Haltepunkt erreicht wird, bevor Sie fortfahren.
### Content Cards {#content-cards}
**Important:**
Der folgende Content-Card-Abschnitt ist für die Integration nicht erforderlich, wenn Sie nicht vorhaben, diesen Kanal in Ihrer Anwendung zu verwenden.
#### Content-Card-Variablen und -Methoden erstellen {#create-content-card-variables-and-methods}
Ermöglichen Sie Ihrem Produktionscode, den Content-Cards-View-Controller ohne unnötige `import AppboyUI`-Anweisungen anzuzeigen.
Erstellen Sie eine Erweiterung für Ihren Content-Cards-Code in `BrazeManager.swift`, damit Sie besser erkennen können, welchem Zweck die Hilfsdatei dient, etwa so:
1. Zeigen Sie den `ABKContentCardsTableViewController` an. Ein optionaler `navigationController` ist der einzige Parameter, der benötigt wird, um den View Controller zu präsentieren oder zu pushen.
2. Initialisieren Sie ein `ABKContentCardsTableViewController`-Objekt und ändern Sie optional den Titel. Sie müssen auch den initialisierten View Controller zum Navigations-Stack hinzufügen.
```swift
// MARK: - Content Cards
extension BrazeManager {
// 1
func displayContentCards(navigationController: UINavigationController?) {
// 2
let contentCardsVc = ABKContentCardsTableViewController()
contentCardsVc.title = "Content Cards"
navigationController?.pushViewController(contentCardsVc, animated: true)
}
}
```
```objc
// MARK: - Content Cards
// 1
- (void)displayContentCards:(UINavigationController *)navigationController {
// 2
ABKContentCardsTableViewController *contentCardsVc = [[ABKContentCardsTableViewController alloc] init];
contentCardsVc.title = @"Content Cards";
[navigationController pushViewController:contentCardsVc animated:YES];
}
```
**Checkpoint:**
Fahren Sie mit der Kompilierung Ihres Codes fort und führen Sie Ihre Anwendung aus.
Versuchen Sie, den `ABKContentCardsTableViewController` in Ihrer Anwendung anzuzeigen, bevor Sie fortfahren.
## Nächste Schritte {#next-steps}
Herzlichen Glückwunsch! Sie haben diesen Leitfaden für die Integration von Best Practices abgeschlossen! Ein Beispiel für die `BrazeManager`-Hilfsdatei finden Sie auf [GitHub](https://github.com/braze-inc/braze-growth-shares-ios-demo-app/blob/master/Braze-Demo/BrazeManager.swift).
Jetzt, wo Sie alle Abhängigkeiten vom Braze iOS SDK vom Rest Ihres Produktionscodes entkoppelt haben, sollten Sie sich einige unserer optionalen Anleitungen zur erweiterten Implementierung ansehen:
- [Anleitung zur erweiterten Implementierung von Push-Benachrichtigungen](https://www.braze.com/docs/de/de/developer_guide/platforms/legacy_sdks/ios/push_notifications/implementation_guide)
- [Anleitung zur erweiterten Implementierung von In-App-Nachrichten](https://www.braze.com/docs/de/de/developer_guide/platforms/legacy_sdks/ios/in-app_messaging/implementation_guide)
- [Anleitung zur erweiterten Implementierung von Content Cards](https://www.braze.com/docs/de/de/developer_guide/platforms/legacy_sdks/ios/content_cards/implementation_guide)
# Push-Integration für iOS
Source: /docs/de/developer_guide/platforms/legacy_sdks/ios/push_notifications/integration/index.md
**Warning:**
[AppboyKit](https://github.com/Appboy/appboy-ios-sdk) (also known as the Objective-C SDK) is no longer supported and has been replaced by the [Swift SDK](https://www.braze.com/docs/de/de/developer_guide/sdk_integration/?sdktab=swift). It will no longer receive new features, bug fixes, security updates, or technical support—however, messaging and analytics will continue to function as normal. To learn more, see [Introducing the New Braze Swift SDK](https://www.braze.com/resources/articles/introducing-the-new-braze-swift-sdk).
# Push-Integration {#push-integration}
## 1. Schritt: Laden Sie Ihr APNs-Token hoch {#step-1-upload-your-apns-token}
Before you can send an iOS push notification using Braze, you need to upload your `.p8` push notification file, as described in [Apple's developer documentation](https://developer.apple.com/documentation/usernotifications/establishing-a-token-based-connection-to-apns):
1. In your Apple developer account, go to [**Certificates, Identifiers & Profiles**](https://developer.apple.com/account/ios/certificate).
2. Under **Keys**, select **All** and click the add button (+) at the top of the page.
3. Under **Key Description**, enter a unique name for the signing key.
4. Under **Key Services**, select the **Apple Push Notification service (APNs)** checkbox, then click **Continue**. Click **Confirm**.
5. Note the key ID. Click **Download** to generate and download the key. Make sure to save the downloaded file in a secure place, as you cannot download this more than once.
6. In Braze, go to **Settings** > **App Settings** and upload the `.p8` file under **Apple Push Certificate**. You can upload either your development or production push certificate. To test push notifications after your app is live in the App Store, its recommended to set up a separate workspace for the development version of your app.
7. When prompted, enter your app's [bundle ID](https://developer.apple.com/documentation/foundation/nsbundle/1418023-bundleidentifier), [key ID](https://developer.apple.com/help/account/manage-keys/get-a-key-identifier/), and [team ID](https://developer.apple.com/help/account/manage-your-team/locate-your-team-id). You'll also need to specify whether to send notifications to your app's development or production environment, which is defined by its provisioning profile.
8. When you're finished, select **Save**.
## 2. Schritt: Push-Funktionen aktivieren {#step-2-enable-push-capabilities}
Vergewissern Sie sich in Ihren Projekteinstellungen, dass auf dem Tab **Capabilities** die Funktion **Push Notifications** aktiviert ist.

Wenn Sie über getrennte Push-Zertifikate für Entwicklung und Produktion verfügen, müssen Sie auf dem Tab **General** das Kontrollkästchen **Automatically manage signing** deaktivieren. Auf diese Weise können Sie für jede Build-Konfiguration unterschiedliche Bereitstellungsprofile wählen, da das Feature zur automatischen Code-Signierung in Xcode nur für die Entwicklung gilt.

## 3. Schritt: Für Push-Benachrichtigungen registrieren {#step-3-register-for-push-notifications}
Das entsprechende Code-Beispiel muss in der Delegate-Methode `application:didFinishLaunchingWithOptions:` Ihrer App enthalten sein, damit sich das Gerät Ihrer Nutzer:innen bei APNs registrieren kann. Stellen Sie sicher, dass Sie den gesamten Code für die Push-Integration im Hauptthread Ihrer Anwendung aufrufen.
Braze bietet auch Standard-Push-Kategorien für die Unterstützung von Push-Action-Buttons, die manuell zu Ihrem Code für die Push-Registrierung hinzugefügt werden müssen. Weitere Schritte zur Integration finden Sie unter [Push-Action-Buttons](https://www.braze.com/docs/de/de/developer_guide/platforms/legacy_sdks/ios/push_notifications/customization/action_buttons).
**Warning:**
Wenn Sie einen angepassten Push-Prompt wie in unseren [Best Practices für Push-Benachrichtigungen](https://www.braze.com/docs/de/de/developer_guide/platforms/legacy_sdks/ios/push_notifications/troubleshooting) beschrieben implementiert haben, stellen Sie sicher, dass Sie den folgenden Code **jedes Mal aufrufen, wenn die App ausgeführt wird**, nachdem die Push-Berechtigungen für Ihre App erteilt wurden. **Apps müssen sich bei APNs neu registrieren, da [sich Geräte-Token beliebig ändern können](https://developer.apple.com/library/ios/documentation/iPhone/Conceptual/iPhoneOSProgrammingGuide/BackgroundExecution/BackgroundExecution.html).**
### UserNotification-Framework verwenden (iOS 10+) {#using-usernotification-framework-ios-10}
Wenn Sie das in iOS 10 eingeführte Framework `UserNotifications` verwenden (empfohlen), fügen Sie den folgenden Code zur Methode `application:didFinishLaunchingWithOptions:` Ihres App-Delegaten hinzu.
**Important:**
Das folgende Code-Beispiel enthält die Integration für die vorläufige Push-Authentifizierung (Zeilen 5 und 6). Wenn Sie nicht vorhaben, eine vorläufige Autorisierung in Ihrer App zu verwenden, können Sie die Zeilen des Codes entfernen, die `UNAuthorizationOptionProvisional` zu den `requestAuthorization`-Optionen hinzufügen. In den [iOS-Benachrichtigungsoptionen](https://www.braze.com/docs/de/de/user_guide/channels/push/platform_specific_resources/ios/notification_options) erfahren Sie mehr über die vorläufige Push-Authentifizierung.
```objc
if (floor(NSFoundationVersionNumber) > NSFoundationVersionNumber_iOS_9_x_Max) {
UNUserNotificationCenter *center = [UNUserNotificationCenter currentNotificationCenter];
center.delegate = self;
UNAuthorizationOptions options = UNAuthorizationOptionAlert | UNAuthorizationOptionSound | UNAuthorizationOptionBadge;
if (@available(iOS 12.0, *)) {
options = options | UNAuthorizationOptionProvisional;
}
[center requestAuthorizationWithOptions:options
completionHandler:^(BOOL granted, NSError * _Nullable error) {
[[Appboy sharedInstance] pushAuthorizationFromUserNotificationCenter:granted];
}];
[[UIApplication sharedApplication] registerForRemoteNotifications];
} else {
UIUserNotificationSettings *settings = [UIUserNotificationSettings settingsForTypes:(UIUserNotificationTypeBadge | UIUserNotificationTypeAlert | UIUserNotificationTypeSound) categories:nil];
[[UIApplication sharedApplication] registerForRemoteNotifications];
[[UIApplication sharedApplication] registerUserNotificationSettings:settings];
}
```
```swift
if #available(iOS 10, *) {
let center = UNUserNotificationCenter.current()
center.delegate = self as? UNUserNotificationCenterDelegate
var options: UNAuthorizationOptions = [.alert, .sound, .badge]
if #available(iOS 12.0, *) {
options = UNAuthorizationOptions(rawValue: options.rawValue | UNAuthorizationOptions.provisional.rawValue)
}
center.requestAuthorization(options: options) { (granted, error) in
Appboy.sharedInstance()?.pushAuthorization(fromUserNotificationCenter: granted)
}
UIApplication.shared.registerForRemoteNotifications()
} else {
let types : UIUserNotificationType = [.alert, .badge, .sound]
let setting : UIUserNotificationSettings = UIUserNotificationSettings(types:types, categories:nil)
UIApplication.shared.registerUserNotificationSettings(setting)
UIApplication.shared.registerForRemoteNotifications()
}
```
**Warning:**
Sie müssen Ihr Delegate-Objekt mit `center.delegate = self` synchron zuweisen, bevor Ihre App den Startvorgang beendet, vorzugsweise in `application:didFinishLaunchingWithOptions:`. Wenn Sie dies nicht tun, kann Ihre App eingehende Push-Benachrichtigungen verpassen. Mehr dazu erfahren Sie in der Dokumentation zu [`UNUserNotificationCenterDelegate`](https://developer.apple.com/documentation/usernotifications/unusernotificationcenterdelegate) von Apple.
### Ohne UserNotifications-Framework {#without-usernotifications-framework}
Wenn Sie das Framework `UserNotifications` nicht verwenden, fügen Sie den folgenden Code zur Methode `application:didFinishLaunchingWithOptions:` Ihres App-Delegaten hinzu:
```objc
UIUserNotificationSettings *settings = [UIUserNotificationSettings settingsForTypes:(UIUserNotificationTypeBadge | UIUserNotificationTypeAlert | UIUserNotificationTypeSound) categories:nil];
[[UIApplication sharedApplication] registerForRemoteNotifications];
[[UIApplication sharedApplication] registerUserNotificationSettings:settings];
```
```swift
let types : UIUserNotificationType = UIUserNotificationType.Badge | UIUserNotificationType.Sound | UIUserNotificationType.Alert
var setting : UIUserNotificationSettings = UIUserNotificationSettings(forTypes: types, categories: nil)
UIApplication.shared.registerUserNotificationSettings(setting)
UIApplication.shared.registerForRemoteNotifications()
```
## 4. Schritt: Push-Token bei Braze registrieren {#step-4-register-push-tokens-with-braze}
Sobald die APNs-Registrierung abgeschlossen ist, muss die folgende Methode geändert werden, um das resultierende `deviceToken` an Braze zu übergeben, damit die Nutzer:innen für Push-Benachrichtigungen aktiviert werden:
Fügen Sie den folgenden Code zu Ihrer Methode `application:didRegisterForRemoteNotificationsWithDeviceToken:` hinzu:
```objc
[[Appboy sharedInstance] registerDeviceToken:deviceToken];
```
Fügen Sie den folgenden Code in die Methode `application(_:didRegisterForRemoteNotificationsWithDeviceToken:)` Ihrer App ein:
```swift
Appboy.sharedInstance()?.registerDeviceToken(deviceToken)
```
**Important:**
Die Delegate-Methode `application:didRegisterForRemoteNotificationsWithDeviceToken:` wird jedes Mal aufgerufen, nachdem `[[UIApplication sharedApplication] registerForRemoteNotifications]` aufgerufen wurde. Wenn Sie von einem anderen Push-Dienst zu Braze migrieren und das Gerät Ihrer Nutzer:innen sich bereits bei APNs registriert hat, sammelt diese Methode beim nächsten Aufruf Token von bestehenden Registrierungen, und die Nutzer:innen müssen sich nicht erneut für Push anmelden.
## 5. Schritt: Push-Verarbeitung aktivieren {#step-5-enable-push-handling}
Der folgende Code leitet empfangene Push-Benachrichtigungen an Braze weiter und ist für die Protokollierung von Push-Analytics und die Behandlung von Links erforderlich. Stellen Sie sicher, dass Sie den gesamten Code für die Push-Integration im Hauptthread Ihrer Anwendung aufrufen.
### iOS 10+
Für iOS 10+ empfehlen wir die Integration des Frameworks `UserNotifications` und die folgenden Schritte:
Fügen Sie den folgenden Code in die Methode `application:didReceiveRemoteNotification:fetchCompletionHandler:` Ihrer Anwendung ein:
```objc
[[Appboy sharedInstance] registerApplication:application
didReceiveRemoteNotification:userInfo
fetchCompletionHandler:completionHandler];
```
Als Nächstes fügen Sie den folgenden Code in die Methode `(void)userNotificationCenter:didReceiveNotificationResponse:withCompletionHandler:` Ihrer App ein:
```objc
[[Appboy sharedInstance] userNotificationCenter:center
didReceiveNotificationResponse:response
withCompletionHandler:completionHandler];
```
**Push-Verarbeitung im Vordergrund**
Um eine Push-Benachrichtigung anzuzeigen, während sich die App im Vordergrund befindet, implementieren Sie `userNotificationCenter:willPresentNotification:withCompletionHandler:`:
```objc
- (void)userNotificationCenter:(UNUserNotificationCenter *)center
willPresentNotification:(UNNotification *)notification
withCompletionHandler:(void (^)(UNNotificationPresentationOptions options))completionHandler {
if (@available(iOS 14.0, *)) {
completionHandler(UNNotificationPresentationOptionList | UNNotificationPresentationOptionBanner);
} else {
completionHandler(UNNotificationPresentationOptionAlert);
}
}
```
Wenn auf die Benachrichtigung im Vordergrund geklickt wird, wird der iOS-10-Push-Delegat `userNotificationCenter:didReceiveNotificationResponse:withCompletionHandler:` aufgerufen und Braze protokolliert ein Push-Klick-Event.
Fügen Sie den folgenden Code in die Methode `application(_:didReceiveRemoteNotification:fetchCompletionHandler:)` Ihrer App ein:
```swift
Appboy.sharedInstance()?.register(application,
didReceiveRemoteNotification: userInfo,
fetchCompletionHandler: completionHandler)
```
Als Nächstes fügen Sie den folgenden Code in die Methode `userNotificationCenter(_:didReceive:withCompletionHandler:)` Ihrer App ein:
```swift
Appboy.sharedInstance()?.userNotificationCenter(center,
didReceive: response,
withCompletionHandler: completionHandler)
```
**Push-Verarbeitung im Vordergrund**
Um eine Push-Benachrichtigung anzuzeigen, während sich die App im Vordergrund befindet, implementieren Sie `userNotificationCenter(_:willPresent:withCompletionHandler:)`:
```swift
func userNotificationCenter(_ center: UNUserNotificationCenter,
willPresent notification: UNNotification,
withCompletionHandler completionHandler: @escaping (UNNotificationPresentationOptions) -> Void) {
if #available(iOS 14.0, *) {
completionHandler([.list, .banner]);
} else {
completionHandler([.alert]);
}
}
```
Wenn auf die Benachrichtigung im Vordergrund geklickt wird, wird der iOS-10-Push-Delegat `userNotificationCenter(_:didReceive:withCompletionHandler:)` aufgerufen und Braze protokolliert ein Push-Klick-Event.
### Vor iOS 10 {#pre-ios-10}
iOS 10 hat das Verhalten aktualisiert, sodass beim Klicken auf einen Push `application:didReceiveRemoteNotification:fetchCompletionHandler:` nicht mehr aufgerufen wird. Aus diesem Grund müssen Sie, wenn Sie nicht auf iOS 10+ aktualisieren und das Framework `UserNotifications` verwenden, Braze von beiden alten Delegaten aufrufen, was einen Bruch mit unserer früheren Integration darstellt.
Für Apps, die mit SDKs < iOS 10 erstellt werden, verwenden Sie die folgenden Anweisungen:
Um das Öffnungs-Tracking für Push-Benachrichtigungen zu aktivieren, fügen Sie den folgenden Code in die Methode `application:didReceiveRemoteNotification:fetchCompletionHandler:` Ihrer App ein:
```objc
[[Appboy sharedInstance] registerApplication:application
didReceiveRemoteNotification:userInfo
fetchCompletionHandler:completionHandler];
```
Um Push-Analytics unter iOS 10 zu unterstützen, müssen Sie außerdem den folgenden Code zur Delegate-Methode `application:didReceiveRemoteNotification:` Ihrer App hinzufügen:
```objc
[[Appboy sharedInstance] registerApplication:application
didReceiveRemoteNotification:userInfo];
```
Um das Öffnungs-Tracking für Push-Benachrichtigungen zu aktivieren, fügen Sie den folgenden Code in die Methode `application(_:didReceiveRemoteNotification:fetchCompletionHandler:)` Ihrer App ein:
```swift
Appboy.sharedInstance()?.register(application,
didReceiveRemoteNotification: userInfo,
fetchCompletionHandler: completionHandler)
```
Um Push-Analytics unter iOS 10 zu unterstützen, müssen Sie außerdem den folgenden Code zur Delegate-Methode `application(_:didReceiveRemoteNotification:)` Ihrer App hinzufügen:
```swift
Appboy.sharedInstance()?.register(application,
didReceiveRemoteNotification: userInfo)
```
## 6. Schritt: Deeplinking {#step-6-deep-linking}
Deeplinks von einem Push in die App werden automatisch über unsere standardmäßige Dokumentation zur Push-Integration verarbeitet. Wenn Sie mehr darüber erfahren möchten, wie Sie Deeplinks zu bestimmten Stellen in Ihrer App hinzufügen, sehen Sie sich unsere [fortgeschrittenen Anwendungsfälle](https://www.braze.com/docs/de/de/developer_guide/platform_integration_guides/ios/advanced_use_cases/linking#linking-implementation) an.
## 7. Schritt: Unit-Tests (optional) {#step-7-unit-tests-optional}
Um die Testabdeckung für die soeben durchgeführten Integrationsschritte zu erhöhen, implementieren Sie [Push-Unit-Tests](https://www.braze.com/docs/de/de/developer_guide/platforms/legacy_sdks/ios/push_notifications/unit_tests).
# iOS Push-Anpassung
Source: /docs/de/developer_guide/platforms/legacy_sdks/ios/push_notifications/customization/index.md
# Push-Action-Buttons für iOS
Source: /docs/de/developer_guide/platforms/legacy_sdks/ios/push_notifications/customization/action_buttons/index.md
**Warning:**
[AppboyKit](https://github.com/Appboy/appboy-ios-sdk) (also known as the Objective-C SDK) is no longer supported and has been replaced by the [Swift SDK](https://www.braze.com/docs/de/de/developer_guide/sdk_integration/?sdktab=swift). It will no longer receive new features, bug fixes, security updates, or technical support—however, messaging and analytics will continue to function as normal. To learn more, see [Introducing the New Braze Swift SDK](https://www.braze.com/resources/articles/introducing-the-new-braze-swift-sdk).
# Aktions-Buttons {#push-action-buttons-integration}
Das Braze iOS SDK unterstützt die standardmäßigen Push-Kategorien, einschließlich URL-Handling für jeden Push-Action-Button. Die Standard-Kategorien verfügen derzeit über vier Sets von Push-Action-Buttons: `Accept`/`Decline`, `Yes`/`No`, `Confirm`/`Cancel` und `More`.

Um unsere Standard-Push-Kategorien zu registrieren, folgen Sie den Anweisungen zur Integration:
## 1. Schritt: Hinzufügen von Braze Standard-Push-Kategorien {#step-1-adding-braze-default-push-categories}
Verwenden Sie den folgenden Code, um sich für unsere Standard-Push-Kategorien zu registrieren, wenn Sie [sich für Push anmelden](https://www.braze.com/docs/de/de/developer_guide/platform_integration_guides/ios/push_notifications/integration#step-4-register-push-tokens-with-braze):
```objc
// For UserNotification.framework (iOS 10+ only)
NSSet *appboyCategories = [ABKPushUtils getAppboyUNNotificationCategorySet];
[[UNUserNotificationCenter currentNotificationCenter] setNotificationCategories:appboyCategories];
// For UIUserNotificationSettings (before iOS 10)
NSSet *appboyCategories = [ABKPushUtils getAppboyUIUserNotificationCategorySet];
UIUserNotificationSettings *settings = [UIUserNotificationSettings settingsForTypes:UIUserNotificationTypeBadge
categories:appboyCategories];
[[UIApplication sharedApplication] registerUserNotificationSettings:settings];
```
```swift
// For UserNotification.framework (iOS 10+ only)
let appboyCategories = ABKPushUtils.getAppboyUNNotificationCategorySet()
UNUserNotificationCenter.current().setNotificationCategories(appboyCategories)
// For UIUserNotificationSettings (before iOS 10)
let appboyCategories = ABKPushUtils.getAppboyUIUserNotificationCategorySet()
let settings = UIUserNotificationSettings.init(types: .badge, categories: appboyCategories)
UIApplication.shared.registerUserNotificationSettings(settings)
```
Wenn Sie auf Push-Action-Buttons mit Hintergrundaktivierung klicken, wird nur die Benachrichtigung geschlossen und die App nicht geöffnet. Wenn Nutzer:innen die App das nächste Mal öffnen, werden die Klick-Analytics für diese Aktionen an den Server übertragen.
Wenn Sie Ihre eigenen angepassten Benachrichtigungskategorien erstellen möchten, lesen Sie den Abschnitt zur [Anpassung der Aktions-Buttons](https://www.braze.com/docs/de/de/developer_guide/platform_integration_guides/ios/push_notifications/customization/action_buttons#push-category-customization).
## 2. Schritt: Aktivieren der interaktiven Push-Verarbeitung {#step-2-enable-interactive-push-handling}
Wenn Sie das `UNNotification`-Framework verwenden und Braze-[Delegates](https://www.braze.com/docs/de/de/developer_guide/platform_integration_guides/ios/push_notifications/integration#step-5-enable-push-handling) implementiert haben, sollten Sie diese Methode bereits integriert haben.
Um die Verarbeitung von Push-Action-Buttons, einschließlich Klick-Analytics und URL-Routing, zu aktivieren, fügen Sie den folgenden Code in die Delegate-Methode `(void)userNotificationCenter:didReceiveNotificationResponse:withCompletionHandler:` Ihrer App ein:
```objc
[[Appboy sharedInstance] userNotificationCenter:center
didReceiveNotificationResponse:response
withCompletionHandler:completionHandler];
```
```swift
Appboy.sharedInstance()?.userNotificationCenter(center,
didReceive: response,
withCompletionHandler: completionHandler)
```
Wenn Sie das UNNotification-Framework nicht verwenden, müssen Sie den folgenden Code in die Methode `application:handleActionWithIdentifier:forRemoteNotification:completionHandler:` Ihrer App einfügen, um die Verarbeitung unserer Push-Action-Buttons zu aktivieren:
```objc
[[Appboy sharedInstance] getActionWithIdentifier:identifier
forRemoteNotification:userInfo
completionHandler:completionHandler];
```
```swift
Appboy.sharedInstance()?.getActionWithIdentifier(identifier,
forRemoteNotification: userInfo,,
completionHandler: completionHandler)
```
**Important:**
Wir empfehlen Nutzer:innen von `handleActionWithIdentifier` dringend, auf das `UNNotification`-Framework umzusteigen. Wir empfehlen dies aufgrund der Deprecation von [`handleActionWithIdentifier`](https://developer.apple.com/documentation/uikit/uiapplicationdelegate/1623068-application?language=objc).
## Anpassung der Push-Kategorie {#push-category-customization}
Braze bietet nicht nur eine Reihe von [Standard-Push-Kategorien](https://www.braze.com/docs/de/de/developer_guide/platforms/legacy_sdks/ios/push_notifications/customization/action_buttons), sondern unterstützt auch angepasste Benachrichtigungskategorien und Aktionen. Nachdem Sie Kategorien in Ihrer Anwendung registriert haben, können Sie das Braze-Dashboard verwenden, um Benachrichtigungskategorien an Ihre Nutzer:innen zu senden.
Wenn Sie nicht das `UserNotifications`-Framework verwenden, lesen Sie die Dokumentation zu den [alternativen Kategorien](https://developer.apple.com/documentation/usernotifications/unnotificationcategory).
Diese Kategorien können dann über unser Dashboard Push-Benachrichtigungen zugewiesen werden, um die Aktions-Button-Konfigurationen Ihres Designs zu triggern. Hier ist ein Beispiel, das die `LIKE_CATEGORY` nutzt, die auf dem Gerät angezeigt wird:

# Benutzerdefinierte Push-Benachrichtigungstöne für iOS
Source: /docs/de/developer_guide/platforms/legacy_sdks/ios/push_notifications/customization/custom_sounds/index.md
**Warning:**
[AppboyKit](https://github.com/Appboy/appboy-ios-sdk) (also known as the Objective-C SDK) is no longer supported and has been replaced by the [Swift SDK](https://www.braze.com/docs/de/de/developer_guide/sdk_integration/?sdktab=swift). It will no longer receive new features, bug fixes, security updates, or technical support—however, messaging and analytics will continue to function as normal. To learn more, see [Introducing the New Braze Swift SDK](https://www.braze.com/resources/articles/introducing-the-new-braze-swift-sdk).
# Benutzerdefinierte Klänge {#custom-sounds}
## 1. Schritt: Hosting des Sounds in der App {#step-1-hosting-the-sound-in-the-app}
Angepasste Push-Benachrichtigungstöne müssen lokal innerhalb des Hauptbundles der Client-Anwendung gehostet werden. Die folgenden Audiodatenformate werden akzeptiert:
- Lineare PCM
- MA4
- µLaw
- aLaw
Sie können die Audiodaten in eine AIFF-, WAV- oder CAF-Datei packen. In Xcode fügen Sie die Sounddatei als nicht lokalisierte Ressource des Anwendungsbundles zu Ihrem Projekt hinzu.
Sie können das Tool afconvert verwenden, um Töne zu konvertieren. Um zum Beispiel den linearen 16-Bit-PCM-Systemton Submarine.aiff in IMA4-Audio in einer CAF-Datei zu konvertieren, verwenden Sie den folgenden Befehl im Terminal:
```bash
afconvert /System/Library/Sounds/Submarine.aiff ~/Desktop/sub.caf -d ima4 -f caff -v
```
Sie können einen Sound untersuchen, um sein Datenformat zu bestimmen, indem Sie ihn im QuickTime Player öffnen und im Menü **Film** die Option **Filminspektor anzeigen** wählen.
Benutzerdefinierte Sounds müssen beim Abspielen unter 30 Sekunden bleiben. Wenn ein angepasster Sound dieses Limit überschreitet, wird stattdessen der standardmäßige Systemton abgespielt.
## 2. Schritt: Das Dashboard mit einer Protokoll-URL für den Sound versorgen {#step-2-providing-the-dashboard-with-a-protocol-url-for-the-sound}
Ihr Sound muss lokal in der App gehostet werden. Sie müssen im Feld **Sound** des Push-Composers eine Protokoll-URL angeben, die auf den Speicherort der Sounddatei in der App verweist. Wenn Sie in diesem Feld „default“ angeben, wird der standardmäßige Benachrichtigungston auf dem Gerät abgespielt. Dies kann über unsere [Messaging-API](https://www.braze.com/docs/de/de/api/endpoints/messaging) oder unser Dashboard unter **Einstellungen** im Push-Composer festgelegt werden, wie im folgenden Screenshot zu sehen ist:

Wenn die angegebene Sounddatei nicht existiert oder das Schlüsselwort „default“ eingegeben wird, verwendet Braze den standardmäßigen Alarmton des Geräts. Abgesehen von unserem Dashboard kann der Sound auch über unsere [Messaging-API](https://www.braze.com/docs/de/de/api/endpoints/messaging) konfiguriert werden. Weitere Informationen finden Sie in der Apple-Entwicklerdokumentation zur [Vorbereitung von benutzerdefinierten Warntönen](https://developer.apple.com/library/content/documentation/NetworkingInternet/Conceptual/RemoteNotificationsPG/SupportingNotificationsinYourApp.html).
# Rich-Push-Benachrichtigungen für iOS
Source: /docs/de/developer_guide/platforms/legacy_sdks/ios/push_notifications/customization/rich_notifications/index.md
**Warning:**
[AppboyKit](https://github.com/Appboy/appboy-ios-sdk) (also known as the Objective-C SDK) is no longer supported and has been replaced by the [Swift SDK](https://www.braze.com/docs/de/de/developer_guide/sdk_integration/?sdktab=swift). It will no longer receive new features, bug fixes, security updates, or technical support—however, messaging and analytics will continue to function as normal. To learn more, see [Introducing the New Braze Swift SDK](https://www.braze.com/resources/articles/introducing-the-new-braze-swift-sdk).
# Rich-Benachrichtigungen unter iOS 10 {#ios-10-rich-notifications}
iOS 10 führt die Möglichkeit ein, Push-Benachrichtigungen mit Bildern, GIFs und Videos zu versenden. Um diese Funktion zu aktivieren, müssen Clients eine `Service Extension` erstellen. Dabei handelt es sich um eine neue Art von Erweiterung, die die Modifizierung einer Push-Nutzlast ermöglicht, bevor diese angezeigt wird.
## Erstellen einer Serviceerweiterung {#creating-a-service-extension}
Navigieren Sie zum Erstellen einer [`Notification Service Extension`](https://developer.apple.com/reference/usernotifications/unnotificationserviceextension) in Xcode zu **File > New > Target** und wählen Sie **Notification Service Extension** aus.
{: style="max-width:90%"}
Vergewissern Sie sich, dass **Embed In Application** so eingestellt ist, dass die Erweiterung in Ihre Anwendung eingebettet wird.
## Einrichten der Serviceerweiterung {#setting-up-the-service-extension}
Eine `Notification Service Extension` ist eine eigene Binärdatei, die mit Ihrer App gebündelt wird. Sie muss im [Apple Developer Portal](https://developer.apple.com) mit einer eigenen App-ID und einem eigenen Bereitstellungsprofil eingerichtet werden.
Die Bundle-ID der `Notification Service Extension` muss sich von der Bundle-ID des App-Hauptziels unterscheiden. Wenn die Bundle-ID Ihrer App zum Beispiel `com.company.appname` lautet, können Sie für die Serviceerweiterung `com.company.appname.AppNameServiceExtension` verwenden.
### Konfigurieren der Serviceerweiterung für die Zusammenarbeit mit Braze {#configuring-the-service-extension-to-work-with-braze}
Braze sendet in der APNs-Nutzlast eine Attachment-Nutzlast unter dem Schlüssel `ab`, den wir zum Konfigurieren, Herunterladen und Anzeigen von Rich Content verwenden. Zum Beispiel:
```json
{
"ab" :
{
...
"att" :
{
"url" : "http://mysite.com/myimage.jpg",
"type" : "jpg"
}
},
"aps" :
{
...
}
}
```
Die relevanten Nutzlastwerte sind:
```objc
// The Braze dictionary key
static NSString *const AppboyAPNSDictionaryKey = @"ab";
// The attachment dictionary
static NSString *const AppboyAPNSDictionaryAttachmentKey = @"att";
// The attachment URL
static NSString *const AppboyAPNSDictionaryAttachmentURLKey = @"url";
// The type of the attachment - a suffix for the file you save
static NSString *const AppboyAPNSDictionaryAttachmentTypeKey = @"type";
```
Um Push-Nachrichten mit einer Braze-Nutzlast manuell anzuzeigen, laden Sie den Inhalt aus dem Wert unter `AppboyAPNSDictionaryAttachmentURLKey` herunter, speichern Sie ihn als Datei mit dem Dateityp, der unter dem Schlüssel `AppboyAPNSDictionaryAttachmentTypeKey` gespeichert ist, und fügen Sie ihn zu den Benachrichtigungsanhängen hinzu.
### Beispiel-Code {#example-code}
Sie können die Serviceerweiterung in Objective-C oder Swift schreiben.
Um unseren Beispiel-Code in Objective-C zu verwenden, ersetzen Sie den Inhalt der automatisch generierten `NotificationService.m` Ihres Ziels für die `Notification Service Extension` durch den Inhalt der Appboy [`NotificationService.m`](https://github.com/Appboy/appboy-ios-sdk/blob/master/Example/StopwatchNotificationService/NotificationService.m).
Um unseren Swift-Beispielcode zu verwenden, ersetzen Sie den Inhalt der automatisch generierten `NotificationService.swift` Ihres `Notification Service Extension`-Ziels durch den Inhalt der Appboy [`NotificationService.swift`](https://github.com/Appboy/appboy-ios-sdk/blob/master/HelloSwift/HelloSwiftNotificationExtension/NotificationService.swift).
## Erstellen einer Rich-Benachrichtigung in Ihrem Dashboard {#creating-a-rich-notification-in-your-dashboard}
Um eine Rich-Benachrichtigung in Ihrem Braze-Dashboard zu erstellen, erstellen Sie einen iOS-Push, hängen Sie ein Bild oder GIF an oder geben Sie eine URL an, die ein Bild, GIF oder Video enthält. Beachten Sie, dass beim Empfang von Push-Benachrichtigungen Assets heruntergeladen werden. Planen Sie deshalb große, synchrone Anfragespitzen ein, wenn Sie Ihre Inhalte selbst hosten.
Eine Liste der unterstützten Dateitypen und -größen finden Sie unter [`unnotificationattachment`](https://developer.apple.com/reference/usernotifications/unnotificationattachment).
# Push-Benachrichtigung Badge Counts für iOS
Source: /docs/de/developer_guide/platforms/legacy_sdks/ios/push_notifications/customization/badges/index.md
**Warning:**
[AppboyKit](https://github.com/Appboy/appboy-ios-sdk) (also known as the Objective-C SDK) is no longer supported and has been replaced by the [Swift SDK](https://www.braze.com/docs/de/de/developer_guide/sdk_integration/?sdktab=swift). It will no longer receive new features, bug fixes, security updates, or technical support—however, messaging and analytics will continue to function as normal. To learn more, see [Introducing the New Braze Swift SDK](https://www.braze.com/resources/articles/introducing-the-new-braze-swift-sdk).
# Abzeichen
Sie können die gewünschte Anzahl der Badges angeben, wenn Sie eine Push-Benachrichtigung über das Braze-Dashboard verfassen. Sie können die Anzahl der Badges auch manuell über die Eigenschaft [`applicationIconBadgeNumber`](https://developer.apple.com/library/ios/documentation/UIKit/Reference/UIApplication_Class/index.html#//apple_ref/occ/instp/UIApplication/applicationIconBadgeNumber) Ihrer Anwendung oder die [remote Benachrichtigungs-Payload](https://developer.apple.com/library/content/documentation/NetworkingInternet/Conceptual/RemoteNotificationsPG/CreatingtheNotificationPayload.html#//apple_ref/doc/uid/TP40008194-CH10-SW1) aktualisieren. Braze löscht auch die Anzahl der Badges, wenn eine Braze-Benachrichtigung empfangen wird, während die App im Vordergrund ist.
Wenn Sie nicht vorhaben, die Badges im Rahmen des normalen Betriebs der App oder durch das Senden von Push-Nachrichten zu löschen, sollten Sie die Badges löschen, wenn die App aktiv wird, indem Sie den folgenden Code in die Delegate-Methode `applicationDidBecomeActive:` Ihrer App einfügen:
```objc
// For iOS 16.0+
UNUserNotificationCenter *center = [UNUserNotificationCenter currentNotificationCenter];
[center setBadgeCount:0 withCompletionHandler:^(NSError * _Nullable error) {
if (error != nil) {
// Handle errors
}
}];
// Prior to iOS 16. Deprecated in iOS 17+.
[UIApplication sharedApplication].applicationIconBadgeNumber = 0;
```
```swift
// For iOS 16.0+
let center = UNUserNotificationCenter.current()
do {
try await center.setBadgeCount(0)
} catch {
// Handle errors
}
// Prior to iOS 16. Deprecated in iOS 17+.
UIApplication.shared.applicationIconBadgeNumber = 0
```
Beachten Sie, dass das Setzen der Badge-Nummer auf 0 auch die Benachrichtigungen in der Benachrichtigungszentrale löscht. Auch wenn Sie die Badge-Nummer in den Push-Payloads nicht festlegen, können Sie die Badge-Nummer auf 0 setzen, um die Push-Benachrichtigung(en) im Notification Center zu entfernen, nachdem die Nutzer:innen auf den Push geklickt haben.
# Interne Push-Benachrichtigungen von Braze für iOS ignorieren
Source: /docs/de/developer_guide/platforms/legacy_sdks/ios/push_notifications/customization/ignoring_internal_push/index.md
**Warning:**
[AppboyKit](https://github.com/Appboy/appboy-ios-sdk) (also known as the Objective-C SDK) is no longer supported and has been replaced by the [Swift SDK](https://www.braze.com/docs/de/de/developer_guide/sdk_integration/?sdktab=swift). It will no longer receive new features, bug fixes, security updates, or technical support—however, messaging and analytics will continue to function as normal. To learn more, see [Introducing the New Braze Swift SDK](https://www.braze.com/resources/articles/introducing-the-new-braze-swift-sdk).
# Interne Push-Benachrichtigungen von Braze ignorieren
Braze verwendet stille Push-Benachrichtigungen für die interne Implementierung bestimmter erweiterter Funktionen. Bei den meisten Integrationen erfordert dies keine Änderungen an Ihrer App. Wenn Sie jedoch eine Braze-Funktion integrieren, die auf interne Push-Benachrichtigungen angewiesen ist (z. B. Deinstallations-Tracking oder Geofences), sollten Sie Ihre App so aktualisieren, dass sie unsere internen Push-Benachrichtigungen ignoriert.
Wenn Ihre App beim Starten von Anwendungen oder bei Push-Nachrichten im Hintergrund automatisch Aktionen ausführt, sollten Sie in Erwägung ziehen, diese Aktivitäten so zu steuern, dass sie nicht durch interne Push-Benachrichtigungen ausgelöst werden. Wenn Sie beispielsweise eine Logik haben, die Ihre Server bei jedem Hintergrund-Push oder Anwendungsstart nach neuen Inhalten fragt, möchten Sie wahrscheinlich nicht, dass unsere internen Pushs dies auslösen, da dies unnötigen Netzwerkverkehr verursachen würde. Da Braze außerdem bestimmte Arten von internen Push-Nachrichten an alle Benutzer ungefähr zur gleichen Zeit sendet, könnten Netzwerkaufrufe beim Start von internen Push-Nachrichten zu einer erheblichen Serverbelastung führen, wenn sie nicht unterbrochen werden.
## Überprüfen Sie Ihre App auf automatische Aktionen
Sie sollten Ihre Anwendung an den folgenden Stellen auf automatische Aktionen überprüfen und Ihren Code aktualisieren, um unsere internen Pushes zu ignorieren:
1. **Push-Empfänger.** Push-Benachrichtigungen im Hintergrund rufen `application:didReceiveRemoteNotification:fetchCompletionHandler:` auf der `UIApplicationDelegate` auf.
2. **App-Delegat.** Pushes im Hintergrund können [angehaltene](https://developer.apple.com/library/ios/documentation/iPhone/Conceptual/iPhoneOSProgrammingGuide/TheAppLifeCycle/TheAppLifeCycle.html#//apple_ref/doc/uid/TP40007072-CH2-SW3) Apps im Hintergrund starten und dabei die Methoden `application:willFinishLaunchingWithOptions:` und `application:didFinishLaunchingWithOptions:` beim `UIApplicationDelegate` triggern. Sie können die `launchOptions` dieser Methoden überprüfen, um festzustellen, ob die Anwendung durch einen Push im Hintergrund gestartet wurde.
## Verwendung der internen Push-Utility-Methoden von Braze
Sie können die Utility-Methoden in `ABKPushUtils` verwenden, um zu überprüfen, ob Ihre App eine interne Push-Benachrichtigung von Braze erhalten hat oder durch eine solche gestartet wurde. `isAppboyInternalRemoteNotification:` gibt `YES` für alle internen Push-Benachrichtigungen von Braze zurück, während `isUninstallTrackingRemoteNotification:` und `isGeofencesSyncRemoteNotification:` `YES` für Tracking-Benachrichtigungen zur Deinstallation bzw. für Synchronisierungsbenachrichtigungen von Geofences zurückgeben. Siehe [`ABKPushUtils.h`](https://github.com/Appboy/appboy-ios-sdk/blob/master/AppboyKit/include/ABKPushUtils.h) für Methodendeklarationen.
## Implementierungsbeispiel {#internal-push-implementation-example}
```objc
- (BOOL)application:(UIApplication *)application didFinishLaunchingWithOptions:(NSDictionary *)launchOptions {
NSDictionary *pushDictionary = launchOptions[UIApplicationLaunchOptionsRemoteNotificationKey];
BOOL launchedFromAppboyInternalPush = pushDictionary && [ABKPushUtils isAppboyInternalRemoteNotification:pushDictionary];
if (!launchedFromAppboyInternalPush) {
// ... Gated logic here (such as pinging your server to download content) ...
}
}
```
```objc
- (void)application:(UIApplication *)application didReceiveRemoteNotification:(NSDictionary *)userInfo fetchCompletionHandler:(void (^)(UIBackgroundFetchResult result))completionHandler {
if (![ABKPushUtils isAppboyInternalRemoteNotification:userInfo]) {
// ... Gated logic here (such as pinging server for content) ...
}
}
```
```swift
func application(_ application: UIApplication, didFinishLaunchingWithOptions launchOptions: [UIApplicationLaunchOptionsKey : Any]? = nil) -> Bool {
let pushDictionary = launchOptions?[UIApplicationLaunchOptionsKey.remoteNotification] as? NSDictionary as? [AnyHashable : Any] ?? [:]
let launchedFromAppboyInternalPush = ABKPushUtils.isAppboyInternalRemoteNotification(pushDictionary)
if (!launchedFromAppboyInternalPush) {
// ... Gated logic here (such as pinging your server to download content) ...
}
}
```
```swift
func application(_ application: UIApplication,
didReceiveRemoteNotification userInfo: [AnyHashable : Any],
fetchCompletionHandler completionHandler: @escaping (UIBackgroundFetchResult) -> Void) {
if (!ABKPushUtils.isAppboyInternalRemoteNotification(userInfo)) {
// ... Gated logic here (such as pinging server for content) ...
}
}
```
# Erweiterte Push-Einstellungen
Source: /docs/de/developer_guide/platforms/legacy_sdks/ios/push_notifications/customization/advanced_settings/index.md
**Warning:**
[AppboyKit](https://github.com/Appboy/appboy-ios-sdk) (also known as the Objective-C SDK) is no longer supported and has been replaced by the [Swift SDK](https://www.braze.com/docs/de/de/developer_guide/sdk_integration/?sdktab=swift). It will no longer receive new features, bug fixes, security updates, or technical support—however, messaging and analytics will continue to function as normal. To learn more, see [Introducing the New Braze Swift SDK](https://www.braze.com/resources/articles/introducing-the-new-braze-swift-sdk).
# Erweiterte Einstellungen {#advanced-settings}
Wenn Sie eine Push-Campaign erstellen, wählen Sie im Schritt „Verfassen“ die Option **Settings**, um die verfügbaren erweiterten Einstellungen anzuzeigen.

## Extrahieren von Daten aus Push-Schlüssel-Wert-Paaren {#extracting-data-from-push-key-value-pairs}
Braze ermöglicht es Ihnen, benutzerdefinierte String-Schlüssel-Wert-Paare, bekannt als `extras`, zusammen mit einer Push-Benachrichtigung an Ihre Anwendung zu senden. Extras können über das Dashboard oder die API definiert werden und stehen dann als Schlüssel-Wert-Paare im `notification`-Wörterbuch zur Verfügung, das an Ihre Push-Delegate-Implementierungen weitergegeben wird.
## Benachrichtigungsoptionen {#alert-options}
Aktivieren Sie das Kontrollkästchen **Alert Options**, um eine Dropdown-Liste mit Schlüsselwerten anzuzeigen, mit denen Sie die Anzeige der Benachrichtigung auf den Geräten anpassen können.
## Hinzufügen des Content-Available-Flags {#adding-content-available-flag}
Aktivieren Sie das Kontrollkästchen **Add Content-Available Flag**, um die Geräte anzuweisen, neue Inhalte im Hintergrund herunterzuladen. In der Regel können Sie diese Option aktivieren, wenn Sie [stille Benachrichtigungen](https://www.braze.com/docs/de/de/developer_guide/platforms/legacy_sdks/ios/push_notifications/silent_push_notifications) versenden möchten.
## Hinzufügen des Mutable-Content-Flags {#adding-mutable-content-flag}
Aktivieren Sie das Kontrollkästchen **Add Mutable-Content Flag**, um die erweiterte Empfängeranpassung auf Geräten mit iOS 10+ zu aktivieren. Dieses Flag wird automatisch gesendet, wenn Sie eine [Rich-Benachrichtigung](https://www.braze.com/docs/de/de/developer_guide/platforms/legacy_sdks/ios/push_notifications/customization/rich_notifications) verfassen, unabhängig vom Wert dieses Kontrollkästchens.
## App-Badge-Zähler aktualisieren {#update-app-badge-count}
Geben Sie die Zahl ein, auf die Sie Ihren Badge-Zähler aktualisieren möchten, oder verwenden Sie die Liquid-Syntax, um Ihre angepassten Bedingungen festzulegen. Sie können Ihren Badge-Zähler auch manuell über die Eigenschaft `applicationIconBadgeNumber` Ihrer Anwendung oder die Payload der Push-Benachrichtigung aktualisieren. Weitere Informationen finden Sie in unserem Artikel über [Badge-Zähler](https://www.braze.com/docs/de/de/developer_guide/platforms/legacy_sdks/ios/push_notifications/customization/badges).
## Töne {#sounds}
Hier können Sie einen Pfad zu einer Tondatei in Ihrem App-Bundle eingeben, um einen Sound festzulegen, der beim Empfang der Push-Nachricht abgespielt wird. Wenn die angegebene Tondatei nicht vorhanden ist oder das Schlüsselwort „default“ eingegeben wird, verwendet Braze den Standard-Gerätealarmton. Weitere Informationen zur Anpassung finden Sie in unserem Artikel über [angepasste Sounds](https://www.braze.com/docs/de/de/developer_guide/platforms/legacy_sdks/ios/push_notifications/customization/custom_sounds).
## Collapse-ID {#collapse-id}
Geben Sie eine Collapse-ID an, um ähnliche Benachrichtigungen zusammenzufassen. Wenn Sie mehrere Benachrichtigungen mit derselben Collapse-ID senden, zeigt das Gerät nur die zuletzt empfangene Benachrichtigung an. Lesen Sie die Dokumentation von Apple über [zusammengefasste Benachrichtigungen](https://developer.apple.com/library/content/documentation/NetworkingInternet/Conceptual/RemoteNotificationsPG/APNSOverview.html#//apple_ref/doc/uid/TP40008194-CH8-SW1).
## Ablauf {#expiry}
Wenn Sie das Kontrollkästchen **Expiry** aktivieren, können Sie eine Ablaufzeit für Ihre Nachricht festlegen. Sollte das Gerät einer Nutzerin oder eines Nutzers die Verbindung verlieren, wird Braze weiterhin versuchen, die Nachricht bis zur angegebenen Zeit zu senden. Wenn dieser Wert nicht festgelegt ist, verwendet die Plattform standardmäßig einen Ablauf von 30 Tagen. Beachten Sie, dass Push-Benachrichtigungen, die vor der Zustellung ablaufen, nicht als fehlgeschlagen gelten und nicht als Bounce registriert werden.
# Stille Push-Benachrichtigungen für iOS
Source: /docs/de/developer_guide/platforms/legacy_sdks/ios/push_notifications/silent_push_notifications/index.md
**Warning:**
[AppboyKit](https://github.com/Appboy/appboy-ios-sdk) (also known as the Objective-C SDK) is no longer supported and has been replaced by the [Swift SDK](https://www.braze.com/docs/de/de/developer_guide/sdk_integration/?sdktab=swift). It will no longer receive new features, bug fixes, security updates, or technical support—however, messaging and analytics will continue to function as normal. To learn more, see [Introducing the New Braze Swift SDK](https://www.braze.com/resources/articles/introducing-the-new-braze-swift-sdk).
# Stille Push-Benachrichtigungen {#silent-push-notifications}
Push-Benachrichtigungen ermöglichen es Ihnen, Ihre App bei wichtigen Ereignissen zu benachrichtigen. Sie können eine Push-Benachrichtigung senden, wenn Sie neue Sofortnachrichten zustellen möchten, aktuelle Eilmeldungen versenden oder die neueste Folge der Lieblingssendung Ihrer Nutzer:innen zum Herunterladen für die Offline-Nutzung bereitsteht. Push-Benachrichtigungen können auch still sein – sie enthalten dann keine Warnmeldung und keinen Ton und dienen ausschließlich dazu, die Oberfläche Ihrer App zu aktualisieren oder Hintergrundarbeiten auszulösen.
Push-Benachrichtigungen eignen sich hervorragend für sporadische, aber unmittelbar wichtige Inhalte, bei denen die Verzögerung zwischen Hintergrundabrufen möglicherweise nicht akzeptabel ist. Push-Benachrichtigungen können auch deutlich effizienter sein als Hintergrundabrufe, da Ihre Anwendung nur bei Bedarf gestartet wird.
Push-Benachrichtigungen unterliegen Rate-Limits – senden Sie also ruhig so viele, wie Ihre Anwendung benötigt. iOS und die APNs-Server steuern, wie oft sie zugestellt werden, und Sie bekommen keine Probleme, wenn Sie zu viele senden. Wenn Ihre Push-Benachrichtigungen gedrosselt werden, werden sie möglicherweise verzögert, bis das Gerät das nächste Mal ein Keep-Alive-Paket sendet oder eine andere Benachrichtigung erhält.
## Stille Push-Benachrichtigungen senden {#sending-silent-push-notifications}
Um eine stille Push-Benachrichtigung zu senden, setzen Sie das Flag `content-available` in der Nutzlast einer Push-Benachrichtigung auf `1`. Wenn Sie eine stille Push-Benachrichtigung senden, möchten Sie möglicherweise auch einige Daten in die Nutzlast der Benachrichtigung aufnehmen, damit Ihre Anwendung auf das Ereignis Bezug nehmen kann. Dies kann Ihnen einige Netzwerkanfragen ersparen und die Reaktionsfähigkeit Ihrer App verbessern.
**Warning:**
Es wird davon abgeraten, sowohl einen Titel als auch einen Textkörper zusammen mit `content-available=1` anzuhängen, da dies zu undefiniertem Verhalten führen kann. Um sicherzustellen, dass eine Benachrichtigung wirklich still ist, schließen Sie sowohl den Titel als auch den Text aus, wenn Sie das `content-available`-Flag auf `1` setzen. Weitere Einzelheiten finden Sie in der offiziellen [Apple-Dokumentation über Hintergrundaktualisierungen](https://developer.apple.com/documentation/usernotifications/setting_up_a_remote_notification_server/pushing_background_updates_to_your_app).
Das `content-available`-Flag kann sowohl im Braze-Dashboard als auch in unserem [Apple-Push-Objekt](https://www.braze.com/docs/de/de/api/objects_filters/messaging/apple_object) in der [Messaging-API](https://www.braze.com/docs/de/de/api/endpoints/messaging) gesetzt werden.

## Stille Push-Benachrichtigungen zum Triggern von Hintergrundarbeiten verwenden {#use-silent-push-notifications-to-trigger-background-work}
Stille Push-Benachrichtigungen können Ihre App aus dem Zustand „Angehalten“ oder „Nicht ausgeführt“ aufwecken, um Inhalte zu aktualisieren oder bestimmte Aufgaben auszuführen, ohne Ihre Nutzer:innen darüber zu informieren.
Um stille Push-Benachrichtigungen zum Triggern von Hintergrundarbeiten zu verwenden, richten Sie das `content-available`-Flag gemäß den vorhergehenden Anweisungen ohne Nachricht oder Ton ein. Richten Sie den Hintergrundmodus Ihrer App ein, um `remote notifications` unter dem Tab **Capabilities** in Ihren Projekteinstellungen zu aktivieren. Eine Remote-Benachrichtigung ist einfach eine normale Push-Benachrichtigung mit gesetztem `content-available`-Flag.

Die Aktivierung des Hintergrundmodus für Remote-Benachrichtigungen ist für das [Uninstall-Tracking](https://www.braze.com/docs/de/de/developer_guide/analytics/tracking_uninstalls?sdktab=swift) erforderlich.
Auch wenn der Hintergrundmodus für Remote-Benachrichtigungen aktiviert ist, startet das System Ihre App nicht im Hintergrund, wenn die Nutzer:innen das Beenden der Anwendung erzwungen haben. Die Nutzer:innen müssen die Anwendung explizit starten oder das Gerät neu starten, bevor die App vom System automatisch im Hintergrund gestartet werden kann.
Weitere Informationen finden Sie unter [Hintergrundaktualisierungen pushen](https://developer.apple.com/documentation/usernotifications/setting_up_a_remote_notification_server/pushing_background_updates_to_your_app?language=objc) und [`application:didReceiveRemoteNotification:fetchCompletionHandler:`](https://developer.apple.com/library/ios/documentation/UIKit/Reference/UIApplicationDelegate_Protocol/index.html#//apple_ref/occ/intfm/UIApplicationDelegate/application:didReceiveRemoteNotification:fetchCompletionHandler:).
## Einschränkungen bei stillen iOS-Benachrichtigungen {#ios-silent-notifications-limitations}
Das iOS-Betriebssystem kann Benachrichtigungen für einige Features einschränken. Beachten Sie, dass bei Schwierigkeiten mit diesen Features die iOS-Einschränkung für stille Benachrichtigungen die Ursache sein könnte.
Braze verfügt über mehrere Features, die auf stille Push-Benachrichtigungen unter iOS angewiesen sind:
| Feature | Nutzererlebnis |
|---|---|
| Uninstall-Tracking | Nutzer:innen erhalten nachts eine stille Uninstall-Tracking-Push-Benachrichtigung. |
| Geofences | Stille Synchronisierung von Geofences vom Server zum Gerät. |
{: .reset-td-br-1 .reset-td-br-2 aria-label="Einschränkungen bei stillen iOS-Benachrichtigungen" }
Weitere Einzelheiten finden Sie in der Dokumentation zu Apples [Instanzmethode](https://developer.apple.com/documentation/uikit/uiapplicationdelegate/1623013-application) und [nicht empfangenen Benachrichtigungen](https://developer.apple.com/library/content/technotes/tn2265/_index.html#//apple_ref/doc/uid/DTS40010376-CH1-TNTAG23).
[8]:https://developer.apple.com/library/content/technotes/tn2265/_index.html#//apple_ref/doc/uid/DTS40010376-CH1-TNTAG23
# Push Primer für iOS
Source: /docs/de/developer_guide/platforms/legacy_sdks/ios/push_notifications/push_primer/index.md
**Warning:**
[AppboyKit](https://github.com/Appboy/appboy-ios-sdk) (also known as the Objective-C SDK) is no longer supported and has been replaced by the [Swift SDK](https://www.braze.com/docs/de/de/developer_guide/sdk_integration/?sdktab=swift). It will no longer receive new features, bug fixes, security updates, or technical support—however, messaging and analytics will continue to function as normal. To learn more, see [Introducing the New Braze Swift SDK](https://www.braze.com/resources/articles/introducing-the-new-braze-swift-sdk).
# Push-Primer-Integration {#push-primer-integration}
Push-Primer-Campaigns ermutigen Ihre Nutzer:innen, Push auf ihrem Gerät für Ihre App zu aktivieren. Die Erlaubnis von Nutzer:innen einzuholen, um Nachrichten direkt an ihre Geräte zu senden, kann komplex sein, aber unsere Anleitungen können Ihnen dabei helfen! Dieser Leitfaden beschreibt die Schritte, die Entwickler:innen für die Integration von Push Priming durchführen müssen.
## 1. Schritt: Snippet in die Datei AppDelegate.m einfügen {#step-1-add-snippet-in-appdelegatem-file}
Fügen Sie die folgende Codezeile anstelle der Standardintegration in Ihre `AppDelegate.m`-Datei ein:
```objc
- (BOOL)application:(UIApplication *)application didFinishLaunchingWithOptions:(NSDictionary *)launchOptions {
...
if (@available(iOS 10.0, *)) {
UNUserNotificationCenter *center = [UNUserNotificationCenter currentNotificationCenter];
[center getNotificationSettingsWithCompletionHandler:^(UNNotificationSettings * _Nonnull settings) {
if (settings.authorizationStatus != UNAuthorizationStatusNotDetermined) {
// authorization has already been requested, need to follow usual steps
[center requestAuthorizationWithOptions:(UNAuthorizationOptionAlert | UNAuthorizationOptionSound | UNAuthorizationOptionBadge) completionHandler:^(BOOL granted, NSError * _Nullable error) {
[[Appboy sharedInstance] pushAuthorizationFromUserNotificationCenter:granted];
}];
center.delegate = self;
[center setNotificationCategories:[ABKPushUtils getAppboyUNNotificationCategorySet]];
[[UIApplication sharedApplication] registerForRemoteNotifications];
}
}];
} else {
UIApplication *sharedApplication = [UIApplication sharedApplication];
UIUserNotificationSettings *notificationSettings = [sharedApplication currentUserNotificationSettings];
if (notificationSettings.types) {
UIUserNotificationSettings *settings = [UIUserNotificationSettings settingsForTypes:(UIUserNotificationTypeBadge | UIUserNotificationTypeAlert | UIUserNotificationTypeSound) categories:[ABKPushUtils getAppboyUIUserNotificationCategorySet]];
[sharedApplication registerUserNotificationSettings:settings];
[sharedApplication registerForRemoteNotifications];
}
}
```
```swift
if #available(iOS 10, *) {
let center = UNUserNotificationCenter.current()
center.getNotificationSettings(completionHandler: { (settings) in
if settings.authorizationStatus != .notDetermined {
// authorization has already been requested, need to follow usual steps
center.requestAuthorization(options: [.alert, .sound, .badge]) { (granted, error) in
Appboy.sharedInstance()?.pushAuthorization(fromUserNotificationCenter: granted)
}
center.delegate = self as? UNUserNotificationCenterDelegate
center.setNotificationCategories(ABKPushUtils.getAppboyUNNotificationCategorySet())
UIApplication.shared.registerForRemoteNotifications()
}
})
} else {
let notificationSettiings = UIApplication.shared.currentUserNotificationSettings
if notificationSettiings?.types != nil {
let setting = UIUserNotificationSettings(types: [.alert, .badge, .sound], categories:nil)
UIApplication.shared.registerUserNotificationSettings(setting)
UIApplication.shared.registerForRemoteNotifications()
}
}
```
## 2. Schritt: Prüfung für angepasste Events an die Datei AppDelegate.m anhängen {#step-2-append-custom-event-checker-to-appdelegatem-file}
Das folgende Code-Snippet prüft, ob ein angepasstes Event ausgelöst werden muss. Fügen Sie die folgende Codezeile in Ihre `AppDelegate.m`-Datei ein.
```objc
if (@available(iOS 10.0, *)) {
UNUserNotificationCenter *center = [UNUserNotificationCenter currentNotificationCenter];
[center getNotificationSettingsWithCompletionHandler:^(UNNotificationSettings * _Nonnull settings) {
if (settings.authorizationStatus == UNAuthorizationStatusNotDetermined) {
// ...
// fire custom event
// ...
}
}];
} else {
UIUserNotificationSettings *notificationSettings = [[UIApplication sharedApplication] currentUserNotificationSettings];
if (!notificationSettings.types) {
// …
// fire custom event
// ...
}
}
```
```swift
if #available(iOS 10, *) {
let center = UNUserNotificationCenter.current()
center.getNotificationSettings(completionHandler: { (settings) in
if settings.authorizationStatus == .notDetermined {
// ...
// fire custom event
// ...
}
})
} else {
let notificationSettiings = UIApplication.shared.currentUserNotificationSettings
if notificationSettiings?.types != nil {
// ...
// fire custom event
// ...
}
}
```
## 3. Schritt: Deeplink-Handler einrichten {#step-3-set-up-a-deep-link-handler}
Platzieren Sie das folgende Code-Snippet in Ihrem Deeplink-Handling-Code. Sie sollten diesen Deeplinking-Code nur für Ihre Push-Primer-In-App-Nachricht ausführen.
Weitere Informationen über Deeplinking finden Sie unter [Anpassung der Linkbehandlung](https://www.braze.com/docs/de/de/developer_guide/platform_integration_guides/ios/advanced_use_cases/linking#linking-handling-customization).
```objc
// ...
// check that this deep link relates to the push prompt
// ...
if (@available(iOS 10.0, *)) {
UNUserNotificationCenter *center = [UNUserNotificationCenter currentNotificationCenter];
[center requestAuthorizationWithOptions:(UNAuthorizationOptionAlert | UNAuthorizationOptionSound | UNAuthorizationOptionBadge) completionHandler:^(BOOL granted, NSError * _Nullable error) {
[[Appboy sharedInstance] pushAuthorizationFromUserNotificationCenter:granted];
}];
center.delegate = self;
[center setNotificationCategories:[ABKPushUtils getAppboyUNNotificationCategorySet]];
[[UIApplication sharedApplication] registerForRemoteNotifications];
} else {
UIUserNotificationSettings *settings = [UIUserNotificationSettings settingsForTypes:(UIUserNotificationTypeBadge | UIUserNotificationTypeAlert | UIUserNotificationTypeSound) categories:[ABKPushUtils getAppboyUIUserNotificationCategorySet]];
UIApplication *sharedApplication = [UIApplication sharedApplication];
[sharedApplication registerUserNotificationSettings:settings];
[sharedApplication registerForRemoteNotifications];
}
```
```swift
// ...
// check that this deep link relates to the push prompt
// ...
if #available(iOS 10, *) {
let center = UNUserNotificationCenter.current()
center.delegate = self as? UNUserNotificationCenterDelegate
center.requestAuthorization(options: [.alert, .sound, .badge]) { (granted, error) in
Appboy.sharedInstance()?.pushAuthorization(fromUserNotificationCenter: granted)
}
UIApplication.shared.registerForRemoteNotifications()
} else {
let setting = UIUserNotificationSettings(types: [.alert, .badge, .sound], categories:nil)
UIApplication.shared.registerUserNotificationSettings(setting)
UIApplication.shared.registerForRemoteNotifications()
}
```
# Push Stories für iOS
Source: /docs/de/developer_guide/platforms/legacy_sdks/ios/push_notifications/push_story/index.md
**Warning:**
[AppboyKit](https://github.com/Appboy/appboy-ios-sdk) (also known as the Objective-C SDK) is no longer supported and has been replaced by the [Swift SDK](https://www.braze.com/docs/de/de/developer_guide/sdk_integration/?sdktab=swift). It will no longer receive new features, bug fixes, security updates, or technical support—however, messaging and analytics will continue to function as normal. To learn more, see [Introducing the New Braze Swift SDK](https://www.braze.com/resources/articles/introducing-the-new-braze-swift-sdk).
# Push Story einrichten {#push-story-setup}
Die Push Story-Funktion erfordert das `UNNotification`-Framework und iOS 10. Das Feature ist erst ab iOS SDK Version 3.2.1 verfügbar.
## 1. Schritt: Push in Ihrer App aktivieren {#step-1-enable-push-in-your-app}
Folgen Sie der [Integration von Push-Benachrichtigungen](https://www.braze.com/docs/de/de/developer_guide/platforms/legacy_sdks/ios/push_notifications/integration), um Push in Ihrer App zu aktivieren.
## 2. Schritt: Notification Content Extension-Ziel hinzufügen {#step-2-adding-the-notification-content-extension-target}
Wählen Sie in Ihrem App-Projekt das Menü **File > New > Target...** und fügen Sie ein neues `Notification Content Extension`-Ziel hinzu und aktivieren Sie es.

Xcode sollte ein neues Ziel generieren und automatisch folgende Dateien für Sie anlegen:
- `NotificationViewController.h`
- `NotificationViewController.m`
- `MainInterface.storyboard`
- `NotificationViewController.swift`
- `MainInterface.storyboard`
## 3. Schritt: Fähigkeiten aktivieren {#step-3-enable-capabilities}
Die Push Story-Funktion erfordert den Hintergrundmodus im Abschnitt **Capabilities** des Hauptziels der App. Nachdem Sie die Hintergrundmodi aktiviert haben, wählen Sie **Background fetch** und **Remote notifications**.

### App-Gruppe hinzufügen {#adding-an-app-group}
Sie müssen außerdem `Capability App Groups` hinzufügen. Wenn Sie noch keine App-Gruppe in Ihrer App haben, gehen Sie zur **Capability** des Hauptziels der App, schalten Sie die `App Groups` ein und klicken Sie auf die Schaltfläche **+**. Verwenden Sie die Bundle-ID Ihrer App, um die App-Gruppe zu erstellen. Wenn die Bundle-ID Ihrer App beispielsweise `com.company.appname` lautet, können Sie die App-Gruppe `group.com.company.appname.xyz` nennen. Sie müssen `App Groups` sowohl für die Haupt-App als auch für die Ziele der Inhaltserweiterung aktivieren.
**Important:**
`App Groups` bezieht sich in diesem Zusammenhang auf die [App Groups Entitlement](https://developer.apple.com/documentation/bundleresources/entitlements/com_apple_security_application-groups) von Apple und nicht auf Ihre Braze-Workspace-ID (früher App-Gruppe).
Wenn Sie Ihre App nicht zu einer App-Gruppe hinzufügen, kann es sein, dass Ihre App bestimmte Felder aus der Push-Nutzlast nicht ausfüllt und nicht vollständig wie erwartet funktioniert.
## 4. Schritt: Push Story-Framework zu Ihrer App hinzufügen {#step-4-adding-the-push-story-framework-to-your-app}
Nachdem Sie den [Leitfaden für die Integration des Swift-Paketmanagers](https://www.braze.com/docs/de/de/developer_guide/platforms/legacy_sdks/ios/initial_sdk_setup/installation_methods/swift_package_manager) befolgt haben, fügen Sie `AppboyPushStory` zur `Notification Content Extension` hinzu:


Fügen Sie die folgende Zeile in Ihr Podfile ein:
```ruby
target 'YourContentExtensionTarget' do
pod 'Appboy-Push-Story'
end
```
Navigieren Sie nach der Aktualisierung des Podfile in Ihrem Terminal zum Verzeichnis Ihres Xcode-App-Projekts und führen Sie `pod install` aus.
Laden Sie die neueste Version der `AppboyPushStory.zip` von der [GitHub-Release-Seite](https://github.com/Appboy/appboy-ios-sdk/releases) herunter, extrahieren Sie sie und fügen Sie der `Notification Content Extension` Ihres Projekts die folgenden Dateien hinzu:
- `Resources/ABKPageView.nib`
- `AppboyPushStory.xcframework`

**Important:**
Stellen Sie sicher, dass unter der Spalte **Embed** die Option **Do Not Embed** für **AppboyPushStory.xcframework** ausgewählt ist.
Fügen Sie unter **Build Settings > Other Linker Flags** das Flag `-ObjC` zur `Notification Content Extension` Ihres Projekts hinzu.
## 5. Schritt: View-Controller für Benachrichtigungen aktualisieren {#step-5-updating-your-notification-view-controller}
Fügen Sie in Ihrer `NotificationViewController.h` die folgenden Zeilen hinzu, um neue Eigenschaften hinzuzufügen und die Header-Dateien zu importieren:
```objc
#import
```
```objc
@property (nonatomic) IBOutlet ABKStoriesView *storiesView;
@property (nonatomic) ABKStoriesViewDataSource *dataSource;
```
Entfernen Sie in Ihrer `NotificationViewController.m` die Standardimplementierung und fügen Sie folgenden Code hinzu:
```objc
@implementation NotificationViewController
- (void)didReceiveNotification:(UNNotification *)notification {
self.dataSource = [[ABKStoriesViewDataSource alloc] initWithNotification:notification
storiesView:self.storiesView
appGroup:@"YOUR-APP-GROUP-IDENTIFIER"];
}
- (void)didReceiveNotificationResponse:(UNNotificationResponse *)response
completionHandler:(void (^)(UNNotificationContentExtensionResponseOption option))completion {
UNNotificationContentExtensionResponseOption option = [self.dataSource didReceiveNotificationResponse:response];
completion(option);
}
- (void)viewWillDisappear:(BOOL)animated {
[self.dataSource viewWillDisappear];
[super viewWillDisappear:animated];
}
@end
```
Fügen Sie in Ihrer `NotificationViewController.swift` die folgende Zeile hinzu, um die Header-Dateien zu importieren:
```swift
import AppboyPushStory
```
Entfernen Sie als Nächstes die Standardimplementierung und fügen Sie den folgenden Code hinzu:
```swift
class NotificationViewController: UIViewController, UNNotificationContentExtension {
@IBOutlet weak var storiesView: ABKStoriesView!
var dataSource: ABKStoriesViewDataSource?
func didReceive(_ notification: UNNotification) {
dataSource = ABKStoriesViewDataSource(notification: notification, storiesView: storiesView, appGroup: "YOUR-APP-GROUP-IDENTIFIER")
}
func didReceive(_ response: UNNotificationResponse, completionHandler completion: @escaping (UNNotificationContentExtensionResponseOption) -> Void) {
if dataSource != nil {
let option: UNNotificationContentExtensionResponseOption = dataSource!.didReceive(response)
completion(option)
}
}
override func viewWillDisappear(_ animated: Bool) {
dataSource?.viewWillDisappear()
super.viewWillDisappear(animated)
}
}
```
## 6. Schritt: Storyboard der Notification Content Extension festlegen {#step-6-set-the-notification-content-extension-storyboard}
Öffnen Sie das Storyboard der `Notification Content Extension` und platzieren Sie eine neue `UIView` im View-Controller für Benachrichtigungen. Benennen Sie die Klasse in `ABKStoriesView` um. Legen Sie Breite und Höhe der Ansicht so fest, dass sie automatisch an den Rahmen der Hauptansicht des View-Controllers für Benachrichtigungen angepasst werden.


Verknüpfen Sie als Nächstes das IBOutlet `storiesView` des View-Controllers für Benachrichtigungen mit der hinzugefügten `ABKStoriesView`.

## 7. Schritt: Plist-Datei der Notification Content Extension anpassen {#step-7-set-the-notification-content-extension-plist}
Öffnen Sie die Datei `Info.plist` der `Notification Content Extension` und fügen Sie unter `NSExtension \ NSExtensionAttributes` die folgenden Schlüssel hinzu und ändern Sie sie:
`UNNotificationExtensionCategory` = `ab_cat_push_story_v2` (Typ `String`)
`UNNotificationExtensionDefaultContentHidden` = `YES` (Typ `Boolean`)
`UNNotificationExtensionInitialContentSizeRatio` = `0.65` (Typ `Number`)

## 8. Schritt: Braze-Integration in Ihrer Hauptanwendung aktualisieren {#step-8-updating-the-braze-integration-in-your-main-app}
### Option 1: Laufzeit {#option-1-runtime}
Fügen Sie in dem Wörterbuch `appboyOptions`, das zur Konfiguration Ihrer Braze-Instanz verwendet wird, den Eintrag `ABKPushStoryAppGroupKey` hinzu und legen Sie den Wert auf den API-Bezeichner Ihres Workspace fest.
```objc
NSMutableDictionary *appboyOptions = [NSMutableDictionary dictionary];
appboyOptions[ABKPushStoryAppGroupKey] = @"YOUR-APP-GROUP-IDENTIFIER";
[Appboy startWithApiKey:@"YOUR-API-KEY"
inApplication:application
withLaunchOptions:launchOptions
withAppboyOptions:appboyOptions];
```
```swift
let appboyOptions: [AnyHashable: Any] = [
ABKPushStoryAppGroupKey : "YOUR-APP-GROUP-IDENTIFIER"
]
Appboy.start(withApiKey: "YOUR-API-KEY", in:application, withLaunchOptions:launchOptions, withAppboyOptions:appboyOptions)
```
#### Option 2: Info.plist {#option-2-infoplist}
Um den Push Story-Workspace über Ihre Datei `Info.plist` zu konfigurieren, können Sie alternativ ein Wörterbuch mit dem Namen `Braze` zu Ihrer Datei `Info.plist` hinzufügen. Fügen Sie im Wörterbuch `Braze` den String-Untereintrag `PushStoryAppGroup` hinzu und legen Sie den Wert auf den Bezeichner Ihres Workspace fest. Beachten Sie, dass vor Braze iOS SDK v4.0.2 der Wörterbuchschlüssel `Appboy` anstelle von `Braze` verwendet werden muss.
## Nächste Schritte {#next-steps}
Sehen Sie sich als Nächstes die Schritte zur Integration von [Aktions-Buttons](https://www.braze.com/docs/de/de/developer_guide/platforms/legacy_sdks/ios/push_notifications/customization/action_buttons) an, die erforderlich sind, damit Buttons in einer Push Story-Nachricht angezeigt werden.
# Erweiterte Implementierung von Push-Benachrichtigungen für iOS (optional)
Source: /docs/de/developer_guide/platforms/legacy_sdks/ios/push_notifications/implementation_guide/index.md
**Warning:**
[AppboyKit](https://github.com/Appboy/appboy-ios-sdk) (also known as the Objective-C SDK) is no longer supported and has been replaced by the [Swift SDK](https://www.braze.com/docs/de/de/developer_guide/sdk_integration/?sdktab=swift). It will no longer receive new features, bug fixes, security updates, or technical support—however, messaging and analytics will continue to function as normal. To learn more, see [Introducing the New Braze Swift SDK](https://www.braze.com/resources/articles/introducing-the-new-braze-swift-sdk).
**Important:**
Suchen Sie nach dem grundlegenden Leitfaden zur Integration von Push-Benachrichtigungen für Entwickler:innen? Finden Sie ihn [hier](https://www.braze.com/docs/de/de/developer_guide/platforms/legacy_sdks/ios/push_notifications/integration).
# Implementierungsleitfaden für Push-Benachrichtigungen {#push-notification-implementation-guide}
> Dieser Leitfaden für die optionale erweiterte Implementierung beschreibt, wie Sie die App-Erweiterungen für Push-Benachrichtigungsinhalte nutzen können, um den größtmöglichen Erfolg mit Ihren Push-Nachrichten zu erzielen. Er enthält drei von unserem Team erstellte angepasste Anwendungsfälle, begleitende Code-Snippets und eine Anleitung zur Protokollierung von Analytics. Besuchen Sie das [Braze Demo Repository](https://github.com/braze-inc/braze-growth-shares-ios-demo-app)! Beachten Sie, dass sich dieser Implementierungsleitfaden auf eine Swift-Implementierung konzentriert. Für Interessierte werden jedoch Objective-C-Snippets bereitgestellt.
## App-Erweiterungen für Benachrichtigungsinhalte {#notification-content-app-extensions}
{: style="max-width:65%;border:0;margin-top:10px"}
Push-Benachrichtigungen scheinen zwar auf verschiedenen Plattformen Standard zu sein, bieten jedoch immense Anpassungsmöglichkeiten, die über das hinausgehen, was normalerweise in der Standard-Benutzeroberfläche implementiert ist. Wenn eine Push-Benachrichtigung erweitert wird, ermöglichen Inhaltsbenachrichtigungserweiterungen eine angepasste Ansicht der erweiterten Push-Benachrichtigung.
Push-Benachrichtigungen können auf drei verschiedene Arten erweitert werden: - Langes Drücken auf das Push-Banner - Wischen auf dem Push-Banner nach unten - Wischen des Banners nach links und Auswählen von „Anzeigen“
Diese angepassten Ansichten bieten intelligente Möglichkeiten, Kund:innen einzubinden. Sie können viele verschiedene Arten von Inhalten anzeigen, darunter interaktive Benachrichtigungen, mit Nutzerdaten gefüllte Benachrichtigungen und sogar Push-Nachrichten, die Informationen wie Telefonnummern und E-Mail-Adressen erfassen können. Auch wenn die Implementierung von Push auf diese Weise für einige ungewohnt sein mag, ist eine unserer bekannten Funktionen bei Braze, [Push Stories](https://www.braze.com/docs/de/de/user_guide/channels/push/create_a_push_message/push_stories), ein Paradebeispiel dafür, wie eine angepasste Ansicht für eine App-Erweiterung für Benachrichtigungsinhalte aussehen kann!
### Anforderungen {#requirements}
{: style="float:right;max-width:50%;margin-left:10px; border:0;margin-top:10px"}
- [Push-Benachrichtigungen](https://www.braze.com/docs/de/de/developer_guide/platforms/legacy_sdks/ios/push_notifications/integration) erfolgreich in Ihre App integriert
- iOS 10 oder höher
- Die folgenden Dateien, die von Xcode basierend auf Ihrer Programmiersprache generiert werden:
Swift
- `NotificationViewController.swift`
- `MainInterface.storyboard`
Objective-C
- `NotificationViewController.h`
- `NotificationViewController.m`
- `MainInterface.storyboard`
### Konfiguration angepasster Kategorien {#custom-category-configuration}
Um eine angepasste Ansicht im Dashboard einzurichten, müssen Sie die Benachrichtigungs-Buttons aktivieren und Ihre angepasste Kategorie eingeben. Die von Ihnen angegebene vorregistrierte angepasste iOS-Kategorie wird dann mit der `UNNotificationExtensionCategory` in der `.plist` Ihres Notification Content Extension Targets abgeglichen. Der hier angegebene Wert muss mit den Einstellungen im Braze-Dashboard übereinstimmen.
{: style="max-width:75%;border:0;margin-top:10px"}
{: style="max-width:75%;border:0;margin-top:10px"}
**Tip:**
Da Push-Benachrichtigungen mit Inhaltserweiterungen nicht immer offensichtlich sind, empfiehlt es sich, eine Handlungsaufforderung einzufügen, um Ihre Nutzer:innen dazu zu bewegen, ihre Push-Benachrichtigungen zu erweitern.
## Anwendungsfall und Implementierungsanleitung {#use-case-and-implementation-walkthrough}
Es gibt drei Arten von App-Erweiterungen für Push-Benachrichtigungsinhalte. Für jeden Typ gibt es eine Konzeptanleitung, mögliche Anwendungsfälle und einen Blick darauf, wie Variablen für Push-Benachrichtigungen im Braze-Dashboard aussehen und verwendet werden können:
- [Interaktive Push-Benachrichtigung](#interactive-push-notification)
- [Personalisierte Push-Benachrichtigungen](#personalized-push-notifications)
- [Push-Benachrichtigungen zur Informationserfassung](#information-capture-push-notification)
### Interaktive Push-Benachrichtigung {#interactive-push-notification}
Push-Benachrichtigungen können auf Nutzeraktionen innerhalb einer Inhaltserweiterung reagieren. Für Nutzer:innen mit iOS 12 oder höher bedeutet dies, dass Sie Ihre Push-Nachrichten in vollständig interaktive Push-Benachrichtigungen verwandeln können! Diese Interaktivität bietet viele Möglichkeiten, um Ihre Nutzer:innen zur Interaktion mit Ihren Benachrichtigungen zu bewegen. Das folgende Beispiel zeigt einen Push, bei dem Nutzer:innen in der erweiterten Benachrichtigung ein Memory-Spiel spielen können.
{: style="border:0"}
#### Dashboard-Konfiguration {#dashboard-configuration}
Um eine angepasste Ansicht im Dashboard einzurichten, geben Sie in den Einstellungen der Benachrichtigungs-Buttons die spezifische Kategorie ein, die Sie anzeigen möchten. Als Nächstes müssen Sie in der `.plist` Ihrer Notification Content Extension auch die angepasste Kategorie auf das Attribut `UNNotificationExtensionCategory` setzen. Der hier angegebene Wert muss mit den Einstellungen im Braze-Dashboard übereinstimmen. Um Nutzerinteraktionen in einer Push-Benachrichtigung zu aktivieren, setzen Sie den Schlüssel `UNNotificationExtensionInteractionEnabled` auf true.
{: style="float:right;max-width:45%;"}
{: style="max-width:50%;"}
#### Andere Anwendungsfälle {#other-use-cases}
Push-Inhaltserweiterungen sind eine spannende Option, um Interaktivität in Ihre Aktionen und Anwendungen einzubringen. Beispiele hierfür sind ein Spiel für Nutzer:innen, ein Glücksrad für Rabatte oder ein „Gefällt mir“-Button zum Speichern eines Listings oder Songs.
##### Sind Sie bereit für die Protokollierung von Analytics? {#ready-to-log-analytics}
Im [folgenden Abschnitt](#logging-analytics) wird näher beschrieben, wie der Datenfluss aussehen sollte.
### Personalisierte Push-Benachrichtigungen {#personalized-push-notifications}
{: style="float:right;max-width:40%;margin-left:15px;border:0"}
Push-Benachrichtigungen können nutzerspezifische Informationen innerhalb einer Inhaltserweiterung anzeigen. Das Beispiel zeigt eine Push-Benachrichtigung, nachdem Nutzer:innen eine bestimmte Aufgabe (Braze-Lernkurs) abgeschlossen haben und nun aufgefordert werden, diese Benachrichtigung zu erweitern, um ihren Fortschritt zu überprüfen. Die hier bereitgestellten Informationen sind nutzerspezifisch und können über einen API-Trigger ausgelöst werden, wenn eine Sitzung abgeschlossen ist oder eine bestimmte Nutzeraktion durchgeführt wird.
#### Dashboard-Konfiguration
Um einen personalisierten Push im Dashboard einzurichten, müssen Sie die spezifische Kategorie registrieren, die angezeigt werden soll, und dann innerhalb der Schlüssel-Wert-Paare mit Hilfe von Standard-Liquid die entsprechenden Nutzerattribute einstellen, die in der Nachricht angezeigt werden sollen. Diese Ansichten können auf der Grundlage bestimmter Nutzerattribute eines bestimmten Nutzerprofils personalisiert werden.
{: style="max-width:60%;"}
#### Umgang mit Schlüssel-Wert-Paaren {#handling-key-value-pairs}
Die folgende Methode `didReceive` wird aufgerufen, wenn die Inhaltserweiterung eine Benachrichtigung erhalten hat. Sie befindet sich in `NotificationViewController`. Die im Dashboard bereitgestellten Schlüssel-Wert-Paare werden im Code durch die Verwendung eines `userInfo`-Wörterbuchs dargestellt.
**Analysieren von Schlüssel-Wert-Paaren aus Push-Benachrichtigungen**
``` swift
func didReceive(_ notification: UNNotification) {
let userInfo = notification.request.content.userInfo
guard let value = userInfo["YOUR-KEY-VALUE-PAIR"] as? String,
let otherValue = userInfo["YOUR-OTHER-KEY-VALUE-PAIR"] as? String,
else { fatalError("Key-Value Pairs are incorrect.")}
...
}
```
```objc
- (void)didReceiveNotification:(nonnull UNNotification *)notification {
NSDictionary *userInfo = notification.request.content.userInfo;
if (userInfo[@"YOUR-KEY-VALUE-PAIR"] && userInfo[@"YOUR-OTHER-KEY-VALUE-PAIR"]) {
...
} else {
[NSException raise:NSGenericException format:@"Key-Value Pairs are incorrect"];
}
}
```
#### Andere Anwendungsfälle
Es gibt unendlich viele Möglichkeiten für fortschrittsbasierte und nutzerorientierte Push-Inhaltserweiterungen. Einige Beispiele: eine Option zum Teilen des Fortschritts auf verschiedenen Plattformen, freigeschaltete Errungenschaften, Bonuskarten oder sogar Onboarding-Checklisten.
##### Sind Sie bereit für die Protokollierung von Analytics?
Im [folgenden Abschnitt](#logging-analytics) wird näher beschrieben, wie der Datenfluss aussehen sollte.
### Push-Benachrichtigung zur Informationserfassung {#information-capture-push-notification}
Push-Benachrichtigungen können Nutzerinformationen innerhalb einer Inhaltserweiterung erfassen, wodurch sich Ihnen völlig neue Möglichkeiten für Push-Benachrichtigungen eröffnen. Der folgende Ablauf zeigt, dass die Ansicht auf Statusänderungen reagieren kann. Diese Komponenten der Statusänderung werden in jedem Bild dargestellt.
1. Nutzer:innen erhalten eine Push-Benachrichtigung.
2. Der Push wird geöffnet und fordert Nutzer:innen zur Eingabe von Informationen auf.
3. Die Informationen werden eingegeben und wenn sie gültig sind, wird der Button „Anmelden“ angezeigt.
3. Die Bestätigungsansicht wird angezeigt und der Push wird geschlossen.
Beachten Sie, dass es sich bei den hier angeforderten Informationen um eine Vielzahl von Dingen handeln kann, wie z. B. die Erfassung von SMS-Nummern – sie müssen nicht unbedingt auf E-Mails bezogen sein.
#### Dashboard-Konfiguration
Um einen Push für die Informationserfassung im Dashboard einzurichten, müssen Sie Ihre angepasste Kategorie registrieren und einstellen und die benötigten Schlüssel-Wert-Paare bereitstellen. Wie im Beispiel gezeigt, können Sie auch ein Bild in Ihren Push einfügen. Dazu müssen Sie [Rich-Benachrichtigungen](https://www.braze.com/docs/de/de/developer_guide/platforms/legacy_sdks/ios/push_notifications/customization/rich_notifications) integrieren, den Benachrichtigungsstil in Ihrer Campaign auf Rich Notification einstellen und ein Rich-Push-Bild einfügen.

#### Verarbeitung von Button-Aktionen {#handling-button-actions}
Jeder Aktions-Button ist eindeutig gekennzeichnet. Der Code prüft, ob der Antwort-Bezeichner mit `actionIdentifier` übereinstimmt. Wenn ja, weiß er, dass Nutzer:innen auf den Aktions-Button geklickt haben.
**Verarbeitung von Antworten auf Aktions-Buttons in Push-Benachrichtigungen**
``` swift
func didReceive(_ response: UNNotificationResponse, completionHandler completion: @escaping (UNNotificationContentExtensionResponseOption) -> Void) {
if response.actionIdentifier == "YOUR-REGISTER-IDENTIFIER" {
// do something
} else {
// do something else
}
}
```
```objc
- (void)didReceiveNotificationResponse:(UNNotificationResponse *)response completionHandler:(void (^)(UNNotificationContentExtensionResponseOption))completion {
if ([response.actionIdentifier isEqualToString:@"YOUR-REGISTER-IDENTIFIER"]) {
completion(UNNotificationContentExtensionResponseOptionDismiss);
} else {
completion(UNNotificationContentExtensionResponseOptionDoNotDismiss);
}
}
```
##### Ausblenden von Pushes {#dismissing-pushes}
Push-Benachrichtigungen können durch Drücken eines Aktions-Buttons automatisch ausgeblendet werden. Es gibt drei vorgefertigte Optionen zum Ausblenden von Push-Benachrichtigungen, die empfohlen werden:
1. `completion(.dismiss)` – Blendet die Benachrichtigung aus
2. `completion(.doNotDismiss)` – Benachrichtigung bleibt offen
3. `completion(.dismissAndForward)` – Push wird ausgeblendet und Nutzer:innen werden in die Anwendung weitergeleitet.
#### Andere Anwendungsfälle
Das Anfordern von Nutzereingaben über Push-Benachrichtigungen ist eine spannende Möglichkeit, die viele Unternehmen nicht nutzen. In diesen Push-Nachrichten können Sie nicht nur grundlegende Informationen wie Name, E-Mail oder Telefonnummer abfragen, sondern Nutzer:innen auch auffordern, ein Nutzerprofil zu vervollständigen, falls es noch nicht abgeschlossen ist, oder sogar Feedback zu übermitteln.
##### Sind Sie bereit für die Protokollierung von Analytics?
Im [folgenden Abschnitt](#logging-analytics) wird näher beschrieben, wie der Datenfluss aussehen sollte.
## Protokollieren von Analytics {#logging-analytics}
### Protokollierung mit der Braze-API (empfohlen) {#logging-with-the-braze-api-recommended}
Das Protokollieren von Analytics kann nur in Realtime erfolgen, wenn der Server der Kund:innen unseren [`/users/track`-Endpunkt](https://www.braze.com/docs/de/de/api/endpoints/user_data/post_user_track) aufruft. Zum Protokollieren von Analytics übermitteln Sie den Wert `braze_id` im Feld für Schlüssel-Wert-Paare (wie im folgenden Screenshot gezeigt), um das zu aktualisierende Nutzerprofil zu identifizieren.
{: style="max-width:80%;"}
### Manuell protokollieren {#logging-manually}
Für die manuelle Protokollierung müssen Sie zunächst App-Gruppen in Xcode konfigurieren und anschließend Analytics erstellen, speichern und abrufen. Hierfür sind einige angepasste Entwicklungsarbeiten auf Ihrer Seite erforderlich. Die folgenden Code-Snippets helfen Ihnen dabei.
Ein weiterer wichtiger Punkt ist, dass Analytics erst dann an Braze gesendet werden, wenn die mobile Anwendung anschließend gestartet wird. Das bedeutet, dass je nach Ihren Einstellungen für das Ausblenden oft eine unbestimmte Zeitspanne zwischen dem Ausblenden einer Push-Benachrichtigung und dem Start der mobilen App und dem Abrufen der Analytics vergeht. Auch wenn dieser Zeitpuffer möglicherweise nicht alle Anwendungsfälle betrifft, sollten Nutzer:innen die Auswirkungen bedenken und ggf. die Nutzer-Journey so anpassen, dass sie das Öffnen der Anwendung beinhaltet.

#### Schritt 1: App-Gruppen in Xcode konfigurieren {#step-1-configure-app-groups-within-xcode}
Fügen Sie die Fähigkeit `App Groups` hinzu. Wenn Sie noch keine App-Gruppe in Ihrer App hatten, navigieren Sie zur Fähigkeit des Hauptziels Ihrer App, aktivieren Sie `App Groups` und klicken Sie auf das Pluszeichen (+). Verwenden Sie die Bundle-ID Ihrer App, um die App-Gruppe zu erstellen. Wenn die Bundle-ID Ihrer App beispielsweise `com.company.appname` lautet, können Sie die App-Gruppe `group.com.company.appname.xyz` nennen. Vergewissern Sie sich, dass `App Groups` sowohl für das Hauptziel Ihrer App als auch für das Ziel der Inhaltserweiterung aktiviert ist.

#### Schritt 2: Code-Snippets integrieren {#step-2-integrate-code-snippets}
Die folgenden Code-Snippets sind eine hilfreiche Referenz, wie Sie angepasste Events, angepasste Attribute und Nutzerattribute speichern und senden können. In dieser Anleitung wird von UserDefaults gesprochen. Die Code-Darstellung erfolgt jedoch in Form der Hilfsdatei `RemoteStorage`. Darüber hinaus gibt es die Hilfsdateien `UserAttributes` und `EventName Dictionary`, die beim Senden und Speichern von Nutzerattributen verwendet werden. Alle Hilfsdateien sind am Ende dieser Anleitung aufgeführt.
##### Speichern von angepassten Events {#saving-custom-events}
Um angepasste Events zu speichern, müssen Sie die Analytics von Grund auf neu erstellen. Dazu erstellen Sie ein Wörterbuch, füllen es mit Metadaten und speichern die Daten mit Hilfe einer Hilfsdatei.
1. Initialisieren Sie ein Wörterbuch mit Event-Metadaten
2. Initialisieren Sie `userDefaults`, um die Event-Daten abzurufen und zu speichern
3. Wenn es ein bestehendes Array gibt: Fügen Sie die neuen Daten an das bestehende Array an und speichern Sie
4. Wenn es kein bestehendes Array gibt: Speichern Sie das neue Array in `userDefaults`
``` swift
func saveCustomEvent(with properties: [String: Any]? = nil) {
// 1
let customEventDictionary = Dictionary(eventName: "YOUR-EVENT-NAME", properties: properties)
// 2
let remoteStorage = RemoteStorage(storageType: .suite)
// 3
if var pendingEvents = remoteStorage.retrieve(forKey: .pendingCustomEvents) as? [[String: Any]] {
pendingEvents.append(contentsOf: [customEventDictionary])
remoteStorage.store(pendingEvents, forKey: .pendingCustomEvents)
} else {
// 4
remoteStorage.store([customEventDictionary], forKey: .pendingCustomEvents)
}
}
```
```objc
- (void)saveCustomEvent:(NSDictionary *)properties {
// 1
NSDictionary *customEventDictionary = [[NSDictionary alloc] initWithEventName:@"YOUR-EVENT-NAME" properties:properties];
// 2
RemoteStorage *remoteStorage = [[RemoteStorage alloc] initWithStorageType:StorageTypeSuite];
NSMutableArray *pendingEvents = [[remoteStorage retrieveForKey:RemoteStorageKeyPendingCustomEvents] mutableCopy];
// 3
if (pendingEvents) {
[pendingEvents addObject:customEventDictionary];
[remoteStorage store:pendingEvents forKey:RemoteStorageKeyPendingCustomAttributes];
} else {
// 4
[remoteStorage store:@[ customEventDictionary ] forKey:RemoteStorageKeyPendingCustomAttributes];
}
}
```
##### Senden von angepassten Events an Braze {#sending-custom-events-to-braze}
Nach der Initialisierung des SDK ist der beste Zeitpunkt, um alle gespeicherten Analytics von einer App-Erweiterung für Benachrichtigungsinhalte zu protokollieren. Dazu durchlaufen Sie alle ausstehenden Events, suchen nach dem Schlüssel „Event Name“, setzen die entsprechenden Werte in Braze und löschen dann den Speicher für das nächste Mal, wenn diese Funktion benötigt wird.
1. Array der ausstehenden Events mit einer Schleife durchlaufen
2. Jedes Schlüssel-Wert-Paar im Wörterbuch `pendingEvents` mit einer Schleife durchlaufen
3. Schlüssel für „Event Name“ explizit überprüfen, um den Wert entsprechend festzulegen
4. Jeder andere Schlüsselwert wird dem `properties`-Wörterbuch hinzugefügt
5. Individuelles angepasstes Event protokollieren
6. Alle ausstehenden Events aus dem Speicher entfernen
``` swift
func logPendingCustomEventsIfNecessary() {
let remoteStorage = RemoteStorage(storageType: .suite)
guard let pendingEvents = remoteStorage.retrieve(forKey: .pendingCustomEvents) as? [[String: Any]] else { return }
// 1
for event in pendingEvents {
var eventName: String?
var properties: [AnyHashable: Any] = [:]
// 2
for (key, value) in event {
if key == PushNotificationKey.eventName.rawValue {
// 3
if let eventNameValue = value as? String {
eventName = eventNameValue
} else {
print("Invalid type for event_name key")
}
} else {
// 4
properties[key] = value
}
}
// 5
if let eventName = eventName {
logCustomEvent(eventName, withProperties: properties)
}
}
// 6
remoteStorage.removeObject(forKey: .pendingCustomEvents)
}
```
```objc
- (void)logPendingEventsIfNecessary {
RemoteStorage *remoteStorage = [[RemoteStorage alloc] initWithStorageType:StorageTypeSuite];
NSArray *pendingEvents = [remoteStorage retrieveForKey:RemoteStorageKeyPendingCustomEvents];
// 1
for (NSDictionary *event in pendingEvents) {
NSString *eventName = nil;
NSMutableDictionary *properties = [NSMutableDictionary dictionary];
// 2
for (NSString* key in event) {
if ([key isEqualToString:@"event_name"]) {
// 3
if ([[event objectForKey:key] isKindOfClass:[NSString class]]) {
eventName = [event objectForKey:key];
} else {
NSLog(@"Invalid type for event_name key");
}
} else {
// 4
properties[key] = event[key];
}
}
// 5
if (eventName != nil) {
[[Appboy sharednstance] logCustomEvent:eventName withProperties:properties];
}
}
// 6
[remoteStorage removeObjectForKey:RemoteStorageKeyPendingCustomEvents];
}
```
##### Speichern von angepassten Attributen {#saving-custom-attributes}
Um angepasste Attribute zu speichern, müssen Sie die Analytics von Grund auf neu erstellen. Dazu erstellen Sie ein Wörterbuch, füllen es mit Metadaten und speichern die Daten mit Hilfe einer Hilfsdatei.
1. Initialisieren Sie ein Wörterbuch mit Attribut-Metadaten
2. Initialisieren Sie `userDefaults`, um die Attributdaten abzurufen und zu speichern
3. Wenn es ein bestehendes Array gibt: Fügen Sie die neuen Daten an das bestehende Array an und speichern Sie
4. Wenn es kein bestehendes Array gibt: Speichern Sie das neue Array in `userDefaults`
``` swift
func saveCustomAttribute() {
// 1
let customAttributeDictionary: [String: Any] = ["YOUR-CUSTOM-ATTRIBUTE-KEY": "YOUR-CUSTOM-ATTRIBUTE-VALUE"]
// 2
let remoteStorage = RemoteStorage(storageType: .suite)
// 3
if var pendingAttributes = remoteStorage.retrieve(forKey: .pendingCustomAttributes) as? [[String: Any]] {
pendingAttributes.append(contentsOf: [customAttributeDictionary])
remoteStorage.store(pendingAttributes, forKey: .pendingCustomAttributes)
} else {
// 4
remoteStorage.store([customAttributeDictionary], forKey: .pendingCustomAttributes)
}
}
```
``` objc
- (void)saveCustomAttribute {
// 1
NSDictionary *customAttributeDictionary = @{ @"YOUR-CUSTOM-ATTRIBUTE-KEY": @"YOUR-CUSTOM-ATTRIBUTE-VALUE" };
// 2
RemoteStorage *remoteStorage = [[RemoteStorage alloc] initWithStorageType:StorageTypeSuite];
NSMutableArray *pendingAttributes = [[remoteStorage retrieveForKey:RemoteStorageKeyPendingCustomAttributes] mutableCopy];
// 3
if (pendingAttributes) {
[pendingAttributes addObject:customAttributeDictionary];
[remoteStorage store:pendingAttributes forKey:RemoteStorageKeyPendingCustomAttributes];
} else {
// 4
[remoteStorage store:@[ customAttributeDictionary ] forKey:RemoteStorageKeyPendingCustomAttributes];
}
}
```
##### Senden von angepassten Attributen an Braze {#sending-custom-attributes-to-braze}
Nach der Initialisierung des SDK ist der beste Zeitpunkt, um alle gespeicherten Analytics von einer App-Erweiterung für Benachrichtigungsinhalte zu protokollieren. Dazu durchlaufen Sie die ausstehenden Attribute, setzen das entsprechende angepasste Attribut in Braze und löschen dann den Speicher für das nächste Mal, wenn diese Funktion benötigt wird.
1. Array der ausstehenden Attribute mit einer Schleife durchlaufen
2. Jedes Schlüssel-Wert-Paar im Wörterbuch `pendingAttributes` mit einer Schleife durchlaufen
3. Individuelles angepasstes Attribut mit entsprechendem Schlüssel und Wert protokollieren
4. Alle ausstehenden Attribute aus dem Speicher entfernen
``` swift
func logPendingCustomAttributesIfNecessary() {
let remoteStorage = RemoteStorage(storageType: .suite)
guard let pendingAttributes = remoteStorage.retrieve(forKey: .pendingCustomAttributes) as? [[String: Any]] else { return }
// 1
pendingAttributes.forEach { setCustomAttributesWith(keysAndValues: $0) }
// 4
remoteStorage.removeObject(forKey: .pendingCustomAttributes)
}
func setCustomAttributesWith(keysAndValues: [String: Any]) {
// 2
for (key, value) in keysAndValues {
// 3
if let value = value as? [String] {
setCustomAttributeArrayWithKey(key, andValue: value)
} else {
setCustomAttributeWithKey(key, andValue: value)
}
}
}
```
```objc
- (void)logPendingCustomAttributesIfNecessary {
RemoteStorage *remoteStorage = [[RemoteStorage alloc] initWithStorageType:StorageTypeSuite];
NSArray *pendingAttributes = [remoteStorage retrieveForKey:RemoteStorageKeyPendingCustomAttributes];
// 1
for (NSDictionary *attribute in pendingAttributes) {
[self setCustomAttributeWith:attribute];
}
// 4
[remoteStorage removeObjectForKey:RemoteStorageKeyPendingCustomAttributes];
}
- (void)setCustomAttributeWith:(NSDictionary *)keysAndValues {
// 2
for (NSString *key in keysAndValues) {
// 3
[self setCustomAttributeWith:key andValue:[keysAndValues objectForKey:key]];
}
}
```
##### Speichern von Nutzerattributen {#saving-user-attributes}
Beim Speichern von Nutzerattributen empfiehlt es sich, ein angepasstes Objekt zu erstellen, um festzustellen, welche Art von Attribut aktualisiert wird (`email`, `first_name`, `phone_number` usw.). Das Objekt sollte mit der Speicherung/dem Abruf von `UserDefaults` kompatibel sein. In der Hilfsdatei `UserAttribute` finden Sie ein Beispiel dafür, wie Sie dies bewerkstelligen können.
1. Initialisieren Sie ein kodiertes `UserAttribute`-Objekt mit dem entsprechenden Typ
2. Initialisieren Sie `userDefaults`, um die Event-Daten abzurufen und zu speichern
3. Wenn es ein bestehendes Array gibt: Fügen Sie die neuen Daten an das bestehende Array an und speichern Sie
4. Wenn es kein bestehendes Array gibt: Speichern Sie das neue Array in `userDefaults`
``` swift
func saveUserAttribute() {
// 1
guard let data = try? PropertyListEncoder().encode(UserAttribute.userAttributeType("USER-ATTRIBUTE-VALUE")) else { return }
// 2
let remoteStorage = RemoteStorage(storageType: .suite)
// 3
if var pendingAttributes = remoteStorage.retrieve(forKey: .pendingUserAttributes) as? [Data] {
pendingAttributes.append(contentsOf: [data])
remoteStorage.store(pendingAttributes, forKey: .pendingUserAttributes)
} else {
// 4
remoteStorage.store([data], forKey: .pendingUserAttributes)
}
}
```
```objc
- (void)saveUserAttribute {
// 1
UserAttribute *userAttribute = [[UserAttribute alloc] initWithUserField:@"USER-ATTRIBUTE-VALUE" attributeType:UserAttributeTypeEmail];
NSError *error;
NSData *data = [NSKeyedArchiver archivedDataWithRootObject:userAttribute requiringSecureCoding:YES error:&error];
if (error != nil) {
// log error
}
// 2
RemoteStorage *remoteStorage = [[RemoteStorage alloc] initWithStorageType:StorageTypeSuite];
NSMutableArray *pendingAttributes = [[remoteStorage retrieveForKey:RemoteStorageKeyPendingUserAttributes] mutableCopy];
// 3
if (pendingAttributes) {
[pendingAttributes addObject:data];
[remoteStorage store:pendingAttributes forKey:RemoteStorageKeyPendingUserAttributes];
} else {
// 4
[remoteStorage store:@[data] forKey:RemoteStorageKeyPendingUserAttributes];
}
}
```
##### Senden von Nutzerattributen an Braze {#sending-user-attributes-to-braze}
Nach der Initialisierung des SDK ist der beste Zeitpunkt, um alle gespeicherten Analytics von einer App-Erweiterung für Benachrichtigungsinhalte zu protokollieren. Dazu durchlaufen Sie die ausstehenden Attribute, setzen das entsprechende angepasste Attribut in Braze und löschen dann den Speicher für das nächste Mal, wenn diese Funktion benötigt wird.
1. Array der `pendingAttributes`-Daten mit einer Schleife durchlaufen
2. Initialisieren Sie ein kodiertes `UserAttribute`-Objekt aus Attributdaten
3. Bestimmtes Nutzerfeld basierend auf dem Typ des Nutzerattributs (E-Mail) festlegen
4. Alle ausstehenden Nutzerattribute aus dem Speicher entfernen
``` swift
func logPendingUserAttributesIfNecessary() {
let remoteStorage = RemoteStorage(storageType: .suite)
guard let pendingAttributes = remoteStorage.retrieve(forKey: .pendingUserAttributes) as? [Data] else { return }
// 1
for attributeData in pendingAttributes {
// 2
guard let userAttribute = try? PropertyListDecoder().decode(UserAttribute.self, from: attributeData) else { continue }
// 3
switch userAttribute {
case .email(let email):
user?.email = email
}
}
// 4
remoteStorage.removeObject(forKey: .pendingUserAttributes)
}
```
```objc
- (void)logPendingUserAttributesIfNecessary {
RemoteStorage *remoteStorage = [[RemoteStorage alloc] initWithStorageType:StorageTypeSuite];
NSArray *pendingAttributes = [remoteStorage retrieveForKey:RemoteStorageKeyPendingUserAttributes];
// 1
for (NSData *attributeData in pendingAttributes) {
NSError *error;
// 2
UserAttribute *userAttribute = [NSKeyedUnarchiver unarchivedObjectOfClass:[UserAttribute class] fromData:attributeData error:&error];
if (error != nil) {
// log error
}
// 3
if (userAttribute) {
switch (userAttribute.attributeType) {
case UserAttributeTypeEmail:
[self user].email = userAttribute.userField;
break;
}
}
}
// 4
[remoteStorage removeObjectForKey:RemoteStorageKeyPendingUserAttributes];
}
```
##### Hilfsdateien {#helper-files}
**RemoteStorage-Hilfsdatei**
```swift
enum RemoteStorageKey: String, CaseIterable {
// MARK: - Notification Content Extension Analytics
case pendingCustomEvents = "pending_custom_events"
case pendingCustomAttributes = "pending_custom_attributes"
case pendingUserAttributes = "pending_user_attributes"
}
enum RemoteStorageType {
case standard
case suite
}
class RemoteStorage: NSObject {
private var storageType: RemoteStorageType = .standard
private lazy var defaults: UserDefaults = {
switch storageType {
case .standard:
return .standard
case .suite:
return UserDefaults(suiteName: "YOUR-DOMAIN-IDENTIFIER")!
}
}()
init(storageType: RemoteStorageType = .standard) {
self.storageType = storageType
}
func store(_ value: Any, forKey key: RemoteStorageKey) {
defaults.set(value, forKey: key.rawValue)
}
func retrieve(forKey key: RemoteStorageKey) -> Any? {
return defaults.object(forKey: key.rawValue)
}
func removeObject(forKey key: RemoteStorageKey) {
defaults.removeObject(forKey: key.rawValue)
}
func resetStorageKeys() {
for key in RemoteStorageKey.allCases {
defaults.removeObject(forKey: key.rawValue)
}
}
}
```
```objc
@interface RemoteStorage ()
@property (nonatomic) StorageType storageType;
@property (nonatomic, strong) NSUserDefaults *defaults;
@end
@implementation RemoteStorage
- (id)initWithStorageType:(StorageType)storageType {
if (self = [super init]) {
self.storageType = storageType;
}
return self;
}
- (void)store:(id)value forKey:(RemoteStorageKey)key {
[[self defaults] setValue:value forKey:[self rawValueForKey:key]];
}
- (id)retrieveForKey:(RemoteStorageKey)key {
return [[self defaults] objectForKey:[self rawValueForKey:key]];
}
- (void)removeObjectForKey:(RemoteStorageKey)key {
[[self defaults] removeObjectForKey:[self rawValueForKey:key]];
}
- (void)resetStorageKeys {
[[self defaults] removeObjectForKey:[self rawValueForKey:RemoteStorageKeyPendingCustomEvents]];
[[self defaults] removeObjectForKey:[self rawValueForKey:RemoteStorageKeyPendingCustomAttributes]];
[[self defaults] removeObjectForKey:[self rawValueForKey:RemoteStorageKeyPendingUserAttributes]];
}
- (NSUserDefaults *)defaults {
if (!self.defaults) {
switch (self.storageType) {
case StorageTypeStandard:
return [NSUserDefaults standardUserDefaults];
break;
case StorageTypeSuite:
return [[NSUserDefaults alloc] initWithSuiteName:@"YOUR-DOMAIN-IDENTIFIER"];
}
} else {
return self.defaults;
}
}
- (NSString*)rawValueForKey:(RemoteStorageKey)remoteStorageKey {
switch(remoteStorageKey) {
case RemoteStorageKeyPendingCustomEvents:
return @"pending_custom_events";
case RemoteStorageKeyPendingCustomAttributes:
return @"pending_custom_attributes";
case RemoteStorageKeyPendingUserAttributes:
return @"pending_user_attributes";
default:
[NSException raise:NSGenericException format:@"Unexpected FormatType."];
}
}
```
**UserAttribute-Hilfsdatei**
```swift
enum UserAttribute: Hashable {
case email(String?)
}
// MARK: - Codable
extension UserAttribute: Codable {
private enum CodingKeys: String, CodingKey {
case email
}
func encode(to encoder: Encoder) throws {
var values = encoder.container(keyedBy: CodingKeys.self)
switch self {
case .email(let email):
try values.encode(email, forKey: .email)
}
}
init(from decoder: Decoder) throws {
let values = try decoder.container(keyedBy: CodingKeys.self)
let email = try values.decode(String.self, forKey: .email)
self = .email(email)
}
}
```
```objc
@implementation UserAttribute
- (id)initWithUserField:(NSString *)userField attributeType:(UserAttributeType)attributeType {
if (self = [super init]) {
self.userField = userField;
self.attributeType = attributeType;
}
return self;
}
- (void)encodeWithCoder:(NSCoder *)encoder {
[encoder encodeObject:self.userField forKey:@"userField"];
[encoder encodeInteger:self.attributeType forKey:@"attributeType"];
}
- (id)initWithCoder:(NSCoder *)decoder {
if (self = [super init]) {
self.userField = [decoder decodeObjectForKey:@"userField"];
NSInteger attributeRawValue = [decoder decodeIntegerForKey:@"attributeType"];
self.attributeType = (UserAttributeType) attributeRawValue;
}
return self;
}
@end
```
**EventName Dictionary-Hilfsdatei**
```swift
extension Dictionary where Key == String, Value == Any {
init(eventName: String, properties: [String: Any]? = nil) {
self.init()
self[PushNotificationKey.eventName.rawValue] = eventName
if let properties = properties {
for (key, value) in properties {
self[key] = value
}
}
}
}
```
```objc
@implementation NSDictionary (Helper)
- (id)initWithEventName:(NSString *)eventName properties:(NSDictionary *)properties {
self = [self init];
if (self) {
dict[@"event_name"] = eventName;
for(id key in properties) {
dict[key] = properties[key];
}
}
return self;
}
@end
```
# Push-Benachrichtigungstests für iOS
Source: /docs/de/developer_guide/platforms/legacy_sdks/ios/push_notifications/testing/index.md
**Warning:**
[AppboyKit](https://github.com/Appboy/appboy-ios-sdk) (also known as the Objective-C SDK) is no longer supported and has been replaced by the [Swift SDK](https://www.braze.com/docs/de/de/developer_guide/sdk_integration/?sdktab=swift). It will no longer receive new features, bug fixes, security updates, or technical support—however, messaging and analytics will continue to function as normal. To learn more, see [Introducing the New Braze Swift SDK](https://www.braze.com/resources/articles/introducing-the-new-braze-swift-sdk).
# Testen {#push-testing}
Wenn Sie In-App- und Push-Benachrichtigungen über die Befehlszeile testen möchten, können Sie über CURL und die [Messaging API](https://www.braze.com/docs/de/de/api/endpoints/messaging) eine einzelne Benachrichtigung über das Terminal senden. Sie müssen die folgenden Felder durch die richtigen Werte für Ihren Testfall ersetzen:
Erforderliche Felder:
- `YOUR-API-KEY-HERE` – verfügbar unter **Einstellungen** > **API-Schlüssel**. Stellen Sie sicher, dass der Schlüssel berechtigt ist, Nachrichten über den REST-API-Endpunkt `/messages/send` zu versenden.
- `EXTERNAL_USER_ID` – verfügbar auf der Seite **Nutzer:innen suchen**.
- `REST_API_ENDPOINT_URL` – aufgeführt auf der Braze-Seite [Instanzen](https://www.braze.com/docs/de/de/api/basics#endpoints. Ensure using the endpoint corresponds to the Braze instance your workspace is on.
Optional fields:
- `YOUR_KEY1` (optional). Stellen Sie sicher, dass der verwendete Endpunkt der Braze-Instanz entspricht, auf der sich Ihr Workspace befindet.
Optionale Felder:
- `YOUR_KEY1` (optional)
- `YOUR_VALUE1` (optional)
```bash
curl -X POST -H "Content-Type: application/json" -H "Authorization: Bearer YOUR-API-KEY-HERE" -d '{
"external_user_ids":["EXTERNAL_USER_ID"],
"messages": {
"apple_push": {
"alert":"Test push",
"extra": {
"YOUR_KEY1":"YOUR_VALUE1"
}
}
}
}' https://{REST_API_ENDPOINT_URL}/messages/send
```
# Push-Benachrichtigung Unit-Tests für iOS
Source: /docs/de/developer_guide/platforms/legacy_sdks/ios/push_notifications/unit_tests/index.md
**Warning:**
[AppboyKit](https://github.com/Appboy/appboy-ios-sdk) (also known as the Objective-C SDK) is no longer supported and has been replaced by the [Swift SDK](https://www.braze.com/docs/de/de/developer_guide/sdk_integration/?sdktab=swift). It will no longer receive new features, bug fixes, security updates, or technical support—however, messaging and analytics will continue to function as normal. To learn more, see [Introducing the New Braze Swift SDK](https://www.braze.com/resources/articles/introducing-the-new-braze-swift-sdk).
# Unit-Tests {#unit-tests}
Diese optionale Anleitung beschreibt, wie Sie einige Unit-Tests implementieren, mit denen Sie überprüfen können, ob Ihr App-Delegate die in unseren [Anweisungen zur Push-Integration](https://www.braze.com/docs/de/de/developer_guide/platforms/legacy_sdks/ios/push_notifications/integration) beschriebenen Schritte korrekt ausführt.
Wenn alle Tests bestanden werden, bedeutet dies im Allgemeinen, dass der codebasierte Teil Ihrer Push-Einrichtung funktionsfähig ist. Wenn ein Test fehlschlägt, kann dies bedeuten, dass Sie einen Schritt falsch befolgt haben, oder es kann das Ergebnis einer gültigen Anpassung sein, die nicht genau mit unseren Standardanweisungen übereinstimmt.
In jedem Fall kann dies ein hilfreicher Ansatz sein, um zu überprüfen, ob Sie die Integrationsschritte befolgt haben, und um eventuelle Regressionen zu erkennen.
## 1. Schritt: Ein Unit-Tests-Ziel erstellen {#step-1-creating-a-unit-tests-target}
Überspringen Sie diesen Schritt, wenn Ihr App-Projekt in Xcode bereits ein Unit Testing Bundle enthält.
Wählen Sie in Ihrem App-Projekt das Menü **File > New > Target** und fügen Sie ein neues „Unit Testing Bundle“ hinzu. Dieses Bundle kann entweder Objective-C oder Swift verwenden und einen beliebigen Namen haben. Setzen Sie das „Target to be Tested“ auf Ihr App-Hauptziel.
## 2. Schritt: Das Braze SDK zu Ihren Unit-Tests hinzufügen {#step-2-add-the-braze-sdk-to-your-unit-tests}
Stellen Sie mit der gleichen Methode, mit der Sie ursprünglich [das Braze SDK installiert](https://www.braze.com/docs/de/de/developer_guide/platforms/legacy_sdks/ios/initial_sdk_setup/overview) haben, sicher, dass die gleiche SDK-Installation auch für Ihr Unit-Tests-Ziel verfügbar ist. Zum Beispiel mit CocoaPods:
```
target 'YourAppTarget' do
pod 'Appboy-iOS-SDK'
target 'YourAppTargetTests' do
inherit! :search_paths
end
end
```
## 3. Schritt: OCMock zu Ihren Unit-Tests hinzufügen {#step-3-add-ocmock-to-your-unit-tests}
Fügen Sie [OCMock](https://ocmock.org/) über CocoaPods, Carthage oder die statische Bibliothek zu Ihrem Test-Ziel hinzu. Zum Beispiel mit CocoaPods:
```
target 'YourAppTarget' do
pod 'Appboy-iOS-SDK'
target 'YourAppTargetTests' do
inherit! :search_paths
pod 'OCMock'
end
end
```
## 4. Schritt: Installation der hinzugefügten Bibliotheken abschließen {#step-4-finish-installing-the-added-libraries}
Schließen Sie die Installation des Braze SDK und von OCMock ab. Wenn Sie zum Beispiel CocoaPods verwenden, navigieren Sie in Ihrem Terminal zum Verzeichnis Ihres Xcode-App-Projekts und führen Sie den folgenden Befehl aus:
```
pod install
```
Jetzt sollten Sie in der Lage sein, den von CocoaPods erstellten Xcode-Projekt-Workspace zu öffnen.
## 5. Schritt: Push-Tests hinzufügen {#step-5-adding-push-tests}
Erstellen Sie eine neue Objective-C-Datei in Ihrem Unit-Tests-Ziel.
Wenn das Unit-Tests-Ziel in Swift ist, fragt Xcode möglicherweise: „Would you like to configure an Objective-C bridging header?“ Der Bridging Header ist optional. Sie können also auf **Don't Create** klicken und die Unit-Tests trotzdem erfolgreich ausführen.
Fügen Sie den Inhalt der [`AppboyPushUnitTests.m`](https://github.com/Appboy/appboy-ios-sdk/blob/master/HelloSwift/HelloSwiftTests/AppboyPushUnitTests.m) aus der HelloSwift-Beispiel-App in die neue Datei ein.
## 6. Schritt: Test-Suite ausführen {#step-6-run-test-suite}
Führen Sie die Unit-Tests Ihrer App aus. Dies kann ein einmaliger Überprüfungsschritt sein, oder Sie können ihn dauerhaft in Ihre Test-Suite aufnehmen, um eventuelle Regressionen zu erkennen.
# Fehlerbehebung für Push-Benachrichtigungen unter iOS
Source: /docs/de/developer_guide/platforms/legacy_sdks/ios/push_notifications/troubleshooting/index.md
**Warning:**
[AppboyKit](https://github.com/Appboy/appboy-ios-sdk) (also known as the Objective-C SDK) is no longer supported and has been replaced by the [Swift SDK](https://www.braze.com/docs/de/de/developer_guide/sdk_integration/?sdktab=swift). It will no longer receive new features, bug fixes, security updates, or technical support—however, messaging and analytics will continue to function as normal. To learn more, see [Introducing the New Braze Swift SDK](https://www.braze.com/resources/articles/introducing-the-new-braze-swift-sdk).
# Fehlerbehebung {#push-troubleshooting}
## Den Arbeitsablauf von Braze/APNs verstehen {#understanding-the-brazeapns-workflow}
Der Apple Push Notification Service (APNs) ist Apples Infrastruktur für den Versand von Push-Benachrichtigungen an iOS- und OS X-Anwendungen. Hier ist die vereinfachte Struktur, wie Push-Benachrichtigungen für die Geräte Ihrer Nutzer:innen aktiviert werden und wie Braze Push-Benachrichtigungen an sie senden kann:
1. Sie konfigurieren das Push-Zertifikat und das Bereitstellungsprofil
2. Geräte registrieren sich für APNs und versorgen Braze mit Push-Token
3. Sie starten eine Braze-Push-Campaign
4. Braze entfernt ungültige Token
### 1. Schritt: Konfigurieren des Push-Zertifikats und des Bereitstellungsprofils {#step-1-configuring-the-push-certificate-and-provisioning-profile}
Bei der Entwicklung Ihrer App müssen Sie ein SSL-Zertifikat erstellen, um Push-Benachrichtigungen zu aktivieren. Dieses Zertifikat wird in das Bereitstellungsprofil Ihrer App aufgenommen und muss außerdem in das Braze-Dashboard hochgeladen werden. Das Zertifikat ermöglicht es Braze, APNs mitzuteilen, dass wir in Ihrem Namen Push-Benachrichtigungen senden dürfen.
Es gibt zwei Arten von [Bereitstellungsprofilen](https://developer.apple.com/library/content/documentation/IDEs/Conceptual/AppDistributionGuide/MaintainingProfiles/MaintainingProfiles.html) und Zertifikaten: Entwicklung und Verteilung. Um Unklarheiten zu vermeiden, empfehlen wir, nur Verteilungsprofile und -zertifikate zu verwenden. Wenn Sie unterschiedliche Profile und Zertifikate für die Entwicklung und Verteilung verwenden möchten, stellen Sie sicher, dass das in das Dashboard hochgeladene Zertifikat mit dem derzeit verwendeten Bereitstellungsprofil übereinstimmt.
**Warning:**
Ändern Sie nicht die Push-Zertifikat-Umgebung (Entwicklung oder Produktion). Wenn Sie das Push-Zertifikat in die falsche Umgebung ändern, kann dies dazu führen, dass Ihren Nutzer:innen versehentlich ihr Push-Token entzogen wird, sodass sie nicht mehr per Push erreichbar sind.
#### 2. Schritt: Geräte registrieren sich für APNs und versorgen Braze mit Push-Token {#step-2-devices-register-for-apns-and-provide-braze-with-push-tokens}
Wenn Nutzer:innen Ihre App öffnen, werden sie aufgefordert, Push-Benachrichtigungen zu akzeptieren. Stimmen sie der Aufforderung zu, generieren die APNs ein Push-Token für das betreffende Gerät. Das iOS SDK sendet das Push-Token für Apps, die die standardmäßige [Auto-Flush-Richtlinie](https://www.braze.com/docs/de/de/developer_guide/platform_integration_guides/ios/advanced_use_cases/fine_network_traffic_control#automatic-request-processing) verwenden, sofort und asynchron. Nachdem wir ein Push-Token mit einer Nutzer:in verknüpft haben, wird diese im Dashboard auf ihrem Nutzerprofil unter dem Tab **Engagement** als „Push registriert“ angezeigt und ist berechtigt, Push-Benachrichtigungen von Braze-Campaigns zu erhalten.
**Note:**
Ab Xcode 14 können Sie Remote-Push-Benachrichtigungen auf einem iOS-Simulator testen.
#### 3. Schritt: Starten einer Braze-Push-Campaign {#step-3-launching-a-braze-push-campaign}
Beim Starten einer Push-Campaign stellt Braze Anfragen an APNs, um Ihre Nachricht zuzustellen. Braze verwendet das im Dashboard hochgeladene SSL-Push-Zertifikat, um sich zu authentifizieren und zu überprüfen, ob wir Push-Benachrichtigungen an die angegebenen Push-Token senden dürfen. Wenn ein Gerät online ist, sollte die Benachrichtigung kurz nach dem Senden der Campaign empfangen werden. Beachten Sie, dass Braze das standardmäßige APNs-[Ablaufdatum](https://developer.apple.com/documentation/usernotifications/setting_up_a_remote_notification_server/sending_notification_requests_to_apns#2947607) für Benachrichtigungen auf 30 Tage festlegt.
#### 4. Schritt: Entfernen ungültiger Token {#step-4-removing-invalid-tokens}
Wenn [APNs](https://developer.apple.com/library/content/documentation/NetworkingInternet/Conceptual/RemoteNotificationsPG/APNSOverview.html#//apple_ref/doc/uid/TP40008194-CH8-SW1) uns informiert, dass eines der Push-Token, an das wir eine Nachricht senden wollten, ungültig ist, entfernen wir diese Token aus den Nutzerprofilen, mit denen sie verknüpft waren.
## Verwendung der Push-Fehlerprotokolle {#utilizing-the-push-error-logs}
Braze bietet ein Protokoll der Push-Benachrichtigungsfehler im **Nachrichten-Aktivitätsprotokoll**. Dieses Fehlerprotokoll enthält eine Reihe von Warnungen, die sehr hilfreich sein können, um festzustellen, warum Ihre Campaigns nicht wie erwartet funktionieren. Wenn Sie auf eine Fehlermeldung klicken, werden Sie zur entsprechenden Dokumentation weitergeleitet, die Sie bei der Fehlerbehebung unterstützt.

Zu den häufigen Fehlern, die Ihnen hier angezeigt werden, gehören nutzerspezifische Benachrichtigungen wie [„Nicht registrierte Sendung an Push-Token empfangen“](#received-unregistered-sending).
Darüber hinaus stellt Braze unter dem Tab **Engagement** ein Push-Changelog für das Nutzerprofil bereit. Dieses Changelog enthält Insights zum Verhalten bei der Push-Registrierung, z. B. Token-Invalidierung, Fehler bei der Push-Registrierung, zu neuen Nutzer:innen verschobene Token usw.
{: style="max-width:50%;" }
## Probleme bei der Push-Registrierung {#push-registration-issues}
Um die Logik der Push-Registrierung für Ihre Anwendung zu verifizieren, implementieren Sie [Push-Unit-Tests](https://www.braze.com/docs/de/de/developer_guide/platforms/legacy_sdks/ios/push_notifications/unit_tests).
### Keine Push-Registrierungsaufforderung {#no-push-registration-prompt}
Wenn die Anwendung Sie nicht auffordert, sich für Push-Benachrichtigungen zu registrieren, liegt wahrscheinlich ein Problem mit der Integration der Push-Registrierung vor. Stellen Sie sicher, dass Sie unsere [Dokumentation](https://www.braze.com/docs/de/de/developer_guide/platforms/legacy_sdks/ios/push_notifications/integration) befolgt und unsere Push-Registrierung korrekt integriert haben. Sie können auch Haltepunkte in Ihrem Code setzen, um sicherzustellen, dass der Code für die Push-Registrierung ausgeführt wird.
#### Keine „push-registrierten“ Nutzer:innen im Dashboard sichtbar {#no-push-registered-users-showing-in-the-dashboard}
- Überprüfen Sie, ob Sie von Ihrer App aufgefordert werden, Push-Benachrichtigungen zuzulassen. Normalerweise erscheint diese Aufforderung beim ersten Öffnen der App, aber sie kann auch so programmiert werden, dass sie an anderen Stellen erscheint. Wenn sie nicht dort erscheint, wo sie sein sollte, liegt das Problem wahrscheinlich bei der Grundkonfiguration der Push-Funktionen Ihrer App.
- Überprüfen Sie, ob die Schritte für die [Push-Integration](https://www.braze.com/docs/de/de/developer_guide/platforms/legacy_sdks/ios/push_notifications/integration) erfolgreich abgeschlossen wurden.
- Vergewissern Sie sich, dass das Bereitstellungsprofil Ihrer App Berechtigungen für Push enthält. Stellen Sie sicher, dass Sie alle verfügbaren Bereitstellungsprofile aus Ihrem Apple-Entwicklerkonto abrufen. Um dies zu bestätigen, führen Sie die folgenden Schritte aus:
1. Navigieren Sie in Xcode zu **Preferences > Accounts** (oder verwenden Sie die Tastenkombination Command+,).
2. Wählen Sie die Apple ID, die Sie für Ihr Entwicklerkonto verwenden, und klicken Sie auf **View Details**.
3. Klicken Sie auf der nächsten Seite auf ** Refresh** und bestätigen Sie, dass Sie alle verfügbaren Bereitstellungsprofile abrufen.
- Überprüfen Sie, ob die [Push-Funktion in Ihrer App korrekt aktiviert ist](https://www.braze.com/docs/de/de/developer_guide/platform_integration_guides/ios/push_notifications/integration#step-2-enable-push-capabilities).
- Stellen Sie sicher, dass das Push-Bereitstellungsprofil mit der Umgebung übereinstimmt, in der Sie testen. Universelle Zertifikate können im Braze-Dashboard so konfiguriert werden, dass sie entweder an die APNs-Entwicklungs- oder die Produktionsumgebung gesendet werden. Die Verwendung eines Entwicklungszertifikats für eine Produktionsanwendung oder eines Produktionszertifikats für eine Entwicklungsanwendung wird nicht funktionieren.
- Überprüfen Sie, ob unsere Methode `registerPushToken` aufgerufen wird, indem Sie einen Haltepunkt in Ihrem Code setzen.
- Stellen Sie sicher, dass Sie sich auf einem Gerät befinden (Push funktioniert nicht auf einem Simulator) und eine gute Netzwerkverbindung haben.
## Geräte erhalten keine Push-Benachrichtigungen {#devices-not-receiving-push-notifications}
### Nutzer:innen sind nach dem Senden einer Push-Benachrichtigung nicht mehr „push-registriert“ {#users-no-longer-push-registered-after-sending-a-push-notification}
Dies deutet wahrscheinlich darauf hin, dass das Push-Token der Nutzer:in ungültig war. Dafür kann es mehrere Gründe geben:
#### Dashboard und App-Zertifikat stimmen nicht überein {#dashboard-and-app-certificate-mismatch}
Wenn das Push-Zertifikat, das Sie im Dashboard hochgeladen haben, nicht dasselbe ist wie das im Bereitstellungsprofil, mit dem Ihre App erstellt wurde, lehnen die APNs das Token ab. Vergewissern Sie sich, dass Sie das richtige Zertifikat hochgeladen und eine weitere Sitzung in der App abgeschlossen haben, bevor Sie eine weitere Testbenachrichtigung versuchen.
##### Deinstallationen {#uninstalls}
Wenn eine Nutzer:in Ihre Anwendung deinstalliert hat, ist ihr Push-Token ungültig und wird beim nächsten Senden entfernt.
##### Ihr Bereitstellungsprofil neu generieren {#regenerating-your-provisioning-profile}
Als letzten Ausweg können Sie von vorne beginnen und ein völlig neues Bereitstellungsprofil erstellen, um Konfigurationsfehler zu beheben, die durch die gleichzeitige Arbeit mit mehreren Umgebungen, Profilen und Anwendungen entstehen. Bei der Einrichtung von Push-Benachrichtigungen für iOS-Apps gibt es viele „bewegliche Teile“. Daher ist es mitunter sinnvoll, noch einmal von vorn zu beginnen. Diese Vorgehensweise ist auch hilfreich, um das Problem einzugrenzen, wenn Sie die Fehlerbehebung fortsetzen müssen.
#### Nutzer:innen sind nach dem Senden einer Push-Benachrichtigung weiterhin „push-registriert“ {#users-still-push-registered-after-sending-a-push-notification}
##### App befindet sich im Vordergrund {#app-is-foregrounded}
Bei iOS-Versionen, die Push nicht über das Framework `UserNotifications` integrieren, wird die Nachricht nicht angezeigt, wenn sich die App beim Empfang der Push-Nachricht im Vordergrund befindet. Vor dem Senden von Testnachrichten sollten Sie die App auf Ihren Testgeräten in den Hintergrund versetzen.
##### Testbenachrichtigung falsch geplant {#test-notification-scheduled-incorrectly}
Überprüfen Sie den Zeitplan, den Sie für Ihre Testnachricht festgelegt haben. Wenn sie auf Zustellung in der lokalen Zeitzone oder [intelligentes Timing](https://www.braze.com/docs/de/de/user_guide/brazeai/intelligence_suite/intelligent_timing) eingestellt ist, haben Sie die Nachricht möglicherweise noch nicht erhalten (oder die App war im Vordergrund, als sie empfangen wurde).
#### Nutzer:in ist für die zu testende App nicht „push-registriert“ {#user-not-push-registered-for-the-app-being-tested}
Überprüfen Sie das Nutzerprofil der Nutzer:in, an die Sie eine Testnachricht senden möchten. Unter dem Tab **Engagement** sollte eine Liste der „pushbaren Apps“ angezeigt werden. Vergewissern Sie sich, dass die App, an die Sie Testnachrichten senden möchten, in dieser Liste enthalten ist. Nutzer:innen werden als „Push registriert“ angezeigt, wenn sie ein Push-Token für eine beliebige App in Ihrem Workspace haben, es könnte sich also um ein falsches Positiv handeln.
Das Folgende deutet auf ein Problem mit der Push-Registrierung hin oder darauf, dass das Token der Nutzer:in von den APNs nach dem Push-Vorgang als ungültig an Braze zurückgegeben wurde:
{: style="max-width:50%"}
## Push-Nachrichten werden nicht gesendet {#push-messages-not-sending}
Zur Fehlerbehebung bei Push-Benachrichtigungen, die nicht gesendet werden, lesen Sie [Fehlerbehebung für Push](https://www.braze.com/docs/de/de/user_guide/channels/push/troubleshooting).
## Fehler im Nachrichten-Aktivitätsprotokoll {#message-activity-log-errors}
### Nicht registrierte Sendung an Push-Token empfangen {#received-unregistered-sending}
- Stellen Sie sicher, dass das Push-Token, das über die Methode `[[Appboy sharedInstance] registerPushToken:]` an Braze gesendet wird, gültig ist. Im **Nachrichten-Aktivitätsprotokoll** können Sie das Push-Token einsehen. Es sollte etwa so aussehen wie `6e407a9be8d07f0cdeb9e724733a89445f57a89ec890d63867c482a483506fa6`, eine lange Zeichenkette mit einer Mischung aus Buchstaben und Zahlen. Wenn Ihr Push-Token anders aussieht, überprüfen Sie Ihren [Code](https://www.braze.com/docs/de/de/developer_guide/platform_integration_guides/ios/push_notifications/integration#step-4-register-push-tokens-with-braze) zum Senden der Push-Token an Braze.
- Vergewissern Sie sich, dass das Push-Bereitstellungsprofil mit der Umgebung übereinstimmt, in der Sie testen. Universelle Zertifikate können im Braze-Dashboard so konfiguriert werden, dass sie entweder an die APNs-Entwicklungs- oder die Produktionsumgebung gesendet werden. Die Verwendung eines Entwicklungszertifikats für eine Produktionsanwendung oder eines Produktionszertifikats für eine Entwicklungsanwendung wird nicht funktionieren.
- Überprüfen Sie, ob das Push-Token, das Sie auf Braze hochgeladen haben, mit dem Bereitstellungsprofil übereinstimmt, das Sie zum Erstellen der App verwendet haben, von der Sie das Push-Token gesendet haben.
#### Geräte-Token nicht zum Thema {#device-token-not-for-topic}
Dieser Fehler zeigt an, dass das Push-Zertifikat Ihrer App und die Bundle-ID nicht übereinstimmen. Überprüfen Sie, ob das Push-Zertifikat, das Sie auf Braze hochgeladen haben, mit dem Bereitstellungsprofil übereinstimmt, das zur Erstellung der App verwendet wurde, von der das Push-Token gesendet wurde.
#### BadDeviceToken beim Senden an Push-Token {#baddevicetoken-sending-to-push-token}
`BadDeviceToken` ist ein APNs-Fehlercode und stammt nicht von Braze. Es kann eine Reihe von Gründen dafür geben, dass diese Antwort zurückgegeben wird, wie beispielsweise:
- Die App hat ein Push-Token empfangen, das für die im Dashboard hochgeladenen Zugangsdaten ungültig war.
- Push wurde für diesen Workspace deaktiviert.
- Die Nutzer:in hat die Push-Funktion abbestellt.
- Die App wurde deinstalliert.
- Apple hat das Push-Token erneuert, wodurch das alte Token ungültig wurde.
- Die App wurde für eine Produktionsumgebung erstellt, aber die auf Braze hochgeladenen Push-Zugangsdaten sind für eine Entwicklungsumgebung eingestellt (oder umgekehrt).
## Probleme nach der Push-Zustellung {#issues-after-push-delivery}
Um die Push-Verarbeitung Ihrer Anwendung zu verifizieren, implementieren Sie [Push-Unit-Tests](https://www.braze.com/docs/de/de/developer_guide/platforms/legacy_sdks/ios/push_notifications/unit_tests).
### Nicht protokollierte Push-Klicks {#push-clicks-not-logged}
- Wenn dieses Problem nur unter iOS 10 auftritt, stellen Sie sicher, dass Sie die Schritte zur Push-Integration für [iOS 10](https://www.braze.com/docs/de/de/developer_guide/platform_integration_guides/ios/push_notifications/integration#step-5-enable-push-handling) befolgt haben.
- Braze verarbeitet keine Push-Benachrichtigungen, die still im Vordergrund empfangen werden (z. B. Standardverhalten von Push im Vordergrund vor dem Framework `UserNotifications`). Das bedeutet, dass Links nicht geöffnet werden und Push-Klicks nicht protokolliert werden. Wenn das Framework `UserNotifications` noch nicht in Ihrer Anwendung integriert ist, verarbeitet Braze keine Push-Benachrichtigungen, wenn der Anwendungsstatus `UIApplicationStateActive` lautet. Sie sollten sicherstellen, dass Ihre App die Aufrufe unserer [Push-Verarbeitungsmethoden](https://www.braze.com/docs/de/de/developer_guide/platform_integration_guides/ios/push_notifications/integration#step-5-enable-push-handling) nicht verzögert. Andernfalls kann es sein, dass das iOS SDK Push-Benachrichtigungen als stille Vordergrund-Push-Ereignisse behandelt und sie nicht weitergibt.
#### Weblinks von Push-Klicks werden nicht geöffnet {#web-links-from-push-clicks-not-opening}
Unter iOS 9+ müssen Links ATS-konform sein, damit sie in Webansichten geöffnet werden können. Stellen Sie sicher, dass Ihre Weblinks HTTPS verwenden. Weitere Informationen finden Sie in unserem Artikel zur [ATS-Konformität](https://www.braze.com/docs/de/de/developer_guide/platform_integration_guides/ios/advanced_use_cases/linking#app-transport-security-ats).
#### Deeplinks von Push-Klicks werden nicht geöffnet {#deep-links-from-push-clicks-not-opening}
Der Großteil des Codes, der Deeplinks verarbeitet, verarbeitet auch Push-Öffnungen. Stellen Sie zunächst sicher, dass Push-Öffnungen protokolliert werden. Wenn nicht, [beheben Sie das Problem](#push-clicks-not-logged) (hierdurch wird oftmals auch die Linkverarbeitung korrigiert).
Wenn Öffnungen protokolliert werden, prüfen Sie, ob es sich um ein Problem mit Deeplinks im Allgemeinen oder nur mit Deeplinks bei der Verarbeitung von Push-Klicks handelt. Um dies herauszufinden, testen Sie per Klick auf eine In-App-Nachricht, ob ein Deeplink funktioniert.
#### Wenige oder keine direkten Öffnungen {#few-or-no-direct-opens}
Wenn mindestens eine Nutzer:in Ihre iOS-Push-Benachrichtigung öffnet, aber nur wenige oder keine _direkten Öffnungen_ in Braze protokolliert werden, gibt es möglicherweise ein Problem mit Ihrer [SDK-Integration](https://www.braze.com/docs/de/de/developer_guide/platforms/legacy_sdks/ios/initial_sdk_setup/overview). Denken Sie daran, dass _direkte Öffnungen_ nicht für Testsendungen oder stille Push-Benachrichtigungen protokolliert werden.
- Stellen Sie sicher, dass die Nachrichten nicht als [stille Push-Benachrichtigungen](https://www.braze.com/docs/de/de/developer_guide/platform_integration_guides/swift/push_notifications/silent_push_notifications#sending-silent-push-notifications) gesendet werden. Die Nachricht muss Text im Titel oder Textkörper enthalten, um nicht als stille Nachricht zu gelten.
- Überprüfen Sie die folgenden Schritte im [Leitfaden zur Push-Integration](https://www.braze.com/docs/de/de/developer_guide/platforms/legacy_sdks/ios/push_notifications/integration):
- [Push-Registrierung](https://www.braze.com/docs/de/de/developer_guide/platform_integration_guides/swift/push_notifications/integration#step-1-register-for-push-notifications-with-apns): Bei jedem einzelnen App-Start, vorzugsweise innerhalb von `application:didFinishLaunchingWithOptions:`, muss der Code aus Schritt 3 ausgeführt werden. Die Eigenschaft „delegate“ von `UNUserNotificationCenter.current()` muss einem Objekt zugewiesen sein, das `UNUserNotificationCenterDelegate` implementiert und die Methode `(void)userNotificationCenter:didReceiveNotificationResponse:withCompletionHandler:` enthält.
- [Push-Verarbeitung aktivieren](https://www.braze.com/docs/de/de/developer_guide/platform_integration_guides/legacy_sdks/ios/push_notifications/integration#step-5-enable-push-handling): Überprüfen Sie, ob die Methode `(void)userNotificationCenter:didReceiveNotificationResponse:withCompletionHandler:` implementiert wurde.
# Übersicht der In-App-Nachrichten für iOS
Source: /docs/de/developer_guide/platforms/legacy_sdks/ios/in-app_messaging/overview/index.md
**Warning:**
[AppboyKit](https://github.com/Appboy/appboy-ios-sdk) (also known as the Objective-C SDK) is no longer supported and has been replaced by the [Swift SDK](https://www.braze.com/docs/de/de/developer_guide/sdk_integration/?sdktab=swift). It will no longer receive new features, bug fixes, security updates, or technical support—however, messaging and analytics will continue to function as normal. To learn more, see [Introducing the New Braze Swift SDK](https://www.braze.com/resources/articles/introducing-the-new-braze-swift-sdk).
# In-App-Nachrichten {#in-app-messages}
Mit [In-App-Nachrichten](https://www.braze.com/docs/de/de/user_guide/channels/in_app_messages) können Sie Inhalte an Ihre Nutzer:innen übermitteln, ohne sie mit einer Push-Benachrichtigung zu unterbrechen. Angepasste und maßgeschneiderte In-App-Nachrichten verbessern das Nutzererlebnis und helfen Ihrer Zielgruppe, den größtmöglichen Nutzen aus Ihrer App zu ziehen. Mit einer Vielzahl von Layouts und Anpassungswerkzeugen, aus denen Sie wählen können, binden In-App-Nachrichten Ihre Nutzer:innen mehr als je zuvor.
In unseren [Fallstudien](https://www.braze.com/customers) finden Sie Beispiele für In-App-Nachrichten.
## Arten von In-App-Nachrichten {#in-app-message-types}
Braze bietet derzeit die folgenden standardmäßigen In-App-Nachrichtenarten:
- `Slideup`
- `Modal`
- `Full`
- `HTML Full`
Jede Art von In-App-Nachricht ist in Bezug auf Inhalt, Bilder, Symbole, Klickaktionen, Analytics, Anzeige und Zustellung in hohem Maße anpassbar.
Alle In-App-Nachrichten sind Unterklassen von `ABKInAppMessage`, die das grundlegende Verhalten und die Merkmale für alle In-App-Nachrichten definiert. Es gibt folgende Klassenstrukturen von In-App-Nachrichten:

**Important:**
In-App-Nachrichten werden standardmäßig nach Abschluss der standardmäßigen SDK-Integration aktiviert, einschließlich der GIF-Unterstützung.
Beachten Sie, dass die Integration von `SDWebImage` erforderlich ist, wenn Sie unsere Braze UI für die Anzeige von Bildern in iOS-In-App-Nachrichten oder Content Cards verwenden möchten.
### Erwartete Verhaltensweisen nach Nachrichtentypen {#expected-behaviors-by-message-types}
So sieht es aus, wenn Ihre Nutzer:innen eine unserer Standardarten von In-App-Nachrichten öffnen.
[`Slideup`](https://appboy.github.io/appboy-ios-sdk/docs/interface_a_b_k_in_app_message_slideup.html)-In-App-Nachrichten werden so genannt, weil sie vom oberen oder unteren Bildschirmrand nach oben oder unten gleiten. Sie bedecken nur einen kleinen Teil des Bildschirms und bieten eine effektive und unaufdringliche Möglichkeit zur Nachrichtenübermittlung.
{: style="border:0px;"}
[`Modal`](https://appboy.github.io/appboy-ios-sdk/docs/interface_a_b_k_in_app_message_modal.html)-In-App-Nachrichten erscheinen in der Mitte des Bildschirms und werden von einem durchscheinenden Panel eingerahmt. Sie können mit bis zu zwei Buttons für Klickaktionen und Analytics ausgestattet werden und sind damit für wichtigere Mitteilungen geeignet.
{: style="border:0px;"}
[`Full`](https://appboy.github.io/appboy-ios-sdk/docs/interface_a_b_k_in_app_message_full.html)-In-App-Nachrichten sind nützlich, um den Inhalt und die Wirkung Ihrer Nutzerkommunikation zu maximieren. Die obere Hälfte einer `full`-In-App-Nachricht enthält ein Bild, die untere Hälfte Text und bis zu zwei Buttons mit Klickaktionen und Analytics-Funktionalität.
{: style="border:0px;"}
[`HTML Full`](https://appboy.github.io/appboy-ios-sdk/docs/interface_a_b_k_in_app_message_h_t_m_l_full.html)-In-App-Nachrichten sind nützlich, um vollständig angepasste Nutzerinhalte zu erstellen. Der gesamte Inhalt von benutzerdefinierten HTML-Full-In-App-Nachrichten wird in einer `WKWebView` angezeigt und kann optional anderen Rich Content wie Bilder und Schriftarten enthalten. So haben Sie die volle Kontrolle über das Aussehen und die Funktionalität der Nachrichten.
iOS-In-App-Nachrichten unterstützen eine JavaScript-`brazeBridge`-Schnittstelle, um Methoden des Braze Web SDK aus Ihrem HTML-Code heraus aufzurufen. Weitere Details finden Sie in unseren [Best Practices](https://www.braze.com/docs/de/de/user_guide/channels/in_app_messages/best_practices).
Das folgende Beispiel zeigt eine paginierte HTML-Full-In-App-Nachricht:

Der Inhalt einer Full-In-App-Nachricht wird in einer `WKWebView` angezeigt und kann optional anderen Rich Content wie Bilder und Schriftarten enthalten. So haben Sie die volle Kontrolle über das Aussehen und die Funktionalität der Nachrichten. Beachten Sie, dass die Anzeige von angepassten In-App-Nachrichten im HTML-Format in einem iFrame unter iOS und Android derzeit nicht unterstützt wird.
**Note:**
Ab iOS SDK Version 3.19.0 sind die folgenden JavaScript-Methoden in In-App-Nachrichten im HTML-Format No-Ops: `alert`, `confirm`, `prompt`.
# Anpassung von iOS-In-App-Nachrichten
Source: /docs/de/developer_guide/platforms/legacy_sdks/ios/in-app_messaging/customization/index.md
# In-App-Nachrichten-Delegates für iOS festlegen
Source: /docs/de/developer_guide/platforms/legacy_sdks/ios/in-app_messaging/customization/setting_delegates/index.md
**Warning:**
[AppboyKit](https://github.com/Appboy/appboy-ios-sdk) (also known as the Objective-C SDK) is no longer supported and has been replaced by the [Swift SDK](https://www.braze.com/docs/de/de/developer_guide/sdk_integration/?sdktab=swift). It will no longer receive new features, bug fixes, security updates, or technical support—however, messaging and analytics will continue to function as normal. To learn more, see [Introducing the New Braze Swift SDK](https://www.braze.com/resources/articles/introducing-the-new-braze-swift-sdk).
# Delegates festlegen {#set-delegates}
Die Anzeige und Zustellung von In-App-Nachrichten kann im Code angepasst werden, indem Sie unsere optionalen Delegates festlegen.
## In-App-Nachrichten-Delegate {#in-app-message-delegate}
Der [`ABKInAppMessageUIDelegate`](https://github.com/Appboy/appboy-ios-sdk/blob/master/AppboyUI/ABKInAppMessage/ABKInAppMessageUIDelegate.h)-Delegate kann verwendet werden, um getriggerte In-App-Nachrichten-Payloads zur weiteren Verarbeitung zu empfangen, Ereignisse im Anzeige-Lebenszyklus zu empfangen und das Anzeige-Timing zu steuern.
Setzen Sie Ihr `ABKInAppMessageUIDelegate`-Delegate-Objekt auf der Braze-Instanz, indem Sie Folgendes aufrufen:
```objc
[[Appboy sharedInstance].inAppMessageController.inAppMessageUIController setInAppMessageUIDelegate:self];
```
```swift
Appboy.sharedInstance()?.inAppMessageController.inAppMessageUIController?.setInAppMessageUIDelegate?(self)
```
In unserer [Beispiel-App](https://github.com/Appboy/appboy-ios-sdk/blob/master/Samples/InAppMessage/BrazeInAppMessageSample/BrazeInAppMessageSample/ViewController.m) für In-App-Nachrichten finden Sie ein Beispiel für die Implementierung. Beachten Sie, dass dieser Delegate nicht verfügbar ist, wenn Sie die Braze-UI-Bibliothek nicht in Ihr Projekt einbinden (ungewöhnlich).
## Kern-Delegate für In-App-Nachrichten {#core-in-app-message-delegate}
Wenn Sie die Braze-UI-Bibliothek nicht in Ihr Projekt einbinden und getriggerte In-App-Nachrichten-Payloads zur weiteren Verarbeitung oder angepassten Anzeige in Ihrer App empfangen möchten, implementieren Sie das Protokoll [`ABKInAppMessageControllerDelegate`](https://www.braze.com/docs/de/de/developer_guide/platforms/legacy_sdks/ios/in-app_messaging/customization/setting_delegates).
Setzen Sie Ihr `ABKInAppMessageControllerDelegate`-Delegate-Objekt auf der Braze-Instanz, indem Sie Folgendes aufrufen:
```objc
[Appboy sharedInstance].inAppMessageController.delegate = self;
```
```swift
Appboy.sharedInstance()?.inAppMessageController.delegate = self
```
Alternativ können Sie Ihren Kern-Delegate für In-App-Nachrichten zur Initialisierungszeit über `appboyOptions` mit dem Schlüssel `ABKInAppMessageControllerDelegateKey` festlegen:
```objc
[Appboy startWithApiKey:@"YOUR-API_KEY"
inApplication:application
withLaunchOptions:options
withAppboyOptions:@{ ABKInAppMessageControllerDelegateKey : self }];
```
```swift
Appboy.start(withApiKey: "YOUR-API-KEY",
in:application,
withLaunchOptions:launchOptions,
withAppboyOptions:[ ABKInAppMessageControllerDelegateKey : self ])
```
## Methodendeklarationen {#method-declarations}
Weitere Informationen finden Sie in den folgenden Header-Dateien:
- [`ABKInAppMessage.h`](https://github.com/Appboy/appboy-ios-sdk/blob/master/AppboyKit/include/ABKInAppMessage.h)
- [`ABKInAppMessageControllerDelegate.h`](https://github.com/Appboy/appboy-ios-sdk/blob/master/AppboyKit/include/ABKInAppMessageControllerDelegate.h)
## Implementierungsbeispiele {#implementation-samples}
Siehe [`ViewController.m`](https://github.com/Appboy/appboy-ios-sdk/blob/master/Samples/InAppMessage/BrazeInAppMessageSample/BrazeInAppMessageSample/ViewController.m) in der Beispiel-App für In-App-Nachrichten.
# Anpassen der Ausrichtung von In-App-Nachrichten für iOS
Source: /docs/de/developer_guide/platforms/legacy_sdks/ios/in-app_messaging/customization/customizing_orientation/index.md
**Warning:**
[AppboyKit](https://github.com/Appboy/appboy-ios-sdk) (also known as the Objective-C SDK) is no longer supported and has been replaced by the [Swift SDK](https://www.braze.com/docs/de/de/developer_guide/sdk_integration/?sdktab=swift). It will no longer receive new features, bug fixes, security updates, or technical support—however, messaging and analytics will continue to function as normal. To learn more, see [Introducing the New Braze Swift SDK](https://www.braze.com/resources/articles/introducing-the-new-braze-swift-sdk).
# Ausrichtung anpassen {#customize-orientation}
## Ausrichtung für alle In-App-Nachrichten einstellen {#setting-orientation-for-all-in-app-messages}
Um eine feste Ausrichtung für alle In-App-Nachrichten festzulegen, können Sie die Eigenschaft `supportedOrientationMask` auf `ABKInAppMessageUIController` setzen. Fügen Sie den folgenden Code nach dem Aufruf Ihrer App an `startWithApiKey:inApplication:withLaunchOptions:` hinzu:
```objc
// Set fixed in-app message orientation to portrait.
// Use UIInterfaceOrientationMaskLandscape to display in-app messages in landscape
id inAppMessageUIController = [Appboy sharedInstance].inAppMessageController.inAppMessageUIController;
((ABKInAppMessageUIController *)inAppMessageUIController).supportedOrientationMask = UIInterfaceOrientationMaskPortrait;
```
```swift
// Set fixed in-app message orientation to portrait
// Use .landscape to display in-app messages in landscape
if let controller = Appboy.sharedInstance()?.inAppMessageController.inAppMessageUIController as? ABKInAppMessageUIController {
controller.supportedOrientationMask = .portrait
}
```
Danach werden alle In-App-Nachrichten in der unterstützten Ausrichtung angezeigt, unabhängig von der Geräteausrichtung. Beachten Sie, dass die Geräteausrichtung auch von der Eigenschaft `orientation` der In-App-Nachricht unterstützt werden muss, damit die Nachricht angezeigt wird.
## Ausrichtung pro In-App-Nachricht einstellen {#setting-orientation-per-in-app-message}
Alternativ können Sie die Ausrichtung auch pro Nachricht einzeln festlegen. Legen Sie dazu einen [Delegaten für In-App-Nachrichten](https://www.braze.com/docs/de/de/developer_guide/platforms/legacy_sdks/ios/in-app_messaging/customization/setting_delegates) fest. Setzen Sie dann in Ihrer Delegate-Methode `beforeInAppMessageDisplayed:` die Eigenschaft `orientation` auf `ABKInAppMessage`:
```objc
// Set inAppMessage orientation to portrait
inAppMessage.orientation = ABKInAppMessageOrientationPortrait;
// Set inAppMessage orientation to landscape
inAppMessage.orientation = ABKInAppMessageOrientationLandscape;
```
```swift
// Set inAppMessage orientation to portrait
inAppMessage.orientation = ABKInAppMessageOrientation.portrait
// Set inAppMessage orientation to landscape
inAppMessage.orientation = ABKInAppMessageOrientation.landscape
```
In-App-Nachrichten werden nicht angezeigt, wenn die Geräteausrichtung nicht mit der Eigenschaft `orientation` der In-App-Nachricht übereinstimmt.
**Note:**
Bei iPads werden In-App-Nachrichten im von Nutzer:innen bevorzugten Ausrichtungsstil angezeigt, unabhängig von der tatsächlichen Bildschirmausrichtung.
## Methodendeklarationen {#method-declarations}
Weitere Informationen finden Sie in der folgenden Header-Datei:
- [`ABKInAppMessage.h`](https://github.com/Appboy/appboy-ios-sdk/blob/master/AppboyKit/include/ABKInAppMessage.h)
# Anpassen der Anzeige von In-App-Nachrichten für iOS
Source: /docs/de/developer_guide/platforms/legacy_sdks/ios/in-app_messaging/customization/handling_in_app_display/index.md
**Warning:**
[AppboyKit](https://github.com/Appboy/appboy-ios-sdk) (also known as the Objective-C SDK) is no longer supported and has been replaced by the [Swift SDK](https://www.braze.com/docs/de/de/developer_guide/sdk_integration/?sdktab=swift). It will no longer receive new features, bug fixes, security updates, or technical support—however, messaging and analytics will continue to function as normal. To learn more, see [Introducing the New Braze Swift SDK](https://www.braze.com/resources/articles/introducing-the-new-braze-swift-sdk).
# Angepasste Handhabung der Anzeige von In-App-Nachrichten {#custom-handling-in-app-message-display}
Wenn die [`ABKInAppMessageControllerDelegate`](https://github.com/Appboy/appboy-ios-sdk/blob/master/AppboyKit/include/ABKInAppMessageControllerDelegate.h) gesetzt ist, wird die folgende Delegatenmethode aufgerufen, bevor In-App-Nachrichten angezeigt werden:
```objc
- (ABKInAppMessageDisplayChoice) beforeInAppMessageDisplayed:(ABKInAppMessage *)inAppMessage;
```
```swift
func beforeInAppMessageDisplayed(inAppMessage: ABKInAppMessage!) -> ABKInAppMessageDisplayChoice
```
Wenn Sie nur [`ABKInAppMessageUIDelegate`](https://github.com/Appboy/appboy-ios-sdk/blob/master/AppboyUI/ABKInAppMessage/ABKInAppMessageUIDelegate.h) implementiert haben, wird stattdessen die folgende UI-Delegate-Methode aufgerufen:
```objc
- (ABKInAppMessageDisplayChoice) beforeInAppMessageDisplayed:(ABKInAppMessage *)inAppMessage withKeyboardIsUp:(BOOL)keyboardIsUp;
```
```swift
func beforeInAppMessageDisplayed(inAppMessage: ABKInAppMessage!, withKeyboardIsUp keyboardIsUp: Bool) -> ABKInAppMessageDisplayChoice
```
Sie können die Behandlung von In-App-Nachrichten anpassen, indem Sie diese Delegatenmethode implementieren und einen der folgenden Werte für `ABKInAppMessageDisplayChoice` zurückgeben:
| `ABKInAppMessageDisplayChoice` | Verhalten |
| -------------------------- | -------- |
| Objective-C: `ABKDisplayInAppMessageNow` Swift: `displayInAppMessageNow` | Die Nachricht wird sofort angezeigt. |
| Objective-C: `ABKDisplayInAppMessageLater` Swift: `displayInAppMessageLater` | Die Nachricht wird nicht angezeigt und wieder oben auf dem Stack abgelegt. |
| Objective-C: `ABKDiscardInAppMessage` Swift: `discardInAppMessage`| Die Nachricht wird verworfen und nicht angezeigt. |
{: .reset-td-br-1 .reset-td-br-2 aria-label="Angepasste Handhabung der Anzeige von In-App-Nachrichten" }
Mit der Delegatenmethode `beforeInAppMessageDisplayed:` können Sie eine Logik für die Anzeige von In-App-Nachrichten hinzufügen, In-App-Nachrichten anpassen, bevor Braze sie anzeigt, oder die Anzeigelogik und das UI von Braze für In-App-Nachrichten vollständig umgehen.
In unserer [Beispielanwendung](https://github.com/Appboy/appboy-ios-sdk/blob/master/Samples/InAppMessage/BrazeInAppMessageSample/BrazeInAppMessageSample/AppDelegate.m) finden Sie ein Implementierungsbeispiel.
## In-App-Nachrichten vor der Anzeige außer Kraft setzen {#overriding-in-app-messages-before-display}
Wenn Sie das Anzeigeverhalten von In-App-Nachrichten ändern möchten, sollten Sie die erforderliche Anzeigelogik zu Ihrer `beforeInAppMessageDisplayed:`-Delegatenmethode hinzufügen. So können Sie z. B. die In-App-Nachricht vom oberen Bildschirmrand aus anzeigen lassen, wenn gerade die Tastatur eingeblendet ist, oder das Datenmodell der In-App-Nachricht übernehmen und die In-App-Nachricht selbst anzeigen.
Wenn die In-App-Nachricht-Campaign nicht angezeigt wird, wenn die Sitzung gestartet wurde, vergewissern Sie sich, dass Sie die notwendige Anzeigelogik zu Ihrer `beforeInAppMessageDisplayed:`-Delegatenmethode hinzugefügt haben. Damit kann die In-App-Nachricht-Campaign auch dann vom oberen Bildschirmrand aus angezeigt werden, wenn die Tastatur eingeblendet ist.
## Dark Mode deaktivieren {#disabling-dark-mode}
Um zu verhindern, dass In-App-Nachrichten das Design des Dark Mode übernehmen, wenn auf dem Gerät der Nutzer:innen der Dark Mode aktiviert ist, verwenden Sie die Eigenschaft [`ABKInAppMessage.enableDarkTheme`](https://appboy.github.io/appboy-ios-sdk/docs/interface_a_b_k_in_app_message.html#ae89df6090bed623099ab0ecc0a74ad5d). Setzen Sie entweder in der Methode `ABKInAppMessageControllerDelegate.beforeInAppMessageDisplayed:` oder `ABKInAppMessageUIDelegate.beforeInAppMessageDisplayed:` die Eigenschaft `enableDarkTheme` des Parameters `inAppMessage` auf `NO`.
```objc
// ABKInAppMessageControllerDelegate
- (ABKInAppMessageDisplayChoice)beforeInAppMessageDisplayed:(ABKInAppMessage *)inAppMessage {
...
inAppMessage.enableDarkTheme = NO;
...
return ABKDisplayInAppMessageNow;
}
// ABKInAppMessageUIDelegate
- (ABKInAppMessageDisplayChoice)beforeInAppMesssageDisplayed:(ABKInAppMessage *)inAppMessage
withKeyboardIsUp:(BOOL)keyboardIsUp {
...
inAppMessage.enableDarkTheme = NO;
...
return ABKDisplayInAppMessageNow;
}
```
```swift
// ABKInAppMessageControllerDelegate
func before(inAppMessageDisplayed inAppMessage: ABKInAppMessage) -> ABKInAppMessageDisplayChoice {
...
inAppMessage.enableDarkTheme = false
...
return ABKInAppMessageDisplayChoice.displayInAppMessageNow
}
// ABKInAppMessageUIDelegate
func before(inAppMessageDisplayed inAppMessage: ABKInAppMessage, withKeyboardIsUp keyboardIsUp: Bool) -> ABKInAppMessageDisplayChoice {
...
inAppMessage.enableDarkTheme = false
...
return ABKInAppMessageDisplayChoice.displayInAppMessageNow
}
```
## Ausblenden der Statusleiste während der Anzeige {#hiding-the-status-bar-during-display}
Bei `Full`- und `HTML`-In-App-Nachrichten versucht das SDK standardmäßig, die Nachricht über der Statusleiste zu platzieren. In einigen Fällen kann die Statusleiste jedoch weiterhin über der In-App-Nachricht erscheinen. Ab Version [3.21.1](https://github.com/Appboy/appboy-ios-sdk/blob/master/CHANGELOG.md#3211) des iOS SDK können Sie erzwingen, dass die Statusleiste beim Anzeigen von `Full`- und `HTML`-In-App-Nachrichten ausgeblendet wird, indem Sie `ABKInAppMessageHideStatusBarKey` auf `YES` innerhalb der `appboyOptions` setzen, die an `startWithApiKey:` übergeben werden.
## Impressionen und Klicks protokollieren {#logging-impressions-and-clicks}
Die Protokollierung von Impressionen und Klicks bei In-App-Nachrichten erfolgt nicht automatisch, wenn Sie eine vollständig angepasste Handhabung implementieren (z. B. wenn Sie die Anzeige von In-App-Nachrichten durch Braze umgehen, indem Sie `ABKDiscardInAppMessage` in Ihrer `beforeInAppMessageDisplayed:`-Methode zurückgeben). Wenn Sie sich dafür entscheiden, Ihr eigenes UI unter Verwendung unserer In-App-Nachricht-Modelle zu implementieren, müssen Sie die Analytics mit den folgenden Methoden der Klasse `ABKInAppMessage` protokollieren:
```objc
// Registers that a user has viewed an in-app message with the Braze server.
- (void) logInAppMessageImpression;
// Registers that a user has clicked on an in-app message with the Braze server.
- (void) logInAppMessageClicked;
```
```swift
// Registers that a user has viewed an in-app message with the Braze server.
func logInAppMessageImpression()
// Registers that a user has clicked on an in-app message with the Braze server.
func logInAppMessageClicked()
```
Außerdem sollten Sie die Button-Klicks in den Unterklassen von `ABKInAppMessageImmersive` protokollieren (*d. h.* `Modal`- und `Full`-In-App-Nachrichten):
```objc
// Logs button click analytics
- (void)logInAppMessageClickedWithButtonID:(NSInteger)buttonID;
```
```swift
// Logs button click analytics
func logInAppMessageClickedWithButtonID(buttonId: NSInteger)
```
## Methoden-Deklarationen {#method-declarations}
Weitere Informationen finden Sie in den folgenden Header-Dateien:
- [`ABKInAppMessage.h`](https://github.com/Appboy/appboy-ios-sdk/blob/master/AppboyKit/include/ABKInAppMessage.h)
- [`ABKInAppMessageControllerDelegate.h`](https://github.com/Appboy/appboy-ios-sdk/blob/master/AppboyKit/include/ABKInAppMessageControllerDelegate.h)
## Beispiele für die Implementierung {#implementation-samples}
Siehe die Beispiel-App für In-App-Nachrichten [`AppDelegate.m`](https://github.com/Appboy/appboy-ios-sdk/blob/master/Samples/InAppMessage/BrazeInAppMessageSample/BrazeInAppMessageSample/AppDelegate.m).
# Anpassen des Verhaltens bei Klick auf In-App-Nachrichten für iOS
Source: /docs/de/developer_guide/platforms/legacy_sdks/ios/in-app_messaging/customization/behavior_on_click/index.md
**Warning:**
[AppboyKit](https://github.com/Appboy/appboy-ios-sdk) (also known as the Objective-C SDK) is no longer supported and has been replaced by the [Swift SDK](https://www.braze.com/docs/de/de/developer_guide/sdk_integration/?sdktab=swift). It will no longer receive new features, bug fixes, security updates, or technical support—however, messaging and analytics will continue to function as normal. To learn more, see [Introducing the New Braze Swift SDK](https://www.braze.com/resources/articles/introducing-the-new-braze-swift-sdk).
# Anpassen des Verhaltens von In-App-Nachrichten bei einem Klick {#customize-in-app-message-behavior-on-click}
Die Eigenschaft `inAppMessageClickActionType` von `ABKInAppMessage` definiert das Aktionsverhalten nach dem Klicken auf die In-App-Nachricht. Diese Eigenschaft ist schreibgeschützt. Wenn Sie das Klickverhalten der In-App-Nachricht ändern möchten, können Sie die folgende Methode auf `ABKInAppMessage` aufrufen:
```objc
[inAppMessage setInAppMessageClickAction:clickActionType withURI:uri];
```
```swift
inAppMessage.setInAppMessageClickAction(clickActionType: clickActionType, withURI: uri)
```
Die `inAppMessageClickActionType` kann auf einen der folgenden Werte eingestellt werden:
| `ABKInAppMessageClickActionType` | On-Click-Verhalten |
| -------------------------- | -------- |
| `ABKInAppMessageRedirectToURI` | Die angegebene URI wird angezeigt, wenn auf die Nachricht geklickt wird, und die Nachricht wird ausgeblendet. Beachten Sie, dass der Parameter `uri` nicht nil sein darf. |
| `ABKInAppMessageNoneClickAction` | Die Nachricht wird ausgeblendet, wenn sie angeklickt wird. Beachten Sie, dass der Parameter `uri` ignoriert und die Eigenschaft `uri` von `ABKInAppMessage` auf nil gesetzt wird. |
{: .reset-td-br-1 .reset-td-br-2 aria-label="Customize in-app message behavior on click" }
**Important:**
Bei In-App-Nachrichten mit Buttons wird die `clickAction` der Nachricht ebenfalls in die endgültige Nutzlast aufgenommen, wenn die Klickaktion vor dem Hinzufügen des Button-Textes hinzugefügt wird.
## Anpassen von Klicks auf den In-App-Nachrichtentext {#customizing-in-app-message-body-clicks}
Wenn auf eine In-App-Nachricht geklickt wird, wird die folgende Delegate-Methode [`ABKInAppMessageUIDelegate`](https://github.com/Appboy/appboy-ios-sdk/blob/master/AppboyUI/ABKInAppMessage/ABKInAppMessageUIDelegate.h) aufgerufen:
```objc
- (BOOL) onInAppMessageClicked:(ABKInAppMessage *)inAppMessage;
```
```swift
func onInAppMessageClicked(inAppMessage: ABKInAppMessage!) -> Bool
```
## Anpassen von Klicks auf Buttons in In-App-Nachrichten {#customizing-in-app-message-button-clicks}
Für Klicks auf In-App-Nachrichten-Buttons und HTML-In-App-Nachrichten-Buttons (z. B. Links) enthält [`ABKInAppMessageUIDelegate`](https://github.com/Appboy/appboy-ios-sdk/blob/master/AppboyUI/ABKInAppMessage/ABKInAppMessageUIDelegate.h) die folgenden Delegate-Methoden:
```objc
- (BOOL)onInAppMessageButtonClicked:(ABKInAppMessageImmersive *)inAppMessage
button:(ABKInAppMessageButton *)button;
- (BOOL)onInAppMessageHTMLButtonClicked:(ABKInAppMessageHTML *)inAppMessage
clickedURL:(nullable NSURL *)clickedURL
buttonID:(NSString *)buttonID;
```
```swift
func onInAppMessageButtonClicked(inAppMessage: ABKInAppMessageImmersive!,
button: ABKInAppMessageButton) -> Bool
func onInAppMessageHTMLButtonClicked(inAppMessage: ABKInAppMessageHTML!,
clickedURL: URL, buttonID: String) -> Bool
```
Jede Methode gibt einen `BOOL`-Wert zurück, der angibt, ob Braze die Klickaktion weiter ausführen soll.
Mit dem folgenden Code können Sie auf den Typ der Klickaktion eines Buttons in einer Delegate-Methode zugreifen:
```objc
if ([inAppMessage isKindOfClass:[ABKInAppMessageImmersive class]]) {
ABKInAppMessageImmersive *immersiveIAM = (ABKInAppMessageImmersive *)inAppMessage;
NSArray *buttons = immersiveIAM.buttons;
for (ABKInAppMessageButton *button in buttons) {
// Button action type is accessible via button.buttonClickActionType
}
}
```
```swift
if inAppMessage is ABKInAppMessageImmersive {
let immersiveIAM = inAppMessage as! ABKInAppMessageImmersive;
for button in inAppMessage.buttons as! [ABKInAppMessageButton]{
// Button action type is accessible via button.buttonClickActionType
}
}
```
Wenn eine In-App-Nachricht Buttons enthält, werden nur die Klickaktionen auf dem Modell `ABKInAppMessageButton` ausgeführt. Der In-App-Nachrichtentext kann nicht angeklickt werden, obwohl dem Modell `ABKInAppMessage` die Standard-Klickaktion zugewiesen ist.
## Methoden-Deklarationen {#method-declarations}
Weitere Informationen finden Sie in den folgenden Header-Dateien:
- [`ABKInAppMessage.h`](https://github.com/Appboy/appboy-ios-sdk/blob/master/AppboyKit/include/ABKInAppMessage.h)
# Anpassen der Auslösung von In-App-Nachrichten für iOS
Source: /docs/de/developer_guide/platforms/legacy_sdks/ios/in-app_messaging/customization/custom_triggering/index.md
**Warning:**
[AppboyKit](https://github.com/Appboy/appboy-ios-sdk) (also known as the Objective-C SDK) is no longer supported and has been replaced by the [Swift SDK](https://www.braze.com/docs/de/de/developer_guide/sdk_integration/?sdktab=swift). It will no longer receive new features, bug fixes, security updates, or technical support—however, messaging and analytics will continue to function as normal. To learn more, see [Introducing the New Braze Swift SDK](https://www.braze.com/resources/articles/introducing-the-new-braze-swift-sdk).
# Angepasstes Triggern von In-App-Nachrichten {#custom-in-app-message-triggering}
Standardmäßig werden In-App-Nachrichten durch Event-Typen ausgelöst, die vom SDK protokolliert werden. Sie können In-App-Nachrichten jedoch auch durch vom Server gesendete Events auslösen.
Um dieses Feature zu aktivieren, senden Sie eine stille Push-Benachrichtigung an das Gerät. Sie ermöglicht es dem Gerät, ein SDK-basiertes Event zu protokollieren. Dieses SDK-Event würde dann die für Nutzer:innen sichtbare In-App-Nachricht auslösen.
## 1. Schritt: Stille Push-Benachrichtigungen und Schlüssel-Wert-Paare verarbeiten {#step-1-handle-silent-push-and-key-value-pairs}
Fügen Sie den folgenden Code in die Methode `application(_:didReceiveRemoteNotification:fetchCompletionHandler:)` ein:
```objc
- (void)handleExtrasFromPush:(NSDictionary *)userInfo {
NSLog(@"A push was received.");
if (userInfo !=nil && userInfo[@"IS_SERVER_EVENT"] !=nil && userInfo[@"CAMPAIGN_NAME"]!=nil) {
[[Appboy sharedInstance] logCustomEvent:@"IAM Trigger" withProperties:@{@"campaign_name": userInfo[@"CAMPAIGN_NAME"]}];
}
};
```
```swift
func handleExtras(userInfo: [AnyHashable : Any]) {
NSLog("A push was received");
if userInfo != nil && (userInfo["IS_SERVER_EVENT"] as? String) != nil && (userInfo["CAMPAIGN_NAME"] as? String) != nil {
Appboy.sharedInstance()?.logCustomEvent("IAM Trigger", withProperties: ["campaign_name": userInfo["CAMPAIGN_NAME"]])
}
}
```
Beim Empfang einer stillen Push-Benachrichtigung wird ein vom SDK aufgezeichnetes Event des Typs „In-App-Nachrichten-Trigger“ im Nutzerprofil protokolliert. Beachten Sie, dass diese In-App-Nachrichten nur ausgelöst werden, wenn sich die Anwendung beim Empfang der stillen Push-Benachrichtigung im Vordergrund befindet.
## 2. Schritt: Eine Push-Kampagne erstellen {#step-2-create-a-push-campaign}
Erstellen Sie eine Kampagne mit einem stillen Push, die über das vom Server gesendete Event ausgelöst wird. Einzelheiten zur Erstellung einer stillen Push-Kampagne finden Sie unter [Stille Push-Benachrichtigungen](https://www.braze.com/docs/de/de/developer_guide/platforms/legacy_sdks/ios/push_notifications/silent_push_notifications).

Die Push-Kampagne muss zusätzliche Schlüssel-Wert-Paare (Extras) enthalten, die angeben, dass diese Push-Kampagne gesendet wird, um ein angepasstes SDK-Event zu protokollieren. Dieses Event wird zum Triggern der In-App-Nachricht verwendet:

Der Code in der Methode `application(_:didReceiveRemoteNotification:fetchCompletionHandler:)` prüft auf den Schlüssel `IS_SERVER_EVENT` und protokolliert ein angepasstes SDK-Event, wenn dieser vorhanden ist.
Sie können entweder den Event-Namen oder die Event-Eigenschaften ändern, indem Sie den gewünschten Wert in den zusätzlichen Schlüssel-Wert-Paaren (Extras) der Push-Nutzlast senden. Bei der Protokollierung des angepassten Events können diese Extras entweder als Parameter des Event-Namens oder als Event-Eigenschaft verwendet werden.
## 3. Schritt: Eine In-App-Nachrichten-Kampagne erstellen {#step-3-create-an-in-app-message-campaign}
Erstellen Sie Ihre für Nutzer:innen sichtbare In-App-Nachrichten-Kampagne über das Braze-Dashboard. Diese Kampagne sollte eine aktionsbasierte Zustellung haben und durch das angepasste Event ausgelöst werden, das in der Methode `application(_:didReceiveRemoteNotification:fetchCompletionHandler:)` protokolliert wird.
Im folgenden Beispiel wurde die zu triggernde In-App-Nachricht konfiguriert, indem die Event-Eigenschaft im Rahmen des ursprünglichen stillen Push gesendet wurde.

Da eine Push-Nachricht verwendet wird, um ein vom SDK protokolliertes angepasstes Event aufzuzeichnen, muss Braze ein Push-Token für jede:n Nutzer:in speichern, um diese Lösung zu ermöglichen. Sowohl für iOS als auch für Android speichert Braze ein Token erst ab dem Zeitpunkt, an dem Nutzer:innen die Push-Aufforderung des Betriebssystems erhalten haben. Davor sind Nutzer:innen nicht per Push erreichbar und die obige Lösung ist nicht möglich.
# In-App Nachricht in einem benutzerdefinierten View Controller für iOS
Source: /docs/de/developer_guide/platforms/legacy_sdks/ios/in-app_messaging/customization/custom_view_controller/index.md
**Warning:**
[AppboyKit](https://github.com/Appboy/appboy-ios-sdk) (also known as the Objective-C SDK) is no longer supported and has been replaced by the [Swift SDK](https://www.braze.com/docs/de/de/developer_guide/sdk_integration/?sdktab=swift). It will no longer receive new features, bug fixes, security updates, or technical support—however, messaging and analytics will continue to function as normal. To learn more, see [Introducing the New Braze Swift SDK](https://www.braze.com/resources/articles/introducing-the-new-braze-swift-sdk).
# Anzeigen von In-App-Nachrichten in einem benutzerdefinierten View-Controller
In-App-Nachrichten können auch in einem angepassten View-Controller angezeigt werden, den Sie an Braze übergeben. Braze animiert die angepasste In-App-Nachricht und verarbeitet die Analytics der In-App-Nachricht. Der View Controller muss die folgenden Anforderungen erfüllen:
- Es muss eine Unterklasse oder eine Instanz von `ABKInAppMessageViewController` sein.
- Die Ansicht des zurückgegebenen View-Controllers sollte eine Instanz von `ABKInAppMessageView` oder seiner Unterklasse sein.
Die folgende UI-Delegate-Methode wird jedes Mal aufgerufen, wenn eine In-App-Nachricht auf `ABKInAppMessageViewController` angeboten wird, damit die App einen angepassten View-Controller für die Anzeige von In-App-Nachrichten an Braze übergeben kann:
```objc
- (ABKInAppMessageViewController *)inAppMessageViewControllerWithInAppMessage:(ABKInAppMessage *)inAppMessage;
```
```swift
func inAppMessageViewControllerWithInAppMessage(inAppMessage: ABKInAppMessage!) -> ABKInAppMessageViewController!
```
Unsere [Controller für die In-App-Nachrichtenansicht](https://github.com/Appboy/appboy-ios-sdk/tree/master/AppboyUI/ABKInAppMessage/ViewControllers) sind anpassbar. Sie können Unterklassen oder Kategorien verwenden, um die Anzeige oder das Verhalten von In-App-Nachrichten anzupassen.
## Methoden-Deklarationen
Weitere Informationen finden Sie in den folgenden Header-Dateien:
- [`ABKInAppMessage.h`](https://github.com/Appboy/appboy-ios-sdk/blob/master/AppboyKit/include/ABKInAppMessage.h)
## Beispiele für die Umsetzung
Siehe [`ViewController.m`](https://github.com/Appboy/appboy-ios-sdk/blob/master/Samples/InAppMessage/BrazeInAppMessageSample/BrazeInAppMessageSample/ViewController.m) und [`CustomInAppMessageViewController.m`](https://github.com/Appboy/appboy-ios-sdk/blob/master/Samples/InAppMessage/BrazeInAppMessageSample/BrazeInAppMessageSample/) in der Beispiel-App für In-App-Nachrichten.
# Modale Beendigung von In-App-Nachrichten für iOS
Source: /docs/de/developer_guide/platforms/legacy_sdks/ios/in-app_messaging/customization/modal_dismissal/index.md
**Warning:**
[AppboyKit](https://github.com/Appboy/appboy-ios-sdk) (also known as the Objective-C SDK) is no longer supported and has been replaced by the [Swift SDK](https://www.braze.com/docs/de/de/developer_guide/sdk_integration/?sdktab=swift). It will no longer receive new features, bug fixes, security updates, or technical support—however, messaging and analytics will continue to function as normal. To learn more, see [Introducing the New Braze Swift SDK](https://www.braze.com/resources/articles/introducing-the-new-braze-swift-sdk).
# Modal durch Tippen außerhalb des Fensters ausblenden {#dismiss-modal-on-outside-tap}
Der Standardwert ist `NO`. Hierdurch wird festgelegt, ob die modale In-App-Nachricht ausgeblendet wird, wenn der/die Nutzer:in auf eine Stelle außerhalb der In-App-Nachricht tippt.
Wenn Sie Ausblendungen durch Tippen außerhalb des Fensters aktivieren möchten, fügen Sie ein Wörterbuch namens `Braze` zur Datei `Info.plist` hinzu. Fügen Sie im Wörterbuch `Braze` den booleschen Untereintrag `DismissModalOnOutsideTap` hinzu und setzen Sie den Wert auf `YES`. Siehe hierzu das folgende Code-Snippet. Beachten Sie, dass vor Braze iOS SDK v4.0.2 der Wörterbuchschlüssel `Appboy` anstelle von `Braze` verwendet werden muss.
```
BrazeDismissModalOnOutsideTapYES
```
Sie können das Feature auch zur Laufzeit aktivieren, indem Sie `ABKEnableDismissModalOnOutsideTapKey` in `appboyOptions` auf `YES` setzen.
| `DismissModalOnOutsideTap` | Beschreibung |
|----------|-------------|
| `YES` | Modale In-App-Nachrichten werden ausgeblendet, wenn auf eine Stelle außerhalb des Fensters getippt wird. |
| `NO` | Standardmäßig werden modale In-App-Nachrichten beim Tippen auf eine Stelle außerhalb des Fensters nicht ausgeblendet. |
{: .reset-td-br-1 .reset-td-br-2 aria-label="Modal durch Tippen außerhalb des Fensters ausblenden" }
# In-App Nachrichten Schlüssel-Wert-Paare für iOS
Source: /docs/de/developer_guide/platforms/legacy_sdks/ios/in-app_messaging/customization/key_value_pairs/index.md
**Warning:**
[AppboyKit](https://github.com/Appboy/appboy-ios-sdk) (also known as the Objective-C SDK) is no longer supported and has been replaced by the [Swift SDK](https://www.braze.com/docs/de/de/developer_guide/sdk_integration/?sdktab=swift). It will no longer receive new features, bug fixes, security updates, or technical support—however, messaging and analytics will continue to function as normal. To learn more, see [Introducing the New Braze Swift SDK](https://www.braze.com/resources/articles/introducing-the-new-braze-swift-sdk).
# Schlüssel-Wert-Paar-Extras
Objekte des Typs `ABKInAppMessage` können Schlüssel-Wert-Paare als `extras` enthalten. Diese werden bei der Erstellung einer Kampagne auf dem Dashboard angegeben. Schlüssel-Wert-Paare können verwendet werden, um Daten mit einer In-App-Nachricht zur weiteren Bearbeitung durch Ihre App zu senden.
# In-App-Nachrichten-Zustellung für iOS
Source: /docs/de/developer_guide/platforms/legacy_sdks/ios/in-app_messaging/in-app_message_delivery/index.md
**Warning:**
[AppboyKit](https://github.com/Appboy/appboy-ios-sdk) (also known as the Objective-C SDK) is no longer supported and has been replaced by the [Swift SDK](https://www.braze.com/docs/de/de/developer_guide/sdk_integration/?sdktab=swift). It will no longer receive new features, bug fixes, security updates, or technical support—however, messaging and analytics will continue to function as normal. To learn more, see [Introducing the New Braze Swift SDK](https://www.braze.com/resources/articles/introducing-the-new-braze-swift-sdk).
# Zustellung von In-App-Nachrichten {#in-app-message-delivery}
## Trigger-Typen {#trigger-types}
Mit unserem Produkt für In-App-Nachrichten können Sie die Anzeige von In-App-Nachrichten infolge verschiedener Event-Typen auslösen: `Any Purchase`, `Specific Purchase`, `Session Start`, `Custom Event` und `Push Click`. Darüber hinaus enthalten die Trigger `Specific Purchase` und `Custom Event` robuste Eigenschaftsfilter.
**Note:**
Getriggerte In-App-Nachrichten funktionieren nur mit angepassten Events, die über das Braze SDK protokolliert werden. In-App-Nachrichten können nicht über die API oder durch API-Events (wie Kauf-Events) getriggert werden. Wenn Sie mit iOS arbeiten, lesen Sie unseren Artikel zum [Tracking angepasster Events](https://www.braze.com/docs/de/de/developer_guide/analytics/logging_events?tab=swift), um mehr zu erfahren.
## Zustellungssemantik {#delivery-semantics}
Alle In-App-Nachrichten, für die Nutzer:innen berechtigt sind, werden zu Beginn der Sitzung an das Gerät gesendet. Wenn durch ein Event zwei In-App-Nachrichten ausgelöst werden, wird die In-App-Nachricht mit der höheren Priorität angezeigt. Weitere Informationen zur Sitzungsstart-Semantik des SDK finden Sie unter [Lebenszyklus einer Sitzung](https://www.braze.com/docs/de/de/developer_guide/platform_integration_guides/ios/analytics/tracking_sessions#session-lifecycle). Bei der Zustellung ruft das SDK die Assets per Prefetching ab, damit sie zum Trigger-Zeitpunkt sofort verfügbar sind und die Anzeigelatenz minimiert wird.
Wenn ein Trigger-Event mit mehr als einer in Frage kommenden In-App-Nachricht verknüpft ist, wird nur die In-App-Nachricht mit der höchsten Priorität zugestellt.
Bei In-App-Nachrichten, die sofort nach der Zustellung angezeigt werden (Sitzungsstart, Push-Klick), kann es zu einer gewissen Latenz kommen, da die Assets nicht per Prefetching abgerufen werden.
## Mindestzeitintervall zwischen Triggern {#minimum-time-interval-between-triggers}
Standardmäßig begrenzen wir In-App-Nachrichten auf einmal alle 30 Sekunden, um ein hochwertiges Nutzungserlebnis zu gewährleisten.
Sie können diesen Wert über `ABKMinimumTriggerTimeIntervalKey` im Parameter `appboyOptions` überschreiben, der an `startWithApiKey:inApplication:withLaunchOptions:withAppboyOptions:` übergeben wird. Setzen Sie `ABKMinimumTriggerTimeIntervalKey` auf den ganzzahligen Wert, den Sie als Mindestzeit in Sekunden zwischen In-App-Nachrichten verwenden möchten:
```objc
// Sets the minimum trigger time interval to 5 seconds
[Appboy startWithApiKey:@"YOUR-API-KEY"
inApplication:application
withLaunchOptions:options
withAppboyOptions:@{ ABKMinimumTriggerTimeIntervalKey : @(5) }];
```
```swift
Appboy.start(withApiKey: "YOUR-API-KEY", in:application, withLaunchOptions:launchOptions, withAppboyOptions:[ABKMinimumTriggerTimeIntervalKey : 5])
```
## Wenn kein passender Trigger gefunden wird {#failing-to-find-a-matching-trigger}
Wenn Braze keinen passenden Trigger für ein bestimmtes Event findet, wird die Methode [noMatchingTriggerForEvent:name:](https://appboy.github.io/appboy-ios-sdk/docs/protocol_a_b_k_in_app_message_controller_delegate-p.html#ab4d57b13c51545d487227945a37d4ab8) von [`ABKInAppMessageControllerDelegate`](https://appboy.github.io/appboy-ios-sdk/docs/protocol_a_b_k_in_app_message_controller_delegate-p.html) aufgerufen. Implementieren Sie diese Methode in Ihrer Klasse, die das Delegate-Protokoll übernimmt, um dieses Szenario zu behandeln.
## Lokale Zustellung von In-App-Nachrichten {#local-in-app-message-delivery}
### Der In-App-Nachrichten-Stack {#the-in-app-message-stack}
#### Anzeigen von In-App-Nachrichten {#showing-in-app-messages}
Wenn Nutzer:innen zum Empfang einer In-App-Nachricht berechtigt sind, wird dem `ABKInAppMessageController` die neueste In-App-Nachricht aus dem In-App-Nachrichten-Stack angeboten. Der Stack hält nur gespeicherte In-App-Nachrichten im Arbeitsspeicher und wird zwischen App-Starts aus dem angehaltenen Modus geleert.
**Important:**
Zeigen Sie keine In-App-Nachrichten an, wenn die Tastatur auf dem Bildschirm angezeigt wird, da die Darstellung in diesem Fall undefiniert ist.
#### Hinzufügen von In-App-Nachrichten zum Stack {#adding-in-app-messages-to-the-stack}
Nutzer:innen sind in den folgenden Situationen zum Empfang einer In-App-Nachricht berechtigt:
- Ein Trigger-Event für eine In-App-Nachricht wird ausgelöst
- Sitzungsstart-Event
- Die App wird über eine Push-Benachrichtigung geöffnet
Getriggerte In-App-Nachrichten werden auf den Stack gelegt, wenn ihr Trigger-Event ausgelöst wird. Wenn sich mehrere In-App-Nachrichten im Stack befinden und darauf warten, angezeigt zu werden, zeigt Braze die zuletzt empfangene In-App-Nachricht zuerst an (Last-in-first-out-Prinzip).
#### Rückgabe von In-App-Nachrichten an den Stack {#returning-in-app-messages-to-the-stack}
Eine getriggerte In-App-Nachricht kann in den folgenden Situationen an den Stack zurückgegeben werden:
- Die In-App-Nachricht wird ausgelöst, wenn sich die App im Hintergrund befindet.
- Eine andere In-App-Nachricht ist derzeit sichtbar.
- Die veraltete [UI-Delegate-Methode](https://www.braze.com/docs/de/de/developer_guide/platform_integration_guides/ios/in-app_messaging/customization/setting_delegates#in-app-message-delegate) `beforeInAppMessageDisplayed:withKeyboardIsUp:` wurde nicht implementiert und die Tastatur wird derzeit angezeigt.
- Die [Delegate-Methode](https://www.braze.com/docs/de/de/developer_guide/platform_integration_guides/ios/in-app_messaging/customization/setting_delegates#core-in-app-message-delegate) `beforeInAppMessageDisplayed:` oder die veraltete [UI-Delegate-Methode](https://www.braze.com/docs/de/de/developer_guide/platform_integration_guides/ios/in-app_messaging/customization/setting_delegates#in-app-message-delegate) `beforeInAppMessageDisplayed:withKeyboardIsUp:` hat `ABKDisplayInAppMessageLater` zurückgegeben.
#### Verwerfen von In-App-Nachrichten {#discarding-in-app-messages}
Eine getriggerte In-App-Nachricht wird in den folgenden Situationen verworfen:
- Die [Delegate-Methode](https://www.braze.com/docs/de/de/developer_guide/platform_integration_guides/ios/in-app_messaging/customization/setting_delegates#core-in-app-message-delegate) `beforeInAppMessageDisplayed:` oder die veraltete [UI-Delegate-Methode](https://www.braze.com/docs/de/de/developer_guide/platform_integration_guides/ios/in-app_messaging/customization/setting_delegates#in-app-message-delegate) `beforeInAppMessageDisplayed:withKeyboardIsUp:` hat `ABKDiscardInAppMessage` zurückgegeben.
- Das Asset (Bild oder ZIP-Datei) der In-App-Nachricht konnte nicht heruntergeladen werden.
- Die In-App-Nachricht ist zur Anzeige bereit, hat aber die Timeout-Dauer überschritten.
- Die Geräteausrichtung stimmt nicht mit der Ausrichtung der getriggerten In-App-Nachricht überein.
- Die In-App-Nachricht ist eine Vollbild-In-App-Nachricht, enthält aber kein Bild.
- Die In-App-Nachricht ist eine modale In-App-Nachricht, die nur ein Bild enthält, aber kein Bild vorhanden ist.
#### Manuelles Einreihen von In-App-Nachrichten in die Anzeigewarteschlange {#manually-queue-in-app-message-display}
Wenn Sie eine In-App-Nachricht zu anderen Zeitpunkten in Ihrer App anzeigen möchten, können Sie die oberste In-App-Nachricht auf dem Stack manuell anzeigen, indem Sie die folgende Methode aufrufen:
```objc
[[Appboy sharedInstance].inAppMessageController displayNextInAppMessage];
```
```swift
Appboy.sharedInstance()!.inAppMessageController.displayNextInAppMessage()
```
### Erstellung und Anzeige von In-App-Nachrichten in Realtime {#real-time-in-app-message-creation-and-display}
In-App-Nachrichten können auch lokal in der App erstellt und über Braze angezeigt werden. Dies ist besonders nützlich für die Anzeige von Nachrichten, die Sie in Realtime in der App auslösen möchten. Braze unterstützt keine Analytics für lokal erstellte In-App-Nachrichten.
```objc
ABKInAppMessageSlideup *customInAppMessage = [[ABKInAppMessageSlideup alloc] init];
customInAppMessage.message = @"YOUR_CUSTOM_SLIDEUP_MESSAGE";
customInAppMessage.duration = 2.5;
customInAppMessage.extras = @{@"key" : @"value"};
[[Appboy sharedInstance].inAppMessageController addInAppMessage:customInAppMessage];
```
```swift
let customInAppMessage = ABKInAppMessageSlideup.init()
customInAppMessage.message = "YOUR_CUSTOM_SLIDEUP_MESSAGE"
customInAppMessage.duration = 2.5
customInAppMessage.extras = ["key": "value"]
Appboy.sharedInstance()!.inAppMessageController.add(customInAppMessage)
```
# Angepasste App Store-Bewertungsaufforderung
Source: /docs/de/developer_guide/platforms/legacy_sdks/ios/in-app_messaging/custom_app_store_review_prompt/index.md
**Warning:**
[AppboyKit](https://github.com/Appboy/appboy-ios-sdk) (also known as the Objective-C SDK) is no longer supported and has been replaced by the [Swift SDK](https://www.braze.com/docs/de/de/developer_guide/sdk_integration/?sdktab=swift). It will no longer receive new features, bug fixes, security updates, or technical support—however, messaging and analytics will continue to function as normal. To learn more, see [Introducing the New Braze Swift SDK](https://www.braze.com/resources/articles/introducing-the-new-braze-swift-sdk).
# Angepasste App Store-Bewertungsaufforderung {#custom-app-store-review-prompt}
**Note:**
Sobald Sie diese Aufforderung implementieren, hört Braze auf, Impressionen automatisch zu tracken, und Sie müssen Ihre eigenen [Analytics](https://www.braze.com/docs/de/de/developer_guide/platform_integration_guides/ios/in-app_messaging/customization/handing_in_app_display#logging-impressions-and-clicks) protokollieren.
Eine Campaign zu erstellen, um Nutzer:innen um eine Bewertung im App Store zu bitten, ist eine beliebte Verwendung von In-App-Nachrichten.
Beginnen Sie damit, den [Delegat für In-App-Nachrichten](#in-app-message-controller-delegate) in Ihrer App festzulegen. Als Nächstes implementieren Sie die folgende Delegatmethode, um die standardmäßige App Store-Bewertungsnachricht zu deaktivieren:
```objc
- (ABKInAppMessageDisplayChoice)beforeInAppMessageDisplayed:(ABKInAppMessage *)inAppMessage {
if (inAppMessage.extras != nil && inAppMessage.extras[@"Appstore Review"] != nil) {
[[UIApplication sharedApplication] openURL:inAppMessage.uri options:@{} completionHandler:nil];
return ABKDiscardInAppMessage;
} else {
return ABKDisplayInAppMessageNow;
}
}
```
```swift
func before(inAppMessageDisplayed inAppMessage: ABKInAppMessage) -> ABKInAppMessageDisplayChoice {
if inAppMessage.extras?["Appstore Review"] != nil && inAppMessage.uri != nil {
UIApplication.shared.open(inAppMessage.uri!, options: [:], completionHandler: nil)
return ABKInAppMessageDisplayChoice.discardInAppMessage
} else {
return ABKInAppMessageDisplayChoice.displayInAppMessageNow
}
}
```
Fügen Sie in Ihrem Code zur Behandlung von Deeplinks den folgenden Code hinzu, um den Deeplink `{YOUR-APP-SCHEME}:appstore-review` zu verarbeiten. Beachten Sie, dass Sie `StoreKit` importieren müssen, um `SKStoreReviewController` zu verwenden:
```objc
- (BOOL)application:(UIApplication *)app openURL:(NSURL *)url options:(NSDictionary *)options {
NSString *urlString = url.absoluteString.stringByRemovingPercentEncoding;
if ([urlString isEqualToString:@"{YOUR-APP-SCHEME}:appstore-review"]) {
[SKStoreReviewController requestReview];
return YES;
}
// Other deep link handling code…
}
```
```swift
func application(_ app: UIApplication, open url: URL, options: [UIApplicationOpenURLOptionsKey : Any] = [:]) -> Bool {
let urlString = url.absoluteString.removingPercentEncoding
if (urlString == "{YOUR-APP-SCHEME}:appstore-review") {
SKStoreReviewController.requestReview()
return true;
}
// Other deep link handling code…
}
```
Als Nächstes erstellen Sie eine In-App-Nachricht-Campaign mit den folgenden Elementen:
- Das Schlüssel-Wert-Paar `"Appstore Review" : "true"`
- Das Klickverhalten ist auf „Deeplink in die App“ gesetzt, unter Verwendung des Deeplinks `{YOUR-APP-SCHEME}:appstore-review`.
**Tip:**
Apple begrenzt die Anzahl der App Store-Bewertungsaufforderungen auf maximal drei (3) Mal pro Jahr und Nutzer:in. Ihre Campaign sollte daher auf drei Mal pro Jahr und Nutzer:in [begrenzt](https://www.braze.com/docs/de/de/user_guide/messaging/messaging_fundamentals/frequency_capping) werden.
Nutzer:innen können die Aufforderungen zur Bewertung im App Store deaktivieren. Daher sollte Ihre angepasste Bewertungsaufforderung nicht versprechen, dass eine native App Store-Bewertungsaufforderung erscheint, oder direkt um eine Bewertung bitten.
# Implementierungsleitfaden für In-App-Nachrichten für iOS (optional)
Source: /docs/de/developer_guide/platforms/legacy_sdks/ios/in-app_messaging/implementation_guide/index.md
**Warning:**
[AppboyKit](https://github.com/Appboy/appboy-ios-sdk) (also known as the Objective-C SDK) is no longer supported and has been replaced by the [Swift SDK](https://www.braze.com/docs/de/de/developer_guide/sdk_integration/?sdktab=swift). It will no longer receive new features, bug fixes, security updates, or technical support—however, messaging and analytics will continue to function as normal. To learn more, see [Introducing the New Braze Swift SDK](https://www.braze.com/resources/articles/introducing-the-new-braze-swift-sdk).
**Important:**
Suchen Sie den grundlegenden Entwicklerleitfaden zur Integration von In-App-Nachrichten? Finden Sie ihn im [grundlegenden Entwicklerleitfaden zur Integration von In-App-Nachrichten](https://www.braze.com/docs/de/de/developer_guide/platforms/legacy_sdks/ios/in-app_messaging/overview).
# Implementierungsleitfaden für In-App-Nachrichten {#in-app-messaging-implementation-guide}
> Dieser optionale Leitfaden für die erweiterte Implementierung enthält Hinweise zur Code-Anpassung für In-App-Nachrichten, drei von unserem Team entwickelte angepasste Anwendungsfälle und begleitende Code-Snippets. Besuchen Sie unser [Braze Demo Repository auf GitHub](https://github.com/braze-inc/braze-growth-shares-ios-demo-app)! Dieser Implementierungsleitfaden konzentriert sich auf eine Swift-Implementierung, aber für Interessierte werden auch Objective-C-Snippets bereitgestellt. Suchen Sie nach HTML-Implementierungen? Werfen Sie einen Blick auf unser [HTML-Template-Repository](https://github.com/braze-inc/in-app-message-templates)!
## Hinweise zur Code-Anpassung {#code-considerations}
Der folgende Leitfaden beschreibt eine optionale angepasste Entwickler-Integration, die zusätzlich zu den standardmäßigen In-App-Nachrichten verwendet werden kann. Zu jedem Anwendungsfall gibt es angepasste View-Controller mit Beispielen, wie Sie die Funktionalität erweitern und Aussehen und Handhabung Ihrer In-App-Nachrichten nativ anpassen können.
### ABKInAppMessage-Unterklassen {#abkinappmessage-subclasses}
Bei dem folgenden Code-Snippet handelt es sich um eine UI-Delegate-Methode aus dem Braze SDK, die festlegt, mit welcher Unterklassenansicht die In-App-Nachricht befüllt werden soll. Wir beschreiben in diesem Leitfaden eine grundlegende Implementierung und zeigen, wie die Unterklassen „Full“, „Slide-up“ und „Modal“ auf ansprechende Weise implementiert werden können. Beachten Sie, dass Sie alle anderen Unterklassen für In-App-Nachrichten einrichten müssen, wenn Sie einen angepassten View-Controller einrichten möchten. Nachdem Sie sich ein solides Verständnis der Konzepte hinter der Einrichtung von Unterklassen angeeignet haben, sehen Sie sich unsere [Anwendungsfälle](#sample-use-cases) an, um mit der Implementierung von Unterklassen für In-App-Nachrichten zu beginnen.
**ABKInAppMessage-Unterklassen**
```swift
extension AppboyManager: ABKInAppMessageUIDelegate {
func inAppMessageViewControllerWith(_ inAppMessage: ABKInAppMessage) -> ABKInAppMessageViewController {
switch inAppMessage {
case is ABKInAppMessageSlideup:
return slideupViewController(inAppMessage: inAppMessage) //Custom Method
case is ABKInAppMessageModal:
return modalViewController(inAppMessage: inAppMessage) //Custom Method
case is ABKInAppMessageFull:
return fullViewController(inAppMessage: inAppMessage) //Custom Method
case is ABKInAppMessageHTML:
return ABKInAppMessageHTMLViewController(inAppMessage: inAppMessage)
default:
return ABKInAppMessageViewController(inAppMessage: inAppMessage)
}
}
}
```
**ABKInAppMessage-Unterklassen**
```objc
- (ABKInAppMessageViewController *)inAppMessageViewControllerWithInAppMessage:(ABKInAppMessage *)inAppMessage {
if ([inAppMessage isKindOfClass:[ABKInAppMessageSlideup class]]) {
return [self slideupViewControllerWithInAppMessage:inAppMessage]; //Custom Method
} else if ([inAppMessage isKindOfClass:[ABKInAppMessageModal class]]) {
return [self modalViewControllerWithInAppMessage:inAppMessage]; //Custom Method
} else if ([inAppMessage isKindOfClass:[ABKInAppMessageFull class]]) {
return [self fullViewControllerWithInAppMessage:inAppMessage]; //Custom Method
} else if ([inAppMessage isKindOfClass:[ABKInAppMessageHTML class]]) {
return [[ABKInAppMessageHTMLViewController alloc] initWithInAppMessage:inAppMessage];
} else {
return [[ABKInAppMessageViewController alloc] initWithInAppMessage:inAppMessage];
}
}
```
## Anwendungsfälle {#use-cases}
Im Folgenden finden Sie drei Anwendungsfälle. Jeder Anwendungsfall enthält eine ausführliche Erklärung, relevante Code-Snippets sowie einen Blick darauf, wie In-App-Nachrichten im Braze-Dashboard aussehen und verwendet werden können:
- [Angepasste Slide-up-In-App-Nachricht](#custom-slide-up-in-app-message)
- [Angepasste modale In-App-Nachricht](#custom-modal-in-app-message)
- [Angepasste Full-In-App-Nachricht](#custom-full-in-app-message)
### Angepasste Slide-up-In-App-Nachricht {#custom-slide-up-in-app-message}
{: style="float:right;max-width:45%;margin-left:15px;border:0;"}
Bei der Erstellung Ihrer Slide-up-In-App-Nachricht werden Sie feststellen, dass Sie die Platzierung der Nachricht mit den Standardmethoden nicht ändern können. Eine solche Änderung wird durch die Erstellung einer Unterklasse von `ABKInAppMessageSlideupViewController` und das Überschreiben der Variable `offset` mit Ihrer eigenen angepassten Variablen ermöglicht. Das nebenstehende Bild zeigt, wie Sie damit Ihre Slide-up-In-App-Nachrichten anpassen können.
Besuchen Sie den [`SlideFromBottomViewController`](https://github.com/braze-inc/braze-growth-shares-ios-demo-app/blob/master/Braze-Demo/ViewController/In-App-Messages/SlideFromBottomViewController.swift), um loszulegen.
#### Hinzufügen von zusätzlichem Verhalten zur Standard-Benutzeroberfläche
{#adding-additional-behavior-to-our-default-ui}
**Aktualisieren der Variable `offset`**
Aktualisieren Sie die Variable `offset` und legen Sie einen Offset fest, der Ihren Anforderungen entspricht.
```swift
func setSlideConstraint() {
offset = 0
}
```
```swift
override var offset: CGFloat {
get {
return super.offset
}
set {
super.offset = newValue + adjustedOffset
}
}
```
**Version 3.34.0 or earlier**
**Aktualisieren der Variable `slideConstraint`**
Die öffentliche Variable `slideConstraint` stammt aus der Superklasse `ABKInAppMessageSlideupViewController`.
```swift
func setSlideConstraint() {
slideConstraint?.constant = bottomSpacing
}
```
```swift
private var bottomSpacing: CGFloat {
return AppboyManager.shared.activeApplicationViewController.topMostViewController().view.safeAreaInsets.bottom
}
```
Besuchen Sie das Braze Demo Repository für die Funktion [`topMostViewController()`](https://github.com/braze-inc/braze-growth-shares-ios-demo-app/blob/master/Braze-Demo/Utils/UIViewController_Util.swift#L17).
**Aktualisieren der Variable `offset`**
Aktualisieren Sie die Variable `offset` und legen Sie einen Offset fest, der Ihren Anforderungen entspricht.
```objc
- (void)setOffset {
self.offset = 0;
}
```
```objc
- (CGFloat)offset {
return [super offset];
}
- (void)setOffset:(CGFloat)offset {
[super setOffset:offset + [self adjustedOffset]];
}
```
**Version 3.34.0 or earlier**
**Aktualisieren der Variable `slideConstraint`**
Die öffentliche Variable `slideConstraint` stammt aus der Superklasse `ABKInAppMessageSlideupViewController`.
```objc
- (void)self.setSlideConstraint:(NSLayoutConstraint *)slideConstraint {
slideConstraint.constant = bottomSpacing;
}
```
```objc
- (CGFloat)bottomSpacing {
return [AppboyManager shared].activeApplicationViewController.topMostViewController.view.safeAreaInsets.bottom;
}
```
**Angepassten Constraint überschreiben und festlegen**
Überschreiben Sie `beforeMoveInAppMessageViewOnScreen()` und legen Sie einen angepassten Constraint-Wert fest, der Ihren Anforderungen entspricht. Der ursprüngliche Wert wird in der Superklasse festgelegt.
```swift
override func beforeMoveInAppMessageViewOnScreen() {
super.beforeMoveInAppMessageViewOnScreen()
setOffset()
}
```
**Version 3.34.0 or earlier**
```swift
override func beforeMoveInAppMessageViewOnScreen() {
setSlideConstraint()
}
```
**Angepassten Constraint überschreiben und festlegen**
Überschreiben Sie `beforeMoveInAppMessageViewOnScreen()` und legen Sie einen angepassten Constraint-Wert fest, der Ihren Anforderungen entspricht. Der ursprüngliche Wert wird in der Superklasse festgelegt.
```objc
- (void)beforeMoveInAppMessageViewOnScreen {
[super beforeMoveInAppMessageViewOnScreen];
[self setOffset];
}
```
**Version 3.34.0 or earlier**
```objc
- (void)beforeMoveInAppMessageViewOnScreen {
[self setSlideConstraint:self.slideConstraint];
}
```
**Constraint für Geräteausrichtung anpassen**
Passen Sie den entsprechenden Wert in `viewWillTransition()` an, da die Unterklasse für die Synchronisierung des Constraints bei Layoutänderungen zuständig ist.
### Angepasste modale In-App-Nachricht {#custom-modal-in-app-message}
{: style="float:right;max-width:23%;margin-left:15px;border:0;"}
Ein `ABKInAppMessageModalViewController` kann in Unterklassen unterteilt werden, um eine `UIPickerView` zur Erfassung wertvoller Nutzerattribute zu nutzen. Die angepasste modale In-App-Nachricht ermöglicht es Ihnen, Connected-Content oder eine beliebige verfügbare Liste zu verwenden, um Attribute aus einer dynamischen Artikelliste anzuzeigen und zu erfassen.
Sie können Ihre eigenen Ansichten in unterklassifizierte In-App-Nachrichten einfügen. Dieses Beispiel zeigt, wie eine `UIPickerView` genutzt werden kann, um die Funktionalität eines `ABKModalInAppMessageViewController` zu erweitern.
Besuchen Sie den [ModalPickerViewController](https://github.com/braze-inc/braze-growth-shares-ios-demo-app/blob/master/Braze-Demo/ViewController/In-App-Messages/ModalPickerViewController/ModalPickerViewController.swift), um loszulegen.
#### Dashboard-Konfiguration {#dashboard-configuration}
Um eine modale In-App-Nachricht im Dashboard einzurichten, müssen Sie eine Artikelliste angeben, die als kommagetrennte Zeichenkette formatiert ist. In unserem Beispiel verwenden wir Connected-Content, um eine JSON-Liste mit Teamnamen abzurufen und entsprechend zu formatieren.

Geben Sie in den Schlüssel-Wert-Paaren einen `attribute_key` an. Dieser Schlüssel wird zusammen mit dem von Nutzer:innen ausgewählten Wert als angepasstes Attribut in ihrem Nutzerprofil gespeichert. Ihre angepasste Ansichtslogik muss die an Braze gesendeten Nutzerattribute verarbeiten.
Das Wörterbuch `extras` im Objekt `ABKInAppMessage` ermöglicht Ihnen die Abfrage eines Schlüssels des Typs `view_type` (falls vorhanden), der die korrekte Ansicht für die Anzeige angibt. Es ist wichtig zu wissen, dass In-App-Nachrichten pro Nachricht konfiguriert werden, sodass angepasste und standardmäßige modale Ansichten harmonisch zusammenarbeiten können.
{: style="max-width:65%;"}
**Verwendung von `view_type` für das Anzeigeverhalten der Benutzeroberfläche**
Fragen Sie das Wörterbuch `extras` für Ihren `view_type` ab, um den gewünschten untergeordneten View-Controller zu laden.
```swift
func modalViewController(inAppMessage: ABKInAppMessage) -> ABKInAppMessageModalViewController {
switch inAppMessage.extras?[InAppMessageKey.viewType.rawValue] as? String {
case InAppMessageViewType.picker.rawValue:
return ModalPickerViewController(inAppMessage: inAppMessage)
default:
return ABKInAppMessageModalViewController(inAppMessage: inAppMessage)
}
}
```
**Verwendung von `view_type` für das Anzeigeverhalten der Benutzeroberfläche**
Fragen Sie das Wörterbuch `extras` für Ihren `view_type` ab, um den gewünschten untergeordneten View-Controller zu laden.
```objc
- (ABKInAppMessageModalViewController *)modalViewControllerWithInAppMessage:(ABKInAppMessage *)inAppMessage {
InAppMessageData *inAppMessageData = [[InAppMessageData alloc] init];
NSString *key = [inAppMessageData rawValueForInAppMessageKey:InAppMessageKeyViewType];
NSString *viewType = [inAppMessageData rawValueForInAppMessageViewType:InAppMessageViewTypePicker];
if ([inAppMessage.extras objectForKey:key] && [inAppMessage.extras[key] isEqualToString:viewType]) {
return [[ModalViewController alloc] initWithInAppMessage:inAppMessage];
} else {
return [[ABKInAppMessageModalViewController alloc] initWithInAppMessage:inAppMessage];
}
}
```
**Angepasste Ansicht überschreiben und bereitstellen**
Überschreiben Sie `loadView()` und stellen Sie Ihre eigene angepasste Ansicht ein, die Ihren Anforderungen entspricht.
```swift
override var nibname: String{
return "ModalPickerViewController"
}
override func loadView() {
Bundle.main.loadNibNamed(nibName, owner: self, options: nil)
}
```
**Angepasste Ansicht überschreiben und bereitstellen**
Überschreiben Sie `loadView()` und stellen Sie Ihre eigene angepasste Ansicht ein, die Ihren Anforderungen entspricht.
```objc
- (void)loadView {
NSString *nibName = @"ModalPickerViewController";
[[NSBundle mainBundle] loadNibNamed:nibName owner:self options:nil];
}
```
**Variablen für eine dynamische Liste formatieren**
Bevor die Komponenten von `UIPickerView` neu geladen werden, wird die Nachrichten-Variable `inAppMessage` als _String_ ausgegeben. Diese Nachricht muss als Array formatiert werden, um korrekt angezeigt zu werden. Dies kann beispielsweise durch die Verwendung von [`components(separatedBy: ", ")`](https://developer.apple.com/documentation/foundation/nsstring/1413214-components) erreicht werden.
```swift
override func viewDidLoad() {
super.viewDidLoad()
items = inAppMessage.message.separatedByCommaSpaceValue
pickerView.reloadAllComponents()
}
```
**Variablen für PickerView formatieren**
Bevor die Komponenten von `UIPickerView` neu geladen werden, wird die Nachrichten-Variable `inAppMessage` als _String_ ausgegeben. Diese Nachricht muss als Array formatiert werden, um korrekt angezeigt zu werden. Dies kann beispielsweise durch die Verwendung von [`componentsSeparatedByString`](https://developer.apple.com/documentation/foundation/nsstring/1413214-componentsseparatedbystring?language=objc) erreicht werden.
```objc
- (void)viewDidLoad {
[super viewDidLoad];
self.items = [[NSArray alloc] initWithArray:[self.inAppMessage.message componentsSeparatedByString:@", "]];
[self.pickerView reloadAllComponents];
}
```
**Angepasstes Attribut zuweisen**
Nachdem Nutzer:innen auf „Senden“ getippt haben, übergeben Sie das Attribut mit dem entsprechend ausgewählten Wert unter Verwendung der Unterklasse an Braze.
```swift
@IBAction func primaryButtonTapped(_ sender: Any) {
guard let item = selectedItem, !item.isEmpty, let attributeKey = inAppMessage.extras?[InAppMessageKey.attributeKey.rawValue] as? String else { return }
AppboyManager.shared.setCustomAttributeWithKey(attributeKey, andStringValue: item)
}
```
**Angepasstes Attribut zuweisen**
Nachdem Nutzer:innen auf „Senden“ getippt haben, übergeben Sie das Attribut mit dem entsprechend ausgewählten Wert unter Verwendung der Unterklasse an Braze.
```objc
- (IBAction)primaryButtonTapped:(id)sender {
InAppMessageData *inAppMessageData = [[InAppMessageData alloc] init];
NSString *key = [inAppMessageData rawValueForInAppMessageKey:InAppMessageKeyAttributeKey];
if (self.selectedItem.length > 0 && [self.inAppMessage.extras objectForKey:key]) {
[[AppboyManager shared] setCustomAttributeWithKey:self.inAppMessage.extras[key] andStringValue:self.selectedItem];
}
}
```
**Tip:**
Möchten Sie unsere angepassten modalen In-App-Nachrichten nutzen, um Videos über FaceTime zu teilen? Sehen Sie sich unseren [Implementierungsleitfaden](https://www.braze.com/docs/de/de/developer_guide/platforms/legacy_sdks/ios/in-app_messaging/implementation_guide/shareplay) für In-App-Nachrichten mit SharePlay an.
### Angepasste Full-In-App-Nachricht {#custom-full-in-app-message}
{: style="float:right;max-width:23%;margin-left:15px;border:0;"}
Verwenden Sie angepasste Full-In-App-Nachrichten, um interaktive, nutzerfreundliche Aufforderungen zur Erfassung wertvoller Kundendaten zu erstellen. Das nebenstehende Beispiel zeigt die Implementierung einer angepassten Full-In-App-Nachricht, die als interaktiver Push-Primer mit Präferenzen für Benachrichtigungen umgesetzt wurde.
Besuchen Sie den [`FullListViewController`](https://github.com/braze-inc/braze-growth-shares-ios-demo-app/blob/master/Braze-Demo/ViewController/In-App-Messages/FullListViewController/FullListViewController.swift), um loszulegen.
#### Dashboard-Konfiguration
Um eine angepasste Full-In-App-Nachricht im Dashboard einzurichten, müssen Sie eine Liste Ihrer Tags angeben, die als kommagetrennte Zeichenkette formatiert ist.
Geben Sie in den Schlüssel-Wert-Paaren einen `attribute_key` an. Dieser Schlüssel wird zusammen mit den von Nutzer:innen ausgewählten Werten als angepasstes Attribut in ihrem Nutzerprofil gespeichert. Ihre angepasste Ansichtslogik muss die an Braze gesendeten Nutzerattribute verarbeiten.
{: style="max-width:65%;"}
#### Touch-Ereignisse in der In-App-Nachricht abfangen {#intercepting-in-app-message-touches}
{: style="float:right;max-width:30%;margin-left:10px;border:0"}
Das Abfangen von Touch-Ereignissen in der In-App-Nachricht ist entscheidend, damit die Buttons der angepassten Full-In-App-Nachricht korrekt funktionieren. Standardmäßig fügt `ABKInAppMessageImmersive` der Nachricht eine Tippgesten-Erkennung hinzu, sodass Nutzer:innen Nachrichten ohne Buttons ausblenden können. Durch Hinzufügen eines `UISwitch` oder Buttons zur Ansichtshierarchie `UITableViewCell` werden die Berührungen nun von der angepassten Ansicht verarbeitet. Seit iOS 6 haben Buttons und andere Steuerelemente bei der Arbeit mit Gestenerkennung Vorrang, sodass unsere angepasste Full-In-App-Nachricht wie vorgesehen funktioniert.
# SharePlay-Implementierungsleitfaden für In-App-Nachrichten
Source: /docs/de/developer_guide/platforms/legacy_sdks/ios/in-app_messaging/implementation_guide/shareplay/index.md
**Warning:**
[AppboyKit](https://github.com/Appboy/appboy-ios-sdk) (also known as the Objective-C SDK) is no longer supported and has been replaced by the [Swift SDK](https://www.braze.com/docs/de/de/developer_guide/sdk_integration/?sdktab=swift). It will no longer receive new features, bug fixes, security updates, or technical support—however, messaging and analytics will continue to function as normal. To learn more, see [Introducing the New Braze Swift SDK](https://www.braze.com/resources/articles/introducing-the-new-braze-swift-sdk).
# SharePlay-Implementierungsleitfaden für In-App-Nachrichten {#shareplay-in-app-message-implementation-guide}
> SharePlay ist ein neues Feature, das Nutzer:innen von iOS 15 FaceTime ein gemeinsames Medienerlebnis auf ihren Geräten ermöglicht, indem es Audio und Video in Echtzeit synchronisiert. SharePlay ist eine großartige Möglichkeit für Nutzer:innen, Inhalte mit Freunden und Familie zu erleben. Es bietet Braze-Kund:innen eine zusätzliche Möglichkeit für Video-Inhalte und Gelegenheiten, neue Nutzer:innen in Ihre Anwendung einzuführen.
{: style="border:0;margin-top:10px;"}
## Übersicht {#overview}
Das neue Framework `GroupActivities`, das Apple im Rahmen des iOS 15 Updates veröffentlicht hat, erlaubt es Ihnen, FaceTime zu nutzen, indem Sie SharePlay mit Hilfe der In-App-Nachrichten von Braze in Ihre Anwendungen integrieren.
{: style="float:right;max-width:30%;margin-left:15px;margin-top:10px;"}
Wenn Nutzer:innen ein SharePlay-Video in einem FaceTime-Anruf initiieren, erscheint ein „Öffnen“-Button am oberen Rand des Bildschirms aller Teilnehmer:innen. Nach dem Öffnen werden Audio und Video auf allen kompatiblen Geräten synchronisiert, sodass Nutzer:innen gemeinsam Videos in Realtime ansehen können. Diejenigen, die die App nicht heruntergeladen haben, werden zum App Store weitergeleitet.
**Synchrone Medienwiedergabe**
Bei der synchronisierten Medienwiedergabe wird das SharePlay-Video, wenn es von einer Person angehalten wird, auf allen Geräten angehalten.
{: style="border:0"}
## Integration {#integration}
Die In-App-Nachricht, die in dieser Integration verwendet wird, ist ein unterklassifizierter View-Controller für modale In-App-Nachrichten. Eine Anleitung für die Einrichtung finden Sie im [Implementierungsleitfaden](https://www.braze.com/docs/de/de/developer_guide/platforms/legacy_sdks/ios/in-app_messaging/implementation_guide) für erweiterte Anwendungsfälle bei In-App-Nachrichten unter iOS. Stellen Sie vor der Integration sicher, dass Sie die Berechtigung `GroupActivities` zu Ihrem Xcode-Projekt hinzufügen.
**Important:**
Wir empfehlen, die [Apple SharePlay-Dokumentation](https://developer.apple.com/documentation/avfoundation/media_playback_and_selection/supporting_coordinated_media_playback) parallel zu dieser Anleitung zu öffnen, um die Integration abzuschließen.
### 1. Schritt: Überschreiben und Laden von XIB {#step-1-overriding-and-loading-xib}
```swift
override var nibName: String {
return "ModalVideoViewController"
}
/// Overriding loadView() from ABKInAppMessageModalViewController to provide our own view for the in-app message
override func loadView() {
Bundle.main.loadNibNamed(nibName, owner: self, options: nil)
}
```
### 2. Schritt: AVPlayer für In-App-Nachrichten konfigurieren {#step-2-configure-avplayer-for-in-app-messages}
In-App-Nachrichten können mit geringem Entwicklungsaufwand nativ Videos abspielen. Auf diese Weise haben Sie Zugriff auf alle Features von `AVPlayerVideoController`, wie z. B. SharePlay. Die für dieses Beispiel verwendete In-App-Nachricht ist eine Unterklasse von `ABKInAppMessageModalViewController`, die über eine angepasste Ansicht verfügt, um einen nativen Video-Player einzubetten.
```swift
func configureVideoPlayer() {
guard let urlString = inAppMessage.extras?["video_url"] as? String,
let url = URL(string: urlString) else { return }
let videoTitle = inAppMessage.extras?["video_title"] as? String
mediaItem = MediaItem(title: videoTitle ?? "Video Content", url: url)
let asset = AVAsset(url: url)
let playerItem = AVPlayerItem(asset: asset)
player.replaceCurrentItem(with: playerItem)
playerViewController.player = player
addChild(playerViewController)
videoPlayerContainer.addSubview(playerViewController.view)
playerViewController.didMove(toParent: self)
}
```
#### Dashboard-Konfiguration {#dashboard-configuration}
**Schlüssel-Wert-Paare**: Die Videodatei muss in den Schlüssel-Wert-Paaren der In-App-Nachricht angegeben werden und kann nicht an das Medienelement selbst angehängt werden. Sie können auch eine URL-Gültigkeitsprüfung in `beforeInAppMessageDisplayed` als Sicherheitsmechanismus hinzufügen, bevor Sie den Inhalt anzeigen.
**Trigger**: Die In-App-Nachricht sollte für alle Nutzer:innen mit aktivierter erneuter Berechtigung zugänglich sein. Dazu können Sie zwei Trigger festlegen: einen Standard-Trigger, um die Nachricht zu starten, und einen weiteren, um die Nachricht zu starten, wenn sie von SharePlay initiiert wird. Nutzer:innen, die nicht über iOS 15 verfügen, können Nachrichten nur lokal einsehen.
**Important:**
Achten Sie auf andere In-App-Nachrichten, die beim Start der Sitzung getriggert werden und miteinander in Konflikt geraten können.
### 3. Schritt: Gruppenbeobachtungsaktivität erstellen {#step-3-create-group-watching-activity}
Erstellen Sie ein Objekt, das dem Protokoll `GroupActivity` entspricht. Bei dem Objekt handelt es sich um die Metadaten der `GroupSession`, die während des SharePlay-Lebenszyklus gemeinsam genutzt werden.
```swift
struct MediaItem: Hashable, Codable {
let title: String
let url: URL
}
@available(iOS 15, *)
struct MediaItemActivity: GroupActivity {
static let activityIdentifier = "com.book-demo.GroupWatching"
let mediaItem: MediaItem
var metadata: GroupActivityMetadata {
var metadata = GroupActivityMetadata()
metadata.type = .watchTogether
metadata.title = mediaItem.title
metadata.fallbackURL = mediaItem.url
return metadata
}
}
```
#### Wiedergabe vorbereiten {#prepare-to-play}
Wenn Sie die Wiedergabe des Medienelements vorbereiten, hat jede Gruppenaktivität drei Zustände von `prepareForActivation()`:
- `.activationDisabled` – einzeln ansehen
- `.activationPreferred` – gemeinsam ansehen
- `.cancelled` – ignorieren und ordnungsgemäß behandeln
Wenn der Status als `activationPreferred` zurückkommt, ist das Ihr Signal, den Rest des Lebenszyklus der Gruppenaktivität zu aktivieren.
{: style="border:0;"}
### 4. Schritt: In-App-Nachricht über die SharePlay-API starten {#step-4-launch-in-app-message-from-shareplay-api}
Die `GroupActivities`-API ermittelt, ob ein Video vorhanden ist. Wenn ja, sollten Sie das angepasste Event triggern, um Ihre SharePlay-fähige In-App-Nachricht zu starten. Der `CoordinationManager` ist für die Zustandsänderungen von SharePlay verantwortlich, z. B. wenn Nutzer:innen den Anruf verlassen oder ihm beitreten.
```swift
private var subscriptions = Set()
private var selectedMediaItem: MediaItem? {
didSet {
// Ensure the UI selection always represents the currently playing media.
guard let _ = selectedMediaItem else { return }
if !BrazeManager.shared.inAppMessageCurrentlyVisible {
BrazeManager.shared.logCustomEvent("SharePlay Event")
}
}
}
private func launchVideoPlayerIfNecessary() {
CoordinationManager.shared.$enqueuedMediaItem
.receive(on: DispatchQueue.main)
.compactMap { $0 }
.assign(to: \.selectedMediaItem, on: self)
.store(in: &subscriptions)
}
```
### 5. Schritt: Gruppensitzung beim Verwerfen der In-App-Nachricht verlassen {#step-5-leaving-a-group-session-on-in-app-message-dismissal}
Wenn die In-App-Nachricht verworfen wird, ist ein geeigneter Zeitpunkt, um die SharePlay-Sitzung zu verlassen und das Sitzungsobjekt zu verwerfen.
```swift
override func viewDidDisappear(_ animated: Bool) {
super.viewDidDisappear(animated)
groupSession?.leave()
CoordinationManager.shared.leave()
}
class CoordinationManager() {
...
// Published values that the player, and other UI items, observe.
@Published var enqueuedMediaItem: MediaItem?
@Published var groupSession: GroupSession?
// Clear activity when the user leaves
func leave() {
groupSession = nil
enqueuedMediaItem = nil
}
...
}
```
### Sichtbarkeit des SharePlay-Buttons konfigurieren {#configure-shareplay-button-visibility}
Es empfiehlt sich, jeden SharePlay-Indikator dynamisch aus- oder einzublenden. Verwenden Sie die Variable `isEligibleForGroupSession`, um festzustellen, ob die Nutzer:innen gerade ein FaceTime-Gespräch führen oder nicht. Wenn ja, sollte ein Button sichtbar sein, mit dem das Video für alle kompatiblen Geräte im Chat geteilt werden kann. Wenn Nutzer:innen zum ersten Mal SharePlay starten, erscheint auf dem ursprünglichen Gerät eine Aufforderung zur Auswahl der Optionen. Auf den Geräten der eingeladenen Nutzer:innen erscheint dann eine Aufforderung, sich mit dem Inhalt zu beschäftigen.
```swift
private var isEligibleForSharePlay: Bool = false {
didSet {
sharePlayButton.isHidden = !isEligibleForSharePlay
}
}
override func viewDidLoad() {
super.viewDidLoad()
// SharePlay button eligibility
groupStateObserver.$isEligibleForGroupSession
.receive(on: DispatchQueue.main)
.assign(to: \.isEligibleForSharePlay, on: self)
.store(in: &subscriptions)
}
```
# Fehlerbehebung bei In-App-Nachrichten für iOS
Source: /docs/de/developer_guide/platforms/legacy_sdks/ios/in-app_messaging/troubleshooting/index.md
**Warning:**
[AppboyKit](https://github.com/Appboy/appboy-ios-sdk) (also known as the Objective-C SDK) is no longer supported and has been replaced by the [Swift SDK](https://www.braze.com/docs/de/de/developer_guide/sdk_integration/?sdktab=swift). It will no longer receive new features, bug fixes, security updates, or technical support—however, messaging and analytics will continue to function as normal. To learn more, see [Introducing the New Braze Swift SDK](https://www.braze.com/resources/articles/introducing-the-new-braze-swift-sdk).
# Fehlerbehebung bei In-App-Nachrichten {#troubleshoot-in-app-messages}
## Impressionen {#impressions}
### Impressions- oder Klick-Analytics werden nicht protokolliert {#impression-or-click-analytics-arent-being-logged}
Wenn Sie einen Delegaten für In-App-Nachrichten so festgelegt haben, dass die Anzeige von Nachrichten oder Klickaktionen manuell gesteuert wird, müssen Sie Klicks und Impressionen für die In-App-Nachricht manuell protokollieren.
#### Impressionen sind niedriger als erwartet {#impressions-are-lower-than-expected}
Die Synchronisierung der Trigger mit dem Gerät beim Start der Sitzung nimmt einige Zeit in Anspruch, sodass es zu einer Race-Condition kommen kann, wenn Nutzer:innen ein Event oder einen Kauf direkt nach dem Start einer Sitzung protokollieren. Ein möglicher Workaround könnte darin bestehen, die Campaign so zu ändern, dass sie beim Start der Sitzung getriggert wird, und dann nach dem beabsichtigten Event oder Kauf zu segmentieren. Beachten Sie, dass dies die In-App-Nachricht beim nächsten Sitzungsstart nach Eintreten des Events zustellen würde.
## Die erwartete In-App-Nachricht wurde nicht angezeigt {#expected-in-app-message-did-not-display}
Die meisten Probleme mit In-App-Nachrichten lassen sich in zwei Hauptkategorien unterteilen: Zustellung und Anzeige. Um herauszufinden, warum eine erwartete In-App-Nachricht nicht auf Ihrem Gerät angezeigt wurde, sollten Sie zunächst sicherstellen, dass die [In-App-Nachricht an das Gerät zugestellt wurde](#troubleshooting-in-app-message-delivery), und dann [die Anzeige der Nachricht überprüfen](#troubleshooting-in-app-message-display).
### Zustellung von In-App-Nachrichten {#troubleshooting-in-app-message-delivery}
Das SDK fordert beim Start der Sitzung In-App-Nachrichten von den Braze-Servern an. Um zu überprüfen, ob In-App-Nachrichten an Ihr Gerät zugestellt werden, müssen Sie sicherstellen, dass In-App-Nachrichten sowohl vom SDK angefordert als auch von den Braze-Servern zurückgegeben werden.
#### Prüfen Sie, ob Nachrichten angefordert und zurückgegeben werden {#check-if-messages-are-requested-and-returned}
1. Fügen Sie sich als [Testnutzer:in](https://www.braze.com/docs/de/de/user_guide/administrative/app_settings/developer_console/internal_groups_tab/#adding-test-users) im Dashboard hinzu.
2. Richten Sie eine In-App-Nachrichten-Campaign ein, die auf Ihre Nutzer:in ausgerichtet ist.
3. Stellen Sie sicher, dass in Ihrer Anwendung eine neue Sitzung stattfindet.
4. Überprüfen Sie anhand der [Event-Nutzerprotokolle](https://www.braze.com/docs/de/de/user_guide/administrative/app_settings/developer_console/event_user_log_tab/#event-user-log-tab), ob Ihr Gerät zu Beginn der Sitzung In-App-Nachrichten anfordert. Suchen Sie die SDK-Anfrage, die mit dem Sitzungsstart-Event Ihrer Testnutzer:in verknüpft ist.
- Wenn Ihre App getriggerte In-App-Nachrichten anfordern sollte, sollten Sie `trigger` im Feld **Requested Responses** unter **Response Data** sehen.
- Wenn Ihre App originale In-App-Nachrichten anfordern sollte, sollten Sie `in_app` im Feld **Requested Responses** unter **Response Data** sehen.
5. Überprüfen Sie anhand der [Event-Nutzerprotokolle](https://www.braze.com/docs/de/de/user_guide/administrative/app_settings/developer_console/event_user_log_tab/#event-user-log-tab), ob die korrekten In-App-Nachrichten in den Antwortdaten zurückgegeben werden. 
#### Fehlerbehebung bei nicht angeforderten Nachrichten {#troubleshoot-messages-not-being-requested}
Wenn Ihre In-App-Nachrichten nicht angefordert werden, kann es sein, dass Ihre App die Sitzungen nicht korrekt verfolgt, da In-App-Nachrichten beim Start der Sitzung aktualisiert werden. Vergewissern Sie sich außerdem, dass Ihre App tatsächlich eine Sitzung gemäß der Sitzungs-Timeout-Semantik Ihrer App startet:

### Fehlerbehebung bei nicht zurückgegebenen Nachrichten {#troubleshoot-messages-not-being-returned}
Wenn Ihre In-App-Nachrichten nicht zurückgegeben werden, liegt wahrscheinlich ein Problem mit dem Targeting Ihrer Campaign vor:
- Ihr Segment enthält Ihre Nutzer:in nicht.
- Überprüfen Sie den Tab [**Engagement**](https://www.braze.com/docs/de/de/user_guide/audience/manage_audience/user_profiles/#engagement-tab) Ihrer Nutzer:in, um sicherzustellen, dass das korrekte Segment unter **Segments** angezeigt wird.
- Ihre Nutzer:in hat die In-App-Nachricht bereits erhalten und war nicht berechtigt, sie erneut zu erhalten.
- Überprüfen Sie die [Einstellungen für die erneute Berechtigung der Campaign](https://www.braze.com/docs/de/de/user_guide/engagement_tools/campaigns/building_campaigns/delivery_types/reeligibility/) im Schritt **Delivery** des **Campaign Composers** und stellen Sie sicher, dass die Einstellungen für die erneute Berechtigung mit Ihrer Testkonfiguration übereinstimmen.
- Ihre Nutzer:in hat die Häufigkeitsbegrenzung für die Campaign erreicht.
- Überprüfen Sie die [Frequency-Capping-Einstellungen](https://www.braze.com/docs/de/de/user_guide/engagement_tools/campaigns/building_campaigns/rate-limiting/#frequency-capping) der Campaign und stellen Sie sicher, dass diese mit Ihrer Testkonfiguration übereinstimmen.
- Wenn es in der Campaign eine Kontrollgruppe gab, könnte Ihre Nutzer:in in die Kontrollgruppe gefallen sein.
- Sie können überprüfen, ob dies geschehen ist, indem Sie ein Segment mit einem Filter für empfangene Kampagnenvarianten erstellen, bei dem die Kampagnenvariante auf **Control** eingestellt ist, und überprüfen, ob Ihre Nutzer:in in dieses Segment fällt.
- Wenn Sie Campaigns für Integrationstests erstellen, achten Sie darauf, keine Kontrollgruppe hinzuzufügen.
### Anzeige von In-App-Nachrichten {#troubleshooting-in-app-message-display}
Wenn Ihre App erfolgreich In-App-Nachrichten anfordert und empfängt, diese aber nicht angezeigt werden, verhindert möglicherweise eine geräteseitige Logik die Anzeige:
- Getriggerte In-App-Nachrichten werden auf Grundlage des [minimalen Zeitintervalls zwischen Triggern](https://www.braze.com/docs/de/de/developer_guide/platform_integration_guides/ios/in-app_messaging/in-app_message_delivery#minimum-time-interval-between-triggers) begrenzt, das standardmäßig 30 Sekunden beträgt.
- Wenn Sie einen Delegaten zum Anpassen der Handhabung von In-App-Nachrichten festgelegt haben, überprüfen Sie Ihren Delegaten, um sicherzustellen, dass er die Anzeige der In-App-Nachrichten nicht beeinträchtigt.
- Fehlgeschlagene Bild-Downloads verhindern die Anzeige von In-App-Nachrichten mit Bildern. Bild-Downloads schlagen immer fehl, wenn das `SDWebImage`-Framework nicht korrekt integriert ist. Überprüfen Sie Ihre Geräteprotokolle, um sicherzustellen, dass Bild-Downloads nicht fehlschlagen.
- Wenn die Ausrichtung des Geräts nicht mit der in der In-App-Nachricht angegebenen Ausrichtung übereinstimmt, wird die In-App-Nachricht nicht angezeigt. Vergewissern Sie sich, dass Ihr Gerät die korrekte Ausrichtung hat.
# Content-Card View Controller Integration für iOS
Source: /docs/de/developer_guide/platforms/legacy_sdks/ios/content_cards/integration/index.md
**Warning:**
[AppboyKit](https://github.com/Appboy/appboy-ios-sdk) (also known as the Objective-C SDK) is no longer supported and has been replaced by the [Swift SDK](https://www.braze.com/docs/de/de/developer_guide/sdk_integration/?sdktab=swift). It will no longer receive new features, bug fixes, security updates, or technical support—however, messaging and analytics will continue to function as normal. To learn more, see [Introducing the New Braze Swift SDK](https://www.braze.com/resources/articles/introducing-the-new-braze-swift-sdk).
# Content-Card-Integration {#content-card-integration}
## Content-Cards-Datenmodell {#content-cards-data-model}
Das Content-Cards-Datenmodell ist im iOS SDK verfügbar.
### Abrufen der Daten {#getting-the-data}
Um auf das Content-Cards-Datenmodell zuzugreifen, abonnieren Sie die Update-Events für Content Cards:
```objc
// Subscribe to Content Cards updates
// Note: you should remove the observer where appropriate
[[NSNotificationCenter defaultCenter] addObserver:self
selector:@selector(contentCardsUpdated:)
name:ABKContentCardsProcessedNotification
object:nil];
```
```objc
// Called when Content Cards are refreshed (via `requestContentCardsRefresh`)
- (void)contentCardsUpdated:(NSNotification *)notification {
BOOL updateIsSuccessful = [notification.userInfo[ABKContentCardsProcessedIsSuccessfulKey] boolValue];
if (updateIsSuccessful) {
// get the cards using [[Appboy sharedInstance].contentCardsController getContentCards];
}
}
```
```swift
// Subscribe to content card updates
// Note: you should remove the observer where appropriate
NotificationCenter.default.addObserver(self, selector:
#selector(contentCardsUpdated),
name:NSNotification.Name.ABKContentCardsProcessed, object: nil)
```
```swift
// Called when the Content Cards are refreshed (via `requestContentCardsRefresh`)
@objc private func contentCardsUpdated(_ notification: Notification) {
if let updateIsSuccessful = notification.userInfo?[ABKContentCardsProcessedIsSuccessfulKey] as? Bool {
if (updateIsSuccessful) {
// get the cards using Appboy.sharedInstance()?.contentCardsController.contentCards
}
}
}
```
Wenn Sie die Kartendaten ändern möchten, nachdem sie von Braze gesendet wurden, empfehlen wir Ihnen, eine Tiefenkopie der Kartendaten lokal zu speichern, die Daten zu aktualisieren und sie selbst anzuzeigen. Die Karten sind über [`ABKContentCardsController`](https://appboy.github.io/appboy-ios-sdk/docs/interface_a_b_k_content_cards_controller.html) zugänglich.
## Content-Card-Modell {#content-card-model}
Braze bietet drei Content-Card-Typen: Banner, Bild mit Bildunterschrift und klassisch. Jeder Typ erbt gemeinsame Eigenschaften von einer Basisklasse `ABKContentCard` und hat die folgenden zusätzlichen Eigenschaften.
### Eigenschaften des Basis-Content-Card-Modells – ABKContentCard {#base-content-card-model-properties-abkcontentcard}
| Eigenschaft | Beschreibung |
|---|---|
| `idString` | (Nur Lesen) Die von Braze festgelegte ID der Karte. |
| `viewed` | Diese Eigenschaft zeigt an, ob die Nutzer:in die Karte angesehen hat oder nicht. |
| `created` | (Nur Lesen) Diese Eigenschaft ist der Unix-Zeitstempel der Erstellungszeit der Karte von Braze. |
| `expiresAt` | (Nur Lesen) Diese Eigenschaft ist der Unix-Zeitstempel der Ablaufzeit der Karte. |
| `dismissible` | Diese Eigenschaft gibt an, ob die Nutzer:in die Karte ausblenden kann. |
| `pinned` | Diese Eigenschaft zeigt an, ob die Karte im Dashboard als „angeheftet“ eingerichtet wurde. |
| `dismissed` | Diese Eigenschaft gibt an, ob die Nutzer:in die Karte ausgeblendet hat. |
| `url` | Die URL, die geöffnet wird, nachdem auf die Karte geklickt wurde. Dabei kann es sich um eine HTTP(S)-URL oder eine Protokoll-URL handeln. |
| `openURLInWebView` | Diese Eigenschaft bestimmt, ob die URL innerhalb der App oder in einem externen Webbrowser geöffnet wird. |
| `extras` | Ein optionales `NSDictionary` von `NSString`-Werten. |
{: .reset-td-br-1 .reset-td-br-2 aria-label="Base Content Card model properties - ABKContentCard" }
### Banner-Content-Card-Eigenschaften – ABKBannerContentCard {#banner-content-card-properties-abkbannercontentcard}
| Eigenschaft | Beschreibung |
|---|---|
| `image` | Diese Eigenschaft ist die URL des Bildes der Karte. |
| `imageAspectRatio` | Diese Eigenschaft ist das Seitenverhältnis des Kartenbildes und dient als Hinweis, bevor das Laden des Bildes abgeschlossen ist. Beachten Sie, dass die Eigenschaft unter bestimmten Umständen nicht übermittelt werden kann. |
{: .reset-td-br-1 .reset-td-br-2 aria-label="Banner Content Card properties - ABKBannerContentCard" }
### Eigenschaften von Content Cards mit Bildunterschriften – ABKCaptionedImageCard {#captioned-image-content-card-properties-abkcaptionedimagecard}
| Eigenschaft | Beschreibung |
|---|---|
| `image` | Diese Eigenschaft ist die URL des Bildes der Karte. |
| `imageAspectRatio` | Diese Eigenschaft ist das Seitenverhältnis des Bildes der Karte. |
| `title` | Der Titeltext für die Karte. |
| `cardDescription` | Der Fließtext für die Karte. |
| `domain` | Der Linktext für die Eigenschaft URL, z. B. @"blog.braze.com". Er kann auf der UI der Karte angezeigt werden, um die Aktion/Richtung beim Anklicken der Karte anzugeben. |
{: .reset-td-br-1 .reset-td-br-2 aria-label="Captioned image Content Card properties - ABKCaptionedImageCard" }
### Eigenschaften der klassischen Content-Card – ABKClassicContentCard {#classic-content-card-properties-abkclassiccontentcard}
| Eigenschaft | Beschreibung |
|---|---|
| `image` | (Optional) Diese Eigenschaft ist die URL des Bildes der Karte. |
| `title` | Der Titeltext für die Karte. |
| `cardDescription` | Der Fließtext für die Karte. |
| `domain` | Der Linktext für die Eigenschaft URL, z. B. @"blog.braze.com". Er kann auf der UI der Karte angezeigt werden, um die Aktion und Richtung beim Anklicken der Karte anzugeben. |
{: .reset-td-br-1 .reset-td-br-2 aria-label="Classic Content Card properties - ABKClassicContentCard" }
## Karten-Methoden {#card-methods}
| Methode | Beschreibung |
|---|---|
| `logContentCardImpression` | Protokollieren Sie manuell eine Impression in Braze für eine bestimmte Karte. |
| `logContentCardClicked` | Protokollieren Sie manuell einen Klick in Braze für eine bestimmte Karte. Das SDK protokolliert einen Klick auf die Karte nur, wenn die Eigenschaft `url` einen gültigen Wert hat. |
| `logContentCardDismissed` | Protokollieren Sie manuell eine Karten-Ausblendung in Braze für eine bestimmte Karte. Das SDK protokolliert eine Karten-Ausblendung nur, wenn die Eigenschaft `dismissed` der Karte nicht bereits auf `true` gesetzt ist. |
| `isControlCard` | Bestimmen Sie, ob eine Karte die Kontrollkarte für einen A/B-Test ist. |
{: .reset-td-br-1 .reset-td-br-2 aria-label="Card methods" }
Weitere Einzelheiten finden Sie in der [Dokumentation der Klassenreferenz](https://appboy.github.io/appboy-ios-sdk/docs/interface_a_b_k_content_card.html).
## Integration des Content-Cards-View-Controllers {#content-cards-view-controller-integration}
Content Cards können in zwei View-Controller-Kontexte integriert werden: Navigation oder Modal.
### Navigationskontext {#navigation-context}
Beispiel für das Pushing einer `ABKContentCardsTableViewController`-Instanz in einen Navigation-Controller:
```objc
ABKContentCardsTableViewController *contentCards = [[ABKContentCardsTableViewController alloc] init];
contentCards.title = @"Content Cards Title";
contentCards.disableUnreadIndicator = YES;
[self.navigationController pushViewController:contentCards animated:YES];
```
```swift
let contentCards = ABKContentCardsTableViewController()
contentCards.title = "Content Cards Title"
contentCards.disableUnreadIndicator = true
navigationController?.pushViewController(contentCards, animated: true)
```
**Note:**
Um den Titel der Navigationsleiste anzupassen, legen Sie die Eigenschaft title des `navigationItem` der `ABKContentCardsTableViewController`-Instanz fest.
### Modaler Kontext {#modal-context}
Dieses Modal wird verwendet, um den View-Controller in einer modalen Ansicht zu präsentieren, mit einer Navigationsleiste oben und einem **Done**-Button an der Seite der Leiste.
```objc
ABKContentCardsViewController *contentCards = [[ABKContentCardsViewController alloc] init];
contentCards.contentCardsViewController.title = @"Content Cards Title";
contentCards.contentCardsViewController.disableUnreadIndicator = YES;
[self.navigationController presentViewController:contentCards animated:YES completion:nil];
```
```swift
let contentCards = ABKContentCardsViewController()
contentCards.contentCardsViewController.title = "Content Cards Title"
contentCards.contentCardsViewController.disableUnreadIndicator = true
self.present(contentCards, animated: true, completion: nil)
```
Beispiele für View-Controller finden Sie in unserer [Content-Cards-Beispiel-App](https://github.com/Appboy/appboy-ios-sdk/tree/master/Samples/ContentCards/BrazeContentCardsSampleApp).
**Note:**
Um die Kopfzeile anzupassen, legen Sie die Eigenschaft title des `navigationItem` fest, das zur `ABKContentCardsTableViewController`-Instanz gehört, die in der übergeordneten `ABKContentCardsViewController`-Instanz eingebettet ist.
# iOS Content-Card-Anpassung
Source: /docs/de/developer_guide/platforms/legacy_sdks/ios/content_cards/customization/index.md
# Individuelle Gestaltung von Inhaltskarten für iOS
Source: /docs/de/developer_guide/platforms/legacy_sdks/ios/content_cards/customization/custom_styling/index.md
**Warning:**
[AppboyKit](https://github.com/Appboy/appboy-ios-sdk) (also known as the Objective-C SDK) is no longer supported and has been replaced by the [Swift SDK](https://www.braze.com/docs/de/de/developer_guide/sdk_integration/?sdktab=swift). It will no longer receive new features, bug fixes, security updates, or technical support—however, messaging and analytics will continue to function as normal. To learn more, see [Introducing the New Braze Swift SDK](https://www.braze.com/resources/articles/introducing-the-new-braze-swift-sdk).
# Angepasste Stile
## Überschreiben der Standardbilder
**Important:**
Die Integration von `SDWebImage` ist erforderlich, wenn Sie unsere Braze UI für die Anzeige von Bildern in iOS In-App-Nachrichten oder Content Cards verwenden möchten.
Braze ermöglicht es Kunden, vorhandene Standardbilder durch eigene angepasste Bilder zu ersetzen. Erstellen Sie dazu eine neue `png`-Datei mit dem angepassten Bild und fügen Sie sie dem Bild-Bundle der App hinzu. Benennen Sie dann die Datei in den Namen des Bildes um, um das Standardbild in unserer Bibliothek zu überschreiben. Stellen Sie außerdem sicher, dass Sie die Versionen `@2x` und `@3x` der Bilder hochladen, damit sie für verschiedene Handygrößen geeignet sind. Folgende Bilder können in Content-Cards überschrieben werden:
- Platzhalterbild: `appboy_cc_noimage_lrg`
- Angepinntes Symbolbild: `appboy_cc_icon_pinned`
Da Content-Cards eine maximale Größe von 2 KB für Inhalte haben, die Sie im Dashboard eingeben haben (einschließlich Nachrichtentext, Bild-URLs, Links und aller Schlüssel-Wert-Paare), sollten Sie die Größe vor dem Senden überprüfen. Wenn Sie diesen Betrag überschreiten, kann die Karte nicht gesendet werden.
**Important:**
Das Überschreiben von Standardbildern wird derzeit in unserer .NET MAUI iOS-Integration nicht unterstützt.
## Deaktivieren des dunklen Modus
Um zu verhindern, dass die Content-Card-UI ein dunkles Design annimmt, wenn der Dark Mode auf dem Nutzergerät aktiviert ist, legen Sie die Eigenschaft `ABKContentCardsTableViewController.enableDarkTheme` fest. Sie können direkt auf einer Instanz von `ABKContentCardsTableViewController` oder über die Eigenschaft `ABKContentCardsViewController.contentCardsViewController` auf die Eigenschaft `enableDarkTheme` zugreifen, um Ihre Benutzeroberfläche optimal zu gestalten.
```objc
// Accessing enableDarkTheme via ABKContentCardsViewController.contentCardsViewController.
- (IBAction)presentModalContentCards:(id)sender {
ABKContentCardsViewController *contentCardsVC = [ABKContentCardsViewController new];
contentCardsVC.contentCardsViewController.enableDarkTheme = NO;
...
[self.navigationController presentViewController:contentCardsVC animated:YES completion:nil];
}
// Accessing enableDarkTheme directly.
- (IBAction)presentNavigationContentCards:(id)sender {
ABKContentCardsTableViewController *contentCardsTableVC = [[ABKContentCardsTableViewController alloc] init];
contentCardsTableVC.enableDarkTheme = NO;
...
[self.navigationController pushViewController:contentCardsTableVC animated:YES];
}
```
```swift
// Accessing enableDarkTheme via ABKContentCardsViewController.contentCardsViewController.
@IBAction func presentModalContentCards(_ sender: Any) {
let contentCardsVC = ABKContentCardsViewController()
contentCardsVC.contentCardsViewController.enableDarkTheme = false
...
self.navigationController?.present(contentCardsVC, animated: true, completion: nil)
}
// Accessing enableDarkTheme directly.
@IBAction func presentNavigationContentCards(_ sender: Any) {
let contentCardsTableVC = ABKContentCardsTableViewController()
contentCardsTableVC.enableDarkTheme = false
...
self.navigationController?.present(contentCardsTableVC, animated: true, completion: nil)
}
```
# Content-Card-Feed für iOS anpassen
Source: /docs/de/developer_guide/platforms/legacy_sdks/ios/content_cards/customization/customizing_feed/index.md
**Warning:**
[AppboyKit](https://github.com/Appboy/appboy-ios-sdk) (also known as the Objective-C SDK) is no longer supported and has been replaced by the [Swift SDK](https://www.braze.com/docs/de/de/developer_guide/sdk_integration/?sdktab=swift). It will no longer receive new features, bug fixes, security updates, or technical support—however, messaging and analytics will continue to function as normal. To learn more, see [Introducing the New Braze Swift SDK](https://www.braze.com/resources/articles/introducing-the-new-braze-swift-sdk).
# Content-Card-Feed anpassen {#customize-the-content-cards-feed}
Sie können Ihre eigene Content-Cards-Schnittstelle erstellen, indem Sie `ABKContentCardsTableViewController` erweitern, um alle UI-Elemente und das Verhalten der Content Cards anzupassen. Die Content-Card-Zellen können auch unterklassifiziert und dann programmatisch oder mithilfe eines angepassten Storyboards, das die neuen Klassen registriert, verwendet werden. Ein vollständiges Beispiel finden Sie in der Content Cards [Beispiel-App](https://github.com/Appboy/appboy-ios-sdk/tree/master/Samples/ContentCards/BrazeContentCardsSampleApp).
Es ist auch wichtig zu überlegen, ob Sie eine Strategie der Unterklassifizierung oder einen vollständig angepassten View Controller verwenden und [Daten-Updates abonnieren](https://www.braze.com/docs/de/de/developer_guide/platforms/legacy_sdks/ios/content_cards/integration) möchten. Wenn Sie zum Beispiel `ABKContentCardsTableViewController` unterklassifizieren, können Sie die [`populateContentCards`-Methode](#overriding-populated-content-cards) zum Filtern und Ordnen von Karten verwenden (empfohlen). Wenn Sie jedoch einen vollständig angepassten View Controller verwenden, haben Sie mehr Kontrolle über das Kartenverhalten – wie z. B. die Anzeige in einem Karussell oder das Hinzufügen interaktiver Elemente –, müssen sich dann aber auf einen Beobachter verlassen, um die Sortier- und Filterlogik zu implementieren. Sie müssen außerdem die entsprechenden Analytics-Methoden implementieren, um Impressionen, Abbrüche und Klicks ordnungsgemäß zu protokollieren.
## UI anpassen {#customizing-ui}
Die folgenden Code-Snippets zeigen, wie Sie Content Cards mit den vom SDK bereitgestellten Methoden gestalten und an Ihre UI-Anforderungen anpassen können. Diese Methoden erlauben es Ihnen, alle Aspekte der Content-Card-UI anzupassen, einschließlich angepasster Schriftarten, angepasster Farbkomponenten, angepasster Texte und mehr.
Es gibt zwei verschiedene Möglichkeiten, die Content-Card-UI anzupassen:
- Dynamische Methode: Update der UI pro Karte
- Statische Methode: Update der UI über alle Karten hinweg
### Dynamische UI {#dynamic-ui}
Die Content-Card-Methode `applyCard` kann das Kartenobjekt referenzieren und ihm Schlüssel-Wert-Paare übergeben, die für das Update der UI verwendet werden:
```objc
- (void)applyCard:(ABKCaptionedImageContentCard *)captionedImageCard {
[super applyCard:captionedImageCard];
if ([card.extras objectForKey:ContentCardKeyBackgroundColorValue]) {
NSString *backgroundColor = [card.extras objectForKey:ContentCardKeyBackgroundColor];
if ([backgroundColor colorValue]) {
self.rootView.backgroundColor = [backgroundColor colorValue];
} else {
self.rootView.backgroundColor = [UIColor lightGray];
}
} else {
self.rootView.backgroundColor = [UIColor lightGray];
}
}
```
```swift
override func apply(_ captionedImageCard: ABKCaptionedImageContentCard!) {
super.apply(captionedImageCard)
if let backgroundColor = card.extras?[ContentCardKey.backgroundColor.rawValue] as? String,
let backgroundColorValue = backgroundColor.colorValue() {
rootView.backgroundColor = backgroundColorValue
} else {
rootView.backgroundColor = .lightGray
}
}
```
### Statische UI {#static-ui}
Die Methode `setUpUI` kann den statischen Content-Card-Komponenten über alle Karten hinweg Werte zuweisen:
```objc
#import "CustomClassicContentCardCell.h"
@implementation CustomClassicContentCardCell
- (void)setUpUI {
[super setUpUI];
self.rootView.backgroundColor = [UIColor lightGrayColor];
self.rootView.layer.borderColor = [UIColor purpleColor].CGColor;
self.unviewedLineView.backgroundColor = [UIColor redColor];
self.titleLabel.font = [UIFont italicSystemFontOfSize:20];
}
```
```swift
override func setUpUI() {
super.setUpUI()
rootView.backgroundColor = .lightGray
rootView.layer.borderColor = UIColor.purple.cgColor
unviewedLineViewColor = .red
titleLabel.font = .italicSystemFont(ofSize: 20)
}
```
## Angepasste Schnittstellen bereitstellen {#providing-custom-interfaces}
Angepasste Schnittstellen können durch die Registrierung von angepassten Klassen für jeden gewünschten Kartentyp bereitgestellt werden.
{: style="max-width:35%;margin-left:15px;"}
{: style="max-width:25%;margin-left:15px;"}
{: style="max-width:18%;margin-left:15px;"}
Braze bietet drei Content-Card-Templates (Banner, hervorgehobenes Bild und klassisch). Wenn Sie eigene angepasste Schnittstellen bereitstellen möchten, referenzieren Sie die folgenden Code-Snippets:
```objc
- (void)registerTableViewCellClasses {
[super registerTableViewCellClasses];
// Replace the default class registrations with custom classes for these two types of cards
[self.tableView registerClass:[CustomCaptionedImageContentCardCell class] forCellReuseIdentifier:@"ABKCaptionedImageContentCardCell"];
[self.tableView registerClass:[CustomClassicContentCardCell class] forCellReuseIdentifier:@"ABKClassicCardCell"];
}
```
```swift
override func registerTableViewCellClasses() {
super.registerTableViewCellClasses()
// Replace the default class registrations with custom classes
tableView.register(CustomCaptionedImageContentCardCell.self, forCellReuseIdentifier: "ABKCaptionedImageContentCardCell")
tableView.register(CustomBannerContentCardCell.self, forCellReuseIdentifier: "ABKBannerContentCardCell")
tableView.register(CustomClassicImageContentCardCell.self, forCellReuseIdentifier: "ABKClassicImageCardCell")
tableView.register(CustomClassicContentCardCell.self, forCellReuseIdentifier: "ABKClassicCardCell")
}
```
## Ausgefüllte Content Cards überschreiben {#overriding-populated-content-cards}
Content Cards können programmatisch mit der Methode `populateContentCards` geändert werden:
```objc
- (void)populateContentCards {
NSMutableArray *cards = [NSMutableArray arrayWithArray:[Appboy.sharedInstance.contentCardsController getContentCards]];
for (ABKContentCard *card in cards) {
// Replaces the card description for all Classic Content Cards
if ([card isKindOfClass:[ABKClassicContentCard class]]) {
((ABKClassicContentCard *)card).cardDescription = @"Custom Feed Override title [classic cards only]!";
}
}
super.cards = cards;
}
```
```swift
override func populateContentCards() {
guard let cards = Appboy.sharedInstance()?.contentCardsController.contentCards else { return }
for card in cards {
// Replaces the card description for all Classic Content Cards
if let classicCard = card as? ABKClassicContentCard {
classicCard.cardDescription = "Custom Feed Override title [classic cards only]!"
}
}
super.cards = (cards as NSArray).mutableCopy() as? NSMutableArray
}
```
# Klickvorgänge auf Content-Cards für iOS manuell verarbeiten
Source: /docs/de/developer_guide/platforms/legacy_sdks/ios/content_cards/customization/handling_clicks_manually/index.md
**Warning:**
[AppboyKit](https://github.com/Appboy/appboy-ios-sdk) (also known as the Objective-C SDK) is no longer supported and has been replaced by the [Swift SDK](https://www.braze.com/docs/de/de/developer_guide/sdk_integration/?sdktab=swift). It will no longer receive new features, bug fixes, security updates, or technical support—however, messaging and analytics will continue to function as normal. To learn more, see [Introducing the New Braze Swift SDK](https://www.braze.com/resources/articles/introducing-the-new-braze-swift-sdk).
# Klicken Sie manuell
Sie können Content-Card-Klicks manuell verarbeiten, indem Sie das Protokoll [`ABKContentCardsTableViewControllerDelegate`](https://appboy.github.io/appboy-ios-sdk/docs/protocol_a_b_k_content_cards_table_view_controller_delegate-p.html) implementieren und Ihr Delegate-Objekt als Eigenschaft des Typs `delegate` für `ABKContentCardsTableViewController` festlegen. Ein Beispiel dafür finden Sie in der [Beispielanwendung Content Cards](https://github.com/Appboy/appboy-ios-sdk/tree/master/Samples/ContentCards/BrazeContentCardsSampleApp).
```objc
contentCardsTableViewController.delegate = delegate;
// Methods to implement in delegate
- (BOOL)contentCardTableViewController:(ABKContentCardsTableViewController *)viewController
shouldHandleCardClick:(NSURL *)url {
if ([[url.host lowercaseString] isEqualToString:@"my-domain.com"]) {
// Custom handle link here
NSLog(@"Manually handling Content Card click with URL %@", url.absoluteString);
return NO;
}
// Let the Braze SDK handle the click action
return YES;
}
- (void)contentCardTableViewController:(ABKContentCardsTableViewController *)viewController
didHandleCardClick:(NSURL *)url {
NSLog(@"Braze SDK handled Content Card click with URL %@", url.absoluteString);
}
```
```swift
contentCardsTableViewController.delegate = delegate
// Methods to implement in delegate
func contentCardTableViewController(_ viewController: ABKContentCardsTableViewController!,
shouldHandleCardClick url: URL!) -> Bool {
if (url.host?.lowercased() == "my-domain.com") {
// Custom handle link here
NSLog("Manually handling Content Card click with URL %@", url.absoluteString)
return false
}
// Let the Braze SDK handle the click action
return true
}
func contentCardTableViewController(_ viewController: ABKContentCardsTableViewController!,
didHandleCardClick url: URL!) {
NSLog("Braze SDK handled Content Card click with URL %@", url.absoluteString)
}
```
**Important:**
Wenn Sie die Methode `handleCardClick:` in `ABKContentCardsTableViewController` außer Kraft setzen, werden diese Delegate-Methoden möglicherweise nicht aufgerufen.
# Gelesen- und Ungelesen-Anzeige für Content-Cards unter iOS
Source: /docs/de/developer_guide/platforms/legacy_sdks/ios/content_cards/customization/read_unread_indicators/index.md
**Warning:**
[AppboyKit](https://github.com/Appboy/appboy-ios-sdk) (also known as the Objective-C SDK) is no longer supported and has been replaced by the [Swift SDK](https://www.braze.com/docs/de/de/developer_guide/sdk_integration/?sdktab=swift). It will no longer receive new features, bug fixes, security updates, or technical support—however, messaging and analytics will continue to function as normal. To learn more, see [Introducing the New Braze Swift SDK](https://www.braze.com/resources/articles/introducing-the-new-braze-swift-sdk).
# Gelesen- und Ungelesen-Anzeige
## Deaktivieren der Ungelesen-Anzeige
{: style="max-width:80%"}
Sie können die blaue Linie am unteren Rand der Karte, die anzeigt, ob die Karte angesehen wurde oder nicht, deaktivieren, indem Sie die Eigenschaft `disableUnviewedIndicator` in `ABKContentCardsTableViewController` auf `YES` setzen.
## Anpassen der Ungelesen-Anzeige
Auf die Ungelesen-Anzeige kann über die Eigenschaft `unviewedLineView` der Klasse `ABKBaseContentCardCell` zugegriffen werden. Wenn Sie `UITableViewCell`-Implementierungen verwenden, sollten Sie auf die Eigenschaft zugreifen, bevor die Zelle gezeichnet wird.
So setzen Sie beispielsweise die Farbe der Ungelesen-Anzeige auf Rot:
```objc
((ABKBaseContentCardCell *)cell).unviewedLineView.backgroundColor = [UIColor redColor];
```
```swift
(card as? ABKBaseContentCardCell).unviewedLineView.backgroundColor = UIColor.red
```
# Content Card Badges für iOS
Source: /docs/de/developer_guide/platforms/legacy_sdks/ios/content_cards/customization/badges/index.md
**Warning:**
[AppboyKit](https://github.com/Appboy/appboy-ios-sdk) (also known as the Objective-C SDK) is no longer supported and has been replaced by the [Swift SDK](https://www.braze.com/docs/de/de/developer_guide/sdk_integration/?sdktab=swift). It will no longer receive new features, bug fixes, security updates, or technical support—however, messaging and analytics will continue to function as normal. To learn more, see [Introducing the New Braze Swift SDK](https://www.braze.com/resources/articles/introducing-the-new-braze-swift-sdk).
# Abzeichen
## Abfrage der Anzahl ungelesener Inhaltskarten
Wenn Sie die Anzahl der ungelesenen Inhaltskarten Ihres Benutzers anzeigen möchten, empfehlen wir Ihnen, die Anzahl der Karten abzufragen und diese mit einem Badge darzustellen. Badges sind eine großartige Möglichkeit, um Ihre Nutzer auf neue Inhalte in den Content-Cards aufmerksam zu machen. Wenn Sie Ihren Content-Cards ein Badge hinzufügen möchten, bietet das Braze SDK Methoden zur Abfrage der folgenden Informationen:
- Ungelesene Inhaltskarten für den aktuellen Benutzer
- Gesamtzahl der sichtbaren Inhaltskarten für den aktuellen Benutzer
Die folgenden Methodendeklarationen in [`ABKContentCardsController`](https://appboy.github.io/appboy-ios-sdk/docs/interface_a_b_k_content_cards_controller.html) beschreiben dies im Detail:
```objc
- (NSInteger)unviewedContentCardCount;
/*
This method returns the number of currently active Content Cards that have not been viewed.
A "view" happens when a card becomes visible in the Content Cards view. This differentiates between cards that are off-screen in the scrolling view and those which are on-screen; when a card scrolls onto the screen, it's counted as viewed.
Cards are counted as viewed only once -- if a card scrolls off the screen and back on, it's not re-counted.
Cards are counted only once, even if they appear in multiple Content Cards views or across multiple devices.
*/
- (NSInteger)contentCardCount;
/*
This method returns the total number of currently active Content Cards. Cards are counted only once even if they appear in multiple Content Cards views.
*/
```
## Anzeige der Anzahl der ungesehenen Inhaltskarten auf der App-Badge-Anzeige
Badges dienen nicht nur als Push-Benachrichtigung für eine App, sondern können auch verwendet werden, um ungesehene Elemente im Content Cards Feed des Benutzers zu kennzeichnen. Das Aktualisieren des Badge-Zählers auf der Basis von nicht aufgerufenen Content-Card-Updates kann dazu beitragen, Nutzer wieder auf Ihre App aufmerksam zu machen und die Anzahl der Sitzungen zu erhöhen.
Diese Methode erfasst den Badge-Zähler, nach dem die App geschlossen und die Sitzung beendet wurde:
```objc
(void)applicationDidEnterBackground:(UIApplication *)application
```
Implementieren Sie innerhalb dieser Methode den folgenden Code, der den Badge-Zähler aktiv aktualisiert, wenn der Nutzer in einer bestimmten Sitzung Karten ansieht:
```objc
[UIApplication sharedApplication].applicationIconBadgeNumber = [[Appboy sharedInstance].contentCardsController unviewedContentCardCount];
```
```swift
func applicationDidEnterBackground(_ application: UIApplication)
```
Implementieren Sie innerhalb dieser Methode den folgenden Code, der den Badge-Zähler aktiv aktualisiert, wenn der Nutzer in einer bestimmten Sitzung Karten ansieht:
```swift
UIApplication.shared.applicationIconBadgeNumber =
Appboy.sharedInstance()?.contentCardsController.unviewedContentCardCount() ?? 0
```
Weitere Informationen finden Sie in der [Header-Datei](https://github.com/Appboy/appboy-ios-sdk/blob/master/AppboyKit/include/Appboy.h) `Appboy.h`.
# Content-Card-Karussell-Ansicht für iOS
Source: /docs/de/developer_guide/platforms/legacy_sdks/ios/content_cards/customization/use_cases/carousel_view/index.md
**Warning:**
[AppboyKit](https://github.com/Appboy/appboy-ios-sdk) (also known as the Objective-C SDK) is no longer supported and has been replaced by the [Swift SDK](https://www.braze.com/docs/de/de/developer_guide/sdk_integration/?sdktab=swift). It will no longer receive new features, bug fixes, security updates, or technical support—however, messaging and analytics will continue to function as normal. To learn more, see [Introducing the New Braze Swift SDK](https://www.braze.com/resources/articles/introducing-the-new-braze-swift-sdk).
# Anwendungsfall: Karussell-Ansicht {#use-case-carousel-view}
{: style="max-width:35%;float:right;margin-left:15px;border:none;"}
In diesem Abschnitt erfahren Sie, wie Sie einen Karussell-Feed mit mehreren Karten implementieren, bei dem Nutzer:innen horizontal wischen können, um weitere vorgestellte Karten anzuzeigen. Für die Integration einer Karussell-Ansicht müssen Sie eine vollständig angepasste Content-Card-Implementierung verwenden – die „Run“-Phase des [Crawl-Walk-Run-Ansatzes](https://www.braze.com/docs/de/de/user_guide/message_building_by_channel/content_cards/customize#customization-approaches).
Bei diesem Ansatz verwenden Sie nicht die Braze-Ansichten und die Standardlogik, sondern zeigen die Content Cards auf eine völlig angepasste Weise an, indem Sie Ihre eigenen Ansichten verwenden, die mit Daten aus den Braze-Modellen befüllt werden.
Die wichtigsten Unterschiede im Hinblick auf den Entwicklungsaufwand zwischen der Basis-Implementierung und der Karussell-Implementierung sind:
- Erstellen eigener Ansichten
- Protokollierung der Content-Card-Analytics
- Einführung zusätzlicher clientseitiger Logik, um zu bestimmen, wie viele und welche Karten im Karussell angezeigt werden sollen
## Implementierung {#implementation}
### 1. Schritt: Einen angepassten View Controller erstellen {#step-1-create-a-custom-view-controller}
Um das Content-Card-Karussell zu erstellen, erstellen Sie Ihren eigenen angepassten View Controller (z. B. `UICollectionViewController`) und [abonnieren Sie Datenaktualisierungen](https://www.braze.com/docs/de/de/developer_guide/platform_integration_guides/legacy_sdks/ios/content_cards/integration#getting-the-data). Beachten Sie, dass Sie den standardmäßigen `ABKContentCardTableViewController` nicht erweitern oder als Unterklasse verwenden können, da er nur die standardmäßigen Content-Card-Typen verarbeiten kann.
### 2. Schritt: Analytics implementieren {#step-2-implement-analytics}
Wenn Sie einen vollständig angepassten View Controller erstellen, werden Content-Card-Impressionen, -Klicks und -Ausblendungen nicht automatisch protokolliert. Sie müssen die entsprechenden Analytics-Methoden implementieren, um sicherzustellen, dass Impressionen, Ausblende-Ereignisse und Klicks ordnungsgemäß in den Analytics des Braze-Dashboards aufgezeichnet werden.
Informationen zu den Analytics-Methoden finden Sie unter [Kartenmethoden](https://www.braze.com/docs/de/de/developer_guide/platform_integration_guides/legacy_sdks/ios/content_cards/integration#card-methods).
**Note:**
Auf derselben Seite finden Sie auch die verschiedenen Eigenschaften, die von unserer generischen Content-Card-Modellklasse geerbt werden und die Sie bei der Implementierung Ihrer Ansicht nützlich finden könnten.
### 3. Schritt: Einen Content-Card-Beobachter erstellen {#step-3-create-a-content-card-observer}
Erstellen Sie einen [Content-Card-Beobachter](https://www.braze.com/docs/de/de/developer_guide/platform_integration_guides/ios/content_cards/multiple_feeds#step-2-set-up-a-content-card-listener), der für das Eintreffen von Content Cards verantwortlich ist, und implementieren Sie bedingte Logik, um eine bestimmte Anzahl von Karten gleichzeitig im Karussell anzuzeigen. Standardmäßig werden Content Cards nach dem Erstellungsdatum sortiert (neueste zuerst), und Nutzer:innen sehen alle Karten, für die sie berechtigt sind.
Sie können die Sortierung und zusätzliche Anzeigelogik jedoch auf verschiedene Weisen anpassen. Zum Beispiel könnten Sie die ersten fünf Content-Card-Objekte aus dem Array auswählen oder Schlüssel-Wert-Paare (die Eigenschaft `extras` im Datenmodell) einführen, um bedingte Logik aufzubauen.
Wenn Sie ein Karussell als sekundären Content-Card-Feed implementieren, lesen Sie den Abschnitt [Mehrere Content-Card-Feeds verwenden](https://www.braze.com/docs/de/de/developer_guide/platforms/legacy_sdks/ios/content_cards/multiple_feeds), um sicherzustellen, dass Sie die Karten anhand von Schlüssel-Wert-Paaren in den richtigen Feed sortieren.
**Important:**
Es ist wichtig, dass sich Ihre Marketing- und Entwicklerteams darüber abstimmen, welche Schlüssel-Wert-Paare verwendet werden sollen (z. B. `feed_type = brand_homepage`), denn alle Schlüssel-Wert-Paare, die Marketer in das Braze-Dashboard eingeben, müssen exakt mit den Schlüssel-Wert-Paaren übereinstimmen, die die Entwickler:innen in die App-Logik einbauen.
Die iOS-spezifische Entwicklerdokumentation zur Content-Card-Klasse, den Methoden und Attributen finden Sie in der iOS-[`ABKContentCard`-Klassenreferenz](https://appboy.github.io/appboy-ios-sdk/docs/interface_a_b_k_content_card.html).
## Überlegungen {#considerations}
- Wenn Sie vollständig angepasste Ansichten verwenden, können Sie die in `ABKContentCardsController` verwendeten Methoden nicht erweitern oder als Unterklasse verwenden. Stattdessen müssen Sie die Methoden und Eigenschaften des Datenmodells selbst integrieren.
- Die Logik und Implementierung der Karussell-Ansicht ist kein standardmäßiger Content-Card-Typ in Braze. Daher muss die Logik zur Umsetzung dieses Anwendungsfalls von Ihrem Entwicklungsteam bereitgestellt und unterstützt werden.
- Sie müssen clientseitige Logik implementieren, um jeweils eine bestimmte Anzahl von Karten im Karussell anzuzeigen.
# Aktualisieren Sie den Feed für Content-Cards für iOS
Source: /docs/de/developer_guide/platforms/legacy_sdks/ios/content_cards/refreshing_the_feed/index.md
**Warning:**
[AppboyKit](https://github.com/Appboy/appboy-ios-sdk) (also known as the Objective-C SDK) is no longer supported and has been replaced by the [Swift SDK](https://www.braze.com/docs/de/de/developer_guide/sdk_integration/?sdktab=swift). It will no longer receive new features, bug fixes, security updates, or technical support—however, messaging and analytics will continue to function as normal. To learn more, see [Introducing the New Braze Swift SDK](https://www.braze.com/resources/articles/introducing-the-new-braze-swift-sdk).
# Den Feed aktualisieren
## Aktualisieren von Inhaltskarten
Sie können Braze manuell anfragen, die Content-Cards des Nutzers mit der Methode `requestContentCardsRefresh:` auf der Schnittstelle `Appboy` zu aktualisieren:
```objc
[[Appboy sharedInstance] requestContentCardsRefresh];
```
```swift
Appboy.sharedInstance()?.requestContentCardsRefresh()
```
Weitere Informationen finden Sie in der [Header-Datei](https://github.com/Appboy/appboy-ios-sdk/blob/master/AppboyKit/include/Appboy.h) `Appboy.h`.
# Verwenden Sie mehrere Content-Card-Feeds für iOS
Source: /docs/de/developer_guide/platforms/legacy_sdks/ios/content_cards/multiple_feeds/index.md
**Warning:**
[AppboyKit](https://github.com/Appboy/appboy-ios-sdk) (also known as the Objective-C SDK) is no longer supported and has been replaced by the [Swift SDK](https://www.braze.com/docs/de/de/developer_guide/sdk_integration/?sdktab=swift). It will no longer receive new features, bug fixes, security updates, or technical support—however, messaging and analytics will continue to function as normal. To learn more, see [Introducing the New Braze Swift SDK](https://www.braze.com/resources/articles/introducing-the-new-braze-swift-sdk).
# Verwendung mehrere Content-Card-Feeds
Content Cards können in der App gefiltert werden, so dass nur bestimmte Karten angezeigt werden. So können Sie mehrere Content Card Feeds für verschiedene Anwendungsfälle haben (z.B. einen Transaktions-Feed und einen Marketing-Feed).
Die folgende Dokumentation zeigt eine Beispielimplementierung, die an Ihre spezifische Integration angepasst werden kann.
## Schritt 1: Schlüssel-Wert-Paare auf Karten setzen
Bei der Erstellung einer Content-Card-Kampagne können für jede Karte Schlüssel-Wert-Paare festgelegt werden. Unsere Filterlogik wird diese Schlüssel-Wert-Paar-Daten verwenden, um die Karten zu kategorisieren.
In diesem Beispiel legen wir ein Schlüssel-Wert-Paar mit dem Schlüssel `feed_type` fest, um anzugeben, welcher Content-Card-Feed angezeigt werden soll. Der Wert entspricht dem Ihrer benutzerdefinierten Feeds, z. B. `Transactional`, `Marketing`, usw.
## Schritt 2: Einrichten eines Inhaltskarten-Hörers
Verwenden Sie das folgende Code-Snippet, um einen Beobachter hinzuzufügen, der auf Content-Card-Updates wartet.
```objc
[[NSNotificationCenter defaultCenter] addObserver:self
selector:@selector(contentCardsUpdatedNotificationReceived:)
name:ABKContentCardsProcessedNotification
object:nil];
```
```swift
NotificationCenter.default.addObserver(self, selector:
#selector(contentCardsUpdated),
name:NSNotification.Name.ABKContentCardsProcessed, object: nil)
```
Fügen Sie die folgenden Methoden hinzu, um auf Updates vom Beobachter zu reagieren und die zurückgegebenen Karten nach Typ zu filtern.
Die erste Methode, `contentCardsUpdatedNotificationReceived:`, verarbeitet Updates vom Beobachter. Sie ruft die zweite Methode, `getCardsForFeedType:`, mit dem gewünschten Feed-Typ – in diesem Fall `Transactional` – auf.
```objc
- (void)contentCardsUpdatedNotificationReceived:(NSNotification *)notification {
BOOL updateIsSuccessful = [notification.userInfo[ABKContentCardsProcessedIsSuccessfulKey] boolValue];
if (updateIsSuccessful) {
// Get an array containing only cards that have the "Transactional" feed type set in their extras.
NSArray *filteredArray = [self getCardsForFeedType:@"Transactional"];
NSLog(@"Got filtered array of length: %lu", [filteredArray count]);
// Pass filteredArray to your UI layer for display.
}
}
- (NSArray *)getCardsForFeedType:(NSString *)type {
NSArray *cards = [Appboy.sharedInstance.contentCardsController getContentCards];
NSArray *filteredArray = [cards filteredArrayUsingPredicate:[NSPredicate predicateWithBlock:^BOOL(ABKContentCard * card, NSDictionary *bindings) {
NSDictionary *extras = [card extras];
if (extras != nil && [extras objectForKey:@"feed_type"] != nil && [[extras objectForKey:@"feed_type"] isEqualToString:type]) {
NSLog(@"Got card: %@ ", card.idString);
return YES;
}
return NO;
}]];
return filteredArray;
}
```
```swift
@objc private func contentCardsUpdatedNotificationReceived(notification: NSNotification) {
guard let updateSuccessful = notification.userInfo?[ABKContentCardsProcessedIsSuccessfulKey] as? Bool else { return }
if updateSuccessful {
// Get an array containing only cards that have the "Transactional" feed type set in their extras.
let filteredArray = getCards(forFeedType: "Transactional")
NSLog("Got filtered array of length: %@",filteredArray?.count ?? 0)
// Pass filteredArray to your UI layer for display.
}
}
func getCards(forFeedType type: String) -> [ABKContentCard]? {
guard let allCards = Appboy.sharedInstance()?.contentCardsController.contentCards as? [ABKContentCard] else { return nil }
// return filtered cards
return allCards.filter {
if $0.extras?["feed_type"] as? String == type {
NSLog("%@","Got card: \($0.idString)")
return true
} else {
return false
}
}
}
```
# Implementierungsleitfaden für Content Cards für iOS (optional)
Source: /docs/de/developer_guide/platforms/legacy_sdks/ios/content_cards/implementation_guide/index.md
**Warning:**
[AppboyKit](https://github.com/Appboy/appboy-ios-sdk) (also known as the Objective-C SDK) is no longer supported and has been replaced by the [Swift SDK](https://www.braze.com/docs/de/de/developer_guide/sdk_integration/?sdktab=swift). It will no longer receive new features, bug fixes, security updates, or technical support—however, messaging and analytics will continue to function as normal. To learn more, see [Introducing the New Braze Swift SDK](https://www.braze.com/resources/articles/introducing-the-new-braze-swift-sdk).
**Important:**
Suchen Sie nach dem grundlegenden Entwicklerleitfaden zur Integration von Content Cards? Finden Sie ihn [hier](https://www.braze.com/docs/de/de/developer_guide/platforms/legacy_sdks/ios/content_cards/integration).
# Implementierungsleitfaden für Content Cards {#content-card-implementation-guide}
> Dieser optionale Leitfaden für die erweiterte Implementierung enthält Hinweise zur Code-Anpassung für Content Cards, drei von unserem Team entwickelte angepasste Anwendungsfälle, begleitende Code-Snippets sowie eine Anleitung zur Protokollierung von Impressionen, Klicks und Ausblendungen. Besuchen Sie unser [Braze Demo Repository auf GitHub](https://github.com/braze-inc/braze-growth-shares-ios-demo-app)! Beachten Sie, dass sich dieser Implementierungsleitfaden auf eine Swift-Implementierung konzentriert, aber für Interessierte auch Objective-C-Snippets bereitgestellt werden.
## Hinweise zur Code-Anpassung {#code-considerations}
### Content Cards als angepasste Objekte {#content-cards-as-custom-objects}
Ähnlich wie ein Raketenschiff, das einen Booster hinzufügt, können Ihre eigenen angepassten Objekte erweitert werden, um als Content Cards zu fungieren. Begrenzte API-Oberflächen wie diese bieten die Flexibilität, mit verschiedenen Daten-Backends austauschbar zu arbeiten. Dies kann durch die Konformität mit dem `ContentCardable`-Protokoll und die Implementierung des Initialisierers (wie in den folgenden Code-Snippets zu sehen) erreicht werden. Durch die Verwendung der `ContentCardData`-Struktur können Sie auf die `ABKContentCard`-Daten zugreifen. Die `ABKContentCard`-Payload wird verwendet, um die `ContentCardData`-Struktur und das angepasste Objekt selbst zu initialisieren – alles aus einem `Dictionary`-Typ über den Initialisierer, den das Protokoll mitbringt.
Der Initialisierer enthält auch ein `ContentCardClassType`-enum. Dieses enum wird verwendet, um zu entscheiden, welches Objekt initialisiert werden soll. Durch die Verwendung von Schlüssel-Wert-Paaren im Braze-Dashboard können Sie einen expliziten `class_type`-Schlüssel festlegen, der bestimmt, welches Objekt initialisiert werden soll. Diese Schlüssel-Wert-Paare für Content Cards sind in der Variable `extras` auf der `ABKContentCard` enthalten. Eine weitere zentrale Komponente des Initialisierers ist der Wörterbuchparameter `metaData`. `metaData` enthält alles aus der `ABKContentCard`, aufgeteilt in eine Reihe von Schlüsseln und Werten. Nachdem die relevanten Karten geparst und in Ihre angepassten Objekte umgewandelt wurden, kann die App mit ihnen arbeiten, als ob sie aus JSON oder einer anderen Quelle instanziiert worden wären.
Sobald Sie diese Hinweise zur Code-Anpassung verstanden haben, sehen Sie sich unsere [Anwendungsfälle](#sample-use-cases) an, um mit der Implementierung Ihrer angepassten Objekte zu beginnen.
**ContentCardable-Protokoll**
Ein `ContentCardData`-Objekt, das die `ABKContentCard`-Daten zusammen mit einem `ContentCardClassType`-enum darstellt. Ein Initialisierer, der zur Instanziierung angepasster Objekte mit `ABKContentCard`-Metadaten verwendet wird.
```swift
protocol ContentCardable {
var contentCardData: ContentCardData? { get }
init?(metaData: [ContentCardKey: Any], classType contentCardClassType: ContentCardClassType)
}
extension ContentCardable {
var isContentCard: Bool {
return contentCardData != nil
}
func logContentCardClicked() {
BrazeManager.shared.logContentCardClicked(idString: contentCardData?.contentCardId)
}
func logContentCardDismissed() {
BrazeManager.shared.logContentCardDismissed(idString: contentCardData?.contentCardId)
}
func logContentCardImpression() {
BrazeManager.shared.logContentCardImpression(idString: contentCardData?.contentCardId)
}
}
```
**Content-Card-Datenstruktur**
`ContentCardData` stellt die ausgewerteten Werte einer `ABKContentCard` dar.
```swift
struct ContentCardData: Hashable {
let contentCardId: String
let contentCardClassType: ContentCardClassType
let createdAt: Double
let isDismissable: Bool
...
// other Content Card properties such as expiresAt, pinned, etc.
}
extension ContentCardData: Equatable {
static func ==(lhs: ContentCardData, rhs: ContentCardData) -> Bool {
return lhs.contentCardId == rhs.contentCardId
}
}
```
**ContentCardable-Protokoll**
Ein `ContentCardData`-Objekt, das die `ABKContentCard`-Daten zusammen mit einem `ContentCardClassType`-enum darstellt, ein Initialisierer, der zur Instanziierung angepasster Objekte mit `ABKContentCard`-Metadaten verwendet wird.
```objc
@protocol ContentCardable
@property (nonatomic, strong) ContentCardData *contentCardData;
- (instancetype __nullable)initWithMetaData:(NSDictionary *)metaData
classType:(enum ContentCardClassType)classType;
- (BOOL)isContentCard;
- (void)logContentCardImpression;
- (void)logContentCardClicked;
- (void)logContentCardDismissed;
@end
```
**Content-Card-Datenstruktur**
`ContentCardData` stellt die ausgewerteten Werte einer `ABKContentCard` dar.
```objc
@interface ContentCardData : NSObject
+ (ContentCardClassType)contentCardClassTypeForString:(NSString *)rawValue;
- (instancetype)initWithIdString:(NSString *)idString
classType:(ContentCardClassType)classType
createdAt:(double)createdAt isDismissible:(BOOL)isDismissible;
@property (nonatomic, readonly) NSString *contentCardId;
@property (nonatomic) ContentCardClassType classType;
@property (nonatomic, readonly) double *createdAt;
@property (nonatomic, readonly) BOOL isDismissible;
...
// other Content Card properties such as expiresAt, pinned, etc.
@end
```
**Angepasster Objekt-Initialisierer**
Die Metadaten einer `ABKContentCard` werden verwendet, um die Variablen Ihres Objekts zu füllen. Die im Braze-Dashboard eingerichteten Schlüssel-Wert-Paare sind im Wörterbuch „extras“ dargestellt.
```swift
extension CustomObject: ContentCardable {
init?(metaData: [ContentCardKey: Any], classType contentCardClassType: ContentCardClassType) {
guard let idString = metaData[.idString] as? String,
let createdAt = metaData[.created] as? Double,
let isDismissable = metaData[.dismissable] as? Bool,
let extras = metaData[.extras] as? [AnyHashable: Any],
else { return nil }
let contentCardData = ContentCardData(contentCardId: idString, contentCardClassType: contentCardClassType, createdAt: createdAt, isDismissable: isDismissable)
let customObjectProperty = extras["YOUR-CUSTOM-OBJECT-PROPERTY"] as? String
self.init(contentCardData: contentCardData, property: customObjectProperty)
}
}
```
**Identifizieren von Typen**
Das `ContentCardClassType`-enum stellt den `class_type`-Wert im Braze-Dashboard dar. Dieser Wert wird auch als Filter-Bezeichner verwendet, um Content Cards an verschiedenen Stellen anzuzeigen.
```swift
enum ContentCardClassType: Hashable {
case yourValue
case yourOtherValue
...
case none
init(rawType: String?) {
switch rawType?.lowercased() {
case "your_value": // these values much match the value set in the Braze dashboard
self = .yourValue
case "your_other_value": // these values much match the value set in the Braze dashboard
self = .yourOtherValue
...
default:
self = .none
}
}
}
```
**Angepasster Objekt-Initialisierer**
Die Metadaten einer `ABKContentCard` werden verwendet, um die Variablen Ihres Objekts zu füllen. Die im Braze-Dashboard eingerichteten Schlüssel-Wert-Paare sind im Wörterbuch „extras“ dargestellt.
```objc
- (id _Nullable)initWithMetaData:(nonnull NSDictionary *)metaData classType:(enum ContentCardClassType)classType {
self = [super init];
if (self) {
if ([metaData objectForKey:ContentCardKeyIdString] && [metaData objectForKey:ContentCardKeyCreated] && [metaData objectForKey:ContentCardKeyDismissible] && [metaData objectForKey:ContentCardKeyExtras]) {
NSDictionary *extras = metaData[ContentCardKeyExtras];
NSString *idString = metaData[ContentCardKeyIdString];
double createdAt = [metaData[ContentCardKeyCreated] doubleValue];
BOOL isDismissible = metaData[ContentCardKeyDismissible];
if ([extras objectForKey: @"YOUR-CUSTOM-PROPERTY")
_customObjectProperty = extras[@"YOUR-CUSTOM-OBJECT-PROPERTY"];
self.contentCardData = [[ContentCardData alloc] initWithIdString:idString classType:classType createdAt:createdAt isDismissible:isDismissible];
return self;
}
}
return nil;
}
```
**Identifizieren von Typen**
Das `ContentCardClassType`-enum stellt den `class_type`-Wert im Braze-Dashboard dar. Dieser Wert wird auch als Filter-Bezeichner verwendet, um Content Cards an verschiedenen Stellen anzuzeigen.
```objc
typedef NS_ENUM(NSInteger, ContentCardClassType) {
ContentCardClassTypeNone = 0,
ContentCardClassTypeYourValue,
ContentCardClassTypeYourOtherValue,
...
};
+ (NSArray *)contentCardClassTypeArray {
return @[ @"", @"your_value", @"your_other_value" ];
}
+ (ContentCardClassType)contentCardClassTypeForString:(NSString*)rawValue {
if ([[self contentCardClassTypeArray] indexOfObject:rawValue] == NSNotFound) {
return ContentCardClassTypeNone;
} else {
NSInteger value = [[self contentCardClassTypeArray] indexOfObject:rawValue];
return (ContentCardClassType) value;
}
}
```
**Content Cards anfordern**
Solange der Beobachter noch im Speicher gehalten wird, kann der Benachrichtigungs-Callback vom Braze SDK erwartet werden.
```swift
func loadContentCards() {
BrazeManager.shared.addObserverForContentCards(observer: self, selector: #selector(contentCardsUpdated))
BrazeManager.shared.requestContentCardsRefresh()
}
```
**SDK-Callback für Content Cards verarbeiten**
Leiten Sie den Benachrichtigungs-Callback an die Hilfsdatei weiter, um die Payload-Daten für Ihre angepassten Objekte zu parsen.
```swift
@objc func contentCardsUpdated(_ notification: Notification) {
guard let contentCards = BrazeManager.shared.handleContentCardsUpdated(notification, for: [.yourValue]) as? [CustomObject],!contentCards.isEmpty else { return }
// do something with your array of custom objects
}
```
**Mit Content Cards arbeiten**
Der `class_type` wird als Filter übergeben, um nur Content Cards zurückzugeben, die einen passenden `class_type` haben.
```swift
func handleContentCardsUpdated(_ notification: Notification, for classTypes: [ContentCardClassType]) -> [ContentCardable] {
guard let updateIsSuccessful = notification.userInfo?[ABKContentCardsProcessedIsSuccessfulKey] as? Bool, updateIsSuccessful, let cards = contentCards else { return [] }
return convertContentCards(cards, for: classTypes)
}
```
**Content Cards anfordern**
Solange der Beobachter noch im Speicher gehalten wird, kann der Benachrichtigungs-Callback vom Braze SDK erwartet werden.
```objc
- (void)loadContentCards {
[[BrazeManager shared] addObserverForContentCards:self selector:@selector(contentCardsUpdated:)];
[[BrazeManager shared] requestContentCardsRefresh];
}
```
**SDK-Callback für Content Cards verarbeiten**
Leiten Sie den Benachrichtigungs-Callback an die Hilfsdatei weiter, um die Payload-Daten für Ihre angepassten Objekte zu parsen.
```objc
- (void)contentCardsUpdated:(NSNotification *)notification {
NSArray *classTypes = @[@(ContentCardClassTypeYourValue)];
NSArray *contentCards = [[BrazeManager shared] handleContentCardsUpdated:notification forClassTypes:classTypes];
// do something with your array of custom objects
}
```
**Mit Content Cards arbeiten**
Der `class_type` wird als Filter übergeben, um nur Content Cards zurückzugeben, die einen passenden `class_type` haben.
```objc
- (NSArray *)handleContentCardsUpdated:(NSNotification *)notification forClassType:(ContentCardClassType)classType {
BOOL updateIsSuccessful = [notification.userInfo[ABKContentCardsProcessedIsSuccessfulKey] boolValue];
if (updateIsSuccessful) {
return [self convertContentCards:self.contentCards forClassType:classType];
} else {
return @[];
}
}
```
**Mit Payload-Daten arbeiten**
Durchläuft das Array der Content Cards in einer Schleife und parst nur die Karten mit einem passenden `class_type`. Die Payload einer ABKContentCard wird in ein `Dictionary` geparst.
```swift
func convertContentCards(_ cards: [ABKContentCard], for classTypes: [ContentCardClassType]) -> [ContentCardable] {
var contentCardables: [ContentCardable] = []
for card in cards {
let classTypeString = card.extras?[ContentCardKey.classType.rawValue] as? String
let classType = ContentCardClassType(rawType: classTypeString)
guard classTypes.contains(classType) else { continue }
var metaData: [ContentCardKey: Any] = [:]
switch card {
case let banner as ABKBannerContentCard:
metaData[.image] = banner.image
case let captioned as ABKCaptionedImageContentCard:
metaData[.title] = captioned.title
metaData[.cardDescription] = captioned.cardDescription
metaData[.image] = captioned.image
case let classic as ABKClassicContentCard:
metaData[.title] = classic.title
metaData[.cardDescription] = classic.cardDescription
default:
break
}
metaData[.idString] = card.idString
metaData[.created] = card.created
metaData[.dismissible] = card.dismissible
metaData[.urlString] = card.urlString
metaData[.extras] = card.extras
...
// other Content Card properties such as expiresAt, pinned, etc.
if let contentCardable = contentCardable(with: metaData, for: classType) {
contentCardables.append(contentCardable)
}
}
return contentCardables
}
```
**Angepasste Objekte aus Content-Card-Payload-Daten initialisieren**
Der `class_type` wird verwendet, um zu bestimmen, welche Ihrer angepassten Objekte aus den Payload-Daten initialisiert werden sollen.
```swift
func contentCardable(with metaData: [ContentCardKey: Any], for classType: ContentCardClassType) -> ContentCardable? {
switch classType {
case .yourValue:
return CustomObject(metaData: metaData, classType: classType)
case .yourOtherValue:
return OtherCustomObject(metaData: metaData, classType: classType)
...
default:
return nil
}
}
```
**Mit Payload-Daten arbeiten**
Durchläuft das Array der Content Cards in einer Schleife und parst nur die Karten mit einem passenden `class_type`. Die Payload einer ABKContentCard wird in ein `Dictionary` geparst.
```objc
- (NSArray *)convertContentCards:(NSArray *)cards forClassType:(ContentCardClassType)classType {
NSMutableArray *contentCardables = [[NSMutableArray alloc] init]; for (ABKContentCard *card in cards) {
NSString *classTypeString = [card.extras objectForKey:ContentCardKeyClassType];
ContentCardClassType cardClassType = [ContentCardData contentCardClassTypeForString: classTypeString];
if (cardClassType != classType) { continue; }
NSMutableDictionary *metaData = [[NSMutableDictionary alloc] init];
if ([card isKindOfClass:[ABKBannerContentCard class]]) {
ABKBannerContentCard *banner = (ABKBannerContentCard *)card;
metaData[ContentCardKeyImage] = banner.image;
} else if ([card isKindOfClass:[ABKCaptionedImageContentCard class]]) {
ABKCaptionedImageContentCard *captioned = (ABKCaptionedImageContentCard *)card;
metaData[ContentCardKeyTitle] = captioned.title;
metaData[ContentCardKeyCardDescription] = captioned.cardDescription;
metaData[ContentCardKeyImage] = captioned.image;
} else if ([card isKindOfClass:[ABKClassicContentCard class]]) {
ABKClassicContentCard *classic = (ABKClassicContentCard *)card;
metaData[ContentCardKeyCardDescription] = classic.title;
metaData[ContentCardKeyImage] = classic.image;
}
metaData[ContentCardKeyIdString] = card.idString;
metaData[ContentCardKeyCreated] = [NSNumber numberWithDouble:card.created];
metaData[ContentCardKeyDismissible] = [NSNumber numberWithBool:card.dismissible];
metaData[ContentCardKeyUrlString] = card.urlString;
metaData[ContentCardKeyExtras] = card.extras;
...
// other Content Card properties such as expiresAt, pinned, etc.
id contentCardable = [self contentCardableWithMetaData:metaData forClassType:classType];
if (contentCardable) {
[contentCardables addObject:contentCardable];
}
}
return contentCardables;
}
```
**Angepasste Objekte aus Content-Card-Payload-Daten initialisieren**
Der `class_type` wird verwendet, um zu bestimmen, welche Ihrer angepassten Objekte aus den Payload-Daten initialisiert werden sollen.
```obj-c
- (id)contentCardableWithMetaData:(NSDictionary *)metaData forClassType:(ContentCardClassType)classType {
switch (classType) {
case ContentCardClassTypeYourValue:
return [[CustomObject alloc] initWithMetaData:metaData classType:classType];
case ContentCardClassTypeYourOtherValue:
return nil;
...
default:
return nil;
}
}
```
## Anwendungsfälle {#sample-use-cases}
Im Folgenden finden Sie drei Anwendungsfälle. Jeder Anwendungsfall enthält eine ausführliche Erklärung, relevante Code-Snippets sowie einen Blick darauf, wie Content-Card-Variablen im Braze-Dashboard aussehen und verwendet werden können:
- [Content Cards als zusätzlicher Inhalt](#content-cards-as-supplemental-content)
- [Content Cards in einer Nachrichtenzentrale](#content-cards-in-a-message-center)
- [Interaktive Content Cards](#interactive-content-cards)
### Content Cards als zusätzlicher Inhalt {#content-cards-as-supplemental-content}
{: style="float:right;max-width:25%;margin-left:15px;border:0;"}
Sie können Content Cards nahtlos in einen bestehenden Feed einfügen, sodass Daten aus mehreren Feeds gleichzeitig geladen werden können. Dadurch entsteht ein zusammenhängendes, harmonisches Erlebnis mit Braze Content Cards und vorhandenen Feed-Inhalten.
Das Beispiel zeigt eine `UICollectionView` mit einer hybriden Liste von Artikeln, die über lokale Daten und von Braze bereitgestellte Content Cards gefüllt werden. Auf diese Weise können Content Cards nicht von bestehenden Inhalten unterschieden werden.
#### Dashboard-Konfiguration {#dashboard-configuration}
Diese Content Card wird über eine API-getriggerte Campaign mit API-getriggerten Schlüssel-Wert-Paaren zugestellt. Dies ist ideal für Campaigns, bei denen die Werte der Karte von externen Faktoren abhängen, um zu bestimmen, welche Inhalte den Nutzer:innen angezeigt werden sollen. Beachten Sie, dass `class_type` zum Zeitpunkt der Einrichtung bekannt sein sollte.
{: style="max-width:60%;"}
##### Bereit für die Protokollierung von Analytics? {#ready-to-log-analytics}
Im [folgenden Abschnitt](#logging-impressions-clicks-and-dismissals) wird näher beschrieben, wie der Datenfluss aussehen sollte.
### Content Cards in einer Nachrichtenzentrale {#content-cards-in-a-message-center}
Content Cards können in einem Nachrichtenzentrale-Format verwendet werden, bei dem jede Nachricht eine eigene Karte ist. Jede Nachricht in der Nachrichtenzentrale wird über eine Content-Card-Payload gefüllt, und jede Karte enthält zusätzliche Schlüssel-Wert-Paare für die On-Click-UI/UX. Im folgenden Beispiel verweist eine Nachricht auf eine beliebige angepasste Ansicht, während eine andere eine Webansicht öffnet, die angepasstes HTML anzeigt.
{: style="border:0;"}{: style="max-width:80%;border:0"}
#### Dashboard-Konfiguration
Für die folgenden Nachrichtentypen muss das Schlüssel-Wert-Paar `class_type` zu Ihrer Dashboard-Konfiguration hinzugefügt werden. Die hier zugewiesenen Werte sind willkürlich, sollten aber zwischen den Klassentypen unterscheidbar sein. Diese Schlüssel-Wert-Paare sind die Bezeichner, anhand derer die Anwendung entscheidet, wohin navigiert werden soll, wenn Nutzer:innen auf eine gekürzte Posteingangs-Nachricht klicken.
Die Schlüssel-Wert-Paare für diesen Anwendungsfall umfassen:
- `message_header` festgelegt als `Full Page`
- `class_type` festgelegt als `message_full_page`
{: style="max-width:60%;"}
Die Schlüssel-Wert-Paare für diesen Anwendungsfall umfassen:
- `message_header` festgelegt als `HTML`
- `class_type` festgelegt als `message_webview`
- `message_title`
Diese Nachricht sucht ebenfalls nach einem HTML-Schlüssel-Wert-Paar, aber wenn Sie mit einer Web-Domain arbeiten, ist auch ein URL-Schlüssel-Wert-Paar gültig.
{: style="max-width:60%;"}
#### Weitere Erklärung {#further-explanation}
Die Logik der Nachrichtenzentrale wird vom `contentCardClassType` gesteuert, der durch die Schlüssel-Wert-Paare von Braze bereitgestellt wird. Mit der Methode `addContentCardToView` können Sie diese Klassentypen sowohl filtern als auch identifizieren.
**Verwendung von `class_type` für On-Click-Verhalten**
Wenn eine Nachricht angeklickt wird, bestimmt `ContentCardClassType`, wie der nächste Bildschirm gefüllt werden soll.
```swift
func addContentCardToView(with message: Message) {
switch message.contentCardData?.contentCardClassType {
case .message(.fullPage):
loadContentCardFullPageView(with: message as! FullPageMessage)
case .message(.webView):
loadContentCardWebView(with: message as! WebViewMessage)
default:
break
}
}
```
**Verwendung von `class_type` für On-Click-Verhalten**
Wenn eine Nachricht angeklickt wird, bestimmt `ContentCardClassType`, wie der nächste Bildschirm gefüllt werden soll.
```objc
- (void)addContentCardToView:(Message *)message {
switch (message.contentCardData.classType) {
case ContentCardClassTypeMessageFullPage:
[self loadContentCardFullPageView:(FullPageMessage *)message];
break;
case ContentCardClassTypeMessageWebview:
[self loadContentCardWebView:(WebViewMessage *)message];
break;
default:
break;
}
}
```
##### Bereit für die Protokollierung von Analytics?
Im [folgenden Abschnitt](#logging-impressions-clicks-and-dismissals) wird näher beschrieben, wie der Datenfluss aussehen sollte.
{: style="border:0;"}{: style="float:right;max-width:45%;border:0;margin-left:15px;"}
### Interaktive Content Cards {#interactive-content-cards}
Content Cards können genutzt werden, um dynamische und interaktive Erlebnisse für Ihre Nutzer:innen zu schaffen. Im Beispiel erscheint an der Kasse ein Content-Card-Popup, das den Nutzer:innen Last-Minute-Aktionen bietet.
Gut platzierte Karten wie diese sind eine großartige Möglichkeit, den Nutzer:innen einen „Anstoß“ zu bestimmten Aktionen zu geben.
#### Dashboard-Konfiguration
Die Dashboard-Konfiguration für interaktive Content Cards ist unkompliziert. Die Schlüssel-Wert-Paare für diesen Anwendungsfall umfassen einen `discount_percentage`, der als gewünschter Rabattbetrag festgelegt ist, und einen `class_type`, der als `coupon_code` festgelegt ist. Diese Schlüssel-Wert-Paare sorgen dafür, dass typspezifische Content Cards gefiltert und auf dem Checkout-Bildschirm angezeigt werden.
{: style="max-width:70%;"}
##### Bereit für die Protokollierung von Analytics?
Im [folgenden Abschnitt](#logging-impressions-clicks-and-dismissals) wird näher beschrieben, wie der Datenfluss aussehen sollte.
## Dark-Mode-Anpassung {#dark-mode-customization}
Standardmäßig reagieren die Content-Card-Ansichten automatisch auf Änderungen im Dark Mode auf dem Gerät mit einer Reihe von Themenfarben.
Dieses Verhalten kann wie in unserer [Anleitung für angepasste Stile](https://www.braze.com/docs/de/de/developer_guide/platform_integration_guides/ios/content_cards/customization/custom_styling#disabling-dark-mode) beschrieben außer Kraft gesetzt werden.
## Protokollieren von Impressionen, Klicks und Ausblendungen {#logging-impressions-clicks-and-dismissals}
Nachdem Sie Ihre angepassten Objekte so erweitert haben, dass sie als Content Cards fungieren, können Sie wertvolle Metriken wie Impressionen, Klicks und Ausblendungen schnell protokollieren. Dies kann mit Hilfe eines `ContentCardable`-Protokolls geschehen, das auf eine Hilfsdatei verweist und ihr Daten bereitstellt, die vom Braze SDK erfasst werden.
### Komponenten der Implementierung
{#implementation-components}
**Analytics protokollieren**
Die Protokollierungsmethoden können direkt aus Objekten aufgerufen werden, die dem `ContentCardable`-Protokoll entsprechen.
```swift
customObject.logContentCardImpression()
customObject.logContentCardClicked()
customObject.logContentCardDismissed()
```
**`ABKContentCard` abrufen**
Der von Ihrem angepassten Objekt übergebene `idString` wird verwendet, um die zugehörige Content Card für die Protokollierung von Analytics zu identifizieren.
```swift
extension BrazeManager {
func logContentCardImpression(idString: String?) {
guard let contentCard = getContentCard(forString: idString) else { return }
contentCard.logContentCardImpression()
}
private func getContentCard(forString idString: String?) -> ABKContentCard? {
return contentCards?.first(where: { $0.idString == idString })
}
}
```
**Analytics protokollieren**
Die Protokollierungsmethoden können direkt aus Objekten aufgerufen werden, die dem `ContentCardable`-Protokoll entsprechen.
```objc
[customObject logContentCardImpression];
[customObject logContentCardClicked];
[customObject logContentCardDismissed];
```
**`ABKContentCard` abrufen**
Der von Ihrem angepassten Objekt übergebene `idString` wird verwendet, um die zugehörige Content Card für die Protokollierung von Analytics zu identifizieren.
```objc
- (void)logContentCardImpression:(NSString *)idString {
ABKContentCard *contentCard = [self getContentCard:idString];
[contentCard logContentCardImpression];
}
- (ABKContentCard *)getContentCard:(NSString *)idString {
NSPredicate *predicate = [NSPredicate predicateWithFormat:@"self.idString == %@", idString];
NSArray *filteredArray = [self.contentCards filteredArrayUsingPredicate:predicate];
return filteredArray.firstObject;
}
```
**Important:**
Für eine Kontrollgruppen-Variante einer Content Card sollte dennoch ein angepasstes Objekt instanziiert werden, und die UI-Logik sollte die entsprechende Ansicht des Objekts als ausgeblendet festlegen. Das Objekt kann dann eine Impression protokollieren, um unsere Analytics darüber zu informieren, wann Nutzer:innen die Kontrollkarte gesehen hätten.
## Hilfsdateien {#helper-files}
**ContentCardKey-Hilfsdatei**
```swift
enum ContentCardKey: String {
case idString
case created
case classType = "class_type"
case dismissible
case extras
...
}
```
```objc
static NSString *const ContentCardKeyIdString = @"idString";
static NSString *const ContentCardKeyCreated = @"created";
static NSString *const ContentCardKeyClassType = @"class_type";
static NSString *const ContentCardKeyDismissible = @"dismissible";
static NSString *const ContentCardKeyExtras = @"extras";
...
```
# Track Sessions für iOS
Source: /docs/de/developer_guide/platforms/legacy_sdks/ios/analytics/tracking_sessions/index.md
**Warning:**
[AppboyKit](https://github.com/Appboy/appboy-ios-sdk) (also known as the Objective-C SDK) is no longer supported and has been replaced by the [Swift SDK](https://www.braze.com/docs/de/de/developer_guide/sdk_integration/?sdktab=swift). It will no longer receive new features, bug fixes, security updates, or technical support—however, messaging and analytics will continue to function as normal. To learn more, see [Introducing the New Braze Swift SDK](https://www.braze.com/resources/articles/introducing-the-new-braze-swift-sdk).
# Sitzungs-Tracking für iOS
Das Braze SDK meldet Sitzungsdaten, die vom Braze Dashboard verwendet werden, um das Nutzer-Engagement und andere Analysen zu berechnen, die für das Verständnis Ihrer Nutzer wichtig sind. Unser SDK generiert Datenpunkte für "Sitzung starten" und "Sitzung schließen", die die Sitzungslänge und die Anzahl der Sitzungen berücksichtigen und im Braze-Dashboard auf der Grundlage der folgenden Session-Semantik angezeigt werden können.
## Lebenszyklus einer Sitzung
Eine Sitzung wird gestartet, wenn Sie `[[Appboy sharedInstance]` `startWithApiKey:inApplication:withLaunchOptions:withAppboyOptions]` aufrufen. Danach beginnen Sitzungen standardmäßig, wenn die Benachrichtigung `UIApplicationWillEnterForegroundNotification` ausgelöst wird (z. B. wenn die App in den Vordergrund tritt). Sie enden, wenn die App den Vordergrund verlässt (z. B. wenn die Benachrichtigung `UIApplicationDidEnterBackgroundNotification` ausgelöst wird oder die App abstürzt).
**Note:**
Wenn Sie eine neue Sitzung erzwingen müssen, können Sie dies tun, indem Sie den Nutzer wechseln.
## Anpassen des Sitzungs-Timeouts
Ab Braze iOS SDK v3.14.1 können Sie das Sitzungs-Timeout über die Datei Info.plist einstellen. Fügen Sie das Wörterbuch `Braze` zu Ihrer Datei `Info.plist` hinzu. Fügen Sie im Wörterbuch `Braze` den Untereintrag `SessionTimeout` hinzu und legen Sie den Wert auf Ihr angepasstes Sitzungs-Timeout fest. Beachten Sie, dass vor Braze iOS SDK v4.0.2 der Wörterbuchschlüssel `Appboy` anstelle von `Braze` verwendet werden muss.
Alternativ können Sie in Ihrem `appboyOptions`-Objekt, das an [`startWithApiKey`](https://appboy.github.io/appboy-ios-sdk/docs/interface_appboy.html#afd911d60dfe7e5361afbfb364f5d20f9) übergeben wird, den Schlüssel `ABKSessionTimeoutKey` auf den gewünschten Integer-Wert setzen.
```objc
// Sets the session timeout to 60 seconds
[Appboy startWithApiKey:@"YOUR-API_KEY"
inApplication:application
withLaunchOptions:options
withAppboyOptions:@{ ABKSessionTimeoutKey : @(60) }];
```
```swift
// Sets the session timeout to 60 seconds
Appboy.start(withApiKey: "YOUR-API-KEY",
in:application,
withLaunchOptions:launchOptions,
withAppboyOptions:[ ABKSessionTimeoutKey : 60 ])
```
Wenn Sie einen Timeout für die Sitzung festgelegt haben, erstreckt sich die Session-Semantik auf diesen angepassten Timeout.
**Note:**
Der Mindestwert für `sessionTimeoutInSeconds` ist 1 Sekunde. Der Standardwert ist 10 Sekunden.
## Testen des Sitzungs-Trackings
Um Sitzungen über Ihren Benutzer zu erkennen, suchen Sie Ihren Benutzer im Dashboard und navigieren Sie im Benutzerprofil zu **App-Nutzung**. Um sicherzugehen, dass das Sitzungs-Tracking funktioniert, können Sie überprüfen, ob die Metrik "Sitzungen" ansteigt, wenn Sie es erwarten.

# Benutzer-IDs für iOS festlegen
Source: /docs/de/developer_guide/platforms/legacy_sdks/ios/analytics/setting_user_ids/index.md
**Warning:**
[AppboyKit](https://github.com/Appboy/appboy-ios-sdk) (also known as the Objective-C SDK) is no longer supported and has been replaced by the [Swift SDK](https://www.braze.com/docs/de/de/developer_guide/sdk_integration/?sdktab=swift). It will no longer receive new features, bug fixes, security updates, or technical support—however, messaging and analytics will continue to function as normal. To learn more, see [Introducing the New Braze Swift SDK](https://www.braze.com/resources/articles/introducing-the-new-braze-swift-sdk).
# Benutzer-IDs für iOS festlegen
User IDs should be set for each of your users. These should be unchanging and accessible when a user opens the app. Naming your user IDs correctly from the start is one of the most **crucial** steps when setting up user IDs. We strongly suggest using the Braze standard of UUIDs and GUIDs (detailed in the following section). We also strongly recommend providing this identifier as it will allow you to:
- Track your users across devices and platforms, improving the quality of your behavioral and demographic data.
- Import data about your users using our [user data API](https://www.braze.com/docs/de/de/developer_guide/rest_api/user_data/#user-data).
- Target specific users with our [messaging API](https://www.braze.com/docs/de/de/api/endpoints/messaging/) for both general and transactional messages.
**Note:**
If such an identifier is not available, Braze will assign a unique identifier to your users, but you will lack the capabilities listed for user IDs. You should avoid setting user IDs for users for whom you lack a unique identifier that is tied to them as an individual. Passing a device identifier offers no benefit versus the automatic anonymous user tracking Braze offers by default.
**Warning:**
If you want to include an identifiable value as your user ID, for additional security, we **strongly recommend** adding our [SDK authentication](https://www.braze.com/docs/de/de/developer_guide/authentication/) feature to prevent user impersonation.
## Vorgeschlagene Namenskonvention für Nutzer:in
At Braze, we **strongly recommend** naming user IDs, also referred to as external IDs, in a [UUIDs and GUIDs](https://en.wikipedia.org/wiki/Universally_unique_identifier) format. UUIDs and GUIDs are universally unique identifiers that consist of a 128-bit number used to identify information in computer systems. This means that these UUIDs are long, random and well distributed. If you choose a different method in which to name your user IDs, they must also be long, random and well distributed. It is also important to note, that user IDs are **case sensitive**. For example, "Abcdef" is a different user from "abcdef".
If you find your user IDs include names, email addresses, timestamps, or incrementors, we suggest using a new naming method that is more secure so that your user IDs are not as easy to guess or impersonate. If you choose to include this in your user IDs, we **strongly recommend** adding our [SDK authentication](https://www.braze.com/docs/de/de/developer_guide/authentication/) feature to prevent user impersonation.
Providing this information to others may allow people outside your organization to glean information on how your user IDs are structured, opening up your organization to potentially malicious updates or removal of information. Choosing the correct naming convention from the start is one of the most important steps in setting up user IDs. However, a migration is possible using our [external ID migration endpoint](https://www.braze.com/docs/de/de/api/endpoints/user_data/external_id_migration/).
| User ID Naming |
| Recommended | Not Recommended |
| ------------ | ----------- |
| 123e4567-e89b-12d3-a456-836199333115 | JonDoe829525552 |
| 8c0b3728-7fa7-4c68-a32e-12de1d3ed2d5 | Anna@email.com |
| f0a9b506-3c5b-4d86-b16a-94fc4fc3f7b0 | CompanyName-1-2-19 |
| 2d9e96a1-8f15-4eaf-bf7b-eb8c34e25962 | jon-doe-1-2-19 |
{: .reset-td-br-1 .reset-td-br-2 aria-label="Table" }
## Zuweisung einer Nutzer:in ID
Sobald der Nutzer identifiziert ist (in der Regel nach dem Einloggen), sollten Sie den folgenden Aufruf tätigen, um die Nutzer-ID festzulegen:
```objc
[[Appboy sharedInstance] changeUser:@"YOUR_USER_ID_STRING"];
```
```swift
Appboy.sharedInstance()?.changeUser("YOUR_USER_ID")
```
**Warning:**
**Rufen Sie `changeUser()` nicht auf, wenn sich ein Nutzer abmeldet. `changeUser()` darf nur beim Anmelden aufgerufen werden.** Wenn Sie [`changeUser()`](https://appboy.github.io/appboy-ios-sdk/docs/interface_appboy.html#ac8b369b40e15860b0ec18c0f4b46ac69%20%22changeuser%22) auf einen statischen Standardwert setzen, werden ALLE Benutzeraktivitäten mit diesem "Standardnutzer" verknüpft, bis eine erneute Anmeldung erfolgt.
Stellen Sie sicher, dass Sie diese Methode im Haupt-Thread Ihrer Anwendung aufrufen. Der asynchrone Aufruf der Methode kann zu undefiniertem Verhalten führen.
Außerdem empfehlen wir, die ID nicht zu ändern, wenn sich ein Nutzer:innen abmeldet, da Sie dann den zuvor angemeldeten Nutzer:innen nicht mit erneuten Interaktionen ansprechen können. Wenn Sie mit mehreren Nutzern auf demselben Gerät rechnen, aber nur einen von ihnen ansprechen möchten, wenn sich Ihre App im abgemeldeten Zustand befindet, empfehlen wir Ihnen, die ID des Nutzers, den Sie ansprechen möchten, während Sie abgemeldet sind, separat zu verfolgen und im Rahmen des Abmeldevorgangs Ihrer App wieder zu dieser ID zu wechseln.
## Best Practices und Hinweise zur Integration von Nutzer:in
### Automatic preservation of anonymous user history
| Identification Context | Preservation Behavior |
| ---------------------- | -------------------------- |
| User **has not** been previously identified | Anonymous history **is merged** with user profile upon identification. |
| User **has been** previously identified in-app or via API | Anonymous history **is not merged** with user profile upon identification. |
{: .reset-td-br-1 .reset-td-br-2 aria-label="Automatic preservation of anonymous user history" }
Refer to [Identified user profiles](https://www.braze.com/docs/de/de/user_guide/data_and_analytics/user_data_collection/user_profile_lifecycle/#identified-user-profiles) for more information on what occurs when you identify anonymous users.
### Additional notes and best practices
Note the following:
- If your app is used by multiple people, you can assign each user a unique identifier to track them.
- After a user ID has been set, you cannot revert that user to an anonymous profile.
- Do not change the user ID when a user logs out as this can separate the device from the user profile.
- As a result, you won't be able to target the previously logged out user with re-engagement messages. If you anticipate multiple users on the same device, but only want to target one of them when your app is in a logged-out state, we recommend separately keeping track of the user ID you want to target while logged out and switching back to that user ID as part of your app's logout process. By default, only the last user that was logged in will receive push notifications from your app.
- Switching from one identified user to another is a relatively costly operation.
- When you request the user switch, the current session for the previous user is automatically closed and a new session is started. Braze will automatically make a data refresh request for in-app messages and other Braze resources for the new user.
**Tip:**
If you opt to use a hash of a unique identifier as your user ID, be sure that you're normalizing the input to your hashing function. For example, if you're going to use a hash of an email address, confirm that you're stripping leading and trailing whitespace from the input, and taking localization into account.
## User:innen Aliasing
A [user alias](https://www.braze.com/docs/de/de/user_guide/data_and_analytics/user_data_collection/user_profile_lifecycle/#user-aliases) serves as an alternative unique user identifier. You can use aliases to identify users along different dimensions than your core user ID:
* Set a consistent identifier for analytics that will follow a given user both before and after they have logged in to a mobile app or website.
* Add the identifiers used by a third-party vendor to your company users in order to more easily reconcile your data externally.
Each alias consists of two parts: a name for the identifier itself, and a label indicating the type of alias. Users can have multiple aliases with different labels, but only one name per label.
For more information on setting user aliases against a user profile, refer to [User aliases](https://www.braze.com/docs/de/de/user_guide/data_and_analytics/user_data_collection/user_profile_lifecycle/#user-aliases).
# Angepasste Events für iOS verfolgen
Source: /docs/de/developer_guide/platforms/legacy_sdks/ios/analytics/tracking_custom_events/index.md
**Warning:**
[AppboyKit](https://github.com/Appboy/appboy-ios-sdk) (also known as the Objective-C SDK) is no longer supported and has been replaced by the [Swift SDK](https://www.braze.com/docs/de/de/developer_guide/sdk_integration/?sdktab=swift). It will no longer receive new features, bug fixes, security updates, or technical support—however, messaging and analytics will continue to function as normal. To learn more, see [Introducing the New Braze Swift SDK](https://www.braze.com/resources/articles/introducing-the-new-braze-swift-sdk).
# Angepasste Events für iOS verfolgen {#track-custom-events-for-ios}
Sie können angepasste Events in Braze aufzeichnen, um mehr über das Nutzungsverhalten Ihrer App zu erfahren und Ihre Nutzer:innen nach ihren Aktionen auf dem Dashboard zu segmentieren.
Lesen Sie vor der Implementierung unbedingt die Beispiele für die Segmentierungsmöglichkeiten durch angepasste Events, angepasste Attribute und Kauf-Events in unseren [Best Practices](https://www.braze.com/docs/de/de/developer_guide/platform_wide/analytics_overview#user-data-collection) sowie unsere Hinweise zu den [Namenskonventionen für Events](https://www.braze.com/docs/de/de/user_guide/data/activation/events/event_naming_conventions).
## Hinzufügen eines angepassten Events {#adding-a-custom-event}
```objc
[[Appboy sharedInstance] logCustomEvent:@"YOUR_EVENT_NAME"];
```
```swift
Appboy.sharedInstance()?.logCustomEvent("YOUR_EVENT_NAME")
```
### Hinzufügen von Eigenschaften {#adding-properties}
Sie können Metadaten zu angepassten Events hinzufügen, indem Sie ein `NSDictionary` mit den Werten `NSNumber`, `NSString` oder `NSDate` übergeben.
```objc
[[Appboy sharedInstance] logCustomEvent:@"YOUR-EVENT-NAME"
withProperties:@{
@"you": @"can",
@"pass": @(NO),
@"orNumbers": @42,
@"orDates": [NSDate date],
@"or": @[@"any", @"array", @"here"],
@"andEven": @{
@"deeply": @[@"nested", @"json"]
}
}];
```
```swift
Appboy.sharedInstance()?.logCustomEvent(
"YOUR-EVENT-NAME",
withProperties: [
"you": "can",
"pass": false,
"orNumbers": 42,
"orDates": Date(),
"or": ["any", "array", "here"],
"andEven": [
"deeply": ["nested", "json"]
]
]
)
```
Weitere Informationen finden Sie in unserer [Klassendokumentation](http://appboy.github.io/appboy-ios-sdk/docs/interface_appboy.html#a4f0051d73d85cb37f63c232248124c79).
### Reservierte Schlüssel {#event-reserved-keys}
Die folgenden Schlüssel sind reserviert und können nicht als Event-Eigenschaften für angepasste Events verwendet werden:
- `time`
- `event_name`
## Zusätzliche Ressourcen {#additional-resources}
- Siehe die Methodendeklaration in der `Appboy.h`-[Datei](https://github.com/Appboy/appboy-ios-sdk/blob/master/AppboyKit/include/Appboy.h).
- Weitere Informationen finden Sie in der Dokumentation zu [`logCustomEvent`](http://appboy.github.io/appboy-ios-sdk/docs/interface_appboy.html#ad80c39e8c96482a77562a5b1a1d387aa).
# Angepasste Attribute für iOS festlegen
Source: /docs/de/developer_guide/platforms/legacy_sdks/ios/analytics/setting_custom_attributes/index.md
**Warning:**
[AppboyKit](https://github.com/Appboy/appboy-ios-sdk) (also known as the Objective-C SDK) is no longer supported and has been replaced by the [Swift SDK](https://www.braze.com/docs/de/de/developer_guide/sdk_integration/?sdktab=swift). It will no longer receive new features, bug fixes, security updates, or technical support—however, messaging and analytics will continue to function as normal. To learn more, see [Introducing the New Braze Swift SDK](https://www.braze.com/resources/articles/introducing-the-new-braze-swift-sdk).
# Angepasste Attribute für iOS festlegen {#set-custom-attributes-for-ios}
Braze bietet Methoden für die Zuweisung von Attributen an Nutzer:innen. Im Dashboard können Sie Ihre Nutzer:innen nach diesen Attributen filtern und segmentieren.
Lesen Sie vor der Implementierung unbedingt die Beispiele für die Segmentierungsoptionen, die angepasste Events, angepasste Attribute und Kauf-Events bieten, in unseren [Best Practices](https://www.braze.com/docs/de/de/developer_guide/platform_wide/analytics_overview#user-data-collection) sowie unsere Hinweise zu den [Namenskonventionen für Events](https://www.braze.com/docs/de/de/user_guide/data/activation/events/event_naming_conventions).
## Zuweisen von Standard-Nutzerattributen {#assigning-default-user-attributes}
Um Nutzerattribute zuzuweisen, müssen Sie das entsprechende Feld für das gemeinsame `ABKUser`-Objekt festlegen.
Im Folgenden sehen Sie ein Beispiel für das Festlegen des Vorname-Attributs:
```objc
[Appboy sharedInstance].user.firstName = @"first_name";
```
```swift
Appboy.sharedInstance()?.user.firstName = "first_name"
```
Die folgenden Attribute sollten für das `ABKUser`-Objekt festgelegt werden:
- `firstName`
- `lastName`
- `email`
- `dateOfBirth`
- `country`
- `language`
- `homeCity`
- `phone`
- `userID`
- `gender`
## Zuweisen von angepassten Nutzerattributen {#assigning-custom-user-attributes}
Neben den Standard-Nutzerattributen können Sie in Braze auch angepasste Attribute mit verschiedenen Datentypen definieren. Weitere Informationen zu den Segmentierungsoptionen, die Ihnen jedes dieser Attribute bietet, finden Sie in unserer Dokumentation zur [Datenerfassung](https://www.braze.com/docs/de/de/developer_guide/analytics).
### Angepasstes Attribut mit einem String-Wert {#custom-attribute-with-a-string-value}
```objc
[[Appboy sharedInstance].user setCustomAttributeWithKey:@"your_attribute_key" andStringValue:"your_attribute_value"];
```
```swift
Appboy.sharedInstance()?.user.setCustomAttributeWithKey("your_attribute_key", andStringValue: "your_attribute_value")
```
### Angepasstes Attribut mit einem Integer-Wert {#custom-attribute-with-an-integer-value}
```objc
[[Appboy sharedInstance].user setCustomAttributeWithKey:@"your_attribute_key" andIntegerValue:yourIntegerValue];
```
```swift
Appboy.sharedInstance()?.user.setCustomAttributeWithKey("your_attribute_key", andIntegerValue: yourIntegerValue)
```
### Angepasstes Attribut mit einem Double-Wert {#custom-attribute-with-a-double-value}
Braze behandelt `float`- und `double`-Werte in der Datenbank gleich.
```objc
[[Appboy sharedInstance].user setCustomAttributeWithKey:@"your_attribute_key" andDoubleValue:yourDoubleValue];
```
```swift
Appboy.sharedInstance()?.user.setCustomAttributeWithKey("your_attribute_key", andDoubleValue: yourDoubleValue)
```
### Angepasstes Attribut mit einem booleschen Wert {#custom-attribute-with-a-boolean-value}
```objc
[[Appboy sharedInstance].user setCustomAttributeWithKey:@"your_attribute_key" andBOOLValue:yourBOOLValue];
```
```swift
Appboy.sharedInstance()?.user.setCustomAttributeWithKey("your_attribute_key", andBOOLValue: yourBoolValue)
```
### Angepasstes Attribut mit einem Datumswert {#custom-attribute-with-a-date-value}
Datumsangaben, die mit dieser Methode an Braze übergeben werden, müssen entweder im [ISO 8601-Format](http://en.wikipedia.org/wiki/ISO_8601) (z. B. `2013-07-16T19:20:30+01:00`) oder im Format `yyyy-MM-dd'T'HH:mm:ss:SSSZ` (`2016-12-14T13:32:31.601-0800`) vorliegen.
```objc
[[Appboy sharedInstance].user setCustomAttributeWithKey:@"your_attribute_key" andDateValue:yourDateValue];
```
```swift
Appboy.sharedInstance()?.user.setCustomAttributeWithKey("your_attribute_key", andDateValue:yourDateValue)
```
### Angepasstes Attribut mit einem Array-Wert {#custom-attribute-with-an-array-value}
Die Standard- und Höchstzahl an Elementen in einem Array beträgt 500. Sie können die Höchstzahl an Elementen im Braze-Dashboard unter **Dateneinstellungen** > **Angepasste Attribute** aktualisieren. Arrays, die die Höchstzahl an Elementen überschreiten, werden gekürzt, sodass nur die Höchstzahl an Elementen enthalten bleibt.
```objc
// Setting a custom attribute with an array value
[[Appboy sharedInstance].user setCustomAttributeArrayWithKey:@"array_name" array:@[@"value1", @"value2"]];
// Adding to a custom attribute with an array value
[[Appboy sharedInstance].user addToCustomAttributeArrayWithKey:@"array_name" value:@"value3"];
// Removing a value from an array type custom attribute
[[Appboy sharedInstance].user removeFromCustomAttributeArrayWithKey:@"array_name" value:@"value2"];
// Removing an entire array and key
[[Appboy sharedInstance].user setCustomAttributeArrayWithKey:@"array_name" array:nil];
```
```swift
// Setting a custom attribute with an array value
Appboy.sharedInstance()?.user.setCustomAttributeArrayWithKey("array_name", array: ["value1", "value2"])
// Adding to a custom attribute with an array value
Appboy.sharedInstance()?.user.addToCustomAttributeArrayWithKey("array_name", value: "value3")
// Removing a value from an array type custom attribute
Appboy.sharedInstance()?.user.removeFromCustomAttributeArrayWithKey("array_name", value: "value2")
```
### Aufheben eines angepassten Attributs {#unsetting-a-custom-attribute}
Angepasste Attribute können auch mit der folgenden Methode aufgehoben werden:
```objc
[[Appboy sharedInstance].user unsetCustomAttributeWithKey:@"your_attribute_key"];
```
```swift
Appboy.sharedInstance()?.user.unsetCustomAttributeWithKey("your_attribute_key")
```
### Inkrementieren/Dekrementieren von angepassten Attributen {#incrementingdecrementing-custom-attributes}
Dieser Code ist ein Beispiel für ein inkrementierendes angepasstes Attribut. Sie können den Wert eines angepassten Attributs um jeden positiven oder negativen Integer- oder Long-Wert erhöhen:
```objc
[[Appboy sharedInstance].user incrementCustomUserAttribute:@"your_attribute_key" by:incrementIntegerValue];
```
```swift
Appboy.sharedInstance()?.user.incrementCustomUserAttribute("your_attribute_key", by: incrementIntegerValue)
```
### Festlegen eines angepassten Attributs über die REST API {#setting-a-custom-attribute-via-the-rest-api}
Sie können auch die REST API verwenden, um Nutzerattribute festzulegen. Einzelheiten finden Sie in der [Nutzer-API-Dokumentation](https://www.braze.com/docs/de/de/developer_guide/rest_api/user_data#user-data).
### Wertgrenzen für angepasste Attribute {#custom-attribute-value-limits}
Angepasste Attributwerte haben eine maximale Länge von 255 Zeichen; längere Werte werden abgeschnitten.
#### Zusätzliche Informationen {#additional-information}
- Weitere Einzelheiten finden Sie in der Datei [`ABKUser.h`](https://github.com/Appboy/appboy-ios-sdk/blob/master/AppboyKit/include/Appboy.h).
- Weitere Informationen finden Sie in der [`ABKUser`-Dokumentation](http://appboy.github.io/appboy-ios-sdk/docs/interface_a_b_k_user.html).
## Einrichten von Nutzer-Abos {#setting-up-user-subscriptions}
Um ein Abo für Ihre Nutzer:innen einzurichten (entweder E-Mail oder Push), rufen Sie die Funktion `setEmailNotificationSubscriptionType` bzw. `setPushNotificationSubscriptionType` auf. Beide Funktionen nehmen den enum-Typ `ABKNotificationSubscriptionType` als Argumente an. Dieser Typ hat drei verschiedene Zustände:
| Abostatus | Definition |
| ------------------- | ---------- |
| `ABKOptedin` | Abonniert und ausdrücklich angemeldet |
| `ABKSubscribed` | Abonniert, aber nicht ausdrücklich angemeldet |
| `ABKUnsubscribed` | Abbestellt und/oder ausdrücklich abgemeldet |
{: .reset-td-br-1 .reset-td-br-2 aria-label="Einrichten von Nutzer-Abos" }
Nutzer:innen, die einer App die Erlaubnis erteilen, ihnen Push-Benachrichtigungen zu senden, haben standardmäßig den Status `ABKOptedin`, da iOS eine ausdrückliche Zustimmung verlangt.
Nutzer:innen werden bei Erhalt einer gültigen E-Mail-Adresse automatisch auf `ABKSubscribed` gesetzt. Wir empfehlen Ihnen jedoch, ein ausdrückliches Opt-in-Verfahren einzurichten und diesen Wert bei Erhalt einer ausdrücklichen Zustimmung auf `OptedIn` zu setzen. Weitere Einzelheiten finden Sie unter [Verwalten von Nutzer-Abos](https://www.braze.com/docs/de/de/user_guide/channels/email/subscriptions).
### Einstellen von E-Mail-Abos {#setting-email-subscriptions}
```objc
[[Appboy sharedInstance].user setEmailNotificationSubscriptionType: ABKNotificationSubscriptionType]
```
```swift
Appboy.sharedInstance()?.user.setEmailNotificationSubscriptionType(ABKNotificationSubscriptionType)
```
### Einstellen von Push-Benachrichtigungs-Abos {#setting-push-notification-subscriptions}
```objc
[[Appboy sharedInstance].user setPushNotificationSubscriptionType: ABKNotificationSubscriptionType]
```
```swift
Appboy.sharedInstance()?.user.setPushNotificationSubscriptionType(ABKNotificationSubscriptionType)
```
Weitere Einzelheiten finden Sie unter [Verwalten von Nutzer-Abos](https://www.braze.com/docs/de/de/user_guide/channels/email/subscriptions).
# Käufe für iOS protokollieren
Source: /docs/de/developer_guide/platforms/legacy_sdks/ios/analytics/logging_purchases/index.md
**Warning:**
[AppboyKit](https://github.com/Appboy/appboy-ios-sdk) (also known as the Objective-C SDK) is no longer supported and has been replaced by the [Swift SDK](https://www.braze.com/docs/de/de/developer_guide/sdk_integration/?sdktab=swift). It will no longer receive new features, bug fixes, security updates, or technical support—however, messaging and analytics will continue to function as normal. To learn more, see [Introducing the New Braze Swift SDK](https://www.braze.com/resources/articles/introducing-the-new-braze-swift-sdk).
# Käufe für iOS protokollieren {#log-purchases-for-ios}
Erfassen Sie In-App-Käufe, um Ihre Umsätze im Zeitverlauf über verschiedene Umsatzquellen hinweg zu tracken und Ihre Nutzer:innen nach ihrem Lifetime-Value zu segmentieren.
Braze unterstützt Einkäufe in mehreren Währungen. Einkäufe, die Sie in einer anderen Währung als dem USD melden, werden im Dashboard in USD auf der Grundlage des Wechselkurses an dem Tag, an dem sie gemeldet wurden, angezeigt.
Lesen Sie vor der Implementierung unbedingt die Beispiele für die Segmentierungsoptionen, die angepasste Events, angepasste Attribute und Kauf-Events bieten, in unseren [Best Practices](https://www.braze.com/docs/de/de/developer_guide/platform_wide/analytics_overview#user-data-collection) sowie unsere Hinweise zu den [Namenskonventionen für Events](https://www.braze.com/docs/de/de/user_guide/data/activation/events/event_naming_conventions).
## Käufe und Umsätze tracken {#tracking-purchases-and-revenue}
Um diese Funktion zu nutzen, fügen Sie diesen Methodenaufruf nach einem erfolgreichen Kauf in Ihrer App hinzu:
```objc
[[Appboy sharedInstance] logPurchase:@"your product ID"
inCurrency:@"USD"
atPrice:[[[NSDecimalNumber alloc] initWithString:@"0.99"] autorelease]];
```
```swift
Appboy.sharedInstance()?.logPurchase("your product ID", inCurrency: "USD", atPrice: NSDecimalNumber(string: "0.99"))
```
- Folgende Währungssymbole werden unterstützt: USD, CAD, EUR, GBP, JPY, AUD, CHF, NOK, MXN, NZD, CNY, RUB, TRY, INR, IDR, ILS, SAR, ZAR, AED, SEK, HKD, SPD, DKK und mehr.
- Jedes andere angegebene Währungssymbol führt zu einer protokollierten Warnung und zu keiner weiteren Aktion durch das SDK.
- Die Produkt-ID darf maximal 255 Zeichen lang sein.
- Beachten Sie, dass der Kauf nicht in Braze protokolliert wird, wenn der Bezeichner des Produkts leer ist.
### Eigenschaften hinzufügen {#properties-purchases}
Sie können Metadaten über Käufe hinzufügen, indem Sie entweder ein [Array mit Event-Eigenschaften](https://www.braze.com/docs/de/de/user_guide/data_and_analytics/custom_data/custom_events#nested-objects) oder ein `NSDictionary` mit `NSNumber`-, `NSString`- oder `NSDate`-Werten übergeben.
Weitere Einzelheiten finden Sie in der [Dokumentation zur iOS-Klasse](http://appboy.github.io/appboy-ios-sdk/docs/interface_appboy.html#aaca4b885a8f61ac9fad3936b091448cc).
### Menge hinzufügen {#adding-quantity}
Sie können eine Menge zu Ihren Einkäufen hinzufügen, wenn Kund:innen denselben Einkauf mehrmals in einem einzigen Bezahlvorgang tätigen. Sie können dies erreichen, indem Sie eine `NSUInteger` für die Menge übergeben.
* Die eingegebene Menge muss im Bereich von [0, 100] liegen, damit das SDK einen Kauf protokollieren kann.
* Methoden ohne Mengeneingabe haben standardmäßig den Mengenwert 1.
* Methoden mit einer Mengeneingabe haben keinen Standardwert und **müssen** eine Mengeneingabe erhalten, damit das SDK einen Kauf protokollieren kann.
Weitere Einzelheiten finden Sie in der [Dokumentation zur iOS-Klasse](http://appboy.github.io/appboy-ios-sdk/docs/interface_appboy.html#ab50403068be47c0acba9943583e259fa).
```objc
[[Appboy sharedInstance] logPurchase:@"your product ID"
inCurrency:@"USD"
atPrice:[[[NSDecimalNumber alloc] initWithString:@"0.99"] autorelease]
withProperties:@{@"key1":"value1"}];
```
```swift
Appboy.sharedInstance()?.logPurchase("your product ID", inCurrency: "USD", atPrice: NSDecimalNumber(string: "0.99"), withProperties: ["key1":"value1"])
```
**Tip:**
Wenn Sie einen Wert von 10 USD und eine Menge von 3 übergeben, wird dies im Profil der Nutzer:innen als drei Käufe von 10 Dollar für insgesamt 30 Dollar protokolliert.
### Käufe auf Bestellebene protokollieren {#log-purchases-at-the-order-level}
Wenn Sie Einkäufe auf der Bestellebene statt auf der Produktebene protokollieren möchten, können Sie den Bestellnamen oder die Bestellkategorie als `product_id` verwenden. Weitere Informationen finden Sie in unserer [Spezifikation für Kauf-Objekte](https://www.braze.com/docs/de/de/api/objects_filters/purchase_object#product-id-naming-conventions).
### Reservierte Schlüssel {#reserved-keys}
Die folgenden Schlüssel sind reserviert und können nicht als Kauf-Details verwendet werden:
- `time`
- `product_id`
- `quantity`
- `event_name`
- `price`
- `currency`
### REST API
Sie können auch unsere REST API verwenden, um Einkäufe zu erfassen. Einzelheiten finden Sie in der [Nutzer:innen-API-Dokumentation](https://www.braze.com/docs/de/de/developer_guide/rest_api/user_data#user-data).
# Standort-Tracking für iOS
Source: /docs/de/developer_guide/platforms/legacy_sdks/ios/analytics/location_tracking/index.md
**Warning:**
[AppboyKit](https://github.com/Appboy/appboy-ios-sdk) (also known as the Objective-C SDK) is no longer supported and has been replaced by the [Swift SDK](https://www.braze.com/docs/de/de/developer_guide/sdk_integration/?sdktab=swift). It will no longer receive new features, bug fixes, security updates, or technical support—however, messaging and analytics will continue to function as normal. To learn more, see [Introducing the New Braze Swift SDK](https://www.braze.com/resources/articles/introducing-the-new-braze-swift-sdk).
# Standort-Tracking für iOS
Standardmäßig deaktiviert Braze das Standort-Tracking. Wir aktivieren das Standort-Tracking, nachdem sich die Host-Anwendung für das Standort-Tracking entschieden und die Erlaubnis des Nutzers eingeholt hat. Wenn er/sie dem Standort-Tracking zugestimmt hat, protokolliert Braze beim Start der Sitzung einen einzigen Standort für jeden Nutzer.
**Important:**
Damit das Standort-Tracking in iOS 14 auch für den ungefähren Standort zuverlässig funktioniert, müssen Sie Ihr SDK mindestens auf die Version `3.26.1` aktualisieren.
## Automatisches Standort-Tracking aktivieren
Ab Braze iOS SDK `v3.17.0` ist das Standort-Tracking standardmäßig deaktiviert. Sie können das automatische Standort-Tracking über die Datei `Info.plist` aktivieren. Fügen Sie das Wörterbuch `Braze` zu Ihrer Datei `Info.plist` hinzu. Fügen Sie im Wörterbuch `Braze` den booleschen Untereintrag `EnableAutomaticLocationCollection` hinzu und setzen Sie den Wert auf `YES`. Beachten Sie, dass vor Braze iOS SDK v4.0.2 der Wörterbuchschlüssel `Appboy` anstelle von `Braze` verwendet werden muss.
Sie können das automatische Standort-Tracking beim Start der App auch über die Methode [`startWithApiKey:inApplication:withLaunchOptions:withAppboyOptions`](https://appboy.github.io/appboy-ios-sdk/docs/interface_appboy.html#aa9f1bd9e4a5c082133dd9cc344108b24). Setzen Sie im Wörterbuch `appboyOptions` `ABKEnableAutomaticLocationCollectionKey` auf `YES`. Zum Beispiel:
```objc
[Appboy startWithApiKey:@"YOUR-API_KEY"
inApplication:application
withLaunchOptions:options
withAppboyOptions:@{ ABKEnableAutomaticLocationCollectionKey : @(YES) }];
```
```swift
Appboy.start(withApiKey: "YOUR-API-KEY",
in:application,
withLaunchOptions:launchOptions,
withAppboyOptions:[ ABKEnableAutomaticLocationCollectionKey : true ])
```
### Übergabe von Standort-Daten an Braze
Die folgenden beiden Methoden können verwendet werden, um den letzten bekannten Standort manuell festzulegen.
```objc
[[Appboy sharedInstance].user setLastKnownLocationWithLatitude:latitude
longitude:longitude
horizontalAccuracy:horizontalAccuracy];
```
```objc
[[Appboy sharedInstance].user setLastKnownLocationWithLatitude:latitude
longitude:longitude
horizontalAccuracy:horizontalAccuracy
altitude:altitude
verticalAccuracy:verticalAccuracy];
```
```swift
Appboy.sharedInstance()?.user.setLastKnownLocationWithLatitude(latitude: latitude, longitude: longitude, horizontalAccuracy: horizontalAccuracy)
```
```swift
Appboy.sharedInstance()?.user.setLastKnownLocationWithLatitude(latitude: latitude, longitude: longitude, horizontalAccuracy: horizontalAccuracy, altitude: altitude, verticalAccuracy: verticalAccuracy)
```
Refernzieren Sie unter [`ABKUser.h`](https://github.com/Appboy/appboy-ios-sdk/blob/master/AppboyKit/include/ABKUser.h) für weitere Informationen.
# Uninstall-Tracking für iOS
Source: /docs/de/developer_guide/platforms/legacy_sdks/ios/analytics/uninstall_tracking/index.md
**Warning:**
[AppboyKit](https://github.com/Appboy/appboy-ios-sdk) (also known as the Objective-C SDK) is no longer supported and has been replaced by the [Swift SDK](https://www.braze.com/docs/de/de/developer_guide/sdk_integration/?sdktab=swift). It will no longer receive new features, bug fixes, security updates, or technical support—however, messaging and analytics will continue to function as normal. To learn more, see [Introducing the New Braze Swift SDK](https://www.braze.com/resources/articles/introducing-the-new-braze-swift-sdk).
# Uninstall-Tracking für iOS {#uninstall-tracking-for-ios}
> In diesem Artikel erfahren Sie, wie Sie das Uninstall-Tracking für Ihre iOS-Anwendung konfigurieren und wie Sie testen können, damit Ihre App keine unerwünschten automatischen Aktionen ausführt, wenn sie einen Push zum Uninstall-Tracking von Braze empfängt.
Das Uninstall-Tracking verwendet Push-Benachrichtigungen im Hintergrund mit einem Braze-Flag in der Payload. Weitere Informationen finden Sie unter [Uninstall-Tracking](https://www.braze.com/docs/de/de/user_guide/data_and_analytics/tracking/uninstall_tracking#uninstall-tracking) in unserem Benutzerhandbuch.
## 1. Schritt: Hintergrund-Push aktivieren {#step-1-enabling-background-push}
Vergewissern Sie sich, dass Sie die Option **Remote notifications** im Abschnitt **Background Modes** auf dem Tab **Capabilities** Ihres Xcode-Projekts aktiviert haben. Weitere Einzelheiten finden Sie in unserer Dokumentation zur [stillen Push-Benachrichtigung](https://www.braze.com/docs/de/de/developer_guide/platforms/legacy_sdks/ios/push_notifications/silent_push_notifications).
## 2. Schritt: Braze-Hintergrund-Push prüfen {#step-2-checking-for-braze-background-push}
Braze verwendet Push-Benachrichtigungen im Hintergrund, um Analytics für das Uninstall-Tracking zu sammeln. Stellen Sie sicher, dass Ihre Anwendung [keine unerwünschten Aktionen durchführt](https://www.braze.com/docs/de/de/developer_guide/platforms/legacy_sdks/ios/push_notifications/customization/ignoring_internal_push), wenn sie Benachrichtigungen zum Uninstall-Tracking empfängt.
## 3. Schritt: Im Dashboard testen {#step-3-test-from-the-dashboard}
Als Nächstes senden Sie sich selbst einen Test-Push vom Dashboard aus. Dieser Test-Push wird Ihr Nutzerprofil nicht aktualisieren.
1. Erstellen Sie auf der Seite **Campaigns** eine Push-Benachrichtigungskampagne und wählen Sie **iOS push** als Plattform.
2. Fügen Sie auf der Seite **Settings** den Schlüssel `appboy_uninstall_tracking` mit dem entsprechenden Wert `true` hinzu und markieren Sie **Add Content-Available Flag**.
3. Verwenden Sie die Seite **Preview**, um sich selbst einen Test-Push für das Uninstall-Tracking zu senden.
4. Vergewissern Sie sich, dass Ihre App beim Empfang des Push keine unerwünschten automatischen Aktionen ausführt.
**Important:**
Diese Testschritte sind ein Proxy für das Senden eines Uninstall-Tracking-Push von Braze. Wenn Sie die Badge-Zählung aktiviert haben, wird eine Badge-Nummer zusammen mit dem Test-Push gesendet, aber die Braze-Uninstall-Tracking-Pushes setzen keine Badge-Nummer in Ihrer Anwendung.
## 4. Schritt: Uninstall-Tracking aktivieren {#step-4-enable-uninstall-tracking}
Folgen Sie den Anweisungen zur [Aktivierung des Uninstall-Trackings](https://www.braze.com/docs/de/de/user_guide/data_and_analytics/tracking/uninstall_tracking#uninstall-tracking).
# SDK-Tracking für iOS deaktivieren
Source: /docs/de/developer_guide/platforms/legacy_sdks/ios/analytics/disabling_tracking/index.md
**Warning:**
[AppboyKit](https://github.com/Appboy/appboy-ios-sdk) (also known as the Objective-C SDK) is no longer supported and has been replaced by the [Swift SDK](https://www.braze.com/docs/de/de/developer_guide/sdk_integration/?sdktab=swift). It will no longer receive new features, bug fixes, security updates, or technical support—however, messaging and analytics will continue to function as normal. To learn more, see [Introducing the New Braze Swift SDK](https://www.braze.com/resources/articles/introducing-the-new-braze-swift-sdk).
# Datenerfassung für iOS deaktivieren {#disable-data-collection-for-ios}
Um den Datenschutzbestimmungen zu entsprechen, kann die Tracking-Aktivität im iOS SDK mit der Methode [`disableSDK`](http://appboy.github.io/appboy-ios-sdk/docs/interface_appboy.html#a8d3b78a98420713d8590ed63c9172733) vollständig gestoppt werden. Diese Methode führt dazu, dass alle Netzwerkverbindungen abgebrochen werden und das Braze SDK keine Daten an unsere Server weitergibt. Wenn Sie die Datenerfassung später wieder aufnehmen möchten, können Sie die Methode [`requestEnableSDKOnNextAppRun`](http://appboy.github.io/appboy-ios-sdk/docs/interface_appboy.html#a781078a40a3db0de64ac82dcae3b595b) verwenden, um die Datenerfassung fortzusetzen.
Außerdem können Sie die Methode [`wipeDataAndDisableForAppRun`](http://appboy.github.io/appboy-ios-sdk/docs/interface_appboy.html#ac8d580f60ec0608cd91240a8a3aa23a3) verwenden, um alle auf dem Gerät gespeicherten clientseitigen Daten vollständig zu löschen.
Sofern ein:e Nutzer:in nicht alle Apps eines Anbieters auf einem bestimmten Gerät deinstalliert, führt die nächste Ausführung von Braze SDK und App nach dem Aufruf von `wipeDataAndDisableForAppRun()` dazu, dass unser Server diese:n Nutzer:in über den Identifier for Vendors (IDFV) erneut identifiziert. Um alle Nutzerdaten vollständig zu löschen, sollten Sie einen Aufruf von `wipeDataAndDisableForAppRun` mit einer Anfrage zum Löschen von Daten auf dem Server über die Braze [REST API](https://www.braze.com/docs/de/de/developer_guide/rest_api/user_data#user-delete-endpoint) kombinieren.
## iOS SDK v5.7.0+ {#ios-sdk-v570}
Bei Geräten, die iOS SDK v5.7.0 und höher verwenden, führt der Aufruf von [`wipeData`](https://braze-inc.github.io/braze-swift-sdk/documentation/brazekit/braze/wipedata()) bei [deaktivierter IDFV-Erfassung](https://www.braze.com/docs/de/de/developer_guide/platform_integration_guides/legacy_sdks/ios/initial_sdk_setup/other_sdk_customizations#optional-idfv-collection---swift) nicht dazu, dass unser Server diese:n Nutzer:in über den Identifier for Vendors (IDFV) erneut identifiziert.
# Deeplinking für iOS
Source: /docs/de/developer_guide/platforms/legacy_sdks/ios/advanced_use_cases/linking/index.md
**Warning:**
[AppboyKit](https://github.com/Appboy/appboy-ios-sdk) (also known as the Objective-C SDK) is no longer supported and has been replaced by the [Swift SDK](https://www.braze.com/docs/de/de/developer_guide/sdk_integration/?sdktab=swift). It will no longer receive new features, bug fixes, security updates, or technical support—however, messaging and analytics will continue to function as normal. To learn more, see [Introducing the New Braze Swift SDK](https://www.braze.com/resources/articles/introducing-the-new-braze-swift-sdk).
# Deeplinking für iOS {#deep-linking-for-ios}
Einführende Informationen zu Deeplinks finden Sie in unserem [Artikel im Benutzerhandbuch](https://www.braze.com/docs/de/de/user_guide/messaging/design_and_edit/personalize/actions_and_media_urls#what-is-deep-linking). Wenn Sie zum ersten Mal Deeplinks in Ihrer Braze-App implementieren möchten, helfen Ihnen die folgenden Schritte beim Einstieg.
## Schritt 1: Ein Schema registrieren {#step-1-register-a-scheme}
Sie müssen ein angepasstes Schema in der Datei `Info.plist` angeben. Die Navigationsstruktur wird durch ein Array von Wörterbüchern definiert. Jedes dieser Wörterbücher enthält ein String-Array.
Verwenden Sie Xcode, um Ihre `Info.plist`-Datei zu bearbeiten:
1. Fügen Sie einen neuen Schlüssel hinzu, `URL types`. Xcode macht daraus automatisch ein Array, das ein Wörterbuch namens `Item 0` enthält.
2. Fügen Sie innerhalb von `Item 0` einen Schlüssel `URL identifier` hinzu. Setzen Sie den Wert auf Ihr angepasstes Schema.
3. Fügen Sie innerhalb von `Item 0` einen Schlüssel `URL Schemes` hinzu. Dies wird automatisch ein Array sein, das einen `Item 0`-String enthält.
4. Setzen Sie `URL Schemes` >> `Item 0` auf Ihr angepasstes Schema.
Wenn Sie Ihre `Info.plist`-Datei direkt bearbeiten möchten, können Sie auch dieser Spezifikation folgen:
```html
CFBundleURLTypesCFBundleURLName{YOUR.SCHEME}CFBundleURLSchemes{YOUR.SCHEME}
```
## Schritt 2: Angepasstes Schema in die Allowlist eintragen (iOS 9+) {#step-2-allowlist-the-custom-scheme-ios-9}
Ab iOS 9 müssen Apps eine Allowlist mit angepassten Schemata haben, die die App öffnen darf. Der Versuch, Schemata außerhalb dieser Liste aufzurufen, führt dazu, dass das System einen Fehler in den Protokollen des Geräts aufzeichnet und der Deeplink nicht geöffnet wird. Ein Beispiel für diesen Fehler sieht so aus:
```
: -canOpenURL: failed for URL: "yourapp://deeplink" – error: "This app is not allowed to query for scheme yourapp"
```
Wenn zum Beispiel eine In-App-Nachricht beim Antippen die Facebook-App öffnen soll, muss die App das angepasste Schema von Facebook (`fb`) in der Allowlist haben. Andernfalls wird das System den Deeplink ablehnen. Deeplinks, die auf eine Seite oder Ansicht innerhalb Ihrer eigenen App verweisen, erfordern nach wie vor, dass das angepasste Schema Ihrer App in der `Info.plist` Ihrer App aufgeführt ist.
Sie sollten alle Schemata, zu denen die App Deeplinks setzen muss, in einer Allowlist in der `Info.plist`-Datei Ihrer App mit dem Schlüssel `LSApplicationQueriesSchemes` auflisten. Zum Beispiel:
```html
LSApplicationQueriesSchemesmyappfacebooktwitter
```
Weitere Informationen finden Sie in der [Dokumentation von Apple](https://developer.apple.com/library/content/documentation/General/Reference/InfoPlistKeyReference/Articles/LaunchServicesKeys.html#//apple_ref/doc/uid/TP40009250-SW14) zum Schlüssel `LSApplicationQueriesSchemes`.
## Schritt 3: Handler implementieren {#step-3-implement-a-handler}
Nachdem Ihre App aktiviert wurde, ruft iOS die Methode [`application:openURL:options:`](https://developer.apple.com/reference/uikit/uiapplicationdelegate/1623112-application?language=objc) auf. Das wichtige Argument ist das [NSURL](https://developer.apple.com/library/ios/DOCUMENTATION/Cocoa/Reference/Foundation/Classes/NSURL_Class/Reference/Reference.html#//apple_ref/doc/c_ref/NSURL)-Objekt.
```objc
- (BOOL)application:(UIApplication *)app openURL:(NSURL *)url options:(NSDictionary *)options {
NSString *path = [url path];
NSString *query = [url query];
// Here you should insert code to take some action based upon the path and query.
return YES;
}
```
```swift
func application(_ app: UIApplication, open url: URL, options: [UIApplication.OpenURLOptionsKey : Any] = [:]) -> Bool {
let path = url.path
let query = url.query
// Here you should insert code to take some action based upon the path and query.
return true
}
```

# Universelle Links {#universal-links}
Um universelle Links zu verwenden, stellen Sie sicher, dass Sie eine registrierte Domain zu den Fähigkeiten Ihrer App hinzugefügt und eine `apple-app-site-association`-Datei hochgeladen haben. Implementieren Sie dann die Methode `application:continueUserActivity:restorationHandler:` in Ihrer `AppDelegate`. Zum Beispiel:
```objc
- (BOOL)application:(UIApplication *)application
continueUserActivity:(NSUserActivity *)userActivity
restorationHandler:(void (^)(NSArray *restorableObjects))restorationHandler {
if ([userActivity.activityType isEqualToString:NSUserActivityTypeBrowsingWeb]) {
NSURL *url = userActivity.webpageURL;
// Handle url
}
return YES;
}
```
```swift
func application(_ application: UIApplication, continue userActivity: NSUserActivity, restorationHandler: @escaping ([UIUserActivityRestoring]?) -> Void) -> Bool {
if (userActivity.activityType == NSUserActivityTypeBrowsingWeb) {
let url = userActivity.webpageURL
// Handle url
}
return true
}
```
Weitere Informationen finden Sie bei [Apple](https://developer.apple.com/library/content/documentation/General/Conceptual/AppSearch/UniversalLinks.html).
**Note:**
Die Standard-Integration für universelle Links ist nicht mit Push-Benachrichtigungen oder In-App-Nachrichten von Braze kompatibel. Informationen zur Handhabung universeller Links innerhalb Ihrer Anwendung finden Sie unter [Anpassung der Link-Handhabung](#linking-handling-customization). Alternativ empfehlen wir, [schemabasierte Deeplinks](#step-1-registering-a-scheme) mit Push-Benachrichtigungen und In-App-Nachrichten zu verwenden.
## App Transport Security (ATS) {#app-transport-security-ats}
Mit iOS 9 wurde eine grundlegende Änderung eingeführt, die in In-App-Nachrichten und Push-Benachrichtigungen eingebettete Internet-URLs betrifft.
### ATS-Anforderungen {#ats-requirements}
Aus der [Dokumentation von Apple](https://developer.apple.com/library/prerelease/ios/releasenotes/General/WhatsNewIniOS/Articles/iOS9.html#//apple_ref/doc/uid/TP40016198-SW14): „App Transport Security ist ein Feature, das die Sicherheit der Verbindungen zwischen einer App und Internetdiensten verbessert. Das Feature besteht aus Standard-Verbindungsanforderungen, die den Best Practices für sichere Verbindungen entsprechen. Apps können dieses Standardverhalten außer Kraft setzen und die Transportsicherheit deaktivieren.“
ATS wird standardmäßig ab iOS 9 angewendet. Es erfordert, dass alle Verbindungen HTTPS verwenden und mit TLS 1.2 mit Forward Secrecy verschlüsselt werden. Weitere Informationen finden Sie unter [Voraussetzungen für die Verbindung mit ATS](https://developer.apple.com/library/ios/documentation/General/Reference/InfoPlistKeyReference/Articles/CocoaKeys.html#//apple_ref/doc/uid/TP40009251-SW35). Alle Bilder, die von Braze an Endgeräte geliefert werden, werden über ein Content Delivery Network („CDN“) bereitgestellt, das TLS 1.2 unterstützt und mit ATS kompatibel ist.
Sofern sie nicht als Ausnahmen in der `Info.plist` Ihrer Anwendung angegeben sind, schlagen Verbindungen, die diese Anforderungen nicht erfüllen, mit Fehlern fehl, die in etwa so aussehen:
```
CFNetwork SSLHandshake failed (-9801)
Error Domain=NSURLErrorDomain Code=-1200 "An SSL error has occurred, and a secure connection to the server cannot be made."
```
```
NSURLSession/NSURLConnection HTTP load failed (kCFStreamErrorDomainSSL, -9802)
```
Die ATS-Konformität wird für Links durchgesetzt, die innerhalb der mobilen App geöffnet werden (unsere Standardbehandlung angeklickter Links), und gilt nicht für Websites, die extern über einen Webbrowser geöffnet werden.
### Umgang mit ATS-Anforderungen {#handling-ats-requirements}
Sie können ATS auf eine der folgenden drei Arten handhaben:
#### Bestätigen, dass alle Links ATS-konform sind (empfohlen) {#confirm-all-links-are-ats-compliant-recommended}
Ihre Braze-Integration kann die ATS-Anforderungen erfüllen, indem Sie sicherstellen, dass alle bestehenden Links, zu denen Sie Nutzer:innen führen (über In-App-Nachrichten und Push-Campaigns), die ATS-Anforderungen erfüllen. Es gibt zwar Möglichkeiten, die ATS-Beschränkungen zu umgehen, aber wir empfehlen, zu überprüfen, ob alle verlinkten URLs ATS-konform sind. Da Apple immer mehr Wert auf die Sicherheit von Anwendungen legt, werden die folgenden Ansätze zur Zulassung von ATS-Ausnahmen von Apple nicht garantiert unterstützt.
Ein SSL-Tool kann Ihnen dabei helfen, Sicherheitsprobleme des Webservers zu erkennen. Dieser [SSL-Server-Test](https://www.ssllabs.com/ssltest/index.html) von Qualys, Inc. bietet einen Punkt speziell für die Einhaltung von Apple ATS 9 und iOS 9.
#### ATS teilweise deaktivieren {#partially-disable-ats}
Sie können zulassen, dass eine Teilmenge von Links mit bestimmten Domains oder Schemata als Ausnahmen von den ATS-Regeln behandelt wird. Ihre Braze-Integration erfüllt die ATS-Anforderungen, wenn jeder Link, den Sie in einem Braze-Messaging-Kanal verwenden, entweder ATS-konform ist oder durch eine Ausnahme abgedeckt wird.
Um eine Domain als Ausnahme von ATS hinzuzufügen, fügen Sie Folgendes in die Datei `Info.plist` Ihrer App ein:
```html
NSAppTransportSecurityNSAllowsArbitraryLoadsNSExceptionDomainsexample.comNSExceptionAllowsInsecureHTTPLoadsNSIncludesSubdomains
```
Weitere Informationen finden Sie in Apples Artikel über [App-Transport-Security-Schlüssel](https://developer.apple.com/library/ios/documentation/General/Reference/InfoPlistKeyReference/Articles/CocoaKeys.html#//apple_ref/doc/uid/TP40009251-SW33).
#### ATS vollständig deaktivieren {#disable-ats-entirely}
Sie können ATS vollständig deaktivieren. Beachten Sie, dass dies aufgrund des verlorenen Sicherheitsschutzes und der zukünftigen iOS-Kompatibilität nicht empfohlen wird. Um ATS zu deaktivieren, fügen Sie Folgendes in die Datei `Info.plist` Ihrer App ein:
```html
NSAppTransportSecurityNSAllowsArbitraryLoads
```
Weitere Informationen zum Debuggen von ATS-Fehlern finden Sie unter [Versand einer App mit App Transport Security](http://timekl.com/blog/2015/08/21/shipping-an-app-with-app-transport-security/?utm_campaign=iOS+Dev+Weekly&utm_medium=email&utm_source=iOS_Dev_Weekly_Issue_213).
## URL-Kodierung {#url-encoding}
Ab Braze iOS SDK v2.21.0 kodiert das SDK Links prozentual, um gültige `NSURL`s zu erstellen. Alle Link-Zeichen, die in einer korrekt geformten URL nicht zulässig sind, wie z. B. Unicode-Zeichen, werden prozentual escaped.
Um einen kodierten Link zu dekodieren, verwenden Sie die `NSString`-Methode [`stringByRemovingPercentEncoding`](https://developer.apple.com/library/ios/documentation/Cocoa/Reference/Foundation/Classes/NSString_Class/index.html#//apple_ref/occ/instm/NSString/stringByRemovingPercentEncoding). Beachten Sie, dass Sie in `ABKURLDelegate` auch `YES` zurückgeben müssen und dass ein Aufruf zur Aktion erforderlich ist, um die Verarbeitung der URL durch die App zu triggern. Zum Beispiel:
```objc
- (BOOL)application:(UIApplication *)application openURL:(NSURL *)url options:(NSDictionary *)options {
NSString *urlString = url.absoluteString.stringByRemovingPercentEncoding;
// Handle urlString
return YES;
}
```
```swift
func application(_ app: UIApplication, open url: URL, options: [UIApplication.OpenURLOptionsKey : Any] = [:]) -> Bool {
let urlString = url.absoluteString.removingPercentEncoding
// Handle urlString
return true
}
```
## Anpassung {#linking-customization}
### Standard-WebView-Anpassung {#default-webview-customization}
Die anpassbare Klasse `ABKModalWebViewController` zeigt Internet-URLs an, die vom SDK geöffnet werden – typischerweise wenn „Internet-URL in App öffnen“ für einen Web-Deeplink ausgewählt wurde.
Sie können eine Kategorie für die Klasse `ABKModalWebViewController` deklarieren oder sie direkt ändern, um die Webansicht anzupassen. Weitere Details finden Sie in der [.h-Datei](https://github.com/Appboy/appboy-ios-sdk/blob/master/AppboyKit/include/ABKModalWebViewController.h) und der [.m-Datei](https://github.com/Appboy/appboy-ios-sdk/blob/master/AppboyKit/ABKModalWebViewController.m) der Klasse.
### Anpassung der Link-Handhabung {#linking-handling-customization}
Mit dem Protokoll `ABKURLDelegate` können Sie die Handhabung von URLs wie Deeplinks, Web-URLs und universellen Links anpassen. Um den Delegaten während der Initialisierung von Braze zu setzen, übergeben Sie ein Delegaten-Objekt an den `ABKURLDelegateKey` in `appboyOptions` von [`startWithApiKey:inApplication:withAppboyOptions:`](https://appboy.github.io/appboy-ios-sdk/docs/interface_appboy.html#aa9f1bd9e4a5c082133dd9cc344108b24). Braze ruft dann die Implementierung von `handleAppboyURL:fromChannel:withExtras:` in Ihrem Delegaten auf, bevor URIs verarbeitet werden.
#### Integrationsbeispiel: ABKURLDelegate {#integration-example-abkurldelegate}
```objc
- (BOOL)handleAppboyURL:(NSURL *)url fromChannel:(ABKChannel)channel withExtras:(NSDictionary *)extras {
if ([[url.host lowercaseString] isEqualToString:@"MY-DOMAIN.com"]) {
// Custom handle link here
return YES;
}
// Let Braze handle links otherwise
return NO;
}
```
```swift
func handleAppboyURL(_ url: URL?, from channel: ABKChannel, withExtras extras: [AnyHashable : Any]?) -> Bool {
if (url.host == "MY-DOMAIN.com") {
// Custom handle link here
return true;
}
// Let Braze handle links otherwise
return false;
}
```
**Important:**
Wenn `handleAppboyURL:fromChannel:withExtras:` den Wert `YES` zurückgibt, geht Braze davon aus, dass Ihre App die URL verarbeitet, und öffnet sie nicht. Wenn Sie universelle Links verarbeiten, müssen Sie die URL explizit an den Universal-Link-Handler Ihrer App weiterleiten, z. B. indem Sie `application:continueUserActivity:restorationHandler:` selbst aufrufen. Wenn Sie `YES` zurückgeben, ohne die URL zu verarbeiten, wird die In-App-Nachricht oder Content Card ohne sichtbare Aktion geschlossen.
Geben Sie `NO` zurück, wenn Sie möchten, dass Braze die URL mit seinem Standardverhalten verarbeitet.
Weitere Informationen finden Sie unter [`ABKURLDelegate.h`](https://github.com/Appboy/appboy-ios-sdk/blob/master/AppboyKit/include/ABKURLDelegate.h).
## Häufige Anwendungsfälle {#frequent-use-cases}
### Deeplinks zu den App-Einstellungen {#deep-linking-to-app-settings}
iOS kann Nutzer:innen von Ihrer App auf deren Seite in der iOS-Einstellungs-App weiterleiten. Sie können `UIApplicationOpenSettingsURLString` nutzen, um Nutzer:innen über Push-Benachrichtigungen und In-App-Nachrichten per Deeplink zu den Einstellungen zu führen.
1. Vergewissern Sie sich zunächst, dass Ihre Anwendung entweder für [schemabasierte Deeplinks](#deep-links) oder für [universelle Links](#universal-links) eingerichtet ist.
2. Legen Sie eine URI für Deeplinks zur Seite **Einstellungen** fest (z. B. `myapp://settings` oder `https://www.braze.com/settings`).
3. Wenn Sie angepasste schemabasierte Deeplinks verwenden, fügen Sie den folgenden Code zu Ihrer `application:openURL:options:`-Methode hinzu:
```objc
- (BOOL)application:(UIApplication *)app
openURL:(NSURL *)url
options:(NSDictionary *)options {
NSString *path = [url path];
if ([path isEqualToString:@"settings"]) {
NSURL *settingsURL = [NSURL URLWithString:UIApplicationOpenSettingsURLString];
[[UIApplication sharedApplication] openURL:settingsURL];
}
return YES;
}
```
```swift
func application(_ app: UIApplication, open url: URL, options: [UIApplicationOpenURLOptionsKey : Any] = [:]) -> Bool {
let path = url.path
if (path == "settings") {
UIApplication.shared.openURL(URL(string:UIApplicationOpenSettingsURLString)!)
}
return true
}
```
# Fine Network Traffic Control für iOS
Source: /docs/de/developer_guide/platforms/legacy_sdks/ios/advanced_use_cases/fine_network_traffic_control/index.md
**Warning:**
[AppboyKit](https://github.com/Appboy/appboy-ios-sdk) (also known as the Objective-C SDK) is no longer supported and has been replaced by the [Swift SDK](https://www.braze.com/docs/de/de/developer_guide/sdk_integration/?sdktab=swift). It will no longer receive new features, bug fixes, security updates, or technical support—however, messaging and analytics will continue to function as normal. To learn more, see [Introducing the New Braze Swift SDK](https://www.braze.com/resources/articles/introducing-the-new-braze-swift-sdk).
# Feinsteuerung des Netzwerkverkehrs
## Richtlinien für die Bearbeitung von Anfragen
Braze erlaubt es den Nutzer, den Netzwerkverkehr mit den folgenden Protokollen zu steuern:
### Automatische Bearbeitung von Anfragen
***`ABKRequestProcessingPolicy` Enum-Wert: `ABKAutomaticRequestProcessing`***
- Dies ist der **Standardwert für die Anfragenrichtlinie**.
- Das Braze SDK kümmert sich automatisch um die gesamte Serverkommunikation, darunter:
- Flushen der Daten von angepassten Events und Attributen an die Braze-Server
- Updates von Content-Cards und Geofences
- Anfordern neuer In-App-Nachrichten
- Unmittelbare Server-Anfragen werden durchgeführt, wenn für Braze Features, wie z. B. In-App-Nachrichten, benutzerseitige Daten erforderlich sind.
- Um die Serverlast zu minimieren, führt Braze regelmäßig alle paar Sekunden Flushes neuer Nutzerdaten durch.
Sie können die Daten jederzeit manuell auf die Braze Server übertragen, indem Sie die folgende Methode verwenden:
```objc
[[Appboy sharedInstance] flushDataAndProcessRequestQueue];
```
```swift
Appboy.sharedInstance()?.flushDataAndProcessRequestQueue()
```
### Manuelle Bearbeitung von Anfragen
***`ABKRequestProcessingPolicy` Enum-Wert: `ABKManualRequestProcessing`***
- Dieses Protokoll ist dasselbe wie die automatische Anforderungsverarbeitung, mit der Ausnahme, dass es sich um ein Protokoll handelt:
- Benutzerdefinierte Attribute und benutzerdefinierte Ereignisdaten werden während der Benutzersitzung nicht automatisch an den Server übertragen.
- Braze führt weiterhin automatische Netzwerkanforderungen für interne Features durch, wie z. B. das Anfordern von In-App-Nachrichten, Liquid-Templates in In-App-Nachrichten, Geofences und Standortverfolgung. Weitere Einzelheiten finden Sie in der Erklärung `ABKRequestProcessingPolicy` in [`Appboy.h`](https://github.com/Appboy/appboy-ios-sdk/blob/master/AppboyKit/include/Appboy.h). Wenn diese internen Anfragen gestellt werden, können je nach Art der Anfrage lokal gespeicherte benutzerdefinierte Attribute und benutzerdefinierte Ereignisdaten an den Braze-Server übertragen werden.
Sie können die Daten jederzeit manuell auf die Braze Server übertragen, indem Sie die folgende Methode verwenden:
```objc
[[Appboy sharedInstance] flushDataAndProcessRequestQueue];
```
```swift
Appboy.sharedInstance()?.flushDataAndProcessRequestQueue()
```
## Festlegen der Richtlinien für die Bearbeitung von Anfragen
### Festlegen der Anfragenrichtlinie bei App-Start
Diese Richtlinien kann beim Start der App mit der Methode [`startWithApiKey:inApplication:withLaunchOptions:withAppboyOptions`](https://appboy.github.io/appboy-ios-sdk/docs/interface_appboy.html#aa9f1bd9e4a5c082133dd9cc344108b24) festgelegt werden. Setzen Sie im Wörterbuch `appboyOptions` den `ABKRequestProcessingPolicyOptionKey` wie im folgenden Code Snippet gezeigt:
```objc
NSDictionary *appboyOptions = @{
// Other entries
ABKRequestProcessingPolicyOptionKey : @(ABKAutomaticRequestProcessing)
};
```
```swift
let appboyOptions: [AnyHashable: Any] = [
// Other entries
ABKRequestProcessingPolicyOptionKey: ABKRequestProcessingPolicy.automaticRequestProcessing.rawValue
]
```
### Festlegen der Anfragenrichtlinie bei Laufzeit
Die Richtlinie für die Verarbeitung von Anfragen kann auch während der Laufzeit über die Eigenschaft `requestProcessingPolicy` auf `Appboy` festgelegt werden:
```objc
// Sets the request processing policy to automatic (the default value)
[Appboy sharedInstance].requestProcessingPolicy = ABKAutomaticRequestProcessing;
```
```swift
// Sets the request processing policy to automatic (the default value)
Appboy.sharedInstance()?.requestProcessingPolicy = ABKRequestProcessingPolicy.automaticRequestProcessing
```
## Manuelle Abschaltung von In-Flight-Serverkommunikation
Wenn zu irgendeinem Zeitpunkt eine "In-Flight"-Serverkommunikation angehalten werden muss, müssen Sie die folgende Methode aufrufen:
```objc
[[Appboy sharedInstance] shutdownServerCommunication];
```
```swift
Appboy.sharedInstance()?.shutdownServerCommunication();
```
Nach dem Aufruf dieser Methode müssen Sie den Bearbeitungsmodus der Anfrage auf automatisch zurücksetzen. Aus diesem Grund empfehlen wir, diese Funktion nur dann aufzurufen, wenn das Betriebssystem Sie dazu zwingt, Hintergrundaufgaben oder ähnliches zu beenden.
# Lokalisierung für iOS
Source: /docs/de/developer_guide/platforms/legacy_sdks/ios/advanced_use_cases/localization/index.md
**Warning:**
[AppboyKit](https://github.com/Appboy/appboy-ios-sdk) (also known as the Objective-C SDK) is no longer supported and has been replaced by the [Swift SDK](https://www.braze.com/docs/de/de/developer_guide/sdk_integration/?sdktab=swift). It will no longer receive new features, bug fixes, security updates, or technical support—however, messaging and analytics will continue to function as normal. To learn more, see [Introducing the New Braze Swift SDK](https://www.braze.com/resources/articles/introducing-the-new-braze-swift-sdk).
# Lokalisierung {#localization}
Die Lokalisierung wird im Braze iOS SDK unterstützt. Außer Englisch unterstützt Braze noch weitere Sprachen für die integrierten SDK-Nachrichten. Diese beziehen sich auf die Standardmeldungen, die in den mit Braze integrierten Anwendungen angezeigt werden, wie z. B. die Stellen in der App, an denen es Probleme mit der Verbindung gibt (z. B. „Netzwerkverbindung kann nicht hergestellt werden. Bitte versuchen Sie es später noch einmal.“). Wenn die Sprache des Telefons auf eine der unterstützten Sprachen eingestellt ist, werden alle Braze-Standardzeichenfolgen, die innerhalb einer integrierten Anwendung ausgelöst werden, automatisch in dieser Sprache angezeigt.
Wenn Sie eine vollständige Liste der unterstützten Sprachen suchen, die Sie Ihren Nutzer:innen in deren Profilen zuweisen können, sehen Sie sich unsere [Liste der Nutzer:innensprachen](https://www.braze.com/docs/de/de/user_guide/data/unification/user_data/language_codes) an.
## Unterstützte Sprachen {#languages-supported}
- Arabisch
- Birmanisch
- Katalanisch
- Chinesisch
- Tschechisch
- Dänisch
- Niederländisch
- Englisch
- Esperanto
- Estnisch
- Ewe
- Filipino
- Finnisch
- Französisch
- Georgisch
- Deutsch
- Griechisch
- Hebräisch
- Hindi
- Ungarisch
- Indonesisch
- Irisch
- Italienisch
- Japanisch
- Koreanisch
- Malaiisch
- Norwegisch
- Nynorsk
- Polnisch
- Portugiesisch
- Russisch
- Spanisch
- Schwedisch
- Thai
- Ukrainisch
- Vietnamesisch
Weitere Informationen finden Sie in unserem Artikel zur [Lokalisierung von Apple](https://developer.apple.com/library/ios/documentation/CoreFoundation/Reference/CFLocaleRef/) sowie in der [LOC-Standardsprachliste](http://www.loc.gov/standards/iso639-2/php/English_list.php).
# Beacon-Integration für iOS
Source: /docs/de/developer_guide/platforms/legacy_sdks/ios/advanced_use_cases/beacon_integration/index.md
**Warning:**
[AppboyKit](https://github.com/Appboy/appboy-ios-sdk) (also known as the Objective-C SDK) is no longer supported and has been replaced by the [Swift SDK](https://www.braze.com/docs/de/de/developer_guide/sdk_integration/?sdktab=swift). It will no longer receive new features, bug fixes, security updates, or technical support—however, messaging and analytics will continue to function as normal. To learn more, see [Introducing the New Braze Swift SDK](https://www.braze.com/resources/articles/introducing-the-new-braze-swift-sdk).
# Beacon-Integration {#beacon-integration}
Hier erfahren Sie, wie Sie bestimmte Arten von Beacons in Braze integrieren, um Segmentierung und Messaging zu ermöglichen.
## Infillion Beacons {#infillion-beacons}
Sobald Sie Ihre Infillion Beacons eingerichtet und in Ihre App integriert haben, können Sie angepasste Events protokollieren, z. B. den Beginn oder das Ende eines Besuchs oder die Sichtung eines Beacons. Sie können auch Eigenschaften für diese Events wie den Ortsnamen oder die Verweildauer protokollieren.
Um ein angepasstes Event zu protokollieren, wenn ein:e Nutzer:in einen Ort betritt, geben Sie diesen Code in die Methode `didBeginVisit` ein:
```objc
[[Appboy sharedInstance] logCustomEvent:@"Entered %@", visit.place.name];
[[Appboy sharedInstance] flushDataAndProcessRequestQueue];
```
```swift
Appboy.sharedInstance()?.logCustomEvent("Entered %@", visit.place.name)
Appboy.sharedInstance()?.flushDataAndProcessRequestQueue()
```
`flushDataAndProcessRequestQueue` bestätigt, dass Ihr Event auch dann protokolliert wird, wenn sich die App im Hintergrund befindet. Der gleiche Prozess kann für das Verlassen eines Standorts implementiert werden. Beachten Sie, dass hierbei für jeden neuen Ort, den ein:e Nutzer:in betritt, ein eindeutiges angepasstes Event erstellt und inkrementiert wird. Wenn Sie voraussichtlich mehr als 50 Orte erstellen, empfehlen wir Ihnen, ein allgemeines angepasstes Event „Ort betreten“ zu erstellen und den Ortsnamen als Event-Eigenschaft aufzunehmen.
# Standorte und Geofences für iOS
Source: /docs/de/developer_guide/platforms/legacy_sdks/ios/advanced_use_cases/locations_and_geofences/index.md
**Warning:**
[AppboyKit](https://github.com/Appboy/appboy-ios-sdk) (also known as the Objective-C SDK) is no longer supported and has been replaced by the [Swift SDK](https://www.braze.com/docs/de/de/developer_guide/sdk_integration/?sdktab=swift). It will no longer receive new features, bug fixes, security updates, or technical support—however, messaging and analytics will continue to function as normal. To learn more, see [Introducing the New Braze Swift SDK](https://www.braze.com/resources/articles/introducing-the-new-braze-swift-sdk).
# Standorte und Geofences {#locations-and-geofences}
Zur Unterstützung von Geofences für iOS:
1. Ihre Integration muss Push-Benachrichtigungen im Hintergrund unterstützen.
2. Braze Geofences [müssen](https://www.braze.com/docs/de/de/developer_guide/platform_integration_guides/swift/analytics/location_tracking#enabling-automatic-location-tracking) über das SDK aktiviert werden – entweder implizit durch Aktivieren der Standorterfassung oder explizit durch Aktivieren der Geofence-Erfassung. Sie sind standardmäßig nicht aktiviert.
**Important:**
Ab iOS 14 funktionieren Geofences nicht mehr zuverlässig für Nutzer:innen, die lediglich ihren ungefähren Standort freigeben.
## 1. Schritt: Push im Hintergrund aktivieren {#step-1-enable-background-push}
Um unsere Strategie zur Synchronisierung von Geofences vollständig nutzen zu können, müssen Sie zusätzlich zur standardmäßigen Push-Integration die [Hintergrund-Push-Funktion](https://www.braze.com/docs/de/de/developer_guide/platform_integration_guides/ios/push_notifications/silent_push_notifications#use-silent-remote-notifications-to-trigger-background-work) aktivieren.
## 2. Schritt: Geofences aktivieren {#step-2-enable-geofences}
Standardmäßig sind Geofences aktiviert, wenn die automatische Standorterfassung aktiviert ist. Sie können Geofences über die Datei `Info.plist` aktivieren. Fügen Sie das Wörterbuch `Braze` zu Ihrer Datei `Info.plist` hinzu. Fügen Sie im Wörterbuch `Braze` den booleschen Untereintrag `EnableGeofences` hinzu und setzen Sie den Wert auf `YES`. Beachten Sie, dass vor Braze iOS SDK v4.0.2 der Wörterbuchschlüssel `Appboy` anstelle von `Braze` verwendet werden muss.
Sie können Geofences auch beim Start der App aktivieren, indem Sie die Methode [`startWithApiKey:inApplication:withLaunchOptions:withAppboyOptions`](https://appboy.github.io/appboy-ios-sdk/docs/interface_appboy.html#aa9f1bd9e4a5c082133dd9cc344108b24) verwenden. Setzen Sie im Wörterbuch `appboyOptions` den Wert `ABKEnableGeofencesKey` auf `YES`. Zum Beispiel:
```objc
[Appboy startWithApiKey:@"YOUR-API_KEY"
inApplication:application
withLaunchOptions:options
withAppboyOptions:@{ ABKEnableGeofencesKey : @(YES) }];
```
```swift
Appboy.start(withApiKey: "YOUR-API-KEY",
in:application,
withLaunchOptions:launchOptions,
withAppboyOptions:[ ABKEnableGeofencesKey : true ])
```
## 3. Schritt: Auf Braze-Hintergrund-Push prüfen {#step-3-check-for-braze-background-push}
Braze synchronisiert Geofences mit Geräten über Push-Benachrichtigungen im Hintergrund. Befolgen Sie den Artikel zur [iOS-Anpassung](https://www.braze.com/docs/de/de/developer_guide/platforms/legacy_sdks/ios/push_notifications/customization/ignoring_internal_push), um sicherzustellen, dass Ihre Anwendung keine unerwünschten Aktionen ausführt, wenn sie Braze-Benachrichtigungen zur Geofence-Synchronisierung empfängt.
## 4. Schritt: NSLocationAlwaysUsageDescription zu Ihrer Info.plist hinzufügen {#step-4-add-nslocationalwaysusagedescription-to-your-infoplist}
Fügen Sie Ihrer `info.plist` die Schlüssel `NSLocationAlwaysUsageDescription` und `NSLocationAlwaysAndWhenInUseUsageDescription` mit einem `String`-Wert hinzu, der beschreibt, warum Ihre Anwendung den Standort tracken muss. Beide Schlüssel sind ab iOS 11 erforderlich.
Diese Beschreibung wird angezeigt, wenn die Standortabfrage des Systems eine Autorisierung verlangt, und sollte Ihren Nutzer:innen die Vorteile des Standort-Trackings deutlich erklären.
## 5. Schritt: Freigabe von Nutzer:innen anfordern {#step-5-request-authorization-from-the-user}
Das Geofence-Feature ist nur funktionsfähig, wenn die Standortfreigabe auf `Always` festgelegt ist.
Verwenden Sie den folgenden Code, um die Standortfreigabe `Always` anzufordern:
```objc
CLLocationManager *locationManager = [[CLLocationManager alloc] init];
[locationManager requestAlwaysAuthorization];
```
```swift
var locationManager = CLLocationManager()
locationManager.requestAlwaysAuthorization()
```
## 6. Schritt: Geofences auf dem Dashboard aktivieren {#step-6-enable-geofences-on-the-dashboard}
Unter iOS können nur bis zu 20 Geofences für eine bestimmte App gespeichert werden. Durch die Verwendung von Standorten werden einige dieser 20 verfügbaren Geofence-Slots verbraucht. Um eine versehentliche oder unerwünschte Beeinträchtigung anderer Geofence-bezogener Funktionen in Ihrer App zu verhindern, müssen Standort-Geofences für einzelne Apps auf dem Dashboard aktiviert werden.
Damit die Standortfunktion korrekt funktioniert, sollten Sie außerdem sicherstellen, dass Ihre App nicht alle verfügbaren Geofence-Slots nutzt.
### Geofences auf der Standortseite aktivieren: {#enable-geofences-from-the-locations-page}

### Geofences auf der Einstellungsseite aktivieren: {#enable-geofences-from-the-settings-page}

## Automatische Geofence-Anfragen deaktivieren {#disabling-automatic-geofence-requests}
Ab iOS SDK Version 3.21.3 können Sie automatische Geofence-Anfragen deaktivieren. Verwenden Sie hierzu die Datei `Info.plist`. Fügen Sie das Wörterbuch `Braze` zu Ihrer Datei `Info.plist` hinzu. Fügen Sie im Wörterbuch `Braze` den booleschen Untereintrag `DisableAutomaticGeofenceRequests` hinzu und setzen Sie den Wert auf `YES`.
Über die Methode [`startWithApiKey:inApplication:withLaunchOptions:withAppboyOptions`](https://appboy.github.io/appboy-ios-sdk/docs/interface_appboy.html#aa9f1bd9e4a5c082133dd9cc344108b24) können automatische Geofence-Anfragen auch beim Start der App deaktiviert werden. Setzen Sie im Wörterbuch `appboyOptions` den Wert `ABKDisableAutomaticGeofenceRequestsKey` auf `YES`. Zum Beispiel:
```objc
[Appboy startWithApiKey:@"YOUR-API_KEY"
inApplication:application
withLaunchOptions:options
withAppboyOptions:@{ ABKDisableAutomaticGeofenceRequestsKey : @(YES) }];
```
```swift
Appboy.start(withApiKey: "YOUR-API-KEY",
in:application,
withLaunchOptions:launchOptions,
withAppboyOptions:[ ABKDisableAutomaticGeofenceRequestsKey : true ])
```
Wenn Sie sich für diese Option entscheiden, müssen Sie die Geofences manuell anfragen, damit das Feature funktioniert.
## Geofences manuell anfragen {#manually-requesting-geofences}
Wenn das Braze SDK Geofences zur Überwachung vom Backend anfragt, meldet es den aktuellen Standort der Nutzer:innen und erhält Geofences, die auf Grundlage des gemeldeten Standorts als optimal relevant eingestuft werden. Es gibt ein Rate-Limit von einer Geofence-Aktualisierung pro Sitzung.
Um den Standort zu kontrollieren, den das SDK für den Empfang der relevantesten Geofences meldet, können Sie ab iOS SDK Version 3.21.3 Geofences manuell anfragen, indem Sie den Breiten- und Längengrad eines Standorts angeben. Es wird empfohlen, bei Verwendung dieser Methode automatische Geofence-Anfragen zu deaktivieren. Verwenden Sie dazu den folgenden Code:
```objc
[[Appboy sharedInstance] requestGeofencesWithLongitude:longitude
latitude:latitude];
```
```swift
Appboy.sharedInstance()?.requestGeofences(withLongitude: longitude, latitude: latitude)
```
# Google Tag Manager für iOS
Source: /docs/de/developer_guide/platforms/legacy_sdks/ios/advanced_use_cases/google_tag_manager/index.md
**Warning:**
[AppboyKit](https://github.com/Appboy/appboy-ios-sdk) (also known as the Objective-C SDK) is no longer supported and has been replaced by the [Swift SDK](https://www.braze.com/docs/de/de/developer_guide/sdk_integration/?sdktab=swift). It will no longer receive new features, bug fixes, security updates, or technical support—however, messaging and analytics will continue to function as normal. To learn more, see [Introducing the New Braze Swift SDK](https://www.braze.com/resources/articles/introducing-the-new-braze-swift-sdk).
# Google Tag Manager für iOS {#google-tag-manager-for-ios}
## Initialisierung des SDK {#initializing-ios-google-tag-provider}
Das Braze iOS SDK kann durch Tags, die im [Google Tag Manager](https://tagmanager.google.com/) konfiguriert wurden, initialisiert und gesteuert werden.
Bevor Sie Google Tag Manager verwenden, müssen Sie zunächst die [SDK-Ersteinrichtung](https://www.braze.com/docs/de/de/developer_guide/platforms/legacy_sdks/ios/initial_sdk_setup/overview) durchführen.
## Konfigurieren Ihres Google Tag Managers {#configuring-ios-google-tag-manager}
In diesem Beispiel tun wir so, als wären wir eine Musik-Streaming-App, die verschiedene Ereignisse protokollieren möchte, während Nutzer:innen Lieder anhören. Mit dem Google Tag Manager für iOS können wir steuern, welche unserer Drittanbieter dieses Ereignis erhalten, und Tags speziell für Braze erstellen.
### Angepasste Events {#custom-events}
Angepasste Events werden protokolliert, wenn `actionType` auf `logEvent` eingestellt ist. Der angepasste Tag-Anbieter von Braze erwartet in unserem Beispiel, dass der Name des angepassten Events mit `eventName` festgelegt wird.
Um zu beginnen, erstellen Sie einen Trigger, der nach einem „Event Name“ sucht, der gleich `played song` ist.

Als Nächstes erstellen Sie ein neues Tag („Funktionsaufruf“) und geben den Klassenpfad Ihres [angepassten Tag-Anbieters](#adding-ios-google-tag-provider) ein, der weiter unten in diesem Artikel beschrieben wird.
Dieses Tag wird ausgelöst, wenn Sie das soeben erstellte Event `played song` protokollieren.
In den angepassten Parametern (Schlüssel-Wert-Paare) unseres Beispiel-Tags haben wir `eventName` auf `played song` gesetzt – das ist der Name des angepassten Events, der in Braze protokolliert wird.
**Important:**
Wenn Sie ein angepasstes Event senden, setzen Sie `actionType` auf `logEvent` und legen Sie einen Wert für `eventName` fest, wie im folgenden Beispiel gezeigt.
Der angepasste Tag-Anbieter in unserem Beispiel verwendet diese Schlüssel, um zu bestimmen, welche Aktion durchgeführt und welcher Event-Name an Braze gesendet werden soll, wenn er Daten vom Google Tag Manager erhält.

Sie können dem Tag auch zusätzliche Schlüssel-Wert-Paar-Argumente hinzufügen, die als Event-Eigenschaften des angepassten Events an Braze gesendet werden. `eventName` und `actionType` werden für Event-Eigenschaften angepasster Events nicht ignoriert. Im folgenden Beispiel-Tag übergeben wir `genre`, das über eine Tag-Variable im Google Tag Manager definiert wurde und aus dem angepassten Event stammt, das wir in unserer App protokolliert haben.
Die Event-Eigenschaft `genre` wird als Variable „Firebase - Event Parameter“ an den Google Tag Manager gesendet, da Google Tag Manager für iOS Firebase als Datenebene verwendet.

Wenn Nutzer:innen schließlich einen Song in unserer App abspielen, protokollieren wir ein Ereignis über Firebase und den Google Tag Manager unter Verwendung des Firebase-Analytics-Event-Namens, der mit dem Trigger-Namen unseres Tags übereinstimmt: `played song`:
```obj-c
NSDictionary *parameters = @{@"genre" : @"pop",
@"number of times listened" : @42};
[FIRAnalytics logEventWithName:@"played song" parameters:parameters];
```
### Angepasste Attribute protokollieren {#logging-custom-attributes}
Angepasste Attribute werden über einen `actionType` gesetzt, der auf `customAttribute` eingestellt ist. Der angepasste Tag-Anbieter von Braze erwartet, dass der Schlüssel-Wert des angepassten Attributs über `customAttributeKey` und `customAttributeValue` gesetzt wird:
```obj-c
NSDictionary *parameters = @{@"customAttributeKey" : @"favorite song",
@"customAttributeValue" : @"Private Eyes"};
[FIRAnalytics logEventWithName:@"customAttribute" parameters:parameters];
```
### Aufruf von changeUser {#calling-changeuser}
Aufrufe von `changeUser()` erfolgen über einen `actionType`, der auf `changeUser` eingestellt ist. Der angepasste Tag-Anbieter von Braze erwartet, dass die Braze-Nutzer-ID über das Schlüssel-Wert-Paar `externalUserId` in Ihrem Tag festgelegt wird:
```obj-c
NSDictionary *parameters = @{@"externalUserId" : userId};
[FIRAnalytics logEventWithName:@"changeUser" parameters:parameters];
```
## Angepasster Tag-Anbieter für das Braze SDK {#adding-ios-google-tag-provider}
Wenn die Tags und Trigger eingerichtet sind, müssen Sie auch den Google Tag Manager in Ihrer iOS-App implementieren. Informationen dazu finden Sie in der [Dokumentation](https://developers.google.com/tag-manager/ios/v5/) von Google.
Sobald Google Tag Manager in Ihrer App installiert ist, fügen Sie einen angepassten Tag-Anbieter hinzu, um Braze-SDK-Methoden auf der Grundlage der Tags aufzurufen, die Sie im Google Tag Manager konfiguriert haben.
Achten Sie darauf, den „Klassenpfad“ der Datei zu notieren – diesen geben Sie ein, wenn Sie ein Tag in der [Google Tag Manager](https://tagmanager.google.com/)-Konsole einrichten.
Dieses Beispiel zeigt eine von vielen Möglichkeiten, Ihren angepassten Tag-Anbieter zu strukturieren. Dabei bestimmen wir anhand des vom GTM-Tag gesendeten Schlüssel-Wert-Paares `actionType`, welche Braze-SDK-Methode aufgerufen werden soll.
Die `actionType`-Werte, die wir in unserem Beispiel unterstützen, sind `logEvent`, `customAttribute` und `changeUser`. Sie können jedoch ändern, wie Ihr Tag-Anbieter die Daten vom Google Tag Manager verarbeitet.
Fügen Sie den folgenden Code in Ihre Datei `BrazeGTMTagManager.h` ein:
```obj-c
@import Firebase;
@import GoogleTagManager;
@interface BrazeGTMTagManager : NSObject
@end
```
Und fügen Sie den folgenden Code in Ihre Datei `BrazeGTMTagManager.m` ein:
```obj-c
#import
#import "BrazeGTMTagManager.h"
#import "Appboy-iOS-SDK/AppboyKit.h"
static NSString *const ActionTypeKey = @"actionType";
// Custom Events
static NSString *const LogEventActionType = @"logEvent";
static NSString *const LogEventEventName = @"eventName";
// Custom Attributes
static NSString *const CustomAttributeActionType = @"customAttribute";
static NSString *const CustomAttributeKey = @"customAttributeKey";
static NSString *const CustomAttributeValueKey = @"customAttributeValue";
// Change User
static NSString *const ChangeUserActionType = @"changeUser";
static NSString *const ChangeUserExternalUserId = @"externalUserId";
@implementation BrazeGTMTagManager
- (NSObject *)executeWithParameters:(NSDictionary *)parameters {
NSMutableDictionary *mutableParameters = [parameters mutableCopy];
NSString *actionType = mutableParameters[ActionTypeKey];
if (!actionType) {
NSLog(@"There is no Braze action type key in this call. Doing nothing.", nil);
return nil;
}
[mutableParameters removeObjectForKey:ActionTypeKey];
if ([actionType isEqualToString:LogEventActionType]) {
[self logEvent:mutableParameters];
} else if ([actionType isEqualToString:CustomAttributeActionType]) {
[self logCustomAttribute:mutableParameters];
} else if ([actionType isEqualToString:ChangeUserActionType]) {
[self changeUser:mutableParameters];
} else {
NSLog(@"Invalid action type. Doing nothing.");
}
return nil;
}
- (void)logEvent:(NSMutableDictionary *)parameters {
NSString *eventName = parameters[LogEventEventName];
[parameters removeObjectForKey:LogEventEventName];
[[Appboy sharedInstance] logCustomEvent:eventName withProperties:parameters];
}
- (void)logCustomAttribute:(NSMutableDictionary *)parameters {
NSString *customAttributeKey = parameters[CustomAttributeKey];
id customAttributeValue = parameters[CustomAttributeValueKey];
if ([customAttributeValue isKindOfClass:[NSString class]]) {
[[Appboy sharedInstance].user setCustomAttributeWithKey:customAttributeKey
andStringValue:customAttributeValue];
} else if ([customAttributeValue isKindOfClass:[NSDate class]]) {
[[Appboy sharedInstance].user setCustomAttributeWithKey:customAttributeKey
andDateValue:customAttributeValue];
} else if ([customAttributeValue isKindOfClass:[NSNumber class]]) {
if (strcmp([customAttributeValue objCType], [@(YES) objCType]) == 0) {
[[Appboy sharedInstance].user setCustomAttributeWithKey:customAttributeKey
andBOOLValue:[(NSNumber *)customAttributeValue boolValue]];
} else if (strcmp([customAttributeValue objCType], @encode(short)) == 0 ||
strcmp([customAttributeValue objCType], @encode(int)) == 0 ||
strcmp([customAttributeValue objCType], @encode(long)) == 0) {
[[Appboy sharedInstance].user setCustomAttributeWithKey:customAttributeKey
andIntegerValue:[(NSNumber *)customAttributeValue integerValue]];
} else if (strcmp([customAttributeValue objCType], @encode(float)) == 0 ||
strcmp([customAttributeValue objCType], @encode(double)) == 0) {
[[Appboy sharedInstance].user setCustomAttributeWithKey:customAttributeKey
andDoubleValue:[(NSNumber *)customAttributeValue doubleValue]];
} else {
NSLog(@"Could not map NSNumber value to Appboy custom attribute:%@", customAttributeValue);
}
} else if ([customAttributeValue isKindOfClass:[NSArray class]]) {
[[Appboy sharedInstance].user setCustomAttributeArrayWithKey:customAttributeKey
array:customAttributeValue];
}
}
- (void)changeUser:(NSMutableDictionary *)parameters {
NSString *userId = parameters[ChangeUserExternalUserId];
[[Appboy sharedInstance] changeUser:userId];
}
@end
```
# Speicher für iOS
Source: /docs/de/developer_guide/platforms/legacy_sdks/ios/storage/index.md
**Warning:**
[AppboyKit](https://github.com/Appboy/appboy-ios-sdk) (also known as the Objective-C SDK) is no longer supported and has been replaced by the [Swift SDK](https://www.braze.com/docs/de/de/developer_guide/sdk_integration/?sdktab=swift). It will no longer receive new features, bug fixes, security updates, or technical support—however, messaging and analytics will continue to function as normal. To learn more, see [Introducing the New Braze Swift SDK](https://www.braze.com/resources/articles/introducing-the-new-braze-swift-sdk).
# Speicher {#storage}
Dieser Artikel beschreibt die verschiedenen Eigenschaften auf Geräteebene, die bei der Verwendung des Braze iOS SDK erfasst werden.
## Geräteeigenschaften {#device-properties}
Standardmäßig erfasst Braze die folgenden [Eigenschaften auf Geräteebene](https://github.com/Appboy/appboy-ios-sdk/blob/16e893f2677af7de905b927505d4101c6fb2091d/AppboyKit/headers/AppboyKitLibrary/Appboy.h#L181), um die Personalisierung von Nachrichten auf der Grundlage von Gerät, Sprache und Zeitzone zu ermöglichen:
* Geräteauflösung
* Netzbetreiber des Geräts
* Gebietsschema des Geräts
* Gerätemodell
* Betriebssystemversion des Geräts
* IDFV (optional mit [iOS SDK v5.7.0+](https://github.com/braze-inc/braze-swift-sdk))
* Push aktiviert
* Zeitzone des Geräts
* Push-Autorisierungsstatus
* Ad-Tracking aktiviert
**Note:**
Das Braze SDK erfasst IDFA nicht automatisch. Apps können optional IDFA an Braze weitergeben, indem sie unser `ABKIDFADelegate`-Protokoll implementieren. Apps müssen das ausdrückliche Opt-in der Endnutzer:innen für das Tracking über das App-Tracking-Transparenz-Framework einholen, bevor sie IDFA an Braze weitergeben.
Konfigurierbare Gerätefelder sind in der [`ABKDeviceOptions`](https://github.com/Appboy/appboy-ios-sdk/blob/4390e9eac8401bccdb81b053fa54eb87b1f6fcaa/Appboy-tvOS-SDK/AppboyTVOSKit.framework/Headers/Appboy.h#L179)-enum definiert. Um das Gerätefeld, das Sie auf die Zulassungsliste setzen möchten, zu deaktivieren oder anzugeben, weisen Sie das bitweise `OR` der gewünschten Felder [`ABKDeviceAllowlistKey`](https://github.com/Appboy/appboy-ios-sdk/blob/fed071000722673754da288cace15c1ff8aca432/AppboyKit/include/Appboy.h#L148) in den `appboyOptions` von `startWithApiKey:inApplication:withAppboyOptions:` zu.
Um beispielsweise die Erfassung von Zeitzone und Gebietsschema zuzulassen, setzen Sie:
```
appboyOptions[ABKDeviceAllowlistKey] = @(ABKDeviceOptionTimezone | ABKDeviceOptionLocale);
```
Standardmäßig sind alle Felder aktiviert. Beachten Sie, dass ohne einige Eigenschaften nicht alle Features ordnungsgemäß funktionieren. Zum Beispiel funktioniert die Zustellung zur Ortszeit nicht ohne die Zeitzone.
Weitere Informationen zu den automatisch erfassten Geräteeigenschaften finden Sie unter [SDK-Datenerfassung](https://www.braze.com/docs/de/de/user_guide/data/unification/user_data/sdk_data_collection).
# Beispiel-Apps für iOS
Source: /docs/de/developer_guide/platforms/legacy_sdks/ios/sample_apps/index.md
**Warning:**
[AppboyKit](https://github.com/Appboy/appboy-ios-sdk) (also known as the Objective-C SDK) is no longer supported and has been replaced by the [Swift SDK](https://www.braze.com/docs/de/de/developer_guide/sdk_integration/?sdktab=swift). It will no longer receive new features, bug fixes, security updates, or technical support—however, messaging and analytics will continue to function as normal. To learn more, see [Introducing the New Braze Swift SDK](https://www.braze.com/resources/articles/introducing-the-new-braze-swift-sdk).
# Beispiel-Apps {#sample-apps}
Die Braze SDKs werden jeweils mit Beispielanwendungen im Repository geliefert. Jede dieser Apps ist vollständig lauffähig, sodass Sie die Features von Braze testen und gleichzeitig in Ihre eigenen Anwendungen implementieren können. Das Testen des Verhaltens in Ihrer eigenen Anwendung im Vergleich zum erwarteten Verhalten und zu den Codepfaden in den Beispielanwendungen ist eine hervorragende Möglichkeit zur Fehlersuche bei Problemen.
## Erstellen von Testanwendungen {#building-test-applications}
Mehrere Testanwendungen sind im [iOS SDK GitHub Repository](https://github.com/appboy/appboy-ios-sdk) verfügbar. Folgen Sie diesen Anweisungen, um unsere Testanwendungen zu erstellen und auszuführen.
1. Erstellen Sie einen neuen [Workspace](https://www.braze.com/docs/de/de/developer_guide/platform_wide/app_group_configuration#creating-your-app-group-in-my-apps) und notieren Sie sich den API-Schlüssel (App-Bezeichner).
2. Geben Sie Ihren API-Schlüssel in das entsprechende Feld in der Datei `AppDelegate.m` ein.
Push-Benachrichtigungen für die iOS-Testanwendung erfordern eine zusätzliche Konfiguration. Einzelheiten finden Sie in unserer [iOS Push-Integration](https://www.braze.com/docs/de/de/developer_guide/platforms/legacy_sdks/ios/push_notifications/integration).
# Changelog für iOS Swift SDK
Source: /docs/de/developer_guide/platforms/legacy_sdks/ios/changelog/swift_changelog/index.md
**Warning:**
[AppboyKit](https://github.com/Appboy/appboy-ios-sdk) (also known as the Objective-C SDK) is no longer supported and has been replaced by the [Swift SDK](https://www.braze.com/docs/de/de/developer_guide/sdk_integration/?sdktab=swift). It will no longer receive new features, bug fixes, security updates, or technical support—however, messaging and analytics will continue to function as normal. To learn more, see [Introducing the New Braze Swift SDK](https://www.braze.com/resources/articles/introducing-the-new-braze-swift-sdk).
# iOS Swift SDK Änderungsprotokoll
17.0.0
Breaking
Braze.init and changeUser(userId:) no longer block the calling thread.
The following properties now block the calling thread until the SDK has settled, ensuring they reflect the latest user state immediately after changeUser or Braze.init:
braze.user.id
braze.deviceId
braze.contentCards.cards
braze.contentCards.unviewedCards
braze.contentCards.lastUpdate
braze.featureFlags.featureFlags
braze.featureFlags.featureFlag(id:)
For UI and other latency-sensitive code paths, prefer the asynchronous getters (getCachedContentCards(_:), getUnviewedCards(_:), getLastUpdate(_:), getAllFeatureFlags(_:)).
braze.user.id now returns nil after calling wipeData().
Previously, braze.user.id continued to return the last user ID after wipeData().
This matches the Swift SDK’s behavior with that of the Android SDK.
changeUser now notifies Braze.ContentCards.subscribeToUpdates(_:) subscribers after a user switch, matching the existing Android SDK behavior.
Previously, subscribers were not notified until the next Content Cards sync.
Removes the deprecated push-to-start token update API on Braze.LiveActivities.
Removes the deprecated Braze.LiveActivities.PushToStartTokenUpdate enum and the pushToStartTokenUpdatesStream property.
Use subscribeToStateUpdates(_:) instead, which delivers the push-to-start token lifecycle events (UpdateEvent.ActivityType.pushToStartTokenRead, .pushToStartTokenFlushed, .pushToStartOptedOut, .pushToStartOptOutFlushed) as part of the complete Live Activities lifecycle in a single subscription.
Added
Adds non-blocking asynchronous accessors for user and device identifiers:
Braze.User.getId(_:) and Braze.User.getId() async — deliver on the main thread.
Braze.getDeviceId(_:) and Braze.getDeviceId() async — deliver on the main thread.
ObjC bridges: getIdWithCompletion: and getDeviceIdWithCompletion:.
Prefer these over the synchronous properties on the main thread or in @MainActor contexts.
Adds an sdkDisabled error on Braze.ContentCards.requestRefresh(_:), Braze.FeatureFlags.requestRefresh(_:), and Braze.Banners.requestBannersRefresh(_:). When the SDK is disabled, these now invoke their completion handler with .sdkDisabled instead of leaving it uncalled.
16.0.0
Breaking
Updates to Content Cards behavior and reliability
braze.contentCards.cards is now immediately updated after a card is marked as viewed, dismissed, or clicked via its context.
Previously, these mutations were only visible in braze.contentCards.cards after the next server sync.
Disabling Content Cards via Braze.Configuration now immediately clears braze.contentCards.cards and notifies subscribeToUpdates subscribers with an empty list.
Previously, braze.contentCards.cards retained its last value and subscribers were not notified.
Added
Adds Braze.FeatureFlags.getAllFeatureFlags(_:) — an asynchronous, callback-based getter that delivers cached feature flags on the main thread without blocking the calling thread.
15.2.0
Added
Adds optional subtotalValue, tax, and shipping fields to Braze.Ecommerce.OrderPlacedEvent, all Braze.Ecommerce.CartUpdated variants (Replace / Add / Remove), and Braze.Ecommerce.CheckoutStartedEvent.
Available in Objective-C on BRZEcommerceOrderPlacedEvent, BRZEcommerceCartUpdatedEvent, and BRZEcommerceCheckoutStartedEvent.
Fixed
Fixes a video player configuration error for embedded YouTube videos in HTML in-app messages.
15.1.0
Added
Adds dismiss() to Braze.Banner.Context and dismiss(using:) to Braze.Banner to dismiss a banner when using a custom UI.
Recommended to use Braze.Banner.Context.dismiss.
Both methods must be called from the main thread.
Calling either method fires the onDismiss callback on any registered BrazeBannerPlacement for that placement ID.
Available in Objective-C as -[BRZBannerContext dismiss] and -[BRZBanner dismissUsing:].
Adds example implementations for building a custom UI with banners.
Adds Braze.ContentCards.getCachedContentCards(_:), Braze.ContentCards.getUnviewedCards(_:), and Braze.ContentCards.getLastUpdate(_:) — asynchronous, callback-based getters that deliver on the main thread.
Fixed
Fixes a bug in the default Content Cards UI that would prevent image loading if multiple cards contained the same remote image URL. (#176)
If multiple cards contained the same image URL, only the first card to finish loading would display the image, whereas all others would indefinitely display the loading spinner.
15.0.1
Fixed
Improves the stability of the SDK’s internal state management, resolving a crash that would occur under low memory conditions.
getBanner now returns the cached banner immediately even when the SDK is rate limited.
15.0.0
Breaking
Banners: onDismiss now receives Braze/BannerDismissalEvent instead of Braze/Banner.
Raises the Xcode version to 26.0 (17A324).
Raises the minimum Mac Catalyst deployment target from iOS 13 (macOS 10.15 Catalina) to iOS 16 (macOS 13 Ventura).
Mac Catalyst users on macOS 12 Monterey or earlier are no longer supported.
Removes the ability to control whether the SDK prevents showing in-app messages to different users in certain edge cases.
Removes the option to configure through Braze.Configuration.preventInAppMessageDisplayForDifferentUser.
The SDK will now always behave as if this configuration option were set to true.
Updates the Braze.WebViewBridge.ScriptMessageHandler and Braze.WebViewBridge.SchemeHandler init to have non-optional channel parameter.
Added
Logs configuration validation messages when Braze.Configuration.devicePropertyAllowList omits pushEnabled or pushAuthStatus.
Both are required for push token registration and for push notifications to behave correctly.
Adds the following API: Braze.logEcommerceEvent(_:)
Adds Objective-C compatible APIs:
-[Braze logEcommerceProductViewed:]
-[Braze logEcommerceCartUpdated:]
-[Braze logEcommerceCheckoutStarted:]
-[Braze logEcommerceOrderPlaced:]
Fixed
Fixes a rare race condition where the app would become unresponsive when calling changeUser or wipeData while an HTML in-app message or banner was in the middle of displaying.
14.2.1
Fixed
Improves the reliability of resuming the SDK’s tracking of Live Activities when there are multiple active activity types.
This improves the tracking of Live Activities when relaunching the app after it has been terminated.
Fixes a compilation issue introduced in 14.2.0 on Mac Catalyst targets caused by ActivityKit imports.
14.2.0
Added
Adds methods to observe all key events and errors in the ActivityKit API, enabling observation of real-time state and error events from the SDK’s Live Activity lifecycle.
Adds Braze.LiveActivities.UpdateEvent, a new enum covering activity and token lifecycle events (e.g. started, active, dismissed, stale, ended, contentUpdated, pushTokenUpdated) as well as Braze SDK operation events (trackingStarted, trackingResumed, pushTokenFlushed).
Adds Braze.LiveActivities.ErrorEvent, a new enum covering observation failures, token registration failures (with isTransient for retry logic), activityNotFound, and invalidPushTokenTag.
Adds subscribeToStateUpdates(_:) and subscribeToErrors(_:) methods on Braze.LiveActivities to register callbacks for the above events. Both return a Braze.Cancellable to remove the subscription.
Deprecates the push-to-start token update API on Braze.LiveActivities in favor of the new subscribeToStateUpdates(_:) API.
Deprecates the Braze.LiveActivities.PushToStartTokenUpdate enum and the pushToStartTokenUpdatesStream property.
Use subscribeToStateUpdates(_:) instead, which delivers the push-to-start token lifecycle events (UpdateEvent.ActivityType.pushToStartTokenRead, .pushToStartTokenFlushed, .pushToStartOptedOut, .pushToStartOptOutFlushed) as part of the complete Live Activities lifecycle in a single subscription, covering the same information as the deprecated PushToStartTokenUpdate cases without the need to maintain a separate subscription.
Fixed
Improves reliability of Live Activity push token updates during app background and foreground transitions, including cold start scenarios where push-to-start activities may not have received token updates.
Content cards now filter out invalid cards so users can still view remaining valid cards.
Previously, if any of the cards were invalid in the content card sync, the entire sync would be dropped and no cards would be added.
This update brings parity with the behavior on Android and Web.
Improves the robustness of the SDK’s internal state management.
This release includes an internal refactor intended to make SDK behavior more consistent. No external API changes.
Adds error logging for Banners operations, providing actionable diagnostics for persistence failures and invalid banner states.
Fixed
Improves robustness around push notification and deep link handling during delayed SDK initialization.
Fixes an issue where Braze.FeatureFlags.subscribeToUpdates would not trigger the update closure upon all refresh completions.
All refresh completions, regardless of a success or error result, will now trigger the update closure. This change brings parity with the Android and Web SDKs.
Previously, the update closure would not always trigger upon the completion of a refresh request, depending on whether the cached data had previously been reported.
14.0.4
Fixed
Fixes an issue where the configuration of push notification automation would be dropped upon every other re-initialization of the Braze instance.
14.0.3
Fixed
Push Stories now filter out invalid pages so users can still navigate through remaining valid pages.
14.0.2
Fixed
Fixes the SwiftUI implementation of BannerView to update Banner contents in-place whenever a refresh has succeeded.
Re-exposes the public initializer of BrazeInAppMessageUI.HtmlView as a designated init instead of a convenience init, which was introduced in version 14.0.0
This allows subclasses of HtmlView to access the public initializer.
Improves robustness of internal SDK logic around dictionary access to prevent potential crashes.
14.0.1
Fixed
Resolves an issue where the handling of universal links defaulted to the UIApplicationDelegate implementation instead of the UISceneDelegate implementation when the app was not in foreground.
This would occur even if there was no UIApplicationDelegate implementation, resulting in dropped universal link handling under such scenarios.
Fixes a memory leak where base64-encoded tracking IDs in in-app messages would accumulate on background threads.
Resolves an issue where in-app messages were not dismissed when the user is changed, resulting in the user seeing incorrect content.
This change also adds changeUser dismissal reason for in-app messages.
14.0.0
Breaking
Removes News Feed.
This fully removes all UI elements, data models, and actions associated with News Feed.
Added
Remote configuration now automatically refetches after SDK upgrades, keeping server defaults in sync and improving reliability after version changes.
Fixed
Resolves an issue where long text in in-app message buttons would wrap to multiple lines.
These messages will now match the dashboard preview behavior of truncating long text.
Push Stories now fail gracefully when receiving null/empty deeplink values.
Previously, an invalid deeplink would cause the Push Story’s content to appear blank.
StoryPage safely trims and percent-encodes deeplink strings, dropping invalid values instead of throwing an error.
StoryView only scrolls when pages exist, preventing the “Next” action from crashing when the carousel is empty.
HTML in-app messages now reuse cached payloads to mitigate app hangs that occur in rare situations during presentation.
Templated in-app messages with delayed presentation will now request templated values only after completion of the delay.
This ensures that templated values are most up-to-date with the display of the message.
Previously, the request for templated values would occur at trigger time, prior to the delay.
13.3.0
Added
Improves reliability when sending the push token and push authorization status to the backend.
This change ensures that push authorization status changes will be flushed immediately as soon as they are read.
13.2.1
Fixed
Resolves an issue where an accumulation of Banners pending requests could cause the host application to hang at app startup.
This fix performs additional cleanup to any existing requests that were accumulated from previous versions, so you do not need to do any manual cleanup.
13.2.0
Added
Adds support for compilation with Xcode 26.0 and its corresponding operating system runtimes on all platforms supported by the Braze Swift SDK.
13.1.0
Added
Adds support for Banner properties via new public methods on Braze.Banner instances.
banner.stringProperty(key:) for accessing String properties.
banner.numberProperty(key:) for accessing Double properties.
banner.timestampProperty(key:) for accessing Int Unix millisecond timestamp properties.
banner.booleanProperty(key:) for accessing Bool properties.
banner.imageProperty(key:) for accessing image URL properties as Strings.
banner.jsonProperty(key:) for accessing JSON properties as [String:Any] dictionaries.
banner.jsonProperty<T: Decodable>(key:type:decoder:) for accessing JSON properties as values of any custom Decodable type.
The default client-side rate limiting values for Banners refresh has been increased. For more information on SDK rate limiting, please refer to the Braze Developer Guide
Fixed
Improves the behavior of VoiceOver for assets that are missing an imageAltText for Content Card and In-App Message campaigns created via the Traditional editor.
These assets will no longer be selectable or narrated by VoiceOver. Previously, the asset would be selectable and VoiceOver would read gibberish.
Drag-and-drop campaigns are not affected by this issue.
Campaigns created using the Traditional editor should always have the Alt text field populated for accessible users.
13.0.0
Breaking
Extends the functionality of BrazeSDKAuthDelegate.braze(_:sdkAuthenticationFailedWithError:) to be triggered for “Optional” authentication errors.
The delegate method BrazeSDKAuthDelegate.braze(_:sdkAuthenticationFailedWithError:) will now be triggered for both “Required” and “Optional” authentication errors.
If you want to only handle “Required” SDK authentication errors, add a check ensuring that BrazeSDKAuthError.optional is false inside your implementation of this delegate method.
Fixes the usage of Braze.Configuration.sdkAuthentication to take effect when enabled.
Previously, the value of this configuration was not consumed by the SDK and the token was always attached to requests if it was present.
Now, the SDK will only attach the SDK authentication token to outgoing network requests when this configuration is enabled.
The setters for all properties of Braze.FeatureFlag and all properties of Braze.Banner have been made private. The properties of these classes are now read-only.
Removes the banner.id property, which was deprecated in version 11.4.0.
Instead, use banner.trackingId to read a banner’s campaign tracking ID.
Added
Adds the boolean field optional to BrazeSDKAuthError to indicate if it is an optional authentication error.
12.1.0
Added
Adds optional imageAltText and language fields to UI classes and structs associated with Content Card and In-App Message campaigns for improved accessibility.
The imageAltText field contains the image accessibility alt text (if any) for the image or icon in a given campaign. The SDK’s default UI will use this field to inform how VoiceOver narrates the image portion of a campaign
The optional language field is a BCP 47 tag. If it is present, VoiceOver will use the corresponding language narrator when reading the campaign. Otherwise, the user system default settings will be used.
These are the classes and structs with imageAltText and language:
Braze.ContentCard.ClassicImage
Braze.ContentCard.ImageOnly
Braze.ContentCard.CaptionedImage
Braze.ContentCardRaw (BRZContentCardRaw in Objective-C)
Braze.InAppMessage.Slideup
Braze.InAppMessage.Modal
Braze.InAppMessage.ModalImage
Braze.InAppMessage.Full
Braze.InAppMessage.FullImage
Braze.InAppMessageRaw (BRZInAppMessageRaw in Objective-C)
Braze.ContentCard.Classic has the language field only
Full support will be added to the main repository closer to the public release of Xcode 26.
For any compatibility issues discovered while using the Xcode 26 Beta, submit a GitHub issue on the main repository.
12.0.3
Fixed
Fixes the Banner rendering incompatibility with iOS 18.5+ while maintaining the correct URL redirect behavior.
Banners can now successfully render on iOS 18.5+ without compromising click action functionality.
See the changelog entries for versions 12.0.1 and 12.0.2 for further details.
12.0.2
⚠️ Important: This version has a known issue preventing Banners from rendering on iOS 18.5+.
Fixed
Reverts Banners to the behavior found in versions 12.0.0 and prior.
Banners remain unusable on iOS 18.5+. A future release will address this issue.
12.0.1
⚠️ Important: This version has a known issue in Drag-and-Drop in-app messages and Banners, preventing certain URLs from redirecting properly. Update to a newer version if you are using this feature.
Fixed
Fixes an issue where setting configuration.forwardUniversalLinks = true would not properly forward universal links to the system APIs in some cases.
The SDK now verifies that the system APIs are implemented (either in your UIApplicationDelegate or SceneDelegate) before forwarding the universal link.
When multiple implementations are found, the SDK favors the SceneDelegate implementation over the UIApplicationDelegate implementation.
Fixes an issue when configuring Braze.Configuration.Push.Automation.authorizationOptions with the .provisional option.
Previously, the .provisional option was also applied for push primer in-app messages. This resulted in no push notification permission prompt being shown to the user.
With this change, push primer in-app messages will request push notification permissions using only the .alert, .badge, and .sound options, ensuring that the system prompt is presented to the user.
Fixes an incompatibility with iOS 18.5 where Banners would not render.
Previously, the Banner view would be added to the view hierarchy with a height of 0 but never successfully load the HTML content.
Banner views will no longer trigger superfluous about:blank URLs upon initial load.
12.0.0
Breaking
The distributed static XCFrameworks now include their resources directly instead of relying on external resources bundles.
When manually integrating the static XCFrameworks, you must select the Embed & Sign option for each XCFramework in the Frameworks, Libraries, and Embedded Content section of your target’s General settings.
No changes are required for Swift Package Manager or CocoaPods integrations.
Fixed
Fixes an App Store validation issue where Braze’s libraries privacy manifests would fail to be detected when integrating the SDK as static XCFrameworks.
Fixes BrazeKitCompatABKContentCard.expiresAt to return the correct expiration date.
Previously, ABKContentCard.expiresAt would always return 0.
Fixes an issue where the Braze.FeatureFlags.subscribeToUpdates(_:) update closure was being called immediately after calling changeUser(userId:) instead of waiting for the next feature flags sync result.
Fixes an issue where Braze.ContentCards.subscribeToUpdates(_:) would not call the update closure whenever a sync occurred without any changes in the Content Cards data.
Previously, the update closure would only be called when the sync resulted in a change.
Fixes the Braze.User.set(dateOfBirth:) method to report dates using the Gregorian calendar instead of the device’s current calendar setting.
Previously, the SDK would override input dates and formats if the device’s calendar settings were non-Gregorian.
With this change, you will still need to ensure that dates provided to set(dateOfBirth:) are generated with the Gregorian calendar, but the Braze SDK will no longer override their formats inadvertently.
Enhances the braze.wipeData() function to send a final update to all registered channel subscribers, notifying them of the data wipe.
This update ensures that any UI components utilizing the channel’s data are properly dismissed and cleaned up.
For instance, if an in-app message is currently displaying as braze.wipeData() is called, the message will be removed from display.
Fixes braze.user.id not resetting to nil after calling braze.wipeData().
Internally, the user identifier was properly reset, but the public braze.user.id property was not updated to reflect this change.
Added
Adds the BrazeInAppMessagePresenter.dismiss(reason:) optional protocol method.
This method enables the SDK to inform the in-app message presenter when an in-app message should be dismissed due to an internal SDK state change.
Currently, this method is triggered only by calling braze.wipeData().
BrazeInAppMessageUI implements this optional method and dismisses the in-app message when triggered.
Adds dSYM files to the dynamic and mergeable variants of the Braze SDK XCFrameworks.
This addresses an App Store submission validation warning when using Xcode 16.0 or later.
Fixed
The SDK Debugger tool will now capture logs even when Braze.configuration.logger.level is .disabled and no SDK logging occurs locally.
This aligns the Braze Swift SDK Debugger Tool behavior with that of the Debugger Tool on the Braze Android SDK.
Sets the default background of BannerUIView to be transparent.
Renames the VisibilityTracker.displayLinkTick method to VisibilityTracker.brazeDisplayLinkTick in BrazeUI to avoid potential naming conflicts with private system methods.
11.8.0
Added
Network requests made by the SDK to the Braze Live Activities /push_token_tag endpoint will now be retried in the case of a request failure.
Expands customizability options of custom endpoints passed when initializing a Braze instance.
You can now specify a base path to be used for SDK network requests (i.e. “example.com/mockServer”).
http schemes are now supported for use by custom endpoints (i.e. http://example.com). Previously, only https schemes were supported.
Fixed
Fixes an issue where in-app messages would not always be triggered when sending Braze requests to the tracking endpoint. This occurred when both of the following conditions are true:
The Braze.Configuration.Api.trackingPropertyAllowList did not include the .everything type.
All other Braze.Configuration.TrackingProperty types were manually listed in the trackingPropertyAllowList.
Improves the rendering behavior of Banner Cards embedded in a scroll view on hybrid development frameworks.
Fixes the Banner Card view to prevent drag gestures from exposing the background of the HTML content.
Fixes an issue on the Braze web view bridge where numeric values of 1 or 0 would be incorrectly reported as true or false, respectively.
11.7.0
Added
Adds the ability for a banner container to resize when the banner content changes height.
11.6.1
Fixed
Improves the reliability of collecting Live Activity push-to-start tokens on calling registerPushToStart:
Push-to-start tokens will now flush to the server immediately as soon as they are retrieved.
Push-to-start tokens will now be read immediately from the pushToStartToken property as soon as registerPushToStart is called, in addition to the existing behavior where an observable is set up to monitor new tokens.
Resolves issues with the SDK’s internal state for devices that were previously affected after restoring from another device’s iCloud or iTunes backup.
Previously, these devices would incorrectly inherit the device ID from the original device.
With this update, the SDK now generates a unique device ID for each restored device, ensuring proper identification and functionality.
This update follows up on the 11.6.0 fix, which prevented the issue from occurring on future backups.
11.6.0
Fixed
Fixes the behavior in the Braze-provided UI for Banner Cards where content would not automatically be cleared from the UI when changing to a user that was not eligible for that campaign.
Changes the behavior of Braze.Banners.subscribeToUpdates(_:) to match behavior of the corresponding API on the Braze Android SDK.
Upon calling Braze.Banners.subscribeToUpdates(_:), the update handler closure will only be called if a banners sync has succeeded during the current user session.
Previously, calling Braze.Banners.subscribeToUpdates(_:) would always result in the update handler being called one time immediately.
Upon successfully completing a banners sync, Braze.Banners.subscribeToUpdates(_:) will call its registered update handler even if the sync result is identical to the last successful sync.
Changes the behavior of Braze.Banners.bannersStream to match behavior of the corresponding API on the Braze Android SDK.
Braze.Banners.bannersStream will now only emit an update immediately upon access if a banners sync has succeeded during the current user session.
Previously, accessing Braze.Banners.bannersStream would always emit one update immediately.
Upon successfully completing a banners sync, Braze.Banners.bannersStream will emit an update even if the sync result is identical to the last successful sync.
JavaScript bridge methods expecting number arguments now also accept string representations of numbers.
This change aligns the behavior of the Swift SDK with the behavior of the Web SDK.
Added
Adds an optional method removeBannerContent to the BrazeBannerPlacement protocol.
Locally persisted Braze SDK data will no longer transfer during OS backups. This resolves an issue introduced in 6.2.0.
11.5.0
Fixed
Braze.banners.getBanner(for:_:) now successfully returns a cached Banner object for the requested placement ID as long as a Banner Cards sync has ever succeeded for the current user.
Previously, it would log a warning and pass nil to the completion handler if a Banner Cards sync had not been completed for the current user during the current session specifically.
This change aligns behavior with the Android SDK.
Fixes an issue where images with the "JPEG" image type would sometimes not display in Push Stories.
Fixes an issue where an in-app message in a Braze-provided UI can be displayed for an ineligible user under rare conditions.
This may occur if the in-app message was in the process of being displayed in the UI at the same time that the user was changed to a different user.
Added
Adds Braze.User.id to access the current user identifier synchronously.
Deprecates Braze.User.id() async and Braze.User.id(queue:completion:) in favor of Braze.User.id.
These methods will be removed fully in a future update.
Adds the optional parameter userIDMatchBehavior to the initializers of Braze.InAppMessageRaw.Context. This determines the behavior in the UI when the current identified user is different from the one that triggered the in-app message.
The default for Braze-provided UIs (.enforce) will enforce that the user ID matches the user ID that triggered the in-app message. If there is a mismatch, the in-app message will not be displayed.
For custom UIs, the default is .ignore and a mismatch will still display the in-app message.
11.4.0
Fixed
Fixes an issue where the SDK could hang during initialization if previous sessions generated a large number of geofence refreshes. This hang could sometimes lead to a crash by blocking the main thread for an extended period.
Fixes an issue where the triggering of in-app messages could be delayed in cases where requests for updated in-app message triggers are also delayed due to rate limiting.
Adds additional safeguards to ensure that ongoing network requests are dropped when changing users mid-flight.
Added
When Content Cards, Feature Flags, or Banner Cards go from enabled to disabled, the stored data is removed from cache.
Fixes the Objective-C Braze.delegate declaration to be weak like the Swift variant.
Added
Braze.prepareForDelayedInitialization now takes an optional parameter analyticsBehavior: PushEnqueueBehavior.
Braze uses this value to determine whether any Braze push payloads received before initialization should be processed once initialization is complete.
PushEnqueueBehavior.queue will enqueue received push payloads to be processed upon initialization. This option is selected by default.
PushEnqueueBehavior.drop will drop received push payloads, ignoring them.
Adds configuration properties to customize the lineSpacing, maxLineHeight, minLineHeight, and lineHeightMultiple for the header and message texts in full and modal in-app messages.
Updates BrazeContentCardUI.ViewController.Attributes.defaults to be a var to allow directly editing the property for convenience.
11.1.1
Fixed
Fixes an issue introduced in 11.0.0 where the push subscription status would be sent to the backend with an inaccurate value at startup, causing an unexpected subscription state. The SDK now sends up the accurate subscription status at each startup.
11.1.0
⚠️ Important: This version has a known issue related to push subscription status. Upgrade to version 11.1.1 instead.
Fixed
Fixes an issue introduced in 11.0.0 where the push token status would not always be reported in all circumstances.
Fixes a display bug where an in-app message would appear truncated after certain keyboard dismissal scenarios.
Fixes a reference cycle in Braze.NewsFeedCard.Context that could prevent the card from being deallocated.
Added
Adds a public initializer for Braze.Notifications.Payload.
11.0.1
Fixed
Fixes an issue introduced in 11.0.0 where the push subscription status would be sent to the backend with an inaccurate value at startup, causing an unexpected subscription state. The SDK now sends up the accurate subscription status at each startup.
11.0.0
⚠️ Important: This version has a known issue related to push subscription status. Upgrade to version 11.1.1 instead.
Relevant public Braze classes and data types now conform to the Sendable protocol and can be safely used across concurrency contexts.
Main thread-only APIs are now marked with the @MainActor attribute.
We recommend using Xcode 16.0 or later to take advantage of these features while minimizing the number of warnings generated by the compiler. Previous versions of Xcode may still be used, but some features may generate warnings.
When integrating push notification support manually, you may need to update the UNUserNotificationCenterDelegate conformance to use the @preconcurrency attribute to prevent warnings.
Applying the @preconcurrency attribute on protocol conformance is only available in Xcode 16.0 or later. Reference our sample integration code here.
As of Xcode 16.0, Apple has not yet audited the UNUserNotificationCenterDelegate protocol for Swift concurrency.
1
2
3
extensionAppDelegate:@preconcurrencyUNUserNotificationCenterDelegate{// Your existing implementation}
Updates the SDWebImage dependency in BrazeUICompat and sample apps to 5.19.7+ to support Swift 6 strict concurrency checking.
Fixed
Fixes the push authorization status reporting to display the proper push token status on the Dashboard when a user has not explicitly accepted or declined push permissions.
10.3.1
Fixed
Improves the reliability of sending updates to Live Activities that were launched via a push-to-start notification to an app in the terminated state.
10.3.0
Fixed
Fixes the in-app message orientation validation logic, which prevented certain device classes from displaying messages under certain orientation configurations.
Fixes the default behavior on full-screen in-app messages to display as modals only on tablet screen sizes.
Previously, full-screen messages would erroneously default to modal presentations on some larger phones.
Fixes a crash when dismissing a slideup in-app message before it has finished presenting.
Fixes an issue on iOS 18.0+ where the in-app message UI would persist on the screen when attempting to dismiss the message before it has finished presenting.
Updates custom attribute value, custom event, and purchase string validation to use a 255 character maximum instead of a 255 byte maximum.
Adds additional safeguards to Braze.Notifications.subscribeToUpdates to ensure the same Push notification can’t trigger the update closure multiple times.
10.2.0
Fixed
Updates the content card image background color to be clear.
Added
Adds support for an upcoming Braze SDK Debugging tool.
10.1.0
Fixed
Fixes an issue affecting the Objective-C variants of BrazeDelegate, BrazeContentCardUIViewControllerDelegate and BrazeInAppMessageUIDelegate.
When setting these delegates in Objective-C a second time, the delegate would end up being set to nil.
This issue has been resolved and the delegates can now be set multiple times without issue.
Added
Adds support for delayed SDK initialization, allowing you to create the Braze instance outside of application(_:didFinishLaunchingWithOptions:).
The SDK can now be initialized asynchronously, while conserving the ability to process incoming Braze push notifications.
The update closure will now be triggered by both “Push Opened” and “Push Received” events by default. Previously, it would only be triggered by “Push Opened” events.
To continue subscribing only to “Push Opened” events, pass in [.opened] for the parameter payloadTypes. Alternatively, implement your update closure to check that the type from the Braze.Notifications.Payload is .opened.
When receiving a push notification with content-available: true, the Braze.Notifications.Payload.type will now be .received instead of .opened.
Marks the following deprecated APIs as unavailable:
Removes the deprecated BrazeLocation class in favor of BrazeLocationProvider.
Fixed
Fixes a crash when handling a scheme-based deep link containing a registered applink domain (e.g. applinks:example.com with a deep link to app://example.com/path).
The following notifications will trigger this subscription:
Notifications received in the foreground
Notifications with the field content-available: true received in the foreground or background
The following notifications will not trigger this subscription:
Notifications received while terminated
Notifications received in the background without the field content-available: true
The new parameter payloadTypes will allow you to subscribe to “Push Opened” events, “Push Received” events, or both. If the parameter is omitted, it will subscribe to both by default.
If you are using manual push integration, you will need to first implement UNUserNotificationCenter.userNotificationCenter(_:willPresent:withCompletionHandler:), and make sure to call Braze.Notifications.handleForegroundNotification(notification:) within your implementation. Then, use subscribeToUpdates as noted above. See our guide on push notification integration for more info.
Fixes an issue where the Braze.FeatureFlag.subscribeToUpdates(_:) callback was not triggered at app launch when the cached feature flags matched the remote feature flags.
Fixes an issue in Objective-C projects where the return value of Braze.FeatureFlag.jsonProperty(key:) would incorrectly encode any entry value equal to null under certain conditions.
[String: Any] dictionaries returned by the Swift API will now drop null values.
NSDictionary objects returned by the Objective-C API will now encode null values as NSNull.
Customization of ViewAttributes via the attributes property is not available in the Objective-C version of PresentationContextRaw.
Adds Braze.FeatureFlag.jsonProperty(key:type:decoder:) to decode jsonobject type Feature Flag properties into custom Decodable types.
Deprecates the existing Feature Flag APIs, to be removed in a future version:
Braze.FeatureFlag.jsonStringProperty(key:) has been deprecated.
Braze.FeatureFlag.jsonObjectProperty(key:) has been deprecated in favor of Braze.FeatureFlag.jsonProperty(key:).
Fixed
Fixes an issue where the preferredOrientation on the presentation context of an in-app message would not be respected.
9.2.0
Added
Adds the openNewWindowLinksInBrowser configuration (default: false) to Braze.ModalContext.
Set this value in the braze(_:willPresentModalWithContext:) method of your BrazeDelegate to specify whether to launch the device browser to open web view hyperlinks that normally open a new tab or window.
Fixed
Fixes an issue with the automatic push integration feature that could cause the SDK not to send the device token to Braze.
Fixes an issue that prevented external links, which open in a new tab, from being activated in presented web views.
9.1.0
Added
Adds support for 3 new Feature Flag property types and various APIs for accessing them:
Braze.FeatureFlag.timestampProperty(key:) for accessing Int Unix millisecond timestamps.
Braze.FeatureFlag.imageProperty(key:) for accessing image URLs as Strings.
Braze.FeatureFlag.jsonObjectProperty(key:) for accessing JSONs as [String:Any] dictionaries.
Braze.FeatureFlag.jsonStringProperty(key:) for accessing JSONs as Strings.
Adds safeguards when reading the device model.
Fixed
Fixes the duplicate symbols compilation errors and runtime warnings that may occur under specific conditions when integrating BrazeKit and either BrazeNotificationService or BrazePushStory via CocoaPods.
9.0.0
Breaking
Removes the default privacy tracking domains from the BrazeKit privacy manifest.
If you are using the Braze data tracking features, you will need to manually add your tracking endpoint to your app-level privacy manifest.
Refer to the updated tutorial for integration guidance.
Removes the deprecated BrazeDelegate.braze(_:sdkAuthenticationFailedWithError) method in favor of BrazeSDKAuthDelegate.braze(_:sdkAuthenticationFailedWithError).
This method was originally deprecated in release 5.14.0.
Failing to switch to the new delegate method will not trigger a compiler error; instead, the BrazeDelegate.braze(_:sdkAuthenticationFailedWithError) method you define will simply not be called.
Fixed
Adds the missing NSPrivacyCollectedDataTypes key to the BrazePushStory privacy manifest.
8.4.0
Added
Expands Geofences behavior in the background while “When In Use” authorization is selected:
Adds the Braze.Location.Configuration.allowBackgroundGeofenceUpdates property to toggle whether geofences should be updated in the background.
When using this setting, verify that you have enabled the Location updates background mode.
Adds the Braze.Location.Configuration.distanceFilter property to configure the minimum distance sensitivity for triggering a location update.
Adds support for the message_extras Liquid tag for in-app messages.
8.3.0
Added
Adds early access for a third alternative repository which provides all Braze modules as mergeable XCFrameworks. For instructions on how to leverage it, refer to the repository README:
Adds a missing privacy manifest for BrazePushStory.
Fixes an invalid privacy manifest warning in BrazeLocation when submitting to the App Store as a dynamic XCFramework.
Fixes an issue where already enqueued in-app messages would not be removed from the stack after subsequent .reenqueue and .discard display actions.
Fixes an issue preventing retried requests from using an updated SDK authentication token until a new request was scheduled for processing.
Purchases, custom events, and nested custom user attributes can now include properties with values of any type conforming to BinaryInteger (Int64, UInt16, etc).
All values will be cast to Int before being logged.
This resolves an issue with a bugfix in 7.6.0.
8.2.1
Fixed
Fixes App Store validation issues when archiving with Xcode 15.3.
8.2.0
Added
Adds support for remotely starting Live Activities via push notifications.
Adds the following methods to the liveActivities module:
Adds public APIs to access BrazeKit, BrazeLocation and BrazeUI resources bundles:
Braze.Resources.bundle
BrazeLocationResources.bundle
BrazeUIResources.bundle
BrazeKit.overrideResourceBundle and BrazeUI.overrideResourceBundle have been deprecated in favor of BrazeKit.overrideResourcesBundle and BrazeUI.overrideResourcesBundle.
Re-enables visionOS sample apps requiring SDWebImage in Examples-CocoaPods.xcworkspace. SDWebImage for visionOS is now supported when using CocoaPods.
Updated SDWebImage dependency in BrazeUICompat to 5.19.0+.
Fixed
Fixes multiple issues on visionOS:
Sessions now properly start as expected.
The click behavior Open Web URL Inside App now properly opens the URL in a modal web view. Previously, the URL would always be opened using the default web browser.
[BrazeDelegate.braze(:willPresentModalWithContext:)](https://braze-inc.github.io/braze-swift-sdk/documentation/brazekit/brazedelegate/braze(:willpresentmodalwithcontext:)-1fj41) now has a default implementation.
Handling network requests and persisting data properly extend the lifetime of the application for processing.
Removes crash data from the BrazeKit privacy manifest. This data type is not collected by Braze.
8.0.0
⚠️ Warning
This release reports the SDK version as 7.7.0 instead of 8.0.0.
Breaking
Compiles the SDK using Xcode version 15.2 (15C500b).
This also raises the minimum deployment targets to iOS 12.0 and tvOS 12.0.
The BrazeLocation class is now marked as unavailable. It was previously deprecated in favor of BrazeLocationProvider in 5.8.1.
Added
Adds support for visionOS 1.0.
⚠️ Rich push notifications and Push Stories may not display as expected on visionOS 1.0. We are monitoring the latest versions for potential fixes.
⚠️ CocoaPods is not yet supported by SDWebImage for visionOS. visionOS sample apps requiring SDWebImage have been disabled in the Examples-CocoaPods.xcworkspace. Refer to the SwiftPM or manual integration Xcode project instead.
7.7.0
Added
Updates the prebuilt release assets to include the privacy manifest for manual integrations of SDWebImage.
Follow the manual integration guide to add the SDWebImage.bundle to your project for static XCFrameworks.
Enhances support for language localizations.
Introduces a localization for Azerbaijani strings.
Updates Ukrainian localization strings for accuracy.
Fixed
Fixes the default button placement for full in-app message views.
Fixes an issue where setting Braze.Configuration.Api.endpoint to a URL with invalid characters could cause a crash.
If the SDK is given an invalid endpoint, it will no longer attempt to make network requests and will instead log an error.
Fixes an issue preventing BrazeLocation from working correctly when using the dynamic XCFrameworks.
7.6.0
Added
Adds the Braze.InAppMessage.Data.isTestSend property, which indicates whether an in-app message was triggered as part of a test send.
Adds logic to separate Braze data into tracking and non-tracking requests.
Adds the following methods to set and edit the allow list for properties that will be used for tracking:
Braze.Configuration.Api.trackingPropertyAllowList: Set the initial allow list before initializing Braze.
Braze.updateTrackingAllowList(adding:removing:): Update the existing allow list during runtime.
For full usage details on these configurations, refer to our tutorial here.
Fixed
Adds safeguards to prevent a rare race condition occuring in the SDK network layer.
Prevents in-app message test sends from attempting re-display after being discarded by a custom in-app message UI delegate.
Fixes an issue in the default Braze in-app message UI where some messages were not being removed from the stack after display.
Fixes the compilation of BrazeKitCompat and BrazeUICompat in Objective-C++ projects.
Fixes an issue in BrazeUICompat where the header text in Full or Modal in-app messages would be duplicated in place of the body text under certain conditions.
Fixes the encoding of values of types Float, Int8, Int16, Int32, Int64, UInt, UInt8, UInt16, UInt32 and UInt64. Those types were previously not supported in custom events and purchase properties.
Fixes an issue preventing purchase events from being logged when the product identifier has a leading dollar sign.
Fixes an issue preventing custom attributes from being logged when the attribute key has a leading dollar sign.
7.5.0
Added
Adds privacy manifests for BrazeKit and BrazeLocation to describe Braze’s data collection policies. For more details, refer to Apple’s documentation on privacy manifests.
More fine-tuned configurations to manage your data collection practices will be made available in a future release.
Adds the optInWhenPushAuthorized configuration property to specify whether a user’s notification subscription state should automatically be set to optedIn when updating push permissions to authorized.
The WebKit Inspector developer tool is now enabled by default for all instances of BrazeInAppMessagesUI.HtmlView. It can be disabled by setting BrazeInAppMessagesUI.HtmlView.Attributes.allowInspector to false.
Fixed
Fixes an issue with the code signatures of XCFrameworks introduced in 7.1.0.
Fixes a crash on tvOS devices running versions below 16.0, caused by the absence of the UIApplication.openNotificationSettingsURLString symbol in those OS versions.
Fixes an issue where a content card would not display if the value under “Redirect to Web URL” was an empty string.
Fixes incorrect behavior in BrazeUI where tapping the body of a Full or Modal in-app message with buttons and an “Image Only” layout would dismiss that message and process the button’s click action.
Tapping the body will now be a no-op, bringing parity with other platforms.
7.4.0
Added
Adds two alternative repositories to support specialized integration options. For instructions on how to leverage them, refer to their respective READMEs:
In-App Message assets from URLs containing the query parameter cache=false will not be prefetched.
Additionally, when presented as a part of In-App Messages or Content Cards, those URLs will be fetched using the URLRequest.CachePolicy.reloadIgnoringLocalAndRemoteCacheData caching policy, which always requests a fresh version from the source and ignores any cached versions.
Fixed
Fixes XCFrameworks headers to use the #import syntax instead of @import for compatibility with Objective-C++ contexts.
Fixes the push token tag validation during Live Activity registration, accepting strings up to 256 bytes instead of 255 bytes.
Braze.ContentCards.unviewedCards no longer includes Control cards to bring parity with Android and Web.
Fixes an Objective-C metaclass crash that occurs when initializing a custom subclass of certain BrazeUI views.
7.3.0
Added
Adds support for Expo Notifications event listeners when using the automatic push integration.
Fixed
Fixes a rare concurrency issue that might result in duplicated events when logging large amount of events.
Fixes an issue where user.set(dateOfBirth:) was not setting the date of birth accurately due to variations in the device’s timezone.
7.2.0
Added
Exposes the BrazePushStory.NotificationViewController.didReceive methods for custom handling of push story notification events.
Fixed
Resolves an issue for in-app messages with buttons where tapping on the body would incorrectly execute the button’s click action.
Now, when you tap on the body of an in-app message with buttons, no event should occur.
Resolves a potential deadlock under rare circumstances in BrazeUI’s In-App messages presentation.
Refactors some text layout logic in BrazeUI into a new Braze.ModalTextView class.
Updates the behavior for Feature Flags methods.
FeatureFlags.featureFlag(id:) now returns nil for an ID that does not exist.
FeatureFlags.subscribeToUpdates(:) will trigger the callback when any refresh request completes with a success or failure.
The callback will also trigger immediately upon initial subscription if previously cached data exists from the current session.
Fixed
Fixes compiler warnings about Swift 6 when compiling BrazeUI while using Xcode 15.
Exposes public imports for ABKClassicImageContentCardCell.h and ABKControlTableViewCell.h for use in the BrazeUICompat layer.
Adds additional safeguards around invalid constraint values for BrazeInAppMessageUI.SlideupView.
Resolves a Content Cards feed UI issue displaying a placeholder image in Classic cards without an attached image.
Added
Adds the enableDarkTheme property to BrazeContentCardUI.ViewController.Attributes.
Set this field to false to prevent the Content Cards feed UI from adopting dark theme styling when the device is in dark mode.
This field is true by default.
6.6.2
Fixed
Fixes an issue preventing purchase events from being logged when the product identifier has a leading dollar sign ($).
Fixes an issue preventing custom attributes from being logged when the attribute key has a leading dollar sign ($).
6.6.1
Fixed
Fixes a crash in the geofences feature that could occur when the number of monitored regions exceeded the maximum count.
Fixes an issue introduced in 6.3.1 that would always update a user’s push subscription status to optedIn on app launch if push permissions were authorized on the device settings.
The SDK now will only send the subscription status at app launch if the device notification settings goes from denied to authorized.
Braze.ContentCard.logClick(using braze: Braze) will now log a click regardless of whether the ContentCard has a ClickAction.
This behavior differs from the default API Braze.ContentCard.Context.logClick(), which has the safeguard of requiring a ClickAction to log a click.
6.6.0
Fixed
Fixes an issue in HTML in-app messages where custom event and purchase properties would always convert values for 1 and 0 to become true and false, respectively.
These property values will now respect their original form in the HTML.
Prevents the default Braze UI from displaying in-app messages underneath the keyboard when Stage Manager is in use.
When enabled, the SDK will automatically implement the necessary system delegate methods for handling push notifications.
Compatibility with other push providers, whether first or third party, is maintained. The SDK will automatically handle only Braze push notifications, while original system delegate methods will be executed for all other push notifications.
Each automation step can be independently enabled or disabled. For example, configuration.push.automation.requestAuthorizationAtLaunch = false can be used to prevent the automatic request for push permissions at launch.
Adds the Braze.Configuration.forwardUniversalLinks configuration. When enabled, the SDK will redirect universal links from Braze campaigns to the appropriate system methods.
Fixes an issue preventing text fields from being selected in HTML IAMs for iOS 15.
Fixes an issue where the device model was inaccurately reported as iPad on macOS (Mac Catalyst and Designed for iPad configurations).
Fixes an issue where custom event and purchase properties would not accept an entry if its value was an empty string.
Fixes a crash that occurred in the default UI for Content Cards when encountering a zero-value aspect ratio.
Fixes an issue introduced in 6.0.0 where images in in-app messages would appear smaller than expected when using the compatibility UI (BrazeUICompat).
Added
Adds the unviewedCards convenience property to the Braze.ContentCards class to get the unviewed content cards for the current user.
6.3.1
Fixed
Fixes an issue where the previous user’s data would not be flushed after calling changeUser(userId:sdkAuthSignature:) when the SDK authentication feature is enabled.
A content card impression can now be logged once per session. Previously, the Braze-provided Content Cards UI would limit to a single impression per card at maximum, irrespective of sessions.
Fixes an issue that previously caused push notification URLs with percent-encoded characters to fail during decoding.
Fixes a behavior to automatically set a user’s push subscription state to optedIn after push permissions have explicitly been authorized via the Settings app.
Correctly hides shadows on in-app messages that are configured with a transparent background.
Fixes a rare crash occurring when deinitializing the Braze instance.
Added
Adds additional logging for network-related decoding errors.
6.3.0
Fixed
“Confirm” and “Cancel” notification categories now show the correct titles on the action buttons.
Added
Adds a new SDKMetadata option .reactnativenewarch for the React Native New Architecture.
Fixes a crash introduced in 6.0.0 when displaying an HTML in-app message using the BrazeUICompat module.
Removed a system call that is known to be slow on older versions of macOS. This resolves the SDK hanging during initialization on Mac Catalyst when running on affected macOS versions.
Added
Adds support for target attributes on anchor tags in HTML in-app messages (e.g. <a href="..." target="_blank"></a>).
Adding the target attribute to links will allow them to open in a new webview without dismissing the current in-app message.
This behavior can be disabled via the linkTargetSupport property of the BrazeInAppMessageUI.HtmlView.Attributes struct.
Fixes an issue that led to disproportionately large close buttons on in-app messages when the user has set a large font size in the device settings.
Fixes an issue that would lock the screen in a specific orientation after the dismissal of an in-app message customized to be presented in that orientation.
Renames User.setCustomAttributeArray(key: String, array: [String]?) to setCustomAttribute(…) to align it with other custom attribute setters, and adds “string” to the addTo and removeFrom attribute array methods to clarify which custom attributes they’re used for.
6.0.0
Breaking
The in-app message data models sent to BrazeInAppMessagePresenter.present(message:) now contain remote asset URLs. Previously, these data models would contain local asset URLs.
This change is only breaking in two situations:
When implementing a custom BrazeInAppMessagePresenter.
VoiceOver now correctly focuses on in-app message views when they are presented.
Fixes an issue causing in-app messages with re-eligibility disabled to display multiple times under certain conditions.
Fixes an issue where modal and full in-app message headers were truncated on devices running iOS versions lower than 16 when displaying non-ASCII characters.
The dynamic variant of BrazeUI.framework in the release artifact braze-swift-sdk-prebuilt.zip is now an actual dynamic framework. Previously, this specific framework was mistakenly distributed as a static framework.
Added
Adds the BrazeSDKAuthDelegate protocol as a separate protocol from BrazeDelegate, allowing for more flexible integrations.
Apps implementing BrazeDelegate.braze(_:sdkAuthenticationFailedWithError:) should migrate to use BrazeSDKAuthDelegate and remove the old implementation. The BrazeDelegate method will be removed in a future major release.
5.13.0
Fixed
Fixes an issue where the SDK would automatically track body clicks on non-legacy HTML in-app messages.
Added
Adds the synchronous deviceId property on the Braze instance.
deviceId(queue:completion:) is now deprecated.
deviceId() async is now deprecated.
Adds the automaticBodyClicks property to the HTML in-app message view attributes. This property can be used to enable automatic body clicks tracking on non-legacy HTML in-app messages.
This property is false by default.
This property is ignored for legacy HTML in-app messages.
Adds json() and decoding(json:) public methods to the Feature Flag model object for JSON encoding/decoding.
5.11.2
Fixed
Fixes a crash occurring when the SDK is configured with a flush interval of 0 and network connectivity is poor.
5.11.1
Fixed
Fixes an issue preventing the correct calculation of the delay when retrying failed requests. This led to a more aggressive retry schedule than intended.
Improves the performance of Live Activity tracking by de-duping push token tag requests.
Fixes an issue in logClick(using:) where it would incorrectly open the url field in addition to logging a click for metrics. It now only logs a click for metrics.
This applies to the associated APIs for content cards, in-app messages, and news feed cards.
It is still recommended to use the associated Context object to log interactions instead of these APIs.
Adds support for News Feed data models and analytics.
News Feed UI is not supported by the Swift SDK. See the migration guide for instructions on using the compatibility UI.
5.7.0
Fixed
Fixes an issue where modal image in-app messages would not respect the aspect ratio of the image when the height of the image is larger than its width.
Changed
Changes modal, modal image, full, and full image in-app message view attributes to use the ViewDimension type for their minWidth, maxWidth and maxHeight attributes.
The ViewDimension type enables providing different values for regular and large size-classes.
Added
Adds a configuration to use a randomly generated UUID instead of IDFV as the device ID: useUUIDAsDeviceId.
This configuration defaults to false. To opt in to this feature, set this value to true.
Enabling this value will only affect new devices. Existing devices will use the device identifier that was previously registered.
5.6.4
Fixed
Fixes an issue preventing the execution of BrazeDelegate methods when setting the delegate using Objective-C.
Fixes an issue where triggering an in-app message twice with the same event did not place the message on the in-app message stack under certain conditions.
Added
Adds the public id field to Braze.InAppMessage.Data.
Adds logImpression(using:) and logClick(buttonId:using:) to both in-app messages and content cards, and adds logDismissed(using:) to content cards.
It is recommended to continue using the associated Context to log impressions, clicks, and dismissals for the majority of use cases.
Adds Swift concurrency to support async/await versions of the following public methods. These methods can be used as alternatives to their corresponding counterparts that use completion handlers:
The applyAttributes() method for BrazeContentCardUI views now take the attributes explicitly as a parameter.
5.5.1
Fixed
Fixes an issue where content cards would not be properly removed when stopping a content card campaign on the dashboard and selecting the option Remove card after the next sync (e.g. session start).
5.5.0
Added
Adds support for host apps written in Objective-C.
Braze Objective-C types start either with BRZ or Braze, e.g.:
Renamed ClickAction.uri(_:useWebView:) to ClickAction.url(_:useWebView:).
5.4.0
Fixed
Fixes an issue where brazeBridge.logClick(button_id) would incorrectly accept invalid button_id values like "", [], or {}.
Added
Adds support for Braze Action Deeplink Click Actions.
5.3.2
Fixed
Fixes an issue preventing compilation when importing BrazeUI via SwiftPM in specific cases.
Lowers BrazeUI minimum deployment target to iOS 10.0.
5.3.1
Fixed
Fixes an HTML in-app message issue where clicking a link in an iFrame would launch a separate webview and close the message, instead of redirecting within the iFrame.
Fixes the rounding of In-App Message modal view top corners.
Fixes the display of modals and full screen in-app messages on iPads in landscape mode.
Added
Adds two Example schemes:
InAppMessage-Custom-UI:
Demonstrates how to implement your own custom In-App Message UI.
Available on iOS and tvOS.
ContentCards-Custom-UI:
Demonstrates how to implement your own custom Content Card UI.
# Changelog für iOS Objective-C SDK
Source: /docs/de/developer_guide/platforms/legacy_sdks/ios/changelog/objc_changelog/index.md
**Warning:**
[AppboyKit](https://github.com/Appboy/appboy-ios-sdk) (also known as the Objective-C SDK) is no longer supported and has been replaced by the [Swift SDK](https://www.braze.com/docs/de/de/developer_guide/sdk_integration/?sdktab=swift). It will no longer receive new features, bug fixes, security updates, or technical support—however, messaging and analytics will continue to function as normal. To learn more, see [Introducing the New Braze Swift SDK](https://www.braze.com/resources/articles/introducing-the-new-braze-swift-sdk).
# iOS Objective-C SDK Änderungsprotokoll
Improves resilience when triggering in-app messages with date property filters.
Added
Adds a new option ABKReenqueueInAppMessage to enum ABKInAppMessageDisplayChoice.
Return this option in beforeInAppMessageDisplayed: of an ABKInAppMessageControllerDelegate to ensure that an in-app message is not displayed and becomes eligible to trigger again.
This option will reset any trigger times and re-eligibility rules as if it was never triggered. It will not add the message to the in-app message stack.
4.5.4
Fixed
Improves reliability of custom event property type validation.
Fixes an issue where the status bar would not restore to its original state after a full in-app message was dismissed.
4.5.3
Fixed
Fixes a crash that occurs when receiving custom event properties of numeric types under certain conditions.
Fixes UI responsiveness warnings when requesting location authorization status.
4.5.2
Fixed
Improves reliability when validating trigger properties.
Improves the NSURLSessionConfiguration disk and memory cache capacities for file downloads. This change enables larger file downloads to be cached if needed.
4.5.1
Fixed
Improves eligibility checks around the minimum trigger timeout for in-app messages by now checking at trigger time in addition to display time.
Fixes an issue where purchases would not trigger certain templated in-app messages.
Added
Adds the delegate method noMatchingTriggerForEvent:name: to ABKInAppMessageControllerDelegate, which is called if no Braze in-app message was triggered for a given event.
4.5.0
Added
Adds support for Content Cards to evaluate Retry-After headers.
4.4.4
Fixed
Calling appboyBridge.closeMessage() or brazeBridge.closeMessage() from an HTML in-app message now correctly triggers ABKInAppMessageUIDelegate.onInAppMessageDismissed: when implemented.
Fixes an issue in 4.4.3 where the tvOS SDK incorrectly referenced an older SDK version.
4.4.3
Fixed
Fixes an issue introduced in 4.4.0 which prevented custom events or purchases with an empty dictionary of properties from being logged.
Improves handling of ABKInAppMessageWindow’s dismissal to promptly remove it from the view hierarchy.
Fixes the position of the pinned indicator for Captioned Image Content Cards when using the default UI.
Fixes an issue introduced in 4.3.2 and limited to users of Appboy-tvOS-SDK, which prevented custom events with properties or purchases with properties from being logged.
Added
Adds a padding property to ABKCaptionedImageContentCardCell to support modifying the default value.
4.4.2
Fixed
Fixes a bug for HTML in-app messages using the HTML Upload with Preview option to improve the reliability of in-app message display.
Fixes a bug preventing integration via Swift Package Manager in specific contexts.
Fixes an issue in the default Content Cards UI where the empty feed label was truncated if it was too large for the screen, for example due to accessibility or localization.
Fixes an issue where Slideup in-app messages would be automatically dismissed after multiple interaction with the app’s main window.
Changed
If changeUser:sdkAuthSignature: is called with the current user’s ID, but with a new and valid SDK Authentication signature, the new signature will be used.
Improves push tracking accuracy for apps making use of UISceneDelegate (UIKit) or Scene (SwiftUI).
4.4.1
Fixed
Fixes an issue in which input elements with type="date" in HTML in-app messages do not respond to some user interactions on iOS 14 and iOS 15.
Fixes ABKSdkMetadata availability when using the dynamic variant of the SDK.
Fixes an issue in which the default content cards UI’s empty feed label does not wrap properly when the device is using Larger Accessibility Sizes for its text size.
Changed
Changed ABKInAppMessageUIDelegate.inAppMessageViewControllerWithInAppMessage: to accept a nil return value.
Added
Adds support for the playsinline attribute on HTML <video> elements within webpages that are opened in the app by Braze.
Adds XCFramework support for the Core integration via Carthage. Please follow the Carthage migration guide when transitioning to the new artifact.
4.4.0
Breaking
Adds XCFramework support to Carthage. This allows projects integrated via Carthage to support Apple Silicon simulators and Mac Catalyst.
To continue using the original Full .framework file, include the Cartfile lines above but reference appboy_ios_sdk_full.json. Then, run carthage update.
For those using the Thin integration, use the same Cartfile above but exclude the line with SDWebImage.
The Core integration does not support XCFrameworks, and you can use the original .framework files as before.
Added
Adds a new attachment to the release called Appboy_iOS_SDK.xcframework.zip.
This artifact has the all-in-one XCFramework containing the full SDK code including all of the assets.
When importing this code manually, drag-and-drop the XCFramework into your project and select Embed & Sign. Then, add -ObjC under Build Settings > Other Linker Flags in your app’s target.
Adds localization support for the close button’s accessibility label in modal and full in-app messages.
Adds the ability to set the SDK’s log level at runtime by setting ABKLogLevelKey to an integer in appboyOptions. Descriptions of the available log levels can be found here.
Adds Appboy.addSdkMetadata: to allow self reporting of SDK Metadata fields via the ABKSdkMetadata enum.
4.3.4
This release requires Xcode 13.
Fixed
Fixes an issue in which the pinned indicator for a Banner Content Card would not display in the default Content Cards UI.
Fixes an issue which prevented custom events and purchases with properties larger than 50 KB to be properly discarded.
4.3.3
Fixed
Fixes a race-condition occasionally preventing HTML in-app messages with assets from being displayed from a test push.
Fixes an issue which prevented HTML in-app messages from opening sms:, mailto:, tel:, facetime: and facetime-audio: urls.
Previously, those urls would fail to open silently.
Fixes an issue where ABKContentCardsTableViewController was not displaying the “no update” label after the last card was deleted from the feed.
Added
Adds methods addToSubscriptionGroupWithGroupId: and removeFromSubscriptionGroupWithGroupId: to ABKUser to manage SMS/Email Subscription Groups.
Also adds appboyBridge.getUser().addToSubscriptionGroup(groupId) and appboyBridge.getUser().removeFromSubscriptionGroup(groupId) to the javascript interface for HTML in-app messages.
4.3.2
Fixed
Iframes embedded in an HTML in-app message are now displayed as part of the same in-app message. Previously, iframes would be loaded in a separate webview.
Added
Adds support for navigation bar transparency changes introduced in iOS 15. Apps using Braze default UIs for Content Cards, the News Feed, and the modal WebView should upgrade to this version as soon as possible ahead of iOS 15’s release.
4.3.1
Fixed
The sdkAuthenticationDelegate now works as expected when setting the property directly.
VoiceOver no longer reads content beneath the displayed in-app message.
Changed
The number of unviewed Content Cards in ABKContentCardsController’s unviewedContentCardCount now excludes control cards.
The default Content Cards UI now allows swipe-to-refresh gestures when empty.
Deprecates ABKInAppMessageController’s method displayNextInAppMessageWithDelegate: in favor of displayNextInAppMessage.
Added
Custom events and purchases now support nested properties.
In addition to integers, floats, booleans, dates, or strings, a JSON object can be provided containing dictionaries of arrays or nested dictionaries. All properties combined can be up to 50 KB in total length.
4.3.0
Breaking
Refined Content Cards UI public api changes introduced in 4.2.0.
Fixed
Fixes an issue introduced in 4.2.0 that caused Content Card type ABKClassicImageContentCardCell to crash on display when not using Storyboard.
4.2.0
⚠️ Known Issues
This release contains a known issue with the Content Cards default UI on iOS, where showing a “Classic” type card with an image causes a crash. If you are using the default Content Cards UI, do not upgrade to this version.
Breaking
Content Cards and News Feed are now more extensible!
Class level API methods have changed to instance methods to make subclassing easier, however getNavigationContentCardsViewController and getNavigationFeedViewController are left in as class methods for backwards compatibility.
Fixes an issue with Dynamic Type support introduced in 3.34.0 to be compatible with iOS 9.
Added
Adds support for new SDK Authentication feature.
Exposes window.brazeBridge in HTML in-app messages which replaces window.appboyBridge. appboyBridge is deprecated and will be removed in a future version of the SDK.
Changed
Makes in-app message window handling more resilient:
The in-app message window tries to display up to 10 times when another window competes for visibility. If the in-app message is not guaranteed visibility, it is dismissed and an error is logged.
Improves Appboy’s wipeDataAndDisableForAppRun and disableSDK to handle additional use cases.
Deprecates flushDataAndProcessRequestQueue in favor of requestImmediateDataFlush.
4.1.0
Breaking
ABKURLDelegate method handleAppboyURL:fromChannel:withExtras: is now invoked for all urls.
Previously, this delegate method was not invoked for urls opened in a WebView or the default browser when originating from the News Feed or Content Cards.
Removes ABKUIURLUtils method openURLWithSystem:fromChannel:. Use openURLWithSystem: as a replacement.
Fixed
Fixes a case where the ABKURLDelegate method handleAppboyURL:fromChannel:withExtras: was being called twice when opening a push notification with an url.
Changed
Deprecates ABKUnknownChannel.
4.0.2
Fixed
Fixes a double redirection bug in Push Stories when the app is in a terminated state and application:didReceiveRemoteNotification:fetchCompletionHandler: is not implemented.
Changed
Improves the Swift Package Manager bundle lookup to be more flexible.
Added
Adds support to use a dictionary named Braze instead of Appboy when adding customization in the Info.plist. After adding the Braze dictionary, please remove the previous Appboy dictionary.
4.0.1
Fixed
Sets CFBundleSupportedPlatforms in .plist files to the correct non-simulator value.
Removes the Dynamic Type support warnings.
4.0.0
Breaking
AppboyKit is now distributed as an XCFramework when integrating with Cocoapods. Cocoapods 1.10.0+ is required.
This removes the need for integrators to exclude the arm64 architecture when building for the simulator. Please undo any of the changes that may have been made when upgrading to 3.27.0 (Integrators will now be required to exclude …).
Fixed
Fixes the Swift Package Manager cleanup script to remove only the necessary files.
Added
Adds Mac Catalyst support for apps integrating with Cocoapods.
3.34.0
Breaking
Replaces ABKInAppMessageSlideupViewController’s slideConstraint by offset.
Added
Adds a new Github repo to optimize import speeds for applications integrating with Swift Package Manager.
To use this repo, follow these steps:
Remove the existing package in your application that points to the url: https://github.com/Appboy/Appboy-ios-sdk.
Add a new package using the new url: https://github.com/braze-inc/braze-ios-sdk.
Adds support for Right-to-Left languages in the News Feed.
Adds support for scaling fonts automatically with Dynamic Type for in-app messages and the News Feed.
Changed
Improves accessibility handling for modal and full in-app messages.
Improves Slideup in-app message animations.
3.33.1
Fixed
Fixes Swift Package Manager integration.
In Xcode, select File ▸ Swift Packages ▸ Update to Latest Package Versions to update.
Fixes Push Story integration via CocoaPods for applications that have use_frameworks! in their Podfile.
3.33.0
Breaking
Changed Push Story integration to use XCFrameworks for Cocoapods and manual integration. Applications currently integrating Push Stories via Cocoapods or manual integration must follow these steps when updating:
In your Notification Content Extension target:
Remove AppboyPushStory.framework from Frameworks and Libraries under the General tab.
In your application target:
Delete the Copy File build phase copying the AppboyPushStory.framework to the Frameworks destination.
Delete the Run Script build phase that starts with:
1
2
3
4
APP_PATH="${TARGET_BUILD_DIR}/${WRAPPER_NAME}"

find "$APP_PATH" -name 'AppboyPushStory.framework' -type d | while read -r FRAMEWORK
...
Fixes a double redirection bug in Push Stories when the app is in a terminated state and the UNUserNotificationCenter delegate is not the AppDelegate.
3.32.0
Added
Adds Mac Catalyst support for apps integrating with Swift Package Manager (SPM).
Please follow the instructions here to import the SDK with SPM. The SDK does not currently support Mac Catalyst when integrated through Cocoapods or Carthage.
Fixes the formatting of Full and Slideup in-app messages when displaying on iPhone 12 mini.
Changed
Improves Push Story click tracking handling.
3.31.1
Breaking
Removes the method getSDWebImageProxyClass from ABKUIUtils.
You can access the public class ABKSDWebImageProxy directly by importing ABKSDWebImageProxy.h.
Fixed
Fixes a bug in the Cocoapods integration that would lead to SDK localizations being embedded for languages not explicitly supported in the app.
Fixes a rare crash that would occur when no windows exist at UIWindowLevelNormal while an in-app message is being displayed and UIKit requests UI updates (orientation change, etc.).
Fixes a bug in modal in-app messages where some languages (such as Burmese) may have clipped text.
3.31.0
Breaking
For apps that have previously integrated through Swift Package Manager, please perform the following steps:
In the Xcode menu, click Product > Scheme > Edit Scheme...
Click the expand ▶️ next to Build and select Post-actions. Press + and select New Run Script Action.
In the dropdown next to Provide build settings from, select your app’s target.
If you are updating from 3.29.0 or 3.29.1, remove the Run Script Action previously specified in the 3.29.0 section of this changelog.
Added
Adds Push Stories support for apps integrating with Swift Package Manager.
In your app content extension’s target, under Build Settings > Other Linker Flags, add the -ObjC linker flag.
Changed
Updates the email validation on the SDK to be more lenient in favor of more accurate validation by the Braze backend. Valid emails with uncommon patterns or international characters that were previously rejected will now be accepted.
Deprecates ABKDeviceWhitelistKey in favor of ABKDeviceAllowlistKey.
Fixed
Fixes a bug in HTML in-app messages where some native WebKit UI elements could be unresponsive.
3.30.0
Breaking
Body click analytics will no longer automatically be collected for HTML in-app messages created using the HTML Upload with Preview option in the platform.
To continue to receive body click analytics, you must log body clicks explicitly from your message via Javascript using appboyBridge.logClick().
Fixed
Fixes a bug with Full in-app messages where the button positions did not match the preview on the Braze dashboard.
Fixes a bug where in-app messages would be displayed below the application window under specific conditions.
Apps that set up their window asynchronously at startup could accidentally hide the in-app message window if one was being displayed (e.g. as a result of clicking on a test in-app message notification).
Added
Adds support for custom endpoints with a scheme included (https, http, etc.). For example, http://localhost:3001 will no longer result in https://http://localhost:3001 as the resolved endpoint.
3.29.1
Added
Adds improved support for in-app message display on iPhone 12 models.
3.29.0
Added
Adds initial support for Swift Package Manager. There are 2 new packages that have been added: AppboyKit for the core SDK and AppboyUI for the full SDK (including UI elements), which correspond to the Appboy-iOS-SDK/Core and Appboy-iOS-SDK pods, respectively.
Note that tvOS support is not available via Swift Package Manager for this release. Push Stories is only available through a side-by-side integration with Cocoapods.
To add the package to your project follow these steps:
Select File > Swift Packages > Add Package Dependency.
In the search bar, enter https://github.com/Appboy/Appboy-ios-sdk.
Select one of AppboyKit or AppboyUI. Note that AppboyUI includes AppboyKit automatically.
In your app’s target, under Build Settings > Other Linker Flags, add the -ObjC linker flag.
In the Xcode menu, click Product > Scheme > Edit Scheme...
Click the expand ▶️ next to Build and select Post-actions. Press + and select New Run Script Action.
In the dropdown next to Provide build settings from, select your app’s target.
Removes userNotificationWasSentFromAppboy: and pushNotificationWasSentFromAppboy: on Appboy. Use isAppboyUserNotification: and isAppboyRemoteNotification: in ABKPushUtils instead.
Updates ABKURLDelegate’s method signature for handleAppboyURL:fromChannel:withExtras: to include nullability annotations required for proper Swift support.
Fixed
Fixes a race condition in Appboy method wipeDataAndDisableForAppRun where certain persisted fields would still be available immediately after calling the method. These fields now are removed synchronously.
Changed
Updated SDWebImage to use version 5.9.x.
3.27.0
Breaking
Adds support for iOS 14. Requires Xcode 12.
Removes the ABK_ENABLE_IDFA_COLLECTION preprocessor macro from the SDK.
Updates the ABKIDFADelegate protocol by renaming isAdvertisingTrackingEnabled to isAdvertisingTrackingEnabledOrATTAuthorized to reflect the addition of the AppTrackingTransparency framework in iOS 14.
If you use the Ad Tracking Enabled segment filter on the Braze dashboard or are implementing AppTrackingTransparency, you must update your integration to use AppTrackingTransparency to read the correct user status. Please see our sample app for implementation details.
If you do not use the Ad Tracking Enabled segment filter and are not implementing AppTrackingTransparency yet, your implementation of isAdvertisingTrackingEnabledOrATTAuthorized may temporarily continue to use isAdvertisingTrackingEnabled. However, the returned value will always be NO in iOS 14, regardless of actual IDFA availability.
Note that Apple announced that they will delay the enforcement of upcoming IDFA changes until early 2021. Please reference our iOS 14 upgrade guide for more details.
Updates the minimum required version of SDWebImage from 5.0 to 5.8.2.
Integrators will now be required to exclude the arm64 simulator slice in their entire project.
This is done automatically when integrating via Cocoapods.
For other cases:
If you are using xcconfig files to build your app, please set:
For iOS targets: EXCLUDED_ARCHS[sdk=iphonesimulator*] = arm64
For tvOS targets: EXCLUDED_ARCHS[sdk=appletvsimulator*] = arm64
If you are using the Xcode Build Settings panel, enable Build Active Architecture Only for the configuration you use to run your app on the simulator. (ONLY_ACTIVE_ARCH = YES)
3.26.1
Changed
Deprecates the compilation macro ABK_ENABLE_IDFA_COLLECTION in favor of the ABKIDFADelegate implementation.
ABK_ENABLE_IDFA_COLLECTION will not function properly in iOS 14. To continue collecting IDFA on iOS 14 devices, please upgrade to Xcode 12 and implement App Tracking Transparency and Braze’s ABKIDFADelegate (see the iOS 14 upgrade guide for more information).
Added
Adds improved support for iOS 14 Approximate Location tracking.
3.26.0
Breaking
Removed readonly property overrideApplicationStatusBarHiddenState in ABKInAppMessageViewController.h.
Fixed
Fixes an issue with in-app messages not respecting the application’s status bar style when View controller-based status bar appearance (UIViewControllerBasedStatusBarAppearance) is set to YES in the Info.plist.
Fixes an issue which can lead to text being cut off in Content Cards for specific iPhone models.
Fixes an issue preventing test Content Cards from displaying under specific conditions.
Changed
Added Binary Project Specification file for more efficient Carthage integration of the full SDK.
Update your Cartfile to use binary "https://raw.githubusercontent.com/Appboy/appboy-ios-sdk/master/appboy_ios_sdk_full.json"
Support for this integration method was added starting with version 3.24.0 of the SDK.
Added
Adds support for specifying PushStoryAppGroup in the Appboy dictionary in your app’s Info.plist. This Apple App Group will share the Braze Push Story information such as Campaign IDs between applications from a single Apple Developer account.
Adds appboyBridge.getUser().addAlias(alias, label) to the javascript interface for HTML in-app messages.
Adds the property overrideUserInterfaceStyle to ABKInAppMessage that allows forcing Light or Dark mode in the same way as Apple’s UIViewController.overrideUserInterfaceStyle.
Adds the ability to dismiss modal in-app messages when the user clicks outside of the in-app message.
This feature is disabled by default.
You can enable the feature by adding the Appboy dictionary to your Info.plist file. Inside the Appboy dictionary, add the DismissModalOnOutsideTap boolean subentry and set the value to YES.
You can also enable the feature at runtime by setting ABKEnableDismissModalOnOutsideTapKey to YES in appboyOptions.
3.25.0
Breaking
Removes the arm64e architecture when building with Cocoapods.
Removes the deprecated property appWindow from ABKInAppMessageWindowController.
3.24.2
Fixed
Fixes an issue with post-dismissal view hierarchy restoration for in-app messages under specific conditions.
Fixes an issue introduced in 3.24.0 breaking the SDK compatibility with Cocoapods.
3.24.0
Important This release is not compatible with Cocoapods. Do not upgrade to this version and upgrade to 3.24.1 and above instead.
Breaking
Renames ABKInAppMessageWindow’s catchClicksOutsideInAppMessage to handleAllTouchEvents.
Fixed
Fixes an issue where the unread indicator on a Content Card would persist even after being read.
Fixes an issue preventing long texts from displaying correctly in Full in-app messages.
Fixes an issue where appboyBridge would not work in an Ajax callback within HTML In-App Messages.
Changed
Changes the manual integration steps for versions 3.24.0 and newer. Please follow the updated integration steps here.
Added
Adds support for JavaScript functions window.alert(), window.confirm() and window.prompt() in HTML in-app messages.
Adds the ABKContentCardsTableViewControllerDelegate protocol to more intricately handle Content Card clicks using the methods contentCardTableViewController:shouldHandleCardClick: and contentCardTableViewController:didHandleCardClick:.
3.23.0
Fixed
Fixes an issue with regex based event property triggers not working as expected. Previously on iOS they had to match the entire string, now they will search for matches as expected.
Improves resiliency when handling multiple background requests.
Added
Adds support for upcoming HTML In-App Message templates.
Adds support for applications using scenes (UIWindowSceneDelegate). In-app messages are now properly displayed in that context.
3.22.0
Breaking
Removes the key ABKInAppMessageHideStatusBarKey from appboyOptions and the property forceHideStatusBar from ABKInAppMessageController. Full screen in-app messages are now always displayed with the status bar hidden.
Adds Dark Mode support to Content Cards. This feature is enabled by default and can be disabled by setting enableDarkTheme property to NO on ABKContentCardsTableViewController before the view controller is presented.
Fixed
Fixes an issue in HTML in-app messages where button clicks weren’t correctly being attributed for mailto: and tel: links.
Fixes an issue in HTML in-app messages where videos would be displayed underneath the in-app message when full screen playback was enabled. The in-app message UIWindow’s windowLevel is now set to UIWindowLevelNormal instead of being above UIWindowLevelStatusBar.
Fixes an issue in Content Cards where ABKURLDelegate was not being respected when opening links.
Added
Adds appboyBridge.logClick(id), appboyBridge.logClick() and appboyBridge.getUser().setCustomLocationAttribute(key, latitude, longitude) to the javascript interface for HTML in-app messages.
Adds Czech and Ukrainian language support for Braze UI elements.
Adds the ability to unset the current user’s email attribute by setting the email property of the current ABKUser instance to nil (e.g. [Appboy sharedInstance].user.email = nil;).
Adds Dark Mode support to Push Stories.
Adds the ability to set maximum width of Content Cards by using the maxContentCardWidth property of ABKContentCardsTableViewController.
3.21.3
Added
Adds an option to disable automatic geofence requests.
You can do this in the plist by adding the Appboy dictionary to your Info.plist file. Inside the Appboy dictionary, add the DisableAutomaticGeofenceRequests boolean subentry and set the value to YES.
You can also disable automatic geofence requests at runtime by setting ABKDisableAutomaticGeofenceRequestsKey to YES in appboyOptions.
Adds the method requestGeofencesWithLongitude:latitude: to Appboy.h. This method can be called whenever you explicitly want Braze to send a request for updated Geofences information. This call is rate limited to once per user session.
3.21.2
Fixed
Fixes an issue in HTML in-app messages where, during display, the viewport would shift down if the keyboard was opened but not shift back up when the keyboard was closed.
Fixes an issue introduced in 3.17.0 where the SDK would give precedence to the endpoint passed in Info.plist if given both an endpoint from the Info.plist and appboyOptions.
Added
Adds the ability to set a custom WKWebViewConfiguration for HTML in-app messages. You can set it using the method setCustomWKWebViewConfiguration in ABKInAppMessageUIDelegate.
Changed
Removes calls to deprecated APIs statusBarOrientation and statusBarFrame.
Un-deprecates the following push utility methods: isUninstallTrackingUserNotification:, isUninstallTrackingRemoteNotification:, isGeofencesSyncUserNotification:, isGeofencesSyncRemoteNotification:, and isPushStoryRemoteNotification: from ABKPushUtils. These APIs were originally deprecated in 3.16.0.
3.21.1
Fixed
Fixes an issue for Modal and Full in-app messages where the opacity value of the close X button was not being respected.
Changed
ABKContentCard.m will now log a click event when logContentCardClicked is called and no URL field is populated.
Added
Adds the ability to force the status bar to hide when a Full or HTML in-app message is being actively displayed. To opt in to this feature, set ABKInAppMessageHideStatusBarKey to YES in appboyOptions.
3.21.0
Breaking
Requires XCode 11.
Fixed
Fixes an issue in the animate-in behavior of HTML in-app messages that could cause a brief flicker before the message displayed on older devices and simulators.
Fixes an issue with Slideup in-app messages where they would cover part of the status bar when animating from the top on non-notched devices.
Fixes an issue introduced in 3.14.1 where boolean-typed event properties would be improperly cast to numbers.
Changed
Updates the logging format for debug, warn, and error ABKLogger messages to now print their log level.
Added
Adds support for the upcoming feature, in-app messages with Dark Mode support.
Dark Mode enabled messages must be created from the dashboard. Braze does not dynamically theme in-app messages for Dark Mode.
This feature is enabled by default for all new ABKInAppMessage instances. To prevent Braze from automatically applying a Dark Theme when the fields are available on Braze’s servers, set the enableDarkTheme flag on ABKInAppMessage to NO in the beforeInAppMessageDisplayed: method of your ABKInAppMessageControllerDelegate delegate implementation.
Adds the ability to reference the Braze iOS SDK API from Swift when using the Appboy-tvOS-SDK pod. Adding import AppboyTVOSKit to the top of your Swift file while using the Appboy-tvOS-SDK pod will give you equivalent behavior to adding import Appboy_iOS_SDK while using the Appboy-iOS-SDK pod.
Adds the populateContentCards: method and the cards property to ABKContentCardsTableViewController’s public interface. By setting the cards property from within populateContentCards:, you may manipulate ABKContentCard field data and/or control which ABKContentCard instances are displayed from the context of a custom ABKContentCardsTableViewController subclass.
3.20.4
Fixed
Fixed an issue with Content Cards where the header and description text fields would appear to be missing in Dark Mode.
Added
Adds a TEALIUM SDK flavor option.
3.20.3
Added
If Automatic Braze location collection is enabled, the SDK now submits a session start location request if location hasn’t already been sent up for the session after any affirmative location permission prompt. This also applies to the new “Allow Once” option in iOS 13.
3.20.2
Important If you are on Braze iOS SDK 3.19.0 or below, we recommend upgrading to this version immediately to ensure uninterrupted collection of new push tokens as users upgrade to iOS 13.
In application:didRegisterForRemoteNotificationsWithDeviceToken:, replace
If you are on Braze iOS SDK 3.19.0 or below and unable to upgrade, you must ensure your [Appboy registerPushToken] implementation does not rely on stringWithFormat or description for parsing the deviceToken passed in from application:didRegisterForRemoteNotificationsWithDeviceToken:. Please reach out to your Customer Success Manager for more information.
Important In Braze iOS SDK 3.19.0, we updated our HTML in-app message container from UIWebview to WKWebView, however, the initial releases have known issues displaying HTML in-app messages. If you are currently using 3.19.0, 3.20.0, or 3.20.1, you are strongly encouraged to upgrade if you make use of HTML in-app messages. Please see the following for more important information about the transition to WKWebView:
If you are utilizing customization for HTML in-app messages (such as customizing ABKInAppMessageHTMLFullViewController or ABKInAppMessageHTMLViewController), we strongly recommend testing to ensure your in-app messages continue to display correctly and interactions function as intended.
The following javascript methods are now no-ops: alert, confirm, prompt.
Deep links without schemes are no longer supported. Ensure that your in-app message deep links contain schemes.
Fixed
Fixes an issue introduced in 3.19.0 where HTML in-app messages would not register user clicks when the .xib failed to load.
Fixes an issue introduced in 3.19.0 where HTML in-app messages with select special characters and an assets zip would cause display irregularities.
Changed
Updates the WKWebView which displays HTML in-app messages with the following attributes:
suppressesIncrementalRendering is set to true
mediaTypesRequiringUserActionForPlayback is set to WKAudiovisualMediaTypeAll
Updates the background color of the WKWebView which displays HTML in-app messages from [[UIColor blackColor] colorWithAlphaComponent:.3] to [UIColor clearColor].
3.20.1
Important This release has known issues displaying HTML in-app messages. Do not upgrade to this version and upgrade to 3.20.2 and above instead. If you are using this version, you are strongly encouraged to upgrade to 3.20.2 or above if you make use of HTML in-app messages.
Fixed
Fixes an issue introduced in 3.19.0 which changed the background of HTML in-app messages to a non-transparent color.
Improves the robustness of push token collection code for iOS 13 introduced in 3.20.0.
3.20.0
Important This release has known issues displaying HTML in-app messages and a known issue with push token collection. Do not upgrade to this version and upgrade to 3.20.2 and above instead. If you are using this version, you are strongly encouraged to upgrade to 3.20.2 or above if you make use of HTML in-app messages.
Breaking
Introduced a signature change for push token collection methods:
Important This release has known issues displaying HTML in-app messages. Do not upgrade to this version and upgrade to 3.20.2 and above instead. If you are using this version, you are strongly encouraged to upgrade to 3.20.2 or above if you make use of HTML in-app messages.
Breaking
Replaces UIWebView with WKWebView for HTML in-app messages.
If you are utilizing customization for HTML in-app messages (such as customizing ABKInAppMessageHTMLFullViewController or ABKInAppMessageHTMLViewController), you must test to ensure your in-app messages continue to display correctly and interactions function as intended.
The following javascript methods are now no-ops: alert, confirm, prompt.
Deep links without schemes are no longer supported. Please ensure that your in-app message deep links contain schemes.
3.18.0
Breaking
Automatic Braze location collection is now disabled by default. If you choose to use our location collection, you must explicitly enable location collection.
You can do this in the plist by adding the Appboy dictionary to your Info.plist file. Inside the Appboy dictionary, add the EnableAutomaticLocationCollection boolean subentry and set the value to YES.
You can also enable location at runtime by setting ABKEnableAutomaticLocationCollectionKey to YES in appboyOptions.
Removes the Feedback feature from the SDK. The Feedback subspec and all Feedback methods on the SDK, including [[Appboy sharedInstance] submitFeedback] and [[Appboy sharedInstance] logFeedbackDisplayed], are removed.
Changed
Improves support for in-app messages on “notched” devices (for example, iPhone X, Pixel 3XL). Full-screen messages now expand to fill the entire screen of any phone, while covering the status bar.
Added
Adds the ability to enable Braze Geofences without enabling Braze location collection. You can set this in the plist by adding the Appboy dictionary to your Info.plist file. Inside the Appboy dictionary, add the EnableGeofences boolean subentry and set the value to YES to enable Braze Geofences. You can also enable geofences at runtime by setting ABKEnableGeofencesKey to YES in appboyOptions.
If this key is not set, it will default to the status of automatic location collection (see breaking change above).
Note that Braze Geofences will continue to work on existing integrations if location collection is enabled and this new configuration is not present. This new configuration is intended for integrations that want Braze Geofences, but not location collection enabled as well.
3.17.0
Breaking
Removes ABKAppboyEndpointDelegate.
You can now set the endpoint at runtime by setting the value of ABKEndpointKey in appboyOptions to your custom endpoint (ex. sdk.api.braze.eu) at initialization.
3.16.0
Important: If you are using ABKAppboyEndpointDelegate, you will need to replace dev.appboy.com with sdk.iad-01.braze.com in the getApiEndpoint method.
Breaking
Removes the methods: allowRequestWhenInUseLocationPermission and allowRequestAlwaysPermission from ABKLocationManager.
To request when in use location permission, use the following code:
The preprocessor macro ABK_DISABLE_LOCATION_SERVICES is no longer needed.
Important: Configuring geofences to request always location permissions remotely from the Braze dashboard is no longer supported. If you are using Geofences, you will need to ensure that your app requests always location permission from your users manually.
ABKAutomaticRequestProcessingExceptForDataFlush is deprecated. Users using ABKAutomaticRequestProcessingExceptForDataFlush should switch to ABKManualRequestProcessing, as the new behavior of ABKManualRequestProcessing is identical to the previous behavior of ABKAutomaticRequestProcessingExceptForDataFlush
Changed
Deprecates the push utility methods: isUninstallTrackingUserNotification:, isUninstallTrackingRemoteNotification:, isGeofencesSyncUserNotification:, isGeofencesSyncRemoteNotification:, and isPushStoryRemoteNotification: from ABKPushUtils. Please use the function isAppboyInternalRemoteNotification:.
Minor changes to the logic of ABKManualRequestProcessing. The original ABKManualRequestProcessing had specific exceptions and behaved more like ABKAutomaticRequestProcessingExceptForDataFlush in practice. As a result, the two policies have been merged into ABKManualRequestProcessing. Note that the new definition of ABKManualRequestProcessing is that periodic automatic data flushes are disabled. Other requests important to basic Braze functionality will still occur.
3.15.0
Important: If you are using ABKAppboyEndpointDelegate, you will need to replace dev.appboy.com with sdk.iad-01.braze.com in the getApiEndpoint method.
Breaking
Adds support for SDWebImage version 5.0.
Note that upgrading to SDWebImage 5.0 also removed the FLAnimatedImage transitive dependency from the SDK.
3.14.1
Important: If you are using ABKAppboyEndpointDelegate, you will need to replace dev.appboy.com with sdk.iad-01.braze.com in the getApiEndpoint method.
Changed
Changed in-app message trigger behavior to not perform trigger events until after any pending trigger sync requests to the server have finished.
Fixed
Fixed a serialization issue that could cause improper type conversions for certain decimal values.
Fixed a behavior introduced in 3.12.0 which caused in-app messages to not be considered triggered locally if ABKDiscardInAppMessage was returned by the host app in beforeInAppMessageDisplayed:.
Added
Added the ability to set the session timeout via the Info.plist.
Add the Appboy dictionary to your Info.plist file. Inside the Appboy Dictionary, add the SessionTimeout Number subentry and set the value to your session timeout.
Added the ability to disable location tracking via the Info.plist.
Add the Appboy dictionary to your Info.plist file. Inside the Appboy Dictionary, add the DisableAutomaticLocation Boolean subentry and set the value to YES.
Added dynamic cell resizing for Content Cards cells with templated images in our default Content Cards UI.
Added validation to the local filename’s canonical path during zip file extraction.
3.14.0
Important: If you are using ABKAppboyEndpointDelegate and plan to upgrade to 3.14.1, you will need to replace dev.appboy.com with sdk.iad-01.braze.com in the getApiEndpoint method.
Added
Improves the look and feel of In-App Messages to adhere to the latest UX and UI best practices. Changes affect font sizes, padding, and responsiveness across all message types. Now supports button border styling.
3.13.0
Breaking
Upgrades the delivery mechanism of Push Stories to allow delivery even after a user’s app has been force closed..
Required: Please change your integration to use ab_cat_push_story_v2 instead of ab_cat_push_story for the UNNotificationExtensionCategory in your content extension. See documentation for more details.
Changed
Improves in-app message triggering logic to fall back to lower priority messages when the Braze server aborts templating (e.g. from a Connected Content abort in the message body, or because the user is no longer in the correct Segment for the message).
Updates German translations to improve formatting.
3.12.0
Breaking
Drops support for iOS 8.
Adds support for the arm64e architecture when building with Cocoapods. Requires Xcode 10.1.
Fixed
Fixes bitcode support for the Push Story framework when using Xcode 10.
Cross-Promotion cards have also been removed as a card model and will thus no longer be returned.
3.11.0
Added
Adds the ability to set or remove custom location attributes for a specific user from within HTML IAMs.
Updates the SDK to report users who disable banner notifications but are still opted-in to push notifications as push enabled. Note this change does not affect provisionally authorized users on iOS 12, who were considered push enabled before this release regardless of their banner notification settings.
Adds Carthage Core support which allows for integration with the core Braze SDK without any UI components. To implement the core SDK, add binary "https://raw.githubusercontent.com/Appboy/appboy-ios-sdk/master/appboy_ios_sdk_core.json" to your Cartfile.
Changed
Deprecates the Feedback feature.
Fixed
Fixes an issue with the JS bridge when trying to set a custom attribute with the character ‘&’.
3.10.0
Added
Adds the ability to specify a whitelist for device fields that are collected by the Braze SDK.
Configurable device fields are defined in the ABKDeviceOptions enum.
To specify whitelisted device fields, assign the bitwise OR of desired fields to ABKDeviceWhitelistKey in the appboyOptions of startWithApiKey:inApplication:withAppboyOptions:.
For example, to specify timezone and locale collection to be whitelisted, set appboyOptions[ABKDeviceWhitelistKey] = @(ABKDeviceOptionTimezone | ABKDeviceOptionLocale);.
To turn off all fields, set appboyOptions[ABKDeviceWhitelistKey] = @(ABKDeviceOptionNone);.
By default, all fields are enabled.
Added the clicked property to ABKContentCard. Clicks made through [ABKContentCard logContentCardClicked] are now saved locally on the device.
Breaking
Removes ABKSignificantChangeCollectionEnabledOptionKey, ABKSignificantChangeCollectionDistanceFilterOptionKey, and ABKSignificantChangeCollectionTimeFilterOptionKey from the Appboy interface.
Removed
Removes the ability to optionally track locations in the background.
Fixed
Fixes an issue where Slideup and Full In-App Message content could be obscured by the notch on iPhone XR and iPhone XS Max.
3.9.0
Breaking
Adds support for iOS 12. Requires Xcode 10.
Fixed
Fixes minor issues with subclassing ABKInAppMessageModalViewController and News Feed request timeouts.
Thanks @datkinnguyen for your contribution.
3.8.4
Fixed
Fixes a regression introduced in version 3.8.3 that caused background tasks to extend beyond execution time.
3.8.3
Fixed
Fixes an issue where ABKContentCardsController unviewedContentCardCount would always return 0.
Changed
Updates the Content Cards UI with minor layout improvements.
3.8.2
Fixed
Fixes an issue with possible build failure when using Content Cards related to duplicate image names in Content Cards and News Feed pods. Please use this version if integrating Content Cards.
Changed
Updates the Content Cards UI with minor layout improvements.
3.8.1
Fixed
Important: Fixes an issue with Content Cards syncing. Note: As additional fixes were added in later versions, please use Braze iOS SDK version 3.8.2 or above if integrating Content Cards.
3.8.0
Added
In ABKUser class, addLocationCustomAttributeWithKey:latitude:longitude: and removeLocationCustomAttributeWithKey: methods are added to manage location custom attributes.
Introduces support for the upcoming Content Cards feature, which will eventually replace the existing News Feed feature and adds significant capability. This feature is currently in closed beta testing; if you’re interested in joining the beta, please reach out to your Customer Success Manager or Account Manager.
Changed
Status bar is not obscured when displaying a full screen in-app message.
3.7.1
Changed
Improves data handling immediately following a user change to bring behavioral parity with the Android and Web SDKs.
3.7.0
Breaking
In ABKInAppMessageUIControlling protocol, getCurrentDisplayChoiceForControlInAppMessage method is added to define whether the control in-app message impression should be logged now, later or discarded.
In ABKInAppMessageControllerDelegate protocol, beforeControlMessageImpressionLogged method is added to define whether the control in-app message impression should be logged now, later or discarded.
Added
CLLocationManager authorization requests can now be prevented from compiling by setting a Preprocessor flag ABK_DISABLE_LOCATION_SERVICES.
Fixed
Fixes an issue where in-app messages triggered on session start could potentially be templated with the old user’s attributes.
3.6.0
Breaking
In ABKSDWebImageProxy.h, renames removeImageForKey to removeSDWebImageForKey and clearCache to clearSDWebImageCache to avoid conflicts with internal Apple API. Important: We have received reports of sporadic App Store rejection stemming from Apple’s static checks mistaking our APIs for an invalid usage of the internal Apple API. We recommend new App Store submissions integrating the Braze iOS SDK ship with this version or above to decrease the likelihood of rejection.
Added
Exposes handleCardClick on ABKNewsFeedTableViewController.h to enable custom handling via subclassing.
Improves News Feed image handling on iPad.
3.5.1
Fixed
Fixes an issue with integrating the NewsFeed subspec in Swift projects via Cocoapods.
3.5.0
Breaking
Open sources the News Feed UI code and moves it into a new subspec named “NewsFeed”.
Manual integrators must now add the AppboyUI folder of this repository to their projects as a group, in addition to AppboyKit.
The “NewsFeed” subspec contains the Braze News Feed UI and the Core SDK. It does not include the Feedback or In-App Message UI.
The “UI” subspec contains all Braze UI and the Core SDK subpsec.
ABKFeedViewControllerDelegate was removed.
To integrate a navigation context News Feed, use the following code:
Removes NUI support for Feedback, In-App Messages, and the News Feed.
All customization can now be done by using categories or by extending our open sourced view controllers.
Removes deprecated ABKPushURIDelegate from the SDK. Use ABKURLDelegate instead.
3.4.0
Breaking
Adds preferredOrientation to ABKInAppMessageUIController and ABKInAppMessageWindowController.
Removes supportedOrientations from ABKInAppMessageUIController and ABKInAppMessageWindowController.
Renames supportedOrientationMasks to supportedOrientationMask in ABKInAppMessageUIController and ABKInAppMessageWindowController.
Fixed
Fixes an issue that caused GIFs to not animate on SDWebImage versions above or equal to 4.3.0
3.3.4
Added
Adds the ability to view verbose logs from the SDK for debugging.
To enable verbose logging, add a dictionary named Appboy to your Info.plist file. Inside the Appboy Dictionary, add the LogLevel String subentry and set the value to “0”.
3.3.3
Added
Adds wipeDataAndDisableForAppRun: on the Appboy interface to support wiping all customer data created by the Braze SDK.
Adds disableSDK: and requestEnableSDKOnNextAppRun: to the Appboy interface to disable and re-enable the Braze SDK.
Fixed
Fixes an issue where events setting custom attribute arrays to nil would persist on the SDK beyond their useful life.
3.3.2
Changed
Updates the SDK with internal, non-functional improvements.
3.3.1
Added
Adds Other, Unknown, Not Applicable, and Prefer not to Say options for user gender.
Adds umbrella header files AppboyFeedback.h and AppboyInAppMessage.h for the Feedback and InAppMessage subspecs.
Fixed
Fixes an issue where the method beforeInAppMessageDisplayed: in class ABKInAppMessageControllerDelegate is not called when the host app is using the Core subspec.
3.3.0
Breaking
Open sources the In-App Message UI code and moves it into a new subspec named “InAppMessage”.
Manual integrators must now add the AppboyUI folder of this repository to their projects as a group, in addition to AppboyKit.
The “InAppMessage” subspec contains the Braze In-App Message UI and the Core SDK. It does not include Feedback or the News Feed UI.
The “UI” subspec contains all Braze UI and the Core SDK subpsec.
The open-sourced In-App Message view controllers offer backward compatible NUI support, although we recommend using categories or subclassing the In-App Message view controllers for customization as the NUI library isn’t actively maintained any more. Support for NUI customization will be removed in a future release.
Most delegate customization methods are moved from ABKInAppMessageControllerDelegate to ABKInAppMessageUIDelegate.
Fixes an issue introduced in version 3.0.0 which caused detailed device model information to not be collected by the SDK.
Fixes an issue where Braze’s Carthage framework did not support simulators.
3.2.2
Fixed
Fixes an issue where Slideup and Full In-App Message content could be obscured by the notch on iPhone X.
3.2.1
Fixed
Fixes an issue where Push Story Framework did not support bitcode.
3.2.0
Added
Adds Push Stories, a new push type that uses UNNotificationContentExtension to display multiple images in a single notification.
This feature requires iOS 10 and above.
Fixed
Fixes an issue where tvOS SDK did not support bitcode.
3.1.1
Added
Adds a new property language to ABKUser to allow explicit control over the user’s language in the Braze dashboard. Note that this is separate and independent from the language settings on the user’s device.
Adds an Objective-C sample app for the Core subspec of the SDK. See Samples/Core/ObjCSample.
Fixed
Fixes a bug introduced in version 2.30 where crashes could occur if the SDK was directed to handle a custom scheme deep link inside a WebView.
Fixes a bug introduced in version 3.0 where new custom attributes were not being flushed if custom attributes had been previously flushed in the same foregrounded session.
Fixes a bug introduced in version 3.0 where previously flushed custom attributes were being re-sent.
Fixes an issue where slow image fetching blocked image-only modal in-app messages from displaying.
Adds the ability to set a custom API endpoint via the Info.plist.
Add the Appboy dictionary to your Info.plist file. Inside the Appboy Dictionary, add the Endpoint String subentry and set the value to your custom endpoint (e.g., sdk.api.braze.eu).
Fixed
Fixes an issue where changing the IDFA settings through a third party wrapper could cause a crash.
3.0.1
Fixed
Fixes an issue where calling incrementCustomUserAttribute: on ABKUser could cause a crash.
3.0.0
Breaking
Removes the deprecated foursquareAccessToken property from ABKUser. To associate a Foursquare access token with a user profile, use setCustomAttributeWithKey:andStringValue: instead.
Note: Braze iOS SDK version 3.0.0 will only support downgrading to iOS SDK version 2.31.0. Downgrading to versions prior to 2.31.0 may result in app crashes.
Added
Adds a major performance upgrade that reduces CPU usage, memory footprint, and network traffic.
2.31.0
Breaking
Open sources the Feedback view controllers and moves them into a new subspec “Feedback”.
The “Feedback” subspec has the Braze Feedback UI and the Core SDK. It will not include in-app messages or News Feed UI.
Removes the popover context for Feedback due to the deprecation of UIPopoverViewController in iOS.
Renames the ABKFeedbackViewControllerModalContext and ABKFeedbackViewControllerNavigationContext class to ABKModalFeedbackViewController and ABKNavigationFeedbackViewController.
The open-sourced Feedback view controllers offer backward compatible NUI support, although we recommend using categories or subclassing the Feedback view controllers for customization as NUI library isn’t actively maintained any more. See here for customization details.
Adds user aliasing capability. Aliases can be used in the API and dashboard to identify users in addition to their ID. See the addAlias:withLabel: method on ABKUser for more information.
Changed
Updates the AppboyKit.h to include all the public header files in the SDK.
2.30.0
Breaking
Open sources the ABKModalWebViewController class, which is used to display the web URLs from push or in-app message clicks.
Drops NUI customization support for the navigation bar and navigation bar button item on ABKModalWebViewController. To customize the UI, create an ABKModalWebViewController category and override the corresponding method(s) exposed.
Open sources the ABKNoConnectionLocalization class, which provides Braze’s default localized string for “No Connection” error.
You can customize the localization by adding Appboy.no-connection.message as the key in your Localizable.strings files.
Removes the Appboy.bundle from the Core subspec of the SDK.
If you use the Core subspec, the in-app messages will not display, and trying to display Braze’s News Feed and Feedback UI will lead to unpredictable behavior.
2.29.1
Added
Adds a new property buttonTextFont to ABKInAppMessageButton. It allows clients to set customized fonts on in-app message buttons before the in-app message is displayed.
Fixed
Makes class ABKInAppMessageWindowController.h public.
Fixes an issue where device information was not flushed for a new user when server requests were queued for two or more users.
Changed
Removes the warnings in ABKSDWebImageProxy.
2.29.0
Breaking
Drops support for iOS 7.
Removes the shouldOpenURIExternally field from ABKInAppMessage.
Requires XCode 8.3.
Changes the behavior of the onCardClicked:feedViewController: method in ABKFeedViewControllerDelegate to let Braze handle the card click action if the delegate method returns NO.
Previously, Braze would handle the card click action if onCardClicked:feedViewController: returned YES.
This change standardizes delegate behavior with ABKInAppMessageControllerDelegate and ABKURLDelegate.
Added
Adds the property openUrlInWebView to ABKInAppMessage, ABKInAppMessageButton and ABKCard. This property determines if the URL associated with the object will be opened in a UIWebView.
Adds a Javascript interface to HTML in-app messages with ability to log custom events, log purchases, set user attributes, navigate users, and close the message.
Adds an abDeepLink query field to HTML in-app messages, which defaults to false. To prevent the SDK from opening deep links in a UIWebView, specify abDeepLink=true in your link (e.g., https://www.braze.com?abDeepLink=true).
Adds the ABKURLDelegate protocol for customizing URL handling across channels. Set the ABKURLDelegate by passing a delegate object to the ABKURLDelegateKey in the appboyOptions of startWithApiKey:inApplication:withAppboyOptions:. See our Stopwatch sample application for a Universal Link implementation sample.
Adds the following utility methods to ABKPushUtils for detecting if a push notification was sent by Braze for internal feature purposes:
These methods can be used to ensure that your app does not take any undesired or unnecessary actions upon receiving Braze’s internal content-available notifications (e.g., pinging your server for content).
Changed
Deprecates ABKPushURIDelegate. If you were previously using ABKPushURIDelegate, use ABKURLDelegate instead.
Deprecates userNotificationWasSentFromAppboy: and pushNotificationWasSentFromAppboy: on Appboy. Use isAppboyUserNotification: and isAppboyRemoteNotification: on ABKPushUtils instead.
Deprecates shouldFetchTestTriggersFlagContainedInPayload: on ABKPushUtils.
2.28.0
Breaking:
Removes support for watchOS 1, including Braze WatchKit SDK and all public APIs for watchOS in Braze iOS SDK.
Added
Adds ABKSDWebImageProxy to access the SDWebImage framework. This will prevent the Core subspec of the SDK from calling any SDWebImage methods directly.
2.27.0
Breaking
Removes the following deprecated items: the bio field of ABKUser, the setIsSubscribedToEmails: method of ABKUser, and the getResourceEndpoint: method of the ABKAppboyEndpointDelegate protocol.
Added
Adds support for registering geofences and messaging on geofence events. Please reach out to success@braze.com for more information about this feature.
Adds Braze default push categories which can be fetched from ABKPushUtils.
To use the Braze default push categories, you need to manually add the Braze categories when you register for push. You can get the Braze categories from [ABKPushUtils getAppboyUNNotificationCategorySet] or [ABKPushUtils getAppboyUIUserNotificationCategorySet].
In this version, we add four sets of push action buttons: accept/decline, yes/no, confirm/cancel, more. These will be available as button sets on the dashboard when creating an iOS push campaign.
All Braze push action buttons support localization.
Adds support for web link and deep link handling of push action buttons.
Fixed
Fixes the issue where the combination of the Core subspec of the SDK and a non-supported version of SDWebImage framework can cause apps to crash.
HTML in-app messages now log body click analytics on all links that are not appboy://customEvent and do not include the abButtonId query field. Previously, no body click analytics were logged.
Removed
Removes deprecated method - (NSString *)getResourceEndpoint:(NSString *)appboyResourceEndpoint from ABKAppboyEndpointDelegate.
Removes deprecated property bio and deprecated method - (BOOL)setIsSubscribedToEmails:(BOOL)subscribed from ABKUser.
2.26.0
Breaking
Adds support for SDWebImage version 4.0.0 with GIF support. SDWebImage version 3.x will not be supported from this version on. Please make sure you are using the correct version of SDWebImage.framework. Note: SDWebImage 4.0.0 relies on FLAnimatedImage - users integrating in ways besides CocoaPods should ensure they link the FLAnimatedImage framework if they want GIF support.
Removes the url property from subclasses of ABKCard. This property has been renamed to urlString and moved onto the ABKCard superclass.
Added
Adds Cocoapods subspecs “Core” and “UI”.
The “UI” subspsec has the full feature set of the current SDK. This is the default subspec when no subspec is specified in the Podfile.
The “Core” subspec removes the SDWebImage framework dependency. This is for apps who do not use any Braze UI that leverages images (News Feed, in-app messages). If you use the “Core” subspec, in-app messages with images will not display, and the News Feed will render with plain white images.
Makes ABKThemableFeedNavigationBar.h and ABKNavigationBar.h public.
Adds ABKIDFADelegate protocol that can be used to create a delegate to pass Braze the IDFA in startWithApiKey: in the appboyOptions dictionary under the ABKIDFADelegateKey key. Alternative to existing ABKIdentifierForAdvertisingProvider compile flag solution.
Changed
Disables the -webkit-touch-callout property on HTML in-app messages. Long presses and 3D Touch on links will no longer display pop-ups with additional link information.
2.25.0
Added
Adds the ability to set the ABKInAppMessageControllerDelegate when the SDK starts by passing a delegate object to the ABKInAppMessageControllerDelegateKey in the appboyOptions of startWithApiKey:inApplication:withAppboyOptions:.
This is the recommended way to set the ABKInAppMessageControllerDelegate and circumvents a potential race condition where in-app messages can be shown before the delegate has been set.
Exposes the ABKFeedback object and adds a new method - (void)submitFeedback:(ABKFeedback *)feedback withCompletionHandler:(nullable void (^)(ABKFeedbackSentResult feedbackSentResult))completionHandler; in Appboy. The new method accepts a completion handler which receives an ABKFeedbackSentResult enum as feedback sending result.
The possible feedback sending results are: invalid feedback object(ABKInvalidFeedback), fail to send feedback(ABKNetworkIssue), and feedback sent successfully(ABKFeedbackSentSuccessfully).
Adds the utility method - (BOOL)userNotificationWasSentFromAppboy:(UNNotificationResponse *)response; to Appboy. This method is compatible with the UserNotifications framework and returns whether a push notification was sent from Braze’s server.
Those using - (BOOL)pushNotificationWasSentFromAppboy:(NSDictionary *)options; who have integrated the UserNotifications framework should use this method instead.
Fixed
Changes the ABKInAppMessageButton from a UIButton object to a pure data model class in NSObject.
This resolves the issue https://github.com/Appboy/appboy-ios-sdk/issues/97.
Changed
Adds more protection around triggered in-app message display.
2.24.5
Fixed
Fixes an issue where in-app messages triggered off of push clicks wouldn’t fire when the push click happened before the in-app message configuration was synced to the device.
Changed
Updates push registration to flush the token to the server immediately.
Improves the accessibility of in-app messages and news feed cards.
When in voiceOver mode, the SDK auto-focuses on in-app messages when they appear and resets focus on dismissal.
VoiceOver no longer reads Braze internal labels.
News feed cards are enhanced to be more accessible.
2.24.4
Added
Adds protection around in-app message UI code to avoid displaying in-app messages with corrupted images.
Fixed
Fixes the iOS version number in the deprecation warnings in Appboy.h.
2.24.3
Breaking
Update REQUIRED for apps using Braze SDK 2.24.0, 2.24.1 or 2.24.2 with UserNotifications.framework
Fixed
Fixes an issue where a user’s foreground push enabled status could erroneously be marked as disabled.
This issue can occur when opening the app from suspended mode. At that time, the foreground push enabled status was defaulted to disabled until the UserNotifications.framework returned the user’s push authorization status. If the user closed the app within a few seconds, the SDK would not flush the updated push status and the user would mistakenly be marked as “push disabled”.
This issue only affected apps using UserNotifications.framework to register for push notifications.
The updated code stores the push authorization status on disk to fix the issue.
Fixes an issue where triggered in-app messages with event property templating did not respect re-eligibility settings.
Changed
Updates the Podspecs for iOS and tvOS SDK.
Updates deprecation warnings to specify iOS version.
Updates the ABKFeedController with more generic nullability.
Disables all data detectors on HTML in-app messages. Phone numbers, web URLs, addresses and calendar events will no longer be automatically converted.
Disables scrolling bounces on HTML in-app messages.
2.24.2
Fixed
Fixes an issue where HTML in-app messages loaded JavaScript more than once.
Fixes the Appboy.inAppMessage.webview.done-button.title string in the French localization file, which was named incorrectly and wasn’t being found.
2.24.1
Added
Adds nullability annotation for the completionHandler in userNotificationCenter :didReceiveNotificationResponse:withCompletionHandler.
2.24.0
Breaking
Updates the SDK to require XCode 8.
iOS 10 changes behavior of application:didReceiveRemoteNotification:fetchCompletionHandler and subsequently breaks open tracking and deep link handling on most existing Braze iOS integrations. If you don’t currently implement application:didReceiveRemoteNotification: you need to modify your integration, and we recommend that all users update.
Added
Updates the iOS and tvOS SDKs to support iOS 10.
Adds a new method - (void)userNotificationCenter:(UNUserNotificationCenter *)center didReceiveNotificationResponse:(UNNotificationResponse *)response withCompletionHandler:(void (^)())completionHandler. This method supports the new delegate method for push notification handling in UserNotification framework.
Changed
Deprecates two push delegate methods:
- (void)registerApplication:(UIApplication *)application didReceiveRemoteNotification:(NSDictionary *)notification and
- (void)getActionWithIdentifier:(NSString *)identifier forRemoteNotification:(NSDictionary *)userInfo completionHandler:(nullable void (^)())completionHandler.
2.23.0
Added
Adds support for upgraded in-app messages including image-only messages, improved image sizing/cropping, text scrolling, text alignment, configurable orientation, and configurable frame color.
Adds support for in-app messages triggered on custom event properties, purchase properties, and in-app message clicks.
Adds support for templating event properties within in-app messages.
Removed
Removes the deprecated method logSocialShare from Appboy class.
2.22.1
Changed
Updates tvOS bitcode support, patching an error introduced by an Xcode bug.
2.22.0
Added
Adds tvOS support for logging analytics; adds sample applications for tvOS and TVML.
Adds Hebrew localization support.
2.21.0
Breaking
Drops support for iOS 6.
Added
Adds support for deep links with non-URL-encoded characters. The SDK will encode unencoded url strings to create valid deep link NSURLs.
Fixed
Fixes a bug where the background of a slideup in-app message remained transparent when configured with 100% opacity.
Changed
Updates the podspec SDWebImage dependency to fetch the latest version.
Replaces SDK usage of NSURLConnection with NSURLSession.
Updates the SDK to always call canOpenURL: before opening a deep link. After this change, the SDK will only direct deep links whose schemes are whitelisted.
Updates push registration to immediately, asynchronously send up the push token.
2.20.1
Fixed
Fixes an issue where in certain conditions NSUserDefault blocking would cause custom events logged in the main thread to result in UI freezing.
Changed
Implements an optimization in push handling to not prefetch the News Feed when a push arrives and the app is in the background.
2.20.0
Added
Adds Carthage support.
Fixed
Fixes a multithreading issue where logging custom events from different threads would sporadically cause errors.
Fixes the issue where a close button’s color on modal and full in-app messages didn’t respect the opacity value.
Fixes an issue where failure to download HTML in-app message assets mid-download resulted in display without assets.
Changed
Now the onInAppMessageHTMLButtonClicked:clickedURL:buttonID: delegate method will be called every time a URL is clicked. The method used to be only called when there was a button ID in the URL link.
Updates the feedback element to reject messages that contain only whitespace.
Updates remote push handling to call the completion handler passed in every time (a code path previously existed that would return without calling it).
Removed
Removes the delegate method onInAppMessageHTMLButtonClicked:buttonID: from ABKInAppMessageControllerDelegate protocol.
2.19.3
Added
Adds a new feature allowing manual control of deep link handling in push notications. To use this, add a ABKPushURIDelegate value for the ABKPushURIDelegate key in the appboyOptions dictionary of startWithApiKey:inApplication:inApplication:withAppboyOptions:. Also updates the ABKPushURIDelegate integration to be initialized through that integration point.
Adds guarding against a possible crash caused by a user’s offline state being corrupted and not including an active session when a network request
occurred.
Fixed
Fixes an issue where duplicate data could be recorded when a force quit or crash occurs after a network request completed successfully, but before any other activity (such as leaving the app, putting it to sleep, updating an attribute or firing some other event or purchase) occurred.
2.19.2
Added
Adds warning when messaging doesn’t succeed because SDWebImage is not integrated.
Fixed
Fixes a bug where users who went from being eligible for triggered messages to not being eligible for any triggered messages didn’t see their local triggers configuration get updated. This has already been fixed with a server-side update for affected versions; this update fixes the issue client-side.
Changed
Updates headers to be compatible with Swift 2.2.
2.19.1
Added
Adds sample code for a universal link in Stopwatch.
Fixed
Fixes the benign issue that caused the log message *** -[NSKeyedUnarchiver initForReadingWithData:]: data is NULL.
Fixes an issue where NULL campaign IDs in push messages (e.g. from a REST API push message without a specified campaign id) resulted in push-clicked triggers for triggered in-app messages not firing.
Fixes an issue where calling changeUser between identified users caused the read/unread state of the news feed cards of the old user to be set as the new user’s read/unread states.
Fixes an issue where a user attribute value that had been set to multiple different values created a state that would not let you set the original value again. The bug was introduced in version 2.17.1.
Changed
Analytics are now logged for in-app messages and in-app message buttons with ‘ABKInAppMessageNoneClickAction’ click actions. ABKInAppMessageNoneClickAction is set when an in-app message on the dashboard has a click action that only closes the in-app message; formerly this did not count as a click.
2.19.0
Added
Adds support for action-based, locally triggered in-app messages. In-app messages are now sent to the device at session start with associated trigger events. The SDK will display in-app messages in near real-time when the trigger event associated with a message occurs. Trigger events can be app opens, push opens, purchases, and custom events.
Changed
Deprecates the old system of requesting in-app message display, now collectively known as ‘original’ in-app messaging, where messages were limited to displaying at app start.
2.18.4
Fixed
Fixes a Cocoapods issue that emerged during the release of 2.8.13.
2.18.3
Changed
Makes an internal update to provide functionality for SDKs that embed this library.
2.18.2
Added
Adds warning logging if [Appboy sharedInstance] is called while in an uninitialized state.
Changed
Deprecates the delegate method getResourceEndpoint: in ABKAppboyEndpointDelegate. The SDK will no longer call this delegate method.
2.18.1
Fixed
Fixes the nullability annotation warnings in the public header files.
Changed
Updates HelloSwift sample app to adopt swift 2.0.
2.18
Added
Adds nullability annotations to all Braze public APIs.
Adds a new delegate method to support custom push URI handle. For more detail, please see ABKPushURIDelegate.h;
Changed
Updates to auto-dismiss the Braze web view when a user returns to the app after following a link out of the app from an Braze web view.
Removed
Removes the deprecated method requestSlideupRefresh from Braze class.
2.17.1
Fixed
Fixes a bug where in certain conditions the SDK would resend user attributes that had already synced with the server.
2.17
Added
Adds a new button clicked delegate method for HTML in-app message. The new delegate method also passes the URL of the clicked button.
Fixed
Fixes the crash caused by inserting a nil object into an NSDictionary when parsing an event object.
Changed
Makes the WebView background for HTML in-app messages transparent. Ensure HTML in-app messages you send to the device are created expecting a transparent background.
Applies the Braze endpoint delegate methods to in-app messages’ resource(zip and image) fetching.
Removed
Removes the Facebook button from Feedback page.
2.16.1
Added
Adds the ability to log a custom event from an HTML in-app message. To log a custom event from an HTML in-app message, navigate a user to a url of the form appboy://customEvent?name=customEventName&p1=v2, where the name URL parameter is the name of the event, and the remaining parameters are logged as String properties on the event.
Adds the support for customization of the background color of modal in-app messages.
Fixed
Fixes an issue where daylight savings changes were not reflected in the user profile timezone.
Changed
Enables users to input text into HTML in-app messages by allowing HTML in-app messages to be displayed with a keyboard on screen. For all other in-app messages, the in-app message will be dismissed when a keyboard is displayed.
2.16
Added
Adds HTML In-App Message types.
HTML In-App Messages consist of HTML and a url of a zipped archive of assets (e.g. images, css) to download locally which the HTML can reference. See InAppMessageUIViewController in our Stopwatch sample app for an example for the callbacks on the actions inside the WebView hosting the HTML In-App Message.
Changed
Deprecates the method - (void) logSocialShare:(ABKSocialNetwork)socialNetwork and enum ABKSocialNetwork in the Appboy class. If you use logSocialShare: to track user’s social account sharing, you can use logCustomEvent: instead.
Deprecates the property bio in the ABKUser class.
2.15.1
Fixed
Fixes the warning “full bitcode bundle could not be generated because XXX was built only with bitcode marker”.
2.15
Changed
Updates the SDK to support iOS 9. In iOS9, previous versions of the SDK: 1) did not have bitcode support, 2) had a minor UI issue in in-app messages where the slideup messages were not docked on the bottom of the screen if they had one line of text, 3) failed to localize for zh-HK and zh-TW.
2.14
Breaking
Migrates the SDK to ARC. If you are using our Apple Watch Extension and not using ARC, you must apply -fobjc-arc to the extension files.
Added
Adds configurable session timeout feature.
Adds feedbackViewControllerBeforeFeedbackSent method to the feedback delegate protocols, which can be used to modify the feedback message before it’s sent to Braze.
Adds a setAttributionData method to ABKUser that sets an ABKAttributionData object for the user. To be used with attribution provider SDKs when attribution events are fired.
2.13.2
Changed
Increases the number of supported currency codes from 22 to 171. All common currency codes are now supported. The full list of supported codes is available at Appboy.h.
2.13.1
Changed
Updates the isUninstallTrackingNotification method in ABKPushUtils to return the correct value.
2.13
Added
Adds an open-source Watch SDK to support data analytics on watchKit apps. You can use the Appboy-WatchKit SDK by downloading and adding the “Appboy-WatchKit” folder in your watchKit extension target. For more detail, please refer to ABWKUser.h and AppboyWatchKit.h.
Adds an opt-in location service that logs background location events; adds ABKLocationManager with methods for allowing Braze to request location permission on your behalf and logging the current location. More information on the background location capabilities will be made available when dashboard support is released.
Adds client side blocking of blacklisted attributes and events.
Adds ABKPushUtils with method + (BOOL) isUninstallTrackingNotification:(NSDictionary *)userInfo; that can be used to detect if a content-available push is from Braze uninstall tracking (and shouldn’t be acted upon).
Adds a new property expiresAt in class ABKCard. The property is the unix timestamp of the card’s expiration time. For more detail, please refer to ABKCard.h.
Changed
Stops collecting user’s Twitter data automatically. You can pass a user’s Twitter information to Braze by initialzing a ABKTwitterUser object with the twitter data, and setting it to [Appboy sharedInstance].user.twitterUser. For more information, please refer to ABKUser.h and ABKTwitterUser.h.
Stops logging foreground push as a push open as it is not delivered by the system.
Removed
Removes the feature of prompting a user to connect his/her social account. You can refer to the method promptUserToConnectTwitterAccountOnDeviceAndFetchAccountData in TwitterViewController.m to continue prompting the user to connect the Twitter account.
2.12.2
Fixed
Fixes the slideup in-app message display issue. When the host app sets the launch screen file, slideup in-app message from bottom sometimes didn’t dock at the bottom of the screen on iPhone 6 and iPhone 6 Plus.
2.12.1
Added
Adds font and font size customization to all in-app message’s header and message text through NUI. You can customize in-app message’s font by adding ABKInAppMessageSlideupMessageLabel, ABKInAppMessageeModalHeaderLabel,ABKInAppMessageModalMessageLabel, ABKInAppMessageFullHeaderLabel, ABKInAppMessageFullMessageLabel to your NUI nss style sheet.
Fixed
Fixes news feed issue where no news feed cards resulted in the loading spinner remaining on screen.
Changed
Cleans up the console logging in Class ABKIdentifierForAdvertisingProvider.
2.12.0
Fixed
Fixes the incorrect path runtime error for users who integrate our pod as a dynamic framework. For SDK versions before 2.12, when you integrate Braze with use_frameworks! in the Podfile, the library is integrated as a dynamic framework and the Appboy.bundle is stored in a different path.
Changed
Changes HelloSwift sample app to integrate Braze SDK as a dynamic framework.
Removed
Removes the subspecs from the podspec. This fixes the duplicate symbol error https://github.com/Appboy/appboy-ios-sdk/issues/24. If you are still using subspec like pod 'Appboy-iOS-SDK/AppboyKit' in your podfile, please make sure to change it to pod 'Appboy-iOS-SDK'.
2.11.3
Added
Adds the ability to send and retrieve extra key-value pairs via a News Feed card.
Adds the ability to define custom key-value properties on a custom event or purchase. Property keys are strings and values may be NSString, NSDate, or NSNumber objects.
Added the fix for an edge case when there are extra UIWindows at the time in-app message is going to display, the in-app message would have issue during dismissing.
2.11.2
Changed
Updates the serialize and deserialize methods for in-app message classes. This is for use by wrappers such as Braze’s Unity SDK for iOS.
2.11.1
Fixed
Fixes a UI issue in modal in-app messages displayed on iPads running iOS 6/7.
2.11
Added
Adds support for modal and full screen style in-app messages. Also adds support for including fontawesome icons and images with in-app messages, changing colors on in-app message UI elements, expanded customization options, and message resizing for tablets. Please visit our documentation for more information.
Changed
Updates the completionHandler signature in getActionWithIdentifier:forRemoteNotification:completionHandler: to match the comletionHandler passed by the system in method - (void) application:(UIApplication *)application handleActionWithIdentifier:(NSString *)identifier forRemoteNotification:(NSDictionary *)userInfo completionHandler:(void (^)())completionHandler.
2.10.2
Added
Adds the fix for an edge case when there are extra UIWindows at the time in-app message is going to display, the in-app message would have issue during dismissing.
2.10.1
Fixed
Fixes a bug which would cause the host app to crash when a deep link was launched from a push notification. In versions 2.10.0 and 2.9.4, if the host app used [[Appboy sharedInstance] registerApplication: didReceiveRemoteNotification:]; instead of [[Appboy sharedInstance] registerApplication: didReceiveRemoteNotification: fetchCompletionHandler:];, opening a push with a deep link would crash the host app in some circumstances.
2.10.0
Changed
Updates the minimum deployment targets of Braze iOS SDK to iOS 6.0. For apps supporting lower iOS versions, please continue to use 2.9.+ versions of the Braze SDK.
Stops collecting user’s Facebook data automatically. You can pass a user’s Facebook information to Braze by initializing a ABKFacebookUser object with the facebook data, and set it to [Appboy sharedInstance].user.facebookUser. For more information, please refer to ABKUser.h and ABKFacebookUser.h.
Removed
Removes Facebook SDK dependent builds. Now there is a single library - AppboyKit - and a single Pod without functional subspecs - Appboy-iOS-SDK (note we now have both the subspecs pointing at the same library). Please update your Podfile to pod 'Appboy-iOS-SDK if you are integrating Braze with Cocoapods.
Removes the feature of prompting a user to connect his/her Facebook account. You can refer to the method promptUserToConnectFacebookAccountOnDeviceAndFetchAccountData in FacebookViewController.m to continue prompting the user to connect the Facebook account.
2.9.6
Added
Adds the fix for an edge case when there are extra UIWindows at the time in-app message is going to display, the in-app message would have issue during dismissing.
2.9.5
Fixed
Fixes a bug which would cause the host app to crash when a deep link was launched from a push notification. In versions 2.9.4, if the host app used [[Appboy sharedInstance] registerApplication: didReceiveRemoteNotification:]; instead of [[Appboy sharedInstance] registerApplication: didReceiveRemoteNotification: fetchCompletionHandler:];, opening a push with a deep link would crash the host app in some circumstances.
2.9.4
Added
Adds a major performance upgrade that reduces CPU usage, memory footprint, and network traffic.
Adds 26 additional languages to localization support for Braze UI elements.
Adds support for deep linking from APNS push notification clicks.
Adds ability to customize the font of Feedback text using NUI with NUI class name ABKFeedbackTextView.
Fixed
Fixes the feedback page UI issues in iOS 8: when the device’s orientation is UIInterfaceOrientationPortraitUpsideDown, the contact info bar was off.
Fixes in-app messages to display correctly in landscape mode in iOS 8.
Changed
Updates the SDK to adopt the latest SDWebImage protocol methods.
Removed
Removes the “required” labels on the feedback page.
2.9.3
Added
Adds a new method - (void) registerApplication:(UIApplication *)application didReceiveRemoteNotification:(NSDictionary *)notification fetchCompletionHandler:(void (^)(UIBackgroundFetchResult))completionHandler to support push with background fetch. This method should be called in - (void) application:(UIApplication *)application didReceiveRemoteNotification:(NSDictionary *)userInfo fetchCompletionHandler:(void (^)(UIBackgroundFetchResult))completionHandler. For more details, please refer to Appboy.h.
Adds a HelloSwift sample app to demo how to use Braze in a swift app.
Adds a new NSString property “displayPrice” in ABKCrossPromotionCard to enable server side price localization.
Fixed
Fixes a bug of when sessions were being created when the app opened in the background.
Fixes a bug where requesting the news feed with a news feed open led to card impressions not updating until the next feed refresh.
2.9.2
Added
Adds the ability to turn off Braze’s automatic location collection by setting the ABKDisableAutomaticLocationCollectionKey boolean in AppboyOptions in startWithApiKey:inApplication:inApplication:withAppboyOptions:.
Adds the ability to send location tracking events to Braze manually using setLastKnownLocationWithLatitude:longitude:horizontalAccuracy: and setLastKnownLocationWithLatitude:longitude:horizontalAccuracy:altitude:verticalAccuracy: on the ABKUser. this is intended to be used with ABKDisableAutomaticLocationCollectionKey set to true in the AppboyOptions so that locations are only being recorded from a single source.
Fixed
Fixes a news feed bug: sometimes the spinner keeps spinning on the screen even after the news feed card image is displayed.
Changed
Updates sample app core location fetching code based on the changes in iOS 8.
2.9.1
Fixed
Fixes a news feed bug: When a user refreshed the news feed by swiping down, if the total number of cards in the feed was going to be reduced by the refresh, the app would crash.
2.9.0
Fixed
Fixes an App Store validation error introduced when the App Store started accepting submissions for iOS8. This was done by changing the packaging of the Braze framework to include a universal binary and a resource bundle (instead of combining them both together in a universal framework). Due to this change, Cocoapod integration is even more highly recommended than before to fully automate integration.
2.8.1
Added
Adds a new method - (void) getActionWithIdentifier:(NSString *)identifier forRemoteNotification:(NSDictionary *)userInfo to collect analytics data for push actions in iOS 8. It should be called in the UIApplication delegate method - (void) application:(UIApplication *)application handleActionWithIdentifier:(NSString *)identifier forRemoteNotification:(NSDictionary *)userInfo completionHandler:(void (^)())completionHandler. For more details, please refer to Appboy.h.
New Custom Attribute Data Type (Array): Braze now supports custom attributes which contain an array of string elements. In addition, we also provide methods for adding or removing an string element from an array type custom attribute. For more information, please refer to ABKUser.h.
Users can now pull down on the Braze Newsfeed to refresh the content on iOS version 6.0 or later.
Changed
Restricts product identifier string to 255 characters for method - (void) logPurchase:(NSString *)productIdentifier inCurrency:(NSString *)currencyCode atPrice:(NSDecimalNumber *)price and - (void) logPurchase:(NSString *)productIdentifier inCurrency:(NSString *)currencyCode atPrice:(NSDecimalNumber *)price withQuantity:(NSUInteger)quantity.
News feed card now can update the card height and display a full image based on the image ratio. Card image ratio used to be a fix number and images were aspect stretched to fit in the views.
The right and left margins in the news feed are now touchable areas for scrolling.
Card titles have been improved and will now truncate with “…” when they are more than 2 lines.
2.8
Breaking
Renames the class names of news feed cards to match the names on dashboard:
v2.8
v2.7
ABKBannerCard
ABKCardBanner
ABKCaptionedImageCard
ABKCardCaptionedMessage
ABKCrossPromotionCard
ABKCardCrossPromotionSmall
ABKClassicCard
ABKCardNews
ABKTextAnnouncementCard
ABKCardTextAnnouncement
Added
Adds email and push notification subscription types for a user. Subscription types are explicitly opted in, subscribed, and unsubscribed. The previous email boolean subscribe method has been deprecated.
Adds custom slideup orientation support. You can now ask the slideup to only support certain orientations. For more details on slideup custom orientation support, please refer to ABKSlideupController.h.
Adds quantity parameter as an option when logging purchase. The quanlity should be an unsigned interger greater than 0 and no larger than 100. For more information, please refer to Appboy.h.
Adds a class method in ABKCard to deserialize a given dictionary to a card. This is for use by wrappers such as Braze’s Unity SDK for iOS. Please refer to ABKCard.h for more information.
2.7
News Feed Update
Exposes raw card data in ABKFeedController
Developers can use the raw card data to creat custom user interfaces for the news feed. For more details on the card data, please refer to ABKFeedController.h.
Addes support for categories on cards and news feed view controllers.
Categories include Announcement, Advertising, Social, News and No Category. You can get cards of certain categories from ABKFeedController, or you can make ABKFeedViewController only display certain categories of cards.
Uses SDWebImage to handle images downloading and caching in the news feed, display a spinner while downloading images and show a default image when no image available.
Adds support for asynchronous image downloading in the news feed, asynchronous memory and disk image caching with automatic cache expiration handling.
Adds news feed view controller delegate to support custom handling of card clicks on news feed.
The app can customize click actions from the feed and display any card link in their own user interface.
Slideup Changes
Updates ABKSlideupControllerDelegate method onSlideupClicked to return a BOOL value to indicate if Braze should continue to execute the click action.
Stops logging slideup click when the slideup click action is ABKSlideupNoneClickAction.
Feedback Changes
Updates the ABKFeedbackViewControllerPopoverContext so now it should be used in all cases where the feedback page displayed in a popover, including the case that the feedback is push on a navigation controller in a popover.
Fixes the ABKFeedbackVIewControllerModalContext cancel button delegate issue.
Fixes the form sheet style ABKFeedbackViewControllerModalContext layout issue.
Other Changes
Adds API to request feed and slideup refresh.
Adds API to log news feed displayed and feedback displayed.
Allows updating analytics data even using customized news feed or feedback user interfaces.
Updates badge count policy to only update when app is foreground.
Adds clearTwitterDataWhenNoDataOfTwitterIdentifier to ABKUser, allowing developer to clear user data when a user disconnectes their twitter accounts.
Updates custom key and string value for custom attributes to automatically trim.
2.6.3
Changed
Updates the SDK to authenticate with the Twitter API using SSL.
2.6.2
Fixed
Fixes a news feed card click tracking issue.
Changed
Updates data flush time interval.
2.6.1
Fixed
Fixes a minor display problem that affected news items with no image or link for version 2.6.
2.6
Breaking
Braze iOS SDK now supports 64 bit as well. The minimum deployment targets that Braze iOS SDK supports is iOS 5.1.1.
The Braze iOS SDK will now allow function with 64-bit apps. This version of the SDK only supports iOS 5.1.1+. Legacy iOS apps should continue to use version 2.5 of the SDK.
You can install legacy versions of our SDK via CocoaPods by following changing the podfile to include something like the following example pod 'Appboy-iOS-SDK/AppboyKit', '~> 2.5'.
2.5.1
Fixed
Fixes a minor display problem that affected news items with no image or link for version 2.5.
2.5
Localization
Localization is now supported in version 2.5 of the Braze SDK. We have provided .string files for English, Simplified Chinese and Traditional Chinese. You can also optionally override our Braze’s default LocalizedAppboyUIString.strings right within your app’s Localizable.Strings file in much the same way you would do an override in CSS. To do so, copy the key and string pair into your Localizable.Strings file and edit the string as you so desire.
For your convenience our CocoaPod integrates the LocalizedAppboyUIString.strings files for the three aforementioned languages. If you do not wish to use one or more of these languages, you can feel free to delete these files from your project.
Slideup Upgrade
Braze version 2.5 provides a substantial upgrade to the slideup code and reorganization for better flexibility moving forward, but at the expense of a number of breaking changes. We’ve detailed the changes in this changelog and hope that you’ll love the added power, increased flexibility, and improved UI that the new Braze slideup provides. If you have any trouble with these changes, feel free to reach out to success@braze.com for help, but most migrations to the new code structure should be relatively painless.
New Slideup Controller
The property slideupController has been added to the Braze object. Please see ABKSlideupController.h for details.
The delegate property allows you to specify a delegate for the slideup.
This replaces slideupDelegate which has been removed.
The displayNextSlideupWithDelegate: method displays the next available slideup with the specified delegate.
This replaces provideSlideupToDelegate: which has been removed from Braze.
The slideupsRemainingOnStack method returns the number of slideups that are waiting locally to be displayed.
The addSlideup: method allows you to display a slideup object with custom content. This is useful in testing or if you want to use the Braze slideup’s UI/UX with another notification system that you are using.
Clicks and impressions of slideups added by this method will not be collected by Braze.
hideCurrentSlideup: method will remove any slideup currently on screen, with or without animation.
New Slideup Properties and Methods in ABKSlideup.h
The following properties and methods all belong to the ABKSlideup object. Please see ABKSlideup.h for more information.
New Properties
The extras property carries additional data within key value pairs that have been defined on the dashboard, just like a push notification. Braze does nothing with the extras property, any additional behavior is at your discretion.
The slideupAnchor property defines whether the slideup originates from the top or the bottom of the screen.
The slideupDismissType property controls whether the slideup will dismiss automatically after a period of time has lapsed, or if it will wait for interaction with the user before disappearing.
The slideup will be dismissed automatically after the number of seconds defined by the newly added duration property if the slideup’s slideupDismissType is ABKSlideupDismissAutomatically.
The slideupClickActionType property defines the action behavior after the slideup is clicked: displaying a news feed, redirect to a uri, or nothing but dismissing the slideup. This property is read only. If you want to change the slideup’s click behavior, you can call one of the following method: setSlideupClickActionToNewsFeed, setSlideupClickActionToUri: or setSlideupClickActionToNone.
The uri property defines the uri string that the slide up will open when the slideupClickActionType is ABKSlideupRedirectToURI. This is a read only property, you can call setSlideupClickActionToUri: to change it’s value.
New Methods
logSlideupImpression and logSlideupClicked have been added to allow you to report user interactions with the slideup in the case that you’ve fully customized the slideup experience and Braze is not handling the interactions.
setSlideupClickActionToNewsFeed, setSlideupClickActionToUri: and setSlideupClickActionToNone have been added to allow you to change the slideup’s click action behavior. setSlideupClickActionToUri: accepts a uri string as parameter and required the given uri string is valid.
Delegate Method Changes
All former Braze slideup delegate methods have been depreciated and removed. In their place Braze has added new slideup delegate methods within ABKSlideupControllerDelegate.h.
onSlideupReceived: is called when slideup objects are received from the Braze server.
beforeSlideupDisplayed:withKeyboardIsUp: is called before slideup objects are displayed, the return value determines whether the slideup will be displayed, queued or discarded.
slideupViewControllerWithSlideup: This delegate method allows you to specify custom view controllers in which your slideups will be displayed.
The custom view controller should be a subclass of ABKSlideupViewController.
Alternatively, it can also be an instance of ABKSlideupViewController.
The view of the returned view controller should be an instance of ABKSlideupView or its subclass.
For integration examples of a custom slideup view controller, see the CustomSlideupViewController class in Braze’s sample app Stopwatch.
onSlideupClicked: is called when a user clicks on a slideup. We recommend that you specify behavior on click via the dashboard, but you can additionally specify behavior on click by defining this delegate method.
onSlideupDismissed: is called whenever the slideup is dismissed regardless of whether the dismissal occurs automatically or via swipe. This method is not called if the user clicks on the slideup. If the user clicks or taps on the slideup, onSlideupClicked is called instead.
New Options on the Dashboard
Slideup behavior on click can now be set within the dashboard to open a modal news feed, open a URI within a modal, or do nothing.
The following properties can be set remotely from the Braze Dashboard:
extras
slideupAnchor
slideupDismissType
slideupClickActionType
uri
News Feed Changes
News feed items are now cached in offline storage, allowing the news feed to render even when no internet connectivity is available. Braze will still automatically try to pull down a new news feed when a session opens, even if an offline feed is available.
Each card now has a maximum height of no more than 2009 points to avoid any performance issues as recommended by iOS developer guidelines.
The entirety of captioned image cards are now clickable. Formerly, only the link itself was clickable.
When the news feed is brought to the foreground, it will now automatically check for new content if the cached version of the feed was received more than 60 seconds ago.
— The width of news feed cards as well as the minimum margin between any card and the left & right edges of the view controller can now be customized. These values can be set separately for both iPad and iPhone. This allows for a larger news feed to render on larger screen sizes. All card images will scale proportionally. Please see ABKFeedViewControllerContext.h and ABKFeedViewController.h for more information.
Other Changes
Various internal and news feed display optimizations.
2.4
IDFA Collection is now optional.
By default, IDFA collection is now disabled by the Braze SDK.
There will be no loss of continuity on user profiles or loss of functionality whatsoever as a result of this change.
If you’re using advertising elsewhere in the app or through our in-app news feed, we recommend continuing to collect the IDFA through Braze. You should be able to do so safely without fear of rejection from the iOS App Store.
The future availability of IDFAs will enable functionality like integrating with other third-party systems, including your own servers, and enabling re-targeting of existing users outside of Braze. If you continue to record them we will store IDFAs free of charge so you can take advantage of these options immediately when they are released without additional development work.
Necessary Project Changes
ABKIdentifierForAdvertisingProvider.m and ABKIdentifierForAdvertisingProvider.h must be added to your project regardless of whether or not you enable collection. This occurs automatically if you integrate/update via the CocoaPod.
Enabling Braze IDFA Collection
IDFA collection can be enabled via adding the following PreProcessor Macro to the Build Settings of your app:
ABK_ENABLE_IDFA_COLLECTION
2.3.1
The Braze SDK for iOS now has two versions, one for use with apps which incorporate the official Facebook SDK and one for those which do not. In November of 2013, the App Store Validation Process started generating warnings about the usage of isOpen and setActiveSession in the Braze SDK. These selectors were being sent to instances of classes in the Facebook SDK and are generally able to be used without generating warnings. However because of the way that the classes were initialized in Braze (a result of building a single Braze binary to fully support apps with and without the Facebook SDK), the App Store Validation Process started generating warnings the Facebook SDK methods share a name with private selectors elsewhere in iOS. Although none of our customers have been denied App Store approval yet, to protect against potential validation policy changes by Apple, Braze now provides two versions of its SDK, neither of which generate warnings. Going forward, the appboy-ios-sdk repository will provide both versions of the SDK in the folders ‘AppboySDK’ (as before) and ‘AppboySDKWithoutFacebookSupport’. The ‘AppboySDKWithoutFacebookSupport’ does not require the host app to include the Facebook SDK, but as a result does not include all of the Braze features for Facebook data fetching. More information is available here within the Braze documentation.
Fixed a bug that repeatedly updated the push token of some users unnecessarily.
The “Reporting an Issue?” box within the UI layout of the Feedback Page has been moved to the left side of the label away from the “Send” button. This change was made to reduce the number of misclicks of the “Send” button. The “Reporting an Issue?” label is now clickable as well.
Cross Promotion Cards for apps with long titles will now render appropriately in iOS5. Before the title would render abnormally large on these devices.
Fixed a bug where view recycling would cause incorrect card images to appear for newly rendered cards (until the image for that card finished downloading). Card images for newly rendered cards will now remain empty until the correct image is downloaded.
Internal changes to enable future support for a 64 bit library release.
Improvements to the Braze Sample App.
Internal code structure and performance improvements including the move of more offline caching to background tasks.
2.3
BREAKING CHANGE: The ABKSlideupControllerDelegate interface has been changed to work with ABKSlideup objects instead of simply the slideup message. This provides you with more control over the click actions and display of slideups and is also being made in anticipation of the augmentation of the ABKSlideup object with more data properties in future releases. To access the message previously sent to shouldDisplaySlideup, simply access the message property on the provided ABKSlideup argument.
displayNextAvailableSlideup has been deprecated and will be removed in the next minor release, it has been replaced by provideSlideupToDelegate, see Appboy.h documentation for more information.
provideSlideupToDelegate has been added to Braze to allow for more fine grained control over slideup display.
Fixes a bug where the slideupDelegate property getter on Braze would always return nil.
Changes the slideupDelegate property on Braze to be retained, instead of assigned.
2.2.1
Adds a startup option to appboyOptions to control the automatic capture of social network data. See the documentation on ABKSocialAccountAcquisitionPolicy in Appboy.h for more information.
Changes a table cell’s default background color to clear, from the white value that became default in iOS7.
Adds support for developer to send up image_url for user avatars, allowing for custom images to be included in user profiles on the dashboard.
2.2
Adds support for new banner and captioned image card types.
Adds support for submitting feedback programmatically through an Appboy.h method without using Braze feedback form. This allows you to create your own feedback form.
Fixes an issue where the the news feed’s web view would display “Connection Error” when a user came back into the app after a card had directed him or her to a protocol URL. Now when users come back from a redirected protocol URL, the feed is properly displayed.
Fixes an issue where the SDK might have incorrectly sent both read and write Facebook permissions at the same time, instead preferring to request only those read permissions that Braze is interested in and have already been requested by the incorporating app.
Fixes a corner case where card impressions could be miscounted when the feed view controller is the master view controller of a split view.
Makes cards truncate properly at two lines.
2.1.1
URGENT BUGFIX: This fixes an issue which exists in all previous versions of the v2 SDK which is causing crashes on the just release iPhone 5c and iPhone 5s. All users of v2 are recommended to upgrade the Braze SDK to 2.1.1 immediately and re-submit to the app store.
2.1.0
Adds support for iOS 7. You will need to use Xcode 5 to use this and future versions of the Braze iOS SDK.
Updates internal usage of NUI. If you’re using NUI, please ensure that you are at least using version 0.3.3 (the most up to date as of this writing is 0.3.4).
Removes support for iOS 4.3.
Optimizes news feed rendering for faster start up times and smoother scrolling of long feeds.
Removes the deprecated - (void) logPurchase:(NSString *)productId priceInCents:(NSUInteger)price method in favor of the new multi-currency tracking method. Conversion of old method calls is straightforward. [[Appboy sharedInstance] logPurchase:@"powerups" priceInCents:99]; should turn into [[Appboy sharedInstance] logPurchase:@"powerups" inCurrency:@"USD" atPrice:[[[NSDecimalNumber alloc] initWithFloat:.99f] autorelease]];
Any references to the delegate property of ABKFeedbackViewControllerModalContext should be updated to the new property name feedbackDelegate.
Following the removal of support for 4.3, removes SBJson parsing and uses built-in parsing added in iOS5 to improve performance and lower the SDK footprint.
2.0.4
Adds support for reporting purchases in multiple currencies. Also, changes the price reporting object type to NSDecimalNumber for consistency with StoreKit.
Adds additional space savings optimizations to image assets.
Minor fix to orientation change handling in the example app code.
2.0.3
Adds the ability to assign a Foursquare access token for each user. Doing so will cause the Braze backend to make Foursquare data available in user profiles on the dasbhard.
Adds more fine grained control options for Braze’s network activity. See Appboy.h for more information.
2.0.2
Fixes a bug where Braze might reopen a Facebook read session when a publish session already exists
2.0.1
UI Improvements
Fixed a bug when using the nav context feedback in a popover window that would cause the email bar to disappear
Updated news feed’s close button when opened from a slide up
Added a loading spinner on the feedback page when fetching email address from Facebook
Fixed the bug where the modal context feed page’s navigation bar would not adhere to NUI theming
Improved the look of the popover content feedback page
Enabled resizable webpages when clicking on to a web URL through a card
API updates
Updated custom user attribute setting methods to return a boolean value indicating if the setting is successful
Added methods for incrementing custom user attributes
Added support for device push tokens as NSData when registering the token to Braze
More detailed error messages logged in console
Removed the enable/disable Braze methods from Appboy.h
2.0
Initial release
# SDK-Ersteinrichtung für MacOS
Source: /docs/de/developer_guide/platforms/legacy_sdks/macOS/initial_sdk_setup/index.md
**Warning:**
[AppboyKit](https://github.com/Appboy/appboy-ios-sdk) (also known as the Objective-C SDK) is no longer supported and has been replaced by the [Swift SDK](https://www.braze.com/docs/de/de/developer_guide/sdk_integration/?sdktab=swift). It will no longer receive new features, bug fixes, security updates, or technical support—however, messaging and analytics will continue to function as normal. To learn more, see [Introducing the New Braze Swift SDK](https://www.braze.com/resources/articles/introducing-the-new-braze-swift-sdk).
# SDK-Ersteinrichtung {#initial-sdk-setup}
> Dieser Referenzartikel beschreibt, wie Sie das Braze SDK für MacOS installieren.
Ab Version [3.32.0](https://github.com/Appboy/appboy-ios-sdk/releases/tag/3.32.0) unterstützt das Braze SDK macOS für Apps, die [Mac Catalyst](https://developer.apple.com/mac-catalyst/) verwenden, wenn die Integration über den Swift-Paketmanager erfolgt. Derzeit unterstützt das SDK Mac Catalyst nicht, wenn Sie CocoaPods oder Carthage verwenden.
**Note:**
Ziehen Sie für die Erstellung Ihrer App mit Mac Catalyst die Dokumentation von Apple zurate.
Sobald Ihre App Catalyst unterstützt, folgen Sie [diesen Anweisungen zur Verwendung des Swift-Paketmanagers](https://www.braze.com/docs/de/de/developer_guide/platform_integration_guides/swift/sdk_integration?tab=swift%20package%20manager/), um das Braze SDK in Ihre App zu importieren.
## Unterstützte Features {#supported-features}
Unter Mac Catalyst unterstützt Braze [Push-Benachrichtigungen](https://www.braze.com/docs/de/de/developer_guide/push_notifications?sdktab=swift), [Content Cards](https://www.braze.com/docs/de/de/developer_guide/platforms/swift/content_cards#content-cards-data-model), [In-App-Nachrichten](https://www.braze.com/docs/de/de/developer_guide/analytics/tracking_location?sdktab=swift) und die [automatische Standorterfassung](https://www.braze.com/docs/de/de/developer_guide/analytics/tracking_location?sdktab=swift).
Beachten Sie, dass Push Stories, Rich-Push-Benachrichtigungen und Geofences unter macOS nicht unterstützt werden.
[1]:https://github.com/Appboy/appboy-ios-sdk/releases/tag/3.32.0
[2]:https://developer.apple.com/mac-catalyst/
# SDK-Ersteinrichtung für tvOS
Source: /docs/de/developer_guide/platforms/legacy_sdks/tvos/initial_sdk_setup/index.md
**Warning:**
[AppboyKit](https://github.com/Appboy/appboy-ios-sdk) (also known as the Objective-C SDK) is no longer supported and has been replaced by the [Swift SDK](https://www.braze.com/docs/de/de/developer_guide/sdk_integration/?sdktab=swift). It will no longer receive new features, bug fixes, security updates, or technical support—however, messaging and analytics will continue to function as normal. To learn more, see [Introducing the New Braze Swift SDK](https://www.braze.com/resources/articles/introducing-the-new-braze-swift-sdk).
# SDK-Ersteinrichtung {#initial-sdk-setup}
> Dieser Referenzartikel beschreibt, wie Sie das Braze SDK für tvOS installieren. Durch die Installation des Braze SDK erhalten Sie die grundlegenden Analytics-Funktionen.
**Note:**
Unser tvOS SDK unterstützt derzeit Analytics-Funktionen. Um eine tvOS-App in Ihrem Dashboard hinzuzufügen, öffnen Sie ein [Support-Ticket](https://www.braze.com/docs/de/de/braze_support).
Das tvOS Braze SDK sollte mit [CocoaPods](http://cocoapods.org/), einem Abhängigkeitsmanager für Objective-C- und Swift-Projekte, installiert oder aktualisiert werden. CocoaPods bietet zusätzliche Einfachheit bei der Integration und Aktualisierung.
## tvOS SDK CocoaPods-Integration {#tvos-sdk-cocoapods-integration}
### 1. Schritt: CocoaPods installieren {#step-1-install-cocoapods}
Die Installation des SDK über die tvOS [CocoaPods](http://cocoapods.org/) automatisiert den Großteil des Installationsprozesses für Sie. Bevor Sie mit diesem Vorgang beginnen, stellen Sie sicher, dass Sie [Ruby Version 2.0.0](https://www.ruby-lang.org/en/installation/) oder höher verwenden.
Führen Sie als Erstes folgenden Befehl aus:
```bash
$ sudo gem install cocoapods
```
- Wenn Sie aufgefordert werden, die ausführbare Datei `rake` zu überschreiben, finden Sie weitere Informationen unter [Erste Schritte](http://guides.cocoapods.org/using/getting-started.html) auf CocoaPods.org.
- Wenn Sie Probleme mit CocoaPods haben, lesen Sie bitte die [Anleitung zur Fehlerbehebung für CocoaPods](http://guides.cocoapods.org/using/troubleshooting.html).
### 2. Schritt: Erstellen der Poddatei {#step-2-constructing-the-podfile}
Nachdem Sie nun den CocoaPods Ruby Gem installiert haben, müssen Sie in Ihrem Xcode-Projektverzeichnis eine Datei namens `Podfile` erstellen.
Fügen Sie die folgende Zeile in Ihr Podfile ein:
```
target 'YourAppTarget' do
pod 'Appboy-tvOS-SDK'
end
```
Wir empfehlen Ihnen, Braze so zu versionieren, dass Pod-Updates automatisch alles erfassen, was kleiner als eine Minor-Versionsaktualisierung ist. Also etwa `pod 'Appboy-tvOS-SDK' ~> Major.Minor.Build`. Wenn Sie die neueste Version des Braze SDK automatisch integrieren möchten, auch bei größeren Änderungen, können Sie `pod 'Appboy-tvOS-SDK'` in Ihrem Podfile verwenden.
### 3. Schritt: Installieren des Braze SDK {#step-3-installing-the-braze-sdk}
Um die Braze SDK CocoaPods zu installieren, navigieren Sie in Ihrem Terminal zum Verzeichnis Ihres Xcode-App-Projekts und führen den folgenden Befehl aus:
```
pod install
```
Jetzt sollten Sie den von CocoaPods erstellten neuen Xcode-Projektarbeitsbereich öffnen können. Stellen Sie sicher, dass Sie diesen Xcode-Workspace anstelle Ihres Xcode-Projekts verwenden.

### 4. Schritt: Aktualisieren Ihres App-Delegaten {#step-4-updating-your-app-delegate}
Fügen Sie die folgende Codezeile in Ihre Datei `AppDelegate.m` ein:
```objc
#import
```
Fügen Sie in Ihrer `AppDelegate.m`-Datei das folgende Snippet in Ihre Methode `application:didFinishLaunchingWithOptions` ein:
```objc
[Appboy startWithApiKey:@"YOUR-API-KEY"
inApplication:application
withLaunchOptions:launchOptions];
```
Aktualisieren Sie abschließend `YOUR-API-KEY` mit dem korrekten Wert auf Ihrer Seite **Einstellungen verwalten**.
Wenn Sie das Braze SDK mit CocoaPods oder Carthage integrieren, fügen Sie die folgende Codezeile in Ihre `AppDelegate.swift`-Datei ein:
```swift
import AppboyTVOSKit
```
Weitere Informationen zur Verwendung von Objective-C-Code in Swift-Projekten finden Sie in den [Apple Developer Docs](https://developer.apple.com/library/ios/documentation/swift/conceptual/buildingcocoaapps/MixandMatch.html).
Fügen Sie in `AppDelegate.swift` folgendes Snippet zu Ihrem `application(application: UIApplication, didFinishLaunchingWithOptions launchOptions: [NSObject: AnyObject]?) -> Bool` hinzu:
```swift
Appboy.start(withApiKey: "YOUR-API-KEY", in:application, withLaunchOptions:launchOptions)
```
Aktualisieren Sie als Nächstes `YOUR-API-KEY` auf der Seite **Einstellungen verwalten** mit dem richtigen Wert.
Unser `sharedInstance`-Singleton wird nil sein, bevor `startWithApiKey:` aufgerufen wird, da dies eine Voraussetzung für die Verwendung jeglicher Braze-Funktionen ist.
**Warning:**
Stellen Sie sicher, dass Sie Braze im Haupt-Thread Ihrer Anwendung initialisieren. Eine asynchrone Initialisierung kann zu fehlerhaften Funktionen führen.
### 5. Schritt: Geben Sie Ihren angepassten Endpunkt oder Daten-Cluster an {#step-5-specify-your-custom-endpoint-or-data-cluster}
**Note:**
Ab Dezember 2019 werden keine angepassten Endpunkte mehr vergeben. Wenn Sie einen bereits bestehenden angepassten Endpunkt haben, können Sie diesen weiterhin verwenden. Weitere Einzelheiten finden Sie in unserer Liste der verfügbaren Endpunkte.
Ihre Braze-Vertretung sollte Sie bereits über den [korrekten Endpunkt](https://www.braze.com/docs/de/de/user_guide/administrative/access_braze/sdk_endpoints/) informiert haben.
#### Endpunktkonfiguration zur Kompilierzeit (empfohlen) {#compile-time-endpoint-configuration-recommended}
Wenn ein bereits vorhandener angepasster Endpunkt angegeben wird:
- Ab Braze iOS SDK v3.0.2 können Sie einen angepassten Endpunkt mithilfe der Datei `Info.plist` festlegen. Fügen Sie das Wörterbuch `Appboy` zu Ihrer Datei Info.plist hinzu. Fügen Sie im `Appboy`-Dictionary den String-Untereintrag `Endpoint` hinzu und setzen Sie den Wert auf die Autorität Ihrer angepassten Endpunkt-URLs (z. B. `sdk.iad-01.braze.com`, nicht `https://sdk.iad-01.braze.com`).
#### Laufzeit-Endpunkt-Konfiguration {#runtime-endpoint-configuration}
Wenn ein bereits vorhandener angepasster Endpunkt angegeben wird:
- Ab Braze iOS SDK v3.17.0+ können Sie Ihren Endpunkt über den `ABKEndpointKey` innerhalb des `appboyOptions`-Parameters, der an `startWithApiKey:inApplication:withLaunchOptions:withAppboyOptions:` übergeben wird, überschreiben. Setzen Sie den Wert auf Ihre angepasste Endpunkt-URL-Autorität (z. B. `sdk.iad-01.braze.com`, nicht `https://sdk.iad-01.braze.com`).
**Note:**
Die Unterstützung für das Setzen von Endpunkten zur Laufzeit mit `ABKAppboyEndpointDelegate` wurde in Braze iOS SDK v3.17.0 entfernt. Wenn Sie bereits `ABKAppboyEndpointDelegate` verwenden, beachten Sie, dass in den Braze iOS SDK Versionen v3.14.1 bis v3.16.0 jeder Verweis auf `dev.appboy.com` in Ihrer `getApiEndpoint()`-Methode durch einen Verweis auf `sdk.iad-01.braze.com` ersetzt werden muss.
### SDK-Integration abgeschlossen {#sdk-integration-complete}
Braze sollte nun Daten von Ihrer Anwendung erfassen und die grundlegende Integration sollte abgeschlossen sein. Beachten Sie, dass Bitcode bei der Kompilierung Ihrer tvOS-App und aller anderen Bibliotheken von Drittanbietern aktiviert sein muss.
### Aktualisieren des Braze SDK über CocoaPods {#updating-the-braze-sdk-via-cocoapods}
Um einen CocoaPod zu aktualisieren, führen Sie einfach die folgenden Befehle in Ihrem Projektverzeichnis aus:
```
pod update
```
## Anpassen von Braze beim Start {#customizing-braze-on-startup}
Wenn Sie Braze beim Start anpassen möchten, können Sie stattdessen die Braze-Initialisierungsmethode `startWithApiKey:inApplication:withLaunchOptions:withAppboyOptions` verwenden und ein optionales `NSDictionary` von Braze-Startschlüsseln übergeben.
Fügen Sie in Ihrer `AppDelegate.m`-Datei innerhalb Ihrer `application:didFinishLaunchingWithOptions`-Methode die folgende Braze-Methode hinzu:
```objc
[Appboy startWithApiKey:@"YOUR-API-KEY"
inApplication:application
withLaunchOptions:launchOptions
withAppboyOptions:appboyOptions];
```
Fügen Sie in `AppDelegate.swift` innerhalb Ihrer Methode `application(application: UIApplication, didFinishLaunchingWithOptions launchOptions: [NSObject: AnyObject]?) -> Bool` die folgende Braze-Methode hinzu:
```swift
Appboy.start(withApiKey: "YOUR-API-KEY",
in:application,
withLaunchOptions:launchOptions,
withAppboyOptions:appboyOptions)
```
wobei `appboyOptions` ein `Dictionary` der Werte der Startkonfiguration ist.
Diese Methode ersetzt die Initialisierungsmethode `startWithApiKey:inApplication:withLaunchOptions:` und wird mit den folgenden Parametern aufgerufen:
- `YOUR-API-KEY`: Den API-Schlüssel Ihrer Anwendung finden Sie unter **Einstellungen verwalten** im Braze-Dashboard.
- `application`: Die aktuelle App.
- `launchOptions`: Das Optionen-`NSDictionary`, das Sie von `application:didFinishLaunchingWithOptions:` erhalten.
- `appboyOptions`: Ein optionales `NSDictionary` mit Werten für die Startkonfiguration von Braze.
Siehe [Appboy.h](https://github.com/Appboy/appboy-ios-sdk/blob/master/AppboyKit/include/Appboy.h) für eine Liste der Braze-Startschlüssel.
## Appboy.sharedInstance() und Swift-Nullbarkeit {#appboysharedinstance-and-swift-nullability}
Abweichend von der üblichen Praxis ist das Singleton `Appboy.sharedInstance()` optional. Das liegt daran, dass `sharedInstance` `nil` ist, bevor `startWithApiKey:` aufgerufen wird, und es gibt einige nicht standardmäßige, aber nicht ungültige Implementierungen, in denen eine verzögerte Initialisierung verwendet werden kann.
Wenn Sie `startWithApiKey:` in Ihrem `didFinishLaunchingWithOptions:`-Delegaten aufrufen, bevor Sie auf `sharedInstance` von Appboy (Standardimplementierung) zugreifen, können Sie eine optionale Verkettung wie `Appboy.sharedInstance()?.changeUser("testUser")` verwenden, um lästige Überprüfungen zu vermeiden. Dies ist vergleichbar mit einer Objective-C-Implementierung, die von einem Nicht-Null-Wert `sharedInstance` ausgeht.
## Optionen für die manuelle Integration {#manual-integration-options}
Sie können unser tvOS SDK auch manuell integrieren – holen Sie sich einfach das Framework aus unserem [Public Repository](https://github.com/appboy/appboy-ios-sdk) und initialisieren Sie Braze wie in den vorangegangenen Abschnitten beschrieben.
## Nutzer:innen identifizieren und Analytics-Berichte {#identifying-users-and-reporting-analytics}
In unserer [iOS-Dokumentation](https://www.braze.com/docs/de/de/developer_guide/analytics/setting_user_ids?tab=swift) finden Sie Informationen zum Festlegen von Nutzer-IDs, zum Protokollieren angepasster Events und zum Festlegen von Nutzerattributen. Wir empfehlen Ihnen auch, sich mit unseren [Namenskonventionen für Events](https://www.braze.com/docs/de/de/user_guide/data/activation/events/event_naming_conventions) vertraut zu machen.
# Über Banner
Source: /docs/de/developer_guide/banners/index.md
# Banners
> With Banners, you can create personalized messaging for your users, all while extending the reach of your other channels, such as email or push notifications. You can embed Banners directly in your app or website, which lets you engage with users through an experience that feels natural.
## Prerequisites
Banners availability depends on your Braze package. Contact your account manager or customer success manager to get started.
Before you start, make sure you have [Banner placements](https://www.braze.com/docs/de/de/developer_guide/banners/placements/) created in your app or website.

## Why use Banners?
Banners allow marketing and product teams to personalize app or website content dynamically, reflecting real-time user eligibility and behavior. They persistently display messages inline, providing non-intrusive, contextually relevant experiences that can be refreshed at the start of a session or mid-session when your app or website explicitly requests it.
After Banners are integrated into an app or website, marketers can design and launch Banners using a drag-and-drop editor or a full HTML editor, eliminating the need for ongoing developer assistance, reducing complexity, and improving efficiency.
| Use case | Explanation |
| --- | --- |
| Announcements | Keep announcements like upcoming events or policy changes at the forefront of your app experience. |
| Personalizing offers | Show personalized promotions and incentives based on each user’s browsing history, cart content, subscription tier, and loyalty status. |
| Targeting new user engagement | Guide new users through onboarding flows and account setup. |
| Sales and promotions | Highlight featured content, trending products, and ongoing brand campaigns persistently and directly on your homepage without disrupting the user experience. |
{: .reset-td-br-1 .reset-td-br-2 aria-label="Why use Banners?" }
## Features
Features for Banners include:
- **Easy content building:** Create and preview your Banner using a visual, drag-and-drop editor with support for images, text, buttons, email capture forms, custom code, and more. Teams that prefer to manage their own markup can use the HTML editor instead for full control over the Banner's HTML and styles, or ask [BrazeAI Operator™](https://www.braze.com/docs/de/de/user_guide/brazeai/operator/capabilities/#generate-messages) to generate HTML from a description.
- **Flexible placements:** Define multiple locations within your application or website where Banners can appear, enabling precise targeting to specific contexts or user experiences.
- **Dynamic personalization:** Banners recalculate personalization (Liquid logic) and segmentation every time the banner is refreshed. If a user updates their profile or a custom attribute changes, the next Banner refresh will reflect those changes.
- **Native prioritization:** Set the display priority for when multiple Banners target the same placement, ensuring the right message reaches users at the right time.
- **Custom Code editor block:** Use the Custom Code editor block to add custom HTML for advanced customization or seamless integration with your existing web styles.
## About Banners {#about-banners}
### Placement IDs {#placement-id}
Banner placements are specific locations in your app or website [you create with the Braze SDK](https://www.braze.com/docs/de/de/developer_guide/banners/placements/) that designate where Banners can appear.
Common locations include the top of your homepage, product detail pages, and checkout flows. After placements are created, Banners can be [assigned in your Banner campaign](https://www.braze.com/docs/de/de/user_guide/channels/banners/create_a_banner/).
There is no fixed limit on the number of placements you can create per workspace, and you can create as many placement IDs as your experience requires. Each placement must be unique within a workspace. A single placement ID can be referenced by up to 25 active messages at the same time.
**Important:**
Avoid modifying placement IDs after launching a Banner campaign.
### Banner priority {#priority}
When multiple Banner messages reference the same placement ID, Banners are displayed in order of priority: high, medium, or low. By default, Banners are set to medium, but you can [manually set the priority](https://www.braze.com/docs/de/de/user_guide/channels/banners/create_a_banner/#set-banner-priority-optional) when you create or edit your Banner campaign.
If multiple Banners are set to the same priority, the newest Banner that the user is eligible for is displayed first.
### Placement requests {#requests}
When you [create placements in your app or website](https://www.braze.com/docs/de/de/developer_guide/banners/placements/#requestBannersRefresh), your app sends a request to Braze to fetch Banner messages for each placement.
- You can request up to **10 placements per refresh request**.
- For each placement, Braze returns the **highest-priority Banner** the user is eligible to receive.
- If more than 10 placements are requested in a refresh, only the first 10 are returned; the rest are dropped.
For example, an app might request three placements in a refresh request: `homepage_promo`, `cart_abandonment`, and `seasonal_offer`. Each request returns the most relevant Banner for that placement.
#### Rate limiting for refresh requests
If you're on older SDK versions (before Swift 13.1.0, Android 38.0.0, Web 6.1.0, React Native 17.0.0, and Flutter 15.0.0), only one refresh request is permitted per user session.
If you're on newer minimum SDK versions (Swift 13.1.0+, Android 38.0.0+, Web 6.1.0+, React Native 17.0.0+, and Flutter 15.0.0+), refresh requests are controlled by a token bucket algorithm to prevent excessive polling:
- Each user session begins with five refresh tokens.
- Tokens refill at a rate of one token every 180 seconds (3 minutes).
Each explicit call to `requestBannersRefresh` consumes one token. The automatic refresh that occurs at the start of a new session or when `changeUser` is called does not consume a token, as this refresh is a publishing of the last cached Banner for that user. If you attempt a refresh when no tokens are available, the SDK doesn't make the request and logs an error until a token refills. This is important for mid-session and event-triggered updates. To implement dynamic updates (for example, after a user completes an action on the same page), call the refresh method after the custom event is logged, but note the necessary delay for Braze to ingest and process the event before the user qualifies for a different Banner campaign.
### Message delivery
Banner messages are delivered to your app or website as HTML content, typically rendered inside an iframe. This ensures that your Banners render consistently across devices, and helps you keep their styles and scripts separate from the rest of your code.
Iframes allow for dynamic and personalized content updates that don't require changes to your codebase. Each iframe retrieves and displays the HTML for each user session using campaign targeting and personalization logic.
### Dimensions and sizing
Here's what you need to know about Banner dimensions and sizing:
- While the composer allows you to preview Banners in different dimensions, that information isn't saved or sent to the SDK.
- The HTML takes up the full width of the container it's rendered in.
- We recommend making a fixed dimension element and testing those dimensions in composer.
## Limitations
Each workspace can support up to 200 active Banner campaigns. If this limit is reached, you'll need to [archive or deactivate](https://www.braze.com/docs/de/de/user_guide/messaging/governance/statuses/#changing-the-status) an existing campaign before creating a new one.
Additionally, Banner messages do not support the following features:
- API-triggered and action-based campaigns
- Connected Content
- Promotional codes
- `catalog_items` using the [`:rerender` tag](https://www.braze.com/docs/de/de/user_guide/data/activation/catalogs/using_catalogs/#using-liquid)
## Next steps
- [Create Banner placements in your app or website](https://www.braze.com/docs/de/de/developer_guide/banners/placements/)
- [Create a Banner campaign in Braze](https://www.braze.com/docs/de/de/user_guide/channels/banners/create_a_banner/)
- [Tutorial: Displaying a Banner by Placement ID](https://www.braze.com/docs/de/de/developer_guide/banners/tutorial_displaying_banners)
**Tip:**
Want to help prioritize what's next? Contact [banners-feedback@braze.com](mailto:banners-feedback@braze.com).
# Bannerplatzierungen für das Braze SDK verwalten
Source: /docs/de/developer_guide/banners/placements/index.md
# Bannerplatzierungen verwalten {#manage-banner-placements}
> Erfahren Sie, wie Sie Bannerplatzierungen im Braze SDK erstellen und verwalten, einschließlich des Zugriffs auf deren eindeutige Eigenschaften und der Protokollierung von Impressionen. Weitere allgemeine Informationen finden Sie unter [Über Banner](https://www.braze.com/docs/de/de/developer_guide/banners).
## Über Platzierungsanfragen {#requests}
When you [create placements in your app or website](https://www.braze.com/docs/de/de/developer_guide/banners/placements/#requestBannersRefresh), your app sends a request to Braze to fetch Banner messages for each placement.
- You can request up to **10 placements per refresh request**.
- For each placement, Braze returns the **highest-priority Banner** the user is eligible to receive.
- If more than 10 placements are requested in a refresh, only the first 10 are returned; the rest are dropped.
For example, an app might request three placements in a refresh request: `homepage_promo`, `cart_abandonment`, and `seasonal_offer`. Each request returns the most relevant Banner for that placement.
#### Rate limiting for refresh requests
If you're on older SDK versions (before Swift 13.1.0, Android 38.0.0, Web 6.1.0, React Native 17.0.0, and Flutter 15.0.0), only one refresh request is permitted per user session.
If you're on newer minimum SDK versions (Swift 13.1.0+, Android 38.0.0+, Web 6.1.0+, React Native 17.0.0+, and Flutter 15.0.0+), refresh requests are controlled by a token bucket algorithm to prevent excessive polling:
- Each user session begins with five refresh tokens.
- Tokens refill at a rate of one token every 180 seconds (3 minutes).
Each explicit call to `requestBannersRefresh` consumes one token. The automatic refresh that occurs at the start of a new session or when `changeUser` is called does not consume a token, as this refresh is a publishing of the last cached Banner for that user. If you attempt a refresh when no tokens are available, the SDK doesn't make the request and logs an error until a token refills. This is important for mid-session and event-triggered updates. To implement dynamic updates (for example, after a user completes an action on the same page), call the refresh method after the custom event is logged, but note the necessary delay for Braze to ingest and process the event before the user qualifies for a different Banner campaign.
## Platzierung erstellen {#create-a-placement}
### Voraussetzungen {#prerequisites}
Dies sind die erforderlichen Mindestversionen des SDK, um Bannerplatzierungen zu erstellen:
### Step 1: Create placements in Braze
If you haven't already, you'll need to create Banner placements in Braze that are used to define the locations in your app or site can display Banners. To create a placement, go to **Settings** > **Banners Placements**, then select **Create Placement**.

Give your placement a name and assign a **Placement ID**. Be sure you consult other teams before assigning an ID, as it'll be used throughout the card's lifecycle and shouldn't be changed later. For more information, see [Placement IDs].

### Schritt 2: Platzierungen in Ihrer App aktualisieren {#requestBannersRefresh}
Um Platzierungen zu aktualisieren, rufen Sie die Aktualisierungsmethode für Ihr SDK auf (`requestBannersRefresh()` bei Web und Android oder `requestRefresh()` bei Swift).
Das Aktualisierungsverhalten von Bannern hat zwei Pfade:
1. **Explizite Aktualisierung:** Sie können die Aktualisierungsmethode jederzeit während einer aktiven Sitzung aufrufen.
2. **Automatische Aktualisierung bei neuer Sitzung:** Nachdem Sie mindestens eine explizite Aktualisierungsanfrage gestellt haben, kann das SDK die zuletzt angeforderten Platzierungs-IDs erneut anfordern, wenn eine neue Braze-Sitzung beginnt (z. B. nach `changeUser()` oder nach einem Sitzungs-Timeout).
Die Rolle von `subscribeToBannersUpdates()` unterscheidet sich je nach Plattform:
- **iOS und Android:** `subscribeToBannersUpdates()` (oder `subscribeToUpdates()` bei Swift) registriert einen Update-Callback. Die automatische Aktualisierung bei Sitzungsstart ist nicht davon abhängig, ob das Abo aktiv ist.
- **Web:** Die automatische Aktualisierung bei Sitzungsstart ist an die Registrierung von `subscribeToBannersUpdates()` gebunden. Ohne aktives Abo wiederholt das SDK die Aktualisierung bei einer neuen Sitzung nicht automatisch.
In allen Fällen müssen Sie mindestens eine explizite Aktualisierungsanfrage pro App-Lebenszyklus stellen, damit das SDK weiß, welche Platzierungs-IDs aktuell gehalten werden sollen. Banner werden beim ersten Start ohne diesen initialen Aufruf nicht automatisch abgerufen, und die erfassten Platzierungs-IDs werden nach einem Neustart der App zurückgesetzt.
Automatische Aktualisierungen bei Sitzungsstart verbrauchen kein Rate-Limiting-Token.
**Tip:**
Aktualisieren Sie die Platzierungen so schnell wie möglich, um Verzögerungen beim Herunterladen oder Anzeigen von Bannern zu vermeiden.
```javascript
import * as braze from "@braze/web-sdk";
braze.requestBannersRefresh(["global_banner", "navigation_square_banner"]);
```
```swift
AppDelegate.braze?.banners.requestRefresh(placementIds: ["global_banner", "navigation_square_banner"])
```
```java
ArrayList listOfBanners = new ArrayList<>();
listOfBanners.add("global_banner");
listOfBanners.add("navigation_square_banner");
Braze.getInstance(context).requestBannersRefresh(listOfBanners);
```
```kotlin
Braze.getInstance(context).requestBannersRefresh(listOf("global_banner", "navigation_square_banner"))
```
```javascript
Braze.requestBannersRefresh(["global_banner", "navigation_square_banner"]);
```
```csharp
This feature is not currently supported on Unity.
```
```javascript
This feature is not currently supported on Cordova.
```
```dart
braze.requestBannersRefresh(["global_banner", "navigation_square_banner"]);
```
```brightscript
This feature is not currently supported on Roku.
```
### Schritt 3: Auf Updates achten {#subscribeToBannersUpdates}
**Tip:**
Wenn Sie Banner mithilfe der SDK-Methoden in diesem Leitfaden einfügen, werden alle Analytics-Ereignisse (wie Impressionen und Klicks) automatisch verarbeitet, und Impressionen werden nur protokolliert, wenn das Banner sichtbar ist.
Wenn Sie Vanilla JavaScript mit dem Web-Braze-SDK verwenden, nutzen Sie [`subscribeToBannersUpdates`](https://js.appboycdn.com/web-sdk/latest/doc/modules/braze.html#subscribetobannersupdates), um auf Platzierungs-Updates zu warten, und rufen Sie anschließend [`requestBannersRefresh`](https://js.appboycdn.com/web-sdk/latest/doc/modules/braze.html#requestbannersrefresh) auf, um diese abzurufen.
```javascript
import * as braze from "@braze/web-sdk";
braze.subscribeToBannersUpdates((banners) => {
console.log("Banners were updated");
});
// always refresh after your subscriber function has been registered
braze.requestBannersRefresh(["global_banner", "navigation_square_banner"]);
```
Wenn Sie React mit dem Web-Braze-SDK verwenden, richten Sie [`subscribeToBannersUpdates`](https://js.appboycdn.com/web-sdk/latest/doc/modules/braze.html#subscribetobannersupdates) innerhalb eines `useEffect`-Hooks ein und rufen Sie [`requestBannersRefresh`](https://js.appboycdn.com/web-sdk/latest/doc/modules/braze.html#requestbannersrefresh) nach der Registrierung Ihres Listeners auf.
```typescript
import * as braze from "@braze/web-sdk";
useEffect(() => {
const subscriptionId = braze.subscribeToBannersUpdates((banners) => {
console.log("Banners were updated");
});
// always refresh after your subscriber function has been registered
braze.requestBannersRefresh(["global_banner", "navigation_square_banner"]);
// cleanup listeners
return () => {
braze.removeSubscription(subscriptionId);
}
}, []);
```
**Note:**
Ihr Banner-Update-Listener spiegelt den In-Memory-Bannerstatus des SDK wider. Ein einzelnes Update kann Platzierungen enthalten, die bereits zwischengespeichert waren (z. B. von einer früheren Aktualisierung, einem anderen Bildschirm oder automatischer SDK-Arbeit), nicht nur die Platzierungs-IDs aus Ihrem letzten `requestRefresh`-Aufruf. Wenn Sie sich nur für bestimmte Platzierungen interessieren, prüfen Sie die Platzierungs-ID jedes Banners in Ihrem Listener und überspringen Sie den Rest. Nachdem Sie Ihren Listener registriert haben, rufen Sie `requestRefresh` für die Platzierungen auf, die Sie von Braze synchronisieren möchten.
```swift
let placementIds = ["global_banner", "navigation_square_banner"]
let cancellable = brazeClient.braze()?.banners.subscribeToUpdates { banners in
banners.forEach { placementId, banner in
print("Received banner: \(banner) with placement ID: \(placementId)")
}
}
// Always refresh after your subscriber is registered
brazeClient.braze()?.banners.requestRefresh(placementIds: placementIds)
```
**Note:**
Ihr Banner-Update-Listener spiegelt den In-Memory-Bannerstatus des SDK wider. Ein einzelnes Update kann Platzierungen enthalten, die bereits zwischengespeichert waren (z. B. von einer früheren Aktualisierung, einem anderen Bildschirm oder automatischer SDK-Arbeit), nicht nur die Platzierungs-IDs aus Ihrem letzten `requestBannersRefresh`-Aufruf. Wenn Sie sich nur für bestimmte Platzierungen interessieren, prüfen Sie die Platzierungs-ID jedes Banners in Ihrem Listener und überspringen Sie den Rest. Nachdem Sie Ihren Listener registriert haben, rufen Sie `requestBannersRefresh` für die Platzierungen auf, die Sie von Braze synchronisieren möchten.
```java
ArrayList placementIds = new ArrayList<>();
placementIds.add("global_banner");
placementIds.add("navigation_square_banner");
Braze.getInstance(context).subscribeToBannersUpdates(banners -> {
for (Banner banner : banners.getBanners()) {
Log.d(TAG, "Received banner: " + banner.getPlacementId());
}
});
// Always refresh after your subscriber is registered
Braze.getInstance(context).requestBannersRefresh(placementIds);
```
```kotlin
val placementIds = listOf("global_banner", "navigation_square_banner")
Braze.getInstance(context).subscribeToBannersUpdates { update ->
for (banner in update.banners) {
Log.d(TAG, "Received banner: " + banner.placementId)
}
}
// Always refresh after your subscriber is registered
Braze.getInstance(context).requestBannersRefresh(placementIds)
```
```javascript
const bannerCardsSubscription = Braze.addListener(
Braze.Events.BANNER_CARDS_UPDATED,
(data) => {
const banners = data.banners;
console.log(
`Received ${banners.length} Banner Cards with placement IDs:`,
banners.map((banner) => banner.placementId)
);
}
);
```
```csharp
This feature is not currently supported on Unity.
```
```javascript
This feature is not currently supported on Cordova.
```
```dart
StreamSubscription bannerStreamSubscription = braze.subscribeToBanners((List banners) {
for (final banner in banners) {
print("Received banner: " + banner.toString());
}
});
```
```brightscript
This feature is not currently supported on Roku.
```
### Schritt 4: Einfügen unter Verwendung der Platzierungs-ID {#insertBanner}
**Tip:**
Eine vollständige Schritt-für-Schritt-Anleitung finden Sie unter [Anzeigen eines Banners nach Platzierungs-ID](https://www.braze.com/docs/de/de/developer_guide/banners/tutorial_displaying_banners).
Erstellen Sie ein Containerelement für das Banner. Stellen Sie sicher, dass Sie die Breite und Höhe festlegen.
```html
```
Wenn Sie Vanilla JavaScript mit dem Web-Braze-SDK verwenden, rufen Sie die [`insertBanner`](https://js.appboycdn.com/web-sdk/latest/doc/modules/braze.html#insertbanner)-Methode auf, um den inneren HTML-Code des Containerelements zu ersetzen.
```javascript
import * as braze from "@braze/web-sdk";
braze.initialize("sdk-api-key", {
baseUrl: "sdk-base-url",
allowUserSuppliedJavascript: true, // banners require you to opt-in to user-supplied javascript
});
braze.subscribeToBannersUpdates((banners) => {
// get this placement's banner. If it's `null` the user did not qualify for one.
const globalBanner = braze.getBanner("global_banner");
if (!globalBanner) {
return;
}
// choose where in the DOM you want to insert the banner HTML
const container = document.getElementById("global-banner-container");
// Insert the banner which replaces the innerHTML of that container
braze.insertBanner(globalBanner, container);
// Special handling if the user is part of a Control Variant
if (globalBanner.isControl) {
// hide or collapse the container
container.style.display = "none";
}
});
braze.requestBannersRefresh(["global_banner", "navigation_square_banner"]);
```
Wenn Sie React mit dem Web-Braze-SDK verwenden, rufen Sie die [`insertBanner`](https://js.appboycdn.com/web-sdk/latest/doc/modules/braze.html#insertbanner)-Methode mit einem `ref` auf, um den inneren HTML-Code des Containerelements zu ersetzen.
```tsx
import { useRef } from 'react';
import * as braze from "@braze/web-sdk";
export default function App() {
const bannerRef = useRef(null);
useEffect(() => {
const globalBanner = braze.getBanner("global_banner");
if (!globalBanner || globalBanner.isControl) {
// hide the container
} else {
// insert the banner to the container node
braze.insertBanner(globalBanner, bannerRef.current);
}
}, []);
return
}
```
**Tip:**
Um Impressionen zu tracken, rufen Sie `insertBanner` für `isControl` auf. Anschließend können Sie Ihren Container ausblenden oder einklappen.
```swift
// To get access to the Banner model object:
let globalBanner: Braze.Banner?
AppDelegate.braze?.banners.getBanner(for: "global_banner", { banner in
self.globalBanner = banner
})
// UIKit implementation:
// If you simply want the Banner view, initialize a `UIView` with the placement ID:
if let braze = AppDelegate.braze {
let bannerUIView = BrazeBannerUI.BannerUIView(
placementId: "global_banner",
braze: braze,
// iOS does not perform automatic resizing or visibility changes.
// Use the `processContentUpdates` parameter to adjust the size and visibility of your Banner according to your use case.
processContentUpdates: { result in
switch result {
case .success(let updates):
if let height = updates.height {
// Adjust the visibility and/or height.
}
case .failure(let error):
// Handle the error.
}
}
)
}
// SwiftUI implementation:
// Similarly, if you want a Banner view in SwiftUI, use the corresponding `BannerView` initializer:
if let braze = AppDelegate.braze {
let bannerView = BrazeBannerUI.BannerView(
placementId: "global_banner",
braze: braze,
// iOS does not perform automatic resizing or visibility changes.
// Use the `processContentUpdates` parameter to adjust the size and visibility of your Banner according to your use case.
processContentUpdates: { result in
switch result {
case .success(let updates):
if let height = updates.height {
// Adjust the visibility and/or height according to your parent controller.
}
case .failure(let error):
// Handle the error.
}
}
)
}
```
Um das Banner im Java-Code abzurufen, verwenden Sie Folgendes:
```java
Banner globalBanner = Braze.getInstance(context).getBanner("global_banner");
```
Sie können Banner im Layout Ihrer Android-Ansichten erstellen, indem Sie dieses XML einfügen:
```xml
```
Wenn Sie Android Views verwenden, nutzen Sie dieses XML:
```xml
```
Um Jetpack Compose zu verwenden, fügen Sie das Artefakt `com.braze:android-sdk-jetpack-compose` zu Ihrem App-Modul hinzu. Verwenden Sie dieselbe Version wie Ihre anderen Braze Android SDK-Abhängigkeiten. Dieses Modul ist von `android-sdk-ui` getrennt und liefert das [`Banner`](https://braze-inc.github.io/braze-android-sdk/kdoc/braze-android-sdk/com.braze.jetpackcompose.banners/-banner.html)-Composable unter `com.braze.jetpackcompose.banners`.
**Note:**
Einige Compose-UI-Bibliotheken definieren ihr eigenes `Banner`-Composable. Importieren Sie `com.braze.jetpackcompose.banners.Banner` explizit, damit Sie die API von Braze aufrufen.
```kotlin
import com.braze.jetpackcompose.banners.Banner
@Composable
fun myBannerSlot() {
Banner(placementId = "global_banner")
}
```
Optional können Sie `heightCallback` übergeben, um die gerenderte Höhe in dp zu erhalten, wenn sich die Bannergröße ändert. Weitere Informationen finden Sie in der [KDoc für `Banner`](https://braze-inc.github.io/braze-android-sdk/kdoc/braze-android-sdk/com.braze.jetpackcompose.banners/-banner.html).
Wenn Sie das Jetpack-Compose-Modul nicht hinzufügen, umschließen Sie [`BannerView`](https://braze-inc.github.io/braze-android-sdk/kdoc/braze-android-sdk/com.braze.ui.banners/-banner-view/index.html) in [`AndroidView`](https://developer.android.com/reference/kotlin/androidx/compose/ui/viewinterop/AndroidView):
```kotlin
import android.view.ViewGroup
import androidx.compose.runtime.Composable
import androidx.compose.ui.viewinterop.AndroidView
import com.braze.ui.banners.BannerView
@Composable
fun myBannerSlot() {
AndroidView(
factory = { context ->
BannerView(context, "global_banner").apply {
layoutParams = ViewGroup.LayoutParams(
ViewGroup.LayoutParams.MATCH_PARENT,
ViewGroup.LayoutParams.WRAP_CONTENT
)
}
},
update = { it.placementId = "global_banner" }
)
}
```
Um das Banner in Kotlin abzurufen, verwenden Sie Folgendes:
```kotlin
val banner = Braze.getInstance(context).getBanner("global_banner")
```
Wenn Sie [die neue Architektur von React Native](https://reactnative.dev/architecture/landing-page) verwenden, müssen Sie `BrazeBannerView` als Fabric-Komponente in Ihrem `AppDelegate.mm` registrieren.
```swift
#ifdef RCT_NEW_ARCH_ENABLED
/// Register the `BrazeBannerView` for use as a Fabric component.
- (NSDictionary> *)thirdPartyFabricComponents {
NSMutableDictionary * dictionary = [super thirdPartyFabricComponents].mutableCopy;
dictionary[@"BrazeBannerView"] = [BrazeBannerView class];
return dictionary;
}
#endif
```
Für die einfachste Integration fügen Sie das folgende JavaScript-XML-Snippet (JSX) in Ihre Ansichtshierarchie ein und geben nur die Platzierungs-ID an.
```javascript
```
Um das Datenmodell des Banners in React Native abzurufen oder um zu prüfen, ob diese Platzierung im Cache der Nutzer:in vorhanden ist, verwenden Sie:
```javascript
const banner = await Braze.getBanner("global_banner");
```
```csharp
This feature is not currently supported on Unity.
```
```javascript
This feature is not currently supported on Cordova.
```
Für die einfachste Integration fügen Sie das folgende Widget in Ihre Ansichtshierarchie ein und geben nur die Platzierungs-ID an.
```dart
BrazeBannerView(
placementId: "global_banner",
),
To get the Banner's data model in Flutter, use:
```
Mit der `getBanner`-Methode können Sie prüfen, ob diese Platzierung im Cache der Nutzer:in vorhanden ist.
```dart
braze.getBanner("global_banner").then((banner) {
if (banner == null) {
// Handle null cases.
} else {
print(banner.toString());
}
});
```
```brightscript
This feature is not currently supported on Roku.
```
### Schritt 5: Testbanner senden (optional) {#handling-test-cards}
Bevor Sie eine Banner-Campaign starten, können Sie [ein Testbanner senden](https://www.braze.com/docs/de/de/user_guide/messaging/messaging_fundamentals/sending_test_messages?tab=banners), um Ihre Integration zu überprüfen. Testbanner werden in einem separaten In-Memory-Cache gespeichert und bleiben bei Neustarts der App nicht erhalten. Es ist zwar keine zusätzliche Einrichtung erforderlich, aber Ihr Testgerät muss in der Lage sein, Push-Benachrichtigungen im Vordergrund zu empfangen, damit der Test angezeigt werden kann.
**Note:**
Testbanner sind wie alle anderen Banner, nur dass sie bei der nächsten App-Sitzung entfernt werden.
## Impressionen protokollieren {#log-impressions}
Braze protokolliert automatisch Impressionen für Banner, die sichtbar sind, wenn Sie SDK-Methoden zum Einfügen eines Banners verwenden—eine manuelle Erfassung von Impressionen ist daher nicht erforderlich.
## Klicks protokollieren {#logging-clicks}
Die Methode zur Protokollierung von Banner-Klicks hängt davon ab, wie Ihr Banner gerendert wird und wo sich Ihr Klick-Handler befindet.
### Standard-Bannerinhalt (automatisch) {#standard-banner-content-automatic}
Wenn Sie die standardmäßigen, sofort einsatzbereiten SDK-Methoden zum Einfügen von Bannern verwenden und Ihr Banner Standard-Editor-Komponenten (Bilder, Buttons, Text) enthält, werden Klicks automatisch erfasst. Das SDK fügt diesen Elementen Klick-Listener hinzu, und es ist kein zusätzlicher Code erforderlich.
### Benutzerdefinierte Codeblöcke {#custom-code-blocks}
Wenn Ihr Banner den **Custom Code**-Editor-Block im Braze-Dashboard verwendet, müssen Sie `brazeBridge.logClick()` verwenden, um Klicks aus diesem benutzerdefinierten HTML zu protokollieren. Dies gilt auch bei der Verwendung von SDK-Methoden zum Rendern des Banners, da das SDK nicht automatisch Listener an Elemente innerhalb Ihres angepassten Codes anhängen kann.
```html
```
Die vollständige Referenz finden Sie unter [Benutzerdefinierter Code und JavaScript-Bridge für Banner](https://www.braze.com/docs/de/de/user_guide/channels/banners/create_a_banner#custom-code). `brazeBridge` stellt eine Kommunikationsschicht zwischen dem internen HTML des Banners und dem übergeordneten Braze SDK bereit.
### Angepasste UI-Implementierungen (Headless) {#custom-ui-implementations-headless}
Wenn Sie eine vollständig angepasste UI unter Verwendung der [angepassten Eigenschaften](#custom-properties) des Banners erstellen, anstatt den Banner-HTML-Code zu rendern, müssen Sie Klicks und Impressionen manuell aus Ihrem Anwendungscode protokollieren. Da das SDK das Banner nicht rendert, kann es Interaktionen mit Ihren angepassten UI-Elementen nicht automatisch verfolgen.
Vollständige Methodensignaturen und Details finden Sie in der [Braze SDK-Referenzdokumentation](https://www.braze.com/docs/de/de/developer_guide/references).
#### Impressionen protokollieren {#logging-impressions}
Rufen Sie die plattformspezifische Methode für Banner-Impressionen auf, wenn Ihre angepasste UI das Banner als „gesehen“ betrachtet. Implementieren Sie eine robuste Logik dafür, was als Impression zählt, um doppelte Ereignisse zu vermeiden – protokollieren Sie beispielsweise nur, wenn das Banner in den sichtbaren Bereich eintritt (oder gleichwertig), und protokollieren Sie nicht erneut, wenn dasselbe Banner zurück in den sichtbaren Bereich gescrollt wird oder wenn Ihre Komponente ohne ein neues Ansichtsereignis neu gerendert wird.
```javascript
import * as braze from "@braze/web-sdk";
// Log impression when your custom UI considers the banner viewed (for example, once when it enters viewport)
const banner = braze.getBanner("placement_id_homepage_top");
if (banner) {
braze.logBannerImpressions([banner]);
}
```
[Web-SDK-Referenz](https://js.appboycdn.com/web-sdk/latest/doc/modules/braze.html#logbannerimpressions)
```kotlin
// Log impression when your custom UI considers the banner viewed (for example, once when it enters viewport)
Braze.getInstance(context).logBannerImpression("placement_id_homepage_top")
```
```java
// Log impression when your custom UI considers the banner viewed (for example, once when it enters viewport)
Braze.getInstance(context).logBannerImpression("placement_id_homepage_top");
```
[Android-SDK-Referenz](https://braze-inc.github.io/braze-android-sdk/kdoc/braze-android-sdk/com.braze/-i-braze/log-banner-impression.html)
```swift
// Retrieve a banner and log an impression on it (for example, once when it enters viewport)
braze.banners.getBanner(for: "placement_id_homepage_top") { banner in
banner?.context.logImpression()
}
```
[Swift-SDK-Referenz](https://braze-inc.github.io/braze-swift-sdk/documentation/brazekit/braze/banner/context-swift.class/logimpression())
```javascript
// Log impression when your custom UI considers the banner viewed (for example, once when it enters viewport)
Braze.logBannerImpression("placement_id_homepage_top");
```
Die neuesten Methodensignaturen finden Sie im [React Native SDK-Repository](https://github.com/braze-inc/braze-react-native-sdk).
```dart
// Log impression when your custom UI considers the banner viewed (for example, once when it enters viewport)
braze.logBannerImpression("placement_id_homepage_top");
```
[Flutter-SDK-Referenz](https://pub.dev/documentation/braze_plugin/latest/braze_plugin/BrazePlugin/logBannerImpression.html)
#### Klicks protokollieren
Rufen Sie die plattformspezifische Methode für Banner-Klicks auf, wenn Nutzer:innen auf Ihr angepasstes Banner (oder einen bestimmten Button) tippen. Übergeben Sie die optionale `buttonId`, wenn der Klick auf einen bestimmten Button erfolgt, damit Analytics den Klick korrekt zuordnen kann.
```javascript
import * as braze from "@braze/web-sdk";
// Log click
braze.logBannerClick("placement_id_homepage_top", buttonId); // buttonID is optional
```
[Web-SDK-Referenz](https://js.appboycdn.com/web-sdk/latest/doc/modules/braze.html#logbannerclick)
```kotlin
// Log click
Braze.getInstance(context).logBannerClick("placement_id_homepage_top", buttonId) // buttonID parameter can be null
```
```java
// Log click
Braze.getInstance(context).logBannerClick("placement_id_homepage_top", buttonId); // buttonID parameter can be null
```
[Android-SDK-Referenz](https://braze-inc.github.io/braze-android-sdk/kdoc/braze-android-sdk/com.braze/-i-braze/log-banner-click.html)
```swift
// Retrieve a banner and log a click on it
braze.banners.getBanner(for: "placement_id_homepage_top") { banner in
banner?.context.logClick(buttonId: buttonId) // buttonID is optional
}
```
[Swift-SDK-Referenz](https://braze-inc.github.io/braze-swift-sdk/documentation/brazekit/braze/banner/context-swift.class/logclick(buttonid:))
```javascript
// Log click
Braze.logBannerClick("placement_id_homepage_top", buttonId); // buttonID is optional
```
Die neuesten Methodensignaturen finden Sie im [React Native SDK-Repository](https://github.com/braze-inc/braze-react-native-sdk).
```dart
// Log click
braze.logBannerClicked("placement_id_homepage_top", buttonId); // buttonID parameter can be null
```
[Flutter-SDK-Referenz](https://pub.dev/documentation/braze_plugin/latest/braze_plugin/BrazePlugin/logBannerClicked.html)
## Schließungen protokollieren {#log-dismissals}
Banner-Schließungen entfernen ein Banner programmatisch aus einer Platzierung, wenn Nutzer:innen es aktiv schließen. Nach dem Schließen wird das Banner für diese Nutzer:in unterdrückt. Beim nächsten Aktualisieren der Platzierungsliste wird ein neues Banner zurückgegeben, sofern die Nutzer:in dafür qualifiziert ist.
### Voraussetzungen
Dies sind die erforderlichen Mindestversionen des SDK, um Banner-Schließungen zu protokollieren:
### Integrationen {#integrations}
#### Standard-Banner-Integrationen (Drag-and-Drop-Editor) {#standard-banner-integrations-drag-and-drop-editor}
Wenn Ihr Banner den Drag-and-Drop-Editor verwendet und eine Schließen-Button-Komponente enthält, ist kein zusätzlicher Code erforderlich. Wenn Nutzer:innen auf den Schließen-Button klicken, wird die Nachricht ausgeblendet, eine Schließung ausgelöst und anschließend ein Schließungsereignis für Analytics aufgezeichnet.
#### Benutzerdefinierte Codeblöcke
Wenn Ihr Banner den **Custom Code**-Editor-Block verwendet, können Sie eine Schließung direkt aus dem HTML des Banners heraus mit `brazeBridge.closeMessage()` auslösen.
```html
```
#### Ein Banner programmatisch schließen {#dismiss-a-banner-programmatically}
Wenn Sie die Standard-`BrazeBannerView` mit dem im Drag-and-Drop-Editor erstellten Schließen-Button verwenden, ist kein zusätzlicher Code erforderlich; die Schließung wird automatisch verarbeitet.
Für angepasste UI-Integrationen können Sie die Dismiss-Methode direkt auf Ihrer Braze-Instanz aufrufen, um ein Banner programmatisch zu schließen und ein Schließungsereignis zu protokollieren. Die Dismiss-Methode kann sicher mehrfach aufgerufen werden – das SDK ignoriert doppelte Aufrufe für dasselbe Banner.
Dies sind die erforderlichen Mindestversionen des SDK, um ein Banner programmatisch zu schließen:
Übergeben Sie das `Banner`-Objekt an `braze.dismissBanner()`. Sie können das `Banner`-Objekt über `braze.getAllBanners()` oder aus einem `subscribeToBannersUpdates`-Callback erhalten.
```javascript
import * as braze from "@braze/web-sdk";
const banners = braze.getAllBanners();
const banner = banners["global_banner"];
if (banner) {
braze.dismissBanner(banner);
}
```
```typescript
import * as braze from "@braze/web-sdk";
const banners = braze.getAllBanners();
const banner = banners["global_banner"];
if (banner) {
braze.dismissBanner(banner);
}
```
```java
Braze.getInstance(context).dismissBanner("your-placement-id");
```
```kotlin
Braze.getInstance(context).dismissBanner("your-placement-id")
```
Verwenden Sie `dismiss()` auf dem Kontext des Banners, wenn verfügbar. Diese Methode ist idempotent und löst den `onDismiss`-Callback automatisch aus. Wenn der Kontext nicht verfügbar ist, rufen Sie `dismiss(using:)` direkt auf dem Banner auf. Beide Methoden müssen vom Hauptthread aufgerufen werden.
```swift
// Preferred: dismiss via context.
banner.context?.dismiss()
// Fallback: if context is unavailable.
banner.dismiss(using: braze)
```
In Objective-C sind diese als `[banner.context dismiss]` und `[banner dismissUsing:braze]` verfügbar.
```javascript
Braze.dismissBanner("your-placement-id");
```
```dart
braze.dismissBanner("your-placement-id");
```
### Benutzerdefinierte Analytics bei Banner-Schließung protokollieren {#log-custom-analytics-on-banner-dismissal}
Um benutzerdefinierte Logik auszuführen, wenn ein Banner geschlossen wird – z. B. das Protokollieren von Analytics – verwenden Sie den Dismiss-Callback für Ihr SDK. Der Callback erhält ein Ereignisobjekt mit der `placementId`, dem `stableKey` und der `trackingId` des Banners.
Verwenden Sie [`Banner.subscribeToDismissedEvent()`](https://js.appboycdn.com/web-sdk/latest/doc/classes/braze.banner.html#subscribetodismissedevent), um benutzerdefinierte Logik auszuführen, wenn ein bestimmtes Banner geschlossen wird. Abonnieren Sie das Ereignis, bevor Sie das Banner anzeigen.
**Note:**
`Banner.subscribeToDismissedEvent()` erfordert Web SDK 6.9.0 oder höher. Bei früheren Versionen verwenden Sie `braze.subscribeToBannersUpdates()` und erkennen die Schließung, indem Sie prüfen, ob das Banner nicht mehr in der aktualisierten Banner-Map vorhanden ist.
```javascript
import * as braze from "@braze/web-sdk";
braze.subscribeToBannersUpdates((banners) => {
const banner = banners["global_banner"];
if (banner) {
banner.subscribeToDismissedEvent(() => {
// Run any custom logic here, such as logging custom analytics
console.log("Banner was dismissed");
});
}
});
braze.requestBannersRefresh(["global_banner"]);
```
```typescript
import { useEffect } from "react";
import * as braze from "@braze/web-sdk";
useEffect(() => {
const subscriptionId = braze.subscribeToBannersUpdates((banners) => {
const banner = banners["global_banner"];
if (banner) {
banner.subscribeToDismissedEvent(() => {
// Run any custom logic here, such as logging custom analytics
console.log("Banner was dismissed");
});
}
});
braze.requestBannersRefresh(["global_banner"]);
return () => {
braze.removeSubscription(subscriptionId);
};
}, []);
```
Setzen Sie die optionale [`onDismissCallback`](https://braze-inc.github.io/braze-android-sdk/kdoc/braze-android-sdk/com.braze.ui.banners/-banner-view/on-dismiss-callback.html)-Eigenschaft auf [`BannerView`](https://braze-inc.github.io/braze-android-sdk/kdoc/braze-android-sdk/com.braze.ui.banners/-banner-view/index.html).
```java
import android.util.Log;
import com.braze.ui.banners.BannerView;
import kotlin.Unit;
// After obtaining your BannerView instance (for example from XML via findViewById, or `new BannerView(context, "global_banner")`)
bannerView.setOnDismissCallback((snapshot) -> {
Log.d(TAG, "placementId: " + snapshot.getPlacementId()
+ ", stableKey: " + snapshot.getStableKey()
+ ", trackingId: " + snapshot.getTrackingId());
// Run any custom logic here, such as logging custom analytics
return Unit.INSTANCE;
});
```
```kotlin
import android.util.Log
import com.braze.ui.banners.BannerView
// After obtaining your BannerView instance (for example via findViewById or `BannerView(context, "global_banner")`)
bannerView.onDismissCallback = { snapshot ->
Log.d(TAG, "placementId: ${snapshot.placementId}, stableKey: ${snapshot.stableKey}, trackingId: ${snapshot.trackingId}")
// Run any custom logic here, such as logging custom analytics
}
```
```swift
// After initializing your banner view instance using UIKit or SwiftUI
bannerView.onDismiss = { event in
print("Banner dismissed — placementId: \(event.placementId ?? "unknown")")
print(" stableKey: \(event.stableKey ?? "unknown")")
print(" trackingId: \(event.trackingId ?? "unknown")")
// Run any custom logic here, such as logging custom analytics
}
```
Setzen Sie die `onDismiss`-Prop auf `Braze.BrazeBannerView`, um benutzerdefinierte Logik auszuführen, wenn ein Banner geschlossen wird.
```javascript
import Braze from "@braze/react-native-sdk";
{
console.log("placementId:", event.placementId, "stableKey:", event.stableKey, "trackingId:", event.trackingId);
// Run any custom logic here, such as logging custom analytics
}}
/>
```
Setzen Sie den `onDismiss`-Parameter auf `BrazeBannerView`, um benutzerdefinierte Logik auszuführen, wenn ein Banner geschlossen wird.
```dart
BrazeBannerView(
placementId: 'global_banner',
onDismiss: (BrazeBannerDismissEvent event) {
print('placementId: ${event.placementId}, stableKey: ${event.stableKey}, trackingId: ${event.trackingId}');
// Run any custom logic here, such as logging custom analytics
},
)
```
### Speicherlimit für ausstehende Schließungen {#pending-dismissal-storage-cap}
Schließungsereignisse werden lokal als ausstehende Einträge gespeichert, bis sie beim nächsten `requestBannersRefresh`-Aufruf mit dem Braze-Server synchronisiert werden können.
**Warning:**
In seltenen Fällen, in denen sich eine große Anzahl von Schließungen ohne erfolgreiche Synchronisierung ansammelt, können ältere ausstehende Schließungen verworfen werden. In diesem Fall können zuvor geschlossene Banner wieder erscheinen, bis die nächste erfolgreiche Synchronisierung abgeschlossen ist. Um dieses Risiko zu minimieren, rufen Sie `requestBannersRefresh` auf, wann immer Ihre App wieder Netzwerkverbindung erhält.
## Abmessungen und Größenangaben {#dimensions-and-sizing}
Hier erfahren Sie, was Sie über die Abmessungen und die Größe von Bannern wissen müssen:
- Der Composer erlaubt Ihnen zwar die Vorschau von Bannern in verschiedenen Abmessungen, aber diese Informationen werden nicht gespeichert oder an das SDK gesendet.
- Der HTML-Code nimmt die gesamte Breite des Containers ein, in dem er gerendert wird.
- Wir empfehlen, ein Element mit festen Abmessungen zu erstellen und diese Abmessungen im Composer zu testen.
## Benutzerdefinierte Eigenschaften {#custom-properties}
Sie können benutzerdefinierte Eigenschaften aus Ihrer Banner-Campaign verwenden, um Schlüssel-Wert-Daten über das SDK abzurufen und das Verhalten oder das Erscheinungsbild Ihrer App anzupassen. Beispielsweise könnten Sie:
- Metadaten für Ihre Analytics oder Drittanbieter-Integrationen senden.
- Metadaten wie einen `timestamp` oder ein JSON-Objekt verwenden, um bedingte Logik zu triggern.
- Das Verhalten eines Banners basierend auf enthaltenen Metadaten wie `ratio` oder `format` steuern.
### Voraussetzungen
Sie müssen Ihrer Banner-Campaign [benutzerdefinierte Eigenschaften hinzufügen](https://www.braze.com/docs/de/de/user_guide/channels/banners/create_a_banner#custom-properties). Darüber hinaus sind dies die erforderlichen Mindestversionen des SDK, um auf benutzerdefinierte Eigenschaften zugreifen zu können:
### Auf benutzerdefinierte Eigenschaften zugreifen {#access-custom-properties}
Um auf die benutzerdefinierten Eigenschaften eines Banners zuzugreifen, verwenden Sie eine der folgenden Methoden basierend auf dem im Dashboard definierten Typ der Eigenschaft. Wenn der Schlüssel nicht mit einer Eigenschaft dieses Typs übereinstimmt oder nicht existiert, gibt die Methode `null` zurück.
```javascript
// Returns the Banner instance
const banner = braze.getBanner("placement_id_homepage_top");
// banner may be undefined or null
if (banner) {
// Returns the string property
const stringProperty = banner.getStringProperty("color");
// Returns the boolean property
const booleanProperty = banner.getBooleanProperty("expanded");
// Returns the number property
const numberProperty = banner.getNumberProperty("height");
// Returns the timestamp property (as a number)
const timestampProperty = banner.getTimestampProperty("account_start");
// Returns the image URL property as a string of the URL
const imageProperty = banner.getImageProperty("homepage_icon");
// Returns the JSON object property
const jsonObjectProperty = banner.getJsonProperty("footer_settings");
}
```
```swift
// Passes the specified banner to the completion handler
AppDelegate.braze?.banners.getBanner(for: "placement_id_homepage_top") { banner in
// Returns the string property
let stringProperty: String? = banner.stringProperty(key: "color")
// Returns the boolean property
let booleanProperty: Bool? = banner.boolProperty(key: "expanded")
// Returns the number property as a double
let numberProperty: Double? = banner.numberProperty(key: "height")
// Returns the Unix UTC millisecond timestamp property as an integer
let timestampProperty: Int? = banner.timestampProperty(key: "account_start")
// Returns the image property as a String of the image URL
let imageProperty: String? = banner.imageProperty(key: "homepage_icon")
// Returns the JSON object property as a [String: Any] dictionary
let jsonObjectProperty: [String: Any]? = banner.jsonObjectProperty(key: "footer_settings")
}
```
```java
// Returns the Banner instance
Banner banner = Braze.getInstance(context).getBanner("placement_id_homepage_top");
// banner may be undefined or null
if (banner != null) {
// Returns the string property
String stringProperty = banner.getStringProperty("color");
// Returns the boolean property
Boolean booleanProperty = banner.getBooleanProperty("expanded");
// Returns the number property
Number numberProperty = banner.getNumberProperty("height");
// Returns the timestamp property (as a Long)
Long timestampProperty = banner.getTimestampProperty("account_start");
// Returns the image URL property as a String of the URL
String imageProperty = banner.getImageProperty("homepage_icon");
// Returns the JSON object property as a JSONObject
JSONObject jsonObjectProperty = banner.getJSONProperty("footer_settings");
}
```
```kotlin
// Returns the Banner instance
val banner: Banner = Braze.getInstance(context).getBanner("placement_id_homepage_top") ?: return
// Returns the string property
val stringProperty: String? = banner.getStringProperty("color")
// Returns the boolean property
val booleanProperty: Boolean? = banner.getBooleanProperty("expanded")
// Returns the number property
val numberProperty: Number? = banner.getNumberProperty("height")
// Returns the timestamp property (as a Long)
val timestampProperty: Long? = banner.getTimestampProperty("account_start")
// Returns the image URL property as a String of the URL
val imageProperty: String? = banner.getImageProperty("homepage_icon")
// Returns the JSON object property as a JSONObject
val jsonObjectProperty: JSONObject? = banner.getJSONProperty("footer_settings")
```
```javascript
// Get the Banner instance
const banner = await Braze.getBanner('placement_id_homepage_top');
if (!banner) return;
// Get the string property
const stringProperty = banner.getStringProperty('color');
// Get the boolean property
const booleanProperty = banner.getBooleanProperty('expanded');
// Get the number property
const numberProperty = banner.getNumberProperty('height');
// Get the timestamp property (as a number)
const timestampProperty = banner.getTimestampProperty('account_start');
// Get the image URL property as a string
const imageProperty = banner.getImageProperty('homepage_icon');
// Get the JSON object property
const jsonObjectProperty = banner.getJSONProperty('footer_settings');
```
```dart
// Fetch the banner asynchronously
_braze.getBanner(placementId).then(('placement_id_homepage_top') {
// Get the string property
final String? stringProperty = banner?.getStringProperty('color');
// Get the boolean property
final bool? booleanProperty = banner?.getBooleanProperty('expanded');
// Get the number property
final num? numberProperty = banner?.getNumberProperty('height');
// Get the timestamp property
final int? timestampProperty = banner?.getTimestampProperty('account_start');
// Get the image URL property
final String? imageProperty = banner?.getImageProperty('homepage_icon');
// Get the JSON object property
final Map? jsonObjectProperty = banner?.getJSONProperty('footer_settings');
// Use these properties as needed in your UI or logic
});
```
# Banner testen
Source: /docs/de/developer_guide/banners/testing/index.md
# Banner testen {#test-banners}
> Erfahren Sie, wie Sie Ihre Bannernachricht testen können, bevor Sie Ihre Campaign starten, damit Sie sicherstellen können, dass alle Medien, Texte, Personalisierung und angepassten Attribute korrekt dargestellt werden. Weitere allgemeine Informationen finden Sie unter [Über Banner](https://www.braze.com/docs/de/de/developer_guide/banners).
## Voraussetzungen {#prerequisites}
Bevor Sie Bannernachrichten in Braze testen können, müssen Sie eine [Banner-Campaign in Braze](https://www.braze.com/docs/de/de/user_guide/channels/banners/create_a_banner) erstellen. Überprüfen Sie außerdem, ob die Platzierung, die Sie testen möchten, bereits [in Ihrer App oder auf Ihrer Website platziert](https://www.braze.com/docs/de/de/developer_guide/banners/placements) ist.
Um einen Test entweder an [Inhaltstestgruppen](https://www.braze.com/docs/de/de/user_guide/administrative/app_settings/developer_console/internal_groups_tab#content-test-groups) oder an einzelne Nutzer:innen zu senden, muss Push auf Ihren Testgeräten aktiviert sein und es müssen gültige Push-Token für die Testnutzer:in registriert sein, bevor Sie den Test senden.
## Banner testen {#test-a-banner}
**Preview** to you preview your Banner or send a test message.
{: style="max-width:50%;"}
Keep in mind, your preview may not be identical to the final render on a user's device due to differences across hardware.
To send a test message, add either a content test group or one or more individual users as **Test Recipients**, then select **Send Test**. You'll be able to view your test message on the device for up to 5 minutes. You can then select **Copy preview link** to generate and copy a shareable preview link that shows what the banner will look like for a random user. The link will last for seven days before it needs to be regenerated.

While reviewing your test Banner, verify the following:
- Is your Banner campaign assigned to a placement?
- Do the images and media show up and act as expected on your targeted device types and screen sizes?
- Do your links and buttons direct the user to where they should go?
- Does the Liquid function as expected? Have you accounted for a default attribute value in the event that the Liquid returns no information?
- Is your copy clear, concise, and correct?
For more information, see [Send test messages](https://www.braze.com/docs/de/de/user_guide/messaging/messaging_fundamentals/sending_test_messages/).
# Banner Analytics
Source: /docs/de/developer_guide/banners/analytics/index.md
# Banner Analytics
> Erfahren Sie, wie Sie die Analytics für Ihre Banner überprüfen können, einschließlich der Details der Kampagne, der Performance der Nachrichten und der historischen Performance. Weitere allgemeine Informationen finden Sie unter [Über Banner](https://www.braze.com/docs/de/de/developer_guide/banners).
## Viewing analytics
Once you've launched your campaign, you can return to the details page for that campaign to view key metrics. Navigate to the **Campaigns** page and select your campaign to open the details page. For sent in Canvas, refer to [Canvas analytics](https://www.braze.com/docs/de/de/user_guide/engagement_tools/canvas/testing_canvases/measuring_and_testing_with_canvas_analytics/).
**Tip:**
Looking for definitions for the terms and metrics listed in your report? Refer to our
From the **Campaign Analytics** tab, you can view your reports in a series of panels. You may see more or less than those listed in the following sections, but each has its own useful purpose.
### Time range
By default, the time range for **Campaign Analytics** will display the last 90 days from the current time. This means that if the campaign was launched more than 90 days ago, the analytics will display as "0" for the given time range. To view all analytics for older campaigns, adjust the reporting time range.
### Campaign details
The **Campaign Details** panel shows a high-level overview of the entire performance for your
Review this panel to see overall metrics such as the number of messages sent to the number of recipients, the primary conversion rate, and the total revenue generated by this message. You can also review delivery, audience, and conversion settings from this page.
**Note:**
Analytics numbers in the dashboard and Snowflake may differ slightly. Braze measures numbers in the dashboard and records rows to Snowflake separately. Snowflake is the more precise data source, so if you see discrepancies between these sources, we recommend referring to Snowflake data.
#### Estimated Audience and Current Audience
Depending on how large your workspace is, the **Campaign Details** panel may label audience statistics **Estimated Audience** or **Current Audience**.
The following table summarizes what each label means.
| Footer label | When it is used |
| --- | --- |
| **Estimated Audience** | Braze does not run a full-database count by default. Audience size is estimated from a sample and extrapolated, similar to the **Reachable users** range in the segment builder. Margins of error are expected, especially for large workspaces or small segments as a share of the workspace. |
| **Current Audience** | Braze can compute the default statistic with a full scan of workspace profiles, so the displayed audience size is a current, unsampled count (still subject to channel reachability, subscription rules, and other targeting options). |
{: .reset-td-br-1 .reset-td-br-2 aria-label="Estimated Audience and Current Audience" }
For details on sampling behavior, **Calculate exact statistics**, and segmenting **Reachable users**, see [Measure segment size](https://www.braze.com/docs/de/de/user_guide/audience/segments/measuring_segment_size/).
#### Changes Since Last Viewed
The number of updates to the campaign from other members of your team is tracked by the *Changes Since Last Viewed* metric on the campaign overview page. Select **Changes Since Last Viewed** to view a changelog of updates to the campaign's name, schedule, tags, message, audience, approval status, or team access configuration. For each update, you can see who performed the update and when. You can use this changelog to audit changes to your campaign.
If you want to simplify your view, click **Add/Remove Columns** and clear any metrics as desired. By default, all metrics are displayed.
### Historical performance
The **Historical Performance** panel allows you to view the metrics from the **Message Performance** panel as a graph over time. Use the filters at the top of the panel to modify the stats and channels shown in the graph. The time range of this graph will always mirror the time range specified at the top of the page.
To get a day-by-day breakdown, click the hamburger menu and select **Download CSV** to receive a CSV export of the report.

### Conversion event details
The **Conversion Event Details** panel shows you the performance of your conversion events for your campaign. For more information, refer to [Conversion Events](https://www.braze.com/docs/de/de/user_guide/engagement_tools/campaigns/building_campaigns/conversion_events/#step-3-view-results).

### Conversion correlation
The **Conversion Correlation** panel gives you insight into what user attributes and behaviors help or hurt the outcomes you set for campaigns. For more information, refer to [Conversion correlation](https://www.braze.com/docs/de/de/user_guide/engagement_tools/testing/conversion_correlation/).

## Retention report
Retention reports show you the rates at which your users have performed a selected retention event over time periods in a specific campaign or Canvas. For more information, refer to [Retention reports](https://www.braze.com/docs/de/de/user_guide/analytics/reporting/retention_reports/).
## Funnel report
Funnel reporting offers a visual report that allows you to analyze the journeys your customers take after receiving a campaign or Canvas. If your campaign or Canvas uses a control group or multiple variants, you will be able to understand how the different variants have impacted the conversion funnel at a more granular level and optimize based on this data.
For more information, refer to [Funnel reports](https://www.braze.com/docs/de/de/user_guide/analytics/reporting/funnel_reports/).
# Von Content Cards zu Banner migrieren
Source: /docs/de/developer_guide/banners/migrating_from_content_cards/index.md
# Von Content Cards zu Banner migrieren {#migrate-from-content-cards-to-banners}
> Dieser Leitfaden unterstützt Sie bei der Migration von Content Cards zu Bannern für Anwendungsfälle im Bereich des bannerartigen Messaging. Banner eignen sich ideal für Inline-Anzeigen, persistente In-App- und Web-Nachrichten, die an bestimmten Stellen in Ihrer App erscheinen.
## Warum zu Bannern migrieren? {#why-migrate-to-banners}
- Wenn Ihr Entwicklerteam angepasste Content Cards erstellt oder wartet, kann die Migration zu Bannern diese laufenden Investitionen reduzieren. Mit Bannern können Marketer die UI direkt steuern, wodurch Entwickler:innen für andere Aufgaben entlastet werden.
- Wenn Sie neue Homepage-Nachrichten, Onboarding-Abläufe oder persistente Ankündigungen einführen möchten, empfehlen wir, zunächst mit Bannern zu beginnen, anstatt auf Content Cards aufzubauen. Sie profitieren von Realtime-Personalisierung, keiner 30-tägigen Ablaufzeit, keiner Größenbeschränkung und nativer Priorisierung vom ersten Tag an.
- Wenn Sie mit der 30-tägigen Ablaufgrenze arbeiten, komplexe Logik zur erneuten Berechtigungsprüfung verwalten oder von veralteter Personalisierung frustriert sind, lösen Banner diese Probleme auf native Weise.
Banner bieten gegenüber Content Cards mehrere Vorteile für das Messaging im Banner-Stil:
### Beschleunigte Produktion {#accelerated-production}
- **Reduzierter laufender technischer Support erforderlich**: Marketer können mithilfe eines Drag-and-Drop-Editors und angepasstem HTML individuelle Nachrichten erstellen, ohne dass sie für die Anpassung die Unterstützung von Entwickler:innen benötigen.
- **Flexible Anpassungsmöglichkeiten**: Entwerfen Sie direkt im Editor, verwenden Sie HTML oder nutzen Sie vorhandene Datenmodelle mit angepassten Eigenschaften.
### Verbesserte Benutzererfahrung {#better-ux}
- **Dynamische Content-Updates**: Banner aktualisieren Liquid-Logik und die Berechtigung bei jeder Aktualisierung, um sicherzustellen, dass Nutzer:innen stets die relevantesten Inhalte sehen.
- **Native Platzierungsunterstützung**: Nachrichten werden in bestimmten Kontexten und nicht in einem Feed angezeigt, wodurch eine bessere kontextuelle Relevanz gewährleistet wird.
- **Native Priorisierung**: Steuerung der Anzeigereihenfolge ohne angepasste Logik, wodurch die Verwaltung der Nachrichtenhierarchie vereinfacht wird.
### Persistenz {#persistence}
- **Keine Verfallsfrist**: Banner-Campaigns haben keine 30-tägige Ablaufgrenze wie Content Cards, was eine echte Persistenz der Nachrichten ermöglicht.
## Wann sollte die Migration erfolgen? {#when-to-migrate}
Erwägen Sie eine Migration zu Bannern, wenn Sie Content Cards für folgende Zwecke verwenden:
- Homepage-Banner, Aktionen auf Produktseiten, Checkout-Angebote
- Persistente Navigationsansagen oder Sidebar-Nachrichten
- Always-on-Nachrichten, die länger als 30 Tage angezeigt werden
- Nachrichten, bei denen Sie eine Realtime-Personalisierung und eine Eignungsprüfung wünschen
## Wann sollten Sie Content Cards beibehalten? {#when-to-keep-content-cards}
Verwenden Sie weiterhin Content Cards, wenn Sie Folgendes benötigen:
- **Feed-Erlebnisse:** Jeder Anwendungsfall, der mehrere scrollbare Nachrichten oder einen kartenbasierten „Posteingang“ umfasst.
- **Besondere Features:** Nachrichten, die Connected-Content oder Aktionscodes erfordern, da Banner diese nicht nativ unterstützen.
- **Getriggerte Zustellung:** Anwendungsfälle, die eine API-gesteuerte oder aktionsbasierte Zustellung erfordern. Obwohl Banner keine API-gesteuerte oder aktionsbasierte Zustellung unterstützen, bedeutet die Realtime-Berechtigungsevaluierung, dass Nutzer:innen bei jeder Aktualisierung sofort anhand ihrer Segmentzugehörigkeit qualifiziert oder disqualifiziert werden.
## Migrationsleitfaden {#migration-guide}
### Voraussetzungen {#prerequisites}
Stellen Sie vor der Migration sicher, dass das Braze SDK die Mindestversionsanforderungen erfüllt:
Für das Schließen und die erneute Berechtigung sind die folgenden Mindestversionen des SDK erforderlich:
### Updates abonnieren {#subscribe-to-updates}
#### Content-Cards-Ansatz {#content-cards-approach}
```javascript
import * as braze from "@braze/web-sdk";
braze.subscribeToContentCardsUpdates((cards) => {
// Handle array of cards
cards.forEach(card => {
console.log("Card:", card.id);
});
});
```
```kotlin
Braze.getInstance(context).subscribeToContentCardsUpdates { cards ->
// Handle array of cards
cards.forEach { card ->
Log.d(TAG, "Card: ${card.id}")
}
}
```
```swift
braze.contentCards.subscribeToUpdates { cards in
// Handle array of cards
for card in cards {
print("Card: \(card.id)")
}
}
```
```javascript
Braze.addListener(Braze.Events.CONTENT_CARDS_UPDATED, (update) => {
const cards = update.cards;
// Handle array of cards
cards.forEach(card => {
console.log("Card:", card.id);
});
});
```
```dart
StreamSubscription contentCardsStreamSubscription = braze.subscribeToContentCards((List contentCards) {
// Handle array of cards
for (final card in contentCards) {
print("Card: ${card.id}");
}
});
```
#### Banner-Ansatz {#banners-approach}
```javascript
import * as braze from "@braze/web-sdk";
braze.subscribeToBannersUpdates((banners) => {
// Get banner for specific placement
const banner = braze.getBanner("sample_placement_id");
if (banner) {
console.log("Banner received for placement:", banner.placementId);
}
});
```
```kotlin
Braze.getInstance(context).subscribeToBannersUpdates { update ->
// Get banner for specific placement
val banner = Braze.getInstance(context).getBanner("sample_placement_id")
if (banner != null) {
Log.d(TAG, "Banner received for placement: ${banner.placementId}")
}
}
```
```swift
braze.banners.subscribeToUpdates { banners in
// Get banner for specific placement
braze.banners.getBanner(for: "sample_placement_id") { banner in
guard let banner = banner else { return }
print("Banner received for placement: \(banner.placementId)")
}
}
```
```javascript
Braze.addListener(Braze.Events.BANNER_CARDS_UPDATED, (data) => {
const banners = data.banners;
// Get banner for specific placement
Braze.getBanner("sample_placement_id").then(banner => {
if (banner) {
console.log("Banner received for placement:", banner.placementId);
}
});
});
```
```dart
StreamSubscription bannerStreamSubscription = braze.subscribeToBanners((List banners) {
// Get banner for specific placement
braze.getBanner("sample_placement_id").then((banner) {
if (banner != null) {
print("Banner received for placement: ${banner.placementId}");
}
});
});
```
### Inhalt anzeigen {#display-content}
**Note:**
Content Cards können manuell mit angepasster UI-Logik gerendert werden, während Banner nur mit den vorgefertigten SDK-Methoden gerendert werden können.
#### Content-Cards-Ansatz
```javascript
// Show default feed UI
braze.showContentCards(document.getElementById("feed"));
// Or manually render cards
const cards = braze.getCachedContentCards();
cards.forEach(card => {
// Custom rendering logic
if (card instanceof braze.ClassicCard) {
// Render classic card
}
});
```
```kotlin
// Using default fragment
val fragment = ContentCardsFragment()
supportFragmentManager.beginTransaction()
.replace(R.id.content_cards_container, fragment)
.commit()
// Or manually render cards
val cards = Braze.getInstance(context).getCachedContentCards()
cards.forEach { card ->
when (card) {
is ClassicCard -> {
// Render classic card
}
}
}
```
```swift
// Using default view controller
let contentCardsController = BrazeContentCardUI.ViewController(braze: braze)
navigationController?.pushViewController(contentCardsController, animated: true)
// Or manually render cards
let cards = braze.contentCards.cards
for card in cards {
switch card {
case let card as Braze.ContentCard.Classic:
// Render classic card
default:
break
}
}
```
```javascript
// Launch default feed
Braze.launchContentCards();
// Or manually render cards
const cards = await Braze.getCachedContentCards();
cards.forEach(card => {
if (card.type === 'CLASSIC') {
// Render classic card
}
});
```
```dart
// Launch default feed
braze.launchContentCards();
// Or manually render cards
final cards = await braze.getContentCards();
for (final card in cards) {
if (card.type == 'CLASSIC') {
// Render classic card
}
}
```
#### Banner-Ansatz
```javascript
braze.subscribeToBannersUpdates((banners) => {
const banner = braze.getBanner("sample_placement_id");
if (!banner) {
return;
}
const container = document.getElementById("global-banner-container");
braze.insertBanner(banner, container);
if (banner.isControl) {
container.style.display = "none";
}
});
braze.requestBannersRefresh(["sample_placement_id"]);
```
```kotlin
// Using BannerView in XML
//
// Or programmatically
val bannerView = BannerView(context).apply {
placementId = "sample_placement_id"
}
container.addView(bannerView)
Braze.getInstance(context).requestBannersRefresh(listOf("sample_placement_id"))
```
```swift
// Using BannerUIView
let bannerView = BrazeBannerUI.BannerUIView(
placementId: "sample_placement_id",
braze: braze,
processContentUpdates: { result in
switch result {
case .success(let updates):
if let height = updates.height {
// Update height constraint
}
case .failure:
break
}
}
)
view.addSubview(bannerView)
braze.banners.requestBannersRefresh(placementIds: ["sample_placement_id"])
```
```javascript
// Using BrazeBannerView component
// Or get banner data
const banner = await Braze.getBanner("sample_placement_id");
if (banner) {
// Render custom banner UI
}
Braze.requestBannersRefresh(["sample_placement_id"]);
```
```dart
// Using BrazeBannerView widget
BrazeBannerView(
placementId: "sample_placement_id",
)
// Or get banner data
final banner = await braze.getBanner("sample_placement_id");
if (banner != null) {
// Render custom banner UI
}
braze.requestBannersRefresh(["sample_placement_id"]);
```
### Analytics protokollieren (angepasste Implementierungen) {#log-analytics-custom-implementations}
**Note:**
Sowohl Content Cards als auch Banner erfassen automatisch Analytics, wenn ihre Standard-UI-Komponenten verwendet werden. Die folgenden Beispiele beziehen sich auf angepasste Implementierungen, bei denen Sie Ihre eigene UI erstellen.
#### Content-Cards-Ansatz
```javascript
// Manual impression logging required for custom implementations
cards.forEach(card => {
braze.logContentCardImpressions([card]);
});
// Manual click logging required for custom implementations
card.logClick();
```
```kotlin
// Manual impression logging required for custom implementations
cards.forEach { card ->
card.logImpression()
}
// Manual click logging required for custom implementations
card.logClick()
```
```swift
// Manual impression logging required for custom implementations
for card in cards {
card.context?.logImpression()
}
// Manual click logging required for custom implementations
card.context?.logClick()
```
```javascript
// Manual impression logging required for custom implementations
cards.forEach(card => {
Braze.logContentCardImpression(card.id);
});
// Manual click logging required for custom implementations
Braze.logContentCardClicked(card.id);
```
```dart
// Manual impression logging required for custom implementations
for (final card in cards) {
braze.logContentCardImpression(card);
}
// Manual click logging required for custom implementations
braze.logContentCardClicked(card);
```
#### Banner-Ansatz
**Important:**
Analytics werden bei der Verwendung von `insertBanner()` automatisch erfasst. Bei der Verwendung von `insertBanner()` sollte keine manuelle Protokollierung verwendet werden.
```javascript
// Analytics are automatically tracked when using insertBanner()
// Manual logging should not be used when using insertBanner()
// For custom implementations, use manual logging methods:
// Log impression
braze.logBannerImpressions([banner]);
// Log click (with optional buttonId)
braze.logBannerClick("sample_placement_id", buttonId);
```
**Important:**
Bei der Verwendung von BannerView werden Analytics automatisch erfasst. Bei der Verwendung von BannerView sollte keine manuelle Protokollierung durchgeführt werden.
```kotlin
// Analytics are automatically tracked when using BannerView
// Manual logging should not be used for default BannerView
// For custom implementations, use manual logging methods:
// Log impression
Braze.getInstance(context).logBannerImpression("sample_placement_id");
// Log click (with optional buttonId)
Braze.getInstance(context).logBannerClick("sample_placement_id", buttonId);
```
**Important:**
Bei der Verwendung von BannerUIView werden Analytics automatisch erfasst. Die manuelle Protokollierung sollte nicht für die Standard-BannerUIView verwendet werden.
```swift
// Analytics are automatically tracked when using BannerUIView
// Manual logging should not be used for default BannerUIView
// For custom implementations, use manual logging methods:
// Get banner for specific placement
braze.banners.getBanner(for: "sample_placement_id") { banner in
guard let banner = banner else { return }
// Log impression
banner.context?.logImpression()
// Log click (with optional buttonId)
banner.context?.logClick(buttonId: buttonId)
}
// Control groups are automatically handled by BannerUIView
```
**Important:**
Bei der Verwendung von BrazeBannerView werden Analytics automatisch erfasst. Es ist keine manuelle Protokollierung erforderlich.
```javascript
// Analytics are automatically tracked when using BrazeBannerView
// No manual logging required
// Note: Manual logging methods for Banners are not yet supported in React Native
// Control groups are automatically handled by BrazeBannerView
```
**Important:**
Bei der Verwendung von BrazeBannerView werden Analytics automatisch erfasst. Es ist keine manuelle Protokollierung erforderlich.
```dart
// Analytics are automatically tracked when using BrazeBannerView
// No manual logging required
// Note: Manual logging methods for Banners are not yet supported in Flutter
// Control groups are automatically handled by BrazeBannerView
```
### Eigenschaften abrufen {#getting-properties}
#### Content-Cards-Ansatz
```javascript
cards.forEach(card => {
console.log("Card id:", card.id, "Extras:", card.extras);
});
```
```kotlin
cards.forEach { card ->
Log.d(TAG, "Card id: ${card.id} Extras: ${card.extras}")
}
```
```swift
for card in cards {
print("Card id: \(card.id) Extras: \(card.extras)")
}
```
```javascript
cards.forEach(card => {
console.log("Card id:", card.id, "Extras:", card.extras);
});
```
```dart
for (final card in cards) {
print("Card id: ${card.id} Extras: ${card.extras}");
}
```
#### Banner-Ansatz
```javascript
const banner = braze.getBanner("sample_placement_id");
if (!banner) {
return;
}
console.log("Banner placement:", banner.placementId, "Properties:", banner.properties);
```
```kotlin
val banner = Braze.getInstance(context).getBanner("sample_placement_id")
if (banner != null) {
Log.d(TAG, "Banner placement: ${banner.placementId} Properties: ${banner.properties}")
}
```
```swift
braze.banners.getBanner(for: "sample_placement_id") { banner in
guard let banner = banner else { return }
print("Banner placement: \(banner.placementId) Properties: \(banner.properties)")
}
```
```javascript
const banner = await Braze.getBanner("sample_placement_id");
if (banner) {
console.log("Banner placement:", banner.placementId, "Properties:", banner.properties);
}
```
```dart
final banner = await braze.getBanner("sample_placement_id");
if (banner != null) {
print("Banner placement: ${banner.placementId} Properties: ${banner.properties}");
}
```
### Umgang mit Kontrollgruppen {#handling-control-groups}
#### Content-Cards-Ansatz
```javascript
cards.forEach(card => {
if (card.isControl) {
// Logic for control cards ie. don't display but log analytics
} else {
// Logic for cards ie. render card
}
});
```
```kotlin
cards.forEach { card ->
if (card.isControl) {
// Logic for control cards ie. don't display but log analytics
} else {
// Logic for cards ie. render card
}
}
```
```swift
for card in cards {
if card.isControl {
// Logic for control cards ie. don't display but log analytics
} else {
// Logic for cards ie. render card
}
}
```
```javascript
cards.forEach(card => {
if (card.isControl) {
// Logic for control cards ie. don't display but log analytics
} else {
// Logic for cards ie. render card
}
});
```
```dart
for (final card in cards) {
if (card.isControl) {
// Logic for control cards ie. don't display but log analytics
} else {
// Logic for cards ie. render card
}
}
```
#### Banner-Ansatz
```javascript
braze.subscribeToBannersUpdates((banners) => {
const banner = braze.getBanner("sample_placement_id");
if (!banner) {
return;
}
const container = document.getElementById("global-banner-container");
// Always call insertBanner to track impression (including control)
braze.insertBanner(banner, container);
// Hide if control group
if (banner.isControl) {
container.style.display = "none";
}
});
```
```kotlin
// BannerView automatically handles control groups
// No additional code needed
val bannerView = BannerView(context).apply {
placementId = "sample_placement_id"
}
```
```swift
// BannerUIView automatically handles control groups
// No additional code needed
let bannerView = BrazeBannerUI.BannerUIView(
placementId: "sample_placement_id",
braze: braze
)
```
```javascript
// BrazeBannerView automatically handles control groups
// No additional code needed
```
```dart
// BrazeBannerView automatically handles control groups
// No additional code needed
BrazeBannerView(
placementId: "sample_placement_id",
)
```
## Einschränkungen {#limitations}
Beachten Sie bei der Migration von Content Cards zu Bannern die folgenden Einschränkungen:
### Migration getriggerter Nachrichten {#migrating-triggered-messages}
Banner unterstützen ausschließlich geplante Zustellungs-Campaigns. Um eine Nachricht zu migrieren, die zuvor API-gesteuert oder aktionsbasiert war, konvertieren Sie sie in ein segmentbasiertes Targeting:
- **Beispiel:** Anstatt eine Karte „Profil vervollständigen“ mit der API zu triggern, erstellen Sie ein Segment für Nutzer:innen, die sich in den letzten 7 Tagen registriert haben, ihr Profil jedoch noch nicht vervollständigt haben.
- **Realtime-Berechtigung:** Nutzer:innen werden bei jeder Aktualisierung sofort für das Banner qualifiziert oder disqualifiziert, basierend auf ihrer Segmentzugehörigkeit.
### Unterschiede in den Features {#feature-differences}
| Feature | Content Cards | Banner |
|---------|--------------|---------|
| **Inhaltsstruktur** |
| Mehrere Karten im Feed | ✅ Unterstützt | ✅ Es können mehrere Platzierungen erstellt werden, um eine karussellähnliche Implementierung zu erzielen. Pro Platzierung wird nur ein Banner zurückgegeben. |
| Mehrere Platzierungen | N/A | ✅ Mehrere Platzierungen werden unterstützt |
| Kartentypen (klassisch, mit Bildunterschrift, nur Bild) | ✅ Mehrere vordefinierte Typen | ✅ Einzelnes HTML-basiertes Banner (flexibler) |
| **Inhaltsverwaltung** |
| Drag-and-Drop-Editor | ❌ Erfordert Entwickler:innen für die Anpassung | ✅ Marketer können ohne technische Unterstützung Inhalte erstellen und aktualisieren |
| Angepasstes HTML/CSS | ❌ Beschränkt auf die Kartenstruktur | ✅ Vollständige HTML/CSS-Unterstützung |
| Schlüssel-Wert-Paare für die Anpassung | ✅ Für erweiterte Anpassungen erforderlich | ✅ Stark typisierte Schlüssel-Wert-Paare, die als „Eigenschaften“ bezeichnet werden, ermöglichen eine erweiterte Anpassung |
| **Persistenz und Ablauf** |
| Ablauf der Karte | ✅ Unterstützt (30-Tage-Limit) | ✅ Unterstützt (ohne Ablauflimit) |
| Wahre Persistenz | ❌ Maximal 30 Tage | ✅ Unbegrenzte Persistenz |
| **Anzeige und Targeting** |
| Feed-UI | ✅ Standard-Feed verfügbar | ❌ Nur platzierungsbasiert |
| Kontextspezifische Platzierung | ❌ Feed-basiert | ✅ Native Platzierungsunterstützung |
| Priorisierung | ❌ Erfordert angepasste Logik | ✅ Native Priorisierung |
| **Nutzer:innen-Interaktion** |
| Manuelles Schließen | ✅ Unterstützt | ✅ Unterstützt |
| Erneute Berechtigung nach dem Schließen | ❌ Erfordert angepasste Filter oder Campaign-Logik | ✅ Standard-Wartezeit |
| Gepinnte Karten | ✅ Unterstützt | N/A |
| **Analytics** |
| Automatische Analytics (Standard-UI) | ✅ Unterstützt | ✅ Unterstützt |
| Prioritätssortierung | ❌ Nicht unterstützt | ✅ Unterstützt |
| **Inhaltsupdates** |
| Liquid-Template-Aktualisierung | ❌ Einmal pro Karte beim Senden/Starten | ✅ Aktualisiert bei jeder Aktualisierung |
| Aktualisierung der Berechtigung | ❌ Einmal pro Karte beim Senden/Starten | ✅ Wird bei jeder Sitzung aktualisiert |
{: .reset-td-br-1 .reset-td-br-2 .reset-td-br-3 aria-label="Unterschiede in den Features" }
### Produkteinschränkungen {#product-limitations}
- Bis zu 25 aktive Nachrichten pro Platzierung.
- Bis zu 10 Platzierungs-IDs pro Aktualisierungsanfrage; darüber hinausgehende Anfragen werden gekürzt.
### SDK-Einschränkungen {#sdk-limitations}
- Banner werden derzeit auf den Plattformen .NET MAUI (Xamarin), Cordova, Unity, Vega oder TV nicht unterstützt.
- Stellen Sie sicher, dass Sie die in den Voraussetzungen aufgeführten Mindestversionen des SDK verwenden.
## Verwandte Artikel {#related-articles}
- [Banner-Platzierungen](https://www.braze.com/docs/de/de/developer_guide/banners/placements)
- [Anleitung: Anzeige eines Banners anhand der Platzierungs-ID](https://www.braze.com/docs/de/de/developer_guide/banners/tutorial_displaying_banners)
- [Banner-Analytics](https://www.braze.com/docs/de/de/developer_guide/banners/analytics)
- [Häufig gestellte Fragen zu Bannern](https://www.braze.com/docs/de/de/developer_guide/banners/faq)
# Anleitung: Anzeige eines Banners nach Platzierungs-ID
Source: /docs/de/developer_guide/banners/tutorial_displaying_banners/index.md
# Anleitung: Anzeige eines Banners nach Platzierungs-ID {#tutorial-displaying-a-banner-by-placement-id}
> Folgen Sie dem Beispielcode in dieser Anleitung, um Banner anhand ihrer Platzierungs-ID anzuzeigen. Weitere allgemeine Informationen finden Sie unter [Banner](https://www.braze.com/docs/de/de/developer_guide/banners).
## Prerequisites
Before you can start this tutorial, verify that your Braze SDK meets the minimum version requirements:
## Displaying banners for the Web SDK
**Important:**
We're piloting this new tutorial format. [Tell us what you think](https://docs.google.com/forms/d/e/1FAIpQLSe_5uhWM7eXXk9F_gviO_pvA4rkYO3WA9B6tNJZ3TY91md5bw/viewform?usp=pp_url&entry.569173304=General+Feedback) — your feedback helps us improve future guides.
```js file=index.js
import * as braze from "@braze/web-sdk";
braze.initialize("YOUR-API-KEY", {
baseUrl: "YOUR-ENDPOINT",
enableLogging: true,
});
braze.subscribeToBannersUpdates((banners) => {
// Get this placement's banner. If it's `null`, the user did not qualify for any banners.
const globalBanner = braze.getBanner("global_banner");
if (!globalBanner) {
return;
}
const container = document.getElementById("global-banner-container");
braze.insertBanner(globalBanner, container);
if (globalBanner.isControl) {
// Hide or collapse the container
container.style.display = "none";
}
});
braze.requestBannersRefresh(["global_banner", "navigation_square_banner"]);
```
```html file=main.html
```
!!step
lines-index.js=5
### 1. Enable debugging (optional)
To make troubleshooting easier while developing, consider enabling debugging.
!!step
lines-index.js=8-23
### 2. Subscribe to Banner updates
Use `subscribeToBannersUpdates()` to register a handler that runs whenever a Banner is updated. Inside the handler, call `braze.getBanner("global_banner")` to get the latest placement.
!!step
lines-index.js=15-22
### 3. Insert the Banner and handle control groups
Use `braze.insertBanner(banner, container)` to insert a Banner when it's returned. To ensure keep your layout clean, hide or collapse Banners that are apart of a control group (for example, when `isControl` is `true`).
!!step
lines-index.js=25
### 4. Refresh your Banners
After initializing the SDK, call `requestBannersRefresh(["global_banner", ...])` to ensure that Banners are refreshed at the start of each session.
You can also call this function at any time to refresh Banner placements later.
!!step
lines-main.html=3
### 5. Add a container for your Banner
In your HTML, add a new `
` element and give it a short, Banner-related `id`, such as `global-banner-container`. Braze will use this `
` to insert your Banner into the page.
## Prerequisites
Before you can start this tutorial, verify that your Braze SDK meets the minimum version requirements:
## Displaying banners for the Android SDK
**Important:**
We're piloting this new tutorial format. [Tell us what you think](https://docs.google.com/forms/d/e/1FAIpQLSe_5uhWM7eXXk9F_gviO_pvA4rkYO3WA9B6tNJZ3TY91md5bw/viewform?usp=pp_url&entry.569173304=General+Feedback) — your feedback helps us improve future guides.
```kotlin file=MainApplication.kt
import android.app.Application
import android.util.Log
import com.braze.Braze
import com.braze.configuration.BrazeConfig
import com.braze.support.BrazeLogger
public class MainApplication : Application() {
override fun onCreate() {
super.onCreate()
// Turn on verbose Braze logging
BrazeLogger.logLevel = Log.VERBOSE
// Configure Braze with your SDK key and endpoint
val config = BrazeConfig.Builder()
.setApiKey("YOUR-API-KEY")
.setCustomEndpoint("YOUR-ENDPOINT")
.build()
Braze.configure(this, config)
// Subscribe to Banner updates
Braze.getInstance(this)
.subscribeToBannersUpdates { update ->
for (banner in update.banners) {
Log.d("brazeBanners", "Received banner for placement: ${banner.placementId}")
// Add any custom banner logic you'd like
}
}
}
}
```
```kotlin file=MainActivity.kt
import android.os.Bundle
import androidx.activity.ComponentActivity
class MainActivity : ComponentActivity() {
override fun onCreate(savedInstanceState: Bundle?) {
super.onCreate(savedInstanceState)
// Inflate the XML layout
setContentView(R.layout.banners)
// Refresh placements
Braze.getInstance(this)
.requestBannersRefresh(
listOf("top-1")
)
}
}
```
```xml file=banners.xml
```
!!step
lines-MainApplication.kt=12
### 1. Enable debugging (optional)
To make troubleshooting easier while developing, consider enabling debugging.
!!step
lines-MainApplication.kt=21-28
### 2. Subscribe to Banner updates
Use `subscribeToBannersUpdates()` to register a handler that runs whenever a Banner is updated.
!!step
lines-MainActivity.kt=10-14
### 3. Refresh your placements
After initializing the Braze SDK, call `requestBannersRefresh(["PLACEMENT_ID"])` to fetch the latest Banner content for that placement.
!!step
lines-banners.xml=15-19
### 4. Define `BannerView` in your `banners.xml`
In `banners.xml`, declare a `` element with `app:placementId="PLACEMENT_ID"`. Braze will use this element to insert your Banner into your UI.
## Prerequisites
Before you can start this tutorial, verify that your Braze SDK meets the minimum version requirements:
## Displaying banners for the Swift SDK
**Important:**
We're piloting this new tutorial format. [Tell us what you think](https://docs.google.com/forms/d/e/1FAIpQLSe_5uhWM7eXXk9F_gviO_pvA4rkYO3WA9B6tNJZ3TY91md5bw/viewform?usp=pp_url&entry.569173304=General+Feedback) — your feedback helps us improve future guides.
```swift file=AppDelegate.swift
import UIKit
import BrazeKit
import BrazeUI
class AppDelegate: UIResponder, UIApplicationDelegate {
static var braze: Braze? = nil
func application(
_ application: UIApplication,
didFinishLaunchingWithOptions launchOptions: [UIApplication.LaunchOptionsKey: Any]?
) -> Bool {
// Braze configuration with your SDK API key and endpoint
let configuration = Braze.Configuration(apiKey: "YOUR-API-TOKEN", endpoint: "YOUR-ENDPOINT")
configuration.logger.level = .debug
// Initialize Braze SDK instance
AppDelegate.braze = Braze(configuration: configuration)
// Request a banners refresh
AppDelegate.braze?.banners.requestBannersRefresh(placementIds: ["top-1"])
return true
}
}
```
```swift file=SampleApp.swift
import SwiftUI
@main
struct SampleApp: App {
// Bind the AppDelegate into the SwiftUI lifecycle
@UIApplicationDelegateAdaptor(AppDelegate.self) var delegate
var body: some Scene {
WindowGroup {
ContentView()
}
}
}
```
```swift file=BannerViewController.swift
import UIKit
import BrazeKit
import BrazeUI
final class BannerViewController: UIViewController {
static let bannerPlacementID = "top-1"
var bannerHeightConstraints: NSLayoutConstraint?
lazy var contentView: UILabel = {
let contentView = UILabel()
contentView.text = "Your Content Here"
contentView.textAlignment = .center
contentView.translatesAutoresizingMaskIntoConstraints = false
return contentView
}()
lazy var bannerView: BrazeBannerUI.BannerUIView = {
var bannerView = BrazeBannerUI.BannerUIView(
placementId: BannerViewController.bannerPlacementID,
braze: AppDelegate.braze!,
processContentUpdates: { [weak self] result in
// Update layout properties when banner content has finished loading.
DispatchQueue.main.async {
guard let self else { return }
switch result {
case .success(let updates):
if let height = updates.height {
self.bannerView.isHidden = false
self.bannerHeightConstraint?.constant = min(height, 80)
}
case .failure(let error):
return
}
}
}
)
bannerView.translatesAutoresizingMaskIntoConstraints = false
bannerView.isHidden = true
return bannerView
}()
override func viewDidLoad() {
super.viewDidLoad()
self.view.addSubview(contentView)
self.view.addSubview(bannerView)
bannerHeightConstraint = bannerView.heightAnchor.constraint(equalToConstant: 0)
NSLayoutConstraint.activate([
contentView.topAnchor.constraint(equalTo: self.view.safeAreaLayoutGuide.topAnchor),
contentView.leadingAnchor.constraint(equalTo: self.view.safeAreaLayoutGuide.leadingAnchor),
contentView.trailingAnchor.constraint(equalTo: self.view.safeAreaLayoutGuide.trailingAnchor),
bannerView.topAnchor.constraint(equalTo: self.contentView.bottomAnchor),
bannerView.leadingAnchor.constraint(equalTo: self.view.safeAreaLayoutGuide.leadingAnchor),
bannerView.trailingAnchor.constraint(equalTo: self.view.safeAreaLayoutGuide.trailingAnchor),
bannerView.bottomAnchor.constraint(equalTo: self.view.safeAreaLayoutGuide.bottomAnchor),
bannerHeightConstraint!,
])
}
}
```
!!step
lines-AppDelegate.swift=14
### 1. Enable debugging (optional)
To make troubleshooting easier while developing, consider enabling debugging.
!!step
lines-AppDelegate.swift=20
### 2. Refresh your placements
After initializing the Braze SDK, `call requestBannersRefresh(placementIds: ["PLACEMENT_ID"])` to refresh Banner content at the start of each session.
!!step
lines-BannerViewController.swift=19-37
### 3. Initialize the Banner and provide a callback
Create a `BrazeBannerUI.BannerUIView` instance with your Braze object and placement ID, and provide a `processContentUpdates` callback to unhide the Banner and update its height constraint based on the provided content height.
!!step
lines-BannerViewController.swift=38-40
### 4. Enable Auto Layout constraints
Hide the Banner view by default, then disable autoresizing mask translation to enable Auto Layout constraints.
!!step
lines-BannerViewController.swift=43-58
### 5. Anchor content and set height constraints
Anchor your main content to the top using Auto Layout, and place the Banner view after it. Pin the Banner’s leading, trailing, and bottom edges to the safe area, and set an initial height constraint of `0` that will be updated when content loads.
```swift file=AppDelegate.swift
import BrazeKit
import BrazeUI
class AppDelegate: UIResponder, UIApplicationDelegate {
static var braze: Braze? = nil
func application(
_ application: UIApplication,
didFinishLaunchingWithOptions launchOptions: [UIApplication.LaunchOptionsKey: Any]?
) -> Bool {
// Braze configuration with your SDK API key and endpoint
let configuration = Braze.Configuration(apiKey: "YOUR-API-TOKEN", endpoint: "YOUR-ENDPOINT")
configuration.logger.level = .debug
// Initialize Braze SDK instance
AppDelegate.braze = Braze(configuration: configuration)
// Request a banners refresh
AppDelegate.braze?.banners.requestBannersRefresh(placementIds: ["top-1"])
return true
}
}
```
```swift file=SampleApp.swift
import SwiftUI
@main
struct SampleApp: App {
// Bind the AppDelegate into the SwiftUI lifecycle
@UIApplicationDelegateAdaptor(AppDelegate.self) var delegate
var body: some Scene {
WindowGroup {
BannerSwiftUIView()
}
}
}
```
```swift file=BannerSwiftUIView.swift
import BrazeKit
import BrazeUI
import SwiftUI
@available(iOS 13.0, *)
struct BannerSwiftUIView: View {
static let bannerPlacementID = "top-1"
@State var hasBannerForPlacement: Bool = false
@State var contentHeight: CGFloat = 0
var body: some View {
VStack {
Text("Your Content Here")
.frame(maxWidth: .infinity, maxHeight: .infinity)
if let braze = AppDelegate.braze,
hasBannerForPlacement
{
BrazeBannerUI.BannerView(
placementId: BannerSwiftUIView.bannerPlacementID,
braze: braze,
processContentUpdates: { result in
switch result {
case .success(let updates):
if let height = updates.height {
self.contentHeight = height
}
case .failure:
return
}
}
)
.frame(height: min(contentHeight, 80))
}
}.onAppear {
AppDelegate.braze?.banners.getBanner(
for: BannerSwiftUIView.bannerPlacementID,
{ banner in
hasBannerForPlacement = banner != nil
}
)
}
}
}
```
!!step
lines-AppDelegate.swift=13
### 1. Enable debugging (optional)
To make troubleshooting easier while developing, consider enabling debugging.
!!step
lines-AppDelegate.swift=19
### 2. Refresh your placements
After initializing the Braze SDK, call `requestBannersRefresh(placementIds: ["PLACEMENT_ID"])` to refresh Banner content at the start of each session.
!!step
lines-BannerSwiftUIView.swift=1-46
### 3. Create a view component
Create a reusable SwiftUI view component that displays available Banners and contains your main app content if needed.
!!step
lines-BannerSwiftUIView.swift=36-43
### 4. Only display available Banners
Only attempt to show `BrazeBannerUI.BannerView` if the SDK is initialized and Banner content exists for that user. In `.onAppear`, call `getBanner(for:placementID)` to set the state of `hasBannerForPlacement`.
!!step
lines-BannerSwiftUIView.swift=17-32
### 5. Only show `BannerView` after it loads
To avoid blank space in your UI, only show `BrazeBannerUI.BannerView` if a Banner is present and the SDK is initialized.
!!step
lines-BannerSwiftUIView.swift=23-32
### 6. Dynamically update Banner height
Use the `processContentUpdates` callback to fetch the Banner’s content height as soon as it loads. Update your SwiftUI state (`contentHeight`) and apply a `.frame(height:)` constraint using the provided height.
!!step
lines-BannerSwiftUIView.swift=34
### 7. Limit the Banner height
To ensure your Banner never exceeds the maximum height, apply a `.frame(height: min(contentHeight, 80))` modifier. This will keep your UI visually balanced regardless of the Banner's content.
# Banner: Häufig gestellte Fragen
Source: /docs/de/developer_guide/banners/faq/index.md
# Frequently asked questions
> These are answers to frequently asked questions about Banners in Braze. For more general information, see [About Banners]().
## When do Banner updates appear for users?
Banners are refreshed with their latest data whenever you call the refresh method—there's no need to resend or update your Banner campaign.
## How many placements can I request in a session?
In a single refresh request, you can request a maximum of 10 placements. For each one you request, Braze will return the highest-priority Banner a user is eligible for. Additional requests will return an error.
For more information, see [Placement requests]().
## How many Banner campaigns can be active simultaneously?
Each workspace can support up to 200 active Banner campaigns. If this limit is reached, you'll need to [archive or deactivate](https://www.braze.com/docs/de/de/user_guide/engagement_tools/messaging_fundamentals/about_statuses/#changing-the-status) an existing campaign before creating a new one.
## For campaigns sharing a placement, which Banner is displayed first?
If a user qualifies for multiple Banner campaigns that share the same placement, the Banner with the highest priority will be displayed. For more information, see [Banner priority]().
## Can I use Banners in my existing Content Card feed?
Banners are different from Content Cards, meaning you can’t use Banners and Content Cards in the same feed. To replace existing Content Card feeds with Banners, you’ll need to [create placements in your app or website](https://www.braze.com/docs/de/de/developer_guide/banners/placements/).
## Can Banners include video?
The standard Banner builder supports images, text, and buttons. To include a video in a Banner, you can use a **Custom Code** block in the builder, or build the entire Banner with the HTML editor and embed a video player directly in your HTML.
## Can I trigger a banner based on user actions?
While Banners do not support [action-based delivery](https://www.braze.com/docs/de/de/user_guide/engagement_tools/campaigns/building_campaigns/delivery_types/triggered_delivery), you can target users based on their past actions using segmentation and priority.
For example, to show a special Banner only to users who have completed a `purchase` event:
1. **Targeting:** In your campaign, target a segment of users who have performed the custom event `purchase` at least once.
2. **Priority:** If you have a general Banner for all users and this specific Banner for purchasers targeting the same placement, set the specific Banner's priority to **High** and the general Banner to **Medium** or **Low**.
When the user starts a new session or refreshes Banners after performing the action, Braze evaluates their eligibility. If they match the "Purchase" segment, the high-priority Banner will be displayed.
## Can users dismiss a Banner?
Yes. You can allow users to manually dismiss a Banner. See [Configure dismissal behavior](https://www.braze.com/docs/de/de/user_guide/channels/banners/create_a_banner/#dismiss-behavior) for details on how to configure dismissal in both the builder and the HTML editor.
Users can manually dismiss Banners only if dismissal behavior is enabled. If dismissal isn't enabled, you can control Banner visibility by managing user segment eligibility. When a user no longer meets the targeting criteria for a Banner campaign, they won't see it again on their next session.
When a user dismisses a Banner, they're ineligible for that campaign by default. To let dismissed users see the Banner again, [configure re-eligibility](https://www.braze.com/docs/de/de/user_guide/channels/banners/create_a_banner/#re-eligibility) in the campaign's **Delivery Controls** step. Canvas Banner steps use Canvas re-entry settings to control re-eligibility instead.
For example, if you display a promotional Banner until a user makes a purchase, logging an event such as `purchase_completed` can remove that user from the targeted segment, effectively hiding the Banner in subsequent sessions.
## Can I export Banners campaign analytics using the Braze API?
Yes. You can use the [`/campaigns/data_series` endpoint](https://www.braze.com/docs/de/de/api/endpoints/export/campaigns/get_campaign_analytics/) to get data on how many Banner campaigns were viewed, clicked, or converted.
## When are users segmented?
Users are segmented at the beginning of the session. If a campaign's targeted segments depend on custom attributes, custom events, or other targeting attributes, they must be present on the user at the beginning of the session.
## How can I compose Banners to ensure the lowest latency?
The simpler the messaging in your Banner, the faster it will render. It’s best to test your Banner campaign against the expected latency for your use case. For example, be sure to test Liquid attributes like `catalog_items`.
## Are all Liquid tags supported?
No. However, most Liquid tags are supported for Banner messages, except for `catalog_items` that are re-rendered using the [`:rerender` tag](https://www.braze.com/docs/de/de/user_guide/data/activation/catalogs/using_catalogs/#using-liquid).
## Can I capture click events?
Yes. How click events are captured depends on how your Banner is rendered:
- **Builder — standard components:** If your Banner uses standard editor components (images, buttons, text), clicks are tracked automatically when using the SDK's insertion methods.
- **Builder — Custom Code blocks:** If you want to track clicks for elements within a Custom Code editor block, you must call `brazeBridge.logClick()` from within your custom HTML. This applies even when using the SDK methods to insert and render the Banner.
- **HTML editor:** Click tracking is not automatic. You must call `brazeBridge.logClick()` for every clickable element you want to track. For the full reference, see [Custom code and JavaScript bridge for Banners](https://www.braze.com/docs/de/de/user_guide/channels/banners/custom_code/#javascript-bridge).
- **Custom UI (headless):** If you're building a fully custom UI using the Banner's custom properties instead of rendering the Banner HTML, call `logClick()` on the Banner object from your application code.
For more information, see [Logging clicks](https://www.braze.com/docs/de/de/developer_guide/banners/placements/#logging-clicks).
# Content-Cards im Braze SDK
Source: /docs/de/developer_guide/content_cards/index.md
# Content-Cards
> Erfahren Sie mehr über Content-Cards für das Braze SDK, einschließlich der verschiedenen Datenmodelle und kartenspezifischen Eigenschaften, die für Ihre Anwendung verfügbar sind.
**Tip:**
Using Content Cards for banner-style messages? Try out [Banners](https://www.braze.com/docs/de/de/user_guide/message_building_by_channel/banners/)— perfect for inline, persistent in-app and web messages.
**Note:**
This guide uses code samples from the Braze Web SDK 4.0.0+. To upgrade to the latest Web SDK version, see [SDK Upgrade Guide](https://github.com/braze-inc/braze-web-sdk/blob/master/UPGRADE_GUIDE.md).
## Prerequisites
Before you can use Content Cards, you'll need to [integrate the Braze Web SDK](https://www.braze.com/docs/de/de/developer_guide/sdk_integration/?sdktab=web) into your app. However, no additional setup is required. To build your own UI instead, see [Content Card Customization Guide](https://www.braze.com/docs/de/de/developer_guide/content_cards/).
**Note:**
Some ad blockers and browser privacy extensions can block the Braze Web SDK script or related network requests, which can prevent Content Cards from loading. If you're using the CDN integration method, consider switching to the [NPM integration method](https://www.braze.com/docs/de/de/developer_guide/sdk_integration/?subtab=package%20manager&sdktab=web), which stores SDK libraries locally on your website and can avoid some ad-blocker-related issues.
## Standard feed UI
To use the included Content Cards UI, you'll need to specify where to show the feed on your website.
In this example, we have a `` in which we want to place the Content Cards feed. We'll use three buttons to hide, show, or toggle (hide or show based on its current state) the feed.
```html
```
When using the `toggleContentCards(parentNode, filterFunction)` and `showContentCards(parentNode, filterFunction)` methods, if no arguments are provided, all Content Cards will be shown in a fixed-position sidebar on the page. Otherwise, the feed will be placed in the specified `parentNode` option.
|Parameters | Description |
|---|---|
|`parentNode` | The HTML node to render the Content Cards into. If the parent node already has a Braze Content Cards view as a direct descendant, the existing Content Cards will be replaced. For example, you should pass in `document.querySelector(".my-container")`.|
|`filterFunction` | A filter or sort function for cards displayed in this view. Invoked with the array of `Card` objects, sorted by `{pinned, date}`. Expected to return an array of sorted `Card` objects to render for this user. If omitted, all cards will be displayed. |
{: .reset-td-br-1 .reset-td-br-2 aria-label="Standard feed UI" }
[See the SDK reference docs](https://js.appboycdn.com/web-sdk/latest/doc/modules/braze.html#togglecontentcards) for more information on Content Card toggling.
## Testing Content Cards on the web
You can test your Content Cards integration using your browser's developer tools.
1. Create a Content Card campaign and target your test user.
2. Log in to the website that has your Web SDK integration.
3. Open your browser console. For Chrome, right-click the page, select **Inspect**, then select the **Console** tab.
4. Run these commands in the console:
- `window.braze.getCachedContentCards()`
- `window.braze.toggleContentCards()`
## Card types and properties
The Content Cards data model is available in the Web SDK and offers the following Content Card types: [ImageOnly](https://js.appboycdn.com/web-sdk/latest/doc/classes/braze.imageonly.html), [CaptionedImage](https://js.appboycdn.com/web-sdk/latest/doc/classes/braze.captionedimage.html), and [ClassicCard](https://js.appboycdn.com/web-sdk/latest/doc/classes/braze.classiccard.html). Each type inherits common properties from a base model [Card](https://js.appboycdn.com/web-sdk/latest/doc/classes/braze.card.html) and has the following additional properties.
**Tip:**
To log Content Card data, see [Logging analytics](https://www.braze.com/docs/de/de/developer_guide/content_cards/logging_analytics/).
### Base card model
All Content Cards have these shared properties:
|Property|Description|
|---|---|
| `expiresAt` | The UNIX timestamp of the card's expiration time.|
| `extras`| (Optional) Key-value pair data formatted as a string object with a value string. |
| `id` | (Optional) The id of the card. This will be reported back to Braze with events for analytics purposes. |
| `pinned` | This property reflects if the card was set up as "pinned" in the dashboard.|
| `updated` | The UNIX timestamp of when this card was last modified. |
| `viewed` | This property reflects whether the user viewed the card or not.|
| `isControl` | This property is `true` when a card is a "control" group within an A/B test.|
{: .reset-td-br-1 .reset-td-br-2 aria-label="Base card model" }
### Image only
[ImageOnly](https://js.appboycdn.com/web-sdk/latest/doc/classes/braze.imageonly.html) cards are clickable full-sized images.
|Property|Description|
|---|---|
| `aspectRatio` | The aspect ratio of the card's image and serves as a hint before image loading completes. Note that the property may not be supplied in certain circumstances. |
| `categories` | This property is purely for organization in your custom implementation; these categories can be set in the dashboard composer. |
| `clicked` | This property indicates whether this card has ever been clicked on this device. |
| `created` | The UNIX timestamp of the card's creation time from Braze. |
| `dismissed` | This property indicates if this card has been dismissed. |
| `dismissible` | This property reflects if the user can dismiss the card, removing it from view. |
| `imageUrl` | The URL of the card's image.|
| `linkText` | The display text for the URL. |
| `url` | The URL that will be opened after the card is clicked on. |
{: .reset-td-br-1 .reset-td-br-2 aria-label="Image only" }
### Captioned image
[CaptionedImage](https://js.appboycdn.com/web-sdk/latest/doc/classes/braze.captionedimage.html) cards are clickable, full-sized images with accompanying descriptive text.
|Property|Description|
|---|---|
| `aspectRatio` | The aspect ratio of the card's image and serves as a hint before image loading completes. Note that the property may not be supplied in certain circumstances. |
| `categories` | This property is purely for organization in your custom implementation; these categories can be set in the dashboard composer. |
| `clicked` | This property indicates whether this card has ever been clicked on this device. |
| `created` | The UNIX timestamp of the card's creation time from Braze. |
| `dismissed` | This property indicates if this card has been dismissed. |
| `dismissible` | This property reflects if the user can dismiss the card, removing it from view. |
| `imageUrl` | The URL of the card's image.|
| `linkText` | The display text for the URL. |
| `title` | The title text for this card. |
| `url` | The URL that will be opened after the card is clicked on. |
{: .reset-td-br-1 .reset-td-br-2 aria-label="Captioned image" }
### Classic
The [ClassicCard](https://js.appboycdn.com/web-sdk/latest/doc/classes/braze.classiccard.html) model can contain an image with no text or a text with image.
|Property|Description|
|---|---|
| `aspectRatio` | The aspect ratio of the card's image and serves as a hint before image loading completes. Note that the property may not be supplied in certain circumstances. |
| `categories` | This property is purely for organization in your custom implementation; these categories can be set in the dashboard composer. |
| `clicked` | This property indicates whether this card has ever been clicked on this device. |
| `created` | The UNIX timestamp of the card's creation time from Braze. |
| `description` | The body text for this card. |
| `dismissed` | This property indicates if this card has been dismissed. |
| `dismissible` | This property reflects if the user can dismiss the card, removing it from view. |
| `imageUrl` | The URL of the card's image.|
| `linkText` | The display text for the URL. |
| `title` | The title text for this card. |
| `url` | The URL that will be opened after the card is clicked on. |
{: .reset-td-br-1 .reset-td-br-2 aria-label="Classic" }
## Control group
If you use the default Content Cards feed, impressions and clicks will be automatically tracked.
If you use a custom integration for Content Cards, you need need [log impressions](https://www.braze.com/docs/de/de/developer_guide/content_cards/logging_analytics/) when a Control Card would have been seen. As part of this effort, make sure to handle Control cards when logging impressions in an A/B test. These cards are blank, and while they aren’t seen by users, you should still log impressions in order to compare how they perform against non-Control cards.
To determine if a Content Card is in the Control group for an A/B test, check the `card.isControl` property (Web SDK v4.5.0+) or check if the card is a `ControlCard` instance (`card instanceof braze.ControlCard`).
## Card methods
### Default feed methods
Use these methods when displaying Content Cards using the Braze default feed UI:
|Method | Description |
|---|---|
|[`showContentCards`](https://js.appboycdn.com/web-sdk/latest/doc/modules/braze.html#showcontentcards)| Displays the default Content Cards feed. Renders cards into a provided `parentNode` HTML element, or as a fixed-position sidebar if no element is given. Accepts an optional `filterFunction` to sort or filter cards before display. |
|[`hideContentCards`](https://js.appboycdn.com/web-sdk/latest/doc/modules/braze.html#hidecontentcards)| Hides the default Content Cards feed if it is currently showing. |
|[`toggleContentCards`](https://js.appboycdn.com/web-sdk/latest/doc/modules/braze.html#togglecontentcards)| Shows the default Content Cards feed if it is hidden, or hides it if it is visible. If you need to display multiple Content Card feeds simultaneously, use `showContentCards` and `hideContentCards` instead. |
{: .reset-td-br-1 .reset-td-br-2 aria-label="Default feed methods" }
### Custom feed methods
Use these methods when building your own Content Card UI:
|Method | Description |
|---|---|
|[`subscribeToContentCardsUpdates`](https://js.appboycdn.com/web-sdk/latest/doc/modules/braze.html#subscribetocontentcardsupdates)| Registers a callback function that is invoked whenever Content Cards are updated for the current user, such as on session start. Use this as the primary way to receive card data for your custom feed. Must be called before `openSession()` to receive updates on the initial session. |
|[`getCachedContentCards`](https://js.appboycdn.com/web-sdk/latest/doc/modules/braze.html#getcachedcontentcards)| Returns all currently available cards from the most recent Content Cards refresh. Use this to immediately display cards on page load without waiting for a new server request, such as when the user returns to a page during an active session. |
|[`requestContentCardsRefresh`](https://js.appboycdn.com/web-sdk/latest/doc/modules/braze.html#requestcontentcardsrefresh)| Requests an immediate refresh of Content Cards from Braze servers. By default, cards refresh on session start and when the default feed is reopened. Use this to force a refresh at other times, such as after a specific user action. Be aware of [rate limits](https://www.braze.com/docs/de/de/developer_guide/content_cards/customizing_cards/feed/#rate-limit). |
|[`logContentCardImpressions`](https://js.appboycdn.com/web-sdk/latest/doc/modules/braze.html#logcontentcardimpressions)| Logs impression events for an array of cards. Call this when cards are rendered and visible to the user. Required for accurate campaign reporting when using a custom UI, as impressions are not tracked automatically outside the default feed. |
|[`logContentCardClick`](https://js.appboycdn.com/web-sdk/latest/doc/modules/braze.html#logcontentcardclick)| Logs a click event for a single card. Call this when a user interacts with a card in your custom UI. Required for accurate campaign reporting, as clicks are not tracked automatically outside the default feed. |
|[`handleBrazeAction`](https://js.appboycdn.com/web-sdk/latest/doc/modules/braze.html#handlebrazeaction)| Processes a card's URL and executes the configured on-click action, including Braze actions (`brazeActions://` URLs) and standard URL navigation. Call this in your card click handler to ensure on-click behaviors configured in the Braze dashboard are executed. |
|[`dismissCard`](https://js.appboycdn.com/web-sdk/latest/doc/classes/braze.card.html#dismisscard)| Programmatically dismisses a card, removing it from the user's feed. Use this to allow users to dismiss cards in your custom UI. |
{: .reset-td-br-1 .reset-td-br-2 aria-label="Custom feed methods" }
For more details, refer to the [SDK reference documentation](https://js.appboycdn.com/web-sdk/latest/doc/modules/braze.html).
## Best practices
### Call methods in the correct order
For custom feeds, Content Cards refresh only on session start if `subscribeToContentCardsUpdates()` is called before `openSession()`. Call your Braze methods in this order:
```javascript
import * as braze from "@braze/web-sdk";
// Step 1: Initialize the SDK
braze.initialize("YOUR-API-KEY", { baseUrl: "YOUR-SDK-ENDPOINT" });
// Step 2: Subscribe to card updates
braze.subscribeToContentCardsUpdates((updates) => {
const cards = updates.cards;
renderCards(cards);
});
// Step 3: Identify the user
braze.changeUser("USER_ID");
// Step 4: Start the session
braze.openSession();
```
### Use cached cards to persist content across page loads
Because `subscribeToContentCardsUpdates()` invokes only its callback when there are new updates (such as on session start), cards can disappear from your custom feed if a user refreshes the page mid-session. To prevent this, use `getCachedContentCards()` to immediately render cards from the local cache, alongside your subscription for new updates:
```javascript
import * as braze from "@braze/web-sdk";
function renderCards(cards) {
const container = document.getElementById("content-cards");
container.textContent = "";
const displayedCards = [];
cards.forEach(card => {
if (card instanceof braze.ClassicCard || card instanceof braze.CaptionedImage) {
const cardElement = document.createElement("div");
const h3 = document.createElement("h3");
h3.textContent = card.title || "";
cardElement.appendChild(h3);
const p = document.createElement("p");
p.textContent = card.description || "";
cardElement.appendChild(p);
if (card.imageUrl) {
const img = document.createElement("img");
img.src = card.imageUrl;
img.alt = card.title || "";
cardElement.appendChild(img);
}
if (card.url) {
cardElement.addEventListener("click", () => {
braze.logContentCardClick(card);
braze.handleBrazeAction(card.url);
});
}
container.appendChild(cardElement);
displayedCards.push(card);
}
});
if (displayedCards.length > 0) {
braze.logContentCardImpressions(displayedCards);
}
}
// Display cached cards immediately
const cached = braze.getCachedContentCards();
if (cached && cached.cards.length > 0) {
renderCards(cached.cards);
}
// Subscribe to future updates
braze.subscribeToContentCardsUpdates((updates) => {
renderCards(updates.cards);
});
```
### Log analytics for custom feeds
When using a custom UI, impressions, clicks, and dismissals are not tracked automatically. You must log each event manually:
- **Impressions:** Call `logContentCardImpressions([card1, card2, ...])` with an array of card objects when cards become visible to the user.
- **Clicks:** Call `logContentCardClick(card)` when a user interacts with a card.
- **On-click behavior:** Call `handleBrazeAction(card.url)` to execute the card's configured on-click action (such as navigating to a URL or logging a custom event).
**Warning:**
The argument passed to `logContentCardClick()` must be an original Braze `Card` object. If you transform or reconstruct the card data (for example, by serializing and deserializing), clicks are not logged and you see the error: "card must be a Card object."
## Using Google Tag Manager
Google Tag Manager works by injecting the [Braze CDN](https://www.braze.com/docs/de/de/developer_guide/platform_integration_guides/web/initial_sdk_setup#install-cdn) (a version of our Web SDK) directly into your website code, which means that all SDK methods are available just as if you had integrated the SDK without Google Tag Manager, except when implementing Content Cards.
### Setting up Content Cards
For a standard integration of the Content Card feed, you can use a **Custom HTML** tag in Google Tag Manager. Add the following to your Custom HTML tag, which will activate the standard Content Card feed:
```html
```

For more freedom over customizing the appearance of Content Cards and their feed, you can directly integrate Content Cards into your native website. There are two approaches you can take with this: using the standard feed UI or creating a custom feed UI.
When implementing the [standard feed UI](https://www.braze.com/docs/de/de/developer_guide/platform_integration_guides/web/content_cards/integration/#standard-feed-ui), Braze methods must have `window.` added to the start of the method. For example, `braze.showContentCards` should instead be `window.braze.showContentCards`.
For [custom feed](https://www.braze.com/docs/de/de/developer_guide/content_cards/creating_cards/) styling, the steps are the same as if you had integrated the SDK without GTM. For example, if you want to customize the width of the Content Card feed, you can paste the following into your CSS file:
```css
body .ab-feed {
width: 800px;
}
```
### Upgrading templates {#upgrading}
To upgrade to the latest version of the Braze Web SDK, take the following three steps in your Google Tag Manager dashboard:
1. **Update tag template** Go to the **Templates** page within your workspace. Here you should see an icon indicating an update is available.

Click that icon and after reviewing the change, click to **Accept Update**.

2. **Update version number** Once your tag template has been updated, edit the Braze Initialization Tag, and update the SDK version to the most recent `major.minor` version. For example, if the latest version is `4.1.2`, enter `4.1`. You can view a list of SDK versions in our [changelog](https://github.com/braze-inc/braze-web-sdk/blob/master/CHANGELOG.md).

3. **QA and publish** Verify the new SDK version is working using Google Tag Manager's [debugging tool](https://support.google.com/tagmanager/answer/6107056?hl=en) prior to publishing an update to your tag container.
### Troubleshooting {#troubleshooting}
#### Enable tag debugging {#debugging}
Each Braze tag template has an optional **GTM Tag Debugging** checkbox which can be used to log debug messages to your web page's JavaScript console.

#### Enter debug mode
Another way to help debug your Google Tag Manager integration is using Google's [Preview mode](https://support.google.com/tagmanager/answer/6107056) feature.
This will help identify what values are being sent from your web page's data layer to each triggered Braze tag and will also explain which tags were or were not triggered.

#### Verify tag sequencing for custom events {#tag-sequencing}
If custom events or other actions aren't logging in Braze, a common cause is a race condition where an action tag (such as **Custom Event** or **Purchase**) fires before the **Braze Initialization** tag has completed. To fix this, configure [tag sequencing](https://support.google.com/tagmanager/answer/6238868) in GTM:
1. Open the action tag that isn't logging correctly.
2. Under **Advanced Settings** > **Tag Sequencing**, select **A tag that fires before \[this tag\]**.
3. Choose your **Braze Initialization** tag as the setup tag.
This ensures the SDK is fully initialized before any action tags attempt to send data to Braze.
#### Enable verbose logging
To capture detailed logs for troubleshooting, you can enable verbose logging on your Google Tag Manager integration. These logs will appear in the **Console** tab of your browser's [developer tools](https://developer.mozilla.org/en-US/docs/Learn/Common_questions/What_are_browser_developer_tools).
In your Google Tag Manager integration, navigate to your Braze Initialization Tag and select **Enable Web SDK Logging**.

[changelog]: https://github.com/braze-inc/braze-web-sdk/blob/master/CHANGELOG.md
## Prerequisites
Before you can use Braze Content Cards, you'll need to integrate the [Braze Android SDK](https://www.braze.com/docs/de/de/developer_guide/sdk_integration/?sdktab=android) into your app. However, no additional setup is required.
## Google fragments
In Android, the Content Cards feed is implemented as a [fragment](https://developer.android.com/guide/components/fragments.html) available in the Braze Android UI project. The [`ContentCardsFragment`](https://braze-inc.github.io/braze-android-sdk/kdoc/braze-android-sdk/com.braze.ui.contentcards/-content-cards-fragment/index.html) class will automatically refresh and display the contents of the Content Cards and log usage analytics. The cards that can appear in a user's `ContentCards` are created on the Braze dashboard.
To learn how to add a fragment to an activity, see [Google's fragments documentation](https://developer.android.com/guide/fragments#Adding).
## Card types and properties
The Content Cards data model is available in the Android SDK and offers the following unique Content Card types. Each type shares a base model, which allows them to inherit common properties from the base model, in addition to having their own unique properties. For full reference documentation, see [`com.braze.models.cards`](https://braze-inc.github.io/braze-android-sdk/kdoc/braze-android-sdk/com.braze.models.cards/index.html).
### Base card model {#base-card-for-android}
The [base card](https://braze-inc.github.io/braze-android-sdk/kdoc/braze-android-sdk/com.braze.models.cards/-card/index.html) model provides foundational behavior for all cards.
|Property | Description |
|---|---|
|`getId()` | Returns the card's ID set by Braze.|
|`getViewed()` | Returns a boolean reflects if the card is read or unread by the user.|
|`getExtras()` | Returns a map of key-value extras for this card.|
|`getCreated()` | Returns the unix timestamp of the card's creation time from Braze.|
|`isPinned` | Returns a boolean that reflects whether the card is pinned.|
|`getOpenUriInWebView()` | Returns a boolean that reflects whether Uris for this card should be opened in the Braze WebView or not.|
|`getExpiredAt()` | Gets the expiration date of the card.|
|`isRemoved()` | Returns a boolean that reflects whether the end user has dismissed this card.|
|`isDismissibleByUser()` | Returns a boolean that reflects whether the card is dismissible by the user.|
|`isClicked()` | Returns a boolean that reflects the clicked state of this card.|
|`isDismissed` | Returns a boolean that reflects whether the card has been dismissed. Set to `true` to mark the card as dismissed. If a card is already marked as dismissed, it cannot be marked as dismissed again.|
|`isControl()` | Returns a boolean if this card is a control card and should not be rendered.|
{: .reset-td-br-1 .reset-td-br-2 aria-label="Base card model #base-card-for-android" }
### Image only {#banner-image-card-for-android}
[Image only cards](https://braze-inc.github.io/braze-android-sdk/kdoc/braze-android-sdk/com.braze.models.cards/-image-only-card/index.html) are clickable full-sized images.
|Property | Description |
|---|---|
|`getImageUrl()` | Returns the URL of the card's image.|
|`getUrl()` | Returns the URL that will be opened after the card is clicked. It can be a HTTP(s) URL or a protocol URL.|
|`getDomain()` | Returns link text for the property URL.|
{: .reset-td-br-1 .reset-td-br-2 aria-label="Image only #banner-image-card-for-android" }
### Captioned image {#captioned-image-card-for-android}
[Captioned image cards](https://braze-inc.github.io/braze-android-sdk/kdoc/braze-android-sdk/com.braze.models.cards/-captioned-image-card/index.html) are clickable, full-sized images with accompanying descriptive text.
|Property | Description |
|---|---|
|`getImageUrl()` | Returns the URL of the card's image.|
|`getTitle()` | Returns the title text for the card.|
|`getDescription()` | Returns the body text for the card.|
|`getUrl()` | Returns the URL that will be opened after the card is clicked. It can be a HTTP(s) URL or a protocol URL.|
|`getDomain()` | Returns the link text for the property URL. |
{: .reset-td-br-1 .reset-td-br-2 aria-label="Captioned image #captioned-image-card-for-android" }
### Classic {#text-Announcement-card-for-android}
A classic card without an image included will result in a [text announcement card](https://braze-inc.github.io/braze-android-sdk/kdoc/braze-android-sdk/com.braze.models.cards/-text-announcement-card/index.html). If an image is included, you will receive a [short news card](https://braze-inc.github.io/braze-android-sdk/kdoc/braze-android-sdk/com.braze.models.cards/-short-news-card/index.html).
|Property | Description |
|---|---|
|`getTitle()` | Returns the title text for the card. |
|`getDescription()` | Returns the body text for the card. |
|`getUrl()` | Returns the URL that will be opened after the card is clicked. It can be a HTTP(s) URL or a protocol URL. |
|`getDomain()` | Returns the link text for the property URL. |
|`getImageUrl()` | Returns the URL of the card's image, applies only to the classic Short News Card. |
|`isDismissed` | Returns a boolean that reflects whether the card has been dismissed. Set to `true` to mark the card as dismissed. If a card is already marked as dismissed, it cannot be marked as dismissed again. |
{: .reset-td-br-1 .reset-td-br-2 aria-label="Classic #text-Announcement-card-for-android" }
## Card methods
All [`Card`](https://braze-inc.github.io/braze-android-sdk/kdoc/braze-android-sdk/com.braze.models.cards/index.html) data model objects offer the following analytics methods for logging user events to Braze servers.
|Method | Description |
|---|---|
|`logImpression()` | Manually log an impression to Braze for a particular card. |
|`logClick()` | Manually log a click to Braze for a particular card. |
{: .reset-td-br-1 .reset-td-br-2 aria-label="Card methods" }
## Prerequisites
Before you can use Content Cards, you'll need to integrate the [Braze Swift SDK](https://www.braze.com/docs/de/de/developer_guide/sdk_integration/?sdktab=swift) into your app. However, no additional setup is required.
## View controller contexts
The default Content Cards UI can be integrated from the `BrazeUI` library of the Braze SDK. Create the Content Cards view controller using the `braze` instance. If you wish to intercept and react to the Content Card UI lifecycle, implement [`BrazeContentCardUIViewControllerDelegate`](https://braze-inc.github.io/braze-swift-sdk/documentation/brazeui/brazecontentcarduiviewcontrollerdelegate) as the delegate for your `BrazeContentCardUI.ViewController`.
**Note:**
For more information about iOS view controller options, refer to the [Apple developer documentation](https://developer.apple.com/documentation/uikit/view_controllers/showing_and_hiding_view_controllers).
The `BrazeUI` library of the Swift SDK provides two default view controller contexts: [navigation](#swift_navigation) or [modal](#swift_modal). This means you can integrate Content Cards in these contexts by adding a few lines of code to your app or site. Both views offer customization and styling options as described in the [customization guide](https://www.braze.com/docs/de/de/developer_guide/customization_guides/content_cards/customizing_styles/?tab=ios). You can also create a custom Content Card view controller instead of using the standard Braze one for even more customization options—refer to the [Content Cards UI tutorial](https://braze-inc.github.io/braze-swift-sdk/tutorials/braze/c2-contentcardsui/) for an example.
**Important:**
To handle control variant Content Cards in your custom UI, pass in your [`Braze.ContentCard.Control`](https://braze-inc.github.io/braze-swift-sdk/documentation/brazekit/braze/contentcard/control(_:)) object, then call the `logImpression` method as you would with any other Content Card type. The object will implicitly log a control impression to inform our analytics of when a user would have seen the control card.
### Navigation
A navigation controller is a view controller that manages one or more child view controllers in a navigation interface. Here is an example of pushing a `BrazeContentCardUI.ViewController` instance into a navigation controller:
```swift
func pushViewController() {
guard let braze = AppDelegate.braze else { return }
let contentCardsController = BrazeContentCardUI.ViewController(braze: braze)
// Implement and set `BrazeContentCardUIViewControllerDelegate` if you wish to intercept click actions.
contentCardsController.delegate = self
self.navigationController?.pushViewController(contentCardsController, animated: true)
}
```
```objc
- (void)pushViewController {
BRZContentCardUIViewController *contentCardsController = [[BRZContentCardUIViewController alloc] initWithBraze:self.braze];
// Implement and set `BrazeContentCardUIViewControllerDelegate` if you wish to intercept click actions.
[contentCardsController setDelegate:self];
[self.navigationController pushViewController:contentCardsController animated:YES];
}
```
### Modal
Use modal presentations to create temporary interruptions in your app’s workflow, such as prompting the user for important information. This model view has a navigation bar on top and a **Done** button on the side of the bar. Here is an example of pushing a `BrazeContentCard.ViewController` instance into a modal controller:
```swift
func presentModalViewController() {
guard let braze = AppDelegate.braze else { return }
let contentCardsModal = BrazeContentCardUI.ModalViewController(braze: braze)
// Implement and set `BrazeContentCardUIViewControllerDelegate` if you wish to intercept click actions.
contentCardsModal.viewController.delegate = self
self.navigationController?.present(contentCardsModal, animated: true, completion: nil)
}
```
```objc
- (void)presentModalViewController {
BRZContentCardUIModalViewController *contentCardsModal = [[BRZContentCardUIModalViewController alloc] initWithBraze:AppDelegate.braze];
// Implement and set `BrazeContentCardUIViewControllerDelegate` if you wish to intercept click actions.
[contentCardsModal.viewController setDelegate:self];
[self.navigationController presentViewController:contentCardsModal animated:YES completion:nil];
}
```
For example usage of `BrazeUI` view controllers, check out the corresponding Content Cards UI samples in our [Examples app](https://github.com/braze-inc/braze-swift-sdk/tree/main/Examples).
## Base card model
The Content Cards data model is available in the `BrazeKit` module of the Braze Swift SDK. This module contains the following Content Card types, which are an implementation of the `Braze.ContentCard` type. For a full list of Content Card properties and their usage, see [`ContentCard` class](https://braze-inc.github.io/braze-swift-sdk/documentation/brazekit/braze/contentcard).
- Image only
- Captioned image
- Classic
- Classic image
- Control
To access the Content Cards data model, call `contentCards.cards` on your `braze` instance. See [Logging analytics](https://www.braze.com/docs/de/de/developer_guide/content_cards/logging_analytics/) for more information on subscribing to card data.
**Note:**
Reading `contentCards.cards`, `contentCards.unviewedCards`, or `contentCards.lastUpdate` blocks the calling thread until the SDK has completed its post-initialization operations. For main-thread or latency-sensitive contexts, use the non-blocking alternatives [`getCachedContentCards(_:)`](https://braze-inc.github.io/braze-swift-sdk/documentation/brazekit/braze/contentcards-swift.class/getcachedcontentcards(_:)), [`getUnviewedCards(_:)`](https://braze-inc.github.io/braze-swift-sdk/documentation/brazekit/braze/contentcards-swift.class/getunviewedcards(_:)), or [`getLastUpdate(_:)`](https://braze-inc.github.io/braze-swift-sdk/documentation/brazekit/braze/contentcards-swift.class/getlastupdate(_:)) instead.
**Note:**
Keep in mind, `BrazeKit` offers an alternative [`ContentCardRaw`](https://braze-inc.github.io/braze-swift-sdk/documentation/brazekit/braze/contentcardraw) class for Objective-C compatibility.
## Card methods
Each card is initialized with a `Context` object, which contains various methods for managing your card's state. Call these methods when you want to modify the corresponding state property on a particular card object.
| Method | Description |
|--------------------------------------|------------------------------------------------------------------------------------------------------------------------------------------|
| `card.context?.logImpression()` | Log the content card impression event. |
| `card.context?.logClick()` | Log the content card click event. |
| `card.context?.processClickAction()` | Process a given [`ClickAction`](https://braze-inc.github.io/braze-swift-sdk/documentation/brazekit/braze/contentcard/clickaction) input. |
| `card.context?.logDismissed()` | Log the content card dismissed event. |
| `card.context?.logError()` | Log an error related to the content card. |
| `card.context?.loadImage()` | Load a given content card image from a URL. This method can be nil when the content card does not have an image. |
{: .reset-td-br-1 .reset-td-br-2 aria-label="Card methods" }
For more details, refer to the [`Context` class documentation](https://braze-inc.github.io/braze-swift-sdk/documentation/brazekit/braze/contentcardraw/context-swift.class)
## Prerequisites
Before you can use this feature, you'll need to [integrate the Cordova Braze SDK](https://www.braze.com/docs/de/de/developer_guide/sdk_integration/?sdktab=cordova).
## Card Feeds
The Braze SDK includes a default card feed. To show the default card feed, you can use the `launchContentCards()` method. This method handles all analytics tracking, dismissals, and rendering for a user's Content Cards.
## Content Cards
You can use these additional methods to build a custom Content Cards Feed within your app:
|Method | Description |
|---|---|
|`requestContentCardsRefresh()`|Sends a background request to request the latest Content Cards from the Braze SDK server.|
|`getContentCardsFromServer(successCallback, errorCallback)`|Retrieves Content Cards from the Braze SDK. This will request the latest Content Cards from the server and return the list of cards upon completion.|
|`getContentCardsFromCache(successCallback, errorCallback)`|Retrieves Content Cards from the Braze SDK. This will return the latest list of cards from the local cache, which was updated at the last refresh.|
|`logContentCardClicked(cardId)`|Logs a click for the given Content Card ID.|
|`logContentCardImpression(cardId)`|Logs an impression for the given Content Card ID.|
|`logContentCardDismissed(cardId)`|Logs a dismissal for the given Content Card ID.|
{: .reset-td-br-1 .reset-td-br-2 aria-label="Content Cards" }
## About Flutter Content Cards
The Braze SDK includes a default card feed to get you started with Content Cards. To show the card feed, you can use the `braze.launchContentCards()` method. The default card feed included with the Braze SDK will handle all analytics tracking, dismissals, and rendering for a user's Content Cards.
## Prerequisites
Before you can use this feature, you'll need to [integrate the Flutter Braze SDK](https://www.braze.com/docs/de/de/developer_guide/sdk_integration/?sdktab=flutter).
## Card methods
You can use these additional methods to build a custom Content Cards Feed within your app by using the following methods available on the [plugin public interface](https://github.com/braze-inc/braze-flutter-sdk/blob/master/lib/braze_plugin.dart):
| Method | Description |
| ---------------------------------------------- | ------------------------------------------------------------------------------------------------------ |
| `braze.requestContentCardsRefresh()` | Requests the latest Content Cards from the Braze SDK server. |
| `braze.logContentCardClicked(contentCard)` | Logs a click for the given Content Card object. |
| `braze.logContentCardImpression(contentCard)` | Logs an impression for the given Content Card object. |
| `braze.logContentCardDismissed(contentCard)` | Logs a dismissal for the given Content Card object. |
{: .reset-td-br-1 .reset-td-br-2 aria-label="Card methods" }
## Receiving Content Card data
To receive Content Card data in your Flutter app, the `BrazePlugin` supports sending Content Card data by using [Dart Streams](https://dart.dev/tutorials/language/streams).
The `BrazeContentCard` [object](https://pub.dev/documentation/braze_plugin/latest/braze_plugin/BrazeContentCard-class.html) supports a subset of fields available in the native model objects, including `description`, `title`, `image`, `url`, `extras`, and more.
### Listen for Content Card data in the Dart layer
To receive Content Card data in the Dart layer, use the following code to create a `StreamSubscription` and call `braze.subscribeToContentCards()`. Remember to `cancel()` the stream subscription when it is no longer needed.
```dart
// Create stream subscription
StreamSubscription contentCardsStreamSubscription;
contentCardsStreamSubscription = braze.subscribeToContentCards((List contentCards) {
// Handle Content Cards
}
// Cancel stream subscription
contentCardsStreamSubscription.cancel();
```
For an example, see [main.dart](https://github.com/braze-inc/braze-flutter-sdk/blob/master/example/lib/main.dart) in the Braze Flutter SDK sample application.
### Forward Content Card data from the native iOS layer
Content Card data is automatically forwarded from both the Android and iOS native layers. No additional setup is required.
If you're using Flutter SDK 17.1.0 or earlier, Content Card data forwarding from the iOS native layer requires manual setup. Your application likely contains a `contentCards.subscribeToUpdates` callback that calls `BrazePlugin.processContentCards(contentCards)`. To migrate to Flutter SDK 18.0.0, remove the `BrazePlugin.processContentCards(_:)` call—data forwarding is now handled automatically.
For an example, see [AppDelegate.swift](https://github.com/braze-inc/braze-flutter-sdk/blob/master/example/ios/Runner/AppDelegate.swift) in the Braze Flutter SDK sample application.
#### Replaying the callback for Content Cards
To store any Content Cards triggered before the callback is available and replay them after it is set, add the following entry to the `customConfigs` map when initializing the `BrazePlugin`:
```dart
BrazePlugin braze = new BrazePlugin(customConfigs: {replayCallbacksConfigKey: true});
```
## About React Native Content Cards
The Braze SDKs include a default card feed to get you started with Content Cards. To show the card feed, you can use the `Braze.launchContentCards()` method. The default card feed included with the Braze SDK will handle all analytics tracking, dismissals, and rendering for a user's Content Cards.
## Prerequisites
Before you can use this feature, you'll need to [integrate the React Native Braze SDK](https://www.braze.com/docs/de/de/developer_guide/sdk_integration/?sdktab=react%20native).
## Cards methods
To build your own UI, you can get a list of available cards, and listen for updates to cards:
```javascript
// Set initial cards
const [cards, setCards] = useState([]);
// Listen for updates as a result of card refreshes, such as:
// a new session, a manual refresh with `requestContentCardsRefresh()`, or after the timeout period
Braze.addListener(Braze.Events.CONTENT_CARDS_UPDATED, async (update) => {
setCards(update.cards);
});
// Manually trigger a refresh of cards
Braze.requestContentCardsRefresh();
```
**Important:**
If you choose to build your own UI to display cards, you must call `logContentCardImpression` in order to receive analytics for those cards. This includes `control` cards, which must be tracked even though they are not displayed to the user.
You can use these additional methods to build a custom Content Cards Feed within your app:
| Method | Description |
| ---------------------------------------- | ------------------------------------------------------------------------------------------------------ |
| `launchContentCards()` | Launches the Content Cards UI element. |
| `requestContentCardsRefresh()` | Requests the latest Content Cards from the Braze SDK server. The resulting list of cards is passed to each of the previously registered [content card event listeners](#reactnative_cards-methods). |
| `getCachedContentCards()` | Returns the most recent Content Cards array from the cache. |
| `logContentCardClicked(cardId)` | Logs a click for the given Content Card ID. This method is used only for analytics. To execute the click action, call `processContentCardClickAction(cardId)` in addition. |
| `logContentCardImpression(cardId)` | Logs an impression for the given Content Card ID. |
| `logContentCardDismissed(cardId)` | Logs a dismissal for the given Content Card ID. |
| `processContentCardClickAction(cardId)` | Perform the action of a particular card. |
{: .reset-td-br-1 .reset-td-br-2 aria-label="Cards methods" }
## Card types and properties
The Content Cards data model is available in the React Native SDK and offers the following Content Cards card types: [Image Only](#image-only), [Captioned Image](#captioned-image), and [Classic](#classic). There's also a special [Control](#control) card type, which is returned to users that are in the control group for a given card. Each type inherits common properties from a base model in addition to its own unique properties.
**Tip:**
For a full reference of the Content Card data model, see the [Android](https://braze-inc.github.io/braze-android-sdk/kdoc/braze-android-sdk/com.braze.models.cards/index.html) and [iOS](https://braze-inc.github.io/braze-swift-sdk/documentation/brazekit/braze/contentcard) documentation.
### Base card model
The base card model provides foundational behavior for all cards.
|Property | Description |
|--------------|------------------------------------------------------------------------------------------------------------------------|
|`id` | The card's ID set by Braze. |
|`created` | The UNIX timestamp of the card's creation time from Braze. |
|`expiresAt` | The UNIX timestamp of the card's expiration time. When the value is less than 0, it means the card never expires. |
|`viewed` | Whether the card is read or unread by the user. This does not log analytics. |
|`clicked` | Whether the card has been clicked by the user. |
|`pinned` | Whether the card is pinned. |
|`dismissed` | Whether the user has dismissed this card. Marking a card as dismissed that has already been dismissed will be a no-op. |
|`dismissible` | Whether the card is dismissible by the user. |
|`url` | (Optional) The URL string associated with the card click action. |
|`openURLInWebView` | Whether URLs for this card should be opened in the Braze WebView or not. |
|`isControl` | Whether this card is a control card. Control cards should not be displayed to the user. |
|`extras` | The map of key-value extras for this card. |
{: .reset-td-br-1 .reset-td-br-2 aria-label="Base card model" }
For a full reference of the base card, see the [Android](https://braze-inc.github.io/braze-android-sdk/kdoc/braze-android-sdk/com.braze.models.cards/-card/index.html) and [iOS](https://braze-inc.github.io/braze-swift-sdk/documentation/brazekit/braze/contentcard/data-swift.struct) documentation.
### Image only
Image only cards are clickable, full-sized images.
|Property | Description |
|-------------------|-------------------------------------------------------------------------------------------------------------------|
|`type` | The Content Card type, `IMAGE_ONLY`. |
|`image` | The URL of the card's image. |
|`imageAspectRatio` | The aspect ratio of the card's image. It is meant to serve as a hint before image loading completes. Note that the property may not be supplied in certain circumstances. |
{: .reset-td-br-1 .reset-td-br-2 aria-label="Image only" }
For a full reference of the image only card, see the [Android](https://braze-inc.github.io/braze-android-sdk/kdoc/braze-android-sdk/com.braze.models.cards/-image-only-card/index.html) and [iOS](https://braze-inc.github.io/braze-swift-sdk/documentation/brazekit/braze/contentcard/imageonly-swift.struct) documentation.
### Captioned image
Captioned image cards are clickable, full-sized images with accompanying descriptive text.
|Property | Description |
|-------------------|-------------------------------------------------------------------------------------------------------------------|
|`type` | The Content Card type, `CAPTIONED`. |
|`image` | The URL of the card's image. |
|`imageAspectRatio` | The aspect ratio of the card's image. It is meant to serve as a hint before image loading completes. Note that the property may not be supplied in certain circumstances. |
|`title` | The title text for the card. |
|`cardDescription` | The description text for the card. |
|`domain` | (Optional) The link text for the property URL, for example, `"braze.com/resources/"`. It can be displayed on the card's UI to indicate the action/direction of clicking on the card. |
{: .reset-td-br-1 .reset-td-br-2 aria-label="Captioned image" }
For a full reference of the captioned image card, see the [Android](https://braze-inc.github.io/braze-android-sdk/kdoc/braze-android-sdk/com.braze.models.cards/-captioned-image-card/index.html) and [iOS](https://braze-inc.github.io/braze-swift-sdk/documentation/brazekit/braze/contentcard/captionedimage-swift.struct) documentation.
### Classic
Classic cards have a title, description, and an optional image before the text.
|Property | Description |
|-------------------|-------------------------------------------------------------------------------------------------------------------|
|`type` | The Content Card type, `CLASSIC`. |
|`image` | (Optional) The URL of the card's image. |
|`title` | The title text for the card. |
|`cardDescription` | The description text for the card. |
|`domain` | (Optional) The link text for the property URL, for example, `"braze.com/resources/"`. It can be displayed on the card's UI to indicate the action/direction of clicking on the card. |
{: .reset-td-br-1 .reset-td-br-2 aria-label="Classic" }
For a full reference of the classic (text announcement) Content Card, see the [Android](https://braze-inc.github.io/braze-android-sdk/kdoc/braze-android-sdk/com.braze.models.cards/-text-announcement-card/index.html) and [iOS](https://braze-inc.github.io/braze-swift-sdk/documentation/brazekit/braze/contentcard/classic-swift.struct) documentation. For the classic image (short news) card, see the [Android](https://braze-inc.github.io/braze-android-sdk/kdoc/braze-android-sdk/com.braze.models.cards/-short-news-card/index.html) and [iOS](https://braze-inc.github.io/braze-swift-sdk/documentation/brazekit/braze/contentcard/classicimage-swift.struct) documentation.
### Control
Control cards include all of the base properties, with a few important differences. Most importantly:
- The `isControl` property is guaranteed to be `true`.
- The `extras` property is guaranteed to be empty.
For a full reference of the control card, see the [Android](https://braze-inc.github.io/braze-android-sdk/kdoc/braze-android-sdk/com.braze.models.cards/-control-card/index.html) and [iOS](https://braze-inc.github.io/braze-swift-sdk/documentation/brazekit/braze/contentcard/control-swift.struct) documentation.
## Prerequisites
Before you can use Content Cards, you'll need to integrate the [Braze Swift SDK](https://www.braze.com/docs/de/de/developer_guide/sdk_integration/?sdktab=swift) into your app. Then you'll need to complete the steps for setting up your tvOS app.
**Important:**
Keep in mind, you'll need to implement your own custom UI since Content Cards are supported via headless UI using the Swift SDK—which does not include any default UI or views for tvOS.
## Setting up your tvOS app
### Step 1: Create a new iOS app
In Braze, select **Settings** > **App Settings**, then select **Add App**. Enter a name for your tvOS app, select **iOS**—_not tvOS_—then select **Add App**.
{: style="width:70%"}
**Warning:**
If you select the **tvOS** checkbox, you will not be able to customize Content Cards for tvOS.
### Step 2: Get your app's API key
In your app settings, select your new tvOS app then take note of your app's API key. You'll use this key to configure your app in Xcode.
{: style="width:70%"}
### Step 3: Integrate BrazeKit
Use your app's API key to integrate the [Braze Swift SDK](https://github.com/braze-inc/braze-swift-sdk) into your tvOS project in Xcode. You only need to integrate BrazeKit from the Braze Swift SDK.
### Step 4: Create your custom UI
Because Braze doesn't provide a default UI for content cards on tvOS, you'll need to customize it yourself. For a full walkthrough, see our step-by-step tutorial: [Customizing content cards for tvOS](https://braze-inc.github.io/braze-swift-sdk/documentation/braze/content-cards-customization/). For a sample project, see [Braze Swift SDK samples](https://github.com/braze-inc/braze-swift-sdk/tree/main/Examples#contentcards-custom-ui).
## Prerequisites
Before you can use this feature, you'll need to [integrate the Unity Braze SDK](https://www.braze.com/docs/de/de/developer_guide/sdk_integration/?sdktab=unity).
## Displaying Content Cards natively {#unity-content-cards-native-ui}
You can display the default UI for Content Cards using the following call:
```csharp
Appboy.AppboyBinding.DisplayContentCards();
```
## Receiving Content Card data in Unity
You may register Unity game objects to be notified of incoming Content Cards. We recommend setting game object listeners from the Braze configuration editor.
If you need to configure your game object listener at runtime, use `AppboyBinding.ConfigureListener()` and specify `BrazeUnityMessageType.CONTENT_CARDS_UPDATED`.
Note, you will additionally need to make a call to `AppboyBinding.RequestContentCardsRefresh()` to start receiving data in your game object listener on iOS.
## Parsing Content Cards
Incoming `string` messages received in your Content Cards game object callback can be parsed into our pre-supplied [`ContentCard`](https://github.com/braze-inc/braze-unity-sdk/blob/master/Assets/Plugins/Appboy/Models/Cards/ContentCard.cs) model object for convenience.
Parsing Content Cards requires JSON parsing, see the following example for details:
### Example Content Cards callback
```csharp
void ExampleCallback(string message) {
try {
JSONClass json = (JSONClass)JSON.Parse(message);
// Content Card data is contained in the `mContentCards` field of the top level object.
if (json["mContentCards"] != null) {
JSONArray jsonArray = (JSONArray)JSON.Parse(json["mContentCards"].ToString());
Debug.Log(String.Format("Parsed content cards array with {0} cards", jsonArray.Count));
// Iterate over the card array to parse individual cards.
for (int i = 0; i < jsonArray.Count; i++) {
JSONClass cardJson = jsonArray[i].AsObject;
try {
ContentCard card = new ContentCard(cardJson);
Debug.Log(String.Format("Created card object for card: {0}", card));
// Example of logging Content Card analytics on the ContentCard object
card.LogImpression();
card.LogClick();
} catch {
Debug.Log(String.Format("Unable to create and log analytics for card {0}", cardJson));
}
}
}
} catch {
throw new ArgumentException("Could not parse content card JSON message.");
}
}
```
## Refreshing Content Cards
To refresh Content Cards from Braze, call either of the following methods:
```csharp
// results in a network request to Braze
AppboyBinding.RequestContentCardsRefresh()
AppboyBinding.RequestContentCardsRefreshFromCache()
```
## Analytics
Clicks and impressions must be manually logged for Content Cards not displayed directly by Braze.
Use `LogClick()` and `LogImpression()` on [ContentCard](https://github.com/braze-inc/braze-unity-sdk/blob/master/Assets/Plugins/Appboy/Models/Cards/ContentCard.cs) to log clicks and impressions for specific cards.
## About .NET MAUI Content Cards
The Braze .NET MAUI (formerly Xamarin) SDK includes a default card feed to get you started with Content Cards. The default card feed included with the Braze SDK will handle all analytics tracking, dismissals, and rendering for a user’s Content Cards.
## Prerequisites
Before you can use this feature, you'll need to [integrate the .NET MAUI Braze SDK](https://www.braze.com/docs/de/de/developer_guide/sdk_integration/?sdktab=.net%20maui%20(xamarin)).
## Card types and properties
The Braze .NET MAUI SDK has three unique Content Cards card types that share a base model: [Banner](#xamarin_banner), [Captioned Image](#xamarin_captioned-image), and [Classic](#xamarin_classic). Each type inherits common properties from a base model and has the following additional properties.
### Base card model
|Property | Description |
|-------------------|------------------------------------------------------------------------------------------------------------------------|
|`idString` | The card's ID set by Braze. |
|`created` | The UNIX timestamp of the card's creation time from Braze. |
|`expiresAt` | The UNIX timestamp of the card's expiration time. When the value is less than 0, it means the card never expires. |
|`viewed` | Whether the card is read or unread by the user. This does not log analytics. |
|`clicked` | Whether the card has been clicked by the user. |
|`pinned` | Whether the card is pinned. |
|`dismissed` | Whether the user has dismissed this card. Marking a card as dismissed that has already been dismissed will be a no-op. |
|`dismissible` | Whether the card is dismissible by the user. |
|`urlString` | (Optional) The URL string associated with the card click action. |
|`openUrlInWebView` | Whether URLs for this card should be opened in the Braze WebView or not. |
|`isControlCard` | Whether this card is a control card. Control cards should not be displayed to the user. |
|`extras` | The map of key-value extras for this card. |
|`isTest` | Whether this card is a test card. |
{: .reset-td-br-1 .reset-td-br-2 aria-label="Base card model" }
For a full reference of the base card, see the [Android](https://braze-inc.github.io/braze-android-sdk/kdoc/braze-android-sdk/com.braze.models.cards/-card/index.html) and [iOS](https://braze-inc.github.io/braze-swift-sdk/documentation/brazekit/braze/contentcard/data-swift.struct) documentation.
### Banner
Banner cards are clickable, full-sized images.
|Property | Description |
|-------------------|-------------------------------------------------------------------------------------------------------------------|
|`image` | The URL of the card's image. |
|`imageAspectRatio` | The aspect ratio of the card's image. It is meant to serve as a hint before image loading completes. Note that the property may not be supplied in certain circumstances. |
{: .reset-td-br-1 .reset-td-br-2 aria-label="Banner" }
For a full reference of the banner card, see the [Android](https://braze-inc.github.io/braze-android-sdk/kdoc/braze-android-sdk/com.braze.models.cards/-image-only-card/index.html) and [iOS](https://braze-inc.github.io/braze-swift-sdk/documentation/brazekit/braze/contentcard/imageonly-swift.struct) documentation (now renamed to image only).
### Captioned image
Captioned image cards are clickable, full-sized images with accompanying descriptive text.
|Property | Description |
|-------------------|-------------------------------------------------------------------------------------------------------------------|
|`image` | The URL of the card's image. |
|`imageAspectRatio` | The aspect ratio of the card's image. It is meant to serve as a hint before image loading completes. Note that the property may not be supplied in certain circumstances. |
|`title` | The title text for the card. |
|`cardDescription` | The description text for the card. |
|`domain` | (Optional) The link text for the property URL, for example, `"braze.com/resources/"`. It can be displayed on the card's UI to indicate the action/direction of clicking on the card. |
{: .reset-td-br-1 .reset-td-br-2 aria-label="Captioned image" }
For a full reference of the captioned image card, see the [Android](https://braze-inc.github.io/braze-android-sdk/kdoc/braze-android-sdk/com.braze.models.cards/-captioned-image-card/index.html) and [iOS](https://braze-inc.github.io/braze-swift-sdk/documentation/brazekit/braze/contentcard/captionedimage-swift.struct) documentation.
### Classic
Classic cards have a title, description, and an optional image before the text.
|Property | Description |
|-------------------|-------------------------------------------------------------------------------------------------------------------|
|`image` | (Optional) The URL of the card's image. |
|`title` | The title text for the card. |
|`cardDescription` | The description text for the card. |
|`domain` | (Optional) The link text for the property URL, for example, `"braze.com/resources/"`. It can be displayed on the card's UI to indicate the action/direction of clicking on the card. |
{: .reset-td-br-1 .reset-td-br-2 aria-label="Classic" }
For a full reference of the classic (text announcement) Content Card, see the [Android](https://braze-inc.github.io/braze-android-sdk/kdoc/braze-android-sdk/com.braze.models.cards/-text-announcement-card/index.html) and [iOS](https://braze-inc.github.io/braze-swift-sdk/documentation/brazekit/braze/contentcard/classic-swift.struct) documentation. For a full reference of the classic image (short news) card, see the [Android](https://braze-inc.github.io/braze-android-sdk/kdoc/braze-android-sdk/com.braze.models.cards/-short-news-card/index.html) and [iOS](https://braze-inc.github.io/braze-swift-sdk/documentation/brazekit/braze/contentcard/classicimage-swift.struct) documentation.
## Card methods
You can use these additional methods to build a custom Content Cards Feed within your app:
| Method | Description |
| ---------------------------------------- | ------------------------------------------------------------------------------------------------------ |
| `requestContentCardsRefresh()` | Requests the latest Content Cards from the Braze SDK server. |
| `getContentCards()` | Retrieves Content Cards from the Braze SDK. This will return the latest list of cards from the server. |
| `logContentCardClicked(cardId)` | Logs a click for the given Content Card ID. This method is used only for analytics. |
| `logContentCardImpression(cardId)` | Logs an impression for the given Content Card ID. |
| `logContentCardDismissed(cardId)` | Logs a dismissal for the given Content Card ID. |
{: .reset-td-br-1 .reset-td-br-2 aria-label="Card methods" }
# Content Cards erstellen
Source: /docs/de/developer_guide/content_cards/creating_cards/index.md
# Content Cards erstellen {#create-content-cards}
> Dieser Artikel beschreibt den grundlegenden Ansatz, den Sie bei der Implementierung angepasster Content Cards verwenden, sowie drei häufige Anwendungsfälle. Es wird davon ausgegangen, dass Sie bereits die anderen Artikel der Anleitung zur Anpassung von Content Cards gelesen haben, um zu verstehen, was standardmäßig möglich ist und was angepassten Code erfordert. Es ist besonders hilfreich zu verstehen, wie Sie [Analytics protokollieren](https://www.braze.com/docs/de/de/developer_guide/content_cards/logging_analytics) für Ihre angepassten Content Cards.
**Tip:**
Using Content Cards for banner-style messages? Try out [Banners](https://www.braze.com/docs/de/de/user_guide/message_building_by_channel/banners/)— perfect for inline, persistent in-app and web messages.
## Eine Karte erstellen {#creating-a-card}
### 1. Schritt: Erstellen Sie ein angepasstes UI {#step-1-create-a-custom-ui}
Erstellen Sie zunächst Ihre angepasste HTML-Komponente, die zum Rendern der Karten verwendet werden soll.
Erstellen Sie zunächst Ihr eigenes angepasstes Fragment. Das standardmäßige [`ContentCardsFragment`](https://braze-inc.github.io/braze-android-sdk/kdoc/braze-android-sdk/com.braze.ui.contentcards/-content-cards-fragment/index.html) ist nur für unsere Standard-Content-Card-Typen gedacht, ist aber ein guter Ausgangspunkt.
Erstellen Sie zunächst Ihre eigene angepasste View-Controller-Komponente. Der standardmäßige [`BrazeContentCardUI.ViewController`](https://braze-inc.github.io/braze-swift-sdk/documentation/brazeui/brazecontentcardui/viewcontroller) ist nur für unsere Standard-Content-Card-Typen gedacht, ist aber ein guter Ausgangspunkt.
### 2. Schritt: Updates für Karten abonnieren {#step-2-subscribe-to-card-updates}
Registrieren Sie eine Callback-Funktion, um Daten-Updates zu abonnieren, wenn die Karten aktualisiert werden. Sie können die Content-Card-Objekte parsen und deren Payload-Daten wie `title`, `cardDescription` und `imageUrl` extrahieren und dann die resultierenden Modelldaten verwenden, um Ihr angepasstes UI zu befüllen.
Um die Content-Card-Datenmodelle zu erhalten, abonnieren Sie Content-Card-Updates. Achten Sie dabei besonders auf die folgenden Eigenschaften:
* **`id`:** Repräsentiert den Content-Card-ID-String. Dies ist der eindeutige Bezeichner, der zum Protokollieren von Analytics aus angepassten Content Cards verwendet wird.
* **`extras`:** Umfasst alle Schlüssel-Wert-Paare aus dem Braze-Dashboard.
Alle Eigenschaften außer `id` und `extras` sind für angepasste Content Cards optional zu parsen. Weitere Informationen zum Datenmodell finden Sie im Integrationsartikel der jeweiligen Plattform: [Android](https://www.braze.com/docs/de/de/developer_guide/content_cards?sdktab=android), [iOS](https://www.braze.com/docs/de/de/developer_guide/content_cards?sdktab=swift), [Web](https://www.braze.com/docs/de/de/developer_guide/content_cards?sdktab=web).
```javascript
import * as braze from "@braze/web-sdk";
braze.subscribeToContentCardsUpdates((updates) => {
const cards = updates.cards;
// For example:
cards.forEach(card => {
if (card.isControl) {
// Do not display the control card, but remember to call `logContentCardImpressions([card])`
}
else if (card instanceof braze.ClassicCard || card instanceof braze.CaptionedImage) {
// Use `card.title`, `card.imageUrl`, etc.
}
else if (card instanceof braze.ImageOnly) {
// Use `card.imageUrl`, etc.
}
})
});
braze.openSession();
```
**Note:**
Content Cards werden nur beim Sitzungsstart aktualisiert, wenn `subscribeToContentCardsUpdates()` vor `openSession()` aufgerufen wird. Sie können den [Feed auch jederzeit manuell aktualisieren](https://www.braze.com/docs/de/de/developer_guide/content_cards/customizing_cards/feed).
#### Schritt 2a: Erstellen Sie eine private Subscriber-Variable {#step-2a-create-a-private-subscriber-variable}
Um Karten-Updates zu abonnieren, deklarieren Sie zunächst eine private Variable in Ihrer angepassten Klasse, die Ihren Subscriber hält:
```java
// subscriber variable
private IEventSubscriber mContentCardsUpdatedSubscriber;
```
#### Schritt 2b: Updates abonnieren {#step-2b-subscribe-to-updates}
Fügen Sie den folgenden Code hinzu, um Content-Card-Updates von Braze zu abonnieren, typischerweise innerhalb der `Activity.onCreate()` Ihrer angepassten Content-Cards-Activity:
```java
// Remove the previous subscriber before rebuilding a new one with our new activity.
Braze.getInstance(context).removeSingleSubscription(mContentCardsUpdatedSubscriber, ContentCardsUpdatedEvent.class);
mContentCardsUpdatedSubscriber = new IEventSubscriber() {
@Override
public void trigger(ContentCardsUpdatedEvent event) {
// List of all Content Cards
List allCards = event.getAllCards();
// Your logic below
}
};
Braze.getInstance(context).subscribeToContentCardsUpdates(mContentCardsUpdatedSubscriber);
Braze.getInstance(context).requestContentCardsRefresh();
```
#### Schritt 2c: Abo kündigen {#step-2c-unsubscribe}
Kündigen Sie das Abo, wenn Ihre angepasste Activity nicht mehr sichtbar ist. Fügen Sie den folgenden Code zur `onDestroy()`-Lifecycle-Methode Ihrer Activity hinzu:
```java
Braze.getInstance(context).removeSingleSubscription(mContentCardsUpdatedSubscriber, ContentCardsUpdatedEvent.class);
```
#### Schritt 2a: Erstellen Sie eine private Subscriber-Variable
Um Karten-Updates zu abonnieren, deklarieren Sie zunächst eine private Variable in Ihrer angepassten Klasse, die Ihren Subscriber hält:
```kotlin
private var contentCardsUpdatedSubscriber: IEventSubscriber? = null
```
#### Schritt 2b: Updates abonnieren
Fügen Sie den folgenden Code hinzu, um Content-Card-Updates von Braze zu abonnieren, typischerweise innerhalb der `Activity.onCreate()` Ihrer angepassten Content-Cards-Activity:
```kotlin
// Remove the previous subscriber before rebuilding a new one with our new activity.
Braze.getInstance(context).subscribeToContentCardsUpdates(contentCardsUpdatedSubscriber)
Braze.getInstance(context).requestContentCardsRefresh()
// List of all Content Cards
val allCards = event.allCards
// Your logic below
}
Braze.getInstance(context).subscribeToContentCardsUpdates(mContentCardsUpdatedSubscriber)
Braze.getInstance(context).requestContentCardsRefresh(true)
```
#### Schritt 2c: Abo kündigen
Kündigen Sie das Abo, wenn Ihre angepasste Activity nicht mehr sichtbar ist. Fügen Sie den folgenden Code zur `onDestroy()`-Lifecycle-Methode Ihrer Activity hinzu:
```kotlin
Braze.getInstance(context).removeSingleSubscription(contentCardsUpdatedSubscriber, ContentCardsUpdatedEvent::class.java)
```
Um auf das Content-Cards-Datenmodell zuzugreifen, rufen Sie [`contentCards.cards`](https://braze-inc.github.io/braze-swift-sdk/documentation/brazekit/braze/contentcards-swift.class/cards) auf Ihrer `braze`-Instanz auf.
```swift
let cards: [Braze.ContentCard] = AppDelegate.braze?.contentCards.cards
```
Zusätzlich können Sie ein Abo aufrechterhalten, um Änderungen an Ihren Content Cards zu beobachten. Dies ist auf zwei Arten möglich:
1. Über ein Cancellable; oder
2. Über einen `AsyncStream`.
##### Cancellable {#cancellable}
```swift
// This subscription is maintained through a Braze cancellable, which will observe for changes until the subscription is cancelled.
// You must keep a strong reference to the cancellable to keep the subscription active.
// The subscription is canceled either when the cancellable is deinitialized or when you call its `.cancel()` method.
let cancellable = AppDelegate.braze?.contentCards.subscribeToUpdates { [weak self] contentCards in
// Implement your completion handler to respond to updates in `contentCards`.
}
```
##### AsyncStream
```swift
let stream: AsyncStream<[Braze.ContentCard]> = AppDelegate.braze?.contentCards.cardsStream
```
```objc
NSArray *contentCards = AppDelegate.braze.contentCards.cards;
```
Wenn Sie zusätzlich ein Abo für Ihre Content Cards aufrechterhalten möchten, können Sie [`subscribeToUpdates`](https://braze-inc.github.io/braze-swift-sdk/documentation/brazekit/braze/contentcards-swift.class/subscribetoupdates(_:)) aufrufen:
```objc
// This subscription is maintained through Braze cancellable, which will continue to observe for changes until the subscription is cancelled.
BRZCancellable *cancellable = [self.braze.contentCards subscribeToUpdates:^(NSArray *contentCards) {
// Implement your completion handler to respond to updates in `contentCards`.
}];
```
### 3. Schritt: Analytics implementieren {#step-3-implement-analytics}
Impressionen, Klicks und Schließungen von Content Cards werden in Ihrer angepassten Ansicht nicht automatisch protokolliert. Sie müssen [die jeweilige Methode implementieren](https://www.braze.com/docs/de/de/developer_guide/content_cards/logging_analytics), um alle Metriken ordnungsgemäß in die Analytics des Braze-Dashboards zu protokollieren.
### 4. Schritt: Testen Sie Ihre Karte (optional) {#step-4-test-your-card-optional}
So testen Sie Ihre Content Card:
1. Legen Sie eine:n aktive:n Nutzer:in in Ihrer Anwendung fest, indem Sie die [`changeUser()`](https://js.appboycdn.com/web-sdk/latest/doc/modules/braze.html#changeuser)-Methode aufrufen.
2. Gehen Sie in Braze zu **Campaigns** und [erstellen Sie eine neue Content-Card-Kampagne](https://www.braze.com/docs/de/de/user_guide/channels/content_cards/create_a_content_card).
3. Wählen Sie in Ihrer Kampagne **Test** aus und geben Sie die `user-id` der Testnutzer:in ein. Wenn Sie bereit sind, wählen Sie **Send Test**. Sie können dann in Kürze eine Content Card auf Ihrem Gerät starten.

## Platzierung von Content Cards {#content-card-placements}
Content Cards können auf viele verschiedene Arten verwendet werden. Drei gängige Implementierungen sind die Verwendung als Nachrichtenzentrale, als dynamische Bildanzeige oder als Bildkarussell. Für jede dieser Platzierungen weisen Sie Ihren Content Cards [Schlüssel-Wert-Paare](https://www.braze.com/docs/de/de/developer_guide/customization_guides/content_cards/customizing_behavior#key-value-pairs) (die Eigenschaft `extras` im Datenmodell) zu und passen auf der Grundlage der Werte das Verhalten, das Aussehen oder die Funktionalität der Karte während der Laufzeit dynamisch an.
{: style="border:0px;"}
### Posteingang für Nachrichten {#message-inbox}
Content Cards können verwendet werden, um eine Nachrichtenzentrale zu simulieren. In diesem Format ist jede Nachricht eine eigene Karte, die [Schlüssel-Wert-Paare](https://www.braze.com/docs/de/de/developer_guide/customization_guides/content_cards/customizing_behavior#key-value-pairs) enthält, die Events beim Klicken triggern. Diese Schlüssel-Wert-Paare sind die Bezeichner, anhand derer die Anwendung entscheidet, wohin navigiert wird, wenn Nutzer:innen auf eine Nachricht im Posteingang klicken. Die Werte der Schlüssel-Wert-Paare sind frei wählbar.
#### Beispiel {#example}
Sie möchten beispielsweise zwei Messaging-Karten erstellen: einen Call-to-Action für Nutzer:innen zum Aktivieren von Leseempfehlungen und einen Gutschein-Code für Ihr neues Segment von Abonnent:innen.
Schlüssel wie `body`, `title` und `buttonText` können einfache String-Werte haben, die Ihre Marketer festlegen können. Schlüssel wie `terms` können Werte haben, die eine kleine Sammlung von Phrasen enthalten, die von Ihrer Rechtsabteilung genehmigt wurden. Schlüssel wie `style` und `class_type` haben String-Werte, die Sie festlegen können, um zu bestimmen, wie Ihre Karte in Ihrer App oder Website dargestellt wird.
Schlüssel-Wert-Paare für die Leseempfehlungskarte:
| Schlüssel | Wert |
|------------|----------------------------------------------------------------------|
| `body` | Fügen Sie Ihre Interessen zu Ihrem Politer Weekly Profil hinzu, um persönliche Leseempfehlungen zu erhalten. |
| `style` | info |
| `class_type` | notification_center |
| `card_priority` | 1 |
{: .reset-td-br-1 .reset-td-br-2 aria-label="Beispiel" }
Schlüssel-Wert-Paare für einen neuen Abonnent:innen-Gutschein:
| Schlüssel | Wert |
|------------|------------------------------------------------------------------|
| `title` | Unbegrenztes Spiele-Abo |
| `body` | End of Summer Special – Hol dir 10 % Rabatt auf Politer-Spiele |
| `buttonText` | Jetzt abonnieren |
| `style` | promo |
| `class_type` | notification_center |
| `card_priority` | 2 |
| `terms` | new_subscribers_only |
{: .reset-td-br-1 .reset-td-br-2 aria-label="Beispiel" }
**Zusätzliche Informationen für Android**
Im Android- und FireOS-SDK wird die Logik der Nachrichtenzentrale durch den Wert `class_type` gesteuert, der durch die Schlüssel-Wert-Paare von Braze bereitgestellt wird. Mit der Methode [`createContentCardable`](https://www.braze.com/docs/de/de/developer_guide/content_cards) können Sie diese Klassentypen filtern und identifizieren.
**Verwendung von `class_type` für On-Click-Verhalten**
Wenn wir die Content-Card-Daten in unsere angepassten Klassen überführen, verwenden wir die Eigenschaft `ContentCardClass` der Daten, um zu bestimmen, welche konkrete Unterklasse zum Speichern der Daten verwendet werden soll.
```kotlin
private fun createContentCardable(metadata: Map, type: ContentCardClass?): ContentCardable?{
return when(type){
ContentCardClass.AD -> Ad(metadata)
ContentCardClass.MESSAGE_WEB_VIEW -> WebViewMessage(metadata)
ContentCardClass.NOTIFICATION_CENTER -> FullPageMessage(metadata)
ContentCardClass.ITEM_GROUP -> Group(metadata)
ContentCardClass.ITEM_TILE -> Tile(metadata)
ContentCardClass.COUPON -> Coupon(metadata)
else -> null
}
}
```
Bei der Verarbeitung der Nutzerinteraktion mit der Nachrichtenliste können wir dann anhand des Nachrichtentyps bestimmen, welche Ansicht den Nutzer:innen angezeigt werden soll.
```kotlin
override fun onCreate(savedInstanceState: Bundle?) {
super.onCreate(savedInstanceState)
//...
listView.onItemClickListener = AdapterView.OnItemClickListener { parent, view, position, id ->
when (val card = dataProvider[position]){
is WebViewMessage -> {
val intent = Intent(this, WebViewActivity::class.java)
val bundle = Bundle()
bundle.putString(WebViewActivity.INTENT_PAYLOAD, card.contentString)
intent.putExtras(bundle)
startActivity(intent)
}
is FullPageMessage -> {
val intent = Intent(this, FullPageContentCard::class.java)
val bundle = Bundle()
bundle.putString(FullPageContentCard.CONTENT_CARD_IMAGE, card.icon)
bundle.putString(FullPageContentCard.CONTENT_CARD_TITLE, card.messageTitle)
bundle.putString(FullPageContentCard.CONTENT_CARD_DESCRIPTION, card.cardDescription)
intent.putExtras(bundle)
startActivity(intent)
}
}
}
}
```
**Verwendung von `class_type` für On-Click-Verhalten**
Wenn wir die Content-Card-Daten in unsere angepassten Klassen überführen, verwenden wir die Eigenschaft `ContentCardClass` der Daten, um zu bestimmen, welche konkrete Unterklasse zum Speichern der Daten verwendet werden soll.
```java
private ContentCardable createContentCardable(Map metadata, ContentCardClass type){
switch(type){
case ContentCardClass.AD:{
return new Ad(metadata);
}
case ContentCardClass.MESSAGE_WEB_VIEW:{
return new WebViewMessage(metadata);
}
case ContentCardClass.NOTIFICATION_CENTER:{
return new FullPageMessage(metadata);
}
case ContentCardClass.ITEM_GROUP:{
return new Group(metadata);
}
case ContentCardClass.ITEM_TILE:{
return new Tile(metadata);
}
case ContentCardClass.COUPON:{
return new Coupon(metadata);
}
default:{
return null;
}
}
}
```
Bei der Verarbeitung der Nutzerinteraktion mit der Nachrichtenliste können wir dann anhand des Nachrichtentyps bestimmen, welche Ansicht den Nutzer:innen angezeigt werden soll.
```java
@Override
protected void onCreate(Bundle savedInstanceState) {
super.onCreate(savedInstanceState)
//...
listView.setOnItemClickListener(new AdapterView.OnItemClickListener() {
@Override
public void onItemClick(AdapterView parent, View view, int position, long id){
ContentCardable card = dataProvider.get(position);
if (card instanceof WebViewMessage){
Bundle intent = new Intent(this, WebViewActivity.class);
Bundle bundle = new Bundle();
bundle.putString(WebViewActivity.INTENT_PAYLOAD, card.getContentString());
intent.putExtras(bundle);
startActivity(intent);
}
else if (card instanceof FullPageMessage){
Intent intent = new Intent(this, FullPageContentCard.class);
Bundle bundle = Bundle();
bundle.putString(FullPageContentCard.CONTENT_CARD_IMAGE, card.getIcon());
bundle.putString(FullPageContentCard.CONTENT_CARD_TITLE, card.getMessageTitle());
bundle.putString(FullPageContentCard.CONTENT_CARD_DESCRIPTION, card.getCardDescription());
intent.putExtras(bundle)
startActivity(intent)
}
}
});
}
```
### Karussell {#carousel}
Sie können Content Cards in Ihrem vollständig angepassten Karussell-Feed einrichten, sodass Nutzer:innen durch zusätzliche hervorgehobene Karten wischen und diese ansehen können. Standardmäßig werden Content Cards nach Erstellungsdatum sortiert (das neueste zuerst), und Ihre Nutzer:innen sehen alle Karten, für die sie in Frage kommen.
So implementieren Sie ein Content-Card-Karussell:
1. Erstellen Sie eine angepasste Logik, die auf [Änderungen in Ihren Content Cards](https://www.braze.com/docs/de/de/developer_guide/customization_guides/content_cards/customizing_feed#refreshing-the-feed) achtet und die Ankunft der Content Cards behandelt.
2. Erstellen Sie eine angepasste clientseitige Logik, um eine bestimmte Anzahl von Karten gleichzeitig im Karussell anzuzeigen. Sie könnten zum Beispiel die ersten fünf Content-Card-Objekte aus dem Array auswählen oder Schlüssel-Wert-Paare einführen, um bedingte Logik aufzubauen.
**Tip:**
Wenn Sie ein Karussell als sekundären Content-Cards-Feed implementieren, stellen Sie sicher, dass Sie [die Karten mithilfe von Schlüssel-Wert-Paaren in den richtigen Feed einsortieren](https://www.braze.com/docs/de/de/developer_guide/customization_guides/content_cards/customizing_feed#multiple-feeds).
### Nur Bild {#image-only}
Content Cards müssen nicht wie „Karten“ aussehen. Content Cards können zum Beispiel als dynamisches Bild erscheinen, das persistent auf Ihrer Homepage oder am Anfang bestimmter Seiten angezeigt wird.
Um dies zu erreichen, erstellen Ihre Marketer eine Kampagne oder einen Canvas-Schritt mit einer Content Card vom Typ **Nur Bild**. Legen Sie dann Schlüssel-Wert-Paare fest, die für die Verwendung von [Content Cards als ergänzende Inhalte](https://www.braze.com/docs/de/de/developer_guide/customization_guides/content_cards/customizing_behavior#content-cards-as-supplemental-content) geeignet sind.
# Karten anpassen
Source: /docs/de/developer_guide/content_cards/customizing_cards/index.md
**Tip:**
Using Content Cards for banner-style messages? Try out [Banners](https://www.braze.com/docs/de/de/user_guide/message_building_by_channel/banners/)— perfect for inline, persistent in-app and web messages.
# Den Stil der Content Cards anpassen
Source: /docs/de/developer_guide/content_cards/customizing_cards/style/index.md
# Den Stil der Content Cards anpassen {#customize-the-style-of-content-cards}
> Braze Content Cards werden mit einem Standard-Look-and-Feel geliefert. Dieser Artikel befasst sich mit den Styling-Optionen für Ihre Content Cards, damit Sie sie an Ihre Markenidentität anpassen können. Eine vollständige Liste der Content-Card-Typen finden Sie unter [Über Content Cards](https://www.braze.com/docs/de/de/developer_guide/content_cards).
## Einen angepassten Stil erstellen {#creating-a-custom-style}
Die Standard-UI für Content Cards wird aus der UI-Schicht des Braze SDK importiert. Von dort aus können Sie bestimmte Teile des Kartendesigns, die Reihenfolge der Karten und die Art und Weise, wie der Feed Ihren Nutzer:innen angezeigt wird, anpassen.

**Note:**
Eigenschaften von Content Cards wie `title`, `cardDescription`, `imageUrl` usw. können direkt über das [Dashboard](https://www.braze.com/docs/de/de/user_guide/channels/content_cards/creative_details) bearbeitet werden – das ist die bevorzugte Methode, um diese Details zu ändern.
Die Standardstile von Braze sind in CSS innerhalb des Braze SDK definiert. Durch das Überschreiben ausgewählter Stile in Ihrer Anwendung können Sie unseren Standard-Feed mit Ihren eigenen Hintergrundbildern, Schriftarten, Stilen, Größen, Animationen und vielem mehr anpassen. Das folgende Beispiel zeigt eine Überschreibung, die bewirkt, dass Content Cards mit einer Breite von 800 px angezeigt werden:
``` css
body .ab-feed {
width: 800px;
}
```
Eine vollständige Liste der Eigenschaften, die Sie ändern können, finden Sie unter [Braze SDK-Konfigurationsoptionen](https://js.appboycdn.com/web-sdk/latest/doc/modules/braze.html).
Standardmäßig entsprechen die Content Cards des Android- und FireOS-SDK den Standard-Android-UI-Richtlinien, um ein nahtloses Erlebnis zu bieten. Sie können diese Standardstile in der Datei [`res/values/styles.xml`](https://github.com/braze-inc/braze-android-sdk/blob/master/android-sdk-ui/src/main/res/values/styles.xml) in der Braze-SDK-Distribution einsehen:
```xml
```
Um den Stil Ihrer Content Cards anzupassen, überschreiben Sie diesen Standardstil. Um einen Stil zu überschreiben, kopieren Sie ihn vollständig in die Datei `styles.xml` Ihres Projekts und nehmen Sie die gewünschten Änderungen vor. Der gesamte Stil muss in Ihre lokale Datei `styles.xml` kopiert werden, damit alle Attribute korrekt gesetzt werden.
```xml
```
```xml
```
Standardmäßig entsprechen die Content Cards des Android- und FireOS-SDK den Standard-Android-UI-Richtlinien, um ein nahtloses Erlebnis zu bieten.
Es gibt zwei Möglichkeiten, einen Stil anzuwenden. Die erste besteht darin, ein [`ContentCardListStyling`](https://braze-inc.github.io/braze-android-sdk/kdoc/braze-android-sdk/com.braze.jetpackcompose.contentcards.styling/-content-card-list-styling/index.html) und [`ContentCardStyling`](https://braze-inc.github.io/braze-android-sdk/kdoc/braze-android-sdk/com.braze.jetpackcompose.contentcards.styling/-content-card-styling/index.html) an [`ContentCardsList`](https://braze-inc.github.io/braze-android-sdk/kdoc/braze-android-sdk/com.braze.jetpackcompose.contentcards/-content-cards-list.html) zu übergeben, wie im folgenden Beispiel:
```kotlin
ContentCardsList(
style = ContentCardListStyling(listBackgroundColor = Color.Red),
cardStyle = ContentCardStyling(
titleTextStyle = TextStyle(
fontFamily = fontFamily,
fontSize = 25.sp
),
shadowRadius = 10.dp,
shortNewsContentCardStyle = BrazeShortNewsContentCardStyling(
shadowRadius = 15.dp
)
)
)
```
Die zweite Möglichkeit ist die Verwendung von [`BrazeStyle`](https://braze-inc.github.io/braze-android-sdk/kdoc/braze-android-sdk/com.braze.jetpackcompose/-braze-style.html), um ein globales Styling für Braze-Komponenten zu erstellen, wie im folgenden Beispiel:
```kotlin
BrazeStyle(
contentCardStyle = ContentCardStyling(
textAnnouncementContentCardStyle = BrazeTextAnnouncementContentCardStyling(
cardBackgroundColor = Color.Red,
descriptionTextStyle = TextStyle(
fontFamily = fontFamily,
fontSize = 25.sp,
)
),
titleTextColor = Color.Magenta
)
) {
// Your app here, including any ContentCardsList() in it
}
```
Mit dem View Controller für Content Cards können Sie das Aussehen und Verhalten aller Zellen über die Struktur [`BrazeContentCardUI.ViewController.Attributes`](https://braze-inc.github.io/braze-swift-sdk/documentation/brazeui/brazecontentcardui/viewcontroller/attributes-swift.struct) anpassen. Die Konfiguration von Content Cards mit `Attributes` ist eine unkomplizierte Option, mit der Sie Ihre Content-Cards-UI mit minimalem Aufwand starten können.
**Important:**
Die Anpassung über `Attributes` ist nur in Swift möglich.
**`Attributes.default` ändern**
Passen Sie das Aussehen aller Instanzen des Braze Content-Card-UI-View-Controllers an, indem Sie die statische Variable [`Attributes.defaults`](https://braze-inc.github.io/braze-swift-sdk/documentation/brazeui/brazecontentcardui/viewcontroller/attributes-swift.struct/defaults) direkt ändern.
So ändern Sie beispielsweise die Standardbildgröße und den Eckenradius für alle Zellen:
```swift
BrazeContentCardUI.ViewController.Attributes.defaults.cellAttributes.cornerRadius = 20
BrazeContentCardUI.ViewController.Attributes.defaults.cellAttributes.classicImageSize = CGSize(width: 65, height: 65)
```
**Den View Controller mit Attributes initialisieren**
Wenn Sie nur eine bestimmte Instanz des Braze Content-Card-UI-View-Controllers ändern möchten, verwenden Sie den Initialisierer [`init(braze:attributes:)`](https://braze-inc.github.io/braze-swift-sdk/documentation/brazeui/brazecontentcardui/viewcontroller/init(braze:attributes:)/), um eine angepasste `Attributes`-Struktur an den View Controller zu übergeben.
So können Sie zum Beispiel die Bildgröße und den Eckenradius für eine bestimmte Instanz des View Controllers ändern:
```swift
var attributes = BrazeContentCardUI.ViewController.Attributes.defaults
attributes.cellAttributes.cornerRadius = 20
attributes.cellAttributes.classicImageSize = CGSize(width: 65, height: 65)
let viewController = BrazeContentCardUI.ViewController(braze: AppDelegate.braze, attributes: attributes)
```
**Zellen mithilfe von Unterklassen anpassen**
Alternativ können Sie angepasste Schnittstellen erstellen, indem Sie angepasste Klassen für jeden gewünschten Kartentyp registrieren. Um anstelle der Standardzelle eine Unterklasse zu verwenden, ändern Sie die Eigenschaft [`cells`](https://braze-inc.github.io/braze-swift-sdk/documentation/brazeui/brazecontentcardui/viewcontroller/attributes-swift.struct/cells) in der `Attributes`-Struktur. Zum Beispiel:
```swift
var attributes = BrazeContentCardUI.ViewController.Attributes.defaults
// Register your own custom cell
attributes.cells[BrazeContentCardUI.ClassicImageCell.identifier] = CustomClassicImageCell.self
let viewController = BrazeContentCardUI.ViewController(braze: AppDelegate.braze, attributes: attributes)
```
**Content Cards programmatisch ändern**
Sie können Content Cards programmatisch ändern, indem Sie die [`transform`](https://braze-inc.github.io/braze-swift-sdk/documentation/brazeui/brazecontentcardui/viewcontroller/attributes-swift.struct/transform)-Closure Ihrer `Attributes`-Struktur zuweisen. Das folgende Beispiel ändert `title` und `description` kompatibler Karten:
```swift
var attributes = BrazeContentCardUI.ViewController.Attributes.defaults
attributes.transform = { cards in
cards.map { card in
var card = card
if let title = card.title {
card.title = "[modified] \(title)"
}
if let description = card.description {
card.description = "[modified] \(description)"
}
return card
}
}
let viewController = BrazeContentCardUI.ViewController(braze: AppDelegate.braze, attributes: attributes)
```
Ein vollständiges Beispiel finden Sie in der [Beispiel-App „Examples“](https://github.com/braze-inc/braze-swift-sdk/tree/main/Examples/Swift).
Die Anpassung von Content Cards über `Attributes` wird in Objective-C nicht unterstützt.
## Beispiele für Anpassungen {#customization-examples}
### Eigene Schriftart {#custom-font}
Durch die Anpassung der in Ihren Content Cards verwendeten Schriftart können Sie Ihre Markenidentität wahren und ein visuell ansprechendes Erlebnis für Ihre Nutzer:innen schaffen. Verwenden Sie die folgenden Vorgehensweisen, um die Schriftart für alle Content Cards programmatisch festzulegen.
Sie können das Aussehen von Content Cards wie jedes andere Web-Element ganz einfach über CSS anpassen. Verwenden Sie in Ihrer CSS-Datei oder in Inline-Styles die Eigenschaft `font-family` und geben Sie den gewünschten Schriftnamen oder Font-Stack an.
```css
/* CSS selector targeting the Content Card element */
.card-element {
font-family: "Helvetica Neue", Arial, sans-serif;
}
```
Um die Standardschriftart programmatisch zu ändern, legen Sie einen Stil für Karten fest und verwenden Sie das Attribut `fontFamily`, um Braze anzuweisen, Ihre eigene Schriftfamilie zu verwenden.
Wenn Sie beispielsweise die Schriftart für alle Titel von Bildkarten mit Bildunterschriften aktualisieren möchten, überschreiben Sie den Stil `Braze.ContentCards.CaptionedImage.Title` und verweisen Sie auf Ihre eigene Schriftfamilie. Der Attributwert sollte auf eine Schriftfamilie in Ihrem Verzeichnis `res/font` verweisen.
Hier ist ein gekürztes Beispiel mit einer angepassten Schriftfamilie `my_custom_font_family`, auf die in der letzten Zeile verwiesen wird:
```xml
```
Weitere Informationen zur Anpassung von Schriftarten im Android SDK finden Sie in der [Anleitung zur Schriftfamilie](https://www.braze.com/docs/de/de/developer_guide/platform_integration_guides/android/advanced_use_cases/font_customization#font-customization).
Um die Standardschriftart programmatisch zu ändern, können Sie [`titleTextStyle`](https://braze-inc.github.io/braze-android-sdk/kdoc/braze-android-sdk/com.braze.jetpackcompose.contentcards.styling/-content-card-styling/index.html#715371549%2FProperties%2F-1725759721) von `ContentCardStyling` setzen.
Sie können `titleTextStyle` auch für einen bestimmten Kartentyp festlegen, indem Sie es auf [`BrazeShortNewsContentCardStyling`](https://braze-inc.github.io/braze-android-sdk/kdoc/braze-android-sdk/com.braze.jetpackcompose.contentcards.styling/-braze-short-news-content-card-styling/index.html) setzen und an [`shortNewsContentCardStyle`](https://braze-inc.github.io/braze-android-sdk/kdoc/braze-android-sdk/com.braze.jetpackcompose.contentcards.styling/-content-card-styling/index.html#8580250%2FProperties%2F-1725759721) von `ContentCardStyling` übergeben.
```kotlin
val fontFamily = FontFamily(
Font(R.font.sailec_bold)
)
ContentCardStyling(
titleTextStyle = TextStyle(
fontFamily = fontFamily
)
)
```
Passen Sie Ihre Schriftarten an, indem Sie die `Attributes` der Instanz-Eigenschaft [`cellAttributes`](https://braze-inc.github.io/braze-swift-sdk/documentation/brazeui/brazecontentcardui/viewcontroller/attributes-swift.struct/cellattributes/) ändern. Zum Beispiel:
```swift
var attributes = BrazeContentCardUI.ViewController.Attributes.defaults
attributes.cellAttributes.titleFont = .preferredFont(textStyle: .callout, weight: .bold)
attributes.cellAttributes.descriptionFont = .preferredFont(textStyle: .footnote, weight: .regular)
attributes.cellAttributes.domainFont = .preferredFont(textStyle: .footnote, weight: .medium)
let viewController = BrazeContentCardUI.ViewController.init(braze: braze, attributes: attributes)
```
Das Anpassen von Schriftarten über `Attributes` wird in Objective-C nicht unterstützt.
Ein Beispiel für die Erstellung Ihrer eigenen UI mit angepassten Schriftarten finden Sie in der [Beispiel-App „Examples“](https://github.com/braze-inc/braze-swift-sdk/blob/main/Examples/ObjC/Sources/ContentCards-Custom-UI/CardsInfoViewController.m#L97).
### Angepasste Pin-Symbole {#custom-pinned-icons}
Bei der Erstellung einer Content Card haben Marketer die Möglichkeit, die Karte zu pinnen. Eine gepinnte Karte wird oben im Feed der Nutzer:innen angezeigt und kann nicht geschlossen werden. Wenn Sie Ihre Kartenstile anpassen, können Sie auch das Aussehen des Pin-Symbols ändern.
{:style="border:none"}
Die Struktur des Pin-Symbols für Content Cards lautet wie folgt:
```css
```
Wenn Sie ein anderes FontAwesome-Symbol verwenden möchten, ersetzen Sie den Klassennamen des `i`-Elements durch den Klassennamen des gewünschten Symbols.
Wenn Sie das Symbol vollständig austauschen möchten, entfernen Sie das `i`-Element und fügen Sie das angepasste Symbol als untergeordnetes Element von `ab-pinned-indicator` hinzu. Es gibt mehrere Möglichkeiten, das Symbol zu ändern. Eine einfache Methode besteht darin, `replaceChildren()` auf dem `ab-pinned-indicator`-Element zu verwenden.
Zum Beispiel:
```javascript
// Get the parent element
const pinnedIndicator = document.querySelector('.ab-pinned-indicator');
// Create a new custom icon element
const customIcon = document.createElement('span');
customIcon.classList.add('customIcon');
// Replace the existing icon with the custom icon
pinnedIndicator.replaceChildren(customIcon);
```
Um ein angepasstes Pin-Symbol festzulegen, überschreiben Sie den Stil `Braze.ContentCards.PinnedIcon`. Ihr angepasstes Bild-Asset sollte im Element `android:src` deklariert werden. Zum Beispiel:
```xml
```
Um das Standard-Pin-Symbol zu ändern, können Sie [`pinnedResourceId`](https://braze-inc.github.io/braze-android-sdk/kdoc/braze-android-sdk/com.braze.jetpackcompose.contentcards.styling/-content-card-styling/index.html#794044424%2FProperties%2F-1725759721) von `ContentCardStyling` setzen. Zum Beispiel:
```kotlin
ContentCardStyling(
pinnedResourceId = R.drawable.pushpin,
pinnedImageAlignment = Alignment.TopCenter
)
```
Sie können auch ein Composable in [`pinnedComposable`](https://braze-inc.github.io/braze-android-sdk/kdoc/braze-android-sdk/com.braze.jetpackcompose.contentcards.styling/-content-card-styling/index.html#1460938052%2FProperties%2F-1725759721) von `ContentCardStyling` angeben. Wenn `pinnedComposable` angegeben ist, überschreibt es den Wert von `pinnedResourceId`.
```kotlin
ContentCardStyling(
pinnedComposable = {
Box(Modifier.fillMaxWidth()) {
Text(
modifier = Modifier
.align(Alignment.Center)
.width(50.dp),
text = "This message is not read. Please read it."
)
}
}
)
```
Passen Sie das Pin-Symbol an, indem Sie die Eigenschaften `pinIndicatorColor` und `pinIndicatorImage` der Instanz-Eigenschaft [`cellAttributes`](https://braze-inc.github.io/braze-swift-sdk/documentation/brazeui/brazecontentcardui/viewcontroller/attributes-swift.struct/cellattributes/) ändern. Zum Beispiel:
```swift
var attributes = BrazeContentCardUI.ViewController.Attributes.defaults
attributes.cellAttributes.pinIndicatorColor = .red
attributes.cellAttributes.pinIndicatorImage = UIImage(named: "my-image")
let viewController = BrazeContentCardUI.ViewController.init(braze: braze, attributes: attributes)
```
Sie können auch Unterklassen verwenden, um Ihre eigene Version von `BrazeContentCardUI.Cell` zu erstellen, die den Pin-Indikator enthält. Zum Beispiel:
```swift
var attributes = BrazeContentCardUI.ViewController.Attributes.defaults
attributes.cells[BrazeContentCardUI.ClassicImageCell.identifier] = CustomClassicImageCell.self
let viewController = BrazeContentCardUI.ViewController(braze: AppDelegate.braze, attributes: attributes)
```
Das Anpassen des Pin-Indikators über `Attributes` wird in Objective-C nicht unterstützt.
### Farbe der Ungelesen-Anzeige ändern {#changing-the-unread-indicator-color}
Content Cards enthalten eine blaue Linie am unteren Rand der Karte, die anzeigt, ob die Karte bereits angesehen wurde oder nicht.

Um die Farbe der Ungelesen-Anzeige einer Karte zu ändern, fügen Sie Ihrer Webseite angepasstes CSS hinzu. So setzen Sie beispielsweise die Farbe der Ungelesen-Anzeige auf Grün:
```css
.ab-unread-indicator { background-color: green; }
```
Ändern Sie die Farbe des Ungelesen-Balkens, indem Sie den Wert von `com_braze_content_cards_unread_bar_color` in Ihrer `colors.xml`-Datei anpassen:
```xml
#1676d0
```
Um die Farbe des Ungelesen-Balkens zu ändern, passen Sie den Wert von [`unreadIndicatorColor`](https://braze-inc.github.io/braze-android-sdk/kdoc/braze-android-sdk/com.braze.jetpackcompose.contentcards.styling/-content-card-styling/index.html#-1669590042%2FProperties%2F-1725759721) in `ContentCardStyling` an:
```kotlin
ContentCardStyling(
unreadIndicatorColor = Color.Red
)
```
Ändern Sie die Farbe des Ungelesen-Balkens, indem Sie der Tint-Farbe Ihrer `BrazeContentCardUI.ViewController`-Instanz einen Wert zuweisen:
```swift
let viewController = BrazeContentCardUI.ViewController(braze: AppDelegate.braze)
viewController.view.tintColor = .systemGreen
```
Wenn Sie jedoch nur den Indikator für nicht angesehene Karten ändern möchten, können Sie auf die Eigenschaft `unviewedIndicatorColor` Ihrer `BrazeContentCardUI.ViewController.Attributes`-Struktur zugreifen. Wenn Sie Braze-`UITableViewCell`-Implementierungen verwenden, greifen Sie auf die Eigenschaft zu, bevor die Zelle gezeichnet wird.
So setzen Sie beispielsweise die Farbe der Nicht-angesehen-Anzeige auf Rot:
```swift
var attributes = BrazeContentCardUI.ViewController.Attributes.defaults
attributes.cellAttributes.unviewedIndicatorColor = .red
let viewController = BrazeContentCardUI.ViewController(braze: AppDelegate.braze, attributes: attributes)
```
Ein vollständiges Beispiel finden Sie in der [Beispiel-App „Examples“](https://github.com/braze-inc/braze-swift-sdk/tree/main/Examples/Swift).
Ändern Sie die Farbe des Ungelesen-Balkens, indem Sie der Tint-Farbe Ihres `BRZContentCardUIViewController` einen Wert zuweisen:
```objc
BRZContentCardUIViewController *viewController = [[BRZContentCardUIViewController alloc] initWithBraze:AppDelegate.braze];
[viewController.view setTintColor:[UIColor systemGreenColor]];
```
Die Anpassung ausschließlich der Nicht-angesehen-Anzeige über `Attributes` wird in Objective-C nicht unterstützt.
### Dark Mode {#dark-mode}
Um je nach Dark Mode oder Light Mode des Geräts unterschiedliche Bilder oder Stile anzuzeigen, verwenden Sie [Schlüssel-Wert-Paare](https://www.braze.com/docs/de/de/user_guide/message_building_by_channel/content_cards/creative_details#key-value-pairs) in Ihrer Content-Card-Nachricht. Fügen Sie beispielsweise ein Schlüssel-Wert-Paar wie `dark_mode_image` mit der URL Ihres Dark-Mode-Bild-Assets hinzu. Fügen Sie dann in Ihrer App eine angepasste Logik hinzu, um den aktuellen Darstellungsmodus des Geräts zu prüfen und das entsprechende Bild anzuzeigen.
```swift
if let darkImageUrl = card.extras["dark_mode_image"],
view.traitCollection.userInterfaceStyle == .dark {
// Use darkImageUrl for the image
}
```
```kotlin
val darkModeImage = card.extras["dark_mode_image"]
val isDarkMode = (resources.configuration.uiMode and Configuration.UI_MODE_NIGHT_MASK) == Configuration.UI_MODE_NIGHT_YES
if (isDarkMode && darkModeImage != null) {
// Use darkModeImage for the image
}
```
```javascript
const darkModeImage = card.extras?.dark_mode_image;
const isDarkMode = window.matchMedia("(prefers-color-scheme: dark)").matches;
if (isDarkMode && darkModeImage) {
// Use darkModeImage for the image
}
```
Dieses Muster funktioniert für alle darstellungsabhängigen Inhalte, einschließlich Text, Farben oder Layouts. Laden Sie Ihre Dark-Mode-Bild-Assets in die [Medienbibliothek](https://www.braze.com/docs/de/de/user_guide/messaging/design_and_edit/media_library/image_specifications) hoch und referenzieren Sie sie dann in einem Schlüssel-Wert-Paar.
### Ungelesen-Anzeige deaktivieren {#disabling-unread-indicator}
Blenden Sie den Ungelesen-Balken aus, indem Sie den folgenden Stil zu Ihrem `css` hinzufügen:
```css
.ab-unread-indicator { display: none; }
```
Blenden Sie den Ungelesen-Balken aus, indem Sie [`setUnreadBarVisible`](https://braze-inc.github.io/braze-android-sdk/kdoc/braze-android-sdk/com.braze.ui.contentcards.view/-content-card-view-holder/set-unread-bar-visible.html?query=fun%20setUnreadBarVisible(isVisible:%20Boolean)) auf `ContentCardViewHolder` auf `false` setzen.
Die Deaktivierung der Ungelesen-Anzeige wird in Jetpack Compose nicht unterstützt.
Blenden Sie den Ungelesen-Balken aus, indem Sie die Eigenschaft `attributes.cellAttributes.unviewedIndicatorColor` in Ihrer `Attributes`-Struktur auf `.clear` setzen.
Die Anpassung ausschließlich der Nicht-angesehen-Anzeige über `Attributes` wird in Objective-C nicht unterstützt.
# Verhalten von Content Cards anpassen
Source: /docs/de/developer_guide/content_cards/customizing_cards/behavior/index.md
# Verhalten von Content Cards anpassen {#customize-the-behavior-of-content-cards}
> In diesem Implementierungsleitfaden werden Änderungen am Verhalten von Content Cards, das Hinzufügen von Extras wie Schlüssel-Wert-Paaren zur Nutzlast und Vorgehensweisen für gängige Anpassungen erläutert. Eine vollständige Liste der Content-Card-Typen finden Sie unter [Über Content Cards](https://www.braze.com/docs/de/de/developer_guide/content_cards).
## Schlüssel-Wert-Paare {#key-value-pairs}
Mit Braze können Sie zusätzliche Daten-Nutzlasten über Content Cards an Nutzer:innengeräte senden, indem Sie Schlüssel-Wert-Paare verwenden. Diese können Ihnen helfen, interne Metriken zu tracken, App-Inhalte zu aktualisieren und Eigenschaften anzupassen. [Fügen Sie Schlüssel-Wert-Paare über das Dashboard hinzu](https://www.braze.com/docs/de/de/user_guide/message_building_by_channel/content_cards/create#step-4-configure-additional-settings-optional).
**Note:**
Wir raten davon ab, verschachtelte JSON-Werte als Schlüssel-Wert-Paare zu senden. Stattdessen sollten die JSON-Werte vor dem Senden durch Flatten vereinfacht werden.
Schlüssel-Wert-Paare werden in Objekten des Typs `card` als `extras` gespeichert. Diese können verwendet werden, um Daten zusammen mit einer Karte zur weiteren Bearbeitung durch die Anwendung zu senden. Rufen Sie `card.extras` auf, um auf diese Werte zuzugreifen.
Schlüssel-Wert-Paare werden in Objekten des Typs `card` als `extras` gespeichert. Diese können verwendet werden, um Daten zusammen mit einer Karte zur weiteren Bearbeitung durch die Anwendung zu senden. Rufen Sie `card.extras` auf, um auf diese Werte zuzugreifen.
Schlüssel-Wert-Paare werden in Objekten des Typs `card` als `extras` gespeichert. Diese können verwendet werden, um Daten zusammen mit einer Karte zur weiteren Bearbeitung durch die Anwendung zu senden. Rufen Sie `card.extras` auf, um auf diese Werte zuzugreifen.
**Tip:**
Es ist wichtig, dass sich Ihre Marketing- und Entwicklerteams darüber abstimmen, welche Schlüssel-Wert-Paare verwendet werden sollen (z. B. `feed_type = brand_homepage`), denn alle Schlüssel-Wert-Paare, die Marketer in das Braze-Dashboard eingeben, müssen exakt mit den Schlüssel-Wert-Paaren übereinstimmen, die die Entwickler:innen in die App-Logik einbauen.
## Content Cards als ergänzender Inhalt {#content-cards-as-supplemental-content}
{: style="float:right;max-width:25%;margin-left:15px;border:0;"}
Sie können Content Cards nahtlos in einen bestehenden Feed einfügen, sodass Daten aus mehreren Feeds gleichzeitig geladen werden können. Dadurch entsteht ein zusammenhängendes, harmonisches Erlebnis mit Braze Content Cards und vorhandenen Feed-Inhalten.
Das nebenstehende Beispiel zeigt einen Feed mit einer hybriden Liste von Artikeln, die über lokale Daten und von Braze bereitgestellte Content Cards gefüllt werden. Auf diese Weise können Content Cards ununterscheidbar neben bestehenden Inhalten stehen.
### API-getriggerte Schlüssel-Wert-Paare {#api-triggered-key-value-pairs}
[API-getriggerte Campaigns](https://www.braze.com/docs/de/de/user_guide/messaging/campaigns/schedule_your_campaign/api_triggered_delivery) sind eine gute Strategie, wenn die Werte einer Karte von externen Faktoren abhängen, um zu bestimmen, welche Inhalte den Nutzer:innen angezeigt werden sollen. Um zum Beispiel ergänzende Inhalte anzuzeigen, legen Sie Schlüssel-Wert-Paare mit Liquid fest. Beachten Sie, dass `class_type` zum Zeitpunkt der Einrichtung bekannt sein sollte.
{: style="max-width:60%;"}
## Content Cards als interaktive Inhalte {#content-cards-as-interactive-content}
{: style="border:0;"}{: style="float:right;max-width:45%;border:0;margin-left:15px;"}
Content Cards können genutzt werden, um dynamische und interaktive Erlebnisse für Ihre Nutzer:innen zu schaffen. Im nebenstehenden Beispiel erscheint an der Kasse ein Content-Card-Popup, das den Nutzer:innen Last-Minute-Aktionen bietet. Gut platzierte Karten wie diese sind eine großartige Möglichkeit, den Nutzer:innen einen „Anstoß“ zu bestimmten Aktionen zu geben.
Die Schlüssel-Wert-Paare für diesen Anwendungsfall umfassen einen `discount_percentage`, der als gewünschter Rabattbetrag festgelegt ist, und einen `class_type`, der als `coupon_code` festgelegt ist. Mit diesen Schlüssel-Wert-Paaren können Sie typspezifische Content Cards im Checkout-Bildschirm filtern und anzeigen. Weitere Informationen zur Verwendung von Schlüssel-Wert-Paaren zur Verwaltung mehrerer Feeds finden Sie unter [Anpassen des Standard-Content-Card-Feeds](https://www.braze.com/docs/de/de/developer_guide/customization_guides/content_cards/customizing_feed#multiple-feeds).
{: style="max-width:80%;"}
## Content-Card-Badges {#content-card-badges}
{: style="max-width:35%;float:right;margin-left:15px;border:none;"}
Badges sind kleine Symbole, die ideal dazu geeignet sind, die Aufmerksamkeit von Nutzer:innen zu gewinnen. Mithilfe von Badges, die Nutzer:innen auf neue Content-Card-Inhalte aufmerksam machen, können Sie Ihre App wieder in das Bewusstsein der Nutzer:innen rücken und die Anzahl der Sitzungen erhöhen.
### Anzeige der Anzahl ungelesener Content Cards als Badge {#displaying-the-number-of-unread-content-cards-as-a-badge}
Sie können die Anzahl der ungelesenen Content Cards, die Ihre Nutzer:innen haben, als Badge auf dem Symbol Ihrer App anzeigen.
Sie können die Anzahl der ungelesenen Karten jederzeit abfragen, indem Sie Folgendes aufrufen:
```javascript
braze.getCachedContentCards().getUnviewedCardCount();
```
Anhand dieser Informationen können Sie dann ein Badge anzeigen, das die Anzahl der ungelesenen Content Cards angibt. Weitere Informationen finden Sie in der SDK-Referenzdokumentation.
Sie können die Anzahl der ungelesenen Karten jederzeit abfragen, indem Sie Folgendes aufrufen:
```java
Braze.getInstance(context).getContentCardUnviewedCount();
```
```kotlin
Braze.getInstance(context).contentCardUnviewedCount
```
Anhand dieser Informationen können Sie dann ein Badge anzeigen, das die Anzahl der ungelesenen Content Cards angibt. Weitere Informationen finden Sie in der SDK-Referenzdokumentation.
Das folgende Beispiel verwendet `braze.contentCards`, um die Anzahl der ungelesenen Content Cards abzufragen und anzuzeigen. Nachdem die App geschlossen und die Sitzung der Nutzer:innen beendet wurde, fordert dieser Code eine Kartenzählung an und filtert die Anzahl der Karten anhand der Eigenschaft `viewed`.
```swift
func applicationDidEnterBackground(_ application: UIApplication)
```
Implementieren Sie innerhalb dieser Methode den folgenden Code, der den Badge-Zähler aktiv aktualisiert, wenn Nutzer:innen in einer bestimmten Sitzung Karten ansehen:
```swift
let unreadCards = AppDelegate.braze?.contentCards.cards.filter { $0.viewed == false }
UIApplication.shared.applicationIconBadgeNumber = unreadCards?.count ?? 0
```
```objc
(void)applicationDidEnterBackground:(UIApplication *)application
```
Implementieren Sie innerhalb dieser Methode den folgenden Code, der den Badge-Zähler aktiv aktualisiert, wenn Nutzer:innen in einer bestimmten Sitzung Karten ansehen:
```objc
NSInteger unreadCardCount = 0;
for (BRZContentCardRaw *card in AppDelegate.braze.contentCards.cards) {
if (card.viewed == NO) {
unreadCardCount += 1;
}
}
[UIApplication sharedApplication].applicationIconBadgeNumber = unreadCardCount;
```
# Den Feed für Content Cards anpassen
Source: /docs/de/developer_guide/content_cards/customizing_cards/feed/index.md
# Den Feed für Content Cards anpassen {#customize-the-feed-for-content-cards}
> Ein Content-Card-Feed ist die Abfolge von Content Cards in Ihren Mobil- oder Internet-Apps. Dieser Artikel befasst sich mit der Konfiguration, wann der Feed aktualisiert wird, der Reihenfolge der Karten, der Verwaltung mehrerer Feeds und den Fehlermeldungen „leerer Feed“. Eine vollständige Liste der Content-Card-Typen finden Sie unter [Über Content Cards](https://www.braze.com/docs/de/de/developer_guide/content_cards).
## About the session lifecycle
A session refers to the period of time the Braze SDK tracks user activity in your app after it's launched. You can also force a new session by [calling the `changeUser()` method](https://www.braze.com/docs/de/de/developer_guide/analytics/setting_user_ids/#setting-a-user-id).
By default, a session starts when you first call `braze.openSession()`. The session will remain active for up to `30` minutes of inactivity (unless you [change the default session timeout](https://www.braze.com/docs/de/de/developer_guide/analytics/tracking_sessions/?tab=web#change-session-timeout) or the user closes the app.
**Note:**
If you've set up the [activity lifecycle callback](https://www.braze.com/docs/de/de/developer_guide/platform_integration_guides/android/initial_sdk_setup/android_sdk_integration/#step-4-tracking-user-sessions-in-android) for Android, Braze will automatically call [`openSession()`](https://braze-inc.github.io/braze-android-sdk/kdoc/braze-android-sdk/com.braze/-i-braze/open-session.html) and [`closeSession()`](https://braze-inc.github.io/braze-android-sdk/kdoc/braze-android-sdk/com.braze/-i-braze/close-session.html) for each activity in your app.
By default, a session starts when `openSession()` is first called. If your app goes to the background and then returns to the foreground, the SDK will check if more than 10 seconds have passed since the session started (unless you [change the default session timeout](https://www.braze.com/docs/de/de/developer_guide/analytics/tracking_sessions/?tab=android#change-session-timeout)). If so, a new session will begin. Keep in mind that if the user closes your app while it's in the background, session data may not be sent to Braze until they reopen the app.
Calling `closeSession()` will not immediately end the session. Instead, it will end the session after 10 seconds if `openSession()` isn't called again by the user starting another activity.
By default, a session starts when you call `Braze.init(configuration:)`. This occurs when the `UIApplicationWillEnterForegroundNotification` notification is triggered, meaning the app has entered the foreground.
If your app goes to the background, `UIApplicationDidEnterBackgroundNotification` is triggered. The app does not remain in an active session while in the background. When your app returns to the foreground, the SDK compares the time elapsed since the session started against the session timeout (unless you [change the default session timeout](https://www.braze.com/docs/de/de/developer_guide/analytics/tracking_sessions/?tab=swift#change-session-timeout)). If the time since the session started exceeds the timeout period, a new session begins.
## Aktualisieren des Feeds {#refreshing-the-feed}
### Automatische Aktualisierung {#automatic-refresh}
Standardmäßig wird der Content-Card-Feed automatisch aktualisiert, wenn:
- Eine neue Sitzung gestartet wird
- Der Standard-Content-Card-Feed geschlossen und nach mehr als 60 Sekunden seit der letzten Aktualisierung erneut geöffnet wird.
**Tip:**
Um aktuelle Content Cards dynamisch anzuzeigen, ohne sie manuell zu aktualisieren, wählen Sie bei der Kartenerstellung die Option **At first impression** aus. Diese Karten werden aktualisiert, sobald sie verfügbar sind.
### Manuelle Aktualisierung {#manual-refresh}
So aktualisieren Sie den Feed manuell zu einem bestimmten Zeitpunkt:
Sie können jederzeit eine manuelle Aktualisierung der Braze Content Cards über das Internet-SDK anfordern, indem Sie [`requestContentCardsRefresh()`](https://js.appboycdn.com/web-sdk/latest/doc/modules/braze.html#requestcontentcardsrefresh) aufrufen.
Sie können auch [`getCachedContentCards`](https://js.appboycdn.com/web-sdk/latest/doc/modules/braze.html#getcachedcontentcards) aufrufen, um alle derzeit verfügbaren Karten von der letzten Content-Cards-Aktualisierung zu erhalten.
```javascript
import * as braze from "@braze/web-sdk";
function refresh() {
braze.requestContentCardsRefresh();
}
```
Um Content-Card-Links in einem neuen Browser-Tab statt im selben Tab zu öffnen, setzen Sie `openCardsInNewTab: true` in Ihren Initialisierungsoptionen des Internet-SDK. Weitere Informationen zu Initialisierungsoptionen finden Sie im [Leitfaden zum Internet-SDK-Repository](https://www.braze.com/docs/de/de/developer_guide/sdk_repository_guides/web).
Sie können jederzeit eine manuelle Aktualisierung der Braze Content Cards über das Android SDK anfordern, indem Sie [`requestContentCardsRefresh`](https://braze-inc.github.io/braze-android-sdk/kdoc/braze-android-sdk/com.braze/-i-braze/request-content-cards-refresh.html) aufrufen.
```java
Braze.getInstance(context).requestContentCardsRefresh();
```
```kotlin
Braze.getInstance(context).requestContentCardsRefresh()
```
Sie können jederzeit eine manuelle Aktualisierung der Braze Content Cards über das Swift SDK anfordern, indem Sie die Methode [`requestRefresh`](https://braze-inc.github.io/braze-swift-sdk/documentation/brazekit/braze/contentcards-swift.class/requestrefresh(_:)) der Klasse [`Braze.ContentCards`](https://braze-inc.github.io/braze-swift-sdk/documentation/brazekit/braze/contentcards-swift.class) aufrufen:
In Swift können Content Cards entweder mit einem optionalen Completion Handler oder mit einer asynchronen Rückgabe unter Verwendung der nativen Swift-Concurrency-APIs aktualisiert werden.
#### Completion Handler {#completion-handler}
```swift
AppDelegate.braze?.contentCards.requestRefresh { result in
// Implement completion handler
}
```
#### Async/Await
```swift
let contentCards = await AppDelegate.braze?.contentCards.requestRefresh()
```
```objc
[AppDelegate.braze.contentCards requestRefreshWithCompletion:^(NSArray * contentCards, NSError * error) {
// Implement completion handler
}];
```
### Vollständige Synchronisierung vs. teilweise Synchronisierung {#full-sync-vs-partial-sync}
Das Braze SDK verwendet zwei Arten der Synchronisierung beim Abrufen von Content Cards vom Server:
- **Vollständige Synchronisierung:** Ruft alle Content Cards ab, für die ein:e Nutzer:in berechtigt ist. Vollständige Synchronisierungen erfolgen automatisch alle 7 Tage oder wenn `changeUser()` aufgerufen wird.
- **Teilweise Synchronisierung:** Ruft nur neue Content Cards seit der letzten Anfrage ab. Wenn der oder die Nutzer:in für keine neuen Karten berechtigt ist, gibt die Antwort null Karten zurück. Teilweise Synchronisierungen erfolgen bei jedem Aufruf von `requestContentCardsRefresh()` (es sei denn, seit der letzten vollständigen Synchronisierung sind 7 Tage vergangen – in diesem Fall wird stattdessen eine vollständige Synchronisierung ausgelöst).
Teilweise Synchronisierungen reduzieren die Serverlast und den Akkuverbrauch des Geräts. Content Cards, die bereits empfangen wurden, werden lokal im SDK gespeichert, sodass Nutzer:innen ihre verfügbaren Karten weiterhin sehen, auch wenn eine teilweise Synchronisierung null neue Karten zurückgibt.
### Rate-Limits {#rate-limit}
Braze verwendet einen Token-Bucket-Algorithmus, um die folgenden Rate-Limits durchzusetzen:
- Bis zu 5 Aktualisierungsaufrufe pro Gerät, gemeinsam genutzt von Nutzer:innen und Aufrufen an `openSession()`
- Nach Erreichen des Limits wird alle 180 Sekunden (3 Minuten) ein neuer Aufruf verfügbar
- Das System hält bis zu fünf Aufrufe für Sie bereit, die Sie jederzeit nutzen können
- `subscribeToContentCards()` gibt auch bei Rate-Limiting weiterhin zwischengespeicherte Karten zurück
**Important:**
Das Braze SDK wendet außerdem Rate-Limits für Performance und Zuverlässigkeit an. Beachten Sie dies, wenn Sie automatisierte Tests durchführen oder manuelle Qualitätssicherung betreiben. Weitere Informationen finden Sie unter [Braze SDK-Rate-Limits](https://www.braze.com/docs/de/de/developer_guide/sdk_integration/rate_limits).
## Anpassen der angezeigten Kartenreihenfolge {#customizing-displayed-card-order}
Sie können die Reihenfolge ändern, in der Ihre Content Cards angezeigt werden. So können Sie das Nutzererlebnis durch die Priorisierung bestimmter Inhalte, wie z. B. zeitkritischer Aktionen, feinabstimmen.
Passen Sie die Anzeigereihenfolge der Content Cards in Ihrem Feed an, indem Sie den Parameter [`filterFunction`](https://js.appboycdn.com/web-sdk/latest/doc/modules/braze.html#showcontentcards) von `showContentCards():` verwenden. Zum Beispiel:
```javascript
braze.showContentCards(null, (cards) => {
return sortBrazeCards(cards); // Where sortBrazeCards is your sorting function that returns the sorted card array
});
```
Das [`ContentCardsFragment`](https://braze-inc.github.io/braze-android-sdk/kdoc/braze-android-sdk/com.braze.ui.contentcards/-content-cards-fragment/index.html) stützt sich auf einen [`IContentCardsUpdateHandler`](https://braze-inc.github.io/braze-android-sdk/kdoc/braze-android-sdk/com.braze.ui.contentcards.handlers/-i-content-cards-update-handler/index.html), um Sortierungen oder Änderungen von Content Cards zu verarbeiten, bevor sie im Feed angezeigt werden. Ein angepasster Update Handler kann über [`setContentCardUpdateHandler`](https://braze-inc.github.io/braze-android-sdk/kdoc/braze-android-sdk/com.braze.ui.contentcards/-content-cards-fragment/set-content-card-update-handler.html) auf Ihrem `ContentCardsFragment` festgelegt werden.
Das Folgende ist der Standard-`IContentCardsUpdateHandler` und kann als Ausgangspunkt für Anpassungen verwendet werden:
**Java-Beispiel anzeigen**
```java
public class DefaultContentCardsUpdateHandler implements IContentCardsUpdateHandler {
// Interface that must be implemented and provided as a public CREATOR
// field that generates instances of your Parcelable class from a Parcel.
public static final Parcelable.Creator CREATOR = new Parcelable.Creator() {
public DefaultContentCardsUpdateHandler createFromParcel(Parcel in) {
return new DefaultContentCardsUpdateHandler();
}
public DefaultContentCardsUpdateHandler[] newArray(int size) {
return new DefaultContentCardsUpdateHandler[size];
}
};
@Override
public List handleCardUpdate(ContentCardsUpdatedEvent event) {
List sortedCards = event.getAllCards();
// Sort by pinned, then by the 'updated' timestamp descending
// Pinned before non-pinned
Collections.sort(sortedCards, new Comparator() {
@Override
public int compare(Card cardA, Card cardB) {
// A displays above B
if (cardA.getIsPinned() && !cardB.getIsPinned()) {
return -1;
}
// B displays above A
if (!cardA.getIsPinned() && cardB.getIsPinned()) {
return 1;
}
// At this point, both A & B are pinned or both A & B are non-pinned
// A displays above B since A is newer
if (cardA.getUpdated() > cardB.getUpdated()) {
return -1;
}
// B displays above A since A is newer
if (cardA.getUpdated() < cardB.getUpdated()) {
return 1;
}
// At this point, every sortable field matches so keep the natural ordering
return 0;
}
});
return sortedCards;
}
// Parcelable interface method
@Override
public int describeContents() {
return 0;
}
// Parcelable interface method
@Override
public void writeToParcel(Parcel dest, int flags) {
// No state is kept in this class so the parcel is left unmodified
}
}
```
**Kotlin-Beispiel anzeigen**
```kotlin
class DefaultContentCardsUpdateHandler : IContentCardsUpdateHandler {
override fun handleCardUpdate(event: ContentCardsUpdatedEvent): List {
val sortedCards = event.allCards
// Sort by pinned, then by the 'updated' timestamp descending
// Pinned before non-pinned
sortedCards.sortWith(Comparator sort@{ cardA: Card, cardB: Card ->
// A displays above B
if (cardA.isPinned && !cardB.isPinned) {
return@sort -1
}
// B displays above A
if (!cardA.isPinned && cardB.isPinned) {
return@sort 1
}
// At this point, both A & B are pinned or both A & B are non-pinned
// A displays above B since A is newer
if (cardA.updated > cardB.updated) {
return@sort -1
}
// B displays above A since A is newer
if (cardA.updated < cardB.updated) {
return@sort 1
}
0
})
return sortedCards
}
// Parcelable interface method
override fun describeContents(): Int {
return 0
}
// Parcelable interface method
override fun writeToParcel(dest: Parcel, flags: Int) {
// No state is kept in this class so the parcel is left unmodified
}
companion object {
// Interface that must be implemented and provided as a public CREATOR
// field that generates instances of your Parcelable class from a Parcel.
val CREATOR: Parcelable.Creator = object : Parcelable.Creator {
override fun createFromParcel(`in`: Parcel): DefaultContentCardsUpdateHandler? {
return DefaultContentCardsUpdateHandler()
}
override fun newArray(size: Int): Array {
return arrayOfNulls(size)
}
}
}
}
```
**Tip:**
Den Quellcode von `ContentCardsFragment` finden Sie auf [GitHub](https://github.com/braze-inc/braze-android-sdk/blob/master/android-sdk-ui/src/main/java/com/braze/ui/contentcards/ContentCardsFragment.kt).
Um Content Cards in Jetpack Compose zu filtern und zu sortieren, legen Sie den Parameter `cardUpdateHandler` fest. Zum Beispiel:
```kotlin
ContentCardsList(
cardUpdateHandler = {
it.sortedWith { cardA, cardB ->
// A displays above B
if (cardA.isPinned && !cardB.isPinned) {
return@sortedWith -1
}
// B displays above A
if (!cardA.isPinned && cardB.isPinned) {
return@sortedWith 1
}
// At this point, both A & B are pinned or both A & B are non-pinned
// A displays above B since A is newer
if (cardA.updated > cardB.updated) {
return@sortedWith -1
}
// B displays above A since A is newer
if (cardA.updated < cardB.updated) {
return@sortedWith 1
}
0
}
}
)
```
Passen Sie die Reihenfolge des Card-Feeds an, indem Sie direkt die statische Variable [`Attributes.defaults`](https://braze-inc.github.io/braze-swift-sdk/documentation/brazeui/brazecontentcardui/viewcontroller/attributes-swift.struct/defaults) ändern.
```swift
var attributes = BrazeContentCardUI.ViewController.Attributes.defaults
attributes.transform = { cards in
cards.sorted {
if $0.pinned && !$1.pinned {
return true
} else if !$0.pinned && $1.pinned {
return false
} else {
return $0.createdAt > $1.createdAt
}
}
}
let viewController = BrazeContentCardUI.ViewController(braze: AppDelegate.braze, attributes: attributes)
```
Die Anpassung über `BrazeContentCardUI.ViewController.Attributes` ist in Objective-C nicht verfügbar.
## Anpassen der Nachricht „Leerer Feed“ {#customizing-empty-feed-message}
Wenn sich ein:e Nutzer:in für keine Content Cards qualifiziert, zeigt das SDK die Fehlermeldung „Leerer Feed“ an: „We have no updates. Please check again later.“ Sie können diese Fehlermeldung wie folgt anpassen:

Das Internet-SDK unterstützt keine programmatische Ersetzung der Sprache für „Leerer Feed“. Sie können sie bei jeder Anzeige des Feeds ersetzen. Dies ist jedoch nicht empfehlenswert, da die Aktualisierung des Feeds einige Zeit in Anspruch nehmen kann und der leere Feed-Text nicht sofort angezeigt wird.
Wenn das [`ContentCardsFragment`](https://braze-inc.github.io/braze-android-sdk/kdoc/braze-android-sdk/com.braze.ui.contentcards/-content-cards-fragment/index.html) feststellt, dass der oder die Nutzer:in für keine Content Cards in Frage kommt, zeigt es die Fehlermeldung „Leerer Feed“ an.
Ein spezieller Adapter, der [`EmptyContentCardsAdapter`](https://github.com/braze-inc/braze-android-sdk/blob/master/android-sdk-ui/src/main/java/com/braze/ui/contentcards/adapters/EmptyContentCardsAdapter.kt), ersetzt den Standard-[`ContentCardAdapter`](https://github.com/braze-inc/braze-android-sdk/blob/master/android-sdk-ui/src/main/java/com/braze/ui/contentcards/adapters/ContentCardAdapter.kt), um diese Fehlermeldung anzuzeigen. Um die angepasste Nachricht festzulegen, überschreiben Sie die String-Ressource `com_braze_feed_empty`.
Den Stil, der zur Anzeige dieser Nachricht verwendet wird, finden Sie unter [`Braze.ContentCardsDisplay.Empty`](https://github.com/braze-inc/braze-android-sdk/blob/2e386dfa59a87bfc24ef7cb6ff5adf6b16f44d24/android-sdk-ui/src/main/res/values/styles.xml#L522-L530). Er wird im folgenden Code-Snippet wiedergegeben:
```xml
```
Weitere Informationen zum Anpassen der Content-Card-Stil-Elemente finden Sie unter [Stil anpassen](https://www.braze.com/docs/de/de/developer_guide/content_cards/customizing_cards/style).
Um die Fehlermeldung „Leerer Feed“ mit Jetpack Compose anzupassen, können Sie einen `emptyString` an [`ContentCardsList`](https://braze-inc.github.io/braze-android-sdk/kdoc/braze-android-sdk/com.braze.jetpackcompose.contentcards/-content-cards-list.html) übergeben. Sie können auch [`emptyTextStyle`](https://braze-inc.github.io/braze-android-sdk/kdoc/braze-android-sdk/com.braze.jetpackcompose.contentcards.styling/-content-card-list-styling/index.html#1193499348%2FProperties%2F-1725759721) an `ContentCardListStyling` übergeben, um diese Nachricht weiter anzupassen.
```kotlin
ContentCardsList(
emptyString = "No messages today",
style = ContentCardListStyling(
emptyTextStyle = TextStyle(...)
)
)
```
Wenn Sie ein Composable haben, das Sie stattdessen anzeigen möchten, können Sie `emptyComposable` an [`ContentCardsList`](https://braze-inc.github.io/braze-android-sdk/kdoc/braze-android-sdk/com.braze.jetpackcompose.contentcards/-content-cards-list.html) übergeben. Wenn `emptyComposable` angegeben wird, wird `emptyString` nicht verwendet.
```kotlin
ContentCardsList(
emptyComposable = {
Image(
painter = painterResource(id = R.drawable.noMessages),
contentDescription = "No messages"
)
}
)
```
Passen Sie den leeren Zustand des View Controllers an, indem Sie die entsprechenden [`Attributes`](https://braze-inc.github.io/braze-swift-sdk/documentation/brazeui/brazecontentcardui/viewcontroller/attributes-swift.struct/defaults) setzen.
```swift
var attributes = BrazeContentCardUI.ViewController.Attributes.defaults
attributes.emptyStateMessage = "This is a custom empty state message"
attributes.emptyStateMessageFont = .preferredFont(forTextStyle: .title1)
attributes.emptyStateMessageColor = .secondaryLabel
```
Ändern Sie die Sprache, die automatisch in leeren Content-Card-Feeds erscheint, indem Sie die lokalisierbaren Content-Card-Strings in der [`ContentCardsLocalizable.strings`](https://github.com/braze-inc/braze-swift-sdk/tree/main/Sources/BrazeUI/Resources/Localization/en.lproj)-Datei Ihrer App neu definieren.
**Note:**
Wenn Sie diese Nachricht in verschiedenen Lokalisierungssprachen aktualisieren möchten, suchen Sie die entsprechende Sprache in der [Ordnerstruktur „Resources“](https://github.com/braze-inc/braze-swift-sdk/tree/main/Sources/BrazeUI/Resources/Localization) mit dem String `ContentCardsLocalizable.strings`.
## Mehrere Feeds implementieren {#implementing-multiple-feeds}
Content Cards können in Ihrer App gefiltert werden, sodass nur bestimmte Karten angezeigt werden. So können Sie mehrere Content-Card-Feeds für verschiedene Anwendungsfälle einrichten. Sie können zum Beispiel sowohl einen Transaktions-Feed als auch einen Marketing-Feed pflegen. Erstellen Sie dazu verschiedene Kategorien von Content Cards, indem Sie Schlüssel-Wert-Paare im Braze-Dashboard festlegen. Erstellen Sie dann in Ihrer App oder auf Ihrer Website Feeds, die diese Arten von Content Cards unterschiedlich behandeln, indem Sie einige Typen herausfiltern und andere anzeigen.
### 1. Schritt: Schlüssel-Wert-Paare auf Karten setzen {#step-1-set-key-value-pairs-on-cards}
Wenn Sie eine Content-Card-Kampagne erstellen, legen Sie [Schlüssel-Wert-Paar-Daten](https://www.braze.com/docs/de/de/developer_guide/content_cards/customizing_cards/behavior) auf jeder Karte fest. Sie verwenden dieses Schlüssel-Wert-Paar, um die Karten zu kategorisieren. Schlüssel-Wert-Paare werden in der Eigenschaft `extras` im Datenmodell der Karte gespeichert.
In diesem Beispiel legen wir ein Schlüssel-Wert-Paar mit dem Schlüssel `feed_type` fest, das angibt, in welchem Content-Card-Feed die Karte angezeigt werden soll. Der Wert entspricht dem Ihrer angepassten Feeds, z. B. `home_screen` oder `marketing`.
### 2. Schritt: Content Cards filtern {#step-2-filter-content-cards}
Sobald Sie die Schlüssel-Wert-Paare zugewiesen haben, erstellen Sie einen Feed mit einer Logik, die die gewünschten Karten anzeigt und Karten anderer Typen herausfiltert. In diesem Beispiel werden nur Karten mit einem passenden Schlüssel-Wert-Paar von `feed_type: "Transactional"` angezeigt.
Das folgende Beispiel zeigt den Content-Cards-Feed für Karten vom Typ `Transactional`:
```javascript
/**
* @param {String} feed_type - value of the "feed_type" KVP to filter
*/
function showCardsByFeedType(feed_type) {
braze.showContentCards(null, function(cards) {
return cards.filter((card) => card.extras["feed_type"] === feed_type);
});
}
```
Dann können Sie einen Toggle für Ihren angepassten Feed einrichten:
```javascript
// show the "Transactional" feed when this button is clicked
document.getElementById("show-transactional-feed").onclick = function() {
showCardsByFeedType("Transactional");
};
```
Weitere Informationen finden Sie in der [SDK-Methoden-Dokumentation](https://js.appboycdn.com/web-sdk/latest/doc/modules/braze.html#showcontentcards).
Standardmäßig wird der Content-Card-Feed in einem [`ContentCardsFragment`](https://braze-inc.github.io/braze-android-sdk/kdoc/braze-android-sdk/com.braze.ui.contentcards/-content-cards-fragment/index.html) angezeigt, und [`IContentCardsUpdateHandler`](https://braze-inc.github.io/braze-android-sdk/kdoc/braze-android-sdk/com.braze.ui.contentcards.handlers/-i-content-cards-update-handler/index.html) gibt eine Liste von Karten zurück, die nach dem Empfang eines [`ContentCardsUpdatedEvent`](https://braze-inc.github.io/braze-android-sdk/kdoc/braze-android-sdk/com.braze.events/-content-cards-updated-event/index.html) vom Braze SDK angezeigt werden sollen. Es sortiert jedoch nur die Karten und führt keine direkte Filterung durch.
#### Schritt 2.1: Einen angepassten Handler erstellen {#step-21-create-a-custom-handler}
Sie können Content Cards herausfiltern, indem Sie einen angepassten [`IContentCardsUpdateHandler`](https://braze-inc.github.io/braze-android-sdk/kdoc/braze-android-sdk/com.braze.ui.contentcards.handlers/-i-content-cards-update-handler/index.html) implementieren, der die im Dashboard über [`Card.getExtras()`](https://braze-inc.github.io/braze-android-sdk/kdoc/braze-android-sdk/com.braze.models.cards/-card/extras.html) festgelegten Schlüssel-Wert-Paare verwendet, und ihn dann so anpassen, dass alle Karten aus der Liste entfernt werden, die nicht mit dem zuvor festgelegten Wert für `feed_type` übereinstimmen.
**Java-Beispiel anzeigen**
```java
private IContentCardsUpdateHandler getUpdateHandlerForFeedType(final String desiredFeedType) {
return new IContentCardsUpdateHandler() {
@Override
public List handleCardUpdate(ContentCardsUpdatedEvent event) {
// Use the default card update handler for a first
// pass at sorting the cards. This is not required
// but is done for convenience.
final List cards = new DefaultContentCardsUpdateHandler().handleCardUpdate(event);
final Iterator cardIterator = cards.iterator();
while (cardIterator.hasNext()) {
final Card card = cardIterator.next();
// Make sure the card has our custom KVP
// from the dashboard with the key "feed_type"
if (card.getExtras().containsKey("feed_type")) {
final String feedType = card.getExtras().get("feed_type");
if (!desiredFeedType.equals(feedType)) {
// The card has a feed type, but it doesn't match
// our desired feed type, remove it.
cardIterator.remove();
}
} else {
// The card doesn't have a feed
// type at all, remove it
cardIterator.remove();
}
}
// At this point, all of the cards in this list have
// a feed type that explicitly matches the value we put
// in the dashboard.
return cards;
}
};
}
```
**Kotlin-Beispiel anzeigen**
```kotlin
private fun getUpdateHandlerForFeedType(desiredFeedType: String): IContentCardsUpdateHandler {
return IContentCardsUpdateHandler { event ->
// Use the default card update handler for a first
// pass at sorting the cards. This is not required
// but is done for convenience.
val cards = DefaultContentCardsUpdateHandler().handleCardUpdate(event)
val cardIterator = cards.iterator()
while (cardIterator.hasNext()) {
val card = cardIterator.next()
// Make sure the card has our custom KVP
// from the dashboard with the key "feed_type"
if (card.extras.containsKey("feed_type")) {
val feedType = card.extras["feed_type"]
if (desiredFeedType != feedType) {
// The card has a feed type, but it doesn't match
// our desired feed type, remove it.
cardIterator.remove()
}
} else {
// The card doesn't have a feed
// type at all, remove it
cardIterator.remove()
}
}
// At this point, all of the cards in this list have
// a feed type that explicitly matches the value we put
// in the dashboard.
cards
}
}
```
#### Schritt 2.2: Einem Fragment hinzufügen {#step-22-add-it-to-a-fragment}
Nachdem Sie einen [`IContentCardsUpdateHandler`](https://braze-inc.github.io/braze-android-sdk/kdoc/braze-android-sdk/com.braze.ui.contentcards.handlers/-i-content-cards-update-handler/index.html) erstellt haben, erstellen Sie ein [`ContentCardsFragment`](https://braze-inc.github.io/braze-android-sdk/kdoc/braze-android-sdk/com.braze.ui.contentcards/-content-cards-fragment/index.html), das ihn verwendet. Dieser angepasste Feed kann wie jedes andere `ContentCardsFragment` verwendet werden. Zeigen Sie in den verschiedenen Bereichen Ihrer App verschiedene Content-Card-Feeds an, die auf dem im Dashboard festgelegten Schlüssel basieren. Jeder `ContentCardsFragment`-Feed zeigt dank des angepassten `IContentCardsUpdateHandler` auf jedem Fragment einen eindeutigen Satz von Karten an.
**Java-Beispiel anzeigen**
```java
// We want a Content Cards feed that only shows "Transactional" cards.
ContentCardsFragment customContentCardsFragment = new ContentCardsFragment();
customContentCardsFragment.setContentCardUpdateHandler(getUpdateHandlerForFeedType("Transactional"));
```
**Kotlin-Beispiel anzeigen**
```kotlin
// We want a Content Cards feed that only shows "Transactional" cards.
val customContentCardsFragment = ContentCardsFragment()
customContentCardsFragment.contentCardUpdateHandler = getUpdateHandlerForFeedType("Transactional")
```
Um zu filtern, welche Content Cards in diesem Feed angezeigt werden, verwenden Sie `cardUpdateHandler`. Zum Beispiel:
```kotlin
ContentCardsList(
cardUpdateHandler = {
it.filter { card ->
card.extras["feed_type"] == "Transactional"
}
}
)
```
The following example will show the Content Cards feed for `Transactional` type cards:
```swift
// Filter cards by the `Transactional` feed type based on your key-value pair.
let transactionalCards = cards.filter { $0.extras["feed_type"] as? String == "Transactional" }
```
Um noch einen Schritt weiter zu gehen, können Sie die im View Controller angezeigten Karten filtern, indem Sie die Eigenschaft `transform` auf Ihrem `Attributes`-Struct so setzen, dass nur die nach Ihren Kriterien gefilterten Karten angezeigt werden.
```swift
var attributes = BrazeContentCardUI.ViewController.Attributes.defaults
attributes.transform = { cards in
cards.filter { $0.extras["feed_type"] as? String == "Transactional" }
}
// Pass your attributes containing the transformed cards to the Content Card UI.
let viewController = BrazeContentCardUI.ViewController(braze: AppDelegate.braze, attributes: attributes)
```
```objc
// Filter cards by the `Transactional` feed type based on your key-value pair.
NSMutableArray *transactionalCards = [[NSMutableArray alloc] init];
for (BRZContentCardRaw *card in AppDelegate.braze.contentCards.cards) {
if ([card.extras[@"feed_type"] isEqualToString:@"Transactional"]) {
[transactionalCards addObject:card];
}
}
```
# Analytics protokollieren
Source: /docs/de/developer_guide/content_cards/logging_analytics/index.md
# Analytics protokollieren {#log-analytics}
> When building a custom UI for Content Cards, you must manually log analytics like impressions, clicks, and dismissals, as this is only handled automatically for default card models. Logging these events is a standard part of a Content Card integration and is essential for accurate campaign reporting and billing. To do this, populate your custom UI with data from the Braze data models and then manually log the events. Once you understand how to log analytics, you can see common ways Braze customers [create custom Content Cards](https://www.braze.com/docs/de/de/developer_guide/content_cards/creating_cards/).
## Logging analytics
When implementing your custom Content Cards, you can parse the Content Card objects and extract their payload data such as `title`, `cardDescription`, and `imageUrl`. Then, you can use the resulting model data to populate your custom UI.
To obtain the Content Card data models, subscribe to Content Card updates. There are two properties to pay particular attention to:
* **`id`**: Represents the Content Card ID string. This is the unique identifier used to log analytics from custom Content Cards.
* **`extras`**: Encompasses all the key-value pairs from the Braze dashboard.
All properties outside of `id` and `extras` are optional to parse for custom Content Cards. For more information on the data model, see each platform's integration article: [Android](https://www.braze.com/docs/de/de/developer_guide/content_cards/?sdktab=android), [iOS](https://www.braze.com/docs/de/de/developer_guide/content_cards/?sdktab=swift), [Web](https://www.braze.com/docs/de/de/developer_guide/content_cards/?sdktab=web).
Register a callback function to subscribe for updates when cards are refreshed.
```javascript
import * as braze from "@braze/web-sdk";
braze.subscribeToContentCardsUpdates((updates) => {
const cards = updates.cards;
// For example:
cards.forEach(card => {
if (card.isControl) {
// Do not display the control card, but remember to call `logContentCardImpressions([card])`
}
else if (card instanceof braze.ClassicCard || card instanceof braze.CaptionedImage) {
// Use `card.title`, `card.imageUrl`, etc.
}
else if (card instanceof braze.ImageOnly) {
// Use `card.imageUrl`, etc.
}
})
});
braze.openSession();
```
**Note:**
Content Cards will only refresh on session start if a subscribe request is called before `openSession()`. You can always choose to [manually refresh the feed](https://www.braze.com/docs/de/de/developer_guide/content_cards/customizing_cards/feed/) as well.
### Step 1: Create a private subscriber variable
To subscribe to card updates, first declare a private variable in your custom class to hold your subscriber:
```java
// subscriber variable
private IEventSubscriber mContentCardsUpdatedSubscriber;
```
### Step 2: Subscribe to updates
Next, add the following code to subscribe to Content Card updates from Braze, typically inside of your custom Content Cards activity's `Activity.onCreate()`:
```java
// Remove the previous subscriber before rebuilding a new one with our new activity.
Braze.getInstance(context).removeSingleSubscription(mContentCardsUpdatedSubscriber, ContentCardsUpdatedEvent.class);
mContentCardsUpdatedSubscriber = new IEventSubscriber() {
@Override
public void trigger(ContentCardsUpdatedEvent event) {
// List of all Content Cards
List allCards = event.getAllCards();
// Your logic below
}
};
Braze.getInstance(context).subscribeToContentCardsUpdates(mContentCardsUpdatedSubscriber);
Braze.getInstance(context).requestContentCardsRefresh();
```
### Step 3: Unsubscribe
We also recommend unsubscribing when your custom activity moves out of view. Add the following code to your activity's `onDestroy()` lifecycle method:
```java
Braze.getInstance(context).removeSingleSubscription(mContentCardsUpdatedSubscriber, ContentCardsUpdatedEvent.class);
```
### Step 1: Create a private subscriber variable
To subscribe to card updates, first declare a private variable in your custom class to hold your subscriber:
```kotlin
private var contentCardsUpdatedSubscriber: IEventSubscriber? = null
```
### Step 2: Subscribe to updates
Next, add the following code to subscribe to Content Card updates from Braze, typically inside of your custom Content Cards activity's `Activity.onCreate()`:
```kotlin
// Remove the previous subscriber before rebuilding a new one with our new activity.
Braze.getInstance(context).removeSingleSubscription(contentCardsUpdatedSubscriber, ContentCardsUpdatedEvent::class.java)
contentCardsUpdatedSubscriber = IEventSubscriber { event ->
// List of all Content Cards
val allCards = event.allCards
// Your logic below
}
Braze.getInstance(context).subscribeToContentCardsUpdates(contentCardsUpdatedSubscriber)
Braze.getInstance(context).requestContentCardsRefresh(true)
```
### Step 3: Unsubscribe
We also recommend unsubscribing when your custom activity moves out of view. Add the following code to your activity's `onDestroy()` lifecycle method:
```kotlin
Braze.getInstance(context).removeSingleSubscription(contentCardsUpdatedSubscriber, ContentCardsUpdatedEvent::class.java)
```
To access the Content Cards data model, call [`contentCards.cards`](https://braze-inc.github.io/braze-swift-sdk/documentation/brazekit/braze/contentcards-swift.class/cards) on your `braze` instance.
```swift
let cards: [Braze.ContentCard] = AppDelegate.braze?.contentCards.cards
```
**Note:**
Reading `contentCards.cards`, `contentCards.unviewedCards`, or `contentCards.lastUpdate` blocks the calling thread until the SDK has completed its post-initialization operations. Use the non-blocking getters in [Non-blocking snapshot accessors](#non-blocking-snapshot-accessors) for main-thread or latency-sensitive contexts.
Additionally, you can also maintain a subscription to observe for changes in your Content Cards. You can do so in one of two ways:
1. Maintaining a cancellable; or
2. Maintaining an `AsyncStream`.
### Cancellable
```swift
// This subscription is maintained through a Braze cancellable, which will observe for changes until the subscription is cancelled.
// You must keep a strong reference to the cancellable to keep the subscription active.
// The subscription is canceled either when the cancellable is deinitialized or when you call its `.cancel()` method.
let cancellable = AppDelegate.braze?.contentCards.subscribeToUpdates { [weak self] contentCards in
// Implement your completion handler to respond to updates in `contentCards`.
}
```
### AsyncStream
```swift
let stream: AsyncStream<[Braze.ContentCard]> = AppDelegate.braze?.contentCards.cardsStream
```
### Non-blocking snapshot accessors {#non-blocking-snapshot-accessors}
Use these methods to read the current cached state without blocking the calling thread. Each completion handler is always delivered on the main thread.
```swift
// All cached cards.
AppDelegate.braze?.contentCards.getCachedContentCards { cards in
// Use `cards` here.
}
// Unviewed cards only (excludes control cards).
AppDelegate.braze?.contentCards.getUnviewedCards { cards in
// Use `cards` here.
}
// Date of the last server sync for the current user (nil until the first sync completes).
AppDelegate.braze?.contentCards.getLastUpdate { date in
// Use `date` here.
}
```
```objc
NSArray *contentCards = AppDelegate.braze.contentCards.cards;
```
Additionally, if you wish to maintain a subscription to your content cards, you can call [`subscribeToUpdates`](https://braze-inc.github.io/braze-swift-sdk/documentation/brazekit/braze/contentcards-swift.class/subscribetoupdates(_:)):
```objc
// This subscription is maintained through Braze cancellable, which will continue to observe for changes until the subscription is cancelled.
BRZCancellable *cancellable = [self.braze.contentCards subscribeToUpdates:^(NSArray *contentCards) {
// Implement your completion handler to respond to updates in `contentCards`.
}];
```
To read the current cached state without blocking the calling thread, use the following methods. Each completion handler is delivered on the main thread.
```objc
// All cached cards.
[AppDelegate.braze.contentCards getCachedContentCardsWithCompletion:^(NSArray *cards) {
// Use `cards` here.
}];
// Unviewed cards only (excludes control cards).
[AppDelegate.braze.contentCards getUnviewedCardsWithCompletion:^(NSArray *cards) {
// Use `cards` here.
}];
// Date of the last server sync for the current user (nil until the first sync completes).
[AppDelegate.braze.contentCards getLastUpdateWithCompletion:^(NSDate * _Nullable date) {
// Use `date` here.
}];
```
To listen for updates, subscribe to Content Card update events:
```javascript
const subscription = Braze.addListener(Braze.Events.CONTENT_CARDS_UPDATED, (update) => {
const cards = update.cards;
cards.forEach(card => {
if (card.isControl) {
// Do not display the control card, but remember to log an impression
} else {
// Use card.title, card.cardDescription, card.image, etc.
}
});
});
```
To get the most recently cached Content Card data:
```javascript
import Braze from "@braze/react-native-sdk";
const cachedCards = await Braze.getCachedContentCards();
```
To request a manual refresh of Content Cards from Braze servers:
```javascript
Braze.requestContentCardsRefresh();
```
## Logging events
Logging valuable metrics like impressions, clicks, and dismissals is quick and simple. Set a custom click listener to manually handle these analytics.
Log impression events when cards are viewed by users using [`logContentCardImpressions`](https://js.appboycdn.com/web-sdk/latest/doc/modules/braze.html#logcontentcardimpressions):
```javascript
import * as braze from "@braze/web-sdk";
braze.logContentCardImpressions([card1, card2, card3]);
```
Log card click events when users interact with a card using [`logContentCardClick`](https://js.appboycdn.com/web-sdk/latest/doc/modules/braze.html#logcontentcardclick):
```javascript
import * as braze from "@braze/web-sdk";
braze.logContentCardClick(card);
```
The [`BrazeManager`](https://github.com/braze-inc/braze-growth-shares-android-demo-app/blob/main/app/src/main/java/com/braze/advancedsamples/BrazeManager.kt) can reference Braze SDK dependencies such as the Content Card objects array list to get the [`Card`](https://braze-inc.github.io/braze-android-sdk/kdoc/braze-android-sdk/com.braze.models.cards/-card/index.html) to call the Braze logging methods. Use the `ContentCardable` base class to easily reference and provide data to the `BrazeManager`.
To log an impression or click on a card, call [`Card.logClick()`](https://braze-inc.github.io/braze-android-sdk/kdoc/braze-android-sdk/com.braze.models.cards/-card/log-click.html) or [`Card.logImpression()`](https://braze-inc.github.io/braze-android-sdk/kdoc/braze-android-sdk/com.braze.models.cards/-card/log-impression.html) respectively.
You can manually log or set a Content Card as "dismissed" to Braze for a particular card with [`isDismissed`](https://braze-inc.github.io/braze-android-sdk/kdoc/braze-android-sdk/com.braze.models.cards/-card/is-dismissed.html). If a card is already marked as dismissed, it cannot be marked as dismissed again.
To create a custom click listener, create a class that implements [`IContentCardsActionListener`](https://braze-inc.github.io/braze-android-sdk/kdoc/braze-android-sdk/com.braze.ui.contentcards.listeners/-i-content-cards-action-listener/index.html) and register it with [`BrazeContentCardsManager`](https://braze-inc.github.io/braze-android-sdk/kdoc/braze-android-sdk/com.braze.ui.contentcards.managers/-braze-content-cards-manager/index.html). Implement the [`onContentCardClicked()`](https://braze-inc.github.io/braze-android-sdk/kdoc/braze-android-sdk/com.braze.ui.contentcards.listeners/-i-content-cards-action-listener/on-content-card-clicked.html) method, which will be called when the user clicks a Content Card. Then, instruct Braze to use your Content Card click listener.
For example:
```java
BrazeContentCardsManager.getInstance().setContentCardsActionListener(new IContentCardsActionListener() {
@Override
public boolean onContentCardClicked(Context context, Card card, IAction cardAction) {
return false;
}
@Override
public void onContentCardDismissed(Context context, Card card) {
}
});
```
For example:
```kotlin
BrazeContentCardsManager.getInstance().contentCardsActionListener = object : IContentCardsActionListener {
override fun onContentCardClicked(context: Context, card: Card, cardAction: IAction): Boolean {
return false
}
override fun onContentCardDismissed(context: Context, card: Card) {
}
}
```
**Important:**
To handle control variant Content Cards in your custom UI, pass in your [`com.braze.models.cards.Card`](https://braze-inc.github.io/braze-android-sdk/kdoc/braze-android-sdk/com.braze.models.cards/-card/index.html) object, then call the `logImpression` method as you would with any other Content Card type. The object will implicitly log a control impression to inform our analytics of when a user would have seen the control card.
Implement the [`BrazeContentCardUIViewControllerDelegate`](https://braze-inc.github.io/braze-swift-sdk/documentation/brazeui/brazecontentcarduiviewcontrollerdelegate) protocol and set your delegate object as the `delegate` property of your `BrazeContentCardUI.ViewController`. This delegate will handle passing the data of your custom object back to Braze to be logged. For an example, see [Content Cards UI tutorial](https://braze-inc.github.io/braze-swift-sdk/tutorials/braze/c2-contentcardsui/).
```swift
// Set the delegate when creating the Content Cards controller
contentCardsController.delegate = delegate
// Method to implement in delegate
func contentCard(
_ controller: BrazeContentCardUI.ViewController,
shouldProcess clickAction: Braze.ContentCard.ClickAction,
card: Braze.ContentCard
) -> Bool {
// Intercept the content card click action here.
return true
}
```
```objc
// Set the delegate when creating the Content Cards controller
contentCardsController.delegate = delegate;
// Method to implement in delegate
- (BOOL)contentCardController:(BRZContentCardUIViewController *)controller
shouldProcess:(NSURL *)url
card:(BRZContentCardRaw *)card {
// Intercept the content card click action here.
return YES;
}
```
**Important:**
To handle control variant Content Cards in your custom UI, pass in your [`Braze.ContentCard.Control`](https://braze-inc.github.io/braze-swift-sdk/documentation/brazekit/braze/contentcard/control(_:)) object, then call the `logImpression` method as you would with any other Content Card type. The object will implicitly log a control impression to inform our analytics of when a user would have seen the control card.
Log impression events when cards are viewed by users:
```javascript
Braze.logContentCardImpression(card.id);
```
Log card click events when users interact with a card:
```javascript
Braze.logContentCardClicked(card.id);
```
Log dismissal events when a user dismisses a card:
```javascript
Braze.logContentCardDismissed(card.id);
```
## Handling on-click behavior
When a user clicks a Content Card in a custom feed, the on-click behavior (such as navigating to a URL, deep linking, or logging a custom event) is not handled automatically. Use [`handleBrazeAction`](https://js.appboycdn.com/web-sdk/latest/doc/modules/braze.html#handlebrazeaction) to process the card's URL and execute the configured on-click action, including Braze actions (`brazeActions://` URLs).
```javascript
import * as braze from "@braze/web-sdk";
// In your card click handler
function onCardClick(card) {
// Log the click
braze.logContentCardClick(card);
// Handle the on-click behavior
if (card.url) {
braze.handleBrazeAction(card.url);
}
}
```
| Parameter | Description |
|---|---|
| `url` | A valid URL, or a valid Braze action URL with the scheme `brazeActions://`. |
| `openLinkInNewTab` | (Optional) Whether the URL should open in a new tab. Defaults to `false`. |
{: .reset-td-br-1 .reset-td-br-2 aria-label="Handling on-click behavior" }
**Important:**
If you don't call `handleBrazeAction()`, on-click behaviors configured in the Braze dashboard (such as "Log Custom Event" or "Navigate to URL") won't execute for cards displayed in a custom feed.
On-click behavior is handled automatically by the default Content Cards UI. For custom implementations, use the [`IContentCardsActionListener`](https://braze-inc.github.io/braze-android-sdk/kdoc/braze-android-sdk/com.braze.ui.contentcards.listeners/-i-content-cards-action-listener/index.html) interface described in the [Logging analytics](#logging-analytics) section.
On-click behavior is handled automatically by the default Content Cards UI. For custom implementations, use the [`BrazeContentCardUIViewControllerDelegate`](https://braze-inc.github.io/braze-swift-sdk/documentation/brazeui/brazecontentcarduiviewcontrollerdelegate) protocol described in the [Logging analytics](#logging-analytics) section.
## Eindeutige Ausblendungen höher als eindeutige Impressionen {#unique-dismissals-higher-than-unique-impressions}
Wenn *Eindeutige Ausblendungen* die *Eindeutigen Impressionen* übersteigen, hat Ihre angepasste Content-Card-Integration Ausblendungen protokolliert, ohne für dieselben Karten Impressionen zu protokollieren. Die Standard-Content-Card-UI von Braze protokolliert beides automatisch, sodass diese Abweichung nur auftritt, wenn Sie eine angepasste UI verwenden.
Protokollieren Sie jedes Mal eine Impression, wenn Sie eine Karte anzeigen, und protokollieren Sie eine Ausblendung, wenn Nutzer:innen sie ausblenden. Methodennamen und Beispiele finden Sie in den nachfolgenden Plattformabschnitten.
## Fehlende Content-Cards-Analytics {#missing-content-cards-analytics}
Wenn Content Cards in Ihrer App korrekt angezeigt werden, Sie aber durchgehend keine Analytics erhalten (Impressionen, Klicks usw.), liegt wahrscheinlich ein Problem mit der SDK-Integration vor.
- **Angepasste Content-Card-Ansichten (Android, iOS, Internet):** Die Standard-Braze-UI protokolliert Impressionen und Klicks auf allen Plattformen automatisch. Wenn Sie eine angepasste Content-Card-Ansicht oder -Implementierung verwenden, müssen Sie die entsprechenden Protokollierungsmethoden explizit in Ihrer Anwendung aufrufen. Weitere Informationen finden Sie unter [Analytics protokollieren](https://www.braze.com/docs/de/de/developer_guide/content_cards/logging_analytics) für Ihre Plattform. Stellen Sie bei angepassten Internet-Implementierungen insbesondere sicher, dass das Braze Web SDK geladen ist, prüfen Sie die Browser-Konsole auf Fehler und überprüfen Sie, ob Kartendaten empfangen werden.
- **SDK-Initialisierung und Nutzeridentifikation:** Stellen Sie sicher, dass das SDK vollständig initialisiert ist, bevor Karten angezeigt werden. Ereignisse werden stillschweigend verworfen (nicht in die Warteschlange gestellt), wenn das SDK nicht initialisiert ist, sich im verzögerten Initialisierungsmodus befindet oder DSGVO-deaktiviert ist. Das SDK protokolliert zwar Analytics für anonyme Nutzer:innen, aber Dashboard-Metriken wie „Eindeutige tägliche Impressionen“ erfordern eine aufgelöste Nutzeridentität. Rufen Sie daher nach Möglichkeit `changeUser` auf, bevor Karten angezeigt werden.
## Content-Card-ID {#content-card-id}
Jeder Campaign-Versand an eine:n Empfänger:in erzeugt eine neue Content-Card-ID. Wenn dieselben Nutzer:innen die Campaign bei einem späteren Versand erneut erhalten, weist Braze eine neue ID zu. Referenzieren Sie die Karten-`id`, wenn Sie Impressionen, Klicks und Ausblendungen in angepassten Implementierungen protokollieren.
# Deeplinking in Content Cards
Source: /docs/de/developer_guide/content_cards/deep_linking/index.md
# Deeplinking in Content Cards {#deep-linking-in-content-cards}
> Erfahren Sie, wie Sie mit dem Braze SDK Deeplinks innerhalb einer Content-Card setzen können. Um mehr über Deeplinks zu erfahren, lesen Sie bitte [Was ist Deeplinking?](https://www.braze.com/docs/de/de/user_guide/messaging/design_and_edit/personalize/actions_and_media_urls#what-is-deep-linking).
Derzeit werden Content-Card-Deeplinks für das Braze Web SDK nicht unterstützt.
## Prerequisites
Before you can use this feature, you'll need to [integrate the Android Braze SDK](https://www.braze.com/docs/de/de/developer_guide/sdk_integration/?sdktab=android).
## Creating a universal delegate
The Android SDK provides the ability to set a single delegate object to custom handle all deep links opened by Braze across Content Cards, in-app messages, and push notifications.
Your delegate object should implement the [`IBrazeDeeplinkHandler`](https://braze-inc.github.io/braze-android-sdk/kdoc/braze-android-sdk/com.braze.ui/-braze-deeplink-handler/index.html) interface and be set using [`BrazeDeeplinkHandler.setBrazeDeeplinkHandler()`](https://braze-inc.github.io/braze-android-sdk/kdoc/braze-android-sdk/com.braze.ui/-braze-deeplink-handler/-companion/set-braze-deeplink-handler.html). In most cases, the delegate should be set in your app's `Application.onCreate()`.
The following is an example of overriding the default [`UriAction`](https://braze-inc.github.io/braze-android-sdk/kdoc/braze-android-sdk/com.braze.ui.actions/-uri-action/index.html) behavior with custom intent flags and custom behavior for YouTube URLs:
```java
public class CustomDeeplinkHandler implements IBrazeDeeplinkHandler {
private static final String TAG = BrazeLogger.getBrazeLogTag(CustomDeeplinkHandler.class);
@Override
public void gotoUri(Context context, UriAction uriAction) {
String uri = uriAction.getUri().toString();
// Open YouTube URLs in the YouTube app and not our app
if (!StringUtils.isNullOrBlank(uri) && uri.contains("youtube.com")) {
uriAction.setUseWebView(false);
}
CustomUriAction customUriAction = new CustomUriAction(uriAction);
customUriAction.execute(context);
}
public static class CustomUriAction extends UriAction {
public CustomUriAction(@NonNull UriAction uriAction) {
super(uriAction);
}
@Override
protected void openUriWithActionView(Context context, Uri uri, Bundle extras) {
Intent intent = getActionViewIntent(context, uri, extras);
intent.setFlags(Intent.FLAG_ACTIVITY_NEW_TASK | Intent.FLAG_ACTIVITY_CLEAR_TOP | Intent.FLAG_ACTIVITY_SINGLE_TOP);
if (intent.resolveActivity(context.getPackageManager()) != null) {
context.startActivity(intent);
} else {
BrazeLogger.w(TAG, "Could not find appropriate activity to open for deep link " + uri + ".");
}
}
}
}
```
```kotlin
class CustomDeeplinkHandler : IBrazeDeeplinkHandler {
override fun gotoUri(context: Context, uriAction: UriAction) {
val uri = uriAction.uri.toString()
// Open YouTube URLs in the YouTube app and not our app
if (!StringUtils.isNullOrBlank(uri) && uri.contains("youtube.com")) {
uriAction.useWebView = false
}
val customUriAction = CustomUriAction(uriAction)
customUriAction.execute(context)
}
class CustomUriAction(uriAction: UriAction) : UriAction(uriAction) {
override fun openUriWithActionView(context: Context, uri: Uri, extras: Bundle) {
val intent = getActionViewIntent(context, uri, extras)
intent.flags = Intent.FLAG_ACTIVITY_NEW_TASK or Intent.FLAG_ACTIVITY_CLEAR_TOP or Intent.FLAG_ACTIVITY_SINGLE_TOP
if (intent.resolveActivity(context.packageManager) != null) {
context.startActivity(intent)
} else {
BrazeLogger.w(TAG, "Could not find appropriate activity to open for deep link $uri.")
}
}
}
companion object {
private val TAG = BrazeLogger.getBrazeLogTag(CustomDeeplinkHandler::class.java)
}
}
```
## Deep linking to app settings
To allow deep links to directly open your app's settings, you'll need a custom `BrazeDeeplinkHandler`. In the following example, the presence of a custom key-value pair called `open_notification_page` will make the deep link open the app's settings page:
```java
BrazeDeeplinkHandler.setBrazeDeeplinkHandler(new IBrazeDeeplinkHandler() {
@Override
public void gotoUri(Context context, UriAction uriAction) {
final Bundle extras = uriAction.getExtras();
if (extras.containsKey("open_notification_page")) {
Intent intent = new Intent();
intent.setAction("android.settings.APP_NOTIFICATION_SETTINGS");
intent.setFlags(Intent.FLAG_ACTIVITY_NEW_TASK);
//for Android 5-7
intent.putExtra("app_package", context.getPackageName());
intent.putExtra("app_uid", context.getApplicationInfo().uid);
// for Android 8 and later
intent.putExtra("android.provider.extra.APP_PACKAGE", context.getPackageName());
context.startActivity(intent);
}
}
});
```
```kotlin
BrazeDeeplinkHandler.setBrazeDeeplinkHandler(object : IBrazeDeeplinkHandler {
override fun gotoUri(context: Context, uriAction: UriAction) {
val extras = uriAction.extras
if (extras.containsKey("open_notification_page")) {
val intent = Intent()
intent.action = "android.settings.APP_NOTIFICATION_SETTINGS"
intent.flags = Intent.FLAG_ACTIVITY_NEW_TASK
//for Android 5-7
intent.putExtra("app_package", context.packageName)
intent.putExtra("app_uid", context.applicationInfo.uid)
// for Android 8 and later
intent.putExtra("android.provider.extra.APP_PACKAGE", context.packageName)
context.startActivity(intent)
}
}
})
```
## Customizing WebView activity {#Custom_Webview_Activity}
When Braze opens website deeplinks inside the app, the deeplinks are handled by [`BrazeWebViewActivity`](https://braze-inc.github.io/braze-android-sdk/kdoc/braze-android-sdk/com.braze.ui/-braze-web-view-activity/index.html).
**Note:**
For custom HTML in-app messages, links configured with `target="_blank"` open in the device's default web browser and are not handled by `BrazeWebViewActivity`.
To change this:
1. Create a new Activity that handles the target URL from `Intent.getExtras()` with the key `com.braze.Constants.BRAZE_WEBVIEW_URL_EXTRA`. For an example, see [`BrazeWebViewActivity.kt`](https://github.com/braze-inc/braze-android-sdk/blob/master/android-sdk-ui/src/main/java/com/braze/ui/BrazeWebViewActivity.kt).
2. Add that activity to `AndroidManifest.xml` and set `exported` to `false`.
```xml
```
3. Set your custom Activity in a `BrazeConfig` [builder object](https://braze-inc.github.io/braze-android-sdk/kdoc/braze-android-sdk/com.braze.configuration/-braze-config/-builder/set-custom-web-view-activity-class.html). Build the builder and pass it to [`Braze.configure()`](https://braze-inc.github.io/braze-android-sdk/kdoc/braze-android-sdk/com.braze/-braze/-companion/configure.html) in your [`Application.onCreate()`](https://developer.android.com/reference/android/app/Application.html#onCreate()).
```java
BrazeConfig brazeConfig = new BrazeConfig.Builder()
.setCustomWebViewActivityClass(MyCustomWebViewActivity::class)
...
.build();
Braze.configure(this, brazeConfig);
```
```kotlin
val brazeConfig = BrazeConfig.Builder()
.setCustomWebViewActivityClass(MyCustomWebViewActivity::class.java)
...
.build()
Braze.configure(this, brazeConfig)
```
## Troubleshooting
If deep links from push notifications aren't working on Android, try the following steps:
1. **Test the deep link outside of Braze.** Open the deep link URL from another app, such as email or a browser. If it doesn't open your app, the deep link may not be configured correctly in your `AndroidManifest.xml`. For more information, see Android's [Create Deep Links](https://developer.android.com/training/app-links/deep-linking) documentation.
2. **Check that automatic deep link handling is enabled.** Verify that `com_braze_handle_push_deep_links_automatically` is set to `true` in `braze.xml`, or set this option through [runtime configuration](https://www.braze.com/docs/de/de/developer_guide/sdk_integration/?sdktab=android#runtime-configuration). Without this setting, Braze doesn't automatically open your app and deep link destination when someone taps a push notification.
3. **Verify your deep link handler delegate.** If you set a custom `IBrazeDeeplinkHandler`, confirm that your `gotoUri` implementation handles the URI and doesn't drop it.
4. **Test across channels.** If the same deep link works in an in-app message but not from push, the issue is likely in your push deep link handling, not in the deep link itself.
## Using Jetpack Compose
To handle deeplinks when using Jetpack Compose with NavHost:
1. Ensure that the activity handling your deeplink is registered in the Android Manifest.
```xml
```
2. In NavHost, specify which deeplinks you want it to handle.
```kotlin
composableWithCompositionLocal(
route = "YOUR_ROUTE_HERE",
deepLinks = listOf(navDeepLink {
uriPattern = "myapp://articles/{${MainDestinations.ARTICLE_ID_KEY}}"
}),
arguments = listOf(
navArgument(MainDestinations.ARTICLE_ID_KEY) {
type = NavType.LongType
}
),
) { backStackEntry ->
val arguments = requireNotNull(backStackEntry.arguments)
val articleId = arguments.getLong(MainDestinations.ARTICLE_ID_KEY)
ArticleDetail(
articleId
)
}
```
3. Depending on your app architecture, you may need to handle the new intent that's sent to your current activity as well.
```kotlin
DisposableEffect(Unit) {
val listener = Consumer {
navHostController.handleDeepLink(it)
}
addOnNewIntentListener(listener)
onDispose { removeOnNewIntentListener(listener) }
}
```
## Prerequisites
Before you can use this feature, you'll need to [integrate the Swift Braze SDK](https://www.braze.com/docs/de/de/developer_guide/sdk_integration/?sdktab=swift).
**Tip:**
For help choosing between custom scheme deep links, universal links, and "Open Web URL Inside App," see [iOS deep linking guide](https://www.braze.com/docs/de/de/developer_guide/push_notifications/ios_deep_linking_guide). For troubleshooting, see [Deep linking troubleshooting](https://www.braze.com/docs/de/de/developer_guide/push_notifications/deep_linking_troubleshooting).
## Handling deep links
### Step 1: Register a scheme {#register-a-scheme}
To handle deep linking, a custom scheme must be stated in your `Info.plist` file. The navigation structure is defined by an array of dictionaries. Each of those dictionaries contains an array of strings.
Use Xcode to edit your `Info.plist` file:
1. Add a new key, `URL types`. Xcode will automatically make this an array containing a dictionary called `Item 0`.
2. Within `Item 0`, add a key `URL identifier`. Set the value to your custom scheme.
3. Within `Item 0`, add a key `URL Schemes`. This will automatically be an array containing a `Item 0` string.
4. Set `URL Schemes` >> `Item 0` to your custom scheme.
Alternatively, if you wish to edit your `Info.plist` file directly, you can follow this spec:
```html
CFBundleURLTypesCFBundleURLNameYOUR.SCHEMECFBundleURLSchemesYOUR.SCHEME
```
### Step 2: Add a scheme allowlist
You must declare the URL schemes you wish to pass to `canOpenURL(_:)` by adding the `LSApplicationQueriesSchemes` key to your app's Info.plist file. Attempting to call schemes outside this allowlist will cause the system to record an error in the device's logs, and the deep link will not open. An example of this error will look like this:
```
: -canOpenURL: failed for URL: "yourapp://deeplink" – error: "This app is not allowed to query for scheme yourapp"
```
For example, if an in-app message should open the Facebook app when tapped, the app has to have the Facebook custom scheme (`fb`) in your allowlist. Otherwise, the system will reject the deep link. Deep links that direct to a page or view inside your own app still require that your app's custom scheme be listed in your app's `Info.plist`.
Your example allowlist might look something like:
```html
LSApplicationQueriesSchemesmyappfbtwitter
```
For more information, refer to [Apple's documentation](https://developer.apple.com/library/content/documentation/General/Reference/InfoPlistKeyReference/Articles/LaunchServicesKeys.html#//apple_ref/doc/uid/TP40009250-SW14) on the `LSApplicationQueriesSchemes` key.
### Step 3: Implement a handler
After activating your app, iOS will call the method [`application:openURL:options:`](https://developer.apple.com/reference/uikit/uiapplicationdelegate/1623112-application?language=objc). The important argument is the [NSURL](https://developer.apple.com/library/ios/DOCUMENTATION/Cocoa/Reference/Foundation/Classes/NSURL_Class/Reference/Reference.html#//apple_ref/doc/c_ref/NSURL) object.
```swift
func application(_ app: UIApplication, open url: URL, options: [UIApplication.OpenURLOptionsKey : Any] = [:]) -> Bool {
let path = url.path
let query = url.query
// Insert your code here to take some action based upon the path and query.
return true
}
```
```objc
- (BOOL)application:(UIApplication *)app openURL:(NSURL *)url options:(NSDictionary *)options {
NSString *path = [url path];
NSString *query = [url query];
// Insert your code here to take some action based upon the path and query.
return YES;
}
```
## App Transport Security (ATS)
As defined by [Apple](https://developer.apple.com/library/prerelease/ios/releasenotes/General/WhatsNewIniOS/Articles/iOS9.html#//apple_ref/doc/uid/TP40016198-SW14), "App Transport Security is a feature that improves the security of connections between an app and web services. The feature consists of default connection requirements that conform to best practices for secure connections. Apps can override this default behavior and turn off transport security."
ATS is applied by default. It requires that all connections use HTTPS and are encrypted using TLS 1.2 with forward secrecy. Refer to [Requirements for Connecting Using ATS](https://developer.apple.com/library/ios/documentation/General/Reference/InfoPlistKeyReference/Articles/CocoaKeys.html#//apple_ref/doc/uid/TP40009251-SW35) for more information. All images served by Braze to end devices are handled by a content delivery network ("CDN") that supports TLS 1.2 and is compatible with ATS.
Unless they are specified as exceptions in your application's `Info.plist`, connections that do not follow these requirements will fail with errors that are similar to the following.
**Example Error 1:**
```bash
CFNetwork SSLHandshake failed (-9801)
Error Domain=NSURLErrorDomain Code=-1200 "An SSL error has occurred, and a secure connection to the server cannot be made."
```
**Example Error 2:**
```bash
NSURLSession/NSURLConnection HTTP load failed (kCFStreamErrorDomainSSL, -9802)
```
ATS compliance is enforced for links opened within the mobile app (our default handling of clicked links) and does not apply to sites opened externally via a web browser.
### Working with ATS
You can handle ATS in either of the following ways, but we recommend **complying with ATS requirements**.
Your Braze integration can satisfy ATS requirements by ensuring that any existing links you drive users to (for example, though in-app message and push campaigns) satisfy ATS requirements. While there are ways to bypass ATS restrictions, our recommendation is to ensure that all linked URLs are ATS-compliant. Given Apple's increasing emphasis on application security, the following approaches to allowing ATS exceptions are not guaranteed to be supported by Apple.
You can allow a subset of links with certain domains or schemes to be treated as exceptions to the ATS rules. Your Braze integration will satisfy ATS requirements if every link you use in a Braze messaging channel is either ATS compliant or handled by an exception.
To add a domain as an exception of the ATS, add following to your app's `Info.plist` file:
```html
NSAppTransportSecurityNSAllowsArbitraryLoadsNSExceptionDomainsexample.comNSExceptionAllowsInsecureHTTPLoadsNSIncludesSubdomains
```
Refer to Apple's article on [app transport security keys](https://developer.apple.com/library/ios/documentation/General/Reference/InfoPlistKeyReference/Articles/CocoaKeys.html#//apple_ref/doc/uid/TP40009251-SW33) for more information.
You can turn off ATS entirely. Note that this is not recommended practice, due to both lost security protections and future iOS compatibility. To disable ATS, insert the following in your app's `Info.plist` file:
```html
NSAppTransportSecurityNSAllowsArbitraryLoads
```
## Decoding URLs
The SDK percent-encodes links to create valid `URL`s. All link characters that are not allowed in a properly formed URL, such as Unicode characters, will be percent escaped.
To decode an encoded link, use the `String` property [`removingPercentEncoding`](https://developer.apple.com/documentation/swift/stringprotocol/removingpercentencoding). You must also return `true` in the `BrazeDelegate.braze(_:shouldOpenURL:)`. A call to action is required to trigger the handling of the URL by your app. For example:
```swift
func application(_ app: UIApplication, open url: URL, options: [UIApplication.OpenURLOptionsKey : Any] = [:]) -> Bool {
let urlString = url.absoluteString.removingPercentEncoding
// Handle urlString
return true
}
```
```objc
- (BOOL)application:(UIApplication *)application openURL:(NSURL *)url options:(NSDictionary *)options {
NSString *urlString = [url.absoluteString stringByRemovingPercentEncoding];
// Handle urlString
return YES;
}
```
## Deep linking to app settings
You can take advantage of `UIApplicationOpenSettingsURLString` to deep link users to your app's settings from Braze push notifications and in-app messages.
To take users from your app into the iOS settings:
1. First, make sure your application is set up for either [scheme-based deep links](#swift_register-a-scheme) or [universal links](#swift_universal-links).
2. Decide on a URI for deep linking to the **Settings** page (for example, `myapp://settings` or `https://www.braze.com/settings`).
3. If you are using custom scheme-based deep links, add the following code to your `application:openURL:options:` method:
```swift
func application(_ app: UIApplication, open url: URL, options: [UIApplicationOpenURLOptionsKey : Any] = [:]) -> Bool {
let path = url.path
if (path == "settings") {
UIApplication.shared.openURL(URL(string:UIApplication.openSettingsURLString)!)
}
return true
}
```
```objc
- (BOOL)application:(UIApplication *)app
openURL:(NSURL *)url
options:(NSDictionary *)options {
NSString *path = [url path];
if ([path isEqualToString:@"settings"]) {
NSURL *settingsURL = [NSURL URLWithString:UIApplicationOpenSettingsURLString];
[[UIApplication sharedApplication] openURL:settingsURL];
}
return YES;
}
```
## Customization options {#customization-options}
### Default WebView customization
The `Braze.WebViewController` class displays web URLs opened by the SDK, typically when "Open Web URL Inside App" is selected for a web deep link.
You can customize the `Braze.WebViewController` via the [`BrazeDelegate.braze(_:willPresentModalWithContext:)`](https://braze-inc.github.io/braze-swift-sdk/documentation/brazekit/brazedelegate/braze(_:willpresentmodalwithcontext:)-12sqy/) delegate method.
### Linking handling customization
The `BrazeDelegate` protocol can be used to customize the handling of URLs such as deep links, web URLs, and universal links. To set the delegate during Braze initialization, set a delegate object on the `Braze` instance. Braze will then call your delegate's implementation of `shouldOpenURL` before handling any URIs.
When a push notification or in-app message uses **Open web URL inside mobile app**, Braze passes `context.useWebView == true` on [`Braze.URLContext`](https://braze-inc.github.io/braze-swift-sdk/documentation/brazekit/braze/urlcontext). When the message opens the URL in the system browser instead, `useWebView` is `false`. Inspect `context.useWebView` in `braze(_:shouldOpenURL:)` to branch your custom handling—for example, to open an in-app `WebViewController` only when the campaign requested in-app display.
#### Universal links {#universal-links}
Braze supports universal links in push notifications, in-app messages, and Content Cards. To enable universal link support, [`configuration.forwardUniversalLinks`](https://braze-inc.github.io/braze-swift-sdk/documentation/brazekit/braze/configuration-swift.class/forwarduniversallinks) must be set to `true`.
When enabled, Braze will forward universal links to your app's `AppDelegate` via the [`application:continueUserActivity:restorationHandler:`](https://developer.apple.com/documentation/uikit/uiapplicationdelegate/1623072-application) method.
Your application also needs to be set up to handle universal links. Refer to [Apple's documentation](https://developer.apple.com/documentation/xcode/supporting-universal-links-in-your-app) to ensure your application is configured correctly for universal links.
**Warning:**
Universal link forwarding requires access to the application entitlements. When running the application in a simulator, these entitlements are not directly available and universal links are not forwarded to the system handlers.
To add support to simulator builds, you can add the application `.entitlements` file to the _Copy Bundle Resources_ build phase. See [`forwardUniversalLinks`](https://braze-inc.github.io/braze-swift-sdk/documentation/brazekit/braze/configuration-swift.class/forwarduniversallinks) documentation for more details.
**Note:**
The SDK does not query your domains' `apple-app-site-association` file. It performs the differentiation between universal links and regular URLs by looking at the domain name only. As a result, the SDK does not respect any exclusion rule defined in the `apple-app-site-association` per [Supporting associated domains](https://developer.apple.com/documentation/xcode/supporting-associated-domains).
## Examples
### BrazeDelegate
Here's an example using `BrazeDelegate`. For more information, see [Braze Swift SDK reference](https://braze-inc.github.io/braze-swift-sdk/documentation/brazekit/brazedelegate).
```swift
func braze(_ braze: Braze, shouldOpenURL context: Braze.URLContext) -> Bool {
if context.url.host == "MY-DOMAIN.com" {
// Custom handle link here
return false
}
// Let Braze handle links otherwise
return true
}
```
```objc
- (BOOL)braze:(Braze *)braze shouldOpenURL:(BRZURLContext *)context {
if ([[context.url.host lowercaseString] isEqualToString:@"MY-DOMAIN.com"]) {
// Custom handle link here
return NO;
}
// Let Braze handle links otherwise
return YES;
}
```
# GIFs in Content-Cards einbetten
Source: /docs/de/developer_guide/content_cards/embedding_gifs/index.md
# GIFs in Content-Cards einbetten
> Erfahren Sie, wie Sie mit dem Braze SDK GIFs in Content-Cards einbetten können.
**Note:**
Für Wrapper-SDKs, die nicht aufgeführt sind, verwenden Sie stattdessen die entsprechende native Android- oder Swift-Methode. Denken Sie daran, dass die Android und Swift Braze SDKs animierte GIFs nicht nativ unterstützen, so dass Sie Content-Card-GIFs stattdessen mit Tools von Drittanbietern implementieren werden.
Die GIF-Unterstützung ist standardmäßig in der Web SDK-Integration enthalten.
## About GIFs
Braze offers the ability to use a custom image library to display animated GIFs. Although the following example uses [Glide](https://bumptech.github.io/glide/), any image library that supports GIFs is compatible.
## Integrating a custom image library
### Step 1: Creating the image loader delegate
The Image Loader delegate must implement the following methods:
* [`getInAppMessageBitmapFromUrl()`](https://braze-inc.github.io/braze-android-sdk/kdoc/braze-android-sdk/com.braze.images/-i-braze-image-loader/get-in-app-message-bitmap-from-url.html)
* [`getPushBitmapFromUrl()`](https://braze-inc.github.io/braze-android-sdk/kdoc/braze-android-sdk/com.braze.images/-i-braze-image-loader/get-push-bitmap-from-url.html)
* [`renderUrlIntoCardView()`](https://braze-inc.github.io/braze-android-sdk/kdoc/braze-android-sdk/com.braze.images/-i-braze-image-loader/render-url-into-card-view.html)
* [`renderUrlIntoInAppMessageView()`](https://braze-inc.github.io/braze-android-sdk/kdoc/braze-android-sdk/com.braze.images/-i-braze-image-loader/render-url-into-in-app-message-view.html)
* [`setOffline()`](https://braze-inc.github.io/braze-android-sdk/kdoc/braze-android-sdk/com.braze.images/-i-braze-image-loader/set-offline.html)
The following integration example is taken from the [Glide integration sample app](https://github.com/braze-inc/braze-android-sdk/tree/master/samples/glide-image-integration) included with the Braze Android SDK.
```java
import com.braze.support.BrazeLogger;
import com.bumptech.glide.load.resource.gif.GifDrawable;
import android.graphics.drawable.Drawable;
public class GlideBrazeImageLoader implements IBrazeImageLoader {
private static final String TAG = GlideBrazeImageLoader.class.getName();
private RequestOptions mRequestOptions = new RequestOptions();
@Override
public void renderUrlIntoCardView(Context context, Card card, String imageUrl, ImageView imageView, BrazeViewBounds viewBounds) {
renderUrlIntoView(context, imageUrl, imageView);
}
@Override
public void renderUrlIntoInAppMessageView(Context context, IInAppMessage inAppMessage, String imageUrl, ImageView imageView, BrazeViewBounds viewBounds) {
renderUrlIntoView(context, imageUrl, imageView);
}
@Override
public Bitmap getPushBitmapFromUrl(Context context, Bundle extras, String imageUrl, BrazeViewBounds viewBounds) {
return getBitmapFromUrl(context, imageUrl, viewBounds);
}
@Override
public Bitmap getInAppMessageBitmapFromUrl(Context context, IInAppMessage inAppMessage, String imageUrl, BrazeViewBounds viewBounds) {
return getBitmapFromUrl(context, imageUrl, viewBounds);
}
private void renderUrlIntoView(Context context, String imageUrl, ImageView imageView) {
try {
final Drawable drawable = Glide.with(context)
.load(imageUrl)
.apply(mRequestOptions)
.submit()
.get();
imageView.post(() -> {
imageView.setImageDrawable(drawable);
if (drawable instanceof GifDrawable) {
((GifDrawable) drawable).start();
}
});
} catch (Exception e) {
BrazeLogger.e(TAG, "Failed to render URL into view: " + imageUrl, e);
}
}
private Bitmap getBitmapFromUrl(Context context, String imageUrl, BrazeViewBounds viewBounds) {
try {
return Glide.with(context)
.asBitmap()
.apply(mRequestOptions)
.load(imageUrl).submit().get();
} catch (Exception e) {
Log.e(TAG, "Failed to retrieve bitmap at url: " + imageUrl, e);
}
return null;
}
@Override
public void setOffline(boolean isOffline) {
// If the loader is offline, then we should only be retrieving from the cache
mRequestOptions = mRequestOptions.onlyRetrieveFromCache(isOffline);
}
}
```
```kotlin
import com.braze.support.BrazeLogger
import com.bumptech.glide.load.resource.gif.GifDrawable
class GlideBrazeImageLoader : IBrazeImageLoader {
companion object {
private val TAG = GlideBrazeImageLoader::class.qualifiedName
}
private var mRequestOptions = RequestOptions()
override fun renderUrlIntoCardView(context: Context, card: Card, imageUrl: String, imageView: ImageView, viewBounds: BrazeViewBounds) {
renderUrlIntoView(context, imageUrl, imageView)
}
override fun renderUrlIntoInAppMessageView(context: Context, inAppMessage: IInAppMessage, imageUrl: String, imageView: ImageView, viewBounds: BrazeViewBounds) {
renderUrlIntoView(context, imageUrl, imageView)
}
override fun getPushBitmapFromUrl(context: Context, extras: Bundle, imageUrl: String, viewBounds: BrazeViewBounds): Bitmap? {
return getBitmapFromUrl(context, imageUrl, viewBounds)
}
override fun getInAppMessageBitmapFromUrl(context: Context, inAppMessage: IInAppMessage, imageUrl: String, viewBounds: BrazeViewBounds): Bitmap? {
return getBitmapFromUrl(context, imageUrl, viewBounds)
}
private fun renderUrlIntoView(context: Context, imageUrl: String, imageView: ImageView) {
try {
val drawable = Glide.with(context)
.load(imageUrl)
.apply(mRequestOptions)
.submit()
.get()
imageView.post {
imageView.setImageDrawable(drawable)
if (drawable is GifDrawable) {
drawable.start()
}
}
} catch (e: Exception) {
BrazeLogger.e(TAG, "Failed to render URL into view: $imageUrl", e)
}
}
private fun getBitmapFromUrl(context: Context, imageUrl: String, viewBounds: BrazeViewBounds): Bitmap? {
try {
return Glide.with(context)
.asBitmap()
.apply(mRequestOptions)
.load(imageUrl).submit().get()
} catch (e: Exception) {
Log.e(TAG, "Failed to retrieve bitmap at url: $imageUrl", e)
}
return null
}
override fun setOffline(isOffline: Boolean) {
// If the loader is offline, then we should only be retrieving from the cache
mRequestOptions = mRequestOptions.onlyRetrieveFromCache(isOffline)
}
}
```
### Fixing image loading for Android SDK 36.0.0 and later
In Android SDK 36.0.0 and later, `displayInAppMessage()` is a `suspend` function. This means `renderUrlIntoInAppMessageView()` runs on a background thread instead of the main thread.
If your custom image loader calls `Glide.into(imageView)` in `renderUrlIntoInAppMessageView()`, your app can fail with "You must call this method on the main thread."
To avoid this:
1. Load the image on the background thread with `submit().get()`.
2. Post the UI update to the main thread with `imageView.post { ... }`.
3. If the loaded result is a GIF drawable, start the animation after setting it on the view.
This separates image loading from UI rendering, and keeps your custom image loader compatible with Android SDK 36.0.0 and later.
This guidance applies to Android custom image loaders. Web in-app messages support GIFs out of the box.
The following Kotlin sample uses placeholder values to show this pattern:
```kotlin
private const val TAG = "SampleGlideLoader"
private const val glideBrazeImageLoaderTag = "sample-loader"
private fun renderUrlIntoView(
context: Context,
imageUrl: String,
imageView: ImageView
) {
try {
val drawable: Drawable = Glide.with(context)
.load(imageUrl)
.apply(mRequestOptions)
.submit()
.get()
imageView.post {
imageView.setImageDrawable(drawable)
if (drawable is GifDrawable) {
drawable.start()
}
}
} catch (e: Exception) {
Log.e(TAG, "$glideBrazeImageLoaderTag renderUrlIntoView failed: url=$imageUrl", e)
}
}
```
### Step 2: Setting the image loader delegate
The Braze SDK will use any custom image loader set with [`IBrazeImageLoader`](https://braze-inc.github.io/braze-android-sdk/kdoc/braze-android-sdk/com.braze.images/-i-braze-image-loader/index.html). We recommend setting the custom image loader in a custom application subclass:
```java
public class GlideIntegrationApplication extends Application {
@Override
public void onCreate() {
super.onCreate();
Braze.getInstance(context).setImageLoader(new GlideBrazeImageLoader());
}
}
```
```kotlin
class GlideIntegrationApplication : Application() {
override fun onCreate() {
super.onCreate()
Braze.getInstance(context).imageLoader = GlideBrazeImageLoader()
}
}
```
## Custom Image Loading with Jetpack Compose
To override image loading with Jetpack Compose, you can pass in a value to [`imageComposable`](https://braze-inc.github.io/braze-android-sdk/kdoc/braze-android-sdk/com.braze.jetpackcompose.contentcards.styling/-content-card-styling/index.html#-808910455%2FProperties%2F-1725759721). This function will take a `Card` and render the image and the modifiers needed. Alternatively, you can use `customCardComposer` of `ContentCardsList` to render the entire card.
In the following example, Glide's Compose library is used for the cards listed in the `imageComposable` function:
```kotlin
ContentCardsList(
cardStyle = ContentCardStyling(
imageComposable = { card ->
when (card.cardType) {
CardType.CAPTIONED_IMAGE -> {
val captionedImageCard = card as CaptionedImageCard
GlideImage(
modifier = Modifier
.fillMaxWidth()
.wrapContentHeight()
.run {
if (captionedImageCard.aspectRatio > 0) {
aspectRatio(captionedImageCard.aspectRatio)
} else {
this
}
},
contentScale = ContentScale.Crop,
model = captionedImageCard.url,
loading = placeholder(R.drawable.pushpin),
contentDescription = ""
)
}
CardType.IMAGE -> {
val imageOnlyCard = card as ImageOnlyCard
GlideImage(
modifier = Modifier
.fillMaxWidth()
.run {
if (imageOnlyCard.aspectRatio > 0) {
aspectRatio(imageOnlyCard.aspectRatio)
} else {
this
}
},
contentScale = ContentScale.Crop,
model = imageOnlyCard.url,
loading = placeholder(R.drawable.pushpin),
contentDescription = ""
)
}
CardType.SHORT_NEWS -> {
val shortNews = card as ShortNewsCard
GlideImage(
modifier = Modifier
.width(100.dp)
.height(100.dp),
model = shortNews.url,
loading = placeholder(R.drawable.pushpin),
contentDescription = ""
)
}
else -> Unit
}
}
)
)
```
## Prerequisites
Before you can use this feature, you'll need to [integrate the Swift Braze SDK](https://www.braze.com/docs/de/de/developer_guide/sdk_integration/?sdktab=swift).
## Integrating a custom image library
### Step 1: Integrate SDWebImage
Integrate the [SDWebImage repository](https://github.com/SDWebImage/SDWebImage) into your Xcode project.
### Step 2: Create a new Swift file
In your Xcode project, create a new file named `SDWebImageGIFViewProvider.swift` and import the following:
```swift
import UIKit
import BrazeUI
import SDWebImage
```
### Step 3: Add `GIFViewProvider`
Next, add our sample SDWebImage [`GIFViewProvider`](https://braze-inc.github.io/braze-swift-sdk/documentation/brazeui/gifviewprovider/). Your file should be similar to the following:
```swift
import UIKit
import BrazeUI
import SDWebImage
extension GIFViewProvider {
/// A GIF view provider using [SDWebImage](https://github.com/SDWebImage/SDWebImage) as a
/// rendering library.
public static let sdWebImage = Self(
view: { SDAnimatedImageView(image: image(for: $0)) },
updateView: { ($0 as? SDAnimatedImageView)?.image = image(for: $1) }
)
private static func image(for url: URL?) -> UIImage? {
guard let url else { return nil }
return url.pathExtension == "gif"
? SDAnimatedImage(contentsOfFile: url.path)
: UIImage(contentsOfFile: url.path)
}
}
```
### Step 4: Modify your `AppDelegate.swift`
In your project's `AppDelegate.swift`, add GIF support to your `BrazeUI` components using `GIFViewProvider`. Your file should be similar to the following:
```swift
import UIKit
import BrazeKit
import BrazeUI
@main
class AppDelegate: UIResponder, UIApplicationDelegate {
static var braze: Braze? = nil
func application(
_ application: UIApplication,
didFinishLaunchingWithOptions launchOptions: [UIApplication.LaunchOptionsKey: Any]?
) -> Bool {
/* ... */
GIFViewProvider.shared = .sdWebImage
return true
}
}
```
# Anleitung: Einen Posteingang mit Content Cards erstellen
Source: /docs/de/developer_guide/content_cards/content_card_inbox/index.md
# Anleitung: Einen Posteingang mit Content Cards erstellen {#tutorial-making-an-inbox-with-content-cards}
> Folgen Sie dem Beispielcode in dieser Anleitung, um einen Posteingang mit Braze Content Cards zu erstellen.
## Prerequisites
Before you can use this feature, you'll need to [integrate the Android Braze SDK](https://www.braze.com/docs/de/de/developer_guide/sdk_integration/?sdktab=android).
## Einen Posteingang mit Content Cards für Android erstellen (Compose) {#making-an-inbox-with-content-cards-for-android-compose}
**Important:**
We're piloting this new tutorial format. [Tell us what you think](https://docs.google.com/forms/d/e/1FAIpQLSe_5uhWM7eXXk9F_gviO_pvA4rkYO3WA9B6tNJZ3TY91md5bw/viewform?usp=pp_url&entry.569173304=General+Feedback) — your feedback helps us improve future guides.
```kotlin file=MainApplication.kt
import android.app.Application
import com.braze.Braze
import com.braze.support.BrazeLogger
import com.braze.configuration.BrazeConfig
import android.util.Log
class ContentCardsApplication : Application() {
override fun onCreate() {
super.onCreate()
// Turn on verbose Braze logging
BrazeLogger.enableVerboseLogging()
// Configure Braze with your SDK key & endpoint
val config = BrazeConfig.Builder()
.setApiKey("YOUR_API_KEY")
.setCustomEndpoint("YOUR_API_ENDPOINT")
.build()
Braze.configure(this, config)
}
}
```
```kotlin file=ContentCardsInboxScreen.kt
import android.content.Intent
import android.net.Uri
import androidx.compose.foundation.clickable
import androidx.compose.foundation.layout.*
import androidx.compose.foundation.lazy.LazyColumn
import androidx.compose.foundation.lazy.items
import androidx.compose.material3.*
import androidx.compose.runtime.*
import androidx.compose.ui.Modifier
import androidx.compose.ui.platform.LocalContext
import androidx.compose.ui.text.font.FontWeight
import androidx.compose.ui.unit.dp
import androidx.compose.ui.unit.sp
import com.braze.Braze
import com.braze.events.ContentCardsUpdatedEvent
import com.braze.events.IEventSubscriber
import com.braze.models.cards.*
@Composable
fun ContentCardInboxScreen() {
val context = LocalContext.current
var cards by remember { mutableStateOf>(emptyList()) }
val loggedImpressions = remember { mutableSetOf() }
DisposableEffect(Unit) {
val subscriber = IEventSubscriber { event ->
cards = event.allCards.filter { !it.isControl }
}
Braze.getInstance(context).subscribeToContentCardsUpdates(subscriber)
Braze.getInstance(context).requestContentCardsRefresh(false)
onDispose {
Braze.getInstance(context)
.removeSingleSubscription(subscriber, ContentCardsUpdatedEvent::class.java)
}
}
Column(modifier = Modifier.fillMaxSize()) {
Text(
text = "Message Inbox",
fontSize = 20.sp,
fontWeight = FontWeight.Bold,
modifier = Modifier.padding(start = 16.dp, end = 16.dp, top = 12.dp, bottom = 8.dp)
)
LazyColumn(
modifier = Modifier
.fillMaxSize()
.padding(horizontal = 16.dp)
) {
items(cards, key = { it.id }) { card ->
ContentCardItem(
card = card,
onImpression = {
if (!loggedImpressions.contains(card.id)) {
card.logImpression()
loggedImpressions.add(card.id)
}
},
onClick = {
card.logClick()
card.url?.let {
context.startActivity(Intent(Intent.ACTION_VIEW, Uri.parse(it)))
}
}
)
}
}
}
}
@Composable
fun ContentCardItem(
card: Card,
onImpression: () -> Unit,
onClick: () -> Unit
) {
// Log impression when the card becomes visible
LaunchedEffect(card.id) {
onImpression()
}
val title = when (card) {
is CaptionedImageCard -> card.title
is ShortNewsCard -> card.title
is TextAnnouncementCard -> card.title
else -> null
}
val description = when (card) {
is CaptionedImageCard -> card.description
is ShortNewsCard -> card.description
is TextAnnouncementCard -> card.description
else -> null
}
Card(
modifier = Modifier
.fillMaxWidth()
.padding(vertical = 4.dp)
.clickable { onClick() }
) {
Column(modifier = Modifier.padding(16.dp)) {
title?.let {
Text(
text = it,
fontWeight = FontWeight.Bold,
fontSize = 16.sp
)
}
description?.let {
Spacer(modifier = Modifier.height(4.dp))
Text(
text = it,
fontSize = 14.sp
)
}
}
}
}
```
!!step
lines-MainApplication.kt=12
### 1. Debugging aktivieren (optional) {#1-enable-debugging-optional}
Um die Fehlerbehebung während der Entwicklung zu erleichtern, sollten Sie das Debugging aktivieren.
!!step
lines-ContentCardsInboxScreen.kt=47-69
#### 2. Eine UI-Ansicht erstellen {#2-build-a-ui-view}
Verwenden Sie für Jetpack Compose eine [`LazyColumn`](), um Content Cards in einer scrollbaren Liste anzuzeigen.
!!step
lines-ContentCardsInboxScreen.kt=25-37
#### 3. Content-Card-Updates abonnieren {#3-subscribe-to-content-card-updates}
Verwenden Sie einen [`DisposableEffect`](), um den Lebenszyklus des Abos zu verwalten und sicherzustellen, dass eine ordnungsgemäße Bereinigung erfolgt, wenn das Composable die Komposition verlässt.
!!step
lines-ContentCardsInboxScreen.kt=84-95
#### 4. Eine angepasste Posteingangs-UI erstellen {#4-build-a-custom-inbox-ui}
Mit den [Attributen]() der Content-Card wie `title`, `description` und `url` können Sie Content Cards erstellen, die Ihren spezifischen UI-Anforderungen entsprechen. In diesem Fall erstellen wir einen Posteingang mit den Composables `Card` und `Column` von Jetpack Compose.
!!step
lines-ContentCardsInboxScreen.kt=57,62
#### 5. Impressionen und Klicks tracken {#5-track-impressions-and-clicks}
Sie können Impressionen und Klicks mithilfe der für Content Cards verfügbaren Methoden [`logImpressions`]() und [`logClick`]() protokollieren.
Impressionen sollten nur einmal protokolliert werden, wenn eine Karte von Nutzer:innen angesehen wird. Verwenden Sie `LaunchedEffect`, um Impressionen zu protokollieren, wenn eine Karte sichtbar wird. Beachten Sie, dass Sie möglicherweise den Lebenszyklus der Ansicht Ihrer App sowie den Anwendungsfall berücksichtigen müssen, um sicherzustellen, dass Impressionen korrekt protokolliert werden.
## Einen Posteingang mit Content Cards für Android erstellen (RecyclerView) {#making-an-inbox-with-content-cards-for-android-recyclerview}
```kotlin file=MainApplication.kt
import android.app.Application
import com.braze.Braze
import com.braze.support.BrazeLogger
import com.braze.configuration.BrazeConfig
import android.util.Log
class ContentCardsApplication : Application() {
override fun onCreate() {
super.onCreate()
// Turn on verbose Braze logging
BrazeLogger.enableVerboseLogging()
// Configure Braze with your SDK key & endpoint
val config = BrazeConfig.Builder()
.setApiKey("YOUR_API_KEY")
.setCustomEndpoint("YOUR_API_ENDPOINT")
.build()
Braze.configure(this, config)
}
}
```
```kotlin file=ContentCardInboxActivity.kt
import android.content.Intent
import android.net.Uri
import android.os.Bundle
import androidx.activity.ComponentActivity
import androidx.recyclerview.widget.LinearLayoutManager
import androidx.recyclerview.widget.RecyclerView
import android.view.*
import android.widget.TextView
import com.braze.Braze
import com.braze.events.ContentCardsUpdatedEvent
import com.braze.events.IEventSubscriber
import com.braze.models.cards.*
class ContentCardsActivity : ComponentActivity() {
private val cards = mutableListOf()
private var subscriber: IEventSubscriber? = null
private lateinit var recyclerView: RecyclerView
private val adapter = ContentCardAdapter()
override fun onCreate(savedInstanceState: Bundle?) {
super.onCreate(savedInstanceState)
setContentView(R.layout.content_card_inbox)
recyclerView = findViewById(R.id.contentCardsRecyclerView)
recyclerView.layoutManager = LinearLayoutManager(this)
recyclerView.adapter = adapter
// Prepare the subscriber (attach/detach in onStart/onStop)
subscriber = IEventSubscriber { event ->
runOnUiThread {
cards.clear()
cards.addAll(event.allCards.filter { !it.isControl })
adapter.notifyDataSetChanged()
}
}
}
override fun onStart() {
super.onStart()
subscriber?.let {
Braze.getInstance(this).subscribeToContentCardsUpdates(it)
}
// Fetch fresh cards
Braze.getInstance(this).requestContentCardsRefresh(false)
}
override fun onStop() {
// Avoid leaks by removing the subscription when not visible
Braze.getInstance(this)
.removeSingleSubscription(subscriber, ContentCardsUpdatedEvent::class.java)
super.onStop()
}
inner class ContentCardAdapter :
RecyclerView.Adapter() {
inner class CardViewHolder(v: View) : RecyclerView.ViewHolder(v) {
val title: TextView = v.findViewById(android.R.id.text1)
val description: TextView = v.findViewById(android.R.id.text2)
}
override fun onCreateViewHolder(parent: ViewGroup, viewType: Int): CardViewHolder {
val view = LayoutInflater.from(parent.context)
.inflate(android.R.layout.simple_list_item_2, parent, false)
return CardViewHolder(view)
}
override fun getItemCount() = cards.size
override fun onBindViewHolder(holder: CardViewHolder, position: Int) {
val card = cards[position]
val title = when (card) {
is CaptionedImageCard -> card.title
is ShortNewsCard -> card.title
is TextAnnouncementCard -> card.title
else -> null
}
val description = when (card) {
is CaptionedImageCard -> card.description
is ShortNewsCard -> card.description
is TextAnnouncementCard -> card.description
else -> null
}
holder.title.text = title.orEmpty()
holder.description.text = description.orEmpty()
// Naive impression guard: only log the first time we bind a not-yet-viewed card.
if (!card.viewed) card.logImpression()
holder.itemView.setOnClickListener {
card.logClick()
card.url?.let { startActivity(Intent(Intent.ACTION_VIEW, Uri.parse(it))) }
}
}
}
}
```
```xml file=content_card_inbox.xml
```
!!step
lines-MainApplication.kt=12
### 1. Debugging aktivieren (optional)
Um die Fehlerbehebung während der Entwicklung zu erleichtern, sollten Sie das Debugging aktivieren.
!!step
lines-content_card_inbox.xml=1-24
#### 2. Eine UI-Ansicht erstellen
In dieser Anleitung verwenden wir Androids [`RecyclerView`](), um Content Cards anzuzeigen. Wir empfehlen jedoch, eine UI mit Klassen und Komponenten zu erstellen, die Ihrem Anwendungsfall entspricht. Braze stellt die UI standardmäßig bereit, aber diese Anleitung führt Sie durch die Erstellung einer angepassten Ansicht, um das Erscheinungsbild und Verhalten anzupassen.
!!step
lines-ContentCardInboxActivity.kt=29-35,40-42,44
#### 3. Content-Card-Updates abonnieren
Verwenden Sie [`subscribeToContentCardsUpdates`](), damit Ihre UI reagieren kann, wenn neue Content Cards verfügbar sind. Hier werden Subscriber innerhalb der Activity-Lifecycle-Hooks registriert und entfernt.
!!step
lines-ContentCardInboxActivity.kt=73-84
#### 4. Eine angepasste Posteingangs-UI erstellen
Mit den [Attributen]() der Content-Card wie `title`, `description` und `url` können Sie Content Cards erstellen, die Ihren spezifischen UI-Anforderungen entsprechen. In diesem Fall erstellen wir einen Posteingang mit Androids nativer `RecyclerView`.
!!step
lines-ContentCardInboxActivity.kt=90,93
#### 5. Impressionen und Klicks tracken
Sie können Impressionen und Klicks mithilfe der für Content Cards verfügbaren Methoden [`logImpressions`]() und [`logClick`]() protokollieren.
Impressionen sollten nur einmal protokolliert werden, wenn eine Karte von Nutzer:innen angesehen wird. Hier verwenden wir einen einfachen Mechanismus, um doppelte Protokollierungen mit einem Flag pro Karte zu verhindern. Beachten Sie, dass Sie möglicherweise den Lebenszyklus der Ansicht Ihrer App sowie den Anwendungsfall berücksichtigen müssen, um sicherzustellen, dass Impressionen korrekt protokolliert werden.
## Prerequisites
Before you can use this feature, you'll need to [integrate the Swift Braze SDK](https://www.braze.com/docs/de/de/developer_guide/sdk_integration/?sdktab=swift). Außerdem müssen Sie [In-App Messages für Swift aktivieren](https://www.braze.com/docs/de/de/developer_guide/in_app_messages?sdktab=swift#swift_enabling-in-app-messages).
## Einen Posteingang mit Content Cards für Swift erstellen {#making-an-inbox-with-content-cards-for-swift}
**Important:**
We're piloting this new tutorial format. [Tell us what you think](https://docs.google.com/forms/d/e/1FAIpQLSe_5uhWM7eXXk9F_gviO_pvA4rkYO3WA9B6tNJZ3TY91md5bw/viewform?usp=pp_url&entry.569173304=General+Feedback) — your feedback helps us improve future guides.
```swift file=AppDelegate.swift
import SwiftUI
import BrazeKit
import BrazeUI
class AppDelegate: UIResponder, UIApplicationDelegate {
static var braze: Braze!
func application(
_ application: UIApplication,
didFinishLaunchingWithOptions launchOptions: [UIApplication.LaunchOptionsKey: Any]?
) -> Bool {
// Braze configuration with your SDK API key and endpoint
let configuration = Braze.Configuration(apiKey: "YOUR_API_ENDPOINT", endpoint: "YOUR_API_KEY")
configuration.logger.level = .debug
// Initialize Braze SDK instance
AppDelegate.braze = Braze(configuration: configuration)
return true
}
}
struct InboxViewControllerRepresentable: UIViewControllerRepresentable {
func makeUIViewController(context: Context) -> UINavigationController {
let vc = BrazeInboxViewController(style: .plain)
return UINavigationController(rootViewController: vc)
}
func updateUIViewController(_ uiViewController: UINavigationController, context: Context) {}
}
struct ContentView: View {
var body: some View {
NavigationView {
InboxViewControllerRepresentable()
.navigationTitle("Message Inbox")
}
}
}
```
```swift file=SampleApp.swift
import SwiftUI
@main
struct SampleApp: App {
@UIApplicationDelegateAdaptor(AppDelegate.self) var delegate
var body: some Scene {
WindowGroup {
ContentView()
}
}
}
```
```swift file=BrazeInboxView.swift
import SwiftUI
import UIKit
import BrazeKit
class BrazeInboxViewController: UITableViewController {
private var cards: [Braze.ContentCard] = []
private var subscription: Any?
private var loggedImpressions = Set()
override func viewDidLoad() {
super.viewDidLoad()
tableView.register(UITableViewCell.self, forCellReuseIdentifier: "CardCell")
tableView.rowHeight = 100
subscription = AppDelegate.braze.contentCards.subscribeToUpdates { [weak self] updatedCards in
self?.cards = updatedCards
self?.tableView.reloadData()
}
AppDelegate.braze.contentCards.requestRefresh()
}
override func numberOfSections(in tableView: UITableView) -> Int { 1 }
override func tableView(_ tableView: UITableView, numberOfRowsInSection section: Int) -> Int {
cards.count
}
override func tableView(_ tableView: UITableView, cellForRowAt indexPath: IndexPath) -> UITableViewCell {
let card = cards[indexPath.row]
let cell = tableView.dequeueReusableCell(withIdentifier: "CardCell", for: indexPath)
// Work with the content card's title and description
cell.textLabel?.numberOfLines = 2
cell.textLabel?.text = [card.title, card.description].compactMap { $0 }.joined(separator: "\n")
return cell
}
override func tableView(_ tableView: UITableView, didSelectRowAt indexPath: IndexPath) {
let card = cards[indexPath.row]
card.logClick(using: AppDelegate.braze)
if let url = card.clickAction?.url {
UIApplication.shared.open(url, options: [:], completionHandler: nil)
}
tableView.deselectRow(at: indexPath, animated: true)
}
override func tableView(_ tableView: UITableView,
willDisplay cell: UITableViewCell,
forRowAt indexPath: IndexPath) {
let card = cards[indexPath.row]
if !loggedImpressions.contains(card.id) {
card.logImpression(using: AppDelegate.braze)
}
}
}
```
!!step
lines-AppDelegate.swift=15
### 1. Debugging aktivieren (optional)
Um die Fehlerbehebung während der Entwicklung zu erleichtern, sollten Sie das Debugging aktivieren.
!!step
lines-BrazeInboxView.swift=5
#### 2. Eine UI-Ansicht erstellen
In dieser Anleitung verwenden wir Swifts [`UITableViewController`](https://developer.apple.com/documentation/uikit/uitableviewcontroller). Wir empfehlen jedoch, eine UI mit Klassen und Komponenten zu erstellen, die Ihrem Anwendungsfall entspricht.
!!step
lines-BrazeInboxView.swift=15-20
#### 3. Content-Card-Updates abonnieren
Abonnieren Sie den Content-Cards-Listener, um die neuesten Updates zu erhalten, und rufen Sie anschließend `requestRefresh()` auf, um die neuesten Content Cards für diese Nutzer:in anzufordern.
!!step
lines-BrazeInboxView.swift=34-35
#### 4. Eine angepasste Posteingangs-UI erstellen
Mit den [Attributen](https://braze-inc.github.io/braze-swift-sdk/documentation/brazekit/braze/contentcard) der Content-Card wie `title`, `description` und `imageUrl` können Sie Content Cards erstellen, die Ihren spezifischen UI-Anforderungen entsprechen. In diesem Fall erstellen wir einen Posteingang mit den nativen Tabellen-APIs von Swift.
!!step
lines-BrazeInboxView.swift=8,43,49-56
#### 5. Impressionen und Klicks tracken
Sie können Impressionen und Klicks mithilfe der für eine Content-Card verfügbaren Methoden [`logClick(using:)`]() und [`logImpression(using:)`]() protokollieren.
Darüber hinaus können Sie [`logDismissed(using:)`]() für Dismissals verwenden.
Impressionen sollten nur einmal protokolliert werden, wenn sie von Nutzer:innen angesehen werden. Hier wird ein einfacher Mechanismus unter Verwendung eines `Set` und `willDisplay` eingesetzt, um dies zu erreichen. Beachten Sie, dass Sie möglicherweise den UI-Lebenszyklus Ihrer App sowie den Anwendungsfall berücksichtigen müssen, um sicherzustellen, dass Impressionen korrekt protokolliert werden.
## Prerequisites
Before you can use this feature, you'll need to [integrate the Web Braze SDK](https://www.braze.com/docs/de/de/developer_guide/sdk_integration/?sdktab=web). Es ist jedoch keine zusätzliche Einrichtung erforderlich.
## Einen Posteingang mit Content Cards für Web erstellen {#making-an-inbox-with-content-cards-for-web}
**Important:**
We're piloting this new tutorial format. [Tell us what you think](https://docs.google.com/forms/d/e/1FAIpQLSe_5uhWM7eXXk9F_gviO_pvA4rkYO3WA9B6tNJZ3TY91md5bw/viewform?usp=pp_url&entry.569173304=General+Feedback) — your feedback helps us improve future guides.
```js file=main.js
import * as braze from "@braze/web-sdk";
// Uncomment this if you'd like to run braze web SDK methods in the console
// window.braze = braze;
// initialize the Braze SDK
braze.initialize("YOUR_API_KEY", {
baseUrl: "YOUR_API_ENDPOINT",
enableLogging: true,
});
braze.openSession();
// --- DOM refs ---
const listEl = document.getElementById("cards-list");
// --- State for impression de-duping & lookup ---
const loggedImpressions = new Set();
const idToCard = new Map();
let observer = null;
// Utility: clean observer between renders
function resetObserver() {
if (observer) observer.disconnect();
observer = new IntersectionObserver(onIntersect, { threshold: 0.6 });
}
// Intersection callback: logs impression once when ≥60% visible
function onIntersect(entries) {
entries.forEach((entry) => {
if (!entry.isIntersecting) return;
const id = entry.target.dataset.cardId;
if (!id || loggedImpressions.has(id)) return;
const card = idToCard.get(id);
if (!card) return;
// Log a single-card impression and stop observing this element
braze.logContentCardImpressions([card]);
loggedImpressions.add(id);
observer.unobserve(entry.target);
});
}
// Renders cards into the DOM, sets up click + visibility tracking
function renderCards(cards) {
// Rebuild lookup and observer each render
idToCard.clear();
resetObserver();
listEl.textContent = ""; // clear list
cards.forEach((card) => {
// Skip control-group cards in UI; (optional) you could log impressions for them elsewhere
if (card.isControl) return;
idToCard.set(card.id, card);
const item = document.createElement("article");
item.className = "card-item";
item.dataset.cardId = card.id;
const h3 = document.createElement("h3");
h3.textContent = card.title || "";
const p = document.createElement("p");
p.textContent = card.description || "";
let img = undefined;
if (card.imageUrl) {
img = document.createElement("img");
img.src = card.imageUrl;
item.append(img);
}
const children = [h3, p];
if (img) {
children.push(img);
}
item.append(...children);
// Click tracking + action
item.addEventListener("click", (e) => {
braze.logContentCardClick(card);
if (card.url) {
// any url-handling logic for your use case
}
});
listEl.appendChild(item);
observer.observe(item);
});
}
// Subscribe to updates *then* ask for a refresh
braze.subscribeToContentCardsUpdates((updates) => {
const cards = updates.cards || [];
renderCards(cards);
});
braze.requestContentCardsRefresh();
```
```html file=index.html
Message Inbox
```
!!step
lines-main.js=3-4,9
### 1. Debugging aktivieren (optional)
Um die Fehlerbehebung während der Entwicklung zu erleichtern, sollten Sie das Debugging aktivieren. Optional können Sie auch Braze Web SDK-Methoden in der Konsole ausführen.
!!step
lines-index.html=1-44
#### 2. Die UI erstellen {#2-build-the-ui}
Erstellen Sie eine UI für die Posteingangsseite. Hier erstellen wir eine einfache HTML-Seite, die ein `div` mit der ID `cards-list` enthält. Dieses wird als Zielcontainer für die Darstellung von Content Cards verwendet.
!!step
lines-main.js=96-99,101
#### 3. Content-Card-Updates abonnieren
Abonnieren Sie den Content-Cards-Listener, um die neuesten Updates zu erhalten, und rufen Sie anschließend [`requestContentCardsRefresh()`]() auf, um die neuesten Content Cards für diese Nutzer:in anzufordern. Alternativ können Sie den Subscriber vor `openSession()` aufrufen, um eine automatische Aktualisierung beim Sitzungsstart auszulösen.
!!step
lines-main.js=64,67,70-74
#### 4. Die Posteingangs-Elemente erstellen {#4-build-the-inbox-elements}
Durch die Verwendung der [Attribute]() der Content-Card wie `title`, `description` und `url` können Sie Content Cards entsprechend Ihren spezifischen UI-Anforderungen anzeigen.
!!step
lines-main.js=22-25,28-43,84,91
#### 5. Impressionen und Klicks tracken
Sie können Impressionen und Klicks mithilfe der für Content Cards verfügbaren Methoden [`logContentCardImpressions`]() und [`logContentCardClick`]() protokollieren.
Darüber hinaus können Sie [`logCardDismissal`]() für Dismissals verwenden.
Impressionen sollten nur einmal protokolliert werden, wenn sie von Nutzer:innen angesehen werden. Hier verhindert ein `IntersectionObserver` zusammen mit einem `Set`, das nach `card.id` schlüsselt, doppelte Protokollierungen. Beachten Sie, dass Sie möglicherweise den UI-Lebenszyklus Ihrer App sowie den Anwendungsfall berücksichtigen müssen, um sicherzustellen, dass Impressionen korrekt protokolliert werden.
# In-App-Nachrichten für das Braze SDK
Source: /docs/de/developer_guide/in_app_messages/index.md
# In-App-Nachrichten
> Erfahren Sie mehr über In-App-Nachrichten und wie Sie sie für das Braze SDK einrichten.
## Prerequisites
Before you can use this feature, you'll need to [integrate the Web Braze SDK](https://www.braze.com/docs/de/de/developer_guide/sdk_integration/?sdktab=web). However, no additional setup is required.
## Message types
All in-app messages inherit their prototype from [`InAppMessage`](https://js.appboycdn.com/web-sdk/latest/doc/classes/braze.inappmessage.html), which defines basic behavior and traits for all in-app messages. The prototypical subclasses are [`SlideUpMessage`](https://js.appboycdn.com/web-sdk/latest/doc/classes/braze.slideupmessage.html), [`ModalMessage`](https://js.appboycdn.com/web-sdk/latest/doc/classes/braze.modalmessage.html), [`FullScreenMessage`](https://js.appboycdn.com/web-sdk/latest/doc/classes/braze.fullscreenmessage.html), and [`HtmlMessage`](https://js.appboycdn.com/web-sdk/latest/doc/classes/braze.htmlmessage.html).
Each in-app message type is customizable across content, images, icons, click actions, analytics, display, and delivery.
[`SlideUp`](https://js.appboycdn.com/web-sdk/latest/doc/classes/braze.slideupmessage.html) in-app messages are so-named because traditionally on mobile platforms, they "slide up" or "slide down" from the top or bottom of the screen. In the Braze Web SDK, these messages are displayed as more of a Growl or Toast style notification to align with the web's dominant paradigm. They cover a small portion of the screen and provide an effective and non-intrusive messaging capability.
{: style="border:0px;"}
[`Modal`](https://js.appboycdn.com/web-sdk/latest/doc/classes/braze.modalmessage.html) in-app messages appear in the center of the screen and are framed by a translucent panel. Useful for more critical messaging, they can be equipped with up to two click action and analytics-enabled buttons.
{: style="border:0px;"}
[`Full`](https://js.appboycdn.com/web-sdk/latest/doc/classes/braze.fullscreenmessage.html) in-app messages are useful for maximizing the content and impact of your user communication. On narrow browser windows (for example, the mobile web), `full` in-app messages take up the entire browser window. On larger browser windows, `full` in-app messages appear similarly to `modal` in-app messages. The upper half of a `full` in-app message contains an image, and the lower half allows up to eight lines of text as well as up to two click action, and analytics-enabled buttons
{: style="border:0px;"}
[`HTML`](https://js.appboycdn.com/web-sdk/latest/doc/classes/braze.htmlmessage.html) in-app messages are useful for creating fully customized user content. User-defined HTML is displayed in an iFrame and may contain rich content, such as images, fonts, videos, and interactive elements, allowing for full control over message appearance and functionality. These support a JavaScript `brazeBridge` interface to call methods on the Braze Web SDK from within your HTML, see our [best practices](https://www.braze.com/docs/de/de/user_guide/message_building_by_channel/in-app_messages/best_practices/) for more details.
**Important:**
To enable HTML in-app messages through the Web SDK, you **must** supply the `allowUserSuppliedJavascript` initialization option to Braze, for example, `braze.initialize('YOUR-API_KEY', {allowUserSuppliedJavascript: true})`. This is for security reasons. HTML in-app messages can execute JavaScript, so we require a site maintainer to enable them.
The following example shows a paginated HTML in-app message:

## Prerequisites
Before you can use this feature, you'll need to [integrate the Android Braze SDK](https://www.braze.com/docs/de/de/developer_guide/sdk_integration/?sdktab=android). You'll also need to enable in-app messages.
## Message types
Braze offers several default in-app message types, each customizable with messages, images, [Font Awesome](https://fontawesome.com/icons?d=gallery&p=2) icons, click actions, analytics, color schemes, and more.
Their basic behavior and traits are defined by the [`IInAppMessage`](https://braze-inc.github.io/braze-android-sdk/kdoc/braze-android-sdk/com.braze.models.inappmessage/-i-in-app-message/index.html) interface, in a subclass called [`InAppMessageBase`](https://braze-inc.github.io/braze-android-sdk/kdoc/braze-android-sdk/com.braze.models.inappmessage/-in-app-message-base/index.html). `IInAppMessage` also includes a subinterface, [`IInAppMessageImmersive`](https://braze-inc.github.io/braze-android-sdk/kdoc/braze-android-sdk/com.braze.models.inappmessage/-i-in-app-message-immersive/index.html), which lets you add close, click-action, and analytics [buttons](https://braze-inc.github.io/braze-android-sdk/kdoc/braze-android-sdk/com.braze.models.inappmessage/-message-button/index.html) to your app.
**Important:**
Keep in mind, in-app messages containing buttons will include the `clickAction` message in the final payload if the click action is added prior to adding the button text.
[`slideup`](https://braze-inc.github.io/braze-android-sdk/kdoc/braze-android-sdk/com.braze.models.inappmessage/-in-app-message-slideup/index.html) in-app messages are so-named because they "slide up" or "slide down" from the top or bottom of the screen. They cover a small portion of the screen and provide an effective and non-intrusive messaging capability.
The `slideup` in-app message object extends [`InAppMessageBase`](https://braze-inc.github.io/braze-android-sdk/kdoc/braze-android-sdk/com.braze.models.inappmessage/-in-app-message-base/index.html).
{: style="border:0px;"}
[`modal`](https://braze-inc.github.io/braze-android-sdk/kdoc/braze-android-sdk/com.braze.models.inappmessage/-in-app-message-modal/index.html) in-app messages appear in the center of the screen and are framed by a translucent panel. Useful for more critical messaging, they can be equipped with two click-action and analytics-enabled buttons.
This message type is a subclass of [`InAppMessageImmersiveBase`](https://braze-inc.github.io/braze-android-sdk/kdoc/braze-android-sdk/com.braze.models.inappmessage/-in-app-message-immersive-base/index.html), an abstract class that implements `IInAppMessageImmersive`, giving you the option to add custom functionality to your locally generated in-app messages.
{: style="border:0px;"}
[`full`](https://braze-inc.github.io/braze-android-sdk/kdoc/braze-android-sdk/com.braze.models.inappmessage/-in-app-message-full/index.html) in-app messages are useful for maximizing the content and impact of your user communication. The upper half of a `full` in-app message contains an image, and the lower half displays text and up to two click action and analytics-enabled buttons.
This message type extends [`InAppMessageImmersiveBase`](https://braze-inc.github.io/braze-android-sdk/kdoc/braze-android-sdk/com.braze.models.inappmessage/-in-app-message-immersive-base/index.html), giving you the option to add custom functionality to your locally generated in-app messages.

[`HTML`](https://braze-inc.github.io/braze-android-sdk/kdoc/braze-android-sdk/com.braze.models.inappmessage/-in-app-message-html/index.html) in-app messages are useful for creating fully customized user content. User-defined HTML in-app message content is displayed in a `WebView` and may optionally contain other rich content, such as images and fonts, allowing for full control over message appearance and functionality.
This message type implements [`IInAppMessageHtml`](https://braze-inc.github.io/braze-android-sdk/kdoc/braze-android-sdk/com.braze.models.inappmessage/-i-in-app-message-html/index.html), which is a subclass of [`IInAppMessage`](https://braze-inc.github.io/braze-android-sdk/kdoc/braze-android-sdk/com.braze.models.inappmessage/-i-in-app-message/index.html).
**Note:**
On Android, links configured with `target="_blank"` in custom HTML in-app messages open in the device's default web browser.
Android in-app messages support a JavaScript `brazeBridge` interface to call methods on the Braze Android SDK from within your HTML, see our JavaScript bridge page for more details.
{: style="border:0px;"}
**Important:**
We currently do not support the display of custom HTML in-app messages in an iFrame on the iOS and Android platforms.
**Tip:**
You can also define custom in-app message views for your app. For a full walkthrough, see [Setting custom factories](https://www.braze.com/docs/de/de/developer_guide/in_app_messages/customization#android_setting-custom-factories).
## Enabling in-app messages
### Step 1: Register `BrazeInAppMessageManager`
In-app message display is managed by the [`BrazeInAppMessageManager`](https://braze-inc.github.io/braze-android-sdk/kdoc/braze-android-sdk/com.braze.ui.inappmessage/-braze-in-app-message-manager/index.html) class. Every activity in your app must be registered with the `BrazeInAppMessageManager` to allow it to add in-app message views to the view hierarchy. There are two ways to accomplish this:
The [activity lifecycle callback integration](https://www.braze.com/docs/de/de/developer_guide/sdk_integration#android_step-4-enable-user-session-tracking) handles in-app message registration automatically; no extra integration is required. This is the recommended method for handling in-app message registration.
**Warning:**
If you're using activity lifecycle callback for automatic registration, do not complete this step.
In your [`Application.onCreate()`](https://developer.android.com/reference/android/app/Application.html#onCreate()), call [`ensureSubscribedToInAppMessageEvents()`](https://braze-inc.github.io/braze-android-sdk/kdoc/braze-android-sdk/com.braze.ui.inappmessage/-braze-in-app-message-manager/ensure-subscribed-to-in-app-message-events.html):
```java
BrazeInAppMessageManager.getInstance().ensureSubscribedToInAppMessageEvents(context);
```
```kotlin
BrazeInAppMessageManager.getInstance().ensureSubscribedToInAppMessageEvents(context)
```
In every activity where in-app messages can be shown, call [`registerInAppMessageManager()`](https://braze-inc.github.io/braze-android-sdk/kdoc/braze-android-sdk/com.braze.ui.inappmessage/-braze-in-app-message-manager/register-in-app-message-manager.html) in that activity's `onResume()`:
```java
@Override
public void onResume() {
super.onResume();
// Registers the BrazeInAppMessageManager for the current Activity. This Activity will now listen for
// in-app messages from Braze.
BrazeInAppMessageManager.getInstance().registerInAppMessageManager(activity);
}
```
```kotlin
public override fun onResume() {
super.onResume()
// Registers the BrazeInAppMessageManager for the current Activity. This Activity will now listen for
// in-app messages from Braze.
BrazeInAppMessageManager.getInstance().registerInAppMessageManager(this)
}
```
In every activity where [`registerInAppMessageManager()`](https://braze-inc.github.io/braze-android-sdk/kdoc/braze-android-sdk/com.braze.ui.inappmessage/-braze-in-app-message-manager/register-in-app-message-manager.html) was called, call [`unregisterInAppMessageManager()`](https://braze-inc.github.io/braze-android-sdk/kdoc/braze-android-sdk/com.braze.ui.inappmessage/-braze-in-app-message-manager/unregister-in-app-message-manager.html) in that activity's `onPause()`:
```java
@Override
public void onPause() {
super.onPause();
// Unregisters the BrazeInAppMessageManager for the current Activity.
BrazeInAppMessageManager.getInstance().unregisterInAppMessageManager(activity);
}
```
```kotlin
public override fun onPause() {
super.onPause()
// Unregisters the BrazeInAppMessageManager.
BrazeInAppMessageManager.getInstance().unregisterInAppMessageManager(this)
}
```
### Step 2: Update the manager's blocklist (optional)
In your integration, you may require that certain activities in your app should not show in-app messages. The [activity lifecycle callback integration](https://www.braze.com/docs/de/de/developer_guide/sdk_integration#android_step-4-enable-user-session-tracking) provides an easy way to accomplish this.
The following sample code adds two activities to the in-app message registration blocklist, `SplashActivity` and `SettingsActivity`:
```java
public class MyApplication extends Application {
@Override
public void onCreate() {
super.onCreate();
Set inAppMessageBlocklist = new HashSet<>();
inAppMessageBlocklist.add(SplashActivity.class);
inAppMessageBlocklist.add(SettingsActivity.class);
registerActivityLifecycleCallbacks(new BrazeActivityLifecycleCallbackListener(inAppMessageBlocklist));
}
}
```
```kotlin
class MyApplication : Application() {
override fun onCreate() {
super.onCreate()
val inAppMessageBlocklist = HashSet>()
inAppMessageBlocklist.add(SplashActivity::class.java)
inAppMessageBlocklist.add(SettingsActivity::class.java)
registerActivityLifecycleCallbacks(BrazeActivityLifecycleCallbackListener(inAppMessageBlocklist))
}
}
```
## Prerequisites
Before you can use this feature, you'll need to [integrate the Swift Braze SDK](https://www.braze.com/docs/de/de/developer_guide/sdk_integration/?sdktab=swift). You'll also need to enable in-app messages.
## Message types
Each in-app message type is highly customizable across content, images, icons, click actions, analytics, display, and delivery. They are enumerated types of `Braze.InAppMessage`, which defines basic behavior and traits for all in-app messages. For the full list of in-app message properties and usage, see the [`InAppMessage` class](https://braze-inc.github.io/braze-swift-sdk/documentation/brazekit/braze/inappmessage).
These are the available in-app message types in Braze and how they will look like for end-users.
[`Slideup`](https://braze-inc.github.io/braze-swift-sdk/documentation/brazekit/braze/inappmessage/slideup-swift.struct) in-app messages are given this name because they "slide up" or "slide down" from the top or bottom of the screen. They cover a small portion of the screen and provide an effective and non-intrusive messaging capability.
{: style="max-width:35%;border:none;"}
[`Modal`](https://braze-inc.github.io/braze-swift-sdk/documentation/brazekit/braze/inappmessage/modal-swift.struct) in-app messages appear in the center of the screen and are framed by a translucent panel. Useful for more critical messaging, they can be equipped with up to two analytics-enabled buttons.
{: style="max-width:35%;border:none;"}
[`Modal Image`](https://braze-inc.github.io/braze-swift-sdk/documentation/brazekit/braze/inappmessage/modalimage-swift.struct) in-app messages appear in the center of the screen and are framed by a translucent panel. These messages are similar to the `Modal` type except without header or message text. Useful for more critical messaging, they can be equipped with up to two analytics-enabled buttons.
{: style="max-width:35%;border:none;"}
[`Full`](https://braze-inc.github.io/braze-swift-sdk/documentation/brazekit/braze/inappmessage/full-swift.struct) in-app messages are useful for maximizing the content and impact of your user communication. The upper half of a `Full` in-app message contains an image, and the lower half displays text and up to two analytics-enabled buttons.
{: style="max-width:35%;border:none;"}
[`Full Image`](https://braze-inc.github.io/braze-swift-sdk/documentation/brazekit/braze/inappmessage/fullimage-swift.struct) in-app messages are similar to `Full` in-app messages except without header or message text. This message type is useful for maximizing the content and impact of your user communication. A `Full Image` in-app message contains an image spanning the entire screen, with the option to display up to two analytics-enabled buttons.
{: style="max-width:35%;border:none;"}
[`HTML`](https://braze-inc.github.io/braze-swift-sdk/documentation/brazekit/braze/inappmessage/html-swift.struct) in-app messages are useful for creating fully customized user content. User-defined HTML Full in-app message content is displayed in a `WKWebView`and may optionally contain other rich content, such as images and fonts, allowing for full control over message appearance and functionality.
iOS in-app messages support a JavaScript `brazeBridge` interface to call methods on the Braze Web SDK from within your HTML, see our [best practices](https://www.braze.com/docs/de/de/user_guide/message_building_by_channel/in-app_messages/best_practices/) for more details.
The following example shows a paginated HTML Full in-app message:

Note that we currently do not support the display of custom HTML in-app messages in an iFrame on the iOS and Android platforms.
[`Control`](https://braze-inc.github.io/braze-swift-sdk/documentation/brazekit/braze/inappmessage/control-swift.struct) in-app messages do not contain a UI component and are used primarily for analytics purposes. This type is used to verify receipt of an in-app message sent to a control group.
For further details about Intelligent Selection and control groups, refer to [Intelligent Selection](https://www.braze.com/docs/de/de/user_guide/brazeai/intelligence/intelligent_selection/).
## Enabling in-app messages
### Step 1: Create an implementation of `BrazeInAppMessagePresenter`
To let Braze display in-app messages, create an implementation of the `BrazeInAppMessagePresenter` protocol and assign it to the optional `inAppMessagePresenter` on your Braze instance. You can also use the default Braze UI presenter by instantiating a `BrazeInAppMessageUI` object.
Note that you will need to import the `BrazeUI` library to access the `BrazeInAppMessageUI` class.
```swift
AppDelegate.braze?.inAppMessagePresenter = BrazeInAppMessageUI()
```
```objc
AppDelegate.braze.inAppMessagePresenter = [[BrazeInAppMessageUI alloc] init];
```
### Step 2: Handle no matching triggers
Implement [`BrazeDelegate.(_:noMatchingTriggerForEvent)`](https://braze-inc.github.io/braze-swift-sdk/documentation/brazekit/brazedelegate/braze(_:nomatchingtriggerforevent:)-8rt7y/) within the relevant `BrazeDelegate` class. When Braze fails to find a matching trigger for a particular event, it will call this method automatically.
## Prerequisites
Before you can use this feature, you'll need to [integrate the Android Braze SDK](https://www.braze.com/docs/de/de/developer_guide/sdk_integration/?sdktab=android).
## About TV and OTT support
The Android Braze SDK natively supports displaying in-app messages on OTT devices like Android TV or Fire Stick. However, there's some key differences between native Android and OTT in-app messages. For OTT devices:
- In-app messages that require touch mode, such as slideup, are disabled on OTT.
- The currently selected or focused item, such as a button or close button, will be highlighted.
- Body clicks on the in-app message itself, such as not on a button, are not supported.
## Prerequisites
Before you can use this feature, you'll need to [integrate the Cordova Braze SDK](https://www.braze.com/docs/de/de/developer_guide/sdk_integration/?sdktab=cordova).
## Message types
Braze offers several default in-app message types, each customizable with messages, images, [Font Awesome](https://fontawesome.com/icons?d=gallery&p=2) icons, click actions, analytics, color schemes, and more.
Their basic behavior and traits are defined by the [`IInAppMessage`](https://braze-inc.github.io/braze-android-sdk/kdoc/braze-android-sdk/com.braze.models.inappmessage/-i-in-app-message/index.html) interface, in a subclass called [`InAppMessageBase`](https://braze-inc.github.io/braze-android-sdk/kdoc/braze-android-sdk/com.braze.models.inappmessage/-in-app-message-base/index.html). `IInAppMessage` also includes a subinterface, [`IInAppMessageImmersive`](https://braze-inc.github.io/braze-android-sdk/kdoc/braze-android-sdk/com.braze.models.inappmessage/-i-in-app-message-immersive/index.html), which lets you add close, click-action, and analytics [buttons](https://braze-inc.github.io/braze-android-sdk/kdoc/braze-android-sdk/com.braze.models.inappmessage/-message-button/index.html) to your app.
**Important:**
Keep in mind, in-app messages containing buttons will include the `clickAction` message in the final payload if the click action is added prior to adding the button text.
[`slideup`](https://braze-inc.github.io/braze-android-sdk/kdoc/braze-android-sdk/com.braze.models.inappmessage/-in-app-message-slideup/index.html) in-app messages are so-named because they "slide up" or "slide down" from the top or bottom of the screen. They cover a small portion of the screen and provide an effective and non-intrusive messaging capability.
The `slideup` in-app message object extends [`InAppMessageBase`](https://braze-inc.github.io/braze-android-sdk/kdoc/braze-android-sdk/com.braze.models.inappmessage/-in-app-message-base/index.html).
{: style="border:0px;"}
[`modal`](https://braze-inc.github.io/braze-android-sdk/kdoc/braze-android-sdk/com.braze.models.inappmessage/-in-app-message-modal/index.html) in-app messages appear in the center of the screen and are framed by a translucent panel. Useful for more critical messaging, they can be equipped with two click-action and analytics-enabled buttons.
This message type is a subclass of [`InAppMessageImmersiveBase`](https://braze-inc.github.io/braze-android-sdk/kdoc/braze-android-sdk/com.braze.models.inappmessage/-in-app-message-immersive-base/index.html), an abstract class that implements `IInAppMessageImmersive`, giving you the option to add custom functionality to your locally generated in-app messages.
{: style="border:0px;"}
[`full`](https://braze-inc.github.io/braze-android-sdk/kdoc/braze-android-sdk/com.braze.models.inappmessage/-in-app-message-full/index.html) in-app messages are useful for maximizing the content and impact of your user communication. The upper half of a `full` in-app message contains an image, and the lower half displays text and up to two click action and analytics-enabled buttons.
This message type extends [`InAppMessageImmersiveBase`](https://braze-inc.github.io/braze-android-sdk/kdoc/braze-android-sdk/com.braze.models.inappmessage/-in-app-message-immersive-base/index.html), giving you the option to add custom functionality to your locally generated in-app messages.

[`HTML`](https://braze-inc.github.io/braze-android-sdk/kdoc/braze-android-sdk/com.braze.models.inappmessage/-in-app-message-html/index.html) in-app messages are useful for creating fully customized user content. User-defined HTML in-app message content is displayed in a `WebView` and may optionally contain other rich content, such as images and fonts, allowing for full control over message appearance and functionality.
This message type implements [`IInAppMessageHtml`](https://braze-inc.github.io/braze-android-sdk/kdoc/braze-android-sdk/com.braze.models.inappmessage/-i-in-app-message-html/index.html), which is a subclass of [`IInAppMessage`](https://braze-inc.github.io/braze-android-sdk/kdoc/braze-android-sdk/com.braze.models.inappmessage/-i-in-app-message/index.html).
**Note:**
On Android, links configured with `target="_blank"` in custom HTML in-app messages open in the device's default web browser.
Android in-app messages support a JavaScript `brazeBridge` interface to call methods on the Braze Android SDK from within your HTML, see our JavaScript bridge page for more details.
{: style="border:0px;"}
**Important:**
We currently do not support the display of custom HTML in-app messages in an iFrame on the iOS and Android platforms.
**Tip:**
You can also define custom in-app message views for your app. For a full walkthrough, see [Setting custom factories](https://www.braze.com/docs/de/de/developer_guide/in_app_messages/customization#android_setting-custom-factories).
Each in-app message type is highly customizable across content, images, icons, click actions, analytics, display, and delivery. They are enumerated types of `Braze.InAppMessage`, which defines basic behavior and traits for all in-app messages. For the full list of in-app message properties and usage, see the [`InAppMessage` class](https://braze-inc.github.io/braze-swift-sdk/documentation/brazekit/braze/inappmessage).
These are the available in-app message types in Braze and how they will look like for end-users.
[`Slideup`](https://braze-inc.github.io/braze-swift-sdk/documentation/brazekit/braze/inappmessage/slideup-swift.struct) in-app messages are given this name because they "slide up" or "slide down" from the top or bottom of the screen. They cover a small portion of the screen and provide an effective and non-intrusive messaging capability.
{: style="max-width:35%;border:none;"}
[`Modal`](https://braze-inc.github.io/braze-swift-sdk/documentation/brazekit/braze/inappmessage/modal-swift.struct) in-app messages appear in the center of the screen and are framed by a translucent panel. Useful for more critical messaging, they can be equipped with up to two analytics-enabled buttons.
{: style="max-width:35%;border:none;"}
[`Modal Image`](https://braze-inc.github.io/braze-swift-sdk/documentation/brazekit/braze/inappmessage/modalimage-swift.struct) in-app messages appear in the center of the screen and are framed by a translucent panel. These messages are similar to the `Modal` type except without header or message text. Useful for more critical messaging, they can be equipped with up to two analytics-enabled buttons.
{: style="max-width:35%;border:none;"}
[`Full`](https://braze-inc.github.io/braze-swift-sdk/documentation/brazekit/braze/inappmessage/full-swift.struct) in-app messages are useful for maximizing the content and impact of your user communication. The upper half of a `Full` in-app message contains an image, and the lower half displays text and up to two analytics-enabled buttons.
{: style="max-width:35%;border:none;"}
[`Full Image`](https://braze-inc.github.io/braze-swift-sdk/documentation/brazekit/braze/inappmessage/fullimage-swift.struct) in-app messages are similar to `Full` in-app messages except without header or message text. This message type is useful for maximizing the content and impact of your user communication. A `Full Image` in-app message contains an image spanning the entire screen, with the option to display up to two analytics-enabled buttons.
{: style="max-width:35%;border:none;"}
[`HTML`](https://braze-inc.github.io/braze-swift-sdk/documentation/brazekit/braze/inappmessage/html-swift.struct) in-app messages are useful for creating fully customized user content. User-defined HTML Full in-app message content is displayed in a `WKWebView`and may optionally contain other rich content, such as images and fonts, allowing for full control over message appearance and functionality.
iOS in-app messages support a JavaScript `brazeBridge` interface to call methods on the Braze Web SDK from within your HTML, see our [best practices](https://www.braze.com/docs/de/de/user_guide/message_building_by_channel/in-app_messages/best_practices/) for more details.
The following example shows a paginated HTML Full in-app message:

Note that we currently do not support the display of custom HTML in-app messages in an iFrame on the iOS and Android platforms.
[`Control`](https://braze-inc.github.io/braze-swift-sdk/documentation/brazekit/braze/inappmessage/control-swift.struct) in-app messages do not contain a UI component and are used primarily for analytics purposes. This type is used to verify receipt of an in-app message sent to a control group.
For further details about Intelligent Selection and control groups, refer to [Intelligent Selection](https://www.braze.com/docs/de/de/user_guide/brazeai/intelligence/intelligent_selection/).
## Prerequisites
Before you can use this feature, you'll need to [integrate the Flutter Braze SDK](https://www.braze.com/docs/de/de/developer_guide/sdk_integration/?sdktab=flutter).
## Message types
Braze offers several default in-app message types, each customizable with messages, images, [Font Awesome](https://fontawesome.com/icons?d=gallery&p=2) icons, click actions, analytics, color schemes, and more.
Their basic behavior and traits are defined by the [`IInAppMessage`](https://braze-inc.github.io/braze-android-sdk/kdoc/braze-android-sdk/com.braze.models.inappmessage/-i-in-app-message/index.html) interface, in a subclass called [`InAppMessageBase`](https://braze-inc.github.io/braze-android-sdk/kdoc/braze-android-sdk/com.braze.models.inappmessage/-in-app-message-base/index.html). `IInAppMessage` also includes a subinterface, [`IInAppMessageImmersive`](https://braze-inc.github.io/braze-android-sdk/kdoc/braze-android-sdk/com.braze.models.inappmessage/-i-in-app-message-immersive/index.html), which lets you add close, click-action, and analytics [buttons](https://braze-inc.github.io/braze-android-sdk/kdoc/braze-android-sdk/com.braze.models.inappmessage/-message-button/index.html) to your app.
**Important:**
Keep in mind, in-app messages containing buttons will include the `clickAction` message in the final payload if the click action is added prior to adding the button text.
[`slideup`](https://braze-inc.github.io/braze-android-sdk/kdoc/braze-android-sdk/com.braze.models.inappmessage/-in-app-message-slideup/index.html) in-app messages are so-named because they "slide up" or "slide down" from the top or bottom of the screen. They cover a small portion of the screen and provide an effective and non-intrusive messaging capability.
The `slideup` in-app message object extends [`InAppMessageBase`](https://braze-inc.github.io/braze-android-sdk/kdoc/braze-android-sdk/com.braze.models.inappmessage/-in-app-message-base/index.html).
{: style="border:0px;"}
[`modal`](https://braze-inc.github.io/braze-android-sdk/kdoc/braze-android-sdk/com.braze.models.inappmessage/-in-app-message-modal/index.html) in-app messages appear in the center of the screen and are framed by a translucent panel. Useful for more critical messaging, they can be equipped with two click-action and analytics-enabled buttons.
This message type is a subclass of [`InAppMessageImmersiveBase`](https://braze-inc.github.io/braze-android-sdk/kdoc/braze-android-sdk/com.braze.models.inappmessage/-in-app-message-immersive-base/index.html), an abstract class that implements `IInAppMessageImmersive`, giving you the option to add custom functionality to your locally generated in-app messages.
{: style="border:0px;"}
[`full`](https://braze-inc.github.io/braze-android-sdk/kdoc/braze-android-sdk/com.braze.models.inappmessage/-in-app-message-full/index.html) in-app messages are useful for maximizing the content and impact of your user communication. The upper half of a `full` in-app message contains an image, and the lower half displays text and up to two click action and analytics-enabled buttons.
This message type extends [`InAppMessageImmersiveBase`](https://braze-inc.github.io/braze-android-sdk/kdoc/braze-android-sdk/com.braze.models.inappmessage/-in-app-message-immersive-base/index.html), giving you the option to add custom functionality to your locally generated in-app messages.

[`HTML`](https://braze-inc.github.io/braze-android-sdk/kdoc/braze-android-sdk/com.braze.models.inappmessage/-in-app-message-html/index.html) in-app messages are useful for creating fully customized user content. User-defined HTML in-app message content is displayed in a `WebView` and may optionally contain other rich content, such as images and fonts, allowing for full control over message appearance and functionality.
This message type implements [`IInAppMessageHtml`](https://braze-inc.github.io/braze-android-sdk/kdoc/braze-android-sdk/com.braze.models.inappmessage/-i-in-app-message-html/index.html), which is a subclass of [`IInAppMessage`](https://braze-inc.github.io/braze-android-sdk/kdoc/braze-android-sdk/com.braze.models.inappmessage/-i-in-app-message/index.html).
**Note:**
On Android, links configured with `target="_blank"` in custom HTML in-app messages open in the device's default web browser.
Android in-app messages support a JavaScript `brazeBridge` interface to call methods on the Braze Android SDK from within your HTML, see our JavaScript bridge page for more details.
{: style="border:0px;"}
**Important:**
We currently do not support the display of custom HTML in-app messages in an iFrame on the iOS and Android platforms.
**Tip:**
You can also define custom in-app message views for your app. For a full walkthrough, see [Setting custom factories](https://www.braze.com/docs/de/de/developer_guide/in_app_messages/customization#android_setting-custom-factories).
Each in-app message type is highly customizable across content, images, icons, click actions, analytics, display, and delivery. They are enumerated types of `Braze.InAppMessage`, which defines basic behavior and traits for all in-app messages. For the full list of in-app message properties and usage, see the [`InAppMessage` class](https://braze-inc.github.io/braze-swift-sdk/documentation/brazekit/braze/inappmessage).
These are the available in-app message types in Braze and how they will look like for end-users.
[`Slideup`](https://braze-inc.github.io/braze-swift-sdk/documentation/brazekit/braze/inappmessage/slideup-swift.struct) in-app messages are given this name because they "slide up" or "slide down" from the top or bottom of the screen. They cover a small portion of the screen and provide an effective and non-intrusive messaging capability.
{: style="max-width:35%;border:none;"}
[`Modal`](https://braze-inc.github.io/braze-swift-sdk/documentation/brazekit/braze/inappmessage/modal-swift.struct) in-app messages appear in the center of the screen and are framed by a translucent panel. Useful for more critical messaging, they can be equipped with up to two analytics-enabled buttons.
{: style="max-width:35%;border:none;"}
[`Modal Image`](https://braze-inc.github.io/braze-swift-sdk/documentation/brazekit/braze/inappmessage/modalimage-swift.struct) in-app messages appear in the center of the screen and are framed by a translucent panel. These messages are similar to the `Modal` type except without header or message text. Useful for more critical messaging, they can be equipped with up to two analytics-enabled buttons.
{: style="max-width:35%;border:none;"}
[`Full`](https://braze-inc.github.io/braze-swift-sdk/documentation/brazekit/braze/inappmessage/full-swift.struct) in-app messages are useful for maximizing the content and impact of your user communication. The upper half of a `Full` in-app message contains an image, and the lower half displays text and up to two analytics-enabled buttons.
{: style="max-width:35%;border:none;"}
[`Full Image`](https://braze-inc.github.io/braze-swift-sdk/documentation/brazekit/braze/inappmessage/fullimage-swift.struct) in-app messages are similar to `Full` in-app messages except without header or message text. This message type is useful for maximizing the content and impact of your user communication. A `Full Image` in-app message contains an image spanning the entire screen, with the option to display up to two analytics-enabled buttons.
{: style="max-width:35%;border:none;"}
[`HTML`](https://braze-inc.github.io/braze-swift-sdk/documentation/brazekit/braze/inappmessage/html-swift.struct) in-app messages are useful for creating fully customized user content. User-defined HTML Full in-app message content is displayed in a `WKWebView`and may optionally contain other rich content, such as images and fonts, allowing for full control over message appearance and functionality.
iOS in-app messages support a JavaScript `brazeBridge` interface to call methods on the Braze Web SDK from within your HTML, see our [best practices](https://www.braze.com/docs/de/de/user_guide/message_building_by_channel/in-app_messages/best_practices/) for more details.
The following example shows a paginated HTML Full in-app message:

Note that we currently do not support the display of custom HTML in-app messages in an iFrame on the iOS and Android platforms.
[`Control`](https://braze-inc.github.io/braze-swift-sdk/documentation/brazekit/braze/inappmessage/control-swift.struct) in-app messages do not contain a UI component and are used primarily for analytics purposes. This type is used to verify receipt of an in-app message sent to a control group.
For further details about Intelligent Selection and control groups, refer to [Intelligent Selection](https://www.braze.com/docs/de/de/user_guide/brazeai/intelligence/intelligent_selection/).
## Enabling in-app messages
The Braze Flutter SDK automatically sets up the default in-app message presenter on both Android and iOS. In-app messages are displayed and forwarded to the Dart layer without additional setup.
### Customizing the in-app message presenter on iOS
To override the default in-app message presenter on iOS, use the `postInitialization` closure in `BrazePlugin.configure(_:postInitialization:)`. Your custom presenter must call `BrazePlugin.processInAppMessage(message)` to forward in-app message data to the Dart layer.
```swift
import BrazeUI
BrazePlugin.configure(
{ configuration in
// Set non-API-key configurations here.
},
postInitialization: { braze in
let customPresenter = CustomInAppMessagePresenter()
braze.inAppMessagePresenter = customPresenter
}
)
```
In the custom presenter class, call `BrazePlugin.processInAppMessage(message)` and `super.present(message: message)` to forward data to Dart and display the default UI.
```swift
class CustomInAppMessagePresenter: BrazeInAppMessageUI {
override func present(message: Braze.InAppMessage) {
BrazePlugin.processInAppMessage(message)
super.present(message: message)
}
}
```
**Note:**
This step is for iOS only. The default implementation for in-app messages is already set up on Android.
To set up the default presenter for in-app messages on iOS, create an implementation of the `BrazeInAppMessagePresenter` protocol and assign it to the optional `inAppMessagePresenter` on your Braze instance. You can also use the default Braze UI presenter by instantiating a `BrazeInAppMessageUI` object.
You must import the `BrazeUI` library to access the `BrazeInAppMessageUI` class.
```swift
import BrazeUI
override func application(
_ application: UIApplication,
didFinishLaunchingWithOptions launchOptions: [UIApplication.LaunchOptionsKey : Any]? = nil
) -> Bool {
...
let braze = BrazePlugin.initBraze(configuration)
braze.inAppMessagePresenter = BrazeInAppMessageUI()
AppDelegate.braze = braze
return true
}
```
```objc
@import BrazeUI;
- (BOOL)application:(UIApplication *)application
didFinishLaunchingWithOptions:(NSDictionary *)launchOptions {
...
Braze *braze = [BrazePlugin initBraze:configuration];
braze.inAppMessagePresenter = [[BrazeInAppMessageUI alloc] init];
AppDelegate.braze = braze;
[self.window makeKeyAndVisible];
return YES;
}
```
For more information about accessing in-app message data, refer to [Logging in-app message data](https://www.braze.com/docs/de/de/developer_guide/in_app_messages/logging_message_data?sdktab=flutter).
## Prerequisites
Before you can use this feature, you'll need to [integrate the React Native Braze SDK](https://www.braze.com/docs/de/de/developer_guide/sdk_integration/?sdktab=react%20native).
## Message types
Braze offers several default in-app message types, each customizable with messages, images, [Font Awesome](https://fontawesome.com/icons?d=gallery&p=2) icons, click actions, analytics, color schemes, and more.
Their basic behavior and traits are defined by the [`IInAppMessage`](https://braze-inc.github.io/braze-android-sdk/kdoc/braze-android-sdk/com.braze.models.inappmessage/-i-in-app-message/index.html) interface, in a subclass called [`InAppMessageBase`](https://braze-inc.github.io/braze-android-sdk/kdoc/braze-android-sdk/com.braze.models.inappmessage/-in-app-message-base/index.html). `IInAppMessage` also includes a subinterface, [`IInAppMessageImmersive`](https://braze-inc.github.io/braze-android-sdk/kdoc/braze-android-sdk/com.braze.models.inappmessage/-i-in-app-message-immersive/index.html), which lets you add close, click-action, and analytics [buttons](https://braze-inc.github.io/braze-android-sdk/kdoc/braze-android-sdk/com.braze.models.inappmessage/-message-button/index.html) to your app.
**Important:**
Keep in mind, in-app messages containing buttons will include the `clickAction` message in the final payload if the click action is added prior to adding the button text.
[`slideup`](https://braze-inc.github.io/braze-android-sdk/kdoc/braze-android-sdk/com.braze.models.inappmessage/-in-app-message-slideup/index.html) in-app messages are so-named because they "slide up" or "slide down" from the top or bottom of the screen. They cover a small portion of the screen and provide an effective and non-intrusive messaging capability.
The `slideup` in-app message object extends [`InAppMessageBase`](https://braze-inc.github.io/braze-android-sdk/kdoc/braze-android-sdk/com.braze.models.inappmessage/-in-app-message-base/index.html).
{: style="border:0px;"}
[`modal`](https://braze-inc.github.io/braze-android-sdk/kdoc/braze-android-sdk/com.braze.models.inappmessage/-in-app-message-modal/index.html) in-app messages appear in the center of the screen and are framed by a translucent panel. Useful for more critical messaging, they can be equipped with two click-action and analytics-enabled buttons.
This message type is a subclass of [`InAppMessageImmersiveBase`](https://braze-inc.github.io/braze-android-sdk/kdoc/braze-android-sdk/com.braze.models.inappmessage/-in-app-message-immersive-base/index.html), an abstract class that implements `IInAppMessageImmersive`, giving you the option to add custom functionality to your locally generated in-app messages.
{: style="border:0px;"}
[`full`](https://braze-inc.github.io/braze-android-sdk/kdoc/braze-android-sdk/com.braze.models.inappmessage/-in-app-message-full/index.html) in-app messages are useful for maximizing the content and impact of your user communication. The upper half of a `full` in-app message contains an image, and the lower half displays text and up to two click action and analytics-enabled buttons.
This message type extends [`InAppMessageImmersiveBase`](https://braze-inc.github.io/braze-android-sdk/kdoc/braze-android-sdk/com.braze.models.inappmessage/-in-app-message-immersive-base/index.html), giving you the option to add custom functionality to your locally generated in-app messages.

[`HTML`](https://braze-inc.github.io/braze-android-sdk/kdoc/braze-android-sdk/com.braze.models.inappmessage/-in-app-message-html/index.html) in-app messages are useful for creating fully customized user content. User-defined HTML in-app message content is displayed in a `WebView` and may optionally contain other rich content, such as images and fonts, allowing for full control over message appearance and functionality.
This message type implements [`IInAppMessageHtml`](https://braze-inc.github.io/braze-android-sdk/kdoc/braze-android-sdk/com.braze.models.inappmessage/-i-in-app-message-html/index.html), which is a subclass of [`IInAppMessage`](https://braze-inc.github.io/braze-android-sdk/kdoc/braze-android-sdk/com.braze.models.inappmessage/-i-in-app-message/index.html).
**Note:**
On Android, links configured with `target="_blank"` in custom HTML in-app messages open in the device's default web browser.
Android in-app messages support a JavaScript `brazeBridge` interface to call methods on the Braze Android SDK from within your HTML, see our JavaScript bridge page for more details.
{: style="border:0px;"}
**Important:**
We currently do not support the display of custom HTML in-app messages in an iFrame on the iOS and Android platforms.
**Tip:**
You can also define custom in-app message views for your app. For a full walkthrough, see [Setting custom factories](https://www.braze.com/docs/de/de/developer_guide/in_app_messages/customization#android_setting-custom-factories).
Each in-app message type is highly customizable across content, images, icons, click actions, analytics, display, and delivery. They are enumerated types of `Braze.InAppMessage`, which defines basic behavior and traits for all in-app messages. For the full list of in-app message properties and usage, see the [`InAppMessage` class](https://braze-inc.github.io/braze-swift-sdk/documentation/brazekit/braze/inappmessage).
These are the available in-app message types in Braze and how they will look like for end-users.
[`Slideup`](https://braze-inc.github.io/braze-swift-sdk/documentation/brazekit/braze/inappmessage/slideup-swift.struct) in-app messages are given this name because they "slide up" or "slide down" from the top or bottom of the screen. They cover a small portion of the screen and provide an effective and non-intrusive messaging capability.
{: style="max-width:35%;border:none;"}
[`Modal`](https://braze-inc.github.io/braze-swift-sdk/documentation/brazekit/braze/inappmessage/modal-swift.struct) in-app messages appear in the center of the screen and are framed by a translucent panel. Useful for more critical messaging, they can be equipped with up to two analytics-enabled buttons.
{: style="max-width:35%;border:none;"}
[`Modal Image`](https://braze-inc.github.io/braze-swift-sdk/documentation/brazekit/braze/inappmessage/modalimage-swift.struct) in-app messages appear in the center of the screen and are framed by a translucent panel. These messages are similar to the `Modal` type except without header or message text. Useful for more critical messaging, they can be equipped with up to two analytics-enabled buttons.
{: style="max-width:35%;border:none;"}
[`Full`](https://braze-inc.github.io/braze-swift-sdk/documentation/brazekit/braze/inappmessage/full-swift.struct) in-app messages are useful for maximizing the content and impact of your user communication. The upper half of a `Full` in-app message contains an image, and the lower half displays text and up to two analytics-enabled buttons.
{: style="max-width:35%;border:none;"}
[`Full Image`](https://braze-inc.github.io/braze-swift-sdk/documentation/brazekit/braze/inappmessage/fullimage-swift.struct) in-app messages are similar to `Full` in-app messages except without header or message text. This message type is useful for maximizing the content and impact of your user communication. A `Full Image` in-app message contains an image spanning the entire screen, with the option to display up to two analytics-enabled buttons.
{: style="max-width:35%;border:none;"}
[`HTML`](https://braze-inc.github.io/braze-swift-sdk/documentation/brazekit/braze/inappmessage/html-swift.struct) in-app messages are useful for creating fully customized user content. User-defined HTML Full in-app message content is displayed in a `WKWebView`and may optionally contain other rich content, such as images and fonts, allowing for full control over message appearance and functionality.
iOS in-app messages support a JavaScript `brazeBridge` interface to call methods on the Braze Web SDK from within your HTML, see our [best practices](https://www.braze.com/docs/de/de/user_guide/message_building_by_channel/in-app_messages/best_practices/) for more details.
The following example shows a paginated HTML Full in-app message:

Note that we currently do not support the display of custom HTML in-app messages in an iFrame on the iOS and Android platforms.
[`Control`](https://braze-inc.github.io/braze-swift-sdk/documentation/brazekit/braze/inappmessage/control-swift.struct) in-app messages do not contain a UI component and are used primarily for analytics purposes. This type is used to verify receipt of an in-app message sent to a control group.
For further details about Intelligent Selection and control groups, refer to [Intelligent Selection](https://www.braze.com/docs/de/de/user_guide/brazeai/intelligence/intelligent_selection/).
## Data model
The in-app message model is available in the React Native SDK. Braze has four in-app message types that share the same data model: **slideup**, **modal**, **full** and **HTML full**.
### Messages
The in-app message model provides the base for all in-app messages.
|Property | Description |
|------------------|------------------------------------------------------------------------------------------------------------------------|
|`inAppMessageJsonString` | The message JSON representation. |
|`message` | The message text. |
|`header` | The message header. |
|`uri` | The URI associated with the button click action. |
|`imageUrl` | The message image URL. |
|`zippedAssetsUrl` | The zipped assets prepared to display HTML content. |
|`useWebView` | Indicates whether the button click action should redirect using a web view. |
|`duration` | The message display duration. |
|`clickAction` | The button click action type. The types are: `URI`, and `NONE`. |
|`dismissType` | The message close type. The two types are: `SWIPE` and `AUTO_DISMISS`. |
|`messageType` | The in-app message type supported by the SDK. The four types are: `SLIDEUP`, `MODAL`, `FULL` and `HTML_FULL`. |
|`extras` | The message extras dictionary. Default value: `[:]`. |
|`buttons` | The list of buttons on the in-app message. |
|`toString()` | The message as a String representation. |
{: .reset-td-br-1 .reset-td-br-2 aria-label="Messages" }
For a full reference of the in-app message model, see the [Android](https://braze-inc.github.io/braze-android-sdk/kdoc/braze-android-sdk/com.braze.models.inappmessage/index.html) and [iOS](https://braze-inc.github.io/braze-swift-sdk/documentation/brazekit/braze/inappmessage) documentation.
### Buttons
Buttons can be added to in-app messages to perform actions and log analytics. The button model provides the base for all in-app message buttons.
|Property | Description |
|------------------|-----------------------------------------------------------------------------------------------------------------------------|
|`text` | The text on the button. |
|`uri` | The URI associated with the button click action. |
|`useWebView` | Indicates whether the button click action should redirect using a web view. |
|`clickAction` | The type of click action processed when the user clicks on the button. The types are: `URI`, and `NONE`. |
|`id` | The button ID on the message. |
|`toString()` | The button as a String representation. |
{: .reset-td-br-1 .reset-td-br-2 aria-label="Buttons" }
For a full reference of button model, see the [Android](https://braze-inc.github.io/braze-android-sdk/kdoc/braze-android-sdk/com.braze.models.inappmessage/-message-button/index.html) and [iOS](https://braze-inc.github.io/braze-swift-sdk/documentation/brazekit/braze/inappmessage/button) documentation.
## Prerequisites
Before you can use this feature, you'll need to [integrate the Roku Braze SDK](https://www.braze.com/docs/de/de/developer_guide/sdk_integration/?sdktab=roku).
Additionally, in-app messages will only be sent to Roku devices running the minimum supported SDK version:
## Message types
Braze offers several default in-app message types, each customizable with messages, images, [Font Awesome](https://fontawesome.com/icons?d=gallery&p=2) icons, click actions, analytics, color schemes, and more.
Their basic behavior and traits are defined by the [`IInAppMessage`](https://braze-inc.github.io/braze-android-sdk/kdoc/braze-android-sdk/com.braze.models.inappmessage/-i-in-app-message/index.html) interface, in a subclass called [`InAppMessageBase`](https://braze-inc.github.io/braze-android-sdk/kdoc/braze-android-sdk/com.braze.models.inappmessage/-in-app-message-base/index.html). `IInAppMessage` also includes a subinterface, [`IInAppMessageImmersive`](https://braze-inc.github.io/braze-android-sdk/kdoc/braze-android-sdk/com.braze.models.inappmessage/-i-in-app-message-immersive/index.html), which lets you add close, click-action, and analytics [buttons](https://braze-inc.github.io/braze-android-sdk/kdoc/braze-android-sdk/com.braze.models.inappmessage/-message-button/index.html) to your app.
**Important:**
Keep in mind, in-app messages containing buttons will include the `clickAction` message in the final payload if the click action is added prior to adding the button text.
[`slideup`](https://braze-inc.github.io/braze-android-sdk/kdoc/braze-android-sdk/com.braze.models.inappmessage/-in-app-message-slideup/index.html) in-app messages are so-named because they "slide up" or "slide down" from the top or bottom of the screen. They cover a small portion of the screen and provide an effective and non-intrusive messaging capability.
The `slideup` in-app message object extends [`InAppMessageBase`](https://braze-inc.github.io/braze-android-sdk/kdoc/braze-android-sdk/com.braze.models.inappmessage/-in-app-message-base/index.html).
{: style="border:0px;"}
[`modal`](https://braze-inc.github.io/braze-android-sdk/kdoc/braze-android-sdk/com.braze.models.inappmessage/-in-app-message-modal/index.html) in-app messages appear in the center of the screen and are framed by a translucent panel. Useful for more critical messaging, they can be equipped with two click-action and analytics-enabled buttons.
This message type is a subclass of [`InAppMessageImmersiveBase`](https://braze-inc.github.io/braze-android-sdk/kdoc/braze-android-sdk/com.braze.models.inappmessage/-in-app-message-immersive-base/index.html), an abstract class that implements `IInAppMessageImmersive`, giving you the option to add custom functionality to your locally generated in-app messages.
{: style="border:0px;"}
[`full`](https://braze-inc.github.io/braze-android-sdk/kdoc/braze-android-sdk/com.braze.models.inappmessage/-in-app-message-full/index.html) in-app messages are useful for maximizing the content and impact of your user communication. The upper half of a `full` in-app message contains an image, and the lower half displays text and up to two click action and analytics-enabled buttons.
This message type extends [`InAppMessageImmersiveBase`](https://braze-inc.github.io/braze-android-sdk/kdoc/braze-android-sdk/com.braze.models.inappmessage/-in-app-message-immersive-base/index.html), giving you the option to add custom functionality to your locally generated in-app messages.

[`HTML`](https://braze-inc.github.io/braze-android-sdk/kdoc/braze-android-sdk/com.braze.models.inappmessage/-in-app-message-html/index.html) in-app messages are useful for creating fully customized user content. User-defined HTML in-app message content is displayed in a `WebView` and may optionally contain other rich content, such as images and fonts, allowing for full control over message appearance and functionality.
This message type implements [`IInAppMessageHtml`](https://braze-inc.github.io/braze-android-sdk/kdoc/braze-android-sdk/com.braze.models.inappmessage/-i-in-app-message-html/index.html), which is a subclass of [`IInAppMessage`](https://braze-inc.github.io/braze-android-sdk/kdoc/braze-android-sdk/com.braze.models.inappmessage/-i-in-app-message/index.html).
**Note:**
On Android, links configured with `target="_blank"` in custom HTML in-app messages open in the device's default web browser.
Android in-app messages support a JavaScript `brazeBridge` interface to call methods on the Braze Android SDK from within your HTML, see our JavaScript bridge page for more details.
{: style="border:0px;"}
**Important:**
We currently do not support the display of custom HTML in-app messages in an iFrame on the iOS and Android platforms.
**Tip:**
You can also define custom in-app message views for your app. For a full walkthrough, see [Setting custom factories](https://www.braze.com/docs/de/de/developer_guide/in_app_messages/customization#android_setting-custom-factories).
Each in-app message type is highly customizable across content, images, icons, click actions, analytics, display, and delivery. They are enumerated types of `Braze.InAppMessage`, which defines basic behavior and traits for all in-app messages. For the full list of in-app message properties and usage, see the [`InAppMessage` class](https://braze-inc.github.io/braze-swift-sdk/documentation/brazekit/braze/inappmessage).
These are the available in-app message types in Braze and how they will look like for end-users.
[`Slideup`](https://braze-inc.github.io/braze-swift-sdk/documentation/brazekit/braze/inappmessage/slideup-swift.struct) in-app messages are given this name because they "slide up" or "slide down" from the top or bottom of the screen. They cover a small portion of the screen and provide an effective and non-intrusive messaging capability.
{: style="max-width:35%;border:none;"}
[`Modal`](https://braze-inc.github.io/braze-swift-sdk/documentation/brazekit/braze/inappmessage/modal-swift.struct) in-app messages appear in the center of the screen and are framed by a translucent panel. Useful for more critical messaging, they can be equipped with up to two analytics-enabled buttons.
{: style="max-width:35%;border:none;"}
[`Modal Image`](https://braze-inc.github.io/braze-swift-sdk/documentation/brazekit/braze/inappmessage/modalimage-swift.struct) in-app messages appear in the center of the screen and are framed by a translucent panel. These messages are similar to the `Modal` type except without header or message text. Useful for more critical messaging, they can be equipped with up to two analytics-enabled buttons.
{: style="max-width:35%;border:none;"}
[`Full`](https://braze-inc.github.io/braze-swift-sdk/documentation/brazekit/braze/inappmessage/full-swift.struct) in-app messages are useful for maximizing the content and impact of your user communication. The upper half of a `Full` in-app message contains an image, and the lower half displays text and up to two analytics-enabled buttons.
{: style="max-width:35%;border:none;"}
[`Full Image`](https://braze-inc.github.io/braze-swift-sdk/documentation/brazekit/braze/inappmessage/fullimage-swift.struct) in-app messages are similar to `Full` in-app messages except without header or message text. This message type is useful for maximizing the content and impact of your user communication. A `Full Image` in-app message contains an image spanning the entire screen, with the option to display up to two analytics-enabled buttons.
{: style="max-width:35%;border:none;"}
[`HTML`](https://braze-inc.github.io/braze-swift-sdk/documentation/brazekit/braze/inappmessage/html-swift.struct) in-app messages are useful for creating fully customized user content. User-defined HTML Full in-app message content is displayed in a `WKWebView`and may optionally contain other rich content, such as images and fonts, allowing for full control over message appearance and functionality.
iOS in-app messages support a JavaScript `brazeBridge` interface to call methods on the Braze Web SDK from within your HTML, see our [best practices](https://www.braze.com/docs/de/de/user_guide/message_building_by_channel/in-app_messages/best_practices/) for more details.
The following example shows a paginated HTML Full in-app message:

Note that we currently do not support the display of custom HTML in-app messages in an iFrame on the iOS and Android platforms.
[`Control`](https://braze-inc.github.io/braze-swift-sdk/documentation/brazekit/braze/inappmessage/control-swift.struct) in-app messages do not contain a UI component and are used primarily for analytics purposes. This type is used to verify receipt of an in-app message sent to a control group.
For further details about Intelligent Selection and control groups, refer to [Intelligent Selection](https://www.braze.com/docs/de/de/user_guide/brazeai/intelligence/intelligent_selection/).
## Enabling in-app messages
### Step 1: Add an observer
To process in-app messages, you can add an observer on `BrazeTask.BrazeInAppMessage`:
```brightscript
m.BrazeTask.observeField("BrazeInAppMessage", "onInAppMessageReceived")
```
### Step 2: Access triggered messages
Then within your handler, you have access to the highest in-app message that your campaigns have triggered:
```brightscript
sub onInAppMessageReceived()
in_app_message = m.BrazeTask.BrazeInAppMessage
...
end sub
```
## Message fields
### Handling
The following lists the fields you will need to handle your in-app messages:
| Fields | Description |
| ------ | ----------- |
| `buttons` | List of buttons (could be an empty list). |
| `click_action` | `"URI"` or `"NONE"`. Use this field to indicate whether the in-app message should open to a URI link or close the message when clicked. When there are no buttons, this should happen when the user clicks "OK" when the in-app message is displayed. |
| `dismiss_type` | `"AUTO_DISMISS"` or `"SWIPE"`. Use this field to indicate whether your in-app message will auto dismiss or require a swipe to dismiss. |
| `display_delay` | How long (seconds) to wait until displaying the in-app message. |
| `duration` | How long (milliseconds) the message should be displayed when `dismiss_type` is set to `"AUTO_DISMISS"`. |
| `extras` | Key-value pairs. |
| `header` | The header text. |
| `id` | The ID used to log impressions or clicks. |
| `image_url` | In-app message image URL. |
| `message` | Message body text. |
| `uri` | Your URI users will be sent to based on your `click_action`. This field must be included when `click_action` is `"URI"`. |
{: .reset-td-br-1 .reset-td-br-2 aria-label="Handling" }
**Important:**
For in-app messages containing buttons, the message `click_action` will also be included in the final payload if the click action is added prior to adding the button text.
### Styling
There are also various styling fields that you could choose to use from the dashboard:
| Fields | Description |
| ------ | ----------- |
| `bg_color` | Background color. |
| `close_button_color` | Close button color. |
| `frame_color` | The color of the background screen overlay. |
| `header_text_color` | Header text color. |
| `message_text_color` | Message text color. |
| `text_align` | "START", "CENTER", or "END". Your selected text alignment. |
{: .reset-td-br-1 .reset-td-br-2 aria-label="Styling" }
Alternatively, you could implement the in-app message and style it within your Roku application using a standard palette:
### Buttons
| Fields | Description |
| ------ | ----------- |
| `click_action` | `"URI"` or `"NONE"`. Use this field to indicate whether the in-app message should open to a URI link or close the message when clicked. |
| `id` | The ID value of the button itself. |
| `text` | The text to display on the button. |
| `uri` | Your URI users will be sent to based on your `click_action`. This field must be included when `click_action` is `"URI"`. |
{: .reset-td-br-1 .reset-td-br-2 aria-label="Buttons" }
**Important:**
Keep in mind, you'll need to implement your own custom UI since in-app messaging is supported via headless UI using the Swift SDK—which does not include any default UI or views for tvOS.
## Prerequisites
Before you can use this feature, you'll need to [integrate the Swift Braze SDK](https://www.braze.com/docs/de/de/developer_guide/sdk_integration/?sdktab=swift).
## Enabling in-app messages
### Step 1: Create a new iOS app
In Braze, select **Settings** > **App Settings**, then select **Add App**. Enter a name for your tvOS app, select **iOS**—_not tvOS_—then select **Add App**.
{: style="width:70%"}
**Warning:**
If you select the **tvOS** checkbox, you will not be able to customize in-app messages for tvOS.
### Step 2: Get your app's API key
In your app settings, select your new tvOS app then take note of your app's API key. You'll use this key to configure your app in Xcode.
{: style="width:70%"}
### Step 3: Integrate BrazeKit
Use your app's API key to integrate the [Braze Swift SDK](https://github.com/braze-inc/braze-swift-sdk) into your tvOS project in Xcode. You only need to integrate BrazeKit from the Braze Swift SDK.
### Step 4: Create your custom UI
Because Braze doesn't provide a default UI for in-app messages on tvOS, you'll need to customize it yourself. For a full walkthrough, see our step-by-step tutorial: [Customizing in-app messages for tvOS](https://braze-inc.github.io/braze-swift-sdk/documentation/braze/in-app-message-customization). For a sample project, see [Braze Swift SDK samples](https://github.com/braze-inc/braze-swift-sdk/tree/main/Examples#inappmessages-custom-ui).
## Prerequisites
Before you can use this feature, you'll need to [integrate the Unity Braze SDK](https://www.braze.com/docs/de/de/developer_guide/sdk_integration/?sdktab=unity).
## Message types
Braze offers several default in-app message types, each customizable with messages, images, [Font Awesome](https://fontawesome.com/icons?d=gallery&p=2) icons, click actions, analytics, color schemes, and more.
Their basic behavior and traits are defined by the [`IInAppMessage`](https://braze-inc.github.io/braze-android-sdk/kdoc/braze-android-sdk/com.braze.models.inappmessage/-i-in-app-message/index.html) interface, in a subclass called [`InAppMessageBase`](https://braze-inc.github.io/braze-android-sdk/kdoc/braze-android-sdk/com.braze.models.inappmessage/-in-app-message-base/index.html). `IInAppMessage` also includes a subinterface, [`IInAppMessageImmersive`](https://braze-inc.github.io/braze-android-sdk/kdoc/braze-android-sdk/com.braze.models.inappmessage/-i-in-app-message-immersive/index.html), which lets you add close, click-action, and analytics [buttons](https://braze-inc.github.io/braze-android-sdk/kdoc/braze-android-sdk/com.braze.models.inappmessage/-message-button/index.html) to your app.
**Important:**
Keep in mind, in-app messages containing buttons will include the `clickAction` message in the final payload if the click action is added prior to adding the button text.
[`slideup`](https://braze-inc.github.io/braze-android-sdk/kdoc/braze-android-sdk/com.braze.models.inappmessage/-in-app-message-slideup/index.html) in-app messages are so-named because they "slide up" or "slide down" from the top or bottom of the screen. They cover a small portion of the screen and provide an effective and non-intrusive messaging capability.
The `slideup` in-app message object extends [`InAppMessageBase`](https://braze-inc.github.io/braze-android-sdk/kdoc/braze-android-sdk/com.braze.models.inappmessage/-in-app-message-base/index.html).
{: style="border:0px;"}
[`modal`](https://braze-inc.github.io/braze-android-sdk/kdoc/braze-android-sdk/com.braze.models.inappmessage/-in-app-message-modal/index.html) in-app messages appear in the center of the screen and are framed by a translucent panel. Useful for more critical messaging, they can be equipped with two click-action and analytics-enabled buttons.
This message type is a subclass of [`InAppMessageImmersiveBase`](https://braze-inc.github.io/braze-android-sdk/kdoc/braze-android-sdk/com.braze.models.inappmessage/-in-app-message-immersive-base/index.html), an abstract class that implements `IInAppMessageImmersive`, giving you the option to add custom functionality to your locally generated in-app messages.
{: style="border:0px;"}
[`full`](https://braze-inc.github.io/braze-android-sdk/kdoc/braze-android-sdk/com.braze.models.inappmessage/-in-app-message-full/index.html) in-app messages are useful for maximizing the content and impact of your user communication. The upper half of a `full` in-app message contains an image, and the lower half displays text and up to two click action and analytics-enabled buttons.
This message type extends [`InAppMessageImmersiveBase`](https://braze-inc.github.io/braze-android-sdk/kdoc/braze-android-sdk/com.braze.models.inappmessage/-in-app-message-immersive-base/index.html), giving you the option to add custom functionality to your locally generated in-app messages.

[`HTML`](https://braze-inc.github.io/braze-android-sdk/kdoc/braze-android-sdk/com.braze.models.inappmessage/-in-app-message-html/index.html) in-app messages are useful for creating fully customized user content. User-defined HTML in-app message content is displayed in a `WebView` and may optionally contain other rich content, such as images and fonts, allowing for full control over message appearance and functionality.
This message type implements [`IInAppMessageHtml`](https://braze-inc.github.io/braze-android-sdk/kdoc/braze-android-sdk/com.braze.models.inappmessage/-i-in-app-message-html/index.html), which is a subclass of [`IInAppMessage`](https://braze-inc.github.io/braze-android-sdk/kdoc/braze-android-sdk/com.braze.models.inappmessage/-i-in-app-message/index.html).
**Note:**
On Android, links configured with `target="_blank"` in custom HTML in-app messages open in the device's default web browser.
Android in-app messages support a JavaScript `brazeBridge` interface to call methods on the Braze Android SDK from within your HTML, see our JavaScript bridge page for more details.
{: style="border:0px;"}
**Important:**
We currently do not support the display of custom HTML in-app messages in an iFrame on the iOS and Android platforms.
**Tip:**
You can also define custom in-app message views for your app. For a full walkthrough, see [Setting custom factories](https://www.braze.com/docs/de/de/developer_guide/in_app_messages/customization#android_setting-custom-factories).
Each in-app message type is highly customizable across content, images, icons, click actions, analytics, display, and delivery. They are enumerated types of `Braze.InAppMessage`, which defines basic behavior and traits for all in-app messages. For the full list of in-app message properties and usage, see the [`InAppMessage` class](https://braze-inc.github.io/braze-swift-sdk/documentation/brazekit/braze/inappmessage).
These are the available in-app message types in Braze and how they will look like for end-users.
[`Slideup`](https://braze-inc.github.io/braze-swift-sdk/documentation/brazekit/braze/inappmessage/slideup-swift.struct) in-app messages are given this name because they "slide up" or "slide down" from the top or bottom of the screen. They cover a small portion of the screen and provide an effective and non-intrusive messaging capability.
{: style="max-width:35%;border:none;"}
[`Modal`](https://braze-inc.github.io/braze-swift-sdk/documentation/brazekit/braze/inappmessage/modal-swift.struct) in-app messages appear in the center of the screen and are framed by a translucent panel. Useful for more critical messaging, they can be equipped with up to two analytics-enabled buttons.
{: style="max-width:35%;border:none;"}
[`Modal Image`](https://braze-inc.github.io/braze-swift-sdk/documentation/brazekit/braze/inappmessage/modalimage-swift.struct) in-app messages appear in the center of the screen and are framed by a translucent panel. These messages are similar to the `Modal` type except without header or message text. Useful for more critical messaging, they can be equipped with up to two analytics-enabled buttons.
{: style="max-width:35%;border:none;"}
[`Full`](https://braze-inc.github.io/braze-swift-sdk/documentation/brazekit/braze/inappmessage/full-swift.struct) in-app messages are useful for maximizing the content and impact of your user communication. The upper half of a `Full` in-app message contains an image, and the lower half displays text and up to two analytics-enabled buttons.
{: style="max-width:35%;border:none;"}
[`Full Image`](https://braze-inc.github.io/braze-swift-sdk/documentation/brazekit/braze/inappmessage/fullimage-swift.struct) in-app messages are similar to `Full` in-app messages except without header or message text. This message type is useful for maximizing the content and impact of your user communication. A `Full Image` in-app message contains an image spanning the entire screen, with the option to display up to two analytics-enabled buttons.
{: style="max-width:35%;border:none;"}
[`HTML`](https://braze-inc.github.io/braze-swift-sdk/documentation/brazekit/braze/inappmessage/html-swift.struct) in-app messages are useful for creating fully customized user content. User-defined HTML Full in-app message content is displayed in a `WKWebView`and may optionally contain other rich content, such as images and fonts, allowing for full control over message appearance and functionality.
iOS in-app messages support a JavaScript `brazeBridge` interface to call methods on the Braze Web SDK from within your HTML, see our [best practices](https://www.braze.com/docs/de/de/user_guide/message_building_by_channel/in-app_messages/best_practices/) for more details.
The following example shows a paginated HTML Full in-app message:

Note that we currently do not support the display of custom HTML in-app messages in an iFrame on the iOS and Android platforms.
[`Control`](https://braze-inc.github.io/braze-swift-sdk/documentation/brazekit/braze/inappmessage/control-swift.struct) in-app messages do not contain a UI component and are used primarily for analytics purposes. This type is used to verify receipt of an in-app message sent to a control group.
For further details about Intelligent Selection and control groups, refer to [Intelligent Selection](https://www.braze.com/docs/de/de/user_guide/brazeai/intelligence/intelligent_selection/).
## Prerequisites
Before you can use this feature, you'll need to [integrate the .NET MAUI Braze SDK](https://www.braze.com/docs/de/de/developer_guide/sdk_integration/?sdktab=.net%20maui%20(xamarin)).
## Message types
Braze offers several default in-app message types, each customizable with messages, images, [Font Awesome](https://fontawesome.com/icons?d=gallery&p=2) icons, click actions, analytics, color schemes, and more.
Their basic behavior and traits are defined by the [`IInAppMessage`](https://braze-inc.github.io/braze-android-sdk/kdoc/braze-android-sdk/com.braze.models.inappmessage/-i-in-app-message/index.html) interface, in a subclass called [`InAppMessageBase`](https://braze-inc.github.io/braze-android-sdk/kdoc/braze-android-sdk/com.braze.models.inappmessage/-in-app-message-base/index.html). `IInAppMessage` also includes a subinterface, [`IInAppMessageImmersive`](https://braze-inc.github.io/braze-android-sdk/kdoc/braze-android-sdk/com.braze.models.inappmessage/-i-in-app-message-immersive/index.html), which lets you add close, click-action, and analytics [buttons](https://braze-inc.github.io/braze-android-sdk/kdoc/braze-android-sdk/com.braze.models.inappmessage/-message-button/index.html) to your app.
**Important:**
Keep in mind, in-app messages containing buttons will include the `clickAction` message in the final payload if the click action is added prior to adding the button text.
[`slideup`](https://braze-inc.github.io/braze-android-sdk/kdoc/braze-android-sdk/com.braze.models.inappmessage/-in-app-message-slideup/index.html) in-app messages are so-named because they "slide up" or "slide down" from the top or bottom of the screen. They cover a small portion of the screen and provide an effective and non-intrusive messaging capability.
The `slideup` in-app message object extends [`InAppMessageBase`](https://braze-inc.github.io/braze-android-sdk/kdoc/braze-android-sdk/com.braze.models.inappmessage/-in-app-message-base/index.html).
{: style="border:0px;"}
[`modal`](https://braze-inc.github.io/braze-android-sdk/kdoc/braze-android-sdk/com.braze.models.inappmessage/-in-app-message-modal/index.html) in-app messages appear in the center of the screen and are framed by a translucent panel. Useful for more critical messaging, they can be equipped with two click-action and analytics-enabled buttons.
This message type is a subclass of [`InAppMessageImmersiveBase`](https://braze-inc.github.io/braze-android-sdk/kdoc/braze-android-sdk/com.braze.models.inappmessage/-in-app-message-immersive-base/index.html), an abstract class that implements `IInAppMessageImmersive`, giving you the option to add custom functionality to your locally generated in-app messages.
{: style="border:0px;"}
[`full`](https://braze-inc.github.io/braze-android-sdk/kdoc/braze-android-sdk/com.braze.models.inappmessage/-in-app-message-full/index.html) in-app messages are useful for maximizing the content and impact of your user communication. The upper half of a `full` in-app message contains an image, and the lower half displays text and up to two click action and analytics-enabled buttons.
This message type extends [`InAppMessageImmersiveBase`](https://braze-inc.github.io/braze-android-sdk/kdoc/braze-android-sdk/com.braze.models.inappmessage/-in-app-message-immersive-base/index.html), giving you the option to add custom functionality to your locally generated in-app messages.

[`HTML`](https://braze-inc.github.io/braze-android-sdk/kdoc/braze-android-sdk/com.braze.models.inappmessage/-in-app-message-html/index.html) in-app messages are useful for creating fully customized user content. User-defined HTML in-app message content is displayed in a `WebView` and may optionally contain other rich content, such as images and fonts, allowing for full control over message appearance and functionality.
This message type implements [`IInAppMessageHtml`](https://braze-inc.github.io/braze-android-sdk/kdoc/braze-android-sdk/com.braze.models.inappmessage/-i-in-app-message-html/index.html), which is a subclass of [`IInAppMessage`](https://braze-inc.github.io/braze-android-sdk/kdoc/braze-android-sdk/com.braze.models.inappmessage/-i-in-app-message/index.html).
**Note:**
On Android, links configured with `target="_blank"` in custom HTML in-app messages open in the device's default web browser.
Android in-app messages support a JavaScript `brazeBridge` interface to call methods on the Braze Android SDK from within your HTML, see our JavaScript bridge page for more details.
{: style="border:0px;"}
**Important:**
We currently do not support the display of custom HTML in-app messages in an iFrame on the iOS and Android platforms.
**Tip:**
You can also define custom in-app message views for your app. For a full walkthrough, see [Setting custom factories](https://www.braze.com/docs/de/de/developer_guide/in_app_messages/customization#android_setting-custom-factories).
Each in-app message type is highly customizable across content, images, icons, click actions, analytics, display, and delivery. They are enumerated types of `Braze.InAppMessage`, which defines basic behavior and traits for all in-app messages. For the full list of in-app message properties and usage, see the [`InAppMessage` class](https://braze-inc.github.io/braze-swift-sdk/documentation/brazekit/braze/inappmessage).
These are the available in-app message types in Braze and how they will look like for end-users.
[`Slideup`](https://braze-inc.github.io/braze-swift-sdk/documentation/brazekit/braze/inappmessage/slideup-swift.struct) in-app messages are given this name because they "slide up" or "slide down" from the top or bottom of the screen. They cover a small portion of the screen and provide an effective and non-intrusive messaging capability.
{: style="max-width:35%;border:none;"}
[`Modal`](https://braze-inc.github.io/braze-swift-sdk/documentation/brazekit/braze/inappmessage/modal-swift.struct) in-app messages appear in the center of the screen and are framed by a translucent panel. Useful for more critical messaging, they can be equipped with up to two analytics-enabled buttons.
{: style="max-width:35%;border:none;"}
[`Modal Image`](https://braze-inc.github.io/braze-swift-sdk/documentation/brazekit/braze/inappmessage/modalimage-swift.struct) in-app messages appear in the center of the screen and are framed by a translucent panel. These messages are similar to the `Modal` type except without header or message text. Useful for more critical messaging, they can be equipped with up to two analytics-enabled buttons.
{: style="max-width:35%;border:none;"}
[`Full`](https://braze-inc.github.io/braze-swift-sdk/documentation/brazekit/braze/inappmessage/full-swift.struct) in-app messages are useful for maximizing the content and impact of your user communication. The upper half of a `Full` in-app message contains an image, and the lower half displays text and up to two analytics-enabled buttons.
{: style="max-width:35%;border:none;"}
[`Full Image`](https://braze-inc.github.io/braze-swift-sdk/documentation/brazekit/braze/inappmessage/fullimage-swift.struct) in-app messages are similar to `Full` in-app messages except without header or message text. This message type is useful for maximizing the content and impact of your user communication. A `Full Image` in-app message contains an image spanning the entire screen, with the option to display up to two analytics-enabled buttons.
{: style="max-width:35%;border:none;"}
[`HTML`](https://braze-inc.github.io/braze-swift-sdk/documentation/brazekit/braze/inappmessage/html-swift.struct) in-app messages are useful for creating fully customized user content. User-defined HTML Full in-app message content is displayed in a `WKWebView`and may optionally contain other rich content, such as images and fonts, allowing for full control over message appearance and functionality.
iOS in-app messages support a JavaScript `brazeBridge` interface to call methods on the Braze Web SDK from within your HTML, see our [best practices](https://www.braze.com/docs/de/de/user_guide/message_building_by_channel/in-app_messages/best_practices/) for more details.
The following example shows a paginated HTML Full in-app message:

Note that we currently do not support the display of custom HTML in-app messages in an iFrame on the iOS and Android platforms.
[`Control`](https://braze-inc.github.io/braze-swift-sdk/documentation/brazekit/braze/inappmessage/control-swift.struct) in-app messages do not contain a UI component and are used primarily for analytics purposes. This type is used to verify receipt of an in-app message sent to a control group.
For further details about Intelligent Selection and control groups, refer to [Intelligent Selection](https://www.braze.com/docs/de/de/user_guide/brazeai/intelligence/intelligent_selection/).
## Nächste Schritte
Sind Sie bereit, tiefer einzutauchen? Bitte beachten Sie diese Schritt-für-Schritt-Anleitungen:
- Optimieren Sie den Zeitpunkt der Zustellung von Nachrichten, indem Sie [getriggerte Nachrichten zurückstellen und wiederherstellen](https://www.braze.com/docs/de/de/developer_guide/in_app_messages/tutorials/deferring_triggered_messages).
- Verfeinern Sie das Targeting Ihrer Nachrichten, indem [Sie bedingte Anzeigeregeln festlegen](https://www.braze.com/docs/de/de/developer_guide/in_app_messages/tutorials/conditionally_displaying_messages).
- Passen Sie das Erscheinungsbild Ihrer Marke an, indem [Sie das Design der Nachrichten mit Schlüssel-Wert-Paaren individuell anpassen](https://www.braze.com/docs/de/de/developer_guide/in_app_messages/tutorials/customizing_message_styling).
# Anpassen von In-App-Nachrichten für das Braze SDK
Source: /docs/de/developer_guide/in_app_messages/customization/index.md
# Anpassen von In-App-Nachrichten
> Erfahren Sie, wie Sie In-App-Nachrichten für das Braze SDK anpassen können. Für fortgeschrittene Formatierungstechniken empfehlen wir Ihnen unser Tutorial zur [Anpassung der Nachrichtenformatierung mithilfe von Schlüssel-Wert-Paaren](https://www.braze.com/docs/de/de/developer_guide/in_app_messages/tutorials/customizing_message_styling).
## Prerequisites
Before you can use this feature, you'll need to [integrate the Web Braze SDK](https://www.braze.com/docs/de/de/developer_guide/sdk_integration/?sdktab=web).
## Custom styles
Braze UI elements come with a default look and feel that create a neutral in-app message experience and aim for consistency with other Braze mobile platforms. The default Braze styles are defined in CSS within the Braze SDK.
### Setting a default style
By overriding selected styles in your application, you can customize our standard in-app message types with your own background images, font families, styles, sizes, animations, and more.
For instance, the following is an example override that will cause an in-app message's headers to appear italicized:
```css
body .ab-in-app-message .ab-message-header {
font-style: italic;
}
```
See the [JSDocs](https://js.appboycdn.com/web-sdk/latest/doc/classes/braze.inappmessage.html) for more information.
### Customizing the z-index
By default, in-app messages are displayed using `z-index: 9001`. This is configurable using the `inAppMessageZIndex ` [initialization option](https://js.appboycdn.com/web-sdk/latest/doc/modules/braze.html#initializationoptions) in the scenario that your website styles elements with higher values than that.
```javascript
braze.initialize("YOUR-API-KEY", {
baseUrl: "YOUR-API-ENDPOINT",
inAppMessageZIndex: 12000
});
```
**Important:**
This feature is only available for Web Braze SDK v3.3.0 and later.
## Customizing message dismissals
By default, when an in-app message is showing, pressing the escape button or a click on the grayed-out background of the page will dismiss the message. Configure the `requireExplicitInAppMessageDismissal` [initialization option](https://js.appboycdn.com/web-sdk/latest/doc/modules/braze.html#initializationoptions) to `true` to prevent this behavior and require an explicit button click to dismiss messages.
```javascript
import * as braze from "@braze/web-sdk";
braze.initialize("YOUR-API-KEY", {
baseUrl: "YOUR-API-ENDPOINT",
requireExplicitInAppMessageDismissal: true
});
```
## Customizing display timing
To override the default display timing, remove calls to `braze.automaticallyShowInAppMessages()` and handle messages in `braze.subscribeToInAppMessage()`. Register your callback before `braze.openSession()`, so you can intercept session-start messages and decide whether to display or defer each message.
By default, Braze displays in-app messages when they are triggered and eligible to display. If you need different behavior for your app experience, use a custom callback to defer or display messages based on your own logic.
The following example shows how to subscribe to triggered in-app messages, defer selected messages, and display deferred messages later:
```javascript
import * as braze from "@braze/web-sdk";
braze.initialize("YOUR-API-KEY", {
baseUrl: "YOUR-API-ENDPOINT"
});
braze.subscribeToInAppMessage(function (message) {
// Control-group messages should always be "shown" to log analytics.
if (message.isControl || message instanceof braze.ControlMessage) {
braze.showInAppMessage(message);
return;
}
const shouldDefer = true; // Replace with your own display logic
if (shouldDefer) {
braze.deferInAppMessage(message);
return;
}
braze.showInAppMessage(message);
});
braze.openSession();
// Later, when your app is ready to display a deferred message:
const deferredMessage = braze.getDeferredInAppMessage();
if (deferredMessage) {
braze.showInAppMessage(deferredMessage);
}
```
For related delivery customization guidance, see:
- [Web `deferInAppMessage` reference](https://js.appboycdn.com/web-sdk/latest/doc/modules/braze.html#deferinappmessage)
- [Web `subscribeToInAppMessage` reference](https://js.appboycdn.com/web-sdk/latest/doc/modules/braze.html#subscribetoinappmessage)
## Opening links in a new tab
To set your in-app message links to open in a new tab, set the `openInAppMessagesInNewTab` option to `true` to force all links from in-app message clicks open in a new tab or window.
```javascript
braze.initialize('api-key', { openInAppMessagesInNewTab: true} );
```
## Prerequisites
Before you can use this feature, you'll need to [integrate the Android Braze SDK](https://www.braze.com/docs/de/de/developer_guide/sdk_integration/?sdktab=android). You'll also need to [set up in-app messages](https://www.braze.com/docs/de/de/developer_guide/in_app_messages).
## Setting custom manager listeners
While the `BrazeInAppMessageManager` listener can automatically handle the display and lifecycle of in-app messages, you'll need to implement a custom manager listener if you'd like to fully customize your messages.
The Braze SDK has a default `DefaultHtmlInAppMessageActionListener` class that is used if no custom listener is defined and takes appropriate action automatically. If you require more control over how a user interacts with different buttons inside a custom HTML in-app message, implement a custom `IHtmlInAppMessageActionListener` class.
This listener applies to __both__ messages built with custom HTML and messages created using the Drag-and-Drop (DnD) editor. It does not apply to traditional IAMs. Traditional IAMs are Braze's built-in, SDK-rendered message types (for example, slideup, modal, and full) created in the original in-app message composer using predefined layouts. Unlike custom HTML and DnD IAMs, they do not run through the HTML action listener flow.
If you set a custom `IHtmlInAppMessageActionListener`, its logic will override the default click behavior for _all_ DnD messages. Please ensure your marketing team is aware of this, as it may affect their campaigns in unexpected ways.
### Step 1: Implement the custom manager listener
#### Step 1.1: Implement `IInAppMessageManagerListener`
Create a class that implements [`IInAppMessageManagerListener`](https://braze-inc.github.io/braze-android-sdk/kdoc/braze-android-sdk/com.braze.ui.inappmessage.listeners/-i-in-app-message-manager-listener/index.html).
The callbacks in your `IInAppMessageManagerListener` will also be called at various points in the in-app message lifecycle. For example, if you set a custom manager listener when an in-app message is received from Braze, the [`beforeInAppMessageDisplayed()`](https://braze-inc.github.io/braze-android-sdk/kdoc/braze-android-sdk/com.braze.ui.inappmessage.listeners/-i-in-app-message-manager-listener/before-in-app-message-displayed.html) method will be called. If your implementation of this method returns [`InAppMessageOperation.DISCARD`](https://braze-inc.github.io/braze-android-sdk/kdoc/braze-android-sdk/com.braze.ui.inappmessage/-in-app-message-operation/-d-i-s-c-a-r-d/index.html), that signals to Braze that the in-app message will be handled by the host app and should not be displayed by Braze. If [`InAppMessageOperation.DISPLAY_NOW`](https://braze-inc.github.io/braze-android-sdk/kdoc/braze-android-sdk/com.braze.ui.inappmessage/-in-app-message-operation/-d-i-s-p-l-a-y_-n-o-w/index.html) is returned, Braze will attempt to display the in-app message. This method should be used if you choose to display the in-app message in a customized manner.
`IInAppMessageManagerListener` also includes delegate methods for message clicks and buttons, which can be used in cases like intercepting a message when a button or message is clicked for further processing.
#### Step 1.2: Hook into IAM view lifecycle methods (optional)
The [`IInAppMessageManagerListener`](https://braze-inc.github.io/braze-android-sdk/kdoc/braze-android-sdk/com.braze.ui.inappmessage.listeners/-i-in-app-message-manager-listener/index.html) interface has in-app message view methods called at distinct points in the in-app message view lifecycle. These methods are called in the following order:
1. [`beforeInAppMessageViewOpened`](https://braze-inc.github.io/braze-android-sdk/kdoc/braze-android-sdk/com.braze.ui.inappmessage.listeners/-i-in-app-message-manager-listener/before-in-app-message-view-opened.html): Called just before the in-app message is added to the activity's view. The in-app message is not yet visible to the user at this time.
2. [`afterInAppMessageViewOpened`](https://braze-inc.github.io/braze-android-sdk/kdoc/braze-android-sdk/com.braze.ui.inappmessage.listeners/-i-in-app-message-manager-listener/after-in-app-message-view-opened.html): Called just after the in-app message is added to the activity's view. The in-app message is now visible to the user at this time.
3. [`beforeInAppMessageViewClosed`](https://braze-inc.github.io/braze-android-sdk/kdoc/braze-android-sdk/com.braze.ui.inappmessage.listeners/-i-in-app-message-manager-listener/before-in-app-message-view-closed.html): Called just before the in-app message is removed from the activity's view. The in-app message is still visible to the user at this time.
4. [`afterInAppMessageViewClosed`](https://braze-inc.github.io/braze-android-sdk/kdoc/braze-android-sdk/com.braze.ui.inappmessage.listeners/-i-in-app-message-manager-listener/after-in-app-message-view-closed.html): Called just after the in-app message is removed from the activity's view. The in-app message is no longer visible to the user at this time.
Note that the time between [`afterInAppMessageViewOpened`](https://braze-inc.github.io/braze-android-sdk/kdoc/braze-android-sdk/com.braze.ui.inappmessage.listeners/-i-in-app-message-manager-listener/after-in-app-message-view-opened.html) and [`beforeInAppMessageViewClosed`](https://braze-inc.github.io/braze-android-sdk/kdoc/braze-android-sdk/com.braze.ui.inappmessage.listeners/-i-in-app-message-manager-listener/before-in-app-message-view-closed.html) is when the in-app message view is on screen, visible to the user.
**Note:**
Implementation of these methods is not required. They're only provided to track and inform the in-app message view lifecycle. You can leave these method implementations empty.
Create a class that implements [`IHtmlInAppMessageActionListener`](https://braze-inc.github.io/braze-android-sdk/kdoc/braze-android-sdk/com.braze.ui.inappmessage.listeners/-i-html-in-app-message-action-listener/index.html).
The callbacks in your `IHtmlInAppMessageActionListener` will be called whenever the user initiates any of the following actions inside the HTML in-app message:
- Clicks on the close button
- Fires a custom event
- Clicks on a URL inside HTML in-app message
```java
public class CustomHtmlInAppMessageActionListener implements IHtmlInAppMessageActionListener {
private final Context mContext;
public CustomHtmlInAppMessageActionListener(Context context) {
mContext = context;
}
@Override
public void onCloseClicked(IInAppMessage inAppMessage, String url, Bundle queryBundle) {
Toast.makeText(mContext, "HTML In App Message closed", Toast.LENGTH_LONG).show();
BrazeInAppMessageManager.getInstance().hideCurrentlyDisplayingInAppMessage(false);
}
@Override
public boolean onCustomEventFired(IInAppMessage inAppMessage, String url, Bundle queryBundle) {
Toast.makeText(mContext, "Custom event fired. Ignoring.", Toast.LENGTH_LONG).show();
return true;
}
@Override
public boolean onOtherUrlAction(IInAppMessage inAppMessage, String url, Bundle queryBundle) {
Toast.makeText(mContext, "Custom url pressed: " + url + " . Ignoring", Toast.LENGTH_LONG).show();
BrazeInAppMessageManager.getInstance().hideCurrentlyDisplayingInAppMessage(false);
return true;
}
}
```
```kotlin
class CustomHtmlInAppMessageActionListener(private val mContext: Context) : IHtmlInAppMessageActionListener {
override fun onCloseClicked(inAppMessage: IInAppMessage, url: String, queryBundle: Bundle) {
Toast.makeText(mContext, "HTML In App Message closed", Toast.LENGTH_LONG).show()
BrazeInAppMessageManager.getInstance().hideCurrentlyDisplayingInAppMessage(false)
}
override fun onCustomEventFired(inAppMessage: IInAppMessage, url: String, queryBundle: Bundle): Boolean {
Toast.makeText(mContext, "Custom event fired. Ignoring.", Toast.LENGTH_LONG).show()
return true
}
override fun onOtherUrlAction(inAppMessage: IInAppMessage, url: String, queryBundle: Bundle): Boolean {
Toast.makeText(mContext, "Custom url pressed: $url . Ignoring", Toast.LENGTH_LONG).show()
BrazeInAppMessageManager.getInstance().hideCurrentlyDisplayingInAppMessage(false)
return true
}
}
```
### Step 2: Instruct Braze to use the custom manager listener
After you create `IInAppMessageManagerListener`, call `BrazeInAppMessageManager.getInstance().setCustomInAppMessageManagerListener()` to instruct `BrazeInAppMessageManager`
to use your custom `IInAppMessageManagerListener` instead of the default listener. Do this in your [`Application.onCreate()`](https://developer.android.com/reference/android/app/Application.html#onCreate()) before any other calls to Braze, so the custom listener is set before any in-app messages are displayed.
#### Altering in-app messages before display
When a new in-app message is received, and there is already an in-app message being displayed, the new message will be put onto the top of the stack and can be displayed at a later time.
However, if there is no in-app message being displayed, the following delegate method in `IInAppMessageManagerListener` will be called:
```java
@Override
public InAppMessageOperation beforeInAppMessageDisplayed(IInAppMessage inAppMessage) {
return InAppMessageOperation.DISPLAY_NOW;
}
```
```kotlin
override fun beforeInAppMessageDisplayed(inAppMessage: IInAppMessage): InAppMessageOperation {
return InAppMessageOperation.DISPLAY_NOW
}
```
The `InAppMessageOperation()` return value can control when the message should be displayed. The suggested usage of this method would be to delay messages in certain parts of the app by returning `DISPLAY_LATER` when in-app messages would be distracting to the user's app experience.
| `InAppMessageOperation` return value | Behavior |
| -------------------------- | -------- |
| `DISPLAY_NOW` | The message will be displayed |
| `DISPLAY_LATER` | The message will be returned to the stack and displayed at the next available opportunity |
| `DISCARD` | The message will be discarded |
| `null` | The message will be ignored. This method should **NOT** return `null` |
{: .reset-td-br-1 .reset-td-br-2 .reset-td-br-3 aria-label="Altering in-app messages before display" }
See [`InAppMessageOperation`](https://braze-inc.github.io/braze-android-sdk/kdoc/braze-android-sdk/com.braze.ui.inappmessage/-in-app-message-operation/index.html) for more details.
**Tip:**
If you choose to `DISCARD` the in-app message and replace it with your in-app message view, you will need to log in-app message clicks and impressions manually.
On Android, this is done by calling `logClick` and `logImpression` on in-app messages and `logButtonClick` on immersive in-app messages.
**Tip:**
Once an in-app message has been placed on the stack, you can request for it to be retrieved and displayed at any time by calling [`BrazeInAppMessageManager.getInstance().requestDisplayInAppMessage()`](https://braze-inc.github.io/braze-android-sdk/kdoc/braze-android-sdk/com.braze.ui.inappmessage/-braze-in-app-message-manager/request-display-in-app-message.html). This method requests Braze to display the next available in-app message from the stack.
After your `IHtmlInAppMessageActionListener` is created, call `BrazeInAppMessageManager.getInstance().setCustomHtmlInAppMessageActionListener()` to instruct `BrazeInAppMessageManager` to use your custom `IHtmlInAppMessageActionListener` instead of the default action listener.
We recommend setting your `IHtmlInAppMessageActionListener` in your [`Application.onCreate()`](https://developer.android.com/reference/android/app/Application.html#onCreate()) before any other calls to Braze. This will set the custom action listener before any in-app message is displayed:
```java
BrazeInAppMessageManager.getInstance().setCustomHtmlInAppMessageActionListener(new CustomHtmlInAppMessageActionListener(context));
```
```kotlin
BrazeInAppMessageManager.getInstance().setCustomHtmlInAppMessageActionListener(CustomHtmlInAppMessageActionListener(context))
```
## Setting custom factories
You can override a number of defaults through custom factory objects. These can be registered with the Braze SDK as needed to achieve the desired results. However, if you decide to override a factory, you'll likely need to explicitly defer to the default or reimplement the functionality provided by the Braze default. The following code snippet illustrates how to supply custom implementations of the `IInAppMessageViewFactory` and the `IInAppMessageViewWrapperFactory` interfaces.
**In-app message types**
```kotlin
class BrazeDemoApplication : Application(){
override fun onCreate() {
super.onCreate()
registerActivityLifecycleCallbacks(BrazeActivityLifecycleCallbackListener(true, true))
BrazeInAppMessageManager.getInstance().setCustomInAppMessageViewWrapperFactory(CustomInAppMessageViewWrapperFactory())
BrazeInAppMessageManager.getInstance().setCustomInAppMessageViewFactory(CustomInAppMessageViewFactory())
}
}
```
**In-app message types**
```java
public class BrazeDemoApplication extends Application {
@Override
public void onCreate{
super.onCreate();
registerActivityLifecycleCallbacks(new BrazeActivityLifecycleCallbackListener(true, true));
BrazeInAppMessageManager.getInstance().setCustomInAppMessageViewWrapperFactory(new CustomInAppMessageViewWrapperFactory());
BrazeInAppMessageManager.getInstance().setCustomInAppMessageViewFactory(new CustomInAppMessageViewFactory());
}
}
```
Braze in-app message types are versatile enough to cover most custom use cases. However, if you want to fully define the visual appearance of your in-app messages instead of using a default type, Braze makes this possible by setting a custom view factory.
The `BrazeInAppMessageManager` automatically handles placing the in-app message model into the existing activity view hierarchy by default using [`DefaultInAppMessageViewWrapper`](https://braze-inc.github.io/braze-android-sdk/kdoc/braze-android-sdk/com.braze.ui.inappmessage/-default-in-app-message-view-wrapper/index.html). If you need to customize how in-app messages are placed into the view hierarchy, you should use a custom [`IInAppMessageViewWrapperFactory`](https://braze-inc.github.io/braze-android-sdk/kdoc/braze-android-sdk/com.braze.ui.inappmessage/-i-in-app-message-view-wrapper-factory/index.html).
In-app messages have preset animation behavior. `Slideup` messages slide into the screen; `full` and `modal` messages fade in and out. If you want to define custom animation behaviors for your in-app messages, Braze makes this possible by setting up a custom animation factory.
### Step 1: Implement the factory
Create a class that implements [`IInAppMessageViewFactory`](https://braze-inc.github.io/braze-android-sdk/kdoc/braze-android-sdk/com.braze.ui.inappmessage/-i-in-app-message-view-factory/index.html):
```java
public class CustomInAppMessageViewFactory implements IInAppMessageViewFactory {
@Override
public View createInAppMessageView(Activity activity, IInAppMessage inAppMessage) {
// Uses a custom view for slideups, modals, and full in-app messages.
// HTML in-app messages and any other types will use the Braze default in-app message view factories
switch (inAppMessage.getMessageType()) {
case SLIDEUP:
case MODAL:
case FULL:
// Use a custom view of your choosing
return createMyCustomInAppMessageView();
default:
// Use the default in-app message factories
final IInAppMessageViewFactory defaultInAppMessageViewFactory = BrazeInAppMessageManager.getInstance().getDefaultInAppMessageViewFactory(inAppMessage);
return defaultInAppMessageViewFactory.createInAppMessageView(activity, inAppMessage);
}
}
}
```
```kotlin
class CustomInAppMessageViewFactory : IInAppMessageViewFactory {
override fun createInAppMessageView(activity: Activity, inAppMessage: IInAppMessage): View {
// Uses a custom view for slideups, modals, and full in-app messages.
// HTML in-app messages and any other types will use the Braze default in-app message view factories
when (inAppMessage.messageType) {
MessageType.SLIDEUP, MessageType.MODAL, MessageType.FULL ->
// Use a custom view of your choosing
return createMyCustomInAppMessageView()
else -> {
// Use the default in-app message factories
val defaultInAppMessageViewFactory = BrazeInAppMessageManager.getInstance().getDefaultInAppMessageViewFactory(inAppMessage)
return defaultInAppMessageViewFactory!!.createInAppMessageView(activity, inAppMessage)
}
}
}
}
```
Create a class that implements [`IInAppMessageViewWrapperFactory`](https://braze-inc.github.io/braze-android-sdk/kdoc/braze-android-sdk/com.braze.ui.inappmessage/-i-in-app-message-view-wrapper-factory/index.html) and returns an [`IInAppMessageViewWrapper`](https://braze-inc.github.io/braze-android-sdk/kdoc/braze-android-sdk/com.braze.ui.inappmessage/-i-in-app-message-view-wrapper/index.html).
This factory is called immediately after the in-app message view is created. The easiest way to implement a custom [`IInAppMessageViewWrapper`](https://braze-inc.github.io/braze-android-sdk/kdoc/braze-android-sdk/com.braze.ui.inappmessage/-i-in-app-message-view-wrapper/index.html) is just to extend the default [`DefaultInAppMessageViewWrapper`](https://braze-inc.github.io/braze-android-sdk/kdoc/braze-android-sdk/com.braze.ui.inappmessage/-default-in-app-message-view-wrapper/index.html):
```java
public class CustomInAppMessageViewWrapper extends DefaultInAppMessageViewWrapper {
public CustomInAppMessageViewWrapper(View inAppMessageView,
IInAppMessage inAppMessage,
IInAppMessageViewLifecycleListener inAppMessageViewLifecycleListener,
BrazeConfigurationProvider brazeConfigurationProvider,
Animation openingAnimation,
Animation closingAnimation, View clickableInAppMessageView) {
super(inAppMessageView,
inAppMessage,
inAppMessageViewLifecycleListener,
brazeConfigurationProvider,
openingAnimation,
closingAnimation,
clickableInAppMessageView);
}
@Override
public void open(@NonNull Activity activity) {
super.open(activity);
Toast.makeText(activity.getApplicationContext(), "Opened in-app message", Toast.LENGTH_SHORT).show();
}
@Override
public void close() {
super.close();
Toast.makeText(mInAppMessageView.getContext().getApplicationContext(), "Closed in-app message", Toast.LENGTH_SHORT).show();
}
}
```
```kotlin
class CustomInAppMessageViewWrapper(inAppMessageView: View,
inAppMessage: IInAppMessage,
inAppMessageViewLifecycleListener: IInAppMessageViewLifecycleListener,
brazeConfigurationProvider: BrazeConfigurationProvider,
openingAnimation: Animation,
closingAnimation: Animation, clickableInAppMessageView: View) :
DefaultInAppMessageViewWrapper(inAppMessageView,
inAppMessage,
inAppMessageViewLifecycleListener,
brazeConfigurationProvider,
openingAnimation,
closingAnimation,
clickableInAppMessageView) {
override fun open(activity: Activity) {
super.open(activity)
Toast.makeText(activity.applicationContext, "Opened in-app message", Toast.LENGTH_SHORT).show()
}
override fun close() {
super.close()
Toast.makeText(mInAppMessageView.context.applicationContext, "Closed in-app message", Toast.LENGTH_SHORT).show()
}
}
```
Create a class that implements [`IInAppMessageAnimationFactory`](https://braze-inc.github.io/braze-android-sdk/kdoc/braze-android-sdk/com.braze.ui.inappmessage/-i-in-app-message-animation-factory/index.html):
```java
public class CustomInAppMessageAnimationFactory implements IInAppMessageAnimationFactory {
@Override
public Animation getOpeningAnimation(IInAppMessage inAppMessage) {
Animation animation = new AlphaAnimation(0, 1);
animation.setInterpolator(new AccelerateInterpolator());
animation.setDuration(2000L);
return animation;
}
@Override
public Animation getClosingAnimation(IInAppMessage inAppMessage) {
Animation animation = new AlphaAnimation(1, 0);
animation.setInterpolator(new DecelerateInterpolator());
animation.setDuration(2000L);
return animation;
}
}
```
```kotlin
class CustomInAppMessageAnimationFactory : IInAppMessageAnimationFactory {
override fun getOpeningAnimation(inAppMessage: IInAppMessage): Animation {
val animation: Animation = AlphaAnimation(0, 1)
animation.interpolator = AccelerateInterpolator()
animation.duration = 2000L
return animation
}
override fun getClosingAnimation(inAppMessage: IInAppMessage): Animation {
val animation: Animation = AlphaAnimation(1, 0)
animation.interpolator = DecelerateInterpolator()
animation.duration = 2000L
return animation
}
}
```
### Step 2: Instruct Braze to use the factory
After your `IInAppMessageViewFactory` is created, call `BrazeInAppMessageManager.getInstance().setCustomInAppMessageViewFactory()` to instruct `BrazeInAppMessageManager`
to use your custom `IInAppMessageViewFactory` instead of the default view factory.
**Tip:**
We recommend setting your `IInAppMessageViewFactory` in your `Application.onCreate()` before any other calls to Braze. This will set the custom view factory before any in-app message is displayed.
#### How it works
The `slideup` in-app message view implements [`IInAppMessageView`](https://braze-inc.github.io/braze-android-sdk/kdoc/braze-android-sdk/com.braze.ui.inappmessage.views/-i-in-app-message-view/index.html). The `full` and `modal` type message views implement [`IInAppMessageImmersiveView`](https://braze-inc.github.io/braze-android-sdk/kdoc/braze-android-sdk/com.braze.ui.inappmessage.views/-i-in-app-message-immersive-view/index.html). Implementing one of these classes allows Braze to add click listeners to your custom view where appropriate. All Braze view classes extend Android's [`View`](http://developer.android.com/reference/android/view/View.html) class.
Implementing `IInAppMessageView` allows you to define a certain portion of your custom view as clickable. Implementing [`IInAppMessageImmersiveView`](https://braze-inc.github.io/braze-android-sdk/kdoc/braze-android-sdk/com.braze.ui.inappmessage.views/-i-in-app-message-immersive-view/index.html) allows you to define message button views and a close button view.
After your [`IInAppMessageViewWrapper`](https://braze-inc.github.io/braze-android-sdk/kdoc/braze-android-sdk/com.braze.ui.inappmessage/-i-in-app-message-view-wrapper/index.html) is created, call [`BrazeInAppMessageManager.getInstance().setCustomInAppMessageViewWrapperFactory()`](https://braze-inc.github.io/braze-android-sdk/kdoc/braze-android-sdk/com.braze.ui.inappmessage/-in-app-message-manager-base/set-custom-in-app-message-view-factory.html) to instruct `BrazeInAppMessageManager` to use your custom [`IInAppMessageViewWrapperFactory`](https://braze-inc.github.io/braze-android-sdk/kdoc/braze-android-sdk/com.braze.ui.inappmessage/-i-in-app-message-view-wrapper-factory/index.html) instead of the default view wrapper factory.
We recommend setting your [`IInAppMessageViewWrapperFactory`](https://braze-inc.github.io/braze-android-sdk/kdoc/braze-android-sdk/com.braze.ui.inappmessage/-i-in-app-message-view-wrapper-factory/index.html) in your [`Application.onCreate()`](https://developer.android.com/reference/android/app/Application.html#onCreate()) before any other calls to Braze. This will set the custom view wrapper factory before any in-app message is displayed:
```java
BrazeInAppMessageManager.getInstance().setCustomInAppMessageViewWrapperFactory(new CustomInAppMessageViewWrapper());
```
```kotlin
BrazeInAppMessageManager.getInstance().setCustomInAppMessageViewWrapperFactory(CustomInAppMessageViewWrapper())
```
Once your `IInAppMessageAnimationFactory` is created, call `BrazeInAppMessageManager.getInstance().setCustomInAppMessageAnimationFactory()` to instruct `BrazeInAppMessageManager`
to use your custom `IInAppMessageAnimationFactory` instead of the default animation factory.
We recommend setting your `IInAppMessageAnimationFactory` in your [`Application.onCreate()`](https://developer.android.com/reference/android/app/Application.html#onCreate()) before any other calls to Braze. This will set the custom animation factory before any in-app message is displayed.
## Custom styles
Braze UI elements come with a default look and feel that matches the Android standard UI guidelines and provides a seamless experience. This reference article covers custom in-app messaging styling for your Android or FireOS application.
### Setting a default style
You can see default styles in the Braze SDK's [`styles.xml`](https://github.com/braze-inc/braze-android-sdk/blob/master/android-sdk-ui/src/main/res/values/styles.xml) file:
```xml
```
If you would prefer, you can override these styles to create a look and feel that better suits your app.
To override a style, copy it in its entirety to the `styles.xml` file in your project and make modifications. The whole style must be copied over to your local `styles.xml` file for all attributes to be correctly set. Note that these custom styles are for changes to individual UI elements, not wholesale changes to layouts. Layout-level changes need to be handled with custom views.
**Note:**
You can customize some colors directly in your Braze campaign without modifying the XML. Keep in mind, colors set in the Braze dashboard will override colors you set anywhere else.
### Customizing the font
You can set a custom font by locating the typeface in the `res/font` directory. To use it, override the style for message text, headers, and button text and use the `fontFamily` attribute to instruct Braze to use your custom font family.
For example, to update the font on your in-app message button text, override the `Braze.InAppMessage.Button` style and reference your custom font family. The attribute value should point to a font family in your `res/font` directory.
Here is a truncated example with a custom font family, `my_custom_font_family`, referenced on the last line:
```xml
```
Aside from the `Braze.InAppMessage.Button` style for button text, the style for message text is `Braze.InAppMessage.Message` and the style for message headers is `Braze.InAppMessage.Header`. If you want to use your custom font family across all possible in-app message text, you can set your font family on the `Braze.InAppMessage` style, which is the parent style for all in-app messages.
**Important:**
As with other custom styles, the entire style must be copied over to your local `styles.xml` file for all attributes to be correctly set.
## Message dismissals
### Swiping to dismiss slideup messages
By default, slideup in-app messages can be dismissed with a swipe gesture. The direction of the swipe depends on the slideup position:
- **Left or right swipe:** Dismisses the slideup regardless of its position.
- **Slideup from the bottom:** Swiping from top to bottom dismisses the message. Swiping from bottom to top does not dismiss it.
- **Slideup from the top:** Swiping from bottom to top dismisses the message. Swiping from top to bottom does not dismiss it.
This swipe behavior is built into the default [`DefaultInAppMessageViewWrapper`](https://braze-inc.github.io/braze-android-sdk/kdoc/braze-android-sdk/com.braze.ui.inappmessage/-default-in-app-message-view-wrapper/index.html) and applies only to slideup in-app messages. Modal and full in-app messages don't support swipe-to-dismiss. To customize this behavior, you can implement a [custom view wrapper factory](#android_setting-custom-factories).
**Note:**
Tapping outside of a slideup message does not dismiss it by default. This behavior differs from modal messages, which can be configured for outside tap dismissal. For slideups, use the swipe gesture or the close button to dismiss the message.
### Disabling back button dismissals
By default, the hardware back button dismisses Braze in-app messages. This behavior can be disabled on a per-message basis via [`BrazeInAppMessageManager.setBackButtonDismissesInAppMessageView()`](https://braze-inc.github.io/braze-android-sdk/kdoc/braze-android-sdk/com.braze.ui.inappmessage/-in-app-message-manager-base/set-back-button-dismisses-in-app-message-view.html).
In the following example, `disable_back_button` is a custom key-value pair set on the in-app message that signifies whether the message should allow for the back button to dismiss the message:
```java
BrazeInAppMessageManager.getInstance().setCustomInAppMessageManagerListener(new DefaultInAppMessageManagerListener() {
@Override
public void beforeInAppMessageViewOpened(View inAppMessageView, IInAppMessage inAppMessage) {
super.beforeInAppMessageViewOpened(inAppMessageView, inAppMessage);
final Map extras = inAppMessage.getExtras();
if (extras != null && extras.containsKey("disable_back_button")) {
BrazeInAppMessageManager.getInstance().setBackButtonDismissesInAppMessageView(false);
}
}
@Override
public void afterInAppMessageViewClosed(IInAppMessage inAppMessage) {
super.afterInAppMessageViewClosed(inAppMessage);
BrazeInAppMessageManager.getInstance().setBackButtonDismissesInAppMessageView(true);
}
});
```
```kotlin
BrazeInAppMessageManager.getInstance().setCustomInAppMessageManagerListener(object : DefaultInAppMessageManagerListener() {
override fun beforeInAppMessageViewOpened(inAppMessageView: View, inAppMessage: IInAppMessage) {
super.beforeInAppMessageViewOpened(inAppMessageView, inAppMessage)
val extras = inAppMessage.extras
if (extras != null && extras.containsKey("disable_back_button")) {
BrazeInAppMessageManager.getInstance().setBackButtonDismissesInAppMessageView(false)
}
}
override fun afterInAppMessageViewClosed(inAppMessage: IInAppMessage) {
super.afterInAppMessageViewClosed(inAppMessage)
BrazeInAppMessageManager.getInstance().setBackButtonDismissesInAppMessageView(true)
}
})
```
**Note:**
Note that if this functionality is disabled, the host activity's hardware back button default behavior will be used instead. This may lead to the back button closing the application instead of the displayed in-app message.
### Enabling outside tap dismissals
By default, dismissing the modal using an outside tap is set to `false`. Setting this value to `true` will result in the modal in-app message being dismissed when the user taps outside of the in-app message. This behavior can be toggled on by calling:
```java
BrazeInAppMessageManager.getInstance().setClickOutsideModalViewDismissInAppMessageView(true)
```
## Customizing the orientation
To set a fixed orientation for an in-app message, first [set a custom in-app message manager listener](https://www.braze.com/docs/de/de/developer_guide/in_app_messages/customization/?sdktab=android#android_setting-custom-manager-listeners). Then, update the orientation on the `IInAppMessage` object in the `beforeInAppMessageDisplayed()` delegate method:
```java
public InAppMessageOperation beforeInAppMessageDisplayed(IInAppMessage inAppMessage) {
// Set the orientation to portrait
inAppMessage.setOrientation(Orientation.PORTRAIT);
return InAppMessageOperation.DISPLAY_NOW;
}
```
```kotlin
override fun beforeInAppMessageDisplayed(inAppMessage: IInAppMessage): InAppMessageOperation {
// Set the orientation to portrait
inAppMessage.orientation = Orientation.PORTRAIT
return InAppMessageOperation.DISPLAY_NOW
}
```
For tablet devices, in-app messages will appear in the user's preferred orientation style regardless of actual screen orientation.
## Disabling dark theme {#android-in-app-message-dark-theme-customization}
By default, `IInAppMessageManagerListener`'s `beforeInAppMessageDisplayed()` checks the system settings and conditionally enables dark theme styling on the message with the following code:
```java
@Override
public InAppMessageOperation beforeInAppMessageDisplayed(IInAppMessage inAppMessage) {
if (inAppMessage instanceof IInAppMessageThemeable && ViewUtils.isDeviceInNightMode(BrazeInAppMessageManager.getInstance().getApplicationContext())) {
((IInAppMessageThemeable) inAppMessage).enableDarkTheme();
}
return InAppMessageOperation.DISPLAY_NOW;
}
```
```kotlin
override fun beforeInAppMessageDisplayed(inAppMessage: IInAppMessage): InAppMessageOperation {
if (inAppMessage is IInAppMessageThemeable && ViewUtils.isDeviceInNightMode(BrazeInAppMessageManager.getInstance().applicationContext!!)) {
(inAppMessage as IInAppMessageThemeable).enableDarkTheme()
}
return InAppMessageOperation.DISPLAY_NOW
}
```
To change this, you can call [`enableDarkTheme`](https://braze-inc.github.io/braze-android-sdk/kdoc/braze-android-sdk/com.braze.models.inappmessage/-i-in-app-message-themeable/enable-dark-theme.html) at any step in the pre-display process to implement your own conditional logic.
## Customizing the Google Play review prompt
Due to the limitations and restrictions set by Google, custom Google Play review prompts are not currently supported by Braze. While some users have been able to integrate these prompts successfully, others have shown low success rates due to [Google Play quotas](https://developer.android.com/guide/playcore/in-app-review#quotas). Integrate at your own risk. Refer to documentation on [Google Play in-app review prompts](https://developer.android.com/guide/playcore/in-app-review).
## Prerequisites
Before you can use this feature, you'll need to [integrate the Swift Braze SDK](https://www.braze.com/docs/de/de/developer_guide/sdk_integration/?sdktab=swift).
## Setting up the UI delegate (required)
To customize the presentation of in-app messages and react to various lifecycle events, you'll need to set up [`BrazeInAppMessageUIDelegate`](https://braze-inc.github.io/braze-swift-sdk/documentation/brazeui/brazeinappmessageuidelegate). This is a delegate protocol used for receiving and processing triggered in-app message payloads, receiving display lifecycle events, and controlling display timing. To use `BrazeInAppMessageUIDelegate`, you must:
- Use the default [`BrazeInAppMessageUI`](https://braze-inc.github.io/braze-swift-sdk/documentation/brazeui/brazeinappmessageui) implementation as your `inAppMessagePresenter`.
- Include the `BrazeUI` library in your project.
### Step 1: Implement the `BrazeInAppMessageUIDelegate` protocol
First, implement the `BrazeInAppMessageUIDelegate` protocol and any corresponding methods you wish. In the following example, this protocol is implemented in the application's `AppDelegate` class.
```swift
extension AppDelegate: BrazeInAppMessageUIDelegate {
// Implement your protocol methods here.
}
```
```objc
@interface AppDelegate ()
@end
@implementation AppDelegate
// Implement your protocol methods here.
@end
```
### Step 2: Assign the `delegate` object
Assign the `delegate` object on the `BrazeInAppMessageUI` instance before assigning this in-app message UI as your `inAppMessagePresenter`.
```swift
let inAppMessageUI = BrazeInAppMessageUI()
inAppMessageUI.delegate = self
AppDelegate.braze?.inAppMessagePresenter = inAppMessageUI
```
```objc
BrazeInAppMessageUI *inAppMessageUI = [[BrazeInAppMessageUI alloc] init];
inAppMessageUI.delegate = self;
AppDelegate.braze.inAppMessagePresenter = inAppMessageUI;
```
**Important:**
Not all delegate methods are available in Objective-C due to the incompatibility of their parameters with the language runtime.
**Tip:**
For a step-by-step implementation of the in-app message UI delegate, refer to this [tutorial](https://braze-inc.github.io/braze-swift-sdk/tutorials/braze/c1-inappmessageui).
## On-click behavior
Each `Braze.InAppMessage` object contains a corresponding [`ClickAction`](https://braze-inc.github.io/braze-swift-sdk/documentation/brazekit/braze/inappmessage/clickaction), which defines the behavior upon clicking.
### Click action types
The `clickAction` property on your `Braze.InAppMessage` defaults to `.none` but can be set to one of the following values:
| `ClickAction` | On-Click Behavior |
| -------------------------- | -------- |
| `.url(URL, useWebView: Bool)` | Opens the given URL in an external browser. If `useWebView` is set to `true`, it will open in a web view. |
| `.none` | The message will be dismissed when clicked. |
{: .reset-td-br-1 .reset-td-br-2 aria-label="Click action types" }
**Important:**
For in-app messages containing buttons, the message `clickAction` will also be included in the final payload if the click action is added prior to adding the button text.
### Customizing on-click behavior
To customize this behavior, you may modify the `clickAction` property by referring to the following sample:
```swift
func inAppMessage(
_ ui: BrazeInAppMessageUI,
prepareWith context: inout BrazeInAppMessageUI.PresentationContext
) {
if let newUrl = URL(string: "{your-url}") {
context.message.clickAction = .url(newUrl, useWebView: true)
}
}
```
The `inAppMessage(_:prepareWith:)` method is not available in Objective-C.
### Handling the custom behavior
The following [`BrazeInAppMessageUIDelegate`](https://braze-inc.github.io/braze-swift-sdk/documentation/brazeui/brazeinappmessageuidelegate) delegate method is called when a user clicks an in-app message. This callback is triggered for user-initiated clicks on in-app message buttons and HTML in-app message buttons (links), and a button ID is provided as an optional parameter for these interactions. This callback is not invoked for programmatic clicks triggered through `brazeBridge.logClick()`.
```swift
func inAppMessage(
_ ui: BrazeInAppMessageUI,
shouldProcess clickAction: Braze.InAppMessage.ClickAction,
buttonId: String?,
message: Braze.InAppMessage,
view: InAppMessageView
) -> Bool
```
```objc
- (BOOL)inAppMessage:(BrazeInAppMessageUI *)ui
shouldProcess:(enum BRZInAppMessageRawClickAction)clickAction
url:(NSURL *)uri
buttonId:(NSString *)buttonId
message:(BRZInAppMessageRaw *)message
view:(UIView *)view;
```
This method returns a boolean value to indicate if Braze should continue to execute the click action.
```swift
func inAppMessage(
_ ui: BrazeInAppMessageUI, shouldProcess clickAction: Braze.InAppMessage.ClickAction,
buttonId: String?, message: Braze.InAppMessage, view: InAppMessageView
) -> Bool {
guard let buttonId,
let idInt = Int(buttonId)
else { return true }
var button: BrazeKit.Braze.InAppMessage.Button? = nil
switch message {
case .modal(let modal):
button = modal.buttons[idInt]
case .modalImage(let modalImage):
button = modalImage.buttons[idInt]
case .full(let full):
button = full.buttons[idInt]
case .fullImage(let fullImage):
button = fullImage.buttons[idInt]
default:
break
}
print(button?.id)
print(button?.text)
print(button?.clickAction)
return true
}
```
```objc
- (BOOL)inAppMessage:(BrazeInAppMessageUI *)ui
shouldProcess:(enum BRZInAppMessageRawClickAction)clickAction
url:(NSURL *)uri
buttonId:(NSString *)buttonId
message:(BRZInAppMessageRaw *)message
view:(UIView *)view {
NSInteger buttonInt = [buttonId integerValue];
if (message.type == BRZInAppMessageRawTypeFull || message.type == BRZInAppMessageRawTypeModal) {
BRZInAppMessageRawButton *button = message.buttons[buttonInt];
NSLog(@"%ld", (long)button.identifier);
NSLog(@"%@", button.text);
NSLog(@"%ld", (long)button.clickAction);
}
return YES;
}
```
## Swiping to dismiss slideup messages
By default, slideup in-app messages can be dismissed with a swipe gesture. The direction of the swipe depends on the slideup position:
- **Left or right swipe:** Dismisses the slideup regardless of its position.
- **Slideup from the bottom:** Swiping from top to bottom dismisses the message. Swiping from bottom to top does not dismiss it.
- **Slideup from the top:** Swiping from bottom to top dismisses the message. Swiping from top to bottom does not dismiss it.
This swipe behavior is built into the default `BrazeInAppMessageUI` [`SlideupView`](https://braze-inc.github.io/braze-swift-sdk/documentation/brazeui/brazeinappmessageui/slideupview) and applies only to slideup in-app messages. Modal and full in-app messages don't support swipe-to-dismiss. To further customize the slideup view, including swipe behavior, you can modify the [`SlideupView.Attributes`](https://braze-inc.github.io/braze-swift-sdk/documentation/brazeui/brazeinappmessageui/slideupview/attributes-swift.struct) or provide a custom view via subclassing.
**Note:**
Tapping outside of a slideup message does not dismiss it. For modal or full in-app messages, you can enable outside tap dismissals using the `dismissOnBackgroundTap` attribute described in the following section.
## Customizing modal dismissals
To enable outside tap dismissals, you can modify the `dismissOnBackgroundTap` property on the `Attributes` struct of the in-app message type you wish to customize.
For example, if you wish to enable this feature for modal image in-app messages, you can configure the following:
```swift
BrazeInAppMessageUI.ModalImageView.Attributes.defaults.dismissOnBackgroundTap = true
```
Customization via `Attributes` is not available in Objective-C.
The default value is `false`. This determines if the modal in-app message will be dismissed when the user taps outside of the in-app message.
| `DismissModalOnOutsideTap` | Description |
|----------|-------------|
| `true` | Modal in-app messages will be dismissed on outside tap. |
| `false` | Default, modal in-app messages will not be dismissed on outside tap. |
{: .reset-td-br-1 .reset-td-br-2 aria-label="Customizing modal dismissals" }
For more details on in-app message customization, refer to this [article](https://braze-inc.github.io/braze-swift-sdk/documentation/braze/in-app-message-customization).
## Customizing message orientation
You can customize the orientation of your in-app messages. You can set a new default orientation for all messages or set a custom orientation for a single message.
To choose a default orientation for all in-app messages, use the [`inAppMessage(_:prepareWith:)`](https://braze-inc.github.io/braze-swift-sdk/documentation/brazeui/brazeinappmessageuidelegate/inappmessage(_:preparewith:)-11fog) method to set the `preferredOrientation` property on the `PresentationContext`.
For example, to set portrait as the default orientation:
```swift
func inAppMessage(
_ ui: BrazeInAppMessageUI,
prepareWith context: inout BrazeInAppMessageUI.PresentationContext
) {
context.preferredOrientation = .portrait
}
```
```objc
- (void)inAppMessage:(BrazeInAppMessageUI *)ui
prepareWith:(BrazeInAppMessageUIPresentationContextRaw *)context {
context.preferredOrientation = BRZInAppMessageRawOrientationPortrait;
}
```
To set the orientation for a single message, modify the `orientation` property of `Braze.InAppMessage`:
```swift
// Set inAppMessage orientation to support any configuration
inAppMessage.orientation = .any
// Set inAppMessage orientation to only display in portrait
inAppMessage.orientation = .portrait
// Set inAppMessage orientation to only display in landscape
inAppMessage.orientation = .landscape
```
```objc
// Set inAppMessage orientation to support any configuration
inAppMessage.orientation = BRZInAppMessageRawOrientationAny;
// Set inAppMessage orientation to only display in portrait
inAppMessage.orientation = BRZInAppMessageRawOrientationPortrait;
// Set inAppMessage orientation to only display in landscape
inAppMessage.orientation = BRZInAppMessageRawOrientationLandscape;
```
After the in-app message is displayed, any device orientation changes while the message is still being displayed will cause the message to rotate with the device (provided it's supported by the message's `orientation` configuration).
The device orientation must also be supported by the in-app message's `orientation` property for the message to display. Additionally, the `preferredOrientation` setting will only be respected if it is included in your application's supported interface orientations under the **Deployment Info** section of your target's settings in Xcode.

**Note:**
The orientation is applied only for the presentation of the message. After the device changes orientation, the message view adopts one of the orientations it supports. On smaller devices (iPhones, iPod Touch), setting a landscape orientation for a modal or full in-app message may lead to truncated content.
## Customizing display timing
You can control if an available in-app message will display during certain points of your user experience. If there are situations where you would not want the in-app message to appear, such as during a fullscreen game or on a loading screen, you can delay or discard pending in-app message messages. To control the timing of in-app message, use the `inAppMessage(_:displayChoiceForMessage:)` [delegate method](https://braze-inc.github.io/braze-swift-sdk/documentation/brazeui/brazeinappmessageuidelegate/inappmessage(_:displaychoiceformessage:)-9w1nb) to set the `BrazeInAppMessageUI.DisplayChoice` property.
```swift
func inAppMessage(
_ ui: BrazeInAppMessageUI,
displayChoiceForMessage message: Braze.InAppMessage
) -> BrazeInAppMessageUI.DisplayChoice
```
```objc
- (enum BRZInAppMessageUIDisplayChoice)inAppMessage:(BrazeInAppMessageUI *)ui displayChoiceForMessage:(BRZInAppMessageRaw *)message
```
Configure `BrazeInAppMessageUI.DisplayChoice` to return one of the following values:
| Display Choice | Behavior |
| ----------------------------------- | --------------------------------------------------------------------------------------------------------------------------- |
| `.now` | The message will be displayed immediately. This is the default value. |
| `.reenqueue` | The message will be not be displayed and will be placed back on the top of the stack. |
| `.later` | The message will be not be displayed and will be placed back on the top of the stack. (Deprecated, please use `.reenqueue`) |
| `.discard` | The message will be discarded and will not be displayed. |
{: .reset-td-br-1 .reset-td-br-2 aria-label="Customizing display timing" }
**Tip:**
For a sample of `InAppMessageUI`, check out our [Swift Braze SDK repository](https://github.com/braze-inc/braze-swift-sdk/tree/main/Examples/Swift/Sources/InAppMessageUI) and [Objective-C](https://github.com/braze-inc/braze-swift-sdk/tree/main/Examples/ObjC/Sources/InAppMessageUI).
## Hiding the status bar
For `Full`, `FullImage` and `HTML` in-app messages, the SDK will hide the status bar by default. For other types of in-app messages, the status bar is left untouched. To configure this behavior, use the `inAppMessage(_:prepareWith:)` [delegate method](https://braze-inc.github.io/braze-swift-sdk/documentation/brazeui/brazeinappmessageuidelegate/inappmessage(_:preparewith:)-11fog) to set the `statusBarHideBehavior` property on the `PresentationContext`. This field takes one of the following values:
| Status Bar Hide Behavior | Description |
| ----------------------------------- | ------------------------------------------------------------------------------------- |
| `.auto` | The message view decides the status bar hidden state. |
| `.hidden` | Always hide the status bar. |
| `.visible` | Always display the status bar. |
{: .reset-td-br-1 .reset-td-br-2 aria-label="Hiding the status bar" }
## Disabling dark mode
To prevent in-app messages from adopting dark mode styling when the user device has dark mode enabled, implement the `inAppMessage(_:prepareWith:)` [delegate method](https://braze-inc.github.io/braze-swift-sdk/documentation/brazeui/brazeinappmessageuidelegate/inappmessage(_:preparewith:)-11fog) method. The `PresentationContext` passed to the method contains a reference to the `InAppMessage` object to be presented. Each `InAppMessage` has a `themes` property containing a `dark` and `light` mode theme. If you set the `themes.dark` property to `nil`, Braze will automatically present the in-app message using its light theme.
In-app message types with buttons have an additional `themes` object on their `buttons` property. To prevent buttons from adopting dark mode styling, you can use [`map(_:)`](https://developer.apple.com/documentation/swift/array/map(_:)-87c4d) to create a new array of buttons with a `light` theme and no `dark` theme.
```swift
func inAppMessage(
_ ui: BrazeInAppMessageUI,
prepareWith context: inout BrazeInAppMessageUI.PresentationContext
) {
switch context.message {
case .slideup:
guard var slideup = context.message.slideup else { return }
slideup.themes.dark = nil
context.message.slideup = slideup
case .modal:
guard var modal = context.message.modal else { return }
modal.themes.dark = nil
modal.buttons = modal.buttons.map {
var newButton = $0
newButton.themes = .init(themes: ["light": $0.themes.light])
return newButton
}
context.message.modal = modal
case .modalImage:
guard var modalImage = context.message.modalImage else { return }
modalImage.themes.dark = nil
modalImage.buttons = modalImage.buttons.map {
var newButton = $0
newButton.themes = .init(themes: ["light": $0.themes.light])
return newButton
}
context.message.modalImage = modalImage
case .full:
guard var full = context.message.full else { return }
full.themes.dark = nil
full.buttons = full.buttons.map {
var newButton = $0
newButton.themes = .init(themes: ["light": $0.themes.light])
return newButton
}
context.message.full = full
case .fullImage:
guard var fullImage = context.message.fullImage else { return }
fullImage.themes.dark = nil
fullImage.buttons = fullImage.buttons.map {
var newButton = $0
newButton.themes = .init(themes: ["light": $0.themes.light])
return newButton
}
context.message.fullImage = fullImage
default:
break
}
}
```
```objc
- (void)inAppMessage:(BrazeInAppMessageUI *)ui
prepareWith:(BrazeInAppMessageUIPresentationContextRaw *)context {
switch (context.message.type) {
case BRZInAppMessageRawTypeSlideup: {
NSMutableDictionary *updatedThemes = [context.message.themes mutableCopy];
[updatedThemes removeObjectForKey:@"dark"];
context.message.themes = updatedThemes;
break;
}
case BRZInAppMessageRawTypeModal:
case BRZInAppMessageRawTypeFull:
{
NSMutableDictionary *updatedThemes = [context.message.themes mutableCopy];
[updatedThemes removeObjectForKey:@"dark"];
context.message.themes = updatedThemes;
NSMutableArray *updatedButtons = [NSMutableArray arrayWithCapacity:context.message.buttons.count];
for (BRZInAppMessageRawButton *button in context.message.buttons) {
BRZInAppMessageRawButtonTheme *lightTheme = BRZInAppMessageRawButtonTheme.defaultLight;
BRZInAppMessageRawButton *newButton = [button mutableCopy];
newButton.textColor = lightTheme.textColor;
newButton.backgroundColor = lightTheme.backgroundColor;
newButton.borderColor = lightTheme.borderColor;
[updatedButtons addObject:newButton];
}
context.message.buttons = updatedButtons;
break;
}
default:
break;
}
}
```
## Customizing the app store review prompt
You can use in-app messages in a campaign to ask users for an App Store review.
**Note:**
Because this example prompt overrides default behavior of Braze, we cannot automatically track impressions if it is implemented. You must [log your own analytics](https://www.braze.com/docs/de/de/developer_guide/analytics/).
### Step 1: Set the in-app message delegate
First, set the [`BrazeInAppMessageUIDelegate`](https://www.braze.com/docs/de/de/developer_guide/in_app_messages/customization/#swift_setting-up-the-ui-delegate-required) in your app.
### Step 2: Disable the default App Store review message
Next, implement the `inAppMessage(_:displayChoiceForMessage:)` [delegate method](https://braze-inc.github.io/braze-swift-sdk/documentation/brazeui/brazeinappmessageuidelegate/inappmessage(_:displaychoiceformessage:)-9w1nb) to disable the default App Store review message.
```swift
func inAppMessage(_ ui: BrazeInAppMessageUI, displayChoiceForMessage message: Braze.InAppMessage) -> BrazeInAppMessageUI.DisplayChoice {
if message.extras["AppStore Review"] != nil,
let messageUrl = message.clickAction.url {
UIApplication.shared.open(messageUrl, options: [:], completionHandler: nil)
return .discard
} else {
return .now
}
}
```
```objc
- (enum BRZInAppMessageUIDisplayChoice)inAppMessage:(BrazeInAppMessageUI *)ui
displayChoiceForMessage:(BRZInAppMessageRaw *)message {
if (message.extras != nil && message.extras[@"AppStore Review"] != nil) {
[[UIApplication sharedApplication] openURL:message.url options:@{} completionHandler:nil];
return BRZInAppMessageUIDisplayChoiceDiscard;
} else {
return BRZInAppMessageUIDisplayChoiceNow;
}
}
```
### Step 3: Create a deep link
In your deep link handling code, add the following code to process the `{YOUR-APP-SCHEME}:app-store-review` deep link. Note that you will need to import `StoreKit` to use `SKStoreReviewController`:
```swift
func application(_ app: UIApplication, open url: URL, options: [UIApplicationOpenURLOptionsKey : Any] = [:]) -> Bool {
let urlString = url.absoluteString.removingPercentEncoding
if (urlString == "{YOUR-APP-SCHEME}:app-store-review") {
SKStoreReviewController.requestReview()
return true;
}
// Other deep link handling code…
}
```
```objc
- (BOOL)application:(UIApplication *)app openURL:(NSURL *)url options:(NSDictionary *)options {
NSString *urlString = url.absoluteString.stringByRemovingPercentEncoding;
if ([urlString isEqualToString:@"{YOUR-APP-SCHEME}:app-store-review"]) {
[SKStoreReviewController requestReview];
return YES;
}
// Other deep link handling code…
}
```
### Step 4: Set custom on-click behavior
Next, create an in-app messaging campaign with the following:
- The key-value pair `"AppStore Review" : "true"`
- The on-click behavior set to "Deep Link Into App", using the deep link `{YOUR-APP-SCHEME}:app-store-review`.
**Tip:**
Apple limits App Store review prompts to a maximum of three times per year for each user, so your campaign should be [rate-limited](https://www.braze.com/docs/de/de/user_guide/engagement_tools/campaigns/building_campaigns/rate-limiting/) to three times per year per user.
Users may turn off App Store review prompts. As a result, your custom review prompt should not promise that a native App Store review prompt will appear or directly ask for a review.
## Prerequisites
Before you can use this feature, you'll need to [integrate the React Native Braze SDK](https://www.braze.com/docs/de/de/developer_guide/sdk_integration/?sdktab=react%20native).
## Methods for logging
You can use these methods by passing your `BrazeInAppMessage` instance to log analytics and perform actions:
| Method | Description |
| --------------------------------------------------------- | ------------------------------------------------------------------------------------- |
| `logInAppMessageClicked(inAppMessage)` | Logs a click for the provided in-app message data. |
| `logInAppMessageImpression(inAppMessage)` | Logs an impression for the provided in-app message data. |
| `logInAppMessageButtonClicked(inAppMessage, buttonId)` | Logs a button click for the provided in-app message data and button ID. |
| `hideCurrentInAppMessage()` | Dismisses the currently displayed in-app message. |
| `performInAppMessageAction(inAppMessage)` | Performs the action for an in-app message. |
| `performInAppMessageButtonAction(inAppMessage, buttonId)` | Performs the action for an in-app message button. |
{: .reset-td-br-1 .reset-td-br-2 aria-label="Methods for logging" }
## Handling message data
In most cases, you can use the `Braze.addListener` method to register event listeners to handle data coming from in-app messages.
Additionally, you can access the in-app message data in the JavaScript layer by calling the `Braze.subscribeToInAppMessage` method to have the SDKs publish an `inAppMessageReceived` event when an in-app message is triggered. Pass a callback to this method to execute your own code when the in-app message is triggered and received by the listener.
To customize how message data is handled, refer to the following implementation examples:
To enhance the default behavior, or if you don't have access to customize the native iOS or Android code, we recommend that you disable the default UI while still receiving in-app message events from Braze. To disable the default UI, pass `false` to the `Braze.subscribeToInAppMessage` method and use the in-app message data to construct your own message in JavaScript. Note that you will need to manually log analytics on your messages if you choose to disable the default UI.
```javascript
import Braze from "@braze/react-native-sdk";
// Option 1: Listen for the event directly via `Braze.addListener`.
//
// You may use this method to accomplish the same thing if you don't
// wish to make any changes to the default Braze UI.
Braze.addListener(Braze.Events.IN_APP_MESSAGE_RECEIVED, (event) => {
console.log(event.inAppMessage);
});
// Option 2: Call `subscribeToInAppMessage`.
//
// Pass in `false` to disable the automatic display of in-app messages.
Braze.subscribeToInAppMessage(false, (event) => {
console.log(event.inAppMessage);
// Use `event.inAppMessage` to construct your own custom message UI.
});
```
To include more advanced logic to determine whether or not to show an in-app message using the built-in UI, implement in-app messages through the native layer.
**Warning:**
Since this is an advanced customization option, note that overriding the default Braze implementation will also nullify the logic to emit in-app message events to your JavaScript listeners. If you wish to still use `Braze.subscribeToInAppMessage` or `Braze.addListener` as described in [Accessing in-app message data](#accessing-in-app-message-data), you will need to handle publishing the events yourself.
Implement the `IInAppMessageManagerListener` as described in our Android article on [Custom Manager Listener](https://www.braze.com/docs/de/de/developer_guide/in_app_messages/customization/?sdktab=android#android_setting-custom-manager-listeners). In your `beforeInAppMessageDisplayed` implementation, you can access the `inAppMessage` data, send it to the JavaScript layer, and decide to show or not show the native message based on the return value.
For more on these values, see our [Android documentation](https://www.braze.com/docs/de/de/developer_guide/in_app_messages/).
```java
// In-app messaging
@Override
public InAppMessageOperation beforeInAppMessageDisplayed(IInAppMessage inAppMessage) {
WritableMap parameters = new WritableNativeMap();
parameters.putString("inAppMessage", inAppMessage.forJsonPut().toString());
getReactNativeHost()
.getReactInstanceManager()
.getCurrentReactContext()
.getJSModule(DeviceEventManagerModule.RCTDeviceEventEmitter.class)
.emit("inAppMessageReceived", parameters);
// Note: return InAppMessageOperation.DISCARD if you would like
// to prevent the Braze SDK from displaying the message natively.
return InAppMessageOperation.DISPLAY_NOW;
}
```
### Overriding the default UI delegate
By default, [`BrazeInAppMessageUI`](https://braze-inc.github.io/braze-swift-sdk/documentation/brazeui/brazeinappmessageui/) is created and assigned when you initialize the `braze` instance. `BrazeInAppMessageUI` is an implementation of the [`BrazeInAppMessagePresenter`](https://braze-inc.github.io/braze-swift-sdk/documentation/brazekit/brazeinappmessagepresenter) protocol and comes with a `delegate` property that can be used to customize the handling of in-app messages that have been received.
1. Implement the `BrazeInAppMessageUIDelegate` delegate as described in [our iOS article here](https://braze-inc.github.io/braze-swift-sdk/tutorials/braze/c1-inappmessageui).
2. In the `inAppMessage(_:displayChoiceForMessage:)` delegate method, you can access the `inAppMessage` data, send it to the JavaScript layer, and decide to show or not show the native message based on the return value.
For more details on these values, see our [iOS documentation](https://braze-inc.github.io/braze-swift-sdk/documentation/brazeui/brazeinappmessageuidelegate/).
```objc
- (enum BRZInAppMessageUIDisplayChoice)inAppMessage:(BrazeInAppMessageUI *)ui
displayChoiceForMessage:(BRZInAppMessageRaw *)message {
// Convert the message to a JavaScript representation.
NSData *inAppMessageData = [message json];
NSString *inAppMessageString = [[NSString alloc] initWithData:inAppMessageData encoding:NSUTF8StringEncoding];
NSDictionary *arguments = @{
@"inAppMessage" : inAppMessageString
};
// Send to JavaScript.
[self sendEventWithName:@"inAppMessageReceived" body:arguments];
// Note: Return `BRZInAppMessageUIDisplayChoiceDiscard` if you would like
// to prevent the Braze SDK from displaying the message natively.
return BRZInAppMessageUIDisplayChoiceNow;
}
```
To use this delegate, assign it to `brazeInAppMessagePresenter.delegate` after initializing the `braze` instance.
**Note:**
`BrazeUI` can only be imported in Objective-C or Swift. If you are using Objective-C++, you will need to handle this in a separate file.
```objc
@import BrazeUI;
- (BOOL)application:(UIApplication *)application didFinishLaunchingWithOptions:(NSDictionary *)launchOptions {
BRZConfiguration *configuration = [[BRZConfiguration alloc] initWithApiKey:apiKey endpoint:endpoint];
Braze *braze = [BrazeReactBridge initBraze:configuration];
((BrazeInAppMessageUI *)braze.inAppMessagePresenter).delegate = [[CustomDelegate alloc] init];
AppDelegate.braze = braze;
}
```
### Overriding the default native UI
If you wish to fully customize the presentation of your in-app messages at the native iOS layer, conform to the [`BrazeInAppMessagePresenter`](https://braze-inc.github.io/braze-swift-sdk/documentation/brazekit/brazeinappmessagepresenter) protocol and assign your custom presenter following this sample:
```objc
BRZConfiguration *configuration = [[BRZConfiguration alloc] initWithApiKey:apiKey endpoint:endpoint];
Braze *braze = [BrazeReactBridge initBraze:configuration];
braze.inAppMessagePresenter = [[MyCustomPresenter alloc] init];
AppDelegate.braze = braze;
```
## Customizing the display behavior
You can change the display behavior of in-app messages at runtime via the following:
```csharp
// Sets in-app messages to display immediately when triggered.
Appboy.AppboyBinding.SetInAppMessageDisplayAction(BrazeUnityInAppMessageDisplayActionType.IAM_DISPLAY_NOW);
// Sets in-app messages to display at a later time and be saved in a stack.
Appboy.AppboyBinding.SetInAppMessageDisplayAction(BrazeUnityInAppMessageDisplayActionType.IAM_DISPLAY_LATER);
// Sets in-app messages to be discarded after being triggered.
Appboy.AppboyBinding.SetInAppMessageDisplayAction(BrazeUnityInAppMessageDisplayActionType.IAM_DISCARD);
```
## Setting a custom listener
If you require more control over how a user interacts with in-app messages, use a `BrazeInAppMessageListener` and assign it to `Appboy.AppboyBinding.inAppMessageListener`. For any delegates you don't want to use, you can simply leave them as `null`.
```csharp
BrazeInAppMessageListener listener = new BrazeInAppMessageListener() {
BeforeInAppMessageDisplayed = BeforeInAppMessageDisplayed,
OnInAppMessageButtonClicked = OnInAppMessageButtonClicked,
OnInAppMessageClicked = OnInAppMessageClicked,
OnInAppMessageHTMLClicked = OnInAppMessageHTMLClicked,
OnInAppMessageDismissed = OnInAppMessageDismissed,
};
Appboy.AppboyBinding.inAppMessageListener = listener;
public void BeforeInAppMessageDisplayed(IInAppMessage inAppMessage) {
// Executed before an in-app message is displayed.
}
public void OnInAppMessageButtonClicked(IInAppMessage inAppMessage, InAppMessageButton inAppMessageButton) {
// Executed whenever an in-app message button is clicked.
}
public void OnInAppMessageClicked(IInAppMessage inAppMessage) {
// Executed whenever an in-app message is clicked.
}
public void OnInAppMessageHTMLClicked(IInAppMessage inAppMessage, Uri uri) {
// Executed whenever an HTML in-app message is clicked.
}
public void OnInAppMessageDismissed(IInAppMessage inAppMessage) {
// Executed whenever an in-app message is dismissed without a click.
}
```
# In-App-Nachrichten über das Braze SDK triggern
Source: /docs/de/developer_guide/in_app_messages/triggering_messages/index.md
# In-App-Nachrichten triggern {#trigger-in-app-messages}
> Erfahren Sie, wie Sie In-App-Nachrichten über das Braze SDK triggern können.
## Auslöser und Zustellung von Nachrichten {#message-triggers-and-delivery}
In-App-Nachrichten werden ausgelöst, wenn das SDK einen der folgenden angepassten Event-Typen protokolliert: `Session Start`, `Push Click`, `Any Purchase`, `Specific Purchase` und `Custom Event` (die letzten beiden enthalten robuste Filter für Eigenschaften).
Zu Beginn der Sitzung einer Nutzerin oder eines Nutzers stellt Braze alle in Frage kommenden In-App-Nachrichten auf deren Gerät zu, während gleichzeitig Assets vorab abgerufen werden, um die Anzeige-Latenz zu minimieren. Wenn das triggernde Ereignis mehr als eine in Frage kommende In-App-Nachricht hat, wird nur die Nachricht mit der höchsten Priorität zugestellt. Weitere Informationen finden Sie unter [Session Lifecycle](https://www.braze.com/docs/de/de/developer_guide/analytics/tracking_sessions#about-the-session-lifecycle).
**Note:**
In-App-Nachrichten können nicht über die API oder durch API-Ereignisse ausgelöst werden—nur durch angepasste Events, die vom SDK protokolliert werden. Wenn Sie mehr über die Protokollierung erfahren möchten, lesen Sie den Abschnitt [Protokollierung angepasster Events](https://www.braze.com/docs/de/de/developer_guide/analytics/logging_events).
## Typen von In-App-Nachrichten {#types-of-in-app-messages}
Braze sendet die folgenden Typen von In-App-Nachrichten beim Sitzungsstart an die Geräte der Nutzer:innen: `inapp` und `templated_iam`. Als Dashboard-Nutzer:in sehen Sie die verschiedenen Typen nicht, aber Braze behandelt sie je nach Einrichtung und Inhalt unterschiedlich.
### `inapp` (Standard) {#inapp-standard}
Eine `inapp`- (oder „[Standard](https://www.braze.com/docs/de/de/user_guide/message_building_by_channel/in-app_messages#standard-message-types)“-) In-App-Nachricht ist bereits mit den erforderlichen Informationen vorausgefüllt, wie z. B. angepassten Attributen, die Braze bereits kennt. Wenn die In-App-Nachricht auf das Gerät heruntergeladen wird, bewirkt das triggernde Ereignis in der Regel, dass das SDK die `inapp`-In-App-Nachricht anzeigt, auch wenn das Gerät offline ist oder sich im Flugmodus befindet.
### `templated_iam` (Templated) {#templated_iam-templated}
Eine `templated_iam`- (oder „Templated“-) In-App-Nachricht ist noch nicht mit den erforderlichen Informationen vorausgefüllt. Braze muss eine weitere Anfrage stellen, um die Informationen abzurufen, bevor die Nachricht angezeigt werden kann.
In-app messages are delivered as templated in-app messages when **Re-evaluate campaign eligibility before displaying** is selected or if any of the following Liquid tags exist in the message:
- `canvas_entry_properties`
- `connected_content`
- SMS variables such as `{sms.${*}}`
- `catalog_items`
- `catalog_selection_items`
- `event_properties`
This means that during session start, the device will receive the trigger of that in-app message instead of the entire message. When the user triggers the in-app message, the user's device will make a network request to fetch the actual message.
**Note:**
The message will not be delivered if the device doesn't have access to the internet. The message might not be delivered if the Liquid logic takes too long to resolve.
## Schlüssel-Wert-Paare {#key-value-pairs}
Wenn Sie eine Campaign in Braze erstellen, können Sie Schlüssel-Wert-Paare als `extras` festlegen, die das In-App-Messaging-Objekt verwenden kann, um Daten an Ihre App zu senden.
```javascript
import * as braze from "@braze/web-sdk";
braze.subscribeToInAppMessage(function(inAppMessage) {
// control group messages should always be "shown"
// this will log an impression and not show a visible message
if (inAppMessage instanceof braze.ControlMessage) {
return braze.showInAppMessage(inAppMessage);
}
if (inAppMessage instanceof braze.InAppMessage) {
const extras = inAppMessage.extras;
if (extras) {
for (const key in extras) {
console.log("key: " + key + ", value: " + extras[key]);
}
}
}
braze.showInAppMessage(inAppMessage);
});
```
```java
Map getExtras()
```
```kotlin
extras: Map
```
**Tip:**
Weitere Informationen finden Sie in der [KDoc](https://braze-inc.github.io/braze-android-sdk/kdoc/braze-android-sdk/com.braze.models.inappmessage/-i-in-app-message/index.html#1498425856%2FProperties%2F-1725759721).
Das folgende Beispiel verwendet eine angepasste Logik, um die Darstellung einer In-App-Nachricht auf der Grundlage ihrer Schlüssel-Wert-Paare in `extras` festzulegen. Ein Beispiel für eine vollständige Anpassung finden Sie in [unserer Beispiel-App](https://github.com/braze-inc/braze-swift-sdk/tree/main/Examples).
```swift
let customization = message.extras["custom-display"] as? String
if customization == "colorful-slideup" {
// Perform your custom logic.
}
```
```objc
if ([message.extras[@"custom-display"] isKindOfClass:[NSString class]]) {
NSString *customization = message.extras[@"custom-display"];
if ([customization isEqualToString:@"colorful-slideup"]) {
// Perform your custom logic.
}
}
```
## Deaktivieren von automatischen Triggern {#disabling-automatic-triggers}
In-App-Nachrichten werden standardmäßig automatisch getriggert. Um dies zu deaktivieren:
Entfernen Sie den Aufruf von `braze.automaticallyShowInAppMessages()` in Ihrem Lade-Snippet und erstellen Sie dann eine angepasste Logik für die Anzeige oder Nichtanzeige einer In-App-Nachricht.
```javascript
braze.subscribeToInAppMessage(function(inAppMessage) {
// control group messages should always be "shown"
// this will log an impression and not show a visible message
if (inAppMessage.isControl) { // v4.5.0+, otherwise use `inAppMessage instanceof braze.ControlMessage`
return braze.showInAppMessage(inAppMessage);
}
// Display the in-app message. You could defer display here by pushing this message to code within your own application.
// If you don't want to use the display capabilities in Braze, you could alternatively pass the in-app message to your own display code here.
if ( should_show_the_message_according_to_your_custom_logic ) {
braze.showInAppMessage(inAppMessage);
} else {
// do nothing
}
});
```
**Important:**
Wenn Sie `braze.showInAppMessage` aufrufen, ohne `braze.automaticallyShowInAppMessages()` zu entfernen, werden Nachrichten möglicherweise doppelt angezeigt.
Für eine erweiterte Steuerung des Nachrichtenzeitplans, einschließlich des Aufschiebens und Wiederherstellens getriggerter Nachrichten, lesen Sie bitte unser [Tutorial: Aufschieben und Wiederherstellen von getriggerten Nachrichten](https://www.braze.com/docs/de/de/developer_guide/in_app_messages/tutorials/deferring_triggered_messages).
1. Implementieren Sie den [`IInAppMessageManagerListener`](https://www.braze.com/docs/de/de/developer_guide/in_app_messages/customization?sdktab=android&tab=global%20listener#android_step-1-implement-the-custom-manager-listener), um einen angepassten Listener festzulegen.
2. Aktualisieren Sie Ihre [`beforeInAppMessageDisplayed()`](https://braze-inc.github.io/braze-android-sdk/kdoc/braze-android-sdk/com.braze.ui.inappmessage.listeners/-i-in-app-message-manager-listener/before-in-app-message-displayed.html)-Methode, um [`InAppMessageOperation.DISCARD`](https://braze-inc.github.io/braze-android-sdk/kdoc/braze-android-sdk/com.braze.ui.inappmessage/-in-app-message-operation/-d-i-s-c-a-r-d/index.html) zurückzugeben.
Für eine erweiterte Steuerung des Nachrichtenzeitplans, einschließlich der Anzeige zu einem späteren Zeitpunkt und der erneuten Einreihung in die Warteschlange, konsultieren Sie bitte unsere Seite [Anpassen von Nachrichten](https://www.braze.com/docs/de/de/developer_guide/in_app_messages/customization?tab=global%20listener&subtab=kotlin#android_step-2-instruct-braze-to-use-the-custom-manager-listener).
1. Implementieren Sie den Delegaten `BrazeInAppMessageUIDelegate` in Ihrer App. Eine vollständige Anleitung finden Sie unter [Tutorial: In-App-Nachricht UI](https://braze-inc.github.io/braze-swift-sdk/tutorials/braze/c1-inappmessageui).
2. Aktualisieren Sie die Delegate-Methode `inAppMessage(_:displayChoiceForMessage:)`, um `.discard` zurückzugeben.
Für eine erweiterte Steuerung des Nachrichtenzeitplans, einschließlich des Aufschiebens und Wiederherstellens getriggerter Nachrichten, lesen Sie bitte unser [Tutorial: Aufschieben und Wiederherstellen von getriggerten Nachrichten](https://www.braze.com/docs/de/de/developer_guide/in_app_messages/tutorials/deferring_triggered_messages).
1. Überprüfen Sie, ob Sie die automatische Initialisierung der Integration verwenden, die in den Versionen `2.2.0` und höher standardmäßig aktiviert ist.
2. Setzen Sie die Standardeinstellung für In-App-Nachrichten auf `DISCARD`, indem Sie die folgende Zeile in Ihre Datei `braze.xml` einfügen.
```xml
DISCARD
```
Für Android deaktivieren Sie die Option **Automatically Display In-App Messages** im Braze-Konfigurationseditor. Alternativ können Sie `com_braze_inapp_show_inapp_messages_automatically` auf `false` in der Datei `braze.xml` Ihres Unity-Projekts setzen.
Die anfängliche Anzeigeoperation für In-App-Nachrichten kann in der Braze-Konfiguration über „In App Message Manager Initial Display Operation“ eingestellt werden.
Für iOS stellen Sie Spielobjekt-Listener im Braze-Konfigurationseditor ein und stellen Sie sicher, dass **Braze Displays In-App Messages** nicht ausgewählt ist.
Die anfängliche Anzeigeoperation für In-App-Nachrichten kann in der Braze-Konfiguration über „In App Message Manager Initial Display Operation“ eingestellt werden.
## Zwei In-App-Nachrichten in einer Sitzung verketten {#chaining-two-in-app-messages-in-one-session}
Sie können eine In-App-Nachricht beim Sitzungsstart triggern und dann eine zweite In-App-Nachricht auslösen, nachdem ein Button in der ersten Nachricht gedrückt wurde. Protokollieren Sie dazu ein angepasstes Event für den Button-Klick, das die zweite Nachricht triggert. Der Trigger für die zweite Nachricht muss bereits auf dem Gerät vorhanden sein (die Nutzerin oder der Nutzer muss bereits für die zweite Nachricht berechtigt sein) und auf der Geräteseite auftreten (das Braze SDK übernimmt keine Änderungen an angepassten Attributen, die auf Braze-Servern vorgenommen werden). Der standardmäßige 30-Sekunden-Cooldown zwischen In-App-Nachrichten-Triggern muss angepasst werden, um mehrere In-App-Nachrichten in schneller Folge anzuzeigen. Informationen zur plattformspezifischen Konfiguration finden Sie unter [Außerkraftsetzen des Standard-Rate-Limits](#overriding-the-default-rate-limit).
## Außerkraftsetzen des Standard-Rate-Limits {#overriding-the-default-rate-limit}
Standardmäßig begrenzt das SDK getriggerte In-App-Nachrichten auf einmal alle 30 Sekunden. Um dies außer Kraft zu setzen, fügen Sie die folgende Eigenschaft zu Ihrer Konfigurationsdatei hinzu, bevor die Braze-Instanz initialisiert wird. Dieser Wert wird als neues Rate-Limit in Sekunden verwendet.
Setzen Sie diesen Wert bei Produktions-Apps nicht unter 10 Sekunden, damit Nutzer:innen nicht mit aufeinanderfolgenden In-App-Nachrichten überhäuft werden. Für Tests und Beispiel-App-Abläufe ist ein Wert von 5 Sekunden eine gängige Einstellung.
Sie können dieses Intervall zu Testzwecken auf `0` setzen. Ein Intervall von `0` Sekunden erzwingt jedoch nicht, dass mehrere In-App-Nachrichten gleichzeitig erscheinen. Wenn eine In-App-Nachricht bereits sichtbar ist, wird eine weitere getriggerte Nachricht erst angezeigt, nachdem die aktuelle Nachricht geschlossen wurde.
```javascript
// Sets the minimum time interval between triggered in-app messages to 5 seconds instead of the default 30
braze.initialize('YOUR-API-KEY', { minimumIntervalBetweenTriggerActionsInSeconds: 5 })
```
```xml
5
```
```swift
let configuration = Braze.Configuration(
apiKey: "YOUR-APP-IDENTIFIER-API-KEY",
endpoint: "YOUR-BRAZE-ENDPOINT"
)
// Sets the minimum trigger time interval to 5 seconds
configuration.triggerMinimumTimeInterval = 5
let braze = Braze(configuration: configuration)
AppDelegate.braze = braze
```
```objc
BRZConfiguration *configuration =
[[BRZConfiguration alloc] initWithApiKey:@""
endpoint:@""];
// Sets the minimum trigger time interval to 5 seconds
configuration.triggerMinimumTimeInterval = 5;
Braze *braze = [BrazePlugin initBraze:configuration];
AppDelegate.braze = braze;
```
## Manuelles Auslösen von Nachrichten {#manually-triggering-messages}
Standardmäßig werden In-App-Nachrichten automatisch getriggert, wenn das SDK ein angepasstes Event protokolliert. Darüber hinaus können Sie Nachrichten aber auch manuell triggern, indem Sie die folgenden Methoden verwenden.
### Ein serverseitiges Ereignis verwenden {#using-a-server-side-event}
Derzeit unterstützt das Web Braze SDK das manuelle Triggern von Nachrichten über serverseitige Ereignisse nicht.
Um eine In-App-Nachricht über ein vom Server gesendetes Ereignis auszulösen, senden Sie eine stille Push-Benachrichtigung an das Gerät, die einen angepassten Push-Callback zur Protokollierung eines SDK-basierten Ereignisses ermöglicht. Dieses Ereignis triggert dann die In-App-Nachricht für die Nutzer:innen.
#### 1. Schritt: Erstellen Sie einen Push-Callback, um den stillen Push zu empfangen {#step-1-create-a-push-callback-to-receive-the-silent-push}
Registrieren Sie Ihren angepassten Push-Callback, um auf eine bestimmte stille Push-Benachrichtigung zu warten. Weitere Informationen finden Sie unter [Push-Benachrichtigungen einrichten](https://www.braze.com/docs/de/de/developer_guide/push_notifications#android_setting-up-push-notifications).
Für die zuzustellende In-App-Nachricht werden zwei Events protokolliert, eines vom Server und eines von Ihrem angepassten Push-Callback. Um sicherzustellen, dass dasselbe Event nicht doppelt vorkommt, sollte das von Ihrem Push-Callback protokollierte Event einer generischen Namenskonvention folgen, z. B. „In-App-Nachricht triggern“, und nicht denselben Namen tragen wie das vom Server gesendete Event. Andernfalls können die Segmentierung und die Nutzerdaten dadurch beeinträchtigt werden, dass für eine einzelne Nutzeraktion doppelte Ereignisse protokolliert werden.
```java
Braze.getInstance(context).subscribeToPushNotificationEvents(event -> {
final Bundle kvps = event.getNotificationPayload().getBrazeExtras();
if (kvps.containsKey("IS_SERVER_EVENT")) {
BrazeProperties eventProperties = new BrazeProperties();
// The campaign name is a string extra that clients can include in the push
String campaignName = kvps.getString("CAMPAIGN_NAME");
eventProperties.addProperty("campaign_name", campaignName);
Braze.getInstance(context).logCustomEvent("IAM Trigger", eventProperties);
}
});
```
```kotlin
Braze.getInstance(applicationContext).subscribeToPushNotificationEvents { event ->
val kvps = event.notificationPayload.brazeExtras
if (kvps.containsKey("IS_SERVER_EVENT")) {
val eventProperties = BrazeProperties()
// The campaign name is a string extra that clients can include in the push
val campaignName = kvps.getString("CAMPAIGN_NAME")
eventProperties.addProperty("campaign_name", campaignName)
Braze.getInstance(applicationContext).logCustomEvent("IAM Trigger", eventProperties)
}
}
```
#### 2. Schritt: Erstellen Sie eine Push-Kampagne {#step-2-create-a-push-campaign}
Erstellen Sie eine [stille Push-Kampagne](https://www.braze.com/docs/de/de/developer_guide/push_notifications/silent?sdktab=android), die über das vom Server gesendete Event getriggert wird.

Die Push-Kampagne muss Schlüssel-Wert-Paare enthalten, die angeben, dass diese Push-Kampagne gesendet wird, um ein angepasstes SDK-Event zu protokollieren. Dieses Event wird verwendet, um die In-App-Nachricht zu triggern.
{: style="max-width:70%;" }
Der frühere Code für den Push-Callback erkennt die Schlüssel-Wert-Paare und protokolliert das entsprechende angepasste SDK-Event.
Wenn Sie Ihrem „In-App-Nachricht triggern“-Event Event-Eigenschaften hinzufügen möchten, können Sie diese in den Schlüssel-Wert-Paaren des Push-Payloads übergeben. In diesem Beispiel wurde der Campaign-Name der nachfolgenden In-App-Nachricht eingefügt. Ihr angepasster Push-Callback kann dann bei der Protokollierung des angepassten Events den Wert als Parameter der Event-Eigenschaft übergeben.
#### 3. Schritt: In-App-Kampagne erstellen {#step-3-create-an-in-app-message-campaign}
Erstellen Sie Ihre für Nutzer:innen sichtbare In-App-Nachrichten-Kampagne im Braze-Dashboard. Diese Kampagne sollte eine aktionsbasierte Zustellung haben und durch das angepasste Event ausgelöst werden, das in Ihrem angepassten Push-Callback protokolliert wird.
Im folgenden Beispiel wurde die zu triggernde In-App-Nachricht konfiguriert, indem die Event-Eigenschaft im Rahmen des ursprünglichen stillen Push gesendet wurde.

Wenn ein vom Server gesendetes Event protokolliert wird, während sich die App nicht im Vordergrund befindet, wird das Event protokolliert, aber die In-App-Nachricht wird nicht angezeigt. Wenn Sie möchten, dass das Event verzögert wird, bis die Anwendung im Vordergrund ist, müssen Sie in Ihrem angepassten Push-Empfänger eine Prüfung einbauen, um das Event zu verwerfen oder zu verzögern, bis die App in den Vordergrund getreten ist.
#### 1. Schritt: Stille Push-Benachrichtigungen und Schlüssel-Wert-Paare verarbeiten {#step-1-handle-silent-push-and-key-value-pairs}
Implementieren Sie die folgende Funktion und rufen Sie sie in der [`application(_:didReceiveRemoteNotification:fetchCompletionHandler:)`-Methode](https://developer.apple.com/documentation/uikit/uiapplicationdelegate/1623013-application/) auf:
```swift
func handleExtras(userInfo: [AnyHashable : Any]) {
print("A push was received")
if userInfo != nil && (userInfo["IS_SERVER_EVENT"] as? String) != nil && (userInfo["CAMPAIGN_NAME"] as? String) != nil {
AppDelegate.braze?.logCustomEvent("IAM Trigger", properties: ["campaign_name": userInfo["CAMPAIGN_NAME"]])
}
}
```
```objc
- (void)handleExtrasFromPush:(NSDictionary *)userInfo {
NSLog(@"A push was received.");
if (userInfo !=nil && userInfo[@"IS_SERVER_EVENT"] !=nil && userInfo[@"CAMPAIGN_NAME"]!=nil) {
[AppDelegate.braze logCustomEvent:@"IAM Trigger" properties:@{@"campaign_name": userInfo[@"CAMPAIGN_NAME"]}];
}
};
```
Beim Empfang einer stillen Push-Benachrichtigung wird ein vom SDK aufgezeichnetes Event des Typs „In-App-Nachrichten-Trigger“ im Nutzerprofil protokolliert.
**Important:**
Da eine Push-Nachricht verwendet wird, um ein vom SDK protokolliertes angepasstes Event aufzuzeichnen, muss Braze ein Push-Token für jede Nutzerin und jeden Nutzer speichern, um diese Lösung zu aktivieren. Für iOS-Nutzer:innen speichert Braze ein Token erst ab dem Zeitpunkt, an dem Nutzer:innen den Push-Prompt des Betriebssystems erhalten haben. Davor sind die Nutzer:innen nicht per Push erreichbar und die obige Lösung ist nicht möglich.
#### 2. Schritt: Erstellen Sie eine stille Push-Kampagne {#step-2-create-a-silent-push-campaign}
Erstellen Sie eine [stille Push-Kampagne](https://www.braze.com/docs/de/de/developer_guide/push_notifications/silent?sdktab=swift), die über das vom Server gesendete Event ausgelöst wird.

Die Push-Kampagne muss zusätzliche Schlüssel-Wert-Paare (Extras) enthalten, die angeben, dass diese Push-Kampagne gesendet wird, um ein angepasstes SDK-Event zu protokollieren. Dieses Event wird verwendet, um die In-App-Nachricht zu triggern.

Der Code in der Methode `application(_:didReceiveRemoteNotification:fetchCompletionHandler:)` prüft auf den Schlüssel `IS_SERVER_EVENT` und protokolliert ein angepasstes SDK-Event, wenn dieser vorhanden ist.
Sie können entweder den Event-Namen oder die Event-Eigenschaften ändern, indem Sie den gewünschten Wert in den zusätzlichen Schlüssel-Wert-Paaren (Extras) der Push-Nutzlast senden. Bei der Protokollierung des angepassten Events können diese Extras entweder als Parameter des Event-Namens oder der Event-Eigenschaft verwendet werden.
#### 3. Schritt: In-App-Kampagne erstellen
Erstellen Sie im Braze-Dashboard eine für Ihre Nutzer:innen sichtbare In-App-Nachrichten-Kampagne. Diese Kampagne sollte eine aktionsbasierte Zustellung haben und durch das angepasste Event ausgelöst werden, das in der Methode `application(_:didReceiveRemoteNotification:fetchCompletionHandler:)` protokolliert wird.
Im folgenden Beispiel wurde die zu triggernde In-App-Nachricht konfiguriert, indem die Event-Eigenschaft im Rahmen des ursprünglichen stillen Push gesendet wurde.

**Note:**
Beachten Sie, dass diese In-App-Nachrichten nur ausgelöst werden, wenn sich die Anwendung beim Empfang der stillen Push-Benachrichtigung im Vordergrund befindet.
### Anzeige einer vordefinierten Nachricht {#displaying-a-pre-defined-message}
Um eine vordefinierte In-App-Nachricht manuell anzuzeigen, verwenden Sie die folgende Methode:
Für das Web SDK verwenden Sie `braze.showInAppMessage(inAppMessage)`, um jede In-App-Nachricht anzuzeigen. Weitere Informationen und ein Beispiel finden Sie unter [Anzeige einer Nachricht in Realtime](#displaying-a-message-in-real-time).
```java
BrazeInAppMessageManager.getInstance().addInAppMessage(inAppMessage);
```
```kotlin
BrazeInAppMessageManager.getInstance().addInAppMessage(inAppMessage)
```
```swift
if let inAppMessage = AppDelegate.braze?.inAppMessagePresenter?.nextAvailableMessage() {
AppDelegate.braze?.inAppMessagePresenter?.present(message: inAppMessage)
}
```
### Anzeige einer Nachricht in Realtime {#displaying-a-message-in-real-time}
Sie können auch In-App-Nachrichten in Realtime erstellen und anzeigen, indem Sie dieselben Anpassungsoptionen nutzen, die auch auf dem Dashboard zur Verfügung stehen. Um dies zu tun:
```javascript
// Displays a slideup type in-app message.
var message = new braze.SlideUpMessage("Welcome to Braze! This is an in-app message.");
message.slideFrom = braze.InAppMessage.SlideFrom.TOP;
braze.showInAppMessage(message);
```
```java
// Initializes a new slideup type in-app message and specifies its message.
InAppMessageSlideup inAppMessage = new InAppMessageSlideup();
inAppMessage.setMessage("Welcome to Braze! This is a slideup in-app message.");
```
```kotlin
// Initializes a new slideup type in-app message and specifies its message.
val inAppMessage = InAppMessageSlideup()
inAppMessage.message = "Welcome to Braze! This is a slideup in-app message."
```
**Important:**
Zeigen Sie keine In-App-Nachrichten an, wenn die Softtastatur auf dem Bildschirm angezeigt wird, da das Rendering unter diesen Umständen undefiniert ist.
Rufen Sie manuell die [`present(message:)`](https://braze-inc.github.io/braze-swift-sdk/documentation/brazekit/brazeinappmessagepresenter/present(message:))-Methode auf Ihrem `inAppMessagePresenter` auf. Zum Beispiel:
```swift
let customInAppMessage = Braze.InAppMessage.slideup(
.init(message: "YOUR_CUSTOM_SLIDEUP_MESSAGE", slideFrom: .bottom, themes: .defaults)
)
AppDelegate.braze?.inAppMessagePresenter?.present(message: customInAppMessage)
```
```objc
BRZInAppMessageRaw *customInAppMessage = [[BRZInAppMessageRaw alloc] init];
customInAppMessage.type = BRZInAppMessageRawTypeSlideup;
customInAppMessage.message = @"YOUR_CUSTOM_SLIDEUP_MESSAGE";
customInAppMessage.slideFrom = BRZInAppMessageRawSlideFromBottom;
customInAppMessage.themes = @{
@"light": BRZInAppMessageRawTheme.defaultLight,
@"dark": BRZInAppMessageRawTheme.defaultDark
};
[AppDelegate.braze.inAppMessagePresenter presentMessage:customInAppMessage];
```
**Note:**
Wenn Sie Ihre eigene In-App-Nachricht erstellen, verzichten Sie auf jegliches Analytics-Tracking und müssen die Protokollierung von Klicks und Impressionen manuell über Ihr `message.context` vornehmen.
Um die nächste Nachricht im Stack anzuzeigen, verwenden Sie die Methode `DisplayNextInAppMessage()`. Nachrichten werden in diesem Stack gespeichert, wenn `DISPLAY_LATER` oder `BrazeUnityInAppMessageDisplayActionType.IAM_DISPLAY_LATER` als Aktion zur Anzeige von In-App-Nachrichten gewählt wurde.
```csharp
Appboy.AppboyBinding.DisplayNextInAppMessage();
```
## Ursachen für Verzögerungen bei In-App-Nachrichten {#causes-of-in-app-message-delays}
Wenn Sie eine In-App-Nachrichten-Kampagne einige Sekunden nach dem Sitzungsstart erhalten, kann die Verzögerung folgende Ursachen haben:
- Eine Verzögerung beim Kampagnen-Trigger
- Anpassungen
- Das triggernde Ereignis wurde später als erwartet aufgezeichnet (z. B. bei einer `templated_iam`)
## Exit-Intent-Nachrichten für das Web {#exit-intent-messages-for-web}
Exit-Intent-Nachrichten sind nicht-störende In-App-Nachrichten, die verwendet werden, um Besuchern wichtige Informationen mitzuteilen, bevor sie Ihre Website verlassen.
Um Trigger für diese Nachrichtentypen im Web SDK einzurichten, implementieren Sie eine Exit-Intent-Bibliothek in Ihrer Website (wie z. B. [die Open-Source-Bibliothek von ouibounce](https://github.com/carlsednaoui/ouibounce)) und verwenden Sie dann den folgenden Code, um `'exit intent'` als angepasstes Event in Braze zu protokollieren. Jetzt können Ihre zukünftigen In-App-Nachrichten-Campaigns diesen Nachrichtentyp als angepassten Event-Trigger verwenden.
```javascript
var _ouibounce = ouibounce(false, {
callback: function() { braze.logCustomEvent('exit intent'); }
});
```
# HTML In-App-Nachrichten
Source: /docs/de/developer_guide/in_app_messages/html_messages/index.md
# HTML In-App-Nachrichten {#html-in-app-messages}
> Erfahren Sie, wie Sie die Braze JavaScript-Schnittstelle zu Ihrer App hinzufügen, damit Sie die Braze API nutzen können, um [HTML In-App-Nachrichten](https://www.braze.com/docs/de/de/user_guide/channels/in_app_messages/message_types/custom_html) in Ihren angepassten WebViews zu erstellen.
## Prerequisites
Before you can use this feature, you'll need to [integrate the Android Braze SDK](https://www.braze.com/docs/de/de/developer_guide/sdk_integration/?sdktab=android).
## About HTML messages
With the Braze JavaScript interface, you can leverage Braze inside the custom WebViews within your app. The [`InAppMessageJavascriptInterface`](https://braze-inc.github.io/braze-android-sdk/kdoc/braze-android-sdk/com.braze.ui.inappmessage.jsinterface/-in-app-message-javascript-interface/index.html) is responsible for:
1. Injecting the Braze JavaScript bridge into your WebView, as outlined in [User Guide: HTML in-app messages](https://www.braze.com/docs/de/de/user_guide/message_building_by_channel/in-app_messages/customize/#custom-html-messages).
2. Passing the bridge methods received from your WebView to the [Braze Android SDK](https://github.com/braze-inc/braze-android-sdk).
## Adding the interface to a WebView
Using Braze functionality from a WebView in your app can be done by adding the Braze JavaScript interface to your WebView. After the interface has been added, the same API available for [User Guide: HTML in-app messages](https://www.braze.com/docs/de/de/user_guide/message_building_by_channel/in-app_messages/customize/#custom-html-messages) will be available within your custom WebView.
```java
String javascriptString = BrazeFileUtils.getAssetFileStringContents(context.getAssets(), "braze-html-bridge.js");
myWebView.loadUrl("javascript:" + javascriptString);
final InAppMessageJavascriptInterface javascriptInterface = new InAppMessageJavascriptInterface(context, inAppMessage);
myWebView.addJavascriptInterface(javascriptInterface, "brazeInternalBridge");
```
```kotlin
val javascriptString = context.assets.getAssetFileStringContents("braze-html-bridge.js")
myWebView.loadUrl("javascript:" + javascriptString!!)
val javascriptInterface = InAppMessageJavascriptInterface(context, inAppMessage)
myWebView.addJavascriptInterface(javascriptInterface, "brazeInternalBridge")
```
## Embedding YouTube content
YouTube and other HTML5 content can play in HTML in-app messages. This requires hardware acceleration to be enabled in the activity where the in-app message is being displayed; see the [Android developer guide](https://developer.android.com/guide/topics/graphics/hardware-accel.html#controlling) for more details. Hardware acceleration is only available on Android API versions 11 and later.
The following is an example of an embedded YouTube video in an HTML snippet:
```html
```
## Using deep links
When using deep links or external links in Android HTML in-app messages, **do not** call `brazeBridge.closeMessage()` in your JavaScript. The SDK's internal logic automatically closes the in-app message when it redirects to a link. Calling `brazeBridge.closeMessage()` interferes with this process and may cause the message to become unresponsive when users return to your app.
The following is an example of a deep link in a code snippet:
```javascript
```
## Prerequisites
Before you can use this feature, you'll need to [integrate the Swift Braze SDK](https://www.braze.com/docs/de/de/developer_guide/sdk_integration/?sdktab=swift).
## About HTML messages
With the Braze JavaScript interface, you can leverage Braze inside the custom WebViews within your app. The interface's [`ScriptMessageHandler`](https://braze-inc.github.io/braze-swift-sdk/documentation/brazekit/braze/webviewbridge/scriptmessagehandler) is responsible for:
1. Injecting the Braze JavaScript bridge into your WebView, as outlined in [User Guide: HTML in-app messages](https://www.braze.com/docs/de/de/user_guide/message_building_by_channel/in-app_messages/customize/#custom-html-messages).
2. Passing the bridge methods received from your WebView to the [Braze Swift SDK](https://github.com/braze-inc/braze-swift-sdk).
## Adding the interface to a WebView
First, add the [`ScriptMessageHandler`](https://braze-inc.github.io/braze-swift-sdk/documentation/brazekit/braze/webviewbridge/scriptmessagehandler) from `WebViewBridge` to your app.
```swift
let scriptMessageHandler = Braze.WebViewBridge.ScriptMessageHandler(braze: braze)
```
Add the initialized `scriptMessageHandler` to a WkWebView's `userContentController`.
```swift
configuration.userContentController.add(
scriptMessageHandler,
name: Braze.WebViewBridge.ScriptMessageHandler.name
)
```
Then create the WebView using your configuration.
```swift
let webView = WKWebView(frame: .zero, configuration: configuration)
```
When you're finished, your code should be similar to the following:
```swift
// Create the script message handler using your initialized Braze instance.
let scriptMessageHandler = Braze.WebViewBridge.ScriptMessageHandler(braze: braze)
// Create a web view configuration and setup the script message handler.
let configuration = WKWebViewConfiguration()
configuration.userContentController.addUserScript(
Braze.WebViewBridge.ScriptMessageHandler.script
)
configuration.userContentController.add(
scriptMessageHandler,
name: Braze.WebViewBridge.ScriptMessageHandler.name
)
// Create the webview using the configuration
let webView = WKWebView(frame: .zero, configuration: configuration)
```
## Example: Logging a custom event
In the following example, `BrazeBridge` logs a custom event from existing web content to the Braze Swift SDK.
```javascript
Logging data via BrazeBridge Example
```
# Deeplinking in In-App-Nachrichten für das Braze SDK
Source: /docs/de/developer_guide/in_app_messages/deep_linking/index.md
# Deeplinking in In-App-Nachrichten {#in-app-message-deep-linking}
> Erfahren Sie, wie Sie Deeplinks innerhalb einer In-App-Nachricht für das Braze SDK setzen können.
## Prerequisites
Before you can use this feature, you'll need to [integrate the Android Braze SDK](https://www.braze.com/docs/de/de/developer_guide/sdk_integration/?sdktab=android).
## Creating a universal delegate
The Android SDK provides the ability to set a single delegate object to custom handle all deep links opened by Braze across Content Cards, in-app messages, and push notifications.
Your delegate object should implement the [`IBrazeDeeplinkHandler`](https://braze-inc.github.io/braze-android-sdk/kdoc/braze-android-sdk/com.braze.ui/-braze-deeplink-handler/index.html) interface and be set using [`BrazeDeeplinkHandler.setBrazeDeeplinkHandler()`](https://braze-inc.github.io/braze-android-sdk/kdoc/braze-android-sdk/com.braze.ui/-braze-deeplink-handler/-companion/set-braze-deeplink-handler.html). In most cases, the delegate should be set in your app's `Application.onCreate()`.
The following is an example of overriding the default [`UriAction`](https://braze-inc.github.io/braze-android-sdk/kdoc/braze-android-sdk/com.braze.ui.actions/-uri-action/index.html) behavior with custom intent flags and custom behavior for YouTube URLs:
```java
public class CustomDeeplinkHandler implements IBrazeDeeplinkHandler {
private static final String TAG = BrazeLogger.getBrazeLogTag(CustomDeeplinkHandler.class);
@Override
public void gotoUri(Context context, UriAction uriAction) {
String uri = uriAction.getUri().toString();
// Open YouTube URLs in the YouTube app and not our app
if (!StringUtils.isNullOrBlank(uri) && uri.contains("youtube.com")) {
uriAction.setUseWebView(false);
}
CustomUriAction customUriAction = new CustomUriAction(uriAction);
customUriAction.execute(context);
}
public static class CustomUriAction extends UriAction {
public CustomUriAction(@NonNull UriAction uriAction) {
super(uriAction);
}
@Override
protected void openUriWithActionView(Context context, Uri uri, Bundle extras) {
Intent intent = getActionViewIntent(context, uri, extras);
intent.setFlags(Intent.FLAG_ACTIVITY_NEW_TASK | Intent.FLAG_ACTIVITY_CLEAR_TOP | Intent.FLAG_ACTIVITY_SINGLE_TOP);
if (intent.resolveActivity(context.getPackageManager()) != null) {
context.startActivity(intent);
} else {
BrazeLogger.w(TAG, "Could not find appropriate activity to open for deep link " + uri + ".");
}
}
}
}
```
```kotlin
class CustomDeeplinkHandler : IBrazeDeeplinkHandler {
override fun gotoUri(context: Context, uriAction: UriAction) {
val uri = uriAction.uri.toString()
// Open YouTube URLs in the YouTube app and not our app
if (!StringUtils.isNullOrBlank(uri) && uri.contains("youtube.com")) {
uriAction.useWebView = false
}
val customUriAction = CustomUriAction(uriAction)
customUriAction.execute(context)
}
class CustomUriAction(uriAction: UriAction) : UriAction(uriAction) {
override fun openUriWithActionView(context: Context, uri: Uri, extras: Bundle) {
val intent = getActionViewIntent(context, uri, extras)
intent.flags = Intent.FLAG_ACTIVITY_NEW_TASK or Intent.FLAG_ACTIVITY_CLEAR_TOP or Intent.FLAG_ACTIVITY_SINGLE_TOP
if (intent.resolveActivity(context.packageManager) != null) {
context.startActivity(intent)
} else {
BrazeLogger.w(TAG, "Could not find appropriate activity to open for deep link $uri.")
}
}
}
companion object {
private val TAG = BrazeLogger.getBrazeLogTag(CustomDeeplinkHandler::class.java)
}
}
```
## Deep linking to app settings
To allow deep links to directly open your app's settings, you'll need a custom `BrazeDeeplinkHandler`. In the following example, the presence of a custom key-value pair called `open_notification_page` will make the deep link open the app's settings page:
```java
BrazeDeeplinkHandler.setBrazeDeeplinkHandler(new IBrazeDeeplinkHandler() {
@Override
public void gotoUri(Context context, UriAction uriAction) {
final Bundle extras = uriAction.getExtras();
if (extras.containsKey("open_notification_page")) {
Intent intent = new Intent();
intent.setAction("android.settings.APP_NOTIFICATION_SETTINGS");
intent.setFlags(Intent.FLAG_ACTIVITY_NEW_TASK);
//for Android 5-7
intent.putExtra("app_package", context.getPackageName());
intent.putExtra("app_uid", context.getApplicationInfo().uid);
// for Android 8 and later
intent.putExtra("android.provider.extra.APP_PACKAGE", context.getPackageName());
context.startActivity(intent);
}
}
});
```
```kotlin
BrazeDeeplinkHandler.setBrazeDeeplinkHandler(object : IBrazeDeeplinkHandler {
override fun gotoUri(context: Context, uriAction: UriAction) {
val extras = uriAction.extras
if (extras.containsKey("open_notification_page")) {
val intent = Intent()
intent.action = "android.settings.APP_NOTIFICATION_SETTINGS"
intent.flags = Intent.FLAG_ACTIVITY_NEW_TASK
//for Android 5-7
intent.putExtra("app_package", context.packageName)
intent.putExtra("app_uid", context.applicationInfo.uid)
// for Android 8 and later
intent.putExtra("android.provider.extra.APP_PACKAGE", context.packageName)
context.startActivity(intent)
}
}
})
```
## Customizing WebView activity {#Custom_Webview_Activity}
When Braze opens website deeplinks inside the app, the deeplinks are handled by [`BrazeWebViewActivity`](https://braze-inc.github.io/braze-android-sdk/kdoc/braze-android-sdk/com.braze.ui/-braze-web-view-activity/index.html).
**Note:**
For custom HTML in-app messages, links configured with `target="_blank"` open in the device's default web browser and are not handled by `BrazeWebViewActivity`.
To change this:
1. Create a new Activity that handles the target URL from `Intent.getExtras()` with the key `com.braze.Constants.BRAZE_WEBVIEW_URL_EXTRA`. For an example, see [`BrazeWebViewActivity.kt`](https://github.com/braze-inc/braze-android-sdk/blob/master/android-sdk-ui/src/main/java/com/braze/ui/BrazeWebViewActivity.kt).
2. Add that activity to `AndroidManifest.xml` and set `exported` to `false`.
```xml
```
3. Set your custom Activity in a `BrazeConfig` [builder object](https://braze-inc.github.io/braze-android-sdk/kdoc/braze-android-sdk/com.braze.configuration/-braze-config/-builder/set-custom-web-view-activity-class.html). Build the builder and pass it to [`Braze.configure()`](https://braze-inc.github.io/braze-android-sdk/kdoc/braze-android-sdk/com.braze/-braze/-companion/configure.html) in your [`Application.onCreate()`](https://developer.android.com/reference/android/app/Application.html#onCreate()).
```java
BrazeConfig brazeConfig = new BrazeConfig.Builder()
.setCustomWebViewActivityClass(MyCustomWebViewActivity::class)
...
.build();
Braze.configure(this, brazeConfig);
```
```kotlin
val brazeConfig = BrazeConfig.Builder()
.setCustomWebViewActivityClass(MyCustomWebViewActivity::class.java)
...
.build()
Braze.configure(this, brazeConfig)
```
## Troubleshooting
If deep links from push notifications aren't working on Android, try the following steps:
1. **Test the deep link outside of Braze.** Open the deep link URL from another app, such as email or a browser. If it doesn't open your app, the deep link may not be configured correctly in your `AndroidManifest.xml`. For more information, see Android's [Create Deep Links](https://developer.android.com/training/app-links/deep-linking) documentation.
2. **Check that automatic deep link handling is enabled.** Verify that `com_braze_handle_push_deep_links_automatically` is set to `true` in `braze.xml`, or set this option through [runtime configuration](https://www.braze.com/docs/de/de/developer_guide/sdk_integration/?sdktab=android#runtime-configuration). Without this setting, Braze doesn't automatically open your app and deep link destination when someone taps a push notification.
3. **Verify your deep link handler delegate.** If you set a custom `IBrazeDeeplinkHandler`, confirm that your `gotoUri` implementation handles the URI and doesn't drop it.
4. **Test across channels.** If the same deep link works in an in-app message but not from push, the issue is likely in your push deep link handling, not in the deep link itself.
## Using Jetpack Compose
To handle deeplinks when using Jetpack Compose with NavHost:
1. Ensure that the activity handling your deeplink is registered in the Android Manifest.
```xml
```
2. In NavHost, specify which deeplinks you want it to handle.
```kotlin
composableWithCompositionLocal(
route = "YOUR_ROUTE_HERE",
deepLinks = listOf(navDeepLink {
uriPattern = "myapp://articles/{${MainDestinations.ARTICLE_ID_KEY}}"
}),
arguments = listOf(
navArgument(MainDestinations.ARTICLE_ID_KEY) {
type = NavType.LongType
}
),
) { backStackEntry ->
val arguments = requireNotNull(backStackEntry.arguments)
val articleId = arguments.getLong(MainDestinations.ARTICLE_ID_KEY)
ArticleDetail(
articleId
)
}
```
3. Depending on your app architecture, you may need to handle the new intent that's sent to your current activity as well.
```kotlin
DisposableEffect(Unit) {
val listener = Consumer {
navHostController.handleDeepLink(it)
}
addOnNewIntentListener(listener)
onDispose { removeOnNewIntentListener(listener) }
}
```
## Prerequisites
Before you can use this feature, you'll need to [integrate the Swift Braze SDK](https://www.braze.com/docs/de/de/developer_guide/sdk_integration/?sdktab=swift).
**Tip:**
For help choosing between custom scheme deep links, universal links, and "Open Web URL Inside App," see [iOS deep linking guide](https://www.braze.com/docs/de/de/developer_guide/push_notifications/ios_deep_linking_guide). For troubleshooting, see [Deep linking troubleshooting](https://www.braze.com/docs/de/de/developer_guide/push_notifications/deep_linking_troubleshooting).
## Handling deep links
### Step 1: Register a scheme {#register-a-scheme}
To handle deep linking, a custom scheme must be stated in your `Info.plist` file. The navigation structure is defined by an array of dictionaries. Each of those dictionaries contains an array of strings.
Use Xcode to edit your `Info.plist` file:
1. Add a new key, `URL types`. Xcode will automatically make this an array containing a dictionary called `Item 0`.
2. Within `Item 0`, add a key `URL identifier`. Set the value to your custom scheme.
3. Within `Item 0`, add a key `URL Schemes`. This will automatically be an array containing a `Item 0` string.
4. Set `URL Schemes` >> `Item 0` to your custom scheme.
Alternatively, if you wish to edit your `Info.plist` file directly, you can follow this spec:
```html
CFBundleURLTypesCFBundleURLNameYOUR.SCHEMECFBundleURLSchemesYOUR.SCHEME
```
### Step 2: Add a scheme allowlist
You must declare the URL schemes you wish to pass to `canOpenURL(_:)` by adding the `LSApplicationQueriesSchemes` key to your app's Info.plist file. Attempting to call schemes outside this allowlist will cause the system to record an error in the device's logs, and the deep link will not open. An example of this error will look like this:
```
: -canOpenURL: failed for URL: "yourapp://deeplink" – error: "This app is not allowed to query for scheme yourapp"
```
For example, if an in-app message should open the Facebook app when tapped, the app has to have the Facebook custom scheme (`fb`) in your allowlist. Otherwise, the system will reject the deep link. Deep links that direct to a page or view inside your own app still require that your app's custom scheme be listed in your app's `Info.plist`.
Your example allowlist might look something like:
```html
LSApplicationQueriesSchemesmyappfbtwitter
```
For more information, refer to [Apple's documentation](https://developer.apple.com/library/content/documentation/General/Reference/InfoPlistKeyReference/Articles/LaunchServicesKeys.html#//apple_ref/doc/uid/TP40009250-SW14) on the `LSApplicationQueriesSchemes` key.
### Step 3: Implement a handler
After activating your app, iOS will call the method [`application:openURL:options:`](https://developer.apple.com/reference/uikit/uiapplicationdelegate/1623112-application?language=objc). The important argument is the [NSURL](https://developer.apple.com/library/ios/DOCUMENTATION/Cocoa/Reference/Foundation/Classes/NSURL_Class/Reference/Reference.html#//apple_ref/doc/c_ref/NSURL) object.
```swift
func application(_ app: UIApplication, open url: URL, options: [UIApplication.OpenURLOptionsKey : Any] = [:]) -> Bool {
let path = url.path
let query = url.query
// Insert your code here to take some action based upon the path and query.
return true
}
```
```objc
- (BOOL)application:(UIApplication *)app openURL:(NSURL *)url options:(NSDictionary *)options {
NSString *path = [url path];
NSString *query = [url query];
// Insert your code here to take some action based upon the path and query.
return YES;
}
```
## App Transport Security (ATS)
As defined by [Apple](https://developer.apple.com/library/prerelease/ios/releasenotes/General/WhatsNewIniOS/Articles/iOS9.html#//apple_ref/doc/uid/TP40016198-SW14), "App Transport Security is a feature that improves the security of connections between an app and web services. The feature consists of default connection requirements that conform to best practices for secure connections. Apps can override this default behavior and turn off transport security."
ATS is applied by default. It requires that all connections use HTTPS and are encrypted using TLS 1.2 with forward secrecy. Refer to [Requirements for Connecting Using ATS](https://developer.apple.com/library/ios/documentation/General/Reference/InfoPlistKeyReference/Articles/CocoaKeys.html#//apple_ref/doc/uid/TP40009251-SW35) for more information. All images served by Braze to end devices are handled by a content delivery network ("CDN") that supports TLS 1.2 and is compatible with ATS.
Unless they are specified as exceptions in your application's `Info.plist`, connections that do not follow these requirements will fail with errors that are similar to the following.
**Example Error 1:**
```bash
CFNetwork SSLHandshake failed (-9801)
Error Domain=NSURLErrorDomain Code=-1200 "An SSL error has occurred, and a secure connection to the server cannot be made."
```
**Example Error 2:**
```bash
NSURLSession/NSURLConnection HTTP load failed (kCFStreamErrorDomainSSL, -9802)
```
ATS compliance is enforced for links opened within the mobile app (our default handling of clicked links) and does not apply to sites opened externally via a web browser.
### Working with ATS
You can handle ATS in either of the following ways, but we recommend **complying with ATS requirements**.
Your Braze integration can satisfy ATS requirements by ensuring that any existing links you drive users to (for example, though in-app message and push campaigns) satisfy ATS requirements. While there are ways to bypass ATS restrictions, our recommendation is to ensure that all linked URLs are ATS-compliant. Given Apple's increasing emphasis on application security, the following approaches to allowing ATS exceptions are not guaranteed to be supported by Apple.
You can allow a subset of links with certain domains or schemes to be treated as exceptions to the ATS rules. Your Braze integration will satisfy ATS requirements if every link you use in a Braze messaging channel is either ATS compliant or handled by an exception.
To add a domain as an exception of the ATS, add following to your app's `Info.plist` file:
```html
NSAppTransportSecurityNSAllowsArbitraryLoadsNSExceptionDomainsexample.comNSExceptionAllowsInsecureHTTPLoadsNSIncludesSubdomains
```
Refer to Apple's article on [app transport security keys](https://developer.apple.com/library/ios/documentation/General/Reference/InfoPlistKeyReference/Articles/CocoaKeys.html#//apple_ref/doc/uid/TP40009251-SW33) for more information.
You can turn off ATS entirely. Note that this is not recommended practice, due to both lost security protections and future iOS compatibility. To disable ATS, insert the following in your app's `Info.plist` file:
```html
NSAppTransportSecurityNSAllowsArbitraryLoads
```
## Decoding URLs
The SDK percent-encodes links to create valid `URL`s. All link characters that are not allowed in a properly formed URL, such as Unicode characters, will be percent escaped.
To decode an encoded link, use the `String` property [`removingPercentEncoding`](https://developer.apple.com/documentation/swift/stringprotocol/removingpercentencoding). You must also return `true` in the `BrazeDelegate.braze(_:shouldOpenURL:)`. A call to action is required to trigger the handling of the URL by your app. For example:
```swift
func application(_ app: UIApplication, open url: URL, options: [UIApplication.OpenURLOptionsKey : Any] = [:]) -> Bool {
let urlString = url.absoluteString.removingPercentEncoding
// Handle urlString
return true
}
```
```objc
- (BOOL)application:(UIApplication *)application openURL:(NSURL *)url options:(NSDictionary *)options {
NSString *urlString = [url.absoluteString stringByRemovingPercentEncoding];
// Handle urlString
return YES;
}
```
## Deep linking to app settings
You can take advantage of `UIApplicationOpenSettingsURLString` to deep link users to your app's settings from Braze push notifications and in-app messages.
To take users from your app into the iOS settings:
1. First, make sure your application is set up for either [scheme-based deep links](#swift_register-a-scheme) or [universal links](#swift_universal-links).
2. Decide on a URI for deep linking to the **Settings** page (for example, `myapp://settings` or `https://www.braze.com/settings`).
3. If you are using custom scheme-based deep links, add the following code to your `application:openURL:options:` method:
```swift
func application(_ app: UIApplication, open url: URL, options: [UIApplicationOpenURLOptionsKey : Any] = [:]) -> Bool {
let path = url.path
if (path == "settings") {
UIApplication.shared.openURL(URL(string:UIApplication.openSettingsURLString)!)
}
return true
}
```
```objc
- (BOOL)application:(UIApplication *)app
openURL:(NSURL *)url
options:(NSDictionary *)options {
NSString *path = [url path];
if ([path isEqualToString:@"settings"]) {
NSURL *settingsURL = [NSURL URLWithString:UIApplicationOpenSettingsURLString];
[[UIApplication sharedApplication] openURL:settingsURL];
}
return YES;
}
```
## Customization options {#customization-options}
### Default WebView customization
The `Braze.WebViewController` class displays web URLs opened by the SDK, typically when "Open Web URL Inside App" is selected for a web deep link.
You can customize the `Braze.WebViewController` via the [`BrazeDelegate.braze(_:willPresentModalWithContext:)`](https://braze-inc.github.io/braze-swift-sdk/documentation/brazekit/brazedelegate/braze(_:willpresentmodalwithcontext:)-12sqy/) delegate method.
### Linking handling customization
The `BrazeDelegate` protocol can be used to customize the handling of URLs such as deep links, web URLs, and universal links. To set the delegate during Braze initialization, set a delegate object on the `Braze` instance. Braze will then call your delegate's implementation of `shouldOpenURL` before handling any URIs.
When a push notification or in-app message uses **Open web URL inside mobile app**, Braze passes `context.useWebView == true` on [`Braze.URLContext`](https://braze-inc.github.io/braze-swift-sdk/documentation/brazekit/braze/urlcontext). When the message opens the URL in the system browser instead, `useWebView` is `false`. Inspect `context.useWebView` in `braze(_:shouldOpenURL:)` to branch your custom handling—for example, to open an in-app `WebViewController` only when the campaign requested in-app display.
#### Universal links {#universal-links}
Braze supports universal links in push notifications, in-app messages, and Content Cards. To enable universal link support, [`configuration.forwardUniversalLinks`](https://braze-inc.github.io/braze-swift-sdk/documentation/brazekit/braze/configuration-swift.class/forwarduniversallinks) must be set to `true`.
When enabled, Braze will forward universal links to your app's `AppDelegate` via the [`application:continueUserActivity:restorationHandler:`](https://developer.apple.com/documentation/uikit/uiapplicationdelegate/1623072-application) method.
Your application also needs to be set up to handle universal links. Refer to [Apple's documentation](https://developer.apple.com/documentation/xcode/supporting-universal-links-in-your-app) to ensure your application is configured correctly for universal links.
**Warning:**
Universal link forwarding requires access to the application entitlements. When running the application in a simulator, these entitlements are not directly available and universal links are not forwarded to the system handlers.
To add support to simulator builds, you can add the application `.entitlements` file to the _Copy Bundle Resources_ build phase. See [`forwardUniversalLinks`](https://braze-inc.github.io/braze-swift-sdk/documentation/brazekit/braze/configuration-swift.class/forwarduniversallinks) documentation for more details.
**Note:**
The SDK does not query your domains' `apple-app-site-association` file. It performs the differentiation between universal links and regular URLs by looking at the domain name only. As a result, the SDK does not respect any exclusion rule defined in the `apple-app-site-association` per [Supporting associated domains](https://developer.apple.com/documentation/xcode/supporting-associated-domains).
## Examples
### BrazeDelegate
Here's an example using `BrazeDelegate`. For more information, see [Braze Swift SDK reference](https://braze-inc.github.io/braze-swift-sdk/documentation/brazekit/brazedelegate).
```swift
func braze(_ braze: Braze, shouldOpenURL context: Braze.URLContext) -> Bool {
if context.url.host == "MY-DOMAIN.com" {
// Custom handle link here
return false
}
// Let Braze handle links otherwise
return true
}
```
```objc
- (BOOL)braze:(Braze *)braze shouldOpenURL:(BRZURLContext *)context {
if ([[context.url.host lowercaseString] isEqualToString:@"MY-DOMAIN.com"]) {
// Custom handle link here
return NO;
}
// Let Braze handle links otherwise
return YES;
}
```
# Einbetten von GIFs in In-App-Nachrichten für das Braze SDK
Source: /docs/de/developer_guide/in_app_messages/gifs/index.md
# GIFs in In-App-Nachrichten einbetten
> Erfahren Sie, wie Sie GIFs in In-App-Nachrichten für das Braze SDK einbetten können.
## About GIFs
Braze offers the ability to use a custom image library to display animated GIFs. Although the following example uses [Glide](https://bumptech.github.io/glide/), any image library that supports GIFs is compatible.
## Integrating a custom image library
### Step 1: Creating the image loader delegate
The Image Loader delegate must implement the following methods:
* [`getInAppMessageBitmapFromUrl()`](https://braze-inc.github.io/braze-android-sdk/kdoc/braze-android-sdk/com.braze.images/-i-braze-image-loader/get-in-app-message-bitmap-from-url.html)
* [`getPushBitmapFromUrl()`](https://braze-inc.github.io/braze-android-sdk/kdoc/braze-android-sdk/com.braze.images/-i-braze-image-loader/get-push-bitmap-from-url.html)
* [`renderUrlIntoCardView()`](https://braze-inc.github.io/braze-android-sdk/kdoc/braze-android-sdk/com.braze.images/-i-braze-image-loader/render-url-into-card-view.html)
* [`renderUrlIntoInAppMessageView()`](https://braze-inc.github.io/braze-android-sdk/kdoc/braze-android-sdk/com.braze.images/-i-braze-image-loader/render-url-into-in-app-message-view.html)
* [`setOffline()`](https://braze-inc.github.io/braze-android-sdk/kdoc/braze-android-sdk/com.braze.images/-i-braze-image-loader/set-offline.html)
The following integration example is taken from the [Glide integration sample app](https://github.com/braze-inc/braze-android-sdk/tree/master/samples/glide-image-integration) included with the Braze Android SDK.
```java
import com.braze.support.BrazeLogger;
import com.bumptech.glide.load.resource.gif.GifDrawable;
import android.graphics.drawable.Drawable;
public class GlideBrazeImageLoader implements IBrazeImageLoader {
private static final String TAG = GlideBrazeImageLoader.class.getName();
private RequestOptions mRequestOptions = new RequestOptions();
@Override
public void renderUrlIntoCardView(Context context, Card card, String imageUrl, ImageView imageView, BrazeViewBounds viewBounds) {
renderUrlIntoView(context, imageUrl, imageView);
}
@Override
public void renderUrlIntoInAppMessageView(Context context, IInAppMessage inAppMessage, String imageUrl, ImageView imageView, BrazeViewBounds viewBounds) {
renderUrlIntoView(context, imageUrl, imageView);
}
@Override
public Bitmap getPushBitmapFromUrl(Context context, Bundle extras, String imageUrl, BrazeViewBounds viewBounds) {
return getBitmapFromUrl(context, imageUrl, viewBounds);
}
@Override
public Bitmap getInAppMessageBitmapFromUrl(Context context, IInAppMessage inAppMessage, String imageUrl, BrazeViewBounds viewBounds) {
return getBitmapFromUrl(context, imageUrl, viewBounds);
}
private void renderUrlIntoView(Context context, String imageUrl, ImageView imageView) {
try {
final Drawable drawable = Glide.with(context)
.load(imageUrl)
.apply(mRequestOptions)
.submit()
.get();
imageView.post(() -> {
imageView.setImageDrawable(drawable);
if (drawable instanceof GifDrawable) {
((GifDrawable) drawable).start();
}
});
} catch (Exception e) {
BrazeLogger.e(TAG, "Failed to render URL into view: " + imageUrl, e);
}
}
private Bitmap getBitmapFromUrl(Context context, String imageUrl, BrazeViewBounds viewBounds) {
try {
return Glide.with(context)
.asBitmap()
.apply(mRequestOptions)
.load(imageUrl).submit().get();
} catch (Exception e) {
Log.e(TAG, "Failed to retrieve bitmap at url: " + imageUrl, e);
}
return null;
}
@Override
public void setOffline(boolean isOffline) {
// If the loader is offline, then we should only be retrieving from the cache
mRequestOptions = mRequestOptions.onlyRetrieveFromCache(isOffline);
}
}
```
```kotlin
import com.braze.support.BrazeLogger
import com.bumptech.glide.load.resource.gif.GifDrawable
class GlideBrazeImageLoader : IBrazeImageLoader {
companion object {
private val TAG = GlideBrazeImageLoader::class.qualifiedName
}
private var mRequestOptions = RequestOptions()
override fun renderUrlIntoCardView(context: Context, card: Card, imageUrl: String, imageView: ImageView, viewBounds: BrazeViewBounds) {
renderUrlIntoView(context, imageUrl, imageView)
}
override fun renderUrlIntoInAppMessageView(context: Context, inAppMessage: IInAppMessage, imageUrl: String, imageView: ImageView, viewBounds: BrazeViewBounds) {
renderUrlIntoView(context, imageUrl, imageView)
}
override fun getPushBitmapFromUrl(context: Context, extras: Bundle, imageUrl: String, viewBounds: BrazeViewBounds): Bitmap? {
return getBitmapFromUrl(context, imageUrl, viewBounds)
}
override fun getInAppMessageBitmapFromUrl(context: Context, inAppMessage: IInAppMessage, imageUrl: String, viewBounds: BrazeViewBounds): Bitmap? {
return getBitmapFromUrl(context, imageUrl, viewBounds)
}
private fun renderUrlIntoView(context: Context, imageUrl: String, imageView: ImageView) {
try {
val drawable = Glide.with(context)
.load(imageUrl)
.apply(mRequestOptions)
.submit()
.get()
imageView.post {
imageView.setImageDrawable(drawable)
if (drawable is GifDrawable) {
drawable.start()
}
}
} catch (e: Exception) {
BrazeLogger.e(TAG, "Failed to render URL into view: $imageUrl", e)
}
}
private fun getBitmapFromUrl(context: Context, imageUrl: String, viewBounds: BrazeViewBounds): Bitmap? {
try {
return Glide.with(context)
.asBitmap()
.apply(mRequestOptions)
.load(imageUrl).submit().get()
} catch (e: Exception) {
Log.e(TAG, "Failed to retrieve bitmap at url: $imageUrl", e)
}
return null
}
override fun setOffline(isOffline: Boolean) {
// If the loader is offline, then we should only be retrieving from the cache
mRequestOptions = mRequestOptions.onlyRetrieveFromCache(isOffline)
}
}
```
### Fixing image loading for Android SDK 36.0.0 and later
In Android SDK 36.0.0 and later, `displayInAppMessage()` is a `suspend` function. This means `renderUrlIntoInAppMessageView()` runs on a background thread instead of the main thread.
If your custom image loader calls `Glide.into(imageView)` in `renderUrlIntoInAppMessageView()`, your app can fail with "You must call this method on the main thread."
To avoid this:
1. Load the image on the background thread with `submit().get()`.
2. Post the UI update to the main thread with `imageView.post { ... }`.
3. If the loaded result is a GIF drawable, start the animation after setting it on the view.
This separates image loading from UI rendering, and keeps your custom image loader compatible with Android SDK 36.0.0 and later.
This guidance applies to Android custom image loaders. Web in-app messages support GIFs out of the box.
The following Kotlin sample uses placeholder values to show this pattern:
```kotlin
private const val TAG = "SampleGlideLoader"
private const val glideBrazeImageLoaderTag = "sample-loader"
private fun renderUrlIntoView(
context: Context,
imageUrl: String,
imageView: ImageView
) {
try {
val drawable: Drawable = Glide.with(context)
.load(imageUrl)
.apply(mRequestOptions)
.submit()
.get()
imageView.post {
imageView.setImageDrawable(drawable)
if (drawable is GifDrawable) {
drawable.start()
}
}
} catch (e: Exception) {
Log.e(TAG, "$glideBrazeImageLoaderTag renderUrlIntoView failed: url=$imageUrl", e)
}
}
```
### Step 2: Setting the image loader delegate
The Braze SDK will use any custom image loader set with [`IBrazeImageLoader`](https://braze-inc.github.io/braze-android-sdk/kdoc/braze-android-sdk/com.braze.images/-i-braze-image-loader/index.html). We recommend setting the custom image loader in a custom application subclass:
```java
public class GlideIntegrationApplication extends Application {
@Override
public void onCreate() {
super.onCreate();
Braze.getInstance(context).setImageLoader(new GlideBrazeImageLoader());
}
}
```
```kotlin
class GlideIntegrationApplication : Application() {
override fun onCreate() {
super.onCreate()
Braze.getInstance(context).imageLoader = GlideBrazeImageLoader()
}
}
```
## Custom Image Loading with Jetpack Compose
To override image loading with Jetpack Compose, you can pass in a value to [`imageComposable`](https://braze-inc.github.io/braze-android-sdk/kdoc/braze-android-sdk/com.braze.jetpackcompose.contentcards.styling/-content-card-styling/index.html#-808910455%2FProperties%2F-1725759721). This function will take a `Card` and render the image and the modifiers needed. Alternatively, you can use `customCardComposer` of `ContentCardsList` to render the entire card.
In the following example, Glide's Compose library is used for the cards listed in the `imageComposable` function:
```kotlin
ContentCardsList(
cardStyle = ContentCardStyling(
imageComposable = { card ->
when (card.cardType) {
CardType.CAPTIONED_IMAGE -> {
val captionedImageCard = card as CaptionedImageCard
GlideImage(
modifier = Modifier
.fillMaxWidth()
.wrapContentHeight()
.run {
if (captionedImageCard.aspectRatio > 0) {
aspectRatio(captionedImageCard.aspectRatio)
} else {
this
}
},
contentScale = ContentScale.Crop,
model = captionedImageCard.url,
loading = placeholder(R.drawable.pushpin),
contentDescription = ""
)
}
CardType.IMAGE -> {
val imageOnlyCard = card as ImageOnlyCard
GlideImage(
modifier = Modifier
.fillMaxWidth()
.run {
if (imageOnlyCard.aspectRatio > 0) {
aspectRatio(imageOnlyCard.aspectRatio)
} else {
this
}
},
contentScale = ContentScale.Crop,
model = imageOnlyCard.url,
loading = placeholder(R.drawable.pushpin),
contentDescription = ""
)
}
CardType.SHORT_NEWS -> {
val shortNews = card as ShortNewsCard
GlideImage(
modifier = Modifier
.width(100.dp)
.height(100.dp),
model = shortNews.url,
loading = placeholder(R.drawable.pushpin),
contentDescription = ""
)
}
else -> Unit
}
}
)
)
```
## Prerequisites
Before you can use this feature, you'll need to [integrate the Swift Braze SDK](https://www.braze.com/docs/de/de/developer_guide/sdk_integration/?sdktab=swift).
## Integrating a custom image library
### Step 1: Integrate SDWebImage
Integrate the [SDWebImage repository](https://github.com/SDWebImage/SDWebImage) into your Xcode project.
### Step 2: Create a new Swift file
In your Xcode project, create a new file named `SDWebImageGIFViewProvider.swift` and import the following:
```swift
import UIKit
import BrazeUI
import SDWebImage
```
### Step 3: Add `GIFViewProvider`
Next, add our sample SDWebImage [`GIFViewProvider`](https://braze-inc.github.io/braze-swift-sdk/documentation/brazeui/gifviewprovider/). Your file should be similar to the following:
```swift
import UIKit
import BrazeUI
import SDWebImage
extension GIFViewProvider {
/// A GIF view provider using [SDWebImage](https://github.com/SDWebImage/SDWebImage) as a
/// rendering library.
public static let sdWebImage = Self(
view: { SDAnimatedImageView(image: image(for: $0)) },
updateView: { ($0 as? SDAnimatedImageView)?.image = image(for: $1) }
)
private static func image(for url: URL?) -> UIImage? {
guard let url else { return nil }
return url.pathExtension == "gif"
? SDAnimatedImage(contentsOfFile: url.path)
: UIImage(contentsOfFile: url.path)
}
}
```
### Step 4: Modify your `AppDelegate.swift`
In your project's `AppDelegate.swift`, add GIF support to your `BrazeUI` components using `GIFViewProvider`. Your file should be similar to the following:
```swift
import UIKit
import BrazeKit
import BrazeUI
@main
class AppDelegate: UIResponder, UIApplicationDelegate {
static var braze: Braze? = nil
func application(
_ application: UIApplication,
didFinishLaunchingWithOptions launchOptions: [UIApplication.LaunchOptionsKey: Any]?
) -> Bool {
/* ... */
GIFViewProvider.shared = .sdWebImage
return true
}
}
```
# Bitte melden Sie sich über das Braze SDK bei den Daten der In-App-Nachrichten an.
Source: /docs/de/developer_guide/in_app_messages/logging_message_data/index.md
# Daten zu In-App-Nachrichten protokollieren
> Erfahren Sie, wie Sie In-App-Nachricht-Daten (IAM) über das Braze SDK protokollieren können.
## Prerequisites
Before you can use this feature, you'll need to [integrate the Web Braze SDK](https://www.braze.com/docs/de/de/developer_guide/sdk_integration/?sdktab=web).
## Logging message data
Logging in-app message [impressions](https://js.appboycdn.com/web-sdk/latest/doc/modules/braze.html#loginappmessageimpression) and [clicks](https://js.appboycdn.com/web-sdk/latest/doc/modules/braze.html#loginappmessagebuttonclick) is performed automatically when you use the `showInAppMessage` or `automaticallyShowInAppMessage` method.
If you do not use either method and opt to manually display the message using your own UI code, use the following methods to log analytics:
```javascript
// Registers that a user has viewed an in-app message with the Braze server.
braze.logInAppMessageImpression(inAppMessage);
// Registers that a user has clicked on the specified in-app message with the Braze server.
braze.logInAppMessageClick(inAppMessage);
// Registers that a user has clicked a specified in-app message button with the Braze server.
braze.logInAppMessageButtonClick(button, inAppMessage);
// Registers that a user has clicked on a link in an HTML in-app message with the Braze server.
braze.logInAppMessageHtmlClick(inAppMessage, buttonId?, url?)
```
## Prerequisites
Before you can use this feature, you'll need to [integrate the Flutter Braze SDK](https://www.braze.com/docs/de/de/developer_guide/sdk_integration/?sdktab=flutter).
## Logging message data
To log analytics using your `BrazeInAppMessage`, pass the instance into the desired analytics function:
- `logInAppMessageClicked`
- `logInAppMessageImpression`
- `logInAppMessageButtonClicked` (along with the button index)
For example:
```dart
// Log a click
braze.logInAppMessageClicked(inAppMessage);
// Log an impression
braze.logInAppMessageImpression(inAppMessage);
// Log button index `0` being clicked
braze.logInAppMessageButtonClicked(inAppMessage, 0);
```
## Accessing message data
To access in-app message data in your Flutter app, the `BrazePlugin` supports sending in-app message data using [Dart Streams](https://dart.dev/tutorials/language/streams).
The `BrazeInAppMessage` object supports a subset of fields available in the native model objects, including `uri`, `message`, `header`, `buttons`, `extras`, and more.
### Listen for in-app message data in the Dart layer
To receive in-app message data in the Dart layer, use the following code to create a `StreamSubscription` and call `braze.subscribeToInAppMessages()`. Remember to `cancel()` the stream subscription when it is no longer needed.
```dart
// Create stream subscription
StreamSubscription inAppMessageStreamSubscription;
inAppMessageStreamSubscription = braze.subscribeToInAppMessages((BrazeInAppMessage inAppMessage) {
// Handle in-app messages
}
// Cancel stream subscription
inAppMessageStreamSubscription.cancel();
```
For an example, see [main.dart](https://github.com/braze-inc/braze-flutter-sdk/blob/master/example/lib/main.dart) in the Braze Flutter SDK sample application.
### Forward in-app message data from the native layer
In-app message data is automatically forwarded from both the Android and iOS native layers. No additional setup is required.
If you're using Flutter SDK 17.1.0 or earlier, in-app message data forwarding from the iOS native layer requires manual setup. Your application likely contains one of the following. To migrate to Flutter SDK 18.0.0, remove the `BrazePlugin.processInAppMessage(_:)` call—data forwarding is now handled automatically.
Remove the `BrazePlugin.processInAppMessage(_:)` call from your [`willPresent` delegate implementation](https://braze-inc.github.io/braze-swift-sdk/documentation/brazeui/brazeinappmessageuidelegate/inappmessage(_:willpresent:view:)-4pzvv).
Remove the `BrazePlugin.processInAppMessage(message)` call from your custom presenter's [`present(message:)`](https://braze-inc.github.io/braze-swift-sdk/documentation/brazeui/brazeinappmessageui/present(message:)-f2ra) implementation:
```swift
class CustomInAppMessagePresenter: BrazeInAppMessageUI {
override func present(message: Braze.InAppMessage) {
// Pass in-app message data to the Dart layer.
BrazePlugin.processInAppMessage(message)
// If you want the default UI to display the in-app message.
super.present(message: message)
}
}
```
### Replaying the callback for in-app messages (optional)
To store any in-app messages triggered before the callback is available and replay them after it is set, add the following entry to the `customConfigs` map when initializing the `BrazePlugin`:
```dart
BrazePlugin braze = new BrazePlugin(customConfigs: {replayCallbacksConfigKey: true});
```
## Prerequisites
Before you can use this feature, you'll need to [integrate the React Native Braze SDK](https://www.braze.com/docs/de/de/developer_guide/sdk_integration/?sdktab=react%20native).
## Methods for logging
You can use these methods by passing your `BrazeInAppMessage` instance to log analytics and perform actions:
| Method | Description |
| --------------------------------------------------------- | ------------------------------------------------------------------------------------- |
| `logInAppMessageClicked(inAppMessage)` | Logs a click for the provided in-app message data. |
| `logInAppMessageImpression(inAppMessage)` | Logs an impression for the provided in-app message data. |
| `logInAppMessageButtonClicked(inAppMessage, buttonId)` | Logs a button click for the provided in-app message data and button ID. |
| `hideCurrentInAppMessage()` | Dismisses the currently displayed in-app message. |
| `performInAppMessageAction(inAppMessage)` | Performs the action for an in-app message. |
| `performInAppMessageButtonAction(inAppMessage, buttonId)` | Performs the action for an in-app message button. |
{: .reset-td-br-1 .reset-td-br-2 aria-label="Methods for logging" }
## Handling message data
In most cases, you can use the `Braze.addListener` method to register event listeners to handle data coming from in-app messages.
Additionally, you can access the in-app message data in the JavaScript layer by calling the `Braze.subscribeToInAppMessage` method to have the SDKs publish an `inAppMessageReceived` event when an in-app message is triggered. Pass a callback to this method to execute your own code when the in-app message is triggered and received by the listener.
To customize how message data is handled, refer to the following implementation examples:
To enhance the default behavior, or if you don't have access to customize the native iOS or Android code, we recommend that you disable the default UI while still receiving in-app message events from Braze. To disable the default UI, pass `false` to the `Braze.subscribeToInAppMessage` method and use the in-app message data to construct your own message in JavaScript. Note that you will need to manually log analytics on your messages if you choose to disable the default UI.
```javascript
import Braze from "@braze/react-native-sdk";
// Option 1: Listen for the event directly via `Braze.addListener`.
//
// You may use this method to accomplish the same thing if you don't
// wish to make any changes to the default Braze UI.
Braze.addListener(Braze.Events.IN_APP_MESSAGE_RECEIVED, (event) => {
console.log(event.inAppMessage);
});
// Option 2: Call `subscribeToInAppMessage`.
//
// Pass in `false` to disable the automatic display of in-app messages.
Braze.subscribeToInAppMessage(false, (event) => {
console.log(event.inAppMessage);
// Use `event.inAppMessage` to construct your own custom message UI.
});
```
To include more advanced logic to determine whether or not to show an in-app message using the built-in UI, implement in-app messages through the native layer.
**Warning:**
Since this is an advanced customization option, note that overriding the default Braze implementation will also nullify the logic to emit in-app message events to your JavaScript listeners. If you wish to still use `Braze.subscribeToInAppMessage` or `Braze.addListener` as described in [Accessing in-app message data](#accessing-in-app-message-data), you will need to handle publishing the events yourself.
Implement the `IInAppMessageManagerListener` as described in our Android article on [Custom Manager Listener](https://www.braze.com/docs/de/de/developer_guide/in_app_messages/customization/?sdktab=android#android_setting-custom-manager-listeners). In your `beforeInAppMessageDisplayed` implementation, you can access the `inAppMessage` data, send it to the JavaScript layer, and decide to show or not show the native message based on the return value.
For more on these values, see our [Android documentation](https://www.braze.com/docs/de/de/developer_guide/in_app_messages/).
```java
// In-app messaging
@Override
public InAppMessageOperation beforeInAppMessageDisplayed(IInAppMessage inAppMessage) {
WritableMap parameters = new WritableNativeMap();
parameters.putString("inAppMessage", inAppMessage.forJsonPut().toString());
getReactNativeHost()
.getReactInstanceManager()
.getCurrentReactContext()
.getJSModule(DeviceEventManagerModule.RCTDeviceEventEmitter.class)
.emit("inAppMessageReceived", parameters);
// Note: return InAppMessageOperation.DISCARD if you would like
// to prevent the Braze SDK from displaying the message natively.
return InAppMessageOperation.DISPLAY_NOW;
}
```
### Overriding the default UI delegate
By default, [`BrazeInAppMessageUI`](https://braze-inc.github.io/braze-swift-sdk/documentation/brazeui/brazeinappmessageui/) is created and assigned when you initialize the `braze` instance. `BrazeInAppMessageUI` is an implementation of the [`BrazeInAppMessagePresenter`](https://braze-inc.github.io/braze-swift-sdk/documentation/brazekit/brazeinappmessagepresenter) protocol and comes with a `delegate` property that can be used to customize the handling of in-app messages that have been received.
1. Implement the `BrazeInAppMessageUIDelegate` delegate as described in [our iOS article here](https://braze-inc.github.io/braze-swift-sdk/tutorials/braze/c1-inappmessageui).
2. In the `inAppMessage(_:displayChoiceForMessage:)` delegate method, you can access the `inAppMessage` data, send it to the JavaScript layer, and decide to show or not show the native message based on the return value.
For more details on these values, see our [iOS documentation](https://braze-inc.github.io/braze-swift-sdk/documentation/brazeui/brazeinappmessageuidelegate/).
```objc
- (enum BRZInAppMessageUIDisplayChoice)inAppMessage:(BrazeInAppMessageUI *)ui
displayChoiceForMessage:(BRZInAppMessageRaw *)message {
// Convert the message to a JavaScript representation.
NSData *inAppMessageData = [message json];
NSString *inAppMessageString = [[NSString alloc] initWithData:inAppMessageData encoding:NSUTF8StringEncoding];
NSDictionary *arguments = @{
@"inAppMessage" : inAppMessageString
};
// Send to JavaScript.
[self sendEventWithName:@"inAppMessageReceived" body:arguments];
// Note: Return `BRZInAppMessageUIDisplayChoiceDiscard` if you would like
// to prevent the Braze SDK from displaying the message natively.
return BRZInAppMessageUIDisplayChoiceNow;
}
```
To use this delegate, assign it to `brazeInAppMessagePresenter.delegate` after initializing the `braze` instance.
**Note:**
`BrazeUI` can only be imported in Objective-C or Swift. If you are using Objective-C++, you will need to handle this in a separate file.
```objc
@import BrazeUI;
- (BOOL)application:(UIApplication *)application didFinishLaunchingWithOptions:(NSDictionary *)launchOptions {
BRZConfiguration *configuration = [[BRZConfiguration alloc] initWithApiKey:apiKey endpoint:endpoint];
Braze *braze = [BrazeReactBridge initBraze:configuration];
((BrazeInAppMessageUI *)braze.inAppMessagePresenter).delegate = [[CustomDelegate alloc] init];
AppDelegate.braze = braze;
}
```
### Overriding the default native UI
If you wish to fully customize the presentation of your in-app messages at the native iOS layer, conform to the [`BrazeInAppMessagePresenter`](https://braze-inc.github.io/braze-swift-sdk/documentation/brazekit/brazeinappmessagepresenter) protocol and assign your custom presenter following this sample:
```objc
BRZConfiguration *configuration = [[BRZConfiguration alloc] initWithApiKey:apiKey endpoint:endpoint];
Braze *braze = [BrazeReactBridge initBraze:configuration];
braze.inAppMessagePresenter = [[MyCustomPresenter alloc] init];
AppDelegate.braze = braze;
```
## Prerequisites
Before you can use this feature, you'll need to [integrate the Android Braze SDK](https://www.braze.com/docs/de/de/developer_guide/sdk_integration/?sdktab=android).
## Logging message data
You will need to make sure certain functions are called to handle the analytics for your campaign.
### Displayed messages
When a message is displayed or seen, log an impression:
```brightscript
LogInAppMessageImpression(in_app_message.id, brazetask)
```
### Clicked messages
Once a user clicks on the message, log a click and then process `in_app_message.click_action`:
```brightscript
LogInAppMessageClick(in_app_message.id, brazetask)
```
### Clicked buttons
If the user clicks on a button, log the button click and then process `inappmessage.buttons[selected].click_action`:
```brightscript
LogInAppMessageButtonClick(inappmessage.id, inappmessage.buttons[selected].id, brazetask)
```
### After processing a message
After processing an in-app message, you should clear the field:
```brightscript
m.BrazeTask.BrazeInAppMessage = invalid
```
## Subscribing to in-app messages
You may register Unity game objects to be notified of incoming in-app messages. We recommend setting game object listeners from the Braze configuration editor. In the configuration editor, listeners must be set separately for Android and iOS.
If you need to configure your game object listener at runtime, use `AppboyBinding.ConfigureListener()` and specify `BrazeUnityMessageType.IN_APP_MESSAGE`.
## Parsing messages
Incoming `string` messages received in your in-app message game object callback can be parsed into our pre-supplied model objects for convenience.
Use `InAppMessageFactory.BuildInAppMessage()` to parse your in-app message. The resulting object will either be an instance of [`IInAppMessage.cs`](https://github.com/braze-inc/braze-unity-sdk/blob/18cb8ee89f1841c576eb954793edb6e06f9130b4/Assets/Plugins/Appboy/Models/InAppMessage/IInAppMessage.cs) or [`IInAppMessageImmersive.cs`](https://github.com/braze-inc/braze-unity-sdk/blob/18cb8ee89f1841c576eb954793edb6e06f9130b4/Assets/Plugins/Appboy/Models/InAppMessage/IInAppMessageImmersive.cs) depending on its type.
```csharp
// Automatically logs a button click, if present.
void InAppMessageReceivedCallback(string message) {
IInAppMessage inApp = InAppMessageFactory.BuildInAppMessage(message);
if (inApp is IInAppMessageImmersive) {
IInAppMessageImmersive inAppImmersive = inApp as IInAppMessageImmersive;
if (inAppImmersive.Buttons != null && inAppImmersive.Buttons.Count > 0) {
inAppImmersive.LogButtonClicked(inAppImmersive.Buttons[0].ButtonID);
}
}
}
```
## Logging message data
Clicks and impressions must be manually logged for in-app messages not displayed directly by Braze.
Use `LogClicked()` and `LogImpression()` on [`IInAppMessage`](https://github.com/braze-inc/braze-unity-sdk/blob/18cb8ee89f1841c576eb954793edb6e06f9130b4/Assets/Plugins/Appboy/Models/InAppMessage/IInAppMessage.cs) to log clicks and impressions on your message.
Use `LogButtonClicked(int buttonID)` on [`IInAppMessageImmersive`](https://github.com/braze-inc/braze-unity-sdk/blob/18cb8ee89f1841c576eb954793edb6e06f9130b4/Assets/Plugins/Appboy/Models/InAppMessage/IInAppMessageImmersive.cs) to log button clicks. Note that buttons are represented as lists of[`InAppMessageButton`](https://github.com/braze-inc/braze-unity-sdk/blob/18cb8ee89f1841c576eb954793edb6e06f9130b4/Assets/Plugins/Appboy/Models/InAppMessage/InAppMessageButton.cs) instances, each of which contains a `ButtonID`.
# Bitte senden Sie eine Testnachricht für das Braze SDK.
Source: /docs/de/developer_guide/in_app_messages/sending_test_messages/index.md
# Sending test messages
> Before sending out a messaging campaign to your users, you may want to test it to make sure it looks right and operates in the intended manner. You can use the dashboard to create and send test messages with push notifications, in-app messages (IAM), or email.
## Sending a test message
### Step 1: Create a designated test segment
After you set up a test segment, you can use it to test any of your Braze messaging channels. When set up correctly, this only needs to be done a single time.
To set up a test segment, go to **Segments** and create a new segment. Select **Add Filter**, then choose a one of the test filters.

With test filters, you can ensure that only users with a specific email address or [external user ID](https://www.braze.com/docs/de/de/developer_guide/platform_integration_guides/swift/analytics/setting_user_ids/#setting-user-ids) are sent the test message.

Both email address and external user ID filters offer the following options:
| Operator | Description |
|------------------|--------------------------------------------------------------------------------------------------------------------------------|
| `equals` | This will look for an exact match of the email or user ID that you provide. Use this if you only want to send the test campaigns to devices associated with a single email or user ID. |
| `does not equal` | Use this if you want to exclude a particular email or user ID from test campaigns. |
| `matches` | This will find users that have email addresses or user IDs that match part of the search term you provide. You could use this to find only the users that have an `@yourcompany.com` address, allowing you to send messages to everyone on your team. |
{: .reset-td-br-1 .reset-td-br-2 aria-label="Step 1: Create a designated test segment a class="margin-fix" name="test-segment"/a" }
You can select multiple specific emails using the "`matches`" option and separating the email addresses with a | character. For example: "`matches`" "`email1@braze.com` | `email2@braze.com`". You can also combine multiple operators together. For example, the test segment could include an email address filter that "`matches`" "`@braze.com`" and another filter that "`does not equal`" "`sales@braze.com`".
After adding the testing filters to your test segment, you can verify it's working by selecting **Preview** or by selecting **Settings** > **CSV Export All User Data** to export that segment's user data to a CSV file.

**Note:**
Exporting the segment's User Data to a CSV file is the most accurate verification method, as the preview will only show a sample of your users and may not include all users.
### Step 2: Send the message
You can send a message using the Braze dashboard or the command line.
To send test push notifications or in-app messages, you need to target your previously created test segment. Begin by creating your campaign and following the usual steps. When you reach the **Target Audiences** step, select your test segment from the dropdown menu.

Confirm your campaign and launch it to test your push notification and in-app messages.
**Note:**
Be sure to select **Allow users to become re-eligible to receive campaign** under the **Schedule** portion of the campaign composer if you intend to use a single campaign to send a test message to yourself more than once.
If you're only testing email messages, you do not necessarily have to set up a test segment. In the first step of the campaign composer where you compose your campaign's email message, click **Send Test** and enter the email address to which you wish to send a test email.

**Tip:**
You can also enable or disable [TEST (or SEED)](https://www.braze.com/docs/de/de/user_guide/administrative/app_settings/email_settings/#append-email-subject-lines) being appended on your test messages.
Alternatively, you can send a single notification using cURL and the [Braze Messaging API](https://www.braze.com/docs/de/de/api/endpoints/messaging/). Note that these examples make a request using the `US-01` instance. To find out yours, refer to [API endpoints](https://www.braze.com/docs/de/de/api/basics/#endpoints).
```bash
curl -X POST -H "Content-Type: application/json" -H "Authorization: Bearer {BRAZE_API_KEY}" -d '{
"external_user_ids":["EXTERNAL_USER_ID"],
"messages": {
"android_push": {
"title":"Test push title",
"alert":"Test push",
"extra":{
"CUSTOM_KEY":"CUSTOM_VALUE"
}
}
}
}' https://rest.iad-01.braze.com/messages/send
```
```bash
curl -X POST -H "Content-Type: application/json" -H "Authorization: Bearer {BRAZE_API_KEY}" -d '{
"external_user_ids":["EXTERNAL_USER_ID"],
"messages": {
"apple_push": {
"alert": "Test push",
"extra": {
"CUSTOM_KEY" :"CUSTOM_VALUE"
}
}
}
}' https://rest.iad-01.braze.com/messages/send
```
```bash
curl -X POST -H "Content-Type: application/json" -H "Authorization: Bearer {BRAZE_API_KEY}" -d '{
"external_user_ids":["EXTERNAL_USER_ID"],
"messages": {
"kindle_push": {
"title":"Test push title",
"alert":"Test push",
"extra":{
"CUSTOM_KEY":"CUSTOM_VALUE"
}
}
}
}' https://rest.iad-01.braze.com/messages/send
```
Replace the following:
| Placeholder | Description |
|---------------------|-----------------------------------------------------------|
| `BRAZE_API_KEY` | Your Braze API key used for authentication. In Braze, go to **Settings** > **API Keys** to locate your key. |
| `EXTERNAL_USER_ID` | The external user ID used to send your message to a specific user. In Braze, go to **Audience** > **Search users**, then search for a user. |
| `CUSTOM_KEY` | (Optional) A custom key for additional data. |
| `CUSTOM_VALUE` | (Optional) A custom value assigned to your custom key. |
{: .reset-td-br-1 .reset-td-br-2 aria-label="Step 2: Send the message" }
## Test limitations
There are a few situations where test messages don't have complete feature parity with launching a campaign or Canvas to a real set of users. In these instances, to validate this behavior, you should launch the campaign or Canvas to a limited set of test users.
- Viewing the Braze [preference center](https://www.braze.com/docs/de/de/user_guide/message_building_by_channel/email/managing_user_subscriptions/#subscription-groups) from **Test Messages** will cause the submit button to be grayed out.
- The list-unsubscribe header is not included in emails sent by the test message functionality.
- For in-app messages and Content Cards, the target user must have a push token for the target device.
# Tutorials
Source: /docs/de/developer_guide/in_app_messages/tutorials/index.md
# Anleitung: Bedingte Anzeige von In-App-Nachrichten
Source: /docs/de/developer_guide/in_app_messages/tutorials/conditionally_displaying_messages/index.md
# Anleitung: Bedingte Anzeige von In-App-Nachrichten {#tutorial-conditionally-displaying-in-app-messages}
> Folgen Sie dem Beispielcode in dieser Anleitung, um In-App-Nachrichten mit dem Braze SDK bedingt anzuzeigen.
## Prerequisites
Before you can use this feature, you'll need to [integrate the Web Braze SDK](https://www.braze.com/docs/de/de/developer_guide/sdk_integration/?sdktab=web). Es ist jedoch keine zusätzliche Einrichtung erforderlich.
## Bedingte Anzeige von In-App-Nachrichten für das Internet {#conditionally-displaying-in-app-messages-for-web}
**Important:**
We're piloting this new tutorial format. [Tell us what you think](https://docs.google.com/forms/d/e/1FAIpQLSe_5uhWM7eXXk9F_gviO_pvA4rkYO3WA9B6tNJZ3TY91md5bw/viewform?usp=pp_url&entry.569173304=General+Feedback) — your feedback helps us improve future guides.
```js file=index.js
import * as braze from "@braze/web-sdk";
// Remove any calls to `braze.automaticallyShowInAppMessages()`
braze.initialize("YOUR-API-KEY", {
baseUrl: "YOUR-ENDPOINT",
enableLogging: true,
});
braze.subscribeToInAppMessage(function (message) {
if (
location.pathname === "/checkout" ||
document.getElementById("#checkout")
) {
// do not show the message
} else {
braze.showInAppMessage(message);
}
});
```
!!step
lines-index.js=2
### 1. Aufrufe von `automaticallyShowInAppMessages()` entfernen {#1-remove-calls-to-automaticallyshowinappmessages}
Entfernen Sie alle Aufrufe von [`automaticallyShowInAppMessages()`](https://js.appboycdn.com/web-sdk/latest/doc/modules/braze.html#automaticallyshowinappmessages), da sie jede angepasste Logik, die Sie später implementieren, außer Kraft setzen.
!!step
lines-index.js=6
#### 2. Debugging aktivieren (optional) {#2-enable-debugging-optional}
Um die Fehlerbehebung während der Entwicklung zu erleichtern, sollten Sie das Debugging aktivieren.
!!step
lines-index.js=9-18
#### 3. Updates für In-App-Nachrichten abonnieren {#3-subscribe-to-in-app-message-updates}
Registrieren Sie einen Callback mit [`subscribeToInAppMessage(callback)`](https://js.appboycdn.com/web-sdk/latest/doc/modules/braze.html#subscribetoinappmessage), um jedes Mal eine `message` zu erhalten, wenn eine In-App-Nachricht getriggert wird.
!!step
lines-index.js=10-13
#### 4. Bedingte Logik erstellen {#4-create-conditional-logic}
Erstellen Sie eine angepasste Logik, um zu steuern, wann Nachrichten angezeigt werden. In diesem Beispiel prüft die Logik, ob die URL `"checkout"` enthält oder ob ein `#checkout`-Element auf der Seite existiert.
!!step
lines-index.js=16
#### 5. Nachrichten mit `showInAppMessage` anzeigen {#5-display-messages-with-showinappmessage}
Um die Nachricht anzuzeigen, rufen Sie [`showInAppMessage(message)`](https://js.appboycdn.com/web-sdk/latest/doc/modules/braze.html#showinappmessage) auf. Wird dies ausgelassen, wird die Nachricht übersprungen.
## Prerequisites
Before you can use this feature, you'll need to [integrate the Android Braze SDK](https://www.braze.com/docs/de/de/developer_guide/sdk_integration/?sdktab=android). Außerdem müssen Sie [In-App-Nachrichten für Android aktivieren](https://www.braze.com/docs/de/de/developer_guide/in_app_messages?sdktab=android#android_enabling-in-app-messages).
## Bedingte Anzeige von In-App-Nachrichten für Android {#conditionally-displaying-in-app-messages-for-android}
**Important:**
We're piloting this new tutorial format. [Tell us what you think](https://docs.google.com/forms/d/e/1FAIpQLSe_5uhWM7eXXk9F_gviO_pvA4rkYO3WA9B6tNJZ3TY91md5bw/viewform?usp=pp_url&entry.569173304=General+Feedback) — your feedback helps us improve future guides.
```kotlin file=MainApplication.kt
import android.app.Application
import com.braze.Braze
import com.braze.support.BrazeLogger
import com.braze.configuration.BrazeConfig
import com.braze.ui.inappmessage.BrazeInAppMessageManager
import com.braze.BrazeActivityLifecycleCallbackListener
import com.braze.ui.inappmessage.listeners.IInAppMessageManagerListener
import com.braze.models.inappmessage.IInAppMessage
import com.braze.ui.inappmessage.InAppMessageOperation
import android.util.Log
class MyApplication : Application() {
override fun onCreate() {
super.onCreate()
// Enable verbose Braze SDK logs
BrazeLogger.logLevel = Log.VERBOSE
// Initialize Braze
val brazeConfig = BrazeConfig.Builder()
.setApiKey("YOUR-API-KEY")
.setCustomEndpoint("YOUR-ENDPOINT")
.build()
Braze.configure(this, brazeConfig)
registerActivityLifecycleCallbacks(
BrazeActivityLifecycleCallbackListener()
)
// Set up in-app message listener
BrazeInAppMessageManager.getInstance().setCustomInAppMessageManagerListener(object : IInAppMessageManagerListener {
override fun beforeInAppMessageDisplayed(inAppMessage: IInAppMessage): InAppMessageOperation {
// Check if we should show the message
val shouldShow = inAppMessage.extras["should_display_message"] == "true"
return if (shouldShow) {
// Show the message using Braze's UI
InAppMessageOperation.DISPLAY_NOW
} else {
// Discard the message (or we could also create our own UI using KVP values)
InAppMessageOperation.DISCARD
}
}
})
}
}
```
!!step
lines-MainApplication.kt=17
### 1. Debugging aktivieren (optional) {#1-enable-debugging-optional}
Um die Fehlerbehebung während der Entwicklung zu erleichtern, sollten Sie das Debugging aktivieren.
!!step
lines-MainApplication.kt=26-28
#### 2. Activity-Lifecycle-Callbacks registrieren {#2-register-activity-lifecycle-callbacks}
Registrieren Sie den Standard-Listener von Braze, um den Lebenszyklus der In-App-Nachrichten zu verwalten.
!!step
lines-MainApplication.kt=30-44
#### 3. Einen In-App-Nachrichten-Listener einrichten {#3-set-up-an-in-app-message-listener}
Verwenden Sie `BrazeInAppMessageManager`, um einen angepassten Listener einzurichten, der Nachrichten abfängt, bevor sie angezeigt werden.
!!step
lines-MainApplication.kt=34-42
#### 4. Bedingte Logik erstellen
Verwenden Sie eine angepasste Logik, um die Anzeige von Nachrichten zu steuern. In diesem Beispiel prüft die angepasste Logik, ob das Extra `should_display_message` auf `"true"` gesetzt ist.
!!step
lines-MainApplication.kt=38,41
#### 5. Nachricht zurückgeben oder verwerfen {#5-return-or-discard-the-message}
Geben Sie eine `InAppMessageOperation` mit `DISPLAY_NOW` zurück, um die Nachricht anzuzeigen, oder mit `DISCARD`, um sie zu unterdrücken.
## Prerequisites
Before you can use this feature, you'll need to [integrate the Swift Braze SDK](https://www.braze.com/docs/de/de/developer_guide/sdk_integration/?sdktab=swift). Außerdem müssen Sie [In-App-Nachrichten für Swift aktivieren](https://www.braze.com/docs/de/de/developer_guide/in_app_messages?sdktab=swift#swift_enabling-in-app-messages).
## Bedingte Anzeige von In-App-Nachrichten für Swift {#conditionally-displaying-in-app-messages-for-swift}
**Important:**
We're piloting this new tutorial format. [Tell us what you think](https://docs.google.com/forms/d/e/1FAIpQLSe_5uhWM7eXXk9F_gviO_pvA4rkYO3WA9B6tNJZ3TY91md5bw/viewform?usp=pp_url&entry.569173304=General+Feedback) — your feedback helps us improve future guides.
```swift file=AppDelegate.swift
import SwiftUI
import BrazeKit
import BrazeUI
class AppDelegate: NSObject, UIApplicationDelegate, BrazeInAppMessageUIDelegate {
static var braze: Braze?
func application(_ application: UIApplication,
didFinishLaunchingWithOptions launchOptions: [UIApplication.LaunchOptionsKey: Any]? = nil) -> Bool {
// 1. Braze configuration with your SDK API key and endpoint
let configuration = Braze.Configuration(apiKey: "YOUR_API_ENDPOINT", endpoint: "YOUR_API_KEY")
configuration.logger.level = .debug
// 2. Initialize Braze SDK instance
let brazeInstance = Braze(configuration: configuration)
AppDelegate.braze = brazeInstance
// 3. Set up Braze In-App Message UI and delegate
let inAppMessageUI = BrazeInAppMessageUI()
inAppMessageUI.delegate = self
brazeInstance.inAppMessagePresenter = inAppMessageUI
return true
}
func inAppMessage(_ ui: BrazeInAppMessageUI,
displayChoiceForMessage message: Braze.InAppMessage) -> BrazeInAppMessageUI.DisplayChoice {
if let showFlag = message.extras["should_display_message"] as? String, showFlag == "true" {
return .now
} else {
return .discard
}
}
}
```
```swift file=SampleApp.swift
import SwiftUI
@main
struct SampleApp: App {
@UIApplicationDelegateAdaptor(AppDelegate.self) var appDelegate
var body: some Scene {
WindowGroup {
YourView()
}
}
}
```
!!step
lines-AppDelegate.swift=5
### 1. `BrazeInAppMessageUIDelegate` implementieren {#1-implement-the-brazeinappmessageuidelegate}
Implementieren Sie in Ihrer AppDelegate-Klasse das [`BrazeInAppMessageUIDelegate`](https://braze-inc.github.io/braze-swift-sdk/documentation/brazeui/brazeinappmessageui/delegate), damit Sie später die Methode `inAppMessage` überschreiben können.
!!step
lines-AppDelegate.swift=12
#### 2. Debugging aktivieren (optional)
Um die Fehlerbehebung während der Entwicklung zu erleichtern, sollten Sie das Debugging aktivieren.
!!step
lines-AppDelegate.swift=19-21
#### 3. Braze-UI und Delegate einrichten {#3-set-up-your-braze-ui-and-delegate}
`BrazeInAppMessageUI()` rendert In-App-Nachrichten standardmäßig. Indem Sie `self` als Delegate zuweisen, können Sie Nachrichten abfangen und verarbeiten, bevor sie angezeigt werden.
!!step
lines-AppDelegate.swift=26-33
#### 4. `DisplayChoice` mit bedingter Logik überschreiben {#4-override-displaychoice-with-conditional-logic}
Überschreiben Sie [`inAppMessage(_:displayChoiceForMessage:)`](https://braze-inc.github.io/braze-swift-sdk/documentation/brazeui/brazeinappmessageuidelegate/inappmessage(_:displaychoiceformessage:)-9w1nb), um zu entscheiden, ob eine Nachricht angezeigt werden soll. Geben Sie `.now` zurück, um die Nachricht anzuzeigen, oder `.discard`, um sie zu unterdrücken.
# Anleitung: Stil mit Schlüssel-Wert-Paaren anpassen
Source: /docs/de/developer_guide/in_app_messages/tutorials/customizing_message_styling/index.md
# Anleitung: Nachrichtenstil mit Schlüssel-Wert-Paaren anpassen {#tutorial-customizing-message-styling-using-key-value-pairs}
> Folgen Sie dem Beispielcode in dieser Anleitung, um den Stil Ihrer In-App-Nachricht mithilfe von Schlüssel-Wert-Paaren im Braze SDK anzupassen.
## Prerequisites
Before you can use this feature, you'll need to [integrate the Web Braze SDK](https://www.braze.com/docs/de/de/developer_guide/sdk_integration/?sdktab=web). Es ist jedoch keine zusätzliche Einrichtung erforderlich.
## Nachrichtenstil mit Schlüssel-Wert-Paaren für Web anpassen {#customizing-message-styling-using-key-value-pairs-for-web}
**Important:**
We're piloting this new tutorial format. [Tell us what you think](https://docs.google.com/forms/d/e/1FAIpQLSe_5uhWM7eXXk9F_gviO_pvA4rkYO3WA9B6tNJZ3TY91md5bw/viewform?usp=pp_url&entry.569173304=General+Feedback) — your feedback helps us improve future guides.
```js file=index.js
import * as braze from "@braze/web-sdk";
// Remove any calls to `braze.automaticallyShowInAppMessages()`
braze.initialize("YOUR-API-KEY", {
baseUrl: "YOUR-ENDPOINT",
enableLogging: true,
});
braze.subscribeToInAppMessage(function (message) {
const extras = message.extras;
const customTemplateType = extras["custom-template"] || "";
const customColor = extras["custom-color"] || "";
const customMessageId = extras["message-id"] || "";
if (customTemplateType) {
// add your own custom code to render this message
} else {
// otherwise, use Braze built-in UI
braze.showInAppMessage(message);
}
});
```
!!step
lines-index.js=2
### 1. Aufrufe von `automaticallyShowInAppMessages()` entfernen {#1-remove-calls-to-automaticallyshowinappmessages}
Entfernen Sie alle Aufrufe von [`automaticallyShowInAppMessages()`](https://js.appboycdn.com/web-sdk/latest/doc/modules/braze.html#automaticallyshowinappmessages), da diese jede angepasste Logik überschreiben, die Sie später implementieren.
!!step
lines-index.js=6
#### 2. Debugging aktivieren (optional) {#2-enable-debugging-optional}
Um die Fehlerbehebung während der Entwicklung zu erleichtern, sollten Sie das Debugging aktivieren.
!!step
lines-index.js=9-21
#### 3. Den Callback-Handler für In-App-Nachrichten abonnieren {#3-subscribe-to-the-in-app-message-callback-handler}
Registrieren Sie einen Callback mit [`subscribeToInAppMessage(callback)`](https://js.appboycdn.com/web-sdk/latest/doc/modules/braze.html#subscribetoinappmessage), um jedes Mal eine Nachricht zu erhalten, wenn eine In-App-Nachricht getriggert wird.
!!step
lines-index.js=10-13
#### 4. Auf die Eigenschaft `message.extras` zugreifen {#4-access-the-messageextras-property}
Verwenden Sie `message.extras`, um auf Anpassungstypen, Styling-Attribute oder andere im Dashboard definierte Werte zuzugreifen. Alle Werte werden als Strings zurückgegeben.
!!step
lines-index.js=19
#### 5. `showInAppMessage` bedingt aufrufen {#5-conditionally-call-showinappmessage}
Um die Nachricht anzuzeigen, rufen Sie [`showInAppMessage(message)`](https://js.appboycdn.com/web-sdk/latest/doc/modules/braze.html#showinappmessage) auf. Andernfalls verwenden Sie die angepassten Eigenschaften nach Bedarf.
## Prerequisites
Before you can use this feature, you'll need to [integrate the Android Braze SDK](https://www.braze.com/docs/de/de/developer_guide/sdk_integration/?sdktab=android). Außerdem müssen Sie [In-App-Nachrichten für Android aktivieren](https://www.braze.com/docs/de/de/developer_guide/in_app_messages?sdktab=android#android_enabling-in-app-messages).
## Nachrichtenstil mit Schlüssel-Wert-Paaren für Android anpassen {#customizing-message-styling-using-key-value-pairs-for-android}
**Important:**
We're piloting this new tutorial format. [Tell us what you think](https://docs.google.com/forms/d/e/1FAIpQLSe_5uhWM7eXXk9F_gviO_pvA4rkYO3WA9B6tNJZ3TY91md5bw/viewform?usp=pp_url&entry.569173304=General+Feedback) — your feedback helps us improve future guides.
```kotlin file=MainApplication.kt
package com.example.brazedevlab
import android.app.Application
import com.braze.Braze
import com.braze.support.BrazeLogger
import com.braze.configuration.BrazeConfig
import com.braze.ui.inappmessage.BrazeInAppMessageManager
import com.braze.BrazeActivityLifecycleCallbackListener
import com.braze.ui.inappmessage.listeners.IInAppMessageManagerListener
import com.braze.models.inappmessage.IInAppMessage
import com.braze.ui.inappmessage.InAppMessageOperation
import android.util.Log
class MyApplication : Application() {
override fun onCreate() {
super.onCreate()
// Enable verbose Braze SDK logs
BrazeLogger.logLevel = Log.VERBOSE
// Initialize Braze
val brazeConfig = BrazeConfig.Builder()
.setApiKey("YOUR-API-KEY")
.setCustomEndpoint("YOUR-ENDPOINT")
.build()
Braze.configure(this, brazeConfig)
registerActivityLifecycleCallbacks(
BrazeActivityLifecycleCallbackListener()
)
// Set up custom in-app message view factory
BrazeInAppMessageManager.getInstance()
.setCustomInAppMessageViewFactory(CustomInAppMessageViewFactory())
}
}
```
```kotlin file=CustomInAppMessageViewFactory.kt
import android.app.Activity
import android.graphics.Color
import android.view.View
import com.braze.models.inappmessage.IInAppMessage
import com.braze.ui.inappmessage.BrazeInAppMessageManager
import com.braze.ui.inappmessage.IInAppMessageViewFactory
class CustomInAppMessageViewFactory : IInAppMessageViewFactory {
override fun createInAppMessageView(
activity: Activity,
inAppMessage: IInAppMessage
): View {
// 1) Obtain Braze’s default view factory for this message type
val defaultFactory =
BrazeInAppMessageManager.getInstance()
.getDefaultInAppMessageViewFactory(inAppMessage)
?: throw IllegalStateException(
"Braze default IAM view factory is missing"
)
// 2) Inflate the default view
val iamView = defaultFactory
.createInAppMessageView(activity, inAppMessage)
?: throw IllegalStateException(
"Braze default IAM view is null"
)
// 3) Get your KVP extras
val extras = inAppMessage.extras ?: emptyMap()
val customization = extras["customization"]
val overrideColor = extras["custom-color"]
// 4) Style your root view
if (customization == "slideup-attributes" && overrideColor != null) {
try {
iamView.setBackgroundColor(Color.parseColor(overrideColor))
} catch (_: IllegalArgumentException) {
// ignore bad styling
}
}
return iamView
}
}
```
!!step
lines-MainApplication.kt=19
### 1. Debugging aktivieren (optional) {#1-enable-debugging-optional}
Um die Fehlerbehebung während der Entwicklung zu erleichtern, sollten Sie das Debugging aktivieren.
!!step
lines-MainApplication.kt=28-30
#### 2. Activity-Lifecycle-Callbacks registrieren {#2-register-activity-lifecycle-callbacks}
Registrieren Sie den Standard-Listener von Braze, um den Lebenszyklus der In-App-Nachrichten zu verwalten.
!!step
lines-CustomInAppMessageViewFactory.kt=8
#### 3. Ihre angepasste View-Factory-Klasse erstellen {#3-create-your-custom-view-factory-class}
Stellen Sie sicher, dass Ihre Klasse [`IInAppMessageViewFactory`](https://braze-inc.github.io/braze-android-sdk/kdoc/braze-android-sdk/com.braze.ui.inappmessage/-i-in-app-message-view-factory/index.html) implementiert, damit sie angepasste Nachrichtenansichten erstellen und zurückgeben kann.
!!step
lines-CustomInAppMessageViewFactory.kt=15-20
#### 4. An die Standard-Factory von Braze delegieren {#4-delegate-to-brazes-default-factory}
Delegieren Sie an die Standard-Factory, um das in Braze integrierte Styling beizubehalten, bevor Sie Ihre eigenen bedingten Änderungen anwenden.
!!step
lines-CustomInAppMessageViewFactory.kt=30-32,35-41
#### 5. Auf Schlüssel-Wert-Paare über `inAppMessage.extras` zugreifen {#5-access-key-value-pairs-from-inappmessageextras}
Verwenden Sie `inAppMessage.extras`, um auf Anpassungstypen, Styling-Attribute oder andere im Dashboard definierte Werte zuzugreifen. Wenden Sie Styling-Überschreibungen an, bevor Sie die Ansicht zurückgeben.
!!step
lines-MainApplication.kt=33-34
#### 6. Eine angepasste `IInAppMessageViewFactory` implementieren {#6-implement-a-custom-iinappmessageviewfactory}
Implementieren Sie [`IInAppMessageViewFactory`](https://braze-inc.github.io/braze-android-sdk/kdoc/braze-android-sdk/com.braze.ui.inappmessage/-i-in-app-message-view-factory/index.html) in Ihrer angepassten Klasse, um In-App-Nachricht-Ansichten zu erstellen und darzustellen.
## Prerequisites
Before you can use this feature, you'll need to [integrate the Swift Braze SDK](https://www.braze.com/docs/de/de/developer_guide/sdk_integration/?sdktab=swift). Außerdem müssen Sie [In-App-Nachrichten für Swift aktivieren](https://www.braze.com/docs/de/de/developer_guide/in_app_messages?sdktab=swift#swift_enabling-in-app-messages).
## Nachrichtenstil mit Schlüssel-Wert-Paaren für Swift anpassen {#customizing-message-styling-using-key-value-pairs-for-swift}
**Important:**
We're piloting this new tutorial format. [Tell us what you think](https://docs.google.com/forms/d/e/1FAIpQLSe_5uhWM7eXXk9F_gviO_pvA4rkYO3WA9B6tNJZ3TY91md5bw/viewform?usp=pp_url&entry.569173304=General+Feedback) — your feedback helps us improve future guides.
```swift file=AppDelegate.swift
import UIKit
import BrazeKit
import BrazeUI
class AppDelegate: UIResponder, UIApplicationDelegate, BrazeInAppMessageUIDelegate {
var window: UIWindow?
static var braze: Braze?
func application(
_ application: UIApplication,
didFinishLaunchingWithOptions launchOptions: [UIApplication.LaunchOptionsKey: Any]?
) -> Bool {
let configuration = Braze.Configuration(
apiKey: "YOUR-API-KEY",
endpoint: "YOUR-ENDPOINT"
)
configuration.logger.level = .debug
let braze = Braze(configuration: configuration)
AppDelegate.braze = braze
// Set up Braze In-App Message UI and delegate
let inAppMessageUI = BrazeInAppMessageUI()
inAppMessageUI.delegate = self
brazeInstance.inAppMessagePresenter = inAppMessageUI
return true
}
func inAppMessage(
_ ui: BrazeInAppMessageUI,
prepareWith context: inout BrazeInAppMessageUI.PresentationContext
) {
let customization = context.message.extras["customization"] as? String
if customization == "slideup-attributes" {
// Create a new attributes object and make customizations.
var attributes = context.attributes?.slideup
attributes?.font = UIFont(name: "Chalkduster", size: 17)!
attributes?.imageSize = CGSize(width: 65, height: 65)
attributes?.cornerRadius = 20
attributes?.imageCornerRadius = 10
if #available(iOS 13.0, *) {
attributes?.cornerCurve = .continuous
attributes?.imageCornerCurve = .continuous
}
context.attributes?.slideup = attributes
}
}
}
```
```swift file=SampleApp.swift
import SwiftUI
@main
struct SampleApp: App {
@UIApplicationDelegateAdaptor(AppDelegate.self) var appDelegate
var body: some Scene {
WindowGroup {
YourView()
}
}
}
```
!!step
lines-AppDelegate.swift=5
### 1. `BrazeInAppMessageUIDelegate` implementieren {#1-implement-brazeinappmessageuidelegate}
Implementieren Sie in Ihrer `AppDelegate`-Klasse [`BrazeInAppMessageUIDelegate`](https://braze-inc.github.io/braze-swift-sdk/documentation/brazeui/brazeinappmessageui/delegate), damit Sie die Methode `inAppMessage` später überschreiben können.
!!step
lines-AppDelegate.swift=17
#### 2. Debugging aktivieren (optional)
Um die Fehlerbehebung während der Entwicklung zu erleichtern, sollten Sie das Debugging aktivieren.
!!step
lines-AppDelegate.swift=30-50
#### 3. Nachrichten vor der Anzeige vorbereiten {#3-prepare-messages-before-theyre-displayed}
Braze ruft `inAppMessage(_:prepareWith:)` während der Nachrichtenvorbereitung auf. Verwenden Sie diese Methode, um den Stil anzupassen oder Logik auf Grundlage von Schlüssel-Wert-Paaren anzuwenden.
!!step
lines-AppDelegate.swift=34
#### 4. Auf Schlüssel-Wert-Paare über `message.extras` zugreifen {#4-access-key-value-pairs-from-messageextras}
Verwenden Sie `message.extras`, um auf Anpassungstypen, Styling-Attribute oder andere im Dashboard definierte Werte zuzugreifen.
!!step
lines-AppDelegate.swift=38-46
#### 5. Styling-Attribute der Nachricht aktualisieren {#5-update-the-messages-styling-attributes}
Verwenden Sie [`inAppMessage(_:prepareWith:)`](https://braze-inc.github.io/braze-swift-sdk/documentation/brazeui/brazeinappmessageuidelegate/inappmessage(_:preparewith:)-11fog), um auf den `PresentationContext` zuzugreifen und Styling-Attribute direkt zu ändern. Jeder In-App-Nachrichtentyp stellt unterschiedliche Attribute bereit.
# Anleitung: Getriggerte Nachrichten aufschieben und wiederherstellen
Source: /docs/de/developer_guide/in_app_messages/tutorials/deferring_triggered_messages/index.md
# Anleitung: Getriggerte Nachrichten aufschieben und wiederherstellen {#tutorial-deferring-and-restoring-triggered-messages}
> Folgen Sie dem Beispielcode in dieser Anleitung, um getriggerte In-App-Nachrichten mit dem Braze SDK aufzuschieben und wiederherzustellen.
## Prerequisites
Before you can use this feature, you'll need to [integrate the Web Braze SDK](https://www.braze.com/docs/de/de/developer_guide/sdk_integration/?sdktab=web). Es ist jedoch keine zusätzliche Einrichtung erforderlich.
## Getriggerte Nachrichten für Web aufschieben und wiederherstellen {#deferring-and-restoring-triggered-messages-for-web}
**Important:**
We're piloting this new tutorial format. [Tell us what you think](https://docs.google.com/forms/d/e/1FAIpQLSe_5uhWM7eXXk9F_gviO_pvA4rkYO3WA9B6tNJZ3TY91md5bw/viewform?usp=pp_url&entry.569173304=General+Feedback) — your feedback helps us improve future guides.
```js file=index.js
import * as braze from "@braze/web-sdk";
// Remove any calls to `braze.automaticallyShowInAppMessages()`
braze.initialize("YOUR-API-KEY", {
baseUrl: "YOUR-ENDPOINT",
enableLogging: true,
});
braze.subscribeToInAppMessage(function (message) {
const shouldDefer = true; // customize for your own logic
if (shouldDefer) {
braze.deferInAppMessage(message);
} else {
braze.showInAppMessage(message);
}
});
// elsewhere in your app
document.getElementById("button").onclick = function () {
const deferredMessage = braze.getDeferredInAppMessage();
if (deferredMessage) {
braze.showInAppMessage(deferredMessage);
}
};
```
!!step
lines-index.js=2
### 1. Aufrufe von `automaticallyShowInAppMessages()` entfernen {#1-remove-calls-to-automaticallyshowinappmessages}
Entfernen Sie alle Aufrufe von [`automaticallyShowInAppMessages()`](https://js.appboycdn.com/web-sdk/latest/doc/modules/braze.html#automaticallyshowinappmessages), da sie jede angepasste Logik, die Sie später implementieren, außer Kraft setzen.
!!step
lines-index.js=6
#### 2. Debugging aktivieren (optional) {#2-enable-debugging-optional}
Um die Fehlerbehebung während der Entwicklung zu erleichtern, sollten Sie das Debugging aktivieren.
!!step
lines-index.js=9-16
#### 3. Den Callback-Handler für In-App-Nachrichten abonnieren {#3-subscribe-to-the-in-app-message-callback-handler}
Registrieren Sie einen Callback mit [`subscribeToInAppMessage(callback)`](https://js.appboycdn.com/web-sdk/latest/doc/modules/braze.html#subscribetoinappmessage), um jedes Mal eine Nachricht zu erhalten, wenn eine In-App-Nachricht getriggert wird.
!!step
lines-index.js=11-12
#### 4. Die `message`-Instanz aufschieben {#4-defer-the-message-instance}
Um die Nachricht aufzuschieben, rufen Sie [`deferInAppMessage(message)`](https://js.appboycdn.com/web-sdk/latest/doc/modules/braze.html#deferinappmessage) auf. Braze serialisiert und speichert diese Nachricht, damit Sie sie bei einem späteren Seitenaufruf anzeigen können.
!!step
lines-index.js=18-24
#### 5. Eine zuvor aufgeschobene Nachricht abrufen {#5-retrieve-a-previously-deferred-message}
Um zuvor aufgeschobene Nachrichten abzurufen, rufen Sie [`getDeferredInAppMessage()`](https://js.appboycdn.com/web-sdk/latest/doc/modules/braze.html#getdeferredinappmessage) auf.
!!step
lines-index.js=21-23
#### 6. Die aufgeschobene Nachricht anzeigen {#6-display-the-deferred-message}
Nachdem Sie eine aufgeschobene Nachricht abgerufen haben, zeigen Sie sie an, indem Sie sie an [`showInAppMessage(message)`](https://js.appboycdn.com/web-sdk/latest/doc/modules/braze.html#showinappmessage) übergeben.
!!step
lines-index.js=13-15
#### 7. Eine Nachricht sofort anzeigen {#7-display-a-message-immediately}
Um eine Nachricht sofort anzuzeigen, anstatt sie aufzuschieben, rufen Sie [`showInAppMessage(message)`](https://js.appboycdn.com/web-sdk/latest/doc/modules/braze.html#showinappmessage) direkt in Ihrem `subscribeToInAppMessage`-Callback auf.
## Prerequisites
Before you can use this feature, you'll need to [integrate the Android Braze SDK](https://www.braze.com/docs/de/de/developer_guide/sdk_integration/?sdktab=android). Außerdem müssen Sie [In-App-Nachrichten für Android aktivieren](https://www.braze.com/docs/de/de/developer_guide/in_app_messages?sdktab=android#android_enabling-in-app-messages).
## Getriggerte Nachrichten für Android aufschieben und wiederherstellen {#deferring-and-restoring-triggered-messages-for-android}
**Important:**
We're piloting this new tutorial format. [Tell us what you think](https://docs.google.com/forms/d/e/1FAIpQLSe_5uhWM7eXXk9F_gviO_pvA4rkYO3WA9B6tNJZ3TY91md5bw/viewform?usp=pp_url&entry.569173304=General+Feedback) — your feedback helps us improve future guides.
```kotlin file=MainApplication.kt
import android.app.Application
import com.braze.Braze
import com.braze.support.BrazeLogger
import com.braze.configuration.BrazeConfig
import com.braze.ui.inappmessage.BrazeInAppMessageManager
import com.braze.BrazeActivityLifecycleCallbackListener
import com.braze.ui.inappmessage.listeners.IInAppMessageManagerListener
import com.braze.models.inappmessage.IInAppMessage
import com.braze.ui.inappmessage.InAppMessageOperation
import android.util.Log
class MyApplication : Application() {
companion object {
private var instance: MyApplication? = null
fun getInstance(): MyApplication = instance!!
}
private var showMessage = false
override fun onCreate() {
super.onCreate()
instance = this
// Enable verbose Braze SDK logs
BrazeLogger.logLevel = Log.VERBOSE
// Initialize Braze
val brazeConfig = BrazeConfig.Builder()
.setApiKey("YOUR-API-KEY")
.setCustomEndpoint("YOUR-ENDPOINT")
.build()
Braze.configure(this, brazeConfig)
registerActivityLifecycleCallbacks(
BrazeActivityLifecycleCallbackListener()
)
// Set up in-app message listener
BrazeInAppMessageManager.getInstance().setCustomInAppMessageManagerListener(object : IInAppMessageManagerListener {
override fun beforeInAppMessageDisplayed(inAppMessage: IInAppMessage): InAppMessageOperation {
return if (showMessage) {
// Show the message using Braze's UI
InAppMessageOperation.DISPLAY_NOW
} else {
// Re-enqueue the message for later
InAppMessageOperation.DISPLAY_LATER
}
}
})
}
fun showDeferredMessage(show: Boolean) {
showMessage = show
BrazeInAppMessageManager.getInstance().requestDisplayInAppMessage()
}
}
```
```kotlin file=MainActivity.kt
import android.os.Bundle
import androidx.activity.ComponentActivity
import androidx.activity.compose.setContent
import androidx.compose.foundation.layout.*
import androidx.compose.material.Button
import androidx.compose.material.Text
import androidx.compose.runtime.Composable
import androidx.compose.ui.Modifier
import androidx.compose.ui.unit.dp
class MainActivity : ComponentActivity() {
override fun onCreate(savedInstanceState: Bundle?) {
super.onCreate(savedInstanceState)
setContent {
ContentView()
}
}
}
@Composable
fun ContentView() {
Column(
modifier = Modifier.padding(16.dp),
verticalArrangement = Arrangement.spacedBy(20.dp)
) {
// ... your UI
Button(onClick = {
MyApplication.getInstance().showDeferredMessage(true)
}) {
Text("Show Deferred IAM")
}
}
}
```
!!step
lines-MainApplication.kt=13-16
### 1. Eine Singleton-`Application`-Instanz erstellen {#1-create-a-singleton-application-instance}
Verwenden Sie ein Companion-Objekt, um Ihre `Application`-Klasse als Singleton bereitzustellen, damit Sie später in Ihrem Code darauf zugreifen können.
!!step
lines-MainApplication.kt=25
#### 2. Debugging aktivieren (optional)
Um die Fehlerbehebung während der Entwicklung zu erleichtern, sollten Sie das Debugging aktivieren.
!!step
lines-MainApplication.kt=34-36
#### 3. Activity-Lifecycle-Callbacks registrieren {#3-register-activity-lifecycle-callbacks}
Registrieren Sie den Standard-Listener von Braze, um den Lebenszyklus der In-App-Nachrichten zu verwalten.
!!step
lines-MainApplication.kt=39-49
#### 4. Einen Listener für In-App-Nachrichten einrichten {#4-set-up-an-in-app-message-listener}
Verwenden Sie `BrazeInAppMessageManager`, um einen angepassten Listener einzurichten, der Nachrichten abfängt, bevor sie angezeigt werden.
!!step
lines-MainApplication.kt=43,46
#### 5. Bedingte Logik erstellen {#5-create-conditional-logic}
Verwenden Sie das Flag `showMessage`, um das Timing zu steuern – geben Sie `DISPLAY_NOW` zurück, um die Nachricht sofort anzuzeigen, oder `DISPLAY_LATER`, um sie aufzuschieben.
!!step
lines-MainApplication.kt=52-55
#### 6. Eine Methode zur Anzeige aufgeschobener Nachrichten erstellen {#6-create-a-method-for-displaying-deferred-messages}
Verwenden Sie `showDeferredMessage`, um die nächste In-App-Nachricht zu triggern. Wenn `showMessage` den Wert `true` hat, gibt der Listener `DISPLAY_NOW` zurück.
!!step
lines-MainActivity.kt=29
#### 7. Die Methode über Ihre UI triggern {#7-trigger-the-method-from-your-ui}
Um die zuvor aufgeschobene Nachricht anzuzeigen, rufen Sie `showDeferredMessage(true)` über Ihre UI auf, z. B. über einen Button oder durch Antippen.
## Prerequisites
Before you can use this feature, you'll need to [integrate the Swift Braze SDK](https://www.braze.com/docs/de/de/developer_guide/sdk_integration/?sdktab=swift). Außerdem müssen Sie [In-App-Nachrichten für Swift aktivieren](https://www.braze.com/docs/de/de/developer_guide/in_app_messages?sdktab=swift#swift_enabling-in-app-messages).
## Getriggerte Nachrichten für Swift aufschieben und wiederherstellen {#deferring-and-restoring-triggered-messages-for-swift}
**Important:**
We're piloting this new tutorial format. [Tell us what you think](https://docs.google.com/forms/d/e/1FAIpQLSe_5uhWM7eXXk9F_gviO_pvA4rkYO3WA9B6tNJZ3TY91md5bw/viewform?usp=pp_url&entry.569173304=General+Feedback) — your feedback helps us improve future guides.
```swift file=AppDelegate.swift
import SwiftUI
import BrazeKit
import BrazeUI
class AppDelegate: UIResponder, UIApplicationDelegate, BrazeInAppMessageUIDelegate {
static private(set) var shared: AppDelegate!
private var braze: Braze!
public var showMessage: Bool = false
func application(
_ application: UIApplication,
didFinishLaunchingWithOptions launchOptions: [UIApplication.LaunchOptionsKey: Any]?
) -> Bool {
AppDelegate.shared = self
// 1. Braze configuration with your SDK API key and endpoint
let configuration = Braze.Configuration(apiKey: "a1fc095b-ae3d-40f4-bb33-3fb5176562c0", endpoint: "sondheim.braze.com")
configuration.logger.level = .debug
// 2. Initialize Braze SDK instance
braze = Braze(configuration: configuration)
// 3. Set up Braze In-App Message UI and delegate
let ui = BrazeInAppMessageUI()
ui.delegate = self
braze.inAppMessagePresenter = ui
return true
}
func inAppMessage(
_ ui: BrazeInAppMessageUI,
displayChoiceForMessage message: Braze.InAppMessage
) -> BrazeInAppMessageUI.DisplayChoice {
if !showMessage {
return .reenqueue
}
return .now
}
func showDeferredMessage(showMessage: Bool) {
self.showMessage = showMessage
(braze.inAppMessagePresenter as? BrazeInAppMessageUI)?.presentNext()
}
}
```
```swift file=SampleApp.swift
import SwiftUI
@main
struct IAMDeferApp: App {
@UIApplicationDelegateAdaptor(AppDelegate.self) var delegate
var body: some Scene {
WindowGroup {
ContentView()
}
}
}
```
```swift file=ContentView.swift
import SwiftUI
struct ContentView: View {
var body: some View {
VStack(spacing: 20) {
// ...your UI
Button("Show Deferred IAM") {
AppDelegate.shared.showDeferredMessage(showMessage: true)
}
}
.padding()
}
}
```
!!step
lines-AppDelegate.swift=5
### 1. Das `BrazeInAppMessageUIDelegate` implementieren {#1-implement-the-brazeinappmessageuidelegate}
Implementieren Sie in Ihrer `AppDelegate`-Klasse das [`BrazeInAppMessageUIDelegate`](https://braze-inc.github.io/braze-swift-sdk/documentation/brazeui/brazeinappmessageuidelegate), damit Sie die Methode `inAppMessage` später überschreiben können.
!!step
lines-AppDelegate.swift=19
#### 2. Debugging aktivieren (optional)
Um die Fehlerbehebung während der Entwicklung zu erleichtern, sollten Sie das Debugging aktivieren.
!!step
lines-AppDelegate.swift=25-27
#### 3. Braze-UI und Delegate einrichten {#3-set-up-your-braze-ui-and-delegate}
`BrazeInAppMessageUI()` rendert In-App-Nachrichten standardmäßig. Wenn Sie `self` als Delegate zuweisen, können Sie Nachrichten abfangen und verarbeiten, bevor sie angezeigt werden. Speichern Sie die Instanz unbedingt, da Sie sie später benötigen, um aufgeschobene Nachrichten wiederherzustellen.
!!step
lines-AppDelegate.swift=32-41
#### 4. `DisplayChoice` mit bedingter Logik überschreiben {#4-override-displaychoice-with-conditional-logic}
Überschreiben Sie [`inAppMessage(_:displayChoiceForMessage:)`](https://braze-inc.github.io/braze-swift-sdk/documentation/brazeui/brazeinappmessageuidelegate/inappmessage(_:displaychoiceformessage:)-9w1nb), um festzulegen, wann eine Nachricht angezeigt werden soll. Geben Sie `.now` zurück, um sie sofort anzuzeigen, oder `.reenqueue`, um sie aufzuschieben.
!!step
lines-AppDelegate.swift=43-46
#### 5. Eine Methode zur Anzeige aufgeschobener Nachrichten erstellen {#5-create-a-method-to-show-deferred-messages}
Erstellen Sie eine Methode, die `showDeferredMessage(true)` aufruft, um die nächste aufgeschobene Nachricht im Stack anzuzeigen. Beim Aufruf wird `showMessage` auf `true` gesetzt, sodass der Delegate `.now` zurückgibt.
!!step
lines-ContentView.swift=1-14
#### 6. Die Methode über Ihre UI triggern {#5-trigger-the-method-from-your-ui}
Um die zuvor aufgeschobene Nachricht anzuzeigen, rufen Sie `showDeferredMessage(true)` über Ihre UI auf, z. B. über einen Button oder durch Antippen.
# Fehlerbehebung für In-App-Nachrichten im Braze SDK
Source: /docs/de/developer_guide/in_app_messages/troubleshooting/index.md
# Fehlerbehebung für In-App-Nachrichten {#troubleshoot-in-app-messages}
> Verwenden Sie diese Seite, um zu diagnostizieren, warum In-App-Nachrichten nicht zugestellt oder auf einem Gerät angezeigt werden. Informationen zur Dashboard-Einrichtung (Priorität, Trigger, Segmente und Wiederberechtigung) finden Sie in den [FAQ zu In-App-Nachrichten](https://www.braze.com/docs/de/de/user_guide/channels/in_app_messages/faq).
Bevor Sie mit dem Debugging beginnen, fügen Sie sich als [Testnutzer:in](https://www.braze.com/docs/de/de/user_guide/administer/global/user_management/internal_groups#adding-test-users) hinzu und lesen Sie [Testnachrichten senden](https://www.braze.com/docs/de/de/developer_guide/in_app_messages/sending_test_messages).
## Hier starten: Symptom zuordnen {#start-here-match-your-symptom}
| Symptom | Gehe zu |
| --- | --- |
| In-App-Nachricht wurde für eine:n Nutzer:in nicht angezeigt | [Eine:r Nutzer:in](#in-app-message-not-shown-for-one-user) |
| In-App-Nachricht wurde auf einer Plattform nicht angezeigt (Android, iOS oder Web) | [Eine Plattform](#in-app-message-not-shown-on-one-platform) |
| In-App-Nachricht aus einem **Canvas**-Schritt wurde nicht angezeigt | [Canvas-In-App-Nachrichten](#canvas-in-app-messages) |
| In-App-Nachricht wurde verspätet oder nach einer Verzögerung angezeigt | [Timing und verzögerte Anzeige](#timing-and-delayed-display) |
| Impressionen oder Klicks sehen falsch aus | [Impressionen und Analytics](#impressions-and-analytics) |
| `triggers` fehlen oder sind leer in den Event-Nutzerprotokollen | [Fehlerbehebung bei der Zustellung](#delivery-troubleshooting) |
| Trigger wurden zurückgegeben, aber nichts wird auf dem Gerät angezeigt | [Plattformspezifische Fehlerbehebung bei der Anzeige](#platform-specific-display-troubleshooting) |
| In-App-Nachrichten-Assets können nicht geladen werden (iOS, `NSURLError` -1008) | [Asset-Laden (Swift-Tab)](https://www.braze.com/docs/de/de/developer_guide/in_app_messages/troubleshooting?sdktab=swift#asset-loading) |
{: .reset-td-br-1 .reset-td-br-2 aria-label="Symptom für In-App-Nachrichten" }
## Standardisierter Untersuchungspfad {#standard-investigation-path}
Verwenden Sie diesen Workflow für jeden Vorfall. Beginnen Sie bei Schritt 1.
1. Bestätigen Sie, dass ein **Sitzungsstart** für das Testgerät protokolliert wird. In-App-Nachrichten werden beim Sitzungsstart angefordert.
2. Öffnen Sie die [Event-Nutzerprotokolle](https://www.braze.com/docs/de/de/user_guide/administer/global/workspace_settings/logs_and_alerts/event_user_log) und suchen Sie die SDK-Anfrage für diesen Sitzungsstart. In den **Antwortdaten**:
- Bestätigen Sie im Roh-JSON, dass `respond_with` `"triggers": true` enthält.
- Die Zeile **Requested Responses** sollte **`triggers`** enthalten.
- **Trigger In-App Message**-Zeilen listen jede In-App-Nachricht auf, die für diese Anfrage zurückgegeben wurde.
- Wenn kein `triggers`-Schlüssel oder keine **Trigger In-App Message**-Zeilen vorhanden sind, gehen Sie zu [Fehlerbehebung: Nachrichten werden nicht angefordert](#troubleshoot-messages-not-being-requested).
- Wenn `triggers` vorhanden, aber leer ist (`[]`), gehen Sie zu [Fehlerbehebung: Nachrichten werden nicht zurückgegeben](#troubleshoot-messages-not-being-returned).
- Wenn **Trigger In-App Message**-Zeilen vorhanden sind, aber nichts angezeigt wird, gehen Sie zu [Plattformspezifische Fehlerbehebung bei der Anzeige](#platform-specific-display-troubleshooting).
- Jeder Trigger-Payload enthält einen `type`: `inapp` (Standard) oder `templated_iam` (erfordert eine Template-Anfrage vor der Anzeige). Siehe [Typen von In-App-Nachrichten](https://www.braze.com/docs/de/de/developer_guide/in_app_messages/triggering_messages#types-of-in-app-messages).
3. Informationen zur Dashboard-seitigen Berechtigung (Segment, Wiederberechtigung, Frequency Caps, Priorität, Kontrollgruppen) finden Sie unter [Fehlerbehebung bei der Zustellung](#delivery-troubleshooting) und in den [FAQ zu In-App-Nachrichten](https://www.braze.com/docs/de/de/user_guide/channels/in_app_messages/faq).
4. Bei geräteseitigen Anzeigeproblemen (Delegates, Rate-Limits, Ausrichtung, Sitzungs-Timeout) wählen Sie Ihren SDK-Tab unter [Plattformspezifische Fehlerbehebung bei der Anzeige](#platform-specific-display-troubleshooting).
## Canvas-In-App-Nachrichten {#canvas-in-app-messages}
**Symptom:** Ein:e Nutzer:in ist in einen Canvas-In-App-Nachrichten-Schritt eingetreten, hat die Nachricht aber nicht wie erwartet gesehen.
Drei Verhaltensweisen verursachen die meisten Canvas- und In-App-Nachrichten-Tickets:
1. **Anzeige bei nächster Sitzung:** Canvas-In-App-Nachrichten sind beim *nächsten* Sitzungsstart berechtigt, nachdem der Schritt verarbeitet wurde – nicht sofort mitten in der Sitzung. Siehe [Wann werden In-App-Nachrichten in Canvas gesendet?](https://www.braze.com/docs/de/de/user_guide/messaging/canvas/faqs#when-are-in-app-messages-in-canvas-sent) in den Canvas-FAQ.
2. **Zustellungsvalidierungen beim Schritteintritt:** Wenn **Zielgruppe beim Nachrichtenversand validieren** im Nachrichten-Schritt aktiviert ist, werden Segmentzugehörigkeit und Frequency Caps ausgewertet, wenn der/die Nutzer:in **in den Schritt eintritt**, nicht zum Anzeigezeitpunkt. Siehe [Zustellungsvalidierungen](https://www.braze.com/docs/de/de/user_guide/messaging/canvas/canvas_components/message_step#delivery-validations).
3. **Verzögerung und Sitzungs-Timeout:** Wenn ein:e Nutzer:in in einen Verzögerungsschritt eintritt, der länger als Ihr SDK-Sitzungs-Timeout ist, kann eine neue Sitzung beginnen, bevor der In-App-Nachrichten-Schritt erreicht wird. Die Nachricht wird möglicherweise nicht beim Sitzungsstart abgerufen, wenn Sie erwarten, dass sie angezeigt wird.
Informationen zu Verfügbarkeitsfenstern, Ablauf und null _Sends_ in Canvas-Analytics finden Sie unter [In-App-Nachrichten und Zustellung](https://www.braze.com/docs/de/de/user_guide/messaging/canvas/faqs#messages-and-delivery) in den Canvas-FAQ.
**Important:**
In-App-Nachrichten in Canvas können nur durch Ereignisse getriggert werden, die über das SDK gesendet werden, nicht über die REST API.
## In-App-Nachricht wurde für eine:n Nutzer:in nicht angezeigt {#in-app-message-not-shown-for-one-user}
**Symptom:** Ein:e Nutzer:in hat eine erwartete In-App-Nachricht nicht erhalten; andere Nutzer:innen sind möglicherweise nicht betroffen.
Überprüfen Sie Folgendes:
- War der/die Nutzer:in beim **Sitzungsstart** im Segment, wenn das SDK neue In-App-Nachrichten anfordert?
- War der/die Nutzer:in gemäß den Targeting-Regeln der Campaign oder des Canvas berechtigt oder wiederberechtigt? Siehe [Wiederberechtigung für Campaigns und Canvas](https://www.braze.com/docs/de/de/user_guide/messaging/messaging_fundamentals/re_eligibility).
- Galt ein [Frequency Cap](https://www.braze.com/docs/de/de/user_guide/messaging/messaging_fundamentals/frequency_capping)?
- War der/die Nutzer:in in einer Campaign-Kontrollgruppe? Prüfen Sie, ob die Campaign für A/B-Tests konfiguriert ist.
- Wurde stattdessen eine In-App-Nachricht mit höherer Priorität angezeigt? Siehe [Können mehrere In-App-Nachrichten in derselben Sitzung angezeigt werden?](https://www.braze.com/docs/de/de/user_guide/channels/in_app_messages/faq#can-multiple-in-app-messages-display-in-the-same-session) in den FAQ zu In-App-Nachrichten.
- War das Gerät in der von der Campaign angegebenen Ausrichtung?
- Wurde die Nachricht durch das standardmäßige Mindestintervall von 30 Sekunden zwischen Triggern unterdrückt? Siehe [Überschreiben des Standard-Rate-Limits](https://www.braze.com/docs/de/de/developer_guide/in_app_messages/triggering_messages#overriding-the-default-rate-limit).
Folgen Sie dann dem [standardisierten Untersuchungspfad](#standard-investigation-path).
## In-App-Nachricht wurde auf einer Plattform nicht angezeigt {#in-app-message-not-shown-on-one-platform}
**Symptom:** In-App-Nachrichten werden auf Android, iOS oder Web nicht angezeigt, funktionieren aber möglicherweise auf anderen Plattformen.
| Wahrscheinliche Ursache | Was zu prüfen ist |
| --- | --- |
| Falsches **Senden an**-Ziel | Bestätigen Sie, dass die Campaign oder der Canvas-Schritt entsprechend auf **Mobile Apps** oder **Web Browsers** ausgerichtet ist. Eine reine Web-Campaign wird nicht an Android-Geräte gesendet. |
| Angepasste UI oder Handler unterdrückt die Anzeige | Überprüfen Sie Delegates (Mobilgerät) oder [`braze.subscribeToInAppMessage`](https://js.appboycdn.com/web-sdk/latest/doc/modules/braze.html#subscribetoinappmessage) (Web). Siehe [Anpassung](https://www.braze.com/docs/de/de/developer_guide/in_app_messages/customization) und Ihren SDK-Tab für Ihre Plattform. |
| Integration hat auf dieser Plattform nie funktioniert | Bestätigen Sie, dass diese Plattform und App-Version zuvor In-App-Nachrichten angezeigt haben. |
| Trigger wurde auf dem Gerät nicht ausgelöst | Der Trigger muss lokal über das SDK erfolgen. Ein REST-API-Aufruf kann keine In-App-Nachricht im SDK triggern. Siehe [Nachrichten triggern](https://www.braze.com/docs/de/de/developer_guide/in_app_messages/triggering_messages). |
| Leere `triggers` in den Event-Nutzerprotokollen | Segment, Wiederberechtigung, Frequency Cap oder Kontrollgruppe. Siehe [Fehlerbehebung: Nachrichten werden nicht zurückgegeben](#troubleshoot-messages-not-being-returned). |
{: .reset-td-br-1 .reset-td-br-2 aria-label="Plattform-Symptom-Ursache" }
## In-App-Nachricht wurde für alle Nutzer:innen nicht angezeigt {#in-app-message-not-shown-for-all-users}
**Symptom:** Keine oder weniger Nutzer:innen als erwartet haben die In-App-Nachricht erhalten.
Überprüfen Sie Folgendes:
- Ist die Trigger-Aktion im Dashboard und in der App-Integration korrekt konfiguriert?
- Hat eine In-App-Nachricht mit höherer Priorität die Campaign abgefangen? Siehe die [FAQ zu In-App-Nachrichten](https://www.braze.com/docs/de/de/user_guide/channels/in_app_messages/faq#can-multiple-in-app-messages-display-in-the-same-session).
- Verwenden Sie eine aktuelle SDK-Version? Einige In-App-Nachrichtentypen haben Mindestanforderungen an die SDK-Version.
- Sind Sitzungen korrekt integriert? Bestätigen Sie, dass die Sitzungs-Analytics für diese App funktionieren.
- Stört eine angepasste UI-Bibliothek die Anzeige? Siehe [Anpassung](https://www.braze.com/docs/de/de/developer_guide/in_app_messages/customization).
Folgen Sie dann dem [standardisierten Untersuchungspfad](#standard-investigation-path).
## Timing und verzögerte Anzeige {#timing-and-delayed-display}
**Symptom:** Die In-App-Nachricht erschien später als erwartet oder erst bei einer neuen Sitzung.
Häufige Ursachen:
- **Sitzungsstart-Prefetch der Campaign:** In-App-Nachrichten werden beim Sitzungsstart zwischengespeichert und angezeigt, wenn der Trigger ausgelöst wird. Ein Trigger, der vor dem nächsten Sitzungsstart auftritt, wird erst in dieser Sitzung angezeigt. Siehe [Nachrichten triggern](https://www.braze.com/docs/de/de/developer_guide/in_app_messages/triggering_messages).
- **Canvas-Verhalten bei nächster Sitzung:** Siehe [Canvas-In-App-Nachrichten](#canvas-in-app-messages).
- **Geplante Dashboard-Verzögerung:** Prüfen Sie, ob eine Verzögerung für die Campaign oder den Schritt konfiguriert ist.
- **Trigger-Synchronisierungs-Race-Condition:** Wenn Nutzer:innen ein Ereignis unmittelbar nach dem Sitzungsstart protokollieren, sind die Trigger möglicherweise noch nicht synchronisiert. Erwägen Sie, den Trigger auf den Sitzungsstart zu setzen und nach dem beabsichtigten Ereignis zu segmentieren, damit die Zustellung in der nächsten Sitzung nach dem Ereignis erfolgt.
- **Sequenzielle In-App-Nachrichten:** Wenn Sie Nachrichten in einer Tour zurückstellen oder wiederherstellen, siehe [Getriggerte In-App-Nachrichten zurückstellen](https://www.braze.com/docs/de/de/developer_guide/in_app_messages/tutorials/deferring_triggered_messages).
- **Große Assets oder langsames CDN:** Optimieren Sie Bilder und Videos für HTML-In-App-Nachrichten. Auf Mobilgeräten können Bilder bei langsamen Netzwerken vor der Anzeige heruntergeladen werden – wählen Sie Ihren SDK-Tab für plattformspezifische Hinweise.
**Note:**
Wenn Ihre In-App-Nachricht durch den Sitzungsstart getriggert wird und Sie ein verlängertes Sitzungs-Timeout festgelegt haben, wird das Schließen und erneute Öffnen der App innerhalb dieses Zeitfensters die Sitzung nicht aktualisieren. Beispiel: Bei einem 300-Sekunden-Timeout wird eine Sitzungsstart-In-App-Nachricht erst angezeigt, wenn die Sitzung tatsächlich aktualisiert wird. Passen Sie das Sitzungs-Timeout oder den Trigger-Typ an, wenn dies Ihren Test beeinflusst.
## Fehlerbehebung bei der Zustellung {#delivery-troubleshooting}
Die meisten Probleme mit In-App-Nachrichten betreffen die **Zustellung** (das Gerät hat keine Trigger erhalten) oder die **Anzeige** (Trigger sind angekommen, wurden aber nicht angezeigt). Bestätigen Sie zuerst die [Zustellung](#troubleshooting-in-app-message-delivery) und prüfen Sie dann die [Anzeige](#platform-specific-display-troubleshooting).
### Fehlerbehebung bei der Zustellung {#troubleshooting-in-app-message-delivery}
Das SDK fordert In-App-Nachrichten beim Sitzungsstart von den Braze-Servern an. Bestätigen Sie, dass das SDK Trigger anfordert und Braze diese zurückgibt.
#### Prüfen, ob Nachrichten angefordert und zurückgegeben werden {#check-if-messages-are-requested-and-returned}
1. Fügen Sie sich als [Testnutzer:in](https://www.braze.com/docs/de/de/user_guide/administer/global/user_management/internal_groups#adding-test-users) hinzu.
2. Richten Sie eine In-App-Nachrichten-Campaign ein, die auf Ihre:n Nutzer:in ausgerichtet ist.
3. Starten Sie eine neue Sitzung in Ihrer Anwendung.
4. Suchen Sie in den [Event-Nutzerprotokollen](https://www.braze.com/docs/de/de/user_guide/administer/global/workspace_settings/logs_and_alerts/event_user_log) die SDK-Anfrage für das Sitzungsstart-Ereignis. In den **Antwortdaten**:
- Bestätigen Sie im Roh-JSON, dass `respond_with` `"triggers": true` enthält.
- Die Zeile **Requested Responses** listet die Top-Level-Schlüssel in der Antwort auf. Für In-App-Nachrichten erwarten Sie **`triggers`**.
- **Trigger In-App Message**-Zeilen listen jede In-App-Nachricht auf, die für diese Anfrage zurückgegeben wurde.
Dann triagieren:
- Wenn kein `triggers`-Schlüssel oder keine **Trigger In-App Message**-Zeilen vorhanden sind, siehe [Fehlerbehebung: Nachrichten werden nicht angefordert](#troubleshoot-messages-not-being-requested).
- Wenn `triggers` vorhanden, aber leer ist (`[]`), siehe [Fehlerbehebung: Nachrichten werden nicht zurückgegeben](#troubleshoot-messages-not-being-returned).
- Wenn **Trigger In-App Message**-Zeilen vorhanden sind, aber nichts auf dem Gerät angezeigt wird, siehe [Plattformspezifische Fehlerbehebung bei der Anzeige](#platform-specific-display-troubleshooting).
- Jeder Trigger-Payload enthält einen `type`: `inapp` (Standard) oder `templated_iam` (erfordert eine Template-Anfrage vor der Anzeige). Siehe [Typen von In-App-Nachrichten](https://www.braze.com/docs/de/de/developer_guide/in_app_messages/triggering_messages#types-of-in-app-messages).
5. Bestätigen Sie, dass die richtigen In-App-Nachrichten in den Antwortdaten erscheinen.

##### Fehlerbehebung: Nachrichten werden nicht angefordert {#troubleshoot-messages-not-being-requested}
Wenn In-App-Nachrichten nicht angefordert werden, verfolgt Ihre App möglicherweise Sitzungen nicht korrekt – In-App-Nachrichten werden beim Sitzungsstart aktualisiert. Bestätigen Sie, dass die App eine Sitzung basierend auf Ihrer Sitzungs-Timeout-Semantik startet:

##### Fehlerbehebung: Nachrichten werden nicht zurückgegeben {#troubleshoot-messages-not-being-returned}
Wenn In-App-Nachrichten nicht zurückgegeben werden, liegt wahrscheinlich ein Targeting- oder Berechtigungsproblem vor:
1. Ihr Segment enthält Ihre:n Nutzer:in nicht.
- Überprüfen Sie den Tab [**Engagement**](https://www.braze.com/docs/de/de/user_guide/audience/manage_audience/user_profiles#engagement-tab) des/der Nutzer:in auf das erwartete Segment.
2. Ihr:e Nutzer:in hat die Nachricht bereits erhalten und war nicht wiederberechtigt.
- Überprüfen Sie die [Wiederberechtigungseinstellungen](https://www.braze.com/docs/de/de/user_guide/messaging/messaging_fundamentals/re_eligibility) und die [FAQ zu In-App-Nachrichten](https://www.braze.com/docs/de/de/user_guide/channels/in_app_messages/faq#campaigns).
3. Ihr:e Nutzer:in hat das Frequency Cap erreicht.
- Überprüfen Sie die [Frequency-Cap-Einstellungen](https://www.braze.com/docs/de/de/user_guide/messaging/messaging_fundamentals/frequency_capping).
4. Ihr:e Nutzer:in ist in eine Kontrollgruppe gefallen.
- Erstellen Sie ein Segment mit einem Filter **Received campaign variant**, der auf **Control** gesetzt ist, oder deaktivieren Sie Kontrollgruppen während der Integrationstests.
5. Eine In-App-Nachricht mit höherer Priorität hatte Vorrang. Siehe die [FAQ zu In-App-Nachrichten](https://www.braze.com/docs/de/de/user_guide/channels/in_app_messages/faq#can-multiple-in-app-messages-display-in-the-same-session).
Informationen zu archivierten Campaigns, Trigger-Konfiguration und Ruhezeiten finden Sie in den [FAQ zu In-App-Nachrichten](https://www.braze.com/docs/de/de/user_guide/channels/in_app_messages/faq).
## Impressionen und Analytics {#impressions-and-analytics}
**Symptom:** Impressionen- oder Klickzahlen entsprechen nicht den Erwartungen.
- **_Impressionen_ größer als _Eindeutige Impressionen_:** Erwartet, wenn Nutzer:innen mehrere Geräte haben oder wenn eine geplante Verzögerung dazu führt, dass derselbe/dieselbe Nutzer:in sich mehr als einmal qualifiziert. Siehe [Wiederberechtigung für Campaigns und Canvas](https://www.braze.com/docs/de/de/user_guide/messaging/messaging_fundamentals/re_eligibility).
- **Impressionen niedriger als erwartet:** Nutzer:innen haben die Nachricht möglicherweise nicht gesehen (Impressionen werden bei der Anzeige protokolliert), mehrere Nachrichten mit hoher Priorität können sich gegenseitig abfangen, oder Trigger-Synchronisierungs-Race-Conditions können auftreten. Für Canvas-In-App-Nachrichten siehe [Canvas-In-App-Nachrichten](#canvas-in-app-messages). Vollständige Metrikdefinitionen finden Sie unter [Reporting für In-App-Nachrichten](https://www.braze.com/docs/de/de/user_guide/channels/in_app_messages/reporting) und in den [FAQ zu In-App-Nachrichten](https://www.braze.com/docs/de/de/user_guide/channels/in_app_messages/faq).
- **Impressionen niedriger als zuvor:** Überprüfen Sie die Segment- und Campaign-Changelogs. Bestätigen Sie, dass Sie nicht dasselbe Trigger-Ereignis in einer Campaign mit höherer Priorität wiederverwendet haben.

Wenn Sie einen Delegate oder angepassten Handler verwenden, um In-App-Nachrichten manuell anzuzeigen, müssen Sie Impressionen und Klicks selbst protokollieren. Siehe Ihren SDK-Tab unter [Plattformspezifische Fehlerbehebung bei der Anzeige](#platform-specific-display-troubleshooting) für Swift- und Android-Details oder [In-App-Nachrichtendaten protokollieren](https://www.braze.com/docs/de/de/developer_guide/in_app_messages/logging_message_data) für Web.
## Plattformspezifische Fehlerbehebung bei der Anzeige {#platform-specific-display-troubleshooting}
Wenn **Trigger In-App Message**-Zeilen in den Event-Nutzerprotokollen erscheinen, aber nichts auf dem Gerät angezeigt wird, wählen Sie Ihren SDK-Tab für Anzeige-Prüfungen (Delegates, Rate-Limits, Ausrichtung und angepasste Handler).
### Troubleshooting display {#troubleshooting-in-app-message-display}
If your app is requesting and receiving in-app messages but they aren't showing, device-side logic may be preventing display:
1. Is the trigger event firing as expected? To test, configure the message to trigger on a different action (such as session start) and verify whether it displays.
3. Failed image downloads prevent in-app messages with images from displaying. Check device logs for download failures. Try removing the image temporarily to see if the message displays.
### Troubleshooting display {#troubleshooting-in-app-message-display}
If your app is requesting and receiving in-app messages but they aren't showing, device-side logic may be preventing display:
1. Is the trigger event firing as expected? To test, configure the message to trigger on a different action (such as session start) and verify whether it displays.
3. Failed image downloads prevent in-app messages with images from displaying. Check device logs for download failures. Try removing the image temporarily to see if the message displays.
### Troubleshooting display {#troubleshooting-in-app-message-display}
If your app is requesting and receiving in-app messages but they aren't showing, device-side logic may be preventing display:
1. Is the trigger event firing as expected? To test, configure the message to trigger on a different action (such as session start) and verify whether it displays.
3. Failed image downloads prevent in-app messages with images from displaying. Check device logs for download failures. Try removing the image temporarily to see if the message displays.
### Troubleshooting asset loading (`NSURLError` code `-1008`) {#asset-loading}
When integrating Braze alongside third-party network logging libraries, developers can commonly run into an `NSURLError` with the domain code `-1008`. This error indicates that assets like images and fonts could not be retrieved or failed to cache. To work around such cases, you must register Braze CDN URLs to the list of domains that should be ignored by these libraries.
#### Domains
The full list of CDN domains is as follows:
* `"appboy-images.com"`
* `"braze-images.com"`
* `"cdn.braze.eu"`
* `"cdn.braze.com"`
#### Examples
The following libraries are known to conflict with Braze asset caching, along with example code to work around the issue. If your project uses a library that causes an unavailable resource error and is not listed here, consult the documentation of that library for similar usage APIs.
##### Netfox
```swift
NFX.sharedInstance().ignoreURLs(["https://cdn.braze.com"])
```
```objc
[NFX.sharedInstance ignoreURLs:@[@"https://cdn.braze.com"]];
```
##### NetGuard
```swift
NetGuard.blackListHosts.append(contentsOf: ["cdn.braze.com"])
```
```objc
NSMutableArray *blackListHosts = [NetGuard.blackListHosts mutableCopy];
[blackListHosts addObject:@"cdn.braze.com"];
NetGuard.blackListHosts = blackListHosts;
```
##### XNLogger
```swift
let brazeAssetsHostFilter = XNHostFilter(host: "https://cdn.braze.com")
XNLogger.shared.addFilters([brazeAssetsHostFilter])
```
```objc
XNHostFilter *brazeAssetsHostFilter = [[XNHostFilter alloc] initWithHost: @"https://cdn.braze.com"];
[XNLogger.shared addFilters:@[brazeAssetsHostFilter]];
```
# Push-Benachrichtigungen für das Braze SDK
Source: /docs/de/developer_guide/push_notifications/index.md
# Push-Benachrichtigungen {#push-notifications}
> [Push-Benachrichtigungen](https://www.braze.com/docs/de/de/user_guide/channels/push) ermöglichen es Ihnen, von Ihrer App aus Benachrichtigungen über wichtige Ereignisse zu versenden. Sie können eine Push-Benachrichtigung senden, wenn Sie neue Sofortnachrichten zustellen möchten, aktuelle Eilmeldungen versenden oder die neueste Folge der Lieblingssendung Ihrer Nutzer:innen zum Herunterladen für die Offline-Nutzung bereitsteht. Sie sind auch effizienter als Hintergrundabrufe, da Ihre Anwendung nur bei Bedarf gestartet wird.
**Note:**
Wenn **Redirect to web URL** mit **Open web URL inside app** nicht ausgewählt ist, der Link aber trotzdem in der App geöffnet wird, verarbeitet die App möglicherweise die URL selbst (z. B. über Universal Links unter iOS oder App Links unter Android). Um den Link stattdessen im Browser zu öffnen, stellen Sie sicher, dass Ihre App die URL an den Systembrowser delegiert, wenn Nutzer:innen auf die Benachrichtigung tippen, oder passen Sie die URL-Verarbeitung Ihrer App so an, dass die Klickaktion mit der Einstellung im Braze-Dashboard übereinstimmt. Informationen zur Konfiguration von Klickaktionen und URL-Verarbeitung finden Sie in der Push-Dokumentation Ihrer Plattform.
**Note:**
This guide uses code samples from the Braze Web SDK 4.0.0+. To upgrade to the latest Web SDK version, see [SDK Upgrade Guide](https://github.com/braze-inc/braze-web-sdk/blob/master/UPGRADE_GUIDE.md).
## Prerequisites
Before you can use this feature, you'll need to [integrate the Web Braze SDK](https://www.braze.com/docs/de/de/developer_guide/sdk_integration/?sdktab=web).
## Push protocols
Web push notifications are implemented using the [W3C push standard](http://www.w3.org/TR/push-api/), which most major browsers support. For more information on specific push protocol standards and browser support, you can review resources from [Apple](https://developer.apple.com/notifications/safari-push-notifications/) [Mozilla](https://developer.mozilla.org/en-us/docs/web/api/push_api#browser_compatibility) and [Microsoft](https://developer.microsoft.com/en-us/microsoft-edge/status/pushapi/).
## Setting up push notifications
### Step 1: Configure your service worker
In your project's `service-worker.js` file, add the following snippet and set the [`manageServiceWorkerExternally`](https://js.appboycdn.com/web-sdk/latest/doc/modules/braze.html#initialize) initialization option to `true` when initializing the Web SDK.
**Important:**
Your web server must return a `Content-Type: application/javascript` when serving your service worker file. Additionally, if your service worker file is not `service-worker.js` named, you'll need to use the `serviceWorkerLocation` [initialization option](https://js.appboycdn.com/web-sdk/latest/doc/modules/braze.html#initializationoptions).
### Step 2: Register the browser
To immediately request push permissions from a user so their browser can receive push notifications, call `braze.requestPushPermission()`. To test if push is supported in their browser first, call `braze.isPushSupported()`.
You can also [send a soft push prompt](https://www.braze.com/docs/de/de/developer_guide/push_notifications/soft_push_prompts/?sdktab=web) to the user before requesting push permission to show your own push-related UI.
**Important:**
On macOS, both **Google Chrome** and **Google Chrome Helper (Alerts)** must be enabled by the end-user in **System Settings > Notifications** before push notifications can be displayed—even if permissions are granted.
### Step 3: Disable `skipWaiting` (optional)
The Braze service worker file will automatically call `skipWaiting` upon install. If you'd like to disable this functionality, add the following code to your service worker file, after importing Braze:
## Unsubscribing a user
To unsubscribe a user, call `braze.unregisterPush()`.
**Important:**
Recent versions of Safari and Firefox require that you call this method from a short-lived event handler (such as from a button-click handler or soft push prompt). This is consistent with [Chrome's user experience best practices](https://docs.google.com/document/d/1WNPIS_2F0eyDm5SS2E6LZ_75tk6XtBSnR1xNjWJ_DPE) for push registration.
## Alternate domains
To integrate web push, your domain must be [secure](https://w3c.github.io/webappsec-secure-contexts/), which generally means `https`, `localhost`, and other exceptions as defined in the [W3C push standard](https://www.w3.org/TR/service-workers/#security-considerations). You'll also need to be able to register a Service Worker at the root of your domain, or at least be able to control the HTTP headers for that file. This article covers how to integrate Braze Web Push on an alternate domain.
### Use cases
If you can't meet all of the criteria outlined in the [W3C push standard](https://www.w3.org/TR/service-workers/#security-considerations), you can use this method to add a push prompt dialog to your website instead. This can be helpful if you want to let your users opt-in from an `http` website or a browser extension popup that's preventing your push prompt from displaying.
### Considerations
Keep in mind, like many workarounds on the web, browsers continually evolve, and this method may not be viable in the future. Before continuing, ensure that:
- You own a separate secure domain (`https://`) and permissions to register a Service Worker on that domain.
- Users are logged in to your website which ensures push tokens are match to the correct profile.
**Important:**
You cannot use this method to implement push notifications for Shopify. Shopify will automatically remove the headers need to deliver push this way.
### Setting up an alternate push domain
To make the following example clear, we'll use use `http://insecure.com` and `https://secure.com` as our two domains with the goal of getting visitors to register for push on `http://insecure.com`. This example could also be applied to a `chrome-extension://` scheme for a browser extension's popup page.
#### Step 1: Initiate prompting flow
On `insecure.com`, open a new window to your secure domain using a URL parameter to pass the currently logged-in user's Braze external ID.
**http://insecure.com**
```html
```
#### Step 2: Register for push
At this point, `secure.com` will open a popup window in which you can initialize the Braze Web SDK for the same user ID and request the user's permission for Web push.
**https://secure.com/push-registration.html**
#### Step 3: Communicate between domains (optional)
Now that users can opt-in from this workflow originating on `insecure.com`, you may want to modify your site based on if the user is already opted-in or not. There's no point in asking the user to register for push if they already are.
You can use iFrames and the [`postMessage`](https://developer.mozilla.org/en-US/docs/Web/API/Window/postMessage) API to communicate between your two domains.
**insecure.com**
On our `insecure.com` domain, we will ask the secure domain (where push is _actually_ registered) for information on the current user's push registration:
```html
```
**secure.com/push-status.html**
## Frequently Asked Questions (FAQ)
### Service workers
#### What if I can't register a service worker in the root directory?
By default, a service worker can only be used within the same directory it is registered in. For example, if your service worker file exists in `/assets/service-worker.js`, it would only be possible to register it within `example.com/assets/*` or a subdirectory of the `assets` folder, but not on your homepage (`example.com/`). For this reason, it is recommended to host and register the service worker in the root directory (such as `https://example.com/service-worker.js`).
If you cannot register a service worker in your root domain, an alternative approach is to use the [`Service-Worker-Allowed`](https://w3c.github.io/ServiceWorker/#service-worker-script-response) HTTP header when serving your service worker file. By configuring your server to return `Service-Worker-Allowed: /` in the response for the service worker, this will instruct the browser to broaden the scope and allow it to be used from within a different directory.
#### Can I create a service worker using a Tag Manager?
No, service workers must be hosted on your website's server and can't be loaded via Tag Manager.
### Site security
#### Is HTTPS required?
Yes. Web standards require that the domain requesting push notification permission be secure.
#### When is a site considered "secure"?
A site is considered secure if it matches one of the following secure-origin patterns. Braze Web push notifications are built on this open standard, so man-in-the-middle attacks are prevented.
- `(https, , *)`
- `(wss, *, *)`
- `(, localhost, )`
- `(, .localhost, *)`
- `(, 127/8, )`
- `(, ::1/128, *)`
- `(file, *, —)`
- `(chrome-extension, *, —)`
#### What if a secure site is not available?
While industry best practice is to make your whole site secure, customers who cannot secure their site domain can work around the requirement by using a secure modal. Read more in our guide to using [Alternate push domain](https://www.braze.com/docs/de/de/developer_guide/platform_integration_guides/web/push_notifications/alternate_push_domain) or view a [working demo](http://appboyj.com/modal-test.html).
## Prerequisites
Before you can use this feature, you'll need to [integrate the Android Braze SDK](https://www.braze.com/docs/de/de/developer_guide/sdk_integration/?sdktab=android).
## Built-in features
The following features are built into the Braze Android SDK. To use any other push notification features, you will need to [set up push notifications](#android_setting-up-push-notifications) for your app.
|Feature|Description|
|-------|-----------|
|Push Stories|Android Push Stories are built into the Braze Android SDK by default. To learn more, see [Push Stories](https://www.braze.com/docs/de/de/user_guide/message_building_by_channel/push/advanced_push_options/push_stories/).|
|Push Primers|Push primer campaigns encourage your users to enable push notifications on their device for your app. This can be done without SDK customization using our [no code push primer](https://www.braze.com/docs/de/de/user_guide/message_building_by_channel/push/best_practices/push_primer_messages/).|
{: .reset-td-br-1 .reset-td-br-2 aria-label="Built-in features" }
## About the push notification lifecycle {#push-notification-lifecycle}
The following flowchart shows how Braze handles the push notification lifecycle, such as permission prompts, token generation, and message delivery.
```mermaid
---
config:
theme: neutral
---
flowchart TD
%% Permission flow
subgraph Permission[Push Permissions]
B{Android version of the device?}
B -->|Android 13+| C["requestPushPermissionPrompt() called"]
B -->|Android 12 and earlier| D[No permissions required]
%% Connect Android 12 path to Braze state
D --> H3[Braze: user subscription state]
H3 --> J3[Defaults to 'subscribed' when user profile created]
C --> E{Did the user grant push permission?}
E -->|Yes| F[POST_NOTIFICATIONS permission granted]
E -->|No| G[POST_NOTIFICATIONS permission denied]
%% Braze subscription state updates
F --> H1[Braze: user subscription state]
G --> H2[Braze: user subscription state]
H1 --> I1{Automatically opt in after permission granted?}
I1 -->|true| J1[Set to 'opted-in']
I1 -->|false| J2[Remains 'subscribed']
H2 --> K1[Remains 'subscribed' or 'unsubscribed']
%% Subscription state legend
subgraph BrazeStates[Braze subscription states]
L1['Subscribed' - default state when user profile created]
L2['Opted-in' - user explicitly wants push notifications]
L3['Unsubscribed' - user explicitly opted out of push]
end
%% Note about user-level states
note1[Note: These states are user-level and apply across all devices for the user]
%% Connect states to legend
J1 -.-> L2
J2 -.-> L1
J3 -.-> L1
K1 -.-> L3
note1 -.-> BrazeStates
end
%% Styling
classDef permissionClass fill:#e3f2fd,stroke:#1565c0,stroke-width:2px
classDef tokenClass fill:#e8f5e9,stroke:#2e7d32,stroke-width:2px
classDef sdkClass fill:#fff3e0,stroke:#e65100,stroke-width:2px
classDef configClass fill:#f3e5f5,stroke:#7b1fa2,stroke-width:2px
classDef displayClass fill:#ffebee,stroke:#c62828,stroke-width:2px
classDef deliveryClass fill:#fce4ec,stroke:#c2185b,stroke-width:2px
classDef brazeClass fill:#e8f5e9,stroke:#2e7d32,stroke-width:3px
class A,B,C,E,F,G permissionClass
class H,I tokenClass
class J,K sdkClass
class N,O,P configClass
class R,S,S1,T,U,V displayClass
class W,X,X1,X2,Y,Z deliveryClass
class H1,H2,H3,I1,J1,J2,J3,K1,L1,L2,L3,note1 brazeClass
```
```mermaid
---
config:
theme: neutral
---
flowchart TD
%% Token generation flow
subgraph Token[Token Generation]
H["Braze SDK initialized"] --> Q{Is FCM auto-registration enabled?}
Q -->|Yes| L{Is required configuration present?}
Q -->|No| M[No FCM token generated]
L -->|Yes| I[Generate FCM token]
L -->|No| M
I --> K[Register token with Braze]
%% Configuration requirements
subgraph Config[Required configuration]
N['google-services.json' file is present]
O['com.google.firebase:firebase-messaging' in gradle]
P['com.google.gms.google-services' plugin in gradle]
end
%% Connect config to check
N -.-> L
O -.-> L
P -.-> L
end
%% Styling
classDef permissionClass fill:#e3f2fd,stroke:#1565c0,stroke-width:2px
classDef tokenClass fill:#e8f5e9,stroke:#2e7d32,stroke-width:2px
classDef sdkClass fill:#fff3e0,stroke:#e65100,stroke-width:2px
classDef configClass fill:#f3e5f5,stroke:#7b1fa2,stroke-width:2px
classDef displayClass fill:#ffebee,stroke:#c62828,stroke-width:2px
classDef deliveryClass fill:#fce4ec,stroke:#c2185b,stroke-width:2px
classDef brazeClass fill:#e8f5e9,stroke:#2e7d32,stroke-width:3px
class A,B,C,E,F,G permissionClass
class H,I tokenClass
class J,K sdkClass
class N,O,P configClass
class R,S,S1,T,U,V displayClass
class W,X,X1,X2,Y,Z deliveryClass
class H1,H2,H3,I1,J1,J2,J3,K1,L1,L2,L3,note1 brazeClass
```
```mermaid
---
config:
theme: neutral
fontSize: 10
---
flowchart TD
subgraph Display[Push Display]
%% Push delivery flow
W[Push sent to FCM servers] --> X{Did FCM receive push?}
X -->|App is terminated| Y[FCM cannot deliver push to the app]
X -->|Delivery conditions met| X1[App receives push from FCM]
X1 --> X2[Braze SDK receives push]
X2 --> R[Push type?]
%% Push Display Flow
R -->|Standard push| S{Is push permission required?}
R -->|Silent push| T[Braze SDK processes silent push]
S -->|Yes| S1{Did the user grant push permission?}
S -->|No| V[Notification is shown to the user]
S1 -->|Yes| V
S1 -->|No| U[Notification is not shown to the user]
end
%% Styling
classDef permissionClass fill:#e3f2fd,stroke:#1565c0,stroke-width:2px
classDef tokenClass fill:#e8f5e9,stroke:#2e7d32,stroke-width:2px
classDef sdkClass fill:#fff3e0,stroke:#e65100,stroke-width:2px
classDef configClass fill:#f3e5f5,stroke:#7b1fa2,stroke-width:2px
classDef displayClass fill:#ffebee,stroke:#c62828,stroke-width:2px
classDef deliveryClass fill:#fce4ec,stroke:#c2185b,stroke-width:2px
classDef brazeClass fill:#e8f5e9,stroke:#2e7d32,stroke-width:3px
class A,B,C,E,F,G permissionClass
class H,I tokenClass
class J,K sdkClass
class N,O,P configClass
class R,S,S1,T,U,V displayClass
class W,X,X1,X2,Y,Z deliveryClass
class H1,H2,H3,I1,J1,J2,J3,K1,L1,L2,L3,note1 brazeClass
```
## Setting up push notifications
**Tip:**
To check out a sample app using FCM with the Braze Android SDK, see [Braze: Firebase Push Sample App](https://github.com/braze-inc/braze-android-sdk/tree/master/samples/firebase-push).
### Rate limits
Firebase Cloud Messaging (FCM) API has a default rate limit of 600,000 requests per minute. If you reach this limit, Braze will automatically try again in a few minutes. To request an increase, contact [Firebase Support](https://firebase.google.com/support).
### Step 1: Add Firebase to your project
First, add Firebase to your Android project. For step-by-step instructions, see Google's [Firebase setup guide](https://firebase.google.com/docs/android/setup).
### Step 2: Add Cloud Messaging to your dependencies
Next, add the Cloud Messaging library to your project dependencies. In your Android project, open `build.gradle`, then add the following line to your `dependencies` block.
```gradle
implementation "google.firebase:firebase-messaging:+"
```
Your dependencies should look similar to the following:
```gradle
dependencies {
implementation project(':android-sdk-ui')
implementation "com.google.firebase:firebase-messaging:+"
}
```
### Step 3: Enable the Firebase Cloud Messaging API
In Google Cloud, select the project your Android app is using, then enable the [Firebase Cloud Messaging API](https://console.cloud.google.com/apis/library/fcm.googleapis.com).
{: style="max-width:80%;"}
### Step 4: Create a service account {#service-account}
Next, create a new service account, so Braze can make authorized API calls when registering FCM tokens. In Google Cloud, go to **Service Accounts**, then choose your project. On the **Service Accounts** page, select **Create Service Account**.

Enter a service account name, ID, and description, then select **Create and continue**.
In the **Role** field, find and select **Firebase Cloud Messaging API Admin** from the list of roles. For more restrictive access, create a [custom role](https://cloud.google.com/iam/docs/creating-custom-roles) with the `cloudmessaging.messages.create` permission, then choose it from the list instead. When you're finished, select **Done**.
**Warning:**
Be sure to select **Firebase Cloud Messaging _API_ Admin**, not **Firebase Cloud Messaging Admin**.

### Step 5: Generate JSON credentials {#json}
Next, generate JSON credentials for your FCM service account. On Google Cloud IAM & Admin, go to **Service Accounts**, then choose your project. Locate the FCM service account [you created earlier](#android_service-account), then select **Actions** > **Manage Keys**.

Select **Add Key** > **Create new key**.

Choose **JSON**, then select **Create**. If you created your service account using a different Google Cloud project ID than your FCM project ID, you'll need to manually update the value assigned to the `project_id` in your JSON file.
Be sure to remember where you downloaded the key—you'll need it in the next step.
{: style="max-width:65%;"}
**Warning:**
Private keys could pose a security risk if compromised. Store your JSON credentials in a secure location for now—you'll delete your key after you upload it to Braze.
### Step 6: Upload your JSON credentials to Braze
Next, upload your JSON credentials to your Braze dashboard. In Braze, select **Settings** > **App Settings**.

Under your Android app's **Push Notification Settings**, choose **Firebase**, then select **Upload JSON File** and upload the credentials [you generated earlier](#android_json). When you're finished, select **Save**.

**Warning:**
Private keys could pose a security risk if compromised. Now that your key is uploaded to Braze, delete the file [you generated previously](#android_json).
### Step 7: Set up automatic token registration
When one of your users opt-in for push notifications, your app needs to generate an FCM token on their device before you can send them push notifications. With the Braze SDK, you can enable automatic FCM token registration for each user's device in your project's Braze configuration files.
First, go to Firebase Console, open your project, then select **Settings** > **Project settings**.

Select **Cloud Messaging**, then under **Firebase Cloud Messaging API (V1)**, copy the number in the **Sender ID** field.

Next, open your Android Studio project and use your Firebase Sender ID to enable automatic FCM token registration within your `braze.xml` or `BrazeConfig`.
To configure automatic FCM token registration, add the following lines to your `braze.xml` file:
```xml
trueFIREBASE_SENDER_ID
```
Replace `FIREBASE_SENDER_ID` with the value you copied from your Firebase project settings. Your `braze.xml` should look similar to the following:
```xml
12345ABC-6789-DEFG-0123-HIJK456789LMtrue603679405392
```
To configure automatic FCM token registration, add the following lines to your `BrazeConfig`:
```java
.setIsFirebaseCloudMessagingRegistrationEnabled(true)
.setFirebaseCloudMessagingSenderIdKey("FIREBASE_SENDER_ID")
```
```kotlin
.setIsFirebaseCloudMessagingRegistrationEnabled(true)
.setFirebaseCloudMessagingSenderIdKey("FIREBASE_SENDER_ID")
```
Replace `FIREBASE_SENDER_ID` with the value you copied from your Firebase project settings. Your `BrazeConfig` should look similar to the following:
```java
BrazeConfig brazeConfig = new BrazeConfig.Builder()
.setApiKey("12345ABC-6789-DEFG-0123-HIJK456789LM")
.setCustomEndpoint("sdk.iad-01.braze.com")
.setSessionTimeout(60)
.setHandlePushDeepLinksAutomatically(true)
.setGreatNetworkDataFlushInterval(10)
.setIsFirebaseCloudMessagingRegistrationEnabled(true)
.setFirebaseCloudMessagingSenderIdKey("603679405392")
.build();
Braze.configure(this, brazeConfig);
```
```kotlin
val brazeConfig = BrazeConfig.Builder()
.setApiKey("12345ABC-6789-DEFG-0123-HIJK456789LM")
.setCustomEndpoint("sdk.iad-01.braze.com")
.setSessionTimeout(60)
.setHandlePushDeepLinksAutomatically(true)
.setGreatNetworkDataFlushInterval(10)
.setIsFirebaseCloudMessagingRegistrationEnabled(true)
.setFirebaseCloudMessagingSenderIdKey("603679405392")
.build()
Braze.configure(this, brazeConfig)
```
**Tip:**
If you'd like to manually register FCM tokens instead, set the [`registeredPushToken`](https://braze-inc.github.io/braze-android-sdk/kdoc/braze-android-sdk/com.braze/-i-braze/registered-push-token.html) property on the Braze instance inside your app's [`onCreate()`](https://developer.android.com/reference/android/app/Application.html#onCreate()) method.
```kotlin
// Kotlin
Braze.getInstance(context).registeredPushToken = "FCM_TOKEN"
```
```java
// Java
Braze.getInstance(context).setRegisteredPushToken("FCM_TOKEN");
```
### Step 8: Remove automatic requests in your application class
To prevent Braze from triggering unnecessary network requests every time you send silent push notifications, remove any automatic network requests configured in your `Application` class's `onCreate()` method. For more information see, [Android Developer Reference: Application](https://developer.android.com/reference/android/app/Application).
## Displaying notifications
### Step 1: Register Braze Firebase Messaging Service
You can either create a new, existing, or non-Braze Firebase Messaging Service. Choose whichever best meets your specific needs.
Braze includes a service to handle push receipt and open intents. Our `BrazeFirebaseMessagingService` class will need to be registered in your `AndroidManifest.xml`:
```xml
```
Our notification code also uses `BrazeFirebaseMessagingService` to handle open and click action tracking. This service must be registered in the `AndroidManifest.xml` to function correctly. Also, remember that Braze prefixes notifications from our system with a unique key so that we only render notifications sent from our systems. You may register additional services separately to render notifications sent from other FCM services. See [`AndroidManifest.xml`](https://github.com/braze-inc/braze-android-sdk/blob/master/samples/firebase-push/src/main/AndroidManifest.xml) in the Firebase push sample app.
**Important:**
Before Braze SDK 3.1.1, `AppboyFcmReceiver` was used to handle FCM push. The `AppboyFcmReceiver` class should be removed from your manifest and replaced with the preceding integration.
If you already have a Firebase Messaging Service registered, you can pass [`RemoteMessage`](https://firebase.google.com/docs/reference/android/com/google/firebase/messaging/RemoteMessage) objects to Braze via [`BrazeFirebaseMessagingService.handleBrazeRemoteMessage()`](https://braze-inc.github.io/braze-android-sdk/kdoc/braze-android-sdk/com.braze.push/-braze-firebase-messaging-service/-companion/handle-braze-remote-message.html). This method will only display a notification if the [`RemoteMessage`](https://firebase.google.com/docs/reference/android/com/google/firebase/messaging/RemoteMessage) object originated from Braze and will safely ignore if not.
```java
public class MyFirebaseMessagingService extends FirebaseMessagingService {
@Override
public void onMessageReceived(RemoteMessage remoteMessage) {
super.onMessageReceived(remoteMessage);
if (BrazeFirebaseMessagingService.handleBrazeRemoteMessage(this, remoteMessage)) {
// This Remote Message originated from Braze and a push notification was displayed.
// No further action is needed.
} else {
// This Remote Message did not originate from Braze.
// No action was taken and you can safely pass this Remote Message to other handlers.
}
}
}
```
```kotlin
class MyFirebaseMessagingService : FirebaseMessagingService() {
override fun onMessageReceived(remoteMessage: RemoteMessage?) {
super.onMessageReceived(remoteMessage)
if (BrazeFirebaseMessagingService.handleBrazeRemoteMessage(this, remoteMessage)) {
// This Remote Message originated from Braze and a push notification was displayed.
// No further action is needed.
} else {
// This Remote Message did not originate from Braze.
// No action was taken and you can safely pass this Remote Message to other handlers.
}
}
}
```
If you have another Firebase Messaging Service you would also like to use, you can also specify a fallback Firebase Messaging Service to call if your application receives a push that isn't from Braze.
In your `braze.xml`, specify:
```xml
truecom.company.OurFirebaseMessagingService
```
or set via [runtime configuration:](https://www.braze.com/docs/de/de/developer_guide/sdk_integration/?sdktab=android#runtime-configuration)
```java
BrazeConfig brazeConfig = new BrazeConfig.Builder()
.setFallbackFirebaseMessagingServiceEnabled(true)
.setFallbackFirebaseMessagingServiceClasspath("com.company.OurFirebaseMessagingService")
.build();
Braze.configure(this, brazeConfig);
```
```kotlin
val brazeConfig = BrazeConfig.Builder()
.setFallbackFirebaseMessagingServiceEnabled(true)
.setFallbackFirebaseMessagingServiceClasspath("com.company.OurFirebaseMessagingService")
.build()
Braze.configure(this, brazeConfig)
```
### Step 2: Conform small icons to design guidelines
For general information about Android notification icons, visit the [Notifications overview](https://developer.android.com/guide/topics/ui/notifiers/notifications).
Starting in Android N, you should update or remove small notification icon assets that involve color. The Android system (not the Braze SDK) ignores all non-alpha and transparency channels in action icons and the notification small icon. In other words, Android will convert all parts of your notification small icon to monochrome except for transparent regions.
To create a notification small icon asset that displays properly:
- Remove all colors from the image except for white.
- All other non-white regions of the asset should be transparent.
**Note:**
A common symptom of an improper asset is the small notification icon rendering as a solid monochrome square. This is due to the Android system not being able to find any transparent regions in the notification small icon asset.
The following large and small icons pictured are examples of properly designed icons:

### Step 3: Configure notification icons {#configure-icons}
#### Specifying icons in braze.xml
Braze allows you to configure your notification icons by specifying drawable resources in your `braze.xml`:
```xml
REPLACE_WITH_YOUR_ICONREPLACE_WITH_YOUR_ICON
```
Setting a small notification icon is required. **If you do not set one, Braze will default to using the application icon as the small notification icon, which may look suboptimal.**
Setting a large notification icon is optional but recommended.
#### Specifying icon accent color
The notification icon accent color can be overridden in your `braze.xml`. If the color is not specified, the default color is the same gray Lollipop uses for system notifications.
```xml
0xFFf33e3e
```
You may also optionally use a color reference:
```xml
@color/my_color_here
```
### Step 4: Add deep links
#### Enabling automatic deep link opening
To enable Braze to automatically open your app and any deep links when a push notification is clicked, set `com_braze_handle_push_deep_links_automatically` to `true`, in your `braze.xml`:
```xml
true
```
This flag can also be set via [runtime configuration](https://www.braze.com/docs/de/de/developer_guide/sdk_integration/?sdktab=android#runtime-configuration):
```java
BrazeConfig brazeConfig = new BrazeConfig.Builder()
.setHandlePushDeepLinksAutomatically(true)
.build();
Braze.configure(this, brazeConfig);
```
```kotlin
val brazeConfig = BrazeConfig.Builder()
.setHandlePushDeepLinksAutomatically(true)
.build()
Braze.configure(this, brazeConfig)
```
If you want to custom handle deep links, you will need to create a push callback that listens for push received and opened intents from Braze. For more information, see [Using a callback for push events](https://www.braze.com/docs/de/de/developer_guide/push_notifications/customization#android_using-a-callback-for-push-events).
## Handling foreground notifications
By default, when a push notification arrives while your app is in the foreground on Android, the system displays it automatically. To have Braze process the push notification payload (for analytics tracking, deep link handling, and custom processing), route the incoming push data to Braze inside your `FirebaseMessagingService.onMessageReceived` method.
### How it works
When you call `BrazeFirebaseMessagingService.handleBrazeRemoteMessage`, Braze determines if the payload is a Braze push notification and, if so, creates and displays the notification with the `NotificationManagerCompat` method. Unlike iOS, Android displays notifications regardless of whether the app is in the foreground or background.
```java
package com.example.push;
import com.braze.push.BrazeFirebaseMessagingService;
import com.google.firebase.messaging.FirebaseMessagingService;
import com.google.firebase.messaging.RemoteMessage;
public class MyFirebaseMessagingService extends FirebaseMessagingService {
@Override
public void onMessageReceived(RemoteMessage remoteMessage) {
super.onMessageReceived(remoteMessage);
// Let Braze process the payload and display the notification
if (BrazeFirebaseMessagingService.handleBrazeRemoteMessage(this, remoteMessage)) {
// Braze successfully handled the push notification
} else {
// Handle non-Braze messages
}
}
}
```
```kotlin
package com.example.push
import com.braze.push.BrazeFirebaseMessagingService
import com.google.firebase.messaging.FirebaseMessagingService
import com.google.firebase.messaging.RemoteMessage
class MyFirebaseMessagingService : FirebaseMessagingService() {
override fun onMessageReceived(remoteMessage: RemoteMessage) {
super.onMessageReceived(remoteMessage)
// Let Braze process the payload and display the notification
if (BrazeFirebaseMessagingService.handleBrazeRemoteMessage(this, remoteMessage)) {
// Braze successfully handled the push notification
} else {
// Handle non-Braze messages
}
}
}
```
For more information, see the [Firebase integration sample](https://github.com/braze-inc/braze-android-sdk/blob/master/samples/firebase-push/src/main/java/com/braze/firebasepush/FirebaseMessagingService.kt) in the Braze Android SDK repository.
### Customizing foreground behavior
If you want custom foreground behavior, such as suppressing the system notification or showing an in-app UI instead, you can:
- Use `subscribeToPushNotificationEvents` to react to push events and handle deep links with the `BrazeNotificationUtils.routeUserWithNotificationOpenedIntent` method. For more information, see the [Firebase push sample](https://github.com/braze-inc/braze-android-sdk/blob/master/samples/firebase-push/src/main/java/com/braze/firebasepush/FirebaseApplication.kt).
- Build and post your own notification using a custom `IBrazeNotificationFactory`, or suppress the notification by not calling `notificationManager.notify` in your handling path.
For more information on customizing notifications, see [Custom notification factory](https://www.braze.com/docs/de/de/developer_guide/push_notifications/customization/?sdktab=android#custom-notification-factory).
#### Creating custom deep links
Follow the instructions found within the [Android developer documentation](http://developer.android.com/training/app-indexing/deep-linking.html) on deep linking if you have not already added deep links to your app. To learn more about what deep links are, see our [FAQ article](https://www.braze.com/docs/de/de/user_guide/messaging/design_and_edit/personalize/actions_and_media_urls/#what-is-deep-linking).
#### Adding deep links
The Braze dashboard supports setting deep links or web URLs in push notifications campaigns and Canvases that will be opened when the notification is clicked.

#### Customizing back stack behavior
The Android SDK, by default, will place your host app's main launcher activity in the back stack when following push deep links. Braze allows you to set a custom activity to open in the back stack in place of your main launcher activity or to disable the back stack altogether.
For example, to set an activity called `YourMainActivity` as the back stack activity using [runtime configuration](https://www.braze.com/docs/de/de/developer_guide/sdk_integration/?sdktab=android#runtime-configuration):
```java
BrazeConfig brazeConfig = new BrazeConfig.Builder()
.setPushDeepLinkBackStackActivityEnabled(true)
.setPushDeepLinkBackStackActivityClass(YourMainActivity.class)
.build();
Braze.configure(this, brazeConfig);
```
```kotlin
val brazeConfig = BrazeConfig.Builder()
.setPushDeepLinkBackStackActivityEnabled(true)
.setPushDeepLinkBackStackActivityClass(YourMainActivity.class)
.build()
Braze.configure(this, brazeConfig)
```
See the equivalent configuration for your `braze.xml`. Note that the class name must be the same as returned by `Class.forName()`.
```xml
trueyour.package.name.YourMainActivity
```
### Step 5: Define notification channels
The Braze Android SDK supports [Android notification channels](https://developer.android.com/preview/features/notification-channels.html). If a Braze notification does not contain the ID for a notification channel or that a Braze notification contains an invalid channel ID, Braze will display the notification with the default notification channel defined in the SDK. Company users use [Android Notification Channels](https://www.braze.com/docs/de/de/user_guide/message_building_by_channel/push/android/notification_channels/) within the platform to group notifications.
To set the user facing name of the default Braze notification channel, use [`BrazeConfig.setDefaultNotificationChannelName()`](https://braze-inc.github.io/braze-android-sdk/kdoc/braze-android-sdk/com.braze.configuration/-braze-config/-builder/set-default-notification-channel-name.html).
To set the user facing description of the default Braze notification channel, use [`BrazeConfig.setDefaultNotificationChannelDescription()`](https://braze-inc.github.io/braze-android-sdk/kdoc/braze-android-sdk/com.braze.configuration/-braze-config/-builder/set-default-notification-channel-description.html).
Update any API campaigns with the [Android push object](https://www.braze.com/docs/de/de/api/objects_filters/messaging/android_object/) parameter to include the `notification_channel` field. If this field is not specified, Braze will send the notification payload with the [dashboard fallback](https://www.braze.com/docs/de/de/user_guide/message_building_by_channel/push/android/notification_channels/#dashboard-fallback-channel) channel ID.
Other than the default notification channel, Braze will not create any channels. All other channels must be programmatically defined by the host app and then entered into the Braze dashboard.
The default channel name and description can also be configured in `braze.xml`.
```xml
Your channel nameYour channel description
```
### Step 6: Test notification display and analytics
#### Testing display
At this point, you should be able to see notifications sent from Braze. To test this, go to the **Campaigns** page on your Braze dashboard and create a **Push Notification** campaign. Choose **Android Push** and design your message. Then click the eye icon in the composer to get the test sender. Enter the user ID or email address of your current user and click **Send Test**. You should see the push show up on your device.

For issues related to push display, see our [troubleshooting guide](https://www.braze.com/docs/de/de/developer_guide/push_notifications/troubleshooting/?sdktab=android).
#### Testing analytics
At this point, you should also have analytics logging for push notification opens. Clicking on the notification when it arrives should result in the **Direct Opens** on your campaign results page to increase by 1. Check out our [push reporting](https://www.braze.com/docs/de/de/user_guide/message_building_by_channel/push/push_reporting/) article for a break down on push analytics.
For issues related to push analytics, see our [troubleshooting guide](https://www.braze.com/docs/de/de/developer_guide/push_notifications/troubleshooting/?sdktab=android).
#### Testing from command line
If you'd like to test in-app and push notifications via the command-line interface, you can send a single notification through the terminal via cURL and the [messaging API](https://www.braze.com/docs/de/de/api/endpoints/messaging/). You will need to replace the following fields with the correct values for your test case:
- `YOUR_API_KEY` (Go to **Settings** > **API Keys**.)
- `YOUR_EXTERNAL_USER_ID` (Search for a profile on the **Search Users** page.)
- `YOUR_KEY1` (optional)
- `YOUR_VALUE1` (optional)
```bash
curl -X POST -H "Content-Type: application/json" -H "Authorization: Bearer {YOUR_API_KEY}" -d '{
"external_user_ids":["YOUR_EXTERNAL_USER_ID"],
"messages": {
"android_push": {
"title":"Test push title",
"alert":"Test push",
"extra": {
"YOUR_KEY1":"YOUR_VALUE1"
}
}
}
}' https://rest.iad-01.braze.com/messages/send
```
This example uses the `US-01` instance. If you are not on this instance, replace the `US-01` endpoint with [your endpoint](https://www.braze.com/docs/de/de/api/basics/#endpoints).
## Conversation push notifications
{: style="float:right;max-width:35%;margin-left:15px;border: 0;"}
The [people and conversations initiative](https://developer.android.com/guide/topics/ui/conversations) is a multi-year Android initiative that aims to elevate people and conversations in the system surfaces of the phone. This priority is based on the fact that communication and interaction with other people is still the most valued and important functional area for the majority of Android users across all demographics.
### Usage requirements
- This notification type requires the Braze Android SDK v15.0.0+ and Android 11+ devices.
- Unsupported devices or SDKs will fallback to a standard push notification.
This feature is only available over the Braze REST API. See the [Android push object](https://www.braze.com/docs/de/de/api/objects_filters/messaging/android_object#android-conversation-push-object) for more information.
## FCM quota exceeded errors
When your limit for Firebase Cloud Messaging (FCM) is exceeded, Google returns "quota exceeded" errors. The default limit for FCM is 600,000 requests per minute. Braze retries sending according to Google's recommended best practices. However, a large volume of these errors can prolong sending time by several minutes. To mitigate potential impact, Braze will send you an alert that the rate limit is being exceeded and steps you can take to prevent the errors.
To check your current limit, go to your **Google Cloud Console** > **APIs & Services** > **Firebase Cloud Messaging API** > **Quotas & System Limits**, or visit the [FCM API Quotas page](https://console.cloud.google.com/apis/api/fcm.googleapis.com/quotas).
### Best practices
We recommend these best practices to keep these error volumes low.
#### Request a rate limit increase from FCM
To request a rate limit increase from FCM, you can contact [Firebase Support](https://firebase.google.com/support) directly or do the following:
1. Go to the [FCM API Quotas page](https://console.cloud.google.com/apis/api/fcm.googleapis.com/quotas).
2. Locate the **Send requests per minute** quota.
3. Select **Edit Quota**.
4. Enter a new value and submit your request.
#### Apply a workspace rate limit
You can apply a workspace rate limit for Android push notifications. This can help regulate the delivery rate of your outgoing messages. For more details, see [Workspace messaging rate limits](https://www.braze.com/docs/de/de/user_guide/administrative/app_settings/messaging_rate_limits).
## Rate limits
Push notifications are rate-limited, so don't be afraid of sending as many as your application needs. iOS and the Apple Push Notification service (APNs) servers will control how often they are delivered, and you won't get into trouble for sending too many. If your push notifications are throttled, they might be delayed until the next time the device sends a keep-alive packet or receives another notification.
## Setting up push notifications
### Step 1: Upload your APNs token
Before you can send an iOS push notification using Braze, you need to upload your `.p8` push notification file, as described in [Apple's developer documentation](https://developer.apple.com/documentation/usernotifications/establishing-a-token-based-connection-to-apns):
1. In your Apple developer account, go to [**Certificates, Identifiers & Profiles**](https://developer.apple.com/account/ios/certificate).
2. Under **Keys**, select **All** and click the add button (+) at the top of the page.
3. Under **Key Description**, enter a unique name for the signing key.
4. Under **Key Services**, select the **Apple Push Notification service (APNs)** checkbox, then click **Continue**. Click **Confirm**.
5. Note the key ID. Click **Download** to generate and download the key. Make sure to save the downloaded file in a secure place, as you cannot download this more than once.
6. In Braze, go to **Settings** > **App Settings** and upload the `.p8` file under **Apple Push Certificate**. You can upload either your development or production push certificate. To test push notifications after your app is live in the App Store, its recommended to set up a separate workspace for the development version of your app.
7. When prompted, enter your app's [bundle ID](https://developer.apple.com/documentation/foundation/nsbundle/1418023-bundleidentifier), [key ID](https://developer.apple.com/help/account/manage-keys/get-a-key-identifier/), and [team ID](https://developer.apple.com/help/account/manage-your-team/locate-your-team-id). You'll also need to specify whether to send notifications to your app's development or production environment, which is defined by its provisioning profile.
8. When you're finished, select **Save**.
### Step 2: Enable push capabilities
In Xcode, go to the **Signing & Capabilities** section of the main app target and add the push notifications capability.

### Step 3: Set up push handling
You can use the Swift SDK to automate the processing of remote notifications received from Braze. This is the simplest way to handle push notifications and is the recommended handling method.
#### Step 3.1: Enable automation in the push property
To enable the automatic push integration, set the `automation` property of the `push` configuration to `true`:
```swift
let configuration = Braze.Configuration(apiKey: "{YOUR-BRAZE-API-KEY}", endpoint: "{YOUR-BRAZE-API-ENDPOINT}")
configuration.push.automation = true
```
```objc
BRZConfiguration *configuration = [[BRZConfiguration alloc] initWithApiKey:@"{YOUR-BRAZE-API-KEY}" endpoint:@"{YOUR-BRAZE-API-ENDPOINT}"];
configuration.push.automation = [[BRZConfigurationPushAutomation alloc] initEnablingAllAutomations:YES];
```
This instructs the SDK to:
- Register your application for push notification on the system.
- Request the push notification authorization/permission at initialization.
- Dynamically provide implementations for the push notification related system delegate methods.
**Note:**
The automation steps performed by the SDK are compatible with pre-existing push notification handling integrations in your codebase. The SDK only automates the processing of remote notification received from Braze. Any system handler implemented to process your own or another third party SDK remote notifications will continue to work when `automation` is enabled.
**Warning:**
The SDK must be initialized on the main thread to enable push notification automation. SDK initialization must happen before the application has finished launching or in your AppDelegate [`application(_:didFinishLaunchingWithOptions:)`](https://developer.apple.com/documentation/uikit/uiapplicationdelegate/1622921-application) implementation.
If your application requires additional setup before initializing the SDK, please refer to the [Delayed Initialization](https://www.braze.com/docs/de/de/developer_guide/sdk_integration/?sdktab=swift#step-2-set-up-delayed-initialization-optional) documentation page.
#### Step 3.2: Override individual configurations (optional)
For more granular control, each automation step can be enabled or disabled individually:
```swift
// Enable all automations and disable the automatic notification authorization request at launch.
configuration.push.automation = true
configuration.push.automation.requestAuthorizationAtLaunch = false
```
```objc
// Enable all automations and disable the automatic notification authorization request at launch.
configuration.push.automation = [[BRZConfigurationPushAutomation alloc] initEnablingAllAutomations:YES];
configuration.push.automation.requestAuthorizationAtLaunch = NO;
```
See [`Braze.Configuration.Push.Automation`](https://braze-inc.github.io/braze-swift-sdk/documentation/brazekit/braze/configuration-swift.class/push-swift.class/automation-swift.class) for all available options and [`automation`](https://braze-inc.github.io/braze-swift-sdk/documentation/brazekit/braze/configuration-swift.class/push-swift.class/automation-swift.property) for more information on the automation behavior.
**Note:**
If you rely on push notifications for additional behavior specific to your app, you may still be able to use automatic push integration instead of manual push notification integration. The [`subscribeToUpdates(_:)`](https://braze-inc.github.io/braze-swift-sdk/documentation/brazekit/braze/notifications-swift.class/subscribetoupdates(_:)) method provides a way to be notified of remote notifications processed by Braze.
#### Step 3.1: Register for push notifications with APNs
Include the appropriate code sample within your app's [`application:didFinishLaunchingWithOptions:` delegate method](https://developer.apple.com/documentation/uikit/uiapplicationdelegate/1622921-application) so that your users' devices can register with APNs. Ensure that you call all push integration code in your application's main thread.
Braze also provides default push categories for push action button support, which must be manually added to your push registration code. Refer to [push action buttons](https://www.braze.com/docs/de/de/developer_guide/push_notifications/customization/?sdktab=swift#swift_customizing-push-categories) for additional integration steps.
Add the following code to the `application:didFinishLaunchingWithOptions:` method of your app delegate.
**Note:**
The following code sample includes integration for provisional push authentication (lines 5 and 6). If you are not planning on using provisional authorization in your app, you can remove the lines of code that add `UNAuthorizationOptionProvisional` to the `requestAuthorization` options. Visit [iOS notification options](https://www.braze.com/docs/de/de/user_guide/message_building_by_channel/push/ios/notification_options/) to learn more about push provisional authentication.
```swift
application.registerForRemoteNotifications()
let center = UNUserNotificationCenter.current()
center.setNotificationCategories(Braze.Notifications.categories)
center.delegate = self
var options: UNAuthorizationOptions = [.alert, .sound, .badge]
if #available(iOS 12.0, *) {
options = UNAuthorizationOptions(rawValue: options.rawValue | UNAuthorizationOptions.provisional.rawValue)
}
center.requestAuthorization(options: options) { granted, error in
print("Notification authorization, granted: \(granted), error: \(String(describing: error))")
}
```
```objc
[application registerForRemoteNotifications];
UNUserNotificationCenter *center = UNUserNotificationCenter.currentNotificationCenter;
[center setNotificationCategories:BRZNotifications.categories];
center.delegate = self;
UNAuthorizationOptions options = UNAuthorizationOptionAlert | UNAuthorizationOptionSound | UNAuthorizationOptionBadge;
if (@available(iOS 12.0, *)) {
options = options | UNAuthorizationOptionProvisional;
}
[center requestAuthorizationWithOptions:options
completionHandler:^(BOOL granted, NSError *_Nullable error) {
NSLog(@"Notification authorization, granted: %d, "
@"error: %@)",
granted, error);
}];
```
**Warning:**
You must assign your delegate object using `center.delegate = self` synchronously before your app finishes launching, preferably in `application:didFinishLaunchingWithOptions:`. Not doing so may cause your app to miss incoming push notifications. Visit Apple's [`UNUserNotificationCenterDelegate`](https://developer.apple.com/documentation/usernotifications/unusernotificationcenterdelegate) documentation to learn more.
If your app calls `wipeData()` and later re-enables the Braze SDK in the same app run, you must call `registerForRemoteNotifications()` again to re-populate the device token used by the SDK.
#### Step 3.2: Register push tokens with Braze
Once APNs registration is complete, pass the resulting `deviceToken` to Braze to enable for push notifications for the user.
Add the following code to your app's `application(_:didRegisterForRemoteNotificationsWithDeviceToken:)` method:
```swift
AppDelegate.braze?.notifications.register(deviceToken: deviceToken)
```
Add the following code to your app's `application:didRegisterForRemoteNotificationsWithDeviceToken:` method:
```objc
[AppDelegate.braze.notifications registerDeviceToken:deviceToken];
```
**Important:**
The `application:didRegisterForRemoteNotificationsWithDeviceToken:` delegate method is called every time after `application.registerForRemoteNotifications()` is called.
If you are migrating to Braze from another push service and your user's device has already registered with APNs, this method will collect tokens from existing registrations the next time the method is called, and users will not have to re-opt-in to push.
#### Step 3.3: Enable push handling
Next, pass the received push notifications along to Braze. This step is necessary for logging push analytics and link handling. Ensure that you call all push integration code in your application's main thread.
##### Default push handling
To enable the Braze default push handling, add the following code to your app's `application(_:didReceiveRemoteNotification:fetchCompletionHandler:)` method:
```swift
if let braze = AppDelegate.braze, braze.notifications.handleBackgroundNotification(
userInfo: userInfo,
fetchCompletionHandler: completionHandler
) {
return
}
completionHandler(.noData)
```
Next, add the following to your app's `userNotificationCenter(_:didReceive:withCompletionHandler:)` method:
```swift
if let braze = AppDelegate.braze, braze.notifications.handleUserNotification(
response: response,
withCompletionHandler: completionHandler
) {
return
}
completionHandler()
```
To enable the Braze default push handling, add the following code to your application's `application:didReceiveRemoteNotification:fetchCompletionHandler:` method:
```objc
BOOL processedByBraze = AppDelegate.braze != nil && [AppDelegate.braze.notifications handleBackgroundNotificationWithUserInfo:userInfo
fetchCompletionHandler:completionHandler];
if (processedByBraze) {
return;
}
completionHandler(UIBackgroundFetchResultNoData);
```
Next, add the following code to your app's `(void)userNotificationCenter:didReceiveNotificationResponse:withCompletionHandler:` method:
```objc
BOOL processedByBraze = AppDelegate.braze != nil && [AppDelegate.braze.notifications handleUserNotificationWithResponse:response
withCompletionHandler:completionHandler];
if (processedByBraze) {
return;
}
completionHandler();
```
##### Foreground push handling
To enable foreground push notifications and let Braze recognize them when they're received, implement `UNUserNotificationCenter.userNotificationCenter(_:willPresent:withCompletionHandler:)`. If a user taps your foreground notification, the `userNotificationCenter(_:didReceive:withCompletionHandler:)` push delegate will be called and Braze will log the push click event.
```swift
func userNotificationCenter(
_ center: UNUserNotificationCenter,
willPresent notification: UNNotification,
withCompletionHandler completionHandler: @escaping (UNNotificationPresentationOptions
) -> Void) {
if let braze = AppDelegate.braze {
// Forward notification payload to Braze for processing.
braze.notifications.handleForegroundNotification(notification: notification)
}
// Configure application's foreground notification display options.
if #available(iOS 14.0, *) {
completionHandler([.list, .banner])
} else {
completionHandler([.alert])
}
}
```
To enable foreground push notifications and let Braze recognize them when they're received, implement `userNotificationCenter:willPresentNotification:withCompletionHandler:`. If a user taps your foreground notification, the `userNotificationCenter:didReceiveNotificationResponse:withCompletionHandler:` push delegate will be called and Braze will log the push click event.
```objc
- (void)userNotificationCenter:(UNUserNotificationCenter *)center
willPresentNotification:(UNNotification *)notification
withCompletionHandler:(void (^)(UNNotificationPresentationOptions options))completionHandler {
if (AppDelegate.braze != nil) {
// Forward notification payload to Braze for processing.
[AppDelegate.braze.notifications handleForegroundNotificationWithNotification:notification];
}
// Configure application's foreground notification display options.
if (@available(iOS 14.0, *)) {
completionHandler(UNNotificationPresentationOptionList | UNNotificationPresentationOptionBanner);
} else {
completionHandler(UNNotificationPresentationOptionAlert);
}
}
```
## Testing notifications {#push-testing}
If you'd like to test in-app and push notifications via the command line, you can send a single notification through the terminal via CURL and the [messaging API](https://www.braze.com/docs/de/de/api/endpoints/messaging/send_messages/post_send_messages/). You will need to replace the following fields with the correct values for your test case:
- `YOUR_API_KEY` - available at **Settings** > **API Keys**.
- `YOUR_EXTERNAL_USER_ID` - available on the **Search Users** page. See [assigning user IDs](https://www.braze.com/docs/de/de/developer_guide/platform_integration_guides/swift/analytics/setting_user_ids/#assigning-a-user-id) for more information.
- `YOUR_KEY1` (optional)
- `YOUR_VALUE1` (optional)
In the following example, the `US-01` instance is being used. If you're not on this instance, refer to our [API documentation](https://www.braze.com/docs/de/de/api/basics/) to see which endpoint to make requests to.
```bash
curl -X POST -H "Content-Type: application/json" -H "Authorization: Bearer {YOUR_API_KEY}" -d '{
"external_user_ids":["YOUR_EXTERNAL_USER_ID"],
"messages": {
"apple_push": {
"alert":"Test push",
"extra": {
"YOUR_KEY1":"YOUR_VALUE1"
}
}
}
}' https://rest.iad-01.braze.com/messages/send
```
## Subscribing to push notifications updates
To access the push notification payloads processed by Braze, use the [`Braze.Notifications.subscribeToUpdates(payloadTypes:_:)`](https://braze-inc.github.io/braze-swift-sdk/documentation/brazekit/braze/notifications-swift.class/subscribetoupdates(payloadtypes:_:)/) method.
You can use the `payloadTypes` parameter to specify whether you'd like to subscribe to notifications involving push open events, push received events, or both.
```swift
// This subscription is maintained through a Braze cancellable, which will observe for changes until the subscription is cancelled.
// You must keep a strong reference to the cancellable to keep the subscription active.
// The subscription is canceled either when the cancellable is deinitialized or when you call its `.cancel()` method.
let cancellable = AppDelegate.braze?.notifications.subscribeToUpdates(payloadTypes: [.open, .received]) { payload in
print("Braze processed notification with title '\(payload.title)' and body '\(payload.body)'")
}
```
**Important:**
Keep in mind, push received events will only trigger for foreground notifications and `content-available` background notifications. It will not trigger for notifications received while terminated or for background notifications without the `content-available` field.
```objc
NSInteger filtersValue = BRZNotificationsPayloadTypeFilter.opened.rawValue | BRZNotificationsPayloadTypeFilter.received.rawValue;
BRZNotificationsPayloadTypeFilter *filters = [[BRZNotificationsPayloadTypeFilter alloc] initWithRawValue: filtersValue];
BRZCancellable *cancellable = [notifications subscribeToUpdatesWithPayloadTypes:filters update:^(BRZNotificationsPayload * _Nonnull payload) {
NSLog(@"Braze processed notification with title '%@' and body '%@'", payload.title, payload.body);
}];
```
**Important:**
Keep in mind, push received events will only trigger for foreground notifications and `content-available` background notifications. It will not trigger for notifications received while terminated or for background notifications without the `content-available` field.
**Note:**
When using the automatic push integration, `subscribeToUpdates(_:)` is the only way to be notified of remote notifications processed by Braze. The `UIAppDelegate` and `UNUserNotificationCenterDelegate` system methods are not called when the notification is automatically processed by Braze.
**Tip:**
Create your push notification subscription in `application(_:didFinishLaunchingWithOptions:)` to ensure your subscription is triggered after an end-user taps a notification while your app is in a terminated state.
## Handling foreground notifications
By default, when a push notification arrives while your app is in the foreground, iOS does not display it automatically. To display push notifications in the foreground and track them with Braze analytics, call the `handleForegroundNotification(notification:)` method inside your `UNUserNotificationCenterDelegate.userNotificationCenter(_:willPresent:withCompletionHandler:)` implementation.
### How it works
When you call `handleForegroundNotification(notification:)`, Braze processes the notification payload to log analytics and handle any deep links or button actions. The actual display behavior is controlled by the `UNNotificationPresentationOptions` you pass to the completion handler.
```swift
import BrazeKit
import UserNotifications
extension AppDelegate: UNUserNotificationCenterDelegate {
func userNotificationCenter(
_ center: UNUserNotificationCenter,
willPresent notification: UNNotification,
withCompletionHandler completionHandler: @escaping (UNNotificationPresentationOptions) -> Void
) {
// Let Braze process the notification payload
if let braze = AppDelegate.braze {
braze.notifications.handleForegroundNotification(notification: notification)
}
// Control how the notification appears in the foreground
if #available(iOS 14.0, *) {
completionHandler([.banner, .list, .sound])
} else {
completionHandler([.alert, .sound])
}
}
}
```
For a complete example, see the [push notifications manual integration sample](https://github.com/braze-inc/braze-swift-sdk/blob/e31907eaa0dbd151dc2e6826de66cc494242ba60/Examples/Swift/Sources/PushNotifications-Manual/AppDelegate.swift#L1-L120) in the Braze Swift SDK repository.
## Push primers {#push-primers}
Push primer campaigns encourage your users to enable push notifications on their device for your app. This can be done without SDK customization using our [no code push primer](https://www.braze.com/docs/de/de/user_guide/message_building_by_channel/push/best_practices/push_primer_messages/).
## Dynamic APNs gateway management
Dynamic Apple Push Notification Service (APNs) gateway management enhances the reliability and efficiency of iOS push notifications by automatically detecting the correct APNs environment. Previously, you would manually select APNs environments (development or production) for your push notifications, which sometimes led to incorrect gateway configurations, delivery failures, and `BadDeviceToken` errors.
With dynamic APNs gateway management, you'll have:
- **Improved reliability:** Notifications are always delivered to the correct APNs environment, reducing failed deliveries.
- **Simplified configuration:** You no longer need to manually manage APNs gateway settings.
- **Error resilience:** Invalid or missing gateway values are gracefully handled, providing uninterrupted service.
### Prerequisites
Braze supports Dynamic APNs gateway management for push notifications on iOS with the following SDK version requirement:
### How it works
When an iOS app integrates with the Braze Swift SDK, it sends device-related data, including [`aps-environment`](https://developer.apple.com/documentation/bundleresources/entitlements/aps-environment) to the Braze SDK API, if available. The `apns_gateway` value indicates whether the app is using the development (`dev`) or production (`prod`) APNs environment.
Braze also stores the reported gateway value for each device. If a new, valid gateway value is received, Braze updates the stored value automatically.
When Braze sends a push notification:
- If a valid gateway value (dev or prod) is stored for the device, Braze uses it to determine the correct APNs environment.
- If no gateway value is stored, Braze defaults to the APNs environment configured in the **App Settings** page.
### Frequently asked questions
#### Why was this feature introduced?
With dynamic APNs gateway management, the correct environment is selected automatically. Previously, you had to manually configure the APNs gateway, which could lead to `BadDeviceToken` errors, token invalidation, and potential APNs rate-limiting issues.
#### How does this impact push delivery performance?
This feature improves delivery rates by always routing push tokens to the correct APNs environment, avoiding failures caused by misconfigured gateways.
#### Can I disable this feature?
Dynamic APNs Gateway Management is turned on by default and provides reliability improvements. If you have specific use cases that require manual gateway selection, contact [Braze Support](https://www.braze.com/docs/de/de/user_guide/administrative/access_braze/support/).
## About push notifications for Android TV
{: style="float:right;max-width:25%;margin-left:15px; border: 0"}
While not a native feature, Android TV push integration is made possible by leveraging the Braze Android SDK and Firebase Cloud Messaging to register a push token for Android TV. It is, however, necessary to build a UI to display the notification payload after it is received.
## Prerequisites
To use this feature, you'll need to complete the following:
- [Integrate the Braze Android SDK](https://www.braze.com/docs/de/de/developer_guide/sdk_integration/?sdktab=android)
- [Set up push notifications for the Braze Android SDK](https://www.braze.com/docs/de/de/developer_guide/platform_integration_guides/android/push_notifications/?tab=android)
## Setting up push notifications
To set up push notifications for Android TV:
1. Create a custom view in your app to display your notifications.
2. Create a [custom notification factory](https://www.braze.com/docs/de/de/developer_guide/push_notifications/customization#customization-display). This will override the default SDK behavior and allow you to manually display the notifications. By returning `null`, this will prevent the SDK from processing and will require custom code to display the notification. After these steps have been completed, you can start sending push to Android TV!
3. (Optional) To track click analytics effectively, set up click analytics tracking. This can be achieved by creating a [push callback](https://www.braze.com/docs/de/de/developer_guide/push_notifications/customization#push-callback) to listen for Braze push opened and received intents.
**Note:**
These notifications **will not persist** and will only be visible to the user when the device displays them. This is due to Android TV's notification center not supporting historical notifications.
## Testing Android TV push notifications
To test if your push implementation is successful, send a notification from the Braze dashboard as you would normally for an Android device.
- **If the application is closed**: The push message will display a toast notification on the screen.
- **If the application is open**: You have the opportunity to display the message in your own hosted UI. We recommend following the UI styling of our Android Mobile SDK in-app messages.
## Best practices
For marketers using Braze, launching a campaign to Android TV will be identical to launching a push to Android mobile apps. To target these devices exclusively, we recommend selecting the Android TV App in segmentation.
The delivered and clicked response returned by FCM will follow the same convention as a mobile Android device; therefore, any errors will be visible in the message activity log.
## Prerequisites
Before you can use this feature, you'll need to [integrate the Cordova Braze SDK](https://www.braze.com/docs/de/de/developer_guide/sdk_integration/?sdktab=cordova). After you integrate the SDK, basic push notification functionality is enabled by default. To use [rich push notifications](https://www.braze.com/docs/de/de/developer_guide/push_notifications/rich/?sdktab=cordova) and [push stories](https://www.braze.com/docs/de/de/developer_guide/push_notifications/push_stories/?sdktab=cordova), you'll need to set them up individually. To use iOS push messages, you also need to upload a valid push certificate.
**Warning:**
Anytime you add, remove, or update your Cordova plugins, Cordova will overwrite the Podfile in your iOS app's Xcode project. This means you’ll need to set these features up again anytime you modify your Cordova plugins.
## Enabling push deep linking
By default, the Braze Cordova SDK doesn't automatically handle deep links from push notifications. To enable push deep linking, follow the configuration steps in [Deep linking](https://www.braze.com/docs/de/de/developer_guide/cordova/deep_linking/).
For more details about these and other push configuration options, see [Optional configurations](https://www.braze.com/docs/de/de/developer_guide/sdk_integration?sdktab=cordova#optional).
## Disabling basic push notifications (iOS only)
After you integrate the Braze Cordova SDK for iOS, basic push notification functionality is enabled by default. To disable this functionality in your iOS app, add the following to your `config.xml` file. For more information, see [Optional configurations](https://www.braze.com/docs/de/de/developer_guide/sdk_integration?sdktab=cordova#optional).
```xml
```
## Prerequisites
Before you can use this feature, you'll need to [integrate the Flutter Braze SDK](https://www.braze.com/docs/de/de/developer_guide/sdk_integration/?sdktab=flutter).
## Setting up push notifications
### Step 1: Complete the initial setup
#### Step 1.1: Register for push
Register for push using Google’s Firebase Cloud Messaging (FCM) API. For a full walkthrough, refer to the following steps from the [Native Android push integration guide](https://www.braze.com/docs/de/de/developer_guide/platform_integration_guides/android/push_notifications/?tab=android/):
1. [Add Firebase to your project](https://www.braze.com/docs/de/de/developer_guide/platform_integration_guides/android/push_notifications/android/integration/standard_integration/#step-1-add-firebase-to-your-project).
2. [Add Cloud Messaging to your dependencies](https://www.braze.com/docs/de/de/developer_guide/platform_integration_guides/android/push_notifications/android/integration/standard_integration/#step-2-add-cloud-messaging-to-your-dependencies).
3. [Create a service account](https://www.braze.com/docs/de/de/developer_guide/platform_integration_guides/android/push_notifications/android/integration/standard_integration/#step-3-create-a-service-account).
4. [Generate JSON credentials](https://www.braze.com/docs/de/de/developer_guide/platform_integration_guides/android/push_notifications/android/integration/standard_integration/#step-4-generate-json-credentials).
5. [Upload your JSON credentials to Braze](https://www.braze.com/docs/de/de/developer_guide/platform_integration_guides/android/push_notifications/android/integration/standard_integration/#step-5-upload-your-json-credentials-to-braze).
#### Step 1.2: Get your Google Sender ID
First, go to Firebase Console, open your project, then select **Settings** > **Project settings**.

Select **Cloud Messaging**, then under **Firebase Cloud Messaging API (V1)**, copy the **Sender ID** to your clipboard.

#### Step 1.3: Update your `braze.xml`
Add the following to your `braze.xml` file. Replace `FIREBASE_SENDER_ID` with the sender ID you copied previously.
```xml
trueFIREBASE_SENDER_ID
```
#### Step 1.1: Upload APNs certificates
Generate an Apple Push Notification service (APNs) certificate and uploaded it to the Braze dashboard. For a full walkthrough, see [Uploading your APNs certificate](https://www.braze.com/docs/de/de/developer_guide/platform_integration_guides/swift/push_notifications/integration/#step-1-upload-your-apns-certificate).
#### Step 1.2: Add push notification support to your app
Follow the [native iOS integration guide](https://www.braze.com/docs/de/de/developer_guide/platform_integration_guides/swift/push_notifications/integration/?tab=objective-c#automatic-push-integration).
### Step 2: Listen for push notification events (optional)
To listen for push notification events that Braze has detected and handled, call `subscribeToPushNotificationEvents()` and pass in an argument to execute.
**Note:**
Braze push notification events are available on both Android and iOS. Due to platform differences, iOS will only detect Braze push events when a user has interacted with a notification.
```dart
// Create stream subscription
StreamSubscription pushEventsStreamSubscription;
pushEventsStreamSubscription = braze.subscribeToPushNotificationEvents((BrazePushEvent pushEvent) {
print("Push Notification event of type ${pushEvent.payloadType} seen. Title ${pushEvent.title}\n and deeplink ${pushEvent.url}");
// Handle push notification events
});
// Cancel stream subscription
pushEventsStreamSubscription.cancel();
```
#### Push notification event fields
**Note:**
Because of platform limitations on iOS, the Braze SDK can only process push payloads while the app is in the foreground. Listeners will only trigger for the `push_opened` event type on iOS after a user has interacted with a push.
For a full list of push notification fields, refer to the following table:
| Field Name | Type | Description |
| ------------------ | --------- | ----------- |
| `payloadType` | String | Specifies the notification payload type. The two values that are sent from the Braze Flutter SDK are `push_opened` and `push_received`. Only `push_opened` events are supported on iOS. |
| `url` | String | Specifies the URL that was opened by the notification. |
| `useWebview` | Boolean | If `true`, URL will open in-app in a modal webview. If `false`, the URL will open in the device browser. |
| `title` | String | Represents the title of the notification. |
| `body` | String | Represents the body or content text of the notification. |
| `summaryText` | String | Represents the summary text of the notification. This is mapped from `subtitle` on iOS. |
| `badgeCount` | Number | Represents the badge count of the notification. |
| `timestamp` | Number | Represents the time at which the payload was received by the application. |
| `isSilent` | Boolean | If `true`, the payload is received silently. For details on sending Android silent push notifications, refer to [Silent push notifications on Android](https://www.braze.com/docs/de/de/developer_guide/push_notifications/silent/?sdktab=android). For details on sending iOS silent push notifications, refer to [Silent push notifications on iOS](https://www.braze.com/docs/de/de/developer_guide/push_notifications/silent/?sdktab=swift). |
| `isBrazeInternal`| Boolean | This will be `true` if a notification payload was sent for an internal SDK feature, such as Feature Flag sync or uninstall tracking. The payload is received silently for the user. |
| `imageUrl` | String | Specifies the URL associated with the notification image. |
| `brazeProperties` | Object | Represents Braze properties associated with the campaign (key-value pairs). |
| `ios` | Object | Represents iOS-specific fields. |
| `android` | Object | Represents Android-specific fields. |
{: .reset-td-br-1 .reset-td-br-2 aria-label="Push notification event fields" }
### Step 3: Test displaying push notifications
To test your integration after configuring push notifications in the native layer:
1. Set an active user in the Flutter application. To do so, initialize your plugin by calling `braze.changeUser('your-user-id')`.
2. Head to **Campaigns** and create a new push notification campaign. Choose the platforms that you'd like to test.
3. Compose your test notification and head over to the **Test** tab. Add the same `user-id` as the test user and click **Send Test**.
4. You should receive the notification on your device shortly. You may need to check in the Notification Center or update Settings if it doesn't display.
**Tip:**
Starting with Xcode 14, you can test remote push notifications on an iOS simulator.
## Prerequisites
Before you can use this feature, you'll need to [integrate the Android Braze SDK](https://www.braze.com/docs/de/de/developer_guide/sdk_integration/?sdktab=android).
## Setting up push notifications
Newer phones manufactured by [Huawei](https://huaweimobileservices.com/) come equipped with Huawei Mobile Services (HMS) - a service used to deliver push instead of Google's Firebase Cloud Messaging (FCM).
### Step 1: Register for a Huawei developer account
Before getting started, you'll need to register and set up a [Huawei Developer account](https://developer.huawei.com/consumer/en/console). In your Huawei account, go to **My Projects > Project Settings > App Information**, and take note of the `App ID` and `App secret`.

### Step 2: Create a new Huawei app in the Braze dashboard
In the Braze dashboard, go to **App Settings**, listed under the **Settings** navigation.
Click **+ Add App**, provide a name (such as My Huawei App), select `Android` as the platform.
{: style="max-width:60%;"}
Once your new Braze app has been created, locate the push notification settings and select `Huawei` as the push provider. Next, provide your `Huawei Client Secret` and `Huawei App ID`.

### Step 3: Integrate the Huawei messaging SDK into your app
Huawei has provided an [Android integration codelab](https://developer.huawei.com/consumer/en/codelab/HMSPushKit/index.html) detailing integrating the Huawei Messaging Service into your application. Follow those steps to get started.
After completing the codelab, you will need to create a custom [Huawei Message Service](https://developer.huawei.com/consumer/en/doc/development/HMS-References/push-HmsMessageService-cls) to obtain push tokens and forward messages to the Braze SDK.
```java
public class CustomPushService extends HmsMessageService {
@Override
public void onNewToken(String token) {
super.onNewToken(token);
Braze.getInstance(this.getApplicationContext()).setRegisteredPushToken(token);
}
@Override
public void onMessageReceived(RemoteMessage remoteMessage) {
super.onMessageReceived(remoteMessage);
if (BrazeHuaweiPushHandler.handleHmsRemoteMessageData(this.getApplicationContext(), remoteMessage.getDataOfMap())) {
// Braze has handled the Huawei push notification
}
}
}
```
```kotlin
class CustomPushService: HmsMessageService() {
override fun onNewToken(token: String?) {
super.onNewToken(token)
Braze.getInstance(applicationContext).setRegisteredPushToken(token!!)
}
override fun onMessageReceived(hmsRemoteMessage: RemoteMessage?) {
super.onMessageReceived(hmsRemoteMessage)
if (BrazeHuaweiPushHandler.handleHmsRemoteMessageData(applicationContext, hmsRemoteMessage?.dataOfMap)) {
// Braze has handled the Huawei push notification
}
}
}
```
After adding your custom push service, add the following to your `AndroidManifest.xml`:
```xml
```
### Step 4: Handle foreground notifications
By default, when a push notification arrives while your app is in the foreground, Huawei displays it automatically. To have Braze process the push notification payload (for analytics tracking, deep link handling, and custom processing), route the incoming push data to Braze inside your `HmsMessageService.onMessageReceived` method.
When you call `BrazeHuaweiPushHandler.handleHmsRemoteMessageData`, Braze determines if the payload is a Braze push notification and, if so, creates and displays the notification. For more information, see [Handling foreground notifications](https://www.braze.com/docs/de/de/developer_guide/push_notifications/?sdktab=android#handling-foreground-notifications) in the Android push notifications documentation.
For a complete example, see the [Huawei handler reference](https://braze-inc.github.io/braze-android-sdk/kdoc/braze-android-sdk/com.braze.push/-braze-huawei-push-handler/index.html) in the Braze Android SDK documentation.
### Step 5: Test your push notifications (optional)
At this point, you've created a new Huawei Android app in the Braze dashboard, configured it with your Huawei developer credentials, and have integrated the Braze and Huawei SDKs into your app.
Next, we can test out the integration by testing a new push campaign in Braze.
#### Step 5.1: Create a new push notification campaign
In the **Campaigns** page, create a new campaign, and choose **Push Notification** as your message type.
After you name your campaign, choose **Android Push** as the push platform.

Next, compose your push campaign with a title and message.
#### Step 5.2: Send a test push
In the **Test** tab, enter your user ID, which you've set in your app using the [`changeUser(USER_ID_STRING)` method](https://www.braze.com/docs/de/de/developer_guide/platform_integration_guides/android/analytics/setting_user_ids/#assigning-a-user-id), and click **Send Test** to send a test push.

At this point, you should receive a test push notification on your Huawei (HMS) device from Braze.
#### Step 5.3: Set up Huawei segmentation (optional)
Since your Huawei app in the Braze dashboard is built upon the Android push platform, you have the flexibility to send push to all Android users (Firebase Cloud Messaging and Huawei Mobile Services), or you can choose to segment your campaign audience to specific apps.
To send push to only Huawei apps, [create a new Segment](https://www.braze.com/docs/de/de/user_guide/engagement_tools/segments/creating_a_segment/#step-3-choose-your-app-or-platform) and select your Huawei App within the **Apps** section.

Of course, if you want to send the same push to all Android push providers, you can choose not to specify the app which will send to all Android apps configured within the current workspace.
## Prerequisites
Before you can use this feature, you'll need to [integrate the React Native Braze SDK](https://www.braze.com/docs/de/de/developer_guide/sdk_integration/?sdktab=react%20native).
## Setting up push notifications {#setting-up-push-notifications}
### Step 1: Complete the initial setup
#### Prerequisites
Before you can use Expo for push notifications, you'll need to [set up the Braze Expo plugin](https://www.braze.com/docs/de/de/developer_guide/platform_integration_guides/react_native/sdk_integration/?tab=expo).
#### Step 1.1: Update your `app.json` file
Next update your `app.json` file for Android and iOS:
- **Android:** Add the `enableFirebaseCloudMessaging` option.
- **iOS:** Add the `enableBrazeIosPush` option.
#### Step 1.2: Add your Google Sender ID
First, go to Firebase Console, open your project, then select **Settings** > **Project settings**.

Select **Cloud Messaging**, then under **Firebase Cloud Messaging API (V1)**, copy the **Sender ID** to your clipboard.

Next, open your project's `app.json` file and set your `firebaseCloudMessagingSenderId` property to the Sender ID in your clipboard. For example:
```
"firebaseCloudMessagingSenderId": "693679403398"
```
#### Step 1.3: Add the path to your Google Services JSON
In your project's `app.json` file, add the path to your `google-services.json` file. This file is required when setting `enableFirebaseCloudMessaging: true` in your configuration.
```json
{
"expo": {
"android": {
"googleServicesFile": "PATH_TO_GOOGLE_SERVICES"
},
"plugins": [
[
"@braze/expo-plugin",
{
"androidApiKey": "YOUR-ANDROID-API-KEY",
"iosApiKey": "YOUR-IOS-API-KEY",
"enableBrazeIosPush": true,
"enableFirebaseCloudMessaging": true,
"firebaseCloudMessagingSenderId": "YOUR-FCM-SENDER-ID",
"androidHandlePushDeepLinksAutomatically": true
}
],
]
}
}
```
Note that you will need to use these settings instead of the native setup instructions if you are depending on additional push notification libraries like [Expo Notifications](https://docs.expo.dev/versions/latest/sdk/notifications/).
If you are not using the Braze Expo plugin, or would like to configure these settings natively instead, register for push by referring to the [Native Android push integration guide](https://www.braze.com/docs/de/de/developer_guide/platform_integration_guides/android/push_notifications/?tab=android/).
If you are not using the Braze Expo plugin, or would like to configure these settings natively instead, register for push by referring to the following steps from the [Native iOS push integration guide](https://www.braze.com/docs/de/de/developer_guide/push_notifications/?sdktab=swift):
#### Step 1.1: Request for push permissions
If you don't plan on requesting push permissions when the app is launched, omit the `requestAuthorizationWithOptions:completionHandler:` call in your AppDelegate. Then, skip to [Step 2](#reactnative_step-2-request-push-notifications-permission). Otherwise, follow the [native iOS integration guide](https://www.braze.com/docs/de/de/developer_guide/platform_integration_guides/swift/push_notifications/integration/?tab=objective-c#automatic-push-integration).
#### Step 1.2 (Optional): Migrate your push key
If you were previously using `expo-notifications` to manage your push key, run `expo fetch:ios:certs` from your application's root folder. This will download your push key (a .p8 file), which can then be uploaded to the Braze dashboard.
### Step 2: Request push notifications permission
Use the `Braze.requestPushPermission()` method (available on v1.38.0 and up) to request permission for push notifications from the user on iOS and Android 13+. For Android 12 and earlier, this method is a no-op.
This method takes in a required parameter that specifies which permissions the SDK should request from the user on iOS. These options have no effect on Android.
```javascript
const permissionOptions = {
alert: true,
sound: true,
badge: true,
provisional: false
};
Braze.requestPushPermission(permissionOptions);
```
#### Step 2.1: Listen for push notifications (optional)
You can additionally subscribe to events where Braze has detected and handled an incoming push notification. Use the listener key `Braze.Events.PUSH_NOTIFICATION_EVENT`.
**Important:**
iOS push received events will only trigger for foreground notifications and `content-available` background notifications. It will not trigger for notifications received while terminated or for background notifications without the `content-available` field.
```javascript
Braze.addListener(Braze.Events.PUSH_NOTIFICATION_EVENT, data => {
console.log(`Push Notification event of type ${data.payload_type} seen. Title ${data.title}\n and deeplink ${data.url}`);
console.log(JSON.stringify(data, undefined, 2));
});
```
##### Push notification event fields
For a full list of push notification fields, refer to the following table:
| Field Name | Type | Description |
| ------------------ | --------- | ----------- |
| `payload_type` | String | Specifies the notification payload type. The two values that are sent from the Braze React Native SDK are `push_opened` and `push_received`. |
| `url` | String | Specifies the URL that was opened by the notification. |
| `use_webview` | Boolean | If `true`, URL will open in-app in a modal webview. If `false`, the URL will open in the device browser. |
| `title` | String | Represents the title of the notification. |
| `body` | String | Represents the body or content text of the notification. |
| `summary_text` | String | Represents the summary text of the notification. This is mapped from `subtitle` on iOS. |
| `badge_count` | Number | Represents the badge count of the notification. |
| `timestamp` | Number | Represents the time at which the payload was received by the application. |
| `is_silent` | Boolean | If `true`, the payload is received silently. For details on sending Android silent push notifications, refer to [Silent push notifications on Android](https://www.braze.com/docs/de/de/developer_guide/push_notifications/silent/?sdktab=android). For details on sending iOS silent push notifications, refer to [Silent push notifications on iOS](https://www.braze.com/docs/de/de/developer_guide/push_notifications/silent/?sdktab=swift). |
| `is_braze_internal`| Boolean | This will be `true` if a notification payload was sent for an internal SDK feature, such as Feature Flag sync or uninstall tracking. The payload is received silently for the user. |
| `image_url` | String | Specifies the URL associated with the notification image. |
| `braze_properties` | Object | Represents Braze properties associated with the campaign (key-value pairs). |
| `ios` | Object | Represents iOS-specific fields. |
| `android` | Object | Represents Android-specific fields. |
{: .reset-td-br-1 .reset-td-br-2 aria-label="Push notification event fields" }
### Step 3: Enable deep linking (optional)
To enable Braze to handle deep links inside React components when a push notification is clicked, first implement the steps described in [React Native Linking](https://reactnative.dev/docs/linking) library, or with your solution of choice. Then, follow the additional steps.
To learn more about what deep links are, see our [FAQ article](https://www.braze.com/docs/de/de/user_guide/messaging/design_and_edit/personalize/actions_and_media_urls/#what-is-deep-linking).
**Important:**
If you're migrating an existing React Native push integration, re-test deep linking after you upgrade the Braze SDK, React Native, Expo, or related libraries. Confirm that:
- [React Native Linking](https://reactnative.dev/docs/linking) is still configured and handling your deep link URLs.
- Your iOS initial push payload handling (see [Step 3.1: Store the push notification payload on app launch](#step-3-1)) is implemented and still called on app launch.
- Any native delegate or listener methods you use to handle push click events are still registered and invoked as expected.
If you're using the [Braze Expo plugin](https://www.braze.com/docs/de/de/developer_guide/platforms/react_native/sdk_integration/?tab=expo#step-2-choose-a-setup-option), you can handle push notification deep links automatically by setting `androidHandlePushDeepLinksAutomatically` to `true` in your `app.json`.
To handle deep links manually instead, refer to the native Android documentation: [Adding deep links](https://www.braze.com/docs/de/de/developer_guide/push_notifications/deep_linking).
#### Step 3.1: Store the push notification payload on app launch
**Note:**
This is supported as of React Native SDK 19.1.0.
Add `populateInitialPushPayloadFromIntent` to your main activity's `onCreate()` method. This must be called before React Native initializes to capture the initial Intent data. For example:
```kotlin
override fun onCreate(savedInstanceState: Bundle?) {
BrazeReactUtils.populateInitialPushPayloadFromIntent(intent)
super.onCreate(savedInstanceState)
}
```
#### Step 3.2: Handle deep links from a closed state
In addition to the base scenarios handled by [React Native Linking](https://reactnative.dev/docs/linking), implement the `Braze.getInitialPushPayload` method and retrieve the `url` value to account for deep links from push notifications that open your app when it isn't running. For example:
```javascript
// Handles deep links when an app is launched from a hard close via push click.
Braze.getInitialPushPayload(pushPayload => {
if (pushPayload) {
console.log('Braze.getInitialPushPayload is ' + pushPayload);
showToast('Initial URL is ' + pushPayload.url);
handleOpenUrl({ pushPayload.url });
}
});
```
**Note:**
This method requires the native setup in Step 3.1 for your platform. If you're using the Braze Expo plugin, this may be handled automatically.
**Important:**
To handle deep links from push notifications on iOS, you must also configure link handling in your native iOS layer.
This includes registering a custom URL scheme and implementing a URL handler in your `AppDelegate`. For full setup instructions, see [Handling deep links](https://www.braze.com/docs/de/de/developer_guide/platforms/swift/in_app_messages/deep_linking/?tab=objective-c) in the native iOS documentation.
#### Step 3.1: Store the push notification payload on app launch {#step-3-1}
**Note:**
Skip step 3.1 if you're using the Braze Expo plugin, as this functionality is handled automatically.
For iOS, add `populateInitialPayloadFromLaunchOptions` to your AppDelegate's `didFinishLaunchingWithOptions` method. For example:
```objc
- (BOOL)application:(UIApplication *)application didFinishLaunchingWithOptions:(NSDictionary *)launchOptions
{
// ... Perform regular React Native setup
BRZConfiguration *configuration = [[BRZConfiguration alloc] initWithApiKey:apiKey endpoint:endpoint];
configuration.triggerMinimumTimeInterval = 1;
configuration.logger.level = BRZLoggerLevelInfo;
Braze *braze = [BrazeReactBridge initBraze:configuration];
AppDelegate.braze = braze;
[self registerForPushNotifications];
[[BrazeReactUtils sharedInstance] populateInitialPayloadFromLaunchOptions:launchOptions];
return [super application:application didFinishLaunchingWithOptions:launchOptions];
}
```
```swift
func application(
_ application: UIApplication,
didFinishLaunchingWithOptions launchOptions: [UIApplication.LaunchOptionsKey: Any]? = nil
) -> Bool {
// ... Perform regular React Native setup
let configuration = Braze.Configuration(apiKey: apiKey, endpoint: endpoint)
configuration.triggerMinimumTimeInterval = 1
configuration.logger.level = .info
let braze = BrazeReactBridge.initBraze(configuration)
AppDelegate.braze = braze
registerForPushNotifications()
BrazeReactUtils.shared().populateInitialPayload(fromLaunchOptions: launchOptions)
return super.application(application, didFinishLaunchingWithOptions: launchOptions)
}
```
#### Step 3.2: Handle deep links from a closed state
In addition to the base scenarios handled by [React Native Linking](https://reactnative.dev/docs/linking), implement the `Braze.getInitialPushPayload` method and retrieve the `url` value to account for deep links from push notifications that open your app when it isn't running. For example:
```javascript
// Handles deep links when an app is launched from a hard close via push click.
Braze.getInitialPushPayload(pushPayload => {
if (pushPayload) {
console.log('Braze.getInitialPushPayload is ' + pushPayload);
showToast('Initial URL is ' + pushPayload.url);
handleOpenUrl({ pushPayload.url });
}
});
```
**Note:**
This method requires the native setup in Step 3.1 for your platform. If you're using the Braze Expo plugin, this may be handled automatically.
#### Step 3.3: Enable Universal Links (optional)
To enable [universal linking](https://www.braze.com/docs/de/de/developer_guide/push_notifications/deep_linking/?sdktab=swift#universal-links) support, implement a Braze delegate that determines whether to open a given URL, then register it with your Braze instance.
Create a `BrazeReactDelegate.swift` file in your `iOS` directory and add the following. Replace `YOUR_DOMAIN_HOST` with your actual domain.
```swift
import Foundation
import BrazeKit
import UIKit
class BrazeReactDelegate: NSObject, BrazeDelegate {
/// This delegate method determines whether to open a given URL.
/// Reference the context to get additional details about the URL payload.
func braze(_ braze: Braze, shouldOpenURL context: Braze.URLContext) -> Bool {
if let host = context.url.host,
host.caseInsensitiveCompare("YOUR_DOMAIN_HOST") == .orderedSame {
// Sample custom handling of universal links
let application = UIApplication.shared
let userActivity = NSUserActivity(activityType: NSUserActivityTypeBrowsingWeb)
userActivity.webpageURL = context.url
// Routes to the `continueUserActivity` method, which should be handled in your AppDelegate.
application.delegate?.application?(
application,
continue: userActivity,
restorationHandler: { _ in }
)
return false
}
// Let Braze handle links otherwise
return true
}
}
```
Then, create and register your `BrazeReactDelegate` in `didFinishLaunchingWithOptions` of your project's `AppDelegate.swift` file.
```swift
import BrazeKit
class AppDelegate: UIResponder, UIApplicationDelegate {
static var braze: Braze?
// Keep a strong reference to the BrazeDelegate so it is not deallocated.
private var brazeDelegate: BrazeReactDelegate?
func application(
_ application: UIApplication,
didFinishLaunchingWithOptions launchOptions: [UIApplication.LaunchOptionsKey: Any]? = nil
) -> Bool {
// Other setup code (e.g., Braze initialization)
brazeDelegate = BrazeReactDelegate()
AppDelegate.braze?.delegate = brazeDelegate
return true
}
}
```
Create a `BrazeReactDelegate.h` file in your `iOS` directory and then add the following code snippet.
```objc
#import
#import
@interface BrazeReactDelegate: NSObject
@end
```
Next, create a `BrazeReactDelegate.m` file and then add the following code snippet. Replace `YOUR_DOMAIN_HOST` with your actual domain.
```objc
#import "BrazeReactDelegate.h"
#import
@implementation BrazeReactDelegate
/// This delegate method determines whether to open a given URL.
///
/// Reference the `BRZURLContext` object to get additional details about the URL payload.
- (BOOL)braze:(Braze *)braze shouldOpenURL:(BRZURLContext *)context {
if ([[context.url.host lowercaseString] isEqualToString:@"YOUR_DOMAIN_HOST"]) {
// Sample custom handling of universal links
UIApplication *application = UIApplication.sharedApplication;
NSUserActivity* userActivity = [[NSUserActivity alloc] initWithActivityType:NSUserActivityTypeBrowsingWeb];
userActivity.webpageURL = context.url;
// Routes to the `continueUserActivity` method, which should be handled in your `AppDelegate`.
[application.delegate application:application
continueUserActivity:userActivity restorationHandler:^(NSArray> * _Nullable restorableObjects) {}];
return NO;
}
// Let Braze handle links otherwise
return YES;
}
@end
```
Then, create and register your `BrazeReactDelegate` in `didFinishLaunchingWithOptions` of your project's `AppDelegate.m` file.
```objc
#import "BrazeReactUtils.h"
#import "BrazeReactDelegate.h"
@interface AppDelegate ()
// Keep a strong reference to the BrazeDelegate to ensure it is not deallocated.
@property (nonatomic, strong) BrazeReactDelegate *brazeDelegate;
@end
- (BOOL)application:(UIApplication *)application didFinishLaunchingWithOptions:(NSDictionary *)launchOptions
{
// Other setup code
self.brazeDelegate = [[BrazeReactDelegate alloc] init];
braze.delegate = self.brazeDelegate;
}
```
For an example integration, reference our sample app [in this AppDelegate example](https://github.com/braze-inc/braze-react-native-sdk/blob/master/BrazeProject/ios/BrazeProject/AppDelegate.mm).
### Step 4: Handle foreground notifications
Foreground notification handling works differently depending on your platform and setup. Choose the approach that matches your integration:
For iOS, foreground notification handling is the same as the native Swift integration. Call `handleForegroundNotification(notification:)` inside your `UNUserNotificationCenterDelegate.userNotificationCenter(_:willPresent:withCompletionHandler:)` implementation.
For complete details and code examples, see [Handling foreground notifications](https://www.braze.com/docs/de/de/developer_guide/push_notifications/?sdktab=swift#handling-foreground-notifications) in the Swift push notifications documentation.
For Android, foreground notification handling is the same as the native Android integration. Call `BrazeFirebaseMessagingService.handleBrazeRemoteMessage` inside your `FirebaseMessagingService.onMessageReceived` method.
For complete details and code examples, see [Handling foreground notifications](https://www.braze.com/docs/de/de/developer_guide/push_notifications/?sdktab=android#handling-foreground-notifications) in the Android push notifications documentation.
In Expo-managed workflow, you don't call native notification handlers directly. Instead, use the Expo Notifications API to control foreground presentation, while the Braze Expo Plugin handles native processing automatically.
```javascript
import * as Notifications from 'expo-notifications';
import Braze from '@braze/react-native-sdk';
// Control foreground presentation in Expo
Notifications.setNotificationHandler({
handleNotification: async () => ({
shouldShowAlert: true, // Show alert while in foreground
shouldPlaySound: false,
shouldSetBadge: false,
}),
});
// React to Braze push events
const subscription = Braze.addListener('pushNotificationEvent', (event) => {
console.log('Braze push event', {
type: event.payload_type, // "push_received" | "push_opened"
title: event.title,
url: event.url,
is_silent: event.is_silent,
});
// Handle deep links, custom behavior, etc.
});
// Handle initial payload when app launches via push
Braze.getInitialPushPayload((payload) => {
if (payload) {
console.log('Initial push payload', payload);
}
});
```
**Note:**
In Expo-managed workflow, the Braze Expo Plugin handles native push processing automatically. You control foreground UI via the Expo Notifications presentation options shown earlier.
For bare workflow integrations, follow the native iOS and Android approaches instead.
### Step 5: Send a test push notification
At this point, you should be able to send notifications to the devices. Adhere to the following steps to test your push integration.
**Note:**
Starting in macOS 13, on certain devices, you can test iOS push notifications on an iOS 16+ simulator running on Xcode 14 or higher. For further details, refer to the [Xcode 14 Release Notes](https://developer.apple.com/documentation/xcode-release-notes/xcode-14-release-notes).
1. Set an active user in the React Native application by calling `Braze.changeUserId('your-user-id')` method.
2. Head to **Campaigns** and create a new push notification campaign. Choose the platforms that you'd like to test.
3. Compose your test notification and head over to the **Test** tab. Add the same `user-id` as the test user and click **Send Test**. You should receive the notification on your device shortly.

## Using the Expo plugin
After you [set up push notifications for Expo](#reactnative_setting-up-push-notifications), you can use it to handle the following push notifications behaviors—without needing to write any code in the native Android or iOS layers.
### Forwarding Android push to additional FMS
If you want to use an additional Firebase Messaging Service (FMS), you can specify a fallback FMS to call if your application receives a push that isn't from Braze. For example:
```json
{
"expo": {
"plugins": [
[
"@braze/expo-plugin",
{
...
"androidFirebaseMessagingFallbackServiceEnabled": true,
"androidFirebaseMessagingFallbackServiceClasspath": "com.company.OurFirebaseMessagingService"
}
]
]
}
}
```
### Using app extensions with Expo Application Services {#app-extensions}
If you are using Expo Application Services (EAS) and have enabled `enableBrazeIosRichPush` or `enableBrazeIosPushStories`, you will need to declare the corresponding bundle identifiers for each app extension in your project. There are multiple ways you can approach this step, depending on how your project is configured to manage code signing with EAS.
One approach is to use the `appExtensions` configuration in your `app.json` file by following Expo's [app extensions documentation](https://docs.expo.dev/build-reference/app-extensions/). Alternatively, you can set up the `multitarget` setting in your `credentials.json` file by following Expo's [local credentials documentation](https://docs.expo.dev/app-signing/local-credentials/#multi-target-project).
### Troubleshooting
These are common troubleshooting steps for push notification integrations with the Braze React Native SDK and Expo plugin.
#### Push notifications stopped working {#troubleshooting-stopped-working}
If push notifications through the Expo plugin have stopped working:
1. Check that the Braze SDK is still tracking sessions.
2. Check that the SDK wasn't disabled by an explicit or implicit call to `wipeData`.
3. Review any recent upgrades to Expo or it's related libraries, as there may be conflicts with your Braze configuration.
4. Review recently added project dependencies and check if they are manually overriding your existing push notification delegate methods.
**Tip:**
For iOS integrations, you can also reference our [push notification setup tutorial](https://braze-inc.github.io/braze-swift-sdk/tutorials/braze/b1-standard-push-notifications) to help you identify potential conflicts with your project dependencies.
#### Device token won't register with Braze {#troubleshooting-token-registration}
If your device token won't register with Braze, first review [Push notifications stopped working](#troubleshooting-stopped-working).
If your issue persists, there may be a separate dependency interfering with your Braze push notification configuration. You can try removing it or manually call `Braze.registerPushToken` instead.
#### Deep links from push notifications don't open {#troubleshooting-deep-links}
If deep links from push notifications stop opening after a migration, check the following:
1. Verify your [React Native Linking](https://reactnative.dev/docs/linking) setup is still valid in your upgraded app.
2. For iOS native integrations, confirm you implemented `populateInitialPayloadFromLaunchOptions` and `Braze.getInitialPushPayload` so that, when the app is launched from a terminated state, it can retrieve the initial push payload and pass its `url` into your deep link handler.
3. If you're using the Braze Expo plugin, verify `androidHandlePushDeepLinksAutomatically` is set correctly for your implementation.
4. Review recently added dependencies for overrides to notification handling or app delegate behavior.
If you've completed these checks and the issue persists, [open a support ticket](https://www.braze.com/docs/de/de/user_guide/administrative/access_braze/support/) and include SDK logs plus reproduction steps.
## Prerequisites
Before you can use this feature, you'll need to [integrate the Web Braze SDK](https://www.braze.com/docs/de/de/developer_guide/sdk_integration/?sdktab=web). You'll also need to [set up push notifications](https://www.braze.com/docs/de/de/developer_guide/push_notifications/?sdktab=web) for the Web SDK. Note that you can only send push notifications to iOS and iPadOS users that are using [Safari v16.4](https://developer.apple.com/documentation/safari-release-notes/safari-16_4-release-notes) or later.
## Setting up Safari push for mobile
### Step 1: Create a manifest file {#manifest}
A [Web Application Manifest](https://developer.mozilla.org/en-US/docs/Web/Manifest) is a JSON file that controls how your website is presented when installed to a user's home screen.
For example, you can set the background theme color and icon that the [App Switcher](https://support.apple.com/en-us/HT202070) uses, whether it renders as full screen to resemble a native app, or whether the app should open in landscape or portrait mode.
Create a new `manifest.json` file in your website's root directory, with the following mandatory fields.
```json
{
"name": "your app name",
"short_name": "your app name",
"display": "fullscreen",
"icons": [{
"src": "favicon.ico",
"sizes": "128x128",
}]
}
```
The full list of supported fields can be found [here](https://developer.mozilla.org/en-US/docs/Web/Manifest).
### Step 2: Link the manifest file {#manifest-link}
Add the following `` tag to your website's `` element pointing to where your manifest file is hosted.
```html
```
### Step 3: Add a service worker {#service-worker}
Your website must have a service worker file that imports the Braze service-worker library, as described in our [web push integration guide](https://www.braze.com/docs/de/de/developer_guide/platform_integration_guides/web/push_notifications/integration/#step-1-configure-your-sites-service-worker).
### Step 4: Add to home screen {#add-to-homescreen}
Popular browsers (such as Safari, Chrome, FireFox, and Edge) all support web push notifications in their later versions. To request push permission on iOS or iPadOS, your website must be added to the user's home screen by selecting **Share To** > **Add to Home Screen**. [Add to Homescreen](https://support.apple.com/guide/iphone/bookmark-favorite-webpages-iph42ab2f3a7/ios#iph4f9a47bbc) lets users bookmark your website, adding your icon to their valuable home screen real estate.
{: style="max-width:40%"}
### Step 5: Show the native push prompt {#push-prompt}
After the app has been added to your home screen you can now request push permission when the user takes an action (such as clicking a button). This can be done using the [`requestPushPermission`](https://js.appboycdn.com/web-sdk/latest/doc/modules/braze.html#requestpushpermission) method, or with a [no-code push primer in-app message](https://www.braze.com/docs/de/de/user_guide/message_building_by_channel/push/best_practices/push_primer_messages/).
**Note:**
After you accept or decline the prompt, you need to delete and reinstall the website to your home screen to be able to show the prompt again.
{: style="max-width:40%"}
For example:
```typescript
import { requestPushPermission } from "@braze/web-sdk";
button.onclick = function(){
requestPushPermission(() => {
console.log(`User accepted push prompt`);
}, (temporary) => {
console.log(`User ${temporary ? "temporarily dismissed" : "permanently denied"} push prompt`);
});
};
```
## Next steps
Next, send yourself a [test message](https://www.braze.com/docs/de/de/developer_guide/in_app_messages/sending_test_messages/) to validate the integration. After your integration is complete, you can use our [no-code push primer messages](https://www.braze.com/docs/de/de/user_guide/message_building_by_channel/push/best_practices/push_primer_messages/) to optimize your push opt-in rates.
## Prerequisites
Before you can use this feature, you'll need to [integrate the Unity Braze SDK](https://www.braze.com/docs/de/de/developer_guide/sdk_integration/?sdktab=unity).
## Setting up push notification
### Step 1: Set up the platform
#### Step 1.1: Enable Firebase
To get started, follow the [Firebase Unity setup documentation](https://firebase.google.com/docs/unity/setup).
**Note:**
Integrating the Firebase Unity SDK may cause your `AndroidManifest.xml` to be overridden. If that occurs, make sure to revert it to the original.
#### Step 1.2: Set your Firebase credentials
You need to input your Firebase Server Key and Sender ID into the Braze dashboard. To do this, log in to the [Firebase Developers Console](https://console.firebase.google.com/) and select your Firebase project. Next, select **Cloud Messaging** under **Settings** and copy the Server Key and Sender ID: 
In Braze, select your Android app on the **App Settings** page under **Manage Settings**. Next, enter your Firebase Server Key in the **Firebase Cloud Messaging Server Key** field and Firebase Sender ID in the **Firebase Cloud Messaging Sender** ID field.

#### Step 1.1: Verify integration method
Braze provides a native Unity solution for automating iOS push integrations. If you you'd like to set up and manage your integration manually instead, see [Swift: Push Notifications](https://www.braze.com/docs/de/de/developer_guide/push_notifications/?sdktab=swift).
Otherwise, continue to the next step.
**Note:**
Our automatic push notification solution takes advantage of iOS 12's Provisional Authorization feature and is not available to use with the native push prompt pop-up.
#### Step 1.1: Enable ADM
1. Create an account with the [Amazon Apps & Games Developer Portal](https://developer.amazon.com/public) if you have not already done so.
2. Obtain [OAuth credentials (Client ID and Client Secret) and an ADM API key](https://developer.amazon.com/public/apis/engage/device-messaging/tech-docs/02-obtaining-adm-credentials).
3. Enable **Automatic ADM Registration Enabled** in the Unity Braze Configuration window.
- Alternatively, you may add the following line to your `res/values/braze.xml` file to enable ADM registration:
```xml
true
```
### Step 2: Configure push notifications
#### Step 2.1: Configure push settings {#unity_step-21-configure-push-settings}
The Braze SDK can automatically handle push registration with the Firebase Cloud Messaging Servers to have devices receive push notifications. In Unity, enable **Automate Unity Android Integration**, then configure the following **Push Notification** settings.
| Setting | Description |
|----------------------------------------|----------------------------------------------------------------------------------------------------------------------------------------------------------|
| Automatic Firebase Cloud Messaging Registration Enabled | Instructs the Braze SDK to automatically retrieve and send an FCM push token for a device. |
| Firebase Cloud Messaging Sender ID | The Sender ID from your Firebase console. |
| Handle Push Deeplinks Automatically | Whether the SDK should handle opening deep links or opening the app when push notifications are clicked. |
| Small Notification Icon Drawable | Android drawable resource reference for the small icon shown when a push arrives. Enter the full reference including the `@drawable/` prefix (for example, `@drawable/hourglass_icon`). The automated integration writes this value into `braze.xml` as entered. If you leave this empty, the notification uses the application icon as the small icon. |
| Large Notification Icon Drawable | Optional large icon for notifications. Use the same `@drawable/` format as the small icon (for example, `@drawable/my_large_icon`). |
{: .reset-td-br-1 .reset-td-br-2 aria-label="Step 2.1: Configure push settings" }
**Note:**
**Small Notification Icon Drawable** and **Large Notification Icon Drawable** appear under **Push Configuration** in **Braze > Braze Configuration**. Both values are written into `braze.xml` as you enter them. Include the `@drawable/` prefix yourself—the Braze Unity integration does not add it for you (for example, `@drawable/hourglass_icon`).
#### Step 2.1: Upload your APNs token
Before you can send an iOS push notification using Braze, you need to upload your `.p8` push notification file, as described in [Apple's developer documentation](https://developer.apple.com/documentation/usernotifications/establishing-a-token-based-connection-to-apns):
1. In your Apple developer account, go to [**Certificates, Identifiers & Profiles**](https://developer.apple.com/account/ios/certificate).
2. Under **Keys**, select **All** and click the add button (+) at the top of the page.
3. Under **Key Description**, enter a unique name for the signing key.
4. Under **Key Services**, select the **Apple Push Notification service (APNs)** checkbox, then click **Continue**. Click **Confirm**.
5. Note the key ID. Click **Download** to generate and download the key. Make sure to save the downloaded file in a secure place, as you cannot download this more than once.
6. In Braze, go to **Settings** > **App Settings** and upload the `.p8` file under **Apple Push Certificate**. You can upload either your development or production push certificate. To test push notifications after your app is live in the App Store, its recommended to set up a separate workspace for the development version of your app.
7. When prompted, enter your app's [bundle ID](https://developer.apple.com/documentation/foundation/nsbundle/1418023-bundleidentifier), [key ID](https://developer.apple.com/help/account/manage-keys/get-a-key-identifier/), and [team ID](https://developer.apple.com/help/account/manage-your-team/locate-your-team-id). You'll also need to specify whether to send notifications to your app's development or production environment, which is defined by its provisioning profile.
8. When you're finished, select **Save**.
#### Step 2.2: Enable automatic push
Open the Braze Configuration Settings in the Unity Editor by navigating to **Braze > Braze Configuration**.
Check **Integrate Push With Braze** to automatically register users for push notifications, pass push tokens to Braze, track analytics for push opens, and take advantage of our default push notification handling.
#### Step 2.3: Enable background push (optional)
Check **Enable Background Push** if you want to enable `background mode` for push notifications. This allows the system to wake your application from the `suspended` state when a push notification arrives, enabling your application to download content in response to push notifications. Checking this option is required for our uninstall tracking functionality.

#### Step 2.4: Disable automatic registration (optional)
Users who have not yet opted-in to push notifications will automatically be authorized for push upon opening your application. To disable this feature and manually register users for push, check **Disable Automatic Push Registration**.
- If **Disable Provisional Authorization** is not checked on iOS 12 or later, the user will be provisionally (silently) authorized to receive quiet push. If checked, the user will be shown the native push prompt.
- If you need to configure exactly when the prompt is shown at runtime, disable automatic registration from the Braze configuration editor and use `AppboyBinding.PromptUserForPushPermissions()` instead.

#### Step 2.1: Update `AndroidManifest.xml`
If your app does not have an `AndroidManifest.xml`, you can use the following as a template. Otherwise, if you already have an `AndroidManifest.xml`, ensure that any of the following missing sections are added to your existing `AndroidManifest.xml`.
```xml
```
#### Step 2.2: Store your ADM API key
First, [generate an ADM API Key for your app](https://developer.amazon.com/public/apis/engage/device-messaging/tech-docs/02-obtaining-adm-credentials), then save the key to a file named `api_key.txt` and add it in your project's [`Assets/`](https://docs.unity3d.com/Manual/AndroidAARPlugins.html) directory.
**Important:**
Amazon will not recognize your key if `api_key.txt` contains any white space characters, such as a trailing line break.
Next, in your `mainTemplate.gradle` file, add the following:
```gradle
task copyAmazon(type: Copy) {
def unityProjectPath = $/file:///**DIR_UNITYPROJECT**/$.replace("\\", "/")
from unityProjectPath + '/Assets/api_key.txt'
into new File(projectDir, 'src/main/assets')
}
preBuild.dependsOn(copyAmazon)
```
#### Step 2.3: Add ADM Jar
The required ADM Jar file may be placed anywhere in your project according to the [Unity JAR documentation](https://docs.unity3d.com/Manual/AndroidJARPlugins.html).
#### Step 2.4: Add Client Secret and Client ID to your Braze dashboard
Lastly, you must add the Client Secret and Client ID you obtained in [Step 1](#unity_step-1-enable-adm) to the Braze dashboard's **Manage Settings** page.

### Step 3: Set push listeners
#### Step 3.1: Enable push received listener
The push received listener is fired when a user receives a push notification. To send the push payload to Unity, set the name of your game object and push the received listener callback method under the **Set Push Received Listener**.
#### Step 3.2: Enable push opened listener
The push opened listener is fired when a user launches the app by clicking on a push notification. To send the push payload to Unity, set the name of your game object and push opened listener callback method under the **Set Push Opened Listener**.
#### Step 3.3: Enable push deleted listener
The push deleted listener is fired when a user swipes away or dismisses a push notification. To send the push payload to Unity, set the name of your game object and push deleted listener callback method under the **Set Push Deleted Listener**.
#### Push listener example
The following example implements the `BrazeCallback` game object using a callback method name of `PushNotificationReceivedCallback`, `PushNotificationOpenedCallback`, and `PushNotificationDeletedCallback` respectively.

```csharp
public class MainMenu : MonoBehaviour {
void PushNotificationReceivedCallback(string message) {
#if UNITY_ANDROID
Debug.Log("PushNotificationReceivedCallback message: " + message);
PushNotification pushNotification = new PushNotification(message);
Debug.Log("Push Notification received: " + pushNotification);
#elif UNITY_IOS
ApplePushNotification pushNotification = new ApplePushNotification(message);
Debug.Log("Push received Notification event: " + pushNotification);
#endif
}
void PushNotificationOpenedCallback(string message) {
#if UNITY_ANDROID
Debug.Log("PushNotificationOpenedCallback message: " + message);
PushNotification pushNotification = new PushNotification(message);
Debug.Log("Push Notification opened: " + pushNotification);
#elif UNITY_IOS
ApplePushNotification pushNotification = new ApplePushNotification(message);
Debug.Log("Push opened Notification event: " + pushNotification);
#endif
}
void PushNotificationDeletedCallback(string message) {
#if UNITY_ANDROID
Debug.Log("PushNotificationDeletedCallback message: " + message);
PushNotification pushNotification = new PushNotification(message);
Debug.Log("Push Notification dismissed: " + pushNotification);
#endif
}
}
```
#### Step 3.1: Enable push received listener
The push received listener is fired when a user receives a push notification while actively using the application (such as when the app is foregrounded). Set the push received listener in the Braze configuration editor. If you need to configure your game object listener at runtime, use `AppboyBinding.ConfigureListener()` and specify `BrazeUnityMessageType.PUSH_RECEIVED`.

#### Step 3.2: Enable push opened listener
The push opened listener is fired when a user launches the app by clicking on a push notification. To send the push payload to Unity, set the name of your game object and push opened listener callback method under the **Set Push Opened Listener** option:

If you need to configure your game object listener at runtime, use `AppboyBinding.ConfigureListener()` and specify `BrazeUnityMessageType.PUSH_OPENED`.
#### Push listener example
The following example implements the `AppboyCallback` game object using a callback method name of `PushNotificationReceivedCallback` and `PushNotificationOpenedCallback`, respectively.

```csharp
public class MainMenu : MonoBehaviour {
void PushNotificationReceivedCallback(string message) {
#if UNITY_ANDROID
Debug.Log("PushNotificationReceivedCallback message: " + message);
PushNotification pushNotification = new PushNotification(message);
Debug.Log("Push Notification received: " + pushNotification);
#elif UNITY_IOS
ApplePushNotification pushNotification = new ApplePushNotification(message);
Debug.Log("Push received Notification event: " + pushNotification);
#endif
}
void PushNotificationOpenedCallback(string message) {
#if UNITY_ANDROID
Debug.Log("PushNotificationOpenedCallback message: " + message);
PushNotification pushNotification = new PushNotification(message);
Debug.Log("Push Notification opened: " + pushNotification);
#elif UNITY_IOS
ApplePushNotification pushNotification = new ApplePushNotification(message);
Debug.Log("Push opened Notification event: " + pushNotification);
#endif
}
}
```
By updating your `AndroidManifest.xml` in the [previous step](#unity_step-21-update-androidmanifestxml), push listeners were automatically set up when you added the following lines. So, no further setup is required.
```xml
```
**Note:**
To learn more about ADM push listeners, see [Amazon: Integrate Amazon Device Messaging](https://developer.amazon.com/docs/video-skills-fire-tv-apps/integrate-adm.html).
## Optional configurations
### Deep linking to in-app resources
Although Braze can handle standard deep links (such as website URLs, Android URIs, etc.) by default, creating custom deep links requires an additional Manifest setup.
For setup guidance, visit [Deep Linking to In-App Resources](https://developer.android.com/training/app-links/deep-linking).
#### Adding Braze push notification icons
**Important:**
Do not add notification icon images under `Assets/Plugins/Android/res`. Unity [deprecated providing Android resources in that path](https://support.unity.com/hc/en-us/articles/115005875443-Providing-Android-resources-in-Assets-Plugins-Android-res-is-deprecated), which can surface build warnings or validation errors. Package your icon drawables in an [Android Archive (AAR) plug-in](https://docs.unity3d.com/Manual/AndroidAARPlugins.html) or Android library project instead so they merge into the built app's resources like any other drawable.
To add push icons to your project, create an AAR plug-in or Android library that contains the icon image files under `res/drawable*` (or density-specific folders), then reference each icon in **Braze > Braze Configuration** using the full `@drawable/` resource name (see [Step 2.1: Configure push settings](#unity_step-21-configure-push-settings)). For Unity's packaging and import steps, see [Android Library Projects and Android Archive plug-ins](https://docs.unity3d.com/Manual/AndroidAARPlugins.html).
For small icon artwork rules (alpha-only, no color), see [Android push notifications](https://www.braze.com/docs/de/de/developer_guide/push_notifications/?sdktab=android), Step 2: Conform small icons to design guidelines.
#### Push token callback
To receive a copy of Braze device tokens from the OS, set a delegate using `AppboyBinding.SetPushTokenReceivedFromSystemDelegate()`.
There are no optional configurations for ADM at this time.
## Prerequisites
Before you can use this feature, you'll need to [integrate the .NET MAUI Braze SDK](https://www.braze.com/docs/de/de/developer_guide/sdk_integration/?sdktab=.net%20maui%20(xamarin)).
## Setting up push notifications
**Tip:**
To see how namespaces change between Java and C#, check out our [Xample sample app on GitHub](https://github.com/braze-inc/braze-xamarin-sdk/tree/master/appboy-component/samples/android-net-maui/BrazeAndroidMauiSampleApp/BrazeAndroidMauiSampleApp).
To integrate push notifications for .NET MAUI (formerly Xamarin), you'll need to complete the steps for native Android push notifications. The following steps are only a summary. For a full walkthrough, see the [native push notification guide](https://www.braze.com/docs/de/de/developer_guide/platform_integration_guides/android/push_notifications/?tab=android/).
### Step 1: Update your project
1. Add Firebase to your Android project.
2. Add the Cloud Messaging library to your Android project's `build.gradle`:
```gradle
implementation "google.firebase:firebase-messaging:+"
```
### Step 2: Create your JSON credentials
1. In Google Cloud, enable the [Firebase Cloud Messaging API](https://console.cloud.google.com/apis/library/fcm.googleapis.com).
2. Select **Service Accounts** > your project > **Create Service Account**, then enter a service account name, ID, and description. When you're finished, select **Create and continue**.
3. In the **Role** field, find and select **Firebase Cloud Messaging API Admin** from the list of roles.
4. In **Service Accounts**, choose your project, then select **Actions** > **Manage Keys** > **Add Key** > **Create new key**. Choose **JSON**, then select **Create**.
### Step 3: Upload your JSON credentials
1. In Braze, select **Settings** > **App Settings**. Under your Android app's **Push Notification Settings**, choose **Firebase**, then select **Upload JSON File** and upload the credentials you generated earlier. When you're finished, select **Save**.
2. Enable automatic FCM token registration, by going to Firebase Console. Open your project, then select **Settings** > **Project settings**. Select **Cloud Messaging**, then under **Firebase Cloud Messaging API (V1)**, copy the number in the **Sender ID** field.
3. In your Android Studio project and the following to your `braze.xml`.
```xml
trueFIREBASE_SENDER_ID
```
**Important:**
To prevent Braze from triggering unnecessary network requests every time you send silent push notifications, remove any automatic network requests configured in your `Application` class's `onCreate()` method. For more information see, [Android Developer Reference: Application](https://developer.android.com/reference/android/app/Application).
### Step 1: Complete the initial setup
See the [Swift integration instructions](https://www.braze.com/docs/de/de/developer_guide/push_notifications/?sdktab=swift) for information about setting up your application with push and storing your credentials on our server. Refer to the [iOS MAUI](https://github.com/braze-inc/braze-xamarin-sdk/tree/master/appboy-component/samples/ios-net-maui/BrazeiOSMauiSampleApp) sample application for more details.
### Step 2: Request push notifications permission
Our .NET MAUI SDK now supports automatic push set up. Set up push automation and permissions by adding the following code to your Braze instance configuration:
```csharp
configuration.Push.Automation = new BRZConfigurationPushAutomation(true);
configuration.Push.Automation.RequestAuthorizationAtLaunch = false;
```
Refer to the [iOS MAUI](https://github.com/braze-inc/braze-xamarin-sdk/tree/master/appboy-component/samples/ios-net-maui/BrazeiOSMauiSampleApp) sample application for more details. For more details, see the Xamarin documentation for [Enhanced User Notifications in Xamarin.iOS](https://learn.microsoft.com/en-us/previous-versions/xamarin/ios/platform/user-notifications/enhanced-user-notifications?tabs=macos).
# Push-Benachrichtigungen für das Braze SDK anpassen
Source: /docs/de/developer_guide/push_notifications/customization/index.md
# Push-Benachrichtigungen anpassen
> Erfahren Sie, wie Sie Push-Benachrichtigungen für das Braze SDK anpassen können.
## Prerequisites
Before you can use this feature, you'll need to [integrate the Android Braze SDK](https://www.braze.com/docs/de/de/developer_guide/sdk_integration/?sdktab=android). You'll also need to [set up push notifications](https://www.braze.com/docs/de/de/developer_guide/push_notifications/?sdktab=android).
## Using a callback for push events {#push-callback}
Braze provides a [`subscribeToPushNotificationEvents()`](https://braze-inc.github.io/braze-android-sdk/kdoc/braze-android-sdk/com.braze/-i-braze/subscribe-to-push-notification-events.html) callback for when push notifications are received, opened, or dismissed. It is recommended to place this callback in your `Application.onCreate()` in order to not miss any events occurring while your application is not running.
**Note:**
If previously using a Custom Broadcast Receiver for this functionality in your application, you can safely remove it in favor of this integration option.
```java
Braze.getInstance(context).subscribeToPushNotificationEvents(event -> {
final BrazeNotificationPayload parsedData = event.getNotificationPayload();
//
// The type of notification itself
//
final boolean isPushOpenEvent = event.getEventType() == BrazePushEventType.NOTIFICATION_OPENED;
final boolean isPushReceivedEvent = event.getEventType() == BrazePushEventType.NOTIFICATION_RECEIVED;
// Sent when a user has dismissed a notification
final boolean isPushDeletedEvent = event.getEventType() == BrazePushEventType.NOTIFICATION_DELETED;
//
// Notification data
//
final String pushTitle = parsedData.getTitleText();
final Long pushArrivalTimeMs = parsedData.getNotificationReceivedTimestampMillis();
final String deeplink = parsedData.getDeeplink();
//
// Custom KVP data
//
final String myCustomKvp1 = parsedData.getBrazeExtras().getString("my first kvp");
final String myCustomKvp2 = parsedData.getBrazeExtras().getString("my second kvp");
});
```
```kotlin
Braze.getInstance(context).subscribeToPushNotificationEvents { event ->
val parsedData = event.notificationPayload
//
// The type of notification itself
//
val isPushOpenEvent = event.eventType == BrazePushEventType.NOTIFICATION_OPENED
val isPushReceivedEvent = event.eventType == BrazePushEventType.NOTIFICATION_RECEIVED
// Sent when a user has dismissed a notification
val isPushDeletedEvent = event.eventType == BrazePushEventType.NOTIFICATION_DELETED
//
// Notification data
//
val pushTitle = parsedData.titleText
val pushArrivalTimeMs = parsedData.notificationReceivedTimestampMillis
val deeplink = parsedData.deeplink
//
// Custom KVP data
//
val myCustomKvp1 = parsedData.brazeExtras.getString("my first kvp")
val myCustomKvp2 = parsedData.brazeExtras.getString("my second kvp")
}
```
**Tip:**
With notification action buttons, `BRAZE_PUSH_INTENT_NOTIFICATION_OPENED` intents fire when buttons with `opens app` or `deep link` actions are clicked. Deep link and extras handling remains the same. Buttons with `close` actions don't fire `BRAZE_PUSH_INTENT_NOTIFICATION_OPENED` intents and dismiss the notification automatically.
**Important:**
Create your push notification listener in `Application.onCreate` to ensure your listener is triggered after an end-user taps a notification while your app is in a terminated state.
## Customizing notification display {#customization-display}
### Step 1: Create your custom notification factory
In some scenarios, you may wish to customize push notifications in ways that would be cumbersome or unavailable server side. To give you complete control of notification display, we've added the ability to define your own [`IBrazeNotificationFactory`](https://braze-inc.github.io/braze-android-sdk/kdoc/braze-android-sdk/com.braze/-i-braze-notification-factory/index.html) to create notification objects for display by Braze.
If a custom `IBrazeNotificationFactory` is set, Braze will call your factory's `createNotification()` method upon push receipt before the notification is displayed to the user. Braze will pass in a `Bundle` containing Braze push data and another `Bundle` containing custom key-value pairs sent either via the dashboard or the messaging APIs:
Braze will pass in a [`BrazeNotificationPayload`](https://braze-inc.github.io/braze-android-sdk/kdoc/braze-android-sdk/com.braze.models.push/-braze-notification-payload/index.html) containing data from the Braze push notification.
```java
// Factory method implemented in your custom IBrazeNotificationFactory
@Override
public Notification createNotification(BrazeNotificationPayload brazeNotificationPayload) {
// Example of getting notification title
String title = brazeNotificationPayload.getTitleText();
// Example of retrieving a custom KVP ("my_key" -> "my_value")
String customKvp = brazeNotificationPayload.getBrazeExtras().getString("my_key");
}
```
```kotlin
// Factory method implemented in your custom IBrazeNotificationFactory
override fun createNotification(brazeNotificationPayload: BrazeNotificationPayload): Notification {
// Example of getting notification title
val title = brazeNotificationPayload.getTitleText()
// Example of retrieving a custom KVP ("my_key" -> "my_value")
val customKvp = brazeNotificationPayload.getBrazeExtras().getString("my_key")
}
```
You can return `null` from your custom `createNotification()` method to not show the notification at all, use `BrazeNotificationFactory.getInstance().createNotification()` to obtain our default `notification` object for that data and modify it before display, or generate a completely separate `notification` object for display.
**Note:**
For documentation on Braze push data keys, refer to the [Android SDK](https://braze-inc.github.io/braze-android-sdk/kdoc/braze-android-sdk/com.braze/-constants/index.html).
### Step 2: Set your custom notification factory
To instruct Braze to use your custom notification factory, use the `setCustomBrazeNotificationFactory` method to set your [`IBrazeNotificationFactory`](https://braze-inc.github.io/braze-android-sdk/kdoc/braze-android-sdk/com.braze/-i-braze-notification-factory/index.html):
```java
setCustomBrazeNotificationFactory(IBrazeNotificationFactory brazeNotificationFactory);
```
```kotlin
setCustomBrazeNotificationFactory(brazeNotificationFactory: IBrazeNotificationFactory)
```
The recommended place to set your custom `IBrazeNotificationFactory` is in the `Application.onCreate()` application lifecycle method (not activity). This will allow the notification factory to be set correctly whenever your app process is active.
**Important:**
Creating your own notification from scratch is an advanced use case and should be done only with thorough testing and a deep understanding of the Braze push functionality. For example, you must make sure your notification logs push opens correctly.
To unset your custom [`IBrazeNotificationFactory`](https://braze-inc.github.io/braze-android-sdk/kdoc/braze-android-sdk/com.braze/-i-braze-notification-factory/index.html) and return to default Braze handling for push, pass in `null` to our custom notification factory setter:
```java
setCustomBrazeNotificationFactory(null);
```
```kotlin
setCustomBrazeNotificationFactory(null)
```
## Rendering multicolor text
In Braze SDK version 3.1.1, HTML can be sent to a device to render multicolor text in push notifications.
{: style="max-width:40%;"}
This example is rendered with the following HTML:
```html
MultiColorPush
testmessage
```
Keep in mind that, Android limits which HTML elements and tags are valid in your push notifications. For example, `marquee` is not allowed.
**Important:**
Multicolor text rendering is device-specific and may not display based on Android device or version.
To render multicolor text in a push notification, you can update your `braze.xml` or `BrazeConfig`:
Add the following in your `braze.xml`:
```xml
true
```
Add the following in your [`BrazeConfig`](https://www.braze.com/docs/de/de/developer_guide/platform_integration_guides/android/advanced_use_cases/runtime_configuration/#runtime-configuration):
```java
BrazeConfig brazeConfig = new BrazeConfig.Builder()
.setPushHtmlRenderingEnabled(true)
.build();
Braze.configure(this, brazeConfig);
```
```kotlin
val brazeConfig = BrazeConfig.Builder()
.setPushHtmlRenderingEnabled(true)
.build()
Braze.configure(this, brazeConfig)
```
### Supported HTML tags
Currently, Google doesn't list their supported HTML tags for Android directly in their documentation—this information can only be found in their [Git repository's `Html.java` file](https://android.googlesource.com/platform/frameworks/base/+/master/core/java/android/text/Html.java). Keep this in mind when referencing the following table, as this information was pulled from this file, and their supported HTML tags could be subject to change.
Category
HTML Tag
Description
Basic Text Styling
<b>, <strong>
Bold text
<i>, <em>
Italic text
<u>
Underline text
<s>, <strike>, <del>
Strikethrough text
<sup>
Superscript text
<sub>
Subscript text
<tt>
Monospace text
Size/Font
<big>, <small>
Relative text size changes
<font color="...">
Sets foreground color
<span> (with inline CSS)
Inline styles (e.g., color, background)
Paragraph & Block
<p>, <div>
Block-level sections
<br>
Line break
<blockquote>
Quoted block
<ul> + <li>
Unordered list with bullets
Headings
<h1> - <h6>
Headings (various sizes)
Links & Images
<a href="...">
Clickable link
<img src="...">
Inline image
Other Inline
<em>, <strong>, <dfn>, <cite>
Synonyms for italic or bold
{: .reset-td-br-1 .reset-td-br-2 .reset-td-br-3 aria-label="Supported HTML tags" }
## Rendering inline images
### How it works
You can showcase a larger image within your Android push notification using inline image push. With this design, users won't have to manually expand the push to enlarge the image. Unlike regular Android push notifications, inline image push images are in a 3:2 aspect ratio.
{: style="max-width:50%;"}
### Compatibility
While you can send inline images to any device, devices and SDKs that don't meet the minimum versions will display a standard image instead. For inline images to display properly, both the Android Braze SDK v10.0.0+ and a device running Android M+ are required. The SDK must also be enabled for the image to render.
**Note:**
Devices running Android 12 will render differently due to changes in custom push notification styles.
### Sending an inline image push
When creating an Android push message, this feature is available in the **Notification Type** dropdown.

## Settings
There are many advanced settings available for Android push notifications sent through the Braze dashboard. This article will describe these features and how to use them successfully.

### Notification ID {#notification-id}
A **Notification ID** is a unique identifier for a message category of your choosing that informs the messaging service to only respect the most recent message from that ID. Setting a notification ID allows you to send just the most recent and relevant message, rather than a stack of outdated, irrelevant ones.
### Firebase Messaging Delivery priority {#fcm-priority}
The [Firebase Messaging Delivery Priority](https://firebase.google.com/docs/cloud-messaging/android/message-priority#setting-priority-for-messages) field lets you control whether a push is sent with "normal" or "high" priority to Firebase Cloud Messaging.
### Time to live (TTL) {#ttl}
The **Time to Live** (TTL) field allows you to set a custom length of time to store messages with the push messaging service. The default values for time to live are four weeks for FCM and 31 days for ADM.
### Summary text {#summary-text}
The summary text allows you to set additional text in the expanded notification view. It also serves as a caption for notifications with images.
{: style="max-width:65%;"}
The summary text will display under the body of the message in the expanded view.
{: style="max-width:65%;"}
For push notifications that include images, the message text will be shown in the collapsed view, while the summary text will be displayed as the image caption when the notification is expanded.
### Custom URIs {#custom-uri}
The **Custom URI** feature allows you to specify a Web URL or an Android resource to navigate to when the notification is clicked. If no custom URI is specified, clicking on the notification brings users into your app. You can use the custom URI to deep link inside your app and direct users to resources that exist outside of your app. This can be specified via the [Messaging API](https://www.braze.com/docs/de/de/api/endpoints/messaging/) or our dashboard under **Advanced Settings** in the push composer as pictured:

### Notification display priority {#notification-priority}
**Important:**
The Notification Display Priority setting is no longer used on devices running Android O or newer. For newer devices, set the priority through [notification channel configuration](https://developer.android.com/training/notify-user/channels#importance).
The priority level of a push notification affects how your notification is displayed in the notification tray relative to other notifications. It can also affect the speed and manner of delivery, as normal and lower priority messages may be sent with slightly higher latency or batched to preserve battery life, whereas high priority messages are always sent immediately.
In Android O, notification priority became a property of notification channels. You will need to work with your developer to define the priority for a channel during its configuration and then use the dashboard to select the proper channel when sending your notification sounds. For devices running versions of Android before O, specifying a priority level for Android notifications is possible via the Braze dashboard and messaging API.
To message your full user base with a specific priority, we recommend that you indirectly specify the priority through [notification channel configuration](https://developer.android.com/training/notify-user/channels#importance) (to target O+ devices) *and* send the individual priority from the dashboard (to target <O devices).
The priority levels that you can set on Android or Fire OS push notifications are:
| Priority | Description/Intended Use | `priority` value (for API messages) |
|----------|--------------------------|-------------------------------------|
| Max | Urgent or time-critical messages | `2` |
| High | Important communication, such as a new message from a friend | `1` |
| Default | Most notifications - use if your message doesn't explicitly fall under any of the other priority types | `0` |
| Low | Information that you want users to know about but does not require immediate action | `-1` |
| Min | Contextual or background information. | `-2` |
{: .reset-td-br-1 .reset-td-br-2 .reset-td-br-3 aria-label="Notification display priority #notification-priority" }
For more information, refer to Google's [Android notification](http://developer.android.com/design/patterns/notifications.html) documentation.
### Sounds {#sounds}
In Android O, notification sounds became a property of notification channels. You will need to work with your developer to define the sound for a channel during its configuration and then use the dashboard to select the proper channel when sending your notifications.
For devices running versions of Android before O, Braze allows you to set the sound of an individual push message through the dashboard composer. You can do so by specifying a local sound resource on the device (for example, `android.resource://com.mycompany.myapp/raw/mysound`). Specifying "default" in this field will play the default notification sound on the device. This can be specified via the [Messaging API](https://www.braze.com/docs/de/de/api/endpoints/messaging/) or the dashboard under **Advanced Settings** in the push composer.

Enter the full sound resource URI (for example, `android.resource://com.mycompany.myapp/raw/mysound`) into the dashboard prompt.
To message your full user base with a specific sound, we recommend that you indirectly specify the sound through [notification channel configuration](https://developer.android.com/training/notify-user/channels) (to target O+ devices) *and* send the individual sound from the dashboard (to target <O devices).
## Prerequisites
Before you can use this feature, you'll need to [integrate the Swift Braze SDK](https://www.braze.com/docs/de/de/developer_guide/sdk_integration/?sdktab=swift). You'll also need to [set up push notifications](https://www.braze.com/docs/de/de/developer_guide/push_notifications/?sdktab=swift).
## Customizing action buttons {#push-action-buttons-integration}
The Braze Swift SDK provides URL handling support for push action buttons. There are four sets of default push action buttons for Braze default push categories: `Accept/Decline`, `Yes/No`, `Confirm/Cancel`, and `More`.
{: style="max-width:60%"}
### Manually registering action buttons
**Important:**
Manually registering push action buttons are not recommended.
If you [set up push notifications](https://www.braze.com/docs/de/de/developer_guide/push_notifications/?sdktab=swift) using the `configuration.push.automation` configuration option, Braze automatically registers the action buttons for the default push categories and handles the push action button click analytics and URL routing.
However, you can choose to manually register push action buttons instead.
#### Step 1: Adding Braze default push categories {#registering}
Use the following code to register for the default push categories when you [register for push](https://www.braze.com/docs/de/de/developer_guide/platform_integration_guides/swift/push_notifications/integration/#step-4-register-push-tokens-with-braze):
a
```swift
UNUserNotificationCenter.current().setNotificationCategories(Braze.Notifications.categories)
```
```objc
[[UNUserNotificationCenter currentNotificationCenter] setNotificationCategories:BRZNotifications.categories];
```
**Note:**
Clicking on push action buttons with background activation mode will only dismiss the notification and not open the app. The next time the user opens the app, the button click analytics for these actions will be flushed to the server.
#### Step 2: Enable interactive push handling {#enable-push-handling}
To enable our push action button handling, including click analytics and URL routing, add the following code to your app's `didReceive(_:completionHandler:)` delegate method:
```swift
AppDelegate.braze?.notifications.handleUserNotification(response: response, withCompletionHandler: completionHandler)
```
```objc
[AppDelegate.braze.notifications handleUserNotificationWithResponse:response
withCompletionHandler:completionHandler];
```
If you use the `UNNotification` framework and have implemented the Braze [notification methods](https://www.braze.com/docs/de/de/developer_guide/platform_integration_guides/swift/push_notifications/integration/#step-5-enable-push-handling), you should already have this method integrated.
## Customizing push categories {#customizing-push-categories}
In addition to providing a set of default push categories, Braze supports custom notification categories and actions. After you register categories in your application, you can use the Braze dashboard to send these custom notification categories to your users.
Here's an example that leverages the `LIKE_CATEGORY` displayed on the device:

### Step 1: Register a category
To register a category in your app, use a similar approach to the following:
```swift
Braze.Notifications.categories.insert(
.init(identifier: "LIKE_CATEGORY",
actions: [
.init(identifier: "LIKE_IDENTIFIER", title: "Like", options: [.foreground]),
.init(identifier: "UNLIKE_IDENTIFIER", title: "Unlike", options: [.foreground])
],
intentIdentifiers: []
)
)
UNUserNotificationCenter.current().setNotificationCategories(Braze.Notifications.categories)
```
```objc
NSMutableSet *categories = [BRZNotifications.categories mutableCopy];
UNNotificationAction *likeAction = [UNNotificationAction actionWithIdentifier:@"LIKE_IDENTIFIER"
title:@"Like"
options:UNNotificationActionOptionForeground];
UNNotificationAction *unlikeAction = [UNNotificationAction actionWithIdentifier:@"UNLIKE_IDENTIFIER"
title:@"Unlike"
options:UNNotificationActionOptionForeground];
UNNotificationCategory *likeCategory = [UNNotificationCategory categoryWithIdentifier:@"LIKE_CATEGORY"
actions:@[likeAction, unlikeAction]
intentIdentifiers:@[]
options:UNNotificationCategoryOptionNone];
[categories addObject:likeCategory];
[UNUserNotificationCenter.currentNotificationCenter setNotificationCategories:categories];
```
**Note:**
When you create a `UNNotificationAction`, you can specify a list of action options. For example, `.foreground` lets your users open your app after tapping the action button. This is necessary for navigational on-click behaviors, such as "Open App" and "Deep Link into Application". If you want an action button that simply dismisses the notification without opening the app, leave `.foreground` out of the action's `options` array. For more information, see [`UNNotificationActionOptions`](https://developer.apple.com/documentation/usernotifications/unnotificationactionoptions).
### Step 2: Select your categories
After you register a category, use the Braze dashboard to send notifications of that type to users.
**Tip:**
You only need to define action buttons on the Braze dashboard for behaviors that can't be created locally in your Swift code, such as deep linking into your app or redirecting to a web URL. These actions need to be configured on the dashboard so they can define what URL or deep link to open. For action buttons that simply dismiss the notification without opening the app, you don't need to configure them on the dashboard—dismissal behavior is handled automatically by iOS. Just register your custom category and its actions in your app code, then enter the matching category name on the dashboard.
1. In the Braze dashboard, select **Messaging** > **Push Notifications**, then choose your iOS [push campaign](https://www.braze.com/docs/de/de/user_guide/message_building_by_channel/push/creating_a_push_message).
2. Under **Compose push notification**, turn on **Action Buttons**.
3. In the **iOS Notification Category** dropdown, select **Enter pre-registered custom iOS Category**.
4. Finally, enter one of the categories you created earlier. The following example, uses the custom category: `LIKE_CATEGORY`.

### Example: Custom push category {#example-custom-push-category}
Suppose you want to create a push notification with two action buttons: **Manage**, which deep links into your app, and **Keep**, which simply dismisses the notification.
In the following example, the `MANAGE_IDENTIFIER` action includes the `.foreground` option, which opens the app when tapped—this is necessary because it will deep link into a specific part of the app. The `KEEP_IDENTIFIER` action uses an empty options array, meaning it will dismiss the notification without opening the app.
```swift
Braze.Notifications.categories.insert(
.init(identifier: "YOUR_CATEGORY",
actions: [
.init(identifier: "KEEP_IDENTIFIER", title: "Keep", options: []),
.init(identifier: "MANAGE_IDENTIFIER", title: "Manage", options: [.foreground])
],
intentIdentifiers: []
)
)
UNUserNotificationCenter.current().setNotificationCategories(Braze.Notifications.categories)
```
Because `MANAGE_IDENTIFIER` deep links into the app, you would set up that action button on the Braze dashboard with the associated deep link URL. However, you don't need to define a button on the dashboard for `KEEP_IDENTIFIER` because it only dismisses the notification. On the dashboard, you only need to enter the category name (for example, `YOUR_CATEGORY`) to match what you registered in your app code.
## Customizing badges
Badges are small icons that are ideal for getting a user's attention. You can specify a badge count in the [**Settings**](https://www.braze.com/docs/de/de/developer_guide/push_notifications/customization/?sdktab=swift#swift_settings) tab when you compose a push notification using the Braze dashboard. You may also update your badge count manually through your application's [`applicationIconBadgeNumber`](https://developer.apple.com/library/ios/documentation/UIKit/Reference/UIApplication_Class/index.html#//apple_ref/occ/instp/UIApplication/applicationIconBadgeNumber) property or the [remote notification payload](https://developer.apple.com/library/content/documentation/NetworkingInternet/Conceptual/RemoteNotificationsPG/CreatingtheNotificationPayload.html#//apple_ref/doc/uid/TP40008194-CH10-SW1).
Braze will automatically clear the badge count when a Braze notification is received while the app is in the foreground. Manually setting the badge number to 0 will also clear notifications in the notification center.
If you do not have a plan for clearing badges as part of normal app operation or by sending pushes that clear the badge, you should clear the badge when the app becomes active by adding the following code to your app's `applicationDidBecomeActive:` delegate method:
```swift
// For iOS 16.0+
let center = UNUserNotificationCenter.current()
do {
try await center.setBadgeCount(0)
} catch {
// Handle errors
}
// Prior to iOS 16. Deprecated in iOS 17+.
UIApplication.shared.applicationIconBadgeNumber = 0
```
```objc
// For iOS 16.0+
UNUserNotificationCenter *center = [UNUserNotificationCenter currentNotificationCenter];
[center setBadgeCount:0 withCompletionHandler:^(NSError * _Nullable error) {
if (error != nil) {
// Handle errors
}
}];
// Prior to iOS 16. Deprecated in iOS 17+.
[UIApplication sharedApplication].applicationIconBadgeNumber = 0;
```
## Customizing sounds
### Step 1: Host the sound in your app
Custom push notification sounds must be hosted locally within the main bundle of your app. The following audio data formats are accepted:
- Linear PCM
- MA4
- µLaw
- aLaw
You can package the audio data in an AIFF, WAV, or CAF file. In Xcode, add the sound file to your project as a non-localized resource of the application bundle.
**Note:**
Custom sounds must be under 30 seconds when played. If a custom sound is over that limit, the default system sound is played instead.
#### Converting sound files
You can use the afconvert tool to convert sounds. For example, to convert the 16-bit linear PCM system sound Submarine.aiff to IMA4 audio in a CAF file, use the following command in the terminal:
```bash
afconvert /System/Library/Sounds/Submarine.aiff ~/Desktop/sub.caf -d ima4 -f caff -v
```
**Tip:**
You can inspect a sound to determine its data format by opening it in QuickTime Player and choosing **Show Movie Inspector** from the **Movie** menu.
### Step 2: Provide a protocol URL for the sound
You must specify a protocol URL that directs to the location of the sound file in your app. There are two methods for doing this:
* Use the `sound` parameter of the [Apple push object](https://www.braze.com/docs/de/de/api/objects_filters/messaging/apple_object#apple-push-object) to pass the URL to Braze.
* Specify the URL in the dashboard. In the [push composer](https://www.braze.com/docs/de/de/user_guide/message_building_by_channel/push/creating_a_push_message/#step-3-select-notification-type-ios-and-android), select **Settings** and enter the protocol URL in the **Sound** field.

If the specified sound file doesn't exist or the keyword "default" is entered, Braze will use the default device alert sound. Aside from our dashboard, sound can also be configured via our [messaging API][12].
See the Apple Developer Documentation regarding [preparing custom alert sounds](https://developer.apple.com/library/content/documentation/NetworkingInternet/Conceptual/RemoteNotificationsPG/SupportingNotificationsinYourApp.html) for additional information.
## Settings
When creating a push campaign through the dashboard, click the **Settings** tab on the **Compose** step to view the advanced settings available.

### Key-value pairs
Braze allows you to send custom-defined string key-value pairs, known as `extras`, along with a push notification to your application. Extras can be defined via the dashboard or API and will be available as key-value pairs within the `notification` dictionary passed to your push delegate implementations.
### Alert options
Select the **Alert Options** checkbox to see a dropdown of key-values available to adjust how the notification appears on devices.
### Adding content-available flag
Check the **Add Content-Available Flag** checkbox to instruct devices to download new content in the background. Most commonly, this can be checked if you are interested in sending [silent notifications](https://www.braze.com/docs/de/de/developer_guide/push_notifications/silent/?sdktab=swift).
### Adding mutable-content flag
Check the **Add Mutable-Content Flag** checkbox to enable advanced receiver customization. This flag will automatically be sent when composing a [rich notification](https://www.braze.com/docs/de/de/developer_guide/push_notifications/rich/?sdktab=swift), regardless of the value of this checkbox.
### Collapse ID
Specify a collapse ID to coalesce similar notifications. If you send multiple notifications with the same collapse ID, the device will only show the most recently received notification. Refer to Apple's documentation on [coalesced notifications](https://developer.apple.com/library/content/documentation/NetworkingInternet/Conceptual/RemoteNotificationsPG/APNSOverview.html#//apple_ref/doc/uid/TP40008194-CH8-SW1).
### Expiry
Checking the **Expiry** checkbox will allow setting an expiration time for your message. Should a user's device lose connectivity, Braze will continue to try and send the message until the specified time. If this is not set, the platform will default to an expiration of 30 days. Note that push notifications that expire before delivery are not considered failed and will not be recorded as a bounce.
## Prerequisites
Before you can use this feature, you'll need to [integrate the Android Braze SDK](https://www.braze.com/docs/de/de/developer_guide/sdk_integration/?sdktab=android). You'll also need to [set up push notifications](https://www.braze.com/docs/de/de/developer_guide/push_notifications/?sdktab=android).
## Settings
There are many advanced settings available for FireOS push notifications sent through the Braze dashboard. This article will describe these features and how to use them successfully.

### Time to live (TTL) {#ttl}
The **Time to Live** (TTL) field allows you to set a custom length of time to store messages with the push messaging service. The default values for time to live are four weeks for FCM and 31 days for ADM.
### Summary text {#summary-text}
The summary text allows you to set additional text in the expanded notification view. It also serves as a caption for notifications with images.
{: style="max-width:65%;"}
The summary text will display under the body of the message in the expanded view.
{: style="max-width:65%;"}
For push notifications that include images, the message text will be shown in the collapsed view, while the summary text will be displayed as the image caption when the notification is expanded.
### Custom URIs {#custom-uri}
The **Custom URI** feature allows you to specify a Web URL or an Android resource to navigate to when the notification is clicked. If no custom URI is specified, clicking on the notification brings users into your app. You can use the custom URI to deep link inside your app and direct users to resources that exist outside of your app. This can be specified via the [Messaging API](https://www.braze.com/docs/de/de/api/endpoints/messaging) or our dashboard under **Advanced Settings** in the push composer as pictured:

### Notification display priority
**Important:**
The Notification Display Priority setting is no longer used on devices running Android O or newer. For newer devices, set the priority through [notification channel configuration](https://developer.android.com/training/notify-user/channels#importance).
The priority level of a push notification affects how your notification is displayed in the notification tray relative to other notifications. It can also affect the speed and manner of delivery, as normal and lower priority messages may be sent with slightly higher latency or batched to preserve battery life whereas high priority messages are always sent immediately.
In Android O, notification priority became a property of notification channels. You will need to work with your developer to define the priority for a channel during its configuration and then use the dashboard to select the proper channel when sending your notification sounds. For devices running versions of Android before O, specifying a priority level for FireOS notifications is possible via the Braze dashboard and messaging API.
To message your full user base with a specific priority, we recommend that you indirectly specify the priority through [notification channel configuration](https://developer.android.com/training/notify-user/channels#importance) (to target O+ devices) *and* send the individual priority from the dashboard (to target <O devices).
The priority levels that you can set on Fire OS push notifications are:
| Priority | Description/Intended Use | `priority` value (for API messages) |
|----------|--------------------------|-------------------------------------|
| Max | Urgent or time-critical messages | `2` |
| High | Important communication, such as a new message from a friend | `1` |
| Default | Most notifications - use if your message doesn't explicitly fall under any of the other priority types | `0` |
| Low | Information that you want users to know about but does not require immediate action | `-1` |
| Min | Contextual or background information. | `-2` |
{: .reset-td-br-1 .reset-td-br-2 .reset-td-br-3 aria-label="Notification display priority" }
For more information, refer to Google's [Android notification](http://developer.android.com/design/patterns/notifications.html) documentation.
### Sounds {#sounds}
In Android O, notification sounds became a property of notification channels. You will need to work with your developer to define the sound for a channel during its configuration and then use the dashboard to select the proper channel when sending your notifications.
For devices running versions of Android before O, Braze allows you to set the sound of an individual push message through the dashboard composer. You can do so by specifying a local sound resource on the device (for example, `android.resource://com.mycompany.myapp/raw/mysound`). Specifying "default" in this field will play the default notification sound on the device. This can be specified via the [Messaging API](https://www.braze.com/docs/de/de/api/endpoints/messaging) or the dashboard under **Settings** in the push composer.

Enter the full sound resource URI (for example, `android.resource://com.mycompany.myapp/raw/mysound`) into the dashboard prompt.
To message your full user base with a specific sound, we recommend that you indirectly specify the sound through [notification channel configuration](https://developer.android.com/training/notify-user/channels) (to target O+ devices) *and* send the individual sound from the dashboard (to target <O devices).
## Prerequisites
Before you can use this feature, you'll need to [integrate the React Native Braze SDK](https://www.braze.com/docs/de/de/developer_guide/sdk_integration/?sdktab=react%20native). You must also [set up push notifications](https://www.braze.com/docs/de/de/developer_guide/push_notifications/?sdktab=react%20native).
## Push customization in React Native
The Braze React Native SDK does not expose push notification customization (action buttons, categories, custom notification factories) through its JavaScript API. These features require native configuration in your iOS and Android projects.
The following table shows which features require native configuration:
| Feature | iOS | Android |
| --- | --- | --- |
| Action buttons | Configure in native Swift/Objective-C | Configure in native Java/Kotlin |
| Push categories | Configure in native Swift/Objective-C | Configure in native Java/Kotlin |
| Custom notification factory | N/A | Configure in native Java/Kotlin |
| Badge customization | Configure in native Swift/Objective-C | N/A |
| Custom sounds | Configure in native Swift/Objective-C | Configure in native Java/Kotlin |
{: .reset-td-br-1 .reset-td-br-2 .reset-td-br-3 aria-label="Push customization in React Native" }
### iOS customization
To add push action buttons, categories, badges, or custom sounds on iOS, implement the native configuration in your `AppDelegate` (Swift or Objective-C). See [Customize push notifications – Swift](https://www.braze.com/docs/de/de/developer_guide/push_notifications/customization/?sdktab=swift) for step-by-step instructions.
### Android customization
To add push action buttons, categories, or a custom notification factory on Android, implement the native configuration in your Android project. See [Customize push notifications – Android](https://www.braze.com/docs/de/de/developer_guide/push_notifications/customization/?sdktab=android) for step-by-step instructions.
# Deeplinks in Push-Benachrichtigungen für das Braze SDK setzen
Source: /docs/de/developer_guide/push_notifications/deep_linking/index.md
# Deeplinks in Push-Benachrichtigungen setzen
> Erfahren Sie, wie Sie stille Push-Benachrichtigungen für das Braze SDK einrichten können.
## Prerequisites
Before you can use this feature, you'll need to [integrate the Android Braze SDK](https://www.braze.com/docs/de/de/developer_guide/sdk_integration/?sdktab=android).
## Creating a universal delegate
The Android SDK provides the ability to set a single delegate object to custom handle all deep links opened by Braze across Content Cards, in-app messages, and push notifications.
Your delegate object should implement the [`IBrazeDeeplinkHandler`](https://braze-inc.github.io/braze-android-sdk/kdoc/braze-android-sdk/com.braze.ui/-braze-deeplink-handler/index.html) interface and be set using [`BrazeDeeplinkHandler.setBrazeDeeplinkHandler()`](https://braze-inc.github.io/braze-android-sdk/kdoc/braze-android-sdk/com.braze.ui/-braze-deeplink-handler/-companion/set-braze-deeplink-handler.html). In most cases, the delegate should be set in your app's `Application.onCreate()`.
The following is an example of overriding the default [`UriAction`](https://braze-inc.github.io/braze-android-sdk/kdoc/braze-android-sdk/com.braze.ui.actions/-uri-action/index.html) behavior with custom intent flags and custom behavior for YouTube URLs:
```java
public class CustomDeeplinkHandler implements IBrazeDeeplinkHandler {
private static final String TAG = BrazeLogger.getBrazeLogTag(CustomDeeplinkHandler.class);
@Override
public void gotoUri(Context context, UriAction uriAction) {
String uri = uriAction.getUri().toString();
// Open YouTube URLs in the YouTube app and not our app
if (!StringUtils.isNullOrBlank(uri) && uri.contains("youtube.com")) {
uriAction.setUseWebView(false);
}
CustomUriAction customUriAction = new CustomUriAction(uriAction);
customUriAction.execute(context);
}
public static class CustomUriAction extends UriAction {
public CustomUriAction(@NonNull UriAction uriAction) {
super(uriAction);
}
@Override
protected void openUriWithActionView(Context context, Uri uri, Bundle extras) {
Intent intent = getActionViewIntent(context, uri, extras);
intent.setFlags(Intent.FLAG_ACTIVITY_NEW_TASK | Intent.FLAG_ACTIVITY_CLEAR_TOP | Intent.FLAG_ACTIVITY_SINGLE_TOP);
if (intent.resolveActivity(context.getPackageManager()) != null) {
context.startActivity(intent);
} else {
BrazeLogger.w(TAG, "Could not find appropriate activity to open for deep link " + uri + ".");
}
}
}
}
```
```kotlin
class CustomDeeplinkHandler : IBrazeDeeplinkHandler {
override fun gotoUri(context: Context, uriAction: UriAction) {
val uri = uriAction.uri.toString()
// Open YouTube URLs in the YouTube app and not our app
if (!StringUtils.isNullOrBlank(uri) && uri.contains("youtube.com")) {
uriAction.useWebView = false
}
val customUriAction = CustomUriAction(uriAction)
customUriAction.execute(context)
}
class CustomUriAction(uriAction: UriAction) : UriAction(uriAction) {
override fun openUriWithActionView(context: Context, uri: Uri, extras: Bundle) {
val intent = getActionViewIntent(context, uri, extras)
intent.flags = Intent.FLAG_ACTIVITY_NEW_TASK or Intent.FLAG_ACTIVITY_CLEAR_TOP or Intent.FLAG_ACTIVITY_SINGLE_TOP
if (intent.resolveActivity(context.packageManager) != null) {
context.startActivity(intent)
} else {
BrazeLogger.w(TAG, "Could not find appropriate activity to open for deep link $uri.")
}
}
}
companion object {
private val TAG = BrazeLogger.getBrazeLogTag(CustomDeeplinkHandler::class.java)
}
}
```
## Deep linking to app settings
To allow deep links to directly open your app's settings, you'll need a custom `BrazeDeeplinkHandler`. In the following example, the presence of a custom key-value pair called `open_notification_page` will make the deep link open the app's settings page:
```java
BrazeDeeplinkHandler.setBrazeDeeplinkHandler(new IBrazeDeeplinkHandler() {
@Override
public void gotoUri(Context context, UriAction uriAction) {
final Bundle extras = uriAction.getExtras();
if (extras.containsKey("open_notification_page")) {
Intent intent = new Intent();
intent.setAction("android.settings.APP_NOTIFICATION_SETTINGS");
intent.setFlags(Intent.FLAG_ACTIVITY_NEW_TASK);
//for Android 5-7
intent.putExtra("app_package", context.getPackageName());
intent.putExtra("app_uid", context.getApplicationInfo().uid);
// for Android 8 and later
intent.putExtra("android.provider.extra.APP_PACKAGE", context.getPackageName());
context.startActivity(intent);
}
}
});
```
```kotlin
BrazeDeeplinkHandler.setBrazeDeeplinkHandler(object : IBrazeDeeplinkHandler {
override fun gotoUri(context: Context, uriAction: UriAction) {
val extras = uriAction.extras
if (extras.containsKey("open_notification_page")) {
val intent = Intent()
intent.action = "android.settings.APP_NOTIFICATION_SETTINGS"
intent.flags = Intent.FLAG_ACTIVITY_NEW_TASK
//for Android 5-7
intent.putExtra("app_package", context.packageName)
intent.putExtra("app_uid", context.applicationInfo.uid)
// for Android 8 and later
intent.putExtra("android.provider.extra.APP_PACKAGE", context.packageName)
context.startActivity(intent)
}
}
})
```
## Customizing WebView activity {#Custom_Webview_Activity}
When Braze opens website deeplinks inside the app, the deeplinks are handled by [`BrazeWebViewActivity`](https://braze-inc.github.io/braze-android-sdk/kdoc/braze-android-sdk/com.braze.ui/-braze-web-view-activity/index.html).
**Note:**
For custom HTML in-app messages, links configured with `target="_blank"` open in the device's default web browser and are not handled by `BrazeWebViewActivity`.
To change this:
1. Create a new Activity that handles the target URL from `Intent.getExtras()` with the key `com.braze.Constants.BRAZE_WEBVIEW_URL_EXTRA`. For an example, see [`BrazeWebViewActivity.kt`](https://github.com/braze-inc/braze-android-sdk/blob/master/android-sdk-ui/src/main/java/com/braze/ui/BrazeWebViewActivity.kt).
2. Add that activity to `AndroidManifest.xml` and set `exported` to `false`.
```xml
```
3. Set your custom Activity in a `BrazeConfig` [builder object](https://braze-inc.github.io/braze-android-sdk/kdoc/braze-android-sdk/com.braze.configuration/-braze-config/-builder/set-custom-web-view-activity-class.html). Build the builder and pass it to [`Braze.configure()`](https://braze-inc.github.io/braze-android-sdk/kdoc/braze-android-sdk/com.braze/-braze/-companion/configure.html) in your [`Application.onCreate()`](https://developer.android.com/reference/android/app/Application.html#onCreate()).
```java
BrazeConfig brazeConfig = new BrazeConfig.Builder()
.setCustomWebViewActivityClass(MyCustomWebViewActivity::class)
...
.build();
Braze.configure(this, brazeConfig);
```
```kotlin
val brazeConfig = BrazeConfig.Builder()
.setCustomWebViewActivityClass(MyCustomWebViewActivity::class.java)
...
.build()
Braze.configure(this, brazeConfig)
```
## Troubleshooting
If deep links from push notifications aren't working on Android, try the following steps:
1. **Test the deep link outside of Braze.** Open the deep link URL from another app, such as email or a browser. If it doesn't open your app, the deep link may not be configured correctly in your `AndroidManifest.xml`. For more information, see Android's [Create Deep Links](https://developer.android.com/training/app-links/deep-linking) documentation.
2. **Check that automatic deep link handling is enabled.** Verify that `com_braze_handle_push_deep_links_automatically` is set to `true` in `braze.xml`, or set this option through [runtime configuration](https://www.braze.com/docs/de/de/developer_guide/sdk_integration/?sdktab=android#runtime-configuration). Without this setting, Braze doesn't automatically open your app and deep link destination when someone taps a push notification.
3. **Verify your deep link handler delegate.** If you set a custom `IBrazeDeeplinkHandler`, confirm that your `gotoUri` implementation handles the URI and doesn't drop it.
4. **Test across channels.** If the same deep link works in an in-app message but not from push, the issue is likely in your push deep link handling, not in the deep link itself.
## Using Jetpack Compose
To handle deeplinks when using Jetpack Compose with NavHost:
1. Ensure that the activity handling your deeplink is registered in the Android Manifest.
```xml
```
2. In NavHost, specify which deeplinks you want it to handle.
```kotlin
composableWithCompositionLocal(
route = "YOUR_ROUTE_HERE",
deepLinks = listOf(navDeepLink {
uriPattern = "myapp://articles/{${MainDestinations.ARTICLE_ID_KEY}}"
}),
arguments = listOf(
navArgument(MainDestinations.ARTICLE_ID_KEY) {
type = NavType.LongType
}
),
) { backStackEntry ->
val arguments = requireNotNull(backStackEntry.arguments)
val articleId = arguments.getLong(MainDestinations.ARTICLE_ID_KEY)
ArticleDetail(
articleId
)
}
```
3. Depending on your app architecture, you may need to handle the new intent that's sent to your current activity as well.
```kotlin
DisposableEffect(Unit) {
val listener = Consumer {
navHostController.handleDeepLink(it)
}
addOnNewIntentListener(listener)
onDispose { removeOnNewIntentListener(listener) }
}
```
## Prerequisites
Before you can use this feature, you'll need to [integrate the Swift Braze SDK](https://www.braze.com/docs/de/de/developer_guide/sdk_integration/?sdktab=swift).
**Tip:**
For help choosing between custom scheme deep links, universal links, and "Open Web URL Inside App," see [iOS deep linking guide](https://www.braze.com/docs/de/de/developer_guide/push_notifications/ios_deep_linking_guide). For troubleshooting, see [Deep linking troubleshooting](https://www.braze.com/docs/de/de/developer_guide/push_notifications/deep_linking_troubleshooting).
## Handling deep links
### Step 1: Register a scheme {#register-a-scheme}
To handle deep linking, a custom scheme must be stated in your `Info.plist` file. The navigation structure is defined by an array of dictionaries. Each of those dictionaries contains an array of strings.
Use Xcode to edit your `Info.plist` file:
1. Add a new key, `URL types`. Xcode will automatically make this an array containing a dictionary called `Item 0`.
2. Within `Item 0`, add a key `URL identifier`. Set the value to your custom scheme.
3. Within `Item 0`, add a key `URL Schemes`. This will automatically be an array containing a `Item 0` string.
4. Set `URL Schemes` >> `Item 0` to your custom scheme.
Alternatively, if you wish to edit your `Info.plist` file directly, you can follow this spec:
```html
CFBundleURLTypesCFBundleURLNameYOUR.SCHEMECFBundleURLSchemesYOUR.SCHEME
```
### Step 2: Add a scheme allowlist
You must declare the URL schemes you wish to pass to `canOpenURL(_:)` by adding the `LSApplicationQueriesSchemes` key to your app's Info.plist file. Attempting to call schemes outside this allowlist will cause the system to record an error in the device's logs, and the deep link will not open. An example of this error will look like this:
```
: -canOpenURL: failed for URL: "yourapp://deeplink" – error: "This app is not allowed to query for scheme yourapp"
```
For example, if an in-app message should open the Facebook app when tapped, the app has to have the Facebook custom scheme (`fb`) in your allowlist. Otherwise, the system will reject the deep link. Deep links that direct to a page or view inside your own app still require that your app's custom scheme be listed in your app's `Info.plist`.
Your example allowlist might look something like:
```html
LSApplicationQueriesSchemesmyappfbtwitter
```
For more information, refer to [Apple's documentation](https://developer.apple.com/library/content/documentation/General/Reference/InfoPlistKeyReference/Articles/LaunchServicesKeys.html#//apple_ref/doc/uid/TP40009250-SW14) on the `LSApplicationQueriesSchemes` key.
### Step 3: Implement a handler
After activating your app, iOS will call the method [`application:openURL:options:`](https://developer.apple.com/reference/uikit/uiapplicationdelegate/1623112-application?language=objc). The important argument is the [NSURL](https://developer.apple.com/library/ios/DOCUMENTATION/Cocoa/Reference/Foundation/Classes/NSURL_Class/Reference/Reference.html#//apple_ref/doc/c_ref/NSURL) object.
```swift
func application(_ app: UIApplication, open url: URL, options: [UIApplication.OpenURLOptionsKey : Any] = [:]) -> Bool {
let path = url.path
let query = url.query
// Insert your code here to take some action based upon the path and query.
return true
}
```
```objc
- (BOOL)application:(UIApplication *)app openURL:(NSURL *)url options:(NSDictionary *)options {
NSString *path = [url path];
NSString *query = [url query];
// Insert your code here to take some action based upon the path and query.
return YES;
}
```
## App Transport Security (ATS)
As defined by [Apple](https://developer.apple.com/library/prerelease/ios/releasenotes/General/WhatsNewIniOS/Articles/iOS9.html#//apple_ref/doc/uid/TP40016198-SW14), "App Transport Security is a feature that improves the security of connections between an app and web services. The feature consists of default connection requirements that conform to best practices for secure connections. Apps can override this default behavior and turn off transport security."
ATS is applied by default. It requires that all connections use HTTPS and are encrypted using TLS 1.2 with forward secrecy. Refer to [Requirements for Connecting Using ATS](https://developer.apple.com/library/ios/documentation/General/Reference/InfoPlistKeyReference/Articles/CocoaKeys.html#//apple_ref/doc/uid/TP40009251-SW35) for more information. All images served by Braze to end devices are handled by a content delivery network ("CDN") that supports TLS 1.2 and is compatible with ATS.
Unless they are specified as exceptions in your application's `Info.plist`, connections that do not follow these requirements will fail with errors that are similar to the following.
**Example Error 1:**
```bash
CFNetwork SSLHandshake failed (-9801)
Error Domain=NSURLErrorDomain Code=-1200 "An SSL error has occurred, and a secure connection to the server cannot be made."
```
**Example Error 2:**
```bash
NSURLSession/NSURLConnection HTTP load failed (kCFStreamErrorDomainSSL, -9802)
```
ATS compliance is enforced for links opened within the mobile app (our default handling of clicked links) and does not apply to sites opened externally via a web browser.
### Working with ATS
You can handle ATS in either of the following ways, but we recommend **complying with ATS requirements**.
Your Braze integration can satisfy ATS requirements by ensuring that any existing links you drive users to (for example, though in-app message and push campaigns) satisfy ATS requirements. While there are ways to bypass ATS restrictions, our recommendation is to ensure that all linked URLs are ATS-compliant. Given Apple's increasing emphasis on application security, the following approaches to allowing ATS exceptions are not guaranteed to be supported by Apple.
You can allow a subset of links with certain domains or schemes to be treated as exceptions to the ATS rules. Your Braze integration will satisfy ATS requirements if every link you use in a Braze messaging channel is either ATS compliant or handled by an exception.
To add a domain as an exception of the ATS, add following to your app's `Info.plist` file:
```html
NSAppTransportSecurityNSAllowsArbitraryLoadsNSExceptionDomainsexample.comNSExceptionAllowsInsecureHTTPLoadsNSIncludesSubdomains
```
Refer to Apple's article on [app transport security keys](https://developer.apple.com/library/ios/documentation/General/Reference/InfoPlistKeyReference/Articles/CocoaKeys.html#//apple_ref/doc/uid/TP40009251-SW33) for more information.
You can turn off ATS entirely. Note that this is not recommended practice, due to both lost security protections and future iOS compatibility. To disable ATS, insert the following in your app's `Info.plist` file:
```html
NSAppTransportSecurityNSAllowsArbitraryLoads
```
## Decoding URLs
The SDK percent-encodes links to create valid `URL`s. All link characters that are not allowed in a properly formed URL, such as Unicode characters, will be percent escaped.
To decode an encoded link, use the `String` property [`removingPercentEncoding`](https://developer.apple.com/documentation/swift/stringprotocol/removingpercentencoding). You must also return `true` in the `BrazeDelegate.braze(_:shouldOpenURL:)`. A call to action is required to trigger the handling of the URL by your app. For example:
```swift
func application(_ app: UIApplication, open url: URL, options: [UIApplication.OpenURLOptionsKey : Any] = [:]) -> Bool {
let urlString = url.absoluteString.removingPercentEncoding
// Handle urlString
return true
}
```
```objc
- (BOOL)application:(UIApplication *)application openURL:(NSURL *)url options:(NSDictionary *)options {
NSString *urlString = [url.absoluteString stringByRemovingPercentEncoding];
// Handle urlString
return YES;
}
```
## Deep linking to app settings
You can take advantage of `UIApplicationOpenSettingsURLString` to deep link users to your app's settings from Braze push notifications and in-app messages.
To take users from your app into the iOS settings:
1. First, make sure your application is set up for either [scheme-based deep links](#swift_register-a-scheme) or [universal links](#swift_universal-links).
2. Decide on a URI for deep linking to the **Settings** page (for example, `myapp://settings` or `https://www.braze.com/settings`).
3. If you are using custom scheme-based deep links, add the following code to your `application:openURL:options:` method:
```swift
func application(_ app: UIApplication, open url: URL, options: [UIApplicationOpenURLOptionsKey : Any] = [:]) -> Bool {
let path = url.path
if (path == "settings") {
UIApplication.shared.openURL(URL(string:UIApplication.openSettingsURLString)!)
}
return true
}
```
```objc
- (BOOL)application:(UIApplication *)app
openURL:(NSURL *)url
options:(NSDictionary *)options {
NSString *path = [url path];
if ([path isEqualToString:@"settings"]) {
NSURL *settingsURL = [NSURL URLWithString:UIApplicationOpenSettingsURLString];
[[UIApplication sharedApplication] openURL:settingsURL];
}
return YES;
}
```
## Customization options {#customization-options}
### Default WebView customization
The `Braze.WebViewController` class displays web URLs opened by the SDK, typically when "Open Web URL Inside App" is selected for a web deep link.
You can customize the `Braze.WebViewController` via the [`BrazeDelegate.braze(_:willPresentModalWithContext:)`](https://braze-inc.github.io/braze-swift-sdk/documentation/brazekit/brazedelegate/braze(_:willpresentmodalwithcontext:)-12sqy/) delegate method.
### Linking handling customization
The `BrazeDelegate` protocol can be used to customize the handling of URLs such as deep links, web URLs, and universal links. To set the delegate during Braze initialization, set a delegate object on the `Braze` instance. Braze will then call your delegate's implementation of `shouldOpenURL` before handling any URIs.
When a push notification or in-app message uses **Open web URL inside mobile app**, Braze passes `context.useWebView == true` on [`Braze.URLContext`](https://braze-inc.github.io/braze-swift-sdk/documentation/brazekit/braze/urlcontext). When the message opens the URL in the system browser instead, `useWebView` is `false`. Inspect `context.useWebView` in `braze(_:shouldOpenURL:)` to branch your custom handling—for example, to open an in-app `WebViewController` only when the campaign requested in-app display.
#### Universal links {#universal-links}
Braze supports universal links in push notifications, in-app messages, and Content Cards. To enable universal link support, [`configuration.forwardUniversalLinks`](https://braze-inc.github.io/braze-swift-sdk/documentation/brazekit/braze/configuration-swift.class/forwarduniversallinks) must be set to `true`.
When enabled, Braze will forward universal links to your app's `AppDelegate` via the [`application:continueUserActivity:restorationHandler:`](https://developer.apple.com/documentation/uikit/uiapplicationdelegate/1623072-application) method.
Your application also needs to be set up to handle universal links. Refer to [Apple's documentation](https://developer.apple.com/documentation/xcode/supporting-universal-links-in-your-app) to ensure your application is configured correctly for universal links.
**Warning:**
Universal link forwarding requires access to the application entitlements. When running the application in a simulator, these entitlements are not directly available and universal links are not forwarded to the system handlers.
To add support to simulator builds, you can add the application `.entitlements` file to the _Copy Bundle Resources_ build phase. See [`forwardUniversalLinks`](https://braze-inc.github.io/braze-swift-sdk/documentation/brazekit/braze/configuration-swift.class/forwarduniversallinks) documentation for more details.
**Note:**
The SDK does not query your domains' `apple-app-site-association` file. It performs the differentiation between universal links and regular URLs by looking at the domain name only. As a result, the SDK does not respect any exclusion rule defined in the `apple-app-site-association` per [Supporting associated domains](https://developer.apple.com/documentation/xcode/supporting-associated-domains).
## Examples
### BrazeDelegate
Here's an example using `BrazeDelegate`. For more information, see [Braze Swift SDK reference](https://braze-inc.github.io/braze-swift-sdk/documentation/brazekit/brazedelegate).
```swift
func braze(_ braze: Braze, shouldOpenURL context: Braze.URLContext) -> Bool {
if context.url.host == "MY-DOMAIN.com" {
// Custom handle link here
return false
}
// Let Braze handle links otherwise
return true
}
```
```objc
- (BOOL)braze:(Braze *)braze shouldOpenURL:(BRZURLContext *)context {
if ([[context.url.host lowercaseString] isEqualToString:@"MY-DOMAIN.com"]) {
// Custom handle link here
return NO;
}
// Let Braze handle links otherwise
return YES;
}
```
## Prerequisites
Before you can implement deep linking into your Flutter iOS app, configure your URL schemes in your `Info.plist` file. For details, refer to [Deep linking for iOS](https://www.braze.com/docs/de/de/developer_guide/push_notifications/deep_linking/?sdktab=swift#url-schemes).
For Flutter Android, no additional native setup is required if you're handling deep links on the Dart layer. The minimal implementation shown in this article is sufficient for most Flutter apps.
If you need advanced native-layer link handling (such as custom `IBrazeDeeplinkHandler` implementations), refer to [Deep linking for Android](https://www.braze.com/docs/de/de/developer_guide/push_notifications/deep_linking/?sdktab=android).
## Implementing deep linking
### Step 1: Set up Flutter's built-in handling
1. In your Xcode project, open your `Info.plist` file.
2. Add a new key-value pair.
3. Set the key to `FlutterDeepLinkingEnabled`.
4. Set the type to `Boolean`.
5. Set the value to `YES`.

1. In your Android Studio project, open your `AndroidManifest.xml` file.
2. Locate `.MainActivity` in your `activity` tags.
3. Within the `activity` tag, add the following `meta-data` tag:
```xml
```
### Step 2: Forward data to the Dart layer (optional)
You can use native, first-party, or third-party link handling for complex use cases, such as sending a user to a specific location in your app, or calling a specific function.
#### Example: Deep linking to an alert dialog
**Note:**
While the following example does not rely on additional packages, you can use a similar approach to implement native, first-party, or third-party packages, such as [`go_router`](https://pub.dev/packages/go_router). Additional Dart code may be required.
First, a method channel is used in the native layer to forward the deep link's URL string data to the Dart layer.
```swift
extension AppDelegate {
// Delegate method for handling custom scheme links.
override func application(_ app: UIApplication, open url: URL, options: [UIApplication.OpenURLOptionsKey : Any] = [:]) -> Bool {
forwardURL(url)
return true
}
// Delegate method for handling universal links.
override func application(_ application: UIApplication, continue userActivity: NSUserActivity, restorationHandler: @escaping ([UIUserActivityRestoring]?) -> Void) -> Bool {
guard userActivity.activityType == NSUserActivityTypeBrowsingWeb,
let url = userActivity.webpageURL else {
return false
}
forwardURL(url)
return true
}
private func forwardURL(_ url: URL) {
guard let controller: FlutterViewController = window?.rootViewController as? FlutterViewController else { return }
let deepLinkChannel = FlutterMethodChannel(name: "deepLinkChannel", binaryMessenger: controller.binaryMessenger)
deepLinkChannel.invokeMethod("receiveDeepLink", arguments: url.absoluteString)
}
}
```
```kotlin
class MainActivity : FlutterActivity() {
override fun onCreate(savedInstanceState: Bundle?) {
super.onCreate(savedInstanceState)
handleDeepLink(intent)
}
override fun onNewIntent(intent: Intent) {
super.onNewIntent(intent)
handleDeepLink(intent)
}
private fun handleDeepLink(intent: Intent) {
val binaryMessenger = flutterEngine?.dartExecutor?.binaryMessenger
if (intent?.action == Intent.ACTION_VIEW && binaryMessenger != null) {
MethodChannel(binaryMessenger, "deepLinkChannel")
.invokeMethod("receivedDeepLink", intent?.data.toString())
}
}
}
```
Next, a callback function is used in the Dart layer to display an alert dialogue using the URL string data sent previously.
```dart
MethodChannel('deepLinkChannel').setMethodCallHandler((call) async {
deepLinkAlert(call.arguments, context);
});
void deepLinkAlert(String link, BuildContext context) {
showDialog(
context: context,
builder: (BuildContext context) {
return AlertDialog(
title: Text("Deep Link Alert"),
content: Text("Opened with deep link: $link"),
actions: [
TextButton(
child: Text("Close"),
onPressed: () {
Navigator.of(context).pop();
},
),
],
);
},
);
}
```
## Prerequisites
Before you can use this feature, you'll need to [integrate the Cordova Braze SDK](https://www.braze.com/docs/de/de/developer_guide/sdk_integration/?sdktab=cordova).
## Enabling push deep linking
By default, the Braze Cordova SDK doesn't automatically handle push deep linking from notifications. To enable push deep linking, add the following preferences to the `platform` element in your project's `config.xml` file.
```xml
```
```xml
```
To customize back stack behavior when deep links are followed, you can also add these optional preferences:
```xml
```
For a full list of available push configuration options, see [Optional configurations](https://www.braze.com/docs/de/de/developer_guide/sdk_integration?sdktab=cordova#optional).
# Leitfaden für Deeplinking unter iOS
Source: /docs/de/developer_guide/push_notifications/ios_deep_linking_guide/index.md
# Leitfaden für Deeplinking unter iOS {#ios-deep-linking-guide}
> Dieser Leitfaden unterstützt Sie bei der Auswahl der geeigneten Deeplinking-Strategie für Ihre iOS-App – abhängig davon, welchen Messaging-Kanal Sie verwenden und ob Sie einen Drittanbieter für Links wie Branch nutzen.
Für Details zur Implementierung siehe [Deeplinking](https://www.braze.com/docs/de/de/developer_guide/push_notifications/deep_linking?sdktab=swift). Informationen zur Fehlerbehebung finden Sie unter [Fehlerbehebung bei Deeplinking](https://www.braze.com/docs/de/de/developer_guide/push_notifications/deep_linking_troubleshooting).
## Auswahl eines Link-Typs {#choosing-a-link-type}
Es gibt drei Möglichkeiten, Links aus Braze-Nachrichten in Ihrer iOS-App zu verarbeiten. Jede funktioniert anders und eignet sich für unterschiedliche Kanäle und Anwendungsfälle.
| Link-Typ | Beispiel | Am besten geeignet für | Öffnet ohne installierte App? |
|---|---|---|---|
| **Angepasstes Schema** | `myapp://products/123` | Push-Benachrichtigungen, In-App-Nachrichten, Content Cards | Nein – Link funktioniert nicht |
| **Universeller Link** | `https://myapp.com/products/123` | E-Mail, SMS, Kanäle mit Klick-Tracking | Ja – Fallback auf das Internet |
| **Web-URL in der App öffnen** | Jede `https://`-URL | Anzeige von Webinhalten in einem modalen WebView | Nicht zutreffend – wird im WebView angezeigt |
{: .reset-td-br-1 .reset-td-br-2 .reset-td-br-3 .reset-td-br-4 aria-label="Auswahl eines Link-Typs" }
### Deeplinks mit angepasstem Schema {#custom-scheme-deep-links}
Deeplinks mit angepasstem Schema (zum Beispiel `myapp://products/123`) öffnen Ihre App direkt auf einem bestimmten Bildschirm. Sie stellen die einfachste Option für Kanäle dar, bei denen Links nicht von Dritten verändert werden.
**Verwenden Sie Deeplinks mit angepasstem Schema, wenn:**
- Sie Push-Benachrichtigungen, In-App-Nachrichten oder Content Cards versenden
- Der Link nicht funktionieren muss, falls die App nicht installiert ist
- Sie kein Klick-Tracking benötigen (E-Mail-ESP-Link-Wrapping)
**Verwenden Sie keine Deeplinks mit angepasstem Schema, wenn:**
- Sie E-Mails versenden – ESPs verpacken Links für das Klick-Tracking, wodurch angepasste Schemata nicht mehr funktionieren
- Sie den Link als Fallback auf eine Webseite benötigen, falls die App nicht installiert ist
### Universelle Links {#universal-links}
Universelle Links (zum Beispiel `https://myapp.com/products/123`) sind Standard-HTTPS-URLs, die iOS an Ihre App weiterleiten kann, anstatt sie im Browser zu öffnen. Sie erfordern eine serverseitige Konfiguration (eine AASA-Datei) und eine appseitige Einrichtung (Berechtigung für zugehörige Domains).
**Verwenden Sie universelle Links, wenn:**
- Sie E-Mails versenden. Ihr ESP verpackt Links für das Klick-Tracking, daher müssen die Links HTTPS sein.
- Sie SMS oder andere Kanäle nutzen, bei denen Links umgebrochen oder gekürzt werden.
- Sie den Link als Fallback auf eine Webseite benötigen, wenn die App nicht installiert ist.
- Sie einen Drittanbieter für Verlinkungen wie Branch oder AppsFlyer nutzen.
**Verwenden Sie keine universellen Links, wenn:**
- Sie lediglich Deeplinks aus Push-Benachrichtigungen, In-App-Nachrichten oder Content Cards benötigen. Angepasste Schemata sind einfacher.
### „Web-URL in der App öffnen“ {#open-web-url-inside-app}
Diese Option öffnet eine Webseite in einem modalen WebView innerhalb Ihrer App. Dies wird vollständig vom Braze SDK mithilfe von `Braze.WebViewController` abgewickelt – Sie müssen keinen Code für die URL-Verarbeitung schreiben.
**Verwenden Sie „Web-URL in der App öffnen“, wenn:**
- Sie eine Webseite (z. B. eine Aktion oder einen Artikel) anzeigen möchten, ohne Ihre App zu verlassen.
- Die URL eine Standard-HTTPS-Webseite ist und kein Deeplink zu einem bestimmten App-Bildschirm.
**Verwenden Sie „Web-URL in der App öffnen“ nicht, wenn:**
- Sie zu einer bestimmten Ansicht in Ihrer App navigieren müssen. Verwenden Sie stattdessen ein angepasstes Schema oder einen universellen Link.
- Die Webseite eine Authentifizierung erfordert oder über Content-Security-Policy-Header verfügt, die die Einbettung verhindern.
## Was Sie für jeden Link-Typ benötigen {#what-you-need-for-each-link-type}
### Deeplinks mit angepasstem Schema
| Anforderung | Details |
|---|---|
| AASA-Datei | Nicht erforderlich |
| `Info.plist` | Registrieren Sie Ihr Schema unter `CFBundleURLTypes` und fügen Sie es zu `LSApplicationQueriesSchemes` hinzu |
| App-Delegate-Methode | Implementieren Sie `application(_:open:options:)`, um die URL zu parsen und die Navigation durchzuführen |
| Konfiguration des Braze SDK | Keine – das SDK öffnet standardmäßig URLs mit angepasstem Schema |
{: .reset-td-br-1 .reset-td-br-2 aria-label="Deeplinks mit angepasstem Schema" }
### Universelle Links
| Anforderung | Details |
|---|---|
| AASA-Datei | Erforderlich – hosten Sie sie unter `https://yourdomain.com/.well-known/apple-app-site-association` |
| Zugehörige Domains | Fügen Sie `applinks:yourdomain.com` in Xcode unter **Signing & Capabilities** hinzu |
| App-Delegate-Methode | Implementieren Sie `application(_:continue:restorationHandler:)`, um `NSUserActivity` zu verarbeiten |
| Konfiguration des Braze SDK | Setzen Sie `configuration.forwardUniversalLinks = true` |
| BrazeDelegate (optional) | Implementieren Sie `braze(_:shouldOpenURL:)` für angepasstes Routing (z. B. Branch) |
{: .reset-td-br-1 .reset-td-br-2 aria-label="Universelle Links" }
**Important:**
Wenn Sie E-Mails über Braze versenden, verpackt Ihr ESP (SendGrid, SparkPost oder Amazon SES) Links in eine Klick-Tracking-Domain. Sie müssen die AASA-Datei auch auf Ihrer Klick-Tracking-Domain hosten, nicht nur auf Ihrer primären Domain. Für die vollständige Einrichtung siehe [Universelle Links und App-Links](https://www.braze.com/docs/de/de/user_guide/channels/email/customize/universal_links_and_app_links).
### „Web-URL in der App öffnen“
| Anforderung | Details |
|---|---|
| AASA-Datei | Nicht erforderlich |
| App-Delegate-Methode | Nicht erforderlich – das SDK übernimmt dies automatisch |
| Konfiguration des Braze SDK | Keine – wählen Sie **Open Web URL Inside App** im Campaign-Composer aus |
{: .reset-td-br-1 .reset-td-br-2 aria-label="„Web-URL in der App öffnen“" }
## Wann Sie eine AASA-Datei benötigen {#when-aasa}
Eine Apple App Site Association (AASA)-Datei ist nur erforderlich, wenn Sie **universelle Links** verwenden. Sie teilt iOS mit, welche URLs Ihre App verarbeiten kann.
Sie benötigen eine AASA-Datei, wenn:
- Sie Deeplinks in E-Mail-Campaigns versenden (da ESPs Links in HTTPS-Klick-Tracking-URLs einbinden).
- Sie Deeplinks in SMS-Campaigns versenden (da Links möglicherweise zu HTTPS-URLs gekürzt werden).
- Sie Branch, AppsFlyer oder einen anderen Linking-Anbieter verwenden (da diese ihre eigenen HTTPS-Domains nutzen).
- Sie universelle Links aus Push-Benachrichtigungen, In-App-Nachrichten oder Content Cards verwenden (weniger verbreitet, aber möglich mit `forwardUniversalLinks = true`).
Sie benötigen keine AASA-Datei, wenn:
- Sie ausschließlich Deeplinks mit angepasstem Schema (z. B. `myapp://`) aus Push-Benachrichtigungen, In-App-Nachrichten oder Content Cards verwenden.
- Sie die Option **Web-URL in der App öffnen** nutzen.
Anweisungen zur AASA-Einrichtung finden Sie unter [Universelle Links und App-Links](https://www.braze.com/docs/de/de/user_guide/message_building_by_channel/email/universal_links#setting-up-universal-links-and-app-links).
## Wann Sie App-Code zur Verarbeitung von Links benötigen {#when-app-code}
Welche Delegate-Methode Sie implementieren, hängt von der Art des verwendeten Links ab:
| Delegate-Methode | Verarbeitet | Wann implementieren |
|---|---|---|
| `application(_:open:options:)` | Deeplinks mit angepasstem Schema (`myapp://`) | Sie verwenden Deeplinks mit angepasstem Schema aus einem beliebigen Kanal |
| `application(_:continue:restorationHandler:)` | Universelle Links (`https://`) | Sie verwenden universelle Links aus E-Mail, SMS oder mit `forwardUniversalLinks = true` |
| `BrazeDelegate.braze(_:shouldOpenURL:)` | Alle vom SDK geöffneten URLs | Sie benötigen eine angepasste Routing-Logik (z. B. Branch, bedingte Verarbeitung, Analytics) |
{: .reset-td-br-1 .reset-td-br-2 .reset-td-br-3 aria-label="Wann Sie App-Code zur Verarbeitung von Links benötigen" }
**Tip:**
Wenn Sie einen Drittanbieter für Verlinkungen wie Branch verwenden, implementieren Sie `BrazeDelegate.braze(_:shouldOpenURL:)`, um URLs abzufangen und an das SDK des Anbieters weiterzuleiten. Ein vollständiges Beispiel finden Sie unter [Branch für Deeplinking](https://www.braze.com/docs/de/de/partners/message_orchestration/deeplinking/branch_for_deeplinking).
## Verwendung von Branch mit Braze {#branch}
Wenn Sie [Branch](https://www.braze.com/docs/de/de/partners/message_orchestration/deeplinking/branch_for_deeplinking) als Ihren Linking-Anbieter verwenden, sind für Ihre Einrichtung einige zusätzliche Schritte erforderlich, die über die Standardkonfiguration für universelle Links hinausgehen:
1. **Branch SDK**: Integrieren Sie das Branch SDK gemäß der [Dokumentation von Branch](https://help.branch.io/developers-hub/docs/native-sdks-overview).
2. **Zugehörige Domains**: Fügen Sie Ihre Branch-Domain (z. B. `applinks:yourapp.app.link`) in Xcode unter **Signing & Capabilities** hinzu.
3. **BrazeDelegate**: Implementieren Sie `braze(_:shouldOpenURL:)`, um Branch-Links an das Branch SDK weiterzuleiten, anstatt sie direkt von Braze verarbeiten zu lassen.
4. **Universelle Links weiterleiten**: Setzen Sie `configuration.forwardUniversalLinks = true` in Ihrer Braze-SDK-Konfiguration.
Implementierungsdetails und Anleitungen zur Fehlerbehebung finden Sie unter [Branch für Deeplinking](https://www.braze.com/docs/de/de/partners/message_orchestration/deeplinking/branch_for_deeplinking).
# Fehlerbehebung bei Deeplinking
Source: /docs/de/developer_guide/push_notifications/deep_linking_troubleshooting/index.md
# Fehlerbehebung bei Deeplinking {#deep-linking-troubleshooting}
> Diese Seite behandelt häufige Probleme mit Deeplinking unter iOS und deren Diagnose. Hilfe bei der Auswahl des richtigen Linktyps finden Sie im [iOS-Deeplinking-Leitfaden](https://www.braze.com/docs/de/de/developer_guide/push_notifications/ios_deep_linking_guide). Für Details zur Implementierung siehe [Deeplinking](https://www.braze.com/docs/de/de/developer_guide/push_notifications/deep_linking?sdktab=swift).
## Deeplink mit benutzerdefiniertem Schema öffnet nicht die korrekte Ansicht {#custom-scheme-deep-link-doesnt-open-the-correct-view}
Wenn ein Deeplink mit benutzerdefiniertem Schema (z. B. `myapp://products/123`) Ihre App öffnet, aber nicht zum gewünschten Bildschirm navigiert:
1. **Überprüfen Sie, ob das Schema registriert ist.** Prüfen Sie in Xcode, ob Ihr Schema unter `CFBundleURLTypes` in `Info.plist` aufgeführt ist.
2. **Überprüfen Sie Ihren Handler.** Setzen Sie einen Haltepunkt in `application(_:open:options:)`, um zu bestätigen, dass die Methode aufgerufen wird, und inspizieren Sie den `url`-Parameter.
3. **Testen Sie den Link unabhängig.** Führen Sie den folgenden Befehl im Terminal aus, um den Deeplink außerhalb von Braze zu testen:
```bash
xcrun simctl openurl booted "myapp://products/123"
```
Wenn der Link hier nicht funktioniert, liegt das Problem in der URL-Verarbeitung Ihrer App – nicht bei Braze.
4. **Überprüfen Sie das URL-Format.** Stellen Sie sicher, dass die URL in Ihrer Campaign mit den Erwartungen Ihres Handlers übereinstimmt. Häufige Fehler sind fehlende Pfadkomponenten oder falsche Groß-/Kleinschreibung.
## Universal Link öffnet in Safari statt in der App {#universal-link-opens-in-safari-instead-of-the-app}
Wenn ein Universal Link (z. B. `https://myapp.com/products/123`) in Safari statt in Ihrer App geöffnet wird:
### Überprüfen Sie die Associated-Domains-Berechtigung {#verify-the-associated-domains-entitlement}
Öffnen Sie in Xcode Ihr App-Ziel > **Signing & Capabilities** und prüfen Sie, ob `applinks:yourdomain.com` unter **Associated Domains** aufgeführt ist.
### Validieren Sie die AASA-Datei {#validate-the-aasa-file}
Ihre Apple App Site Association (AASA)-Datei muss an einem der folgenden Orte gehostet werden:
- `https://yourdomain.com/.well-known/apple-app-site-association`
- `https://yourdomain.com/apple-app-site-association`
Überprüfen Sie Folgendes:
- Die Datei wird über HTTPS mit einem gültigen Zertifikat bereitgestellt.
- Der `Content-Type` ist `application/json`.
- Die Dateigröße liegt unter 128 KB.
- Die `appID` stimmt mit Ihrer Team-ID und Bundle-ID überein (z. B. `ABCDE12345.com.example.myapp`).
- Das `paths`- oder `components`-Array enthält die erwarteten URL-Muster.
Sie können Ihre AASA mit dem [Suchvalidierungstool von Apple](https://search.developer.apple.com/appsearch-validation-tool/) oder durch Ausführen des folgenden Befehls validieren:
```bash
swcutil dl -d yourdomain.com
```
### Überprüfen Sie den `AppDelegate` {#check-the-appdelegate}
Stellen Sie sicher, dass `application(_:continue:restorationHandler:)` in Ihrem `AppDelegate` implementiert ist und die `NSUserActivity` korrekt verarbeitet:
```swift
func application(_ application: UIApplication,
continue userActivity: NSUserActivity,
restorationHandler: @escaping ([UIUserActivityRestoring]?) -> Void) -> Bool {
guard userActivity.activityType == NSUserActivityTypeBrowsingWeb,
let url = userActivity.webpageURL else {
return false
}
// Handle the URL
return true
}
```
### Überprüfen Sie die Braze-SDK-Konfiguration {#verify-braze-sdk-configuration}
Wenn Sie Universal Links aus Push-Benachrichtigungen, In-App-Nachrichten oder Content Cards von Braze verwenden, stellen Sie sicher, dass `forwardUniversalLinks` aktiviert ist:
```swift
let configuration = Braze.Configuration(apiKey: "", endpoint: "")
configuration.forwardUniversalLinks = true
```
**Note:**
Die Weiterleitung von Universal Links erfordert Zugriff auf die Anwendungsberechtigungen. Bei der Ausführung in einem Simulator sind diese Berechtigungen nicht direkt verfügbar. Um in einem Simulator zu testen, fügen Sie die `.entitlements`-Datei zur Build-Phase **Copy Bundle Resources** hinzu.
### Überprüfen Sie das Problem mit langem Drücken {#check-for-the-long-press-issue}
Wenn Sie einen Universal Link lange gedrückt halten und **Öffnen** auswählen, kann iOS die Universal-Link-Zuordnung für diese Domain „aufheben“. Dies ist ein bekanntes iOS-Verhalten. Um es zurückzusetzen, drücken Sie erneut lange auf den Link und wählen Sie **In [App-Name] öffnen**.
## Deeplink aus E-Mail öffnet die App nicht {#deep-link-from-email-doesnt-open-the-app}
E-Mail-Links werden durch das Klick-Tracking-System Ihres ESP geleitet, das Links in eine Tracking-Domain einbettet (z. B. `https://click.yourdomain.com/...`). Damit Universal Links aus E-Mails funktionieren, müssen Sie die AASA-Datei auf Ihrer Klick-Tracking-Domain konfigurieren – nicht nur auf Ihrer primären Domain.
### Überprüfen Sie die AASA der Klick-Tracking-Domain {#verify-click-tracking-domain-aasa}
1. Identifizieren Sie Ihre Klick-Tracking-Domain in Ihren ESP-Einstellungen (SendGrid, SparkPost oder Amazon SES).
2. Hosten Sie die AASA-Datei unter `https://your-click-tracking-domain/.well-known/apple-app-site-association`.
3. Stellen Sie sicher, dass die AASA-Datei auf der Klick-Tracking-Domain dieselbe `appID` und gültige Pfadmuster enthält.
Für ESP-spezifische Einrichtungsanweisungen siehe [Universal Links und App Links](https://www.braze.com/docs/de/de/user_guide/channels/email/customize/universal_links_and_app_links).
### Überprüfen Sie die Weiterleitungskette {#check-the-redirect-chain}
Einige ESPs führen eine Weiterleitung von der Klick-Tracking-URL zu Ihrer endgültigen URL durch. Universal Links funktionieren nur, wenn iOS die *ursprüngliche* Domain (die Klick-Tracking-Domain) als mit Ihrer App verknüpft erkennt. Wenn die Weiterleitung die AASA-Prüfung umgeht, wird der Link in Safari geöffnet.
Zum Testen:
1. Senden Sie sich selbst eine Test-E-Mail.
2. Halten Sie den Link gedrückt und inspizieren Sie die URL – dies ist die Klick-Tracking-URL.
3. Überprüfen Sie, ob diese Domain eine gültige AASA-Datei hat.
## Deeplink funktioniert über Push, aber nicht über In-App-Nachrichten (oder umgekehrt) {#deep-link-works-from-push-but-not-from-in-app-messages-or-vice-versa}
### Überprüfen Sie den BrazeDelegate {#check-the-brazedelegate}
Wenn Sie `BrazeDelegate.braze(_:shouldOpenURL:)` implementieren, stellen Sie sicher, dass Links kanalübergreifend konsistent verarbeitet werden. Der `context`-Parameter enthält den Quellkanal. Prüfen Sie die bedingte Logik, die möglicherweise versehentlich Links aus bestimmten Kanälen herausfiltert.
### Aktivieren Sie die ausführliche Protokollierung {#enable-verbose-logging}
[Aktivieren Sie die ausführliche Protokollierung](https://www.braze.com/docs/de/de/developer_guide/sdk_integration/verbose_logging) und reproduzieren Sie das Problem. Suchen Sie nach dem `Opening`-Protokolleintrag:
```
Opening '':
- channel:
- useWebView:
- isUniversalLink:
```
Vergleichen Sie die Protokollausgabe des funktionierenden Kanals mit der des nicht funktionierenden Kanals. Unterschiede bei `useWebView` oder `isUniversalLink` zeigen, wie das SDK den Link unterschiedlich interpretiert.
### Überprüfen Sie angepasste Anzeige-Delegates {#check-for-custom-display-delegates}
Wenn Sie einen angepassten In-App-Nachrichten-Anzeige-Delegaten oder einen Content-Card-Klick-Handler verwenden, stellen Sie sicher, dass dieser Link-Ereignisse korrekt an das Braze SDK zur Verarbeitung weiterleitet.
## „Web-URL in App öffnen“ zeigt eine leere oder fehlerhafte Seite {#open-web-url-inside-app-shows-a-blank-or-broken-page}
Wenn die Auswahl von **Open Web URL Inside App** zu einer leeren oder fehlerhaften WebView führt:
1. **Überprüfen Sie, ob die URL HTTPS verwendet.** Die WebView des SDK erfordert ATS-konforme URLs. HTTP-Links schlagen ohne Fehlermeldung fehl.
2. **Überprüfen Sie die Content-Security-Policy-Header.** Wenn die Zielwebseite `X-Frame-Options: DENY` oder eine restriktive `Content-Security-Policy` setzt, wird die Darstellung in einer WebView blockiert.
3. **Überprüfen Sie Weiterleitungen zu benutzerdefinierten Schemata.** Wenn die Webseite zu einem benutzerdefinierten Schema weiterleitet (z. B. `myapp://`), kann die WebView dies nicht verarbeiten.
4. **Testen Sie die URL in Safari.** Wenn die Seite in Safari auf dem Gerät nicht geladen wird, wird sie auch in der WebView nicht geladen.
## Fehlerbehebung bei Branch mit Braze {#branch}
Wenn Sie [Branch](https://www.braze.com/docs/de/de/partners/message_orchestration/deeplinking/branch_for_deeplinking) als Ihren Linking-Anbieter verwenden:
### Überprüfen Sie, ob der BrazeDelegate an Branch weiterleitet {#verify-the-brazedelegate-routes-to-branch}
Ihr `BrazeDelegate` muss Branch-Links abfangen und an das Branch SDK weiterleiten. Überprüfen Sie Folgendes:
```swift
func braze(_ braze: Braze, shouldOpenURL context: Braze.URLContext) -> Bool {
if let host = context.url.host, host.contains("app.link") {
// Route to Branch SDK
Branch.getInstance.handleDeepLink(context.url)
return false
}
// Let Braze handle other links
return true
}
```
Wenn `shouldOpenURL` für Branch-Links `true` zurückgibt, verarbeitet Braze diese direkt, anstatt sie an Branch weiterzuleiten.
### Überprüfen Sie die Branch-Link-Domain {#check-branch-link-domain}
Stellen Sie sicher, dass die Branch-Domain in Ihrem `BrazeDelegate` mit Ihrer tatsächlichen Branch-Link-Domain übereinstimmt. Branch verwendet mehrere Domain-Formate:
- `yourapp.app.link` (Standard)
- `yourapp-alternate.app.link` (alternativ)
- Angepasste Domains (sofern im Branch-Dashboard konfiguriert)
### Aktivieren Sie die Protokollierung beider SDKs {#enable-both-sdks-logging}
Um festzustellen, wo der Link in der Kette unterbrochen wird:
1. Aktivieren Sie die [ausführliche Protokollierung von Braze](https://www.braze.com/docs/de/de/developer_guide/sdk_integration/verbose_logging) – suchen Sie nach `Opening '':`-Einträgen, um zu überprüfen, ob das SDK den Link erhalten hat.
2. Aktivieren Sie den [Branch-Testmodus](https://help.branch.io/developers-hub/docs/ios-basic-integration#test-deep-linking) – überprüfen Sie das Branch-Dashboard auf Link-Klick-Ereignisse.
1. Aktivieren Sie die [ausführliche Protokollierung von Braze](https://www.braze.com/docs/de/de/developer_guide/sdk_integration/verbose_logging). Suchen Sie nach `Opening '':`-Einträgen, um sicherzustellen, dass das SDK den Link erhalten hat.
2. Aktivieren Sie den [Branch-Testmodus](https://help.branch.io/developers-hub/docs/ios-basic-integration#test-deep-linking). Überprüfen Sie das Branch-Dashboard auf Link-Klick-Ereignisse.
3. Wenn Braze den Link protokolliert, Branch jedoch keinen Klick erkennt, liegt das Problem wahrscheinlich an der `BrazeDelegate`-Weiterleitungslogik.
### Überprüfen Sie die Branch-Dashboard-Konfiguration {#check-branch-dashboard-configuration}
Überprüfen Sie im Branch-Dashboard Folgendes:
- Die **Bundle-ID** und **Team-ID** Ihrer App stimmen mit Ihrem Xcode-Projekt überein.
- Ihre **Associated Domains** enthalten die Branch-Link-Domain.
- Ihre Branch-AASA-Datei ist gültig (Branch hostet diese automatisch auf `app.link`-Domains).
### Testen Sie Branch-Links unabhängig {#test-branch-links-independently}
Testen Sie den Branch-Link außerhalb von Braze, um das Problem einzugrenzen:
1. Öffnen Sie den Branch-Link in Safari auf Ihrem Gerät. Wenn die App nicht geöffnet wird, liegt das Problem in Ihrer Branch- oder AASA-Konfiguration – nicht bei Braze.
2. Fügen Sie den Branch-Link in die Notizen-App ein und tippen Sie darauf. Universal Links funktionieren über die Notizen-App zuverlässiger als über die Adressleiste von Safari.
## Allgemeine Tipps zur Fehlerbehebung {#general-debugging-tips}
### Verwenden Sie die ausführliche Protokollierung {#use-verbose-logging}
[Aktivieren Sie die ausführliche Protokollierung](https://www.braze.com/docs/de/de/developer_guide/sdk_integration/verbose_logging), um genau zu sehen, wie das SDK Links verarbeitet. Wichtige Einträge, auf die Sie achten sollten:
| Protokolleintrag | Bedeutung |
|---|---|
| `Opening '': - channel: notification` | Das SDK verarbeitet einen Link aus einer Push-Benachrichtigung |
| `Opening '': - channel: inAppMessage` | Das SDK verarbeitet einen Link aus einer In-App-Nachricht |
| `Opening '': - channel: contentCard` | Das SDK verarbeitet einen Link aus einer Content Card |
| `useWebView: true` | Das SDK öffnet die URL in der In-App-WebView |
| `isUniversalLink: true` | Das SDK hat die URL als Universal Link identifiziert |
{: .reset-td-br-1 .reset-td-br-2 aria-label="Ausführliche Protokollierung verwenden" }
Weitere Informationen zum Lesen dieser Protokolle finden Sie unter [Ausführliche Protokolle lesen](https://www.braze.com/docs/de/de/developer_guide/sdk_integration/verbose_logging).
### Testen Sie Links isoliert {#test-links-in-isolation}
Bevor Sie über Braze testen, überprüfen Sie, ob Ihr Deeplink oder Universal Link eigenständig funktioniert:
- **Benutzerdefiniertes Schema**: Führen Sie `xcrun simctl openurl booted "myapp://path"` im Terminal aus.
- **Universal Link**: Fügen Sie die URL in die Notizen-App auf einem physischen Gerät ein und tippen Sie darauf. Testen Sie nicht über die Adressleiste von Safari, da iOS eingegebene URLs anders behandelt als angetippte Links.
- **Branch-Link**: Öffnen Sie den Branch-Link über die Notizen-App auf einem Gerät.
### Testen Sie auf einem physischen Gerät {#test-on-a-physical-device}
Universal Links werden im iOS-Simulator nur eingeschränkt unterstützt. Testen Sie stets auf einem physischen Gerät, um genaue Ergebnisse zu erzielen. Falls Sie in einem Simulator testen müssen, fügen Sie die `.entitlements`-Datei zur Build-Phase **Copy Bundle Resources** hinzu.
# Richten Sie stille Push-Benachrichtigungen für das Braze SDK ein.
Source: /docs/de/developer_guide/push_notifications/silent/index.md
# Stille Push-Benachrichtigungen
> Erfahren Sie, wie Sie stille Push-Benachrichtigungen für das Braze SDK einrichten können.
## Prerequisites
Before you can use this feature, you'll need to [integrate the Android Braze SDK](https://www.braze.com/docs/de/de/developer_guide/sdk_integration/?sdktab=android). You'll also need to [set up push notifications](https://www.braze.com/docs/de/de/developer_guide/push_notifications/?sdktab=android).
## Setting up silent push notifications
Silent notifications are available through the Braze [Messaging API](https://www.braze.com/docs/de/de/api/endpoints/messaging/). To take advantage of them, you need to set the `send_to_sync` flag to `true` within the [Android push object](https://www.braze.com/docs/de/de/api/objects_filters/messaging/android_object/) and ensure there are no `title` or `alert` fields set as it will cause errors when used alongside `send_to_sync`—however, you can include data `extras` within the object.
## Prerequisites
Before you can use this feature, you'll need to [integrate the Swift Braze SDK](https://www.braze.com/docs/de/de/developer_guide/sdk_integration/?sdktab=swift). You'll also need to [set up push notifications](https://www.braze.com/docs/de/de/developer_guide/push_notifications/?sdktab=swift).
## iOS limitations
The iOS operating system may gate notifications for some features. Note that if you are experiencing difficulties with these features, the iOS's silent notifications gate might be the cause. For more details, refer to Apple's [instance method](https://developer.apple.com/documentation/uikit/uiapplicationdelegate/1623013-application) and [unreceived notifications](https://developer.apple.com/library/content/technotes/tn2265/_index.html#//apple_ref/doc/uid/DTS40010376-CH1-TNTAG23) documentation.
## Setting up silent push notifications
To use silent push notifications to trigger background work, you must configure your app to receive notifications even when it is in the background. To do this, add the Background Modes capability using the **Signing & Capabilities** pane to the main app target in Xcode. Select the **Remote notifications** checkbox.

Even with the remote notifications background mode enabled, the system will not launch your app into the background if the user has force-quit the application. The user must explicitly launch the application or reboot the device before the app can be automatically launched into the background by the system.
For more information, refer to [pushing background updates](https://developer.apple.com/documentation/usernotifications/setting_up_a_remote_notification_server/pushing_background_updates_to_your_app) and the `application:didReceiveRemoteNotification:fetchCompletionHandler:` [documentation](https://developer.apple.com/library/ios/documentation/UIKit/Reference/UIApplicationDelegate_Protocol/index.html#//apple_ref/occ/intfm/UIApplicationDelegate/application:didReceiveRemoteNotification:fetchCompletionHandler:).
## Sending silent push notifications
To send a silent push notification, set the `content-available` flag to `1` in a push notification payload.
**Note:**
What Apple calls a remote notification is just a normal push notification with the `content-available` flag set.
The `content-available` flag can be set in the Braze dashboard as well as within our [Apple push object](https://www.braze.com/docs/de/de/api/objects_filters/messaging/apple_object/) in the [messaging API](https://www.braze.com/docs/de/de/api/endpoints/messaging/).
**Warning:**
Attaching both a title and body with `content-available=1` is not recommended because it can lead to undefined behavior. To ensure that a notification is truly silent, exclude both the title and body when setting the `content-available` flag to `1.` For further details, refer to the official [Apple documentation on background updates](https://developer.apple.com/documentation/usernotifications/setting_up_a_remote_notification_server/pushing_background_updates_to_your_app).

When sending a silent push notification, you might also want to include some data in the notification payload, so your application can reference the event. This could save you a few networking requests and increase the responsiveness of your app.
## Ignoring internal push notifications
Braze uses silent push notifications to internally handle certain advanced features, such as uninstall tracking. If your app takes automatic actions on application launches or background pushes, consider gating that activity so it's not triggered by any internal push notifications.
For example, if you have logic that calls your servers for new content upon every background push or application launch, you may want to prevent triggering Braze’s internal pushes to avoid unnecessary network traffic. Because Braze sends certain kinds of internal pushes to all users at approximately the same time, significant server load may occur if on-launch network calls from internal pushes are not gated.
### Step 1: Check your app for automatic actions
Check your application for automatic actions in the following places and update your code to ignore Braze’s internal pushes:
1. **Push Receivers.** Background push notifications will call `application:didReceiveRemoteNotification:fetchCompletionHandler:` on the `UIApplicationDelegate`.
2. **Application Delegate.** Background pushes can launch [suspended](https://developer.apple.com/documentation/uikit/app_and_environment/managing_your_app_s_life_cycle) apps into the background, triggering the `application:willFinishLaunchingWithOptions:` and `application:didFinishLaunchingWithOptions:` methods on your `UIApplicationDelegate`. Check the `launchOptions` of these methods to determine if the application has been launched from a background push.
### Step 2: Use the internal push utility method
You can use the static utility method in `Braze.Notifications` to check if your app has received or was launched by a Braze internal push. [`Braze.Notifications.isInternalNotification(_:)`](https://braze-inc.github.io/braze-swift-sdk/documentation/brazekit/braze/notifications-swift.class/isinternalnotification(_:)) returns `true` for all Braze internal push notifications, which include uninstall tracking and [Feature flags](https://www.braze.com/docs/de/de/user_guide/messaging/feature_flags/) sync notifications.
For example:
```swift
func application(_ application: UIApplication,
didReceiveRemoteNotification userInfo: [AnyHashable : Any],
fetchCompletionHandler completionHandler: @escaping (UIBackgroundFetchResult) -> Void) {
if (!Braze.Notifications.isInternalNotification(userInfo)) {
// Gated logic here (for example pinging server for content)
}
}
```
```objc
- (void)application:(UIApplication *)application didReceiveRemoteNotification:(NSDictionary *)userInfo fetchCompletionHandler:(void (^)(UIBackgroundFetchResult result))completionHandler {
if (![BRZNotifications isInternalNotification:userInfo]) {
// Gated logic here (for example pinging server for content)
}
}
```
## Prerequisites
Before you can use this feature, you'll need to [integrate the Android Braze SDK](https://www.braze.com/docs/de/de/developer_guide/sdk_integration/?sdktab=android). You'll also need to [set up push notifications](https://www.braze.com/docs/de/de/developer_guide/push_notifications/?sdktab=android).
## Setting up silent push notifications
Silent notifications are available through the Braze [Messaging API](https://www.braze.com/docs/de/de/api/endpoints/messaging/). To take advantage of them, you need to set the `send_to_sync` flag to `true` within the [Android push object](https://www.braze.com/docs/de/de/api/objects_filters/messaging/android_object/) and ensure there are no `title` or `alert` fields set as it will cause errors when used alongside `send_to_sync`—however, you can include data `extras` within the object.
# Rich-Push-Benachrichtigungen für das Braze SDK einrichten
Source: /docs/de/developer_guide/push_notifications/rich/index.md
# Umfangreiche Push-Benachrichtigungen
> Erfahren Sie, wie Sie Rich-Push-Benachrichtigungen für das Braze SDK einrichten.
## Prerequisites
Before you can use this feature, you'll need to [integrate the Swift Braze SDK](https://www.braze.com/docs/de/de/developer_guide/sdk_integration/?sdktab=swift). You'll also need to [set up push notifications](https://www.braze.com/docs/de/de/developer_guide/push_notifications/?sdktab=swift).
## Setting up rich push notifications
### Step 1: Creating a service extension
To create a [notification service extension](https://developer.apple.com/reference/usernotifications/unnotificationserviceextension), navigate to **File > New > Target** in Xcode and select **Notification Service Extension**.
{: style="max-width:90%"}
Ensure that **Embed In Application** is set to embed the extension in your application.
### Step 2: Setting up the notification service extension
A notification service extension is its own binary that is bundled with your app. It must be set up in the [Apple Developer Portal](https://developer.apple.com) with its own app ID and provisioning profile.
The notification service extension's bundle ID must be distinct from your main app target's bundle ID. For example, if your app's bundle ID is `com.company.appname`, you can use `com.company.appname.AppNameServiceExtension` for your service extension.
### Step 3: Adding an App Group
In Xcode, add the App Groups capability from the **Signing & Capabilities** pane to your main app target as well as the Notification Service Extension target. Then, click the **+** button. Use your app's bundle ID to create the app group. For example, if your app's bundle ID is `com.company.appname`, you can name your app group `group.com.company.appname.xyz`.
**Important:**
App Groups in this context refer to Apple's [App Groups Entitlement](https://developer.apple.com/documentation/bundleresources/entitlements/com_apple_security_application-groups) and not your Braze workspace (previously app group) ID.
You need a shared App Group so your main app and the Notification Service Extension can access shared data. If you do not add your app to an app group, your app may fail to populate certain fields from the push payload and will not work fully as expected.
### Step 4: Integrating rich push notifications
For a step-by-step guide on integrating rich push notifications with `BrazeNotificationService`, refer to our [tutorial](https://braze-inc.github.io/braze-swift-sdk/tutorials/braze/b2-rich-push-notifications).
To see a sample, refer to the usage in [`NotificationService`](https://github.com/braze-inc/braze-swift-sdk/blob/main/Examples/Swift/Sources/PushNotificationsServiceExtension/NotificationService.swift) of our Examples app.
#### Adding the rich push framework to your app
After following the [Swift Package Manager integration guide](https://www.braze.com/docs/de/de/developer_guide/platform_integration_guides/swift/sdk_integration/?tab=swift%20package%20manager/), add `BrazeNotificationService` to your `Notification Service Extension` by doing the following:
1. In Xcode, under frameworks and libraries, select the add icon to add a framework.

2. Select the "BrazeNotificationService" framework.

Add the following to your Podfile:
```ruby
target 'YourAppTarget' do
pod 'BrazeKit'
pod 'BrazeUI'
pod 'BrazeLocation'
end
target 'YourNotificationServiceExtensionTarget' do
pod 'BrazeNotificationService'
end
# Only include the below if you want to also integrate Push Stories
target 'YourNotificationContentExtensionTarget' do
pod 'BrazePushStory'
end
```
**Note:**
For instructions to implement Push Stories, see the [documentation](https://www.braze.com/docs/de/de/developer_guide/platform_integration_guides/swift/push_notifications/push_story/?tab=swift%20package%20manager).
After updating the Podfile, navigate to the directory of your Xcode app project within your terminal and run `pod install`.
To add `BrazeNotificationService.xcframework` to your `Notification Service Extension`, see [Manual integration](https://www.braze.com/docs/de/de/developer_guide/platform_integration_guides/swift/sdk_integration?tab=manual/).

#### Using your own UNNotificationServiceExtension
If you need to use your own UNNotificationServiceExtension, you can instead call [`brazeHandle`](https://braze-inc.github.io/braze-swift-sdk/documentation/brazenotificationservice/brazehandle(request:contenthandler:)) in your `didReceive` method.
```swift
import BrazeNotificationService
import UserNotifications
class NotificationService: UNNotificationServiceExtension {
override func didReceive(
_ request: UNNotificationRequest,
withContentHandler contentHandler: @escaping (UNNotificationContent) -> Void
) {
if brazeHandle(request: request, contentHandler: contentHandler) {
return
}
// Custom handling here
contentHandler(request.content)
}
}
```
### Step 5: Configuring the App Group in Braze
Before initializing Braze, assign the name of your app group to your Braze configuration's [`push.appGroup`](https://braze-inc.github.io/braze-swift-sdk/documentation/brazekit/braze/configuration-swift.class/push-swift.class/appgroup) property.
```swift
let configuration = Braze.Configuration(apiKey: "",
endpoint: "")
configuration.push.appGroup = "REPLACE_WITH_APPGROUP"
let braze = Braze(configuration: configuration)
```
### Step 6: Creating a rich notification in your dashboard
Your marketing team can also create rich notifications from the dashboard. Create a push notification through the push composer and attach an image or GIF, or provide a URL that hosts an image, GIF, or video. Note that assets are downloaded on the receipt of push notifications, so you should plan for large, synchronous spikes in requests if you are hosting your content.
## Prerequisites
Before you can use this feature, you'll need to [integrate the Cordova Braze SDK](https://www.braze.com/docs/de/de/developer_guide/sdk_integration/?sdktab=cordova). You'll also need to [set up push notifications](https://www.braze.com/docs/de/de/developer_guide/push_notifications/?sdktab=cordova).
## Setting up rich push notifications
### Step 1: Create a notification service extension
In your Xcode project, create a notification service extension. For a full walkthrough, see [iOS Rich Push Notifications Tutorial](https://braze-inc.github.io/braze-swift-sdk/tutorials/braze/b2-rich-push-notifications).
### Step 2: Add a new target
Open your Podfile and add `BrazeNotificationService` to the notification service extension target [you just created](#cordova_step-1-create-a-notification-service-extension). If `BrazeNotificationService` is already added to a target, remove it before continuing. To avoid duplicate symbol errors, use static linking.
```ruby
target 'NOTIFICATION_SERVICE_EXTENSION' do
use_frameworks! :linkage => :static
pod 'BrazeNotificationService'
end
```
Replace `NOTIFICATION_SERVICE_EXTENSION` with the name of your notification service extension. Your Podfile should be similar to the following:
```ruby
target 'MyAppRichNotificationService' do
use_frameworks! :linkage => :static
pod 'BrazeNotificationService'
end
```
### Step 3: Reinstall your CocoaPods dependencies
In the terminal, go to your project's iOS directory and reinstall your CocoaPod dependencies.
```bash
cd PATH_TO_PROJECT/platform/ios
pod install
```
## Prerequisites
Before you can use this feature, you'll need to [integrate the React Native Braze SDK](https://www.braze.com/docs/de/de/developer_guide/sdk_integration/?sdktab=react%20native). You'll also need to [set up push notifications](https://www.braze.com/docs/de/de/developer_guide/push_notifications/?sdktab=react%20native).
## Using Expo to enable rich push notifications
For the React Native SDK, **rich push notifications are available for Android by default**.
To enable rich push notifications on iOS using Expo, configure the `enableBrazeIosRichPush` property to `true` in your `expo.plugins` object in `app.json`:
```json
{
"expo": {
"plugins": [
[
"@braze/expo-plugin",
{
...
"enableBrazeIosRichPush": true
}
]
]
}
}
```
Lastly, add the bundle identifier for this app extension to your project's credentials configuration: `.BrazeExpoRichPush`. For further details on this process, refer to [Using app extensions with Expo Application Services](https://www.braze.com/docs/de/de/developer_guide/push_notifications/?sdktab=react%20native#reactnative_app-extensions).
# Richten Sie Push-Storys für das Braze SDK ein.
Source: /docs/de/developer_guide/push_notifications/push_stories/index.md
# Push-Storys
> Erfahren Sie, wie Sie Push-Storys für das Braze SDK einrichten.
## Prerequisites
Before you can use this feature, you'll need to [integrate the Swift Braze SDK](https://www.braze.com/docs/de/de/developer_guide/sdk_integration/?sdktab=swift). You'll also need to [set up push notifications](https://www.braze.com/docs/de/de/developer_guide/push_notifications/?sdktab=swift), which includes implementing the `UNNotification` framework.
The following minimum SDK version is required to receive Push Stories:
## Setting up Push Stories
### Step 1: Adding the Notification Content Extension target {#notification-content-extension}
In your app project, go to menu **File > New > Target** and add a new `Notification Content Extension` target and activate it.

Xcode should generate a new target for you and create files automatically for you including:
- `NotificationViewController.swift`
- `MainInterface.storyboard`
### Step 2: Enable capabilities {#enable-capabilities}
In Xcode, add the Background Modes capability using the **Signing & Capabilities** pane to the main app target. Select both the **Background fetch** and **Remote notifications** checkboxes.

#### Adding an App Group
Additionally, from the **Signing & Capabilities** pane in Xcode, add the App Groups capability to your main app target as well as the Notification Content Extension targets. Then, click the **+** button. Use your app's bundle ID to create the app group. For example, if your app's bundle ID is `com.company.appname`, you can name your app group `group.com.company.appname.xyz`.
**Important:**
App Groups in this context refer to Apple's [App Groups Entitlement](https://developer.apple.com/documentation/bundleresources/entitlements/com_apple_security_application-groups) and not your Braze workspace (previously app group) ID.
If you do not add your app to an App Group, your app may fail to populate certain fields from the push payload and will not work fully as expected.
### Step 3: Adding the Push Story framework to your app {#enable-capabilities}
After following the [Swift Package Manager integration guide](https://www.braze.com/docs/de/de/developer_guide/platform_integration_guides/swift/sdk_integration/?tab=swift%20package%20manager/), add `BrazePushStory` to your `Notification Content Extension`:


Add the following line to your Podfile:
```ruby
target 'YourAppTarget' do
pod 'BrazeKit'
pod 'BrazeUI'
pod 'BrazeLocation'
end
target 'YourNotificationContentExtensionTarget' do
pod 'BrazePushStory'
end
# Only include the below if you want to also integrate Rich Push
target 'YourNotificationServiceExtensionTarget' do
pod 'BrazeNotificationService'
end
```
**Note:**
For instructions to implement Rich Push, see [Rich notifications](https://www.braze.com/docs/de/de/developer_guide/platform_integration_guides/swift/push_notifications/customization/rich_notifications/?tab=swift%20package%20manager).
After updating the Podfile, navigate to the directory of your Xcode app project within your terminal and run `pod install`.
Download the latest `BrazePushStory.zip` from the [GitHub release page](https://github.com/braze-inc/braze-swift-sdk/releases), extract it, and add the `BrazePushStory.xcframework` to your project's `Notification Content Extension`.

**Important:**
Make sure that **Do Not Embed** is selected for **BrazePushStory.xcframework** under the **Embed** column.
### Step 4: Updating your notification view controller {#enable-capabilities}
In `NotificationViewController.swift`, add the following line to import the header files:
```swift
import BrazePushStory
```
Next, replace the default implementation by inheriting [`BrazePushStory.NotificationViewController`](https://braze-inc.github.io/braze-swift-sdk/documentation/brazepushstory/notificationviewcontroller/):
```swift
class NotificationViewController: BrazePushStory.NotificationViewController {}
```
#### Custom handling push story events
If you want to implement your own custom logic to handle push story notification events, inherit `BrazePushStory.NotificationViewController` as shown in the previous example and override the [`didReceive`](https://braze-inc.github.io/braze-swift-sdk/documentation/brazepushstory/notificationviewcontroller/didreceive(_:)) methods in the following example.
```swift
import BrazePushStory
import UserNotifications
import UserNotificationsUI
class NotificationViewController: BrazePushStory.NotificationViewController {
override func didReceive(_ notification: UNNotification) {
super.didReceive(notification)
// Custom handling logic
}
override func didReceive(_ response: UNNotificationResponse, completionHandler completion: @escaping (UNNotificationContentExtensionResponseOption) -> Void) {
super.didReceive(response, completionHandler: completion)
// Custom handling logic
}
}
```
### Step 5: Setting the Notification Content Extension plist {#notification-content-extension}
Open the `Info.plist` file of the `Notification Content Extension`, then add and change the following keys under `NSExtension \ NSExtensionAttributes`:
| Key | Type | Value |
|--------------------------------------------------|---------|------------------------|
| `UNNotificationExtensionCategory` | String | `ab_cat_push_story_v2` |
| `UNNotificationExtensionDefaultContentHidden` | Boolean | `YES` |
| `UNNotificationExtensionInitialContentSizeRatio` | Number | `0.6` |
| `UNNotificationExtensionUserInteractionEnabled` | Boolean | `YES` |
{: .reset-td-br-1 .reset-td-br-2 .reset-td-br-3 aria-label="Step 5: Setting the Notification Content Extension plist #notification-content-extension" }
Additionally, add the following top-level `Braze` dictionary to the same `Info.plist` file, replacing `REPLACE_WITH_APPGROUP` with the App Group you created in [Step 2](#enable-capabilities):
| Key | Type | Value |
|------------------|--------|--------------------------|
| `Braze.AppGroup` | String | `REPLACE_WITH_APPGROUP` |
{: .reset-td-br-1 .reset-td-br-2 .reset-td-br-3 aria-label="Step 5: Setting the Notification Content Extension plist #notification-content-extension" }
Your `Info.plist` file should match the following image:

### Step 6: Updating the Braze integration in your main app {#update-braze}
Before initializing Braze, assign the name of your app group to your Braze configuration's [`push.appGroup`](https://braze-inc.github.io/braze-swift-sdk/documentation/brazekit/braze/configuration-swift.class/push-swift.class/appgroup) property.
```swift
let configuration = Braze.Configuration(apiKey: "",
endpoint: "")
configuration.push.appGroup = "REPLACE_WITH_APPGROUP"
let braze = Braze(configuration: configuration)
```
## Prerequisites
Before you can use this feature, you'll need to [integrate the Cordova Braze SDK](https://www.braze.com/docs/de/de/developer_guide/sdk_integration/?sdktab=cordova). You'll also need to [set up push notifications](https://www.braze.com/docs/de/de/developer_guide/push_notifications/?sdktab=cordova).
## Setting up push stories
### Step 1: Create a notification content extension
In your Xcode project, create a notification content extension. For a full walkthrough, see [iOS Push Stories Tutorial](https://braze-inc.github.io/braze-swift-sdk/tutorials/braze/b3-push-stories/).
### Step 2: Configure your push app group
In your project's `config.xml` file, configure the push app group [you just created](#cordova_step-1-create-a-notification-content-extension).
```xml
```
Replace `PUSH_APP_GROUP` with the name of your push app group. Your `config.xml` should be similar to the following:
```xml
```
### Step 3: Add a new target
Open your Podfile and add `BrazePushStory` to the notification content extension target [you created previously](#cordova_step-1-create-a-notification-content-extension). To avoid duplicate symbol errors, use static linking.
```ruby
target 'NOTIFICATION_CONTENT_EXTENSION' do
use_frameworks! :linkage => :static
pod 'BrazePushStory'
end
```
Replace `NOTIFICATION_CONTENT_EXTENSION` with the name of your notification content extension. Your Podfile should be similar to the following:
```ruby
target 'MyAppNotificationContentExtension' do
use_frameworks! :linkage => :static
pod 'BrazePushStory'
end
```
### Step 4: Reinstall your CocoaPods dependencies
In the terminal, go to your iOS directory and reinstall your CocoaPod dependencies.
```bash
cd PATH_TO_PROJECT/platform/ios
pod install
```
## Prerequisites
Before you can use this feature, you'll need to [integrate the React Native Braze SDK](https://www.braze.com/docs/de/de/developer_guide/sdk_integration/?sdktab=react%20native). You'll also need to [set up push notifications](https://www.braze.com/docs/de/de/developer_guide/push_notifications/?sdktab=react%20native).
## Enabling push stories
For the React Native SDK, **push stories are available for Android by default**.
To enable Push Stories on iOS using Expo, ensure you have an app group defined for your application. For more information, see [Adding an App Group](https://www.braze.com/docs/de/de/developer_guide/platform_integration_guides/swift/push_notifications/push_story/#adding-an-app-group).
Next, configure the `enableBrazeIosPushStories` property to `true` and assign your app group ID to `iosPushStoryAppGroup` in your `expo.plugins` object in `app.json`:
```json
{
"expo": {
"plugins": [
[
"@braze/expo-plugin",
{
...
"enableBrazeIosPushStories": true,
"iosPushStoryAppGroup": "group.com.company.myApp.PushStories"
}
]
]
}
}
```
Lastly, add the bundle identifier for this app extension to your project's credentials configuration: `.BrazeExpoPushStories`. For further details on this process, refer to [Using app extensions with Expo Application Services](https://www.braze.com/docs/de/de/developer_guide/push_notifications/?sdktab=react%20native#reactnative_app-extensions).
**Warning:**
If you are using Push Stories with Expo Application Services, be sure to use the `EXPO_NO_CAPABILITY_SYNC=1` flag when running `eas build`. There is a known issue in the command line which removes the App Groups capability from your extension's provisioning profile.
# Richten Sie Soft-Push-Aufforderungen für das Braze SDK ein.
Source: /docs/de/developer_guide/push_notifications/soft_push_prompts/index.md
# Soft-Push-Eingabeaufforderungen für das Internet
> Erfahren Sie, wie Sie Soft Push Prompts für das Braze SDK einrichten können.
## Prerequisites
Before you can use this feature, you'll need to [integrate the Web Braze SDK](https://www.braze.com/docs/de/de/developer_guide/sdk_integration/?sdktab=web). You'll also need to [set up push notifications](https://www.braze.com/docs/de/de/developer_guide/push_notifications/?sdktab=web).
If you're integrating Braze through mParticle's embedded kit on the web, see [Step 3 in mParticle's Braze Web event integration](https://docs.mparticle.com/integrations/braze/event/#web) for instructions to implement soft push prompts.
## About soft push prompts
It's often a good idea for sites to implement a "soft" push prompt where you "prime" the user and make your case for sending them push notifications before requesting push permission. This is useful because the browser throttles how often you may prompt the user directly, and if the user denies permission you can never ask them again.
Alternatively, if you would like to include special custom handling, instead of calling `requestPushPermission()` directly as described in the standard [Web push integration](https://www.braze.com/docs/de/de/developer_guide/platform_integration_guides/web/push_notifications/integration/#step-2-browser-registration), use our [triggered in-app messages](https://www.braze.com/docs/de/de/developer_guide/in_app_messages/triggering_messages/?tab=web).
**Tip:**
This can be done without SDK customization using our new [no code push primer](https://www.braze.com/docs/de/de/user_guide/message_building_by_channel/push/best_practices/push_primer_messages/).
## Setting up soft push prompts
**Note:**
This guide uses code samples from the Braze Web SDK 4.0.0+. To upgrade to the latest Web SDK version, see [SDK Upgrade Guide](https://github.com/braze-inc/braze-web-sdk/blob/master/UPGRADE_GUIDE.md).
### Step 1: Create a push primer campaign
First, you must create a "Prime for Push" in-app messaging campaign in the Braze dashboard:
1. Create a **Modal** in-app message with the text and styling you want.
2. Next, set the on-click behavior to **Close Message**. This behavior will be customized later.
3. Add a key-value pair to the message where the key is `msg-id`, and the value is `push-primer`.
4. Assign a custom event trigger action (such as "prime-for-push") to the message. You can create the custom event manually from the dashboard if needed.
### Step 2: Remove calls
In your Braze SDK integration, find and remove any calls to `automaticallyShowInAppMessages()` from within your loading snippet.
### Step 3: Update integration
Finally, replace the removed call with the following snippet. Call `subscribeToInAppMessage()` before calling `openSession()`. This ensures your in-app message listener is registered in time to receive the push primer message.
```javascript
import * as braze from "@braze/web-sdk";
// Be sure to remove any calls to braze.automaticallyShowInAppMessages()
braze.subscribeToInAppMessage(function(inAppMessage) {
// check if message is not a control variant
if (inAppMessage instanceof braze.inAppMessage) {
// access the key-value pairs, defined as `extras`
const keyValuePairs = inAppMessage.extras || {};
// check the value of our key `msg-id` defined in the Braze dashboard
if (keyValuePairs["msg-id"] === "push-primer") {
// We don't want to display the soft push prompt to users on browsers
// that don't support push, or if the user has already granted/blocked permission
if (
braze.isPushSupported() === false ||
braze.isPushPermissionGranted() ||
braze.isPushBlocked()
) {
// do not call `showInAppMessage`
return;
}
// user is eligible to receive the native prompt
// register a click handler on one of the two buttons
if (inAppMessage.buttons[0]) {
// Prompt the user when the first button is clicked
inAppMessage.buttons[0].subscribeToClickedEvent(function() {
braze.requestPushPermission(
function() {
// success!
},
function() {
// user declined
}
);
});
}
}
}
// show the in-app message now
braze.showInAppMessage(inAppMessage);
});
```
When you wish to display the soft push prompt to the user, call `braze.logCustomEvent` - with whatever event name triggers this in-app message.
# Push-Analytics und Protokollierung angepasster Events
Source: /docs/de/developer_guide/push_notifications/logging_message_data/index.md
# Push-Analytics und Protokollierung angepasster Events {#push-analytics-and-custom-event-logging}
> Diese Seite behandelt die folgenden Workflows: native Push-Analytics (Öffnungen, beeinflusste Öffnungen und Campaign-Reporting) sowie die Protokollierung angepasster Daten (angepasste Events und Attribute) aus Push-Payloads. Nutzen Sie diesen Leitfaden, um festzustellen, welcher Workflow für Ihren Anwendungsfall gilt, und folgen Sie den Schritten für Ihre Plattform.
## Voraussetzungen {#prerequisites}
Bevor Sie beginnen, schließen Sie die initiale Push-Benachrichtigungs-Integration für Ihre Plattform ab:
- [Android-Push-Benachrichtigungen](https://www.braze.com/docs/de/de/developer_guide/push_notifications?sdktab=android)
- [Swift-Push-Benachrichtigungen](https://www.braze.com/docs/de/de/developer_guide/push_notifications?sdktab=swift)
- [Web-Push-Benachrichtigungen](https://www.braze.com/docs/de/de/developer_guide/push_notifications?sdktab=web)
## Native Push-Analytics vs. Protokollierung angepasster Events {#native-push-analytics-vs-custom-event-logging}
Die folgenden Workflows haben jeweils unterschiedliche Reporting-Oberflächen.
| Analytics-Kategorie | Beschreibung | Wo sie angezeigt wird |
| --- | --- | --- |
| Native Push-Analytics | Push-Metriken wie Öffnungen und beeinflusste Öffnungen, die mit Braze-Push-Campaigns verknüpft sind | Push-Campaign-Analytics, Currents-Nachrichten-Engagement-Events, Berichts-Builder |
| Angepasste Events und Attribute | Analytics, die Sie definieren und über SDK-Methoden oder den `/users/track`-Endpunkt protokollieren | Nutzerprofile, Segmentierung, aktionsbasierte Campaigns und Canvases, Analytics für angepasste Events |
{: .reset-td-br-1 .reset-td-br-2 .reset-td-br-3 aria-label="Native Push-Analytics vs. Protokollierung angepasster Events" }
**Important:**
Das Protokollieren eines angepassten Events (z. B. `push_notification_opened`) ist nicht dasselbe wie das native Braze-Push-Öffnungs-Tracking. Angepasste Events füllen keine nativen Push-Campaign-Öffnungsmetriken oder Push-Attribution.
## Was Braze automatisch protokolliert {#what-braze-logs-automatically}
Wenn Ihre SDK-Integration konfiguriert ist, protokolliert Braze automatisch grundlegende Kanal-Interaktionsdaten, einschließlich Push-Öffnungen und beeinflusster Öffnungen. Für Standard-Push-Analytics ist kein zusätzlicher Code erforderlich. Eine vollständige Liste der automatisch erfassten Daten finden Sie unter [SDK-Datenerfassung](https://www.braze.com/docs/de/de/user_guide/data/unification/user_data/sdk_data_collection).
Weitere Details finden Sie hier:
- [SDK-Datenerfassung](https://www.braze.com/docs/de/de/user_guide/data/unification/user_data/sdk_data_collection) für eine vollständige Liste automatisch erfasster und optionaler Daten.
- [Beeinflusste Öffnungen](https://www.braze.com/docs/de/de/user_guide/analytics/tracking/influenced_opens) für Informationen darüber, wie Braze beeinflusste Öffnungen berechnet.
- [Nachrichten-Engagement-Events](https://www.braze.com/docs/de/de/user_guide/data/distribution/braze_currents/event_glossary/message_engagement_events) für nachgelagerte Event-Schemas in Currents.
## Native Push-Analytics bei angepasster Push-Verarbeitung beibehalten {#preserving-native-push-analytics-with-custom-push-handling}
Sie verwenden möglicherweise einen angepassten Push-Handler, wenn Sie mehrere Push-Anbieter integrieren, zusätzliche Payload-Daten verarbeiten oder eine angepasste Logik für die Benachrichtigungsanzeige implementieren müssen. Wenn Sie einen angepassten Push-Handler verwenden, müssen Sie Push-Payloads dennoch an Braze-SDK-Methoden übergeben. Dadurch kann Braze die eingebetteten Tracking-Daten extrahieren und native Push-Analytics (Öffnungen, beeinflusste Öffnungen und Zustellungsmetriken) protokollieren.
Wenn Sie einen angepassten `FirebaseMessagingService` haben, rufen Sie `BrazeFirebaseMessagingService.handleBrazeRemoteMessage(...)` innerhalb Ihrer `onMessageReceived`-Methode auf. Beachten Sie, dass Ihre `FirebaseMessagingService`-Unterklasse die Ausführung innerhalb von 9 Sekunden nach dem Aufruf abschließen muss, um nicht vom Android-System [markiert oder beendet](https://firebase.google.com/docs/cloud-messaging/android/receive) zu werden.
```java
public class MyFirebaseMessagingService extends FirebaseMessagingService {
@Override
public void onMessageReceived(RemoteMessage remoteMessage) {
super.onMessageReceived(remoteMessage);
if (BrazeFirebaseMessagingService.handleBrazeRemoteMessage(this, remoteMessage)) {
// Braze processed a Braze push payload.
} else {
// Non-Braze payload: pass to your other handlers.
}
}
}
```
Ein vollständiges Implementierungsbeispiel finden Sie in der [Braze Android SDK Firebase Push-Beispiel-App](https://github.com/braze-inc/braze-android-sdk/tree/master/samples/firebase-push).
Bei einer manuellen Push-Integration leiten Sie Hintergrund- und Nutzerbenachrichtigungs-Callbacks an Braze weiter.
**Hintergrund-Benachrichtigungen:**
```swift
if let braze = AppDelegate.braze, braze.notifications.handleBackgroundNotification(
userInfo: userInfo,
fetchCompletionHandler: completionHandler
) {
return
}
completionHandler(.noData)
```
**Nutzerbenachrichtigungs-Antworten:**
```swift
if let braze = AppDelegate.braze, braze.notifications.handleUserNotification(
response: response,
withCompletionHandler: completionHandler
) {
return
}
completionHandler()
```
**Vordergrund-Benachrichtigungen:**
```swift
func userNotificationCenter(
_ center: UNUserNotificationCenter,
willPresent notification: UNNotification,
withCompletionHandler completionHandler: @escaping (UNNotificationPresentationOptions) -> Void
) {
if let braze = AppDelegate.braze {
braze.notifications.handleForegroundNotification(notification: notification)
}
if #available(iOS 14.0, *) {
completionHandler([.banner, .list, .sound])
} else {
completionHandler([.alert, .sound])
}
}
```
Ein vollständiges Implementierungsbeispiel finden Sie im [Braze Swift SDK Manual Push-Beispiel (`AppDelegate.swift`)](https://github.com/braze-inc/braze-swift-sdk/blob/main/Examples/Swift/Sources/PushNotifications-Manual/AppDelegate.swift).
Für Web-Push konfigurieren Sie Ihren Service Worker und die SDK-Initialisierung wie unter [Web-Push-Benachrichtigungen](https://www.braze.com/docs/de/de/developer_guide/push_notifications?sdktab=web) beschrieben.
Weitere Code-Beispiele finden Sie im [Braze Web SDK-Repository](https://github.com/braze-inc/braze-web-sdk).
## Angepasste Daten aus Push-Payloads protokollieren {#logging-custom-data-from-push-payloads}
Verwenden Sie diesen Abschnitt, wenn Sie zusätzliche Daten aus Push-Payload-Schlüssel-Wert-Paaren protokollieren müssen, z. B. angepasste Events oder Attribute, die mit Ihrer Geschäftslogik verknüpft sind.
Weitere Informationen zu angepassten Events finden Sie unter [Angepasste Events](https://www.braze.com/docs/de/de/user_guide/data/activation/events/custom_events). Informationen zum Protokollieren angepasster Events über SDK-Methoden finden Sie unter [Angepasste Events protokollieren](https://www.braze.com/docs/de/de/developer_guide/analytics/logging_events).
### Option A: Protokollierung über den `/users/track`-Endpunkt {#option-a-log-with-the-userstrack-endpoint}
Sie können Analytics in Echtzeit protokollieren, indem Sie den [`/users/track`](https://www.braze.com/docs/de/de/api/endpoints/user_data/post_user_track)-Endpunkt aufrufen.
Um das Nutzerprofil zu identifizieren, fügen Sie `braze_id` in Ihre Push-Payload-Schlüssel-Wert-Paare ein.
**Note:**
Die Übergabe von `braze_id` identifiziert nur das Profil. Sie benötigen weiterhin Implementierungslogik, die Payload-Werte liest und die `/users/track`-Anfrage mit den Events oder Attributen sendet, die Sie protokollieren möchten.
### Option B: Protokollierung über SDK-Methoden nach dem App-Start {#option-b-log-with-sdk-methods-after-app-launch}
Sie können Payload-Daten auch lokal speichern und angepasste Events und Attribute über SDK-Methoden protokollieren, nachdem die App initialisiert wurde. Dieser Ansatz ist üblich in Notification Content Extension-Flows, bei denen Analytics-Daten zuerst persistiert und beim nächsten App-Start gesendet werden.
**Important:**
Analytics werden erst an Braze gesendet, wenn die App gestartet wird. Abhängig von Ihren Einstellungen zum Schließen kann es eine Verzögerung zwischen dem Zeitpunkt geben, an dem die Nutzer:innen die Benachrichtigung schließen, und dem Zeitpunkt, an dem die App öffnet und Analytics sendet.
## Protokollierung aus einer Notification Content Extension (Swift) {#logging-from-a-notification-content-extension-swift}
Die folgenden Schritte beschreiben, wie Sie angepasste Events, angepasste Attribute und Nutzerattribute aus einer Swift Notification Content Extension speichern und senden.
### 1. Schritt: App-Gruppen in Xcode konfigurieren {#step-1-configure-app-groups-in-xcode}
Fügen Sie in Xcode die `App Groups`-Fähigkeit zu Ihrem Haupt-App-Target hinzu. Aktivieren Sie **App Groups** und klicken Sie dann auf **+**, um eine neue Gruppe hinzuzufügen. Verwenden Sie die Bundle-ID Ihrer App, um den Gruppenbezeichner zu erstellen (z. B. `group.com.company.appname.xyz`). Aktivieren Sie **App Groups** sowohl für Ihr Haupt-App-Target als auch für das Content Extension-Target.

### 2. Schritt: Auswählen, was protokolliert werden soll {#step-2-choose-what-to-log}
Bevor Sie die Snippets implementieren, wählen Sie aus, welche Analytics-Kategorie Sie protokollieren möchten:
- **Angepasste Events:** Aktionen, die Nutzer:innen ausführen (z. B. einen Flow abschließen oder auf ein bestimmtes UI-Element tippen). Verwenden Sie angepasste Events für aktionsbasierte Trigger, Segmentierung und Event-Analytics. Weitere Informationen finden Sie unter [Angepasste Events](https://www.braze.com/docs/de/de/user_guide/data/activation/events/custom_events) und [Angepasste Events protokollieren](https://www.braze.com/docs/de/de/developer_guide/analytics/logging_events).
- **Angepasste Attribute:** Profilfelder, die Sie definieren (z. B. `plan_tier` oder `preferred_language`) und im Laufe der Zeit aktualisieren. Weitere Informationen finden Sie unter [Angepasste Attribute](https://www.braze.com/docs/de/de/user_guide/data/activation/custom_data/data_types) und [Nutzerattribute festlegen](https://www.braze.com/docs/de/de/developer_guide/analytics/setting_user_attributes).
- **Nutzerattribute:** Standard-Profilfelder (z. B. E-Mail, Vorname und Telefonnummer). Im Beispielcode werden diese durch ein typisiertes `UserAttribute`-Modell dargestellt und dann auf Braze-Nutzerfelder abgebildet.
Die Hilfsdateien in diesem Abschnitt (`RemoteStorage`, `UserAttribute` und `EventName Dictionary`) sind lokale Hilfsdateien, die von dieser Beispielimplementierung verwendet werden. Sie sind keine integrierten SDK-Klassen. Sie speichern aus Payloads abgeleitete Daten in `UserDefaults`, definieren ein typisiertes Modell für ausstehende Nutzer-Updates und standardisieren die Event-Payload-Konstruktion. Weitere Informationen zum lokalen Datenspeicherverhalten finden Sie unter [Speicher](https://www.braze.com/docs/de/de/developer_guide/storage?tab=swift).
**Note:**
Die Beispiele für Hilfsdateien in diesem Abschnitt sind iOS-spezifisch (Swift und Objective-C). Für Android- und Web-Ansätze zur Protokollierung angepasster Events und Attribute siehe [Angepasste Events protokollieren](https://www.braze.com/docs/de/de/developer_guide/analytics/logging_events) ([Android](https://www.braze.com/docs/de/de/developer_guide/analytics/logging_events?tab=android), [Web](https://www.braze.com/docs/de/de/developer_guide/analytics/logging_events?tab=web)) und [Nutzerattribute festlegen](https://www.braze.com/docs/de/de/developer_guide/analytics/setting_user_attributes) ([Android](https://www.braze.com/docs/de/de/developer_guide/analytics/setting_user_attributes?tab=android), [Web](https://www.braze.com/docs/de/de/developer_guide/analytics/setting_user_attributes?tab=web)).
#### Angepasste Events speichern {#saving-custom-events}
Erstellen Sie den Analytics-Payload, indem Sie ein Dictionary aufbauen, Metadaten befüllen und es mit der Hilfsdatei speichern.
1. Initialisieren Sie ein Dictionary mit Event-Metadaten.
2. Initialisieren Sie `userDefaults`, um Event-Daten abzurufen und zu speichern.
3. Wenn ein vorhandenes Array gefunden wird, anhängen und speichern.
4. Wenn kein Array vorhanden ist, ein neues Array speichern.
```swift
func saveCustomEvent(with properties: [String: Any]? = nil) {
// 1
let customEventDictionary = Dictionary(eventName: "YOUR-EVENT-NAME", properties: properties)
// 2
let remoteStorage = RemoteStorage(storageType: .suite)
// 3
if var pendingEvents = remoteStorage.retrieve(forKey: .pendingCustomEvents) as? [[String: Any]] {
pendingEvents.append(contentsOf: [customEventDictionary])
remoteStorage.store(pendingEvents, forKey: .pendingCustomEvents)
} else {
// 4
remoteStorage.store([customEventDictionary], forKey: .pendingCustomEvents)
}
}
```
```objc
- (void)saveCustomEvent:(NSDictionary *)properties {
// 1
NSDictionary *customEventDictionary = [[NSDictionary alloc] initWithEventName:@"YOUR-EVENT-NAME" properties:properties];
// 2
RemoteStorage *remoteStorage = [[RemoteStorage alloc] initWithStorageType:StorageTypeSuite];
NSMutableArray *pendingEvents = [[remoteStorage retrieveForKey:RemoteStorageKeyPendingCustomEvents] mutableCopy];
// 3
if (pendingEvents) {
[pendingEvents addObject:customEventDictionary];
[remoteStorage store:pendingEvents forKey:RemoteStorageKeyPendingCustomEvents];
} else {
// 4
[remoteStorage store:@[ customEventDictionary ] forKey:RemoteStorageKeyPendingCustomEvents];
}
}
```
#### Angepasste Events an Braze senden {#sending-custom-events-to-braze}
Protokollieren Sie gespeicherte Analytics direkt nach der SDK-Initialisierung.
1. Durchlaufen Sie die ausstehenden Events.
2. Durchlaufen Sie die Schlüssel-Wert-Paare in jedem Event.
3. Prüfen Sie auf den `event_name`-Schlüssel.
4. Fügen Sie die verbleibenden Schlüssel-Wert-Paare zum `properties`-Dictionary hinzu.
5. Protokollieren Sie jedes angepasste Event.
6. Entfernen Sie ausstehende Events aus dem Speicher.
```swift
func logPendingCustomEventsIfNecessary() {
let remoteStorage = RemoteStorage(storageType: .suite)
guard let pendingEvents = remoteStorage.retrieve(forKey: .pendingCustomEvents) as? [[String: Any]] else { return }
// 1
for event in pendingEvents {
var eventName: String?
var properties: [AnyHashable: Any] = [:]
// 2
for (key, value) in event {
if key == "event_name" {
// 3
if let eventNameValue = value as? String {
eventName = eventNameValue
} else {
print("Invalid type for event_name key")
}
} else {
// 4
properties[key] = value
}
}
// 5
if let eventName = eventName {
AppDelegate.braze?.logCustomEvent(name: eventName, properties: properties)
}
}
// 6
remoteStorage.removeObject(forKey: .pendingCustomEvents)
}
```
```objc
- (void)logPendingEventsIfNecessary {
RemoteStorage *remoteStorage = [[RemoteStorage alloc] initWithStorageType:StorageTypeSuite];
NSArray *pendingEvents = [remoteStorage retrieveForKey:RemoteStorageKeyPendingCustomEvents];
// 1
for (NSDictionary *event in pendingEvents) {
NSString *eventName = nil;
NSMutableDictionary *properties = [NSMutableDictionary dictionary];
// 2
for (NSString* key in event) {
if ([key isEqualToString:@"event_name"]) {
// 3
if ([[event objectForKey:key] isKindOfClass:[NSString class]]) {
eventName = [event objectForKey:key];
} else {
NSLog(@"Invalid type for event_name key");
}
} else {
// 4
properties[key] = event[key];
}
}
// 5
if (eventName != nil) {
[AppDelegate.braze logCustomEvent:eventName properties:properties];
}
}
// 6
[remoteStorage removeObjectForKey:RemoteStorageKeyPendingCustomEvents];
}
```
#### Angepasste Attribute speichern {#saving-custom-attributes}
Erstellen Sie das Analytics-Dictionary von Grund auf und persistieren Sie es.
1. Initialisieren Sie ein Dictionary mit Attribut-Metadaten.
2. Initialisieren Sie `userDefaults`, um Attributdaten abzurufen und zu speichern.
3. Wenn ein vorhandenes Array gefunden wird, anhängen und speichern.
4. Wenn kein Array vorhanden ist, ein neues Array speichern.
```swift
func saveCustomAttribute() {
// 1
let customAttributeDictionary: [String: Any] = ["YOUR-CUSTOM-ATTRIBUTE-KEY": "YOUR-CUSTOM-ATTRIBUTE-VALUE"]
// 2
let remoteStorage = RemoteStorage(storageType: .suite)
// 3
if var pendingAttributes = remoteStorage.retrieve(forKey: .pendingCustomAttributes) as? [[String: Any]] {
pendingAttributes.append(contentsOf: [customAttributeDictionary])
remoteStorage.store(pendingAttributes, forKey: .pendingCustomAttributes)
} else {
// 4
remoteStorage.store([customAttributeDictionary], forKey: .pendingCustomAttributes)
}
}
```
```objc
- (void)saveCustomAttribute {
// 1
NSDictionary *customAttributeDictionary = @{ @"YOUR-CUSTOM-ATTRIBUTE-KEY": @"YOUR-CUSTOM-ATTRIBUTE-VALUE" };
// 2
RemoteStorage *remoteStorage = [[RemoteStorage alloc] initWithStorageType:StorageTypeSuite];
NSMutableArray *pendingAttributes = [[remoteStorage retrieveForKey:RemoteStorageKeyPendingCustomAttributes] mutableCopy];
// 3
if (pendingAttributes) {
[pendingAttributes addObject:customAttributeDictionary];
[remoteStorage store:pendingAttributes forKey:RemoteStorageKeyPendingCustomAttributes];
} else {
// 4
[remoteStorage store:@[ customAttributeDictionary ] forKey:RemoteStorageKeyPendingCustomAttributes];
}
}
```
#### Angepasste Attribute an Braze senden {#sending-custom-attributes-to-braze}
Protokollieren Sie gespeicherte Analytics direkt nach der SDK-Initialisierung.
1. Durchlaufen Sie die ausstehenden Attribute.
2. Durchlaufen Sie jedes Schlüssel-Wert-Paar.
3. Protokollieren Sie jeden angepassten Attribut-Schlüssel und -Wert.
4. Entfernen Sie ausstehende Attribute aus dem Speicher.
```swift
func logPendingCustomAttributesIfNecessary() {
let remoteStorage = RemoteStorage(storageType: .suite)
guard let pendingAttributes = remoteStorage.retrieve(forKey: .pendingCustomAttributes) as? [[String: Any]] else { return }
// 1
pendingAttributes.forEach { setCustomAttributesWith(keysAndValues: $0) }
// 4
remoteStorage.removeObject(forKey: .pendingCustomAttributes)
}
func setCustomAttributesWith(keysAndValues: [String: Any]) {
// 2
for (key, value) in keysAndValues {
// 3
if let value = value as? [String] {
setCustomAttributeArrayWithKey(key, andValue: value)
} else {
setCustomAttributeWithKey(key, andValue: value)
}
}
}
```
```objc
- (void)logPendingCustomAttributesIfNecessary {
RemoteStorage *remoteStorage = [[RemoteStorage alloc] initWithStorageType:StorageTypeSuite];
NSArray *pendingAttributes = [remoteStorage retrieveForKey:RemoteStorageKeyPendingCustomAttributes];
// 1
for (NSDictionary *attribute in pendingAttributes) {
[self setCustomAttributeWith:attribute];
}
// 4
[remoteStorage removeObjectForKey:RemoteStorageKeyPendingCustomAttributes];
}
- (void)setCustomAttributeWith:(NSDictionary *)keysAndValues {
// 2
for (NSString *key in keysAndValues) {
// 3
[self setCustomAttributeWith:key andValue:[keysAndValues objectForKey:key]];
}
}
```
#### Nutzerattribute speichern {#saving-user-attributes}
Beim Speichern von Nutzerattributen erstellen Sie ein angepasstes Objekt, das erfasst, welches Nutzerfeld aktualisiert wird (`email`, `first_name`, `phone_number` usw.). Das Objekt sollte mit dem Speichern und Abrufen über `UserDefaults` kompatibel sein. Ein Beispiel finden Sie in der `UserAttribute`-Hilfsdatei im Tab **Hilfsdateien**.
1. Initialisieren Sie ein codiertes `UserAttribute`-Objekt mit dem entsprechenden Typ.
2. Initialisieren Sie `userDefaults`, um die Daten abzurufen und zu speichern.
3. Wenn ein vorhandenes Array gefunden wird, anhängen und speichern.
4. Wenn kein Array vorhanden ist, ein neues Array speichern.
```swift
func saveUserAttribute() {
// 1
guard let data = try? PropertyListEncoder().encode(UserAttribute.email("USER-ATTRIBUTE-VALUE")) else { return }
// 2
let remoteStorage = RemoteStorage(storageType: .suite)
// 3
if var pendingAttributes = remoteStorage.retrieve(forKey: .pendingUserAttributes) as? [Data] {
pendingAttributes.append(contentsOf: [data])
remoteStorage.store(pendingAttributes, forKey: .pendingUserAttributes)
} else {
// 4
remoteStorage.store([data], forKey: .pendingUserAttributes)
}
}
```
```objc
- (void)saveUserAttribute {
// 1
UserAttribute *userAttribute = [[UserAttribute alloc] initWithUserField:@"USER-ATTRIBUTE-VALUE" attributeType:UserAttributeTypeEmail];
NSError *error;
NSData *data = [NSKeyedArchiver archivedDataWithRootObject:userAttribute requiringSecureCoding:YES error:&error];
if (error != nil) {
// log error
}
// 2
RemoteStorage *remoteStorage = [[RemoteStorage alloc] initWithStorageType:StorageTypeSuite];
NSMutableArray *pendingAttributes = [[remoteStorage retrieveForKey:RemoteStorageKeyPendingUserAttributes] mutableCopy];
// 3
if (pendingAttributes) {
[pendingAttributes addObject:data];
[remoteStorage store:pendingAttributes forKey:RemoteStorageKeyPendingUserAttributes];
} else {
// 4
[remoteStorage store:@[data] forKey:RemoteStorageKeyPendingUserAttributes];
}
}
```
#### Nutzerattribute an Braze senden {#sending-user-attributes-to-braze}
Protokollieren Sie gespeicherte Analytics direkt nach der SDK-Initialisierung.
1. Durchlaufen Sie die `pendingAttributes`-Daten.
2. Decodieren Sie jedes `UserAttribute`.
3. Setzen Sie Nutzerfelder basierend auf dem Attributtyp.
4. Entfernen Sie ausstehende Nutzerattribute aus dem Speicher.
```swift
func logPendingUserAttributesIfNecessary() {
let remoteStorage = RemoteStorage(storageType: .suite)
guard let pendingAttributes = remoteStorage.retrieve(forKey: .pendingUserAttributes) as? [Data] else { return }
// 1
for attributeData in pendingAttributes {
// 2
guard let userAttribute = try? PropertyListDecoder().decode(UserAttribute.self, from: attributeData) else { continue }
// 3
switch userAttribute {
case .email(let email):
AppDelegate.braze?.user.set(email: email)
}
}
// 4
remoteStorage.removeObject(forKey: .pendingUserAttributes)
}
```
```objc
- (void)logPendingUserAttributesIfNecessary {
RemoteStorage *remoteStorage = [[RemoteStorage alloc] initWithStorageType:StorageTypeSuite];
NSArray *pendingAttributes = [remoteStorage retrieveForKey:RemoteStorageKeyPendingUserAttributes];
// 1
for (NSData *attributeData in pendingAttributes) {
NSError *error;
// 2
UserAttribute *userAttribute = [NSKeyedUnarchiver unarchivedObjectOfClass:[UserAttribute class] fromData:attributeData error:&error];
if (error != nil) {
// log error
}
// 3
if (userAttribute) {
switch (userAttribute.attributeType) {
case UserAttributeTypeEmail:
[self user].email = userAttribute.userField;
break;
}
}
}
// 4
[remoteStorage removeObjectForKey:RemoteStorageKeyPendingUserAttributes];
}
```
#### RemoteStorage-Hilfsdatei {#remotestorage-helper-file}
```swift
enum RemoteStorageKey: String, CaseIterable {
// MARK: - Notification Content Extension Analytics
case pendingCustomEvents = "pending_custom_events"
case pendingCustomAttributes = "pending_custom_attributes"
case pendingUserAttributes = "pending_user_attributes"
}
enum RemoteStorageType {
case standard
case suite
}
class RemoteStorage: NSObject {
private var storageType: RemoteStorageType = .standard
private lazy var defaults: UserDefaults = {
switch storageType {
case .standard:
return .standard
case .suite:
// Use the App Group identifier you created in Step 1.
return UserDefaults(suiteName: "group.com.company.appname.xyz")!
}
}()
init(storageType: RemoteStorageType = .standard) {
self.storageType = storageType
}
func store(_ value: Any, forKey key: RemoteStorageKey) {
defaults.set(value, forKey: key.rawValue)
}
func retrieve(forKey key: RemoteStorageKey) -> Any? {
return defaults.object(forKey: key.rawValue)
}
func removeObject(forKey key: RemoteStorageKey) {
defaults.removeObject(forKey: key.rawValue)
}
func resetStorageKeys() {
for key in RemoteStorageKey.allCases {
defaults.removeObject(forKey: key.rawValue)
}
}
}
```
```objc
@interface RemoteStorage ()
@property (nonatomic) StorageType storageType;
@property (nonatomic, strong) NSUserDefaults *defaults;
@end
@implementation RemoteStorage
- (id)initWithStorageType:(StorageType)storageType {
if (self = [super init]) {
self.storageType = storageType;
}
return self;
}
- (void)store:(id)value forKey:(RemoteStorageKey)key {
[[self defaults] setValue:value forKey:[self rawValueForKey:key]];
}
- (id)retrieveForKey:(RemoteStorageKey)key {
return [[self defaults] objectForKey:[self rawValueForKey:key]];
}
- (void)removeObjectForKey:(RemoteStorageKey)key {
[[self defaults] removeObjectForKey:[self rawValueForKey:key]];
}
- (void)resetStorageKeys {
[[self defaults] removeObjectForKey:[self rawValueForKey:RemoteStorageKeyPendingCustomEvents]];
[[self defaults] removeObjectForKey:[self rawValueForKey:RemoteStorageKeyPendingCustomAttributes]];
[[self defaults] removeObjectForKey:[self rawValueForKey:RemoteStorageKeyPendingUserAttributes]];
}
- (NSUserDefaults *)defaults {
if (!_defaults) {
switch (self.storageType) {
case StorageTypeStandard:
_defaults = [NSUserDefaults standardUserDefaults];
break;
case StorageTypeSuite:
_defaults = [[NSUserDefaults alloc] initWithSuiteName:@"group.com.company.appname.xyz"];
break;
}
}
return _defaults;
}
- (NSString*)rawValueForKey:(RemoteStorageKey)remoteStorageKey {
switch(remoteStorageKey) {
case RemoteStorageKeyPendingCustomEvents:
return @"pending_custom_events";
case RemoteStorageKeyPendingCustomAttributes:
return @"pending_custom_attributes";
case RemoteStorageKeyPendingUserAttributes:
return @"pending_user_attributes";
default:
[NSException raise:NSGenericException format:@"Unexpected FormatType."];
}
}
```
#### UserAttribute-Hilfsdatei {#userattribute-helper-file}
```swift
enum UserAttribute: Hashable {
case email(String?)
}
// MARK: - Codable
extension UserAttribute: Codable {
private enum CodingKeys: String, CodingKey {
case email
}
func encode(to encoder: Encoder) throws {
var values = encoder.container(keyedBy: CodingKeys.self)
switch self {
case .email(let email):
try values.encodeIfPresent(email, forKey: .email)
}
}
init(from decoder: Decoder) throws {
let values = try decoder.container(keyedBy: CodingKeys.self)
let email = try values.decodeIfPresent(String.self, forKey: .email)
self = .email(email)
}
}
```
```objc
@implementation UserAttribute
- (id)initWithUserField:(NSString *)userField attributeType:(UserAttributeType)attributeType {
if (self = [super init]) {
self.userField = userField;
self.attributeType = attributeType;
}
return self;
}
- (void)encodeWithCoder:(NSCoder *)encoder {
[encoder encodeObject:self.userField forKey:@"userField"];
[encoder encodeInteger:self.attributeType forKey:@"attributeType"];
}
- (id)initWithCoder:(NSCoder *)decoder {
if (self = [super init]) {
self.userField = [decoder decodeObjectForKey:@"userField"];
NSInteger attributeRawValue = [decoder decodeIntegerForKey:@"attributeType"];
self.attributeType = (UserAttributeType) attributeRawValue;
}
return self;
}
@end
```
#### EventName-Dictionary-Hilfsdatei {#eventname-dictionary-helper-file}
```swift
extension Dictionary where Key == String, Value == Any {
init(eventName: String, properties: [String: Any]? = nil) {
self.init()
self[PushNotificationKey.eventName.rawValue] = eventName
if let properties = properties {
for (key, value) in properties {
self[key] = value
}
}
}
}
```
```objc
@implementation NSMutableDictionary (Helper)
+ (instancetype)dictionaryWithEventName:(NSString *)eventName
properties:(NSDictionary *)properties {
NSMutableDictionary *dict = [NSMutableDictionary dictionary];
dict[@"event_name"] = eventName;
if (properties) {
for (id key in properties) {
dict[key] = properties[key];
}
}
return dict;
}
@end
```
## Ergebnisse analysieren {#analyzing-results}
Verwenden Sie die Reporting-Oberfläche, die zur Analytics-Kategorie passt:
| Analytics-Kategorie | Wo Sie es in Braze einsehen können |
| --- | --- |
| Native Push-Analytics | Um Push-Öffnungsmetriken auf Campaign-Ebene anzuzeigen, navigieren Sie zur Seite **Campaign Analytics** Ihrer Push-Campaign. Für Metrik-Definitionen siehe [Beeinflusste Öffnungen](https://www.braze.com/docs/de/de/user_guide/analytics/tracking/influenced_opens). Um angepasste Analytics-Ansichten zu erstellen, navigieren Sie zu **Analytics** > **Report Builder (New)**. Für Navigationsschritte siehe [Berichts-Builder](https://www.braze.com/docs/de/de/user_guide/analytics/reports/report_builder). Für Event-Schemas auf Warehouse-Ebene siehe [Nachrichten-Engagement-Events](https://www.braze.com/docs/de/de/user_guide/data/distribution/braze_currents/event_glossary/message_engagement_events). |
| Angepasste Events und Attribute | Um Trends angepasster Events anzuzeigen, navigieren Sie zu **Analytics** > **Bericht zu angepassten Events**. Weitere Details finden Sie unter [Angepasste Events](https://www.braze.com/docs/de/de/user_guide/data/activation/events/custom_events). Um Werte auf Nutzerebene zu prüfen, navigieren Sie zur Seite **Nutzer:innen suchen** und öffnen Sie ein Profil. Für die Schritte siehe [Nutzerprofile](https://www.braze.com/docs/de/de/user_guide/audience/manage_audience/user_profiles). Um Zielgruppen nach diesen Werten zu filtern, navigieren Sie zu **Zielgruppe** > **Segments**. Für Navigationsschritte siehe [Segment erstellen](https://www.braze.com/docs/de/de/user_guide/audience/segments/creating_a_segment) und Filteroptionen unter [Segmentierungsfilter](https://www.braze.com/docs/de/de/user_guide/audience/segments/segmentation_filters). |
{: .reset-td-br-1 .reset-td-br-2 aria-label="Ergebnisse analysieren" }
Informationen zur Erstellung angepasster Berichte finden Sie unter [Berichts-Builder](https://www.braze.com/docs/de/de/user_guide/analytics/reports/report_builder).
## Weiterführende Referenzen {#related-references}
- [Push-Benachrichtigungen](https://www.braze.com/docs/de/de/developer_guide/push_notifications)
- [Angepasste Events protokollieren](https://www.braze.com/docs/de/de/developer_guide/analytics/logging_events)
- [Angepasste Events](https://www.braze.com/docs/de/de/user_guide/data/activation/events/custom_events)
- [Nutzer:innen-Tracking-Endpunkt (`/users/track`)](https://www.braze.com/docs/de/de/api/endpoints/user_data/post_user_track)
- [Braze Android SDK-Repository](https://github.com/braze-inc/braze-android-sdk)
- [Braze Swift SDK-Repository](https://github.com/braze-inc/braze-swift-sdk)
- [Braze Web SDK-Repository](https://github.com/braze-inc/braze-web-sdk)
# Testnachrichten senden
Source: /docs/de/developer_guide/push_notifications/sending_test_messages/index.md
# Sending test messages
> Before sending out a messaging campaign to your users, you may want to test it to make sure it looks right and operates in the intended manner. You can use the dashboard to create and send test messages with push notifications, in-app messages (IAM), or email.
## Sending a test message
### Step 1: Create a designated test segment
After you set up a test segment, you can use it to test any of your Braze messaging channels. When set up correctly, this only needs to be done a single time.
To set up a test segment, go to **Segments** and create a new segment. Select **Add Filter**, then choose a one of the test filters.

With test filters, you can ensure that only users with a specific email address or [external user ID](https://www.braze.com/docs/de/de/developer_guide/platform_integration_guides/swift/analytics/setting_user_ids/#setting-user-ids) are sent the test message.

Both email address and external user ID filters offer the following options:
| Operator | Description |
|------------------|--------------------------------------------------------------------------------------------------------------------------------|
| `equals` | This will look for an exact match of the email or user ID that you provide. Use this if you only want to send the test campaigns to devices associated with a single email or user ID. |
| `does not equal` | Use this if you want to exclude a particular email or user ID from test campaigns. |
| `matches` | This will find users that have email addresses or user IDs that match part of the search term you provide. You could use this to find only the users that have an `@yourcompany.com` address, allowing you to send messages to everyone on your team. |
{: .reset-td-br-1 .reset-td-br-2 aria-label="Step 1: Create a designated test segment a class="margin-fix" name="test-segment"/a" }
You can select multiple specific emails using the "`matches`" option and separating the email addresses with a | character. For example: "`matches`" "`email1@braze.com` | `email2@braze.com`". You can also combine multiple operators together. For example, the test segment could include an email address filter that "`matches`" "`@braze.com`" and another filter that "`does not equal`" "`sales@braze.com`".
After adding the testing filters to your test segment, you can verify it's working by selecting **Preview** or by selecting **Settings** > **CSV Export All User Data** to export that segment's user data to a CSV file.

**Note:**
Exporting the segment's User Data to a CSV file is the most accurate verification method, as the preview will only show a sample of your users and may not include all users.
### Step 2: Send the message
You can send a message using the Braze dashboard or the command line.
To send test push notifications or in-app messages, you need to target your previously created test segment. Begin by creating your campaign and following the usual steps. When you reach the **Target Audiences** step, select your test segment from the dropdown menu.

Confirm your campaign and launch it to test your push notification and in-app messages.
**Note:**
Be sure to select **Allow users to become re-eligible to receive campaign** under the **Schedule** portion of the campaign composer if you intend to use a single campaign to send a test message to yourself more than once.
If you're only testing email messages, you do not necessarily have to set up a test segment. In the first step of the campaign composer where you compose your campaign's email message, click **Send Test** and enter the email address to which you wish to send a test email.

**Tip:**
You can also enable or disable [TEST (or SEED)](https://www.braze.com/docs/de/de/user_guide/administrative/app_settings/email_settings/#append-email-subject-lines) being appended on your test messages.
Alternatively, you can send a single notification using cURL and the [Braze Messaging API](https://www.braze.com/docs/de/de/api/endpoints/messaging/). Note that these examples make a request using the `US-01` instance. To find out yours, refer to [API endpoints](https://www.braze.com/docs/de/de/api/basics/#endpoints).
```bash
curl -X POST -H "Content-Type: application/json" -H "Authorization: Bearer {BRAZE_API_KEY}" -d '{
"external_user_ids":["EXTERNAL_USER_ID"],
"messages": {
"android_push": {
"title":"Test push title",
"alert":"Test push",
"extra":{
"CUSTOM_KEY":"CUSTOM_VALUE"
}
}
}
}' https://rest.iad-01.braze.com/messages/send
```
```bash
curl -X POST -H "Content-Type: application/json" -H "Authorization: Bearer {BRAZE_API_KEY}" -d '{
"external_user_ids":["EXTERNAL_USER_ID"],
"messages": {
"apple_push": {
"alert": "Test push",
"extra": {
"CUSTOM_KEY" :"CUSTOM_VALUE"
}
}
}
}' https://rest.iad-01.braze.com/messages/send
```
```bash
curl -X POST -H "Content-Type: application/json" -H "Authorization: Bearer {BRAZE_API_KEY}" -d '{
"external_user_ids":["EXTERNAL_USER_ID"],
"messages": {
"kindle_push": {
"title":"Test push title",
"alert":"Test push",
"extra":{
"CUSTOM_KEY":"CUSTOM_VALUE"
}
}
}
}' https://rest.iad-01.braze.com/messages/send
```
Replace the following:
| Placeholder | Description |
|---------------------|-----------------------------------------------------------|
| `BRAZE_API_KEY` | Your Braze API key used for authentication. In Braze, go to **Settings** > **API Keys** to locate your key. |
| `EXTERNAL_USER_ID` | The external user ID used to send your message to a specific user. In Braze, go to **Audience** > **Search users**, then search for a user. |
| `CUSTOM_KEY` | (Optional) A custom key for additional data. |
| `CUSTOM_VALUE` | (Optional) A custom value assigned to your custom key. |
{: .reset-td-br-1 .reset-td-br-2 aria-label="Step 2: Send the message" }
## Test limitations
There are a few situations where test messages don't have complete feature parity with launching a campaign or Canvas to a real set of users. In these instances, to validate this behavior, you should launch the campaign or Canvas to a limited set of test users.
- Viewing the Braze [preference center](https://www.braze.com/docs/de/de/user_guide/message_building_by_channel/email/managing_user_subscriptions/#subscription-groups) from **Test Messages** will cause the submit button to be grayed out.
- The list-unsubscribe header is not included in emails sent by the test message functionality.
- For in-app messages and Content Cards, the target user must have a push token for the target device.
# Über Push-Abo-Status
Source: /docs/de/developer_guide/push_notifications/subscription_states/index.md
# Über Push-Abo-Status
## Push subscription states {#push-sub-states}
A "Push Subscription State" in Braze identifies a **user's** global preference for their desire to receive push notifications. Because the subscription state is user-based, it is not specific to any individual app. Subscription states become helpful flags when deciding which users to target for push notifications.
**Note:**
A user's push subscription state applies to their entire user profile, which includes all of the user's devices.
The following subscription state options exist: `Subscribed`, `Opted-In`, and `Unsubscribed`.
By default, for your user to receive your messages through push, their push subscription state must be either `Subscribed` or `Opted-In`, and they must have foreground push enabled. You can override this setting if needed when composing a message.
|Opt-in State|Description|
|---|---|
|`Subscribed`| Default push subscription state when a user profile is created in Braze. |
|`Opted-In`| A user has explicitly expressed a preference to receive push notifications. Braze automatically moves a user's opt-in state to `Opted-In` if the user accepts an OS-level push prompt.
This does not apply to Android 12 or earlier users.|
|`Unsubscribed`| A user explicitly unsubscribed from push through your application or other methods your brand provides. By default, Braze push campaigns target only users that are `Subscribed` or `Opted-in` for push.|
{: .reset-td-br-1 .reset-td-br-2 aria-label="Push subscription states #push-sub-states" }
**Important:**
Braze does not automatically change a user's push subscription state to `Unsubscribed`. Remember that if a user's push subscription state is `Unsubscribed`, then the user's `Foreground Push Enabled` filter in segmentation is `false`.
### Push registration and reachable users
Push subscription state reflects a user's preference, but whether they count as **reachable** for push in the dashboard also depends on [push registration](https://www.braze.com/docs/de/de/user_guide/channels/push/push_setup/push_token_lifecycle/)—that is, a valid foreground push token on their profile. For how Braze calculates channel-level counts, see [Measure segment size](https://www.braze.com/docs/de/de/user_guide/audience/segments/measuring_segment_size/).
- **Push campaigns and Canvases:** Users who aren't push registered aren't included in **Reachable users** for Android Push or iOS Push in audience statistics, even when their push subscription state is `Subscribed` or `Opted-In`.
- **Other channels:** The same users can still count as reachable for other channels they qualify for (for example, email or in-app messages).
- **Segments:** Segment membership follows your filters. Users without push registration remain in the segment unless a filter excludes them (for example, **Foreground Push Enabled**). Total segment membership can be higher than the sum of users shown in push-specific **Reachable users** rows.
A user profile can show push subscription state `Subscribed` while no push token is assigned. Those users still don't count toward **Reachable users** for Android Push or iOS Push until Braze records a valid token.
For filter definitions, see [Segmentation filters](https://www.braze.com/docs/de/de/user_guide/audience/segments/segmentation_filters/).
### Updating push subscription states {#update-push-subscription-state}
Review the following ways to update a user's push subscription state:
#### Automatic opt-in (default)
By default, Braze sets a user's push subscription state to `Opted-In` when they first authorize push notifications for your app. Braze also does this when a user re-enables push permissions in their system settings after previously disabling them.
To disable this default behavior, add the following property to your Android Studio project's `braze.xml` file:
```xml
false
```
On iOS, a new install typically shows push subscription state **`Subscribed`** until the user allows notifications. After the user selects **Allow** on the OS prompt, Braze sets the state to **`Opted-In`** when automatic opt-in is enabled. If the user selects **Don't Allow** and later turns push on in iOS Settings, the state updates after the user logs a session—not at the moment they change Settings.
Starting with [Braze Swift SDK version 7.5.0](https://github.com/braze-inc/braze-swift-sdk/releases/tag/7.5.0), you can disable or further customize this behavior by adding the `optInWhenPushAuthorized` configuration to your Xcode project's `AppDelegate.swift` file:
```swift
configuration.optInWhenPushAuthorized = false // disables the default behavior
let braze = Braze(configuration: configuration)
AppDelegate.braze = braze
```
#### SDK integration
You can update a user's subscription state with the Braze SDK using the `setPushNotificationSubscriptionType` method on [Web](https://js.appboycdn.com/web-sdk/latest/doc/classes/braze.user.html#setpushnotificationsubscriptiontype), [Android](https://braze-inc.github.io/braze-android-sdk/kdoc/braze-android-sdk/com.braze/-braze-user/set-push-notification-subscription-type.html), or [iOS](https://braze-inc.github.io/braze-swift-sdk/documentation/brazekit/braze/user-swift.class/set(pushnotificationsubscriptionstate:)). For example, you can use this method to create a settings page in your app where users can manually enable or disable push notifications.
#### REST API
You can update a user's subscription state with the Braze REST API using the [`/users/track` endpoint](https://www.braze.com/docs/de/de/api/endpoints/user_data/post_user_track/) to update their [`push_subscribe`](https://www.braze.com/docs/de/de/api/objects_filters/user_attributes_object) attribute.
### Differences between push enablement and push subscription status
Push enablement refers to whether a user has granted OS- or browser-level permission to receive notifications on a specific device. Push subscription state is a Braze-level setting that represents a user's global preference for receiving push across their profile.
When automatic opt-in is enabled (the default), Braze updates a user's push subscription state to `Opted-In` when they authorize push notifications for your app or re-enable permissions in their system settings (for example, on iOS, Android 13+, and supported web browsers). Otherwise, the user's push subscription state remains `Subscribed` until you explicitly change it using an SDK method or REST API call.
Braze does not automatically change a user's push subscription state to `Unsubscribed` when they opt out of notifications at the OS, browser, or app level. To update a user's push subscription state, you must update it in Braze. For example, if a user disables push from an in-app preference center, update the push subscription state to `Unsubscribed` in Braze. Braze does not update user profiles based on your preference center. To align subscription states with a user's in-app preferences, call the appropriate methods using the [SDK](https://www.braze.com/docs/de/de/user_guide/channels/push/push_setup/push_subscription_states/#sdk-integration) (iOS or Android) or [REST API](https://www.braze.com/docs/de/de/user_guide/channels/push/push_setup/push_subscription_states/#rest-api).
### Imported push tokens (iOS)
When you [import iOS push tokens](https://www.braze.com/docs/de/de/api/endpoints/user_data/post_user_track/#push-token-import) with `push_token_import`, the user's push subscription state is typically **`Subscribed`** until they log a session in your Braze-integrated app. After the first session, Braze may update the state to **`Opted-In`** if [automatic opt-in](#automatic-opt-in-default) applies (for example, when the user authorizes push on iOS and `optInWhenPushAuthorized` is enabled).
Review **Contact Settings** on the user's profile after import and again after the user's first in-app session to confirm the expected state.
### Checking push subscription state
{: style="float:right;max-width:35%;margin-left:15px;"}
You can check a user's push subscription state with Braze in any of the following ways:
* **User profile:** You can access individual user profiles through the Braze dashboard on the **[User Search](https://www.braze.com/docs/de/de/user_guide/engagement_tools/segments/user_profiles/)** page. After finding a user's profile (via email address, phone number, or external user ID), you can select the **Engagement** tab to view and manually adjust a user's subscription state.
* **REST API export:** You can export individual user profiles in JSON format using the export [Users by segment](https://www.braze.com/docs/de/de/api/endpoints/export/user_data/post_users_segment/) or [Users by identifier](https://www.braze.com/docs/de/de/api/endpoints/export/user_data/post_users_identifier/) endpoints. Braze returns a push tokens object that contains push enablement information per device.
# Fehlerbehebung für Push-Benachrichtigungen im Braze SDK
Source: /docs/de/developer_guide/push_notifications/troubleshooting/index.md
# Fehlerbehebung für Push-Benachrichtigungen {#troubleshoot-push-notifications}
> Erfahren Sie, wie Sie Probleme mit Push-Benachrichtigungen im Braze SDK beheben können.
## Troubleshooting
If you're experiencing issues after setting up push notifications, consider the following:
- Web push notifications require that your site be HTTPS.
- Not all browsers can receive push messages. Ensure that `braze.isPushSupported()` returns `true` in the browser.
- Some browsers, such as Firefox, do not display images in push notifications. For details on browser support, refer to the [MDN documentation for Notification images](https://developer.mozilla.org/en-US/docs/Web/API/Notification/image).
- If a user has denied a site push access, they won't be prompted for permission again unless they remove the denied status from their browser preferences.
## Understanding the Braze push workflow
The Firebase Cloud Messaging (FCM) service is Google's infrastructure for push notifications sent to Android applications. Here is the simplified structure of how push notifications are enabled for your users' devices and how Braze can send push notifications to them:
```mermaid
---
config:
theme: mc
---
sequenceDiagram
participant Device as User Device
participant App as Android App
participant BrazeSDK as Braze SDK
participant BrazeAPI as Braze Server
participant Firebase as Google Firebase
Note over Device, Firebase: Register Option 1 Register Automatically using `com_braze_firebase_cloud_messaging_registration_enabled` in braze.xml
App ->> Braze: App initializes Braze with the first Braze call This could be automatic session handling
BrazeSDK ->> App: Get push token from Firebase Manager
BrazeSDK ->> BrazeAPI: Send push token to Braze Server
Note right of BrazeAPI: Braze will remove push token from any other user who may have previously been logged in on the same device.
Note over Device, Firebase: Register Option 2 Manual registration.
App ->> BrazeSDK: App sets `Braze.registeredPushToken`
BrazeSDK ->> BrazeAPI: Send push token to Braze Server
Note right of BrazeAPI: Braze will remove push token from any other user who may have previously been logged in on the same device.
Note over Device, Firebase: Push permission
BrazeAPI ->> BrazeSDK: In-App Message containing push prompt
BrazeSDK -> App: In-App Message is displayed
App -> BrazeSDK: User requests permissions
BrazeSDK -> App: Displays the Push Authorization prompt
BrazeSDK -> BrazeAPI: If authorized and `com_braze_optin_when_push_authorized`, Opt-In value is sent.
Note over Device, Firebase: Push Notification Is Sent
BrazeAPI ->> Firebase: Sends push message
Firebase ->> Device: Push message sent
Device ->> App: Android will send the push to the App. This could be blocked to Do Not Disturb, Power Saving Mode, etc.
App ->> BrazeSDK: Message is sent to BrazeFirebaseMessagingService
BrazeSDK ->> Device: SDK will check if the push is from Braze. If so, push data is transformed into a Push Notification and displayed.
```
### Step 1: Configuring your Google Cloud API key
In developing your app, you'll need to provide the Braze Android SDK with your Firebase sender ID. Additionally, you'll need to provide an API Key for server applications to the Braze dashboard. Braze will use this API key to send messages to your devices. You will also need to check that FCM service is enabled in Google Developer's console.
**Note:**
A common mistake during this step is using the app identifier API key instead of the REST API key.
### Step 2: Devices register for FCM and provide Braze with push tokens
In typical integrations, the Braze Android SDK will handle registering devices for FCM capability. This will usually happen immediately upon opening the app for the first time. After registration, Braze will be provided with an FCM Registration ID, which is used to send messages to that device specifically. We will store the Registration ID for that user, and that user will become "push registered" if they previously did not have a push token for any of your apps.
### Step 3: Launching a Braze push campaign
When a push campaign is launched, Braze will make requests to FCM to deliver your message. Braze will use the API key copied in the dashboard to authenticate and verify that we can send push notifications to the push tokens provided.
### Step 4: Removing invalid tokens
If FCM informs us that any of the push tokens we were attempting to send a message to are invalid, we remove those tokens from the user profiles they were associated with. If users have no other push tokens, they will no longer show up as "Push Registered" under the **Segments** page.
For more details about FCM, visit [Cloud messaging](https://firebase.google.com/docs/cloud-messaging/).
## Utilizing the push error logs
Braze provides push notification errors within the message activity log. This error log provides a variety of warnings which can be very helpful for identifying why your campaigns aren't working as expected. Clicking on an error message will redirect you to relevant documentation to help you troubleshoot a particular incident.

## Troubleshooting scenarios
### Push isn't sending
Your push messages might not be sending because of the following situations:
- Your credentials exist in the wrong Google Cloud Platform project ID (wrong sender ID).
- Your credentials have the wrong permission scope.
- You uploaded wrong credentials to the wrong Braze workspace (wrong sender ID).
For other issues that may prevent you from sending a push message, refer to [User Guide: Troubleshooting Push Notifications](https://www.braze.com/docs/de/de/user_guide/message_building_by_channel/push/troubleshooting/).
### No "push registered" users showing in the Braze dashboard (prior to sending messages)
Confirm that your app is correctly configured to allow push notifications. Common failure points to check include:
#### Incorrect sender ID
Check that the correct FCM sender ID is included in the `braze.xml` file. An incorrect sender ID will lead to `MismatchSenderID` errors reported in the dashboard's message activity log.
#### Braze registration not occurring
Since FCM registration is handled outside of Braze, failure to register can only occur in two places:
1. During registration with FCM
2. When passing the FCM-generated push token to Braze
We recommend setting a breakpoint or logging to confirm that the FCM-generated push token is being sent to Braze. If a token is not generated correctly or at all, we recommend consulting the [FCM documentation](https://firebase.google.com/docs/cloud-messaging/android/client).
#### Google Play Services not present
For FCM push to work, Google Play Services must be present on the device. If Google Play Services isn't on a device, push registration will not occur.
**Note:** Google Play Services is not installed on Android emulators without Google APIs installed.
#### Device not connected to the internet
Check that your device has good internet connectivity and isn't sending network traffic through a proxy.
### Tapping push notification doesn't open the app
Check if `com_braze_handle_push_deep_links_automatically` is set to `true` or `false`. To enable Braze to automatically open the app and any deep links when a push notification is tapped, set `com_braze_handle_push_deep_links_automatically` to `true` in your `braze.xml` file.
If `com_braze_handle_push_deep_links_automatically` is set to its default of `false`, you need to use a Braze Push Callback to listen for and handle the push received and opened intents.
### Push notifications bounced
If a push notification isn't delivered, make sure it didn't bounce by looking in the [developer console](https://www.braze.com/docs/de/de/developer_guide/platforms/android/push_notifications/troubleshooting/#utilizing-the-push-error-logs). The following are descriptions of common errors that may be logged in the developer console:
#### Error: MismatchSenderID
`MismatchSenderID` indicates an authentication failure. Confirm your Firebase sender ID and FCM API key are correct.
#### Error: InvalidRegistration
`InvalidRegistration` can be caused by a malformed push token.
1. Make sure to pass a valid push token to Braze from [Firebase Cloud Messaging](https://firebase.google.com/docs/cloud-messaging/android/client#retrieve-the-current-registration-token).
#### Error: NotRegistered
1. `NotRegistered` typically occurs when an app has been deleted from a device. Braze uses `NotRegistered` internally to signal that an app has been uninstalled from a device.
2. `NotRegistered` may also occur when multiple registrations occur and a second registration invalidates the first token.
### Push notifications sent but not displayed on users' devices
There are a few reasons why this could be occurring:
#### Application was force quit
If you force-quit your application through your system settings, your push notifications will not be sent. Launching the app again will re-enable your device to receive push notifications.
#### BrazeFirebaseMessagingService not registered
The BrazeFirebaseMessagingService must be properly registered in `AndroidManifest.xml` for push notifications to appear:
```xml
```
#### Firewall is blocking push
If you are testing push over Wi-Fi, your firewall may be blocking ports necessary for FCM to receive messages. Confirm that ports `5228`, `5229`, and `5230` are open. Additionally, since FCM doesn't specify its IPs, you must also allow your firewall to accept outgoing connections to all IP addresses contained in the IP blocks listed in Google's ASN of `15169`.
#### Custom notification factory returning null
If you have implemented a [custom notification factory](https://www.braze.com/docs/de/de/developer_guide/platform_integration_guides/android/push_notifications/android/integration/standard_integration/#custom-displaying-notifications), ensure that it is not returning `null`. This will cause notifications not to be displayed.
### "Push registered" users no longer enabled after sending messages
There are a few reasons why this could be happening:
#### Application was uninstalled
Users have uninstalled the application. This will invalidate their FCM push token.
#### Invalid Firebase Cloud Messaging server key
The Firebase Cloud Messaging server key provided in the Braze dashboard is invalid. The sender ID provided should match the one referenced in your app's `braze.xml` file. The server key and sender ID are found here in your Firebase Console:

### Push clicks not logged
Braze logs push clicks automatically, so this scenario should be comparatively rare.
If push clicks are not being logged, it is possible that push click data has not been flushed to our servers yet. Braze throttles the frequency of its flushes based on the strength of the network connection. With a good network connection, push click-data should arrive at the server within a minute in most circumstances.
### Deep links not working
#### Verify deep link configuration
Deep links can be [tested with ADB](https://developer.android.com/training/app-indexing/deep-linking.html#testing-filters). We recommend testing your deep link with the following command:
`adb shell am start -W -a android.intent.action.VIEW -d "THE_DEEP_LINK" THE_PACKAGE_NAME`
If the deep link fails to work, the deep link may be misconfigured. A misconfigured deep link will not work when sent through Braze push.
#### Verify custom handling logic
If the deep link [works correctly with ADB](https://developer.android.com/training/app-indexing/deep-linking.html#testing-filters) but fails to work from Braze push, check whether any [custom push open handling](https://www.braze.com/docs/de/de/developer_guide/platform_integration_guides/android/push_notifications/android/integration/standard_integration/#android-push-listener-callback) has been implemented. If so, verify that the custom handling code properly handles the incoming deep link.
#### Disable back stack behavior
If the deep link [works correctly with ADB](https://developer.android.com/training/app-indexing/deep-linking.html#testing-filters) but fails to work from Braze push, try disabling [back stack](https://developer.android.com/guide/components/activities/tasks-and-back-stack). To do so, update your **braze.xml** file to include:
```xml
false
```
## Understanding the Braze/APNs workflow
The Apple Push Notification service (APNs) is the infrastructure for sending push notifications to applications running on Apple's platforms. Here is the simplified structure of how push notifications are enabled for your users' devices and how Braze can send push notifications to them:
1. You configure the push certificate and provisioning profile
2. Devices register for APNs and provide Braze with push tokens
3. You launch a Braze push campaign
4. Braze removes invalid tokens
### Step 1: Configuring the push certificate and provisioning profile
In developing your app, you'll need to create an SSL certificate to enable push notifications. This certificate will be included in the provisioning profile your app is built with and will also need to be uploaded to the Braze dashboard. The certificate allows Braze to tell APNs that we are allowed to send push notifications on your behalf.
There are two types of [provisioning profiles](https://developer.apple.com/library/content/documentation/IDEs/Conceptual/AppDistributionGuide/MaintainingProfiles/MaintainingProfiles.html) and certificates: development and distribution. We recommend just using distribution profiles and certificates to avoid any confusion. If you choose to use different profiles and certificates for development and distribution, ensure that the certificate uploaded to the dashboard matches the provisioning profile you are currently using.
**Warning:**
Do not change the push certificate environment (development versus production). Changing the push certificate to the wrong environment can lead to your users having their push token accidentally removed, making them unreachable by push.
### Step 2: Devices register for APNs and provide Braze with push tokens
When users open your app, they will be prompted to accept push notifications. If they accept this prompt, APNs will generate a push token for that particular device. The Swift SDK will immediately and asynchronously send up the push token for apps using the default [automatic flush policy](https://www.braze.com/docs/de/de/developer_guide/platform_integration_guides/swift/advanced_use_cases/fine_network_traffic_control/#automatic-request-processing). After we have a push token associated with a user, they will show as "Push Registered" in the dashboard on their user profile under the **Engagement** tab and will be eligible to receive push notifications from Braze campaigns.
**Note:**
Starting in macOS 13, on certain devices, you can test push notifications on an iOS 16 Simulator running on Xcode 14. For further details, refer to the [Xcode 14 Release Notes](https://developer.apple.com/documentation/xcode-release-notes/xcode-14-release-notes).
#### Considerations for push token generation
- If users install your app on another device, another token will be created and captured in the same way.
- If users reinstall your app, a new token will be generated and passed to Braze. However, the original token may still be logged as valid by APNs and Braze.
- If users uninstall your app, Braze doesn't get immediately notified of this and the token will still appear as valid until it is retired by APNs.
- At some point, APNs will retire old tokens. Braze doesn't have control or visibility of this.
### Step 3: Launching a Braze push campaign
When a push campaign is launched, Braze will make requests to APNs to deliver your message. Specifically, the requests are passed to APNs for each current valid push token unless **Send to a user's most recent device** is selected. After Braze receives a successful response from APNs, we will log a successful delivery on the user profile, though the user may not have received the actual message for reasons including:
- Their device is powered off.
- Their device isn't connected to the internet (Wi-Fi or cellular).
- They recently uninstalled the app.
Braze will use the SSL push certificate uploaded in the dashboard to authenticate and verify that we are allowed to send push notifications to the push tokens provided. If a device is online, the notification should be received shortly after the campaign has been sent. Note that Braze sets the default APNs [expiration date](https://developer.apple.com/documentation/usernotifications/setting_up_a_remote_notification_server/sending_notification_requests_to_apns#2947607) for notifications to 30 days.
### Step 4: Removing invalid tokens
If [APNs](https://developer.apple.com/library/content/documentation/NetworkingInternet/Conceptual/RemoteNotificationsPG/APNSOverview.html#//apple_ref/doc/uid/TP40008194-CH8-SW1) informs us that any of the push tokens we were attempting to send a message to are invalid, we remove those tokens from the user profiles they were associated with.
**Note:**
It's normal for APNs to initially return a success status even if a token becomes unregistered, as APNs doesn't immediately report token invalidation events. APNs intentionally delays returning a `410` status for invalid tokens on a randomized schedule, designed to protect user privacy and prevent tracking of app uninstalls. You can safely continue sending notifications to an unregistered token until APNs returns a `410` status.
## Using the push error logs
The [Message Activity Log](https://www.braze.com/docs/de/de/user_guide/administrative/app_settings/message_activity_log_tab/) gives you the opportunity to see any messages (especially error messages) associated with your campaigns and sends, including push notification errors. This error log provides a variety of warnings which can be very helpful for identifying why your campaigns aren't working as expected. Clicking on an error message will redirect you to relevant documentation to help you troubleshoot a particular incident.

Common errors you might see here include user-specific notifications, such as ["Received Unregistered Sending to Push Token"](#swift_received-unregistered-sending).
In addition, Braze also provides a push changelog on the user profile under the **Engagement** tab. This changelog provides insight into push registration behavior such as token invalidation, push registration errors, tokens being moved to new users, etc.
{: style="max-width:50%;" }
### Message Activity Log errors
#### Received unregistered sending to push token {#received-unregistered-sending}
- Make sure that the push token being sent to Braze from the method `AppDelegate.braze?.notifications.register(deviceToken:)` is valid. You can look in the **Message Activity Log** to see the push token. It should look something like `6e407a9be8d07f0cdeb9e724733a89445f57a89ec890d63867c482a483506fa6`, a long string containing a mix of letters and numbers. If your push token looks different, check your [code](https://www.braze.com/docs/de/de/developer_guide/platform_integration_guides/swift/push_notifications/integration/#step-4-register-push-tokens-with-braze) for sending Braze the push tokens.
- Ensure that your push provisioning profile matches the environment you're testing. Universal certificates may be configured in the Braze dashboard to send to either the development or production APNs environment. Using a development certificate for a production app or a production certificate for a development app will not work.
- Check that the push token you have uploaded to Braze matches the provisioning profile you used to build the app you sent the push token from.
#### Device token not for topic
APNs returns `DeviceTokenNotForTopic` (HTTP status 400) when the push token doesn't match the topic (bundle ID) configured for your credentials. Braze may surface this in **Message Activity Log** or push delivery logs as `DeviceTokenNotForTopic`.
To resolve the mismatch:
1. Confirm the app's **bundle ID** matches the **App Bundle ID** in Braze (**Settings** > **App Settings** > **Push Notification Settings**).
2. Verify the provisioning profile used to build the app includes push capability for that bundle ID.
3. Confirm the push credential uploaded to Braze matches the app's environment (development versus production).
4. For `.p8` keys, verify **Team ID** and **Key ID** in Braze match your Apple Developer account.
5. Re-upload a valid `.p8` key or `.p12` certificate if credentials were rotated or revoked.
Prefer `.p8` authentication keys when possible. For credential types and dashboard status indicators, see [Migrate to a .p8 authentication key](https://www.braze.com/docs/de/de/user_guide/channels/push/troubleshooting/#migrate-to-a-p8-authentication-key).
#### BadDeviceToken sending to push token
The `BadDeviceToken` is an APNs error code and does not originate from Braze. There could be a number of reasons for this response being returned, including the following:
- The app received a push token that was invalid for the credentials uploaded to the dashboard.
- Push was disabled for this workspace.
- The user has opted out of push.
- The app was uninstalled.
- Apple refreshed the push token, which invalidated the old token.
- The app was built for a production environment, but the push credentials uploaded to Braze are set for a development environment (or the other way around).
## Push registration issues
### No push registration prompt
If the application does not prompt you to register for push notifications, there is likely an issue with your push registration integration. Ensure you have followed our [documentation](https://www.braze.com/docs/de/de/developer_guide/push_notifications/?sdktab=swift) and correctly integrated our push registration. You can also set breakpoints in your code to ensure the push registration code is running.
### No "push registered" users showing in the dashboard (prior to sending messages)
Ensure that your app is correctly configured to allow push notifications. Common failure points to check include:
- Check that your app is prompting you to allow push notifications. Typically, this prompt will appear upon your first open of the app, but it can be programmed to appear elsewhere. If it does not appear where it should be, the problem is likely with the basic configuration of your app's push capabilities.
- Verify the steps for [push integration](https://www.braze.com/docs/de/de/developer_guide/push_notifications/?sdktab=swift) were successfully completed.
- Check that the provisioning profile your app was built with includes permissions for push. Make sure that you're pulling down all of the available provisioning profiles from your Apple developer account. To confirm this, perform the following steps:
1. In Xcode, navigate to **Preferences > Accounts** (or use the keyboard shortcut Command+,).
2. Select the Apple ID you use for your developer account and click **View Details**.
3. On the next page, click ** Refresh** and confirm that you're pulling all available provisioning profiles.
- Check you have [properly enabled push capability](https://www.braze.com/docs/de/de/developer_guide/platform_integration_guides/swift/push_notifications/integration/#step-2-enable-push-capabilities) in your app.
- Check your push provisioning profile matches the environment you're testing in. Universal certificates may be configured in the Braze dashboard to send to either the development or production APNs environment. Using a development certificate for a production app or a production certificate for a development app will not work.
- Check that you are calling our `registerPushToken` method by setting a breakpoint in your code.
- Make sure you're testing using a device (push will not work on a simulator) and have good network connectivity.
## Push notifications sent but not displayed on users’ devices
### "Push registered" users no longer enabled after sending messages
This likely indicates that the user had an invalid push token. This can happen for several reasons:
#### Dashboard and app certificate mismatch
If the push certificate you uploaded in the dashboard is not the same one in the provisioning profile that your app was built with, APNs will reject the token. Verify that you have uploaded the correct certificate and completed another session in the app before attempting another test notification.
#### Application was uninstalled
If a user has uninstalled your application, their push token will be invalid and removed upon the next send.
#### Regenerating your provisioning profile
As a last resort, starting over fresh and creating a whole new provisioning profile can clear up configuration errors that come from working with multiple environments, profiles, and apps at the same time. There are many "moving parts" in setting up push notifications, so sometimes, it is best to retry from the beginning. This will also help isolate the problem if you need to continue troubleshooting.
### Messages not delivered to "push registered" users
#### App is foregrounded
On iOS versions that do not integrate push via the `UserNotifications` framework, if the app is in the foreground when the push message is received, it will not be displayed. You should background the app on your test devices before sending test messages.
#### Test notification scheduled incorrectly
Check the schedule you set for your test message. If it is set to local time zone delivery or [Intelligent Timing](https://www.braze.com/docs/de/de/user_guide/brazeai/intelligence/intelligent_timing/), you may have just not received the message yet (or had the app in the foreground when it was received).
### User not "push registered" for the app being tested
Check the user profile of the user you are trying to send a test message to. Under the **Engagement** tab, there should be a list of "pushable apps." Verify the app you are trying to send test messages to is in this list. Users will show up as "Push Registered" if they have a push token for any app in your workspace, so this could be something of a false positive.
The following would indicate a problem with push registration or that the user's token had been returned to Braze as invalid by APNs after being pushed:
{: style="max-width:50%"}
## Push clicks not logged {#push-clicks-not-logged}
- Make sure you have followed the [push integration steps](https://www.braze.com/docs/de/de/developer_guide/platform_integration_guides/swift/push_notifications/integration/#step-5-enable-push-handling).
- Braze does not handle push notifications received silently in the foreground (default foreground push behavior prior to the `UserNotifications` framework). This means that links will not be opened, and push clicks will not be logged. If your application has not yet integrated the `UserNotifications` framework, Braze will not handle push notifications when the application state is `UIApplicationStateActive`. Ensure that your app does not delay calls to [push handling methods](https://www.braze.com/docs/de/de/developer_guide/platform_integration_guides/swift/push_notifications/integration/#step-5-enable-push-handling); otherwise, the Swift SDK may treat push notifications as silent foreground push events and not handle them.
## Deep links not working
For comprehensive troubleshooting across all channels—including universal links, custom schemes, email, and third-party providers like Branch—see [Deep linking troubleshooting](https://www.braze.com/docs/de/de/developer_guide/push_notifications/deep_linking_troubleshooting).
### Web links from push clicks not opening
Links in push notifications need to be ATS compliant to be opened in web views. Ensure that your web links use HTTPS. For more information, refer to [ATS compliance](https://www.braze.com/docs/de/de/developer_guide/platform_integration_guides/swift/advanced_use_cases/linking/#app-transport-security-ats).
### Deep links from push clicks not opening
Most of the code that handles deep links also handles push opens. First, ensure that push opens are being logged. If not, fix that issue (as the fix often fixes link handling).
If opens are being logged, check whether it is an issue with the deep link in general or with the deep linking push click handling. To do this, test to see if a deep link from an in-app message click works.
## Understanding the Braze push workflow
The Firebase Cloud Messaging (FCM) service is Google's infrastructure for push notifications sent to Android applications. Here is the simplified structure of how push notifications are enabled for your users' devices and how Braze can send push notifications to them:
```mermaid
---
config:
theme: mc
---
sequenceDiagram
participant Device as User Device
participant App as Android App
participant BrazeSDK as Braze SDK
participant BrazeAPI as Braze Server
participant Firebase as Google Firebase
Note over Device, Firebase: Register Option 1 Register Automatically using `com_braze_firebase_cloud_messaging_registration_enabled` in braze.xml
App ->> Braze: App initializes Braze with the first Braze call This could be automatic session handling
BrazeSDK ->> App: Get push token from Firebase Manager
BrazeSDK ->> BrazeAPI: Send push token to Braze Server
Note right of BrazeAPI: Braze will remove push token from any other user who may have previously been logged in on the same device.
Note over Device, Firebase: Register Option 2 Manual registration.
App ->> BrazeSDK: App sets `Braze.registeredPushToken`
BrazeSDK ->> BrazeAPI: Send push token to Braze Server
Note right of BrazeAPI: Braze will remove push token from any other user who may have previously been logged in on the same device.
Note over Device, Firebase: Push permission
BrazeAPI ->> BrazeSDK: In-App Message containing push prompt
BrazeSDK -> App: In-App Message is displayed
App -> BrazeSDK: User requests permissions
BrazeSDK -> App: Displays the Push Authorization prompt
BrazeSDK -> BrazeAPI: If authorized and `com_braze_optin_when_push_authorized`, Opt-In value is sent.
Note over Device, Firebase: Push Notification Is Sent
BrazeAPI ->> Firebase: Sends push message
Firebase ->> Device: Push message sent
Device ->> App: Android will send the push to the App. This could be blocked to Do Not Disturb, Power Saving Mode, etc.
App ->> BrazeSDK: Message is sent to BrazeFirebaseMessagingService
BrazeSDK ->> Device: SDK will check if the push is from Braze. If so, push data is transformed into a Push Notification and displayed.
```
### Step 1: Configuring your Google Cloud API key
In developing your app, you'll need to provide the Braze Android SDK with your Firebase sender ID. Additionally, you'll need to provide an API Key for server applications to the Braze dashboard. Braze will use this API key to send messages to your devices. You will also need to check that FCM service is enabled in Google Developer's console.
**Note:**
A common mistake during this step is using the app identifier API key instead of the REST API key.
### Step 2: Devices register for FCM and provide Braze with push tokens
In typical integrations, the Braze Android SDK will handle registering devices for FCM capability. This will usually happen immediately upon opening the app for the first time. After registration, Braze will be provided with an FCM Registration ID, which is used to send messages to that device specifically. We will store the Registration ID for that user, and that user will become "push registered" if they previously did not have a push token for any of your apps.
### Step 3: Launching a Braze push campaign
When a push campaign is launched, Braze will make requests to FCM to deliver your message. Braze will use the API key copied in the dashboard to authenticate and verify that we can send push notifications to the push tokens provided.
### Step 4: Removing invalid tokens
If FCM informs us that any of the push tokens we were attempting to send a message to are invalid, we remove those tokens from the user profiles they were associated with. If users have no other push tokens, they will no longer show up as "Push Registered" under the **Segments** page.
For more details about FCM, visit [Cloud messaging](https://firebase.google.com/docs/cloud-messaging/).
## Utilizing the push error logs
Braze provides push notification errors within the message activity log. This error log provides a variety of warnings which can be very helpful for identifying why your campaigns aren't working as expected. Clicking on an error message will redirect you to relevant documentation to help you troubleshoot a particular incident.

## Troubleshooting scenarios
### Push isn't sending
Your push messages might not be sending because of the following situations:
- Your credentials exist in the wrong Google Cloud Platform project ID (wrong sender ID).
- Your credentials have the wrong permission scope.
- You uploaded wrong credentials to the wrong Braze workspace (wrong sender ID).
For other issues that may prevent you from sending a push message, refer to [User Guide: Troubleshooting Push Notifications](https://www.braze.com/docs/de/de/user_guide/message_building_by_channel/push/troubleshooting/).
### No "push registered" users showing in the Braze dashboard (prior to sending messages)
Confirm that your app is correctly configured to allow push notifications. Common failure points to check include:
#### Incorrect sender ID
Check that the correct FCM sender ID is included in the `braze.xml` file. An incorrect sender ID will lead to `MismatchSenderID` errors reported in the dashboard's message activity log.
#### Braze registration not occurring
Since FCM registration is handled outside of Braze, failure to register can only occur in two places:
1. During registration with FCM
2. When passing the FCM-generated push token to Braze
We recommend setting a breakpoint or logging to confirm that the FCM-generated push token is being sent to Braze. If a token is not generated correctly or at all, we recommend consulting the [FCM documentation](https://firebase.google.com/docs/cloud-messaging/android/client).
#### Google Play Services not present
For FCM push to work, Google Play Services must be present on the device. If Google Play Services isn't on a device, push registration will not occur.
**Note:** Google Play Services is not installed on Android emulators without Google APIs installed.
#### Device not connected to the internet
Check that your device has good internet connectivity and isn't sending network traffic through a proxy.
### Tapping push notification doesn't open the app
Check if `com_braze_handle_push_deep_links_automatically` is set to `true` or `false`. To enable Braze to automatically open the app and any deep links when a push notification is tapped, set `com_braze_handle_push_deep_links_automatically` to `true` in your `braze.xml` file.
If `com_braze_handle_push_deep_links_automatically` is set to its default of `false`, you need to use a Braze Push Callback to listen for and handle the push received and opened intents.
### Push notifications bounced
If a push notification isn't delivered, make sure it didn't bounce by looking in the [developer console](https://www.braze.com/docs/de/de/developer_guide/platforms/android/push_notifications/troubleshooting/#utilizing-the-push-error-logs). The following are descriptions of common errors that may be logged in the developer console:
#### Error: MismatchSenderID
`MismatchSenderID` indicates an authentication failure. Confirm your Firebase sender ID and FCM API key are correct.
#### Error: InvalidRegistration
`InvalidRegistration` can be caused by a malformed push token.
1. Make sure to pass a valid push token to Braze from [Firebase Cloud Messaging](https://firebase.google.com/docs/cloud-messaging/android/client#retrieve-the-current-registration-token).
#### Error: NotRegistered
1. `NotRegistered` typically occurs when an app has been deleted from a device. Braze uses `NotRegistered` internally to signal that an app has been uninstalled from a device.
2. `NotRegistered` may also occur when multiple registrations occur and a second registration invalidates the first token.
### Push notifications sent but not displayed on users' devices
There are a few reasons why this could be occurring:
#### Application was force quit
If you force-quit your application through your system settings, your push notifications will not be sent. Launching the app again will re-enable your device to receive push notifications.
#### BrazeFirebaseMessagingService not registered
The BrazeFirebaseMessagingService must be properly registered in `AndroidManifest.xml` for push notifications to appear:
```xml
```
#### Firewall is blocking push
If you are testing push over Wi-Fi, your firewall may be blocking ports necessary for FCM to receive messages. Confirm that ports `5228`, `5229`, and `5230` are open. Additionally, since FCM doesn't specify its IPs, you must also allow your firewall to accept outgoing connections to all IP addresses contained in the IP blocks listed in Google's ASN of `15169`.
#### Custom notification factory returning null
If you have implemented a [custom notification factory](https://www.braze.com/docs/de/de/developer_guide/platform_integration_guides/android/push_notifications/android/integration/standard_integration/#custom-displaying-notifications), ensure that it is not returning `null`. This will cause notifications not to be displayed.
### "Push registered" users no longer enabled after sending messages
There are a few reasons why this could be happening:
#### Application was uninstalled
Users have uninstalled the application. This will invalidate their FCM push token.
#### Invalid Firebase Cloud Messaging server key
The Firebase Cloud Messaging server key provided in the Braze dashboard is invalid. The sender ID provided should match the one referenced in your app's `braze.xml` file. The server key and sender ID are found here in your Firebase Console:

### Push clicks not logged
Braze logs push clicks automatically, so this scenario should be comparatively rare.
If push clicks are not being logged, it is possible that push click data has not been flushed to our servers yet. Braze throttles the frequency of its flushes based on the strength of the network connection. With a good network connection, push click-data should arrive at the server within a minute in most circumstances.
### Deep links not working
#### Verify deep link configuration
Deep links can be [tested with ADB](https://developer.android.com/training/app-indexing/deep-linking.html#testing-filters). We recommend testing your deep link with the following command:
`adb shell am start -W -a android.intent.action.VIEW -d "THE_DEEP_LINK" THE_PACKAGE_NAME`
If the deep link fails to work, the deep link may be misconfigured. A misconfigured deep link will not work when sent through Braze push.
#### Verify custom handling logic
If the deep link [works correctly with ADB](https://developer.android.com/training/app-indexing/deep-linking.html#testing-filters) but fails to work from Braze push, check whether any [custom push open handling](https://www.braze.com/docs/de/de/developer_guide/platform_integration_guides/android/push_notifications/android/integration/standard_integration/#android-push-listener-callback) has been implemented. If so, verify that the custom handling code properly handles the incoming deep link.
#### Disable back stack behavior
If the deep link [works correctly with ADB](https://developer.android.com/training/app-indexing/deep-linking.html#testing-filters) but fails to work from Braze push, try disabling [back stack](https://developer.android.com/guide/components/activities/tasks-and-back-stack). To do so, update your **braze.xml** file to include:
```xml
false
```
## Troubleshooting
### Push doesn't appear after app is closed from task switcher
If you observe that push notifications no longer appear after the app is closed from the task switcher, your app is likely in Debug mode. .NET MAUI adds scaffolding in Debug mode that prevents apps from receiving push after their process is killed. If you run your app in Release Mode, you should see push even after the app is closed from the task switcher.
### Custom notification factory not being set correctly
Custom notification factories (and all delegates) must extend [`Java.Lang.Object`](https://developer.xamarin.com/api/type/Android.Runtime.IJavaObject/) to work properly across the C# and Java divide. See [Xamarin](https://developer.xamarin.com/guides/android/advanced_topics/java_integration_overview/working_with_jni/#Implementing_Interfaces) on implementing Java interfaces for more information.
## Zeilenumbrüche in Push-Benachrichtigungen {#push-linebreaks}
Beim Verfassen von Push-Benachrichtigungen mit Liquid-Tags werden Zeilenumbrüche neben Liquid-Tags automatisch entfernt, bevor die Nachricht gesendet wird. Im [Push-Benachrichtigungs-Composer](https://www.braze.com/docs/de/de/user_guide/message_building_by_channel/push/creating_a_push_message) werden diese Zeilenumbrüche wieder eingefügt, damit Ihre Nachricht beim Bearbeiten lesbar bleibt. Wenn Sie beim Speichern Ihrer Nachricht Zeilenumbrüche um Liquid-Tags herum bemerken, ist dies das erwartete Verhalten.
# Erweiterte Beispiele für Push-Benachrichtigungen für das Braze SDK
Source: /docs/de/developer_guide/push_notifications/examples/index.md
# Live-Aktivitäten für das Braze SDK
Source: /docs/de/developer_guide/live_notifications/index.md
Live-Aktivitäten
> Erfahren Sie, wie Sie persistente, dynamische Benachrichtigungen direkt an die Sperrbildschirme Ihrer Nutzer:innen senden können, damit diese Realtime-Updates erhalten, ohne Ihre App öffnen zu müssen. Für Swift wird dies nativ unterstützt.
Erfahren Sie, wie Sie persistente, dynamische Benachrichtigungen direkt an die Sperrbildschirme Ihrer Nutzer:innen senden können, damit diese Realtime-Updates erhalten, ohne Ihre App öffnen zu müssen.
Featured:
- Implementierung von Live-Aktivitäten für Swift
# Live-Aktivitäten für das Swift Braze SDK
Source: /docs/de/developer_guide/live_notifications/live_activities/index.md
# Live-Aktivitäten für Swift {#live-activities-for-swift}
> Erfahren Sie, wie Sie Live-Aktivitäten für das Swift Braze SDK implementieren. Live-Aktivitäten sind persistente, interaktive Benachrichtigungen, die direkt auf dem Sperrbildschirm angezeigt werden und es Nutzer:innen ermöglichen, dynamische Realtime-Updates zu erhalten—ohne ihr Gerät zu entsperren.
## Funktionsweise {#how-it-works}
{: style="max-width:40%;float:right;margin-left:15px;"}
Live-Aktivitäten stellen eine Kombination aus statischen und dynamischen Informationen dar, die Sie aktualisieren. Sie können zum Beispiel eine Live-Aktivität mit einem Status-Tracker für eine Zustellung erstellen. Diese Live-Aktivität enthält den Namen Ihres Unternehmens als statische Information sowie eine dynamische „Zeit bis zur Lieferung“, die aktualisiert wird, wenn sich der Zusteller seinem Ziel nähert.
Als Entwickler:in können Sie mit Braze Ihre Live-Aktivitäts-Lebenszyklen verwalten, die Braze REST API aufrufen, um Live-Aktivitäts-Updates durchzuführen, und dafür sorgen, dass alle abonnierten Geräte das Update so schnell wie möglich erhalten. Und da Sie die Live-Aktivitäten über Braze verwalten, können Sie sie zusammen mit Ihren anderen Messaging-Kanälen—Push-Benachrichtigungen, In-App-Nachrichten, Content Cards—einsetzen, um die Akzeptanz zu steigern.
## Sequenzdiagramm {#sequence-diagram}
**Diagramm anzeigen**
```mermaid
---
config:
theme: mc
---
sequenceDiagram
participant Server as Client Server
participant Device as User Device
participant App as iOS App / Braze SDK
participant BrazeAPI as Braze API
participant APNS as Apple Push Notification Service
Note over Server, APNS: Launch Option 1 Locally Start Activities
App ->> App: Register a Live Activity using `launchActivity(pushTokenTag:activity:)`
App ->> App: Get push token from iOS
App ->> BrazeAPI: Activity ID & Push token automatically sent to Braze
Note over Server, APNS: Launch Option 2 Remotely Start Activities
Device ->> App: Call `registerPushToStart` to collect push tokens early
App ->> BrazeAPI: Push-to-start tokens sent to Braze
Server ->> BrazeAPI: POST /messages/live_activity/start
Note right of BrazeAPI: Payload includes: - push_token - activity_id - external_id - event_name - content_state (optional)
BrazeAPI ->> APNS: Live activity start request
APNS ->> Device: APNS sends activity to device
App ->> App: Get push token from iOS
App ->> BrazeAPI: Activity ID & Push token automatically sent to Braze
Note over Server, APNS: Resuming activities upon app launch
App ->> App: Call `resumeActivities(ofType:)` on each app launch
Note over Server, APNS: Updating a Live Activity
loop update a live activity
Server ->> BrazeAPI: POST /messages/live_activity/update
Note right of BrazeAPI: Payload includes changes to ContentState (dynamic variables)
BrazeAPI ->> APNS: Update sent to APNS
APNS ->> Device: APNS sends update to device
end
Note over Server, APNS: Ending a Live Activity
Server ->> BrazeAPI: POST /messages/live_activity/update
Note right of BrazeAPI: Activity can be ended via: - User manually dismisses - Times out after 12 hours - Setting `end_activity: true` on `/messages/live_activity/update`
APNS ->> Device: Live activity is dismissed
```
## Eine Live-Aktivität implementieren {#implementing-a-live-activity}
### Prerequisites
Before you can use this feature, you'll need to [integrate the Swift Braze SDK](https://www.braze.com/docs/de/de/developer_guide/sdk_integration/?sdktab=swift). Außerdem müssen Sie Folgendes abschließen:
- Stellen Sie sicher, dass Ihr Projekt auf iOS 16.1 oder höher ausgerichtet ist.
- Fügen Sie die `Push Notification`-Berechtigung unter **Signing & Capabilities** in Ihrem Xcode-Projekt hinzu.
- Vergewissern Sie sich, dass `.p8`-Schlüssel zum Senden von Benachrichtigungen verwendet werden. Ältere Dateien wie `.p12` oder `.pem` werden nicht unterstützt.
- Ab Version 8.2.0 des Braze Swift SDK können Sie [eine Live-Aktivität remote registrieren](#swift_step-2-start-the-activity). Um dieses Feature zu nutzen, ist iOS 17.2 oder höher erforderlich.
**Note:**
Live-Aktivitäten und Push-Benachrichtigungen sind zwar ähnlich, aber ihre Systemberechtigungen sind unterschiedlich. Standardmäßig sind alle Features für Live-Aktivitäten aktiviert, aber Nutzer:innen können dieses Feature pro App deaktivieren.
### Schritt 1: Eine Aktivität erstellen {#create-an-activity}
Vergewissern Sie sich zunächst, dass Sie in Ihrer iOS-Anwendung Live-Aktivitäten wie unter [Displaying live data with Live Activities](https://developer.apple.com/documentation/activitykit/displaying-live-data-with-live-activities) in der Apple-Dokumentation beschrieben eingerichtet haben. Stellen Sie dabei sicher, dass Sie `NSSupportsLiveActivities` mit der Einstellung `YES` in Ihre `Info.plist` aufnehmen.
Da die genaue Art Ihrer Live-Aktivität spezifisch für Ihren Geschäftsfall ist, müssen Sie die [Aktivitätsobjekte](https://developer.apple.com/documentation/activitykit/activityattributes) einrichten und initialisieren. Insbesondere müssen Sie Folgendes definieren:
* `ActivityAttributes`: Dieses Protokoll definiert die statischen (unveränderlichen) und die dynamischen (sich ändernden) Inhalte Ihrer Live-Aktivität.
* `ActivityAttributes.ContentState`: Dieser Typ definiert die dynamischen Daten, die im Verlauf der Aktivität aktualisiert werden.
Außerdem verwenden Sie SwiftUI, um die UI-Darstellung des Sperrbildschirms und der Dynamic Island auf unterstützten Geräten zu erstellen.
Stellen Sie sicher, dass Sie mit den [Voraussetzungen und Einschränkungen](https://developer.apple.com/documentation/activitykit/displaying-live-data-with-live-activities#Understand-constraints) von Apple für Live-Aktivitäten vertraut sind, da diese Einschränkungen unabhängig von Braze gelten.
**Note:**
Wenn Sie erwarten, häufig Push-Nachrichten an dieselbe Live-Aktivität zu senden, können Sie eine Drosselung durch Apples Budgetgrenze vermeiden, indem Sie `NSSupportsLiveActivitiesFrequentUpdates` in Ihrer `Info.plist`-Datei auf `YES` setzen. Weitere Einzelheiten finden Sie im Abschnitt [`Determine the update frequency`](https://developer.apple.com/documentation/activitykit/updating-and-ending-your-live-activity-with-activitykit-push-notifications#Determine-the-update-frequency) der ActivityKit-Dokumentation.
#### Beispiel {#example}
Stellen wir uns vor, wir möchten eine Live-Aktivität erstellen, um unsere Nutzer:innen über die Superb Owl Show auf dem Laufenden zu halten, bei der zwei konkurrierende Tierrettungsorganisationen Punkte für die Eulen erhalten, die sie beherbergen. Für dieses Beispiel haben wir eine Struktur namens `SportsActivityAttributes` erstellt. Sie können jedoch auch Ihre eigene Implementierung von `ActivityAttributes` verwenden.
```swift
#if canImport(ActivityKit)
import ActivityKit
#endif
@available(iOS 16.1, *)
struct SportsActivityAttributes: ActivityAttributes {
public struct ContentState: Codable, Hashable {
var teamOneScore: Int
var teamTwoScore: Int
}
var gameName: String
var gameNumber: String
}
```
### Schritt 2: Die Aktivität starten {#start-the-activity}
Wählen Sie zunächst, wie Sie Ihre Aktivität registrieren möchten:
- **Remote:** Verwenden Sie die [`registerPushToStart`]()-Methode zu einem frühen Zeitpunkt im Lebenszyklus Ihrer Nutzer:innen und bevor das Push-to-Start-Token benötigt wird, und starten Sie dann eine Aktivität über den [`/messages/live_activity/start`](https://www.braze.com/docs/de/de/api/endpoints/messaging/live_activity/start)-Endpunkt.
- **Lokal:** Erstellen Sie eine Instanz Ihrer Live-Aktivität und verwenden Sie dann die [`launchActivity`]()-Methode, um Push-Token zu erstellen, die Braze verwalten soll.
**Important:**
Um eine Live-Aktivität remote zu registrieren, ist iOS 17.2 oder höher erforderlich.
#### Schritt 2.1: BrazeKit zu Ihrer Widget-Erweiterung hinzufügen {#step-21-add-brazekit-to-your-widget-extension}
Wählen Sie in Ihrem Xcode-Projekt den Namen Ihrer App und dann **General** aus. Prüfen Sie unter **Frameworks and Libraries**, ob `BrazeKit` aufgeführt ist.

#### Schritt 2.2: Das Protokoll BrazeLiveActivityAttributes hinzufügen {#brazeActivityAttributes}
Fügen Sie in Ihrer `ActivityAttributes`-Implementierung die Konformität mit dem `BrazeLiveActivityAttributes`-Protokoll hinzu und ergänzen Sie die Eigenschaft `brazeActivityId` in Ihrem Attribut-Modell.
**Important:**
iOS bildet die Eigenschaft `brazeActivityId` auf das entsprechende Feld in Ihrer Push-to-Start-Payload für Live-Aktivitäten ab. Sie sollte daher nicht umbenannt oder mit einem anderen Wert versehen werden.
```swift
import BrazeKit
#if canImport(ActivityKit)
import ActivityKit
#endif
@available(iOS 16.1, *)
// 1. Add the `BrazeLiveActivityAttributes` conformance to your `ActivityAttributes` struct.
struct SportsActivityAttributes: ActivityAttributes, BrazeLiveActivityAttributes {
public struct ContentState: Codable, Hashable {
var teamOneScore: Int
var teamTwoScore: Int
}
var gameName: String
var gameNumber: String
// 2. Add the `String?` property to represent the activity ID.
var brazeActivityId: String?
}
```
#### Schritt 2.3: Für Push-to-Start registrieren {#step-23-register-for-push-to-start}
Als Nächstes registrieren Sie den Typ der Live-Aktivität, damit Braze alle Push-to-Start-Token und Live-Aktivitätsinstanzen verfolgen kann, die mit diesem Typ verknüpft sind.
**Warning:**
Das iOS-Betriebssystem erzeugt Push-to-Start-Token nur bei der ersten App-Installation nach einem Geräteneustart. Um sicherzustellen, dass Ihre Token zuverlässig registriert werden, rufen Sie `registerPushToStart` in der Methode `didFinishLaunchingWithOptions` auf.
##### Beispiel
Im folgenden Beispiel verarbeitet die Klasse `LiveActivityManager` Live-Aktivitätsobjekte. Anschließend registriert die Methode `registerPushToStart` den Typ `SportsActivityAttributes`:
```swift
import BrazeKit
#if canImport(ActivityKit)
import ActivityKit
#endif
class LiveActivityManager {
@available(iOS 17.2, *)
func registerActivityType() {
// This method returns a Swift background task.
// You may keep a reference to this task if you need to cancel it wherever appropriate, or ignore the return value if you wish.
let pushToStartObserver: Task = Self.braze?.liveActivities.registerPushToStart(
forType: Activity.self,
name: SportsActivityAttributes.name
)
}
}
```
#### Schritt 2.4: Push-to-Start-Benachrichtigung senden {#step-24-send-a-push-to-start-notification}
Senden Sie remote eine Push-to-Start-Benachrichtigung über den Endpunkt [`/messages/live_activity/start`](https://www.braze.com/docs/de/de/api/endpoints/messaging/live_activity/start).
Sie können [Apples ActivityKit-Framework](https://developer.apple.com/documentation/activitykit) verwenden, um ein Push-Token zu erhalten, das das Braze SDK für Sie verwalten kann. Damit können Sie Live-Aktivitäten über die Braze API aktualisieren, da Braze das Push-Token im Backend an den Apple Push Notification Service (APNs) sendet.
1. Erstellen Sie eine Instanz Ihrer Live-Activity-Implementierung unter Verwendung der ActivityKit-APIs von Apple.
2. Setzen Sie den Parameter `pushType` auf `.token`.
3. Übergeben Sie die von Ihnen definierten `ActivitiesAttributes` und `ContentState` für Live-Aktivitäten.
4. Registrieren Sie Ihre Aktivität bei Ihrer Braze-Instanz, indem Sie sie an [`launchActivity(pushTokenTag:activity:)`](https://braze-inc.github.io/braze-swift-sdk/documentation/brazekit/braze/liveactivities-swift.class) übergeben. Der Parameter `pushTokenTag` ist ein von Ihnen definierter String. Er sollte für jede Live-Aktivität, die Sie erstellen, eindeutig sein.
Sobald Sie die Live-Aktivität registriert haben, extrahiert und beobachtet das Braze SDK Änderungen an den Push-Token.
#### Beispiel
Für unser Beispiel erstellen wir eine Klasse namens `LiveActivityManager` als Schnittstelle für unsere Live-Activity-Objekte. Dann setzen wir den `pushTokenTag` auf `"sports-game-2024-03-15"`.
```swift
import BrazeKit
#if canImport(ActivityKit)
import ActivityKit
#endif
class LiveActivityManager {
@available(iOS 16.2, *)
func createActivity() {
let activityAttributes = SportsActivityAttributes(gameName: "Superb Owl", gameNumber: "Game 1")
let contentState = SportsActivityAttributes.ContentState(teamOneScore: "0", teamTwoScore: "0")
let activityContent = ActivityContent(state: contentState, staleDate: nil)
if let activity = try? Activity.request(attributes: activityAttributes,
content: activityContent,
// Setting your pushType as .token allows the Activity to generate push tokens for the server to watch.
pushType: .token) {
// Register your Live Activity with Braze using the pushTokenTag.
// This method returns a Swift background task.
// You may keep a reference to this task if you need to cancel it wherever appropriate, or ignore the return value if you wish.
let liveActivityObserver: Task = AppDelegate.braze?.liveActivities.launchActivity(pushTokenTag: "sports-game-2024-03-15",
activity: activity)
}
}
}
```
Ihr Live-Aktivitäts-Widget zeigt Ihren Nutzer:innen diese anfänglichen Inhalte an.
{: style="max-width:40%;"}
### Schritt 3: Tracking der Aktivitäten fortsetzen {#resume-activity-tracking}
So stellen Sie sicher, dass Braze Ihre Live-Aktivitäten beim Start der App verfolgt:
1. Öffnen Sie Ihre `AppDelegate`-Datei.
2. Importieren Sie das Modul `ActivityKit`, wenn es verfügbar ist.
3. Rufen Sie [`resumeActivities(ofType:)`](https://braze-inc.github.io/braze-swift-sdk/documentation/brazekit/braze/liveactivities-swift.class/resumeactivities(oftype:)) in `application(_:didFinishLaunchingWithOptions:)` für alle `ActivityAttributes`-Typen auf, die Sie in Ihrer Anwendung registriert haben.
Dadurch kann Braze die Aufgaben zur Verfolgung von Push-Token-Aktualisierungen für alle aktiven Live-Aktivitäten wieder aufnehmen. Beachten Sie: Wenn Nutzer:innen die Live-Aktivität explizit auf ihrem Gerät geschlossen haben, gilt sie als entfernt und Braze verfolgt sie nicht mehr.
#### Beispiel
```swift
import UIKit
import BrazeKit
#if canImport(ActivityKit)
import ActivityKit
#endif
@main
class AppDelegate: UIResponder, UIApplicationDelegate {
static var braze: Braze? = nil
func application(
_ application: UIApplication,
didFinishLaunchingWithOptions launchOptions: [UIApplication.LaunchOptionsKey: Any]?
) -> Bool {
if #available(iOS 16.1, *) {
Self.braze?.liveActivities.resumeActivities(
ofType: Activity.self
)
}
return true
}
}
```
### Schritt 4: Die Aktivität aktualisieren {#update-the-activity}
{: style="max-width:40%;float:right;margin-left:15px;"}
Über den Endpunkt [`/messages/live_activity/update`](https://www.braze.com/docs/de/de/api/endpoints/messaging/live_activity/update) können Sie eine Live-Aktivität durch Push-Benachrichtigungen aktualisieren, die über die Braze REST API übermittelt werden. Verwenden Sie diesen Endpunkt, um den `ContentState` Ihrer Live-Aktivität zu aktualisieren.
Wenn Sie Ihren `ContentState` aktualisieren, zeigt das Live-Aktivitäts-Widget die neuen Informationen an. So könnte die Superb Owl Show am Ende der ersten Halbzeit aussehen.
Ausführliche Informationen finden Sie in unserem Artikel zum [`/messages/live_activity/update`-Endpunkt](https://www.braze.com/docs/de/de/api/endpoints/messaging/live_activity/update).
### Schritt 5: Die Aktivität beenden {#end-the-activity}
Wenn eine Live-Aktivität aktiv ist, wird sie sowohl auf dem Sperrbildschirm der Nutzer:innen als auch in der Dynamic Island angezeigt. Um sie über Braze zu beenden, verwenden Sie den Endpunkt [`/messages/live_activity/update`](https://www.braze.com/docs/de/de/api/endpoints/messaging/live_activity/update) mit `end_activity` auf `true` gesetzt.
Um die Zuverlässigkeit beim Beenden einer Live-Aktivität zu verbessern, führen Sie die folgenden optionalen Schritte aus:
1. Fügen Sie optional `dismissal_date` in derselben `update`-Anfrage hinzu, um vorzuschlagen, wann iOS die Live-Aktivitäts-UI entfernen soll.
2. Überprüfen Sie die Zustellungsergebnisse im [Nachrichten-Aktivitätsprotokoll](https://www.braze.com/docs/de/de/user_guide/administrative/app_settings/message_activity_log_tab).
#### Automatisches Ausblenden einrichten {#arranging-automatic-dismissal}
Um ein automatisches Ausblenden einzurichten, planen Sie eine Folgeanfrage an den Update-Endpunkt, nachdem Sie die Live-Aktivität gestartet haben.
1. Senden Sie eine `/messages/live_activity/start`-Anfrage mit einer `activity_id`, die Sie verfolgen können.
2. Speichern Sie diese `activity_id` und Ihre gewünschte Endzeit in Ihrem Backend-Scheduler.
3. Senden Sie zum gewünschten Endzeitpunkt eine `/messages/live_activity/update`-Anfrage mit `end_activity` auf `true` gesetzt.
4. Konfigurieren Sie das Ausblendungsdatum in derselben Update-Anfrage. Details finden Sie beim [`/messages/live_activity/update`](https://www.braze.com/docs/de/de/api/endpoints/messaging/live_activity/update)-Endpunkt.
Beachten Sie, dass der Zeitpunkt des Ausblendens von iOS gesteuert wird. Auch nachdem Sie eine gültige Beendigungsanfrage gesendet haben, kann die Entfernung vom Sperrbildschirm oder der Dynamic Island verzögert sein oder sich je nach Bedingungen auf Betriebssystemebene unterschiedlich verhalten.
Eine Live-Aktivität kann auch außerhalb von Braze enden:
* **Ausblendung durch Nutzer:innen**: Nutzer:innen können eine Live-Aktivität manuell ausblenden.
* **Timeout**: Nach einer Standardzeit von acht Stunden entfernt iOS die Live-Aktivität aus der Dynamic Island. Nach einer Standardzeit von 12 Stunden entfernt iOS die Live-Aktivität vom Sperrbildschirm.
Ausführliche Informationen finden Sie in unserem Artikel zum [`/messages/live_activity/update`-Endpunkt](https://www.braze.com/docs/de/de/api/endpoints/messaging/live_activity/update).
## Tracking von Live-Aktivitäten {#tracking-live-activities}
Ereignisse zu Live-Aktivitäten sind in Currents, Snowflake Data Sharing und Query Builder verfügbar. Die folgenden Ereignisse helfen Ihnen dabei, den Lebenszyklus Ihrer Live-Aktivitäten zu verstehen und zu überwachen, die Verfügbarkeit von Token zu verfolgen und Probleme unabhängig zu diagnostizieren oder den Zustellungsstatus zu überprüfen.
- [Änderung des Live-Aktivitäts-Push-to-Start-Tokens](https://www.braze.com/docs/de/de/user_guide/data/braze_currents/event_glossary/customer_behavior_events#live-activity-push-to-start-token-change-events): Erfasst, wenn ein Push-to-Start-Token (PTS) in Braze hinzugefügt oder aktualisiert wird, sodass Sie die Registrierung und Verfügbarkeit von Token pro Nutzer:in verfolgen können.
- [Änderung des Live-Aktivitäts-Update-Tokens](https://www.braze.com/docs/de/de/user_guide/data/braze_currents/event_glossary/customer_behavior_events#live-activity-update-token-change-events): Verfolgt das Hinzufügen, Aktualisieren oder Entfernen von Live Activity Update (LAU)-Token.
- [Live-Aktivität senden](https://www.braze.com/docs/de/de/user_guide/data/braze_currents/event_glossary/message_engagement_events#live-activity-send-events): Protokolliert jedes Mal, wenn eine Live-Aktivität von Braze gestartet, aktualisiert oder beendet wird.
- [Ergebnis der Live-Aktivität](https://www.braze.com/docs/de/de/user_guide/data/braze_currents/event_glossary/message_engagement_events#live-activity-outcome-events): Gibt den endgültigen Zustellungsstatus an den Apple Push Notification Service (APNs) für jede von Braze gesendete Live-Aktivität an.
## Zustellung von Live-Aktivitäten überprüfen {#verify-live-activity-sends}
Wenn Sie bestätigen müssen, ob ein Workspace iOS-Live-Aktivitäten sendet, können Sie die folgenden Methoden verwenden:
### Nachrichten-Aktivitätsprotokoll {#message-activity-log}
Gehen Sie zu **Einstellungen** > **Nachrichten-Aktivitätsprotokoll** und filtern Sie nach Live-Aktivitäts-Fehlern, um alle Zustellungsergebnisse im Zusammenhang mit Live-Aktivitäten in Ihrem erwarteten Zeitraum zu sehen. Weitere Informationen finden Sie unter [Nachrichten-Aktivitätsprotokoll](https://www.braze.com/docs/de/de/user_guide/administer/global/workspace_settings/logs_and_alerts/message_activity_log).
### Query Builder, Currents oder Snowflake Data Sharing {#query-builder-currents-or-snowflake-data-sharing}
Prüfen Sie die folgenden Live-Aktivitäts-Ereignisse, um den Lebenszyklus und die Zustellung der Live-Aktivität zu verifizieren:
- **Live-Aktivität senden:** Wird jedes Mal protokolliert, wenn eine Live-Aktivität von Braze gestartet, aktualisiert oder beendet wird.
- **Ergebnis der Live-Aktivität:** Endgültiger Zustellungsstatus an APNs für jede gesendete Live-Aktivität.
Optional können Sie auch die Verfügbarkeit von Token überprüfen:
- **Änderung des Live-Aktivitäts-Push-to-Start-Tokens**
- **Änderung des Live-Aktivitäts-Update-Tokens**
### API-Nutzungs-Dashboard {#api-usage-dashboard}
Gehen Sie zu **Einstellungen** > **APIs und Bezeichner** > **Dashboard**, wählen Sie **Filter** und filtern Sie nach **Endpunkt**, um API-Antworten zu sehen. Wählen Sie zum Beispiel `/messages/live_activity/update` (oder `/messages/live_activity/start`) und sehen Sie sich das Anfragevolumen der letzten 30 Tage an. API-Antworten zeigen an, dass die API aufgerufen wird und iOS-Live-Aktivitäts-Benachrichtigungen in diesem Workspace verwendet werden. Weitere Informationen finden Sie unter [API-Nutzungs-Dashboard](https://www.braze.com/docs/de/de/user_guide/analytics/dashboards/api_usage).
## Ereignisse von Live-Aktivitäten beobachten (optional) {#observe-live-activity-events}
**Important:**
Abonnieren Sie diese ActivityKit-Streams nicht direkt über Apple, da dies mit den Abos von Braze in Konflikt gerät und die korrekte Funktion von Live-Aktivitäten verhindert:
1. [`pushTokenUpdates`](https://developer.apple.com/documentation/activitykit/activity/pushtokenupdates-swift.property)
2. [`activityStateUpdates`](https://developer.apple.com/documentation/activitykit/activity/activitystateupdates-swift.property)
3. [`contentUpdates`](https://developer.apple.com/documentation/activitykit/activity/contentupdates-swift.property)
4. [`pushToStartTokenUpdates`](https://developer.apple.com/documentation/activitykit/activity/pushtostarttokenupdates)
5. [`activityUpdates`](https://developer.apple.com/documentation/activitykit/activity/activityupdates-swift.type.property)
Verwenden Sie stattdessen die in diesem Abschnitt beschriebenen Abos.
Das Braze SDK bietet zwei Abo-Methoden auf `braze.liveActivities`, um den gesamten Lebenszyklus von Live-Aktivitäten zu beobachten. Eine vollständige Schritt-für-Schritt-Anleitung finden Sie im [Live Activities Tutorial](https://braze-inc.github.io/braze-swift-sdk/tutorials/brazekit/b4-live-activities).
- [`subscribeToStateUpdates(_:)`](#subscribe-to-state-updates): Liefert Lebenszyklus-Ereignisse sowohl für die Push-to-Start-Token-Registrierung als auch für laufende Aktivitätsinstanzen.
- [`subscribeToErrors(_:)`](#subscribe-to-errors): Liefert SDK- und serverseitige Fehler, die beim Tracking von Live-Aktivitäten auftreten.
**Note:**
Beide Methoden geben ein [`Braze.Cancellable`](https://braze-inc.github.io/braze-swift-sdk/documentation/brazekit/braze/cancellable-swift.typealias) zurück. Das Abo bleibt aktiv, solange der zurückgegebene Wert durch eine starke Referenz gehalten wird (speichern Sie ihn z. B. in einer Eigenschaft mit demselben Lebenszyklus wie Ihre `Braze`-Instanz).
### Abos einrichten {#set-up-subscriptions}
Richten Sie Abos einmalig in `application(_:didFinishLaunchingWithOptions:)` ein und behalten Sie sie für die gesamte Lebensdauer Ihrer App bei:
```swift
class AppDelegate: UIResponder, UIApplicationDelegate {
static var braze: Braze?
var stateSubscription: Braze.Cancellable?
var errorSubscription: Braze.Cancellable?
func application(
_ application: UIApplication,
didFinishLaunchingWithOptions launchOptions: [UIApplication.LaunchOptionsKey: Any]?
) -> Bool {
let braze = Braze(configuration: config)
Self.braze = braze
if #available(iOS 16.1, *) {
stateSubscription = Self.braze?.liveActivities.subscribeToStateUpdates { event in
self.handleStateUpdate(event)
}
errorSubscription = Self.braze?.liveActivities.subscribeToErrors { error in
self.handleLiveActivityError(error)
}
}
return true
}
}
```
**Note:**
Callbacks werden nur für zukünftige Live-Aktivitäts-Ereignisse ausgelöst – sie geben nicht den aktuellen Zustand zum Zeitpunkt des Abos wieder. Um den aktuellen Zustandsschnappschuss abzufragen, verwenden Sie `Activity.activities`.
### subscribeToStateUpdates {#subscribe-to-state-updates}
`subscribeToStateUpdates(_:)` liefert `UpdateEvent`-Werte, die den gesamten Lebenszyklus von Live-Aktivitäten abdecken. Ereignisse sind in zwei Bereiche unterteilt:
- `.activityType(ActivityType)`: Ereignisse auf Typebene für die Push-to-Start-Token-Registrierung (iOS 17.2+). Es existiert noch keine Aktivitätsinstanz.
- `.activityInstance(ActivityInstance)`: Ereignisse auf Instanzebene für eine bestimmte laufende Aktivität.
Mehrere Abonnent:innen werden unterstützt – jedes aktive Abo erhält jede Emission unabhängig.
#### Ereignisse auf Typebene {#type-scoped-events}
| Ereignis | Wann es ausgelöst wird |
| ----- | ------------- |
| `.pushToStartTokenRead(activityType:)` | Ein Push-to-Start-Token wurde vom Betriebssystem gelesen. Braze kann jetzt remote eine neue Aktivität dieses Typs starten. |
| `.pushToStartTokenFlushed(activityType:)` | Das Token wurde an den Braze-Server gesendet. Braze kann Push-to-Start-Benachrichtigungen für diesen Typ senden. |
| `.pushToStartOptedOut(activityType:)` | Die Nutzer:innen haben sich über `optOutPushToStart(type:)` von Push-to-Start für diesen Aktivitätstyp abgemeldet. |
| `.pushToStartOptOutFlushed(activityType:)` | Die Abmeldung wurde an den Braze-Server gesendet. |
{: .reset-td-br-1 .reset-td-br-2 aria-label="Ereignisse auf Typebene" }
#### Ereignisse auf Instanzebene {#instance-scoped-events}
| Ereignis | Wann es ausgelöst wird |
| ----- | ------------- |
| `.started(activityId:activityType:pushTokenTag:launchSource:)` | Das SDK hat begonnen, diese Aktivität über `launchActivity(pushTokenTag:activity:)` zu verfolgen. Der Wert `launchSource` ist `.local` für app-initiierte Aktivitäten oder `.pushToStart` für remote gestartete Aktivitäten. |
| `.resumed(activityId:activityType:pushTokenTag:)` | Das SDK hat das Tracking dieser Aktivität über `resumeActivities(ofType:)` wieder aufgenommen. |
| `.pushTokenFlushed(activityId:activityType:pushTokenTag:)` | Das Push-Token der Aktivität wurde vom Braze-Server akzeptiert – die Aktivität kann jetzt Remote-Updates empfangen. |
| `.active(activityId:activityType:)` | Die Aktivität ist derzeit aktiv und für die Nutzer:innen sichtbar. |
| `.stale(activityId:activityType:staleDate:)` | Der Inhalt der Aktivität ist veraltet. Wird nur unter iOS 16.2 und höher ausgegeben. |
| `.dismissed(activityId:activityType:)` | Die Nutzer:innen haben die Aktivität manuell ausgeblendet. |
| `.ended(activityId:activityType:)` | Die Aktivität wurde beendet. |
| `.contentUpdated(activityId:activityType:)` | Der Inhaltsstatus der Aktivität wurde aktualisiert (iOS 16.2+). Verwenden Sie benutzerdefinierte Logik, um die `Activity` anhand der ID aus `Activity.activities` nachzuschlagen und über `activity.content.state` auf den typisierten Zustand zuzugreifen. |
| `.pushTokenUpdated(activityId:activityType:)` | ActivityKit hat das Push-Token der Aktivität rotiert. |
{: .reset-td-br-1 .reset-td-br-2 aria-label="Ereignisse auf Instanzebene" }
##### Beispiel
```swift
func handleStateUpdate(_ event: Braze.LiveActivities.UpdateEvent) {
switch event {
// Type-scoped: push-to-start token lifecycle (iOS 17.2+)
case .activityType(.pushToStartTokenRead(let activityType)):
print("[\(activityType)] Push-to-start token read by SDK")
// ...
// Instance-scoped: SDK tracking
case .activityInstance(.started(let id, let type, let tag, let source)):
print("[\(type)] Activity \(id) started via \(source), tag: \(tag)")
// ...
// Instance-scoped: ActivityKit lifecycle
case .activityInstance(.active(let id, let type)):
print("[\(type)] Activity \(id) is active")
// ...
case .activityInstance(.ended(let id, let type)):
print("[\(type)] Activity \(id) ended")
// Instance-scoped: content updates (iOS 16.2+)
case .activityInstance(.contentUpdated(let id, let type)):
// For more advanced use cases of `contentUpdated`, see the section below
print("[\(type)] Content updated for activity \(id)")
case .activityInstance(.pushTokenUpdated(let id, let type)):
print("[\(type)] Activity \(id) push token rotated")
}
}
```
### subscribeToErrors {#subscribe-to-errors}
`subscribeToErrors(_:)` liefert `ErrorEvent`-Werte mit denselben zwei Bereichen wie `UpdateEvent`:
- `.activityType(ActivityType)`: Fehler auf Typebene bei fehlgeschlagener Push-to-Start-Registrierung.
- `.activityInstance(ActivityInstance)`: Fehler auf Instanzebene für eine laufende Aktivität.
Verwenden Sie das Flag `isTransient`, um zu bestimmen, ob ein erneuter Versuch sinnvoll ist. Das SDK wiederholt vorübergehende Fehler automatisch.
#### Fehler auf Typebene {#type-scoped-errors}
| Fehler | Wann er ausgelöst wird |
| ----- | ------------- |
| `.pushToStartRegistrationFailed(activityType:isTransient:reason:)` | Das Push-to-Start-Token konnte den Braze-Server nicht erreichen. |
{: .reset-td-br-1 .reset-td-br-2 aria-label="Fehler auf Typebene" }
#### Fehler auf Instanzebene {#instance-scoped-errors}
| Fehler | Wann er ausgelöst wird |
| ----- | ------------- |
| `.registrationFailed(activityId:activityType:pushTokenTag:isTransient:reason:)` | Das Push-Token der Aktivität konnte nicht bei Braze registriert werden. |
| `.activityNotFound(activityId:activityType:)` | `resumeActivities(ofType:)` hat eine gespeicherte Zuordnung für eine Aktivität gefunden, die nicht mehr läuft – sie wurde wahrscheinlich beendet, während die App geschlossen war. |
| `.invalidPushTokenTag(activityId:activityType:tag:)` | `launchActivity(pushTokenTag:activity:)` wurde mit einem ungültigen Tag aufgerufen. Tags müssen nicht leer und unter 256 Bytes sein. |
{: .reset-td-br-1 .reset-td-br-2 aria-label="Fehler auf Instanzebene" }
##### Beispiel
```swift
func handleLiveActivityError(_ error: Braze.LiveActivities.ErrorEvent) {
switch error {
// Type-scoped errors
case .activityType(.pushToStartRegistrationFailed(let type, let isTransient, let reason)):
if isTransient {
print("[\(type)] Push-to-start registration failed (transient, will retry): \(reason)")
} else {
print("[\(type)] Push-to-start registration failed (permanent): \(reason)")
}
// Instance-scoped errors
case .activityInstance(.registrationFailed(let id, let type, _, let isTransient, let reason)):
if isTransient {
print("[\(type)] Activity \(id) registration failed (transient, retrying): \(reason)")
} else {
print("[\(type)] Activity \(id) registration failed (permanent): \(reason)")
}
case .activityInstance(.activityNotFound(let id, let type)):
print("[\(type)] Stored activity \(id) not found on resume")
case .activityInstance(.invalidPushTokenTag(let id, let type, let tag)):
print("[\(type)] Activity \(id) has invalid push token tag '\(tag)'")
}
}
```
### Aktualisierungen des Inhaltsstatus verarbeiten (optional) {#handle-content-state}
Wenn Sie den tatsächlichen Inhaltsstatus der Live-Aktivitätsinstanz verwenden möchten, folgen Sie diesem Abschnitt.
Wenn ein `.contentUpdated`-Ereignis ausgelöst wird, verwenden Sie benutzerdefinierte Logik, um die laufende `Activity` anhand ihrer ID aus `Activity.activities` nachzuschlagen und dann über `activity.content.state` auf den typisierten `ContentState` zuzugreifen.
#### Einzelner Attributtyp {#single-attributes-type}
```swift
case .activityInstance(.contentUpdated(let id, let type)):
#if canImport(ActivityKit)
// Add custom logic look up the Activity