배너 카드 삽입
Braze SDK를 사용하여 배너 카드를 임베드하는 방법을 알아보고 자연스러운 경험으로 사용자의 참여를 유도할 수 있습니다. 자세한 내용은 배너 카드 정보를 참조하세요.
important:
배너 카드는 현재 얼리 액세스 중입니다. 이번 얼리 액세스에 참여하려면 Braze 계정 관리자에게 문의하세요.
Prerequisites
배너 카드 사용을 시작하는 데 필요한 최소 SDK 버전입니다:
배너 카드 삽입
Step 1: Create placements
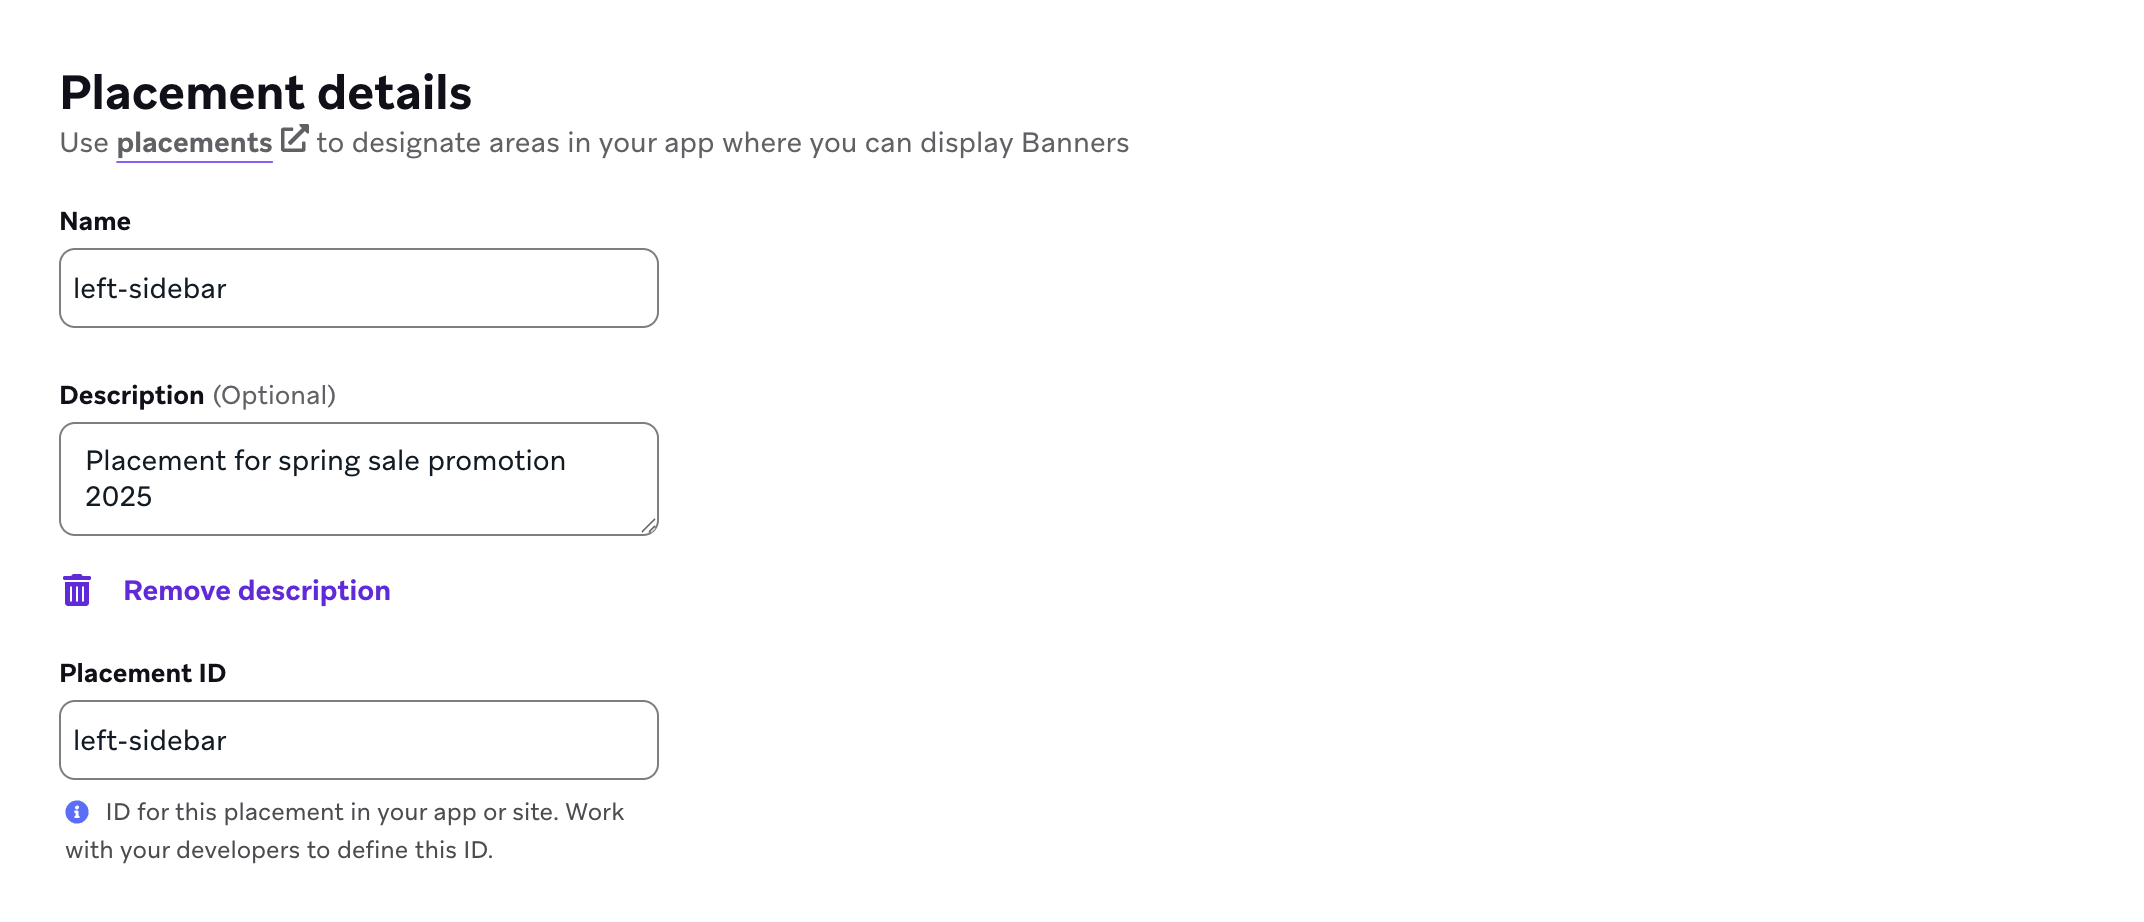
If you haven’t already, you’ll need to create Banner placements in Braze that are used to define the locations in your app or site can display Banners. To create a placement, go to Settings > Banners Placements, then select Create Placement.

Give your placement a name and assign a Placement ID. Be sure you consult other teams before assigning an ID, as it’ll be used throughout the card’s lifecycle and shouldn’t be changed later. For more information, see Placement IDs.
2단계: 앱의 게재 위치 새로 고침
게재 위치는 세션마다 요청할 수 있으며, 사용자의 세션이 만료되거나 changeUser 방법을 사용하여 식별된 사용자를 변경하면 자동으로 캐시됩니다.
tip:
배너 다운로드 또는 표시가 지연되지 않도록 가능한 한 빨리 게재 위치를 새로고침하세요.
1
2
3
| import * as braze from "@braze/web-sdk";
braze.requestBannersRefresh(["global_banner", "navigation_square_banner"])
|
1
| AppDelegate.braze?.banners.requestRefresh(placementIds: ["global_banner", "navigation_square_banner"])
|
1
2
3
4
| ArrayList<String> listOfBanners = new ArrayList<>();
listOfBanners.add("global_banner");
listOfBanners.add("navigation_square_banner");
Braze.getInstance(context).requestBannersRefresh(listOfBanners);
|
1
| Braze.getInstance(context).requestBannersRefresh(listOf("global_banner", "navigation_square_banner"))
|
1
| Braze.requestBannersRefresh(["global_banner", "navigation_square_banner"]);
|
1
| This feature is not currently supported on Unity.
|
1
| This feature is not currently supported on Cordova.
|
1
| braze.requestBannersRefresh(["global_banner", "navigation_square_banner"]);
|
1
| This feature is not currently supported on Roku.
|
3단계: 업데이트 듣기
tip:
이 가이드의 SDK 방법을 사용하여 배너를 삽입하면 모든 애널리틱스 이벤트가 자동으로 처리됩니다. HTML을 수동으로 렌더링하려면 알려주세요.
1
2
3
4
5
6
7
8
| import * as braze from "@braze/web-sdk";
braze.subscribeToBannersUpdates((banners) => {
console.log(`Banners were updated`);
})
// always refresh after your subscriber function has been registered
braze.requestBannersRefresh(["global_banner", "navigation_square_banner"])
|
1
2
3
4
5
| let cancellable = brazeClient.braze()?.banners.subscribeToUpdates { banners in
banners.forEach { placementId, banner in
print("Received banner: \(banner) with placement ID: \(placementId)")
}
}
|
1
2
3
4
5
| Braze.getInstance(context).subscribeToBannersUpdates(banners -> {
for (Banner banner : banners.getBanners()) {
Log.d(TAG, "Received banner: " + banner.getPlacementId());
}
});
|
1
2
3
4
5
| Braze.getInstance(context).subscribeToBannersUpdates { update ->
for (banner in update.banners) {
Log.d(TAG, "Received banner: " + banner.placementId)
}
}
|
1
2
3
4
5
6
7
8
9
10
| const bannerCardsSubscription = Braze.addListener(
Braze.Events.BANNER_CARDS_UPDATED,
data => {
const banners = data.banners;
console.log(
`Received ${banners.length} Banner Cards with placement IDs:`,
banners.map(banner => banner.placementId),
);
},
);
|
1
| This feature is not currently supported on Unity.
|
1
| This feature is not currently supported on Cordova.
|
1
2
3
4
5
| StreamSubscription bannerStreamSubscription = braze.subscribeToBanners((List<BrazeBanner> banners) {
for (final banner in banners) {
print("Received banner: " + banner.toString());
}
});
|
1
| This feature is not currently supported on Roku.
|
4단계: 게재 위치 ID를 사용하여 퍼가기
배너를 위한 컨테이너 요소를 만듭니다. 너비와 높이를 설정해야 합니다.
1
| <div id="global-banner-container" style="width: 100%; height: 450px;"></div>
|
그런 다음 insertBanner 메서드를 사용하여 컨테이너 요소의 내부 HTML을 교체합니다.
1
2
3
4
5
6
7
8
9
10
11
12
13
14
15
16
17
18
19
20
21
22
23
24
25
26
27
28
29
30
| import * as braze from "@braze/web-sdk";
braze.initialize("sdk-api-key", {
baseUrl: "sdk-base-url",
allowUserSuppliedJavascript: true, // banners require you to opt-in to user-supplied javascript
});
braze.subscribeToBannersUpdates((banners) => {
// get this placement's banner. If it's `null` the user did not qualify for one.
const globalBanner = braze.getBanner("global_banner");
if (!globalBanner) {
return;
}
// choose where in the DOM you want to insert the banner HTML
const container = document.getElementById("global-banner-container");
// Insert the banner which replacees the innerHTML of that container
braze.insertBanner(globalBanner, container);
// Special handling if the user is part of a Control Variant
if (globalBanner.isControl) {
// hide or collapse the container
container.style.display = 'none';
}
});
braze.requestBannersRefresh(["global_banner", "navigation_square_banner"])
|
1
2
3
4
5
6
7
8
9
10
11
12
13
14
15
16
17
18
19
20
21
22
23
24
25
26
27
28
29
30
31
32
33
34
35
36
37
38
39
40
41
42
43
44
45
| // To get access to the Banner model object:
let globalBanner: Braze.Banner?
AppDelegate.braze?.banners.getBanner(for: "global_banner", { banner in
self.globalBanner = banner
})
// If you simply want the Banner view, you may initialize a `UIView` with the placement ID:
if let braze = AppDelegate.braze {
let bannerUIView = BrazeBannerUI.BannerUIView(
placementId: "global_banner",
braze: braze,
// iOS does not perform automatic resizing or visibility changes.
// Use the `processContentUpdates` parameter to adjust the size and visibility of your Banner Card according to your use case.
processContentUpdates: { result in
switch result {
case .success(let updates):
if let height = updates.height {
// Adjust the visibility and/or height.
}
case .failure(let error):
// Handle the error.
}
}
)
}
// Similarly, if you want a Banner view in SwiftUI, use the corresponding `BannerView` initializer:
if let braze = AppDelegate.braze {
let bannerView = BrazeBannerUI.BannerView(
placementId: "global_banner",
braze: braze,
// iOS does not perform automatic resizing or visibility changes.
// Use the `processContentUpdates` parameter to adjust the size and visibility of your Banner Card according to your use case.
processContentUpdates: { result in
switch result {
case .success(let updates):
if let height = updates.height {
// Adjust the visibility and/or height according to your parent controller.
}
case .failure(let error):
// Handle the error.
}
}
)
}
|
Java 코드로 배너를 가져오려면 다음을 사용합니다:
1
| Banner globalBanner = Braze.getInstance(context).getBanner("global_banner");
|
이 XML을 포함하면 Android 보기 레이아웃에 배너 카드를 만들 수 있습니다:
1
2
3
4
5
| <com.braze.ui.banners.BannerView
android:id="@+id/global_banner_id"
android:layout_width="match_parent"
android:layout_height="wrap_content"
app:placementId="global_banner" />
|
Kotlin에서 배너를 가져오려면 다음을 사용하세요:
1
| val banner = Braze.getInstance(context).getBanner("global_banner")
|
Android 보기를 사용하는 경우 이 XML을 사용하세요:
1
2
3
4
5
| <com.braze.ui.banners.BannerView
android:id="@+id/global_banner_id"
android:layout_width="match_parent"
android:layout_height="wrap_content"
app:placementId="global_banner" />
|
젯팩 컴포즈를 사용하는 경우 이 기능을 사용할 수 있습니다:
1
| Banner(placementId = "global_banner")
|
React Native의 새 아키텍처를 사용하는 경우, AppDelegate.mm 에 BrazeBannerView 을 패브릭 컴포넌트로 등록해야 합니다.
1
2
3
4
5
6
7
8
| #ifdef RCT_NEW_ARCH_ENABLED
/// Register the `BrazeBannerView` for use as a Fabric component.
- (NSDictionary<NSString *,Class<RCTComponentViewProtocol>> *)thirdPartyFabricComponents {
NSMutableDictionary * dictionary = [super thirdPartyFabricComponents].mutableCopy;
dictionary[@"BrazeBannerView"] = [BrazeBannerView class];
return dictionary;
}
#endif
|
리액트 네이티브에서 배너 카드의 데이터 모델을 가져오려면 다음을 사용하세요:
1
| const banner = await Braze.getBanner("global_banner");
|
getBanner 메서드를 사용하여 사용자 캐시에 해당 위치가 있는지 확인할 수 있습니다. 그러나 가장 간단한 통합을 위해서는 배치 ID만 제공하는 다음 JavaScript XML(JSX) 스니펫을 뷰 계층 구조에 추가합니다.
1
2
3
| <Braze.BrazeBannerView
placementID='global_banner'
/>
|
1
| This feature is not currently supported on Unity.
|
1
| This feature is not currently supported on Cordova.
|
Flutter에서 배너 카드의 데이터 모델을 가져오려면 다음을 사용합니다:
1
2
3
4
5
6
7
| braze.getBanner("global_banner").then((banner) {
if (banner == null) {
// Handle null cases.
} else {
print(banner.toString());
}
});
|
getBanner 메서드를 사용하여 사용자 캐시에 해당 위치가 있는지 확인할 수 있습니다. 그러나 가장 간단한 통합을 위해 다음 위젯을 보기 계층 구조에 추가하고 배치 ID만 제공하면 됩니다.
1
2
3
| BrazeBannerView(
placementId: "global_banner",
),
|
1
| This feature is not currently supported on Roku.
|
5단계: 테스트 카드 보내기(선택 사항)
배너 카드 캠페인을 시작하기 전에 테스트 배너 카드를 전송하여 연동 여부를 확인할 수 있습니다. 테스트 카드는 별도의 인메모리 캐시에 저장되며 앱을 다시 시작할 때에도 지속되지 않습니다. 추가 설정은 필요하지 않지만, 테스트 기기가 테스트 카드를 표시할 수 있도록 포그라운드 푸시 알림을 수신할 수 있어야 합니다.
note:
테스트 배너 카드는 다음 앱 세션에서 제거된다는 점을 제외하면 다른 배너와 비슷합니다.
로그 분석
SDK 방식을 사용하여 배너 카드를 삽입하면 Braze가 자동으로 노출을 기록하므로 수동으로 노출을 추적할 필요가 없습니다. 사용자 지정 보기에서 HTML을 파싱하고 렌더링해야 하는 경우 [email protected] 으로 문의하세요.
크기 및 크기 조정
배너 카드의 크기와 사이즈에 대해 알아야 할 몇 가지 사항은 다음과 같습니다:
- 컴포저를 사용하면 배너를 다양한 크기로 미리 볼 수 있지만, 해당 정보는 SDK에 저장되거나 전송되지 않습니다.
- HTML은 렌더링되는 컨테이너의 전체 너비를 차지합니다.
- 고정된 치수 요소를 만들고 컴포저에서 해당 치수를 테스트하는 것이 좋습니다.
 GitHub 에서 이 페이지를 편집합니다.