# Braze Developer Guide Full Text
Consolidated full markdown text for all pages in the Developer Guide collection.
# Braze Developer Guide
Source: /docs/developer_guide/home/index.md
Braze Developer Guide
This is where developers can find everything they need to know about the Braze SDK. Each SDK is hosted in its own public GitHub repository, which includes fully-buildable sample apps you can use to test Braze features or implement alongside your own applications. To learn more, see References, Repositories, and Sample Apps . Want to connect, learn, and get inspired by other developers building with Braze? Join the Braze developer community !
This landing page is where developers can find all the integrations available with Braze.
Featured:
- Web
- Android
- Swift
# Getting Started
Source: /docs/developer_guide/getting_started/index.md
You can follow along with this guide, or you can check out [Braze Learning](https://learning.braze.com) for guided courses, such as our [Marketer](https://learning.braze.com/path/marketer) and [Developer](https://learning.braze.com/path/developer) learning paths.
# SDK Overview for Developers
Source: /docs/developer_guide/getting_started/sdk_overview/index.md
# [](https://learning.braze.com/path/developer/sdk-integration-basics){: style="float:right;width:120px;border:0;" class="noimgborder"}SDK overview for developers
> Before you begin to integrate the Braze SDKs, you may find yourself wondering what exactly you're building and integrating. You may be curious about how you can customize the SDK to further to meet your needs. This article can help you answer all of your SDK questions.
Are you a marketer looking for a basic rundown of the SDK? Check out our [marketer overview](https://www.braze.com/docs/user_guide/getting_started/web_sdk/), instead.
In brief, the Braze SDK:
* Collects and syncs user data into a consolidated user profile
* Automatically collects session data, device info, and push tokens
* Captures marketing engagement data and custom data specific to your business
* Powers push notifications, in-app messages, and Content Card messaging channels
## App performance
Braze should have no negative impact on your app's performance.
The Braze SDKs have a very small footprint. We automatically change the rate that we flush user data depending on the quality of the network, in addition to allowing manual network control. We automatically batch API requests from the SDK to make sure that data is logged quickly while maintaining maximum network efficiency. Lastly, the amount of data sent from the client to Braze within each API call is extremely small.
## SDK compatibility
The Braze SDK is designed to be very well-behaved, and not interfere with other SDKs present in your app. If you are experiencing any issues you think might be due to incompatibility with another SDK, contact Braze Support.
## Default analytics and session handling
Certain user data is collected automatically by our SDK—for example, First Used App, Last Used App, Total Session Count, Device OS, etc. If you follow our integration guides to implement our SDKs, you will be able to take advantage of this [default data collection](https://www.braze.com/docs/user_guide/data/user_data_collection/sdk_data_collection/). Checking this list can help you avoid storing the same information about users more than once. With the exception of session start and session end, all other automatically tracked data does not count toward your data point usage.
**Note:**
All of our features are configurable, but it's a good idea to fully implement the default data collection model.
If necessary for your use case, you can [limit the collection of certain data](#blocking-data-collection) after the integration is complete.
## Data upload and download
The Braze SDK caches data (sessions, custom events, etc.) and uploads it periodically. Only after the data has been uploaded will the values be updated on the dashboard. The upload interval takes into account the state of the device and is governed by the quality of the network connection:
|Network Connection Quality | Data Flush Interval|
|---|---|
|Great |10 Seconds|
|Good |30 Seconds|
|Poor |60 Seconds|
{: .reset-td-br-1 .reset-td-br-2 role="presentation" }
If there is no network connection, data is cached locally on the device until the network connection is re-established. When the connection is re-established, the data will be uploaded to Braze.
Braze sends data to the SDK at the beginning of a session based on which segments the user falls into at the time of the session. The new in-app messages will not be updated during the session. However, user data during the session will be continually processed as it is sent from the client. For example, a lapsed user (last used the app more than 7 days ago) will still receive content targeted at lapsed users on their first session back in the app.
## Blocking data collection
It is possible (though not suggested) to block the automatic collection of certain data from your SDK integration, or allowlist processes that do so.
Blocking data collection is not recommended because removing analytical data reduces your platform's capacity for personalization and targeting. For example:
- If you choose not to fully integrate for location on one of the SDKs, you will not be able to personalize your messaging based on language or location.
- If you choose not to integrate for time zone, you might not be able to send messages within a user's time zone.
- If you choose to not integrate for specific device visual information, message content might not be optimized for that device.
We highly recommend completely integrating the SDKs to take full advantage of our product's capabilities.
You may either simply not integrate certain parts of the SDK, or use [`disableSDK`](https://js.appboycdn.com/web-sdk/latest/doc/modules/braze.html#disablesdk) for a user. This method will sync data logged prior to when `disableSDK()` was called, and will cause all subsequent calls to the Braze Web SDK for this page and future page loads to be ignored. If you wish to resume data collection at a later point in time, you can use the [`enableSDK()`](https://js.appboycdn.com/web-sdk/latest/doc/modules/braze.html#enablesdk) method in the future to resume data collection. You can learn more about this in our [Disabling Web Tracking](https://www.braze.com/docs/developer_guide/analytics/managing_data_collection/?sdktab=web) article.
You can use [`setDeviceObjectAllowlist`](https://braze-inc.github.io/braze-android-sdk/kdoc/braze-android-sdk/com.braze.configuration/-braze-config/-builder/set-device-object-allowlist.html?query=fun%20setDeviceObjectAllowlist(deviceObjectAllowlist:%20EnumSet%3CDeviceKey%3E):%20BrazeConfig.Builder) to configure the SDK to only send a subset of the device object keys or values according to a set allowlist. This must be enabled via [`setDeviceObjectAllowlistEnabled`](https://braze-inc.github.io/braze-android-sdk/kdoc/braze-android-sdk/com.braze.configuration/-braze-config/-builder/set-device-object-allowlist-enabled.html?query=fun%20setDeviceObjectAllowlistEnabled(enabled:%20Boolean):%20BrazeConfig.Builder).
**Important:**
An empty allowlist will result in **no** device data being sent to Braze.
You can assign a set of eligible fields to [`configuration.devicePropertyAllowList`](https://braze-inc.github.io/braze-swift-sdk/documentation/brazekit/braze/configuration-swift.class/devicepropertyallowlist) on your `Braze.Configuration` to specify an allowlist for device fields that are collected by the SDK. The full list of fields is defined in [`Braze.Configuration.DeviceProperty`](https://braze-inc.github.io/braze-swift-sdk/documentation/brazekit/braze/configuration-swift.class/deviceproperty). To turn off the collection of all device fields, set the value of this property to an empty set (`[]`).
**Important:**
By default, all fields are collected by the Braze Swift SDK. Removing some device properties may disable SDK features.
For more usage details, refer to [Storage](https://www.braze.com/docs/developer_guide/storage/?tab=swift) in the Swift SDK documentation.
## What version of the SDK am I on?
You can use the dashboard to see the SDK version of a particular app by visiting **Settings > App Settings**. The **Live SDK Version** lists the highest Braze SDK version used by your most recent live application for at least 5% of your users.
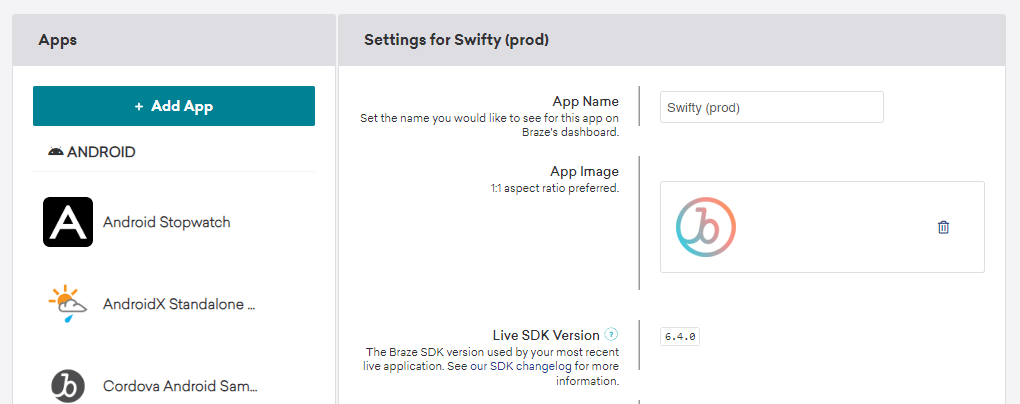{: style="max-width:80%"}
**Tip:**
If you have an iOS app, you can confirm that you are using the [Swift SDK](https://www.braze.com/docs/developer_guide/sdk_integration/?sdktab=swift) instead of the legacy [Objective-C iOS SDK](https://www.braze.com/docs/developer_guide/platforms/legacy_sdks/ios/initial_sdk_setup/overview/) if your **Live SDK Version** is equal to or higher than 5.0.0, which was the first released version of the Swift SDK.
# Platform Overview
Source: /docs/developer_guide/getting_started/platform_overview/index.md
# [](https://learning.braze.com/path/developer){: style="float:right;width:120px;border:0;" class="noimgborder"}Getting started: Platform overview
> This article covers the basic parts and capabilities of the Braze platform. Links from this article connect to essential Braze topics.
**Tip:**
Check out our free [Developer Learning Path](https://learning.braze.com/path/developer) course along with these articles.
## What is Braze?
Braze is a customer engagement platform. It ingests user data, surfaces user actions and behaviors, and lets you act on them. The platform has three primary components: the SDK, the dashboard, and the REST API.
If you're a marketer looking for a more general overview of Braze, check out the [Getting Started section for marketers](https://www.braze.com/docs/user_guide/getting_started/overview/), instead.
{: style="max-width:55%;float:right;margin-left:15px;"}
### SDK
The [Braze SDKs](#integrating-braze) can be integrated into your mobile and web applications to provide powerful marketing, user management, and analytics tools.
In brief, when fully integrated, the SDK:
* Collects and syncs user data into a consolidated user profile
* Automatically collects session data, device info, and push tokens
* Captures marketing engagement data and custom data specific to your business
* Is architected for security and penetration tested by third parties
* Is optimized for low-battery or slow-network devices
* Supports server-side JWT signatures for added security
* Has write-only access to your systems (can’t retrieve user data)
* Powers push notifications, in-app messages, and Content Card messaging channels
### Dashboard user interface
The dashboard is the UI that controls all of the data and interactions at the heart of the Braze platform. Marketers will use the dashboard to do their job and create content. Developers use the dashboard to manage settings for integrating apps, such as API keys and push notification credentials.
If you're just getting started, your team administrator should add you (and all other team members who need access to Braze) as [users on your dashboard](https://www.braze.com/docs/user_guide/administrative/access_braze).
### REST API
The Braze API allows you move data in and out of Braze at scale. Use the API to bring in updates from your backend, data warehouses, and other first and third-party sources. Additionally, use the API to add custom events for segmentation purposes directly from a web-based applications. You can trigger and send messages through the API, allowing technical resources to include complex JSON metadata as part of your campaigns.
The API also provides a web service where you can record actions taken by your users directly via HTTP, rather than through the mobile and web SDKs. Combined with webhooks, this means you can track actions and trigger activities for users inside and outside your app experience. The [API guide](https://www.braze.com/docs/api/home) lists available Braze API endpoints and their uses.
For more on the parts and pieces of Braze, check out: [Getting Started: Architecture overview](https://www.braze.com/docs/developer_guide/getting_started/architecture_overview/).
## Data analysis and action
Data stored in Braze is retained and usable for segmentation, personalization, and targeting as long as you’re a Braze customer. That allows you to act on user profile data (for example, session activity or purchases) until you choose to deprecate that information. For instance, a streaming service could track each subscriber’s viewed content from their first day on the service (even if that was many years ago) and use that data to power relevant messaging.
{: style="max-width:80%"}
### App analytics
The Braze dashboard displays graphs updated in real time based on analytics metrics and custom events that you instrument. Consistent measurement and optimization using A/B testing, custom reporting, analytics, and automated intelligence helps to support your customer engagement and differentiation.
### User segmentation
Segmentation allows you to create groups of users based on powerful filters of their in-app behavior, demographic data, and similar. Braze also allows you to define any in-app user action as a "custom event" if the desired action is not captured by default. The same is true of user characteristics via "custom attributes." After a user segment is created on the dashboard, your users will move in and out of the segment as they meet (or fail to meet) the defined criteria. For example, you can create a segment that includes all users who have spent money in-app and last used the app more than two weeks ago.
For more on our data models, check out: [Getting Started: Analytics overview](https://www.braze.com/docs/developer_guide/getting_started/architecture_overview/).
## Multichannel messaging
After you have defined a segment, Braze messaging tools allow you to engage with your users in a dynamic, personalized way. Braze was designed with a channel-agnostic, user-centric data model. Messaging is done inside your app or site (such as sending in-app messages or through graphic elements like Content Card carousels and banners) or outside your app experience (such as sending push notifications or emails). For example, your marketers can send a push notification and an email to the example segment defined in the previous section.
{: style="border:none" }
| Channel | Description |
| ---------------------------------------------------------------------------------------------------- | ------------------------------------------------------------------------------------------------------------------------------------------------------ |
| [Content Cards](https://www.braze.com/docs/user_guide/message_building_by_channel/content_cards/about/)* | Send highly-targeted and dynamic in-app notifications without interrupting the customer. |
| [Email](https://www.braze.com/docs/user_guide/message_building_by_channel/email/about/) | Send rich HTML messages by building your email using the rich-text editor, our drag-and-drop editor, or by uploading one of your existing HTML templates. |
| [In-app messages](https://www.braze.com/docs/user_guide/message_building_by_channel/in-app_messages/about/) | Send unobtrusive in-app notifications using the Braze custom-built native user interface. |
| [Push](https://www.braze.com/docs/user_guide/message_building_by_channel/push/about/) | Automatically trigger push notifications from messaging campaigns or news items using the Apple Push Notification Service (APNs) for iOS or Firebase Cloud Messaging (FCM) for Android. |
| [SMS, MMS, and RCS](https://www.braze.com/docs/user_guide/message_building_by_channel/sms_mms_rcs)* | Use SMS, MMS, or RCS to send transactional notifications, share promotions, send reminders, and more. |
| [Web push](https://www.braze.com/docs/user_guide/message_building_by_channel/push/web) | Send web browser notifications, even if your users aren't currently active on your site. |
| [Webhooks](https://www.braze.com/docs/user_guide/message_building_by_channel/webhooks/understanding_webhooks/) | Use webhooks to trigger non-app actions, providing other systems and applications with real-time data. |
| [WhatsApp](https://www.braze.com/docs/user_guide/message_building_by_channel/whatsapp/overview/)* | Directly connect with your users and customers by leveraging the popular peer-to-peer messaging platform: WhatsApp. |
{: .reset-td-br-1 .reset-td-br-2 role="presentation" }
**Available as an add-on feature.*
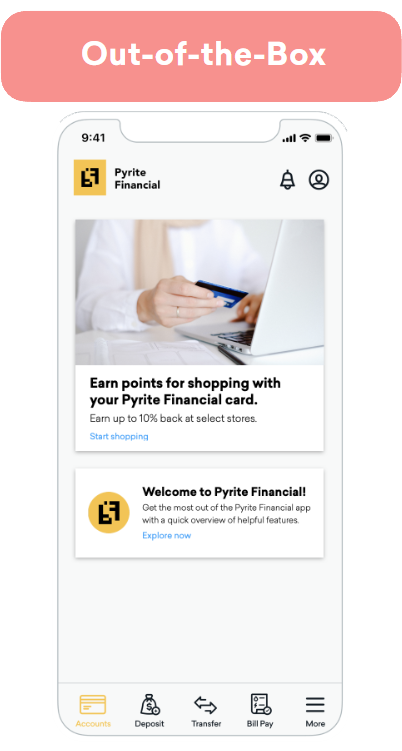
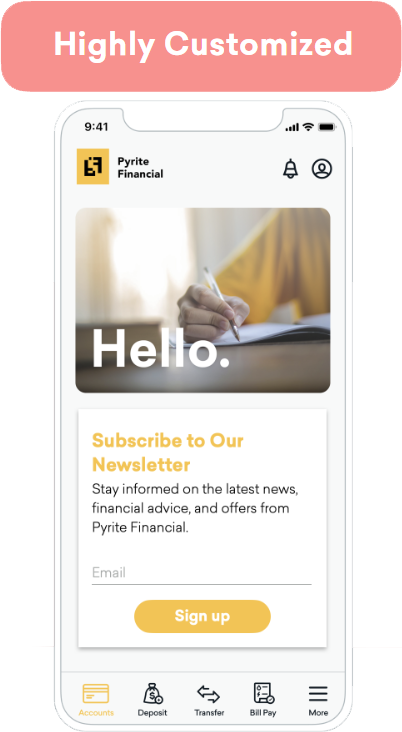
### Customizable components
All Braze components are crafted to be accessible, adaptive, and customizable. You can start with Braze by using the default BrazeUI components and customizing them to suit your brand needs and use case.
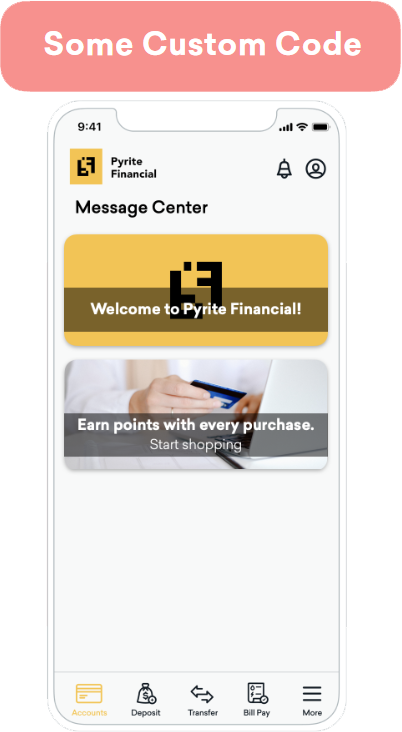
To go beyond the default options, you can write custom code to update a message channel’s look and feel to more closely match your brand. This includes changing a component’s font type, font size, and colors. Marketers maintain control of the audience, content, on-click behavior, and expiration directly in the Braze dashboard.
You can also create completely custom components to control what your messaging looks like, how it behaves, and how they interact with other messaging channels (for example, triggering a Content Card based on a push notification). Braze provides SDK methods to allow you to log metrics like impressions, clicks, and dismissals in the Braze dashboard. Each messaging channel has an analytics article to help facilitate this.
## Integrating Braze
Braze is designed for rapid integration. The average time-to-value is six weeks across our customer base. For more on the integration process, see [Getting Started: Integration overview](https://www.braze.com/docs/developer_guide/getting_started/integration_overview/).
## Resources to bookmark
As a technical resource, you'll be involved in a lot of the nuts and bolts of Braze. Here are good resources to bookmark outside of our documentation. As you're going forward, keep our [Terms to Know](https://www.braze.com/docs/user_guide/getting_started/terms_to_know/) glossary handy in case you have questions on Braze terms.
| Resource | What You'll Learn|
|---|---|
| [Debugging the SDK](https://www.braze.com/docs/developer_guide/sdk_integration/debugging) | When troubleshooting your integration, the SDK debugging tool will be a helpful tool. Make sure you have it on hand! |
| [Braze Public GitHub](https://github.com/braze-inc/) | You'll find detailed integration information and sample code in our GitHub repository. |
| [Android SDK GitHub Repository](https://github.com/braze-inc/braze-android-sdk/) | The Android SDK GitHub repository. |
| [Android SDK Reference](https://appboy.github.io/appboy-android-sdk/kdoc/index.html) | Class documentation for the Android SDK. |
| [iOS (Swift) SDK GitHub Repository](https://github.com/braze-inc/braze-swift-sdk) | The Swift SDK GitHub repository. |
| [iOS (Swift) SDK Reference](https://braze-inc.github.io/braze-swift-sdk/) | Class documentation for the iOS SDK. |
| [Web SDK GitHub Repository](https://github.com/braze-inc/braze-web-sdk) | The Web SDK GitHub repository. |
| [Web SDK Reference](https://js.appboycdn.com/web-sdk/5.0/doc/modules/braze.html) | Class documentation for the iOS SDK. |
| [SDK Changelogs](https://www.braze.com/docs/developer_guide/changelogs) | Braze has predictable monthly releases, in addition to releases for any critical issues and major OS updates. |
| [Braze API Postman Collection](https://documenter.getpostman.com/view/4689407/SVYrsdsG?version=latest) | Download our Postman collection here. |
| [Braze System Status Monitor](https://braze.statuspage.io/) | Our status page is updated whenever there are incidents or outages. Go to this page to subscribe to alerts. |
{: .reset-td-br-1 .reset-td-br-2 .reset-td-br-3 role="presentation" }
# Integration Overview
Source: /docs/developer_guide/getting_started/integration_overview/index.md
# [](https://learning.braze.com/sdk-integration-basics){: style="float:right;width:120px;border:0;" class="noimgborder"}Getting started: Integration overview
> This article provides a basic overview of the onboarding process.
{: style="max-width:50%;float:right;margin-left:15px;border:none;"}
As a technical resource, you'll empower your team by integrating Braze into your tech stack. Onboarding is broadly split up into four steps:
* [Discovery and planning](#discovery): Work with your team to align on scope, plan a structure for data and campaigns, and create an appropriate workspace structure.
* [Integration](#integration): Execute on your plan by integrating the SDK and API, enabling messaging channels, and setting up data import and export.
* [Quality Assurance](#qa): Confirm that the loop of data and messaging between the Braze platform and your app or site is working as expected.
* [Maintenance](#maintenance): After you've passed off Braze to your marketing team, you'll continue to make sure everything continues to run smoothly.
**Tip:**
We recognize that every organization has its distinct needs, and Braze is built to cater to a diverse range of customization options that can be tailored to your specific requirements. Integration times will vary based on your use case.
## Discovery and planning {#discovery}
During this phase, you will work with your team to scope onboarding tasks and ensure all stakeholders are aligned on a common goal.
Your team will perform end-to-end planning of your use cases to make sure everything can be built as expected, with the correct data available to do so. This phase includes your project lead, CRM lead, front and back-end engineering, product owners, and marketers.
The discovery and planning phase takes, on average, about six weeks. Engineering leads can expect to spend 2-4 hours a week during this phase. Developers working with the product can expect to spend 10-20 hours a week on Braze during the discovery and planning phase.
**Tip:**
During your company's onboarding period, Braze will host technical overview sessions. We strongly recommend that engineers attend these sessions. Technical overview sessions provide you an opportunity to have conversations about the scalability of the platform architecture and see practical examples of how companies of your size have previously been successful with similar use cases.
{: style="max-width:40%;float:right;margin-left:15px;"}
### Campaign planning
Your CRM team will plan out the messaging use cases that you'll launch in the near future. This includes the:
* [Channel](https://www.braze.com/docs/user_guide/message_building_by_channel) (for example, push notifications or in-app messages)
* [Delivery method](https://www.braze.com/docs/user_guide/engagement_tools/campaigns/building_campaigns/delivery_types) (for example, scheduled delivery or action-based delivery)
* [Target audience](https://www.braze.com/docs/user_guide/engagement_tools/segments)
* [Success metrics](https://www.braze.com/docs/user_guide/engagement_tools/messaging_fundamentals/conversion_events/)
For example, a new customer campaign might be: an email sent daily at 10 am to a segment of customers who logged their first session yesterday. The conversion event (the success metric) is logging a session.
**Important:**
Integration cannot begin until the campaign planning step is complete. This step will determine what parts and pieces of Braze need to be configured during the integration phase.
### Creating data requirements
Then, your CRM team should define what data is required to launch the campaigns they have planned, creating data requirements.
Many common types of user attributes, such as name, email, date of birth, country, and similar are automatically tracked after the Braze SDK is integrated. Other types of data will need to be defined as custom data.
As a developer, you'll work with your team to define what additional, custom data makes sense to track. Your custom data will impact how your user base will be classified and segmented. You will set up an event taxonomy across your growth stack, structuring your data so that it is compatible with your systems as it moves in and out of Braze.
**Tip:**
Keep data nomenclature consistent across tools. For example, your data warehouse may record "purchase limited time offer" in a particular way. You will need to decide if a custom event in Braze is needed to match this format.
Learn more about [automatically collected data and custom data](https://www.braze.com/docs/developer_guide/analytics/).
### Customizations planning
Talk to your marketers about their desired customizations. For example, do you want to implement the default Braze Content Cards? Do you want to slightly tweak their look and feel to match your brand guidelines? Do you want to develop an entirely new UI for a component and have Braze track its analytics? Different levels of customization require different levels of scope.
### Getting dashboard access
The Braze dashboard is our web UI interface. Marketers will use the dashboard to do their job and create content. Developers use the dashboard to manage settings for integrating apps, such as API keys and push notification credentials.
Your team administrator should add you (and all other team members who need access to Braze) as users on your dashboard.
### Workspaces and API keys
Your team administrator will also create different [workspaces](https://www.braze.com/docs/user_guide/administrative/app_settings/workspaces/). Workspaces group your data—users, segments, API keys—into one location. As a best practice, we suggest only putting different versions of the same or very similar apps together under one workspace.
Importantly, workspaces provide API keys for multiple platforms (such as iOS and Android). You'll use the correlated API keys to associate SDK data with a particular workspace. Navigate to your workspaces to access the API key for each of your apps. Make sure each API key has the correct permissions to perform the work you've scoped. See the [API provisioning article](https://www.braze.com/docs/api/basics/#rest-api-key) for details.
**Important:**
It's important that you set up different environments for development and production. Setting up a test environment will prevent you from spending actual money during onboarding and QA. To create a testing environment, set up a testing workspace and be sure to use its API key so that you aren't populating your production workspace with test data.
## Integration {#integration}
{: style="max-width:45%;float:right;margin-left:15px;"}
Braze supports iOS apps, Android apps, web apps, and more. You can also opt to use a cross-platform wrapper SDK, like React Native or Unity. We typically see customers integrate in anywhere from 1-6 weeks. Many customers have integrated Braze with just one engineer, depending on their breadth of technical skills and bandwidth. It's entirely dependent on your specific integration scope and how much time your team dedicates to the Braze project.
You'll need developers who are familiar with:
* Working in your app or site's native layer
* Creating processes to hit our REST API
* Integration testing
* JSON web token authentication
* General data management skills
* Settings up DNS records
### CDP integration partners
Many customers use Braze onboarding as an opportunity to also integrate with a customer data platform (CDP) as an integration partner. Braze provides data tracking and analytics, while a CDP can provide additional data routing and orchestration. Braze offers seamless integration with many CDPs, such as [mParticle](https://www.braze.com/docs/partners/data_and_analytics/customer_data_platform/mparticle/mparticle/) and [Segment](https://www.braze.com/docs/partners/data_and_analytics/customer_data_platform/segment/segment/).
If you are performing side-by-side integration with a CDP, you will map the calls from your CDP's SDK to the Braze SDK. Essentially, you will:
* Map identifying calls to `changeUser` ([Android](https://braze-inc.github.io/braze-android-sdk/kdoc/braze-android-sdk/com.braze/-i-braze/change-user.html), [iOS](https://braze-inc.github.io/braze-swift-sdk/documentation/brazekit/braze/changeuser(userid:sdkauthsignature:fileid:line:)/), [web](https://js.appboycdn.com/web-sdk/latest/doc/modules/braze.html#changeuser)) and set attributes.
* Map data flush calls to `requestImmediateDataFlush` ([Android](https://braze-inc.github.io/braze-android-sdk/kdoc/braze-android-sdk/com.braze/-i-braze/request-immediate-data-flush.html?query=abstract%20fun%20requestImmediateDataFlush()), [iOS](https://braze-inc.github.io/braze-swift-sdk/documentation/brazekit/braze/requestimmediatedataflush()), [web](https://js.appboycdn.com/web-sdk/latest/doc/modules/braze.html#requestimmediatedataflush)).
* Log custom events or purchases.
Example integrations between the Braze SDK and your CDP of choice might be available, depending on which platform you've chosen. See our [list of CDP technology partners](https://www.braze.com/docs/partners/data_and_analytics/) for more information.
### Braze SDK integration
The Braze SDK provides two critical pieces of functionality: it collects and syncs user data into a consolidated user profile, and powers messaging channels such as push notifications, in-app messages, and Content Cards.
**Tip:**
When fully integrated with your app or site, the Braze SDK offers a completely-realized level of marketing sophistication. If you defer integrating the Braze SDK, some of the functionality described in the documentation will not be available.
**Note:**
To add an additional layer of security, you can enable [SDK Authentication](https://www.braze.com/docs/developer_guide/sdk_integration/authentication/) to prevent unauthorized SDK requests. This feature is available across all major platforms including Web, iOS, Android, React Native, Flutter, Unity, Cordova, .NET MAUI (Xamarin), and Expo.
During SDK implementation, you will:
* Write SDK integration code for each platform you want to support.
* Activate the messaging channels for each platform, ensuring that the Braze SDK tracks the data from your interactions with your customers across email, SMS, push notifications, and other channels.
* Create any planned UI component customizations (for example, custom Content Cards). For completely custom content, you will need to log analytics since the SDK's automatic data collection won't be aware of your new components. You can pattern this implementation on our default components.
### Using the Braze API
You will use our REST API for different tasks at different points throughout your time using Braze. The Braze API is useful for:
1. Importing historical data; and
2. Continuous updates that aren’t triggered in Braze. For example, a user profile upgrades to VIP without them logging into an app, so the API needs to communicate this info to Braze.
Get started with the [Braze API](https://www.braze.com/docs/api/basics).
**Important:**
While using the API, ensure you batch your requests and only send delta values. Braze re-writes every attribute that is sent. Do not update any custom attribute if its value has not changed.
### Setting up product analytics
Braze is all about data. Data in Braze is stored on the user profile.
Data points are a structure by which you ensure you're capturing the right data for your marketers, not just "any" data you can possibly vacuum up. Familiarize yourself with [data points](https://www.braze.com/docs/user_guide/data/data_points/).
### Migrating legacy user data
You can use the Braze [`/users/track endpoint`](https://www.braze.com/docs/api/endpoints/user_data/post_user_track/) to migrate historical data that was recorded outside of Braze. Examples of commonly imported data include push tokens and past purchases. This endpoint can be used for one-off imports or regular batch updates.
You can also import users and update customer attribute values through a one-time [CSV upload](https://www.braze.com/docs/user_guide/data_and_analytics/user_data_collection/user_import#importing-a-csv) to the dashboard. Uploading CSVs can be helpful for marketers, while our REST API allows for greater flexibility.
### Setting up session tracking
The Braze SDK generates "open session" and "close session" data points. The Braze SDK also flushes data at regular intervals. Refer to these links for session tracking default values, all of which can be customized ([Android](https://www.braze.com/docs/developer_guide/analytics/tracking_sessions/?tab=android), [iOS](https://www.braze.com/docs/developer_guide/analytics/tracking_sessions/?tab=swift), [web](https://www.braze.com/docs/developer_guide/analytics/tracking_sessions/?tab=web)).
### Tracking custom events, attributes, and purchase events
Coordinate with your team to set up your planned data schema, including custom events, user attributes, and purchase events. Your [custom data scheme](https://www.braze.com/docs/user_guide/data/custom_data/custom_events/) will be entered using the dashboard and must match exactly what you implement during SDK integration.
**Tip:**
User IDs, called `external_id`s in Braze, should be set for all known users. These should be unchanging and accessible when a user opens the app, allowing you to track your users across devices and platforms. See the [User lifecycle](https://www.braze.com/docs/user_guide/data/user_data_collection/user_profile_lifecycle/) article for best practices.
### Other tools
Based on your use case, there may be other tools you need to set up. For example, you might need to configure a tool like [geofences](https://www.braze.com/docs/user_guide/engagement_tools/locations_and_geofences#about-locations-and-geofences/) to realize your user stories. We have found that customers who have the ability to set up these additional tools after completing the essential integration steps are most successful.
## Quality assurance {#qa}
As you execute your integration, you'll provide quality assurance to make sure everything you're setting up is working as expected. This QA falls into two general categories: data ingestion and message channels.
**Important:**
Make sure your production and testing environments are set up before beginning QA.
| **QA data ingestion** | **QA messaging** |
|---------------------------|---------------------------------------------------------------|
| You'll perform quality assurance on the way data is ingested, stored, and exported. | You'll make sure that your messages are being sent correctly to your users and everything looks excellent. |
| Run tests to confirm data is stored properly. | Create segments of users. |
| Confirm session data is correctly attributed to the intended workspace within Braze. | Launch campaigns and Canvases successfully. |
| Confirm session starts and ends are being recorded. | Confirm the correct campaigns are being shown to the correct user segments. |
| Confirm user attribute information is correctly recorded against user profiles. | Confirm that push tokens are correctly being registered. |
| Test that custom data is being correctly recorded against user profiles. | Confirm that push tokens are correctly removed. |
| Create anonymous user profiles. | Test that push campaigns are correctly sending to devices and engagement is logged. |
| Confirm that anonymous user profiles become known user profiles when the `changeUser()` method is called. | Test that in-app messages are delivered and metrics logged. |
| | Test that Content Cards are delivered and metrics logged. |
| | Facilitate Connected Content (for example, AccuWeather). |
| | Confirm all message channel integrations are working together properly. |
{: .reset-td-br-1 .reset-td-br-2 .reset-td-br-3 .reset-td-br-4 role="presentation" }
**Note:**
While performing QA on your SDK integration, use the [SDK Debugger](https://www.braze.com/docs/developer_guide/sdk_integration/debugging) to get troubleshoot issues without turning on verbose logging for your app.
### Passing Braze off to marketers
Once you have integrated your platform or site, you will want to involve your Marketing team to pass ownership of the platform to them. This process looks different at every company, but might include the following:
* Composing complex [Liquid logic](https://www.braze.com/docs/user_guide/personalization_and_dynamic_content/liquid#about-liquid)
* Help facilitating [email IP warming](https://www.braze.com/docs/user_guide/message_building_by_channel/email/email_setup/ip_warming/)
* Making sure other stakeholders understand the kind of data being tracked
### Develop for the future
Have you ever inherited a codebase and had no clue what the initial developer was thinking? Worse, have you ever written code, understood it completely, and then felt completely baffled when you came back to it a year later?
When onboarding Braze, the collective decisions you make concerning data, user profiles, what integrations were and were not in scope, how customizations are supposed to work, and more, will feel fresh in your mind and therefore obvious. When your team wants to expand Braze or when other technical resources are assigned to your Braze project, this information will be obscure.
Create a resource to cement the information you learned during your technical overview sessions. This resource will help reduce the time to onboard new developers who join your team (or serve as a reminder to yourself when you need to expand your current Braze implementation).
## Maintenance {#maintenance}
After handoff to your marketers, you will continue to serve as a resource for maintenance. You will pay attention to iOS and Android updates that might impact the Braze SDK and make sure that your third-party vendors are up to date.
You will track updates to the Braze platform via the Braze [GitHub](https://github.com/braze-inc/). Occasionally, your administrator will receive emails about urgent updates and bug fixes directly from Braze, as well.
## SDK rate limits
### Monthly Active Users CY 24-25, Universal MAU, Web MAU, and Mobile MAU
For customers who have purchased Monthly Active Users CY 24-25, Universal MAU, Web MAU, and Mobile MAU , Braze enforces server-side rate limits on API requests used by our SDKs to update sessions, user attributes, events, and other user profile data. This is to ensure platform stability and to maintain fast, reliable service.
* Hourly rate limits are set according to the expected SDK traffic on your account, which may correspond to the number of monthly active users (MAU) you have purchased, industry, seasonality, or other factors. When the hourly rate limit is reached, Braze will throttle requests until the next hour.
* All rate limited requests are automatically retried by the SDK.
* SDK requests correlate with the amount of custom data collected in your implementation. If you're consistently near or at your hourly rate limit, consider:
* Reviewing your SDK integration to reduce excessive data collection.
* Blocklisting custom data that isn't essential for your marketing use cases.
* Burst rate limits are short-lived rate limits that apply when a high volume of requests arrive in a very short period (that is, within seconds). You don't need to take action when burst limits occur, and the SDK will retry shortly after.
* Steady rate limits control sustained request volume over a rolling window longer than the burst window (for example, several minutes) and help smooth ongoing traffic between burst limits and your hourly rate limit.
### Finding your rate limits
To find current limits based on expected SDK throughput, go to **Settings** > **APIs and Identifiers** > **API and SDK limits**.
For historical usage, go to **Settings** > **APIs and Identifiers** > **API and SDK dashboard**.
### Requesting higher rate limits
If you need a higher Braze rate limit, contact Braze Support or your customer success manager and include the following details:
* Whether you need a temporary or permanent increase.
* Why you need the increase.
* Which endpoints and environments are affected.
* Your approximate traffic volume and timeline, including start date, duration, and peak hours.
* Whether you can batch calls or spread traffic over time.
After you submit your request, Braze reviews it and updates you with the outcome.
### Changes and support
Braze may modify rate limits to protect system stability or allow for increased data throughput on your account. Contact Braze Support or your customer success manager for questions or concerns regarding rate limits and how they impact your business.
# Architectural Overview
Source: /docs/developer_guide/getting_started/architecture_overview/index.md
# Getting started: Architectural overview
> This article discusses the different parts and pieces of the Braze technology stack, with links to relevant articles.
At a high level, Braze is about data. The Braze platform, powered by the SDK, the REST API, and partner integrations, allows you to aggregate and act on your data.
{: style="display:block;margin:auto;" }
* [Data ingestion](#ingestion): Braze pulls in data from a variety of sources.
* [Classification](#classification): Your marketing team dynamically segments your user base using these metrics.
* [Orchestration](#orchestration): Braze intelligently coordinates messages to different audience segments at the ideal time.
* [Action](#action): Your marketing team acts on the data, creating content through a variety of messaging channels such as SMS and email.
* [Personalization](#personalization): The data is transformed in real time with personalized information about your audience.
* [Export](#exporting-data): Then, Braze tracks your users' engagement with this messaging and feeds it back into the platform, creating a loop. You get insights into this data through real-time reports and analytics.
This all works together to create successful interactions between your user base and your brand so that you can achieve your goals. Braze does all this in the context of something we call our vertically integrated stack. Let's dig into each layer, one at a time.
## Data ingestion {#ingestion}
Braze is built on a streaming data architecture leveraging Snowflake, Kafka, MongoDB, and Redis. Data from many sources can be loaded into Braze through SDK and API. The platform can handle any data in real time, regardless of how it’s nested or structured. Data in Braze is stored on the user profile.
**Tip:**
Braze can track data for a user throughout their journey with you, from the time that they're anonymous to the time they're logged in to your app and known. User IDs, called `external_id`s in Braze, should be set for each of your users. These should be unchanging and accessible when a user opens the app, allowing you to track your users across devices and platforms. See the [User lifecycle article](https://www.braze.com/docs/user_guide/data/user_data_collection/user_profile_lifecycle/) for best practices.
{: style="display:block;margin:auto;" }
**Note:**
This person-centric user profile database allows for real-time, interactive speed. Braze pre-computes values when data arrives and stores the results in our lightweight document format for fast retrieval. And because the platform was designed this way from the ground up, it is ideal for most messaging use cases—especially combined with other data concepts like Connected Content, product catalogs, and nested attributes.
### Data source breakdown
Braze uses different data storage systems for various features. Understanding which features use which data sources is important for data management and troubleshooting.
#### MongoDB-powered features
- Custom events (tracked by SDK and API)
- Custom attributes
- User profiles
- Purchase events
- Most segmentation and targeting features
#### Snowflake-powered features
- [SQL Segment Extensions](https://www.braze.com/docs/user_guide/engagement_tools/segments/sql_segments/)
- [Prediction Suite](https://www.braze.com/docs/user_guide/brazeai/predictive_suite/)
- [Personalized Paths](https://www.braze.com/docs/user_guide/engagement_tools/canvas/canvas_components/experiment_step/personalized_paths/) and [Personalized Variant](https://www.braze.com/docs/user_guide/engagement_tools/testing/multivariant_testing/optimizations/#personalized-variant)
- [AI Personalized Item Recommendations](https://www.braze.com/docs/user_guide/brazeai/recommendations/creating_recommendations/ai/)
- [Estimated Real Open Rate](https://www.braze.com/docs/user_guide/message_building_by_channel/email/reporting_and_analytics/email_reporting#estimated-real-open-rate) (does not use custom events)
**Important:**
**Data removal considerations:** Custom events are stored in MongoDB and are separate from Snowflake data. If you need to remove erroneous custom event data, you must address it in MongoDB. Snowflake-powered features (like SQL Segment Extensions and other Snowflake-powered features) use data from Snowflake, which is handled separately. Removing data from one system does not automatically remove it from the other.
### Backend data sources through the Braze API
Braze can pull data from user databases, offline transactions, and data warehouses through our [REST API](https://www.braze.com/docs/api/endpoints/user_data).
### Frontend data sources through Braze SDK
Braze automatically captures first-party data from frontend data sources, such as users' devices, by way of the [Braze SDK](https://www.braze.com/docs/user_guide/getting_started/web_sdk/). The SDK handles new (anonymous) users and manages data on their user profile throughout their lifecycle.
### Partner integrations
Braze has over 150 technology partners, which we call "Alloys." You can supplement your data feeds through a meaningfully robust network of [interoperable technologies and data APIs.](https://www.braze.com/docs/partners/home)
### Direct warehouse connection through Braze Cloud Data Ingestion
You can stream customer data from your data warehouse into the platform through [Braze Cloud Data Ingestion](https://www.braze.com/docs/user_guide/data/cloud_ingestion/) in just a few minutes, allowing you to sync relevant user attributes, events, and purchases. The Cloud Data Ingestion integration supports complex data structures including nested JSON and arrays of objects.
Cloud Data Ingestion can sync data from Snowflake, Amazon Redshift, Databricks, and Google BigQuery.
## Classification {#classification}
The classification layer enables your team to dynamically classify and build audiences, called [segments](https://www.braze.com/docs/user_guide/engagement_tools/segments), based on data passing through Braze.
**Note:**
The classification, orchestration, and personalization layers are where your marketing team will do much of their work. They interface with these layers most often through the Braze dashboard, our web interface. Developers have a role in setting up and customizing these layers.
Many common types of user attributes, such as name, email, date of birth, country, and others are automatically tracked by the SDK by default. As a developer, you'll work with your team to define what additional, custom data makes sense to track for your use case. Your custom data will impact how your user base will be classified and segmented. You will set this data model up during the implementation process.
Learn more about [automatically collected data and custom data](https://www.braze.com/docs/developer_guide/analytics/).
## Orchestration {#orchestration}
The orchestration layer allows your marketing team to design user journeys based on your user data and prior engagement. This work is mostly done through our dashboard interface, but you also have the option to launch [campaigns through the API](https://www.braze.com/docs/api/api_campaigns#api-campaigns). For example, you can have your backend tell Braze when to send the messages and campaigns your marketers designed in the dashboard, and trigger them according to your backend logic. An example of an API-triggered message might be password resets or shipping confirmations.
**Note:**
API-triggered campaigns are ideal for more advanced transactional use-cases. They allow marketers to manage campaign copy, multivariate testing, and re-eligibility rules within the Braze dashboard while triggering the delivery of that content from your servers and systems. The API request to trigger the message can also include additional data to be templated into the message in real-time.
### Feature flags
Braze allows you to remotely enable or disable functionality for a selection of users through [feature flags](https://www.braze.com/docs/developer_guide/feature_flags/). This lets your marketers target the correct segment of your user base with messaging for features you haven't yet rolled out to your entire audience. But more than that, feature flags can be used to turn a feature on and off in production without additional code deployment or app store updates. This allows you to safely roll out new features with confidence.
## Personalization {#personalization}
The personalization layer represents the ability to deliver dynamic content in your messages. By using Liquid, a widely-used personalization language, your team can dynamically pull in existing data to display the message tailored to each recipient. Additionally, you can insert any information accessible on your webserver or through API directly into the messages you're sending, such as push notifications or emails, by using [Connected Content](https://www.braze.com/docs/user_guide/personalization_and_dynamic_content/connected_content). Connected Content builds on top of Liquid and uses familiar syntax.
And because this dynamic content is programmable, marketers can include computed values, responses from other calls, or product catalog items. After you've set these systems up during implementation, your marketing team can do this with little to no support from technical teams.
## Action {#action}
The action layer enables your actual messaging to your users. The purpose of the action layer is to send the right message to the right user at the right time, based on the data available through all of the layers previously discussed. Messaging is done inside your app or site (such as sending in-app messages or through graphic elements like Content Card carousels and banners) or outside your app experience (such as sending push notifications or emails).
### Messaging channels
Braze was designed to handle an evolving technological landscape with its channel-agnostic, user-centric data model. The dashboard manages message delivery and transactional triggers. For example, your marketers can trigger an SMS message offering a coupon for one of your newly-opened storefronts when a user enters the geofence set near this location, or send a user an email to let them know their favorite show has a new season.
The [Braze SDK](https://www.braze.com/docs/user_guide/getting_started/web_sdk/) powers additional messaging channels: push, in-app messages, and Content Cards. You integrate the SDK with your app or site to allow your marketing team to use the Braze dashboard to coordinate their campaigns across all supported messaging channels.

## Exporting data
Critically, all end-user interactions with Braze are tracked so you can measure your engagement and outreach. And after Braze has aggregated your data from all these sources, it can be exported back to your tech stack using a variety of tools, closing the loop.
### Currents
[Currents](https://www.braze.com/docs/user_guide/data/braze_currents/) is an optional Braze add-on that provides a granular streaming export that continuously feeds other destinations of your stack. Currents is a per user per event raw data feed that exports data every five minutes, or every 15,000 events, whichever comes first. Examples of some downstream destinations for Currents would be Segment, S3, Redshift and Mixpanel, among others.
### Snowflake data sharing
Snowflake’s [Secure Data Sharing](https://www.braze.com/docs/partners/data_and_analytics/data_warehouses/snowflake/) functionality allows Braze to give you secure access to data on our Snowflake portal without worrying about workflow friction, failure points, and unnecessary costs that come with typical data provider relationships. All sharing is accomplished through Snowflake’s unique services layer and metadata store: no data is actually copied or transferred between accounts. This is an important concept because shared data does not take up any storage in a consumer account and, therefore, does not contribute to your monthly data storage charges. The only charges to consumers are for the computing resources (that is, virtual warehouses) used to query the shared data.
### Braze export APIs
The Braze API provides [endpoints](https://www.braze.com/docs/api/endpoints/export) that allow you to programmatically export aggregate analytics, as well as to export individual user data. This data can be exported for audiences and segments of any size.
### CSVs
Lastly, there is an option to download your aggregate-level data directly from the dashboard as a [CSV](https://www.braze.com/docs/user_guide/data/export_braze_data/). The CSV option easily allows your team members to export data from Braze.
**Tip:**
While the CSV export has a base limit of 500,000 rows, the APIs do not have a limit in this regard.
## Putting it all together
One of your users, let's call them Mel, just received your product announcement. Behind the scenes, all of the layers of the Braze platform worked together to make sure this process went smoothly.
Mel's information was pulled into Braze from your legacy customer engagement platform through a CSV import. Every time Mel interacted with your app after integration, more data was added to her customer profile.
Your product announcement was sent to all customers who liked a similar item in your app. You defined this data as a custom event. The SDK tracked this event and segmented your user base accordingly. Braze orchestrated the best time of day to send this announcement, and personalized the announcement by calling Mel by her preferred name.
When Mel opens the announcement, she adds your new product to her wishlist. Braze tracks that she clicked the email automatically. The SDK tracks that she's wishlisted your new product. Each time they engage with your brand, you and your users are learning more about each other.

# Building with an LLM
Source: /docs/developer_guide/getting_started/build_with_llm/index.md
# Building with an LLM
> Use AI coding assistants to accelerate your Braze integration workflow. Connect your IDE to the Braze Docs MCP server through Context7 and get accurate, up-to-date SDK guidance directly in your development environment.
AI coding assistants can help you write integration code, troubleshoot issues, and explore Braze SDK features—but only if they have the right context. The Braze Docs MCP server provides your AI assistant with direct access to Braze documentation, so it can generate accurate code snippets and answer technical questions based on the latest SDK references.
## Connecting to the Braze Docs MCP
[Context7](https://context7.com/braze-inc/braze-docs) serves as the bridge between your AI assistant and the Braze documentation library. By adding Context7 to your IDE's MCP configuration, your AI assistant can query the full Braze documentation set and retrieve relevant SDK references, code examples, and integration guides on demand.
### Setting up Context7
To connect your AI assistant to the Braze Docs MCP through Context7, add the following configuration to your IDE's `mcp.json` file.
In [Cursor](https://cursor.com/), go to **Settings** > **Tools and Integrations** > **MCP Tools** > **Add Custom MCP**, then add the following snippet:
```json
{
"mcpServers": {
"context7": {
"command": "npx",
"args": ["-y", "@upstash/context7-mcp@latest"]
}
}
}
```
Save the configuration and restart Cursor. Your AI assistant can now access Braze documentation through Context7 when you include `use context7` in your prompts.
In Claude Desktop, go to **Settings** > **Developer** > **Edit Config**, then add the following to your `claude_desktop_config.json` file:
```json
{
"mcpServers": {
"context7": {
"command": "npx",
"args": ["-y", "@upstash/context7-mcp@latest"]
}
}
}
```
Save the configuration and restart Claude Desktop.
Add the following to your VS Code `settings.json` or `.vscode/mcp.json` file:
```json
{
"mcpServers": {
"context7": {
"command": "npx",
"args": ["-y", "@upstash/context7-mcp@latest"]
}
}
}
```
Save the configuration and restart VS Code.
**Note:**
Context7 is different from the [Braze MCP server](https://www.braze.com/docs/developer_guide/mcp_server/). Context7 provides your AI assistant with access to **Braze documentation**, while the Braze MCP server provides read-only access to **your Braze workspace data** (such as campaigns, segments, and analytics). You can use both together for a more complete AI-assisted development experience.
## Writing prompts for Braze SDK development
After you set up Context7, include `use context7` in your prompts to signal your AI assistant to pull in Braze documentation as context. The following examples show how to write effective prompts for common SDK tasks.
### React Native SDK
These prompts demonstrate common integration tasks for the [Braze React Native SDK](https://www.braze.com/docs/developer_guide/platform_integration_guides/react_native/react_sdk_setup/).
#### Initializing the SDK
```text
Using the Braze React Native SDK, show me how to initialize the SDK
in my App.tsx with an API key and custom endpoint. Include the
configuration for automatic session tracking. Use context7.
```
#### Logging custom events with properties
```text
I need to track user activity in my React Native app using the Braze
React Native SDK. Show me how to log a custom event called
"ProductViewed" with properties for product_id, category, and price.
Use context7.
```
#### Setting up push notifications
```text
Using the Braze React Native SDK, walk me through requesting push
notification permissions on both iOS and Android 13+. Include the
code for registering the push token with Braze. Use context7.
```
#### Handling in-app messages
```text
Show me how to subscribe to in-app messages using the Braze React
Native SDK, including how to log impressions and button clicks
programmatically. Use context7.
```
### Web SDK
These prompts demonstrate common integration tasks for the [Braze Web SDK](https://www.braze.com/docs/developer_guide/platform_integration_guides/web/initial_sdk_setup/).
#### Initializing the SDK
```text
Using the Braze Web SDK, show me how to initialize the SDK with
braze.initialize(), including the API key, base URL, and options
for enabling logging and automatic in-app message display.
Use context7.
```
#### Tracking custom events and purchases
```text
Using the Braze Web SDK, create a JavaScript module that logs a
custom event called "VideoPlayed" with properties for video_id,
duration_seconds, and completion_percentage. Also show how to log
a purchase with product ID, price, currency code, and quantity.
Use context7.
```
#### Registering for web push
```text
Using the Braze Web SDK, provide the HTML and JavaScript needed to
register a user for web push notifications after they click a
"Subscribe to updates" button. Include the service worker setup.
Use context7.
```
#### Managing user attributes
```text
Using the Braze Web SDK, show me how to set standard user attributes
(first name, email, country) and custom user attributes (favorite_genre,
subscription_tier) for the current user. Use context7.
```
## Plain text documentation
You can access the Braze Developer Guide documentation as plain text files optimized for AI tools and LLMs. These files provide Braze documentation in a format that AI assistants can parse and understand without the overhead of HTML rendering.
| File | Description |
|------|-------------|
| [llms.txt](https://www.braze.com/docs/developer_guide/llms.txt) | An index of Braze developer documentation pages with titles and descriptions. Use this as a starting point for discovering available documentation. |
| [llms-full.txt](https://www.braze.com/docs/developer_guide/llms-full.txt) | The complete Braze developer documentation in a single plain text file, formatted for LLM consumption. |
{: .reset-td-br-1 .reset-td-br-2 role="presentation"}
These files follow the [llms.txt standard](https://llmstxt.org/), an emerging convention for making documentation accessible to AI tools. You can reference these files directly in your prompts or paste their contents into an LLM for context.
# Customization Overview
Source: /docs/developer_guide/getting_started/customization_overview/index.md
# Customization overview
> Almost everything at Braze is fully customizable! The articles in this Customization Guide show you how to approach refining your Braze experience through a mixture of configuration and customization. During this process, marketing and engineering teams should work closely together to coordinate exactly how to customize Braze messaging channels.
**Note:**
The Braze SDK is a powerful toolkit, but at a high level it provides two important pieces of functionality: it helps collect and sync user data across platforms to a consolidated user profile, and also handles messaging channels like in-app messages, push notifications, and Content Cards. The articles in the Customization Guide assume you've already gone through the [SDK implementation process](https://www.braze.com/docs/developer_guide/home).
All Braze components are crafted to be accessible, adaptive, and customizable. As such, we recommend starting with the default `BrazeUI` components and customizing them to suit your brand needs and use case. At Braze, we break down customization into three different approaches based on the associated effort and level of flexibility provided. These approaches are referred to as "crawl," "walk," or "run."
- **Crawl:** Take advantage of basic styling options for a quick, low-effort implementation.
- **Walk:** Add some custom styling to the default templates to better match your brand experience.
- **Run:** Customize every part of your messaging, from style to behavior to cross-channel connections.
{: style="max-width:35%;float:right;margin-left:15px;border:none;"}
The Crawl approach puts the power of customization directly in the hands of marketers. While some light development work is necessary upfront to integrate Braze messaging channels with your app or site, this approach allows you to get up and running sooner.
Marketers determine the content, audience, and timing of messages through the dashboard. Styling options are limited, however. This approach is best suited for teams with limited developer resources or who want to quickly share simple content.
Customization
Description
Effort
Low
Developer Work
0-1 hours
Card style
Use default Braze templates.
Behavior
Choose from default behavior options.
Analytics tracking
Analytics are captured in Braze.
Key-value pairs
Optional, powers additional UI/UX customization.
{: style="max-width:35%;float:right;margin-left:15px;border:none;"}
A hybrid approach to implementation, the Walk approach involves both marketing and developer teams pitching in to match your app or site's branding.
During the implementation process, developers write custom code to update a message channel's look and feel to more closely match your brand. This includes changing font type, font size, rounded corners, and colors. This approach still uses the default options, just with programmatic template styling.
Marketers still maintain control of the audience, content, on-click behavior, and expiration directly in the Braze dashboard.
Customization
Description
Effort
Low
Developer Work
0-4 hours
UI
Use Braze templates or use your own developer-created templates.
Behavior
Choose from default behavior options.
Analytics tracking
Default analytics are captured in Braze.
Key-value pairs
Optional, powers additional UI/UX customization.
{: style="max-width:35%;float:right;margin-left:15px;border:none;"}
With the Run approach, developers take the lead with full control of the user experience. Custom code dictates what the messages will look like, how they behave, and how they interact with other messaging channels (for example, triggering a Content Card based on a push notification).
When you create completely new custom content, such as new types of Content Cards or in-app messages with bespoke UI, the Braze SDK won’t automatically [track analytics](https://www.braze.com/docs/developer_guide/analytics/). You must be programmatically handle analytics so marketers continue to have access to metrics like impressions, clicks, and dismissals in the Braze dashboard. Call the Braze SDK’s analytics methods to have the SDK pass this data back to Braze. Each messaging channel has an analytics article to help facilitate this.
Customization
Description
Effort
Depends on use case.
Developer Work
Low effort: 1-4 hours Medium effort: 4-8 hours High effort: 8+ hours
UI
Custom
Behavior
Custom
Analytics tracking
Custom
Key-value pairs
Required
**Tip:**
When developers and implementers create custom content for Braze, there's an opportunity for cross-functional collaboration with marketers. For example, if you develop a new UI or new functionality for a particular component, set your team up for success by documenting the new behavior and how it integrates with your backend.
# Braze SDK Tutorials
Source: /docs/developer_guide/tutorials/index.md
# Integrate the Braze SDK
Source: /docs/developer_guide/sdk_integration/index.md
# {: style="float:right;width:120px;border:0;" class="noimgborder"}Integrate the Braze SDK
> Learn how to integrate the Braze SDK. Each SDK is hosted in its own public GitHub repository, which includes fully-buildable sample apps you can use to test Braze features or implement alongside your own applications. To learn more, see [References, Repositories, and Sample Apps](https://www.braze.com/docs/developer_guide/references/). For more general information about the SDK, see [Getting started: Integration overview](https://www.braze.com/docs/developer_guide/getting_started/integration_overview/).
**Tip:**
After integrating the SDK, you can enable [SDK Authentication](https://www.braze.com/docs/developer_guide/sdk_integration/authentication/) to add an additional layer of security by preventing unauthorized SDK requests. SDK Authentication is available for Web, Android, Swift, React Native, Flutter, Unity, Cordova, .NET MAUI (Xamarin), and Expo.
## About the Web Braze SDK
The Web Braze SDK lets you collect analytics and display rich in-app messages, push, and Content Card messages to your web users. For more information, see [Braze JavaScript reference documentation](https://js.appboycdn.com/web-sdk/latest/doc/modules/braze.html).
**Note:**
This guide uses code samples from the Braze Web SDK 4.0.0+. To upgrade to the latest Web SDK version, see [SDK Upgrade Guide](https://github.com/braze-inc/braze-web-sdk/blob/master/UPGRADE_GUIDE.md).
## Integrate the Web SDK
You can integrate the Web Braze SDK using the following methods. For additional options, see [other integration methods](#web_other-integration-methods).
- **Code-based integration:** Integrate the Web Braze SDK directly in your codebase using your preferred package manager or the Braze CDN. This gives you full control over how the SDK is loaded and configured.
- **Google Tag Manager:** A no-code solution that lets you integrate the Web Braze SDK without modifying your site's code. For more information, see [Google Tag Manager with the Braze SDK](https://www.braze.com/docs/developer_guide/sdk_integration/google_tag_manager/).
**Important:**
We recommend using the [NPM integration method](https://www.braze.com/docs/developer_guide/sdk_integration/?subtab=package%20manager&sdktab=web). Benefits include storing SDK libraries locally on your website, providing immunity from ad-blocker extensions, and contributing to faster load times as part of bundler support.
### Step 1: Install the Braze library
You can install the Braze library using one of the following methods. However, if your website uses a `Content-Security-Policy`, review the [Content Security Policy](https://www.braze.com/docs/developer_guide/platforms/web/content_security_policy/) before continuing.
**Important:**
While most ad blockers do not block the Braze Web SDK, some more-restrictive ad blockers are known to cause issues.
If your site uses NPM or Yarn package managers, you can add the [Braze NPM package](https://www.npmjs.com/package/@braze/web-sdk) as a dependency.
Typescript definitions are now included as of v3.0.0. For notes on upgrading from 2.x to 3.x, see our [changelog](https://github.com/braze-inc/braze-web-sdk/blob/master/UPGRADE_GUIDE.md).
```bash
npm install --save @braze/web-sdk
# or, using yarn:
# yarn add @braze/web-sdk
```
Once installed, you can `import` or `require` the library in the typical fashion:
```typescript
import * as braze from "@braze/web-sdk";
// or, using `require`
const braze = require("@braze/web-sdk");
```
Add the Braze Web SDK directly to your HTML by referencing our CDN-hosted script, which loads the library asynchronously.
**Important:**
The default **Prevent Cross-Site Tracking** setting in Safari can prevent in-app message types like Banners and Content Cards from displaying when you use the CDN integration method. To avoid this issue, use the NPM integration method so that Safari does not classify these messages as cross-site traffic and your web users can see them in all supported browsers.
### Step 2: Initialize the SDK
After the Braze Web SDK is added to your website, initialize the library with the API key and [SDK endpoint URL](https://www.braze.com/docs/user_guide/administrative/access_braze/sdk_endpoints) found in **Settings** > **App Settings** within your Braze dashboard. For a complete list of options for `braze.initialize()`, along with our other JavaScript methods, see [Braze JavaScript documentation](https://js.appboycdn.com/web-sdk/latest/doc/modules/braze.html#initialize).
**Note:**
**Custom domains for Web SDK requests are not supported**: The Web SDK `baseUrl` must be a Braze SDK endpoint (for example, `sdk.iad-05.braze.com`). Braze does not support routing Web SDK traffic through a customer-owned domain via CNAME records. If you need Web SDK requests to originate from your own domain, contact Braze support.
```javascript
// initialize the SDK
braze.initialize('YOUR-API-KEY-HERE', {
baseUrl: "YOUR-SDK-ENDPOINT-HERE",
enableLogging: false, // set to `true` for debugging
allowUserSuppliedJavascript: false, // set to `true` to support custom HTML messages
});
// Enable automatic display of in-app messages
// Required if you want in-app messages to display automatically when triggered
braze.automaticallyShowInAppMessages();
// if you use Content Cards
braze.subscribeToContentCardsUpdates(function(cards){
// cards have been updated
});
// optionally set the current user's external ID before starting a new session
// you can also call `changeUser` later in the session after the user logs in
if (isLoggedIn){
braze.changeUser(userIdentifier);
}
// `openSession` should be called last - after `changeUser` and `automaticallyShowInAppMessages`
braze.openSession();
```
**Important:**
**In-App Message Display**: To display in-app messages automatically when they're triggered, you must call `braze.automaticallyShowInAppMessages()`. Without this call, in-app messages don't display automatically. If you want to manage message display manually, remove this call and use `braze.subscribeToInAppMessage()` instead. For more information, see [In-app message delivery](https://www.braze.com/docs/developer_guide/in_app_messages/delivery/).
**Important:**
Anonymous users on mobile or web devices may be counted towards your [MAU](https://www.braze.com/docs/user_guide/data_and_analytics/reporting/understanding_your_app_usage_data/#monthly-active-users). As a result, you may want to conditionally load or initialize the SDK to exclude these users from your MAU count.
### Prerequisites
Before you can use this integration method, you'll need to [create an account and container for Google Tag Manager](https://support.google.com/tagmanager/answer/14842164).
### Step 1: Open the tag template gallery
In [Google Tag Manager](https://tagmanager.google.com/), choose your workspace, then select **Templates**. In the **Tag Template** pane, select **Search Gallery**.
{: style="max-width:95%;"}
### Step 2: Add the initialization tag template
In the template gallery, search for `braze-inc`, then select **Braze Initialization Tag**.
{: style="max-width:80%;"}
Select **Add to workspace** > **Add**.
{: style="max-width:70%;"}
### Step 3: Configure the tag
From the **Templates** section, select your newly added template.
{: style="max-width:95%;"}
Select the pencil icon to open the **Tag Configuration** dropdown.

Enter the minimum required information:
| Field | Description |
| ------------- | ----------- |
| **API Key** | Your [Braze API Key](https://www.braze.com/docs/api/basics/#about-rest-api-keys), found in the Braze dashboard under **Settings** > **App Settings**. |
| **API Endpoint** | Your REST endpoint URL. Your endpoint will depend on the Braze URL for [your instance](https://www.braze.com/docs/api/basics/#endpoints). |
| **SDK Version** | The most recent `MAJOR.MINOR` version of the Web Braze SDK listed in the [changelog](https://www.braze.com/docs/developer_guide/changelogs/?sdktab=web). For example, if the latest version is `4.1.2`, enter `4.1`. For more information, see [About SDK version management](https://www.braze.com/docs/developer_guide/sdk_integration/version_management/). |
{: .reset-td-br-1 .reset-td-br-2 role="presentation"}
For additional initialization settings, select **Braze Initialization Options** and choose any options you need.
{: style="max-width:65%;"}
### Step 4: Set to Trigger on *all pages*
The initialization tag should be run on all pages of your site. This allows you to use Braze SDK methods and record web push analytics.
### Step 5: Verify your integration
You can verify your integration using either of the following options:
- **Option 1:** Using Google Tag Manager's [debugging tool](https://support.google.com/tagmanager/answer/6107056?hl=en), you can check if the Braze Initialization Tag is triggering correctly on your configured pages or events.
- **Option 2:** Check for any network requests made to Braze from your web page. Additionally, the global `window.braze` library should now be defined.
## Filtering bot traffic {#bot-filtering}
MAU can include a percentage of bot users, which inflates your monthly active user count. While the Braze Web SDK includes built-in detection for some common web crawlers (such as search engine bots and social media preview bots), it is especially important to stay proactive with robust solutions to detect bots, as SDK updates alone cannot consistently detect every new bot.
### Limitations of SDK-side bot detection
The Web SDK includes basic user-agent-based bot detection that filters out known crawlers. However, this approach has limitations:
- **New bots emerge constantly**: AI companies and other actors regularly create new bots that may disguise themselves to avoid detection.
- **User-agent spoofing**: Sophisticated bots can mimic legitimate browser user-agents.
- **Custom bots**: Non-technical users can now easily create bots using large language models (LLMs), making bot behavior unpredictable.
### Implementing bot filtering
**Important:**
The solutions outlined below are general suggestions. Tailor bot filtering logic to your unique environment and traffic patterns.
The most robust solution is to implement your own bot filtering logic before initializing the Braze SDK. Common approaches include:
#### Require user interaction
Consider delaying SDK initialization until a user performs a meaningful interaction, such as accepting a cookie consent banner, scrolling, or clicking. This approach is often easier to implement and can be highly effective at filtering bot traffic.
**Important:**
Delaying SDK initialization until user interaction might cause Banners and Content Cards to also not display until that interaction occurs.
#### Custom bot detection
Implement custom detection based on your specific bot traffic patterns, such as:
- Analyzing user-agent strings for patterns you've identified in your traffic
- Checking for headless browser indicators
- Using third-party bot detection services
- Monitoring behavioral signals specific to your site
**Example of conditional initialization:**
```javascript
// Only initialize Braze if your custom bot detection determines this is not a bot
if (!isLikelyBot()) {
braze.initialize('YOUR-API-KEY-HERE', {
baseUrl: "YOUR-SDK-ENDPOINT-HERE"
});
braze.automaticallyShowInAppMessages();
braze.openSession();
}
```
### Best practices
- Regularly analyze your MAU data and web traffic patterns to identify new bot behavior.
- Test thoroughly to ensure your bot filtering doesn't prevent legitimate users from being tracked.
- Update your filtering logic based on the bot traffic patterns you observe in your environment.
## Optional configurations
### Logging
To quickly enable logging, you can add `?brazeLogging=true` as a parameter to your website URL. Alternatively, you can enable [basic](#web_basic-logging) or [custom](#web_custom-logging) logging. For a centralized overview across all platforms, see [Verbose logging](https://www.braze.com/docs/developer_guide/sdk_integration/verbose_logging).
#### Basic logging
Use `enableLogging` to log basic debugging messages to the JavaScript console before the SDK is initialized.
```javascript
enableLogging: true
```
Your method should be similar to the following:
```javascript
braze.initialize('API-KEY', {
baseUrl: 'API-ENDPOINT',
enableLogging: true
});
braze.openSession();
```
Use `braze.toggleLogging()` to log basic debugging messages to the JavaScript console after the SDK is initialized. Your method should be similar to the following:
```javascript
braze.initialize('API-KEY', {
baseUrl: 'API-ENDPOINT',
});
braze.openSession();
...
braze.toggleLogging();
```
**Important:**
Basic logs are visible to all users, so consider disabling, or switch to [`setLogger`](#web_custom-logging), before releasing your code to production.
#### Custom logging
Use `setLogger` to log custom debugging messages to the JavaScript console. Unlike basic logs, these logs are not visible to users.
```javascript
setLogger(loggerFunction: (message: STRING) => void): void
```
Replace `STRING` with your message as a single string parameter. Your method should be similar to the following:
```javascript
braze.initialize('API-KEY');
braze.setLogger(function(message) {
console.log("Braze Custom Logger: " + message);
});
braze.openSession();
```
## Upgrading the SDK
**Note:**
This guide uses code samples from the Braze Web SDK 4.0.0+. To upgrade to the latest Web SDK version, see [SDK Upgrade Guide](https://github.com/braze-inc/braze-web-sdk/blob/master/UPGRADE_GUIDE.md).
When you reference the Braze Web SDK from our content delivery network, for example, `https://js.appboycdn.com/web-sdk/a.a/braze.min.js` (as recommended by our default integration instructions), your users receive minor updates (bug fixes and backward compatible features, versions `a.a.a` through `a.a.z` in the above examples) automatically when they refresh your site.
However, when we release major changes, we require you to upgrade the Braze Web SDK manually to ensure that breaking changes do not impact your integration. Additionally, if you download our SDK and host it yourself, you don't receive any version updates automatically and should upgrade manually to receive the latest features and bug fixes.
You can keep up-to-date with our latest release [following our release feed](https://github.com/braze-inc/braze-web-sdk/tags.atom) with the RSS Reader or service of your choice, and see [our changelog](https://github.com/braze-inc/braze-web-sdk/blob/master/CHANGELOG.md) for a full accounting of our Web SDK release history. To upgrade the Braze Web SDK:
- Update the Braze library version by changing the version number of `https://js.appboycdn.com/web-sdk/[OLD VERSION NUMBER]/braze.min.js`, or in your package manager's dependencies.
- If you have web push integrated, update the service worker file on your site - by default, this is located at `/service-worker.js` at your site's root directory, but the location may be customized in some integrations. You must access the root directory to host a service worker file.
You must update these two files in coordination with each other for proper functionality.
## Other integration methods
### Accelerated Mobile Pages (AMP)
**See more**
#### Step 1: Include AMP web push script
Add the following async script tag to your head:
```js
```
#### Step 2: Add subscription widgets
Add a widget to the body of your HTML that allows users to subscribe and unsubscribe from push.
```js
```
#### Step 3: Add `helper-iframe` and `permission-dialog`
The AMP Web Push component creates a popup to handle push subscriptions, so you must add the following helper files to your project to enable this feature:
- [`helper-iframe.html`](https://cdn.ampproject.org/v0/amp-web-push-helper-frame.html)
- [`permission-dialog.html`](https://cdn.ampproject.org/v0/amp-web-push-permission-dialog.html)
#### Step 4: Create a service worker file
Create a `service-worker.js` file in the root directory of your website and add the following snippet:
#### Step 5: Configure the AMP web push HTML element
Add the following `amp-web-push` HTML element to your HTML body. Keep in mind, you need to append your [`apiKey` and `baseUrl`](https://documenter.getpostman.com/view/4689407/SVYrsdsG) as query parameters to `service-worker-URL`.
```js
```
### Asynchronous Module Definition (AMD)
#### Disable support
If your site uses RequireJS or another AMD module-loader, but you prefer to load the Braze Web SDK through one of the other options in this list, you can load a version of the library that does not include AMD support. This version of the library can be loaded from the following CDN location:
#### Module loader
If you use RequireJS or other AMD module-loaders we recommend self-hosting a copy of our library and referencing it as you would with other resources:
```javascript
require(['path/to/braze.min.js'], function(braze) {
braze.initialize('YOUR-API-KEY-HERE', { baseUrl: 'YOUR-SDK-ENDPOINT' });
// Required if you want in-app messages to display automatically
braze.automaticallyShowInAppMessages();
braze.openSession();
});
```
### Electron {#electron}
Electron does not officially support web push notifications (see: this [GitHub issue](https://github.com/electron/electron/issues/6697)). There are other [open source workarounds](https://github.com/MatthieuLemoine/electron-push-receiver) you may try that have not been tested by Braze.
### Jest framework {#jest}
When using Jest, you may see an error similar to `SyntaxError: Unexpected token 'export'`. To fix this, adjust your configuration in `package.json` to ignore the Braze SDK:
```
"jest": {
"transformIgnorePatterns": [
"/node_modules/(?!@braze)"
]
}
```
### SSR frameworks {#ssr}
If you use a Server-Side Rendering (SSR) framework such as Next.js, you may encounter errors because the SDK is meant to be run in a browser environment. You can resolve these issues by dynamically importing the SDK.
You can retain the benefits of tree-shaking when doing so by exporting the parts of the SDK that you need in a separate file and then dynamically importing that file into your component.
```javascript
// MyComponent/braze-exports.js
// export the parts of the SDK you need here
export { initialize, openSession } from "@braze/web-sdk";
// MyComponent/MyComponent.js
// import the functions you need from the braze exports file
useEffect(() => {
import("./braze-exports.js").then(({ initialize, openSession }) => {
initialize("YOUR-API-KEY-HERE", {
baseUrl: "YOUR-SDK-ENDPOINT",
enableLogging: true,
});
openSession();
});
}, []);
```
Alternatively, if you're using webpack to bundle your app, you can take advantage of its magic comments to dynamically import only the parts of the SDK that you need.
```javascript
// MyComponent.js
useEffect(() => {
import(
/* webpackExports: ["initialize", "openSession"] */
"@braze/web-sdk"
).then(({ initialize, openSession }) => {
initialize("YOUR-API-KEY-HERE", {
baseUrl: "YOUR-SDK-ENDPOINT",
enableLogging: true,
});
openSession();
});
}, []);
```
### Tealium iQ
Tealium iQ offers a basic turnkey Braze integration. To configure the integration, search for Braze in the Tealium Tag Management interface, and provide the Web SDK API key from your dashboard.
For more details or in-depth Tealium configuration support, check out our [integration documentation](https://www.braze.com/docs/partners/data_and_infrastructure_agility/customer_data_platform/tealium/#about-tealium) or contact your Tealium account manager.
### Vite {#vite}
If you use Vite and see a warning around circular dependencies or `Uncaught TypeError: Class extends value undefined is not a constructor or null`, you may need to exclude the Braze SDK from its [dependency discovery](https://vitejs.dev/guide/dep-pre-bundling.html#customizing-the-behavior):
```
optimizeDeps: {
exclude: ['@braze/web-sdk']
},
```
### Other tag managers
Braze may also be compatible with other tag management solutions by following our integration instructions within a custom HTML tag. Contact a Braze representative if you need help evaluating these solutions.
## Integrating the Android SDK
### Step 1: Update your Gradle build configuration
In your project's repository configuration (for example, `settings.gradle`, `settings.gradle.kts`, or top-level `build.gradle`), add [`mavenCentral()`](https://docs.gradle.org/current/kotlin-dsl/gradle/org.gradle.api.artifacts.dsl/-repository-handler/maven-central.html) to your list of repositories. This syntax is the same for both Groovy and Kotlin DSL.
```groovy
repositories {
mavenCentral()
}
```
Next, add Braze to your dependencies. In the following examples, replace `SDK_VERSION` with the current version of your Android Braze SDK. For the full list of versions, see [Changelogs](https://www.braze.com/docs/developer_guide/changelogs/?sdktab=android).
**Note:**
- For Kotlin DSL (`build.gradle.kts`), use the `implementation("...")` syntax.
- For Groovy (`build.gradle`), use the `implementation '...'` syntax.
- For [version catalogs](https://developer.android.com/build/migrate-to-catalogs), add entries to your `gradle/libs.versions.toml` file and reference them using the generated accessors.
If you don't plan on using Braze UI components, add the following to your dependencies.
```groovy
dependencies {
implementation 'com.braze:android-sdk-base:SDK_VERSION' // (Required) Adds dependencies for the base Braze SDK.
implementation 'com.braze:android-sdk-location:SDK_VERSION' // (Optional) Adds dependencies for Braze location services.
}
```
```kotlin
dependencies {
implementation("com.braze:android-sdk-base:SDK_VERSION") // (Required) Adds dependencies for the base Braze SDK.
implementation("com.braze:android-sdk-location:SDK_VERSION") // (Optional) Adds dependencies for Braze location services.
}
```
In your `gradle/libs.versions.toml` file:
```toml
[versions]
braze = "SDK_VERSION"
[libraries]
braze-android-sdk-base = { group = "com.braze", name = "android-sdk-base", version.ref = "braze" }
braze-android-sdk-location = { group = "com.braze", name = "android-sdk-location", version.ref = "braze" }
```
Then, in your `build.gradle` or `build.gradle.kts` file, add the following dependencies. This syntax is the same for both Groovy and Kotlin DSL.
```groovy
dependencies {
implementation(libs.braze.android.sdk.base) // (Required) Adds dependencies for the base Braze SDK.
implementation(libs.braze.android.sdk.location) // (Optional) Adds dependencies for Braze location services.
}
```
If you plan on using Braze UI components, add the following to your dependencies.
```groovy
dependencies {
implementation 'com.braze:android-sdk-ui:SDK_VERSION' // (Required) Adds dependencies for the Braze SDK and Braze UI components.
implementation 'com.braze:android-sdk-location:SDK_VERSION' // (Optional) Adds dependencies for Braze location services.
}
```
```kotlin
dependencies {
implementation("com.braze:android-sdk-ui:SDK_VERSION") // (Required) Adds dependencies for the Braze SDK and Braze UI components.
implementation("com.braze:android-sdk-location:SDK_VERSION") // (Optional) Adds dependencies for Braze location services.
}
```
In your `gradle/libs.versions.toml` file:
```toml
[versions]
braze = "SDK_VERSION"
[libraries]
braze-android-sdk-ui = { group = "com.braze", name = "android-sdk-ui", version.ref = "braze" }
braze-android-sdk-location = { group = "com.braze", name = "android-sdk-location", version.ref = "braze" }
```
Then, in your `build.gradle` or `build.gradle.kts` file, add the following dependencies. This syntax is the same for both Groovy and Kotlin DSL.
```groovy
dependencies {
implementation(libs.braze.android.sdk.ui) // (Required) Adds dependencies for the Braze SDK and Braze UI components.
implementation(libs.braze.android.sdk.location) // (Optional) Adds dependencies for Braze location services.
}
```
### Step 2: Configure your `braze.xml`
**Note:**
As of December 2019, custom endpoints are no longer given out, if you have a pre-existing custom endpoint, you may continue to use it. For more details, refer to our list of available endpoints.
Create a `braze.xml` file in your project's `res/values` folder. If you are on a specific data cluster or have a pre-existing custom endpoint, you need to specify the endpoint in your `braze.xml` file as well.
The contents of that file should resemble the following code snippet. Make sure to substitute `YOUR_APP_IDENTIFIER_API_KEY` with the identifier found in the **Manage Settings** page of the Braze dashboard. Log in at [dashboard.braze.com](https://dashboard.braze.com) to find your [cluster address](https://www.braze.com/docs/user_guide/administrative/access_braze/sdk_endpoints).
```xml
YOUR_APP_IDENTIFIER_API_KEYYOUR_CUSTOM_ENDPOINT_OR_CLUSTER
```
### Step 3: Add permissions to `AndroidManifest.xml`
Next, add the following permissions to your `AndroidManifest.xml`:
```xml
```
**Note:**
With the release of Android M, Android switched from an install-time to a runtime permissions model. However, both of these permissions are normal permissions and are granted automatically if listed in the app manifest. For more information, visit Android's [permission documentation](https://developer.android.com/training/permissions/index.html).
### Step 4: Enable delayed initialization (optional)
To use delayed initialization, the minimum Braze SDK version is required:
**Note:**
While delayed initialization is enabled, all network connections are canceled, preventing the SDK from sending data to the Braze servers.
#### Step 4.1: Update your `braze.xml`
Delayed initialization is disabled by default. To enable, use one of the following options:
In your project's `braze.xml` file, set `com_braze_enable_delayed_initialization` to `true`.
```xml
true
```
To enable delayed initialization at runtime, use the following method.
```java
Braze.enableDelayedInitialization(context);
```
```kotlin
Braze.enableDelayedInitialization(context)
```
**Note:**
When delayed initialization is enabled and a push notification contains a deep link action, the deep link does not resolve.
#### Step 4.2: Configure push analytics (optional)
When delayed initialization is enabled, push analytics are queued by default. However, you can choose to [explicitly queue](#explicitly-queue-push-analytics) or [drop](#drop-push-analytics) push analytics instead.
##### Explicitly queue {#explicitly-queue-push-analytics}
To explicitly queue push analytics, choose one of the following options:
In your `braze.xml` file, set `com_braze_delayed_initialization_analytics_behavior` to `QUEUE`:
```xml
QUEUE
```
Add `QUEUE` to your [`Braze.enableDelayedInitialization()`](https://braze-inc.github.io/braze-android-sdk/kdoc/braze-android-sdk/com.braze/-braze/-companion/enable-delayed-initialization.html) method:
```java
Braze.enableDelayedInitialization(context, DelayedInitializationAnalyticsBehavior.QUEUE);
```
```kotlin
Braze.enableDelayedInitialization(context, DelayedInitializationAnalyticsBehavior.QUEUE)
```
##### Drop {#drop-push-analytics}
To drop push analytics, choose one of the following options:
In your `braze.xml` file, set `com_braze_delayed_initialization_analytics_behavior` to `DROP`:
```xml
DROP
```
Add `DROP` to the [`Braze.enableDelayedInitialization()`](https://braze-inc.github.io/braze-android-sdk/kdoc/braze-android-sdk/com.braze/-braze/-companion/enable-delayed-initialization.html) method:
```java
Braze.enableDelayedInitialization(context, DelayedInitializationAnalyticsBehavior.DROP);
```
```kotlin
Braze.enableDelayedInitialization(context, DelayedInitializationAnalyticsBehavior.DROP)
```
#### Step 4.3: Manually initialize the SDK
After your chosen delay period, use the [`Braze.disableDelayedInitialization()`](https://braze-inc.github.io/braze-android-sdk/kdoc/braze-android-sdk/com.braze/-braze/-companion/disable-delayed-initialization.html) method to manually initialize the SDK.
```java
Braze.disableDelayedInitialization(context);
```
```kotlin
Braze.disableDelayedInitialization(context)
```
### Step 5: Enable user session tracking
When you enable user session tracking, calls to `openSession()`, `closeSession()`,[`ensureSubscribedToInAppMessageEvents()`](https://braze-inc.github.io/braze-android-sdk/kdoc/braze-android-sdk/com.braze.ui.inappmessage/-braze-in-app-message-manager/ensure-subscribed-to-in-app-message-events.html), and `InAppMessageManager` registration can be handled automatically.
To register activity lifecycle callbacks, add the following code to the `onCreate()` method of your `Application` class.
```java
public class MyApplication extends Application {
@Override
public void onCreate() {
super.onCreate();
registerActivityLifecycleCallbacks(new BrazeActivityLifecycleCallbackListener());
}
}
```
```kotlin
class MyApplication : Application() {
override fun onCreate() {
super.onCreate()
registerActivityLifecycleCallbacks(BrazeActivityLifecycleCallbackListener())
}
}
```
For the list of available parameters, see [`BrazeActivityLifecycleCallbackListener`](https://braze-inc.github.io/braze-android-sdk/kdoc/braze-android-sdk/com.braze/-braze-activity-lifecycle-callback-listener/index.html).
## Testing session tracking
**Tip:**
You can also use the [SDK Debugger](https://www.braze.com/docs/developer_guide/debugging) to diagnose SDK issues.
If you experience issues while testing, enable [verbose logging](#android_enabling-logs), then use logcat to detect missing `openSession` and `closeSession` calls in your activities.
1. In Braze, go to **Overview**, select your app, then in the **Display Data For** dropdown choose **Today**.

2. Open your app, then refresh the Braze dashboard. Verify that your metrics have increased by 1.
3. Navigate through your app and verify that only one session has been logged to Braze.
4. Send the app to the background for at least 10 seconds, then bring it to the foreground. Verify that a new session was logged.
## Optional configurations
### Runtime configuration
To set your Braze options in code rather than your `braze.xml` file, use [runtime configuration](https://braze-inc.github.io/braze-android-sdk/kdoc/braze-android-sdk/com.braze/-braze/-companion/configure.html). If a value exists in both places, the runtime value will be used instead. After all required settings are supplied at runtime, you can delete your `braze.xml` file.
In the following example, a [builder object](https://braze-inc.github.io/braze-android-sdk/kdoc/braze-android-sdk/com.braze.configuration/-braze-config/-builder/index.html) is created and then passed to [`Braze.configure()`](https://braze-inc.github.io/braze-android-sdk/kdoc/braze-android-sdk/com.braze/-braze/-companion/configure.html). Note that only some of the available runtime options are shown—refer to our [KDoc](https://braze-inc.github.io/braze-android-sdk/kdoc/braze-android-sdk/com.braze.configuration/-braze-config/-builder/index.html) for the full list.
```java
BrazeConfig brazeConfig = new BrazeConfig.Builder()
.setApiKey("api-key-here")
.setCustomEndpoint("YOUR_CUSTOM_ENDPOINT_OR_CLUSTER")
.setSessionTimeout(60)
.setHandlePushDeepLinksAutomatically(true)
.setGreatNetworkDataFlushInterval(10)
.build();
Braze.configure(this, brazeConfig);
```
```kotlin
val brazeConfig = BrazeConfig.Builder()
.setApiKey("api-key-here")
.setCustomEndpoint("YOUR_CUSTOM_ENDPOINT_OR_CLUSTER")
.setSessionTimeout(60)
.setHandlePushDeepLinksAutomatically(true)
.setGreatNetworkDataFlushInterval(10)
.build()
Braze.configure(this, brazeConfig)
```
**Tip:**
Looking for another example? Check out our [Hello Braze sample app](https://github.com/braze-inc/braze-android-sdk/blob/master/samples/hello-braze/src/main/java/com/braze/helloworld/CustomApplication.java).
### Google Advertising ID
The [Google Advertising ID (GAID)](https://support.google.com/googleplay/android-developer/answer/6048248/advertising-id?hl=en) is an optional user-specific, anonymous, unique, and resettable ID for advertising, provided by Google Play services. GAID gives users the power to reset their identifier, opt-out of interest-based ads within Google Play apps, and provides developers with a simple, standard system to continue to monetize their apps.
The Google Advertising ID is not automatically collected by the Braze SDK and must be set manually via the [`Braze.setGoogleAdvertisingId()`](https://braze-inc.github.io/braze-android-sdk/kdoc/braze-android-sdk/com.braze/-i-braze/set-google-advertising-id.html) method.
```java
new Thread(new Runnable() {
@Override
public void run() {
try {
AdvertisingIdClient.Info idInfo = AdvertisingIdClient.getAdvertisingIdInfo(getApplicationContext());
Braze.getInstance(getApplicationContext()).setGoogleAdvertisingId(idInfo.getId(), idInfo.isLimitAdTrackingEnabled());
} catch (Exception e) {
e.printStackTrace();
}
}
}).start();
```
```kotlin
suspend fun fetchAndSetAdvertisingId(
context: Context,
scope: CoroutineScope = GlobalScope
) {
scope.launch(Dispatchers.IO) {
try {
val idInfo = AdvertisingIdClient.getAdvertisingIdInfo(context)
Braze.getInstance(context).setGoogleAdvertisingId(
idInfo.id,
idInfo.isLimitAdTrackingEnabled
)
} catch (e: Exception) {
e.printStackTrace()
}
}
}
```
**Important:**
Google requires the Advertising ID to be collected on a non-UI thread.
### Location tracking
To enable Braze location collection, set `com_braze_enable_location_collection` to `true` in your `braze.xml` file:
```xml
true
```
**Important:**
Starting with Braze Android SDK version 3.6.0, Braze location collection is disabled by default.
### Logging
By default, the Braze Android SDK log level is set to `INFO`. You can [suppress these logs](#android_suppressing-logs) or [set a different log level](#android_enabling-logs), such as `VERBOSE`, `DEBUG`, or `WARN`.
#### Enabling logs
To help troubleshoot issues in your app, or reduce turnaround times with Braze Support, you can enable verbose logs for the SDK. When you send verbose logs to Braze Support, ensure they begin as soon as you launch your application and end far after your issue occurs. For a centralized overview, see [Verbose logging](https://www.braze.com/docs/developer_guide/sdk_integration/verbose_logging). To learn how to interpret log output, see [Reading verbose logs](https://www.braze.com/docs/developer_guide/sdk_integration/reading_verbose_logs).
Keep in mind, verbose logs are only intended for your development environment, so you'll want to disable them before releasing your app.
**Important:**
Enable verbose logs before any other calls in `Application.onCreate()` to ensure your logs are as complete as possible.
To enable logs directly in your app, add the following to your application's `onCreate()` method before any other methods.
```java
BrazeLogger.setLogLevel(Log.MIN_LOG_LEVEL);
```
```kotlin
BrazeLogger.logLevel = Log.MIN_LOG_LEVEL
```
Replace `MIN_LOG_LEVEL` with the **Constant** of the log level you'd like to set as your minimum log level. Any logs at a level `>=` to your set `MIN_LOG_LEVEL` will be forwarded to Android's default [`Log`](https://developer.android.com/reference/android/util/Log) method. Any logs `<` your set `MIN_LOG_LEVEL` will be discarded.
| Constant | Value | Description |
|-------------|----------------|---------------------------------------------------------------------------|
| `VERBOSE` | 2 | Logs the most detailed messages for debugging and development. |
| `DEBUG` | 3 | Logs descriptive messages for debugging and development. |
| `INFO` | 4 | Logs informational messages for general highlights. |
| `WARN` | 5 | Logs warning messages for identifying potentially harmful situations. |
| `ERROR` | 6 | Logs error messages for indicating application failure or serious issues. |
| `ASSERT` | 7 | Logs assertion messages when conditions are false during development. |
{: .reset-td-br-1 .reset-td-br-2 .reset-td-br-3 role="presentation" }
For example, the following code will forward log levels `2`, `3`, `4`, `5`, `6`, and `7` to the `Log` method.
```java
BrazeLogger.setLogLevel(Log.VERBOSE);
```
```kotlin
BrazeLogger.logLevel = Log.VERBOSE
```
To enable logs in the `braze.xml`, add the following to your file:
```xml
MIN_LOG_LEVEL
```
Replace `MIN_LOG_LEVEL` with the **Value** of the log level you'd like to set as your minimum log level. Any logs at a level `>=` to your set `MIN_LOG_LEVEL` will be forwarded to Android's default [`Log`](https://developer.android.com/reference/android/util/Log) method. Any logs `<` your set `MIN_LOG_LEVEL` will be discarded.
| Constant | Value | Description |
|-------------|----------------|---------------------------------------------------------------------------|
| `VERBOSE` | 2 | Logs the most detailed messages for debugging and development. |
| `DEBUG` | 3 | Logs descriptive messages for debugging and development. |
| `INFO` | 4 | Logs informational messages for general highlights. |
| `WARN` | 5 | Logs warning messages for identifying potentially harmful situations. |
| `ERROR` | 6 | Logs error messages for indicating application failure or serious issues. |
| `ASSERT` | 7 | Logs assertion messages when conditions are false during development. |
{: .reset-td-br-1 .reset-td-br-2 .reset-td-br-3 role="presentation" }
For example, the following code will forward log levels `2`, `3`, `4`, `5`, `6`, and `7` to the `Log` method.
```xml
2
```
#### Verifying verbose logs
To verify that your logs are set to `VERBOSE`, check if `V/Braze` occurs somewhere in your logs. If it does, then verbose logs have been successfully enabled. For example:
```
2077-11-19 16:22:49.591 ? V/Braze v9.0.01 .bo.app.d3: Request started
```
#### Suppressing logs
To suppress all logs for the Braze Android SDK, set the log level to `BrazeLogger.SUPPRESS` in your application's `onCreate()` method _before_ any other methods.
```java
BrazeLogger.setLogLevel(BrazeLogger.SUPPRESS);
```
```kotlin
BrazeLogger.setLogLevel(BrazeLogger.SUPPRESS)
```
### Multiple API keys
The most common use case for multiple API keys is separating API keys for debug and release build variants.
To easily switch between multiple API keys in your builds, we recommend creating a separate `braze.xml` file for each relevant [build variant](https://developer.android.com/studio/build/build-variants.html). A build variant is a combination of build type and product flavor. By default, new Android projects are configured with [`debug` and `release` build types](https://developer.android.com/reference/tools/gradle-api/8.3/null/com/android/build/api/dsl/BuildType) and no product flavors.
For each relevant build variant, create a new `braze.xml` in the `src//res/values/` directory. When the build variant is compiled, it will use the new API key.
```xml
REPLACE_WITH_YOUR_BUILD_VARIANT_API_KEY
```
**Tip:**
To learn how to set up the API key in your code, see [Runtime configuration](https://www.braze.com/docs/developer_guide/sdk_initalization/?sdktab=android).
### Exclusive in-app message TalkBack
In adherence to the [Android accessibility guidelines](https://developer.android.com/guide/topics/ui/accessibility), the Braze Android SDK offers Android Talkback by default. To ensure that only the contents of in-app messages are read out loud—without including other screen elements like the app title bar or navigation—you can enable exclusive mode for TalkBack.
To enable exclusive mode for in-app messages:
```xml
true
```
```kotlin
val brazeConfigBuilder = BrazeConfig.Builder()
brazeConfigBuilder.setIsInAppMessageAccessibilityExclusiveModeEnabled(true)
Braze.configure(this, brazeConfigBuilder.build())
```
```java
BrazeConfig.Builder brazeConfigBuilder = new BrazeConfig.Builder()
brazeConfigBuilder.setIsInAppMessageAccessibilityExclusiveModeEnabled(true);
Braze.configure(this, brazeConfigBuilder.build());
```
### R8 and ProGuard
[Code shrinking](https://developer.android.com/build/shrink-code) configuration is automatically included with your Braze integration.
Client apps that obfuscate Braze code must store release mapping files for Braze to interpret stack traces. If you want to continue to keep all Braze code, add the following to your ProGuard file:
```
-keep class bo.app.** { *; }
-keep class com.braze.** { *; }
```
## Integrating the Swift SDK
You can integrate and customize the Braze Swift SDK using the Swift Package Manager (SPM), CocoaPods, or manual integration methods. For more information about the various SDK symbols, see [Braze Swift reference documentation](https://braze-inc.github.io/braze-swift-sdk/documentation/brazekit/).
### Prerequisites
Before you start, verify your environment is supported by the [latest Braze Swift SDK version](https://github.com/braze-inc/braze-swift-sdk#version-information).
### Step 1: Install the Braze Swift SDK
We recommend using the [Swift Package Manager (SwiftPM)](https://swift.org/package-manager/) or [CocoaPods](http://cocoapods.org/) to install the Braze Swift SDK. Alternatively, you can install the SDK manually.
#### Step 1.1: Import SDK version
Open your project and navigate to your project's settings. Select the **Swift Packages** tab and click on the add button below the packages list.

**Note:**
Starting in version 7.4.0, the Braze Swift SDK has additional distribution channels as [static XCFrameworks](https://github.com/braze-inc/braze-swift-sdk-prebuilt-static) and [dynamic XCFrameworks](https://github.com/braze-inc/braze-swift-sdk-prebuilt-dynamic). If you'd like to use either of these formats instead, follow the installation instructions from its respective repository.
Enter the URL of our iOS Swift SDK repository `https://github.com/braze-inc/braze-swift-sdk` in the text field. Under the **Dependency Rule** section, select the SDK version. Finally, click **Add Package**.

#### Step 1.2: Select your packages
The Braze Swift SDK separates features into standalone libraries to provide developers with more control over which features to import into their projects.
| Package | Details |
| --------------- | --------------------------------------------------------------------------------------------------------------------------------------------------------------- |
| `BrazeKit` | Main SDK library providing support for analytics and push notifications. |
| `BrazeLocation` | Location library providing support for location analytics and geofence monitoring. |
| `BrazeUI` | Braze-provided user interface library for in-app messages, Content Cards, and Banners. Import this library if you intend to use the default UI components. |
{: .ws-td-nw-1}
##### About Extension libraries
**Warning:**
[BrazeNotificationService](https://braze-inc.github.io/braze-swift-sdk/tutorials/braze/b2-rich-push-notifications) and [BrazePushStory](https://braze-inc.github.io/braze-swift-sdk/tutorials/braze/b3-push-stories) are extension modules that provide additional functionality and should not be added directly to your main application target. Instead follow the linked guides to integrate them separately into their respective target extensions.
| Package | Details |
| -------------------------- | ------------------------------------------------------------------------------------- |
| `BrazeNotificationService` | Notification service extension library providing support for rich push notifications. |
| `BrazePushStory` | Notification content extension library providing support for Push Stories. |
{: .ws-td-nw-1}
Select the package that best suits your needs and click **Add Package**. Make sure you select `BrazeKit` at a minimum.

#### Step 1.1: Install CocoaPods
For a full walkthrough, see CocoaPods' [Getting Started Guide](https://guides.cocoapods.org/using/getting-started.html). Otherwise, you can run the following command to get started quickly:
```bash
$ sudo gem install cocoapods
```
If you get stuck, checkout CocoaPods' [Troubleshooting Guide](http://guides.cocoapods.org/using/troubleshooting.html).
#### Step 1.2: Constructing the Podfile
Next, create a file in your Xcode project directory named `Podfile`.
**Note:**
Starting in version 7.4.0, the Braze Swift SDK has additional distribution channels as [static XCFrameworks](https://github.com/braze-inc/braze-swift-sdk-prebuilt-static) and [dynamic XCFrameworks](https://github.com/braze-inc/braze-swift-sdk-prebuilt-dynamic). If you'd like to use either of these formats instead, follow the installation instructions from its respective repository.
Add the following line to your Podfile:
```
target 'YourAppTarget' do
pod 'BrazeKit'
end
```
`BrazeKit` contains the main SDK library, providing support for analytics and push notifications.
We suggest you version Braze so pod updates automatically grab anything smaller than a minor version update. This looks like `pod 'BrazeKit' ~> Major.Minor.Build`. If you want to automatically integrate the latest Braze SDK version, even with major changes, you can use `pod 'BrazeKit'` in your Podfile.
##### About additional libraries
The Braze Swift SDK separates features into standalone libraries to provide developers with more control over which features to import into their projects. In addition to `BrazeKit`, you may add the following libraries to your Podfile:
| Library | Details |
| --------------------- | --------------------------------------------------------------------------------------------------------------------------------------------------------------- |
| `pod 'BrazeLocation'` | Location library providing support for location analytics and geofence monitoring. |
| `pod 'BrazeUI'` | Braze-provided user interface library for in-app messages, Content Cards, and Banners. Import this library if you intend to use the default UI components. |
{: .ws-td-nw-1}
###### Extension libraries
[BrazeNotificationService](https://braze-inc.github.io/braze-swift-sdk/tutorials/braze/b2-rich-push-notifications) and [BrazePushStory](https://braze-inc.github.io/braze-swift-sdk/tutorials/braze/b3-push-stories) are extension modules that provide additional functionality and should not be added directly to your main application target. Instead, you will need to create separate extension targets for each of these modules and import the Braze modules into their corresponding targets.
| Library | Details |
| -------------------------------- | ------------------------------------------------------------------------------------- |
| `pod 'BrazeNotificationService'` | Notification service extension library providing support for rich push notifications. |
| `pod 'BrazePushStory'` | Notification content extension library providing support for Push Stories. |
{: .ws-td-nw-1}
#### Step 1.3: Install the SDK
To install the Braze SDK CocoaPod, navigate to the directory of your Xcode app project within your terminal and run the following command:
```
pod install
```
At this point, you should be able to open the new Xcode project workspace created by CocoaPods. Make sure to use this Xcode workspace instead of your Xcode project.

#### Updating the SDK using CocoaPods
To update a CocoaPod, simply run the following command within your project directory:
```
pod update
```
#### Step 1.1: Download the Braze SDK
Go to the [Braze SDK release page on GitHub](https://github.com/braze-inc/braze-swift-sdk/releases), then download `braze-swift-sdk-prebuilt.zip`.

#### Step 1.2: Choose your frameworks
The Braze Swift SDK contains a variety of standalone XCFrameworks, which gives you the freedom to integrate the features you want—without needing to integrate them all. Reference the following table to choose your XCFrameworks:
| Package | Required? | Description |
| -------------------------- | --------- | ------------------------------------------------------------------------------------------------------------------------------------------------------------------------------------------------------------------------------------------------------------------------------------------------------------------------------------ |
| `BrazeKit` | Yes | Main SDK library that provides support for analytics and push notifications. |
| `BrazeLocation` | No | Location library that provides support for location analytics and geofence monitoring. |
| `BrazeUI` | No | Braze-provided user interface library for in-app messages, Content Cards, and Banners. Import this library if you intend to use the default UI components. |
| `BrazeNotificationService` | No | Notification service extension library that provides support for rich push notifications. Do not add this library directly to your main application target, instead [add the `BrazeNotificationService` library separately](https://braze-inc.github.io/braze-swift-sdk/tutorials/braze/b2-rich-push-notifications). |
| `BrazePushStory` | No | Notification content extension library that provides support for Push Stories. Do not add this library directly to your main application target, instead [add the `BrazePushStory` library separately](https://braze-inc.github.io/braze-swift-sdk/tutorials/braze/b3-push-stories). |
| `BrazeKitCompat` | No | Compatibility library containing all the `Appboy` and `ABK*` classes and methods that were available in the `Appboy-iOS-SDK` version 4.X.X. For usage details, refer to the minimal migration scenario in the [migration guide](https://braze-inc.github.io/braze-swift-sdk/documentation/braze/appboy-migration-guide/). |
| `BrazeUICompat` | No | Compatibility library containing all the `ABK*` classes and methods that were available in the `AppboyUI` library from `Appboy-iOS-SDK` version 4.X.X. For usage details, refer to the minimal migration scenario in the [migration guide](https://braze-inc.github.io/braze-swift-sdk/documentation/braze/appboy-migration-guide/). |
| `SDWebImage` | No | Dependency used only by `BrazeUICompat` in the minimal migration scenario. |
{: .ws-td-nw-1 .reset-td-br-1 .reset-td-br-2 role="presentation" }
#### Step 1.3: Prepare your files
Decide whether you want to use **Static** or **Dynamic** XCFrameworks, then prepare your files:
1. Create a temporary directory for your XCFrameworks.
2. In `braze-swift-sdk-prebuilt`, open the `dynamic` directory and move `BrazeKit.xcframework` into your directory. Your directory should be similar to the following:
```bash
temp_dir
└── BrazeKit.xcframework
```
3. Move each of your [chosen XCFrameworks](#swift_step-2-choose-your-frameworks) into your temporary directory. Your directory should be similar to the following:
```bash
temp_dir
├── BrazeKit.xcframework
├── BrazeKitCompat.xcframework
├── BrazeLocation.xcframework
└── SDWebImage.xcframework
```
#### Step 1.4: Integrate your frameworks
Next, integrate the **Dynamic** or **Static** XCFrameworks you [prepared previously](#swift_step-3-prepare-your-files):
In your Xcode project, select your build target, then **General**. Under **Frameworks, Libraries, and Embedded Content**, drag and drop the [files you prepared previously](#swift_step-3-prepare-your-files).

**Note:**
Starting with the Swift SDK 12.0.0, you should always select **Embed & Sign** for the Braze XCFrameworks for both the static and dynamic variants. This ensures that the frameworks resources are properly embedded in your app bundle.
**Tip:**
To enable GIF support, add `SDWebImage.xcframework`, located in either `braze-swift-sdk-prebuilt/static` or `braze-swift-sdk-prebuilt/dynamic`.
#### Common errors for Objective-C projects
If your Xcode project only contains Objective-C files, you may get "missing symbol" errors when you try to build your project. To fix these errors, open your project and add an empty Swift file to your file tree. This will force your build toolchain to embed [Swift Runtime](https://support.apple.com/kb/dl1998) and link to the appropriate frameworks during build time.
```bash
FILE_NAME.swift
```
Replace `FILE_NAME` with any non-spaced string. Your file should look similar to the following:
```bash
empty_swift_file.swift
```
### Step 2: Set up delayed initialization (optional)
You can choose to delay when the Braze Swift SDK is initialized, which is useful if your app needs to load a configuration or wait for user consent before starting the SDK. Delayed initialization makes sure Braze push notifications and push tokens received before SDK initialization are enqueued and processed once the SDK is initialized.
To use delayed initialization, the minimum Braze SDK version is required:
#### Step 2.1: Prepare for delayed initialization
Call `Braze.prepareForDelayedInitialization()` as early as possible in your app's lifecycle, ideally in or before `application(_:didFinishLaunchingWithOptions:)`. This makes sure that push notifications received before the SDK is initialized are properly captured and processed later.
**Note:**
This only applies to push notifications from Braze. Other push notifications are handled normally by system delegates.
```swift
func application(_ application: UIApplication, didFinishLaunchingWithOptions launchOptions: [UIApplication.LaunchOptionsKey: Any]?) -> Bool {
// Prepare the SDK for delayed initialization
Braze.prepareForDelayedInitialization()
// ... Additional non-Braze setup code
return true
}
```
```swift
@main
struct MyApp: App {
@UIApplicationDelegateAdaptor var appDelegate: AppDelegate
var body: some Scene {
WindowGroup {
ContentView()
}
}
}
class AppDelegate: NSObject, UIApplicationDelegate {
func application(_ application: UIApplication, didFinishLaunchingWithOptions launchOptions: [UIApplication.LaunchOptionsKey : Any]? = nil) -> Bool {
// Prepare the SDK for delayed initialization
Braze.prepareForDelayedInitialization()
// ... Additional non-Braze setup code
return true
}
}
```
```objc
- (BOOL)application:(UIApplication *)application didFinishLaunchingWithOptions:(NSDictionary *)launchOptions {
// Prepare the SDK for delayed initialization
[Braze prepareForDelayedInitialization];
// ... Additional non-Braze setup code
return YES;
}
```
When using delayed initialization, push notification automation is implicitly enabled. You can [customize the push automation](#swift_step-23-customize-push-automation-optional) configuration by passing a `pushAutomation` parameter.
#### Step 2.2: Configure push analytics behavior (optional)
When delayed initialization is enabled, push analytics are queued by default. However, you can choose to explicitly queue or drop push analytics instead.
##### Explicitly queue
To explicitly queue push analytics (default behavior), pass `.queue` to the `analyticsBehavior` parameter. Push analytics events that are queued prior to initialization will be processed and flushed to the server upon initialization.
```swift
Braze.prepareForDelayedInitialization(analyticsBehavior: .queue)
```
```objc
[Braze prepareForDelayedInitializationWithAnalyticsBehavior:BRZPushEnqueueBehaviorQueue];
```
##### Drop
To drop push analytics received before SDK initialization, pass `.drop` to the `analyticsBehavior` parameter. With this option, any push analytics event that occurs while the SDK is not initialized will be ignored.
```swift
Braze.prepareForDelayedInitialization(analyticsBehavior: .drop)
```
```objc
[Braze prepareForDelayedInitializationWithAnalyticsBehavior:BRZPushEnqueueBehaviorDrop];
```
#### Step 2.3: Customize push automation (optional)
You can customize the push automation configuration by passing a `pushAutomation` parameter. By default, all automation features are enabled except `requestAuthorizationAtLaunch`.
```swift
// Enable all push automation
featuresBraze.prepareForDelayedInitialization(pushAutomation: true)
// Or customize specific automation options
let automation = Braze.Configuration.Push.Automation()
automation.automaticSetup = true
automation.requestAuthorizationAtLaunch = false
Braze.prepareForDelayedInitialization(pushAutomation: automation)
```
```objc
// Enable all push automation features
[Braze prepareForDelayedInitializationWithPushAutomation:[[BRZConfigurationPushAutomation alloc] initWithAutomationEnabled:YES]];
// Or customize specific automation options
BRZConfigurationPushAutomation *automation = [[BRZConfigurationPushAutomation alloc] init];
automation.automaticSetup = YES;
automation.requestAuthorizationAtLaunch = NO;
[Braze prepareForDelayedInitializationWithPushAutomation:automation analyticsBehavior:BRZPushEnqueueBehaviorQueue];
```
#### Step 2.4: Initialize the SDK
After your chosen delay period (for example, after fetching configuration from a server or after user consent), initialize the SDK as normal:
```swift
func initializeBraze() {
let configuration = Braze.Configuration(apiKey: "YOUR-API-KEY", endpoint: "YOUR-ENDPOINT")
// Enable push automation to match the delayed initialization configuration
configuration.push.automation = true
let braze = Braze(configuration: configuration)
// Store the Braze instance for later use
AppDelegate.braze = braze
}
```
```objc
- (void)initializeBraze {
BRZConfiguration *configuration = [[BRZConfiguration alloc] initWithApiKey:@"YOUR-API-KEY" endpoint:@"YOUR-ENDPOINT"];
// Enable push automation to match the delayed initialization configuration
configuration.push.automation = [[BRZConfigurationPushAutomation alloc] initWithAutomationEnabled:YES];
Braze *braze = [[Braze alloc] initWithConfiguration:configuration];
// Store the Braze instance for later use
AppDelegate.braze = braze;
}
```
**Note:**
When the SDK is initialized, all queued push notifications, push tokens, and deep links are automatically processed.
### Step 3: Update your app delegate
**Important:**
The following assumes you've already added an `AppDelegate` to your project (which are not generated by default) and you are not using the delayed initialization feature. If you don't plan on using an `AppDelegate`, be sure to initialize the Braze SDK as early as possible, like during the app's launch. If you are using the delayed initialization feature, refer to [Step 2.4](#swift_step-24-initialize-the-sdk) for initializing the SDK and ignore this step.
Add the following line of code to your `AppDelegate.swift` file to import the features included in the Braze Swift SDK:
```swift
import BrazeKit
```
Next, add a static property to your `AppDelegate` class to keep a strong reference to the Braze instance throughout your application's lifetime:
```swift
class AppDelegate: UIResponder, UIApplicationDelegate {
static var braze: Braze? = nil
}
```
Finally, in `AppDelegate.swift`, add the following snippet to your `application:didFinishLaunchingWithOptions:` method:
```swift
let configuration = Braze.Configuration(
apiKey: "YOUR-APP-IDENTIFIER-API-KEY",
endpoint: "YOUR-BRAZE-ENDPOINT"
)
let braze = Braze(configuration: configuration)
AppDelegate.braze = braze
```
Update `YOUR-APP-IDENTIFIER-API-KEY` and `YOUR-BRAZE-ENDPOINT` with the correct value from your **App Settings** page. Check out our [API identifier types](https://www.braze.com/docs/api/identifier_types/?tab=app%20ids) for more information on where to find your app identifier API key.
Add the following line of code to your `AppDelegate.m` file:
```objc
@import BrazeKit;
```
Next, add a static variable to your `AppDelegate.m` file to keep a reference to the Braze instance throughout your application's lifetime:
```objc
static Braze *_braze;
@implementation AppDelegate
+ (Braze *)braze {
return _braze;
}
+ (void)setBraze:(Braze *)braze {
_braze = braze;
}
@end
```
Finally, within your `AppDelegate.m` file, add the following snippet within your `application:didFinishLaunchingWithOptions:` method:
```objc
BRZConfiguration *configuration = [[BRZConfiguration alloc] initWithApiKey:"YOUR-APP-IDENTIFIER-API-KEY"
endpoint:"YOUR-BRAZE-ENDPOINT"];
Braze *braze = [[Braze alloc] initWithConfiguration:configuration];
AppDelegate.braze = braze;
```
Update `YOUR-APP-IDENTIFIER-API-KEY` and `YOUR-BRAZE-ENDPOINT` with the correct value from your **Manage Settings** page. Check out our [API documentation](https://www.braze.com/docs/api/api_key/#the-app-identifier-api-key) for more information on where to find your app identifier API key.
## Optional configurations
### Logging
For a centralized overview across all platforms, see [Verbose logging](https://www.braze.com/docs/developer_guide/sdk_integration/verbose_logging). To learn how to interpret log output, see [Reading verbose logs](https://www.braze.com/docs/developer_guide/sdk_integration/reading_verbose_logs).
#### Log levels
The default log level for the Braze Swift SDK is `.error`—it's also the minimum supported level when logs are enabled. These are the full list of log levels:
| Swift | Objective-C | Description |
| ----------- | ------------------------ | ------------------------------------------------------------ |
| `.debug` | `BRZLoggerLevelDebug` | Log debugging information + `.info` + `.error`. |
| `.info` | `BRZLoggerLevelInfo` | Log general SDK information (user changes, etc.) + `.error`. |
| `.error` | `BRZLoggerLevelError` | Log errors. |
| `.disabled` | `BRZLoggerLevelDisabled` | No logging occurs. |
{: .reset-td-br-1 .reset-td-br-2 .reset-td-br-3 role="presentation" }
#### Setting the log level
You can assign the log level at runtime in your `Braze.Configuration` object. For complete usage details, see [`Braze.Configuration.Logger`](https://braze-inc.github.io/braze-swift-sdk/documentation/brazekit/braze/configuration-swift.class/logger-swift.class).
```swift
let configuration = Braze.Configuration(
apiKey: "",
endpoint: ""
)
// Enable logging of general SDK information (such as user changes, etc.)
configuration.logger.level = .info
let braze = Braze(configuration: configuration)
```
```objc
BRZConfiguration *configuration = [[BRZConfiguration alloc] initWithApiKey:self.APIKey
endpoint:self.apiEndpoint];
// Enable logging of general SDK information (such as user changes, etc.)
[configuration.logger setLevel:BRZLoggerLevelInfo];
Braze *braze = [[Braze alloc] initWithConfiguration:configuration];
```
## Integrating the Cordova SDK
### Prerequisites
Before you start, verify your environment is supported by the [latest Braze Cordova SDK version](https://github.com/braze-inc/braze-cordova-sdk?tab=readme-ov-file#minimum-version-requirements).
### Step 1: Add the SDK to your project
**Warning:**
Only add the Braze Cordova SDK using the methods below. Do not attempt to install using other methods as it could lead to a security breach.
If you're on Cordova 6 or later, you can add the SDK directly from GitHub. Alternatively, you can download a ZIP of the [GitHub repository](https://github.com/braze-inc/braze-cordova-sdk) and add the SDK manually.
If you don't plan on using location collection and geofences, use the `master` branch from GitHub.
```bash
cordova plugin add https://github.com/braze-inc/braze-cordova-sdk#master
```
If you plan on using location collection and geofences, use the `geofence-branch` from GitHub.
```bash
cordova plugin add https://github.com/braze-inc/braze-cordova-sdk#geofence-branch
```
**Tip:**
You can switch between `master` and `geofence-branch` at anytime by repeating this step.
### Step 2: Configure your project
Next, adding the following preferences to the `platform` element in your project's `config.xml` file.
```xml
```
```xml
```
Replace the following:
| Value | Description |
| --------------------- | -------------------------------------------------------------------------------------------------------------------------------- |
| `BRAZE_API_KEY` | Your [Braze REST API key](https://www.braze.com/docs/user_guide/administrative/app_settings/api_settings_tab/#rest-api-keys). |
| `CUSTOM_API_ENDPOINT` | A custom API endpoint. This endpoint is used to route your Braze instance data to the correct App Group in your Braze dashboard. |
{: .reset-td-br-1 .reset-td-br-2 role="presentation"}
The `platform` element in your `config.xml` file should be similar to the following:
```xml
```
```xml
```
## Platform-specific syntax
The following section covers the platform-specific syntax when using Cordova with iOS or Android.
### Integers
Integer preferences are read as string representations, like in the following example:
```xml
```
Due to how the Cordova 8.0.0+ framework handles preferences, integer-only preferences (such as sender IDs) must be set to strings prepended with `str_`, like in the following example:
```xml
```
### Booleans
Boolean preferences are read by the SDK using `YES` and `NO` keywords as a string representation, like in the following example:
```xml
```
Boolean preferences are read by the SDK using `true` and `false` keywords as a string representation, like in the following example:
```xml
```
## Optional configurations {#optional}
You can add any of the following preferences to the `platform` element in your project's `config.xml` file:
| Method | Description |
| ------------------------------------------------- | ----------------------------------------------------------------------------------------------------------------------------------------------------------------------------------------------------------------------------------------------------- |
| `ios_api_key` | Sets the API key for your application. |
| `ios_api_endpoint` | Sets the [SDK endpoint](https://www.braze.com/docs/api/basics/#endpoints) for your application. |
| `ios_disable_automatic_push_registration` | Sets whether automatic push registration should be disabled. |
| `ios_disable_automatic_push_handling` | Sets whether automatic push handling should be disabled. |
| `ios_enable_idfa_automatic_collection` | Sets whether the Braze SDK should automatically collect the IDFA information. For more information, see [the Braze IDFA method documentation](https://braze-inc.github.io/braze-swift-sdk/documentation/brazekit/braze/set(identifierforadvertiser:)/). |
| `enable_location_collection` | Sets whether the automatic location collection is enabled (if the user permits). The `geofence-branch` |
| `geofences_enabled` | Sets whether geofences are enabled. |
| `ios_session_timeout` | Sets the Braze session timeout for your application in seconds. Defaults to 10 seconds. |
| `sdk_authentication_enabled` | Sets whether to enable the [SDK Authentication](https://www.braze.com/docs/developer_guide/platform_wide/sdk_authentication#sdk-authentication) feature. |
| `display_foreground_push_notifications` | Sets whether push notifications should be displayed while the application is in the foreground. |
| `ios_disable_un_authorization_option_provisional` | Sets whether `UNAuthorizationOptionProvisional` should be disabled. |
| `trigger_action_minimum_time_interval_seconds` | Sets the minimum time interval in seconds between triggers. Defaults to 30 seconds. |
| `ios_push_app_group` | Sets the app group ID for iOS push extensions. |
| `ios_forward_universal_links` | Sets whether the SDK automatically recognizes and forwards universal links to the system methods. Required for deep links from push notifications to work on iOS. Defaults to disabled. |
| `ios_log_level` | Sets the minimum logging level for `Braze.Configuration.Logger`. |
| `ios_use_uuid_as_device_id` | Sets if a randomly generated UUID should be used as the device ID. |
| `ios_flush_interval_seconds` | Sets the interval in seconds between automatic data flushes. Defaults to 10 seconds. |
| `ios_use_automatic_request_policy` | Sets whether the request policy for `Braze.Configuration.Api` should be automatic or manual. |
| `should_opt_in_when_push_authorized` | Sets if a user’s notification subscription state should automatically be set to `optedIn` when push permissions are authorized. |
{: .reset-td-br-1 .reset-td-br-2 role="presentation"}
**Tip:**
For more detailed information, see [GitHub: Braze iOS Cordova plugin](https://github.com/braze-inc/braze-cordova-sdk/blob/master/src/ios/BrazePlugin.m).
| Method | Description |
| ----------------------------------------------------------------- | --------------------------------------------------------------------------------------------------------------------------------------------------------------------------------------------- |
| `android_api_key` | Sets the API key for your application. |
| `android_api_endpoint` | Sets the [SDK endpoint](https://www.braze.com/docs/api/basics/#endpoints) for your application. |
| `android_small_notification_icon` | Sets the notification small icon. |
| `android_large_notification_icon` | Sets the notification large icon. |
| `android_notification_accent_color` | Sets the notification accent color using a hexadecimal representation. |
| `android_default_session_timeout` | Sets the Braze session timeout for your application in seconds. Defaults to 10 seconds. |
| `android_handle_push_deep_links_automatically` | Sets whether the Braze SDK automatically handles push deep links. Required for deep links from push notifications to work on Android. Defaults to disabled. |
| `android_log_level` | Sets the log level for your application. The default log level is 4 and will minimally log info. To enable verbose logging for debugging, use log level 2. |
| `firebase_cloud_messaging_registration_enabled` | Sets whether to use Firebase Cloud Messaging for push notifications. |
| `android_fcm_sender_id` | Sets the Firebase Cloud Messaging sender ID. |
| `enable_location_collection` | Sets whether the automatic location collection is enabled (if the user permits). |
| `geofences_enabled` | Sets whether geofences are enabled. |
| `android_disable_auto_session_tracking` | Disable the Android Cordova plugin from automatically tracking sessions. For more information, see [Disabling automatic session tracking](#cordova_disable-automatic-session-tracking) |
| `sdk_authentication_enabled` | Sets whether to enable the [SDK Authentication](https://www.braze.com/docs/developer_guide/platform_wide/sdk_authentication#sdk-authentication) feature. |
| `trigger_action_minimum_time_interval_seconds` | Sets the minimum time interval in seconds between triggers. Defaults to 30 seconds. |
| `is_session_start_based_timeout_enabled` | Sets whether the session timeout behavior to be based either on session start or session end events. |
| `default_notification_channel_name` | Sets the user-facing name as seen via `NotificationChannel.getName` for the Braze default `NotificationChannel`. |
| `default_notification_channel_description` | Sets the user-facing description as seen via `NotificationChannel.getDescription` for the Braze default `NotificationChannel`. |
| `does_push_story_dismiss_on_click` | Sets whether a Push Story is automatically dismissed when clicked. |
| `is_fallback_firebase_messaging_service_enabled` | Sets whether the use of a fallback Firebase Cloud Messaging Service is enabled. |
| `fallback_firebase_messaging_service_classpath` | Sets the classpath for the fallback Firebase Cloud Messaging Service. |
| `is_content_cards_unread_visual_indicator_enabled` | Sets whether the Content Cards unread visual indication bar is enabled. |
| `is_firebase_messaging_service_on_new_token_registration_enabled` | Sets whether the Braze SDK will automatically register tokens in `com.google.firebase.messaging.FirebaseMessagingService.onNewToken`. |
| `is_push_deep_link_back_stack_activity_enabled` | Sets whether Braze will add an activity to the back stack when automatically following deep links for push. |
| `push_deep_link_back_stack_activity_class_name` | Sets the activity that Braze will add to the back stack when automatically following deep links for push. |
| `should_opt_in_when_push_authorized` | Sets if Braze should automatically opt-in the user when push is authorized. |
{: .reset-td-br-1 .reset-td-br-2 role="presentation"}
**Tip:**
For more detailed information, see [GitHub: Braze Android Cordova plugin](https://github.com/braze-inc/braze-cordova-sdk/blob/master/src/android/BrazePlugin.kt).
The following is an example `config.xml` file with additional configurations:
```xml
```
```xml
```
## Disabling automatic session tracking (Android only) {#disable-automatic-session-tracking}
By default, the Android Cordova plugin automatically tracks sessions. To disable automatic session tracking, add the following preference to the `platform` element in your project's `config.xml` file:
```xml
```
To start tracking sessions again, call `BrazePlugin.startSessionTracking()`. Keep in mind, only sessions started after the next `Activity.onStart()` will be tracked.
## About the Flutter Braze SDK
After you integrate the Braze Flutter SDK on Android and iOS, you'll be able to use the Braze API within your [Flutter apps](https://flutter.dev/) written in Dart. This plugin provides basic analytics functionality and lets you integrate in-app messages and Content Cards for both iOS and Android with a single codebase.
## Integrating the Flutter SDK
### Prerequisites
Before you integrate the Braze Flutter SDK, you'll need to complete the following:
| Prerequisite | Description |
| --- | --- |
| Braze API app identifier | To locate your app's identifier, go to **Settings** > **APIs and Identifiers** > **App Identifiers**. For more information see, [API Identifier Types](https://www.braze.com/docs/api/identifier_types/#app-identifier).|
| Braze REST endpoint | Your REST endpoint URL. Your endpoint will depend on the [Braze URL for your instance](https://www.braze.com/docs/developer_guide/rest_api/basics/#endpoints).|
| Flutter SDK | Install the official [Flutter SDK](https://docs.flutter.dev/get-started/install) and ensure it meets the Braze Flutter SDK's [minimum supported version](https://github.com/braze-inc/braze-flutter-sdk#requirements). |
{: .reset-td-br-1 .reset-td-br-2 role="presentation" }
### Step 1: Integrate the Braze library
Add the Braze Flutter SDK package from the command line. This will add the appropriate line to your `pubspec.yaml`.
```bash
flutter pub add braze_plugin
```
### Step 2: Complete native SDK setup
To connect to Braze servers, create a `braze.xml` file in your project's `android/res/values` folder. Paste the following code and replace the API identifier key and endpoint with your values:
```xml
YOUR_APP_IDENTIFIER_API_KEYYOUR_CUSTOM_ENDPOINT_OR_CLUSTER
```
Add the required permissions to your `AndroidManifest.xml` file:
```xml
```
Add Braze SDK import at the top of the `AppDelegate.swift` file:
```swift
import BrazeKit
import braze_plugin
```
In the same file, create the Braze configuration object in the `application(_:didFinishLaunchingWithOptions:)` method and replace the API key and endpoint with your app's values. Then, create the Braze instance using the configuration, and create a static property on the `AppDelegate` for easy access:
```swift
static var braze: Braze? = nil
override func application(
_ application: UIApplication,
didFinishLaunchingWithOptions launchOptions: [UIApplication.LaunchOptionsKey : Any]? = nil
) -> Bool {
// Setup Braze
let configuration = Braze.Configuration(
apiKey: "",
endpoint: ""
)
// - Enable logging or customize configuration here
configuration.logger.level = .info
let braze = BrazePlugin.initBraze(configuration)
AppDelegate.braze = braze
return true
}
```
Import `BrazeKit` at the top of the `AppDelegate.m` file:
```objc
@import BrazeKit;
```
In the same file, create the Braze configuration object in the `application:didFinishLaunchingWithOptions:` method and replace the API key and endpoint with your app's values. Then, create the Braze instance using the configuration, and create a static property on the `AppDelegate` for easy access:
```objc
- (BOOL)application:(UIApplication *)application
didFinishLaunchingWithOptions:(NSDictionary *)launchOptions {
// Setup Braze
BRZConfiguration *configuration =
[[BRZConfiguration alloc] initWithApiKey:@""
endpoint:@""];
// - Enable logging or customize configuration here
configuration.logger.level = BRZLoggerLevelInfo;
Braze *braze = [BrazePlugin initBraze:configuration];
AppDelegate.braze = braze;
[self.window makeKeyAndVisible];
return YES;
}
#pragma mark - AppDelegate.braze
static Braze *_braze = nil;
+ (Braze *)braze {
return _braze;
}
+ (void)setBraze:(Braze *)braze {
_braze = braze;
}
```
### Step 3: Set up the plugin
To import the plugin into your Dart code, use the following:
```dart
import 'package:braze_plugin/braze_plugin.dart';
```
Then, initialize an instance of the Braze plugin by calling `new BrazePlugin()` like in [our sample app](https://github.com/braze-inc/braze-flutter-sdk/blob/master/example/lib/main.dart).
**Important:**
To avoid undefined behaviors, only allocate and use a single instance of the `BrazePlugin` in your Dart code.
## Testing the integration
You can verify that the SDK is integrated by checking session statistics in the dashboard. If you run your application on either platform, you should see a new session in dashboard (in the **Overview** section).
Open a session for a particular user by calling the following code in your app.
```dart
BrazePlugin braze = BrazePlugin();
braze.changeUser("{some-user-id}");
```
Search for the user with `{some-user-id}` in the dashboard under **Audience** > **Search Users**. There, you can verify that session and device data have been logged.
## About the React Native Braze SDK
Integrating the React Native Braze SDK provides basic analytics functionality and lets you integrate in-app messages and Content Cards for both iOS and Android with just one codebase.
## New Architecture compatibility
The following minimum SDK version is compatible with all apps using [React Native's New Architecture](https://reactnative.dev/docs/the-new-architecture/landing-page):
Starting with SDK version 6.0.0, Braze uses a React Native Turbo Module, which is compatible with both the New Architecture and legacy bridge architecture—meaning no additional setup is required.
**Warning:**
If your iOS app conforms to `RCTAppDelegate` and follows our previous `AppDelegate` setup, review the samples in [Complete native setup](#reactnative_step-2-complete-native-setup) to prevent any crashes from occurring when subscribing to events in the Turbo Module.
## Integrating the React Native SDK
### Prerequisites
To integrate the SDK, React Native version 0.71 or later is required. For the full list of supported versions, see our [React Native SDK GitHub repository](https://github.com/braze-inc/braze-react-native-sdk?tab=readme-ov-file#version-support).
### Step 1: Integrate the Braze library
```bash
npm install @braze/react-native-sdk
```
```bash
yarn add @braze/react-native-sdk
```
### Step 2: Choose a setup option
You can manage the Braze SDK using the Braze Expo plugin or through one of the native layers. With the Expo plugin, you can configure certain SDK features without writing code in any of the native layers. Choose whichever option best meets your app's needs.
#### Step 2.1: Install the Braze Expo plugin
Ensure that your version of the Braze React Native SDK is at least 1.37.0. For the full list of supported versions, check out the [Braze React Native repository](https://github.com/braze-inc/braze-expo-plugin?tab=readme-ov-file#version-support).
To install the Braze Expo plugin, run the following command:
```bash
npx expo install @braze/expo-plugin
```
#### Step 2.2: Add the plugin to your app.json
In your `app.json`, add the Braze Expo Plugin. You can provide the following configuration options:
| Method | Type | Description |
| --------------------------------------------- | ------- | -------------------------------------------------------------------------------------------------------------------------------------------------------- |
| `androidApiKey` | string | Required. The [API key](https://www.braze.com/docs/api/identifier_types/) for your Android application, located in your Braze dashboard under **Manage Settings**. |
| `iosApiKey` | string | Required. The [API key](https://www.braze.com/docs/api/identifier_types/) for your iOS application, located in your Braze dashboard under **Manage Settings**. |
| `baseUrl` | string | Required. The [SDK endpoint](https://www.braze.com/docs/api/basics/#endpoints) for your application, located in your Braze dashboard under **Manage Settings**. |
| `enableBrazeIosPush` | boolean | iOS only. Whether to use Braze to handle push notifications on iOS. Introduced in React Native SDK v1.38.0 and Expo Plugin v0.4.0. |
| `enableFirebaseCloudMessaging` | boolean | Android only. Whether to use Firebase Cloud Messaging for push notifications. Introduced in React Native SDK v1.38.0 and Expo Plugin v0.4.0. |
| `firebaseCloudMessagingSenderId` | string | Android only. Your Firebase Cloud Messaging sender ID. Introduced in React Native SDK v1.38.0 and Expo Plugin v0.4.0. |
| `sessionTimeout` | integer | The Braze session timeout for your application in seconds. |
| `enableSdkAuthentication` | boolean | Whether to enable the [SDK Authentication](https://www.braze.com/docs/developer_guide/platform_wide/sdk_authentication#sdk-authentication) feature. |
| `logLevel` | integer | The log level for your application. The default log level is 8 and minimally logs info. To enable verbose logging for debugging, use log level 0. |
| `minimumTriggerIntervalInSeconds` | integer | The minimum time interval in seconds between triggers. Defaults to 30 seconds. |
| `enableAutomaticLocationCollection` | boolean | Whether automatic location collection is enabled (if the user permits). |
| `enableGeofence` | boolean | Whether geofences are enabled. |
| `enableAutomaticGeofenceRequests` | boolean | Whether geofence requests should be made automatically. |
| `dismissModalOnOutsideTap` | boolean | iOS only. Whether a modal in-app message is dismissed when the user clicks outside of the in-app message. |
| `androidHandlePushDeepLinksAutomatically` | boolean | Android only. Whether the Braze SDK should automatically handle push deep links. |
| `androidPushNotificationHtmlRenderingEnabled` | boolean | Android only. Sets whether the text content in a push notification should be interpreted and rendered as HTML using `android.text.Html.fromHtml`. |
| `androidNotificationAccentColor` | string | Android only. Sets the Android notification accent color. |
| `androidNotificationLargeIcon` | string | Android only. Sets the Android notification large icon. |
| `androidNotificationSmallIcon` | string | Android only. Sets the Android notification small icon. |
| `iosRequestPushPermissionsAutomatically` | boolean | iOS only. Whether the user should automatically be prompted for push permissions on app launch. |
| `enableBrazeIosRichPush` | boolean | iOS only. Whether to enable rich push features for iOS. |
| `enableBrazeIosPushStories` | boolean | iOS only. Whether to enable Braze Push Stories for iOS. |
| `iosPushStoryAppGroup` | string | iOS only. The app group used for iOS Push Stories. |
| `iosUseUUIDAsDeviceId` | boolean | iOS only. Whether the device ID will use a randomly generated UUID. |
| `iosForwardUniversalLinks` | boolean | iOS only. Specifies if the SDK should automatically recognize and forward universal links to the system methods (default: `false`). When enabled, the SDK will automatically forward universal links to the system methods defined in [Supporting universal links in your app](https://braze-inc.github.io/braze-swift-sdk/documentation/brazekit/braze/configuration-swift.class/forwarduniversallinks/). Introduced in React Native SDK v11.1.0 and Expo Plugin v3.2.0. |
{: .reset-td-br-1 .reset-td-br-2 .reset-td-br-3 role="presentation" }
Example configuration:
```json
{
"expo": {
"plugins": [
[
"@braze/expo-plugin",
{
"androidApiKey": "YOUR-ANDROID-API-KEY",
"iosApiKey": "YOUR-IOS-API-KEY",
"baseUrl": "YOUR-SDK-ENDPOINT",
"sessionTimeout": 60,
"enableGeofence": false,
"enableBrazeIosPush": false,
"enableFirebaseCloudMessaging": false,
"firebaseCloudMessagingSenderId": "YOUR-FCM-SENDER-ID",
"androidHandlePushDeepLinksAutomatically": true,
"enableSdkAuthentication": false,
"logLevel": 0,
"minimumTriggerIntervalInSeconds": 0,
"enableAutomaticLocationCollection": false,
"enableAutomaticGeofenceRequests": false,
"dismissModalOnOutsideTap": true,
"androidPushNotificationHtmlRenderingEnabled": true,
"androidNotificationAccentColor": "#ff3344",
"androidNotificationLargeIcon": "@drawable/custom_app_large_icon",
"androidNotificationSmallIcon": "@drawable/custom_app_small_icon",
"iosRequestPushPermissionsAutomatically": false,
"enableBrazeIosPushStories": true,
"iosPushStoryAppGroup": "group.com.example.myapp.PushStories",
"iosForwardUniversalLinks": false
}
],
]
}
}
```
##### Configuring Android push notification icons {#android-push-icons}
When using `androidNotificationLargeIcon` and `androidNotificationSmallIcon`, follow these best practices for proper icon display:
###### Icon placement and format
To use custom push notification icons with the Braze Expo plugin:
1. Create your icon files following Android's requirements as detailed in [Icon requirements](#icon-requirements).
2. Place them in your project's Android native directories at `android/app/src/main/res/drawable-/` (for example, `android/app/src/main/res/drawable-mdpi/`, `drawable-hdpi/`, or similar.)
3. Alternatively, if you're managing assets in your React Native directory, you can use Expo's [app.json icon configuration](https://docs.expo.dev/versions/latest/config/app/#icon) or create an [Expo config plugin](https://docs.expo.dev/config-plugins/introduction/) to copy the icons to the Android drawable folders during prebuild.
The Braze Expo plugin references these icons using Android's drawable resource system.
###### Icon requirements
- **Small icon:** Must be a white silhouette on a transparent background (this is an Android platform requirement)
- **Large icon:** Can be a full-color image
- **Format:** PNG format is recommended
- **Naming:** Use lowercase letters, numbers, and underscores only (for example, `my_large_icon.png`)
###### Configuration in app.json
Use the `@drawable/` prefix followed by the filename _without_ the file extension. For example, if your icon file is named `large_icon.png`, reference it as `@drawable/large_icon`:
```json
{
"expo": {
"plugins": [
[
"@braze/expo-plugin",
{
"androidNotificationLargeIcon": "@drawable/large_icon",
"androidNotificationSmallIcon": "@drawable/small_icon"
}
]
]
}
}
```
**Important:**
Do not use relative file paths (such as `src/assets/images/icon.png`) or include the file extension when referencing icons. The Expo plugin requires the `@drawable/` prefix to properly locate the icons in the Android native folders after the prebuild process.
###### How it works
The Braze Expo plugin references your icon files from the Android `drawable` directories. When you run `npx expo prebuild`, Expo generates the native Android project structure. Your icons must be present in the Android `drawable` folders (either placed manually or copied through a config plugin) before the build process. The plugin then configures the Braze SDK to use these drawable resources by their names (without path or extension), which is why the `@drawable/` prefix is required in your configuration.
For more information on Android notification icons, see [Android's notification icon guidelines](https://developer.android.com/develop/ui/views/notifications#icon).
#### Step 2.3: Build and run your application
Prebuilding your application generates the native files necessary for the Braze Expo plugin to work.
```bash
npx expo prebuild
```
Run your application as specified in the [Expo docs](https://docs.expo.dev/workflow/customizing/). Keep in mind, if you make any changes to the configuration options, you'll be required to prebuild and run the application again.
#### Step 2.1: Add our repository
In your top-level project `build.gradle`, add the following under `buildscript` > `dependencies`:
```groovy
buildscript {
dependencies {
...
// Choose your Kotlin version
classpath("org.jetbrains.kotlin:kotlin-gradle-plugin:1.8.10")
}
}
```
This adds Kotlin to your project.
#### Step 2.2: Configure the Braze SDK
To connect to Braze servers, create a `braze.xml` file in your project's `res/values` folder. Paste the following code and replace the API [key](https://www.braze.com/docs/api/identifier_types/) and [endpoint](https://www.braze.com/docs/api/basics/#endpoints) with your values:
```xml
YOU_APP_IDENTIFIER_API_KEYYOUR_CUSTOM_ENDPOINT_OR_CLUSTER
```
Add the required permissions to your `AndroidManifest.xml` file:
```xml
```
**Tip:**
On Braze SDK version 12.2.0 or later, you can automatically pull in the android-sdk-location library by setting `importBrazeLocationLibrary=true` in your `gradle.properties` file .
#### Step 2.3: Implement user session tracking
The calls to `openSession()` and `closeSession()` are handled automatically.
Add the following code to the `onCreate()` method of your `MainApplication` class:
```java
import com.braze.BrazeActivityLifecycleCallbackListener;
@Override
public void onCreate() {
super.onCreate();
...
registerActivityLifecycleCallbacks(new BrazeActivityLifecycleCallbackListener());
}
```
```kotlin
import com.braze.BrazeActivityLifecycleCallbackListener
override fun onCreate() {
super.onCreate()
...
registerActivityLifecycleCallbacks(BrazeActivityLifecycleCallbackListener())
}
```
#### Step 2.4: Handle intent updates
If your MainActivity has `android:launchMode` set to `singleTask`, add the following code to your `MainActivity` class:
```java
@Override
public void onNewIntent(Intent intent) {
super.onNewIntent(intent);
setIntent(intent);
}
```
```kotlin
override fun onNewIntent(intent: Intent) {
super.onNewIntent(intent)
setIntent(intent)
}
```
#### Step 2.1: (Optional) Configure Podfile for dynamic XCFrameworks
To import certain Braze libraries, such as BrazeUI, into an Objective-C++ file, you must use the `#import` syntax. Starting in version 7.4.0 of the Braze Swift SDK, binaries have an [optional distribution channel as dynamic XCFrameworks](https://github.com/braze-inc/braze-swift-sdk-prebuilt-dynamic), which are compatible with this syntax.
If you'd like to use this distribution channel, manually override the CocoaPods source locations in your Podfile. Reference the sample below and replace `{your-version}` with the relevant version you wish to import:
```ruby
pod 'BrazeKit', :podspec => 'https://raw.githubusercontent.com/braze-inc/braze-swift-sdk-prebuilt-dynamic/{your-version}/BrazeKit.podspec'
pod 'BrazeUI', :podspec => 'https://raw.githubusercontent.com/braze-inc/braze-swift-sdk-prebuilt-dynamic/{your-version}/BrazeUI.podspec'
pod 'BrazeLocation', :podspec => 'https://raw.githubusercontent.com/braze-inc/braze-swift-sdk-prebuilt-dynamic/{your-version}/BrazeLocation.podspec'
```
#### Step 2.2: Install pods
Since React Native automatically links the libraries to the native platform, you can install the SDK with the help of CocoaPods.
From the root folder of the project:
```bash
# To install using the React Native New Architecture
cd ios && pod install
# To install using the React Native legacy architecture
cd ios && RCT_NEW_ARCH_ENABLED=0 pod install
```
#### Step 2.3: Configure the Braze SDK
Import the Braze SDK at the top of the `AppDelegate.swift` file:
```swift
import BrazeKit
import braze_react_native_sdk
```
In the `application(_:didFinishLaunchingWithOptions:)` method, replace the API [key](https://www.braze.com/docs/api/identifier_types/) and [endpoint](https://www.braze.com/docs/api/basics/#endpoints) with your app's values. Then, create the Braze instance using the configuration, and create a static property on the `AppDelegate` for easy access:
**Note:**
Our example assumes an implementation of [RCTAppDelegate](https://github.com/facebook/react-native/blob/e64756ae5bb5c0607a4d97a134620fafcb132b3b/packages/react-native/Libraries/AppDelegate/RCTAppDelegate.h), which provides a number of abstractions in the React Native setup. If you are using a different setup for your app, be sure to adjust your implementation as needed.
```swift
func application(
_ application: UIApplication,
didFinishLaunchingWithOptions launchOptions: [UIApplication.LaunchOptionsKey : Any]? = nil
) -> Bool {
// Setup Braze
let configuration = Braze.Configuration(
apiKey: "{BRAZE_API_KEY}",
endpoint: "{BRAZE_ENDPOINT}")
// Enable logging and customize the configuration here.
configuration.logger.level = .info
let braze = BrazeReactBridge.perform(
#selector(BrazeReactBridge.initBraze(_:)),
with: configuration
).takeUnretainedValue() as! Braze
AppDelegate.braze = braze
/* Other configuration */
return true
}
// MARK: - AppDelegate.braze
static var braze: Braze? = nil
```
Import the Braze SDK at the top of the `AppDelegate.m` file:
```objc
#import
#import "BrazeReactBridge.h"
```
In the `application:didFinishLaunchingWithOptions:` method, replace the API [key](https://www.braze.com/docs/api/identifier_types/) and [endpoint](https://www.braze.com/docs/api/basics/#endpoints) with your app's values. Then, create the Braze instance using the configuration, and create a static property on the `AppDelegate` for easy access:
**Note:**
Our example assumes an implementation of [RCTAppDelegate](https://github.com/facebook/react-native/blob/e64756ae5bb5c0607a4d97a134620fafcb132b3b/packages/react-native/Libraries/AppDelegate/RCTAppDelegate.h), which provides a number of abstractions in the React Native setup. If you are using a different setup for your app, be sure to adjust your implementation as needed.
```objc
- (BOOL)application:(UIApplication *)application
didFinishLaunchingWithOptions:(NSDictionary *)launchOptions {
// Setup Braze
BRZConfiguration *configuration = [[BRZConfiguration alloc] initWithApiKey:@"{BRAZE_API_KEY}"
endpoint:@"{BRAZE_ENDPOINT}"];
// Enable logging and customize the configuration here.
configuration.logger.level = BRZLoggerLevelInfo;
Braze *braze = [BrazeReactBridge initBraze:configuration];
AppDelegate.braze = braze;
/* Other configuration */
return YES;
}
#pragma mark - AppDelegate.braze
static Braze *_braze = nil;
+ (Braze *)braze {
return _braze;
}
+ (void)setBraze:(Braze *)braze {
_braze = braze;
}
```
### Step 3: Import the library
Next, `import` the library in your React Native code. For more details, check out our [sample project](https://github.com/braze-inc/braze-react-native-sdk/tree/master/BrazeProject).
```javascript
import Braze from "@braze/react-native-sdk";
```
### Step 4: Test the integration (optional)
To test your SDK integration, start a new session on either platform for a user by calling the following code in your app.
```javascript
Braze.changeUser("userId");
```
For example, you can assign the user ID at the startup of the app:
```javascript
import React, { useEffect } from "react";
import Braze from "@braze/react-native-sdk";
const App = () => {
useEffect(() => {
Braze.changeUser("some-user-id");
}, []);
return (
...
)
```
In the Braze dashboard, go to [User Search](https://www.braze.com/docs/user_guide/engagement_tools/segments/using_user_search#using-user-search) and look for the user with the ID matching `some-user-id`. Here, you can verify that session and device data were logged.
## Next steps
After integrating the Braze SDK, you can start implementing common messaging features:
- [Push Notifications](https://www.braze.com/docs/developer_guide/push_notifications/): Set up and send push notifications to your users
- [In-App Messages](https://www.braze.com/docs/developer_guide/in_app_messages/): Display contextual messages within your app
- [Banners](https://www.braze.com/docs/developer_guide/banners/): Show persistent banners in your app interface
## Integrating the Roku SDK
### Step 1: Add files
Braze SDK files can be found in the `sdk_files` directory in the [Braze Roku SDK repository](https://github.com/braze-inc/braze-roku-sdk).
1. Add `BrazeSDK.brs` to your app in the `source` directory.
2. Add `BrazeTask.brs` and `BrazeTask.xml` to your app in the `components` directory.
### Step 2: Add references
Add a reference to `BrazeSDK.brs` in your main scene using the following `script` element:
```
```
### Step 3: Configure
Within `main.brs`, set the Braze configuration on the global node:
```brightscript
globalNode = screen.getGlobalNode()
config = {}
config_fields = BrazeConstants().BRAZE_CONFIG_FIELDS
config[config_fields.API_KEY] = {YOUR_API_KEY}
' example endpoint: "https://sdk.iad-01.braze.com/"
config[config_fields.ENDPOINT] = {YOUR_ENDPOINT}
config[config_fields.HEARTBEAT_FREQ_IN_SECONDS] = 5
globalNode.addFields({brazeConfig: config})
```
You can find your [SDK endpoint](https://www.braze.com/docs/user_guide/administrative/access_braze/sdk_endpoints/) and API key within the Braze dashboard.
### Step 4: Initialize Braze
Initialize the Braze instance:
```brightscript
m.BrazeTask = createObject("roSGNode", "BrazeTask")
m.Braze = getBrazeInstance(m.BrazeTask)
```
## Optional configurations
### Logging
To debug your Braze integration, you can view the Roku debug console for Braze logs. Refer to [Debugging code](https://developer.roku.com/docs/developer-program/debugging/debugging-channels.md) from Roku Developers to learn more.
## About the Unity Braze SDK
For a full list of types, functions, variables, and more, see [Unity Declaration File](https://github.com/braze-inc/braze-unity-sdk/blob/master/Assets/Plugins/Appboy/BrazePlatform.cs). Additionally, if you've already integrated Unity manually for iOS, you can [switch to an automated integration](#unity_automated-integration) instead.
## Integrating the Unity SDK
### Prerequisites
Before you start, verify your environment is supported by the [latest Braze Unity SDK version](https://github.com/braze-inc/braze-unity-sdk/releases).
### Step 1: Choose your Braze Unity package
The Braze [`.unitypackage`](https://docs.unity3d.com/Manual/AssetPackages.html) bundles native bindings for the Android and iOS platforms, along with a C# interface.
There are several Braze Unity packages available for download on the [Braze Unity releases page](https://github.com/Appboy/appboy-unity-sdk/releases):
- `Appboy.unitypackage`
- This package bundles the Braze Android and iOS SDKs and the [SDWebImage](https://github.com/SDWebImage/SDWebImage) dependency for the iOS SDK, which is required for the proper functionality of Braze in-app messaging, and Content Cards features on iOS. The SDWebImage framework is used for downloading and displaying images, including GIFs. If you intend on utilizing full Braze functionality, download and import this package.
- `Appboy-nodeps.unitypackage`
- This package is similar to `Appboy.unitypackage` except for the [SDWebImage](https://github.com/SDWebImage/SDWebImage) framework is not present. This package is useful if you do not want the SDWebImage framework present in your iOS app.
**Note:**
As of Unity 2.6.0, the bundled Braze Android SDK artifact requires [AndroidX](https://developer.android.com/jetpack/androidx) dependencies. If you were previously using a `jetified unitypackage`, then you can safely transition to the corresponding `unitypackage`.
The Braze [`.unitypackage`](https://docs.unity3d.com/Manual/AssetPackages.html) bundles native bindings for the Android and iOS platforms, along with a C# interface.
The Braze Unity package is available for download on the [Braze Unity releases page](https://github.com/Appboy/appboy-unity-sdk/releases) with two integration options:
1. `Appboy.unitypackage` only
- This package bundles the Braze Android and iOS SDKs without any additional dependencies. With this integration method, there will not be proper functionality of Braze in-app messaging, and Content Cards features on iOS. If you intend on utilizing full Braze functionality without custom code, use the option below instead.
- To use this integration option, ensure that the box next to `Import SDWebImage dependency` is *unchecked* in the Unity UI under "Braze Configuration".
2. `Appboy.unitypackage` with `SDWebImage`
- This integration option bundles the Braze Android and iOS SDKs and the [SDWebImage](https://github.com/SDWebImage/SDWebImage) dependency for the iOS SDK, which is required for the proper functionality of Braze in-app messaging, and Content Cards features on iOS. The `SDWebImage` framework is used for downloading and displaying images, including GIFs. If you intend on utilizing full Braze functionality, download and import this package.
- To automatically import `SDWebImage`, be sure to *check* the box next to `Import SDWebImage dependency` in the Unity UI under "Braze Configuration".
**Note:**
To see if you require the [SDWebImage](https://github.com/SDWebImage/SDWebImage) dependency for your iOS project, visit the [iOS in-app message documentation](https://www.braze.com/docs/developer_guide/platform_integration_guides/swift/in-app_messaging/overview/).
### Step 2: Import the package
In the Unity Editor, import the package into your Unity project by navigating to **Assets > Import Package > Custom Package**. Next, click **Import**.
Alternatively, follow the [Unity asset package import](https://docs.unity3d.com/Manual/AssetPackages.html) instructions for a more detailed guide on importing custom Unity packages.
**Note:**
If you only wish to import the iOS or Android plugin, deselect the `Plugins/Android` or `Plugins/iOS` subdirectory when importing the Braze `.unitypackage`.
### Step 3: Configure the SDK
#### Step 3.1: Configure `AndroidManifest.xml`
To fullo [`AndroidManifest.xml`](https://docs.unity3d.com/Manual/android-manifest.html) to function. If your app does not have an `AndroidManifest.xml`, you can use the following as a template. Otherwise, if you already have an `AndroidManifest.xml`, ensure that any of the following missing sections are added to your existing `AndroidManifest.xml`.
1. Go to the `Assets/Plugins/Android/` directory and open your `AndroidManifest.xml` file. This is the [default location in the Unity editor](https://docs.unity3d.com/Manual/android-manifest.html).
2. In your `AndroidManifest.xml`, add the required permissions and activities from in the following template.
3. When you're finished, your `AndroidManifest.xml` should only contain a single Activity with `"android.intent.category.LAUNCHER"` present.
```xml
```
**Important:**
All Activity classes registered in your `AndroidManifest.xml` file should be fully integrated with the Braze Android SDK, otherwise your analytics won't be collected. If you add your own Activity class, be sure you [extend the Braze Unity player](#unity_extend-unity-player) so you can prevent this.
#### Step 3.2: Update `AndroidManifest.xml` with your package name
To find your package name, click **File > Build Settings > Player Settings > Android Tab**.

In your `AndroidManifest.xml`, all instances of `REPLACE_WITH_YOUR_PACKAGE_NAME` should be replaced with your `Package Name` from the previous step.
#### Step 3.3: Add gradle dependencies
To add gradle dependencies to your Unity project, first enable ["Custom Main Gradle Template"](https://docs.unity3d.com/Manual/class-PlayerSettingsAndroid.html#Publishing) in your Publishing Settings. This will create a template gradle file that your project will use. A gradle file handles setting dependencies and other build-time project settings. For more information, check out the Braze Unity sample app's [mainTemplate.gradle](https://github.com/braze-inc/braze-unity-sdk/blob/master/unity-samples/Assets/Plugins/Android/mainTemplate.gradle).
The following dependencies are required:
```groovy
implementation 'com.google.firebase:firebase-messaging:22.0.0'
implementation "androidx.swiperefreshlayout:swiperefreshlayout:1.1.0"
implementation "androidx.recyclerview:recyclerview:1.2.1"
implementation "org.jetbrains.kotlin:kotlin-stdlib:1.6.0"
implementation "org.jetbrains.kotlinx:kotlinx-coroutines-android:1.6.1"
implementation 'androidx.core:core:1.6.0'
```
You may also set these dependencies using the [External Dependency Manager](https://github.com/googlesamples/unity-jar-resolver).
#### Step 3.4: Automate the Unity Android integration
Braze provides a native Unity solution for automating the Unity Android integration.
1. In the Unity Editor, open the Braze Configuration Settings by navigating to **Braze > Braze Configuration**.
2. Check the **Automate Unity Android Integration** box.
3. In the **Braze API Key** field, input your application's API key found in **Manage Settings** from the Braze dashboard.
**Note:**
This automatic integration should not be used with a manually created `braze.xml` file since the configuration values may conflict during project building. If you require a manual `braze.xml`, disable the automatic integration.
#### Step 3.1: Set your API key
Braze provides a native Unity solution for automating the Unity iOS integration. This solution modifies the built Xcode project using Unity's [`PostProcessBuildAttribute`](http://docs.unity3d.com/ScriptReference/Callbacks.PostProcessBuildAttribute.html) and subclasses the `UnityAppController` using the `IMPL_APP_CONTROLLER_SUBCLASS` macro.
1. In the Unity Editor, open the Braze Configuration Settings by navigating to **Braze > Braze Configuration**.
2. Check the **Automate Unity iOS Integration** box.
3. In the **Braze API Key** field, input your application's API key found in **Manage Settings**.
If your application is already using another `UnityAppController` subclass, you will need to merge your subclass implementation with `AppboyAppDelegate.mm`.
## Customizing the Unity package
### Step 1: Clone the repository
In your terminal, clone the [Braze Unity SDK GitHub repository](https://github.com/braze-inc/braze-unity-sdk), then navigate to that folder:
```bash
git clone git@github.com:braze-inc/braze-unity-sdk.git
cd ~/PATH/TO/DIRECTORY/braze-unity-sdk
```
```powershell
git clone git@github.com:braze-inc/braze-unity-sdk.git
cd C:\PATH\TO\DIRECTORY\braze-unity-sdk
```
### Step 2: Export package from repository
First, launch Unity and keep it running in the background. Then, in the repository root, run the following command to export the package to `braze-unity-sdk/unity-package/`.
```bash
/Applications/Unity/Unity.app/Contents/MacOS/Unity -batchmode -nographics -projectPath "$(pwd)" -executeMethod Appboy.Editor.Build.ExportAllPackages -quit
```
```powershell
"%UNITY_PATH%" -batchmode -nographics -projectPath "%PROJECT_ROOT%" -executeMethod Appboy.Editor.Build.ExportAllPackages -quit
```
**Tip:**
If you experience any issues after running these commands, refer to [Unity: Command Line Arguments](https://docs.unity3d.com/2017.2/Documentation/Manual/CommandLineArguments.html).
### Step 3: Import package into Unity
1. In Unity, import the desired package into your Unity project by navigating to **Assets** > **Import Package** > **Custom Package**.
2. If there's any files you don't want want to import, deselect them now.
3. Customize the exported Unity package located in `Assets/Editor/Build.cs`.
## Switch to an automated integration (Swift only) {#automated-integration}
To take advantage of the automated iOS integration offered in the Braze Unity SDK, follow these steps on transitioning from a manual to an automated integration.
1. Remove all Braze-related code from your Xcode project's `UnityAppController` subclass.
2. Remove Braze iOS libraries from your Unity or Xcode project (such as `Appboy_iOS_SDK.framework` and `SDWebImage.framework`).
3. Import the Braze Unity package into your project again. For a full walkthrough, see [Step 2: Import the package](#unity_step-2-import-the-package).
4. Set your API key again. For a full walkthrough, see [Step 3.1: Set your API key](#unity_step-31-set-your-api-key).
## Optional configurations
### Verbose logging
To enable verbose logging in the Unity Editor, do the following:
1. Open the Braze Configuration Settings by navigating to **Braze** > **Braze Configuration**.
2. Click the **Show Braze Android Settings** dropdown.
3. In the **SDK Log Level** field, input the value "0".
### Prime 31 compatibility
To use the Braze Unity plugin with Prime31 plugins, edit your project's `AndroidManifest.xml` to use the Prime31 compatible Activity classes. Change all references of
`com.braze.unity.BrazeUnityPlayerActivity` to `com.braze.unity.prime31compatible.BrazeUnityPlayerActivity`
### Amazon Device Messaging (ADM)
Braze supports integrating [ADM push](https://developer.amazon.com/public/apis/engage/device-messaging) into Unity apps. If you want to integrate ADM push, create a file called `api_key.txt` containing your ADM API key and place it in the `Plugins/Android/assets/` folder. For more information on integrating ADM with Braze, visit our [ADM push integration instructions](https://www.braze.com/docs/developer_guide/push_notifications/?sdktab=unity).
### Extending the Braze Unity player (Android only) {#extend-unity-player}
The example `AndroidManifest.xml` file provided has one Activity class registered, [`BrazeUnityPlayerActivity`](https://github.com/braze-inc/braze-android-sdk/blob/e804cb3a10ae68364b354b52abf1bef8a0d1a9dc/android-sdk-unity/src/main/java/com/braze/unity/BrazeUnityPlayerActivity.kt). This class is integrated with the Braze SDK and extends `UnityPlayerActivity` with session handling, in-app message registration, push notification analytics logging, and more. See [Unity](https://docs.unity3d.com/Manual/AndroidUnityPlayerActivity.html) for more information on extending the `UnityPlayerActivity` class.
If you are creating your own custom `UnityPlayerActivity` in a library or plugin project, you will need to extend our `BrazeUnityPlayerActivity` to integrate your custom functionality with Braze. Before beginning work on extending `BrazeUnityPlayerActivity`, follow our instructions for integrating Braze into your Unity project.
1. Add the Braze Android SDK as a dependency to your library or plugin project as described in the [Braze Android SDK integration instructions](https://www.braze.com/docs/developer_guide/sdk_integration/?sdktab=android).
2. Integrate our Unity `.aar`, which contains our Unity-specific functionality, to your Android library project you are building for Unity. The `appboy-unity.aar` is available from our [public repo](https://github.com/braze-inc/braze-unity-sdk/tree/master/Assets/Plugins/Android). After our Unity library is successfully integrated, modify your `UnityPlayerActivity` to extend `BrazeUnityPlayerActivity`.
3. Export your library or plugin project and drop it into `//Assets/Plugins/Android` as normal. Do not include any Braze source code in your library or plugin as they will already be present in `//Assets/Plugins/Android`.
4. Edit your `//Assets/Plugins/Android/AndroidManifest.xml` to specify your `BrazeUnityPlayerActivity` subclass as the main activity.
You should now be able to package an `.apk` from the Unity IDE that is fully integrated with Braze and contains your custom `UnityPlayerActivity` functionality.
## Troubleshooting
### Error: "File could not be read"
Errors resembling the following may be safely ignored. Apple software uses a proprietary PNG extension called CgBI, which Unity does not recognize. These errors will not affect your iOS build or the proper display of the associated images in the Braze bundle.
```
Could not create texture from Assets/Plugins/iOS/AppboyKit/Appboy.bundle/...png: File could not be read
```
## Integrating the .NET MAUI SDK
Integrating the Braze .NET MAUI (formerly Xamarin) SDK will provide you with basic analytics functionality as well as working in-app messages with which you can engage your users.
### Prerequisites
Before you can integrate the .NET MAUI Braze SDK, be sure you meet the following requirements:
- Starting in `version 3.0.0`, this SDK requires using .NET 6+ and removes support for projects using the Xamarin framework.
- Starting in `version 4.0.0`, this SDK dropped support for Xamarin & Xamarin.Forms and added support for .NET MAUI. See [Microsoft's policy](https://dotnet.microsoft.com/en-us/platform/support/policy/xamarin) around the end of support for Xamarin.
### Step 1: Get the .NET MAUI binding
A .NET MAUI binding is a way to use native libraries in .NET MAUI apps. The implementation of a binding consists of building a C# interface to the library, and then using that interface in your application. See the [.NET MAUI documentation](http://developer.xamarin.com/guides/android/advanced_topics/java_integration_overview/binding_a_java_library_%28.jar%29/). There are two ways to include the Braze SDK binding: using NuGet or compiling from source.
The simplest integration method involves getting the Braze SDK from the [NuGet.org](https://www.nuget.org/) central repository. In the Visual Studio sidebar, right click `Packages` folder and click `Add Packages...`. Search for 'Braze' and install the [`BrazePlatform.BrazeAndroidBinding`](https://www.nuget.org/packages/BrazePlatform.BrazeAndroidBinding/) package into your project.
To use Braze location services and geofences, also install the [`BrazePlatform.BrazeAndroidLocationBinding`](https://www.nuget.org/packages/BrazePlatform.BrazeAndroidLocationBinding/) package.
The second integration method is to include the [binding source](https://github.com/braze-inc/braze-xamarin-sdk). Under [`appboy-component/src/androidnet6`](https://github.com/braze-inc/braze-xamarin-sdk/tree/master/appboy-component/src/androidnet6/BrazeAndroidNet6Binding) you will find our binding source code; adding a project reference to the ```BrazeAndroidBinding.csproj``` in your .NET MAUI application will cause the binding to be built with your project and provide you access to the Braze Android SDK.
To use Braze location services and geofences, also add a project reference to the ```BrazeAndroidLocationBinding.csproj``` found under [`appboy-component/src/androidnet6/BrazeAndroidLocationBinding`](https://github.com/braze-inc/braze-xamarin-sdk/tree/master/appboy-component/src/androidnet6/BrazeAndroidLocationBinding).
**Important:**
The iOS bindings for .NET MAUI SDK version 4.0.0 and later use the [Braze Swift SDK](https://github.com/braze-inc/braze-swift-sdk/), while previous versions use the [legacy AppboyKit SDK](https://github.com/Appboy/Appboy-ios-sdk).
A .NET MAUI binding is a way to use native libraries in .NET MAUI apps. The implementation of a binding consists of building a C# interface to the library and then using that interface in your application. There are two ways to include the Braze SDK binding: using NuGet or compiling from source.
The simplest integration method involves getting the Braze SDK from the [NuGet.org](https://www.nuget.org/) central repository. In the Visual Studio sidebar, right-click `Packages` folder and click `Add Packages...`. Search for 'Braze' and install the latest .NET MAUI iOS NuGet packages: [Braze.iOS.BrazeKit](https://www.nuget.org/packages/Braze.iOS.BrazeKit), [Braze.iOS.BrazeUI](https://www.nuget.org/packages/Braze.iOS.BrazeUI), and [Braze.iOS.BrazeLocation](https://www.nuget.org/packages/Braze.iOS.BrazeLocation) into your project.
We also provide the compatibility libraries packages: [Braze.iOS.BrazeKitCompat](https://www.nuget.org/packages/Braze.iOS.BrazeKitCompat) and [Braze.iOS.BrazeUICompat](https://www.nuget.org/packages/Braze.iOS.BrazeUICompat), to help make your migration to .NET MAUI easier.
The second integration method is to include the [binding source](https://github.com/braze-inc/braze-xamarin-sdk). Under [`appboy-component/src/iosnet6`](https://github.com/braze-inc/braze-xamarin-sdk/tree/master/appboy-component/src/iosnet6/BrazeiOSNet6Binding) you will find our binding source code; adding a project reference to the ```BrazeiOSBinding.csproj``` in your .NET MAUI application will cause the binding to be built with your project and provide you access to the Braze iOS SDK. Make sure `BrazeiOSBinding.csproj` is showing in your project's "Reference" folder.
### Step 2: Configure your Braze instance
#### Step 2.1: Configure the Braze SDK in Braze.xml
Now that the libraries have been integrated, you have to create an `Braze.xml` file in your project's `Resources/values` folder. The contents of that file should resemble the following code snippet:
**Note:**
Be sure to substitute `YOUR_API_KEY` with the API key located at **Settings** > **API Keys** in the Braze dashboard.
If you are using the [older navigation](https://www.braze.com/docs/user_guide/administrative/access_braze/navigation/), you can find API keys at **Developer Console** > **API Settings**..
```xml
YOUR_API_KEYYOUR_CUSTOM_ENDPOINT_OR_CLUSTERXAMARINNUGET
```
If you are including the binding source manually, remove `NUGET` from your code.
**Tip:**
To see an example `Braze.xml`, check out our [Android MAUI sample app](https://github.com/braze-inc/braze-xamarin-sdk/blob/master/appboy-component/samples/android-net-maui/BrazeAndroidMauiSampleApp/BrazeAndroidMauiSampleApp/Resources/values/Braze.xml).
#### Step 2.2: Add required permissions to Android manifest
Now that you've added your API key, you need to add the following permissions to your `AndroidManifest.xml` file:
```xml
```
For an example of your `AndroidManifest.xml`, see the [Android MAUI](https://github.com/braze-inc/braze-xamarin-sdk/blob/master/appboy-component/samples/android-net-maui/BrazeAndroidMauiSampleApp/BrazeAndroidMauiSampleApp/AndroidManifest.xml) sample application.
#### Step 2.3: Track user sessions and registering for in-app messages
To enable user session tracking and register your app for in-app messages, add the following call to the `OnCreate()` lifecycle method of the `Application` class in your app:
```kotlin
RegisterActivityLifecycleCallbacks(new BrazeActivityLifecycleCallbackListener());
```
When setting up your Braze instance, add the following snippet to configure your instance:
**Note:**
Be sure to substitute `YOUR_API_KEY` with the API key located at **Settings** > **API Keys** in the Braze dashboard.
If you are using the [older navigation](https://www.braze.com/docs/user_guide/administrative/access_braze/navigation/), you can find API keys at **Developer Console** > **API Settings**..
```csharp
var configuration = new BRZConfiguration("YOUR_API_KEY", "YOUR_ENDPOINT");
configuration.Api.AddSDKMetadata(new[] { BRZSDKMetadata.Xamarin });
braze = new Braze(configuration);
```
See the `App.xaml.cs` file in the [iOS MAUI](https://github.com/braze-inc/braze-xamarin-sdk/blob/master/appboy-component/samples/ios-net-maui/BrazeiOSMauiSampleApp/BrazeiOSMauiSampleApp/App.xaml.cs) sample application.
### Step 3: Test the integration
Now you can launch your application and see sessions being logged to the Braze dashboard (along with device information and other analytics). For a more in-depth discussion of best practices for the basic SDK integration, consult the [Android integration instructions](https://www.braze.com/docs/developer_guide/sdk_integration/?sdktab=android).
Now you can launch your application and see sessions being logged to the Braze dashboard. For a more in-depth discussion of best practices for the basic SDK integration, consult the [iOS integration instructions](https://www.braze.com/docs/developer_guide/sdk_integration/?sdktab=swift).
**Important:**
Our current public .NET MAUI binding for the iOS SDK does not connect to the iOS Facebook SDK (linking social data) and does not include sending the IDFA to Braze.
# ChatGPT app integration
## Setup
### Step 1: Get the Braze integration file
Copy the `braze.js` file from our [ChatGPT apps integration repository](https://github.com/braze-inc/chatgpt-apps-braze-integration/blob/main/src/braze/braze.ts) to your project. This file contains all the necessary Braze SDK configuration and helper functions.
### Step 2: Install dependencies
Install our Web SDK for Braze's most up-to-date set of features:
**For client-side integration:**
```bash
npm install @braze/web-sdk
```
## Implementation
There are two ways to integrate Braze with your ChatGPT app depending on your use case:
### Client-side integration (custom widgets)
**Tip:**
**Recommended Approach:** This method enables rich messaging experiences and real-time user interaction tracking within your ChatGPT app widgets.
For displaying Braze messaging and tracking user interactions within your custom ChatGPT app widgets, use the Web SDK integration. A full messaging example can be found in our sample repository [here](https://github.com/braze-inc/chatgpt-apps-braze-integration/tree/main/src/inbox).
#### Configure widget metadata
Add the following metadata to your MCP server file to allow Braze domains, ensuring to update the CDN domain based on [your region](https://www.braze.com/docs/developer_guide/platforms/web/content_security_policy):
```javascript
"openai/widgetCSP": {
connect_domains: ["https://YOUR-SDK-ENDPOINT"],
resource_domains: [
"https://appboy-images.com",
"https://braze-images.com",
"https://cdn.braze.eu",
"https://use.fontawesome.com"
],
}
```
Replace `YOUR-SDK-ENDPOINT` with your actual Braze SDK endpoint.
#### Set up the useBraze hook
```javascript
import { useBraze } from "./utils/braze";
function YourWidget() {
const braze = useBraze({
apiKey: "your-braze-api-key",
baseUrl: "your-braze-endpoint.braze.com",
});
useEffect(() => {
if (!braze.isInitialized) {
return;
}
// Set user identity
braze.changeUser("user-id-123");
// Log widget interactions
braze.logCustomEvent("viewed_pizzaz_list");
}, [braze.isInitialized]);
return (
// Your widget JSX
);
}
```
#### Display Braze Content Cards
```javascript
const [cards, setCards] = useState([]);
useEffect(() => {
// Get cached content cards
setCards(braze.getCachedContentCards()?.cards ?? []);
// Subscribe to content card updates
braze.subscribeToContentCardsUpdates((contentCards) => {
setCards(contentCards.cards);
});
// Open session
braze.openSession();
return () => {
braze.removeAllSubscriptions();
}
}, []);
```
#### Track widget events
```javascript
// Track user interactions within your widget
const handleButtonClick = () => {
braze.logCustomEvent("widget_button_clicked", {
button_type: "save_list",
widget_name: "pizza_list"
});
};
const handleItemInteraction = (itemId) => {
braze.logCustomEvent("item_interacted", {
item_id: itemId,
interaction_type: "view_details"
});
};
```
### Server-side integration (MCP server)
If you also need a server-side integration for messaging functionality on your MCP server, contact `mcp-product@braze.com`. For tracking events and purchases from your MCP server, use our [REST API](https://www.braze.com/docs/api/home).
## About the Braze Vega SDK
The Braze Vega SDK lets you collect analytics and display rich in-app messages to your users. Most methods in the Braze Vega SDK are asynchronous and return promises that should be awaited or resolved.
## Integrating the Braze Vega SDK
### Step 1: Install the Braze library
Install the Braze Vega SDK using your preferred package manager.
If your project uses NPM, you can add the Braze Vega SDK as a dependency.
```bash
npm install @braze/vega-sdk --save
```
After installation, you can import the methods you need:
```javascript
import { initialize, changeUser, openSession } from "@braze/vega-sdk";
```
If your project uses Yarn, you can add the Braze Vega SDK as a dependency.
```bash
yarn add @braze/vega-sdk
```
After installation, you can import the methods you need:
```javascript
import { initialize, changeUser, openSession } from "@braze/vega-sdk";
```
### Step 2: Initialize the SDK
After the Braze Vega SDK is added to your project, initialize the library with the API key and [SDK endpoint URL](https://www.braze.com/docs/user_guide/administrative/access_braze/sdk_endpoints) found in **Settings** > **App Settings** within your Braze dashboard.
**Important:**
You must await or resolve the `changeUser` promise before calling other Braze methods, or events and attributes may be set on the incorrect user.
```javascript
import { useEffect } from "react-native";
import {
initialize,
changeUser,
logCustomEvent,
openSession,
setCustomUserAttribute,
setUserCountry
} from "@braze/vega-sdk";
const App = () => {
useEffect(() => {
const initBraze = async () => {
// Initialize the SDK
await initialize("YOUR-API-KEY", "YOUR-SDK-ENDPOINT", {
sessionTimeoutInSeconds: 60,
appVersionNumber: "1.2.3.4",
enableLogging: true, // set to `true` for debugging
});
// Change user
await changeUser("user-id-123");
// Start a session
await openSession();
// Log custom events and set user attributes
logCustomEvent("visited-page", { pageName: "home" });
setCustomUserAttribute("my-attribute", "my-attribute-value");
setUserCountry("USA");
};
initBraze();
}, []);
return (
// Your app components
);
};
```
**Important:**
Anonymous users may be counted towards your [MAU](https://www.braze.com/docs/user_guide/data_and_analytics/reporting/understanding_your_app_usage_data/#monthly-active-users). As a result, you may want to conditionally load or initialize the SDK to exclude these users from your MAU count.
## Optional configurations
### Logging
You can enable SDK logging to help with debugging and troubleshooting. There are multiple ways to enable logging.
#### Enable logging during initialization
Pass `enableLogging: true` to `initialize()` to log debugging messages to the console:
```javascript
initialize("YOUR-API-KEY", "YOUR-SDK-ENDPOINT", {
enableLogging: true
});
```
**Important:**
Basic logs are visible to all users, so consider disabling logging before releasing your code to production.
#### Enable logging after initialization
Use `toggleLogging()` to enable or disable SDK logging after initialization:
```javascript
import { toggleLogging } from "@braze/vega-sdk";
// Enable logging
toggleLogging();
```
#### Custom logging
Use `setLogger()` to provide a custom logger function for more control over how SDK logs are handled:
```javascript
import { setLogger } from "@braze/vega-sdk";
setLogger((message) => {
console.log("Braze Custom Logger: " + message);
// Add your custom logging logic here
});
```
### Configuration options
You can pass additional configuration options to `initialize()` to customize the SDK behavior:
```javascript
await initialize("YOUR-API-KEY", "YOUR-SDK-ENDPOINT", {
sessionTimeoutInSeconds: 60, // Configure session timeout (default is 30 seconds)
appVersionNumber: "1.2.3.4", // Set your app version
enableLogging: true, // Enable SDK logging
});
```
## Upgrading the SDK
When you reference the Braze Vega SDK from NPM or Yarn, you can upgrade to the latest version by updating your package dependency:
```bash
npm update @braze/vega-sdk
# or, using yarn:
yarn upgrade @braze/vega-sdk
```
## Testing your integration
To verify your SDK integration is working correctly:
1. Initialize the SDK with `enableLogging: true` to see debug messages in the console
2. Ensure you `await changeUser()` before calling other SDK methods
3. Call `await openSession()` to start a session
4. Check your Braze dashboard under **Overview** to verify that session data is being recorded
5. Test logging a custom event and verify it appears in your dashboard
**Note:**
While performing QA on your SDK integration, use the [SDK Debugger](https://www.braze.com/docs/developer_guide/sdk_integration/debugging) to get troubleshoot issues without turning on verbose logging for your app.
# Google Tag Manager with the Braze SDK
Source: /docs/developer_guide/sdk_integration/google_tag_manager/index.md
# Google Tag Manager with the Braze SDK
> Learn how to use [Google Tag Manager (GTM)](https://developers.google.com/tag-platform/tag-manager) with the Braze SDK, so you can remotely control Braze event tracking and user attribute updates without requiring code changes or new app releases.
## About Google Tag Manager for Web {#google-tag-manager}
Google Tag Manager (GTM) lets you remotely add, remove, and edit tags on your website without requiring a production code release or engineering resources. Braze offers the following templates for the Web SDK:
|Tag Type|Use Case|
|--------|--------|
| Initialization tag | This tag lets you [integrate the Web Braze SDK](https://www.braze.com/docs/developer_guide/sdk_integration/?tab=google%20tag%20manager&sdktab=web) without needing to modify your site’s code.|
| Action tag | This tag lets you [create Content Cards](https://www.braze.com/docs/developer_guide/content_cards/?sdktab=web#web_using-google-tag-manager), [set user attributes](https://www.braze.com/docs/developer_guide/analytics/setting_user_attributes/?tab=google%20tag%20manager&sdktab=web), and [manage data collection](https://www.braze.com/docs/developer_guide/analytics/managing_data_collection/?tab=google%20tag%20manager&sdktab=web).|
{: .reset-td-br-1 .reset-td-br-2 role="presentation"}
## Google's EU User Consent Policy
**Important:**
Google is updating their [EU User Consent Policy](https://www.google.com/about/company/user-consent-policy/) in response to changes to the [Digital Markets Act (DMA)](https://ads-developers.googleblog.com/2023/10/updates-to-customer-match-conversion.html), which is in effect as of March 6, 2024. This new change requires advertisers to disclose certain information to their EEA and UK end users, as well as obtain necessary consents from them. Review the following documentation to learn more.
As part of Google's EU User Consent Policy, the following boolean custom attributes need to be logged to user profiles:
- `$google_ad_user_data`
- `$google_ad_personalization`
If setting these via the GTM integration, custom attributes require creating a custom HTML tag. The following is an example of how to log these values as boolean data types (not as strings):
```js
```
For more information, refer to [Audience Sync to Google](https://www.braze.com/docs/partners/canvas_audience_sync/google_audience_sync/).
## Prerequisites
Before you can use this feature, you'll need to [integrate the Android Braze SDK](https://www.braze.com/docs/developer_guide/sdk_integration/?sdktab=android).
## Using Google Tag Manager for Android
In the following example, a music streaming app wants to log different events as users listen to songs. Using Google Tag Manager for Android, they can control which of the Braze third-party vendors receive this event, and create tags specific to Braze.
### Step 1: Create a trigger for custom events
Custom events are logged with `actionType` set to `logEvent`. The Braze custom tag provider in this example is expecting the custom event name to be set using `eventName`.
To get started, create a trigger that looks for an "Event Name" that equals `played song`

Next, create a new tag (also known as a "Function Call") and enter the class path of your [custom tag provider](#adding-android-google-tag-provider) described later in this article. This tag will be triggered when you log the `played song` event.
In the tag's custom parameters (also known as the key-value pairs), set `eventName` to `played song`. This will be the custom event name logged to Braze.

**Important:**
When sending a custom event, be sure to set `actionType` to `logEvent`, and set a value for `eventName` so Braze receives the correct event name and action to take.
You can also include additional key-value pair arguments to the tag, which will be sent as custom event properties to Braze. `eventName` and `actionType` will not be ignored for custom event properties. In the following example tag, `genre` is passed and defined using a tag variable in Google Tag Manager, which is sourced from the custom event logged in the app.
Because Google Tag Manager for Android uses Firebase as the data layer, the `genre` event property is sent to Google Tag Manager as a "Firebase - Event Parameter" variable.

When a user plays a song in the app, an event will be logged through Firebase and Google Tag Manager using the Firebase analytics event name that matches the tag's trigger name, `played song`:
```java
Bundle params = new Bundle();
params.putString("genre", "pop");
params.putInt("number of times listened", 42);
mFirebaseAnalytics.logEvent("played song", params);
```
```kotlin
val params = Bundle()
params.putString("genre", "pop")
params.putInt("number of times listened", 42);
mFirebaseAnalytics.logEvent("played song", params)
```
### Step 2: Log custom attributes
Custom attributes are set via an `actionType` set to `customAttribute`. The Braze custom tag provider is expecting the custom attribute key-value to be set via `customAttributeKey` and `customAttributeValue`:
```java
Bundle params = new Bundle();
params.putString("customAttributeKey", "favorite song");
params.putString("customAttributeValue", "Private Eyes");
mFirebaseAnalytics.logEvent("customAttribute", params);
```
```kotlin
val params = Bundle()
params.putString("customAttributeKey", "favorite song")
params.putString("customAttributeValue", "Private Eyes")
mFirebaseAnalytics.logEvent("customAttribute", params)
```
### Step 3: Call `changeUser()`
Calls to `changeUser()` are made via an `actionType` set to `changeUser`. The Braze custom tag provider is expecting the Braze user ID to be set via an `externalUserId` key-value pair within your tag:
```java
Bundle params = new Bundle();
params.putString("externalUserId", userId);
mFirebaseAnalytics.logEvent("changeUser", params);
```
```kotlin
val params = Bundle()
params.putString("externalUserId", userId)
mFirebaseAnalytics.logEvent("changeUser", params)
```
### Step 4: Add a custom tag provider {#adding-android-google-tag-provider}
With the tags and triggers set up, you will also need to implement Google Tag Manager in your Android app which can be found in Google's [documentation](https://developers.google.com/tag-manager/android/v5/).
After the Google Tag Manager is installed in your app, add a custom tag provider to call Braze SDK methods based on the tags you've configured within Google Tag Manager.
Be sure to note the "Class Path" to the file - this is what you'll enter when setting up a Tag in the [Google Tag Manager](https://tagmanager.google.com/) console.
This example highlights one of many ways you can structure your custom tag provider. Specifically, it shows how to determine which Braze SDK method to call based on the `actionType` key-value pair sent from the GTM Tag.
The `actionType` shown in this example are `logEvent`, `customAttribute`, and `changeUser`, but you may prefer to change how your tag provider handles data from Google Tag Manager.
```java
public class BrazeGtmTagProvider implements CustomTagProvider {
private static final String TAG = BrazeLogger.getBrazeLogTag(BrazeGtmTagProvider.class);
private static final String ACTION_TYPE_KEY = "actionType";
// Custom Events
private static final String LOG_EVENT_ACTION_TYPE = "logEvent";
private static final String EVENT_NAME_VARIABLE = "eventName";
// Custom Attributes
private static final String CUSTOM_ATTRIBUTE_ACTION_TYPE = "customAttribute";
private static final String CUSTOM_ATTRIBUTE_KEY = "customAttributeKey";
private static final String CUSTOM_ATTRIBUTE_VALUE_KEY = "customAttributeValue";
// Change User
private static final String CHANGE_USER_ACTION_TYPE = "changeUser";
private static final String CHANGE_USER_ID_VARIABLE = "externalUserId";
private static Context sApplicationContext;
/**
* Must be set before calling any of the following methods
* so that the proper application context is available when needed.
*
* Recommended to be called in your {@link Application#onCreate()}.
*/
public static void setApplicationContext(Context applicationContext) {
if (applicationContext != null) {
sApplicationContext = applicationContext.getApplicationContext();
}
}
@Override
public void execute(Map map) {
BrazeLogger.i(TAG, "Got google tag manager parameters map: " + map);
if (sApplicationContext == null) {
BrazeLogger.w(TAG, "No application context provided to this tag provider.");
return;
}
if (!map.containsKey(ACTION_TYPE_KEY)) {
BrazeLogger.w(TAG, "Map does not contain the Braze action type key: " + ACTION_TYPE_KEY);
return;
}
String actionType = String.valueOf(map.remove(ACTION_TYPE_KEY));
switch (actionType) {
case LOG_EVENT_ACTION_TYPE:
logEvent(map);
break;
case CUSTOM_ATTRIBUTE_ACTION_TYPE:
setCustomAttribute(map);
break;
case CHANGE_USER_ACTION_TYPE:
changeUser(map);
break;
default:
BrazeLogger.w(TAG, "Got unknown action type: " + actionType);
break;
}
}
private void logEvent(Map tagParameterMap) {
String eventName = String.valueOf(tagParameterMap.remove(EVENT_NAME_VARIABLE));
Braze.getInstance(sApplicationContext).logCustomEvent(eventName, parseMapIntoProperties(tagParameterMap));
}
private BrazeProperties parseMapIntoProperties(Map map) {
BrazeProperties brazeProperties = new BrazeProperties();
for (Map.Entry entry : map.entrySet()) {
final Object value = entry.getValue();
final String key = entry.getKey();
if (value instanceof Boolean) {
brazeProperties.addProperty(key, (Boolean) value);
} else if (value instanceof Integer) {
brazeProperties.addProperty(key, (Integer) value);
} else if (value instanceof Date) {
brazeProperties.addProperty(key, (Date) value);
} else if (value instanceof Long) {
brazeProperties.addProperty(key, (Long) value);
} else if (value instanceof String) {
brazeProperties.addProperty(key, (String) value);
} else if (value instanceof Double) {
brazeProperties.addProperty(key, (Double) value);
} else {
BrazeLogger.w(TAG, "Failed to parse value into an BrazeProperties "
+ "accepted type. Key: '" + key + "' Value: '" + value + "'");
}
}
return brazeProperties;
}
private void setCustomAttribute(Map tagParameterMap) {
String key = String.valueOf(tagParameterMap.get(CUSTOM_ATTRIBUTE_KEY));
Object value = tagParameterMap.get(CUSTOM_ATTRIBUTE_VALUE_KEY);
Braze.getInstance(sApplicationContext).getCurrentUser(new IValueCallback() {
@Override
public void onSuccess(BrazeUser brazeUser) {
if (value instanceof Boolean) {
brazeUser.setCustomUserAttribute(key, (Boolean) value);
} else if (value instanceof Integer) {
brazeUser.setCustomUserAttribute(key, (Integer) value);
} else if (value instanceof Long) {
brazeUser.setCustomUserAttribute(key, (Long) value);
} else if (value instanceof String) {
brazeUser.setCustomUserAttribute(key, (String) value);
} else if (value instanceof Double) {
brazeUser.setCustomUserAttribute(key, (Double) value);
} else if (value instanceof Float) {
brazeUser.setCustomUserAttribute(key, (Float) value);
} else {
BrazeLogger.w(TAG, "Failed to parse value into a custom "
+ "attribute accepted type. Key: '" + key + "' Value: '" + value + "'");
}
}
});
}
private void changeUser(Map tagParameterMap) {
String userId = String.valueOf(tagParameterMap.get(CHANGE_USER_ID_VARIABLE));
Braze.getInstance(sApplicationContext).changeUser(userId);
}
}
```
```kotlin
class BrazeGtmTagProvider : CustomTagProvider {
override fun execute(map: MutableMap) {
BrazeLogger.i(TAG, "Got google tag manager parameters map: $map")
if (sApplicationContext == null) {
BrazeLogger.w(TAG, "No application context provided to this tag provider.")
return
}
if (!map.containsKey(ACTION_TYPE_KEY)) {
BrazeLogger.w(TAG, "Map does not contain the Braze action type key: $ACTION_TYPE_KEY")
return
}
val actionType = map.remove(ACTION_TYPE_KEY).toString()
when (actionType) {
LOG_EVENT_ACTION_TYPE -> logEvent(map)
CUSTOM_ATTRIBUTE_ACTION_TYPE -> setCustomAttribute(map)
CHANGE_USER_ACTION_TYPE -> changeUser(map)
else -> BrazeLogger.w(TAG, "Got unknown action type: $actionType")
}
}
private fun logEvent(tagParameterMap: MutableMap) {
val eventName = tagParameterMap.remove(EVENT_NAME_VARIABLE).toString()
Braze.getInstance(sApplicationContext).logCustomEvent(eventName, parseMapIntoProperties(tagParameterMap))
}
private fun parseMapIntoProperties(map: Map): BrazeProperties {
val brazeProperties = BrazeProperties()
map.forEach { param ->
val key = param.key
val value = param.value
when (value) {
is Boolean -> brazeProperties.addProperty(key, value)
is Int -> brazeProperties.addProperty(key, value)
is Date -> brazeProperties.addProperty(key, value)
is Long -> brazeProperties.addProperty(key, value)
is String -> brazeProperties.addProperty(key, value)
is Double -> brazeProperties.addProperty(key, value)
else -> BrazeLogger.w(TAG, "Failed to parse value into an BrazeProperties "
+ "accepted type. Key: '" + key + "' Value: '" + value + "'")
}
}
return brazeProperties
}
private fun setCustomAttribute(tagParameterMap: Map) {
val key = tagParameterMap[CUSTOM_ATTRIBUTE_KEY].toString()
val value = tagParameterMap[CUSTOM_ATTRIBUTE_VALUE_KEY]
Braze.getInstance(sApplicationContext).getCurrentUser { brazeUser ->
when (value) {
is Boolean -> brazeUser.setCustomUserAttribute(key, value)
is Int -> brazeUser.setCustomUserAttribute(key, value)
is Long -> brazeUser.setCustomUserAttribute(key, value)
is String -> brazeUser.setCustomUserAttribute(key, value)
is Double -> brazeUser.setCustomUserAttribute(key, value)
is Float -> brazeUser.setCustomUserAttribute(key, value)
else -> BrazeLogger.w(
TAG, "Failed to parse value into a custom "
+ "attribute accepted type. Key: '" + key + "' Value: '" + value + "'"
)
}
}
}
private fun changeUser(tagParameterMap: Map) {
val userId = tagParameterMap[CHANGE_USER_ID_VARIABLE].toString()
Braze.getInstance(sApplicationContext).changeUser(userId)
}
companion object {
private val TAG = BrazeLogger.getBrazeLogTag(BrazeGtmTagProvider::class.java)
private val ACTION_TYPE_KEY = "actionType"
// Custom Events
private val LOG_EVENT_ACTION_TYPE = "logEvent"
private val EVENT_NAME_VARIABLE = "eventName"
// Custom Attributes
private val CUSTOM_ATTRIBUTE_ACTION_TYPE = "customAttribute"
private val CUSTOM_ATTRIBUTE_KEY = "customAttributeKey"
private val CUSTOM_ATTRIBUTE_VALUE_KEY = "customAttributeValue"
// Change User
private val CHANGE_USER_ACTION_TYPE = "changeUser"
private val CHANGE_USER_ID_VARIABLE = "externalUserId"
private var sApplicationContext: Context? = null
/**
* Must be set before calling any of the following methods so
* that the proper application context is available when needed.
*
* Recommended to be called in your [Application.onCreate].
*/
fun setApplicationContext(applicationContext: Context?) {
if (applicationContext != null) {
sApplicationContext = applicationContext.applicationContext
}
}
}
}
```
In your `Application.onCreate()` be sure to add the following initialization for the previous snippet:
```java
BrazeGtmTagProvider.setApplicationContext(this.getApplicationContext());
```
```kotlin
BrazeGtmTagProvider.setApplicationContext(this.applicationContext)
```
## Prerequisites
Before you can use this feature, you'll need to [integrate the Swift Braze SDK](https://www.braze.com/docs/developer_guide/sdk_integration/?sdktab=swift).
## Using Google Tag Manager for Swift
In the following example, a music streaming app wants to log different events as users listen to songs. Using Google Tag Manager for iOS, they can control which of the Braze third-party vendors receive this event and create tags specific to Braze.
### Step 1: Create a trigger for custom events
Custom events are logged with `actionType` set to `logEvent`. In this example, the Braze custom tag provider is expecting the custom event name to be set using `eventName`.
First, create a trigger that looks for an `eventName` that equals `played song`.

Next, create a new Tag (also known as a "Function Call") and enter the class path of your [custom tag provider](#adding-ios-google-tag-provider) described later in this article. This tag will be triggered when you log the `played song` event. Because `eventName` is set to `played song` it will be used as custom event name that's logged to Braze.
**Important:**
When sending a custom event, set `actionType` to `logEvent`, and set a value for `eventName` so Braze receives the correct event name and action to take.

You can also include additional key-value pair arguments to the tag, which will be sent as custom event properties to Braze. `eventName` and `actionType` will not be ignored for custom event properties. In the following example tag, pass in `genre`, which was defined using a tag variable in Google Tag Manager and sourced from the custom event logged in the app.
The `genre` event property is sent to Google Tag Manager as a "Firebase - Event Parameter" variable since Google Tag Manager for iOS uses Firebase as the data layer.

When a user plays a song in the app, log an event through Firebase and Google Tag Manager using the Firebase analytics event name that matches the tag's trigger name, `played song`:
```swift
let parameters: [String: Any] = ["genre": "pop",
"number of times listened": 42]
Analytics.logEvent("played song", parameters: parameters)
```
```obj-c
NSDictionary *parameters = @{@"genre" : @"pop",
@"number of times listened" : @42};
[FIRAnalytics logEventWithName:@"played song" parameters:parameters];
```
### Step 2: Log custom attributes
Custom attributes are set via an `actionType` set to `customAttribute`. The Braze custom tag provider is expecting the custom attribute key-value to be set via `customAttributeKey` and `customAttributeValue`:
```swift
let parameters: [String: Any] = ["customAttributeKey": "favoriteSong",
"customAttributeValue": "Private Eyes"]
FIRAnalytics.logEvent(withName:"customAttribute", parameters: parameters)
```
```obj-c
NSDictionary *parameters = @{@"customAttributeKey" : @"favoriteSong",
@"customAttributeValue" : @"Private Eyes"};
[FIRAnalytics logEventWithName:@"customAttribute" parameters:parameters];
```
### Step 3: Call `changeUser()`
Calls to `changeUser()` are made via an `actionType` set to `changeUser`. The Braze custom tag provider is expecting the Braze user ID to be set via an `externalUserId` key-value pair within your tag:
```swift
let parameters: [String: Any] = ["externalUserId": "favorite userId"]
Analytics.logEvent(withName:"changeUser", parameters: parameters)
```
```obj-c
NSDictionary *parameters = @{@"externalUserId" : userId};
[FIRAnalytics logEventWithName:@"changeUser" parameters:parameters];
```
### Step 4: Add a custom tag provider {#adding-ios-google-tag-provider}
With the tags and triggers set up, you will also need to implement Google Tag Manager in your iOS app which can be found in Google's [documentation](https://developers.google.com/tag-manager/ios/v5/).
After Google Tag Manager is installed in your app, add a custom tag provider to call Braze SDK methods based on the tags you've configured within Google Tag Manager.
Be sure to note the "Class Path" to the file - this is what you'll enter when setting up a tag in the [Google Tag Manager](https://tagmanager.google.com/) console.
This example highlights one of many ways you can structure your custom tag provider. Specifically, it shows how to determine which Braze SDK method to call based on the `actionType` key-value pair sent from the GTM Tag. This example assumes you've assigned the Braze instance as a variable in the AppDelegate.
The `actionType` supported in this example are `logEvent`, `customAttribute`, and `changeUser`, but you may prefer to change how your tag provider handles data from Google Tag Manager.
Add the following code to your `BrazeGTMTagManager.swift` file.
```swift
import FirebaseAnalytics
import GoogleTagManager
import BrazeKit
let ActionTypeKey: String = "actionType"
// Custom Events
let LogEventAction: String = "logEvent"
let LogEventName: String = "eventName"
// Custom Attributes
let CustomAttributeAction: String = "customAttribute"
let CustomAttributeKey: String = "customAttributeKey"
let CustomAttributeValueKey: String = "customAttributeValue"
// Change User
let ChangeUserAction: String = "changeUser"
let ChangeUserExternalUserId: String = "externalUserId"
@objc(BrazeGTMTagManager)
final class BrazeGTMTagManager : NSObject, TAGCustomFunction {
@objc func execute(withParameters parameters: [AnyHashable : Any]!) -> NSObject! {
var parameters: [String : Any] = parameters as! [String : Any]
guard let actionType: String = parameters[ActionTypeKey] as? String else {
print("There is no Braze action type key in this call. Doing nothing.")
return nil
}
parameters.removeValue(forKey: ActionTypeKey)
if actionType == LogEventAction {
logEvent(parameters: parameters)
} else if actionType == CustomAttributeAction {
logCustomAttribute(parameters: parameters)
} else if actionType == ChangeUserAction {
changeUser(parameters: parameters)
}
return nil
}
func logEvent(parameters: [String : Any]) {
var parameters: [String : Any] = parameters
guard let eventName: String = parameters[LogEventName] as? String else { return }
parameters.removeValue(forKey: LogEventName)
AppDelegate.braze?.logCustomEvent(name: eventName, properties: parameters)
}
func logCustomAttribute(parameters: [String: Any]) {
guard let customAttributeKey = parameters[CustomAttributeKey] as? String else { return }
let customAttributeValue = parameters[CustomAttributeValueKey]
if let customAttributeValue = customAttributeValue as? String {
AppDelegate.braze?.user.setCustomAttribute(key: customAttributeKey, value: customAttributeValue)
} else if let customAttributeValue = customAttributeValue as? Date {
AppDelegate.braze?.user.setCustomAttribute(key: customAttributeKey, value: customAttributeValue)
} else if let customAttributeValue = customAttributeValue as? Double {
AppDelegate.braze?.user.setCustomAttribute(key: customAttributeKey, value: customAttributeValue)
} else if let customAttributeValue = customAttributeValue as? Bool {
AppDelegate.braze?.user.setCustomAttribute(key: customAttributeKey, value: customAttributeValue)
} else if let customAttributeValue = customAttributeValue as? Int {
AppDelegate.braze?.user.setCustomAttribute(key: customAttributeKey, value: customAttributeValue)
} else if let customAttibuteValue = customAttributeValue as? [String] {
AppDelegate.braze?.user.setCustomAttributeArray(key: customAttributeKey, array: customAttibuteValue)
}
}
func changeUser(parameters: [String: Any]) {
guard let userId = parameters[ChangeUserExternalUserId] as? String else { return }
AppDelegate.braze?.changeUser(userId: userId)
}
}
```
Add the following code to your `BrazeGTMTagManager.h` file:
```obj-c
@import Firebase;
@import GoogleTagManager;
@interface BrazeGTMTagManager : NSObject
@end
```
And add the following code to your `BrazeGTMTagManager.m` file:
```obj-c
#import
#import "BrazeGTMTagManager.h"
#import "BrazeKit"
#import "AppDelegate.h"
static NSString *const ActionTypeKey = @"actionType";
// Custom Events
static NSString *const LogEventAction = @"logEvent";
static NSString *const LogEventEventName = @"eventName";
// Custom Attributes
static NSString *const CustomAttributeAction = @"customAttribute";
static NSString *const CustomAttributeKey = @"customAttributeKey";
static NSString *const CustomAttributeValueKey = @"customAttributeValue";
// Change User
static NSString *const ChangeUserAction = @"changeUser";
static NSString *const ChangeUserExternalUserId = @"externalUserId";
@implementation BrazeGTMTagManager
- (NSObject *)executeWithParameters:(NSDictionary *)parameters {
NSMutableDictionary *mutableParameters = [parameters mutableCopy];
NSString *actionType = mutableParameters[ActionTypeKey];
if (!actionType) {
NSLog(@"There is no Braze action type key in this call. Doing nothing.", nil);
return nil;
}
[mutableParameters removeObjectForKey:ActionTypeKey];
if ([actionType isEqualToString:LogEventAction]) {
[self logEvent:mutableParameters];
} else if ([actionType isEqualToString:CustomAttributeAction]) {
[self logCustomAttribute:mutableParameters];
} else if ([actionType isEqualToString:ChangeUserAction]) {
[self changeUser:mutableParameters];
} else {
NSLog(@"Invalid action type. Doing nothing.");
}
return nil;
}
- (void)logEvent:(NSMutableDictionary *)parameters {
NSString *eventName = parameters[LogEventEventName];
[parameters removeObjectForKey:LogEventEventName];
[AppDelegate.braze logCustomEvent:eventName
properties:parameters];
}
- (void)logCustomAttribute:(NSMutableDictionary *)parameters {
NSString *customAttributeKey = parameters[CustomAttributeKey];
id customAttributeValue = parameters[CustomAttributeValueKey];
if ([customAttributeValue isKindOfClass:[NSString class]]) {
[AppDelegate.braze logCustomEvent:customAttributeKey
properties:parameters];
} else if ([customAttributeValue isKindOfClass:[NSDate class]]) {
[AppDelegate.braze.user setCustomAttributeWithKey:customAttributeKey
dateValue:customAttributeValue];
} else if ([customAttributeValue isKindOfClass:[NSNumber class]]) {
if (strcmp([customAttributeValue objCType], [@(YES) objCType]) == 0) {
[AppDelegate.braze.user setCustomAttributeWithKey:customAttributeKey
boolValue:[(NSNumber *)customAttributeValue boolValue]];
} else if (strcmp([customAttributeValue objCType], @encode(short)) == 0 ||
strcmp([customAttributeValue objCType], @encode(int)) == 0 ||
strcmp([customAttributeValue objCType], @encode(long)) == 0) {
[AppDelegate.braze.user setCustomAttributeWithKey:customAttributeKey
intValue:[(NSNumber *)customAttributeValue integerValue]];
} else if (strcmp([customAttributeValue objCType], @encode(float)) == 0 ||
strcmp([customAttributeValue objCType], @encode(double)) == 0) {
[AppDelegate.braze.user setCustomAttributeWithKey:customAttributeKey
doubleValue:[(NSNumber *)customAttributeValue doubleValue]];
} else {
NSLog(@"Could not map NSNumber value to Braze custom attribute:%@", customAttributeValue);
}
} else if ([customAttributeValue isKindOfClass:[NSArray class]]) {
[AppDelegate.braze.user setCustomAttributeArrayWithKey:customAttributeKey
array:customAttributeValue];
}
}
- (void)changeUser:(NSMutableDictionary *)parameters {
NSString *userId = parameters[ChangeUserExternalUserId];
[AppDelegate.braze changeUser:userId];
}
@end
```
# Set up authentication for the Braze SDK
Source: /docs/developer_guide/sdk_integration/authentication/index.md
# Set up SDK authentication
> SDK Authentication allows you to supply cryptographic proof (generated server-side) to SDK requests made on behalf of logged-in users.
## How it works
After you enable this feature in your app, you can configure the Braze dashboard to reject any requests with an invalid or missing JSON Web Token (JWT), which includes:
- Sending custom events, attributes, purchases, and session data
- Creating new users in your Braze workspace
- Updating standard user profile attributes
- Receiving or triggering messages
Now you can prevent unauthenticated logged-in users from using your app's SDK API key to perform malicious actions, such as impersonating your other users.
## Setting up authentication
### Step 1: Set up your server {#server-side-integration}
#### Step 1.1: Generate a public/private key-pair {#generate-keys}
Generate an RSA256 public/private key-pair. The public key will eventually be added to the Braze dashboard, while the private key should be stored securely on your server.
We recommend an RSA Key with 2048 bits for use with the RS256 JWT algorithm.
**Warning:**
Remember to keep your private keys _private_. Never expose or hard-code your private key in your app or website. Anyone who knows your private key can impersonate or create users on behalf of your application.
#### Step 1.2: Create a JSON Web Token for the current user {#create-jwt}
Once you have your private key, your server-side application should use it to return a JWT to your app or website for the currently logged-in user.
Typically, this logic could go wherever your app would normally request the current user's profile; such as a login endpoint or wherever your app refreshes the current user's profile.
When generating the JWT, the following fields are expected:
**JWT Header**
| Field | Required | Description |
| ----- | -------- | ----------------------------------- |
| `alg` | Yes | The supported algorithm is `RS256`. |
| `typ` | Yes | The type should equal `JWT`. |
{: .reset-td-br-1 .reset-td-br-2 .reset-td-br-3 role="presentation" }
**JWT Payload**
| Field | Required | Description |
| ----- | -------- | -------------------------------------------------------------------------------------- |
| `sub` | Yes | The "subject" should equal the User ID you supply Braze SDK when calling `changeUser` |
| `exp` | Yes | The "expiration" of when you want this token to expire. |
{: .reset-td-br-1 .reset-td-br-2 .reset-td-br-3 role="presentation" }
**Tip:**
To learn more about JSON Web Tokens, or to browse the many open source libraries that simplify this signing process, check out [https://jwt.io](https://jwt.io).
### Step 2: Configure the SDK {#sdk-integration}
This feature is available as of the following [SDK versions](https://www.braze.com/docs/user_guide/engagement_tools/campaigns/ideas_and_strategies/new_features/#filtering-by-most-recent-app-versions):
**Note:**
For iOS integrations, this page details the steps for the Braze Swift SDK. For sample usage in the legacy AppboyKit iOS SDK, reference [this file](https://github.com/Appboy/appboy-ios-sdk/blob/master/Example/Stopwatch/Sources/AppDelegate.m) and [this file](https://github.com/Appboy/appboy-ios-sdk/blob/master/Example/Stopwatch/Sources/Utils/SdkAuthDelegate.m).
#### Step 2.1: Enable authentication in the Braze SDK.
When this feature is enabled, the Braze SDK will append the current user's last known JWT to network requests made to Braze Servers.
**Note:**
Don't worry, initializing with this option alone won't impact data collection in any way, until you start [enforcing authentication](#braze-dashboard) within the Braze dashboard.
When calling `initialize`, set the optional `enableSdkAuthentication` property to `true`.
```javascript
import * as braze from "@braze/web-sdk";
braze.initialize("YOUR-API-KEY-HERE", {
baseUrl: "YOUR-SDK-ENDPOINT-HERE",
enableSdkAuthentication: true,
});
```
SDK Authentication must be enabled during native SDK initialization. Add the following configuration to your native iOS and Android code:
**iOS (AppDelegate.swift)**
```swift
import BrazeKit
import braze_react_native_sdk
let configuration = Braze.Configuration(
apiKey: "{YOUR-BRAZE-API-KEY}",
endpoint: "{YOUR-BRAZE-ENDPOINT}"
)
configuration.api.sdkAuthentication = true
let braze = BrazeReactBridge.perform(
#selector(BrazeReactBridge.initBraze(_:)),
with: configuration
).takeUnretainedValue() as! Braze
```
**Android (braze.xml)**
```xml
true
```
After enabling SDK Authentication in the native layer, you can use the React Native JavaScript methods shown in the following steps.
When configuring the Braze instance, call `setIsSdkAuthenticationEnabled` to `true`.
```java
BrazeConfig.Builder brazeConfigBuilder = new BrazeConfig.Builder()
.setIsSdkAuthenticationEnabled(true);
Braze.configure(this, brazeConfigBuilder.build());
```
Alternatively, you can add `true` to your braze.xml.
When configuring the Braze instance, call `setIsSdkAuthenticationEnabled` to `true`.
```kotlin
BrazeConfig.Builder brazeConfigBuilder = BrazeConfig.Builder()
.setIsSdkAuthenticationEnabled(true)
Braze.configure(this, brazeConfigBuilder.build())
```
Alternatively, you can add `true` to your braze.xml.
To enable SDK Authentication, set the `configuration.api.sdkAuthentication` property of your `BRZConfiguration` object to `YES` before initializing the Braze instance:
```objc
BRZConfiguration *configuration =
[[BRZConfiguration alloc] initWithApiKey:@"{BRAZE_API_KEY}"
endpoint:@"{BRAZE_ENDPOINT}"];
configuration.api.sdkAuthentication = YES;
Braze *braze = [[Braze alloc] initWithConfiguration:configuration];
AppDelegate.braze = braze;
```
To enable SDK Authentication, set the `configuration.api.sdkAuthentication` property of your `Braze.Configuration` object to `true` when initializing the SDK:
```swift
let configuration = Braze.Configuration(apiKey: "{YOUR-BRAZE-API-KEY}",
endpoint: "{YOUR-BRAZE-ENDPOINT}")
configuration.api.sdkAuthentication = true
let braze = Braze(configuration: configuration)
AppDelegate.braze = braze
```
Currently, SDK Authentication must be enabled as part of initializing the SDK in native iOS and Android code. To enable SDK Authentication in the Flutter SDK, follow the integrations for iOS and Android from the other tabs. After SDK Authentication is enabled, the rest of the feature can be integrated in Dart.
SDK Authentication must be enabled as part of initializing the SDK in native iOS and Android code. When enabled in the native layer, you can use Flutter SDK methods to pass the JWT signature.
**iOS**
To enable SDK Authentication, set the `configuration.api.sdkAuthentication` property to `true` in your native iOS code:
```swift
let configuration = Braze.Configuration(apiKey: "{YOUR-BRAZE-API-KEY}", endpoint: "{YOUR-BRAZE-ENDPOINT}")
configuration.api.sdkAuthentication = true
let braze = Braze(configuration: configuration)
```
**Android (braze.xml)**
```xml
true
```
After enabling SDK Authentication in the native layer, you can use the Flutter SDK methods shown in the following steps.
SDK Authentication must be enabled during native SDK initialization. Add the following configuration to your native iOS and Android code:
**iOS**
Set the `SDKAuthenticationEnabled` property to `true` in your configuration file:
```xml
SDKAuthenticationEnabled
```
**Android (braze.xml)**
```xml
true
```
After enabling SDK Authentication in the native layer, you can use the Unity C# methods shown in the following steps.
SDK Authentication must be enabled during native SDK initialization. Add the following configuration to your native iOS and Android code:
**iOS**
To enable SDK Authentication, set the `enableSDKAuthentication` property to `true` in your `config.xml`:
```xml
```
**Android (braze.xml)**
```xml
true
```
After enabling SDK Authentication in the native layer, you can use the Cordova JavaScript methods shown in the following steps.
SDK Authentication must be enabled during native SDK initialization. Configure SDK Authentication separately for iOS and Android:
**iOS**
To enable SDK Authentication, set the `configuration.Api.SdkAuthentication` property to `true` when initializing the SDK:
```csharp
var configuration = new BRZConfiguration("YOUR-API-KEY", "YOUR-ENDPOINT");
configuration.Api.SdkAuthentication = true;
var braze = new Braze(configuration);
```
**Android (braze.xml)**
```xml
true
```
After enabling SDK Authentication, you can use the .NET MAUI methods shown in the following steps.
When using the Braze Expo plugin, set the `enableSdkAuthentication` property to `true` in your app configuration. This automatically configures SDK Authentication in the native iOS and Android layers without requiring manual native code changes.
**app.json or app.config.js**
```json
{
"expo": {
"plugins": [
[
"@braze/expo-plugin",
{
"enableSdkAuthentication": true
}
]
]
}
}
```
After enabling SDK Authentication in your app configuration, you can use the React Native JavaScript methods shown in the React Native tab for the following steps.
**Note:**
For a complete implementation example, see the [Braze Expo plugin sample app](https://github.com/braze-inc/braze-expo-plugin/blob/main/example/components/Braze.tsx) on GitHub.
#### Step 2.2: Set the current user's JWT
Whenever your app calls the Braze `changeUser` method, also supply the JWT that was [generated server-side](#braze-dashboard).
You can also configure the token to refresh mid-session for the current user.
**Note:**
Keep in mind that `changeUser` should only be called when the User ID has _actually changed_. You should not use this method as a way to update the authentication token (JWT) if the user ID has not changed.
Supply the JWT when calling [`changeUser`](https://js.appboycdn.com/web-sdk/latest/doc/modules/braze.html#changeuser):
```javascript
import * as braze from "@braze/web-sdk";
braze.changeUser("NEW-USER-ID", "JWT-FROM-SERVER");
```
Or, when you have refreshed the user's token mid-session:
```javascript
import * as braze from "@braze/web-sdk";
braze.setSdkAuthenticationSignature("NEW-JWT-FROM-SERVER");
```
Supply the JWT when calling [`changeUser`](https://braze-inc.github.io/braze-react-native-sdk/classes/Braze.Braze-1.html#changeUser):
```typescript
import Braze from '@braze/react-native-sdk';
Braze.changeUser("NEW-USER-ID", "JWT-FROM-SERVER");
```
Or, when you have refreshed the user's token mid-session:
```typescript
import Braze from '@braze/react-native-sdk';
Braze.setSdkAuthenticationSignature("NEW-JWT-FROM-SERVER");
```
Supply the JWT when calling [`changeUser`](https://braze-inc.github.io/braze-android-sdk/kdoc/braze-android-sdk/com.braze/-i-braze/change-user.html):
```java
Braze.getInstance(this).changeUser("NEW-USER-ID", "JWT-FROM-SERVER");
```
Or, when you have refreshed the user's token mid-session:
```java
Braze.getInstance(this).setSdkAuthenticationSignature("NEW-JWT-FROM-SERVER");
```
Supply the JWT when calling [`changeUser`](https://braze-inc.github.io/braze-android-sdk/kdoc/braze-android-sdk/com.braze/-i-braze/change-user.html):
```kotlin
Braze.getInstance(this).changeUser("NEW-USER-ID", "JWT-FROM-SERVER")
```
Or, when you have refreshed the user's token mid-session:
```kotlin
Braze.getInstance(this).setSdkAuthenticationSignature("NEW-JWT-FROM-SERVER")
```
Supply the JWT when calling [`changeUser`](https://braze-inc.github.io/braze-swift-sdk/documentation/brazekit/braze/changeuser(userid:sdkauthsignature:fileid:line:)):
```objc
[AppDelegate.braze changeUser:@"userId" sdkAuthSignature:@"JWT-FROM-SERVER"];
```
Or, when you have refreshed the user's token mid-session:
```objc
[AppDelegate.braze setSDKAuthenticationSignature:@"NEW-JWT-FROM-SERVER"];
```
Supply the JWT when calling [`changeUser`](https://braze-inc.github.io/braze-swift-sdk/documentation/brazekit/braze/changeuser(userid:sdkauthsignature:fileid:line:)):
```swift
AppDelegate.braze?.changeUser(userId: "userId", sdkAuthSignature: "JWT-FROM-SERVER")
```
Or, when you have refreshed the user's token mid-session:
```swift
AppDelegate.braze?.set(sdkAuthenticationSignature: "NEW-JWT-FROM-SERVER")
```
Supply the JWT when calling [`changeUser`](https://js.appboycdn.com/web-sdk/latest/doc/modules/braze.html#changeuser):
```dart
braze.changeUser("userId", sdkAuthSignature: "JWT-FROM-SERVER")
```
Or, when you have refreshed the user's token mid-session:
```dart
braze.setSdkAuthenticationSignature("NEW-JWT-FROM-SERVER")
```
Supply the JWT when calling `changeUser`:
```dart
import 'package:braze_plugin/braze_plugin.dart';
BrazePlugin braze = BrazePlugin();
braze.changeUser("NEW-USER-ID", sdkAuthSignature: "JWT-FROM-SERVER");
```
Or, when you have refreshed the user's token mid-session:
```dart
import 'package:braze_plugin/braze_plugin.dart';
BrazePlugin braze = BrazePlugin();
braze.setSdkAuthenticationSignature("NEW-JWT-FROM-SERVER");
```
Supply the JWT when calling `ChangeUser`:
```csharp
BrazeBinding.ChangeUser("NEW-USER-ID", "JWT-FROM-SERVER");
```
Or, when you have refreshed the user's token mid-session:
```csharp
BrazeBinding.SetSdkAuthenticationSignature("NEW-JWT-FROM-SERVER");
```
Supply the JWT when calling `changeUser`:
```javascript
BrazePlugin.changeUser("NEW-USER-ID", "JWT-FROM-SERVER");
```
Or, when you have refreshed the user's token mid-session:
```javascript
BrazePlugin.setSdkAuthenticationSignature("NEW-JWT-FROM-SERVER");
```
Supply the JWT when calling `ChangeUser`:
**iOS**
```csharp
Braze.SharedInstance?.ChangeUser("NEW-USER-ID", "JWT-FROM-SERVER");
```
Or, when you have refreshed the user's token mid-session:
```csharp
Braze.SharedInstance?.SetSDKAuthenticationSignature("NEW-JWT-FROM-SERVER");
```
**Android**
```csharp
Braze.GetInstance(this).ChangeUser("NEW-USER-ID", "JWT-FROM-SERVER");
```
Or, when you have refreshed the user's token mid-session:
```csharp
Braze.GetInstance(this).SetSdkAuthenticationSignature("NEW-JWT-FROM-SERVER");
```
When using the Braze Expo plugin, use the same React Native SDK methods. Supply the JWT when calling `changeUser`:
```typescript
import Braze from '@braze/react-native-sdk';
Braze.changeUser("NEW-USER-ID", "JWT-FROM-SERVER");
```
Or, when you have refreshed the user's token mid-session:
```typescript
import Braze from '@braze/react-native-sdk';
Braze.setSdkAuthenticationSignature("NEW-JWT-FROM-SERVER");
```
#### Step 2.3: Register a callback function for invalid tokens {#sdk-callback}
When this feature is set as [Required](#enforcement-options), the following scenarios will cause SDK requests to be rejected by Braze:
- JWT was expired by the time is was received by the Braze API
- JWT was empty or missing
- JWT failed to verify for the public keys you uploaded to the Braze dashboard
You can use `subscribeToSdkAuthenticationFailures` to subscribe to be notified when the SDK requests fail for one of these reasons. A callback function contains an object with the relevant [`errorCode`](#error-codes), `reason` for the error, the `userId` of the request (the user cannot be anonymous), and the authentication token (JWT) that caused the error.
Failed requests will periodically be retried until your app supplies a new valid JWT. If that user is still logged in, you can use this callback as an opportunity to request a new JWT from your server and supply the Braze SDK with this new valid token.
When you receive an authentication error, verify the `userId` in the error matches your currently logged-in user, then fetch a new signature from your server and provide it to the Braze SDK. You can also log these errors to your monitoring or error-reporting service.
**Tip:**
These callback methods are a great place to add your own monitoring or error-logging service to keep track of how often your Braze requests are being rejected.
```javascript
import * as braze from "@braze/web-sdk";
braze.subscribeToSdkAuthenticationFailures((error) => {
console.error("SDK authentication failed:", error);
console.log("Error code:", error.errorCode);
console.log("User ID:", error.userId);
// Note: Do not log error.signature as it contains sensitive authentication credentials
// Verify the error.userId matches the currently logged-in user
// Fetch a new token from your server and set it
fetchNewSignature(error.userId).then((newSignature) => {
braze.setSdkAuthenticationSignature(newSignature);
});
});
```
```typescript
import Braze from '@braze/react-native-sdk';
const sdkAuthErrorSubscription = Braze.addListener(
Braze.Events.SDK_AUTHENTICATION_ERROR,
(error) => {
console.log(`SDK Authentication for ${error.userId} failed with error code ${error.errorCode}.`);
const updated_jwt = getNewTokenSomehow(error);
Braze.setSdkAuthenticationSignature(updated_jwt);
}
);
// Don't forget to remove the listener when done
// sdkAuthErrorSubscription.remove();
```
```java
Braze.getInstance(this).subscribeToSdkAuthenticationFailures(error -> {
String newToken = getNewTokenSomehow(error);
Braze.getInstance(getContext()).setSdkAuthenticationSignature(newToken);
});
```
```kotlin
Braze.getInstance(this).subscribeToSdkAuthenticationFailures({ error: BrazeSdkAuthenticationErrorEvent ->
val newToken: String = getNewTokenSomehow(error)
Braze.getInstance(getContext()).setSdkAuthenticationSignature(newToken)
})
```
```objc
Braze *braze = [[Braze alloc] initWithConfiguration:configuration];
braze.sdkAuthDelegate = delegate;
AppDelegate.braze = braze;
// Method to implement in delegate
- (void)braze:(Braze *)braze sdkAuthenticationFailedWithError:(BRZSDKAuthenticationError *)error {
NSLog(@"Invalid SDK Authentication Token.");
NSString *newSignature = getNewTokenSomehow(error);
[AppDelegate.braze setSDKAuthenticationSignature:newSignature];
}
```
```swift
let braze = Braze(configuration: configuration)
braze.sdkAuthDelegate = delegate
AppDelegate.braze = braze
// Method to implement in delegate
func braze(_ braze: Braze, sdkAuthenticationFailedWithError error: Braze.SDKAuthenticationError) {
print("Invalid SDK Authentication Token.")
let newSignature = getNewTokenSomehow(error)
AppDelegate.braze?.set(sdkAuthenticationSignature: newSignature)
}
```
```dart
braze.setBrazeSdkAuthenticationErrorCallback((BrazeSdkAuthenticationError error) async {
print("Invalid SDK Authentication Token.");
final newSignature = getNewTokenSomehow(error);
braze.setSdkAuthenticationSignature(newSignature);
});
```
```dart
import 'package:braze_plugin/braze_plugin.dart';
BrazePlugin braze = BrazePlugin();
braze.setBrazeSdkAuthenticationErrorCallback((BrazeSdkAuthenticationError error) async {
print("SDK Authentication for ${error.userId} failed with error code ${error.errorCode}.");
String newSignature = getNewTokenSomehow(error);
braze.setSdkAuthenticationSignature(newSignature);
});
```
**iOS**
Set the SDK authentication delegate in your native iOS implementation:
```csharp
public class SdkAuthDelegate : BRZSdkAuthDelegate
{
public void Braze(Braze braze, BRZSDKAuthenticationError error)
{
Debug.Log("Invalid SDK Authentication Token.");
string newSignature = GetNewTokenSomehow(error);
BrazeBinding.SetSdkAuthenticationSignature(newSignature);
}
}
```
**Android**
```csharp
Braze.GetInstance(this).SubscribeToSdkAuthenticationFailures((error) => {
string newToken = GetNewTokenSomehow(error);
Braze.GetInstance(this).SetSdkAuthenticationSignature(newToken);
});
```
```javascript
BrazePlugin.subscribeToSdkAuthenticationFailures((error) => {
console.log(`SDK Authentication for ${error.user_id} failed with error code ${error.error_code}.`);
const newSignature = getNewTokenSomehow(error);
BrazePlugin.setSdkAuthenticationSignature(newSignature);
});
```
**iOS**
Set the SDK authentication delegate on your `Braze` instance:
```csharp
public class SdkAuthDelegate : BRZSdkAuthDelegate
{
public override void Braze(Braze braze, BRZSDKAuthenticationError error)
{
Console.WriteLine("Invalid SDK Authentication Token.");
string newSignature = GetNewTokenSomehow(error);
Braze.SharedInstance?.SetSDKAuthenticationSignature(newSignature);
}
}
// Set the delegate during initialization
var configuration = new BRZConfiguration("YOUR-API-KEY", "YOUR-ENDPOINT");
configuration.Api.SdkAuthentication = true;
var braze = new Braze(configuration);
braze.SdkAuthDelegate = new SdkAuthDelegate();
```
**Android**
```csharp
Braze.GetInstance(this).SubscribeToSdkAuthenticationFailures((error) => {
string newToken = GetNewTokenSomehow(error);
Braze.GetInstance(this).SetSdkAuthenticationSignature(newToken);
});
```
When using the Braze Expo plugin, use the same React Native SDK methods:
```typescript
import Braze from '@braze/react-native-sdk';
const sdkAuthErrorSubscription = Braze.addListener(
Braze.Events.SDK_AUTHENTICATION_ERROR,
(error) => {
console.log(`SDK Authentication for ${error.userId} failed with error code ${error.errorCode}.`);
const updated_jwt = getNewTokenSomehow(error);
Braze.setSdkAuthenticationSignature(updated_jwt);
}
);
// Don't forget to remove the listener when done
// sdkAuthErrorSubscription.remove();
```
### Step 3: Enable authentication in the dashboard {#braze-dashboard}
Next, you can enable authentication in the Braze dashboard for the apps you set up previously.
Keep in mind that SDK requests will continue to flow as usual without authentication unless the app's SDK Authentication setting is set to **Required** in the Braze dashboard.
Should anything go wrong with your integration (for example, your app is incorrectly passing tokens to the SDK, or your server is generating invalid tokens), disable this feature in the Braze dashboard, and data will resume to flow as usual without verification.
#### Enforcement options {#enforcement-options}
In the dashboard **Manage Settings** page, each app has three SDK Authentication states which control how Braze verifies requests.
| Setting| Description|
| ------ | ---------- |
| **Disabled** | Braze will not verify the JWT supplied for a user. (Default Setting)|
| **Optional** | Braze will verify requests for logged-in users, but will not reject invalid requests. |
| **Required** | Braze will verify requests for logged-in users and will reject invalid JWTs.|
{: .reset-td-br-1 .reset-td-br-2 role="presentation" }

The **Optional** setting is a useful way to monitor the potential impact this feature will have on your app's SDK traffic.
An invalid JWT will be reported in both **Optional** and **Required** states, however only the **Required** state will reject SDK requests causing apps to retry and request a new JWT.
## Managing public keys {#key-management}
### Adding a public key
You can add up to three public keys for each app: a primary, a secondary, and a tertiary. You can also add the same key to more than one app if needed. To add a public key:
1. Go to the Braze dashboard and select **Settings** > **App Settings**.
2. Choose an app from your list of available apps.
3. Under **SDK Authentication**, select **Add Public Key**.
4. Enter an optional description, paste in your public key, then select **Add Public Key**.
### Assign a new primary key
To assign a secondary or tertiary key as your new primary key:
1. Go to the Braze dashboard and select **Settings** > **App Settings**.
2. Choose an app from your list of available apps.
3. Under **SDK Authentication**, choose a key and select **Manage** > **Make Primary Key**.
### Deleting a key
To delete a primary key, first [assign a new primary](#assign-a-new-primary-key), then delete your key. To delete a non-primary key:
1. Go to the Braze dashboard and select **Settings** > **App Settings**.
2. Choose an app from your list of available apps.
3. Under **SDK Authentication**, choose a non-primary key and select **Manage** > **Delete Public Key**.
## Analytics {#analytics}
Each app will show a breakdown of SDK Authentication errors collected while this feature is in the **Optional** and **Required** state.
Data is available in real-time, and you can hover over points in the chart to see a breakdown of errors for a given date.
{: style="max-width:80%"}
## Error codes {#error-codes}
| Error code| Error reason | Description | Steps to resolve |
| -------- | ------------ | --------- | --------- |
| 10 | `EXPIRATION_REQUIRED` | Expiration is a required field for Braze usage.| Add an `exp` or expiration field to your JWT creation logic. |
| 20 | `DECODING_ERROR` | Non-matching public key or a general uncaught error.| Copy your JWT into a JWT testing tool to diagnose why your JWT is an invalid format. |
| 21 | `SUBJECT_MISMATCH` | The expected and actual subjects are not the same.| The `sub` field should be the same user ID passed to the `changeUser` SDK method. |
| 22 | `EXPIRED` | The token provided has expired.| Extend your expiration or periodically refresh tokens before they expire. |
| 23 | `INVALID_PAYLOAD` | The token payload is invalid.| Copy your JWT into a JWT testing tool to diagnose why your JWT is an invalid format. |
| 24 | `INCORRECT_ALGORITHM` | The algorithm of the token is not supported.| Change your JWT to use `RS256` encryption. Other types are not supported. |
| 25 | `PUBLIC_KEY_ERROR` | The public key could not be converted into the proper format.| Copy your JWT into a JWT testing tool to diagnose why your JWT is an invalid format. |
| 26 | `MISSING_TOKEN` | No token was provided in the request.| Make sure you are passing a token when calling `changeUser(id, token)` and that your token is not blank.|
| 27 | `NO_MATCHING_PUBLIC_KEYS` | No public keys matched the provided token.| The private key used in the JWT does not match any public keys configured for your app. Confirm that you added the public keys to the correct app in your workspace that matches this API Key.|
| 28 | `PAYLOAD_USER_ID_MISMATCH` | Not all user IDs in the request payload match as is required.| This is unexpected and can result in a malformed payload. Open a support ticket for assistance. |
{: .reset-td-br-1 .reset-td-br-2 .reset-td-br-3 .reset-td-br-4 role="presentation" }
## Frequently Asked Questions (FAQ) {#faq}
#### Does this feature need to be enabled on all of my apps at the same time? {#faq-app-by-app}
No, this feature can be enabled for specific apps and doesn't need to be used on all of your apps, all at once.
#### What happens to users who are still on older versions of my app? {#faq-sdk-backward-compatibility}
When you begin to enforce this feature, requests made by older app versions will be rejected by Braze and retried by the SDK. After users upgrade their app to a supported version, those enqueued requests will begin to be accepted again.
If possible, you should push users to upgrade as you would for any other mandatory upgrade. Alternatively, you can keep the feature [Optional](#enforcement-options) until you see that an acceptable percentage of users have upgraded.
#### What expiration should I use when generating a JWT? {#faq-expiration}
We recommend using the higher value of average session duration, session cookie/token expiration, or the frequency at which your application would otherwise refresh the current user's profile.
#### What happens if a JWT expires in the middle of a user's session? {#faq-jwt-expiration}
Should a user's token expire mid-session, the SDK has a [callback function](#sdk-callback) it will invoke to let your app know that a new JWT is needed to continue sending data to Braze.
#### What happens if my server-side integration breaks and I can no longer create a JWT? {#faq-server-downtime}
If your server is not able to provide a JWT or you notice some integration issue, you can always disable the feature in the Braze dashboard.
Once disabled, any pending failed SDK requests will eventually be retried by the SDK and accepted by Braze.
#### Why does this feature use public/private keys instead of shared secrets? {#faq-shared-secrets}
When using shared secrets, anyone with access to that shared secret, such as the Braze dashboard page, would be able to generate tokens and impersonate your end-users.
Instead, we use public/private keys so that not even Braze Employees (let alone your company users) have access to your private keys.
#### How will rejected requests be retried? {#faq-retry-logic}
When a request is rejected because of an authentication error, the SDK will invoke your callback used to refresh the user's JWT.
Requests will retry periodically using an exponential backoff approach. After 50 consecutive failed attempts, retries will be paused until the next session start. Each SDK also has a method to manually request a data flush.
#### Can you use SDK authentication for anonymous users? {#faq-anonymous-users}
No. SDK authentication will no-op for anonymous users.
# Debugging the Braze SDK
Source: /docs/developer_guide/sdk_integration/debugging/index.md
# Debugging the Braze SDK
> Learn how to use the Braze SDK's built-in debugger, so you can troubleshoot issues for your SDK-powered channels, without needing to enable verbose logging in your app.
**Tip:**
For deeper investigation, you can also [enable verbose logging](https://www.braze.com/docs/developer_guide/sdk_integration/verbose_logging) to capture detailed SDK output and [learn how to read verbose logs](https://www.braze.com/docs/developer_guide/sdk_integration/reading_verbose_logs) for specific channels.
## Prerequisites
To use the Braze SDK debugger, you'll need "View PII" and "View User Profiles PII Compliant" permissions. To download your debugging session logs, you'll also need the "Export User Data" permission. Additionally, your Braze SDK needs to meet or point to the following minimum versions:
## Debugging the Braze SDK
**Tip:**
To enable debugging for the Braze Web SDK, you can [use a URL parameter](https://www.braze.com/docs/developer_guide/platform_integration_guides/web/initial_sdk_setup/#logging).
### Step 1: Close your app
Before you start your debugging session, close the app that's currently experiencing issues. You can relaunch the app at the start of your session.
### Step 2: Create a debugging session
In Braze, go to **Settings**, then under **Setup and Testing**, select **SDK Debugger**.

Select **Create debugging session**.

### Step 3: Select a user
Search for a user using their email address, `external_id`, user alias, or push token. When you're ready to start your session, select **Select User**.
{: style="max-width:85%;"}
### Step 4: Relaunch the app
First, launch the app and confirm that your device is paired. If the pairing is successful, relaunch your app—this will ensure that app's initialization logs are fully captured.
### Step 5: Complete the reproduction steps
After relaunching your app, follow the steps to reproduce the error.
**Tip:**
When you're reproducing the error, be sure to follow the reproduction steps as closely as possible, so you can create [quality logs](#step-6-export-your-session-logs-optional).
### Step 6: End your session
When you're finished with your reproduction steps, select **End Session** > **Close**.
{: style="max-width:85%;"}
**Note:**
It may take a few minutes to generate your logs depending on your session length and network connectivity.
### Step 7: Share or export your session (optional)
After your session, you can export your session logs as a CSV file. Additionally, others can use your **Session ID** to search for your debug session, so you don't need to send them your logs directly.

# Verbose logging
Source: /docs/developer_guide/sdk_integration/verbose_logging/index.md
# Verbose logging
> Verbose logging outputs detailed, low-level information from the Braze SDK, giving you visibility into how the SDK initializes, communicates with servers, and processes messaging channels like push, in-app messages, and Content Cards.
When something isn't working as expected—such as a push notification not arriving, an in-app message not displaying, or user data not syncing—verbose logs help you identify the root cause. Instead of guessing, you can see exactly what the SDK is doing at each step.
**Tip:**
If you want to debug without enabling verbose logging manually, you can use the [SDK Debugger](https://www.braze.com/docs/developer_guide/sdk_integration/debugging) to create debugging sessions directly in the Braze dashboard.
## When to use verbose logging
Turn on verbose logging when you need to:
- **Verify SDK initialization**: Confirm the SDK starts correctly with the right API key and endpoint.
- **Troubleshoot message delivery**: Check whether push tokens are registered, in-app messages are triggered, or Content Cards are synced.
- **Debug deep links**: Verify the SDK receives and opens deep links from push, in-app messages, or Content Cards.
- **Validate session tracking**: Confirm sessions start and end as expected.
- **Diagnose connectivity issues**: Inspect the network requests and responses between the SDK and Braze servers.
## Enabling verbose logging
**Important:**
Verbose logs are intended for development and testing environments only. Disable verbose logging before releasing your app to production to prevent sensitive information from being exposed.
Enable verbose logging before any other SDK calls in your `Application.onCreate()` method to capture the most complete output.
**In code:**
```java
BrazeLogger.setLogLevel(Log.VERBOSE);
```
```kotlin
BrazeLogger.logLevel = Log.VERBOSE
```
**In `braze.xml`:**
```xml
2
```
To verify that verbose logging is enabled, search for `V/Braze` in your Logcat output. For example:
```
2077-11-19 16:22:49.591 ? V/Braze v9.0.01 .bo.app.d3: Request started
```
For full details, see [Android SDK logging](https://www.braze.com/docs/developer_guide/sdk_integration#android_enabling-logs).
Set the log level to `.debug` on your `Braze.Configuration` object during initialization.
```swift
let configuration = Braze.Configuration(
apiKey: "",
endpoint: ""
)
configuration.logger.level = .debug
let braze = Braze(configuration: configuration)
```
```objc
BRZConfiguration *configuration = [[BRZConfiguration alloc] initWithApiKey:@""
endpoint:@""];
[configuration.logger setLevel:BRZLoggerLevelDebug];
Braze *braze = [[Braze alloc] initWithConfiguration:configuration];
```
The `.debug` level is the most verbose and is recommended for troubleshooting. For full details, see [Swift SDK logging](https://www.braze.com/docs/developer_guide/sdk_integration#swift_log-levels).
Add `?brazeLogging=true` as a URL parameter, or enable logging during SDK initialization:
```javascript
braze.initialize('YOUR-API-KEY', {
baseUrl: 'YOUR-SDK-ENDPOINT',
enableLogging: true
});
```
You can also toggle logging after initialization:
```javascript
braze.toggleLogging();
```
Logs appear in the **Console** tab of your browser's developer tools. For full details, see [Web SDK logging](https://www.braze.com/docs/developer_guide/sdk_integration#web_logging).
1. Open the Braze Configuration Settings by navigating to **Braze** > **Braze Configuration**.
2. Select the **Show Braze Android Settings** dropdown.
3. In the **SDK Log Level** field, enter `0`.
Set the log level during SDK configuration:
```javascript
const configuration = new Braze.BrazeConfiguration('YOUR-API-KEY', 'YOUR-SDK-ENDPOINT');
configuration.logLevel = Braze.LogLevel.Verbose;
```
## Collecting logs
After you enable verbose logging, reproduce the issue you're troubleshooting, then collect the logs from your platform's console or debugging tool.
Use **Logcat** in Android Studio to capture logs:
1. Connect your device or start an emulator.
2. In Android Studio, open **Logcat** from the bottom panel.
3. Filter by `V/Braze` or `D/Braze` to isolate Braze SDK output.
4. Reproduce the issue.
5. Copy the relevant logs and save them to a text file.
Use the **Console** app on macOS to capture logs:
1. Install the app on your device with verbose logging enabled.
2. Connect your device to your Mac.
3. Open the **Console** app and select your device from the **Devices** sidebar.
4. Filter logs by `Braze` or `BrazeKit` in the search bar.
5. Reproduce the issue.
6. Copy the relevant logs and save them to a text file.
Use your browser's developer tools:
1. Open your browser's developer tools (usually **F12** or **Cmd+Option+I**).
2. Go to the **Console** tab.
3. Reproduce the issue.
4. Copy the console output and save it to a text file.
**Tip:**
When collecting logs for Braze Support, start logging before launching your app and continue until well after the issue occurs. This helps capture the full sequence of events.
## Reading verbose logs
Verbose logs follow a consistent structure that helps you trace what the SDK is doing. To learn how to interpret log output for specific channels, including what key entries to look for and common troubleshooting patterns, see [Reading verbose logs](https://www.braze.com/docs/developer_guide/sdk_integration/reading_verbose_logs).
## Sharing logs with Braze Support
When you contact Braze Support with an SDK issue, include the following:
1. **Verbose log file**: A complete log capture from before app launch through the issue occurrence.
2. **Steps to reproduce**: A clear description of the actions that trigger the issue.
3. **Expected vs. actual behavior**: What you expected to happen and what happened instead.
4. **SDK version**: The version of the Braze SDK you're using.
5. **Platform and OS version**: For example, iOS 18.0, Android 14, or Chrome 120.
# Reading verbose logs
Source: /docs/developer_guide/sdk_integration/reading_verbose_logs/index.md
# Reading verbose logs
> This page explains how to interpret the verbose log output from the Braze SDK. For each messaging channel, you'll find the key log entries to look for, what they mean, and common issues to watch for.
Before you start, make sure you've [enabled verbose logging](https://www.braze.com/docs/developer_guide/sdk_integration/verbose_logging) and know how to collect logs on your platform.
## Sessions
Sessions are the foundation of Braze analytics and message delivery. Many messaging features—including in-app messages and Content Cards—depend on a valid session starting before they can function. If sessions aren't logging correctly, investigate this first. For more information about enabling session tracking, see [Step 5: Enable user session tracking](https://www.braze.com/docs/developer_guide/sdk_integration/?sdktab=android#android_step-5-enable-user-session-tracking).
### Key log entries
**Session start:**
```
Started user session (id: )
```
**Session end:**
```
Ended user session (id: , duration: s)
Logged event:
- userId:
- sessionId:
- data: sessionEnd(duration: )
```
**Session start:**
Look for the following entries:
```
New session created with ID:
Session start event for new session received
Completed the openSession call
Opened session with activity:
```
Filter network requests for your configured Braze endpoint (for example, sdk.iad-01.braze.com) to see the session start (`ss`) event.
**Session end:**
```
Closed session with activity:
Closed session with session ID:
Requesting data flush on internal session close flush timer.
```
### What to check
- Verify that a session start log appears when the app launches.
- If you don't see a session start, check that the SDK is properly initialized and that `openSession` (Android) is being called.
- On Android, confirm that a network request is being made to the Braze endpoint. If you don't see this, verify your API key and endpoint configuration.
## Push notifications
Push notification logs help you verify that device tokens are registered, notifications are delivered, and click events are tracked.
### Token registration
When a session starts, the SDK registers the device's push token with Braze.
```
Updated push notification authorization:
- authorization: authorized
Received remote notifications device token:
```
Filter for requests to your configured Braze endpoint (for example, sdk.iad-01.braze.com) and look for `push_token` in the request body attributes:
```
"attributes": [
{
"push_token": "",
"user_id": ""
}
]
```
Also confirm the device info includes:
```
"device": {
"ios_push_auth": "authorized",
"remote_notification_enabled": 1
}
```
Look for the FCM registration log:
```
Registering for Firebase Cloud Messaging token using sender id:
```
Verify the following:
- `com_braze_firebase_cloud_messaging_registration_enabled` is `true`.
- The FCM sender ID matches your Firebase project.
A common error is `SENDER_ID_MISMATCH`, which means the configured sender ID doesn't match your Firebase project.
### What to check
- If `push_token` is missing from the request body, the token wasn't captured. Verify push setup in your app configuration.
- If `ios_push_auth` shows `denied` or `provisional`, the user hasn't granted full push permission.
- On Android, if you see `SENDER_ID_MISMATCH`, update your FCM sender ID to match your Firebase project.
### Push delivery and click
When a push notification is tapped, the SDK logs the processing and click events.
```
Processing push notification:
- date:
- silent: false
- userInfo: {
"ab": { ... },
"ab_uri": "",
"aps": {
"alert": {
"body": "",
"title": ""
}
}
}
```
Followed by the click event:
```
Logged event:
- userId:
- sessionId:
- data: pushClick(campaignId: ...)
```
If the push contains a deep link, you'll also see:
```
Opening '':
- channel: notification
- useWebView: false
- isUniversalLink: false
```
```
BrazeFirebaseMessagingService: Got Remote Message from FCM
```
Followed by the push payload and display logs. For deep links, look for the Deep Link Delegate or `UriAction` entries.
### What to check
- Verify the push payload contains the expected `title`, `body`, and any deep links (`ab_uri`).
- Confirm a `pushClick` event is logged after tapping.
- If the click event is missing, check that your app delegate or notification handler is properly forwarding push events to the Braze SDK.
## In-app messages
In-app message logs show you the full lifecycle: delivery from the server, triggering based on events, display, impression logging, and click tracking.
### Message delivery
When a user starts a session and is eligible for an in-app message, the SDK receives the message payload from the server.
Filter for responses from your configured Braze endpoint (for example, sdk.iad-01.braze.com) containing the in-app message data.
The response body contains the message payload, including:
```
"templated_message": {
"data": {
"message": "...",
"type": "HTML",
"message_close": "SWIPE",
"trigger_id": ""
},
"type": "inapp"
}
```
Look for the trigger event matching log:
```
Triggering action:
```
This confirms the in-app message was matched to a trigger event.
### Message display and impression
```
In-app message ready for display:
- triggerId: (campaignId: , ...)
- extras: { ... }
```
Followed by the impression log:
```
Logged event:
- userId:
- sessionId:
- data: inAppMessageImpression(triggerIds: [...])
```
```
handleExistingInAppMessagesInStackWithDelegate:: Displaying in-app message
```
### Click and button events
When a user taps a button or closes the message:
```
Logged event:
- userId:
- sessionId:
- data: inAppMessageButtonClick(triggerIds: [...], buttonId: "")
```
If no further triggered messages match, you'll also see:
```
No matching trigger for event.
```
This is expected behavior when no additional in-app messages are configured for the event.
Filter for requests to your configured Braze endpoint (for example, sdk.iad-01.braze.com) and look for events with the name `sbc` (button click) or `si` (impression) in the request body.
### What to check
- If the in-app message doesn't display, verify that a session start is logged first.
- Filter for responses from your configured Braze endpoint to confirm the message payload was delivered.
- If impressions aren't logging, verify you haven't implemented a custom `inAppMessageDisplay` delegate that suppresses logging.
- If "No matching trigger for event" appears, this is normal and indicates that no additional in-app messages are configured for that event.
## Content Cards
Content Card logs help you verify that cards are synced to the device, displayed to the user, and that interactions (impressions, clicks, dismissals) are tracked.
### Card sync
Content Cards sync on session start and when a manual refresh is requested. If no session is logged, no Content Cards are displayed.
Filter for responses from your configured Braze endpoint (for example, sdk.iad-01.braze.com) containing the card data.
The response body contains the card data, including:
```
"cards": [
{
"id": "",
"tt": "",
"ds": "",
"tp": "short_news",
"v": 0,
"cl": 0,
"p": 1
}
]
```
Key fields:
- `v` (viewed): `0` = not viewed, `1` = viewed
- `cl` (clicked): `0` = not clicked, `1` = clicked
- `p` (pinned): `0` = not pinned, `1` = pinned
- `tp` (type): `short_news`, `captioned_image`, `classic`, etc.
```
Requesting content cards sync.
```
Followed by a POST request to your configured Braze endpoint (for example, sdk.iad-01.braze.com) containing user and device information.
### Impressions, clicks, and dismissals
**Impression:**
```
Logged event:
- userId:
- sessionId:
- data: contentCardImpression(cardIds: [...])
```
**Click:**
```
Logged event:
- userId:
- sessionId:
- data: contentCardClick(cardIds: [...])
```
If the card has a URL, you'll also see:
```
Opening '':
- channel: contentCard
- useWebView: true
```
**Dismissal:**
```
Logged event:
- userId:
- sessionId:
- data: contentCardDismissed(cardIds: [...])
```
Filter for requests to your configured Braze endpoint (for example, sdk.iad-01.braze.com) and look for event names in the request body:
- `cci` — Content Card impression
- `ccc` — Content Card click
- `ccd` — Content Card dismissed
### What to check
- **No cards displayed**: Verify that a session start is logged. Content Cards require an active session to sync.
- **Cards missing for new users**: New users on their first session may not see Content Cards until the next session. This is expected behavior.
- **Card exceeds size limit**: Content Cards over 2 KB aren't displayed and the message is aborted.
- **Card persists after stopping campaign**: Verify that the sync completed after the campaign was stopped. Content Cards are removed from the device after a successful sync. When stopping a campaign, ensure the option to remove active cards from user feeds is selected.
## Deep links
Deep link logs appear across push notifications, in-app messages, and Content Cards. The log structure is consistent regardless of the source channel.
When the SDK processes a deep link:
```
Opening '':
- channel:
- useWebView: false
- isUniversalLink: false
- extras: { ... }
```
Where `` is one of: `notification`, `inAppMessage`, or `contentCard`.
For deep links, look for the **Deep Link Delegate** or **UriAction** entries in Logcat. To test deep link resolution independently, run the following command:
```bash
adb shell am start -W -a android.intent.action.VIEW -d "" ""
```
This confirms whether the deep link resolves correctly outside of the Braze SDK.
### What to check
- Verify the deep link URL matches what you configured in the campaign.
- If the deep link works from one channel (for example, push) but not another (for example, Content Cards), check that your deep link handling implementation supports all channels.
- On iOS, universal links require additional handling. If universal links aren't working from Braze channels, verify that your app implements the `BrazeDelegate` protocol for URL handling.
- On Android, check that automatic deep link handling is disabled if you use a custom handler. Otherwise the default handler may conflict with your implementation.
## User identification
When a user is identified with an `external_id`, the SDK logs a change user event.
```
changeUser called with:
```
Key things to know:
- Call `changeUser` as soon as the user logs in—the sooner, the better.
- If a user logs out, there's no way to call `changeUser` to revert them to an anonymous user.
- If you don't want anonymous users, call `changeUser` during session start or app startup.
Filter for requests to your configured Braze endpoint (for example, sdk.iad-01.braze.com) and look for user identification in the request body:
```
"user_id": ""
```
## Network requests
Verbose logs include full HTTP request and response details for SDK communication with Braze servers. These are useful for diagnosing connectivity issues.
### Request structure
Filter for requests to your configured Braze endpoint (for example, sdk.iad-01.braze.com). The request structure includes:
```
[http] request POST:
- Headers:
- Content-Type: application/json
- X-Braze-Api-Key:
- X-Braze-Req-Attempt: 1
- X-Braze-Req-Tokens-Remaining:
- Body: { ... }
```
```
Making request(id = ) to
```
### What to check
- **API key**: Verify `XBraze-ApiKey` matches your workspace's API key.
- **Endpoint**: Confirm the request URL matches your configured SDK endpoint.
- **Retry attempts**: `XBraze-Req-Attempt` greater than 1 indicates the SDK is retrying a failed request, which may signal connectivity issues.
- **Rate limiting**: `XBraze-Req-Tokens-Remaining` shows the remaining request tokens. A low count may indicate the SDK is approaching rate limits.
- **Missing requests**: On Android, if you don't see a request to the Braze endpoint after session start, verify your API key and endpoint configuration.
## Common event abbreviations
In verbose log payloads, Braze uses abbreviated event names. Here's a reference:
| Abbreviation | Event |
|---|---|
| `ss` | Session start |
| `se` | Session end |
| `si` | In-app message impression |
| `sbc` | In-app message button click |
| `cci` | Content Card impression |
| `ccc` | Content Card click |
| `ccd` | Content Card dismissed |
| `lr` | Location recorded |
{: .reset-td-br-1 .reset-td-br-2 role="presentation" }
# Braze SDK rate limits
Source: /docs/developer_guide/sdk_integration/rate_limits/index.md
# Braze SDK rate limits
> Learn about the Braze SDK's intelligent, client-side rate limiting that optimizes battery life, reduces bandwidth usage, and ensures reliable data delivery.
## Understanding SDK rate limits
Braze SDK rate limiting uses the following features to optimize performance, minimize battery drain, reduce data usage, and ensure reliable data delivery:
### Asynchronous processing
The Braze SDK uses a token bucket algorithm for rate limiting. This approach allows for bursts of activity while maintaining long-term rate control. Instead of processing requests in a strict queue, the token bucket operates asynchronously:
- **Token generation**: Tokens are replenished at a steady rate into the bucket.
- **Request handling**: Any SDK call that arrives when a token is available proceeds immediately, regardless of when other calls arrived.
- **No strict ordering**: Requests don’t wait in line; multiple calls may compete for the next available token.
- **Burst handling**: Short bursts of activity are allowed if enough tokens are available at the time of the requests.
- **Rate control**: Long-term throughput is limited by the steady token replenishment rate.
This asynchronous flow helps the SDK respond quickly to available network capacity while maintaining predictable overall traffic levels.
### Adaptive rate limiting
The Braze SDK can adjust rate limits in real time to protect network infrastructure and maintain optimal performance. This approach:
- **Prevents overload**: Adjusts limits to avoid network congestion.
- **Optimizes performance**: Maintains smooth SDK operation under varying conditions.
- **Responds to conditions**: Adapts based on current network and usage patterns.
**Note:**
Because limits adapt in real time, exact bucket sizes and static values are not provided. They may change depending on network conditions and usage.
### Networking optimizations
The Braze SDK includes several built-in behaviors to improve efficiency, reduce battery usage, and handle varying network conditions:
- **Automatic batching**: Queues events and sends them in efficient batches.
- **Network-aware behavior**: Adjusts flush rates based on connectivity quality.
- **Battery optimization**: Minimizes radio wake-ups and network calls.
- **Graceful degradation**: Maintains functionality during poor network conditions.
- **Background/foreground awareness**: Optimizes behavior as the app’s lifecycle changes.
## Best practices
Follow these best practices to help avoid rate limit issues:
| Do this | Not this |
| --- | --- |
| Track meaningful user actions and milestones | Track every minor interaction or UI event |
| Refresh content only when necessary | Refresh content on every user action (like scroll events) |
| Let the SDK handle batching automatically | Force immediate data transmission (unless absolutely necessary) |
| Focus on events that add value to analytics | Call SDK methods in rapid succession without considering frequency |
{: .reset-td-br-1 .reset-td-br-2 role="presentation"}
## Getting help
If you're experiencing SDK rate limit issues, review the following networking methods:
- `requestImmediateDataFlush()`
- `requestContentCardsRefresh()`
- `refreshFeatureFlags()`
- `logCustomEvent()`
- `logPurchase()`
When contacting [support@braze.com](mailto:support@braze.com), please include the following details for each of the networking SDK methods you use:
```plaintext
Method name:
Frequency:
[Describe how often this is called, e.g., at every app launch, once per session]
Trigger/context:
[Describe what causes it to be called, e.g., button click, scroll event]
Code snippet:
[Paste the exact code where this method is called, one snippet for each time it is called]
Patterns in user flow that may cause bursts or excessive calls:
[Describe here]
```
# Integrate Braze with ChatGPT Apps
Source: /docs/developer_guide/sdk_integration/chatgpt_apps/index.md
# Integrate Braze with ChatGPT apps
> This guide covers how to integrate Braze with ChatGPT apps to enable analytics and event logging within AI-powered applications.
{: style="float:right;max-width:30%;border:none;" }
## Overview
ChatGPT apps provide a powerful platform for building AI conversational applications. By integrating Braze with your ChatGPT app, you can continue to maintain first-party data control in the age of AI, including how to:
- Track user engagement and behavior within your ChatGPT app (such as identifying which questions or chat features your customers use)
- Segment and retarget Braze campaigns based on AI interaction patterns (such as emailing users who have used the chat more than three times per week)
### Key benefits
- **Own your customer journey:** While users interact with your brand through ChatGPT, you maintain visibility into their behavior, preferences, and engagement patterns. This data flows directly onto Braze user profiles, not just the AI platform's analytics.
- **Cross-platform retargeting:** Track user interactions in your ChatGPT app and retarget them across your owned channels (email, SMS, push notifications, in-app messaging) with personalized campaigns based on their AI usage patterns.
- **Return 1:1 promotional content to ChatGPT conversations:** Deliver Braze [in-app messages](https://www.braze.com/docs/user_guide/message_building_by_channel/in-app_messages), [Content Cards](https://www.braze.com/docs/user_guide/message_building_by_channel/content_cards), and more directly within your ChatGPT experience using the custom conversational UI components your team has built for your app.
- **Revenue attribution:** Track purchases and conversions that originate from ChatGPT app interactions.
## Prerequisites
Before integrating Braze with your ChatGPT app, you must have the following:
- A new web app and API key in your Braze workspace
- A [ChatGPT app](https://openai.com/index/introducing-apps-in-chatgpt/) created in the OpenAI platform ([OpenAI sample app](https://github.com/openai/openai-apps-sdk-examples))
# ChatGPT app integration
## Setup
### Step 1: Get the Braze integration file
Copy the `braze.js` file from our [ChatGPT apps integration repository](https://github.com/braze-inc/chatgpt-apps-braze-integration/blob/main/src/braze/braze.ts) to your project. This file contains all the necessary Braze SDK configuration and helper functions.
### Step 2: Install dependencies
Install our Web SDK for Braze's most up-to-date set of features:
**For client-side integration:**
```bash
npm install @braze/web-sdk
```
## Implementation
There are two ways to integrate Braze with your ChatGPT app depending on your use case:
### Client-side integration (custom widgets)
**Tip:**
**Recommended Approach:** This method enables rich messaging experiences and real-time user interaction tracking within your ChatGPT app widgets.
For displaying Braze messaging and tracking user interactions within your custom ChatGPT app widgets, use the Web SDK integration. A full messaging example can be found in our sample repository [here](https://github.com/braze-inc/chatgpt-apps-braze-integration/tree/main/src/inbox).
#### Configure widget metadata
Add the following metadata to your MCP server file to allow Braze domains, ensuring to update the CDN domain based on [your region](https://www.braze.com/docs/developer_guide/platforms/web/content_security_policy):
```javascript
"openai/widgetCSP": {
connect_domains: ["https://YOUR-SDK-ENDPOINT"],
resource_domains: [
"https://appboy-images.com",
"https://braze-images.com",
"https://cdn.braze.eu",
"https://use.fontawesome.com"
],
}
```
Replace `YOUR-SDK-ENDPOINT` with your actual Braze SDK endpoint.
#### Set up the useBraze hook
```javascript
import { useBraze } from "./utils/braze";
function YourWidget() {
const braze = useBraze({
apiKey: "your-braze-api-key",
baseUrl: "your-braze-endpoint.braze.com",
});
useEffect(() => {
if (!braze.isInitialized) {
return;
}
// Set user identity
braze.changeUser("user-id-123");
// Log widget interactions
braze.logCustomEvent("viewed_pizzaz_list");
}, [braze.isInitialized]);
return (
// Your widget JSX
);
}
```
#### Display Braze Content Cards
```javascript
const [cards, setCards] = useState([]);
useEffect(() => {
// Get cached content cards
setCards(braze.getCachedContentCards()?.cards ?? []);
// Subscribe to content card updates
braze.subscribeToContentCardsUpdates((contentCards) => {
setCards(contentCards.cards);
});
// Open session
braze.openSession();
return () => {
braze.removeAllSubscriptions();
}
}, []);
```
#### Track widget events
```javascript
// Track user interactions within your widget
const handleButtonClick = () => {
braze.logCustomEvent("widget_button_clicked", {
button_type: "save_list",
widget_name: "pizza_list"
});
};
const handleItemInteraction = (itemId) => {
braze.logCustomEvent("item_interacted", {
item_id: itemId,
interaction_type: "view_details"
});
};
```
### Server-side integration (MCP server)
If you also need a server-side integration for messaging functionality on your MCP server, contact `mcp-product@braze.com`. For tracking events and purchases from your MCP server, use our [REST API](https://www.braze.com/docs/api/home).
# About version management for the Braze SDK
Source: /docs/developer_guide/sdk_integration/version_management/index.md
# About version management
> Learn about version management for the Braze SDK, so your app can stay up-to-date with the latest features and quality improvements. Because older versions of the SDK may not receive the latest patch, bugfix, or support, we recommend always keeping your it up-to-date as a part of your ongoing development lifecycle.
## Versioning recommendations
All Braze SDKs adhere to the [Semantic Versioning Specification (SemVer)](https://semver.org/), so given a version number `MAJOR.MINOR.PATCH`, we recommend the following:
|Version|About this Version|Recommendation|
|-------|------------------|--------------|
| `PATCH` | Updates are always non-breaking, and include important bug fixes. They'll always be safe. | You should always try to update to the latest patch version of your current major and minor version immediately. |
| `MINOR` | Updates are always non-breaking, and include net new functionality. They'll never require changes in your application code. | While you don't need to do this immediately, you should update to the latest minor version of your current major version as soon as possible.
| `MAJOR` | Updates are breaking changes, and may require changes in your application code. | Because this may require code changes, update to the latest major version in a timeframe that works best for your team. |
{: .reset-td-br-1 .reset-td-br-2 .reset-td-br-3 role="presentation"}
**Note:**
Sometimes new Android or Apple OS updates require changes to the Braze SDK. To ensure your app is compatible with newer phones, it's important you keep your SDK up-to-date.
## About known issues
To ensure our changes won't break your build pipelines, **we will never alter or remove a release after it's been published to a distribution system**—even if that particular release has known issues.
In these cases, we'll document the issue to the [Braze SDK changelog](https://www.braze.com/docs/developer_guide/changelogs/), then release a new patch for the impacted major or minor versions as soon as possible.
# Android 13 Upgrade Guide
Source: /docs/developer_guide/platforms/android/android_13/index.md
# Upgrading to Android 13
> This guide describes relevant changes introduced in Android 13 (2022) and the required upgrade steps for your Braze Android SDK integration.
Refer to the [Android 13 developer documentation](https://developer.android.com/about/versions/13) for a full migration guide.
## Android 13 Braze SDK
To prepare for Android 13, please upgrade your Braze SDK to the [latest version (v21.0.0+)](https://github.com/braze-inc/braze-android-sdk/blob/master/CHANGELOG.md#2300). Doing so will give you access to our new ["no-code" push primer feature](https://www.braze.com/docs/user_guide/message_building_by_channel/push/best_practices/push_primer_messages/).
## Changes in Android 13
### Push permission {#push-permission}
Android 13 introduces a [major change](https://developer.android.com/about/versions/13/changes/notification-permission) in how users manage apps that send push notifications. In Android 13, apps are required to obtain permission before push notifications can be shown.
{: style="float:right;max-width:430px;width:50%;margin-left:15px;border:0"}
This new permission follows a similar pattern to iOS and Web push, where you only have one attempt to obtain permission. If a user chooses `Don't Allow` or dismisses the prompt, your app cannot ask for permission again.
Note that apps are granted an [exemption](https://developer.android.com/about/versions/13/changes/notification-permission#eligibility) for users who previously had push notifications enabled prior to updating to Android 13. These users [will remain eligible](https://developer.android.com/about/versions/13/changes/notification-permission#existing-apps) to receive push when they update to Android 13 without having to request permission.
#### Permission prompt timing {#push-permission-timing}
**Targeting Android 13**
Apps targeting Android 13 can control when to request permission and show the native push prompt.
If your user upgrades from Android 12 to 13, your app was previously installed, and you were already sending push, the system automatically pre-grants the new notification permission to all eligible apps. In other words, these apps can continue to send notifications to users, and users don't see a runtime permission prompt.
For more details on this see Android's Developer Documentation for [effects on updates to existing apps](https://developer.android.com/about/versions/13/changes/notification-permission#existing-apps).
**Targeting Android 12 or earlier**
If your app does not yet target Android 13, then a new user on Android 13 installs your app, they will automatically see a push permission prompt when your app creates its first notification channel (via `notificationManager.createNotificationChannel`). Users who already have your app installed and then upgrade to Android 13 are never shown a prompt and are automatically granted push permission.
**Note:**
Braze SDK v23.0.0 automatically creates a default notification channel if one does not already exist when a push notification is received. If you don't target Android 13, this will cause the push permission prompt to be shown, which is required to show the notification.
## Preparing for Android 13 {#next-steps}
It is strongly recommended that your app targets Android 13 in order to control when users are prompted for push permission.
This will allow you to optimize your [push opt-in rates](https://www.braze.com/resources/articles/android-13-developer-preview-push-opt-ins-arrive-for-android-apps) by prompting users at more appropriate times and will lead to a better user experience in how and when your app asks for push permission.
To start using our new ["no-code" push primer feature](https://www.braze.com/docs/user_guide/message_building_by_channel/push/best_practices/push_primer_messages/), upgrade your Android SDK to the [latest version (v23.0.0+)](https://github.com/braze-inc/braze-android-sdk/blob/master/CHANGELOG.md#2300).
# Upgrading to iOS 18
Source: /docs/developer_guide/platforms/swift/ios_18/index.md
# Upgrading to iOS 18
> Curious about how Braze is preparing for the upcoming iOS release? This article summarizes our insights into the iOS 18 release to help you create a seamless experience for you and your users.
Apple's [WWDC](https://developer.apple.com/wwdc24/) took place June 9th - 11th 2024. Learn more about their announcements in our [blog post](https://www.braze.com/resources/articles/wwdc-announcements-bring-apple-intelligence-rcs-and-more-to-ios-18), or read on to learn how you can leverage iOS 18 with Braze.
## Changes in iOS 18
### Live Activities on Apple Watch
[Live Activities](https://www.braze.com/docs/developer_guide/push_notifications/live_notifications/?sdktab=swift) will be supported on watchOS 11. No additional setup is required. However, Apple offers the option to customize the watch interface.
### Apple Vision Pro
The Vision Pro is now available in China, Japan, Singapore, Australia, Canada, France, Germany, and the UK. Check out our blog to see how [Braze supports visionOS](https://www.braze.com/resources/articles/building-braze-a-new-era-of-customer-engagement-braze-announces-visionos-support).
### iPhone notifications on macOS
Apple's new [iPhone mirroring](https://www.apple.com/newsroom/2024/06/macos-sequoia-takes-productivity-and-intelligence-on-mac-to-new-heights/) feature allows users to receive iPhone notifications on their macOS devices. Keep in mind, some media types, such as Push Story images and GIFs, are not supported, since they can't be rendered as a macOS notification.
### Apple Intelligence
[Apple Intelligence](https://developer.apple.com/documentation/Updates/Apple-Intelligence) is now available for devices running iOS 18.1 and later.
As a Braze user, the most important new feature for you to be aware of are [notification summaries](https://support.apple.com/en-us/108781), which uses on-device processing to automatically group and generate text summaries for related push notifications sent from a single app. End-users can tap to expand a summary and view each push notification as they were originally sent.
Due to how these summaries are generated, you won't have control over their specific behavior or the generated text. However, this will not impact any analytics or reporting features, such as push-click tracking.

# visionOS support
Source: /docs/developer_guide/platforms/swift/visionos/index.md
# visionOS support
> Starting with [Braze Swift SDK 8.0.0](https://github.com/braze-inc/braze-swift-sdk/blob/main/CHANGELOG.md#800), you can leverage Braze with [visionOS](https://developer.apple.com/visionos/), Apple's spacial-computing platform for the Apple Vision Pro. For a sample visionOS app using Braze, see [Sample Apps](https://www.braze.com/docs/developer_guide/references/?tab=swift).
## Fully supported features
Most features available on iOS are also available on visionOS, including:
- Analytics (sessions, custom events, purchases, etc.)
- In-App Messaging (data models and UI)
- Content Cards (data models and UI)
- Push Notifications (user-visible with action buttons and silent notifications)
- Feature Flags
- Location Analytics
## Partially supported features
Some features are only partially supported on visionOS, but Apple is likely to address these in the future:
- Rich Push Notifications
- Images are supported.
- GIFs and videos display the preview thumbnail, but cannot be played.
- Audio playback is not supported.
- Push Stories
- Scrolling and selecting the Push Story page is supported.
- Navigating between Push Story pages using **Next** is not supported.
## Unsupported features
- Geofences Monitoring is not supported. Apple has not made the Core Location APIs for region monitoring available on visionOS.
- Live Activities are not supported. Currently, ActivityKit is only available on iOS and iPadOS.
# iOS 14 SDK Upgrade Guide
Source: /docs/developer_guide/platforms/swift/_archived_updates/ios_14/index.md
# iOS 14 SDK upgrade guide
> This guide describes Braze-related changes introduced in iOS 14 and the required upgrade steps for your Braze iOS SDK integration. For a complete list of new iOS 14 updates, see Apple's [iOS 14 Page](https://www.apple.com/ios/ios-14/).
**Tip:**
As of iOS 14.5, **IDFA** collection and [certain data sharing](https://developer.apple.com/app-store/user-privacy-and-data-use/#permission-to-track) will require the new [AppTrackingTransparency](https://developer.apple.com/documentation/apptrackingtransparency) Framework permission prompt ([Learn More](#idfa)).
#### Summary of iOS 14 breaking changes
- Apps targeting iOS 14 / Xcode 12 must use our [official iOS 14 release](https://github.com/Appboy/appboy-ios-sdk/releases/tag/3.27.0).
- Geofences are [no longer supported by iOS](https://developer.apple.com/documentation/corelocation/cllocationmanager/3600215-accuracyauthorization) for users who choose the new _approximate location_ permission.
- Use of the "Last Known Location" targeting features will require an upgrade to Braze iOS SDK v3.26.1+ for compatibility with _approximate location_ permission. Note that if you are using Xcode 12, you will need to upgrade to at least v3.27.0.
- As of iOS 14.5, IDFA collection and [certain data sharing](https://developer.apple.com/app-store/user-privacy-and-data-use/#permission-to-track) require the new [AppTrackingTransparency](https://developer.apple.com/documentation/apptrackingtransparency) Framework permission prompt.
- If you use the "Ad Tracking Enabled" field for campaign targeting or analytics, you will need to upgrade to Xcode 12 and use the new AppTrackingTransparency framework to report users' opt-in status.
## Upgrade summary
|If Your App Uses:|Upgrade Recommendation|Description|
|------|--------|---|
|Xcode 12|**Upgrade to iOS SDK v3.27 or later**|Customers using Xcode 12 must use v3.27.0+ for compatibility. If you experience any issues or questions related to our iOS 14 compatibility, open a new [GitHub issue](https://github.com/Appboy/appboy-ios-sdk/issues).|
|Most Recent Location| **Upgrade to iOS SDK v3.26.1 or later**|If you use the Most Recent Location targeting feature and are still using Xcode 11, you should upgrade to at least iOS SDK v3.26.1 which supports the new _Approximate Location_ feature. Older SDKs will not be able to reliably collect location when a user upgrades to iOS 14 _and_ choose Approximate Location.
Even though your app might not target iOS 14, your users may upgrade to iOS 14 and begin to use the new location accuracy option. Apps that do not upgrade to iOS SDK v3.26.1+ will not be able to reliably collect location attributes when users provide their _approximate location_ on iOS 14 devices.|
|IDFA Ad Tracking ID| **Upgrade to Xcode 12 and iOS SDK v3.27 may be required**|Sometime in 2021, Apple will begin to require a permission prompt for the collection of the IDFA. At that time, apps must upgrade to Xcode 12 and use the new `AppTrackingTransparency` framework in order to continue collecting IDFA. If you pass IDFA to the Braze SDK you must also upgrade to v3.27.0+ at that time.
Apps that do not use the new iOS 14 APIs will be unable to collect IDFA, and will instead collect a blank ID (`00000000-0000-0000-0000-000000000000`) after Apple begins to enforce this change in 2021. For more information on whether or not this applies to your app, see [IDFA details](#idfa).|
## iOS 14 behavior changes
### Approximate location permission
{: style="float:right;max-width:45%;margin-left:15px;"}
#### Overview
When requesting location permission, users will now have a choice to provide their _precise location_ (previous behavior), or the new _approximate location_. Approximate location will return a larger radius in which the user is located, instead of their exact coordinates.
#### Geofences {#geofences}
Geofences are [no longer supported by iOS](https://developer.apple.com/documentation/corelocation/cllocationmanager/3600215-accuracyauthorization) for users who choose the new _approximate location_ permission. While no updates are required for your Braze SDK integration, you may need to adjust your [location-based marketing strategy](https://www.braze.com/blog/geofencing-geo-targeting-beaconing-when-to-use/) for campaigns that rely on geofences.
#### Location targeting {#location-tracking}
To continue to collect users' _last known location_ when _approximate location_ is granted, your app will need to upgrade to at least v3.26.1 of the Braze iOS SDK. Keep in mind that the location will be less precise, and based on our testing has been upwards of 12,000 meters (7+ miles). When using the _last known location_ targeting options in the Braze dashboard, be sure to increase the location's radius to account for new _approximate locations_ (we recommend at least a 1 mile/1.6km radius).
Apps that do not upgrade the Braze iOS SDK to at least v3.26.1 will no longer be able to use location tracking when _approximate location_ is granted on iOS 14 devices.
Users who have already granted location access will continue to provide _precise location_ after upgrading.
Note that if you are using Xcode 12, you will need to upgrade to at least v3.27.0.
For more information on Approximate Location, see Apple's [What's New In Location](https://developer.apple.com/videos/play/wwdc2020/10660/) WWDC Video.
### IDFA and app tracking transparency {#idfa}
#### Overview
IDFA (Identifier for Advertisers) is an identifier provided by Apple for use with advertising and attribution partners for cross-device tracking and is tied to an individual's Apple ID.
Starting in iOS 14.5, a new permission prompt (launched by the new `AppTrackingTransparency` framework) must be shown to collect explicit user consent for IDFA. This permission prompt to "track you across apps and websites owned by other companies" will be requested similarly to how you'd prompt users to request their location.
If a user does not accept the prompt, or if you do not upgrade to Xcode 12's `AppTrackingTransparency` framework, then a blank IDFA value (`00000000-0000-0000-0000-000000000000`) will be returned, and your app will not be allowed to prompt the user again.
**Important:**
These IDFA updates will take effect after end-users upgrade their device to iOS 14.5. Ensure your app uses the new `AppTransparencyFramework` with Xcode 12 if you plan to collect IDFA.
#### Changes to Braze IDFA collection
{: style="float:right;max-width:25%;margin-left:15px;border:0"}
1. Braze will continue to allow apps to provide a user's IDFA value _to_ the Braze SDK.
2. The `ABK_ENABLE_IDFA_COLLECTION` compilation macro, which would conditionally compile in optional automatic IDFA collection, will no longer function in iOS 14 and has been removed in 3.27.0.
3. If you use the "Ad Tracking Enabled" field for campaign targeting or analytics, you will need to upgrade to Xcode 12 and use the new AppTrackingTransparency framework to report your users' opt-in status. The reason for this change is that in iOS 14, the old [`advertisingTrackingEnabled`](https://developer.apple.com/documentation/adsupport/asidentifiermanager/1614148-advertisingtrackingenabled) field will always return No.
4. If your app has used IDFA or IDFV as your Braze external ID, we strongly recommend migrating away from these identifiers in favor of a UUID. For more information on migrating external IDs, see our [External ID migration API endpoints](https://www.braze.com/docs/api/endpoints/user_data/external_id_migration/).
Read more from Apple about their [Privacy Updates](https://developer.apple.com/app-store/user-privacy-and-data-use/) and the new [App Tracking Transparency framework](https://developer.apple.com/documentation/apptrackingtransparency).
### Push authorization {#push-provisional-auth}
**Important:**
No changes to Provisional Push Authorization are included in iOS 14. In an earlier beta version of iOS 14, Apple introduced a change which has since been reverted back to prior behavior.
## iOS 14 new features
### App privacy and data collection overview {#app-privacy}
Since Dec 8, 2020, all submissions to the App Store require additional steps to adhere to [Apple's new App Privacy standards](https://developer.apple.com/app-store/app-privacy-details/).
#### Apple developer portal questionnaire
On the _Apple Developer Portal_:
* You will be asked to fill out a questionnaire to describe how your app or third-party partners collect data.
* The questionnaire is expected to always be up-to-date with your most recent release in the App Store.
* The questionnaire may be updated even without a new app submission.
* You will be required to paste a link to your app's Privacy Policy URL.
As you fill out your questionnaire, consult your legal team, and consider how your usage of Braze for the following fields may affect your disclosure requirements.
#### Braze default data collection
**Identifiers** - An anonymous device identifier is always collected by the Braze SDK. This is currently set to the device IDFV (identifier for vendor).
**Usage Data** - This can include Braze session data, as well as any event or attribute collection you use to measure product interaction.
#### Optional data collection
Data you may optionally be collecting through your usage of Braze:
**Location** - Both Approximate Location and Precise Location can optionally be collected by the Braze SDK. These feature are disabled by default.
**Contact Info** - This can include events and attributes related to the user's identity.
**Purchases** - This can include events and purchases logged on behalf of the user.
**Important:**
Note that this is not an exhaustive list. If you manually collect other information about your users in Braze that apply to other categories in the App Privacy Questionnaire, you will need to disclose those as well.
To learn more about this feature, see [Apple's Privacy and Data Use](https://developer.apple.com/app-store/user-privacy-and-data-use/).
# iOS 15 SDK Upgrade Guide
Source: /docs/developer_guide/platforms/swift/_archived_updates/ios_15/index.md
# iOS 15 SDK upgrade guide
> This guide outlines changes introduced in iOS 15 (WWDC21) and the required upgrade steps for your Braze iOS SDK integration. For a complete list of new iOS 15 updates, see Apple's [iOS 15 release notes](https://developer.apple.com/documentation/ios-ipados-release-notes/ios-ipados-15-release-notes).
## Transparency changes to UI navigations
As part of our annual testing of iOS betas, we have identified a change made by Apple which causes certain UI navigation bars to appear transparent instead of opaque. This will be visible on iOS 15 when using the Braze default UI for Content Cards, or when web deep links are opened inside your app instead of in a separate browser app.
To avoid this visual change in iOS 15, we strongly recommend you upgrade to the [Braze iOS SDK v4.3.2](https://github.com/Appboy/appboy-ios-sdk/releases/tag/4.3.2) as soon as possible, before users begin to upgrade their phone to the new iOS 15 operating system.
## New notification settings {#notification-settings}
iOS 15 introduced new notification features to help users stay focused and avoid frequent interruptions throughout the day. We're excited to offer support for these new features. These features do not require any additional SDK upgrades and will only be applied to users on iOS 15 devices.
### Focus modes {#focus-mode}
iOS 15 users can now create "Focus Modes"—custom profiles used to determine which notifications they want to break through their focus and display prominently.
{: style="float:right;max-width:25%;margin-left:15px;border:0"}
### Interruption levels {#interruption-levels}
In iOS 15, push notifications can be sent with one of four interruption levels:
* **Passive** (new) - No sound, no vibration, no screen waking, no break through of focus settings.
* **Active** (default) - Allows sound, vibration, screen waking, no break through of focus settings.
* **Time-Sensitive** (new) - Allows sound, vibration, screen waking, can break through system controls if allowed.
* **Critical** - Allows sound, vibration, screen waking, can break through system controls, and bypass ringer switch.
See [iOS notification options](https://www.braze.com/docs/user_guide/message_building_by_channel/push/ios/notification_options/#interruption-level) to learn more about how to set this option in iOS Push.
### Notification summary {#notification-summary}
{: style="float:right;max-width:25%;margin-left:15px;border:0"}
In iOS 15, users can (optionally) choose certain times throughout the day to receive a summary of notifications. Notifications that don't require immediate attention (such as sent as "Passive" or while the user is in Focus Mode) will be grouped to prevent constant interruptions throughout the day.
For each notification you send, you'll soon be able to specify a "relevance score" to control which notification should appear at the top of the summary.
See [iOS Notification Options](https://www.braze.com/docs/user_guide/message_building_by_channel/push/ios/notification_options/#relevance-score) to learn more about how to set a notification's "relevance score".
## Location buttons {#location-buttons}
iOS 15 introduces a new, convenient way for users to temporarily grant location access within an app.
The new location button builds off the existing "Allow Once" permission without repeatedly prompting users who click multiple times in the same session.
For more information, watch Apple's [Meet the Location Button](https://developer.apple.com/videos/play/wwdc2021/10102/) video from this year's Worldwide Developer Conference (WWDC).
**Tip:**
This feature gives you an extra chance to prompt users for permission! Users who have previously declined location permissions before iOS 15 will be shown a prompt when clicking the location button as an opportunity to reset the permission from the declined state one last time.
### Using location buttons with Braze
No additional integration is required when using location buttons with Braze. Your app should continue passing a user's location (once they've granted permission) as usual.
According to Apple, for users who have already shared background location access, the "While Using App" option will continue to grant that level of permission after they upgrade to iOS 15.
## Apple mail {#mail}
This year, Apple has announced many updates to email tracking and privacy. For more information, check out our [blog post](https://www.braze.com/resources/articles/9-ways-email-marketers-can-respond-to-apples-mail-privacy-protection-feature).
## Safari IP address location
In iOS 15, users will be able to configure Safari to anonymize or generalize the location determined from their IP addresses. Keep this in mind when using location-based targeting or segmentation.
# iOS 16 Upgrade Guide
Source: /docs/developer_guide/platforms/swift/_archived_updates/ios_16/index.md
# iOS 16 SDK upgrade guide
> This guide describes relevant changes introduced in iOS 16 (2022) and the impact on your Braze iOS SDK integration. Refer to the [iOS 16 release notes](https://developer.apple.com/documentation/ios-ipados-release-notes/ios-ipados-16-release-notes) for a full migration guide.
## Changes in iOS 16
### Safari Web Push {#safari-web-push}
Apple has announced two changes to their Web Push functionality.
#### Desktop Web Push (MacOS) {#macos-push}
Previously, Apple supported push notifications on macOS (desktop) using their own Safari push APIs.
Beginning in macOS Ventura (released October 24, 2022), [Safari has added support](https://webkit.org/blog/12824/news-from-wwdc-webkit-features-in-safari-16-beta/#web-push-for-macos) for Web Push APIs in addition to Safari push. This is an existing cross-browser API standard used in other popular browsers.
If you're already sending Web Push for Safari through Braze, no change is needed.
#### Mobile Web Push (iOS and iPadOS) {#ios-push}
Previously, Safari on iPhone and iPad did not support receiving push notifications.
In 2023, Apple will be adding support for Web Push on iPhone and iPad devices through Safari.
Braze will support this new iOS and iPadOS Web Push without requiring additional changes or upgrades.
## Preparing for iOS 16 {#next-steps}
While you do not need to upgrade your Braze iOS SDK for iOS 16, there are two other exciting updates:
1. Braze has launched a [new Swift SDK](https://github.com/braze-inc/braze-swift-sdk). This brings improved performance, new features, and many improvements.
2. Our Braze Swift SDK supports a new ["no-code" push primer feature](https://www.braze.com/docs/user_guide/message_building_by_channel/push/best_practices/push_primer_messages/)!
# iOS 17 Upgrade Guide
Source: /docs/developer_guide/platforms/swift/_archived_updates/ios_17/index.md
# iOS 17 upgrade guide
> Curious about how Braze is preparing for the upcoming iOS release? This article summarizes our insights into the iOS 17 release to help you create a seamless experience for you and your users.
## iOS 17 and Xcode 15 compatibility
The Braze Swift SDK and Objective-C SDK are both backward compatible with Xcode 14 and Xcode 15, and compatible with iOS 17 devices.
## Changes in iOS 17
### Link tracking and UTM parameter stripping
One of the important changes in iOS 17 is blocking UTM parameters in Safari. UTM parameters are pieces of code that are added to URLs, which are frequently used in marketing campaigns to measure the effectiveness of email, SMS, and other messaging channels.
This change does not impact Braze email click tracking and SMS link shortening sends.
### App Tracking Transparency
Apple announced its commitment to expand the scope of [Ad Tracking Transparency (ATT)](https://support.apple.com/en-us/HT212025), which enables users to control whether an app can access their activity on apps and websites belonging to other companies. The iOS 17 release contains two key ATT features: privacy manifests and code signing.
#### Privacy manifests
Apple now requires a privacy manifest file that describes the reason your app and third-party SDKs collect data, along with their data-collection methods. Starting with iOS 17.2, Apple will block all declared tracking endpoints in your app until the end-user accepts the ATT prompt.
Braze has released our own privacy manifest, along with new flexible APIs that automatically reroute declared tracking data to dedicated `-tracking` endpoints. For more information, see the [Braze privacy manifest](https://www.braze.com/docs/developer_guide/analytics/managing_data_collection/?sdktab=swift#swift_privacy-manifest).
#### Code signing
Code signing allows developers who use a third-party SDK in their application to validate that the same developer signed it as previous versions in Xcode.
### Braze SDK and privacy
Apple has also announced that they will release a list of third-party SDKs that are considered "privacy impacting" in late 2023. These SDKs are expected to have an especially high impact on user privacy by Apple.
Unlike traditional tracking SDKs that are designed to monitor users across multiple websites and applications, the Braze SDK focuses on first-party data messaging and user experiences.
While we do not expect the Braze SDK to be included in this list, we intend to monitor this situation closely and release any necessary updates.
# Browser Extensions Integration for Web
Source: /docs/developer_guide/platforms/web/browser_extensions/index.md
# Browser extension
> This article describes how to use the Braze Web SDK inside your Browser Extensions (Google Chrome, Firefox).
Integrate the Braze Web SDK within your browser extension to collect analytics and display rich messaging to users. This includes both **Google Chrome Extensions** and **Firefox Add-Ons**.
## What's supported
In general, since extensions are HTML and JavaScript, you can use Braze for the following:
* **Analytics**: Capture custom events, attributes, and even identify repeat users within your extension. Use these profile traits to power cross-channel messaging.
* **In-app messages**: Trigger in-app messages when users take action within your extension, using our native or custom HTML messaging.
* **Content Cards**: Add a feed of native cards to your extension for onboarding or promotional content.
* **Web Push**: Send timely notifications even when your web page is not currently open.
## What's not supported
* Service workers are not supported by the Braze Web SDK, however, this is on the roadmap for future consideration.
## Extension types
Braze can be included in the following areas of your extension:
| Area | Details | What's supported |
|--------|-------|------|
| Popup Page | The [Popup](https://developer.mozilla.org/en-US/docs/Mozilla/Add-ons/WebExtensions/user_interface/Popups) page is a dialog that can be shown to users when clicking on your extension's icon in the browser toolbar.| Analytics, in-app messages, and Content Cards |
| Background Scripts | [Background Scripts](https://developer.chrome.com/extensions/background_pages) (Manifest v2 only) allow your extension to inspect and interact with user navigation or modify webpages (for example, how ad blockers detect and change content on pages). | Analytics, in-app messages, and Content Cards.
Background scripts aren't visible to users, so for messaging, you would need to communicate with browser tabs or your popup page when displaying messages. |
| Options Pages | The [Options Page](https://developer.mozilla.org/en-US/docs/Mozilla/Add-ons/WebExtensions/user_interface/Options_pages) lets your users toggle settings within your extension. It's a standalone HTML page that opens a new tab. | Analytics, in-app messages, and Content Cards |
{: .reset-td-br-1 .reset-td-br-2, .reset-td-br-3 role="presentation" }
## Permissions
No additional permissions are required in your `manifest.json` when integrating the Braze SDK (`braze.min.js`) as a local file bundled with your extension.
However, if you use [Google Tag Manager](https://www.braze.com/docs/developer_guide/platform_integration_guides/web/google_tag_manager/), or reference the Braze SDK from an external URL, or have set a strict Content Security Policy for your extension, you will need to adjust the [`content_security_policy`](https://developer.chrome.com/extensions/contentSecurityPolicy) setting in your `manifest.json` to allow remote script sources.
## Getting started
**Tip:**
Before you get started, make sure you've read through the Web SDK's [Initial SDK setup guide](https://www.braze.com/docs/developer_guide/sdk_integration/?sdktab=web) to learn more about our JavaScript integration in general.
You may also want to bookmark the [JavaScript SDK reference](https://js.appboycdn.com/web-sdk/latest/doc/modules/braze.html) for full details on all of the different SDK methods and configuration options.
To integrate the Braze Web SDK, you'll first need to download a copy of the latest JavaScript library. This can be done using NPM or directly downloading it from the [Braze CDN](https://js.appboycdn.com/web-sdk/latest/braze.min.js).
Alternatively, if you prefer to use [Google Tag Manager](https://www.braze.com/docs/developer_guide/platform_integration_guides/web/google_tag_manager/) or use an externally hosted copy of the Braze SDK, keep in mind that loading external resources will require you to adjust your [`content_security_policy`](https://developer.chrome.com/extensions/contentSecurityPolicy) setting in your `manifest.json`.
Once downloaded, be sure to copy the `braze.min.js` file somewhere into your extension's directory.
### Extension popups {#popup}
To add Braze to an extension popup, reference the local JavaScript file in your `popup.html`, as you would in a regular website. If you're using Google Tag Manager, you can add Braze using our [Google Tag Manager templates](https://www.braze.com/docs/developer_guide/platform_integration_guides/web/google_tag_manager/) instead.
```html
popup.html
```
### Background script (Manifest v2 only) {#background-script}
To use Braze within your extension's background script, add the Braze library to your `manifest.json` in the `background.scripts` array. This will make the global `braze` variable available in your background script context.
```json
{
"manifest_version": 2,
"background": {
"scripts": [
"relative/path/to/braze.min.js",
"background.js"
]
}
}
```
### Options page {#options-page}
If you use an options page (via the `options` or `options_ui` manifest properties), you can include Braze just as you would in the [`popup.html` instructions](#popup).
## Initialization
Once the SDK is included, you can initialize the library as usual.
Since cookies are not supported in browser extensions, you can disable cookies by initializing with `noCookies: true`.
```javascript
braze.initialize("YOUR-API-KEY-HERE", {
baseUrl: "YOUR-API-ENDPOINT",
enableLogging: true,
noCookies: true
});
```
For more information on our supported initialization options, visit the [Web SDK reference](https://js.appboycdn.com/web-sdk/latest/doc/modules/braze.html#initialize).
## Push
Extension popup dialogs don't allow for push prompts (they don't have the URL bar in the navigation). So to register and request push permission within an extension's Popup dialog, you'll have to make use of an alternate domain workaround, as described in [Alternate push domain](https://www.braze.com/docs/developer_guide/platform_integration_guides/web/push_notifications/alternate_push_domain).
# Content Security Policy Headers for Web
Source: /docs/developer_guide/platforms/web/content_security_policy/index.md
# Content security policy headers
> Content-Security-Policy provides added security by restricting how and where content can be loaded on your website. This reference article covers which content security policy headers are needed with the Web SDK.
**Important:**
This article is intended for developers working on websites that enforce CSP rules and integrate with Braze. It is not intended as advice on how you should approach security.
**Note:**
This guide uses code samples from the Braze Web SDK 4.0.0+. To upgrade to the latest Web SDK version, see [SDK Upgrade Guide](https://github.com/braze-inc/braze-web-sdk/blob/master/UPGRADE_GUIDE.md).
## Nonce attributes {#nonce}
If you use a `nonce` value in your `script-src` or `style-src` directives, pass that value to the `contentSecurityNonce` initialization option to propagate it to newly created scripts and styles generated by the SDK:
```javascript
import * as braze from "@braze/web-sdk";
braze.initialize(apiKey, {
baseUrl: baseUrl,
contentSecurityNonce: "YOUR-NONCE-HERE", // assumes a "nonce-YOUR-NONCE-HERE" CSP value
});
```
## Directives {#directives}
### `connect-src` {#connect-src}
**Warning:**
Your URL must match the [API SDK endpoint](https://www.braze.com/docs/user_guide/administrative/access_braze/sdk_endpoints/) of your chosen `baseUrl` initialization option.
|URL|Information|
|---|-----------|
|`connect-src https://sdk.iad-01.braze.com`|Allows the SDK to communicate with Braze APIs. Change this URL to match the [API SDK endpoint](https://www.braze.com/docs/user_guide/administrative/access_braze/sdk_endpoints/) for your chosen `baseUrl` initialization option.|
{: .reset-td-br-1 .reset-td-br-2 role="presentation"}
### `script-src` {#script-src}
|URL|Information|
|---|-----------|
|`script-src https://js.appboycdn.com`|Required when using the CDN-hosted integration.|
|`script-src 'unsafe-eval'`|Required when using the integration snippet which contains reference to `appboyQueue`. To avoid using this directive, [integrate the SDK using NPM](https://www.braze.com/docs/developer_guide/platform_integration_guides/web/initial_sdk_setup/?tab=package%20manager) instead.|
|`script-src 'nonce-...'` or `script-src 'unsafe-inline'`|Required for certain in-app messages, such as custom HTML.|
{: .reset-td-br-1 .reset-td-br-2 role="presentation"}
### `img-src` {#img-src}
|URL|Information|
|---|-----------|
|`img-src: appboy-images.com braze-images.com cdn.braze.eu`|Required when using Braze CDN-hosted images. Hostnames may vary based on dashboard cluster.
**Important:** If you're using custom fonts, you also need to include `font-src`.|
{: .reset-td-br-1 .reset-td-br-2 role="presentation"}
## Font Awesome {#font-awesome}
To disable the automatic inclusion of Font Awesome, use the `doNotLoadFontAwesome` initialization option:
```javascript
import * as braze from "@braze/web-sdk";
braze.initialize(apiKey, {
baseUrl: baseUrl,
doNotLoadFontAwesome: true,
});
```
If you choose to use Font Awesome, the following CSP directives are required:
- `font-src https://use.fontawesome.com`
- `style-src https://use.fontawesome.com`
- `style-src 'nonce-...'` or `style-src 'unsafe-inline'`
# Accessibility
Source: /docs/developer_guide/platforms/web/accessibility/index.md
# Accessibility
> This article provides an overview of how Braze supports accessibility within your integration.
Braze Web SDK supports the standards provided by the [Web Content Accessibility Guidelines (WCAG 2.1)](https://www.w3.org/TR/WCAG21/). We maintain a [100/100 lighthouse score](https://developer.chrome.com/docs/lighthouse/accessibility/scoring) for content cards and in-app messages on all of our new builds to uphold our accessibility standard.
## Prerequisites
The minimum SDK version that satisfies WCAG 2.1 is close to v3.4.0. However, we recommend upgrading to at least v6.0.0 for major image tag fixes.
### Notable accessibility fixes
| Version | Type | Key changes |
|---------|------|-------------|
| **6.0.0** | **Major** | Images as `` tags, `imageAltText` or `language` fields, general UI accessibility improvements |
| **3.5.0** | Minor | Scrollable text accessibility improvements |
| **3.4.0** | Fix | Content Cards `article` role fix |
| **3.2.0** | Minor | 45x45px minimum touch targets for buttons |
| **3.1.2** | Minor | Default alt text for images |
| **2.4.1** | **Major** | Semantic HTML (`h1` or `button`), ARIA attributes, keyboard navigation, focus management |
| **2.0.5** | Minor | Focus management, keyboard navigation, labels |
{: .reset-td-br-1, .reset-td-br-2 role="presentation" }
## Supported accessibility features
We support these features for content cards and in-app messages:
- ARIA roles and labels
- Keyboard navigation support
- Focus management
- Screen reader announcements
- Alt text support for images
## Accessibility guidelines for SDK integrations
Refer to [Building accessible messages in Braze](https://www.braze.com/docs/user_guide/engagement_tools/messaging_fundamentals/accessibility) for general accessibility guidelines. This guide provides tips and best practices for maximum accessibility when integrating the Braze Web SDK into your web application.
### Content Cards
#### Setting a maximum height
To prevent Content Cards from taking up too much vertical space and improve accessibility, you can set a maximum height on the feed container, such as in this example:
```css
/* Limit the height of the Content Cards feed */
.ab-feed {
max-height: 600px; /* Adjust to your needs */
overflow-y: auto;
}
/* For inline feeds (non-sidebar), you may want to limit individual cards */
.ab-card {
max-height: 400px; /* Optional: limit individual card height */
overflow: hidden;
}
```
#### Viewport considerations
For Content Cards that are displayed inline, consider viewport constraints, such as in this example.
```css
/* Limit feed height on mobile to prevent covering too much screen */
@media (max-width: 768px) {
body > .ab-feed {
max-height: 80vh; /* Leave space for other content */
}
}
```
### In-app messages
**Warning:**
Do not put important information within slide up in-app messages, as they are not accessible for screen readers.
### Mobile considerations
#### Responsive design
The SDK includes responsive breakpoints. Confirm that your customizations work across screen sizes, such as in this example:
```css
/* Mobile-specific accessibility considerations */
@media (max-width: 768px) {
/* Ensure readable font sizes */
.ab-feed {
font-size: 14px; /* Minimum 14px for mobile readability */
}
/* Ensure sufficient touch targets */
.ab-card {
padding: 16px; /* Adequate padding for touch */
}
}
```
### Testing accessibility
#### Manual test checklist
Manually test your accessibility by completing these tasks:
- Navigate Content Cards and in-app messages with keyboard only (Tab, Enter, Space)
- Test with screen reader (NVDA, JAWS, VoiceOver)
- Verify all images have alt text
- Check color contrast ratios (use tools like WebAIM Contrast Checker)
- Test on mobile devices with touch
- Verify focus indicators are visible
- Test modal message focus trapping
- Verify all interactive elements are reachable by a keyboard
### Common accessibility issues
To avoid common accessibility issues, do the following:
1. **Keep focus styles:** The SDK's focus indicators are essential for keyboard users.
2. **Only use `display: none` on non-interactive elements:** Use `visibility: hidden` or `opacity: 0` to hide interactive elements.
3. **Don't override ARIA attributes:** The SDK sets appropriate ARIA roles and labels.
4. **Use `tabindex` attributes:** These control keyboard navigation order.
5. **Provide a scroll if you set `overflow: hidden`:** Confirm that scrollable content remains accessible.
6. **Don't interfere with built-in keyboard handlers:** Confirm that existing keyboard navigation works.
# Smart TV support for the Web Braze SDK
Source: /docs/developer_guide/platforms/web/smart_tvs/index.md
# Smart TV support
> The Braze Web SDK lets you collect analytics and display rich in-app messages and Content Card messages to Smart TV users, including [Samsung Tizen TVs](https://developer.samsung.com/smarttv/develop/specifications/tv-model-groups.html) and [LG TVs (webOS)](https://webostv.developer.lge.com/discover). This article covers how to use the Braze Web SDK to integrate with Smart TVs.
**Tip:**
For a complete technical reference, check out our [JavaScript Documentation](https://js.appboycdn.com/web-sdk/latest/doc/modules/braze.html) or our [sample apps](https://github.com/Appboy/smart-tv-sample-apps) to see the Web SDK running on a TV.
## Prerequisites
Before you can use this feature, you'll need to [integrate the Web Braze SDK](https://www.braze.com/docs/developer_guide/sdk_integration/?sdktab=web).
## Configuring the Web Braze SDK
There are two changes required when integrating with Smart TVs:
1. When downloading or importing the Web SDK, be sure to use the "core" bundle (available at `https://js.appboycdn.com/web-sdk/x.y/braze.core.min.js`, where `x.y` is the desired version). We recommend using the CDN version of our Web SDK, since the NPM version is written in native ES modules whereas the CDN version is transpiled down to ES5. If you prefer to use the [NPM version](https://www.npmjs.com/package/@braze/web-sdk), ensure you are using a bundler such as webpack that will remove unused code and that the code is transpiled down to ES5.
2. When initializing the Web SDK, you must set the `disablePushTokenMaintenance` and `manageServiceWorkerExternally` initialization options to `true`.
## Analytics
All of the same Web SDK methods for analytics can be used on Smart TVs. For a full walkthrough for tracking custom events, custom attributes, and more, see [Analytics](https://www.braze.com/docs/developer_guide/analytics/tracking_sessions/?tab=web).
## In-app messages and Content Cards
The Braze Web SDK supports both [in-app messages](https://www.braze.com/docs/developer_guide/in_app_messages/?sdktab=web) and [Content Cards](https://www.braze.com/docs/developer_guide/content_cards/?sdktab=web) on Smart TVs. Note that you must use the ["Core" Web SDK](https://www.npmjs.com/package/@braze/web-sdk) as rendering in-app messages and Content Cards is not supported using our standard UI display and should instead be customized by your app to fit into your TV App's experience.
For more information on how your Smart TV App can receive and display in-app messages, see [Triggering messages](https://www.braze.com/docs/developer_guide/in_app_messages/triggering_messages/?tab=web).
# TV and OTT Integrations for Braze
Source: /docs/developer_guide/platforms/tv_and_ott/index.md
# TV and OTT integrations
> As technology evolves to new platforms and devices, so can your messaging with Braze! Braze offers different engagement channels for a number of different TV Operating Systems and Over-the-Top (OTT) content delivery methods.
## Platforms and features
The following lists features and messaging channels supported today.
Device type
Data and analytics
In-app messages
Content Cards
Push notifications
Canvas
Feature Flags
Amazon Fire TV
Kindle Fire
Android TV
LG TV (webOS)
N/A
Samsung Tizen TV
N/A
Roku
N/A
Apple TV OS
Apple Vision Pro
- = Supported
- = Partial support
- = Not supported by Braze
- N/A = Not supported by OTT platform
## Integration guides
### Amazon Fire TV {#fire-tv}
Use the Braze Fire OS SDK to integrate with Amazon Fire TV devices.
Features include:
- Data and Analytics collection for cross-channel engagement
- Push Notifications (known as ["Heads Up Notifications"](https://developer.amazon.com/docs/fire-tv/notifications.html#headsup))
- The priority must be set to "HIGH" for these to appear. All notifications appear in the Fire TV settings menu.
- Content Cards
- Feature Flags
- In-app messages
- To show HTML messages on non-touch environments like TVs, set `com.braze.configuration.BrazeConfig.Builder.setIsTouchModeRequiredForHtmlInAppMessages` to `false` (available from [Android SDK v23.1.0](https://github.com/braze-inc/braze-android-sdk/blob/master/CHANGELOG.md#2310))
For more information, visit the [Fire OS integration guide](https://www.braze.com/docs/developer_guide/sdk_integration/?sdktab=android).
### Kindle Fire {#kindle-fire}
Use the Braze Fire OS SDK to integrate with Amazon Kindle Fire devices.
Features include:
- Data and Analytics collection for cross-channel engagement
- Push Notifications
- Content Cards
- Feature Flags
- In-app messages
For more information, visit the [Fire OS integration guide](https://www.braze.com/docs/developer_guide/sdk_integration/?sdktab=android).
### Android TV {#android-tv}
Use the Braze Android SDK to integrate with Android TV devices.
Features include:
- Data and Analytics collection for cross-channel engagement
- Content Cards
- Feature Flags
- In-app messages
- To show HTML messages on non-touch environments like TVs, set `com.braze.configuration.BrazeConfig.Builder.setIsTouchModeRequiredForHtmlInAppMessages` to `false` (available from [Android SDK v23.1.0](https://github.com/braze-inc/braze-android-sdk/blob/master/CHANGELOG.md#2310))
- * Push Notifications (Manual Integration Required)
- Push notifications are not supported natively on Android TV. To learn why, see Google's [Design Guidelines](https://designguidelines.withgoogle.com/android-tv/patterns/notifications.html). You may however, **do a manual integration of Push notification UI to achieve this**. See our [documentation](https://www.braze.com/docs/developer_guide/push_notifications/?sdktab=android%20tv) on how to set this up.
For more information, visit the [Android SDK integration guide](https://www.braze.com/docs/developer_guide/sdk_integration/?sdktab=android).
**Note:**
Make sure to create a new Android app in the dashboard for your Android OTT integration.
### LG webOS {#lg-webos}
Use the Braze Web SDK to integrate with [LG webOS TVs](https://webostv.developer.lge.com/discover).
Features include:
- Data and analytics collection for cross-channel engagement
- Content Cards (via [Headless UI](#custom-ui))
- Feature Flags
- In-app messages (via [Headless UI](#custom-ui))
For more information, visit the [Web Smart TV integration guide](https://www.braze.com/docs/developer_guide/platforms/web/smart_tvs/).
### Samsung Tizen {#tizen}
Use the Braze Web SDK to integrate with the [Samsung Tizen TVs](https://developer.samsung.com/smarttv/develop/specifications/tv-model-groups.html).
Features include:
- Data and analytics collection for cross-channel engagement
- Content Cards (via [Headless UI](#custom-ui))
- Feature Flags
- In-app messages (via [Headless UI](#custom-ui))
For more information, visit the [Web Smart TV integration guide](https://www.braze.com/docs/developer_guide/platforms/web/smart_tvs/).
### Roku {#roku}
Use the Braze Roku SDK to integrate with [Roku TVs](https://developer.roku.com/docs/developer-program/getting-started/roku-dev-prog.md).
Features include:
- Data and analytics collection for cross-channel engagement
- In-app messages (via [Headless UI](#custom-ui))
- Webviews are not supported by the Roku platform, so HTML in-app messages are therefore not supported.
- Feature Flags
For more information, visit the [Roku integration guide](https://www.braze.com/docs/developer_guide/in_app_messages/?sdktab=roku).
### Apple TV OS {#tvos}
Use the Braze Swift SDK to integrate with tvOS. Keep in mind, the Swift SDK doesn't include any default UI or views for tvOS, so you will need to implement your own.
Features include:
- Data and analytics collection for cross-channel engagement
- Content Cards (via [Headless UI](#custom-ui))
- Feature Flags
- In-app messages (via [Headless UI](#custom-ui))
- Webviews are not supported by the tvOS platform, so HTML in-app messages are therefore not supported.
- See our [sample app](https://github.com/braze-inc/braze-swift-sdk/tree/main/Examples#inappmessages-custom-ui) to learn more about how to use a Headless UI for customized messaging on tvOS.
- Silent push notifications and update badging
For more information, visit the [iOS Swift SDK integration guide](https://github.com/braze-inc/braze-swift-sdk).
**Note:**
To avoid showing mobile in-app messages to your TV users, be sure to set up either [App Targeting](#app-targeting) or use key-value pairs to filter out messages. For example, only displaying tvOS messages if they contain a special `tv = true` key-value pair.
### Apple Vision Pro {#vision-pro}
Use the Braze Swift SDK to integrate with visionOS. Most features available on iOS are also available on visionOS, including:
- Analytics (sessions, custom events, purchases, etc.)
- In-App Messaging (data models and UI)
- Content Cards (data models and UI)
- Push Notifications (user-visible with action buttons and silent notifications)
- Feature Flags
- Location Analytics
For more information, visit the [iOS Swift SDK integration guide](https://github.com/braze-inc/braze-swift-sdk).
**Important:**
Some iOS features are partially-supported or unsupported. For the full list, see [visionOS support](https://www.braze.com/docs/developer_guide/platform_integration_guides/swift/visionos).
## App targeting {#app-targeting}
To target OTT apps for messaging, we recommend creating a segment specific to your OTT app.

## Headless UI {#custom-ui}
**Important:**
Platforms that support in-app messages or Content Cards through headless UI **do not** include any default UI or views. Build your own custom UI (such as for in-app messages) and then use the SDK-provided data models to populate those UIs.
With headless UI, Braze will deliver a data model, such as JSON, that your app can read and use within a UI your app controls. This data will contain the fields configured in the dashboard (title, body, button text, colors, etc.) which your app can read and display accordingly. For more information about custom handling messaging, see the following:
**Android SDK**
- [In-App Message Customization](https://www.braze.com/docs/developer_guide/in_app_messages/customization/?sdktab=android#android_setting-custom-manager-listeners)
- [Content Cards Customization](https://www.braze.com/docs/developer_guide/content_cards/customizing_cards/style/)
**Swift SDK**
- [In-App Message Customization](https://braze-inc.github.io/braze-swift-sdk/documentation/brazekit/brazeinappmessagepresenter/)
- [Headless UI Sample App](https://github.com/braze-inc/braze-swift-sdk/tree/main/Examples#inappmessages-custom-ui)
- [Content Cards Customization](https://braze-inc.github.io/braze-swift-sdk/documentation/brazekit/braze/contentcards-swift.class/)
**Web SDK**
- [In-App Message Customization](https://www.braze.com/docs/developer_guide/in_app_messages/triggering_messages/?tab=web)
- [Content Cards Customization](https://www.braze.com/docs/developer_guide/content_cards/customizing_cards/style/)
# Integration Overview for iOS
Source: /docs/developer_guide/platforms/legacy_sdks/ios/initial_sdk_setup/overview/index.md
**Warning:**
[AppboyKit](https://github.com/Appboy/appboy-ios-sdk) (also known as the Objective-C SDK) is no longer supported and has been replaced by the [Swift SDK](https://www.braze.com/docs/developer_guide/sdk_integration/?sdktab=swift). It will no longer receive new features, bug fixes, security updates, or technical support—however, messaging and analytics will continue to function as normal. To learn more, see [Introducing the New Braze Swift SDK](https://www.braze.com/resources/articles/introducing-the-new-braze-swift-sdk).
Installing the Braze iOS SDK will provide you with basic analytics functionality (session handling) and basic in-app messages. You must further customize your integration for additional channels and features.
The Braze iOS SDK can be installed or updated using CocoaPods, Carthage, Swift Package Manager, or a Manual integration.
Additionally, the Braze iOS SDK fully supports RubyMotion apps.
**Important:**
The iOS SDK will add 1 MB to 2 MB to the app IPA file, in addition to an APP File, and 30 MB for the framework.
After you have integrated using one of the listed options, followed the steps for [completing the integration](https://www.braze.com/docs/developer_guide/platforms/legacy_sdks/ios/initial_sdk_setup/completing_integration/), and enabled other SDK customizations (optional), move on to integrating, enabling, and customizing additional channels and features to fit the needs of your future campaigns.
# Carthage Integration for iOS
Source: /docs/developer_guide/platforms/legacy_sdks/ios/initial_sdk_setup/installation_methods/carthage_integration/index.md
**Warning:**
[AppboyKit](https://github.com/Appboy/appboy-ios-sdk) (also known as the Objective-C SDK) is no longer supported and has been replaced by the [Swift SDK](https://www.braze.com/docs/developer_guide/sdk_integration/?sdktab=swift). It will no longer receive new features, bug fixes, security updates, or technical support—however, messaging and analytics will continue to function as normal. To learn more, see [Introducing the New Braze Swift SDK](https://www.braze.com/resources/articles/introducing-the-new-braze-swift-sdk).
# Carthage integration
## Import the SDK
Starting from version `4.4.0`, the Braze SDK supports XCFrameworks when integrating via Carthage. To import the full SDK, include these lines in your `Cartfile`:
```
binary "https://raw.githubusercontent.com/Appboy/appboy-ios-sdk/master/appboy_ios_sdk.json"
github "SDWebImage/SDWebImage"
```
Reference the [Carthage quick start guide](https://github.com/Carthage/Carthage#quick-start) for more instructions about importing the SDK.
When migrating from a version prior to `4.4.0`, follow the [Carthage migration guide for XCFrameworks](https://github.com/Carthage/Carthage#migrating-a-project-from-framework-bundles-to-xcframeworks).
**Note:**
For more details around the syntax of the `Cartfile` or features such as version pinning, visit the [Carthage documentation](https://github.com/Carthage/Carthage/blob/master/Documentation/Artifacts.md#cartfile).
For platform-specific usage of Carthage, refer to their [user guide](https://github.com/Carthage/Carthage#if-youre-building-for-ios-tvos-or-watchos).
### Previous versions
For versions `3.24.0` through `4.3.4`, include the following in your `Cartfile`:
```
binary "https://raw.githubusercontent.com/Appboy/appboy-ios-sdk/master/appboy_ios_sdk_full.json"
```
To import versions prior to `3.24.0`, include the following in your `Cartfile`:
```
github "Appboy/Appboy-iOS-SDK" ""
```
Make sure to replace `` with the [appropriate version](https://github.com/Appboy/appboy-ios-sdk/releases) of the Braze iOS SDK in "x.y.z" format.
## Next steps
Follow the instructions for [completing the integration](https://www.braze.com/docs/developer_guide/platforms/legacy_sdks/ios/initial_sdk_setup/completing_integration/).
## Core only integration
If you want to use the Core SDK without any UI components or dependencies, install the core version of the Braze Carthage framework by including the following line in your `Cartfile`:
```
binary "https://raw.githubusercontent.com/Appboy/appboy-ios-sdk/master/appboy_ios_sdk_core.json"
```
# CocoaPods Integration for iOS
Source: /docs/developer_guide/platforms/legacy_sdks/ios/initial_sdk_setup/installation_methods/cocoapods/index.md
**Warning:**
[AppboyKit](https://github.com/Appboy/appboy-ios-sdk) (also known as the Objective-C SDK) is no longer supported and has been replaced by the [Swift SDK](https://www.braze.com/docs/developer_guide/sdk_integration/?sdktab=swift). It will no longer receive new features, bug fixes, security updates, or technical support—however, messaging and analytics will continue to function as normal. To learn more, see [Introducing the New Braze Swift SDK](https://www.braze.com/resources/articles/introducing-the-new-braze-swift-sdk).
# CocoaPods integration
## Step 1: Install CocoaPods
Installing the iOS SDK via [CocoaPods](http://cocoapods.org/) automates the majority of the installation process for you. Before beginning this process, make sure you use [Ruby version 2.0.0](https://www.ruby-lang.org/en/installation/) or greater. Don't worry, knowledge of Ruby syntax isn't necessary to install this SDK.
Run the following command to get started:
```bash
$ sudo gem install cocoapods
```
If you have issues regarding CocoaPods, refer to the CocoaPods [troubleshooting guide](http://guides.cocoapods.org/using/troubleshooting.html).
**Note:**
If prompted to overwrite the `rake` executable, refer to the [Getting started](http://guides.cocoapods.org/using/getting-started.html) directions on CocoaPods.org for more details.
## Step 2: Constructing the Podfile
Now that you've installed the CocoaPods Ruby Gem, you will need to create a file in your Xcode project directory named `Podfile`.
Add the following line to your Podfile:
```
target 'YourAppTarget' do
pod 'Appboy-iOS-SDK'
end
```
We suggest you version Braze so pod updates automatically grab anything smaller than a minor version update. This looks like `pod 'Appboy-iOS-SDK' ~> Major.Minor.Build`. If you want to automatically integrate the latest Braze SDK version, even with major changes, you can use `pod 'Appboy-iOS-SDK'` in your Podfile.
#### Subspecs
We recommend that integrators import our full SDK. However, if you are certain that you are only going to integrate a particular Braze feature, you can import just the desired UI subspec instead of the full SDK.
| Subspec | Details |
| ------- | ------- |
| `pod 'Appboy-iOS-SDK/InAppMessage'` | The `InAppMessage` subspec contains the Braze in-app message UI and the Core SDK.|
| `pod 'Appboy-iOS-SDK/ContentCards'` | The `ContentCards` subspec contains the Braze Content Card UI and the Core SDK. |
| `pod 'Appboy-iOS-SDK/NewsFeed'` | The `NewsFeed` subspec contains the Braze Core SDK. |
| `pod 'Appboy-iOS-SDK/Core'` | The `Core` subspec contains support for analytics, such as custom events and attributes. |
{: .ws-td-nw-1}
## Step 3: Installing the Braze SDK
To install the Braze SDK CocoaPods, navigate to the directory of your Xcode app project within your terminal and run the following command:
```
pod install
```
At this point, you should be able to open the new Xcode project workspace created by CocoaPods. Make sure to use this Xcode workspace instead of your Xcode project.
## Next steps
Follow the instructions for [completing the integration](https://www.braze.com/docs/developer_guide/platforms/legacy_sdks/ios/initial_sdk_setup/completing_integration/).
## Updating the Braze SDK via CocoaPods
To update a CocoaPod, simply run the following command within your project directory:
```
pod update
```
# Swift Package Manager Integration for iOS
Source: /docs/developer_guide/platforms/legacy_sdks/ios/initial_sdk_setup/installation_methods/swift_package_manager/index.md
**Warning:**
[AppboyKit](https://github.com/Appboy/appboy-ios-sdk) (also known as the Objective-C SDK) is no longer supported and has been replaced by the [Swift SDK](https://www.braze.com/docs/developer_guide/sdk_integration/?sdktab=swift). It will no longer receive new features, bug fixes, security updates, or technical support—however, messaging and analytics will continue to function as normal. To learn more, see [Introducing the New Braze Swift SDK](https://www.braze.com/resources/articles/introducing-the-new-braze-swift-sdk).
# Swift Package Manager integration
Installing the iOS SDK via [Swift Package Manager](https://swift.org/package-manager/) (SPM) automates the majority of the installation process for you. Before beginning this process, ensure that you use Xcode 12 or greater.
**Note:**
tvOS is not currently available via Swift Package Manager.
## Step 1: Adding the dependency to your project
### Import SDK version
Open your project and navigate to your project's settings. Select the **Swift Packages** tab and click on the add button below the packages list.
When importing SDK version `3.33.1` or later, enter the URL of our iOS SDK repository (`https://github.com/braze-inc/braze-ios-sdk`) in the text field and click **Next**.
For versions `3.29.0` through `3.32.0`, use the URL `https://github.com/Appboy/Appboy-ios-sdk`.

On the next screen, select the SDK version and click **Next**. Versions `3.29.0` and later are compatible with Swift Package Manager.

### Select packages
Select the package that best suits your needs and click **Finish**. Make sure you select either `AppboyKit` or `AppboyUI`. Including both packages can lead to undesired behavior:
- `AppboyUI`
- Best suited if you plan to use UI components provided by Braze.
- Includes `AppboyKit` automatically.
- `AppboyKit`
- Best suited if you don't need to use any of the UI components provided by Braze (for example, Content Cards, in-app messages, etc.).
- `AppboyPushStory`
- Include this package if you have integrated Push Stories in your app. This is supported as of version `3.31.0`.
- In the dropdown under `Add to Target`, select your `ContentExtension` target instead of your main app's target.

## Step 2: Configuring your project
Next, navigate to your project **build settings** and add the `-ObjC` flag to the **Other Linker Flags** setting. This flag must be added and any [errors](https://developer.apple.com/library/archive/qa/qa1490/_index.html) resolved in order to further integrate the SDK.
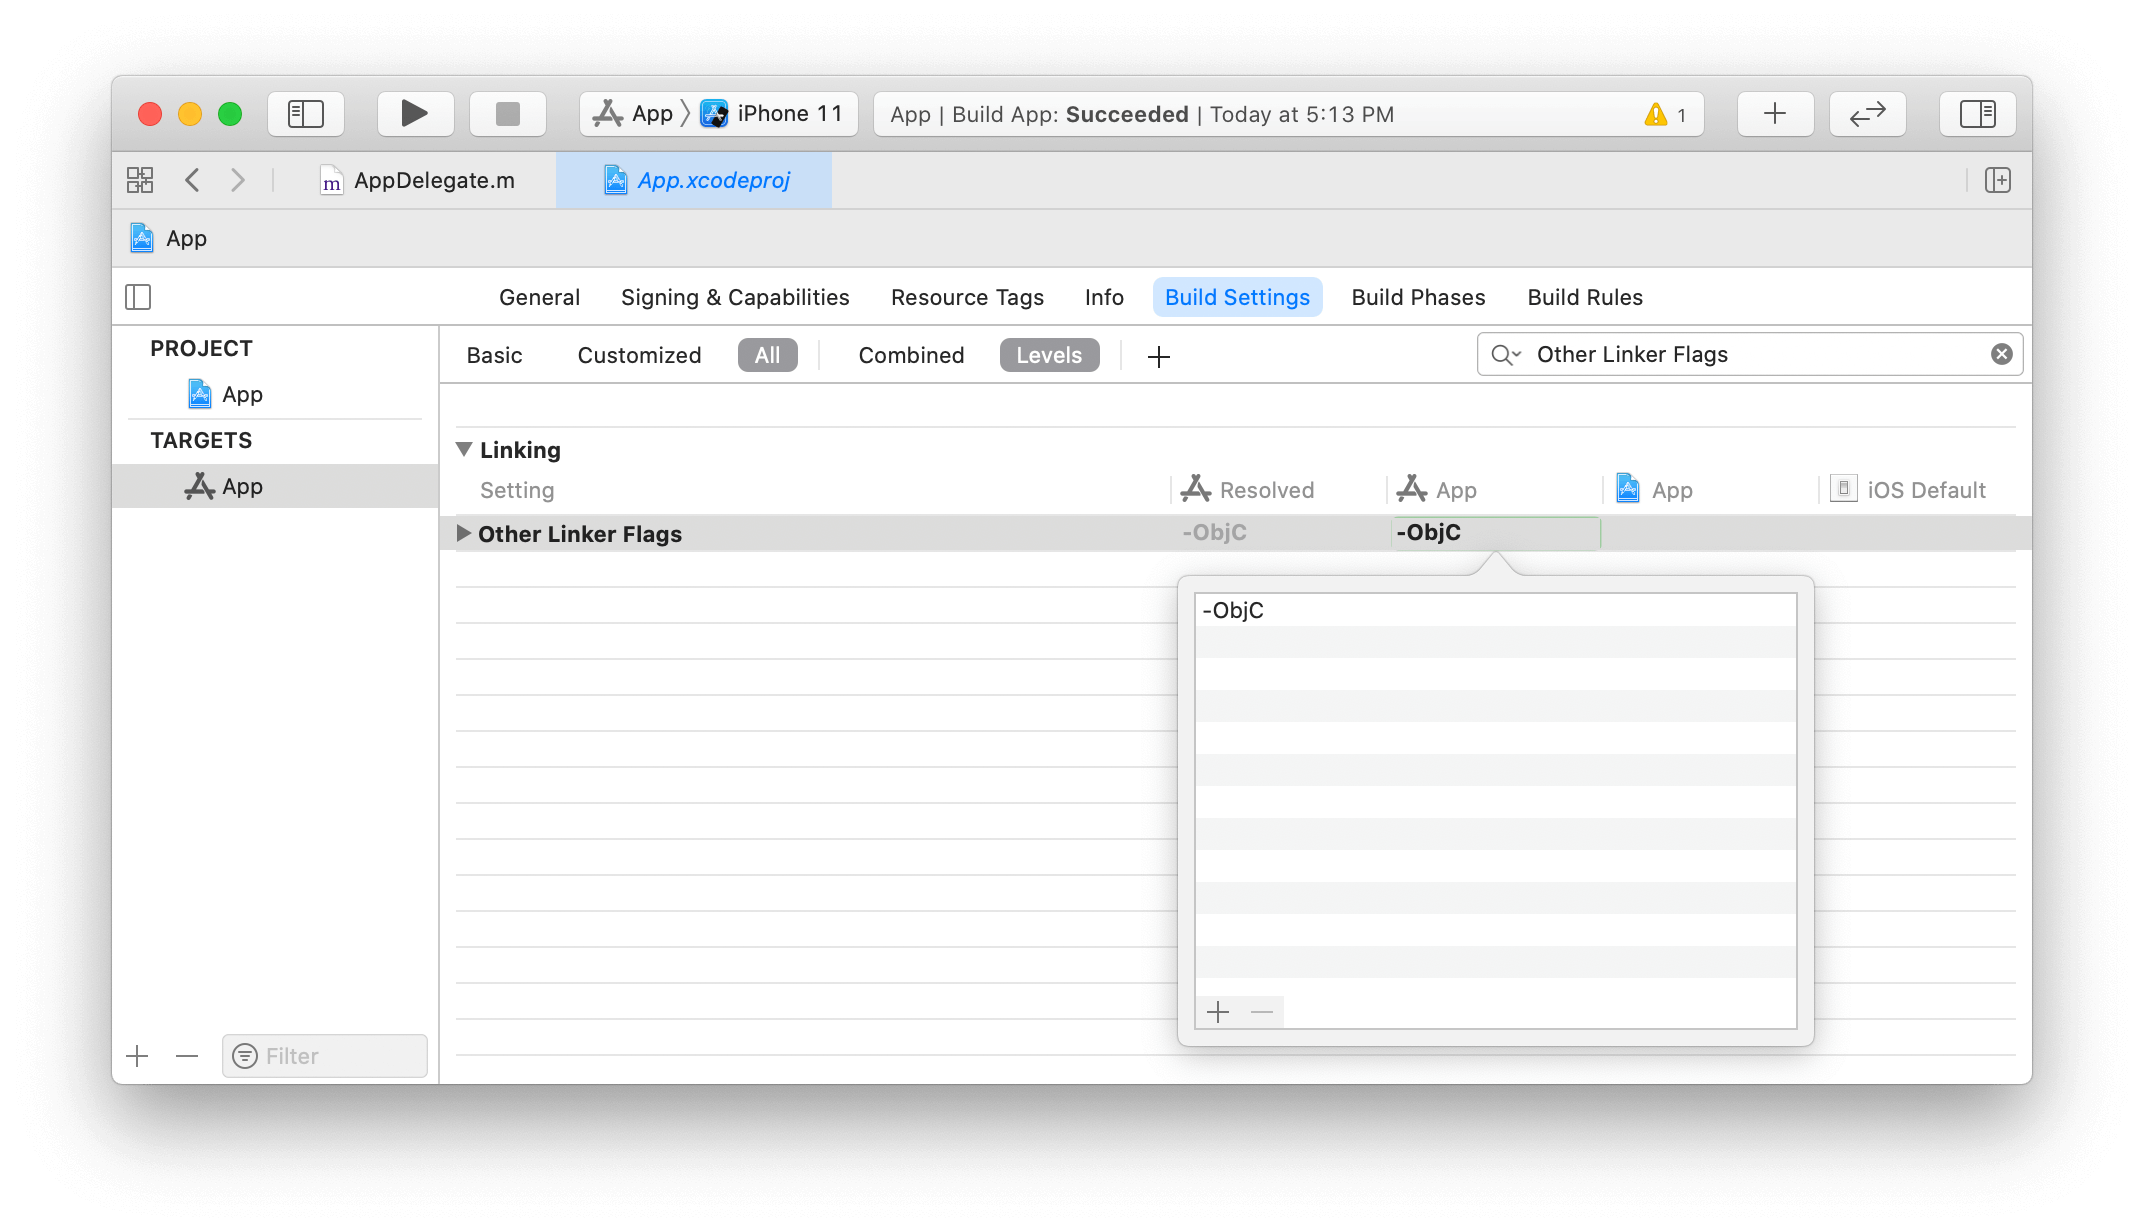
**Note:**
If you do not add the `-ObjC` flag, parts of the API may become missing and behavior will be undefined. You may encounter unexpected errors such as "unrecognized selector sent to class", application crashes, and other issues.
## Step 3: Editing the target's scheme
**Important:**
If you are using Xcode 12.5 or newer, skip this step.
If you are using Xcode 12.4 or earlier, edit the scheme of the target including the Appboy package (**Product > Scheme > Edit Scheme** menu item):
1. Expand the **Build** menu and select **Post-actions**. Press the plus (+) button and select **New Run Script Action**.
2. In the **Provide build settings from** dropdown, select your app's target.
3. Copy this script into the open field:
```sh
# iOS
bash "$BUILT_PRODUCTS_DIR/Appboy_iOS_SDK_AppboyKit.bundle/Appboy.bundle/appboy-spm-cleanup.sh"
# macOS (if applicable)
bash "$BUILT_PRODUCTS_DIR/Appboy_iOS_SDK_AppboyKit.bundle/Contents/Resources/Appboy.bundle/appboy-spm-cleanup.sh"
```

## Next steps
Follow the instructions for [completing the integration](https://www.braze.com/docs/developer_guide/platforms/legacy_sdks/ios/initial_sdk_setup/completing_integration/).
# Manual Integration Options for iOS
Source: /docs/developer_guide/platforms/legacy_sdks/ios/initial_sdk_setup/installation_methods/manual_integration_options/index.md
**Warning:**
[AppboyKit](https://github.com/Appboy/appboy-ios-sdk) (also known as the Objective-C SDK) is no longer supported and has been replaced by the [Swift SDK](https://www.braze.com/docs/developer_guide/sdk_integration/?sdktab=swift). It will no longer receive new features, bug fixes, security updates, or technical support—however, messaging and analytics will continue to function as normal. To learn more, see [Introducing the New Braze Swift SDK](https://www.braze.com/resources/articles/introducing-the-new-braze-swift-sdk).
# Manual integration
**Tip:**
We strongly recommend that you implement the SDK via a package manager such as [Swift Package Manager](../swift_package_manager/), [CocoaPods](../cocoapods/), or [Carthage](../carthage_integration/). It will save you a lot of time and automate much of the process. However, if you are unable to do so, you may complete the integration manually by following the instructions.
## Step 1: Downloading the Braze SDK
### Option 1: Dynamic XCFramework
1. Download `Appboy_iOS_SDK.xcframework.zip` from the [release page](https://github.com/appboy/appboy-ios-sdk/releases) and extract the file.
2. In Xcode, drag and drop this `.xcframework` into your project.
3. Under the **General** tab of the project, select **Embed & Sign** for `Appboy_iOS_SDK.xcframework`.
### Option 2: Static XCFramework for static integration
1. Download `Appboy_iOS_SDK.zip` from the [release page](https://github.com/appboy/appboy-ios-sdk/releases).
2. In Xcode, from the project navigator, select the destination project or group for Braze
3. Navigate to **File > Add Files > Project_Name**.
4. Add the `AppboyKit` and `AppboyUI` folders to your project as a group.
- Make sure that the **Copy items into destination group's folder** option is selected if you are integrating for the first time. Expand **Options** in the file picker to select **Copy items if needed** and **Create groups**.
- Delete the `AppboyKit/include` and `AppboyUI/include` directories.
5. (Optional) If one of the following applies to you:
- You only want the core analytics features of the SDK and do not use any UI features (for example, in-app messages or Content Cards).
- You have custom UI for Braze UI features and handle the image downloading yourself.
You can use the core version of the SDK by removing the file `ABKSDWebImageProxy.m` and `Appboy.bundle`. This will remove the `SDWebImage` framework dependency and all the UI-related resources (for example, Nib files, images, localization files) from the SDK.
**Warning:**
If you try to use the core version of the SDK without Braze UI features, in-app messages will not display. Trying to display Braze Content Cards UI with the core version will lead to unpredictable behavior.
## Step 2: Adding required iOS libraries
1. Click on the target for your project (using the left-side navigation), and select the **Build Phases** tab.
2. Click the button under **Link Binary With Libraries**.
3. In the menu, select `SystemConfiguration.framework`.
4. Mark this library as required using the pull-down menu next to `SystemConfiguration.framework`.
5. Repeat to add each of the following required frameworks to your project, marking each as "required".
- `QuartzCore.framework`
- `libz.tbd`
- `CoreImage.framework`
- `CoreText.framework`
- `WebKit.framework`
6. Add the following frameworks and mark them as optional:
- `CoreTelephony.framework`
7. Select the **Build Settings** tab. In the **Linking** section, locate the **Other Linker Flags** setting and add the `-ObjC` flag.
8. The `SDWebImage` framework is required for Content Cards and in-app messaging to function properly. `SDWebImage` is used for image downloading and displaying, including GIFs. If you intend to use Content Cards or in-app messages, follow the SDWebImage integration steps.
### SDWebImage integration
To install `SDWebImage`, follow their [instructions](https://github.com/SDWebImage/SDWebImage/wiki/Installation-Guide#build-sdwebimage-as-xcframework) and then drag and drop the resulting `XCFramework` into your project.
### Optional location tracking
1. Add the `CoreLocation.framework` to enable location tracking.
2. You must authorize location for your users using `CLLocationManager` in your app.
## Step 3: Objective-C bridging header
**Note:**
If your project only uses Objective-C, skip this step.
If your project uses Swift, you will need a bridging header file.
If you do not have a bridging header file, create one and name it `your-product-module-name-Bridging-Header.h` by choosing **File > New > File > (iOS or OS X) > Source > Header File**. Then, add the following line of code to the top of your bridging header file:
```
#import "AppboyKit.h"
```
In your project's **Build Settings**, add the relative path of your header file to the `Objective-C Bridging Header` build setting under `Swift Compiler - Code Generation`.
## Next steps
Follow the instructions for [completing the integration](https://www.braze.com/docs/developer_guide/platforms/legacy_sdks/ios/initial_sdk_setup/completing_integration/).
# Complete the iOS SDK Integration
Source: /docs/developer_guide/platforms/legacy_sdks/ios/initial_sdk_setup/completing_integration/index.md
**Warning:**
[AppboyKit](https://github.com/Appboy/appboy-ios-sdk) (also known as the Objective-C SDK) is no longer supported and has been replaced by the [Swift SDK](https://www.braze.com/docs/developer_guide/sdk_integration/?sdktab=swift). It will no longer receive new features, bug fixes, security updates, or technical support—however, messaging and analytics will continue to function as normal. To learn more, see [Introducing the New Braze Swift SDK](https://www.braze.com/resources/articles/introducing-the-new-braze-swift-sdk).
# Complete the integration
Before following these steps, make sure you have integrated the SDK using either [Carthage](https://www.braze.com/docs/developer_guide/platforms/legacy_sdks/ios/initial_sdk_setup/installation_methods/carthage_integration/), [CocoaPods](https://www.braze.com/docs/developer_guide/platforms/legacy_sdks/ios/initial_sdk_setup/installation_methods/cocoapods/), [Swift Package Manager](https://www.braze.com/docs/developer_guide/platforms/legacy_sdks/ios/initial_sdk_setup/installation_methods/swift_package_manager/), or a [manual](https://www.braze.com/docs/developer_guide/platforms/legacy_sdks/ios/initial_sdk_setup/installation_methods/manual_integration_options/) integration.
## Step 1: Update your app delegate
If you are integrating the Braze SDK with CocoaPods, Carthage, or with a [dynamic manual integration](https://www.braze.com/docs/developer_guide/platforms/legacy_sdks/ios/initial_sdk_setup/installation_methods/manual_integration_options/), add the following line of code to your `AppDelegate.m` file:
```objc
#import "Appboy-iOS-SDK/AppboyKit.h"
```
If you are integrating with Swift Package Manager or with a [static manual integration](https://www.braze.com/docs/developer_guide/platforms/legacy_sdks/ios/initial_sdk_setup/installation_methods/manual_integration_options/), use this line instead:
```objc
#import "AppboyKit.h"
```
Next, within your `AppDelegate.m` file, add the following snippet within your `application:didFinishLaunchingWithOptions:` method:
```objc
[Appboy startWithApiKey:@"YOUR-APP-IDENTIFIER-API-KEY"
inApplication:application
withLaunchOptions:launchOptions];
```
Update `YOUR-APP-IDENTIFIER-API-KEY` with the correct value from your **Manage Settings** page. Check out our [API documentation](https://www.braze.com/docs/api/api_key/#the-app-identifier-api-key) for more information on where to find your app identifier API key.
If you are integrating the Braze SDK with CocoaPods, Carthage, or with a [dynamic manual integration](https://www.braze.com/docs/developer_guide/platforms/legacy_sdks/ios/initial_sdk_setup/installation_methods/manual_integration_options/), add the following line of code to your `AppDelegate.swift` file:
```swift
import Appboy_iOS_SDK
```
If you are integrating with Swift Package Manager or with a [static manual integration](https://www.braze.com/docs/developer_guide/platforms/legacy_sdks/ios/initial_sdk_setup/installation_methods/manual_integration_options/), use this line instead:
```swift
import AppboyKit
```
Refer to the [Apple developer docs](https://developer.apple.com/library/ios/documentation/swift/conceptual/buildingcocoaapps/MixandMatch.html) for more information on using Objective-C code in Swift projects.
Next, in `AppDelegate.swift`, add following snippet to your `application(application: UIApplication, didFinishLaunchingWithOptions launchOptions: [NSObject: AnyObject]?) -> Bool`:
```swift
Appboy.start(withApiKey: "YOUR-APP-IDENTIFIER-API-KEY", in:application, withLaunchOptions:launchOptions)
```
Update `YOUR-APP-IDENTIFIER-API-KEY` with the correct value from your **Manage Settings** page. Check out our [API documentation](https://www.braze.com/docs/api/api_key/#the-app-identifier-api-key) for more information on where to find your app identifier API key.
**Note:**
The `sharedInstance` singleton will be nil before `startWithApiKey:` is called, as that is a prerequisite to using any Braze functionality.
**Warning:**
Be sure to initialize Braze in your application's main thread. Initializing asynchronously can lead to broken functionality.
## Step 2: Specify your data cluster
**Note:**
Note that as of December 2019, custom endpoints are no longer given out. If you have a pre-existing custom endpoint, you may continue to use it. For more details, refer to our list of available endpoints.
### Compile-time endpoint configuration (recommended)
If given a pre-existing custom endpoint:
- Starting with Braze iOS SDK v3.0.2, you can set a custom endpoint using the `Info.plist` file. Add the `Braze` dictionary to your `Info.plist` file. Inside the `Braze` dictionary, add the `Endpoint` string subentry and set the value to your custom endpoint URL's authority (for example, `sdk.iad-01.braze.com`, not `https://sdk.iad-01.braze.com`). Note that before Braze iOS SDK v4.0.2, the dictionary key `Appboy` must be used in place of `Braze`.
Your Braze representative should have already advised you of the [correct endpoint](https://www.braze.com/docs/user_guide/administrative/access_braze/sdk_endpoints/).
### Runtime endpoint configuration
If given a pre-existing custom endpoint:
- Starting with Braze iOS SDK v3.17.0+, you can override set your endpoint via the `ABKEndpointKey` inside the `appboyOptions` parameter passed to `startWithApiKey:inApplication:withLaunchOptions:withAppboyOptions:`. Set the value to your custom endpoint URL's authority (for example, `sdk.iad-01.braze.com`, not `https://sdk.iad-01.braze.com`).
## SDK integration complete
Braze should now be collecting data from your application, and your basic integration should be complete. See the following articles to enable [custom event tracking](https://www.braze.com/docs/developer_guide/analytics/logging_events/?tab=swift), [push messaging](https://www.braze.com/docs/developer_guide/platforms/legacy_sdks/ios/push_notifications/integration/), and the complete suite of Braze features.
## Customizing Braze on startup
If you wish to customize Braze on startup, you can instead use the Braze initialization method `startWithApiKey:inApplication:withLaunchOptions:withAppboyOptions:` and pass in an optional `NSDictionary` of Braze startup keys.
In your `AppDelegate.m` file, within your `application:didFinishLaunchingWithOptions:` method, add the following Braze method:
```objc
[Appboy startWithApiKey:@"YOUR-APP-IDENTIFIER-API-KEY"
inApplication:application
withLaunchOptions:launchOptions
withAppboyOptions:appboyOptions];
```
Note that this method would replace the `startWithApiKey:inApplication:withLaunchOptions:` initialization method.
In `AppDelegate.swift`, within your `application(application: UIApplication, didFinishLaunchingWithOptions launchOptions: [NSObject: AnyObject]?) -> Bool` method, add the following Braze method where `appboyOptions` is a `Dictionary` of startup configuration values:
```swift
Appboy.start(withApiKey: "YOUR-APP-IDENTIFIER-API-KEY",
in:application,
withLaunchOptions:launchOptions,
withAppboyOptions:appboyOptions)
```
Note that this method would replace the `startWithApiKey:inApplication:withLaunchOptions:` initialization method.
This method is called with the following parameters:
- `YOUR-APP-IDENTIFIER-API-KEY` – Your [app identifier](https://www.braze.com/docs/api/api_key/#the-app-identifier-api-key) API key from the Braze dashboard.
- `application` – The current app.
- `launchOptions` – The options `NSDictionary` that you get from `application:didFinishLaunchingWithOptions:`.
- `appboyOptions` – An optional `NSDictionary` with startup configuration values for Braze.
See [Appboy.h](https://github.com/braze-inc/braze-ios-sdk/blob/master/AppboyKit/include/Appboy.h) for a list of Braze startup keys.
## Appboy.sharedInstance() and Swift nullability
Differing somewhat from common practice, the `Appboy.sharedInstance()` singleton is optional. This is because `sharedInstance` is `nil` before `startWithApiKey:` is called, and there are some non-standard but not-invalid implementations in which a delayed initialization can be used.
If you call `startWithApiKey:` in your `didFinishLaunchingWithOptions:` delegate before any access to Appboy's `sharedInstance` (the standard implementation), you can use optional chaining, like `Appboy.sharedInstance()?.changeUser("testUser")`, to avoid cumbersome checks. This will have parity with an Objective-C implementation that assumed a non-null `sharedInstance`.
## Additional resources
Full [iOS class documentation](http://appboy.github.io/appboy-ios-sdk/docs/annotated.html) is available to provide additional guidance on any SDK methods.
# Other SDK Customizations for iOS
Source: /docs/developer_guide/platforms/legacy_sdks/ios/initial_sdk_setup/other_sdk_customizations/index.md
**Warning:**
[AppboyKit](https://github.com/Appboy/appboy-ios-sdk) (also known as the Objective-C SDK) is no longer supported and has been replaced by the [Swift SDK](https://www.braze.com/docs/developer_guide/sdk_integration/?sdktab=swift). It will no longer receive new features, bug fixes, security updates, or technical support—however, messaging and analytics will continue to function as normal. To learn more, see [Introducing the New Braze Swift SDK](https://www.braze.com/resources/articles/introducing-the-new-braze-swift-sdk).
# Other SDK customizations
## Braze log level
The default log level for the Braze iOS SDK is minimal, or `8` in the following chart. This level suppresses most logging so that no sensitive information is logged in a production-released application.
See the following list of available log levels:
### Log levels
| Level | Description |
|----------|-------------|
| 0 | Verbose. All log information will be logged to the iOS console. |
| 1 | Debug. Debug and higher log information will be logged to the iOS console. |
| 2 | Warning. Warning and higher log information will be logged to the iOS console. |
| 4 | Error. Error and higher log information will be logged to the iOS console. |
| 8 | Minimal. Minimal information will be logged to the iOS console. The SDK's default setting. |
{: .reset-td-br-1 .reset-td-br-2 role="presentation" }
### Verbose logging
You can configure log level to any available value. However, setting log level to verbose, or `0`, can be very useful for debugging issues with your integration. This level is only intended for development environments and should not be set in a released application. Verbose logging won't send any extra or new user information to Braze.
### Setting log level
Log level can be assigned either at compile time or at runtime:
Add a dictionary named `Braze` to your `Info.plist` file. Inside the `Braze` dictionary, add the `LogLevel` string subentry and set the value to `0`.
**Note:**
Prior to Braze iOS SDK v4.0.2, the dictionary key `Appboy` must be used in place of `Braze`.
Example `Info.plist` contents:
```
BrazeLogLevel0
```
Add the `ABKLogLevelKey` inside the `appboyOptions` parameter passed to `startWithApiKey:inApplication:withLaunchOptions:withAppboyOptions:`. Set its value to the integer `0`.
```objc
NSMutableDictionary *appboyOptions = [NSMutableDictionary dictionary];
appboyOptions[ABKLogLevelKey] = @(0);
[Appboy startWithApiKey:@"YOUR-API-KEY"
inApplication:application
withLaunchOptions:launchOptions
withAppboyOptions:appboyOptions];
```
```swift
let appboyOptions: [AnyHashable: Any] = [
ABKLogLevelKey : 0
]
Appboy.start(withApiKey: "YOUR-API-KEY", in:application, withLaunchOptions:launchOptions, withAppboyOptions:appboyOptions)
```
**Note:**
Log level can only be set at runtime with Braze iOS SDK v4.4.0 or newer. If using an earlier version of the SDK, set log level at compile time instead.
## Optional IDFV collection - Swift
In previous versions of the Braze iOS Swift SDK, the IDFV (Identifier for Vendor) field was automatically collected as the user's device ID.
Beginning in Swift SDK v5.7.0, the IDFV field can optionally be disabled, and instead, Braze will set a random UUID as the device ID. For more information, refer to [Collecting IDFV](https://www.braze.com/docs/developer_guide/analytics/managing_data_collection/?sdktab=swift).
## Optional IDFA collection
IDFA Collection is optional within the Braze SDK and disabled by default. IDFA Collection is only required within Braze if you intend to use our [install attribution integrations](https://www.braze.com/docs/partners/message_orchestration/attribution/adjust/). If you opt to store your IDFA, we will store it free of charge, so you may take advantage of these options immediately upon release without additional development work.
As a result, we recommend continuing to collect the IDFA if you meet any of the following criteria:
- You are attributing app installation to a previously served advertisement
- You are attributing an action within the application to a previously served advertisement
### iOS 14.5 AppTrackingTransparency
Apple requires users to opt-in through a permission prompt to collect IDFA.
To collect IDFA, in addition to implementing our `ABKIDFADelegate` protocol, your application will need to request authorization from the user using Apple's `ATTrackingManager` in the app tracking transparency framework. Refer to Apple's [user privacy article](https://developer.apple.com/app-store/user-privacy-and-data-use/) for more information.
The prompt for app tracking transparency authorization requires an `Info.plist` entry to explain your usage of the identifier:
```
NSUserTrackingUsageDescriptionTo retarget ads and build a global profile to better serve you things you would like.
```
### Implementing IDFA collection
Follow these steps to implement IDFA Collection:
##### Step 1: Implement ABKIDFADelegate
Create a class that conforms to the [`ABKIDFADelegate`](https://github.com/Appboy/appboy-ios-sdk/blob/master/AppboyKit/include/ABKIDFADelegate.h) protocol:
```objc
#import "IDFADelegate.h"
#import
#import
@implementation IDFADelegate
- (NSString *)advertisingIdentifierString {
return [[[ASIdentifierManager sharedManager] advertisingIdentifier] UUIDString];
}
- (BOOL)isAdvertisingTrackingEnabledOrATTAuthorized {
if (@available(iOS 14, *)) {
return [ATTrackingManager trackingAuthorizationStatus] == ATTrackingManagerAuthorizationStatusAuthorized;
}
return [[ASIdentifierManager sharedManager] isAdvertisingTrackingEnabled];
}
@end
```
```swift
import Appboy_iOS_SDK
import AdSupport
import AppTrackingTransparency
class IDFADelegate: NSObject, ABKIDFADelegate {
func advertisingIdentifierString() -> String {
return ASIdentifierManager.shared().advertisingIdentifier.uuidString
}
func isAdvertisingTrackingEnabledOrATTAuthorized() -> Bool {
if #available(iOS 14, *) {
return ATTrackingManager.trackingAuthorizationStatus == ATTrackingManager.AuthorizationStatus.authorized
}
return ASIdentifierManager.shared().isAdvertisingTrackingEnabled
}
}
```
##### Step 2: Set the delegate during Braze initialization
In the `appboyOptions` dictionary passed to `startWithApiKey:inApplication:withAppboyOptions:`, set the `ABKIDFADelegateKey` key to an instance of your `ABKIDFADelegate` conforming class.
## Approximate iOS SDK size {#ios-sdk-size}
The approximate iOS SDK framework file size is 30 MB, and the approximate .ipa (addition to app file) size is between 1 MB and 2 MB.
Braze measures the size of our iOS SDK by observing the SDK's effect on `.ipa` size, per Apple's [recommendations on app sizing](https://developer.apple.com/library/content/qa/qa1795/_index.html). If you are calculating the iOS SDK's size addition to your application, we recommend following [Getting an app size report](https://developer.apple.com/library/content/qa/qa1795/_index.html) to compare the size difference in your `.ipa` before and after integrating the Braze iOS SDK. When comparing sizes from the app thinning size report, we also recommend looking at app sizes for thinned `.ipa` files, as universal `.ipa` files will be larger than the binaries downloaded from the App Store and installed onto user devices.
**Note:**
If you are integrating via CocoaPods with `use_frameworks!`, set `Enable Bitcode = NO` in target's Build Settings for accurate sizing.
# Braze SDK Integration Guide for iOS (Optional)
Source: /docs/developer_guide/platforms/legacy_sdks/ios/initial_sdk_setup/ios_sdk_integration/index.md
**Warning:**
[AppboyKit](https://github.com/Appboy/appboy-ios-sdk) (also known as the Objective-C SDK) is no longer supported and has been replaced by the [Swift SDK](https://www.braze.com/docs/developer_guide/sdk_integration/?sdktab=swift). It will no longer receive new features, bug fixes, security updates, or technical support—however, messaging and analytics will continue to function as normal. To learn more, see [Introducing the New Braze Swift SDK](https://www.braze.com/resources/articles/introducing-the-new-braze-swift-sdk).
# Braze iOS SDK integration guide
> This optional iOS integration guide takes you on a step-by-step journey on setup best practices when first integrating the iOS SDK and its core components into your application. This guide will help you build a `BrazeManager.swift` helper file that will decouple any dependencies on the Braze iOS SDK from the rest of your production code, resulting in one `import AppboyUI` in your entire application. This approach limits issues that arise from excessive SDK imports, making it easier to track, debug, and alter code.
**Important:**
This guide assumes you have already [added the SDK](https://www.braze.com/docs/developer_guide/platforms/legacy_sdks/ios/initial_sdk_setup/overview/) into your Xcode project.
## Integration overview
The following steps help you build a `BrazeManager` helper file that your production code calls into. This helper file will deal with all Braze-related dependencies by adding various extensions for the following integration topics listed. Each topic will include horizontal tab steps and code snippets in both Swift and Objective-C. Note that the Content Card and in-app message steps are not required for integration if you do not plan to use these channels in your application.
- [Create BrazeManager.swift](#create-brazemanagerswift)
- [Initialize the SDK](#initialize-the-sdk)
- [Push notifications](#push-notifications)
- [Access user variables and methods](#access-user-variables-and-methods)
- [Log analytics](#log-analytics)
- [In-app messages (optional)](#in-app-messages)
- [Content Cards (optional)](#content-cards)
- [Next steps](#next-steps)
### Create BrazeManager.swift
##### Create BrazeManager.swift
To build out your `BrazeManager.swift` file, create a new Swift file named _BrazeManager_ to add to your project at your desired location. Next, Replace `import Foundation` with `import AppboyUI` for SPM (`import Appboy_iOS_SDK` for CocoaPods) and then create a `BrazeManager` class that will be used to host all Braze-related methods and variables. `Appboy_iOS_SDK`
**Note:**
- `BrazeManager` is an `NSObject` class and not a struct, so it can conform to ABK delegates such as the `ABKInAppMessageUIDelegate`.
- The `BrazeManager` is a singleton class by design so that only one instance of this class will be used. This is done to provide a unified point of access to the object.
1. Add a static variable named _shared_ that initializes the `BrazeManager` class. This is guaranteed to be lazily initiated only once.
2. Next, add a private constant variable named _apiKey_ and set it as the API key-value from your workspace in the Braze dashboard.
3. Add a private computed variable named _appboyOptions_, which will store configuration values for the SDK. It will be empty for now.
```swift
class BrazeManager: NSObject {
// 1
static let shared = BrazeManager()
// 2
private let apikey = "YOUR-API-KEY"
// 3
private var appboyOptions: [String:Any] {
return [:]
}
}
```
```objc
@implementation BrazeManager
// 1
+ (instancetype)shared {
static BrazeManager *shared = nil;
static dispatch_once_t onceToken;
dispatch_once(&onceToken, ^{
shared = [[BrazeManager alloc] init];
// Do any other initialisation stuff here
});
return shared;
}
// 2
- (NSString *)apiKey {
return @"YOUR-API-KEY";
}
// 3
- (NSDictionary *)appboyOptions {
return [NSDictionary dictionary];
}
```
### Initialize the SDK
##### Initialize SDK from BrazeManager.swift
Next, you must initialize the SDK. This guide assumes you have already [added the SDK](https://www.braze.com/docs/developer_guide/platforms/legacy_sdks/ios/initial_sdk_setup/overview/) into your Xcode project. You must also have your [workspace SDK endpoint](https://www.braze.com/docs/developer_guide/platform_integration_guides/ios/initial_sdk_setup/completing_integration/#step-2-specify-your-data-cluster) and [`LogLevel`](https://www.braze.com/docs/developer_guide/platform_integration_guides/ios/initial_sdk_setup/other_sdk_customizations/#braze-log-level) set in your `Info.plist` file or in `appboyOptions`.
Add the `didFinishLaunchingWithOptions` method from the `AppDelegate.swift` file without a return type in your `BrazeManager.swift` file. By creating a similar method in the `BrazeManager.swift` file, there will not be an `import AppboyUI` statement in your `AppDelegate.swift` file.
Next, initialize the SDK using your newly declared `apiKey` and `appboyOptions` variables.
**Important:**
Initialization should be done in the main thread.
```swift
func application(_ application: UIApplication, didFinishLaunchingWithOptions launchOptions: [UIApplication.LaunchOptionsKey: Any]?) {
Appboy.start(withApiKey: apikey, in: application, withLaunchOptions: launchOptions, withAppboyOptions: appboyOptions)
}
```
```objc
- (void)application:(UIApplication *)application didFinishLaunchingWithOptions:(NSDictionary *)launchOptions {
[Appboy startWithApiKey:[self apiKey] inApplication:application withLaunchOptions:launchOptions withAppboyOptions:[self appboyOptions]];
}
```
##### Handle Appboy initialization in the AppDelegate.swift
Next, navigate back to the `AppDelegate.swift` file and add the following code snippet in the AppDelegate's `didFinishLaunchingWithOptions` method to handle the Appboy initialization from the `BrazeManager.swift` helper file. Remember, there is no need to add an `import AppboyUI` statement in the `AppDelegate.swift`.
```swift
func application(
_ application: UIApplication,
didFinishLaunchingWithOptions launchOptions: [UIApplication.LaunchOptionsKey: Any]?
) -> Bool {
// Override point for customization after application launch
BrazeManager.shared.application(application, didFinishLaunchingWithOptions: launchOptions)
return true
}
```
```objc
- (BOOL)application:(UIApplication *)application didFinishLaunchingWithOptions:(NSDictionary *)launchOptions {
// Override point for customization after application launch
[[BrazeManager shared] application:application didFinishLaunchingWithOptions:launchOptions];
return YES;
}
```
**Checkpoint:**
Proceed to compile your code and run your application.
At this point, the SDK should be up and running. In your dashboard, observe that sessions are being logged before advancing any further.
### Push notifications
##### Add push certificate
Navigate to your existing workspace in the Braze dashboard. Under **Push Notification Settings** upload your push certificate file to your Braze dashboard and save it.
{: style="max-width:60%;"}
**Important:**
Don't miss the dedicated checkpoint at the end of this step!
##### Register for push notifications
Next, register for push notifications. This guide assumes you have [set up your push credentials correctly](https://www.braze.com/docs/developer_guide/platforms/legacy_sdks/ios/push_notifications/integration/) in your Apple developer portal and Xcode project.
The code for registering push notifications will be added in the `didFinishLaunching...` method in the `BrazeManager.swift` file. Your initialization code should end up looking like the following:
1. Configure the contents for requesting authorization to interact with the user. These options are listed as an example.
2. Request authorization to send your users push notifications. The user's response to allow or deny push notifications is tracked in the `granted` variable.
3. Forward the push authorization results to Braze after the user interacts with the notification prompt.
4. Initiate the registration process with APNs; this should be done in the main thread. If the registration succeeds, the app calls your `AppDelegate` object's `didRegisterForRemoteNotificationsWithDeviceToken` method.
```swift
func application(_ application: UIApplication, didFinishLaunchingWithOptions launchOptions:[UIApplication.LaunchOptionsKey:Any]?) {
Appboy.start(withAPIKey: apikey, in: application, withLaunchOptions: launchOptions, withAppboyOptions: appboyOptions)
// 1
let options: UNAuthorizationOptions = [.alert, .sound, .badge]
// 2
UNUserNotificationCenter.current().requestAuthorization(option: options) { (granted, error) in
// 3
Appboy.sharedInstance()?.pushAuthorization(fromUserNotificationCenter: granted)
}
// 4
UIApplications.shared.registerForRemoteNotificiations()
}
```
```objc
- (void)application:(UIApplication *)application didFinishLaunchingWithOptions:(NSDictionary *)launchOptions {
[Appboy startWithApiKey:[self apiKey] inApplication:application withLaunchOptions:launchOptions withAppboyOptions:[self appboyOptions]];
// 1
UNAuthorizationOptions options = (UNAuthorizationOptionSound | UNAuthorizationOptionAlert | UNAuthorizationOptionBadge);
// 2
[[UNUserNotificationCenter currentNotificationCenter] requestAuthorizationWithOptions:options completionHandler:^(BOOL granted, NSError * _Nullable error) {
// 3
[[Appboy sharedInstance] pushAuthorizationFromUserNotificationCenter:granted];
}];
// 4
[[UIApplication sharedApplication] registerForRemoteNotifications];
}
```
**Checkpoint:**
Proceed to compile your code and run your application.
- In your app, confirm that you are being prompted for push notifications before advancing any further.
- If you are not prompted, try deleting and re-installing the app to ensure the push notification prompt was not displayed previously.
Observe you are being prompted for push notifications before advancing any further.
##### Forward push notification methods
Next, forward the system push notifications methods from `AppDelegate.swift` to `BrazeManager.swift` to be handled by the Braze iOS SDK.
###### Step 1: Create extension for push notification code
Create an extension for your push notification code in your `BrazeManager.swift` file so it reads in a more organized manner as to what purpose is being served in the helper file, like so:
1. Following the pattern of not including an `import AppboyUI` statement in your `AppDelegate`, we will handle the push notifications methods in the `BrazeManager.swift` file. User's device tokens will need to be passed to Braze from the `didRegisterForRemote...` method. This method is required to implement silent push notifications. Next, add the same method from the `AppDelegate` in your `BrazeManager` class.
2. Add the following line inside the method to register the device token to Braze. This is necessary for Braze to associate the token with the current device.
```swift
// MARK - Push Notifications
extension BrazeManager {
// 1
func application(
_ application: UIApplication,
didRegisterForRemoteNotificationsWithDeviceToken deviceToken: Data
) {
// 2
Appboy.sharedInstance().?registerDeviceToken(deviceToken)
}
}
```
```objc
// MARK - Push Notifications
// 1
- (void)application:(UIApplication *)application didRegisterForRemoteNotificationsWithDeviceToken:(NSData *)deviceToken {
// 2
[[Appboy sharedInstance] registerDeviceToken:deviceToken];
}
```
###### Step 2: Support remote notifications
In the **Signing & Capabilities** tab, add **Background Modes** support and select **Remote notifications** to begin your support of remote push notifications originating from Braze.

###### Step 3: Remote notification handling
The Braze SDK can handle remote push notifications that originate from Braze. Forward remote notifications to Braze; the SDK will automatically ignore push notifications that do not originate from Braze. Add the following method to your `BrazeManager.swift` file in the push notification extension.
```swift
func application(
_ application: UIApplication,
didReceiveRemoteNotification userInfo: [AnyHashable : Any],
fetchCompletionHandler completionHandler: @escaping (UIBackgroundFetchResult) -> Void
) {
Appboy.sharedInstance()?.register(
application,
didReceiveRemoteNotification: userInfo,
fetchCompletionHandler: completionHandler
)
}
```
```objc
- (void)application:(UIApplication *)application didReceiveRemoteNotification:(NSDictionary *)userInfo fetchCompletionHandler:(void (^)(UIBackgroundFetchResult))completionHandler {
[[Appboy sharedInstance] registerApplication:application didReceiveRemoteNotification:userInfo fetchCompletionHandler:completionHandler];
}
```
###### Step 4: Forward notification responses
The Braze SDK can handle the response of push notifications that originate from Braze. Forward the response of the notifications to Braze; the SDK will automatically ignore responses from push notifications that do not originate from Braze. Add the following method to your `BrazeManager.swift` file:
```swift
func userNotificationCenter(
_ center: UNUserNotificationCenter,
didReceive response: UNNotificationResponse,
withCompletionHandler completionHandler: @escaping () -> Void
) {
Appboy.sharedInstance()?.userNotificationCenter(
center,
didReceive: response,
withCompletionHandler: completionHandler
)
}
```
```objc
- (void)userNotificationCenter:(UNUserNotificationCenter *)center
didReceiveNotificationResponse:(UNNotificationResponse *)response
withCompletionHandler:(void (^)(void))completionHandler {
[[Appboy sharedInstance] userNotificationCenter:center
didReceiveNotificationResponse:response
withCompletionHandler:completionHandler];
}
```
**Checkpoint:**
Proceed to compile your code and run your application.
Try sending yourself a push notification from the Braze dashboard and observe that analytics are being logged from push notifications before advancing any further.
### Access user variables and methods
##### Create user variables and methods
Next, you will want easy access to the `ABKUser` variables and methods. Create an extension for your user code in the `BrazeManager.swift` file so it reads in a more organized manner as to what purpose is being served in the helper file, like so:
1. An `ABKUser` object represents a known or anonymous user in your iOS application. Add a computed variable to retrieve the `ABKUser`; this variable will be reused to retrieve variables about the user.
2. Query the user variable to easily access the `userId`. Among the other variables, the `ABKUser` object is responsible for (`firstName`, `lastName`, `phone`, `homeCity`, etc.)
3. Set the user by calling `changeUser()` with a corresponding `userId`.
```swift
// MARK: - User
extension BrazeManager {
// 1
var user: ABKUser? {
return Appboy.sharedInstance()?.user
}
// 2
var userId: String? {
return user?.userID
}
// 3
func changeUser(_ userId: String) {
Appboy.sharedInstance()?.changeUser(userId)
}
}
```
```objc
// MARK: - User
// 1
- (ABKUser *)user {
return [[Appboy sharedInstance] user];
}
// 2
- (NSString *)userId {
return [self user].userID;
}
// 3
- (void)changeUser:(NSString *)userId {
[[Appboy sharedInstance] changeUser:userId];
}
```
**Checkpoint:**
Proceed to compile your code and run your application.
Try identifying users from a successful sign-in/sign-up. Be sure you have a solid understanding of what is and what is not an appropriate user identifier.
In your dashboard, observe that the user identifier is logged before advancing any further.
### Log analytics
##### Create log custom event method
Based on the following Braze SDK `logCustomEvent` method, create a matching method.
**Braze `logCustomEvent` reference method**
This is by design because only the `BrazeManager.swift` file can directly access the Braze iOS SDK methods. Therefore, by creating a matching method, the result is the same and is done without the need for any direct dependencies on the Braze iOS SDK in your production code.
```
open func logCustomEvent(_ eventName: String, withProperties properties: [AnyHashable : Any]?)
```
**Matching method**
Log custom events from the `Appboy` object to Braze. `Properties` is an optional parameter with a default value of nil. Custom events are not required to have properties but are required to have a name.
```swift
func logCustomEvent(_ eventName: String, withProperties properties: [AnyHashable: Any]? = nil) {
Appboy.sharedInstance()?.logCustomEvent(eventName, withProperties: properties)
}
```
```objc
- (void)logCustomEvent:(NSString *)eventName withProperties:(nullable NSDictionary *)properties {
[[Appboy sharedInstance] logCustomEvent:eventName withProperties:properties];
}
```
##### Create log custom attributes method
The SDK can log numerous types as custom attributes. There is no need to create helper methods for each value type that can be set. Instead, only expose one method that can filter down to the appropriate value.
```
- (BOOL)setCustomAttributeWithKey:(NSString *)key andBOOLValue:(BOOL)value;
- (BOOL)setCustomAttributeWithKey:(NSString *)key andIntegerValue:(NSIntenger)value;
- (BOOL)setCustomAttributeWithKey:(NSString *)key andDoubleValue:(double)value;
- (BOOL)setCustomAttributeWithKey:(NSString *)key andStringValue:(NSString *)value;
- (BOOL)setCustomAttributeWithKey:(NSString *)key andDateValue:(NSDate *)value;
```
Custom attributes are logged from the `ABKUser` object.
Create **one method** that can encompass all of the available types that can be set for an attribute. Add this method in your `BrazeManager.swift` file in the analytics extension. This can be done by filtering through the valid custom attribute types and call the method associated with the matching type.
- The parameter `value` is a generic type that conforms to the `Equatable` protocol. This is explicitly done, so if the type is not what the Braze iOS SDK expects, there will be a compile-time error.
- The parameters `key` and `value` are optional parameters that will be conditionally unwrapped in the method. This is just one way to ensure non-nil values are being passed to the Braze iOS SDK.
```swift
func setCustomAttributeWithKey(_ key: String?, andValue value: T?) {
guard let key = key, let value = value else { return }
switch value.self {
case let value as Date:
user?.setCustomAttributeWithKey(key, andDateValue: value)
case let value as Bool:
user?.setCustomAttributeWithKey(key, andBOOLValue: value)
case let value as String:
user?.setCustomAttributeWithKey(key, andStringValue: value)
case let value as Double:
user?.setCustomAttributeWithKey(key, andDoubleValue: value)
case let value as Int:
user?.setCustomAttributeWithKey(key, andIntegerValue: value)
default:
return
}
}
```
```objc
- (void)setCustomAttributeWith:(NSString *)key andValue:(id)value {
if ([value isKindOfClass:[NSDate class]]) {
[[self user] setCustomAttributeWithKey:key andDateValue:value];
} else if ([value isKindOfClass:[NSString class]]) {
[[self user] setCustomAttributeWithKey:key andStringValue:value];
} else if ([value isKindOfClass:[NSNumber class]]) {
if (strcmp([value objCType], @encode(double)) == 0) {
[[self user] setCustomAttributeWithKey:key andDoubleValue:[value doubleValue]];
} else if (strcmp([value objCType], @encode(int)) == 0) {
[[self user] setCustomAttributeWithKey:key andIntegerValue:[value integerValue]];
} else if ([value boolValue]) {
[[self user] setCustomAttributeWithKey:key andBOOLValue:[value boolValue]];
}
}
}
```
##### Create log purchase method
Next, based on the following Braze SDK `logPurchase` method, create a matching method.
**Braze `logPurchase` reference method**
This is by design because only the `BrazeManager.swift` file can directly access the Braze iOS SDK methods. Therefore, by creating a matching method, the result is the same and is done without the need for any direct dependencies on the Braze iOS SDK in your production code.
```
open func logPurchase(_ productIdentifier: String, inCurrency currency: String, atPrice price: NSDecimalNumber, withoutQuantity quantity: UInt)
```
**Matching method**
Log purchases from the `Appboy` object to Braze. The SDK has multiple methods for logging purchases, and this is just one example. This method also handles creating the `NSDecimal` and `UInt` objects. How you want to handle that part is up to you, provided is just one example.
```swift
func logPurchase(_ productIdentifier: String, inCurrency currency: String, atPrice price:
String, withQuantity quantity: Int) {
Appboy.sharedInstance()?.logPurchase(productIdentifier, inCurrency: currency, atPrice: NSDecimalNumber(string: price), withQuantity: UInt(quantity))
}
```
```objc
- (void)logPurchase:(NSString *)productIdentifier inCurrency:(nonnull NSString *)currencyCode atPrice:(nonnull NSDecimalNumber *)price withQuantity:(NSUInteger)quantity {
[[Appboy sharedInstance] logPurchase:productIdentifier inCurrency:currencyCode atPrice:price withQuantity:quantity];
}
```
**Checkpoint:**
Proceed to compile your code and run your application.
Try logging custom events.
In your dashboard, observe that the custom events are logged before advancing any further.
### In-app messages
**Important:**
The following in-app message section is not required for integration if you do not plan to use this channel in your application.
##### Conform to ABKInAppMessageUIDelegate
Next, enable your `BrazeManager.swift` file code to conform to the `ABKInAppMessageUIDelegate` to directly handle the associated methods.
The code for conforming to the delegate will be added in the `didFinishLaunching...` methods in the `BrazeManager.swift` file. Your initialization code should end up looking like this:
```swift
func application(_ application: UIApplication, didFinishLaunchingWithOptions launchOptions: [UIApplication.LaunchOptionsKey: Any]?) {
Appboy.start(withApiKey: apiKey, in: application, withLaunchOptions: launchOptions, withAppboyOptions: appboyOptions)
let options: UNAuthorizationOptions = [.alert, .sound, .badge]
UNUserNotificationCenter.current().requestAuthorization(options: options) { (granted, error) in
Appboy.sharedInstance()?.pushAuthorization(fromUserNotificationCenter: granted)
}
UIApplication.shared.registerForRemoteNotifications()
Appboy.sharedInstance()?.inAppMessageController.inAppMessageUIController?.setInAppMessageUIDelegate?(self)
}
```
```objc
- (void)application:(UIApplication *)application didFinishLaunchingWithOptions:(NSDictionary *)launchOptions {
[Appboy startWithApiKey:[self apiKey] inApplication:application withLaunchOptions:launchOptions withAppboyOptions:[self appboyOptions]];
UNAuthorizationOptions options = (UNAuthorizationOptionSound | UNAuthorizationOptionAlert | UNAuthorizationOptionBadge);
[[UNUserNotificationCenter currentNotificationCenter] requestAuthorizationWithOptions:options completionHandler:^(BOOL granted, NSError * _Nullable error) {
[[Appboy sharedInstance] pushAuthorizationFromUserNotificationCenter:granted];
}];
[[UIApplication sharedApplication] registerForRemoteNotifications];
[[Appboy sharedInstance].inAppMessageController.inAppMessageUIController setInAppMessageUIDelegate:self];
}
```
##### Add delegate methods
Next, create an extension that conforms to the `ABKInAppMessageUIDelegate`.
Add the following snippet the analytics section. Note that the `BrazeManager.swift` object is set as the delegate; this will be where the `BrazeManager.swift` file handles all the `ABKInAppMessageUIDelegate` methods.
**Important:**
The `ABKInAppMessageUIDelegate` does not come with any required methods, but the following is an example of one.
```swift
// MARK: - ABKInAppMessage UI Delegate
extension AppboyManager: ABKInAppMessageUIDelegate{
func inAppMessageViewControllerWith(_ inAppMessage: ABKInAppMessage) -> ABKInAppMessageViewController {
switch inAppMessage {
case is ABKInAppMessageSlideup:
return ABKInAppMessageSlideupViewController(inAppMessage: inAppMessage)
case is ABKInAppMessageModal:
return ABKInAppMessageModalViewController(inAppMessage: inAppMessage)
case is ABKInAppMessageFull:
return ABKInAppMessageFullViewController(inAppMessage: inAppMessage)
case is ABKInAppMessageHTML:
return ABKInAppMessageHTMLViewController(inAppMessage: inAppMessage)
default:
return ABKInAppMessageViewController(inAppMessage: inAppMessage)
}
```
```objc
// MARK: - ABKInAppMessage UI Delegate
- (ABKInAppMessageViewController *)inAppMessageViewControllerWithInAppMessage:(ABKInAppMessage *)inAppMessage {
if ([inAppMessage isKindOfClass:[ABKInAppMessageSlideup class]]) {
return [[ABKInAppMessageSlideupViewController alloc] initWithInAppMessage:inAppMessage];
} else if ([inAppMessage isKindOfClass:[ABKInAppMessageModal class]]) {
return [[ABKInAppMessageModalViewController alloc] initWithInAppMessage:inAppMessage];
} else if ([inAppMessage isKindOfClass:[ABKInAppMessageFull class]]) {
return [[ABKInAppMessageFullViewController alloc] initWithInAppMessage:inAppMessage];
} else if ([inAppMessage isKindOfClass:[ABKInAppMessageHTML class]]) {
return [[ABKInAppMessageHTMLViewController alloc] initWithInAppMessage:inAppMessage];
}
return nil;
}
```
**Checkpoint:**
Proceed to compile your code and run your application.
Try sending yourself an in-app message.
In the `BrazeManager.swift` file, set a breakpoint at the entry of the example `ABKInAppMessageUIDelegate` method. Send yourself an in-app message and confirm the breakpoint is hit before advancing any further.
### Content Cards
**Important:**
The following Content Card section is not required for integration if you do not plan to use this channel in your application.
##### Create Content Card variables and methods
Enable your production code to display the Content Cards view controller without the need for unnecessary `import AppboyUI` statements.
Create an extension for your Content Cards code in your `BrazeManager.swift` file, so it reads in a more organized manner as to what purpose is being served in the helper file, like so:
1. Display the `ABKContentCardsTableViewController`. An optional `navigationController` is the only parameter needed to present or push our view controller.
2. Initialize an `ABKContentCardsTableViewController` object and optionally change the title. You must also add the initialized view controller to the navigation stack.
```swift
// MARK: - Content Cards
extension BrazeManager {
// 1
func displayContentCards(navigationController: UINavigationController?) {
// 2
let contentCardsVc = ABKContentCardsTableViewController()
contentCardsVc.title = "Content Cards"
navigationController?.pushViewController(contentCardsVc, animated: true)
}
}
```
```objc
// MARK: - Content Cards
// 1
- (void)displayContentCards:(UINavigationController *)navigationController {
// 2
ABKContentCardsTableViewController *contentCardsVc = [[ABKContentCardsTableViewController alloc] init];
contentCardsVc.title = @"Content Cards";
[navigationController pushViewController:contentCardsVc animated:YES];
}
```
**Checkpoint:**
Proceed to compile your code and run your application.
Try displaying the `ABKContentCardsTableViewController` in your application before advancing any further.
## Next steps
Congratulations! You've completed this best practice integration guide! An example `BrazeManager` helper file can be found on [GitHub](https://github.com/braze-inc/braze-growth-shares-ios-demo-app/blob/master/Braze-Demo/BrazeManager.swift).
Now that you have decoupled any dependencies on the Braze iOS SDK from the rest of your production code, check out some of our optional advanced implementation guides:
- [Advanced push notification implementation guide](https://www.braze.com/docs/developer_guide/platforms/legacy_sdks/ios/push_notifications/implementation_guide/)
- [Advanced in-app messages implementation guide](https://www.braze.com/docs/developer_guide/platforms/legacy_sdks/ios/in-app_messaging/implementation_guide/)
- [Advanced Content Card implementation guide](https://www.braze.com/docs/developer_guide/platforms/legacy_sdks/ios/content_cards/implementation_guide/)
# Push Integration for iOS
Source: /docs/developer_guide/platforms/legacy_sdks/ios/push_notifications/integration/index.md
**Warning:**
[AppboyKit](https://github.com/Appboy/appboy-ios-sdk) (also known as the Objective-C SDK) is no longer supported and has been replaced by the [Swift SDK](https://www.braze.com/docs/developer_guide/sdk_integration/?sdktab=swift). It will no longer receive new features, bug fixes, security updates, or technical support—however, messaging and analytics will continue to function as normal. To learn more, see [Introducing the New Braze Swift SDK](https://www.braze.com/resources/articles/introducing-the-new-braze-swift-sdk).
# Push integration
## Step 1: Upload your APNs token
Before you can send an iOS push notification using Braze, you need to upload your `.p8` push notification file, as described in [Apple's developer documentation](https://developer.apple.com/documentation/usernotifications/establishing-a-token-based-connection-to-apns):
1. In your Apple developer account, go to [**Certificates, Identifiers & Profiles**](https://developer.apple.com/account/ios/certificate).
2. Under **Keys**, select **All** and click the add button (+) in the upper-right corner.
3. Under **Key Description**, enter a unique name for the signing key.
4. Under **Key Services**, select the **Apple Push Notification service (APNs)** checkbox, then click **Continue**. Click **Confirm**.
5. Note the key ID. Click **Download** to generate and download the key. Make sure to save the downloaded file in a secure place, as you cannot download this more than once.
6. In Braze, go to **Settings** > **App Settings** and upload the `.p8` file under **Apple Push Certificate**. You can upload either your development or production push certificate. To test push notifications after your app is live in the App Store, its recommended to set up a separate workspace for the development version of your app.
7. When prompted, enter your app's [bundle ID](https://developer.apple.com/documentation/foundation/nsbundle/1418023-bundleidentifier), [key ID](https://developer.apple.com/help/account/manage-keys/get-a-key-identifier/), and [team ID](https://developer.apple.com/help/account/manage-your-team/locate-your-team-id). You'll also need to specify whether to send notifications to your app's development or production environment, which is defined by its provisioning profile.
8. When you're finished, select **Save**.
## Step 2: Enable push capabilities
In your project settings, ensure that under the **Capabilities** tab, your **Push Notifications** capability is toggled on.

If you have separate development and production push certificates, make sure to uncheck the **Automatically manage signing** box in the **General** tab. This will allow you to choose different provisioning profiles for each build configuration, as Xcode's automatic code signing feature only does development signing.
## Step 3: Register for push notifications
The appropriate code sample must be included within your app's `application:didFinishLaunchingWithOptions:` delegate method for your users' device to register with APNs. Ensure that you call all push integration code in your application's main thread.
Braze also provides default push categories for push action button support, which must be manually added to your push registration code. Refer to [push action buttons](https://www.braze.com/docs/developer_guide/platforms/legacy_sdks/ios/push_notifications/customization/action_buttons/) for additional integration steps.
**Warning:**
If you've implemented a custom push prompt as described in our [push best practices](https://www.braze.com/docs/developer_guide/platforms/legacy_sdks/ios/push_notifications/troubleshooting/), make sure that you're calling the following code **every time the app runs** after they grant push permissions to your app. **Apps need to re-register with APNs as [device tokens can change arbitrarily](https://developer.apple.com/library/ios/documentation/iPhone/Conceptual/iPhoneOSProgrammingGuide/BackgroundExecution/BackgroundExecution.html).**
### Using UserNotification framework (iOS 10+)
If you are using the `UserNotifications` framework (recommended) introduced in iOS 10, add the following code to the `application:didFinishLaunchingWithOptions:` method of your app delegate.
**Important:**
The following code sample includes integration for provisional push authentication (lines 5 and 6). If you are not planning on using provisional authorization in your app, you can remove the lines of code that add `UNAuthorizationOptionProvisional` to the `requestAuthorization` options. Visit [iOS notification options](https://www.braze.com/docs/user_guide/message_building_by_channel/push/ios/notification_options/) to learn more about push provisional authentication.
```objc
if (floor(NSFoundationVersionNumber) > NSFoundationVersionNumber_iOS_9_x_Max) {
UNUserNotificationCenter *center = [UNUserNotificationCenter currentNotificationCenter];
center.delegate = self;
UNAuthorizationOptions options = UNAuthorizationOptionAlert | UNAuthorizationOptionSound | UNAuthorizationOptionBadge;
if (@available(iOS 12.0, *)) {
options = options | UNAuthorizationOptionProvisional;
}
[center requestAuthorizationWithOptions:options
completionHandler:^(BOOL granted, NSError * _Nullable error) {
[[Appboy sharedInstance] pushAuthorizationFromUserNotificationCenter:granted];
}];
[[UIApplication sharedApplication] registerForRemoteNotifications];
} else {
UIUserNotificationSettings *settings = [UIUserNotificationSettings settingsForTypes:(UIUserNotificationTypeBadge | UIUserNotificationTypeAlert | UIUserNotificationTypeSound) categories:nil];
[[UIApplication sharedApplication] registerForRemoteNotifications];
[[UIApplication sharedApplication] registerUserNotificationSettings:settings];
}
```
```swift
if #available(iOS 10, *) {
let center = UNUserNotificationCenter.current()
center.delegate = self as? UNUserNotificationCenterDelegate
var options: UNAuthorizationOptions = [.alert, .sound, .badge]
if #available(iOS 12.0, *) {
options = UNAuthorizationOptions(rawValue: options.rawValue | UNAuthorizationOptions.provisional.rawValue)
}
center.requestAuthorization(options: options) { (granted, error) in
Appboy.sharedInstance()?.pushAuthorization(fromUserNotificationCenter: granted)
}
UIApplication.shared.registerForRemoteNotifications()
} else {
let types : UIUserNotificationType = [.alert, .badge, .sound]
let setting : UIUserNotificationSettings = UIUserNotificationSettings(types:types, categories:nil)
UIApplication.shared.registerUserNotificationSettings(setting)
UIApplication.shared.registerForRemoteNotifications()
}
```
**Warning:**
You must assign your delegate object using `center.delegate = self` synchronously before your app finishes launching, preferably in `application:didFinishLaunchingWithOptions:`. Not doing so may cause your app to miss incoming push notifications. Visit Apple's [`UNUserNotificationCenterDelegate`](https://developer.apple.com/documentation/usernotifications/unusernotificationcenterdelegate) documentation to learn more.
### Without UserNotifications framework
If you are not using the `UserNotifications` framework, add the following code to the `application:didFinishLaunchingWithOptions:` method of your app delegate:
```objc
UIUserNotificationSettings *settings = [UIUserNotificationSettings settingsForTypes:(UIUserNotificationTypeBadge | UIUserNotificationTypeAlert | UIUserNotificationTypeSound) categories:nil];
[[UIApplication sharedApplication] registerForRemoteNotifications];
[[UIApplication sharedApplication] registerUserNotificationSettings:settings];
```
```swift
let types : UIUserNotificationType = UIUserNotificationType.Badge | UIUserNotificationType.Sound | UIUserNotificationType.Alert
var setting : UIUserNotificationSettings = UIUserNotificationSettings(forTypes: types, categories: nil)
UIApplication.shared.registerUserNotificationSettings(setting)
UIApplication.shared.registerForRemoteNotifications()
```
## Step 4: Register push tokens with Braze
Once APNs registration is complete, the following method must be altered to pass the resulting `deviceToken` to Braze so the user becomes enabled for push notifications:
Add the following code to your `application:didRegisterForRemoteNotificationsWithDeviceToken:` method:
```objc
[[Appboy sharedInstance] registerDeviceToken:deviceToken];
```
Add the following code to your app's `application(_:didRegisterForRemoteNotificationsWithDeviceToken:)` method:
```swift
Appboy.sharedInstance()?.registerDeviceToken(deviceToken)
```
**Important:**
The `application:didRegisterForRemoteNotificationsWithDeviceToken:` delegate method is called every time after `[[UIApplication sharedApplication] registerForRemoteNotifications]` is called. If you are migrating to Braze from another push service and your user's device has already registered with APNs, this method will collect tokens from existing registrations the next time the method is called, and users will not have to re-opt-in to push.
## Step 5: Enable push handling
The following code passes received push notifications along to Braze and is necessary for logging push analytics and link handling. Ensure you call all push integration code in your application's main thread.
### iOS 10+
When building against iOS 10+, we recommend you integrate the `UserNotifications` framework and do the following:
Add the following code to your application's `application:didReceiveRemoteNotification:fetchCompletionHandler:` method:
```objc
[[Appboy sharedInstance] registerApplication:application
didReceiveRemoteNotification:userInfo
fetchCompletionHandler:completionHandler];
```
Next, add the following code to your app's `(void)userNotificationCenter:didReceiveNotificationResponse:withCompletionHandler:` method:
```objc
[[Appboy sharedInstance] userNotificationCenter:center
didReceiveNotificationResponse:response
withCompletionHandler:completionHandler];
```
**Foreground Push Handling**
To display a push notification while the app is in the foreground, implement `userNotificationCenter:willPresentNotification:withCompletionHandler:`:
```objc
- (void)userNotificationCenter:(UNUserNotificationCenter *)center
willPresentNotification:(UNNotification *)notification
withCompletionHandler:(void (^)(UNNotificationPresentationOptions options))completionHandler {
if (@available(iOS 14.0, *)) {
completionHandler(UNNotificationPresentationOptionList | UNNotificationPresentationOptionBanner);
} else {
completionHandler(UNNotificationPresentationOptionAlert);
}
}
```
If the foreground notification is clicked, the iOS 10 push delegate `userNotificationCenter:didReceiveNotificationResponse:withCompletionHandler:` will be called, and Braze will log a push click event.
Add the following code to your app's `application(_:didReceiveRemoteNotification:fetchCompletionHandler:)` method:
```swift
Appboy.sharedInstance()?.register(application,
didReceiveRemoteNotification: userInfo,
fetchCompletionHandler: completionHandler)
```
Next, add the following code to your app's `userNotificationCenter(_:didReceive:withCompletionHandler:)` method:
```swift
Appboy.sharedInstance()?.userNotificationCenter(center,
didReceive: response,
withCompletionHandler: completionHandler)
```
**Foreground Push Handling**
To display a push notification while the app is in the foreground, implement `userNotificationCenter(_:willPresent:withCompletionHandler:)`:
```swift
func userNotificationCenter(_ center: UNUserNotificationCenter,
willPresent notification: UNNotification,
withCompletionHandler completionHandler: @escaping (UNNotificationPresentationOptions) -> Void) {
if #available(iOS 14.0, *) {
completionHandler([.list, .banner]);
} else {
completionHandler([.alert]);
}
}
```
If the foreground notification is clicked, the iOS 10 push delegate `userNotificationCenter(_:didReceive:withCompletionHandler:)` will be called, and Braze will log a push click event.
### Pre-iOS 10
iOS 10 updated behavior such that it no longer calls `application:didReceiveRemoteNotification:fetchCompletionHandler:` when a push is clicked. For this reason, if you don't update to building against iOS 10+ and use the `UserNotifications` framework, you have to call Braze from both old-style delegates, which is a break from our previous integration.
For apps building against SDKs < iOS 10, use the following instructions:
To enable open tracking on push notifications, add the following code to your app's `application:didReceiveRemoteNotification:fetchCompletionHandler:` method:
```objc
[[Appboy sharedInstance] registerApplication:application
didReceiveRemoteNotification:userInfo
fetchCompletionHandler:completionHandler];
```
To support push analytics on iOS 10, you must also add the following code to your app's `application:didReceiveRemoteNotification:` delegate method:
```objc
[[Appboy sharedInstance] registerApplication:application
didReceiveRemoteNotification:userInfo];
```
To enable open tracking on push notifications, add the following code to your app's `application(_:didReceiveRemoteNotification:fetchCompletionHandler:)` method:
```swift
Appboy.sharedInstance()?.register(application,
didReceiveRemoteNotification: userInfo,
fetchCompletionHandler: completionHandler)
```
To support push analytics on iOS 10, you must also add the following code to your app's `application(_:didReceiveRemoteNotification:)` delegate method:
```swift
Appboy.sharedInstance()?.register(application,
didReceiveRemoteNotification: userInfo)
```
## Step 6: Deep linking
Deep linking from a push into the app is automatically handled via our standard push integration documentation. If you'd like to learn more about how to add deep links to specific locations in your app, see our [advanced use cases](https://www.braze.com/docs/developer_guide/platform_integration_guides/ios/advanced_use_cases/linking/#linking-implementation).
## Step 7: Unit tests (optional)
To add test coverage for the integration steps you've just followed, implement [push unit testing](https://www.braze.com/docs/developer_guide/platforms/legacy_sdks/ios/push_notifications/unit_tests/).
# iOS Push Customization
Source: /docs/developer_guide/platforms/legacy_sdks/ios/push_notifications/customization/index.md
# Push Action Buttons for iOS
Source: /docs/developer_guide/platforms/legacy_sdks/ios/push_notifications/customization/action_buttons/index.md
**Warning:**
[AppboyKit](https://github.com/Appboy/appboy-ios-sdk) (also known as the Objective-C SDK) is no longer supported and has been replaced by the [Swift SDK](https://www.braze.com/docs/developer_guide/sdk_integration/?sdktab=swift). It will no longer receive new features, bug fixes, security updates, or technical support—however, messaging and analytics will continue to function as normal. To learn more, see [Introducing the New Braze Swift SDK](https://www.braze.com/resources/articles/introducing-the-new-braze-swift-sdk).
# Action buttons {#push-action-buttons-integration}
The Braze iOS SDK supports default push categories, including URL handling support for each push action button. Currently, the default categories have four sets of push action buttons: `Accept`/`Decline`, `Yes`/`No`, `Confirm`/`Cancel`, and `More`.
To register our default push categories, follow the integration instructions:
## Step 1: Adding Braze default push categories
Use the following code to register for our default push categories when you [register for push](https://www.braze.com/docs/developer_guide/platform_integration_guides/ios/push_notifications/integration/#step-4-register-push-tokens-with-braze):
```objc
// For UserNotification.framework (iOS 10+ only)
NSSet *appboyCategories = [ABKPushUtils getAppboyUNNotificationCategorySet];
[[UNUserNotificationCenter currentNotificationCenter] setNotificationCategories:appboyCategories];
// For UIUserNotificationSettings (before iOS 10)
NSSet *appboyCategories = [ABKPushUtils getAppboyUIUserNotificationCategorySet];
UIUserNotificationSettings *settings = [UIUserNotificationSettings settingsForTypes:UIUserNotificationTypeBadge
categories:appboyCategories];
[[UIApplication sharedApplication] registerUserNotificationSettings:settings];
```
```swift
// For UserNotification.framework (iOS 10+ only)
let appboyCategories = ABKPushUtils.getAppboyUNNotificationCategorySet()
UNUserNotificationCenter.current().setNotificationCategories(appboyCategories)
// For UIUserNotificationSettings (before iOS 10)
let appboyCategories = ABKPushUtils.getAppboyUIUserNotificationCategorySet()
let settings = UIUserNotificationSettings.init(types: .badge, categories: appboyCategories)
UIApplication.shared.registerUserNotificationSettings(settings)
```
Clicking on push action buttons with background activation mode will only dismiss the notification and not open the app. The next time the user opens the app, the button click analytics for these actions will be flushed to the server.
If you want to create your own custom notification categories, see [action button customization](https://www.braze.com/docs/developer_guide/platform_integration_guides/ios/push_notifications/customization/action_buttons/#push-category-customization).
## Step 2: Enable interactive push handling
If you use the `UNNotification` framework and have implemented Braze [delegates](https://www.braze.com/docs/developer_guide/platform_integration_guides/ios/push_notifications/integration/#step-5-enable-push-handling), you should already have this method integrated.
To enable our push action button handling, including click analytics and URL routing, add the following code to your app's `(void)userNotificationCenter:didReceiveNotificationResponse:withCompletionHandler:` delegate method:
```objc
[[Appboy sharedInstance] userNotificationCenter:center
didReceiveNotificationResponse:response
withCompletionHandler:completionHandler];
```
```swift
Appboy.sharedInstance()?.userNotificationCenter(center,
didReceive: response,
withCompletionHandler: completionHandler)
```
If you are not using UNNotification Framework, you will need to add the following code to your app's `application:handleActionWithIdentifier:forRemoteNotification:completionHandler:` to enable our push action button handling:
```objc
[[Appboy sharedInstance] getActionWithIdentifier:identifier
forRemoteNotification:userInfo
completionHandler:completionHandler];
```
```swift
Appboy.sharedInstance()?.getActionWithIdentifier(identifier,
forRemoteNotification: userInfo,,
completionHandler: completionHandler)
```
**Important:**
We strongly recommend that people using `handleActionWithIdentifier` begin using `UNNotification` framework. We recommend this due to the deprecation of [`handleActionWithIdentifier`](https://developer.apple.com/documentation/uikit/uiapplicationdelegate/1623068-application?language=objc).
## Push category customization
In addition to providing a set of [default push categories](https://www.braze.com/docs/developer_guide/platforms/legacy_sdks/ios/push_notifications/customization/action_buttons/), Braze supports custom notification categories and actions. After you register categories in your application, you can use the Braze dashboard to send notification categories to your users.
If you are not using the `UserNotifications` framework, see the [alternative categories](https://developer.apple.com/documentation/usernotifications/unnotificationcategory) documentation.
These categories can then be assigned to push notifications via our dashboard to trigger the action button configurations of your design. Here's an example that leverages the `LIKE_CATEGORY` displayed on the device:
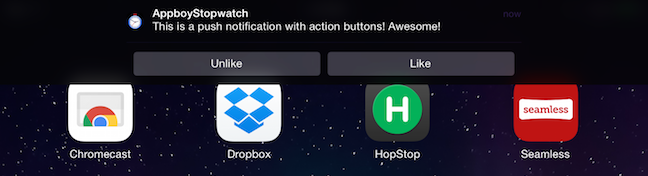
# Custom Push Notification Sounds for iOS
Source: /docs/developer_guide/platforms/legacy_sdks/ios/push_notifications/customization/custom_sounds/index.md
**Warning:**
[AppboyKit](https://github.com/Appboy/appboy-ios-sdk) (also known as the Objective-C SDK) is no longer supported and has been replaced by the [Swift SDK](https://www.braze.com/docs/developer_guide/sdk_integration/?sdktab=swift). It will no longer receive new features, bug fixes, security updates, or technical support—however, messaging and analytics will continue to function as normal. To learn more, see [Introducing the New Braze Swift SDK](https://www.braze.com/resources/articles/introducing-the-new-braze-swift-sdk).
# Custom sounds
## Step 1: Hosting the sound in the app
Custom push notification sounds must be hosted locally within the main bundle of the client application. The following audio data formats are accepted:
- Linear PCM
- MA4
- µLaw
- aLaw
You can package the audio data in an AIFF, WAV, or CAF file. In Xcode, add the sound file to your project as a non-localized resource of the application bundle.
You may use the afconvert tool to convert sounds. For example, to convert the 16-bit linear PCM system sound Submarine.aiff to IMA4 audio in a CAF file, use the following command in the terminal:
```bash
afconvert /System/Library/Sounds/Submarine.aiff ~/Desktop/sub.caf -d ima4 -f caff -v
```
You can inspect a sound to determine its data format by opening it in QuickTime Player and choosing **Show Movie Inspector** from the **Movie** menu.
Custom sounds must be under 30 seconds when played. If a custom sound is over that limit, the default system sound is played instead.
## Step 2: Providing the dashboard with a protocol URL for the sound
Your sound must be hosted locally within the app. You must specify a protocol URL that directs to the location of the sound file in the app within the **Sound** field in the push composer. Specifying "default" in this field will play the default notification sound on the device. This can be specified via our [messaging API](https://www.braze.com/docs/api/endpoints/messaging/) or our dashboard under **Settings** in the push composer, as pictured in the following screenshot:
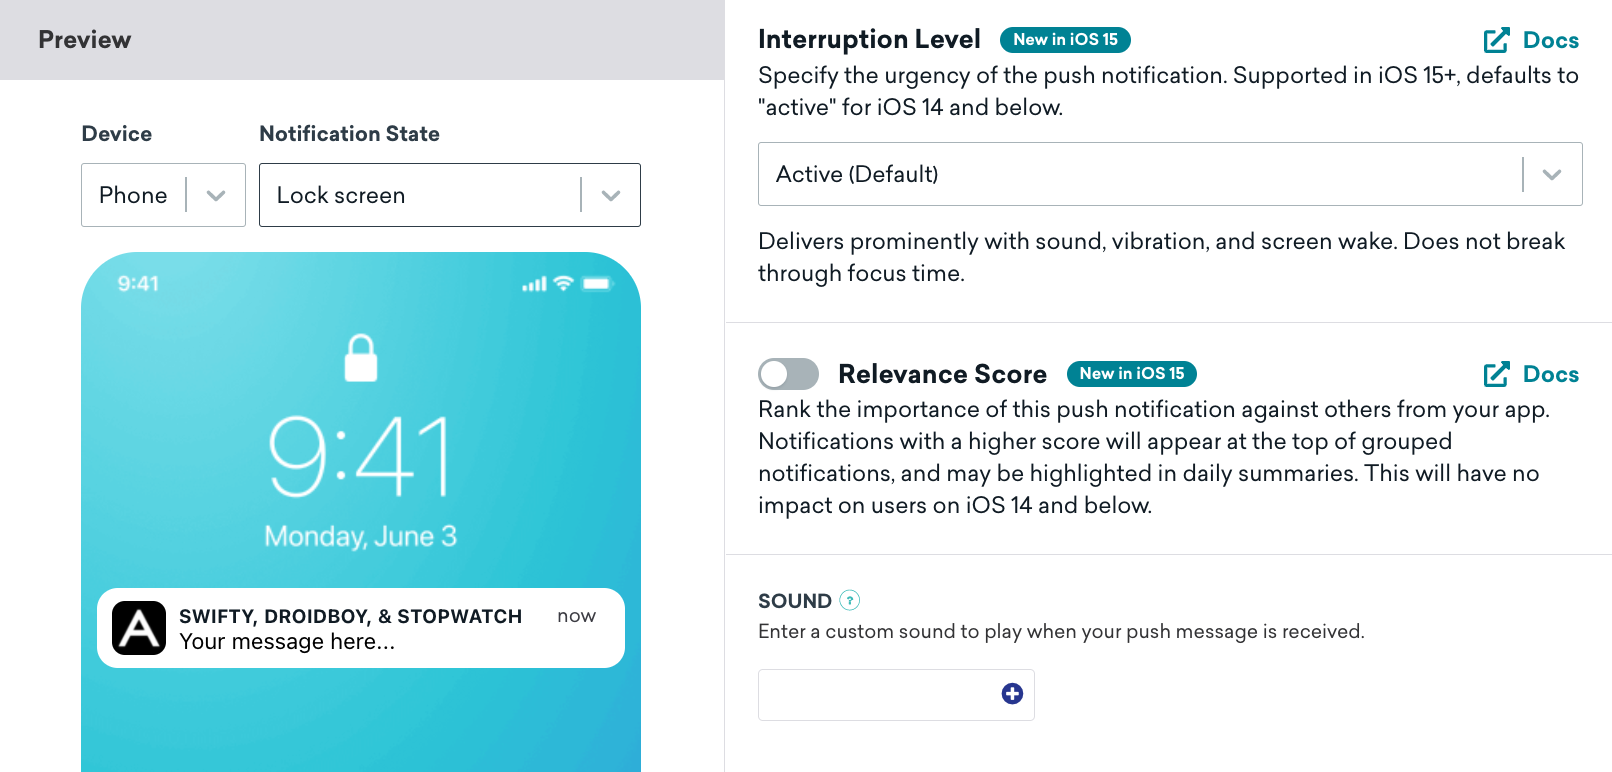
If the specified sound file doesn't exist or the keyword "default" is entered, Braze will use the default device alert sound. Aside from our dashboard, sound can also be configured via our [messaging API](https://www.braze.com/docs/api/endpoints/messaging/). See the Apple Developer Documentation regarding [preparing custom alert sounds](https://developer.apple.com/library/content/documentation/NetworkingInternet/Conceptual/RemoteNotificationsPG/SupportingNotificationsinYourApp.html) for additional information.
# Rich Push Notifications for iOS
Source: /docs/developer_guide/platforms/legacy_sdks/ios/push_notifications/customization/rich_notifications/index.md
**Warning:**
[AppboyKit](https://github.com/Appboy/appboy-ios-sdk) (also known as the Objective-C SDK) is no longer supported and has been replaced by the [Swift SDK](https://www.braze.com/docs/developer_guide/sdk_integration/?sdktab=swift). It will no longer receive new features, bug fixes, security updates, or technical support—however, messaging and analytics will continue to function as normal. To learn more, see [Introducing the New Braze Swift SDK](https://www.braze.com/resources/articles/introducing-the-new-braze-swift-sdk).
# iOS 10 rich notifications
iOS 10 introduces the ability to send push notifications with images, GIFs, and video. To enable this functionality, clients must create a `Service Extension`, a new type of extension that enables modification of a push payload before it is displayed.
## Creating a service extension
To create a [`Notification Service Extension`](https://developer.apple.com/reference/usernotifications/unnotificationserviceextension), navigate to **File > New > Target** in Xcode and select **Notification Service Extension**.
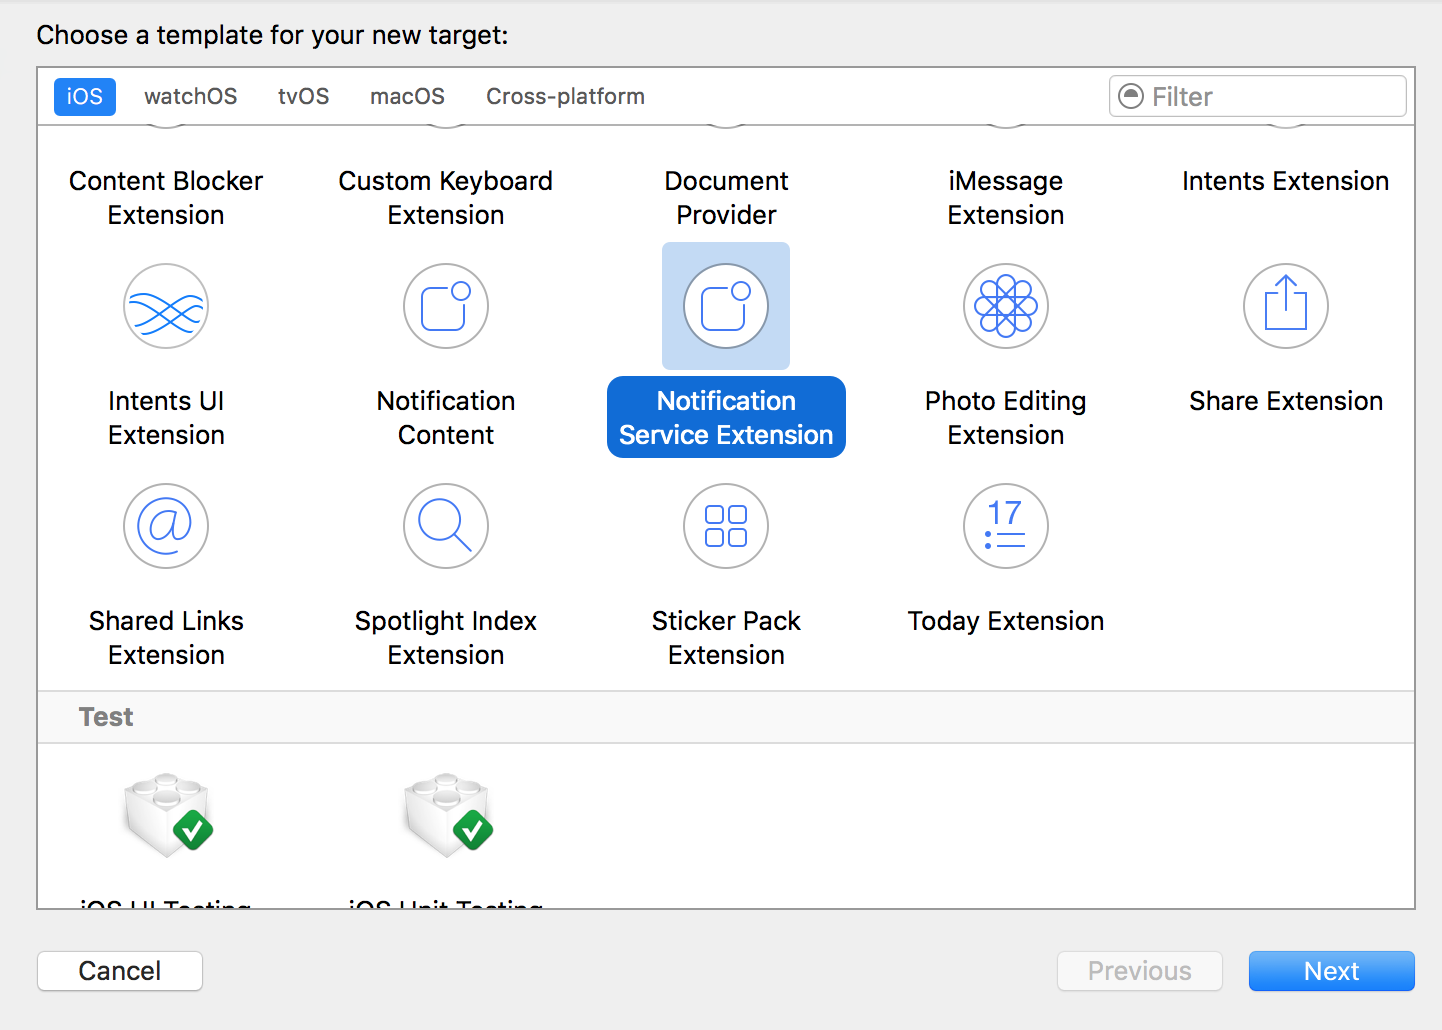{: style="max-width:90%"}
Ensure that **Embed In Application** is set to embed the extension in your application.
## Setting up the service extension
A `Notification Service Extension` is its own binary that is bundled with your app. It must be set up in the [Apple Developer Portal](https://developer.apple.com) with its own app ID and provisioning profile.
The `Notification Service Extension`'s bundle ID must be distinct from your main app target's bundle ID. For example, if your app's bundle ID is `com.company.appname`, you can use `com.company.appname.AppNameServiceExtension` for your service extension.
### Configuring the service extension to work with Braze
Braze sends down an attachment payload in the APNs payload under the `ab` key that we use to configure, download and display rich content. For example:
```json
{
"ab" :
{
...
"att" :
{
"url" : "http://mysite.com/myimage.jpg",
"type" : "jpg"
}
},
"aps" :
{
...
}
}
```
The relevant payload values are:
```objc
// The Braze dictionary key
static NSString *const AppboyAPNSDictionaryKey = @"ab";
// The attachment dictionary
static NSString *const AppboyAPNSDictionaryAttachmentKey = @"att";
// The attachment URL
static NSString *const AppboyAPNSDictionaryAttachmentURLKey = @"url";
// The type of the attachment - a suffix for the file you save
static NSString *const AppboyAPNSDictionaryAttachmentTypeKey = @"type";
```
To manually display push with a Braze payload, download the content from the value under `AppboyAPNSDictionaryAttachmentURLKey`, save it as a file with the file type stored under the `AppboyAPNSDictionaryAttachmentTypeKey` key, and add it to the notification attachments.
### Example code
You can write the service extension in either Objective-C or Swift.
To use our Objective-C sample code, replace the contents of your `Notification Service Extension` target's autogenerated `NotificationService.m` with the contents from the Appboy [`NotificationService.m`](https://github.com/Appboy/appboy-ios-sdk/blob/master/Example/StopwatchNotificationService/NotificationService.m).
To use our Swift sample code, replace the contents of your `Notification Service Extension` target's autogenerated `NotificationService.swift` with the contents from the Appboy [`NotificationService.swift`](https://github.com/Appboy/appboy-ios-sdk/blob/master/HelloSwift/HelloSwiftNotificationExtension/NotificationService.swift).
## Creating a rich notification in your dashboard
To create a rich notification in your Braze dashboard, create an iOS push, attach an image or GIF, or provide a URL that hosts an image, GIF, or video. Note that assets are downloaded on the receipt of push notifications, so you should plan for large, synchronous spikes in requests if you are hosting your content.
Refer to [`unnotificationattachment`](https://developer.apple.com/reference/usernotifications/unnotificationattachment) for a list of supported file types and sizes.
# Push Notification Badge Counts for iOS
Source: /docs/developer_guide/platforms/legacy_sdks/ios/push_notifications/customization/badges/index.md
**Warning:**
[AppboyKit](https://github.com/Appboy/appboy-ios-sdk) (also known as the Objective-C SDK) is no longer supported and has been replaced by the [Swift SDK](https://www.braze.com/docs/developer_guide/sdk_integration/?sdktab=swift). It will no longer receive new features, bug fixes, security updates, or technical support—however, messaging and analytics will continue to function as normal. To learn more, see [Introducing the New Braze Swift SDK](https://www.braze.com/resources/articles/introducing-the-new-braze-swift-sdk).
# Badges
You can specify the desired badge count when you compose a push notification through the Braze dashboard. You may also update your badge count manually through your application's [`applicationIconBadgeNumber`](https://developer.apple.com/library/ios/documentation/UIKit/Reference/UIApplication_Class/index.html#//apple_ref/occ/instp/UIApplication/applicationIconBadgeNumber) property or the [remote notification payload](https://developer.apple.com/library/content/documentation/NetworkingInternet/Conceptual/RemoteNotificationsPG/CreatingtheNotificationPayload.html#//apple_ref/doc/uid/TP40008194-CH10-SW1). Braze will also clear the badge count when a Braze notification is received while the app is foregrounded.
If you do not have a plan for clearing badges as part of normal app operation or by sending pushes that clear the badge, you should clear the badge when the app becomes active by adding the following code to your app's `applicationDidBecomeActive:` delegate method:
```objc
// For iOS 16.0+
UNUserNotificationCenter *center = [UNUserNotificationCenter currentNotificationCenter];
[center setBadgeCount:0 withCompletionHandler:^(NSError * _Nullable error) {
if (error != nil) {
// Handle errors
}
}];
// Prior to iOS 16. Deprecated in iOS 17+.
[UIApplication sharedApplication].applicationIconBadgeNumber = 0;
```
```swift
// For iOS 16.0+
let center = UNUserNotificationCenter.current()
do {
try await center.setBadgeCount(0)
} catch {
// Handle errors
}
// Prior to iOS 16. Deprecated in iOS 17+.
UIApplication.shared.applicationIconBadgeNumber = 0
```
Note that setting the badge number to 0 will also clear up notifications in the notification center. So even if you don't set badge number in push payloads, you can still set the badge number to 0 to remove the push notification(s) in the notification center after users click on the push.
# Ignore Braze Internal Push Notifications for iOS
Source: /docs/developer_guide/platforms/legacy_sdks/ios/push_notifications/customization/ignoring_internal_push/index.md
**Warning:**
[AppboyKit](https://github.com/Appboy/appboy-ios-sdk) (also known as the Objective-C SDK) is no longer supported and has been replaced by the [Swift SDK](https://www.braze.com/docs/developer_guide/sdk_integration/?sdktab=swift). It will no longer receive new features, bug fixes, security updates, or technical support—however, messaging and analytics will continue to function as normal. To learn more, see [Introducing the New Braze Swift SDK](https://www.braze.com/resources/articles/introducing-the-new-braze-swift-sdk).
# Ignore Braze internal push notifications
Braze uses silent push notifications for the internal implementation of certain advanced features. For most integrations, this requires no changes on your app's behalf. However, if you integrate a Braze feature that relies on internal push notifications (for example, uninstall tracking or geofences), you may want to update your app to ignore our internal pushes.
If your app takes automatic actions on application launches or background pushes, you should consider gating that activity so that it's not triggered by \ internal push notifications. For example, if you have logic that calls your servers for new content upon every background push or application launch, you likely would not want our internal pushes triggering that because you would incur unnecessary network traffic. Furthermore, because Braze sends certain kinds of internal pushes to all users at approximately the same time, not gating network calls on launch from internal pushes could introduce significant server load.
## Checking your app for automatic actions
You should check your application for automatic actions in the following places and update your code to ignore our internal pushes:
1. **Push Receivers.** Background push notifications will call `application:didReceiveRemoteNotification:fetchCompletionHandler:` on the `UIApplicationDelegate`.
2. **Application Delegate.** Background pushes can launch [suspended](https://developer.apple.com/library/ios/documentation/iPhone/Conceptual/iPhoneOSProgrammingGuide/TheAppLifeCycle/TheAppLifeCycle.html#//apple_ref/doc/uid/TP40007072-CH2-SW3) apps into the background, triggering the `application:willFinishLaunchingWithOptions:` and `application:didFinishLaunchingWithOptions:` methods on your `UIApplicationDelegate`. You can check the `launchOptions` of these methods to determine if the application has been launched from a background push.
## Using Braze internal push utility methods
You can use the utility methods in `ABKPushUtils` to check if your app has received or was launched by a Braze internal push. `isAppboyInternalRemoteNotification:` will return `YES` on all Braze internal push notifications, while `isUninstallTrackingRemoteNotification:` and `isGeofencesSyncRemoteNotification:` will return `YES` for uninstall tracking and geofences sync notifications, respectively. Refer to [`ABKPushUtils.h`](https://github.com/Appboy/appboy-ios-sdk/blob/master/AppboyKit/include/ABKPushUtils.h) for method declarations.
## Implementation example {#internal-push-implementation-example}
```objc
- (BOOL)application:(UIApplication *)application didFinishLaunchingWithOptions:(NSDictionary *)launchOptions {
NSDictionary *pushDictionary = launchOptions[UIApplicationLaunchOptionsRemoteNotificationKey];
BOOL launchedFromAppboyInternalPush = pushDictionary && [ABKPushUtils isAppboyInternalRemoteNotification:pushDictionary];
if (!launchedFromAppboyInternalPush) {
// ... Gated logic here (such as pinging your server to download content) ...
}
}
```
```objc
- (void)application:(UIApplication *)application didReceiveRemoteNotification:(NSDictionary *)userInfo fetchCompletionHandler:(void (^)(UIBackgroundFetchResult result))completionHandler {
if (![ABKPushUtils isAppboyInternalRemoteNotification:userInfo]) {
// ... Gated logic here (such as pinging server for content) ...
}
}
```
```swift
func application(_ application: UIApplication, didFinishLaunchingWithOptions launchOptions: [UIApplicationLaunchOptionsKey : Any]? = nil) -> Bool {
let pushDictionary = launchOptions?[UIApplicationLaunchOptionsKey.remoteNotification] as? NSDictionary as? [AnyHashable : Any] ?? [:]
let launchedFromAppboyInternalPush = ABKPushUtils.isAppboyInternalRemoteNotification(pushDictionary)
if (!launchedFromAppboyInternalPush) {
// ... Gated logic here (such as pinging your server to download content) ...
}
}
```
```swift
func application(_ application: UIApplication,
didReceiveRemoteNotification userInfo: [AnyHashable : Any],
fetchCompletionHandler completionHandler: @escaping (UIBackgroundFetchResult) -> Void) {
if (!ABKPushUtils.isAppboyInternalRemoteNotification(userInfo)) {
// ... Gated logic here (such as pinging server for content) ...
}
}
```
# Advanced Push Settings
Source: /docs/developer_guide/platforms/legacy_sdks/ios/push_notifications/customization/advanced_settings/index.md
**Warning:**
[AppboyKit](https://github.com/Appboy/appboy-ios-sdk) (also known as the Objective-C SDK) is no longer supported and has been replaced by the [Swift SDK](https://www.braze.com/docs/developer_guide/sdk_integration/?sdktab=swift). It will no longer receive new features, bug fixes, security updates, or technical support—however, messaging and analytics will continue to function as normal. To learn more, see [Introducing the New Braze Swift SDK](https://www.braze.com/resources/articles/introducing-the-new-braze-swift-sdk).
# Advanced settings
When creating a push campaign, on the compose step, select **Settings** to view the advanced settings available.
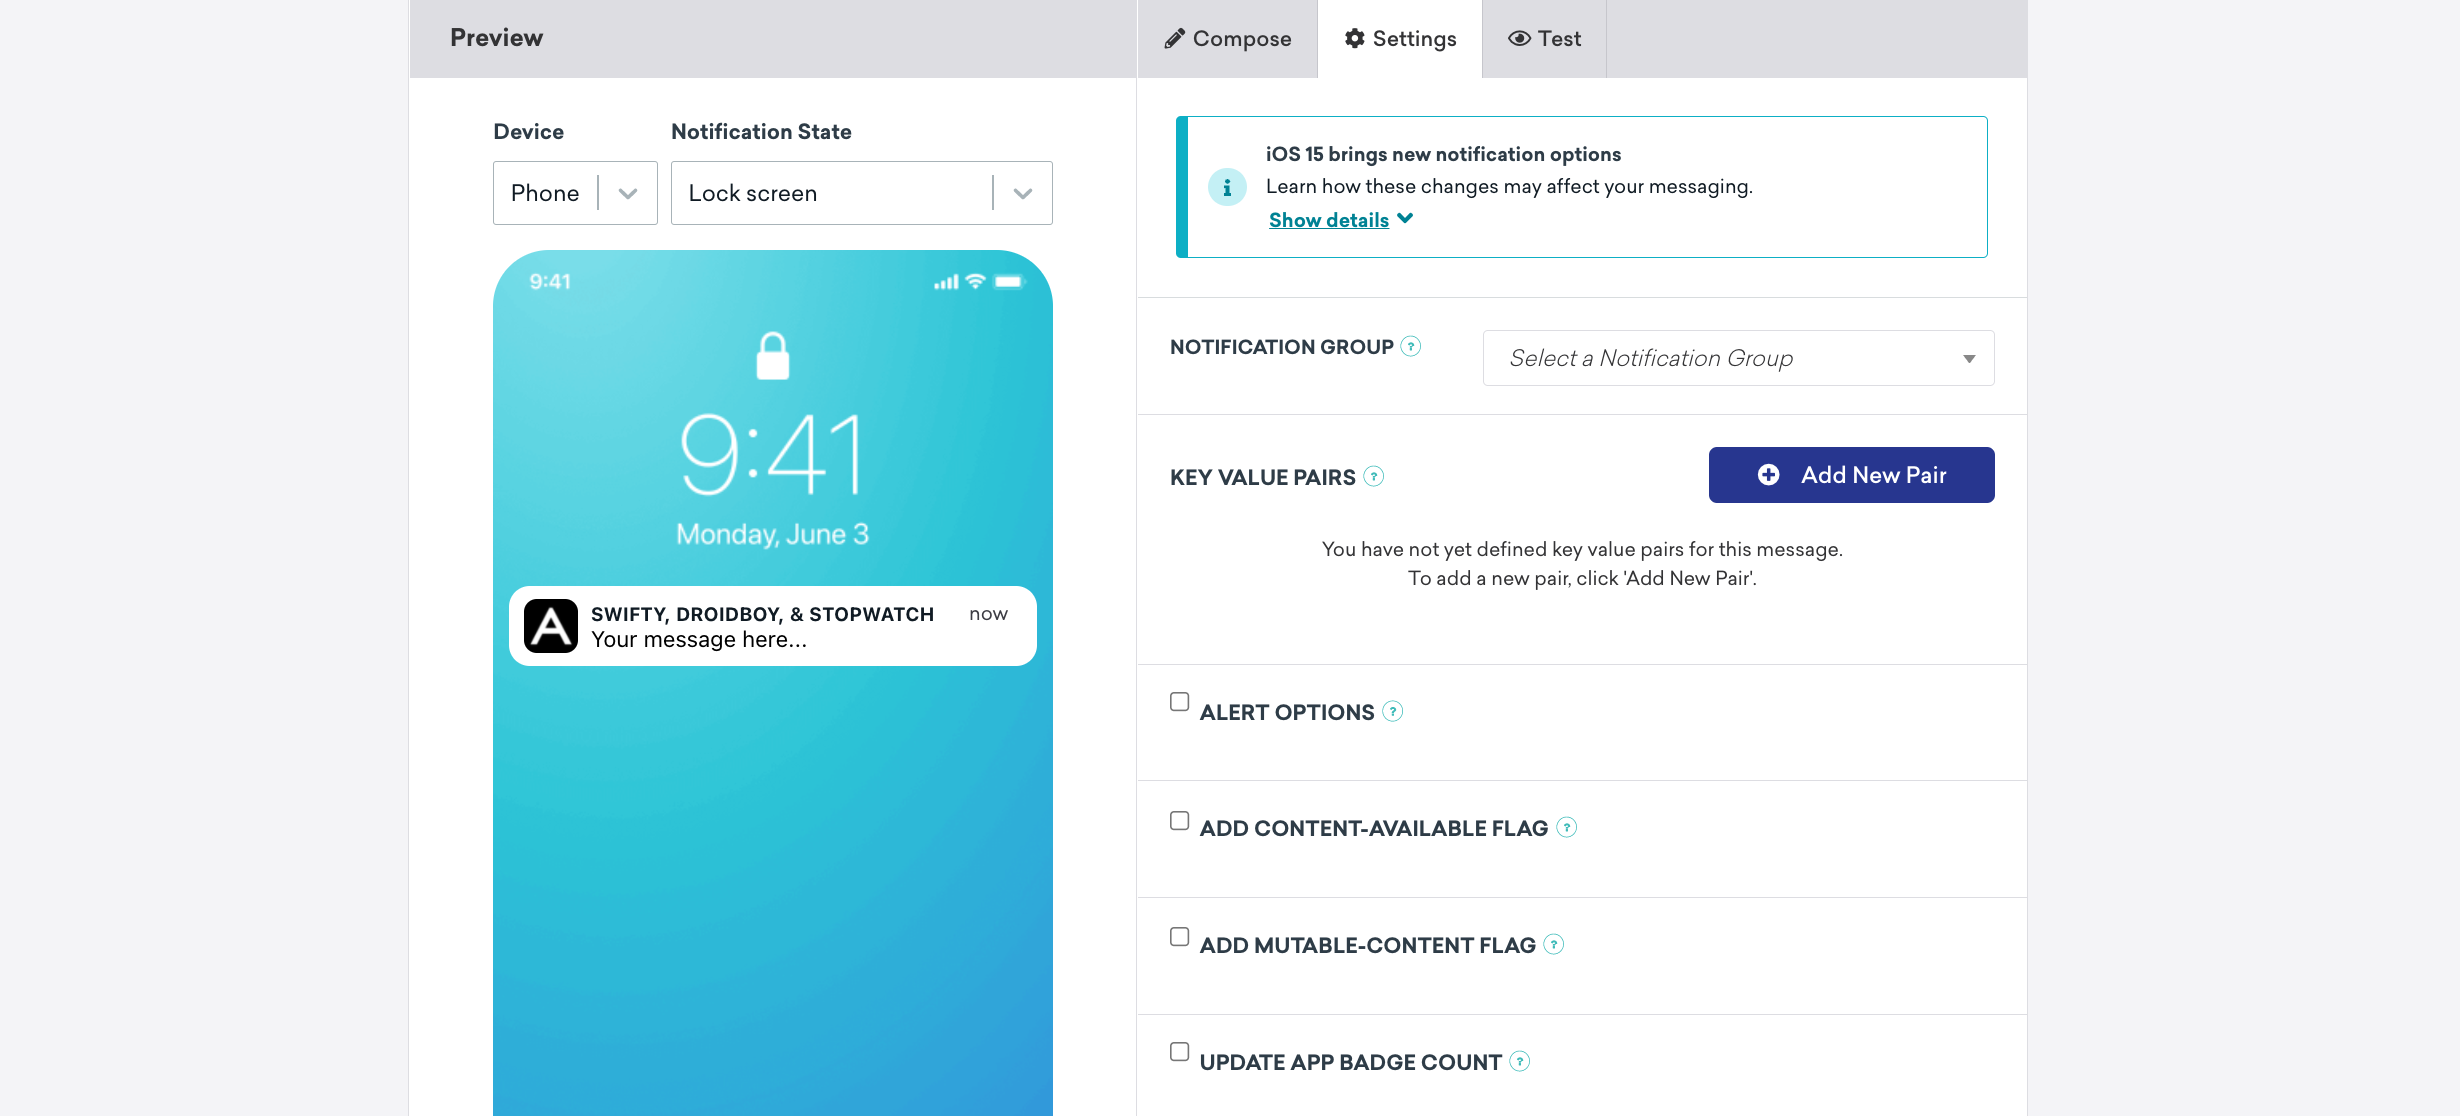
## Extracting data from push key-value pairs
Braze allows you to send custom-defined string key-value pairs, known as `extras`, along with a push notification to your application. Extras can be defined via the dashboard or API and will be available as key-value pairs within the `notification` dictionary passed to your push delegate implementations.
## Alert options
Check the **Alert Options** checkbox to see a dropdown of key-values available to adjust how the notification appears on devices.
## Adding content-available flag
Check the **Add Content-Available Flag** checkbox to instruct devices to download new content in the background. Most commonly, this can be checked if you are interested in sending [silent notifications](https://www.braze.com/docs/developer_guide/platforms/legacy_sdks/ios/push_notifications/silent_push_notifications/).
## Adding mutable-content flag
Check the **Add Mutable-Content Flag** checkbox to enable advanced receiver customization in iOS 10+ devices. This flag will automatically be sent when composing a [rich notification](https://www.braze.com/docs/developer_guide/platforms/legacy_sdks/ios/push_notifications/customization/rich_notifications/), regardless of the value of this checkbox.
## Update app badge count
Enter the number that you want to update your badge count to, or use Liquid syntax to set your custom conditions. You may also update your badge count manually through your application's `applicationIconBadgeNumber` property or the push notification payload. To read more, refer to our dedicated [Badge count](https://www.braze.com/docs/developer_guide/platforms/legacy_sdks/ios/push_notifications/customization/badges/) article.
## Sounds
Here you can enter a path to a sound file in your app bundle to specify a sound to be played when the push message is received. If the specified sound file does not exist or should the keyword "default" be entered, Braze will use the default device alert sound. For more on customization, refer to our dedicated [Custom sounds](https://www.braze.com/docs/developer_guide/platforms/legacy_sdks/ios/push_notifications/customization/custom_sounds/) article.
## Collapse ID
Specify a collapse ID to coalesce similar notifications. If you send multiple notifications with the same collapse ID, the device will only show the most recently received notification. Refer to Apple's documentation on [coalesced notifications](https://developer.apple.com/library/content/documentation/NetworkingInternet/Conceptual/RemoteNotificationsPG/APNSOverview.html#//apple_ref/doc/uid/TP40008194-CH8-SW1).
## Expiry
Checking the **Expiry** checkbox will allow setting an expiration time for your message. Should a user's device lose connectivity, Braze will continue to try and send the message until the specified time. If this is not set, the platform will default to an expiration of 30 days. Note that push notifications that expire before delivery are not considered failed and will not be recorded as a bounce.
# Silent Push Notifications for iOS
Source: /docs/developer_guide/platforms/legacy_sdks/ios/push_notifications/silent_push_notifications/index.md
**Warning:**
[AppboyKit](https://github.com/Appboy/appboy-ios-sdk) (also known as the Objective-C SDK) is no longer supported and has been replaced by the [Swift SDK](https://www.braze.com/docs/developer_guide/sdk_integration/?sdktab=swift). It will no longer receive new features, bug fixes, security updates, or technical support—however, messaging and analytics will continue to function as normal. To learn more, see [Introducing the New Braze Swift SDK](https://www.braze.com/resources/articles/introducing-the-new-braze-swift-sdk).
# Silent push notifications
Push notifications allow you to notify your app when important events occur. You might send a push notification when you have new instant messages to deliver, breaking news alerts to send, or the latest episode of your user's favorite TV show ready for them to download for offline viewing. Push notifications can also be silent, containing no alert message or sound, being used only to update your app's interface or trigger background work.
Push notifications are great for sporadic but immediately important content, where the delay between background fetches might not be acceptable. Push notifications can also be much more efficient than background fetch, as your application only launches when necessary.
Push notifications are rate-limited, so don't be afraid of sending as many as your application needs. iOS and the APNs servers will control how often they are delivered, and you won't get into trouble for sending too many. If your push notifications are throttled, they might be delayed until the next time the device sends a keep-alive packet or receives another notification.
## Sending silent push notifications
To send a silent push notification, set the `content-available` flag to `1` in a push notification payload. When sending a silent push notification, you might also want to include some data in the notification payload, so your application can reference the event. This could save you a few networking requests and increase the responsiveness of your app.
**Warning:**
Attaching both a title and body with `content-available=1` is not recommended because it can lead to undefined behavior. To ensure that a notification is truly silent, exclude both the title and body when setting the `content-available` flag to `1.` For further details, refer to the official [Apple documentation on background updates](https://developer.apple.com/documentation/usernotifications/setting_up_a_remote_notification_server/pushing_background_updates_to_your_app).
The `content-available` flag can be set in the Braze dashboard as well as within our [Apple push object](https://www.braze.com/docs/api/objects_filters/messaging/apple_object/) in the [messaging API](https://www.braze.com/docs/api/endpoints/messaging/).

## Use silent push notifications to trigger background work
Silent push notifications can wake your app from a "Suspended" or "Not Running" state to update content or run certain tasks without notifying your users.
To use silent push notifications to trigger background work, set up the `content-available` flag following the preceding instructions with no message or sound. Set up your app's background mode to enable `remote notifications` under the **Capabilities** tab in your project settings. A remote notification is just a normal push notification with the `content-available` flag set.

Enabling background mode for remote notifications is required for [uninstall tracking](https://www.braze.com/docs/developer_guide/analytics/tracking_uninstalls/?sdktab=swift).
Even with the remote notifications background mode enabled, the system will not launch your app into the background if the user has force-quit the application. The user must explicitly launch the application or reboot the device before the app can be automatically launched into the background by the system.
For more information, refer to [pushing background updates](https://developer.apple.com/documentation/usernotifications/setting_up_a_remote_notification_server/pushing_background_updates_to_your_app?language=objc) and [`application:didReceiveRemoteNotification:fetchCompletionHandler:`](https://developer.apple.com/library/ios/documentation/UIKit/Reference/UIApplicationDelegate_Protocol/index.html#//apple_ref/occ/intfm/UIApplicationDelegate/application:didReceiveRemoteNotification:fetchCompletionHandler:).
## iOS silent notifications limitations
The iOS operating system may gate notifications for some features. Note that if you are experiencing difficulties with these features, the iOS's silent notifications gate might be the cause.
Braze has several features which rely on iOS silent push notifications:
|Feature|User Experience|
|---|---|
|Uninstall Tracking | User receives a silent, nightly uninstall tracking push.|
|Geofences | Silent syncing of geofences from server to device.|
{: .reset-td-br-1 .reset-td-br-2 role="presentation" }
Refer to Apple's [instance method](https://developer.apple.com/documentation/uikit/uiapplicationdelegate/1623013-application) and [unreceived notifications](https://developer.apple.com/library/content/technotes/tn2265/_index.html#//apple_ref/doc/uid/DTS40010376-CH1-TNTAG23) documentation for more details.
[8]:https://developer.apple.com/library/content/technotes/tn2265/_index.html#//apple_ref/doc/uid/DTS40010376-CH1-TNTAG23
# Push Primer for iOS
Source: /docs/developer_guide/platforms/legacy_sdks/ios/push_notifications/push_primer/index.md
**Warning:**
[AppboyKit](https://github.com/Appboy/appboy-ios-sdk) (also known as the Objective-C SDK) is no longer supported and has been replaced by the [Swift SDK](https://www.braze.com/docs/developer_guide/sdk_integration/?sdktab=swift). It will no longer receive new features, bug fixes, security updates, or technical support—however, messaging and analytics will continue to function as normal. To learn more, see [Introducing the New Braze Swift SDK](https://www.braze.com/resources/articles/introducing-the-new-braze-swift-sdk).
# Push primer integration
Push primer campaigns encourage your users to enable push on their device for your app. Getting permission from users to send messages directly to their devices can be complex, but our guides can help! This guide shows the steps developers must make to integrate push priming.
## Step 1: Add snippet in AppDelegate.m file
Add the following line of code to your `AppDelegate.m` file in place of the standard integration:
```objc
- (BOOL)application:(UIApplication *)application didFinishLaunchingWithOptions:(NSDictionary *)launchOptions {
...
if (@available(iOS 10.0, *)) {
UNUserNotificationCenter *center = [UNUserNotificationCenter currentNotificationCenter];
[center getNotificationSettingsWithCompletionHandler:^(UNNotificationSettings * _Nonnull settings) {
if (settings.authorizationStatus != UNAuthorizationStatusNotDetermined) {
// authorization has already been requested, need to follow usual steps
[center requestAuthorizationWithOptions:(UNAuthorizationOptionAlert | UNAuthorizationOptionSound | UNAuthorizationOptionBadge) completionHandler:^(BOOL granted, NSError * _Nullable error) {
[[Appboy sharedInstance] pushAuthorizationFromUserNotificationCenter:granted];
}];
center.delegate = self;
[center setNotificationCategories:[ABKPushUtils getAppboyUNNotificationCategorySet]];
[[UIApplication sharedApplication] registerForRemoteNotifications];
}
}];
} else {
UIApplication *sharedApplication = [UIApplication sharedApplication];
UIUserNotificationSettings *notificationSettings = [sharedApplication currentUserNotificationSettings];
if (notificationSettings.types) {
UIUserNotificationSettings *settings = [UIUserNotificationSettings settingsForTypes:(UIUserNotificationTypeBadge | UIUserNotificationTypeAlert | UIUserNotificationTypeSound) categories:[ABKPushUtils getAppboyUIUserNotificationCategorySet]];
[sharedApplication registerUserNotificationSettings:settings];
[sharedApplication registerForRemoteNotifications];
}
}
```
```swift
if #available(iOS 10, *) {
let center = UNUserNotificationCenter.current()
center.getNotificationSettings(completionHandler: { (settings) in
if settings.authorizationStatus != .notDetermined {
// authorization has already been requested, need to follow usual steps
center.requestAuthorization(options: [.alert, .sound, .badge]) { (granted, error) in
Appboy.sharedInstance()?.pushAuthorization(fromUserNotificationCenter: granted)
}
center.delegate = self as? UNUserNotificationCenterDelegate
center.setNotificationCategories(ABKPushUtils.getAppboyUNNotificationCategorySet())
UIApplication.shared.registerForRemoteNotifications()
}
})
} else {
let notificationSettiings = UIApplication.shared.currentUserNotificationSettings
if notificationSettiings?.types != nil {
let setting = UIUserNotificationSettings(types: [.alert, .badge, .sound], categories:nil)
UIApplication.shared.registerUserNotificationSettings(setting)
UIApplication.shared.registerForRemoteNotifications()
}
}
```
## Step 2: Append custom event checker to AppDelegate.m file
The following code snippet checks if a custom event needs to be fired. Add the following line of code to your `AppDelegate.m`.
```objc
if (@available(iOS 10.0, *)) {
UNUserNotificationCenter *center = [UNUserNotificationCenter currentNotificationCenter];
[center getNotificationSettingsWithCompletionHandler:^(UNNotificationSettings * _Nonnull settings) {
if (settings.authorizationStatus == UNAuthorizationStatusNotDetermined) {
// ...
// fire custom event
// ...
}
}];
} else {
UIUserNotificationSettings *notificationSettings = [[UIApplication sharedApplication] currentUserNotificationSettings];
if (!notificationSettings.types) {
// …
// fire custom event
// ...
}
}
```
```swift
if #available(iOS 10, *) {
let center = UNUserNotificationCenter.current()
center.getNotificationSettings(completionHandler: { (settings) in
if settings.authorizationStatus == .notDetermined {
// ...
// fire custom event
// ...
}
})
} else {
let notificationSettiings = UIApplication.shared.currentUserNotificationSettings
if notificationSettiings?.types != nil {
// ...
// fire custom event
// ...
}
}
```
## Step 3: Set up a deep link handler
Place this following code snippet inside your deep link handling code. You should only execute this deep linking code for your push primer in-app message.
Refer to [link handling customization](https://www.braze.com/docs/developer_guide/platform_integration_guides/ios/advanced_use_cases/linking/#linking-handling-customization) for more information on deep linking.
```objc
// ...
// check that this deep link relates to the push prompt
// ...
if (@available(iOS 10.0, *)) {
UNUserNotificationCenter *center = [UNUserNotificationCenter currentNotificationCenter];
[center requestAuthorizationWithOptions:(UNAuthorizationOptionAlert | UNAuthorizationOptionSound | UNAuthorizationOptionBadge) completionHandler:^(BOOL granted, NSError * _Nullable error) {
[[Appboy sharedInstance] pushAuthorizationFromUserNotificationCenter:granted];
}];
center.delegate = self;
[center setNotificationCategories:[ABKPushUtils getAppboyUNNotificationCategorySet]];
[[UIApplication sharedApplication] registerForRemoteNotifications];
} else {
UIUserNotificationSettings *settings = [UIUserNotificationSettings settingsForTypes:(UIUserNotificationTypeBadge | UIUserNotificationTypeAlert | UIUserNotificationTypeSound) categories:[ABKPushUtils getAppboyUIUserNotificationCategorySet]];
UIApplication *sharedApplication = [UIApplication sharedApplication];
[sharedApplication registerUserNotificationSettings:settings];
[sharedApplication registerForRemoteNotifications];
}
```
```swift
// ...
// check that this deep link relates to the push prompt
// ...
if #available(iOS 10, *) {
let center = UNUserNotificationCenter.current()
center.delegate = self as? UNUserNotificationCenterDelegate
center.requestAuthorization(options: [.alert, .sound, .badge]) { (granted, error) in
Appboy.sharedInstance()?.pushAuthorization(fromUserNotificationCenter: granted)
}
UIApplication.shared.registerForRemoteNotifications()
} else {
let setting = UIUserNotificationSettings(types: [.alert, .badge, .sound], categories:nil)
UIApplication.shared.registerUserNotificationSettings(setting)
UIApplication.shared.registerForRemoteNotifications()
}
```
# Push Stories for iOS
Source: /docs/developer_guide/platforms/legacy_sdks/ios/push_notifications/push_story/index.md
**Warning:**
[AppboyKit](https://github.com/Appboy/appboy-ios-sdk) (also known as the Objective-C SDK) is no longer supported and has been replaced by the [Swift SDK](https://www.braze.com/docs/developer_guide/sdk_integration/?sdktab=swift). It will no longer receive new features, bug fixes, security updates, or technical support—however, messaging and analytics will continue to function as normal. To learn more, see [Introducing the New Braze Swift SDK](https://www.braze.com/resources/articles/introducing-the-new-braze-swift-sdk).
# Push Story setup
The Push Story feature requires the `UNNotification` framework and iOS 10. The feature is only available from iOS SDK version 3.2.1.
## Step 1: Enable push in your app
Follow the [push notification integration](https://www.braze.com/docs/developer_guide/platforms/legacy_sdks/ios/push_notifications/integration/) to enable push in your app.
## Step 2: Adding the Notification Content Extension target
In your app project, go to menu **File > New > Target...** and add a new `Notification Content Extension` target and activate it.

Xcode should generate a new target for you and create files automatically for you including:
- `NotificationViewController.h`
- `NotificationViewController.m`
- `MainInterface.storyboard`
- `NotificationViewController.swift`
- `MainInterface.storyboard`
## Step 3: Enable capabilities
The Push Story feature requires the background mode in the **Capabilities** section of the main app target. After turning on the background modes, select **Background fetch** and **Remote notifications**.

### Adding an App Group
You also need to add `Capability App Groups`. If you haven't had any app group in your app, go to the **Capability** of the main app target, turn on the `App Groups`, and click the **+** button. Use your app's bundle ID to create the app group. For example, if your app's bundle ID is `com.company.appname`, you can name your app group `group.com.company.appname.xyz`. You need to turn on the `App Groups` for both the main app and content extension targets.
**Important:**
`App Groups` in this context refer to Apple's [App Groups Entitlement](https://developer.apple.com/documentation/bundleresources/entitlements/com_apple_security_application-groups) and not your Braze workspace (previously app group) ID.
If you do not add your app to an App Group, your app may fail to populate certain fields from the push payload and will not work fully as expected.
## Step 4: Adding the Push Story framework to your app
After following the [Swift Package Manager integration guide](https://www.braze.com/docs/developer_guide/platforms/legacy_sdks/ios/initial_sdk_setup/installation_methods/swift_package_manager/), add `AppboyPushStory` to your `Notification Content Extension`:


Add the following line to your Podfile:
```ruby
target 'YourContentExtensionTarget' do
pod 'Appboy-Push-Story'
end
```
After updating the Podfile, navigate to the directory of your Xcode app project within your terminal and run `pod install`.
Download the latest `AppboyPushStory.zip` from the [GitHub release page](https://github.com/Appboy/appboy-ios-sdk/releases), extract it, and add the following files to your project's `Notification Content Extension`:
- `Resources/ABKPageView.nib`
- `AppboyPushStory.xcframework`

**Important:**
Make sure that **Do Not Embed** is selected for **AppboyPushStory.xcframework** under the **Embed** column.
Add the `-ObjC` flag to your project's `Notification Content Extension` in **Build Settings > Other Linker Flags**.
## Step 5: Updating your notification view controller
In your `NotificationViewController.h`, add following lines to add new properties and import the header files:
```objc
#import
```
```objc
@property (nonatomic) IBOutlet ABKStoriesView *storiesView;
@property (nonatomic) ABKStoriesViewDataSource *dataSource;
```
In your `NotificationViewController.m`, remove the default implementation and add following code:
```objc
@implementation NotificationViewController
- (void)didReceiveNotification:(UNNotification *)notification {
self.dataSource = [[ABKStoriesViewDataSource alloc] initWithNotification:notification
storiesView:self.storiesView
appGroup:@"YOUR-APP-GROUP-IDENTIFIER"];
}
- (void)didReceiveNotificationResponse:(UNNotificationResponse *)response
completionHandler:(void (^)(UNNotificationContentExtensionResponseOption option))completion {
UNNotificationContentExtensionResponseOption option = [self.dataSource didReceiveNotificationResponse:response];
completion(option);
}
- (void)viewWillDisappear:(BOOL)animated {
[self.dataSource viewWillDisappear];
[super viewWillDisappear:animated];
}
@end
```
In your `NotificationViewController.swift`, add the following line to import the header files:
```swift
import AppboyPushStory
```
Next, remove the default implementation and add following code:
```swift
class NotificationViewController: UIViewController, UNNotificationContentExtension {
@IBOutlet weak var storiesView: ABKStoriesView!
var dataSource: ABKStoriesViewDataSource?
func didReceive(_ notification: UNNotification) {
dataSource = ABKStoriesViewDataSource(notification: notification, storiesView: storiesView, appGroup: "YOUR-APP-GROUP-IDENTIFIER")
}
func didReceive(_ response: UNNotificationResponse, completionHandler completion: @escaping (UNNotificationContentExtensionResponseOption) -> Void) {
if dataSource != nil {
let option: UNNotificationContentExtensionResponseOption = dataSource!.didReceive(response)
completion(option)
}
}
override func viewWillDisappear(_ animated: Bool) {
dataSource?.viewWillDisappear()
super.viewWillDisappear(animated)
}
}
```
## Step 6: Set the notification content extension storyboard
Open the `Notification Content Extension` storyboard and place a new `UIView` in the notification view controller. Rename the class to `ABKStoriesView`. Make the view width and height auto-resizable matching the notification view controller's main view frame.


Next, link the notification view controller's `storiesView` IBOutlet to the added `ABKStoriesView`.

## Step 7: Set the notification content extension plist
Open the `Info.plist` file of the `Notification Content Extension` and add and change the following keys under `NSExtension \ NSExtensionAttributes`:
`UNNotificationExtensionCategory` = `ab_cat_push_story_v2` (`String` type)
`UNNotificationExtensionDefaultContentHidden` = `YES` (`Boolean` type)
`UNNotificationExtensionInitialContentSizeRatio` = `0.65` (`Number` type)

## Step 8: Updating the Braze integration in your main app
##### Option 1: Runtime
In the `appboyOptions` dictionary used to configure your Braze instance, add an `ABKPushStoryAppGroupKey` entry and set the value to your workspace API identifier.
```objc
NSMutableDictionary *appboyOptions = [NSMutableDictionary dictionary];
appboyOptions[ABKPushStoryAppGroupKey] = @"YOUR-APP-GROUP-IDENTIFIER";
[Appboy startWithApiKey:@"YOUR-API-KEY"
inApplication:application
withLaunchOptions:launchOptions
withAppboyOptions:appboyOptions];
```
```swift
let appboyOptions: [AnyHashable: Any] = [
ABKPushStoryAppGroupKey : "YOUR-APP-GROUP-IDENTIFIER"
]
Appboy.start(withApiKey: "YOUR-API-KEY", in:application, withLaunchOptions:launchOptions, withAppboyOptions:appboyOptions)
```
##### Option 2: Info.plist
Alternatively, to configure the Push Story workspace from your `Info.plist` file, add a dictionary named `Braze` to your `Info.plist` file. Inside the `Braze` dictionary, add a string-typed `PushStoryAppGroup` subentry and set the value to your workspace identifier. Note that prior to Braze iOS SDK v4.0.2, the dictionary key `Appboy` must be used in place of `Braze`.
## Next steps
Next refer to the steps for integrating [action buttons](https://www.braze.com/docs/developer_guide/platforms/legacy_sdks/ios/push_notifications/customization/action_buttons/), which is required for buttons to show on a Push Story message.
# Advanced Push Notification Implementation for iOS (Optional)
Source: /docs/developer_guide/platforms/legacy_sdks/ios/push_notifications/implementation_guide/index.md
**Warning:**
[AppboyKit](https://github.com/Appboy/appboy-ios-sdk) (also known as the Objective-C SDK) is no longer supported and has been replaced by the [Swift SDK](https://www.braze.com/docs/developer_guide/sdk_integration/?sdktab=swift). It will no longer receive new features, bug fixes, security updates, or technical support—however, messaging and analytics will continue to function as normal. To learn more, see [Introducing the New Braze Swift SDK](https://www.braze.com/resources/articles/introducing-the-new-braze-swift-sdk).
**Important:**
Looking for the basic push notification developer integration guide? Find it [here](https://www.braze.com/docs/developer_guide/platforms/legacy_sdks/ios/push_notifications/integration/).
# Push notification implementation guide
> This optional and advanced implementation guide covers ways to leverage push notification content app extensions to get the most out of your push messages. Included are three custom use cases built by our team, accompanying code snippets, and guidance on logging analytics. Visit our Braze Demo Repository [here](https://github.com/braze-inc/braze-growth-shares-ios-demo-app)! Note that this implementation guide is centered around a Swift implementation, but Objective-C snippets are provided for those interested.
## Notification content app extensions
{: style="max-width:65%;border:0;margin-top:10px"}
Push notifications while seemingly standard across different platforms, offer immense customization options past what is normally implemented in the default UI. When a push notification is expanded, content notification extensions enable a custom view of the expanded push notification.
Push notifications can be expanded in three different ways: - A long press on the push banner - Swiping down on the push banner - Swiping the banner to the left and selecting "View"
These custom views offer smart ways to engage customers allowing you to display many distinct types of content including interactive notifications, notifications populated with user data, and even push messages that can capture information like phone numbers and email. While implementing push in this way may be unfamiliar to some, one of our well-known features at Braze, [Push Stories](https://www.braze.com/docs/user_guide/message_building_by_channel/push/advanced_push_options/push_stories/), are a prime example of what a custom view for a notification content app extension can look like!
#### Requirements
{: style="float:right;max-width:50%;margin-left:10px; border:0;margin-top:10px"}
- [Push notifications](https://www.braze.com/docs/developer_guide/platforms/legacy_sdks/ios/push_notifications/integration/) successfully integrated in your app
- iOS 10 or higher
- The following files generated by Xcode based on your coding language:
Swift
- `NotificationViewController.swift`
- `MainInterface.storyboard`
Objective-C
- `NotificationViewController.h`
- `NotificationViewController.m`
- `MainInterface.storyboard`
### Custom category configuration
To set up a custom view in the dashboard you must toggle on notification buttons and enter your custom category. The pre-registered custom iOS category you provide is then checked against the `UNNotificationExtensionCategory` in the `.plist` of your Notification Content Extension Target. The value given here must match what is set in the Braze dashboard.
{: style="max-width:75%;border:0;margin-top:10px"}
{: style="max-width:75%;border:0;margin-top:10px"}
**Tip:**
Since pushes with content extensions aren't always apparent, it is recommended to include a call to action to nudge your users to expand their push notifications.
## Use case and implementation walkthrough
There are three push notification content app extension types provided. Each type has a concept walkthrough, potential use cases, and a look into how push notification variables may look and be used in the Braze dashboard:
- [Interactive push notification](#interactive-push-notification)
- [Personalized push notifications](#personalized-push-notifications)
- [Information capture push notifications](#information-capture-push-notification)
### Interactive push notification
Push notifications can respond to user actions inside a content extension. For users running iOS 12 or later, this means you can turn your push messages into fully interactive push notifications! This interactivity offers many possibilities to get your users engaged in your notifications. The following example shows a push where users are able to play a match game inside the expanded notification.
{: style="border:0"}
#### Dashboard configuration
To set up a custom view in the dashboard, within the notification button settings enter the specific category you want to display. Next, in the `.plist` of your Notification Content Extension, you must also set the custom category to the `UNNotificationExtensionCategory` attribute. The value given here must match what is set in the Braze dashboard. Lastly, to enable user interactions in a push notification, set the `UNNotificationExtensionInteractionEnabled` key to true.
{: style="float:right;max-width:45%;"}
{: style="max-width:50%;"}
#### Other use cases
Push content extensions are an exciting option to introduce interactivity to your promotions and applications. Some examples include a game for users to play, a spin-to-win wheel for discounts, or a "like" button to save a listing or song.
##### Ready to log analytics?
Visit the [following section](#logging-analytics) to get a better understanding of how the flow of data should look.
### Personalized push notifications
{: style="float:right;max-width:40%;margin-left:15px;border:0"}
Push notifications can display user-specific information inside a content extension. The example to the right shows a push notification after a user has completed a specific task (Braze Learning course) and is now encouraged to expand this notification to check their progress. The information provided here is user-specific and can be fired off as a session is completed or specific user action is taken by leveraging an API trigger.
#### Dashboard configuration
To set up a personalized push in the dashboard, you must register the specific category you want to be displayed, and then within the key-value pairs using standard Liquid, set the appropriate user attributes you want the message to show. These views can be personalized based on specific user attributes of a specific user profile.
{: style="max-width:60%;"}
#### Handling key-value pairs
The following method, `didReceive` is called when the content extension has received a notification, it can be found within the `NotificationViewController`. The key-value pairs provided in the dashboard are represented in the code through the use of a `userInfo` dictionary.
**Parsing Key-Value Pairs from Push Notifications**
``` swift
func didReceive(_ notification: UNNotification) {
let userInfo = notification.request.content.userInfo
guard let value = userInfo["YOUR-KEY-VALUE-PAIR"] as? String,
let otherValue = userInfo["YOUR-OTHER-KEY-VALUE-PAIR"] as? String,
else { fatalError("Key-Value Pairs are incorrect.")}
...
}
```
```objc
- (void)didReceiveNotification:(nonnull UNNotification *)notification {
NSDictionary *userInfo = notification.request.content.userInfo;
if (userInfo[@"YOUR-KEY-VALUE-PAIR"] && userInfo[@"YOUR-OTHER-KEY-VALUE-PAIR"]) {
...
} else {
[NSException raise:NSGenericException format:@"Key-Value Pairs are incorrect"];
}
}
```
#### Other use cases
The ideas for progress-based and user-focused push content extensions are endless, some examples include adding the option to share your progress across different platforms, expressing achievements unlocked, punch cards, or even onboarding checklists.
##### Ready to log analytics?
Visit the [following section](#logging-analytics) to get a better understanding of how the flow of data should look.
### Information capture push notification
Push notifications can capture user information inside a content extension, allowing you to push the limits of what is possible with a push. Examining the following flow shown, the view is able to respond to state changes. Those state change components are represented in each image.
1. User receives a push notification.
2. Push is opened and prompts the user for information.
3. Information is provided and if valid, the register button is shown.
3. Confirmation view is displayed, and push gets dismissed.
{: style="border:0;"}
Note that the information requested here can be a wide range of things such as SMS number capture, it doesn't have to be email-specific.
#### Dashboard configuration
To set up an information capture capable push in the dashboard, you must register and set your custom category, and provide the key-value pairs that are needed. As seen in the example, you may also include an image in your push. To do this, you must integrate [rich notifications](https://www.braze.com/docs/developer_guide/platforms/legacy_sdks/ios/push_notifications/customization/rich_notifications/), set the notification style in your campaign to Rich Notification, and include a rich push image.

#### Handling button actions
Each action button is uniquely identified. The code checks if your response identifier is equal to the `actionIndentifier`, and if so, knows that the user clicked the action button.
**Handling Push Notification Action Button Responses**
``` swift
func didReceive(_ response: UNNotificationResponse, completionHandler completion: @escaping (UNNotificationContentExtensionResponseOption) -> Void) {
if response.actionIdentifier == "YOUR-REGISTER-IDENTIFIER" {
// do something
} else {
// do something else
}
}
```
```objc
- (void)didReceiveNotificationResponse:(UNNotificationResponse *)response completionHandler:(void (^)(UNNotificationContentExtensionResponseOption))completion {
if ([response.actionIdentifier isEqualToString:@"YOUR-REGISTER-IDENTIFIER"]) {
completion(UNNotificationContentExtensionResponseOptionDismiss);
} else {
completion(UNNotificationContentExtensionResponseOptionDoNotDismiss);
}
}
```
##### Dismissing pushes
Push notifications can be automatically dismissed from an action button press. There exist three pre-built push dismissal options that are recommended:
1. `completion(.dismiss)` - Dismisses the notification
2. `completion(.doNotDismiss)` - Notification stays open
3. `completion(.dismissAndForward)` - Push dismisses and the user gets forwarded into the application.
#### Other use cases
Requesting user input through push notifications is an exciting opportunity that many companies do not take advantage of. In these push messages, you can not only request basic information like name, email, or number, but you could also prompt users to complete a user profile if unfinished, or even to submit feedback.
##### Ready to log analytics?
Visit the [following section](#logging-analytics) to get a better understanding of how the flow of data should look.
## Logging analytics
### Logging with the Braze API (recommended)
Logging analytics can only be done in real-time with the help of the customer's server hitting our [`/users/track` endpoint](https://www.braze.com/docs/api/endpoints/user_data/post_user_track/). To log analytics, send down the `braze_id` value in the key-value pairs field (as seen in the following screenshot) to identify which user profile to update.
{: style="max-width:80%;"}
### Logging manually
Logging manually will require you to first configure App Groups within Xcode, and then create, save, and retrieve analytics. This will require some custom developer work on your end. The following code snippets shown will help address this.
It's also important to note that analytics are not sent to Braze until the mobile application is subsequently launched. This means that, depending on your dismissal settings, there often exists an indeterminate period of time between when a push notification is dismissed and the mobile app is launched and the analytics are retrieved. While this time buffer may not affect all use cases, users should consider the impact and if necessary, adjust their user journey to include opening the application to address this concern.

#### Step 1: Configure App Groups within Xcode
Add a capability `App Groups`. If you haven't had any app group in your app, go to the capability of the main app target, turn on the `App Groups`, and click the "+". Use your App's bundle ID to create the App Group. For example, if your app's bundle ID is `com.company.appname`, you can name your App Group `group.com.company.appname.xyz`. Make sure the `App Groups` are turned on for both your main app target and the content extension target.

#### Step 2: Integrate code snippets
The following code snippets are a helpful reference on how to save and send custom events, custom attributes, and user attributes. This guide will be speaking in terms of UserDefaults, but the code representation will be in the form of a helper file `RemoteStorage`. There also exist additional helper files `UserAttributes` and `EventName Dictionary` that are used when sending and saving user attributes. All helper files can be found at the end of this guide.
##### Saving custom events
To save custom events you must create the analytics from scratch. This is done by creating a dictionary, populating it with metadata, and saving the data through the use of a helper file.
1. Initialize a dictionary with event metadata
2. Initialize `userDefaults` to retrieve and store the event data
3. If there is an existing array, append new data to the existing array and save
4. If there is not an existing array, save the new array to `userDefaults`
``` swift
func saveCustomEvent(with properties: [String: Any]? = nil) {
// 1
let customEventDictionary = Dictionary(eventName: "YOUR-EVENT-NAME", properties: properties)
// 2
let remoteStorage = RemoteStorage(storageType: .suite)
// 3
if var pendingEvents = remoteStorage.retrieve(forKey: .pendingCustomEvents) as? [[String: Any]] {
pendingEvents.append(contentsOf: [customEventDictionary])
remoteStorage.store(pendingEvents, forKey: .pendingCustomEvents)
} else {
// 4
remoteStorage.store([customEventDictionary], forKey: .pendingCustomEvents)
}
}
```
```objc
- (void)saveCustomEvent:(NSDictionary *)properties {
// 1
NSDictionary *customEventDictionary = [[NSDictionary alloc] initWithEventName:@"YOUR-EVENT-NAME" properties:properties];
// 2
RemoteStorage *remoteStorage = [[RemoteStorage alloc] initWithStorageType:StorageTypeSuite];
NSMutableArray *pendingEvents = [[remoteStorage retrieveForKey:RemoteStorageKeyPendingCustomEvents] mutableCopy];
// 3
if (pendingEvents) {
[pendingEvents addObject:customEventDictionary];
[remoteStorage store:pendingEvents forKey:RemoteStorageKeyPendingCustomAttributes];
} else {
// 4
[remoteStorage store:@[ customEventDictionary ] forKey:RemoteStorageKeyPendingCustomAttributes];
}
}
```
##### Sending custom events to Braze
After the SDK is initialized is the best time to log any saved analytics from a notification content app extension. This can be done by, looping through any pending events, checking for the "Event Name" key, setting the appropriate values in Braze, and then clearing the storage for the next time this function is needed.
1. Loop through the array of pending events
2. Loop through each key-value pair in the `pendingEvents` dictionary
3. Explicitly checking key for "Event Name" to set the value accordingly
4. Every other key-value will be added to the `properties` dictionary
5. Log individual custom event
6. Remove all pending events from storage
``` swift
func logPendingCustomEventsIfNecessary() {
let remoteStorage = RemoteStorage(storageType: .suite)
guard let pendingEvents = remoteStorage.retrieve(forKey: .pendingCustomEvents) as? [[String: Any]] else { return }
// 1
for event in pendingEvents {
var eventName: String?
var properties: [AnyHashable: Any] = [:]
// 2
for (key, value) in event {
if key == PushNotificationKey.eventName.rawValue {
// 3
if let eventNameValue = value as? String {
eventName = eventNameValue
} else {
print("Invalid type for event_name key")
}
} else {
// 4
properties[key] = value
}
}
// 5
if let eventName = eventName {
logCustomEvent(eventName, withProperties: properties)
}
}
// 6
remoteStorage.removeObject(forKey: .pendingCustomEvents)
}
```
```objc
- (void)logPendingEventsIfNecessary {
RemoteStorage *remoteStorage = [[RemoteStorage alloc] initWithStorageType:StorageTypeSuite];
NSArray *pendingEvents = [remoteStorage retrieveForKey:RemoteStorageKeyPendingCustomEvents];
// 1
for (NSDictionary *event in pendingEvents) {
NSString *eventName = nil;
NSMutableDictionary *properties = [NSMutableDictionary dictionary];
// 2
for (NSString* key in event) {
if ([key isEqualToString:@"event_name"]) {
// 3
if ([[event objectForKey:key] isKindOfClass:[NSString class]]) {
eventName = [event objectForKey:key];
} else {
NSLog(@"Invalid type for event_name key");
}
} else {
// 4
properties[key] = event[key];
}
}
// 5
if (eventName != nil) {
[[Appboy sharednstance] logCustomEvent:eventName withProperties:properties];
}
}
// 6
[remoteStorage removeObjectForKey:RemoteStorageKeyPendingCustomEvents];
}
```
##### Saving custom attributes
To save custom attributes you must create the analytics from scratch. This is done by creating a dictionary, populating it with metadata, and saving the data through the use of a helper file.
1. Initialize a dictionary with attribute metadata
2. Initialize `userDefaults` to retrieve and store the attribute data
3. If there is an existing array, append new data to the existing array and save
4. If there is not an existing array, save the new array to `userDefaults`
``` swift
func saveCustomAttribute() {
// 1
let customAttributeDictionary: [String: Any] = ["YOUR-CUSTOM-ATTRIBUTE-KEY": "YOUR-CUSTOM-ATTRIBUTE-VALUE"]
// 2
let remoteStorage = RemoteStorage(storageType: .suite)
// 3
if var pendingAttributes = remoteStorage.retrieve(forKey: .pendingCustomAttributes) as? [[String: Any]] {
pendingAttributes.append(contentsOf: [customAttributeDictionary])
remoteStorage.store(pendingAttributes, forKey: .pendingCustomAttributes)
} else {
// 4
remoteStorage.store([customAttributeDictionary], forKey: .pendingCustomAttributes)
}
}
```
``` objc
- (void)saveCustomAttribute {
// 1
NSDictionary *customAttributeDictionary = @{ @"YOUR-CUSTOM-ATTRIBUTE-KEY": @"YOUR-CUSTOM-ATTRIBUTE-VALUE" };
// 2
RemoteStorage *remoteStorage = [[RemoteStorage alloc] initWithStorageType:StorageTypeSuite];
NSMutableArray *pendingAttributes = [[remoteStorage retrieveForKey:RemoteStorageKeyPendingCustomAttributes] mutableCopy];
// 3
if (pendingAttributes) {
[pendingAttributes addObject:customAttributeDictionary];
[remoteStorage store:pendingAttributes forKey:RemoteStorageKeyPendingCustomAttributes];
} else {
// 4
[remoteStorage store:@[ customAttributeDictionary ] forKey:RemoteStorageKeyPendingCustomAttributes];
}
}
```
##### Sending custom attributes to Braze
After the SDK is initialized is the best time to log any saved analytics from a notification content app extension. This can be done by looping through the pending attributes, setting the appropriate custom attribute in Braze, and then clearing the storage for the next time this function is needed.
1. Loop through the array of pending attributes
2. Loop through each key-value pair in the `pendingAttributes` dictionary
3. Log individual custom attribute with corresponding key and value
4. Remove all pending attributes from storage
``` swift
func logPendingCustomAttributesIfNecessary() {
let remoteStorage = RemoteStorage(storageType: .suite)
guard let pendingAttributes = remoteStorage.retrieve(forKey: .pendingCustomAttributes) as? [[String: Any]] else { return }
// 1
pendingAttributes.forEach { setCustomAttributesWith(keysAndValues: $0) }
// 4
remoteStorage.removeObject(forKey: .pendingCustomAttributes)
}
func setCustomAttributesWith(keysAndValues: [String: Any]) {
// 2
for (key, value) in keysAndValues {
// 3
if let value = value as? [String] {
setCustomAttributeArrayWithKey(key, andValue: value)
} else {
setCustomAttributeWithKey(key, andValue: value)
}
}
}
```
```objc
- (void)logPendingCustomAttributesIfNecessary {
RemoteStorage *remoteStorage = [[RemoteStorage alloc] initWithStorageType:StorageTypeSuite];
NSArray *pendingAttributes = [remoteStorage retrieveForKey:RemoteStorageKeyPendingCustomAttributes];
// 1
for (NSDictionary *attribute in pendingAttributes) {
[self setCustomAttributeWith:attribute];
}
// 4
[remoteStorage removeObjectForKey:RemoteStorageKeyPendingCustomAttributes];
}
- (void)setCustomAttributeWith:(NSDictionary *)keysAndValues {
// 2
for (NSString *key in keysAndValues) {
// 3
[self setCustomAttributeWith:key andValue:[keysAndValues objectForKey:key]];
}
}
```
##### Saving user attributes
When saving user attributes, it is recommended to create a custom object to decipher what type of attribute is being updated (`email`, `first_name`, `phone_number`, etc.). The object should be compatible with being stored/retrieved from `UserDefaults`. See the `UserAttribute` helper file for one example of how to accomplish this.
1. Initialize an encoded `UserAttribute` object with the corresponding type
2. Initialize `userDefaults` to retrieve and store the event data
3. If there is an existing array, append new data to the existing array and save
4. If there is not an existing array, save the new array to `userDefaults`
``` swift
func saveUserAttribute() {
// 1
guard let data = try? PropertyListEncoder().encode(UserAttribute.userAttributeType("USER-ATTRIBUTE-VALUE")) else { return }
// 2
let remoteStorage = RemoteStorage(storageType: .suite)
// 3
if var pendingAttributes = remoteStorage.retrieve(forKey: .pendingUserAttributes) as? [Data] {
pendingAttributes.append(contentsOf: [data])
remoteStorage.store(pendingAttributes, forKey: .pendingUserAttributes)
} else {
// 4
remoteStorage.store([data], forKey: .pendingUserAttributes)
}
}
```
```objc
- (void)saveUserAttribute {
// 1
UserAttribute *userAttribute = [[UserAttribute alloc] initWithUserField:@"USER-ATTRIBUTE-VALUE" attributeType:UserAttributeTypeEmail];
NSError *error;
NSData *data = [NSKeyedArchiver archivedDataWithRootObject:userAttribute requiringSecureCoding:YES error:&error];
if (error != nil) {
// log error
}
// 2
RemoteStorage *remoteStorage = [[RemoteStorage alloc] initWithStorageType:StorageTypeSuite];
NSMutableArray *pendingAttributes = [[remoteStorage retrieveForKey:RemoteStorageKeyPendingUserAttributes] mutableCopy];
// 3
if (pendingAttributes) {
[pendingAttributes addObject:data];
[remoteStorage store:pendingAttributes forKey:RemoteStorageKeyPendingUserAttributes];
} else {
// 4
[remoteStorage store:@[data] forKey:RemoteStorageKeyPendingUserAttributes];
}
}
```
##### Sending user attributes to Braze
After the SDK is initialized is the best time to log any saved analytics from a notification content app extension. This can be done by looping through the pending attributes, setting the appropriate custom attribute in Braze, and then clearing the storage for the next time this function is needed.
1. Loop through the array of `pendingAttributes` data
2. Initialize an encoded `UserAttribute` object from attribute data
3. Set specific user field based on the User Attribute type (email)
4. Remove all pending user attributes from storage
``` swift
func logPendingUserAttributesIfNecessary() {
let remoteStorage = RemoteStorage(storageType: .suite)
guard let pendingAttributes = remoteStorage.retrieve(forKey: .pendingUserAttributes) as? [Data] else { return }
// 1
for attributeData in pendingAttributes {
// 2
guard let userAttribute = try? PropertyListDecoder().decode(UserAttribute.self, from: attributeData) else { continue }
// 3
switch userAttribute {
case .email(let email):
user?.email = email
}
}
// 4
remoteStorage.removeObject(forKey: .pendingUserAttributes)
}
```
```objc
- (void)logPendingUserAttributesIfNecessary {
RemoteStorage *remoteStorage = [[RemoteStorage alloc] initWithStorageType:StorageTypeSuite];
NSArray *pendingAttributes = [remoteStorage retrieveForKey:RemoteStorageKeyPendingUserAttributes];
// 1
for (NSData *attributeData in pendingAttributes) {
NSError *error;
// 2
UserAttribute *userAttribute = [NSKeyedUnarchiver unarchivedObjectOfClass:[UserAttribute class] fromData:attributeData error:&error];
if (error != nil) {
// log error
}
// 3
if (userAttribute) {
switch (userAttribute.attributeType) {
case UserAttributeTypeEmail:
[self user].email = userAttribute.userField;
break;
}
}
}
// 4
[remoteStorage removeObjectForKey:RemoteStorageKeyPendingUserAttributes];
}
```
##### Helper files
**RemoteStorage Helper File**
```swift
enum RemoteStorageKey: String, CaseIterable {
// MARK: - Notification Content Extension Analytics
case pendingCustomEvents = "pending_custom_events"
case pendingCustomAttributes = "pending_custom_attributes"
case pendingUserAttributes = "pending_user_attributes"
}
enum RemoteStorageType {
case standard
case suite
}
class RemoteStorage: NSObject {
private var storageType: RemoteStorageType = .standard
private lazy var defaults: UserDefaults = {
switch storageType {
case .standard:
return .standard
case .suite:
return UserDefaults(suiteName: "YOUR-DOMAIN-IDENTIFIER")!
}
}()
init(storageType: RemoteStorageType = .standard) {
self.storageType = storageType
}
func store(_ value: Any, forKey key: RemoteStorageKey) {
defaults.set(value, forKey: key.rawValue)
}
func retrieve(forKey key: RemoteStorageKey) -> Any? {
return defaults.object(forKey: key.rawValue)
}
func removeObject(forKey key: RemoteStorageKey) {
defaults.removeObject(forKey: key.rawValue)
}
func resetStorageKeys() {
for key in RemoteStorageKey.allCases {
defaults.removeObject(forKey: key.rawValue)
}
}
}
```
```objc
@interface RemoteStorage ()
@property (nonatomic) StorageType storageType;
@property (nonatomic, strong) NSUserDefaults *defaults;
@end
@implementation RemoteStorage
- (id)initWithStorageType:(StorageType)storageType {
if (self = [super init]) {
self.storageType = storageType;
}
return self;
}
- (void)store:(id)value forKey:(RemoteStorageKey)key {
[[self defaults] setValue:value forKey:[self rawValueForKey:key]];
}
- (id)retrieveForKey:(RemoteStorageKey)key {
return [[self defaults] objectForKey:[self rawValueForKey:key]];
}
- (void)removeObjectForKey:(RemoteStorageKey)key {
[[self defaults] removeObjectForKey:[self rawValueForKey:key]];
}
- (void)resetStorageKeys {
[[self defaults] removeObjectForKey:[self rawValueForKey:RemoteStorageKeyPendingCustomEvents]];
[[self defaults] removeObjectForKey:[self rawValueForKey:RemoteStorageKeyPendingCustomAttributes]];
[[self defaults] removeObjectForKey:[self rawValueForKey:RemoteStorageKeyPendingUserAttributes]];
}
- (NSUserDefaults *)defaults {
if (!self.defaults) {
switch (self.storageType) {
case StorageTypeStandard:
return [NSUserDefaults standardUserDefaults];
break;
case StorageTypeSuite:
return [[NSUserDefaults alloc] initWithSuiteName:@"YOUR-DOMAIN-IDENTIFIER"];
}
} else {
return self.defaults;
}
}
- (NSString*)rawValueForKey:(RemoteStorageKey)remoteStorageKey {
switch(remoteStorageKey) {
case RemoteStorageKeyPendingCustomEvents:
return @"pending_custom_events";
case RemoteStorageKeyPendingCustomAttributes:
return @"pending_custom_attributes";
case RemoteStorageKeyPendingUserAttributes:
return @"pending_user_attributes";
default:
[NSException raise:NSGenericException format:@"Unexpected FormatType."];
}
}
```
**UserAttribute Helper File**
```swift
enum UserAttribute: Hashable {
case email(String?)
}
// MARK: - Codable
extension UserAttribute: Codable {
private enum CodingKeys: String, CodingKey {
case email
}
func encode(to encoder: Encoder) throws {
var values = encoder.container(keyedBy: CodingKeys.self)
switch self {
case .email(let email):
try values.encode(email, forKey: .email)
}
}
init(from decoder: Decoder) throws {
let values = try decoder.container(keyedBy: CodingKeys.self)
let email = try values.decode(String.self, forKey: .email)
self = .email(email)
}
}
```
```objc
@implementation UserAttribute
- (id)initWithUserField:(NSString *)userField attributeType:(UserAttributeType)attributeType {
if (self = [super init]) {
self.userField = userField;
self.attributeType = attributeType;
}
return self;
}
- (void)encodeWithCoder:(NSCoder *)encoder {
[encoder encodeObject:self.userField forKey:@"userField"];
[encoder encodeInteger:self.attributeType forKey:@"attributeType"];
}
- (id)initWithCoder:(NSCoder *)decoder {
if (self = [super init]) {
self.userField = [decoder decodeObjectForKey:@"userField"];
NSInteger attributeRawValue = [decoder decodeIntegerForKey:@"attributeType"];
self.attributeType = (UserAttributeType) attributeRawValue;
}
return self;
}
@end
```
**EventName Dictionary Helper File**
```swift
extension Dictionary where Key == String, Value == Any {
init(eventName: String, properties: [String: Any]? = nil) {
self.init()
self[PushNotificationKey.eventName.rawValue] = eventName
if let properties = properties {
for (key, value) in properties {
self[key] = value
}
}
}
}
```
```objc
@implementation NSDictionary (Helper)
- (id)initWithEventName:(NSString *)eventName properties:(NSDictionary *)properties {
self = [self init];
if (self) {
dict[@"event_name"] = eventName;
for(id key in properties) {
dict[key] = properties[key];
}
}
return self;
}
@end
```
# Push Notification Testing for iOS
Source: /docs/developer_guide/platforms/legacy_sdks/ios/push_notifications/testing/index.md
**Warning:**
[AppboyKit](https://github.com/Appboy/appboy-ios-sdk) (also known as the Objective-C SDK) is no longer supported and has been replaced by the [Swift SDK](https://www.braze.com/docs/developer_guide/sdk_integration/?sdktab=swift). It will no longer receive new features, bug fixes, security updates, or technical support—however, messaging and analytics will continue to function as normal. To learn more, see [Introducing the New Braze Swift SDK](https://www.braze.com/resources/articles/introducing-the-new-braze-swift-sdk).
# Testing {#push-testing}
If you'd like to test in-app and push notifications via the command line, you can send a single notification through the terminal via CURL and the [messaging API](https://www.braze.com/docs/api/endpoints/messaging/). You will need to replace the following fields with the correct values for your test case:
Required fields:
- `YOUR-API-KEY-HERE` - available at **Settings** > **API Keys**. Ensure the key is authorized to send messages via the `/messages/send` REST API endpoint.
- `EXTERNAL_USER_ID` - available on the **Search Users** page.
- `REST_API_ENDPOINT_URL` - listed on the Braze [Instances](https://www.braze.com/docs/api/basics/#endpoints. Ensure using the endpoint corresponds to the Braze instance your workspace is on.
Optional fields:
- `YOUR_KEY1` (optional)
- `YOUR_VALUE1` (optional)
```bash
curl -X POST -H "Content-Type: application/json" -H "Authorization: Bearer YOUR-API-KEY-HERE" -d '{
"external_user_ids":["EXTERNAL_USER_ID"],
"messages": {
"apple_push": {
"alert":"Test push",
"extra": {
"YOUR_KEY1":"YOUR_VALUE1"
}
}
}
}' https://{REST_API_ENDPOINT_URL}/messages/send
```
# Push Notification Unit Tests for iOS
Source: /docs/developer_guide/platforms/legacy_sdks/ios/push_notifications/unit_tests/index.md
**Warning:**
[AppboyKit](https://github.com/Appboy/appboy-ios-sdk) (also known as the Objective-C SDK) is no longer supported and has been replaced by the [Swift SDK](https://www.braze.com/docs/developer_guide/sdk_integration/?sdktab=swift). It will no longer receive new features, bug fixes, security updates, or technical support—however, messaging and analytics will continue to function as normal. To learn more, see [Introducing the New Braze Swift SDK](https://www.braze.com/resources/articles/introducing-the-new-braze-swift-sdk).
# Unit tests {#unit-tests}
This optional guide describes how to implement some unit tests that will verify whether your app delegate correctly follows the steps described in our [push integration instructions](https://www.braze.com/docs/developer_guide/platforms/legacy_sdks/ios/push_notifications/integration/).
If all the tests pass, generally, this means the code-based part of your push setup is functional. If a test fails, this might mean that you incorrectly followed a step, or it may result from a valid customization that doesn't align precisely with our default instructions.
Either way, this can be a helpful approach to verify you've followed the integration steps and to help monitor for any regressions.
## Step 1: Creating a unit tests target
Skip this step if your app project in Xcode already contains a Unit Testing Bundle.
In your app project, go to menu **File > New > Target** and add a new "Unit Testing Bundle". This bundle can use either Objective-C or Swift and have any name. Set the "Target to be Tested" to your main app target.
## Step 2: Add the Braze SDK to your unit tests
Using the same method you used initially to [install the Braze SDK](https://www.braze.com/docs/developer_guide/platforms/legacy_sdks/ios/initial_sdk_setup/overview/), make sure the same SDK installation is also available to your unit tests target. For example, using CocoaPods:
```
target 'YourAppTarget' do
pod 'Appboy-iOS-SDK'
target 'YourAppTargetTests' do
inherit! :search_paths
end
end
```
## Step 3: Add OCMock to your unit tests
Add [OCMock](https://ocmock.org/) to your test target via CocoaPods, Carthage, or its static library. For example, using CocoaPods:
```
target 'YourAppTarget' do
pod 'Appboy-iOS-SDK'
target 'YourAppTargetTests' do
inherit! :search_paths
pod 'OCMock'
end
end
```
## Step 4: Finish installing the added libraries
Finish installing the Braze SDK and OCMock. For example, using CocoaPods, navigate to the directory of your Xcode app project within your terminal and run the following command:
```
pod install
```
At this point, you should be able to open the Xcode project workspace created by CocoaPods.
## Step 5: Adding push tests
Create a new Objective-C file in your unit tests target.
If the unit tests target is in Swift, Xcode may ask, "Would you like to configure an Objective-C bridging header?" The bridging header is optional, so you can click **Don't Create** and still run these unit tests successfully.
Add the contents of the HelloSwift sample app's [`AppboyPushUnitTests.m`](https://github.com/Appboy/appboy-ios-sdk/blob/master/HelloSwift/HelloSwiftTests/AppboyPushUnitTests.m) to the new file.
## Step 6: Run test suite
Run your app's unit tests. This can be a one-time verification step, or you can include this indefinitely in your test suite to help catch any regressions.
# Push Notification Troubleshooting for iOS
Source: /docs/developer_guide/platforms/legacy_sdks/ios/push_notifications/troubleshooting/index.md
**Warning:**
[AppboyKit](https://github.com/Appboy/appboy-ios-sdk) (also known as the Objective-C SDK) is no longer supported and has been replaced by the [Swift SDK](https://www.braze.com/docs/developer_guide/sdk_integration/?sdktab=swift). It will no longer receive new features, bug fixes, security updates, or technical support—however, messaging and analytics will continue to function as normal. To learn more, see [Introducing the New Braze Swift SDK](https://www.braze.com/resources/articles/introducing-the-new-braze-swift-sdk).
# Troubleshooting {#push-troubleshooting}
## Understanding the Braze/APNs workflow
The Apple Push Notification service (APNs) is Apple's infrastructure for push notifications sending to iOS and OS X applications. Here is the simplified structure of how push notifications are enabled for your users' devices and how Braze can send push notifications to them:
1. You configure the push certificate and provisioning profile
2. Devices register for APNs and provide Braze with push tokens
3. You launch a Braze push campaign
4. Braze removes invalid tokens
#### Step 1: Configuring the push certificate and provisioning profile
In developing your app, you'll need to create an SSL certificate to enable push notifications. This certificate will be included in the provisioning profile your app is built with and will also need to be uploaded to the Braze dashboard. The certificate allows Braze to tell APNs that we are allowed to send push notifications on your behalf.
There are two types of [provisioning profiles](https://developer.apple.com/library/content/documentation/IDEs/Conceptual/AppDistributionGuide/MaintainingProfiles/MaintainingProfiles.html) and certificates: development and distribution. We recommend just using distribution profiles and certificates to avoid any confusion. If you choose to use different profiles and certificates for development and distribution, ensure that the certificate uploaded to the dashboard matches the provisioning profile you are currently using.
**Warning:**
Do not change the push certificate environment (development versus production). Changing the push certificate to the wrong environment can lead to your users having their push token accidentally removed, making them unreachable by push.
#### Step 2: Devices register for APNs and provide Braze with push tokens
When users open your app, they will be prompted to accept push notifications. If they accept this prompt, APNs will generate a push token for that particular device. The iOS SDK will immediately and asynchronously send up the push token for apps using the default [automatic flush policy](https://www.braze.com/docs/developer_guide/platform_integration_guides/ios/advanced_use_cases/fine_network_traffic_control/#automatic-request-processing). After we have a push token associated with a user, they will show as "Push Registered" in the dashboard on their user profile under the **Engagement** tab and will be eligible to receive push notifications from Braze campaigns.
**Note:**
As of Xcode 14, you can test remote push notifications on an iOS simulator.
#### Step 3: Launching a Braze push campaign
When a push campaign is launched, Braze will make requests to APNs to deliver your message. Braze will use the SSL push certificate uploaded in the dashboard to authenticate and verify that we are allowed to send push notifications to the push tokens provided. If a device is online, the notification should be received shortly after the campaign has been sent. Note that Braze sets the default APNs [expiration date](https://developer.apple.com/documentation/usernotifications/setting_up_a_remote_notification_server/sending_notification_requests_to_apns#2947607) for notifications to 30 days.
#### Step 4: Removing invalid tokens
If [APNs](https://developer.apple.com/library/content/documentation/NetworkingInternet/Conceptual/RemoteNotificationsPG/APNSOverview.html#//apple_ref/doc/uid/TP40008194-CH8-SW1) informs us that any of the push tokens we were attempting to send a message to are invalid, we remove those tokens from the user profiles they were associated with.
## Utilizing the push error logs
Braze provides a log of push notification errors within the **Message Activity Log**. This error log provides a variety of warnings which can be very helpful for identifying why your campaigns aren't working as expected. Clicking on an error message will redirect you to relevant documentation to help you troubleshoot a particular incident.

Common errors you might see here include user-specific notifications, such as ["Received Unregistered Sending to Push Token"](#received-unregistered-sending).
In addition, Braze also provides a push changelog on the user profile under the **Engagement** tab. This changelog provides insight into push registration behavior such as token invalidation, push registration errors, tokens being moved to new users, etc.
{: style="max-width:50%;" }
## Push registration issues
To add verification for your application's push registration logic, implement [push unit testing](https://www.braze.com/docs/developer_guide/platforms/legacy_sdks/ios/push_notifications/unit_tests/).
#### No push registration prompt
If the application does not prompt you to register for push notifications, there is likely an issue with your push registration integration. Ensure you have followed our [documentation](https://www.braze.com/docs/developer_guide/platforms/legacy_sdks/ios/push_notifications/integration/) and correctly integrated our push registration. You can also set breakpoints in your code to ensure the push registration code is running.
#### No "push registered" users showing in the dashboard
- Check that your app is prompting you to allow push notifications. Typically, this prompt will appear upon your first open of the app, but it can be programmed to appear elsewhere. If it does not appear where it should be, the problem is likely with the basic configuration of your app's push capabilities.
- Verify the steps for [push integration](https://www.braze.com/docs/developer_guide/platforms/legacy_sdks/ios/push_notifications/integration/) were successfully completed.
- Check that the provisioning profile your app was built with includes permissions for push. Make sure that you're pulling down all of the available provisioning profiles from your Apple developer account. To confirm this, perform the following steps:
1. In Xcode, navigate to **Preferences > Accounts** (Or use the keyboard shortcut Command+,).
2. Select the Apple ID you use for your developer account and click **View Details**.
3. On the next page, click ** Refresh** and confirm that you're pulling all available provisioning profiles.
- Check you have [properly enabled push capability](https://www.braze.com/docs/developer_guide/platform_integration_guides/ios/push_notifications/integration/#step-2-enable-push-capabilities) in your app.
- Check your push provisioning profile matches the environment you're testing in. Universal certificates may be configured in the Braze dashboard to send to either the development or production APNs environment. Using a development certificate for a production app or a production certificate for a development app will not work.
- Check that you are calling our `registerPushToken` method by setting a breakpoint in your code.
- Check that you are on a device (push will not work on a simulator) and have good network connectivity.
## Devices not receiving push notifications
#### Users no longer "push registered" after sending a push notification
This likely indicates that the user had an invalid push token. This can happen for several reasons:
##### Dashboard and app certificate mismatch
If the push certificate you uploaded in the dashboard is not the same one in the provisioning profile that your app was built with, APNs will reject the token. Verify that you have uploaded the correct certificate and completed another session in the app before attempting another test notification.
##### Uninstalls
If a user has uninstalled your application, their push token will be invalid and removed upon the next send.
##### Regenerating your provisioning profile
As a last resort, starting over fresh and creating a whole new provisioning profile can clear up configuration errors that come from working with multiple environments, profiles, and apps at the same time. There are many "moving parts" in setting up push notifications for iOS apps, so sometimes, it is best to retry from the beginning. This will also help isolate the problem if you need to continue troubleshooting.
#### Users still "push registered" after sending a push notification
##### App is foregrounded
On iOS versions that do not integrate push via the `UserNotifications` framework, if the app is in the foreground when the push message is received, it will not be displayed. You should background the app on your test devices before sending test messages.
##### Test notification scheduled incorrectly
Check the schedule you set for your test message. If it is set to local time zone delivery or [Intelligent Timing](https://www.braze.com/docs/user_guide/brazeai/intelligence/intelligent_timing/), you may have just not received the message yet (or had the app in the foreground when it was received).
#### User not "push registered" for the app being tested
Check the user profile of the user you are trying to send a test message to. Under the **Engagement** tab, there should be a list of "pushable apps". Verify the app you are trying to send test messages to is in this list. Users will show up as "Push Registered" if they have a push token for any app in your workspace, so this could be something of a false positive.
The following would indicate a problem with push registration or that the user's token had been returned to Braze as invalid by APNs after being pushed:
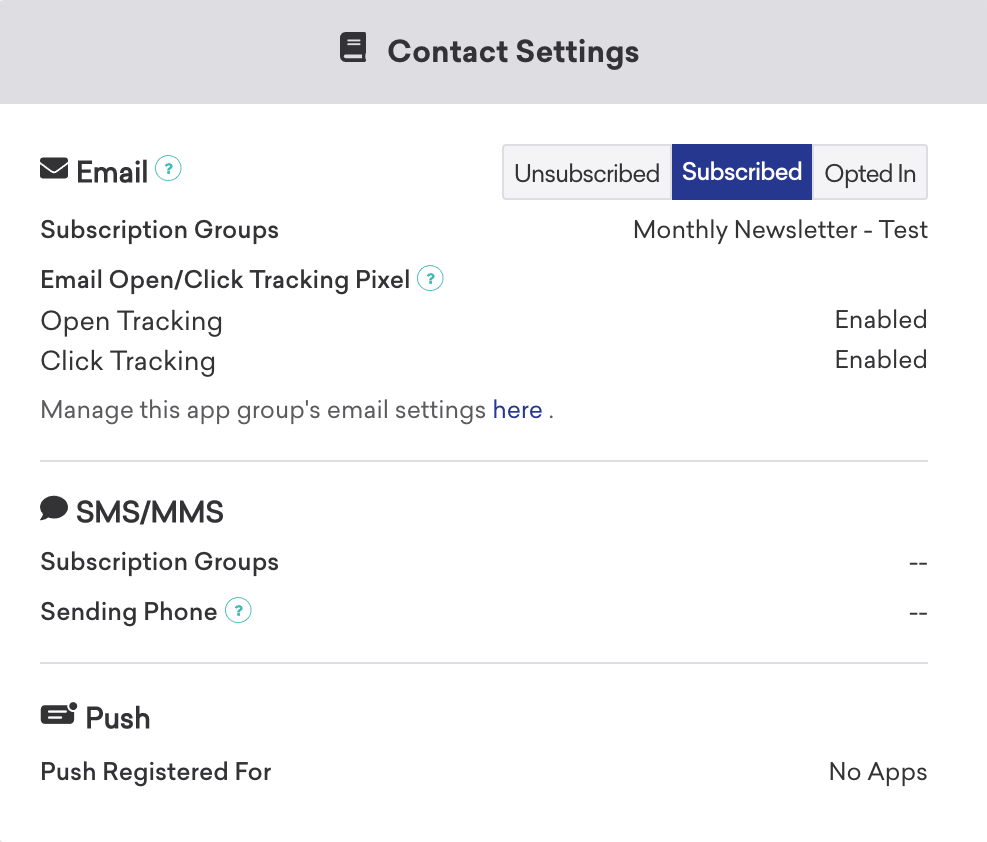{: style="max-width:50%"}
## Push messages not sending
To troubleshoot push notifications that aren't sending, refer to [Troubleshooting Push](https://www.braze.com/docs/user_guide/message_building_by_channel/push/troubleshooting/).
## Message activity log errors
#### Received unregistered sending to push token {#received-unregistered-sending}
- Make sure that the push token being sent to Braze from the method `[[Appboy sharedInstance] registerPushToken:]` is valid. You can look in the **Message Activity Log** to see the push token. It should look something like `6e407a9be8d07f0cdeb9e724733a89445f57a89ec890d63867c482a483506fa6`, a long string containing a mix of letters and numbers. If your push token looks different, check your [code](https://www.braze.com/docs/developer_guide/platform_integration_guides/ios/push_notifications/integration/#step-4-register-push-tokens-with-braze) for sending Braze the push tokens.
- Ensure that your push provisioning profile matches the environment you're testing. Universal certificates may be configured in the Braze dashboard to send to either the development or production APNs environment. Using a development certificate for a production app or a production certificate for a development app will not work.
- Check that the push token you have uploaded to Braze matches the provisioning profile you used to build the app you sent the push token from.
#### Device token not for topic
This error indicates that your app's push certificate and bundle ID are mismatched. Check that the push certificate you uploaded to Braze matches the provisioning profile used to build the app from which the push token was sent.
#### BadDeviceToken sending to push token
The `BadDeviceToken` is an APNs error code and does not originate from Braze. There could be a number of reasons for this response being returned, including the following:
- The app received a push token that was invalid for the credentials uploaded to the dashboard.
- Push was disabled for this workspace.
- The user has opted out of push.
- The app was uninstalled.
- Apple refreshed the push token, which invalidated the old token.
- The app was built for a production environment, but the push credentials uploaded to Braze are set for a development environment (or the other way around).
## Issues after push delivery
To add verification for your application's push handling, implement [push unit tests](https://www.braze.com/docs/developer_guide/platforms/legacy_sdks/ios/push_notifications/unit_tests/) .
#### Push clicks not logged {#push-clicks-not-logged}
- If this is only occurring on iOS 10, make sure you have followed the push integration steps for [iOS 10](https://www.braze.com/docs/developer_guide/platform_integration_guides/ios/push_notifications/integration/#step-5-enable-push-handling).
- Braze does not handle push notifications received silently in the foreground (for example, default foreground push behavior prior to the `UserNotifications` framework). This means that links will not be opened, and push clicks will not be logged. If your application has not yet integrated the `UserNotifications` framework, Braze will not handle push notifications when the application state is `UIApplicationStateActive`. You should ensure that your app does not delay calls to our [push handling methods](https://www.braze.com/docs/developer_guide/platform_integration_guides/ios/push_notifications/integration/#step-5-enable-push-handling); otherwise, the iOS SDK may treat push notifications as silent foreground push events and not handing them.
#### Web links from push clicks not opening
iOS 9+ requires links to be ATS compliant to be opened in web views. Ensure that your web links use HTTPS. Refer to our [ATS compliance](https://www.braze.com/docs/developer_guide/platform_integration_guides/ios/advanced_use_cases/linking/#app-transport-security-ats) article for more information.
#### Deep links from push clicks not opening
Most of the code that handles deep links also handles push opens. First, ensure that push opens are being logged. If not, [fix that issue](#push-clicks-not-logged) (as the fix often fixes link handling).
If opens are being logged, check whether it is an issue with the deep link in general or with the deep linking push click handling. To do this, test to see if a deep link from an in-app message click works.
#### Few or no direct opens
If at least one user opens your iOS push notification, but few or no _Direct Opens_ are logged to Braze, there may be an issue with your [SDK integration](https://www.braze.com/docs/developer_guide/platforms/legacy_sdks/ios/initial_sdk_setup/overview/). Keep in mind, _Direct Opens_ are not logged for test sends or silent push notifications.
- Make sure that the messages are not being sent as [silent push notifications](https://www.braze.com/docs/developer_guide/platform_integration_guides/swift/push_notifications/silent_push_notifications/#sending-silent-push-notifications). The message must have text in the title or body to not be considered silent.
- Double-check the following steps from the [push integration guide](https://www.braze.com/docs/developer_guide/platforms/legacy_sdks/ios/push_notifications/integration/):
- [Register for push](https://www.braze.com/docs/developer_guide/platform_integration_guides/swift/push_notifications/integration/#step-1-register-for-push-notifications-with-apns): On every single app launch, preferably within `application:didFinishLaunchingWithOptions:`, the code from step 3 needs to occur. The delegate property of `UNUserNotificationCenter.current()` needs to be assigned to an object that implements `UNUserNotificationCenterDelegate` and contains the `(void)userNotificationCenter:didReceiveNotificationResponse:withCompletionHandler:` method.
- [Enable push handling](https://www.braze.com/docs/developer_guide/platform_integration_guides/legacy_sdks/ios/push_notifications/integration/#step-5-enable-push-handling): Verify that the `(void)userNotificationCenter:didReceiveNotificationResponse:withCompletionHandler:` method has been implemented.
# In-App Message Overview for iOS
Source: /docs/developer_guide/platforms/legacy_sdks/ios/in-app_messaging/overview/index.md
**Warning:**
[AppboyKit](https://github.com/Appboy/appboy-ios-sdk) (also known as the Objective-C SDK) is no longer supported and has been replaced by the [Swift SDK](https://www.braze.com/docs/developer_guide/sdk_integration/?sdktab=swift). It will no longer receive new features, bug fixes, security updates, or technical support—however, messaging and analytics will continue to function as normal. To learn more, see [Introducing the New Braze Swift SDK](https://www.braze.com/resources/articles/introducing-the-new-braze-swift-sdk).
# In-app messages
[In-app messages](https://www.braze.com/docs/user_guide/message_building_by_channel/in-app_messages/) help you get content to your user without interrupting their day with a push notification. Customized and tailored in-app messages enhance the user experience and help your audience get the most value from your app. With a variety of layouts and customization tools to choose from, in-app messages engage your users more than ever before.
Check out our [case studies](https://www.braze.com/customers) to see examples of in-app messages.
## In-app message types
Braze currently offers the following default in-app message types:
- `Slideup`
- `Modal`
- `Full`
- `HTML Full`
Each in-app message type is highly customizable across content, images, icons, click actions, analytics, display, and delivery.
All in-app messages are subclasses of the `ABKInAppMessage`, which defines basic behavior and traits for all in-app messages. The in-app message class structures are as follows:
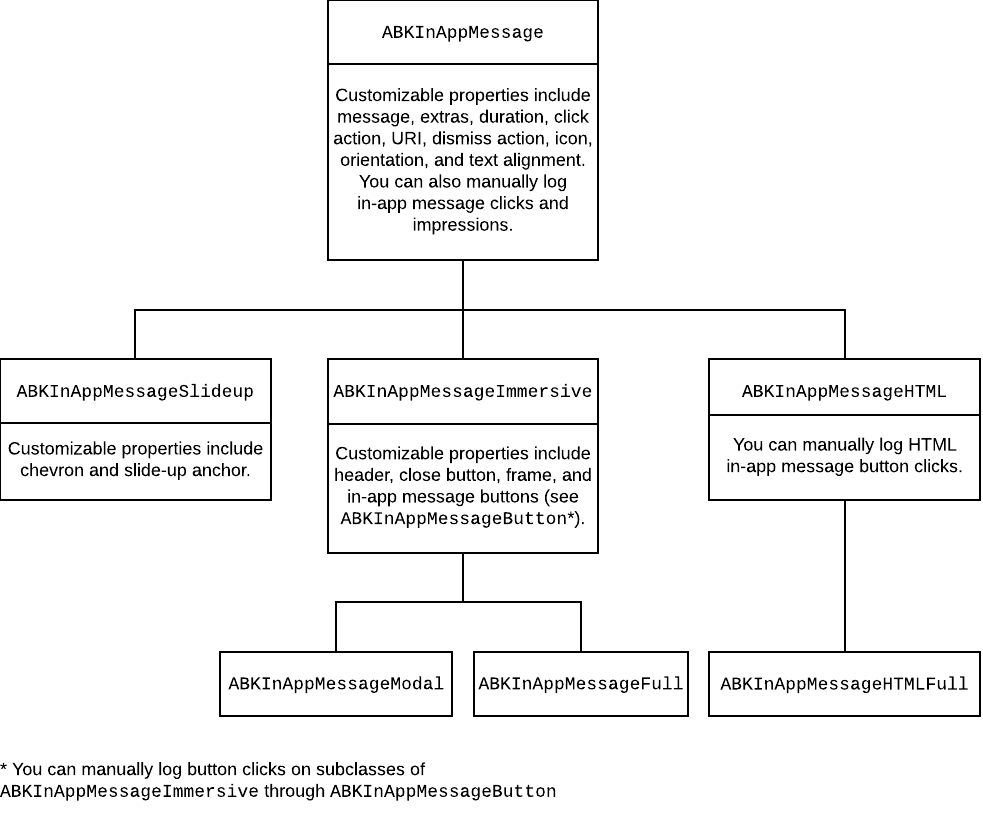
**Important:**
By default, in-app messages are enabled after completing the standard SDK integration, including GIF support.
Note that integration of `SDWebImage` is required if you plan on using our Braze UI for displaying images within iOS in-app messages or Content Cards.
### Expected behaviors by message types
This is what it looks like for your users to open one of our default in-app message types.
[`Slideup`](https://appboy.github.io/appboy-ios-sdk/docs/interface_a_b_k_in_app_message_slideup.html) in-app messages are so-named because they "slide up" or "slide down" from the top or bottom of the screen. They cover a small portion of the screen and provide an effective and non-intrusive messaging capability.
{: style="border:0px;"}
[`Modal`](https://appboy.github.io/appboy-ios-sdk/docs/interface_a_b_k_in_app_message_modal.html) in-app messages appear in the center of the screen and are framed by a translucent panel. Useful for more critical messaging, they can be equipped with up to two click action and analytics-enabled buttons.
{: style="border:0px;"}
[`Full`](https://appboy.github.io/appboy-ios-sdk/docs/interface_a_b_k_in_app_message_full.html) in-app messages are useful for maximizing the content and impact of your user communication. The upper half of a `full` in-app message contains an image, and the lower half displays text and up to two click action and analytics-enabled buttons.
{: style="border:0px;"}
[`HTML Full`](https://appboy.github.io/appboy-ios-sdk/docs/interface_a_b_k_in_app_message_h_t_m_l_full.html) in-app messages are useful for creating fully customized user content. User-defined HTML Full in-app message content is displayed in a `WKWebView`and may optionally contain other rich content, such as images and fonts, allowing for full control over message appearance and functionality.
iOS in-app messages support a JavaScript `brazeBridge` interface to call methods on the Braze Web SDK from within your HTML, see our [best practices](https://www.braze.com/docs/user_guide/message_building_by_channel/in-app_messages/best_practices/) for more details.
The following example shows a paginated HTML Full in-app message:

Full in-app message content is displayed in a `WKWebView` and may optionally contain other rich content, such as images and fonts, allowing full control over message appearance and functionality. Note that we currently do not support the display of custom HTML in-app messages in an iFrame on the iOS and Android platforms.
**Note:**
Starting in iOS SDK version 3.19.0, the following JavaScript methods are no-ops in HTML in-app messages: `alert`, `confirm`, `prompt`.
# iOS In-App Message Customization
Source: /docs/developer_guide/platforms/legacy_sdks/ios/in-app_messaging/customization/index.md
# Set In-App Message Delegates for iOS
Source: /docs/developer_guide/platforms/legacy_sdks/ios/in-app_messaging/customization/setting_delegates/index.md
**Warning:**
[AppboyKit](https://github.com/Appboy/appboy-ios-sdk) (also known as the Objective-C SDK) is no longer supported and has been replaced by the [Swift SDK](https://www.braze.com/docs/developer_guide/sdk_integration/?sdktab=swift). It will no longer receive new features, bug fixes, security updates, or technical support—however, messaging and analytics will continue to function as normal. To learn more, see [Introducing the New Braze Swift SDK](https://www.braze.com/resources/articles/introducing-the-new-braze-swift-sdk).
# Set delegates
In-app message display and delivery customizations can be accomplished in code by setting our optional delegates.
## In-app message delegate
The [`ABKInAppMessageUIDelegate`](https://github.com/Appboy/appboy-ios-sdk/blob/master/AppboyUI/ABKInAppMessage/ABKInAppMessageUIDelegate.h) delegate can be used to receive triggered in-app message payloads for further processing, receive display lifecycle events, and control display timing.
Set your `ABKInAppMessageUIDelegate` delegate object on the Braze instance by calling:
```objc
[[Appboy sharedInstance].inAppMessageController.inAppMessageUIController setInAppMessageUIDelegate:self];
```
```swift
Appboy.sharedInstance()?.inAppMessageController.inAppMessageUIController?.setInAppMessageUIDelegate?(self)
```
Check out our in-app message [sample app](https://github.com/Appboy/appboy-ios-sdk/blob/master/Samples/InAppMessage/BrazeInAppMessageSample/BrazeInAppMessageSample/ViewController.m) for an example implementation. Note that if you are not including the Braze UI library in your project (uncommon), this delegate is unavailable.
## Core in-app message delegate
If you are not including the Braze UI library in your project and want to receive triggered in-app message payloads for further processing or custom display in your app, implement the [`ABKInAppMessageControllerDelegate`](https://www.braze.com/docs/developer_guide/platforms/legacy_sdks/ios/in-app_messaging/customization/setting_delegates/) protocol.
Set your `ABKInAppMessageControllerDelegate` delegate object on the Braze instance by calling:
```objc
[Appboy sharedInstance].inAppMessageController.delegate = self;
```
```swift
Appboy.sharedInstance()?.inAppMessageController.delegate = self
```
You can alternatively set your core in-app message delegate at initialization time via `appboyOptions` using the key `ABKInAppMessageControllerDelegateKey`:
```objc
[Appboy startWithApiKey:@"YOUR-API_KEY"
inApplication:application
withLaunchOptions:options
withAppboyOptions:@{ ABKInAppMessageControllerDelegateKey : self }];
```
```swift
Appboy.start(withApiKey: "YOUR-API-KEY",
in:application,
withLaunchOptions:launchOptions,
withAppboyOptions:[ ABKInAppMessageControllerDelegateKey : self ])
```
## Method declarations
For additional information, see the following header files:
- [`ABKInAppMessage.h`](https://github.com/Appboy/appboy-ios-sdk/blob/master/AppboyKit/include/ABKInAppMessage.h)
- [`ABKInAppMessageControllerDelegate.h`](https://github.com/Appboy/appboy-ios-sdk/blob/master/AppboyKit/include/ABKInAppMessageControllerDelegate.h)
## Implementation samples
See [`ViewController.m`](https://github.com/Appboy/appboy-ios-sdk/blob/master/Samples/InAppMessage/BrazeInAppMessageSample/BrazeInAppMessageSample/ViewController.m) in the in-app message sample app.
# Customize In-App Message Orientation for iOS
Source: /docs/developer_guide/platforms/legacy_sdks/ios/in-app_messaging/customization/customizing_orientation/index.md
**Warning:**
[AppboyKit](https://github.com/Appboy/appboy-ios-sdk) (also known as the Objective-C SDK) is no longer supported and has been replaced by the [Swift SDK](https://www.braze.com/docs/developer_guide/sdk_integration/?sdktab=swift). It will no longer receive new features, bug fixes, security updates, or technical support—however, messaging and analytics will continue to function as normal. To learn more, see [Introducing the New Braze Swift SDK](https://www.braze.com/resources/articles/introducing-the-new-braze-swift-sdk).
# Customize orientation
## Setting orientation for all in-app messages
To set a fixed orientation for all in-app messages, you can set the `supportedOrientationMask` property on `ABKInAppMessageUIController`. Add the following code after your app's call to `startWithApiKey:inApplication:withLaunchOptions:`:
```objc
// Set fixed in-app message orientation to portrait.
// Use UIInterfaceOrientationMaskLandscape to display in-app messages in landscape
id inAppMessageUIController = [Appboy sharedInstance].inAppMessageController.inAppMessageUIController;
((ABKInAppMessageUIController *)inAppMessageUIController).supportedOrientationMask = UIInterfaceOrientationMaskPortrait;
```
```swift
// Set fixed in-app message orientation to portrait
// Use .landscape to display in-app messages in landscape
if let controller = Appboy.sharedInstance()?.inAppMessageController.inAppMessageUIController as? ABKInAppMessageUIController {
controller.supportedOrientationMask = .portrait
}
```
Following this, all in-app messages will be displayed in the supported orientation, regardless of device orientation. Note that the device orientation must also be supported by the in-app message's `orientation` property for the message to display.
## Setting orientation per in-app message
You may alternatively set orientation on a per-message basis. To do this, set an [in-app message delegate](https://www.braze.com/docs/developer_guide/platforms/legacy_sdks/ios/in-app_messaging/customization/setting_delegates/). Then, in your `beforeInAppMessageDisplayed:` delegate method, set the `orientation` property on the `ABKInAppMessage`:
```objc
// Set inAppMessage orientation to portrait
inAppMessage.orientation = ABKInAppMessageOrientationPortrait;
// Set inAppMessage orientation to landscape
inAppMessage.orientation = ABKInAppMessageOrientationLandscape;
```
```swift
// Set inAppMessage orientation to portrait
inAppMessage.orientation = ABKInAppMessageOrientation.portrait
// Set inAppMessage orientation to landscape
inAppMessage.orientation = ABKInAppMessageOrientation.landscape
```
In-app messages will not display if the device orientation does not match the `orientation` property on the in-app message.
**Note:**
For iPads, in-app messages will appear in the user's preferred orientation style regardless of actual screen orientation.
## Method declarations
For additional information, see the following header file:
- [`ABKInAppMessage.h`](https://github.com/Appboy/appboy-ios-sdk/blob/master/AppboyKit/include/ABKInAppMessage.h)
# Customize In-App Message Display Handling for iOS
Source: /docs/developer_guide/platforms/legacy_sdks/ios/in-app_messaging/customization/handling_in_app_display/index.md
**Warning:**
[AppboyKit](https://github.com/Appboy/appboy-ios-sdk) (also known as the Objective-C SDK) is no longer supported and has been replaced by the [Swift SDK](https://www.braze.com/docs/developer_guide/sdk_integration/?sdktab=swift). It will no longer receive new features, bug fixes, security updates, or technical support—however, messaging and analytics will continue to function as normal. To learn more, see [Introducing the New Braze Swift SDK](https://www.braze.com/resources/articles/introducing-the-new-braze-swift-sdk).
# Custom handling in-app message display
When the [`ABKInAppMessageControllerDelegate`](https://github.com/Appboy/appboy-ios-sdk/blob/master/AppboyKit/include/ABKInAppMessageControllerDelegate.h) is set, the following delegate method will be called before in-app messages are displayed:
```objc
- (ABKInAppMessageDisplayChoice) beforeInAppMessageDisplayed:(ABKInAppMessage *)inAppMessage;
```
```swift
func beforeInAppMessageDisplayed(inAppMessage: ABKInAppMessage!) -> ABKInAppMessageDisplayChoice
```
If you have only implemented [`ABKInAppMessageUIDelegate`](https://github.com/Appboy/appboy-ios-sdk/blob/master/AppboyUI/ABKInAppMessage/ABKInAppMessageUIDelegate.h), the following UI delegate method will be called instead:
```objc
- (ABKInAppMessageDisplayChoice) beforeInAppMessageDisplayed:(ABKInAppMessage *)inAppMessage withKeyboardIsUp:(BOOL)keyboardIsUp;
```
```swift
func beforeInAppMessageDisplayed(inAppMessage: ABKInAppMessage!, withKeyboardIsUp keyboardIsUp: Bool) -> ABKInAppMessageDisplayChoice
```
You can customize in-app message handling by implementing this delegate method and returning one of the following values for `ABKInAppMessageDisplayChoice`:
| `ABKInAppMessageDisplayChoice` | Behavior |
| -------------------------- | -------- |
| Objective-C: `ABKDisplayInAppMessageNow` Swift: `displayInAppMessageNow` | The message will be displayed immediately. |
| Objective-C: `ABKDisplayInAppMessageLater` Swift: `displayInAppMessageLater` | The message will be not be displayed and will be placed back on the top of the stack. |
| Objective-C: `ABKDiscardInAppMessage` Swift: `discardInAppMessage`| The message will be discarded and will not be displayed. |
{: .reset-td-br-1 .reset-td-br-2 role="presentation" }
You can use the `beforeInAppMessageDisplayed:` delegate method to add in-app message display logic, customize in-app messages before Braze displays them, or opt out of the Braze in-app message display logic and UI entirely.
Check out our [sample application](https://github.com/Appboy/appboy-ios-sdk/blob/master/Samples/InAppMessage/BrazeInAppMessageSample/BrazeInAppMessageSample/AppDelegate.m) for an implementation example.
## Overriding in-app messages before display
If you want to alter the display behavior of in-app messages, you should add any necessary display logic to your `beforeInAppMessageDisplayed:` delegate method. For example, you might want to display the in-app message from the top of the screen if the keyboard is currently being displayed, or take the in-app message data model and display the in-app message yourself.
If the in-app message campaign is not displaying when the session has been started, make sure you have the necessary display logic added to your `beforeInAppMessageDisplayed:` delegate method. This allows the in-app message campaign to display from the top of the screen even if the keyboard is being displayed.
## Disabling Dark Mode
To prevent in-app messages from adopting dark mode styling when the user device has dark mode enabled, use the [`ABKInAppMessage.enableDarkTheme`](https://appboy.github.io/appboy-ios-sdk/docs/interface_a_b_k_in_app_message.html#ae89df6090bed623099ab0ecc0a74ad5d) property. From within either the `ABKInAppMessageControllerDelegate.beforeInAppMessageDisplayed:` or `ABKInAppMessageUIDelegate.beforeInAppMessageDisplayed:` method, set the `enableDarkTheme` property of the method's `inAppMessage` parameter to `NO`.
```objc
// ABKInAppMessageControllerDelegate
- (ABKInAppMessageDisplayChoice)beforeInAppMessageDisplayed:(ABKInAppMessage *)inAppMessage {
...
inAppMessage.enableDarkTheme = NO;
...
return ABKDisplayInAppMessageNow;
}
// ABKInAppMessageUIDelegate
- (ABKInAppMessageDisplayChoice)beforeInAppMesssageDisplayed:(ABKInAppMessage *)inAppMessage
withKeyboardIsUp:(BOOL)keyboardIsUp {
...
inAppMessage.enableDarkTheme = NO;
...
return ABKDisplayInAppMessageNow;
}
```
```swift
// ABKInAppMessageControllerDelegate
func before(inAppMessageDisplayed inAppMessage: ABKInAppMessage) -> ABKInAppMessageDisplayChoice {
...
inAppMessage.enableDarkTheme = false
...
return ABKInAppMessageDisplayChoice.displayInAppMessageNow
}
// ABKInAppMessageUIDelegate
func before(inAppMessageDisplayed inAppMessage: ABKInAppMessage, withKeyboardIsUp keyboardIsUp: Bool) -> ABKInAppMessageDisplayChoice {
...
inAppMessage.enableDarkTheme = false
...
return ABKInAppMessageDisplayChoice.displayInAppMessageNow
}
```
## Hiding the status bar during display
For `Full` and `HTML` in-app messages, the SDK will attempt to place the message over the status bar by default. However, in some cases, the status bar may still appear on top of the in-app message. As of version [3.21.1](https://github.com/Appboy/appboy-ios-sdk/blob/master/CHANGELOG.md#3211) of the iOS SDK, you can force the status bar to hide when displaying `Full` and `HTML` in-app messages by setting `ABKInAppMessageHideStatusBarKey` to `YES` within the `appboyOptions` passed to `startWithApiKey:`.
## Logging impressions and clicks
Logging in-app message impressions and clicks is not automatic when you implement completely custom handling (for example, you circumvent Braze in-app message display by returning `ABKDiscardInAppMessage` in your `beforeInAppMessageDisplayed:`). If you choose to implement your own UI using our in-app message models, you must log analytics with the following methods on the `ABKInAppMessage` class:
```objc
// Registers that a user has viewed an in-app message with the Braze server.
- (void) logInAppMessageImpression;
// Registers that a user has clicked on an in-app message with the Braze server.
- (void) logInAppMessageClicked;
```
```swift
// Registers that a user has viewed an in-app message with the Braze server.
func logInAppMessageImpression()
// Registers that a user has clicked on an in-app message with the Braze server.
func logInAppMessageClicked()
```
Furthermore, you should be logging button clicks on subclasses of `ABKInAppMessageImmersive` (*i.e*., `Modal` and `Full` in-app messages):
```objc
// Logs button click analytics
- (void)logInAppMessageClickedWithButtonID:(NSInteger)buttonID;
```
```swift
// Logs button click analytics
func logInAppMessageClickedWithButtonID(buttonId: NSInteger)
```
## Method declarations
For additional information, see the following header files:
- [`ABKInAppMessage.h`](https://github.com/Appboy/appboy-ios-sdk/blob/master/AppboyKit/include/ABKInAppMessage.h)
- [`ABKInAppMessageControllerDelegate.h`](https://github.com/Appboy/appboy-ios-sdk/blob/master/AppboyKit/include/ABKInAppMessageControllerDelegate.h)
## Implementation samples
See [`AppDelegate.m`](https://github.com/Appboy/appboy-ios-sdk/blob/master/Samples/InAppMessage/BrazeInAppMessageSample/BrazeInAppMessageSample/AppDelegate.m) in-app message sample app.
# Customize In-App Message On-Click Behavior for iOS
Source: /docs/developer_guide/platforms/legacy_sdks/ios/in-app_messaging/customization/behavior_on_click/index.md
**Warning:**
[AppboyKit](https://github.com/Appboy/appboy-ios-sdk) (also known as the Objective-C SDK) is no longer supported and has been replaced by the [Swift SDK](https://www.braze.com/docs/developer_guide/sdk_integration/?sdktab=swift). It will no longer receive new features, bug fixes, security updates, or technical support—however, messaging and analytics will continue to function as normal. To learn more, see [Introducing the New Braze Swift SDK](https://www.braze.com/resources/articles/introducing-the-new-braze-swift-sdk).
# Customize in-app message behavior on click
The `inAppMessageClickActionType` property on the `ABKInAppMessage` defines the action behavior after the in-app message is clicked. This property is read-only. If you want to change the in-app message's click behavior, you can call the following method on `ABKInAppMessage`:
```objc
[inAppMessage setInAppMessageClickAction:clickActionType withURI:uri];
```
```swift
inAppMessage.setInAppMessageClickAction(clickActionType: clickActionType, withURI: uri)
```
The `inAppMessageClickActionType` can be set to one of the following values:
| `ABKInAppMessageClickActionType` | On-Click Behavior |
| -------------------------- | -------- |
| `ABKInAppMessageRedirectToURI` | The given URI will be displayed when the message is clicked, and the message will be dismissed. Note that the `uri` parameter cannot be nil. |
| `ABKInAppMessageNoneClickAction` | The message will be dismissed when clicked. Note that the `uri` parameter will be ignored, and the `uri` property on the `ABKInAppMessage` will be set to nil. |
{: .reset-td-br-1 .reset-td-br-2 role="presentation" }
**Important:**
For in-app messages containing buttons, the message `clickAction` will also be included in the final payload if the click action is added prior to adding the button text.
## Customizing in-app message body clicks
The following [`ABKInAppMessageUIDelegate`](https://github.com/Appboy/appboy-ios-sdk/blob/master/AppboyUI/ABKInAppMessage/ABKInAppMessageUIDelegate.h) delegate method is called when an in-app message is clicked:
```objc
- (BOOL) onInAppMessageClicked:(ABKInAppMessage *)inAppMessage;
```
```swift
func onInAppMessageClicked(inAppMessage: ABKInAppMessage!) -> Bool
```
## Customizing in-app message button clicks
For clicks on in-app message buttons and HTML in-app message buttons (such as links), [`ABKInAppMessageUIDelegate`](https://github.com/Appboy/appboy-ios-sdk/blob/master/AppboyUI/ABKInAppMessage/ABKInAppMessageUIDelegate.h) includes the following delegate methods:
```objc
- (BOOL)onInAppMessageButtonClicked:(ABKInAppMessageImmersive *)inAppMessage
button:(ABKInAppMessageButton *)button;
- (BOOL)onInAppMessageHTMLButtonClicked:(ABKInAppMessageHTML *)inAppMessage
clickedURL:(nullable NSURL *)clickedURL
buttonID:(NSString *)buttonID;
```
```swift
func onInAppMessageButtonClicked(inAppMessage: ABKInAppMessageImmersive!,
button: ABKInAppMessageButton) -> Bool
func onInAppMessageHTMLButtonClicked(inAppMessage: ABKInAppMessageHTML!,
clickedURL: URL, buttonID: String) -> Bool
```
Each method returns a `BOOL` value to indicate if Braze should continue to execute the click action.
To access the click action type of a button in a delegate method, you can use the following code:
```objc
if ([inAppMessage isKindOfClass:[ABKInAppMessageImmersive class]]) {
ABKInAppMessageImmersive *immersiveIAM = (ABKInAppMessageImmersive *)inAppMessage;
NSArray *buttons = immersiveIAM.buttons;
for (ABKInAppMessageButton *button in buttons) {
// Button action type is accessible via button.buttonClickActionType
}
}
```
```swift
if inAppMessage is ABKInAppMessageImmersive {
let immersiveIAM = inAppMessage as! ABKInAppMessageImmersive;
for button in inAppMessage.buttons as! [ABKInAppMessageButton]{
// Button action type is accessible via button.buttonClickActionType
}
}
```
When an in-app message has buttons, the only click actions that will be executed are those on the `ABKInAppMessageButton` model. The in-app message body will not be clickable even though the `ABKInAppMessage` model will have the default click action assigned.
## Method declarations
For additional information, see the following header files:
- [`ABKInAppMessage.h`](https://github.com/Appboy/appboy-ios-sdk/blob/master/AppboyKit/include/ABKInAppMessage.h)
# Customize In-App Message Triggering for iOS
Source: /docs/developer_guide/platforms/legacy_sdks/ios/in-app_messaging/customization/custom_triggering/index.md
**Warning:**
[AppboyKit](https://github.com/Appboy/appboy-ios-sdk) (also known as the Objective-C SDK) is no longer supported and has been replaced by the [Swift SDK](https://www.braze.com/docs/developer_guide/sdk_integration/?sdktab=swift). It will no longer receive new features, bug fixes, security updates, or technical support—however, messaging and analytics will continue to function as normal. To learn more, see [Introducing the New Braze Swift SDK](https://www.braze.com/resources/articles/introducing-the-new-braze-swift-sdk).
# Custom in-app message triggering
By default, in-app messages are triggered by event types logged by the SDK. If you want to trigger in-app messages by server-sent events, you can also achieve this.
To enable this feature, you would send a silent push to the device, which allows the device to log an SDK-based event. This SDK event would subsequently trigger the user-facing in-app message.
## Step 1: Handle silent push and key-value pairs
Add the following code within the `application(_:didReceiveRemoteNotification:fetchCompletionHandler:)` method:
```objc
- (void)handleExtrasFromPush:(NSDictionary *)userInfo {
NSLog(@"A push was received.");
if (userInfo !=nil && userInfo[@"IS_SERVER_EVENT"] !=nil && userInfo[@"CAMPAIGN_NAME"]!=nil) {
[[Appboy sharedInstance] logCustomEvent:@"IAM Trigger" withProperties:@{@"campaign_name": userInfo[@"CAMPAIGN_NAME"]}];
}
};
```
```swift
func handleExtras(userInfo: [AnyHashable : Any]) {
NSLog("A push was received");
if userInfo != nil && (userInfo["IS_SERVER_EVENT"] as? String) != nil && (userInfo["CAMPAIGN_NAME"] as? String) != nil {
Appboy.sharedInstance()?.logCustomEvent("IAM Trigger", withProperties: ["campaign_name": userInfo["CAMPAIGN_NAME"]])
}
}
```
When the silent push is received, an SDK recorded event "in-app message trigger" will be logged against the user profile. Note that these in-app messages will only trigger if the silent push is received while the application is in the foreground.
## Step 2: Create a push campaign
Create a silent push campaign that is triggered via the server sent event. For details on creating a silent push campaign, refer to [silent push notifications](https://www.braze.com/docs/developer_guide/platforms/legacy_sdks/ios/push_notifications/silent_push_notifications/).
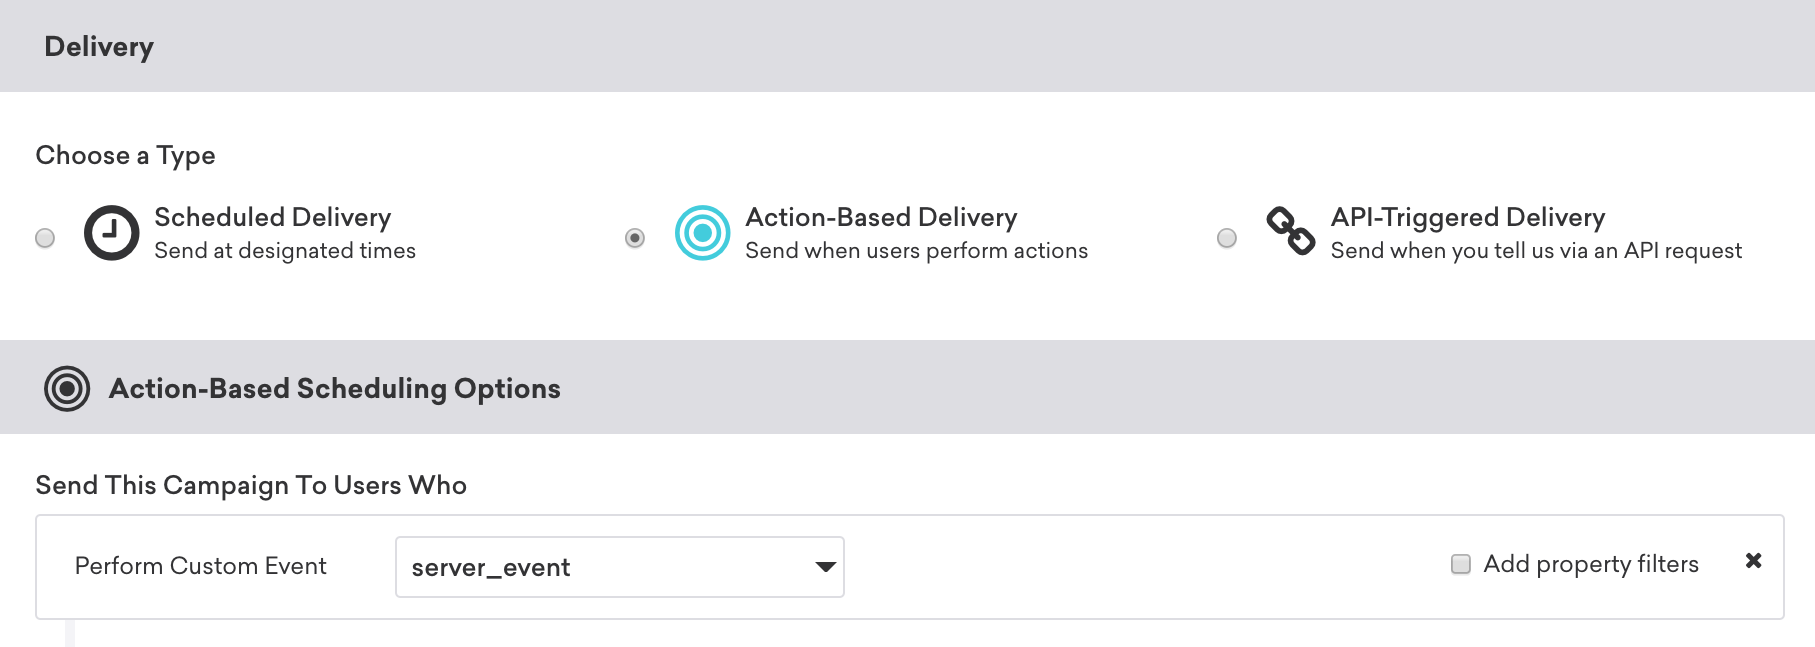
The push campaign must include key-value pair extras, which indicate that this push campaign is sent to log an SDK custom event. This event will be used to trigger the in-app message:
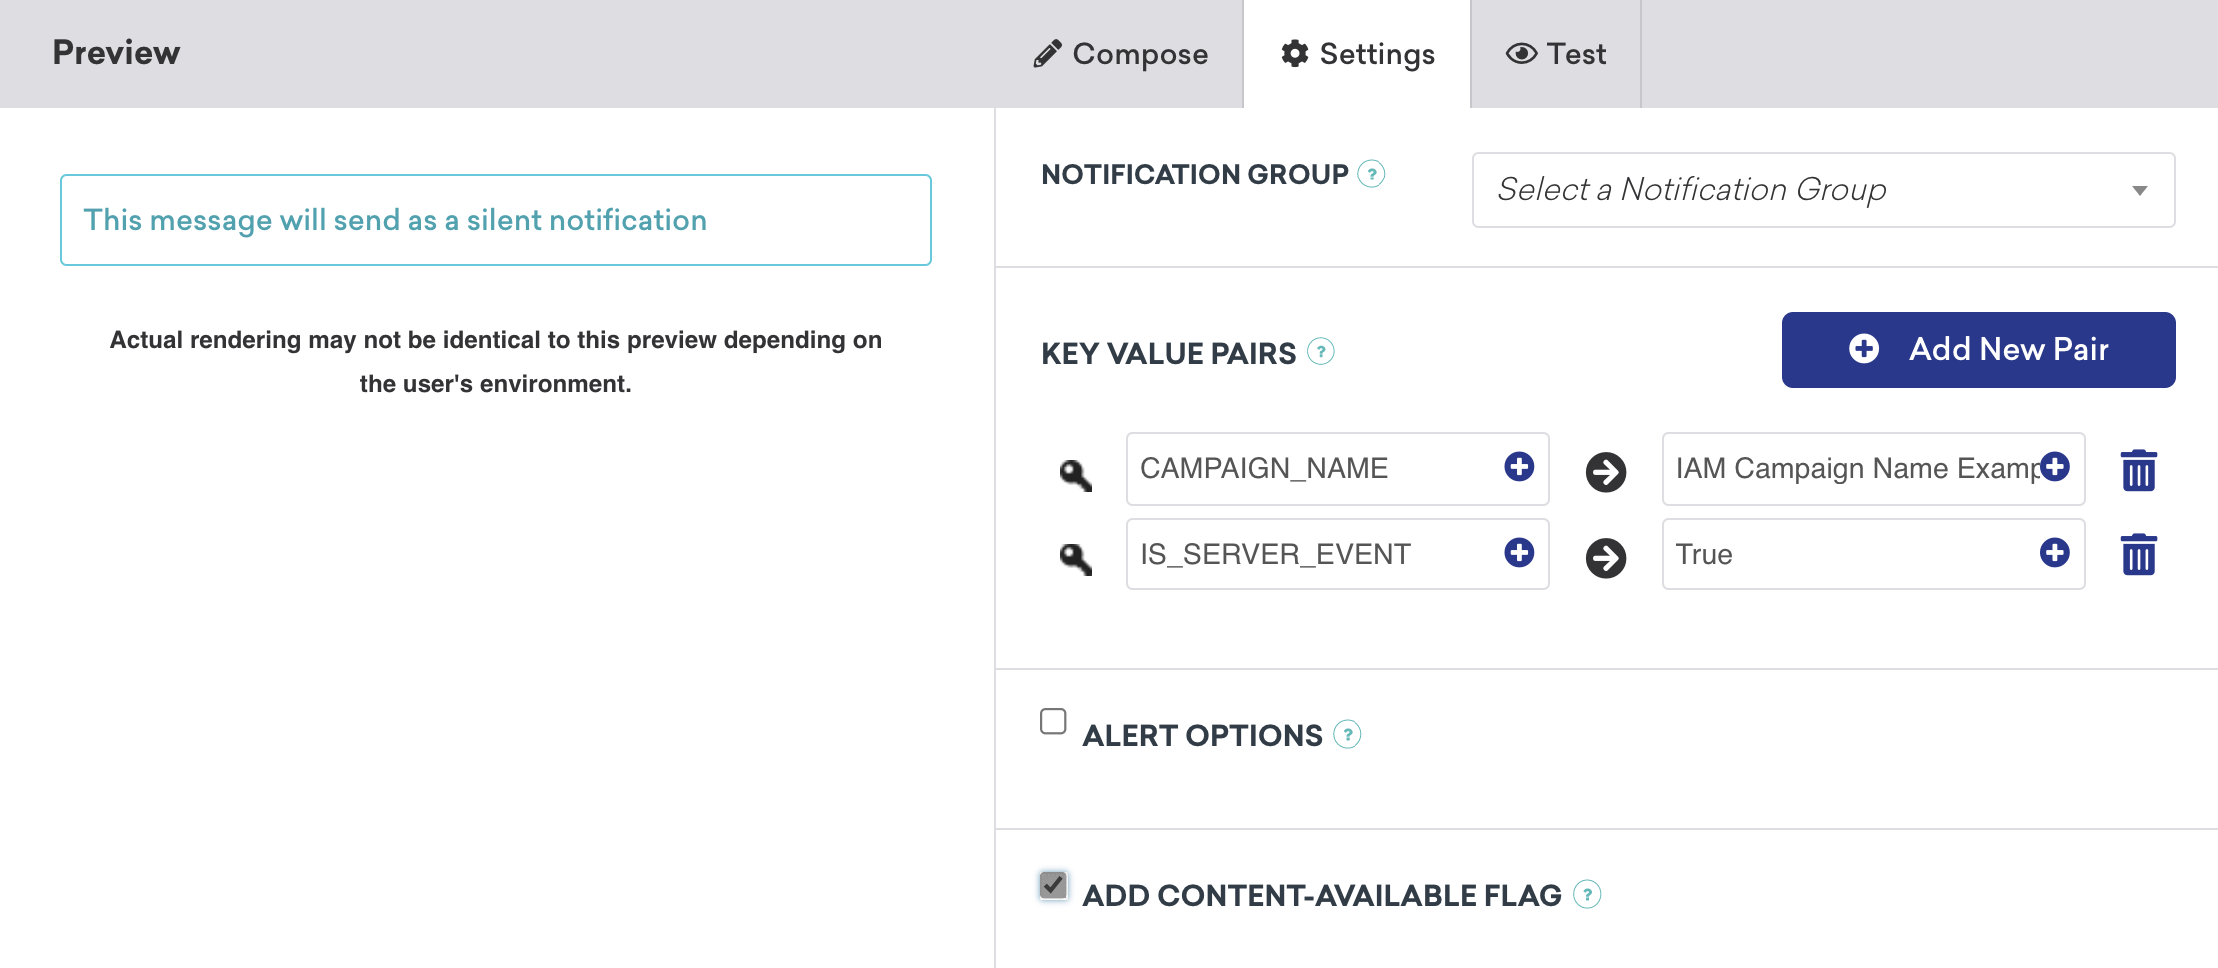
The code within the `application(_:didReceiveRemoteNotification:fetchCompletionHandler:)` method checks for key `IS_SERVER_EVENT` and will log an SDK custom event if this is present.
You can alter either the event name or event properties by sending the desired value within the key-value pair extras of the push payload. When logging the custom event, these extras can be used as the parameter of either the event name or as an event property.
## Step 3: Create an in-app message campaign
Create your user-visible in-app message campaign from within the Braze dashboard. This campaign should have an action-based delivery and be triggered from the custom event logged from within the `application(_:didReceiveRemoteNotification:fetchCompletionHandler:)` method.
In the following example, the specific in-app message to be triggered has been configured by sending the event property as part of the initial silent push.
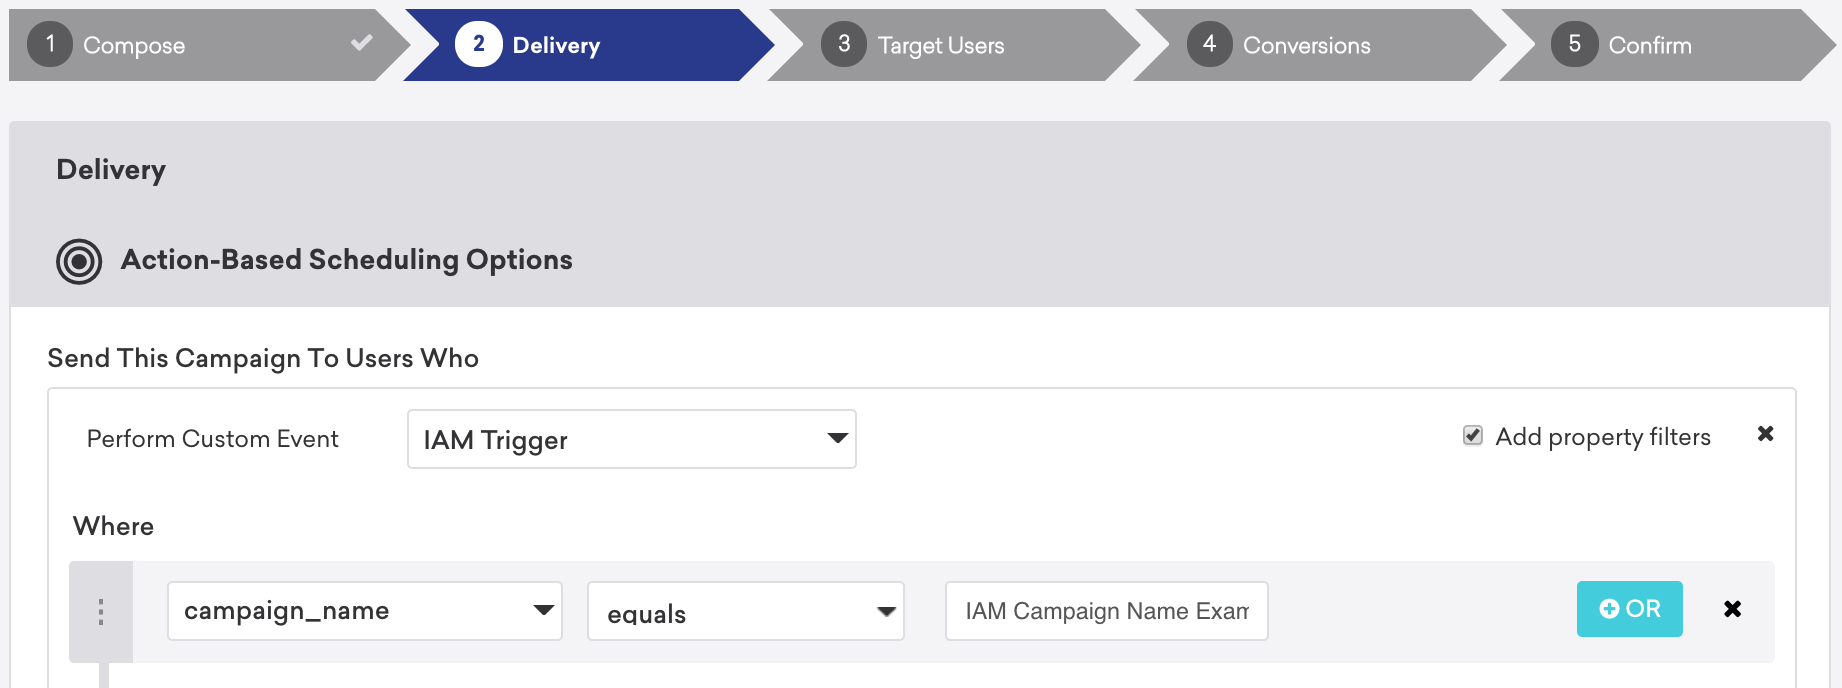
Due to a push message being used to record an SDK logged custom event, Braze will need to store a push token for each user to enable this solution. For both iOS and Android, Braze will only store a token from the point that a user has been served the OS's push prompt. Before this, the user will not be reachable using push, and the preceding solution will not be possible.
# In-App Message in a Custom View Controller for iOS
Source: /docs/developer_guide/platforms/legacy_sdks/ios/in-app_messaging/customization/custom_view_controller/index.md
**Warning:**
[AppboyKit](https://github.com/Appboy/appboy-ios-sdk) (also known as the Objective-C SDK) is no longer supported and has been replaced by the [Swift SDK](https://www.braze.com/docs/developer_guide/sdk_integration/?sdktab=swift). It will no longer receive new features, bug fixes, security updates, or technical support—however, messaging and analytics will continue to function as normal. To learn more, see [Introducing the New Braze Swift SDK](https://www.braze.com/resources/articles/introducing-the-new-braze-swift-sdk).
# Display in-app messages in a custom view controller
In-app messages can also be displayed within a custom view controller, which you pass to Braze. Braze will animate the customized in-app message in and out and handle analytics of the in-app message. The view controller must meet the following requirements:
- It must be a subclass or an instance of `ABKInAppMessageViewController`.
- The view of the returned view controller should be an instance of `ABKInAppMessageView` or its subclass.
The following UI delegate method is called every time an in-app message is offered to `ABKInAppMessageViewController` to allow the app to pass a custom view controller to Braze for in-app message display:
```objc
- (ABKInAppMessageViewController *)inAppMessageViewControllerWithInAppMessage:(ABKInAppMessage *)inAppMessage;
```
```swift
func inAppMessageViewControllerWithInAppMessage(inAppMessage: ABKInAppMessage!) -> ABKInAppMessageViewController!
```
Our [in-app message view controllers](https://github.com/Appboy/appboy-ios-sdk/tree/master/AppboyUI/ABKInAppMessage/ViewControllers) are customizable. You can use subclasses or categories to customize the display or behavior of in-app messages.
## Method declarations
For additional information, see the following header files:
- [`ABKInAppMessage.h`](https://github.com/Appboy/appboy-ios-sdk/blob/master/AppboyKit/include/ABKInAppMessage.h)
## Implementation samples
See [`ViewController.m`](https://github.com/Appboy/appboy-ios-sdk/blob/master/Samples/InAppMessage/BrazeInAppMessageSample/BrazeInAppMessageSample/ViewController.m) and [`CustomInAppMessageViewController.m`](https://github.com/Appboy/appboy-ios-sdk/blob/master/Samples/InAppMessage/BrazeInAppMessageSample/BrazeInAppMessageSample/) in the in-app message sample app.
# In-App Message Modal Dismissal for iOS
Source: /docs/developer_guide/platforms/legacy_sdks/ios/in-app_messaging/customization/modal_dismissal/index.md
**Warning:**
[AppboyKit](https://github.com/Appboy/appboy-ios-sdk) (also known as the Objective-C SDK) is no longer supported and has been replaced by the [Swift SDK](https://www.braze.com/docs/developer_guide/sdk_integration/?sdktab=swift). It will no longer receive new features, bug fixes, security updates, or technical support—however, messaging and analytics will continue to function as normal. To learn more, see [Introducing the New Braze Swift SDK](https://www.braze.com/resources/articles/introducing-the-new-braze-swift-sdk).
# Dismiss modal on outside tap
The default value is `NO`. This determines if the modal in-app message will be dismissed when the user taps outside of the in-app message.
To enable outside tap dismissals, add a dictionary named `Braze` to your `Info.plist` file. Inside the `Braze` dictionary, add the `DismissModalOnOutsideTap` boolean subentry and set the value to `YES`, as shown in the following code snippet. Note that prior to Braze iOS SDK v4.0.2, the dictionary key `Appboy` must be used in place of `Braze`.
```
BrazeDismissModalOnOutsideTapYES
```
You can also enable the feature at runtime by setting `ABKEnableDismissModalOnOutsideTapKey` to `YES` in `appboyOptions`.
| `DismissModalOnOutsideTap` | Description |
|----------|-------------|
| `YES` | Modal in-app messages will be dismissed on outside tap. |
| `NO` | Default, modal in-app messages will not be dismissed on outside tap. |
{: .reset-td-br-1 .reset-td-br-2 role="presentation" }
# In-App Message Key-Value Pairs for iOS
Source: /docs/developer_guide/platforms/legacy_sdks/ios/in-app_messaging/customization/key_value_pairs/index.md
**Warning:**
[AppboyKit](https://github.com/Appboy/appboy-ios-sdk) (also known as the Objective-C SDK) is no longer supported and has been replaced by the [Swift SDK](https://www.braze.com/docs/developer_guide/sdk_integration/?sdktab=swift). It will no longer receive new features, bug fixes, security updates, or technical support—however, messaging and analytics will continue to function as normal. To learn more, see [Introducing the New Braze Swift SDK](https://www.braze.com/resources/articles/introducing-the-new-braze-swift-sdk).
# Key-value pair extras
`ABKInAppMessage` objects may carry key-value pairs as `extras`. These are specified on the dashboard when creating a campaign. Key-value pairs can be used to send data down with an in-app message for further handling by your app.
# In-App Message Delivery for iOS
Source: /docs/developer_guide/platforms/legacy_sdks/ios/in-app_messaging/in-app_message_delivery/index.md
**Warning:**
[AppboyKit](https://github.com/Appboy/appboy-ios-sdk) (also known as the Objective-C SDK) is no longer supported and has been replaced by the [Swift SDK](https://www.braze.com/docs/developer_guide/sdk_integration/?sdktab=swift). It will no longer receive new features, bug fixes, security updates, or technical support—however, messaging and analytics will continue to function as normal. To learn more, see [Introducing the New Braze Swift SDK](https://www.braze.com/resources/articles/introducing-the-new-braze-swift-sdk).
# In-app message delivery
## Trigger types
Our in-app message product allows you to trigger in-app message display as a result of several different event types: `Any Purchase`, `Specific Purchase`, `Session Start`, `Custom Event`, and `Push Click`. Furthermore, `Specific Purchase` and `Custom Event` triggers contain robust property filters.
**Note:**
Triggered in-app messages only work with custom events logged through the Braze SDK. In-app messages can't be triggered through the API or by API events (such as purchase events). If you're working with iOS, visit our [tracking custom events](https://www.braze.com/docs/developer_guide/analytics/logging_events/?tab=swift) article to learn more.
## Delivery semantics
All in-app messages that a user is eligible for are delivered to the user's device on session start. In the case of two in-app messages being triggered by one event, the in-app message with the higher priority will be shown. For more information about the SDK's session start semantics, read about our [session lifecycle](https://www.braze.com/docs/developer_guide/platform_integration_guides/ios/analytics/tracking_sessions/#session-lifecycle). Upon delivery, the SDK will prefetch assets to be available immediately at trigger time, minimizing display latency.
When a trigger event has more than one eligible in-app message associated with it, only the in-app message with the highest priority will be delivered.
There can be some latency for in-app messages that display immediately on delivery (session start, push click) due to assets not being prefetched.
## Minimum time interval between triggers
By default, we rate limit in-app messages to once every 30 seconds to facilitate a quality user experience.
You can override this value via the `ABKMinimumTriggerTimeIntervalKey` inside the `appboyOptions` parameter passed to `startWithApiKey:inApplication:withLaunchOptions:withAppboyOptions:`. Set the `ABKMinimumTriggerTimeIntervalKey` to the integer value you want as your minimum time in seconds between in-app messages:
```objc
// Sets the minimum trigger time interval to 5 seconds
[Appboy startWithApiKey:@"YOUR-API-KEY"
inApplication:application
withLaunchOptions:options
withAppboyOptions:@{ ABKMinimumTriggerTimeIntervalKey : @(5) }];
```
```swift
Appboy.start(withApiKey: "YOUR-API-KEY", in:application, withLaunchOptions:launchOptions, withAppboyOptions:[ABKMinimumTriggerTimeIntervalKey : 5])
```
## Failing to find a matching trigger
When Braze fails to find a matching trigger for a particular event, it will call the [noMatchingTriggerForEvent:name:](https://appboy.github.io/appboy-ios-sdk/docs/protocol_a_b_k_in_app_message_controller_delegate-p.html#ab4d57b13c51545d487227945a37d4ab8) method of the [`ABKInAppMessageControllerDelegate`](https://appboy.github.io/appboy-ios-sdk/docs/protocol_a_b_k_in_app_message_controller_delegate-p.html). Implement this method in your class adopting the delegate protocol to handle this scenario.
## Local in-app message delivery
### The in-app message stack
#### Showing in-app messages
When a user is eligible to receive an in-app message, the `ABKInAppMessageController` will be offered the latest in-app message off the in-app message stack. The stack only persists stored in-app messages in memory and is cleared up between app launches from suspended mode.
**Important:**
Do not display in-app messages when the keyboard is displayed on screen, as rendering is undefined in this circumstance.
#### Adding in-app messages to the stack
Users are eligible to receive an in-app message in the following situations:
- An in-app message trigger event is fired
- Session start event
- The app is opened from a push notification
Triggered in-app messages are placed on the stack when their trigger event is fired. If multiple in-app messages are in the stack and waiting to be displayed, Braze will display the most recently received in-app message first (last in, first out).
#### Returning in-app messages to the stack
A triggered in-app message can be returned to the stack in the following situations:
- The in-app message is triggered when the app is in the background.
- Another in-app message is currently visible.
- The deprecated `beforeInAppMessageDisplayed:withKeyboardIsUp:` [UI delegate method](https://www.braze.com/docs/developer_guide/platform_integration_guides/ios/in-app_messaging/customization/setting_delegates/#in-app-message-delegate) has not been implemented, and the keyboard is currently being displayed.
- The `beforeInAppMessageDisplayed:` [delegate method](https://www.braze.com/docs/developer_guide/platform_integration_guides/ios/in-app_messaging/customization/setting_delegates/#core-in-app-message-delegate) or the deprecated `beforeInAppMessageDisplayed:withKeyboardIsUp:` [UI delegate method](https://www.braze.com/docs/developer_guide/platform_integration_guides/ios/in-app_messaging/customization/setting_delegates/#in-app-message-delegate) returned `ABKDisplayInAppMessageLater`.
#### Discarding in-app messages
A triggered in-app message will be discarded in the following situations:
- The `beforeInAppMessageDisplayed:` [delegate method](https://www.braze.com/docs/developer_guide/platform_integration_guides/ios/in-app_messaging/customization/setting_delegates/#core-in-app-message-delegate) or the deprecated `beforeInAppMessageDisplayed:withKeyboardIsUp:` [UI delegate method](https://www.braze.com/docs/developer_guide/platform_integration_guides/ios/in-app_messaging/customization/setting_delegates/#in-app-message-delegate) returned `ABKDiscardInAppMessage`.
- The asset (image or ZIP file) of the in-app message failed to download.
- The in-app message is ready to be displayed but past the timeout duration.
- The device orientation doesn't match the triggered in-app message's orientation.
- The in-app message is a full in-app message but has no image.
- The in-app message is an image-only modal in-app message but has no image.
#### Manually queue in-app message display
If you wish to display an in-app message at other times within your app, you may manually display the top-most in-app message on the stack by calling the following method:
```objc
[[Appboy sharedInstance].inAppMessageController displayNextInAppMessage];
```
```swift
Appboy.sharedInstance()!.inAppMessageController.displayNextInAppMessage()
```
### Real-time in-app message creation and display
In-app messages can also be locally created within the app and displayed via Braze. This is particularly useful for displaying messages you wish to trigger within the app in real-time. Braze does not support analytics on in-app messages created locally.
```objc
ABKInAppMessageSlideup *customInAppMessage = [[ABKInAppMessageSlideup alloc] init];
customInAppMessage.message = @"YOUR_CUSTOM_SLIDEUP_MESSAGE";
customInAppMessage.duration = 2.5;
customInAppMessage.extras = @{@"key" : @"value"};
[[Appboy sharedInstance].inAppMessageController addInAppMessage:customInAppMessage];
```
```swift
let customInAppMessage = ABKInAppMessageSlideup.init()
customInAppMessage.message = "YOUR_CUSTOM_SLIDEUP_MESSAGE"
customInAppMessage.duration = 2.5
customInAppMessage.extras = ["key": "value"]
Appboy.sharedInstance()!.inAppMessageController.add(customInAppMessage)
```
# Custom App Store review prompt
Source: /docs/developer_guide/platforms/legacy_sdks/ios/in-app_messaging/custom_app_store_review_prompt/index.md
**Warning:**
[AppboyKit](https://github.com/Appboy/appboy-ios-sdk) (also known as the Objective-C SDK) is no longer supported and has been replaced by the [Swift SDK](https://www.braze.com/docs/developer_guide/sdk_integration/?sdktab=swift). It will no longer receive new features, bug fixes, security updates, or technical support—however, messaging and analytics will continue to function as normal. To learn more, see [Introducing the New Braze Swift SDK](https://www.braze.com/resources/articles/introducing-the-new-braze-swift-sdk).
# Custom App Store review prompt
**Note:**
Once you implement this prompt, Braze stops automatically tracking impressions, and you must log your own [analytics](https://www.braze.com/docs/developer_guide/platform_integration_guides/ios/in-app_messaging/customization/handing_in_app_display/#logging-impressions-and-clicks).
Creating a campaign to ask users for an App Store review is a popular usage of in-app messages.
Start by setting the [in-app message delegate](#in-app-message-controller-delegate) in your app. Next, implement the following delegate method to disable the default App Store review message:
```objc
- (ABKInAppMessageDisplayChoice)beforeInAppMessageDisplayed:(ABKInAppMessage *)inAppMessage {
if (inAppMessage.extras != nil && inAppMessage.extras[@"Appstore Review"] != nil) {
[[UIApplication sharedApplication] openURL:inAppMessage.uri options:@{} completionHandler:nil];
return ABKDiscardInAppMessage;
} else {
return ABKDisplayInAppMessageNow;
}
}
```
```swift
func before(inAppMessageDisplayed inAppMessage: ABKInAppMessage) -> ABKInAppMessageDisplayChoice {
if inAppMessage.extras?["Appstore Review"] != nil && inAppMessage.uri != nil {
UIApplication.shared.open(inAppMessage.uri!, options: [:], completionHandler: nil)
return ABKInAppMessageDisplayChoice.discardInAppMessage
} else {
return ABKInAppMessageDisplayChoice.displayInAppMessageNow
}
}
```
In your deep link handling code, add the following code to process the `{YOUR-APP-SCHEME}:appstore-review` deep link. Note that you will need to import `StoreKit` to use `SKStoreReviewController`:
```objc
- (BOOL)application:(UIApplication *)app openURL:(NSURL *)url options:(NSDictionary *)options {
NSString *urlString = url.absoluteString.stringByRemovingPercentEncoding;
if ([urlString isEqualToString:@"{YOUR-APP-SCHEME}:appstore-review"]) {
[SKStoreReviewController requestReview];
return YES;
}
// Other deep link handling code…
}
```
```swift
func application(_ app: UIApplication, open url: URL, options: [UIApplicationOpenURLOptionsKey : Any] = [:]) -> Bool {
let urlString = url.absoluteString.removingPercentEncoding
if (urlString == "{YOUR-APP-SCHEME}:appstore-review") {
SKStoreReviewController.requestReview()
return true;
}
// Other deep link handling code…
}
```
Next, create an in-app messaging campaign with the following:
- The key-value pair `"Appstore Review" : "true"`
- The on-click behavior set to "Deep Link Into App", using the deep link `{YOUR-APP-SCHEME}:appstore-review`.
**Tip:**
Apple limits App Store review prompts to a maximum of three (3) times per year for each user, so your campaign should be [rate-limited](https://www.braze.com/docs/user_guide/engagement_tools/campaigns/building_campaigns/rate-limiting/) to three times per year per user.
Users may turn off App Store review prompts. As a result, your custom review prompt should not promise that a native App Store review prompt will appear or directly ask for a review.
# In-App Message Implementation Guide for iOS (Optional)
Source: /docs/developer_guide/platforms/legacy_sdks/ios/in-app_messaging/implementation_guide/index.md
**Warning:**
[AppboyKit](https://github.com/Appboy/appboy-ios-sdk) (also known as the Objective-C SDK) is no longer supported and has been replaced by the [Swift SDK](https://www.braze.com/docs/developer_guide/sdk_integration/?sdktab=swift). It will no longer receive new features, bug fixes, security updates, or technical support—however, messaging and analytics will continue to function as normal. To learn more, see [Introducing the New Braze Swift SDK](https://www.braze.com/resources/articles/introducing-the-new-braze-swift-sdk).
**Important:**
Looking for the basic in-app message developer integration guide? Find it [here](https://www.braze.com/docs/developer_guide/platforms/legacy_sdks/ios/in-app_messaging/overview/).
# In-app messaging implementation guide
> This optional and advanced implementation guide covers in-app message code considerations, three custom use cases built by our team, and accompanying code snippets. Visit our Braze Demo repository [here](https://github.com/braze-inc/braze-growth-shares-ios-demo-app)! This implementation guide is centered around a Swift implementation, but Objective-C snippets are provided for those interested. Looking for HTML implementations? Take a look at our [HTML template repository](https://github.com/braze-inc/in-app-message-templates)!
## Code considerations
The following guide offers an optional custom developer integration to use in addition to default in-app messages. Custom view controllers are included with each use case, offering examples to extend functionality and natively customize the look and feel of your in-app messages.
### ABKInAppMessage subclasses
The following code snippet is a UI delegate method from the Braze SDK that determines what subclass view you want to populate your in-app message with. We cover a basic implementation in this guide and show how the full, slide up, and modal subclasses can be implemented in captivating ways. Note that if you want to set up your custom view controller, you must set up all other in-app message subclasses. After you have a solid understanding of the concepts behind subclassing, check out our [use cases](#sample-use-cases) to start implementing in-app messaging subclasses.
**ABKInAppMessage subclasses**
```swift
extension AppboyManager: ABKInAppMessageUIDelegate {
func inAppMessageViewControllerWith(_ inAppMessage: ABKInAppMessage) -> ABKInAppMessageViewController {
switch inAppMessage {
case is ABKInAppMessageSlideup:
return slideupViewController(inAppMessage: inAppMessage) //Custom Method
case is ABKInAppMessageModal:
return modalViewController(inAppMessage: inAppMessage) //Custom Method
case is ABKInAppMessageFull:
return fullViewController(inAppMessage: inAppMessage) //Custom Method
case is ABKInAppMessageHTML:
return ABKInAppMessageHTMLViewController(inAppMessage: inAppMessage)
default:
return ABKInAppMessageViewController(inAppMessage: inAppMessage)
}
}
}
```
**ABKInAppMessage subclasses**
```objc
- (ABKInAppMessageViewController *)inAppMessageViewControllerWithInAppMessage:(ABKInAppMessage *)inAppMessage {
if ([inAppMessage isKindOfClass:[ABKInAppMessageSlideup class]]) {
return [self slideupViewControllerWithInAppMessage:inAppMessage]; //Custom Method
} else if ([inAppMessage isKindOfClass:[ABKInAppMessageModal class]]) {
return [self modalViewControllerWithInAppMessage:inAppMessage]; //Custom Method
} else if ([inAppMessage isKindOfClass:[ABKInAppMessageFull class]]) {
return [self fullViewControllerWithInAppMessage:inAppMessage]; //Custom Method
} else if ([inAppMessage isKindOfClass:[ABKInAppMessageHTML class]]) {
return [[ABKInAppMessageHTMLViewController alloc] initWithInAppMessage:inAppMessage];
} else {
return [[ABKInAppMessageViewController alloc] initWithInAppMessage:inAppMessage];
}
}
```
## Use cases
We've provided three use cases below. Each use case offers a detailed explanation, relevant code snippets, and a look into how in-app messages may look and be used in the Braze dashboard:
- [Custom slide-up in-app message](#custom-slide-up-in-app-message)
- [Custom modal in-app message](#custom-modal-in-app-message)
- [Custom full in-app message](#custom-full-in-app-message)
### Custom slide-up in-app message
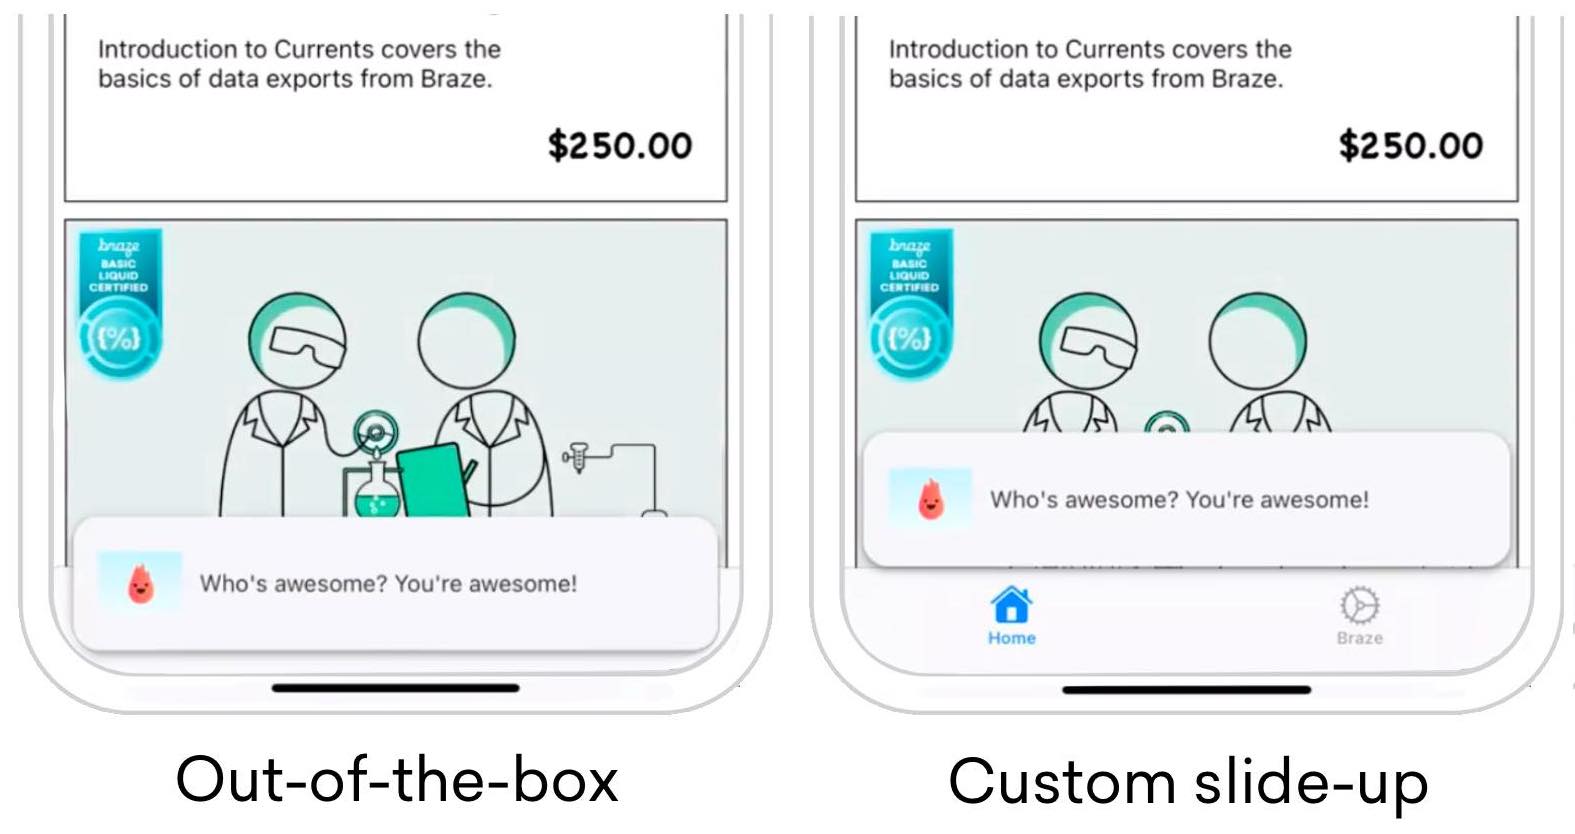{: style="float:right;max-width:45%;margin-left:15px;border:0;"}
While building out your slide-up in-app message, you may notice you aren't able to modify the placement of the message using default methods. Modification like this is made possible by subclassing the `ABKInAppMessageSlideupViewController` and overriding the `offset` variable with your own custom variable. The image to the right shows an example of how this can be used to adjust your slide-up in-app messages.
Visit the [`SlideFromBottomViewController`](https://github.com/braze-inc/braze-growth-shares-ios-demo-app/blob/master/Braze-Demo/ViewController/In-App-Messages/SlideFromBottomViewController.swift) to get started.
#### Adding additional behavior to our default UI
**Update `offset` variable**
Update the `offset` variable and set your own offset to suit your needs.
```swift
func setSlideConstraint() {
offset = 0
}
```
```swift
override var offset: CGFloat {
get {
return super.offset
}
set {
super.offset = newValue + adjustedOffset
}
}
```
**Version 3.34.0 or earlier**
**Update `slideConstraint` variable**
The `slideConstraint` public variable comes from the superclass `ABKInAppMessageSlideupViewController`.
```swift
func setSlideConstraint() {
slideConstraint?.constant = bottomSpacing
}
```
```swift
private var bottomSpacing: CGFloat {
return AppboyManager.shared.activeApplicationViewController.topMostViewController().view.safeAreaInsets.bottom
}
```
Visit the Braze Demo repository for the [`topMostViewController()`](https://github.com/braze-inc/braze-growth-shares-ios-demo-app/blob/master/Braze-Demo/Utils/UIViewController_Util.swift#L17) function.
**Update `offset` variable**
Update the `offset` variable and set your own offset to suit your needs.
```objc
- (void)setOffset {
self.offset = 0;
}
```
```objc
- (CGFloat)offset {
return [super offset];
}
- (void)setOffset:(CGFloat)offset {
[super setOffset:offset + [self adjustedOffset]];
}
```
**Version 3.34.0 or earlier**
**Update `slideConstraint` variable**
The `slideConstraint` public variable comes from the superclass `ABKInAppMessageSlideupViewController`.
```objc
- (void)self.setSlideConstraint:(NSLayoutConstraint *)slideConstraint {
slideConstraint.constant = bottomSpacing;
}
```
```objc
- (CGFloat)bottomSpacing {
return [AppboyManager shared].activeApplicationViewController.topMostViewController.view.safeAreaInsets.bottom;
}
```
**Override and set custom constraint**
Override `beforeMoveInAppMessageViewOnScreen()` and set your own custom constraint value to suit your needs. The original value is set in the superclass.
```swift
override func beforeMoveInAppMessageViewOnScreen() {
super.beforeMoveInAppMessageViewOnScreen()
setOffset()
}
```
**Version 3.34.0 or earlier**
```swift
override func beforeMoveInAppMessageViewOnScreen() {
setSlideConstraint()
}
```
**Override and set custom constraint**
Override `beforeMoveInAppMessageViewOnScreen()` and set your own custom constraint value to suit your needs. The original value is set in the superclass.
```objc
- (void)beforeMoveInAppMessageViewOnScreen {
[super beforeMoveInAppMessageViewOnScreen];
[self setOffset];
}
```
**Version 3.34.0 or earlier**
```objc
- (void)beforeMoveInAppMessageViewOnScreen {
[self setSlideConstraint:self.slideConstraint];
}
```
**Adjust constraint for device orientation**
Adjust the respective value in `viewWillTransition()` because the subclass assumes responsibility for keeping the constraint synced during layout changes.
### Custom modal in-app message
{: style="float:right;max-width:23%;margin-left:15px;border:0;"}
An `ABKInAppMessageModalViewController` can be subclassed to leverage a `UIPickerView` offering engaging ways to collect valuable user attributes. The custom modal in-app message allows you to use Connected Content or any available list to display and capture attributes from a dynamic list of items.
You can interject your own views into subclassed in-app messages. This example showcases how a `UIPickerView` can be utilized to extend the functionality of an `ABKModalInAppMessageViewController`.
Visit the [ModalPickerViewController](https://github.com/braze-inc/braze-growth-shares-ios-demo-app/blob/master/Braze-Demo/ViewController/In-App-Messages/ModalPickerViewController/ModalPickerViewController.swift) to get started.
#### Dashboard configuration
To set up a modal in-app message in the dashboard, you must provide a list of items formatted as a comma-separated string. In our example, we use Connected Content to pull a JSON list of team names and format them accordingly.
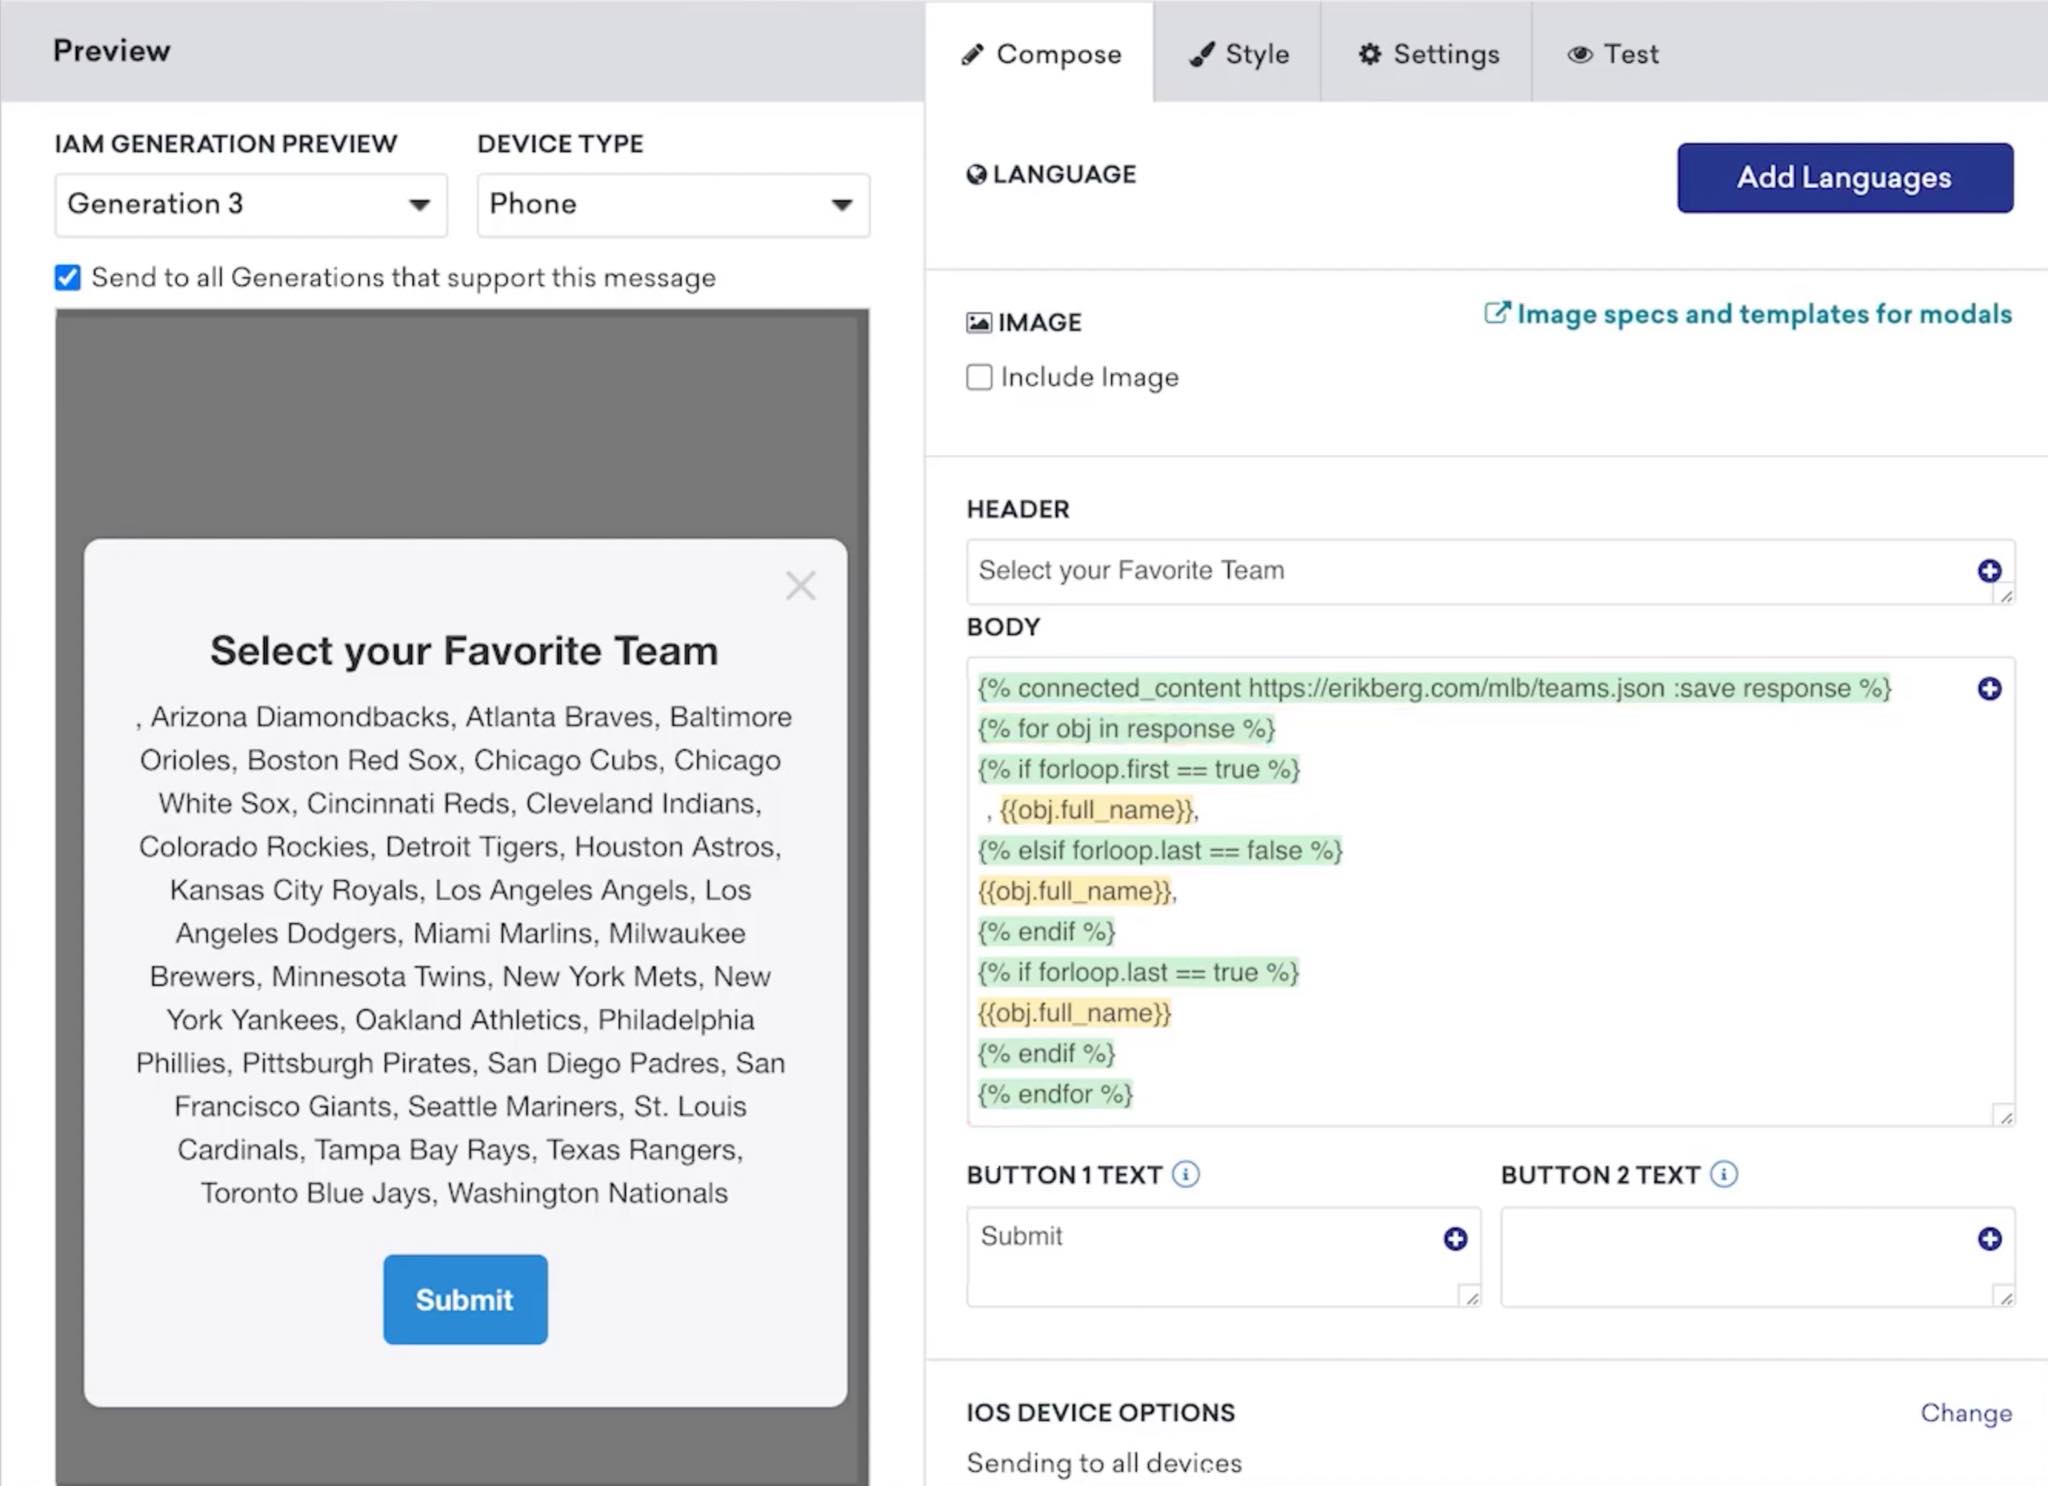
In the key-value pairs, provide an `attribute_key`; this key, along with the user's selected value, will be saved to their user profile as a custom attribute. Your custom view logic must handle user attributes sent to Braze.
The `extras` dictionary in the `ABKInAppMessage` object allows you to query for a `view_type` key (if any) that signals the correct view to display. It's important to note that in-app messages are configured on a per-message basis, so custom and default modal views can work harmoniously.
{: style="max-width:65%;"}
**Using `view_type` for UI display behavior**
Query the `extras` dictionary for your `view_type` to load the desired subclassed view controller.
```swift
func modalViewController(inAppMessage: ABKInAppMessage) -> ABKInAppMessageModalViewController {
switch inAppMessage.extras?[InAppMessageKey.viewType.rawValue] as? String {
case InAppMessageViewType.picker.rawValue:
return ModalPickerViewController(inAppMessage: inAppMessage)
default:
return ABKInAppMessageModalViewController(inAppMessage: inAppMessage)
}
}
```
**Using `view_type` for UI display behavior**
Query the `extras` dictionary for your `view_type` to load the desired subclassed view controller.
```objc
- (ABKInAppMessageModalViewController *)modalViewControllerWithInAppMessage:(ABKInAppMessage *)inAppMessage {
InAppMessageData *inAppMessageData = [[InAppMessageData alloc] init];
NSString *key = [inAppMessageData rawValueForInAppMessageKey:InAppMessageKeyViewType];
NSString *viewType = [inAppMessageData rawValueForInAppMessageViewType:InAppMessageViewTypePicker];
if ([inAppMessage.extras objectForKey:key] && [inAppMessage.extras[key] isEqualToString:viewType]) {
return [[ModalViewController alloc] initWithInAppMessage:inAppMessage];
} else {
return [[ABKInAppMessageModalViewController alloc] initWithInAppMessage:inAppMessage];
}
}
```
**Override and provide custom view**
Override `loadView()` and set your own custom view to suit your needs.
```swift
override var nibname: String{
return "ModalPickerViewController"
}
override func loadView() {
Bundle.main.loadNibNamed(nibName, owner: self, options: nil)
}
```
**Override and provide custom view**
Override `loadView()` and set your own custom view to suit your needs.
```objc
- (void)loadView {
NSString *nibName = @"ModalPickerViewController";
[[NSBundle mainBundle] loadNibNamed:nibName owner:self options:nil];
}
```
**Format variables for a dynamic list**
Before reloading the `UIPickerView` components, the `inAppMessage` message variable is output as a _String_. This message must be formatted as an array of items to be displayed correctly. As an example, this can be achieved using [`components(separatedBy: ", ")`](https://developer.apple.com/documentation/foundation/nsstring/1413214-components).
```swift
override func viewDidLoad() {
super.viewDidLoad()
items = inAppMessage.message.separatedByCommaSpaceValue
pickerView.reloadAllComponents()
}
```
**Format variables for PickerView**
Before reloading the `UIPickerView` components, the `inAppMessage` message variable is output as a _String_. This message must be formatted as an array of items to be displayed correctly. For example, this can be achieved using [`componentsSeparatedByString`](https://developer.apple.com/documentation/foundation/nsstring/1413214-componentsseparatedbystring?language=objc).
```objc
- (void)viewDidLoad {
[super viewDidLoad];
self.items = [[NSArray alloc] initWithArray:[self.inAppMessage.message componentsSeparatedByString:@", "]];
[self.pickerView reloadAllComponents];
}
```
**Assign custom attribute**
Using the subclass, after a user presses submit, pass the attribute with its corresponding selected value to Braze.
```swift
@IBAction func primaryButtonTapped(_ sender: Any) {
guard let item = selectedItem, !item.isEmpty, let attributeKey = inAppMessage.extras?[InAppMessageKey.attributeKey.rawValue] as? String else { return }
AppboyManager.shared.setCustomAttributeWithKey(attributeKey, andStringValue: item)
}
```
**Assign custom attribute**
Using the subclass, after a user presses submit, pass the attribute with its corresponding selected value to Braze.
```objc
- (IBAction)primaryButtonTapped:(id)sender {
InAppMessageData *inAppMessageData = [[InAppMessageData alloc] init];
NSString *key = [inAppMessageData rawValueForInAppMessageKey:InAppMessageKeyAttributeKey];
if (self.selectedItem.length > 0 && [self.inAppMessage.extras objectForKey:key]) {
[[AppboyManager shared] setCustomAttributeWithKey:self.inAppMessage.extras[key] andStringValue:self.selectedItem];
}
}
```
**Tip:**
Interesting in leveraging our custom modal in-app messages to share videos across FaceTime? Check out our SharePlay in-app message [implementation guide](https://www.braze.com/docs/developer_guide/platforms/legacy_sdks/ios/in-app_messaging/implementation_guide/shareplay/).
### Custom full in-app message
{: style="float:right;max-width:23%;margin-left:15px;border:0;"}
Use custom full in-app messages to create interactive, user-friendly prompts to collect valuable customer data. The example to the right shows an implementation of the custom full in-app message reimagined as an interactive push primer with notification preferences.
Visit the [`FullListViewController`](https://github.com/braze-inc/braze-growth-shares-ios-demo-app/blob/master/Braze-Demo/ViewController/In-App-Messages/FullListViewController/FullListViewController.swift) to get started.
#### Dashboard configuration
To set up a custom full in-app message in the dashboard, you must provide a list of your tags formatted as a comma-separated string.
In the key-value pairs, provide an `attribute_key`; this key, along with the user's selected values, will be saved to their user profile as a custom attribute. Your custom view logic must handle user attributes sent to Braze.
{: style="max-width:65%;"}
#### Intercepting in-app message touches
{: style="float:right;max-width:30%;margin-left:10px;border:0"}
Intercepting in-app message touches is crucial in making the custom full in-app message buttons function correctly. By default, the `ABKInAppMessageImmersive` adds a tap gesture recognizer onto the message, so users can dismiss messages without buttons. By adding a `UISwitch` or button to the `UITableViewCell` view hierarchy, the touches now get handled by our custom view. As of iOS 6, buttons and other controls have precedence when working with gesture recognizers, making our custom full in-app message work as it should.
# SharePlay In-App Message Implementation Guide
Source: /docs/developer_guide/platforms/legacy_sdks/ios/in-app_messaging/implementation_guide/shareplay/index.md
**Warning:**
[AppboyKit](https://github.com/Appboy/appboy-ios-sdk) (also known as the Objective-C SDK) is no longer supported and has been replaced by the [Swift SDK](https://www.braze.com/docs/developer_guide/sdk_integration/?sdktab=swift). It will no longer receive new features, bug fixes, security updates, or technical support—however, messaging and analytics will continue to function as normal. To learn more, see [Introducing the New Braze Swift SDK](https://www.braze.com/resources/articles/introducing-the-new-braze-swift-sdk).
# SharePlay in-app message implementation guide
> SharePlay is a newly released feature that enables iOS 15 FaceTime users to have a shared media experience across their devices, offering real-time audio and video syncing. SharePlay is a great way for users to experience content with friends and family, offering Braze customers an additional avenue for video content and opportunities to introduce new users to your application.
{: style="border:0;margin-top:10px;"}
## Overview
The new `GroupActivities` framework released by Apple as part of the iOS 15 update allows you to leverage FaceTime by integrating SharePlay into your applications with the help of Braze in-app messages.
{: style="float:right;max-width:30%;margin-left:15px;margin-top:10px;"}
When users initiate a SharePlay video in a FaceTime call, an "Open" button will appear at the top of everyone's screen. When opened, audio and video will sync across all compatible devices, allowing users to watch videos together in real-time. Those who do not have the app downloaded will be redirected to the App Store.
**Synced Media Playback**
With synced media playback, if one person pauses the SharePlay video, it will be paused across all devices.
{: style="border:0"}
## Integration
The in-app message used in this integration is a subclassed modal in-app message view controller. A guide for setup can be found in the iOS in-app message advanced use case [implementation guide](https://www.braze.com/docs/developer_guide/platforms/legacy_sdks/ios/in-app_messaging/implementation_guide/). Before integrating, make sure to add the `GroupActivities` entitlement to your Xcode project.
**Important:**
We recommend opening the [Apple SharePlay documentation](https://developer.apple.com/documentation/avfoundation/media_playback_and_selection/supporting_coordinated_media_playback) side-by-side by this guide to complete the integration.
### Step 1: Overriding and loading XIB
```swift
override var nibName: String {
return "ModalVideoViewController"
}
/// Overriding loadView() from ABKInAppMessageModalViewController to provide our own view for the in-app message
override func loadView() {
Bundle.main.loadNibNamed(nibName, owner: self, options: nil)
}
```
### Step 2: Configure AVPlayer for in-app messages
In-app messages can play videos natively with some lightweight developer work. By doing this, you have access to all the `AVPlayerVideoController` features, such as SharePlay. The in-app message used for this example is a subclassed `ABKInAppMessageModalViewController` that has a custom view to embed a native video player.
```swift
func configureVideoPlayer() {
guard let urlString = inAppMessage.extras?["video_url"] as? String,
let url = URL(string: urlString) else { return }
let videoTitle = inAppMessage.extras?["video_title"] as? String
mediaItem = MediaItem(title: videoTitle ?? "Video Content", url: url)
let asset = AVAsset(url: url)
let playerItem = AVPlayerItem(asset: asset)
player.replaceCurrentItem(with: playerItem)
playerViewController.player = player
addChild(playerViewController)
videoPlayerContainer.addSubview(playerViewController.view)
playerViewController.didMove(toParent: self)
}
```
#### Dashboard configuration
**Key-Value Pairs**: The video file must be set in the key-value pairs on the in-app message and cannot be attached to the media item itself. You can also add URL validity checking in `beforeInAppMesageDisplayed` as a guardrail before displaying the content.
**Triggering**: The in-app message should be eligible for all users with re-eligibility enabled. This can be done by setting two triggers, a default trigger to launch the message and another to launch the message when initiated from SharePlay. Users not on iOS 15 will only be able to view messages locally.
**Important:**
Be mindful of any other in-app messages triggered on session start that may conflict with each other.
### Step 3: Create group watching activity
Create an object that conforms to the `GroupActivity` protocol. The object will be the metadata of the `GroupSession` shared throughout the SharePlay lifecycle.
```swift
struct MediaItem: Hashable, Codable {
let title: String
let url: URL
}
@available(iOS 15, *)
struct MediaItemActivity: GroupActivity {
static let activityIdentifier = "com.book-demo.GroupWatching"
let mediaItem: MediaItem
var metadata: GroupActivityMetadata {
var metadata = GroupActivityMetadata()
metadata.type = .watchTogether
metadata.title = mediaItem.title
metadata.fallbackURL = mediaItem.url
return metadata
}
}
```
#### Prepare to play
When you prepare to play the media item, each group activity has three states of `prepareForActivation()`:
- `.activationDisabled` - viewing individually
- `.activationPreferred` - viewing together
- `.cancelled` - ignore and handle gracefully
When the state comes back as `activationPreferred`, that is your cue to activate the rest of the group activity lifecycle.
{: style="border:0;"}
### Step 4: Launch in-app message from SharePlay API
The `GroupActivities` API determines if there is a video present. If so, you should trigger the custom event to launch your SharePlay-able in-app message. The `CoordinationManager` is responsible for the state changes of SharePlay, such as if the user(s) leaves or joins the call.
```swift
private var subscriptions = Set()
private var selectedMediaItem: MediaItem? {
didSet {
// Ensure the UI selection always represents the currently playing media.
guard let _ = selectedMediaItem else { return }
if !BrazeManager.shared.inAppMessageCurrentlyVisible {
BrazeManager.shared.logCustomEvent("SharePlay Event")
}
}
}
private func launchVideoPlayerIfNecessary() {
CoordinationManager.shared.$enqueuedMediaItem
.receive(on: DispatchQueue.main)
.compactMap { $0 }
.assign(to: \.selectedMediaItem, on: self)
.store(in: &subscriptions)
}
```
### Step 5: Leaving a group session on in-app message dismissal
When the in-app message is dismissed is an appropriate time to leave the SharePlay session and discard the session object.
```swift
override func viewDidDisappear(_ animated: Bool) {
super.viewDidDisappear(animated)
groupSession?.leave()
CoordinationManager.shared.leave()
}
class CoordinationManager() {
...
// Published values that the player, and other UI items, observe.
@Published var enqueuedMediaItem: MediaItem?
@Published var groupSession: GroupSession?
// Clear activity when the user leaves
func leave() {
groupSession = nil
enqueuedMediaItem = nil
}
...
}
```
### Configure SharePlay button visibility
It is best practice to dynamically hide or show any SharePlay indicator. Use the `isEligibleForGroupSession` variable to observe if the user is currently on a FaceTime call or not. If they happen to be on a FaceTime call, a button should be visible to share the video across the compatible devices in the chat. The first time the user initiates SharePlay, a prompt will appear on the original device to select the options. A subsequent prompt will then appear on the shared users' devices to engage in the content.
```swift
private var isEligibleForSharePlay: Bool = false {
didSet {
sharePlayButton.isHidden = !isEligibleForSharePlay
}
}
override func viewDidLoad() {
super.viewDidLoad()
// SharePlay button eligibility
groupStateObserver.$isEligibleForGroupSession
.receive(on: DispatchQueue.main)
.assign(to: \.isEligibleForSharePlay, on: self)
.store(in: &subscriptions)
}
```
# In-App Messaging Troubleshooting for iOS
Source: /docs/developer_guide/platforms/legacy_sdks/ios/in-app_messaging/troubleshooting/index.md
**Warning:**
[AppboyKit](https://github.com/Appboy/appboy-ios-sdk) (also known as the Objective-C SDK) is no longer supported and has been replaced by the [Swift SDK](https://www.braze.com/docs/developer_guide/sdk_integration/?sdktab=swift). It will no longer receive new features, bug fixes, security updates, or technical support—however, messaging and analytics will continue to function as normal. To learn more, see [Introducing the New Braze Swift SDK](https://www.braze.com/resources/articles/introducing-the-new-braze-swift-sdk).
# Troubleshoot in-app messages
## Impressions
#### Impression or click analytics aren't being logged
If you have set an in-app message delegate to manually handle message display or click actions, you'll need to manually log clicks and impressions on the in-app message.
#### Impressions are lower than expected
Triggers take time to sync to the device on session start, so there can be a race condition if users log an event or purchase right after they start a session. One potential workaround could be changing the campaign to trigger off of session start, then segmenting off the intended event or purchase. Note that this would deliver the in-app message on the next session start after the event has occurred.
## Expected in-app message did not display
Most in-app message issues can be broken down into two main categories: delivery and display. To troubleshoot why an expected in-app message did not display on your device, you should first ensure that the [in-app message was delivered to the device](#troubleshooting-in-app-message-delivery), then [troubleshoot message display](#troubleshooting-in-app-message-display).
### In-app message delivery {#troubleshooting-in-app-message-delivery}
The SDK requests in-app messages from Braze servers on session start. To check if in-app messages are being delivered to your device, you'll need to ensure that in-app messages are being both requested by the SDK and returned by Braze servers.
#### Check if messages are requested and returned
1. Add yourself as a [test user](https://www.braze.com/docs/user_guide/administrative/app_settings/developer_console/internal_groups_tab/#adding-test-users) on the dashboard.
2. Set up an in-app message campaign targeted at your user.
3. Ensure that a new session occurs in your application.
4. Use the [event user logs](https://www.braze.com/docs/user_guide/administrative/app_settings/developer_console/event_user_log_tab/#event-user-log-tab) to check that your device is requesting in-app messages on session start. Find the SDK Request associated with your test user's session start event.
- If your app was meant to request triggered in-app messages, you should see `trigger` in the **Requested Responses** field under **Response Data**.
- If your app was meant to request original in-app messages, you should see `in_app` in the **Requested Responses** field under **Response Data**.
5. Use the [event user logs](https://www.braze.com/docs/user_guide/administrative/app_settings/developer_console/event_user_log_tab/#event-user-log-tab) to check if the correct in-app messages are being returned in the response data. 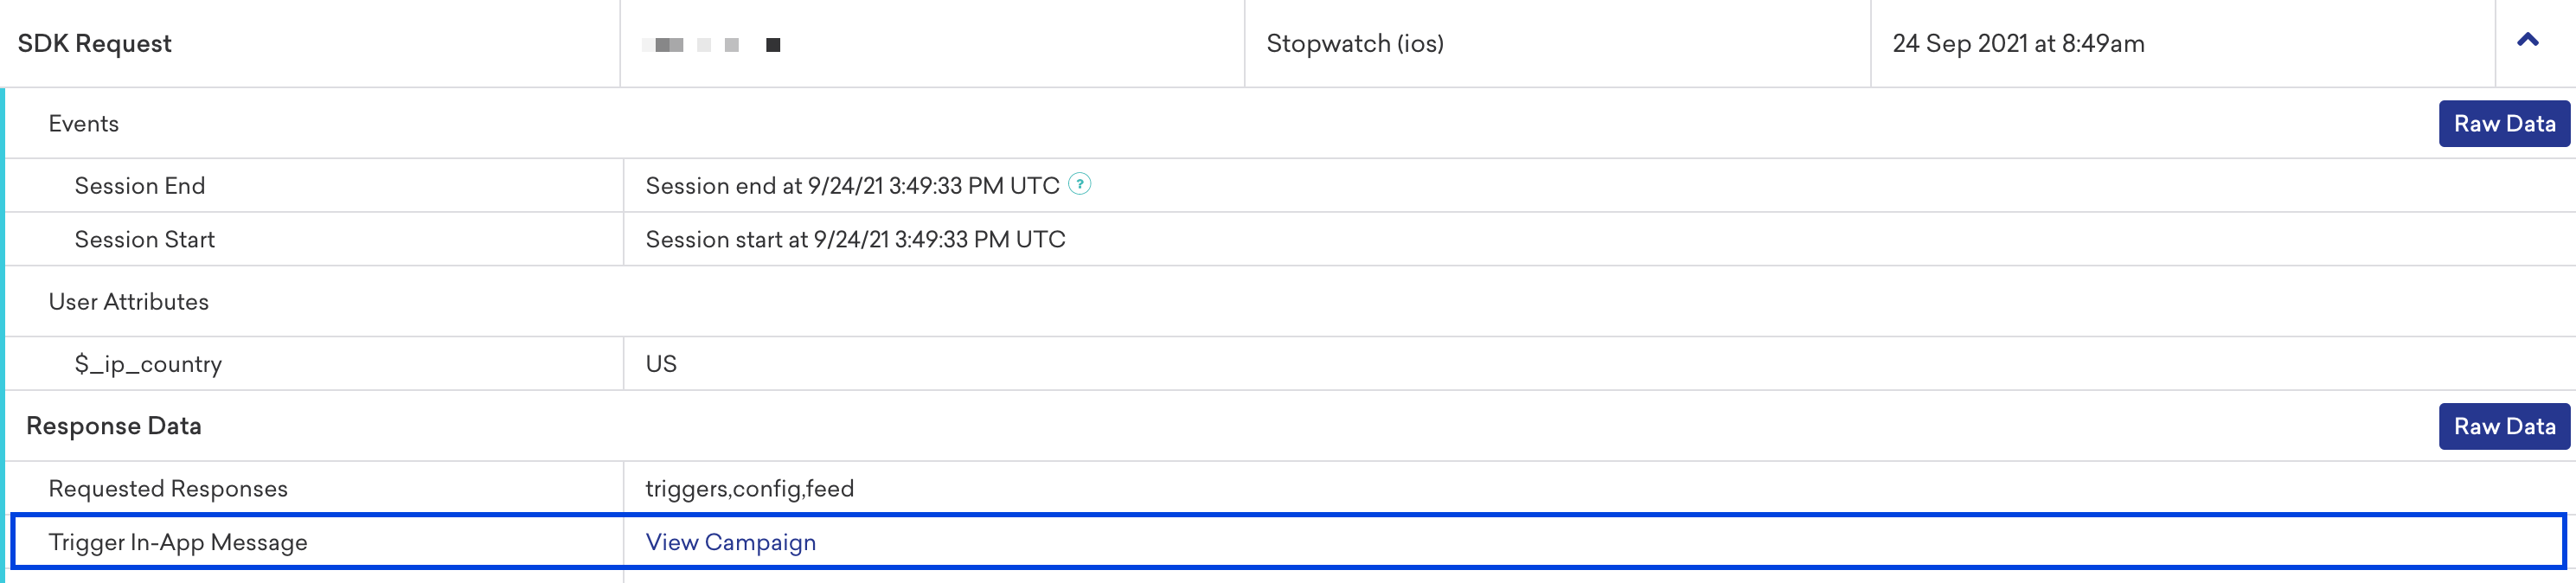
#### Troubleshoot messages not being requested
If your in-app messages are not being requested, your app might not be tracking sessions correctly, as in-app messages are refreshed upon session start. Also, be sure that your app is actually starting a session based on your app's session timeout semantics:

### Troubleshoot messages not being returned
If your in-app messages are not being returned, you're likely experiencing a campaign targeting issue:
- Your segment does not contain your user.
- Check your user's [**Engagement**](https://www.braze.com/docs/user_guide/engagement_tools/segments/using_user_search/#engagement-tab) tab to see if the correct segment appears under **Segments**.
- Your user has previously received the in-app message and was not re-eligible to receive it again.
- Check the [campaign re-eligibility settings](https://www.braze.com/docs/user_guide/engagement_tools/campaigns/building_campaigns/delivery_types/reeligibility/) under the **Delivery** step of the **Campaign Composer** and make sure the re-eligibility settings align with your testing setup.
- Your user hit the frequency cap for the campaign.
- Check the campaign [frequency cap settings](https://www.braze.com/docs/user_guide/engagement_tools/campaigns/building_campaigns/rate-limiting/#frequency-capping) and ensure they align with your testing setup.
- If there was a control group on the campaign, your user may have fallen into the control group.
- You can check if this has happened by creating a segment with a received campaign variant filter, where the campaign variant is set to **Control**, and checking if your user fell into that segment.
- When creating campaigns for integration testing purposes, make sure to opt out of adding a control group.
### In-app message display {#troubleshooting-in-app-message-display}
If your app is successfully requesting and receiving in-app messages but they are not being shown, some device-side logic may be preventing display:
- Triggered in-app messages are rate-limited based on the [minimum time interval between triggers](https://www.braze.com/docs/developer_guide/platform_integration_guides/ios/in-app_messaging/in-app_message_delivery/#minimum-time-interval-between-triggers), which defaults to 30 seconds.
- If you have set a delegate to customize in-app message handling, check your delegate to ensure it is not affecting in-app message display.
- Failed image downloads will prevent in-app messages with images from displaying. Image downloads will always fail if the `SDWebImage` framework is not integrated properly. Check your device logs to ensure that image downloads are not failing.
- If the device orientation did not match the orientation specified by the in-app message, the in-app message will not display. Make sure that your device is in the correct orientation.
# Content Card View Controller Integration for iOS
Source: /docs/developer_guide/platforms/legacy_sdks/ios/content_cards/integration/index.md
**Warning:**
[AppboyKit](https://github.com/Appboy/appboy-ios-sdk) (also known as the Objective-C SDK) is no longer supported and has been replaced by the [Swift SDK](https://www.braze.com/docs/developer_guide/sdk_integration/?sdktab=swift). It will no longer receive new features, bug fixes, security updates, or technical support—however, messaging and analytics will continue to function as normal. To learn more, see [Introducing the New Braze Swift SDK](https://www.braze.com/resources/articles/introducing-the-new-braze-swift-sdk).
# Content Card integration
## Content Cards data model
The Content Cards data model is available in the iOS SDK.
### Getting the data
To access the Content Cards data model, subscribe to Content Cards update events:
```objc
// Subscribe to Content Cards updates
// Note: you should remove the observer where appropriate
[[NSNotificationCenter defaultCenter] addObserver:self
selector:@selector(contentCardsUpdated:)
name:ABKContentCardsProcessedNotification
object:nil];
```
```objc
// Called when Content Cards are refreshed (via `requestContentCardsRefresh`)
- (void)contentCardsUpdated:(NSNotification *)notification {
BOOL updateIsSuccessful = [notification.userInfo[ABKContentCardsProcessedIsSuccessfulKey] boolValue];
if (updateIsSuccessful) {
// get the cards using [[Appboy sharedInstance].contentCardsController getContentCards];
}
}
```
```swift
// Subscribe to content card updates
// Note: you should remove the observer where appropriate
NotificationCenter.default.addObserver(self, selector:
#selector(contentCardsUpdated),
name:NSNotification.Name.ABKContentCardsProcessed, object: nil)
```
```swift
// Called when the Content Cards are refreshed (via `requestContentCardsRefresh`)
@objc private func contentCardsUpdated(_ notification: Notification) {
if let updateIsSuccessful = notification.userInfo?[ABKContentCardsProcessedIsSuccessfulKey] as? Bool {
if (updateIsSuccessful) {
// get the cards using Appboy.sharedInstance()?.contentCardsController.contentCards
}
}
}
```
If you want to change the card data after it's been sent by Braze, we recommend storing a deep copy of the card data locally, updating the data, and displaying it yourself. The cards are accessible via [`ABKContentCardsController`](https://appboy.github.io/appboy-ios-sdk/docs/interface_a_b_k_content_cards_controller.html).
## Content Card model
Braze offers three Content Card types: banner, captioned image, and classic. Each type inherits common properties from a base `ABKContentCard` class and has the following additional properties.
### Base Content Card model properties - ABKContentCard
|Property|Description|
|---|---|
|`idString` | (Read only) The card's ID set by Braze. |
| `viewed` | This property reflects whether the user viewed the card or not.|
| `created` | (Read only) This property is the unix timestamp of the card's creation time from Braze. |
| `expiresAt` | (Read only) This property is the unix timestamp of the card's expiration time.|
| `dismissible` | This property reflects if the user can dismiss the card.|
| `pinned` | This property reflects if the card was set up as "pinned" in the dashboard.|
| `dismissed` | This property reflects if the user has dismissed the card.|
| `url` | The URL that will be opened after the card is clicked on. It can be an HTTP(s) URL or a protocol URL.|
| `openURLInWebView` | This property determines whether the URL will be opened within the app or in an external web browser.|
| `extras`| An optional `NSDictionary` of `NSString` values.|
{: .reset-td-br-1 .reset-td-br-2 role="presentation" }
### Banner Content Card properties - ABKBannerContentCard
|Property|Description|
|---|---|
| `image` | This property is the URL of the card's image.|
| `imageAspectRatio` | This property is the aspect ratio of the card's image and serves as a hint before image loading completes. Note that the property may not be supplied in certain circumstances. |
{: .reset-td-br-1 .reset-td-br-2 role="presentation" }
### Captioned image Content Card properties - ABKCaptionedImageCard
|Property|Description|
|---|---|
| `image` | This property is the URL of the card's image.|
| `imageAspectRatio` | This property is the aspect ratio of the card's image.|
| `title` | The title text for the card.|
| `cardDescription` | The body text for the card.|
| `domain` | The link text for the property URL, like @"blog.braze.com". It can be displayed on the card's UI to indicate the action/direction of clicking on the card.|
{: .reset-td-br-1 .reset-td-br-2 role="presentation" }
### Classic Content Card properties - ABKClassicContentCard
|Property|Description|
|---|---|
| `image` | (Optional) This property is the URL of the card's image.|
| `title` | The title text for the card. |
| `cardDescription` | The body text for the card. |
| `domain` | The link text for the property URL, like @"blog.braze.com". It can be displayed on the card's UI to indicate the action and direction of clicking on the card. |
{: .reset-td-br-1 .reset-td-br-2 role="presentation" }
## Card methods
|Method|Description|
|---|---|
| `logContentCardImpression` | Manually log an impression to Braze for a particular card. |
| `logContentCardClicked` | Manually log a click to Braze for a particular card. The SDK will only log a card click when the card has the `url` property with a valid value. |
| `logContentCardDismissed` | Manually log a dismissal to Braze for a particular card. The SDK will only log a card dismissal if the card's `dismissed` property is not already set to `true`. |
| `isControlCard` | Determine if a card is the Control card for an A/B test. |
{: .reset-td-br-1 .reset-td-br-2 role="presentation" }
For more details, refer to the [class reference documentation](https://appboy.github.io/appboy-ios-sdk/docs/interface_a_b_k_content_card.html)
## Content Cards view controller integration
Content Cards can be integrated with two view controller contexts: navigation or modal.
### Navigation context
Example of pushing a `ABKContentCardsTableViewController` instance into a navigation controller:
```objc
ABKContentCardsTableViewController *contentCards = [[ABKContentCardsTableViewController alloc] init];
contentCards.title = @"Content Cards Title";
contentCards.disableUnreadIndicator = YES;
[self.navigationController pushViewController:contentCards animated:YES];
```
```swift
let contentCards = ABKContentCardsTableViewController()
contentCards.title = "Content Cards Title"
contentCards.disableUnreadIndicator = true
navigationController?.pushViewController(contentCards, animated: true)
```
**Note:**
To customize the navigation bar's title, set the title property of the `ABKContentCardsTableViewController` instance's `navigationItem`.
### Modal context
This modal is used to present the view controller in a modal view, with a navigation bar on top and a **Done** button on the side of the bar.
```objc
ABKContentCardsViewController *contentCards = [[ABKContentCardsViewController alloc] init];
contentCards.contentCardsViewController.title = @"Content Cards Title";
contentCards.contentCardsViewController.disableUnreadIndicator = YES;
[self.navigationController presentViewController:contentCards animated:YES completion:nil];
```
```swift
let contentCards = ABKContentCardsViewController()
contentCards.contentCardsViewController.title = "Content Cards Title"
contentCards.contentCardsViewController.disableUnreadIndicator = true
self.present(contentCards, animated: true, completion: nil)
```
For view controller examples, check out our [Content Cards sample app](https://github.com/Appboy/appboy-ios-sdk/tree/master/Samples/ContentCards/BrazeContentCardsSampleApp).
**Note:**
To customize the header, set the title property of the `navigationItem` belonging to the `ABKContentCardsTableViewController` instance embedded in the parent `ABKContentCardsViewController` instance.
# iOS Content Card Customization
Source: /docs/developer_guide/platforms/legacy_sdks/ios/content_cards/customization/index.md
# Custom Content Card Styling for iOS
Source: /docs/developer_guide/platforms/legacy_sdks/ios/content_cards/customization/custom_styling/index.md
**Warning:**
[AppboyKit](https://github.com/Appboy/appboy-ios-sdk) (also known as the Objective-C SDK) is no longer supported and has been replaced by the [Swift SDK](https://www.braze.com/docs/developer_guide/sdk_integration/?sdktab=swift). It will no longer receive new features, bug fixes, security updates, or technical support—however, messaging and analytics will continue to function as normal. To learn more, see [Introducing the New Braze Swift SDK](https://www.braze.com/resources/articles/introducing-the-new-braze-swift-sdk).
# Custom Styling
## Overriding default images
**Important:**
Integration of `SDWebImage` is required if you plan on using our Braze UI for displaying images within iOS in-app messages or Content Cards.
Braze allows clients to replace existing default images with their own custom images. To accomplish this, create a new `png` file with the custom image and add it to the app's image bundle. Then, rename the file with the image's name to override the default image in our library. Also, be sure to upload the `@2x` and `@3x` versions of the images to accommodate different phone sizes. Images available for override in Content Cards include:
- Placeholder image: `appboy_cc_noimage_lrg`
- Pinned icon image: `appboy_cc_icon_pinned`
Because Content Cards have a maximum size of 2 KB for content you enter in the dashboard (including message text, image URLs, links, and all key-value pairs), check the size before sending. Exceeding this amount will prevent the card from sending.
**Important:**
Overriding default images is currently not supported in our .NET MAUI iOS integration.
## Disabling Dark Mode
To prevent the Content Card UI from adopting dark theme styling when the user device has Dark Mode enabled, set the `ABKContentCardsTableViewController.enableDarkTheme` property. You can access the `enableDarkTheme` property directly on an `ABKContentCardsTableViewController` instance or via the `ABKContentCardsViewController.contentCardsViewController` property to best suit your own UI.
```objc
// Accessing enableDarkTheme via ABKContentCardsViewController.contentCardsViewController.
- (IBAction)presentModalContentCards:(id)sender {
ABKContentCardsViewController *contentCardsVC = [ABKContentCardsViewController new];
contentCardsVC.contentCardsViewController.enableDarkTheme = NO;
...
[self.navigationController presentViewController:contentCardsVC animated:YES completion:nil];
}
// Accessing enableDarkTheme directly.
- (IBAction)presentNavigationContentCards:(id)sender {
ABKContentCardsTableViewController *contentCardsTableVC = [[ABKContentCardsTableViewController alloc] init];
contentCardsTableVC.enableDarkTheme = NO;
...
[self.navigationController pushViewController:contentCardsTableVC animated:YES];
}
```
```swift
// Accessing enableDarkTheme via ABKContentCardsViewController.contentCardsViewController.
@IBAction func presentModalContentCards(_ sender: Any) {
let contentCardsVC = ABKContentCardsViewController()
contentCardsVC.contentCardsViewController.enableDarkTheme = false
...
self.navigationController?.present(contentCardsVC, animated: true, completion: nil)
}
// Accessing enableDarkTheme directly.
@IBAction func presentNavigationContentCards(_ sender: Any) {
let contentCardsTableVC = ABKContentCardsTableViewController()
contentCardsTableVC.enableDarkTheme = false
...
self.navigationController?.present(contentCardsTableVC, animated: true, completion: nil)
}
```
# Customizing Content Card Feed for iOS
Source: /docs/developer_guide/platforms/legacy_sdks/ios/content_cards/customization/customizing_feed/index.md
**Warning:**
[AppboyKit](https://github.com/Appboy/appboy-ios-sdk) (also known as the Objective-C SDK) is no longer supported and has been replaced by the [Swift SDK](https://www.braze.com/docs/developer_guide/sdk_integration/?sdktab=swift). It will no longer receive new features, bug fixes, security updates, or technical support—however, messaging and analytics will continue to function as normal. To learn more, see [Introducing the New Braze Swift SDK](https://www.braze.com/resources/articles/introducing-the-new-braze-swift-sdk).
# Customize the Content Cards feed
You can create your own Content Cards interface by extending `ABKContentCardsTableViewController` to customize all UI elements and Content Cards behavior. The Content Card cells may also be subclassed and then used programmatically or by introducing a custom storyboard that registers the new classes. Check out the Content Cards [sample app](https://github.com/Appboy/appboy-ios-sdk/tree/master/Samples/ContentCards/BrazeContentCardsSampleApp) for a complete example.
It's also important to consider whether you should use a subclassing strategy versus a completely custom view controller and [subscribe for data updates](https://www.braze.com/docs/developer_guide/platforms/legacy_sdks/ios/content_cards/integration/). For example, if you subclass the `ABKContentCardsTableViewController`, you can use the [`populateContentCards` method](#overriding-populated-content-cards) to filter and order cards (recommended). However, if you use a complete view controller customization, you have more control over the card behavior—such as displaying in a carousel or adding interactive elements—but you then have to rely on an observer to implement ordering and filtering logic. You must also implement the respective analytics methods to properly log impressions, dismissal events, and clicks.
## Customizing UI
The following code snippets show how to style and change Content Cards to fit your UI needs using methods provided by the SDK. These methods allow you to customize all aspects of the Content Card UI, including custom fonts, customized color components, customized text, and more.
There exist two distinct ways to customize Content Card UI:
- Dynamic method: update card UI on a per-card basis
- Static method: update the UI across all cards
### Dynamic UI
The Content Card `applyCard` method can reference the card object and pass it key-value pairs that will be used to update the UI:
```objc
- (void)applyCard:(ABKCaptionedImageContentCard *)captionedImageCard {
[super applyCard:captionedImageCard];
if ([card.extras objectForKey:ContentCardKeyBackgroundColorValue]) {
NSString *backgroundColor = [card.extras objectForKey:ContentCardKeyBackgroundColor];
if ([backgroundColor colorValue]) {
self.rootView.backgroundColor = [backgroundColor colorValue];
} else {
self.rootView.backgroundColor = [UIColor lightGray];
}
} else {
self.rootView.backgroundColor = [UIColor lightGray];
}
}
```
```swift
override func apply(_ captionedImageCard: ABKCaptionedImageContentCard!) {
super.apply(captionedImageCard)
if let backgroundColor = card.extras?[ContentCardKey.backgroundColor.rawValue] as? String,
let backgroundColorValue = backgroundColor.colorValue() {
rootView.backgroundColor = backgroundColorValue
} else {
rootView.backgroundColor = .lightGray
}
}
```
### Static UI
The `setUpUI` method can assign values to the static Content Card components across all cards:
```objc
#import "CustomClassicContentCardCell.h"
@implementation CustomClassicContentCardCell
- (void)setUpUI {
[super setUpUI];
self.rootView.backgroundColor = [UIColor lightGrayColor];
self.rootView.layer.borderColor = [UIColor purpleColor].CGColor;
self.unviewedLineView.backgroundColor = [UIColor redColor];
self.titleLabel.font = [UIFont italicSystemFontOfSize:20];
}
```
```swift
override func setUpUI() {
super.setUpUI()
rootView.backgroundColor = .lightGray
rootView.layer.borderColor = UIColor.purple.cgColor
unviewedLineViewColor = .red
titleLabel.font = .italicSystemFont(ofSize: 20)
}
```
## Providing custom interfaces
Custom interfaces can be provided by registering custom classes for each desired card type.
{: style="max-width:35%;margin-left:15px;"}
{: style="max-width:25%;margin-left:15px;"}
{: style="max-width:18%;margin-left:15px;"}
Braze provides three Content Card templates (banner, captioned image, and classic). Alternatively, if you want to provide your own custom interfaces, reference the following code snippets:
```objc
- (void)registerTableViewCellClasses {
[super registerTableViewCellClasses];
// Replace the default class registrations with custom classes for these two types of cards
[self.tableView registerClass:[CustomCaptionedImageContentCardCell class] forCellReuseIdentifier:@"ABKCaptionedImageContentCardCell"];
[self.tableView registerClass:[CustomClassicContentCardCell class] forCellReuseIdentifier:@"ABKClassicCardCell"];
}
```
```swift
override func registerTableViewCellClasses() {
super.registerTableViewCellClasses()
// Replace the default class registrations with custom classes
tableView.register(CustomCaptionedImageContentCardCell.self, forCellReuseIdentifier: "ABKCaptionedImageContentCardCell")
tableView.register(CustomBannerContentCardCell.self, forCellReuseIdentifier: "ABKBannerContentCardCell")
tableView.register(CustomClassicImageContentCardCell.self, forCellReuseIdentifier: "ABKClassicImageCardCell")
tableView.register(CustomClassicContentCardCell.self, forCellReuseIdentifier: "ABKClassicCardCell")
}
```
## Overriding populated Content Cards
Content Cards can be changed programmatically using the `populateContentCards` method:
```objc
- (void)populateContentCards {
NSMutableArray *cards = [NSMutableArray arrayWithArray:[Appboy.sharedInstance.contentCardsController getContentCards]];
for (ABKContentCard *card in cards) {
// Replaces the card description for all Classic Content Cards
if ([card isKindOfClass:[ABKClassicContentCard class]]) {
((ABKClassicContentCard *)card).cardDescription = @"Custom Feed Override title [classic cards only]!";
}
}
super.cards = cards;
}
```
```swift
override func populateContentCards() {
guard let cards = Appboy.sharedInstance()?.contentCardsController.contentCards else { return }
for card in cards {
// Replaces the card description for all Classic Content Cards
if let classicCard = card as? ABKClassicContentCard {
classicCard.cardDescription = "Custom Feed Override title [classic cards only]!"
}
}
super.cards = (cards as NSArray).mutableCopy() as? NSMutableArray
}
```
# Handle Content Card Clicks Manually for iOS
Source: /docs/developer_guide/platforms/legacy_sdks/ios/content_cards/customization/handling_clicks_manually/index.md
**Warning:**
[AppboyKit](https://github.com/Appboy/appboy-ios-sdk) (also known as the Objective-C SDK) is no longer supported and has been replaced by the [Swift SDK](https://www.braze.com/docs/developer_guide/sdk_integration/?sdktab=swift). It will no longer receive new features, bug fixes, security updates, or technical support—however, messaging and analytics will continue to function as normal. To learn more, see [Introducing the New Braze Swift SDK](https://www.braze.com/resources/articles/introducing-the-new-braze-swift-sdk).
# Handle clicks manually
You can manually handle Content Card clicks by implementing the [`ABKContentCardsTableViewControllerDelegate`](https://appboy.github.io/appboy-ios-sdk/docs/protocol_a_b_k_content_cards_table_view_controller_delegate-p.html) protocol and setting your delegate object as the `delegate` property of the `ABKContentCardsTableViewController`. Refer to the [Content Cards sample app](https://github.com/Appboy/appboy-ios-sdk/tree/master/Samples/ContentCards/BrazeContentCardsSampleApp) for an example.
```objc
contentCardsTableViewController.delegate = delegate;
// Methods to implement in delegate
- (BOOL)contentCardTableViewController:(ABKContentCardsTableViewController *)viewController
shouldHandleCardClick:(NSURL *)url {
if ([[url.host lowercaseString] isEqualToString:@"my-domain.com"]) {
// Custom handle link here
NSLog(@"Manually handling Content Card click with URL %@", url.absoluteString);
return NO;
}
// Let the Braze SDK handle the click action
return YES;
}
- (void)contentCardTableViewController:(ABKContentCardsTableViewController *)viewController
didHandleCardClick:(NSURL *)url {
NSLog(@"Braze SDK handled Content Card click with URL %@", url.absoluteString);
}
```
```swift
contentCardsTableViewController.delegate = delegate
// Methods to implement in delegate
func contentCardTableViewController(_ viewController: ABKContentCardsTableViewController!,
shouldHandleCardClick url: URL!) -> Bool {
if (url.host?.lowercased() == "my-domain.com") {
// Custom handle link here
NSLog("Manually handling Content Card click with URL %@", url.absoluteString)
return false
}
// Let the Braze SDK handle the click action
return true
}
func contentCardTableViewController(_ viewController: ABKContentCardsTableViewController!,
didHandleCardClick url: URL!) {
NSLog("Braze SDK handled Content Card click with URL %@", url.absoluteString)
}
```
**Important:**
If you override the `handleCardClick:` method in `ABKContentCardsTableViewController`, these delegate methods might not be called.
# Content Card Read & Unread Indicators for iOS
Source: /docs/developer_guide/platforms/legacy_sdks/ios/content_cards/customization/read_unread_indicators/index.md
**Warning:**
[AppboyKit](https://github.com/Appboy/appboy-ios-sdk) (also known as the Objective-C SDK) is no longer supported and has been replaced by the [Swift SDK](https://www.braze.com/docs/developer_guide/sdk_integration/?sdktab=swift). It will no longer receive new features, bug fixes, security updates, or technical support—however, messaging and analytics will continue to function as normal. To learn more, see [Introducing the New Braze Swift SDK](https://www.braze.com/resources/articles/introducing-the-new-braze-swift-sdk).
# Read and unread indicators
## Disabling the unviewed indicator
{: style="max-width:80%"}
You can choose to disable the blue line at the bottom of the card, which indicates whether or not the card has been viewed by setting the `disableUnviewedIndicator` property in `ABKContentCardsTableViewController` to `YES`.
## Customizing the unviewed indicator
The unviewed indicator can be accessed through the `unviewedLineView` property of the `ABKBaseContentCardCell` class. If you use `UITableViewCell` implementations, you should access the property before the cell is drawn.
For example, to set the color of the unviewed indicator to red:
```objc
((ABKBaseContentCardCell *)cell).unviewedLineView.backgroundColor = [UIColor redColor];
```
```swift
(card as? ABKBaseContentCardCell).unviewedLineView.backgroundColor = UIColor.red
```
# Content Card Badges for iOS
Source: /docs/developer_guide/platforms/legacy_sdks/ios/content_cards/customization/badges/index.md
**Warning:**
[AppboyKit](https://github.com/Appboy/appboy-ios-sdk) (also known as the Objective-C SDK) is no longer supported and has been replaced by the [Swift SDK](https://www.braze.com/docs/developer_guide/sdk_integration/?sdktab=swift). It will no longer receive new features, bug fixes, security updates, or technical support—however, messaging and analytics will continue to function as normal. To learn more, see [Introducing the New Braze Swift SDK](https://www.braze.com/resources/articles/introducing-the-new-braze-swift-sdk).
# Badges
## Requesting unread Content Card counts
If you want to display the number of unread Content Cards your user has, we suggest you request a card count and represent it with a Badge. Badges are a great way to call attention to new content awaiting your users in the Content Cards. If you'd like to add a badge to your Content Cards, the Braze SDK provides methods to query the following:
- Unviewed Content Cards for the current user
- Total Viewable Content Cards for the current user
The following method declarations in [`ABKContentCardsController`](https://appboy.github.io/appboy-ios-sdk/docs/interface_a_b_k_content_cards_controller.html) describe this in detail:
```objc
- (NSInteger)unviewedContentCardCount;
/*
This method returns the number of currently active Content Cards that have not been viewed.
A "view" happens when a card becomes visible in the Content Cards view. This differentiates between cards that are off-screen in the scrolling view and those which are on-screen; when a card scrolls onto the screen, it's counted as viewed.
Cards are counted as viewed only once -- if a card scrolls off the screen and back on, it's not re-counted.
Cards are counted only once, even if they appear in multiple Content Cards views or across multiple devices.
*/
- (NSInteger)contentCardCount;
/*
This method returns the total number of currently active Content Cards. Cards are counted only once even if they appear in multiple Content Cards views.
*/
```
## Displaying the number of unviewed Content Cards on the app badge count
In addition to serving as push notification reminders for an app, badges can also be utilized to denote unviewed items in the user's Content Cards feed. Updating the badge count based on unviewed Content Cards updates can be valuable in attracting users back to your app and increasing sessions.
This method records the badge count after the app is closed and the user's session ends:
```objc
(void)applicationDidEnterBackground:(UIApplication *)application
```
Within this method, implement the following code, which actively updates the badge count while the user views cards during a given session:
```objc
[UIApplication sharedApplication].applicationIconBadgeNumber = [[Appboy sharedInstance].contentCardsController unviewedContentCardCount];
```
```swift
func applicationDidEnterBackground(_ application: UIApplication)
```
Within this method, implement the following code, which actively updates the badge count while the user views cards during a given session:
```swift
UIApplication.shared.applicationIconBadgeNumber =
Appboy.sharedInstance()?.contentCardsController.unviewedContentCardCount() ?? 0
```
For more information see the `Appboy.h` [header file](https://github.com/Appboy/appboy-ios-sdk/blob/master/AppboyKit/include/Appboy.h).
# Content Card Carousel View for iOS
Source: /docs/developer_guide/platforms/legacy_sdks/ios/content_cards/customization/use_cases/carousel_view/index.md
**Warning:**
[AppboyKit](https://github.com/Appboy/appboy-ios-sdk) (also known as the Objective-C SDK) is no longer supported and has been replaced by the [Swift SDK](https://www.braze.com/docs/developer_guide/sdk_integration/?sdktab=swift). It will no longer receive new features, bug fixes, security updates, or technical support—however, messaging and analytics will continue to function as normal. To learn more, see [Introducing the New Braze Swift SDK](https://www.braze.com/resources/articles/introducing-the-new-braze-swift-sdk).
# Use case: Carousel view
{: style="max-width:35%;float:right;margin-left:15px;border:none;"}
This section covers how to implement a multi-card carousel feed where a user can swipe horizontally to view additional featured cards. To integrate a carousel view, you'll need to use a fully customized Content Card implementation—the "run" phase of the [crawl, walk, run approach](https://www.braze.com/docs/user_guide/message_building_by_channel/content_cards/customize/#customization-approaches).
With this approach, you will not use Braze views and default logic but instead, display the Content Cards in a completely custom manner by using your own views populated with data from the Braze models.
In terms of the level of development effort, the key differences between the basic implementation and the carousel implementation include:
- Building your own views
- Logging Content Card analytics
- Introducing additional client-side logic to dictate how many and which cards to show in the carousel
## Implementation
### Step 1: Create a custom view controller
To create the Content Cards carousel, create your own custom view controller (such as `UICollectionViewController`) and [subscribe for data updates](https://www.braze.com/docs/developer_guide/platform_integration_guides/legacy_sdks/ios/content_cards/integration/#getting-the-data). Note that you won't be able to extend or subclass our default `ABKContentCardTableViewController`, as it's only able to handle our default Content Card types.
### Step 2: Implement analytics
When creating a fully custom view controller, Content Card impressions, clicks, and dismissals are not automatically logged. You must implement the respective analytics methods to ensure impressions, dismissal events, and clicks get properly logged back to the Braze dashboard analytics.
For information on the analytics methods, refer to [Card methods](https://www.braze.com/docs/developer_guide/platform_integration_guides/legacy_sdks/ios/content_cards/integration/#card-methods).
**Note:**
The same page also details the different properties inherited from our generic Content Card model class, which you may find useful during your view implementation.
### Step 3: Create a Content Card observer
Create a [Content Card observer](https://www.braze.com/docs/developer_guide/platform_integration_guides/ios/content_cards/multiple_feeds/#step-2-set-up-a-content-card-listener) that is responsible for handling the arrival of Content Cards, and implement conditional logic to display a specific number of cards in the carousel at any one time. By default, Content Cards are sorted by created date (newest first), and a user sees all cards they are eligible for.
That said, you could order and apply additional display logic in a variety of ways. For example, you could select the first five Content Card objects from the array or introduce key-value pairs (the `extras` property in the data model) to build conditional logic around.
If you're implementing a carousel as a secondary Content Cards feed, refer to [Using multiple Content Card feeds](https://www.braze.com/docs/developer_guide/platforms/legacy_sdks/ios/content_cards/multiple_feeds/) to ensure you sort cards into the correct feed based on key-value pairs.
**Important:**
It's important to ensure your marketing and developer teams coordinate on which key-value pairs will be used (for example, `feed_type = brand_homepage`), as any key-value pairs marketers input into the Braze dashboard must exactly match the key-value pairs that the developers build into the app logic.
For iOS-specific developer documentation on the Content Cards class, methods, and attributes, refer to the iOS [`ABKContentCard` class reference](https://appboy.github.io/appboy-ios-sdk/docs/interface_a_b_k_content_card.html).
## Considerations
- By using completely custom views, you will not be able to extend or subclass the methods used in `ABKContentCardsController`. Instead, you'll need to integrate the data model methods and properties yourself.
- The logic and implementation of the carousel view is not a default type of Content Card in Braze, and therefore the logic for achieving the use case must be supplied and supported by your development team.
- You will need to implement client-side logic to display a specific number of cards in the carousel at any one time.
# Refresh the Content Card Feed for iOS
Source: /docs/developer_guide/platforms/legacy_sdks/ios/content_cards/refreshing_the_feed/index.md
**Warning:**
[AppboyKit](https://github.com/Appboy/appboy-ios-sdk) (also known as the Objective-C SDK) is no longer supported and has been replaced by the [Swift SDK](https://www.braze.com/docs/developer_guide/sdk_integration/?sdktab=swift). It will no longer receive new features, bug fixes, security updates, or technical support—however, messaging and analytics will continue to function as normal. To learn more, see [Introducing the New Braze Swift SDK](https://www.braze.com/resources/articles/introducing-the-new-braze-swift-sdk).
# Refresh the feed
## Refreshing Content Cards
You can manually request Braze to refresh the user's Content Cards using the `requestContentCardsRefresh:` method on the `Appboy` interface:
```objc
[[Appboy sharedInstance] requestContentCardsRefresh];
```
```swift
Appboy.sharedInstance()?.requestContentCardsRefresh()
```
For more information, see the `Appboy.h` [header file](https://github.com/Appboy/appboy-ios-sdk/blob/master/AppboyKit/include/Appboy.h).
# Use Multiple Content Card Feeds for iOS
Source: /docs/developer_guide/platforms/legacy_sdks/ios/content_cards/multiple_feeds/index.md
**Warning:**
[AppboyKit](https://github.com/Appboy/appboy-ios-sdk) (also known as the Objective-C SDK) is no longer supported and has been replaced by the [Swift SDK](https://www.braze.com/docs/developer_guide/sdk_integration/?sdktab=swift). It will no longer receive new features, bug fixes, security updates, or technical support—however, messaging and analytics will continue to function as normal. To learn more, see [Introducing the New Braze Swift SDK](https://www.braze.com/resources/articles/introducing-the-new-braze-swift-sdk).
# Using multiple Content Card feeds
Content Cards can be filtered on the app to only display specific cards, enabling you to have multiple Content Card feeds for different use cases (as in having a transactional feed versus a marketing feed).
The following documentation demonstrates an example implementation that can be changed to fit your specific integration.
## Step 1: Setting key-value pairs on cards
When creating a Content Card campaign, key-value pair data can be set on each card. Our filtering logic will use this key-value pair data to categorize cards.
For this example, we'll set a key-value pair with the key `feed_type` that will designate which Content Card feed the card should be displayed. The value will be whatever your custom feeds will be, as in `Transactional`, `Marketing`, etc.
## Step 2: Set Up a content card listener
Use the following code snippet to add an observer to listen for Content Card updates.
```objc
[[NSNotificationCenter defaultCenter] addObserver:self
selector:@selector(contentCardsUpdatedNotificationReceived:)
name:ABKContentCardsProcessedNotification
object:nil];
```
```swift
NotificationCenter.default.addObserver(self, selector:
#selector(contentCardsUpdated),
name:NSNotification.Name.ABKContentCardsProcessed, object: nil)
```
Add the following methods to respond to updates from the observer and filter the returned cards by type.
The first method, `contentCardsUpdatedNotificationReceived:`, handles updates from the observer. It calls the second method, `getCardsForFeedType:`, with the desired feed type, in this case, `Transactional`.
```objc
- (void)contentCardsUpdatedNotificationReceived:(NSNotification *)notification {
BOOL updateIsSuccessful = [notification.userInfo[ABKContentCardsProcessedIsSuccessfulKey] boolValue];
if (updateIsSuccessful) {
// Get an array containing only cards that have the "Transactional" feed type set in their extras.
NSArray *filteredArray = [self getCardsForFeedType:@"Transactional"];
NSLog(@"Got filtered array of length: %lu", [filteredArray count]);
// Pass filteredArray to your UI layer for display.
}
}
- (NSArray *)getCardsForFeedType:(NSString *)type {
NSArray *cards = [Appboy.sharedInstance.contentCardsController getContentCards];
NSArray *filteredArray = [cards filteredArrayUsingPredicate:[NSPredicate predicateWithBlock:^BOOL(ABKContentCard * card, NSDictionary *bindings) {
NSDictionary *extras = [card extras];
if (extras != nil && [extras objectForKey:@"feed_type"] != nil && [[extras objectForKey:@"feed_type"] isEqualToString:type]) {
NSLog(@"Got card: %@ ", card.idString);
return YES;
}
return NO;
}]];
return filteredArray;
}
```
```swift
@objc private func contentCardsUpdatedNotificationReceived(notification: NSNotification) {
guard let updateSuccessful = notification.userInfo?[ABKContentCardsProcessedIsSuccessfulKey] as? Bool else { return }
if updateSuccessful {
// Get an array containing only cards that have the "Transactional" feed type set in their extras.
let filteredArray = getCards(forFeedType: "Transactional")
NSLog("Got filtered array of length: %@",filteredArray?.count ?? 0)
// Pass filteredArray to your UI layer for display.
}
}
func getCards(forFeedType type: String) -> [ABKContentCard]? {
guard let allCards = Appboy.sharedInstance()?.contentCardsController.contentCards as? [ABKContentCard] else { return nil }
// return filtered cards
return allCards.filter {
if $0.extras?["feed_type"] as? String == type {
NSLog("%@","Got card: \($0.idString)")
return true
} else {
return false
}
}
}
```
# Content Card Implementation Guide for iOS (Optional)
Source: /docs/developer_guide/platforms/legacy_sdks/ios/content_cards/implementation_guide/index.md
**Warning:**
[AppboyKit](https://github.com/Appboy/appboy-ios-sdk) (also known as the Objective-C SDK) is no longer supported and has been replaced by the [Swift SDK](https://www.braze.com/docs/developer_guide/sdk_integration/?sdktab=swift). It will no longer receive new features, bug fixes, security updates, or technical support—however, messaging and analytics will continue to function as normal. To learn more, see [Introducing the New Braze Swift SDK](https://www.braze.com/resources/articles/introducing-the-new-braze-swift-sdk).
**Important:**
Looking for the basic Content Card developer integration guide? Find it [here](https://www.braze.com/docs/developer_guide/platforms/legacy_sdks/ios/content_cards/integration/).
# Content Card implementation guide
> This optional and advanced implementation guide covers Content Card code considerations, three custom use cases built by our team, accompanying code snippets, and guidance on logging impressions, clicks, and dismissals. Visit our Braze Demo Repository [here](https://github.com/braze-inc/braze-growth-shares-ios-demo-app)! Note that this implementation guide is centered around a Swift implementation, but Objective-C snippets are provided for those interested.
## Code considerations
### Content Cards as custom objects
Much like a rocket ship adding a booster, your own custom objects can be extended to function as Content Cards. Limited API surfaces such as this provide flexibility to work with different data backends interchangeably. This can be done by conforming to the `ContentCardable` protocol and implementing the initializer (as seen in the following code snippets) and, through the use of the `ContentCardData` struct, allows you to access the `ABKContentCard` data. The `ABKContentCard` payload will be used to initialize the `ContentCardData` struct and the custom object itself, all from a `Dictionary` type via the initializer the protocol comes with.
The initializer also includes a `ContentCardClassType` enum. This enum is used to decide which object to initialize. Through the use of key-value pairs within the Braze dashboard, you can set an explicit `class_type` key that will be used to determine what object to initialize. These key-value pairs for Content Cards come through in the `extras` variable on the `ABKContentCard`. Another core component of the initializer is the `metaData` dictionary parameter. The `metaData` includes everything from the `ABKContentCard` parsed out into a series of keys and values. After the relevant cards are parsed and converted to your custom objects, the app is ready to begin working with them as if they were instantiated from JSON or any other source.
Once you have a solid understanding of these code considerations, check out our [use cases](#sample-use-cases) to get started implementing your custom objects.
**ContentCardable protocol**
A `ContentCardData` object that represents the `ABKContentCard` data along with a `ContentCardClassType` enum. An initializer used to instantiate custom objects with `ABKContentCard` metadata.
```swift
protocol ContentCardable {
var contentCardData: ContentCardData? { get }
init?(metaData: [ContentCardKey: Any], classType contentCardClassType: ContentCardClassType)
}
extension ContentCardable {
var isContentCard: Bool {
return contentCardData != nil
}
func logContentCardClicked() {
BrazeManager.shared.logContentCardClicked(idString: contentCardData?.contentCardId)
}
func logContentCardDismissed() {
BrazeManager.shared.logContentCardDismissed(idString: contentCardData?.contentCardId)
}
func logContentCardImpression() {
BrazeManager.shared.logContentCardImpression(idString: contentCardData?.contentCardId)
}
}
```
**Content Card data struct**
`ContentCardData` represents the parsed out values of an `ABKContentCard`.
```swift
struct ContentCardData: Hashable {
let contentCardId: String
let contentCardClassType: ContentCardClassType
let createdAt: Double
let isDismissable: Bool
...
// other Content Card properties such as expiresAt, pinned, etc.
}
extension ContentCardData: Equatable {
static func ==(lhs: ContentCardData, rhs: ContentCardData) -> Bool {
return lhs.contentCardId == rhs.contentCardId
}
}
```
**ContentCardable protocol**
A `ContentCardData` object that represents the `ABKContentCard` data along with a `ContentCardClassType` enum, an initializer used to instantiate custom objects with `ABKContentCard` metadata.
```objc
@protocol ContentCardable
@property (nonatomic, strong) ContentCardData *contentCardData;
- (instancetype __nullable)initWithMetaData:(NSDictionary *)metaData
classType:(enum ContentCardClassType)classType;
- (BOOL)isContentCard;
- (void)logContentCardImpression;
- (void)logContentCardClicked;
- (void)logContentCardDismissed;
@end
```
**Content Card data struct**
`ContentCardData` represents the parsed out values of an `ABKContentCard`.
```objc
@interface ContentCardData : NSObject
+ (ContentCardClassType)contentCardClassTypeForString:(NSString *)rawValue;
- (instancetype)initWithIdString:(NSString *)idString
classType:(ContentCardClassType)classType
createdAt:(double)createdAt isDismissible:(BOOL)isDismissible;
@property (nonatomic, readonly) NSString *contentCardId;
@property (nonatomic) ContentCardClassType classType;
@property (nonatomic, readonly) double *createdAt;
@property (nonatomic, readonly) BOOL isDismissible;
...
// other Content Card properties such as expiresAt, pinned, etc.
@end
```
**Custom object initializer**
MetaData from an `ABKContentCard` is used to populate your object's variables. The key-value pairs set up in the Braze dashboard are represented in the "extras" dictionary.
```swift
extension CustomObject: ContentCardable {
init?(metaData: [ContentCardKey: Any], classType contentCardClassType: ContentCardClassType) {
guard let idString = metaData[.idString] as? String,
let createdAt = metaData[.created] as? Double,
let isDismissable = metaData[.dismissable] as? Bool,
let extras = metaData[.extras] as? [AnyHashable: Any],
else { return nil }
let contentCardData = ContentCardData(contentCardId: idString, contentCardClassType: contentCardClassType, createdAt: createdAt, isDismissable: isDismissable)
let customObjectProperty = extras["YOUR-CUSTOM-OBJECT-PROPERTY"] as? String
self.init(contentCardData: contentCardData, property: customObjectProperty)
}
}
```
**Identifying types**
The `ContentCardClassType` enum represents the `class_type` value in the Braze dashboard. This value is also used as a filter identifier to display Content Cards in different places.
```swift
enum ContentCardClassType: Hashable {
case yourValue
case yourOtherValue
...
case none
init(rawType: String?) {
switch rawType?.lowercased() {
case "your_value": // these values much match the value set in the Braze dashboard
self = .yourValue
case "your_other_value": // these values much match the value set in the Braze dashboard
self = .yourOtherValue
...
default:
self = .none
}
}
}
```
**Custom object initializer**
MetaData from an `ABKContentCard` is used to populate your object's variables. The key-value pairs set up in the Braze dashboard are represented in the "extras" dictionary.
```objc
- (id _Nullable)initWithMetaData:(nonnull NSDictionary *)metaData classType:(enum ContentCardClassType)classType {
self = [super init];
if (self) {
if ([metaData objectForKey:ContentCardKeyIdString] && [metaData objectForKey:ContentCardKeyCreated] && [metaData objectForKey:ContentCardKeyDismissible] && [metaData objectForKey:ContentCardKeyExtras]) {
NSDictionary *extras = metaData[ContentCardKeyExtras];
NSString *idString = metaData[ContentCardKeyIdString];
double createdAt = [metaData[ContentCardKeyCreated] doubleValue];
BOOL isDismissible = metaData[ContentCardKeyDismissible];
if ([extras objectForKey: @"YOUR-CUSTOM-PROPERTY")
_customObjectProperty = extras[@"YOUR-CUSTOM-OBJECT-PROPERTY"];
self.contentCardData = [[ContentCardData alloc] initWithIdString:idString classType:classType createdAt:createdAt isDismissible:isDismissible];
return self;
}
}
return nil;
}
```
**Identifying types**
The `ContentCardClassType` enum represents the `class_type` value in the Braze dashboard. This value is also used as a filter identifier to display Content Cards in different places.
```objc
typedef NS_ENUM(NSInteger, ContentCardClassType) {
ContentCardClassTypeNone = 0,
ContentCardClassTypeYourValue,
ContentCardClassTypeYourOtherValue,
...
};
+ (NSArray *)contentCardClassTypeArray {
return @[ @"", @"your_value", @"your_other_value" ];
}
+ (ContentCardClassType)contentCardClassTypeForString:(NSString*)rawValue {
if ([[self contentCardClassTypeArray] indexOfObject:rawValue] == NSNotFound) {
return ContentCardClassTypeNone;
} else {
NSInteger value = [[self contentCardClassTypeArray] indexOfObject:rawValue];
return (ContentCardClassType) value;
}
}
```
**Requesting Content Cards**
As long as the observer is still retained in memory, the notification callback from the Braze SDK can be expected.
```swift
func loadContentCards() {
BrazeManager.shared.addObserverForContentCards(observer: self, selector: #selector(contentCardsUpdated))
BrazeManager.shared.requestContentCardsRefresh()
}
```
**Handling the Content Cards SDK callback**
Forward the notification callback to the helper file to parse the payload data for your custom object(s).
```swift
@objc func contentCardsUpdated(_ notification: Notification) {
guard let contentCards = BrazeManager.shared.handleContentCardsUpdated(notification, for: [.yourValue]) as? [CustomObject],!contentCards.isEmpty else { return }
// do something with your array of custom objects
}
```
**Working with Content Cards**
The `class_type` is passed in as a filter to only return Content Cards that have a matching `class_type`.
```swift
func handleContentCardsUpdated(_ notification: Notification, for classTypes: [ContentCardClassType]) -> [ContentCardable] {
guard let updateIsSuccessful = notification.userInfo?[ABKContentCardsProcessedIsSuccessfulKey] as? Bool, updateIsSuccessful, let cards = contentCards else { return [] }
return convertContentCards(cards, for: classTypes)
}
```
**Requesting Content Cards**
As long as the observer is still retained in memory, the notification callback from the Braze SDK can be expected.
```objc
- (void)loadContentCards {
[[BrazeManager shared] addObserverForContentCards:self selector:@selector(contentCardsUpdated:)];
[[BrazeManager shared] requestContentCardsRefresh];
}
```
**Handling the Content Cards SDK callback**
Forward the notification callback to the helper file to parse the payload data for your custom object(s).
```objc
- (void)contentCardsUpdated:(NSNotification *)notification {
NSArray *classTypes = @[@(ContentCardClassTypeYourValue)];
NSArray *contentCards = [[BrazeManager shared] handleContentCardsUpdated:notification forClassTypes:classTypes];
// do something with your array of custom objects
}
```
**Working with Content Cards**
The `class_type` is passed in as a filter to only return Content Cards that have a matching `class_type`.
```objc
- (NSArray *)handleContentCardsUpdated:(NSNotification *)notification forClassType:(ContentCardClassType)classType {
BOOL updateIsSuccessful = [notification.userInfo[ABKContentCardsProcessedIsSuccessfulKey] boolValue];
if (updateIsSuccessful) {
return [self convertContentCards:self.contentCards forClassType:classType];
} else {
return @[];
}
}
```
**Working with payload data**
Loops through the array of Content Cards and only parses the cards with a matching `class_type`. The payload from an ABKContentCard is parsed into a `Dictionary`.
```swift
func convertContentCards(_ cards: [ABKContentCard], for classTypes: [ContentCardClassType]) -> [ContentCardable] {
var contentCardables: [ContentCardable] = []
for card in cards {
let classTypeString = card.extras?[ContentCardKey.classType.rawValue] as? String
let classType = ContentCardClassType(rawType: classTypeString)
guard classTypes.contains(classType) else { continue }
var metaData: [ContentCardKey: Any] = [:]
switch card {
case let banner as ABKBannerContentCard:
metaData[.image] = banner.image
case let captioned as ABKCaptionedImageContentCard:
metaData[.title] = captioned.title
metaData[.cardDescription] = captioned.cardDescription
metaData[.image] = captioned.image
case let classic as ABKClassicContentCard:
metaData[.title] = classic.title
metaData[.cardDescription] = classic.cardDescription
default:
break
}
metaData[.idString] = card.idString
metaData[.created] = card.created
metaData[.dismissible] = card.dismissible
metaData[.urlString] = card.urlString
metaData[.extras] = card.extras
...
// other Content Card properties such as expiresAt, pinned, etc.
if let contentCardable = contentCardable(with: metaData, for: classType) {
contentCardables.append(contentCardable)
}
}
return contentCardables
}
```
**Initializing your custom objects from Content Card payload data**
The `class_type` is used to determine which of your custom objects will be initialized from the payload data.
```swift
func contentCardable(with metaData: [ContentCardKey: Any], for classType: ContentCardClassType) -> ContentCardable? {
switch classType {
case .yourValue:
return CustomObject(metaData: metaData, classType: classType)
case .yourOtherValue:
return OtherCustomObject(metaData: metaData, classType: classType)
...
default:
return nil
}
}
```
**Working with payload data**
Loops through the array of Content Cards and only parses the cards with a matching `class_type`. The payload from an ABKContentCard is parsed into a `Dictionary`.
```objc
- (NSArray *)convertContentCards:(NSArray *)cards forClassType:(ContentCardClassType)classType {
NSMutableArray *contentCardables = [[NSMutableArray alloc] init]; for (ABKContentCard *card in cards) {
NSString *classTypeString = [card.extras objectForKey:ContentCardKeyClassType];
ContentCardClassType cardClassType = [ContentCardData contentCardClassTypeForString: classTypeString];
if (cardClassType != classType) { continue; }
NSMutableDictionary *metaData = [[NSMutableDictionary alloc] init];
if ([card isKindOfClass:[ABKBannerContentCard class]]) {
ABKBannerContentCard *banner = (ABKBannerContentCard *)card;
metaData[ContentCardKeyImage] = banner.image;
} else if ([card isKindOfClass:[ABKCaptionedImageContentCard class]]) {
ABKCaptionedImageContentCard *captioned = (ABKCaptionedImageContentCard *)card;
metaData[ContentCardKeyTitle] = captioned.title;
metaData[ContentCardKeyCardDescription] = captioned.cardDescription;
metaData[ContentCardKeyImage] = captioned.image;
} else if ([card isKindOfClass:[ABKClassicContentCard class]]) {
ABKClassicContentCard *classic = (ABKClassicContentCard *)card;
metaData[ContentCardKeyCardDescription] = classic.title;
metaData[ContentCardKeyImage] = classic.image;
}
metaData[ContentCardKeyIdString] = card.idString;
metaData[ContentCardKeyCreated] = [NSNumber numberWithDouble:card.created];
metaData[ContentCardKeyDismissible] = [NSNumber numberWithBool:card.dismissible];
metaData[ContentCardKeyUrlString] = card.urlString;
metaData[ContentCardKeyExtras] = card.extras;
...
// other Content Card properties such as expiresAt, pinned, etc.
id contentCardable = [self contentCardableWithMetaData:metaData forClassType:classType];
if (contentCardable) {
[contentCardables addObject:contentCardable];
}
}
return contentCardables;
}
```
**Initializing your custom objects from Content Card payload data**
The `class_type` is used to determine which of your custom objects will be initialized from the payload data.
```obj-c
- (id)contentCardableWithMetaData:(NSDictionary *)metaData forClassType:(ContentCardClassType)classType {
switch (classType) {
case ContentCardClassTypeYourValue:
return [[CustomObject alloc] initWithMetaData:metaData classType:classType];
case ContentCardClassTypeYourOtherValue:
return nil;
...
default:
return nil;
}
}
```
## Use cases
We've provided three use cases below. Each use case offers a detailed explanation, relevant code snippets, and a look into how Content Card variables may look and be used in the Braze dashboard:
- [Content Cards as supplemental content](#content-cards-as-supplemental-content)
- [Content Cards in a message center](#content-cards-in-a-message-center)
- [Interactive Content Cards](#interactive-content-cards)
### Content Cards as supplemental content
{: style="float:right;max-width:25%;margin-left:15px;border:0;"}
You can seamlessly blend Content Cards into an existing feed, allowing data from multiple feeds to load simultaneously. This creates a cohesive, harmonious experience with Braze Content Cards and existing feed content.
The example to the right shows a `UICollectionView` with a hybrid list of items that are populated via local data and Content Cards powered by Braze. With this, Content Cards can be indistinguishable alongside existing content.
#### Dashboard configuration
This Content Card is delivered by an API-triggered campaign with API-triggered key-value pairs. This is ideal for campaigns where the card's values depend on external factors to determine what content to display to the user. Note that `class_type` should be known at set-up time.
{: style="max-width:60%;"}
##### Ready to log analytics?
Visit the [following section](#logging-impressions-clicks-and-dismissals) to get a better understanding of how the flow of data should look.
### Content Cards in a message center
Content Cards can be used in a message center format where each message is its own card. Each message in the message center is populated via a Content Card payload, and each card contains additional key-value pairs that power on-click UI/UX. In the following example, one message directs you to an arbitrary custom view, while another opens to a webview that displays custom HTML.
{: style="border:0;"}{: style="max-width:80%;border:0"}
#### Dashboard configuration
For the following message types, the key-value pair `class_type` should be added to your dashboard configuration. The values assigned here are arbitrary but should be distinguishable between class types. These key-value pairs are the key identifiers that the application looks at when deciding where to go when the user clicks on an abridged inbox message.
The key-value pairs for this use case include:
- `message_header` set as `Full Page`
- `class_type` set as `message_full_page`
{: style="max-width:60%;"}
The key-value pairs for this use case include:
- `message_header` set as `HTML`
- `class_type` set as `message_webview`
- `message_title`
This message also looks for an HTML key-value pair, but if you are working with a web domain, a URL key-value pair is also valid.
{: style="max-width:60%;"}
#### Further explanation
The message center logic is driven by the `contentCardClassType` that is provided by the key-value pairs from Braze. Using the `addContentCardToView` method, you are able to both filter and identify these class types.
**Using `class_type` for on-click behavior**
When a message is clicked, the `ContentCardClassType` handles how the next screen should be populated.
```swift
func addContentCardToView(with message: Message) {
switch message.contentCardData?.contentCardClassType {
case .message(.fullPage):
loadContentCardFullPageView(with: message as! FullPageMessage)
case .message(.webView):
loadContentCardWebView(with: message as! WebViewMessage)
default:
break
}
}
```
**Using `class_type` for on-click behavior**
When a message is clicked, the `ContentCardClassType` handles how the next screen should be populated.
```objc
- (void)addContentCardToView:(Message *)message {
switch (message.contentCardData.classType) {
case ContentCardClassTypeMessageFullPage:
[self loadContentCardFullPageView:(FullPageMessage *)message];
break;
case ContentCardClassTypeMessageWebview:
[self loadContentCardWebView:(WebViewMessage *)message];
break;
default:
break;
}
}
```
##### Ready to log analytics?
Visit the [following section](#logging-impressions-clicks-and-dismissals) to get a better understanding of how the flow of data should look.
{: style="border:0;"}{: style="float:right;max-width:45%;border:0;margin-left:15px;"}
### Interactive Content Cards
Content Cards can be leveraged to create dynamic and interactive experiences for your users. In the example to the right, we have a Content Card pop-up appear at checkout providing users last-minute promotions.
Well-placed cards like this are a great way to give users a "nudge" toward specific user actions.
#### Dashboard configuration
The dashboard configuration for interactive Content Cards is straightforward. The key-value pairs for this use case include a `discount_percentage` set as the desired discount amount and `class_type` set as `coupon_code`. These key-value pairs are how type-specific Content Cards get filtered and displayed on the checkout screen.
{: style="max-width:70%;"}
##### Ready to log analytics?
Visit the [following section](#logging-impressions-clicks-and-dismissals) to get a better understanding of how the flow of data should look.
## Dark Mode customization
By default, Content Card views will automatically respond to Dark Mode changes on the device with a set of themed colors.
This behavior can be overridden as detailed in our [custom styling guide](https://www.braze.com/docs/developer_guide/platform_integration_guides/ios/content_cards/customization/custom_styling#disabling-dark-mode).
## Logging impressions, clicks, and dismissals
After extending your custom objects to function as Content Cards, logging valuable metrics like impressions, clicks, and dismissals is quick. This can be done by using a `ContentCardable` protocol that references and provides data to a helper file to be logged by the Braze SDK.
#### Implementation components
**Logging analytics**
The logging methods can be called directly from objects conforming to the `ContentCardable` protocol.
```swift
customObject.logContentCardImpression()
customObject.logContentCardClicked()
customObject.logContentCardDismissed()
```
**Retrieving the `ABKContentCard`**
The `idString` passed in from your custom object is used to identify the associated Content Card to log analytics.
```swift
extension BrazeManager {
func logContentCardImpression(idString: String?) {
guard let contentCard = getContentCard(forString: idString) else { return }
contentCard.logContentCardImpression()
}
private func getContentCard(forString idString: String?) -> ABKContentCard? {
return contentCards?.first(where: { $0.idString == idString })
}
}
```
**Logging analytics**
The logging methods can be called directly from objects conforming to the `ContentCardable` protocol.
```objc
[customObject logContentCardImpression];
[customObject logContentCardClicked];
[customObject logContentCardDismissed];
```
**Retrieving the `ABKContentCard`**
The `idString` passed in from your custom object is used to identify the associated Content Card to log analytics.
```objc
- (void)logContentCardImpression:(NSString *)idString {
ABKContentCard *contentCard = [self getContentCard:idString];
[contentCard logContentCardImpression];
}
- (ABKContentCard *)getContentCard:(NSString *)idString {
NSPredicate *predicate = [NSPredicate predicateWithFormat:@"self.idString == %@", idString];
NSArray *filteredArray = [self.contentCards filteredArrayUsingPredicate:predicate];
return filteredArray.firstObject;
}
```
**Important:**
For a control variant Content Card, a custom object should still be instantiated, and UI logic should set the object's corresponding view as hidden. The object can then log an impression to inform our analytics of when a user would have seen the control card.
## Helper files
**ContentCardKey helper file**
```swift
enum ContentCardKey: String {
case idString
case created
case classType = "class_type"
case dismissible
case extras
...
}
```
```objc
static NSString *const ContentCardKeyIdString = @"idString";
static NSString *const ContentCardKeyCreated = @"created";
static NSString *const ContentCardKeyClassType = @"class_type";
static NSString *const ContentCardKeyDismissible = @"dismissible";
static NSString *const ContentCardKeyExtras = @"extras";
...
```
# Track Sessions for iOS
Source: /docs/developer_guide/platforms/legacy_sdks/ios/analytics/tracking_sessions/index.md
**Warning:**
[AppboyKit](https://github.com/Appboy/appboy-ios-sdk) (also known as the Objective-C SDK) is no longer supported and has been replaced by the [Swift SDK](https://www.braze.com/docs/developer_guide/sdk_integration/?sdktab=swift). It will no longer receive new features, bug fixes, security updates, or technical support—however, messaging and analytics will continue to function as normal. To learn more, see [Introducing the New Braze Swift SDK](https://www.braze.com/resources/articles/introducing-the-new-braze-swift-sdk).
# Session tracking for iOS
The Braze SDK reports session data used by the Braze dashboard to calculate user engagement and other analytics integral to understanding your users. Our SDK generates "start session" and "close session" data points that account for session length and session count viewable within the Braze dashboard based on the following session semantics.
## Session lifecycle
A session is started when you call `[[Appboy sharedInstance]` `startWithApiKey:inApplication:withLaunchOptions:withAppboyOptions]`, after which by default sessions start when the `UIApplicationWillEnterForegroundNotification` notification is fired (such as the app enters the foreground) and end when the app leaves the foreground (such as when the `UIApplicationDidEnterBackgroundNotification` notification is fired or when the app dies).
**Note:**
If you need to force a new session, you can do so by changing users.
## Customizing session timeout
Starting with Braze iOS SDK v3.14.1, you can set the session timeout using the Info.plist file. Add the `Braze` dictionary to your `Info.plist` file. Inside the `Braze` dictionary, add the `SessionTimeout` number subentry and set the value to your custom session timeout. Note that prior to Braze iOS SDK v4.0.2, the dictionary key `Appboy` must be used in place of `Braze`.
You may alternatively set the `ABKSessionTimeoutKey` key to the desired integer value in your `appboyOptions` object passed to [`startWithApiKey`](https://appboy.github.io/appboy-ios-sdk/docs/interface_appboy.html#afd911d60dfe7e5361afbfb364f5d20f9).
```objc
// Sets the session timeout to 60 seconds
[Appboy startWithApiKey:@"YOUR-API_KEY"
inApplication:application
withLaunchOptions:options
withAppboyOptions:@{ ABKSessionTimeoutKey : @(60) }];
```
```swift
// Sets the session timeout to 60 seconds
Appboy.start(withApiKey: "YOUR-API-KEY",
in:application,
withLaunchOptions:launchOptions,
withAppboyOptions:[ ABKSessionTimeoutKey : 60 ])
```
If you have set a session timeout, then the session semantics all extend to that customized timeout.
**Note:**
The minimum value for `sessionTimeoutInSeconds` is 1 second. The default value is 10 seconds.
## Testing session tracking
To detect sessions via your user, find your user on the dashboard and navigate to **App Usage** on the user profile. You can confirm that session tracking is working by checking that the "Sessions" metric increases when you expect it to.

# Set User IDs for iOS
Source: /docs/developer_guide/platforms/legacy_sdks/ios/analytics/setting_user_ids/index.md
**Warning:**
[AppboyKit](https://github.com/Appboy/appboy-ios-sdk) (also known as the Objective-C SDK) is no longer supported and has been replaced by the [Swift SDK](https://www.braze.com/docs/developer_guide/sdk_integration/?sdktab=swift). It will no longer receive new features, bug fixes, security updates, or technical support—however, messaging and analytics will continue to function as normal. To learn more, see [Introducing the New Braze Swift SDK](https://www.braze.com/resources/articles/introducing-the-new-braze-swift-sdk).
# Set user IDs for iOS
User IDs should be set for each of your users. These should be unchanging and accessible when a user opens the app. Naming your user IDs correctly from the start is one of the most **crucial** steps when setting up user IDs. We strongly suggest using the Braze standard of UUIDs and GUIDs (detailed below). We also strongly recommend providing this identifier as it will allow you to:
- Track your users across devices and platforms, improving the quality of your behavioral and demographic data.
- Import data about your users using our [user data API](https://www.braze.com/docs/developer_guide/rest_api/user_data/#user-data).
- Target specific users with our [messaging API](https://www.braze.com/docs/api/endpoints/messaging/) for both general and transactional messages.
**Note:**
If such an identifier is not available, Braze will assign a unique identifier to your users, but you will lack the capabilities listed for user IDs. You should avoid setting user IDs for users for whom you lack a unique identifier that is tied to them as an individual. Passing a device identifier offers no benefit versus the automatic anonymous user tracking Braze offers by default.
**Warning:**
If you want to include an identifiable value as your user ID, for additional security, we **strongly recommend** adding our [SDK authentication](https://www.braze.com/docs/developer_guide/authentication/) feature to prevent user impersonation.
## Suggested user ID naming convention
At Braze, we **strongly recommend** naming user IDs, also referred to as external IDs, in a [UUIDs and GUIDs](https://en.wikipedia.org/wiki/Universally_unique_identifier) format. UUIDs and GUIDs are universally unique identifiers that consist of a 128-bit number used to identify information in computer systems. This means that these UUIDs are long, random and well distributed. If you choose a different method in which to name your user IDs, they must also be long, random and well distributed. It is also important to note, that user IDs are **case sensitive**. For example, "Abcdef" is a different user from "abcdef".
If you find your user IDs include names, email addresses, timestamps, or incrementors, we suggest using a new naming method that is more secure so that your user IDs are not as easy to guess or impersonate. If you choose to include this in your user IDs, we **strongly recommend** adding our [SDK authentication](https://www.braze.com/docs/developer_guide/authentication/) feature to prevent user impersonation.
Providing this information to others may allow people outside your organization to glean information on how your user IDs are structured, opening up your organization to potentially malicious updates or removal of information. Choosing the correct naming convention from the start is one of the most important steps in setting up user IDs. However, a migration is possible using our [external ID migration endpoint](https://www.braze.com/docs/api/endpoints/user_data/external_id_migration/).
| User ID Naming |
| Recommended | Not Recommended |
| ------------ | ----------- |
| 123e4567-e89b-12d3-a456-836199333115 | JonDoe829525552 |
| 8c0b3728-7fa7-4c68-a32e-12de1d3ed2d5 | Anna@email.com |
| f0a9b506-3c5b-4d86-b16a-94fc4fc3f7b0 | CompanyName-1-2-19 |
| 2d9e96a1-8f15-4eaf-bf7b-eb8c34e25962 | jon-doe-1-2-19 |
{: .reset-td-br-1 .reset-td-br-2}
## Assigning a user ID
You should make the following call as soon as the user is identified (generally after logging in) to set the user ID:
```objc
[[Appboy sharedInstance] changeUser:@"YOUR_USER_ID_STRING"];
```
```swift
Appboy.sharedInstance()?.changeUser("YOUR_USER_ID")
```
**Warning:**
**Do not call `changeUser()` when a user logs out. `changeUser()` should only be called when the user logs into the application.** Setting [`changeUser()`](https://appboy.github.io/appboy-ios-sdk/docs/interface_appboy.html#ac8b369b40e15860b0ec18c0f4b46ac69%20%22changeuser%22) to a static default value will associate ALL user activity with that default "user" until the user logs in again.
Be sure to call this method in your application's main thread. Calling the method asynchronously can lead to undefined behavior.
Additionally, we recommend against changing the user ID when a user logs out, as it makes you unable to target the previously logged-in user with re-engagement campaigns. If you anticipate multiple users on the same device but only want to target one of them when your app is in a logged-out state, we recommend separately keeping track of the user ID you want to target while logged out and switching back to that user ID as part of your app's logout process.
## User ID integration best practices and notes
### Automatic preservation of anonymous user history
| Identification Context | Preservation Behavior |
| ---------------------- | -------------------------- |
| User **has not** been previously identified | Anonymous history **is merged** with user profile upon identification. |
| User **has been** previously identified in-app or via API | Anonymous history **is not merged** with user profile upon identification. |
{: .reset-td-br-1 .reset-td-br-2}
Refer to [Identified user profiles](https://www.braze.com/docs/user_guide/data_and_analytics/user_data_collection/user_profile_lifecycle/#identified-user-profiles) for more information on what occurs when you identify anonymous users.
### Additional notes and best practices
Note the following:
- If your app is used by multiple people, you can assign each user a unique identifier to track them.
- After a user ID has been set, you cannot revert that user to an anonymous profile.
- Do not change the user ID when a user logs out as this can separate the device from the user profile.
- As a result, you won't be able to target the previously logged out user with re-engagement messages. If you anticipate multiple users on the same device, but only want to target one of them when your app is in a logged-out state, we recommend separately keeping track of the user ID you want to target while logged out and switching back to that user ID as part of your app's logout process. By default, only the last user that was logged in will receive push notifications from your app.
- Switching from one identified user to another is a relatively costly operation.
- When you request the user switch, the current session for the previous user is automatically closed and a new session is started. Braze will automatically make a data refresh request for in-app messages and other Braze resources for the new user.
**Tip:**
If you opt to use a hash of a unique identifier as your user ID, be sure that you're normalizing the input to your hashing function. For example, if you're going to use a hash of an email address, confirm that you're stripping leading and trailing whitespace from the input, and taking localization into account.
## Aliasing users
A [user alias](https://www.braze.com/docs/user_guide/data_and_analytics/user_data_collection/user_profile_lifecycle/#user-aliases) serves as an alternative unique user identifier. You can use aliases to identify users along different dimensions than your core user ID:
* Set a consistent identifier for analytics that will follow a given user both before and after they have logged in to a mobile app or website.
* Add the identifiers used by a third-party vendor to your company users in order to more easily reconcile your data externally.
Each alias consists of two parts: a name for the identifier itself, and a label indicating the type of alias. Users can have multiple aliases with different labels, but only one name per label.
For more information on setting user aliases against a user profile, refer to [User aliases](https://www.braze.com/docs/user_guide/data_and_analytics/user_data_collection/user_profile_lifecycle/#user-aliases).
# Track Custom Events for iOS
Source: /docs/developer_guide/platforms/legacy_sdks/ios/analytics/tracking_custom_events/index.md
**Warning:**
[AppboyKit](https://github.com/Appboy/appboy-ios-sdk) (also known as the Objective-C SDK) is no longer supported and has been replaced by the [Swift SDK](https://www.braze.com/docs/developer_guide/sdk_integration/?sdktab=swift). It will no longer receive new features, bug fixes, security updates, or technical support—however, messaging and analytics will continue to function as normal. To learn more, see [Introducing the New Braze Swift SDK](https://www.braze.com/resources/articles/introducing-the-new-braze-swift-sdk).
# Track custom events for iOS
You can record custom events in Braze to learn more about your app's usage patterns and to segment your users by their actions on the dashboard.
Before implementation, be sure to review examples of the segmentation options afforded by custom events, custom attributes, and purchase events in our [best practices](https://www.braze.com/docs/developer_guide/platform_wide/analytics_overview/#user-data-collection), as well as our notes on [event naming conventions](https://www.braze.com/docs/user_guide/data/custom_data/event_naming_conventions/).
## Adding a custom event
```objc
[[Appboy sharedInstance] logCustomEvent:@"YOUR_EVENT_NAME"];
```
```swift
Appboy.sharedInstance()?.logCustomEvent("YOUR_EVENT_NAME")
```
### Adding properties
You can add metadata about custom events by passing an `NSDictionary` populated with `NSNumber`, `NSString`, or `NSDate` values.
```objc
[[Appboy sharedInstance] logCustomEvent:@"YOUR-EVENT-NAME"
withProperties:@{
@"you": @"can",
@"pass": @(NO),
@"orNumbers": @42,
@"orDates": [NSDate date],
@"or": @[@"any", @"array", @"here"],
@"andEven": @{
@"deeply": @[@"nested", @"json"]
}
}];
```
```swift
Appboy.sharedInstance()?.logCustomEvent(
"YOUR-EVENT-NAME",
withProperties: [
"you": "can",
"pass": false,
"orNumbers": 42,
"orDates": Date(),
"or": ["any", "array", "here"],
"andEven": [
"deeply": ["nested", "json"]
]
]
)
```
Refer to our [class documentation](http://appboy.github.io/appboy-ios-sdk/docs/interface_appboy.html#a4f0051d73d85cb37f63c232248124c79) for more information.
### Reserved keys {#event-reserved-keys}
The following keys are reserved and cannot be used as custom event properties:
- `time`
- `event_name`
## Additional resources
- See the method declaration within the `Appboy.h` [file](https://github.com/Appboy/appboy-ios-sdk/blob/master/AppboyKit/include/Appboy.h).
- Refer to the [`logCustomEvent`](http://appboy.github.io/appboy-ios-sdk/docs/interface_appboy.html#ad80c39e8c96482a77562a5b1a1d387aa) documentation for more information.
# Set Custom Attributes for iOS
Source: /docs/developer_guide/platforms/legacy_sdks/ios/analytics/setting_custom_attributes/index.md
**Warning:**
[AppboyKit](https://github.com/Appboy/appboy-ios-sdk) (also known as the Objective-C SDK) is no longer supported and has been replaced by the [Swift SDK](https://www.braze.com/docs/developer_guide/sdk_integration/?sdktab=swift). It will no longer receive new features, bug fixes, security updates, or technical support—however, messaging and analytics will continue to function as normal. To learn more, see [Introducing the New Braze Swift SDK](https://www.braze.com/resources/articles/introducing-the-new-braze-swift-sdk).
# Set custom attributes for iOS
Braze provides methods for assigning attributes to users. You'll be able to filter and segment your users according to these attributes on the dashboard.
Before implementation, be sure to review examples of the segmentation options afforded by custom events, custom attributes, and purchase events in our [best practices](https://www.braze.com/docs/developer_guide/platform_wide/analytics_overview/#user-data-collection), as well as our notes on [event naming conventions](https://www.braze.com/docs/user_guide/data/custom_data/event_naming_conventions/).
## Assigning default user attributes
To assign user attributes, you need to set the appropriate field on the shared `ABKUser` object.
The following is an example of setting the first name attribute:
```objc
[Appboy sharedInstance].user.firstName = @"first_name";
```
```swift
Appboy.sharedInstance()?.user.firstName = "first_name"
```
The following attributes should be set on the `ABKUser` object:
- `firstName`
- `lastName`
- `email`
- `dateOfBirth`
- `country`
- `language`
- `homeCity`
- `phone`
- `userID`
- `gender`
## Assigning custom user attributes
Beyond the default user attributes, Braze also allows you to define custom attributes using several different data types. See our [user data collection](https://www.braze.com/docs/developer_guide/analytics/) for more information on the segmentation options each of these attributes will afford you.
### Custom attribute with a string value
```objc
[[Appboy sharedInstance].user setCustomAttributeWithKey:@"your_attribute_key" andStringValue:"your_attribute_value"];
```
```swift
Appboy.sharedInstance()?.user.setCustomAttributeWithKey("your_attribute_key", andStringValue: "your_attribute_value")
```
### Custom attribute with an integer value
```objc
[[Appboy sharedInstance].user setCustomAttributeWithKey:@"your_attribute_key" andIntegerValue:yourIntegerValue];
```
```swift
Appboy.sharedInstance()?.user.setCustomAttributeWithKey("your_attribute_key", andIntegerValue: yourIntegerValue)
```
### Custom attribute with a double value
Braze treats `float` and `double` values the same within our database.
```objc
[[Appboy sharedInstance].user setCustomAttributeWithKey:@"your_attribute_key" andDoubleValue:yourDoubleValue];
```
```swift
Appboy.sharedInstance()?.user.setCustomAttributeWithKey("your_attribute_key", andDoubleValue: yourDoubleValue)
```
### Custom attribute with a boolean value
```objc
[[Appboy sharedInstance].user setCustomAttributeWithKey:@"your_attribute_key" andBOOLValue:yourBOOLValue];
```
```swift
Appboy.sharedInstance()?.user.setCustomAttributeWithKey("your_attribute_key", andBOOLValue: yourBoolValue)
```
### Custom attribute with a date value
Dates passed to Braze with this method must either be in the [ISO 8601](http://en.wikipedia.org/wiki/ISO_8601) format (e.g `2013-07-16T19:20:30+01:00`) or in the `yyyy-MM-dd'T'HH:mm:ss:SSSZ` format (`2016-12-14T13:32:31.601-0800`).
```objc
[[Appboy sharedInstance].user setCustomAttributeWithKey:@"your_attribute_key" andDateValue:yourDateValue];
```
```swift
Appboy.sharedInstance()?.user.setCustomAttributeWithKey("your_attribute_key", andDateValue:yourDateValue)
```
### Custom attribute with an array value
The maximum number of elements in [custom attribute arrays](https://www.braze.com/docs/developer_guide/platform_wide/analytics_overview/#arrays) defaults to 25. Arrays exceeding the maximum number of elements are truncated to contain the maximum number of elements. The maximum for individual arrays can be increased to up to 500. To increase this limit above 500, contact your Braze customer success manager.
```objc
// Setting a custom attribute with an array value
[[Appboy sharedInstance].user setCustomAttributeArrayWithKey:@"array_name" array:@[@"value1", @"value2"]];
// Adding to a custom attribute with an array value
[[Appboy sharedInstance].user addToCustomAttributeArrayWithKey:@"array_name" value:@"value3"];
// Removing a value from an array type custom attribute
[[Appboy sharedInstance].user removeFromCustomAttributeArrayWithKey:@"array_name" value:@"value2"];
// Removing an entire array and key
[[Appboy sharedInstance].user setCustomAttributeArrayWithKey:@"array_name" array:nil];
```
```swift
// Setting a custom attribute with an array value
Appboy.sharedInstance()?.user.setCustomAttributeArrayWithKey("array_name", array: ["value1", "value2"])
// Adding to a custom attribute with an array value
Appboy.sharedInstance()?.user.addToCustomAttributeArrayWithKey("array_name", value: "value3")
// Removing a value from an array type custom attribute
Appboy.sharedInstance()?.user.removeFromCustomAttributeArrayWithKey("array_name", value: "value2")
```
### Unsetting a custom attribute
Custom attributes can also be unset using the following method:
```objc
[[Appboy sharedInstance].user unsetCustomAttributeWithKey:@"your_attribute_key"];
```
```swift
Appboy.sharedInstance()?.user.unsetCustomAttributeWithKey("your_attribute_key")
```
### Incrementing/decrementing custom attributes
This code is an example of an incrementing custom attribute. You may increment the value of a custom attribute by any positive or negative integer or long value:
```objc
[[Appboy sharedInstance].user incrementCustomUserAttribute:@"your_attribute_key" by:incrementIntegerValue];
```
```swift
Appboy.sharedInstance()?.user.incrementCustomUserAttribute("your_attribute_key", by: incrementIntegerValue)
```
### Setting a custom attribute via the REST API
You can also use our REST API to set user attributes. Refer to the [User API documentation](https://www.braze.com/docs/developer_guide/rest_api/user_data/#user-data) for details.
### Custom attribute value limits
Custom attribute values have a maximum length of 255 characters; longer values will be truncated.
#### Additional information
- More details can be found within the [`ABKUser.h` file](https://github.com/Appboy/appboy-ios-sdk/blob/master/AppboyKit/include/Appboy.h).
- Refer to the [`ABKUser` documentation](http://appboy.github.io/appboy-ios-sdk/docs/interface_a_b_k_user.html) for more information.
## Setting up user subscriptions
To set up a subscription for your users (either email or push), call the functions `setEmailNotificationSubscriptionType` or `setPushNotificationSubscriptionType`, respectively. Both of these functions take the enum type `ABKNotificationSubscriptionType` as arguments. This type has three different states:
| Subscription Status | Definition |
| ------------------- | ---------- |
| `ABKOptedin` | Subscribed, and explicitly opted in |
| `ABKSubscribed` | Subscribed, but not explicitly opted in |
| `ABKUnsubscribed` | Unsubscribed and/or explicitly opted out |
{: .reset-td-br-1 .reset-td-br-2 role="presentation" }
Users who grant permission for an app to send them push notifications default to the status of `ABKOptedin` as iOS requires an explicit opt-in.
Users will be set to `ABKSubscribed` automatically upon receipt of a valid email address; however, we suggest that you establish an explicit opt-in process and set this value to `OptedIn` upon receipt of explicit consent from your user. Refer to [Managing user subscriptions](https://www.braze.com/docs/user_guide/message_building_by_channel/email/managing_user_subscriptions/) for more details.
### Setting email subscriptions
```objc
[[Appboy sharedInstance].user setEmailNotificationSubscriptionType: ABKNotificationSubscriptionType]
```
```swift
Appboy.sharedInstance()?.user.setEmailNotificationSubscriptionType(ABKNotificationSubscriptionType)
```
### Setting push notification subscriptions
```objc
[[Appboy sharedInstance].user setPushNotificationSubscriptionType: ABKNotificationSubscriptionType]
```
```swift
Appboy.sharedInstance()?.user.setPushNotificationSubscriptionType(ABKNotificationSubscriptionType)
```
Refer to [Managing user subscriptions](https://www.braze.com/docs/user_guide/message_building_by_channel/email/managing_user_subscriptions/) for more details.
# Log Purchases for iOS
Source: /docs/developer_guide/platforms/legacy_sdks/ios/analytics/logging_purchases/index.md
**Warning:**
[AppboyKit](https://github.com/Appboy/appboy-ios-sdk) (also known as the Objective-C SDK) is no longer supported and has been replaced by the [Swift SDK](https://www.braze.com/docs/developer_guide/sdk_integration/?sdktab=swift). It will no longer receive new features, bug fixes, security updates, or technical support—however, messaging and analytics will continue to function as normal. To learn more, see [Introducing the New Braze Swift SDK](https://www.braze.com/resources/articles/introducing-the-new-braze-swift-sdk).
# Log purchases for iOS
Record in-app purchases so that you can track your revenue over time and across revenue sources and segment your users by their lifetime value.
Braze supports purchases in multiple currencies. Purchases that you report in a currency other than USD will be shown in the dashboard in USD based on the exchange rate at the date they were reported.
Before implementation, be sure to review examples of the segmentation options afforded by custom events, custom attributes, and purchase events in our [best practices](https://www.braze.com/docs/developer_guide/platform_wide/analytics_overview/#user-data-collection), as well as our notes on [event naming conventions](https://www.braze.com/docs/user_guide/data/custom_data/event_naming_conventions/).
## Tracking purchases and revenue
To use this feature, add this method call after a successful purchase in your app:
```objc
[[Appboy sharedInstance] logPurchase:@"your product ID"
inCurrency:@"USD"
atPrice:[[[NSDecimalNumber alloc] initWithString:@"0.99"] autorelease]];
```
```swift
Appboy.sharedInstance()?.logPurchase("your product ID", inCurrency: "USD", atPrice: NSDecimalNumber(string: "0.99"))
```
- Supported currency symbols include: USD, CAD, EUR, GBP, JPY, AUD, CHF, NOK, MXN, NZD, CNY, RUB, TRY, INR, IDR, ILS, SAR, ZAR, AED, SEK, HKD, SPD, DKK, and more.
- Any other provided currency symbol will result in a logged warning and no other action taken by the SDK.
- The product ID can have a maximum of 255 characters
- Note that if the product identifier is empty, the purchase will not be logged to Braze.
### Adding properties {#properties-purchases}
You can add metadata about purchases by either passing an [event property array](https://www.braze.com/docs/user_guide/data_and_analytics/custom_data/custom_events#nested-objects) or by passing an `NSDictionary` populated with `NSNumber`, `NSString`, or `NSDate` values.
Refer to the [iOS class documentation](http://appboy.github.io/appboy-ios-sdk/docs/interface_appboy.html#aaca4b885a8f61ac9fad3936b091448cc) for additional details.
### Adding quantity
You can add a quantity to your purchases if customers make the same purchase multiple times in a single checkout. You can accomplish this by passing in an `NSUInteger` for the quantity.
* A quantity input must be in the range of [0, 100] for the SDK to log a purchase.
* Methods without a quantity input will have a default quantity value of 1.
* Methods with a quantity input have no default value, and **must** receive a quantity input for the SDK to log a purchase.
Refer to the [iOS class documentation](http://appboy.github.io/appboy-ios-sdk/docs/interface_appboy.html#ab50403068be47c0acba9943583e259fa) for additional details.
```objc
[[Appboy sharedInstance] logPurchase:@"your product ID"
inCurrency:@"USD"
atPrice:[[[NSDecimalNumber alloc] initWithString:@"0.99"] autorelease]
withProperties:@{@"key1":"value1"}];
```
```swift
Appboy.sharedInstance()?.logPurchase("your product ID", inCurrency: "USD", atPrice: NSDecimalNumber(string: "0.99"), withProperties: ["key1":"value1"])
```
**Tip:**
If you pass in a value of 10 USD and a quantity of 3, that will log to the user's profile as three purchases of 10 dollars for a total of 30 dollars.
### Log purchases at the order level
If you want to log purchases at the order level instead of the product level, you can use order name or order category as the `product_id`. Refer to our [purchase object specification](https://www.braze.com/docs/api/objects_filters/purchase_object/#product-id-naming-conventions) to learn more.
### Reserved keys
The following keys are reserved and cannot be used as purchase properties:
- `time`
- `product_id`
- `quantity`
- `event_name`
- `price`
- `currency`
### REST API
You can also use our REST API to record purchases. Refer to the [User API documentation](https://www.braze.com/docs/developer_guide/rest_api/user_data/#user-data) for details.
# Location Tracking for iOS
Source: /docs/developer_guide/platforms/legacy_sdks/ios/analytics/location_tracking/index.md
**Warning:**
[AppboyKit](https://github.com/Appboy/appboy-ios-sdk) (also known as the Objective-C SDK) is no longer supported and has been replaced by the [Swift SDK](https://www.braze.com/docs/developer_guide/sdk_integration/?sdktab=swift). It will no longer receive new features, bug fixes, security updates, or technical support—however, messaging and analytics will continue to function as normal. To learn more, see [Introducing the New Braze Swift SDK](https://www.braze.com/resources/articles/introducing-the-new-braze-swift-sdk).
# Location tracking for iOS
By default, Braze disables location tracking. We enable location tracking after the host application has opted into location tracking and gained permission from the user. Provided users have opted into location tracking, Braze will log a single location for each user on session start.
**Important:**
For location tracking to work reliably in iOS 14 for users who give approximate location permission, you must update your SDK version to at least `3.26.1`.
## Enabling automatic location tracking
Starting with Braze iOS SDK `v3.17.0`, location tracking is disabled by default. You can enable automatic location tracking using the `Info.plist` file. Add the `Braze` dictionary to your `Info.plist` file. Inside the `Braze` dictionary, add the `EnableAutomaticLocationCollection` boolean subentry and set the value to `YES`. Note that prior to Braze iOS SDK v4.0.2, the dictionary key `Appboy` must be used in place of `Braze`.
You can also enable automatic location tracking at app startup time via the [`startWithApiKey:inApplication:withLaunchOptions:withAppboyOptions`](https://appboy.github.io/appboy-ios-sdk/docs/interface_appboy.html#aa9f1bd9e4a5c082133dd9cc344108b24) method. In the `appboyOptions` dictionary, set `ABKEnableAutomaticLocationCollectionKey` to `YES`. For example:
```objc
[Appboy startWithApiKey:@"YOUR-API_KEY"
inApplication:application
withLaunchOptions:options
withAppboyOptions:@{ ABKEnableAutomaticLocationCollectionKey : @(YES) }];
```
```swift
Appboy.start(withApiKey: "YOUR-API-KEY",
in:application,
withLaunchOptions:launchOptions,
withAppboyOptions:[ ABKEnableAutomaticLocationCollectionKey : true ])
```
### Passing location data to Braze
The following two methods can be used to manually set the last known location for the user.
```objc
[[Appboy sharedInstance].user setLastKnownLocationWithLatitude:latitude
longitude:longitude
horizontalAccuracy:horizontalAccuracy];
```
```objc
[[Appboy sharedInstance].user setLastKnownLocationWithLatitude:latitude
longitude:longitude
horizontalAccuracy:horizontalAccuracy
altitude:altitude
verticalAccuracy:verticalAccuracy];
```
```swift
Appboy.sharedInstance()?.user.setLastKnownLocationWithLatitude(latitude: latitude, longitude: longitude, horizontalAccuracy: horizontalAccuracy)
```
```swift
Appboy.sharedInstance()?.user.setLastKnownLocationWithLatitude(latitude: latitude, longitude: longitude, horizontalAccuracy: horizontalAccuracy, altitude: altitude, verticalAccuracy: verticalAccuracy)
```
Refer to [`ABKUser.h`](https://github.com/Appboy/appboy-ios-sdk/blob/master/AppboyKit/include/ABKUser.h) for more information.
# Uninstall Tracking for iOS
Source: /docs/developer_guide/platforms/legacy_sdks/ios/analytics/uninstall_tracking/index.md
**Warning:**
[AppboyKit](https://github.com/Appboy/appboy-ios-sdk) (also known as the Objective-C SDK) is no longer supported and has been replaced by the [Swift SDK](https://www.braze.com/docs/developer_guide/sdk_integration/?sdktab=swift). It will no longer receive new features, bug fixes, security updates, or technical support—however, messaging and analytics will continue to function as normal. To learn more, see [Introducing the New Braze Swift SDK](https://www.braze.com/resources/articles/introducing-the-new-braze-swift-sdk).
# Uninstall tracking for iOS
> This article covers how to configure uninstall tracking for your iOS application, and how to test so that your app does not take any unwanted automatic actions upon receiving a Braze uninstall tracking push.
Uninstall tracking utilizes background push notifications with a Braze flag in the payload. For more information, see [uninstall tracking](https://www.braze.com/docs/user_guide/data_and_analytics/tracking/uninstall_tracking/#uninstall-tracking) in our user guide.
## Step 1: Enabling background push
Make sure that you have enabled the **Remote notifications** option from the **Background Modes** section of your Xcode project's **Capabilities** tab. Refer to our [silent push notification](https://www.braze.com/docs/developer_guide/platforms/legacy_sdks/ios/push_notifications/silent_push_notifications/) documentation for additional details.
## Step 2: Checking for Braze background push
Braze uses background push notifications to collect uninstall tracking analytics. Make sure that your application [does not take any unwanted actions](https://www.braze.com/docs/developer_guide/platforms/legacy_sdks/ios/push_notifications/customization/ignoring_internal_push/) upon receiving our uninstall tracking notifications.
## Step 3: Test from the dashboard
Next, send yourself a test push from the dashboard. This test push will not update your user profile.
1. On the **Campaigns** page, create a push notification campaign and select **iOS push** as your platform.
2. On the **Settings** page, add the key `appboy_uninstall_tracking` with corresponding value `true` and check **Add Content-Available Flag**.
3. Use the **Preview** page to send yourself a test uninstall tracking push.
4. Check that your app does not take any unwanted automatic actions upon receiving the push.
**Important:**
These testing steps are a proxy for sending an uninstall tracking push from Braze. If you have badge counts enabled, a badge number will be sent along with the test push, but the Braze uninstall tracking pushes will not set a badge number on your application.
## Step 4: Enable uninstall tracking
Follow the instructions for [enabling uninstall tracking](https://www.braze.com/docs/user_guide/data_and_analytics/tracking/uninstall_tracking/#uninstall-tracking).
# Disable SDK Tracking for iOS
Source: /docs/developer_guide/platforms/legacy_sdks/ios/analytics/disabling_tracking/index.md
**Warning:**
[AppboyKit](https://github.com/Appboy/appboy-ios-sdk) (also known as the Objective-C SDK) is no longer supported and has been replaced by the [Swift SDK](https://www.braze.com/docs/developer_guide/sdk_integration/?sdktab=swift). It will no longer receive new features, bug fixes, security updates, or technical support—however, messaging and analytics will continue to function as normal. To learn more, see [Introducing the New Braze Swift SDK](https://www.braze.com/resources/articles/introducing-the-new-braze-swift-sdk).
# Disable data collection for iOS
To comply with data privacy regulations, data tracking activity on the iOS SDK can be stopped entirely using the [`disableSDK`](http://appboy.github.io/appboy-ios-sdk/docs/interface_appboy.html#a8d3b78a98420713d8590ed63c9172733) method. This method will cause all network connections to be canceled, and the Braze SDK will not pass any data to our servers. If you wish to resume data collection later, you can use the [`requestEnableSDKOnNextAppRun`](http://appboy.github.io/appboy-ios-sdk/docs/interface_appboy.html#a781078a40a3db0de64ac82dcae3b595b) method in the future to resume data collection.
Additionally, you can use the method [`wipeDataAndDisableForAppRun`](http://appboy.github.io/appboy-ios-sdk/docs/interface_appboy.html#ac8d580f60ec0608cd91240a8a3aa23a3) to fully clear all client-side data stored on the device.
Unless a user uninstalls all apps from a vendor on a given device, the next Braze SDK and app runs after calling `wipeDataAndDisableForAppRun()` will result in our server re-identifying that user via their device identifier (IDFV). In order to fully remove all user data, you should combine a call to `wipeDataAndDisableForAppRun` with a request to delete data on the server via the Braze [REST API](https://www.braze.com/docs/developer_guide/rest_api/user_data/#user-delete-endpoint).
## iOS SDK v5.7.0+
For devices using iOS SDK v5.7.0 and above, when [disabling IDFV collection](https://www.braze.com/docs/developer_guide/platform_integration_guides/legacy_sdks/ios/initial_sdk_setup/other_sdk_customizations/#optional-idfv-collection---swift/), calling [`wipeData`](https://braze-inc.github.io/braze-swift-sdk/documentation/brazekit/braze/wipedata()) will not result in our server re-identifying that user via their device identifier (IDFV).
# Deep Linking for iOS
Source: /docs/developer_guide/platforms/legacy_sdks/ios/advanced_use_cases/linking/index.md
**Warning:**
[AppboyKit](https://github.com/Appboy/appboy-ios-sdk) (also known as the Objective-C SDK) is no longer supported and has been replaced by the [Swift SDK](https://www.braze.com/docs/developer_guide/sdk_integration/?sdktab=swift). It will no longer receive new features, bug fixes, security updates, or technical support—however, messaging and analytics will continue to function as normal. To learn more, see [Introducing the New Braze Swift SDK](https://www.braze.com/resources/articles/introducing-the-new-braze-swift-sdk).
# Deep linking for iOS
For introductory information on deep links, refer to our [User Guide article](https://www.braze.com/docs/user_guide/personalization_and_dynamic_content/deep_linking_to_in-app_content/#what-is-deep-linking). If you're looking to implement deep links for the first time in your Braze app, the steps below will get you started.
## Step 1: Register a scheme
You must state a custom scheme in the `Info.plist` file. The navigation structure is defined by an array of dictionaries. Each of those dictionaries contains an array of strings.
Use Xcode to edit your `Info.plist` file:
1. Add a new key, `URL types`. Xcode will automatically make this an array containing a dictionary called `Item 0`.
2. Within `Item 0`, add a key `URL identifier`. Set the value to your custom scheme.
3. Within `Item 0`, add a key `URL Schemes`. This will automatically be an array containing a `Item 0` string.
4. Set `URL Schemes` >> `Item 0` to your custom scheme.
Alternatively, if you wish to edit your `Info.plist` file directly, you can follow this spec:
```html
CFBundleURLTypesCFBundleURLName{YOUR.SCHEME}CFBundleURLSchemes{YOUR.SCHEME}
```
## Step 2: Allowlist the custom scheme (iOS 9+)
Starting with iOS 9, apps must have an allowlist of custom schemes that the app is allowed to open. Attempting to call schemes outside this list will cause the system to record an error in the device's logs, and the deep link will not open. An example of this error looks like this:
```
: -canOpenURL: failed for URL: "yourapp://deeplink" – error: "This app is not allowed to query for scheme yourapp"
```
For example, if an in-app message should open the Facebook app when tapped, the app has to have the Facebook custom scheme (`fb`) in the allowlist. Otherwise, the system will reject the deep link. Deep links that direct to a page or view inside your own app still require that your app's custom scheme be listed in your app's `Info.plist`.
You should add all the schemes that the app needs to deep link to in an allowlist in your app's `Info.plist` with the key `LSApplicationQueriesSchemes`. For example:
```html
LSApplicationQueriesSchemesmyappfacebooktwitter
```
For more information, refer to [Apple's documentation](https://developer.apple.com/library/content/documentation/General/Reference/InfoPlistKeyReference/Articles/LaunchServicesKeys.html#//apple_ref/doc/uid/TP40009250-SW14) on the `LSApplicationQueriesSchemes` key.
## Step 3: Implement a handler
After activating your app, iOS will call the method [`application:openURL:options:`](https://developer.apple.com/reference/uikit/uiapplicationdelegate/1623112-application?language=objc). The important argument is the [NSURL](https://developer.apple.com/library/ios/DOCUMENTATION/Cocoa/Reference/Foundation/Classes/NSURL_Class/Reference/Reference.html#//apple_ref/doc/c_ref/NSURL) object.
```objc
- (BOOL)application:(UIApplication *)app openURL:(NSURL *)url options:(NSDictionary *)options {
NSString *path = [url path];
NSString *query = [url query];
// Here you should insert code to take some action based upon the path and query.
return YES;
}
```
```swift
func application(_ app: UIApplication, open url: URL, options: [UIApplication.OpenURLOptionsKey : Any] = [:]) -> Bool {
let path = url.path
let query = url.query
// Here you should insert code to take some action based upon the path and query.
return true
}
```

# Universal links
To use universal links, make sure you have added a registered domain to your app's capabilities and have uploaded an `apple-app-site-association` file. Then implement the method `application:continueUserActivity:restorationHandler:` in your `AppDelegate`. For example:
```objc
- (BOOL)application:(UIApplication *)application
continueUserActivity:(NSUserActivity *)userActivity
restorationHandler:(void (^)(NSArray *restorableObjects))restorationHandler {
if ([userActivity.activityType isEqualToString:NSUserActivityTypeBrowsingWeb]) {
NSURL *url = userActivity.webpageURL;
// Handle url
}
return YES;
}
```
```swift
func application(_ application: UIApplication, continue userActivity: NSUserActivity, restorationHandler: @escaping ([UIUserActivityRestoring]?) -> Void) -> Bool {
if (userActivity.activityType == NSUserActivityTypeBrowsingWeb) {
let url = userActivity.webpageURL
// Handle url
}
return true
}
```
Refer to [Apple](https://developer.apple.com/library/content/documentation/General/Conceptual/AppSearch/UniversalLinks.html) for more information.
**Note:**
The default universal link integration is not compatible with Braze push notifications or in-app messages. See [linking customization](#linking-handling-customization) to handle universal links within your application. Alternatively, we recommend using [scheme-based deep links](#step-1-registering-a-scheme) with push notifications and in-app messages.
## App transport security (ATS)
iOS 9 introduced a breaking change affecting web URLs embedded in in-app messages, and push notifications.
### ATS requirements
From [Apple's documentation](https://developer.apple.com/library/prerelease/ios/releasenotes/General/WhatsNewIniOS/Articles/iOS9.html#//apple_ref/doc/uid/TP40016198-SW14): "App Transport Security is a feature that improves the security of connections between an app and web services. The feature consists of default connection requirements that conform to best practices for secure connections. Apps can override this default behavior and turn off transport security."
ATS is applied by default on iOS 9+. It requires that all connections use HTTPS and are encrypted using TLS 1.2 with forward secrecy. Refer to [Requirements for Connecting Using ATS](https://developer.apple.com/library/ios/documentation/General/Reference/InfoPlistKeyReference/Articles/CocoaKeys.html#//apple_ref/doc/uid/TP40009251-SW35) for more information. All images served by Braze to end devices are handled by a content delivery network ("CDN") that supports TLS 1.2 and is compatible with ATS.
Unless they are specified as exceptions in your application's `Info.plist`, connections that do not follow these requirements will fail with errors that look something like this:
```
CFNetwork SSLHandshake failed (-9801)
Error Domain=NSURLErrorDomain Code=-1200 "An SSL error has occurred, and a secure connection to the server cannot be made."
```
```
NSURLSession/NSURLConnection HTTP load failed (kCFStreamErrorDomainSSL, -9802)
```
ATS compliance is enforced for links opened within the mobile app (our default handling of clicked links) and does not apply to sites opened externally via a web browser.
### Handling ATS requirements
You can handle ATS in one of the following three ways:
#### Confirm all links are ATS compliant (recommended)
Your Braze integration can satisfy ATS requirements by ensuring that any existing links you drive users to (through in-app message and push campaigns) satisfy ATS requirements. While there are ways to bypass ATS restrictions, we recommended checking that all linked URLs are ATS compliant. Given Apple's increasing emphasis on application security, the following approaches to allowing ATS exceptions are not guaranteed to be supported by Apple.
An SSL tool can help you pinpoint web server security issues. This [SSL server test](https://www.ssllabs.com/ssltest/index.html) from Qualys, Inc. provides a line item specifically for Apple ATS 9 and iOS 9 compliance.
#### Partially disable ATS
You can allow a subset of links with certain domains or schemes to be treated as exceptions to the ATS rules. Your Braze integration will satisfy ATS requirements if every link you use in a Braze messaging channel is either ATS compliant or handled by an exception.
To add a domain as an exception of the ATS, add the following to your app's `Info.plist` file:
```html
NSAppTransportSecurityNSAllowsArbitraryLoadsNSExceptionDomainsexample.comNSExceptionAllowsInsecureHTTPLoadsNSIncludesSubdomains
```
Refer to Apple's article on [app transport security keys](https://developer.apple.com/library/ios/documentation/General/Reference/InfoPlistKeyReference/Articles/CocoaKeys.html#//apple_ref/doc/uid/TP40009251-SW33) for more information.
#### Disable ATS entirely
You can turn off ATS entirely. Note that this is not recommended practice, due to both lost security protections and future iOS compatibility. To disable ATS, insert the following in your app's `Info.plist` file:
```html
NSAppTransportSecurityNSAllowsArbitraryLoads
```
Refer to [Shipping an App With App Transport Security](http://timekl.com/blog/2015/08/21/shipping-an-app-with-app-transport-security/?utm_campaign=iOS+Dev+Weekly&utm_medium=email&utm_source=iOS_Dev_Weekly_Issue_213) for more information on how to debug ATS failures.
## URL encoding
As of Braze iOS SDK v2.21.0, the SDK percent-encodes links to create valid `NSURL`s. All link characters that are not allowed in a properly formed URL, such as Unicode characters, will be percent escaped.
To decode an encoded link, use the `NSString` method [`stringByRemovingPercentEncoding`](https://developer.apple.com/library/ios/documentation/Cocoa/Reference/Foundation/Classes/NSString_Class/index.html#//apple_ref/occ/instm/NSString/stringByRemovingPercentEncoding). Note that you must also return `YES` in the `ABKURLDelegate` and that a call to action is required to trigger the handling of the URL by the app. For example:
```objc
- (BOOL)application:(UIApplication *)application openURL:(NSURL *)url options:(NSDictionary *)options {
NSString *urlString = url.absoluteString.stringByRemovingPercentEncoding;
// Handle urlString
return YES;
}
```
```swift
func application(_ app: UIApplication, open url: URL, options: [UIApplication.OpenURLOptionsKey : Any] = [:]) -> Bool {
let urlString = url.absoluteString.removingPercentEncoding
// Handle urlString
return true
}
```
## Customization {#linking-customization}
### Default WebView customization
The customizable `ABKModalWebViewController` class displays web URLs opened by the SDK, typically when "Open Web URL Inside App" is selected for a web deep link.
You can declare a category for, or directly modify, the `ABKModalWebViewController` class to apply customization to the web view. Check the class' [.h file](https://github.com/Appboy/appboy-ios-sdk/blob/master/AppboyKit/include/ABKModalWebViewController.h) and [.m file](https://github.com/Appboy/appboy-ios-sdk/blob/master/AppboyKit/ABKModalWebViewController.m) for more detail.
### Linking handling customization
The `ABKURLDelegate` protocol can be used to customize the handling of URLs such as deep links, web URLs, and universal links. To set the delegate during Braze initialization, pass a delegate object to the `ABKURLDelegateKey` in the `appboyOptions` of [`startWithApiKey:inApplication:withAppboyOptions:`](https://appboy.github.io/appboy-ios-sdk/docs/interface_appboy.html#aa9f1bd9e4a5c082133dd9cc344108b24). Braze will then call your delegate's implementation of `handleAppboyURL:fromChannel:withExtras:` before handling any URIs.
#### Integration example: ABKURLDelegate
```objc
- (BOOL)handleAppboyURL:(NSURL *)url fromChannel:(ABKChannel)channel withExtras:(NSDictionary *)extras {
if ([[url.host lowercaseString] isEqualToString:@"MY-DOMAIN.com"]) {
// Custom handle link here
return YES;
}
// Let Braze handle links otherwise
return NO;
}
```
```swift
func handleAppboyURL(_ url: URL?, from channel: ABKChannel, withExtras extras: [AnyHashable : Any]?) -> Bool {
if (url.host == "MY-DOMAIN.com") {
// Custom handle link here
return true;
}
// Let Braze handle links otherwise
return false;
}
```
For more information, see [`ABKURLDelegate.h`](https://github.com/Appboy/appboy-ios-sdk/blob/master/AppboyKit/include/ABKURLDelegate.h).
## Frequent use cases
### Deep linking to app settings
iOS can take users from your app into its page in the iOS settings application. You can take advantage of `UIApplicationOpenSettingsURLString` to deep link users to settings from push notifications and in-app messages.
1. First, make sure your application is set up for either [scheme-based deep links](#deep-links) or [universal links](#universal-links).
2. Decide on a URI for deep linking to the **Settings** page (for example, `myapp://settings` or `https://www.braze.com/settings`).
3. If you are using custom scheme-based deep links, add the following code to your `application:openURL:options:` method:
```objc
- (BOOL)application:(UIApplication *)app
openURL:(NSURL *)url
options:(NSDictionary *)options {
NSString *path = [url path];
if ([path isEqualToString:@"settings"]) {
NSURL *settingsURL = [NSURL URLWithString:UIApplicationOpenSettingsURLString];
[[UIApplication sharedApplication] openURL:settingsURL];
}
return YES;
}
```
```swift
func application(_ app: UIApplication, open url: URL, options: [UIApplicationOpenURLOptionsKey : Any] = [:]) -> Bool {
let path = url.path
if (path == "settings") {
UIApplication.shared.openURL(URL(string:UIApplicationOpenSettingsURLString)!)
}
return true
}
```
# Fine Network Traffic Control for iOS
Source: /docs/developer_guide/platforms/legacy_sdks/ios/advanced_use_cases/fine_network_traffic_control/index.md
**Warning:**
[AppboyKit](https://github.com/Appboy/appboy-ios-sdk) (also known as the Objective-C SDK) is no longer supported and has been replaced by the [Swift SDK](https://www.braze.com/docs/developer_guide/sdk_integration/?sdktab=swift). It will no longer receive new features, bug fixes, security updates, or technical support—however, messaging and analytics will continue to function as normal. To learn more, see [Introducing the New Braze Swift SDK](https://www.braze.com/resources/articles/introducing-the-new-braze-swift-sdk).
# Fine network traffic control
## Request processing policies
Braze allows the user the option to control network traffic using the following protocols:
### Automatic request processing
***`ABKRequestProcessingPolicy` enum value: `ABKAutomaticRequestProcessing`***
- This is the **default request policy** value.
- The Braze SDK will automatically handle all server communication, including:
- Flushing custom events and attributes data to Braze servers
- Updating Content Cards and Geofences
- Requesting new in-app messages
- Immediate server requests are performed when user-facing data is required for Braze features, such as in-app messages.
- To minimize server load, Braze performs periodic flushes of new user data every few seconds.
Data can be manually flushed to Braze servers at any time using the following method:
```objc
[[Appboy sharedInstance] flushDataAndProcessRequestQueue];
```
```swift
Appboy.sharedInstance()?.flushDataAndProcessRequestQueue()
```
### Manual request processing
***`ABKRequestProcessingPolicy` enum value: `ABKManualRequestProcessing`***
- This protocol is the same as automatic request processing except:
- Custom attributes and custom event data are not automatically flushed to the server throughout the user session.
- Braze will still perform automatic network requests for internal features, such as requesting in-app messages, Liquid templating in in-app messages, Geofences, and location tracking. For more details, see the `ABKRequestProcessingPolicy` declaration in [`Appboy.h`](https://github.com/Appboy/appboy-ios-sdk/blob/master/AppboyKit/include/Appboy.h). When these internal requests are made, locally stored custom attributes and custom event data may be flushed to the Braze server, depending on the request type.
Data can be manually flushed to Braze servers at any time using the following method:
```objc
[[Appboy sharedInstance] flushDataAndProcessRequestQueue];
```
```swift
Appboy.sharedInstance()?.flushDataAndProcessRequestQueue()
```
## Setting the request processing policy
### Set request policy on startup
These policies can be set at app startup time from the [`startWithApiKey:inApplication:withLaunchOptions:withAppboyOptions`](https://appboy.github.io/appboy-ios-sdk/docs/interface_appboy.html#aa9f1bd9e4a5c082133dd9cc344108b24) method. In the `appboyOptions` dictionary, set the `ABKRequestProcessingPolicyOptionKey` as shown in the following code snippet:
```objc
NSDictionary *appboyOptions = @{
// Other entries
ABKRequestProcessingPolicyOptionKey : @(ABKAutomaticRequestProcessing)
};
```
```swift
let appboyOptions: [AnyHashable: Any] = [
// Other entries
ABKRequestProcessingPolicyOptionKey: ABKRequestProcessingPolicy.automaticRequestProcessing.rawValue
]
```
### Set request policy at runtime
The request processing policy can also be set during runtime via the `requestProcessingPolicy` property on `Appboy`:
```objc
// Sets the request processing policy to automatic (the default value)
[Appboy sharedInstance].requestProcessingPolicy = ABKAutomaticRequestProcessing;
```
```swift
// Sets the request processing policy to automatic (the default value)
Appboy.sharedInstance()?.requestProcessingPolicy = ABKRequestProcessingPolicy.automaticRequestProcessing
```
## Manual shutdown of in-flight server communication
If at any time an "in-flight" server communication needs to be halted, you must call the following method:
```objc
[[Appboy sharedInstance] shutdownServerCommunication];
```
```swift
Appboy.sharedInstance()?.shutdownServerCommunication();
```
After calling this method, you must reset the request processing mode to automatic. For this reason, we only recommend calling this if the OS is forcing you to stop background tasks or something similar.
# Localization for iOS
Source: /docs/developer_guide/platforms/legacy_sdks/ios/advanced_use_cases/localization/index.md
**Warning:**
[AppboyKit](https://github.com/Appboy/appboy-ios-sdk) (also known as the Objective-C SDK) is no longer supported and has been replaced by the [Swift SDK](https://www.braze.com/docs/developer_guide/sdk_integration/?sdktab=swift). It will no longer receive new features, bug fixes, security updates, or technical support—however, messaging and analytics will continue to function as normal. To learn more, see [Introducing the New Braze Swift SDK](https://www.braze.com/resources/articles/introducing-the-new-braze-swift-sdk).
# Localization
Localization is supported within the Braze iOS SDK. In addition to English, Braze supports several languages for our built-in SDK messages. These pertain to the default messages displayed in applications integrated with Braze, such as places in the app when there are connectivity issues (for example, "Cannot establish network connection. Please try again later."). If the phone language is set to one of the supported languages, any of the Braze default strings triggered within an integrated application will automatically appear in that language.
If you are looking for a complete list of supported languages you may attribute to your users in their profiles, see our [user language list](https://www.braze.com/docs/user_guide/data/user_data_collection/language_codes/).
## Languages supported
- Arabic
- Burmese
- Catalan
- Chinese
- Czech
- Danish
- Dutch
- English
- Esperanto
- Estonian
- Ewe
- Filipino
- Finnish
- French
- Georgian
- German
- Greek
- Hebrew
- Hindi
- Hungarian
- Indonesian
- Irish
- Italian
- Japanese
- Korean
- Malay
- Norwegian
- Nynorsk
- Polish
- Portuguese
- Russian
- Spanish
- Swedish
- Thai
- Ukrainian
- Vietnamese
For more information, refer to our [Apple localization](https://developer.apple.com/library/ios/documentation/CoreFoundation/Reference/CFLocaleRef/) article as well as the [LOC standard language list](http://www.loc.gov/standards/iso639-2/php/English_list.php).
# Beacon Integration for iOS
Source: /docs/developer_guide/platforms/legacy_sdks/ios/advanced_use_cases/beacon_integration/index.md
**Warning:**
[AppboyKit](https://github.com/Appboy/appboy-ios-sdk) (also known as the Objective-C SDK) is no longer supported and has been replaced by the [Swift SDK](https://www.braze.com/docs/developer_guide/sdk_integration/?sdktab=swift). It will no longer receive new features, bug fixes, security updates, or technical support—however, messaging and analytics will continue to function as normal. To learn more, see [Introducing the New Braze Swift SDK](https://www.braze.com/resources/articles/introducing-the-new-braze-swift-sdk).
# Beacon integration
Here, we will walk through how to integrate specific kinds of beacons with Braze to allow for segmentation and messaging.
## Infillion Beacons
Once you have your Infillion Beacons set up and integrated into your app, you can log custom events like a visit starting or ending or a beacon being sighted. You can also log properties for these events, like the place name or the dwell time.
To log a custom event when a user enters a place, input this code into the `didBeginVisit` method:
```objc
[[Appboy sharedInstance] logCustomEvent:@"Entered %@", visit.place.name];
[[Appboy sharedInstance] flushDataAndProcessRequestQueue];
```
```swift
Appboy.sharedInstance()?.logCustomEvent("Entered %@", visit.place.name)
Appboy.sharedInstance()?.flushDataAndProcessRequestQueue()
```
The `flushDataAndProcessRequestQueue` confirms that your event will log even if the app is in the background, and the same process can be implemented for leaving a location. Note that this will create and increment a unique custom event for each new place that the user enters. If you anticipate creating more than 50 places, we recommend you create one generic "Place Entered" custom event and include the place name as an event property.
# Location & Geofences for iOS
Source: /docs/developer_guide/platforms/legacy_sdks/ios/advanced_use_cases/locations_and_geofences/index.md
**Warning:**
[AppboyKit](https://github.com/Appboy/appboy-ios-sdk) (also known as the Objective-C SDK) is no longer supported and has been replaced by the [Swift SDK](https://www.braze.com/docs/developer_guide/sdk_integration/?sdktab=swift). It will no longer receive new features, bug fixes, security updates, or technical support—however, messaging and analytics will continue to function as normal. To learn more, see [Introducing the New Braze Swift SDK](https://www.braze.com/resources/articles/introducing-the-new-braze-swift-sdk).
# Locations and geofences
To support geofences for iOS:
1. Your integration must support background push notifications.
2. Braze Geofences [must be enabled](https://www.braze.com/docs/developer_guide/platform_integration_guides/swift/analytics/location_tracking/#enabling-automatic-location-tracking) through the SDK either implicitly by enabling location collection or explicitly by enabling geofence collection. They are not enabled by default.
**Important:**
As of iOS 14, Geofences do not work reliably for users who choose to give their approximate location permission.
## Step 1: Enable background push
To fully use our geofence syncing strategy, you must have [background push](https://www.braze.com/docs/developer_guide/platform_integration_guides/ios/push_notifications/silent_push_notifications/#use-silent-remote-notifications-to-trigger-background-work) enabled in addition to completing the standard push integration.
## Step 2: Enable geofences
By default, geofences are enabled based on whether automatic location collection is enabled. You can enable geofences using the `Info.plist` file. Add the `Braze` dictionary to your `Info.plist` file. Inside the `Braze` dictionary, add the `EnableGeofences` boolean subentry and set the value to `YES`. Note that prior to Braze iOS SDK v4.0.2, the dictionary key `Appboy` must be used in place of `Braze`.
You can also enable geofences at app startup time using the [`startWithApiKey:inApplication:withLaunchOptions:withAppboyOptions`](https://appboy.github.io/appboy-ios-sdk/docs/interface_appboy.html#aa9f1bd9e4a5c082133dd9cc344108b24) method. In the `appboyOptions` dictionary, set `ABKEnableGeofencesKey` to `YES`. For example:
```objc
[Appboy startWithApiKey:@"YOUR-API_KEY"
inApplication:application
withLaunchOptions:options
withAppboyOptions:@{ ABKEnableGeofencesKey : @(YES) }];
```
```swift
Appboy.start(withApiKey: "YOUR-API-KEY",
in:application,
withLaunchOptions:launchOptions,
withAppboyOptions:[ ABKEnableGeofencesKey : true ])
```
## Step 3: Check for Braze background push
Braze syncs geofences to devices using background push notifications. Follow the [iOS customization](https://www.braze.com/docs/developer_guide/platforms/legacy_sdks/ios/push_notifications/customization/ignoring_internal_push/) article to ensure that your application does not take any unwanted actions upon receiving Braze geofence sync notifications.
## Step 4: Add NSLocationAlwaysUsageDescription to your Info.plist
Add the key `NSLocationAlwaysUsageDescription` and `NSLocationAlwaysAndWhenInUseUsageDescription` to your `info.plist` with a `String` value that has a description of why your application needs to track location. Both keys are required by iOS 11 or later.
This description will be shown when the system location prompt requests authorization and should clearly explain the benefits of location tracking to your users.
## Step 5: Request authorization from the user
The Geofences feature is only functional while `Always` location authorization is granted.
To request for `Always` location authorization, use the following code:
```objc
CLLocationManager *locationManager = [[CLLocationManager alloc] init];
[locationManager requestAlwaysAuthorization];
```
```swift
var locationManager = CLLocationManager()
locationManager.requestAlwaysAuthorization()
```
## Step 6: Enable geofences on the dashboard
iOS only allows up to 20 geofences to be stored for a given app. Using locations will use up some of these 20 available geofence slots. To prevent accidental or unwanted disruption to other geofence-related functionality in your app, location geofences must be enabled for individual apps on the dashboard.
For locations to work correctly, you should also confirm that your app is not using all available geofence spots.
### Enable geofences from the locations page:
### Enable geofences from the settings page:

## Disabling automatic geofence requests
Starting in iOS SDK version 3.21.3, you can disable geofences from being automatically requested. You can do this by using the `Info.plist` file. Add the `Braze` dictionary to your `Info.plist` file. Inside the `Braze` dictionary, add the `DisableAutomaticGeofenceRequests` boolean subentry and set the value to `YES`.
You can also disable automatic geofence requests at app startup time via the [`startWithApiKey:inApplication:withLaunchOptions:withAppboyOptions`](https://appboy.github.io/appboy-ios-sdk/docs/interface_appboy.html#aa9f1bd9e4a5c082133dd9cc344108b24) method. In the `appboyOptions` dictionary, set `ABKDisableAutomaticGeofenceRequestsKey` to `YES`. For example:
```objc
[Appboy startWithApiKey:@"YOUR-API_KEY"
inApplication:application
withLaunchOptions:options
withAppboyOptions:@{ ABKDisableAutomaticGeofenceRequestsKey : @(YES) }];
```
```swift
Appboy.start(withApiKey: "YOUR-API-KEY",
in:application,
withLaunchOptions:launchOptions,
withAppboyOptions:[ ABKDisableAutomaticGeofenceRequestsKey : true ])
```
If you choose to use this option, you will need to manually request geofences for the feature to work.
## Manually requesting geofences
When the Braze SDK requests geofences to monitor from the backend, it reports the user's current location and receives geofences that are determined to be optimally relevant based on the location reported. There is a rate limit of one geofence refresh per session.
To control the location that the SDK reports for the purposes of receiving the most relevant geofences, starting in iOS SDK version 3.21.3, you can manually request geofences by providing the latitude and longitude of a location. It is recommended to disable automatic geofence requests when using this method. To do so, use the following code:
```objc
[[Appboy sharedInstance] requestGeofencesWithLongitude:longitude
latitude:latitude];
```
```swift
Appboy.sharedInstance()?.requestGeofences(withLongitude: longitude, latitude: latitude)
```
# Google Tag Manager for iOS
Source: /docs/developer_guide/platforms/legacy_sdks/ios/advanced_use_cases/google_tag_manager/index.md
**Warning:**
[AppboyKit](https://github.com/Appboy/appboy-ios-sdk) (also known as the Objective-C SDK) is no longer supported and has been replaced by the [Swift SDK](https://www.braze.com/docs/developer_guide/sdk_integration/?sdktab=swift). It will no longer receive new features, bug fixes, security updates, or technical support—however, messaging and analytics will continue to function as normal. To learn more, see [Introducing the New Braze Swift SDK](https://www.braze.com/resources/articles/introducing-the-new-braze-swift-sdk).
# Google Tag Manager for iOS
## Initializing the SDK {#initializing-ios-google-tag-provider}
The Braze iOS SDK can be initialized and controlled by tags configured within [Google Tag Manager](https://tagmanager.google.com/).
Before using Google Tag Manager, be sure to first follow our [initial SDK setup](https://www.braze.com/docs/developer_guide/platforms/legacy_sdks/ios/initial_sdk_setup/overview/).
## Configuring your Google Tag Manager {#configuring-ios-google-tag-manager}
In this example, we'll pretend we are a music streaming app that wants to log different events as users listen to songs. Using Google Tag Manager for iOS, we can control which of our third-party vendors receive this event and create tags specific to Braze.
### Custom events
Custom events are logged with `actionType` set to `logEvent`. The Braze custom tag provider in our example is expecting the custom event name to be set using `eventName`.
To get started, create a trigger that looks for an "Event Name" that equals `played song`

Next, create a new Tag ("Function Call") and enter the class path of your [custom tag provider](#adding-ios-google-tag-provider) described later in this article.
This tag will be triggered when you log the `played song` event we just created.
In our example tag's custom parameters (key-value pairs), we've set `eventName` to `played song` - which will be the custom event name logged to Braze.
**Important:**
When sending a custom event, set `actionType` to `logEvent`, and set a value for `eventName` as shown in the following example.
The custom tag provider in our example will use these keys to determine what action to take and what event name to send to Braze when it receives data from Google Tag Manager.

You can also include additional key-value pair arguments to the tag, which will be sent as custom event properties to Braze. `eventName` and `actionType` will not be ignored for custom event properties. In the following example tag, we'll pass in `genre`, which was defined using a tag variable in Google Tag Manager - sourced from the custom event we logged in our app.
The `genre` event property is sent to Google Tag Manager as a "Firebase - Event Parameter" variable since Google Tag Manager for iOS uses Firebase as the data layer.

Lastly, when a user plays a song in our app, we will log an event through Firebase and Google Tag Manager using the Firebase analytics event name that matches our tag's trigger name, `played song`:
```obj-c
NSDictionary *parameters = @{@"genre" : @"pop",
@"number of times listened" : @42};
[FIRAnalytics logEventWithName:@"played song" parameters:parameters];
```
### Logging custom attributes
Custom attributes are set via an `actionType` set to `customAttribute`. The Braze custom tag provider is expecting the custom attribute key-value to be set via `customAttributeKey` and `customAttributeValue`:
```obj-c
NSDictionary *parameters = @{@"customAttributeKey" : @"favorite song",
@"customAttributeValue" : @"Private Eyes"};
[FIRAnalytics logEventWithName:@"customAttribute" parameters:parameters];
```
### Calling changeUser
Calls to `changeUser()` are made via an `actionType` set to `changeUser`. The Braze custom tag provider is expecting the Braze user ID to be set via an `externalUserId` key-value pair within your tag:
```obj-c
NSDictionary *parameters = @{@"externalUserId" : userId};
[FIRAnalytics logEventWithName:@"changeUser" parameters:parameters];
```
## Braze SDK custom tag provider {#adding-ios-google-tag-provider}
With the tags and triggers set up, you will also need to implement Google Tag Manager in your iOS app which can be found in Google's [documentation](https://developers.google.com/tag-manager/ios/v5/).
Once Google Tag Manager is installed in your app, add a custom tag provider to call Braze SDK methods based on the tags you've configured within Google Tag Manager.
Be sure to note the "Class Path" to the file - this is what you'll enter when setting up a Tag in the [Google Tag Manager](https://tagmanager.google.com/) console.
This example shows one of many ways to structure your custom tag provider, where we determine which Braze SDK method to call based on the `actionType` key-value pair sent down from the GTM Tag.
The `actionType` we've supported in our example are `logEvent`, `customAttribute`, and `changeUser`, but you may prefer to change how your tag provider handles data from Google Tag Manager.
Add the following code to your `BrazeGTMTagManager.h` file:
```obj-c
@import Firebase;
@import GoogleTagManager;
@interface BrazeGTMTagManager : NSObject
@end
```
And add the following code to your `BrazeGTMTagManager.m` file:
```obj-c
#import
#import "BrazeGTMTagManager.h"
#import "Appboy-iOS-SDK/AppboyKit.h"
static NSString *const ActionTypeKey = @"actionType";
// Custom Events
static NSString *const LogEventActionType = @"logEvent";
static NSString *const LogEventEventName = @"eventName";
// Custom Attributes
static NSString *const CustomAttributeActionType = @"customAttribute";
static NSString *const CustomAttributeKey = @"customAttributeKey";
static NSString *const CustomAttributeValueKey = @"customAttributeValue";
// Change User
static NSString *const ChangeUserActionType = @"changeUser";
static NSString *const ChangeUserExternalUserId = @"externalUserId";
@implementation BrazeGTMTagManager
- (NSObject *)executeWithParameters:(NSDictionary *)parameters {
NSMutableDictionary *mutableParameters = [parameters mutableCopy];
NSString *actionType = mutableParameters[ActionTypeKey];
if (!actionType) {
NSLog(@"There is no Braze action type key in this call. Doing nothing.", nil);
return nil;
}
[mutableParameters removeObjectForKey:ActionTypeKey];
if ([actionType isEqualToString:LogEventActionType]) {
[self logEvent:mutableParameters];
} else if ([actionType isEqualToString:CustomAttributeActionType]) {
[self logCustomAttribute:mutableParameters];
} else if ([actionType isEqualToString:ChangeUserActionType]) {
[self changeUser:mutableParameters];
} else {
NSLog(@"Invalid action type. Doing nothing.");
}
return nil;
}
- (void)logEvent:(NSMutableDictionary *)parameters {
NSString *eventName = parameters[LogEventEventName];
[parameters removeObjectForKey:LogEventEventName];
[[Appboy sharedInstance] logCustomEvent:eventName withProperties:parameters];
}
- (void)logCustomAttribute:(NSMutableDictionary *)parameters {
NSString *customAttributeKey = parameters[CustomAttributeKey];
id customAttributeValue = parameters[CustomAttributeValueKey];
if ([customAttributeValue isKindOfClass:[NSString class]]) {
[[Appboy sharedInstance].user setCustomAttributeWithKey:customAttributeKey
andStringValue:customAttributeValue];
} else if ([customAttributeValue isKindOfClass:[NSDate class]]) {
[[Appboy sharedInstance].user setCustomAttributeWithKey:customAttributeKey
andDateValue:customAttributeValue];
} else if ([customAttributeValue isKindOfClass:[NSNumber class]]) {
if (strcmp([customAttributeValue objCType], [@(YES) objCType]) == 0) {
[[Appboy sharedInstance].user setCustomAttributeWithKey:customAttributeKey
andBOOLValue:[(NSNumber *)customAttributeValue boolValue]];
} else if (strcmp([customAttributeValue objCType], @encode(short)) == 0 ||
strcmp([customAttributeValue objCType], @encode(int)) == 0 ||
strcmp([customAttributeValue objCType], @encode(long)) == 0) {
[[Appboy sharedInstance].user setCustomAttributeWithKey:customAttributeKey
andIntegerValue:[(NSNumber *)customAttributeValue integerValue]];
} else if (strcmp([customAttributeValue objCType], @encode(float)) == 0 ||
strcmp([customAttributeValue objCType], @encode(double)) == 0) {
[[Appboy sharedInstance].user setCustomAttributeWithKey:customAttributeKey
andDoubleValue:[(NSNumber *)customAttributeValue doubleValue]];
} else {
NSLog(@"Could not map NSNumber value to Appboy custom attribute:%@", customAttributeValue);
}
} else if ([customAttributeValue isKindOfClass:[NSArray class]]) {
[[Appboy sharedInstance].user setCustomAttributeArrayWithKey:customAttributeKey
array:customAttributeValue];
}
}
- (void)changeUser:(NSMutableDictionary *)parameters {
NSString *userId = parameters[ChangeUserExternalUserId];
[[Appboy sharedInstance] changeUser:userId];
}
@end
```
# Storage for iOS
Source: /docs/developer_guide/platforms/legacy_sdks/ios/storage/index.md
**Warning:**
[AppboyKit](https://github.com/Appboy/appboy-ios-sdk) (also known as the Objective-C SDK) is no longer supported and has been replaced by the [Swift SDK](https://www.braze.com/docs/developer_guide/sdk_integration/?sdktab=swift). It will no longer receive new features, bug fixes, security updates, or technical support—however, messaging and analytics will continue to function as normal. To learn more, see [Introducing the New Braze Swift SDK](https://www.braze.com/resources/articles/introducing-the-new-braze-swift-sdk).
# Storage
This article describes the different device-level properties captured when using the Braze iOS SDK.
## Device properties
By default, Braze will collect the following [device-level properties](https://github.com/Appboy/appboy-ios-sdk/blob/16e893f2677af7de905b927505d4101c6fb2091d/AppboyKit/headers/AppboyKitLibrary/Appboy.h#L181) to allow device, language, and time zone-based message personalization:
* Device Resolution
* Device Carrier
* Device Locale
* Device Model
* Device OS Version
* IDFV (Optional with [iOS SDK v5.7.0+](https://github.com/braze-inc/braze-swift-sdk))
* Push Enabled
* Device Time Zone
* Push Auth Status
* Ad Tracking Enabled
**Note:**
The Braze SDK does not collect IDFA automatically. Apps may optionally pass IDFA to Braze by implementing our `ABKIDFADelegate` protocol. Apps must obtain explicit end user opt-in to tracking through the app tracking transparency framework before passing IDFA to Braze.
Configurable device fields are defined in the [`ABKDeviceOptions`](https://github.com/Appboy/appboy-ios-sdk/blob/4390e9eac8401bccdb81b053fa54eb87b1f6fcaa/Appboy-tvOS-SDK/AppboyTVOSKit.framework/Headers/Appboy.h#L179) enum. To disable or specify the device field you'd like to allowlist, assign the bitwise `OR` of desired fields to [`ABKDeviceAllowlistKey`](https://github.com/Appboy/appboy-ios-sdk/blob/fed071000722673754da288cace15c1ff8aca432/AppboyKit/include/Appboy.h#L148) in the `appboyOptions` of `startWithApiKey:inApplication:withAppboyOptions:`.
For example, to specify time zone and locale collection to be allowlisted, set:
```
appboyOptions[ABKDeviceAllowlistKey] = @(ABKDeviceOptionTimezone | ABKDeviceOptionLocale);
```
By default, all fields are enabled. Note that without some properties, not all features will function properly. For instance, local time zone delivery will not function without the time zone.
To read more about the automatically collected device properties, visit our [SDK data collection](https://www.braze.com/docs/user_guide/data/user_data_collection/sdk_data_collection/).
# Sample Apps for iOS
Source: /docs/developer_guide/platforms/legacy_sdks/ios/sample_apps/index.md
**Warning:**
[AppboyKit](https://github.com/Appboy/appboy-ios-sdk) (also known as the Objective-C SDK) is no longer supported and has been replaced by the [Swift SDK](https://www.braze.com/docs/developer_guide/sdk_integration/?sdktab=swift). It will no longer receive new features, bug fixes, security updates, or technical support—however, messaging and analytics will continue to function as normal. To learn more, see [Introducing the New Braze Swift SDK](https://www.braze.com/resources/articles/introducing-the-new-braze-swift-sdk).
# Sample apps
Braze SDKs each come with sample applications within the repository for your convenience. Each of these apps is fully buildable, so you can test Braze features alongside implementing them within your own applications. Testing behavior within your own application versus expected behavior and codepaths within the sample applications is an excellent way to debug any problems you may run into.
## Building test applications
Several test applications are available within the [iOS SDK GitHub repository](https://github.com/appboy/appboy-ios-sdk). Follow these instructions to build and run our test applications.
1. Create a new [workspace](https://www.braze.com/docs/developer_guide/platform_wide/app_group_configuration/#creating-your-app-group-in-my-apps) and note the app identifier API key.
2. Place your API key within the appropriate field in the `AppDelegate.m` file.
Push notifications for the iOS test application require additional configuration. Refer to our [iOS Push integration](https://www.braze.com/docs/developer_guide/platforms/legacy_sdks/ios/push_notifications/integration/) for details.
# Changelog for iOS Swift SDK
Source: /docs/developer_guide/platforms/legacy_sdks/ios/changelog/swift_changelog/index.md
**Warning:**
[AppboyKit](https://github.com/Appboy/appboy-ios-sdk) (also known as the Objective-C SDK) is no longer supported and has been replaced by the [Swift SDK](https://www.braze.com/docs/developer_guide/sdk_integration/?sdktab=swift). It will no longer receive new features, bug fixes, security updates, or technical support—however, messaging and analytics will continue to function as normal. To learn more, see [Introducing the New Braze Swift SDK](https://www.braze.com/resources/articles/introducing-the-new-braze-swift-sdk).
# iOS Swift SDK changelog
14.0.2
Fixed
Fixes the SwiftUI implementation of BannerView to update Banner contents in-place whenever a refresh has succeeded.
Re-exposes the public initializer of BrazeInAppMessageUI.HtmlView as a designated init instead of a convenience init, which was introduced in version 14.0.0
This allows subclasses of HtmlView to access the public initializer.
Improves robustness of internal SDK logic around dictionary access to prevent potential crashes.
14.0.1
Fixed
Resolves an issue where the handling of universal links defaulted to the UIApplicationDelegate implementation instead of the UISceneDelegate implementation when the app was not in foreground.
This would occur even if there was no UIApplicationDelegate implementation, resulting in dropped universal link handling under such scenarios.
Fixes a memory leak where base64-encoded tracking IDs in in-app messages would accumulate on background threads.
Resolves an issue where in-app messages were not dismissed when the user is changed, resulting in the user seeing incorrect content.
This change also adds changeUser dismissal reason for in-app messages.
14.0.0
Breaking
Removes News Feed.
This fully removes all UI elements, data models, and actions associated with News Feed.
Added
Remote configuration now automatically refetches after SDK upgrades, keeping server defaults in sync and improving reliability after version changes.
Fixed
Resolves an issue where long text in in-app message buttons would wrap to multiple lines.
These messages will now match the dashboard preview behavior of truncating long text.
Push Stories now fail gracefully when receiving null/empty deeplink values.
Previously, an invalid deeplink would cause the Push Story’s content to appear blank.
StoryPage safely trims and percent-encodes deeplink strings, dropping invalid values instead of throwing an error.
StoryView only scrolls when pages exist, preventing the “Next” action from crashing when the carousel is empty.
HTML in-app messages now reuse cached payloads to mitigate app hangs that occur in rare situations during presentation.
Templated in-app messages with delayed presentation will now request templated values only after completion of the delay.
This ensures that templated values are most up-to-date with the display of the message.
Previously, the request for templated values would occur at trigger time, prior to the delay.
13.3.0
Added
Improves reliability when sending the push token and push authorization status to the backend.
This change ensures that push authorization status changes will be flushed immediately as soon as they are read.
13.2.1
Fixed
Resolves an issue that where an accumulation of Banners pending requests could cause the host application to hang at app startup.
This fix performs additional cleanup to any existing requests that were accumulated from previous versions, so you do not need to do any manual cleanup.
13.2.0
Added
Adds support for compilation with Xcode 26.0 and its corresponding operating system runtimes on all platforms supported by the Braze Swift SDK.
13.1.0
Added
Adds support for Banner properties via new public methods for Braze.Banner.
Braze.Banner.stringProperty(key:) for accessing String properties.
Braze.Banner.numberProperty(key:) for accessing Double properties.
Braze.Banner.timestampProperty(key:) for accessing Int Unix millisecond timestamp properties.
Braze.Banner.booleanProperty(key:) for accessing Bool properties.
Braze.Banner.imageProperty(key:) for accessing image URL properties as Strings.
Braze.Banner.jsonProperty(key:) for accessing JSON properties as [String:Any] dictionaries.
Braze.Banner.jsonProperty<T: Decodable>(key:type:decoder) for accessing JSON properties as values of any custom Decodable type.
The default client-side rate limiting values for Banners refresh has been increased. For more information on SDK rate limiting, please refer to the Braze Developer Guide
Fixed
Improves the behavior of VoiceOver for assets that are missing an imageAltText for Content Card and In-App Message campaigns created via the Traditional editor.
These assets will no longer be selectable or narrated by VoiceOver. Previously, the asset would be selectable and VoiceOver would read gibberish.
Drag-and-drop campaigns are not affected by this issue.
Campaigns created using the Traditional editor should always have the Alt text field populated for accessible users.
13.0.0
Breaking
Extends the functionality of BrazeSDKAuthDelegate.braze(_:sdkAuthenticationFailedWithError:) to be triggered for “Optional” authentication errors.
The delegate method BrazeSDKAuthDelegate.braze(_:sdkAuthenticationFailedWithError:) will now be triggered for both “Required” and “Optional” authentication errors.
If you want to only handle “Required” SDK authentication errors, add a check ensuring that BrazeSDKAuthError.optional is false inside your implementation of this delegate method.
Fixes the usage of Braze.Configuration.sdkAuthentication to take effect when enabled.
Previously, the value of this configuration was not consumed by the SDK and the token was always attached to requests if it was present.
Now, the SDK will only attach the SDK authentication token to outgoing network requests when this configuration is enabled.
The setters for all properties of Braze.FeatureFlag and all properties of Braze.Banner have been made private. The properties of these classes are now read-only.
Removes the Braze.Banner.id property, which was deprecated in version 11.4.0.
Instead, use Braze.Banner.trackingId to read a banner’s campaign tracking ID.
Added
Adds the boolean field optional to BrazeSDKAuthError to indicate if it is an optional authentication error.
12.1.0
Added
Adds optional imageAltText and language fields to UI classes and structs associated with Content Card and In-App Message campaigns for improved accessibility.
The imageAltText field contains the image accessibility alt text (if any) for the image or icon in a given campaign. The SDK’s default UI will use this field to inform how VoiceOver narrates the image portion of a campaign
The optional language field is a BCP 47 tag. If it is present, VoiceOver will use the corresponding language narrator when reading the campaign. Otherwise, the user system default settings will be used.
These are the classes and structs with imageAltText and language:
Braze.ContentCard.ClassicImage
Braze.ContentCard.ImageOnly
Braze.ContentCard.CaptionedImage
Braze.ContentCardRaw (BRZContentCardRaw in Objective-C)
Braze.InAppMessage.Slideup
Braze.InAppMessage.Modal
Braze.InAppMessage.ModalImage
Braze.InAppMessage.Full
Braze.InAppMessage.FullImage
Braze.InAppMessageRaw (BRZInAppMessageRaw in Objective-C)
Braze.ContentCard.Classic has the language field only
Full support will be added to the main repository closer to the public release of Xcode 26.
For any compatibility issues discovered while using the Xcode 26 Beta, submit a GitHub issue on the main repository.
12.0.3
Fixed
Fixes the Banner rendering incompatibility with iOS 18.5+ while maintaining the correct URL redirect behavior.
Banners can now successfully render on iOS 18.5+ without compromising click action functionality.
See the changelog entries for versions 12.0.1 and 12.0.2 for further details.
12.0.2
⚠️ Important: This version has a known issue preventing Banners from rendering on iOS 18.5+.
Fixed
Reverts Banners to the behavior found in versions 12.0.0 and prior.
Banners remain unusable on iOS 18.5+. A future release will address this issue.
12.0.1
⚠️ Important: This version has a known issue in Drag-and-Drop in-app messages and Banners, preventing certain URLs from redirecting properly. Update to a newer version if you are using this feature.
Fixed
Fixes an issue where setting configuration.forwardUniversalLinks = true would not properly forward universal links to the system APIs in some cases.
The SDK now verifies that the system APIs are implemented (either in your UIApplicationDelegate or SceneDelegate) before forwarding the universal link.
When multiple implementations are found, the SDK favors the SceneDelegate implementation over the UIApplicationDelegate implementation.
Fixes an issue when configuring Braze.Configuration.Push.Automation.authorizationOptions with the .provisional option.
Previously, the .provisional option was also applied for push primer in-app messages. This resulted in no push notification permission prompt being shown to the user.
With this change, push primer in-app messages will request push notification permissions using only the .alert, .badge, and .sound options, ensuring that the system prompt is presented to the user.
Fixes an incompatibility with iOS 18.5 where Banners would not render.
Previously, the Banner view would be added to the view hierarchy with a height of 0 but never successfully load the HTML content.
Banner views will no longer trigger superfluous about:blank URLs upon initial load.
12.0.0
Breaking
The distributed static XCFrameworks now include their resources directly instead of relying on external resources bundles.
When manually integrating the static XCFrameworks, you must select the Embed & Sign option for each XCFramework in the Frameworks, Libraries, and Embedded Content section of your target’s General settings.
No changes are required for Swift Package Manager or CocoaPods integrations.
Fixed
Fixes an App Store validation issue where Braze’s libraries privacy manifests would fail to be detected when integrating the SDK as static XCFrameworks.
Fixes BrazeKitCompatABKContentCard.expiresAt to return the correct expiration date.
Previously, ABKContentCard.expiresAt would always return 0.
Fixes an issue where the Braze.FeatureFlags.subscribeToUpdates(_:) update closure was being called immediately after calling changeUser(userId:) instead of waiting for the next feature flags sync result.
Fixes an issue where Braze.ContentCards.subscribeToUpdates(_:) would not call the update closure whenever a sync occurred without any changes in the Content Cards data.
Previously, the update closure would only be called when the sync resulted in a change.
Fixes the Braze.User.set(dateOfBirth:) method to report dates using the Gregorian calendar instead of the device’s current calendar setting.
Previously, the SDK would override input dates and formats if the device’s calendar settings were non-Gregorian.
With this change, you will still need to ensure that dates provided to set(dateOfBirth:) are generated with the Gregorian calendar, but the Braze SDK will no longer override their formats inadvertently.
Enhances the braze.wipeData() function to send a final update to all registered channel subscribers, notifying them of the data wipe.
This update ensures that any UI components utilizing the channel’s data are properly dismissed and cleaned up.
For instance, if an in-app message is currently displaying as braze.wipeData() is called, the message will be removed from display.
Fixes braze.user.id not resetting to nil after calling braze.wipeData().
Internally, the user identifier was properly reset, but the public braze.user.id property was not updated to reflect this change.
Added
Adds the BrazeInAppMessagePresenter.dismiss(reason:) optional protocol method.
This method enables the SDK to inform the in-app message presenter when an in-app message should be dismissed due to an internal SDK state change.
Currently, this method is triggered only by calling braze.wipeData().
BrazeInAppMessageUI implements this optional method and dismisses the in-app message when triggered.
Adds dSYM files to the dynamic and mergeable variants of the Braze SDK XCFrameworks.
This addresses an App Store submission validation warning when using Xcode 16.0 or later.
Fixed
The SDK Debugger tool will now capture logs even when Braze.configuration.logger.level is .disabled and no SDK logging occurs locally.
This aligns the Braze Swift SDK Debugger Tool behavior with that of the Debugger Tool on the Braze Android SDK.
Sets the default background of BannerUIView to be transparent.
Renames the VisibilityTracker.displayLinkTick method to VisibilityTracker.brazeDisplayLinkTick in BrazeUI to avoid potential naming conflicts with private system methods.
11.8.0
Added
Network requests made by the SDK to the Braze Live Activities /push_token_tag endpoint will now be retried in the case of a request failure.
Expands customizability options of custom endpoints passed when initializing a Braze instance.
You can now specify a base path to be used for SDK network requests (i.e. “example.com/mockServer”).
http schemes are now supported for use by custom endpoints (i.e. http://example.com). Previously, only https schemes were supported.
Fixed
Fixes an issue where in-app messages would not always be triggered when sending Braze requests to the tracking endpoint. This occurred when both of the following conditions are true:
The Braze.Configuration.Api.trackingPropertyAllowList did not include the .everything type.
All other Braze.Configuration.TrackingProperty types were manually listed in the trackingPropertyAllowList.
Improves the rendering behavior of Banner Cards embedded in a scroll view on hybrid development frameworks.
Fixes the Banner Card view to prevent drag gestures from exposing the background of the HTML content.
Fixes an issue on the Braze web view bridge where numeric values of 1 or 0 would be incorrectly reported as true or false, respectively.
11.7.0
Added
Adds the ability for a banner container to resize when the banner content changes height.
11.6.1
Fixed
Improves the reliability of collecting Live Activity push-to-start tokens on calling registerPushToStart:
Push-to-start tokens will now flush to the server immediately as soon as they are retrieved.
Push-to-start tokens will now be read immediately from the pushToStartToken property as soon as registerPushToStart is called, in addition to the existing behavior where an observable is set up to monitor new tokens.
Resolves issues with the SDK’s internal state for devices that were previously affected after restoring from another device’s iCloud or iTunes backup.
Previously, these devices would incorrectly inherit the device ID from the original device.
With this update, the SDK now generates a unique device ID for each restored device, ensuring proper identification and functionality.
This update follows up on the 11.6.0 fix, which prevented the issue from occurring on future backups.
11.6.0
Fixed
Fixes the behavior in the Braze-provided UI for Banner Cards where content would not automatically be cleared from the UI when changing to a user that was not eligible for that campaign.
Changes the behavior of Braze.Banners.subscribeToUpdates(_:) to match behavior of the corresponding API on the Braze Android SDK.
Upon calling Braze.Banners.subscribeToUpdates(_:), the update handler closure will only be called if a banners sync has succeeded during the current user session.
Previously, calling Braze.Banners.subscribeToUpdates(_:) would always result in the update handler being called one time immediately.
Upon successfully completing a banners sync, Braze.Banners.subscribeToUpdates(_:) will call its registered update handler even if the sync result is identical to the last successful sync.
Changes the behavior of Braze.Banners.bannersStream to match behavior of the corresponding API on the Braze Android SDK.
Braze.Banners.bannersStream will now only emit an update immediately upon access if a banners sync has succeeded during the current user session.
Previously, accessing Braze.Banners.bannersStream would always emit one update immediately.
Upon successfully completing a banners sync, Braze.Banners.bannersStream will emit an update even if the sync result is identical to the last successful sync.
JavaScript bridge methods expecting number arguments now also accept string representations of numbers.
This change aligns the behavior of the Swift SDK with the behavior of the Web SDK.
Added
Adds an optional method removeBannerContent to the BrazeBannerPlacement protocol.
Locally persisted Braze SDK data will no longer transfer during OS backups. This resolves an issue introduced in 6.2.0.
11.5.0
Fixed
Braze.banners.getBanner(for:_:) now successfully returns a cached Banner object for the requested placement ID as long as a Banner Cards sync has ever succeeded for the current user.
Previously, it would log a warning and pass nil to the completion handler if a Banner Cards sync had not been completed for the current user during the current session specifically.
This change aligns behavior with the Android SDK.
Fixes an issue where images with the "JPEG" image type would sometimes not display in Push Stories.
Fixes an issue where an in-app message in a Braze-provided UI can be displayed for an ineligible user under rare conditions.
This may occur if the in-app message was in the process of being displayed in the UI at the same time that the user was changed to a different user.
Added
Adds Braze.User.id to access the current user identifier synchronously.
Deprecates Braze.User.id() async and Braze.User.id(queue:completion:) in favor of Braze.User.id.
These methods will be removed fully in a future update.
Adds the optional parameter userIDMatchBehavior to the initializers of Braze.InAppMessageRaw.Context. This determines the behavior in the UI when the current identified user is different from the one that triggered the in-app message.
The default for Braze-provided UIs (.enforce) will enforce that the user ID matches the user ID that triggered the in-app message. If there is a mismatch, the in-app message will not be displayed.
For custom UIs, the default is .ignore and a mismatch will still display the in-app message.
11.4.0
Fixed
Fixes an issue where the SDK could hang during initialization if previous sessions generated a large number of geofence refreshes. This hang could sometimes lead to a crash by blocking the main thread for an extended period.
Fixes an issue where the triggering of in-app messages could be delayed in cases where requests for updated in-app message triggers are also delayed due to rate limiting.
Adds additional safeguards to ensure that ongoing network requests are dropped when changing users mid-flight.
Added
When Content Cards, Feature Flags, or Banner Cards go from enabled to disabled, the stored data is removed from cache.
Fixes the Objective-C Braze.delegate declaration to be weak like the Swift variant.
Added
Braze.prepareForDelayedInitialization now takes an optional parameter analyticsBehavior: PushEnqueueBehavior.
Braze uses this value to determine whether any Braze push payloads received before initialization should be processed once initialization is complete.
PushEnqueueBehavior.queue will enqueue received push payloads to be processed upon initialization. This option is selected by default.
PushEnqueueBehavior.drop will drop received push payloads, ignoring them.
Adds configuration properties to customize the lineSpacing, maxLineHeight, minLineHeight, and lineHeightMultiple for the header and message texts in full and modal in-app messages.
Updates BrazeContentCardUI.ViewController.Attributes.defaults to be a var to allow directly editing the property for convenience.
11.1.1
Fixed
Fixes an issue introduced in 11.0.0 where the push subscription status would be sent to the backend with an inaccurate value at startup, causing an unexpected subscription state. The SDK now sends up the accurate subscription status at each startup.
11.1.0
⚠️ Important: This version has a known issue related to push subscription status. Upgrade to version 11.1.1 instead.
Fixed
Fixes an issue introduced in 11.0.0 where the push token status would not always be reported in all circumstances.
Fixes a display bug where an in-app message would appear truncated after certain keyboard dismissal scenarios.
Fixes a reference cycle in Braze.NewsFeedCard.Context that could prevent the card from being deallocated.
Added
Adds a public initializer for Braze.Notifications.Payload.
11.0.1
Fixed
Fixes an issue introduced in 11.0.0 where the push subscription status would be sent to the backend with an inaccurate value at startup, causing an unexpected subscription state. The SDK now sends up the accurate subscription status at each startup.
11.0.0
⚠️ Important: This version has a known issue related to push subscription status. Upgrade to version 11.1.1 instead.
Relevant public Braze classes and data types now conform to the Sendable protocol and can be safely used across concurrency contexts.
Main thread-only APIs are now marked with the @MainActor attribute.
We recommend using Xcode 16.0 or later to take advantage of these features while minimizing the number of warnings generated by the compiler. Previous versions of Xcode may still be used, but some features may generate warnings.
When integrating push notification support manually, you may need to update the UNUserNotificationCenterDelegate conformance to use the @preconcurrency attribute to prevent warnings.
Applying the @preconcurrency attribute on protocol conformance is only available in Xcode 16.0 or later. Reference our sample integration code here.
As of Xcode 16.0, Apple has not yet audited the UNUserNotificationCenterDelegate protocol for Swift concurrency.
1
2
3
extensionAppDelegate:@preconcurrencyUNUserNotificationCenterDelegate{// Your existing implementation}
Updates the SDWebImage dependency in BrazeUICompat and sample apps to 5.19.7+ to support Swift 6 strict concurrency checking.
Fixed
Fixes the push authorization status reporting to display the proper push token status on the Dashboard when a user has not explicitly accepted or declined push permissions.
10.3.1
Fixed
Improves the reliability of sending updates to Live Activities that were launched via a push-to-start notification to an app in the terminated state.
10.3.0
Fixed
Fixes the in-app message orientation validation logic, which prevented certain device classes from displaying messages under certain orientation configurations.
Fixes the default behavior on full-screen in-app messages to display as modals only on tablet screen sizes.
Previously, full-screen messages would erroneously default to modal presentations on some larger phones.
Fixes a crash when dismissing a slideup in-app message before it has finished presenting.
Fixes an issue on iOS 18.0+ where the in-app message UI would persist on the screen when attempting to dismiss the message before it has finished presenting.
Updates custom attribute value, custom event, and purchase string validation to use a 255 character maximum instead of a 255 byte maximum.
Adds additional safeguards to Braze.Notifications.subscribeToUpdates to ensure the same Push notification can’t trigger the update closure multiple times.
10.2.0
Fixed
Updates the content card image background color to be clear.
Added
Adds support for an upcoming Braze SDK Debugging tool.
10.1.0
Fixed
Fixes an issue affecting the Objective-C variants of BrazeDelegate, BrazeContentCardUIViewControllerDelegate and BrazeInAppMessageUIDelegate.
When setting these delegates in Objective-C a second time, the delegate would end up being set to nil.
This issue has been resolved and the delegates can now be set multiple times without issue.
Added
Adds support for delayed SDK initialization, allowing you to create the Braze instance outside of application(_:didFinishLaunchingWithOptions:).
The SDK can now be initialized asynchronously, while conserving the ability to process incoming Braze push notifications.
The update closure will now be triggered by both “Push Opened” and “Push Received” events by default. Previously, it would only be triggered by “Push Opened” events.
To continue subscribing only to “Push Opened” events, pass in [.opened] for the parameter payloadTypes. Alternatively, implement your update closure to check that the type from the Braze.Notifications.Payload is .opened.
When receiving a push notification with content-available: true, the Braze.Notifications.Payload.type will now be .received instead of .opened.
Marks the following deprecated APIs as unavailable:
Removes the deprecated BrazeLocation class in favor of BrazeLocationProvider.
Fixed
Fixes a crash when handling a scheme-based deep link containing a registered applink domain (e.g. applinks:example.com with a deep link to app://example.com/path).
The following notifications will trigger this subscription:
Notifications received in the foreground
Notifications with the field content-available: true received in the foreground or background
The following notifications will not trigger this subscription:
Notifications received while terminated
Notifications received in the background without the field content-available: true
The new parameter payloadTypes will allow you to subscribe to “Push Opened” events, “Push Received” events, or both. If the parameter is omitted, it will subscribe to both by default.
If you are using manual push integration, you will need to first implement UNUserNotificationCenter.userNotificationCenter(_:willPresent:withCompletionHandler:), and make sure to call Braze.Notifications.handleForegroundNotification(notification:) within your implementation. Then, use subscribeToUpdates as noted above. See our guide on push notification integration for more info.
Fixes an issue where the Braze.FeatureFlag.subscribeToUpdates(_:) callback was not triggered at app launch when the cached feature flags matched the remote feature flags.
Fixes an issue in Objective-C projects where the return value of Braze.FeatureFlag.jsonProperty(key:) would incorrectly encode any entry value equal to null under certain conditions.
[String: Any] dictionaries returned by the Swift API will now drop null values.
NSDictionary objects returned by the Objective-C API will now encode null values as NSNull.
Customization of ViewAttributes via the attributes property is not available in the Objective-C version of PresentationContextRaw.
Adds Braze.FeatureFlag.jsonProperty(key:type:decoder:) to decode jsonobject type Feature Flag properties into custom Decodable types.
Deprecates the existing Feature Flag APIs, to be removed in a future version:
Braze.FeatureFlag.jsonStringProperty(key:) has been deprecated.
Braze.FeatureFlag.jsonObjectProperty(key:) has been deprecated in favor of Braze.FeatureFlag.jsonProperty(key:).
Fixed
Fixes an issue where the preferredOrientation on the presentation context of an in-app message would not be respected.
9.2.0
Added
Adds the openNewWindowLinksInBrowser configuration (default: false) to Braze.ModalContext.
Set this value in the braze(_:willPresentModalWithContext:) method of your BrazeDelegate to specify whether to launch the device browser to open web view hyperlinks that normally open a new tab or window.
Fixed
Fixes an issue with the automatic push integration feature that could cause the SDK not to send the device token to Braze.
Fixes an issue that prevented external links, which open in a new tab, from being activated in presented web views.
9.1.0
Added
Adds support for 3 new Feature Flag property types and various APIs for accessing them:
Braze.FeatureFlag.timestampProperty(key:) for accessing Int Unix millisecond timestamps.
Braze.FeatureFlag.imageProperty(key:) for accessing image URLs as Strings.
Braze.FeatureFlag.jsonObjectProperty(key:) for accessing JSONs as [String:Any] dictionaries.
Braze.FeatureFlag.jsonStringProperty(key:) for accessing JSONs as Strings.
Adds safeguards when reading the device model.
Fixed
Fixes the duplicate symbols compilation errors and runtime warnings that may occur under specific conditions when integrating BrazeKit and either BrazeNotificationService or BrazePushStory via CocoaPods.
9.0.0
Breaking
Removes the default privacy tracking domains from the BrazeKit privacy manifest.
If you are using the Braze data tracking features, you will need to manually add your tracking endpoint to your app-level privacy manifest.
Refer to the updated tutorial for integration guidance.
Removes the deprecated BrazeDelegate.braze(_:sdkAuthenticationFailedWithError) method in favor of BrazeSDKAuthDelegate.braze(_:sdkAuthenticationFailedWithError).
This method was originally deprecated in release 5.14.0.
Failing to switch to the new delegate method will not trigger a compiler error; instead, the BrazeDelegate.braze(_:sdkAuthenticationFailedWithError) method you define will simply not be called.
Fixed
Adds the missing NSPrivacyCollectedDataTypes key to the BrazePushStory privacy manifest.
8.4.0
Added
Expands Geofences behavior in the background while “When In Use” authorization is selected:
Adds the Braze.Location.Configuration.allowBackgroundGeofenceUpdates property to toggle whether geofences should be updated in the background.
When using this setting, verify that you have enabled the Location updates background mode.
Adds the Braze.Location.Configuration.distanceFilter property to configure the minimum distance sensitivity for triggering a location update.
Adds support for the message_extras Liquid tag for in-app messages.
8.3.0
Added
Adds early access for a third alternative repository which provides all Braze modules as mergeable XCFrameworks. For instructions on how to leverage it, refer to the repository README:
Adds a missing privacy manifest for BrazePushStory.
Fixes an invalid privacy manifest warning in BrazeLocation when submitting to the App Store as a dynamic XCFramework.
Fixes an issue where already enqueued in-app messages would not be removed from the stack after subsequent .reenqueue and .discard display actions.
Fixes an issue preventing retried requests from using an updated SDK authentication token until a new request was scheduled for processing.
Purchases, custom events, and nested custom user attributes can now include properties with values of any type conforming to BinaryInteger (Int64, UInt16, etc).
All values will be cast to Int before being logged.
This resolves an issue with a bugfix in 7.6.0.
8.2.1
Fixed
Fixes App Store validation issues when archiving with Xcode 15.3.
8.2.0
Added
Adds support for remotely starting Live Activities via push notifications.
Adds the following methods to the liveActivities module:
Adds public APIs to access BrazeKit, BrazeLocation and BrazeUI resources bundles:
Braze.Resources.bundle
BrazeLocationResources.bundle
BrazeUIResources.bundle
BrazeKit.overrideResourceBundle and BrazeUI.overrideResourceBundle have been deprecated in favor of BrazeKit.overrideResourcesBundle and BrazeUI.overrideResourcesBundle.
Re-enables visionOS sample apps requiring SDWebImage in Examples-CocoaPods.xcworkspace. SDWebImage for visionOS is now supported when using CocoaPods.
Updated SDWebImage dependency in BrazeUICompat to 5.19.0+.
Fixed
Fixes multiple issues on visionOS:
Sessions now properly start as expected.
The click behavior Open Web URL Inside App now properly opens the URL in a modal web view. Previously, the URL would always be opened using the default web browser.
[BrazeDelegate.braze(:willPresentModalWithContext:)](https://braze-inc.github.io/braze-swift-sdk/documentation/brazekit/brazedelegate/braze(:willpresentmodalwithcontext:)-1fj41) now has a default implementation.
Handling network requests and persisting data properly extend the lifetime of the application for processing.
Removes crash data from the BrazeKit privacy manifest. This data type is not collected by Braze.
8.0.0
⚠️ Warning
This release reports the SDK version as 7.7.0 instead of 8.0.0.
Breaking
Compiles the SDK using Xcode version 15.2 (15C500b).
This also raises the minimum deployment targets to iOS 12.0 and tvOS 12.0.
The BrazeLocation class is now marked as unavailable. It was previously deprecated in favor of BrazeLocationProvider in 5.8.1.
Added
Adds support for visionOS 1.0.
⚠️ Rich push notifications and Push Stories may not display as expected on visionOS 1.0. We are monitoring the latest versions for potential fixes.
⚠️ CocoaPods is not yet supported by SDWebImage for visionOS. visionOS sample apps requiring SDWebImage have been disabled in the Examples-CocoaPods.xcworkspace. Refer to the SwiftPM or manual integration Xcode project instead.
7.7.0
Added
Updates the prebuilt release assets to include the privacy manifest for manual integrations of SDWebImage.
Follow the manual integration guide to add the SDWebImage.bundle to your project for static XCFrameworks.
Enhances support for language localizations.
Introduces a localization for Azerbaijani strings.
Updates Ukrainian localization strings for accuracy.
Fixed
Fixes the default button placement for full in-app message views.
Fixes an issue where setting Braze.Configuration.Api.endpoint to a URL with invalid characters could cause a crash.
If the SDK is given an invalid endpoint, it will no longer attempt to make network requests and will instead log an error.
Fixes an issue preventing BrazeLocation from working correctly when using the dynamic XCFrameworks.
7.6.0
Added
Adds the Braze.InAppMessage.Data.isTestSend property, which indicates whether an in-app message was triggered as part of a test send.
Adds logic to separate Braze data into tracking and non-tracking requests.
Adds the following methods to set and edit the allow list for properties that will be used for tracking:
Braze.Configuration.Api.trackingPropertyAllowList: Set the initial allow list before initializing Braze.
Braze.updateTrackingAllowList(adding:removing:): Update the existing allow list during runtime.
For full usage details on these configurations, refer to our tutorial here.
Fixed
Adds safeguards to prevent a rare race condition occuring in the SDK network layer.
Prevents in-app message test sends from attempting re-display after being discarded by a custom in-app message UI delegate.
Fixes an issue in the default Braze in-app message UI where some messages were not being removed from the stack after display.
Fixes the compilation of BrazeKitCompat and BrazeUICompat in Objective-C++ projects.
Fixes an issue in BrazeUICompat where the header text in Full or Modal in-app messages would be duplicated in place of the body text under certain conditions.
Fixes the encoding of values of types Float, Int8, Int16, Int32, Int64, UInt, UInt8, UInt16, UInt32 and UInt64. Those types were previously not supported in custom events and purchase properties.
Fixes an issue preventing purchase events from being logged when the product identifier has a leading dollar sign.
Fixes an issue preventing custom attributes from being logged when the attribute key has a leading dollar sign.
7.5.0
Added
Adds privacy manifests for BrazeKit and BrazeLocation to describe Braze’s data collection policies. For more details, refer to Apple’s documentation on privacy manifests.
More fine-tuned configurations to manage your data collection practices will be made available in a future release.
Adds the optInWhenPushAuthorized configuration property to specify whether a user’s notification subscription state should automatically be set to optedIn when updating push permissions to authorized.
The WebKit Inspector developer tool is now enabled by default for all instances of BrazeInAppMessagesUI.HtmlView. It can be disabled by setting BrazeInAppMessagesUI.HtmlView.Attributes.allowInspector to false.
Fixed
Fixes an issue with the code signatures of XCFrameworks introduced in 7.1.0.
Fixes a crash on tvOS devices running versions below 16.0, caused by the absence of the UIApplication.openNotificationSettingsURLString symbol in those OS versions.
Fixes an issue where a content card would not display if the value under “Redirect to Web URL” was an empty string.
Fixes incorrect behavior in BrazeUI where tapping the body of a Full or Modal in-app message with buttons and an “Image Only” layout would dismiss that message and process the button’s click action.
Tapping the body will now be a no-op, bringing parity with other platforms.
7.4.0
Added
Adds two alternative repositories to support specialized integration options. For instructions on how to leverage them, refer to their respective READMEs:
In-App Message assets from URLs containing the query parameter cache=false will not be prefetched.
Additionally, when presented as a part of In-App Messages or Content Cards, those URLs will be fetched using the URLRequest.CachePolicy.reloadIgnoringLocalAndRemoteCacheData caching policy, which always requests a fresh version from the source and ignores any cached versions.
Fixed
Fixes XCFrameworks headers to use the #import syntax instead of @import for compatibility with Objective-C++ contexts.
Fixes the push token tag validation during Live Activity registration, accepting strings up to 256 bytes instead of 255 bytes.
Braze.ContentCards.unviewedCards no longer includes Control cards to bring parity with Android and Web.
Fixes an Objective-C metaclass crash that occurs when initializing a custom subclass of certain BrazeUI views.
7.3.0
Added
Adds support for Expo Notifications event listeners when using the automatic push integration.
Fixed
Fixes a rare concurrency issue that might result in duplicated events when logging large amount of events.
Fixes an issue where user.set(dateOfBirth:) was not setting the date of birth accurately due to variations in the device’s timezone.
7.2.0
Added
Exposes the BrazePushStory.NotificationViewController.didReceive methods for custom handling of push story notification events.
Fixed
Resolves an issue for in-app messages with buttons where tapping on the body would incorrectly execute the button’s click action.
Now, when you tap on the body of an in-app message with buttons, no event should occur.
Resolves a potential deadlock under rare circumstances in BrazeUI’s In-App messages presentation.
Refactors some text layout logic in BrazeUI into a new Braze.ModalTextView class.
Updates the behavior for Feature Flags methods.
FeatureFlags.featureFlag(id:) now returns nil for an ID that does not exist.
FeatureFlags.subscribeToUpdates(:) will trigger the callback when any refresh request completes with a success or failure.
The callback will also trigger immediately upon initial subscription if previously cached data exists from the current session.
Fixed
Fixes compiler warnings about Swift 6 when compiling BrazeUI while using Xcode 15.
Exposes public imports for ABKClassicImageContentCardCell.h and ABKControlTableViewCell.h for use in the BrazeUICompat layer.
Adds additional safeguards around invalid constraint values for BrazeInAppMessageUI.SlideupView.
Resolves a Content Cards feed UI issue displaying a placeholder image in Classic cards without an attached image.
Added
Adds the enableDarkTheme property to BrazeContentCardUI.ViewController.Attributes.
Set this field to false to prevent the Content Cards feed UI from adopting dark theme styling when the device is in dark mode.
This field is true by default.
6.6.2
Fixed
Fixes an issue preventing purchase events from being logged when the product identifier has a leading dollar sign ($).
Fixes an issue preventing custom attributes from being logged when the attribute key has a leading dollar sign ($).
6.6.1
Fixed
Fixes a crash in the geofences feature that could occur when the number of monitored regions exceeded the maximum count.
Fixes an issue introduced in 6.3.1 that would always update a user’s push subscription status to optedIn on app launch if push permissions were authorized on the device settings.
The SDK now will only send the subscription status at app launch if the device notification settings goes from denied to authorized.
Braze.ContentCard.logClick(using braze: Braze) will now log a click regardless of whether the ContentCard has a ClickAction.
This behavior differs from the default API Braze.ContentCard.Context.logClick(), which has the safeguard of requiring a ClickAction to log a click.
6.6.0
Fixed
Fixes an issue in HTML in-app messages where custom event and purchase properties would always convert values for 1 and 0 to become true and false, respectively.
These property values will now respect their original form in the HTML.
Prevents the default Braze UI from displaying in-app messages underneath the keyboard when Stage Manager is in use.
When enabled, the SDK will automatically implement the necessary system delegate methods for handling push notifications.
Compatibility with other push providers, whether first or third party, is maintained. The SDK will automatically handle only Braze push notifications, while original system delegate methods will be executed for all other push notifications.
Each automation step can be independently enabled or disabled. For example, configuration.push.automation.requestAuthorizationAtLaunch = false can be used to prevent the automatic request for push permissions at launch.
Adds the Braze.Configuration.forwardUniversalLinks configuration. When enabled, the SDK will redirect universal links from Braze campaigns to the appropriate system methods.
Fixes an issue preventing text fields from being selected in HTML IAMs for iOS 15.
Fixes an issue where the device model was inaccurately reported as iPad on macOS (Mac Catalyst and Designed for iPad configurations).
Fixes an issue where custom event and purchase properties would not accept an entry if its value was an empty string.
Fixes a crash that occurred in the default UI for Content Cards when encountering a zero-value aspect ratio.
Fixes an issue introduced in 6.0.0 where images in in-app messages would appear smaller than expected when using the compatibility UI (BrazeUICompat).
Added
Adds the unviewedCards convenience property to the Braze.ContentCards class to get the unviewed content cards for the current user.
6.3.1
Fixed
Fixes an issue where the previous user’s data would not be flushed after calling changeUser(userId:sdkAuthSignature:) when the SDK authentication feature is enabled.
A content card impression can now be logged once per session. Previously, the Braze-provided Content Cards UI would limit to a single impression per card at maximum, irrespective of sessions.
Fixes an issue that previously caused push notification URLs with percent-encoded characters to fail during decoding.
Fixes a behavior to automatically set a user’s push subscription state to optedIn after push permissions have explicitly been authorized via the Settings app.
Correctly hides shadows on in-app messages that are configured with a transparent background.
Fixes a rare crash occurring when deinitializing the Braze instance.
Added
Adds additional logging for network-related decoding errors.
6.3.0
Fixed
“Confirm” and “Cancel” notification categories now show the correct titles on the action buttons.
Added
Adds a new SDKMetadata option .reactnativenewarch for the React Native New Architecture.
Fixes a crash introduced in 6.0.0 when displaying an HTML in-app message using the BrazeUICompat module.
Removed a system call that is known to be slow on older versions of macOS. This resolves the SDK hanging during initialization on Mac Catalyst when running on affected macOS versions.
Added
Adds support for target attributes on anchor tags in HTML in-app messages (e.g. <a href="..." target="_blank"></a>).
Adding the target attribute to links will allow them to open in a new webview without dismissing the current in-app message.
This behavior can be disabled via the linkTargetSupport property of the BrazeInAppMessageUI.HtmlView.Attributes struct.
Fixes an issue that led to disproportionately large close buttons on in-app messages when the user has set a large font size in the device settings.
Fixes an issue that would lock the screen in a specific orientation after the dismissal of an in-app message customized to be presented in that orientation.
Renames User.setCustomAttributeArray(key: String, array: [String]?) to setCustomAttribute(…) to align it with other custom attribute setters, and adds “string” to the addTo and removeFrom attribute array methods to clarify which custom attributes they’re used for.
6.0.0
Breaking
The in-app message data models sent to BrazeInAppMessagePresenter.present(message:) now contain remote asset URLs. Previously, these data models would contain local asset URLs.
This change is only breaking in two situations:
When implementing a custom BrazeInAppMessagePresenter.
VoiceOver now correctly focuses on in-app message views when they are presented.
Fixes an issue causing in-app messages with re-eligibility disabled to display multiple times under certain conditions.
Fixes an issue where modal and full in-app message headers were truncated on devices running iOS versions lower than 16 when displaying non-ASCII characters.
The dynamic variant of BrazeUI.framework in the release artifact braze-swift-sdk-prebuilt.zip is now an actual dynamic framework. Previously, this specific framework was mistakenly distributed as a static framework.
Added
Adds the BrazeSDKAuthDelegate protocol as a separate protocol from BrazeDelegate, allowing for more flexible integrations.
Apps implementing BrazeDelegate.braze(_:sdkAuthenticationFailedWithError:) should migrate to use BrazeSDKAuthDelegate and remove the old implementation. The BrazeDelegate method will be removed in a future major release.
5.13.0
Fixed
Fixes an issue where the SDK would automatically track body clicks on non-legacy HTML in-app messages.
Added
Adds the synchronous deviceId property on the Braze instance.
deviceId(queue:completion:) is now deprecated.
deviceId() async is now deprecated.
Adds the automaticBodyClicks property to the HTML in-app message view attributes. This property can be used to enable automatic body clicks tracking on non-legacy HTML in-app messages.
This property is false by default.
This property is ignored for legacy HTML in-app messages.
Adds json() and decoding(json:) public methods to the Feature Flag model object for JSON encoding/decoding.
5.11.2
Fixed
Fixes a crash occurring when the SDK is configured with a flush interval of 0 and network connectivity is poor.
5.11.1
Fixed
Fixes an issue preventing the correct calculation of the delay when retrying failed requests. This led to a more aggressive retry schedule than intended.
Improves the performance of Live Activity tracking by de-duping push token tag requests.
Fixes an issue in logClick(using:) where it would incorrectly open the url field in addition to logging a click for metrics. It now only logs a click for metrics.
This applies to the associated APIs for content cards, in-app messages, and news feed cards.
It is still recommended to use the associated Context object to log interactions instead of these APIs.
Adds support for News Feed data models and analytics.
News Feed UI is not supported by the Swift SDK. See the migration guide for instructions on using the compatibility UI.
5.7.0
Fixed
Fixes an issue where modal image in-app messages would not respect the aspect ratio of the image when the height of the image is larger than its width.
Changed
Changes modal, modal image, full, and full image in-app message view attributes to use the ViewDimension type for their minWidth, maxWidth and maxHeight attributes.
The ViewDimension type enables providing different values for regular and large size-classes.
Added
Adds a configuration to use a randomly generated UUID instead of IDFV as the device ID: useUUIDAsDeviceId.
This configuration defaults to false. To opt in to this feature, set this value to true.
Enabling this value will only affect new devices. Existing devices will use the device identifier that was previously registered.
5.6.4
Fixed
Fixes an issue preventing the execution of BrazeDelegate methods when setting the delegate using Objective-C.
Fixes an issue where triggering an in-app message twice with the same event did not place the message on the in-app message stack under certain conditions.
Added
Adds the public id field to Braze.InAppMessage.Data.
Adds logImpression(using:) and logClick(buttonId:using:) to both in-app messages and content cards, and adds logDismissed(using:) to content cards.
It is recommended to continue using the associated Context to log impressions, clicks, and dismissals for the majority of use cases.
Adds Swift concurrency to support async/await versions of the following public methods. These methods can be used as alternatives to their corresponding counterparts that use completion handlers:
The applyAttributes() method for BrazeContentCardUI views now take the attributes explicitly as a parameter.
5.5.1
Fixed
Fixes an issue where content cards would not be properly removed when stopping a content card campaign on the dashboard and selecting the option Remove card after the next sync (e.g. session start).
5.5.0
Added
Adds support for host apps written in Objective-C.
Braze Objective-C types start either with BRZ or Braze, e.g.:
Renamed ClickAction.uri(_:useWebView:) to ClickAction.url(_:useWebView:).
5.4.0
Fixed
Fixes an issue where brazeBridge.logClick(button_id) would incorrectly accept invalid button_id values like "", [], or {}.
Added
Adds support for Braze Action Deeplink Click Actions.
5.3.2
Fixed
Fixes an issue preventing compilation when importing BrazeUI via SwiftPM in specific cases.
Lowers BrazeUI minimum deployment target to iOS 10.0.
5.3.1
Fixed
Fixes an HTML in-app message issue where clicking a link in an iFrame would launch a separate webview and close the message, instead of redirecting within the iFrame.
Fixes the rounding of In-App Message modal view top corners.
Fixes the display of modals and full screen in-app messages on iPads in landscape mode.
Added
Adds two Example schemes:
InAppMessage-Custom-UI:
Demonstrates how to implement your own custom In-App Message UI.
Available on iOS and tvOS.
ContentCards-Custom-UI:
Demonstrates how to implement your own custom Content Card UI.
# Changelog for iOS Objective-C SDK
Source: /docs/developer_guide/platforms/legacy_sdks/ios/changelog/objc_changelog/index.md
**Warning:**
[AppboyKit](https://github.com/Appboy/appboy-ios-sdk) (also known as the Objective-C SDK) is no longer supported and has been replaced by the [Swift SDK](https://www.braze.com/docs/developer_guide/sdk_integration/?sdktab=swift). It will no longer receive new features, bug fixes, security updates, or technical support—however, messaging and analytics will continue to function as normal. To learn more, see [Introducing the New Braze Swift SDK](https://www.braze.com/resources/articles/introducing-the-new-braze-swift-sdk).
# iOS Objective-C SDK changelog
Improves resilience when triggering in-app messages with date property filters.
Added
Adds a new option ABKReenqueueInAppMessage to enum ABKInAppMessageDisplayChoice.
Return this option in beforeInAppMessageDisplayed: of an ABKInAppMessageControllerDelegate to ensure that an in-app message is not displayed and becomes eligible to trigger again.
This option will reset any trigger times and re-eligibility rules as if it was never triggered. It will not add the message to the in-app message stack.
4.5.4
Fixed
Improves reliability of custom event property type validation.
Fixes an issue where the status bar would not restore to its original state after a full in-app message was dismissed.
4.5.3
Fixed
Fixes a crash that occurs when receiving custom event properties of numeric types under certain conditions.
Fixes UI responsiveness warnings when requesting location authorization status.
4.5.2
Fixed
Improves reliability when validating trigger properties.
Improves the NSURLSessionConfiguration disk and memory cache capacities for file downloads. This change enables larger file downloads to be cached if needed.
4.5.1
Fixed
Improves eligibility checks around the minimum trigger timeout for in-app messages by now checking at trigger time in addition to display time.
Fixes an issue where purchases would not trigger certain templated in-app messages.
Added
Adds the delegate method noMatchingTriggerForEvent:name: to ABKInAppMessageControllerDelegate, which is called if no Braze in-app message was triggered for a given event.
4.5.0
Added
Adds support for Content Cards to evaluate Retry-After headers.
4.4.4
Fixed
Calling appboyBridge.closeMessage() or brazeBridge.closeMessage() from an HTML in-app message now correctly triggers ABKInAppMessageUIDelegate.onInAppMessageDismissed: when implemented.
Fixes an issue in 4.4.3 where the tvOS SDK incorrectly referenced an older SDK version.
4.4.3
Fixed
Fixes an issue introduced in 4.4.0 which prevented custom events or purchases with an empty dictionary of properties from being logged.
Improves handling of ABKInAppMessageWindow’s dismissal to promptly remove it from the view hierarchy.
Fixes the position of the pinned indicator for Captioned Image Content Cards when using the default UI.
Fixes an issue introduced in 4.3.2 and limited to users of Appboy-tvOS-SDK, which prevented custom events with properties or purchases with properties from being logged.
Added
Adds a padding property to ABKCaptionedImageContentCardCell to support modifying the default value.
4.4.2
Fixed
Fixes a bug for HTML in-app messages using the HTML Upload with Preview option to improve the reliability of in-app message display.
Fixes a bug preventing integration via Swift Package Manager in specific contexts.
Fixes an issue in the default Content Cards UI where the empty feed label was truncated if it was too large for the screen, for example due to accessibility or localization.
Fixes an issue where Slideup in-app messages would be automatically dismissed after multiple interaction with the app’s main window.
Changed
If changeUser:sdkAuthSignature: is called with the current user’s ID, but with a new and valid SDK Authentication signature, the new signature will be used.
Improves push tracking accuracy for apps making use of UISceneDelegate (UIKit) or Scene (SwiftUI).
4.4.1
Fixed
Fixes an issue in which input elements with type="date" in HTML in-app messages do not respond to some user interactions on iOS 14 and iOS 15.
Fixes ABKSdkMetadata availability when using the dynamic variant of the SDK.
Fixes an issue in which the default content cards UI’s empty feed label does not wrap properly when the device is using Larger Accessibility Sizes for its text size.
Changed
Changed ABKInAppMessageUIDelegate.inAppMessageViewControllerWithInAppMessage: to accept a nil return value.
Added
Adds support for the playsinline attribute on HTML <video> elements within webpages that are opened in the app by Braze.
Adds XCFramework support for the Core integration via Carthage. Please follow the Carthage migration guide when transitioning to the new artifact.
4.4.0
Breaking
Adds XCFramework support to Carthage. This allows projects integrated via Carthage to support Apple Silicon simulators and Mac Catalyst.
To continue using the original Full .framework file, include the Cartfile lines above but reference appboy_ios_sdk_full.json. Then, run carthage update.
For those using the Thin integration, use the same Cartfile above but exclude the line with SDWebImage.
The Core integration does not support XCFrameworks, and you can use the original .framework files as before.
Added
Adds a new attachment to the release called Appboy_iOS_SDK.xcframework.zip.
This artifact has the all-in-one XCFramework containing the full SDK code including all of the assets.
When importing this code manually, drag-and-drop the XCFramework into your project and select Embed & Sign. Then, add -ObjC under Build Settings > Other Linker Flags in your app’s target.
Adds localization support for the close button’s accessibility label in modal and full in-app messages.
Adds the ability to set the SDK’s log level at runtime by setting ABKLogLevelKey to an integer in appboyOptions. Descriptions of the available log levels can be found here.
Adds Appboy.addSdkMetadata: to allow self reporting of SDK Metadata fields via the ABKSdkMetadata enum.
4.3.4
This release requires Xcode 13.
Fixed
Fixes an issue in which the pinned indicator for a Banner Content Card would not display in the default Content Cards UI.
Fixes an issue which prevented custom events and purchases with properties larger than 50 KB to be properly discarded.
4.3.3
Fixed
Fixes a race-condition occasionally preventing HTML in-app messages with assets from being displayed from a test push.
Fixes an issue which prevented HTML in-app messages from opening sms:, mailto:, tel:, facetime: and facetime-audio: urls.
Previously, those urls would fail to open silently.
Fixes an issue where ABKContentCardsTableViewController was not displaying the “no update” label after the last card was deleted from the feed.
Added
Adds methods addToSubscriptionGroupWithGroupId: and removeFromSubscriptionGroupWithGroupId: to ABKUser to manage SMS/Email Subscription Groups.
Also adds appboyBridge.getUser().addToSubscriptionGroup(groupId) and appboyBridge.getUser().removeFromSubscriptionGroup(groupId) to the javascript interface for HTML in-app messages.
4.3.2
Fixed
Iframes embedded in an HTML in-app message are now displayed as part of the same in-app message. Previously, iframes would be loaded in a separate webview.
Added
Adds support for navigation bar transparency changes introduced in iOS 15. Apps using Braze default UIs for Content Cards, the News Feed, and the modal WebView should upgrade to this version as soon as possible ahead of iOS 15’s release.
4.3.1
Fixed
The sdkAuthenticationDelegate now works as expected when setting the property directly.
VoiceOver no longer reads content beneath the displayed in-app message.
Changed
The number of unviewed Content Cards in ABKContentCardsController’s unviewedContentCardCount now excludes control cards.
The default Content Cards UI now allows swipe-to-refresh gestures when empty.
Deprecates ABKInAppMessageController’s method displayNextInAppMessageWithDelegate: in favor of displayNextInAppMessage.
Added
Custom events and purchases now support nested properties.
In addition to integers, floats, booleans, dates, or strings, a JSON object can be provided containing dictionaries of arrays or nested dictionaries. All properties combined can be up to 50 KB in total length.
4.3.0
Breaking
Refined Content Cards UI public api changes introduced in 4.2.0.
Fixed
Fixes an issue introduced in 4.2.0 that caused Content Card type ABKClassicImageContentCardCell to crash on display when not using Storyboard.
4.2.0
⚠️ Known Issues
This release contains a known issue with the Content Cards default UI on iOS, where showing a “Classic” type card with an image causes a crash. If you are using the default Content Cards UI, do not upgrade to this version.
Breaking
Content Cards and News Feed are now more extensible!
Class level API methods have changed to instance methods to make subclassing easier, however getNavigationContentCardsViewController and getNavigationFeedViewController are left in as class methods for backwards compatibility.
Fixes an issue with Dynamic Type support introduced in 3.34.0 to be compatible with iOS 9.
Added
Adds support for new SDK Authentication feature.
Exposes window.brazeBridge in HTML in-app messages which replaces window.appboyBridge. appboyBridge is deprecated and will be removed in a future version of the SDK.
Changed
Makes in-app message window handling more resilient:
The in-app message window tries to display up to 10 times when another window competes for visibility. If the in-app message is not guaranteed visibility, it is dismissed and an error is logged.
Improves Appboy’s wipeDataAndDisableForAppRun and disableSDK to handle additional use cases.
Deprecates flushDataAndProcessRequestQueue in favor of requestImmediateDataFlush.
4.1.0
Breaking
ABKURLDelegate method handleAppboyURL:fromChannel:withExtras: is now invoked for all urls.
Previously, this delegate method was not invoked for urls opened in a WebView or the default browser when originating from the News Feed or Content Cards.
Removes ABKUIURLUtils method openURLWithSystem:fromChannel:. Use openURLWithSystem: as a replacement.
Fixed
Fixes a case where the ABKURLDelegate method handleAppboyURL:fromChannel:withExtras: was being called twice when opening a push notification with an url.
Changed
Deprecates ABKUnknownChannel.
4.0.2
Fixed
Fixes a double redirection bug in Push Stories when the app is in a terminated state and application:didReceiveRemoteNotification:fetchCompletionHandler: is not implemented.
Changed
Improves the Swift Package Manager bundle lookup to be more flexible.
Added
Adds support to use a dictionary named Braze instead of Appboy when adding customization in the Info.plist. After adding the Braze dictionary, please remove the previous Appboy dictionary.
4.0.1
Fixed
Sets CFBundleSupportedPlatforms in .plist files to the correct non-simulator value.
Removes the Dynamic Type support warnings.
4.0.0
Breaking
AppboyKit is now distributed as an XCFramework when integrating with Cocoapods. Cocoapods 1.10.0+ is required.
This removes the need for integrators to exclude the arm64 architecture when building for the simulator. Please undo any of the changes that may have been made when upgrading to 3.27.0 (Integrators will now be required to exclude …).
Fixed
Fixes the Swift Package Manager cleanup script to remove only the necessary files.
Added
Adds Mac Catalyst support for apps integrating with Cocoapods.
3.34.0
Breaking
Replaces ABKInAppMessageSlideupViewController’s slideConstraint by offset.
Added
Adds a new Github repo to optimize import speeds for applications integrating with Swift Package Manager.
To use this repo, follow these steps:
Remove the existing package in your application that points to the url: https://github.com/Appboy/Appboy-ios-sdk.
Add a new package using the new url: https://github.com/braze-inc/braze-ios-sdk.
Adds support for Right-to-Left languages in the News Feed.
Adds support for scaling fonts automatically with Dynamic Type for in-app messages and the News Feed.
Changed
Improves accessibility handling for modal and full in-app messages.
Improves Slideup in-app message animations.
3.33.1
Fixed
Fixes Swift Package Manager integration.
In Xcode, select File ▸ Swift Packages ▸ Update to Latest Package Versions to update.
Fixes Push Story integration via CocoaPods for applications that have use_frameworks! in their Podfile.
3.33.0
Breaking
Changed Push Story integration to use XCFrameworks for Cocoapods and manual integration. Applications currently integrating Push Stories via Cocoapods or manual integration must follow these steps when updating:
In your Notification Content Extension target:
Remove AppboyPushStory.framework from Frameworks and Libraries under the General tab.
In your application target:
Delete the Copy File build phase copying the AppboyPushStory.framework to the Frameworks destination.
Delete the Run Script build phase that starts with:
1
2
3
4
APP_PATH="${TARGET_BUILD_DIR}/${WRAPPER_NAME}"

find "$APP_PATH" -name 'AppboyPushStory.framework' -type d | while read -r FRAMEWORK
...
Fixes a double redirection bug in Push Stories when the app is in a terminated state and the UNUserNotificationCenter delegate is not the AppDelegate.
3.32.0
Added
Adds Mac Catalyst support for apps integrating with Swift Package Manager (SPM).
Please follow the instructions here to import the SDK with SPM. The SDK does not currently support Mac Catalyst when integrated through Cocoapods or Carthage.
Fixes the formatting of Full and Slideup in-app messages when displaying on iPhone 12 mini.
Changed
Improves Push Story click tracking handling.
3.31.1
Breaking
Removes the method getSDWebImageProxyClass from ABKUIUtils.
You can access the public class ABKSDWebImageProxy directly by importing ABKSDWebImageProxy.h.
Fixed
Fixes a bug in the Cocoapods integration that would lead to SDK localizations being embedded for languages not explicitly supported in the app.
Fixes a rare crash that would occur when no windows exist at UIWindowLevelNormal while an in-app message is being displayed and UIKit requests UI updates (orientation change, etc.).
Fixes a bug in modal in-app messages where some languages (such as Burmese) may have clipped text.
3.31.0
Breaking
For apps that have previously integrated through Swift Package Manager, please perform the following steps:
In the Xcode menu, click Product > Scheme > Edit Scheme...
Click the expand ▶️ next to Build and select Post-actions. Press + and select New Run Script Action.
In the dropdown next to Provide build settings from, select your app’s target.
If you are updating from 3.29.0 or 3.29.1, remove the Run Script Action previously specified in the 3.29.0 section of this changelog.
Added
Adds Push Stories support for apps integrating with Swift Package Manager.
In your app content extension’s target, under Build Settings > Other Linker Flags, add the -ObjC linker flag.
Changed
Updates the email validation on the SDK to be more lenient in favor of more accurate validation by the Braze backend. Valid emails with uncommon patterns or international characters that were previously rejected will now be accepted.
Deprecates ABKDeviceWhitelistKey in favor of ABKDeviceAllowlistKey.
Fixed
Fixes a bug in HTML in-app messages where some native WebKit UI elements could be unresponsive.
3.30.0
Breaking
Body click analytics will no longer automatically be collected for HTML in-app messages created using the HTML Upload with Preview option in the platform.
To continue to receive body click analytics, you must log body clicks explicitly from your message via Javascript using appboyBridge.logClick().
Fixed
Fixes a bug with Full in-app messages where the button positions did not match the preview on the Braze dashboard.
Fixes a bug where in-app messages would be displayed below the application window under specific conditions.
Apps that set up their window asynchronously at startup could accidentally hide the in-app message window if one was being displayed (e.g. as a result of clicking on a test in-app message notification).
Added
Adds support for custom endpoints with a scheme included (https, http, etc.). For example, http://localhost:3001 will no longer result in https://http://localhost:3001 as the resolved endpoint.
3.29.1
Added
Adds improved support for in-app message display on iPhone 12 models.
3.29.0
Added
Adds initial support for Swift Package Manager. There are 2 new packages that have been added: AppboyKit for the core SDK and AppboyUI for the full SDK (including UI elements), which correspond to the Appboy-iOS-SDK/Core and Appboy-iOS-SDK pods, respectively.
Note that tvOS support is not available via Swift Package Manager for this release. Push Stories is only available through a side-by-side integration with Cocoapods.
To add the package to your project follow these steps:
Select File > Swift Packages > Add Package Dependency.
In the search bar, enter https://github.com/Appboy/Appboy-ios-sdk.
Select one of AppboyKit or AppboyUI. Note that AppboyUI includes AppboyKit automatically.
In your app’s target, under Build Settings > Other Linker Flags, add the -ObjC linker flag.
In the Xcode menu, click Product > Scheme > Edit Scheme...
Click the expand ▶️ next to Build and select Post-actions. Press + and select New Run Script Action.
In the dropdown next to Provide build settings from, select your app’s target.
Removes userNotificationWasSentFromAppboy: and pushNotificationWasSentFromAppboy: on Appboy. Use isAppboyUserNotification: and isAppboyRemoteNotification: in ABKPushUtils instead.
Updates ABKURLDelegate’s method signature for handleAppboyURL:fromChannel:withExtras: to include nullability annotations required for proper Swift support.
Fixed
Fixes a race condition in Appboy method wipeDataAndDisableForAppRun where certain persisted fields would still be available immediately after calling the method. These fields now are removed synchronously.
Changed
Updated SDWebImage to use version 5.9.x.
3.27.0
Breaking
Adds support for iOS 14. Requires Xcode 12.
Removes the ABK_ENABLE_IDFA_COLLECTION preprocessor macro from the SDK.
Updates the ABKIDFADelegate protocol by renaming isAdvertisingTrackingEnabled to isAdvertisingTrackingEnabledOrATTAuthorized to reflect the addition of the AppTrackingTransparency framework in iOS 14.
If you use the Ad Tracking Enabled segment filter on the Braze dashboard or are implementing AppTrackingTransparency, you must update your integration to use AppTrackingTransparency to read the correct user status. Please see our sample app for implementation details.
If you do not use the Ad Tracking Enabled segment filter and are not implementing AppTrackingTransparency yet, your implementation of isAdvertisingTrackingEnabledOrATTAuthorized may temporarily continue to use isAdvertisingTrackingEnabled. However, the returned value will always be NO in iOS 14, regardless of actual IDFA availability.
Note that Apple announced that they will delay the enforcement of upcoming IDFA changes until early 2021. Please reference our iOS 14 upgrade guide for more details.
Updates the minimum required version of SDWebImage from 5.0 to 5.8.2.
Integrators will now be required to exclude the arm64 simulator slice in their entire project.
This is done automatically when integrating via Cocoapods.
For other cases:
If you are using xcconfig files to build your app, please set:
For iOS targets: EXCLUDED_ARCHS[sdk=iphonesimulator*] = arm64
For tvOS targets: EXCLUDED_ARCHS[sdk=appletvsimulator*] = arm64
If you are using the Xcode Build Settings panel, enable Build Active Architecture Only for the configuration you use to run your app on the simulator. (ONLY_ACTIVE_ARCH = YES)
3.26.1
Changed
Deprecates the compilation macro ABK_ENABLE_IDFA_COLLECTION in favor of the ABKIDFADelegate implementation.
ABK_ENABLE_IDFA_COLLECTION will not function properly in iOS 14. To continue collecting IDFA on iOS 14 devices, please upgrade to Xcode 12 and implement App Tracking Transparency and Braze’s ABKIDFADelegate (see the iOS 14 upgrade guide for more information).
Added
Adds improved support for iOS 14 Approximate Location tracking.
3.26.0
Breaking
Removed readonly property overrideApplicationStatusBarHiddenState in ABKInAppMessageViewController.h.
Fixed
Fixes an issue with in-app messages not respecting the application’s status bar style when View controller-based status bar appearance (UIViewControllerBasedStatusBarAppearance) is set to YES in the Info.plist.
Fixes an issue which can lead to text being cut off in Content Cards for specific iPhone models.
Fixes an issue preventing test Content Cards from displaying under specific conditions.
Changed
Added Binary Project Specification file for more efficient Carthage integration of the full SDK.
Update your Cartfile to use binary "https://raw.githubusercontent.com/Appboy/appboy-ios-sdk/master/appboy_ios_sdk_full.json"
Support for this integration method was added starting with version 3.24.0 of the SDK.
Added
Adds support for specifying PushStoryAppGroup in the Appboy dictionary in your app’s Info.plist. This Apple App Group will share the Braze Push Story information such as Campaign IDs between applications from a single Apple Developer account.
Adds appboyBridge.getUser().addAlias(alias, label) to the javascript interface for HTML in-app messages.
Adds the property overrideUserInterfaceStyle to ABKInAppMessage that allows forcing Light or Dark mode in the same way as Apple’s UIViewController.overrideUserInterfaceStyle.
Adds the ability to dismiss modal in-app messages when the user clicks outside of the in-app message.
This feature is disabled by default.
You can enable the feature by adding the Appboy dictionary to your Info.plist file. Inside the Appboy dictionary, add the DismissModalOnOutsideTap boolean subentry and set the value to YES.
You can also enable the feature at runtime by setting ABKEnableDismissModalOnOutsideTapKey to YES in appboyOptions.
3.25.0
Breaking
Removes the arm64e architecture when building with Cocoapods.
Removes the deprecated property appWindow from ABKInAppMessageWindowController.
3.24.2
Fixed
Fixes an issue with post-dismissal view hierarchy restoration for in-app messages under specific conditions.
Fixes an issue introduced in 3.24.0 breaking the SDK compatibility with Cocoapods.
3.24.0
Important This release is not compatible with Cocoapods. Do not upgrade to this version and upgrade to 3.24.1 and above instead.
Breaking
Renames ABKInAppMessageWindow’s catchClicksOutsideInAppMessage to handleAllTouchEvents.
Fixed
Fixes an issue where the unread indicator on a Content Card would persist even after being read.
Fixes an issue preventing long texts from displaying correctly in Full in-app messages.
Fixes an issue where appboyBridge would not work in an Ajax callback within HTML In-App Messages.
Changed
Changes the manual integration steps for versions 3.24.0 and newer. Please follow the updated integration steps here.
Added
Adds support for JavaScript functions window.alert(), window.confirm() and window.prompt() in HTML in-app messages.
Adds the ABKContentCardsTableViewControllerDelegate protocol to more intricately handle Content Card clicks using the methods contentCardTableViewController:shouldHandleCardClick: and contentCardTableViewController:didHandleCardClick:.
3.23.0
Fixed
Fixes an issue with regex based event property triggers not working as expected. Previously on iOS they had to match the entire string, now they will search for matches as expected.
Improves resiliency when handling multiple background requests.
Added
Adds support for upcoming HTML In-App Message templates.
Adds support for applications using scenes (UIWindowSceneDelegate). In-app messages are now properly displayed in that context.
3.22.0
Breaking
Removes the key ABKInAppMessageHideStatusBarKey from appboyOptions and the property forceHideStatusBar from ABKInAppMessageController. Full screen in-app messages are now always displayed with the status bar hidden.
Adds Dark Mode support to Content Cards. This feature is enabled by default and can be disabled by setting enableDarkTheme property to NO on ABKContentCardsTableViewController before the view controller is presented.
Fixed
Fixes an issue in HTML in-app messages where button clicks weren’t correctly being attributed for mailto: and tel: links.
Fixes an issue in HTML in-app messages where videos would be displayed underneath the in-app message when full screen playback was enabled. The in-app message UIWindow’s windowLevel is now set to UIWindowLevelNormal instead of being above UIWindowLevelStatusBar.
Fixes an issue in Content Cards where ABKURLDelegate was not being respected when opening links.
Added
Adds appboyBridge.logClick(id), appboyBridge.logClick() and appboyBridge.getUser().setCustomLocationAttribute(key, latitude, longitude) to the javascript interface for HTML in-app messages.
Adds Czech and Ukrainian language support for Braze UI elements.
Adds the ability to unset the current user’s email attribute by setting the email property of the current ABKUser instance to nil (e.g. [Appboy sharedInstance].user.email = nil;).
Adds Dark Mode support to Push Stories.
Adds the ability to set maximum width of Content Cards by using the maxContentCardWidth property of ABKContentCardsTableViewController.
3.21.3
Added
Adds an option to disable automatic geofence requests.
You can do this in the plist by adding the Appboy dictionary to your Info.plist file. Inside the Appboy dictionary, add the DisableAutomaticGeofenceRequests boolean subentry and set the value to YES.
You can also disable automatic geofence requests at runtime by setting ABKDisableAutomaticGeofenceRequestsKey to YES in appboyOptions.
Adds the method requestGeofencesWithLongitude:latitude: to Appboy.h. This method can be called whenever you explicitly want Braze to send a request for updated Geofences information. This call is rate limited to once per user session.
3.21.2
Fixed
Fixes an issue in HTML in-app messages where, during display, the viewport would shift down if the keyboard was opened but not shift back up when the keyboard was closed.
Fixes an issue introduced in 3.17.0 where the SDK would give precedence to the endpoint passed in Info.plist if given both an endpoint from the Info.plist and appboyOptions.
Added
Adds the ability to set a custom WKWebViewConfiguration for HTML in-app messages. You can set it using the method setCustomWKWebViewConfiguration in ABKInAppMessageUIDelegate.
Changed
Removes calls to deprecated APIs statusBarOrientation and statusBarFrame.
Un-deprecates the following push utility methods: isUninstallTrackingUserNotification:, isUninstallTrackingRemoteNotification:, isGeofencesSyncUserNotification:, isGeofencesSyncRemoteNotification:, and isPushStoryRemoteNotification: from ABKPushUtils. These APIs were originally deprecated in 3.16.0.
3.21.1
Fixed
Fixes an issue for Modal and Full in-app messages where the opacity value of the close X button was not being respected.
Changed
ABKContentCard.m will now log a click event when logContentCardClicked is called and no URL field is populated.
Added
Adds the ability to force the status bar to hide when a Full or HTML in-app message is being actively displayed. To opt in to this feature, set ABKInAppMessageHideStatusBarKey to YES in appboyOptions.
3.21.0
Breaking
Requires XCode 11.
Fixed
Fixes an issue in the animate-in behavior of HTML in-app messages that could cause a brief flicker before the message displayed on older devices and simulators.
Fixes an issue with Slideup in-app messages where they would cover part of the status bar when animating from the top on non-notched devices.
Fixes an issue introduced in 3.14.1 where boolean-typed event properties would be improperly cast to numbers.
Changed
Updates the logging format for debug, warn, and error ABKLogger messages to now print their log level.
Added
Adds support for the upcoming feature, in-app messages with Dark Mode support.
Dark Mode enabled messages must be created from the dashboard. Braze does not dynamically theme in-app messages for Dark Mode.
This feature is enabled by default for all new ABKInAppMessage instances. To prevent Braze from automatically applying a Dark Theme when the fields are available on Braze’s servers, set the enableDarkTheme flag on ABKInAppMessage to NO in the beforeInAppMessageDisplayed: method of your ABKInAppMessageControllerDelegate delegate implementation.
Adds the ability to reference the Braze iOS SDK API from Swift when using the Appboy-tvOS-SDK pod. Adding import AppboyTVOSKit to the top of your Swift file while using the Appboy-tvOS-SDK pod will give you equivalent behavior to adding import Appboy_iOS_SDK while using the Appboy-iOS-SDK pod.
Adds the populateContentCards: method and the cards property to ABKContentCardsTableViewController’s public interface. By setting the cards property from within populateContentCards:, you may manipulate ABKContentCard field data and/or control which ABKContentCard instances are displayed from the context of a custom ABKContentCardsTableViewController subclass.
3.20.4
Fixed
Fixed an issue with Content Cards where the header and description text fields would appear to be missing in Dark Mode.
Added
Adds a TEALIUM SDK flavor option.
3.20.3
Added
If Automatic Braze location collection is enabled, the SDK now submits a session start location request if location hasn’t already been sent up for the session after any affirmative location permission prompt. This also applies to the new “Allow Once” option in iOS 13.
3.20.2
Important If you are on Braze iOS SDK 3.19.0 or below, we recommend upgrading to this version immediately to ensure uninterrupted collection of new push tokens as users upgrade to iOS 13.
In application:didRegisterForRemoteNotificationsWithDeviceToken:, replace
If you are on Braze iOS SDK 3.19.0 or below and unable to upgrade, you must ensure your [Appboy registerPushToken] implementation does not rely on stringWithFormat or description for parsing the deviceToken passed in from application:didRegisterForRemoteNotificationsWithDeviceToken:. Please reach out to your Customer Success Manager for more information.
Important In Braze iOS SDK 3.19.0, we updated our HTML in-app message container from UIWebview to WKWebView, however, the initial releases have known issues displaying HTML in-app messages. If you are currently using 3.19.0, 3.20.0, or 3.20.1, you are strongly encouraged to upgrade if you make use of HTML in-app messages. Please see the following for more important information about the transition to WKWebView:
If you are utilizing customization for HTML in-app messages (such as customizing ABKInAppMessageHTMLFullViewController or ABKInAppMessageHTMLViewController), we strongly recommend testing to ensure your in-app messages continue to display correctly and interactions function as intended.
The following javascript methods are now no-ops: alert, confirm, prompt.
Deep links without schemes are no longer supported. Ensure that your in-app message deep links contain schemes.
Fixed
Fixes an issue introduced in 3.19.0 where HTML in-app messages would not register user clicks when the .xib failed to load.
Fixes an issue introduced in 3.19.0 where HTML in-app messages with select special characters and an assets zip would cause display irregularities.
Changed
Updates the WKWebView which displays HTML in-app messages with the following attributes:
suppressesIncrementalRendering is set to true
mediaTypesRequiringUserActionForPlayback is set to WKAudiovisualMediaTypeAll
Updates the background color of the WKWebView which displays HTML in-app messages from [[UIColor blackColor] colorWithAlphaComponent:.3] to [UIColor clearColor].
3.20.1
Important This release has known issues displaying HTML in-app messages. Do not upgrade to this version and upgrade to 3.20.2 and above instead. If you are using this version, you are strongly encouraged to upgrade to 3.20.2 or above if you make use of HTML in-app messages.
Fixed
Fixes an issue introduced in 3.19.0 which changed the background of HTML in-app messages to a non-transparent color.
Improves the robustness of push token collection code for iOS 13 introduced in 3.20.0.
3.20.0
Important This release has known issues displaying HTML in-app messages and a known issue with push token collection. Do not upgrade to this version and upgrade to 3.20.2 and above instead. If you are using this version, you are strongly encouraged to upgrade to 3.20.2 or above if you make use of HTML in-app messages.
Breaking
Introduced a signature change for push token collection methods:
Important This release has known issues displaying HTML in-app messages. Do not upgrade to this version and upgrade to 3.20.2 and above instead. If you are using this version, you are strongly encouraged to upgrade to 3.20.2 or above if you make use of HTML in-app messages.
Breaking
Replaces UIWebView with WKWebView for HTML in-app messages.
If you are utilizing customization for HTML in-app messages (such as customizing ABKInAppMessageHTMLFullViewController or ABKInAppMessageHTMLViewController), you must test to ensure your in-app messages continue to display correctly and interactions function as intended.
The following javascript methods are now no-ops: alert, confirm, prompt.
Deep links without schemes are no longer supported. Please ensure that your in-app message deep links contain schemes.
3.18.0
Breaking
Automatic Braze location collection is now disabled by default. If you choose to use our location collection, you must explicitly enable location collection.
You can do this in the plist by adding the Appboy dictionary to your Info.plist file. Inside the Appboy dictionary, add the EnableAutomaticLocationCollection boolean subentry and set the value to YES.
You can also enable location at runtime by setting ABKEnableAutomaticLocationCollectionKey to YES in appboyOptions.
Removes the Feedback feature from the SDK. The Feedback subspec and all Feedback methods on the SDK, including [[Appboy sharedInstance] submitFeedback] and [[Appboy sharedInstance] logFeedbackDisplayed], are removed.
Changed
Improves support for in-app messages on “notched” devices (for example, iPhone X, Pixel 3XL). Full-screen messages now expand to fill the entire screen of any phone, while covering the status bar.
Added
Adds the ability to enable Braze Geofences without enabling Braze location collection. You can set this in the plist by adding the Appboy dictionary to your Info.plist file. Inside the Appboy dictionary, add the EnableGeofences boolean subentry and set the value to YES to enable Braze Geofences. You can also enable geofences at runtime by setting ABKEnableGeofencesKey to YES in appboyOptions.
If this key is not set, it will default to the status of automatic location collection (see breaking change above).
Note that Braze Geofences will continue to work on existing integrations if location collection is enabled and this new configuration is not present. This new configuration is intended for integrations that want Braze Geofences, but not location collection enabled as well.
3.17.0
Breaking
Removes ABKAppboyEndpointDelegate.
You can now set the endpoint at runtime by setting the value of ABKEndpointKey in appboyOptions to your custom endpoint (ex. sdk.api.braze.eu) at initialization.
3.16.0
Important: If you are using ABKAppboyEndpointDelegate, you will need to replace dev.appboy.com with sdk.iad-01.braze.com in the getApiEndpoint method.
Breaking
Removes the methods: allowRequestWhenInUseLocationPermission and allowRequestAlwaysPermission from ABKLocationManager.
To request when in use location permission, use the following code:
The preprocessor macro ABK_DISABLE_LOCATION_SERVICES is no longer needed.
Important: Configuring geofences to request always location permissions remotely from the Braze dashboard is no longer supported. If you are using Geofences, you will need to ensure that your app requests always location permission from your users manually.
ABKAutomaticRequestProcessingExceptForDataFlush is deprecated. Users using ABKAutomaticRequestProcessingExceptForDataFlush should switch to ABKManualRequestProcessing, as the new behavior of ABKManualRequestProcessing is identical to the previous behavior of ABKAutomaticRequestProcessingExceptForDataFlush
Changed
Deprecates the push utility methods: isUninstallTrackingUserNotification:, isUninstallTrackingRemoteNotification:, isGeofencesSyncUserNotification:, isGeofencesSyncRemoteNotification:, and isPushStoryRemoteNotification: from ABKPushUtils. Please use the function isAppboyInternalRemoteNotification:.
Minor changes to the logic of ABKManualRequestProcessing. The original ABKManualRequestProcessing had specific exceptions and behaved more like ABKAutomaticRequestProcessingExceptForDataFlush in practice. As a result, the two policies have been merged into ABKManualRequestProcessing. Note that the new definition of ABKManualRequestProcessing is that periodic automatic data flushes are disabled. Other requests important to basic Braze functionality will still occur.
3.15.0
Important: If you are using ABKAppboyEndpointDelegate, you will need to replace dev.appboy.com with sdk.iad-01.braze.com in the getApiEndpoint method.
Breaking
Adds support for SDWebImage version 5.0.
Note that upgrading to SDWebImage 5.0 also removed the FLAnimatedImage transitive dependency from the SDK.
3.14.1
Important: If you are using ABKAppboyEndpointDelegate, you will need to replace dev.appboy.com with sdk.iad-01.braze.com in the getApiEndpoint method.
Changed
Changed in-app message trigger behavior to not perform trigger events until after any pending trigger sync requests to the server have finished.
Fixed
Fixed a serialization issue that could cause improper type conversions for certain decimal values.
Fixed a behavior introduced in 3.12.0 which caused in-app messages to not be considered triggered locally if ABKDiscardInAppMessage was returned by the host app in beforeInAppMessageDisplayed:.
Added
Added the ability to set the session timeout via the Info.plist.
Add the Appboy dictionary to your Info.plist file. Inside the Appboy Dictionary, add the SessionTimeout Number subentry and set the value to your session timeout.
Added the ability to disable location tracking via the Info.plist.
Add the Appboy dictionary to your Info.plist file. Inside the Appboy Dictionary, add the DisableAutomaticLocation Boolean subentry and set the value to YES.
Added dynamic cell resizing for Content Cards cells with templated images in our default Content Cards UI.
Added validation to the local filename’s canonical path during zip file extraction.
3.14.0
Important: If you are using ABKAppboyEndpointDelegate and plan to upgrade to 3.14.1, you will need to replace dev.appboy.com with sdk.iad-01.braze.com in the getApiEndpoint method.
Added
Improves the look and feel of In-App Messages to adhere to the latest UX and UI best practices. Changes affect font sizes, padding, and responsiveness across all message types. Now supports button border styling.
3.13.0
Breaking
Upgrades the delivery mechanism of Push Stories to allow delivery even after a user’s app has been force closed..
Required: Please change your integration to use ab_cat_push_story_v2 instead of ab_cat_push_story for the UNNotificationExtensionCategory in your content extension. See documentation for more details.
Changed
Improves in-app message triggering logic to fall back to lower priority messages when the Braze server aborts templating (e.g. from a Connected Content abort in the message body, or because the user is no longer in the correct Segment for the message).
Updates German translations to improve formatting.
3.12.0
Breaking
Drops support for iOS 8.
Adds support for the arm64e architecture when building with Cocoapods. Requires Xcode 10.1.
Fixed
Fixes bitcode support for the Push Story framework when using Xcode 10.
Cross-Promotion cards have also been removed as a card model and will thus no longer be returned.
3.11.0
Added
Adds the ability to set or remove custom location attributes for a specific user from within HTML IAMs.
Updates the SDK to report users who disable banner notifications but are still opted-in to push notifications as push enabled. Note this change does not affect provisionally authorized users on iOS 12, who were considered push enabled before this release regardless of their banner notification settings.
Adds Carthage Core support which allows for integration with the core Braze SDK without any UI components. To implement the core SDK, add binary "https://raw.githubusercontent.com/Appboy/appboy-ios-sdk/master/appboy_ios_sdk_core.json" to your Cartfile.
Changed
Deprecates the Feedback feature.
Fixed
Fixes an issue with the JS bridge when trying to set a custom attribute with the character ‘&’.
3.10.0
Added
Adds the ability to specify a whitelist for device fields that are collected by the Braze SDK.
Configurable device fields are defined in the ABKDeviceOptions enum.
To specify whitelisted device fields, assign the bitwise OR of desired fields to ABKDeviceWhitelistKey in the appboyOptions of startWithApiKey:inApplication:withAppboyOptions:.
For example, to specify timezone and locale collection to be whitelisted, set appboyOptions[ABKDeviceWhitelistKey] = @(ABKDeviceOptionTimezone | ABKDeviceOptionLocale);.
To turn off all fields, set appboyOptions[ABKDeviceWhitelistKey] = @(ABKDeviceOptionNone);.
By default, all fields are enabled.
Added the clicked property to ABKContentCard. Clicks made through [ABKContentCard logContentCardClicked] are now saved locally on the device.
Breaking
Removes ABKSignificantChangeCollectionEnabledOptionKey, ABKSignificantChangeCollectionDistanceFilterOptionKey, and ABKSignificantChangeCollectionTimeFilterOptionKey from the Appboy interface.
Removed
Removes the ability to optionally track locations in the background.
Fixed
Fixes an issue where Slideup and Full In-App Message content could be obscured by the notch on iPhone XR and iPhone XS Max.
3.9.0
Breaking
Adds support for iOS 12. Requires Xcode 10.
Fixed
Fixes minor issues with subclassing ABKInAppMessageModalViewController and News Feed request timeouts.
Thanks @datkinnguyen for your contribution.
3.8.4
Fixed
Fixes a regression introduced in version 3.8.3 that caused background tasks to extend beyond execution time.
3.8.3
Fixed
Fixes an issue where ABKContentCardsController unviewedContentCardCount would always return 0.
Changed
Updates the Content Cards UI with minor layout improvements.
3.8.2
Fixed
Fixes an issue with possible build failure when using Content Cards related to duplicate image names in Content Cards and News Feed pods. Please use this version if integrating Content Cards.
Changed
Updates the Content Cards UI with minor layout improvements.
3.8.1
Fixed
Important: Fixes an issue with Content Cards syncing. Note: As additional fixes were added in later versions, please use Braze iOS SDK version 3.8.2 or above if integrating Content Cards.
3.8.0
Added
In ABKUser class, addLocationCustomAttributeWithKey:latitude:longitude: and removeLocationCustomAttributeWithKey: methods are added to manage location custom attributes.
Introduces support for the upcoming Content Cards feature, which will eventually replace the existing News Feed feature and adds significant capability. This feature is currently in closed beta testing; if you’re interested in joining the beta, please reach out to your Customer Success Manager or Account Manager.
Changed
Status bar is not obscured when displaying a full screen in-app message.
3.7.1
Changed
Improves data handling immediately following a user change to bring behavioral parity with the Android and Web SDKs.
3.7.0
Breaking
In ABKInAppMessageUIControlling protocol, getCurrentDisplayChoiceForControlInAppMessage method is added to define whether the control in-app message impression should be logged now, later or discarded.
In ABKInAppMessageControllerDelegate protocol, beforeControlMessageImpressionLogged method is added to define whether the control in-app message impression should be logged now, later or discarded.
Added
CLLocationManager authorization requests can now be prevented from compiling by setting a Preprocessor flag ABK_DISABLE_LOCATION_SERVICES.
Fixed
Fixes an issue where in-app messages triggered on session start could potentially be templated with the old user’s attributes.
3.6.0
Breaking
In ABKSDWebImageProxy.h, renames removeImageForKey to removeSDWebImageForKey and clearCache to clearSDWebImageCache to avoid conflicts with internal Apple API. Important: We have received reports of sporadic App Store rejection stemming from Apple’s static checks mistaking our APIs for an invalid usage of the internal Apple API. We recommend new App Store submissions integrating the Braze iOS SDK ship with this version or above to decrease the likelihood of rejection.
Added
Exposes handleCardClick on ABKNewsFeedTableViewController.h to enable custom handling via subclassing.
Improves News Feed image handling on iPad.
3.5.1
Fixed
Fixes an issue with integrating the NewsFeed subspec in Swift projects via Cocoapods.
3.5.0
Breaking
Open sources the News Feed UI code and moves it into a new subspec named “NewsFeed”.
Manual integrators must now add the AppboyUI folder of this repository to their projects as a group, in addition to AppboyKit.
The “NewsFeed” subspec contains the Braze News Feed UI and the Core SDK. It does not include the Feedback or In-App Message UI.
The “UI” subspec contains all Braze UI and the Core SDK subpsec.
ABKFeedViewControllerDelegate was removed.
To integrate a navigation context News Feed, use the following code:
Removes NUI support for Feedback, In-App Messages, and the News Feed.
All customization can now be done by using categories or by extending our open sourced view controllers.
Removes deprecated ABKPushURIDelegate from the SDK. Use ABKURLDelegate instead.
3.4.0
Breaking
Adds preferredOrientation to ABKInAppMessageUIController and ABKInAppMessageWindowController.
Removes supportedOrientations from ABKInAppMessageUIController and ABKInAppMessageWindowController.
Renames supportedOrientationMasks to supportedOrientationMask in ABKInAppMessageUIController and ABKInAppMessageWindowController.
Fixed
Fixes an issue that caused GIFs to not animate on SDWebImage versions above or equal to 4.3.0
3.3.4
Added
Adds the ability to view verbose logs from the SDK for debugging.
To enable verbose logging, add a dictionary named Appboy to your Info.plist file. Inside the Appboy Dictionary, add the LogLevel String subentry and set the value to “0”.
3.3.3
Added
Adds wipeDataAndDisableForAppRun: on the Appboy interface to support wiping all customer data created by the Braze SDK.
Adds disableSDK: and requestEnableSDKOnNextAppRun: to the Appboy interface to disable and re-enable the Braze SDK.
Fixed
Fixes an issue where events setting custom attribute arrays to nil would persist on the SDK beyond their useful life.
3.3.2
Changed
Updates the SDK with internal, non-functional improvements.
3.3.1
Added
Adds Other, Unknown, Not Applicable, and Prefer not to Say options for user gender.
Adds umbrella header files AppboyFeedback.h and AppboyInAppMessage.h for the Feedback and InAppMessage subspecs.
Fixed
Fixes an issue where the method beforeInAppMessageDisplayed: in class ABKInAppMessageControllerDelegate is not called when the host app is using the Core subspec.
3.3.0
Breaking
Open sources the In-App Message UI code and moves it into a new subspec named “InAppMessage”.
Manual integrators must now add the AppboyUI folder of this repository to their projects as a group, in addition to AppboyKit.
The “InAppMessage” subspec contains the Braze In-App Message UI and the Core SDK. It does not include Feedback or the News Feed UI.
The “UI” subspec contains all Braze UI and the Core SDK subpsec.
The open-sourced In-App Message view controllers offer backward compatible NUI support, although we recommend using categories or subclassing the In-App Message view controllers for customization as the NUI library isn’t actively maintained any more. Support for NUI customization will be removed in a future release.
Most delegate customization methods are moved from ABKInAppMessageControllerDelegate to ABKInAppMessageUIDelegate.
Fixes an issue introduced in version 3.0.0 which caused detailed device model information to not be collected by the SDK.
Fixes an issue where Braze’s Carthage framework did not support simulators.
3.2.2
Fixed
Fixes an issue where Slideup and Full In-App Message content could be obscured by the notch on iPhone X.
3.2.1
Fixed
Fixes an issue where Push Story Framework did not support bitcode.
3.2.0
Added
Adds Push Stories, a new push type that uses UNNotificationContentExtension to display multiple images in a single notification.
This feature requires iOS 10 and above.
Fixed
Fixes an issue where tvOS SDK did not support bitcode.
3.1.1
Added
Adds a new property language to ABKUser to allow explicit control over the user’s language in the Braze dashboard. Note that this is separate and independent from the language settings on the user’s device.
Adds an Objective-C sample app for the Core subspec of the SDK. See Samples/Core/ObjCSample.
Fixed
Fixes a bug introduced in version 2.30 where crashes could occur if the SDK was directed to handle a custom scheme deep link inside a WebView.
Fixes a bug introduced in version 3.0 where new custom attributes were not being flushed if custom attributes had been previously flushed in the same foregrounded session.
Fixes a bug introduced in version 3.0 where previously flushed custom attributes were being re-sent.
Fixes an issue where slow image fetching blocked image-only modal in-app messages from displaying.
Adds the ability to set a custom API endpoint via the Info.plist.
Add the Appboy dictionary to your Info.plist file. Inside the Appboy Dictionary, add the Endpoint String subentry and set the value to your custom endpoint (e.g., sdk.api.braze.eu).
Fixed
Fixes an issue where changing the IDFA settings through a third party wrapper could cause a crash.
3.0.1
Fixed
Fixes an issue where calling incrementCustomUserAttribute: on ABKUser could cause a crash.
3.0.0
Breaking
Removes the deprecated foursquareAccessToken property from ABKUser. To associate a Foursquare access token with a user profile, use setCustomAttributeWithKey:andStringValue: instead.
Note: Braze iOS SDK version 3.0.0 will only support downgrading to iOS SDK version 2.31.0. Downgrading to versions prior to 2.31.0 may result in app crashes.
Added
Adds a major performance upgrade that reduces CPU usage, memory footprint, and network traffic.
2.31.0
Breaking
Open sources the Feedback view controllers and moves them into a new subspec “Feedback”.
The “Feedback” subspec has the Braze Feedback UI and the Core SDK. It will not include in-app messages or News Feed UI.
Removes the popover context for Feedback due to the deprecation of UIPopoverViewController in iOS.
Renames the ABKFeedbackViewControllerModalContext and ABKFeedbackViewControllerNavigationContext class to ABKModalFeedbackViewController and ABKNavigationFeedbackViewController.
The open-sourced Feedback view controllers offer backward compatible NUI support, although we recommend using categories or subclassing the Feedback view controllers for customization as NUI library isn’t actively maintained any more. See here for customization details.
Adds user aliasing capability. Aliases can be used in the API and dashboard to identify users in addition to their ID. See the addAlias:withLabel: method on ABKUser for more information.
Changed
Updates the AppboyKit.h to include all the public header files in the SDK.
2.30.0
Breaking
Open sources the ABKModalWebViewController class, which is used to display the web URLs from push or in-app message clicks.
Drops NUI customization support for the navigation bar and navigation bar button item on ABKModalWebViewController. To customize the UI, create an ABKModalWebViewController category and override the corresponding method(s) exposed.
Open sources the ABKNoConnectionLocalization class, which provides Braze’s default localized string for “No Connection” error.
You can customize the localization by adding Appboy.no-connection.message as the key in your Localizable.strings files.
Removes the Appboy.bundle from the Core subspec of the SDK.
If you use the Core subspec, the in-app messages will not display, and trying to display Braze’s News Feed and Feedback UI will lead to unpredictable behavior.
2.29.1
Added
Adds a new property buttonTextFont to ABKInAppMessageButton. It allows clients to set customized fonts on in-app message buttons before the in-app message is displayed.
Fixed
Makes class ABKInAppMessageWindowController.h public.
Fixes an issue where device information was not flushed for a new user when server requests were queued for two or more users.
Changed
Removes the warnings in ABKSDWebImageProxy.
2.29.0
Breaking
Drops support for iOS 7.
Removes the shouldOpenURIExternally field from ABKInAppMessage.
Requires XCode 8.3.
Changes the behavior of the onCardClicked:feedViewController: method in ABKFeedViewControllerDelegate to let Braze handle the card click action if the delegate method returns NO.
Previously, Braze would handle the card click action if onCardClicked:feedViewController: returned YES.
This change standardizes delegate behavior with ABKInAppMessageControllerDelegate and ABKURLDelegate.
Added
Adds the property openUrlInWebView to ABKInAppMessage, ABKInAppMessageButton and ABKCard. This property determines if the URL associated with the object will be opened in a UIWebView.
Adds a Javascript interface to HTML in-app messages with ability to log custom events, log purchases, set user attributes, navigate users, and close the message.
Adds an abDeepLink query field to HTML in-app messages, which defaults to false. To prevent the SDK from opening deep links in a UIWebView, specify abDeepLink=true in your link (e.g., https://www.braze.com?abDeepLink=true).
Adds the ABKURLDelegate protocol for customizing URL handling across channels. Set the ABKURLDelegate by passing a delegate object to the ABKURLDelegateKey in the appboyOptions of startWithApiKey:inApplication:withAppboyOptions:. See our Stopwatch sample application for a Universal Link implementation sample.
Adds the following utility methods to ABKPushUtils for detecting if a push notification was sent by Braze for internal feature purposes:
These methods can be used to ensure that your app does not take any undesired or unnecessary actions upon receiving Braze’s internal content-available notifications (e.g., pinging your server for content).
Changed
Deprecates ABKPushURIDelegate. If you were previously using ABKPushURIDelegate, use ABKURLDelegate instead.
Deprecates userNotificationWasSentFromAppboy: and pushNotificationWasSentFromAppboy: on Appboy. Use isAppboyUserNotification: and isAppboyRemoteNotification: on ABKPushUtils instead.
Deprecates shouldFetchTestTriggersFlagContainedInPayload: on ABKPushUtils.
2.28.0
Breaking:
Removes support for watchOS 1, including Braze WatchKit SDK and all public APIs for watchOS in Braze iOS SDK.
Added
Adds ABKSDWebImageProxy to access the SDWebImage framework. This will prevent the Core subspec of the SDK from calling any SDWebImage methods directly.
2.27.0
Breaking
Removes the following deprecated items: the bio field of ABKUser, the setIsSubscribedToEmails: method of ABKUser, and the getResourceEndpoint: method of the ABKAppboyEndpointDelegate protocol.
Added
Adds support for registering geofences and messaging on geofence events. Please reach out to success@braze.com for more information about this feature.
Adds Braze default push categories which can be fetched from ABKPushUtils.
To use the Braze default push categories, you need to manually add the Braze categories when you register for push. You can get the Braze categories from [ABKPushUtils getAppboyUNNotificationCategorySet] or [ABKPushUtils getAppboyUIUserNotificationCategorySet].
In this version, we add four sets of push action buttons: accept/decline, yes/no, confirm/cancel, more. These will be available as button sets on the dashboard when creating an iOS push campaign.
All Braze push action buttons support localization.
Adds support for web link and deep link handling of push action buttons.
Fixed
Fixes the issue where the combination of the Core subspec of the SDK and a non-supported version of SDWebImage framework can cause apps to crash.
HTML in-app messages now log body click analytics on all links that are not appboy://customEvent and do not include the abButtonId query field. Previously, no body click analytics were logged.
Removed
Removes deprecated method - (NSString *)getResourceEndpoint:(NSString *)appboyResourceEndpoint from ABKAppboyEndpointDelegate.
Removes deprecated property bio and deprecated method - (BOOL)setIsSubscribedToEmails:(BOOL)subscribed from ABKUser.
2.26.0
Breaking
Adds support for SDWebImage version 4.0.0 with GIF support. SDWebImage version 3.x will not be supported from this version on. Please make sure you are using the correct version of SDWebImage.framework. Note: SDWebImage 4.0.0 relies on FLAnimatedImage - users integrating in ways besides CocoaPods should ensure they link the FLAnimatedImage framework if they want GIF support.
Removes the url property from subclasses of ABKCard. This property has been renamed to urlString and moved onto the ABKCard superclass.
Added
Adds Cocoapods subspecs “Core” and “UI”.
The “UI” subspsec has the full feature set of the current SDK. This is the default subspec when no subspec is specified in the Podfile.
The “Core” subspec removes the SDWebImage framework dependency. This is for apps who do not use any Braze UI that leverages images (News Feed, in-app messages). If you use the “Core” subspec, in-app messages with images will not display, and the News Feed will render with plain white images.
Makes ABKThemableFeedNavigationBar.h and ABKNavigationBar.h public.
Adds ABKIDFADelegate protocol that can be used to create a delegate to pass Braze the IDFA in startWithApiKey: in the appboyOptions dictionary under the ABKIDFADelegateKey key. Alternative to existing ABKIdentifierForAdvertisingProvider compile flag solution.
Changed
Disables the -webkit-touch-callout property on HTML in-app messages. Long presses and 3D Touch on links will no longer display pop-ups with additional link information.
2.25.0
Added
Adds the ability to set the ABKInAppMessageControllerDelegate when the SDK starts by passing a delegate object to the ABKInAppMessageControllerDelegateKey in the appboyOptions of startWithApiKey:inApplication:withAppboyOptions:.
This is the recommended way to set the ABKInAppMessageControllerDelegate and circumvents a potential race condition where in-app messages can be shown before the delegate has been set.
Exposes the ABKFeedback object and adds a new method - (void)submitFeedback:(ABKFeedback *)feedback withCompletionHandler:(nullable void (^)(ABKFeedbackSentResult feedbackSentResult))completionHandler; in Appboy. The new method accepts a completion handler which receives an ABKFeedbackSentResult enum as feedback sending result.
The possible feedback sending results are: invalid feedback object(ABKInvalidFeedback), fail to send feedback(ABKNetworkIssue), and feedback sent successfully(ABKFeedbackSentSuccessfully).
Adds the utility method - (BOOL)userNotificationWasSentFromAppboy:(UNNotificationResponse *)response; to Appboy. This method is compatible with the UserNotifications framework and returns whether a push notification was sent from Braze’s server.
Those using - (BOOL)pushNotificationWasSentFromAppboy:(NSDictionary *)options; who have integrated the UserNotifications framework should use this method instead.
Fixed
Changes the ABKInAppMessageButton from a UIButton object to a pure data model class in NSObject.
This resolves the issue https://github.com/Appboy/appboy-ios-sdk/issues/97.
Changed
Adds more protection around triggered in-app message display.
2.24.5
Fixed
Fixes an issue where in-app messages triggered off of push clicks wouldn’t fire when the push click happened before the in-app message configuration was synced to the device.
Changed
Updates push registration to flush the token to the server immediately.
Improves the accessibility of in-app messages and news feed cards.
When in voiceOver mode, the SDK auto-focuses on in-app messages when they appear and resets focus on dismissal.
VoiceOver no longer reads Braze internal labels.
News feed cards are enhanced to be more accessible.
2.24.4
Added
Adds protection around in-app message UI code to avoid displaying in-app messages with corrupted images.
Fixed
Fixes the iOS version number in the deprecation warnings in Appboy.h.
2.24.3
Breaking
Update REQUIRED for apps using Braze SDK 2.24.0, 2.24.1 or 2.24.2 with UserNotifications.framework
Fixed
Fixes an issue where a user’s foreground push enabled status could erroneously be marked as disabled.
This issue can occur when opening the app from suspended mode. At that time, the foreground push enabled status was defaulted to disabled until the UserNotifications.framework returned the user’s push authorization status. If the user closed the app within a few seconds, the SDK would not flush the updated push status and the user would mistakenly be marked as “push disabled”.
This issue only affected apps using UserNotifications.framework to register for push notifications.
The updated code stores the push authorization status on disk to fix the issue.
Fixes an issue where triggered in-app messages with event property templating did not respect re-eligibility settings.
Changed
Updates the Podspecs for iOS and tvOS SDK.
Updates deprecation warnings to specify iOS version.
Updates the ABKFeedController with more generic nullability.
Disables all data detectors on HTML in-app messages. Phone numbers, web URLs, addresses and calendar events will no longer be automatically converted.
Disables scrolling bounces on HTML in-app messages.
2.24.2
Fixed
Fixes an issue where HTML in-app messages loaded JavaScript more than once.
Fixes the Appboy.inAppMessage.webview.done-button.title string in the French localization file, which was named incorrectly and wasn’t being found.
2.24.1
Added
Adds nullability annotation for the completionHandler in userNotificationCenter :didReceiveNotificationResponse:withCompletionHandler.
2.24.0
Breaking
Updates the SDK to require XCode 8.
iOS 10 changes behavior of application:didReceiveRemoteNotification:fetchCompletionHandler and subsequently breaks open tracking and deep link handling on most existing Braze iOS integrations. If you don’t currently implement application:didReceiveRemoteNotification: you need to modify your integration, and we recommend that all users update.
Added
Updates the iOS and tvOS SDKs to support iOS 10.
Adds a new method - (void)userNotificationCenter:(UNUserNotificationCenter *)center didReceiveNotificationResponse:(UNNotificationResponse *)response withCompletionHandler:(void (^)())completionHandler. This method supports the new delegate method for push notification handling in UserNotification framework.
Changed
Deprecates two push delegate methods:
- (void)registerApplication:(UIApplication *)application didReceiveRemoteNotification:(NSDictionary *)notification and
- (void)getActionWithIdentifier:(NSString *)identifier forRemoteNotification:(NSDictionary *)userInfo completionHandler:(nullable void (^)())completionHandler.
2.23.0
Added
Adds support for upgraded in-app messages including image-only messages, improved image sizing/cropping, text scrolling, text alignment, configurable orientation, and configurable frame color.
Adds support for in-app messages triggered on custom event properties, purchase properties, and in-app message clicks.
Adds support for templating event properties within in-app messages.
Removed
Removes the deprecated method logSocialShare from Appboy class.
2.22.1
Changed
Updates tvOS bitcode support, patching an error introduced by an Xcode bug.
2.22.0
Added
Adds tvOS support for logging analytics; adds sample applications for tvOS and TVML.
Adds Hebrew localization support.
2.21.0
Breaking
Drops support for iOS 6.
Added
Adds support for deep links with non-URL-encoded characters. The SDK will encode unencoded url strings to create valid deep link NSURLs.
Fixed
Fixes a bug where the background of a slideup in-app message remained transparent when configured with 100% opacity.
Changed
Updates the podspec SDWebImage dependency to fetch the latest version.
Replaces SDK usage of NSURLConnection with NSURLSession.
Updates the SDK to always call canOpenURL: before opening a deep link. After this change, the SDK will only direct deep links whose schemes are whitelisted.
Updates push registration to immediately, asynchronously send up the push token.
2.20.1
Fixed
Fixes an issue where in certain conditions NSUserDefault blocking would cause custom events logged in the main thread to result in UI freezing.
Changed
Implements an optimization in push handling to not prefetch the News Feed when a push arrives and the app is in the background.
2.20.0
Added
Adds Carthage support.
Fixed
Fixes a multithreading issue where logging custom events from different threads would sporadically cause errors.
Fixes the issue where a close button’s color on modal and full in-app messages didn’t respect the opacity value.
Fixes an issue where failure to download HTML in-app message assets mid-download resulted in display without assets.
Changed
Now the onInAppMessageHTMLButtonClicked:clickedURL:buttonID: delegate method will be called every time a URL is clicked. The method used to be only called when there was a button ID in the URL link.
Updates the feedback element to reject messages that contain only whitespace.
Updates remote push handling to call the completion handler passed in every time (a code path previously existed that would return without calling it).
Removed
Removes the delegate method onInAppMessageHTMLButtonClicked:buttonID: from ABKInAppMessageControllerDelegate protocol.
2.19.3
Added
Adds a new feature allowing manual control of deep link handling in push notications. To use this, add a ABKPushURIDelegate value for the ABKPushURIDelegate key in the appboyOptions dictionary of startWithApiKey:inApplication:inApplication:withAppboyOptions:. Also updates the ABKPushURIDelegate integration to be initialized through that integration point.
Adds guarding against a possible crash caused by a user’s offline state being corrupted and not including an active session when a network request
occurred.
Fixed
Fixes an issue where duplicate data could be recorded when a force quit or crash occurs after a network request completed successfully, but before any other activity (such as leaving the app, putting it to sleep, updating an attribute or firing some other event or purchase) occurred.
2.19.2
Added
Adds warning when messaging doesn’t succeed because SDWebImage is not integrated.
Fixed
Fixes a bug where users who went from being eligible for triggered messages to not being eligible for any triggered messages didn’t see their local triggers configuration get updated. This has already been fixed with a server-side update for affected versions; this update fixes the issue client-side.
Changed
Updates headers to be compatible with Swift 2.2.
2.19.1
Added
Adds sample code for a universal link in Stopwatch.
Fixed
Fixes the benign issue that caused the log message *** -[NSKeyedUnarchiver initForReadingWithData:]: data is NULL.
Fixes an issue where NULL campaign IDs in push messages (e.g. from a REST API push message without a specified campaign id) resulted in push-clicked triggers for triggered in-app messages not firing.
Fixes an issue where calling changeUser between identified users caused the read/unread state of the news feed cards of the old user to be set as the new user’s read/unread states.
Fixes an issue where a user attribute value that had been set to multiple different values created a state that would not let you set the original value again. The bug was introduced in version 2.17.1.
Changed
Analytics are now logged for in-app messages and in-app message buttons with ‘ABKInAppMessageNoneClickAction’ click actions. ABKInAppMessageNoneClickAction is set when an in-app message on the dashboard has a click action that only closes the in-app message; formerly this did not count as a click.
2.19.0
Added
Adds support for action-based, locally triggered in-app messages. In-app messages are now sent to the device at session start with associated trigger events. The SDK will display in-app messages in near real-time when the trigger event associated with a message occurs. Trigger events can be app opens, push opens, purchases, and custom events.
Changed
Deprecates the old system of requesting in-app message display, now collectively known as ‘original’ in-app messaging, where messages were limited to displaying at app start.
2.18.4
Fixed
Fixes a Cocoapods issue that emerged during the release of 2.8.13.
2.18.3
Changed
Makes an internal update to provide functionality for SDKs that embed this library.
2.18.2
Added
Adds warning logging if [Appboy sharedInstance] is called while in an uninitialized state.
Changed
Deprecates the delegate method getResourceEndpoint: in ABKAppboyEndpointDelegate. The SDK will no longer call this delegate method.
2.18.1
Fixed
Fixes the nullability annotation warnings in the public header files.
Changed
Updates HelloSwift sample app to adopt swift 2.0.
2.18
Added
Adds nullability annotations to all Braze public APIs.
Adds a new delegate method to support custom push URI handle. For more detail, please see ABKPushURIDelegate.h;
Changed
Updates to auto-dismiss the Braze web view when a user returns to the app after following a link out of the app from an Braze web view.
Removed
Removes the deprecated method requestSlideupRefresh from Braze class.
2.17.1
Fixed
Fixes a bug where in certain conditions the SDK would resend user attributes that had already synced with the server.
2.17
Added
Adds a new button clicked delegate method for HTML in-app message. The new delegate method also passes the URL of the clicked button.
Fixed
Fixes the crash caused by inserting a nil object into an NSDictionary when parsing an event object.
Changed
Makes the WebView background for HTML in-app messages transparent. Ensure HTML in-app messages you send to the device are created expecting a transparent background.
Applies the Braze endpoint delegate methods to in-app messages’ resource(zip and image) fetching.
Removed
Removes the Facebook button from Feedback page.
2.16.1
Added
Adds the ability to log a custom event from an HTML in-app message. To log a custom event from an HTML in-app message, navigate a user to a url of the form appboy://customEvent?name=customEventName&p1=v2, where the name URL parameter is the name of the event, and the remaining parameters are logged as String properties on the event.
Adds the support for customization of the background color of modal in-app messages.
Fixed
Fixes an issue where daylight savings changes were not reflected in the user profile timezone.
Changed
Enables users to input text into HTML in-app messages by allowing HTML in-app messages to be displayed with a keyboard on screen. For all other in-app messages, the in-app message will be dismissed when a keyboard is displayed.
2.16
Added
Adds HTML In-App Message types.
HTML In-App Messages consist of HTML and a url of a zipped archive of assets (e.g. images, css) to download locally which the HTML can reference. See InAppMessageUIViewController in our Stopwatch sample app for an example for the callbacks on the actions inside the WebView hosting the HTML In-App Message.
Changed
Deprecates the method - (void) logSocialShare:(ABKSocialNetwork)socialNetwork and enum ABKSocialNetwork in the Appboy class. If you use logSocialShare: to track user’s social account sharing, you can use logCustomEvent: instead.
Deprecates the property bio in the ABKUser class.
2.15.1
Fixed
Fixes the warning “full bitcode bundle could not be generated because XXX was built only with bitcode marker”.
2.15
Changed
Updates the SDK to support iOS 9. In iOS9, previous versions of the SDK: 1) did not have bitcode support, 2) had a minor UI issue in in-app messages where the slideup messages were not docked on the bottom of the screen if they had one line of text, 3) failed to localize for zh-HK and zh-TW.
2.14
Breaking
Migrates the SDK to ARC. If you are using our Apple Watch Extension and not using ARC, you must apply -fobjc-arc to the extension files.
Added
Adds configurable session timeout feature.
Adds feedbackViewControllerBeforeFeedbackSent method to the feedback delegate protocols, which can be used to modify the feedback message before it’s sent to Braze.
Adds a setAttributionData method to ABKUser that sets an ABKAttributionData object for the user. To be used with attribution provider SDKs when attribution events are fired.
2.13.2
Changed
Increases the number of supported currency codes from 22 to 171. All common currency codes are now supported. The full list of supported codes is available at Appboy.h.
2.13.1
Changed
Updates the isUninstallTrackingNotification method in ABKPushUtils to return the correct value.
2.13
Added
Adds an open-source Watch SDK to support data analytics on watchKit apps. You can use the Appboy-WatchKit SDK by downloading and adding the “Appboy-WatchKit” folder in your watchKit extension target. For more detail, please refer to ABWKUser.h and AppboyWatchKit.h.
Adds an opt-in location service that logs background location events; adds ABKLocationManager with methods for allowing Braze to request location permission on your behalf and logging the current location. More information on the background location capabilities will be made available when dashboard support is released.
Adds client side blocking of blacklisted attributes and events.
Adds ABKPushUtils with method + (BOOL) isUninstallTrackingNotification:(NSDictionary *)userInfo; that can be used to detect if a content-available push is from Braze uninstall tracking (and shouldn’t be acted upon).
Adds a new property expiresAt in class ABKCard. The property is the unix timestamp of the card’s expiration time. For more detail, please refer to ABKCard.h.
Changed
Stops collecting user’s Twitter data automatically. You can pass a user’s Twitter information to Braze by initialzing a ABKTwitterUser object with the twitter data, and setting it to [Appboy sharedInstance].user.twitterUser. For more information, please refer to ABKUser.h and ABKTwitterUser.h.
Stops logging foreground push as a push open as it is not delivered by the system.
Removed
Removes the feature of prompting a user to connect his/her social account. You can refer to the method promptUserToConnectTwitterAccountOnDeviceAndFetchAccountData in TwitterViewController.m to continue prompting the user to connect the Twitter account.
2.12.2
Fixed
Fixes the slideup in-app message display issue. When the host app sets the launch screen file, slideup in-app message from bottom sometimes didn’t dock at the bottom of the screen on iPhone 6 and iPhone 6 Plus.
2.12.1
Added
Adds font and font size customization to all in-app message’s header and message text through NUI. You can customize in-app message’s font by adding ABKInAppMessageSlideupMessageLabel, ABKInAppMessageeModalHeaderLabel,ABKInAppMessageModalMessageLabel, ABKInAppMessageFullHeaderLabel, ABKInAppMessageFullMessageLabel to your NUI nss style sheet.
Fixed
Fixes news feed issue where no news feed cards resulted in the loading spinner remaining on screen.
Changed
Cleans up the console logging in Class ABKIdentifierForAdvertisingProvider.
2.12.0
Fixed
Fixes the incorrect path runtime error for users who integrate our pod as a dynamic framework. For SDK versions before 2.12, when you integrate Braze with use_frameworks! in the Podfile, the library is integrated as a dynamic framework and the Appboy.bundle is stored in a different path.
Changed
Changes HelloSwift sample app to integrate Braze SDK as a dynamic framework.
Removed
Removes the subspecs from the podspec. This fixes the duplicate symbol error https://github.com/Appboy/appboy-ios-sdk/issues/24. If you are still using subspec like pod 'Appboy-iOS-SDK/AppboyKit' in your podfile, please make sure to change it to pod 'Appboy-iOS-SDK'.
2.11.3
Added
Adds the ability to send and retrieve extra key-value pairs via a News Feed card.
Adds the ability to define custom key-value properties on a custom event or purchase. Property keys are strings and values may be NSString, NSDate, or NSNumber objects.
Added the fix for an edge case when there are extra UIWindows at the time in-app message is going to display, the in-app message would have issue during dismissing.
2.11.2
Changed
Updates the serialize and deserialize methods for in-app message classes. This is for use by wrappers such as Braze’s Unity SDK for iOS.
2.11.1
Fixed
Fixes a UI issue in modal in-app messages displayed on iPads running iOS 6/7.
2.11
Added
Adds support for modal and full screen style in-app messages. Also adds support for including fontawesome icons and images with in-app messages, changing colors on in-app message UI elements, expanded customization options, and message resizing for tablets. Please visit our documentation for more information.
Changed
Updates the completionHandler signature in getActionWithIdentifier:forRemoteNotification:completionHandler: to match the comletionHandler passed by the system in method - (void) application:(UIApplication *)application handleActionWithIdentifier:(NSString *)identifier forRemoteNotification:(NSDictionary *)userInfo completionHandler:(void (^)())completionHandler.
2.10.2
Added
Adds the fix for an edge case when there are extra UIWindows at the time in-app message is going to display, the in-app message would have issue during dismissing.
2.10.1
Fixed
Fixes a bug which would cause the host app to crash when a deep link was launched from a push notification. In versions 2.10.0 and 2.9.4, if the host app used [[Appboy sharedInstance] registerApplication: didReceiveRemoteNotification:]; instead of [[Appboy sharedInstance] registerApplication: didReceiveRemoteNotification: fetchCompletionHandler:];, opening a push with a deep link would crash the host app in some circumstances.
2.10.0
Changed
Updates the minimum deployment targets of Braze iOS SDK to iOS 6.0. For apps supporting lower iOS versions, please continue to use 2.9.+ versions of the Braze SDK.
Stops collecting user’s Facebook data automatically. You can pass a user’s Facebook information to Braze by initializing a ABKFacebookUser object with the facebook data, and set it to [Appboy sharedInstance].user.facebookUser. For more information, please refer to ABKUser.h and ABKFacebookUser.h.
Removed
Removes Facebook SDK dependent builds. Now there is a single library - AppboyKit - and a single Pod without functional subspecs - Appboy-iOS-SDK (note we now have both the subspecs pointing at the same library). Please update your Podfile to pod 'Appboy-iOS-SDK if you are integrating Braze with Cocoapods.
Removes the feature of prompting a user to connect his/her Facebook account. You can refer to the method promptUserToConnectFacebookAccountOnDeviceAndFetchAccountData in FacebookViewController.m to continue prompting the user to connect the Facebook account.
2.9.6
Added
Adds the fix for an edge case when there are extra UIWindows at the time in-app message is going to display, the in-app message would have issue during dismissing.
2.9.5
Fixed
Fixes a bug which would cause the host app to crash when a deep link was launched from a push notification. In versions 2.9.4, if the host app used [[Appboy sharedInstance] registerApplication: didReceiveRemoteNotification:]; instead of [[Appboy sharedInstance] registerApplication: didReceiveRemoteNotification: fetchCompletionHandler:];, opening a push with a deep link would crash the host app in some circumstances.
2.9.4
Added
Adds a major performance upgrade that reduces CPU usage, memory footprint, and network traffic.
Adds 26 additional languages to localization support for Braze UI elements.
Adds support for deep linking from APNS push notification clicks.
Adds ability to customize the font of Feedback text using NUI with NUI class name ABKFeedbackTextView.
Fixed
Fixes the feedback page UI issues in iOS 8: when the device’s orientation is UIInterfaceOrientationPortraitUpsideDown, the contact info bar was off.
Fixes in-app messages to display correctly in landscape mode in iOS 8.
Changed
Updates the SDK to adopt the latest SDWebImage protocol methods.
Removed
Removes the “required” labels on the feedback page.
2.9.3
Added
Adds a new method - (void) registerApplication:(UIApplication *)application didReceiveRemoteNotification:(NSDictionary *)notification fetchCompletionHandler:(void (^)(UIBackgroundFetchResult))completionHandler to support push with background fetch. This method should be called in - (void) application:(UIApplication *)application didReceiveRemoteNotification:(NSDictionary *)userInfo fetchCompletionHandler:(void (^)(UIBackgroundFetchResult))completionHandler. For more details, please refer to Appboy.h.
Adds a HelloSwift sample app to demo how to use Braze in a swift app.
Adds a new NSString property “displayPrice” in ABKCrossPromotionCard to enable server side price localization.
Fixed
Fixes a bug of when sessions were being created when the app opened in the background.
Fixes a bug where requesting the news feed with a news feed open led to card impressions not updating until the next feed refresh.
2.9.2
Added
Adds the ability to turn off Braze’s automatic location collection by setting the ABKDisableAutomaticLocationCollectionKey boolean in AppboyOptions in startWithApiKey:inApplication:inApplication:withAppboyOptions:.
Adds the ability to send location tracking events to Braze manually using setLastKnownLocationWithLatitude:longitude:horizontalAccuracy: and setLastKnownLocationWithLatitude:longitude:horizontalAccuracy:altitude:verticalAccuracy: on the ABKUser. this is intended to be used with ABKDisableAutomaticLocationCollectionKey set to true in the AppboyOptions so that locations are only being recorded from a single source.
Fixed
Fixes a news feed bug: sometimes the spinner keeps spinning on the screen even after the news feed card image is displayed.
Changed
Updates sample app core location fetching code based on the changes in iOS 8.
2.9.1
Fixed
Fixes a news feed bug: When a user refreshed the news feed by swiping down, if the total number of cards in the feed was going to be reduced by the refresh, the app would crash.
2.9.0
Fixed
Fixes an App Store validation error introduced when the App Store started accepting submissions for iOS8. This was done by changing the packaging of the Braze framework to include a universal binary and a resource bundle (instead of combining them both together in a universal framework). Due to this change, Cocoapod integration is even more highly recommended than before to fully automate integration.
2.8.1
Added
Adds a new method - (void) getActionWithIdentifier:(NSString *)identifier forRemoteNotification:(NSDictionary *)userInfo to collect analytics data for push actions in iOS 8. It should be called in the UIApplication delegate method - (void) application:(UIApplication *)application handleActionWithIdentifier:(NSString *)identifier forRemoteNotification:(NSDictionary *)userInfo completionHandler:(void (^)())completionHandler. For more details, please refer to Appboy.h.
New Custom Attribute Data Type (Array): Braze now supports custom attributes which contain an array of string elements. In addition, we also provide methods for adding or removing an string element from an array type custom attribute. For more information, please refer to ABKUser.h.
Users can now pull down on the Braze Newsfeed to refresh the content on iOS version 6.0 or later.
Changed
Restricts product identifier string to 255 characters for method - (void) logPurchase:(NSString *)productIdentifier inCurrency:(NSString *)currencyCode atPrice:(NSDecimalNumber *)price and - (void) logPurchase:(NSString *)productIdentifier inCurrency:(NSString *)currencyCode atPrice:(NSDecimalNumber *)price withQuantity:(NSUInteger)quantity.
News feed card now can update the card height and display a full image based on the image ratio. Card image ratio used to be a fix number and images were aspect stretched to fit in the views.
The right and left margins in the news feed are now touchable areas for scrolling.
Card titles have been improved and will now truncate with “…” when they are more than 2 lines.
2.8
Breaking
Renames the class names of news feed cards to match the names on dashboard:
v2.8
v2.7
ABKBannerCard
ABKCardBanner
ABKCaptionedImageCard
ABKCardCaptionedMessage
ABKCrossPromotionCard
ABKCardCrossPromotionSmall
ABKClassicCard
ABKCardNews
ABKTextAnnouncementCard
ABKCardTextAnnouncement
Added
Adds email and push notification subscription types for a user. Subscription types are explicitly opted in, subscribed, and unsubscribed. The previous email boolean subscribe method has been deprecated.
Adds custom slideup orientation support. You can now ask the slideup to only support certain orientations. For more details on slideup custom orientation support, please refer to ABKSlideupController.h.
Adds quantity parameter as an option when logging purchase. The quanlity should be an unsigned interger greater than 0 and no larger than 100. For more information, please refer to Appboy.h.
Adds a class method in ABKCard to deserialize a given dictionary to a card. This is for use by wrappers such as Braze’s Unity SDK for iOS. Please refer to ABKCard.h for more information.
2.7
News Feed Update
Exposes raw card data in ABKFeedController
Developers can use the raw card data to creat custom user interfaces for the news feed. For more details on the card data, please refer to ABKFeedController.h.
Addes support for categories on cards and news feed view controllers.
Categories include Announcement, Advertising, Social, News and No Category. You can get cards of certain categories from ABKFeedController, or you can make ABKFeedViewController only display certain categories of cards.
Uses SDWebImage to handle images downloading and caching in the news feed, display a spinner while downloading images and show a default image when no image available.
Adds support for asynchronous image downloading in the news feed, asynchronous memory and disk image caching with automatic cache expiration handling.
Adds news feed view controller delegate to support custom handling of card clicks on news feed.
The app can customize click actions from the feed and display any card link in their own user interface.
Slideup Changes
Updates ABKSlideupControllerDelegate method onSlideupClicked to return a BOOL value to indicate if Braze should continue to execute the click action.
Stops logging slideup click when the slideup click action is ABKSlideupNoneClickAction.
Feedback Changes
Updates the ABKFeedbackViewControllerPopoverContext so now it should be used in all cases where the feedback page displayed in a popover, including the case that the feedback is push on a navigation controller in a popover.
Fixes the ABKFeedbackVIewControllerModalContext cancel button delegate issue.
Fixes the form sheet style ABKFeedbackViewControllerModalContext layout issue.
Other Changes
Adds API to request feed and slideup refresh.
Adds API to log news feed displayed and feedback displayed.
Allows updating analytics data even using customized news feed or feedback user interfaces.
Updates badge count policy to only update when app is foreground.
Adds clearTwitterDataWhenNoDataOfTwitterIdentifier to ABKUser, allowing developer to clear user data when a user disconnectes their twitter accounts.
Updates custom key and string value for custom attributes to automatically trim.
2.6.3
Changed
Updates the SDK to authenticate with the Twitter API using SSL.
2.6.2
Fixed
Fixes a news feed card click tracking issue.
Changed
Updates data flush time interval.
2.6.1
Fixed
Fixes a minor display problem that affected news items with no image or link for version 2.6.
2.6
Breaking
Braze iOS SDK now supports 64 bit as well. The minimum deployment targets that Braze iOS SDK supports is iOS 5.1.1.
The Braze iOS SDK will now allow function with 64-bit apps. This version of the SDK only supports iOS 5.1.1+. Legacy iOS apps should continue to use version 2.5 of the SDK.
You can install legacy versions of our SDK via CocoaPods by following changing the podfile to include something like the following example pod 'Appboy-iOS-SDK/AppboyKit', '~> 2.5'.
2.5.1
Fixed
Fixes a minor display problem that affected news items with no image or link for version 2.5.
2.5
Localization
Localization is now supported in version 2.5 of the Braze SDK. We have provided .string files for English, Simplified Chinese and Traditional Chinese. You can also optionally override our Braze’s default LocalizedAppboyUIString.strings right within your app’s Localizable.Strings file in much the same way you would do an override in CSS. To do so, copy the key and string pair into your Localizable.Strings file and edit the string as you so desire.
For your convenience our CocoaPod integrates the LocalizedAppboyUIString.strings files for the three aforementioned languages. If you do not wish to use one or more of these languages, you can feel free to delete these files from your project.
Slideup Upgrade
Braze version 2.5 provides a substantial upgrade to the slideup code and reorganization for better flexibility moving forward, but at the expense of a number of breaking changes. We’ve detailed the changes in this changelog and hope that you’ll love the added power, increased flexibility, and improved UI that the new Braze slideup provides. If you have any trouble with these changes, feel free to reach out to success@braze.com for help, but most migrations to the new code structure should be relatively painless.
New Slideup Controller
The property slideupController has been added to the Braze object. Please see ABKSlideupController.h for details.
The delegate property allows you to specify a delegate for the slideup.
This replaces slideupDelegate which has been removed.
The displayNextSlideupWithDelegate: method displays the next available slideup with the specified delegate.
This replaces provideSlideupToDelegate: which has been removed from Braze.
The slideupsRemainingOnStack method returns the number of slideups that are waiting locally to be displayed.
The addSlideup: method allows you to display a slideup object with custom content. This is useful in testing or if you want to use the Braze slideup’s UI/UX with another notification system that you are using.
Clicks and impressions of slideups added by this method will not be collected by Braze.
hideCurrentSlideup: method will remove any slideup currently on screen, with or without animation.
New Slideup Properties and Methods in ABKSlideup.h
The following properties and methods all belong to the ABKSlideup object. Please see ABKSlideup.h for more information.
New Properties
The extras property carries additional data within key value pairs that have been defined on the dashboard, just like a push notification. Braze does nothing with the extras property, any additional behavior is at your discretion.
The slideupAnchor property defines whether the slideup originates from the top or the bottom of the screen.
The slideupDismissType property controls whether the slideup will dismiss automatically after a period of time has lapsed, or if it will wait for interaction with the user before disappearing.
The slideup will be dismissed automatically after the number of seconds defined by the newly added duration property if the slideup’s slideupDismissType is ABKSlideupDismissAutomatically.
The slideupClickActionType property defines the action behavior after the slideup is clicked: displaying a news feed, redirect to a uri, or nothing but dismissing the slideup. This property is read only. If you want to change the slideup’s click behavior, you can call one of the following method: setSlideupClickActionToNewsFeed, setSlideupClickActionToUri: or setSlideupClickActionToNone.
The uri property defines the uri string that the slide up will open when the slideupClickActionType is ABKSlideupRedirectToURI. This is a read only property, you can call setSlideupClickActionToUri: to change it’s value.
New Methods
logSlideupImpression and logSlideupClicked have been added to allow you to report user interactions with the slideup in the case that you’ve fully customized the slideup experience and Braze is not handling the interactions.
setSlideupClickActionToNewsFeed, setSlideupClickActionToUri: and setSlideupClickActionToNone have been added to allow you to change the slideup’s click action behavior. setSlideupClickActionToUri: accepts a uri string as parameter and required the given uri string is valid.
Delegate Method Changes
All former Braze slideup delegate methods have been depreciated and removed. In their place Braze has added new slideup delegate methods within ABKSlideupControllerDelegate.h.
onSlideupReceived: is called when slideup objects are received from the Braze server.
beforeSlideupDisplayed:withKeyboardIsUp: is called before slideup objects are displayed, the return value determines whether the slideup will be displayed, queued or discarded.
slideupViewControllerWithSlideup: This delegate method allows you to specify custom view controllers in which your slideups will be displayed.
The custom view controller should be a subclass of ABKSlideupViewController.
Alternatively, it can also be an instance of ABKSlideupViewController.
The view of the returned view controller should be an instance of ABKSlideupView or its subclass.
For integration examples of a custom slideup view controller, see the CustomSlideupViewController class in Braze’s sample app Stopwatch.
onSlideupClicked: is called when a user clicks on a slideup. We recommend that you specify behavior on click via the dashboard, but you can additionally specify behavior on click by defining this delegate method.
onSlideupDismissed: is called whenever the slideup is dismissed regardless of whether the dismissal occurs automatically or via swipe. This method is not called if the user clicks on the slideup. If the user clicks or taps on the slideup, onSlideupClicked is called instead.
New Options on the Dashboard
Slideup behavior on click can now be set within the dashboard to open a modal news feed, open a URI within a modal, or do nothing.
The following properties can be set remotely from the Braze Dashboard:
extras
slideupAnchor
slideupDismissType
slideupClickActionType
uri
News Feed Changes
News feed items are now cached in offline storage, allowing the news feed to render even when no internet connectivity is available. Braze will still automatically try to pull down a new news feed when a session opens, even if an offline feed is available.
Each card now has a maximum height of no more than 2009 points to avoid any performance issues as recommended by iOS developer guidelines.
The entirety of captioned image cards are now clickable. Formerly, only the link itself was clickable.
When the news feed is brought to the foreground, it will now automatically check for new content if the cached version of the feed was received more than 60 seconds ago.
— The width of news feed cards as well as the minimum margin between any card and the left & right edges of the view controller can now be customized. These values can be set separately for both iPad and iPhone. This allows for a larger news feed to render on larger screen sizes. All card images will scale proportionally. Please see ABKFeedViewControllerContext.h and ABKFeedViewController.h for more information.
Other Changes
Various internal and news feed display optimizations.
2.4
IDFA Collection is now optional.
By default, IDFA collection is now disabled by the Braze SDK.
There will be no loss of continuity on user profiles or loss of functionality whatsoever as a result of this change.
If you’re using advertising elsewhere in the app or through our in-app news feed, we recommend continuing to collect the IDFA through Braze. You should be able to do so safely without fear of rejection from the iOS App Store.
The future availability of IDFAs will enable functionality like integrating with other third-party systems, including your own servers, and enabling re-targeting of existing users outside of Braze. If you continue to record them we will store IDFAs free of charge so you can take advantage of these options immediately when they are released without additional development work.
Necessary Project Changes
ABKIdentifierForAdvertisingProvider.m and ABKIdentifierForAdvertisingProvider.h must be added to your project regardless of whether or not you enable collection. This occurs automatically if you integrate/update via the CocoaPod.
Enabling Braze IDFA Collection
IDFA collection can be enabled via adding the following PreProcessor Macro to the Build Settings of your app:
ABK_ENABLE_IDFA_COLLECTION
2.3.1
The Braze SDK for iOS now has two versions, one for use with apps which incorporate the official Facebook SDK and one for those which do not. In November of 2013, the App Store Validation Process started generating warnings about the usage of isOpen and setActiveSession in the Braze SDK. These selectors were being sent to instances of classes in the Facebook SDK and are generally able to be used without generating warnings. However because of the way that the classes were initialized in Braze (a result of building a single Braze binary to fully support apps with and without the Facebook SDK), the App Store Validation Process started generating warnings the Facebook SDK methods share a name with private selectors elsewhere in iOS. Although none of our customers have been denied App Store approval yet, to protect against potential validation policy changes by Apple, Braze now provides two versions of its SDK, neither of which generate warnings. Going forward, the appboy-ios-sdk repository will provide both versions of the SDK in the folders ‘AppboySDK’ (as before) and ‘AppboySDKWithoutFacebookSupport’. The ‘AppboySDKWithoutFacebookSupport’ does not require the host app to include the Facebook SDK, but as a result does not include all of the Braze features for Facebook data fetching. More information is available here within the Braze documentation.
Fixed a bug that repeatedly updated the push token of some users unnecessarily.
The “Reporting an Issue?” box within the UI layout of the Feedback Page has been moved to the left side of the label away from the “Send” button. This change was made to reduce the number of misclicks of the “Send” button. The “Reporting an Issue?” label is now clickable as well.
Cross Promotion Cards for apps with long titles will now render appropriately in iOS5. Before the title would render abnormally large on these devices.
Fixed a bug where view recycling would cause incorrect card images to appear for newly rendered cards (until the image for that card finished downloading). Card images for newly rendered cards will now remain empty until the correct image is downloaded.
Internal changes to enable future support for a 64 bit library release.
Improvements to the Braze Sample App.
Internal code structure and performance improvements including the move of more offline caching to background tasks.
2.3
BREAKING CHANGE: The ABKSlideupControllerDelegate interface has been changed to work with ABKSlideup objects instead of simply the slideup message. This provides you with more control over the click actions and display of slideups and is also being made in anticipation of the augmentation of the ABKSlideup object with more data properties in future releases. To access the message previously sent to shouldDisplaySlideup, simply access the message property on the provided ABKSlideup argument.
displayNextAvailableSlideup has been deprecated and will be removed in the next minor release, it has been replaced by provideSlideupToDelegate, see Appboy.h documentation for more information.
provideSlideupToDelegate has been added to Braze to allow for more fine grained control over slideup display.
Fixes a bug where the slideupDelegate property getter on Braze would always return nil.
Changes the slideupDelegate property on Braze to be retained, instead of assigned.
2.2.1
Adds a startup option to appboyOptions to control the automatic capture of social network data. See the documentation on ABKSocialAccountAcquisitionPolicy in Appboy.h for more information.
Changes a table cell’s default background color to clear, from the white value that became default in iOS7.
Adds support for developer to send up image_url for user avatars, allowing for custom images to be included in user profiles on the dashboard.
2.2
Adds support for new banner and captioned image card types.
Adds support for submitting feedback programmatically through an Appboy.h method without using Braze feedback form. This allows you to create your own feedback form.
Fixes an issue where the the news feed’s web view would display “Connection Error” when a user came back into the app after a card had directed him or her to a protocol URL. Now when users come back from a redirected protocol URL, the feed is properly displayed.
Fixes an issue where the SDK might have incorrectly sent both read and write Facebook permissions at the same time, instead preferring to request only those read permissions that Braze is interested in and have already been requested by the incorporating app.
Fixes a corner case where card impressions could be miscounted when the feed view controller is the master view controller of a split view.
Makes cards truncate properly at two lines.
2.1.1
URGENT BUGFIX: This fixes an issue which exists in all previous versions of the v2 SDK which is causing crashes on the just release iPhone 5c and iPhone 5s. All users of v2 are recommended to upgrade the Braze SDK to 2.1.1 immediately and re-submit to the app store.
2.1.0
Adds support for iOS 7. You will need to use Xcode 5 to use this and future versions of the Braze iOS SDK.
Updates internal usage of NUI. If you’re using NUI, please ensure that you are at least using version 0.3.3 (the most up to date as of this writing is 0.3.4).
Removes support for iOS 4.3.
Optimizes news feed rendering for faster start up times and smoother scrolling of long feeds.
Removes the deprecated - (void) logPurchase:(NSString *)productId priceInCents:(NSUInteger)price method in favor of the new multi-currency tracking method. Conversion of old method calls is straightforward. [[Appboy sharedInstance] logPurchase:@"powerups" priceInCents:99]; should turn into [[Appboy sharedInstance] logPurchase:@"powerups" inCurrency:@"USD" atPrice:[[[NSDecimalNumber alloc] initWithFloat:.99f] autorelease]];
Any references to the delegate property of ABKFeedbackViewControllerModalContext should be updated to the new property name feedbackDelegate.
Following the removal of support for 4.3, removes SBJson parsing and uses built-in parsing added in iOS5 to improve performance and lower the SDK footprint.
2.0.4
Adds support for reporting purchases in multiple currencies. Also, changes the price reporting object type to NSDecimalNumber for consistency with StoreKit.
Adds additional space savings optimizations to image assets.
Minor fix to orientation change handling in the example app code.
2.0.3
Adds the ability to assign a Foursquare access token for each user. Doing so will cause the Braze backend to make Foursquare data available in user profiles on the dasbhard.
Adds more fine grained control options for Braze’s network activity. See Appboy.h for more information.
2.0.2
Fixes a bug where Braze might reopen a Facebook read session when a publish session already exists
2.0.1
UI Improvements
Fixed a bug when using the nav context feedback in a popover window that would cause the email bar to disappear
Updated news feed’s close button when opened from a slide up
Added a loading spinner on the feedback page when fetching email address from Facebook
Fixed the bug where the modal context feed page’s navigation bar would not adhere to NUI theming
Improved the look of the popover content feedback page
Enabled resizable webpages when clicking on to a web URL through a card
API updates
Updated custom user attribute setting methods to return a boolean value indicating if the setting is successful
Added methods for incrementing custom user attributes
Added support for device push tokens as NSData when registering the token to Braze
More detailed error messages logged in console
Removed the enable/disable Braze methods from Appboy.h
2.0
Initial release
# Initial SDK Setup for MacOS
Source: /docs/developer_guide/platforms/legacy_sdks/macOS/initial_sdk_setup/index.md
**Warning:**
[AppboyKit](https://github.com/Appboy/appboy-ios-sdk) (also known as the Objective-C SDK) is no longer supported and has been replaced by the [Swift SDK](https://www.braze.com/docs/developer_guide/sdk_integration/?sdktab=swift). It will no longer receive new features, bug fixes, security updates, or technical support—however, messaging and analytics will continue to function as normal. To learn more, see [Introducing the New Braze Swift SDK](https://www.braze.com/resources/articles/introducing-the-new-braze-swift-sdk).
# Initial SDK setup
> This reference article covers how to install the Braze SDK for MacOS.
As of version [3.32.0](https://github.com/Appboy/appboy-ios-sdk/releases/tag/3.32.0), the Braze SDK supports macOS for apps using [Mac Catalyst](https://developer.apple.com/mac-catalyst/) when integrating through Swift Package Manager. Currently, the SDK does not support Mac Catalyst when using CocoaPods or Carthage.
**Note:**
To build your app with Mac Catalyst, reference Apple's documentation.
Once your app supports Catalyst, follow [these instructions to use Swift Package Manager](https://www.braze.com/docs/developer_guide/platform_integration_guides/swift/sdk_integration/?tab=swift%20package%20manager/) to import the Braze SDK into your app.
## Supported features
Braze supports [push notifications](https://www.braze.com/docs/developer_guide/push_notifications/?sdktab=swift), [Content Cards](https://www.braze.com/docs/developer_guide/platforms/swift/content_cards/#content-cards-data-model), [in-app messages](https://www.braze.com/docs/developer_guide/analytics/tracking_location/?sdktab=swift), and [automatic location collection](https://www.braze.com/docs/developer_guide/analytics/tracking_location/?sdktab=swift) when running on Mac Catalyst.
Note that Push Stories, rich push, and geofences are not supported on macOS.
[1]:https://github.com/Appboy/appboy-ios-sdk/releases/tag/3.32.0
[2]:https://developer.apple.com/mac-catalyst/
# Initial SDK Setup for tvOS
Source: /docs/developer_guide/platforms/legacy_sdks/tvos/initial_sdk_setup/index.md
**Warning:**
[AppboyKit](https://github.com/Appboy/appboy-ios-sdk) (also known as the Objective-C SDK) is no longer supported and has been replaced by the [Swift SDK](https://www.braze.com/docs/developer_guide/sdk_integration/?sdktab=swift). It will no longer receive new features, bug fixes, security updates, or technical support—however, messaging and analytics will continue to function as normal. To learn more, see [Introducing the New Braze Swift SDK](https://www.braze.com/resources/articles/introducing-the-new-braze-swift-sdk).
# Initial SDK setup
> This reference article covers how to install the Braze SDK for tvOS. Installing the Braze SDK will provide you with basic analytics functionality.
**Note:**
Our tvOS SDK currently supports analytics functionality. To add a tvOS app in your dashboard, open a [support ticket](https://www.braze.com/docs/braze_support/).
The tvOS Braze SDK should be installed or updated using [CocoaPods](http://cocoapods.org/), a dependency manager for Objective-C and Swift projects. CocoaPods provides added simplicity for integration and updating.
## tvOS SDK CocoaPods integration
### Step 1: Install CocoaPods
Installing the SDK via the tvOS [CocoaPods](http://cocoapods.org/) automates the majority of the installation process for you. Before beginning this process, ensure that you are using [Ruby version 2.0.0](https://www.ruby-lang.org/en/installation/) or greater.
Run the following command to get started:
```bash
$ sudo gem install cocoapods
```
- If you are prompted to overwrite the `rake` executable, refer to [Getting started](http://guides.cocoapods.org/using/getting-started.html) on CocoaPods.org for further details.
- If you have issues regarding CocoaPods, refer to the [CocoaPods troubleshooting guide](http://guides.cocoapods.org/using/troubleshooting.html).
### Step 2: Constructing the Podfile
Now that you've installed the CocoaPods Ruby Gem, you're going to need to create a file in your Xcode project directory named `Podfile`.
Add the following line to your Podfile:
```
target 'YourAppTarget' do
pod 'Appboy-tvOS-SDK'
end
```
We suggest you version Braze so pod updates automatically grab anything smaller than a minor version update. This looks like `pod 'Appboy-tvOS-SDK' ~> Major.Minor.Build`. If you want to ,automatically integrate the latest Braze SDK version, even with major changes, you can use `pod 'Appboy-tvOS-SDK'` in your Podfile.
### Step 3: Installing the Braze SDK
To install the Braze SDK CocoaPods, navigate to the directory of your Xcode app project within your terminal and run the following command:
```
pod install
```
At this point, you should be able to open the new Xcode project workspace created by CocoaPods. Make sure to use this Xcode workspace instead of your Xcode project.

### Step 4: Updating your app delegate
Add the following line of code to your `AppDelegate.m` file:
```objc
#import
```
Within your `AppDelegate.m` file, add the following snippet within your `application:didFinishLaunchingWithOptions` method:
```objc
[Appboy startWithApiKey:@"YOUR-API-KEY"
inApplication:application
withLaunchOptions:launchOptions];
```
Lastly, update `YOUR-API-KEY` with the correct value from your **Manage Settings** page.
If you are integrating the Braze SDK with CocoaPods or Carthage, add the following line of code to your `AppDelegate.swift` file:
```swift
import AppboyTVOSKit
```
For more information about using Objective-C code in Swift projects, see the [Apple Developer Docs](https://developer.apple.com/library/ios/documentation/swift/conceptual/buildingcocoaapps/MixandMatch.html).
In `AppDelegate.swift`, add following snippet to your `application(application: UIApplication, didFinishLaunchingWithOptions launchOptions: [NSObject: AnyObject]?) -> Bool`:
```swift
Appboy.start(withApiKey: "YOUR-API-KEY", in:application, withLaunchOptions:launchOptions)
```
Next, update `YOUR-API-KEY` with the correct value from your **Manage Settings** page.
Our `sharedInstance` singleton will be nil before `startWithApiKey:` is called, as that is a prerequisite to using any Braze functionality.
**Warning:**
Be sure to initialize Braze in your application's main thread. Initializing asynchronously can lead to broken functionality.
### Step 5: Specify your custom endpoint or data cluster
**Note:**
As of December 2019, custom endpoints are no longer given out, if you have a pre-existing custom endpoint, you may continue to use it. For more details, refer to our list of available endpoints.
Your Braze representative should have already advised you of the [correct endpoint](https://www.braze.com/docs/user_guide/administrative/access_braze/sdk_endpoints/).
#### Compile-time endpoint configuration (recommended)
If given a pre-existing custom endpoint:
- Starting with Braze iOS SDK v3.0.2, you can set a custom endpoint using the `Info.plist` file. Add the `Appboy` dictionary to your Info.plist file. Inside the `Appboy` dictionary, add the `Endpoint` string subentry and set the value to your custom endpoint URLs authority (for example, `sdk.iad-01.braze.com`, not `https://sdk.iad-01.braze.com`).
#### Runtime endpoint configuration
If given a pre-existing custom endpoint:
- Starting with Braze iOS SDK v3.17.0+, you can override set your endpoint via the `ABKEndpointKey` inside the `appboyOptions` parameter passed to `startWithApiKey:inApplication:withLaunchOptions:withAppboyOptions:`. Set the value to your custom endpoint URL authority (for example, `sdk.iad-01.braze.com`, not `https://sdk.iad-01.braze.com`).
**Note:**
Support for setting endpoints at runtime using `ABKAppboyEndpointDelegate` has been removed in Braze iOS SDK v3.17.0. If you already use `ABKAppboyEndpointDelegate`, note that in Braze iOS SDK versions v3.14.1 to v3.16.0, any reference to `dev.appboy.com` in your `getApiEndpoint()` method must be replaced with a reference to `sdk.iad-01.braze.com`.
### SDK integration complete
Braze should now be collecting data from your application, and your basic integration should be complete. Note that when compiling your tvOS app and any other third-party libraries, Bitcode must be enabled.
### Updating the Braze SDK via CocoaPods
To update a CocoaPod, simply run the following commands within your project directory:
```
pod update
```
## Customizing Braze on startup
If you wish to customize Braze on startup, you can instead use the Braze initialization method `startWithApiKey:inApplication:withLaunchOptions:withAppboyOptions` and pass in an optional `NSDictionary` of Braze startup keys.
In your `AppDelegate.m` file, within your `application:didFinishLaunchingWithOptions` method, add the following Braze method:
```objc
[Appboy startWithApiKey:@"YOUR-API-KEY"
inApplication:application
withLaunchOptions:launchOptions
withAppboyOptions:appboyOptions];
```
In `AppDelegate.swift`, within your `application(application: UIApplication, didFinishLaunchingWithOptions launchOptions: [NSObject: AnyObject]?) -> Bool` method, add the following Braze method:
```swift
Appboy.start(withApiKey: "YOUR-API-KEY",
in:application,
withLaunchOptions:launchOptions,
withAppboyOptions:appboyOptions)
```
where `appboyOptions` is a `Dictionary` of startup configuration values.
This method would replace the `startWithApiKey:inApplication:withLaunchOptions:` initialization method and is called with the following parameters:
- `YOUR-API-KEY`: Your application's API key is found under **Manage Settings** in the Braze dashboard.
- `application`: The current app.
- `launchOptions`: The options `NSDictionary` that you get from `application:didFinishLaunchingWithOptions:`.
- `appboyOptions`: An optional `NSDictionary` with startup configuration values for Braze.
See [Appboy.h](https://github.com/Appboy/appboy-ios-sdk/blob/master/AppboyKit/include/Appboy.h) for a list of Braze startup keys.
## Appboy.sharedInstance() and Swift nullability
Differing somewhat from common practice, the `Appboy.sharedInstance()` singleton is optional. This is because `sharedInstance` is `nil` before `startWithApiKey:` is called, and there are some non-standard but not-invalid implementations in which a delayed initialization can be used.
If you call `startWithApiKey:` in your `didFinishLaunchingWithOptions:` delegate before any access to Appboy's `sharedInstance` (the standard implementation), you can use optional chaining, like `Appboy.sharedInstance()?.changeUser("testUser")`, to avoid cumbersome checks. This will have parity with an Objective-C implementation that assumed a non-null `sharedInstance`.
## Manual integration options
You can also integrate our tvOS SDK manually - simply grab the Framework from our [Public Repository](https://github.com/appboy/appboy-ios-sdk) and initialize Braze as outlined in the preceding sections.
## Identifying users and reporting analytics
See our [iOS documentation](https://www.braze.com/docs/developer_guide/analytics/setting_user_ids/?tab=swift) for information about setting user ids, logging custom events, setting user attributes. We also recommend familiarizing yourself with our [event naming conventions](https://www.braze.com/docs/user_guide/data/custom_data/event_naming_conventions/).
# About Banners
Source: /docs/developer_guide/banners/index.md
# Banners
> With Banners, you can create personalized messaging for your users, all while extending the reach of your other channels, such as email or push notifications. You can embed Banners directly in your app or website, which lets you engage with users through an experience that feels natural.

## Prerequisites
Banners availability depends on your Braze package. Contact your account manager or customer success manager to get started.
## Why use Banners?
Banners allow marketing and product teams to personalize app or website content dynamically, reflecting real-time user eligibility and behavior. They persistently display messages inline, providing non-intrusive, contextually relevant experiences that update automatically at the start of each user session.
After Banners are integrated into an app or website, marketers can design and launch Banners using a simple drag-and-drop editor, eliminating the need for ongoing developer assistance, reducing complexity, and improving efficiency.
| Use case | Explanation |
| --- | --- |
| Announcements | Keep announcements like upcoming events or policy changes at the forefront of your app experience. |
| Personalizing offers | Show personalized promotions and incentives based on each user’s browsing history, cart content, subscription tier, and loyalty status. |
| Targeting new user engagement | Guide new users through onboarding flows and account setup. |
| Sales and promotions | Highlight featured content, trending products, and ongoing brand campaigns persistently and directly on your homepage without disrupting the user experience. |
{: .reset-td-br-1 .reset-td-br-2 role="presentation" }
## Features
Features for Banners include:
- **Easy content building:** Create and preview your Banner using a visual, drag-and-drop editor with support for images, text, buttons, email capture forms, custom code, and more.
- **Flexible placements:** Define multiple locations within your application or website where Banners can appear, enabling precise targeting to specific contexts or user experiences.
- **Dynamic personalization:** Banners dynamically refresh with every new user session, ensuring content stays current and personalized using Braze’s built-in personalization tools and Liquid logic.
- **Native prioritization:** Set the display priority for when multiple Banners target the same placement, ensuring the right message reaches users at the right time.
- **Custom Code editor block:** Use the Custom Code editor block to add custom HTML for advanced customization or seamless integration with your existing web styles.
## About Banners {#about-banners}
### Placement IDs {#placement-id}
Banner placements are specific locations in your app or website [you create with the Braze SDK](https://www.braze.com/docs/developer_guide/banners/placements/) that designate where Banners can appear.
Common locations include the top of your homepage, product detail pages, and checkout flows. After placements are created, Banners can be [assigned in your Banner campaign](https://www.braze.com/docs/user_guide/message_building_by_channel/banners/create/).
There is no fixed limit on the number of placements you can create per workspace, and you can create as many placement IDs as your experience requires. Each placement must be unique within a workspace. A single placement ID can be referenced by up to 25 active messages at the same time.
**Important:**
Avoid modifying placement IDs after launching a Banner campaign.
### Banner priority {#priority}
When multiple Banner messages reference the same placement ID, Banners are displayed in order of priority: high, medium, or low. By default, Banners are set to medium, but you can [manually set the priority](https://www.braze.com/docs/user_guide/message_building_by_channel/banners/create/#set-priority) when you create or edit your Banner campaign.
If multiple Banners are set to the same priority, the newest Banner that the user is eligible for is displayed first.
### Placement requests {#requests}
When you [create placements in your app or website](https://www.braze.com/docs/developer_guide/banners/placements/#requestBannersRefresh), your app sends a request to Braze to fetch Banner messages for each placement.
- You can request up to **10 placements per refresh request**.
- For each placement, Braze returns the **highest-priority Banner** the user is eligible to receive.
- If more than 10 placements are requested in a refresh, only the first 10 are returned; the rest are dropped.
For example, an app might request three placements in a refresh request: `homepage_promo`, `cart_abandonment`, and `seasonal_offer`. Each request returns the most relevant Banner for that placement.
#### Rate limiting for refresh requests
If you're on older SDK versions (before Swift 13.1.0, Android 38.0.0, Web 6.1.0, React Native 17.0.0, and Flutter 15.0.0), only one refresh request is permitted per user session.
If you're on newer minimum SDK versions (Swift 13.1.0+, Android 38.0.0+, Web 6.1.0+, React Native 17.0.0+, and Flutter 15.0.0+), refresh requests are controlled by a token bucket algorithm to prevent excessive polling:
- Each user session begins with five refresh tokens.
- Tokens refill at a rate of one token every 180 seconds (3 minutes).
Each call to `requestBannersRefresh` consumes one token. If you attempt a refresh when no tokens are available, the SDK doesn't make the request and logs an error until a token refills. This is important for mid-session and event-triggered updates. To implement dynamic updates (for example, after a user completes an action on the same page), call the refresh method after the custom event is logged, but note the necessary delay for Braze to ingest and process the event before the user qualifies for a different Banner campaign.
### Message delivery
Banner messages are delivered to your app or website as HTML content, typically rendered inside an iframe. This ensures that your Banners render consistently across devices, and helps you keep their styles and scripts separate from the rest of your code.
Iframes allow for dynamic and personalized content updates that don't require changes to your codebase. Each iframe retrieves and displays the HTML for each user session using campaign targeting and personalization logic.
### Dimensions and sizing
Here's what you need to know about Banner dimensions and sizing:
- While the composer allows you to preview Banners in different dimensions, that information isn't saved or sent to the SDK.
- The HTML takes up the full width of the container it's rendered in.
- We recommend making a fixed dimension element and testing those dimensions in composer.
## Limitations
Each workspace can support up to 200 active Banner campaigns. If this limit is reached, you'll need to [archive or deactivate](https://www.braze.com/docs/user_guide/engagement_tools/messaging_fundamentals/about_statuses/#changing-the-status) an existing campaign before creating a new one.
Additionally, Banner messages do not support the following features:
- API-triggered and action-based campaigns
- Connected Content
- Promotional codes
- User-controlled dismissals
- `catalog_items` using the [`:rerender` tag](https://www.braze.com/docs/user_guide/data/activation/catalogs/using_catalogs/#using-liquid)
**Tip:**
Want to help prioritize what's next? Contact [banners-feedback@braze.com](mailto:banners-feedback@braze.com).
## Next steps
Now that you know about Banners, you're ready for the next steps:
1. [Creating Banner placements in your app or website](https://www.braze.com/docs/developer_guide/banners/placements/)
2. [Creating Banner campaigns in Braze](https://www.braze.com/docs/user_guide/message_building_by_channel/banners/create/)
3. [Tutorial: Displaying a Banner by Placement ID](https://www.braze.com/docs/developer_guide/banners/tutorial_displaying_banners)
# Manage Banner placements for the Braze SDK
Source: /docs/developer_guide/banners/placements/index.md
# Manage Banner placements
> Learn how to create and manage Banner placements in the Braze SDK, including accessing their unique properties and logging impressions. For more general information, see [About Banners](https://www.braze.com/docs/developer_guide/banners).
## About placement requests {#requests}
When you [create placements in your app or website](https://www.braze.com/docs/developer_guide/banners/placements/#requestBannersRefresh), your app sends a request to Braze to fetch Banner messages for each placement.
- You can request up to **10 placements per refresh request**.
- For each placement, Braze returns the **highest-priority Banner** the user is eligible to receive.
- If more than 10 placements are requested in a refresh, only the first 10 are returned; the rest are dropped.
For example, an app might request three placements in a refresh request: `homepage_promo`, `cart_abandonment`, and `seasonal_offer`. Each request returns the most relevant Banner for that placement.
#### Rate limiting for refresh requests
If you're on older SDK versions (before Swift 13.1.0, Android 38.0.0, Web 6.1.0, React Native 17.0.0, and Flutter 15.0.0), only one refresh request is permitted per user session.
If you're on newer minimum SDK versions (Swift 13.1.0+, Android 38.0.0+, Web 6.1.0+, React Native 17.0.0+, and Flutter 15.0.0+), refresh requests are controlled by a token bucket algorithm to prevent excessive polling:
- Each user session begins with five refresh tokens.
- Tokens refill at a rate of one token every 180 seconds (3 minutes).
Each call to `requestBannersRefresh` consumes one token. If you attempt a refresh when no tokens are available, the SDK doesn't make the request and logs an error until a token refills. This is important for mid-session and event-triggered updates. To implement dynamic updates (for example, after a user completes an action on the same page), call the refresh method after the custom event is logged, but note the necessary delay for Braze to ingest and process the event before the user qualifies for a different Banner campaign.
## Create a placement
### Prerequisites
These are the minimum SDK versions needed to create Banner placements:
### Step 1: Create placements in Braze
If you haven't already, you'll need to create Banner placements in Braze that are used to define the locations in your app or site can display Banners. To create a placement, go to **Settings** > **Banners Placements**, then select **Create Placement**.

Give your placement a name and assign a **Placement ID**. Be sure you consult other teams before assigning an ID, as it'll be used throughout the card's lifecycle and shouldn't be changed later. For more information, see [Placement IDs].

### Step 2: Refresh placements in your app {#requestBannersRefresh}
Placements can be refreshed by calling the refresh methods described below. These placements will be cached automatically when a user's session expires or when you change identified users using the `changeUser` method.
**Tip:**
Refresh placements as soon as possible to avoid delays in downloading or displaying Banners.
```javascript
import * as braze from "@braze/web-sdk";
braze.requestBannersRefresh(["global_banner", "navigation_square_banner"]);
```
```swift
AppDelegate.braze?.banners.requestRefresh(placementIds: ["global_banner", "navigation_square_banner"])
```
```java
ArrayList listOfBanners = new ArrayList<>();
listOfBanners.add("global_banner");
listOfBanners.add("navigation_square_banner");
Braze.getInstance(context).requestBannersRefresh(listOfBanners);
```
```kotlin
Braze.getInstance(context).requestBannersRefresh(listOf("global_banner", "navigation_square_banner"))
```
```javascript
Braze.requestBannersRefresh(["global_banner", "navigation_square_banner"]);
```
```csharp
This feature is not currently supported on Unity.
```
```javascript
This feature is not currently supported on Cordova.
```
```dart
braze.requestBannersRefresh(["global_banner", "navigation_square_banner"]);
```
```brightscript
This feature is not currently supported on Roku.
```
### Step 3: Listen for updates {#subscribeToBannersUpdates}
**Tip:**
If you insert Banners using the SDK methods in this guide, all analytics events (such as impressions and clicks) will be handled automatically, and impressions will only be logged when the banner is in view.
If you're using vanilla JavaScript with the Web Braze SDK, use [`subscribeToBannersUpdates`](https://js.appboycdn.com/web-sdk/latest/doc/modules/braze.html#subscribetobannersupdates) to listen for placement updates and then call [`requestBannersRefresh`](https://js.appboycdn.com/web-sdk/latest/doc/modules/braze.html#requestbannersrefresh) to fetch them.
```javascript
import * as braze from "@braze/web-sdk";
braze.subscribeToBannersUpdates((banners) => {
console.log("Banners were updated");
});
// always refresh after your subscriber function has been registered
braze.requestBannersRefresh(["global_banner", "navigation_square_banner"]);
```
If you're using React with the Web Braze SDK, set up [`subscribeToBannersUpdates`](https://js.appboycdn.com/web-sdk/latest/doc/modules/braze.html#subscribetobannersupdates) inside a `useEffect` hook and call [`requestBannersRefresh`](https://js.appboycdn.com/web-sdk/latest/doc/modules/braze.html#requestbannersrefresh) after registering your listener.
```typescript
import * as braze from "@braze/web-sdk";
useEffect(() => {
const subscriptionId = braze.subscribeToBannersUpdates((banners) => {
console.log("Banners were updated");
});
// always refresh after your subscriber function has been registered
braze.requestBannersRefresh(["global_banner", "navigation_square_banner"]);
// cleanup listeners
return () => {
braze.removeSubscription(subscriptionId);
}
}, []);
```
```swift
let cancellable = brazeClient.braze()?.banners.subscribeToUpdates { banners in
banners.forEach { placementId, banner in
print("Received banner: \(banner) with placement ID: \(placementId)")
}
}
```
```java
Braze.getInstance(context).subscribeToBannersUpdates(banners -> {
for (Banner banner : banners.getBanners()) {
Log.d(TAG, "Received banner: " + banner.getPlacementId());
}
});
```
```kotlin
Braze.getInstance(context).subscribeToBannersUpdates { update ->
for (banner in update.banners) {
Log.d(TAG, "Received banner: " + banner.placementId)
}
}
```
```javascript
const bannerCardsSubscription = Braze.addListener(
Braze.Events.BANNER_CARDS_UPDATED,
(data) => {
const banners = data.banners;
console.log(
`Received ${banners.length} Banner Cards with placement IDs:`,
banners.map((banner) => banner.placementId)
);
}
);
```
```csharp
This feature is not currently supported on Unity.
```
```javascript
This feature is not currently supported on Cordova.
```
```dart
StreamSubscription bannerStreamSubscription = braze.subscribeToBanners((List banners) {
for (final banner in banners) {
print("Received banner: " + banner.toString());
}
});
```
```brightscript
This feature is not currently supported on Roku.
```
### Step 4: Insert using the placement ID {#insertBanner}
**Tip:**
For a complete step-by-step tutorial, check out [Displaying a Banner by Placement ID](https://www.braze.com/docs/developer_guide/banners/tutorial_displaying_banners).
Create a container element for the Banner. Be sure to set its width and height.
```html
```
If you're using vanilla JavaScript with the Web Braze SDK, call the [`insertBanner`](https://js.appboycdn.com/web-sdk/latest/doc/modules/braze.html#insertbanner) method to replace the inner HTML of the container element.
```javascript
import * as braze from "@braze/web-sdk";
braze.initialize("sdk-api-key", {
baseUrl: "sdk-base-url",
allowUserSuppliedJavascript: true, // banners require you to opt-in to user-supplied javascript
});
braze.subscribeToBannersUpdates((banners) => {
// get this placement's banner. If it's `null` the user did not qualify for one.
const globalBanner = braze.getBanner("global_banner");
if (!globalBanner) {
return;
}
// choose where in the DOM you want to insert the banner HTML
const container = document.getElementById("global-banner-container");
// Insert the banner which replaces the innerHTML of that container
braze.insertBanner(globalBanner, container);
// Special handling if the user is part of a Control Variant
if (globalBanner.isControl) {
// hide or collapse the container
container.style.display = "none";
}
});
braze.requestBannersRefresh(["global_banner", "navigation_square_banner"]);
```
If you're using React with the Web Braze SDK, call the [`insertBanner`](https://js.appboycdn.com/web-sdk/latest/doc/modules/braze.html#insertbanner) method with a `ref` to replace the inner HTML of the container element.
```tsx
import { useRef } from 'react';
import * as braze from "@braze/web-sdk";
export default function App() {
const bannerRef = useRef(null);
useEffect(() => {
const globalBanner = braze.getBanner("global_banner");
if (!globalBanner || globalBanner.isControl) {
// hide the container
} else {
// insert the banner to the container node
braze.insertBanner(globalBanner, bannerRef.current);
}
}, []);
return
}
```
**Tip:**
To track impressions, be sure to call `insertBanner` for `isControl`. You can then hide or collapse your container afterwards.
```swift
// To get access to the Banner model object:
let globalBanner: Braze.Banner?
AppDelegate.braze?.banners.getBanner(for: "global_banner", { banner in
self.globalBanner = banner
})
// If you simply want the Banner view, you may initialize a `UIView` with the placement ID:
if let braze = AppDelegate.braze {
let bannerUIView = BrazeBannerUI.BannerUIView(
placementId: "global_banner",
braze: braze,
// iOS does not perform automatic resizing or visibility changes.
// Use the `processContentUpdates` parameter to adjust the size and visibility of your Banner according to your use case.
processContentUpdates: { result in
switch result {
case .success(let updates):
if let height = updates.height {
// Adjust the visibility and/or height.
}
case .failure(let error):
// Handle the error.
}
}
)
}
// Similarly, if you want a Banner view in SwiftUI, use the corresponding `BannerView` initializer:
if let braze = AppDelegate.braze {
let bannerView = BrazeBannerUI.BannerView(
placementId: "global_banner",
braze: braze,
// iOS does not perform automatic resizing or visibility changes.
// Use the `processContentUpdates` parameter to adjust the size and visibility of your Banner according to your use case.
processContentUpdates: { result in
switch result {
case .success(let updates):
if let height = updates.height {
// Adjust the visibility and/or height according to your parent controller.
}
case .failure(let error):
// Handle the error.
}
}
)
}
```
To get the Banner in Java code, use:
```java
Banner globalBanner = Braze.getInstance(context).getBanner("global_banner");
```
You can create Banners in your Android views layout by including this XML:
```xml
```
If you're using Android Views, use this XML:
```xml
```
If you're using Jetpack Compose, you can use this:
```kotlin
Banner(placementId = "global_banner")
```
To get the Banner in Kotlin, use:
```kotlin
val banner = Braze.getInstance(context).getBanner("global_banner")
```
If you're using [React Native's New Architecture](https://reactnative.dev/architecture/landing-page), you need to register `BrazeBannerView` as a Fabric component in your `AppDelegate.mm`.
```swift
#ifdef RCT_NEW_ARCH_ENABLED
/// Register the `BrazeBannerView` for use as a Fabric component.
- (NSDictionary> *)thirdPartyFabricComponents {
NSMutableDictionary * dictionary = [super thirdPartyFabricComponents].mutableCopy;
dictionary[@"BrazeBannerView"] = [BrazeBannerView class];
return dictionary;
}
#endif
```
For the simplest integration, add the following JavaScript XML (JSX) snippet into your view hierarchy, providing just the placement ID.
```javascript
```
To get the Banner's data model in React Native, or to check for the presence of that placement in your user's cache, use:
```javascript
const banner = await Braze.getBanner("global_banner");
```
```csharp
This feature is not currently supported on Unity.
```
```javascript
This feature is not currently supported on Cordova.
```
For the simplest integration, add the following widget into your view hierarchy, providing just the placement ID.
```dart
BrazeBannerView(
placementId: "global_banner",
),
To get the Banner's data model in Flutter, use:
```
You can use the `getBanner` method to check for the presence of that placement in your user's cache.
```dart
braze.getBanner("global_banner").then((banner) {
if (banner == null) {
// Handle null cases.
} else {
print(banner.toString());
}
});
```
```brightscript
This feature is not currently supported on Roku.
```
### Step 5: Send a test Banner (optional) {#handling-test-cards}
Before you launch a Banner campaign, you can [send a test Banner](https://www.braze.com/docs/user_guide/engagement_tools/campaigns/testing_and_more/sending_test_messages/) to verify your integration. Test Banners will be stored in a separate in-memory cache and won't persist across app restarts. While no extra setup is needed, your test device must be capable of receiving foreground push notifications so it can display the test.
**Note:**
Test Banners are like any other banners, except they're removed at the next app session.
## Log impressions
Braze automatically logs impressions for Banners that are in view when you use SDK methods to insert a Banner—so no need to track impressions manually.
## Logging clicks
The method used to log Banner clicks depends on how your Banner is rendered and where your click handler is located.
### Standard Banner content (automatic)
If you're using default, out-of-the-box SDK methods to insert Banners, and your Banner uses standard editor components (images, buttons, text), clicks are tracked automatically. The SDK attaches click listeners to these elements, and no additional code is needed.
### Custom Code Blocks
If your Banner uses the **Custom Code** editor block in the Braze dashboard, you must use `brazeBridge.logClick()` to log clicks from within that custom HTML. This applies even when using SDK methods to render the Banner, because the SDK cannot automatically attach listeners to elements inside your custom code.
```html
```
For the full reference, see [Custom code and JavaScript bridge for Banners](https://www.braze.com/docs/user_guide/message_building_by_channel/banners/custom_code/#javascript-bridge). The `brazeBridge` provides a communication layer between the Banner's internal HTML and the parent Braze SDK.
### Custom UI implementations (headless)
If you're building a fully custom UI using the Banner's [custom properties](#custom-properties) rather than rendering the Banner HTML, you must manually log clicks (and impressions) from your application code. Because the SDK is not rendering the Banner, it has no way to automatically track interactions with your custom UI elements.
Use the `logClick()` method on the Banner object.
## Dimensions and sizing
Here's what you need to know about Banner dimensions and sizing:
- While the composer allows you to preview Banners in different dimensions, that information isn't saved or sent to the SDK.
- The HTML will take up the full width of the container it's rendered in.
- We recommend making a fixed dimension element and testing those dimensions in composer.
## Custom properties {#custom-properties}
You can use custom properties from your Banner campaign to retrieve key–value data through the SDK and modify your app’s behavior or appearance. For example, you could:
- Send metadata for your third-party analytics or integrations.
- Use metadata such as a `timestamp` or JSON object to trigger conditional logic.
- Control the behavior of a banner based on included metadate like `ratio` or `format`.
### Prerequisites
You'll need to [add custom properties](https://www.braze.com/docs/user_guide/message_building_by_channel/banners/create/#custom-properties) to your Banner campaign. Additionally, these are the minimum SDK versions required to access custom properties:
### Access custom properties
To access a banner's custom properties, use one of the following methods based on the property's type defined in the dashboard. If the key doesn't match a property of that type or does not exist, the method returns `null`.
```javascript
// Returns the Banner instance
const banner = braze.getBanner("placement_id_homepage_top");
// banner may be undefined or null
if (banner) {
// Returns the string property
const stringProperty = banner.getStringProperty("color");
// Returns the boolean property
const booleanProperty = banner.getBooleanProperty("expanded");
// Returns the number property
const numberProperty = banner.getNumberProperty("height");
// Returns the timestamp property (as a number)
const timestampProperty = banner.getTimestampProperty("account_start");
// Returns the image URL property as a string of the URL
const imageProperty = banner.getImageProperty("homepage_icon");
// Returns the JSON object property
const jsonObjectProperty = banner.getJsonProperty("footer_settings");
}
```
```swift
// Passes the specified banner to the completion handler
AppDelegate.braze?.banners.getBanner(for: "placement_id_homepage_top") { banner in
// Returns the string property
let stringProperty: String? = banner.stringProperty(key: "color")
// Returns the boolean property
let booleanProperty: Bool? = banner.boolProperty(key: "expanded")
// Returns the number property as a double
let numberProperty: Double? = banner.numberProperty(key: "height")
// Returns the Unix UTC millisecond timestamp property as an integer
let timestampProperty: Int? = banner.timestampProperty(key: "account_start")
// Returns the image property as a String of the image URL
let imageProperty: String? = banner.imageProperty(key: "homepage_icon")
// Returns the JSON object property as a [String: Any] dictionary
let jsonObjectProperty: [String: Any]? = banner.jsonObjectProperty(key: "footer_settings")
}
```
```java
// Returns the Banner instance
Banner banner = Braze.getInstance(context).getBanner("placement_id_homepage_top");
// banner may be undefined or null
if (banner != null) {
// Returns the string property
String stringProperty = banner.getStringProperty("color");
// Returns the boolean property
Boolean booleanProperty = banner.getBooleanProperty("expanded");
// Returns the number property
Number numberProperty = banner.getNumberProperty("height");
// Returns the timestamp property (as a Long)
Long timestampProperty = banner.getTimestampProperty("account_start");
// Returns the image URL property as a String of the URL
String imageProperty = banner.getImageProperty("homepage_icon");
// Returns the JSON object property as a JSONObject
JSONObject jsonObjectProperty = banner.getJSONProperty("footer_settings");
}
```
```kotlin
// Returns the Banner instance
val banner: Banner = Braze.getInstance(context).getBanner("placement_id_homepage_top") ?: return
// Returns the string property
val stringProperty: String? = banner.getStringProperty("color")
// Returns the boolean property
val booleanProperty: Boolean? = banner.getBooleanProperty("expanded")
// Returns the number property
val numberProperty: Number? = banner.getNumberProperty("height")
// Returns the timestamp property (as a Long)
val timestampProperty: Long? = banner.getTimestampProperty("account_start")
// Returns the image URL property as a String of the URL
val imageProperty: String? = banner.getImageProperty("homepage_icon")
// Returns the JSON object property as a JSONObject
val jsonObjectProperty: JSONObject? = banner.getJSONProperty("footer_settings")
```
```javascript
// Get the Banner instance
const banner = await Braze.getBanner('placement_id_homepage_top');
if (!banner) return;
// Get the string property
const stringProperty = banner.getStringProperty('color');
// Get the boolean property
const booleanProperty = banner.getBooleanProperty('expanded');
// Get the number property
const numberProperty = banner.getNumberProperty('height');
// Get the timestamp property (as a number)
const timestampProperty = banner.getTimestampProperty('account_start');
// Get the image URL property as a string
const imageProperty = banner.getImageProperty('homepage_icon');
// Get the JSON object property
const jsonObjectProperty = banner.getJSONProperty('footer_settings');
```
```dart
// Fetch the banner asynchronously
_braze.getBanner(placementId).then(('placement_id_homepage_top') {
// Get the string property
final String? stringProperty = banner?.getStringProperty('color');
// Get the boolean property
final bool? booleanProperty = banner?.getBooleanProperty('expanded');
// Get the number property
final num? numberProperty = banner?.getNumberProperty('height');
// Get the timestamp property
final int? timestampProperty = banner?.getTimestampProperty('account_start');
// Get the image URL property
final String? imageProperty = banner?.getImageProperty('homepage_icon');
// Get the JSON object propertyßß
final Map? jsonObjectProperty = banner?.getJSONProperty('footer_settings');
// Use these properties as needed in your UI or logic
});
```
# Test Banners
Source: /docs/developer_guide/banners/testing/index.md
# Test Banners
> Learn how to test your Banner message before launching your campaign so you can ensure all media, copy, personalization, and custom attributes render correctly. For more general information, see [About Banners](https://www.braze.com/docs/developer_guide/banners).
## Prerequisites
Before you can test Banner messages in Braze, you'll need to create a [Banner campaign in Braze](https://www.braze.com/docs/user_guide/message_building_by_channel/banners/create/). Additionally, verify that the placement you want to test is already [placed in your app or website](https://www.braze.com/docs/developer_guide/banners/placements).
To send a test to either [content test groups](https://www.braze.com/docs/user_guide/administrative/app_settings/developer_console/internal_groups_tab/#content-test-groups) or individual users, push must be enabled on your test devices with valid push tokens registered for the test user before sending.
## Test a Banner
**Preview** to you preview your Banner or send a test message.
{: style="max-width:50%;"}
Keep in mind, your preview may not be identical to the final render on a user's device due to differences across hardware.
To send a test message, add either a content test group or one or more individual users as **Test Recipients**, then select **Send Test**. You'll be able to view your test message on the device for up to 5 minutes. You can then select **Copy preview link** to generate and copy a shareable preview link that shows what the banner will look like for a random user. The link will last for seven days before it needs to be regenerated.

While reviewing your test Banner, verify the following:
- Is your Banner campaign assigned to a placement?
- Do the images and media show up and act as expected on your targeted device types and screen sizes?
- Do your links and buttons direct the user to where they should go?
- Does the Liquid function as expected? Have you accounted for a default attribute value in the event that the Liquid returns no information?
- Is your copy clear, concise, and correct?
# Banner analytics
Source: /docs/developer_guide/banners/analytics/index.md
# Banner analytics
> Learn how to review analytics for your Banners, which includes campaign details, message performance, and historical performance. For more general information, see [About Banners](https://www.braze.com/docs/developer_guide/banners).
## Viewing analytics
Once you've launched your campaign, you can return to the details page for that campaign to view key metrics. Navigate to the **Campaigns** page and select your campaign to open the details page. For sent in Canvas, refer to [Canvas analytics](https://www.braze.com/docs/user_guide/engagement_tools/canvas/testing_canvases/measuring_and_testing_with_canvas_analytics/).
**Tip:**
Looking for definitions for the terms and metrics listed in your report? Refer to our
From the **Campaign Analytics** tab, you can view your reports in a series of panels. You may see more or less than those listed in the sections below, but each has its own useful purpose.
### Time range
By default, the time range for **Campaign Analytics** will display the last 90 days from the current time. This means that if the campaign was launched more than 90 days ago, the analytics will display as "0" for the given time range. To view all analytics for older campaigns, adjust the reporting time range.
### Campaign details
The **Campaign Details** panel shows a high-level overview of the entire performance for your
Review this panel to see overall metrics such as the number of messages sent to the number of recipients, the primary conversion rate, and the total revenue generated by this message. You can also review delivery, audience, and conversion settings from this page.
#### Changes Since Last Viewed
The number of updates to the campaign from other members of your team is tracked by the *Changes Since Last Viewed* metric on the campaign overview page. Select **Changes Since Last Viewed** to view a changelog of updates to the campaign's name, schedule, tags, message, audience, approval status, or team access configuration. For each update, you can see who performed the update and when. You can use this changelog to audit changes to your campaign.
If you want to simplify your view, click **Add/Remove Columns** and clear any metrics as desired. By default, all metrics are displayed.
### Historical performance
The **Historical Performance** panel allows you to view the metrics from the **Message Performance** panel as a graph over time. Use the filters at the top of the panel to modify the stats and channels shown in the graph. The time range of this graph will always mirror the time range specified at the top of the page.
To get a day-by-day breakdown, click the hamburger menu and select **Download CSV** to receive a CSV export of the report.

### Conversion event details
The **Conversion Event Details** panel shows you the performance of your conversion events for your campaign. For more information, refer to [Conversion Events](https://www.braze.com/docs/user_guide/engagement_tools/campaigns/building_campaigns/conversion_events/#step-3-view-results).

### Conversion correlation
The **Conversion Correlation** panel gives you insight into what user attributes and behaviors help or hurt the outcomes you set for campaigns. For more information, refer to [Conversion correlation](https://www.braze.com/docs/user_guide/engagement_tools/testing/conversion_correlation/).

## Retention report
Retention reports show you the rates at which your users have performed a selected retention event over time periods in a specific campaign or Canvas. For more information, refer to [Retention reports](https://www.braze.com/docs/user_guide/analytics/reporting/retention_reports/).
## Funnel report
Funnel reporting offers a visual report that allows you to analyze the journeys your customers take after receiving a campaign or Canvas. If your campaign or Canvas uses a control group or multiple variants, you will be able to understand how the different variants have impacted the conversion funnel at a more granular level and optimize based on this data.
For more information, refer to [Funnel reports](https://www.braze.com/docs/user_guide/analytics/reporting/funnel_reports/).
# Migrate from Content Cards to Banners
Source: /docs/developer_guide/banners/migrating_from_content_cards/index.md
# Migrate from Content Cards to Banners
> This guide helps you migrate from Content Cards to Banners for banner-style messaging use cases. Banners are ideal for inline, persistent in-app and web messages that appear at specific placements in your application.
## Why migrate to Banners?
- If your engineering team is building or maintaining custom Content Cards, migrating to Banners can reduce that ongoing investment. Banners let marketers control the UI directly, freeing developers for other work.
- If you're launching new homepage messages, onboarding flows, or persistent announcements, start with Banners rather than building on Content Cards. You can benefit from real-time personalization, no 30-day expiration, no size limit, and native prioritization from day one.
- If you're working around the 30-day expiration limit, managing complex re-eligibility logic, or frustrated by stale personalization, Banners solves these problems natively.
Banners offer several advantages over Content Cards for banner-style messaging:
### Accelerated production
- **Reduced on-going engineering support required**: Marketers can build custom messages using a drag-and-drop editor and custom HTML without requiring developer assistance for customization
- **Flexible customization options**: Design directly in the editor, use HTML or leverage existing data models with custom properties
### Better UX
- **Dynamic content updates**: Banners refresh Liquid logic and eligibility on every refresh, ensuring users always see the most relevant content
- **Native placement support**: Messages appear in specific contexts rather than a feed, providing better contextual relevance
- **Native prioritization**: Control over display order without custom logic, making it easier to manage message hierarchy
### Persistence
- **No expiration limit**: Banner campaigns do not have a 30-day expiration limit like Content Cards, allowing for true persistence of messages
## When to migrate
Consider migrating to Banners if you're using Content Cards for:
- Homepage heroes, product page promotions, checkout offers
- Persistent navigation announcements or sidebar messages
- Always-on messages running longer than 30 days
- Messages where you want real-time personalization and eligibility
## When to keep Content Cards
Continue using Content Cards if you need:
- **Feed experiences:** Any use case involving multiple scrollable messages or a card-based "Inbox".
- **Specific features:** Messages that require Connected Content or Promotional Codes, as Banners do not support these natively.
- **Triggered delivery:** Use cases strictly requiring API-triggered or action-based delivery. While Banners don’t support API-triggered or action-based delivery, real-time eligibility evaluation means users instantly qualify or disqualify based on segment membership at each refresh.
## Migration guide
### Prerequisites
Before migrating, ensure your Braze SDK meets the minimum version requirements:
### Subscribe to updates
#### Content Cards approach
```javascript
import * as braze from "@braze/web-sdk";
braze.subscribeToContentCardsUpdates((cards) => {
// Handle array of cards
cards.forEach(card => {
console.log("Card:", card.id);
});
});
```
```kotlin
Braze.getInstance(context).subscribeToContentCardsUpdates { cards ->
// Handle array of cards
cards.forEach { card ->
Log.d(TAG, "Card: ${card.id}")
}
}
```
```swift
braze.contentCards.subscribeToUpdates { cards in
// Handle array of cards
for card in cards {
print("Card: \(card.id)")
}
}
```
```javascript
Braze.addListener(Braze.Events.CONTENT_CARDS_UPDATED, (update) => {
const cards = update.cards;
// Handle array of cards
cards.forEach(card => {
console.log("Card:", card.id);
});
});
```
```dart
StreamSubscription contentCardsStreamSubscription = braze.subscribeToContentCards((List contentCards) {
// Handle array of cards
for (final card in contentCards) {
print("Card: ${card.id}");
}
});
```
#### Banners approach
```javascript
import * as braze from "@braze/web-sdk";
braze.subscribeToBannersUpdates((banners) => {
// Get banner for specific placement
const globalBanner = braze.getBanner("global_banner");
if (globalBanner) {
console.log("Banner received for placement:", globalBanner.placementId);
}
});
```
```kotlin
Braze.getInstance(context).subscribeToBannersUpdates { update ->
// Get banner for specific placement
val globalBanner = Braze.getInstance(context).getBanner("global_banner")
if (globalBanner != null) {
Log.d(TAG, "Banner received for placement: ${globalBanner.placementId}")
}
}
```
```swift
braze.banners.subscribeToUpdates { banners in
// Get banner for specific placement
braze.banners.getBanner(for: "global_banner") { banner in
if let banner = banner {
print("Banner received for placement: \(banner.placementId)")
}
}
}
```
```javascript
Braze.addListener(Braze.Events.BANNER_CARDS_UPDATED, (data) => {
const banners = data.banners;
// Get banner for specific placement
Braze.getBanner("global_banner").then(banner => {
if (banner) {
console.log("Banner received for placement:", banner.placementId);
}
});
});
```
```dart
StreamSubscription bannerStreamSubscription = braze.subscribeToBanners((List banners) {
// Get banner for specific placement
braze.getBanner("global_banner").then((banner) {
if (banner != null) {
print("Banner received for placement: ${banner.placementId}");
}
});
});
```
### Display content
**Note:**
Content Cards can be manually rendered with custom UI logic, whereas Banners can only be rendered with the out-of-the-box SDK methods.
#### Content Cards approach
```javascript
// Show default feed UI
braze.showContentCards(document.getElementById("feed"));
// Or manually render cards
const cards = braze.getCachedContentCards();
cards.forEach(card => {
// Custom rendering logic
if (card instanceof braze.ClassicCard) {
// Render classic card
}
});
```
```kotlin
// Using default fragment
val fragment = ContentCardsFragment()
supportFragmentManager.beginTransaction()
.replace(R.id.content_cards_container, fragment)
.commit()
// Or manually render cards
val cards = Braze.getInstance(context).getCachedContentCards()
cards.forEach { card ->
when (card) {
is ClassicCard -> {
// Render classic card
}
}
}
```
```swift
// Using default view controller
let contentCardsController = BrazeContentCardUI.ViewController(braze: braze)
navigationController?.pushViewController(contentCardsController, animated: true)
// Or manually render cards
let cards = braze.contentCards.cards
for card in cards {
switch card {
case let card as Braze.ContentCard.Classic:
// Render classic card
default:
break
}
}
```
```javascript
// Launch default feed
Braze.launchContentCards();
// Or manually render cards
const cards = await Braze.getContentCards();
cards.forEach(card => {
if (card.type === 'CLASSIC') {
// Render classic card
}
});
```
```dart
// Launch default feed
braze.launchContentCards();
// Or manually render cards
final cards = await braze.getContentCards();
for (final card in cards) {
if (card.type == 'CLASSIC') {
// Render classic card
}
}
```
#### Banners approach
```javascript
braze.subscribeToBannersUpdates((banners) => {
const globalBanner = braze.getBanner("global_banner");
if (!globalBanner) {
return;
}
const container = document.getElementById("global-banner-container");
braze.insertBanner(globalBanner, container);
if (globalBanner.isControl) {
container.style.display = "none";
}
});
braze.requestBannersRefresh(["global_banner"]);
```
```kotlin
// Using BannerView in XML
//
// Or programmatically
val bannerView = BannerView(context).apply {
placementId = "global_banner"
}
container.addView(bannerView)
Braze.getInstance(context).requestBannersRefresh(listOf("global_banner"))
```
```swift
// Using BannerUIView
let bannerView = BrazeBannerUI.BannerUIView(
placementId: "global_banner",
braze: braze,
processContentUpdates: { result in
switch result {
case .success(let updates):
if let height = updates.height {
// Update height constraint
}
case .failure:
break
}
}
)
view.addSubview(bannerView)
braze.banners.requestBannersRefresh(placementIds: ["global_banner"])
```
```javascript
// Using BrazeBannerView component
// Or get banner data
const banner = await Braze.getBanner("global_banner");
if (banner) {
// Render custom banner UI
}
Braze.requestBannersRefresh(["global_banner"]);
```
```dart
// Using BrazeBannerView widget
BrazeBannerView(
placementId: "global_banner",
)
// Or get banner data
final banner = await braze.getBanner("global_banner");
if (banner != null) {
// Render custom banner UI
}
braze.requestBannersRefresh(["global_banner"]);
```
### Log analytics (custom implementations)
**Note:**
Both Content Cards and Banners automatically track analytics when using their default UI components. The examples below are for custom implementations where you're building your own UI.
#### Content Cards approach
```javascript
// Manual impression logging required for custom implementations
cards.forEach(card => {
braze.logContentCardImpressions([card]);
});
// Manual click logging required for custom implementations
card.logClick();
```
```kotlin
// Manual impression logging required for custom implementations
cards.forEach { card ->
card.logImpression()
}
// Manual click logging required for custom implementations
card.logClick()
```
```swift
// Manual impression logging required for custom implementations
for card in cards {
card.context?.logImpression()
}
// Manual click logging required for custom implementations
card.context?.logClick()
```
```javascript
// Manual impression logging required for custom implementations
cards.forEach(card => {
Braze.logContentCardImpression(card.id);
});
// Manual click logging required for custom implementations
Braze.logContentCardClicked(card.id);
```
```dart
// Manual impression logging required for custom implementations
for (final card in cards) {
braze.logContentCardImpression(card);
}
// Manual click logging required for custom implementations
braze.logContentCardClicked(card);
```
#### Banners approach
**Important:**
Analytics are automatically tracked when using `insertBanner()`. Manual logging should not be used when using `insertBanner()`.
```javascript
// Analytics are automatically tracked when using insertBanner()
// Manual logging should not be used when using insertBanner()
// For custom implementations, use manual logging methods:
// Log impression
braze.logBannerImpressions([globalBanner]);
// Log click (with optional buttonId)
braze.logBannerClick("global_banner", buttonId);
```
**Important:**
Analytics are automatically tracked when using BannerView. Manual logging should not be used when using BannerView.
```kotlin
// Analytics are automatically tracked when using BannerView
// Manual logging should not be used for default BannerView
// For custom implementations, use manual logging methods:
// Log impression
Braze.getInstance(context).logBannerImpression("global_banner");
// Log click (with optional buttonId)
Braze.getInstance(context).logBannerClick("global_banner", buttonId);
```
**Important:**
Analytics are automatically tracked when using BannerUIView. Manual logging should not be used for default BannerUIView.
```swift
// Analytics are automatically tracked when using BannerUIView
// Manual logging should not be used for default BannerUIView
// For custom implementations, use manual logging methods:
// Log impression
braze.banners.logImpression(placementId: "global_banner")
// Log click (with optional buttonId)
braze.banners.logClick(placementId: "global_banner", buttonId: buttonId)
// Control groups are automatically handled by BannerUIView
```
**Important:**
Analytics are automatically tracked when using BrazeBannerView. No manual logging required.
```javascript
// Analytics are automatically tracked when using BrazeBannerView
// No manual logging required
// Note: Manual logging methods for Banners are not yet supported in React Native
// Control groups are automatically handled by BrazeBannerView
```
**Important:**
Analytics are automatically tracked when using BrazeBannerView. No manual logging required.
```dart
// Analytics are automatically tracked when using BrazeBannerView
// No manual logging required
// Note: Manual logging methods for Banners are not yet supported in Flutter
// Control groups are automatically handled by BrazeBannerView
```
### Handling control groups
#### Content Cards approach
```javascript
cards.forEach(card => {
if (card.isControl) {
// Logic for control cards ie. don't display but log analytics
} else {
// Logic for cards ie. render card
}
});
```
```kotlin
cards.forEach { card ->
if (card.isControl) {
// Logic for control cards ie. don't display but log analytics
} else {
// Logic for cards ie. render card
}
}
```
```swift
for card in cards {
if card.isControl {
// Logic for control cards ie. don't display but log analytics
} else {
// Logic for cards ie. render card
}
}
```
```javascript
cards.forEach(card => {
if (card.isControl) {
// Logic for control cards ie. don't display but log analytics
} else {
// Logic for cards ie. render card
}
});
```
```dart
for (final card in cards) {
if (card.isControl) {
// Logic for control cards ie. don't display but log analytics
} else {
// Logic for cards ie. render card
}
}
```
#### Banners approach
```javascript
braze.subscribeToBannersUpdates((banners) => {
const globalBanner = braze.getBanner("global_banner");
if (!globalBanner) {
return;
}
const container = document.getElementById("global-banner-container");
// Always call insertBanner to track impression (including control)
braze.insertBanner(globalBanner, container);
// Hide if control group
if (globalBanner.isControl) {
container.style.display = "none";
}
});
```
```kotlin
// BannerView automatically handles control groups
// No additional code needed
val bannerView = BannerView(context).apply {
placementId = "global_banner"
}
```
```swift
// BannerUIView automatically handles control groups
// No additional code needed
let bannerView = BrazeBannerUI.BannerUIView(
placementId: "global_banner",
braze: braze
)
```
```javascript
// BrazeBannerView automatically handles control groups
// No additional code needed
```
```dart
// BrazeBannerView automatically handles control groups
// No additional code needed
BrazeBannerView(
placementId: "global_banner",
)
```
## Limitations
When migrating from Content Cards to Banners, be aware of the following limitations:
### Migrating triggered messages
Banners only support scheduled delivery campaigns. To migrate a message that was previously API-triggered or action-based, convert it to segment-based targeting:
- **Example:** Instead of triggering a "Complete Profile" card with the API, create a segment for users who signed up in the last 7 days but have not completed their profile.
- **Real-time eligibility:** Users qualify or disqualify for the Banner instantly at each refresh based on their segment membership.
### Feature differences
| Feature | Content Cards | Banners |
|---------|--------------|---------|
| **Content Structure** |
| Multiple cards in feed | ✅ Supported | ✅ Can create multiple placements to achieve carousel-like implementation. Only one banner is returned per placement. |
| Multiple placements | N/A | ✅ Multiple placements supported |
| Card types (Classic, Captioned, Image Only) | ✅ Multiple predefined types | ✅ Single HTML-based banner (more flexible) |
| **Content Management** |
| Drag-and-drop editor | ❌ Requires developer for customization | ✅ Marketers can create/update without engineering |
| Custom HTML/CSS | ❌ Limited to card structure | ✅ Full HTML/CSS support |
| Key-value pairs for customization | ✅ Required for advanced customization | ✅ Strongly-typed key-value pairs called "properties" for advanced customization |
| **Persistence & Expiration** |
| Card expiration | ✅ Supported (30-day limit) | ✅ Supported (no expiration limit) |
| True persistence | ❌ 30-day maximum | ✅ Unlimited persistence |
| **Display & Targeting** |
| Feed UI | ✅ Default feed available | ❌ Placement-based only |
| Context-specific placement | ❌ Feed-based | ✅ Native placement support |
| Native prioritization | ❌ Requires custom logic | ✅ Built-in prioritization |
| **User Interaction** |
| Manual dismissal | ✅ Supported | ❌ Not supported |
| Pinned cards | ✅ Supported | N/A |
| **Analytics** |
| Automatic analytics (default UI) | ✅ Supported | ✅ Supported |
| Priority Sorting | ❌ Not supported | ✅ Supported |
| **Content Updates** |
| Liquid templating refresh | ❌ Once per card at send/launch | ✅ Refreshes on every refresh |
| Eligibility refresh | ❌ Once per card at send/launch | ✅ Refreshes on every session |
{: .reset-td-br-1 .reset-td-br-2 .reset-td-br-3 role="presentation" }
### Product limitations
- Up to 25 active messages per placement.
- Up to 10 placement IDs per refresh request; requests beyond this are truncated.
### SDK limitations
- Banners are not currently supported on .NET MAUI (Xamarin), Cordova, Unity, Vega, or TV platforms.
- Make sure you're using the minimum SDK versions listed in the prerequisites.
## Related articles
- [Banner placements](https://www.braze.com/docs/developer_guide/banners/placements)
- [Tutorial: Displaying a Banner by Placement ID](https://www.braze.com/docs/developer_guide/banners/tutorial_displaying_banners)
- [Banner analytics](https://www.braze.com/docs/developer_guide/banners/analytics)
- [Banner FAQ](https://www.braze.com/docs/developer_guide/banners/faq)
# Tutorial: Displaying a Banner by Placement ID
Source: /docs/developer_guide/banners/tutorial_displaying_banners/index.md
# Tutorial: Displaying a Banner by Placement ID
> Follow along with the sample code in this tutorial to display Banners using their placement ID. For more general information, see [Banners](https://www.braze.com/docs/developer_guide/banners/).
## Prerequisites
Before you can start this tutorial, verify that your Braze SDK meets the minimum version requirements:
## Displaying banners for the Web SDK
**Important:**
We're piloting this new tutorial format. [Tell us what you think](https://docs.google.com/forms/d/e/1FAIpQLSe_5uhWM7eXXk9F_gviO_pvA4rkYO3WA9B6tNJZ3TY91md5bw/viewform?usp=pp_url&entry.569173304=General+Feedback) — your feedback helps us improve future guides.
```js file=index.js
import * as braze from "@braze/web-sdk";
braze.initialize("YOUR-API-KEY", {
baseUrl: "YOUR-ENDPOINT",
enableLogging: true,
});
braze.subscribeToBannersUpdates((banners) => {
// Get this placement's banner. If it's `null`, the user did not qualify for any banners.
const globalBanner = braze.getBanner("global_banner");
if (!globalBanner) {
return;
}
const container = document.getElementById("global-banner-container");
braze.insertBanner(globalBanner, container);
if (globalBanner.isControl) {
// Hide or collapse the container
container.style.display = "none";
}
});
braze.requestBannersRefresh(["global_banner", "navigation_square_banner"]);
```
```html file=main.html
```
!!step
lines-index.js=5
#### 1. Enable debugging (optional)
To make troubleshooting easier while developing, consider enabling debugging.
!!step
lines-index.js=8-23
#### 2. Subscribe to Banner updates
Use `subscribeToBannersUpdates()` to register a handler that runs whenever a Banner is updated. Inside the handler, call `braze.getBanner("global_banner")` to get the latest placement.
!!step
lines-index.js=15-22
#### 3. Insert the Banner and handle control groups
Use `braze.insertBanner(banner, container)` to insert a Banner when it's returned. To ensure keep your layout clean, hide or collapse Banners that are apart of a control group (for example, when `isControl` is `true`).
!!step
lines-index.js=25
#### 4. Refresh your Banners
After initializing the SDK, call `requestBannersRefresh(["global_banner", ...])` to ensure that Banners are refreshed at the start of each session.
You can also call this function at any time to refresh Banner placements later.
!!step
lines-main.html=3
#### 5. Add a container for your Banner
In your HTML, add a new `
` element and give it a short, Banner-related `id`, such as `global-banner-container`. Braze will use this `
` to insert your Banner into the page.
## Prerequisites
Before you can start this tutorial, verify that your Braze SDK meets the minimum version requirements:
## Displaying banners for the Android SDK
**Important:**
We're piloting this new tutorial format. [Tell us what you think](https://docs.google.com/forms/d/e/1FAIpQLSe_5uhWM7eXXk9F_gviO_pvA4rkYO3WA9B6tNJZ3TY91md5bw/viewform?usp=pp_url&entry.569173304=General+Feedback) — your feedback helps us improve future guides.
```kotlin file=MainApplication.kt
import android.app.Application
import android.util.Log
import com.braze.Braze
import com.braze.configuration.BrazeConfig
import com.braze.support.BrazeLogger
public class MainApplication : Application() {
override fun onCreate() {
super.onCreate()
// Turn on verbose Braze logging
BrazeLogger.logLevel = Log.VERBOSE
// Configure Braze with your SDK key and endpoint
val config = BrazeConfig.Builder()
.setApiKey("YOUR-API-KEY")
.setCustomEndpoint("YOUR-ENDPOINT")
.build()
Braze.configure(this, config)
// Subscribe to Banner updates
Braze.getInstance(this)
.subscribeToBannersUpdates { update ->
for (banner in update.banners) {
Log.d("brazeBanners", "Received banner for placement: ${banner.placementId}")
// Add any custom banner logic you'd like
}
}
}
}
```
```kotlin file=MainActivity.kt
import android.os.Bundle
import androidx.activity.ComponentActivity
class MainActivity : ComponentActivity() {
override fun onCreate(savedInstanceState: Bundle?) {
super.onCreate(savedInstanceState)
// Inflate the XML layout
setContentView(R.layout.banners)
// Refresh placements
Braze.getInstance(this)
.requestBannersRefresh(
listOf("top-1")
)
}
}
```
```xml file=banners.xml
```
!!step
lines-MainApplication.kt=12
#### 1. Enable debugging (optional)
To make troubleshooting easier while developing, consider enabling debugging.
!!step
lines-MainApplication.kt=21-28
#### 2. Subscribe to Banner updates
Use `subscribeToBannersUpdates()` to register a handler that runs whenever a Banner is updated.
!!step
lines-MainActivity.kt=10-14
#### 3. Refresh your placements
After initializing the Braze SDK, call `requestBannersRefresh(["PLACEMENT_ID"])` to fetch the latest Banner content for that placement.
!!step
lines-banners.xml=15-19
#### 4. Define `BannerView` in your `banners.xml`
In `banners.xml`, declare a `` element with `app:placementId="PLACEMENT_ID"`. Braze will use this element to insert your Banner into your UI.
## Prerequisites
Before you can start this tutorial, verify that your Braze SDK meets the minimum version requirements:
## Displaying banners for the Swift SDK
**Important:**
We're piloting this new tutorial format. [Tell us what you think](https://docs.google.com/forms/d/e/1FAIpQLSe_5uhWM7eXXk9F_gviO_pvA4rkYO3WA9B6tNJZ3TY91md5bw/viewform?usp=pp_url&entry.569173304=General+Feedback) — your feedback helps us improve future guides.
```swift file=AppDelegate.swift
import UIKit
import BrazeKit
import BrazeUI
class AppDelegate: UIResponder, UIApplicationDelegate {
static var braze: Braze? = nil
func application(
_ application: UIApplication,
didFinishLaunchingWithOptions launchOptions: [UIApplication.LaunchOptionsKey: Any]?
) -> Bool {
// Braze configuration with your SDK API key and endpoint
let configuration = Braze.Configuration(apiKey: "YOUR-API-TOKEN", endpoint: "YOUR-ENDPOINT")
configuration.logger.level = .debug
// Initialize Braze SDK instance
AppDelegate.braze = Braze(configuration: configuration)
// Request a banners refresh
AppDelegate.braze?.banners.requestBannersRefresh(placementIds: ["top-1"])
return true
}
}
```
```swift file=SampleApp.swift
import SwiftUI
@main
struct SampleApp: App {
// Bind the AppDelegate into the SwiftUI lifecycle
@UIApplicationDelegateAdaptor(AppDelegate.self) var delegate
var body: some Scene {
WindowGroup {
ContentView()
}
}
}
```
```swift file=BannerViewController.swift
import UIKit
import BrazeKit
import BrazeUI
final class BannerViewController: UIViewController {
static let bannerPlacementID = "top-1"
var bannerHeightConstraints: NSLayoutConstraint?
lazy var contentView: UILabel = {
let contentView = UILabel()
contentView.text = "Your Content Here"
contentView.textAlignment = .center
contentView.translatesAutoresizingMaskIntoConstraints = false
return contentView
}()
lazy var bannerView: BrazeBannerUI.BannerUIView = {
var bannerView = BrazeBannerUI.BannerUIView(
placementId: BannerViewController.bannerPlacementID,
braze: AppDelegate.braze!,
processContentUpdates: { [weak self] result in
// Update layout properties when banner content has finished loading.
DispatchQueue.main.async {
guard let self else { return }
switch result {
case .success(let updates):
if let height = updates.height {
self.bannerView.isHidden = false
self.bannerHeightConstraint?.constant = min(height, 80)
}
case .failure(let error):
return
}
}
}
)
bannerView.translatesAutoresizingMaskIntoConstraints = false
bannerView.isHidden = true
return bannerView
}()
override func viewDidLoad() {
super.viewDidLoad()
self.view.addSubview(contentView)
self.view.addSubview(bannerView)
bannerHeightConstraint = bannerView.heightAnchor.constraint(equalToConstant: 0)
NSLayoutConstraint.activate([
contentView.topAnchor.constraint(equalTo: self.view.safeAreaLayoutGuide.topAnchor),
contentView.leadingAnchor.constraint(equalTo: self.view.safeAreaLayoutGuide.leadingAnchor),
contentView.trailingAnchor.constraint(equalTo: self.view.safeAreaLayoutGuide.trailingAnchor),
bannerView.topAnchor.constraint(equalTo: self.contentView.bottomAnchor),
bannerView.leadingAnchor.constraint(equalTo: self.view.safeAreaLayoutGuide.leadingAnchor),
bannerView.trailingAnchor.constraint(equalTo: self.view.safeAreaLayoutGuide.trailingAnchor),
bannerView.bottomAnchor.constraint(equalTo: self.view.safeAreaLayoutGuide.bottomAnchor),
bannerHeightConstraint!,
])
}
}
```
!!step
lines-AppDelegate.swift=14
#### 1. Enable debugging (optional)
To make troubleshooting easier while developing, consider enabling debugging.
!!step
lines-AppDelegate.swift=20
#### 2. Refresh your placements
After initializing the Braze SDK, `call requestBannersRefresh(placementIds: ["PLACEMENT_ID"])` to refresh Banner content at the start of each session.
!!step
lines-BannerViewController.swift=19-37
#### 3. Initialize the Banner and provide a callback
Create a `BrazeBannerUI.BannerUIView` instance with your Braze object and placement ID, and provide a `processContentUpdates` callback to unhide the Banner and update its height constraint based on the provided content height.
!!step
lines-BannerViewController.swift=38-40
#### 4. Enable Auto Layout constraints
Hide the Banner view by default, then disable autoresizing mask translation to enable Auto Layout constraints.
!!step
lines-BannerViewController.swift=43-58
#### 5. Anchor content and set height constraints
Anchor your main content to the top using Auto Layout, and place the Banner view directly below it. Pin the Banner’s leading, trailing, and bottom edges to the safe area, and set an initial height constraint of `0` that will be updated when content loads.
```swift file=AppDelegate.swift
import BrazeKit
import BrazeUI
class AppDelegate: UIResponder, UIApplicationDelegate {
static var braze: Braze? = nil
func application(
_ application: UIApplication,
didFinishLaunchingWithOptions launchOptions: [UIApplication.LaunchOptionsKey: Any]?
) -> Bool {
// Braze configuration with your SDK API key and endpoint
let configuration = Braze.Configuration(apiKey: "YOUR-API-TOKEN", endpoint: "YOUR-ENDPOINT")
configuration.logger.level = .debug
// Initialize Braze SDK instance
AppDelegate.braze = Braze(configuration: configuration)
// Request a banners refresh
AppDelegate.braze?.banners.requestBannersRefresh(placementIds: ["top-1"])
return true
}
}
```
```swift file=SampleApp.swift
import SwiftUI
@main
struct SampleApp: App {
// Bind the AppDelegate into the SwiftUI lifecycle
@UIApplicationDelegateAdaptor(AppDelegate.self) var delegate
var body: some Scene {
WindowGroup {
BannerSwiftUIView()
}
}
}
```
```swift file=BannerSwiftUIView.swift
import BrazeKit
import BrazeUI
import SwiftUI
@available(iOS 13.0, *)
struct BannerSwiftUIView: View {
static let bannerPlacementID = "top-1"
@State var hasBannerForPlacement: Bool = false
@State var contentHeight: CGFloat = 0
var body: some View {
VStack {
Text("Your Content Here")
.frame(maxWidth: .infinity, maxHeight: .infinity)
if let braze = AppDelegate.braze,
hasBannerForPlacement
{
BrazeBannerUI.BannerView(
placementId: BannerSwiftUIView.bannerPlacementID,
braze: braze,
processContentUpdates: { result in
switch result {
case .success(let updates):
if let height = updates.height {
self.contentHeight = height
}
case .failure:
return
}
}
)
.frame(height: min(contentHeight, 80))
}
}.onAppear {
AppDelegate.braze?.banners.getBanner(
for: BannerSwiftUIView.bannerPlacementID,
{ banner in
hasBannerForPlacement = banner != nil
}
)
}
}
}
```
!!step
lines-AppDelegate.swift=13
#### 1. Enable debugging (optional)
To make troubleshooting easier while developing, consider enabling debugging.
!!step
lines-AppDelegate.swift=19
#### 2. Refresh your placements
After initializing the Braze SDK, call `requestBannersRefresh(placementIds: ["PLACEMENT_ID"])` to refresh Banner content at the start of each session.
!!step
lines-BannerSwiftUIView.swift=1-46
#### 3. Create a view component
Create a reusable SwiftUI view component that displays available Banners and contains your main app content if needed.
!!step
lines-BannerSwiftUIView.swift=36-43
#### 4. Only display available Banners
Only attempt to show `BrazeBannerUI.BannerView` if the SDK is initialized and Banner content exists for that user. In `.onAppear`, call `getBanner(for:placementID)` to set the state of `hasBannerForPlacement`.
!!step
lines-BannerSwiftUIView.swift=17-32
#### 5. Only show `BannerView` after it loads
To avoid blank space in your UI, only show `BrazeBannerUI.BannerView` if a Banner is present and the SDK is initialized.
!!step
lines-BannerSwiftUIView.swift=23-32
#### 6. Dynamically update Banner height
Use the `processContentUpdates` callback to fetch the Banner’s content height as soon as it loads. Update your SwiftUI state (`contentHeight`) and apply a `.frame(height:)` constraint using the provided height.
!!step
lines-BannerSwiftUIView.swift=34
#### 7. Limit the Banner height
To ensure your Banner never exceeds the maximum height, apply a `.frame(height: min(contentHeight, 80))` modifier. This will keep your UI visually balanced regardless of the Banner's content.
# Banners: Frequently Asked Questions
Source: /docs/developer_guide/banners/faq/index.md
# Banners: Frequently Asked Questions
> These are answers to frequently asked questions about Banners in Braze. For more general information, see [About Banners]().
## When do Banner updates appear for users?
Banners are refreshed with their latest data whenever you call the refresh method—there's no need to resend or update your Banner campaign.
## How many placements can I request in a session?
In a single refresh request, you can request a maximum of 10 placements. For each one you request, Braze will return the highest-priority Banner a user is eligible for. Additional requests will return an error.
For more information, see [Placement requests]().
## How many Banner campaigns can be active simultaneously?
Each workspace can support up to 200 active Banner campaigns. If this limit is reached, you'll need to [archive or deactivate](https://www.braze.com/docs/user_guide/engagement_tools/messaging_fundamentals/about_statuses/#changing-the-status) an existing campaign before creating a new one.
## For campaigns sharing a placement, which Banner is displayed first?
If a user qualifies for multiple Banner campaigns that share the same placement, the Banner with the highest priority will be displayed. For more information, see [Banner priority]().
## Can I use Banners in my existing Content Card feed?
Banners are different from Content Cards, meaning you can’t use Banners and Content Cards in the same feed. To replace existing Content Card feeds with Banners, you’ll need to [create placements in your app or website](https://www.braze.com/docs/developer_guide/banners/placements/).
## Can I trigger a banner based on user actions?
While Banners do not support [action-based delivery](https://www.braze.com/docs/user_guide/engagement_tools/campaigns/building_campaigns/delivery_types/triggered_delivery), you can target users based on their past actions using segmentation and priority.
For example, to show a special Banner only to users who have completed a `purchase` event:
1. **Targeting:** In your campaign, target a segment of users who have performed the custom event `purchase` at least once.
2. **Priority:** If you have a general Banner for all users and this specific Banner for purchasers targeting the same placement, set the specific Banner's priority to **High** and the general Banner to **Medium** or **Low**.
When the user starts a new session or refreshes Banners after performing the action, Braze evaluates their eligibility. If they match the "Purchase" segment, the high-priority Banner will be displayed.
## Can users manually dismiss a Banner?
No. Users cannot manually dismiss Banners. However, you can control Banner visibility by managing user segment eligibility. When a user no longer meets the targeting criteria for a Banner campaign, they won't see it again on their next session.
For example, if you display a promotional Banner until a user makes a purchase, logging an event such as `purchase_completed` can remove that user from the targeted segment, effectively hiding the Banner in subsequent sessions.
## Can I export Banners campaign analytics using the Braze API?
Yes. You can use the [`/campaigns/data_series` endpoint](https://www.braze.com/docs/api/endpoints/export/campaigns/get_campaign_analytics/) to get data on how many Banner campaigns were viewed, clicked, or converted.
## When are users segmented?
Users are segmented at the beginning of the session. If a campaign's targeted segments depend on custom attributes, custom events, or other targeting attributes, they must be present on the user at the beginning of the session.
## How can I compose Banners to ensure the lowest latency?
The simpler the messaging in your Banner, the faster it will render. It’s best to test your Banner campaign against the expected latency for your use case. For example, be sure to test Liquid attributes like `catalog_items`.
## Are all Liquid tags supported?
No. However, most Liquid tags are supported for Banner messages, except for `catalog_items` that are re-rendered using the [`:rerender` tag](https://www.braze.com/docs/user_guide/data/activation/catalogs/using_catalogs/#using-liquid).
## Can I capture click events?
Yes. How click events are captured depends on how your Banner is rendered:
- **Standard editor components:** If your Banner uses standard editor components (images, buttons, text), clicks are tracked automatically when using the SDK's insertion methods.
- **Custom Code Blocks:** If you want to track clicks for elements within a Custom Code editor block, you must call `brazeBridge.logClick()` from within your custom HTML to track clicks. This applies even when using the SDK methods to insert and render the Banner. For the full reference, see [Custom code and JavaScript bridge for Banners](https://www.braze.com/docs/user_guide/message_building_by_channel/banners/custom_code/#javascript-bridge).
- **Custom UI (headless):** If you're building a fully custom UI using the Banner's custom properties instead of rendering the Banner HTML, call `logClick()` on the Banner object from your application code.
For more information, see [Logging clicks](https://www.braze.com/docs/developer_guide/banners/placements/#logging-clicks).
# Content Cards in the Braze SDK
Source: /docs/developer_guide/content_cards/index.md
# Content Cards
> Learn about Content Cards for the Braze SDK, including the different data models and card-specific properties available for your application.
**Tip:**
Using Content Cards for banner-style messages? Try out [Banners](https://www.braze.com/docs/user_guide/message_building_by_channel/banners/)— perfect for inline, persistent in-app and web messages.
**Note:**
This guide uses code samples from the Braze Web SDK 4.0.0+. To upgrade to the latest Web SDK version, see [SDK Upgrade Guide](https://github.com/braze-inc/braze-web-sdk/blob/master/UPGRADE_GUIDE.md).
## Prerequisites
Before you can use Content Cards, you'll need to [integrate the Braze Web SDK](https://www.braze.com/docs/developer_guide/sdk_integration/?sdktab=web) into your app. However, no additional setup is required. To build your own UI instead, see [Content Card Customization Guide](https://www.braze.com/docs/developer_guide/content_cards/).
## Standard feed UI
To use the included Content Cards UI, you'll need to specify where to show the feed on your website.
In this example, we have a `` in which we want to place the Content Cards feed. We'll use three buttons to hide, show, or toggle (hide or show based on its current state) the feed.
```html
```
When using the `toggleContentCards(parentNode, filterFunction)` and `showContentCards(parentNode, filterFunction)` methods, if no arguments are provided, all Content Cards will be shown in a fixed-position sidebar on the right-hand side of the page. Otherwise, the feed will be placed in the specified `parentNode` option.
|Parameters | Description |
|---|---|
|`parentNode` | The HTML node to render the Content Cards into. If the parent node already has a Braze Content Cards view as a direct descendant, the existing Content Cards will be replaced. For example, you should pass in `document.querySelector(".my-container")`.|
|`filterFunction` | A filter or sort function for cards displayed in this view. Invoked with the array of `Card` objects, sorted by `{pinned, date}`. Expected to return an array of sorted `Card` objects to render for this user. If omitted, all cards will be displayed. |
{: .reset-td-br-1 .reset-td-br-2 role="presentation" }
[See the SDK reference docs](https://js.appboycdn.com/web-sdk/latest/doc/modules/braze.html#togglecontentcards) for more information on Content Card toggling.
## Card types and properties
The Content Cards data model is available in the Web SDK and offers the following Content Card types: [ImageOnly](https://js.appboycdn.com/web-sdk/latest/doc/classes/braze.imageonly.html), [CaptionedImage](https://js.appboycdn.com/web-sdk/latest/doc/classes/braze.captionedimage.html), and [ClassicCard](https://js.appboycdn.com/web-sdk/latest/doc/classes/braze.classiccard.html). Each type inherits common properties from a base model [Card](https://js.appboycdn.com/web-sdk/latest/doc/classes/braze.card.html) and has the following additional properties.
**Tip:**
To log Content Card data, see [Logging analytics](https://www.braze.com/docs/developer_guide/content_cards/logging_analytics/).
### Base card model
All Content Cards have these shared properties:
|Property|Description|
|---|---|
| `expiresAt` | The UNIX timestamp of the card's expiration time.|
| `extras`| (Optional) Key-value pair data formatted as a string object with a value string. |
| `id` | (Optional) The id of the card. This will be reported back to Braze with events for analytics purposes. |
| `pinned` | This property reflects if the card was set up as "pinned" in the dashboard.|
| `updated` | The UNIX timestamp of when this card was last modified. |
| `viewed` | This property reflects whether the user viewed the card or not.|
| `isControl` | This property is `true` when a card is a "control" group within an A/B test.|
{: .reset-td-br-1 .reset-td-br-2 role="presentation" }
### Image only
[ImageOnly](https://js.appboycdn.com/web-sdk/latest/doc/classes/braze.imageonly.html) cards are clickable full-sized images.
|Property|Description|
|---|---|
| `aspectRatio` | The aspect ratio of the card's image and serves as a hint before image loading completes. Note that the property may not be supplied in certain circumstances. |
| `categories` | This property is purely for organization in your custom implementation; these categories can be set in the dashboard composer. |
| `clicked` | This property indicates whether this card has ever been clicked on this device. |
| `created` | The UNIX timestamp of the card's creation time from Braze. |
| `dismissed` | This property indicates if this card has been dismissed. |
| `dismissible` | This property reflects if the user can dismiss the card, removing it from view. |
| `imageUrl` | The URL of the card's image.|
| `linkText` | The display text for the URL. |
| `url` | The URL that will be opened after the card is clicked on. |
{: .reset-td-br-1 .reset-td-br-2 role="presentation" }
### Captioned image
[CaptionedImage](https://js.appboycdn.com/web-sdk/latest/doc/classes/braze.captionedimage.html) cards are clickable, full-sized images with accompanying descriptive text.
|Property|Description|
|---|---|
| `aspectRatio` | The aspect ratio of the card's image and serves as a hint before image loading completes. Note that the property may not be supplied in certain circumstances. |
| `categories` | This property is purely for organization in your custom implementation; these categories can be set in the dashboard composer. |
| `clicked` | This property indicates whether this card has ever been clicked on this device. |
| `created` | The UNIX timestamp of the card's creation time from Braze. |
| `dismissed` | This property indicates if this card has been dismissed. |
| `dismissible` | This property reflects if the user can dismiss the card, removing it from view. |
| `imageUrl` | The URL of the card's image.|
| `linkText` | The display text for the URL. |
| `title` | The title text for this card. |
| `url` | The URL that will be opened after the card is clicked on. |
{: .reset-td-br-1 .reset-td-br-2 role="presentation" }
### Classic
The [ClassicCard](https://js.appboycdn.com/web-sdk/latest/doc/classes/braze.classiccard.html) model can contain an image with no text or a text with image.
|Property|Description|
|---|---|
| `aspectRatio` | The aspect ratio of the card's image and serves as a hint before image loading completes. Note that the property may not be supplied in certain circumstances. |
| `categories` | This property is purely for organization in your custom implementation; these categories can be set in the dashboard composer. |
| `clicked` | This property indicates whether this card has ever been clicked on this device. |
| `created` | The UNIX timestamp of the card's creation time from Braze. |
| `description` | The body text for this card. |
| `dismissed` | This property indicates if this card has been dismissed. |
| `dismissible` | This property reflects if the user can dismiss the card, removing it from view. |
| `imageUrl` | The URL of the card's image.|
| `linkText` | The display text for the URL. |
| `title` | The title text for this card. |
| `url` | The URL that will be opened after the card is clicked on. |
{: .reset-td-br-1 .reset-td-br-2 role="presentation" }
## Control group
If you use the default Content Cards feed, impressions and clicks will be automatically tracked.
If you use a custom integration for Content Cards, you need need [log impressions](https://www.braze.com/docs/developer_guide/content_cards/logging_analytics/) when a Control Card would have been seen. As part of this effort, make sure to handle Control cards when logging impressions in an A/B test. These cards are blank, and while they aren’t seen by users, you should still log impressions in order to compare how they perform against non-Control cards.
To determine if a Content Card is in the Control group for an A/B test, check the `card.isControl` property (Web SDK v4.5.0+) or check if the card is a `ControlCard` instance (`card instanceof braze.ControlCard`).
## Card methods
|Method | Description |
|---|---|
|[`logContentCardImpressions`](https://js.appboycdn.com/web-sdk/latest/doc/modules/braze.html#logcontentcardimpressions)| Logs an impression event for the given list of cards. This is required when using a customized UI and not the Braze UI.|
|[`logContentCardClick`](https://js.appboycdn.com/web-sdk/latest/doc/modules/braze.html#logcontentcardclick)| Logs an click event for a given card. This is required when using a customized UI and not the Braze UI.|
|[`showContentCards`](https://js.appboycdn.com/web-sdk/latest/doc/modules/braze.html#showcontentcards)| Display the user's Content Cards. |
|[`hideContentCards`](https://js.appboycdn.com/web-sdk/latest/doc/modules/braze.html#hidecontentcards)| Hide any Braze Content Cards currently showing. |
|[`toggleContentCards`](https://js.appboycdn.com/web-sdk/latest/doc/modules/braze.html#togglecontentcards)| Display the user's Content Cards. |
|[`getCachedContentCards`](https://js.appboycdn.com/web-sdk/latest/doc/modules/braze.html#getcachedcontentcards)|Get all currently available cards from the last Content Cards refresh.|
|[`subscribeToContentCardsUpdates`](https://js.appboycdn.com/web-sdk/latest/doc/modules/braze.html#subscribetocontentcardsupdates)| Subscribe to Content Cards updates. The subscriber callback will be called whenever Content Cards are updated. |
|[`dismissCard`](https://js.appboycdn.com/web-sdk/latest/doc/classes/braze.card.html#dismisscard)|Dismiss the card programmatically (available in v2.4.1).|
{: .reset-td-br-1 .reset-td-br-2 .reset-td-br-3 role="presentation" }
For more details, refer to the [SDK reference documentation](https://js.appboycdn.com/web-sdk/latest/doc/modules/braze.html)
## Using Google Tag Manager
Google Tag Manager works by injecting the [Braze CDN](https://www.braze.com/docs/developer_guide/platform_integration_guides/web/initial_sdk_setup#install-cdn) (a version of our Web SDK) directly into your website code, which means that all SDK methods are available just as if you had integrated the SDK without Google Tag Manager, except when implementing Content Cards.
### Setting up Content Cards
For a standard integration of the Content Card feed, you can use a **Custom HTML** tag in Google Tag Manager. Add the following to your Custom HTML tag, which will activate the standard Content Card feed:
```html
```

For more freedom over customizing the appearance of Content Cards and their feed, you can directly integrate Content Cards into your native website. There are two approaches you can take with this: using the standard feed UI or creating a custom feed UI.
When implementing the [standard feed UI](https://www.braze.com/docs/developer_guide/platform_integration_guides/web/content_cards/integration/#standard-feed-ui), Braze methods must have `window.` added to the start of the method. For example, `braze.showContentCards` should instead be `window.braze.showContentCards`.
For [custom feed](https://www.braze.com/docs/developer_guide/content_cards/creating_cards/) styling, the steps are the same as if you had integrated the SDK without GTM. For example, if you want to customize the width of the Content Card feed, you can paste the following into your CSS file:
```css
body .ab-feed {
width: 800px;
}
```
### Upgrading templates {#upgrading}
To upgrade to the latest version of the Braze Web SDK, take the following three steps in your Google Tag Manager dashboard:
1. **Update tag template** Go to the **Templates** page within your workspace. Here you should see an icon indicating an update is available.

Click that icon and after reviewing the change, click to **Accept Update**.

2. **Update version number** Once your tag template has been updated, edit the Braze Initialization Tag, and update the SDK version to the most recent `major.minor` version. For example, if the latest version is `4.1.2`, enter `4.1`. You can view a list of SDK versions in our [changelog](https://github.com/braze-inc/braze-web-sdk/blob/master/CHANGELOG.md).

3. **QA and publish** Verify the new SDK version is working using Google Tag Manager's [debugging tool](https://support.google.com/tagmanager/answer/6107056?hl=en) prior to publishing an update to your tag container.
### Troubleshooting {#troubleshooting}
#### Enable tag debugging {#debugging}
Each Braze tag template has an optional **GTM Tag Debugging** checkbox which can be used to log debug messages to your web page's JavaScript console.

#### Enter debug mode
Another way to help debug your Google Tag Manager integration is using Google's [Preview mode](https://support.google.com/tagmanager/answer/6107056) feature.
This will help identify what values are being sent from your web page's data layer to each triggered Braze tag and will also explain which tags were or were not triggered.

#### Enable verbose logging
To allow Braze technical support to access logs while testing, you can enable verbose logging on your Google Tag Manager integration. These logs will appear in the **Console** tab of your browser's [developer tools](https://developer.mozilla.org/en-US/docs/Learn/Common_questions/What_are_browser_developer_tools).
In your Google Tag Manager integration, navigate to your Braze Initialization Tag and select **Enable Web SDK Logging**.

[changelog]: https://github.com/braze-inc/braze-web-sdk/blob/master/CHANGELOG.md
## Prerequisites
Before you can use Braze Content Cards, you'll need to integrate the [Braze Android SDK](https://www.braze.com/docs/developer_guide/sdk_integration/?sdktab=android) into your app. However, no additional setup is required.
## Google fragments
In Android, the Content Cards feed is implemented as a [fragment](https://developer.android.com/guide/components/fragments.html) available in the Braze Android UI project. The [`ContentCardsFragment`](https://braze-inc.github.io/braze-android-sdk/kdoc/braze-android-sdk/com.braze.ui.contentcards/-content-cards-fragment/index.html) class will automatically refresh and display the contents of the Content Cards and log usage analytics. The cards that can appear in a user's `ContentCards` are created on the Braze dashboard.
To learn how to add a fragment to an activity, see [Google's fragments documentation](https://developer.android.com/guide/fragments#Adding).
## Card types and properties
The Content Cards data model is available in the Android SDK and offers the following unique Content Card types. Each type shares a base model, which allows them to inherit common properties from the base model, in addition to having their own unique properties. For full reference documentation, see [`com.braze.models.cards`](https://braze-inc.github.io/braze-android-sdk/kdoc/braze-android-sdk/com.braze.models.cards/index.html).
### Base card model {#base-card-for-android}
The [base card](https://braze-inc.github.io/braze-android-sdk/kdoc/braze-android-sdk/com.braze.models.cards/-card/index.html) model provides foundational behavior for all cards.
|Property | Description |
|---|---|
|`getId()` | Returns the card's ID set by Braze.|
|`getViewed()` | Returns a boolean reflects if the card is read or unread by the user.|
|`getExtras()` | Returns a map of key-value extras for this card.|
|`getCreated()` | Returns the unix timestamp of the card's creation time from Braze.|
|`isPinned` | Returns a boolean that reflects whether the card is pinned.|
|`getOpenUriInWebView()` | Returns a boolean that reflects whether Uris for this card should be opened in the Braze WebView or not.|
|`getExpiredAt()` | Gets the expiration date of the card.|
|`isRemoved()` | Returns a boolean that reflects whether the end user has dismissed this card.|
|`isDismissibleByUser()` | Returns a boolean that reflects whether the card is dismissible by the user.|
|`isClicked()` | Returns a boolean that reflects the clicked state of this card.|
|`isDismissed` | Returns a boolean that reflects whether the card has been dismissed. Set to `true` to mark the card as dismissed. If a card is already marked as dismissed, it cannot be marked as dismissed again.|
|`isControl()` | Returns a boolean if this card is a control card and should not be rendered.|
{: .reset-td-br-1 .reset-td-br-2 role="presentation" }
### Image only {#banner-image-card-for-android}
[Image only cards](https://braze-inc.github.io/braze-android-sdk/kdoc/braze-android-sdk/com.braze.models.cards/-image-only-card/index.html) are clickable full-sized images.
|Property | Description |
|---|---|
|`getImageUrl()` | Returns the URL of the card's image.|
|`getUrl()` | Returns the URL that will be opened after the card is clicked. It can be a HTTP(s) URL or a protocol URL.|
|`getDomain()` | Returns link text for the property URL.|
{: .reset-td-br-1 .reset-td-br-2 role="presentation" }
### Captioned image {#captioned-image-card-for-android}
[Captioned image cards](https://braze-inc.github.io/braze-android-sdk/kdoc/braze-android-sdk/com.braze.models.cards/-captioned-image-card/index.html) are clickable, full-sized images with accompanying descriptive text.
|Property | Description |
|---|---|
|`getImageUrl()` | Returns the URL of the card's image.|
|`getTitle()` | Returns the title text for the card.|
|`getDescription()` | Returns the body text for the card.|
|`getUrl()` | Returns the URL that will be opened after the card is clicked. It can be a HTTP(s) URL or a protocol URL.|
|`getDomain()` | Returns the link text for the property URL. |
{: .reset-td-br-1 .reset-td-br-2 role="presentation" }
### Classic {#text-Announcement-card-for-android}
A classic card without an image included will result in a [text announcement card](https://braze-inc.github.io/braze-android-sdk/kdoc/braze-android-sdk/com.braze.models.cards/-text-announcement-card/index.html). If an image is included, you will receive a [short news card](https://braze-inc.github.io/braze-android-sdk/kdoc/braze-android-sdk/com.braze.models.cards/-short-news-card/index.html).
|Property | Description |
|---|---|
|`getTitle()` | Returns the title text for the card. |
|`getDescription()` | Returns the body text for the card. |
|`getUrl()` | Returns the URL that will be opened after the card is clicked. It can be a HTTP(s) URL or a protocol URL. |
|`getDomain()` | Returns the link text for the property URL. |
|`getImageUrl()` | Returns the URL of the card's image, applies only to the classic Short News Card. |
|`isDismissed` | Returns a boolean that reflects whether the card has been dismissed. Set to `true` to mark the card as dismissed. If a card is already marked as dismissed, it cannot be marked as dismissed again. |
{: .reset-td-br-1 .reset-td-br-2 role="presentation" }
## Card methods
All [`Card`](https://braze-inc.github.io/braze-android-sdk/kdoc/braze-android-sdk/com.braze.models.cards/index.html) data model objects offer the following analytics methods for logging user events to Braze servers.
|Method | Description |
|---|---|
|`logImpression()` | Manually log an impression to Braze for a particular card. |
|`logClick()` | Manually log a click to Braze for a particular card. |
{: .reset-td-br-1 .reset-td-br-2 role="presentation" }
## Prerequisites
Before you can use Content Cards, you'll need to integrate the [Braze Swift SDK](https://www.braze.com/docs/developer_guide/sdk_integration/?sdktab=swift) into your app. However, no additional setup is required.
## View controller contexts
The default Content Cards UI can be integrated from the `BrazeUI` library of the Braze SDK. Create the Content Cards view controller using the `braze` instance. If you wish to intercept and react to the Content Card UI lifecycle, implement [`BrazeContentCardUIViewControllerDelegate`](https://braze-inc.github.io/braze-swift-sdk/documentation/brazeui/brazecontentcarduiviewcontrollerdelegate) as the delegate for your `BrazeContentCardUI.ViewController`.
**Note:**
For more information about iOS view controller options, refer to the [Apple developer documentation](https://developer.apple.com/documentation/uikit/view_controllers/showing_and_hiding_view_controllers).
The `BrazeUI` library of the Swift SDK provides two default view controller contexts: [navigation](#swift_navigation) or [modal](#swift_modal). This means you can integrate Content Cards in these contexts by adding a few lines of code to your app or site. Both views offer customization and styling options as described in the [customization guide](https://www.braze.com/docs/developer_guide/customization_guides/content_cards/customizing_styles/?tab=ios). You can also create a custom Content Card view controller instead of using the standard Braze one for even more customization options—refer to the [Content Cards UI tutorial](https://braze-inc.github.io/braze-swift-sdk/tutorials/braze/c2-contentcardsui/) for an example.
**Important:**
To handle control variant Content Cards in your custom UI, pass in your [`Braze.ContentCard.Control`](https://braze-inc.github.io/braze-swift-sdk/documentation/brazekit/braze/contentcard/control(_:)) object, then call the `logImpression` method as you would with any other Content Card type. The object will implicitly log a control impression to inform our analytics of when a user would have seen the control card.
### Navigation
A navigation controller is a view controller that manages one or more child view controllers in a navigation interface. Here is an example of pushing a `BrazeContentCardUI.ViewController` instance into a navigation controller:
```swift
func pushViewController() {
guard let braze = AppDelegate.braze else { return }
let contentCardsController = BrazeContentCardUI.ViewController(braze: braze)
// Implement and set `BrazeContentCardUIViewControllerDelegate` if you wish to intercept click actions.
contentCardsController.delegate = self
self.navigationController?.pushViewController(contentCardsController, animated: true)
}
```
```objc
- (void)pushViewController {
BRZContentCardUIViewController *contentCardsController = [[BRZContentCardUIViewController alloc] initWithBraze:self.braze];
// Implement and set `BrazeContentCardUIViewControllerDelegate` if you wish to intercept click actions.
[contentCardsController setDelegate:self];
[self.navigationController pushViewController:contentCardsController animated:YES];
}
```
### Modal
Use modal presentations to create temporary interruptions in your app’s workflow, such as prompting the user for important information. This model view has a navigation bar on top and a **Done** button on the side of the bar. Here is an example of pushing a `BrazeContentCard.ViewController` instance into a modal controller:
```swift
func presentModalViewController() {
guard let braze = AppDelegate.braze else { return }
let contentCardsModal = BrazeContentCardUI.ModalViewController(braze: braze)
// Implement and set `BrazeContentCardUIViewControllerDelegate` if you wish to intercept click actions.
contentCardsModal.viewController.delegate = self
self.navigationController?.present(contentCardsModal, animated: true, completion: nil)
}
```
```objc
- (void)presentModalViewController {
BRZContentCardUIModalViewController *contentCardsModal = [[BRZContentCardUIModalViewController alloc] initWithBraze:AppDelegate.braze];
// Implement and set `BrazeContentCardUIViewControllerDelegate` if you wish to intercept click actions.
[contentCardsModal.viewController setDelegate:self];
[self.navigationController presentViewController:contentCardsModal animated:YES completion:nil];
}
```
For example usage of `BrazeUI` view controllers, check out the corresponding Content Cards UI samples in our [Examples app](https://github.com/braze-inc/braze-swift-sdk/tree/main/Examples).
## Base card model
The Content Cards data model is available in the `BrazeKit` module of the Braze Swift SDK. This module contains the following Content Card types, which are an implementation of the `Braze.ContentCard` type. For a full list of Content Card properties and their usage, see [`ContentCard` class](https://braze-inc.github.io/braze-swift-sdk/documentation/brazekit/braze/contentcard).
- Image only
- Captioned image
- Classic
- Classic image
- Control
To access the Content Cards data model, call `contentCards.cards` on your `braze` instance. See [Logging analytics](https://www.braze.com/docs/developer_guide/content_cards/logging_analytics/) for more information on subscribing to card data.
**Note:**
Keep in mind, `BrazeKit` offers an alternative [`ContentCardRaw`](https://braze-inc.github.io/braze-swift-sdk/documentation/brazekit/braze/contentcardraw) class for Objective-C compatibility.
## Card methods
Each card is initialized with a `Context` object, which contains various methods for managing your card's state. Call these methods when you want to modify the corresponding state property on a particular card object.
| Method | Description |
|--------------------------------------|------------------------------------------------------------------------------------------------------------------------------------------|
| `card.context?.logImpression()` | Log the content card impression event. |
| `card.context?.logClick()` | Log the content card click event. |
| `card.context?.processClickAction()` | Process a given [`ClickAction`](https://braze-inc.github.io/braze-swift-sdk/documentation/brazekit/braze/contentcard/clickaction) input. |
| `card.context?.logDismissed()` | Log the content card dismissed event. |
| `card.context?.logError()` | Log an error related to the content card. |
| `card.context?.loadImage()` | Load a given content card image from a URL. This method can be nil when the content card does not have an image. |
{: .reset-td-br-1 .reset-td-br-2 role="presentation" }
For more details, refer to the [`Context` class documentation](https://braze-inc.github.io/braze-swift-sdk/documentation/brazekit/braze/contentcardraw/context-swift.class)
## Prerequisites
Before you can use this feature, you'll need to [integrate the Cordova Braze SDK](https://www.braze.com/docs/developer_guide/sdk_integration/?sdktab=cordova).
## Card Feeds
The Braze SDK includes a default card feed. To show the default card feed, you can use the `launchContentCards()` method. This method handles all analytics tracking, dismissals, and rendering for a user's Content Cards.
## Content Cards
You can use these additional methods to build a custom Content Cards Feed within your app:
|Method | Description |
|---|---|
|`requestContentCardsRefresh()`|Sends a background request to request the latest Content Cards from the Braze SDK server.|
|`getContentCardsFromServer(successCallback, errorCallback)`|Retrieves Content Cards from the Braze SDK. This will request the latest Content Cards from the server and return the list of cards upon completion.|
|`getContentCardsFromCache(successCallback, errorCallback)`|Retrieves Content Cards from the Braze SDK. This will return the latest list of cards from the local cache, which was updated at the last refresh.|
|`logContentCardClicked(cardId)`|Logs a click for the given Content Card ID.|
|`logContentCardImpression(cardId)`|Logs an impression for the given Content Card ID.|
|`logContentCardDismissed(cardId)`|Logs a dismissal for the given Content Card ID.|
{: .reset-td-br-1 .reset-td-br-2 role="presentation" }
## About Flutter Content Cards
The Braze SDK includes a default card feed to get you started with Content Cards. To show the card feed, you can use the `braze.launchContentCards()` method. The default card feed included with the Braze SDK will handle all analytics tracking, dismissals, and rendering for a user's Content Cards.
## Prerequisites
Before you can use this feature, you'll need to [integrate the Flutter Braze SDK](https://www.braze.com/docs/developer_guide/sdk_integration/?sdktab=flutter).
## Card methods
You can use these additional methods to build a custom Content Cards Feed within your app by using the following methods available on the [plugin public interface](https://github.com/braze-inc/braze-flutter-sdk/blob/master/lib/braze_plugin.dart):
| Method | Description |
| ---------------------------------------------- | ------------------------------------------------------------------------------------------------------ |
| `braze.requestContentCardsRefresh()` | Requests the latest Content Cards from the Braze SDK server. |
| `braze.logContentCardClicked(contentCard)` | Logs a click for the given Content Card object. |
| `braze.logContentCardImpression(contentCard)` | Logs an impression for the given Content Card object. |
| `braze.logContentCardDismissed(contentCard)` | Logs a dismissal for the given Content Card object. |
{: .reset-td-br-1 .reset-td-br-2 role="presentation" }
## Receiving Content Card data
To receive Content Card data in your Flutter app, the `BrazePlugin` supports sending Content Card data by using [Dart Streams](https://dart.dev/tutorials/language/streams).
The `BrazeContentCard` [object](https://pub.dev/documentation/braze_plugin/latest/braze_plugin/BrazeContentCard-class.html) supports a subset of fields available in the native model objects, including `description`, `title`, `image`, `url`, `extras`, and more.
### Step 1: Listen for Content Card data in the Dart layer
To receive to the content card data in the Dart layer, use the code below to create a `StreamSubscription` and call `braze.subscribeToContentCards()`. Remember to `cancel()` the stream subscription when it is no longer needed.
```dart
// Create stream subscription
StreamSubscription contentCardsStreamSubscription;
contentCardsStreamSubscription = braze.subscribeToContentCards((List contentCards) {
// Handle Content Cards
}
// Cancel stream subscription
contentCardsStreamSubscription.cancel();
```
For an example, see [main.dart](https://github.com/braze-inc/braze-flutter-sdk/blob/master/example/lib/main.dart) in our sample app.
### Step 2: Forward Content Card data from the native layer
**Note:**
This step is for iOS only. The Content Card data is automatically forwarded from the Android layer.
To receive the data in the Dart layer from step 1, add the following code to forward the Content Card data from the native iOS layer.
1. Implement `contentCards.subscribeToUpdates` to subscribe to content cards updates as described in the [subscribeToUpdates](https://braze-inc.github.io/braze-swift-sdk/documentation/brazekit/braze/contentcards-swift.class/subscribetoupdates(_:)) documentation.
2. Your `contentCards.subscribeToUpdates` callback implementation must call `BrazePlugin.processContentCards(contentCards)`.
For an example, see [AppDelegate.swift](https://github.com/braze-inc/braze-flutter-sdk/blob/master/example/ios/Runner/AppDelegate.swift) in our sample app.
#### Replaying the callback for Content Cards
To store any Content Cards triggered before the callback is available and replay them after it is set, add the following entry to the `customConfigs` map when initializing the `BrazePlugin`:
```dart
BrazePlugin braze = new BrazePlugin(customConfigs: {replayCallbacksConfigKey: true});
```
## About React Native Content Cards
The Braze SDKs include a default card feed to get you started with Content Cards. To show the card feed, you can use the `Braze.launchContentCards()` method. The default card feed included with the Braze SDK will handle all analytics tracking, dismissals, and rendering for a user's Content Cards.
## Prerequisites
Before you can use this feature, you'll need to [integrate the React Native Braze SDK](https://www.braze.com/docs/developer_guide/sdk_integration/?sdktab=react%20native).
## Cards methods
To build your own UI, you can get a list of available cards, and listen for updates to cards:
```javascript
// Set initial cards
const [cards, setCards] = useState([]);
// Listen for updates as a result of card refreshes, such as:
// a new session, a manual refresh with `requestContentCardsRefresh()`, or after the timeout period
Braze.addListener(Braze.Events.CONTENT_CARDS_UPDATED, async (update) => {
setCards(update.cards);
});
// Manually trigger a refresh of cards
Braze.requestContentCardsRefresh();
```
**Important:**
If you choose to build your own UI to display cards, you must call `logContentCardImpression` in order to receive analytics for those cards. This includes `control` cards, which must be tracked even though they are not displayed to the user.
You can use these additional methods to build a custom Content Cards Feed within your app:
| Method | Description |
| ---------------------------------------- | ------------------------------------------------------------------------------------------------------ |
| `launchContentCards()` | Launches the Content Cards UI element. |
| `requestContentCardsRefresh()` | Requests the latest Content Cards from the Braze SDK server. The resulting list of cards is passed to each of the previously registered [content card event listeners](#reactnative_cards-methods). |
| `getContentCards()` | Retrieves Content Cards from the Braze SDK. This returns a promise that resolves with the latest list of cards from the server. |
| `getCachedContentCards()` | Returns the most recent Content Cards array from the cache. |
| `logContentCardClicked(cardId)` | Logs a click for the given Content Card ID. This method is used only for analytics. To execute the click action, call `processContentCardClickAction(cardId)` in addition. |
| `logContentCardImpression(cardId)` | Logs an impression for the given Content Card ID. |
| `logContentCardDismissed(cardId)` | Logs a dismissal for the given Content Card ID. |
| `processContentCardClickAction(cardId)` | Perform the action of a particular card. |
{: .reset-td-br-1 .reset-td-br-2 role="presentation" }
## Card types and properties
The Content Cards data model is available in the React Native SDK and offers the following Content Cards card types: [Image Only](#image-only), [Captioned Image](#captioned-image), and [Classic](#classic). There's also a special [Control](#control) card type, which is returned to users that are in the control group for a given card. Each type inherits common properties from a base model in addition to its own unique properties.
**Tip:**
For a full reference of the Content Card data model, see the [Android](https://braze-inc.github.io/braze-android-sdk/kdoc/braze-android-sdk/com.braze.models.cards/index.html) and [iOS](https://braze-inc.github.io/braze-swift-sdk/documentation/brazekit/braze/contentcard) documentation.
### Base card model
The base card model provides foundational behavior for all cards.
|Property | Description |
|--------------|------------------------------------------------------------------------------------------------------------------------|
|`id` | The card's ID set by Braze. |
|`created` | The UNIX timestamp of the card's creation time from Braze. |
|`expiresAt` | The UNIX timestamp of the card's expiration time. When the value is less than 0, it means the card never expires. |
|`viewed` | Whether the card is read or unread by the user. This does not log analytics. |
|`clicked` | Whether the card has been clicked by the user. |
|`pinned` | Whether the card is pinned. |
|`dismissed` | Whether the user has dismissed this card. Marking a card as dismissed that has already been dismissed will be a no-op. |
|`dismissible` | Whether the card is dismissible by the user. |
|`url` | (Optional) The URL string associated with the card click action. |
|`openURLInWebView` | Whether URLs for this card should be opened in the Braze WebView or not. |
|`isControl` | Whether this card is a control card. Control cards should not be displayed to the user. |
|`extras` | The map of key-value extras for this card. |
{: .reset-td-br-1 .reset-td-br-2 role="presentation" }
For a full reference of the base card, see the [Android](https://braze-inc.github.io/braze-android-sdk/kdoc/braze-android-sdk/com.braze.models.cards/-card/index.html) and [iOS](https://braze-inc.github.io/braze-swift-sdk/documentation/brazekit/braze/contentcard/data-swift.struct) documentation.
### Image only
Image only cards are clickable, full-sized images.
|Property | Description |
|-------------------|-------------------------------------------------------------------------------------------------------------------|
|`type` | The Content Card type, `IMAGE_ONLY`. |
|`image` | The URL of the card's image. |
|`imageAspectRatio` | The aspect ratio of the card's image. It is meant to serve as a hint before image loading completes. Note that the property may not be supplied in certain circumstances. |
{: .reset-td-br-1 .reset-td-br-2 role="presentation" }
For a full reference of the image only card, see the [Android](https://braze-inc.github.io/braze-android-sdk/kdoc/braze-android-sdk/com.braze.models.cards/-image-only-card/index.html) and [iOS](https://braze-inc.github.io/braze-swift-sdk/documentation/brazekit/braze/contentcard/imageonly-swift.struct) documentation.
### Captioned image
Captioned image cards are clickable, full-sized images with accompanying descriptive text.
|Property | Description |
|-------------------|-------------------------------------------------------------------------------------------------------------------|
|`type` | The Content Card type, `CAPTIONED`. |
|`image` | The URL of the card's image. |
|`imageAspectRatio` | The aspect ratio of the card's image. It is meant to serve as a hint before image loading completes. Note that the property may not be supplied in certain circumstances. |
|`title` | The title text for the card. |
|`cardDescription` | The description text for the card. |
|`domain` | (Optional) The link text for the property URL, for example, `"braze.com/resources/"`. It can be displayed on the card's UI to indicate the action/direction of clicking on the card. |
{: .reset-td-br-1 .reset-td-br-2 role="presentation" }
For a full reference of the captioned image card, see the [Android](https://braze-inc.github.io/braze-android-sdk/kdoc/braze-android-sdk/com.braze.models.cards/-captioned-image-card/index.html) and [iOS](https://braze-inc.github.io/braze-swift-sdk/documentation/brazekit/braze/contentcard/captionedimage-swift.struct) documentation.
### Classic
Classic cards have a title, description, and an optional image on the left of the text.
|Property | Description |
|-------------------|-------------------------------------------------------------------------------------------------------------------|
|`type` | The Content Card type, `CLASSIC`. |
|`image` | (Optional) The URL of the card's image. |
|`title` | The title text for the card. |
|`cardDescription` | The description text for the card. |
|`domain` | (Optional) The link text for the property URL, for example, `"braze.com/resources/"`. It can be displayed on the card's UI to indicate the action/direction of clicking on the card. |
{: .reset-td-br-1 .reset-td-br-2 role="presentation" }
For a full reference of the classic (text announcement) Content Card, see the [Android](https://braze-inc.github.io/braze-android-sdk/kdoc/braze-android-sdk/com.braze.models.cards/-text-announcement-card/index.html) and [iOS](https://braze-inc.github.io/braze-swift-sdk/documentation/brazekit/braze/contentcard/classic-swift.struct) documentation. For the classic image (short news) card, see the [Android](https://braze-inc.github.io/braze-android-sdk/kdoc/braze-android-sdk/com.braze.models.cards/-short-news-card/index.html) and [iOS](https://braze-inc.github.io/braze-swift-sdk/documentation/brazekit/braze/contentcard/classicimage-swift.struct) documentation.
### Control
Control cards include all of the base properties, with a few important differences. Most importantly:
- The `isControl` property is guaranteed to be `true`.
- The `extras` property is guaranteed to be empty.
For a full reference of the control card, see the [Android](https://braze-inc.github.io/braze-android-sdk/kdoc/braze-android-sdk/com.braze.models.cards/-control-card/index.html) and [iOS](https://braze-inc.github.io/braze-swift-sdk/documentation/brazekit/braze/contentcard/control-swift.struct) documentation.
## Prerequisites
Before you can use Content Cards, you'll need to integrate the [Braze Swift SDK](https://www.braze.com/docs/developer_guide/sdk_integration/?sdktab=swift) into your app. Then you'll need to complete the steps for setting up your tvOS app.
**Important:**
Keep in mind, you'll need to implement your own custom UI since Content Cards are supported via headless UI using the Swift SDK—which does not include any default UI or views for tvOS.
## Setting up your tvOS app
### Step 1: Create a new iOS app
In Braze, select **Settings** > **App Settings**, then select **Add App**. Enter a name for your tvOS app, select **iOS**—_not tvOS_—then select **Add App**.
{: style="width:70%"}
**Warning:**
If you select the **tvOS** checkbox, you will not be able to customize Content Cards for tvOS.
### Step 2: Get your app's API key
In your app settings, select your new tvOS app then take note of your app's API key. You'll use this key to configure your app in Xcode.
{: style="width:70%"}
### Step 3: Integrate BrazeKit
Use your app's API key to integrate the [Braze Swift SDK](https://github.com/braze-inc/braze-swift-sdk) into your tvOS project in Xcode. You only need to integrate BrazeKit from the Braze Swift SDK.
### Step 4: Create your custom UI
Because Braze doesn't provide a default UI for content cards on tvOS, you'll need to customize it yourself. For a full walkthrough, see our step-by-step tutorial: [Customizing content cards for tvOS](https://braze-inc.github.io/braze-swift-sdk/documentation/braze/content-cards-customization/). For a sample project, see [Braze Swift SDK samples](https://github.com/braze-inc/braze-swift-sdk/tree/main/Examples#contentcards-custom-ui).
## Prerequisites
Before you can use this feature, you'll need to [integrate the Unity Braze SDK](https://www.braze.com/docs/developer_guide/sdk_integration/?sdktab=unity).
## Displaying Content Cards natively {#unity-content-cards-native-ui}
You can display the default UI for Content Cards using the following call:
```csharp
Appboy.AppboyBinding.DisplayContentCards();
```
## Receiving Content Card data in Unity
You may register Unity game objects to be notified of incoming Content Cards. We recommend setting game object listeners from the Braze configuration editor.
If you need to configure your game object listener at runtime, use `AppboyBinding.ConfigureListener()` and specify `BrazeUnityMessageType.CONTENT_CARDS_UPDATED`.
Note, you will additionally need to make a call to `AppboyBinding.RequestContentCardsRefresh()` to start receiving data in your game object listener on iOS.
## Parsing Content Cards
Incoming `string` messages received in your Content Cards game object callback can be parsed into our pre-supplied [`ContentCard`](https://github.com/braze-inc/braze-unity-sdk/blob/master/Assets/Plugins/Appboy/Models/Cards/ContentCard.cs) model object for convenience.
Parsing Content Cards requires JSON parsing, see the following example for details:
##### Example Content Cards callback
```csharp
void ExampleCallback(string message) {
try {
JSONClass json = (JSONClass)JSON.Parse(message);
// Content Card data is contained in the `mContentCards` field of the top level object.
if (json["mContentCards"] != null) {
JSONArray jsonArray = (JSONArray)JSON.Parse(json["mContentCards"].ToString());
Debug.Log(String.Format("Parsed content cards array with {0} cards", jsonArray.Count));
// Iterate over the card array to parse individual cards.
for (int i = 0; i < jsonArray.Count; i++) {
JSONClass cardJson = jsonArray[i].AsObject;
try {
ContentCard card = new ContentCard(cardJson);
Debug.Log(String.Format("Created card object for card: {0}", card));
// Example of logging Content Card analytics on the ContentCard object
card.LogImpression();
card.LogClick();
} catch {
Debug.Log(String.Format("Unable to create and log analytics for card {0}", cardJson));
}
}
}
} catch {
throw new ArgumentException("Could not parse content card JSON message.");
}
}
```
## Refreshing Content Cards
To refresh Content Cards from Braze, call either of the following methods:
```csharp
// results in a network request to Braze
AppboyBinding.RequestContentCardsRefresh()
AppboyBinding.RequestContentCardsRefreshFromCache()
```
## Analytics
Clicks and impressions must be manually logged for Content Cards not displayed directly by Braze.
Use `LogClick()` and `LogImpression()` on [ContentCard](https://github.com/braze-inc/braze-unity-sdk/blob/master/Assets/Plugins/Appboy/Models/Cards/ContentCard.cs) to log clicks and impressions for specific cards.
## About .NET MAUI Content Cards
The Braze .NET MAUI (formerly Xamarin) SDK includes a default card feed to get you started with Content Cards. The default card feed included with the Braze SDK will handle all analytics tracking, dismissals, and rendering for a user’s Content Cards.
## Prerequisites
Before you can use this feature, you'll need to [integrate the .NET MAUI Braze SDK](https://www.braze.com/docs/developer_guide/sdk_integration/?sdktab=.net%20maui%20(xamarin)).
## Card types and properties
The Braze .NET MAUI SDK has three unique Content Cards card types that share a base model: [Banner](#xamarin_banner), [Captioned Image](#xamarin_captioned-image), and [Classic](#xamarin_classic). Each type inherits common properties from a base model and has the following additional properties.
### Base card model
|Property | Description |
|-------------------|------------------------------------------------------------------------------------------------------------------------|
|`idString` | The card's ID set by Braze. |
|`created` | The UNIX timestamp of the card's creation time from Braze. |
|`expiresAt` | The UNIX timestamp of the card's expiration time. When the value is less than 0, it means the card never expires. |
|`viewed` | Whether the card is read or unread by the user. This does not log analytics. |
|`clicked` | Whether the card has been clicked by the user. |
|`pinned` | Whether the card is pinned. |
|`dismissed` | Whether the user has dismissed this card. Marking a card as dismissed that has already been dismissed will be a no-op. |
|`dismissible` | Whether the card is dismissible by the user. |
|`urlString` | (Optional) The URL string associated with the card click action. |
|`openUrlInWebView` | Whether URLs for this card should be opened in the Braze WebView or not. |
|`isControlCard` | Whether this card is a control card. Control cards should not be displayed to the user. |
|`extras` | The map of key-value extras for this card. |
|`isTest` | Whether this card is a test card. |
{: .reset-td-br-1 .reset-td-br-2 role="presentation" }
For a full reference of the base card, see the [Android](https://braze-inc.github.io/braze-android-sdk/kdoc/braze-android-sdk/com.braze.models.cards/-card/index.html) and [iOS](https://braze-inc.github.io/braze-swift-sdk/documentation/brazekit/braze/contentcard/data-swift.struct) documentation.
### Banner
Banner cards are clickable, full-sized images.
|Property | Description |
|-------------------|-------------------------------------------------------------------------------------------------------------------|
|`image` | The URL of the card's image. |
|`imageAspectRatio` | The aspect ratio of the card's image. It is meant to serve as a hint before image loading completes. Note that the property may not be supplied in certain circumstances. |
{: .reset-td-br-1 .reset-td-br-2 role="presentation" }
For a full reference of the banner card, see the [Android](https://braze-inc.github.io/braze-android-sdk/kdoc/braze-android-sdk/com.braze.models.cards/-image-only-card/index.html) and [iOS](https://braze-inc.github.io/braze-swift-sdk/documentation/brazekit/braze/contentcard/imageonly-swift.struct) documentation (now renamed to image only).
### Captioned image
Captioned image cards are clickable, full-sized images with accompanying descriptive text.
|Property | Description |
|-------------------|-------------------------------------------------------------------------------------------------------------------|
|`image` | The URL of the card's image. |
|`imageAspectRatio` | The aspect ratio of the card's image. It is meant to serve as a hint before image loading completes. Note that the property may not be supplied in certain circumstances. |
|`title` | The title text for the card. |
|`cardDescription` | The description text for the card. |
|`domain` | (Optional) The link text for the property URL, for example, `"braze.com/resources/"`. It can be displayed on the card's UI to indicate the action/direction of clicking on the card. |
{: .reset-td-br-1 .reset-td-br-2 role="presentation" }
For a full reference of the captioned image card, see the [Android](https://braze-inc.github.io/braze-android-sdk/kdoc/braze-android-sdk/com.braze.models.cards/-captioned-image-card/index.html) and [iOS](https://braze-inc.github.io/braze-swift-sdk/documentation/brazekit/braze/contentcard/captionedimage-swift.struct) documentation.
### Classic
Classic cards have a title, description, and an optional image on the left of the text.
|Property | Description |
|-------------------|-------------------------------------------------------------------------------------------------------------------|
|`image` | (Optional) The URL of the card's image. |
|`title` | The title text for the card. |
|`cardDescription` | The description text for the card. |
|`domain` | (Optional) The link text for the property URL, for example, `"braze.com/resources/"`. It can be displayed on the card's UI to indicate the action/direction of clicking on the card. |
{: .reset-td-br-1 .reset-td-br-2 role="presentation" }
For a full reference of the classic (text announcement) Content Card, see the [Android](https://braze-inc.github.io/braze-android-sdk/kdoc/braze-android-sdk/com.braze.models.cards/-text-announcement-card/index.html) and [iOS](https://braze-inc.github.io/braze-swift-sdk/documentation/brazekit/braze/contentcard/classic-swift.struct) documentation. For a full reference of the classic image (short news) card, see the [Android](https://braze-inc.github.io/braze-android-sdk/kdoc/braze-android-sdk/com.braze.models.cards/-short-news-card/index.html) and [iOS](https://braze-inc.github.io/braze-swift-sdk/documentation/brazekit/braze/contentcard/classicimage-swift.struct) documentation.
## Card methods
You can use these additional methods to build a custom Content Cards Feed within your app:
| Method | Description |
| ---------------------------------------- | ------------------------------------------------------------------------------------------------------ |
| `requestContentCardsRefresh()` | Requests the latest Content Cards from the Braze SDK server. |
| `getContentCards()` | Retrieves Content Cards from the Braze SDK. This will return the latest list of cards from the server. |
| `logContentCardClicked(cardId)` | Logs a click for the given Content Card ID. This method is used only for analytics. |
| `logContentCardImpression(cardId)` | Logs an impression for the given Content Card ID. |
| `logContentCardDismissed(cardId)` | Logs a dismissal for the given Content Card ID. |
# Create Content Cards
Source: /docs/developer_guide/content_cards/creating_cards/index.md
# Create content cards
> This article discusses the basic approach you'll use when implementing custom Content Cards, as well as three common use cases. It assumes you've already read the other articles in the Content Card customization guide to understand what can be done by default and what requires custom code. It's especially helpful to understand how to [log analytics](https://www.braze.com/docs/developer_guide/content_cards/logging_analytics/) for your custom Content Cards.
**Tip:**
Using Content Cards for banner-style messages? Try out [Banners](https://www.braze.com/docs/user_guide/message_building_by_channel/banners/)— perfect for inline, persistent in-app and web messages.
## Creating a card
### Step 1: Create a custom UI
First, create your custom HTML component that will be used to render the cards.
First, create your own custom fragment. The default [`ContentCardsFragment`](https://braze-inc.github.io/braze-android-sdk/kdoc/braze-android-sdk/com.braze.ui.contentcards/-content-cards-fragment/index.html) is only designed to handle our default Content Card types, but is a good starting point.
First, create your own custom view controller component. The default [`BrazeContentCardUI.ViewController`](https://braze-inc.github.io/braze-swift-sdk/documentation/brazeui/brazecontentcardui/viewcontroller) is only designed to handle our default Content Card types, but is a good starting point.
### Step 2: Subscribe to card updates
Then, register a callback function to [subscribe for data updates](https://www.braze.com/docs/developer_guide/customization_guides/content_cards/logging_analytics/#listening-for-card-updates) when cards are refreshed.
### Step 3: Implement analytics
Content Card impressions, clicks, and dismissals are not automatically logged in your custom view. You must [implement each respective method](https://www.braze.com/docs/developer_guide/customization_guides/content_cards/logging_analytics/#logging-events) to properly log all metrics back to Braze dashboard analytics.
### Step 4: Test your card (optional)
To test your Content Card:
1. Set an active user in your application by calling the [`changeUser()`](https://js.appboycdn.com/web-sdk/latest/doc/modules/braze.html#changeuser) method.
2. In Braze, go to **Campaigns**, then [create a new Content Card campaign](https://www.braze.com/docs/user_guide/message_building_by_channel/content_cards/create).
3. In your campaign, select **Test**, then enter the test user's `user-id`. When you're ready, select **Send Test**. You'll be able to launch a Content Card on your device shortly.

## Content Card placements
Content Cards can be used in many different ways. Three common implementations are to use them as a message center, a dynamic image ad, or an image carousel. For each of these placements, you will assign [key-value pairs](https://www.braze.com/docs/developer_guide/customization_guides/content_cards/customizing_behavior/#key-value-pairs) (the `extras` property in the data model) to your Content Cards, and based on the values, dynamically adjust the card's behavior, appearance, or functionality during runtime.
{: style="border:0px;"}
### Message inbox
Content Cards can be used to simulate a message center. In this format, each message is its own card that contains [key-value pairs](https://www.braze.com/docs/developer_guide/customization_guides/content_cards/customizing_behavior/#key-value-pairs) that power on-click events. These key-value pairs are the key identifiers that the application looks at when deciding where to go when the user clicks on an inbox message. The values of the key-value pairs are arbitrary.
#### Example
For example, you may want to create two message cards: a call-to-action for users to enable reading recommendations and a coupon code given to your new subscriber segment.
Keys like `body`, `title`, and `buttonText` might have simple string values your marketers can set. Keys like `terms` might have values that provide a small collection of phrases approved by your Legal department. Keys like `style` and `class_type` have string values that you can set to determine how your card renders on your app or site.
Key-value pairs for the reading recommendation card:
| Key | Value |
|------------|----------------------------------------------------------------------|
| `body` | Add your interests to your Politer Weekly profile for personal reading recommendations. |
| `style` | info |
| `class_type` | notification_center |
| `card_priority` | 1 |
{: .reset-td-br-1 .reset-td-br-2 role="presentation"}
Key-value pairs for a new subscriber coupon:
| Key | Value |
|------------|------------------------------------------------------------------|
| `title` | Subscribe for unlimited games |
| `body` | End of Summer Special - Enjoy 10% off Politer games |
| `buttonText` | Subscribe Now |
| `style` | promo |
| `class_type` | notification_center |
| `card_priority` | 2 |
| `terms` | new_subscribers_only |
{: .reset-td-br-1 .reset-td-br-2 role="presentation"}
**Additional information for Android**
In the Android and FireOS SDK, the message center logic is driven by the `class_type` value that is provided by the key-value pairs from Braze. Using the [`createContentCardable`](https://www.braze.com/docs/developer_guide/content_cards/) method, you can filter and identify these class types.
**Using `class_type` for on-click behavior**
When we inflate the Content Card data into our custom classes, we use the `ContentCardClass` property of the data to determine which concrete subclass should be used to store the data.
```kotlin
private fun createContentCardable(metadata: Map, type: ContentCardClass?): ContentCardable?{
return when(type){
ContentCardClass.AD -> Ad(metadata)
ContentCardClass.MESSAGE_WEB_VIEW -> WebViewMessage(metadata)
ContentCardClass.NOTIFICATION_CENTER -> FullPageMessage(metadata)
ContentCardClass.ITEM_GROUP -> Group(metadata)
ContentCardClass.ITEM_TILE -> Tile(metadata)
ContentCardClass.COUPON -> Coupon(metadata)
else -> null
}
}
```
Then, when handling the user interaction with the message list, we can use the message's type to determine which view to display to the user.
```kotlin
override fun onCreate(savedInstanceState: Bundle?) {
super.onCreate(savedInstanceState)
//...
listView.onItemClickListener = AdapterView.OnItemClickListener { parent, view, position, id ->
when (val card = dataProvider[position]){
is WebViewMessage -> {
val intent = Intent(this, WebViewActivity::class.java)
val bundle = Bundle()
bundle.putString(WebViewActivity.INTENT_PAYLOAD, card.contentString)
intent.putExtras(bundle)
startActivity(intent)
}
is FullPageMessage -> {
val intent = Intent(this, FullPageContentCard::class.java)
val bundle = Bundle()
bundle.putString(FullPageContentCard.CONTENT_CARD_IMAGE, card.icon)
bundle.putString(FullPageContentCard.CONTENT_CARD_TITLE, card.messageTitle)
bundle.putString(FullPageContentCard.CONTENT_CARD_DESCRIPTION, card.cardDescription)
intent.putExtras(bundle)
startActivity(intent)
}
}
}
}
```
**Using `class_type` for on-click behavior**
When we inflate the Content Card data into our custom classes, we use the `ContentCardClass` property of the data to determine which concrete subclass should be used to store the data.
```java
private ContentCardable createContentCardable(Map metadata, ContentCardClass type){
switch(type){
case ContentCardClass.AD:{
return new Ad(metadata);
}
case ContentCardClass.MESSAGE_WEB_VIEW:{
return new WebViewMessage(metadata);
}
case ContentCardClass.NOTIFICATION_CENTER:{
return new FullPageMessage(metadata);
}
case ContentCardClass.ITEM_GROUP:{
return new Group(metadata);
}
case ContentCardClass.ITEM_TILE:{
return new Tile(metadata);
}
case ContentCardClass.COUPON:{
return new Coupon(metadata);
}
default:{
return null;
}
}
}
```
Then, when handling the user interaction with the message list, we can use the message's type to determine which view to display to the user.
```java
@Override
protected void onCreate(Bundle savedInstanceState) {
super.onCreate(savedInstanceState)
//...
listView.setOnItemClickListener(new AdapterView.OnItemClickListener() {
@Override
public void onItemClick(AdapterView parent, View view, int position, long id){
ContentCardable card = dataProvider.get(position);
if (card instanceof WebViewMessage){
Bundle intent = new Intent(this, WebViewActivity.class);
Bundle bundle = new Bundle();
bundle.putString(WebViewActivity.INTENT_PAYLOAD, card.getContentString());
intent.putExtras(bundle);
startActivity(intent);
}
else if (card instanceof FullPageMessage){
Intent intent = new Intent(this, FullPageContentCard.class);
Bundle bundle = Bundle();
bundle.putString(FullPageContentCard.CONTENT_CARD_IMAGE, card.getIcon());
bundle.putString(FullPageContentCard.CONTENT_CARD_TITLE, card.getMessageTitle());
bundle.putString(FullPageContentCard.CONTENT_CARD_DESCRIPTION, card.getCardDescription());
intent.putExtras(bundle)
startActivity(intent)
}
}
});
}
```
### Carousel
You can set Content Cards in your fully-custom carousel feed, allowing users to swipe and view additional featured cards. By default, Content Cards are sorted by created date (newest first), and your users will see all the cards they're eligible for.
To implement a Content Card carousel:
1. Create custom logic that observes for [changes in your Content Cards](https://www.braze.com/docs/developer_guide/customization_guides/content_cards/customizing_feed/#refreshing-the-feed) and handles Content Card arrival.
2. Create custom client-side logic to display a specific number of cards in the carousel any one time. For example, you could select the first five Content Card objects from the array or introduce key-value pairs to build conditional logic around.
**Tip:**
If you're implementing a carousel as a secondary Content Cards feed, be sure to [sort cards into the correct feed using key-value pairs](https://www.braze.com/docs/developer_guide/customization_guides/content_cards/customizing_feed/#multiple-feeds).
### Image-only
Content Cards don't have to look like "cards." For example, Content Cards can appear as a dynamic image that persistently displays on your home page or at the top of designated pages.
To achieve this, your marketers will create a campaign or Canvas step with an **Image Only** type of Content Card. Then, set key-value pairs that are appropriate for using [Content Cards as supplemental content](https://www.braze.com/docs/developer_guide/customization_guides/content_cards/customizing_behavior/#content-cards-as-supplemental-content).
# Customize cards
Source: /docs/developer_guide/content_cards/customizing_cards/index.md
**Tip:**
Using Content Cards for banner-style messages? Try out [Banners](https://www.braze.com/docs/user_guide/message_building_by_channel/banners/)— perfect for inline, persistent in-app and web messages.
# Customize the style of Content Cards
Source: /docs/developer_guide/content_cards/customizing_cards/style/index.md
# Customize the style of Content Cards
> Braze Content Cards come with a default look and feel. This article covers styling options for your Content Cards to help you match your brand identity. For the full list of content card types, see [About Content Cards](https://www.braze.com/docs/developer_guide/content_cards/).
## Creating a custom style
The default Content Cards UI is imported from the UI layer of the Braze SDK. From there, you can tweak certain parts of the card's styling, the order in which cards are displayed, and how the feed is shown to your users.

**Note:**
Content Card properties such as `title`, `cardDescription`, `imageUrl`, etc., are directly editable through the [dashboard](https://www.braze.com/docs/user_guide/message_building_by_channel/content_cards/creative_details), which is the preferred method for changing these details.
Braze's default styles are defined in CSS within the Braze SDK. By overriding selected styles in your application, you can customize our standard feed with your own background images, font families, styles, sizes, animations, and more. For instance, the following is an example override that causes Content Cards to appear 800 px wide:
``` css
body .ab-feed {
width: 800px;
}
```
For a full list of properties you can modify, see [Braze's SDK configuration options](https://js.appboycdn.com/web-sdk/latest/doc/modules/braze.html)
By default, Android and FireOS SDK Content Cards match the standard Android UI guidelines to provide a seamless experience. You can see these default styles in the [`res/values/styles.xml`](https://github.com/braze-inc/braze-android-sdk/blob/master/android-sdk-ui/src/main/res/values/styles.xml) file in the Braze SDK distribution:
```xml
```
To customize your Content Card styling, override this default style. To override a style, copy it in its entirety to the `styles.xml` file in your project and make modifications. The entire style must be copied over to your local `styles.xml` file for all attributes to be correctly set.
```xml
```
```xml
```
By default, Android and FireOS SDK Content Cards match the standard Android UI guidelines to provide a seamless experience.
You can apply styling in one of two ways. The first is to pass a [`ContentCardListStyling`](https://braze-inc.github.io/braze-android-sdk/kdoc/braze-android-sdk/com.braze.jetpackcompose.contentcards.styling/-content-card-list-styling/index.html) and [`ContentCardStyling`](https://braze-inc.github.io/braze-android-sdk/kdoc/braze-android-sdk/com.braze.jetpackcompose.contentcards.styling/-content-card-styling/index.html) to [`ContentCardsList`](https://braze-inc.github.io/braze-android-sdk/kdoc/braze-android-sdk/com.braze.jetpackcompose.contentcards/-content-cards-list.html), like in the following example:
```kotlin
ContentCardsList(
style = ContentCardListStyling(listBackgroundColor = Color.Red),
cardStyle = ContentCardStyling(
titleTextStyle = TextStyle(
fontFamily = fontFamily,
fontSize = 25.sp
),
shadowRadius = 10.dp,
shortNewsContentCardStyle = BrazeShortNewsContentCardStyling(
shadowRadius = 15.dp
)
)
)
```
The second is to use [`BrazeStyle`](https://braze-inc.github.io/braze-android-sdk/kdoc/braze-android-sdk/com.braze.jetpackcompose/-braze-style.html) to create a global styling for Braze components, like in the following example:
```kotlin
BrazeStyle(
contentCardStyle = ContentCardStyling(
textAnnouncementContentCardStyle = BrazeTextAnnouncementContentCardStyling(
cardBackgroundColor = Color.Red,
descriptionTextStyle = TextStyle(
fontFamily = fontFamily,
fontSize = 25.sp,
)
),
titleTextColor = Color.Magenta
)
) {
// Your app here, including any ContentCardsList() in it
}
```
The Content Cards view controller allows you to customize the appearance and behavior of all cells via the [`BrazeContentCardUI.ViewController.Attributes`](https://braze-inc.github.io/braze-swift-sdk/documentation/brazeui/brazecontentcardui/viewcontroller/attributes-swift.struct) struct. Configuring Content Cards using `Attributes` is an easy option, allowing you to launch your Content Cards UI with minimal setup.
**Important:**
Customization via `Attributes` is only available in Swift.
**Modifying `Attributes.default`**
Customize the look and feel of all instances of the Braze Content Card UI view controller by directly modifying the static [`Attributes.defaults`](https://braze-inc.github.io/braze-swift-sdk/documentation/brazeui/brazecontentcardui/viewcontroller/attributes-swift.struct/defaults) variable.
For example, to change the default image size and corner radius for all cells:
```swift
BrazeContentCardUI.ViewController.Attributes.defaults.cellAttributes.cornerRadius = 20
BrazeContentCardUI.ViewController.Attributes.defaults.cellAttributes.classicImageSize = CGSize(width: 65, height: 65)
```
**Initializing the view controller with Attributes**
If you wish to modify only a specific instance of the Braze Content Card UI view controller, use the [`init(braze:attributes:)`](https://braze-inc.github.io/braze-swift-sdk/documentation/brazeui/brazecontentcardui/viewcontroller/init(braze:attributes:)/) initializer to pass a custom `Attributes` struct to the view controller.
For example, you can change the image size and corner radius for a specific instance of the view controller:
```swift
var attributes = BrazeContentCardUI.ViewController.Attributes.defaults
attributes.cellAttributes.cornerRadius = 20
attributes.cellAttributes.classicImageSize = CGSize(width: 65, height: 65)
let viewController = BrazeContentCardUI.ViewController(braze: AppDelegate.braze, attributes: attributes)
```
**Customizing cells by subclassing**
Alternatively, you can create custom interfaces by registering custom classes for each desired card type. To use your subclass instead of the default cell, modify the [`cells`](https://braze-inc.github.io/braze-swift-sdk/documentation/brazeui/brazecontentcardui/viewcontroller/attributes-swift.struct/cells) property in the `Attributes` struct. For example:
```swift
var attributes = BrazeContentCardUI.ViewController.Attributes.defaults
// Register your own custom cell
attributes.cells[BrazeContentCardUI.ClassicImageCell.identifier] = CustomClassicImageCell.self
let viewController = BrazeContentCardUI.ViewController(braze: AppDelegate.braze, attributes: attributes)
```
**Modifying content cards programmatically**
You can change Content Cards programmatically by assigning the [`transform`](https://braze-inc.github.io/braze-swift-sdk/documentation/brazeui/brazecontentcardui/viewcontroller/attributes-swift.struct/transform) closure on your `Attributes` struct. The example below modifies the `title` and `description` of compatible cards:
```swift
var attributes = BrazeContentCardUI.ViewController.Attributes.defaults
attributes.transform = { cards in
cards.map { card in
var card = card
if let title = card.title {
card.title = "[modified] \(title)"
}
if let description = card.description {
card.description = "[modified] \(description)"
}
return card
}
}
let viewController = BrazeContentCardUI.ViewController(braze: AppDelegate.braze, attributes: attributes)
```
Check out the [Examples sample app](https://github.com/braze-inc/braze-swift-sdk/tree/main/Examples/Swift) for a complete example.
Customizing Content Cards through `Attributes` is not supported with Objective-C.
## Customization examples
### Custom font
Customizing the font used in your Content Cards allows you to maintain your brand identity and create a visually appealing experience for your users. Use these recipes to set the font for all Content Cards programmatically.
Just like any other web element, you can easily customize the appearance of Content Cards through CSS. In your CSS file or inline styles, use the `font-family` property and specify the desired font name or font stack.
```css
/* CSS selector targeting the Content Card element */
.card-element {
font-family: "Helvetica Neue", Arial, sans-serif;
}
```
To change the default font programmatically, set a style for cards and use the `fontFamily` attribute to instruct Braze to use your custom font family.
For example, to update the font on all titles for captioned image cards, override the `Braze.ContentCards.CaptionedImage.Title` style and reference your custom font family. The attribute value should point to a font family in your `res/font` directory.
Here is a truncated example with a custom font family, `my_custom_font_family`, referenced on the last line:
```xml
```
For more information about font customization in the Android SDK, see the [font family guide](https://www.braze.com/docs/developer_guide/platform_integration_guides/android/advanced_use_cases/font_customization/#font-customization).
To change the default font programmatically, you can set the [`titleTextStyle`](https://braze-inc.github.io/braze-android-sdk/kdoc/braze-android-sdk/com.braze.jetpackcompose.contentcards.styling/-content-card-styling/index.html#715371549%2FProperties%2F-1725759721) of `ContentCardStyling`.
You can also set `titleTextStyle` for a specific card type by setting it on [`BrazeShortNewsContentCardStyling`](https://braze-inc.github.io/braze-android-sdk/kdoc/braze-android-sdk/com.braze.jetpackcompose.contentcards.styling/-braze-short-news-content-card-styling/index.html) and passing it to the [`shortNewsContentCardStyle`](https://braze-inc.github.io/braze-android-sdk/kdoc/braze-android-sdk/com.braze.jetpackcompose.contentcards.styling/-content-card-styling/index.html#8580250%2FProperties%2F-1725759721) of `ContentCardStyling`.
```kotlin
val fontFamily = FontFamily(
Font(R.font.sailec_bold)
)
ContentCardStyling(
titleTextStyle = TextStyle(
fontFamily = fontFamily
)
)
```
Customize your fonts by customizing the `Attributes` of the [`cellAttributes`](https://braze-inc.github.io/braze-swift-sdk/documentation/brazeui/brazecontentcardui/viewcontroller/attributes-swift.struct/cellattributes/) instance property. For example:
```swift
var attributes = BrazeContentCardUI.ViewController.Attributes.defaults
attributes.cellAttributes.titleFont = .preferredFont(textStyle: .callout, weight: .bold)
attributes.cellAttributes.descriptionFont = .preferredFont(textStyle: .footnote, weight: .regular)
attributes.cellAttributes.domainFont = .preferredFont(textStyle: .footnote, weight: .medium)
let viewController = BrazeContentCardUI.ViewController.init(braze: braze, attributes: attributes)
```
Customization of fonts via `Attributes` is not supported in Objective-C.
Check out the [Examples sample app](https://github.com/braze-inc/braze-swift-sdk/blob/main/Examples/ObjC/Sources/ContentCards-Custom-UI/CardsInfoViewController.m#L97) for an example of building your own UI with custom fonts.
### Custom pinned icons
When creating a Content Card, marketers have the option of pinning the card. A pinned card displays at the top of a user's feed, and the user can't dismiss it. As you customize your card styles, you can change how the pinned icon looks.
{:style="border:none"}
The structure of the Content Card pinned icon is:
```css
```
If you want to use a different FontAwesome icon, you can replace the class name of the `i` element with the class name of the desired icon.
If you want to switch the icon altogether, remove the `i` element and add the custom icon as a child of `ab-pinned-indicator`. There are several ways you can change the icon, but one simple method is to use `replaceChildren()` on the `ab-pinned-indicator` element.
For example:
```javascript
// Get the parent element
const pinnedIndicator = document.querySelector('.ab-pinned-indicator');
// Create a new custom icon element
const customIcon = document.createElement('span');
customIcon.classList.add('customIcon');
// Replace the existing icon with the custom icon
pinnedIndicator.replaceChildren(customIcon);
```
To set a custom pinned icon, override the `Braze.ContentCards.PinnedIcon` style. Your custom image asset should be declared in the `android:src` element. For example:
```xml
```
To change the default pinned icon, you can set the [`pinnedResourceId`](https://braze-inc.github.io/braze-android-sdk/kdoc/braze-android-sdk/com.braze.jetpackcompose.contentcards.styling/-content-card-styling/index.html#794044424%2FProperties%2F-1725759721) of `ContentCardStyling`. For example:
```kotlin
ContentCardStyling(
pinnedResourceId = R.drawable.pushpin,
pinnedImageAlignment = Alignment.TopCenter
)
```
You can also specify a Composable in [`pinnedComposable`](https://braze-inc.github.io/braze-android-sdk/kdoc/braze-android-sdk/com.braze.jetpackcompose.contentcards.styling/-content-card-styling/index.html#1460938052%2FProperties%2F-1725759721) of `ContentCardStyling`. If `pinnedComposable` is specified, it overrides the `pinnedResourceId` value.
```kotlin
ContentCardStyling(
pinnedComposable = {
Box(Modifier.fillMaxWidth()) {
Text(
modifier = Modifier
.align(Alignment.Center)
.width(50.dp),
text = "This message is not read. Please read it."
)
}
}
)
```
Customize the pin icon by modifying the `pinIndicatorColor` and `pinIndicatorImage` properties of the [`cellAttributes`](https://braze-inc.github.io/braze-swift-sdk/documentation/brazeui/brazecontentcardui/viewcontroller/attributes-swift.struct/cellattributes/) instance property. For example:
```swift
var attributes = BrazeContentCardUI.ViewController.Attributes.defaults
attributes.cellAttributes.pinIndicatorColor = .red
attributes.cellAttributes.pinIndicatorImage = UIImage(named: "my-image")
let viewController = BrazeContentCardUI.ViewController.init(braze: braze, attributes: attributes)
```
You can also use subclassing to create your own custom version of `BrazeContentCardUI.Cell`, which includes the pin indicator. For example:
```swift
var attributes = BrazeContentCardUI.ViewController.Attributes.defaults
attributes.cells[BrazeContentCardUI.ClassicImageCell.identifier] = CustomClassicImageCell.self
let viewController = BrazeContentCardUI.ViewController(braze: AppDelegate.braze, attributes: attributes)
```
Customization of the pin indicator via `Attributes` is not supported in Objective-C.
### Changing the unread indicator color
Content Cards contain a blue line at the bottom of the card which indicates whether or not the card has been viewed.

To change the color of the unread indicator of a card, add custom CSS to your webpage. For example, to set the color of the unviewed indicator to green:
```css
.ab-unread-indicator { background-color: green; }
```
Change the color of the unread indicator bar by altering the value in `com_braze_content_cards_unread_bar_color` in your `colors.xml` file:
```xml
#1676d0
```
To change the color of the unread indicator bar, modify the value of [`unreadIndicatorColor`](https://braze-inc.github.io/braze-android-sdk/kdoc/braze-android-sdk/com.braze.jetpackcompose.contentcards.styling/-content-card-styling/index.html#-1669590042%2FProperties%2F-1725759721) in `ContentCardStyling`:
```kotlin
ContentCardStyling(
unreadIndicatorColor = Color.Red
)
```
Change the color of the unread indicator bar by assigning a value to the tint color of your `BrazeContentCardUI.ViewController` instance:
```swift
let viewController = BrazeContentCardUI.ViewController(braze: AppDelegate.braze)
viewController.view.tintColor = .systemGreen
```
However, if you want to modify only the unviewed indicator, you can access the `unviewedIndicatorColor` property of your `BrazeContentCardUI.ViewController.Attributes` struct. If you use Braze `UITableViewCell` implementations, access the property before the cell is drawn.
For example, to set the color of the unviewed indicator to red:
```swift
var attributes = BrazeContentCardUI.ViewController.Attributes.defaults
attributes.cellAttributes.unviewedIndicatorColor = .red
let viewController = BrazeContentCardUI.ViewController(braze: AppDelegate.braze, attributes: attributes)
```
Check out the [Examples sample app](https://github.com/braze-inc/braze-swift-sdk/tree/main/Examples/Swift) for a complete example.
Change the color of the unread indicator bar by assigning a value to the tint color of your `BRZContentCardUIViewController`:
```objc
BRZContentCardUIViewController *viewController = [[BRZContentCardUIViewController alloc] initWithBraze:AppDelegate.braze];
[viewController.view setTintColor:[UIColor systemGreenColor]];
```
Customization of only the unviewed indicator via `Attributes` is not supported in Objective-C.
### Disabling unread indicator
Hide the unread indicator bar by adding the following style to your `css`:
```css
.ab-unread-indicator { display: none; }
```
Hide the unread indicator bar by setting [`setUnreadBarVisible`](https://braze-inc.github.io/braze-android-sdk/kdoc/braze-android-sdk/com.braze.ui.contentcards.view/-content-card-view-holder/set-unread-bar-visible.html?query=fun%20setUnreadBarVisible(isVisible:%20Boolean)) on `ContentCardViewHolder` to `false`.
Disabling the unread indicator is not supported in Jetpack Compose.
Hide the unread indicator bar by setting the `attributes.cellAttributes.unviewedIndicatorColor` property in your `Attributes` struct to `.clear`.
Customization of only the unviewed indicator via `Attributes` is not supported in Objective-C.
# Customize the behavior of Content Cards
Source: /docs/developer_guide/content_cards/customizing_cards/behavior/index.md
# Customize the behavior of Content Cards
> This implementation guide discusses changing the behavior of Content Cards, adding extras such as key-value pairs to your payload, and recipes for common customizations. For the full list of content card types, see [About Content Cards](https://www.braze.com/docs/developer_guide/content_cards/).
## Key-value pairs
Braze enables you to send extra data payloads via Content Cards to user devices using key-value pairs. These can help you track internal metrics, update app content, and customize properties. [Add key-value pairs using the dashboard](https://www.braze.com/docs/user_guide/message_building_by_channel/content_cards/create#step-4-configure-additional-settings-optional).
**Note:**
We do not recommend sending nested JSON values as key-value pairs. Instead, flatten the JSON before sending it.
Key-value pairs are stored on `card` objects as `extras`. These can be used to send data down along with a card for further handling by the application. Call `card.extras` to access these values.
Key-value pairs are stored on `card` objects as `extras`. These can be used to send data down along with a card for further handling by the application. Call `card.extras` to access these values.
Key-value pairs are stored on `card` objects as `extras`. These can be used to send data down along with a card for further handling by the application. Call `card.extras` to access these values.
**Tip:**
It's important that your marketing and developer teams coordinate on which key-value pairs will be used (for example, `feed_type = brand_homepage`), as any key-value pairs marketers input into the Braze dashboard must exactly match the key-value pairs that developers build into the app logic.
## Content Cards as supplemental content
{: style="float:right;max-width:25%;margin-left:15px;border:0;"}
You can seamlessly blend Content Cards into an existing feed, allowing data from multiple feeds to load simultaneously. This creates a cohesive, harmonious experience with Braze Content Cards and existing feed content.
The example to the right shows a feed with a hybrid list of items that are populated via local data and Content Cards powered by Braze. With this, Content Cards can be indistinguishable alongside existing content.
### API-triggered key-value pairs
[API-triggered campaigns](https://www.braze.com/docs/user_guide/engagement_tools/campaigns/building_campaigns/delivery_types/api_triggered_delivery/) are a good strategy to employ when a card's values depend on external factors to determine what content to display to the user. For example, to display supplemental content, set key-value pairs using Liquid. Note that `class_type` should be known at set-up time.
{: style="max-width:60%;"}
## Content Cards as interactive content
{: style="border:0;"}{: style="float:right;max-width:45%;border:0;margin-left:15px;"}
Content Cards can be leveraged to create dynamic and interactive experiences for your users. In the example to the right, we have a Content Card pop-up appear at checkout providing users last-minute promotions. Well-placed cards like this are a great way to give users a "nudge" toward specific user actions.
The key-value pairs for this use case include a `discount_percentage` set as the desired discount amount and `class_type` set as `coupon_code`. These key-value pairs allow you to filter and display type-specific Content Cards on the checkout screen. For more information on using key-value pairs to manage multiple feeds, see [Customizing the default Content Card feed](https://www.braze.com/docs/developer_guide/customization_guides/content_cards/customizing_feed/#multiple-feeds).
{: style="max-width:80%;"}
## Content Card badges
{: style="max-width:35%;float:right;margin-left:15px;border:none;"}
Badges are small icons that are ideal for getting a user's attention. Using badges to alert the user about new Content Card content can attract users back to your app and increase sessions.
### Displaying the number of unread Content Cards as a badge
You can display the number of unread Content Cards your user has as a badge on your app's icon.
You can request the number of unread cards at any time by calling:
```javascript
braze.getCachedContentCards().getUnviewedCardCount();
```
You can then use this information to display a badge signifying how many unread Content Cards there are. See the SDK reference docs for more information.
You can request the number of unread cards at any time by calling:
```java
Braze.getInstance(context).getContentCardUnviewedCount();
```
```kotlin
Braze.getInstance(context).contentCardUnviewedCount
```
You can then use this information to display a badge signifying how many unread Content Cards there are. See the SDK reference docs for more information.
The following sample uses `braze.contentCards` to request and display the number of unread Content Cards. After the app is closed and the user's session ends, this code requests a card count, filtering the number of cards based on the `viewed` property.
```swift
func applicationDidEnterBackground(_ application: UIApplication)
```
Within this method, implement the following code, which actively updates the badge count while the user views cards during a given session:
```swift
let unreadCards = AppDelegate.braze?.contentCards.cards.filter { $0.viewed == false }
UIApplication.shared.applicationIconBadgeNumber = unreadCards?.count ?? 0
```
```objc
(void)applicationDidEnterBackground:(UIApplication *)application
```
Within this method, implement the following code, which actively updates the badge count while the user views cards during a given session:
```objc
NSInteger unreadCardCount = 0;
for (BRZContentCardRaw *card in AppDelegate.braze.contentCards.cards) {
if (card.viewed == NO) {
unreadCardCount += 1;
}
}
[UIApplication sharedApplication].applicationIconBadgeNumber = unreadCardCount;
```
# Customize the feed for Content Cards
Source: /docs/developer_guide/content_cards/customizing_cards/feed/index.md
# Customize the feed for Content Cards
> A Content Card feed is the sequence of Content Cards in your mobile or web applications. This article covers configuring when the feed is refreshed, the order of the cards, managing multiple feeds, and "empty feed" error messages. For the full list of content card types, see [About Content Cards](https://www.braze.com/docs/developer_guide/content_cards/).
## About the session lifecycle
A session refers to the period of time the Braze SDK tracks user activity in your app after it's launched. You can also force a new session by [calling the `changeUser()` method](https://www.braze.com/docs/developer_guide/analytics/setting_user_ids/#setting-a-user-id).
By default, a session starts when you first call `braze.openSession()`. The session will remain active for up to `30` minutes of inactivity (unless you [change the default session timeout](https://www.braze.com/docs/developer_guide/analytics/tracking_sessions/?tab=web#change-session-timeout) or the user closes the app.
**Note:**
If you've set up the [activity lifecycle callback](https://www.braze.com/docs/developer_guide/platform_integration_guides/android/initial_sdk_setup/android_sdk_integration/#step-4-tracking-user-sessions-in-android) for Android, Braze will automatically call [`openSession()`](https://braze-inc.github.io/braze-android-sdk/kdoc/braze-android-sdk/com.braze/-i-braze/open-session.html) and [`closeSession()`](https://braze-inc.github.io/braze-android-sdk/kdoc/braze-android-sdk/com.braze/-i-braze/close-session.html) for each activity in your app.
By default, a session starts when `openSession()` is first called. If your app goes to the background and then returns to the foreground, the SDK will check if more than 10 seconds have passed since the session started (unless you [change the default session timeout](https://www.braze.com/docs/developer_guide/analytics/tracking_sessions/?tab=android#change-session-timeout)). If so, a new session will begin. Keep in mind that if the user closes your app while it's in the background, session data may not be sent to Braze until they reopen the app.
Calling `closeSession()` will not immediately end the session. Instead, it will end the session after 10 seconds if `openSession()` isn't called again by the user starting another activity.
By default, a session starts when you call `Braze.init(configuration:)`. This occurs when the `UIApplicationWillEnterForegroundNotification` notification is triggered, meaning the app has entered the foreground.
If your app goes to the background, `UIApplicationDidEnterBackgroundNotification` is triggered. The app does not remain in an active session while in the background. When your app returns to the foreground, the SDK compares the time elapsed since the session started against the session timeout (unless you [change the default session timeout](https://www.braze.com/docs/developer_guide/analytics/tracking_sessions/?tab=swift#change-session-timeout)). If the time since the session started exceeds the timeout period, a new session begins.
## Refreshing the feed
### Automatic refresh
By default, the Content Card feed will automatically refresh when:
- A new session is started
- The feed is opened, and more than 60 seconds have passed since the last refresh. (This only applies to the default Content Card feed and occurs once per feed opening.)
**Tip:**
To dynamically show up-to-date Content Cards without manually refreshing, select **At first impression** during card creation. These cards will be refreshed when they are available.
### Manual refresh
To manually refresh the feed at a specific time:
Request a manual refresh of Braze Content Cards from the Web SDK at any time by calling [`requestContentCardsRefresh()`](https://js.appboycdn.com/web-sdk/latest/doc/modules/braze.html#requestcontentcardsrefresh).
You can also call [`getCachedContentCards`](https://js.appboycdn.com/web-sdk/latest/doc/modules/braze.html#getcachedcontentcards) to get all currently available cards from the last Content Cards refresh.
```javascript
import * as braze from "@braze/web-sdk";
function refresh() {
braze.requestContentCardsRefresh();
}
```
Request a manual refresh of Braze Content Cards from the Android SDK at any time by calling [`requestContentCardsRefresh`](https://braze-inc.github.io/braze-android-sdk/kdoc/braze-android-sdk/com.braze/-i-braze/request-content-cards-refresh.html).
```java
Braze.getInstance(context).requestContentCardsRefresh();
```
```kotlin
Braze.getInstance(context).requestContentCardsRefresh()
```
Request a manual refresh of Braze Content Cards from the Swift SDK at any time by calling the [`requestRefresh`](https://braze-inc.github.io/braze-swift-sdk/documentation/brazekit/braze/contentcards-swift.class/requestrefresh(_:)) method on the [`Braze.ContentCards`](https://braze-inc.github.io/braze-swift-sdk/documentation/brazekit/braze/contentcards-swift.class) class:
In Swift, Content Cards can be refreshed either with an optional completion handler or with an asynchronous return using the native Swift concurrency APIs.
#### Completion handler
```swift
AppDelegate.braze?.contentCards.requestRefresh { result in
// Implement completion handler
}
```
#### Async/Await
```swift
let contentCards = await AppDelegate.braze?.contentCards.requestRefresh()
```
```objc
[AppDelegate.braze.contentCards requestRefreshWithCompletion:^(NSArray * contentCards, NSError * error) {
// Implement completion handler
}];
```
### Rate limit
Braze uses a token bucket algorithm to enforce the following rate limits:
- Up to 5 refresh calls per device, shared across users and calls to `openSession()`
- After reaching the limit, a new call becomes available every 180 seconds (3 minutes)
- The system will hold up to five calls for you to use at any time
- `subscribeToContentCards()` will still return cached cards even when rate-limited
**Important:**
The Braze SDK also applies rate limits for performance and reliability. Keep this in mind when running automated tests or performing manual QA. See [Braze SDK rate limits](https://www.braze.com/docs/developer_guide/sdk_integration/rate_limits/) for more information.
## Customizing displayed card order
You can change the order in which your Content Cards are displayed. This allows you to fine tune the user experience by prioritizing certain types of content, such as time-sensitive promotions.
Customize the display order of Content Cards in your feed by using the [`filterFunction`](https://js.appboycdn.com/web-sdk/latest/doc/modules/braze.html#showcontentcards) param of `showContentCards():`. For example:
```javascript
braze.showContentCards(null, (cards) => {
return sortBrazeCards(cards); // Where sortBrazeCards is your sorting function that returns the sorted card array
});
```
The [`ContentCardsFragment`](https://braze-inc.github.io/braze-android-sdk/kdoc/braze-android-sdk/com.braze.ui.contentcards/-content-cards-fragment/index.html) relies on a [`IContentCardsUpdateHandler`](https://braze-inc.github.io/braze-android-sdk/kdoc/braze-android-sdk/com.braze.ui.contentcards.handlers/-i-content-cards-update-handler/index.html) to handle any sorting or modifications of Content Cards before they are displayed in the feed. A custom update handler can be set via [`setContentCardUpdateHandler`](https://braze-inc.github.io/braze-android-sdk/kdoc/braze-android-sdk/com.braze.ui.contentcards/-content-cards-fragment/set-content-card-update-handler.html) on your `ContentCardsFragment`.
The following is the default `IContentCardsUpdateHandler` and can be used as a starting point for customization:
**Show Java example**
```java
public class DefaultContentCardsUpdateHandler implements IContentCardsUpdateHandler {
// Interface that must be implemented and provided as a public CREATOR
// field that generates instances of your Parcelable class from a Parcel.
public static final Parcelable.Creator CREATOR = new Parcelable.Creator() {
public DefaultContentCardsUpdateHandler createFromParcel(Parcel in) {
return new DefaultContentCardsUpdateHandler();
}
public DefaultContentCardsUpdateHandler[] newArray(int size) {
return new DefaultContentCardsUpdateHandler[size];
}
};
@Override
public List handleCardUpdate(ContentCardsUpdatedEvent event) {
List sortedCards = event.getAllCards();
// Sort by pinned, then by the 'updated' timestamp descending
// Pinned before non-pinned
Collections.sort(sortedCards, new Comparator() {
@Override
public int compare(Card cardA, Card cardB) {
// A displays above B
if (cardA.getIsPinned() && !cardB.getIsPinned()) {
return -1;
}
// B displays above A
if (!cardA.getIsPinned() && cardB.getIsPinned()) {
return 1;
}
// At this point, both A & B are pinned or both A & B are non-pinned
// A displays above B since A is newer
if (cardA.getUpdated() > cardB.getUpdated()) {
return -1;
}
// B displays above A since A is newer
if (cardA.getUpdated() < cardB.getUpdated()) {
return 1;
}
// At this point, every sortable field matches so keep the natural ordering
return 0;
}
});
return sortedCards;
}
// Parcelable interface method
@Override
public int describeContents() {
return 0;
}
// Parcelable interface method
@Override
public void writeToParcel(Parcel dest, int flags) {
// No state is kept in this class so the parcel is left unmodified
}
}
```
**Show Kotlin example**
```kotlin
class DefaultContentCardsUpdateHandler : IContentCardsUpdateHandler {
override fun handleCardUpdate(event: ContentCardsUpdatedEvent): List {
val sortedCards = event.allCards
// Sort by pinned, then by the 'updated' timestamp descending
// Pinned before non-pinned
sortedCards.sortWith(Comparator sort@{ cardA: Card, cardB: Card ->
// A displays above B
if (cardA.isPinned && !cardB.isPinned) {
return@sort -1
}
// B displays above A
if (!cardA.isPinned && cardB.isPinned) {
return@sort 1
}
// At this point, both A & B are pinned or both A & B are non-pinned
// A displays above B since A is newer
if (cardA.updated > cardB.updated) {
return@sort -1
}
// B displays above A since A is newer
if (cardA.updated < cardB.updated) {
return@sort 1
}
0
})
return sortedCards
}
// Parcelable interface method
override fun describeContents(): Int {
return 0
}
// Parcelable interface method
override fun writeToParcel(dest: Parcel, flags: Int) {
// No state is kept in this class so the parcel is left unmodified
}
companion object {
// Interface that must be implemented and provided as a public CREATOR
// field that generates instances of your Parcelable class from a Parcel.
val CREATOR: Parcelable.Creator = object : Parcelable.Creator {
override fun createFromParcel(`in`: Parcel): DefaultContentCardsUpdateHandler? {
return DefaultContentCardsUpdateHandler()
}
override fun newArray(size: Int): Array {
return arrayOfNulls(size)
}
}
}
}
```
**Tip:**
The `ContentCardsFragment` source can be found on [GitHub](https://github.com/braze-inc/braze-android-sdk/blob/master/android-sdk-ui/src/main/java/com/braze/ui/contentcards/ContentCardsFragment.kt).
To filter and sort Content Cards in Jetpack Compose, set the `cardUpdateHandler` parameter. For example:
```kotlin
ContentCardsList(
cardUpdateHandler = {
it.sortedWith { cardA, cardB ->
// A displays above B
if (cardA.isPinned && !cardB.isPinned) {
return@sortedWith -1
}
// B displays above A
if (!cardA.isPinned && cardB.isPinned) {
return@sortedWith 1
}
// At this point, both A & B are pinned or both A & B are non-pinned
// A displays above B since A is newer
if (cardA.updated > cardB.updated) {
return@sortedWith -1
}
// B displays above A since A is newer
if (cardA.updated < cardB.updated) {
return@sortedWith 1
}
0
}
}
)
```
Customize the card feed order by directly modifying the static [`Attributes.defaults`](https://braze-inc.github.io/braze-swift-sdk/documentation/brazeui/brazecontentcardui/viewcontroller/attributes-swift.struct/defaults) variable.
```swift
var attributes = BrazeContentCardUI.ViewController.Attributes.defaults
attributes.transform = { cards in
cards.sorted {
if $0.pinned && !$1.pinned {
return true
} else if !$0.pinned && $1.pinned {
return false
} else {
return $0.createdAt > $1.createdAt
}
}
}
let viewController = BrazeContentCardUI.ViewController(braze: AppDelegate.braze, attributes: attributes)
```
Customization via `BrazeContentCardUI.ViewController.Attributes` is not available in Objective-C.
## Customizing "empty feed" message
When a user does not qualify for any Content Cards, the SDK displays an "empty feed" error message stating: "We have no updates. Please check again later." You can customize this "empty feed" error message similar to the following:

The Web SDK does not support replacing the "empty feed" language programmatically. You can opt to replace it each time the feed is shown, but this is not recommended because the feed may take some time to refresh and the empty feed text won't display immediately.
If the [`ContentCardsFragment`](https://braze-inc.github.io/braze-android-sdk/kdoc/braze-android-sdk/com.braze.ui.contentcards/-content-cards-fragment/index.html) determines that the user does not qualify for any Content Cards, it displays the empty feed error message.
A special adapter, the [`EmptyContentCardsAdapter`](https://github.com/braze-inc/braze-android-sdk/blob/master/android-sdk-ui/src/main/java/com/braze/ui/contentcards/adapters/EmptyContentCardsAdapter.kt), replaces the standard [`ContentCardAdapter`](https://github.com/braze-inc/braze-android-sdk/blob/master/android-sdk-ui/src/main/java/com/braze/ui/contentcards/adapters/ContentCardAdapter.kt) to display this error message. To set the custom message itself, override the string resource `com_braze_feed_empty`.
The style used to display this message can be found via [`Braze.ContentCardsDisplay.Empty`](https://github.com/braze-inc/braze-android-sdk/blob/2e386dfa59a87bfc24ef7cb6ff5adf6b16f44d24/android-sdk-ui/src/main/res/values/styles.xml#L522-L530) and is reproduced in the following code snippet:
```xml
```
For more information on customizing Content Card style elements, see [Customizing style](https://www.braze.com/docs/developer_guide/content_cards/customizing_cards/style/).
To customize the "empty feed" error message with Jetpack Compose, you can pass in an `emptyString` to [`ContentCardsList`](https://braze-inc.github.io/braze-android-sdk/kdoc/braze-android-sdk/com.braze.jetpackcompose.contentcards/-content-cards-list.html). You can also pass in [`emptyTextStyle`](https://braze-inc.github.io/braze-android-sdk/kdoc/braze-android-sdk/com.braze.jetpackcompose.contentcards.styling/-content-card-list-styling/index.html#1193499348%2FProperties%2F-1725759721) to `ContentCardListStyling` to further customize this message.
```kotlin
ContentCardsList(
emptyString = "No messages today",
style = ContentCardListStyling(
emptyTextStyle = TextStyle(...)
)
)
```
If you have a Composable you would like to display instead, you can pass in `emptyComposable` to [`ContentCardsList`](https://braze-inc.github.io/braze-android-sdk/kdoc/braze-android-sdk/com.braze.jetpackcompose.contentcards/-content-cards-list.html). If `emptyComposable` is specified, the `emptyString` will not be used.
```kotlin
ContentCardsList(
emptyComposable = {
Image(
painter = painterResource(id = R.drawable.noMessages),
contentDescription = "No messages"
)
}
)
```
Customize the view controller empty state by setting the related [`Attributes`](https://braze-inc.github.io/braze-swift-sdk/documentation/brazeui/brazecontentcardui/viewcontroller/attributes-swift.struct/defaults).
```swift
var attributes = BrazeContentCardUI.ViewController.Attributes.defaults
attributes.emptyStateMessage = "This is a custom empty state message"
attributes.emptyStateMessageFont = .preferredFont(forTextStyle: .title1)
attributes.emptyStateMessageColor = .secondaryLabel
```
Change the language that appears automatically in empty Content Card feeds by redefining the localizable Content Card strings in your app's [`ContentCardsLocalizable.strings`](https://github.com/braze-inc/braze-swift-sdk/tree/main/Sources/BrazeUI/Resources/Localization/en.lproj) file.
**Note:**
If you want to update this message in different locale languages, find the corresponding language in the [Resources folder structure](https://github.com/braze-inc/braze-swift-sdk/tree/main/Sources/BrazeUI/Resources/Localization) with the string `ContentCardsLocalizable.strings`.
## Implementing multiple feeds
Content Cards can be filtered on your app so that only specific cards are displayed, enabling you to have multiple Content Card feeds for different use cases. For example, you can maintain both a transactional feed and a marketing feed. To accomplish this, create different categories of Content Cards by setting key-value pairs in the Braze dashboard. Then, create feeds in your app or site that treat these types of Content Cards differently, filtering out some types and displaying others.
### Step 1: Set key-value pairs on cards
When creating a Content Card campaign, set [key-value pair data](https://www.braze.com/docs/developer_guide/content_cards/customizing_cards/behavior/) on each card. You will use this key-value pair to categorize cards. Key-value pairs are stored in the `extras` property in the card's data model.
For this example, we'll set a key-value pair with the key `feed_type` that will designate which Content Card feed the card should be displayed in. The value will be whatever your custom feeds will be, such as `home_screen` or `marketing`.
### Step 2: Filter Content Cards
Once key-value pairs have been assigned, create a feed with logic that will display the cards you wish to display and filter cards of other types. In this example, we will only display cards with a matching key-value pair of `feed_type: "Transactional"`.
The following example will show the Content Cards feed for `Transactional` type cards:
```javascript
/**
* @param {String} feed_type - value of the "feed_type" KVP to filter
*/
function showCardsByFeedType(feed_type) {
braze.showContentCards(null, function(cards) {
return cards.filter((card) => card.extras["feed_type"] === feed_type);
});
}
```
Then, you can set up a toggle for your custom feed:
```javascript
// show the "Transactional" feed when this button is clicked
document.getElementById("show-transactional-feed").onclick = function() {
showCardsByFeedType("Transactional");
};
```
For more information, see the [SDK method documentation](https://js.appboycdn.com/web-sdk/latest/doc/modules/braze.html#showcontentcards).
By default, the Content Card feed is displayed in a [`ContentCardsFragment`](https://braze-inc.github.io/braze-android-sdk/kdoc/braze-android-sdk/com.braze.ui.contentcards/-content-cards-fragment/index.html) and [`IContentCardsUpdateHandler`](https://braze-inc.github.io/braze-android-sdk/kdoc/braze-android-sdk/com.braze.ui.contentcards.handlers/-i-content-cards-update-handler/index.html) returns a list of cards to display after receiving a [`ContentCardsUpdatedEvent`](https://braze-inc.github.io/braze-android-sdk/kdoc/braze-android-sdk/com.braze.events/-content-cards-updated-event/index.html) from the Braze SDK. However, it only sorts cards and doesn't handle any filtering directly.
#### Step 2.1: Create a custom handler
You can filter out Content Cards by implementing a custom [`IContentCardsUpdateHandler`](https://braze-inc.github.io/braze-android-sdk/kdoc/braze-android-sdk/com.braze.ui.contentcards.handlers/-i-content-cards-update-handler/index.html) using the key-value pairs set by [`Card.getExtras()`](https://braze-inc.github.io/braze-android-sdk/kdoc/braze-android-sdk/com.braze.models.cards/-card/extras.html) in the dashboard, then modifying it to remove any cards from the list that don't match the value for `feed_type` you set earlier.
**Show Java example**
```java
private IContentCardsUpdateHandler getUpdateHandlerForFeedType(final String desiredFeedType) {
return new IContentCardsUpdateHandler() {
@Override
public List handleCardUpdate(ContentCardsUpdatedEvent event) {
// Use the default card update handler for a first
// pass at sorting the cards. This is not required
// but is done for convenience.
final List cards = new DefaultContentCardsUpdateHandler().handleCardUpdate(event);
final Iterator cardIterator = cards.iterator();
while (cardIterator.hasNext()) {
final Card card = cardIterator.next();
// Make sure the card has our custom KVP
// from the dashboard with the key "feed_type"
if (card.getExtras().containsKey("feed_type")) {
final String feedType = card.getExtras().get("feed_type");
if (!desiredFeedType.equals(feedType)) {
// The card has a feed type, but it doesn't match
// our desired feed type, remove it.
cardIterator.remove();
}
} else {
// The card doesn't have a feed
// type at all, remove it
cardIterator.remove();
}
}
// At this point, all of the cards in this list have
// a feed type that explicitly matches the value we put
// in the dashboard.
return cards;
}
};
}
```
**Show Kotlin example**
```kotlin
private fun getUpdateHandlerForFeedType(desiredFeedType: String): IContentCardsUpdateHandler {
return IContentCardsUpdateHandler { event ->
// Use the default card update handler for a first
// pass at sorting the cards. This is not required
// but is done for convenience.
val cards = DefaultContentCardsUpdateHandler().handleCardUpdate(event)
val cardIterator = cards.iterator()
while (cardIterator.hasNext()) {
val card = cardIterator.next()
// Make sure the card has our custom KVP
// from the dashboard with the key "feed_type"
if (card.extras.containsKey("feed_type")) {
val feedType = card.extras["feed_type"]
if (desiredFeedType != feedType) {
// The card has a feed type, but it doesn't match
// our desired feed type, remove it.
cardIterator.remove()
}
} else {
// The card doesn't have a feed
// type at all, remove it
cardIterator.remove()
}
}
// At this point, all of the cards in this list have
// a feed type that explicitly matches the value we put
// in the dashboard.
cards
}
}
```
#### Step 2.2: Add it to a fragment
After you've created a [`IContentCardsUpdateHandler`](https://braze-inc.github.io/braze-android-sdk/kdoc/braze-android-sdk/com.braze.ui.contentcards.handlers/-i-content-cards-update-handler/index.html), create a [`ContentCardsFragment`](https://braze-inc.github.io/braze-android-sdk/kdoc/braze-android-sdk/com.braze.ui.contentcards/-content-cards-fragment/index.html) that uses it. This custom feed can be used like any other `ContentCardsFragment`. In the different parts of your app, display different Content Card feeds based on the key provided on the dashboard. Each `ContentCardsFragment` feed will have a unique set of cards displayed thanks to the custom `IContentCardsUpdateHandler` on each fragment.
**Show Java example**
```java
// We want a Content Cards feed that only shows "Transactional" cards.
ContentCardsFragment customContentCardsFragment = new ContentCardsFragment();
customContentCardsFragment.setContentCardUpdateHandler(getUpdateHandlerForFeedType("Transactional"));
```
**Show Kotlin example**
```kotlin
// We want a Content Cards feed that only shows "Transactional" cards.
val customContentCardsFragment = ContentCardsFragment()
customContentCardsFragment.contentCardUpdateHandler = getUpdateHandlerForFeedType("Transactional")
```
To filter which content cards are shown in this feed, use `cardUpdateHandler`. For example:
```kotlin
ContentCardsList(
cardUpdateHandler = {
it.filter { card ->
card.extras["feed_type"] == "Transactional"
}
}
)
```
The following example will show the Content Cards feed for `Transactional` type cards:
```swift
// Filter cards by the `Transactional` feed type based on your key-value pair.
let transactionalCards = cards.filter { $0.extras["feed_type"] as? String == "Transactional" }
```
To take it a step further, the cards presented in the view controller can be filtered by setting the `transform` property on your `Attributes` struct to display only the cards filtered by your criteria.
```swift
var attributes = BrazeContentCardUI.ViewController.Attributes.defaults
attributes.transform = { cards in
cards.filter { $0.extras["feed_type"] as? String == "Transactional" }
}
// Pass your attributes containing the transformed cards to the Content Card UI.
let viewController = BrazeContentCardUI.ViewController(braze: AppDelegate.braze, attributes: attributes)
```
```objc
// Filter cards by the `Transactional` feed type based on your key-value pair.
NSMutableArray *transactionalCards = [[NSMutableArray alloc] init];
for (BRZContentCardRaw *card in AppDelegate.braze.contentCards.cards) {
if ([card.extras[@"feed_type"] isEqualToString:@"Transactional"]) {
[transactionalCards addObject:card];
}
}
```
# Log Analytics
Source: /docs/developer_guide/content_cards/logging_analytics/index.md
# Log analytics
> When building a custom UI for Content Cards, you must manually log analytics like impressions, clicks, and dismissals, as this is only handled automatically for default card models. Logging these events is a standard part of a Content Card integration and is essential for accurate campaign reporting and billing. To do this, populate your custom UI with data from the Braze data models and then manually log the events. Once you understand how to log analytics, you can see common ways Braze customers [create custom Content Cards](https://www.braze.com/docs/developer_guide/content_cards/creating_cards/).
## Listening for card updates
When implementing your custom Content Cards, you can parse the Content Card objects and extract their payload data such as `title`, `cardDescription`, and `imageUrl`. Then, you can use the resulting model data to populate your custom UI.
To obtain the Content Card data models, subscribe to Content Card updates. There are two properties to pay particular attention to:
* **`id`**: Represents the Content Card ID string. This is the unique identifier used to log analytics from custom Content Cards.
* **`extras`**: Encompasses all the key-value pairs from the Braze dashboard.
All properties outside of `id` and `extras` are optional to parse for custom Content Cards. For more information on the data model, see each platform's integration article: [Android](https://www.braze.com/docs/developer_guide/content_cards/?sdktab=android), [iOS](https://www.braze.com/docs/developer_guide/content_cards/?sdktab=swift), [Web](https://www.braze.com/docs/developer_guide/content_cards/?sdktab=web).
Register a callback function to subscribe for updates when cards are refreshed.
```javascript
import * as braze from "@braze/web-sdk";
braze.subscribeToContentCardsUpdates((updates) => {
const cards = updates.cards;
// For example:
cards.forEach(card => {
if (card.isControl) {
// Do not display the control card, but remember to call `logContentCardImpressions([card])`
}
else if (card instanceof braze.ClassicCard || card instanceof braze.CaptionedImage) {
// Use `card.title`, `card.imageUrl`, etc.
}
else if (card instanceof braze.ImageOnly) {
// Use `card.imageUrl`, etc.
}
})
});
braze.openSession();
```
**Note:**
Content Cards will only refresh on session start if a subscribe request is called before `openSession()`. You can always choose to [manually refresh the feed](https://www.braze.com/docs/developer_guide/content_cards/customizing_cards/feed/) as well.
### Step 1: Create a private subscriber variable
To subscribe to card updates, first declare a private variable in your custom class to hold your subscriber:
```java
// subscriber variable
private IEventSubscriber mContentCardsUpdatedSubscriber;
```
### Step 2: Subscribe to updates
Next, add the following code to subscribe to Content Card updates from Braze, typically inside of your custom Content Cards activity's `Activity.onCreate()`:
```java
// Remove the previous subscriber before rebuilding a new one with our new activity.
Braze.getInstance(context).removeSingleSubscription(mContentCardsUpdatedSubscriber, ContentCardsUpdatedEvent.class);
mContentCardsUpdatedSubscriber = new IEventSubscriber() {
@Override
public void trigger(ContentCardsUpdatedEvent event) {
// List of all Content Cards
List allCards = event.getAllCards();
// Your logic below
}
};
Braze.getInstance(context).subscribeToContentCardsUpdates(mContentCardsUpdatedSubscriber);
Braze.getInstance(context).requestContentCardsRefresh();
```
### Step 3: Unsubscribe
We also recommend unsubscribing when your custom activity moves out of view. Add the following code to your activity's `onDestroy()` lifecycle method:
```java
Braze.getInstance(context).removeSingleSubscription(mContentCardsUpdatedSubscriber, ContentCardsUpdatedEvent.class);
```
### Step 1: Create a private subscriber variable
To subscribe to card updates, first declare a private variable in your custom class to hold your subscriber:
```kotlin
private var contentCardsUpdatedSubscriber: IEventSubscriber? = null
```
### Step 2: Subscribe to updates
Next, add the following code to subscribe to Content Card updates from Braze, typically inside of your custom Content Cards activity's `Activity.onCreate()`:
```kotlin
// Remove the previous subscriber before rebuilding a new one with our new activity.
Braze.getInstance(context).subscribeToContentCardsUpdates(contentCardsUpdatedSubscriber)
Braze.getInstance(context).requestContentCardsRefresh()
// List of all Content Cards
val allCards = event.allCards
// Your logic below
}
Braze.getInstance(context).subscribeToContentCardsUpdates(mContentCardsUpdatedSubscriber)
Braze.getInstance(context).requestContentCardsRefresh(true)
```
### Step 3: Unsubscribe
We also recommend unsubscribing when your custom activity moves out of view. Add the following code to your activity's `onDestroy()` lifecycle method:
```kotlin
Braze.getInstance(context).removeSingleSubscription(contentCardsUpdatedSubscriber, ContentCardsUpdatedEvent::class.java)
```
To access the Content Cards data model, call [`contentCards.cards`](https://braze-inc.github.io/braze-swift-sdk/documentation/brazekit/braze/contentcards-swift.class/cards) on your `braze` instance.
```swift
let cards: [Braze.ContentCard] = AppDelegate.braze?.contentCards.cards
```
Additionally, you can also maintain a subscription to observe for changes in your Content Cards. You can do so in one of two ways:
1. Maintaining a cancellable; or
2. Maintaining an `AsyncStream`.
### Cancellable
```swift
// This subscription is maintained through a Braze cancellable, which will observe for changes until the subscription is cancelled.
// You must keep a strong reference to the cancellable to keep the subscription active.
// The subscription is canceled either when the cancellable is deinitialized or when you call its `.cancel()` method.
let cancellable = AppDelegate.braze?.contentCards.subscribeToUpdates { [weak self] contentCards in
// Implement your completion handler to respond to updates in `contentCards`.
}
```
### AsyncStream
```swift
let stream: AsyncStream<[Braze.ContentCard]> = AppDelegate.braze?.contentCards.cardsStream
```
```objc
NSArray *contentCards = AppDelegate.braze.contentCards.cards;
```
Additionally, if you wish to maintain a subscription to your content cards, you can call [`subscribeToUpdates`](https://braze-inc.github.io/braze-swift-sdk/documentation/brazekit/braze/contentcards-swift.class/subscribetoupdates(_:)):
```objc
// This subscription is maintained through Braze cancellable, which will continue to observe for changes until the subscription is cancelled.
BRZCancellable *cancellable = [self.braze.contentCards subscribeToUpdates:^(NSArray *contentCards) {
// Implement your completion handler to respond to updates in `contentCards`.
}];
```
To get the Content Card data, use the `getContentCards` method:
```javascript
import Braze from "@braze/react-native-sdk";
const cards = await Braze.getContentCards();
```
To listen for updates, subscribe to Content Card update events:
```javascript
const subscription = Braze.addListener(Braze.Events.CONTENT_CARDS_UPDATED, (update) => {
const cards = update.cards;
cards.forEach(card => {
if (card.isControl) {
// Do not display the control card, but remember to log an impression
} else {
// Use card.title, card.cardDescription, card.image, etc.
}
});
});
```
To request a manual refresh of Content Cards from Braze servers:
```javascript
Braze.requestContentCardsRefresh();
```
To get cached Content Cards without a network request:
```javascript
const cachedCards = await Braze.getCachedContentCards();
```
## Logging events
Logging valuable metrics like impressions, clicks, and dismissals is quick and simple. Set a custom click listener to manually handle these analytics.
Log impression events when cards are viewed by users using [`logContentCardImpressions`](https://js.appboycdn.com/web-sdk/latest/doc/modules/braze.html#logcontentcardimpressions):
```javascript
import * as braze from "@braze/web-sdk";
braze.logContentCardImpressions([card1, card2, card3]);
```
Log card click events when users interact with a card using [`logContentCardClick`](https://js.appboycdn.com/web-sdk/latest/doc/modules/braze.html#logcontentcardclick):
```javascript
import * as braze from "@braze/web-sdk";
braze.logContentCardClick(card);
```
The [`BrazeManager`](https://github.com/braze-inc/braze-growth-shares-android-demo-app/blob/main/app/src/main/java/com/braze/advancedsamples/BrazeManager.kt) can reference Braze SDK dependencies such as the Content Card objects array list to get the [`Card`](https://braze-inc.github.io/braze-android-sdk/kdoc/braze-android-sdk/com.braze.models.cards/-card/index.html) to call the Braze logging methods. Use the `ContentCardable` base class to easily reference and provide data to the `BrazeManager`.
To log an impression or click on a card, call [`Card.logClick()`](https://braze-inc.github.io/braze-android-sdk/kdoc/braze-android-sdk/com.braze.models.cards/-card/log-click.html) or [`Card.logImpression()`](https://braze-inc.github.io/braze-android-sdk/kdoc/braze-android-sdk/com.braze.models.cards/-card/log-impression.html) respectively.
You can manually log or set a Content Card as "dismissed" to Braze for a particular card with [`isDismissed`](https://braze-inc.github.io/braze-android-sdk/kdoc/braze-android-sdk/com.braze.models.cards/-card/is-dismissed.html). If a card is already marked as dismissed, it cannot be marked as dismissed again.
To create a custom click listener, create a class that implements [`IContentCardsActionListener`](https://braze-inc.github.io/braze-android-sdk/kdoc/braze-android-sdk/com.braze.ui.contentcards.listeners/-i-content-cards-action-listener/index.html) and register it with [`BrazeContentCardsManager`](https://braze-inc.github.io/braze-android-sdk/kdoc/braze-android-sdk/com.braze.ui.contentcards.managers/-braze-content-cards-manager/index.html). Implement the [`onContentCardClicked()`](https://braze-inc.github.io/braze-android-sdk/kdoc/braze-android-sdk/com.braze.ui.contentcards.listeners/-i-content-cards-action-listener/on-content-card-clicked.html) method, which will be called when the user clicks a Content Card. Then, instruct Braze to use your Content Card click listener.
For example:
```java
BrazeContentCardsManager.getInstance().setContentCardsActionListener(new IContentCardsActionListener() {
@Override
public boolean onContentCardClicked(Context context, Card card, IAction cardAction) {
return false;
}
@Override
public void onContentCardDismissed(Context context, Card card) {
}
});
```
For example:
```kotlin
BrazeContentCardsManager.getInstance().contentCardsActionListener = object : IContentCardsActionListener {
override fun onContentCardClicked(context: Context, card: Card, cardAction: IAction): Boolean {
return false
}
override fun onContentCardDismissed(context: Context, card: Card) {
}
}
```
**Important:**
To handle control variant Content Cards in your custom UI, pass in your [`com.braze.models.cards.Card`](https://braze-inc.github.io/braze-android-sdk/kdoc/braze-android-sdk/com.braze.models.cards/-card/index.html) object, then call the `logImpression` method as you would with any other Content Card type. The object will implicitly log a control impression to inform our analytics of when a user would have seen the control card.
Implement the [`BrazeContentCardUIViewControllerDelegate`](https://braze-inc.github.io/braze-swift-sdk/documentation/brazeui/brazecontentcarduiviewcontrollerdelegate) protocol and set your delegate object as the `delegate` property of your `BrazeContentCardUI.ViewController`. This delegate will handle passing the data of your custom object back to Braze to be logged. For an example, see [Content Cards UI tutorial](https://braze-inc.github.io/braze-swift-sdk/tutorials/braze/c2-contentcardsui/).
```swift
// Set the delegate when creating the Content Cards controller
contentCardsController.delegate = delegate
// Method to implement in delegate
func contentCard(
_ controller: BrazeContentCardUI.ViewController,
shouldProcess clickAction: Braze.ContentCard.ClickAction,
card: Braze.ContentCard
) -> Bool {
// Intercept the content card click action here.
return true
}
```
```objc
// Set the delegate when creating the Content Cards controller
contentCardsController.delegate = delegate;
// Method to implement in delegate
- (BOOL)contentCardController:(BRZContentCardUIViewController *)controller
shouldProcess:(NSURL *)url
card:(BRZContentCardRaw *)card {
// Intercept the content card click action here.
return YES;
}
```
**Important:**
To handle control variant Content Cards in your custom UI, pass in your [`Braze.ContentCard.Control`](https://braze-inc.github.io/braze-swift-sdk/documentation/brazekit/braze/contentcard/control(_:)) object, then call the `logImpression` method as you would with any other Content Card type. The object will implicitly log a control impression to inform our analytics of when a user would have seen the control card.
Log impression events when cards are viewed by users:
```javascript
Braze.logContentCardImpression(card.id);
```
Log card click events when users interact with a card:
```javascript
Braze.logContentCardClicked(card.id);
```
Log dismissal events when a user dismisses a card:
```javascript
Braze.logContentCardDismissed(card.id);
```
# Deep Linking in Content Cards
Source: /docs/developer_guide/content_cards/deep_linking/index.md
# Deep Linking in Content Cards
> Learn how deep link within a Content Card using the Braze SDK. To learn more about deep links, check out [What is deep linking?](https://www.braze.com/docs/user_guide/personalization_and_dynamic_content/deep_linking_to_in-app_content/#what-is-deep-linking).
At this time, Content Card deep links are not supported for the Web Braze SDK.
## Prerequisites
Before you can use this feature, you'll need to [integrate the Android Braze SDK](https://www.braze.com/docs/developer_guide/sdk_integration/?sdktab=android).
## Creating a universal delegate
The Android SDK provides the ability to set a single delegate object to custom handle all deep links opened by Braze across Content Cards, in-app messages, and push notifications.
Your delegate object should implement the [`IBrazeDeeplinkHandler`](https://braze-inc.github.io/braze-android-sdk/kdoc/braze-android-sdk/com.braze.ui/-braze-deeplink-handler/index.html) interface and be set using [`BrazeDeeplinkHandler.setBrazeDeeplinkHandler()`](https://braze-inc.github.io/braze-android-sdk/kdoc/braze-android-sdk/com.braze.ui/-braze-deeplink-handler/-companion/set-braze-deeplink-handler.html). In most cases, the delegate should be set in your app's `Application.onCreate()`.
The following is an example of overriding the default [`UriAction`](https://braze-inc.github.io/braze-android-sdk/kdoc/braze-android-sdk/com.braze.ui.actions/-uri-action/index.html) behavior with custom intent flags and custom behavior for YouTube URLs:
```java
public class CustomDeeplinkHandler implements IBrazeDeeplinkHandler {
private static final String TAG = BrazeLogger.getBrazeLogTag(CustomDeeplinkHandler.class);
@Override
public void gotoUri(Context context, UriAction uriAction) {
String uri = uriAction.getUri().toString();
// Open YouTube URLs in the YouTube app and not our app
if (!StringUtils.isNullOrBlank(uri) && uri.contains("youtube.com")) {
uriAction.setUseWebView(false);
}
CustomUriAction customUriAction = new CustomUriAction(uriAction);
customUriAction.execute(context);
}
public static class CustomUriAction extends UriAction {
public CustomUriAction(@NonNull UriAction uriAction) {
super(uriAction);
}
@Override
protected void openUriWithActionView(Context context, Uri uri, Bundle extras) {
Intent intent = getActionViewIntent(context, uri, extras);
intent.setFlags(Intent.FLAG_ACTIVITY_NEW_TASK | Intent.FLAG_ACTIVITY_CLEAR_TOP | Intent.FLAG_ACTIVITY_SINGLE_TOP);
if (intent.resolveActivity(context.getPackageManager()) != null) {
context.startActivity(intent);
} else {
BrazeLogger.w(TAG, "Could not find appropriate activity to open for deep link " + uri + ".");
}
}
}
}
```
```kotlin
class CustomDeeplinkHandler : IBrazeDeeplinkHandler {
override fun gotoUri(context: Context, uriAction: UriAction) {
val uri = uriAction.uri.toString()
// Open YouTube URLs in the YouTube app and not our app
if (!StringUtils.isNullOrBlank(uri) && uri.contains("youtube.com")) {
uriAction.useWebView = false
}
val customUriAction = CustomUriAction(uriAction)
customUriAction.execute(context)
}
class CustomUriAction(uriAction: UriAction) : UriAction(uriAction) {
override fun openUriWithActionView(context: Context, uri: Uri, extras: Bundle) {
val intent = getActionViewIntent(context, uri, extras)
intent.flags = Intent.FLAG_ACTIVITY_NEW_TASK or Intent.FLAG_ACTIVITY_CLEAR_TOP or Intent.FLAG_ACTIVITY_SINGLE_TOP
if (intent.resolveActivity(context.packageManager) != null) {
context.startActivity(intent)
} else {
BrazeLogger.w(TAG, "Could not find appropriate activity to open for deep link $uri.")
}
}
}
companion object {
private val TAG = BrazeLogger.getBrazeLogTag(CustomDeeplinkHandler::class.java)
}
}
```
## Deep linking to app settings
To allow deep links to directly open your app's settings, you'll need a custom `BrazeDeeplinkHandler`. In the following example, the presence of a custom key-value pair called `open_notification_page` will make the deep link open the app's settings page:
```java
BrazeDeeplinkHandler.setBrazeDeeplinkHandler(new IBrazeDeeplinkHandler() {
@Override
public void gotoUri(Context context, UriAction uriAction) {
final Bundle extras = uriAction.getExtras();
if (extras.containsKey("open_notification_page")) {
Intent intent = new Intent();
intent.setAction("android.settings.APP_NOTIFICATION_SETTINGS");
intent.setFlags(Intent.FLAG_ACTIVITY_NEW_TASK);
//for Android 5-7
intent.putExtra("app_package", context.getPackageName());
intent.putExtra("app_uid", context.getApplicationInfo().uid);
// for Android 8 and later
intent.putExtra("android.provider.extra.APP_PACKAGE", context.getPackageName());
context.startActivity(intent);
}
}
});
```
```kotlin
BrazeDeeplinkHandler.setBrazeDeeplinkHandler(object : IBrazeDeeplinkHandler {
override fun gotoUri(context: Context, uriAction: UriAction) {
val extras = uriAction.extras
if (extras.containsKey("open_notification_page")) {
val intent = Intent()
intent.action = "android.settings.APP_NOTIFICATION_SETTINGS"
intent.flags = Intent.FLAG_ACTIVITY_NEW_TASK
//for Android 5-7
intent.putExtra("app_package", context.packageName)
intent.putExtra("app_uid", context.applicationInfo.uid)
// for Android 8 and later
intent.putExtra("android.provider.extra.APP_PACKAGE", context.packageName)
context.startActivity(intent)
}
}
})
```
## Customizing WebView activity {#Custom_Webview_Activity}
When Braze opens website deeplinks inside the app, the deeplinks are handled by [`BrazeWebViewActivity`](https://braze-inc.github.io/braze-android-sdk/kdoc/braze-android-sdk/com.braze.ui/-braze-web-view-activity/index.html).
**Note:**
For custom HTML in-app messages, links configured with `target="_blank"` open in the device's default web browser and are not handled by `BrazeWebViewActivity`.
To change this:
1. Create a new Activity that handles the target URL from `Intent.getExtras()` with the key `com.braze.Constants.BRAZE_WEBVIEW_URL_EXTRA`. For an example, see [`BrazeWebViewActivity.kt`](https://github.com/braze-inc/braze-android-sdk/blob/master/android-sdk-ui/src/main/java/com/braze/ui/BrazeWebViewActivity.kt).
2. Add that activity to `AndroidManifest.xml` and set `exported` to `false`.
```xml
```
3. Set your custom Activity in a `BrazeConfig` [builder object](https://braze-inc.github.io/braze-android-sdk/kdoc/braze-android-sdk/com.braze.configuration/-braze-config/-builder/set-custom-web-view-activity-class.html). Build the builder and pass it to [`Braze.configure()`](https://braze-inc.github.io/braze-android-sdk/kdoc/braze-android-sdk/com.braze/-braze/-companion/configure.html) in your [`Application.onCreate()`](https://developer.android.com/reference/android/app/Application.html#onCreate()).
```java
BrazeConfig brazeConfig = new BrazeConfig.Builder()
.setCustomWebViewActivityClass(MyCustomWebViewActivity::class)
...
.build();
Braze.configure(this, brazeConfig);
```
```kotlin
val brazeConfig = BrazeConfig.Builder()
.setCustomWebViewActivityClass(MyCustomWebViewActivity::class.java)
...
.build()
Braze.configure(this, brazeConfig)
```
## Using Jetpack Compose
To handle deeplinks when using Jetpack Compose with NavHost:
1. Ensure that the activity handling your deeplink is registered in the Android Manifest.
```xml
```
2. In NavHost, specify which deeplinks you want it to handle.
```kotlin
composableWithCompositionLocal(
route = "YOUR_ROUTE_HERE",
deepLinks = listOf(navDeepLink {
uriPattern = "myapp://articles/{${MainDestinations.ARTICLE_ID_KEY}}"
}),
arguments = listOf(
navArgument(MainDestinations.ARTICLE_ID_KEY) {
type = NavType.LongType
}
),
) { backStackEntry ->
val arguments = requireNotNull(backStackEntry.arguments)
val articleId = arguments.getLong(MainDestinations.ARTICLE_ID_KEY)
ArticleDetail(
articleId
)
}
```
3. Depending on your app architecture, you may need to handle the new intent that's sent to your current activity as well.
```kotlin
DisposableEffect(Unit) {
val listener = Consumer {
navHostController.handleDeepLink(it)
}
addOnNewIntentListener(listener)
onDispose { removeOnNewIntentListener(listener) }
}
```
## Prerequisites
Before you can use this feature, you'll need to [integrate the Swift Braze SDK](https://www.braze.com/docs/developer_guide/sdk_integration/?sdktab=swift).
**Tip:**
For help choosing between custom scheme deep links, universal links, and "Open Web URL Inside App," see [iOS deep linking guide](https://www.braze.com/docs/developer_guide/push_notifications/ios_deep_linking_guide). For troubleshooting, see [Deep linking troubleshooting](https://www.braze.com/docs/developer_guide/push_notifications/deep_linking_troubleshooting).
## Handling deep links
### Step 1: Register a scheme {#register-a-scheme}
To handle deep linking, a custom scheme must be stated in your `Info.plist` file. The navigation structure is defined by an array of dictionaries. Each of those dictionaries contains an array of strings.
Use Xcode to edit your `Info.plist` file:
1. Add a new key, `URL types`. Xcode will automatically make this an array containing a dictionary called `Item 0`.
2. Within `Item 0`, add a key `URL identifier`. Set the value to your custom scheme.
3. Within `Item 0`, add a key `URL Schemes`. This will automatically be an array containing a `Item 0` string.
4. Set `URL Schemes` >> `Item 0` to your custom scheme.
Alternatively, if you wish to edit your `Info.plist` file directly, you can follow this spec:
```html
CFBundleURLTypesCFBundleURLNameYOUR.SCHEMECFBundleURLSchemesYOUR.SCHEME
```
### Step 2: Add a scheme allowlist
You must declare the URL schemes you wish to pass to `canOpenURL(_:)` by adding the `LSApplicationQueriesSchemes` key to your app's Info.plist file. Attempting to call schemes outside this allowlist will cause the system to record an error in the device's logs, and the deep link will not open. An example of this error will look like this:
```
: -canOpenURL: failed for URL: "yourapp://deeplink" – error: "This app is not allowed to query for scheme yourapp"
```
For example, if an in-app message should open the Facebook app when tapped, the app has to have the Facebook custom scheme (`fb`) in your allowlist. Otherwise, the system will reject the deep link. Deep links that direct to a page or view inside your own app still require that your app's custom scheme be listed in your app's `Info.plist`.
Your example allowlist might look something like:
```html
LSApplicationQueriesSchemesmyappfbtwitter
```
For more information, refer to [Apple's documentation](https://developer.apple.com/library/content/documentation/General/Reference/InfoPlistKeyReference/Articles/LaunchServicesKeys.html#//apple_ref/doc/uid/TP40009250-SW14) on the `LSApplicationQueriesSchemes` key.
### Step 3: Implement a handler
After activating your app, iOS will call the method [`application:openURL:options:`](https://developer.apple.com/reference/uikit/uiapplicationdelegate/1623112-application?language=objc). The important argument is the [NSURL](https://developer.apple.com/library/ios/DOCUMENTATION/Cocoa/Reference/Foundation/Classes/NSURL_Class/Reference/Reference.html#//apple_ref/doc/c_ref/NSURL) object.
```swift
func application(_ app: UIApplication, open url: URL, options: [UIApplication.OpenURLOptionsKey : Any] = [:]) -> Bool {
let path = url.path
let query = url.query
// Insert your code here to take some action based upon the path and query.
return true
}
```
```objc
- (BOOL)application:(UIApplication *)app openURL:(NSURL *)url options:(NSDictionary *)options {
NSString *path = [url path];
NSString *query = [url query];
// Insert your code here to take some action based upon the path and query.
return YES;
}
```
## App Transport Security (ATS)
As defined by [Apple](https://developer.apple.com/library/prerelease/ios/releasenotes/General/WhatsNewIniOS/Articles/iOS9.html#//apple_ref/doc/uid/TP40016198-SW14), "App Transport Security is a feature that improves the security of connections between an app and web services. The feature consists of default connection requirements that conform to best practices for secure connections. Apps can override this default behavior and turn off transport security."
ATS is applied by default. It requires that all connections use HTTPS and are encrypted using TLS 1.2 with forward secrecy. Refer to [Requirements for Connecting Using ATS](https://developer.apple.com/library/ios/documentation/General/Reference/InfoPlistKeyReference/Articles/CocoaKeys.html#//apple_ref/doc/uid/TP40009251-SW35) for more information. All images served by Braze to end devices are handled by a content delivery network ("CDN") that supports TLS 1.2 and is compatible with ATS.
Unless they are specified as exceptions in your application's `Info.plist`, connections that do not follow these requirements will fail with errors that are similar to the following.
**Example Error 1:**
```bash
CFNetwork SSLHandshake failed (-9801)
Error Domain=NSURLErrorDomain Code=-1200 "An SSL error has occurred, and a secure connection to the server cannot be made."
```
**Example Error 2:**
```bash
NSURLSession/NSURLConnection HTTP load failed (kCFStreamErrorDomainSSL, -9802)
```
ATS compliance is enforced for links opened within the mobile app (our default handling of clicked links) and does not apply to sites opened externally via a web browser.
### Working with ATS
You can handle ATS in either of the following ways, but we recommend **complying with ATS requirements**.
Your Braze integration can satisfy ATS requirements by ensuring that any existing links you drive users to (for example, though in-app message and push campaigns) satisfy ATS requirements. While there are ways to bypass ATS restrictions, our recommendation is to ensure that all linked URLs are ATS-compliant. Given Apple's increasing emphasis on application security, the following approaches to allowing ATS exceptions are not guaranteed to be supported by Apple.
You can allow a subset of links with certain domains or schemes to be treated as exceptions to the ATS rules. Your Braze integration will satisfy ATS requirements if every link you use in a Braze messaging channel is either ATS compliant or handled by an exception.
To add a domain as an exception of the ATS, add following to your app's `Info.plist` file:
```html
NSAppTransportSecurityNSAllowsArbitraryLoadsNSExceptionDomainsexample.comNSExceptionAllowsInsecureHTTPLoadsNSIncludesSubdomains
```
Refer to Apple's article on [app transport security keys](https://developer.apple.com/library/ios/documentation/General/Reference/InfoPlistKeyReference/Articles/CocoaKeys.html#//apple_ref/doc/uid/TP40009251-SW33) for more information.
You can turn off ATS entirely. Note that this is not recommended practice, due to both lost security protections and future iOS compatibility. To disable ATS, insert the following in your app's `Info.plist` file:
```html
NSAppTransportSecurityNSAllowsArbitraryLoads
```
## Decoding URLs
The SDK percent-encodes links to create valid `URL`s. All link characters that are not allowed in a properly formed URL, such as Unicode characters, will be percent escaped.
To decode an encoded link, use the `String` property [`removingPercentEncoding`](https://developer.apple.com/documentation/swift/stringprotocol/removingpercentencoding). You must also return `true` in the `BrazeDelegate.braze(_:shouldOpenURL:)`. A call to action is required to trigger the handling of the URL by your app. For example:
```swift
func application(_ app: UIApplication, open url: URL, options: [UIApplication.OpenURLOptionsKey : Any] = [:]) -> Bool {
let urlString = url.absoluteString.removingPercentEncoding
// Handle urlString
return true
}
```
```objc
- (BOOL)application:(UIApplication *)application openURL:(NSURL *)url options:(NSDictionary *)options {
NSString *urlString = [url.absoluteString stringByRemovingPercentEncoding];
// Handle urlString
return YES;
}
```
## Deep linking to app settings
You can take advantage of `UIApplicationOpenSettingsURLString` to deep link users to your app's settings from Braze push notifications and in-app messages.
To take users from your app into the iOS settings:
1. First, make sure your application is set up for either [scheme-based deep links](#swift_register-a-scheme) or [universal links](#swift_universal-links).
2. Decide on a URI for deep linking to the **Settings** page (for example, `myapp://settings` or `https://www.braze.com/settings`).
3. If you are using custom scheme-based deep links, add the following code to your `application:openURL:options:` method:
```swift
func application(_ app: UIApplication, open url: URL, options: [UIApplicationOpenURLOptionsKey : Any] = [:]) -> Bool {
let path = url.path
if (path == "settings") {
UIApplication.shared.openURL(URL(string:UIApplication.openSettingsURLString)!)
}
return true
}
```
```objc
- (BOOL)application:(UIApplication *)app
openURL:(NSURL *)url
options:(NSDictionary *)options {
NSString *path = [url path];
if ([path isEqualToString:@"settings"]) {
NSURL *settingsURL = [NSURL URLWithString:UIApplicationOpenSettingsURLString];
[[UIApplication sharedApplication] openURL:settingsURL];
}
return YES;
}
```
## Customization options {#customization-options}
### Default WebView customization
The `Braze.WebViewController` class displays web URLs opened by the SDK, typically when "Open Web URL Inside App" is selected for a web deep link.
You can customize the `Braze.WebViewController` via the [`BrazeDelegate.braze(_:willPresentModalWithContext:)`](https://braze-inc.github.io/braze-swift-sdk/documentation/brazekit/brazedelegate/braze(_:willpresentmodalwithcontext:)-12sqy/) delegate method.
### Linking handling customization
The `BrazeDelegate` protocol can be used to customize the handling of URLs such as deep links, web URLs, and universal links. To set the delegate during Braze initialization, set a delegate object on the `Braze` instance. Braze will then call your delegate's implementation of `shouldOpenURL` before handling any URIs.
#### Universal links {#universal-links}
Braze supports universal links in push notifications, in-app messages, and Content Cards. To enable universal link support, [`configuration.forwardUniversalLinks`](https://braze-inc.github.io/braze-swift-sdk/documentation/brazekit/braze/configuration-swift.class/forwarduniversallinks) must be set to `true`.
When enabled, Braze will forward universal links to your app's `AppDelegate` via the [`application:continueUserActivity:restorationHandler:`](https://developer.apple.com/documentation/uikit/uiapplicationdelegate/1623072-application) method.
Your application also needs to be set up to handle universal links. Refer to [Apple's documentation](https://developer.apple.com/documentation/xcode/supporting-universal-links-in-your-app) to ensure your application is configured correctly for universal links.
**Warning:**
Universal link forwarding requires access to the application entitlements. When running the application in a simulator, these entitlements are not directly available and universal links are not forwarded to the system handlers.
To add support to simulator builds, you can add the application `.entitlements` file to the _Copy Bundle Resources_ build phase. See [`forwardUniversalLinks`](https://braze-inc.github.io/braze-swift-sdk/documentation/brazekit/braze/configuration-swift.class/forwarduniversallinks) documentation for more details.
**Note:**
The SDK does not query your domains' `apple-app-site-association` file. It performs the differentiation between universal links and regular URLs by looking at the domain name only. As a result, the SDK does not respect any exclusion rule defined in the `apple-app-site-association` per [Supporting associated domains](https://developer.apple.com/documentation/xcode/supporting-associated-domains).
## Examples
### BrazeDelegate
Here's an example using `BrazeDelegate`. For more information, see [Braze Swift SDK reference](https://braze-inc.github.io/braze-swift-sdk/documentation/brazekit/brazedelegate).
```swift
func braze(_ braze: Braze, shouldOpenURL context: Braze.URLContext) -> Bool {
if context.url.host == "MY-DOMAIN.com" {
// Custom handle link here
return false
}
// Let Braze handle links otherwise
return true
}
```
```objc
- (BOOL)braze:(Braze *)braze shouldOpenURL:(BRZURLContext *)context {
if ([[context.url.host lowercaseString] isEqualToString:@"MY-DOMAIN.com"]) {
// Custom handle link here
return NO;
}
// Let Braze handle links otherwise
return YES;
}
```
# Embed GIFs in Content Cards
Source: /docs/developer_guide/content_cards/embedding_gifs/index.md
# Embed GIFs in Content Cards
> Learn how to embed GIFs into Content Cards using the Braze SDK.
**Note:**
For wrapper SDKs not listed, use the relevant native Android or Swift method instead. Keep in mind, the Android and Swift Braze SDKs don't support animated GIFs natively, so you'll implement Content Card GIFs using third-party tools instead.
GIF support is included by default in the Web SDK integration.
## About GIFs
Braze offers the ability to use a custom image library to display animated GIFs. Although the example below uses [Glide](https://bumptech.github.io/glide/), any image library that supports GIFs is compatible.
## Integrating a custom image library
### Step 1: Creating the image loader delegate
The Image Loader delegate must implement the following methods:
* [`getInAppMessageBitmapFromUrl()`](https://braze-inc.github.io/braze-android-sdk/kdoc/braze-android-sdk/com.braze.images/-i-braze-image-loader/get-in-app-message-bitmap-from-url.html)
* [`getPushBitmapFromUrl()`](https://braze-inc.github.io/braze-android-sdk/kdoc/braze-android-sdk/com.braze.images/-i-braze-image-loader/get-push-bitmap-from-url.html)
* [`renderUrlIntoCardView()`](https://braze-inc.github.io/braze-android-sdk/kdoc/braze-android-sdk/com.braze.images/-i-braze-image-loader/render-url-into-card-view.html)
* [`renderUrlIntoInAppMessageView()`](https://braze-inc.github.io/braze-android-sdk/kdoc/braze-android-sdk/com.braze.images/-i-braze-image-loader/render-url-into-in-app-message-view.html)
* [`setOffline()`](https://braze-inc.github.io/braze-android-sdk/kdoc/braze-android-sdk/com.braze.images/-i-braze-image-loader/set-offline.html)
The integration example below is taken from the [Glide integration sample app](https://github.com/braze-inc/braze-android-sdk/tree/master/samples/glide-image-integration) included with the Braze Android SDK.
```java
public class GlideBrazeImageLoader implements IBrazeImageLoader {
private static final String TAG = GlideBrazeImageLoader.class.getName();
private RequestOptions mRequestOptions = new RequestOptions();
@Override
public void renderUrlIntoCardView(Context context, Card card, String imageUrl, ImageView imageView, BrazeViewBounds viewBounds) {
renderUrlIntoView(context, imageUrl, imageView, viewBounds);
}
@Override
public void renderUrlIntoInAppMessageView(Context context, IInAppMessage inAppMessage, String imageUrl, ImageView imageView, BrazeViewBounds viewBounds) {
renderUrlIntoView(context, imageUrl, imageView, viewBounds);
}
@Override
public Bitmap getPushBitmapFromUrl(Context context, Bundle extras, String imageUrl, BrazeViewBounds viewBounds) {
return getBitmapFromUrl(context, imageUrl, viewBounds);
}
@Override
public Bitmap getInAppMessageBitmapFromUrl(Context context, IInAppMessage inAppMessage, String imageUrl, BrazeViewBounds viewBounds) {
return getBitmapFromUrl(context, imageUrl, viewBounds);
}
private void renderUrlIntoView(Context context, String imageUrl, ImageView imageView, BrazeViewBounds viewBounds) {
Glide.with(context)
.load(imageUrl)
.apply(mRequestOptions)
.into(imageView);
}
private Bitmap getBitmapFromUrl(Context context, String imageUrl, BrazeViewBounds viewBounds) {
try {
return Glide.with(context)
.asBitmap()
.apply(mRequestOptions)
.load(imageUrl).submit().get();
} catch (Exception e) {
Log.e(TAG, "Failed to retrieve bitmap at url: " + imageUrl, e);
}
return null;
}
@Override
public void setOffline(boolean isOffline) {
// If the loader is offline, then we should only be retrieving from the cache
mRequestOptions = mRequestOptions.onlyRetrieveFromCache(isOffline);
}
}
```
```kotlin
class GlideBrazeImageLoader : IBrazeImageLoader {
companion object {
private val TAG = GlideBrazeImageLoader::class.qualifiedName
}
private var mRequestOptions = RequestOptions()
override fun renderUrlIntoCardView(context: Context, card: Card, imageUrl: String, imageView: ImageView, viewBounds: BrazeViewBounds) {
renderUrlIntoView(context, imageUrl, imageView, viewBounds)
}
override fun renderUrlIntoInAppMessageView(context: Context, inAppMessage: IInAppMessage, imageUrl: String, imageView: ImageView, viewBounds: BrazeViewBounds) {
renderUrlIntoView(context, imageUrl, imageView, viewBounds)
}
override fun getPushBitmapFromUrl(context: Context, extras: Bundle, imageUrl: String, viewBounds: BrazeViewBounds): Bitmap? {
return getBitmapFromUrl(context, imageUrl, viewBounds)
}
override fun getInAppMessageBitmapFromUrl(context: Context, inAppMessage: IInAppMessage, imageUrl: String, viewBounds: BrazeViewBounds): Bitmap? {
return getBitmapFromUrl(context, imageUrl, viewBounds)
}
private fun renderUrlIntoView(context: Context, imageUrl: String, imageView: ImageView, viewBounds: BrazeViewBounds) {
Glide.with(context)
.load(imageUrl)
.apply(mRequestOptions)
.into(imageView)
}
private fun getBitmapFromUrl(context: Context, imageUrl: String, viewBounds: BrazeViewBounds): Bitmap? {
try {
return Glide.with(context)
.asBitmap()
.apply(mRequestOptions)
.load(imageUrl).submit().get()
} catch (e: Exception) {
Log.e(TAG, "Failed to retrieve bitmap at url: $imageUrl", e)
}
return null
}
override fun setOffline(isOffline: Boolean) {
// If the loader is offline, then we should only be retrieving from the cache
mRequestOptions = mRequestOptions.onlyRetrieveFromCache(isOffline)
}
}
```
### Step 2: Setting the image loader delegate
The Braze SDK will use any custom image loader set with [`IBrazeImageLoader`](https://braze-inc.github.io/braze-android-sdk/kdoc/braze-android-sdk/com.braze.images/-i-braze-image-loader/index.html). We recommend setting the custom image loader in a custom application subclass:
```java
public class GlideIntegrationApplication extends Application {
@Override
public void onCreate() {
super.onCreate();
Braze.getInstance(context).setImageLoader(new GlideBrazeImageLoader());
}
}
```
```kotlin
class GlideIntegrationApplication : Application() {
override fun onCreate() {
super.onCreate()
Braze.getInstance(context).imageLoader = GlideBrazeImageLoader()
}
}
```
## Custom Image Loading with Jetpack Compose
To override image loading with Jetpack Compose, you can pass in a value to [`imageComposable`](https://braze-inc.github.io/braze-android-sdk/kdoc/braze-android-sdk/com.braze.jetpackcompose.contentcards.styling/-content-card-styling/index.html#-808910455%2FProperties%2F-1725759721). This function will take a `Card` and render the image and the modifiers needed. Alternatively, you can use `customCardComposer` of `ContentCardsList` to render the entire card.
In the following example, Glide's Compose library is used for the cards listed in the `imageComposable` function:
```kotlin
ContentCardsList(
cardStyle = ContentCardStyling(
imageComposable = { card ->
when (card.cardType) {
CardType.CAPTIONED_IMAGE -> {
val captionedImageCard = card as CaptionedImageCard
GlideImage(
modifier = Modifier
.fillMaxWidth()
.wrapContentHeight()
.run {
if (captionedImageCard.aspectRatio > 0) {
aspectRatio(captionedImageCard.aspectRatio)
} else {
this
}
},
contentScale = ContentScale.Crop,
model = captionedImageCard.url,
loading = placeholder(R.drawable.pushpin),
contentDescription = ""
)
}
CardType.IMAGE -> {
val imageOnlyCard = card as ImageOnlyCard
GlideImage(
modifier = Modifier
.fillMaxWidth()
.run {
if (imageOnlyCard.aspectRatio > 0) {
aspectRatio(imageOnlyCard.aspectRatio)
} else {
this
}
},
contentScale = ContentScale.Crop,
model = imageOnlyCard.url,
loading = placeholder(R.drawable.pushpin),
contentDescription = ""
)
}
CardType.SHORT_NEWS -> {
val shortNews = card as ShortNewsCard
GlideImage(
modifier = Modifier
.width(100.dp)
.height(100.dp),
model = shortNews.url,
loading = placeholder(R.drawable.pushpin),
contentDescription = ""
)
}
else -> Unit
}
}
)
)
```
## Prerequisites
Before you can use this feature, you'll need to [integrate the Swift Braze SDK](https://www.braze.com/docs/developer_guide/sdk_integration/?sdktab=swift).
## Integrating a custom image library
### Step 1: Integrate SDWebImage
Integrate the [SDWebImage repository](https://github.com/SDWebImage/SDWebImage) into your Xcode project.
### Step 2: Create a new Swift file
In your Xcode project, create a new file named `SDWebImageGIFViewProvider.swift` and import the following:
```swift
import UIKit
import BrazeUI
import SDWebImage
```
### Step 3: Add `GIFViewProvider`
Next, add our sample SDWebImage [`GIFViewProvider`](https://braze-inc.github.io/braze-swift-sdk/documentation/brazeui/gifviewprovider/). Your file should be similar to the following:
```swift
import UIKit
import BrazeUI
import SDWebImage
extension GIFViewProvider {
/// A GIF view provider using [SDWebImage](https://github.com/SDWebImage/SDWebImage) as a
/// rendering library.
public static let sdWebImage = Self(
view: { SDAnimatedImageView(image: image(for: $0)) },
updateView: { ($0 as? SDAnimatedImageView)?.image = image(for: $1) }
)
private static func image(for url: URL?) -> UIImage? {
guard let url else { return nil }
return url.pathExtension == "gif"
? SDAnimatedImage(contentsOfFile: url.path)
: UIImage(contentsOfFile: url.path)
}
}
```
### Step 4: Modify your `AppDelegate.swift`
In your project's `AppDelegate.swift`, add GIF support to your `BrazeUI` components using `GIFViewProvider`. Your file should be similar to the following:
```swift
import UIKit
import BrazeKit
import BrazeUI
@main
class AppDelegate: UIResponder, UIApplicationDelegate {
static var braze: Braze? = nil
func application(
_ application: UIApplication,
didFinishLaunchingWithOptions launchOptions: [UIApplication.LaunchOptionsKey: Any]?
) -> Bool {
/* ... */
GIFViewProvider.shared = .sdWebImage
return true
}
}
```
# Tutorial: Making an Inbox with Content Cards
Source: /docs/developer_guide/content_cards/content_card_inbox/index.md
# Tutorial: Making an Inbox with Content Cards
> Follow along with the sample code in this tutorial to build an inbox with Braze Content Cards.
## Prerequisites
Before you can use this feature, you'll need to [integrate the Android Braze SDK](https://www.braze.com/docs/developer_guide/sdk_integration/?sdktab=android).
## Making an inbox with Content Cards for Android (Compose)
**Important:**
We're piloting this new tutorial format. [Tell us what you think](https://docs.google.com/forms/d/e/1FAIpQLSe_5uhWM7eXXk9F_gviO_pvA4rkYO3WA9B6tNJZ3TY91md5bw/viewform?usp=pp_url&entry.569173304=General+Feedback) — your feedback helps us improve future guides.
```kotlin file=MainApplication.kt
import android.app.Application
import com.braze.Braze
import com.braze.support.BrazeLogger
import com.braze.configuration.BrazeConfig
import android.util.Log
class ContentCardsApplication : Application() {
override fun onCreate() {
super.onCreate()
// Turn on verbose Braze logging
BrazeLogger.enableVerboseLogging()
// Configure Braze with your SDK key & endpoint
val config = BrazeConfig.Builder()
.setApiKey("YOUR_API_KEY")
.setCustomEndpoint("YOUR_API_ENDPOINT")
.build()
Braze.configure(this, config)
}
}
```
```kotlin file=ContentCardsInboxScreen.kt
import android.content.Intent
import android.net.Uri
import androidx.compose.foundation.clickable
import androidx.compose.foundation.layout.*
import androidx.compose.foundation.lazy.LazyColumn
import androidx.compose.foundation.lazy.items
import androidx.compose.material3.*
import androidx.compose.runtime.*
import androidx.compose.ui.Modifier
import androidx.compose.ui.platform.LocalContext
import androidx.compose.ui.text.font.FontWeight
import androidx.compose.ui.unit.dp
import androidx.compose.ui.unit.sp
import com.braze.Braze
import com.braze.events.ContentCardsUpdatedEvent
import com.braze.events.IEventSubscriber
import com.braze.models.cards.*
@Composable
fun ContentCardInboxScreen() {
val context = LocalContext.current
var cards by remember { mutableStateOf>(emptyList()) }
val loggedImpressions = remember { mutableSetOf() }
DisposableEffect(Unit) {
val subscriber = IEventSubscriber { event ->
cards = event.allCards.filter { !it.isControl }
}
Braze.getInstance(context).subscribeToContentCardsUpdates(subscriber)
Braze.getInstance(context).requestContentCardsRefresh(false)
onDispose {
Braze.getInstance(context)
.removeSingleSubscription(subscriber, ContentCardsUpdatedEvent::class.java)
}
}
Column(modifier = Modifier.fillMaxSize()) {
Text(
text = "Message Inbox",
fontSize = 20.sp,
fontWeight = FontWeight.Bold,
modifier = Modifier.padding(start = 16.dp, end = 16.dp, top = 12.dp, bottom = 8.dp)
)
LazyColumn(
modifier = Modifier
.fillMaxSize()
.padding(horizontal = 16.dp)
) {
items(cards, key = { it.id }) { card ->
ContentCardItem(
card = card,
onImpression = {
if (!loggedImpressions.contains(card.id)) {
card.logImpression()
loggedImpressions.add(card.id)
}
},
onClick = {
card.logClick()
card.url?.let {
context.startActivity(Intent(Intent.ACTION_VIEW, Uri.parse(it)))
}
}
)
}
}
}
}
@Composable
fun ContentCardItem(
card: Card,
onImpression: () -> Unit,
onClick: () -> Unit
) {
// Log impression when the card becomes visible
LaunchedEffect(card.id) {
onImpression()
}
val title = when (card) {
is CaptionedImageCard -> card.title
is ShortNewsCard -> card.title
is TextAnnouncementCard -> card.title
else -> null
}
val description = when (card) {
is CaptionedImageCard -> card.description
is ShortNewsCard -> card.description
is TextAnnouncementCard -> card.description
else -> null
}
Card(
modifier = Modifier
.fillMaxWidth()
.padding(vertical = 4.dp)
.clickable { onClick() }
) {
Column(modifier = Modifier.padding(16.dp)) {
title?.let {
Text(
text = it,
fontWeight = FontWeight.Bold,
fontSize = 16.sp
)
}
description?.let {
Spacer(modifier = Modifier.height(4.dp))
Text(
text = it,
fontSize = 14.sp
)
}
}
}
}
```
!!step
lines-MainApplication.kt=12
#### 1. Enable debugging (optional)
To make troubleshooting easier while developing, consider enabling debugging.
!!step
lines-ContentCardsInboxScreen.kt=47-69
#### 2. Build a UI view
For Jetpack Compose, use a [`LazyColumn`]() to display Content Cards in a scrollable list.
!!step
lines-ContentCardsInboxScreen.kt=25-37
#### 3. Subscribe to Content Card updates
Use a [`DisposableEffect`]() to manage the subscription lifecycle, ensuring proper cleanup when the composable leaves the composition.
!!step
lines-ContentCardsInboxScreen.kt=84-95
#### 4. Build a custom inbox UI
Using the content card [attributes]() such as `title`, `description`, and `url` allows you to build Content Cards to match your specific UI requirements. In this case, we're building an inbox with Jetpack Compose's `Card` and `Column` composables.
!!step
lines-ContentCardsInboxScreen.kt=57,62
#### 5. Track impressions and clicks
You can log impressions and clicks using the [`logImpressions`]() and [`logClick`]() methods available for Content Cards.
Impressions should only be logged once when a card is viewed by the user. Use `LaunchedEffect` to log impressions when a card becomes visible. Note that you may need to consider the view lifecycle of your app, as well as use case, to ensure impressions are logged correctly.
## Making an inbox with Content Cards for Android (RecyclerView)
```kotlin file=MainApplication.kt
import android.app.Application
import com.braze.Braze
import com.braze.support.BrazeLogger
import com.braze.configuration.BrazeConfig
import android.util.Log
class ContentCardsApplication : Application() {
override fun onCreate() {
super.onCreate()
// Turn on verbose Braze logging
BrazeLogger.enableVerboseLogging()
// Configure Braze with your SDK key & endpoint
val config = BrazeConfig.Builder()
.setApiKey("YOUR_API_KEY")
.setCustomEndpoint("YOUR_API_ENDPOINT")
.build()
Braze.configure(this, config)
}
}
```
```kotlin file=ContentCardInboxActivity.kt
import android.content.Intent
import android.net.Uri
import android.os.Bundle
import androidx.activity.ComponentActivity
import androidx.recyclerview.widget.LinearLayoutManager
import androidx.recyclerview.widget.RecyclerView
import android.view.*
import android.widget.TextView
import com.braze.Braze
import com.braze.events.ContentCardsUpdatedEvent
import com.braze.events.IEventSubscriber
import com.braze.models.cards.*
class ContentCardsActivity : ComponentActivity() {
private val cards = mutableListOf()
private var subscriber: IEventSubscriber? = null
private lateinit var recyclerView: RecyclerView
private val adapter = ContentCardAdapter()
override fun onCreate(savedInstanceState: Bundle?) {
super.onCreate(savedInstanceState)
setContentView(R.layout.content_card_inbox)
recyclerView = findViewById(R.id.contentCardsRecyclerView)
recyclerView.layoutManager = LinearLayoutManager(this)
recyclerView.adapter = adapter
// Prepare the subscriber (attach/detach in onStart/onStop)
subscriber = IEventSubscriber { event ->
runOnUiThread {
cards.clear()
cards.addAll(event.allCards.filter { !it.isControl })
adapter.notifyDataSetChanged()
}
}
}
override fun onStart() {
super.onStart()
subscriber?.let {
Braze.getInstance(this).subscribeToContentCardsUpdates(it)
}
// Fetch fresh cards
Braze.getInstance(this).requestContentCardsRefresh(false)
}
override fun onStop() {
// Avoid leaks by removing the subscription when not visible
Braze.getInstance(this)
.removeSingleSubscription(subscriber, ContentCardsUpdatedEvent::class.java)
super.onStop()
}
inner class ContentCardAdapter :
RecyclerView.Adapter() {
inner class CardViewHolder(v: View) : RecyclerView.ViewHolder(v) {
val title: TextView = v.findViewById(android.R.id.text1)
val description: TextView = v.findViewById(android.R.id.text2)
}
override fun onCreateViewHolder(parent: ViewGroup, viewType: Int): CardViewHolder {
val view = LayoutInflater.from(parent.context)
.inflate(android.R.layout.simple_list_item_2, parent, false)
return CardViewHolder(view)
}
override fun getItemCount() = cards.size
override fun onBindViewHolder(holder: CardViewHolder, position: Int) {
val card = cards[position]
val title = when (card) {
is CaptionedImageCard -> card.title
is ShortNewsCard -> card.title
is TextAnnouncementCard -> card.title
else -> null
}
val description = when (card) {
is CaptionedImageCard -> card.description
is ShortNewsCard -> card.description
is TextAnnouncementCard -> card.description
else -> null
}
holder.title.text = title.orEmpty()
holder.description.text = description.orEmpty()
// Naive impression guard: only log the first time we bind a not-yet-viewed card.
if (!card.viewed) card.logImpression()
holder.itemView.setOnClickListener {
card.logClick()
card.url?.let { startActivity(Intent(Intent.ACTION_VIEW, Uri.parse(it))) }
}
}
}
}
```
```xml file=content_card_inbox.xml
```
!!step
lines-MainApplication.kt=12
#### 1. Enable debugging (optional)
To make troubleshooting easier while developing, consider enabling debugging.
!!step
lines-content_card_inbox.xml=1-24
#### 2. Build a UI view
In this tutorial, we use Android's [`RecyclerView`]() to display Content Cards, but we recommend building a UI with classes and components that suits your use case. Braze provides the UI by default, but this tutorial guides you to create a custom view to customize the appearance and behavior.
!!step
lines-ContentCardInboxActivity.kt=29-35,40-42,44
#### 3. Subscribe to Content Card updates
Use [`subscribeToContentCardsUpdates`]() to allow your UI to respond when new Content Cards are available. Here, subscribers are registered and removed within the activity lifecycle hooks.
!!step
lines-ContentCardInboxActivity.kt=73-84
#### 4. Build a custom inbox UI
Using the Content Card [attributes]() such as `title`, `description`, and `url` allows you to build Content Cards to match your specific UI requirements. In this case, we're building an inbox with Android's native `RecyclerView`.
!!step
lines-ContentCardInboxActivity.kt=90,93
#### 5. Track impressions and clicks
You can log impressions and clicks using the [`logImpressions`]() and [`logClick`]() methods available for Content Cards.
Impressions should only be logged once when a card is viewed by the user. Here, we use a naive mechanism to guard against duplicate logs with a per-card flag. Note that you may need to consider the view lifecycle of your app, as well as use case, to ensure impressions are logged correctly.
## Prerequisites
Before you can use this feature, you'll need to [integrate the Swift Braze SDK](https://www.braze.com/docs/developer_guide/sdk_integration/?sdktab=swift). You'll also need to [enable in-app messages for Swift](https://www.braze.com/docs/developer_guide/in_app_messages/?sdktab=swift#swift_enabling-in-app-messages).
## Making an inbox with Content Cards for Swift
**Important:**
We're piloting this new tutorial format. [Tell us what you think](https://docs.google.com/forms/d/e/1FAIpQLSe_5uhWM7eXXk9F_gviO_pvA4rkYO3WA9B6tNJZ3TY91md5bw/viewform?usp=pp_url&entry.569173304=General+Feedback) — your feedback helps us improve future guides.
```swift file=AppDelegate.swift
import SwiftUI
import BrazeKit
import BrazeUI
class AppDelegate: UIResponder, UIApplicationDelegate {
static var braze: Braze!
func application(
_ application: UIApplication,
didFinishLaunchingWithOptions launchOptions: [UIApplication.LaunchOptionsKey: Any]?
) -> Bool {
// Braze configuration with your SDK API key and endpoint
let configuration = Braze.Configuration(apiKey: "YOUR_API_ENDPOINT", endpoint: "YOUR_API_KEY")
configuration.logger.level = .debug
// Initialize Braze SDK instance
AppDelegate.braze = Braze(configuration: configuration)
return true
}
}
struct InboxViewControllerRepresentable: UIViewControllerRepresentable {
func makeUIViewController(context: Context) -> UINavigationController {
let vc = BrazeInboxViewController(style: .plain)
return UINavigationController(rootViewController: vc)
}
func updateUIViewController(_ uiViewController: UINavigationController, context: Context) {}
}
struct ContentView: View {
var body: some View {
NavigationView {
InboxViewControllerRepresentable()
.navigationTitle("Message Inbox")
}
}
}
```
```swift file=SampleApp.swift
import SwiftUI
@main
struct SampleApp: App {
@UIApplicationDelegateAdaptor(AppDelegate.self) var delegate
var body: some Scene {
WindowGroup {
ContentView()
}
}
}
```
```swift file=BrazeInboxView.swift
import SwiftUI
import UIKit
import BrazeKit
class BrazeInboxViewController: UITableViewController {
private var cards: [Braze.ContentCard] = []
private var subscription: Any?
private var loggedImpressions = Set()
override func viewDidLoad() {
super.viewDidLoad()
tableView.register(UITableViewCell.self, forCellReuseIdentifier: "CardCell")
tableView.rowHeight = 100
subscription = AppDelegate.braze.contentCards.subscribeToUpdates { [weak self] updatedCards in
self?.cards = updatedCards
self?.tableView.reloadData()
}
AppDelegate.braze.contentCards.requestRefresh()
}
override func numberOfSections(in tableView: UITableView) -> Int { 1 }
override func tableView(_ tableView: UITableView, numberOfRowsInSection section: Int) -> Int {
cards.count
}
override func tableView(_ tableView: UITableView, cellForRowAt indexPath: IndexPath) -> UITableViewCell {
let card = cards[indexPath.row]
let cell = tableView.dequeueReusableCell(withIdentifier: "CardCell", for: indexPath)
// Work with the content card's title and description
cell.textLabel?.numberOfLines = 2
cell.textLabel?.text = [card.title, card.description].compactMap { $0 }.joined(separator: "\n")
return cell
}
override func tableView(_ tableView: UITableView, didSelectRowAt indexPath: IndexPath) {
let card = cards[indexPath.row]
card.logClick(using: AppDelegate.braze)
if let url = card.clickAction?.url {
UIApplication.shared.open(url, options: [:], completionHandler: nil)
}
tableView.deselectRow(at: indexPath, animated: true)
}
override func tableView(_ tableView: UITableView,
willDisplay cell: UITableViewCell,
forRowAt indexPath: IndexPath) {
let card = cards[indexPath.row]
if !loggedImpressions.contains(card.id) {
card.logImpression(using: AppDelegate.braze)
}
}
}
```
!!step
lines-AppDelegate.swift=15
#### 1. Enable debugging (optional)
To make troubleshooting easier while developing, consider enabling debugging.
!!step
lines-BrazeInboxView.swift=5
#### 2. Build a UI View
In this tutorial, we use Swift's [`UITableViewController`](https://developer.apple.com/documentation/uikit/uitableviewcontroller), but we recommend building a UI with classes and components that suits your use case.
!!step
lines-BrazeInboxView.swift=15-20
#### 3. Subscribe to Content Card updates
Subscribe to the Content Cards listener to receive the latest updates, and then call `requestRefresh()` to request the latest Content Cards for that user.
!!step
lines-BrazeInboxView.swift=34-35
#### 4. Build a custom inbox UI
Using the Content Card [`attributes`](https://braze-inc.github.io/braze-swift-sdk/documentation/brazekit/braze/contentcard) such as `title`, `description`, and `imageUrl` allows you to build Content Cards to match your specific UI requirements. In this case, we're building an inbox with Swift's native table APIs.
!!step
lines-BrazeInboxView.swift=8,43,49-56
#### 5. Track impressions and clicks
You can log impressions and clicks using the [`logClick(using:)`]() and [`logImpression(using:)`]() methods available for a content card.
Additionally, you can use [`logDismissed(using:)`]() for dismissals.
Impressions should only be logged once when viewed by the user. Here, a naive mechanism using a `Set` and `willDisplay` is used to achieve this. Note that you may need to consider the UI lifecycle of your app, as well as use case, to ensure impressions are logged correctly.
## Prerequisites
Before you can use this feature, you'll need to [integrate the Web Braze SDK](https://www.braze.com/docs/developer_guide/sdk_integration/?sdktab=web). However, no additional setup is required.
## Making an inbox with Content Cards for Web
**Important:**
We're piloting this new tutorial format. [Tell us what you think](https://docs.google.com/forms/d/e/1FAIpQLSe_5uhWM7eXXk9F_gviO_pvA4rkYO3WA9B6tNJZ3TY91md5bw/viewform?usp=pp_url&entry.569173304=General+Feedback) — your feedback helps us improve future guides.
```js file=main.js
import * as braze from "@braze/web-sdk";
// Uncomment this if you'd like to run braze web SDK methods in the console
// window.braze = braze;
// initialize the Braze SDK
braze.initialize("YOUR_API_KEY", {
baseUrl: "YOUR_API_ENDPOINT",
enableLogging: true,
});
braze.openSession();
// --- DOM refs ---
const listEl = document.getElementById("cards-list");
// --- State for impression de-duping & lookup ---
const loggedImpressions = new Set();
const idToCard = new Map();
let observer = null;
// Utility: clean observer between renders
function resetObserver() {
if (observer) observer.disconnect();
observer = new IntersectionObserver(onIntersect, { threshold: 0.6 });
}
// Intersection callback: logs impression once when ≥60% visible
function onIntersect(entries) {
entries.forEach((entry) => {
if (!entry.isIntersecting) return;
const id = entry.target.dataset.cardId;
if (!id || loggedImpressions.has(id)) return;
const card = idToCard.get(id);
if (!card) return;
// Log a single-card impression and stop observing this element
braze.logContentCardImpressions([card]);
loggedImpressions.add(id);
observer.unobserve(entry.target);
});
}
// Renders cards into the DOM, sets up click + visibility tracking
function renderCards(cards) {
// Rebuild lookup and observer each render
idToCard.clear();
resetObserver();
listEl.textContent = ""; // clear list
cards.forEach((card) => {
// Skip control-group cards in UI; (optional) you could log impressions for them elsewhere
if (card.isControl) return;
idToCard.set(card.id, card);
const item = document.createElement("article");
item.className = "card-item";
item.dataset.cardId = card.id;
const h3 = document.createElement("h3");
h3.textContent = card.title || "";
const p = document.createElement("p");
p.textContent = card.description || "";
let img = undefined;
if (card.imageUrl) {
img = document.createElement("img");
img.src = card.imageUrl;
item.append(img);
}
const children = [h3, p];
if (img) {
children.push(img);
}
item.append(...children);
// Click tracking + action
item.addEventListener("click", (e) => {
braze.logContentCardClick(card);
if (card.url) {
// any url-handling logic for your use case
}
});
listEl.appendChild(item);
observer.observe(item);
});
}
// Subscribe to updates *then* ask for a refresh
braze.subscribeToContentCardsUpdates((updates) => {
const cards = updates.cards || [];
renderCards(cards);
});
braze.requestContentCardsRefresh();
```
```html file=index.html
Message Inbox
```
!!step
lines-main.js=3-4,9
#### 1. Enable debugging (optional)
To make troubleshooting easier while developing, consider enabling debugging. Optionally, you can also run Braze Web SDK methods in the console.
!!step
lines-index.html=1-44
#### 2. Build the UI
Create a UI for the inbox page. Here, we're building a basic HTML page, which includes a `div` with the id `cards-list`. This is used as the target container for rendering Content Cards.
!!step
lines-main.js=96-99,101
#### 3. Subscribe to Content Card updates
Subscribe to the Content Cards listener to receive the latest updates, and then call [`requestContentCardsRefresh()`]() to request the latest Content Cards for that user. Alternatively, call the subscriber before `openSession()` for an automatic refresh on session start.
!!step
lines-main.js=64,67,70-74
#### 4. Build the inbox elements
Using the Content Card [attributes]() such as `title`, `description`, and `url` allows you to display Content Cards to match your specific UI requirements.
!!step
lines-main.js=22-25,28-43,84,91
#### 5. Track impressions and clicks
You can log impressions and clicks using the [`logContentCardImpressions`]() and [`logContentCardClick`]() methods available for Content Cards.
Additionally, you can use [`logCardDismissal`]() for dismissals.
Impressions should only be logged once when viewed by the user. Here, an `IntersectionObserver` plus a `Set` keyed by `card.id` prevents duplicate logs. Note that you may need to consider the UI lifecycle of your app, as well as use case, to ensure impressions are logged correctly.
# In-app messages for the Braze SDK
Source: /docs/developer_guide/in_app_messages/index.md
# In-app messages
> Learn about in-app messages and how to set them up for the Braze SDK.
## Prerequisites
Before you can use this feature, you'll need to [integrate the Web Braze SDK](https://www.braze.com/docs/developer_guide/sdk_integration/?sdktab=web). However, no additional setup is required.
## Message types
All in-app messages inherit their prototype from [`InAppMessage`](https://js.appboycdn.com/web-sdk/latest/doc/classes/braze.inappmessage.html), which defines basic behavior and traits for all in-app messages. The prototypical subclasses are [`SlideUpMessage`](https://js.appboycdn.com/web-sdk/latest/doc/classes/braze.slideupmessage.html), [`ModalMessage`](https://js.appboycdn.com/web-sdk/latest/doc/classes/braze.modalmessage.html), [`FullScreenMessage`](https://js.appboycdn.com/web-sdk/latest/doc/classes/braze.fullscreenmessage.html), and [`HtmlMessage`](https://js.appboycdn.com/web-sdk/latest/doc/classes/braze.htmlmessage.html).
Each in-app message type is customizable across content, images, icons, click actions, analytics, display, and delivery.
[`SlideUp`](https://js.appboycdn.com/web-sdk/latest/doc/classes/braze.slideupmessage.html) in-app messages are so-named because traditionally on mobile platforms, they "slide up" or "slide down" from the top or bottom of the screen. In the Braze Web SDK, these messages are displayed as more of a Growl or Toast style notification to align with the web's dominant paradigm. They cover a small portion of the screen and provide an effective and non-intrusive messaging capability.
{: style="border:0px;"}
[`Modal`](https://js.appboycdn.com/web-sdk/latest/doc/classes/braze.modalmessage.html) in-app messages appear in the center of the screen and are framed by a translucent panel. Useful for more critical messaging, they can be equipped with up to two click action and analytics-enabled buttons.
{: style="border:0px;"}
[`Full`](https://js.appboycdn.com/web-sdk/latest/doc/classes/braze.fullscreenmessage.html) in-app messages are useful for maximizing the content and impact of your user communication. On narrow browser windows (for example, the mobile web), `full` in-app messages take up the entire browser window. On larger browser windows, `full` in-app messages appear similarly to `modal` in-app messages. The upper half of a `full` in-app message contains an image, and the lower half allows up to eight lines of text as well as up to two click action, and analytics-enabled buttons
{: style="border:0px;"}
[`HTML`](https://js.appboycdn.com/web-sdk/latest/doc/classes/braze.htmlmessage.html) in-app messages are useful for creating fully customized user content. User-defined HTML is displayed in an iFrame and may contain rich content, such as images, fonts, videos, and interactive elements, allowing for full control over message appearance and functionality. These support a JavaScript `brazeBridge` interface to call methods on the Braze Web SDK from within your HTML, see our [best practices](https://www.braze.com/docs/user_guide/message_building_by_channel/in-app_messages/best_practices/) for more details.
**Important:**
To enable HTML in-app messages through the Web SDK, you **must** supply the `allowUserSuppliedJavascript` initialization option to Braze, for example, `braze.initialize('YOUR-API_KEY', {allowUserSuppliedJavascript: true})`. This is for security reasons. HTML in-app messages can execute JavaScript, so we require a site maintainer to enable them.
The following example shows a paginated HTML in-app message:

## Prerequisites
Before you can use this feature, you'll need to [integrate the Android Braze SDK](https://www.braze.com/docs/developer_guide/sdk_integration/?sdktab=android). You'll also need to enable in-app messages.
## Message types
Braze offers several default in-app message types, each customizable with messages, images, [Font Awesome](https://fontawesome.com/icons?d=gallery&p=2) icons, click actions, analytics, color schemes, and more.
Their basic behavior and traits are defined by the [`IInAppMessage`](https://braze-inc.github.io/braze-android-sdk/kdoc/braze-android-sdk/com.braze.models.inappmessage/-i-in-app-message/index.html) interface, in a subclass called [`InAppMessageBase`](https://braze-inc.github.io/braze-android-sdk/kdoc/braze-android-sdk/com.braze.models.inappmessage/-in-app-message-base/index.html). `IInAppMessage` also includes a subinterface, [`IInAppMessageImmersive`](https://braze-inc.github.io/braze-android-sdk/kdoc/braze-android-sdk/com.braze.models.inappmessage/-i-in-app-message-immersive/index.html), which lets you add close, click-action, and analytics [buttons](https://braze-inc.github.io/braze-android-sdk/kdoc/braze-android-sdk/com.braze.models.inappmessage/-message-button/index.html) to your app.
**Important:**
Keep in mind, in-app messages containing buttons will include the `clickAction` message in the final payload if the click action is added prior to adding the button text.
[`slideup`](https://braze-inc.github.io/braze-android-sdk/kdoc/braze-android-sdk/com.braze.models.inappmessage/-in-app-message-slideup/index.html) in-app messages are so-named because they "slide up" or "slide down" from the top or bottom of the screen. They cover a small portion of the screen and provide an effective and non-intrusive messaging capability.
The `slideup` in-app message object extends [`InAppMessageBase`](https://braze-inc.github.io/braze-android-sdk/kdoc/braze-android-sdk/com.braze.models.inappmessage/-in-app-message-base/index.html).
{: style="border:0px;"}
[`modal`](https://braze-inc.github.io/braze-android-sdk/kdoc/braze-android-sdk/com.braze.models.inappmessage/-in-app-message-modal/index.html) in-app messages appear in the center of the screen and are framed by a translucent panel. Useful for more critical messaging, they can be equipped with two click-action and analytics-enabled buttons.
This message type is a subclass of [`InAppMessageImmersiveBase`](https://braze-inc.github.io/braze-android-sdk/kdoc/braze-android-sdk/com.braze.models.inappmessage/-in-app-message-immersive-base/index.html), an abstract class that implements `IInAppMessageImmersive`, giving you the option to add custom functionality to your locally generated in-app messages.
{: style="border:0px;"}
[`full`](https://braze-inc.github.io/braze-android-sdk/kdoc/braze-android-sdk/com.braze.models.inappmessage/-in-app-message-full/index.html) in-app messages are useful for maximizing the content and impact of your user communication. The upper half of a `full` in-app message contains an image, and the lower half displays text and up to two click action and analytics-enabled buttons.
This message type extends [`InAppMessageImmersiveBase`](https://braze-inc.github.io/braze-android-sdk/kdoc/braze-android-sdk/com.braze.models.inappmessage/-in-app-message-immersive-base/index.html), giving you the option to add custom functionality to your locally generated in-app messages.
[`HTML`](https://braze-inc.github.io/braze-android-sdk/kdoc/braze-android-sdk/com.braze.models.inappmessage/-in-app-message-html/index.html) in-app messages are useful for creating fully customized user content. User-defined HTML in-app message content is displayed in a `WebView` and may optionally contain other rich content, such as images and fonts, allowing for full control over message appearance and functionality.
This message type implements [`IInAppMessageHtml`](https://braze-inc.github.io/braze-android-sdk/kdoc/braze-android-sdk/com.braze.models.inappmessage/-i-in-app-message-html/index.html), which is a subclass of [`IInAppMessage`](https://braze-inc.github.io/braze-android-sdk/kdoc/braze-android-sdk/com.braze.models.inappmessage/-i-in-app-message/index.html).
**Note:**
On Android, links configured with `target="_blank"` in custom HTML in-app messages open in the device's default web browser.
Android in-app messages support a JavaScript `brazeBridge` interface to call methods on the Braze Android SDK from within your HTML, see our JavaScript bridge page for more details.
{: style="border:0px;"}
**Important:**
We currently do not support the display of custom HTML in-app messages in an iFrame on the iOS and Android platforms.
**Tip:**
You can also define custom in-app message views for your app. For a full walkthrough, see [Setting custom factories](https://www.braze.com/docs/developer_guide/in_app_messages/customization#android_setting-custom-factories).
## Enabling in-app messages
### Step 1: Register `BrazeInAppMessageManager`
In-app message display is managed by the [`BrazeInAppMessageManager`](https://braze-inc.github.io/braze-android-sdk/kdoc/braze-android-sdk/com.braze.ui.inappmessage/-braze-in-app-message-manager/index.html) class. Every activity in your app must be registered with the `BrazeInAppMessageManager` to allow it to add in-app message views to the view hierarchy. There are two ways to accomplish this:
The [activity lifecycle callback integration](https://www.braze.com/docs/developer_guide/sdk_integration#android_step-4-enable-user-session-tracking) handles in-app message registration automatically; no extra integration is required. This is the recommended method for handling in-app message registration.
**Warning:**
If you're using activity lifecycle callback for automatic registration, do not complete this step.
In your [`Application.onCreate()`](https://developer.android.com/reference/android/app/Application.html#onCreate()), call [`ensureSubscribedToInAppMessageEvents()`](https://braze-inc.github.io/braze-android-sdk/kdoc/braze-android-sdk/com.braze.ui.inappmessage/-braze-in-app-message-manager/ensure-subscribed-to-in-app-message-events.html):
```java
BrazeInAppMessageManager.getInstance().ensureSubscribedToInAppMessageEvents(context);
```
```kotlin
BrazeInAppMessageManager.getInstance().ensureSubscribedToInAppMessageEvents(context)
```
In every activity where in-app messages can be shown, call [`registerInAppMessageManager()`](https://braze-inc.github.io/braze-android-sdk/kdoc/braze-android-sdk/com.braze.ui.inappmessage/-braze-in-app-message-manager/register-in-app-message-manager.html) in that activity's `onResume()`:
```java
@Override
public void onResume() {
super.onResume();
// Registers the BrazeInAppMessageManager for the current Activity. This Activity will now listen for
// in-app messages from Braze.
BrazeInAppMessageManager.getInstance().registerInAppMessageManager(activity);
}
```
```kotlin
public override fun onResume() {
super.onResume()
// Registers the BrazeInAppMessageManager for the current Activity. This Activity will now listen for
// in-app messages from Braze.
BrazeInAppMessageManager.getInstance().registerInAppMessageManager(this)
}
```
In every activity where [`registerInAppMessageManager()`](https://braze-inc.github.io/braze-android-sdk/kdoc/braze-android-sdk/com.braze.ui.inappmessage/-braze-in-app-message-manager/register-in-app-message-manager.html) was called, call [`unregisterInAppMessageManager()`](https://braze-inc.github.io/braze-android-sdk/kdoc/braze-android-sdk/com.braze.ui.inappmessage/-braze-in-app-message-manager/unregister-in-app-message-manager.html) in that activity's `onPause()`:
```java
@Override
public void onPause() {
super.onPause();
// Unregisters the BrazeInAppMessageManager for the current Activity.
BrazeInAppMessageManager.getInstance().unregisterInAppMessageManager(activity);
}
```
```kotlin
public override fun onPause() {
super.onPause()
// Unregisters the BrazeInAppMessageManager.
BrazeInAppMessageManager.getInstance().unregisterInAppMessageManager(this)
}
```
### Step 2: Update the manager's blocklist (optional)
In your integration, you may require that certain activities in your app should not show in-app messages. The [activity lifecycle callback integration](https://www.braze.com/docs/developer_guide/sdk_integration#android_step-4-enable-user-session-tracking) provides an easy way to accomplish this.
The following sample code adds two activities to the in-app message registration blocklist, `SplashActivity` and `SettingsActivity`:
```java
public class MyApplication extends Application {
@Override
public void onCreate() {
super.onCreate();
Set inAppMessageBlocklist = new HashSet<>();
inAppMessageBlocklist.add(SplashActivity.class);
inAppMessageBlocklist.add(SettingsActivity.class);
registerActivityLifecycleCallbacks(new BrazeActivityLifecycleCallbackListener(inAppMessageBlocklist));
}
}
```
```kotlin
class MyApplication : Application() {
override fun onCreate() {
super.onCreate()
val inAppMessageBlocklist = HashSet>()
inAppMessageBlocklist.add(SplashActivity::class.java)
inAppMessageBlocklist.add(SettingsActivity::class.java)
registerActivityLifecycleCallbacks(BrazeActivityLifecycleCallbackListener(inAppMessageBlocklist))
}
}
```
## Prerequisites
Before you can use this feature, you'll need to [integrate the Swift Braze SDK](https://www.braze.com/docs/developer_guide/sdk_integration/?sdktab=swift). You'll also need to enable in-app messages.
## Message types
Each in-app message type is highly customizable across content, images, icons, click actions, analytics, display, and delivery. They are enumerated types of `Braze.InAppMessage`, which defines basic behavior and traits for all in-app messages. For the full list of in-app message properties and usage, see the [`InAppMessage` class](https://braze-inc.github.io/braze-swift-sdk/documentation/brazekit/braze/inappmessage).
These are the available in-app message types in Braze and how they will look like for end-users.
[`Slideup`](https://braze-inc.github.io/braze-swift-sdk/documentation/brazekit/braze/inappmessage/slideup-swift.struct) in-app messages are given this name because they "slide up" or "slide down" from the top or bottom of the screen. They cover a small portion of the screen and provide an effective and non-intrusive messaging capability.
{: style="max-width:35%;border:none;"}
[`Modal`](https://braze-inc.github.io/braze-swift-sdk/documentation/brazekit/braze/inappmessage/modal-swift.struct) in-app messages appear in the center of the screen and are framed by a translucent panel. Useful for more critical messaging, they can be equipped with up to two analytics-enabled buttons.
{: style="max-width:35%;border:none;"}
[`Modal Image`](https://braze-inc.github.io/braze-swift-sdk/documentation/brazekit/braze/inappmessage/modalimage-swift.struct) in-app messages appear in the center of the screen and are framed by a translucent panel. These messages are similar to the `Modal` type except without header or message text. Useful for more critical messaging, they can be equipped with up to two analytics-enabled buttons.
{: style="max-width:35%;border:none;"}
[`Full`](https://braze-inc.github.io/braze-swift-sdk/documentation/brazekit/braze/inappmessage/full-swift.struct) in-app messages are useful for maximizing the content and impact of your user communication. The upper half of a `Full` in-app message contains an image, and the lower half displays text and up to two analytics-enabled buttons.
{: style="max-width:35%;border:none;"}
[`Full Image`](https://braze-inc.github.io/braze-swift-sdk/documentation/brazekit/braze/inappmessage/fullimage-swift.struct) in-app messages are similar to `Full` in-app messages except without header or message text. This message type is useful for maximizing the content and impact of your user communication. A `Full Image` in-app message contains an image spanning the entire screen, with the option to display up to two analytics-enabled buttons.
{: style="max-width:35%;border:none;"}
[`HTML`](https://braze-inc.github.io/braze-swift-sdk/documentation/brazekit/braze/inappmessage/html-swift.struct) in-app messages are useful for creating fully customized user content. User-defined HTML Full in-app message content is displayed in a `WKWebView`and may optionally contain other rich content, such as images and fonts, allowing for full control over message appearance and functionality.
iOS in-app messages support a JavaScript `brazeBridge` interface to call methods on the Braze Web SDK from within your HTML, see our [best practices](https://www.braze.com/docs/user_guide/message_building_by_channel/in-app_messages/best_practices/) for more details.
The following example shows a paginated HTML Full in-app message:

Note that we currently do not support the display of custom HTML in-app messages in an iFrame on the iOS and Android platforms.
[`Control`](https://braze-inc.github.io/braze-swift-sdk/documentation/brazekit/braze/inappmessage/control-swift.struct) in-app messages do not contain a UI component and are used primarily for analytics purposes. This type is used to verify receipt of an in-app message sent to a control group.
For further details about Intelligent Selection and control groups, refer to [Intelligent Selection](https://www.braze.com/docs/user_guide/brazeai/intelligence/intelligent_selection/).
## Enabling in-app messages
### Step 1: Create an implementation of `BrazeInAppMessagePresenter`
To let Braze display in-app messages, create an implementation of the `BrazeInAppMessagePresenter` protocol and assign it to the optional `inAppMessagePresenter` on your Braze instance. You can also use the default Braze UI presenter by instantiating a `BrazeInAppMessageUI` object.
Note that you will need to import the `BrazeUI` library to access the `BrazeInAppMessageUI` class.
```swift
AppDelegate.braze?.inAppMessagePresenter = BrazeInAppMessageUI()
```
```objc
AppDelegate.braze.inAppMessagePresenter = [[BrazeInAppMessageUI alloc] init];
```
### Step 2: Handle no matching triggers
Implement [`BrazeDelegate.(_:noMatchingTriggerForEvent)`](https://braze-inc.github.io/braze-swift-sdk/documentation/brazekit/brazedelegate/braze(_:nomatchingtriggerforevent:)-8rt7y/) within the relevant `BrazeDelegate` class. When Braze fails to find a matching trigger for a particular event, it will call this method automatically.
## Prerequisites
Before you can use this feature, you'll need to [integrate the Android Braze SDK](https://www.braze.com/docs/developer_guide/sdk_integration/?sdktab=android).
## About TV and OTT support
The Android Braze SDK natively supports displaying in-app messages on OTT devices like Android TV or Fire Stick. However, there's some key differences between native Android and OTT in-app messages. For OTT devices:
- In-app messages that require touch mode, such as slideup, are disabled on OTT.
- The currently selected or focused item, such as a button or close button, will be highlighted.
- Body clicks on the in-app message itself, such as not on a button, are not supported.
## Prerequisites
Before you can use this feature, you'll need to [integrate the Cordova Braze SDK](https://www.braze.com/docs/developer_guide/sdk_integration/?sdktab=cordova).
## Message types
Braze offers several default in-app message types, each customizable with messages, images, [Font Awesome](https://fontawesome.com/icons?d=gallery&p=2) icons, click actions, analytics, color schemes, and more.
Their basic behavior and traits are defined by the [`IInAppMessage`](https://braze-inc.github.io/braze-android-sdk/kdoc/braze-android-sdk/com.braze.models.inappmessage/-i-in-app-message/index.html) interface, in a subclass called [`InAppMessageBase`](https://braze-inc.github.io/braze-android-sdk/kdoc/braze-android-sdk/com.braze.models.inappmessage/-in-app-message-base/index.html). `IInAppMessage` also includes a subinterface, [`IInAppMessageImmersive`](https://braze-inc.github.io/braze-android-sdk/kdoc/braze-android-sdk/com.braze.models.inappmessage/-i-in-app-message-immersive/index.html), which lets you add close, click-action, and analytics [buttons](https://braze-inc.github.io/braze-android-sdk/kdoc/braze-android-sdk/com.braze.models.inappmessage/-message-button/index.html) to your app.
**Important:**
Keep in mind, in-app messages containing buttons will include the `clickAction` message in the final payload if the click action is added prior to adding the button text.
[`slideup`](https://braze-inc.github.io/braze-android-sdk/kdoc/braze-android-sdk/com.braze.models.inappmessage/-in-app-message-slideup/index.html) in-app messages are so-named because they "slide up" or "slide down" from the top or bottom of the screen. They cover a small portion of the screen and provide an effective and non-intrusive messaging capability.
The `slideup` in-app message object extends [`InAppMessageBase`](https://braze-inc.github.io/braze-android-sdk/kdoc/braze-android-sdk/com.braze.models.inappmessage/-in-app-message-base/index.html).
{: style="border:0px;"}
[`modal`](https://braze-inc.github.io/braze-android-sdk/kdoc/braze-android-sdk/com.braze.models.inappmessage/-in-app-message-modal/index.html) in-app messages appear in the center of the screen and are framed by a translucent panel. Useful for more critical messaging, they can be equipped with two click-action and analytics-enabled buttons.
This message type is a subclass of [`InAppMessageImmersiveBase`](https://braze-inc.github.io/braze-android-sdk/kdoc/braze-android-sdk/com.braze.models.inappmessage/-in-app-message-immersive-base/index.html), an abstract class that implements `IInAppMessageImmersive`, giving you the option to add custom functionality to your locally generated in-app messages.
{: style="border:0px;"}
[`full`](https://braze-inc.github.io/braze-android-sdk/kdoc/braze-android-sdk/com.braze.models.inappmessage/-in-app-message-full/index.html) in-app messages are useful for maximizing the content and impact of your user communication. The upper half of a `full` in-app message contains an image, and the lower half displays text and up to two click action and analytics-enabled buttons.
This message type extends [`InAppMessageImmersiveBase`](https://braze-inc.github.io/braze-android-sdk/kdoc/braze-android-sdk/com.braze.models.inappmessage/-in-app-message-immersive-base/index.html), giving you the option to add custom functionality to your locally generated in-app messages.

[`HTML`](https://braze-inc.github.io/braze-android-sdk/kdoc/braze-android-sdk/com.braze.models.inappmessage/-in-app-message-html/index.html) in-app messages are useful for creating fully customized user content. User-defined HTML in-app message content is displayed in a `WebView` and may optionally contain other rich content, such as images and fonts, allowing for full control over message appearance and functionality.
This message type implements [`IInAppMessageHtml`](https://braze-inc.github.io/braze-android-sdk/kdoc/braze-android-sdk/com.braze.models.inappmessage/-i-in-app-message-html/index.html), which is a subclass of [`IInAppMessage`](https://braze-inc.github.io/braze-android-sdk/kdoc/braze-android-sdk/com.braze.models.inappmessage/-i-in-app-message/index.html).
**Note:**
On Android, links configured with `target="_blank"` in custom HTML in-app messages open in the device's default web browser.
Android in-app messages support a JavaScript `brazeBridge` interface to call methods on the Braze Android SDK from within your HTML, see our JavaScript bridge page for more details.
{: style="border:0px;"}
**Important:**
We currently do not support the display of custom HTML in-app messages in an iFrame on the iOS and Android platforms.
**Tip:**
You can also define custom in-app message views for your app. For a full walkthrough, see [Setting custom factories](https://www.braze.com/docs/developer_guide/in_app_messages/customization#android_setting-custom-factories).
Each in-app message type is highly customizable across content, images, icons, click actions, analytics, display, and delivery. They are enumerated types of `Braze.InAppMessage`, which defines basic behavior and traits for all in-app messages. For the full list of in-app message properties and usage, see the [`InAppMessage` class](https://braze-inc.github.io/braze-swift-sdk/documentation/brazekit/braze/inappmessage).
These are the available in-app message types in Braze and how they will look like for end-users.
[`Slideup`](https://braze-inc.github.io/braze-swift-sdk/documentation/brazekit/braze/inappmessage/slideup-swift.struct) in-app messages are given this name because they "slide up" or "slide down" from the top or bottom of the screen. They cover a small portion of the screen and provide an effective and non-intrusive messaging capability.
{: style="max-width:35%;border:none;"}
[`Modal`](https://braze-inc.github.io/braze-swift-sdk/documentation/brazekit/braze/inappmessage/modal-swift.struct) in-app messages appear in the center of the screen and are framed by a translucent panel. Useful for more critical messaging, they can be equipped with up to two analytics-enabled buttons.
{: style="max-width:35%;border:none;"}
[`Modal Image`](https://braze-inc.github.io/braze-swift-sdk/documentation/brazekit/braze/inappmessage/modalimage-swift.struct) in-app messages appear in the center of the screen and are framed by a translucent panel. These messages are similar to the `Modal` type except without header or message text. Useful for more critical messaging, they can be equipped with up to two analytics-enabled buttons.
{: style="max-width:35%;border:none;"}
[`Full`](https://braze-inc.github.io/braze-swift-sdk/documentation/brazekit/braze/inappmessage/full-swift.struct) in-app messages are useful for maximizing the content and impact of your user communication. The upper half of a `Full` in-app message contains an image, and the lower half displays text and up to two analytics-enabled buttons.
{: style="max-width:35%;border:none;"}
[`Full Image`](https://braze-inc.github.io/braze-swift-sdk/documentation/brazekit/braze/inappmessage/fullimage-swift.struct) in-app messages are similar to `Full` in-app messages except without header or message text. This message type is useful for maximizing the content and impact of your user communication. A `Full Image` in-app message contains an image spanning the entire screen, with the option to display up to two analytics-enabled buttons.
{: style="max-width:35%;border:none;"}
[`HTML`](https://braze-inc.github.io/braze-swift-sdk/documentation/brazekit/braze/inappmessage/html-swift.struct) in-app messages are useful for creating fully customized user content. User-defined HTML Full in-app message content is displayed in a `WKWebView`and may optionally contain other rich content, such as images and fonts, allowing for full control over message appearance and functionality.
iOS in-app messages support a JavaScript `brazeBridge` interface to call methods on the Braze Web SDK from within your HTML, see our [best practices](https://www.braze.com/docs/user_guide/message_building_by_channel/in-app_messages/best_practices/) for more details.
The following example shows a paginated HTML Full in-app message:

Note that we currently do not support the display of custom HTML in-app messages in an iFrame on the iOS and Android platforms.
[`Control`](https://braze-inc.github.io/braze-swift-sdk/documentation/brazekit/braze/inappmessage/control-swift.struct) in-app messages do not contain a UI component and are used primarily for analytics purposes. This type is used to verify receipt of an in-app message sent to a control group.
For further details about Intelligent Selection and control groups, refer to [Intelligent Selection](https://www.braze.com/docs/user_guide/brazeai/intelligence/intelligent_selection/).
## Prerequisites
Before you can use this feature, you'll need to [integrate the Flutter Braze SDK](https://www.braze.com/docs/developer_guide/sdk_integration/?sdktab=flutter).
## Message types
Braze offers several default in-app message types, each customizable with messages, images, [Font Awesome](https://fontawesome.com/icons?d=gallery&p=2) icons, click actions, analytics, color schemes, and more.
Their basic behavior and traits are defined by the [`IInAppMessage`](https://braze-inc.github.io/braze-android-sdk/kdoc/braze-android-sdk/com.braze.models.inappmessage/-i-in-app-message/index.html) interface, in a subclass called [`InAppMessageBase`](https://braze-inc.github.io/braze-android-sdk/kdoc/braze-android-sdk/com.braze.models.inappmessage/-in-app-message-base/index.html). `IInAppMessage` also includes a subinterface, [`IInAppMessageImmersive`](https://braze-inc.github.io/braze-android-sdk/kdoc/braze-android-sdk/com.braze.models.inappmessage/-i-in-app-message-immersive/index.html), which lets you add close, click-action, and analytics [buttons](https://braze-inc.github.io/braze-android-sdk/kdoc/braze-android-sdk/com.braze.models.inappmessage/-message-button/index.html) to your app.
**Important:**
Keep in mind, in-app messages containing buttons will include the `clickAction` message in the final payload if the click action is added prior to adding the button text.
[`slideup`](https://braze-inc.github.io/braze-android-sdk/kdoc/braze-android-sdk/com.braze.models.inappmessage/-in-app-message-slideup/index.html) in-app messages are so-named because they "slide up" or "slide down" from the top or bottom of the screen. They cover a small portion of the screen and provide an effective and non-intrusive messaging capability.
The `slideup` in-app message object extends [`InAppMessageBase`](https://braze-inc.github.io/braze-android-sdk/kdoc/braze-android-sdk/com.braze.models.inappmessage/-in-app-message-base/index.html).
{: style="border:0px;"}
[`modal`](https://braze-inc.github.io/braze-android-sdk/kdoc/braze-android-sdk/com.braze.models.inappmessage/-in-app-message-modal/index.html) in-app messages appear in the center of the screen and are framed by a translucent panel. Useful for more critical messaging, they can be equipped with two click-action and analytics-enabled buttons.
This message type is a subclass of [`InAppMessageImmersiveBase`](https://braze-inc.github.io/braze-android-sdk/kdoc/braze-android-sdk/com.braze.models.inappmessage/-in-app-message-immersive-base/index.html), an abstract class that implements `IInAppMessageImmersive`, giving you the option to add custom functionality to your locally generated in-app messages.
{: style="border:0px;"}
[`full`](https://braze-inc.github.io/braze-android-sdk/kdoc/braze-android-sdk/com.braze.models.inappmessage/-in-app-message-full/index.html) in-app messages are useful for maximizing the content and impact of your user communication. The upper half of a `full` in-app message contains an image, and the lower half displays text and up to two click action and analytics-enabled buttons.
This message type extends [`InAppMessageImmersiveBase`](https://braze-inc.github.io/braze-android-sdk/kdoc/braze-android-sdk/com.braze.models.inappmessage/-in-app-message-immersive-base/index.html), giving you the option to add custom functionality to your locally generated in-app messages.

[`HTML`](https://braze-inc.github.io/braze-android-sdk/kdoc/braze-android-sdk/com.braze.models.inappmessage/-in-app-message-html/index.html) in-app messages are useful for creating fully customized user content. User-defined HTML in-app message content is displayed in a `WebView` and may optionally contain other rich content, such as images and fonts, allowing for full control over message appearance and functionality.
This message type implements [`IInAppMessageHtml`](https://braze-inc.github.io/braze-android-sdk/kdoc/braze-android-sdk/com.braze.models.inappmessage/-i-in-app-message-html/index.html), which is a subclass of [`IInAppMessage`](https://braze-inc.github.io/braze-android-sdk/kdoc/braze-android-sdk/com.braze.models.inappmessage/-i-in-app-message/index.html).
**Note:**
On Android, links configured with `target="_blank"` in custom HTML in-app messages open in the device's default web browser.
Android in-app messages support a JavaScript `brazeBridge` interface to call methods on the Braze Android SDK from within your HTML, see our JavaScript bridge page for more details.
{: style="border:0px;"}
**Important:**
We currently do not support the display of custom HTML in-app messages in an iFrame on the iOS and Android platforms.
**Tip:**
You can also define custom in-app message views for your app. For a full walkthrough, see [Setting custom factories](https://www.braze.com/docs/developer_guide/in_app_messages/customization#android_setting-custom-factories).
Each in-app message type is highly customizable across content, images, icons, click actions, analytics, display, and delivery. They are enumerated types of `Braze.InAppMessage`, which defines basic behavior and traits for all in-app messages. For the full list of in-app message properties and usage, see the [`InAppMessage` class](https://braze-inc.github.io/braze-swift-sdk/documentation/brazekit/braze/inappmessage).
These are the available in-app message types in Braze and how they will look like for end-users.
[`Slideup`](https://braze-inc.github.io/braze-swift-sdk/documentation/brazekit/braze/inappmessage/slideup-swift.struct) in-app messages are given this name because they "slide up" or "slide down" from the top or bottom of the screen. They cover a small portion of the screen and provide an effective and non-intrusive messaging capability.
{: style="max-width:35%;border:none;"}
[`Modal`](https://braze-inc.github.io/braze-swift-sdk/documentation/brazekit/braze/inappmessage/modal-swift.struct) in-app messages appear in the center of the screen and are framed by a translucent panel. Useful for more critical messaging, they can be equipped with up to two analytics-enabled buttons.
{: style="max-width:35%;border:none;"}
[`Modal Image`](https://braze-inc.github.io/braze-swift-sdk/documentation/brazekit/braze/inappmessage/modalimage-swift.struct) in-app messages appear in the center of the screen and are framed by a translucent panel. These messages are similar to the `Modal` type except without header or message text. Useful for more critical messaging, they can be equipped with up to two analytics-enabled buttons.
{: style="max-width:35%;border:none;"}
[`Full`](https://braze-inc.github.io/braze-swift-sdk/documentation/brazekit/braze/inappmessage/full-swift.struct) in-app messages are useful for maximizing the content and impact of your user communication. The upper half of a `Full` in-app message contains an image, and the lower half displays text and up to two analytics-enabled buttons.
{: style="max-width:35%;border:none;"}
[`Full Image`](https://braze-inc.github.io/braze-swift-sdk/documentation/brazekit/braze/inappmessage/fullimage-swift.struct) in-app messages are similar to `Full` in-app messages except without header or message text. This message type is useful for maximizing the content and impact of your user communication. A `Full Image` in-app message contains an image spanning the entire screen, with the option to display up to two analytics-enabled buttons.
{: style="max-width:35%;border:none;"}
[`HTML`](https://braze-inc.github.io/braze-swift-sdk/documentation/brazekit/braze/inappmessage/html-swift.struct) in-app messages are useful for creating fully customized user content. User-defined HTML Full in-app message content is displayed in a `WKWebView`and may optionally contain other rich content, such as images and fonts, allowing for full control over message appearance and functionality.
iOS in-app messages support a JavaScript `brazeBridge` interface to call methods on the Braze Web SDK from within your HTML, see our [best practices](https://www.braze.com/docs/user_guide/message_building_by_channel/in-app_messages/best_practices/) for more details.
The following example shows a paginated HTML Full in-app message:

Note that we currently do not support the display of custom HTML in-app messages in an iFrame on the iOS and Android platforms.
[`Control`](https://braze-inc.github.io/braze-swift-sdk/documentation/brazekit/braze/inappmessage/control-swift.struct) in-app messages do not contain a UI component and are used primarily for analytics purposes. This type is used to verify receipt of an in-app message sent to a control group.
For further details about Intelligent Selection and control groups, refer to [Intelligent Selection](https://www.braze.com/docs/user_guide/brazeai/intelligence/intelligent_selection/).
## Enabling in-app messages
**Note:**
This step is for iOS only. The default implementation for in-app messages is already set up on Android.
To set up the default presenter for in-app messages on iOS, create an implementation of the `BrazeInAppMessagePresenter` protocol and assign it to the optional `inAppMessagePresenter` on your Braze instance. You can also use the default Braze UI presenter by instantiating a `BrazeInAppMessageUI` object.
You must import the `BrazeUI` library to access the `BrazeInAppMessageUI` class.
```swift
import BrazeUI
override func application(
_ application: UIApplication,
didFinishLaunchingWithOptions launchOptions: [UIApplication.LaunchOptionsKey : Any]? = nil
) -> Bool {
...
let braze = BrazePlugin.initBraze(configuration)
// Initialize and assign the default `BrazeInAppMessageUI` class to the in-app message presenter.
braze.inAppMessagePresenter = BrazeInAppMessageUI()
AppDelegate.braze = braze
return true
}
```
```objc
@import BrazeUI;
- (BOOL)application:(UIApplication *)application
didFinishLaunchingWithOptions:(NSDictionary *)launchOptions {
...
Braze *braze = [BrazePlugin initBraze:configuration];
// Initialize and assign the default `BrazeInAppMessageUI` class to the in-app message presenter.
braze.inAppMessagePresenter = [[BrazeInAppMessageUI alloc] init];
AppDelegate.braze = braze;
[self.window makeKeyAndVisible];
return YES;
}
```
To customize your implementation further, refer to [Logging in-app message data](https://www.braze.com/docs/developer_guide/in_app_messages/logging_message_data?sdktab=flutter).
## Prerequisites
Before you can use this feature, you'll need to [integrate the React Native Braze SDK](https://www.braze.com/docs/developer_guide/sdk_integration/?sdktab=react%20native).
## Message types
Braze offers several default in-app message types, each customizable with messages, images, [Font Awesome](https://fontawesome.com/icons?d=gallery&p=2) icons, click actions, analytics, color schemes, and more.
Their basic behavior and traits are defined by the [`IInAppMessage`](https://braze-inc.github.io/braze-android-sdk/kdoc/braze-android-sdk/com.braze.models.inappmessage/-i-in-app-message/index.html) interface, in a subclass called [`InAppMessageBase`](https://braze-inc.github.io/braze-android-sdk/kdoc/braze-android-sdk/com.braze.models.inappmessage/-in-app-message-base/index.html). `IInAppMessage` also includes a subinterface, [`IInAppMessageImmersive`](https://braze-inc.github.io/braze-android-sdk/kdoc/braze-android-sdk/com.braze.models.inappmessage/-i-in-app-message-immersive/index.html), which lets you add close, click-action, and analytics [buttons](https://braze-inc.github.io/braze-android-sdk/kdoc/braze-android-sdk/com.braze.models.inappmessage/-message-button/index.html) to your app.
**Important:**
Keep in mind, in-app messages containing buttons will include the `clickAction` message in the final payload if the click action is added prior to adding the button text.
[`slideup`](https://braze-inc.github.io/braze-android-sdk/kdoc/braze-android-sdk/com.braze.models.inappmessage/-in-app-message-slideup/index.html) in-app messages are so-named because they "slide up" or "slide down" from the top or bottom of the screen. They cover a small portion of the screen and provide an effective and non-intrusive messaging capability.
The `slideup` in-app message object extends [`InAppMessageBase`](https://braze-inc.github.io/braze-android-sdk/kdoc/braze-android-sdk/com.braze.models.inappmessage/-in-app-message-base/index.html).
{: style="border:0px;"}
[`modal`](https://braze-inc.github.io/braze-android-sdk/kdoc/braze-android-sdk/com.braze.models.inappmessage/-in-app-message-modal/index.html) in-app messages appear in the center of the screen and are framed by a translucent panel. Useful for more critical messaging, they can be equipped with two click-action and analytics-enabled buttons.
This message type is a subclass of [`InAppMessageImmersiveBase`](https://braze-inc.github.io/braze-android-sdk/kdoc/braze-android-sdk/com.braze.models.inappmessage/-in-app-message-immersive-base/index.html), an abstract class that implements `IInAppMessageImmersive`, giving you the option to add custom functionality to your locally generated in-app messages.
{: style="border:0px;"}
[`full`](https://braze-inc.github.io/braze-android-sdk/kdoc/braze-android-sdk/com.braze.models.inappmessage/-in-app-message-full/index.html) in-app messages are useful for maximizing the content and impact of your user communication. The upper half of a `full` in-app message contains an image, and the lower half displays text and up to two click action and analytics-enabled buttons.
This message type extends [`InAppMessageImmersiveBase`](https://braze-inc.github.io/braze-android-sdk/kdoc/braze-android-sdk/com.braze.models.inappmessage/-in-app-message-immersive-base/index.html), giving you the option to add custom functionality to your locally generated in-app messages.

[`HTML`](https://braze-inc.github.io/braze-android-sdk/kdoc/braze-android-sdk/com.braze.models.inappmessage/-in-app-message-html/index.html) in-app messages are useful for creating fully customized user content. User-defined HTML in-app message content is displayed in a `WebView` and may optionally contain other rich content, such as images and fonts, allowing for full control over message appearance and functionality.
This message type implements [`IInAppMessageHtml`](https://braze-inc.github.io/braze-android-sdk/kdoc/braze-android-sdk/com.braze.models.inappmessage/-i-in-app-message-html/index.html), which is a subclass of [`IInAppMessage`](https://braze-inc.github.io/braze-android-sdk/kdoc/braze-android-sdk/com.braze.models.inappmessage/-i-in-app-message/index.html).
**Note:**
On Android, links configured with `target="_blank"` in custom HTML in-app messages open in the device's default web browser.
Android in-app messages support a JavaScript `brazeBridge` interface to call methods on the Braze Android SDK from within your HTML, see our JavaScript bridge page for more details.
{: style="border:0px;"}
**Important:**
We currently do not support the display of custom HTML in-app messages in an iFrame on the iOS and Android platforms.
**Tip:**
You can also define custom in-app message views for your app. For a full walkthrough, see [Setting custom factories](https://www.braze.com/docs/developer_guide/in_app_messages/customization#android_setting-custom-factories).
Each in-app message type is highly customizable across content, images, icons, click actions, analytics, display, and delivery. They are enumerated types of `Braze.InAppMessage`, which defines basic behavior and traits for all in-app messages. For the full list of in-app message properties and usage, see the [`InAppMessage` class](https://braze-inc.github.io/braze-swift-sdk/documentation/brazekit/braze/inappmessage).
These are the available in-app message types in Braze and how they will look like for end-users.
[`Slideup`](https://braze-inc.github.io/braze-swift-sdk/documentation/brazekit/braze/inappmessage/slideup-swift.struct) in-app messages are given this name because they "slide up" or "slide down" from the top or bottom of the screen. They cover a small portion of the screen and provide an effective and non-intrusive messaging capability.
{: style="max-width:35%;border:none;"}
[`Modal`](https://braze-inc.github.io/braze-swift-sdk/documentation/brazekit/braze/inappmessage/modal-swift.struct) in-app messages appear in the center of the screen and are framed by a translucent panel. Useful for more critical messaging, they can be equipped with up to two analytics-enabled buttons.
{: style="max-width:35%;border:none;"}
[`Modal Image`](https://braze-inc.github.io/braze-swift-sdk/documentation/brazekit/braze/inappmessage/modalimage-swift.struct) in-app messages appear in the center of the screen and are framed by a translucent panel. These messages are similar to the `Modal` type except without header or message text. Useful for more critical messaging, they can be equipped with up to two analytics-enabled buttons.
{: style="max-width:35%;border:none;"}
[`Full`](https://braze-inc.github.io/braze-swift-sdk/documentation/brazekit/braze/inappmessage/full-swift.struct) in-app messages are useful for maximizing the content and impact of your user communication. The upper half of a `Full` in-app message contains an image, and the lower half displays text and up to two analytics-enabled buttons.
{: style="max-width:35%;border:none;"}
[`Full Image`](https://braze-inc.github.io/braze-swift-sdk/documentation/brazekit/braze/inappmessage/fullimage-swift.struct) in-app messages are similar to `Full` in-app messages except without header or message text. This message type is useful for maximizing the content and impact of your user communication. A `Full Image` in-app message contains an image spanning the entire screen, with the option to display up to two analytics-enabled buttons.
{: style="max-width:35%;border:none;"}
[`HTML`](https://braze-inc.github.io/braze-swift-sdk/documentation/brazekit/braze/inappmessage/html-swift.struct) in-app messages are useful for creating fully customized user content. User-defined HTML Full in-app message content is displayed in a `WKWebView`and may optionally contain other rich content, such as images and fonts, allowing for full control over message appearance and functionality.
iOS in-app messages support a JavaScript `brazeBridge` interface to call methods on the Braze Web SDK from within your HTML, see our [best practices](https://www.braze.com/docs/user_guide/message_building_by_channel/in-app_messages/best_practices/) for more details.
The following example shows a paginated HTML Full in-app message:

Note that we currently do not support the display of custom HTML in-app messages in an iFrame on the iOS and Android platforms.
[`Control`](https://braze-inc.github.io/braze-swift-sdk/documentation/brazekit/braze/inappmessage/control-swift.struct) in-app messages do not contain a UI component and are used primarily for analytics purposes. This type is used to verify receipt of an in-app message sent to a control group.
For further details about Intelligent Selection and control groups, refer to [Intelligent Selection](https://www.braze.com/docs/user_guide/brazeai/intelligence/intelligent_selection/).
## Data model
The in-app message model is available in the React Native SDK. Braze has four in-app message types that share the same data model: **slideup**, **modal**, **full** and **HTML full**.
### Messages
The in-app message model provides the base for all in-app messages.
|Property | Description |
|------------------|------------------------------------------------------------------------------------------------------------------------|
|`inAppMessageJsonString` | The message JSON representation. |
|`message` | The message text. |
|`header` | The message header. |
|`uri` | The URI associated with the button click action. |
|`imageUrl` | The message image URL. |
|`zippedAssetsUrl` | The zipped assets prepared to display HTML content. |
|`useWebView` | Indicates whether the button click action should redirect using a web view. |
|`duration` | The message display duration. |
|`clickAction` | The button click action type. The types are: `URI`, and `NONE`. |
|`dismissType` | The message close type. The two types are: `SWIPE` and `AUTO_DISMISS`. |
|`messageType` | The in-app message type supported by the SDK. The four types are: `SLIDEUP`, `MODAL`, `FULL` and `HTML_FULL`. |
|`extras` | The message extras dictionary. Default value: `[:]`. |
|`buttons` | The list of buttons on the in-app message. |
|`toString()` | The message as a String representation. |
{: .reset-td-br-1 .reset-td-br-2 role="presentation" }
For a full reference of the in-app message model, see the [Android](https://braze-inc.github.io/braze-android-sdk/kdoc/braze-android-sdk/com.braze.models.inappmessage/index.html) and [iOS](https://braze-inc.github.io/braze-swift-sdk/documentation/brazekit/braze/inappmessage) documentation.
### Buttons
Buttons can be added to in-app messages to perform actions and log analytics. The button model provides the base for all in-app message buttons.
|Property | Description |
|------------------|-----------------------------------------------------------------------------------------------------------------------------|
|`text` | The text on the button. |
|`uri` | The URI associated with the button click action. |
|`useWebView` | Indicates whether the button click action should redirect using a web view. |
|`clickAction` | The type of click action processed when the user clicks on the button. The types are: `URI`, and `NONE`. |
|`id` | The button ID on the message. |
|`toString()` | The button as a String representation. |
{: .reset-td-br-1 .reset-td-br-2 role="presentation" }
For a full reference of button model, see the [Android](https://braze-inc.github.io/braze-android-sdk/kdoc/braze-android-sdk/com.braze.models.inappmessage/-message-button/index.html) and [iOS](https://braze-inc.github.io/braze-swift-sdk/documentation/brazekit/braze/inappmessage/button) documentation.
## Prerequisites
Before you can use this feature, you'll need to [integrate the Roku Braze SDK](https://www.braze.com/docs/developer_guide/sdk_integration/?sdktab=roku).
Additionally, in-app messages will only be sent to Roku devices running the minimum supported SDK version:
## Message types
Braze offers several default in-app message types, each customizable with messages, images, [Font Awesome](https://fontawesome.com/icons?d=gallery&p=2) icons, click actions, analytics, color schemes, and more.
Their basic behavior and traits are defined by the [`IInAppMessage`](https://braze-inc.github.io/braze-android-sdk/kdoc/braze-android-sdk/com.braze.models.inappmessage/-i-in-app-message/index.html) interface, in a subclass called [`InAppMessageBase`](https://braze-inc.github.io/braze-android-sdk/kdoc/braze-android-sdk/com.braze.models.inappmessage/-in-app-message-base/index.html). `IInAppMessage` also includes a subinterface, [`IInAppMessageImmersive`](https://braze-inc.github.io/braze-android-sdk/kdoc/braze-android-sdk/com.braze.models.inappmessage/-i-in-app-message-immersive/index.html), which lets you add close, click-action, and analytics [buttons](https://braze-inc.github.io/braze-android-sdk/kdoc/braze-android-sdk/com.braze.models.inappmessage/-message-button/index.html) to your app.
**Important:**
Keep in mind, in-app messages containing buttons will include the `clickAction` message in the final payload if the click action is added prior to adding the button text.
[`slideup`](https://braze-inc.github.io/braze-android-sdk/kdoc/braze-android-sdk/com.braze.models.inappmessage/-in-app-message-slideup/index.html) in-app messages are so-named because they "slide up" or "slide down" from the top or bottom of the screen. They cover a small portion of the screen and provide an effective and non-intrusive messaging capability.
The `slideup` in-app message object extends [`InAppMessageBase`](https://braze-inc.github.io/braze-android-sdk/kdoc/braze-android-sdk/com.braze.models.inappmessage/-in-app-message-base/index.html).
{: style="border:0px;"}
[`modal`](https://braze-inc.github.io/braze-android-sdk/kdoc/braze-android-sdk/com.braze.models.inappmessage/-in-app-message-modal/index.html) in-app messages appear in the center of the screen and are framed by a translucent panel. Useful for more critical messaging, they can be equipped with two click-action and analytics-enabled buttons.
This message type is a subclass of [`InAppMessageImmersiveBase`](https://braze-inc.github.io/braze-android-sdk/kdoc/braze-android-sdk/com.braze.models.inappmessage/-in-app-message-immersive-base/index.html), an abstract class that implements `IInAppMessageImmersive`, giving you the option to add custom functionality to your locally generated in-app messages.
{: style="border:0px;"}
[`full`](https://braze-inc.github.io/braze-android-sdk/kdoc/braze-android-sdk/com.braze.models.inappmessage/-in-app-message-full/index.html) in-app messages are useful for maximizing the content and impact of your user communication. The upper half of a `full` in-app message contains an image, and the lower half displays text and up to two click action and analytics-enabled buttons.
This message type extends [`InAppMessageImmersiveBase`](https://braze-inc.github.io/braze-android-sdk/kdoc/braze-android-sdk/com.braze.models.inappmessage/-in-app-message-immersive-base/index.html), giving you the option to add custom functionality to your locally generated in-app messages.

[`HTML`](https://braze-inc.github.io/braze-android-sdk/kdoc/braze-android-sdk/com.braze.models.inappmessage/-in-app-message-html/index.html) in-app messages are useful for creating fully customized user content. User-defined HTML in-app message content is displayed in a `WebView` and may optionally contain other rich content, such as images and fonts, allowing for full control over message appearance and functionality.
This message type implements [`IInAppMessageHtml`](https://braze-inc.github.io/braze-android-sdk/kdoc/braze-android-sdk/com.braze.models.inappmessage/-i-in-app-message-html/index.html), which is a subclass of [`IInAppMessage`](https://braze-inc.github.io/braze-android-sdk/kdoc/braze-android-sdk/com.braze.models.inappmessage/-i-in-app-message/index.html).
**Note:**
On Android, links configured with `target="_blank"` in custom HTML in-app messages open in the device's default web browser.
Android in-app messages support a JavaScript `brazeBridge` interface to call methods on the Braze Android SDK from within your HTML, see our JavaScript bridge page for more details.
{: style="border:0px;"}
**Important:**
We currently do not support the display of custom HTML in-app messages in an iFrame on the iOS and Android platforms.
**Tip:**
You can also define custom in-app message views for your app. For a full walkthrough, see [Setting custom factories](https://www.braze.com/docs/developer_guide/in_app_messages/customization#android_setting-custom-factories).
Each in-app message type is highly customizable across content, images, icons, click actions, analytics, display, and delivery. They are enumerated types of `Braze.InAppMessage`, which defines basic behavior and traits for all in-app messages. For the full list of in-app message properties and usage, see the [`InAppMessage` class](https://braze-inc.github.io/braze-swift-sdk/documentation/brazekit/braze/inappmessage).
These are the available in-app message types in Braze and how they will look like for end-users.
[`Slideup`](https://braze-inc.github.io/braze-swift-sdk/documentation/brazekit/braze/inappmessage/slideup-swift.struct) in-app messages are given this name because they "slide up" or "slide down" from the top or bottom of the screen. They cover a small portion of the screen and provide an effective and non-intrusive messaging capability.
{: style="max-width:35%;border:none;"}
[`Modal`](https://braze-inc.github.io/braze-swift-sdk/documentation/brazekit/braze/inappmessage/modal-swift.struct) in-app messages appear in the center of the screen and are framed by a translucent panel. Useful for more critical messaging, they can be equipped with up to two analytics-enabled buttons.
{: style="max-width:35%;border:none;"}
[`Modal Image`](https://braze-inc.github.io/braze-swift-sdk/documentation/brazekit/braze/inappmessage/modalimage-swift.struct) in-app messages appear in the center of the screen and are framed by a translucent panel. These messages are similar to the `Modal` type except without header or message text. Useful for more critical messaging, they can be equipped with up to two analytics-enabled buttons.
{: style="max-width:35%;border:none;"}
[`Full`](https://braze-inc.github.io/braze-swift-sdk/documentation/brazekit/braze/inappmessage/full-swift.struct) in-app messages are useful for maximizing the content and impact of your user communication. The upper half of a `Full` in-app message contains an image, and the lower half displays text and up to two analytics-enabled buttons.
{: style="max-width:35%;border:none;"}
[`Full Image`](https://braze-inc.github.io/braze-swift-sdk/documentation/brazekit/braze/inappmessage/fullimage-swift.struct) in-app messages are similar to `Full` in-app messages except without header or message text. This message type is useful for maximizing the content and impact of your user communication. A `Full Image` in-app message contains an image spanning the entire screen, with the option to display up to two analytics-enabled buttons.
{: style="max-width:35%;border:none;"}
[`HTML`](https://braze-inc.github.io/braze-swift-sdk/documentation/brazekit/braze/inappmessage/html-swift.struct) in-app messages are useful for creating fully customized user content. User-defined HTML Full in-app message content is displayed in a `WKWebView`and may optionally contain other rich content, such as images and fonts, allowing for full control over message appearance and functionality.
iOS in-app messages support a JavaScript `brazeBridge` interface to call methods on the Braze Web SDK from within your HTML, see our [best practices](https://www.braze.com/docs/user_guide/message_building_by_channel/in-app_messages/best_practices/) for more details.
The following example shows a paginated HTML Full in-app message:

Note that we currently do not support the display of custom HTML in-app messages in an iFrame on the iOS and Android platforms.
[`Control`](https://braze-inc.github.io/braze-swift-sdk/documentation/brazekit/braze/inappmessage/control-swift.struct) in-app messages do not contain a UI component and are used primarily for analytics purposes. This type is used to verify receipt of an in-app message sent to a control group.
For further details about Intelligent Selection and control groups, refer to [Intelligent Selection](https://www.braze.com/docs/user_guide/brazeai/intelligence/intelligent_selection/).
## Enabling in-app messages
### Step 1: Add an observer
To process in-app messages, you can add an observer on `BrazeTask.BrazeInAppMessage`:
```brightscript
m.BrazeTask.observeField("BrazeInAppMessage", "onInAppMessageReceived")
```
### Step 2: Access triggered messages
Then within your handler, you have access to the highest in-app message that your campaigns have triggered:
```brightscript
sub onInAppMessageReceived()
in_app_message = m.BrazeTask.BrazeInAppMessage
...
end sub
```
## Message fields
### Handling
The following lists the fields you will need to handle your in-app messages:
| Fields | Description |
| ------ | ----------- |
| `buttons` | List of buttons (could be an empty list). |
| `click_action` | `"URI"` or `"NONE"`. Use this field to indicate whether the in-app message should open to a URI link or close the message when clicked. When there are no buttons, this should happen when the user clicks "OK" when the in-app message is displayed. |
| `dismiss_type` | `"AUTO_DISMISS"` or `"SWIPE"`. Use this field to indicate whether your in-app message will auto dismiss or require a swipe to dismiss. |
| `display_delay` | How long (seconds) to wait until displaying the in-app message. |
| `duration` | How long (milliseconds) the message should be displayed when `dismiss_type` is set to `"AUTO_DISMISS"`. |
| `extras` | Key-value pairs. |
| `header` | The header text. |
| `id` | The ID used to log impressions or clicks. |
| `image_url` | In-app message image URL. |
| `message` | Message body text. |
| `uri` | Your URI users will be sent to based on your `click_action`. This field must be included when `click_action` is `"URI"`. |
{: .reset-td-br-1 .reset-td-br-2 role="presentation" }
**Important:**
For in-app messages containing buttons, the message `click_action` will also be included in the final payload if the click action is added prior to adding the button text.
### Styling
There are also various styling fields that you could choose to use from the dashboard:
| Fields | Description |
| ------ | ----------- |
| `bg_color` | Background color. |
| `close_button_color` | Close button color. |
| `frame_color` | The color of the background screen overlay. |
| `header_text_color` | Header text color. |
| `message_text_color` | Message text color. |
| `text_align` | "START", "CENTER", or "END". Your selected text alignment. |
{: .reset-td-br-1 .reset-td-br-2 role="presentation" }
Alternatively, you could implement the in-app message and style it within your Roku application using a standard palette:
### Buttons
| Fields | Description |
| ------ | ----------- |
| `click_action` | `"URI"` or `"NONE"`. Use this field to indicate whether the in-app message should open to a URI link or close the message when clicked. |
| `id` | The ID value of the button itself. |
| `text` | The text to display on the button. |
| `uri` | Your URI users will be sent to based on your `click_action`. This field must be included when `click_action` is `"URI"`. |
{: .reset-td-br-1 .reset-td-br-2 role="presentation" }
**Important:**
Keep in mind, you'll need to implement your own custom UI since in-app messaging is supported via headless UI using the Swift SDK—which does not include any default UI or views for tvOS.
## Prerequisites
Before you can use this feature, you'll need to [integrate the Swift Braze SDK](https://www.braze.com/docs/developer_guide/sdk_integration/?sdktab=swift).
## Enabling in-app messages
### Step 1: Create a new iOS app
In Braze, select **Settings** > **App Settings**, then select **Add App**. Enter a name for your tvOS app, select **iOS**—_not tvOS_—then select **Add App**.
{: style="width:70%"}
**Warning:**
If you select the **tvOS** checkbox, you will not be able to customize in-app messages for tvOS.
### Step 2: Get your app's API key
In your app settings, select your new tvOS app then take note of your app's API key. You'll use this key to configure your app in Xcode.
{: style="width:70%"}
### Step 3: Integrate BrazeKit
Use your app's API key to integrate the [Braze Swift SDK](https://github.com/braze-inc/braze-swift-sdk) into your tvOS project in Xcode. You only need to integrate BrazeKit from the Braze Swift SDK.
### Step 4: Create your custom UI
Because Braze doesn't provide a default UI for in-app messages on tvOS, you'll need to customize it yourself. For a full walkthrough, see our step-by-step tutorial: [Customizing in-app messages for tvOS](https://braze-inc.github.io/braze-swift-sdk/documentation/braze/in-app-message-customization). For a sample project, see [Braze Swift SDK samples](https://github.com/braze-inc/braze-swift-sdk/tree/main/Examples#inappmessages-custom-ui).
## Prerequisites
Before you can use this feature, you'll need to [integrate the Unity Braze SDK](https://www.braze.com/docs/developer_guide/sdk_integration/?sdktab=unity).
## Message types
Braze offers several default in-app message types, each customizable with messages, images, [Font Awesome](https://fontawesome.com/icons?d=gallery&p=2) icons, click actions, analytics, color schemes, and more.
Their basic behavior and traits are defined by the [`IInAppMessage`](https://braze-inc.github.io/braze-android-sdk/kdoc/braze-android-sdk/com.braze.models.inappmessage/-i-in-app-message/index.html) interface, in a subclass called [`InAppMessageBase`](https://braze-inc.github.io/braze-android-sdk/kdoc/braze-android-sdk/com.braze.models.inappmessage/-in-app-message-base/index.html). `IInAppMessage` also includes a subinterface, [`IInAppMessageImmersive`](https://braze-inc.github.io/braze-android-sdk/kdoc/braze-android-sdk/com.braze.models.inappmessage/-i-in-app-message-immersive/index.html), which lets you add close, click-action, and analytics [buttons](https://braze-inc.github.io/braze-android-sdk/kdoc/braze-android-sdk/com.braze.models.inappmessage/-message-button/index.html) to your app.
**Important:**
Keep in mind, in-app messages containing buttons will include the `clickAction` message in the final payload if the click action is added prior to adding the button text.
[`slideup`](https://braze-inc.github.io/braze-android-sdk/kdoc/braze-android-sdk/com.braze.models.inappmessage/-in-app-message-slideup/index.html) in-app messages are so-named because they "slide up" or "slide down" from the top or bottom of the screen. They cover a small portion of the screen and provide an effective and non-intrusive messaging capability.
The `slideup` in-app message object extends [`InAppMessageBase`](https://braze-inc.github.io/braze-android-sdk/kdoc/braze-android-sdk/com.braze.models.inappmessage/-in-app-message-base/index.html).
{: style="border:0px;"}
[`modal`](https://braze-inc.github.io/braze-android-sdk/kdoc/braze-android-sdk/com.braze.models.inappmessage/-in-app-message-modal/index.html) in-app messages appear in the center of the screen and are framed by a translucent panel. Useful for more critical messaging, they can be equipped with two click-action and analytics-enabled buttons.
This message type is a subclass of [`InAppMessageImmersiveBase`](https://braze-inc.github.io/braze-android-sdk/kdoc/braze-android-sdk/com.braze.models.inappmessage/-in-app-message-immersive-base/index.html), an abstract class that implements `IInAppMessageImmersive`, giving you the option to add custom functionality to your locally generated in-app messages.
{: style="border:0px;"}
[`full`](https://braze-inc.github.io/braze-android-sdk/kdoc/braze-android-sdk/com.braze.models.inappmessage/-in-app-message-full/index.html) in-app messages are useful for maximizing the content and impact of your user communication. The upper half of a `full` in-app message contains an image, and the lower half displays text and up to two click action and analytics-enabled buttons.
This message type extends [`InAppMessageImmersiveBase`](https://braze-inc.github.io/braze-android-sdk/kdoc/braze-android-sdk/com.braze.models.inappmessage/-in-app-message-immersive-base/index.html), giving you the option to add custom functionality to your locally generated in-app messages.

[`HTML`](https://braze-inc.github.io/braze-android-sdk/kdoc/braze-android-sdk/com.braze.models.inappmessage/-in-app-message-html/index.html) in-app messages are useful for creating fully customized user content. User-defined HTML in-app message content is displayed in a `WebView` and may optionally contain other rich content, such as images and fonts, allowing for full control over message appearance and functionality.
This message type implements [`IInAppMessageHtml`](https://braze-inc.github.io/braze-android-sdk/kdoc/braze-android-sdk/com.braze.models.inappmessage/-i-in-app-message-html/index.html), which is a subclass of [`IInAppMessage`](https://braze-inc.github.io/braze-android-sdk/kdoc/braze-android-sdk/com.braze.models.inappmessage/-i-in-app-message/index.html).
**Note:**
On Android, links configured with `target="_blank"` in custom HTML in-app messages open in the device's default web browser.
Android in-app messages support a JavaScript `brazeBridge` interface to call methods on the Braze Android SDK from within your HTML, see our JavaScript bridge page for more details.
{: style="border:0px;"}
**Important:**
We currently do not support the display of custom HTML in-app messages in an iFrame on the iOS and Android platforms.
**Tip:**
You can also define custom in-app message views for your app. For a full walkthrough, see [Setting custom factories](https://www.braze.com/docs/developer_guide/in_app_messages/customization#android_setting-custom-factories).
Each in-app message type is highly customizable across content, images, icons, click actions, analytics, display, and delivery. They are enumerated types of `Braze.InAppMessage`, which defines basic behavior and traits for all in-app messages. For the full list of in-app message properties and usage, see the [`InAppMessage` class](https://braze-inc.github.io/braze-swift-sdk/documentation/brazekit/braze/inappmessage).
These are the available in-app message types in Braze and how they will look like for end-users.
[`Slideup`](https://braze-inc.github.io/braze-swift-sdk/documentation/brazekit/braze/inappmessage/slideup-swift.struct) in-app messages are given this name because they "slide up" or "slide down" from the top or bottom of the screen. They cover a small portion of the screen and provide an effective and non-intrusive messaging capability.
{: style="max-width:35%;border:none;"}
[`Modal`](https://braze-inc.github.io/braze-swift-sdk/documentation/brazekit/braze/inappmessage/modal-swift.struct) in-app messages appear in the center of the screen and are framed by a translucent panel. Useful for more critical messaging, they can be equipped with up to two analytics-enabled buttons.
{: style="max-width:35%;border:none;"}
[`Modal Image`](https://braze-inc.github.io/braze-swift-sdk/documentation/brazekit/braze/inappmessage/modalimage-swift.struct) in-app messages appear in the center of the screen and are framed by a translucent panel. These messages are similar to the `Modal` type except without header or message text. Useful for more critical messaging, they can be equipped with up to two analytics-enabled buttons.
{: style="max-width:35%;border:none;"}
[`Full`](https://braze-inc.github.io/braze-swift-sdk/documentation/brazekit/braze/inappmessage/full-swift.struct) in-app messages are useful for maximizing the content and impact of your user communication. The upper half of a `Full` in-app message contains an image, and the lower half displays text and up to two analytics-enabled buttons.
{: style="max-width:35%;border:none;"}
[`Full Image`](https://braze-inc.github.io/braze-swift-sdk/documentation/brazekit/braze/inappmessage/fullimage-swift.struct) in-app messages are similar to `Full` in-app messages except without header or message text. This message type is useful for maximizing the content and impact of your user communication. A `Full Image` in-app message contains an image spanning the entire screen, with the option to display up to two analytics-enabled buttons.
{: style="max-width:35%;border:none;"}
[`HTML`](https://braze-inc.github.io/braze-swift-sdk/documentation/brazekit/braze/inappmessage/html-swift.struct) in-app messages are useful for creating fully customized user content. User-defined HTML Full in-app message content is displayed in a `WKWebView`and may optionally contain other rich content, such as images and fonts, allowing for full control over message appearance and functionality.
iOS in-app messages support a JavaScript `brazeBridge` interface to call methods on the Braze Web SDK from within your HTML, see our [best practices](https://www.braze.com/docs/user_guide/message_building_by_channel/in-app_messages/best_practices/) for more details.
The following example shows a paginated HTML Full in-app message:

Note that we currently do not support the display of custom HTML in-app messages in an iFrame on the iOS and Android platforms.
[`Control`](https://braze-inc.github.io/braze-swift-sdk/documentation/brazekit/braze/inappmessage/control-swift.struct) in-app messages do not contain a UI component and are used primarily for analytics purposes. This type is used to verify receipt of an in-app message sent to a control group.
For further details about Intelligent Selection and control groups, refer to [Intelligent Selection](https://www.braze.com/docs/user_guide/brazeai/intelligence/intelligent_selection/).
## Prerequisites
Before you can use this feature, you'll need to [integrate the .NET MAUI Braze SDK](https://www.braze.com/docs/developer_guide/sdk_integration/?sdktab=.net%20maui%20(xamarin)).
## Message types
Braze offers several default in-app message types, each customizable with messages, images, [Font Awesome](https://fontawesome.com/icons?d=gallery&p=2) icons, click actions, analytics, color schemes, and more.
Their basic behavior and traits are defined by the [`IInAppMessage`](https://braze-inc.github.io/braze-android-sdk/kdoc/braze-android-sdk/com.braze.models.inappmessage/-i-in-app-message/index.html) interface, in a subclass called [`InAppMessageBase`](https://braze-inc.github.io/braze-android-sdk/kdoc/braze-android-sdk/com.braze.models.inappmessage/-in-app-message-base/index.html). `IInAppMessage` also includes a subinterface, [`IInAppMessageImmersive`](https://braze-inc.github.io/braze-android-sdk/kdoc/braze-android-sdk/com.braze.models.inappmessage/-i-in-app-message-immersive/index.html), which lets you add close, click-action, and analytics [buttons](https://braze-inc.github.io/braze-android-sdk/kdoc/braze-android-sdk/com.braze.models.inappmessage/-message-button/index.html) to your app.
**Important:**
Keep in mind, in-app messages containing buttons will include the `clickAction` message in the final payload if the click action is added prior to adding the button text.
[`slideup`](https://braze-inc.github.io/braze-android-sdk/kdoc/braze-android-sdk/com.braze.models.inappmessage/-in-app-message-slideup/index.html) in-app messages are so-named because they "slide up" or "slide down" from the top or bottom of the screen. They cover a small portion of the screen and provide an effective and non-intrusive messaging capability.
The `slideup` in-app message object extends [`InAppMessageBase`](https://braze-inc.github.io/braze-android-sdk/kdoc/braze-android-sdk/com.braze.models.inappmessage/-in-app-message-base/index.html).
{: style="border:0px;"}
[`modal`](https://braze-inc.github.io/braze-android-sdk/kdoc/braze-android-sdk/com.braze.models.inappmessage/-in-app-message-modal/index.html) in-app messages appear in the center of the screen and are framed by a translucent panel. Useful for more critical messaging, they can be equipped with two click-action and analytics-enabled buttons.
This message type is a subclass of [`InAppMessageImmersiveBase`](https://braze-inc.github.io/braze-android-sdk/kdoc/braze-android-sdk/com.braze.models.inappmessage/-in-app-message-immersive-base/index.html), an abstract class that implements `IInAppMessageImmersive`, giving you the option to add custom functionality to your locally generated in-app messages.
{: style="border:0px;"}
[`full`](https://braze-inc.github.io/braze-android-sdk/kdoc/braze-android-sdk/com.braze.models.inappmessage/-in-app-message-full/index.html) in-app messages are useful for maximizing the content and impact of your user communication. The upper half of a `full` in-app message contains an image, and the lower half displays text and up to two click action and analytics-enabled buttons.
This message type extends [`InAppMessageImmersiveBase`](https://braze-inc.github.io/braze-android-sdk/kdoc/braze-android-sdk/com.braze.models.inappmessage/-in-app-message-immersive-base/index.html), giving you the option to add custom functionality to your locally generated in-app messages.

[`HTML`](https://braze-inc.github.io/braze-android-sdk/kdoc/braze-android-sdk/com.braze.models.inappmessage/-in-app-message-html/index.html) in-app messages are useful for creating fully customized user content. User-defined HTML in-app message content is displayed in a `WebView` and may optionally contain other rich content, such as images and fonts, allowing for full control over message appearance and functionality.
This message type implements [`IInAppMessageHtml`](https://braze-inc.github.io/braze-android-sdk/kdoc/braze-android-sdk/com.braze.models.inappmessage/-i-in-app-message-html/index.html), which is a subclass of [`IInAppMessage`](https://braze-inc.github.io/braze-android-sdk/kdoc/braze-android-sdk/com.braze.models.inappmessage/-i-in-app-message/index.html).
**Note:**
On Android, links configured with `target="_blank"` in custom HTML in-app messages open in the device's default web browser.
Android in-app messages support a JavaScript `brazeBridge` interface to call methods on the Braze Android SDK from within your HTML, see our JavaScript bridge page for more details.
{: style="border:0px;"}
**Important:**
We currently do not support the display of custom HTML in-app messages in an iFrame on the iOS and Android platforms.
**Tip:**
You can also define custom in-app message views for your app. For a full walkthrough, see [Setting custom factories](https://www.braze.com/docs/developer_guide/in_app_messages/customization#android_setting-custom-factories).
Each in-app message type is highly customizable across content, images, icons, click actions, analytics, display, and delivery. They are enumerated types of `Braze.InAppMessage`, which defines basic behavior and traits for all in-app messages. For the full list of in-app message properties and usage, see the [`InAppMessage` class](https://braze-inc.github.io/braze-swift-sdk/documentation/brazekit/braze/inappmessage).
These are the available in-app message types in Braze and how they will look like for end-users.
[`Slideup`](https://braze-inc.github.io/braze-swift-sdk/documentation/brazekit/braze/inappmessage/slideup-swift.struct) in-app messages are given this name because they "slide up" or "slide down" from the top or bottom of the screen. They cover a small portion of the screen and provide an effective and non-intrusive messaging capability.
{: style="max-width:35%;border:none;"}
[`Modal`](https://braze-inc.github.io/braze-swift-sdk/documentation/brazekit/braze/inappmessage/modal-swift.struct) in-app messages appear in the center of the screen and are framed by a translucent panel. Useful for more critical messaging, they can be equipped with up to two analytics-enabled buttons.
{: style="max-width:35%;border:none;"}
[`Modal Image`](https://braze-inc.github.io/braze-swift-sdk/documentation/brazekit/braze/inappmessage/modalimage-swift.struct) in-app messages appear in the center of the screen and are framed by a translucent panel. These messages are similar to the `Modal` type except without header or message text. Useful for more critical messaging, they can be equipped with up to two analytics-enabled buttons.
{: style="max-width:35%;border:none;"}
[`Full`](https://braze-inc.github.io/braze-swift-sdk/documentation/brazekit/braze/inappmessage/full-swift.struct) in-app messages are useful for maximizing the content and impact of your user communication. The upper half of a `Full` in-app message contains an image, and the lower half displays text and up to two analytics-enabled buttons.
{: style="max-width:35%;border:none;"}
[`Full Image`](https://braze-inc.github.io/braze-swift-sdk/documentation/brazekit/braze/inappmessage/fullimage-swift.struct) in-app messages are similar to `Full` in-app messages except without header or message text. This message type is useful for maximizing the content and impact of your user communication. A `Full Image` in-app message contains an image spanning the entire screen, with the option to display up to two analytics-enabled buttons.
{: style="max-width:35%;border:none;"}
[`HTML`](https://braze-inc.github.io/braze-swift-sdk/documentation/brazekit/braze/inappmessage/html-swift.struct) in-app messages are useful for creating fully customized user content. User-defined HTML Full in-app message content is displayed in a `WKWebView`and may optionally contain other rich content, such as images and fonts, allowing for full control over message appearance and functionality.
iOS in-app messages support a JavaScript `brazeBridge` interface to call methods on the Braze Web SDK from within your HTML, see our [best practices](https://www.braze.com/docs/user_guide/message_building_by_channel/in-app_messages/best_practices/) for more details.
The following example shows a paginated HTML Full in-app message:

Note that we currently do not support the display of custom HTML in-app messages in an iFrame on the iOS and Android platforms.
[`Control`](https://braze-inc.github.io/braze-swift-sdk/documentation/brazekit/braze/inappmessage/control-swift.struct) in-app messages do not contain a UI component and are used primarily for analytics purposes. This type is used to verify receipt of an in-app message sent to a control group.
For further details about Intelligent Selection and control groups, refer to [Intelligent Selection](https://www.braze.com/docs/user_guide/brazeai/intelligence/intelligent_selection/).
## Next steps
Ready to dive deeper? Check out these step-by-step tutorials:
- Fine-tune message delivery timing by [deferring and restoring triggered messages](https://www.braze.com/docs/developer_guide/in_app_messages/tutorials/deferring_triggered_messages).
- Refine message targeting by [setting conditional display rules](https://www.braze.com/docs/developer_guide/in_app_messages/tutorials/conditionally_displaying_messages).
- Match your brand’s look by [customizing message styling with key-value pairs](https://www.braze.com/docs/developer_guide/in_app_messages/tutorials/customizing_message_styling).
# Customize in-app messages for the Braze SDK
Source: /docs/developer_guide/in_app_messages/customization/index.md
# Customize in-app messages
> Learn how to customize in-app messages for the Braze SDK. For advanced styling techniques, check out our tutorial for [customizing message styling using key-value pairs](https://www.braze.com/docs/developer_guide/in_app_messages/tutorials/customizing_message_styling).
## Prerequisites
Before you can use this feature, you'll need to [integrate the Web Braze SDK](https://www.braze.com/docs/developer_guide/sdk_integration/?sdktab=web).
## Custom styles
Braze UI elements come with a default look and feel that create a neutral in-app message experience and aim for consistency with other Braze mobile platforms. The default Braze styles are defined in CSS within the Braze SDK.
### Setting a default style
By overriding selected styles in your application, you can customize our standard in-app message types with your own background images, font families, styles, sizes, animations, and more.
For instance, the following is an example override that will cause an in-app message's headers to appear italicized:
```css
body .ab-in-app-message .ab-message-header {
font-style: italic;
}
```
See the [JSDocs](https://js.appboycdn.com/web-sdk/latest/doc/classes/braze.inappmessage.html) for more information.
### Customizing the z-index
By default, in-app messages are displayed using `z-index: 9001`. This is configurable using the `inAppMessageZIndex ` [initialization option](https://js.appboycdn.com/web-sdk/latest/doc/modules/braze.html#initializationoptions) in the scenario that your website styles elements with higher values than that.
```javascript
braze.initialize("YOUR-API-KEY", {
baseUrl: "YOUR-API-ENDPOINT",
inAppMessageZIndex: 12000
});
```
**Important:**
This feature is only available for Web Braze SDK v3.3.0 and later.
## Customizing message dismissals
By default, when an in-app message is showing, pressing the escape button or a click on the grayed-out background of the page will dismiss the message. Configure the `requireExplicitInAppMessageDismissal` [initialization option](https://js.appboycdn.com/web-sdk/latest/doc/modules/braze.html#initializationoptions) to `true` to prevent this behavior and require an explicit button click to dismiss messages.
```javascript
import * as braze from "@braze/web-sdk";
braze.initialize("YOUR-API-KEY", {
baseUrl: "YOUR-API-ENDPOINT",
requireExplicitInAppMessageDismissal: true
});
```
## Opening links in a new tab
To set your in-app message links to open in a new tab, set the `openInAppMessagesInNewTab` option to `true` to force all links from in-app message clicks open in a new tab or window.
```javascript
braze.initialize('api-key', { openInAppMessagesInNewTab: true} );
```
## Prerequisites
Before you can use this feature, you'll need to [integrate the Android Braze SDK](https://www.braze.com/docs/developer_guide/sdk_integration/?sdktab=android). You'll also need to [set up in-app messages](https://www.braze.com/docs/developer_guide/in_app_messages).
## Setting custom manager listeners
While the `BrazeInAppMessageManager` listener can automatically handle the display and lifecycle of in-app messages, you'll need to implement a custom manager listener if you'd like to fully customize your messages.
The Braze SDK has a default `DefaultHtmlInAppMessageActionListener` class that is used if no custom listener is defined and takes appropriate action automatically. If you require more control over how a user interacts with different buttons inside a custom HTML in-app message, implement a custom `IHtmlInAppMessageActionListener` class.
### Step 1: Implement the custom manager listener
#### Step 1.1: Implement `IInAppMessageManagerListener`
Create a class that implements [`IInAppMessageManagerListener`](https://braze-inc.github.io/braze-android-sdk/kdoc/braze-android-sdk/com.braze.ui.inappmessage.listeners/-i-in-app-message-manager-listener/index.html).
The callbacks in your `IInAppMessageManagerListener` will also be called at various points in the in-app message lifecycle. For example, if you set a custom manager listener when an in-app message is received from Braze, the [`beforeInAppMessageDisplayed()`](https://braze-inc.github.io/braze-android-sdk/kdoc/braze-android-sdk/com.braze.ui.inappmessage.listeners/-i-in-app-message-manager-listener/before-in-app-message-displayed.html) method will be called. If your implementation of this method returns [`InAppMessageOperation.DISCARD`](https://braze-inc.github.io/braze-android-sdk/kdoc/braze-android-sdk/com.braze.ui.inappmessage/-in-app-message-operation/-d-i-s-c-a-r-d/index.html), that signals to Braze that the in-app message will be handled by the host app and should not be displayed by Braze. If [`InAppMessageOperation.DISPLAY_NOW`](https://braze-inc.github.io/braze-android-sdk/kdoc/braze-android-sdk/com.braze.ui.inappmessage/-in-app-message-operation/-d-i-s-p-l-a-y_-n-o-w/index.html) is returned, Braze will attempt to display the in-app message. This method should be used if you choose to display the in-app message in a customized manner.
`IInAppMessageManagerListener` also includes delegate methods for message clicks and buttons, which can be used in cases like intercepting a message when a button or message is clicked for further processing.
#### Step 1.2: Hook into IAM view lifecycle methods (optional)
The [`IInAppMessageManagerListener`](https://braze-inc.github.io/braze-android-sdk/kdoc/braze-android-sdk/com.braze.ui.inappmessage.listeners/-i-in-app-message-manager-listener/index.html) interface has in-app message view methods called at distinct points in the in-app message view lifecycle. These methods are called in the following order:
1. [`beforeInAppMessageViewOpened`](https://braze-inc.github.io/braze-android-sdk/kdoc/braze-android-sdk/com.braze.ui.inappmessage.listeners/-i-in-app-message-manager-listener/before-in-app-message-view-opened.html): Called just before the in-app message is added to the activity's view. The in-app message is not yet visible to the user at this time.
2. [`afterInAppMessageViewOpened`](https://braze-inc.github.io/braze-android-sdk/kdoc/braze-android-sdk/com.braze.ui.inappmessage.listeners/-i-in-app-message-manager-listener/after-in-app-message-view-opened.html): Called just after the in-app message is added to the activity's view. The in-app message is now visible to the user at this time.
3. [`beforeInAppMessageViewClosed`](https://braze-inc.github.io/braze-android-sdk/kdoc/braze-android-sdk/com.braze.ui.inappmessage.listeners/-i-in-app-message-manager-listener/before-in-app-message-view-closed.html): Called just before the in-app message is removed from the activity's view. The in-app message is still visible to the user at this time.
4. [`afterInAppMessageViewClosed`](https://braze-inc.github.io/braze-android-sdk/kdoc/braze-android-sdk/com.braze.ui.inappmessage.listeners/-i-in-app-message-manager-listener/after-in-app-message-view-closed.html): Called just after the in-app message is removed from the activity's view. The in-app message is no longer visible to the user at this time.
Note that the time between [`afterInAppMessageViewOpened`](https://braze-inc.github.io/braze-android-sdk/kdoc/braze-android-sdk/com.braze.ui.inappmessage.listeners/-i-in-app-message-manager-listener/after-in-app-message-view-opened.html) and [`beforeInAppMessageViewClosed`](https://braze-inc.github.io/braze-android-sdk/kdoc/braze-android-sdk/com.braze.ui.inappmessage.listeners/-i-in-app-message-manager-listener/before-in-app-message-view-closed.html) is when the in-app message view is on screen, visible to the user.
**Note:**
Implementation of these methods is not required. They're only provided to track and inform the in-app message view lifecycle. You can leave these method implementations empty.
Create a class that implements [`IHtmlInAppMessageActionListener`](https://braze-inc.github.io/braze-android-sdk/kdoc/braze-android-sdk/com.braze.ui.inappmessage.listeners/-i-html-in-app-message-action-listener/index.html).
The callbacks in your `IHtmlInAppMessageActionListener` will be called whenever the user initiates any of the following actions inside the HTML in-app message:
- Clicks on the close button
- Fires a custom event
- Clicks on a URL inside HTML in-app message
```java
public class CustomHtmlInAppMessageActionListener implements IHtmlInAppMessageActionListener {
private final Context mContext;
public CustomHtmlInAppMessageActionListener(Context context) {
mContext = context;
}
@Override
public void onCloseClicked(IInAppMessage inAppMessage, String url, Bundle queryBundle) {
Toast.makeText(mContext, "HTML In App Message closed", Toast.LENGTH_LONG).show();
BrazeInAppMessageManager.getInstance().hideCurrentlyDisplayingInAppMessage(false);
}
@Override
public boolean onCustomEventFired(IInAppMessage inAppMessage, String url, Bundle queryBundle) {
Toast.makeText(mContext, "Custom event fired. Ignoring.", Toast.LENGTH_LONG).show();
return true;
}
@Override
public boolean onOtherUrlAction(IInAppMessage inAppMessage, String url, Bundle queryBundle) {
Toast.makeText(mContext, "Custom url pressed: " + url + " . Ignoring", Toast.LENGTH_LONG).show();
BrazeInAppMessageManager.getInstance().hideCurrentlyDisplayingInAppMessage(false);
return true;
}
}
```
```kotlin
class CustomHtmlInAppMessageActionListener(private val mContext: Context) : IHtmlInAppMessageActionListener {
override fun onCloseClicked(inAppMessage: IInAppMessage, url: String, queryBundle: Bundle) {
Toast.makeText(mContext, "HTML In App Message closed", Toast.LENGTH_LONG).show()
BrazeInAppMessageManager.getInstance().hideCurrentlyDisplayingInAppMessage(false)
}
override fun onCustomEventFired(inAppMessage: IInAppMessage, url: String, queryBundle: Bundle): Boolean {
Toast.makeText(mContext, "Custom event fired. Ignoring.", Toast.LENGTH_LONG).show()
return true
}
override fun onOtherUrlAction(inAppMessage: IInAppMessage, url: String, queryBundle: Bundle): Boolean {
Toast.makeText(mContext, "Custom url pressed: $url . Ignoring", Toast.LENGTH_LONG).show()
BrazeInAppMessageManager.getInstance().hideCurrentlyDisplayingInAppMessage(false)
return true
}
}
```
### Step 2: Instruct Braze to use the custom manager listener
After you create `IInAppMessageManagerListener`, call `BrazeInAppMessageManager.getInstance().setCustomInAppMessageManagerListener()` to instruct `BrazeInAppMessageManager`
to use your custom `IInAppMessageManagerListener` instead of the default listener. Do this in your [`Application.onCreate()`](https://developer.android.com/reference/android/app/Application.html#onCreate()) before any other calls to Braze, so the custom listener is set before any in-app messages are displayed.
#### Altering in-app messages before display
When a new in-app message is received, and there is already an in-app message being displayed, the new message will be put onto the top of the stack and can be displayed at a later time.
However, if there is no in-app message being displayed, the following delegate method in `IInAppMessageManagerListener` will be called:
```java
@Override
public InAppMessageOperation beforeInAppMessageDisplayed(IInAppMessage inAppMessage) {
return InAppMessageOperation.DISPLAY_NOW;
}
```
```kotlin
override fun beforeInAppMessageDisplayed(inAppMessage: IInAppMessage): InAppMessageOperation {
return InAppMessageOperation.DISPLAY_NOW
}
```
The `InAppMessageOperation()` return value can control when the message should be displayed. The suggested usage of this method would be to delay messages in certain parts of the app by returning `DISPLAY_LATER` when in-app messages would be distracting to the user's app experience.
| `InAppMessageOperation` return value | Behavior |
| -------------------------- | -------- |
| `DISPLAY_NOW` | The message will be displayed |
| `DISPLAY_LATER` | The message will be returned to the stack and displayed at the next available opportunity |
| `DISCARD` | The message will be discarded |
| `null` | The message will be ignored. This method should **NOT** return `null` |
{: .reset-td-br-1 .reset-td-br-2 .reset-td-br-3 role="presentation" }
See [`InAppMessageOperation`](https://braze-inc.github.io/braze-android-sdk/kdoc/braze-android-sdk/com.braze.ui.inappmessage/-in-app-message-operation/index.html) for more details.
**Tip:**
If you choose to `DISCARD` the in-app message and replace it with your in-app message view, you will need to log in-app message clicks and impressions manually.
On Android, this is done by calling `logClick` and `logImpression` on in-app messages and `logButtonClick` on immersive in-app messages.
**Tip:**
Once an in-app message has been placed on the stack, you can request for it to be retrieved and displayed at any time by calling [`BrazeInAppMessageManager.getInstance().requestDisplayInAppMessage()`](https://braze-inc.github.io/braze-android-sdk/kdoc/braze-android-sdk/com.braze.ui.inappmessage/-braze-in-app-message-manager/request-display-in-app-message.html). This method requests Braze to display the next available in-app message from the stack.
After your `IHtmlInAppMessageActionListener` is created, call `BrazeInAppMessageManager.getInstance().setCustomHtmlInAppMessageActionListener()` to instruct `BrazeInAppMessageManager` to use your custom `IHtmlInAppMessageActionListener` instead of the default action listener.
We recommend setting your `IHtmlInAppMessageActionListener` in your [`Application.onCreate()`](https://developer.android.com/reference/android/app/Application.html#onCreate()) before any other calls to Braze. This will set the custom action listener before any in-app message is displayed:
```java
BrazeInAppMessageManager.getInstance().setCustomHtmlInAppMessageActionListener(new CustomHtmlInAppMessageActionListener(context));
```
```kotlin
BrazeInAppMessageManager.getInstance().setCustomHtmlInAppMessageActionListener(CustomHtmlInAppMessageActionListener(context))
```
## Setting custom factories
You can override a number of defaults through custom factory objects. These can be registered with the Braze SDK as needed to achieve the desired results. However, if you decide to override a factory, you'll likely need to explicitly defer to the default or reimplement the functionality provided by the Braze default. The following code snippet illustrates how to supply custom implementations of the `IInAppMessageViewFactory` and the `IInAppMessageViewWrapperFactory` interfaces.
**In-app message types**
```kotlin
class BrazeDemoApplication : Application(){
override fun onCreate() {
super.onCreate()
registerActivityLifecycleCallbacks(BrazeActivityLifecycleCallbackListener(true, true))
BrazeInAppMessageManager.getInstance().setCustomInAppMessageViewWrapperFactory(CustomInAppMessageViewWrapperFactory())
BrazeInAppMessageManager.getInstance().setCustomInAppMessageViewFactory(CustomInAppMessageViewFactory())
}
}
```
**In-app message types**
```java
public class BrazeDemoApplication extends Application {
@Override
public void onCreate{
super.onCreate();
registerActivityLifecycleCallbacks(new BrazeActivityLifecycleCallbackListener(true, true));
BrazeInAppMessageManager.getInstance().setCustomInAppMessageViewWrapperFactory(new CustomInAppMessageViewWrapperFactory());
BrazeInAppMessageManager.getInstance().setCustomInAppMessageViewFactory(new CustomInAppMessageViewFactory());
}
}
```
Braze in-app message types are versatile enough to cover most custom use cases. However, if you want to fully define the visual appearance of your in-app messages instead of using a default type, Braze makes this possible by setting a custom view factory.
The `BrazeInAppMessageManager` automatically handles placing the in-app message model into the existing activity view hierarchy by default using [`DefaultInAppMessageViewWrapper`](https://braze-inc.github.io/braze-android-sdk/kdoc/braze-android-sdk/com.braze.ui.inappmessage/-default-in-app-message-view-wrapper/index.html). If you need to customize how in-app messages are placed into the view hierarchy, you should use a custom [`IInAppMessageViewWrapperFactory`](https://braze-inc.github.io/braze-android-sdk/kdoc/braze-android-sdk/com.braze.ui.inappmessage/-i-in-app-message-view-wrapper-factory/index.html).
In-app messages have preset animation behavior. `Slideup` messages slide into the screen; `full` and `modal` messages fade in and out. If you want to define custom animation behaviors for your in-app messages, Braze makes this possible by setting up a custom animation factory.
### Step 1: Implement the factory
Create a class that implements [`IInAppMessageViewFactory`](https://braze-inc.github.io/braze-android-sdk/kdoc/braze-android-sdk/com.braze.ui.inappmessage/-i-in-app-message-view-factory/index.html):
```java
public class CustomInAppMessageViewFactory implements IInAppMessageViewFactory {
@Override
public View createInAppMessageView(Activity activity, IInAppMessage inAppMessage) {
// Uses a custom view for slideups, modals, and full in-app messages.
// HTML in-app messages and any other types will use the Braze default in-app message view factories
switch (inAppMessage.getMessageType()) {
case SLIDEUP:
case MODAL:
case FULL:
// Use a custom view of your choosing
return createMyCustomInAppMessageView();
default:
// Use the default in-app message factories
final IInAppMessageViewFactory defaultInAppMessageViewFactory = BrazeInAppMessageManager.getInstance().getDefaultInAppMessageViewFactory(inAppMessage);
return defaultInAppMessageViewFactory.createInAppMessageView(activity, inAppMessage);
}
}
}
```
```kotlin
class CustomInAppMessageViewFactory : IInAppMessageViewFactory {
override fun createInAppMessageView(activity: Activity, inAppMessage: IInAppMessage): View {
// Uses a custom view for slideups, modals, and full in-app messages.
// HTML in-app messages and any other types will use the Braze default in-app message view factories
when (inAppMessage.messageType) {
MessageType.SLIDEUP, MessageType.MODAL, MessageType.FULL ->
// Use a custom view of your choosing
return createMyCustomInAppMessageView()
else -> {
// Use the default in-app message factories
val defaultInAppMessageViewFactory = BrazeInAppMessageManager.getInstance().getDefaultInAppMessageViewFactory(inAppMessage)
return defaultInAppMessageViewFactory!!.createInAppMessageView(activity, inAppMessage)
}
}
}
}
```
Create a class that implements [`IInAppMessageViewWrapperFactory`](https://braze-inc.github.io/braze-android-sdk/kdoc/braze-android-sdk/com.braze.ui.inappmessage/-i-in-app-message-view-wrapper-factory/index.html) and returns an [`IInAppMessageViewWrapper`](https://braze-inc.github.io/braze-android-sdk/kdoc/braze-android-sdk/com.braze.ui.inappmessage/-i-in-app-message-view-wrapper/index.html).
This factory is called immediately after the in-app message view is created. The easiest way to implement a custom [`IInAppMessageViewWrapper`](https://braze-inc.github.io/braze-android-sdk/kdoc/braze-android-sdk/com.braze.ui.inappmessage/-i-in-app-message-view-wrapper/index.html) is just to extend the default [`DefaultInAppMessageViewWrapper`](https://braze-inc.github.io/braze-android-sdk/kdoc/braze-android-sdk/com.braze.ui.inappmessage/-default-in-app-message-view-wrapper/index.html):
```java
public class CustomInAppMessageViewWrapper extends DefaultInAppMessageViewWrapper {
public CustomInAppMessageViewWrapper(View inAppMessageView,
IInAppMessage inAppMessage,
IInAppMessageViewLifecycleListener inAppMessageViewLifecycleListener,
BrazeConfigurationProvider brazeConfigurationProvider,
Animation openingAnimation,
Animation closingAnimation, View clickableInAppMessageView) {
super(inAppMessageView,
inAppMessage,
inAppMessageViewLifecycleListener,
brazeConfigurationProvider,
openingAnimation,
closingAnimation,
clickableInAppMessageView);
}
@Override
public void open(@NonNull Activity activity) {
super.open(activity);
Toast.makeText(activity.getApplicationContext(), "Opened in-app message", Toast.LENGTH_SHORT).show();
}
@Override
public void close() {
super.close();
Toast.makeText(mInAppMessageView.getContext().getApplicationContext(), "Closed in-app message", Toast.LENGTH_SHORT).show();
}
}
```
```kotlin
class CustomInAppMessageViewWrapper(inAppMessageView: View,
inAppMessage: IInAppMessage,
inAppMessageViewLifecycleListener: IInAppMessageViewLifecycleListener,
brazeConfigurationProvider: BrazeConfigurationProvider,
openingAnimation: Animation,
closingAnimation: Animation, clickableInAppMessageView: View) :
DefaultInAppMessageViewWrapper(inAppMessageView,
inAppMessage,
inAppMessageViewLifecycleListener,
brazeConfigurationProvider,
openingAnimation,
closingAnimation,
clickableInAppMessageView) {
override fun open(activity: Activity) {
super.open(activity)
Toast.makeText(activity.applicationContext, "Opened in-app message", Toast.LENGTH_SHORT).show()
}
override fun close() {
super.close()
Toast.makeText(mInAppMessageView.context.applicationContext, "Closed in-app message", Toast.LENGTH_SHORT).show()
}
}
```
Create a class that implements [`IInAppMessageAnimationFactory`](https://braze-inc.github.io/braze-android-sdk/kdoc/braze-android-sdk/com.braze.ui.inappmessage/-i-in-app-message-animation-factory/index.html):
```java
public class CustomInAppMessageAnimationFactory implements IInAppMessageAnimationFactory {
@Override
public Animation getOpeningAnimation(IInAppMessage inAppMessage) {
Animation animation = new AlphaAnimation(0, 1);
animation.setInterpolator(new AccelerateInterpolator());
animation.setDuration(2000L);
return animation;
}
@Override
public Animation getClosingAnimation(IInAppMessage inAppMessage) {
Animation animation = new AlphaAnimation(1, 0);
animation.setInterpolator(new DecelerateInterpolator());
animation.setDuration(2000L);
return animation;
}
}
```
```kotlin
class CustomInAppMessageAnimationFactory : IInAppMessageAnimationFactory {
override fun getOpeningAnimation(inAppMessage: IInAppMessage): Animation {
val animation: Animation = AlphaAnimation(0, 1)
animation.interpolator = AccelerateInterpolator()
animation.duration = 2000L
return animation
}
override fun getClosingAnimation(inAppMessage: IInAppMessage): Animation {
val animation: Animation = AlphaAnimation(1, 0)
animation.interpolator = DecelerateInterpolator()
animation.duration = 2000L
return animation
}
}
```
### Step 2: Instruct Braze to use the factory
After your `IInAppMessageViewFactory` is created, call `BrazeInAppMessageManager.getInstance().setCustomInAppMessageViewFactory()` to instruct `BrazeInAppMessageManager`
to use your custom `IInAppMessageViewFactory` instead of the default view factory.
**Tip:**
We recommend setting your `IInAppMessageViewFactory` in your `Application.onCreate()` before any other calls to Braze. This will set the custom view factory before any in-app message is displayed.
#### How it works
The `slideup` in-app message view implements [`IInAppMessageView`](https://braze-inc.github.io/braze-android-sdk/kdoc/braze-android-sdk/com.braze.ui.inappmessage.views/-i-in-app-message-view/index.html). The `full` and `modal` type message views implement [`IInAppMessageImmersiveView`](https://braze-inc.github.io/braze-android-sdk/kdoc/braze-android-sdk/com.braze.ui.inappmessage.views/-i-in-app-message-immersive-view/index.html). Implementing one of these classes allows Braze to add click listeners to your custom view where appropriate. All Braze view classes extend Android's [`View`](http://developer.android.com/reference/android/view/View.html) class.
Implementing `IInAppMessageView` allows you to define a certain portion of your custom view as clickable. Implementing [`IInAppMessageImmersiveView`](https://braze-inc.github.io/braze-android-sdk/kdoc/braze-android-sdk/com.braze.ui.inappmessage.views/-i-in-app-message-immersive-view/index.html) allows you to define message button views and a close button view.
After your [`IInAppMessageViewWrapper`](https://braze-inc.github.io/braze-android-sdk/kdoc/braze-android-sdk/com.braze.ui.inappmessage/-i-in-app-message-view-wrapper/index.html) is created, call [`BrazeInAppMessageManager.getInstance().setCustomInAppMessageViewWrapperFactory()`](https://braze-inc.github.io/braze-android-sdk/kdoc/braze-android-sdk/com.braze.ui.inappmessage/-in-app-message-manager-base/set-custom-in-app-message-view-factory.html) to instruct `BrazeInAppMessageManager` to use your custom [`IInAppMessageViewWrapperFactory`](https://braze-inc.github.io/braze-android-sdk/kdoc/braze-android-sdk/com.braze.ui.inappmessage/-i-in-app-message-view-wrapper-factory/index.html) instead of the default view wrapper factory.
We recommend setting your [`IInAppMessageViewWrapperFactory`](https://braze-inc.github.io/braze-android-sdk/kdoc/braze-android-sdk/com.braze.ui.inappmessage/-i-in-app-message-view-wrapper-factory/index.html) in your [`Application.onCreate()`](https://developer.android.com/reference/android/app/Application.html#onCreate()) before any other calls to Braze. This will set the custom view wrapper factory before any in-app message is displayed:
```java
BrazeInAppMessageManager.getInstance().setCustomInAppMessageViewWrapperFactory(new CustomInAppMessageViewWrapper());
```
```kotlin
BrazeInAppMessageManager.getInstance().setCustomInAppMessageViewWrapperFactory(CustomInAppMessageViewWrapper())
```
Once your `IInAppMessageAnimationFactory` is created, call `BrazeInAppMessageManager.getInstance().setCustomInAppMessageAnimationFactory()` to instruct `BrazeInAppMessageManager`
to use your custom `IInAppMessageAnimationFactory` instead of the default animation factory.
We recommend setting your `IInAppMessageAnimationFactory` in your [`Application.onCreate()`](https://developer.android.com/reference/android/app/Application.html#onCreate()) before any other calls to Braze. This will set the custom animation factory before any in-app message is displayed.
## Custom styles
Braze UI elements come with a default look and feel that matches the Android standard UI guidelines and provides a seamless experience. This reference article covers custom in-app messaging styling for your Android or FireOS application.
### Setting a default style
You can see default styles in the Braze SDK's [`styles.xml`](https://github.com/braze-inc/braze-android-sdk/blob/master/android-sdk-ui/src/main/res/values/styles.xml) file:
```xml
```
If you would prefer, you can override these styles to create a look and feel that better suits your app.
To override a style, copy it in its entirety to the `styles.xml` file in your project and make modifications. The whole style must be copied over to your local `styles.xml` file for all attributes to be correctly set. Note that these custom styles are for changes to individual UI elements, not wholesale changes to layouts. Layout-level changes need to be handled with custom views.
**Note:**
You can customize some colors directly in your Braze campaign without modifying the XML. Keep in mind, colors set in the Braze dashboard will override colors you set anywhere else.
### Customizing the font
You can set a custom font by locating the typeface in the `res/font` directory. To use it, override the style for message text, headers, and button text and use the `fontFamily` attribute to instruct Braze to use your custom font family.
For example, to update the font on your in-app message button text, override the `Braze.InAppMessage.Button` style and reference your custom font family. The attribute value should point to a font family in your `res/font` directory.
Here is a truncated example with a custom font family, `my_custom_font_family`, referenced on the last line:
```xml
```
Aside from the `Braze.InAppMessage.Button` style for button text, the style for message text is `Braze.InAppMessage.Message` and the style for message headers is `Braze.InAppMessage.Header`. If you want to use your custom font family across all possible in-app message text, you can set your font family on the `Braze.InAppMessage` style, which is the parent style for all in-app messages.
**Important:**
As with other custom styles, the entire style must be copied over to your local `styles.xml` file for all attributes to be correctly set.
## Message dismissals
### Swiping to dismiss slideup messages
By default, slideup in-app messages can be dismissed with a swipe gesture. The direction of the swipe depends on the slideup position:
- **Left or right swipe:** Dismisses the slideup regardless of its position.
- **Slideup from the bottom:** Swiping from top to bottom dismisses the message. Swiping from bottom to top does not dismiss it.
- **Slideup from the top:** Swiping from bottom to top dismisses the message. Swiping from top to bottom does not dismiss it.
This swipe behavior is built into the default [`DefaultInAppMessageViewWrapper`](https://braze-inc.github.io/braze-android-sdk/kdoc/braze-android-sdk/com.braze.ui.inappmessage/-default-in-app-message-view-wrapper/index.html) and applies only to slideup in-app messages. Modal and full in-app messages don't support swipe-to-dismiss. To customize this behavior, you can implement a [custom view wrapper factory](#android_setting-custom-factories).
**Note:**
Tapping outside of a slideup message does not dismiss it by default. This behavior differs from modal messages, which can be configured for outside tap dismissal. For slideups, use the swipe gesture or the close button to dismiss the message.
### Disabling back button dismissals
By default, the hardware back button dismisses Braze in-app messages. This behavior can be disabled on a per-message basis via [`BrazeInAppMessageManager.setBackButtonDismissesInAppMessageView()`](https://braze-inc.github.io/braze-android-sdk/kdoc/braze-android-sdk/com.braze.ui.inappmessage/-in-app-message-manager-base/set-back-button-dismisses-in-app-message-view.html).
In the following example, `disable_back_button` is a custom key-value pair set on the in-app message that signifies whether the message should allow for the back button to dismiss the message:
```java
BrazeInAppMessageManager.getInstance().setCustomInAppMessageManagerListener(new DefaultInAppMessageManagerListener() {
@Override
public void beforeInAppMessageViewOpened(View inAppMessageView, IInAppMessage inAppMessage) {
super.beforeInAppMessageViewOpened(inAppMessageView, inAppMessage);
final Map extras = inAppMessage.getExtras();
if (extras != null && extras.containsKey("disable_back_button")) {
BrazeInAppMessageManager.getInstance().setBackButtonDismissesInAppMessageView(false);
}
}
@Override
public void afterInAppMessageViewClosed(IInAppMessage inAppMessage) {
super.afterInAppMessageViewClosed(inAppMessage);
BrazeInAppMessageManager.getInstance().setBackButtonDismissesInAppMessageView(true);
}
});
```
```kotlin
BrazeInAppMessageManager.getInstance().setCustomInAppMessageManagerListener(object : DefaultInAppMessageManagerListener() {
override fun beforeInAppMessageViewOpened(inAppMessageView: View, inAppMessage: IInAppMessage) {
super.beforeInAppMessageViewOpened(inAppMessageView, inAppMessage)
val extras = inAppMessage.extras
if (extras != null && extras.containsKey("disable_back_button")) {
BrazeInAppMessageManager.getInstance().setBackButtonDismissesInAppMessageView(false)
}
}
override fun afterInAppMessageViewClosed(inAppMessage: IInAppMessage) {
super.afterInAppMessageViewClosed(inAppMessage)
BrazeInAppMessageManager.getInstance().setBackButtonDismissesInAppMessageView(true)
}
})
```
**Note:**
Note that if this functionality is disabled, the host activity's hardware back button default behavior will be used instead. This may lead to the back button closing the application instead of the displayed in-app message.
### Enabling outside tap dismissals
By default, dismissing the modal using an outside tap is set to `false`. Setting this value to `true` will result in the modal in-app message being dismissed when the user taps outside of the in-app message. This behavior can be toggled on by calling:
```java
BrazeInAppMessageManager.getInstance().setClickOutsideModalViewDismissInAppMessageView(true)
```
## Customizing the orientation
To set a fixed orientation for an in-app message, first [set a custom in-app message manager listener](https://www.braze.com/docs/developer_guide/in_app_messages/customization/?sdktab=android#android_setting-custom-manager-listeners). Then, update the orientation on the `IInAppMessage` object in the `beforeInAppMessageDisplayed()` delegate method:
```java
public InAppMessageOperation beforeInAppMessageDisplayed(IInAppMessage inAppMessage) {
// Set the orientation to portrait
inAppMessage.setOrientation(Orientation.PORTRAIT);
return InAppMessageOperation.DISPLAY_NOW;
}
```
```kotlin
override fun beforeInAppMessageDisplayed(inAppMessage: IInAppMessage): InAppMessageOperation {
// Set the orientation to portrait
inAppMessage.orientation = Orientation.PORTRAIT
return InAppMessageOperation.DISPLAY_NOW
}
```
For tablet devices, in-app messages will appear in the user's preferred orientation style regardless of actual screen orientation.
## Disabling dark theme {#android-in-app-message-dark-theme-customization}
By default, `IInAppMessageManagerListener`'s `beforeInAppMessageDisplayed()` checks the system settings and conditionally enables dark theme styling on the message with the following code:
```java
@Override
public InAppMessageOperation beforeInAppMessageDisplayed(IInAppMessage inAppMessage) {
if (inAppMessage instanceof IInAppMessageThemeable && ViewUtils.isDeviceInNightMode(BrazeInAppMessageManager.getInstance().getApplicationContext())) {
((IInAppMessageThemeable) inAppMessage).enableDarkTheme();
}
return InAppMessageOperation.DISPLAY_NOW;
}
```
```kotlin
override fun beforeInAppMessageDisplayed(inAppMessage: IInAppMessage): InAppMessageOperation {
if (inAppMessage is IInAppMessageThemeable && ViewUtils.isDeviceInNightMode(BrazeInAppMessageManager.getInstance().applicationContext!!)) {
(inAppMessage as IInAppMessageThemeable).enableDarkTheme()
}
return InAppMessageOperation.DISPLAY_NOW
}
```
To change this, you can call [`enableDarkTheme`](https://braze-inc.github.io/braze-android-sdk/kdoc/braze-android-sdk/com.braze.models.inappmessage/-i-in-app-message-themeable/enable-dark-theme.html) at any step in the pre-display process to implement your own conditional logic.
## Customizing the Google Play review prompt
Due to the limitations and restrictions set by Google, custom Google Play review prompts are not currently supported by Braze. While some users have been able to integrate these prompts successfully, others have shown low success rates due to [Google Play quotas](https://developer.android.com/guide/playcore/in-app-review#quotas). Integrate at your own risk. Refer to documentation on [Google Play in-app review prompts](https://developer.android.com/guide/playcore/in-app-review).
## Prerequisites
Before you can use this feature, you'll need to [integrate the Swift Braze SDK](https://www.braze.com/docs/developer_guide/sdk_integration/?sdktab=swift).
## Setting up the UI delegate (required)
To customize the presentation of in-app messages and react to various lifecycle events, you'll need to set up [`BrazeInAppMessageUIDelegate`](https://braze-inc.github.io/braze-swift-sdk/documentation/brazeui/brazeinappmessageuidelegate). This is a delegate protocol used for receiving and processing triggered in-app message payloads, receiving display lifecycle events, and controlling display timing. To use `BrazeInAppMessageUIDelegate`, you must:
- Use the default [`BrazeInAppMessageUI`](https://braze-inc.github.io/braze-swift-sdk/documentation/brazeui/brazeinappmessageui) implementation as your `inAppMessagePresenter`.
- Include the `BrazeUI` library in your project.
### Step 1: Implement the `BrazeInAppMessageUIDelegate` protocol
First, implement the `BrazeInAppMessageUIDelegate` protocol and any corresponding methods you wish. In our example below, we are implementing this protocol in our application's `AppDelegate` class.
```swift
extension AppDelegate: BrazeInAppMessageUIDelegate {
// Implement your protocol methods here.
}
```
```objc
@interface AppDelegate ()
@end
@implementation AppDelegate
// Implement your protocol methods here.
@end
```
### Step 2: Assign the `delegate` object
Assign the `delegate` object on the `BrazeInAppMessageUI` instance before assigning this in-app message UI as your `inAppMessagePresenter`.
```swift
let inAppMessageUI = BrazeInAppMessageUI()
inAppMessageUI.delegate = self
AppDelegate.braze?.inAppMessagePresenter = inAppMessageUI
```
```objc
BrazeInAppMessageUI *inAppMessageUI = [[BrazeInAppMessageUI alloc] init];
inAppMessageUI.delegate = self;
AppDelegate.braze.inAppMessagePresenter = inAppMessageUI;
```
**Important:**
Not all delegate methods are available in Objective-C due to the incompatibility of their parameters with the language runtime.
**Tip:**
For a step-by-step implementation of the in-app message UI delegate, refer to this [tutorial](https://braze-inc.github.io/braze-swift-sdk/tutorials/braze/c1-inappmessageui).
## On-click behavior
Each `Braze.InAppMessage` object contains a corresponding [`ClickAction`](https://braze-inc.github.io/braze-swift-sdk/documentation/brazekit/braze/inappmessage/clickaction), which defines the behavior upon clicking.
### Click action types
The `clickAction` property on your `Braze.InAppMessage` defaults to `.none` but can be set to one of the following values:
| `ClickAction` | On-Click Behavior |
| -------------------------- | -------- |
| `.url(URL, useWebView: Bool)` | Opens the given URL in an external browser. If `useWebView` is set to `true`, it will open in a web view. |
| `.none` | The message will be dismissed when clicked. |
{: .reset-td-br-1 .reset-td-br-2 role="presentation" }
**Important:**
For in-app messages containing buttons, the message `clickAction` will also be included in the final payload if the click action is added prior to adding the button text.
### Customizing on-click behavior
To customize this behavior, you may modify the `clickAction` property by referring to the following sample:
```swift
func inAppMessage(
_ ui: BrazeInAppMessageUI,
prepareWith context: inout BrazeInAppMessageUI.PresentationContext
) {
if let newUrl = URL(string: "{your-url}") {
context.message.clickAction = .url(newUrl, useWebView: true)
}
}
```
The `inAppMessage(_:prepareWith:)` method is not available in Objective-C.
### Handling the custom behavior
The following [`BrazeInAppMessageUIDelegate`](https://braze-inc.github.io/braze-swift-sdk/documentation/brazeui/brazeinappmessageuidelegate) delegate method is called when a user clicks an in-app message. This callback is triggered for user-initiated clicks on in-app message buttons and HTML in-app message buttons (links), and a button ID is provided as an optional parameter for these interactions. This callback is not invoked for programmatic clicks triggered through `brazeBridge.logClick()`.
```swift
func inAppMessage(
_ ui: BrazeInAppMessageUI,
shouldProcess clickAction: Braze.InAppMessage.ClickAction,
buttonId: String?,
message: Braze.InAppMessage,
view: InAppMessageView
) -> Bool
```
```objc
- (BOOL)inAppMessage:(BrazeInAppMessageUI *)ui
shouldProcess:(enum BRZInAppMessageRawClickAction)clickAction
url:(NSURL *)uri
buttonId:(NSString *)buttonId
message:(BRZInAppMessageRaw *)message
view:(UIView *)view;
```
This method returns a boolean value to indicate if Braze should continue to execute the click action.
```swift
func inAppMessage(
_ ui: BrazeInAppMessageUI, shouldProcess clickAction: Braze.InAppMessage.ClickAction,
buttonId: String?, message: Braze.InAppMessage, view: InAppMessageView
) -> Bool {
guard let buttonId,
let idInt = Int(buttonId)
else { return true }
var button: BrazeKit.Braze.InAppMessage.Button? = nil
switch message {
case .modal(let modal):
button = modal.buttons[idInt]
case .modalImage(let modalImage):
button = modalImage.buttons[idInt]
case .full(let full):
button = full.buttons[idInt]
case .fullImage(let fullImage):
button = fullImage.buttons[idInt]
default:
break
}
print(button?.id)
print(button?.text)
print(button?.clickAction)
return true
}
```
```objc
- (BOOL)inAppMessage:(BrazeInAppMessageUI *)ui
shouldProcess:(enum BRZInAppMessageRawClickAction)clickAction
url:(NSURL *)uri
buttonId:(NSString *)buttonId
message:(BRZInAppMessageRaw *)message
view:(UIView *)view {
NSInteger buttonInt = [buttonId integerValue];
if (message.type == BRZInAppMessageRawTypeFull || message.type == BRZInAppMessageRawTypeModal) {
BRZInAppMessageRawButton *button = message.buttons[buttonInt];
NSLog(@"%ld", (long)button.identifier);
NSLog(@"%@", button.text);
NSLog(@"%ld", (long)button.clickAction);
}
return YES;
}
```
## Swiping to dismiss slideup messages
By default, slideup in-app messages can be dismissed with a swipe gesture. The direction of the swipe depends on the slideup position:
- **Left or right swipe:** Dismisses the slideup regardless of its position.
- **Slideup from the bottom:** Swiping from top to bottom dismisses the message. Swiping from bottom to top does not dismiss it.
- **Slideup from the top:** Swiping from bottom to top dismisses the message. Swiping from top to bottom does not dismiss it.
This swipe behavior is built into the default `BrazeInAppMessageUI` [`SlideupView`](https://braze-inc.github.io/braze-swift-sdk/documentation/brazeui/brazeinappmessageui/slideupview) and applies only to slideup in-app messages. Modal and full in-app messages don't support swipe-to-dismiss. To further customize the slideup view, including swipe behavior, you can modify the [`SlideupView.Attributes`](https://braze-inc.github.io/braze-swift-sdk/documentation/brazeui/brazeinappmessageui/slideupview/attributes-swift.struct) or provide a custom view via subclassing.
**Note:**
Tapping outside of a slideup message does not dismiss it. For modal or full in-app messages, you can enable outside tap dismissals using the `dismissOnBackgroundTap` attribute described below.
## Customizing modal dismissals
To enable outside tap dismissals, you can modify the `dismissOnBackgroundTap` property on the `Attributes` struct of the in-app message type you wish to customize.
For example, if you wish to enable this feature for modal image in-app messages, you can configure the following:
```swift
BrazeInAppMessageUI.ModalImageView.Attributes.defaults.dismissOnBackgroundTap = true
```
Customization via `Attributes` is not available in Objective-C.
The default value is `false`. This determines if the modal in-app message will be dismissed when the user taps outside of the in-app message.
| `DismissModalOnOutsideTap` | Description |
|----------|-------------|
| `true` | Modal in-app messages will be dismissed on outside tap. |
| `false` | Default, modal in-app messages will not be dismissed on outside tap. |
{: .reset-td-br-1 .reset-td-br-2 role="presentation" }
For more details on in-app message customization, refer to this [article](https://braze-inc.github.io/braze-swift-sdk/documentation/braze/in-app-message-customization).
## Customizing message orientation
You can customize the orientation of your in-app messages. You can set a new default orientation for all messages or set a custom orientation for a single message.
To choose a default orientation for all in-app messages, use the [`inAppMessage(_:prepareWith:)`](https://braze-inc.github.io/braze-swift-sdk/documentation/brazeui/brazeinappmessageuidelegate/inappmessage(_:preparewith:)-11fog) method to set the `preferredOrientation` property on the `PresentationContext`.
For example, to set portrait as the default orientation:
```swift
func inAppMessage(
_ ui: BrazeInAppMessageUI,
prepareWith context: inout BrazeInAppMessageUI.PresentationContext
) {
context.preferredOrientation = .portrait
}
```
```objc
- (void)inAppMessage:(BrazeInAppMessageUI *)ui
prepareWith:(BrazeInAppMessageUIPresentationContextRaw *)context {
context.preferredOrientation = BRZInAppMessageRawOrientationPortrait;
}
```
To set the orientation for a single message, modify the `orientation` property of `Braze.InAppMessage`:
```swift
// Set inAppMessage orientation to support any configuration
inAppMessage.orientation = .any
// Set inAppMessage orientation to only display in portrait
inAppMessage.orientation = .portrait
// Set inAppMessage orientation to only display in landscape
inAppMessage.orientation = .landscape
```
```objc
// Set inAppMessage orientation to support any configuration
inAppMessage.orientation = BRZInAppMessageRawOrientationAny;
// Set inAppMessage orientation to only display in portrait
inAppMessage.orientation = BRZInAppMessageRawOrientationPortrait;
// Set inAppMessage orientation to only display in landscape
inAppMessage.orientation = BRZInAppMessageRawOrientationLandscape;
```
After the in-app message is displayed, any device orientation changes while the message is still being displayed will cause the message to rotate with the device (provided it's supported by the message's `orientation` configuration).
The device orientation must also be supported by the in-app message's `orientation` property for the message to display. Additionally, the `preferredOrientation` setting will only be respected if it is included in your application's supported interface orientations under the **Deployment Info** section of your target's settings in Xcode.

**Note:**
The orientation is applied only for the presentation of the message. After the device changes orientation, the message view adopts one of the orientations it supports. On smaller devices (iPhones, iPod Touch), setting a landscape orientation for a modal or full in-app message may lead to truncated content.
## Customizing display timing
You can control if an available in-app message will display during certain points of your user experience. If there are situations where you would not want the in-app message to appear, such as during a fullscreen game or on a loading screen, you can delay or discard pending in-app message messages. To control the timing of in-app message, use the `inAppMessage(_:displayChoiceForMessage:)` [delegate method](https://braze-inc.github.io/braze-swift-sdk/documentation/brazeui/brazeinappmessageuidelegate/inappmessage(_:displaychoiceformessage:)-9w1nb) to set the `BrazeInAppMessageUI.DisplayChoice` property.
```swift
func inAppMessage(
_ ui: BrazeInAppMessageUI,
displayChoiceForMessage message: Braze.InAppMessage
) -> BrazeInAppMessageUI.DisplayChoice
```
```objc
- (enum BRZInAppMessageUIDisplayChoice)inAppMessage:(BrazeInAppMessageUI *)ui displayChoiceForMessage:(BRZInAppMessageRaw *)message
```
Configure `BrazeInAppMessageUI.DisplayChoice` to return one of the following values:
| Display Choice | Behavior |
| ----------------------------------- | --------------------------------------------------------------------------------------------------------------------------- |
| `.now` | The message will be displayed immediately. This is the default value. |
| `.reenqueue` | The message will be not be displayed and will be placed back on the top of the stack. |
| `.later` | The message will be not be displayed and will be placed back on the top of the stack. (Deprecated, please use `.reenqueue`) |
| `.discard` | The message will be discarded and will not be displayed. |
{: .reset-td-br-1 .reset-td-br-2 role="presentation" }
**Tip:**
For a sample of `InAppMessageUI`, check out our [Swift Braze SDK repository](https://github.com/braze-inc/braze-swift-sdk/tree/main/Examples/Swift/Sources/InAppMessageUI) and [Objective-C](https://github.com/braze-inc/braze-swift-sdk/tree/main/Examples/ObjC/Sources/InAppMessageUI).
## Hiding the status bar
For `Full`, `FullImage` and `HTML` in-app messages, the SDK will hide the status bar by default. For other types of in-app messages, the status bar is left untouched. To configure this behavior, use the `inAppMessage(_:prepareWith:)` [delegate method](https://braze-inc.github.io/braze-swift-sdk/documentation/brazeui/brazeinappmessageuidelegate/inappmessage(_:preparewith:)-11fog) to set the `statusBarHideBehavior` property on the `PresentationContext`. This field takes one of the following values:
| Status Bar Hide Behavior | Description |
| ----------------------------------- | ------------------------------------------------------------------------------------- |
| `.auto` | The message view decides the status bar hidden state. |
| `.hidden` | Always hide the status bar. |
| `.visible` | Always display the status bar. |
{: .reset-td-br-1 .reset-td-br-2 role="presentation" }
## Disabling dark mode
To prevent in-app messages from adopting dark mode styling when the user device has dark mode enabled, implement the `inAppMessage(_:prepareWith:)` [delegate method](https://braze-inc.github.io/braze-swift-sdk/documentation/brazeui/brazeinappmessageuidelegate/inappmessage(_:preparewith:)-11fog) method. The `PresentationContext` passed to the method contains a reference to the `InAppMessage` object to be presented. Each `InAppMessage` has a `themes` property containing a `dark` and `light` mode theme. If you set the `themes.dark` property to `nil`, Braze will automatically present the in-app message using its light theme.
In-app message types with buttons have an additional `themes` object on their `buttons` property. To prevent buttons from adopting dark mode styling, you can use [`map(_:)`](https://developer.apple.com/documentation/swift/array/map(_:)-87c4d) to create a new array of buttons with a `light` theme and no `dark` theme.
```swift
func inAppMessage(
_ ui: BrazeInAppMessageUI,
prepareWith context: inout BrazeInAppMessageUI.PresentationContext
) {
switch context.message {
case .slideup:
guard var slideup = context.message.slideup else { return }
slideup.themes.dark = nil
context.message.slideup = slideup
case .modal:
guard var modal = context.message.modal else { return }
modal.themes.dark = nil
modal.buttons = modal.buttons.map {
var newButton = $0
newButton.themes = .init(themes: ["light": $0.themes.light])
return newButton
}
context.message.modal = modal
case .modalImage:
guard var modalImage = context.message.modalImage else { return }
modalImage.themes.dark = nil
modalImage.buttons = modalImage.buttons.map {
var newButton = $0
newButton.themes = .init(themes: ["light": $0.themes.light])
return newButton
}
context.message.modalImage = modalImage
case .full:
guard var full = context.message.full else { return }
full.themes.dark = nil
full.buttons = full.buttons.map {
var newButton = $0
newButton.themes = .init(themes: ["light": $0.themes.light])
return newButton
}
context.message.full = full
case .fullImage:
guard var fullImage = context.message.fullImage else { return }
fullImage.themes.dark = nil
fullImage.buttons = fullImage.buttons.map {
var newButton = $0
newButton.themes = .init(themes: ["light": $0.themes.light])
return newButton
}
context.message.fullImage = fullImage
default:
break
}
}
```
```objc
- (void)inAppMessage:(BrazeInAppMessageUI *)ui
prepareWith:(BrazeInAppMessageUIPresentationContextRaw *)context {
switch (context.message.type) {
case BRZInAppMessageRawTypeSlideup: {
NSMutableDictionary *updatedThemes = [context.message.themes mutableCopy];
[updatedThemes removeObjectForKey:@"dark"];
context.message.themes = updatedThemes;
break;
}
case BRZInAppMessageRawTypeModal:
case BRZInAppMessageRawTypeFull:
{
NSMutableDictionary *updatedThemes = [context.message.themes mutableCopy];
[updatedThemes removeObjectForKey:@"dark"];
context.message.themes = updatedThemes;
NSMutableArray *updatedButtons = [NSMutableArray arrayWithCapacity:context.message.buttons.count];
for (BRZInAppMessageRawButton *button in context.message.buttons) {
BRZInAppMessageRawButtonTheme *lightTheme = BRZInAppMessageRawButtonTheme.defaultLight;
BRZInAppMessageRawButton *newButton = [button mutableCopy];
newButton.textColor = lightTheme.textColor;
newButton.backgroundColor = lightTheme.backgroundColor;
newButton.borderColor = lightTheme.borderColor;
[updatedButtons addObject:newButton];
}
context.message.buttons = updatedButtons;
break;
}
default:
break;
}
}
```
## Customizing the app store review prompt
You can use in-app messages in a campaign to ask users for an App Store review.
**Note:**
Because this example prompt overrides default behavior of Braze, we cannot automatically track impressions if it is implemented. You must [log your own analytics](https://www.braze.com/docs/developer_guide/analytics/).
### Step 1: Set the in-app message delegate
First, set the [`BrazeInAppMessageUIDelegate`](https://www.braze.com/docs/developer_guide/in_app_messages/customization/#swift_setting-up-the-ui-delegate-required) in your app.
### Step 2: Disable the default App Store review message
Next, implement the `inAppMessage(_:displayChoiceForMessage:)` [delegate method](https://braze-inc.github.io/braze-swift-sdk/documentation/brazeui/brazeinappmessageuidelegate/inappmessage(_:displaychoiceformessage:)-9w1nb) to disable the default App Store review message.
```swift
func inAppMessage(_ ui: BrazeInAppMessageUI, displayChoiceForMessage message: Braze.InAppMessage) -> BrazeInAppMessageUI.DisplayChoice {
if message.extras["AppStore Review"] != nil,
let messageUrl = message.clickAction.url {
UIApplication.shared.open(messageUrl, options: [:], completionHandler: nil)
return .discard
} else {
return .now
}
}
```
```objc
- (enum BRZInAppMessageUIDisplayChoice)inAppMessage:(BrazeInAppMessageUI *)ui
displayChoiceForMessage:(BRZInAppMessageRaw *)message {
if (message.extras != nil && message.extras[@"AppStore Review"] != nil) {
[[UIApplication sharedApplication] openURL:message.url options:@{} completionHandler:nil];
return BRZInAppMessageUIDisplayChoiceDiscard;
} else {
return BRZInAppMessageUIDisplayChoiceNow;
}
}
```
### Step 3: Create a deep link
In your deep link handling code, add the following code to process the `{YOUR-APP-SCHEME}:app-store-review` deep link. Note that you will need to import `StoreKit` to use `SKStoreReviewController`:
```swift
func application(_ app: UIApplication, open url: URL, options: [UIApplicationOpenURLOptionsKey : Any] = [:]) -> Bool {
let urlString = url.absoluteString.removingPercentEncoding
if (urlString == "{YOUR-APP-SCHEME}:app-store-review") {
SKStoreReviewController.requestReview()
return true;
}
// Other deep link handling code…
}
```
```objc
- (BOOL)application:(UIApplication *)app openURL:(NSURL *)url options:(NSDictionary *)options {
NSString *urlString = url.absoluteString.stringByRemovingPercentEncoding;
if ([urlString isEqualToString:@"{YOUR-APP-SCHEME}:app-store-review"]) {
[SKStoreReviewController requestReview];
return YES;
}
// Other deep link handling code…
}
```
### Step 4: Set custom on-click behavior
Next, create an in-app messaging campaign with the following:
- The key-value pair `"AppStore Review" : "true"`
- The on-click behavior set to "Deep Link Into App", using the deep link `{YOUR-APP-SCHEME}:app-store-review`.
**Tip:**
Apple limits App Store review prompts to a maximum of three times per year for each user, so your campaign should be [rate-limited](https://www.braze.com/docs/user_guide/engagement_tools/campaigns/building_campaigns/rate-limiting/) to three times per year per user.
Users may turn off App Store review prompts. As a result, your custom review prompt should not promise that a native App Store review prompt will appear or directly ask for a review.
## Prerequisites
Before you can use this feature, you'll need to [integrate the React Native Braze SDK](https://www.braze.com/docs/developer_guide/sdk_integration/?sdktab=react%20native).
## Methods for logging
You can use these methods by passing your `BrazeInAppMessage` instance to log analytics and perform actions:
| Method | Description |
| --------------------------------------------------------- | ------------------------------------------------------------------------------------- |
| `logInAppMessageClicked(inAppMessage)` | Logs a click for the provided in-app message data. |
| `logInAppMessageImpression(inAppMessage)` | Logs an impression for the provided in-app message data. |
| `logInAppMessageButtonClicked(inAppMessage, buttonId)` | Logs a button click for the provided in-app message data and button ID. |
| `hideCurrentInAppMessage()` | Dismisses the currently displayed in-app message. |
| `performInAppMessageAction(inAppMessage)` | Performs the action for an in-app message. |
| `performInAppMessageButtonAction(inAppMessage, buttonId)` | Performs the action for an in-app message button. |
{: .reset-td-br-1 .reset-td-br-2 role="presentation"}
## Handling message data
In most cases, you can use the `Braze.addListener` method to register event listeners to handle data coming from in-app messages.
Additionally, you can access the in-app message data in the JavaScript layer by calling the `Braze.subscribeToInAppMessage` method to have the SDKs publish an `inAppMessageReceived` event when an in-app message is triggered. Pass a callback to this method to execute your own code when the in-app message is triggered and received by the listener.
To customize how message data is handled, refer to the following implementation examples:
To enhance the default behavior, or if you don't have access to customize the native iOS or Android code, we recommend that you disable the default UI while still receiving in-app message events from Braze. To disable the default UI, pass `false` to the `Braze.subscribeToInAppMessage` method and use the in-app message data to construct your own message in JavaScript. Note that you will need to manually log analytics on your messages if you choose to disable the default UI.
```javascript
import Braze from "@braze/react-native-sdk";
// Option 1: Listen for the event directly via `Braze.addListener`.
//
// You may use this method to accomplish the same thing if you don't
// wish to make any changes to the default Braze UI.
Braze.addListener(Braze.Events.IN_APP_MESSAGE_RECEIVED, (event) => {
console.log(event.inAppMessage);
});
// Option 2: Call `subscribeToInAppMessage`.
//
// Pass in `false` to disable the automatic display of in-app messages.
Braze.subscribeToInAppMessage(false, (event) => {
console.log(event.inAppMessage);
// Use `event.inAppMessage` to construct your own custom message UI.
});
```
To include more advanced logic to determine whether or not to show an in-app message using the built-in UI, implement in-app messages through the native layer.
**Warning:**
Since this is an advanced customization option, note that overriding the default Braze implementation will also nullify the logic to emit in-app message events to your JavaScript listeners. If you wish to still use `Braze.subscribeToInAppMessage` or `Braze.addListener` as described in [Accessing in-app message data](#accessing-in-app-message-data), you will need to handle publishing the events yourself.
Implement the `IInAppMessageManagerListener` as described in our Android article on [Custom Manager Listener](https://www.braze.com/docs/developer_guide/in_app_messages/customization/?sdktab=android#android_setting-custom-manager-listeners). In your `beforeInAppMessageDisplayed` implementation, you can access the `inAppMessage` data, send it to the JavaScript layer, and decide to show or not show the native message based on the return value.
For more on these values, see our [Android documentation](https://www.braze.com/docs/developer_guide/in_app_messages/).
```java
// In-app messaging
@Override
public InAppMessageOperation beforeInAppMessageDisplayed(IInAppMessage inAppMessage) {
WritableMap parameters = new WritableNativeMap();
parameters.putString("inAppMessage", inAppMessage.forJsonPut().toString());
getReactNativeHost()
.getReactInstanceManager()
.getCurrentReactContext()
.getJSModule(DeviceEventManagerModule.RCTDeviceEventEmitter.class)
.emit("inAppMessageReceived", parameters);
// Note: return InAppMessageOperation.DISCARD if you would like
// to prevent the Braze SDK from displaying the message natively.
return InAppMessageOperation.DISPLAY_NOW;
}
```
### Overriding the default UI delegate
By default, [`BrazeInAppMessageUI`](https://braze-inc.github.io/braze-swift-sdk/documentation/brazeui/brazeinappmessageui/) is created and assigned when you initialize the `braze` instance. `BrazeInAppMessageUI` is an implementation of the [`BrazeInAppMessagePresenter`](https://braze-inc.github.io/braze-swift-sdk/documentation/brazekit/brazeinappmessagepresenter) protocol and comes with a `delegate` property that can be used to customize the handling of in-app messages that have been received.
1. Implement the `BrazeInAppMessageUIDelegate` delegate as described in [our iOS article here](https://braze-inc.github.io/braze-swift-sdk/tutorials/braze/c1-inappmessageui).
2. In the `inAppMessage(_:displayChoiceForMessage:)` delegate method, you can access the `inAppMessage` data, send it to the JavaScript layer, and decide to show or not show the native message based on the return value.
For more details on these values, see our [iOS documentation](https://braze-inc.github.io/braze-swift-sdk/documentation/brazeui/brazeinappmessageuidelegate/).
```objc
- (enum BRZInAppMessageUIDisplayChoice)inAppMessage:(BrazeInAppMessageUI *)ui
displayChoiceForMessage:(BRZInAppMessageRaw *)message {
// Convert the message to a JavaScript representation.
NSData *inAppMessageData = [message json];
NSString *inAppMessageString = [[NSString alloc] initWithData:inAppMessageData encoding:NSUTF8StringEncoding];
NSDictionary *arguments = @{
@"inAppMessage" : inAppMessageString
};
// Send to JavaScript.
[self sendEventWithName:@"inAppMessageReceived" body:arguments];
// Note: Return `BRZInAppMessageUIDisplayChoiceDiscard` if you would like
// to prevent the Braze SDK from displaying the message natively.
return BRZInAppMessageUIDisplayChoiceNow;
}
```
To use this delegate, assign it to `brazeInAppMessagePresenter.delegate` after initializing the `braze` instance.
**Note:**
`BrazeUI` can only be imported in Objective-C or Swift. If you are using Objective-C++, you will need to handle this in a separate file.
```objc
@import BrazeUI;
- (BOOL)application:(UIApplication *)application didFinishLaunchingWithOptions:(NSDictionary *)launchOptions {
BRZConfiguration *configuration = [[BRZConfiguration alloc] initWithApiKey:apiKey endpoint:endpoint];
Braze *braze = [BrazeReactBridge initBraze:configuration];
((BrazeInAppMessageUI *)braze.inAppMessagePresenter).delegate = [[CustomDelegate alloc] init];
AppDelegate.braze = braze;
}
```
### Overriding the default native UI
If you wish to fully customize the presentation of your in-app messages at the native iOS layer, conform to the [`BrazeInAppMessagePresenter`](https://braze-inc.github.io/braze-swift-sdk/documentation/brazekit/brazeinappmessagepresenter) protocol and assign your custom presenter following the sample below:
```objc
BRZConfiguration *configuration = [[BRZConfiguration alloc] initWithApiKey:apiKey endpoint:endpoint];
Braze *braze = [BrazeReactBridge initBraze:configuration];
braze.inAppMessagePresenter = [[MyCustomPresenter alloc] init];
AppDelegate.braze = braze;
```
## Customizing the display behavior
You can change the display behavior of in-app messages at runtime via the following:
```csharp
// Sets in-app messages to display immediately when triggered.
Appboy.AppboyBinding.SetInAppMessageDisplayAction(BrazeUnityInAppMessageDisplayActionType.IAM_DISPLAY_NOW);
// Sets in-app messages to display at a later time and be saved in a stack.
Appboy.AppboyBinding.SetInAppMessageDisplayAction(BrazeUnityInAppMessageDisplayActionType.IAM_DISPLAY_LATER);
// Sets in-app messages to be discarded after being triggered.
Appboy.AppboyBinding.SetInAppMessageDisplayAction(BrazeUnityInAppMessageDisplayActionType.IAM_DISCARD);
```
## Setting a custom listener
If you require more control over how a user interacts with in-app messages, use a `BrazeInAppMessageListener` and assign it to `Appboy.AppboyBinding.inAppMessageListener`. For any delegates you don't want to use, you can simply leave them as `null`.
```csharp
BrazeInAppMessageListener listener = new BrazeInAppMessageListener() {
BeforeInAppMessageDisplayed = BeforeInAppMessageDisplayed,
OnInAppMessageButtonClicked = OnInAppMessageButtonClicked,
OnInAppMessageClicked = OnInAppMessageClicked,
OnInAppMessageHTMLClicked = OnInAppMessageHTMLClicked,
OnInAppMessageDismissed = OnInAppMessageDismissed,
};
Appboy.AppboyBinding.inAppMessageListener = listener;
public void BeforeInAppMessageDisplayed(IInAppMessage inAppMessage) {
// Executed before an in-app message is displayed.
}
public void OnInAppMessageButtonClicked(IInAppMessage inAppMessage, InAppMessageButton inAppMessageButton) {
// Executed whenever an in-app message button is clicked.
}
public void OnInAppMessageClicked(IInAppMessage inAppMessage) {
// Executed whenever an in-app message is clicked.
}
public void OnInAppMessageHTMLClicked(IInAppMessage inAppMessage, Uri uri) {
// Executed whenever an HTML in-app message is clicked.
}
public void OnInAppMessageDismissed(IInAppMessage inAppMessage) {
// Executed whenever an in-app message is dismissed without a click.
}
```
# Trigger in-app messages through the Braze SDK
Source: /docs/developer_guide/in_app_messages/triggering_messages/index.md
# Trigger in-app messages
> Learn how to trigger in-app messages through the Braze SDK.
## Message triggers and delivery
In-app messages are triggered when the SDK logs one of the following custom event types: `Session Start`, `Push Click`, `Any Purchase`, `Specific Purchase`,and `Custom Event` (the last two containing robust property filters).
At the start of a user's session, Braze will deliver all eligible in-app messages to their device, while simultaneously prefetching assets to minimize display latency. If the trigger event has more than one eligible in-app message, only the message with the highest priority will be delivered. For more information, see [Session Lifecycle](https://www.braze.com/docs/developer_guide/analytics/tracking_sessions/#about-the-session-lifecycle).
**Note:**
In-app messages can't be triggered through the API or by API events—only custom events logged by the SDK. To learn more about logging, see [Logging Custom Events](https://www.braze.com/docs/developer_guide/analytics/logging_events/).
## Key-value pairs
When you create a campaign in Braze, you can set key-value pairs as `extras`, which the in-app messaging object can use to send data to your app.
```javascript
import * as braze from "@braze/web-sdk";
braze.subscribeToInAppMessage(function(inAppMessage) {
// control group messages should always be "shown"
// this will log an impression and not show a visible message
if (inAppMessage instanceof braze.ControlMessage) {
return braze.showInAppMessage(inAppMessage);
}
if (inAppMessage instanceof braze.InAppMessage) {
const extras = inAppMessage.extras;
if (extras) {
for (const key in extras) {
console.log("key: " + key + ", value: " + extras[key]);
}
}
}
braze.showInAppMessage(inAppMessage);
});
```
```java
Map getExtras()
```
```kotlin
extras: Map
```
**Tip:**
For more information, refer to the [KDoc](https://braze-inc.github.io/braze-android-sdk/kdoc/braze-android-sdk/com.braze.models.inappmessage/-i-in-app-message/index.html#1498425856%2FProperties%2F-1725759721).
The following example uses custom logic to set the presentation of an in-app message based on it's key-value pairs in `extras`. For a full customization example, check out [our sample app](https://github.com/braze-inc/braze-swift-sdk/tree/main/Examples).
```swift
let customization = message.extras["custom-display"] as? String
if customization == "colorful-slideup" {
// Perform your custom logic.
}
```
```objc
if ([message.extras[@"custom-display"] isKindOfClass:[NSString class]]) {
NSString *customization = message.extras[@"custom-display"];
if ([customization isEqualToString:@"colorful-slideup"]) {
// Perform your custom logic.
}
}
```
## Disabling automatic triggers
By default, in-app messages are triggered automatically. To disable this:
Remove the call to `braze.automaticallyShowInAppMessages()` within your loading snippet, then create custom logic to handle showing or not showing an in-app message.
```javascript
braze.subscribeToInAppMessage(function(inAppMessage) {
// control group messages should always be "shown"
// this will log an impression and not show a visible message
if (inAppMessage.isControl) { // v4.5.0+, otherwise use `inAppMessage instanceof braze.ControlMessage`
return braze.showInAppMessage(inAppMessage);
}
// Display the in-app message. You could defer display here by pushing this message to code within your own application.
// If you don't want to use the display capabilities in Braze, you could alternatively pass the in-app message to your own display code here.
if ( should_show_the_message_according_to_your_custom_logic ) {
braze.showInAppMessage(inAppMessage);
} else {
// do nothing
}
});
```
**Important:**
If you call `braze.showInAppMessage` without removing `braze.automaticallyShowInAppMessages()`, messages may display twice.
For more advanced control over message timing, including deferring and restoring triggered messages, refer to our [Tutorial: Deferring and restoring triggered messages](https://www.braze.com/docs/developer_guide/in_app_messages/tutorials/deferring_triggered_messages).
1. Implement the [`IInAppMessageManagerListener`](https://www.braze.com/docs/developer_guide/in_app_messages/customization/?sdktab=android&tab=global%20listener#android_step-1-implement-the-custom-manager-listener) to set a custom listener.
2. Update your [`beforeInAppMessageDisplayed()`](https://braze-inc.github.io/braze-android-sdk/kdoc/braze-android-sdk/com.braze.ui.inappmessage.listeners/-i-in-app-message-manager-listener/before-in-app-message-displayed.html) method to return [`InAppMessageOperation.DISCARD`](https://braze-inc.github.io/braze-android-sdk/kdoc/braze-android-sdk/com.braze.ui.inappmessage/-in-app-message-operation/-d-i-s-c-a-r-d/index.html).
For more advanced control over message timing, including displaying later and re-enqueuing, refer to our [Customizing Messages](https://www.braze.com/docs/developer_guide/in_app_messages/customization/?tab=global%20listener&subtab=kotlin#android_step-2-instruct-braze-to-use-the-custom-manager-listener) page.
1. Implement the `BrazeInAppMessageUIDelegate` delegate in your app. For a full walkthrough, refer to [Tutorial: In-App Message UI](https://braze-inc.github.io/braze-swift-sdk/tutorials/braze/c1-inappmessageui).
2. Update your `inAppMessage(_:displayChoiceForMessage:)` delegate method to return `.discard`.
For more advanced control over message timing, including deferring and restoring triggered messages, refer to our [Tutorial: Deferring and restoring triggered messages](https://www.braze.com/docs/developer_guide/in_app_messages/tutorials/deferring_triggered_messages).
1. Verify you're using the automatic integration initializer, which is enabled by default in versions `2.2.0` and later.
2. Set the in-app message operation default to `DISCARD` by adding the following line to your `braze.xml` file.
```xml
DISCARD
```
For Android, deselect **Automatically Display In-App Messages** in the Braze configuration editor. Alternatively, you can set `com_braze_inapp_show_inapp_messages_automatically` to `false` in your Unity project's `braze.xml`.
The initial in-app message display operation can be set in Braze config using the "In App Message Manager Initial Display Operation".
For iOS, set game object listeners in the Braze configuration editor and ensure **Braze Displays In-App Messages** is not selected.
The initial in-app message display operation can be set in Braze config using the "In App Message Manager Initial Display Operation".
## Overriding the default rate limit
By default, you can send an in-app message once every 30 seconds. To override this, add the following property to your configuration file before the Braze instance is initialized. This value will be used as the new rate limit in seconds.
```javascript
// Sets the minimum time interval between triggered in-app messages to 5 seconds instead of the default 30
braze.initialize('YOUR-API-KEY', { minimumIntervalBetweenTriggerActionsInSeconds: 5 })
```
```xml
5
```
```swift
let configuration = Braze.Configuration(
apiKey: "YOUR-APP-IDENTIFIER-API-KEY",
endpoint: "YOUR-BRAZE-ENDPOINT"
)
// Sets the minimum trigger time interval to 5 seconds
configuration.triggerMinimumTimeInterval = 5
let braze = Braze(configuration: configuration)
AppDelegate.braze = braze
```
```objc
BRZConfiguration *configuration =
[[BRZConfiguration alloc] initWithApiKey:@""
endpoint:@""];
// Sets the minimum trigger time interval to 5 seconds
configuration.triggerMinimumTimeInterval = 5;
Braze *braze = [BrazePlugin initBraze:configuration];
AppDelegate.braze = braze;
```
## Manually triggering messages
By default, in-app messages are automatically triggered when the SDK logs a custom event. However, in addition to this, you can manually trigger messages using the following methods.
### Using a server-side event
At this time, the Web Braze SDK does not support manually triggering messages using server-side events.
To trigger an in-app message using a server-sent event, send a silent push notification to the device, which allows a custom push callback to log an SDK-based event. This event will then trigger the user-facing in-app message.
#### Step 1: Create a push callback to receive the silent push
Register your custom push callback to listen for a specific silent push notification. For more information, refer to [Setting up push notifications](https://www.braze.com/docs/developer_guide/push_notifications#android_setting-up-push-notifications).
Two events will be logged for the in-app message to be delivered, one by the server and one from within your custom push callback. To make sure the same event is not duplicated, the event logged from within your push callback should follow a generic naming convention, for example, "in-app message trigger event," and not the same name as the server sent event. If this is not done, segmentation and user data may be affected by duplicate events being logged for a single user action.
```java
Braze.getInstance(context).subscribeToPushNotificationEvents(event -> {
final Bundle kvps = event.getNotificationPayload().getBrazeExtras();
if (kvps.containsKey("IS_SERVER_EVENT")) {
BrazeProperties eventProperties = new BrazeProperties();
// The campaign name is a string extra that clients can include in the push
String campaignName = kvps.getString("CAMPAIGN_NAME");
eventProperties.addProperty("campaign_name", campaignName);
Braze.getInstance(context).logCustomEvent("IAM Trigger", eventProperties);
}
});
```
```kotlin
Braze.getInstance(applicationContext).subscribeToPushNotificationEvents { event ->
val kvps = event.notificationPayload.brazeExtras
if (kvps.containsKey("IS_SERVER_EVENT")) {
val eventProperties = BrazeProperties()
// The campaign name is a string extra that clients can include in the push
val campaignName = kvps.getString("CAMPAIGN_NAME")
eventProperties.addProperty("campaign_name", campaignName)
Braze.getInstance(applicationContext).logCustomEvent("IAM Trigger", eventProperties)
}
}
```
#### Step 2: Create a push campaign
Create a [silent push campaign](https://www.braze.com/docs/developer_guide/push_notifications/silent/?sdktab=android) triggered via the server sent event.
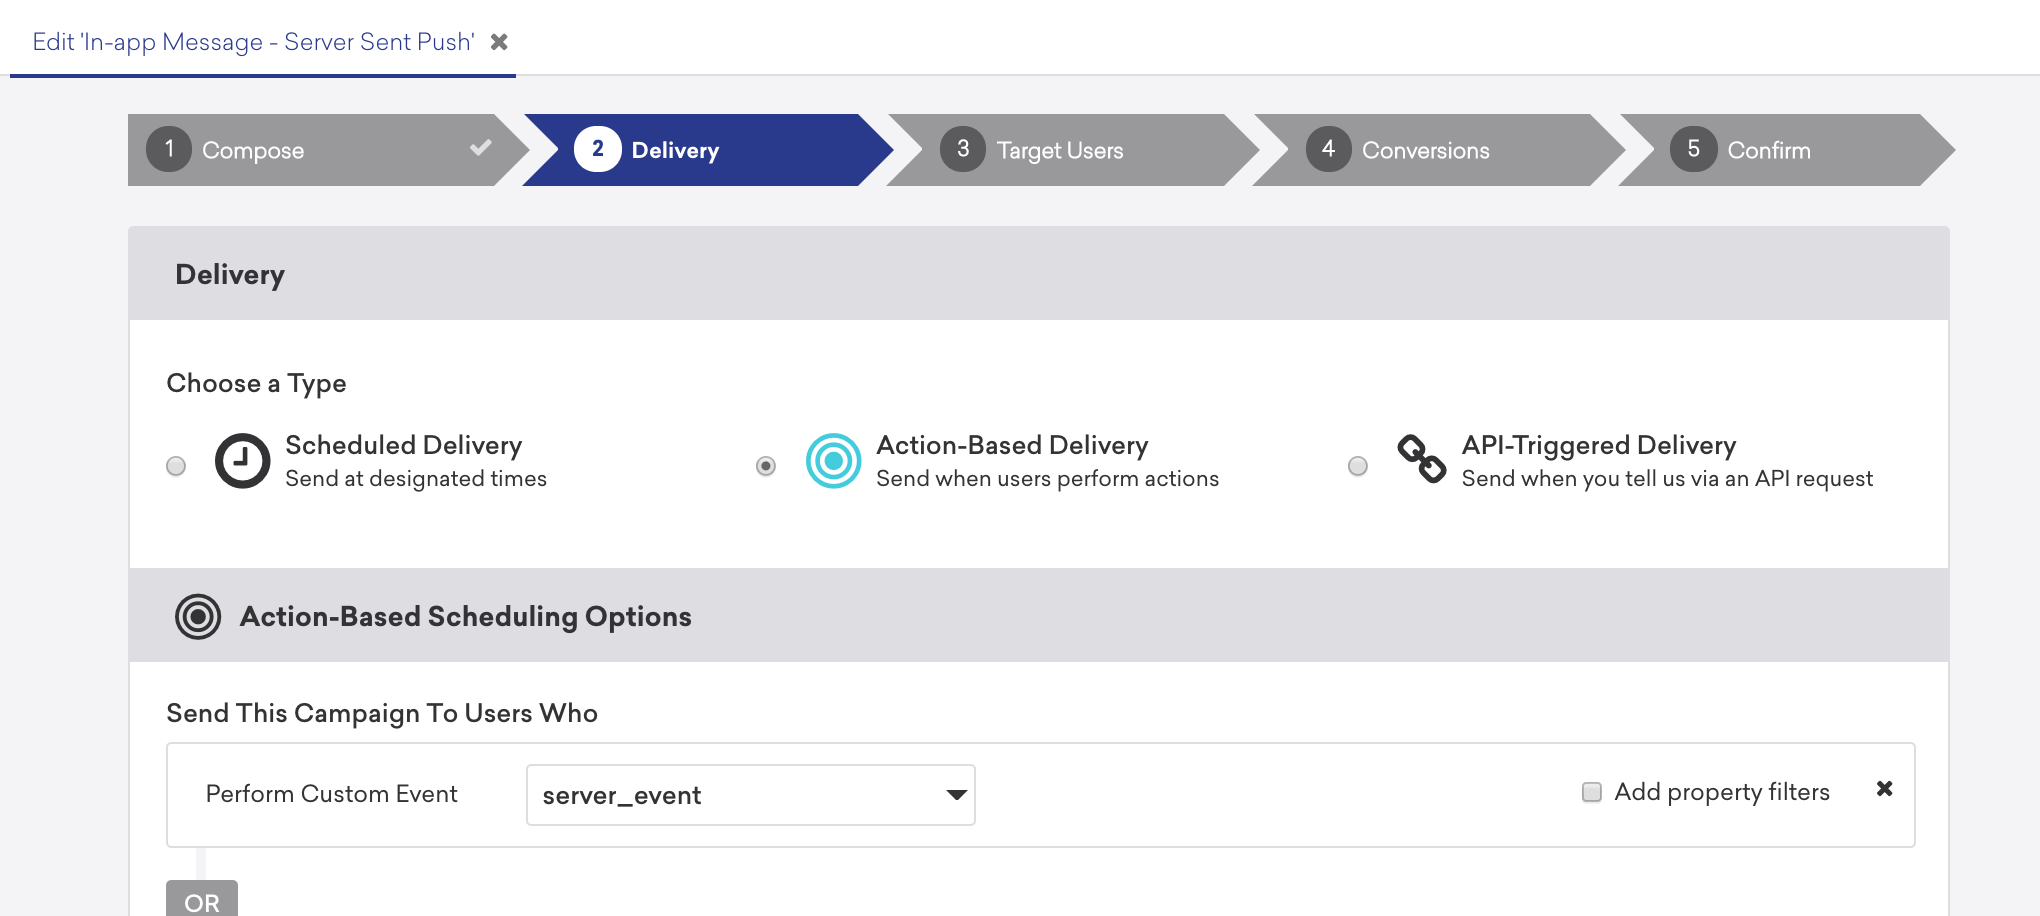
The push campaign must include key-value pair extras that indicate that this push campaign is sent to log an SDK custom event. This event will be used to trigger the in-app message.
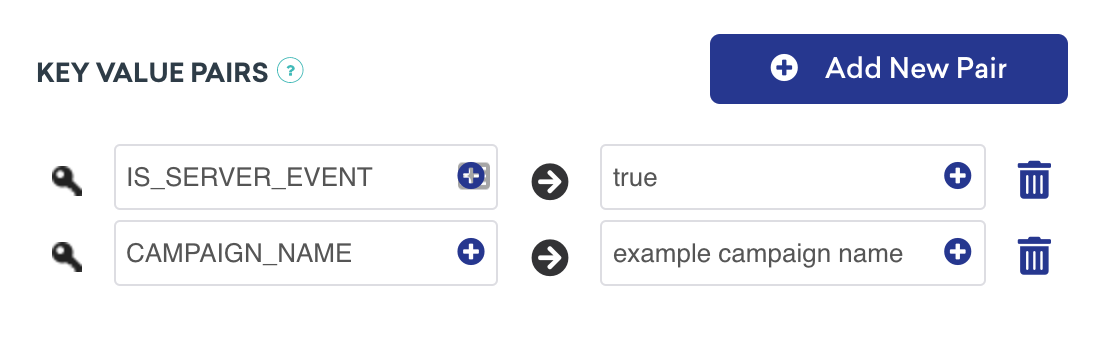{: style="max-width:70%;" }
The earlier push callback sample code recognizes the key-value pairs and logs the appropriate SDK custom event.
Should you want to include any event properties to attach to your "in-app message trigger" event, you can achieve this by passing these in the key-value pairs of the push payload. In this example, the campaign name of the subsequent in-app message has been included. Your custom push callback can then pass the value as the parameter of the event property when logging the custom event.
#### Step 3: Create an in-app message campaign
Create your user-visible in-app message campaign in the Braze dashboard. This campaign should have an action-based delivery and be triggered from the custom event logged from within your custom push callback.
In the following example, the specific in-app message to be triggered has been configured by sending the event property as part of the initial silent push.
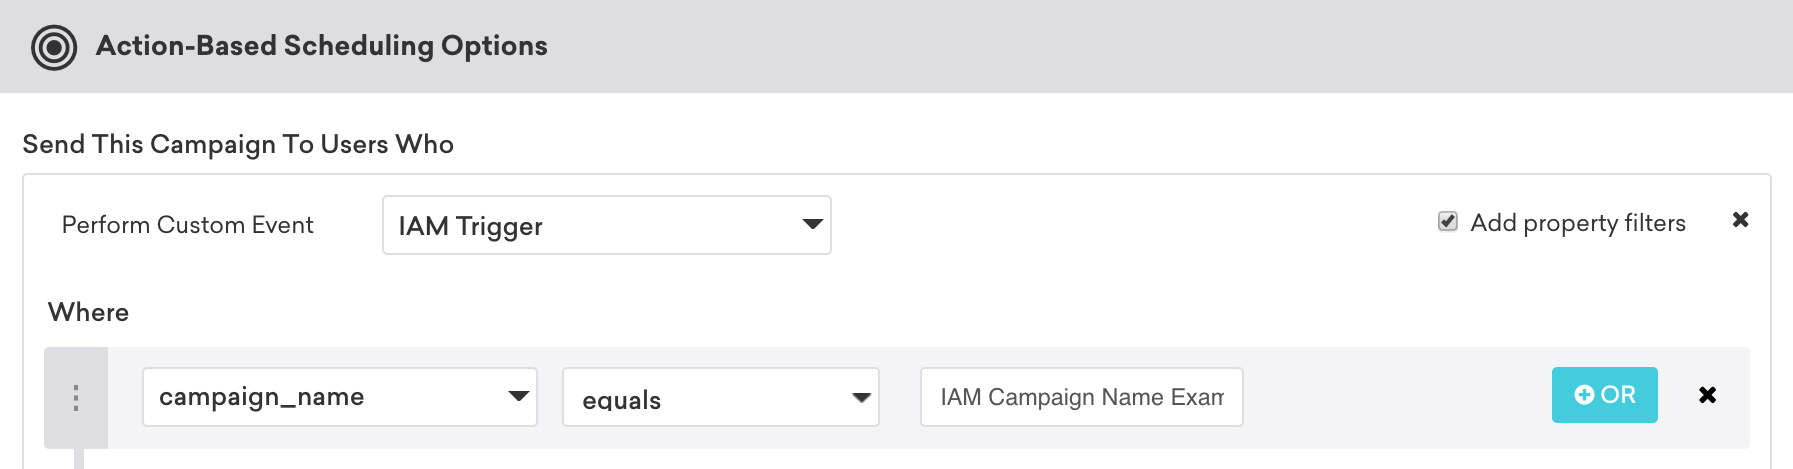
If a server-sent event is logged while the app is not in the foreground, the event will log, but the in-app message will not be displayed. Should you want the event to be delayed until the application is in the foreground, a check must be included in your custom push receiver to dismiss or delay the event until the app has entered the foreground.
#### Step 1: Handle silent push and key-value pairs
Implement the following function and call it within the [`application(_:didReceiveRemoteNotification:fetchCompletionHandler:)`: method](https://developer.apple.com/documentation/uikit/uiapplicationdelegate/1623013-application/):
```swift
func handleExtras(userInfo: [AnyHashable : Any]) {
print("A push was received")
if userInfo != nil && (userInfo["IS_SERVER_EVENT"] as? String) != nil && (userInfo["CAMPAIGN_NAME"] as? String) != nil {
AppDelegate.braze?.logCustomEvent("IAM Trigger", properties: ["campaign_name": userInfo["CAMPAIGN_NAME"]])
}
}
```
```objc
- (void)handleExtrasFromPush:(NSDictionary *)userInfo {
NSLog(@"A push was received.");
if (userInfo !=nil && userInfo[@"IS_SERVER_EVENT"] !=nil && userInfo[@"CAMPAIGN_NAME"]!=nil) {
[AppDelegate.braze logCustomEvent:@"IAM Trigger" properties:@{@"campaign_name": userInfo[@"CAMPAIGN_NAME"]}];
}
};
```
When the silent push is received, an SDK recorded event "in-app message trigger" will be logged against the user profile.
**Important:**
Due to a push message being used to record an SDK logged custom event, Braze will need to store a push token for each user to enable this solution. For iOS users, Braze will only store a token from the point that a user has been served the OS's push prompt. Before this, the user will not be reachable using push, and the preceding solution will not be possible.
#### Step 2: Create a silent push campaign
Create a [silent push campaign](https://www.braze.com/docs/developer_guide/push_notifications/silent/?sdktab=swift) that is triggered via the server-sent event.

The push campaign must include key-value pair extras, which indicate that this push campaign is sent to log an SDK custom event. This event will be used to trigger the in-app message.

The code within the `application(_:didReceiveRemoteNotification:fetchCompletionHandler:)` method checks for key `IS_SERVER_EVENT` and will log an SDK custom event if this is present.
You can alter either the event name or event properties by sending the desired value within the key-value pair extras of the push payload. When logging the custom event, these extras can be used as the parameter of either the event name or as an event property.
#### Step 3: Create an in-app message campaign
Create your user-visible in-app message campaign in the Braze dashboard. This campaign should have an action-based delivery and be triggered from the custom event logged from within the `application(_:didReceiveRemoteNotification:fetchCompletionHandler:)` method.
In the following example, the specific in-app message to be triggered has been configured by sending the event property as part of the initial silent push.

**Note:**
Note that these in-app messages will only trigger if the silent push is received while the application is in the foreground.
### Displaying a pre-defined message
To manually display a pre-defined in-app message, use the following method:
For the Web SDK, use `braze.showInAppMessage(inAppMessage)` to display any in-app message. For details and an example, see [Displaying a message in real-time](#displaying-a-message-in-real-time).
```java
BrazeInAppMessageManager.getInstance().addInAppMessage(inAppMessage);
```
```kotlin
BrazeInAppMessageManager.getInstance().addInAppMessage(inAppMessage)
```
```swift
if let inAppMessage = AppDelegate.braze?.inAppMessagePresenter?.nextAvailableMessage() {
AppDelegate.braze?.inAppMessagePresenter?.present(message: inAppMessage)
}
```
### Displaying a message in real-time
You can also create and display local in-app messages in real-time, using the same customization options available on the dashboard. To do so:
```javascript
// Displays a slideup type in-app message.
var message = new braze.SlideUpMessage("Welcome to Braze! This is an in-app message.");
message.slideFrom = braze.InAppMessage.SlideFrom.TOP;
braze.showInAppMessage(message);
```
```java
// Initializes a new slideup type in-app message and specifies its message.
InAppMessageSlideup inAppMessage = new InAppMessageSlideup();
inAppMessage.setMessage("Welcome to Braze! This is a slideup in-app message.");
```
```kotlin
// Initializes a new slideup type in-app message and specifies its message.
val inAppMessage = InAppMessageSlideup()
inAppMessage.message = "Welcome to Braze! This is a slideup in-app message."
```
**Important:**
Do not display in-app messages when the soft keyboard is displayed on the screen as rendering is undefined in this circumstance.
Manually call the [`present(message:)`](https://braze-inc.github.io/braze-swift-sdk/documentation/brazekit/brazeinappmessagepresenter/present(message:)) method on your `inAppMessagePresenter`. For example:
```swift
let customInAppMessage = Braze.InAppMessage.slideup(
.init(message: "YOUR_CUSTOM_SLIDEUP_MESSAGE", slideFrom: .bottom, themes: .defaults)
)
AppDelegate.braze?.inAppMessagePresenter?.present(message: customInAppMessage)
```
```objc
BRZInAppMessageRaw *customInAppMessage = [[BRZInAppMessageRaw alloc] init];
customInAppMessage.type = BRZInAppMessageRawTypeSlideup;
customInAppMessage.message = @"YOUR_CUSTOM_SLIDEUP_MESSAGE";
customInAppMessage.slideFrom = BRZInAppMessageRawSlideFromBottom;
customInAppMessage.themes = @{
@"light": BRZInAppMessageRawTheme.defaultLight,
@"dark": BRZInAppMessageRawTheme.defaultDark
};
[AppDelegate.braze.inAppMessagePresenter presentMessage:customInAppMessage];
```
**Note:**
Creating your own in-app message, you opt out of any analytics tracking and will have to manually handle click and impression logging using your `message.context`.
To display the next message in the stack, use the `DisplayNextInAppMessage()` method. Messages will be saved to this stack if `DISPLAY_LATER` or `BrazeUnityInAppMessageDisplayActionType.IAM_DISPLAY_LATER` is chosen as the in-app message display action.
```csharp
Appboy.AppboyBinding.DisplayNextInAppMessage();
```
## Exit-intent messages for Web
Exit-intent messages are non-disruptive in-app messages used to communicate important information to visitors before they leave your web site.
To set up triggers for these message types in the Web SDK, implement an exit-intent library in your website (such as [ouibounce's open-source library](https://github.com/carlsednaoui/ouibounce)), then use the following code to log `'exit intent'` as a custom event in Braze. Now your future in-app message campaigns can use this message type as a custom event trigger.
```javascript
var _ouibounce = ouibounce(false, {
callback: function() { braze.logCustomEvent('exit intent'); }
});
```
# Adding the Braze JavaScript Interface to WebViews for Swift
Source: /docs/developer_guide/in_app_messages/html_messages/index.md
# HTML in-app messages
> Learn how to add the Braze JavaScript interface to your app, so you can use the Braze API to create [HTML in-app messages](https://www.braze.com/docs/user_guide/message_building_by_channel/in-app_messages/customize/#custom-html-messages) in your custom WebViews.
## Prerequisites
Before you can use this feature, you'll need to [integrate the Android Braze SDK](https://www.braze.com/docs/developer_guide/sdk_integration/?sdktab=android).
## About HTML messages
With the Braze JavaScript interface, you can leverage Braze inside the custom WebViews within your app. The [`InAppMessageJavascriptInterface`](https://braze-inc.github.io/braze-android-sdk/kdoc/braze-android-sdk/com.braze.ui.inappmessage.jsinterface/-in-app-message-javascript-interface/index.html) is responsible for:
1. Injecting the Braze JavaScript bridge into your WebView, as outlined in [User Guide: HTML in-app messages](https://www.braze.com/docs/user_guide/message_building_by_channel/in-app_messages/customize/#custom-html-messages).
2. Passing the bridge methods received from your WebView to the [Braze Android SDK](https://github.com/braze-inc/braze-android-sdk).
## Adding the interface to a WebView
Using Braze functionality from a WebView in your app can be done by adding the Braze JavaScript interface to your WebView. After the interface has been added, the same API available for [User Guide: HTML in-app messages](https://www.braze.com/docs/user_guide/message_building_by_channel/in-app_messages/customize/#custom-html-messages) will be available within your custom WebView.
```java
String javascriptString = BrazeFileUtils.getAssetFileStringContents(context.getAssets(), "braze-html-bridge.js");
myWebView.loadUrl("javascript:" + javascriptString);
final InAppMessageJavascriptInterface javascriptInterface = new InAppMessageJavascriptInterface(context, inAppMessage);
myWebView.addJavascriptInterface(javascriptInterface, "brazeInternalBridge");
```
```kotlin
val javascriptString = context.assets.getAssetFileStringContents("braze-html-bridge.js")
myWebView.loadUrl("javascript:" + javascriptString!!)
val javascriptInterface = InAppMessageJavascriptInterface(context, inAppMessage)
myWebView.addJavascriptInterface(javascriptInterface, "brazeInternalBridge")
```
## Embedding YouTube content
YouTube and other HTML5 content can play in HTML in-app messages. This requires hardware acceleration to be enabled in the activity where the in-app message is being displayed; see the [Android developer guide](https://developer.android.com/guide/topics/graphics/hardware-accel.html#controlling) for more details. Hardware acceleration is only available on Android API versions 11 and later.
The following is an example of an embedded YouTube video in an HTML snippet:
```html
```
## Using deep links
When using deep links or external links in Android HTML in-app messages, **do not** call `brazeBridge.closeMessage()` in your JavaScript. The SDK's internal logic automatically closes the in-app message when it redirects to a link. Calling `brazeBridge.closeMessage()` interferes with this process and may cause the message to become unresponsive when users return to your app.
The following is an example of a deep link in a code snippet:
```javascript
```
## Prerequisites
Before you can use this feature, you'll need to [integrate the Swift Braze SDK](https://www.braze.com/docs/developer_guide/sdk_integration/?sdktab=swift).
## About HTML messages
With the Braze JavaScript interface, you can leverage Braze inside the custom WebViews within your app. The interface's [`ScriptMessageHandler`](https://braze-inc.github.io/braze-swift-sdk/documentation/brazekit/braze/webviewbridge/scriptmessagehandler) is responsible for:
1. Injecting the Braze JavaScript bridge into your WebView, as outlined in [User Guide: HTML in-app messages](https://www.braze.com/docs/user_guide/message_building_by_channel/in-app_messages/customize/#custom-html-messages).
2. Passing the bridge methods received from your WebView to the [Braze Swift SDK](https://github.com/braze-inc/braze-swift-sdk).
## Adding the interface to a WebView
First, add the [`ScriptMessageHandler`](https://braze-inc.github.io/braze-swift-sdk/documentation/brazekit/braze/webviewbridge/scriptmessagehandler) from `WebViewBridge` to your app.
```swift
let scriptMessageHandler = Braze.WebViewBridge.ScriptMessageHandler(braze: braze)
```
Add the initialized `scriptMessageHandler` to a WkWebView's `userContentController`.
```swift
configuration.userContentController.add(
scriptMessageHandler,
name: Braze.WebViewBridge.ScriptMessageHandler.name
)
```
Then create the WebView using your configuration.
```swift
let webView = WKWebView(frame: .zero, configuration: configuration)
```
When you're finished, your code should be similar to the following:
```swift
// Create the script message handler using your initialized Braze instance.
let scriptMessageHandler = Braze.WebViewBridge.ScriptMessageHandler(braze: braze)
// Create a web view configuration and setup the script message handler.
let configuration = WKWebViewConfiguration()
configuration.userContentController.addUserScript(
Braze.WebViewBridge.ScriptMessageHandler.script
)
configuration.userContentController.add(
scriptMessageHandler,
name: Braze.WebViewBridge.ScriptMessageHandler.name
)
// Create the webview using the configuration
let webView = WKWebView(frame: .zero, configuration: configuration)
```
## Example: Logging a custom event
In the following example, `BrazeBridge` logs a custom event from existing web content to the Braze Swift SDK.
```javascript
Logging data via BrazeBridge Example
```
# In-app message deep-linking for the Braze SDK
Source: /docs/developer_guide/in_app_messages/deep_linking/index.md
# In-app message deep-linking
> Learn how to deep link within an in-app message for the Braze SDK.
## Prerequisites
Before you can use this feature, you'll need to [integrate the Android Braze SDK](https://www.braze.com/docs/developer_guide/sdk_integration/?sdktab=android).
## Creating a universal delegate
The Android SDK provides the ability to set a single delegate object to custom handle all deep links opened by Braze across Content Cards, in-app messages, and push notifications.
Your delegate object should implement the [`IBrazeDeeplinkHandler`](https://braze-inc.github.io/braze-android-sdk/kdoc/braze-android-sdk/com.braze.ui/-braze-deeplink-handler/index.html) interface and be set using [`BrazeDeeplinkHandler.setBrazeDeeplinkHandler()`](https://braze-inc.github.io/braze-android-sdk/kdoc/braze-android-sdk/com.braze.ui/-braze-deeplink-handler/-companion/set-braze-deeplink-handler.html). In most cases, the delegate should be set in your app's `Application.onCreate()`.
The following is an example of overriding the default [`UriAction`](https://braze-inc.github.io/braze-android-sdk/kdoc/braze-android-sdk/com.braze.ui.actions/-uri-action/index.html) behavior with custom intent flags and custom behavior for YouTube URLs:
```java
public class CustomDeeplinkHandler implements IBrazeDeeplinkHandler {
private static final String TAG = BrazeLogger.getBrazeLogTag(CustomDeeplinkHandler.class);
@Override
public void gotoUri(Context context, UriAction uriAction) {
String uri = uriAction.getUri().toString();
// Open YouTube URLs in the YouTube app and not our app
if (!StringUtils.isNullOrBlank(uri) && uri.contains("youtube.com")) {
uriAction.setUseWebView(false);
}
CustomUriAction customUriAction = new CustomUriAction(uriAction);
customUriAction.execute(context);
}
public static class CustomUriAction extends UriAction {
public CustomUriAction(@NonNull UriAction uriAction) {
super(uriAction);
}
@Override
protected void openUriWithActionView(Context context, Uri uri, Bundle extras) {
Intent intent = getActionViewIntent(context, uri, extras);
intent.setFlags(Intent.FLAG_ACTIVITY_NEW_TASK | Intent.FLAG_ACTIVITY_CLEAR_TOP | Intent.FLAG_ACTIVITY_SINGLE_TOP);
if (intent.resolveActivity(context.getPackageManager()) != null) {
context.startActivity(intent);
} else {
BrazeLogger.w(TAG, "Could not find appropriate activity to open for deep link " + uri + ".");
}
}
}
}
```
```kotlin
class CustomDeeplinkHandler : IBrazeDeeplinkHandler {
override fun gotoUri(context: Context, uriAction: UriAction) {
val uri = uriAction.uri.toString()
// Open YouTube URLs in the YouTube app and not our app
if (!StringUtils.isNullOrBlank(uri) && uri.contains("youtube.com")) {
uriAction.useWebView = false
}
val customUriAction = CustomUriAction(uriAction)
customUriAction.execute(context)
}
class CustomUriAction(uriAction: UriAction) : UriAction(uriAction) {
override fun openUriWithActionView(context: Context, uri: Uri, extras: Bundle) {
val intent = getActionViewIntent(context, uri, extras)
intent.flags = Intent.FLAG_ACTIVITY_NEW_TASK or Intent.FLAG_ACTIVITY_CLEAR_TOP or Intent.FLAG_ACTIVITY_SINGLE_TOP
if (intent.resolveActivity(context.packageManager) != null) {
context.startActivity(intent)
} else {
BrazeLogger.w(TAG, "Could not find appropriate activity to open for deep link $uri.")
}
}
}
companion object {
private val TAG = BrazeLogger.getBrazeLogTag(CustomDeeplinkHandler::class.java)
}
}
```
## Deep linking to app settings
To allow deep links to directly open your app's settings, you'll need a custom `BrazeDeeplinkHandler`. In the following example, the presence of a custom key-value pair called `open_notification_page` will make the deep link open the app's settings page:
```java
BrazeDeeplinkHandler.setBrazeDeeplinkHandler(new IBrazeDeeplinkHandler() {
@Override
public void gotoUri(Context context, UriAction uriAction) {
final Bundle extras = uriAction.getExtras();
if (extras.containsKey("open_notification_page")) {
Intent intent = new Intent();
intent.setAction("android.settings.APP_NOTIFICATION_SETTINGS");
intent.setFlags(Intent.FLAG_ACTIVITY_NEW_TASK);
//for Android 5-7
intent.putExtra("app_package", context.getPackageName());
intent.putExtra("app_uid", context.getApplicationInfo().uid);
// for Android 8 and later
intent.putExtra("android.provider.extra.APP_PACKAGE", context.getPackageName());
context.startActivity(intent);
}
}
});
```
```kotlin
BrazeDeeplinkHandler.setBrazeDeeplinkHandler(object : IBrazeDeeplinkHandler {
override fun gotoUri(context: Context, uriAction: UriAction) {
val extras = uriAction.extras
if (extras.containsKey("open_notification_page")) {
val intent = Intent()
intent.action = "android.settings.APP_NOTIFICATION_SETTINGS"
intent.flags = Intent.FLAG_ACTIVITY_NEW_TASK
//for Android 5-7
intent.putExtra("app_package", context.packageName)
intent.putExtra("app_uid", context.applicationInfo.uid)
// for Android 8 and later
intent.putExtra("android.provider.extra.APP_PACKAGE", context.packageName)
context.startActivity(intent)
}
}
})
```
## Customizing WebView activity {#Custom_Webview_Activity}
When Braze opens website deeplinks inside the app, the deeplinks are handled by [`BrazeWebViewActivity`](https://braze-inc.github.io/braze-android-sdk/kdoc/braze-android-sdk/com.braze.ui/-braze-web-view-activity/index.html).
**Note:**
For custom HTML in-app messages, links configured with `target="_blank"` open in the device's default web browser and are not handled by `BrazeWebViewActivity`.
To change this:
1. Create a new Activity that handles the target URL from `Intent.getExtras()` with the key `com.braze.Constants.BRAZE_WEBVIEW_URL_EXTRA`. For an example, see [`BrazeWebViewActivity.kt`](https://github.com/braze-inc/braze-android-sdk/blob/master/android-sdk-ui/src/main/java/com/braze/ui/BrazeWebViewActivity.kt).
2. Add that activity to `AndroidManifest.xml` and set `exported` to `false`.
```xml
```
3. Set your custom Activity in a `BrazeConfig` [builder object](https://braze-inc.github.io/braze-android-sdk/kdoc/braze-android-sdk/com.braze.configuration/-braze-config/-builder/set-custom-web-view-activity-class.html). Build the builder and pass it to [`Braze.configure()`](https://braze-inc.github.io/braze-android-sdk/kdoc/braze-android-sdk/com.braze/-braze/-companion/configure.html) in your [`Application.onCreate()`](https://developer.android.com/reference/android/app/Application.html#onCreate()).
```java
BrazeConfig brazeConfig = new BrazeConfig.Builder()
.setCustomWebViewActivityClass(MyCustomWebViewActivity::class)
...
.build();
Braze.configure(this, brazeConfig);
```
```kotlin
val brazeConfig = BrazeConfig.Builder()
.setCustomWebViewActivityClass(MyCustomWebViewActivity::class.java)
...
.build()
Braze.configure(this, brazeConfig)
```
## Using Jetpack Compose
To handle deeplinks when using Jetpack Compose with NavHost:
1. Ensure that the activity handling your deeplink is registered in the Android Manifest.
```xml
```
2. In NavHost, specify which deeplinks you want it to handle.
```kotlin
composableWithCompositionLocal(
route = "YOUR_ROUTE_HERE",
deepLinks = listOf(navDeepLink {
uriPattern = "myapp://articles/{${MainDestinations.ARTICLE_ID_KEY}}"
}),
arguments = listOf(
navArgument(MainDestinations.ARTICLE_ID_KEY) {
type = NavType.LongType
}
),
) { backStackEntry ->
val arguments = requireNotNull(backStackEntry.arguments)
val articleId = arguments.getLong(MainDestinations.ARTICLE_ID_KEY)
ArticleDetail(
articleId
)
}
```
3. Depending on your app architecture, you may need to handle the new intent that's sent to your current activity as well.
```kotlin
DisposableEffect(Unit) {
val listener = Consumer {
navHostController.handleDeepLink(it)
}
addOnNewIntentListener(listener)
onDispose { removeOnNewIntentListener(listener) }
}
```
## Prerequisites
Before you can use this feature, you'll need to [integrate the Swift Braze SDK](https://www.braze.com/docs/developer_guide/sdk_integration/?sdktab=swift).
**Tip:**
For help choosing between custom scheme deep links, universal links, and "Open Web URL Inside App," see [iOS deep linking guide](https://www.braze.com/docs/developer_guide/push_notifications/ios_deep_linking_guide). For troubleshooting, see [Deep linking troubleshooting](https://www.braze.com/docs/developer_guide/push_notifications/deep_linking_troubleshooting).
## Handling deep links
### Step 1: Register a scheme {#register-a-scheme}
To handle deep linking, a custom scheme must be stated in your `Info.plist` file. The navigation structure is defined by an array of dictionaries. Each of those dictionaries contains an array of strings.
Use Xcode to edit your `Info.plist` file:
1. Add a new key, `URL types`. Xcode will automatically make this an array containing a dictionary called `Item 0`.
2. Within `Item 0`, add a key `URL identifier`. Set the value to your custom scheme.
3. Within `Item 0`, add a key `URL Schemes`. This will automatically be an array containing a `Item 0` string.
4. Set `URL Schemes` >> `Item 0` to your custom scheme.
Alternatively, if you wish to edit your `Info.plist` file directly, you can follow this spec:
```html
CFBundleURLTypesCFBundleURLNameYOUR.SCHEMECFBundleURLSchemesYOUR.SCHEME
```
### Step 2: Add a scheme allowlist
You must declare the URL schemes you wish to pass to `canOpenURL(_:)` by adding the `LSApplicationQueriesSchemes` key to your app's Info.plist file. Attempting to call schemes outside this allowlist will cause the system to record an error in the device's logs, and the deep link will not open. An example of this error will look like this:
```
: -canOpenURL: failed for URL: "yourapp://deeplink" – error: "This app is not allowed to query for scheme yourapp"
```
For example, if an in-app message should open the Facebook app when tapped, the app has to have the Facebook custom scheme (`fb`) in your allowlist. Otherwise, the system will reject the deep link. Deep links that direct to a page or view inside your own app still require that your app's custom scheme be listed in your app's `Info.plist`.
Your example allowlist might look something like:
```html
LSApplicationQueriesSchemesmyappfbtwitter
```
For more information, refer to [Apple's documentation](https://developer.apple.com/library/content/documentation/General/Reference/InfoPlistKeyReference/Articles/LaunchServicesKeys.html#//apple_ref/doc/uid/TP40009250-SW14) on the `LSApplicationQueriesSchemes` key.
### Step 3: Implement a handler
After activating your app, iOS will call the method [`application:openURL:options:`](https://developer.apple.com/reference/uikit/uiapplicationdelegate/1623112-application?language=objc). The important argument is the [NSURL](https://developer.apple.com/library/ios/DOCUMENTATION/Cocoa/Reference/Foundation/Classes/NSURL_Class/Reference/Reference.html#//apple_ref/doc/c_ref/NSURL) object.
```swift
func application(_ app: UIApplication, open url: URL, options: [UIApplication.OpenURLOptionsKey : Any] = [:]) -> Bool {
let path = url.path
let query = url.query
// Insert your code here to take some action based upon the path and query.
return true
}
```
```objc
- (BOOL)application:(UIApplication *)app openURL:(NSURL *)url options:(NSDictionary *)options {
NSString *path = [url path];
NSString *query = [url query];
// Insert your code here to take some action based upon the path and query.
return YES;
}
```
## App Transport Security (ATS)
As defined by [Apple](https://developer.apple.com/library/prerelease/ios/releasenotes/General/WhatsNewIniOS/Articles/iOS9.html#//apple_ref/doc/uid/TP40016198-SW14), "App Transport Security is a feature that improves the security of connections between an app and web services. The feature consists of default connection requirements that conform to best practices for secure connections. Apps can override this default behavior and turn off transport security."
ATS is applied by default. It requires that all connections use HTTPS and are encrypted using TLS 1.2 with forward secrecy. Refer to [Requirements for Connecting Using ATS](https://developer.apple.com/library/ios/documentation/General/Reference/InfoPlistKeyReference/Articles/CocoaKeys.html#//apple_ref/doc/uid/TP40009251-SW35) for more information. All images served by Braze to end devices are handled by a content delivery network ("CDN") that supports TLS 1.2 and is compatible with ATS.
Unless they are specified as exceptions in your application's `Info.plist`, connections that do not follow these requirements will fail with errors that are similar to the following.
**Example Error 1:**
```bash
CFNetwork SSLHandshake failed (-9801)
Error Domain=NSURLErrorDomain Code=-1200 "An SSL error has occurred, and a secure connection to the server cannot be made."
```
**Example Error 2:**
```bash
NSURLSession/NSURLConnection HTTP load failed (kCFStreamErrorDomainSSL, -9802)
```
ATS compliance is enforced for links opened within the mobile app (our default handling of clicked links) and does not apply to sites opened externally via a web browser.
### Working with ATS
You can handle ATS in either of the following ways, but we recommend **complying with ATS requirements**.
Your Braze integration can satisfy ATS requirements by ensuring that any existing links you drive users to (for example, though in-app message and push campaigns) satisfy ATS requirements. While there are ways to bypass ATS restrictions, our recommendation is to ensure that all linked URLs are ATS-compliant. Given Apple's increasing emphasis on application security, the following approaches to allowing ATS exceptions are not guaranteed to be supported by Apple.
You can allow a subset of links with certain domains or schemes to be treated as exceptions to the ATS rules. Your Braze integration will satisfy ATS requirements if every link you use in a Braze messaging channel is either ATS compliant or handled by an exception.
To add a domain as an exception of the ATS, add following to your app's `Info.plist` file:
```html
NSAppTransportSecurityNSAllowsArbitraryLoadsNSExceptionDomainsexample.comNSExceptionAllowsInsecureHTTPLoadsNSIncludesSubdomains
```
Refer to Apple's article on [app transport security keys](https://developer.apple.com/library/ios/documentation/General/Reference/InfoPlistKeyReference/Articles/CocoaKeys.html#//apple_ref/doc/uid/TP40009251-SW33) for more information.
You can turn off ATS entirely. Note that this is not recommended practice, due to both lost security protections and future iOS compatibility. To disable ATS, insert the following in your app's `Info.plist` file:
```html
NSAppTransportSecurityNSAllowsArbitraryLoads
```
## Decoding URLs
The SDK percent-encodes links to create valid `URL`s. All link characters that are not allowed in a properly formed URL, such as Unicode characters, will be percent escaped.
To decode an encoded link, use the `String` property [`removingPercentEncoding`](https://developer.apple.com/documentation/swift/stringprotocol/removingpercentencoding). You must also return `true` in the `BrazeDelegate.braze(_:shouldOpenURL:)`. A call to action is required to trigger the handling of the URL by your app. For example:
```swift
func application(_ app: UIApplication, open url: URL, options: [UIApplication.OpenURLOptionsKey : Any] = [:]) -> Bool {
let urlString = url.absoluteString.removingPercentEncoding
// Handle urlString
return true
}
```
```objc
- (BOOL)application:(UIApplication *)application openURL:(NSURL *)url options:(NSDictionary *)options {
NSString *urlString = [url.absoluteString stringByRemovingPercentEncoding];
// Handle urlString
return YES;
}
```
## Deep linking to app settings
You can take advantage of `UIApplicationOpenSettingsURLString` to deep link users to your app's settings from Braze push notifications and in-app messages.
To take users from your app into the iOS settings:
1. First, make sure your application is set up for either [scheme-based deep links](#swift_register-a-scheme) or [universal links](#swift_universal-links).
2. Decide on a URI for deep linking to the **Settings** page (for example, `myapp://settings` or `https://www.braze.com/settings`).
3. If you are using custom scheme-based deep links, add the following code to your `application:openURL:options:` method:
```swift
func application(_ app: UIApplication, open url: URL, options: [UIApplicationOpenURLOptionsKey : Any] = [:]) -> Bool {
let path = url.path
if (path == "settings") {
UIApplication.shared.openURL(URL(string:UIApplication.openSettingsURLString)!)
}
return true
}
```
```objc
- (BOOL)application:(UIApplication *)app
openURL:(NSURL *)url
options:(NSDictionary *)options {
NSString *path = [url path];
if ([path isEqualToString:@"settings"]) {
NSURL *settingsURL = [NSURL URLWithString:UIApplicationOpenSettingsURLString];
[[UIApplication sharedApplication] openURL:settingsURL];
}
return YES;
}
```
## Customization options {#customization-options}
### Default WebView customization
The `Braze.WebViewController` class displays web URLs opened by the SDK, typically when "Open Web URL Inside App" is selected for a web deep link.
You can customize the `Braze.WebViewController` via the [`BrazeDelegate.braze(_:willPresentModalWithContext:)`](https://braze-inc.github.io/braze-swift-sdk/documentation/brazekit/brazedelegate/braze(_:willpresentmodalwithcontext:)-12sqy/) delegate method.
### Linking handling customization
The `BrazeDelegate` protocol can be used to customize the handling of URLs such as deep links, web URLs, and universal links. To set the delegate during Braze initialization, set a delegate object on the `Braze` instance. Braze will then call your delegate's implementation of `shouldOpenURL` before handling any URIs.
#### Universal links {#universal-links}
Braze supports universal links in push notifications, in-app messages, and Content Cards. To enable universal link support, [`configuration.forwardUniversalLinks`](https://braze-inc.github.io/braze-swift-sdk/documentation/brazekit/braze/configuration-swift.class/forwarduniversallinks) must be set to `true`.
When enabled, Braze will forward universal links to your app's `AppDelegate` via the [`application:continueUserActivity:restorationHandler:`](https://developer.apple.com/documentation/uikit/uiapplicationdelegate/1623072-application) method.
Your application also needs to be set up to handle universal links. Refer to [Apple's documentation](https://developer.apple.com/documentation/xcode/supporting-universal-links-in-your-app) to ensure your application is configured correctly for universal links.
**Warning:**
Universal link forwarding requires access to the application entitlements. When running the application in a simulator, these entitlements are not directly available and universal links are not forwarded to the system handlers.
To add support to simulator builds, you can add the application `.entitlements` file to the _Copy Bundle Resources_ build phase. See [`forwardUniversalLinks`](https://braze-inc.github.io/braze-swift-sdk/documentation/brazekit/braze/configuration-swift.class/forwarduniversallinks) documentation for more details.
**Note:**
The SDK does not query your domains' `apple-app-site-association` file. It performs the differentiation between universal links and regular URLs by looking at the domain name only. As a result, the SDK does not respect any exclusion rule defined in the `apple-app-site-association` per [Supporting associated domains](https://developer.apple.com/documentation/xcode/supporting-associated-domains).
## Examples
### BrazeDelegate
Here's an example using `BrazeDelegate`. For more information, see [Braze Swift SDK reference](https://braze-inc.github.io/braze-swift-sdk/documentation/brazekit/brazedelegate).
```swift
func braze(_ braze: Braze, shouldOpenURL context: Braze.URLContext) -> Bool {
if context.url.host == "MY-DOMAIN.com" {
// Custom handle link here
return false
}
// Let Braze handle links otherwise
return true
}
```
```objc
- (BOOL)braze:(Braze *)braze shouldOpenURL:(BRZURLContext *)context {
if ([[context.url.host lowercaseString] isEqualToString:@"MY-DOMAIN.com"]) {
// Custom handle link here
return NO;
}
// Let Braze handle links otherwise
return YES;
}
```
# Embed GIFs into in-app messages for the Braze SDK
Source: /docs/developer_guide/in_app_messages/gifs/index.md
# Embed GIFs into in-app messages
> Learn how to embed GIFs into in-app messages for the Braze SDK.
## About GIFs
Braze offers the ability to use a custom image library to display animated GIFs. Although the example below uses [Glide](https://bumptech.github.io/glide/), any image library that supports GIFs is compatible.
## Integrating a custom image library
### Step 1: Creating the image loader delegate
The Image Loader delegate must implement the following methods:
* [`getInAppMessageBitmapFromUrl()`](https://braze-inc.github.io/braze-android-sdk/kdoc/braze-android-sdk/com.braze.images/-i-braze-image-loader/get-in-app-message-bitmap-from-url.html)
* [`getPushBitmapFromUrl()`](https://braze-inc.github.io/braze-android-sdk/kdoc/braze-android-sdk/com.braze.images/-i-braze-image-loader/get-push-bitmap-from-url.html)
* [`renderUrlIntoCardView()`](https://braze-inc.github.io/braze-android-sdk/kdoc/braze-android-sdk/com.braze.images/-i-braze-image-loader/render-url-into-card-view.html)
* [`renderUrlIntoInAppMessageView()`](https://braze-inc.github.io/braze-android-sdk/kdoc/braze-android-sdk/com.braze.images/-i-braze-image-loader/render-url-into-in-app-message-view.html)
* [`setOffline()`](https://braze-inc.github.io/braze-android-sdk/kdoc/braze-android-sdk/com.braze.images/-i-braze-image-loader/set-offline.html)
The integration example below is taken from the [Glide integration sample app](https://github.com/braze-inc/braze-android-sdk/tree/master/samples/glide-image-integration) included with the Braze Android SDK.
```java
public class GlideBrazeImageLoader implements IBrazeImageLoader {
private static final String TAG = GlideBrazeImageLoader.class.getName();
private RequestOptions mRequestOptions = new RequestOptions();
@Override
public void renderUrlIntoCardView(Context context, Card card, String imageUrl, ImageView imageView, BrazeViewBounds viewBounds) {
renderUrlIntoView(context, imageUrl, imageView, viewBounds);
}
@Override
public void renderUrlIntoInAppMessageView(Context context, IInAppMessage inAppMessage, String imageUrl, ImageView imageView, BrazeViewBounds viewBounds) {
renderUrlIntoView(context, imageUrl, imageView, viewBounds);
}
@Override
public Bitmap getPushBitmapFromUrl(Context context, Bundle extras, String imageUrl, BrazeViewBounds viewBounds) {
return getBitmapFromUrl(context, imageUrl, viewBounds);
}
@Override
public Bitmap getInAppMessageBitmapFromUrl(Context context, IInAppMessage inAppMessage, String imageUrl, BrazeViewBounds viewBounds) {
return getBitmapFromUrl(context, imageUrl, viewBounds);
}
private void renderUrlIntoView(Context context, String imageUrl, ImageView imageView, BrazeViewBounds viewBounds) {
Glide.with(context)
.load(imageUrl)
.apply(mRequestOptions)
.into(imageView);
}
private Bitmap getBitmapFromUrl(Context context, String imageUrl, BrazeViewBounds viewBounds) {
try {
return Glide.with(context)
.asBitmap()
.apply(mRequestOptions)
.load(imageUrl).submit().get();
} catch (Exception e) {
Log.e(TAG, "Failed to retrieve bitmap at url: " + imageUrl, e);
}
return null;
}
@Override
public void setOffline(boolean isOffline) {
// If the loader is offline, then we should only be retrieving from the cache
mRequestOptions = mRequestOptions.onlyRetrieveFromCache(isOffline);
}
}
```
```kotlin
class GlideBrazeImageLoader : IBrazeImageLoader {
companion object {
private val TAG = GlideBrazeImageLoader::class.qualifiedName
}
private var mRequestOptions = RequestOptions()
override fun renderUrlIntoCardView(context: Context, card: Card, imageUrl: String, imageView: ImageView, viewBounds: BrazeViewBounds) {
renderUrlIntoView(context, imageUrl, imageView, viewBounds)
}
override fun renderUrlIntoInAppMessageView(context: Context, inAppMessage: IInAppMessage, imageUrl: String, imageView: ImageView, viewBounds: BrazeViewBounds) {
renderUrlIntoView(context, imageUrl, imageView, viewBounds)
}
override fun getPushBitmapFromUrl(context: Context, extras: Bundle, imageUrl: String, viewBounds: BrazeViewBounds): Bitmap? {
return getBitmapFromUrl(context, imageUrl, viewBounds)
}
override fun getInAppMessageBitmapFromUrl(context: Context, inAppMessage: IInAppMessage, imageUrl: String, viewBounds: BrazeViewBounds): Bitmap? {
return getBitmapFromUrl(context, imageUrl, viewBounds)
}
private fun renderUrlIntoView(context: Context, imageUrl: String, imageView: ImageView, viewBounds: BrazeViewBounds) {
Glide.with(context)
.load(imageUrl)
.apply(mRequestOptions)
.into(imageView)
}
private fun getBitmapFromUrl(context: Context, imageUrl: String, viewBounds: BrazeViewBounds): Bitmap? {
try {
return Glide.with(context)
.asBitmap()
.apply(mRequestOptions)
.load(imageUrl).submit().get()
} catch (e: Exception) {
Log.e(TAG, "Failed to retrieve bitmap at url: $imageUrl", e)
}
return null
}
override fun setOffline(isOffline: Boolean) {
// If the loader is offline, then we should only be retrieving from the cache
mRequestOptions = mRequestOptions.onlyRetrieveFromCache(isOffline)
}
}
```
### Step 2: Setting the image loader delegate
The Braze SDK will use any custom image loader set with [`IBrazeImageLoader`](https://braze-inc.github.io/braze-android-sdk/kdoc/braze-android-sdk/com.braze.images/-i-braze-image-loader/index.html). We recommend setting the custom image loader in a custom application subclass:
```java
public class GlideIntegrationApplication extends Application {
@Override
public void onCreate() {
super.onCreate();
Braze.getInstance(context).setImageLoader(new GlideBrazeImageLoader());
}
}
```
```kotlin
class GlideIntegrationApplication : Application() {
override fun onCreate() {
super.onCreate()
Braze.getInstance(context).imageLoader = GlideBrazeImageLoader()
}
}
```
## Custom Image Loading with Jetpack Compose
To override image loading with Jetpack Compose, you can pass in a value to [`imageComposable`](https://braze-inc.github.io/braze-android-sdk/kdoc/braze-android-sdk/com.braze.jetpackcompose.contentcards.styling/-content-card-styling/index.html#-808910455%2FProperties%2F-1725759721). This function will take a `Card` and render the image and the modifiers needed. Alternatively, you can use `customCardComposer` of `ContentCardsList` to render the entire card.
In the following example, Glide's Compose library is used for the cards listed in the `imageComposable` function:
```kotlin
ContentCardsList(
cardStyle = ContentCardStyling(
imageComposable = { card ->
when (card.cardType) {
CardType.CAPTIONED_IMAGE -> {
val captionedImageCard = card as CaptionedImageCard
GlideImage(
modifier = Modifier
.fillMaxWidth()
.wrapContentHeight()
.run {
if (captionedImageCard.aspectRatio > 0) {
aspectRatio(captionedImageCard.aspectRatio)
} else {
this
}
},
contentScale = ContentScale.Crop,
model = captionedImageCard.url,
loading = placeholder(R.drawable.pushpin),
contentDescription = ""
)
}
CardType.IMAGE -> {
val imageOnlyCard = card as ImageOnlyCard
GlideImage(
modifier = Modifier
.fillMaxWidth()
.run {
if (imageOnlyCard.aspectRatio > 0) {
aspectRatio(imageOnlyCard.aspectRatio)
} else {
this
}
},
contentScale = ContentScale.Crop,
model = imageOnlyCard.url,
loading = placeholder(R.drawable.pushpin),
contentDescription = ""
)
}
CardType.SHORT_NEWS -> {
val shortNews = card as ShortNewsCard
GlideImage(
modifier = Modifier
.width(100.dp)
.height(100.dp),
model = shortNews.url,
loading = placeholder(R.drawable.pushpin),
contentDescription = ""
)
}
else -> Unit
}
}
)
)
```
## Prerequisites
Before you can use this feature, you'll need to [integrate the Swift Braze SDK](https://www.braze.com/docs/developer_guide/sdk_integration/?sdktab=swift).
## Integrating a custom image library
### Step 1: Integrate SDWebImage
Integrate the [SDWebImage repository](https://github.com/SDWebImage/SDWebImage) into your Xcode project.
### Step 2: Create a new Swift file
In your Xcode project, create a new file named `SDWebImageGIFViewProvider.swift` and import the following:
```swift
import UIKit
import BrazeUI
import SDWebImage
```
### Step 3: Add `GIFViewProvider`
Next, add our sample SDWebImage [`GIFViewProvider`](https://braze-inc.github.io/braze-swift-sdk/documentation/brazeui/gifviewprovider/). Your file should be similar to the following:
```swift
import UIKit
import BrazeUI
import SDWebImage
extension GIFViewProvider {
/// A GIF view provider using [SDWebImage](https://github.com/SDWebImage/SDWebImage) as a
/// rendering library.
public static let sdWebImage = Self(
view: { SDAnimatedImageView(image: image(for: $0)) },
updateView: { ($0 as? SDAnimatedImageView)?.image = image(for: $1) }
)
private static func image(for url: URL?) -> UIImage? {
guard let url else { return nil }
return url.pathExtension == "gif"
? SDAnimatedImage(contentsOfFile: url.path)
: UIImage(contentsOfFile: url.path)
}
}
```
### Step 4: Modify your `AppDelegate.swift`
In your project's `AppDelegate.swift`, add GIF support to your `BrazeUI` components using `GIFViewProvider`. Your file should be similar to the following:
```swift
import UIKit
import BrazeKit
import BrazeUI
@main
class AppDelegate: UIResponder, UIApplicationDelegate {
static var braze: Braze? = nil
func application(
_ application: UIApplication,
didFinishLaunchingWithOptions launchOptions: [UIApplication.LaunchOptionsKey: Any]?
) -> Bool {
/* ... */
GIFViewProvider.shared = .sdWebImage
return true
}
}
```
# Log in-app message data through the Braze SDK
Source: /docs/developer_guide/in_app_messages/logging_message_data/index.md
# Log in-app message data
> Learn how to log in-app message (IAM) data through the Braze SDK.
## Prerequisites
Before you can use this feature, you'll need to [integrate the Web Braze SDK](https://www.braze.com/docs/developer_guide/sdk_integration/?sdktab=web).
## Logging message data
Logging in-app message [impressions](https://js.appboycdn.com/web-sdk/latest/doc/modules/braze.html#loginappmessageimpression) and [clicks](https://js.appboycdn.com/web-sdk/latest/doc/modules/braze.html#loginappmessagebuttonclick) is performed automatically when you use the `showInAppMessage` or `automaticallyShowInAppMessage` method.
If you do not use either method and opt to manually display the message using your own UI code, use the following methods to log analytics:
```javascript
// Registers that a user has viewed an in-app message with the Braze server.
braze.logInAppMessageImpression(inAppMessage);
// Registers that a user has clicked on the specified in-app message with the Braze server.
braze.logInAppMessageClick(inAppMessage);
// Registers that a user has clicked a specified in-app message button with the Braze server.
braze.logInAppMessageButtonClick(button, inAppMessage);
// Registers that a user has clicked on a link in an HTML in-app message with the Braze server.
braze.logInAppMessageHtmlClick(inAppMessage, buttonId?, url?)
```
## Prerequisites
Before you can use this feature, you'll need to [integrate the Flutter Braze SDK](https://www.braze.com/docs/developer_guide/sdk_integration/?sdktab=flutter).
## Logging message data
To log analytics using your `BrazeInAppMessage`, pass the instance into the desired analytics function:
- `logInAppMessageClicked`
- `logInAppMessageImpression`
- `logInAppMessageButtonClicked` (along with the button index)
For example:
```dart
// Log a click
braze.logInAppMessageClicked(inAppMessage);
// Log an impression
braze.logInAppMessageImpression(inAppMessage);
// Log button index `0` being clicked
braze.logInAppMessageButtonClicked(inAppMessage, 0);
```
## Accessing message data
To access in-app message data in your Flutter app, the `BrazePlugin` supports sending in-app message data using [Dart Streams](https://dart.dev/tutorials/language/streams).
The `BrazeInAppMessage` object supports a subset of fields available in the native model objects, including `uri`, `message`, `header`, `buttons`, `extras`, and more.
### Step 1: Listen for in-app message data in the Dart layer
To receive to the in-app message data in the Dart layer, use the code below to create a `StreamSubscription` and call `braze.subscribeToInAppMessages()`. Remember to `cancel()` the stream subscription when it is no longer needed.
```dart
// Create stream subscription
StreamSubscription inAppMessageStreamSubscription;
inAppMessageStreamSubscription = braze.subscribeToInAppMessages((BrazeInAppMessage inAppMessage) {
// Handle in-app messages
}
// Cancel stream subscription
inAppMessageStreamSubscription.cancel();
```
For an example, see [main.dart](https://github.com/braze-inc/braze-flutter-sdk/blob/master/example/lib/main.dart) in our sample app.
### Step 2: Forward in-app message data from the native layer
To receive the data in the Dart layer from step 1, add the following code to forward the in-app message data from the native layers.
The in-app message data is automatically forwarded from the Android layer.
You can forward in-app message data in one of two ways:
1. Implement the `BrazeInAppMessageUIDelegate` delegate as described in our iOS article on [core in-app message delegate](https://braze-inc.github.io/braze-swift-sdk/tutorials/braze/c1-inappmessageui).
2. Update your [`willPresent` delegate implementation](https://braze-inc.github.io/braze-swift-sdk/documentation/brazeui/brazeinappmessageuidelegate/inappmessage(_:willpresent:view:)-4pzvv) to call `BrazePlugin.process(inAppMessage)`.
1. Ensure you have enabled the in-app message UI and set the `inAppMessagePresenter` to your custom presenter.
```swift
let inAppMessageUI = CustomInAppMessagePresenter()
braze.inAppMessagePresenter = inAppMessageUI
```
2. Create your custom presenter class and call `BrazePlugin.process(inAppMessage)` within [`present(message:)`](https://braze-inc.github.io/braze-swift-sdk/documentation/brazeui/brazeinappmessageui/present(message:)-f2ra).
```swift
class CustomInAppMessagePresenter: BrazeInAppMessageUI {
override func present(message: Braze.InAppMessage) {
// Pass in-app message data to the Dart layer.
BrazePlugin.processInAppMessage(message)
// If you want the default UI to display the in-app message.
super.present(message: message)
}
}
```
### Step 3: Replaying the callback for in-app messages (optional)
To store any in-app messages triggered before the callback is available and replay them after it is set, add the following entry to the `customConfigs` map when initializing the `BrazePlugin`:
```dart
BrazePlugin braze = new BrazePlugin(customConfigs: {replayCallbacksConfigKey: true});
```
## Prerequisites
Before you can use this feature, you'll need to [integrate the React Native Braze SDK](https://www.braze.com/docs/developer_guide/sdk_integration/?sdktab=react%20native).
## Methods for logging
You can use these methods by passing your `BrazeInAppMessage` instance to log analytics and perform actions:
| Method | Description |
| --------------------------------------------------------- | ------------------------------------------------------------------------------------- |
| `logInAppMessageClicked(inAppMessage)` | Logs a click for the provided in-app message data. |
| `logInAppMessageImpression(inAppMessage)` | Logs an impression for the provided in-app message data. |
| `logInAppMessageButtonClicked(inAppMessage, buttonId)` | Logs a button click for the provided in-app message data and button ID. |
| `hideCurrentInAppMessage()` | Dismisses the currently displayed in-app message. |
| `performInAppMessageAction(inAppMessage)` | Performs the action for an in-app message. |
| `performInAppMessageButtonAction(inAppMessage, buttonId)` | Performs the action for an in-app message button. |
{: .reset-td-br-1 .reset-td-br-2 role="presentation"}
## Handling message data
In most cases, you can use the `Braze.addListener` method to register event listeners to handle data coming from in-app messages.
Additionally, you can access the in-app message data in the JavaScript layer by calling the `Braze.subscribeToInAppMessage` method to have the SDKs publish an `inAppMessageReceived` event when an in-app message is triggered. Pass a callback to this method to execute your own code when the in-app message is triggered and received by the listener.
To customize how message data is handled, refer to the following implementation examples:
To enhance the default behavior, or if you don't have access to customize the native iOS or Android code, we recommend that you disable the default UI while still receiving in-app message events from Braze. To disable the default UI, pass `false` to the `Braze.subscribeToInAppMessage` method and use the in-app message data to construct your own message in JavaScript. Note that you will need to manually log analytics on your messages if you choose to disable the default UI.
```javascript
import Braze from "@braze/react-native-sdk";
// Option 1: Listen for the event directly via `Braze.addListener`.
//
// You may use this method to accomplish the same thing if you don't
// wish to make any changes to the default Braze UI.
Braze.addListener(Braze.Events.IN_APP_MESSAGE_RECEIVED, (event) => {
console.log(event.inAppMessage);
});
// Option 2: Call `subscribeToInAppMessage`.
//
// Pass in `false` to disable the automatic display of in-app messages.
Braze.subscribeToInAppMessage(false, (event) => {
console.log(event.inAppMessage);
// Use `event.inAppMessage` to construct your own custom message UI.
});
```
To include more advanced logic to determine whether or not to show an in-app message using the built-in UI, implement in-app messages through the native layer.
**Warning:**
Since this is an advanced customization option, note that overriding the default Braze implementation will also nullify the logic to emit in-app message events to your JavaScript listeners. If you wish to still use `Braze.subscribeToInAppMessage` or `Braze.addListener` as described in [Accessing in-app message data](#accessing-in-app-message-data), you will need to handle publishing the events yourself.
Implement the `IInAppMessageManagerListener` as described in our Android article on [Custom Manager Listener](https://www.braze.com/docs/developer_guide/in_app_messages/customization/?sdktab=android#android_setting-custom-manager-listeners). In your `beforeInAppMessageDisplayed` implementation, you can access the `inAppMessage` data, send it to the JavaScript layer, and decide to show or not show the native message based on the return value.
For more on these values, see our [Android documentation](https://www.braze.com/docs/developer_guide/in_app_messages/).
```java
// In-app messaging
@Override
public InAppMessageOperation beforeInAppMessageDisplayed(IInAppMessage inAppMessage) {
WritableMap parameters = new WritableNativeMap();
parameters.putString("inAppMessage", inAppMessage.forJsonPut().toString());
getReactNativeHost()
.getReactInstanceManager()
.getCurrentReactContext()
.getJSModule(DeviceEventManagerModule.RCTDeviceEventEmitter.class)
.emit("inAppMessageReceived", parameters);
// Note: return InAppMessageOperation.DISCARD if you would like
// to prevent the Braze SDK from displaying the message natively.
return InAppMessageOperation.DISPLAY_NOW;
}
```
### Overriding the default UI delegate
By default, [`BrazeInAppMessageUI`](https://braze-inc.github.io/braze-swift-sdk/documentation/brazeui/brazeinappmessageui/) is created and assigned when you initialize the `braze` instance. `BrazeInAppMessageUI` is an implementation of the [`BrazeInAppMessagePresenter`](https://braze-inc.github.io/braze-swift-sdk/documentation/brazekit/brazeinappmessagepresenter) protocol and comes with a `delegate` property that can be used to customize the handling of in-app messages that have been received.
1. Implement the `BrazeInAppMessageUIDelegate` delegate as described in [our iOS article here](https://braze-inc.github.io/braze-swift-sdk/tutorials/braze/c1-inappmessageui).
2. In the `inAppMessage(_:displayChoiceForMessage:)` delegate method, you can access the `inAppMessage` data, send it to the JavaScript layer, and decide to show or not show the native message based on the return value.
For more details on these values, see our [iOS documentation](https://braze-inc.github.io/braze-swift-sdk/documentation/brazeui/brazeinappmessageuidelegate/).
```objc
- (enum BRZInAppMessageUIDisplayChoice)inAppMessage:(BrazeInAppMessageUI *)ui
displayChoiceForMessage:(BRZInAppMessageRaw *)message {
// Convert the message to a JavaScript representation.
NSData *inAppMessageData = [message json];
NSString *inAppMessageString = [[NSString alloc] initWithData:inAppMessageData encoding:NSUTF8StringEncoding];
NSDictionary *arguments = @{
@"inAppMessage" : inAppMessageString
};
// Send to JavaScript.
[self sendEventWithName:@"inAppMessageReceived" body:arguments];
// Note: Return `BRZInAppMessageUIDisplayChoiceDiscard` if you would like
// to prevent the Braze SDK from displaying the message natively.
return BRZInAppMessageUIDisplayChoiceNow;
}
```
To use this delegate, assign it to `brazeInAppMessagePresenter.delegate` after initializing the `braze` instance.
**Note:**
`BrazeUI` can only be imported in Objective-C or Swift. If you are using Objective-C++, you will need to handle this in a separate file.
```objc
@import BrazeUI;
- (BOOL)application:(UIApplication *)application didFinishLaunchingWithOptions:(NSDictionary *)launchOptions {
BRZConfiguration *configuration = [[BRZConfiguration alloc] initWithApiKey:apiKey endpoint:endpoint];
Braze *braze = [BrazeReactBridge initBraze:configuration];
((BrazeInAppMessageUI *)braze.inAppMessagePresenter).delegate = [[CustomDelegate alloc] init];
AppDelegate.braze = braze;
}
```
### Overriding the default native UI
If you wish to fully customize the presentation of your in-app messages at the native iOS layer, conform to the [`BrazeInAppMessagePresenter`](https://braze-inc.github.io/braze-swift-sdk/documentation/brazekit/brazeinappmessagepresenter) protocol and assign your custom presenter following the sample below:
```objc
BRZConfiguration *configuration = [[BRZConfiguration alloc] initWithApiKey:apiKey endpoint:endpoint];
Braze *braze = [BrazeReactBridge initBraze:configuration];
braze.inAppMessagePresenter = [[MyCustomPresenter alloc] init];
AppDelegate.braze = braze;
```
## Prerequisites
Before you can use this feature, you'll need to [integrate the Android Braze SDK](https://www.braze.com/docs/developer_guide/sdk_integration/?sdktab=android).
## Logging message data
You will need to make sure certain functions are called to handle the analytics for your campaign.
### Displayed messages
When a message is displayed or seen, log an impression:
```brightscript
LogInAppMessageImpression(in_app_message.id, brazetask)
```
### Clicked messages
Once a user clicks on the message, log a click and then process `in_app_message.click_action`:
```brightscript
LogInAppMessageClick(in_app_message.id, brazetask)
```
### Clicked buttons
If the user clicks on a button, log the button click and then process `inappmessage.buttons[selected].click_action`:
```brightscript
LogInAppMessageButtonClick(inappmessage.id, inappmessage.buttons[selected].id, brazetask)
```
### After processing a message
After processing an in-app message, you should clear the field:
```brightscript
m.BrazeTask.BrazeInAppMessage = invalid
```
## Subscribing to in-app messages
You may register Unity game objects to be notified of incoming in-app messages. We recommend setting game object listeners from the Braze configuration editor. In the configuration editor, listeners must be set separately for Android and iOS.
If you need to configure your game object listener at runtime, use `AppboyBinding.ConfigureListener()` and specify `BrazeUnityMessageType.IN_APP_MESSAGE`.
## Parsing messages
Incoming `string` messages received in your in-app message game object callback can be parsed into our pre-supplied model objects for convenience.
Use `InAppMessageFactory.BuildInAppMessage()` to parse your in-app message. The resulting object will either be an instance of [`IInAppMessage.cs`](https://github.com/braze-inc/braze-unity-sdk/blob/18cb8ee89f1841c576eb954793edb6e06f9130b4/Assets/Plugins/Appboy/Models/InAppMessage/IInAppMessage.cs) or [`IInAppMessageImmersive.cs`](https://github.com/braze-inc/braze-unity-sdk/blob/18cb8ee89f1841c576eb954793edb6e06f9130b4/Assets/Plugins/Appboy/Models/InAppMessage/IInAppMessageImmersive.cs) depending on its type.
```csharp
// Automatically logs a button click, if present.
void InAppMessageReceivedCallback(string message) {
IInAppMessage inApp = InAppMessageFactory.BuildInAppMessage(message);
if (inApp is IInAppMessageImmersive) {
IInAppMessageImmersive inAppImmersive = inApp as IInAppMessageImmersive;
if (inAppImmersive.Buttons != null && inAppImmersive.Buttons.Count > 0) {
inAppImmersive.LogButtonClicked(inAppImmersive.Buttons[0].ButtonID);
}
}
}
```
## Logging message data
Clicks and impressions must be manually logged for in-app messages not displayed directly by Braze.
Use `LogClicked()` and `LogImpression()` on [`IInAppMessage`](https://github.com/braze-inc/braze-unity-sdk/blob/18cb8ee89f1841c576eb954793edb6e06f9130b4/Assets/Plugins/Appboy/Models/InAppMessage/IInAppMessage.cs) to log clicks and impressions on your message.
Use `LogButtonClicked(int buttonID)` on [`IInAppMessageImmersive`](https://github.com/braze-inc/braze-unity-sdk/blob/18cb8ee89f1841c576eb954793edb6e06f9130b4/Assets/Plugins/Appboy/Models/InAppMessage/IInAppMessageImmersive.cs) to log button clicks. Note that buttons are represented as lists of[`InAppMessageButton`](https://github.com/braze-inc/braze-unity-sdk/blob/18cb8ee89f1841c576eb954793edb6e06f9130b4/Assets/Plugins/Appboy/Models/InAppMessage/InAppMessageButton.cs) instances, each of which contains a `ButtonID`.
# Send a test message for the Braze SDK
Source: /docs/developer_guide/in_app_messages/sending_test_messages/index.md
# Sending test messages
> Before sending out a messaging campaign to your users, you may want to test it to make sure it looks right and operates in the intended manner. You can use the dashboard to create and send test messages with push notifications, in-app messages (IAM), or email.
## Sending a test message
### Step 1: Create a designated test segment
After you set up a test segment, you can use it to test any of your Braze messaging channels. When set up correctly, this only needs to be done a single time.
To set up a test segment, go to **Segments** and create a new segment. Select **Add Filter**, then choose a one of the test filters.
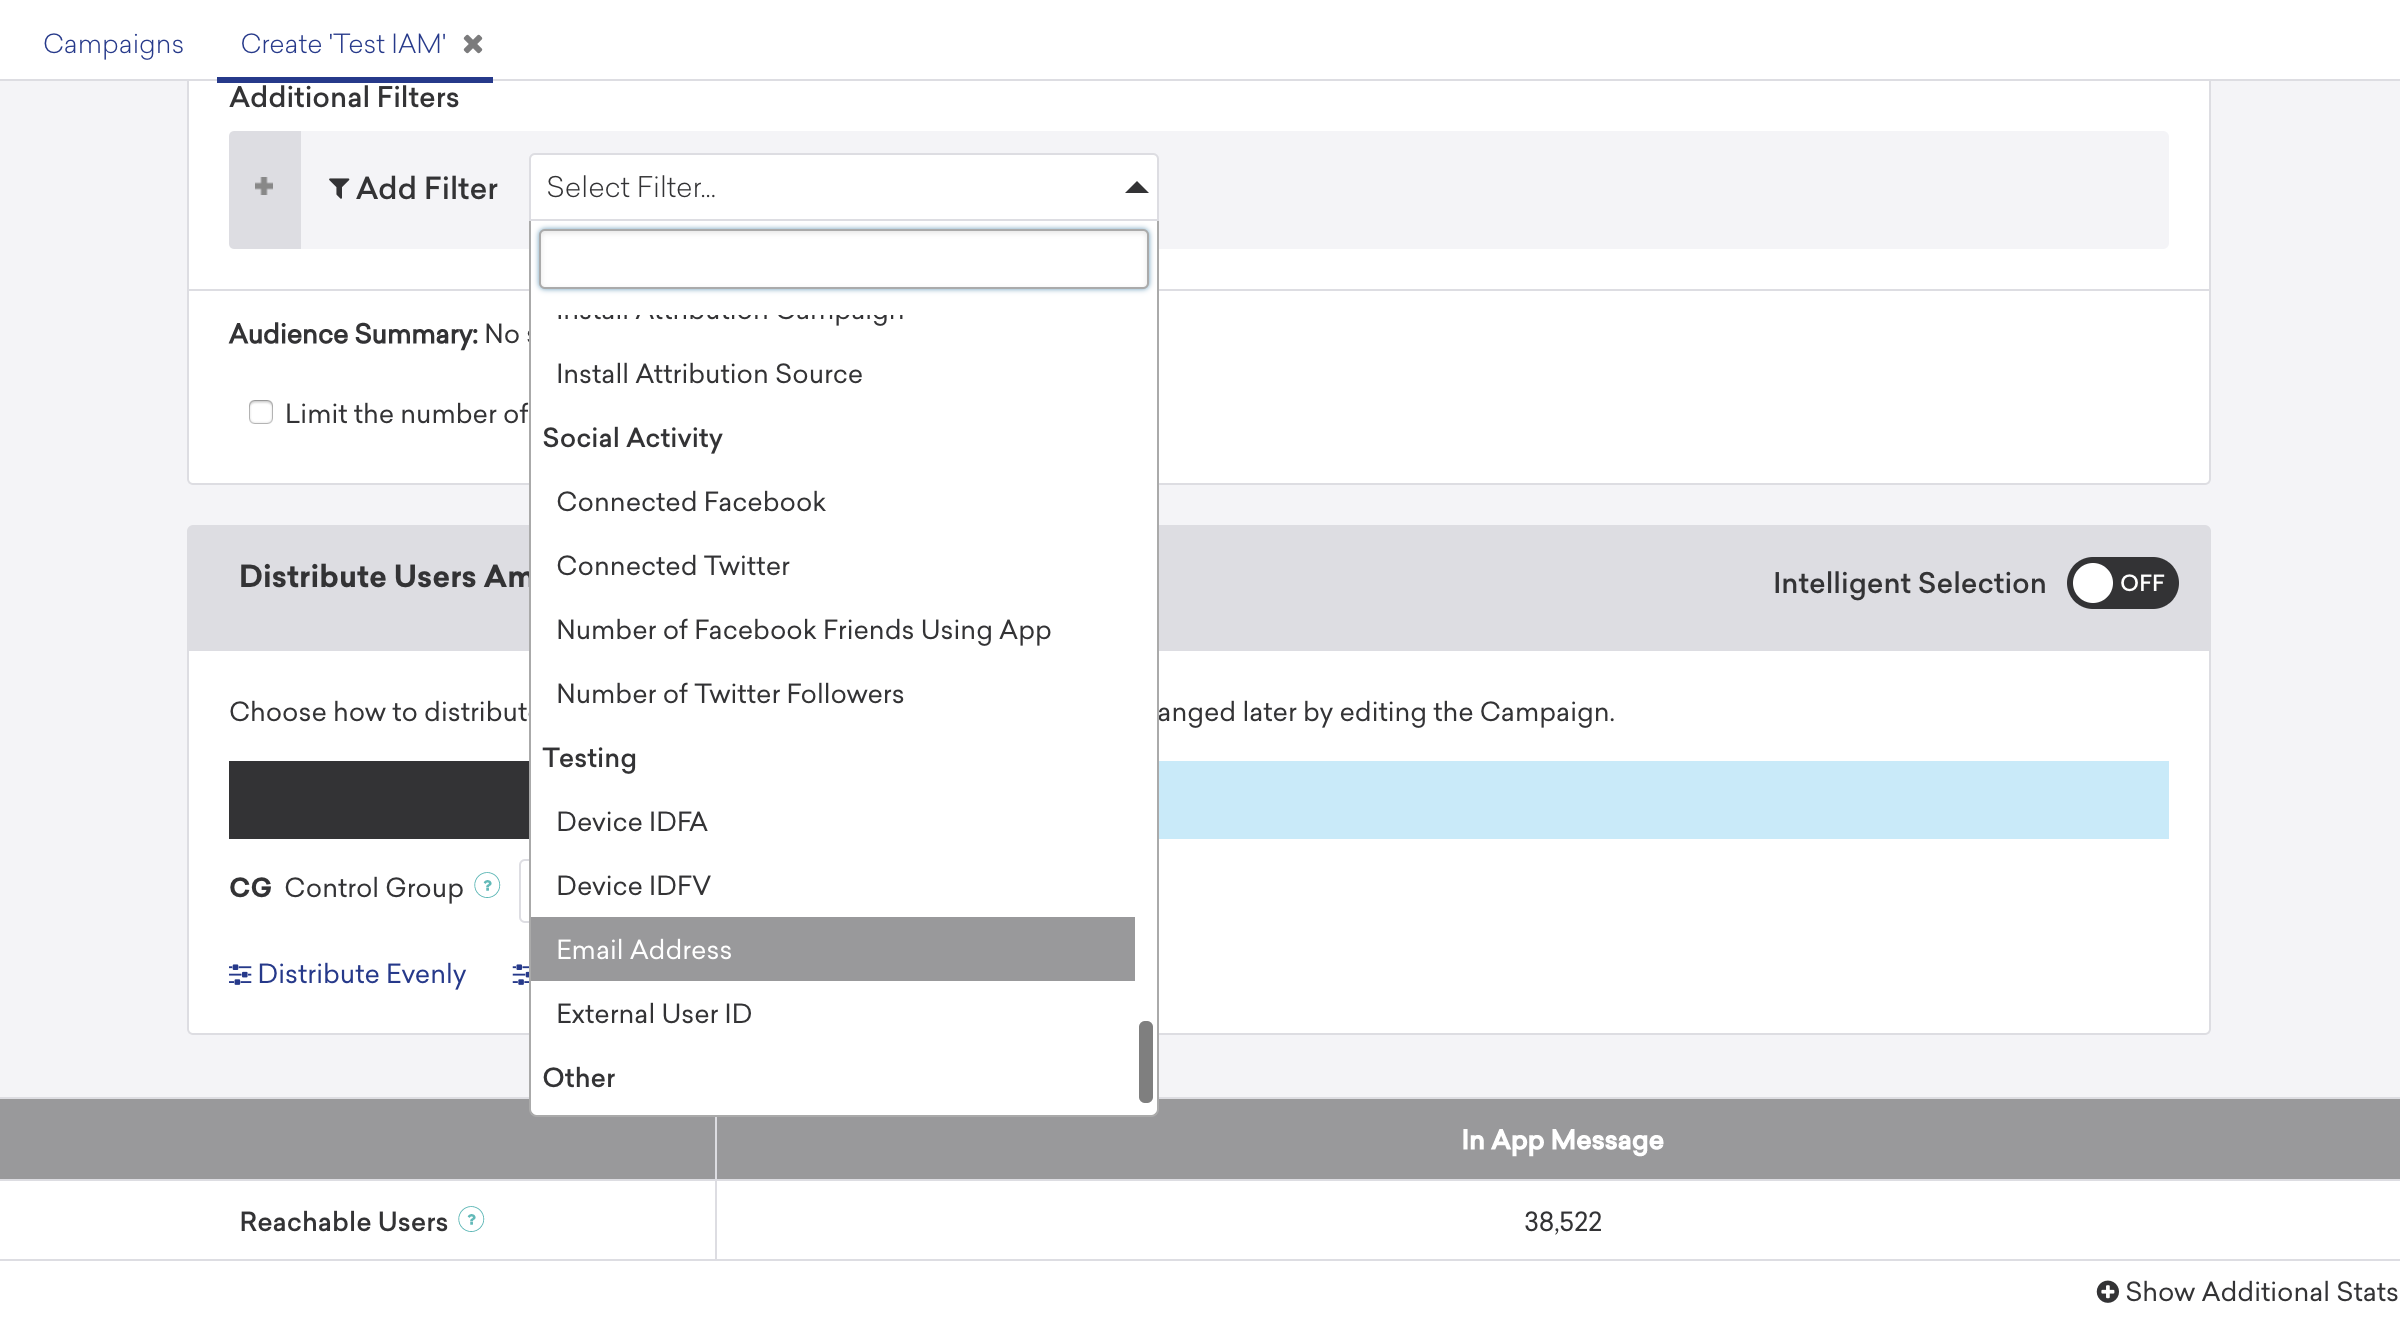
With test filters, you can ensure that only users with a specific email address or [external user ID](https://www.braze.com/docs/developer_guide/platform_integration_guides/swift/analytics/setting_user_ids/#setting-user-ids) are sent the test message.
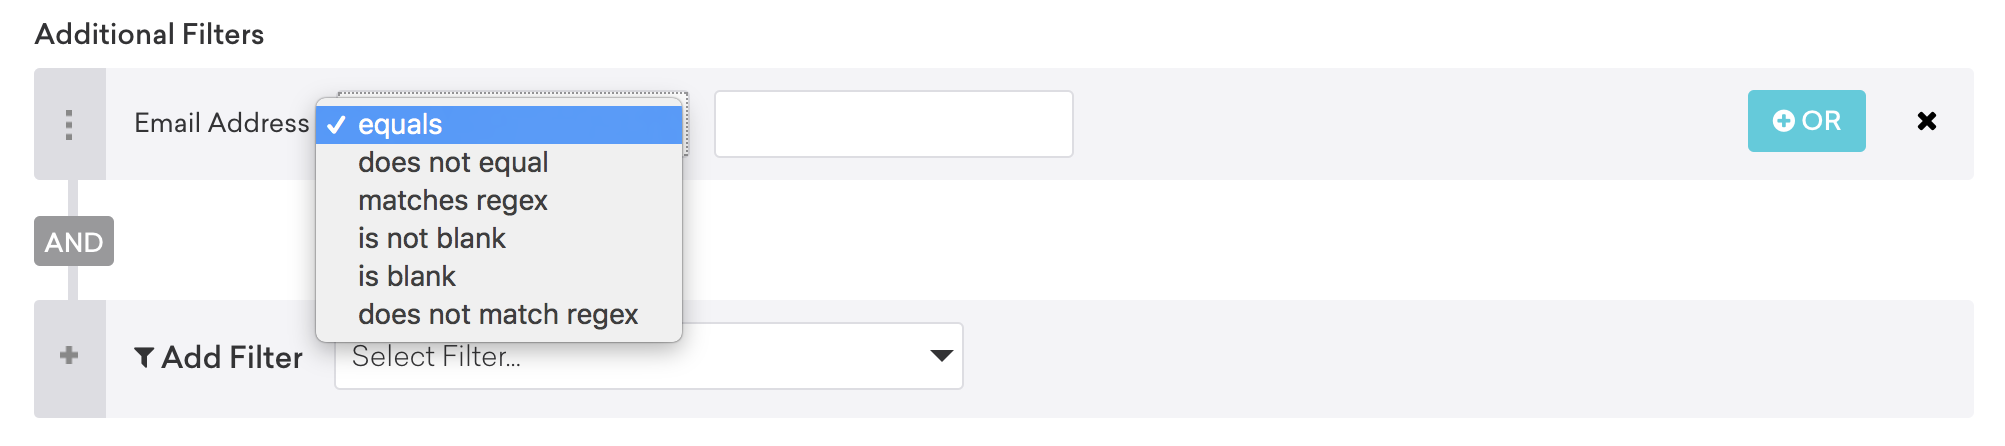
Both email address and external user ID filters offer the following options:
| Operator | Description |
|------------------|--------------------------------------------------------------------------------------------------------------------------------|
| `equals` | This will look for an exact match of the email or user ID that you provide. Use this if you only want to send the test campaigns to devices associated with a single email or user ID. |
| `does not equal` | Use this if you want to exclude a particular email or user ID from test campaigns. |
| `matches` | This will find users that have email addresses or user IDs that match part of the search term you provide. You could use this to find only the users that have an `@yourcompany.com` address, allowing you to send messages to everyone on your team. |
{: .reset-td-br-1 .reset-td-br-2 role="presentation"}
You can select multiple specific emails using the "`matches`" option and separating the email addresses with a | character. For example: "`matches`" "`email1@braze.com` | `email2@braze.com`". You can also combine multiple operators together. For example, the test segment could include an email address filter that "`matches`" "`@braze.com`" and another filter that "`does not equal`" "`sales@braze.com`".
After adding the testing filters to your test segment, you can verify it's working by selecting **Preview** or by selecting **Settings** > **CSV Export All User Data** to export that segment's user data to a CSV file.
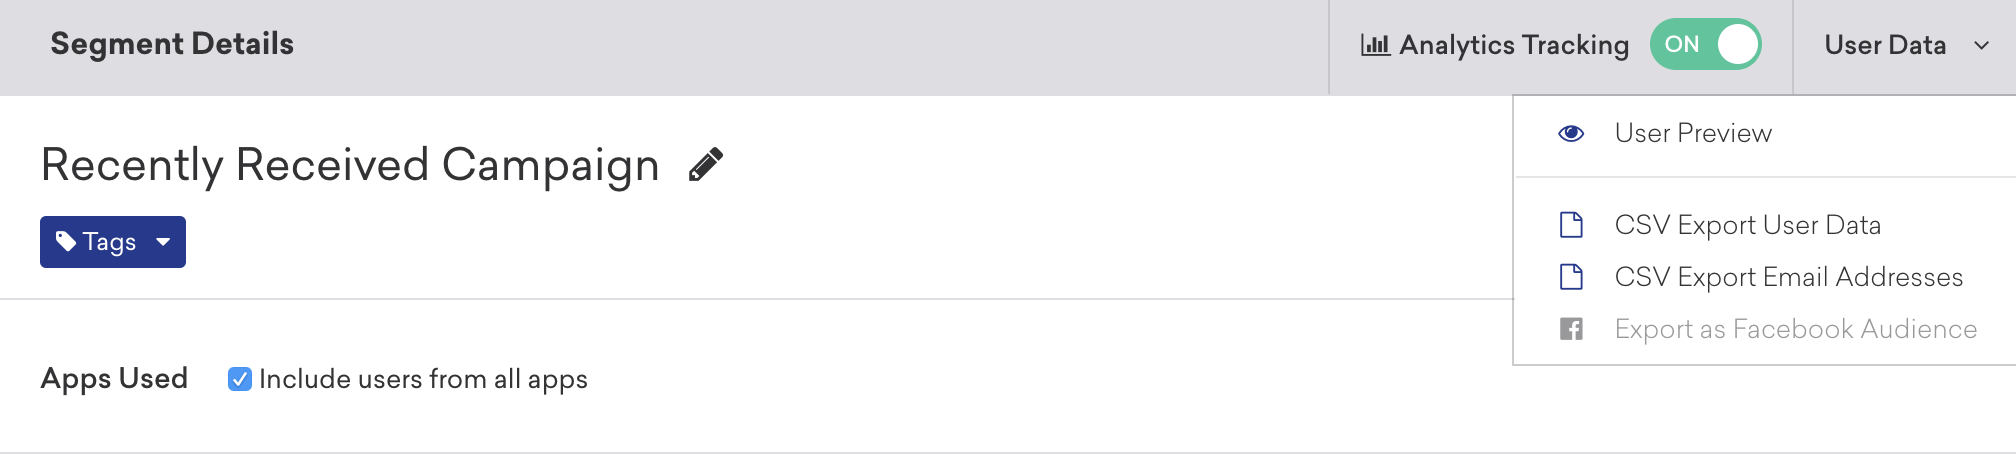
**Note:**
Exporting the segment's User Data to a CSV file is the most accurate verification method, as the preview will only show a sample of your users and may not include all users.
### Step 2: Send the message
You can send a message using the Braze dashboard or the command line.
To send test push notifications or in-app messages, you need to target your previously created test segment. Begin by creating your campaign and following the usual steps. When you reach the **Target Audiences** step, select your test segment from the dropdown menu.
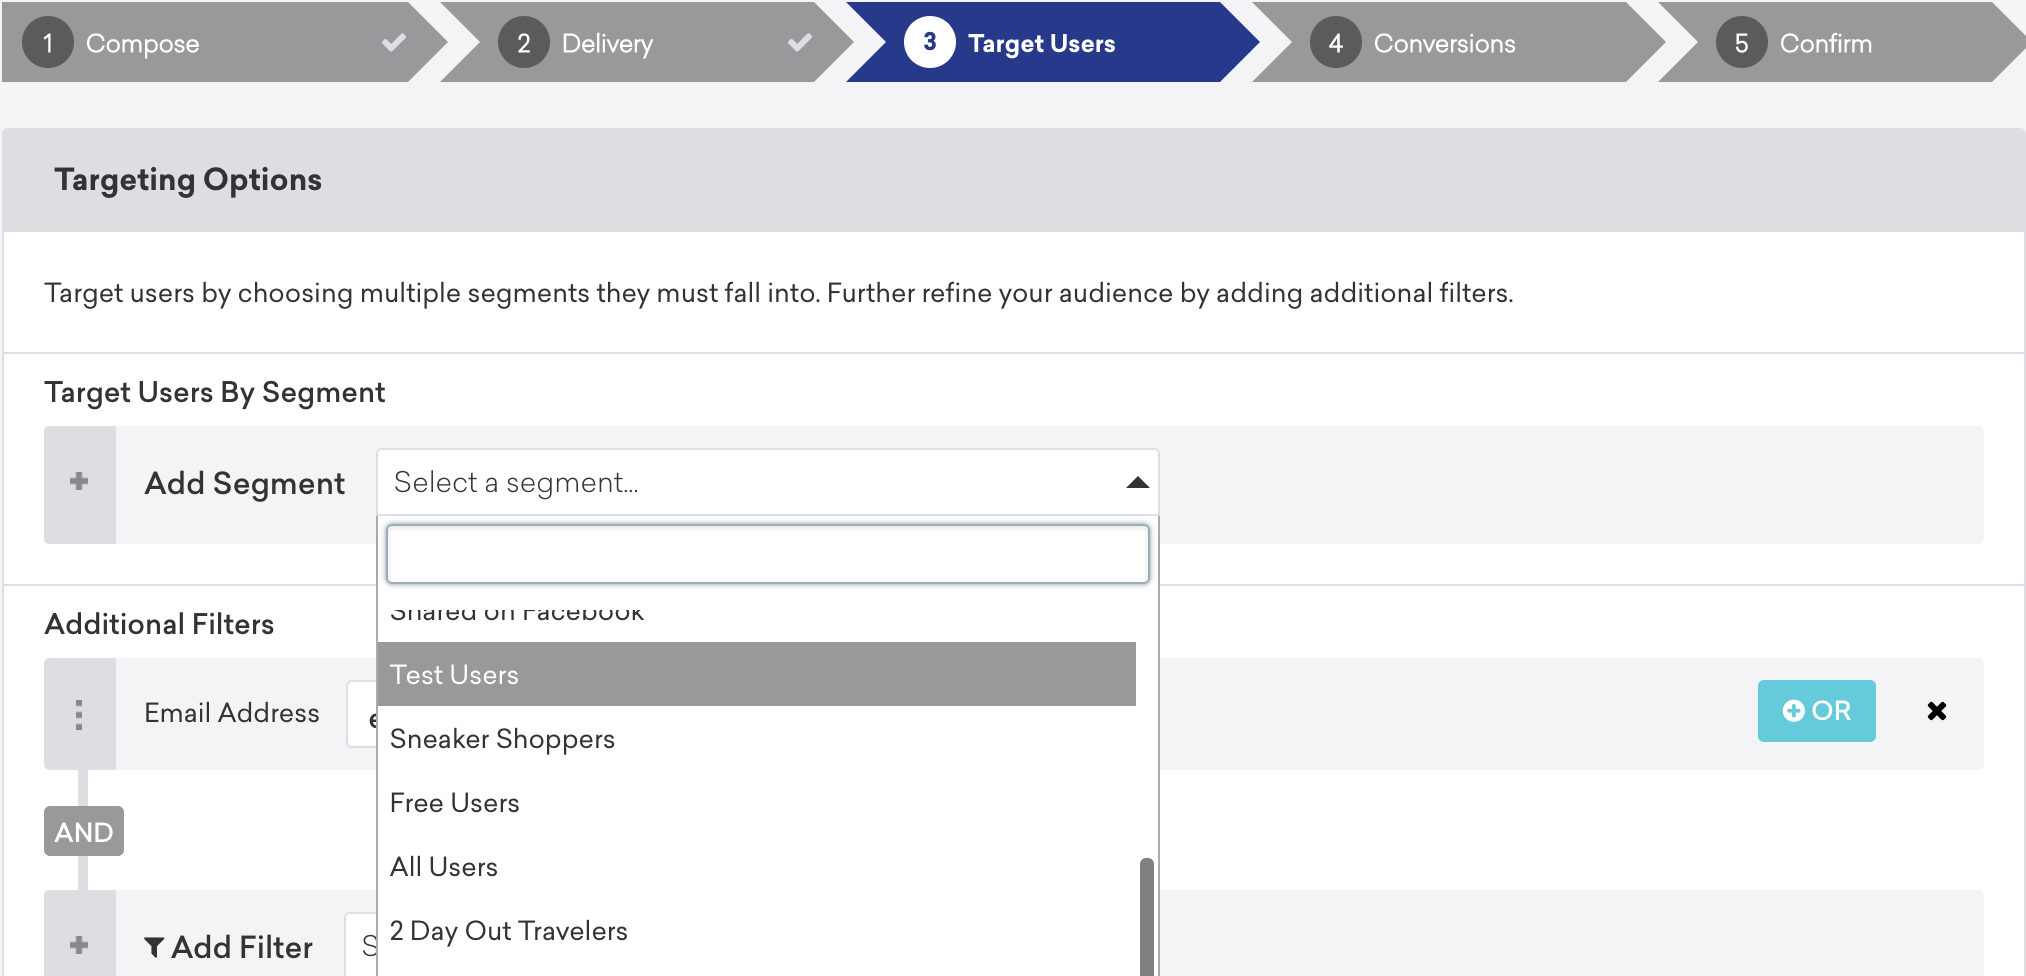
Confirm your campaign and launch it to test your push notification and in-app messages.
**Note:**
Be sure to select **Allow users to become re-eligible to receive campaign** under the **Schedule** portion of the campaign composer if you intend to use a single campaign to send a test message to yourself more than once.
If you're only testing email messages, you do not necessarily have to set up a test segment. In the first step of the campaign composer where you compose your campaign's email message, click **Send Test** and enter the email address to which you wish to send a test email.

**Tip:**
You can also enable or disable [TEST (or SEED)](https://www.braze.com/docs/user_guide/administrative/app_settings/email_settings/#append-email-subject-lines) being appended on your test messages.
Alternatively, you can send a single notification using cURL and the [Braze Messaging API](https://www.braze.com/docs/api/endpoints/messaging/). Note that these examples make a request using the `US-01` instance. To find out yours, refer to [API endpoints](https://www.braze.com/docs/api/basics/#endpoints).
```bash
curl -X POST -H "Content-Type: application/json" -H "Authorization: Bearer {BRAZE_API_KEY}" -d '{
"external_user_ids":["EXTERNAL_USER_ID"],
"messages": {
"android_push": {
"title":"Test push title",
"alert":"Test push",
"extra":{
"CUSTOM_KEY":"CUSTOM_VALUE"
}
}
}
}' https://rest.iad-01.braze.com/messages/send
```
```bash
curl -X POST -H "Content-Type: application/json" -H "Authorization: Bearer {BRAZE_API_KEY}" -d '{
"external_user_ids":["EXTERNAL_USER_ID"],
"messages": {
"apple_push": {
"alert": "Test push",
"extra": {
"CUSTOM_KEY" :"CUSTOM_VALUE"
}
}
}
}' https://rest.iad-01.braze.com/messages/send
```
```bash
curl -X POST -H "Content-Type: application/json" -H "Authorization: Bearer {BRAZE_API_KEY}" -d '{
"external_user_ids":["EXTERNAL_USER_ID"],
"messages": {
"kindle_push": {
"title":"Test push title",
"alert":"Test push",
"extra":{
"CUSTOM_KEY":"CUSTOM_VALUE"
}
}
}
}' https://rest.iad-01.braze.com/messages/send
```
Replace the following:
| Placeholder | Description |
|---------------------|-----------------------------------------------------------|
| `BRAZE_API_KEY` | Your Braze API key used for authentication. In Braze, go to **Settings** > **API Keys** to locate your key. |
| `EXTERNAL_USER_ID` | The external user ID used to send your message to a specific user. In Braze, go to **Audience** > **Search users**, then search for a user. |
| `CUSTOM_KEY` | (Optional) A custom key for additional data. |
| `CUSTOM_VALUE` | (Optional) A custom value assigned to your custom key. |
{: .reset-td-br-1 .reset-td-br-2 role="presentation"}
## Test limitations
There are a few situations where test messages don't have complete feature parity with launching a campaign or Canvas to a real set of users. In these instances, to validate this behavior, you should launch the campaign or Canvas to a limited set of test users.
- Viewing the Braze [preference center](https://www.braze.com/docs/user_guide/message_building_by_channel/email/managing_user_subscriptions/#subscription-groups) from **Test Messages** will cause the submit button to be grayed out.
- The list-unsubscribe header is not included in emails sent by the test message functionality.
- For in-app messages and Content Cards, the target user must have a push token for the target device.
# Tutorials
Source: /docs/developer_guide/in_app_messages/tutorials/index.md
# Tutorial: Conditionally displaying in-app messages
Source: /docs/developer_guide/in_app_messages/tutorials/conditionally_displaying_messages/index.md
# Tutorial: Conditionally displaying in-app messages
> Follow along with the sample code in this tutorial to conditionally display in-app messages using the Braze SDK.
## Prerequisites
Before you can use this feature, you'll need to [integrate the Web Braze SDK](https://www.braze.com/docs/developer_guide/sdk_integration/?sdktab=web). However, no additional setup is required.
## Conditionally displaying in-app messages for Web
**Important:**
We're piloting this new tutorial format. [Tell us what you think](https://docs.google.com/forms/d/e/1FAIpQLSe_5uhWM7eXXk9F_gviO_pvA4rkYO3WA9B6tNJZ3TY91md5bw/viewform?usp=pp_url&entry.569173304=General+Feedback) — your feedback helps us improve future guides.
```js file=index.js
import * as braze from "@braze/web-sdk";
// Remove any calls to `braze.automaticallyShowInAppMessages()`
braze.initialize("YOUR-API-KEY", {
baseUrl: "YOUR-ENDPOINT",
enableLogging: true,
});
braze.subscribeToInAppMessage(function (message) {
if (
location.pathname === "/checkout" ||
document.getElementById("#checkout")
) {
// do not show the message
} else {
braze.showInAppMessage(message);
}
});
```
!!step
lines-index.js=2
#### 1. Remove calls to `automaticallyShowInAppMessages()`
Remove any calls to [`automaticallyShowInAppMessages()`](https://js.appboycdn.com/web-sdk/latest/doc/modules/braze.html#automaticallyshowinappmessages), as they'll override any custom logic you implement later.
!!step
lines-index.js=6
#### 2. Enable debugging (optional)
To make troubleshooting easier while developing, consider enabling debugging.
!!step
lines-index.js=9-18
#### 3. Subscribe to in-app message updates
Register a callback with [`subscribeToInAppMessage(callback)`](https://js.appboycdn.com/web-sdk/latest/doc/modules/braze.html#subscribetoinappmessage) to receive a `message` any time an in-app message is triggered.
!!step
lines-index.js=10-13
#### 4. Create conditional logic
Create custom logic to control when messages are displayed. In this example, the logic checks if the URL contains `"checkout"` or if a `#checkout` element exists on the page.
!!step
lines-index.js=16
#### 5. Display messages with `showInAppMessage`
To display the message, call [`showInAppMessage(message)`](https://js.appboycdn.com/web-sdk/latest/doc/modules/braze.html#showinappmessage). If omitted, the message will be skipped.
## Prerequisites
Before you can use this feature, you'll need to [integrate the Android Braze SDK](https://www.braze.com/docs/developer_guide/sdk_integration/?sdktab=android). You'll also need to [enable in-app messages for Android](https://www.braze.com/docs/developer_guide/in_app_messages/?sdktab=android#android_enabling-in-app-messages).
## Conditionally displaying in-app messages for Android
**Important:**
We're piloting this new tutorial format. [Tell us what you think](https://docs.google.com/forms/d/e/1FAIpQLSe_5uhWM7eXXk9F_gviO_pvA4rkYO3WA9B6tNJZ3TY91md5bw/viewform?usp=pp_url&entry.569173304=General+Feedback) — your feedback helps us improve future guides.
```kotlin file=MainApplication.kt
import android.app.Application
import com.braze.Braze
import com.braze.support.BrazeLogger
import com.braze.configuration.BrazeConfig
import com.braze.ui.inappmessage.BrazeInAppMessageManager
import com.braze.BrazeActivityLifecycleCallbackListener
import com.braze.ui.inappmessage.listeners.IInAppMessageManagerListener
import com.braze.models.inappmessage.IInAppMessage
import com.braze.ui.inappmessage.InAppMessageOperation
import android.util.Log
class MyApplication : Application() {
override fun onCreate() {
super.onCreate()
// Enable verbose Braze SDK logs
BrazeLogger.logLevel = Log.VERBOSE
// Initialize Braze
val brazeConfig = BrazeConfig.Builder()
.setApiKey("YOUR-API-KEY")
.setCustomEndpoint("YOUR-ENDPOINT")
.build()
Braze.configure(this, brazeConfig)
registerActivityLifecycleCallbacks(
BrazeActivityLifecycleCallbackListener()
)
// Set up in-app message listener
BrazeInAppMessageManager.getInstance().setCustomInAppMessageManagerListener(object : IInAppMessageManagerListener {
override fun beforeInAppMessageDisplayed(inAppMessage: IInAppMessage): InAppMessageOperation {
// Check if we should show the message
val shouldShow = inAppMessage.extras["should_display_message"] == "true"
return if (shouldShow) {
// Show the message using Braze's UI
InAppMessageOperation.DISPLAY_NOW
} else {
// Discard the message (or we could also create our own UI using KVP values)
InAppMessageOperation.DISCARD
}
}
})
}
}
```
!!step
lines-MainApplication.kt=17
#### 1. Enable debugging (optional)
To make troubleshooting easier while developing, consider enabling debugging.
!!step
lines-MainApplication.kt=26-28
#### 2. Register activity lifecycle callbacks
Register Braze’s default listener to handle the in-app message lifecycle.
!!step
lines-MainApplication.kt=30-44
#### 3. Set up an in-app message listener
Use `BrazeInAppMessageManager` to set a custom listener that intercepts messages before they're displayed.
!!step
lines-MainApplication.kt=34-42
#### 4. Create conditional logic
Use custom logic to control message display timing. In this example, the custom logic checks if the `should_display_message` extra is set to `"true"`.
!!step
lines-MainApplication.kt=38,41
#### 5. Return or discard the message
Return an `InAppMessageOperation` with `DISPLAY_NOW` to display the message, or with `DISCARD` to suppress it.
## Prerequisites
Before you can use this feature, you'll need to [integrate the Swift Braze SDK](https://www.braze.com/docs/developer_guide/sdk_integration/?sdktab=swift). You'll also need to [enable in-app messages for Swift](https://www.braze.com/docs/developer_guide/in_app_messages/?sdktab=swift#swift_enabling-in-app-messages).
## Conditionally displaying in-app messages for Swift
**Important:**
We're piloting this new tutorial format. [Tell us what you think](https://docs.google.com/forms/d/e/1FAIpQLSe_5uhWM7eXXk9F_gviO_pvA4rkYO3WA9B6tNJZ3TY91md5bw/viewform?usp=pp_url&entry.569173304=General+Feedback) — your feedback helps us improve future guides.
```swift file=AppDelegate.swift
import SwiftUI
import BrazeKit
import BrazeUI
class AppDelegate: NSObject, UIApplicationDelegate, BrazeInAppMessageUIDelegate {
static var braze: Braze?
func application(_ application: UIApplication,
didFinishLaunchingWithOptions launchOptions: [UIApplication.LaunchOptionsKey: Any]? = nil) -> Bool {
// 1. Braze configuration with your SDK API key and endpoint
let configuration = Braze.Configuration(apiKey: "YOUR_API_ENDPOINT", endpoint: "YOUR_API_KEY")
configuration.logger.level = .debug
// 2. Initialize Braze SDK instance
let brazeInstance = Braze(configuration: configuration)
AppDelegate.braze = brazeInstance
// 3. Set up Braze In-App Message UI and delegate
let inAppMessageUI = BrazeInAppMessageUI()
inAppMessageUI.delegate = self
brazeInstance.inAppMessagePresenter = inAppMessageUI
return true
}
func inAppMessage(_ ui: BrazeInAppMessageUI,
displayChoiceForMessage message: Braze.InAppMessage) -> BrazeInAppMessageUI.DisplayChoice {
if let showFlag = message.extras["should_display_message"] as? String, showFlag == "true" {
return .now
} else {
return .discard
}
}
}
```
```swift file=SampleApp.swift
import SwiftUI
@main
struct SampleApp: App {
@UIApplicationDelegateAdaptor(AppDelegate.self) var appDelegate
var body: some Scene {
WindowGroup {
YourView()
}
}
}
```
!!step
lines-AppDelegate.swift=5
#### 1. Implement the `BrazeInAppMessageUIDelegate`
In your AppDelegate class, implement the [`BrazeInAppMessageUIDelegate`](https://braze-inc.github.io/braze-swift-sdk/documentation/brazeui/brazeinappmessageui/delegate) so you can override its `inAppMessage` method later.
!!step
lines-AppDelegate.swift=12
#### 2. Enable debugging (optional)
To make troubleshooting easier while developing, consider enabling debugging.
!!step
lines-AppDelegate.swift=19-21
#### 3. Set up your Braze UI and delegate
`BrazeInAppMessageUI()` renders in-app messages by default. By assigning `self` as its delegate, you can intercept and handle messages before they're displayed.
!!step
lines-AppDelegate.swift=26-33
#### 4. Override `DisplayChoice` with conditional logic
Override [`inAppMessage(_:displayChoiceForMessage:)`](https://braze-inc.github.io/braze-swift-sdk/documentation/brazeui/brazeinappmessageuidelegate/inappmessage(_:displaychoiceformessage:)-9w1nb) to decide whether a message should be shown. Return `.now` to display the message or `.discard` to suppress it.
# Tutorial: Customizing styling using key-value pairs
Source: /docs/developer_guide/in_app_messages/tutorials/customizing_message_styling/index.md
# Tutorial: Customizing message styling using key-value pairs
> Follow along with the sample code in this tutorial to customize your in-app message styling using key-value pairs in the Braze SDK.
## Prerequisites
Before you can use this feature, you'll need to [integrate the Web Braze SDK](https://www.braze.com/docs/developer_guide/sdk_integration/?sdktab=web). However, no additional setup is required.
## Customizing message styling using key-value pairs for Web
**Important:**
We're piloting this new tutorial format. [Tell us what you think](https://docs.google.com/forms/d/e/1FAIpQLSe_5uhWM7eXXk9F_gviO_pvA4rkYO3WA9B6tNJZ3TY91md5bw/viewform?usp=pp_url&entry.569173304=General+Feedback) — your feedback helps us improve future guides.
```js file=index.js
import * as braze from "@braze/web-sdk";
// Remove any calls to `braze.automaticallyShowInAppMessages()`
braze.initialize("YOUR-API-KEY", {
baseUrl: "YOUR-ENDPOINT",
enableLogging: true,
});
braze.subscribeToInAppMessage(function (message) {
const extras = message.extras;
const customTemplateType = extras["custom-template"] || "";
const customColor = extras["custom-color"] || "";
const customMessageId = extras["message-id"] || "";
if (customTemplateType) {
// add your own custom code to render this message
} else {
// otherwise, use Braze built-in UI
braze.showInAppMessage(message);
}
});
```
!!step
lines-index.js=2
#### 1. Remove calls to `automaticallyShowInAppMessages()`
Remove any calls to [`automaticallyShowInAppMessages()`](https://js.appboycdn.com/web-sdk/latest/doc/modules/braze.html#automaticallyshowinappmessages) , as they’ll override any custom logic you implement later.
!!step
lines-index.js=6
#### 2. Enable debugging (optional)
To make troubleshooting easier while developing, consider enabling debugging.
!!step
lines-index.js=9-21
#### 3. Subscribe to the in-app message callback handler
Register a callback with [`subscribeToInAppMessage(callback)`](https://js.appboycdn.com/web-sdk/latest/doc/modules/braze.html#subscribetoinappmessage) to receive a message any time an in-app message is triggered.
!!step
lines-index.js=10-13
#### 4. Access the `message.extras` property
Use `message.extras` to access customization types, styling attributes, or any other values defined in the dashboard. All values are returned as strings.
!!step
lines-index.js=19
#### 5. Conditionally call `showInAppMessage`
To display the message, call [`showInAppMessage(message)`](https://js.appboycdn.com/web-sdk/latest/doc/modules/braze.html#showinappmessage). Otherwise, use any custom properties as needed.
## Prerequisites
Before you can use this feature, you'll need to [integrate the Android Braze SDK](https://www.braze.com/docs/developer_guide/sdk_integration/?sdktab=android). You'll also need to [enable in-app messages for Android](https://www.braze.com/docs/developer_guide/in_app_messages/?sdktab=android#android_enabling-in-app-messages).
## Customizing message styling using key-value pairs for Android
**Important:**
We're piloting this new tutorial format. [Tell us what you think](https://docs.google.com/forms/d/e/1FAIpQLSe_5uhWM7eXXk9F_gviO_pvA4rkYO3WA9B6tNJZ3TY91md5bw/viewform?usp=pp_url&entry.569173304=General+Feedback) — your feedback helps us improve future guides.
```kotlin file=MainApplication.kt
package com.example.brazedevlab
import android.app.Application
import com.braze.Braze
import com.braze.support.BrazeLogger
import com.braze.configuration.BrazeConfig
import com.braze.ui.inappmessage.BrazeInAppMessageManager
import com.braze.BrazeActivityLifecycleCallbackListener
import com.braze.ui.inappmessage.listeners.IInAppMessageManagerListener
import com.braze.models.inappmessage.IInAppMessage
import com.braze.ui.inappmessage.InAppMessageOperation
import android.util.Log
class MyApplication : Application() {
override fun onCreate() {
super.onCreate()
// Enable verbose Braze SDK logs
BrazeLogger.logLevel = Log.VERBOSE
// Initialize Braze
val brazeConfig = BrazeConfig.Builder()
.setApiKey("YOUR-API-KEY")
.setCustomEndpoint("YOUR-ENDPOINT")
.build()
Braze.configure(this, brazeConfig)
registerActivityLifecycleCallbacks(
BrazeActivityLifecycleCallbackListener()
)
// Set up custom in-app message view factory
BrazeInAppMessageManager.getInstance()
.setCustomInAppMessageViewFactory(CustomInAppMessageViewFactory())
}
}
```
```kotlin file=CustomInAppMessageViewFactory.kt
import android.app.Activity
import android.graphics.Color
import android.view.View
import com.braze.models.inappmessage.IInAppMessage
import com.braze.ui.inappmessage.BrazeInAppMessageManager
import com.braze.ui.inappmessage.IInAppMessageViewFactory
class CustomInAppMessageViewFactory : IInAppMessageViewFactory {
override fun createInAppMessageView(
activity: Activity,
inAppMessage: IInAppMessage
): View {
// 1) Obtain Braze’s default view factory for this message type
val defaultFactory =
BrazeInAppMessageManager.getInstance()
.getDefaultInAppMessageViewFactory(inAppMessage)
?: throw IllegalStateException(
"Braze default IAM view factory is missing"
)
// 2) Inflate the default view
val iamView = defaultFactory
.createInAppMessageView(activity, inAppMessage)
?: throw IllegalStateException(
"Braze default IAM view is null"
)
// 3) Get your KVP extras
val extras = inAppMessage.extras ?: emptyMap()
val customization = extras["customization"]
val overrideColor = extras["custom-color"]
// 4) Style your root view
if (customization == "slideup-attributes" && overrideColor != null) {
try {
iamView.setBackgroundColor(Color.parseColor(overrideColor))
} catch (_: IllegalArgumentException) {
// ignore bad styling
}
}
return iamView
}
}
```
!!step
lines-MainApplication.kt=19
#### 1. Enable debugging (optional)
To make troubleshooting easier while developing, consider enabling debugging.
!!step
lines-MainApplication.kt=28-30
#### 2. Register activity lifecycle callbacks
Register Braze’s default listener to handle the in-app message lifecycle.
!!step
lines-CustomInAppMessageViewFactory.kt=8
#### 3. Create your custom view factory class
Ensure your class conforms to [`IInAppMessageViewFactory`](https://braze-inc.github.io/braze-android-sdk/kdoc/braze-android-sdk/com.braze.ui.inappmessage/-i-in-app-message-view-factory/index.html) so it can construct and return custom message views.
!!step
lines-CustomInAppMessageViewFactory.kt=15-20
#### 4. Delegate to Braze’s default factory
Delegate to the default factory to retain Braze’s built-in styling before applying your own conditional changes.
!!step
lines-CustomInAppMessageViewFactory.kt=30-32,35-41
#### 5. Access key-value pairs from `inAppMessage.extras`
Use `inAppMessage.extras` to access customization types, styling attributes, or any other values defined in the dashboard. Apply styling overrides before returning the view.
!!step
lines-MainApplication.kt=33-34
#### 6. Implement a custom `IInAppMessageViewFactory`
Implement [`IInAppMessageViewFactory`](https://braze-inc.github.io/braze-android-sdk/kdoc/braze-android-sdk/com.braze.ui.inappmessage/-i-in-app-message-view-factory/index.html) in your custom class to construct and render in-app message views.
## Prerequisites
Before you can use this feature, you'll need to [integrate the Swift Braze SDK](https://www.braze.com/docs/developer_guide/sdk_integration/?sdktab=swift). You'll also need to [enable in-app messages for Swift](https://www.braze.com/docs/developer_guide/in_app_messages/?sdktab=swift#swift_enabling-in-app-messages).
## Customizing message styling using key-value pairs for Swift
**Important:**
We're piloting this new tutorial format. [Tell us what you think](https://docs.google.com/forms/d/e/1FAIpQLSe_5uhWM7eXXk9F_gviO_pvA4rkYO3WA9B6tNJZ3TY91md5bw/viewform?usp=pp_url&entry.569173304=General+Feedback) — your feedback helps us improve future guides.
```swift file=AppDelegate.swift
import UIKit
import BrazeKit
import BrazeUI
class AppDelegate: UIResponder, UIApplicationDelegate, BrazeInAppMessageUIDelegate {
var window: UIWindow?
static var braze: Braze?
func application(
_ application: UIApplication,
didFinishLaunchingWithOptions launchOptions: [UIApplication.LaunchOptionsKey: Any]?
) -> Bool {
let configuration = Braze.Configuration(
apiKey: "YOUR-API-KEY",
endpoint: "YOUR-ENDPOINT"
)
configuration.logger.level = .debug
let braze = Braze(configuration: configuration)
AppDelegate.braze = braze
// Set up Braze In-App Message UI and delegate
let inAppMessageUI = BrazeInAppMessageUI()
inAppMessageUI.delegate = self
brazeInstance.inAppMessagePresenter = inAppMessageUI
return true
}
func inAppMessage(
_ ui: BrazeInAppMessageUI,
prepareWith context: inout BrazeInAppMessageUI.PresentationContext
) {
let customization = context.message.extras["customization"] as? String
if customization == "slideup-attributes" {
// Create a new attributes object and make customizations.
var attributes = context.attributes?.slideup
attributes?.font = UIFont(name: "Chalkduster", size: 17)!
attributes?.imageSize = CGSize(width: 65, height: 65)
attributes?.cornerRadius = 20
attributes?.imageCornerRadius = 10
if #available(iOS 13.0, *) {
attributes?.cornerCurve = .continuous
attributes?.imageCornerCurve = .continuous
}
context.attributes?.slideup = attributes
}
}
}
```
```swift file=SampleApp.swift
import SwiftUI
@main
struct SampleApp: App {
@UIApplicationDelegateAdaptor(AppDelegate.self) var appDelegate
var body: some Scene {
WindowGroup {
YourView()
}
}
}
```
!!step
lines-AppDelegate.swift=5
#### 1. Implement `BrazeInAppMessageUIDelegate`
In your `AppDelegate` class, implement [`BrazeInAppMessageUIDelegate`](https://braze-inc.github.io/braze-swift-sdk/documentation/brazeui/brazeinappmessageui/delegate) so you can override its `inAppMessage` method later.
!!step
lines-AppDelegate.swift=17
#### 2. Enable debugging (optional)
To make troubleshooting easier while developing, consider enabling debugging.
!!step
lines-AppDelegate.swift=30-50
#### 3. Prepare messages before they're displayed
Braze calls `inAppMessage(_:prepareWith:)` during message preparation. Use it to customize styling or apply logic based on key-value pairs.
!!step
lines-AppDelegate.swift=34
#### 4. Access key-value pairs from `message.extras`
Use `message.extras` to access customization types, styling attributes, or any other values defined in the dashboard.
!!step
lines-AppDelegate.swift=38-46
#### 5. Update the message's styling attributes
Use [`inAppMessage(_:prepareWith:)`](https://braze-inc.github.io/braze-swift-sdk/documentation/brazeui/brazeinappmessageuidelegate/inappmessage(_:preparewith:)-11fog) to access the `PresentationContext` so you can modify styling attributes directly. Each in-app message type exposes different attributes.
# Tutorial: Deferring and restoring triggered messages
Source: /docs/developer_guide/in_app_messages/tutorials/deferring_triggered_messages/index.md
# Tutorial: Deferring and restoring triggered messages
> Follow along with the sample code in this tutorial to defer and restore triggered in-app messages using the Braze SDK.
## Prerequisites
Before you can use this feature, you'll need to [integrate the Web Braze SDK](https://www.braze.com/docs/developer_guide/sdk_integration/?sdktab=web). However, no additional setup is required.
## Deferring and restoring triggered messages for Web
**Important:**
We're piloting this new tutorial format. [Tell us what you think](https://docs.google.com/forms/d/e/1FAIpQLSe_5uhWM7eXXk9F_gviO_pvA4rkYO3WA9B6tNJZ3TY91md5bw/viewform?usp=pp_url&entry.569173304=General+Feedback) — your feedback helps us improve future guides.
```js file=index.js
import * as braze from "@braze/web-sdk";
// Remove any calls to `braze.automaticallyShowInAppMessages()`
braze.initialize("YOUR-API-KEY", {
baseUrl: "YOUR-ENDPOINT",
enableLogging: true,
});
braze.subscribeToInAppMessage(function (message) {
const shouldDefer = true; // customize for your own logic
if (shouldDefer) {
braze.deferInAppMessage(message);
} else {
braze.showInAppMessage(message);
}
});
// elsewhere in your app
document.getElementById("button").onclick = function () {
const deferredMessage = braze.getDeferredInAppMessage();
if (deferredMessage) {
braze.showInAppMessage(deferredMessage);
}
};
```
!!step
lines-index.js=2
#### 1. Remove calls to `automaticallyShowInAppMessages()`
Remove any calls to [`automaticallyShowInAppMessages()`](https://js.appboycdn.com/web-sdk/latest/doc/modules/braze.html#automaticallyshowinappmessages) , as they’ll override any custom logic you implement later.
!!step
lines-index.js=6
#### 2. Enable debugging (optional)
To make troubleshooting easier while developing, consider enabling debugging.
!!step
lines-index.js=9-16
#### 3. Subscribe to the in-app message callback handler
Register a callback with [`subscribeToInAppMessage(callback)`](https://js.appboycdn.com/web-sdk/latest/doc/modules/braze.html#subscribetoinappmessage) to receive a message any time an in-app message is triggered.
!!step
lines-index.js=11-12
#### 4. Defer the `message` instance
To defer the message, call [`deferInAppMessage(message)`](https://js.appboycdn.com/web-sdk/latest/doc/modules/braze.html#deferinappmessage). Braze will serialize and save this message so you can display it on a future page load.
!!step
lines-index.js=18-24
#### 5. Retrieve a previously deferred message
To retrieve any previously-deferred messages, call [`getDeferredInAppMessage()`](https://js.appboycdn.com/web-sdk/latest/doc/modules/braze.html#getdeferredinappmessage).
!!step
lines-index.js=21-23
#### 6. Display the deferred message
After retrieving a deferred message, display it by passing it to [`showInAppMessage(message)`](https://js.appboycdn.com/web-sdk/latest/doc/modules/braze.html#showinappmessage).
!!step
lines-index.js=13-15
#### 7. Display a message immediately
To show a message instead of deferring it, call [`showInAppMessage(message)`](https://js.appboycdn.com/web-sdk/latest/doc/modules/braze.html#showinappmessage) directly in your `subscribeToInAppMessage` callback.
## Prerequisites
Before you can use this feature, you'll need to [integrate the Android Braze SDK](https://www.braze.com/docs/developer_guide/sdk_integration/?sdktab=android). You'll also need to [enable in-app messages for Android](https://www.braze.com/docs/developer_guide/in_app_messages/?sdktab=android#android_enabling-in-app-messages).
## Deferring and restoring triggered messages for Android
**Important:**
We're piloting this new tutorial format. [Tell us what you think](https://docs.google.com/forms/d/e/1FAIpQLSe_5uhWM7eXXk9F_gviO_pvA4rkYO3WA9B6tNJZ3TY91md5bw/viewform?usp=pp_url&entry.569173304=General+Feedback) — your feedback helps us improve future guides.
```kotlin file=MainApplication.kt
import android.app.Application
import com.braze.Braze
import com.braze.support.BrazeLogger
import com.braze.configuration.BrazeConfig
import com.braze.ui.inappmessage.BrazeInAppMessageManager
import com.braze.BrazeActivityLifecycleCallbackListener
import com.braze.ui.inappmessage.listeners.IInAppMessageManagerListener
import com.braze.models.inappmessage.IInAppMessage
import com.braze.ui.inappmessage.InAppMessageOperation
import android.util.Log
class MyApplication : Application() {
companion object {
private var instance: MyApplication? = null
fun getInstance(): MyApplication = instance!!
}
private var showMessage = false
override fun onCreate() {
super.onCreate()
instance = this
// Enable verbose Braze SDK logs
BrazeLogger.logLevel = Log.VERBOSE
// Initialize Braze
val brazeConfig = BrazeConfig.Builder()
.setApiKey("YOUR-API-KEY")
.setCustomEndpoint("YOUR-ENDPOINT")
.build()
Braze.configure(this, brazeConfig)
registerActivityLifecycleCallbacks(
BrazeActivityLifecycleCallbackListener()
)
// Set up in-app message listener
BrazeInAppMessageManager.getInstance().setCustomInAppMessageManagerListener(object : IInAppMessageManagerListener {
override fun beforeInAppMessageDisplayed(inAppMessage: IInAppMessage): InAppMessageOperation {
return if (showMessage) {
// Show the message using Braze's UI
InAppMessageOperation.DISPLAY_NOW
} else {
// Re-enqueue the message for later
InAppMessageOperation.DISPLAY_LATER
}
}
})
}
fun showDeferredMessage(show: Boolean) {
showMessage = show
BrazeInAppMessageManager.getInstance().requestDisplayInAppMessage()
}
}
```
```kotlin file=MainActivity.kt
import android.os.Bundle
import androidx.activity.ComponentActivity
import androidx.activity.compose.setContent
import androidx.compose.foundation.layout.*
import androidx.compose.material.Button
import androidx.compose.material.Text
import androidx.compose.runtime.Composable
import androidx.compose.ui.Modifier
import androidx.compose.ui.unit.dp
class MainActivity : ComponentActivity() {
override fun onCreate(savedInstanceState: Bundle?) {
super.onCreate(savedInstanceState)
setContent {
ContentView()
}
}
}
@Composable
fun ContentView() {
Column(
modifier = Modifier.padding(16.dp),
verticalArrangement = Arrangement.spacedBy(20.dp)
) {
// ... your UI
Button(onClick = {
MyApplication.getInstance().showDeferredMessage(true)
}) {
Text("Show Deferred IAM")
}
}
}
```
!!step
lines-MainApplication.kt=13-16
#### 1. Create a singleton `Application` instance
Use a companion object to expose your `Application` class as a singleton so it can be accessed later in your code.
!!step
lines-MainApplication.kt=25
#### 2. Enable debugging (optional)
To make troubleshooting easier while developing, consider enabling debugging.
!!step
lines-MainApplication.kt=34-36
#### 3. Register activity lifecycle callbacks
Register Braze’s default listener to handle the in-app message lifecycle.
!!step
lines-MainApplication.kt=39-49
#### 4. Set up an in-app message listener
Use `BrazeInAppMessageManager` to set a custom listener that intercepts messages before they’re displayed.
!!step
lines-MainApplication.kt=43,46
#### 5. Create conditional logic
Use the `showMessage` flag to control timing—return `DISPLAY_NOW` to display the message now or `DISPLAY_LATER` to defer it.
!!step
lines-MainApplication.kt=52-55
#### 6. Create a method for displaying deferred messages
Use `showDeferredMessage` to trigger the next in-app message. When `showMessage` is `true`, the listener will return `DISPLAY_NOW`.
!!step
lines-MainActivity.kt=29
#### 7. Trigger the method from your UI
To display the previously-deferred message, call `showDeferredMessage(true)` from your UI, such as a button or tap.
## Prerequisites
Before you can use this feature, you'll need to [integrate the Swift Braze SDK](https://www.braze.com/docs/developer_guide/sdk_integration/?sdktab=swift). You'll also need to [enable in-app messages for Swift](https://www.braze.com/docs/developer_guide/in_app_messages/?sdktab=swift#swift_enabling-in-app-messages).
## Deferring and restoring triggered messages for Swift
**Important:**
We're piloting this new tutorial format. [Tell us what you think](https://docs.google.com/forms/d/e/1FAIpQLSe_5uhWM7eXXk9F_gviO_pvA4rkYO3WA9B6tNJZ3TY91md5bw/viewform?usp=pp_url&entry.569173304=General+Feedback) — your feedback helps us improve future guides.
```swift file=AppDelegate.swift
import SwiftUI
import BrazeKit
import BrazeUI
class AppDelegate: UIResponder, UIApplicationDelegate, BrazeInAppMessageUIDelegate {
static private(set) var shared: AppDelegate!
private var braze: Braze!
public var showMessage: Bool = false
func application(
_ application: UIApplication,
didFinishLaunchingWithOptions launchOptions: [UIApplication.LaunchOptionsKey: Any]?
) -> Bool {
AppDelegate.shared = self
// 1. Braze configuration with your SDK API key and endpoint
let configuration = Braze.Configuration(apiKey: "a1fc095b-ae3d-40f4-bb33-3fb5176562c0", endpoint: "sondheim.braze.com")
configuration.logger.level = .debug
// 2. Initialize Braze SDK instance
braze = Braze(configuration: configuration)
// 3. Set up Braze In-App Message UI and delegate
let ui = BrazeInAppMessageUI()
ui.delegate = self
braze.inAppMessagePresenter = ui
return true
}
func inAppMessage(
_ ui: BrazeInAppMessageUI,
displayChoiceForMessage message: Braze.InAppMessage
) -> BrazeInAppMessageUI.DisplayChoice {
if !showMessage {
return .reenqueue
}
return .now
}
func showDeferredMessage(showMessage: Bool) {
self.showMessage = showMessage
(braze.inAppMessagePresenter as? BrazeInAppMessageUI)?.presentNext()
}
}
```
```swift file=SampleApp.swift
import SwiftUI
@main
struct IAMDeferApp: App {
@UIApplicationDelegateAdaptor(AppDelegate.self) var delegate
var body: some Scene {
WindowGroup {
ContentView()
}
}
}
```
```swift file=ContentView.swift
import SwiftUI
struct ContentView: View {
var body: some View {
VStack(spacing: 20) {
// ...your UI
Button("Show Deferred IAM") {
AppDelegate.shared.showDeferredMessage(showMessage: true)
}
}
.padding()
}
}
```
!!step
lines-AppDelegate.swift=5
#### 1. Implement the `BrazeInAppMessageUIDelegate`
In your `AppDelegate` class, implement the [`BrazeInAppMessageUIDelegate`](https://braze-inc.github.io/braze-swift-sdk/documentation/brazeui/brazeinappmessageuidelegate) so you can override its `inAppMessage` method later.
!!step
lines-AppDelegate.swift=19
#### 2. Enable debugging (optional)
To make troubleshooting easier while developing, consider enabling debugging.
!!step
lines-AppDelegate.swift=25-27
#### 3. Set up your Braze UI and delegate
`BrazeInAppMessageUI()` renders in-app messages by default. By assigning `self` as its delegate, you can intercept and handle messages before they're displayed. Be sure to save the instance, as you'll need it later to restore deferred messages.
!!step
lines-AppDelegate.swift=32-41
#### 4. Override `DisplayChoice` with conditional logic
Override [`inAppMessage(_:displayChoiceForMessage:)`](https://braze-inc.github.io/braze-swift-sdk/documentation/brazeui/brazeinappmessageuidelegate/inappmessage(_:displaychoiceformessage:)-9w1nb) to determine when a message should be displayed. Return `.now` to show it immediately, or `.reenqueue` to defer it for later.
!!step
lines-AppDelegate.swift=43-46
#### 5. Create a method to show deferred messages
Create a method that calls `showDeferredMessage(true)` to display the next deferred message in the stack. When called, `showMessage` is set to `true`, making the delegate return `.now`.
!!step
lines-ContentView.swift=1-14
#### 5. Trigger the method from your UI
To display the previously-deferred message, call `showDeferredMessage(true)` from your UI, such as a button or tap.
# Troubleshoot in-app messages for the Braze SDK
Source: /docs/developer_guide/in_app_messages/troubleshooting/index.md
# Troubleshooting
> Need help troubleshooting in-app messages for the Braze SDK? Start here!
## Basic Checks
### My in-app message wasn't shown for one user
1. Was the user in the segment at session start, when the SDK requests new in-app messages?
2. Was the user eligible or re-eligible to receive the in-app message per campaign targeting rules?
3. Was the user affected by a frequency cap?
4. Was the user in a control group? Check whether your campaign is configured is configured for AB Testing.
5. Was a different, higher priority in-app message displayed in place of the expected message?
6. Was my device in the correct orientation specified by the campaign?
7. Was my message suppressed by the default 30-second minimum time interval between triggers, enforced by the SDK?
### My in-app message wasn't shown to all users on this platform
1. Is your campaign configured to target either Mobile Apps or Web Browsers as appropriate? As an example, if your campaign only targets Web Browsers, it will not send to Android devices.
2. Did you implement a custom UI, and is it working as intended? Is there other app-side custom handling or suppression that could be interfering with display?
3. Has this particular platform and app version ever shown in-app messages successfully?
4. Did the trigger take place locally on the device? Note that a REST call can't be used to trigger an in-app message in the SDK.
### My in-app message wasn't shown for all users
1. Was the Trigger Action set up properly in the dashboard, as well as in the app integration?
2. Was a different, higher priority in-app message displayed in place of the expected message?
3. Are you on a recent version of the SDK? Some in-app message types have SDK version requirements.
4. Have sessions been integrated properly in your integration? Are session analytics working for this app?
### My in-app message took a lot of time to appear
1. If you are serving large image or video files from your CDN to an HTML based in-app message, verify that your files are optimized to be as small as possible and that your CDN is performant.
2. Verify whether you have configured a `delay` for your in-app message on the dashboard.
For more in-depth discussion of these scenarios, visit the advanced troubleshooting section.
## Issues with Impressions and Click Analytics
### Impressions are lower than expected
1. Triggers take time to sync to the device on session start, so there can be a race condition if users log an event or purchase right after they start a session. One potential workaround could be changing the campaign to trigger off of session start, then segmenting off the intended event or purchase. Note that this would deliver the in-app message on the next session start after the event has occurred.
2. If the campaign is triggered by a session start or a custom event, you want to ensure that this event or session is happening frequently enough to trigger the message. Check this data on the [Overview](https://www.braze.com/docs/user_guide/data_and_analytics/analytics/understanding_your_app_usage_data/#understanding-your-app-usage-data) (for session data) or [Custom Events](https://www.braze.com/docs/user_guide/data_and_analytics/configuring_reporting/#configuring-reporting) pages:

### Impressions are lower than they used to be
1. Ensure no one unintentionally altered the segment or campaign since launch. Our segment and campaign changelogs will give you insight into changes that have been made, who made the change, and when it happened.

2. Ensure you didn't reuse your trigger event in a separate in-app message campaign with a higher priority.
## Advanced Troubleshooting {#troubleshooting-in-app-advanced}
Most in-app message issues can be broken down into two main categories: delivery and display. To troubleshoot why an expected in-app message did not display on your device, confirm that the in-app message was delivered to the device, then troubleshoot message display.
### Troubleshooting delivery {#troubleshooting-in-app-message-delivery}
The SDK requests in-app messages from Braze servers on session start. To check if in-app messages are being delivered to your device, you'll need to make sure that in-app messages are being both requested by the SDK and returned by Braze servers.
#### Check if messages are requested and returned
1. Add yourself as a [test user](https://www.braze.com/docs/user_guide/administrative/app_settings/developer_console/internal_groups_tab/#adding-test-users) on the dashboard.
2. Set up an in-app message campaign targeted at your user.
3. Ensure that a new session occurs in your application.
4. Use the [event user logs](https://www.braze.com/docs/user_guide/administrative/app_settings/developer_console/event_user_log_tab/#event-user-log-tab) to check that your device is requesting in-app messages on session start. Find the SDK Request associated with your test user's session start event.
- If your app was meant to request triggered in-app messages, you should see `trigger` in the **Requested Responses** field under **Response Data**.
- If your app was meant to request original in-app messages, you should see `in_app` in the **Requested Responses** field under **Response Data**.
5. Use the [event user logs](https://www.braze.com/docs/user_guide/administrative/app_settings/developer_console/event_user_log_tab/#event-user-log-tab) to check if the correct in-app messages are being returned in the response data. 
##### Troubleshoot messages not being requested
If your in-app messages are not being requested, your app might not be tracking sessions correctly, as in-app messages are refreshed upon session start. Also, be sure that your app is actually starting a session based on your app's session timeout semantics:

##### Troubleshoot messages not being returned
If your in-app messages are not being returned, you're likely experiencing a campaign targeting issue:
1. Your segment does not contain your user.
- Check your user's [**Engagement**](https://www.braze.com/docs/user_guide/engagement_tools/segments/using_user_search/#engagement-tab) tab to see if the correct segment appears under **Segments**.
2. Your user has previously received the in-app message and was not re-eligible to receive it again.
- Check the [campaign re-eligibility settings](https://www.braze.com/docs/user_guide/engagement_tools/campaigns/building_campaigns/delivery_types/reeligibility/) under the **Delivery** step of the **Campaign Composer** and make sure the re-eligibility settings align with your testing setup.
3. Your user hit the frequency cap for the campaign.
- Check the campaign [frequency cap settings](https://www.braze.com/docs/user_guide/engagement_tools/campaigns/building_campaigns/rate-limiting/#frequency-capping) and ensure they align with your testing setup.
4. If there was a control group on the campaign, your user may have fallen into the control group.
- You can check if this has happened by creating a segment with a received campaign variant filter, where the campaign variant is set to **Control**, and checking if your user fell into that segment.
- When creating campaigns for integration testing purposes, make sure to opt out of adding a control group.
### Troubleshooting display {#troubleshooting-in-app-message-display}
If your app is successfully requesting and receiving in-app messages, but they are not being shown, device-side logic may be preventing display:
1. Is the trigger event firing as expected? To test for this, try configuring the message to trigger using a different action (like session start) and verify whether it displays.
3. Failed image downloads will prevent in-app messages with images from displaying. Check your device logs to ensure that image downloads are not failing. Try removing your image temporarily from your message to see if that causes it to display.
7. If your in-app message is triggered by session start and you've set an extended session timeout, this will affect how quickly you can show messages. For instance, if your session timeout is set to 300 seconds, closing and re-opening the app in less than that time will not refresh the session, so an in-app message triggered by a session start will not display.
### Troubleshooting asset loading (`NSURLError` code `-1008`)
When integrating Braze alongside third-party network logging libraries, developers can commonly run into an `NSURLError` with the domain code `-1008`. This error indicates that assets like images and fonts could not be retrieved or failed to cache. To work around such cases, you will need to register Braze CDN URLs to the list of domains that should be ignored by these libraries.
#### Domains
The full list of CDN domains is as listed below:
* `"appboy-images.com"`
* `"braze-images.com"`
* `"cdn.braze.eu"`
* `"cdn.braze.com"`
#### Examples
Below are libraries that are known to conflict with Braze asset caching, along with example code to work around the issue. If your project uses a library that causes an unavailable resource error and is not listed below, consult the documentation of that library for similar usage APIs.
##### Netfox
```swift
NFX.sharedInstance().ignoreURLs(["https://cdn.braze.com"])
```
```objc
[NFX.sharedInstance ignoreURLs:@[@"https://cdn.braze.com"]];
```
##### NetGuard
```swift
NetGuard.blackListHosts.append(contentsOf: ["cdn.braze.com"])
```
```objc
NSMutableArray *blackListHosts = [NetGuard.blackListHosts mutableCopy];
[blackListHosts addObject:@"cdn.braze.com"];
NetGuard.blackListHosts = blackListHosts;
```
##### XNLogger
```swift
let brazeAssetsHostFilter = XNHostFilter(host: "https://cdn.braze.com")
XNLogger.shared.addFilters([brazeAssetsHostFilter])
```
```objc
XNHostFilter *brazeAssetsHostFilter = [[XNHostFilter alloc] initWithHost: @"https://cdn.braze.com"];
[XNLogger.shared addFilters:@[brazeAssetsHostFilter]];
```
# Push notifications for the Braze SDK
Source: /docs/developer_guide/push_notifications/index.md
# Push notifications
> [Push notifications](https://www.braze.com/docs/user_guide/message_building_by_channel/push/about/) allow you to send out notifications from your app when important events occur. You might send a push notification when you have new instant messages to deliver, breaking news alerts to send, or the latest episode of your user's favorite TV show ready for them to download for offline viewing. They are also more efficient than background fetch, as your application only launches when necessary.
**Note:**
This guide uses code samples from the Braze Web SDK 4.0.0+. To upgrade to the latest Web SDK version, see [SDK Upgrade Guide](https://github.com/braze-inc/braze-web-sdk/blob/master/UPGRADE_GUIDE.md).
## Prerequisites
Before you can use this feature, you'll need to [integrate the Web Braze SDK](https://www.braze.com/docs/developer_guide/sdk_integration/?sdktab=web).
## Push protocols
Web push notifications are implemented using the [W3C push standard](http://www.w3.org/TR/push-api/), which most major browsers support. For more information on specific push protocol standards and browser support, you can review resources from [Apple](https://developer.apple.com/notifications/safari-push-notifications/) [Mozilla](https://developer.mozilla.org/en-us/docs/web/api/push_api#browser_compatibility) and [Microsoft](https://developer.microsoft.com/en-us/microsoft-edge/status/pushapi/).
## Setting up push notifications
### Step 1: Configure your service worker
In your project's `service-worker.js` file, add the following snippet and set the [`manageServiceWorkerExternally`](https://js.appboycdn.com/web-sdk/latest/doc/modules/braze.html#initialize) initialization option to `true` when initializing the Web SDK.
**Important:**
Your web server must return a `Content-Type: application/javascript` when serving your service worker file. Additionally, if your service worker file is not `service-worker.js` named, you'll need to use the `serviceWorkerLocation` [initialization option](https://js.appboycdn.com/web-sdk/latest/doc/modules/braze.html#initializationoptions).
### Step 2: Register the browser
To immediately request push permissions from a user so their browser can receive push notifications, call `braze.requestPushPermission()`. To test if push is supported in their browser first, call `braze.isPushSupported()`.
You can also [send a soft push prompt](https://www.braze.com/docs/developer_guide/push_notifications/soft_push_prompts/?sdktab=web) to the user before requesting push permission to show your own push-related UI.
**Important:**
On macOS, both **Google Chrome** and **Google Chrome Helper (Alerts)** must be enabled by the end-user in **System Settings > Notifications** before push notifications can be displayed—even if permissions are granted.
### Step 3: Disable `skipWaiting` (optional)
The Braze service worker file will automatically call `skipWaiting` upon install. If you'd like to disable this functionality, add the following code to your service worker file, after importing Braze:
## Unsubscribing a user
To unsubscribe a user, call `braze.unregisterPush()`.
**Important:**
Recent versions of Safari and Firefox require that you call this method from a short-lived event handler (such as from a button-click handler or soft push prompt). This is consistent with [Chrome's user experience best practices](https://docs.google.com/document/d/1WNPIS_2F0eyDm5SS2E6LZ_75tk6XtBSnR1xNjWJ_DPE) for push registration.
## Alternate domains
To integrate web push, your domain must be [secure](https://w3c.github.io/webappsec-secure-contexts/), which generally means `https`, `localhost`, and other exceptions as defined in the [W3C push standard](https://www.w3.org/TR/service-workers/#security-considerations). You'll also need to be able to register a Service Worker at the root of your domain, or at least be able to control the HTTP headers for that file. This article covers how to integrate Braze Web Push on an alternate domain.
### Use cases
If you can't meet all of the criteria outlined in the [W3C push standard](https://www.w3.org/TR/service-workers/#security-considerations), you can use this method to add a push prompt dialog to your website instead. This can be helpful if you want to let your users opt-in from an `http` website or a browser extension popup that's preventing your push prompt from displaying.
### Considerations
Keep in mind, like many workarounds on the web, browsers continually evolve, and this method may not be viable in the future. Before continuing, ensure that:
- You own a separate secure domain (`https://`) and permissions to register a Service Worker on that domain.
- Users are logged in to your website which ensures push tokens are match to the correct profile.
**Important:**
You cannot use this method to implement push notifications for Shopify. Shopify will automatically remove the headers need to deliver push this way.
### Setting up an alternate push domain
To make the following example clear, we'll use use `http://insecure.com` and `https://secure.com` as our two domains with the goal of getting visitors to register for push on `http://insecure.com`. This example could also be applied to a `chrome-extension://` scheme for a browser extension's popup page.
#### Step 1: Initiate prompting flow
On `insecure.com`, open a new window to your secure domain using a URL parameter to pass the currently logged-in user's Braze external ID.
**http://insecure.com**
```html
```
#### Step 2: Register for push
At this point, `secure.com` will open a popup window in which you can initialize the Braze Web SDK for the same user ID and request the user's permission for Web push.
**https://secure.com/push-registration.html**
#### Step 3: Communicate between domains (optional)
Now that users can opt-in from this workflow originating on `insecure.com`, you may want to modify your site based on if the user is already opted-in or not. There's no point in asking the user to register for push if they already are.
You can use iFrames and the [`postMessage`](https://developer.mozilla.org/en-US/docs/Web/API/Window/postMessage) API to communicate between your two domains.
**insecure.com**
On our `insecure.com` domain, we will ask the secure domain (where push is _actually_ registered) for information on the current user's push registration:
```html
```
**secure.com/push-status.html**
## Frequently Asked Questions (FAQ)
### Service workers
#### What if I can't register a service worker in the root directory?
By default, a service worker can only be used within the same directory it is registered in. For example, if your service worker file exists in `/assets/service-worker.js`, it would only be possible to register it within `example.com/assets/*` or a subdirectory of the `assets` folder, but not on your homepage (`example.com/`). For this reason, it is recommended to host and register the service worker in the root directory (such as `https://example.com/service-worker.js`).
If you cannot register a service worker in your root domain, an alternative approach is to use the [`Service-Worker-Allowed`](https://w3c.github.io/ServiceWorker/#service-worker-script-response) HTTP header when serving your service worker file. By configuring your server to return `Service-Worker-Allowed: /` in the response for the service worker, this will instruct the browser to broaden the scope and allow it to be used from within a different directory.
#### Can I create a service worker using a Tag Manager?
No, service workers must be hosted on your website's server and can't be loaded via Tag Manager.
### Site security
#### Is HTTPS required?
Yes. Web standards require that the domain requesting push notification permission be secure.
#### When is a site considered "secure"?
A site is considered secure if it matches one of the following secure-origin patterns. Braze Web push notifications are built on this open standard, so man-in-the-middle attacks are prevented.
- `(https, , *)`
- `(wss, *, *)`
- `(, localhost, )`
- `(, .localhost, *)`
- `(, 127/8, )`
- `(, ::1/128, *)`
- `(file, *, —)`
- `(chrome-extension, *, —)`
#### What if a secure site is not available?
While industry best practice is to make your whole site secure, customers who cannot secure their site domain can work around the requirement by using a secure modal. Read more in our guide to using [Alternate push domain](https://www.braze.com/docs/developer_guide/platform_integration_guides/web/push_notifications/alternate_push_domain) or view a [working demo](http://appboyj.com/modal-test.html).
## Prerequisites
Before you can use this feature, you'll need to [integrate the Android Braze SDK](https://www.braze.com/docs/developer_guide/sdk_integration/?sdktab=android).
## Built-in features
The following features are built into the Braze Android SDK. To use any other push notification features, you will need to [set up push notifications](#android_setting-up-push-notifications) for your app.
|Feature|Description|
|-------|-----------|
|Push Stories|Android Push Stories are built into the Braze Android SDK by default. To learn more, see [Push Stories](https://www.braze.com/docs/user_guide/message_building_by_channel/push/advanced_push_options/push_stories/).|
|Push Primers|Push primer campaigns encourage your users to enable push notifications on their device for your app. This can be done without SDK customization using our [no code push primer](https://www.braze.com/docs/user_guide/message_building_by_channel/push/best_practices/push_primer_messages/).|
{: .reset-td-br-1 .reset-td-br-2 role="presentation"}
## About the push notification lifecycle {#push-notification-lifecycle}
The following flowchart shows how Braze handles the push notification lifecycle, such as permission prompts, token generation, and message delivery.
```mermaid
---
config:
theme: neutral
---
flowchart TD
%% Permission flow
subgraph Permission[Push Permissions]
B{Android version of the device?}
B -->|Android 13+| C["requestPushPermissionPrompt() called"]
B -->|Android 12 and earlier| D[No permissions required]
%% Connect Android 12 path to Braze state
D --> H3[Braze: user subscription state]
H3 --> J3[Defaults to 'subscribed' when user profile created]
C --> E{Did the user grant push permission?}
E -->|Yes| F[POST_NOTIFICATIONS permission granted]
E -->|No| G[POST_NOTIFICATIONS permission denied]
%% Braze subscription state updates
F --> H1[Braze: user subscription state]
G --> H2[Braze: user subscription state]
H1 --> I1{Automatically opt in after permission granted?}
I1 -->|true| J1[Set to 'opted-in']
I1 -->|false| J2[Remains 'subscribed']
H2 --> K1[Remains 'subscribed' or 'unsubscribed']
%% Subscription state legend
subgraph BrazeStates[Braze subscription states]
L1['Subscribed' - default state when user profile created]
L2['Opted-in' - user explicitly wants push notifications]
L3['Unsubscribed' - user explicitly opted out of push]
end
%% Note about user-level states
note1[Note: These states are user-level and apply across all devices for the user]
%% Connect states to legend
J1 -.-> L2
J2 -.-> L1
J3 -.-> L1
K1 -.-> L3
note1 -.-> BrazeStates
end
%% Styling
classDef permissionClass fill:#e3f2fd,stroke:#1565c0,stroke-width:2px
classDef tokenClass fill:#e8f5e9,stroke:#2e7d32,stroke-width:2px
classDef sdkClass fill:#fff3e0,stroke:#e65100,stroke-width:2px
classDef configClass fill:#f3e5f5,stroke:#7b1fa2,stroke-width:2px
classDef displayClass fill:#ffebee,stroke:#c62828,stroke-width:2px
classDef deliveryClass fill:#fce4ec,stroke:#c2185b,stroke-width:2px
classDef brazeClass fill:#e8f5e9,stroke:#2e7d32,stroke-width:3px
class A,B,C,E,F,G permissionClass
class H,I tokenClass
class J,K sdkClass
class N,O,P configClass
class R,S,S1,T,U,V displayClass
class W,X,X1,X2,Y,Z deliveryClass
class H1,H2,H3,I1,J1,J2,J3,K1,L1,L2,L3,note1 brazeClass
```
```mermaid
---
config:
theme: neutral
---
flowchart TD
%% Token generation flow
subgraph Token[Token Generation]
H["Braze SDK initialized"] --> Q{Is FCM auto-registration enabled?}
Q -->|Yes| L{Is required configuration present?}
Q -->|No| M[No FCM token generated]
L -->|Yes| I[Generate FCM token]
L -->|No| M
I --> K[Register token with Braze]
%% Configuration requirements
subgraph Config[Required configuration]
N['google-services.json' file is present]
O['com.google.firebase:firebase-messaging' in gradle]
P['com.google.gms.google-services' plugin in gradle]
end
%% Connect config to check
N -.-> L
O -.-> L
P -.-> L
end
%% Styling
classDef permissionClass fill:#e3f2fd,stroke:#1565c0,stroke-width:2px
classDef tokenClass fill:#e8f5e9,stroke:#2e7d32,stroke-width:2px
classDef sdkClass fill:#fff3e0,stroke:#e65100,stroke-width:2px
classDef configClass fill:#f3e5f5,stroke:#7b1fa2,stroke-width:2px
classDef displayClass fill:#ffebee,stroke:#c62828,stroke-width:2px
classDef deliveryClass fill:#fce4ec,stroke:#c2185b,stroke-width:2px
classDef brazeClass fill:#e8f5e9,stroke:#2e7d32,stroke-width:3px
class A,B,C,E,F,G permissionClass
class H,I tokenClass
class J,K sdkClass
class N,O,P configClass
class R,S,S1,T,U,V displayClass
class W,X,X1,X2,Y,Z deliveryClass
class H1,H2,H3,I1,J1,J2,J3,K1,L1,L2,L3,note1 brazeClass
```
```mermaid
---
config:
theme: neutral
fontSize: 10
---
flowchart TD
subgraph Display[Push Display]
%% Push delivery flow
W[Push sent to FCM servers] --> X{Did FCM receive push?}
X -->|App is terminated| Y[FCM cannot deliver push to the app]
X -->|Delivery conditions met| X1[App receives push from FCM]
X1 --> X2[Braze SDK receives push]
X2 --> R[Push type?]
%% Push Display Flow
R -->|Standard push| S{Is push permission required?}
R -->|Silent push| T[Braze SDK processes silent push]
S -->|Yes| S1{Did the user grant push permission?}
S -->|No| V[Notification is shown to the user]
S1 -->|Yes| V
S1 -->|No| U[Notification is not shown to the user]
end
%% Styling
classDef permissionClass fill:#e3f2fd,stroke:#1565c0,stroke-width:2px
classDef tokenClass fill:#e8f5e9,stroke:#2e7d32,stroke-width:2px
classDef sdkClass fill:#fff3e0,stroke:#e65100,stroke-width:2px
classDef configClass fill:#f3e5f5,stroke:#7b1fa2,stroke-width:2px
classDef displayClass fill:#ffebee,stroke:#c62828,stroke-width:2px
classDef deliveryClass fill:#fce4ec,stroke:#c2185b,stroke-width:2px
classDef brazeClass fill:#e8f5e9,stroke:#2e7d32,stroke-width:3px
class A,B,C,E,F,G permissionClass
class H,I tokenClass
class J,K sdkClass
class N,O,P configClass
class R,S,S1,T,U,V displayClass
class W,X,X1,X2,Y,Z deliveryClass
class H1,H2,H3,I1,J1,J2,J3,K1,L1,L2,L3,note1 brazeClass
```
## Setting up push notifications
**Tip:**
To check out a sample app using FCM with the Braze Android SDK, see [Braze: Firebase Push Sample App](https://github.com/braze-inc/braze-android-sdk/tree/master/samples/firebase-push).
### Rate limits
Firebase Cloud Messaging (FCM) API has a default rate limit of 600,000 requests per minute. If you reach this limit, Braze will automatically try again in a few minutes. To request an increase, contact [Firebase Support](https://firebase.google.com/support).
### Step 1: Add Firebase to your project
First, add Firebase to your Android project. For step-by-step instructions, see Google's [Firebase setup guide](https://firebase.google.com/docs/android/setup).
### Step 2: Add Cloud Messaging to your dependencies
Next, add the Cloud Messaging library to your project dependencies. In your Android project, open `build.gradle`, then add the following line to your `dependencies` block.
```gradle
implementation "google.firebase:firebase-messaging:+"
```
Your dependencies should look similar to the following:
```gradle
dependencies {
implementation project(':android-sdk-ui')
implementation "com.google.firebase:firebase-messaging:+"
}
```
### Step 3: Enable the Firebase Cloud Messaging API
In Google Cloud, select the project your Android app is using, then enable the [Firebase Cloud Messaging API](https://console.cloud.google.com/apis/library/fcm.googleapis.com).
{: style="max-width:80%;"}
### Step 4: Create a service account {#service-account}
Next, create a new service account, so Braze can make authorized API calls when registering FCM tokens. In Google Cloud, go to **Service Accounts**, then choose your project. On the **Service Accounts** page, select **Create Service Account**.

Enter a service account name, ID, and description, then select **Create and continue**.

In the **Role** field, find and select **Firebase Cloud Messaging API Admin** from the list of roles. For more restrictive access, create a [custom role](https://cloud.google.com/iam/docs/creating-custom-roles) with the `cloudmessaging.messages.create` permission, then choose it from the list instead. When you're finished, select **Done**.
**Warning:**
Be sure to select **Firebase Cloud Messaging _API_ Admin**, not **Firebase Cloud Messaging Admin**.

### Step 5: Generate JSON credentials {#json}
Next, generate JSON credentials for your FCM service account. On Google Cloud IAM & Admin, go to **Service Accounts**, then choose your project. Locate the FCM service account [you created earlier](#android_service-account), then select **Actions** > **Manage Keys**.

Select **Add Key** > **Create new key**.

Choose **JSON**, then select **Create**. If you created your service account using a different Google Cloud project ID than your FCM project ID, you'll need to manually update the value assigned to the `project_id` in your JSON file.
Be sure to remember where you downloaded the key—you'll need it in the next step.
{: style="max-width:65%;"}
**Warning:**
Private keys could pose a security risk if compromised. Store your JSON credentials in a secure location for now—you'll delete your key after you upload it to Braze.
### Step 6: Upload your JSON credentials to Braze
Next, upload your JSON credentials to your Braze dashboard. In Braze, select **Settings** > **App Settings**.

Under your Android app's **Push Notification Settings**, choose **Firebase**, then select **Upload JSON File** and upload the credentials [you generated earlier](#android_json). When you're finished, select **Save**.

**Warning:**
Private keys could pose a security risk if compromised. Now that your key is uploaded to Braze, delete the file [you generated previously](#android_json).
### Step 7: Set up automatic token registration
When one of your users opt-in for push notifications, your app needs to generate an FCM token on their device before you can send them push notifications. With the Braze SDK, you can enable automatic FCM token registration for each user's device in your project's Braze configuration files.
First, go to Firebase Console, open your project, then select **Settings** > **Project settings**.

Select **Cloud Messaging**, then under **Firebase Cloud Messaging API (V1)**, copy the number in the **Sender ID** field.

Next, open your Android Studio project and use your Firebase Sender ID to enable automatic FCM token registration within your `braze.xml` or `BrazeConfig`.
To configure automatic FCM token registration, add the following lines to your `braze.xml` file:
```xml
trueFIREBASE_SENDER_ID
```
Replace `FIREBASE_SENDER_ID` with the value you copied from your Firebase project settings. Your `braze.xml` should look similar to the following:
```xml
12345ABC-6789-DEFG-0123-HIJK456789LMtrue603679405392
```
To configure automatic FCM token registration, add the following lines to your `BrazeConfig`:
```java
.setIsFirebaseCloudMessagingRegistrationEnabled(true)
.setFirebaseCloudMessagingSenderIdKey("FIREBASE_SENDER_ID")
```
```kotlin
.setIsFirebaseCloudMessagingRegistrationEnabled(true)
.setFirebaseCloudMessagingSenderIdKey("FIREBASE_SENDER_ID")
```
Replace `FIREBASE_SENDER_ID` with the value you copied from your Firebase project settings. Your `BrazeConfig` should look similar to the following:
```java
BrazeConfig brazeConfig = new BrazeConfig.Builder()
.setApiKey("12345ABC-6789-DEFG-0123-HIJK456789LM")
.setCustomEndpoint("sdk.iad-01.braze.com")
.setSessionTimeout(60)
.setHandlePushDeepLinksAutomatically(true)
.setGreatNetworkDataFlushInterval(10)
.setIsFirebaseCloudMessagingRegistrationEnabled(true)
.setFirebaseCloudMessagingSenderIdKey("603679405392")
.build();
Braze.configure(this, brazeConfig);
```
```kotlin
val brazeConfig = BrazeConfig.Builder()
.setApiKey("12345ABC-6789-DEFG-0123-HIJK456789LM")
.setCustomEndpoint("sdk.iad-01.braze.com")
.setSessionTimeout(60)
.setHandlePushDeepLinksAutomatically(true)
.setGreatNetworkDataFlushInterval(10)
.setIsFirebaseCloudMessagingRegistrationEnabled(true)
.setFirebaseCloudMessagingSenderIdKey("603679405392")
.build()
Braze.configure(this, brazeConfig)
```
**Tip:**
If you'd like manually register FCM tokens instead, you can call [`Braze.setRegisteredPushToken()`](https://braze-inc.github.io/braze-android-sdk/kdoc/braze-android-sdk/com.braze/-braze/registered-push-token.html) inside your app's [`onCreate()`](https://developer.android.com/reference/android/app/Application.html#onCreate()) method.
### Step 8: Remove automatic requests in your application class
To prevent Braze from triggering unnecessary network requests every time you send silent push notifications, remove any automatic network requests configured in your `Application` class's `onCreate()` method. For more information see, [Android Developer Reference: Application](https://developer.android.com/reference/android/app/Application).
## Displaying notifications
### Step 1: Register Braze Firebase Messaging Service
You can either create a new, existing, or non-Braze Firebase Messaging Service. Choose whichever best meets your specific needs.
Braze includes a service to handle push receipt and open intents. Our `BrazeFirebaseMessagingService` class will need to be registered in your `AndroidManifest.xml`:
```xml
```
Our notification code also uses `BrazeFirebaseMessagingService` to handle open and click action tracking. This service must be registered in the `AndroidManifest.xml` to function correctly. Also, remember that Braze prefixes notifications from our system with a unique key so that we only render notifications sent from our systems. You may register additional services separately to render notifications sent from other FCM services. See [`AndroidManifest.xml`](https://github.com/braze-inc/braze-android-sdk/blob/master/samples/firebase-push/src/main/AndroidManifest.xml) in the Firebase push sample app.
**Important:**
Before Braze SDK 3.1.1, `AppboyFcmReceiver` was used to handle FCM push. The `AppboyFcmReceiver` class should be removed from your manifest and replaced with the preceding integration.
If you already have a Firebase Messaging Service registered, you can pass [`RemoteMessage`](https://firebase.google.com/docs/reference/android/com/google/firebase/messaging/RemoteMessage) objects to Braze via [`BrazeFirebaseMessagingService.handleBrazeRemoteMessage()`](https://braze-inc.github.io/braze-android-sdk/kdoc/braze-android-sdk/com.braze.push/-braze-firebase-messaging-service/-companion/handle-braze-remote-message.html). This method will only display a notification if the [`RemoteMessage`](https://firebase.google.com/docs/reference/android/com/google/firebase/messaging/RemoteMessage) object originated from Braze and will safely ignore if not.
```java
public class MyFirebaseMessagingService extends FirebaseMessagingService {
@Override
public void onMessageReceived(RemoteMessage remoteMessage) {
super.onMessageReceived(remoteMessage);
if (BrazeFirebaseMessagingService.handleBrazeRemoteMessage(this, remoteMessage)) {
// This Remote Message originated from Braze and a push notification was displayed.
// No further action is needed.
} else {
// This Remote Message did not originate from Braze.
// No action was taken and you can safely pass this Remote Message to other handlers.
}
}
}
```
```kotlin
class MyFirebaseMessagingService : FirebaseMessagingService() {
override fun onMessageReceived(remoteMessage: RemoteMessage?) {
super.onMessageReceived(remoteMessage)
if (BrazeFirebaseMessagingService.handleBrazeRemoteMessage(this, remoteMessage)) {
// This Remote Message originated from Braze and a push notification was displayed.
// No further action is needed.
} else {
// This Remote Message did not originate from Braze.
// No action was taken and you can safely pass this Remote Message to other handlers.
}
}
}
```
If you have another Firebase Messaging Service you would also like to use, you can also specify a fallback Firebase Messaging Service to call if your application receives a push that isn't from Braze.
In your `braze.xml`, specify:
```xml
truecom.company.OurFirebaseMessagingService
```
or set via [runtime configuration:](https://www.braze.com/docs/developer_guide/sdk_initalization/?sdktab=android)
```java
BrazeConfig brazeConfig = new BrazeConfig.Builder()
.setFallbackFirebaseMessagingServiceEnabled(true)
.setFallbackFirebaseMessagingServiceClasspath("com.company.OurFirebaseMessagingService")
.build();
Braze.configure(this, brazeConfig);
```
```kotlin
val brazeConfig = BrazeConfig.Builder()
.setFallbackFirebaseMessagingServiceEnabled(true)
.setFallbackFirebaseMessagingServiceClasspath("com.company.OurFirebaseMessagingService")
.build()
Braze.configure(this, brazeConfig)
```
### Step 2: Conform small icons to design guidelines
For general information about Android notification icons, visit the [Notifications overview](https://developer.android.com/guide/topics/ui/notifiers/notifications).
Starting in Android N, you should update or remove small notification icon assets that involve color. The Android system (not the Braze SDK) ignores all non-alpha and transparency channels in action icons and the notification small icon. In other words, Android will convert all parts of your notification small icon to monochrome except for transparent regions.
To create a notification small icon asset that displays properly:
- Remove all colors from the image except for white.
- All other non-white regions of the asset should be transparent.
**Note:**
A common symptom of an improper asset is the small notification icon rendering as a solid monochrome square. This is due to the Android system not being able to find any transparent regions in the notification small icon asset.
The following large and small icons pictured are examples of properly designed icons:

### Step 3: Configure notification icons {#configure-icons}
#### Specifying icons in braze.xml
Braze allows you to configure your notification icons by specifying drawable resources in your `braze.xml`:
```xml
REPLACE_WITH_YOUR_ICONREPLACE_WITH_YOUR_ICON
```
Setting a small notification icon is required. **If you do not set one, Braze will default to using the application icon as the small notification icon, which may look suboptimal.**
Setting a large notification icon is optional but recommended.
#### Specifying icon accent color
The notification icon accent color can be overridden in your `braze.xml`. If the color is not specified, the default color is the same gray Lollipop uses for system notifications.
```xml
0xFFf33e3e
```
You may also optionally use a color reference:
```xml
@color/my_color_here
```
### Step 4: Add deep links
#### Enabling automatic deep link opening
To enable Braze to automatically open your app and any deep links when a push notification is clicked, set `com_braze_handle_push_deep_links_automatically` to `true`, in your `braze.xml`:
```xml
true
```
This flag can also be set via [runtime configuration](https://www.braze.com/docs/developer_guide/sdk_initalization/?sdktab=android):
```java
BrazeConfig brazeConfig = new BrazeConfig.Builder()
.setHandlePushDeepLinksAutomatically(true)
.build();
Braze.configure(this, brazeConfig);
```
```kotlin
val brazeConfig = BrazeConfig.Builder()
.setHandlePushDeepLinksAutomatically(true)
.build()
Braze.configure(this, brazeConfig)
```
If you want to custom handle deep links, you will need to create a push callback that listens for push received and opened intents from Braze. For more information, see [Using a callback for push events](https://www.braze.com/docs/developer_guide/push_notifications/customization#android_using-a-callback-for-push-events).
## Handling foreground notifications
By default, when a push notification arrives while your app is in the foreground on Android, the system displays it automatically. To have Braze process the push notification payload (for analytics tracking, deep link handling, and custom processing), route the incoming push data to Braze inside your `FirebaseMessagingService.onMessageReceived` method.
### How it works
When you call `BrazeFirebaseMessagingService.handleBrazeRemoteMessage`, Braze determines if the payload is a Braze push notification and, if so, creates and displays the notification with the `NotificationManagerCompat` method. Unlike iOS, Android displays notifications regardless of whether the app is in the foreground or background.
```java
package com.example.push;
import com.braze.push.BrazeFirebaseMessagingService;
import com.google.firebase.messaging.FirebaseMessagingService;
import com.google.firebase.messaging.RemoteMessage;
public class MyFirebaseMessagingService extends FirebaseMessagingService {
@Override
public void onMessageReceived(RemoteMessage remoteMessage) {
super.onMessageReceived(remoteMessage);
// Let Braze process the payload and display the notification
if (BrazeFirebaseMessagingService.handleBrazeRemoteMessage(this, remoteMessage)) {
// Braze successfully handled the push notification
} else {
// Handle non-Braze messages
}
}
}
```
```kotlin
package com.example.push
import com.braze.push.BrazeFirebaseMessagingService
import com.google.firebase.messaging.FirebaseMessagingService
import com.google.firebase.messaging.RemoteMessage
class MyFirebaseMessagingService : FirebaseMessagingService() {
override fun onMessageReceived(remoteMessage: RemoteMessage) {
super.onMessageReceived(remoteMessage)
// Let Braze process the payload and display the notification
if (BrazeFirebaseMessagingService.handleBrazeRemoteMessage(this, remoteMessage)) {
// Braze successfully handled the push notification
} else {
// Handle non-Braze messages
}
}
}
```
For more information, see the [Firebase integration sample](https://github.com/braze-inc/braze-android-sdk/blob/master/samples/firebase-push/src/main/java/com/braze/firebasepush/FirebaseMessagingService.kt) in the Braze Android SDK repository.
### Customizing foreground behavior
If you want custom foreground behavior, such as suppressing the system notification or showing an in-app UI instead, you can:
- Use `subscribeToPushNotificationEvents` to react to push events and handle deep links with the `BrazeNotificationUtils.routeUserWithNotificationOpenedIntent` method. For more information, see the [Firebase push sample](https://github.com/braze-inc/braze-android-sdk/blob/master/samples/firebase-push/src/main/java/com/braze/firebasepush/FirebaseApplication.kt).
- Build and post your own notification using a custom `IBrazeNotificationFactory`, or suppress the notification by not calling `notificationManager.notify` in your handling path.
For more information on customizing notifications, see [Custom notification factory](https://www.braze.com/docs/developer_guide/push_notifications/customization/?sdktab=android#custom-notification-factory).
#### Creating custom deep links
Follow the instructions found within the [Android developer documentation](http://developer.android.com/training/app-indexing/deep-linking.html) on deep linking if you have not already added deep links to your app. To learn more about what deep links are, see our [FAQ article](https://www.braze.com/docs/user_guide/personalization_and_dynamic_content/deep_linking_to_in-app_content/#what-is-deep-linking).
#### Adding deep links
The Braze dashboard supports setting deep links or web URLs in push notifications campaigns and Canvases that will be opened when the notification is clicked.

#### Customizing back stack behavior
The Android SDK, by default, will place your host app's main launcher activity in the back stack when following push deep links. Braze allows you to set a custom activity to open in the back stack in place of your main launcher activity or to disable the back stack altogether.
For example, to set an activity called `YourMainActivity` as the back stack activity using [runtime configuration](https://www.braze.com/docs/developer_guide/sdk_initalization/?sdktab=android):
```java
BrazeConfig brazeConfig = new BrazeConfig.Builder()
.setPushDeepLinkBackStackActivityEnabled(true)
.setPushDeepLinkBackStackActivityClass(YourMainActivity.class)
.build();
Braze.configure(this, brazeConfig);
```
```kotlin
val brazeConfig = BrazeConfig.Builder()
.setPushDeepLinkBackStackActivityEnabled(true)
.setPushDeepLinkBackStackActivityClass(YourMainActivity.class)
.build()
Braze.configure(this, brazeConfig)
```
See the equivalent configuration for your `braze.xml`. Note that the class name must be the same as returned by `Class.forName()`.
```xml
trueyour.package.name.YourMainActivity
```
### Step 5: Define notification channels
The Braze Android SDK supports [Android notification channels](https://developer.android.com/preview/features/notification-channels.html). If a Braze notification does not contain the ID for a notification channel or that a Braze notification contains an invalid channel ID, Braze will display the notification with the default notification channel defined in the SDK. Company users use [Android Notification Channels](https://www.braze.com/docs/user_guide/message_building_by_channel/push/android/notification_channels/) within the platform to group notifications.
To set the user facing name of the default Braze notification channel, use [`BrazeConfig.setDefaultNotificationChannelName()`](https://braze-inc.github.io/braze-android-sdk/kdoc/braze-android-sdk/com.braze.configuration/-braze-config/-builder/set-default-notification-channel-name.html).
To set the user facing description of the default Braze notification channel, use [`BrazeConfig.setDefaultNotificationChannelDescription()`](https://braze-inc.github.io/braze-android-sdk/kdoc/braze-android-sdk/com.braze.configuration/-braze-config/-builder/set-default-notification-channel-description.html).
Update any API campaigns with the [Android push object](https://www.braze.com/docs/api/objects_filters/messaging/android_object/) parameter to include the `notification_channel` field. If this field is not specified, Braze will send the notification payload with the [dashboard fallback](https://www.braze.com/docs/user_guide/message_building_by_channel/push/android/notification_channels/#dashboard-fallback-channel) channel ID.
Other than the default notification channel, Braze will not create any channels. All other channels must be programmatically defined by the host app and then entered into the Braze dashboard.
The default channel name and description can also be configured in `braze.xml`.
```xml
Your channel nameYour channel description
```
### Step 6: Test notification display and analytics
#### Testing display
At this point, you should be able to see notifications sent from Braze. To test this, go to the **Campaigns** page on your Braze dashboard and create a **Push Notification** campaign. Choose **Android Push** and design your message. Then click the eye icon in the composer to get the test sender. Enter the user ID or email address of your current user and click **Send Test**. You should see the push show up on your device.

For issues related to push display, see our [troubleshooting guide](https://www.braze.com/docs/developer_guide/push_notifications/troubleshooting/?sdktab=android).
#### Testing analytics
At this point, you should also have analytics logging for push notification opens. Clicking on the notification when it arrives should result in the **Direct Opens** on your campaign results page to increase by 1. Check out our [push reporting](https://www.braze.com/docs/user_guide/message_building_by_channel/push/push_reporting/) article for a break down on push analytics.
For issues related to push analytics, see our [troubleshooting guide](https://www.braze.com/docs/developer_guide/push_notifications/troubleshooting/?sdktab=android).
#### Testing from command line
If you'd like to test in-app and push notifications via the command-line interface, you can send a single notification through the terminal via cURL and the [messaging API](https://www.braze.com/docs/api/endpoints/messaging/). You will need to replace the following fields with the correct values for your test case:
- `YOUR_API_KEY` (Go to **Settings** > **API Keys**.)
- `YOUR_EXTERNAL_USER_ID` (Search for a profile on the **Search Users** page.)
- `YOUR_KEY1` (optional)
- `YOUR_VALUE1` (optional)
```bash
curl -X POST -H "Content-Type: application/json" -H "Authorization: Bearer {YOUR_API_KEY}" -d '{
"external_user_ids":["YOUR_EXTERNAL_USER_ID"],
"messages": {
"android_push": {
"title":"Test push title",
"alert":"Test push",
"extra": {
"YOUR_KEY1":"YOUR_VALUE1"
}
}
}
}' https://rest.iad-01.braze.com/messages/send
```
This example uses the `US-01` instance. If you are not on this instance, replace the `US-01` endpoint with [your endpoint](https://www.braze.com/docs/api/basics/#endpoints).
## Conversation push notifications
{: style="float:right;max-width:35%;margin-left:15px;border: 0;"}
The [people and conversations initiative](https://developer.android.com/guide/topics/ui/conversations) is a multi-year Android initiative that aims to elevate people and conversations in the system surfaces of the phone. This priority is based on the fact that communication and interaction with other people is still the most valued and important functional area for the majority of Android users across all demographics.
### Usage requirements
- This notification type requires the Braze Android SDK v15.0.0+ and Android 11+ devices.
- Unsupported devices or SDKs will fallback to a standard push notification.
This feature is only available over the Braze REST API. See the [Android push object](https://www.braze.com/docs/api/objects_filters/messaging/android_object#android-conversation-push-object) for more information.
## FCM quota exceeded errors
When your limit for Firebase Cloud Messaging (FCM) is exceeded, Google returns "quota exceeded" errors. The default limit for FCM is 600,000 requests per minute. Braze retries sending according to Google's recommended best practices. However, a large volume of these errors can prolong sending time by several minutes. To mitigate potential impact, Braze will send you an alert that the rate limit is being exceeded and steps you can take to prevent the errors.
To check your current limit, go to your **Google Cloud Console** > **APIs & Services** > **Firebase Cloud Messaging API** > **Quotas & System Limits**, or visit the [FCM API Quotas page](https://console.cloud.google.com/apis/api/fcm.googleapis.com/quotas).
### Best practices
We recommend these best practices to keep these error volumes low.
#### Request a rate limit increase from FCM
To request a rate limit increase from FCM, you can contact [Firebase Support](https://firebase.google.com/support) directly or do the following:
1. Go to the [FCM API Quotas page](https://console.cloud.google.com/apis/api/fcm.googleapis.com/quotas).
2. Locate the **Send requests per minute** quota.
3. Select **Edit Quota**.
4. Enter a new value and submit your request.
#### Request global rate limiting via Braze
To apply a workspace-wide limit for Android push notifications, contact [Braze Support](https://www.braze.com/docs/help/support#access-the-support-portal).
## Rate limits
Push notifications are rate-limited, so don't be afraid of sending as many as your application needs. iOS and the Apple Push Notification service (APNs) servers will control how often they are delivered, and you won't get into trouble for sending too many. If your push notifications are throttled, they might be delayed until the next time the device sends a keep-alive packet or receives another notification.
## Setting up push notifications
### Step 1: Upload your APNs token
Before you can send an iOS push notification using Braze, you need to upload your `.p8` push notification file, as described in [Apple's developer documentation](https://developer.apple.com/documentation/usernotifications/establishing-a-token-based-connection-to-apns):
1. In your Apple developer account, go to [**Certificates, Identifiers & Profiles**](https://developer.apple.com/account/ios/certificate).
2. Under **Keys**, select **All** and click the add button (+) in the upper-right corner.
3. Under **Key Description**, enter a unique name for the signing key.
4. Under **Key Services**, select the **Apple Push Notification service (APNs)** checkbox, then click **Continue**. Click **Confirm**.
5. Note the key ID. Click **Download** to generate and download the key. Make sure to save the downloaded file in a secure place, as you cannot download this more than once.
6. In Braze, go to **Settings** > **App Settings** and upload the `.p8` file under **Apple Push Certificate**. You can upload either your development or production push certificate. To test push notifications after your app is live in the App Store, its recommended to set up a separate workspace for the development version of your app.
7. When prompted, enter your app's [bundle ID](https://developer.apple.com/documentation/foundation/nsbundle/1418023-bundleidentifier), [key ID](https://developer.apple.com/help/account/manage-keys/get-a-key-identifier/), and [team ID](https://developer.apple.com/help/account/manage-your-team/locate-your-team-id). You'll also need to specify whether to send notifications to your app's development or production environment, which is defined by its provisioning profile.
8. When you're finished, select **Save**.
### Step 2: Enable push capabilities
In Xcode, go to the **Signing & Capabilities** section of the main app target and add the push notifications capability.

### Step 3: Set up push handling
You can use the Swift SDK to automate the processing of remote notifications received from Braze. This is the simplest way to handle push notifications and is the recommended handling method.
#### Step 3.1: Enable automation in the push property
To enable the automatic push integration, set the `automation` property of the `push` configuration to `true`:
```swift
let configuration = Braze.Configuration(apiKey: "{YOUR-BRAZE-API-KEY}", endpoint: "{YOUR-BRAZE-API-ENDPOINT}")
configuration.push.automation = true
```
```objc
BRZConfiguration *configuration = [[BRZConfiguration alloc] initWithApiKey:@"{YOUR-BRAZE-API-KEY}" endpoint:@"{YOUR-BRAZE-API-ENDPOINT}"];
configuration.push.automation = [[BRZConfigurationPushAutomation alloc] initEnablingAllAutomations:YES];
```
This instructs the SDK to:
- Register your application for push notification on the system.
- Request the push notification authorization/permission at initialization.
- Dynamically provide implementations for the push notification related system delegate methods.
**Note:**
The automation steps performed by the SDK are compatible with pre-existing push notification handling integrations in your codebase. The SDK only automates the processing of remote notification received from Braze. Any system handler implemented to process your own or another third party SDK remote notifications will continue to work when `automation` is enabled.
**Warning:**
The SDK must be initialized on the main thread to enable push notification automation. SDK initialization must happen before the application has finished launching or in your AppDelegate [`application(_:didFinishLaunchingWithOptions:)`](https://developer.apple.com/documentation/uikit/uiapplicationdelegate/1622921-application) implementation.
If your application requires additional setup before initializing the SDK, please refer to the [Delayed Initialization](https://www.braze.com/docs/developer_guide/sdk_initalization/?sdktab=swift) documentation page.
#### Step 3.2: Override individual configurations (optional)
For more granular control, each automation step can be enabled or disabled individually:
```swift
// Enable all automations and disable the automatic notification authorization request at launch.
configuration.push.automation = true
configuration.push.automation.requestAuthorizationAtLaunch = false
```
```objc
// Enable all automations and disable the automatic notification authorization request at launch.
configuration.push.automation = [[BRZConfigurationPushAutomation alloc] initEnablingAllAutomations:YES];
configuration.push.automation.requestAuthorizationAtLaunch = NO;
```
See [`Braze.Configuration.Push.Automation`](https://braze-inc.github.io/braze-swift-sdk/documentation/brazekit/braze/configuration-swift.class/push-swift.class/automation-swift.class) for all available options and [`automation`](https://braze-inc.github.io/braze-swift-sdk/documentation/brazekit/braze/configuration-swift.class/push-swift.class/automation-swift.property) for more information on the automation behavior.
**Note:**
If you rely on push notifications for additional behavior specific to your app, you may still be able to use automatic push integration instead of manual push notification integration. The [`subscribeToUpdates(_:)`](https://braze-inc.github.io/braze-swift-sdk/documentation/brazekit/braze/notifications-swift.class/subscribetoupdates(_:)) method provides a way to be notified of remote notifications processed by Braze.
#### Step 3.1: Register for push notifications with APNs
Include the appropriate code sample within your app's [`application:didFinishLaunchingWithOptions:` delegate method](https://developer.apple.com/documentation/uikit/uiapplicationdelegate/1622921-application) so that your users' devices can register with APNs. Ensure that you call all push integration code in your application's main thread.
Braze also provides default push categories for push action button support, which must be manually added to your push registration code. Refer to [push action buttons](https://www.braze.com/docs/developer_guide/push_notifications/customization/?sdktab=swift#swift_customizing-push-categories) for additional integration steps.
Add the following code to the `application:didFinishLaunchingWithOptions:` method of your app delegate.
**Note:**
The following code sample includes integration for provisional push authentication (lines 5 and 6). If you are not planning on using provisional authorization in your app, you can remove the lines of code that add `UNAuthorizationOptionProvisional` to the `requestAuthorization` options. Visit [iOS notification options](https://www.braze.com/docs/user_guide/message_building_by_channel/push/ios/notification_options/) to learn more about push provisional authentication.
```swift
application.registerForRemoteNotifications()
let center = UNUserNotificationCenter.current()
center.setNotificationCategories(Braze.Notifications.categories)
center.delegate = self
var options: UNAuthorizationOptions = [.alert, .sound, .badge]
if #available(iOS 12.0, *) {
options = UNAuthorizationOptions(rawValue: options.rawValue | UNAuthorizationOptions.provisional.rawValue)
}
center.requestAuthorization(options: options) { granted, error in
print("Notification authorization, granted: \(granted), error: \(String(describing: error))")
}
```
```objc
[application registerForRemoteNotifications];
UNUserNotificationCenter *center = UNUserNotificationCenter.currentNotificationCenter;
[center setNotificationCategories:BRZNotifications.categories];
center.delegate = self;
UNAuthorizationOptions options = UNAuthorizationOptionAlert | UNAuthorizationOptionSound | UNAuthorizationOptionBadge;
if (@available(iOS 12.0, *)) {
options = options | UNAuthorizationOptionProvisional;
}
[center requestAuthorizationWithOptions:options
completionHandler:^(BOOL granted, NSError *_Nullable error) {
NSLog(@"Notification authorization, granted: %d, "
@"error: %@)",
granted, error);
}];
```
**Warning:**
You must assign your delegate object using `center.delegate = self` synchronously before your app finishes launching, preferably in `application:didFinishLaunchingWithOptions:`. Not doing so may cause your app to miss incoming push notifications. Visit Apple's [`UNUserNotificationCenterDelegate`](https://developer.apple.com/documentation/usernotifications/unusernotificationcenterdelegate) documentation to learn more.
#### Step 3.2: Register push tokens with Braze
Once APNs registration is complete, pass the resulting `deviceToken` to Braze to enable for push notifications for the user.
Add the following code to your app's `application(_:didRegisterForRemoteNotificationsWithDeviceToken:)` method:
```swift
AppDelegate.braze?.notifications.register(deviceToken: deviceToken)
```
Add the following code to your app's `application:didRegisterForRemoteNotificationsWithDeviceToken:` method:
```objc
[AppDelegate.braze.notifications registerDeviceToken:deviceToken];
```
**Important:**
The `application:didRegisterForRemoteNotificationsWithDeviceToken:` delegate method is called every time after `application.registerForRemoteNotifications()` is called.
If you are migrating to Braze from another push service and your user's device has already registered with APNs, this method will collect tokens from existing registrations the next time the method is called, and users will not have to re-opt-in to push.
#### Step 3.3: Enable push handling
Next, pass the received push notifications along to Braze. This step is necessary for logging push analytics and link handling. Ensure that you call all push integration code in your application's main thread.
##### Default push handling
To enable the Braze default push handling, add the following code to your app's `application(_:didReceiveRemoteNotification:fetchCompletionHandler:)` method:
```swift
if let braze = AppDelegate.braze, braze.notifications.handleBackgroundNotification(
userInfo: userInfo,
fetchCompletionHandler: completionHandler
) {
return
}
completionHandler(.noData)
```
Next, add the following to your app's `userNotificationCenter(_:didReceive:withCompletionHandler:)` method:
```swift
if let braze = AppDelegate.braze, braze.notifications.handleUserNotification(
response: response,
withCompletionHandler: completionHandler
) {
return
}
completionHandler()
```
To enable the Braze default push handling, add the following code to your application's `application:didReceiveRemoteNotification:fetchCompletionHandler:` method:
```objc
BOOL processedByBraze = AppDelegate.braze != nil && [AppDelegate.braze.notifications handleBackgroundNotificationWithUserInfo:userInfo
fetchCompletionHandler:completionHandler];
if (processedByBraze) {
return;
}
completionHandler(UIBackgroundFetchResultNoData);
```
Next, add the following code to your app's `(void)userNotificationCenter:didReceiveNotificationResponse:withCompletionHandler:` method:
```objc
BOOL processedByBraze = AppDelegate.braze != nil && [AppDelegate.braze.notifications handleUserNotificationWithResponse:response
withCompletionHandler:completionHandler];
if (processedByBraze) {
return;
}
completionHandler();
```
##### Foreground push handling
To enable foreground push notifications and let Braze recognize them when they're received, implement `UNUserNotificationCenter.userNotificationCenter(_:willPresent:withCompletionHandler:)`. If a user taps your foreground notification, the `userNotificationCenter(_:didReceive:withCompletionHandler:)` push delegate will be called and Braze will log the push click event.
```swift
func userNotificationCenter(
_ center: UNUserNotificationCenter,
willPresent notification: UNNotification,
withCompletionHandler completionHandler: @escaping (UNNotificationPresentationOptions
) -> Void) {
if let braze = AppDelegate.braze {
// Forward notification payload to Braze for processing.
braze.notifications.handleForegroundNotification(notification: notification)
}
// Configure application's foreground notification display options.
if #available(iOS 14.0, *) {
completionHandler([.list, .banner])
} else {
completionHandler([.alert])
}
}
```
To enable foreground push notifications and let Braze recognize them when they're received, implement `userNotificationCenter:willPresentNotification:withCompletionHandler:`. If a user taps your foreground notification, the `userNotificationCenter:didReceiveNotificationResponse:withCompletionHandler:` push delegate will be called and Braze will log the push click event.
```objc
- (void)userNotificationCenter:(UNUserNotificationCenter *)center
willPresentNotification:(UNNotification *)notification
withCompletionHandler:(void (^)(UNNotificationPresentationOptions options))completionHandler {
if (AppDelegate.braze != nil) {
// Forward notification payload to Braze for processing.
[AppDelegate.braze.notifications handleForegroundNotificationWithNotification:notification];
}
// Configure application's foreground notification display options.
if (@available(iOS 14.0, *)) {
completionHandler(UNNotificationPresentationOptionList | UNNotificationPresentationOptionBanner);
} else {
completionHandler(UNNotificationPresentationOptionAlert);
}
}
```
## Testing notifications {#push-testing}
If you'd like to test in-app and push notifications via the command line, you can send a single notification through the terminal via CURL and the [messaging API](https://www.braze.com/docs/api/endpoints/messaging/send_messages/post_send_messages/). You will need to replace the following fields with the correct values for your test case:
- `YOUR_API_KEY` - available at **Settings** > **API Keys**.
- `YOUR_EXTERNAL_USER_ID` - available on the **Search Users** page. See [assigning user IDs](https://www.braze.com/docs/developer_guide/platform_integration_guides/swift/analytics/setting_user_ids/#assigning-a-user-id) for more information.
- `YOUR_KEY1` (optional)
- `YOUR_VALUE1` (optional)
In the following example, the `US-01` instance is being used. If you're not on this instance, refer to our [API documentation](https://www.braze.com/docs/api/basics/) to see which endpoint to make requests to.
```bash
curl -X POST -H "Content-Type: application/json" -H "Authorization: Bearer {YOUR_API_KEY}" -d '{
"external_user_ids":["YOUR_EXTERNAL_USER_ID"],
"messages": {
"apple_push": {
"alert":"Test push",
"extra": {
"YOUR_KEY1":"YOUR_VALUE1"
}
}
}
}' https://rest.iad-01.braze.com/messages/send
```
## Subscribing to push notifications updates
To access the push notification payloads processed by Braze, use the [`Braze.Notifications.subscribeToUpdates(payloadTypes:_:)`](https://braze-inc.github.io/braze-swift-sdk/documentation/brazekit/braze/notifications-swift.class/subscribetoupdates(payloadtypes:_:)/) method.
You can use the `payloadTypes` parameter to specify whether you'd like to subscribe to notifications involving push open events, push received events, or both.
```swift
// This subscription is maintained through a Braze cancellable, which will observe for changes until the subscription is cancelled.
// You must keep a strong reference to the cancellable to keep the subscription active.
// The subscription is canceled either when the cancellable is deinitialized or when you call its `.cancel()` method.
let cancellable = AppDelegate.braze?.notifications.subscribeToUpdates(payloadTypes: [.open, .received]) { payload in
print("Braze processed notification with title '\(payload.title)' and body '\(payload.body)'")
}
```
**Important:**
Keep in mind, push received events will only trigger for foreground notifications and `content-available` background notifications. It will not trigger for notifications received while terminated or for background notifications without the `content-available` field.
```objc
NSInteger filtersValue = BRZNotificationsPayloadTypeFilter.opened.rawValue | BRZNotificationsPayloadTypeFilter.received.rawValue;
BRZNotificationsPayloadTypeFilter *filters = [[BRZNotificationsPayloadTypeFilter alloc] initWithRawValue: filtersValue];
BRZCancellable *cancellable = [notifications subscribeToUpdatesWithPayloadTypes:filters update:^(BRZNotificationsPayload * _Nonnull payload) {
NSLog(@"Braze processed notification with title '%@' and body '%@'", payload.title, payload.body);
}];
```
**Important:**
Keep in mind, push received events will only trigger for foreground notifications and `content-available` background notifications. It will not trigger for notifications received while terminated or for background notifications without the `content-available` field.
**Note:**
When using the automatic push integration, `subscribeToUpdates(_:)` is the only way to be notified of remote notifications processed by Braze. The `UIAppDelegate` and `UNUserNotificationCenterDelegate` system methods are not called when the notification is automatically processed by Braze.
**Tip:**
Create your push notification subscription in `application(_:didFinishLaunchingWithOptions:)` to ensure your subscription is triggered after an end-user taps a notification while your app is in a terminated state.
## Handling foreground notifications
By default, when a push notification arrives while your app is in the foreground, iOS does not display it automatically. To display push notifications in the foreground and track them with Braze analytics, call the `handleForegroundNotification(notification:)` method inside your `UNUserNotificationCenterDelegate.userNotificationCenter(_:willPresent:withCompletionHandler:)` implementation.
### How it works
When you call `handleForegroundNotification(notification:)`, Braze processes the notification payload to log analytics and handle any deep links or button actions. The actual display behavior is controlled by the `UNNotificationPresentationOptions` you pass to the completion handler.
```swift
import BrazeKit
import UserNotifications
extension AppDelegate: UNUserNotificationCenterDelegate {
func userNotificationCenter(
_ center: UNUserNotificationCenter,
willPresent notification: UNNotification,
withCompletionHandler completionHandler: @escaping (UNNotificationPresentationOptions) -> Void
) {
// Let Braze process the notification payload
if let braze = AppDelegate.braze {
braze.notifications.handleForegroundNotification(notification: notification)
}
// Control how the notification appears in the foreground
if #available(iOS 14.0, *) {
completionHandler([.banner, .list, .sound])
} else {
completionHandler([.alert, .sound])
}
}
}
```
For a complete example, see the [push notifications manual integration sample](https://github.com/braze-inc/braze-swift-sdk/blob/e31907eaa0dbd151dc2e6826de66cc494242ba60/Examples/Swift/Sources/PushNotifications-Manual/AppDelegate.swift#L1-L120) in the Braze Swift SDK repository.
## Push primers {#push-primers}
Push primer campaigns encourage your users to enable push notifications on their device for your app. This can be done without SDK customization using our [no code push primer](https://www.braze.com/docs/user_guide/message_building_by_channel/push/best_practices/push_primer_messages/).
## Dynamic APNs gateway management
Dynamic Apple Push Notification Service (APNs) gateway management enhances the reliability and efficiency of iOS push notifications by automatically detecting the correct APNs environment. Previously, you would manually select APNs environments (development or production) for your push notifications, which sometimes led to incorrect gateway configurations, delivery failures, and `BadDeviceToken` errors.
With dynamic APNs gateway management, you'll have:
- **Improved reliability:** Notifications are always delivered to the correct APNs environment, reducing failed deliveries.
- **Simplified configuration:** You no longer need to manually manage APNs gateway settings.
- **Error resilience:** Invalid or missing gateway values are gracefully handled, providing uninterrupted service.
### Prerequisites
Braze supports Dynamic APNs gateway management for push notifications on iOS with the following SDK version requirement:
### How it works
When an iOS app integrates with the Braze Swift SDK, it sends device-related data, including [`aps-environment`](https://developer.apple.com/documentation/bundleresources/entitlements/aps-environment) to the Braze SDK API, if available. The `apns_gateway` value indicates whether the app is using the development (`dev`) or production (`prod`) APNs environment.
Braze also stores the reported gateway value for each device. If a new, valid gateway value is received, Braze updates the stored value automatically.
When Braze sends a push notification:
- If a valid gateway value (dev or prod) is stored for the device, Braze uses it to determine the correct APNs environment.
- If no gateway value is stored, Braze defaults to the APNs environment configured in the **App Settings** page.
### Frequently asked questions
#### Why was this feature introduced?
With dynamic APNs gateway management, the correct environment is selected automatically. Previously, you had to manually configure the APNs gateway, which could lead to `BadDeviceToken` errors, token invalidation, and potential APNs rate-limiting issues.
#### How does this impact push delivery performance?
This feature improves delivery rates by always routing push tokens to the correct APNs environment, avoiding failures caused by misconfigured gateways.
#### Can I disable this feature?
Dynamic APNs Gateway Management is turned on by default and provides reliability improvements. If you have specific use cases that require manual gateway selection, contact [Braze Support](https://www.braze.com/docs/user_guide/administrative/access_braze/support/).
## About push notifications for Android TV
{: style="float:right;max-width:25%;margin-left:15px; border: 0"}
While not a native feature, Android TV push integration is made possible by leveraging the Braze Android SDK and Firebase Cloud Messaging to register a push token for Android TV. It is, however, necessary to build a UI to display the notification payload after it is received.
## Prerequisites
To use this feature, you'll need to complete the following:
- [Integrate the Braze Android SDK](https://www.braze.com/docs/developer_guide/sdk_integration/?sdktab=android)
- [Set up push notifications for the Braze Android SDK](https://www.braze.com/docs/developer_guide/platform_integration_guides/android/push_notifications/?tab=android)
## Setting up push notifications
To set up push notifications for Android TV:
1. Create a custom view in your app to display your notifications.
2. Create a [custom notification factory](https://www.braze.com/docs/developer_guide/push_notifications/customization#customization-display). This will override the default SDK behavior and allow you to manually display the notifications. By returning `null`, this will prevent the SDK from processing and will require custom code to display the notification. After these steps have been completed, you can start sending push to Android TV!
3. (Optional) To track click analytics effectively, set up click analytics tracking. This can be achieved by creating a [push callback](https://www.braze.com/docs/developer_guide/push_notifications/customization#push-callback) to listen for Braze push opened and received intents.
**Note:**
These notifications **will not persist** and will only be visible to the user when the device displays them. This is due to Android TV's notification center not supporting historical notifications.
## Testing Android TV push notifications
To test if your push implementation is successful, send a notification from the Braze dashboard as you would normally for an Android device.
- **If the application is closed**: The push message will display a toast notification on the screen.
- **If the application is open**: You have the opportunity to display the message in your own hosted UI. We recommend following the UI styling of our Android Mobile SDK in-app messages.
## Best practices
For marketers using Braze, launching a campaign to Android TV will be identical to launching a push to Android mobile apps. To target these devices exclusively, we recommend selecting the Android TV App in segmentation.
The delivered and clicked response returned by FCM will follow the same convention as a mobile Android device; therefore, any errors will be visible in the message activity log.
## Prerequisites
Before you can use this feature, you'll need to [integrate the Cordova Braze SDK](https://www.braze.com/docs/developer_guide/sdk_integration/?sdktab=cordova). After you integrate the SDK, basic push notification functionality is enabled by default. To use [rich push notifications](https://www.braze.com/docs/developer_guide/push_notifications/rich/?sdktab=cordova) and [push stories](https://www.braze.com/docs/developer_guide/push_notifications/push_stories/?sdktab=cordova), you'll need to set them up individually. To use iOS push messages, you also need to upload a valid push certificate.
**Warning:**
Anytime you add, remove, or update your Cordova plugins, Cordova will overwrite the Podfile in your iOS app's Xcode project. This means you’ll need to set these features up again anytime you modify your Cordova plugins.
## Enabling push deep linking
By default, the Braze Cordova SDK doesn't automatically handle deep links from push notifications. To enable push deep linking, follow the configuration steps in [Deep linking](https://www.braze.com/docs/developer_guide/cordova/deep_linking/).
For more details about these and other push configuration options, see [Optional configurations](https://www.braze.com/docs/developer_guide/sdk_integration?sdktab=cordova#optional).
## Disabling basic push notifications (iOS only)
After you integrate the Braze Cordova SDK for iOS, basic push notification functionality is enabled by default. To disable this functionality in your iOS app, add the following to your `config.xml` file. For more information, see [Optional configurations](https://www.braze.com/docs/developer_guide/sdk_integration?sdktab=cordova#optional).
```xml
```
## Prerequisites
Before you can use this feature, you'll need to [integrate the Flutter Braze SDK](https://www.braze.com/docs/developer_guide/sdk_integration/?sdktab=flutter).
## Setting up push notifications
### Step 1: Complete the initial setup
#### Step 1.1: Register for push
Register for push using Google’s Firebase Cloud Messaging (FCM) API. For a full walkthrough, refer to the following steps from the [Native Android push integration guide](https://www.braze.com/docs/developer_guide/platform_integration_guides/android/push_notifications/?tab=android/):
1. [Add Firebase to your project](https://www.braze.com/docs/developer_guide/platform_integration_guides/android/push_notifications/android/integration/standard_integration/#step-1-add-firebase-to-your-project).
2. [Add Cloud Messaging to your dependencies](https://www.braze.com/docs/developer_guide/platform_integration_guides/android/push_notifications/android/integration/standard_integration/#step-2-add-cloud-messaging-to-your-dependencies).
3. [Create a service account](https://www.braze.com/docs/developer_guide/platform_integration_guides/android/push_notifications/android/integration/standard_integration/#step-3-create-a-service-account).
4. [Generate JSON credentials](https://www.braze.com/docs/developer_guide/platform_integration_guides/android/push_notifications/android/integration/standard_integration/#step-4-generate-json-credentials).
5. [Upload your JSON credentials to Braze](https://www.braze.com/docs/developer_guide/platform_integration_guides/android/push_notifications/android/integration/standard_integration/#step-5-upload-your-json-credentials-to-braze).
#### Step 1.2: Get your Google Sender ID
First, go to Firebase Console, open your project, then select **Settings** > **Project settings**.

Select **Cloud Messaging**, then under **Firebase Cloud Messaging API (V1)**, copy the **Sender ID** to your clipboard.

#### Step 1.3: Update your `braze.xml`
Add the following to your `braze.xml` file. Replace `FIREBASE_SENDER_ID` with the sender ID you copied previously.
```xml
trueFIREBASE_SENDER_ID
```
#### Step 1.1: Upload APNs certificates
Generate an Apple Push Notification service (APNs) certificate and uploaded it to the Braze dashboard. For a full walkthrough, see [Uploading your APNs certificate](https://www.braze.com/docs/developer_guide/platform_integration_guides/swift/push_notifications/integration/#step-1-upload-your-apns-certificate).
#### Step 1.2: Add push notification support to your app
Follow the [native iOS integration guide](https://www.braze.com/docs/developer_guide/platform_integration_guides/swift/push_notifications/integration/?tab=objective-c#automatic-push-integration).
### Step 2: Listen for push notification events (optional)
To listen for push notification events that Braze has detected and handled, call `subscribeToPushNotificationEvents()` and pass in an argument to execute.
**Note:**
Braze push notification events are available on both Android and iOS. Due to platform differences, iOS will only detect Braze push events when a user has interacted with a notification.
```dart
// Create stream subscription
StreamSubscription pushEventsStreamSubscription;
pushEventsStreamSubscription = braze.subscribeToPushNotificationEvents((BrazePushEvent pushEvent) {
print("Push Notification event of type ${pushEvent.payloadType} seen. Title ${pushEvent.title}\n and deeplink ${pushEvent.url}");
// Handle push notification events
});
// Cancel stream subscription
pushEventsStreamSubscription.cancel();
```
##### Push notification event fields
**Note:**
Because of platform limitations on iOS, the Braze SDK can only process push payloads while the app is in the foreground. Listeners will only trigger for the `push_opened` event type on iOS after a user has interacted with a push.
For a full list of push notification fields, refer to the table below:
| Field Name | Type | Description |
| ------------------ | --------- | ----------- |
| `payloadType` | String | Specifies the notification payload type. The two values that are sent from the Braze Flutter SDK are `push_opened` and `push_received`. Only `push_opened` events are supported on iOS. |
| `url` | String | Specifies the URL that was opened by the notification. |
| `useWebview` | Boolean | If `true`, URL will open in-app in a modal webview. If `false`, the URL will open in the device browser. |
| `title` | String | Represents the title of the notification. |
| `body` | String | Represents the body or content text of the notification. |
| `summaryText` | String | Represents the summary text of the notification. This is mapped from `subtitle` on iOS. |
| `badgeCount` | Number | Represents the badge count of the notification. |
| `timestamp` | Number | Represents the time at which the payload was received by the application. |
| `isSilent` | Boolean | If `true`, the payload is received silently. For details on sending Android silent push notifications, refer to [Silent push notifications on Android](https://www.braze.com/docs/developer_guide/push_notifications/silent/?sdktab=android). For details on sending iOS silent push notifications, refer to [Silent push notifications on iOS](https://www.braze.com/docs/developer_guide/push_notifications/silent/?sdktab=swift). |
| `isBrazeInternal`| Boolean | This will be `true` if a notification payload was sent for an internal SDK feature, such as geofences sync, Feature Flag sync, or uninstall tracking. The payload is received silently for the user. |
| `imageUrl` | String | Specifies the URL associated with the notification image. |
| `brazeProperties` | Object | Represents Braze properties associated with the campaign (key-value pairs). |
| `ios` | Object | Represents iOS-specific fields. |
| `android` | Object | Represents Android-specific fields. |
{: .reset-td-br-1 .reset-td-br-2 role="presentation" }
### Step 3: Test displaying push notifications
To test your integration after configuring push notifications in the native layer:
1. Set an active user in the Flutter application. To do so, initialize your plugin by calling `braze.changeUser('your-user-id')`.
2. Head to **Campaigns** and create a new push notification campaign. Choose the platforms that you'd like to test.
3. Compose your test notification and head over to the **Test** tab. Add the same `user-id` as the test user and click **Send Test**.
4. You should receive the notification on your device shortly. You may need to check in the Notification Center or update Settings if it doesn't display.
**Tip:**
Starting with Xcode 14, you can test remote push notifications on an iOS simulator.
## Prerequisites
Before you can use this feature, you'll need to [integrate the Android Braze SDK](https://www.braze.com/docs/developer_guide/sdk_integration/?sdktab=android).
## Setting up push notifications
Newer phones manufactured by [Huawei](https://huaweimobileservices.com/) come equipped with Huawei Mobile Services (HMS) - a service used to deliver push instead of Google's Firebase Cloud Messaging (FCM).
### Step 1: Register for a Huawei developer account
Before getting started, you'll need to register and set up a [Huawei Developer account](https://developer.huawei.com/consumer/en/console). In your Huawei account, go to **My Projects > Project Settings > App Information**, and take note of the `App ID` and `App secret`.

### Step 2: Create a new Huawei app in the Braze dashboard
In the Braze dashboard, go to **App Settings**, listed under the **Settings** navigation.
Click **+ Add App**, provide a name (such as My Huawei App), select `Android` as the platform.
{: style="max-width:60%;"}
Once your new Braze app has been created, locate the push notification settings and select `Huawei` as the push provider. Next, provide your `Huawei Client Secret` and `Huawei App ID`.

### Step 3: Integrate the Huawei messaging SDK into your app
Huawei has provided an [Android integration codelab](https://developer.huawei.com/consumer/en/codelab/HMSPushKit/index.html) detailing integrating the Huawei Messaging Service into your application. Follow those steps to get started.
After completing the codelab, you will need to create a custom [Huawei Message Service](https://developer.huawei.com/consumer/en/doc/development/HMS-References/push-HmsMessageService-cls) to obtain push tokens and forward messages to the Braze SDK.
```java
public class CustomPushService extends HmsMessageService {
@Override
public void onNewToken(String token) {
super.onNewToken(token);
Braze.getInstance(this.getApplicationContext()).setRegisteredPushToken(token);
}
@Override
public void onMessageReceived(RemoteMessage remoteMessage) {
super.onMessageReceived(remoteMessage);
if (BrazeHuaweiPushHandler.handleHmsRemoteMessageData(this.getApplicationContext(), remoteMessage.getDataOfMap())) {
// Braze has handled the Huawei push notification
}
}
}
```
```kotlin
class CustomPushService: HmsMessageService() {
override fun onNewToken(token: String?) {
super.onNewToken(token)
Braze.getInstance(applicationContext).setRegisteredPushToken(token!!)
}
override fun onMessageReceived(hmsRemoteMessage: RemoteMessage?) {
super.onMessageReceived(hmsRemoteMessage)
if (BrazeHuaweiPushHandler.handleHmsRemoteMessageData(applicationContext, hmsRemoteMessage?.dataOfMap)) {
// Braze has handled the Huawei push notification
}
}
}
```
After adding your custom push service, add the following to your `AndroidManifest.xml`:
```xml
```
### Step 4: Handle foreground notifications
By default, when a push notification arrives while your app is in the foreground, Huawei displays it automatically. To have Braze process the push notification payload (for analytics tracking, deep link handling, and custom processing), route the incoming push data to Braze inside your `HmsMessageService.onMessageReceived` method.
When you call `BrazeHuaweiPushHandler.handleHmsRemoteMessageData`, Braze determines if the payload is a Braze push notification and, if so, creates and displays the notification. For more information, see [Handling foreground notifications](https://www.braze.com/docs/developer_guide/push_notifications/?sdktab=android#handling-foreground-notifications) in the Android push notifications documentation.
For a complete example, see the [Huawei handler reference](https://braze-inc.github.io/braze-android-sdk/kdoc/braze-android-sdk/com.braze.push/-braze-huawei-push-handler/index.html) in the Braze Android SDK documentation.
### Step 5: Test your push notifications (optional)
At this point, you've created a new Huawei Android app in the Braze dashboard, configured it with your Huawei developer credentials, and have integrated the Braze and Huawei SDKs into your app.
Next, we can test out the integration by testing a new push campaign in Braze.
#### Step 5.1: Create a new push notification campaign
In the **Campaigns** page, create a new campaign, and choose **Push Notification** as your message type.
After you name your campaign, choose **Android Push** as the push platform.

Next, compose your push campaign with a title and message.
#### Step 5.2: Send a test push
In the **Test** tab, enter your user ID, which you've set in your app using the [`changeUser(USER_ID_STRING)` method](https://www.braze.com/docs/developer_guide/platform_integration_guides/android/analytics/setting_user_ids/#assigning-a-user-id), and click **Send Test** to send a test push.

At this point, you should receive a test push notification on your Huawei (HMS) device from Braze.
#### Step 5.3: Set up Huawei segmentation (optional)
Since your Huawei app in the Braze dashboard is built upon the Android push platform, you have the flexibility to send push to all Android users (Firebase Cloud Messaging and Huawei Mobile Services), or you can choose to segment your campaign audience to specific apps.
To send push to only Huawei apps, [create a new Segment](https://www.braze.com/docs/user_guide/engagement_tools/segments/creating_a_segment/#step-3-choose-your-app-or-platform) and select your Huawei App within the **Apps** section.

Of course, if you want to send the same push to all Android push providers, you can choose not to specify the app which will send to all Android apps configured within the current workspace.
## Prerequisites
Before you can use this feature, you'll need to [integrate the React Native Braze SDK](https://www.braze.com/docs/developer_guide/sdk_integration/?sdktab=react%20native).
## Setting up push notifications {#setting-up-push-notifications}
### Step 1: Complete the initial setup
#### Prerequisites
Before you can use Expo for push notifications, you'll need to [set up the Braze Expo plugin](https://www.braze.com/docs/developer_guide/platform_integration_guides/react_native/sdk_integration/?tab=expo).
#### Step 1.1: Update your `app.json` file
Next update your `app.json` file for Android and iOS:
- **Android:** Add the `enableFirebaseCloudMessaging` option.
- **iOS:** Add the `enableBrazeIosPush` option.
#### Step 1.2: Add your Google Sender ID
First, go to Firebase Console, open your project, then select **Settings** > **Project settings**.

Select **Cloud Messaging**, then under **Firebase Cloud Messaging API (V1)**, copy the **Sender ID** to your clipboard.

Next, open your project's `app.json` file and set your `firebaseCloudMessagingSenderId` property to the Sender ID in your clipboard. For example:
```
"firebaseCloudMessagingSenderId": "693679403398"
```
#### Step 1.3: Add the path to your Google Services JSON
In your project's `app.json` file, add the path to your `google-services.json` file. This file is required when setting `enableFirebaseCloudMessaging: true` in your configuration.
```json
{
"expo": {
"android": {
"googleServicesFile": "PATH_TO_GOOGLE_SERVICES"
},
"plugins": [
[
"@braze/expo-plugin",
{
"androidApiKey": "YOUR-ANDROID-API-KEY",
"iosApiKey": "YOUR-IOS-API-KEY",
"enableBrazeIosPush": true,
"enableFirebaseCloudMessaging": true,
"firebaseCloudMessagingSenderId": "YOUR-FCM-SENDER-ID",
"androidHandlePushDeepLinksAutomatically": true
}
],
]
}
}
```
Note that you will need to use these settings instead of the native setup instructions if you are depending on additional push notification libraries like [Expo Notifications](https://docs.expo.dev/versions/latest/sdk/notifications/).
If you are not using the Braze Expo plugin, or would like to configure these settings natively instead, register for push by referring to the [Native Android push integration guide](https://www.braze.com/docs/developer_guide/platform_integration_guides/android/push_notifications/?tab=android/).
If you are not using the Braze Expo plugin, or would like to configure these settings natively instead, register for push by referring to the following steps from the [Native iOS push integration guide](https://www.braze.com/docs/developer_guide/push_notifications/?sdktab=swift):
#### Step 1.1: Request for push permissions
If you don't plan on requesting push permissions when the app is launched, omit the `requestAuthorizationWithOptions:completionHandler:` call in your AppDelegate. Then, skip to [Step 2](#reactnative_step-2-request-push-notifications-permission). Otherwise, follow the [native iOS integration guide](https://www.braze.com/docs/developer_guide/platform_integration_guides/swift/push_notifications/integration/?tab=objective-c#automatic-push-integration).
#### Step 1.2 (Optional): Migrate your push key
If you were previously using `expo-notifications` to manage your push key, run `expo fetch:ios:certs` from your application's root folder. This will download your push key (a .p8 file), which can then be uploaded to the Braze dashboard.
### Step 2: Request push notifications permission
Use the `Braze.requestPushPermission()` method (available on v1.38.0 and up) to request permission for push notifications from the user on iOS and Android 13+. For Android 12 and below, this method is a no-op.
This method takes in a required parameter that specifies which permissions the SDK should request from the user on iOS. These options have no effect on Android.
```javascript
const permissionOptions = {
alert: true,
sound: true,
badge: true,
provisional: false
};
Braze.requestPushPermission(permissionOptions);
```
#### Step 2.1: Listen for push notifications (optional)
You can additionally subscribe to events where Braze has detected and handled an incoming push notification. Use the listener key `Braze.Events.PUSH_NOTIFICATION_EVENT`.
**Important:**
iOS push received events will only trigger for foreground notifications and `content-available` background notifications. It will not trigger for notifications received while terminated or for background notifications without the `content-available` field.
```javascript
Braze.addListener(Braze.Events.PUSH_NOTIFICATION_EVENT, data => {
console.log(`Push Notification event of type ${data.payload_type} seen. Title ${data.title}\n and deeplink ${data.url}`);
console.log(JSON.stringify(data, undefined, 2));
});
```
##### Push notification event fields
For a full list of push notification fields, refer to the table below:
| Field Name | Type | Description |
| ------------------ | --------- | ----------- |
| `payload_type` | String | Specifies the notification payload type. The two values that are sent from the Braze React Native SDK are `push_opened` and `push_received`. |
| `url` | String | Specifies the URL that was opened by the notification. |
| `use_webview` | Boolean | If `true`, URL will open in-app in a modal webview. If `false`, the URL will open in the device browser. |
| `title` | String | Represents the title of the notification. |
| `body` | String | Represents the body or content text of the notification. |
| `summary_text` | String | Represents the summary text of the notification. This is mapped from `subtitle` on iOS. |
| `badge_count` | Number | Represents the badge count of the notification. |
| `timestamp` | Number | Represents the time at which the payload was received by the application. |
| `is_silent` | Boolean | If `true`, the payload is received silently. For details on sending Android silent push notifications, refer to [Silent push notifications on Android](https://www.braze.com/docs/developer_guide/push_notifications/silent/?sdktab=android). For details on sending iOS silent push notifications, refer to [Silent push notifications on iOS](https://www.braze.com/docs/developer_guide/push_notifications/silent/?sdktab=swift). |
| `is_braze_internal`| Boolean | This will be `true` if a notification payload was sent for an internal SDK feature, such as geofences sync, Feature Flag sync, or uninstall tracking. The payload is received silently for the user. |
| `image_url` | String | Specifies the URL associated with the notification image. |
| `braze_properties` | Object | Represents Braze properties associated with the campaign (key-value pairs). |
| `ios` | Object | Represents iOS-specific fields. |
| `android` | Object | Represents Android-specific fields. |
{: .reset-td-br-1 .reset-td-br-2 role="presentation" }
### Step 3: Enable deep linking (optional)
To enable Braze to handle deep links inside React components when a push notification is clicked, first implement the steps described in [React Native Linking](https://reactnative.dev/docs/linking) library, or with your solution of choice. Then, follow the additional steps below.
To learn more about what deep links are, see our [FAQ article](https://www.braze.com/docs/user_guide/personalization_and_dynamic_content/deep_linking_to_in-app_content/#what-is-deep-linking).
If you're using the [Braze Expo plugin](https://www.braze.com/docs/developer_guide/platforms/react_native/sdk_integration/?tab=expo#step-2-choose-a-setup-option), you can handle push notification deep links automatically by setting `androidHandlePushDeepLinksAutomatically` to `true` in your `app.json`.
To handle deep links manually instead, refer to the native Android documentation: [Adding deep links](https://www.braze.com/docs/developer_guide/push_notifications/deep_linking).
#### Step 3.1: Store the push notification payload on app launch
**Note:**
Skip step 3.1 if you're using the Braze Expo plugin, as this is functionality is handled automatically.
For iOS, add `populateInitialPayloadFromLaunchOptions` to your AppDelegate's `didFinishLaunchingWithOptions` method. For example:
```objc
- (BOOL)application:(UIApplication *)application didFinishLaunchingWithOptions:(NSDictionary *)launchOptions
{
// ... Perform regular React Native setup
BRZConfiguration *configuration = [[BRZConfiguration alloc] initWithApiKey:apiKey endpoint:endpoint];
configuration.triggerMinimumTimeInterval = 1;
configuration.logger.level = BRZLoggerLevelInfo;
Braze *braze = [BrazeReactBridge initBraze:configuration];
AppDelegate.braze = braze;
[self registerForPushNotifications];
[[BrazeReactUtils sharedInstance] populateInitialPayloadFromLaunchOptions:launchOptions];
return [super application:application didFinishLaunchingWithOptions:launchOptions];
}
```
```swift
func application(
_ application: UIApplication,
didFinishLaunchingWithOptions launchOptions: [UIApplication.LaunchOptionsKey: Any]? = nil
) -> Bool {
// ... Perform regular React Native setup
let configuration = Braze.Configuration(apiKey: apiKey, endpoint: endpoint)
configuration.triggerMinimumTimeInterval = 1
configuration.logger.level = .info
let braze = BrazeReactBridge.initBraze(configuration)
AppDelegate.braze = braze
registerForPushNotifications()
BrazeReactUtils.shared().populateInitialPayload(fromLaunchOptions: launchOptions)
return super.application(application, didFinishLaunchingWithOptions: launchOptions)
}
```
#### Step 3.2: Handle deep links from a closed state
In addition to the base scenarios handled by [React Native Linking](https://reactnative.dev/docs/linking), implement the `Braze.getInitialPushPayload` method and retrieve the `url` value to account for deep links from push notifications that open your app when it isn't running. For example:
```javascript
// Handles deep links when an iOS app is launched from a hard close via push click.
// This edge case is not handled in the React Native Linking library and is provided as a workaround by Braze.
Braze.getInitialPushPayload(pushPayload => {
if (pushPayload) {
console.log('Braze.getInitialPushPayload is ' + pushPayload);
showToast('Initial URL is ' + pushPayload.url);
handleOpenUrl({ pushPayload.url });
}
});
```
**Note:**
Braze provides this workaround since React Native's Linking API does not support this scenario due to a race condition on app startup.
#### Step 3.3: Enable Universal Links (optional)
To enable [universal linking](https://www.braze.com/docs/developer_guide/push_notifications/deep_linking/?sdktab=swift#universal-links) support, implement a Braze delegate that determines whether to open a given URL, then register it with your Braze instance.
Create a `BrazeReactDelegate.swift` file in your `iOS` directory and add the following. Replace `YOUR_DOMAIN_HOST` with your actual domain.
```swift
import Foundation
import BrazeKit
import UIKit
class BrazeReactDelegate: NSObject, BrazeDelegate {
/// This delegate method determines whether to open a given URL.
/// Reference the context to get additional details about the URL payload.
func braze(_ braze: Braze, shouldOpenURL context: Braze.URLContext) -> Bool {
if let host = context.url.host,
host.caseInsensitiveCompare("YOUR_DOMAIN_HOST") == .orderedSame {
// Sample custom handling of universal links
let application = UIApplication.shared
let userActivity = NSUserActivity(activityType: NSUserActivityTypeBrowsingWeb)
userActivity.webpageURL = context.url
// Routes to the `continueUserActivity` method, which should be handled in your AppDelegate.
application.delegate?.application?(
application,
continue: userActivity,
restorationHandler: { _ in }
)
return false
}
// Let Braze handle links otherwise
return true
}
}
```
Then, create and register your `BrazeReactDelegate` in `didFinishLaunchingWithOptions` of your project's `AppDelegate.swift` file.
```swift
import BrazeKit
class AppDelegate: UIResponder, UIApplicationDelegate {
static var braze: Braze?
// Keep a strong reference to the BrazeDelegate so it is not deallocated.
private var brazeDelegate: BrazeReactDelegate?
func application(
_ application: UIApplication,
didFinishLaunchingWithOptions launchOptions: [UIApplication.LaunchOptionsKey: Any]? = nil
) -> Bool {
// Other setup code (e.g., Braze initialization)
brazeDelegate = BrazeReactDelegate()
AppDelegate.braze?.delegate = brazeDelegate
return true
}
}
```
Create a `BrazeReactDelegate.h` file in your `iOS` directory and then add the following code snippet.
```objc
#import
#import
@interface BrazeReactDelegate: NSObject
@end
```
Next, create a `BrazeReactDelegate.m` file and then add the following code snippet. Replace `YOUR_DOMAIN_HOST` with your actual domain.
```objc
#import "BrazeReactDelegate.h"
#import
@implementation BrazeReactDelegate
/// This delegate method determines whether to open a given URL.
///
/// Reference the `BRZURLContext` object to get additional details about the URL payload.
- (BOOL)braze:(Braze *)braze shouldOpenURL:(BRZURLContext *)context {
if ([[context.url.host lowercaseString] isEqualToString:@"YOUR_DOMAIN_HOST"]) {
// Sample custom handling of universal links
UIApplication *application = UIApplication.sharedApplication;
NSUserActivity* userActivity = [[NSUserActivity alloc] initWithActivityType:NSUserActivityTypeBrowsingWeb];
userActivity.webpageURL = context.url;
// Routes to the `continueUserActivity` method, which should be handled in your `AppDelegate`.
[application.delegate application:application
continueUserActivity:userActivity restorationHandler:^(NSArray> * _Nullable restorableObjects) {}];
return NO;
}
// Let Braze handle links otherwise
return YES;
}
@end
```
Then, create and register your `BrazeReactDelegate` in `didFinishLaunchingWithOptions` of your project's `AppDelegate.m` file.
```objc
#import "BrazeReactUtils.h"
#import "BrazeReactDelegate.h"
@interface AppDelegate ()
// Keep a strong reference to the BrazeDelegate to ensure it is not deallocated.
@property (nonatomic, strong) BrazeReactDelegate *brazeDelegate;
@end
- (BOOL)application:(UIApplication *)application didFinishLaunchingWithOptions:(NSDictionary *)launchOptions
{
// Other setup code
self.brazeDelegate = [[BrazeReactDelegate alloc] init];
braze.delegate = self.brazeDelegate;
}
```
For an example integration, reference our sample app [here](https://github.com/braze-inc/braze-react-native-sdk/blob/master/BrazeProject/ios/BrazeProject/AppDelegate.mm).
### Step 4: Handle foreground notifications
Foreground notification handling works differently depending on your platform and setup. Choose the approach that matches your integration:
For iOS, foreground notification handling is the same as the native Swift integration. Call `handleForegroundNotification(notification:)` inside your `UNUserNotificationCenterDelegate.userNotificationCenter(_:willPresent:withCompletionHandler:)` implementation.
For complete details and code examples, see [Handling foreground notifications](https://www.braze.com/docs/developer_guide/push_notifications/?sdktab=swift#handling-foreground-notifications) in the Swift push notifications documentation.
For Android, foreground notification handling is the same as the native Android integration. Call `BrazeFirebaseMessagingService.handleBrazeRemoteMessage` inside your `FirebaseMessagingService.onMessageReceived` method.
For complete details and code examples, see [Handling foreground notifications](https://www.braze.com/docs/developer_guide/push_notifications/?sdktab=android#handling-foreground-notifications) in the Android push notifications documentation.
In Expo-managed workflow, you don't call native notification handlers directly. Instead, use the Expo Notifications API to control foreground presentation, while the Braze Expo Plugin handles native processing automatically.
```javascript
import * as Notifications from 'expo-notifications';
import Braze from '@braze/react-native-sdk';
// Control foreground presentation in Expo
Notifications.setNotificationHandler({
handleNotification: async () => ({
shouldShowAlert: true, // Show alert while in foreground
shouldPlaySound: false,
shouldSetBadge: false,
}),
});
// React to Braze push events
const subscription = Braze.addListener('pushNotificationEvent', (event) => {
console.log('Braze push event', {
type: event.payload_type, // "push_received" | "push_opened"
title: event.title,
url: event.url,
is_silent: event.is_silent,
});
// Handle deep links, custom behavior, etc.
});
// Handle initial payload when app launches via push
Braze.getInitialPushPayload((payload) => {
if (payload) {
console.log('Initial push payload', payload);
}
});
```
**Note:**
In Expo-managed workflow, the Braze Expo Plugin handles native push processing automatically. You control foreground UI via the Expo Notifications presentation options shown above.
For bare workflow integrations, follow the native iOS and Android approaches instead.
### Step 5: Send a test push notification
At this point, you should be able to send notifications to the devices. Adhere to the following steps to test your push integration.
**Note:**
Starting in macOS 13, on certain devices, you can test iOS push notifications on an iOS 16+ simulator running on Xcode 14 or higher. For further details, refer to the [Xcode 14 Release Notes](https://developer.apple.com/documentation/xcode-release-notes/xcode-14-release-notes).
1. Set an active user in the React Native application by calling `Braze.changeUserId('your-user-id')` method.
2. Head to **Campaigns** and create a new push notification campaign. Choose the platforms that you'd like to test.
3. Compose your test notification and head over to the **Test** tab. Add the same `user-id` as the test user and click **Send Test**. You should receive the notification on your device shortly.

## Using the Expo plugin
After you [set up push notifications for Expo](#reactnative_setting-up-push-notifications), you can use it to handle the following push notifications behaviors—without needing to write any code in the native Android or iOS layers.
### Forwarding Android push to additional FMS
If you want to use an additional Firebase Messaging Service (FMS), you can specify a fallback FMS to call if your application receives a push that isn't from Braze. For example:
```json
{
"expo": {
"plugins": [
[
"@braze/expo-plugin",
{
...
"androidFirebaseMessagingFallbackServiceEnabled": true,
"androidFirebaseMessagingFallbackServiceClasspath": "com.company.OurFirebaseMessagingService"
}
]
]
}
}
```
### Using app extensions with Expo Application Services {#app-extensions}
If you are using Expo Application Services (EAS) and have enabled `enableBrazeIosRichPush` or `enableBrazeIosPushStories`, you will need to declare the corresponding bundle identifiers for each app extension in your project. There are multiple ways you can approach this step, depending on how your project is configured to manage code signing with EAS.
One approach is to use the `appExtensions` configuration in your `app.json` file by following Expo's [app extensions documentation](https://docs.expo.dev/build-reference/app-extensions/). Alternatively, you can set up the `multitarget` setting in your `credentials.json` file by following Expo's [local credentials documentation](https://docs.expo.dev/app-signing/local-credentials/#multi-target-project).
### Troubleshooting
These are common troubleshooting steps for push notification integrations with the Braze React Native SDK and Expo plugin.
#### Push notifications stopped working {#troubleshooting-stopped-working}
If push notifications through the Expo plugin have stopped working:
1. Check that the Braze SDK is still tracking sessions.
2. Check that the SDK wasn't disabled by an explicit or implicit call to `wipeData`.
3. Review any recent upgrades to Expo or it's related libraries, as there may be conflicts with your Braze configuration.
4. Review recently added project dependencies and check if they are manually overriding your existing push notification delegate methods.
**Tip:**
For iOS integrations, you can also reference our [push notification setup tutorial](https://braze-inc.github.io/braze-swift-sdk/tutorials/braze/b1-standard-push-notifications) to help you identify potential conflicts with your project dependencies.
#### Device token won't register with Braze {#troubleshooting-token-registration}
If your device token won't register with Braze, first review [Push notifications stopped working](#troubleshooting-stopped-working).
If your issue persists, there may be a separate dependency interfering with your Braze push notification configuration. You can try removing it or manually call `Braze.registerPushToken` instead.
## Prerequisites
Before you can use this feature, you'll need to [integrate the Web Braze SDK](https://www.braze.com/docs/developer_guide/sdk_integration/?sdktab=web). You'll also need to [set up push notifications](https://www.braze.com/docs/developer_guide/push_notifications/?sdktab=web) for the Web SDK. Note that you can only send push notifications to iOS and iPadOS users that are using [Safari v16.4](https://developer.apple.com/documentation/safari-release-notes/safari-16_4-release-notes) or later.
## Setting up Safari push for mobile
### Step 1: Create a manifest file {#manifest}
A [Web Application Manifest](https://developer.mozilla.org/en-US/docs/Web/Manifest) is a JSON file that controls how your website is presented when installed to a user's home screen.
For example, you can set the background theme color and icon that the [App Switcher](https://support.apple.com/en-us/HT202070) uses, whether it renders as full screen to resemble a native app, or whether the app should open in landscape or portrait mode.
Create a new `manifest.json` file in your website's root directory, with the following mandatory fields.
```json
{
"name": "your app name",
"short_name": "your app name",
"display": "fullscreen",
"icons": [{
"src": "favicon.ico",
"sizes": "128x128",
}]
}
```
The full list of supported fields can be found [here](https://developer.mozilla.org/en-US/docs/Web/Manifest).
### Step 2: Link the manifest file {#manifest-link}
Add the following `` tag to your website's `` element pointing to where your manifest file is hosted.
```html
```
### Step 3: Add a service worker {#service-worker}
Your website must have a service worker file that imports the Braze service-worker library, as described in our [web push integration guide](https://www.braze.com/docs/developer_guide/platform_integration_guides/web/push_notifications/integration/#step-1-configure-your-sites-service-worker).
### Step 4: Add to home screen {#add-to-homescreen}
Popular browsers (such as Safari, Chrome, FireFox, and Edge) all support web push notifications in their later versions. To request push permission on iOS or iPadOS, your website must be added to the user's home screen by selecting **Share To** > **Add to Home Screen**. [Add to Homescreen](https://support.apple.com/guide/iphone/bookmark-favorite-webpages-iph42ab2f3a7/ios#iph4f9a47bbc) lets users bookmark your website, adding your icon to their valuable home screen real estate.
{: style="max-width:40%"}
### Step 5: Show the native push prompt {#push-prompt}
After the app has been added to your home screen you can now request push permission when the user takes an action (such as clicking a button). This can be done using the [`requestPushPermission`](https://js.appboycdn.com/web-sdk/latest/doc/modules/braze.html#requestpushpermission) method, or with a [no-code push primer in-app message](https://www.braze.com/docs/user_guide/message_building_by_channel/push/best_practices/push_primer_messages/).
**Note:**
After you accept or decline the prompt, you need to delete and reinstall the website to your home screen to be able to show the prompt again.
{: style="max-width:40%"}
For example:
```typescript
import { requestPushPermission } from "@braze/web-sdk";
button.onclick = function(){
requestPushPermission(() => {
console.log(`User accepted push prompt`);
}, (temporary) => {
console.log(`User ${temporary ? "temporarily dismissed" : "permanently denied"} push prompt`);
});
};
```
## Next steps
Next, send yourself a [test message](https://www.braze.com/docs/developer_guide/in_app_messages/sending_test_messages/) to validate the integration. After your integration is complete, you can use our [no-code push primer messages](https://www.braze.com/docs/user_guide/message_building_by_channel/push/best_practices/push_primer_messages/) to optimize your push opt-in rates.
## Prerequisites
Before you can use this feature, you'll need to [integrate the Unity Braze SDK](https://www.braze.com/docs/developer_guide/sdk_integration/?sdktab=unity).
## Setting up push notification
### Step 1: Set up the platform
#### Step 1.1: Enable Firebase
To get started, follow the [Firebase Unity setup documentation](https://firebase.google.com/docs/unity/setup).
**Note:**
Integrating the Firebase Unity SDK may cause your `AndroidManifest.xml` to be overridden. If that occurs, make sure to revert it to the original.
#### Step 1.2: Set your Firebase credentials
You need to input your Firebase Server Key and Sender ID into the Braze dashboard. To do this, log in to the [Firebase Developers Console](https://console.firebase.google.com/) and select your Firebase project. Next, select **Cloud Messaging** under **Settings** and copy the Server Key and Sender ID: 
In Braze, select your Android app on the **App Settings** page under **Manage Settings**. Next, enter your Firebase Server Key in the **Firebase Cloud Messaging Server Key** field and Firebase Sender ID in the **Firebase Cloud Messaging Sender** ID field.

#### Step 1.1: Verify integration method
Braze provides a native Unity solution for automating iOS push integrations. If you you'd like to set up and manage your integration manually instead, see [Swift: Push Notifications](https://www.braze.com/docs/developer_guide/push_notifications/?sdktab=swift).
Otherwise, continue to the next step.
**Note:**
Our automatic push notification solution takes advantage of iOS 12's Provisional Authorization feature and is not available to use with the native push prompt pop-up.
#### Step 1.1: Enable ADM
1. Create an account with the [Amazon Apps & Games Developer Portal](https://developer.amazon.com/public) if you have not already done so.
2. Obtain [OAuth credentials (Client ID and Client Secret) and an ADM API key](https://developer.amazon.com/public/apis/engage/device-messaging/tech-docs/02-obtaining-adm-credentials).
3. Enable **Automatic ADM Registration Enabled** in the Unity Braze Configuration window.
- Alternatively, you may add the following line to your `res/values/braze.xml` file to enable ADM registration:
```xml
true
```
### Step 2: Configure push notifications
#### Step 2.1: Configure push settings
The Braze SDK can automatically handle push registration with the Firebase Cloud Messaging Servers to have devices receive push notifications. In Unity, enable **Automate Unity Android Integration**, then configure the following **Push Notification** settings.
| Setting | Description |
|----------------------------------------|----------------------------------------------------------------------------------------------------------------------------------------------------------|
| Automatic Firebase Cloud Messaging Registration Enabled | Instructs the Braze SDK to automatically retrieve and send an FCM push token for a device. |
| Firebase Cloud Messaging Sender ID | The Sender ID from your Firebase console. |
| Handle Push Deeplinks Automatically | Whether the SDK should handle opening deep links or opening the app when push notifications are clicked. |
| Small Notification Icon Drawable | The drawable should be displayed as the small icon whenever a push notification is received. The notification will use the application icon as the small icon if no icon is provided. |
{: .reset-td-br-1 .reset-td-br-2 role="presentation"}
#### Step 2.1: Upload your APNs token
Before you can send an iOS push notification using Braze, you need to upload your `.p8` push notification file, as described in [Apple's developer documentation](https://developer.apple.com/documentation/usernotifications/establishing-a-token-based-connection-to-apns):
1. In your Apple developer account, go to [**Certificates, Identifiers & Profiles**](https://developer.apple.com/account/ios/certificate).
2. Under **Keys**, select **All** and click the add button (+) in the upper-right corner.
3. Under **Key Description**, enter a unique name for the signing key.
4. Under **Key Services**, select the **Apple Push Notification service (APNs)** checkbox, then click **Continue**. Click **Confirm**.
5. Note the key ID. Click **Download** to generate and download the key. Make sure to save the downloaded file in a secure place, as you cannot download this more than once.
6. In Braze, go to **Settings** > **App Settings** and upload the `.p8` file under **Apple Push Certificate**. You can upload either your development or production push certificate. To test push notifications after your app is live in the App Store, its recommended to set up a separate workspace for the development version of your app.
7. When prompted, enter your app's [bundle ID](https://developer.apple.com/documentation/foundation/nsbundle/1418023-bundleidentifier), [key ID](https://developer.apple.com/help/account/manage-keys/get-a-key-identifier/), and [team ID](https://developer.apple.com/help/account/manage-your-team/locate-your-team-id). You'll also need to specify whether to send notifications to your app's development or production environment, which is defined by its provisioning profile.
8. When you're finished, select **Save**.
#### Step 2.2: Enable automatic push
Open the Braze Configuration Settings in the Unity Editor by navigating to **Braze > Braze Configuration**.
Check **Integrate Push With Braze** to automatically register users for push notifications, pass push tokens to Braze, track analytics for push opens, and take advantage of our default push notification handling.
#### Step 2.3: Enable background push (optional)
Check **Enable Background Push** if you want to enable `background mode` for push notifications. This allows the system to wake your application from the `suspended` state when a push notification arrives, enabling your application to download content in response to push notifications. Checking this option is required for our uninstall tracking functionality.
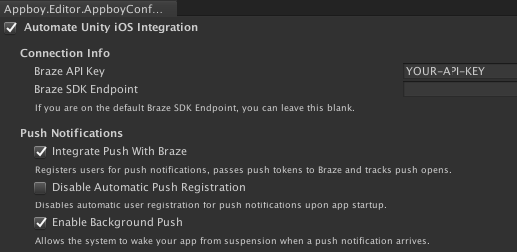
#### Step 2.4: Disable automatic registration (optional)
Users who have not yet opted-in to push notifications will automatically be authorized for push upon opening your application. To disable this feature and manually register users for push, check **Disable Automatic Push Registration**.
- If **Disable Provisional Authorization** is not checked on iOS 12 or later, the user will be provisionally (silently) authorized to receive quiet push. If checked, the user will be shown the native push prompt.
- If you need to configure exactly when the prompt is shown at runtime, disable automatic registration from the Braze configuration editor and use `AppboyBinding.PromptUserForPushPermissions()` instead.

#### Step 2.1: Update `AndroidManifest.xml`
If your app does not have an `AndroidManifest.xml`, you can use the following as a template. Otherwise, if you already have an `AndroidManifest.xml`, ensure that any of the following missing sections are added to your existing `AndroidManifest.xml`.
```xml
```
#### Step 2.2: Store your ADM API key
First, [generate an ADM API Key for your app](https://developer.amazon.com/public/apis/engage/device-messaging/tech-docs/02-obtaining-adm-credentials), then save the key to a file named `api_key.txt` and add it in your project's [`Assets/`](https://docs.unity3d.com/Manual/AndroidAARPlugins.html) directory.
**Important:**
Amazon will not recognize your key if `api_key.txt` contains any white space characters, such as a trailing line break.
Next, in your `mainTemplate.gradle` file, add the following:
```gradle
task copyAmazon(type: Copy) {
def unityProjectPath = $/file:///**DIR_UNITYPROJECT**/$.replace("\\", "/")
from unityProjectPath + '/Assets/api_key.txt'
into new File(projectDir, 'src/main/assets')
}
preBuild.dependsOn(copyAmazon)
```
#### Step 2.3: Add ADM Jar
The required ADM Jar file may be placed anywhere in your project according to the [Unity JAR documentation](https://docs.unity3d.com/Manual/AndroidJARPlugins.html).
#### Step 2.4: Add Client Secret and Client ID to your Braze dashboard
Lastly, you must add the Client Secret and Client ID you obtained in [Step 1](#unity_step-1-enable-adm) to the Braze dashboard's **Manage Settings** page.
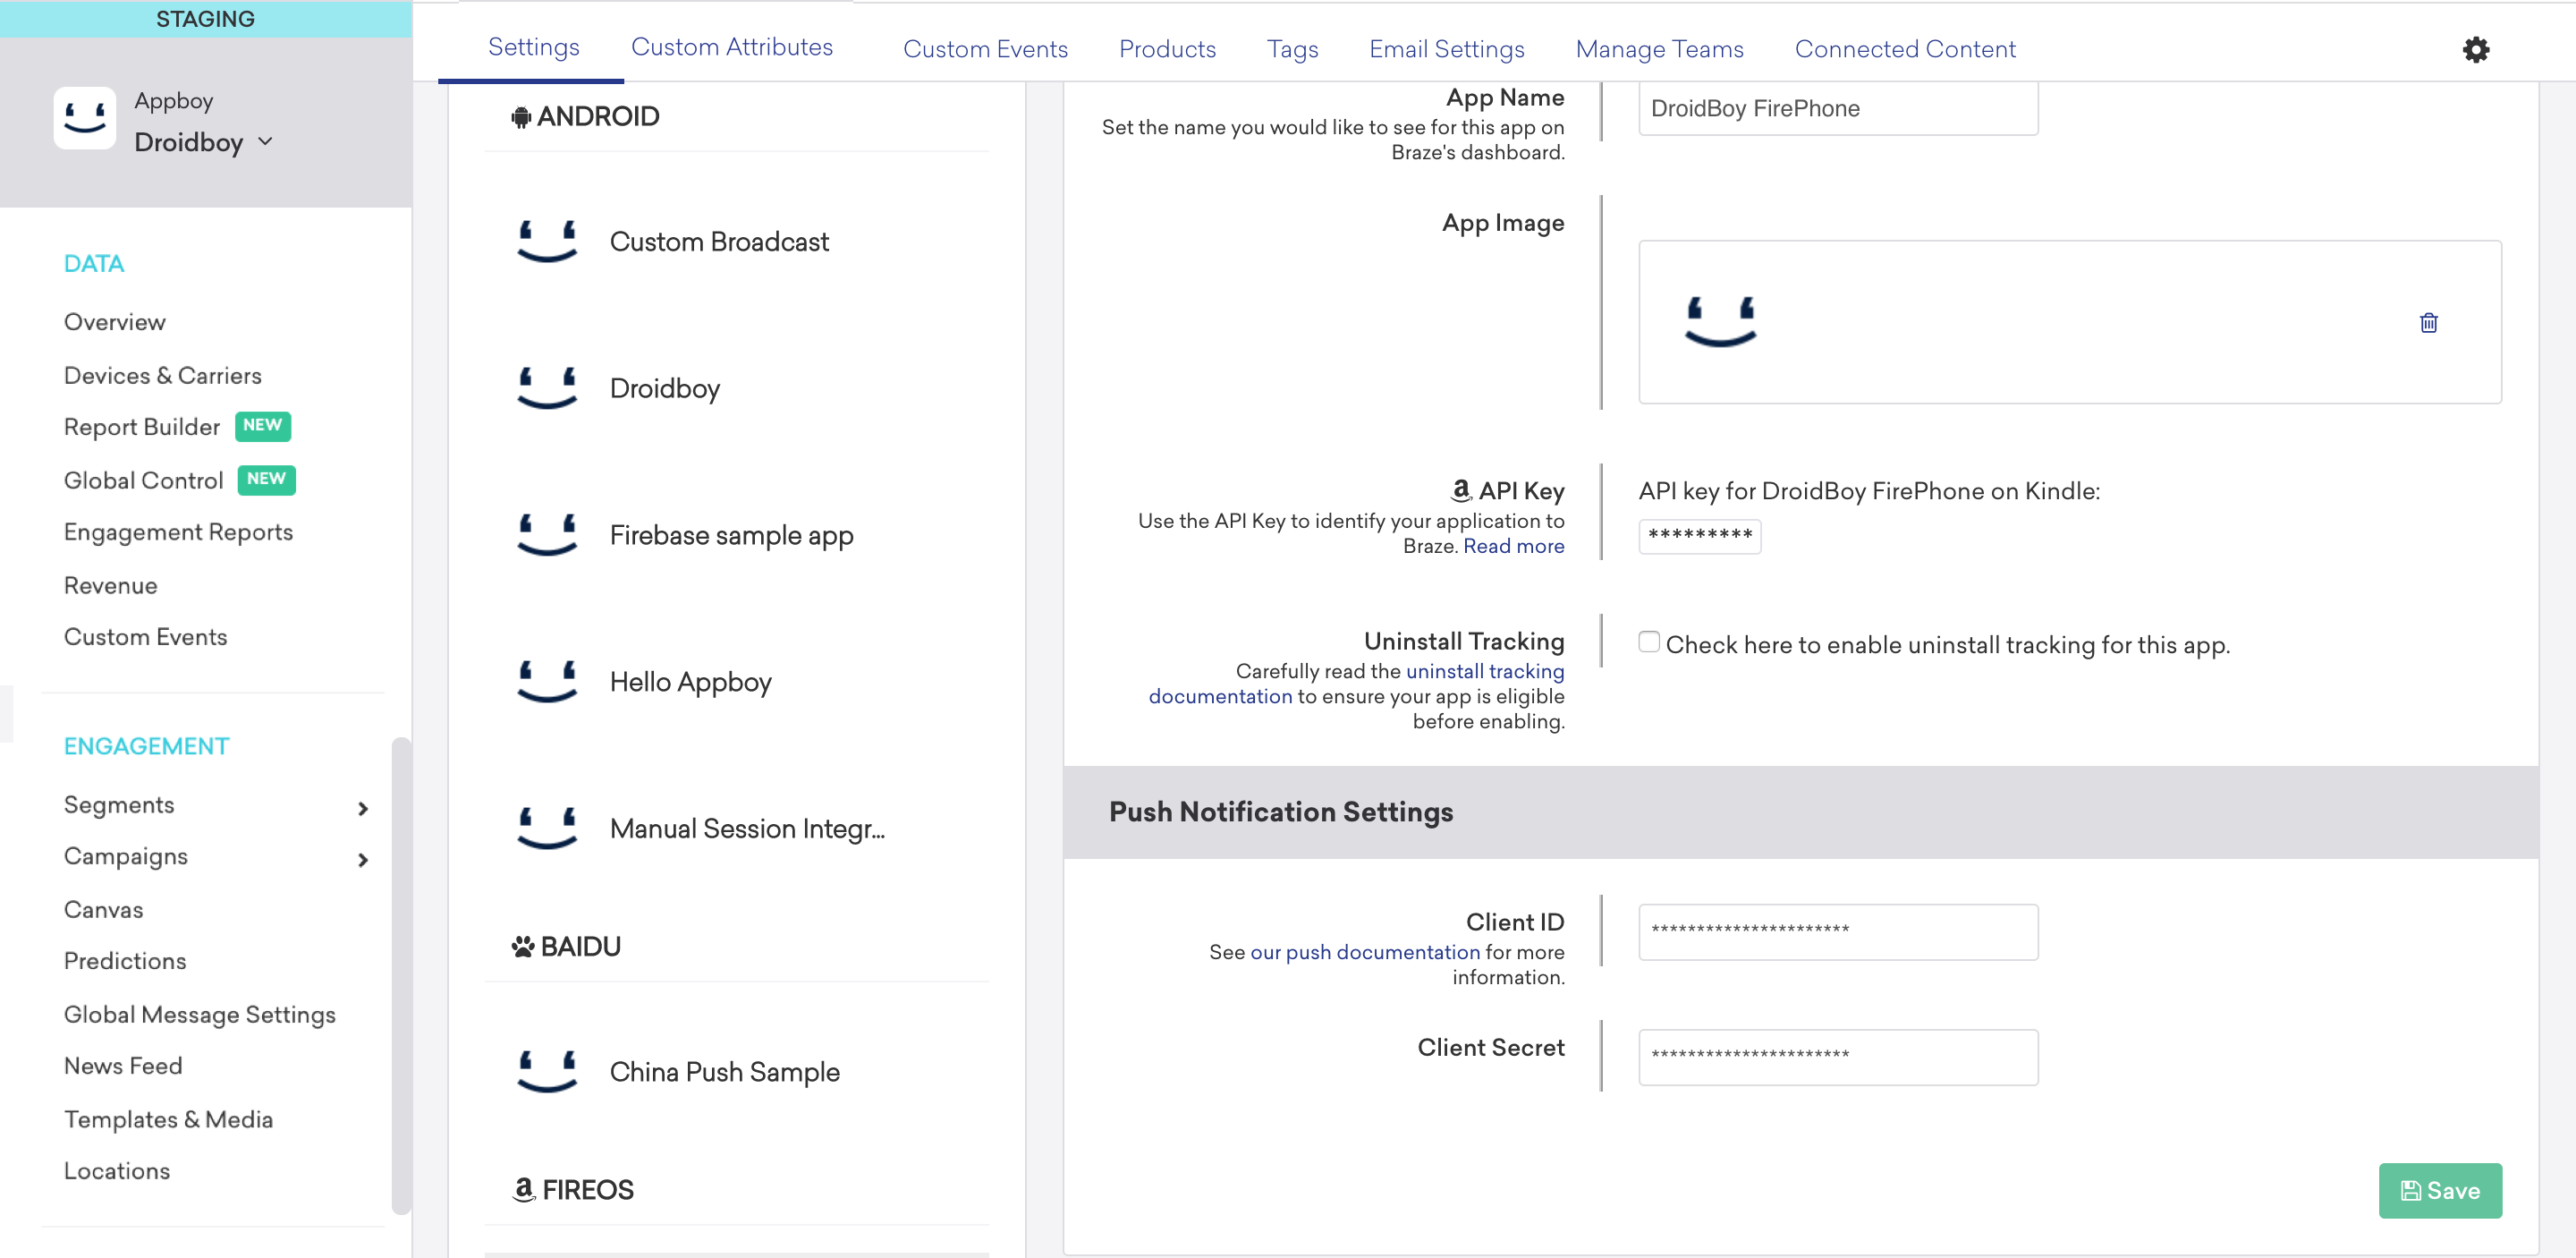
### Step 3: Set push listeners
#### Step 3.1: Enable push received listener
The push received listener is fired when a user receives a push notification. To send the push payload to Unity, set the name of your game object and push the received listener callback method under the **Set Push Received Listener**.
#### Step 3.2: Enable push opened listener
The push opened listener is fired when a user launches the app by clicking on a push notification. To send the push payload to Unity, set the name of your game object and push opened listener callback method under the **Set Push Opened Listener**.
#### Step 3.3: Enable push deleted listener
The push deleted listener is fired when a user swipes away or dismisses a push notification. To send the push payload to Unity, set the name of your game object and push deleted listener callback method under the **Set Push Deleted Listener**.
#### Push listener example
The following example implements the `BrazeCallback` game object using a callback method name of `PushNotificationReceivedCallback`, `PushNotificationOpenedCallback`, and `PushNotificationDeletedCallback` respectively.

```csharp
public class MainMenu : MonoBehaviour {
void PushNotificationReceivedCallback(string message) {
#if UNITY_ANDROID
Debug.Log("PushNotificationReceivedCallback message: " + message);
PushNotification pushNotification = new PushNotification(message);
Debug.Log("Push Notification received: " + pushNotification);
#elif UNITY_IOS
ApplePushNotification pushNotification = new ApplePushNotification(message);
Debug.Log("Push received Notification event: " + pushNotification);
#endif
}
void PushNotificationOpenedCallback(string message) {
#if UNITY_ANDROID
Debug.Log("PushNotificationOpenedCallback message: " + message);
PushNotification pushNotification = new PushNotification(message);
Debug.Log("Push Notification opened: " + pushNotification);
#elif UNITY_IOS
ApplePushNotification pushNotification = new ApplePushNotification(message);
Debug.Log("Push opened Notification event: " + pushNotification);
#endif
}
void PushNotificationDeletedCallback(string message) {
#if UNITY_ANDROID
Debug.Log("PushNotificationDeletedCallback message: " + message);
PushNotification pushNotification = new PushNotification(message);
Debug.Log("Push Notification dismissed: " + pushNotification);
#endif
}
}
```
#### Step 3.1: Enable push received listener
The push received listener is fired when a user receives a push notification while actively using the application (such as when the app is foregrounded). Set the push received listener in the Braze configuration editor. If you need to configure your game object listener at runtime, use `AppboyBinding.ConfigureListener()` and specify `BrazeUnityMessageType.PUSH_RECEIVED`.
#### Step 3.2: Enable push opened listener
The push opened listener is fired when a user launches the app by clicking on a push notification. To send the push payload to Unity, set the name of your game object and push opened listener callback method under the **Set Push Opened Listener** option:

If you need to configure your game object listener at runtime, use `AppboyBinding.ConfigureListener()` and specify `BrazeUnityMessageType.PUSH_OPENED`.
#### Push listener example
The following example implements the `AppboyCallback` game object using a callback method name of `PushNotificationReceivedCallback` and `PushNotificationOpenedCallback`, respectively.

```csharp
public class MainMenu : MonoBehaviour {
void PushNotificationReceivedCallback(string message) {
#if UNITY_ANDROID
Debug.Log("PushNotificationReceivedCallback message: " + message);
PushNotification pushNotification = new PushNotification(message);
Debug.Log("Push Notification received: " + pushNotification);
#elif UNITY_IOS
ApplePushNotification pushNotification = new ApplePushNotification(message);
Debug.Log("Push received Notification event: " + pushNotification);
#endif
}
void PushNotificationOpenedCallback(string message) {
#if UNITY_ANDROID
Debug.Log("PushNotificationOpenedCallback message: " + message);
PushNotification pushNotification = new PushNotification(message);
Debug.Log("Push Notification opened: " + pushNotification);
#elif UNITY_IOS
ApplePushNotification pushNotification = new ApplePushNotification(message);
Debug.Log("Push opened Notification event: " + pushNotification);
#endif
}
}
```
By updating your `AndroidManifest.xml` in the [previous step](#unity_step-21-update-androidmanifestxml), push listeners were automatically set up when you added the following lines. So, no further setup is required.
```xml
```
**Note:**
To learn more about ADM push listeners, see [Amazon: Integrate Amazon Device Messaging](https://developer.amazon.com/docs/video-skills-fire-tv-apps/integrate-adm.html).
## Optional configurations
#### Deep linking to in-app resources
Although Braze can handle standard deep links (such as website URLs, Android URIs, etc.) by default, creating custom deep links requires an additional Manifest setup.
For setup guidance, visit [Deep Linking to In-App Resources](https://developer.android.com/training/app-links/deep-linking).
#### Adding Braze push notification icons
To add push icons to your project, create an Android Archive (AAR) plug-in or Android library that contains the icon image files. For steps and information, refer to Unity's documentation: [Android Library Projects and Android Archive plug-ins](https://docs.unity3d.com/Manual/AndroidAARPlugins.html).
#### Push token callback
To receive a copy of Braze device tokens from the OS, set a delegate using `AppboyBinding.SetPushTokenReceivedFromSystemDelegate()`.
There are no optional configurations for ADM at this time.
## Prerequisites
Before you can use this feature, you'll need to [integrate the .NET MAUI Braze SDK](https://www.braze.com/docs/developer_guide/sdk_integration/?sdktab=.net%20maui%20(xamarin)).
## Setting up push notifications
**Tip:**
To see how namespaces change between Java and C#, check out our [Xample sample app on GitHub](https://github.com/braze-inc/braze-xamarin-sdk/tree/master/appboy-component/samples/android-net-maui/BrazeAndroidMauiSampleApp/BrazeAndroidMauiSampleApp).
To integrate push notifications for .NET MAUI (formerly Xamarin), you'll need to complete the steps for native Android push notifications. The following steps are only a summary. For a full walkthrough, see the [native push notification guide](https://www.braze.com/docs/developer_guide/platform_integration_guides/android/push_notifications/?tab=android/).
### Step 1: Update your project
1. Add Firebase to your Android project.
2. Add the Cloud Messaging library to your Android project's `build.gradle`:
```gradle
implementation "google.firebase:firebase-messaging:+"
```
### Step 2: Create your JSON credentials
1. In Google Cloud, enable the [Firebase Cloud Messaging API](https://console.cloud.google.com/apis/library/fcm.googleapis.com).
2. Select **Service Accounts** > your project > **Create Service Account**, then enter a service account name, ID, and description. When you're finished, select **Create and continue**.
3. In the **Role** field, find and select **Firebase Cloud Messaging API Admin** from the list of roles.
4. In **Service Accounts**, choose your project, then select **Actions** > **Manage Keys** > **Add Key** > **Create new key**. Choose **JSON**, then select **Create**.
### Step 3: Upload your JSON credentials
1. In Braze, select **Settings** > **App Settings**. Under your Android app's **Push Notification Settings**, choose **Firebase**, then select **Upload JSON File** and upload the credentials you generated earlier. When you're finished, select **Save**.
2. Enable automatic FCM token registration, by going to Firebase Console. Open your project, then select **Settings** > **Project settings**. Select **Cloud Messaging**, then under **Firebase Cloud Messaging API (V1)**, copy the number in the **Sender ID** field.
3. In your Android Studio project and the following to your `braze.xml`.
```xml
trueFIREBASE_SENDER_ID
```
**Important:**
To prevent Braze from triggering unnecessary network requests every time you send silent push notifications, remove any automatic network requests configured in your `Application` class's `onCreate()` method. For more information see, [Android Developer Reference: Application](https://developer.android.com/reference/android/app/Application).
### Step 1: Complete the initial setup
See the [Swift integration instructions](https://www.braze.com/docs/developer_guide/push_notifications/?sdktab=swift) for information about setting up your application with push and storing your credentials on our server. Refer to the [iOS MAUI](https://github.com/braze-inc/braze-xamarin-sdk/tree/master/appboy-component/samples/ios-net-maui/BrazeiOSMauiSampleApp) sample application for more details.
### Step 2: Request push notifications permission
Our .NET MAUI SDK now supports automatic push set up. Set up push automation and permissions by adding the following code to your Braze instance configuration:
```csharp
configuration.Push.Automation = new BRZConfigurationPushAutomation(true);
configuration.Push.Automation.RequestAuthorizationAtLaunch = false;
```
Refer to the [iOS MAUI](https://github.com/braze-inc/braze-xamarin-sdk/tree/master/appboy-component/samples/ios-net-maui/BrazeiOSMauiSampleApp) sample application for more details. For more details, see the Xamarin documentation for [Enhanced User Notifications in Xamarin.iOS](https://learn.microsoft.com/en-us/previous-versions/xamarin/ios/platform/user-notifications/enhanced-user-notifications?tabs=macos).
# Customize push notifications for the Braze SDK
Source: /docs/developer_guide/push_notifications/customization/index.md
# Customize push notifications
> Learn how to customize push notifications for the Braze SDK.
## Prerequisites
Before you can use this feature, you'll need to [integrate the Android Braze SDK](https://www.braze.com/docs/developer_guide/sdk_integration/?sdktab=android). You'll also need to [set up push notifications](https://www.braze.com/docs/developer_guide/push_notifications/?sdktab=android).
## Using a callback for push events {#push-callback}
Braze provides a [`subscribeToPushNotificationEvents()`](https://braze-inc.github.io/braze-android-sdk/kdoc/braze-android-sdk/com.braze/-i-braze/subscribe-to-push-notification-events.html) callback for when push notifications are received, opened, or dismissed. It is recommended to place this callback in your `Application.onCreate()` in order to not miss any events occurring while your application is not running.
**Note:**
If previously using a Custom Broadcast Receiver for this functionality in your application, you can safely remove it in favor of this integration option.
```java
Braze.getInstance(context).subscribeToPushNotificationEvents(event -> {
final BrazeNotificationPayload parsedData = event.getNotificationPayload();
//
// The type of notification itself
//
final boolean isPushOpenEvent = event.getEventType() == BrazePushEventType.NOTIFICATION_OPENED;
final boolean isPushReceivedEvent = event.getEventType() == BrazePushEventType.NOTIFICATION_RECEIVED;
// Sent when a user has dismissed a notification
final boolean isPushDeletedEvent = event.getEventType() == BrazePushEventType.NOTIFICATION_DELETED;
//
// Notification data
//
final String pushTitle = parsedData.getTitleText();
final Long pushArrivalTimeMs = parsedData.getNotificationReceivedTimestampMillis();
final String deeplink = parsedData.getDeeplink();
//
// Custom KVP data
//
final String myCustomKvp1 = parsedData.getBrazeExtras().getString("my first kvp");
final String myCustomKvp2 = parsedData.getBrazeExtras().getString("my second kvp");
});
```
```kotlin
Braze.getInstance(context).subscribeToPushNotificationEvents { event ->
val parsedData = event.notificationPayload
//
// The type of notification itself
//
val isPushOpenEvent = event.eventType == BrazePushEventType.NOTIFICATION_OPENED
val isPushReceivedEvent = event.eventType == BrazePushEventType.NOTIFICATION_RECEIVED
// Sent when a user has dismissed a notification
val isPushDeletedEvent = event.eventType == BrazePushEventType.NOTIFICATION_DELETED
//
// Notification data
//
val pushTitle = parsedData.titleText
val pushArrivalTimeMs = parsedData.notificationReceivedTimestampMillis
val deeplink = parsedData.deeplink
//
// Custom KVP data
//
val myCustomKvp1 = parsedData.brazeExtras.getString("my first kvp")
val myCustomKvp2 = parsedData.brazeExtras.getString("my second kvp")
}
```
**Tip:**
With notification action buttons, `BRAZE_PUSH_INTENT_NOTIFICATION_OPENED` intents fire when buttons with `opens app` or `deep link` actions are clicked. Deep link and extras handling remains the same. Buttons with `close` actions don't fire `BRAZE_PUSH_INTENT_NOTIFICATION_OPENED` intents and dismiss the notification automatically.
**Important:**
Create your push notification listener in `Application.onCreate` to ensure your listener is triggered after an end-user taps a notification while your app is in a terminated state.
## Customizing notification display {#customization-display}
### Step 1: Create your custom notification factory
In some scenarios, you may wish to customize push notifications in ways that would be cumbersome or unavailable server side. To give you complete control of notification display, we've added the ability to define your own [`IBrazeNotificationFactory`](https://braze-inc.github.io/braze-android-sdk/kdoc/braze-android-sdk/com.braze/-i-braze-notification-factory/index.html) to create notification objects for display by Braze.
If a custom `IBrazeNotificationFactory` is set, Braze will call your factory's `createNotification()` method upon push receipt before the notification is displayed to the user. Braze will pass in a `Bundle` containing Braze push data and another `Bundle` containing custom key-value pairs sent either via the dashboard or the messaging APIs:
Braze will pass in a [`BrazeNotificationPayload`](https://braze-inc.github.io/braze-android-sdk/kdoc/braze-android-sdk/com.braze.models.push/-braze-notification-payload/index.html) containing data from the Braze push notification.
```java
// Factory method implemented in your custom IBrazeNotificationFactory
@Override
public Notification createNotification(BrazeNotificationPayload brazeNotificationPayload) {
// Example of getting notification title
String title = brazeNotificationPayload.getTitleText();
// Example of retrieving a custom KVP ("my_key" -> "my_value")
String customKvp = brazeNotificationPayload.getBrazeExtras().getString("my_key");
}
```
```kotlin
// Factory method implemented in your custom IBrazeNotificationFactory
override fun createNotification(brazeNotificationPayload: BrazeNotificationPayload): Notification {
// Example of getting notification title
val title = brazeNotificationPayload.getTitleText()
// Example of retrieving a custom KVP ("my_key" -> "my_value")
val customKvp = brazeNotificationPayload.getBrazeExtras().getString("my_key")
}
```
You can return `null` from your custom `createNotification()` method to not show the notification at all, use `BrazeNotificationFactory.getInstance().createNotification()` to obtain our default `notification` object for that data and modify it before display, or generate a completely separate `notification` object for display.
**Note:**
For documentation on Braze push data keys, refer to the [Android SDK](https://braze-inc.github.io/braze-android-sdk/kdoc/braze-android-sdk/com.braze/-constants/index.html).
### Step 2: Set your custom notification factory
To instruct Braze to use your custom notification factory, use the `setCustomBrazeNotificationFactory` method to set your [`IBrazeNotificationFactory`](https://braze-inc.github.io/braze-android-sdk/kdoc/braze-android-sdk/com.braze/-i-braze-notification-factory/index.html):
```java
setCustomBrazeNotificationFactory(IBrazeNotificationFactory brazeNotificationFactory);
```
```kotlin
setCustomBrazeNotificationFactory(brazeNotificationFactory: IBrazeNotificationFactory)
```
The recommended place to set your custom `IBrazeNotificationFactory` is in the `Application.onCreate()` application lifecycle method (not activity). This will allow the notification factory to be set correctly whenever your app process is active.
**Important:**
Creating your own notification from scratch is an advanced use case and should be done only with thorough testing and a deep understanding of the Braze push functionality. For example, you must make sure your notification logs push opens correctly.
To unset your custom [`IBrazeNotificationFactory`](https://braze-inc.github.io/braze-android-sdk/kdoc/braze-android-sdk/com.braze/-i-braze-notification-factory/index.html) and return to default Braze handling for push, pass in `null` to our custom notification factory setter:
```java
setCustomBrazeNotificationFactory(null);
```
```kotlin
setCustomBrazeNotificationFactory(null)
```
## Rendering multicolor text
In Braze SDK version 3.1.1, HTML can be sent to a device to render multicolor text in push notifications.
{: style="max-width:40%;"}
This example is rendered with the following HTML:
```html
MultiColorPush
testmessage
```
Keep in mind that, Android limits which HTML elements and tags are valid in your push notifications. For example, `marquee` is not allowed.
**Important:**
Multicolor text rendering is device-specific and may not display based on Android device or version.
To render multicolor text in a push notification, you can update your `braze.xml` or `BrazeConfig`:
Add the following in your `braze.xml`:
```xml
true
```
Add the following in your [`BrazeConfig`](https://www.braze.com/docs/developer_guide/platform_integration_guides/android/advanced_use_cases/runtime_configuration/#runtime-configuration):
```java
BrazeConfig brazeConfig = new BrazeConfig.Builder()
.setPushHtmlRenderingEnabled(true)
.build();
Braze.configure(this, brazeConfig);
```
```kotlin
val brazeConfig = BrazeConfig.Builder()
.setPushHtmlRenderingEnabled(true)
.build()
Braze.configure(this, brazeConfig)
```
### Supported HTML tags
Currently, Google doesn't list their supported HTML tags for Android directly in their documentation—this information can only be found in their [Git repository's `Html.java` file](https://android.googlesource.com/platform/frameworks/base/+/master/core/java/android/text/Html.java). Keep this in mind when referencing the following table, as this information was pulled from this file, and their supported HTML tags could be subject to change.
Category
HTML Tag
Description
Basic Text Styling
<b>, <strong>
Bold text
<i>, <em>
Italic text
<u>
Underline text
<s>, <strike>, <del>
Strikethrough text
<sup>
Superscript text
<sub>
Subscript text
<tt>
Monospace text
Size/Font
<big>, <small>
Relative text size changes
<font color="...">
Sets foreground color
<span> (with inline CSS)
Inline styles (e.g., color, background)
Paragraph & Block
<p>, <div>
Block-level sections
<br>
Line break
<blockquote>
Quoted block
<ul> + <li>
Unordered list with bullets
Headings
<h1> - <h6>
Headings (various sizes)
Links & Images
<a href="...">
Clickable link
<img src="...">
Inline image
Other Inline
<em>, <strong>, <dfn>, <cite>
Synonyms for italic or bold
{: .reset-td-br-1 .reset-td-br-2 .reset-td-br-3 role="presentation" }
## Rendering inline images
### How it works
You can showcase a larger image within your Android push notification using inline image push. With this design, users won't have to manually expand the push to enlarge the image. Unlike regular Android push notifications, inline image push images are in a 3:2 aspect ratio.
{: style="max-width:50%;"}
### Compatibility
While you can send inline images to any device, devices and SDKs that don't meet the minimum versions will display a standard image instead. For inline images to display properly, both the Android Braze SDK v10.0.0+ and a device running Android M+ are required. The SDK must also be enabled for the image to render.
**Note:**
Devices running Android 12 will render differently due to changes in custom push notification styles.
### Sending an inline image push
When creating an Android push message, this feature is available in the **Notification Type** dropdown.

## Settings
There are many advanced settings available for Android push notifications sent through the Braze dashboard. This article will describe these features and how to use them successfully.
### Notification ID {#notification-id}
A **Notification ID** is a unique identifier for a message category of your choosing that informs the messaging service to only respect the most recent message from that ID. Setting a notification ID allows you to send just the most recent and relevant message, rather than a stack of outdated, irrelevant ones.
### Firebase Messaging Delivery priority {#fcm-priority}
The [Firebase Messaging Delivery Priority](https://firebase.google.com/docs/cloud-messaging/concept-options#setting-the-priority-of-a-message) field lets you control whether a push is sent with "normal" or "high" priority to Firebase Cloud Messaging.
### Time to live (TTL) {#ttl}
The **Time to Live** (TTL) field allows you to set a custom length of time to store messages with the push messaging service. The default values for time to live are four weeks for FCM and 31 days for ADM.
### Summary text {#summary-text}
The summary text allows you to set additional text in the expanded notification view. It also serves as a caption for notifications with images.
{: style="max-width:65%;"}
The summary text will display under the body of the message in the expanded view.
{: style="max-width:65%;"}
For push notifications that include images, the message text will be shown in the collapsed view, while the summary text will be displayed as the image caption when the notification is expanded.
### Custom URIs {#custom-uri}
The **Custom URI** feature allows you to specify a Web URL or an Android resource to navigate to when the notification is clicked. If no custom URI is specified, clicking on the notification brings users into your app. You can use the custom URI to deep link inside your app and direct users to resources that exist outside of your app. This can be specified via the [Messaging API](https://www.braze.com/docs/api/endpoints/messaging/) or our dashboard under **Advanced Settings** in the push composer as pictured:

### Notification display priority {#notification-priority}
**Important:**
The Notification Display Priority setting is no longer used on devices running Android O or newer. For newer devices, set the priority through [notification channel configuration](https://developer.android.com/training/notify-user/channels#importance).
The priority level of a push notification affects how your notification is displayed in the notification tray relative to other notifications. It can also affect the speed and manner of delivery, as normal and lower priority messages may be sent with slightly higher latency or batched to preserve battery life, whereas high priority messages are always sent immediately.
In Android O, notification priority became a property of notification channels. You will need to work with your developer to define the priority for a channel during its configuration and then use the dashboard to select the proper channel when sending your notification sounds. For devices running versions of Android before O, specifying a priority level for Android notifications is possible via the Braze dashboard and messaging API.
To message your full user base with a specific priority, we recommend that you indirectly specify the priority through [notification channel configuration](https://developer.android.com/training/notify-user/channels#importance) (to target O+ devices) *and* send the individual priority from the dashboard (to target <O devices).
The priority levels that you can set on Android or Fire OS push notifications are:
| Priority | Description/Intended Use | `priority` value (for API messages) |
|----------|--------------------------|-------------------------------------|
| Max | Urgent or time-critical messages | `2` |
| High | Important communication, such as a new message from a friend | `1` |
| Default | Most notifications - use if your message doesn't explicitly fall under any of the other priority types | `0` |
| Low | Information that you want users to know about but does not require immediate action | `-1` |
| Min | Contextual or background information. | `-2` |
{: .reset-td-br-1 .reset-td-br-2 .reset-td-br-3 role="presentation" }
For more information, refer to Google's [Android notification](http://developer.android.com/design/patterns/notifications.html) documentation.
### Sounds {#sounds}
In Android O, notification sounds became a property of notification channels. You will need to work with your developer to define the sound for a channel during its configuration and then use the dashboard to select the proper channel when sending your notifications.
For devices running versions of Android before O, Braze allows you to set the sound of an individual push message through the dashboard composer. You can do so by specifying a local sound resource on the device (for example, `android.resource://com.mycompany.myapp/raw/mysound`). Specifying "default" in this field will play the default notification sound on the device. This can be specified via the [Messaging API](https://www.braze.com/docs/api/endpoints/messaging/) or the dashboard under **Advanced Settings** in the push composer.

Enter the full sound resource URI (for example, `android.resource://com.mycompany.myapp/raw/mysound`) into the dashboard prompt.
To message your full user base with a specific sound, we recommend that you indirectly specify the sound through [notification channel configuration](https://developer.android.com/training/notify-user/channels) (to target O+ devices) *and* send the individual sound from the dashboard (to target <O devices).
## Prerequisites
Before you can use this feature, you'll need to [integrate the Swift Braze SDK](https://www.braze.com/docs/developer_guide/sdk_integration/?sdktab=swift). You'll also need to [set up push notifications](https://www.braze.com/docs/developer_guide/push_notifications/?sdktab=swift).
## Customizing action buttons {#push-action-buttons-integration}
The Braze Swift SDK provides URL handling support for push action buttons. There are four sets of default push action buttons for Braze default push categories: `Accept/Decline`, `Yes/No`, `Confirm/Cancel`, and `More`.
{: style="max-width:60%"}
### Manually registering action buttons
**Important:**
Manually registering push action buttons are not recommended.
If you [set up push notifications](https://www.braze.com/docs/developer_guide/push_notifications/?sdktab=swift) using the `configuration.push.automation` configuration option, Braze automatically registers the action buttons for the default push categories and handles the push action button click analytics and URL routing.
However, you can choose to manually register push action buttons instead.
#### Step 1: Adding Braze default push categories {#registering}
Use the following code to register for the default push categories when you [register for push](https://www.braze.com/docs/developer_guide/platform_integration_guides/swift/push_notifications/integration/#step-4-register-push-tokens-with-braze):
a
```swift
UNUserNotificationCenter.current().setNotificationCategories(Braze.Notifications.categories)
```
```objc
[[UNUserNotificationCenter currentNotificationCenter] setNotificationCategories:BRZNotifications.categories];
```
**Note:**
Clicking on push action buttons with background activation mode will only dismiss the notification and not open the app. The next time the user opens the app, the button click analytics for these actions will be flushed to the server.
#### Step 2: Enable interactive push handling {#enable-push-handling}
To enable our push action button handling, including click analytics and URL routing, add the following code to your app's `didReceive(_:completionHandler:)` delegate method:
```swift
AppDelegate.braze?.notifications.handleUserNotification(response: response, withCompletionHandler: completionHandler)
```
```objc
[AppDelegate.braze.notifications handleUserNotificationWithResponse:response
withCompletionHandler:completionHandler];
```
If you use the `UNNotification` framework and have implemented the Braze [notification methods](https://www.braze.com/docs/developer_guide/platform_integration_guides/swift/push_notifications/integration/#step-5-enable-push-handling), you should already have this method integrated.
## Customizing push categories {#customizing-push-categories}
In addition to providing a set of default push categories, Braze supports custom notification categories and actions. After you register categories in your application, you can use the Braze dashboard to send these custom notification categories to your users.
Here's an example that leverages the `LIKE_CATEGORY` displayed on the device:

### Step 1: Register a category
To register a category in your app, use a similar approach to the following:
```swift
Braze.Notifications.categories.insert(
.init(identifier: "LIKE_CATEGORY",
actions: [
.init(identifier: "LIKE_IDENTIFIER", title: "Like", options: [.foreground]),
.init(identifier: "UNLIKE_IDENTIFIER", title: "Unlike", options: [.foreground])
],
intentIdentifiers: []
)
)
UNUserNotificationCenter.current().setNotificationCategories(Braze.Notifications.categories)
```
```objc
NSMutableSet *categories = [BRZNotifications.categories mutableCopy];
UNNotificationAction *likeAction = [UNNotificationAction actionWithIdentifier:@"LIKE_IDENTIFIER"
title:@"Like"
options:UNNotificationActionOptionForeground];
UNNotificationAction *unlikeAction = [UNNotificationAction actionWithIdentifier:@"UNLIKE_IDENTIFIER"
title:@"Unlike"
options:UNNotificationActionOptionForeground];
UNNotificationCategory *likeCategory = [UNNotificationCategory categoryWithIdentifier:@"LIKE_CATEGORY"
actions:@[likeAction, unlikeAction]
intentIdentifiers:@[]
options:UNNotificationCategoryOptionNone];
[categories addObject:likeCategory];
[UNUserNotificationCenter.currentNotificationCenter setNotificationCategories:categories];
```
**Note:**
When you create a `UNNotificationAction`, you can specify a list of action options. For example, `.foreground` lets your users open your app after tapping the action button. This is necessary for navigational on-click behaviors, such as "Open App" and "Deep Link into Application". If you want an action button that simply dismisses the notification without opening the app, leave `.foreground` out of the action's `options` array. For more information, see [`UNNotificationActionOptions`](https://developer.apple.com/documentation/usernotifications/unnotificationactionoptions).
### Step 2: Select your categories
After you register a category, use the Braze dashboard to send notifications of that type to users.
**Tip:**
You only need to define action buttons on the Braze dashboard for behaviors that can't be created locally in your Swift code, such as deep linking into your app or redirecting to a web URL. These actions need to be configured on the dashboard so they can define what URL or deep link to open. For action buttons that simply dismiss the notification without opening the app, you don't need to configure them on the dashboard—dismissal behavior is handled automatically by iOS. Just register your custom category and its actions in your app code, then enter the matching category name on the dashboard.
1. In the Braze dashboard, select **Messaging** > **Push Notifications**, then choose your iOS [push campaign](https://www.braze.com/docs/user_guide/message_building_by_channel/push/creating_a_push_message).
2. Under **Compose push notification**, turn on **Action Buttons**.
3. In the **iOS Notification Category** dropdown, select **Enter pre-registered custom iOS Category**.
4. Finally, enter one of the categories you created earlier. The following example, uses the custom category: `LIKE_CATEGORY`.
### Example: Custom push category {#example-custom-push-category}
Suppose you want to create a push notification with two action buttons: **Manage**, which deep links into your app, and **Keep**, which simply dismisses the notification.
In the following example, the `MANAGE_IDENTIFIER` action includes the `.foreground` option, which opens the app when tapped—this is necessary because it will deep link into a specific part of the app. The `KEEP_IDENTIFIER` action uses an empty options array, meaning it will dismiss the notification without opening the app.
```swift
Braze.Notifications.categories.insert(
.init(identifier: "YOUR_CATEGORY",
actions: [
.init(identifier: "KEEP_IDENTIFIER", title: "Keep", options: []),
.init(identifier: "MANAGE_IDENTIFIER", title: "Manage", options: [.foreground])
],
intentIdentifiers: []
)
)
UNUserNotificationCenter.current().setNotificationCategories(Braze.Notifications.categories)
```
Because `MANAGE_IDENTIFIER` deep links into the app, you would set up that action button on the Braze dashboard with the associated deep link URL. However, you don't need to define a button on the dashboard for `KEEP_IDENTIFIER` because it only dismisses the notification. On the dashboard, you only need to enter the category name (for example, `YOUR_CATEGORY`) to match what you registered in your app code.
## Customizing badges
Badges are small icons that are ideal for getting a user's attention. You can specify a badge count in the [**Settings**](https://www.braze.com/docs/developer_guide/push_notifications/customization/?sdktab=swift#swift_settings) tab when you compose a push notification using the Braze dashboard. You may also update your badge count manually through your application's [`applicationIconBadgeNumber`](https://developer.apple.com/library/ios/documentation/UIKit/Reference/UIApplication_Class/index.html#//apple_ref/occ/instp/UIApplication/applicationIconBadgeNumber) property or the [remote notification payload](https://developer.apple.com/library/content/documentation/NetworkingInternet/Conceptual/RemoteNotificationsPG/CreatingtheNotificationPayload.html#//apple_ref/doc/uid/TP40008194-CH10-SW1).
Braze will automatically clear the badge count when a Braze notification is received while the app is in the foreground. Manually setting the badge number to 0 will also clear notifications in the notification center.
If you do not have a plan for clearing badges as part of normal app operation or by sending pushes that clear the badge, you should clear the badge when the app becomes active by adding the following code to your app's `applicationDidBecomeActive:` delegate method:
```swift
// For iOS 16.0+
let center = UNUserNotificationCenter.current()
do {
try await center.setBadgeCount(0)
} catch {
// Handle errors
}
// Prior to iOS 16. Deprecated in iOS 17+.
UIApplication.shared.applicationIconBadgeNumber = 0
```
```objc
// For iOS 16.0+
UNUserNotificationCenter *center = [UNUserNotificationCenter currentNotificationCenter];
[center setBadgeCount:0 withCompletionHandler:^(NSError * _Nullable error) {
if (error != nil) {
// Handle errors
}
}];
// Prior to iOS 16. Deprecated in iOS 17+.
[UIApplication sharedApplication].applicationIconBadgeNumber = 0;
```
## Customizing sounds
### Step 1: Host the sound in your app
Custom push notification sounds must be hosted locally within the main bundle of your app. The following audio data formats are accepted:
- Linear PCM
- MA4
- µLaw
- aLaw
You can package the audio data in an AIFF, WAV, or CAF file. In Xcode, add the sound file to your project as a non-localized resource of the application bundle.
**Note:**
Custom sounds must be under 30 seconds when played. If a custom sound is over that limit, the default system sound is played instead.
#### Converting sound files
You can use the afconvert tool to convert sounds. For example, to convert the 16-bit linear PCM system sound Submarine.aiff to IMA4 audio in a CAF file, use the following command in the terminal:
```bash
afconvert /System/Library/Sounds/Submarine.aiff ~/Desktop/sub.caf -d ima4 -f caff -v
```
**Tip:**
You can inspect a sound to determine its data format by opening it in QuickTime Player and choosing **Show Movie Inspector** from the **Movie** menu.
### Step 2: Provide a protocol URL for the sound
You must specify a protocol URL that directs to the location of the sound file in your app. There are two methods for doing this:
* Use the `sound` parameter of the [Apple push object](https://www.braze.com/docs/api/objects_filters/messaging/apple_object#apple-push-object) to pass the URL to Braze.
* Specify the URL in the dashboard. In the [push composer](https://www.braze.com/docs/user_guide/message_building_by_channel/push/creating_a_push_message/#step-3-select-notification-type-ios-and-android), select **Settings** and enter the protocol URL in the **Sound** field.

If the specified sound file doesn't exist or the keyword "default" is entered, Braze will use the default device alert sound. Aside from our dashboard, sound can also be configured via our [messaging API][12].
See the Apple Developer Documentation regarding [preparing custom alert sounds](https://developer.apple.com/library/content/documentation/NetworkingInternet/Conceptual/RemoteNotificationsPG/SupportingNotificationsinYourApp.html) for additional information.
## Settings
When creating a push campaign through the dashboard, click the **Settings** tab on the **Compose** step to view the advanced settings available.

### Key-value pairs
Braze allows you to send custom-defined string key-value pairs, known as `extras`, along with a push notification to your application. Extras can be defined via the dashboard or API and will be available as key-value pairs within the `notification` dictionary passed to your push delegate implementations.
### Alert options
Select the **Alert Options** checkbox to see a dropdown of key-values available to adjust how the notification appears on devices.
### Adding content-available flag
Check the **Add Content-Available Flag** checkbox to instruct devices to download new content in the background. Most commonly, this can be checked if you are interested in sending [silent notifications](https://www.braze.com/docs/developer_guide/push_notifications/silent/?sdktab=swift).
### Adding mutable-content flag
Check the **Add Mutable-Content Flag** checkbox to enable advanced receiver customization. This flag will automatically be sent when composing a [rich notification](https://www.braze.com/docs/developer_guide/push_notifications/rich/?sdktab=swift), regardless of the value of this checkbox.
### Collapse ID
Specify a collapse ID to coalesce similar notifications. If you send multiple notifications with the same collapse ID, the device will only show the most recently received notification. Refer to Apple's documentation on [coalesced notifications](https://developer.apple.com/library/content/documentation/NetworkingInternet/Conceptual/RemoteNotificationsPG/APNSOverview.html#//apple_ref/doc/uid/TP40008194-CH8-SW1).
### Expiry
Checking the **Expiry** checkbox will allow setting an expiration time for your message. Should a user's device lose connectivity, Braze will continue to try and send the message until the specified time. If this is not set, the platform will default to an expiration of 30 days. Note that push notifications that expire before delivery are not considered failed and will not be recorded as a bounce.
## Prerequisites
Before you can use this feature, you'll need to [integrate the Android Braze SDK](https://www.braze.com/docs/developer_guide/sdk_integration/?sdktab=android). You'll also need to [set up push notifications](https://www.braze.com/docs/developer_guide/push_notifications/?sdktab=android).
## Settings
There are many advanced settings available for FireOS push notifications sent through the Braze dashboard. This article will describe these features and how to use them successfully.

### Time to live (TTL) {#ttl}
The **Time to Live** (TTL) field allows you to set a custom length of time to store messages with the push messaging service. The default values for time to live are four weeks for FCM and 31 days for ADM.
### Summary text {#summary-text}
The summary text allows you to set additional text in the expanded notification view. It also serves as a caption for notifications with images.
{: style="max-width:65%;"}
The summary text will display under the body of the message in the expanded view.
{: style="max-width:65%;"}
For push notifications that include images, the message text will be shown in the collapsed view, while the summary text will be displayed as the image caption when the notification is expanded.
### Custom URIs {#custom-uri}
The **Custom URI** feature allows you to specify a Web URL or an Android resource to navigate to when the notification is clicked. If no custom URI is specified, clicking on the notification brings users into your app. You can use the custom URI to deep link inside your app and direct users to resources that exist outside of your app. This can be specified via the [Messaging API](https://www.braze.com/docs/api/endpoints/messaging) or our dashboard under **Advanced Settings** in the push composer as pictured:

### Notification display priority
**Important:**
The Notification Display Priority setting is no longer used on devices running Android O or newer. For newer devices, set the priority through [notification channel configuration](https://developer.android.com/training/notify-user/channels#importance).
The priority level of a push notification affects how your notification is displayed in the notification tray relative to other notifications. It can also affect the speed and manner of delivery, as normal and lower priority messages may be sent with slightly higher latency or batched to preserve battery life whereas high priority messages are always sent immediately.
In Android O, notification priority became a property of notification channels. You will need to work with your developer to define the priority for a channel during its configuration and then use the dashboard to select the proper channel when sending your notification sounds. For devices running versions of Android before O, specifying a priority level for FireOS notifications is possible via the Braze dashboard and messaging API.
To message your full user base with a specific priority, we recommend that you indirectly specify the priority through [notification channel configuration](https://developer.android.com/training/notify-user/channels#importance) (to target O+ devices) *and* send the individual priority from the dashboard (to target <O devices).
The priority levels that you can set on Fire OS push notifications are:
| Priority | Description/Intended Use | `priority` value (for API messages) |
|----------|--------------------------|-------------------------------------|
| Max | Urgent or time-critical messages | `2` |
| High | Important communication, such as a new message from a friend | `1` |
| Default | Most notifications - use if your message doesn't explicitly fall under any of the other priority types | `0` |
| Low | Information that you want users to know about but does not require immediate action | `-1` |
| Min | Contextual or background information. | `-2` |
{: .reset-td-br-1 .reset-td-br-2 .reset-td-br-3 role="presentation" }
For more information, refer to Google's [Android notification](http://developer.android.com/design/patterns/notifications.html) documentation.
### Sounds {#sounds}
In Android O, notification sounds became a property of notification channels. You will need to work with your developer to define the sound for a channel during its configuration and then use the dashboard to select the proper channel when sending your notifications.
For devices running versions of Android before O, Braze allows you to set the sound of an individual push message through the dashboard composer. You can do so by specifying a local sound resource on the device (for example, `android.resource://com.mycompany.myapp/raw/mysound`). Specifying "default" in this field will play the default notification sound on the device. This can be specified via the [Messaging API](https://www.braze.com/docs/api/endpoints/messaging) or the dashboard under **Settings** in the push composer.

Enter the full sound resource URI (for example, `android.resource://com.mycompany.myapp/raw/mysound`) into the dashboard prompt.
To message your full user base with a specific sound, we recommend that you indirectly specify the sound through [notification channel configuration](https://developer.android.com/training/notify-user/channels) (to target O+ devices) *and* send the individual sound from the dashboard (to target <O devices).
# Deep linking in push notifications for the Braze SDK
Source: /docs/developer_guide/push_notifications/deep_linking/index.md
# Deep linking in push notifications
> Learn how to set up silent push notifications for the Braze SDK.
## Prerequisites
Before you can use this feature, you'll need to [integrate the Android Braze SDK](https://www.braze.com/docs/developer_guide/sdk_integration/?sdktab=android).
## Creating a universal delegate
The Android SDK provides the ability to set a single delegate object to custom handle all deep links opened by Braze across Content Cards, in-app messages, and push notifications.
Your delegate object should implement the [`IBrazeDeeplinkHandler`](https://braze-inc.github.io/braze-android-sdk/kdoc/braze-android-sdk/com.braze.ui/-braze-deeplink-handler/index.html) interface and be set using [`BrazeDeeplinkHandler.setBrazeDeeplinkHandler()`](https://braze-inc.github.io/braze-android-sdk/kdoc/braze-android-sdk/com.braze.ui/-braze-deeplink-handler/-companion/set-braze-deeplink-handler.html). In most cases, the delegate should be set in your app's `Application.onCreate()`.
The following is an example of overriding the default [`UriAction`](https://braze-inc.github.io/braze-android-sdk/kdoc/braze-android-sdk/com.braze.ui.actions/-uri-action/index.html) behavior with custom intent flags and custom behavior for YouTube URLs:
```java
public class CustomDeeplinkHandler implements IBrazeDeeplinkHandler {
private static final String TAG = BrazeLogger.getBrazeLogTag(CustomDeeplinkHandler.class);
@Override
public void gotoUri(Context context, UriAction uriAction) {
String uri = uriAction.getUri().toString();
// Open YouTube URLs in the YouTube app and not our app
if (!StringUtils.isNullOrBlank(uri) && uri.contains("youtube.com")) {
uriAction.setUseWebView(false);
}
CustomUriAction customUriAction = new CustomUriAction(uriAction);
customUriAction.execute(context);
}
public static class CustomUriAction extends UriAction {
public CustomUriAction(@NonNull UriAction uriAction) {
super(uriAction);
}
@Override
protected void openUriWithActionView(Context context, Uri uri, Bundle extras) {
Intent intent = getActionViewIntent(context, uri, extras);
intent.setFlags(Intent.FLAG_ACTIVITY_NEW_TASK | Intent.FLAG_ACTIVITY_CLEAR_TOP | Intent.FLAG_ACTIVITY_SINGLE_TOP);
if (intent.resolveActivity(context.getPackageManager()) != null) {
context.startActivity(intent);
} else {
BrazeLogger.w(TAG, "Could not find appropriate activity to open for deep link " + uri + ".");
}
}
}
}
```
```kotlin
class CustomDeeplinkHandler : IBrazeDeeplinkHandler {
override fun gotoUri(context: Context, uriAction: UriAction) {
val uri = uriAction.uri.toString()
// Open YouTube URLs in the YouTube app and not our app
if (!StringUtils.isNullOrBlank(uri) && uri.contains("youtube.com")) {
uriAction.useWebView = false
}
val customUriAction = CustomUriAction(uriAction)
customUriAction.execute(context)
}
class CustomUriAction(uriAction: UriAction) : UriAction(uriAction) {
override fun openUriWithActionView(context: Context, uri: Uri, extras: Bundle) {
val intent = getActionViewIntent(context, uri, extras)
intent.flags = Intent.FLAG_ACTIVITY_NEW_TASK or Intent.FLAG_ACTIVITY_CLEAR_TOP or Intent.FLAG_ACTIVITY_SINGLE_TOP
if (intent.resolveActivity(context.packageManager) != null) {
context.startActivity(intent)
} else {
BrazeLogger.w(TAG, "Could not find appropriate activity to open for deep link $uri.")
}
}
}
companion object {
private val TAG = BrazeLogger.getBrazeLogTag(CustomDeeplinkHandler::class.java)
}
}
```
## Deep linking to app settings
To allow deep links to directly open your app's settings, you'll need a custom `BrazeDeeplinkHandler`. In the following example, the presence of a custom key-value pair called `open_notification_page` will make the deep link open the app's settings page:
```java
BrazeDeeplinkHandler.setBrazeDeeplinkHandler(new IBrazeDeeplinkHandler() {
@Override
public void gotoUri(Context context, UriAction uriAction) {
final Bundle extras = uriAction.getExtras();
if (extras.containsKey("open_notification_page")) {
Intent intent = new Intent();
intent.setAction("android.settings.APP_NOTIFICATION_SETTINGS");
intent.setFlags(Intent.FLAG_ACTIVITY_NEW_TASK);
//for Android 5-7
intent.putExtra("app_package", context.getPackageName());
intent.putExtra("app_uid", context.getApplicationInfo().uid);
// for Android 8 and later
intent.putExtra("android.provider.extra.APP_PACKAGE", context.getPackageName());
context.startActivity(intent);
}
}
});
```
```kotlin
BrazeDeeplinkHandler.setBrazeDeeplinkHandler(object : IBrazeDeeplinkHandler {
override fun gotoUri(context: Context, uriAction: UriAction) {
val extras = uriAction.extras
if (extras.containsKey("open_notification_page")) {
val intent = Intent()
intent.action = "android.settings.APP_NOTIFICATION_SETTINGS"
intent.flags = Intent.FLAG_ACTIVITY_NEW_TASK
//for Android 5-7
intent.putExtra("app_package", context.packageName)
intent.putExtra("app_uid", context.applicationInfo.uid)
// for Android 8 and later
intent.putExtra("android.provider.extra.APP_PACKAGE", context.packageName)
context.startActivity(intent)
}
}
})
```
## Customizing WebView activity {#Custom_Webview_Activity}
When Braze opens website deeplinks inside the app, the deeplinks are handled by [`BrazeWebViewActivity`](https://braze-inc.github.io/braze-android-sdk/kdoc/braze-android-sdk/com.braze.ui/-braze-web-view-activity/index.html).
**Note:**
For custom HTML in-app messages, links configured with `target="_blank"` open in the device's default web browser and are not handled by `BrazeWebViewActivity`.
To change this:
1. Create a new Activity that handles the target URL from `Intent.getExtras()` with the key `com.braze.Constants.BRAZE_WEBVIEW_URL_EXTRA`. For an example, see [`BrazeWebViewActivity.kt`](https://github.com/braze-inc/braze-android-sdk/blob/master/android-sdk-ui/src/main/java/com/braze/ui/BrazeWebViewActivity.kt).
2. Add that activity to `AndroidManifest.xml` and set `exported` to `false`.
```xml
```
3. Set your custom Activity in a `BrazeConfig` [builder object](https://braze-inc.github.io/braze-android-sdk/kdoc/braze-android-sdk/com.braze.configuration/-braze-config/-builder/set-custom-web-view-activity-class.html). Build the builder and pass it to [`Braze.configure()`](https://braze-inc.github.io/braze-android-sdk/kdoc/braze-android-sdk/com.braze/-braze/-companion/configure.html) in your [`Application.onCreate()`](https://developer.android.com/reference/android/app/Application.html#onCreate()).
```java
BrazeConfig brazeConfig = new BrazeConfig.Builder()
.setCustomWebViewActivityClass(MyCustomWebViewActivity::class)
...
.build();
Braze.configure(this, brazeConfig);
```
```kotlin
val brazeConfig = BrazeConfig.Builder()
.setCustomWebViewActivityClass(MyCustomWebViewActivity::class.java)
...
.build()
Braze.configure(this, brazeConfig)
```
## Using Jetpack Compose
To handle deeplinks when using Jetpack Compose with NavHost:
1. Ensure that the activity handling your deeplink is registered in the Android Manifest.
```xml
```
2. In NavHost, specify which deeplinks you want it to handle.
```kotlin
composableWithCompositionLocal(
route = "YOUR_ROUTE_HERE",
deepLinks = listOf(navDeepLink {
uriPattern = "myapp://articles/{${MainDestinations.ARTICLE_ID_KEY}}"
}),
arguments = listOf(
navArgument(MainDestinations.ARTICLE_ID_KEY) {
type = NavType.LongType
}
),
) { backStackEntry ->
val arguments = requireNotNull(backStackEntry.arguments)
val articleId = arguments.getLong(MainDestinations.ARTICLE_ID_KEY)
ArticleDetail(
articleId
)
}
```
3. Depending on your app architecture, you may need to handle the new intent that's sent to your current activity as well.
```kotlin
DisposableEffect(Unit) {
val listener = Consumer {
navHostController.handleDeepLink(it)
}
addOnNewIntentListener(listener)
onDispose { removeOnNewIntentListener(listener) }
}
```
## Prerequisites
Before you can use this feature, you'll need to [integrate the Swift Braze SDK](https://www.braze.com/docs/developer_guide/sdk_integration/?sdktab=swift).
**Tip:**
For help choosing between custom scheme deep links, universal links, and "Open Web URL Inside App," see [iOS deep linking guide](https://www.braze.com/docs/developer_guide/push_notifications/ios_deep_linking_guide). For troubleshooting, see [Deep linking troubleshooting](https://www.braze.com/docs/developer_guide/push_notifications/deep_linking_troubleshooting).
## Handling deep links
### Step 1: Register a scheme {#register-a-scheme}
To handle deep linking, a custom scheme must be stated in your `Info.plist` file. The navigation structure is defined by an array of dictionaries. Each of those dictionaries contains an array of strings.
Use Xcode to edit your `Info.plist` file:
1. Add a new key, `URL types`. Xcode will automatically make this an array containing a dictionary called `Item 0`.
2. Within `Item 0`, add a key `URL identifier`. Set the value to your custom scheme.
3. Within `Item 0`, add a key `URL Schemes`. This will automatically be an array containing a `Item 0` string.
4. Set `URL Schemes` >> `Item 0` to your custom scheme.
Alternatively, if you wish to edit your `Info.plist` file directly, you can follow this spec:
```html
CFBundleURLTypesCFBundleURLNameYOUR.SCHEMECFBundleURLSchemesYOUR.SCHEME
```
### Step 2: Add a scheme allowlist
You must declare the URL schemes you wish to pass to `canOpenURL(_:)` by adding the `LSApplicationQueriesSchemes` key to your app's Info.plist file. Attempting to call schemes outside this allowlist will cause the system to record an error in the device's logs, and the deep link will not open. An example of this error will look like this:
```
: -canOpenURL: failed for URL: "yourapp://deeplink" – error: "This app is not allowed to query for scheme yourapp"
```
For example, if an in-app message should open the Facebook app when tapped, the app has to have the Facebook custom scheme (`fb`) in your allowlist. Otherwise, the system will reject the deep link. Deep links that direct to a page or view inside your own app still require that your app's custom scheme be listed in your app's `Info.plist`.
Your example allowlist might look something like:
```html
LSApplicationQueriesSchemesmyappfbtwitter
```
For more information, refer to [Apple's documentation](https://developer.apple.com/library/content/documentation/General/Reference/InfoPlistKeyReference/Articles/LaunchServicesKeys.html#//apple_ref/doc/uid/TP40009250-SW14) on the `LSApplicationQueriesSchemes` key.
### Step 3: Implement a handler
After activating your app, iOS will call the method [`application:openURL:options:`](https://developer.apple.com/reference/uikit/uiapplicationdelegate/1623112-application?language=objc). The important argument is the [NSURL](https://developer.apple.com/library/ios/DOCUMENTATION/Cocoa/Reference/Foundation/Classes/NSURL_Class/Reference/Reference.html#//apple_ref/doc/c_ref/NSURL) object.
```swift
func application(_ app: UIApplication, open url: URL, options: [UIApplication.OpenURLOptionsKey : Any] = [:]) -> Bool {
let path = url.path
let query = url.query
// Insert your code here to take some action based upon the path and query.
return true
}
```
```objc
- (BOOL)application:(UIApplication *)app openURL:(NSURL *)url options:(NSDictionary *)options {
NSString *path = [url path];
NSString *query = [url query];
// Insert your code here to take some action based upon the path and query.
return YES;
}
```
## App Transport Security (ATS)
As defined by [Apple](https://developer.apple.com/library/prerelease/ios/releasenotes/General/WhatsNewIniOS/Articles/iOS9.html#//apple_ref/doc/uid/TP40016198-SW14), "App Transport Security is a feature that improves the security of connections between an app and web services. The feature consists of default connection requirements that conform to best practices for secure connections. Apps can override this default behavior and turn off transport security."
ATS is applied by default. It requires that all connections use HTTPS and are encrypted using TLS 1.2 with forward secrecy. Refer to [Requirements for Connecting Using ATS](https://developer.apple.com/library/ios/documentation/General/Reference/InfoPlistKeyReference/Articles/CocoaKeys.html#//apple_ref/doc/uid/TP40009251-SW35) for more information. All images served by Braze to end devices are handled by a content delivery network ("CDN") that supports TLS 1.2 and is compatible with ATS.
Unless they are specified as exceptions in your application's `Info.plist`, connections that do not follow these requirements will fail with errors that are similar to the following.
**Example Error 1:**
```bash
CFNetwork SSLHandshake failed (-9801)
Error Domain=NSURLErrorDomain Code=-1200 "An SSL error has occurred, and a secure connection to the server cannot be made."
```
**Example Error 2:**
```bash
NSURLSession/NSURLConnection HTTP load failed (kCFStreamErrorDomainSSL, -9802)
```
ATS compliance is enforced for links opened within the mobile app (our default handling of clicked links) and does not apply to sites opened externally via a web browser.
### Working with ATS
You can handle ATS in either of the following ways, but we recommend **complying with ATS requirements**.
Your Braze integration can satisfy ATS requirements by ensuring that any existing links you drive users to (for example, though in-app message and push campaigns) satisfy ATS requirements. While there are ways to bypass ATS restrictions, our recommendation is to ensure that all linked URLs are ATS-compliant. Given Apple's increasing emphasis on application security, the following approaches to allowing ATS exceptions are not guaranteed to be supported by Apple.
You can allow a subset of links with certain domains or schemes to be treated as exceptions to the ATS rules. Your Braze integration will satisfy ATS requirements if every link you use in a Braze messaging channel is either ATS compliant or handled by an exception.
To add a domain as an exception of the ATS, add following to your app's `Info.plist` file:
```html
NSAppTransportSecurityNSAllowsArbitraryLoadsNSExceptionDomainsexample.comNSExceptionAllowsInsecureHTTPLoadsNSIncludesSubdomains
```
Refer to Apple's article on [app transport security keys](https://developer.apple.com/library/ios/documentation/General/Reference/InfoPlistKeyReference/Articles/CocoaKeys.html#//apple_ref/doc/uid/TP40009251-SW33) for more information.
You can turn off ATS entirely. Note that this is not recommended practice, due to both lost security protections and future iOS compatibility. To disable ATS, insert the following in your app's `Info.plist` file:
```html
NSAppTransportSecurityNSAllowsArbitraryLoads
```
## Decoding URLs
The SDK percent-encodes links to create valid `URL`s. All link characters that are not allowed in a properly formed URL, such as Unicode characters, will be percent escaped.
To decode an encoded link, use the `String` property [`removingPercentEncoding`](https://developer.apple.com/documentation/swift/stringprotocol/removingpercentencoding). You must also return `true` in the `BrazeDelegate.braze(_:shouldOpenURL:)`. A call to action is required to trigger the handling of the URL by your app. For example:
```swift
func application(_ app: UIApplication, open url: URL, options: [UIApplication.OpenURLOptionsKey : Any] = [:]) -> Bool {
let urlString = url.absoluteString.removingPercentEncoding
// Handle urlString
return true
}
```
```objc
- (BOOL)application:(UIApplication *)application openURL:(NSURL *)url options:(NSDictionary *)options {
NSString *urlString = [url.absoluteString stringByRemovingPercentEncoding];
// Handle urlString
return YES;
}
```
## Deep linking to app settings
You can take advantage of `UIApplicationOpenSettingsURLString` to deep link users to your app's settings from Braze push notifications and in-app messages.
To take users from your app into the iOS settings:
1. First, make sure your application is set up for either [scheme-based deep links](#swift_register-a-scheme) or [universal links](#swift_universal-links).
2. Decide on a URI for deep linking to the **Settings** page (for example, `myapp://settings` or `https://www.braze.com/settings`).
3. If you are using custom scheme-based deep links, add the following code to your `application:openURL:options:` method:
```swift
func application(_ app: UIApplication, open url: URL, options: [UIApplicationOpenURLOptionsKey : Any] = [:]) -> Bool {
let path = url.path
if (path == "settings") {
UIApplication.shared.openURL(URL(string:UIApplication.openSettingsURLString)!)
}
return true
}
```
```objc
- (BOOL)application:(UIApplication *)app
openURL:(NSURL *)url
options:(NSDictionary *)options {
NSString *path = [url path];
if ([path isEqualToString:@"settings"]) {
NSURL *settingsURL = [NSURL URLWithString:UIApplicationOpenSettingsURLString];
[[UIApplication sharedApplication] openURL:settingsURL];
}
return YES;
}
```
## Customization options {#customization-options}
### Default WebView customization
The `Braze.WebViewController` class displays web URLs opened by the SDK, typically when "Open Web URL Inside App" is selected for a web deep link.
You can customize the `Braze.WebViewController` via the [`BrazeDelegate.braze(_:willPresentModalWithContext:)`](https://braze-inc.github.io/braze-swift-sdk/documentation/brazekit/brazedelegate/braze(_:willpresentmodalwithcontext:)-12sqy/) delegate method.
### Linking handling customization
The `BrazeDelegate` protocol can be used to customize the handling of URLs such as deep links, web URLs, and universal links. To set the delegate during Braze initialization, set a delegate object on the `Braze` instance. Braze will then call your delegate's implementation of `shouldOpenURL` before handling any URIs.
#### Universal links {#universal-links}
Braze supports universal links in push notifications, in-app messages, and Content Cards. To enable universal link support, [`configuration.forwardUniversalLinks`](https://braze-inc.github.io/braze-swift-sdk/documentation/brazekit/braze/configuration-swift.class/forwarduniversallinks) must be set to `true`.
When enabled, Braze will forward universal links to your app's `AppDelegate` via the [`application:continueUserActivity:restorationHandler:`](https://developer.apple.com/documentation/uikit/uiapplicationdelegate/1623072-application) method.
Your application also needs to be set up to handle universal links. Refer to [Apple's documentation](https://developer.apple.com/documentation/xcode/supporting-universal-links-in-your-app) to ensure your application is configured correctly for universal links.
**Warning:**
Universal link forwarding requires access to the application entitlements. When running the application in a simulator, these entitlements are not directly available and universal links are not forwarded to the system handlers.
To add support to simulator builds, you can add the application `.entitlements` file to the _Copy Bundle Resources_ build phase. See [`forwardUniversalLinks`](https://braze-inc.github.io/braze-swift-sdk/documentation/brazekit/braze/configuration-swift.class/forwarduniversallinks) documentation for more details.
**Note:**
The SDK does not query your domains' `apple-app-site-association` file. It performs the differentiation between universal links and regular URLs by looking at the domain name only. As a result, the SDK does not respect any exclusion rule defined in the `apple-app-site-association` per [Supporting associated domains](https://developer.apple.com/documentation/xcode/supporting-associated-domains).
## Examples
### BrazeDelegate
Here's an example using `BrazeDelegate`. For more information, see [Braze Swift SDK reference](https://braze-inc.github.io/braze-swift-sdk/documentation/brazekit/brazedelegate).
```swift
func braze(_ braze: Braze, shouldOpenURL context: Braze.URLContext) -> Bool {
if context.url.host == "MY-DOMAIN.com" {
// Custom handle link here
return false
}
// Let Braze handle links otherwise
return true
}
```
```objc
- (BOOL)braze:(Braze *)braze shouldOpenURL:(BRZURLContext *)context {
if ([[context.url.host lowercaseString] isEqualToString:@"MY-DOMAIN.com"]) {
// Custom handle link here
return NO;
}
// Let Braze handle links otherwise
return YES;
}
```
## Prerequisites
Before you can implement deep linking into your Flutter app, you'll need to set up deep linking in the native [Android](https://www.braze.com/docs/developer_guide/push_notifications/deep_linking/?sdktab=android) or [iOS](https://www.braze.com/docs/developer_guide/push_notifications/deep_linking/?sdktab=swift) layer.
## Implementing deep linking
### Step 1: Set up Flutter's built-in handling
1. In your Xcode project, open your `Info.plist` file.
2. Add a new key-value pair.
3. Set the key to `FlutterDeepLinkingEnabled`.
4. Set the type to `Boolean`.
5. Set the value to `YES`.

1. In your Android Studio project, open your `AndroidManifest.xml` file.
2. Locate `.MainActivity` in your `activity` tags.
3. Within the `activity` tag, add the following `meta-data` tag:
```xml
```
### Step 2: Forward data to the Dart layer (optional)
You can use native, first-party, or third-party link handling for complex use cases, such as sending a user to a specific location in your app, or calling a specific function.
#### Example: Deep linking to an alert dialog
**Note:**
While the following example does not rely on additional packages, you can use a similar approach to implement native, first-party, or third-party packages, such as [`go_router`](https://pub.dev/packages/go_router). Additional Dart code may be required.
First, a method channel is used in the native layer to forward the deep link's URL string data to the Dart layer.
```swift
extension AppDelegate {
// Delegate method for handling custom scheme links.
override func application(_ app: UIApplication, open url: URL, options: [UIApplication.OpenURLOptionsKey : Any] = [:]) -> Bool {
forwardURL(url)
return true
}
// Delegate method for handling universal links.
override func application(_ application: UIApplication, continue userActivity: NSUserActivity, restorationHandler: @escaping ([UIUserActivityRestoring]?) -> Void) -> Bool {
guard userActivity.activityType == NSUserActivityTypeBrowsingWeb,
let url = userActivity.webpageURL else {
return false
}
forwardURL(url)
return true
}
private func forwardURL(_ url: URL) {
guard let controller: FlutterViewController = window?.rootViewController as? FlutterViewController else { return }
let deepLinkChannel = FlutterMethodChannel(name: "deepLinkChannel", binaryMessenger: controller.binaryMessenger)
deepLinkChannel.invokeMethod("receiveDeepLink", arguments: url.absoluteString)
}
}
```
```kotlin
class MainActivity : FlutterActivity() {
override fun onCreate(savedInstanceState: Bundle?) {
super.onCreate(savedInstanceState)
handleDeepLink(intent)
}
override fun onNewIntent(intent: Intent) {
super.onNewIntent(intent)
handleDeepLink(intent)
}
private fun handleDeepLink(intent: Intent) {
val binaryMessenger = flutterEngine?.dartExecutor?.binaryMessenger
if (intent?.action == Intent.ACTION_VIEW && binaryMessenger != null) {
MethodChannel(binaryMessenger, "deepLinkChannel")
.invokeMethod("receivedDeepLink", intent?.data.toString())
}
}
}
```
Next, a callback function is used in the Dart layer to display an alert dialogue using the URL string data sent previously.
```dart
MethodChannel('deepLinkChannel').setMethodCallHandler((call) async {
deepLinkAlert(call.arguments, context);
});
void deepLinkAlert(String link, BuildContext context) {
showDialog(
context: context,
builder: (BuildContext context) {
return AlertDialog(
title: Text("Deep Link Alert"),
content: Text("Opened with deep link: $link"),
actions: [
TextButton(
child: Text("Close"),
onPressed: () {
Navigator.of(context).pop();
},
),
],
);
},
);
}
```
## Prerequisites
Before you can use this feature, you'll need to [integrate the Cordova Braze SDK](https://www.braze.com/docs/developer_guide/sdk_integration/?sdktab=cordova).
## Enabling push deep linking
By default, the Braze Cordova SDK doesn't automatically handle push deep linking from notifications. To enable push deep linking, add the following preferences to the `platform` element in your project's `config.xml` file.
```xml
```
```xml
```
To customize back stack behavior when deep links are followed, you can also add these optional preferences:
```xml
```
For a full list of available push configuration options, see [Optional configurations](https://www.braze.com/docs/developer_guide/sdk_integration?sdktab=cordova#optional).
# iOS deep linking guide
Source: /docs/developer_guide/push_notifications/ios_deep_linking_guide/index.md
# iOS deep linking guide
> This guide helps you choose the right deep linking strategy for your iOS app, depending on which messaging channel you're using and whether you use a third-party linking provider like Branch.
For implementation details, see [Deep linking](https://www.braze.com/docs/developer_guide/push_notifications/deep_linking/?sdktab=swift). For troubleshooting, see [Deep linking troubleshooting](https://www.braze.com/docs/developer_guide/push_notifications/deep_linking_troubleshooting).
## Choosing a link type
There are three ways to handle links from Braze messages in your iOS app. Each one works differently and is suited for different channels and use cases.
| Link type | Example | Best for | Opens without app installed? |
|---|---|---|---|
| **Custom scheme** | `myapp://products/123` | Push, in-app messages, Content Cards | No — link fails |
| **Universal link** | `https://myapp.com/products/123` | Email, SMS, channels with click tracking | Yes — falls back to web |
| **Open Web URL Inside App** | Any `https://` URL | Displaying web content in a modal WebView | N/A — displays in WebView |
{: .reset-td-br-1 .reset-td-br-2 .reset-td-br-3 .reset-td-br-4 role="presentation" }
### Custom scheme deep links
Custom scheme deep links (for example, `myapp://products/123`) open your app directly to a specific screen. They are the simplest option for channels where links aren't modified by a third party.
**Use custom scheme deep links when:**
- Sending push notifications, in-app messages, or Content Cards
- You don't need the link to work if the app isn't installed
- You don't need click tracking (email ESP link wrapping)
**Don't use custom scheme deep links when:**
- Sending emails — ESPs wrap links for click tracking, which breaks custom schemes
- You need the link to fall back to a web page if the app isn't installed
### Universal links
Universal links (for example, `https://myapp.com/products/123`) are standard HTTPS URLs that iOS can route to your app instead of opening in a browser. They require server-side configuration (an AASA file) and app-side setup (Associated Domains entitlement).
**Use universal links when:**
- Sending emails. Your ESP wraps links for click tracking, so links must be HTTPS.
- Sending SMS or other channels where links are wrapped or shortened.
- You need the link to fall back to a web page when the app isn't installed.
- You're using a third-party linking provider like Branch or AppsFlyer.
**Don't use universal links when:**
- You only need deep links from push, in-app messages, or Content Cards. Custom schemes are simpler.
### "Open Web URL Inside App"
This option opens a web page inside a modal WebView within your app. It's handled entirely by the Braze SDK using `Braze.WebViewController` — you don't need to write any URL handling code.
**Use "Open Web URL Inside App" when:**
- You want to display a web page (such as a promotion or article) without leaving your app.
- The URL is a standard HTTPS web page, not a deep link to a specific app screen.
**Don't use "Open Web URL Inside App" when:**
- You need to navigate to a specific view in your app. Instead, use a custom scheme or universal link.
- The web page requires authentication or has Content Security Policy headers that block embedding.
## What you need for each link type
### Custom scheme deep links
| Requirement | Details |
|---|---|
| AASA file | Not required |
| `Info.plist` | Register your scheme under `CFBundleURLTypes` and add it to `LSApplicationQueriesSchemes` |
| App delegate method | Implement `application(_:open:options:)` to parse the URL and navigate |
| Braze SDK configuration | None — the SDK opens custom scheme URLs by default |
{: .reset-td-br-1 .reset-td-br-2 role="presentation" }
### Universal links
| Requirement | Details |
|---|---|
| AASA file | Required — host at `https://yourdomain.com/.well-known/apple-app-site-association` |
| Associated Domains | Add `applinks:yourdomain.com` in Xcode under **Signing & Capabilities** |
| App delegate method | Implement `application(_:continue:restorationHandler:)` to handle `NSUserActivity` |
| Braze SDK configuration | Set `configuration.forwardUniversalLinks = true` |
| BrazeDelegate (optional) | Implement `braze(_:shouldOpenURL:)` for custom routing (for example, Branch) |
{: .reset-td-br-1 .reset-td-br-2 role="presentation" }
**Important:**
If you send emails through Braze, your ESP (SendGrid, SparkPost, or Amazon SES) wraps links in a click-tracking domain. You must host the AASA file on your click-tracking domain as well, not only on your primary domain. For complete setup, see [Universal links and App Links](https://www.braze.com/docs/user_guide/message_building_by_channel/email/universal_links/).
### "Open Web URL Inside App"
| Requirement | Details |
|---|---|
| AASA file | Not required |
| App delegate method | Not required — the SDK handles this automatically |
| Braze SDK configuration | None — select **Open Web URL Inside App** in the campaign composer |
{: .reset-td-br-1 .reset-td-br-2 role="presentation" }
## When you need an AASA file {#when-aasa}
An Apple App Site Association (AASA) file is only required when you use **universal links**. It tells iOS which URLs your app can handle.
You need an AASA file when:
- You send deep links in email campaigns (because ESPs wrap links in HTTPS click-tracking URLs).
- You send deep links in SMS campaigns (because links may be shortened to HTTPS URLs).
- You use Branch, AppsFlyer, or another linking provider (because they use their own HTTPS domains).
- You use universal links from push, in-app messages, or Content Cards (less common, but possible with `forwardUniversalLinks = true`).
You don't need an AASA file when:
- You only use custom scheme deep links (for example, `myapp://`) from push, in-app messages, or Content Cards.
- You use the **Open Web URL Inside App** option.
For AASA setup instructions, see [Universal links and App Links](https://www.braze.com/docs/user_guide/message_building_by_channel/email/universal_links/#setting-up-universal-links-and-app-links).
## When you need app code to handle links {#when-app-code}
Which delegate method you implement depends on the type of link you're using:
| Delegate method | Handles | When to implement |
|---|---|---|
| `application(_:open:options:)` | Custom scheme deep links (`myapp://`) | You use custom scheme deep links from any channel |
| `application(_:continue:restorationHandler:)` | Universal links (`https://`) | You use universal links from email, SMS, or with `forwardUniversalLinks = true` |
| `BrazeDelegate.braze(_:shouldOpenURL:)` | All URLs opened by the SDK | You need custom routing logic (for example, Branch, conditional handling, analytics) |
{: .reset-td-br-1 .reset-td-br-2 .reset-td-br-3 role="presentation" }
**Tip:**
If you use a third-party linking provider like Branch, implement `BrazeDelegate.braze(_:shouldOpenURL:)` to intercept URLs and forward them to the provider's SDK. See [Branch for deep linking](https://www.braze.com/docs/partners/message_orchestration/deeplinking/branch_for_deeplinking/) for a complete example.
## Using Branch with Braze {#branch}
If you use [Branch](https://www.braze.com/docs/partners/message_orchestration/deeplinking/branch_for_deeplinking/) as your linking provider, your setup requires a few additional steps beyond a standard universal link configuration:
1. **Branch SDK**: Integrate the Branch SDK following [Branch's documentation](https://help.branch.io/developers-hub/docs/native-sdks-overview).
2. **Associated Domains**: Add your Branch domain (for example, `applinks:yourapp.app.link`) in Xcode under **Signing & Capabilities**.
3. **BrazeDelegate**: Implement `braze(_:shouldOpenURL:)` to route Branch links to the Branch SDK instead of letting Braze handle them directly.
4. **Forward universal links**: Set `configuration.forwardUniversalLinks = true` in your Braze SDK configuration.
For implementation details and debugging guidance, see [Branch for deep linking](https://www.braze.com/docs/partners/message_orchestration/deeplinking/branch_for_deeplinking/).
# Deep linking troubleshooting
Source: /docs/developer_guide/push_notifications/deep_linking_troubleshooting/index.md
# Deep linking troubleshooting
> This page covers common deep linking issues on iOS and how to diagnose them. For help choosing the right link type, see [iOS deep linking guide](https://www.braze.com/docs/developer_guide/push_notifications/ios_deep_linking_guide). For implementation details, see [Deep linking](https://www.braze.com/docs/developer_guide/push_notifications/deep_linking/?sdktab=swift).
## Custom scheme deep link doesn't open the correct view
If a custom scheme deep link (for example, `myapp://products/123`) opens your app but doesn't navigate to the intended screen:
1. **Verify the scheme is registered.** In Xcode, check that your scheme is listed under `CFBundleURLTypes` in `Info.plist`.
2. **Check your handler.** Set a breakpoint in `application(_:open:options:)` to confirm it's being called and inspect the `url` parameter.
3. **Test the link independently.** Run the following command from Terminal to test the deep link outside of Braze:
```bash
xcrun simctl openurl booted "myapp://products/123"
```
If the link doesn't work here, the issue is in your app's URL handling—not in Braze.
4. **Check the URL format.** Verify the URL in your campaign matches what your handler expects. Common mistakes include missing path components or incorrect casing.
## Universal link opens in Safari instead of the app
If a universal link (for example, `https://myapp.com/products/123`) opens in Safari instead of your app:
### Verify the Associated Domains entitlement
In Xcode, go to your app target > **Signing & Capabilities** and check that `applinks:yourdomain.com` is listed under **Associated Domains**.
### Validate the AASA file
Your Apple App Site Association (AASA) file must be hosted at one of these locations:
- `https://yourdomain.com/.well-known/apple-app-site-association`
- `https://yourdomain.com/apple-app-site-association`
Verify the following:
- The file is served over HTTPS with a valid certificate.
- The `Content-Type` is `application/json`.
- The file size is under 128 KB.
- The `appID` matches your Team ID and Bundle ID (for example, `ABCDE12345.com.example.myapp`).
- The `paths` or `components` array includes the URL patterns you expect.
You can validate your AASA using [Apple's search validation tool](https://search.developer.apple.com/appsearch-validation-tool/) or by running:
```bash
swcutil dl -d yourdomain.com
```
### Check the `AppDelegate`
Verify that `application(_:continue:restorationHandler:)` is implemented in your `AppDelegate` and handles the `NSUserActivity` correctly:
```swift
func application(_ application: UIApplication,
continue userActivity: NSUserActivity,
restorationHandler: @escaping ([UIUserActivityRestoring]?) -> Void) -> Bool {
guard userActivity.activityType == NSUserActivityTypeBrowsingWeb,
let url = userActivity.webpageURL else {
return false
}
// Handle the URL
return true
}
```
### Verify Braze SDK configuration
If you're using universal links from Braze-delivered push notifications, in-app messages, or Content Cards, confirm that `forwardUniversalLinks` is enabled:
```swift
let configuration = Braze.Configuration(apiKey: "", endpoint: "")
configuration.forwardUniversalLinks = true
```
**Note:**
Universal link forwarding requires access to the application entitlements. When running in a simulator, these entitlements aren't directly available. To test in a simulator, add the `.entitlements` file to the **Copy Bundle Resources** build phase.
### Check for the long-press issue
If you long-press a universal link and select **Open**, iOS may "break" the universal link association for that domain. This is a known iOS behavior. To reset it, long-press the link again and select **Open in [App Name]**.
## Deep link from email doesn't open the app
Email links go through your ESP's click-tracking system, which wraps links in a tracking domain (for example, `https://click.yourdomain.com/...`). For universal links to work from email, you must configure the AASA file on your click-tracking domain — not just your primary domain.
### Verify click-tracking domain AASA
1. Identify your click-tracking domain from your ESP settings (SendGrid, SparkPost, or Amazon SES).
2. Host the AASA file at `https://your-click-tracking-domain/.well-known/apple-app-site-association`.
3. Ensure the AASA file on the click-tracking domain includes the same `appID` and valid path patterns.
For ESP-specific setup instructions, see [Universal links and App Links](https://www.braze.com/docs/user_guide/message_building_by_channel/email/universal_links/).
### Check the redirect chain
Some ESPs perform a redirect from the click-tracking URL to your final URL. Universal links only work if iOS recognizes the *initial* domain (the click-tracking domain) as associated with your app. If the redirect bypasses the AASA check, the link opens in Safari.
To test:
1. Send yourself a test email.
2. Long-press the link and inspect the URL — this is the click-tracking URL.
3. Verify this domain has a valid AASA file.
## Deep link works from push but not from in-app messages (or vice versa)
### Check the BrazeDelegate
If you implement `BrazeDelegate.braze(_:shouldOpenURL:)`, verify it handles links consistently across channels. The `context` parameter includes the source channel. Look for conditional logic that may accidentally filter links from specific channels.
### Enable verbose logging
[Enable verbose logging](https://www.braze.com/docs/developer_guide/verbose_logging) and reproduce the issue. Look for the `Opening` log entry:
```
Opening '':
- channel:
- useWebView:
- isUniversalLink:
```
Compare the log output for the working channel vs. the non-working channel. Differences in `useWebView` or `isUniversalLink` indicate how the SDK is interpreting the link differently.
### Check for custom display delegates
If you use a custom in-app message display delegate or Content Card click handler, verify that it correctly passes link events to the Braze SDK for handling.
## "Open Web URL Inside App" shows a blank or broken page
If selecting **Open Web URL Inside App** results in a blank or broken WebView:
1. **Verify the URL uses HTTPS.** The SDK's WebView requires ATS-compliant URLs. HTTP links fail silently.
2. **Check for Content Security Policy headers.** If the target web page sets `X-Frame-Options: DENY` or a restrictive `Content-Security-Policy`, it blocks rendering in a WebView.
3. **Check for redirects to custom schemes.** If the web page redirects to a custom scheme (for example, `myapp://`), the WebView can't handle it.
4. **Test the URL in Safari.** If the page doesn't load in Safari on the device, it won't load in the WebView either.
## Troubleshooting Branch with Braze {#branch}
If you use [Branch](https://www.braze.com/docs/partners/message_orchestration/deeplinking/branch_for_deeplinking/) as your linking provider:
### Verify the BrazeDelegate routes to Branch
Your `BrazeDelegate` must intercept Branch links and pass them to the Branch SDK. Verify the following:
```swift
func braze(_ braze: Braze, shouldOpenURL context: Braze.URLContext) -> Bool {
if let host = context.url.host, host.contains("app.link") {
// Route to Branch SDK
Branch.getInstance.handleDeepLink(context.url)
return false
}
// Let Braze handle other links
return true
}
```
If `shouldOpenURL` returns `true` for Branch links, Braze handles them directly instead of routing to Branch.
### Check Branch link domain
Verify the Branch domain in your `BrazeDelegate` matches your actual Branch link domain. Branch uses several domain formats:
- `yourapp.app.link` (default)
- `yourapp-alternate.app.link` (alternate)
- Custom domains (if configured in Branch dashboard)
### Enable both SDKs' logging
To diagnose where the link breaks in the chain:
1. Enable [Braze verbose logging](https://www.braze.com/docs/developer_guide/verbose_logging) — look for `Opening '':` entries to verify the SDK received the link.
2. Enable [Branch test mode](https://help.branch.io/developers-hub/docs/ios-basic-integration#test-deep-linking) — check the Branch dashboard for link click events.
1. Enable [Braze verbose logging](https://www.braze.com/docs/developer_guide/verbose_logging). Look for `Opening '':` entries to verify the SDK received the link.
2. Enable [Branch test mode](https://help.branch.io/developers-hub/docs/ios-basic-integration#test-deep-linking). Check the Branch dashboard for link click events.
3. If Braze logs the link, but Branch doesn't see a click, the `BrazeDelegate` routing logic is the likely issue.
### Check Branch dashboard configuration
In the Branch dashboard, verify:
- Your app's **Bundle ID** and **Team ID** match your Xcode project.
- Your **Associated Domains** include the Branch link domain.
- Your Branch AASA file is valid (Branch hosts this automatically on `app.link` domains).
### Test Branch links independently
Test the Branch link outside of Braze to isolate the issue:
1. Open the Branch link in Safari on your device. If it doesn't open the app, the issue is in your Branch or AASA configuration — not Braze.
2. Paste the Branch link into the Notes app and tap it. Universal links work more reliably from Notes than from Safari's address bar.
## General debugging tips
### Use verbose logging
[Enable verbose logging](https://www.braze.com/docs/developer_guide/verbose_logging) to see exactly how the SDK processes links. Key entries to look for:
| Log entry | What it means |
|---|---|
| `Opening '': - channel: notification` | SDK is processing a link from a push notification |
| `Opening '': - channel: inAppMessage` | SDK is processing a link from an in-app message |
| `Opening '': - channel: contentCard` | SDK is processing a link from a Content Card |
| `useWebView: true` | SDK opens the URL in the in-app WebView |
| `isUniversalLink: true` | SDK identified the URL as a universal link |
{: .reset-td-br-1 .reset-td-br-2 role="presentation" }
For more details on reading these logs, see [Reading verbose logs](https://www.braze.com/docs/developer_guide/verbose_logging).
### Test links in isolation
Before testing through Braze, verify that your deep link or universal link works on its own:
- **Custom scheme**: Run `xcrun simctl openurl booted "myapp://path"` in Terminal.
- **Universal link**: Paste the URL into the Notes app on a physical device and tap it. Don't test from the Safari address bar, as iOS treats typed URLs differently from tapped links.
- **Branch link**: Open the Branch link from the Notes app on a device.
### Test on a physical device
Universal links have limited support in the iOS simulator. Always test on a physical device for accurate results. If you must test in a simulator, add the `.entitlements` file to the **Copy Bundle Resources** build phase.
# Set up silent push notifications for the Braze SDK
Source: /docs/developer_guide/push_notifications/silent/index.md
# Silent push notifications
> Learn how to set up silent push notifications for the Braze SDK.
## Prerequisites
Before you can use this feature, you'll need to [integrate the Android Braze SDK](https://www.braze.com/docs/developer_guide/sdk_integration/?sdktab=android). You'll also need to [set up push notifications](https://www.braze.com/docs/developer_guide/push_notifications/?sdktab=android).
## Setting up silent push notifications
Silent notifications are available through the Braze [Messaging API](https://www.braze.com/docs/api/endpoints/messaging/). To take advantage of them, you need to set the `send_to_sync` flag to `true` within the [Android push object](https://www.braze.com/docs/api/objects_filters/messaging/android_object/) and ensure there are no `title` or `alert` fields set as it will cause errors when used alongside `send_to_sync`—however, you can include data `extras` within the object.
## Prerequisites
Before you can use this feature, you'll need to [integrate the Swift Braze SDK](https://www.braze.com/docs/developer_guide/sdk_integration/?sdktab=swift). You'll also need to [set up push notifications](https://www.braze.com/docs/developer_guide/push_notifications/?sdktab=swift).
## iOS limitations
The iOS operating system may gate notifications for some features. Note that if you are experiencing difficulties with these features, the iOS's silent notifications gate might be the cause. For more details, refer to Apple's [instance method](https://developer.apple.com/documentation/uikit/uiapplicationdelegate/1623013-application) and [unreceived notifications](https://developer.apple.com/library/content/technotes/tn2265/_index.html#//apple_ref/doc/uid/DTS40010376-CH1-TNTAG23) documentation.
## Setting up silent push notifications
To use silent push notifications to trigger background work, you must configure your app to receive notifications even when it is in the background. To do this, add the Background Modes capability using the **Signing & Capabilities** pane to the main app target in Xcode. Select the **Remote notifications** checkbox.

Even with the remote notifications background mode enabled, the system will not launch your app into the background if the user has force-quit the application. The user must explicitly launch the application or reboot the device before the app can be automatically launched into the background by the system.
For more information, refer to [pushing background updates](https://developer.apple.com/documentation/usernotifications/setting_up_a_remote_notification_server/pushing_background_updates_to_your_app) and the `application:didReceiveRemoteNotification:fetchCompletionHandler:` [documentation](https://developer.apple.com/library/ios/documentation/UIKit/Reference/UIApplicationDelegate_Protocol/index.html#//apple_ref/occ/intfm/UIApplicationDelegate/application:didReceiveRemoteNotification:fetchCompletionHandler:).
## Sending silent push notifications
To send a silent push notification, set the `content-available` flag to `1` in a push notification payload.
**Note:**
What Apple calls a remote notification is just a normal push notification with the `content-available` flag set.
The `content-available` flag can be set in the Braze dashboard as well as within our [Apple push object](https://www.braze.com/docs/api/objects_filters/messaging/apple_object/) in the [messaging API](https://www.braze.com/docs/api/endpoints/messaging/).
**Warning:**
Attaching both a title and body with `content-available=1` is not recommended because it can lead to undefined behavior. To ensure that a notification is truly silent, exclude both the title and body when setting the `content-available` flag to `1.` For further details, refer to the official [Apple documentation on background updates](https://developer.apple.com/documentation/usernotifications/setting_up_a_remote_notification_server/pushing_background_updates_to_your_app).

When sending a silent push notification, you might also want to include some data in the notification payload, so your application can reference the event. This could save you a few networking requests and increase the responsiveness of your app.
## Ignoring internal push notifications
Braze uses silent push notifications to internally handle certain advanced features, such as uninstall tracking or geofences. If your app takes automatic actions on application launches or background pushes, consider gating that activity so it's not triggered by any internal push notifications.
For example, if you have logic that calls your servers for new content upon every background push or application launch, you may want to prevent triggering Braze’s internal pushes to avoid unnecessary network traffic. Because Braze sends certain kinds of internal pushes to all users at approximately the same time, significant server load may occur if on-launch network calls from internal pushes are not gated.
### Step 1: Check your app for automatic actions
Check your application for automatic actions in the following places and update your code to ignore Braze’s internal pushes:
1. **Push Receivers.** Background push notifications will call `application:didReceiveRemoteNotification:fetchCompletionHandler:` on the `UIApplicationDelegate`.
2. **Application Delegate.** Background pushes can launch [suspended](https://developer.apple.com/documentation/uikit/app_and_environment/managing_your_app_s_life_cycle) apps into the background, triggering the `application:willFinishLaunchingWithOptions:` and `application:didFinishLaunchingWithOptions:` methods on your `UIApplicationDelegate`. Check the `launchOptions` of these methods to determine if the application has been launched from a background push.
### Step 2: Use the internal push utility method
You can use the static utility method in `Braze.Notifications` to check if your app has received or was launched by a Braze internal push. [`Braze.Notifications.isInternalNotification(_:)`](https://braze-inc.github.io/braze-swift-sdk/documentation/brazekit/braze/notifications-swift.class/isinternalnotification(_:)) will return `true` on all Braze internal push notifications, which include uninstall tracking, feature flags sync, and geofences sync notifications.
For example:
```swift
func application(_ application: UIApplication,
didReceiveRemoteNotification userInfo: [AnyHashable : Any],
fetchCompletionHandler completionHandler: @escaping (UIBackgroundFetchResult) -> Void) {
if (!Braze.Notifications.isInternalNotification(userInfo)) {
// Gated logic here (for example pinging server for content)
}
}
```
```objc
- (void)application:(UIApplication *)application didReceiveRemoteNotification:(NSDictionary *)userInfo fetchCompletionHandler:(void (^)(UIBackgroundFetchResult result))completionHandler {
if (![BRZNotifications isInternalNotification:userInfo]) {
// Gated logic here (for example pinging server for content)
}
}
```
## Prerequisites
Before you can use this feature, you'll need to [integrate the Android Braze SDK](https://www.braze.com/docs/developer_guide/sdk_integration/?sdktab=android). You'll also need to [set up push notifications](https://www.braze.com/docs/developer_guide/push_notifications/?sdktab=android).
## Setting up silent push notifications
Silent notifications are available through the Braze [Messaging API](https://www.braze.com/docs/api/endpoints/messaging/). To take advantage of them, you need to set the `send_to_sync` flag to `true` within the [Android push object](https://www.braze.com/docs/api/objects_filters/messaging/android_object/) and ensure there are no `title` or `alert` fields set as it will cause errors when used alongside `send_to_sync`—however, you can include data `extras` within the object.
# Set up rich push notifications for the Braze SDK
Source: /docs/developer_guide/push_notifications/rich/index.md
# Rich push notifications
> Learn how to set up rich push notifications for the Braze SDK.
## Prerequisites
Before you can use this feature, you'll need to [integrate the Swift Braze SDK](https://www.braze.com/docs/developer_guide/sdk_integration/?sdktab=swift). You'll also need to [set up push notifications](https://www.braze.com/docs/developer_guide/push_notifications/?sdktab=swift).
## Setting up rich push notifications
### Step 1: Creating a service extension
To create a [notification service extension](https://developer.apple.com/reference/usernotifications/unnotificationserviceextension), navigate to **File > New > Target** in Xcode and select **Notification Service Extension**.
{: style="max-width:90%"}
Ensure that **Embed In Application** is set to embed the extension in your application.
### Step 2: Setting up the notification service extension
A notification service extension is its own binary that is bundled with your app. It must be set up in the [Apple Developer Portal](https://developer.apple.com) with its own app ID and provisioning profile.
The notification service extension's bundle ID must be distinct from your main app target's bundle ID. For example, if your app's bundle ID is `com.company.appname`, you can use `com.company.appname.AppNameServiceExtension` for your service extension.
### Step 3: Integrating rich push notifications
For a step-by-step guide on integrating rich push notifications with `BrazeNotificationService`, refer to our [tutorial](https://braze-inc.github.io/braze-swift-sdk/tutorials/braze/b2-rich-push-notifications).
To see a sample, refer to the usage in [`NotificationService`](https://github.com/braze-inc/braze-swift-sdk/blob/main/Examples/Swift/Sources/PushNotificationsServiceExtension/NotificationService.swift) of our Examples app.
#### Adding the rich push framework to your app
After following the [Swift Package Manager integration guide](https://www.braze.com/docs/developer_guide/platform_integration_guides/swift/sdk_integration/?tab=swift%20package%20manager/), add `BrazeNotificationService` to your `Notification Service Extension` by doing the following:
1. In Xcode, under frameworks and libraries, select the add icon to add a framework.
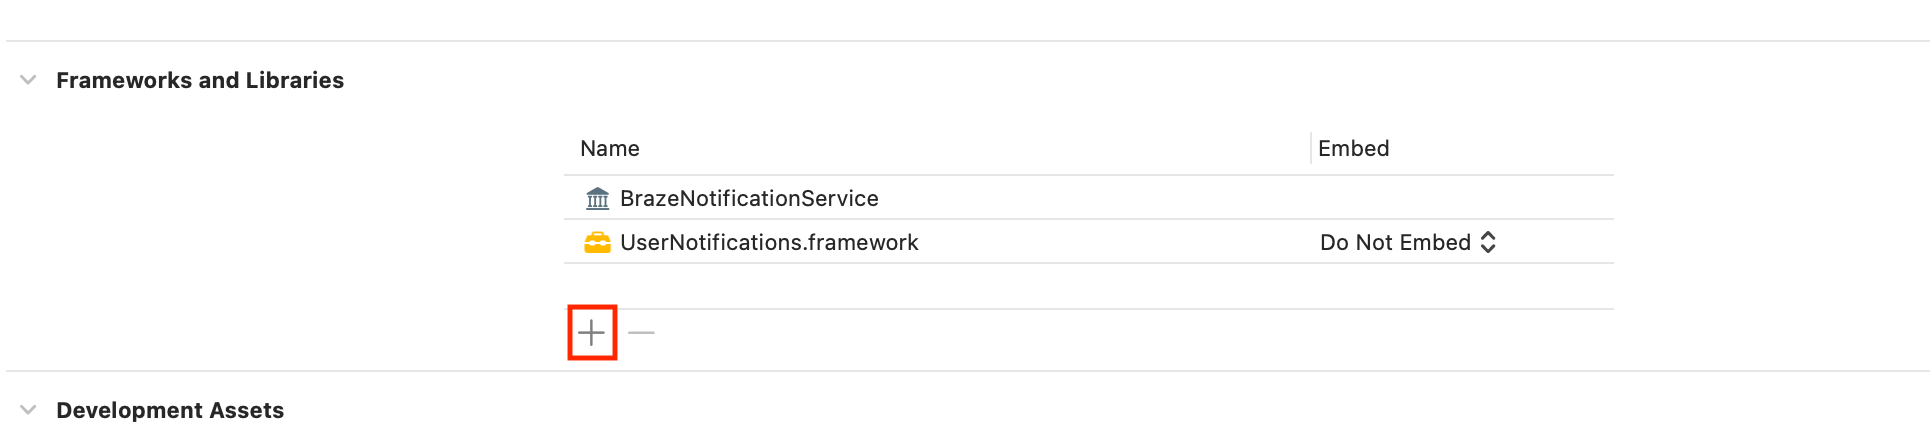
2. Select the "BrazeNotificationService" framework.
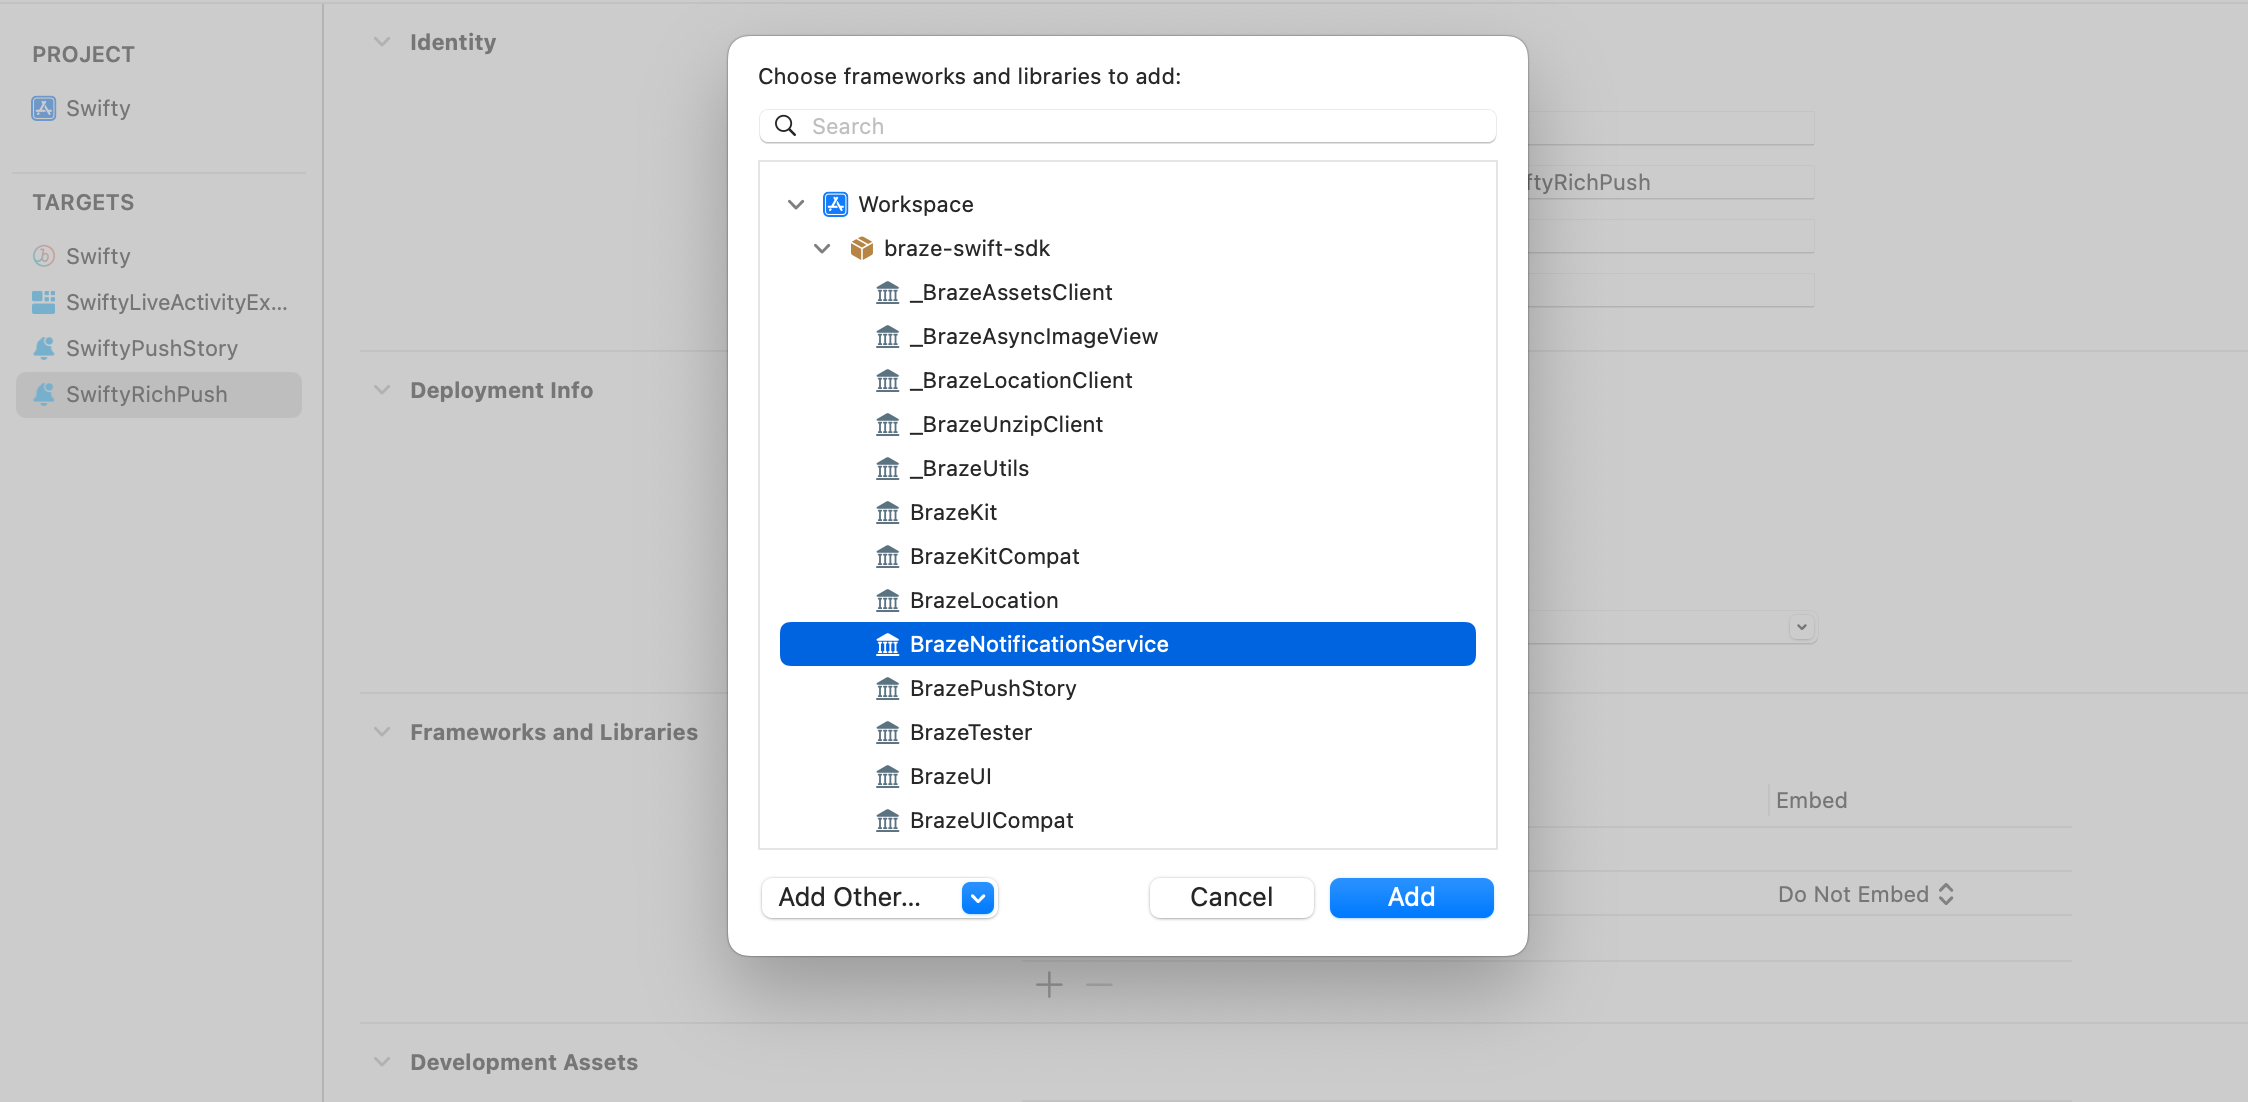
Add the following to your Podfile:
```ruby
target 'YourAppTarget' do
pod 'BrazeKit'
pod 'BrazeUI'
pod 'BrazeLocation'
end
target 'YourNotificationServiceExtensionTarget' do
pod 'BrazeNotificationService'
end
# Only include the below if you want to also integrate Push Stories
target 'YourNotificationContentExtensionTarget' do
pod 'BrazePushStory'
end
```
**Note:**
For instructions to implement Push Stories, see the [documentation](https://www.braze.com/docs/developer_guide/platform_integration_guides/swift/push_notifications/push_story/?tab=swift%20package%20manager).
After updating the Podfile, navigate to the directory of your Xcode app project within your terminal and run `pod install`.
To add `BrazeNotificationService.xcframework` to your `Notification Service Extension`, see [Manual integration](https://www.braze.com/docs/developer_guide/platform_integration_guides/swift/sdk_integration?tab=manual/).

#### Using your own UNNotificationServiceExtension
If you need to use your own UNNotificationServiceExtension, you can instead call [`brazeHandle`](https://braze-inc.github.io/braze-swift-sdk/documentation/brazenotificationservice/brazehandle(request:contenthandler:)) in your `didReceive` method.
```swift
import BrazeNotificationService
import UserNotifications
class NotificationService: UNNotificationServiceExtension {
override func didReceive(
_ request: UNNotificationRequest,
withContentHandler contentHandler: @escaping (UNNotificationContent) -> Void
) {
if brazeHandle(request: request, contentHandler: contentHandler) {
return
}
// Custom handling here
contentHandler(request.content)
}
}
```
### Step 4: Creating a rich notification in your dashboard
Your Marketing team can also create rich notifications from the dashboard. Create a push notification through the push composer and simply attach an image or GIF, or provide a URL that hosts an image, GIF, or video. Note that assets are downloaded on the receipt of push notifications, so you should plan for large, synchronous spikes in requests if you are hosting your content.
## Prerequisites
Before you can use this feature, you'll need to [integrate the Cordova Braze SDK](https://www.braze.com/docs/developer_guide/sdk_integration/?sdktab=cordova). You'll also need to [set up push notifications](https://www.braze.com/docs/developer_guide/push_notifications/?sdktab=cordova).
## Setting up rich push notifications
### Step 1: Create a notification service extension
In your Xcode project, create a notification service extension. For a full walkthrough, see [iOS Rich Push Notifications Tutorial](https://braze-inc.github.io/braze-swift-sdk/tutorials/braze/b2-rich-push-notifications).
### Step 2: Add a new target
Open your Podfile and add `BrazeNotificationService` to the notification service extension target [you just created](#cordova_step-1-create-a-notification-service-extension). If `BrazeNotificationService` is already added to a target, remove it before continuing. To avoid duplicate symbol errors, use static linking.
```ruby
target 'NOTIFICATION_SERVICE_EXTENSION' do
use_frameworks! :linkage => :static
pod 'BrazeNotificationService'
end
```
Replace `NOTIFICATION_SERVICE_EXTENSION` with the name of your notification service extension. Your Podfile should be similar to the following:
```ruby
target 'MyAppRichNotificationService' do
use_frameworks! :linkage => :static
pod 'BrazeNotificationService'
end
```
### Step 3: Reinstall your CocoaPods dependencies
In the terminal, go to your project's iOS directory and reinstall your CocoaPod dependencies.
```bash
cd PATH_TO_PROJECT/platform/ios
pod install
```
## Prerequisites
Before you can use this feature, you'll need to [integrate the React Native Braze SDK](https://www.braze.com/docs/developer_guide/sdk_integration/?sdktab=react%20native). You'll also need to [set up push notifications](https://www.braze.com/docs/developer_guide/push_notifications/?sdktab=react%20native).
## Using Expo to enable rich push notifications
For the React Native SDK, **rich push notifications are available for Android by default**.
To enable rich push notifications on iOS using Expo, configure the `enableBrazeIosRichPush` property to `true` in your `expo.plugins` object in `app.json`:
```json
{
"expo": {
"plugins": [
[
"@braze/expo-plugin",
{
...
"enableBrazeIosRichPush": true
}
]
]
}
}
```
Lastly, add the bundle identifier for this app extension to your project's credentials configuration: `.BrazeExpoRichPush`. For further details on this process, refer to [Using app extensions with Expo Application Services](https://www.braze.com/docs/developer_guide/push_notifications/?sdktab=react%20native#reactnative_app-extensions).
# Set up push stories for the Braze SDK
Source: /docs/developer_guide/push_notifications/push_stories/index.md
# Push stories
> Learn how to set up push stories for the Braze SDK.
## Prerequisites
Before you can use this feature, you'll need to [integrate the Swift Braze SDK](https://www.braze.com/docs/developer_guide/sdk_integration/?sdktab=swift). You'll also need to [set up push notifications](https://www.braze.com/docs/developer_guide/push_notifications/?sdktab=swift), which includes implementing the `UNNotification` framework.
The following minimum SDK version is required to receive Push Stories:
## Setting up Push Stories
### Step 1: Adding the Notification Content Extension target {#notification-content-extension}
In your app project, go to menu **File > New > Target** and add a new `Notification Content Extension` target and activate it.

Xcode should generate a new target for you and create files automatically for you including:
- `NotificationViewController.swift`
- `MainInterface.storyboard`
### Step 2: Enable capabilities {#enable-capabilities}
In Xcode, add the Background Modes capability using the **Signing & Capabilities** pane to the main app target. Select both the **Background fetch** and **Remote notifications** checkboxes.

#### Adding an App Group
Additionally, from the **Signing & Capabilities** pane in Xcode, add the App Groups capability to your main app target as well as the Notification Content Extension targets. Then, click the **+** button. Use your app's bundle ID to create the app group. For example, if your app's bundle ID is `com.company.appname`, you can name your app group `group.com.company.appname.xyz`.
**Important:**
App Groups in this context refer to Apple's [App Groups Entitlement](https://developer.apple.com/documentation/bundleresources/entitlements/com_apple_security_application-groups) and not your Braze workspace (previously app group) ID.
If you do not add your app to an App Group, your app may fail to populate certain fields from the push payload and will not work fully as expected.
### Step 3: Adding the Push Story framework to your app {#enable-capabilities}
After following the [Swift Package Manager integration guide](https://www.braze.com/docs/developer_guide/platform_integration_guides/swift/sdk_integration/?tab=swift%20package%20manager/), add `BrazePushStory` to your `Notification Content Extension`:


Add the following line to your Podfile:
```ruby
target 'YourAppTarget' do
pod 'BrazeKit'
pod 'BrazeUI'
pod 'BrazeLocation'
end
target 'YourNotificationContentExtensionTarget' do
pod 'BrazePushStory'
end
# Only include the below if you want to also integrate Rich Push
target 'YourNotificationServiceExtensionTarget' do
pod 'BrazeNotificationService'
end
```
**Note:**
For instructions to implement Rich Push, see [Rich notifications](https://www.braze.com/docs/developer_guide/platform_integration_guides/swift/push_notifications/customization/rich_notifications/?tab=swift%20package%20manager).
After updating the Podfile, navigate to the directory of your Xcode app project within your terminal and run `pod install`.
Download the latest `BrazePushStory.zip` from the [GitHub release page](https://github.com/braze-inc/braze-swift-sdk/releases), extract it, and add the `BrazePushStory.xcframework` to your project's `Notification Content Extension`.

**Important:**
Make sure that **Do Not Embed** is selected for **BrazePushStory.xcframework** under the **Embed** column.
### Step 4: Updating your notification view controller {#enable-capabilities}
In `NotificationViewController.swift`, add the following line to import the header files:
```swift
import BrazePushStory
```
Next, replace the default implementation by inheriting [`BrazePushStory.NotificationViewController`](https://braze-inc.github.io/braze-swift-sdk/documentation/brazepushstory/notificationviewcontroller/):
```swift
class NotificationViewController: BrazePushStory.NotificationViewController {}
```
#### Custom handling push story events
If you want to implement your own custom logic to handle push story notification events, inherit `BrazePushStory.NotificationViewController` as above and override the [`didReceive`](https://braze-inc.github.io/braze-swift-sdk/documentation/brazepushstory/notificationviewcontroller/didreceive(_:)) methods as below.
```swift
import BrazePushStory
import UserNotifications
import UserNotificationsUI
class NotificationViewController: BrazePushStory.NotificationViewController {
override func didReceive(_ notification: UNNotification) {
super.didReceive(notification)
// Custom handling logic
}
override func didReceive(_ response: UNNotificationResponse, completionHandler completion: @escaping (UNNotificationContentExtensionResponseOption) -> Void) {
super.didReceive(response, completionHandler: completion)
// Custom handling logic
}
}
```
### Step 5: Setting the Notification Content Extension plist {#notification-content-extension}
Open the `Info.plist` file of the `Notification Content Extension`, then add and change the following keys under `NSExtension \ NSExtensionAttributes`:
| Key | Type | Value |
|--------------------------------------------------|---------|------------------------|
| `UNNotificationExtensionCategory` | String | `ab_cat_push_story_v2` |
| `UNNotificationExtensionDefaultContentHidden` | Boolean | `YES` |
| `UNNotificationExtensionInitialContentSizeRatio` | Number | `0.6` |
| `UNNotificationExtensionUserInteractionEnabled` | Boolean | `YES` |
Your `Info.plist` file should match the following image:
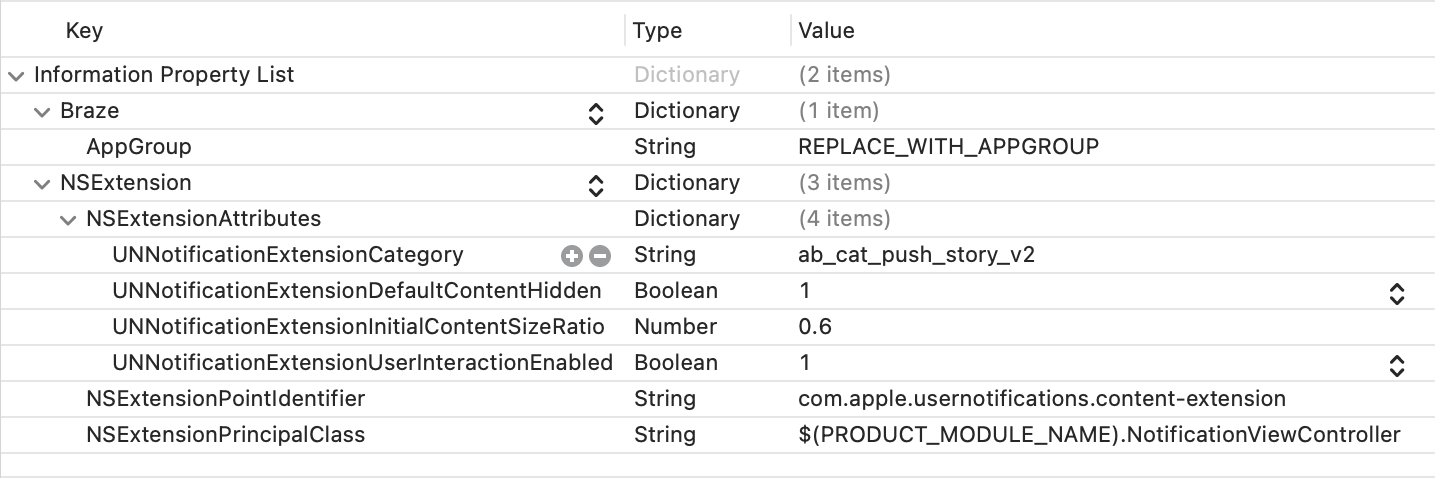
### Step 6: Updating the Braze integration in your main app {#update-braze}
Before initializing Braze, assign the name of your app group to your Braze configuration's [`push.appGroup`](https://braze-inc.github.io/braze-swift-sdk/documentation/brazekit/braze/configuration-swift.class/push-swift.class/appgroup) property.
```swift
let configuration = Braze.Configuration(apiKey: "",
endpoint: "")
configuration.push.appGroup = "REPLACE_WITH_APPGROUP"
let braze = Braze(configuration: configuration)
```
## Prerequisites
Before you can use this feature, you'll need to [integrate the Cordova Braze SDK](https://www.braze.com/docs/developer_guide/sdk_integration/?sdktab=cordova). You'll also need to [set up push notifications](https://www.braze.com/docs/developer_guide/push_notifications/?sdktab=cordova).
## Setting up push stories
### Step 1: Create a notification content extension
In your Xcode project, create a notification content extension. For a full walkthrough, see [iOS Push Stories Tutorial](https://braze-inc.github.io/braze-swift-sdk/tutorials/braze/b3-push-stories/).
### Step 2: Configure your push app group
In your project's `config.xml` file, configure the push app group [you just created](#cordova_step-1-create-a-notification-content-extension).
```xml
```
Replace `PUSH_APP_GROUP` with the name of your push app group. Your `config.xml` should be similar to the following:
```xml
```
### Step 3: Add a new target
Open your Podfile and add `BrazePushStory` to the notification content extension target [you created previously](#cordova_step-1-create-a-notification-content-extension). To avoid duplicate symbol errors, use static linking.
```ruby
target 'NOTIFICATION_CONTENT_EXTENSION' do
use_frameworks! :linkage => :static
pod 'BrazePushStory'
end
```
Replace `NOTIFICATION_CONTENT_EXTENSION` with the name of your notification content extension. Your Podfile should be similar to the following:
```ruby
target 'MyAppNotificationContentExtension' do
use_frameworks! :linkage => :static
pod 'BrazePushStory'
end
```
### Step 4: Reinstall your CocoaPods dependencies
In the terminal, go to your iOS directory and reinstall your CocoaPod dependencies.
```bash
cd PATH_TO_PROJECT/platform/ios
pod install
```
## Prerequisites
Before you can use this feature, you'll need to [integrate the React Native Braze SDK](https://www.braze.com/docs/developer_guide/sdk_integration/?sdktab=react%20native). You'll also need to [set up push notifications](https://www.braze.com/docs/developer_guide/push_notifications/?sdktab=react%20native).
## Enabling push stories
For the React Native SDK, **push stories are available for Android by default**.
To enable Push Stories on iOS using Expo, ensure you have an app group defined for your application. For more information, see [Adding an App Group](https://www.braze.com/docs/developer_guide/platform_integration_guides/swift/push_notifications/push_story/#adding-an-app-group).
Next, configure the `enableBrazeIosPushStories` property to `true` and assign your app group ID to `iosPushStoryAppGroup` in your `expo.plugins` object in `app.json`:
```json
{
"expo": {
"plugins": [
[
"@braze/expo-plugin",
{
...
"enableBrazeIosPushStories": true,
"iosPushStoryAppGroup": "group.com.company.myApp.PushStories"
}
]
]
}
}
```
Lastly, add the bundle identifier for this app extension to your project's credentials configuration: `.BrazeExpoPushStories`. For further details on this process, refer to [Using app extensions with Expo Application Services](https://www.braze.com/docs/developer_guide/push_notifications/?sdktab=react%20native#reactnative_app-extensions).
**Warning:**
If you are using Push Stories with Expo Application Services, be sure to use the `EXPO_NO_CAPABILITY_SYNC=1` flag when running `eas build`. There is a known issue in the command line which removes the App Groups capability from your extension's provisioning profile.
# Set up soft push prompts for the Braze SDK
Source: /docs/developer_guide/push_notifications/soft_push_prompts/index.md
# Soft push prompts for Web
> Learn how to set up soft push prompts for the Braze SDK.
## Prerequisites
Before you can use this feature, you'll need to [integrate the Web Braze SDK](https://www.braze.com/docs/developer_guide/sdk_integration/?sdktab=web). You'll also need to [set up push notifications](https://www.braze.com/docs/developer_guide/push_notifications/?sdktab=web).
## About soft push prompts
It's often a good idea for sites to implement a "soft" push prompt where you "prime" the user and make your case for sending them push notifications before requesting push permission. This is useful because the browser throttles how often you may prompt the user directly, and if the user denies permission you can never ask them again.
Alternatively, if you would like to include special custom handling, instead of calling `requestPushPermission()` directly as described in the standard [Web push integration](https://www.braze.com/docs/developer_guide/platform_integration_guides/web/push_notifications/integration/#step-2-browser-registration), use our [triggered in-app messages](https://www.braze.com/docs/developer_guide/in_app_messages/triggering_messages/?tab=web).
**Tip:**
This can be done without SDK customization using our new [no code push primer](https://www.braze.com/docs/user_guide/message_building_by_channel/push/best_practices/push_primer_messages/).
## Setting up soft push prompts
**Note:**
This guide uses code samples from the Braze Web SDK 4.0.0+. To upgrade to the latest Web SDK version, see [SDK Upgrade Guide](https://github.com/braze-inc/braze-web-sdk/blob/master/UPGRADE_GUIDE.md).
### Step 1: Create a push primer campaign
First, you must create a "Prime for Push" in-app messaging campaign in the Braze dashboard:
1. Create a **Modal** in-app message with the text and styling you want.
2. Next, set the on-click behavior to **Close Message**. This behavior will be customized later.
3. Add a key-value pair to the message where the key is `msg-id`, and the value is `push-primer`.
4. Assign a custom event trigger action (such as "prime-for-push") to the message. You can create the custom event manually from the dashboard if needed.
### Step 2: Remove calls
In your Braze SDK integration, find and remove any calls to `automaticallyShowInAppMessages()` from within your loading snippet.
### Step 3: Update integration
Finally, replace the removed call with the following snippet. Call `subscribeToInAppMessage()` before calling `openSession()`. This ensures your in-app message listener is registered in time to receive the push primer message.
```javascript
import * as braze from "@braze/web-sdk";
// Be sure to remove any calls to braze.automaticallyShowInAppMessages()
braze.subscribeToInAppMessage(function(inAppMessage) {
// check if message is not a control variant
if (inAppMessage instanceof braze.inAppMessage) {
// access the key-value pairs, defined as `extras`
const keyValuePairs = inAppMessage.extras || {};
// check the value of our key `msg-id` defined in the Braze dashboard
if (keyValuePairs["msg-id"] === "push-primer") {
// We don't want to display the soft push prompt to users on browsers
// that don't support push, or if the user has already granted/blocked permission
if (
braze.isPushSupported() === false ||
braze.isPushPermissionGranted() ||
braze.isPushBlocked()
) {
// do not call `showInAppMessage`
return;
}
// user is eligible to receive the native prompt
// register a click handler on one of the two buttons
if (inAppMessage.buttons[0]) {
// Prompt the user when the first button is clicked
inAppMessage.buttons[0].subscribeToClickedEvent(function() {
braze.requestPushPermission(
function() {
// success!
},
function() {
// user declined
}
);
});
}
}
}
// show the in-app message now
braze.showInAppMessage(inAppMessage);
});
```
When you wish to display the soft push prompt to the user, call `braze.logCustomEvent` - with whatever event name triggers this in-app message.
# Log push notification data through the Braze SDK
Source: /docs/developer_guide/push_notifications/logging_message_data/index.md
# Log push notification data
> Learn how to log push notification data through the Braze SDK.
## Logging data with the Braze API (recommended)
You can log analytics in real-time by making calls to the [`/users/track` endpoint](https://www.braze.com/docs/api/endpoints/user_data/post_user_track/). To log analytics, send the `braze_id` value from the Braze dashboard to identify which user profile to update.
{: style="max-width:79%;"}
## Manually logging data
Depending on the details of your payload, you can log analytics manually within your `FirebaseMessagingService.onMessageReceived` implementation or your startup activity. Keep in mind, your `FirebaseMessagingService` subclass must finish execution within 9 seconds of invocation to avoid being [flagged or terminated](https://firebase.google.com/docs/cloud-messaging/android/receive) by the Android system.
## Logging data with the Braze API (recommended)
Logging analytics can be done in real-time with the help of the Braze API [`/users/track` endpoint](https://www.braze.com/docs/api/endpoints/user_data/post_user_track/). To log analytics, send down the `braze_id` value in the key-value pairs field (as seen in the following screenshot) to identify which user profile to update.
{: style="max-width:80%;"}
## Logging data manually
Logging manually will require you to first configure workspaces within Xcode, and then create, save, and retrieve analytics. This will require some custom developer work on your end. The following code snippets shown will help address this.
It's important to note that analytics are not sent to Braze until the mobile application is subsequently launched. This means that, depending on your dismissal settings, there often exists an indeterminate period of time between when a push notification is dismissed and the mobile app is launched and the analytics are retrieved. While this time buffer may not affect all use cases, you should consider this impact adjust your user journey as necessary to include opening the application to address this concern.

### Step 1: Configure app groups within Xcode
In Xcode, add the `App Groups` capability. If you haven’t had any workspaces in your app, go to the capability of the main app target, turn on the `App Groups`, and click the **+** Add button. Then, use your app’s bundle ID to create the workspace. For example, if your app’s bundle ID is `com.company.appname`, you can name your workspace `group.com.company.appname.xyz`. Make sure the `App Groups` are turned on for both your main app target and the content extension target.

### Step 2: Integrate code snippets
The following code snippets are a helpful reference on how to save and send custom events, custom attributes, and user attributes. This guide will be speaking in terms of `UserDefaults`, but the code representation will be in the form of the helper file `RemoteStorage`. There are additional helper files, `UserAttributes` and `EventName Dictionary`, that are used when sending and saving user attributes.
#### Saving custom events
To save custom events, you must create the analytics from scratch. This is done by creating a dictionary, populating it with metadata, and saving the data through the use of a helper file.
1. Initialize a dictionary with event metadata
2. Initialize `userDefaults` to retrieve and store the event data
3. If there is an existing array, append new data to the existing array and save
4. If there is not an existing array, save the new array to `userDefaults`
``` swift
func saveCustomEvent(with properties: [String: Any]? = nil) {
// 1
let customEventDictionary = Dictionary(eventName: "YOUR-EVENT-NAME", properties: properties)
// 2
let remoteStorage = RemoteStorage(storageType: .suite)
// 3
if var pendingEvents = remoteStorage.retrieve(forKey: .pendingCustomEvents) as? [[String: Any]] {
pendingEvents.append(contentsOf: [customEventDictionary])
remoteStorage.store(pendingEvents, forKey: .pendingCustomEvents)
} else {
// 4
remoteStorage.store([customEventDictionary], forKey: .pendingCustomEvents)
}
}
```
```objc
- (void)saveCustomEvent:(NSDictionary *)properties {
// 1
NSDictionary *customEventDictionary = [[NSDictionary alloc] initWithEventName:@"YOUR-EVENT-NAME" properties:properties];
// 2
RemoteStorage *remoteStorage = [[RemoteStorage alloc] initWithStorageType:StorageTypeSuite];
NSMutableArray *pendingEvents = [[remoteStorage retrieveForKey:RemoteStorageKeyPendingCustomEvents] mutableCopy];
// 3
if (pendingEvents) {
[pendingEvents addObject:customEventDictionary];
[remoteStorage store:pendingEvents forKey:RemoteStorageKeyPendingCustomAttributes];
} else {
// 4
[remoteStorage store:@[ customEventDictionary ] forKey:RemoteStorageKeyPendingCustomAttributes];
}
}
```
#### Sending custom events to Braze
The best time to log any saved analytics from a notification content app extension is right after the SDK is initialized. This can be done by looping through any pending events, checking for the "Event Name" key, setting the appropriate values in Braze, and then clearing the storage for the next time this function is needed.
1. Loop through the array of pending events
2. Loop through each key-value pair in the `pendingEvents` dictionary
3. Explicitly check the key for “Event Name” to set the value accordingly
4. Every other key-value will be added to the `properties` dictionary
5. Log individual custom event
6. Remove all pending events from storage
``` swift
func logPendingCustomEventsIfNecessary() {
let remoteStorage = RemoteStorage(storageType: .suite)
guard let pendingEvents = remoteStorage.retrieve(forKey: .pendingCustomEvents) as? [[String: Any]] else { return }
// 1
for event in pendingEvents {
var eventName: String?
var properties: [AnyHashable: Any] = [:]
// 2
for (key, value) in event {
if key == PushNotificationKey.eventName.rawValue {
// 3
if let eventNameValue = value as? String {
eventName = eventNameValue
} else {
print("Invalid type for event_name key")
}
} else {
// 4
properties[key] = value
}
}
// 5
if let eventName = eventName {
AppDelegate.braze?.logCustomEvent(eventName, properties: properties)
}
}
// 6
remoteStorage.removeObject(forKey: .pendingCustomEvents)
}
```
```objc
- (void)logPendingEventsIfNecessary {
RemoteStorage *remoteStorage = [[RemoteStorage alloc] initWithStorageType:StorageTypeSuite];
NSArray *pendingEvents = [remoteStorage retrieveForKey:RemoteStorageKeyPendingCustomEvents];
// 1
for (NSDictionary *event in pendingEvents) {
NSString *eventName = nil;
NSMutableDictionary *properties = [NSMutableDictionary dictionary];
// 2
for (NSString* key in event) {
if ([key isEqualToString:@"event_name"]) {
// 3
if ([[event objectForKey:key] isKindOfClass:[NSString class]]) {
eventName = [event objectForKey:key];
} else {
NSLog(@"Invalid type for event_name key");
}
} else {
// 4
properties[key] = event[key];
}
}
// 5
if (eventName != nil) {
[AppDelegate.braze logCustomEvent:eventName properties:properties];
}
}
// 6
[remoteStorage removeObjectForKey:RemoteStorageKeyPendingCustomEvents];
}
```
#### Saving custom attributes
To save custom attributes, you must create the analytics from scratch. This is done by creating a dictionary, populating it with metadata, and saving the data through the use of a helper file.
1. Initialize a dictionary with attribute metadata
2. Initialize `userDefaults` to retrieve and store the attribute data
3. If there is an existing array, append new data to the existing array and save
4. If there is not an existing array, save the new array to `userDefaults`
``` swift
func saveCustomAttribute() {
// 1
let customAttributeDictionary: [String: Any] = ["YOUR-CUSTOM-ATTRIBUTE-KEY": "YOUR-CUSTOM-ATTRIBUTE-VALUE"]
// 2
let remoteStorage = RemoteStorage(storageType: .suite)
// 3
if var pendingAttributes = remoteStorage.retrieve(forKey: .pendingCustomAttributes) as? [[String: Any]] {
pendingAttributes.append(contentsOf: [customAttributeDictionary])
remoteStorage.store(pendingAttributes, forKey: .pendingCustomAttributes)
} else {
// 4
remoteStorage.store([customAttributeDictionary], forKey: .pendingCustomAttributes)
}
}
```
``` objc
- (void)saveCustomAttribute {
// 1
NSDictionary *customAttributeDictionary = @{ @"YOUR-CUSTOM-ATTRIBUTE-KEY": @"YOUR-CUSTOM-ATTRIBUTE-VALUE" };
// 2
RemoteStorage *remoteStorage = [[RemoteStorage alloc] initWithStorageType:StorageTypeSuite];
NSMutableArray *pendingAttributes = [[remoteStorage retrieveForKey:RemoteStorageKeyPendingCustomAttributes] mutableCopy];
// 3
if (pendingAttributes) {
[pendingAttributes addObject:customAttributeDictionary];
[remoteStorage store:pendingAttributes forKey:RemoteStorageKeyPendingCustomAttributes];
} else {
// 4
[remoteStorage store:@[ customAttributeDictionary ] forKey:RemoteStorageKeyPendingCustomAttributes];
}
}
```
#### Sending custom attributes to Braze
The best time to log any saved analytics from a notification content app extension is right after the SDK is initialized. This can be done by looping through the pending attributes, setting the appropriate custom attribute in Braze, and then clearing the storage for the next time this function is needed.
1. Loop through the array of pending attributes
2. Loop through each key-value pair in the `pendingAttributes` dictionary
3. Log individual custom attributes with corresponding key and value
4. Remove all pending attributes from storage
``` swift
func logPendingCustomAttributesIfNecessary() {
let remoteStorage = RemoteStorage(storageType: .suite)
guard let pendingAttributes = remoteStorage.retrieve(forKey: .pendingCustomAttributes) as? [[String: Any]] else { return }
// 1
pendingAttributes.forEach { setCustomAttributesWith(keysAndValues: $0) }
// 4
remoteStorage.removeObject(forKey: .pendingCustomAttributes)
}
func setCustomAttributesWith(keysAndValues: [String: Any]) {
// 2
for (key, value) in keysAndValues {
// 3
if let value = value as? [String] {
setCustomAttributeArrayWithKey(key, andValue: value)
} else {
setCustomAttributeWithKey(key, andValue: value)
}
}
}
```
```objc
- (void)logPendingCustomAttributesIfNecessary {
RemoteStorage *remoteStorage = [[RemoteStorage alloc] initWithStorageType:StorageTypeSuite];
NSArray *pendingAttributes = [remoteStorage retrieveForKey:RemoteStorageKeyPendingCustomAttributes];
// 1
for (NSDictionary *attribute in pendingAttributes) {
[self setCustomAttributeWith:attribute];
}
// 4
[remoteStorage removeObjectForKey:RemoteStorageKeyPendingCustomAttributes];
}
- (void)setCustomAttributeWith:(NSDictionary *)keysAndValues {
// 2
for (NSString *key in keysAndValues) {
// 3
[self setCustomAttributeWith:key andValue:[keysAndValues objectForKey:key]];
}
}
```
#### Saving user attributes
When saving user attributes, we recommend creating a custom object to decipher what type of attribute is being updated (`email`, `first_name`, `phone_number`, etc.). The object should be compatible with being stored/retrieved from `UserDefaults`. See the `UserAttribute` helper file for one example of how to accomplish this.
1. Initialize an encoded `UserAttribute` object with the corresponding type
2. Initialize `userDefaults` to retrieve and store the event data
3. If there is an existing array, append new data to the existing array and save
4. If there is not an existing array, save the new array to `userDefaults`
``` swift
func saveUserAttribute() {
// 1
guard let data = try? PropertyListEncoder().encode(UserAttribute.userAttributeType("USER-ATTRIBUTE-VALUE")) else { return }
// 2
let remoteStorage = RemoteStorage(storageType: .suite)
// 3
if var pendingAttributes = remoteStorage.retrieve(forKey: .pendingUserAttributes) as? [Data] {
pendingAttributes.append(contentsOf: [data])
remoteStorage.store(pendingAttributes, forKey: .pendingUserAttributes)
} else {
// 4
remoteStorage.store([data], forKey: .pendingUserAttributes)
}
}
```
```objc
- (void)saveUserAttribute {
// 1
UserAttribute *userAttribute = [[UserAttribute alloc] initWithUserField:@"USER-ATTRIBUTE-VALUE" attributeType:UserAttributeTypeEmail];
NSError *error;
NSData *data = [NSKeyedArchiver archivedDataWithRootObject:userAttribute requiringSecureCoding:YES error:&error];
if (error != nil) {
// log error
}
// 2
RemoteStorage *remoteStorage = [[RemoteStorage alloc] initWithStorageType:StorageTypeSuite];
NSMutableArray *pendingAttributes = [[remoteStorage retrieveForKey:RemoteStorageKeyPendingUserAttributes] mutableCopy];
// 3
if (pendingAttributes) {
[pendingAttributes addObject:data];
[remoteStorage store:pendingAttributes forKey:RemoteStorageKeyPendingUserAttributes];
} else {
// 4
[remoteStorage store:@[data] forKey:RemoteStorageKeyPendingUserAttributes];
}
}
```
#### Sending user attributes to Braze
The best time to log any saved analytics from a notification content app extension is right after the SDK is initialized. This can be done by looping through the pending attributes, setting the appropriate custom attribute in Braze, and then clearing the storage for the next time this function is needed.
1. Loop through the array of `pendingAttributes` data
2. Initialize an encoded `UserAttribute` object from attribute data
3. Set specific user field based on the User Attribute type (email)
4. Remove all pending user attributes from storage
``` swift
func logPendingUserAttributesIfNecessary() {
let remoteStorage = RemoteStorage(storageType: .suite)
guard let pendingAttributes = remoteStorage.retrieve(forKey: .pendingUserAttributes) as? [Data] else { return }
// 1
for attributeData in pendingAttributes {
// 2
guard let userAttribute = try? PropertyListDecoder().decode(UserAttribute.self, from: attributeData) else { continue }
// 3
switch userAttribute {
case .email(let email):
user?.email = email
}
}
// 4
remoteStorage.removeObject(forKey: .pendingUserAttributes)
}
```
```objc
- (void)logPendingUserAttributesIfNecessary {
RemoteStorage *remoteStorage = [[RemoteStorage alloc] initWithStorageType:StorageTypeSuite];
NSArray *pendingAttributes = [remoteStorage retrieveForKey:RemoteStorageKeyPendingUserAttributes];
// 1
for (NSData *attributeData in pendingAttributes) {
NSError *error;
// 2
UserAttribute *userAttribute = [NSKeyedUnarchiver unarchivedObjectOfClass:[UserAttribute class] fromData:attributeData error:&error];
if (error != nil) {
// log error
}
// 3
if (userAttribute) {
switch (userAttribute.attributeType) {
case UserAttributeTypeEmail:
[self user].email = userAttribute.userField;
break;
}
}
}
// 4
[remoteStorage removeObjectForKey:RemoteStorageKeyPendingUserAttributes];
}
```
#### Helper files
**RemoteStorage Helper File**
```swift
enum RemoteStorageKey: String, CaseIterable {
// MARK: - Notification Content Extension Analytics
case pendingCustomEvents = "pending_custom_events"
case pendingCustomAttributes = "pending_custom_attributes"
case pendingUserAttributes = "pending_user_attributes"
}
enum RemoteStorageType {
case standard
case suite
}
class RemoteStorage: NSObject {
private var storageType: RemoteStorageType = .standard
private lazy var defaults: UserDefaults = {
switch storageType {
case .standard:
return .standard
case .suite:
return UserDefaults(suiteName: "YOUR-DOMAIN-IDENTIFIER")!
}
}()
init(storageType: RemoteStorageType = .standard) {
self.storageType = storageType
}
func store(_ value: Any, forKey key: RemoteStorageKey) {
defaults.set(value, forKey: key.rawValue)
}
func retrieve(forKey key: RemoteStorageKey) -> Any? {
return defaults.object(forKey: key.rawValue)
}
func removeObject(forKey key: RemoteStorageKey) {
defaults.removeObject(forKey: key.rawValue)
}
func resetStorageKeys() {
for key in RemoteStorageKey.allCases {
defaults.removeObject(forKey: key.rawValue)
}
}
}
```
```objc
@interface RemoteStorage ()
@property (nonatomic) StorageType storageType;
@property (nonatomic, strong) NSUserDefaults *defaults;
@end
@implementation RemoteStorage
- (id)initWithStorageType:(StorageType)storageType {
if (self = [super init]) {
self.storageType = storageType;
}
return self;
}
- (void)store:(id)value forKey:(RemoteStorageKey)key {
[[self defaults] setValue:value forKey:[self rawValueForKey:key]];
}
- (id)retrieveForKey:(RemoteStorageKey)key {
return [[self defaults] objectForKey:[self rawValueForKey:key]];
}
- (void)removeObjectForKey:(RemoteStorageKey)key {
[[self defaults] removeObjectForKey:[self rawValueForKey:key]];
}
- (void)resetStorageKeys {
[[self defaults] removeObjectForKey:[self rawValueForKey:RemoteStorageKeyPendingCustomEvents]];
[[self defaults] removeObjectForKey:[self rawValueForKey:RemoteStorageKeyPendingCustomAttributes]];
[[self defaults] removeObjectForKey:[self rawValueForKey:RemoteStorageKeyPendingUserAttributes]];
}
- (NSUserDefaults *)defaults {
if (!self.defaults) {
switch (self.storageType) {
case StorageTypeStandard:
return [NSUserDefaults standardUserDefaults];
break;
case StorageTypeSuite:
return [[NSUserDefaults alloc] initWithSuiteName:@"YOUR-DOMAIN-IDENTIFIER"];
}
} else {
return self.defaults;
}
}
- (NSString*)rawValueForKey:(RemoteStorageKey)remoteStorageKey {
switch(remoteStorageKey) {
case RemoteStorageKeyPendingCustomEvents:
return @"pending_custom_events";
case RemoteStorageKeyPendingCustomAttributes:
return @"pending_custom_attributes";
case RemoteStorageKeyPendingUserAttributes:
return @"pending_user_attributes";
default:
[NSException raise:NSGenericException format:@"Unexpected FormatType."];
}
}
```
**UserAttribute Helper File**
```swift
enum UserAttribute: Hashable {
case email(String?)
}
// MARK: - Codable
extension UserAttribute: Codable {
private enum CodingKeys: String, CodingKey {
case email
}
func encode(to encoder: Encoder) throws {
var values = encoder.container(keyedBy: CodingKeys.self)
switch self {
case .email(let email):
try values.encode(email, forKey: .email)
}
}
init(from decoder: Decoder) throws {
let values = try decoder.container(keyedBy: CodingKeys.self)
let email = try values.decode(String.self, forKey: .email)
self = .email(email)
}
}
```
```objc
@implementation UserAttribute
- (id)initWithUserField:(NSString *)userField attributeType:(UserAttributeType)attributeType {
if (self = [super init]) {
self.userField = userField;
self.attributeType = attributeType;
}
return self;
}
- (void)encodeWithCoder:(NSCoder *)encoder {
[encoder encodeObject:self.userField forKey:@"userField"];
[encoder encodeInteger:self.attributeType forKey:@"attributeType"];
}
- (id)initWithCoder:(NSCoder *)decoder {
if (self = [super init]) {
self.userField = [decoder decodeObjectForKey:@"userField"];
NSInteger attributeRawValue = [decoder decodeIntegerForKey:@"attributeType"];
self.attributeType = (UserAttributeType) attributeRawValue;
}
return self;
}
@end
```
**EventName Dictionary Helper File**
```swift
extension Dictionary where Key == String, Value == Any {
init(eventName: String, properties: [String: Any]? = nil) {
self.init()
self[PushNotificationKey.eventName.rawValue] = eventName
if let properties = properties {
for (key, value) in properties {
self[key] = value
}
}
}
}
```
```objc
@implementation NSDictionary (Helper)
- (id)initWithEventName:(NSString *)eventName properties:(NSDictionary *)properties {
self = [self init];
if (self) {
dict[@"event_name"] = eventName;
for(id key in properties) {
dict[key] = properties[key];
}
}
return self;
}
@end
```
# Send Test Messages
Source: /docs/developer_guide/push_notifications/sending_test_messages/index.md
# Sending test messages
> Before sending out a messaging campaign to your users, you may want to test it to make sure it looks right and operates in the intended manner. You can use the dashboard to create and send test messages with push notifications, in-app messages (IAM), or email.
## Sending a test message
### Step 1: Create a designated test segment
After you set up a test segment, you can use it to test any of your Braze messaging channels. When set up correctly, this only needs to be done a single time.
To set up a test segment, go to **Segments** and create a new segment. Select **Add Filter**, then choose a one of the test filters.

With test filters, you can ensure that only users with a specific email address or [external user ID](https://www.braze.com/docs/developer_guide/platform_integration_guides/swift/analytics/setting_user_ids/#setting-user-ids) are sent the test message.

Both email address and external user ID filters offer the following options:
| Operator | Description |
|------------------|--------------------------------------------------------------------------------------------------------------------------------|
| `equals` | This will look for an exact match of the email or user ID that you provide. Use this if you only want to send the test campaigns to devices associated with a single email or user ID. |
| `does not equal` | Use this if you want to exclude a particular email or user ID from test campaigns. |
| `matches` | This will find users that have email addresses or user IDs that match part of the search term you provide. You could use this to find only the users that have an `@yourcompany.com` address, allowing you to send messages to everyone on your team. |
{: .reset-td-br-1 .reset-td-br-2 role="presentation"}
You can select multiple specific emails using the "`matches`" option and separating the email addresses with a | character. For example: "`matches`" "`email1@braze.com` | `email2@braze.com`". You can also combine multiple operators together. For example, the test segment could include an email address filter that "`matches`" "`@braze.com`" and another filter that "`does not equal`" "`sales@braze.com`".
After adding the testing filters to your test segment, you can verify it's working by selecting **Preview** or by selecting **Settings** > **CSV Export All User Data** to export that segment's user data to a CSV file.

**Note:**
Exporting the segment's User Data to a CSV file is the most accurate verification method, as the preview will only show a sample of your users and may not include all users.
### Step 2: Send the message
You can send a message using the Braze dashboard or the command line.
To send test push notifications or in-app messages, you need to target your previously created test segment. Begin by creating your campaign and following the usual steps. When you reach the **Target Audiences** step, select your test segment from the dropdown menu.

Confirm your campaign and launch it to test your push notification and in-app messages.
**Note:**
Be sure to select **Allow users to become re-eligible to receive campaign** under the **Schedule** portion of the campaign composer if you intend to use a single campaign to send a test message to yourself more than once.
If you're only testing email messages, you do not necessarily have to set up a test segment. In the first step of the campaign composer where you compose your campaign's email message, click **Send Test** and enter the email address to which you wish to send a test email.

**Tip:**
You can also enable or disable [TEST (or SEED)](https://www.braze.com/docs/user_guide/administrative/app_settings/email_settings/#append-email-subject-lines) being appended on your test messages.
Alternatively, you can send a single notification using cURL and the [Braze Messaging API](https://www.braze.com/docs/api/endpoints/messaging/). Note that these examples make a request using the `US-01` instance. To find out yours, refer to [API endpoints](https://www.braze.com/docs/api/basics/#endpoints).
```bash
curl -X POST -H "Content-Type: application/json" -H "Authorization: Bearer {BRAZE_API_KEY}" -d '{
"external_user_ids":["EXTERNAL_USER_ID"],
"messages": {
"android_push": {
"title":"Test push title",
"alert":"Test push",
"extra":{
"CUSTOM_KEY":"CUSTOM_VALUE"
}
}
}
}' https://rest.iad-01.braze.com/messages/send
```
```bash
curl -X POST -H "Content-Type: application/json" -H "Authorization: Bearer {BRAZE_API_KEY}" -d '{
"external_user_ids":["EXTERNAL_USER_ID"],
"messages": {
"apple_push": {
"alert": "Test push",
"extra": {
"CUSTOM_KEY" :"CUSTOM_VALUE"
}
}
}
}' https://rest.iad-01.braze.com/messages/send
```
```bash
curl -X POST -H "Content-Type: application/json" -H "Authorization: Bearer {BRAZE_API_KEY}" -d '{
"external_user_ids":["EXTERNAL_USER_ID"],
"messages": {
"kindle_push": {
"title":"Test push title",
"alert":"Test push",
"extra":{
"CUSTOM_KEY":"CUSTOM_VALUE"
}
}
}
}' https://rest.iad-01.braze.com/messages/send
```
Replace the following:
| Placeholder | Description |
|---------------------|-----------------------------------------------------------|
| `BRAZE_API_KEY` | Your Braze API key used for authentication. In Braze, go to **Settings** > **API Keys** to locate your key. |
| `EXTERNAL_USER_ID` | The external user ID used to send your message to a specific user. In Braze, go to **Audience** > **Search users**, then search for a user. |
| `CUSTOM_KEY` | (Optional) A custom key for additional data. |
| `CUSTOM_VALUE` | (Optional) A custom value assigned to your custom key. |
{: .reset-td-br-1 .reset-td-br-2 role="presentation"}
## Test limitations
There are a few situations where test messages don't have complete feature parity with launching a campaign or Canvas to a real set of users. In these instances, to validate this behavior, you should launch the campaign or Canvas to a limited set of test users.
- Viewing the Braze [preference center](https://www.braze.com/docs/user_guide/message_building_by_channel/email/managing_user_subscriptions/#subscription-groups) from **Test Messages** will cause the submit button to be grayed out.
- The list-unsubscribe header is not included in emails sent by the test message functionality.
- For in-app messages and Content Cards, the target user must have a push token for the target device.
# Advanced push notification examples for the Braze SDK
Source: /docs/developer_guide/push_notifications/examples/index.md
# Advanced push notification examples
> The following guide covers some advanced push notifications examples for the Braze SDK.
## Prerequisites
Before you can use this feature, you'll need to [integrate the Android Braze SDK](https://www.braze.com/docs/developer_guide/sdk_integration/?sdktab=android). You'll also need to [set up push notifications](https://www.braze.com/docs/developer_guide/push_notifications/?sdktab=android).
## Custom notification layout
Braze notifications are sent as [data messages](https://firebase.google.com/docs/cloud-messaging/concept-options), which means that your application will always have a chance to respond and perform behavior accordingly, even in the background (in contrast to notification messages, which can be handled automatically by the system when your app is in the background). As such, your application will have a chance to customize the experience by, for example displaying personalized UI elements within the notification delivered to the notification tray. While implementing push in this way may be unfamiliar to some, one of our well-known features at Braze, [Push Stories](https://www.braze.com/docs/user_guide/message_building_by_channel/push/advanced_push_options/push_stories/), are a prime example of using custom view components to create an engaging experience!
**Important:**
Android imposes some limitations on what components can be used to implement custom notification views. Notification view layouts must _only_ contain View objects compatible with the [RemoteViews](https://developer.android.com/reference/android/widget/RemoteViews) framework.
You can use the [`IBrazeNotificationFactory`](https://braze-inc.github.io/braze-android-sdk/kdoc/braze-android-sdk/com.braze/-i-braze-notification-factory/index.html) interface to customize how Braze push notifications are displayed. By extending `BrazeNotificationFactory`, Braze will call your factory's `createNotification()` method before the notification is displayed to the user. It will then pass a payload containing custom key-value pairs sent through the Braze dashboard or REST API.
In this section, you'll partner with Superb Owl, the host of a new game show where wildlife rescue teams compete to see who can save the most owls. They're looking to leverage live updating notifications in their Android app, so they can display the status of an on-going match and make dynamic updates to the notification in realtime.
{: style="max-width:65%;"}
### Step 1: Add a custom layout
You can add one or more custom notification RemoteView layouts to your project. These are helpful for handling how notifications are displayed when collapsed or expanded. Your directory structure should be similar to the following:
```plaintext
.
├── app/
└── res/
└── layout/
├── liveupdate_collapsed.xml
└── liveupdate_expanded.xml
```
In each XML file, create a custom layout. Superb Owl created the following layouts for their collapsed and expanded RemoteView layouts:
```xml
```
**Show the sample code**
```xml
```
### Step 2: Create a custom notification factory
In your application, create a new file named `MyCustomNotificationFactory.kt` that extends [`BrazeNotificationFactory`](https://braze-inc.github.io/braze-android-sdk/kdoc/braze-android-sdk/com.braze/-i-braze-notification-factory/index.html) to handle how custom RemoteView layouts are displayed.
In the following example, Superb Owl created a custom notification factory to display a RemoteView layout for on-going matches. In the [next step](#android_step-3-map-custom-data), they'll create a new method called `getTeamInfo` to map a team's data to the activity.
**Show the sample code**
```kotlin
import android.app.Notification
import android.widget.RemoteViews
import androidx.core.app.NotificationCompat
import com.braze.models.push.BrazeNotificationPayload
import com.braze.push.BrazeNotificationFactory
import com.braze.push.BrazeNotificationUtils.getOrCreateNotificationChannelId
import com.braze.support.BrazeLogger.brazelog
class MyCustomNotificationFactory : BrazeNotificationFactory() {
override fun createNotification(payload: BrazeNotificationPayload): Notification? {
if (payload.extras.containsKey("live_update")) {
val kvp = payload.extras
val notificationChannelId = getOrCreateNotificationChannelId(payload)
val context = payload.context
if (context == null) {
brazelog { "BrazeNotificationPayload has null context. Not creating notification" }
return null
}
val team1 = kvp["team1"]
val team2 = kvp["team2"]
val score1 = kvp["score1"]
val score2 = kvp["score2"]
val time = kvp["time"]
val quarter = kvp["quarter"]
// Superb Owl will define the 'getTeamInfo' method in the next step.
val (team1name, team1icon) = getTeamInfo(team1)
val (team2name, team2icon) = getTeamInfo(team2)
// Get the layouts to use in the custom notification.
val notificationLayoutCollapsed = RemoteViews(BuildConfig.APPLICATION_ID, R.layout.liveupdate_collapsed)
val notificationLayoutExpanded = RemoteViews(BuildConfig.APPLICATION_ID, R.layout.liveupdate_expanded)
// Very simple notification for the small layout
notificationLayoutCollapsed.setTextViewText(
R.id.notification_title,
"$team1 $score1 - $score2 $team2\n$time $quarter"
)
notificationLayoutExpanded.setTextViewText(R.id.score, "$score1 - $score2")
notificationLayoutExpanded.setTextViewText(R.id.team1name, team1name)
notificationLayoutExpanded.setTextViewText(R.id.team2name, team2name)
notificationLayoutExpanded.setTextViewText(R.id.timeInfo, "$time - $quarter")
notificationLayoutExpanded.setImageViewResource(R.id.team1logo, team1icon)
notificationLayoutExpanded.setImageViewResource(R.id.team2logo, team2icon)
val customNotification = NotificationCompat.Builder(context, notificationChannelId)
.setSmallIcon(R.drawable.notification_small_icon)
.setStyle(NotificationCompat.DecoratedCustomViewStyle())
.setCustomContentView(notificationLayout)
.setCustomBigContentView(notificationLayoutExpanded)
.build()
return customNotification
} else {
// Use the BrazeNotificationFactory for all other notifications
return super.createNotification(payload)
}
}
}
```
### Step 3: Map custom data
In `MyCustomNotificationFactory.kt`, create a new method for handling data when Live Updates are displayed.
Superb Owl created the following method to map each team's name and logo to expanded Live Updates:
```kotlin
class CustomNotificationFactory : BrazeNotificationFactory() {
override fun createNotification(payload: BrazeNotificationPayload): Notification? {
// Your existing code
return super.createNotification(payload)
}
// Your new method
private fun getTeamInfo(team: String?): Pair {
return when (team) {
"WBF" -> Pair("Wild Bird Fund", R.drawable.team_wbf)
"OWL" -> Pair("Owl Rehab", R.drawable.team_owl)
else -> Pair("Unknown", R.drawable.notification_small_icon)
}
}
}
```
### Step 4: Set the custom notification factory
In your application class, use [`customBrazeNotificationFactory`](https://braze-inc.github.io/braze-android-sdk/kdoc/braze-android-sdk/com.braze/-braze/-companion/custom-braze-notification-factory.html?query=var%20customBrazeNotificationFactory:%20IBrazeNotificationFactory?)to set your custom notification factory.
```kotlin
import com.braze.Braze
class MyApplication : Application() {
override fun onCreate() {
super.onCreate()
// Tell Braze to use your custom factory for notifications
Braze.customBrazeNotificationFactory = MyCustomNotificationFactory()
}
}
```
### Step 5: Send the activity
You can use the [`/messages/send`](https://www.braze.com/docs/api/endpoints/messaging/send_messages/post_send_messages) REST API endpoint to send a push notification to a user's Android device.
#### Example curl command
Superb Owl sent their request using the following curl command:
```
curl -X POST "https://BRAZE_REST_ENDPOINT/messages/send" \
-H "Authorization: Bearer {REST_API_KEY}" \
-H "Content-Type: application/json" \
--data '{
"external_user_ids": ["USER_ID"],
"messages": {
"android_push": {
"title": "WBF vs OWL",
"alert": "2 to 4 1:33 Q4",
"extra": {
"live_update": "true",
"team1": "WBF",
"team2": "OWL",
"score1": "2",
"score2": "4",
"time": "1:33",
"quarter": "Q4"
},
"notification_id": "ASSIGNED_NOTIFICATION_ID"
}
}
}'
```
**Tip:**
While curl commands are helpful for testing, we recommend handling this call in your backend where you're already handling your [iOS Live Activities](https://www.braze.com/docs/developer_guide/push_notifications/live_notifications/?sdktab=swift).
#### Request parameters
| Key | Description |
| ----------------------------- | ------------------------------------------------------------------------------------------------------------------------------------------------------------------------------------------------------------------------------------------------ |
| `REST_API_KEY` | A Braze REST API key with `messages.send` permissions.
This can be created in the Braze dashboard from **Settings** > **API Keys**. |
| `BRAZE_REST_ENDPOINT` | Your REST endpoint URL. Your endpoint will depend on the [Braze URL for your instance](https://www.braze.com/docs/api/basics/#endpoints). |
| `USER_ID` | The ID of the user you are sending the notification to. |
| `messages.android_push.title` | The message's title. By default, this is not used for the custom notification factory's live notifications, but it may be used as a fallback. |
| `messages.android_push.alert` | The message's body. By default, this is not used for the custom notification factory's live notifications, but it may be used as a fallback. |
| `messages.extra` | Key-value pairs that the custom notification factory uses for live notifications. You can assign any string to this value—however, in the example above, `live_updates` is used to determine if it's a default or live push notification. |
| `ASSIGNED_NOTIFICATION_ID` | The notification ID you want to assign to the chosen user's live notification. The ID must be unique to this game, and must be used in order to [update their existing notification](#android_step-4-update-data-with-the-braze-rest-api) later. |
{: .reset-td-br-1 .reset-td-br-2 role="presentation"}
### Step 6: Update the activity
To update the existing RemoteView notification with new data, modify the relevant key-value pairs assigned to `messages.extra`, then use the same `notification_id` and call the `/messages/send` endpoint again.
## Personalized push notifications
Push notifications can display user-specific information inside a custom view hierarchy. In the following example, an API-trigger is used to send personalized push notification to a user so they can track check their current progress after completing a specific task in the app.
{: style="max-width:65%;border:0"}
To set up a personalized push in the dashboard, register the specific category you want to be displayed, then set any relevant user attributes you'd like to display using Liquid.
{: style="max-width:60%;"}
## Prerequisites
Before you can use this feature, you'll need to [integrate the Swift Braze SDK](https://www.braze.com/docs/developer_guide/sdk_integration/?sdktab=swift). You'll also need to [set up push notifications](https://www.braze.com/docs/developer_guide/push_notifications/?sdktab=swift).
**Note:**
This implementation guide is centered around a Swift implementation, but Objective-C snippets are provided for those interested.
## Notification content app extensions
{: style="max-width:65%;border:0;margin-top:10px"}
Notification content app extensions provide you a great option for push notification customization. Notification content app extensions display a custom interface for your app’s notifications when a push notification is expanded.
Push notifications can be expanded in three different ways:
- A long press on the push banner
- Swiping down on the push banner
- Swiping the banner to the left and selecting "View"
These custom views offer smart ways to engage customers by displaying distinct types of content, including interactive notifications, notifications populated with user data, and even push messages that can capture information like phone numbers and email. One of our well-known features at Braze, [Push Stories](https://www.braze.com/docs/user_guide/message_building_by_channel/push/advanced_push_options/push_stories/), are a prime example of what a push notification content app extension can look like!
### Requirements
{: style="float:right;max-width:50%;margin-left:10px; border:0;margin-top:10px"}
- [Push notifications](https://www.braze.com/docs/developer_guide/push_notifications/?sdktab=swift) successfully integrated in your app
- The following files generated by Xcode based on your coding language:
**Swift**
- `NotificationViewController.swift`
- `MainInterface.storyboard`
**Objective-C**
- `NotificationViewController.h`
- `NotificationViewController.m`
- `MainInterface.storyboard`
## Interactive push notification
Push notifications can respond to user actions inside a content app extension. For users running iOS 12 or later, this means you can turn your push notifications into fully interactive messages! This provides an exciting option to introduce interactivity to your promotions and applications. For example, your push notification can include a game for users to play, a spin-to-win wheel for discounts, or a "like" button to save a listing or song.
The following example shows a push notification where users are able to play a match game inside the expanded notification.
{: style="border:0"}
### Dashboard configuration
To create an interactive push notification, you must set a custom view in your dashboard.
1. From the **Campaigns** page, click **Create Campaign** to start a new push notification campaign.
2. On the **Compose** tab, toggle on **Notification Buttons**.
3. Enter a custom iOS category in the **iOS Notification Category** field.
4. In the `.plist` of your Notification Content Extension Target, set the `UNNotificationExtensionCategory` attribute to your custom iOS category. The value given here must match what is set in the Braze dashboard under **iOS Notification Category**.
5. Set the `UNNotificationExtensionInteractionEnabled` key to `true` to enable user interactions in a push notification.
{: style="max-width:75%;border:0;margin-top:10px"}
{: style="max-width:75%;border:0;margin-top:10px"}
## Personalized push notifications
{: style="float:right;max-width:40%;margin-left:15px;border:0"}
Push notifications can display user-specific information inside a content extension. This allows you to create user-focused push content, such as adding the option to share your progress across different platforms, show unlocked achievements, or display onboarding checklists. This example shows a push notification displayed to a user after they have completed a specific task in the Braze Learning course. By expanding the notification, the user can see their progress through their learning path. The information provided here is user-specific and can be fired off as a session is completed or a specific user action is taken by leveraging an API trigger.
### Dashboard configuration
To create a personalized push notification, you must set a custom view in your dashboard.
1. From the **Campaigns** page, click **Create Campaign** to start a new push notification campaign.
2. On the **Compose** tab, toggle on **Notification Buttons**.
3. Enter a custom iOS category in the **iOS Notification Category** field.
4. In the **Settings** tab, create key-value pairs using standard Liquid. Set the appropriate user attributes you want the message to show. These views can be personalized based on specific user attributes of a specific user profile.
5. In the `.plist` of your Notification Content Extension Target, set the `UNNotificationExtensionCategory` attribute to your custom iOS category. The value given here must match what is set in the Braze dashboard under **iOS Notification Category**.
{: style="max-width:60%;"}
### Handling key-value pairs
The method `didReceive` is called when the notification content app extension has received a notification. This method can be found within the `NotificationViewController`. The key-value pairs provided in the dashboard are represented in the code through the use of a `userInfo` dictionary.
#### Parsing Key-Value Pairs from Push Notifications
``` swift
func didReceive(_ notification: UNNotification) {
let userInfo = notification.request.content.userInfo
guard let value = userInfo["YOUR-KEY-VALUE-PAIR"] as? String,
let otherValue = userInfo["YOUR-OTHER-KEY-VALUE-PAIR"] as? String,
else { fatalError("Key-Value Pairs are incorrect.")}
...
}
```
```objc
- (void)didReceiveNotification:(nonnull UNNotification *)notification {
NSDictionary *userInfo = notification.request.content.userInfo;
if (userInfo[@"YOUR-KEY-VALUE-PAIR"] && userInfo[@"YOUR-OTHER-KEY-VALUE-PAIR"]) {
...
} else {
[NSException raise:NSGenericException format:@"Key-Value Pairs are incorrect"];
}
}
```
## Information capture push notification
Push notifications can capture user information inside a content app extension, pushing the limits of what is possible with a push. Requesting user input through push notifications allows you to not only request basic information like name or email, but also prompt users to submit feedback or complete an unfinished user profile.
**Tip:**
For more information, see [Logging push notification data](https://www.braze.com/docs/developer_guide/analytics/logging_channel_data/push_notifications/).
In the following flow, the custom view is able to respond to state changes. Those state change components are represented in each image.
1. User receives a push notification.
2. Push is opened. After expanded, the push prompts the user for information. In this example, the user's email address is requested, but you could request any sort of information.
3. Information is provided, and if in the expected format, the registration button is shown.
3. Confirmation view is displayed, and push gets dismissed.
{: style="border:0;"}
### Dashboard configuration
To create an information capture push notification, you must set a custom view in your dashboard.
1. From the **Campaigns** page, click **Create Campaign** to start a new push notification campaign.
2. On the **Compose** tab, toggle on **Notification Buttons**.
3. Enter a custom iOS category in the **iOS Notification Category** field.
4. In the **Settings** tab, create key-value pairs using standard Liquid. Set the appropriate user attributes you want the message to show.
5. In the `.plist` of your Notification Content Extension Target, set the `UNNotificationExtensionCategory` attribute to your custom iOS category. The value given here must match what is set in the Braze dashboard under **iOS Notification Category**.
As seen in the example, you may also include an image in your push notification. To do this, you must integrate [rich notifications](https://www.braze.com/docs/developer_guide/push_notifications/rich/?sdktab=swift), set the notification style in your campaign to Rich Notification, and include a rich push image.

### Handling button actions
Each action button is uniquely identified. The code checks if your response identifier is equal to the `actionIndentifier`, and if so, knows that the user clicked the action button.
**Handling Push Notification Action Button Responses**
``` swift
func didReceive(_ response: UNNotificationResponse, completionHandler completion: @escaping (UNNotificationContentExtensionResponseOption) -> Void) {
if response.actionIdentifier == "YOUR-REGISTER-IDENTIFIER" {
// do something
} else {
// do something else
}
}
```
```objc
- (void)didReceiveNotificationResponse:(UNNotificationResponse *)response completionHandler:(void (^)(UNNotificationContentExtensionResponseOption))completion {
if ([response.actionIdentifier isEqualToString:@"YOUR-REGISTER-IDENTIFIER"]) {
completion(UNNotificationContentExtensionResponseOptionDismiss);
} else {
completion(UNNotificationContentExtensionResponseOptionDoNotDismiss);
}
}
```
### Dismissing pushes
Push notifications can be automatically dismissed from an action button press. There are three pre-built push dismissal options that we recommend:
1. `completion(.dismiss)` - Dismisses the notification
2. `completion(.doNotDismiss)` - Notification stays open
3. `completion(.dismissAndForward)` - Push dismisses and the user gets forwarded into the application
# Troubleshoot push notifications for the Braze SDK
Source: /docs/developer_guide/push_notifications/troubleshooting/index.md
# Troubleshoot push notifications
> Learn how to troubleshoot push notifications for the Braze SDK.
## Troubleshooting
If you're experiencing issues after setting up push notifications, consider the following:
- Web push notifications require that your site be HTTPS.
- Not all browsers can receive push messages. Ensure that `braze.isPushSupported()` returns `true` in the browser.
- Some browsers, such as Firefox, do not display images in push notifications. For details on browser support, refer to the [MDN documentation for Notification images](https://developer.mozilla.org/en-US/docs/Web/API/Notification/image).
- If a user has denied a site push access, they won't be prompted for permission again unless they remove the denied status from their browser preferences.
## Understanding the Braze push workflow
The Firebase Cloud Messaging (FCM) service is Google's infrastructure for push notifications sent to Android applications. Here is the simplified structure of how push notifications are enabled for your users' devices and how Braze can send push notifications to them:
```mermaid
---
config:
theme: mc
---
sequenceDiagram
participant Device as User Device
participant App as Android App
participant BrazeSDK as Braze SDK
participant BrazeAPI as Braze Server
participant Firebase as Google Firebase
Note over Device, Firebase: Register Option 1 Register Automatically using `com_braze_firebase_cloud_messaging_registration_enabled` in braze.xml
App ->> Braze: App initializes Braze with the first Braze call This could be automatic session handling
BrazeSDK ->> App: Get push token from Firebase Manager
BrazeSDK ->> BrazeAPI: Send push token to Braze Server
Note right of BrazeAPI: Braze will remove push token from any other user who may have previously been logged in on the same device.
Note over Device, Firebase: Register Option 2 Manual registration.
App ->> BrazeSDK: App sets `Braze.registeredPushToken`
BrazeSDK ->> BrazeAPI: Send push token to Braze Server
Note right of BrazeAPI: Braze will remove push token from any other user who may have previously been logged in on the same device.
Note over Device, Firebase: Push permission
BrazeAPI ->> BrazeSDK: In-App Message containing push prompt
BrazeSDK -> App: In-App Message is displayed
App -> BrazeSDK: User requests permissions
BrazeSDK -> App: Displays the Push Authorization prompt
BrazeSDK -> BrazeAPI: If authorized and `com_braze_optin_when_push_authorized`, Opt-In value is sent.
Note over Device, Firebase: Push Notification Is Sent
BrazeAPI ->> Firebase: Sends push message
Firebase ->> Device: Push message sent
Device ->> App: Android will send the push to the App. This could be blocked to Do Not Disturb, Power Saving Mode, etc.
App ->> BrazeSDK: Message is sent to BrazeFirebaseMessagingService
BrazeSDK ->> Device: SDK will check if the push is from Braze. If so, push data is transformed into a Push Notification and displayed.
```
### Step 1: Configuring your Google Cloud API key
In developing your app, you'll need to provide the Braze Android SDK with your Firebase sender ID. Additionally, you'll need to provide an API Key for server applications to the Braze dashboard. Braze will use this API key to send messages to your devices. You will also need to check that FCM service is enabled in Google Developer's console.
**Note:**
A common mistake during this step is using the app identifier API key instead of the REST API key.
### Step 2: Devices register for FCM and provide Braze with push tokens
In typical integrations, the Braze Android SDK will handle registering devices for FCM capability. This will usually happen immediately upon opening the app for the first time. After registration, Braze will be provided with an FCM Registration ID, which is used to send messages to that device specifically. We will store the Registration ID for that user, and that user will become "push registered" if they previously did not have a push token for any of your apps.
### Step 3: Launching a Braze push campaign
When a push campaign is launched, Braze will make requests to FCM to deliver your message. Braze will use the API key copied in the dashboard to authenticate and verify that we can send push notifications to the push tokens provided.
### Step 4: Removing invalid tokens
If FCM informs us that any of the push tokens we were attempting to send a message to are invalid, we remove those tokens from the user profiles they were associated with. If users have no other push tokens, they will no longer show up as "Push Registered" under the **Segments** page.
For more details about FCM, visit [Cloud messaging](https://firebase.google.com/docs/cloud-messaging/).
## Utilizing the push error logs
Braze provides push notification errors within the message activity log. This error log provides a variety of warnings which can be very helpful for identifying why your campaigns aren't working as expected. Clicking on an error message will redirect you to relevant documentation to help you troubleshoot a particular incident.

## Troubleshooting scenarios
### Push isn't sending
Your push messages might not be sending because of the following situations:
- Your credentials exist in the wrong Google Cloud Platform project ID (wrong sender ID).
- Your credentials have the wrong permission scope.
- You uploaded wrong credentials to the wrong Braze workspace (wrong sender ID).
For other issues that may prevent you from sending a push message, refer to [User Guide: Troubleshooting Push Notifications](https://www.braze.com/docs/user_guide/message_building_by_channel/push/troubleshooting/).
### No "push registered" users showing in the Braze dashboard (prior to sending messages)
Confirm that your app is correctly configured to allow push notifications. Common failure points to check include:
#### Incorrect sender ID
Check that the correct FCM sender ID is included in the `braze.xml` file. An incorrect sender ID will lead to `MismatchSenderID` errors reported in the dashboard's message activity log.
#### Braze registration not occurring
Since FCM registration is handled outside of Braze, failure to register can only occur in two places:
1. During registration with FCM
2. When passing the FCM-generated push token to Braze
We recommend setting a breakpoint or logging to confirm that the FCM-generated push token is being sent to Braze. If a token is not generated correctly or at all, we recommend consulting the [FCM documentation](https://firebase.google.com/docs/cloud-messaging/android/client).
#### Google Play Services not present
For FCM push to work, Google Play Services must be present on the device. If Google Play Services isn't on a device, push registration will not occur.
**Note:** Google Play Services is not installed on Android emulators without Google APIs installed.
#### Device not connected to the internet
Check that your device has good internet connectivity and isn't sending network traffic through a proxy.
### Tapping push notification doesn't open the app
Check if `com_braze_handle_push_deep_links_automatically` is set to `true` or `false`. To enable Braze to automatically open the app and any deep links when a push notification is tapped, set `com_braze_handle_push_deep_links_automatically` to `true` in your `braze.xml` file.
If `com_braze_handle_push_deep_links_automatically` is set to its default of `false`, you need to use a Braze Push Callback to listen for and handle the push received and opened intents.
### Push notifications bounced
If a push notification isn't delivered, make sure it didn't bounce by looking in the [developer console](https://www.braze.com/docs/developer_guide/platforms/android/push_notifications/troubleshooting/#utilizing-the-push-error-logs). The following are descriptions of common errors that may be logged in the developer console:
#### Error: MismatchSenderID
`MismatchSenderID` indicates an authentication failure. Confirm your Firebase sender ID and FCM API key are correct.
#### Error: InvalidRegistration
`InvalidRegistration` can be caused by a malformed push token.
1. Make sure to pass a valid push token to Braze from [Firebase Cloud Messaging](https://firebase.google.com/docs/cloud-messaging/android/client#retrieve-the-current-registration-token).
#### Error: NotRegistered
1. `NotRegistered` typically occurs when an app has been deleted from a device. Braze uses `NotRegistered` internally to signal that an app has been uninstalled from a device.
2. `NotRegistered` may also occur when multiple registrations occur and a second registration invalidates the first token.
### Push notifications sent but not displayed on users' devices
There are a few reasons why this could be occurring:
#### Application was force quit
If you force-quit your application through your system settings, your push notifications will not be sent. Launching the app again will re-enable your device to receive push notifications.
#### BrazeFirebaseMessagingService not registered
The BrazeFirebaseMessagingService must be properly registered in `AndroidManifest.xml` for push notifications to appear:
```xml
```
#### Firewall is blocking push
If you are testing push over Wi-Fi, your firewall may be blocking ports necessary for FCM to receive messages. Confirm that ports `5228`, `5229`, and `5230` are open. Additionally, since FCM doesn't specify its IPs, you must also allow your firewall to accept outgoing connections to all IP addresses contained in the IP blocks listed in Google's ASN of `15169`.
#### Custom notification factory returning null
If you have implemented a [custom notification factory](https://www.braze.com/docs/developer_guide/platform_integration_guides/android/push_notifications/android/integration/standard_integration/#custom-displaying-notifications), ensure that it is not returning `null`. This will cause notifications not to be displayed.
### "Push registered" users no longer enabled after sending messages
There are a few reasons why this could be happening:
#### Application was uninstalled
Users have uninstalled the application. This will invalidate their FCM push token.
#### Invalid Firebase Cloud Messaging server key
The Firebase Cloud Messaging server key provided in the Braze dashboard is invalid. The sender ID provided should match the one referenced in your app's `braze.xml` file. The server key and sender ID are found here in your Firebase Console:

### Push clicks not logged
Braze logs push clicks automatically, so this scenario should be comparatively rare.
If push clicks are not being logged, it is possible that push click data has not been flushed to our servers yet. Braze throttles the frequency of its flushes based on the strength of the network connection. With a good network connection, push click-data should arrive at the server within a minute in most circumstances.
### Deep links not working
#### Verify deep link configuration
Deep links can be [tested with ADB](https://developer.android.com/training/app-indexing/deep-linking.html#testing-filters). We recommend testing your deep link with the following command:
`adb shell am start -W -a android.intent.action.VIEW -d "THE_DEEP_LINK" THE_PACKAGE_NAME`
If the deep link fails to work, the deep link may be misconfigured. A misconfigured deep link will not work when sent through Braze push.
#### Verify custom handling logic
If the deep link [works correctly with ADB](https://developer.android.com/training/app-indexing/deep-linking.html#testing-filters) but fails to work from Braze push, check whether any [custom push open handling](https://www.braze.com/docs/developer_guide/platform_integration_guides/android/push_notifications/android/integration/standard_integration/#android-push-listener-callback) has been implemented. If so, verify that the custom handling code properly handles the incoming deep link.
#### Disable back stack behavior
If the deep link [works correctly with ADB](https://developer.android.com/training/app-indexing/deep-linking.html#testing-filters) but fails to work from Braze push, try disabling [back stack](https://developer.android.com/guide/components/activities/tasks-and-back-stack). To do so, update your **braze.xml** file to include:
```xml
false
```
## Understanding the Braze/APNs workflow
The Apple Push Notification service (APNs) is the infrastructure for sending push notifications to applications running on Apple's platforms. Here is the simplified structure of how push notifications are enabled for your users' devices and how Braze can send push notifications to them:
1. You configure the push certificate and provisioning profile
2. Devices register for APNs and provide Braze with push tokens
3. You launch a Braze push campaign
4. Braze removes invalid tokens
### Step 1: Configuring the push certificate and provisioning profile
In developing your app, you'll need to create an SSL certificate to enable push notifications. This certificate will be included in the provisioning profile your app is built with and will also need to be uploaded to the Braze dashboard. The certificate allows Braze to tell APNs that we are allowed to send push notifications on your behalf.
There are two types of [provisioning profiles](https://developer.apple.com/library/content/documentation/IDEs/Conceptual/AppDistributionGuide/MaintainingProfiles/MaintainingProfiles.html) and certificates: development and distribution. We recommend just using distribution profiles and certificates to avoid any confusion. If you choose to use different profiles and certificates for development and distribution, ensure that the certificate uploaded to the dashboard matches the provisioning profile you are currently using.
**Warning:**
Do not change the push certificate environment (development versus production). Changing the push certificate to the wrong environment can lead to your users having their push token accidentally removed, making them unreachable by push.
### Step 2: Devices register for APNs and provide Braze with push tokens
When users open your app, they will be prompted to accept push notifications. If they accept this prompt, APNs will generate a push token for that particular device. The Swift SDK will immediately and asynchronously send up the push token for apps using the default [automatic flush policy](https://www.braze.com/docs/developer_guide/platform_integration_guides/swift/advanced_use_cases/fine_network_traffic_control/#automatic-request-processing). After we have a push token associated with a user, they will show as "Push Registered" in the dashboard on their user profile under the **Engagement** tab and will be eligible to receive push notifications from Braze campaigns.
**Note:**
Starting in macOS 13, on certain devices, you can test push notifications on an iOS 16 Simulator running on Xcode 14. For further details, refer to the [Xcode 14 Release Notes](https://developer.apple.com/documentation/xcode-release-notes/xcode-14-release-notes).
#### Considerations for push token generation
- If users install your app on another device, another token will be created and captured in the same way.
- If users reinstall your app, a new token will be generated and passed to Braze. However, the original token may still be logged as valid by APNs and Braze.
- If users uninstall your app, Braze doesn't get immediately notified of this and the token will still appear as valid until it is retired by APNs.
- At some point, APNs will retire old tokens. Braze doesn't have control or visibility of this.
### Step 3: Launching a Braze push campaign
When a push campaign is launched, Braze will make requests to APNs to deliver your message. Specifically, the requests are passed to APNs for each current valid push token unless **Send to a user's most recent device** is selected. After Braze receives a successful response from APNs, we will log a successful delivery on the user profile, though the user may not have received the actual message for reasons including:
- Their device is powered off.
- Their device isn't connected to the internet (Wi-Fi or cellular).
- They recently uninstalled the app.
Braze will use the SSL push certificate uploaded in the dashboard to authenticate and verify that we are allowed to send push notifications to the push tokens provided. If a device is online, the notification should be received shortly after the campaign has been sent. Note that Braze sets the default APNs [expiration date](https://developer.apple.com/documentation/usernotifications/setting_up_a_remote_notification_server/sending_notification_requests_to_apns#2947607) for notifications to 30 days.
### Step 4: Removing invalid tokens
If [APNs](https://developer.apple.com/library/content/documentation/NetworkingInternet/Conceptual/RemoteNotificationsPG/APNSOverview.html#//apple_ref/doc/uid/TP40008194-CH8-SW1) informs us that any of the push tokens we were attempting to send a message to are invalid, we remove those tokens from the user profiles they were associated with.
**Note:**
It's normal for APNs to initially return a success status even if a token becomes unregistered, as APNs doesn't immediately report token invalidation events. APNs intentionally delays returning a `410` status for invalid tokens on a randomized schedule, designed to protect user privacy and prevent tracking of app uninstalls. You can safely continue sending notifications to an unregistered token until APNs returns a `410` status.
## Using the push error logs
The [Message Activity Log](https://www.braze.com/docs/user_guide/administrative/app_settings/message_activity_log_tab/) gives you the opportunity to see any messages (especially error messages) associated with your campaigns and sends, including push notification errors. This error log provides a variety of warnings which can be very helpful for identifying why your campaigns aren't working as expected. Clicking on an error message will redirect you to relevant documentation to help you troubleshoot a particular incident.

Common errors you might see here include user-specific notifications, such as ["Received Unregistered Sending to Push Token"](#swift_received-unregistered-sending).
In addition, Braze also provides a push changelog on the user profile under the **Engagement** tab. This changelog provides insight into push registration behavior such as token invalidation, push registration errors, tokens being moved to new users, etc.
{: style="max-width:50%;" }
### Message Activity Log errors
#### Received unregistered sending to push token {#received-unregistered-sending}
- Make sure that the push token being sent to Braze from the method `AppDelegate.braze?.notifications.register(deviceToken:)` is valid. You can look in the **Message Activity Log** to see the push token. It should look something like `6e407a9be8d07f0cdeb9e724733a89445f57a89ec890d63867c482a483506fa6`, a long string containing a mix of letters and numbers. If your push token looks different, check your [code](https://www.braze.com/docs/developer_guide/platform_integration_guides/swift/push_notifications/integration/#step-4-register-push-tokens-with-braze) for sending Braze the push tokens.
- Ensure that your push provisioning profile matches the environment you're testing. Universal certificates may be configured in the Braze dashboard to send to either the development or production APNs environment. Using a development certificate for a production app or a production certificate for a development app will not work.
- Check that the push token you have uploaded to Braze matches the provisioning profile you used to build the app you sent the push token from.
#### Device token not for topic
This error indicates that your app's push certificate and bundle ID are mismatched. Check that the push certificate you uploaded to Braze matches the provisioning profile used to build the app from which the push token was sent.
#### BadDeviceToken sending to push token
The `BadDeviceToken` is an APNs error code and does not originate from Braze. There could be a number of reasons for this response being returned, including the following:
- The app received a push token that was invalid for the credentials uploaded to the dashboard.
- Push was disabled for this workspace.
- The user has opted out of push.
- The app was uninstalled.
- Apple refreshed the push token, which invalidated the old token.
- The app was built for a production environment, but the push credentials uploaded to Braze are set for a development environment (or the other way around).
## Push registration issues
### No push registration prompt
If the application does not prompt you to register for push notifications, there is likely an issue with your push registration integration. Ensure you have followed our [documentation](https://www.braze.com/docs/developer_guide/push_notifications/?sdktab=swift) and correctly integrated our push registration. You can also set breakpoints in your code to ensure the push registration code is running.
### No "push registered" users showing in the dashboard (prior to sending messages)
Ensure that your app is correctly configured to allow push notifications. Common failure points to check include:
- Check that your app is prompting you to allow push notifications. Typically, this prompt will appear upon your first open of the app, but it can be programmed to appear elsewhere. If it does not appear where it should be, the problem is likely with the basic configuration of your app's push capabilities.
- Verify the steps for [push integration](https://www.braze.com/docs/developer_guide/push_notifications/?sdktab=swift) were successfully completed.
- Check that the provisioning profile your app was built with includes permissions for push. Make sure that you're pulling down all of the available provisioning profiles from your Apple developer account. To confirm this, perform the following steps:
1. In Xcode, navigate to **Preferences > Accounts** (or use the keyboard shortcut Command+,).
2. Select the Apple ID you use for your developer account and click **View Details**.
3. On the next page, click ** Refresh** and confirm that you're pulling all available provisioning profiles.
- Check you have [properly enabled push capability](https://www.braze.com/docs/developer_guide/platform_integration_guides/swift/push_notifications/integration/#step-2-enable-push-capabilities) in your app.
- Check your push provisioning profile matches the environment you're testing in. Universal certificates may be configured in the Braze dashboard to send to either the development or production APNs environment. Using a development certificate for a production app or a production certificate for a development app will not work.
- Check that you are calling our `registerPushToken` method by setting a breakpoint in your code.
- Make sure you're testing using a device (push will not work on a simulator) and have good network connectivity.
## Push notifications sent but not displayed on users’ devices
### "Push registered" users no longer enabled after sending messages
This likely indicates that the user had an invalid push token. This can happen for several reasons:
#### Dashboard and app certificate mismatch
If the push certificate you uploaded in the dashboard is not the same one in the provisioning profile that your app was built with, APNs will reject the token. Verify that you have uploaded the correct certificate and completed another session in the app before attempting another test notification.
#### Application was uninstalled
If a user has uninstalled your application, their push token will be invalid and removed upon the next send.
#### Regenerating your provisioning profile
As a last resort, starting over fresh and creating a whole new provisioning profile can clear up configuration errors that come from working with multiple environments, profiles, and apps at the same time. There are many "moving parts" in setting up push notifications, so sometimes, it is best to retry from the beginning. This will also help isolate the problem if you need to continue troubleshooting.
### Messages not delivered to "push registered" users
#### App is foregrounded
On iOS versions that do not integrate push via the `UserNotifications` framework, if the app is in the foreground when the push message is received, it will not be displayed. You should background the app on your test devices before sending test messages.
#### Test notification scheduled incorrectly
Check the schedule you set for your test message. If it is set to local time zone delivery or [Intelligent Timing](https://www.braze.com/docs/user_guide/brazeai/intelligence/intelligent_timing/), you may have just not received the message yet (or had the app in the foreground when it was received).
### User not "push registered" for the app being tested
Check the user profile of the user you are trying to send a test message to. Under the **Engagement** tab, there should be a list of "pushable apps." Verify the app you are trying to send test messages to is in this list. Users will show up as "Push Registered" if they have a push token for any app in your workspace, so this could be something of a false positive.
The following would indicate a problem with push registration or that the user's token had been returned to Braze as invalid by APNs after being pushed:
{: style="max-width:50%"}
## Push clicks not logged {#push-clicks-not-logged}
- Make sure you have followed the [push integration steps](https://www.braze.com/docs/developer_guide/platform_integration_guides/swift/push_notifications/integration/#step-5-enable-push-handling).
- Braze does not handle push notifications received silently in the foreground (default foreground push behavior prior to the `UserNotifications` framework). This means that links will not be opened, and push clicks will not be logged. If your application has not yet integrated the `UserNotifications` framework, Braze will not handle push notifications when the application state is `UIApplicationStateActive`. Ensure that your app does not delay calls to [push handling methods](https://www.braze.com/docs/developer_guide/platform_integration_guides/swift/push_notifications/integration/#step-5-enable-push-handling); otherwise, the Swift SDK may treat push notifications as silent foreground push events and not handle them.
## Deep links not working
For comprehensive troubleshooting across all channels—including universal links, custom schemes, email, and third-party providers like Branch—see [Deep linking troubleshooting](https://www.braze.com/docs/developer_guide/push_notifications/deep_linking_troubleshooting).
### Web links from push clicks not opening
Links in push notifications need to be ATS compliant to be opened in web views. Ensure that your web links use HTTPS. For more information, refer to [ATS compliance](https://www.braze.com/docs/developer_guide/platform_integration_guides/swift/advanced_use_cases/linking/#app-transport-security-ats).
### Deep links from push clicks not opening
Most of the code that handles deep links also handles push opens. First, ensure that push opens are being logged. If not, fix that issue (as the fix often fixes link handling).
If opens are being logged, check whether it is an issue with the deep link in general or with the deep linking push click handling. To do this, test to see if a deep link from an in-app message click works.
## Understanding the Braze push workflow
The Firebase Cloud Messaging (FCM) service is Google's infrastructure for push notifications sent to Android applications. Here is the simplified structure of how push notifications are enabled for your users' devices and how Braze can send push notifications to them:
```mermaid
---
config:
theme: mc
---
sequenceDiagram
participant Device as User Device
participant App as Android App
participant BrazeSDK as Braze SDK
participant BrazeAPI as Braze Server
participant Firebase as Google Firebase
Note over Device, Firebase: Register Option 1 Register Automatically using `com_braze_firebase_cloud_messaging_registration_enabled` in braze.xml
App ->> Braze: App initializes Braze with the first Braze call This could be automatic session handling
BrazeSDK ->> App: Get push token from Firebase Manager
BrazeSDK ->> BrazeAPI: Send push token to Braze Server
Note right of BrazeAPI: Braze will remove push token from any other user who may have previously been logged in on the same device.
Note over Device, Firebase: Register Option 2 Manual registration.
App ->> BrazeSDK: App sets `Braze.registeredPushToken`
BrazeSDK ->> BrazeAPI: Send push token to Braze Server
Note right of BrazeAPI: Braze will remove push token from any other user who may have previously been logged in on the same device.
Note over Device, Firebase: Push permission
BrazeAPI ->> BrazeSDK: In-App Message containing push prompt
BrazeSDK -> App: In-App Message is displayed
App -> BrazeSDK: User requests permissions
BrazeSDK -> App: Displays the Push Authorization prompt
BrazeSDK -> BrazeAPI: If authorized and `com_braze_optin_when_push_authorized`, Opt-In value is sent.
Note over Device, Firebase: Push Notification Is Sent
BrazeAPI ->> Firebase: Sends push message
Firebase ->> Device: Push message sent
Device ->> App: Android will send the push to the App. This could be blocked to Do Not Disturb, Power Saving Mode, etc.
App ->> BrazeSDK: Message is sent to BrazeFirebaseMessagingService
BrazeSDK ->> Device: SDK will check if the push is from Braze. If so, push data is transformed into a Push Notification and displayed.
```
### Step 1: Configuring your Google Cloud API key
In developing your app, you'll need to provide the Braze Android SDK with your Firebase sender ID. Additionally, you'll need to provide an API Key for server applications to the Braze dashboard. Braze will use this API key to send messages to your devices. You will also need to check that FCM service is enabled in Google Developer's console.
**Note:**
A common mistake during this step is using the app identifier API key instead of the REST API key.
### Step 2: Devices register for FCM and provide Braze with push tokens
In typical integrations, the Braze Android SDK will handle registering devices for FCM capability. This will usually happen immediately upon opening the app for the first time. After registration, Braze will be provided with an FCM Registration ID, which is used to send messages to that device specifically. We will store the Registration ID for that user, and that user will become "push registered" if they previously did not have a push token for any of your apps.
### Step 3: Launching a Braze push campaign
When a push campaign is launched, Braze will make requests to FCM to deliver your message. Braze will use the API key copied in the dashboard to authenticate and verify that we can send push notifications to the push tokens provided.
### Step 4: Removing invalid tokens
If FCM informs us that any of the push tokens we were attempting to send a message to are invalid, we remove those tokens from the user profiles they were associated with. If users have no other push tokens, they will no longer show up as "Push Registered" under the **Segments** page.
For more details about FCM, visit [Cloud messaging](https://firebase.google.com/docs/cloud-messaging/).
## Utilizing the push error logs
Braze provides push notification errors within the message activity log. This error log provides a variety of warnings which can be very helpful for identifying why your campaigns aren't working as expected. Clicking on an error message will redirect you to relevant documentation to help you troubleshoot a particular incident.

## Troubleshooting scenarios
### Push isn't sending
Your push messages might not be sending because of the following situations:
- Your credentials exist in the wrong Google Cloud Platform project ID (wrong sender ID).
- Your credentials have the wrong permission scope.
- You uploaded wrong credentials to the wrong Braze workspace (wrong sender ID).
For other issues that may prevent you from sending a push message, refer to [User Guide: Troubleshooting Push Notifications](https://www.braze.com/docs/user_guide/message_building_by_channel/push/troubleshooting/).
### No "push registered" users showing in the Braze dashboard (prior to sending messages)
Confirm that your app is correctly configured to allow push notifications. Common failure points to check include:
#### Incorrect sender ID
Check that the correct FCM sender ID is included in the `braze.xml` file. An incorrect sender ID will lead to `MismatchSenderID` errors reported in the dashboard's message activity log.
#### Braze registration not occurring
Since FCM registration is handled outside of Braze, failure to register can only occur in two places:
1. During registration with FCM
2. When passing the FCM-generated push token to Braze
We recommend setting a breakpoint or logging to confirm that the FCM-generated push token is being sent to Braze. If a token is not generated correctly or at all, we recommend consulting the [FCM documentation](https://firebase.google.com/docs/cloud-messaging/android/client).
#### Google Play Services not present
For FCM push to work, Google Play Services must be present on the device. If Google Play Services isn't on a device, push registration will not occur.
**Note:** Google Play Services is not installed on Android emulators without Google APIs installed.
#### Device not connected to the internet
Check that your device has good internet connectivity and isn't sending network traffic through a proxy.
### Tapping push notification doesn't open the app
Check if `com_braze_handle_push_deep_links_automatically` is set to `true` or `false`. To enable Braze to automatically open the app and any deep links when a push notification is tapped, set `com_braze_handle_push_deep_links_automatically` to `true` in your `braze.xml` file.
If `com_braze_handle_push_deep_links_automatically` is set to its default of `false`, you need to use a Braze Push Callback to listen for and handle the push received and opened intents.
### Push notifications bounced
If a push notification isn't delivered, make sure it didn't bounce by looking in the [developer console](https://www.braze.com/docs/developer_guide/platforms/android/push_notifications/troubleshooting/#utilizing-the-push-error-logs). The following are descriptions of common errors that may be logged in the developer console:
#### Error: MismatchSenderID
`MismatchSenderID` indicates an authentication failure. Confirm your Firebase sender ID and FCM API key are correct.
#### Error: InvalidRegistration
`InvalidRegistration` can be caused by a malformed push token.
1. Make sure to pass a valid push token to Braze from [Firebase Cloud Messaging](https://firebase.google.com/docs/cloud-messaging/android/client#retrieve-the-current-registration-token).
#### Error: NotRegistered
1. `NotRegistered` typically occurs when an app has been deleted from a device. Braze uses `NotRegistered` internally to signal that an app has been uninstalled from a device.
2. `NotRegistered` may also occur when multiple registrations occur and a second registration invalidates the first token.
### Push notifications sent but not displayed on users' devices
There are a few reasons why this could be occurring:
#### Application was force quit
If you force-quit your application through your system settings, your push notifications will not be sent. Launching the app again will re-enable your device to receive push notifications.
#### BrazeFirebaseMessagingService not registered
The BrazeFirebaseMessagingService must be properly registered in `AndroidManifest.xml` for push notifications to appear:
```xml
```
#### Firewall is blocking push
If you are testing push over Wi-Fi, your firewall may be blocking ports necessary for FCM to receive messages. Confirm that ports `5228`, `5229`, and `5230` are open. Additionally, since FCM doesn't specify its IPs, you must also allow your firewall to accept outgoing connections to all IP addresses contained in the IP blocks listed in Google's ASN of `15169`.
#### Custom notification factory returning null
If you have implemented a [custom notification factory](https://www.braze.com/docs/developer_guide/platform_integration_guides/android/push_notifications/android/integration/standard_integration/#custom-displaying-notifications), ensure that it is not returning `null`. This will cause notifications not to be displayed.
### "Push registered" users no longer enabled after sending messages
There are a few reasons why this could be happening:
#### Application was uninstalled
Users have uninstalled the application. This will invalidate their FCM push token.
#### Invalid Firebase Cloud Messaging server key
The Firebase Cloud Messaging server key provided in the Braze dashboard is invalid. The sender ID provided should match the one referenced in your app's `braze.xml` file. The server key and sender ID are found here in your Firebase Console:

### Push clicks not logged
Braze logs push clicks automatically, so this scenario should be comparatively rare.
If push clicks are not being logged, it is possible that push click data has not been flushed to our servers yet. Braze throttles the frequency of its flushes based on the strength of the network connection. With a good network connection, push click-data should arrive at the server within a minute in most circumstances.
### Deep links not working
#### Verify deep link configuration
Deep links can be [tested with ADB](https://developer.android.com/training/app-indexing/deep-linking.html#testing-filters). We recommend testing your deep link with the following command:
`adb shell am start -W -a android.intent.action.VIEW -d "THE_DEEP_LINK" THE_PACKAGE_NAME`
If the deep link fails to work, the deep link may be misconfigured. A misconfigured deep link will not work when sent through Braze push.
#### Verify custom handling logic
If the deep link [works correctly with ADB](https://developer.android.com/training/app-indexing/deep-linking.html#testing-filters) but fails to work from Braze push, check whether any [custom push open handling](https://www.braze.com/docs/developer_guide/platform_integration_guides/android/push_notifications/android/integration/standard_integration/#android-push-listener-callback) has been implemented. If so, verify that the custom handling code properly handles the incoming deep link.
#### Disable back stack behavior
If the deep link [works correctly with ADB](https://developer.android.com/training/app-indexing/deep-linking.html#testing-filters) but fails to work from Braze push, try disabling [back stack](https://developer.android.com/guide/components/activities/tasks-and-back-stack). To do so, update your **braze.xml** file to include:
```xml
false
```
## Troubleshooting
### Push doesn't appear after app is closed from task switcher
If you observe that push notifications no longer appear after the app is closed from the task switcher, your app is likely in Debug mode. .NET MAUI adds scaffolding in Debug mode that prevents apps from receiving push after their process is killed. If you run your app in Release Mode, you should see push even after the app is closed from the task switcher.
### Custom notification factory not being set correctly
Custom notification factories (and all delegates) must extend [`Java.Lang.Object`](https://developer.xamarin.com/api/type/Android.Runtime.IJavaObject/) to work properly across the C# and Java divide. See [Xamarin](https://developer.xamarin.com/guides/android/advanced_topics/java_integration_overview/working_with_jni/#Implementing_Interfaces) on implementing Java interfaces for more information.
# Live Activities for the Braze SDK
Source: /docs/developer_guide/live_notifications/index.md
Live Activities
> Learn how to send persistent, dynamic notifications directly to your users' lock screens, so they can get real-time updates without needing to open your app. For Swift, this is natively supported.
Learn how to send persistent, dynamic notifications directly to your users' lock screens, so they can receive real-time updates without even opening your app.
Featured:
- Implementing Live Activities for Swift
# Live Updates for the Android Braze SDK
Source: /docs/developer_guide/live_notifications/live_updates/index.md
# Live Updates for Android
> Learn how to use Android Live Updates in the Braze SDK, also known as [Progress Centric Notifications](https://developer.android.com/about/versions/16/features/progress-centric-notifications). These notifications are similar to [Live Activities for the Swift Braze SDK](https://www.braze.com/docs/developer_guide/live_notifications/live_activities), allowing you to display interactive lock-screen notifications. Android 16 introduces progress-centric notifications to help users seamlessly track user-initiated, start-to-end journeys.
## How it works
You can use the [`IBrazeNotificationFactory`](https://braze-inc.github.io/braze-android-sdk/kdoc/braze-android-sdk/com.braze/-i-braze-notification-factory/index.html) interface to customize how Braze push notifications are displayed. By extending `BrazeNotificationFactory`, Braze will call your factory's `createNotification()` method before the notification is displayed to the user. It will then pass a payload containing custom key-value pairs sent through the Braze dashboard or REST API.
## Displaying a Live Update
In this section, you'll partner with Superb Owl, the host of a new game show where wildlife rescue teams compete to see who can save the most owls. They're looking to leverage Live Updates in their Android app, so they can display the status of an on-going match and make dynamic updates to the notification in realtime.
{: style="max-width:40%;"}
### Prerequisites
Before you can use this feature, you'll need to [integrate the Android Braze SDK](https://www.braze.com/docs/developer_guide/sdk_integration/?sdktab=android).
### Step 1: Create a custom notification factory
In your application, create a new file named `MyCustomNotificationFactory.kt` that extends [`BrazeNotificationFactory`](https://braze-inc.github.io/braze-android-sdk/kdoc/braze-android-sdk/com.braze/-i-braze-notification-factory/index.html) to handle how Braze Live Updates are displayed.
In the following example, Superb Owl created a custom notification factory to display a Live Update for on-going matches. In the next step, you'll create a new method called `getTeamInfo` to map a team's data to the activity.
```kotlin
class MyCustomNotificationFactory : IBrazeNotificationFactory {
override fun createNotification(payload: BrazeNotificationPayload): Notification? {
val notificationBuilder = populateNotificationBuilder(payload)
val context = payload.context ?: return null
if (notificationBuilder == null) {
brazelog { "Notification could not be built. Returning null as created notification." }
return null
}
notificationBuilder.setContentTitle("Android Live Updates").setContentText("Ongoing updates below")
setProgressStyle(notificationBuilder, context)
return notificationBuilder.build()
}
private fun setProgressStyle(notificationBuilder: NotificationCompat.Builder, context: Context) {
val style = NotificationCompat.ProgressStyle()
.setStyledByProgress(false)
.setProgress(200)
.setProgressTrackerIcon(IconCompat.createWithResource(context, R.drawable.notification_small_icon))
.setProgressSegments(
mutableListOf(
NotificationCompat.ProgressStyle.Segment(1000).setColor(Color.GRAY),
NotificationCompat.ProgressStyle.Segment(200).setColor(Color.BLUE),
)
)
.setProgressPoints(
mutableListOf(
NotificationCompat.ProgressStyle.Point(60).setColor(Color.RED),
NotificationCompat.ProgressStyle.Point(560).setColor(Color.GREEN)
)
)
notificationBuilder.setStyle(style)
}
}
```
### Step 2: Map custom data
In `MyCustomNotificationFactory.kt`, create a new method for handling data when Live Updates are displayed.
Superb Owl created the following method to map each team's name and logo to expanded Live Updates:
```kotlin
class CustomNotificationFactory : BrazeNotificationFactory() {
override fun createNotification(payload: BrazeNotificationPayload): Notification? {
// Your existing code
return super.createNotification(payload)
}
// Your new method
private fun getTeamInfo(team: String?): Pair {
return when (team) {
"WBF" -> Pair("Wild Bird Fund", R.drawable.team_wbf)
"OWL" -> Pair("Owl Rehab", R.drawable.team_owl)
else -> Pair("Unknown", R.drawable.notification_small_icon)
}
}
}
```
### Step 3: Set the custom notification factory
In your application class, use [`customBrazeNotificationFactory`](https://braze-inc.github.io/braze-android-sdk/kdoc/braze-android-sdk/com.braze/-braze/-companion/custom-braze-notification-factory.html?query=var%20customBrazeNotificationFactory:%20IBrazeNotificationFactory?)to set your custom notification factory.
```kotlin
class MyApplication : Application() {
override fun onCreate() {
super.onCreate()
// Tell Braze to use your custom factory for notifications
Braze.customBrazeNotificationFactory = MyCustomNotificationFactory()
}
}
```
### Step 4: Send the activity
You can use the [`/messages/send`](https://www.braze.com/docs/api/endpoints/messaging/send_messages/post_send_messages) REST API endpoint to send a push notification to a user's Android device.
#### Example curl command
Superb Owl sent their request using the following curl command:
```
curl -X POST "https://BRAZE_REST_ENDPOINT/messages/send" \
-H "Authorization: Bearer {REST_API_KEY}" \
-H "Content-Type: application/json" \
--data '{
"external_user_ids": ["USER_ID"],
"messages": {
"android_push": {
"title": "WBF vs OWL",
"alert": "2 to 4 1:33 Q4",
"extra": {
"live_update": "true",
"team1": "WBF",
"team2": "OWL",
"score1": "2",
"score2": "4",
"time": "1:33",
"quarter": "Q4"
},
"notification_id": "ASSIGNED_NOTIFICATION_ID"
}
}
}'
```
**Tip:**
While curl commands are helpful for testing, we recommend handling this call in your backend where you're already handling your [iOS Live Activities](https://www.braze.com/docs/developer_guide/push_notifications/live_notifications/?sdktab=swift).
#### Request parameters
| Key | Description |
|------------------------------|------------|
| `REST_API_KEY` | A Braze REST API key with `messages.send` permissions.
This can be created in the Braze dashboard from **Settings** > **API Keys**. |
| `BRAZE_REST_ENDPOINT` | Your REST endpoint URL. Your endpoint will depend on the [Braze URL for your instance](https://www.braze.com/docs/api/basics/#endpoints). |
| `USER_ID` | The ID of the user you are sending the notification to. |
| `messages.android_push.title` | The message's title. By default, this is not used for the custom notification factory's live notifications, but it may be used as a fallback. |
| `messages.android_push.alert` | The message's body. By default, this is not used for the custom notification factory's live notifications, but it may be used as a fallback. |
| `messages.extra` | Key-value pairs that the custom notification factory uses for live notifications. You can assign any string to this value—however, in the example above, `live_updates` is used to determine if it's a default or live push notification. |
| `ASSIGNED_NOTIFICATION_ID` | The notification ID you want to assign to the chosen user's live notification. The ID must be unique to this game, and must be used in order to [update their existing notification](#android_step-4-update-data-with-the-braze-rest-api) later. |
{: .reset-td-br-1 .reset-td-br-2 role="presentation"}
### Step 5: Update the activity
To update the existing Live Update with new data, modify the relevant key-value pairs assigned to `messages.extra`, then use the same `notification_id` and call the `/messages/send` endpoint again.
# Live Activities for the Swift Braze SDK
Source: /docs/developer_guide/live_notifications/live_activities/index.md
# Live Activities for Swift
> Learn how to implement Live Activities for the Swift Braze SDK. Live Activities are persistent, interactive notifications that are displayed directly on the lock screen, allowing users to get dynamic, real-time updates—without unlocking their device.
## How it works
{: style="max-width:40%;float:right;margin-left:15px;"}
Live Activities present a combination of static information and dynamic information that you update. For example, you can create a Live Activity that provides a status tracker for a delivery. This Live Activity would have your company's name as static information, as well as a dynamic "Time to delivery" that would be updated as the delivery driver approaches its destination.
As a developer, you can use Braze to manage your Live Activity lifecycles, make calls to the Braze REST API to make Live Activity updates, and have all subscribed devices receive the update as soon as possible. And, because you're managing Live Activities through Braze, you can use them in tandem with your other messaging channels—push notifications, in-app messages, Content Cards—to drive adoption.
## Sequence Diagram {#sequence-diagram}
**Show Diagram**
```mermaid
---
config:
theme: mc
---
sequenceDiagram
participant Server as Client Server
participant Device as User Device
participant App as iOS App / Braze SDK
participant BrazeAPI as Braze API
participant APNS as Apple Push Notification Service
Note over Server, APNS: Launch Option 1 Locally Start Activities
App ->> App: Register a Live Activity using `launchActivity(pushTokenTag:activity:)`
App ->> App: Get push token from iOS
App ->> BrazeAPI: Activity ID & Push token automatically sent to Braze
Note over Server, APNS: Launch Option 2 Remotely Start Activities
Device ->> App: Call `registerPushToStart` to collect push tokens early
App ->> BrazeAPI: Push-to-start tokens sent to Braze
Server ->> BrazeAPI: POST /messages/live_activity/start
Note right of BrazeAPI: Payload includes: - push_token - activity_id - external_id - event_name - content_state (optional)
BrazeAPI ->> APNS: Live activity start request
APNS ->> Device: APNS sends activity to device
App ->> App: Get push token from iOS
App ->> BrazeAPI: Activity ID & Push token automatically sent to Braze
Note over Server, APNS: Resuming activities upon app launch
App ->> App: Call `resumeActivities(ofType:)` on each app launch
Note over Server, APNS: Updating a Live Activity
loop update a live activity
Server ->> BrazeAPI: POST /messages/live_activity/update
Note right of BrazeAPI: Payload includes changes to ContentState (dynamic variables)
BrazeAPI ->> APNS: Update sent to APNS
APNS ->> Device: APNS sends update to device
end
Note over Server, APNS: Ending a Live Activity
Server ->> BrazeAPI: POST /messages/live_activity/update
Note right of BrazeAPI: Activity can be ended via: - User manually dismisses - Times out after 12 hours - `dismissal_date` is now in the past - Setting `end_activity: true`
APNS ->> Device: Live activity is dismissed
```
## Implementing a Live Activity
### Prerequisites
Before you can use this feature, you'll need to [integrate the Swift Braze SDK](https://www.braze.com/docs/developer_guide/sdk_integration/?sdktab=swift). You'll also need to complete the following:
- Ensure that your project is targeting iOS 16.1 or later.
- Add the `Push Notification` entitlement under **Signing & Capabilities** in your Xcode project.
- Ensure `.p8` keys are used to send notifications. Older files such as a `.p12` or `.pem` are not supported.
- Starting with version 8.2.0 of the Braze Swift SDK, you can [remotely register a Live Activity](#swift_step-2-start-the-activity). To use this feature, iOS 17.2 or later is required.
**Note:**
While Live Activities and push notifications are similar, their system permissions are separate. By default, all Live Activity features are enabled, but users may disable this feature per app.
### Step 1: Create an activity {#create-an-activity}
First, ensure that you have followed [Displaying live data with Live Activities](https://developer.apple.com/documentation/activitykit/displaying-live-data-with-live-activities) in Apple’s documentation to set up Live Activities in your iOS application. As part of this task, make sure you include `NSSupportsLiveActivities` set to `YES` in your `Info.plist`.
Because the exact nature of your Live Activity will be specific to your business case, you will need to set up and initialize the [Activity](https://developer.apple.com/documentation/activitykit/activityattributes) objects. Importantly, you will define:
* `ActivityAttributes`: This protocol defines the static (unchanging) and dynamic (changing) content that will appear in your Live Activity.
* `ActivityAttributes.ContentState`: This type defines the dynamic data that will be updated over the course of the activity.
You will also use SwiftUI to create the UI presentation of the lock screen and Dynamic Island on supported devices.
Make sure you're familiar with Apple's [prerequisites and limitations](https://developer.apple.com/documentation/activitykit/displaying-live-data-with-live-activities#Understand-constraints) for Live Activities, as these constraints are independent from Braze.
**Note:**
If you expect to send frequent pushes to the same Live Activity, you can avoid being throttled by Apple's budget limit by setting `NSSupportsLiveActivitiesFrequentUpdates` to `YES` in your `Info.plist` file. For more details, refer to the [`Determine the update frequency`](https://developer.apple.com/documentation/activitykit/updating-and-ending-your-live-activity-with-activitykit-push-notifications#Determine-the-update-frequency) section in the ActivityKit documentation.
#### Example
Let's imagine that we want to create a Live Activity to give our users updates for the Superb Owl show, where two competing wildlife rescues are given points for the owls they have in residence. For this example, we have created a struct called `SportsActivityAttributes`, but you may use your own implementation of `ActivityAttributes`.
```swift
#if canImport(ActivityKit)
import ActivityKit
#endif
@available(iOS 16.1, *)
struct SportsActivityAttributes: ActivityAttributes {
public struct ContentState: Codable, Hashable {
var teamOneScore: Int
var teamTwoScore: Int
}
var gameName: String
var gameNumber: String
}
```
### Step 2: Start the activity {#start-the-activity}
First, choose how you want to register your activity:
- **Remote:** Use the [`registerPushToStart`]() method early in your user lifecycle and before the push-to-start token is needed, then start an activity using the [`/messages/live_activity/start`](https://www.braze.com/docs/api/endpoints/messaging/live_activity/start) endpoint.
- **Local:** Create an instance of your Live Activity, then use the [`launchActivity`]() method to create push tokens for Braze to manage.
**Important:**
To remotely register a Live Activity, iOS 17.2 or later is required.
#### Step 2.1: Add BrazeKit to your widget extension
In your Xcode project, select your app name, then **General**. Under **Frameworks and Libraries**, confirm `BrazeKit` is listed.

#### Step 2.2: Add the BrazeLiveActivityAttributes protocol {#brazeActivityAttributes}
In your `ActivityAttributes` implementation, add conformance to the `BrazeLiveActivityAttributes` protocol, then add the `brazeActivityId` property to your attributes model.
**Important:**
iOS will map the `brazeActivityId` property to the corresponding field in your Live Activity push-to-start payload, so it should not be renamed or assigned any other value.
```swift
import BrazeKit
#if canImport(ActivityKit)
import ActivityKit
#endif
@available(iOS 16.1, *)
// 1. Add the `BrazeLiveActivityAttributes` conformance to your `ActivityAttributes` struct.
struct SportsActivityAttributes: ActivityAttributes, BrazeLiveActivityAttributes {
public struct ContentState: Codable, Hashable {
var teamOneScore: Int
var teamTwoScore: Int
}
var gameName: String
var gameNumber: String
// 2. Add the `String?` property to represent the activity ID.
var brazeActivityId: String?
}
```
#### Step 2.3: Register for push-to-start
Next, register the Live Activity type, so Braze can track all push-to-start tokens and Live Activity instances associated with this type.
**Warning:**
The iOS operating system only generates push-to-start tokens during the first app install after a device is restarted. To ensure your tokens are reliably registered, call `registerPushToStart` in your `didFinishLaunchingWithOptions` method.
###### Example
In the following example, the `LiveActivityManager` class handles Live Activity objects. Then, the `registerPushToStart` method registers `SportsActivityAttributes`:
```swift
import BrazeKit
#if canImport(ActivityKit)
import ActivityKit
#endif
class LiveActivityManager {
@available(iOS 17.2, *)
func registerActivityType() {
// This method returns a Swift background task.
// You may keep a reference to this task if you need to cancel it wherever appropriate, or ignore the return value if you wish.
let pushToStartObserver: Task = Self.braze?.liveActivities.registerPushToStart(
forType: Activity.self,
name: "SportsActivityAttributes"
)
}
}
```
#### Step 2.4: Send a push-to-start notification
Send a remote push-to-start notification using the [`/messages/live_activity/start`](https://www.braze.com/docs/api/endpoints/messaging/live_activity/start) endpoint.
You can use [Apple's ActivityKit framework](https://developer.apple.com/documentation/activitykit) to get a push token, which the Braze SDK can manage for you. This allows you to update Live Activities through the Braze API, as Braze will send the push token to the Apple Push Notification service (APNs) on the backend.
1. Create an instance of your Live Activity implementation using Apple’s ActivityKit APIs.
2. Set the `pushType` parameter as `.token`.
3. Pass in the Live Activities `ActivitiesAttributes` and `ContentState` you defined.
4. Register your activity with your Braze instance by passing it into [`launchActivity(pushTokenTag:activity:)`](https://braze-inc.github.io/braze-swift-sdk/documentation/brazekit/braze/liveactivities-swift.class). The `pushTokenTag` parameter is a custom string you define. It should be unique for each Live Activity you create.
Once you have registered the Live Activity, the Braze SDK will extract and observe changes in the push tokens.
#### Example
For our example, we’ll create class called `LiveActivityManager` as an interface for our Live Activity objects. Then, we'll set the `pushTokenTag` to `"sports-game-2024-03-15"`.
```swift
import BrazeKit
#if canImport(ActivityKit)
import ActivityKit
#endif
class LiveActivityManager {
@available(iOS 16.2, *)
func createActivity() {
let activityAttributes = SportsActivityAttributes(gameName: "Superb Owl", gameNumber: "Game 1")
let contentState = SportsActivityAttributes.ContentState(teamOneScore: "0", teamTwoScore: "0")
let activityContent = ActivityContent(state: contentState, staleDate: nil)
if let activity = try? Activity.request(attributes: activityAttributes,
content: activityContent,
// Setting your pushType as .token allows the Activity to generate push tokens for the server to watch.
pushType: .token) {
// Register your Live Activity with Braze using the pushTokenTag.
// This method returns a Swift background task.
// You may keep a reference to this task if you need to cancel it wherever appropriate, or ignore the return value if you wish.
let liveActivityObserver: Task = AppDelegate.braze?.liveActivities.launchActivity(pushTokenTag: "sports-game-2024-03-15",
activity: activity)
}
}
}
```
Your Live Activity widget would display this initial content to your users.
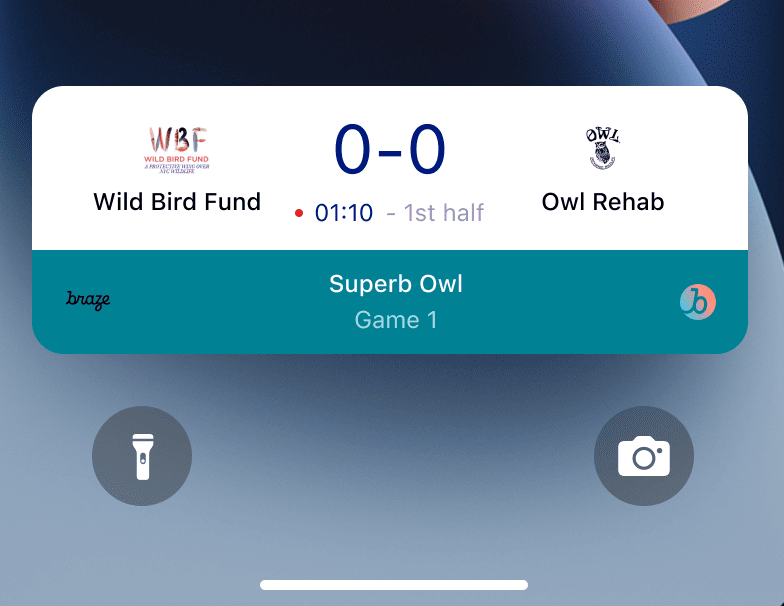{: style="max-width:40%;"}
### Step 3: Resume activity tracking {#resume-activity-tracking}
To ensure Braze tracks your Live Activity upon app launch:
1. Open your `AppDelegate` file.
2. Import the `ActivityKit` module if it’s available.
3. Call [`resumeActivities(ofType:)`](https://braze-inc.github.io/braze-swift-sdk/documentation/brazekit/braze/liveactivities-swift.class/resumeactivities(oftype:)) in `application(_:didFinishLaunchingWithOptions:)` for all `ActivityAttributes` types you have registered in your application.
This allows Braze to resume tasks to track push token updates for all active Live Activities. Note that if a user has explicitly dismissed the Live Activity on their device, it is considered removed, and Braze will no longer track it.
###### Example
```swift
import UIKit
import BrazeKit
#if canImport(ActivityKit)
import ActivityKit
#endif
@main
class AppDelegate: UIResponder, UIApplicationDelegate {
static var braze: Braze? = nil
func application(
_ application: UIApplication,
didFinishLaunchingWithOptions launchOptions: [UIApplication.LaunchOptionsKey: Any]?
) -> Bool {
if #available(iOS 16.1, *) {
Self.braze?.liveActivities.resumeActivities(
ofType: Activity.self
)
}
return true
}
}
```
### Step 4: Update the activity {#update-the-activity}
{: style="max-width:40%;float:right;margin-left:15px;"}
The [`/messages/live_activity/update`](https://www.braze.com/docs/api/endpoints/messaging/live_activity/update) endpoint allows you to update a Live Activity through push notifications passed through the Braze REST API. Use this endpoint to update your Live Activity's `ContentState`.
As you update your `ContentState`, your Live Activity widget will display the new information. Here's what the Superb Owl show might look like at the end of the first half.
See our [`/messages/live_activity/update` endpoint](https://www.braze.com/docs/api/endpoints/messaging/live_activity/update) article for full details.
### Step 5: End the activity {#end-the-activity}
When a Live Activity is active, it is shown on both a user's lock screen and Dynamic Island. There are a few different ways for a Live Activity to end and be removed from a user's UI.
* **User dismissal**: A user can manually dismiss a Live Activity.
* **Time out**: After a default time of 8 hours, iOS will remove the Live Activity from the user's Dynamic Island. After a default time of 12 hours, iOS will remove the Live Activity from the user's lock screen.
* **Dismissal date**: You can provide a datetime for a Live Activity to be removed from a user's UI prior to time out. This is defined either in the Activity's `ActivityUIDismissalPolicy` or using the `dismissal_date` parameter in requests to the `/messages/live_activity/update` endpoint.
* **End activity**: You can set `end_activity` to `true` in a request to the `/messages/live_activity/update` endpoint to immediately end a Live Activity.
See our [`/messages/live_activity/update` endpoint](https://www.braze.com/docs/api/endpoints/messaging/live_activity/update) article for full details.
## Tracking Live Activities
Live Activity events are available in Currents, Snowflake Data Sharing, and Query Builder. The following events can help you understand and monitor the lifecycle of your Live Activities, track token availability, and independently diagnose issues or verify delivery statuses.
- [Live Activity Push To Start Token Change](https://www.braze.com/docs/user_guide/data/braze_currents/event_glossary/customer_behavior_events/#live-activity-push-to-start-token-change-events): Captures when a push-to-start (PTS) token is added or updated in Braze, enabling you to track token registrations and availability per user.
- [Live Activity Update Token Change](https://www.braze.com/docs/user_guide/data/braze_currents/event_glossary/customer_behavior_events/#live-activity-update-token-change-events): Tracks the addition, update, or removal of Live Activity Update (LAU) tokens.
- [Live Activity Send](https://www.braze.com/docs/user_guide/data/braze_currents/event_glossary/message_engagement_events/#live-activity-send-events): Logs each time a Live Activity is started, updated, or ended by Braze.
- [Live Activity Outcome](https://www.braze.com/docs/user_guide/data/braze_currents/event_glossary/message_engagement_events/#live-activity-outcome-events): Indicates the final delivery status to Apple Push Notification service (APNs) for every Live Activity sent from Braze.
## Frequently Asked Questions (FAQ) {#faq}
### Functionality and support
#### What platforms support Live Activities?
Currently, Live Activities are a feature specific to iOS and iPadOS. By default, activities launched on an iPhone or iPad will additionally be displayed on any paired watchOS 11+ or macOS 26+ device.
{: style="max-width:60%;"}
The Live Activities article covers the [prerequisites](https://www.braze.com/docs/developer_guide/platforms/swift/live_activities/#prerequisites) for managing Live Activities through the Braze Swift SDK.
#### Do React Native apps support Live Activities?
Yes, React Native SDK 3.0.0+ supports Live Activities via the Braze Swift SDK. That is, you need to write React Native iOS code directly on top of the Braze Swift SDK.
There isn't a React Native-specific JavaScript convenience API for Live Activities because the Live Activities features provided by Apple use languages untranslatable in JavaScript (for example, Swift concurrency, generics, SwiftUI).
#### Does Braze support Live Activities as a campaign or Canvas step?
No, this is not currently supported.
### Push notifications and Live Activities
#### What happens if a push notification is sent while a Live Activity is active?
{: style="max-width:30%;float:right;margin-left:15px;"}
Live Activities and push notifications occupy different screen real estate and won't conflict on a user's screen.
#### If Live Activities leverage push message functionality, do push notifications need to be enabled to receive Live Activities?
While Live Activities rely on push notifications for updates, they are controlled by different user settings. A user can opt into Live Activities but out of push notifications, and the other way around.
Live Activity update tokens expire after eight hours.
#### Do Live Activities require push primers?
[Push primers](https://www.braze.com/docs/user_guide/message_building_by_channel/push/best_practices/push_primer_messages/) are a best practice to prompt your users to opt in to push notifications from your app. However, there is no system prompt to opt into Live Activities. By default, users are opted into Live Activities for an individual app when the user installs that app on iOS 16.1 or later. This permission can be disabled or re-enabled in the device settings on a per-app basis.
### Technical topics and troubleshooting
#### How do I know if Live Activities has errors?
Any Live Activity errors will be logged in the Braze dashboard in the [Message Activity Log](https://www.braze.com/docs/user_guide/administrative/app_settings/message_activity_log_tab/), where you can filter by "LiveActivity Errors".
#### After sending a push-to-start notification, why haven't I received my Live Activity?
First, verify that your payload includes all the required fields described in the [`messages/live_activity/start`](https://www.braze.com/docs/api/endpoints/messaging/live_activity/start) endpoint. The `activity_attributes` and `content_state` fields should match the properties defined in your project's code. If you're certain that the payload is correct, its possible you may be rate-limited by APNs. This limit is imposed by Apple and not by Braze.
To verify that your push-to-start notification successfully arrived at the device but was not displayed due to rate limits, you can debug your project using the Console app on your Mac. Attach the recording process for your desired device, then filter the logs by `process:liveactivitiesd` in the search bar.
#### After starting my Live Activity with push-to-start, why isn't it receiving new updates?
Verify that you have correctly implemented the instructions described [above](#swift_brazeActivityAttributes). Your `ActivityAttributes` should contain both the `BrazeLiveActivityAttributes` protocol conformance and the `brazeActivityId` property.
After receiving a Live Activity push-to-start notification, double-check that you can see an outgoing network request to the `/push_token_tag` endpoint of your Braze URL and that it contains the correct activity ID under the `"tag"` field.
Finally, make sure the Live Activity attribute type in your update payload matches the exact string and class used in your SDK method call to `registerPushToStart`. Use constants to avoid typos.
#### I am receiving an Access Denied response when I try to use the `live_activity/update` endpoint. Why?
The API keys you use need to be given the correct permissions to access the different Braze API endpoints. If you are using an API key that you previously created, it's possible that you neglected to update its permissions. Read our [API key security overview](https://www.braze.com/docs/api/basics/#rest-api-key-security) for a refresher.
#### Does the `messages/send` endpoint share rate limits with the `messages/live_activity/update` endpoint?
By default, the rate limit for the `messages/live_activity/update` endpoint is 250,000 requests per hour, per workspace, and across multiple endpoints. See the [API rate limits](https://www.braze.com/docs/api/api_limits/) for more information.
# Feature flags for the Braze SDK
Source: /docs/developer_guide/feature_flags/index.md
# Feature flags
> Feature flags allow you to remotely enable or disable functionality for a specific or random selection of users. Importantly, they let you turn a feature on and off in production without additional code deployment or app store updates. This allows you to safely roll out new features with confidence.
**Tip:**
When you're ready to create your own feature flags, check out [Creating feature flags](https://www.braze.com/docs/developer_guide/feature_flags/create/).
## Prerequisites
These are the minimum SDK versions needed to start using feature flags:
## Use cases
### Gradual rollouts
Use feature flags to gradually enable features to a sample population. For example, you can soft launch a new feature to your VIP users first. This strategy helps mitigate risks associated with shipping new features to everyone at once and helps catch bugs early.
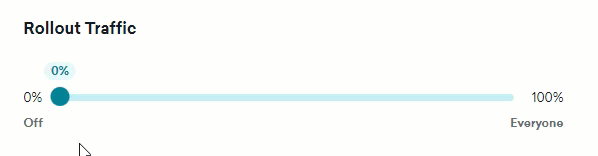
For example, let's say we've decided to add a new "Live Chat Support" link to our app for faster customer service. We could release this feature to all customers at once. However, a wide release carries risks, such as:
* Our Support team is still in training, and customers can start support tickets after it's released. This doesn't give us any leeway in case the Support team needs more time.
* We're unsure of the actual volume of new support cases we'll get, so we might not be staffed appropriately.
* If our Support team is overwhelmed, we have no strategy to quickly turn this feature off again.
* There might be bugs introduced in the chat widget, and we don't want customers to have a negative experience.
With Braze feature flags, we can instead gradually roll out the feature and mitigate all of these risks:
* We will turn on the "Live Chat Support" feature when the Support team says they're ready.
* We will enable this new feature for only 10% of users to determine if we're staffed appropriately.
* If there are any bugs, we can quickly disable the feature instead of rushing to ship a new release.
To gradually roll out this feature, we can [create a feature flag](https://www.braze.com/docs/developer_guide/feature_flags/create/) named "Live Chat Widget."

In our app code, we will only show the **Start Live Chat** button when the Braze feature flag is enabled:
```javascript
import {useState} from "react";
import * as braze from "@braze/web-sdk";
// Get the initial value from the Braze SDK
const featureFlag = braze.getFeatureFlag("enable_live_chat");
const [liveChatEnabled, setLiveChatEnabled] = useState(featureFlag.enabled);
// Listen for updates from the Braze SDK
braze.subscribeToFeatureFlagsUpdates(() => {
const newValue = braze.getFeatureFlag("enable_live_chat").enabled;
setLiveChatEnabled(newValue);
});
// Only show the Live Chat if the Braze SDK determines it is enabled
return (<>
Need help?
{liveChatEnabled && }
)
```
```java
// Get the initial value from the Braze SDK
FeatureFlag featureFlag = braze.getFeatureFlag("enable_live_chat");
Boolean liveChatEnabled = featureFlag != null && featureFlag.getEnabled();
// Listen for updates from the Braze SDK
braze.subscribeToFeatureFlagsUpdates(event -> {
FeatureFlag newFeatureFlag = braze.getFeatureFlag("enable_live_chat");
Boolean newValue = newFeatureFlag != null && newFeatureFlag.getEnabled();
liveChatEnabled = newValue;
});
// Only show the Live Chat view if the Braze SDK determines it is enabled
if (liveChatEnabled) {
liveChatView.setVisibility(View.VISIBLE);
} else {
liveChatView.setVisibility(View.GONE);
}
```
```kotlin
// Get the initial value from the Braze SDK
val featureFlag = braze.getFeatureFlag("enable_live_chat")
var liveChatEnabled = featureFlag?.enabled
// Listen for updates from the Braze SDK
braze.subscribeToFeatureFlagsUpdates() { event ->
val newValue = braze.getFeatureFlag("enable_live_chat")?.enabled
liveChatEnabled = newValue
}
// Only show the Live Chat view if the Braze SDK determines it is enabled
if (liveChatEnabled) {
liveChatView.visibility = View.VISIBLE
} else {
liveChatView.visibility = View.GONE
}
```
```swift
// Get the initial value from the Braze SDK
let featureFlag = braze.featureFlags.featureFlag(id: "enable_live_chat")
var liveChatEnabled = featureFlag?.enabled ?? false
// Listen for updates from the Braze SDK
braze.featureFlags.subscribeToUpdates() { _ in
let newValue = braze.featureFlags.featureFlag(id: "enable_live_chat")?.enabled ?? false
liveChatEnabled = newValue
}
// Only show the Live Chat view if the Braze SDK determines it is enabled
liveChatView.isHidden = !liveChatEnabled
```
### Remotely control app variables
Use feature flags to modify your app's functionality in production. This can be particularly important for mobile apps, where app store approvals prevent rolling out changes quickly to all users.
For example, let's say that our marketing team wants to list our current sales and promotions in our app's navigation. Normally, our engineers require one week's lead time for any changes and three days for an app store review. But with Thanksgiving, Black Friday, Cyber Monday, Hanukkah, Christmas, and New Year's Day all within two months, we won't be able to meet these tight deadlines.
With feature flags, we can let Braze power the content of our app navigation link, letting our marketing manager make changes in minutes rather than days.
To remotely configure this feature, we'll create a new feature flag called `navigation_promo_link` and define the following initial properties:

In our app, we'll use getter methods by Braze to retrieve this feature flag's properties and build the navigation links based on those values:
```javascript
import * as braze from "@braze/web-sdk";
import {useState} from "react";
const featureFlag = braze.getFeatureFlag("navigation_promo_link");
// Check if the feature flag is enabled
const [promoEnabled, setPromoEnabled] = useState(featureFlag.enabled);
// Read the "link" property
const [promoLink, setPromoLink] = useState(featureFlag.getStringProperty("link"));
// Read the "text" property
const [promoText, setPromoText] = useState(featureFlag.getStringProperty("text"));
return (<>
)
```
```java
// liveChatView is the View container for the Live Chat UI
FeatureFlag featureFlag = braze.getFeatureFlag("navigation_promo_link");
if (featureFlag != null && featureFlag.getEnabled()) {
liveChatView.setVisibility(View.VISIBLE);
} else {
liveChatView.setVisibility(View.GONE);
}
liveChatView.setPromoLink(featureFlag.getStringProperty("link"));
liveChatView.setPromoText(featureFlag.getStringProperty("text"));
```
```kotlin
// liveChatView is the View container for the Live Chat UI
val featureFlag = braze.getFeatureFlag("navigation_promo_link")
if (featureFlag?.enabled == true) {
liveChatView.visibility = View.VISIBLE
} else {
liveChatView.visibility = View.GONE
}
liveChatView.promoLink = featureFlag?.getStringProperty("link")
liveChatView.promoText = featureFlag?.getStringProperty("text")
```
```swift
let featureFlag = braze.featureFlags.featureFlag(id: "navigation_promo_link")
if let featureFlag {
liveChatView.isHidden = !featureFlag.enabled
} else {
liveChatView.isHidden = true
}
liveChatView.promoLink = featureFlag?.stringProperty("link")
liveChatView.promoText = featureFlag?.stringProperty("text")
```
Now, the day before Thanksgiving, we only have to change those property values in the Braze dashboard.

As a result, the next time someone loads the app, they will see the new Thanksgiving deals.
### Message coordination
Use feature flags to synchronize a feature's rollout and messaging. This will allow you to use Braze as the source of truth for both your user experience and its relevant messaging. To achieve this, target the new feature to a particular segment or filtered portion of your audience. Then, create a campaign or Canvas that only targets that segment.
Let's say that we're launching a new loyalty rewards program for our users. It can be difficult for marketing and product teams to perfectly coordinate the timing of promotional messaging with a feature's rollout. Feature flags in Canvas let you apply sophisticated logic when it comes to enabling a feature for a select audience and controlling the related messaging to those same users.
To effectively coordinate feature rollout and messaging, we'll create a new feature flag called `show_loyalty_program`. For our initial phased release, we'll let Canvas control when and for whom the feature flag is enabled. For now, we'll leave the rollout percentage at 0% and not select any target segments.

Then, in Canvas, we'll create a [Feature Flag step](https://www.braze.com/docs/user_guide/engagement_tools/canvas/canvas_components/feature_flags/) that enables the `show_loyalty_program` feature flag for our "High Value Customers" segment:

Now, users in this segment will start to see the new loyalty program, and after it's enabled, an email and survey will be sent out automatically to help our team gather feedback.
### Feature experimentation
Use feature flags to experiment and confirm your hypotheses around your new feature. By splitting traffic into two or more groups, you can compare the impact of a feature flag across groups, and determine the best course of action based on the results.
An [A/B test](https://www.braze.com/docs/user_guide/engagement_tools/testing/multivariant_testing/) is a powerful tool that compares users' responses to multiple versions of a variable.
In this example, our team has built a new checkout flow for our eCommerce app. Even though we're confident it's improving the user experience, we want to run an A/B test to measure its impact on our app's revenue.
To begin, we'll create a new feature flag called `enable_checkout_v2`. We won't add an audience or rollout percentage. Instead, we'll use a feature flag experiment to split traffic, enable the feature, and measure the outcome.
In our app, we'll check if the feature flag is enabled or not and swap out the checkout flow based on the response:
```javascript
import * as braze from "@braze/web-sdk";
const featureFlag = braze.getFeatureFlag("enable_checkout_v2");
braze.logFeatureFlagImpression("enable_checkout_v2");
if (featureFlag?.enabled) {
return
} else {
return
}
```
```java
FeatureFlag featureFlag = braze.getFeatureFlag("enable_checkout_v2");
braze.logFeatureFlagImpression("enable_checkout_v2");
if (featureFlag != null && featureFlag.getEnabled()) {
return new NewCheckoutFlow();
} else {
return new OldCheckoutFlow();
}
```
```kotlin
val featureFlag = braze.getFeatureFlag("enable_checkout_v2")
braze.logFeatureFlagImpression("enable_checkout_v2")
if (featureFlag?.enabled == true) {
return NewCheckoutFlow()
} else {
return OldCheckoutFlow()
}
```
```swift
let featureFlag = braze.featureFlags.featureFlag(id: "enable_checkout_v2")
braze.featureFlags.logFeatureFlagImpression(id: "enable_checkout_v2")
if let featureFlag, featureFlag.enabled {
return NewCheckoutFlow()
} else {
return OldCheckoutFlow()
}
```
We'll set up our A/B test in a [Feature Flag Experiment](https://www.braze.com/docs/developer_guide/feature_flags/experiments/).
Now, 50% of users will see the old experience, while the other 50% will see the new experience. We can then analyze the two variants to determine which checkout flow resulted in a higher conversion rate.

Once we determine our winner, we can stop this campaign and increase the rollout percentage on the feature flag to 100% for all users while our engineering team hard-codes this into our next app release.
### Segmentation
Use the **Feature Flag** filter to create a segment or target messaging at users based on whether they have a feature flag enabled. For example, let's say we have a feature flag that controls premium content in our app. We could create a segment that filters for users who don't have the feature flag enabled, and then send that segment a message urging them to upgrade their account to view premium content.

For more information about filtering on segments, see [Creating a segment](https://www.braze.com/docs/user_guide/engagement_tools/segments/creating_a_segment/).
**Note:**
To prevent recursive segments, it is not possible to create a segment that references other feature flags.
## Plan limitations
These are the feature flag limitations for free and paid plans.
| Feature | Free version | Paid version |
| :---------------------------------------------------------------------------------------------------------------- | :--------------- | ----------------- |
| [Active feature flags](#active-feature-flags) | 10 per workspace | 110 per workspace |
| [Active campaign experiments](https://www.braze.com/docs/developer_guide/feature_flags/experiments/) | 1 per workspace | 100 per workspace |
| [Feature Flag Canvas steps](https://www.braze.com/docs/user_guide/engagement_tools/canvas/canvas_components/feature_flags/) | Unlimited | Unlimited |
{: .reset-td-br-1 .reset-td-br-2 role="presentation" }
A feature flag is considered active and will count toward your limit if any of the following apply:
- Rollout is more than 0%
- Used in an active Canvas
- Used in an active experiment
Even if the same feature flag matches multiple criteria, such as if it's used in a Canvas and the rollout is 50%, it will only count as 1 active feature flag toward your limit.
**Note:**
To purchase the paid version of feature flags, contact your Braze account manager, or request an upgrade in the Braze dashboard.
# Creating Feature Flags
Source: /docs/developer_guide/feature_flags/create/index.md
# Creating feature flags
> Feature flags allow you to remotely enable or disable functionality for a selection of users. Create a new feature flag within the Braze dashboard. Provide a name and an `ID`, a target audience, and a percentage of users for whom to enable to this feature. Then, using that same `ID` in your app or website's code, you can conditionally run certain parts of your business logic. To learn more about feature flags and how you can use them in Braze, see [About feature flags](https://www.braze.com/docs/developer_guide/feature_flags/).
## Prerequisites
### SDK version
To use feature flags, ensure your SDKs are up to date with at least these minimum versions:
### Braze permissions
To manage feature flags in the dashboard, you'll either need to be an Administrator, or have the following [permissions](https://www.braze.com/docs/user_guide/administrative/app_settings/manage_your_braze_users/user_permissions/):
| Permission | What you can do |
|-------------------------------------------------------------------------------|-------------------------------------------|
| **Manage Feature Flags** | View, create, and edit feature flags. |
| **Access Campaigns, Canvases, Cards, Feature Flags, Segments, Media Library** | View the list of available feature flags. |
{: .reset-td-br-1 .reset-td-br-2 .reset-td-br-3 role="presentation" }
## Creating a feature flag
### Step 1: Create a new feature flag
Go to **Messaging** > **Feature Flags**, then select **Create Feature Flag**.
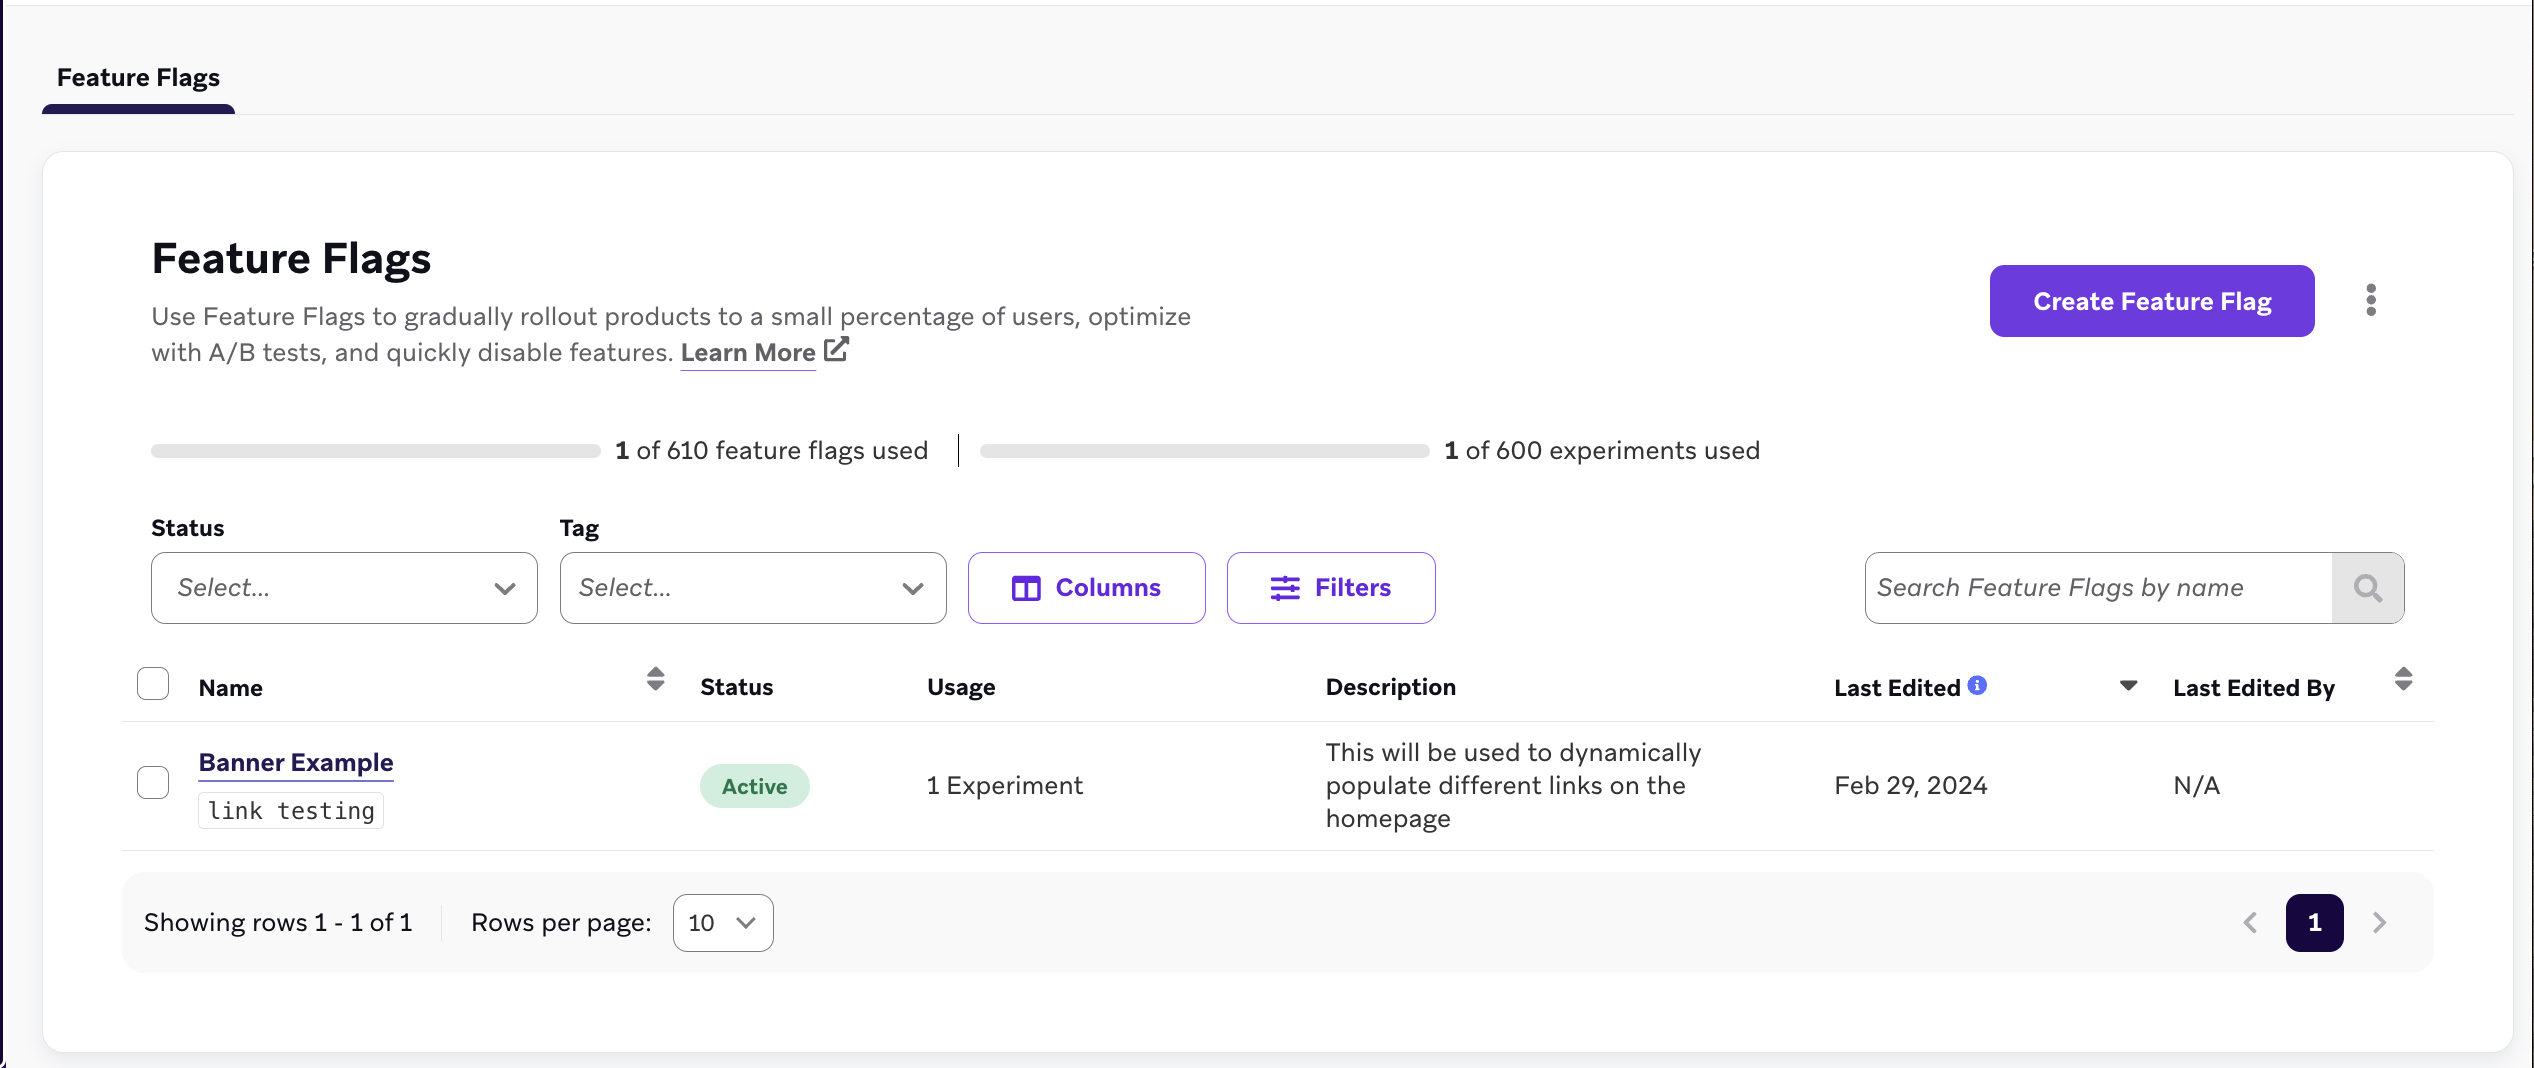{: style="max-width:75%"}
### Step 2: Fill out the details
Under **Feature flag details**, enter a name, ID, and description for your feature flag.
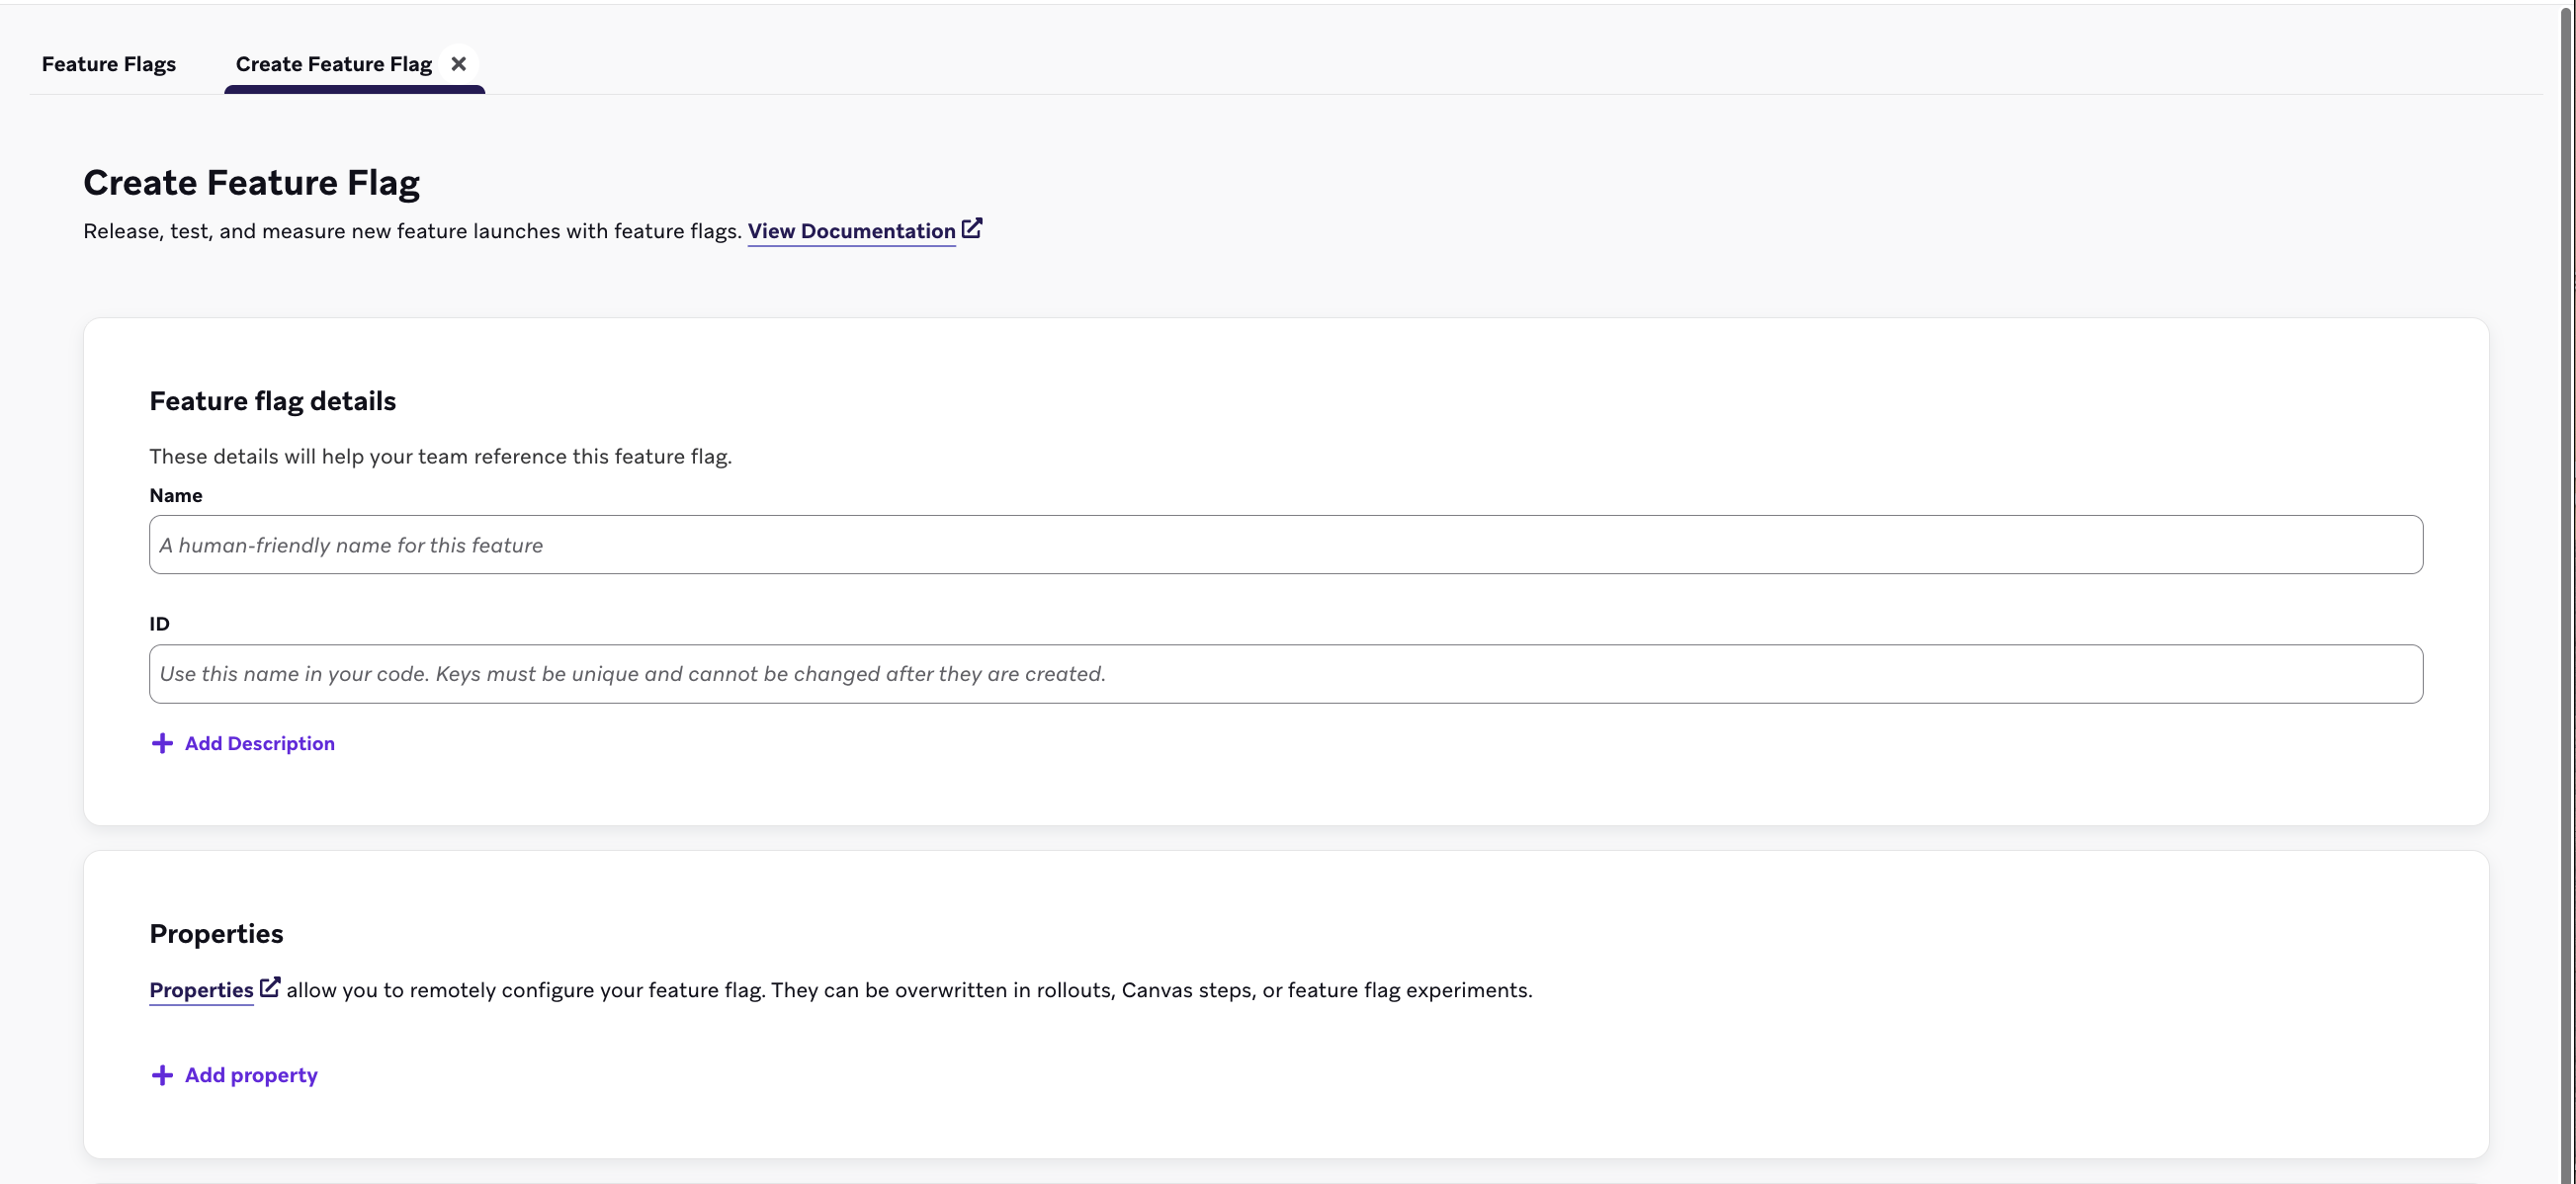{: style="max-width:75%"}
| Field | Description |
|--------------|----------------------------------------------------------------------------|
| Name | A human-readable title for your marketers and administrators. |
| ID | The unique ID you'll use in your code to check if this feature is [enabled for a user](#enabled). This ID cannot be changed later, so review our [ID naming best practices](#naming-conventions) before continuing. |
| Description | An optional description that gives some context about your feature flag. |
| Properties | Optional properties that remotely configure your feature flag. They can be overwritten in Canvas steps or feature flag experiments. |
{: .reset-td-br-1 .reset-td-br-2 .reset-td-br-3 role="presentation" }
### Step 2a: Create custom properties
Under **Properties**, you can optionally create custom properties your app can access through the Braze SDK when your feature is enabled. You can assign a string, boolean, image, timestamp, JSON, or a number value to each variable, as well as set a default value.
In the following example, the feature flag shows an out-of-stock banner for an eCommerce store using the custom properties listed:
|Property Name|Type|Value|
|--|--|--|
|`banner_height`|`number`|`75`|
|`banner_color`|`string`|`blue`|
|`banner_text`|`string`|`Widgets are out of stock until July 1.`|
|`dismissible`|`boolean`|`false`|
|`homepage_icon`|`image`|`http://s3.amazonaws.com/[bucket_name]/`|
|`account_start`|`timestamp`|`2011-01-01T12:00:00Z`|
|`footer_settings`|`JSON`|`{ "colors": [ "red", "blue", "green" ], "placement": 123 }`|
**Tip:**
There is no limit to the number of properties you can add. However, a feature flag's properties are limited to a total of 10 KB. Both property values and keys are limited to 255 characters in length.
### Step 4: Choose segments to target
Before rolling out a feature flag, you need to choose a [segment](https://www.braze.com/docs/user_guide/engagement_tools/segments/) of users to target. Select **Add Rule** on your newly created flag and then use the filter group and segment dropdown menus to filter users out of your target audience. Add multiple filters to further narrow your audience.
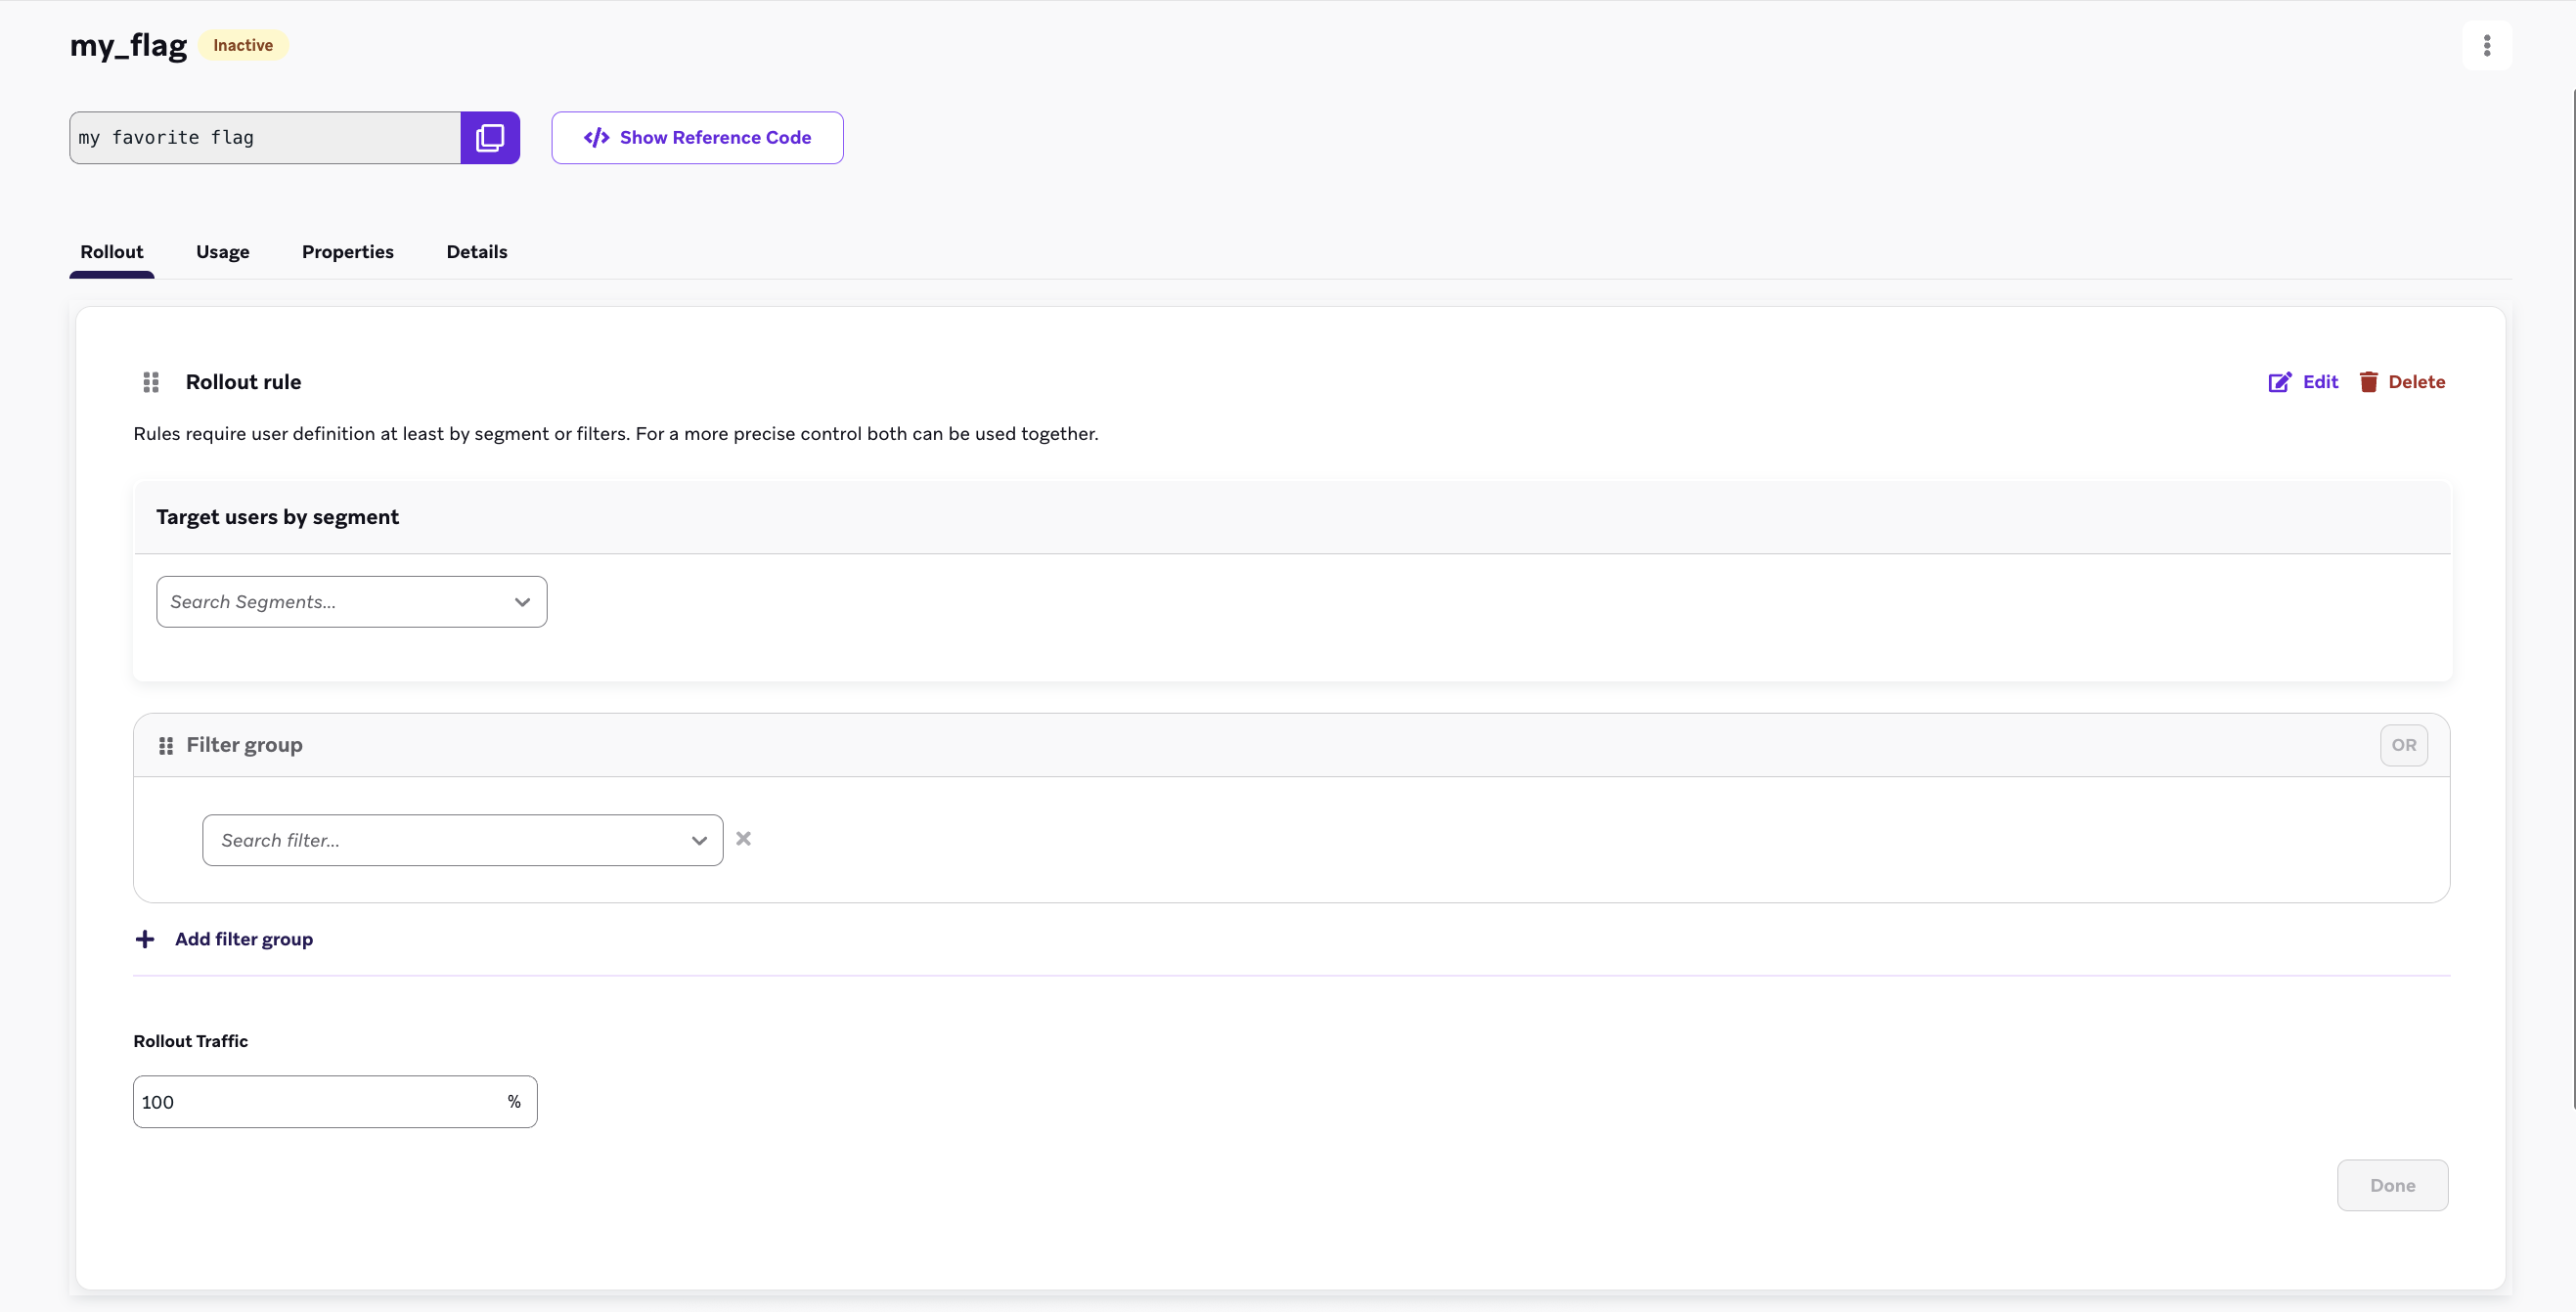{: style="max-width:75%;"}
### Step 5: Set the rollout traffic {#rollout}
By default, feature flags are always inactive, which allows you to separate your feature release's date from your total user activation. To begin your rollout, use the **Rollout Traffic** section to enter a percentage in the text box. This will choose the percentage of random users in your selected segment to receive this new feature.
**Important:**
Do not set your rollout traffic above 0% until you are ready for your new feature to go live. When you initially define your feature flag in the dashboard, leave this setting at 0%.
**Important:**
To roll out a flag with just one rule or to a singular audience, add your first rule with segmentation criteria and rollout percentages selected. Lastly, confirm the **Everyone Else** rule is toggled off, and save your flag.
## Multi-rule feature flag rollouts
Use multi-rule feature flag rollouts to define a sequence of rules for evaluating users, which allows for precise segmentation and controlled feature releases. This method is ideal for deploying the same feature to diverse audiences.
### Evaluation order
Feature flag rules are evaluated from top to bottom, in the order they're listed. A user qualifies for the first rule they meet. If a user doesn't meet any rules, their eligibility is determined by the default "Everyone Else" rule.
### User qualification
- If a user meets the criteria for the first rule, they are immediately eligible to receive the feature flag.
- If a user doesn't qualify for the first rule, they're evaluated against the second rule, and so on.
The sequential evaluation continues until a user qualifies for a rule or reaches the "Everyone Else" rule at the bottom of the list.
### "Everyone Else" rule
The "Everyone Else" rule acts as a default. If a user doesn't qualify for any preceding rules, their eligibility for the feature flag will be determined by the toggle setting of the "Everyone Else" rule. For example, if the "Everyone Else" rule is toggled "Off", in the default state, a user who doesn't meet the criteria for any other rules won't receive the feature flag upon their session start.
### Re-ordering rules
By default, rules are ordered in the sequence that they're created, but you can reorder these rules by dragging and dropping them in the dashboard.
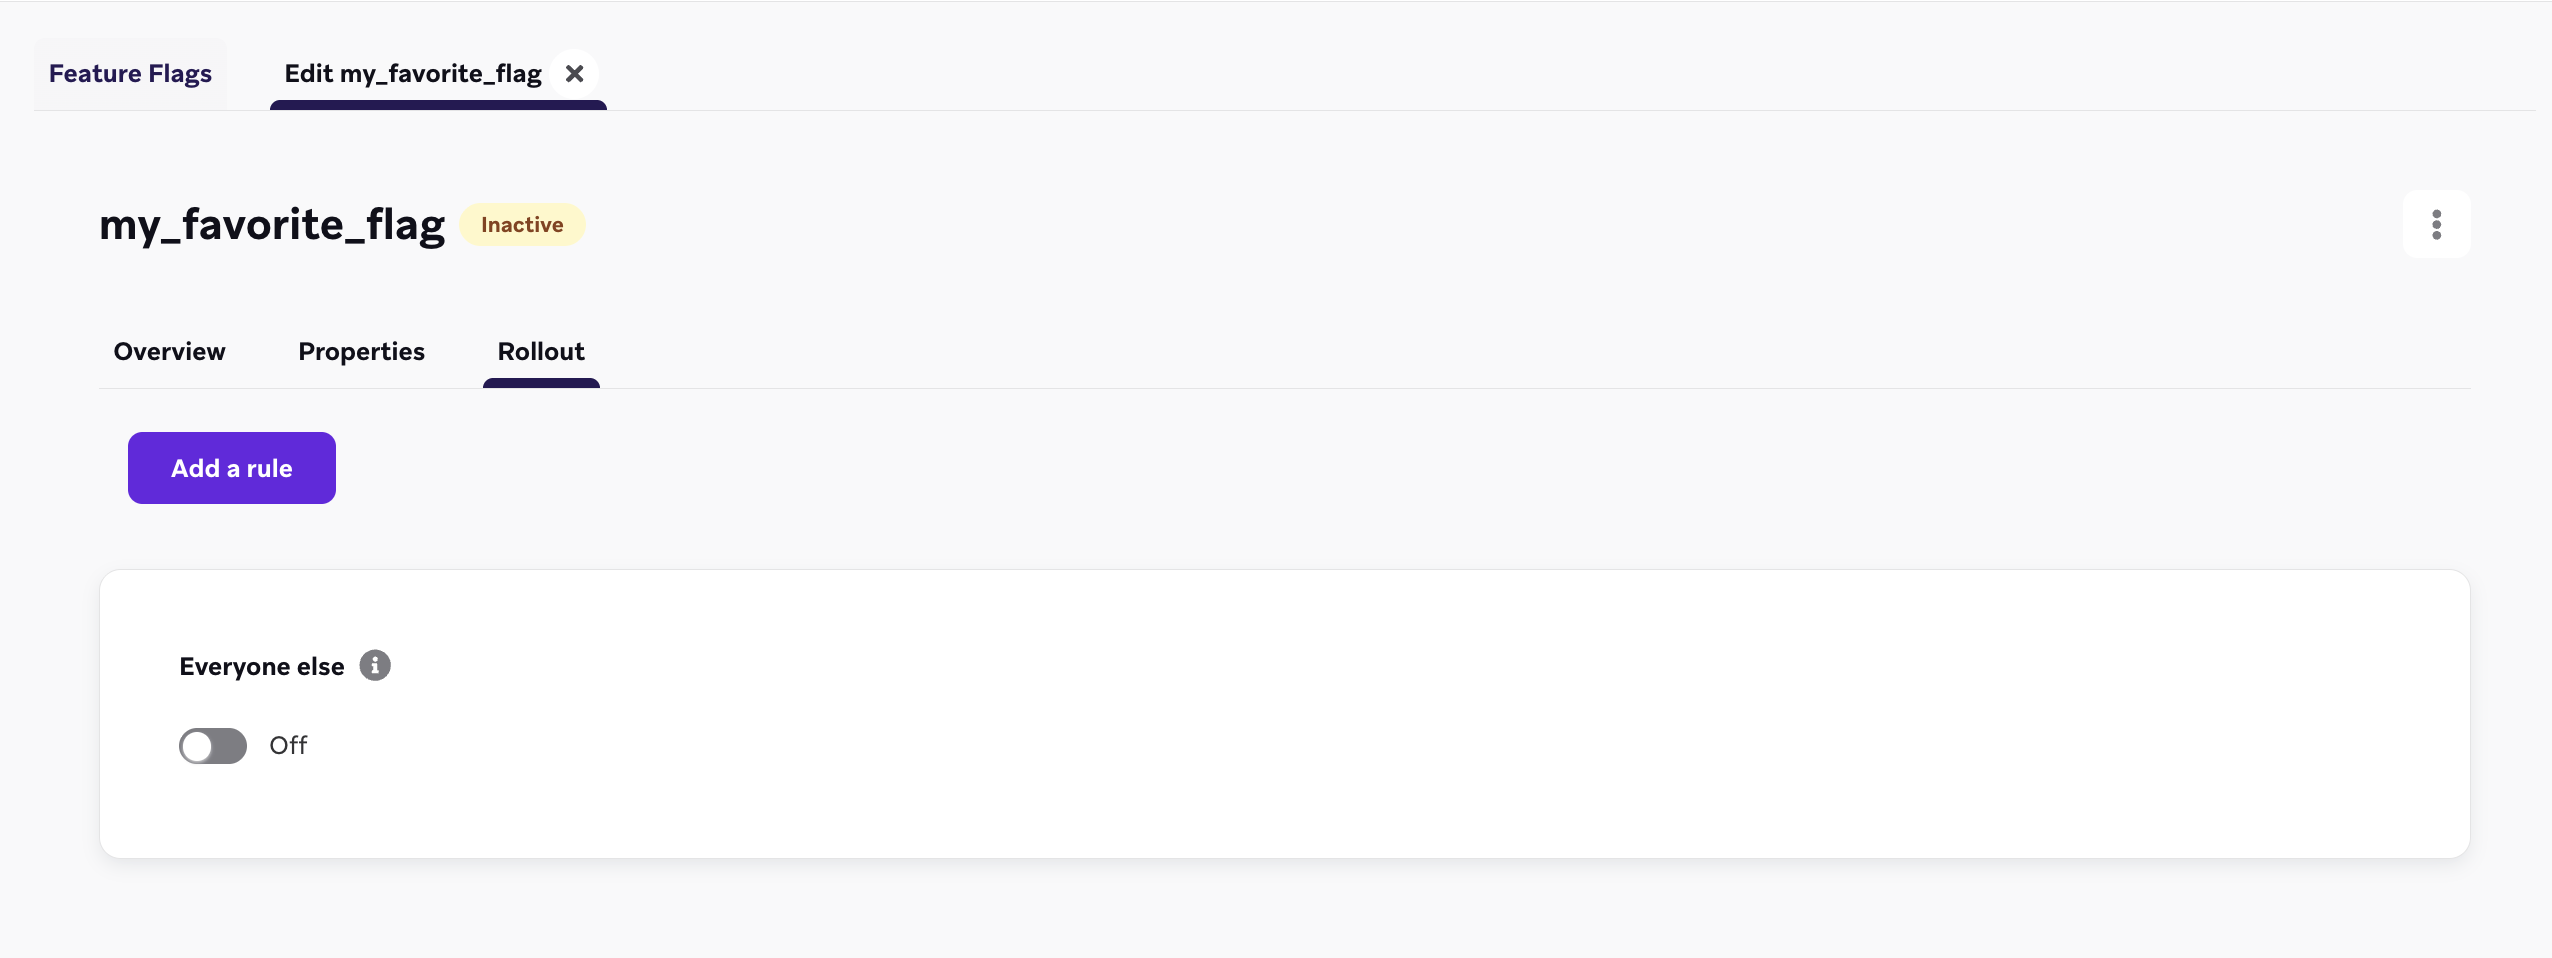{: style="max-width:80%;"}
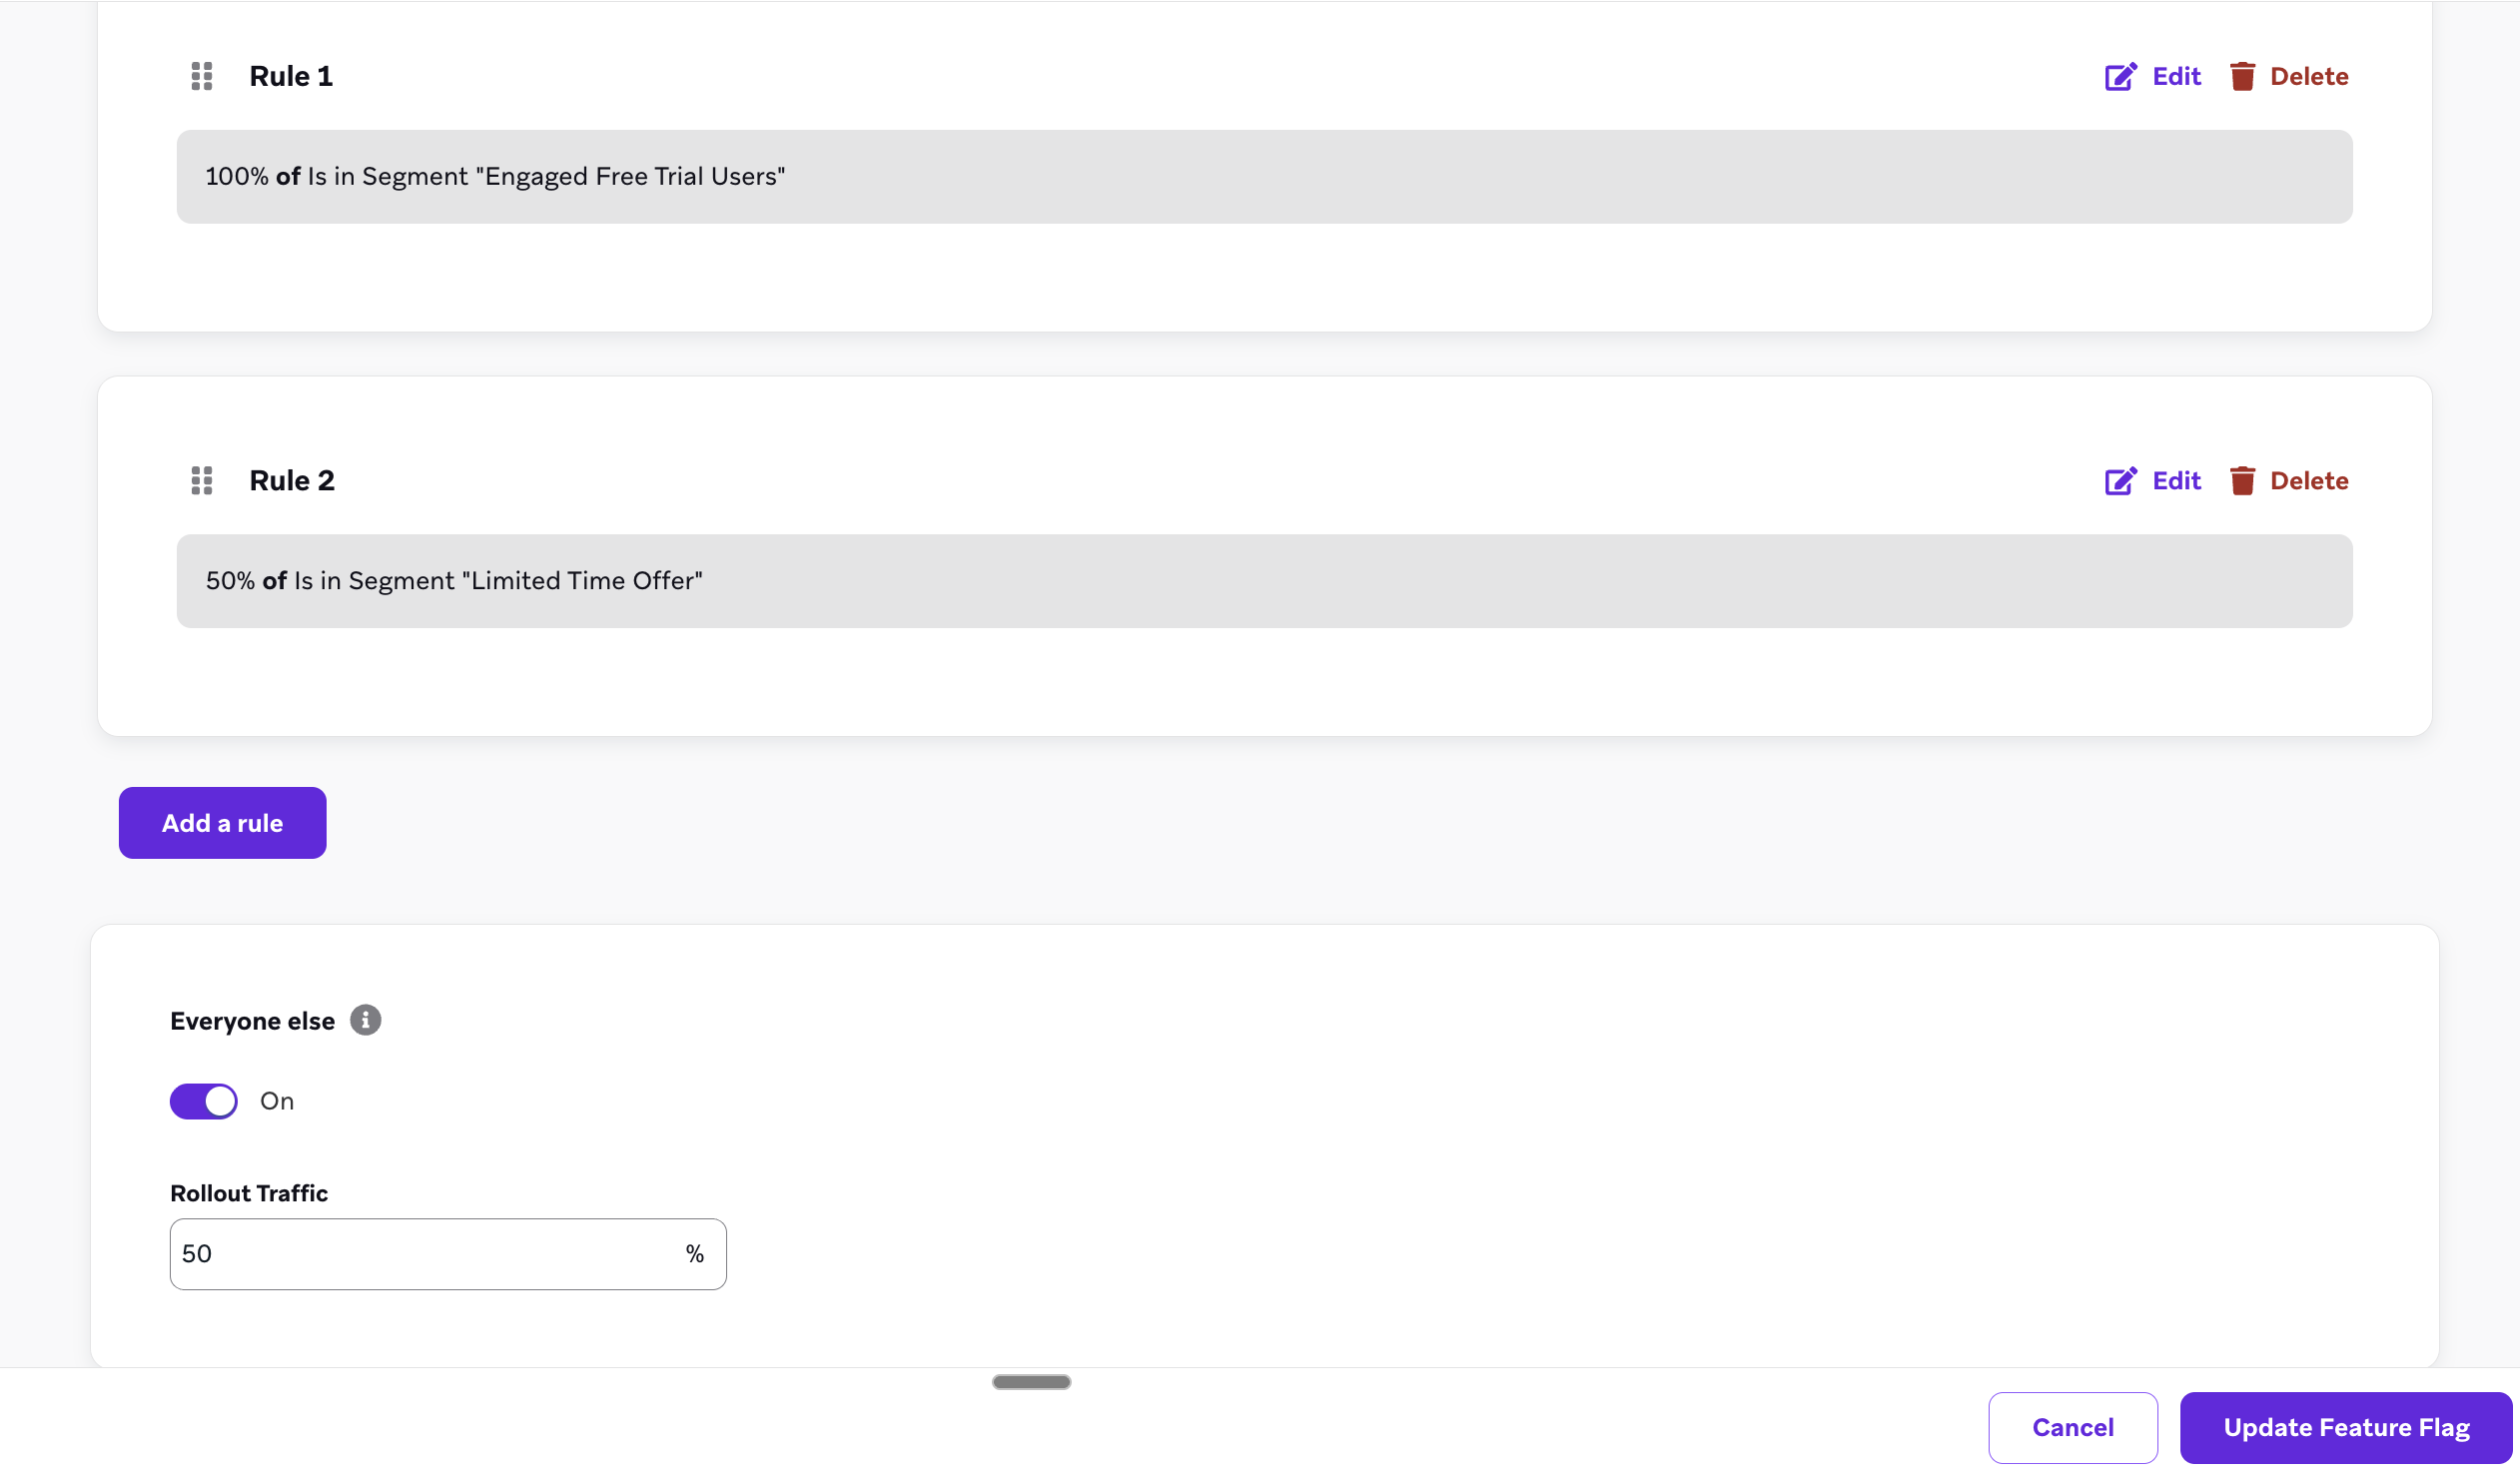{: style="max-width:80%;"}
### Multi-rule feature flag use cases
#### Gradually release a checkout page
Let's say you work for an eCommerce brand and have a new checkout page that you want to rollout across different geographies to ensure stability. Using multi-rule feature flags, you can set the following:
- **Rule 1:** Your US segment is set to 100%.
- **Rule 2:** Your segment is set to 50% of your Brazilian users, so not all of them receive the flow at one time.
- **Rule 3 (Everyone Else):** For all other users, toggle on your "Everyone Else" rule and set it to 15%, so that a portion of all users can check out with the new flow.
#### Reach internal testers first
Let's say you're a product manager who wants to make sure your internal testers always receive the feature flag when you release a new product. You can add your internal testers segment to your first rule and set it to 100%, so that your internal testers are eligible during every feature rollout.
## Using the "enabled" field for your feature flags {#enabled}
After you've defined your feature flag, configure your app or site to check whether or not it is enabled for a particular user. When it is enabled, you'll set some action or reference the feature flag's variable properties based on your use case. The Braze SDK provides getter methods to pull your feature flag's status and its properties into your app.
Feature flags are refreshed automatically at session start so that you can display the most up-to-date version of your feature upon launch. The SDK caches these values so they can be used while offline.
**Note:**
Be sure to log [feature flag impressions](#impressions).
Let's say you were to rolling out a new type of user profile for your app. You might set the `ID` as `expanded_user_profile`. Then, you would have your app check to see if it should display this new user profile to a particular user. For example:
```javascript
const featureFlag = braze.getFeatureFlag("expanded_user_profile");
if (featureFlag?.enabled) {
console.log(`expanded_user_profile is enabled`);
} else {
console.log(`expanded_user_profile is not enabled`);
}
```
```swift
let featureFlag = braze.featureFlags.featureFlag(id: "expanded_user_profile")
if featureFlag?.enabled == true {
print("expanded_user_profile is enabled")
} else {
print("expanded_user_profile is not enabled")
}
```
```java
FeatureFlag featureFlag = braze.getFeatureFlag("expanded_user_profile");
if (featureFlag != null && featureFlag.getEnabled()) {
Log.i(TAG, "expanded_user_profile is enabled");
} else {
Log.i(TAG, "expanded_user_profile is not enabled");
}
```
```kotlin
val featureFlag = braze.getFeatureFlag("expanded_user_profile")
if (featureFlag?.enabled == true) {
Log.i(TAG, "expanded_user_profile is enabled.")
} else {
Log.i(TAG, "expanded_user_profile is not enabled.")
}
```
```javascript
const featureFlag = await Braze.getFeatureFlag("expanded_user_profile");
if (featureFlag?.enabled) {
console.log(`expanded_user_profile is enabled`);
} else {
console.log(`expanded_user_profile is not enabled`);
}
```
```csharp
var featureFlag = Appboy.AppboyBinding.GetFeatureFlag("expanded_user_profile");
if (featureFlag != null && featureFlag.Enabled) {
Console.WriteLine("expanded_user_profile is enabled");
} else {
Console.WriteLine("expanded_user_profile is not enabled");
}
```
```javascript
const featureFlag = await BrazePlugin.getFeatureFlag("expanded_user_profile");
if (featureFlag?.enabled) {
console.log(`expanded_user_profile is enabled`);
} else {
console.log(`expanded_user_profile is not enabled`);
}
```
```dart
BrazeFeatureFlag? featureFlag = await braze.getFeatureFlagByID("expanded_user_profile");
if (featureFlag?.enabled == true) {
print("expanded_user_profile is enabled");
} else {
print("expanded_user_profile is not enabled");
}
```
```brightscript
featureFlag = m.braze.getFeatureFlag("expanded_user_profile")
if featureFlag <> invalid and featureFlag.enabled
print "expanded_user_profile is enabled"
else
print "expanded_user_profile is not enabled"
end if
```
### Logging a feature flag impression {#impressions}
Track a feature flag impression whenever a user has had an opportunity to interact with your new feature, or when they __could__ have interacted if the feature is disabled (in the case of a control group in an A/B test). Feature flag impressions are only logged once per session.
Usually, you can put this line of code directly underneath where you reference your feature flag in your app:
```javascript
braze.logFeatureFlagImpression("expanded_user_profile");
```
```swift
braze.featureFlags.logFeatureFlagImpression(id: "expanded_user_profile")
```
```java
braze.logFeatureFlagImpression("expanded_user_profile");
```
```kotlin
braze.logFeatureFlagImpression("expanded_user_profile")
```
```javascript
Braze.logFeatureFlagImpression("expanded_user_profile");
```
```csharp
Appboy.AppboyBinding.LogFeatureFlagImpression("expanded_user_profile");
```
```javascript
BrazePlugin.logFeatureFlagImpression("expanded_user_profile");
```
```dart
braze.logFeatureFlagImpression("expanded_user_profile");
```
```brightscript
m.Braze.logFeatureFlagImpression("expanded_user_profile");
```
### Accessing properties {#accessing-properties}
To access the properties of a feature flag, use one of the following methods depending on the type you defined in the dashboard.
If there is no such property of the corresponding type for the key you provided, these methods will return `null`.
```javascript
// Returns the Feature Flag instance
const featureFlag = braze.getFeatureFlag("expanded_user_profile");
// Returns the String property
const stringProperty = featureFlag.getStringProperty("color");
// Returns the boolean property
const booleanProperty = featureFlag.getBooleanProperty("expanded");
// Returns the number property
const numberProperty = featureFlag.getNumberProperty("height");
// Returns the Unix UTC millisecond timestamp property as a number
const timestampProperty = featureFlag.getTimestampProperty("account_start");
// Returns the image property as a String of the image URL
const imageProperty = featureFlag.getImageProperty("homepage_icon");
// Returns the JSON object property as a FeatureFlagJsonPropertyValue
const jsonProperty = featureFlag.getJsonProperty("footer_settings");
```
```swift
// Returns the Feature Flag instance
let featureFlag: FeatureFlag = braze.featureFlags.featureFlag(id: "expanded_user_profile")
// Returns the string property
let stringProperty: String? = featureFlag.stringProperty(key: "color")
// Returns the boolean property
let booleanProperty: Bool? = featureFlag.boolProperty(key: "expanded")
// Returns the number property as a double
let numberProperty: Double? = featureFlag.numberProperty(key: "height")
// Returns the Unix UTC millisecond timestamp property as an integer
let timestampProperty: Int? = featureFlag.timestampProperty(key: "account_start")
// Returns the image property as a String of the image URL
let imageProperty: String? = featureFlag.imageProperty(key: "homepage_icon")
// Returns the JSON object property as a [String: Any] dictionary
let jsonObjectProperty: [String: Any]? = featureFlag.jsonObjectProperty(key: "footer_settings")
```
```java
// Returns the Feature Flag instance
FeatureFlag featureFlag = braze.getFeatureFlag("expanded_user_profile");
// Returns the String property
String stringProperty = featureFlag.getStringProperty("color");
// Returns the boolean property
Boolean booleanProperty = featureFlag.getBooleanProperty("expanded");
// Returns the number property
Number numberProperty = featureFlag.getNumberProperty("height");
// Returns the Unix UTC millisecond timestamp property as a long
Long timestampProperty = featureFlag.getTimestampProperty("account_start");
// Returns the image property as a String of the image URL
String imageProperty = featureFlag.getImageProperty("homepage_icon");
// Returns the JSON object property as a JSONObject
JSONObject jsonObjectProperty = featureFlag.getJSONProperty("footer_settings");
```
```kotlin
// Returns the Feature Flag instance
val featureFlag = braze.getFeatureFlag("expanded_user_profile")
// Returns the String property
val stringProperty: String? = featureFlag.getStringProperty("color")
// Returns the boolean property
val booleanProperty: Boolean? = featureFlag.getBooleanProperty("expanded")
// Returns the number property
val numberProperty: Number? = featureFlag.getNumberProperty("height")
// Returns the Unix UTC millisecond timestamp property as a long
val timestampProperty: Long? = featureFlag.getTimestampProperty("account_start")
// Returns the image property as a String of the image URL
val imageProperty: String? = featureFlag.getImageProperty("homepage_icon")
// Returns the JSON object property as a JSONObject
val jsonObjectProperty: JSONObject? = featureFlag.getJSONProperty("footer_settings")
```
```javascript
// Returns the String property
const stringProperty = await Braze.getFeatureFlagStringProperty("expanded_user_profile", "color");
// Returns the boolean property
const booleanProperty = await Braze.getFeatureFlagBooleanProperty("expanded_user_profile", "expanded");
// Returns the number property
const numberProperty = await Braze.getFeatureFlagNumberProperty("expanded_user_profile", "height");
// Returns the Unix UTC millisecond timestamp property as a number
const timestampProperty = await Braze.getFeatureFlagTimestampProperty("expanded_user_profile", "account_start");
// Returns the image property as a String of the image URL
const imageProperty = await Braze.getFeatureFlagImageProperty("expanded_user_profile", "homepage_icon");
// Returns the JSON object property as an object
const jsonObjectProperty = await Braze.getFeatureFlagJSONProperty("expanded_user_profile", "footer_settings");
```
```csharp
// Returns the Feature Flag instance
var featureFlag = Appboy.AppboyBinding.GetFeatureFlag("expanded_user_profile");
// Returns the String property
var stringProperty = featureFlag.GetStringProperty("color");
// Returns the boolean property
var booleanProperty = featureFlag.GetBooleanProperty("expanded");
// Returns the number property as an integer
var integerProperty = featureFlag.GetIntegerProperty("height");
// Returns the number property as a double
var doubleProperty = featureFlag.GetDoubleProperty("height");
// Returns the Unix UTC millisecond timestamp property as a long
var timestampProperty = featureFlag.GetTimestampProperty("account_start");
// Returns the image property as a String of the image URL
var imageProperty = featureFlag.GetImageProperty("homepage_icon");
// Returns the JSON object property as a JSONObject
var jsonObjectProperty = featureFlag.GetJSONProperty("footer_settings");
```
```javascript
// Returns the String property
const stringProperty = await BrazePlugin.getFeatureFlagStringProperty("expanded_user_profile", "color");
// Returns the boolean property
const booleanProperty = await BrazePlugin.getFeatureFlagBooleanProperty("expanded_user_profile", "expanded");
// Returns the number property
const numberProperty = await BrazePlugin.getFeatureFlagNumberProperty("expanded_user_profile", "height");
// Returns the Unix UTC millisecond timestamp property as a number
const timestampProperty = await BrazePlugin.getFeatureFlagTimestampProperty("expanded_user_profile", "account_start");
// Returns the image property as a String of the image URL
const imageProperty = await BrazePlugin.getFeatureFlagImageProperty("expanded_user_profile", "homepage_icon");
// Returns the JSON object property as an object
const jsonObjectProperty = await BrazePlugin.getFeatureFlagJSONProperty("expanded_user_profile", "footer_settings");
```
```dart
// Returns the Feature Flag instance
BrazeFeatureFlag featureFlag = await braze.getFeatureFlagByID("expanded_user_profile");
// Returns the String property
var stringProperty = featureFlag.getStringProperty("color");
// Returns the boolean property
var booleanProperty = featureFlag.getBooleanProperty("expanded");
// Returns the number property
var numberProperty = featureFlag.getNumberProperty("height");
// Returns the Unix UTC millisecond timestamp property as an integer
var timestampProperty = featureFlag.getTimestampProperty("account_start");
// Returns the image property as a String of the image URL
var imageProperty = featureFlag.getImageProperty("homepage_icon");
// Returns the JSON object property as a Map collection
var jsonObjectProperty = featureFlag.getJSONProperty("footer_settings");
```
```brightscript
' Returns the String property
color = featureFlag.getStringProperty("color")
' Returns the boolean property
expanded = featureFlag.getBooleanProperty("expanded")
' Returns the number property
height = featureFlag.getNumberProperty("height")
' Returns the Unix UTC millisecond timestamp property
account_start = featureFlag.getTimestampProperty("account_start")
' Returns the image property as a String of the image URL
homepage_icon = featureFlag.getImageProperty("homepage_icon")
' Returns the JSON object property
footer_settings = featureFlag.getJSONProperty("footer_settings")
```
### Getting a list of all feature flags {#get-list-of-flags}
```javascript
const features = getAllFeatureFlags();
for(const feature of features) {
console.log(`Feature: ${feature.id}`, feature.enabled);
}
```
```swift
let features = braze.featureFlags.featureFlags
for let feature in features {
print("Feature: \(feature.id)", feature.enabled)
}
```
```java
List features = braze.getAllFeatureFlags();
for (FeatureFlag feature: features) {
Log.i(TAG, "Feature: ", feature.getId(), feature.getEnabled());
}
```
```kotlin
val featureFlags = braze.getAllFeatureFlags()
featureFlags.forEach { feature ->
Log.i(TAG, "Feature: ${feature.id} ${feature.enabled}")
}
```
```javascript
const features = await Braze.getAllFeatureFlags();
for(const feature of features) {
console.log(`Feature: ${feature.id}`, feature.enabled);
}
```
```csharp
List features = Appboy.AppboyBinding.GetAllFeatureFlags();
foreach (FeatureFlag feature in features) {
Console.WriteLine("Feature: {0} - enabled: {1}", feature.ID, feature.Enabled);
}
```
```javascript
const features = await BrazePlugin.getAllFeatureFlags();
for(const feature of features) {
console.log(`Feature: ${feature.id}`, feature.enabled);
}
```
```dart
List featureFlags = await braze.getAllFeatureFlags();
featureFlags.forEach((feature) {
print("Feature: ${feature.id} ${feature.enabled}");
});
```
```brightscript
features = m.braze.getAllFeatureFlags()
for each feature in features
print "Feature: " + feature.id + " enabled: " + feature.enabled.toStr()
end for
```
### Refreshing feature flags {#refreshing}
You can refresh the current user's feature flags mid-session to pull the latest values from Braze.
**Tip:**
Refreshing happens automatically upon session start. Refreshing is only needed prior to important user actions, such as before loading a checkout page, or if you know a feature flag will be referenced.
```javascript
braze.refreshFeatureFlags(() => {
console.log(`Feature flags have been refreshed.`);
}, () => {
console.log(`Failed to refresh feature flags.`);
});
```
```swift
braze.featureFlags.requestRefresh { result in
switch result {
case .success(let features):
print("Feature flags have been refreshed:", features)
case .failure(let error):
print("Failed to refresh feature flags:", error)
}
}
```
```java
braze.refreshFeatureFlags();
```
```kotlin
braze.refreshFeatureFlags()
```
```javascript
Braze.refreshFeatureFlags();
```
```csharp
Appboy.AppboyBinding.RefreshFeatureFlags();
```
```javascript
BrazePlugin.refreshFeatureFlags();
```
```dart
braze.refreshFeatureFlags();
```
```brightscript
m.Braze.refreshFeatureFlags()
```
### Listening for changes {#updates}
You can configure the Braze SDK to listen and update your app when the SDK refreshes any feature flags.
This is useful if you want to update your app if a user is no longer eligible for a feature. For example, setting some state in your app based on whether or not a feature is enabled, or one of its property values.
```javascript
// Register an event listener
const subscriptionId = braze.subscribeToFeatureFlagsUpdates((features) => {
console.log(`Features were updated`, features);
});
// Unregister this event listener
braze.removeSubscription(subscriptionId);
```
```swift
// Create the feature flags subscription
// - You must keep a strong reference to the subscription to keep it active
let subscription = braze.featureFlags.subscribeToUpdates { features in
print("Feature flags were updated:", features)
}
// Cancel the subscription
subscription.cancel()
```
```java
braze.subscribeToFeatureFlagsUpdates(event -> {
Log.i(TAG, "Feature flags were updated.");
for (FeatureFlag feature: event.getFeatureFlags()) {
Log.i(TAG, "Feature: ", feature.getId(), feature.getEnabled());
}
});
```
```kotlin
braze.subscribeToFeatureFlagsUpdates() { event ->
Log.i(TAG, "Feature flags were updated.")
event.featureFlags.forEach { feature ->
Log.i(TAG, "Feature: ${feature.id}")
}
}
```
```javascript
// Register an event listener
Braze.addListener(braze.Events.FEATURE_FLAGS_UPDATED, (featureFlags) => {
console.log(`featureFlagUpdates`, JSON.stringify(featureFlags));
});
```
To listen for changes, set the values for **Game Object Name** and **Callback Method Name** under **Braze Configuration** > **Feature Flags** to the corresponding values in your application.
```javascript
// Register an event listener
BrazePlugin.subscribeToFeatureFlagUpdates((featureFlags) => {
console.log(`featureFlagUpdates`, JSON.stringify(featureFlags));
});
```
In the Dart code in your app, use the following sample code:
```dart
// Create stream subscription
StreamSubscription featureFlagsStreamSubscription;
featureFlagsStreamSubscription = braze.subscribeToFeatureFlags((featureFlags) {
print("Feature flags were updated");
});
// Cancel stream subscription
featureFlagsStreamSubscription.cancel();
```
Then, make these changes in the iOS native layer as well. Note that there are no additional steps needed on the Android layer.
1. Implement `featureFlags.subscribeToUpdates` to subscribe to feature flag updates as described in the [subscribeToUpdates](https://braze-inc.github.io/braze-swift-sdk/documentation/brazekit/braze/featureflags-swift.class/subscribetoupdates(_:)) documentation.
2. Your `featureFlags.subscribeToUpdates` callback implementation must call `BrazePlugin.processFeatureFlags(featureFlags)`.
For an example, see [AppDelegate.swift](https://github.com/braze-inc/braze-flutter-sdk/blob/master/example/ios/Runner/AppDelegate.swift) in our sample app.
```brightscript
' Define a function called `onFeatureFlagChanges` to be called when feature flags are refreshed
m.BrazeTask.ObserveField("BrazeFeatureFlags", "onFeatureFlagChanges")
```
```typescript
import { useEffect, useState } from "react";
import {
FeatureFlag,
getFeatureFlag,
removeSubscription,
subscribeToFeatureFlagsUpdates,
} from "@braze/web-sdk";
export const useFeatureFlag = (id: string): FeatureFlag => {
const [featureFlag, setFeatureFlag] = useState(
getFeatureFlag(id)
);
useEffect(() => {
const listener = subscribeToFeatureFlagsUpdates(() => {
setFeatureFlag(getFeatureFlag(id));
});
return () => {
removeSubscription(listener);
};
}, [id]);
return featureFlag;
};
```
## Checking user eligibility
To check which feature flags a user is eligible for in Braze, go to **Audience** > **Search Users**, then search for and select a user.
In the **Feature Flags Eligibility** tab, you can filter the list of eligible feature flags by platform, application, or device. You can also preview the payload that will be returned to the user by selecting next to a feature flag.
{: style="max-width:85%;"}
## Viewing the changelog
To view a feature flag's changelog, open a feature flag and select **Changelog**.
{: style="max-width:60%;"}
Here, you can review when a change happened, who made the change, which category it belongs to, and more.
{: style="max-width:90%;"}
## Segmenting with feature flags {#segmentation}
Braze automatically keeps track of which users are currently enabled for a feature flag. You can create a segment or target messaging using the [**Feature Flag** filter](https://www.braze.com/docs/user_guide/engagement_tools/segments/segmentation_filters/#feature-flags). For more information about filtering on segments, see [Creating a segment](https://www.braze.com/docs/user_guide/engagement_tools/segments/creating_a_segment/).
{: style="max-width:75%;"}
**Note:**
To prevent recursive segments, it is not possible to create a segment that references other feature flags.
## Best practices
### Don't combine rollouts with Canvases or experiments
To avoid users being enabled and disabled by different entry points, you should either set the rollouts slider to a value greater than zero OR enable the feature flag in a Canvas or experiment. As a best practice, if you plan to use a feature flag in a Canvas or experiment, keep the rollout percentage at zero.
### Naming conventions
To keep your code clear and consistent, consider using the following format when naming your feature flag ID:
```plaintext
BEHAVIOR_PRODUCT_FEATURE
```
Replace the following:
| Placeholder | Description |
|-------------|---------------------------------------------------------------------------------------------------------------------------|
| `BEHAVIOR` | The behavior of the feature. In your code, be sure the behavior is disabled by default and avoid using phrases like `disabled` in the feature flag name. |
| `PRODUCT` | The product the feature belongs to. |
| `FEATURE` | The name of the feature. |
{: .reset-td-br-1 .reset-td-br-2 .reset-td-br-3 role="presentation" }
Here's an example feature flag where `show` is the behavior, `animation_profile` is the product, and `driver` is the feature:
```plaintext
show_animation_profile_driver
```
### Planning ahead
Always play it safe. When considering new features that may require an off switch, it's better to release new code with a feature flag and not need it than it is to realize a new app update is required.
### Be descriptive
Add a description to your feature flag. While this is an optional field in Braze, it can help answer questions others may have when browsing available feature flags.
- Contact details for who is responsible for the enablement and behavior of this flag
- When this flag should be disable
- Links to documentation or notes about the new feature this flag controls
- Any dependencies or notes on how to use the feature
### Clean up old feature flags
We're all guilty of leaving features on at 100% rollout for longer than necessary.
To help keep your code (and Braze dashboard) clean, remove permanent feature flags from your code base after all users have upgraded and you no longer need the option to disable the feature. This helps reduce the complexity of your development environment, but also keeps your list of feature flags tidy.
# Feature Flag Experiments
Source: /docs/developer_guide/feature_flags/experiments/index.md
# Feature flag experiments
> Feature flag experiments let you A/B test changes to your applications to optimize conversion rates. Marketers can use feature flags to determine whether a new feature positively or negatively impacts conversion rates, or which set of feature flag properties is most optimal.
## Prerequisites
Before you can track user data in the experiment, your app needs to record when a user interacts with a feature flag. This is called a feature flag impression. Make sure to log a feature flag impression whenever a user sees or could have seen the feature you're testing, even if they're in the control group.
To learn more about logging feature flag impressions, see [Creating feature flags](https://www.braze.com/docs/developer_guide/platform_wide/feature_flags/create/#impressions).
```javascript
const featureFlag = braze.getFeatureFlag("my-new-feature");
braze.logFeatureFlagImpression("my-new-feature");
if (featureFlag?.enabled) {
return
} else {
return
}
```
```java
FeatureFlag featureFlag = braze.getFeatureFlag("my-new-feature");
braze.logFeatureFlagImpression("my-new-feature");
if (featureFlag != null && featureFlag.getEnabled()) {
return new NewFeature();
} else {
return new ExistingFeature();
}
```
```kotlin
val featureFlag = braze.getFeatureFlag("my-new-feature")
braze.logFeatureFlagImpression("my-new-feature")
if (featureFlag?.enabled == true) {
return NewFeature()
} else {
return ExistingFeature()
}
```
## Creating a feature flag experiment
### Step 1: Create an experiment
1. Go to **Messaging** > **Campaigns**, then select **+ Create Campaign**.
2. Select **Feature Flag Experiment**.
3. Give your campaign a clear and meaningful name.
### Step 2: Add experiment variants
Next, create variations. For each variant, choose the feature flag you want to turn on or off, then review its assigned properties.
To test the impact of your feature, use variants to split traffic into two or more groups. Name one group "My control group" and turn its feature flags off.
### Step 3: Overwrite properties (optional)
You can choose to overwrite the default properties you initially set up for users who receive a specific campaign variant.
To edit, add, or remove additional default properties, edit the feature flag itself from **Messaging** > **Feature Flags**. When a variant is disabled, the SDK will return an empty properties object for the given feature flag.
{: style="max-width:80%"}
### Step 4: Choose users to target
Use one of your segments or filters to choose your [target users](https://www.braze.com/docs/user_guide/engagement_tools/messaging_fundamentals/targeting_users/). For example, you can use the **Received Feature Flag Variant** filter to retarget users who have already received an A/B test.
{: style="max-width:70%"}
**Note:**
Segment membership is calculated when feature flags are refreshed for a given user. Changes are made available after your app refreshes feature flags, or when a new session is started.
### Step 5: Distribute variants
Choose the percentage distribution for your experiment. As a best practice, you should not change the distribution after your experiment has been launched.
### Step 6: Assign conversions
Braze lets you to track how often users perform specific actions, [conversion events](https://www.braze.com/docs/user_guide/engagement_tools/messaging_fundamentals/conversion_events/), after receiving a campaign. Specify up to a 30-day window during which a conversion will be counted if the user takes the specified action.
### Step 7: Review and launch
After you’ve finished building the last of your experiment, review its details, then select **Launch Experiment**.
## Reviewing the results
After your feature flag experiment is finished, you can review impression data for your experiment. Go to **Messaging** > **Campaigns** and select the campaign with your feature flag experiment.
### Campaign analytics
**Campaign Analytics** offers a high-level overview of your experiment's performance, such as:
- The total number of impressions
- The number of unique impressions
- The primary conversion rate
- The total revenue generated by the message
- The estimated audience
You can also view the experiment's settings for delivery, audience, and conversion.
### Feature flag experiment performance
**Feature Flags Experiments Performance** shows how well your message performed across various dimensions. The specific metrics you see will vary depending on your chosen messaging channel, and whether you're running a multivariate test. To see the feature flag values associated with each variant, select **Preview**.
# Frequently Asked Questions
Source: /docs/developer_guide/feature_flags/faq/index.md
# Frequently asked questions
> This article provides answers to some frequently asked questions about feature flags.
## Functionality and support
### What platforms are Braze feature flags supported on? {#platforms}
Braze supports feature flags on iOS, Android, and Web platforms with the following SDK version requirements:
Do you need support on other platforms? Email our team: [feature-flags-feedback@braze.com](mailto:feature-flags-feedback@braze.com).
### What is the level of effort involved when implementing a feature flag? {#level-of-effort}
A feature flag can be created and integrated in a few minutes.
Most of the effort involved will be related to your engineering team building the new feature you plan to roll out. But when it comes to adding a feature flag, it's as simple as an `IF`/`ELSE` statement in your app or website's code:
```javascript
import { getFeatureFlag } from "@braze/web-sdk";
if (getFeatureFlag("new_shopping_cart").enabled) {
// Show the new homepage your team has built
}
else {
// Show the old homepage
}
```
```java
if (braze.getFeatureFlag("new_shopping_cart").getEnabled()) {
// Show the new homepage your team has built
} else {
// Show the old homepage
}
```
```kotlin
if (braze.getFeatureFlag("new_shopping_cart")?.enabled == true) {
// Show the new homepage your team has built
} else {
// Show the old homepage
}
```
### How can feature flags benefit Marketing teams? {#marketing-teams}
Marketing teams can use feature flags to coordinate product announcements (such as product launch emails) when a feature is only enabled for a small percentage of users.
For example, with Braze feature flags, you can roll out a new Customer Loyalty program to 10% of users in your app, and send an email, push, or other messaging to that same 10% of enabled users using the Canvas Feature Flag step.
### How can feature flags benefit Product teams? {#product-teams}
Product teams can use feature flags to perform gradual rollouts or soft launches of new features in order to monitor key performance indicators and customer feedback before making it available to all users.
Product teams can use [feature flag properties](https://www.braze.com/docs/developer_guide/platform_wide/feature_flags/create/#properties) to remotely populate content in an app, such as deep links, text, imagery, or other dynamic content.
Using the Canvas Feature Flag step, Product teams can also run an A/B split test to measure how a new feature impacts conversion rates compared to users with the feature disabled.
### How can feature flags benefit engineering teams? {#engineering-teams}
Engineering teams can use feature flags to reduce the risk inherent in launching new features and avoid rushing to deploy code fixes in the middle of the night.
By releasing new code hidden behind a feature flag, your team can turn the feature on or off remotely from the Braze dashboard, bypassing the delay of pushing out new code or waiting for an app store update approval.
## Feature rollouts and targeting
### Can a feature flag be rolled out to only a select group of users? {#target-users}
Yes, create a segment in Braze that targets specific users—by email address, `user_id`, or any other attribute on your user profiles. Then, deploy the feature flag for 100% of that segment.
### How does adjusting the rollout percentage affect users who were previously bucketed into the enabled group? {#random-buckets}
Feature flag rollouts remain consistent for users across devices and sessions.
- When a feature flag is rolled out to 10% of random users, that 10% will remain enabled and persist for the lifetime of that feature flag.
- If you increase the rollout from 10% to 20%, the same 10% will remain enabled, plus a new, additional 10% of users will be added to the enabled group.
- If you lower the rollout from 20% to 10%, only the original 10% of users will remain enabled.
This strategy helps ensure that users are shown a consistent experience in your app and don't flip-flop back and forth across sessions. Of course, disabling a feature down to 0% will remove all users from the feature flag, which is helpful if you discover a bug or need to disable the feature altogether.
## Technical topics
### Can feature flags be used to control when the Braze SDK is initialized? {#initialization}
No, the SDK must be initialized to download and synchronize feature flags for the current user. This means you can't use feature flags to limit which users are created or tracked in Braze.
### How frequently does the SDK refresh feature flags? {#refresh-frequency}
Feature flags are refreshed at session start and when changing active users. Feature flags can also be manually refreshed using the SDK's [refresh method](https://www.braze.com/docs/developer_guide/platform_wide/feature_flags/create/#refreshing). Feature flag refreshes are rate limited to once every five minutes (subject to change).
Keep in mind that good data practices recommend not refreshing feature flags too quickly (with potential rate limiting if done so), so it's best only to refresh before a user interacts with new features or periodically in the app if necessary.
### Are feature flags available while a user is offline? {#offline}
Yes, after feature flags are refreshed, they are stored locally on the user's device and can be accessed while offline.
### What happens if feature flags are refreshed mid-session? {#listen-for-updates}
Feature flags may be refreshed mid-session. There are scenarios where you may want to update your app if certain variables or your configuration should change. There are other scenarios where you may not want to update your app, to avoid a shocking change in how your UI is rendered.
To control this, [listen for updates](https://www.braze.com/docs/developer_guide/platform_wide/feature_flags/create/#updates) to feature flags and determine whether to re-render your app based on which feature flags have changed.
### Why aren't users in my Global Control Group receiving feature flags experiments?
You can't enable feature flags for users in your [Global Control Group](https://www.braze.com/docs/user_guide/engagement_tools/testing/global_control_group/). This means users in your Global Control Group also can't be part of Feature Flag experiments.
## Additional questions?
Have questions or feedback? Email our team: [feature-flags-feedback@braze.com](mailto:feature-flags-feedback@braze.com).
# About Analytics for the Braze SDK
Source: /docs/developer_guide/analytics/index.md
# Analytics
> Learn about the Braze SDK's analytics, so you can better understand which data Braze collects, the difference between custom events and custom attributes, and best practices for managing analytics.
**Tip:**
During your Braze implementation, be sure to discuss marketing goals with your team, so you can best decided the data you want to track and how you want to track it with Braze. For an example, see our [Taxi/Ride-Sharing App](#example-case) case study at the end of this guide.
## Automatically collected data
Certain user data is collected automatically by our SDK—for example, First Used App, Last Used App, Total Session Count, Device OS, etc. If you follow our integration guides to implement our SDKs, you will be able to take advantage of this [default data collection](https://www.braze.com/docs/user_guide/data/user_data_collection/sdk_data_collection/). Checking this list can help you avoid storing the same information about users more than once. With the exception of session start and end, all other automatically tracked data does not count toward your data point usage.
See our [SDK primer](https://www.braze.com/docs/developer_guide/getting_started/sdk_overview/) article to allowlist processes that block the default collection of certain data items.
## Custom events
Custom events are actions taken by your users; they're best suited for tracking high-value user interactions with your application. Logging a custom event can trigger any number of follow-up campaigns with configurable delays, and enables the following segmentation filters around the recency and frequency of that event:
| Segmentation Options | Dropdown Filter | Input Options |
| ---------------------| --------------- | ------------- |
| Check if the custom event has occurred **more than X number of times** | **MORE THAN** | **NUMBER** |
| Check if the custom event has occurred **less than X number of times** | **LESS THAN** | **NUMBER** |
| Check if the custom event has occurred **exactly X number of times** | **EXACTLY** | **NUMBER** |
| Check if the custom event last occurred **after X date** | **AFTER** | **TIME** |
| Check if the custom event last occurred **before X date** | **BEFORE** | **TIME** |
| Check if the custom event last occurred **more than X days ago** | **MORE THAN** | **NUMBER OF DAYS AGO** (Positive) Number) |
| Check if the custom event last occurred **less than X days ago** | **LESS THAN** | **NUMBER OF DAYS AGO** (Positive) Number) |
| Check if the custom event occurred **more than X (Max = 50) number of times** | **MORE THAN** | in the past **Y Days (Y = 1,3,7,14,21,30)** |
| Check if the custom event occurred **less than X (Max = 50) number of times** | **LESS THAN** | in the past **Y Days (Y = 1,3,7,14,21,30)** |
| Check if the custom event occurred **exactly X (Max = 50) number of times** | **EXACTLY** | in the past **Y Days (Y = 1,3,7,14,21,30)** |
{: .reset-td-br-1 .reset-td-br-2 .reset-td-br-3 role="presentation" }
Braze notes the number of times these events have occurred as well as the last time they were performed by each user for segmentation. On the **Custom Events** analytics page, you can view in aggregate how often each custom event occurs, as well as by segment over time for more detailed analysis. This is particularly useful to view how your campaigns have affected custom event activity by looking at the gray lines Braze overlays on the time-series to indicate the last time a campaign was sent.

**Note:**
[Incrementing custom attributes](https://www.braze.com/docs/api/endpoints/messaging/) can be used to keep a counter on a user action similar to a custom event. However, you will not be able to view custom attribute data in a time-series. User actions that do not need to be analyzed in time-series should be recorded via this method.
### Custom event storage
All user profile data (custom events, custom attribute, custom data) is stored as long as those profiles are active.
### Custom event properties
With custom event properties, Braze allows you to set properties on custom events and purchases. These properties can then be used for further qualifying trigger conditions, increasing personalization in messaging, and generating more sophisticated analytics through raw data export. Property values can be string, number, boolean, or time objects. However, property values cannot be array objects.
For example, if an eCommerce application wanted to send a message to a user when they abandon their cart, it could additionally improve its target audience and allow for increased campaign personalization by adding a custom event property of the `cart_value` of users' carts.

Custom event properties can also be used for personalization within the messaging template. Any campaign using [Action-Based Delivery](https://www.braze.com/docs/user_guide/engagement_tools/campaigns/building_campaigns/delivery_types/triggered_delivery/) with a trigger event can use custom event properties from that event for messaging personalization. If a gaming application wanted to send a message to users who had completed a level, it could further personalize the message with a property for the time it took users to complete that level. In this example, the message is personalized for three different segments using [conditional logic](https://www.braze.com/docs/user_guide/personalization_and_dynamic_content/liquid/conditional_logic/). The custom event property called ``time_spent``, can be included in the message by calling `` } ``.
```liquid
Congratulations on beating that level so fast! Check out our online portal where you can play against top players from around the world!
Don't forget to visit the town store between levels to upgrade your tools.
Talk to villagers for essential tips on how to beat levels!
```
Custom event properties are designed to help you personalize your messaging or build granular action-based delivery campaigns. If you would like to create segments based on event property recency and frequency, contact your customer success manager or our Support team.
## Custom attributes
Custom attributes are extraordinarily flexible tools that allow you to target users with greater specificity than you would with standard attributes. Custom attributes are great for storing brand-specific information about your users. You should keep in mind that we don't store time-series information for custom attributes, so you're not going to get any graphs based on them like the preceding example for custom events.
### Custom attribute storage
All user profile data (custom events, custom attribute, custom data) is stored as long as those profiles are active.
### Custom attribute data types
The following data types may be stored as custom attributes:
#### Strings (alphanumeric characters)
String attributes are useful for storing user input, such as a favorite brand, a phone number, or a last search string within your application. String attributes are subject to the [length constraints](#length-constraints) for custom data (479 bytes; approximately 479 single-byte characters or approximately 160 characters for multi-byte scripts such as Japanese).
The following table describes available segmentation options for string attributes.
| Segmentation Options | Dropdown Filter | Input Options |
| ---------------------| --------------- | ------------- |
| Check if the string attribute **exactly matches** an inputted string| **EQUALS** | **STRING** |
| Check if the string attribute **partially matches** an inputted string **OR** regular expression | **MATCHES REGEX** | **STRING** **OR** **REGULAR EXPRESSION** |
| Check if the string attribute **does not partially match** an inputted string **OR** regular expression | **DOES NOT MATCH REGEX** | **STRING** **OR** **REGULAR EXPRESSION** |
| Check if the string attribute **does not match** an inputted string| **DOES NOT EQUAL** | **STRING** |
| Check if the string attribute **exists** on a user's profile | **IS BLANK** | **N/A** |
| Check if the string attribute **does not exist** on a user's profile | **IS NOT BLANK** | **N/A** |
{: .reset-td-br-1 .reset-td-br-2 .reset-td-br-3 role="presentation" }
**Important:**
When segmenting using the **DOES NOT MATCH REGEX** filter, it is required that there already exists a custom attribute with a value assigned in that user profile. Braze suggests using "OR" logic to check if a custom attribute is blank in order to properly target users.
**Tip:**
For more on how to use our regular expressions filter, check out this documentation on [Perl compatible regular expressions (PCRE)](http://www.regextester.com/pregsyntax.html).
More resources on regex:
- [Regex with Braze](https://www.braze.com/docs/user_guide/engagement_tools/segments/regex/)
- [Regex Debugger and Tester](https://regex101.com/)
- [Regex Tutorial](https://medium.com/factory-mind/regex-tutorial-a-simple-cheatsheet-by-examples-649dc1c3f285)
#### Arrays
Array attributes are good for storing related lists of information about your users. For example, storing the last 100 pieces of content a user watched within an array would allow specific interest segmentation.
Custom attribute arrays are one-dimensional sets; multi-dimensional arrays are not supported. **Adding an element to a custom attribute array appends the element to the end of the array, unless it's already present, in which case it gets moved from its current position to the end of the array.** For example, if an array `['hotdog','hotdog','hotdog','pizza']` were imported, it will show in the array attribute as `['hotdog', 'pizza']` because only unique values are supported.
If the array contains its maximum number of elements, the first element will be discarded and the new element added to the end. The following lists some example code showing the array behavior in the web SDK:
```js
var abUser = appboy.getUser();
// initialize array for this user, assuming max length of favorite_foods is set to 4.
abUser.setCustomUserAttribute('favorite_foods', ['pizza', 'wings', 'pasta']); // => ['pizza', 'wings', 'pasta']
abUser.addToCustomAttributeArray('favorite_foods', 'fries'); // => ['pizza', 'wings', 'pasta', 'fries']
abUser.addToCustomAttributeArray('favorite_foods', 'pizza'); // => ['wings', 'pasta', 'fries', 'pizza']
abUser.addToCustomAttributeArray('favorite_foods', 'ice cream'); // => ['pasta', 'fries', 'pizza', 'ice cream']
```
The maximum number of elements in custom attribute arrays defaults to 25. The maximum for individual arrays can be increased to up to 500 in the Braze dashboard, under **Data Settings** > **Custom Attributes**. To increase this limit above 500, contact your Braze customer success manager. Arrays exceeding the maximum number of elements are truncated to contain the maximum number of elements.
The following table describes available segmentation options for array attributes.
| Segmentation Options | Dropdown Filter | Input Options |
| ---------------------| --------------- | ------------- |
| Check if the array attribute **includes a value which exactly matches** an inputted value| **INCLUDES VALUE** | **STRING** |
| Check if the array attribute **does not include a value which exactly matches** an inputted value| **DOESN'T INCLUDE VALUE** | **STRING** |
| Check if the array attribute **contains a value which partially matches** an inputted value **OR** regular expression | **MATCHES REGEX** | **STRING** **OR** **REGULAR EXPRESSION** |
| Check if the array attribute **has any value** | **HAS A VALUE** | **N/A** |
| Check if the array attribute **is empty** | **IS EMPTY** | **N/A** |
{: .reset-td-br-1 .reset-td-br-2 .reset-td-br-3 role="presentation" }
**Note:**
We use [Perl compatible regular expressions (PCRE)](http://www.regextester.com/pregsyntax.html).
#### Dates
Time attributes are useful for storing the last time a specific action was taken, so you can offer content specific re-engagement messaging to your users.
**Note:**
The last date a custom event or purchase event occurred is automatically recorded, and should not be recorded in duplicate via a custom time attribute.
Date filters using relative dates (for example, more than 1 day ago, less than 2 days ago) measure 1 day as 24 hours. Any campaign that you run using these filters will include all users in 24 hour increments. For example, last used app more than 1 day ago will capture all users who "last used the app more than 24 hours" from the exact time the campaign runs. The same will be true for campaigns set with longer date ranges – so five days from activation will mean the prior 120 hours.
The following table describes available segmentation options for time attributes.
| Segmentation Options | Dropdown Filter | Input Options |
| ---------------------| --------------- | ------------- |
| Check if the time attribute **is before** a **selected date**| **BEFORE** | **CALENDAR DATE SELECTOR** |
| Check if the time attribute **is after** a **selected date**| **AFTER** | **CALENDAR DATE SELECTOR** |
| Check if the time attribute is **more than X number** of **days ago** | **MORE THAN** | **NUMBER OF DAYS AGO** |
| Check if the time attribute is **less than X number** of **days ago**| **LESS THAN** | **NUMBER OF DAYS AGO** |
| Check if the time attribute is **in more than X number** of **days in the future** | **IN MORE THAN** | **NUMBER OF DAYS IN FUTURE** |
| Check if the time attribute is **less than X number** of **days in the future** | **IN LESS THAN** | **NUMBER OF DAYS IN FUTURE** |
| Check if the time attribute **exists** on a user's profile | **BLANK** | **N/A** |
| Check if the time attribute **does not exist** on a user's profile | **IS NOT BLANK** | **N/A** |
{: .reset-td-br-1 .reset-td-br-2 .reset-td-br-3 role="presentation" }
#### Numbers {#integers}
Numeric attributes have a wide variety of use cases. Incrementing number custom attributes are useful for storing the number of times a given action or event has occurred. Standard numbers have all sorts of usages, such as recording shoe size, waist size, or the number of times a user has viewed a certain product feature or category.
**Note:**
Money spent should not be recorded by this method. Rather it should be recorded via our [purchase methods](https://www.braze.com/docs/developer_guide/platform_wide/analytics_overview/#purchase-events--revenue-tracking).
The following table describes available segmentation options for numeric attributes.
| Segmentation Options | Dropdown Filter | Input Options |
| ---------------------| --------------- | ------------- |
| Check if the numeric attribute **is more than** a **number**| **MORE THAN** | **NUMBER** |
| Check if the numeric attribute **is less than** a **number**| **LESS THAN** | **NUMBER** |
| Check if the numeric attribute **is exactly** a **number**| **EXACTLY** | **NUMBER** |
| Check if the numeric attribute **does not equal** a **number**| **DOES NOT EQUAL** | **NUMBER** |
| Check if the numeric attribute **exists** on a user's profile | **EXISTS** | **N/A** |
| Check if the numeric attribute **does not exist** on a user's profile | **DOES NOT EXIST** | **N/A** |
{: .reset-td-br-1 .reset-td-br-2 .reset-td-br-3 role="presentation" }
#### Booleans (true/false)
Boolean attributes are useful for storing subscription statuses and other simple binary data about your users. The input options that we provide allow you to find users that have explicitly had a variable set to a boolean in addition to those that don't have any record of that attribute recorded yet.
The following table describes available segmentation options for boolean attributes.
| Segmentation Options | Dropdown Filter | Input Options |
| ---------------------| --------------- | ------------- |
| Check if the boolean value **is** | **IS** | **TRUE**, **FALSE**, **TRUE OR NOT SET**, or **FALSE OR NOT SET** |
| Check if the boolean value **exists** on a user's profile | **EXISTS** | **N/A** |
| Check if the boolean value **does not exist** on a user's profile | **DOES NOT EXIST** | **N/A** |
{: .reset-td-br-1 .reset-td-br-2 .reset-td-br-3 role="presentation" }
## Purchase events / revenue tracking
Using our purchase methods to record in-app purchases establishes the Life-time Value (LTV) for each individual user profile. This data is viewable within our revenue page in time-series graphs.
The following table describes available segmentation options for purchase events.
| Segmentation Options | Dropdown Filter | Input Options |
| ---------------------| --------------- | ------------- |
| Check if the total number of dollars spent **is greater than** a **number**| **GREATER THAN** | **NUMBER** |
| Check if the total number of dollars spent **is less than** a **number**| **LESS THAN** | **NUMBER** |
| Check if total number of dollars spent **is exactly** a **number**| **EXACTLY** | **NUMBER** |
| Check if the purchase last occurred **after X date** | **AFTER** | **TIME** |
| Check if the purchase last occurred **before X date** | **BEFORE** | **TIME** |
| Check if the purchase last occurred **more than X days ago** | **MORE THAN** | **TIME** |
| Check if the purchase last occurred **less than X days ago** | **LESS THAN** | **TIME** |
| Check if the purchase occurred **more than X (Max = 50) number of times** | **MORE THAN** | in the past **Y Days (Y = 1,3,7,14,21,30)** |
| Check if the purchase occurred **less than X (Max = 50) number of times** | **LESS THAN** | in the past **Y Days (Y = 1,3,7,14,21,30)** |
| Check if the purchase occurred **exactly X (Max = 50) number of times** | **EXACTLY** | in the past **Y Days (Y = 1,3,7,14,21,30)** |
{: .reset-td-br-1 .reset-td-br-2 .reset-td-br-3 role="presentation" }
**Note:**
If you would like to segment on the number of times a specific purchase has occurred, you should also record that purchase individually as an [incrementing custom attribute](#integers).
## Taxi/ride-sharing app use case {#example-case}
For this example, let's consider a ride-sharing app that wants to decide what user data to collect. The following questions and brainstorming process are a great model for marketing and development teams to follow. By the end of this exercise, both teams should have a solid understanding of what custom events and attributes make sense to collect in order to help meet their goal.
**Case Question #1: What is the goal?**
Their goal is straightforward in that they want users to hail taxi rides via their app.
**Case Question #2: What are the intermediate steps on the way to that goal from app installation?**
1. They need users to begin the registration process and fill out their personal information.
2. They need users to complete and verify the registration process by inputting a code into the app they receive via SMS.
3. They need to attempt to hail a taxi.
4. In order to hail a taxi, they must be available when they search.
These actions could then be tagged as the following custom events:
- Began Registration
- Completed Registration
- Successful Taxi Hails
- Unsuccessful Taxi Hails
After implementing the events, you can now run the following campaigns:
1. Message users who Began Registration, but didn't trigger the Completed Registration event in a certain time frame.
2. Send congratulation messages to users who complete registration.
3. Send apologies and promotional credit to users who had unsuccessful taxi hails that weren't followed by a successful taxi hail within a certain amount of time.
4. Send promotions to power users with lots of Successful Taxi Hails to thank them for their loyalty.
And many more!
**Case Question #3: What other information might we want to know about our users that will inform our messaging?**
- Whether or not they have any promotional credits?
- The average rating they give to their drivers?
- Unique promo codes for the user?
These characteristics could then be tagged as the following custom attributes:
- Promotional Credit Balance (Decimal Type)
- Average Driver Rating (Number Type)
- Unique Promo Code (String Type)
Adding these attributes would afford you the ability to send campaigns to users, such as:
1. Remind users who haven't logged on in seven days but who have a promotional credit that their credit exists and they should come back to the app to use it!
2. Message users who give low driver ratings to get direct customer feedback to see why they didn't enjoy their rides.
3. Use our [message templating and personalization features](https://www.braze.com/docs/user_guide/personalization_and_dynamic_content/) to drag the unique promotion code attribute into messaging directed at users.
## Best practices
### General best practices
#### Use event properties
- Name a custom event something that describes an action that a user takes.
- Make generous use of custom event properties to represent important data about an event.
- For example, rather than capturing a separate custom event for watching each of 50 different movies, it would be more effective to capture simply watching a movie as an event and have an event property that includes the name of the movie.
### Development best practices
#### Set user IDs for every user
User IDs should be set for each of your users. These should be unchanging and accessible when a user opens the app. We **strongly recommend** providing this identifier as it will allow you to:
- Track your users across devices and platforms, improving the quality of your behavioral and demographic data.
- Import data about your users using our [user data API](https://www.braze.com/docs/api/endpoints/user_data/).
- Target specific users with our [messaging API](https://www.braze.com/docs/api/endpoints/messaging/) for both general and transactional messages.
User IDs must be less than 512 characters long and should be private and not easily obtained (for example, not a plain email address or username). If such an identifier is not available, Braze will assign a unique identifier to your users, but you will lack the capabilities listed for user IDs. You should avoid setting user IDs for users for whom you lack a unique identifier that is tied to them as an individual. Passing a device identifier offers no benefit versus the automatic anonymous user tracking Braze offers by default. The following are some examples of suitable and unsuitable user IDs.
Good options for user IDs:
- Hashed email address or unique username
- Unique database identifier
These should not be used as user IDs:
- Device ID
- Random number or session ID
- Any non-unique ID
- Email address
- Another 3rd party vendor's user ID
#### Give custom events and attributes readable names
Imagine you're a marketer who begins using Braze a year or two after implementation, reading a dropdown list full of names like "usr_no_acct" without further context may be intimidating. Giving your event and attributes identifiable and readable names will make things easier for all users of your platform. Consider the following best-practices:
- Do not begin a custom event with a numeric character. The dropdown list is sorted alphabetically and beginning with a numerical character makes it more difficult to segment by your filter of choice
- Try not to use obscure abbreviations or technical jargon where possible
- Example: `usr_ctry` may be fine as a variable name for a user's country within a piece of code, but the custom attribute should be sent to Braze as something like `user_country` to lend some clarity to a marketer using the dashboard down the line.
#### Only log attributes when they change
We count every attribute passed to Braze as a data point, even if the passed attribute contains the same value as saved previously. Only logging data when it changes helps avoid redundant data point use and supports a smoother experience by avoiding unnecessary API calls.
#### Avoid programmatically generating event names
If you are constantly creating new event names it is going to be impossible to meaningfully segment your users. You should generally capture generic events ("Watched a Video" or "Read an Article") instead of highly specific events such as ("Watched Gangnam Style" or "Read Article: Best 10 Lunch Spots in Midtown Manhattan"). The specific data about the event should be included as an event property, not as part of the event name.
### Technical limitations and constraints
Be mindful of the following limitations and constraints when implementing custom events:
#### Length constraints
Braze enforces a length limit in bytes (479 bytes) for custom event names, custom attribute names (keys), and custom event string values. Values that exceed this limit are truncated. When expressed in characters, this is approximately 479 single-byte characters (for example, ASCII), or approximately 160 characters for multi-byte scripts such as Japanese (assuming about 3 bytes per character in UTF-8). Ideally, keep names and values as short as possible to improve network and battery performance for your app—if possible, limit them to 50 characters.
#### Content constraints
The following content will be trimmed programmatically from your attributes and events. Take care not to use the following:
- Leading and trailing whitespace
- Newlines
- All non-digits within phone numbers
- Example: "(732) 178-1038" will be condensed to "7321781038"
- Non-whitespace characters must be converted into spaces
- $ should not be used as a prefix for any custom events
- Any invalid UTF-8 encoding values
- "My \x80 Field" would be condensed to "My Field"
#### Reserved keys
The following keys are reserved and cannot be used as custom event properties:
- `time`
- `product_id`
- `quantity`
- `event_name`
- `price`
- `currency`
#### Value definitions
- Integer values are 64 bit
- Decimals have 15 decimal digits by default
### Parsing a generic name field
If only a single generic name field exists for a user (for example, 'JohnDoe'), you can assign this entire title to your user's First Name attribute. Additionally, you can attempt to parse out both the first and last name of the user using spaces, but this latter method carries the potential risk of misnaming some of your users.
# Set user IDs through the Braze SDK
Source: /docs/developer_guide/analytics/setting_user_ids/index.md
# Set user IDs
> Learn how to set user IDs through the Braze SDK. These are unique identifiers that let you track users across devices and platforms, import their data through the [user data API](https://www.braze.com/docs/developer_guide/rest_api/user_data/#user-data), and send targeted messages through the [messaging API](https://www.braze.com/docs/api/endpoints/messaging/). If you don't assign a unique ID to a user, Braze will assign them an anonymous ID instead—however, you won't be able to use these features until you do.
**Note:**
For wrapper SDKs not listed, use the relevant native Android or Swift method instead.
## About anonymous users
After you [integrate the Braze SDK](https://www.braze.com/docs/developer_guide/sdk_integration/), users who launch your app for the first time will be considered "anonymous" until you call the `changeUser` method and assign them an `external_id`. Once assigned, you can't make them anonymous again. However, if they uninstall and reinstall your app, they will become anonymous again until `changeUser` is called.
If a previously-identified user starts a session on a new device, all of their anonymous activity will automatically sync to their existing profile after you call `changeUser` on that device using their `external_id`. This includes any attributes, events, or history collected during the session on the new device.
## Setting a user ID
To set a user ID, call the `changeUser()` method after the user initially log ins. IDs should be unique and follow our [naming best practices](#naming-best-practices).
If you're hashing a unique identifier instead, be sure to normalize the input of your hashing function. For example, when hashing an email address, remove any leading or trailing spaces and account for localization.
For a standard Web SDK implementation, you can use the following method:
```javascript
braze.changeUser(YOUR_USER_ID_STRING);
```
If you'd like to use Google Tag Manager instead, you can use the **Change User** tag type to call the [`changeUser` method](https://js.appboycdn.com/web-sdk/latest/doc/modules/braze.html#changeuser). Use it whenever a user logs in or is otherwise identified with their unique `external_id` identifier.
Be sure to enter the current user's unique ID in the **External User ID** field, typically populated using a data layer variable sent by your website.

```java
Braze.getInstance(context).changeUser(YOUR_USER_ID_STRING);
```
```kotlin
Braze.getInstance(context).changeUser(YOUR_USER_ID_STRING)
```
```swift
AppDelegate.braze?.changeUser(userId: "YOUR_USER_ID")
```
```objc
[AppDelegate.braze changeUser:@"YOUR_USER_ID_STRING"];
```
```javascript
BrazePlugin.changeUser("YOUR_USER_ID");
```
```brightscript
m.Braze.setUserId(YOUR_USER_ID_STRING)
```
```csharp
AppboyBinding.ChangeUser("YOUR_USER_ID_STRING");
```
```javascript
Braze.changeUser("YOUR_USER_ID_STRING");
```
**Note:**
Calling `changeUser()` triggers a data flush as part of closing the current user's session. The SDK automatically flushes any pending data for the previous user before switching to the new user, so you don't need to manually request a data flush before calling `changeUser()`.
**Warning:**
**Do not assign a static default ID or call `changeUser()` when a user logs out.** Doing so will prevent you from re-engaging any previously logged-in users on shared devices. Instead, keep track of all user IDs separately and ensure your app's logout process allows for switching back to a previously logged-in user. When a new session starts, Braze will automatically refresh the data for the newly-active profile.
## User aliases
### How they work
Although anonymous users don’t have `external_ids`, you can assign them a [user alias](https://www.braze.com/docs/user_guide/data/user_data_collection/user_profile_lifecycle/#user-aliases) instead. You should assign a user alias when you want to add other identifiers to the user but don't know what their `external_id` is (for example, they aren't logged in). With user aliases, you also can:
- Use the Braze API to log events and attributes associated with anonymous users
- Use the [External User ID is blank](https://www.braze.com/docs/user_guide/engagement_tools/segments/segmentation_filters#external-user-id) segmentation filter to target anonymous users in your messaging
### Setting a user alias
A user alias consists of two parts: a name and a label. The name refers to the identifier itself, while the label refers to the type of identifier it belongs to. For example, if you have a user in a third-party customer support platform with the external ID `987654`, you can assign them an alias in Braze with the name `987654` and the label `support_id`, so you can track them across platforms.
```javascript
braze.getUser().addAlias(ALIAS_NAME, ALIAS_LABEL);
```
```java
Braze.getInstance(context).getCurrentUser().addAlias(ALIAS_NAME, ALIAS_LABEL);
```
```kotlin
Braze.getInstance(context).currentUser?.addAlias(ALIAS_NAME, ALIAS_LABEL)
```
```swift
Appboy.sharedInstance()?.user.addAlias(ALIAS_NAME, ALIAS_LABEL)
```
```objc
[[Appboy sharedInstance].user addAlias:ALIAS_NAME withLabel:ALIAS_LABEL];
```
```json
{
"alias_name" : (required, string),
"alias_label" : (required, string)
}
```
```javascript
Braze.addAlias("ALIAS_NAME", "ALIAS_LABEL");
```
## ID Naming best practices {#naming-best-practices}
We recommend that you create user IDs using the [Universally Unique Identifier (UUID)](https://en.wikipedia.org/wiki/Universally_unique_identifier) standard, meaning they are 128-bit strings that are random and well distributed.
Alternatively, you can hash an existing unique identifier (such as a name or email address) to generate your user IDs instead. If you do so, be sure to implement [SDK authentication](https://www.braze.com/docs/developer_guide/sdk_integration/authentication/), so you can prevent user impersonation.
**Warning:**
Do not use a guessable value or incrementing number for your user ID. This may expose your organization to malicious attacks or data exfiltration.
For added security, use [SDK Authentication](https://www.braze.com/docs/developer_guide/sdk_integration/authentication/).
While it's essential that you correctly name your user IDs from the start, you can always rename them in the future using the [`/users/external_ids/rename`](https://www.braze.com/docs/api/endpoints/user_data/external_id_migration/) endpoint.
| ID types not recommended | Example not recommended |
| ------------ | ----------- |
| User's visible profile ID or username | JonDoe829525552 |
| Email Address | Anna@email.com |
| Auto-incrementing user ID | 123 |
{: .reset-td-br-1 .reset-td-br-2}
**Warning:**
Avoid sharing details about how you create user IDs, as this may expose your organization to malicious attacks or data exfiltration.
# Set user attributes through the Braze SDK
Source: /docs/developer_guide/analytics/setting_user_attributes/index.md
# Set user attributes
> Learn how to set user attributes through the Braze SDK.
**Note:**
For wrapper SDKs not listed, use the relevant native Android or Swift method instead.
## Prerequisites
Before you can use this feature, you'll need to [integrate the Web Braze SDK](https://www.braze.com/docs/developer_guide/sdk_integration/?sdktab=web).
## Default user attributes
### Predefined methods
Braze provides predefined methods for setting the following user attributes within the [`User` class](https://js.appboycdn.com/web-sdk/latest/doc/classes/braze.user.html):
- First Name
- Last Name
- Language
- Country
- Date of Birth
- Email
- Gender
- Home City
- Phone Number
### Setting default attributes
To set a default attribute for a user, call the `getUser()` method on your Braze instance to get a reference to the current user of your app. Then you can call methods to set a user attribute.
```javascript
braze.getUser().setFirstName("SomeFirstName");
```
```javascript
braze.getUser().setGender(braze.User.Genders.FEMALE);
```
```javascript
braze.getUser().setDateOfBirth(2000, 12, 25);
```
Using Google Tag Manager, standard user attributes (such as a user's first name), should be logged in the same manner as custom user attributes. Ensure the values you're passing in for standard attributes match the expected format specified in the [User class](https://js.appboycdn.com/web-sdk/latest/doc/classes/braze.user.html) documentation.
For example, the gender attribute can accept any of the following as values: `"m" | "f" | "o" | "u" | "n" | "p"`. Therefore to set a user's gender as female, create a Custom HTML tag with the following content:
```html
```
### Unsetting default attributes
To unset a default user attribute, pass `null` to the related method. For example:
```javascript
braze.getUser().setFirstName(null);
```
```javascript
braze.getUser().setGender(null);
```
```javascript
braze.getUser().setDateOfBirth(null, null, null);
```
## Custom user attributes
### Setting custom attributes
In addition to the default user attribute methods, you can also set [custom attributes](https://www.braze.com/docs/user_guide/data_and_analytics/custom_data/custom_attributes/#custom-attribute-data-types) for your users. Full method specifications, see [our JSDocs](https://js.appboycdn.com/web-sdk/latest/doc/classes/braze.user.html).
To set a custom attribute with a `string` value:
```javascript
braze.getUser().setCustomUserAttribute(
YOUR_ATTRIBUTE_KEY_STRING,
YOUR_STRING_VALUE
);
```
To set a custom attribute with a `integer` value:
```javascript
braze.getUser().setCustomUserAttribute(
YOUR_ATTRIBUTE_KEY_STRING,
YOUR_INT_VALUE
);
// Integer attributes may also be incremented using code like the following
braze.getUser().incrementCustomUserAttribute(
YOUR_ATTRIBUTE_KEY_STRING,
THE_INTEGER_VALUE_BY_WHICH_YOU_WANT_TO_INCREMENT_THE_ATTRIBUTE
);
```
To set a custom attribute with a `date` value:
```javascript
braze.getUser().setCustomUserAttribute(
YOUR_ATTRIBUTE_KEY_STRING,
YOUR_DATE_VALUE
);
// This method will assign the current time to a custom attribute at the time the method is called
braze.getUser().setCustomUserAttribute(
YOUR_ATTRIBUTE_KEY_STRING,
new Date()
);
// This method will assign the date specified by secondsFromEpoch to a custom attribute
braze.getUser().setCustomUserAttribute(
YOUR_ATTRIBUTE_KEY_STRING,
new Date(secondsFromEpoch * 1000)
);
```
You can have up to 25 elements in custom attribute arrays. Individual arrays that are manually set (not automatically detected) for **Data Type** can be increased up to 500 in the Braze dashboard under **Data Settings** > **Custom Attributes**. To increase this limit above 500, contact your Braze account manager.
[Arrays](https://www.braze.com/docs/developer_guide/platform_wide/getting_started/analytics_overview/#arrays) exceeding the maximum number of elements will be truncated to contain the maximum number of elements.
To set a custom attribute with an `array` value:
```javascript
braze.getUser().setCustomUserAttribute(YOUR_ATTRIBUTE_KEY_STRING, YOUR_ARRAY_OF_STRINGS);
// Adding a new element to a custom attribute with an array value
braze.getUser().addToCustomAttributeArray(YOUR_ATTRIBUTE_KEY_STRING, "new string");
// Removing an element from a custom attribute with an array value
braze.getUser().removeFromCustomAttributeArray(YOUR_ATTRIBUTE_KEY_STRING, "value to be removed");
```
**Important:**
Dates passed to Braze with this method must be JavaScript Date objects.
**Important:**
Custom attribute keys and values can only have a maximum of 255 characters. For more information about valid custom attribute values, refer to the [reference documentation](https://js.appboycdn.com/web-sdk/latest/doc/classes/braze.user.html).
Custom user attributes are not available due to a limitation in Google Tag Manager's scripting language. To log custom attributes, create a Custom HTML tag with the following content:
```html
```
**Important:**
The GTM template does not support nested properties on events or purchases. You can use the preceding HTML to log any events or purchases that require nested properties.
### Unsetting custom attributes
To unset a custom attribute, pass `null` to the related method.
```javascript
braze.getUser().setCustomUserAttribute(YOUR_ATTRIBUTE_KEY_STRING, null);
```
### Nesting custom attributes
You can also nest properties within custom attributes. In the following example, a `favorite_book` object with nested properties is set as a custom attribute on the user profile. For more details, refer to [Nested Custom Attributes](https://www.braze.com/docs/user_guide/data/custom_data/custom_attributes/nested_custom_attribute_support).
```javascript
import * as braze from "@braze/web-sdk";
const favoriteBook = {
title: "The Hobbit",
author: "J.R.R. Tolkien",
publishing_date: "1937"
};
braze.getUser().setCustomUserAttribute("favorite_book", favoriteBook);
```
### Using the REST API
You can also use our REST API to set or unset user attributes. For more information, refer to [User Data Endpoints](https://www.braze.com/docs/developer_guide/rest_api/user_data/#user-data).
## Setting user subscriptions
To set up a subscription for your users (either email or push), call the functions `setEmailNotificationSubscriptionType()` or `setPushNotificationSubscriptionType()`, respectively. Both functions take the `enum` type `braze.User.NotificationSubscriptionTypes` as arguments. This type has three different states:
| Subscription Status | Definition |
| ------------------- | ---------- |
| `braze.User.NotificationSubscriptionTypes.OPTED_IN` | Subscribed, and explicitly opted in |
| `braze.User.NotificationSubscriptionTypes.SUBSCRIBED` | Subscribed, but not explicitly opted in |
| `braze.User.NotificationSubscriptionTypes.UNSUBSCRIBED` | Unsubscribed and/or explicitly opted out |
{: .reset-td-br-1 .reset-td-br-2 role="presentation" }
When a user is registered for push, the browser forces them to choose to allow or block notifications, and if they choose to allow push, they are set `OPTED_IN` by default.
Visit [Managing user subscriptions](https://www.braze.com/docs/user_guide/message_building_by_channel/email/managing_user_subscriptions/#managing-user-subscriptions) for more information on implementing subscriptions and explicit opt-ins.
### Unsubscribing a user from email
```javascript
braze.getUser().setEmailNotificationSubscriptionType(braze.User.NotificationSubscriptionTypes.UNSUBSCRIBED);
```
### Unsubscribing a user from push
```java
braze.getUser().setPushNotificationSubscriptionType(braze.User.NotificationSubscriptionTypes.UNSUBSCRIBED);
```
## Prerequisites
Before you can use this feature, you'll need to [integrate the Android Braze SDK](https://www.braze.com/docs/developer_guide/sdk_integration/?sdktab=android).
## Default user attributes
### Predefined methods
Braze provides predefined methods for setting the following user attributes within the [`BrazeUser`](https://braze-inc.github.io/braze-android-sdk/kdoc/braze-android-sdk/com.braze/-braze-user/index.html) class. For method specifications, refer to [our KDoc](https://braze-inc.github.io/braze-android-sdk/kdoc/braze-android-sdk/com.braze/-braze-user/index.html).
- First name
- Last name
- Country
- Language
- Date of birth
- Email
- Gender
- Home city
- Phone number
**Note:**
All string values such as first name, last name, country, and home city are limited to 255 characters.
### Setting default attributes
To set a default attribute for a user, call the `getCurrentUser()` method on your Braze instance to get a reference to the current user of your app. Then you can call methods to set a user attribute.
```java
Braze.getInstance(context).getCurrentUser(new IValueCallback() {
@Override
public void onSuccess(BrazeUser brazeUser) {
brazeUser.setFirstName("first_name");
}
}
```
```kotlin
Braze.getInstance(context).getCurrentUser { brazeUser ->
brazeUser.setFirstName("first_name")
}
```
### Unsetting default attributes
To unset a user attribute, pass `null` to the relevant method.
```java
Braze.getInstance(context).getCurrentUser(new IValueCallback() {
@Override
public void onSuccess(BrazeUser brazeUser) {
brazeUser.setFirstName(null);
}
}
```
```kotlin
Braze.getInstance(context).getCurrentUser { brazeUser ->
brazeUser.setFirstName(null)
}
```
## Custom user attributes
In addition to the default user attributes, Braze also allows you to define custom attributes using several different data types. For more information on each attribute's segmentation option, see [User data collection](https://www.braze.com/docs/developer_guide/analytics).
### Setting custom attributes
To set a custom attribute with a `string` value:
```java
Braze.getInstance(context).getCurrentUser(new IValueCallback() {
@Override
public void onSuccess(BrazeUser brazeUser) {
brazeUser.setCustomUserAttribute("your_attribute_key", "your_attribute_value");
}
}
```
```kotlin
Braze.getInstance(context).getCurrentUser { brazeUser ->
brazeUser.setCustomUserAttribute("your_attribute_key", "your_attribute_value")
}
```
To set a custom attribute with an `int` value:
```java
Braze.getInstance(context).getCurrentUser(new IValueCallback() {
@Override
public void onSuccess(BrazeUser brazeUser) {
brazeUser.setCustomUserAttribute("your_attribute_key", YOUR_INT_VALUE);
// Integer attributes may also be incremented using code like the following:
brazeUser.incrementCustomUserAttribute("your_attribute_key", YOUR_INCREMENT_VALUE);
}
}
```
```kotlin
Braze.getInstance(context).getCurrentUser { brazeUser ->
brazeUser.setCustomUserAttribute("your_attribute_key", YOUR_INT_VALUE)
// Integer attributes may also be incremented using code like the following:
brazeUser.incrementCustomUserAttribute("your_attribute_key", YOUR_INCREMENT_VALUE)
}
```
To set a custom attribute with a `long` integer value:
```java
Braze.getInstance(context).getCurrentUser(new IValueCallback() {
@Override
public void onSuccess(BrazeUser brazeUser) {
brazeUser.setCustomUserAttribute("your_attribute_key", YOUR_LONG_VALUE);
}
});
```
```kotlin
Braze.getInstance(context).getCurrentUser { brazeUser ->
brazeUser.setCustomUserAttribute("your_attribute_key", YOUR_LONG_VALUE)
}
```
To set a custom attribute with a `float` value:
```java
Braze.getInstance(context).getCurrentUser(new IValueCallback() {
@Override
public void onSuccess(BrazeUser brazeUser) {
brazeUser.setCustomUserAttribute("your_attribute_key", YOUR_FLOAT_VALUE);
}
});
```
```kotlin
Braze.getInstance(context).getCurrentUser { brazeUser ->
brazeUser.setCustomUserAttribute("your_attribute_key", YOUR_FLOAT_VALUE)
}
```
To set a custom attribute with a `double` value:
```java
Braze.getInstance(context).getCurrentUser(new IValueCallback() {
@Override
public void onSuccess(BrazeUser brazeUser) {
brazeUser.setCustomUserAttribute("your_attribute_key", YOUR_DOUBLE_VALUE);
}
});
```
```kotlin
Braze.getInstance(context).getCurrentUser { brazeUser ->
brazeUser.setCustomUserAttribute("your_attribute_key", YOUR_DOUBLE_VALUE)
}
```
To set a custom attribute with a `boolean` value:
```java
Braze.getInstance(context).getCurrentUser(new IValueCallback() {
@Override
public void onSuccess(BrazeUser brazeUser) {
brazeUser.setCustomUserAttribute("your_attribute_key", YOUR_BOOLEAN_VALUE);
}
});
```
```kotlin
Braze.getInstance(context).getCurrentUser { brazeUser ->
brazeUser.setCustomUserAttribute("your_attribute_key", YOUR_BOOLEAN_VALUE)
}
```
```java
Braze.getInstance(context).getCurrentUser(new IValueCallback() {
@Override
public void onSuccess(BrazeUser brazeUser) {
brazeUser.setCustomUserAttribute("your_attribute_key", YOUR_DATE_VALUE);
// This method will assign the current time to a custom attribute at the time the method is called:
brazeUser.setCustomUserAttributeToNow("your_attribute_key");
// This method will assign the date specified by SECONDS_FROM_EPOCH to a custom attribute:
brazeUser.setCustomUserAttributeToSecondsFromEpoch("your_attribute_key", SECONDS_FROM_EPOCH);
}
});
```
```kotlin
Braze.getInstance(context).getCurrentUser { brazeUser ->
brazeUser.setCustomUserAttribute("your_attribute_key", YOUR_DATE_VALUE)
// This method will assign the current time to a custom attribute at the time the method is called:
brazeUser.setCustomUserAttributeToNow("your_attribute_key")
// This method will assign the date specified by SECONDS_FROM_EPOCH to a custom attribute:
brazeUser.setCustomUserAttributeToSecondsFromEpoch("your_attribute_key", SECONDS_FROM_EPOCH)
}
```
**Warning:**
Dates passed to Braze with this method must either be in the [ISO 8601](http://en.wikipedia.org/wiki/ISO_8601) format (e.g `2013-07-16T19:20:30+01:00`) or in the `yyyy-MM-dd'T'HH:mm:ss:SSSZ` format (e.g `2016-12-14T13:32:31.601-0800`).
The maximum number of elements in custom attribute arrays defaults to 25. The maximum for individual arrays can be increased to up to 500 in the Braze dashboard, under **Data Settings** > **Custom Attributes**. Arrays exceeding the maximum number of elements are truncated to contain the maximum number of elements. For more information on custom attribute arrays and their behavior, see [Arrays](https://www.braze.com/docs/developer_guide/platform_wide/analytics_overview/#arrays).
```java
Braze.getInstance(context).getCurrentUser(new IValueCallback() {
@Override
public void onSuccess(BrazeUser brazeUser) {
// Setting a custom attribute with an array value
brazeUser.setCustomAttributeArray("your_attribute_key", testSetArray);
// Adding to a custom attribute with an array value
brazeUser.addToCustomAttributeArray("your_attribute_key", "value_to_add");
// Removing a value from an array type custom attribute
brazeUser.removeFromCustomAttributeArray("your_attribute_key", "value_to_remove");
}
});
```
```kotlin
Braze.getInstance(context).getCurrentUser { brazeUser ->
// Setting a custom attribute with an array value
brazeUser.setCustomAttributeArray("your_attribute_key", testSetArray)
// Adding to a custom attribute with an array value
brazeUser.addToCustomAttributeArray("your_attribute_key", "value_to_add")
// Removing a value from an array type custom attribute
brazeUser.removeFromCustomAttributeArray("your_attribute_key", "value_to_remove")
}
```
### Unsetting custom attributes
To unset a custom attribute, pass the relevant attribute key to the `unsetCustomUserAttribute` method.
```java
Braze.getInstance(context).getCurrentUser(new IValueCallback() {
@Override
public void onSuccess(BrazeUser brazeUser) {
brazeUser.unsetCustomUserAttribute("your_attribute_key");
}
});
```
```kotlin
Braze.getInstance(context).getCurrentUser { brazeUser ->
brazeUser.unsetCustomUserAttribute("your_attribute_key")
}
```
### Nesting custom attributes
You can also nest properties within custom attributes. In the following example, a `favorite_book` object with nested properties is set as a custom attribute on the user profile. For more details, refer to [Nested Custom Attributes](https://www.braze.com/docs/user_guide/data/custom_data/custom_attributes/nested_custom_attribute_support).
```java
JSONObject favoriteBook = new JSONObject();
try {
favoriteBook.put("title", "The Hobbit");
favoriteBook.put("author", "J.R.R. Tolkien");
favoriteBook.put("publishing_date", "1937");
} catch (JSONException e) {
e.printStackTrace();
}
braze.getCurrentUser(user -> {
user.setCustomUserAttribute("favorite_book", favoriteBook);
return null;
});
```
```kotlin
val favoriteBook = JSONObject()
.put("title", "The Hobbit")
.put("author", "J.R.R. Tolkien")
.put("publishing_date", "1937")
braze.getCurrentUser { user ->
user.setCustomUserAttribute("favorite_book", favoriteBook)
}
```
### Using the REST API
You can also use our REST API to set or unset user attributes. For more information, refer to [User Data Endpoints](https://www.braze.com/docs/developer_guide/rest_api/user_data/#user-data).
## Setting user subscriptions
To set up a subscription for your users (either email or push), call the functions `setEmailNotificationSubscriptionType()` or `setPushNotificationSubscriptionType()`, respectively. Both of these functions take the enum type `NotificationSubscriptionType` as arguments. This type has three different states:
| Subscription status | Definition |
| ------------------- | ---------- |
| `OPTED_IN` | Subscribed, and explicitly opted in |
| `SUBSCRIBED` | Subscribed, but not explicitly opted in |
| `UNSUBSCRIBED` | Unsubscribed and/or explicitly opted out |
{: .reset-td-br-1 .reset-td-br-2 role="presentation" }
**Important:**
No explicit opt-in is required by Android to send users push notifications. When a user is registered for push, they are set to `SUBSCRIBED` rather than `OPTED_IN` by default. Refer to [managing user subscriptions](https://www.braze.com/docs/user_guide/message_building_by_channel/email/managing_user_subscriptions/#managing-user-subscriptions) for more information on implementing subscriptions and explicit opt-ins.
### Setting email subscriptions
```java
Braze.getInstance(context).getCurrentUser(new IValueCallback() {
@Override
public void onSuccess(BrazeUser brazeUser) {
brazeUser.setEmailNotificationSubscriptionType(emailNotificationSubscriptionType);
}
});
```
```kotlin
Braze.getInstance(context).getCurrentUser { brazeUser ->
brazeUser.setEmailNotificationSubscriptionType(emailNotificationSubscriptionType)
}
```
### Setting push notification subscription
```java
Braze.getInstance(context).getCurrentUser(new IValueCallback() {
@Override
public void onSuccess(BrazeUser brazeUser) {
brazeUser.setPushNotificationSubscriptionType(pushNotificationSubscriptionType);
}
});
```
```kotlin
Braze.getInstance(context).getCurrentUser { brazeUser ->
brazeUser.setPushNotificationSubscriptionType(pushNotificationSubscriptionType)
}
```
## Prerequisites
Before you can use this feature, you'll need to [integrate the Swift Braze SDK](https://www.braze.com/docs/developer_guide/sdk_integration/?sdktab=swift).
## Default user attributes
### Supported attributes
The following attributes should be set on the `Braze.User` object:
- `firstName`
- `lastName`
- `email`
- `dateOfBirth`
- `country`
- `language`
- `homeCity`
- `phone`
- `gender`
### Setting default attributes
To set a default user attribute, set the appropriate field on the shared `Braze.User` object. The following is an example of setting the first name attribute:
```swift
AppDelegate.braze?.user.set(firstName: "Alex")
```
```objc
[AppDelegate.braze.user setFirstName:@"Alex"];
```
### Unsetting default attributes
To unset a default user attribute, pass `nil` to the relevant method.
```swift
AppDelegate.braze?.user.set(firstName: nil)
```
```objc
[AppDelegate.braze.user setFirstName:nil];
```
## Custom user attributes
In addition to the default user attributes, Braze also allows you to define custom attributes using several different data types. For more information on each attribute's segmentation option, see [User data collection](https://www.braze.com/docs/developer_guide/analytics/).
**Important:**
Custom attribute values have a maximum length of 255 characters; longer values will be truncated. For more information, refer to [`Braze.User`](https://braze-inc.github.io/braze-swift-sdk/documentation/brazekit/braze/user-swift.class).
### Setting custom attributes
To set a custom attribute with a `string` value:
```swift
AppDelegate.braze?.user.setCustomAttribute(key: "your_attribute_key", value: "your_attribute_value")
```
```objc
[AppDelegate.braze.user setCustomAttributeWithKey:@"your_attribute_key" stringValue:"your_attribute_value"];
```
To set a custom attribute with an `integer` value:
```swift
AppDelegate.braze?.user.setCustomAttribute(key: "your_attribute_key", value: yourIntegerValue)
```
```objc
[AppDelegate.braze.user setCustomAttributeWithKey:@"your_attribute_key" andIntegerValue:yourIntegerValue];
```
Braze treats `float` and `double` values the same within our database. To set a custom attribute with a double value:
```swift
AppDelegate.braze?.user.setCustomAttribute(key: "your_attribute_key", value: yourDoubleValue)
```
```objc
[AppDelegate.braze.user setCustomAttributeWithKey:@"your_attribute_key" andDoubleValue:yourDoubleValue];
```
To set a custom attribute with a `boolean` value:
```swift
AppDelegate.braze?.user.setCustomAttribute("your_attribute_key", value: yourBoolValue)
```
```objc
[AppDelegate.braze.user setCustomAttributeWithKey:@"your_attribute_key" andBOOLValue:yourBOOLValue];
```
To set a custom attribute with a `date` value:
```swift
AppDelegate.braze?.user.setCustomAttribute("your_attribute_key", dateValue:yourDateValue)
```
```objc
[AppDelegate.braze.user setCustomAttributeWithKey:@"your_attribute_key" andDateValue:yourDateValue];
```
The maximum number of elements in [custom attribute arrays](https://www.braze.com/docs/developer_guide/platform_wide/analytics_overview/#arrays) defaults to 25. Arrays exceeding the maximum number of elements will be truncated to contain the maximum number of elements. The maximum for individual arrays can be increased to up to 500. To increase this limit above 500, contact your Braze customer success manager.
To set a custom attribute with an `array` value:
```swift
// Setting a custom attribute with an array value
AppDelegate.braze?.user.setCustomAttributeArray(key: "array_name", array: ["value1", "value2"])
// Adding to a custom attribute with an array value
AppDelegate.braze?.user.addToCustomAttributeArray(key: "array_name", value: "value3")
// Removing a value from an array type custom attribute
AppDelegate.braze?.user.removeFromCustomAttributeArray(key: "array_name", value: "value2")
```
```objc
// Setting a custom attribute with an array value
[AppDelegate.braze.user setCustomAttributeArrayWithKey:@"array_name" array:@[@"value1", @"value2"]];
// Adding to a custom attribute with an array value
[AppDelegate.braze.user addToCustomAttributeArrayWithKey:@"array_name" value:@"value3"];
// Removing a value from an array type custom attribute
[AppDelegate.braze.user removeFromCustomAttributeArrayWithKey:@"array_name" value:@"value2"];
// Removing an entire array and key
[AppDelegate.braze.user setCustomAttributeArrayWithKey:@"array_name" array:nil];
```
### Incrementing or decrementing custom attributes
This code is an example of an incrementing custom attribute. You may increment the value of a custom attribute by any `integer` or `long` value:
```swift
AppDelegate.braze?.user.incrementCustomUserAttribute(key: "your_attribute_key", by: incrementIntegerValue)
```
```objc
[AppDelegate.braze.user incrementCustomUserAttribute:@"your_attribute_key" by:incrementIntegerValue];
```
### Unsetting custom attributes
To unset a custom attribute, pass the relevant attribute key to the `unsetCustomAttribute` method.
```swift
AppDelegate.braze?.user.unsetCustomAttribute(key: "your_attribute_key")
```
To unset a custom attribute, pass the relevant attribute key to the `unsetCustomAttributeWithKey` method.
```objc
[AppDelegate.braze.user unsetCustomAttributeWithKey:@"your_attribute_key"];
```
### Nesting custom attributes
You can also nest properties within custom attributes. In the following example, a `favorite_book` object with nested properties is set as a custom attribute on the user profile. For more details, refer to [Nested Custom Attributes](https://www.braze.com/docs/user_guide/data/custom_data/custom_attributes/nested_custom_attribute_support).
```swift
let favoriteBook: [String: Any?] = [
"title": "The Hobbit",
"author": "J.R.R. Tolkien",
"publishing_date": "1937"
]
braze.user.setCustomAttribute(key: "favorite_book", dictionary: favoriteBook)
```
```objc
NSDictionary *favoriteBook = @{
@"title": @"The Hobbit",
@"author": @"J.R.R. Tolkien",
@"publishing_date": @"1937"
};
[AppDelegate.braze.user setCustomAttributeWithKey:@"favorite_book" dictionary:favoriteBook];
```
### Using the REST API
You can also use our REST API to set or unset user attributes. For more information, refer to [User Data Endpoints](https://www.braze.com/docs/developer_guide/rest_api/user_data/#user-data).
## Setting user subscriptions
To set up a subscription for your users (either email or push), call the functions `set(emailSubscriptionState:)` or `set(pushNotificationSubscriptionState:)`, respectively. Both of these functions take the enum type `Braze.User.SubscriptionState` as arguments. This type has three different states:
| Subscription Status | Definition |
| ------------------- | ---------- |
| `optedIn` | Subscribed, and explicitly opted in |
| `subscribed` | Subscribed, but not explicitly opted in |
| `unsubscribed` | Unsubscribed and/or explicitly opted out |
{: .reset-td-br-1 .reset-td-br-2 role="presentation" }
Users who grant permission for an app to send them push notifications default to the status of `optedIn` as iOS requires an explicit opt-in.
Users will be set to `subscribed` automatically upon receipt of a valid email address; however, we suggest that you establish an explicit opt-in process and set this value to `optedIn` upon receipt of explicit consent from your user. Refer to [Managing user subscriptions](https://www.braze.com/docs/user_guide/message_building_by_channel/email/managing_user_subscriptions/) for more details.
### Setting email subscriptions
```swift
AppDelegate.braze?.user.set(emailSubscriptionState: Braze.User.SubscriptionState)
```
```objc
[AppDelegate.braze.user setEmailSubscriptionState: BRZUserSubscriptionState]
```
### Setting push notification subscriptions
```swift
AppDelegate.braze?.user.set(pushNotificationSubscriptionState: Braze.User.SubscriptionState)
```
```objc
[AppDelegate.braze.user setPushNotificationSubscriptionState: BRZUserSubscriptionState]
```
Refer to [Managing user subscriptions](https://www.braze.com/docs/user_guide/message_building_by_channel/email/managing_user_subscriptions/) for more details.
## Prerequisites
Before you can use this feature, you'll need to [integrate the Flutter Braze SDK](https://www.braze.com/docs/developer_guide/sdk_integration/?sdktab=flutter).
## Default user attributes
### Supported attributes
The following attributes are supported:
- First Name
- Last Name
- Gender
- Date of Birth
- Home City
- Country
- Phone Number
- Language
- Email
**Important:**
All string values such as first name, last name, country, and home city are limited to 255 characters.
### Setting default attributes
To set user attributes automatically collected by Braze, you can use the setter methods included with the SDK.
```dart
braze.setFirstName('Name');
```
## Custom user attributes
### Setting custom attributes
In addition to the default user attributes, Braze also allows you to define custom attributes using a number of different data types:
To set a custom attribute with a `string` value:
```dart
braze.setStringCustomUserAttribute("custom string attribute", "string custom attribute");
```
To set a custom attribute with an `integer` value:
```dart
// Set Integer Attribute
braze.setIntCustomUserAttribute("custom int attribute key", integer);
// Increment Integer Attribute
braze.incrementCustomUserAttribute("key", integer);
```
To set a custom attribute with a `double` value:
```dart
braze.setDoubleCustomUserAttribute("custom double attribute key", double);
```
To set a custom attribute with a `boolean` value:
```dart
braze.setBoolCustomUserAttribute("custom boolean attribute key", boolean);
```
To set a custom attribute with a `date` value:
```dart
braze.setDateCustomUserAttribute("custom date attribute key", date);
```
To set a custom attribute with an `array` value:
```dart
// Adding to an Array
braze.addToCustomAttributeArray("key", "attribute");
// Removing an item from an Array
braze.removeFromCustomAttributeArray("key", "attribute");
```
**Important:**
Custom attribute values have a maximum length of 255 characters; longer values will be truncated.
### Unsetting custom attributes
To unset a custom attribute, pass the relevant attribute key to the `unsetCustomUserAttribute` method.
```dart
braze.unsetCustomUserAttribute('attribute_key');
```
## Prerequisites
Before you can use this feature, you'll need to [integrate the Roku Braze SDK](https://www.braze.com/docs/developer_guide/sdk_integration/?sdktab=roku).
## Default user attributes
### Predefined methods
Braze provides predefined methods for setting the following user attributes using the `m.Braze` object.
- `FirstName`
- `LastName`
- `Email`
- `Gender`
- `DateOfBirth`
- `Country`
- `Language`
- `HomeCity`
- `PhoneNumber`
### Setting default attributes
To set a default attribute, call the relevant method on the `m.Braze` object.
```brightscript
m.Braze.setFirstName("Alex")
```
```brightscript
m.Braze.setLastName("Smith")
```
```brightscript
m.Braze.setEmail("alex@example.com")
```
```brightscript
m.Braze.setGender("m") ' Accepts: "m", "f", "o", "n", "u", "p"
```
```brightscript
m.Braze.setDateOfBirth(1990, 5, 15) ' Year, month, day
```
```brightscript
m.Braze.setCountry("United States")
```
```brightscript
m.Braze.setLanguage("en")
```
```brightscript
m.Braze.setHomeCity("New York")
```
```brightscript
m.Braze.setPhoneNumber("+1234567890")
```
## Custom user attributes
In addition to the default user attributes, Braze also allows you to define custom attributes using several different data types.
### Settings custom attributes
To set a custom attribute a `string` value:
```brightscript
m.Braze.setCustomAttribute("stringAttribute", "stringValue")
```
To set a custom attribute with an `integer` value:
```brightscript
m.Braze.setCustomAttribute("intAttribute", 5)
```
Braze treats `float` and `double` values exactly the same. To set a custom attribute with either value:
```brightscript
m.Braze.setCustomAttribute("floatAttribute", 3.5)
```
To set a custom attribute with a `boolean` value:
```brightscript
m.Braze.setCustomAttribute("boolAttribute", true)
```
To set a custom attribute with a `date` value:
```brightscript
dateAttribute = CreateObject("roDateTime")
dateAttribute.fromISO8601String("1992-11-29 00:00:00.000")
m.Braze.setCustomAttribute("dateAttribute", dateAttribute)
```
To set a custom attribute with an `array` value:
```brightscript
stringArray = createObject("roArray", 3, true)
stringArray.Push("string1")
stringArray.Push("string2")
stringArray.Push("string3")
m.Braze.setCustomAttribute("arrayAttribute", stringArray)
```
**Important:**
Custom attribute values have a maximum length of 255 characters; longer values will be truncated.
### Incrementing and decrementing custom attributes
This code is an example of an incrementing custom attribute. You may increment the value of a custom attribute by any positive or negative integer value.
```brightscript
m.Braze.incrementCustomUserAttribute("intAttribute", 3)
```
### Unsetting custom attributes
To unset a custom attribute, pass the relevant attribute key to the `unsetCustomAttribute` method.
```brightscript
m.Braze.unsetCustomAttribute("attributeName")
```
### Using the REST API
You can also use our REST API to set or unset user attributes. For more information, refer to [User Data Endpoints](https://www.braze.com/docs/developer_guide/rest_api/user_data/#user-data).
## Setting email subscriptions
You can set the following email subscription statuses for your users programmatically through the SDK.
| Subscription Status | Definition |
| ------------------- | ---------- |
| `OptedIn` | Subscribed, and explicitly opted in |
| `Subscribed` | Subscribed, but not explicitly opted in |
| `UnSubscribed` | Unsubscribed and/or explicitly opted out |
{: .reset-td-br-1 .reset-td-br-2 role="presentation" }
**Note:**
These types fall under `BrazeConstants().SUBSCRIPTION_STATES`.
The method for setting email subscription status is `setEmailSubscriptionState()`. Users will be set to `Subscribed` automatically upon receipt of a valid email address, however, we suggest that you establish an explicit opt-in process and set this value to `OptedIn` upon receipt of explicit consent from your user. For more details, visit [Managing user subscriptions](https://www.braze.com/docs/user_guide/message_building_by_channel/email/managing_user_subscriptions/#managing-user-subscriptions).
```brightscript
m.Braze.setEmailSubscriptionState(BrazeConstants().SUBSCRIPTION_STATES.OPTED_IN)
```
## Prerequisites
Before you can use this feature, you'll need to [integrate the Unity Braze SDK](https://www.braze.com/docs/developer_guide/sdk_integration/?sdktab=unity).
## Default user attributes
### Predefined methods
Braze provides predefined methods for setting the following user attributes using the `BrazeBinding` object. For more information, see [Braze Unity declaration file](https://github.com/braze-inc/braze-unity-sdk/blob/master/Assets/Plugins/Appboy/BrazePlatform.cs).
- First name
- Last name
- User email
- Gender
- Birth date
- User country
- User home city
- User email subscription
- User push subscription
- User phone number
### Setting default attributes
To set a default attribute, call the relevant method on the `BrazeBinding` object.
```csharp
BrazeBinding.SetUserFirstName("first name");
```
```csharp
BrazeBinding.SetUserLastName("last name");
```
```csharp
BrazeBinding.SetUserEmail("email@email.com");
```
```csharp
BrazeBinding.SetUserGender(Appboy.Models.Gender);
```
```csharp
BrazeBinding.SetUserDateOfBirth("year(int)", "month(int)", "day(int)");
```
```csharp
BrazeBinding.SetUserCountry("country name");
```
```csharp
BrazeBinding.SetUserHomeCity("city name");
```
```csharp
BrazeBinding.SetUserEmailNotificationSubscriptionType(AppboyNotificationSubscriptionType);
```
```csharp
BrazeBinding.SetUserPushNotificationSubscriptionType(AppboyNotificationSubscriptionType);
```
```csharp
BrazeBinding.SetUserPhoneNumber("phone number");
```
### Unsetting default attributes
To unset a default user attribute, pass `null` to the relevant method.
```csharp
BrazeBinding.SetUserFirstName(null);
```
## Custom user attributes
In addition to the default user attributes, Braze also allows you to define custom attributes using several different data types. For more information on each attribute's segmentation option, see [User data collection](https://www.braze.com/docs/developer_guide/analytics).
### Setting custom attributes
To set a custom attribute, use the corresponding method for the attribute type:
```csharp
AppboyBinding.SetCustomUserAttribute("custom string attribute key", "string custom attribute");
```
```csharp
// Set Integer Attribute
AppboyBinding.SetCustomUserAttribute("custom int attribute key", 'integer value');
// Increment Integer Attribute
AppboyBinding.IncrementCustomUserAttribute("key", increment(int))
```
```csharp
AppboyBinding.SetCustomUserAttribute("custom double attribute key", 'double value');
```
```csharp
AppboyBinding.SetCustomUserAttribute("custom boolean attribute key", 'boolean value');
```
```csharp
AppboyBinding.SetCustomUserAttributeToNow("custom date attribute key");
```
```csharp
AppboyBinding.SetCustomUserAttributeToSecondsFromEpoch("custom date attribute key", 'integer value');
```
**Note:**
Dates passed to Braze must either be in the [ISO 8601](http://en.wikipedia.org/wiki/ISO_8601) format (such as `2013-07-16T19:20:30+01:00`) or in the `yyyy-MM-dd'T'HH:mm:ss:SSSZ` format (such as`2016-12-14T13:32:31.601-0800`).
```csharp
// Setting An Array
AppboyBinding.SetCustomUserAttributeArray("key", array(List), sizeOfTheArray(int))
// Adding to an Array
AppboyBinding.AddToCustomUserAttributeArray("key", "Attribute")
// Removing an item from an Array
AppboyBinding.RemoveFromCustomUserAttributeArray("key", "Attribute")
```
**Important:**
Custom attribute values have a maximum length of 255 characters; longer values will be truncated.
### Unsetting custom attributes
To unset a custom attribute, pass the relevant attribute key to the `UnsetCustomUserAttribute` method.
```csharp
AppboyBinding.UnsetCustomUserAttribute("custom attribute key");
```
### Using the REST API
You can also use our REST API to set or unset user attributes. For more information, refer to [User Data Endpoints](https://www.braze.com/docs/developer_guide/rest_api/user_data/#user-data).
## Setting user subscriptions
To set up an email or push subscription for your users, call one of the following functions.
```csharp
// Email notifications
AppboyBinding.SetUserEmailNotificationSubscriptionType()
// Push notifications
AppboyBinding.SetPushNotificationSubscriptionType()`
```
Both functions take `Appboy.Models.AppboyNotificationSubscriptionType` as arguments, which has three different states:
| Subscription Status | Definition |
| ------------------- | ---------- |
| `OPTED_IN` | Subscribed, and explicitly opted in |
| `SUBSCRIBED` | Subscribed, but not explicitly opted in |
| `UNSUBSCRIBED` | Unsubscribed and/or explicitly opted out |
{: .reset-td-br-1 .reset-td-br-2 role="presentation" }
**Note:**
No explicit opt-in is required by Windows to send users push notifications. When a user is registered for push, they are set to `SUBSCRIBED` rather than `OPTED_IN` by default. To learn more, check out our documentation on [implementing subscriptions and explicit opt-ins](https://www.braze.com/docs/user_guide/message_building_by_channel/email/managing_user_subscriptions/#managing-user-subscriptions).
| Subscription Type | Description |
|------------------------------------------|-------------|
| `EmailNotificationSubscriptionType` | Users will be set to `SUBSCRIBED` automatically upon receipt of a valid email address. However, we suggest that you establish an explicit opt-in process and set this value to `OPTED_IN` upon receipt of explicit consent from your user. Visit our [Changing User Subscriptions](https://www.braze.com/docs/user_guide/administrative/manage_your_users/managing_user_subscriptions/#changing-subscriptions) doc for more details. |
| `PushNotificationSubscriptionType` | Users will be set to `SUBSCRIBED` automatically upon valid push registration. However, we suggest that you establish an explicit opt-in process and set this value to `OPTED_IN` upon receipt of explicit consent from your user. Visit our [Changing User Subscriptions](https://www.braze.com/docs/user_guide/administrative/manage_your_users/managing_user_subscriptions/#changing-subscriptions) doc for more details. |
{: .reset-td-br-1 .reset-td-br-2 role="presentation" }
**Note:**
These types fall under `Appboy.Models.AppboyNotificationSubscriptionType`.
### Setting email subscriptions
```csharp
AppboyBinding.SetUserEmailNotificationSubscriptionType(AppboyNotificationSubscriptionType.OPTED_IN);
```
### Setting push notification subscriptions
```csharp
AppboyBinding.SetUserPushNotificationSubscriptionType(AppboyNotificationSubscriptionType.OPTED_IN);
```
## Prerequisites
Before you can use this feature, you'll need to [integrate the React Native Braze SDK](https://www.braze.com/docs/developer_guide/sdk_integration/?sdktab=react%20native).
## Logging custom attributes
Braze provides methods for assigning attributes to users. You'll be able to filter and segment your users according to these attributes on the dashboard.
### Default user attributes
To set user attributes automatically collected by Braze, you can use setter methods that come with the SDK.
```javascript
Braze.setFirstName("Name");
```
The following attributes are supported:
- First Name
- Last Name
- Gender
- Date of Birth
- Home City
- Country
- Phone Number
- Language
- Email
All string values such as first name, last name, country, and home city are limited to 255 characters.
### Custom user attributes
In addition to our predefined user attribute methods, Braze also provides [custom attributes](https://www.braze.com/docs/user_guide/data_and_analytics/custom_data/custom_attributes/#custom-attribute-data-types) to track data from your applications.
```javascript
Braze.setCustomUserAttribute("attribute_key", "attribute_value", function(){
// optional onResult callback
});
```
#### Unsetting custom attributes
```javascript
Braze.unsetCustomUserAttribute("attribute_key", function(){
// optional onResult callback
});
```
#### Custom Attribute Arrays
```javascript
// Adds a string to a custom attribute string array, or creates that array if one doesn't exist.
Braze.addToCustomUserAttributeArray("my-attribute-array", "new or existing value", optionalCallback);
// Removes a string from a custom attribute string array.
Braze.removeFromCustomUserAttributeArray("my-attribute-array", "existing value", optionalCallback);
```
# Log custom events through the Braze SDK
Source: /docs/developer_guide/analytics/logging_events/index.md
# Log custom events
> Learn how to log custom events through the Braze SDK.
**Note:**
For wrapper SDKs not listed, use the relevant native Android or Swift method instead.
## Logging a custom event
To log a custom event, use the following event-logging method.
For a standard Web SDK implementation, you can use the following method:
```javascript
braze.logCustomEvent("YOUR_EVENT_NAME");
```
If you'd like to use Google Tag Manager instead, you can use the **Custom Event** tag type to call the [`logCustomEvent` method](https://js.appboycdn.com/web-sdk/latest/doc/modules/braze.html#logcustomevent) and send custom events to Braze, optionally including custom event properties. To do this:
1. Enter the **Event Name** by either using a variable or typing an event name.
2. Use the **Add Row** button to add event properties.

For native Android, you can use the following method:
```java
Braze.getInstance(context).logCustomEvent(YOUR_EVENT_NAME);
```
```kotlin
Braze.getInstance(context).logCustomEvent(YOUR_EVENT_NAME)
```
```swift
AppDelegate.braze?.logCustomEvent(name: "YOUR_EVENT_NAME")
```
```objc
[AppDelegate.braze logCustomEvent:@"YOUR_EVENT_NAME"];
```
```dart
braze.logCustomEvent('YOUR_EVENT_NAME');
```
Use the Braze Cordova plugin method:
```javascript
BrazePlugin.logCustomEvent("YOUR_EVENT_NAME");
```
The `logCustomEvent` API accepts:
- `eventName` (required string): Use up to 255 characters. Do not start the name with `$`. Use alphanumeric characters and punctuation.
- `eventProperties` (optional object): Add key-value pairs for event metadata. Use keys up to 255 characters, and do not start keys with `$`.
For property values, use `string` (up to 255 characters), `numeric`, `boolean`, arrays, or nested JSON objects.
For implementation details, see the Braze Cordova SDK source:
- [`www/BrazePlugin.js` `logCustomEvent` method (lines 138-140)](https://github.com/braze-inc/braze-cordova-sdk/blob/86132bc7f0b6ddf1b598b0e612db70f11744801c/www/BrazePlugin.js#L138-L140)
- [`www/BrazePlugin.js` JSDoc (lines 128-140)](https://github.com/braze-inc/braze-cordova-sdk/blob/86132bc7f0b6ddf1b598b0e612db70f11744801c/www/BrazePlugin.js#L128-L140)
- [Android handler in `src/android/BrazePlugin.kt` (lines 108-115)](https://github.com/braze-inc/braze-cordova-sdk/blob/86132bc7f0b6ddf1b598b0e612db70f11744801c/src/android/BrazePlugin.kt#L108-L115)
- [iOS handler in `src/ios/BrazePlugin.m` (lines 308-313)](https://github.com/braze-inc/braze-cordova-sdk/blob/86132bc7f0b6ddf1b598b0e612db70f11744801c/src/ios/BrazePlugin.m#L308-L313)
- [iOS method declaration in `src/ios/BrazePlugin.h` (line 24)](https://github.com/braze-inc/braze-cordova-sdk/blob/86132bc7f0b6ddf1b598b0e612db70f11744801c/src/ios/BrazePlugin.h#L24)
If you've integrated [Infillion Beacons](https://infillion.com/software/beacons/) into your Android app, you can optionally use `visit.getPlace()` to log location-specific events. `requestImmediateDataFlush` verifies that your event will log even if your app is in the background.
```java
Braze.getInstance(context).logCustomEvent("Entered " + visit.getPlace());
Braze.getInstance(context).requestImmediateDataFlush();
```
```kotlin
Braze.getInstance(context).logCustomEvent("Entered " + visit.getPlace())
Braze.getInstance(context).requestImmediateDataFlush()
```
```javascript
Braze.logCustomEvent("YOUR_EVENT_NAME");
```
```brightscript
m.Braze.logEvent("YOUR_EVENT_NAME")
```
```csharp
AppboyBinding.LogCustomEvent("YOUR_EVENT_NAME");
```
## Adding metadata properties
When you log a custom event, you have the option to add metadata about that custom event by passing a properties object with the event. Properties are defined as key-value pairs. Keys are strings and values can be `string`, `numeric`, `boolean`, [`Date`](http://www.w3schools.com/jsref/jsref_obj_date.asp) objects, arrays, or nested JSON objects.
To add metadata properties, use the following event-logging method.
```javascript
braze.logCustomEvent("YOUR-EVENT-NAME", {
you: "can",
pass: false,
orNumbers: 42,
orDates: new Date(),
or: ["any", "array", "here"],
andEven: {
deeply: ["nested", "json"]
}
});
```
```java
Braze.logCustomEvent("YOUR-EVENT-NAME",
new BrazeProperties(new JSONObject()
.put("you", "can")
.put("pass", false)
.put("orNumbers", 42)
.put("orDates", new Date())
.put("or", new JSONArray()
.put("any")
.put("array")
.put("here"))
.put("andEven", new JSONObject()
.put("deeply", new JSONArray()
.put("nested")
.put("json"))
)
));
```
```kotlin
Braze.logCustomEvent("YOUR-EVENT-NAME",
BrazeProperties(JSONObject()
.put("you", "can")
.put("pass", false)
.put("orNumbers", 42)
.put("orDates", Date())
.put("or", JSONArray()
.put("any")
.put("array")
.put("here"))
.put("andEven", JSONObject()
.put("deeply", JSONArray()
.put("nested")
.put("json"))
)
))
```
```swift
AppDelegate.braze?.logCustomEvent(
name: "YOUR-EVENT-NAME",
properties: [
"you": "can",
"pass": false,
"orNumbers": 42,
"orDates": Date(),
"or": ["any", "array", "here"],
"andEven": [
"deeply": ["nested", "json"]
]
]
)
```
```objc
[AppDelegate.braze logCustomEvent:@"YOUR-EVENT-NAME"
properties:@{
@"you": @"can",
@"pass": @(NO),
@"orNumbers": @42,
@"orDates": [NSDate date],
@"or": @[@"any", @"array", @"here"],
@"andEven": @{
@"deeply": @[@"nested", @"json"]
}
}];
```
```dart
braze.logCustomEvent('custom_event_with_properties', properties: {
'key1': 'value1',
'key2': ['value2', 'value3'],
'key3': false,
});
```
Log custom events with a properties object:
```javascript
var properties = {};
properties["key1"] = "value1";
properties["key2"] = ["value2", "value3"];
properties["key3"] = false;
BrazePlugin.logCustomEvent("YOUR-EVENT-NAME", properties);
```
You can also pass properties inline:
```javascript
BrazePlugin.logCustomEvent("YOUR-EVENT-NAME", {
"key": "value",
"amount": 42,
});
```
The official Cordova sample app includes string, numeric, boolean, array, and nested object properties:
- [`sample-project/www/js/index.js` (lines 230-251)](https://github.com/braze-inc/braze-cordova-sdk/blob/86132bc7f0b6ddf1b598b0e612db70f11744801c/sample-project/www/js/index.js#L230-L251)
Sample project excerpt:
```javascript
var properties = {};
properties["One"] = "That's the Way of the World";
properties["Two"] = "After the Love Has Gone";
properties["Three"] = "Can't Hide Love";
BrazePlugin.logCustomEvent("cordovaCustomEventWithProperties", properties);
BrazePlugin.logCustomEvent("cordovaCustomEventWithoutProperties");
BrazePlugin.logCustomEvent("cordovaCustomEventWithFloatProperties", {
"Cart Value": 4.95,
"Cart Item Name": "Spicy Chicken Bites 5 pack"
});
BrazePlugin.logCustomEvent("cordovaCustomEventWithNestedProperties", {
"array key": [1, "2", false],
"object key": {
"k1": "1",
"k2": 2,
"k3": false,
},
"deep key": {
"key": [1, "2", true]
}
});
```
For API and native bridge details, see:
- [`www/BrazePlugin.js` JSDoc (lines 128-140)](https://github.com/braze-inc/braze-cordova-sdk/blob/86132bc7f0b6ddf1b598b0e612db70f11744801c/www/BrazePlugin.js#L128-L140)
- [Android handler in `src/android/BrazePlugin.kt` (lines 108-115)](https://github.com/braze-inc/braze-cordova-sdk/blob/86132bc7f0b6ddf1b598b0e612db70f11744801c/src/android/BrazePlugin.kt#L108-L115)
- [iOS handler in `src/ios/BrazePlugin.m` (lines 308-313)](https://github.com/braze-inc/braze-cordova-sdk/blob/86132bc7f0b6ddf1b598b0e612db70f11744801c/src/ios/BrazePlugin.m#L308-L313)
```javascript
Braze.logCustomEvent("custom_event_with_properties", {
key1: "value1",
key2: ["value2", "value3"],
key3: false,
});
```
```brightscript
m.Braze.logEvent("YOUR_EVENT_NAME", {"stringPropKey" : "stringPropValue", "intPropKey" : Integer intPropValue})
```
```csharp
AppboyBinding.LogCustomEvent("event name", properties(Dictionary));
```
**Important:**
The `time` and `event_name` keys are reserved and cannot be used as custom event properties.
## Best practices
There are three important checks to carry out so that your custom event properties log as expected:
* [Establish which events are logged](#verify-events)
* [Verify log](#verify-log)
* [Verify values](#verify-values)
Multiple properties may be logged each time a custom event is logged.
### Verify events
Check with your developers which event properties are being tracked. Keep in mind that all event properties are case-sensitive. For additional information on tracking custom events, check out these articles based on your platform:
* [Android](https://www.braze.com/docs/developer_guide/analytics/logging_events/?tab=android)
* [iOS](https://www.braze.com/docs/developer_guide/analytics/logging_events/?tab=swift)
* [Web](https://www.braze.com/docs/developer_guide/analytics/logging_events/?tab=web)
### Verify log
To confirm that the event properties are successfully tracked, you can view all event properties from the **Custom Events** page.
1. Go to **Data Settings** > **Custom Events**.
2. Locate your custom event from the list.
3. For your event, select **Manage Properties** to view the names of the properties associated with an event.
### Verify values
After [adding your user as a test user](https://www.braze.com/docs/user_guide/administrative/app_settings/internal_groups_tab/#adding-test-users), follow these steps to verify your values:
1. Perform the custom event within the app.
2. Wait for roughly 10 seconds for the data to flush.
3. Refresh the [Event User Log](https://www.braze.com/docs/user_guide/administrative/app_settings/event_user_log_tab/) to view the custom event and the event property value that was passed with it.
# Log purchases through the Braze SDK
Source: /docs/developer_guide/analytics/logging_purchases/index.md
# Log purchases
> Learn how to log in-app purchases through the Braze SDK, so you can determine your revenue over-time and across sources. This will let you segment users [based on their lifetime value](https://www.braze.com/docs/developer_guide/analytics/#purchase-events--revenue-tracking) using custom events, custom attributes, and purchase events.
**Note:**
For wrapper SDKs not listed, use the relevant native Android or Swift method instead.
Any non-USD currency reported will display in Braze in USD based on the exchange rate on the date it was reported. To prevent currency conversion, hardcode the currency to USD.
## Logging purchases and revenue
To log purchases and revenue, call `logPurchase()` after a successful purchase in your app. If the product Identifier is empty, the purchase will not be logged to Braze.
For a standard Web SDK implementation, you can use the following method:
```javascript
braze.logPurchase(product_id, price, "USD", quantity);
```
If you'd like to use Google Tag Manager instead, you can use the **Purchase** tag type to call the [`logPurchase` method](https://js.appboycdn.com/web-sdk/latest/doc/modules/braze.html#logpurchase). Use this tag to track purchases to Braze, optionally including purchase properties. To do so:
1. The **Product ID** and **Price** fields are required.
2. Use the **Add Row** button to add purchase properties.

```java
Braze.getInstance(context).logPurchase(
String productId,
String currencyCode,
BigDecimal price,
int quantity
);
```
```kotlin
Braze.getInstance(context).logPurchase(
productId: String,
currencyCode: String,
price: BigDecimal,
quantity: Int
)
```
```swift
AppDelegate.braze?.logPurchase(productID: "product_id", currency: "USD", price: price)
```
```objc
[AppDelegate.braze logPurchase:"product_id"
currency:@"USD"
price:price];
```
```javascript
var properties = {};
properties["KEY"] = "VALUE";
BrazePlugin.logPurchase("PRODUCT_ID", 10, "USD", 5, properties);
```
```dart
braze.logPurchase(productId, currencyCode, price, quantity, properties: properties);
```
```javascript
Braze.logPurchase(productId, price, currencyCode, quantity, properties);
```
```brightscript
m.Braze.logPurchase("product_id", "currency_code", Double price, Integer quantity)
```
```csharp
AppboyBinding.LogPurchase("product_id", "currencyCode", price(decimal));
```
**Warning:**
`productID` can only have a maximum of 255 characters. Additionally, if the product identifier is empty, the purchase will not be logged to Braze.
### Adding properties
You can add metadata about purchases by passing a Dictionary populated with `Int`, `Double`, `String`, `Bool`, or `Date` values.
For a standard Web SDK implementation, you can use the following method:
```javascript
braze.logPurchase(product_id, price, "USD", quantity, {key: "value"});
```
If your site logs purchases using the standard [eCommerce event](https://developers.google.com/analytics/devguides/collection/ga4/ecommerce?client_type=gtm) data layer item to Google Tag Manager, then you can use the **E-commerce Purchase** tag type. This action type will log a separate "purchase" in Braze for each item sent in the list of `items`.
You can also specify additional property names you want to include as purchase properties by specifying their keys in the Purchase properties list. Note that Braze will look within the individual `item` that is being logged for any purchase properties you add to the list.
For example, given the following eCommerce payload:
```
items: [{
item_name: "5 L WIV ECO SAE 5W/30",
item_id: "10801463",
price: 24.65,
item_brand: "EUROLUB",
quantity: 1
}]
```
If you only want `item_brand` and `item_name` to be passed as purchase properties, then just add those two fields to the purchase properties table. If you don't supply any properties, then no purchase properties will be sent in the [`logPurchase`](https://js.appboycdn.com/web-sdk/latest/doc/modules/braze.html#logpurchase) call to Braze.
```java
BrazeProperties purchaseProperties = new BrazeProperties();
purchaseProperties.addProperty("key", "value");
Braze.getInstance(context).logPurchase(..., purchaseProperties);
```
```kotlin
val purchaseProperties = BrazeProperties()
purchaseProperties.addProperty("key", "value")
Braze.getInstance(context).logPurchase(..., purchaseProperties)
```
```swift
let purchaseProperties = ["key": "value"]
AppDelegate.braze?.logPurchase(productID: "product_id", currency: "USD", price: price, properties: purchaseProperties)
```
```objc
NSDictionary *purchaseProperties = @{@"key": @"value"};
[AppDelegate.braze logPurchase:@"product_id"
currency:@"USD"
price:price
properties:purchaseProperties];
```
```javascript
var properties = {};
properties["key"] = "value";
BrazePlugin.logPurchase("PRODUCT_ID", 10, "USD", 5, properties);
```
```dart
braze.logPurchase(productId, currencyCode, price, quantity, properties: {"key": "value"});
```
```javascript
Braze.logPurchase(productId, price, currencyCode, quantity, { key: "value" });
```
```brightscript
m.Braze.logPurchase("product_id", "currency_code", Double price, Integer quantity, {"stringPropKey" : "stringPropValue", "intPropKey" : Integer intPropValue})
```
```csharp
Dictionary purchaseProperties = new Dictionary
{
{ "key", "value" }
};
AppboyBinding.LogPurchase("product_id", "currencyCode", price(decimal), purchaseProperties);
```
### Adding quantity
By default, `quantity` is set to `1`. However, you can add a quantity to your purchases if customers make the same purchase multiple times in a single checkout. To add a quantity, pass an `Int` value to `quantity`.
### Using the REST API
You can also use our REST API to record purchases. For more information, refer to [User Data Endpoints](https://www.braze.com/docs/developer_guide/rest_api/user_data/#user-data).
## Logging orders
If you want to log purchases at the order level instead of the product level, you can use order name or order category as the `product_id`. Refer to our [purchase object specification](https://www.braze.com/docs/api/objects_filters/purchase_object/#product-id-naming-conventions) to learn more.
## Reserved keys
The following keys are reserved and cannot be used as purchase properties:
- `time`
- `product_id`
- `quantity`
- `event_name`
- `price`
- `currency`
## Supported currencies
Braze supports the following currency symbols. Any other currency symbol you provide logs a warning and the purchase is not logged to Braze.
- `AED`, `AFN`, `ALL`, `AMD`, `ANG`, `AOA`, `ARS`, `AUD`, `AWG`, `AZN`
- `BAM`, `BBD`, `BDT`, `BGN`, `BHD`, `BIF`, `BMD`, `BND`, `BOB`, `BRL`
- `BSD`, `BTC`, `BTN`, `BWP`, `BYR`, `BZD`
- `CAD`, `CDF`, `CHF`, `CLF`, `CLP`, `CNY`, `COP`, `CRC`, `CUC`, `CUP`, `CVE`, `CZK`
- `DJF`, `DKK`, `DOP`, `DZD`
- `EEK`, `EGP`, `ERN`, `ETB`, `EUR`
- `FJD`, `FKP`
- `GBP`, `GEL`, `GGP`, `GHS`, `GIP`, `GMD`, `GNF`, `GTQ`, `GYD`
- `HKD`, `HNL`, `HRK`, `HTG`, `HUF`
- `IDR`, `ILS`, `IMP`, `INR`, `IQD`, `IRR`, `ISK`
- `JEP`, `JMD`, `JOD`, `JPY`
- `KES`, `KGS`, `KHR`, `KMF`, `KPW`, `KRW`, `KWD`, `KYD`, `KZT`
- `LAK`, `LBP`, `LKR`, `LRD`, `LSL`, `LTL`, `LVL`, `LYD`
- `MAD`, `MDL`, `MGA`, `MKD`, `MMK`, `MNT`, `MOP`, `MRO`, `MTL`, `MUR`, `MVR`, `MWK`, `MXN`, `MYR`, `MZN`
- `NAD`, `NGN`, `NIO`, `NOK`, `NPR`, `NZD`
- `OMR`
- `PAB`, `PEN`, `PGK`, `PHP`, `PKR`, `PLN`, `PYG`
- `QAR`
- `RON`, `RSD`, `RUB`, `RWF`
- `SAR`, `SBD`, `SCR`, `SDG`, `SEK`, `SGD`, `SHP`, `SLL`, `SOS`, `SRD`, `STD`, `SVC`, `SYP`, `SZL`
- `THB`, `TJS`, `TMT`, `TND`, `TOP`, `TRY`, `TTD`, `TWD`, `TZS`
- `UAH`, `UGX`, `USD`, `UYU`, `UZS`
- `VEF`, `VND`, `VUV`
- `WST`
- `XAF`, `XAG`, `XAU`, `XCD`, `XDR`, `XOF`, `XPD`, `XPF`, `XPT`
- `YER`
- `ZAR`, `ZMK`, `ZMW`, `ZWL`
# Log Content Card data through the Braze SDK
Source: /docs/developer_guide/analytics/logging_channel_data/content_cards/index.md
# Log Content Card data
> When building a custom UI for Content Cards, you must manually log analytics like impressions, clicks, and dismissals, as this is only handled automatically for default card models. Logging these events is a standard part of a Content Card integration and is essential for accurate campaign reporting and billing. To do this, populate your custom UI with data from the Braze data models and then manually log the events. Once you understand how to log analytics, you can see common ways Braze customers [create custom Content Cards](https://www.braze.com/docs/developer_guide/content_cards/creating_cards/).
## Listening for card updates
When implementing your custom Content Cards, you can parse the Content Card objects and extract their payload data such as `title`, `cardDescription`, and `imageUrl`. Then, you can use the resulting model data to populate your custom UI.
To obtain the Content Card data models, subscribe to Content Card updates. There are two properties to pay particular attention to:
* **`id`**: Represents the Content Card ID string. This is the unique identifier used to log analytics from custom Content Cards.
* **`extras`**: Encompasses all the key-value pairs from the Braze dashboard.
All properties outside of `id` and `extras` are optional to parse for custom Content Cards. For more information on the data model, see each platform's integration article: [Android](https://www.braze.com/docs/developer_guide/content_cards/?sdktab=android), [iOS](https://www.braze.com/docs/developer_guide/content_cards/?sdktab=swift), [Web](https://www.braze.com/docs/developer_guide/content_cards/?sdktab=web).
Register a callback function to subscribe for updates when cards are refreshed.
```javascript
import * as braze from "@braze/web-sdk";
braze.subscribeToContentCardsUpdates((updates) => {
const cards = updates.cards;
// For example:
cards.forEach(card => {
if (card.isControl) {
// Do not display the control card, but remember to call `logContentCardImpressions([card])`
}
else if (card instanceof braze.ClassicCard || card instanceof braze.CaptionedImage) {
// Use `card.title`, `card.imageUrl`, etc.
}
else if (card instanceof braze.ImageOnly) {
// Use `card.imageUrl`, etc.
}
})
});
braze.openSession();
```
**Note:**
Content Cards will only refresh on session start if a subscribe request is called before `openSession()`. You can always choose to [manually refresh the feed](https://www.braze.com/docs/developer_guide/content_cards/customizing_cards/feed/) as well.
### Step 1: Create a private subscriber variable
To subscribe to card updates, first declare a private variable in your custom class to hold your subscriber:
```java
// subscriber variable
private IEventSubscriber mContentCardsUpdatedSubscriber;
```
### Step 2: Subscribe to updates
Next, add the following code to subscribe to Content Card updates from Braze, typically inside of your custom Content Cards activity's `Activity.onCreate()`:
```java
// Remove the previous subscriber before rebuilding a new one with our new activity.
Braze.getInstance(context).removeSingleSubscription(mContentCardsUpdatedSubscriber, ContentCardsUpdatedEvent.class);
mContentCardsUpdatedSubscriber = new IEventSubscriber() {
@Override
public void trigger(ContentCardsUpdatedEvent event) {
// List of all Content Cards
List allCards = event.getAllCards();
// Your logic below
}
};
Braze.getInstance(context).subscribeToContentCardsUpdates(mContentCardsUpdatedSubscriber);
Braze.getInstance(context).requestContentCardsRefresh();
```
### Step 3: Unsubscribe
We also recommend unsubscribing when your custom activity moves out of view. Add the following code to your activity's `onDestroy()` lifecycle method:
```java
Braze.getInstance(context).removeSingleSubscription(mContentCardsUpdatedSubscriber, ContentCardsUpdatedEvent.class);
```
### Step 1: Create a private subscriber variable
To subscribe to card updates, first declare a private variable in your custom class to hold your subscriber:
```kotlin
private var contentCardsUpdatedSubscriber: IEventSubscriber? = null
```
### Step 2: Subscribe to updates
Next, add the following code to subscribe to Content Card updates from Braze, typically inside of your custom Content Cards activity's `Activity.onCreate()`:
```kotlin
// Remove the previous subscriber before rebuilding a new one with our new activity.
Braze.getInstance(context).subscribeToContentCardsUpdates(contentCardsUpdatedSubscriber)
Braze.getInstance(context).requestContentCardsRefresh()
// List of all Content Cards
val allCards = event.allCards
// Your logic below
}
Braze.getInstance(context).subscribeToContentCardsUpdates(mContentCardsUpdatedSubscriber)
Braze.getInstance(context).requestContentCardsRefresh(true)
```
### Step 3: Unsubscribe
We also recommend unsubscribing when your custom activity moves out of view. Add the following code to your activity's `onDestroy()` lifecycle method:
```kotlin
Braze.getInstance(context).removeSingleSubscription(contentCardsUpdatedSubscriber, ContentCardsUpdatedEvent::class.java)
```
To access the Content Cards data model, call [`contentCards.cards`](https://braze-inc.github.io/braze-swift-sdk/documentation/brazekit/braze/contentcards-swift.class/cards) on your `braze` instance.
```swift
let cards: [Braze.ContentCard] = AppDelegate.braze?.contentCards.cards
```
Additionally, you can also maintain a subscription to observe for changes in your Content Cards. You can do so in one of two ways:
1. Maintaining a cancellable; or
2. Maintaining an `AsyncStream`.
### Cancellable
```swift
// This subscription is maintained through a Braze cancellable, which will observe for changes until the subscription is cancelled.
// You must keep a strong reference to the cancellable to keep the subscription active.
// The subscription is canceled either when the cancellable is deinitialized or when you call its `.cancel()` method.
let cancellable = AppDelegate.braze?.contentCards.subscribeToUpdates { [weak self] contentCards in
// Implement your completion handler to respond to updates in `contentCards`.
}
```
### AsyncStream
```swift
let stream: AsyncStream<[Braze.ContentCard]> = AppDelegate.braze?.contentCards.cardsStream
```
```objc
NSArray