CocoaPods Integration
Step 1: Install CocoaPods
Installing the iOS SDK via CocoaPod automates the majority of the installation process for you. Before beginning this process please ensure that you are using Ruby version 2.0.0 or greater. Don’t worry, knowledge of Ruby syntax isn’t necessary to install this SDK.
Simply run the following command to get started:
1
$ sudo gem install cocoapods
Note: If you are prompted to overwrite the rake
executable please refer to the Getting Started Directions on CocoaPods.org for further details.
Note: If you have issues regarding CocoaPods, please refer to the CocoaPods Troubleshooting Guide.
Step 2: Constructing the Podfile
Now that you’ve installed the CocoaPods Ruby Gem, you’re going to need to create a file in your Xcode project directory named Podfile
.
Add the following line to your Podfile:
1
2
3
target 'YourAppTarget' do
pod 'Appboy-iOS-SDK'
end
Note: We suggest you version Braze so pod updates automatically grab anything smaller than a minor version update. This looks like ‘pod ‘Appboy-iOS-SDK’ ~> Major.Minor.Build’. If you want to integrate the latest version of Braze SDK automatically even with major changes, you can use pod 'Appboy-iOS-SDK'
in your Podfile.
We recommend that integrators import our full SDK as outlined above. However, if you are certain that you are only going to integrate a particular Braze feature then you have the option to import just the desired UI subspec instead of the full SDK.
Subspec | Details |
---|---|
pod 'Appboy-iOS-SDK/InAppMessage' |
The InAppMessage subspec contains the Braze In-App Message UI and the Core SDK. |
pod 'Appboy-iOS-SDK/ContentCards' |
The ContentCards subspec contains the Braze Content Card UI and the Core SDK. |
pod 'Appboy-iOS-SDK/NewsFeed' |
The NewsFeed subspec contains the Braze News Feed UI and the Core SDK. |
pod 'Appboy-iOS-SDK/Core' |
The Core subspec contains support for analytics, such as custom events and attributes. |
Example Podfile
If you would like to see an example, see the Podfile within our Stopwatch Sample Application. If you use use_frameworks!
in your Podfile, please see the Podfile within our HelloSwift Sample Application.
Step 3: Installing the Braze SDK
To install the Braze SDK Cocoapod, navigate to the directory of your Xcode app project within your terminal and run the following command:
1
pod install
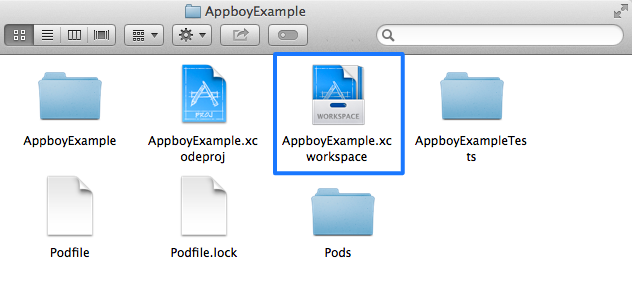
At this point, you should be able to open the new Xcode project workspace created by CocoaPods.
Step 4: Updating your App Delegate
Add the following line of code to your AppDelegate.m
file:
1
#import "Appboy-iOS-SDK/AppboyKit.h"
Within your AppDelegate.m
file, add the following snippet within your application:didFinishLaunchingWithOptions
method:
1
2
3
[Appboy startWithApiKey:@"YOUR-APP-IDENTIFIER-API-KEY"
inApplication:application
withLaunchOptions:launchOptions];
If you are integrating the Braze SDK with CocoaPods or Carthage, add the following line of code to your AppDelegate.swift
file:
1
import Appboy_iOS_SDK
For more information about using Objective-C code in Swift projects, please see the Apple Developer Docs.
In AppDelegate.swift
, add following snippet to your application(application: UIApplication, didFinishLaunchingWithOptions launchOptions: [NSObject: AnyObject]?) -> Bool
:
1
Appboy.start(withApiKey: "YOUR-APP-IDENTIFIER-API-KEY", in:application, withLaunchOptions:launchOptions)
Note: Braze’s sharedInstance
singleton will be nil before startWithApiKey:
is called, as that is a prerequisite to using any Braze functionality.
Be sure to update YOUR-APP-IDENTIFIER-API-KEY
with the correct value from your App Settings page. For more information on where to find your App Identifier API key, check out our API documentation.
Be sure to initialize Braze in your application’s main thread. Initializing asynchronously can lead to broken functionality.
Step 5: Specify Your Data Cluster
Note that as of December 2019, custom endpoints are no longer given out, if you have a pre-existing custom endpoint, you may continue to use it. For a list of our available endpoints, click here.
Compile-time Endpoint Configuration (Recommended)
If given a pre-existing custom endpoint…
- Starting with Braze iOS SDK v3.0.2, you can set a custom endpoint using the
Info.plist
file. Add the Appboy dictionary to yourInfo.plist
file. Inside theAppboy
dictionary, add theEndpoint
string subentry and set the value to your custom endpoint URL’s authority (for example,sdk.iad-01.braze.com
, nothttps://sdk.iad-01.braze.com
).
Your Braze representative should have already advised you of the correct endpoint.
Runtime Endpoint Configuration
If given a pre-existing custom endpoint…
- Starting with Braze iOS SDK v3.17.0+, you can override set your endpoint via the
ABKEndpointKey
inside theappboyOptions
parameter passed tostartWithApiKey:inApplication:withLaunchOptions:withAppboyOptions:
. Set the value to your custom endpoint URL’s authority (for example,sdk.iad-01.braze.com
, nothttps://sdk.iad-01.braze.com
).
To find out your specific cluster, please ask your Customer Success Manager or reach out to our support team.
Implementation Example
See the AppDelegate.m
file in the Stopwatch sample app.
SDK Integration Complete
Braze should now be collecting data from your application and your basic integration should be complete.
Updating the Braze SDK via CocoaPods
To update a Cocoapod simply run the following commands within your project directory:
1
pod update
Customizing Braze On Startup
If you wish to customize Braze on startup, you can instead use the Braze initialization method startWithApiKey:inApplication:withLaunchOptions:withAppboyOptions
and pass in an optional NSDictionary
of Braze startup keys.
In your AppDelegate.m
file, within your application:didFinishLaunchingWithOptions
method, add the following Braze method:
1
2
3
4
[Appboy startWithApiKey:@"YOUR-APP-IDENTIFER-API-KEY"
inApplication:application
withLaunchOptions:launchOptions
withAppboyOptions:appboyOptions];
In AppDelegate.swift
, within your application(application: UIApplication, didFinishLaunchingWithOptions launchOptions: [NSObject: AnyObject]?) -> Bool
method, add the following Braze method:
1
2
3
4
Appboy.start(withApiKey: "YOUR-APP-IDENTIFIER-API-KEY",
in:application,
withLaunchOptions:launchOptions,
withAppboyOptions:appboyOptions)
where appboyOptions
is a Dictionary
of startup configuration values.
Note: This method would replace the startWithApiKey:inApplication:withLaunchOptions:
initialization method from above.
This method is called with the following parameters:
YOUR-APP-IDENTIFIER-API-KEY
– Your App Identifier API Key from the Braze Dashboard.application
– The current applaunchOptions
– The optionsNSDictionary
that you get fromapplication:didFinishLaunchingWithOptions:
appboyOptions
– An optionalNSDictionary
with startup configuration values for Braze
See Appboy.h for a list of Braze startup keys.
Appboy.sharedInstance() and Swift nullability
Differing somewhat from common practice, the Appboy.sharedInstance()
singleton is optional. The reason for this is that, as noted above, sharedInstance
is nil
before startWithApiKey:
is called, and there are some non-standard but not-invalid implementations in which a delayed initialization can be used.
If you call startWithApiKey:
in your didFinishLaunchingWithOptions:
delegate before any access to Appboy’s sharedInstance
(the standard implementation), you can use optional chaining, like Appboy.sharedInstance()?.changeUser("testUser")
, to avoid cumbersome checks. This will have parity with an Objective-C implementation that assumed a non-null sharedInstance
.