Standard Android push integration
Learn how to integrate push notifications in your Android app.
With push notifications, you can re-engage your app users by sending time-sensitive and relevant content directly to their device screen—even if their app is closed. When you’re finished integrating push for your app, be sure to check out our push best practices.
If your Android push integration is already set up, and you’re looking to migrate from Google’s deprecated Cloud Messaging API, see Migrating to the Firebase Cloud Messaging API.
Rate limit
Firebase Cloud Messaging (FCM) API has a default rate limit of 600,000 requests per minute. If you reach this limit, Braze will automatically try again in a few minutes. To request an increase, contact Firebase Support.
Registering for push
In this section, you’ll learn how to register for push using Google’s Firebase Cloud Messaging (FCM) API. If you’d like to view a sample app using FCM with the Braze Android SDK, see Braze: Firebase Push Sample App.
Step 1: Add Firebase to your project
First, add Firebase to your Android project. For step-by-step instructions, see Google’s Firebase setup guide.
Step 2: Add Cloud Messaging to your dependencies
Next, add the Cloud Messaging library to your project dependencies. In your Android project, open build.gradle, then add the following line to your dependencies block.
1
implementation "com.braze:android-sdk-ui:+"
Your dependencies should look similar to the following:
1
2
3
4
dependencies {
  implementation project(':android-sdk-ui')
  implementation "com.braze:android-sdk-ui:+"
}
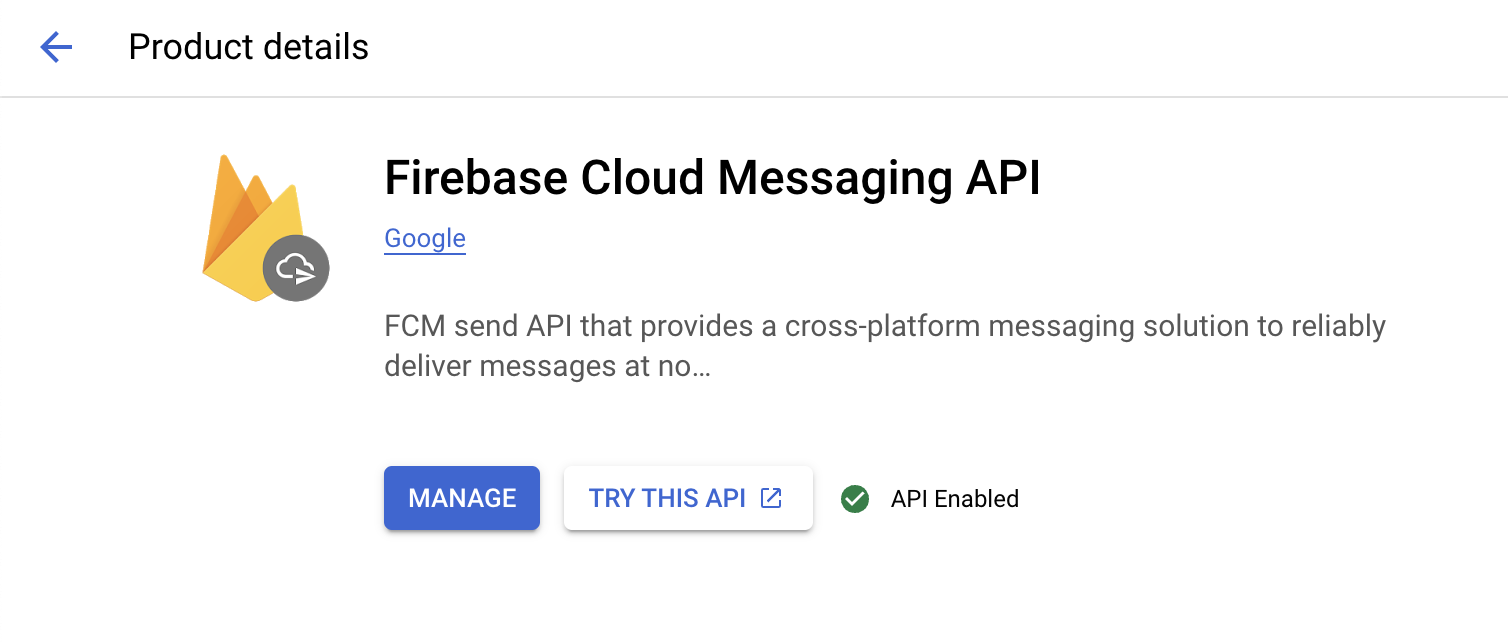
Step 3: Enable the Firebase Cloud Messaging API
In Google Cloud, select the project your Android app is using, then enable the Firebase Cloud Messaging API.
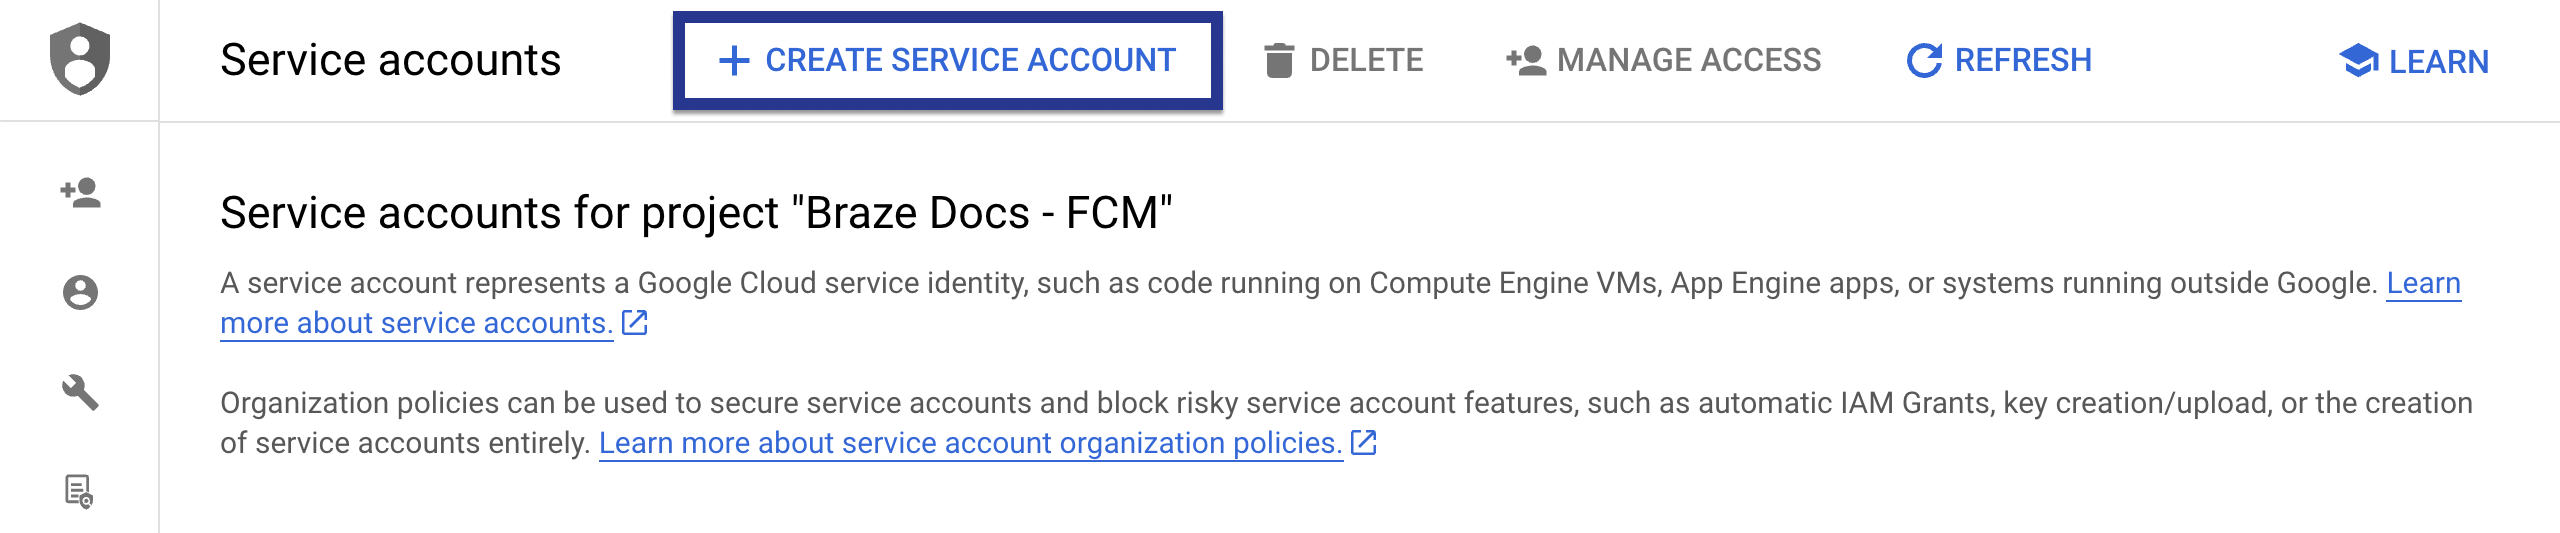
Step 4: Create a service account
Next, create a new service account, so Braze can make authorized API calls when registering FCM tokens. In Google Cloud, go to Service Accounts, then choose your project. On the Service Accounts page, select Create Service Account.
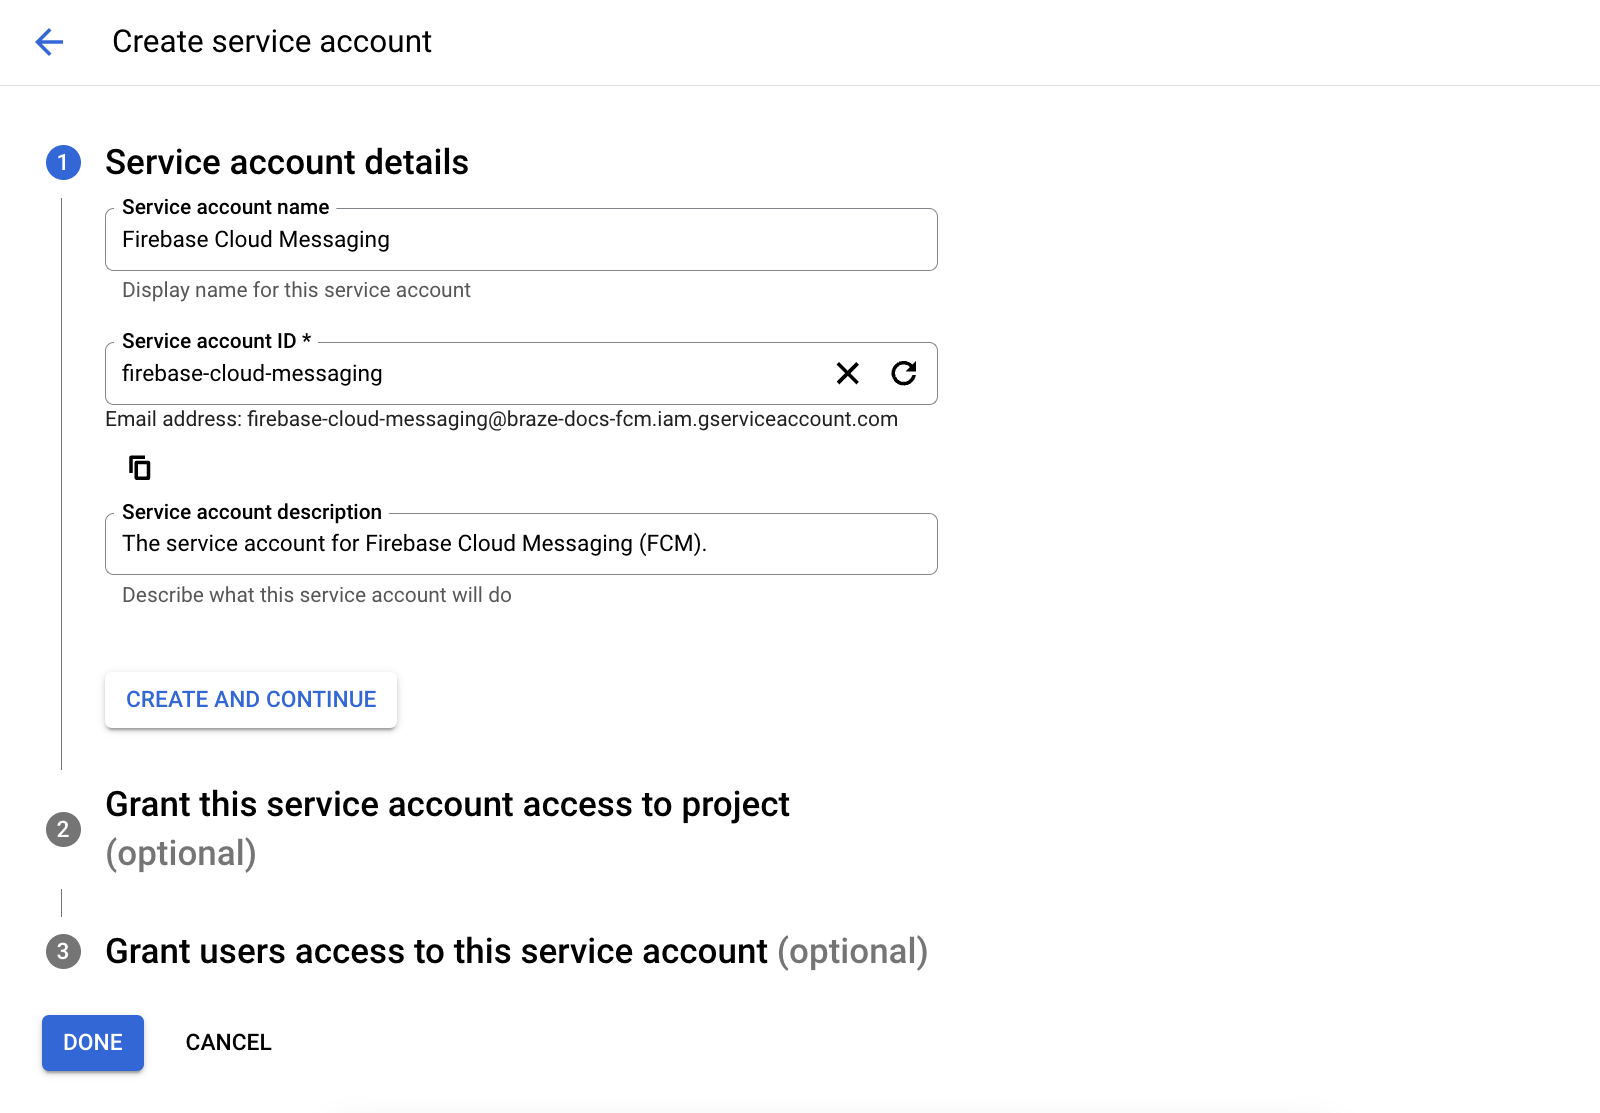
Enter a service account name, ID, and description, then select Create and continue.
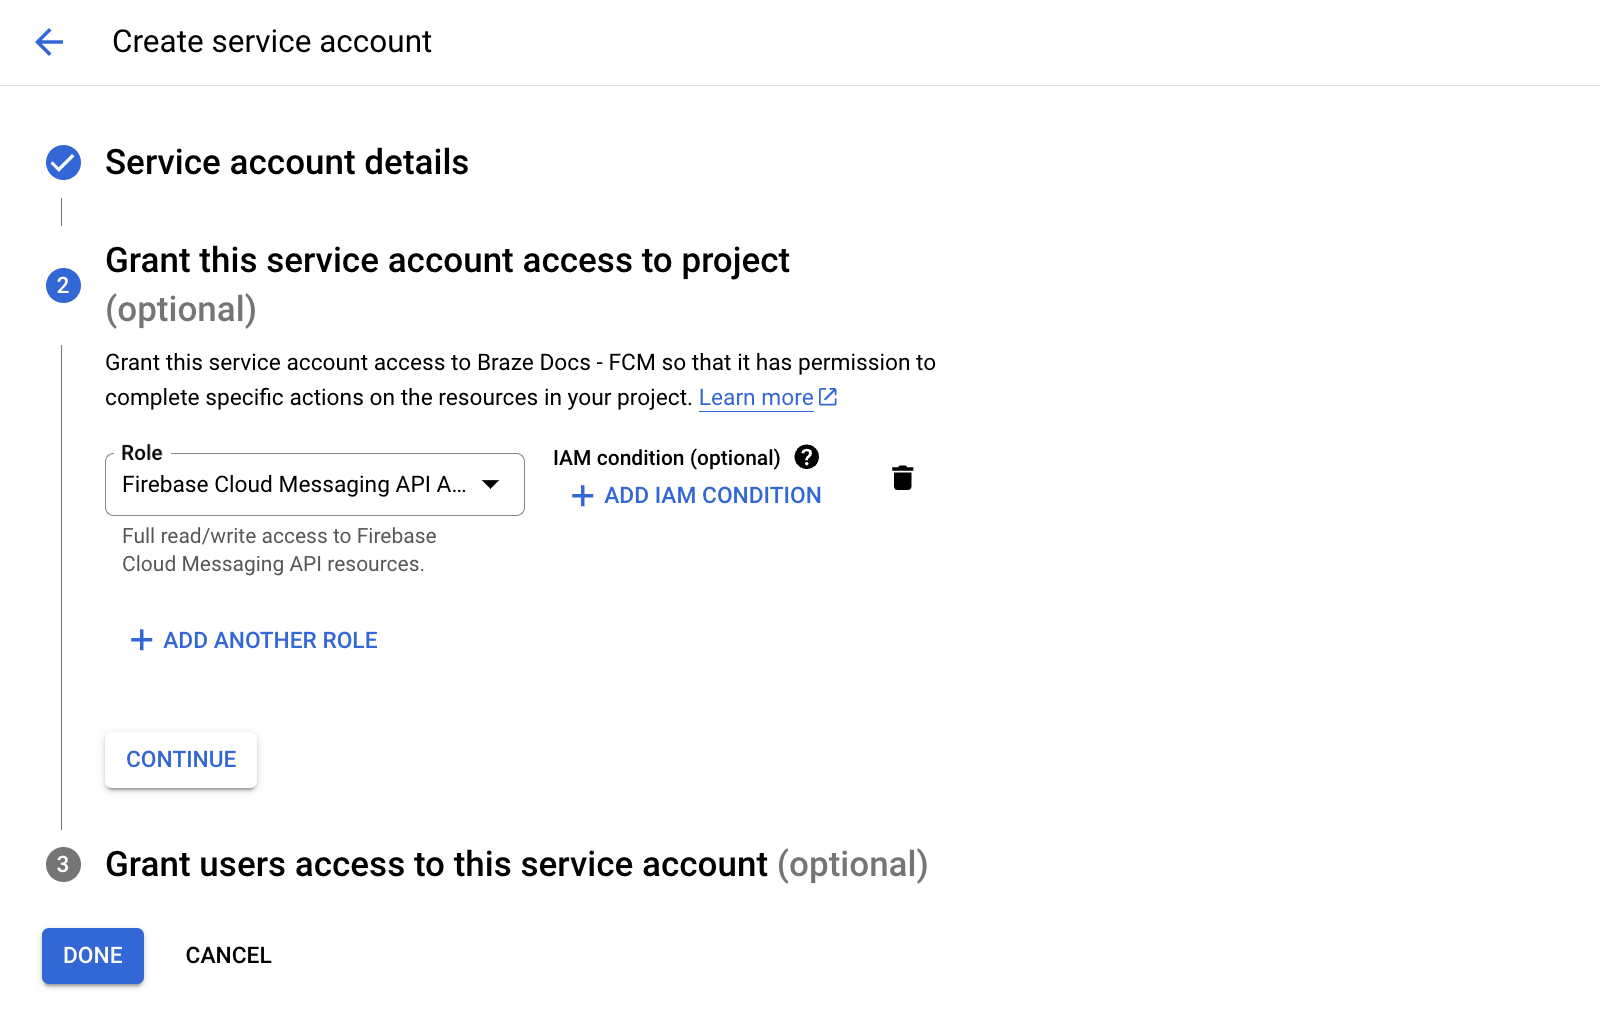
In the Role field, find and select Firebase Cloud Messaging API Admin from the list of roles. For more restrictive access, create a custom role with the cloudmessaging.messages.create permission, then choose it from the list instead. When you’re finished, select Done.
Be sure to select Firebase Cloud Messaging API Admin, not Firebase Cloud Messaging Admin.
Step 5: Generate JSON credentials
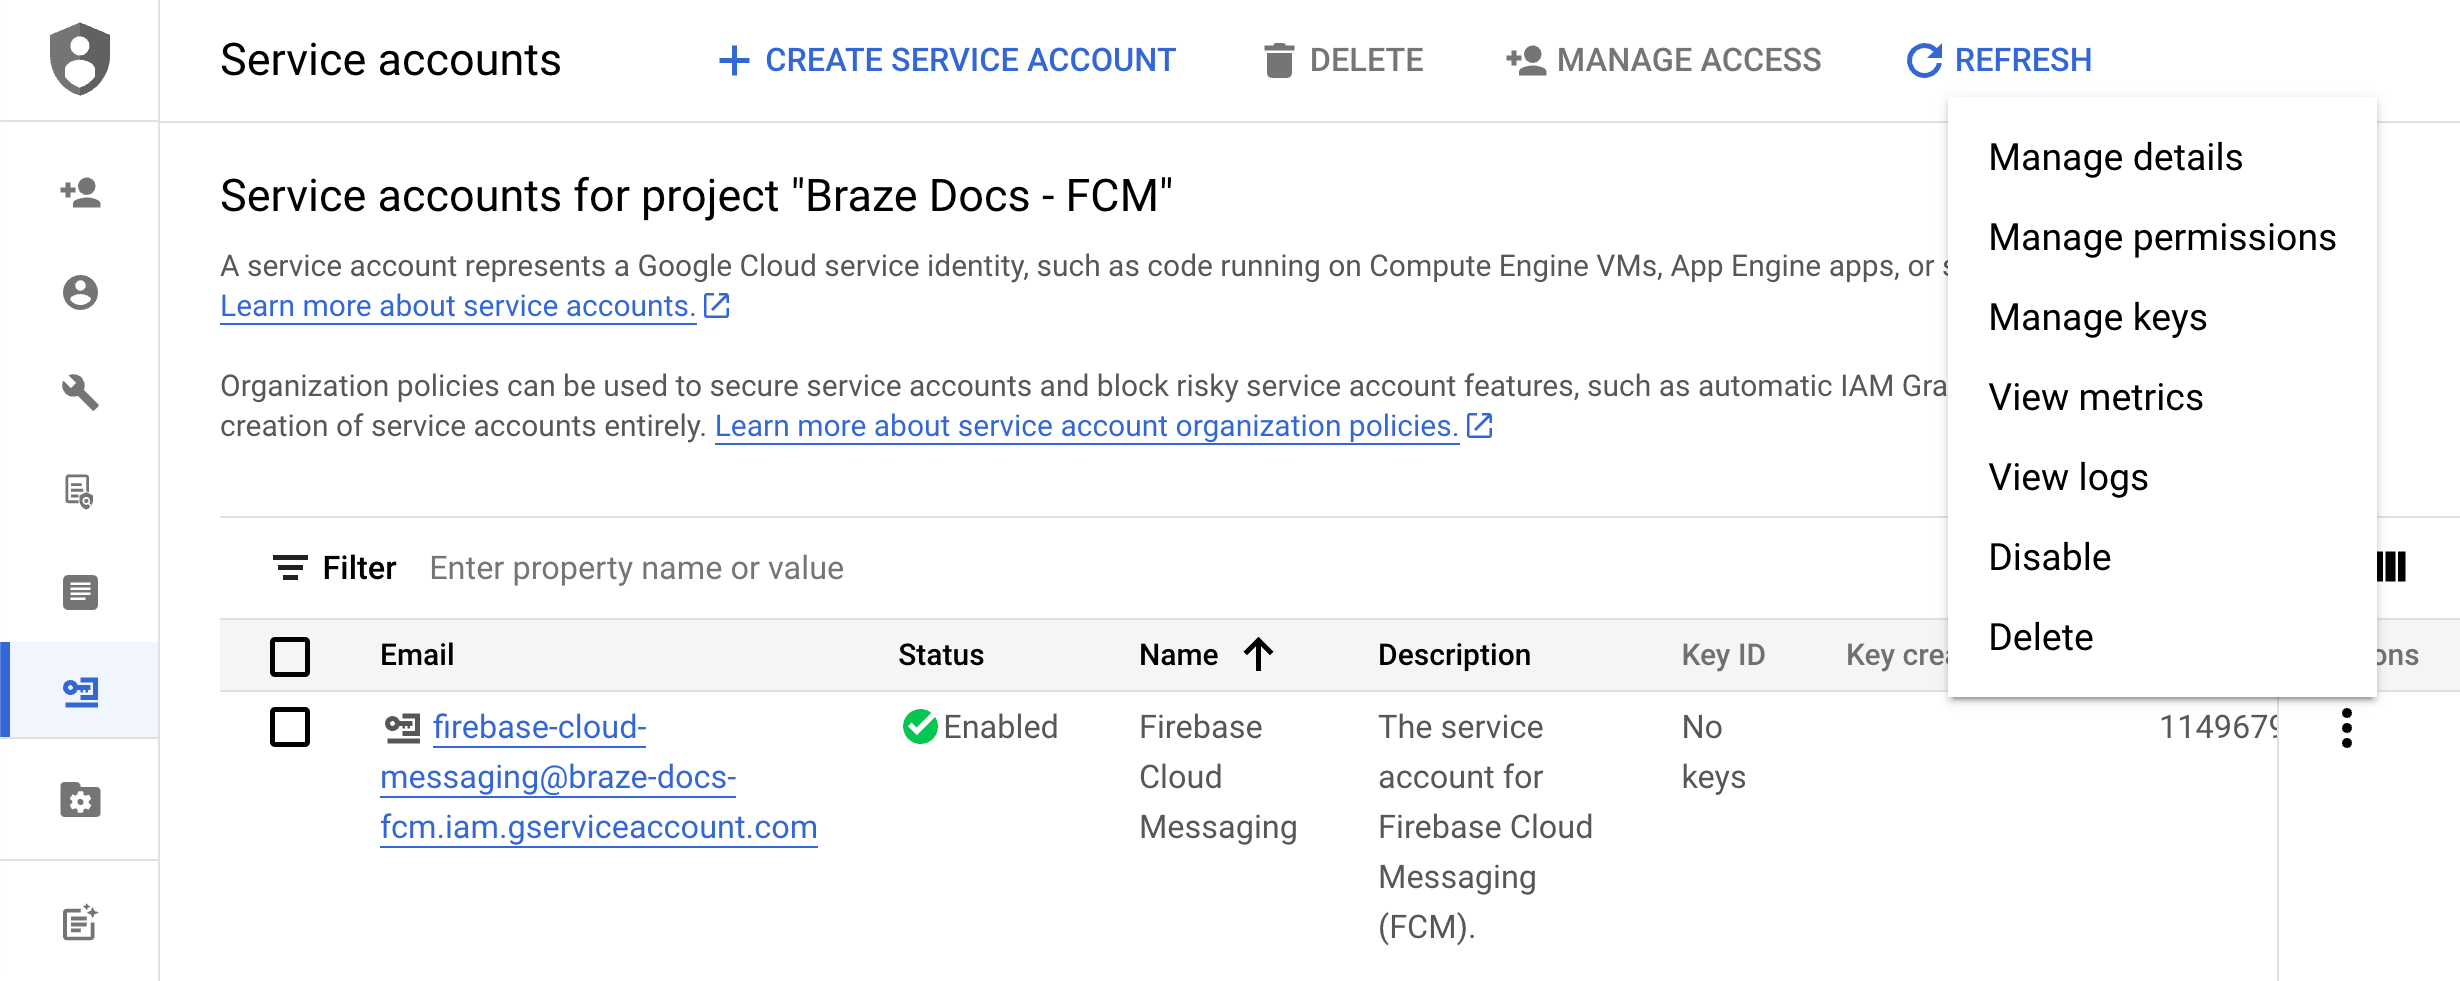
Next, generate JSON credentials for your FCM service account. On Google Cloud IAM & Admin, go to Service Accounts, then choose your project. Locate the FCM service account you created earlier, then select Actions > Manage Keys.
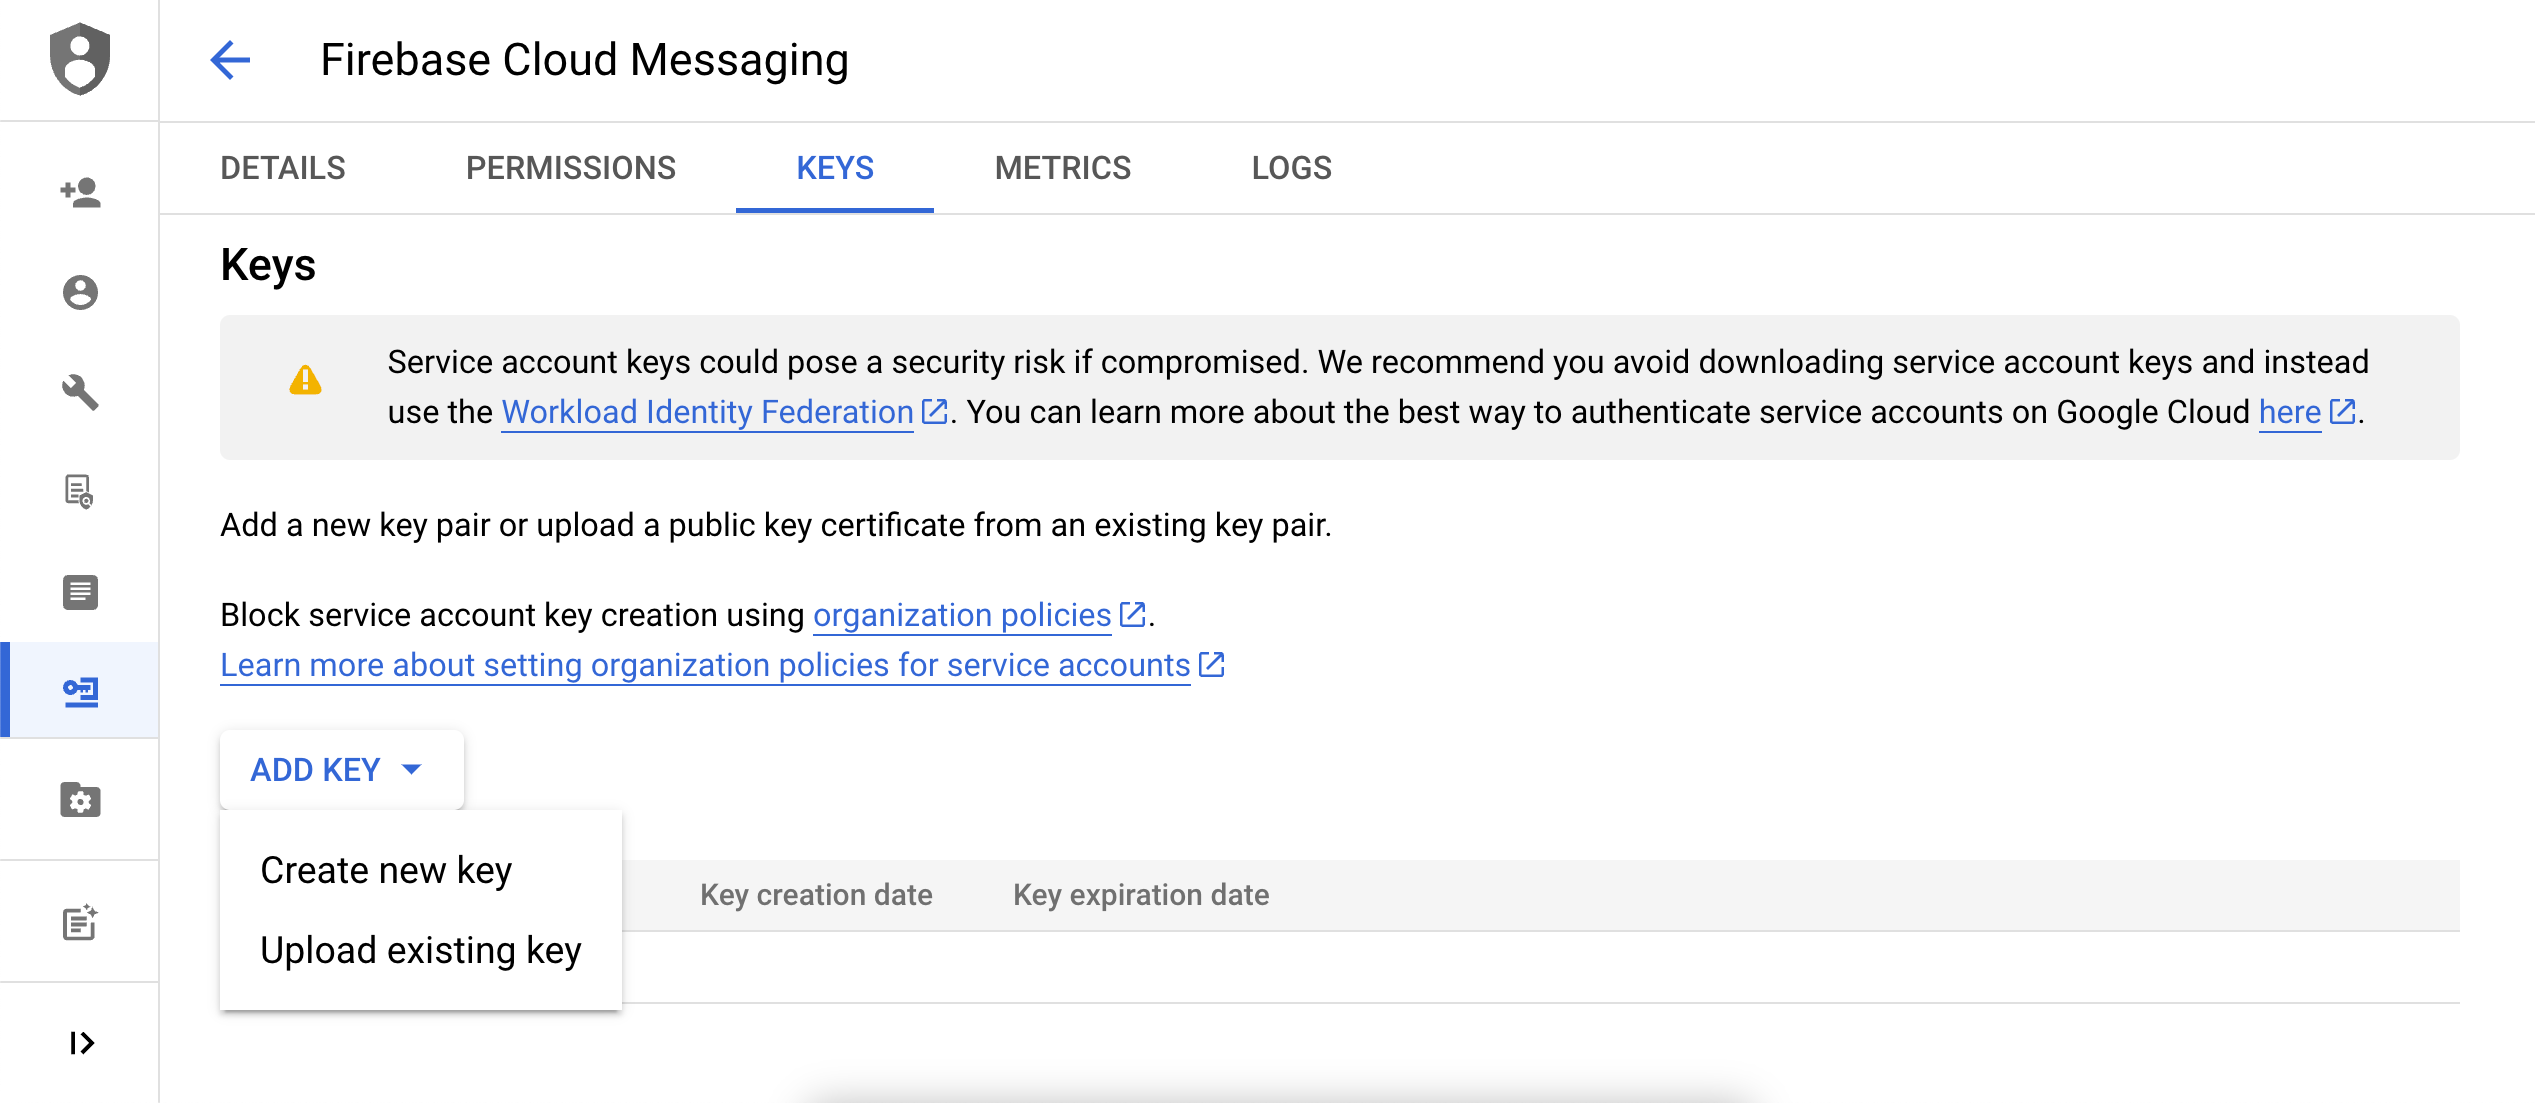
Select Add Key > Create new key.
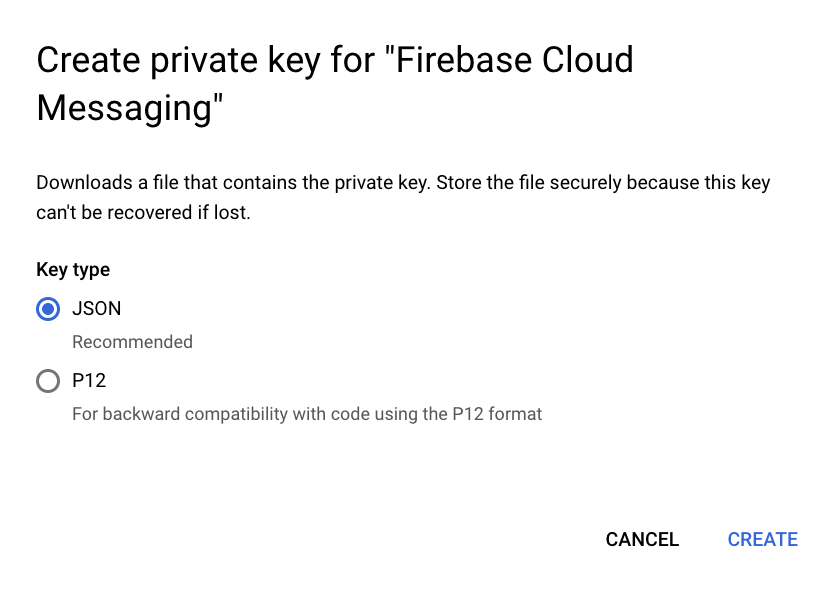
Choose JSON, then select Create. Be sure to remember where you downloaded the key—you’ll need it in the next step.
Private keys could pose a security risk if compromised. Store your JSON credentials in a secure location—you’ll delete your key after you upload it to Braze.
Step 6: Upload your JSON credentials to Braze
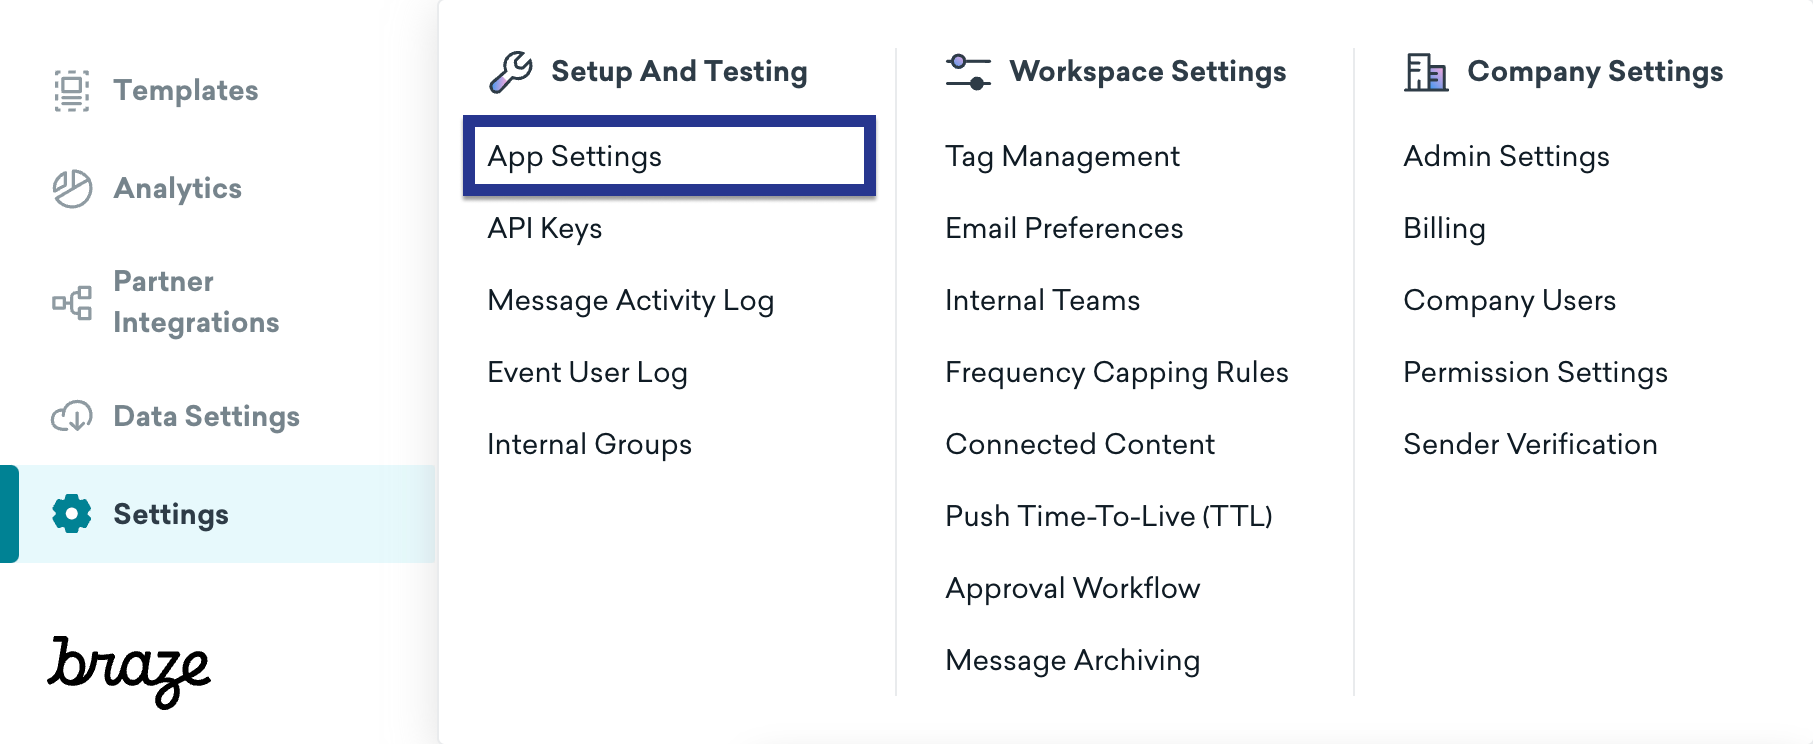
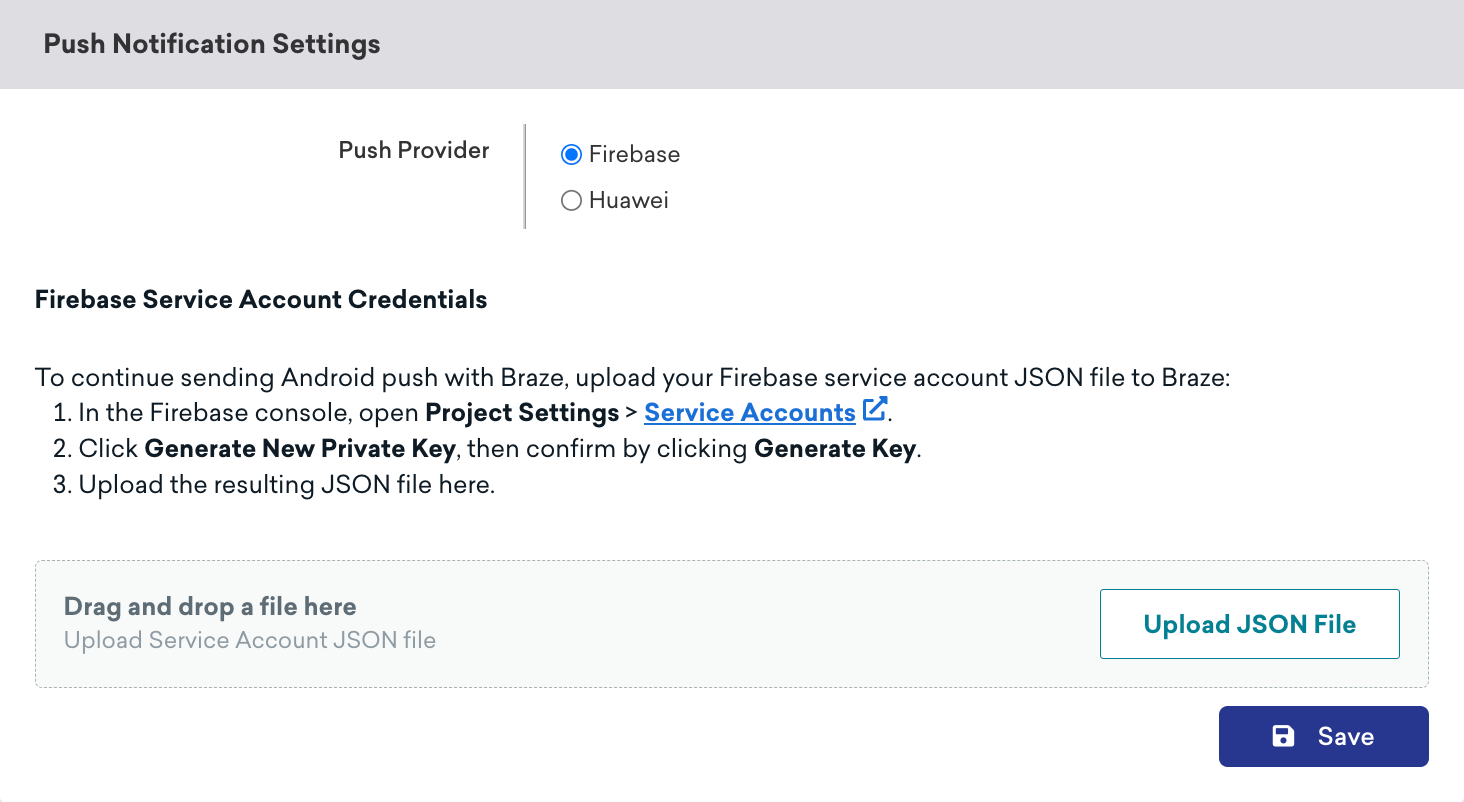
Next, upload your JSON credentials to your Braze dashboard. In Braze, select Settings > App Settings.
Under your Android app’s Push Notification Settings, choose Firebase, then select Upload JSON File and upload the credentials you generated earlier. When you’re finished, select Save.
Private keys could pose a security risk if compromised. Now that your key is uploaded to Braze, delete the file you generated previously.
Step 7: Set up automatic token registration
When one of your users opt-in for push notifications, your app needs to generate an FCM token on their device before you can send them push notifications. With the Braze SDK, you can enable automatic FCM token registration for each user’s device in your project’s Braze configuration files.
First, go to Firebase Console, open your project, then select Settings > Project settings.
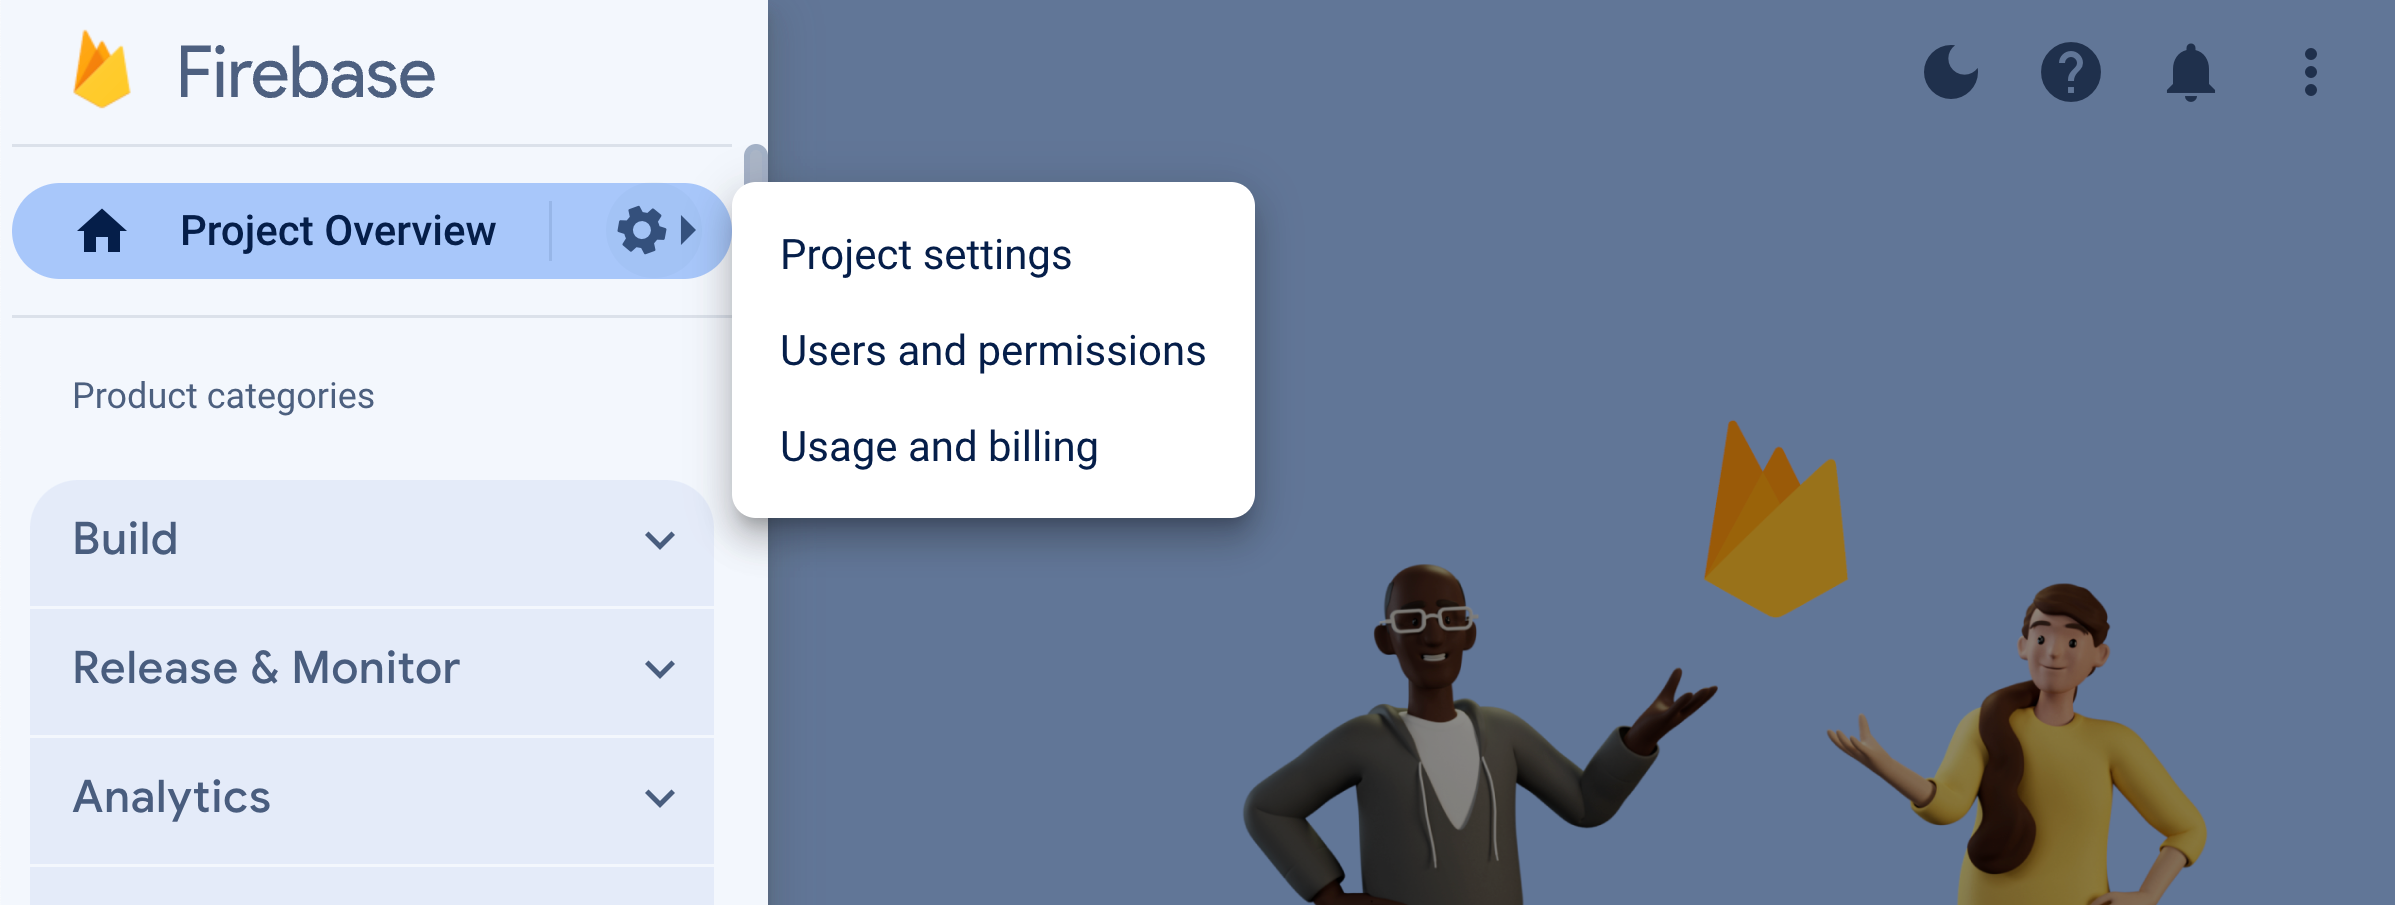
Select Cloud Messaging, then under Firebase Cloud Messaging API (V1), copy the number in the Sender ID field.

Next, open your Android Studio project and use your Firebase Sender ID to enable automatic FCM token registration within your braze.xml or BrazeConfig.
To configure automatic FCM token registration, add the following lines to your braze.xml file:
1
2
<bool translatable="false" name="com_braze_firebase_cloud_messaging_registration_enabled">true</bool>
<string translatable="false" name="com_braze_firebase_cloud_messaging_sender_id">FIREBASE_SENDER_ID</string>
Replace FIREBASE_SENDER_ID with the value you copied from your Firebase project settings. Your braze.xml should look similar to the following:
1
2
3
4
5
6
<?xml version="1.0" encoding="utf-8"?>
<resources>
  <string translatable="false" name="com_braze_api_key">12345ABC-6789-DEFG-0123-HIJK456789LM</string>
  <bool translatable="false" name="com_braze_firebase_cloud_messaging_registration_enabled">true</bool>
<string translatable="false" name="com_braze_firebase_cloud_messaging_sender_id">603679405392</string>
</resources>
To configure automatic FCM token registration, add the following lines to your BrazeConfig:
1
2
.setIsFirebaseCloudMessagingRegistrationEnabled(true)
.setFirebaseCloudMessagingSenderIdKey("FIREBASE_SENDER_ID")
1
2
.setIsFirebaseCloudMessagingRegistrationEnabled(true)
.setFirebaseCloudMessagingSenderIdKey("FIREBASE_SENDER_ID")
Replace FIREBASE_SENDER_ID with the value you copied from your Firebase project settings. Your BrazeConfig should look similar to the following:
1
2
3
4
5
6
7
8
9
10
BrazeConfig brazeConfig = new BrazeConfig.Builder()
  .setApiKey("12345ABC-6789-DEFG-0123-HIJK456789LM")
  .setCustomEndpoint("sdk.iad-01.braze.com")
  .setSessionTimeout(60)
  .setHandlePushDeepLinksAutomatically(true)
  .setGreatNetworkDataFlushInterval(10)
  .setIsFirebaseCloudMessagingRegistrationEnabled(true)
  .setFirebaseCloudMessagingSenderIdKey("603679405392")
  .build();
Braze.configure(this, brazeConfig);
1
2
3
4
5
6
7
8
9
10
val brazeConfig = BrazeConfig.Builder()
  .setApiKey("12345ABC-6789-DEFG-0123-HIJK456789LM")
  .setCustomEndpoint("sdk.iad-01.braze.com")
  .setSessionTimeout(60)
  .setHandlePushDeepLinksAutomatically(true)
  .setGreatNetworkDataFlushInterval(10)
  .setIsFirebaseCloudMessagingRegistrationEnabled(true)
  .setFirebaseCloudMessagingSenderIdKey("603679405392")
  .build()
Braze.configure(this, brazeConfig)
If you’d like manually register FCM tokens instead, you can call Braze.setRegisteredPushToken() inside your app’s onCreate() method.
Step 8: Remove unnecessary permissions
With your new push integration set up, the following permissions are no longer needed by Braze in your project’s braze.xml file:
1
2
3
4
5
  <uses-permission android:name="android.permission.GET_ACCOUNTS" />
  <uses-permission android:name="android.permission.WAKE_LOCK" />
  <uses-permission android:name="com.google.android.c2dm.permission.RECEIVE" />
  <permission android:name="YOUR-APPLICATION-PACKAGE-NAME.permission.C2D_MESSAGE" android:protectionLevel="signature"/>
  <uses-permission android:name="YOUR-APPLICATION-PACKAGE-NAME.permission.C2D_MESSAGE" />
Step 9: Remove automatic requests in your application class
To prevent Braze from triggering unnecessary network requests everytime you send silent push notifications, remove any automatic network requests configured in your Application class’s onCreate() method. For more information see, Android Developer Reference: Application.
Receiving and displaying push
After completing this section, you should be able to receive and display push notifications sent by Braze.
Step 1: Register Braze Firebase Messaging Service
If you already have a Firebase Messaging Service registered, do not complete this step. Instead, proceed to Using your own Firebase Messaging Service and complete the steps listed there.
Braze includes a service to handle push receipt and open intents. Our BrazeFirebaseMessagingService class will need to be registered in your AndroidManifest.xml:
1
2
3
4
5
6
<service android:name="com.braze.push.BrazeFirebaseMessagingService"
  android:exported="false">
  <intent-filter>
    <action android:name="com.google.firebase.MESSAGING_EVENT" />
  </intent-filter>
</service>
Our notification code also uses BrazeFirebaseMessagingService to handle open and click action tracking. This service must be registered in the AndroidManifest.xml to function correctly. Also, remember that Braze prefixes notifications from our system with a unique key to ensure we only render notifications sent from our systems. You may register additional services separately to render notifications sent from other FCM services. See AndroidManifest.xml in the Firebase push sample app.
Before Braze SDK 3.1.1, AppboyFcmReceiver was used to handle FCM push. The AppboyFcmReceiver class should be removed from your manifest and replaced with the preceding integration.
Using a fallback Firebase Messaging Service
If you have another Firebase Messaging Service you would also like to use, you can also specify a fallback Firebase Messaging Service to call if your application receives a push that isn’t from Braze.
In your braze.xml, specify:
1
2
<bool name="com_braze_fallback_firebase_cloud_messaging_service_enabled">true</bool>
<string name="com_braze_fallback_firebase_cloud_messaging_service_classpath">com.company.OurFirebaseMessagingService</string>
or set via runtime configuration:
1
2
3
4
5
BrazeConfig brazeConfig = new BrazeConfig.Builder()
        .setFallbackFirebaseMessagingServiceEnabled(true)
        .setFallbackFirebaseMessagingServiceClasspath("com.company.OurFirebaseMessagingService")
        .build();
Braze.configure(this, brazeConfig);
1
2
3
4
5
val brazeConfig = BrazeConfig.Builder()
        .setFallbackFirebaseMessagingServiceEnabled(true)
        .setFallbackFirebaseMessagingServiceClasspath("com.company.OurFirebaseMessagingService")
        .build()
Braze.configure(this, brazeConfig)
Using your own Firebase Messaging Service
If you already have a Firebase Messaging Service registered, you can pass RemoteMessage objects to Braze via BrazeFirebaseMessagingService.handleBrazeRemoteMessage(). This method will only display a notification if the RemoteMessage object originated from Braze and will safely ignore if not.
1
2
3
4
5
6
7
8
9
10
11
12
13
public class MyFirebaseMessagingService extends FirebaseMessagingService {
  @Override
  public void onMessageReceived(RemoteMessage remoteMessage) {
    super.onMessageReceived(remoteMessage);
    if (BrazeFirebaseMessagingService.handleBrazeRemoteMessage(this, remoteMessage)) {
      // This Remote Message originated from Braze and a push notification was displayed.
      // No further action is needed.
    } else {
      // This Remote Message did not originate from Braze.
      // No action was taken and you can safely pass this Remote Message to other handlers.
    }
  }
}
1
2
3
4
5
6
7
8
9
10
11
12
class MyFirebaseMessagingService : FirebaseMessagingService() {
  override fun onMessageReceived(remoteMessage: RemoteMessage?) {
    super.onMessageReceived(remoteMessage)
    if (BrazeFirebaseMessagingService.handleBrazeRemoteMessage(this, remoteMessage)) {
      // This Remote Message originated from Braze and a push notification was displayed.
      // No further action is needed.
    } else {
      // This Remote Message did not originate from Braze.
      // No action was taken and you can safely pass this Remote Message to other handlers.
    }
  }
}
Step 2: Conform small icons to design guidelines
For general information about Android notification icons, visit the Notifications overview.
Starting in Android N, you should update or remove small notification icon assets that involve color. The Android system (not the Braze SDK) ignores all non-alpha and transparency channels in action icons and the notification small icon. In other words, Android will convert all parts of your notification small icon to monochrome except for transparent regions.
To properly create a notification small icon asset:
- Remove all colors from the image except for white.
- All other non-white regions of the asset should be transparent.
A common symptom of an improper asset is the small notification icon rendering as a solid monochrome square. This is due to the Android system not being able to find any transparent regions in the notification small icon asset.
The following large and small icons pictured are examples of properly designed icons:
![]()
Step 3: Configure notification icons
Specifying icons in braze.xml
Braze allows you to configure your notification icons by specifying drawable resources in your braze.xml:
1
2
<drawable name="com_braze_push_small_notification_icon">REPLACE_WITH_YOUR_ICON</drawable>
<drawable name="com_braze_push_large_notification_icon">REPLACE_WITH_YOUR_ICON</drawable>
Setting a small notification icon is required. If you do not set one, Braze will default to using the application icon as the small notification icon, which may look suboptimal.
Setting a large notification icon is optional but recommended.
Specifying icon accent color
The notification icon accent color can be overridden in your braze.xml. If the color is not specified, the default color is the same gray Lollipop uses for system notifications.
1
<integer name="com_braze_default_notification_accent_color">0xFFf33e3e</integer>
You may also optionally use a color reference:
1
<color name="com_braze_default_notification_accent_color">@color/my_color_here</color>
Step 4: Add deep links
Enabling automatic deep link opening
To enable Braze to automatically open your app and any deep links when a push notification is clicked, set com_braze_handle_push_deep_links_automatically to true, in your braze.xml:
1
<bool name="com_braze_handle_push_deep_links_automatically">true</bool>
This flag can also be set via runtime configuration:
1
2
3
4
BrazeConfig brazeConfig = new BrazeConfig.Builder()
        .setHandlePushDeepLinksAutomatically(true)
        .build();
Braze.configure(this, brazeConfig);
1
2
3
4
val brazeConfig = BrazeConfig.Builder()
        .setHandlePushDeepLinksAutomatically(true)
        .build()
Braze.configure(this, brazeConfig)
If you want to custom handle deep links, you will need to create a push callback that listens for push received and opened intents from Braze. See our Custom handling push receipts and opens article for more information.
Creating custom deep links
Follow the instructions found within the Android developer documentation on deep linking if you have not already added deep links to your app. To learn more about what deep links are, see our FAQ article.
Adding deep links
The Braze dashboard supports setting deep links or web URLs in push notifications campaigns and Canvases that will be opened when the notification is clicked.

Customizing back stack behavior
The Android SDK, by default, will place your host app’s main launcher activity in the back stack when following push deep links. Braze allows you to set a custom activity to open in the back stack in place of your main launcher activity or to disable the back stack altogether.
For example, to set an activity called YourMainActivity as the back stack activity using runtime configuration:
1
2
3
4
5
BrazeConfig brazeConfig = new BrazeConfig.Builder()
        .setPushDeepLinkBackStackActivityEnabled(true)
        .setPushDeepLinkBackStackActivityClass(YourMainActivity.class)
        .build();
Braze.configure(this, brazeConfig);
1
2
3
4
5
val brazeConfig = BrazeConfig.Builder()
        .setPushDeepLinkBackStackActivityEnabled(true)
        .setPushDeepLinkBackStackActivityClass(YourMainActivity.class)
        .build()
Braze.configure(this, brazeConfig)
See the equivalent configuration for your braze.xml. Note that the class name must be the same as returned by Class.forName().
1
2
<bool name="com_braze_push_deep_link_back_stack_activity_enabled">true</bool>
<string name="com_braze_push_deep_link_back_stack_activity_class_name">your.package.name.YourMainActivity</string>
Step 5: Define notification channels
The Braze Android SDK supports Android notification channels. If a Braze notification does not contain the ID for a notification channel or that a Braze notification contains an invalid channel ID, Braze will display the notification with the default notification channel defined in the SDK. Braze users use Android Notification Channels within the platform to group notifications.
To set the user facing name of the default Braze notification channel, use BrazeConfig.setDefaultNotificationChannelName().
To set the user facing description of the default Braze notification channel, use BrazeConfig.setDefaultNotificationChannelDescription().
You should ensure that any API campaigns with the Android push object parameter are updated to include the notification_channel field. If this field is not specified, Braze will send the notification payload with the dashboard fallback channel ID.
Other than the default notification channel, Braze will not create any channels. All other channels must be programmatically defined by the host app and then entered into the Braze dashboard.
The default channel name and description can also be configured in braze.xml.
1
2
<string name="com_braze_default_notification_channel_name">Your channel name</string>
<string name="com_braze_default_notification_channel_description">Your channel description</string>
Step 6: Test notification display and analytics
Testing display
At this point, you should be able to see notifications sent from Braze. To test this, go to the Campaigns page on your Braze dashboard and create a Push Notification campaign. Choose Android Push and design your message. Then click the eye icon in the composer to get the test sender. Enter the user ID or email address of your current user and click Send Test. You should see the push show up on your device.

For issues related to push display, see our troubleshooting guide.
Testing analytics
At this point, you should also have analytics logging for push notification opens. Clicking on the notification when it arrives should result in the Direct Opens on your campaign results page to increase by 1. Check out our push reporting article for a break down on push analytics.
For issues related to push analytics, see our troubleshooting guide.
Testing from command line
If you’d like to test in-app and push notifications via the command-line interface, you can send a single notification through the terminal via cURL and the messaging API. You will need to replace the following fields with the correct values for your test case:
YOUR_API_KEY(Go to Settings > API Keys.)YOUR_EXTERNAL_USER_ID(Search for a profile on the Search Users page.)YOUR_KEY1(optional)YOUR_VALUE1(optional)
If you are using the older navigation, these pages are in a different location:
- API Keys is located at Developer Console > API Settings
- Search Users is located at Users > User Search
1
2
3
4
5
6
7
8
9
10
11
12
curl -X POST -H "Content-Type: application/json" -H "Authorization: Bearer {YOUR_API_KEY}" -d '{
  "external_user_ids":["YOUR_EXTERNAL_USER_ID"],
  "messages": {
    "android_push": {
      "title":"Test push title",
      "alert":"Test push",
      "extra": {
        "YOUR_KEY1":"YOUR_VALUE1"
      }
    }
  }
}' https://rest.iad-01.braze.com/messages/send
This example uses the US-01 instance. If you are not on this instance, replace the US-01 endpoint with your endpoint.
Customizing notification display
Step 1: Create your custom notification factory
In some scenarios, you may wish to customize push notifications in ways that would be cumbersome or unavailable server side. To give you complete control of notification display, we’ve added the ability to define your own IBrazeNotificationFactory to create notification objects for display by Braze.
If a custom IBrazeNotificationFactory is set, Braze will call your factory’s createNotification() method upon push receipt before the notification is displayed to the user. Braze will pass in a Bundle containing Braze push data and another Bundle containing custom key-value pairs sent either via the dashboard or the messaging APIs:
Braze will pass in a BrazeNotificationPayload containing data from the Braze push notification.
1
2
3
4
5
6
7
8
9
// Factory method implemented in your custom IBrazeNotificationFactory
@Override
public Notification createNotification(BrazeNotificationPayload brazeNotificationPayload) {
  // Example of getting notification title
  String title = brazeNotificationPayload.getTitleText();

  // Example of retrieving a custom KVP ("my_key" -> "my_value")
  String customKvp = brazeNotificationPayload.getBrazeExtras().getString("my_key");
}
1
2
3
4
5
6
7
8
// Factory method implemented in your custom IBrazeNotificationFactory
override fun createNotification(brazeNotificationPayload: BrazeNotificationPayload): Notification {
  // Example of getting notification title
  val title = brazeNotificationPayload.getTitleText()

  // Example of retrieving a custom KVP ("my_key" -> "my_value")
  val customKvp = brazeNotificationPayload.getBrazeExtras().getString("my_key")
}
You can return null from your custom createNotification() method to not show the notification at all, use BrazeNotificationFactory.getInstance().createNotification() to obtain our default notification object for that data and modify it before display, or generate a completely separate notification object for display.
For documentation on Braze push data keys, refer to the Android SDK.
Step 2: Set your custom notification factory
To instruct Braze to use your custom notification factory, use the setCustomBrazeNotificationFactory method to set your IBrazeNotificationFactory:
1
setCustomBrazeNotificationFactory(IBrazeNotificationFactory brazeNotificationFactory);
1
setCustomBrazeNotificationFactory(brazeNotificationFactory: IBrazeNotificationFactory)
The recommended place to set your custom IBrazeNotificationFactory is in the Application.onCreate() application lifecycle method (not activity). This will allow the notification factory to be set correctly whenever your app process is active.
Creating your own notification from scratch is an advanced use case and should be done only with thorough testing and a deep understanding of the Braze push functionality. For example, you must make sure your notification logs push opens correctly.
To unset your custom IBrazeNotificationFactory and return to default Braze handling for push, pass in null to our custom notification factory setter:
1
setCustomBrazeNotificationFactory(null);
1
setCustomBrazeNotificationFactory(null)
Push primers
Push primer campaigns encourage your users to enable push notifications on their device for your app. This can be done without SDK customization using our no code push primer.
 Edit this page on GitHub